


HP ProLiant DL320
Firewall/VPN/Cache Server
User Guide
Running Microsoft® Internet Security and
Acceleration Server 2004
June 2005 (Third Edition)
Part Number 341672-003

© Copyright 2004, 2005 Hewlett-Packard Development Company, L.P.
Confidential computer software. Valid license from HP required for possession, use or
copying. Consistent with FAR 12.211 and 12.212, Commercial Computer Software, Computer
Software Documentation, and Technical Data for Commercial Items are licensed to the U.S.
Government under vendor’s standard commercial license.
The information contained herein is subject to change without notice. The only warranties for
HP products and services are set forth in the express warranty statements accompanying such
products and services. Nothing herein should be construed as constituting an additional
warranty. HP shall not be liable for technical or editorial errors or omissions contained herein.
Microsoft, Windows, and Windows NT are U.S. registered trademarks of Microsoft
Corporation.
HP ProLiant DL320 Firewall/VPN/Cache Server User Guide Running Microsoft Internet
Security and Acceleration Server 2004
June 2005 (Third Edition)
Part Number 341672-003

Contents
Introduction ................................................................................................... 5
Initial Setup Considerations......................................................................... 6
Firewall Lockdown Mode .................................................................................................. 6
Affected Functionality ..................................................................................................7
Leaving Lockdown Mode.............................................................................................8
Internal Network Overview................................................................................................ 8
Computer Name and Administrator Password................................................................... 9
Workgroup and Domain Name Considerations................................................................ 10
The ProLiant DL320 Firewall/VPN/Cache Server Internal IP Address........................... 12
DNS Server Address on the Internal Interface ................................................................. 14
Custom Network Adapter Configurations........................................................................ 16
Configuring the External IP Address......................................................... 17
Setting Up the ProLiant DL320 Firewall/VPN/Cache Server .................... 18
Enabling the Web Listener............................................................................................... 18
Enabling the Firewall Client Listener............................................................................... 20
Creating an Internet Access Rule ..................................................................................... 21
HP Virus Throttle ............................................................................................................. 23
Configuring Virus Throttle .........................................................................................23
Available Verified Third-Party Applications and Plug-Ins.............................................. 24
Suggested Third-Party Applications...........................................................................25
Additional Documentation Available from HP................................................................ 25
Managing and Maintaining the Firewall..................................................... 26
Windows Update .............................................................................................................. 27
Remote Desktop ............................................................................................................... 27
Remote ProLiant DL320 Firewall/VPN/Cache Server Management Console................. 28
Remote Assistance ........................................................................................................... 29
Configuring Monitoring, Reporting, and Logging ........................................................... 30
Configuring Firewall Logging ....................................................................................30
Configuring Web Proxy Logging ...............................................................................31
HP ProLiant DL320 Firewall/VPN/Cache Server User Guide 3

Setting Up the Client Installation Share............................................................................32
Supporting Web Proxy and Firewall Client Automatic Discovery...................................33
DNS WPAD Entry .....................................................................................................33
DHCP Option 252 ...................................................................................................... 34
Configuring Time Synchronization............................................................ 36
Remote Access VPN......................................................................................................... 37
Disaster Recovery and Change Management........................................... 38
ProLiant DL320 Firewall/VPN/Cache Server Settings Backup and Restore ...................38
System Backup and Restore..............................................................................................39
Back to Factory Settings................................................................................................... 40
Scheduled Backups........................................................................................................... 41
ProLiant DL320 Firewall/VPN/Cache Server Network Services Support 42
DNS Server....................................................................................................................... 42
DHCP Server ....................................................................................................................44
Hardening Overview and Impact................................................................ 45
HP Customer Support................................................................................. 52
4 HP ProLiant DL320 Firewall/VPN/Cache Server User Guide

Introduction
HP ProLiant DL320 Firewall/VPN/Cache server running Microsoft® Internet
Security and Acceleration (ISA) Server 2004 Service Pack 1 is an advanced
application layer firewall, virtual private network (VPN), and Web cache solution
that enables existing IT investments to be maximized by improving network security
and performance. The ProLiant DL320 Firewall/VPN/Cache server is preinstalled
and hardened to provide secure connections to the Internet and enable a similar level
of security for remote access connections to resources on the protected network.
This guide focuses on important issues that should be considered before and after
installing the ProLiant DL320 Firewall/VPN/Cache server in the network. However,
this user guide is not a comprehensive guide to configuring all of the firewall features
of ProLiant DL320 Firewall/VPN/Cache server. In-depth coverage of the
ProLiant DL320 Firewall/VPN/Cache server and Web caching configuration is
included in the Help file, included with the product, on the Microsoft
ISA server 2004 website at
ProLiant DL320 Firewall/VPN/Cache server website at
http://www.hp.com/servers/DL320FW-VPN-Cache.
http://go.microsoft.com/fwlink/?LinkID=27332, and on the
This guide contains basic information about network configuration and setup. An
experienced firewall or network administrator will already be familiar with most of
the concepts and procedures in this guide. However, HP recommends a review of the
subjects covered in this guide because some of the subjects might be new or of
specific interest.
HP ProLiant DL320 Firewall/VPN/Cache Server User Guide 5

Initial Setup Considerations
Before beginning the ProLiant DL320 Firewall/VPN/Cache server setup, consider the
following subjects so that the ProLiant DL320 Firewall/VPN/Cache server can
provide the best level of security and accessibility.
Firewall Lockdown Mode
The ProLiant DL320 Firewall/VPN/Cache server is defending itself right out of the
box by applying the Firewall Lockdown Mode. You can set up the ProLiant DL320
Firewall/VPN/Cache server while it is connected to the internal network and to the
Internet because the Firewall Lockdown Mode is active.
A critical function of a firewall is to react to an attack. When an attack occurs, it
might seem that the first line of defense is to disconnect from the Internet, isolating
the compromised network from malicious outsiders. However, HP does not
recommend this approach. Although the attack must be handled, normal network
connectivity must be resumed as quickly as possible, and the source of the attack
must be identified.
The lockdown feature introduced with ISA Server 2004 combines the need for
isolation with the need to stay connected. Whenever the Microsoft firewall service is
down, the ISA Server enters the lockdown mode, which occurs when:
• The server is starting up and the firewall service has not yet started.
• An event triggers the firewall service to shut down. When configuring alert
definitions, configure the firewall service by determining which events will cause
the firewall service to shut down.
• The firewall service is manually shut down. If a malicious attack occurs while
configuring the ISA Server computer, shut down the firewall service, and the
network can handle the attack.
6 HP ProLiant DL320 Firewall/VPN/Cache Server User Guide

Affected Functionality
When in lockdown mode, the following functionality applies:
• The Firewall Packet Filter Engine (fweng) applies the firewall policy.
• The following system policy rules are still applicable:
— Allow Internet Control Message Protocol (ICMP) from trusted servers to the
local host.
— Allow remote management of the firewall using Microsoft Management
Console (MMC) (RPC through port 3847).
— Allow remote management of the firewall using Remote Data Protocol.
• Outgoing traffic from the local host network to all networks is allowed. If an
outgoing connection is established, that connection can be used to respond to
incoming traffic. For example, a Domain Name System (DNS) query can receive
a DNS response on the same connection.
• No incoming traffic is allowed unless a system policy rule (listed previously) that
specifically allows the traffic is enabled. The one exception is DHCP traffic,
which is always allowed. That is, the UDP Send protocol on port 68 is allowed
from all networks to the local host network. The corresponding UDP Receive
protocol on port 67 is allowed.
• VPN remote access clients cannot access ISA Server. Similarly, access is denied
to remote site networks in site-to-site VPN scenarios.
• Any changes to the network configuration while in lockdown mode are applied
only after the firewall service restarts and ISA Server exits lockdown mode. For
example, if you physically move a network segment and reconfigure ISA Server
to match the physical changes, the new topology is in effect only after ISA
Server exits lockdown mode.
• ISA Server does not trigger any alerts.
HP ProLiant DL320 Firewall/VPN/Cache Server User Guide 7

Leaving Lockdown Mode
When the firewall service restarts, ISA Server exits lockdown mode and continues
functioning as it did previously. Any changes made to the ISA Server configuration
are applied after ISA Server exits lockdown mode.
Internal Network Overview
The internal network consists of addresses on the protected network that are not
associated with a perimeter or external network interface. Addresses on the LAN are
typically part of the internal network. The ProLiant DL320 Firewall/VPN/Cache
server installation process depends on the correct configuration of the internal
network adapter so that ProLiant DL320 Firewall/VPN/Cache server system policy is
applied correctly. Network infrastructure services, such as Active Directory service
domain controllers, internal DNS servers, DHCP servers, Microsoft Windows®
Internet Name Service (WINS) servers, Terminal Services, ICMP, Common Internet
File System (CIFS), and others depend on the correct configuration of the internal
network.
Incorrect configuration of the internal network addresses could lead to a compromise
of the ProLiant DL320 Firewall/VPN/Cache server.
The internal network consists of a collection of addresses representing a portion of a
network ID, an entire network ID, or several network IDs. The internal network can
represent all addresses accessible from one or more network adapters.
8 HP ProLiant DL320 Firewall/VPN/Cache Server User Guide

Computer Name and Administrator Password
Select a computer name for the ProLiant DL320 Firewall/VPN/Cache server. The
ProLiant DL320 Firewall/VPN/Cache server name must be different from any other
computer on the network. No two computers on the network can have the same
name. The computer name must be 15 characters or less in length and include only
letters, numbers, and non-alphanumeric characters (spaces are not allowed). Refer to
the computer name database if the ProLiant DL320 Firewall/VPN/Cache server is
installed on a larger network.
The administrator account has complete access to all components of the
ProLiant DL320 Firewall/VPN/Cache server. Any person connecting to the ProLiant
DL320 Firewall/VPN/Cache server with the administrator account can take control of
the firewall and attack the network. Use a complex and difficult-to-guess password
for the administrator account to help prevent attackers from easily guessing the
password.
Record the administrator password used for the ProLiant DL320
Firewall/VPN/Cache server, and memorize this password. Store this paper in a
protected location after the ProLiant DL320 Firewall/VPN/Cache server installation
is completed.
NOTE: If the ProLiant DL320 Firewall/VPN/Cache server will join a domain, be sure to comply
with existing domain-wide password policy.
HP ProLiant DL320 Firewall/VPN/Cache Server User Guide 9

Workgroup and Domain Name Considerations
The ProLiant DL320 Firewall/VPN/Cache server can be joined to a workgroup, a
Microsoft Windows Server 2003 domain, a Microsoft Windows 2000 Active
Directory domain, or a Microsoft Windows NT® 4.0 domain. Add the ProLiant
DL320 Firewall/VPN/Cache server to the Windows domain if a Windows
Server 2003, Windows 2000 Active Directory, or Windows NT 4.0 domain already
exists on your network.
An advantage of joining the ProLiant DL320 Firewall/VPN/Cache server to your
domain includes the ability to assign permissions for Internet access on a domain user
or group basis and centralized management of the firewall computer through
Group Policy.
A disadvantage of joining the ProLiant DL320 Firewall/VPN/Cache server to the
domain is that many firewall experts believe that joining the ProLiant DL320
Firewall/VPN/Cache server to the domain might reduce the overall level of
protection that the firewall can provide to the network.
Join the ProLiant DL320 Firewall/VPN/Cache server to a Windows workgroup if
there is not a Windows domain or if there is no need to join the ProLiant DL320
Firewall/VPN/Cache server to an already existing domain.
NOTE: When joining the ProLiant DL320 Firewall/VPN/Cache server to a Windows domain,
the domain Group Policy can be applied to the firewall computer, possibly changing the level
of security on the server. The server can be added to a workgroup and later added to a
Windows domain after developing a better understanding of how Group Policy can potentially
change the security configuration of the firewall.
1. Decide whether to join the ProLiant DL320 Firewall/VPN/Cache server to the
Windows domain before installing the ProLiant DL320 Firewall/VPN/Cache
server onto the network.
2. Record the name of your domain and the user name and password of a user that
has permissions to add a computer to the domain.
3. If a Windows domain does not exist or if there is no need to join the
ProLiant DL320 Firewall/VPN/Cache server to the Windows domain, record the
name of the workgroup already in use on your LAN.
10 HP ProLiant DL320 Firewall/VPN/Cache Server User Guide

4. If a workgroup name is not already established for your LAN, use the workgroup
name, WORKGROUP.
If the ProLiant DL320 Firewall/VPN/Cache server was not added to a Windows
domain during initial setup, complete the following procedure to add the server to a
domain anytime after the initial setup process is complete.
1. Select Start>Control Panel>System.
2. In the System Properties dialog box, click the Computer Name tab.
3. On the Computer Name tab, click Change.
4. In the Computer Name Changes dialog box, select Domain.
5. In the Domain text box, enter the name of the Windows domain to join, and
click OK.
6. In the Computer Name Changes Authentication dialog box, enter the name and
password of a user with permission to add computers to the domain, and
click OK.
7. In the Computer Name Changes dialog box welcoming you to the domain,
click OK.
8. In the Computer Name Changes dialog box informing that you must restart the
computer for the changes to take effect, click OK.
9. In the System Properties dialog box, click OK.
10. In the System Settings Change dialog box prompting you to restart your
computer now, click Yes.
The ProLiant DL320 Firewall/VPN/Cache server is now a member of the internal
network Active Directory domain and can access user accounts contained in the
Active Directory or Windows NT 4.0 domain and domains trusted by that domain.
HP ProLiant DL320 Firewall/VPN/Cache Server User Guide 11

The ProLiant DL320 Firewall/VPN/Cache Server Internal IP Address
The IP address assigned to the internal interface of the ProLiant DL320
Firewall/VPN/Cache server must be a valid IP address for the network to which the
firewall is directly connected. This address must meet the following requirements:
• The internal IP address must be on the same network ID as other computers
connected to the same network segment.
• The internal IP address must not already be in use on the network.
• The internal IP address, in most cases, is statically assigned. Do not use DHCP to
assign an address to the internal interface unless you have a specific requirement
to do so. This configuration helps prevent name resolution issues for the firewall
and Web proxy clients.
• Examples of network IDs commonly used on LANs include:
— 192.168.1.0 with a subnet mask of 255.255.255.0
— 10.1.0.0 with a subnet mask of 255.255.0.0
— 172.16.0.0 with a subnet mask of 255.255.0
NOTE: The ProLiant DL320 Firewall/VPN/Cache server uses a default internal IP address of
192.168.2.1. Change this during setup to meet the unique addressing requirements of the
network.
For example, consider the network depicted in the following figure. All of the
computers on the network have the same subnet mask, which is 255.255.255.0. The
three computers on the LAN have the IP addresses:
• 192.168.2.2
• 192.168.2.3
• 192.168.2.4
12 HP ProLiant DL320 Firewall/VPN/Cache Server User Guide
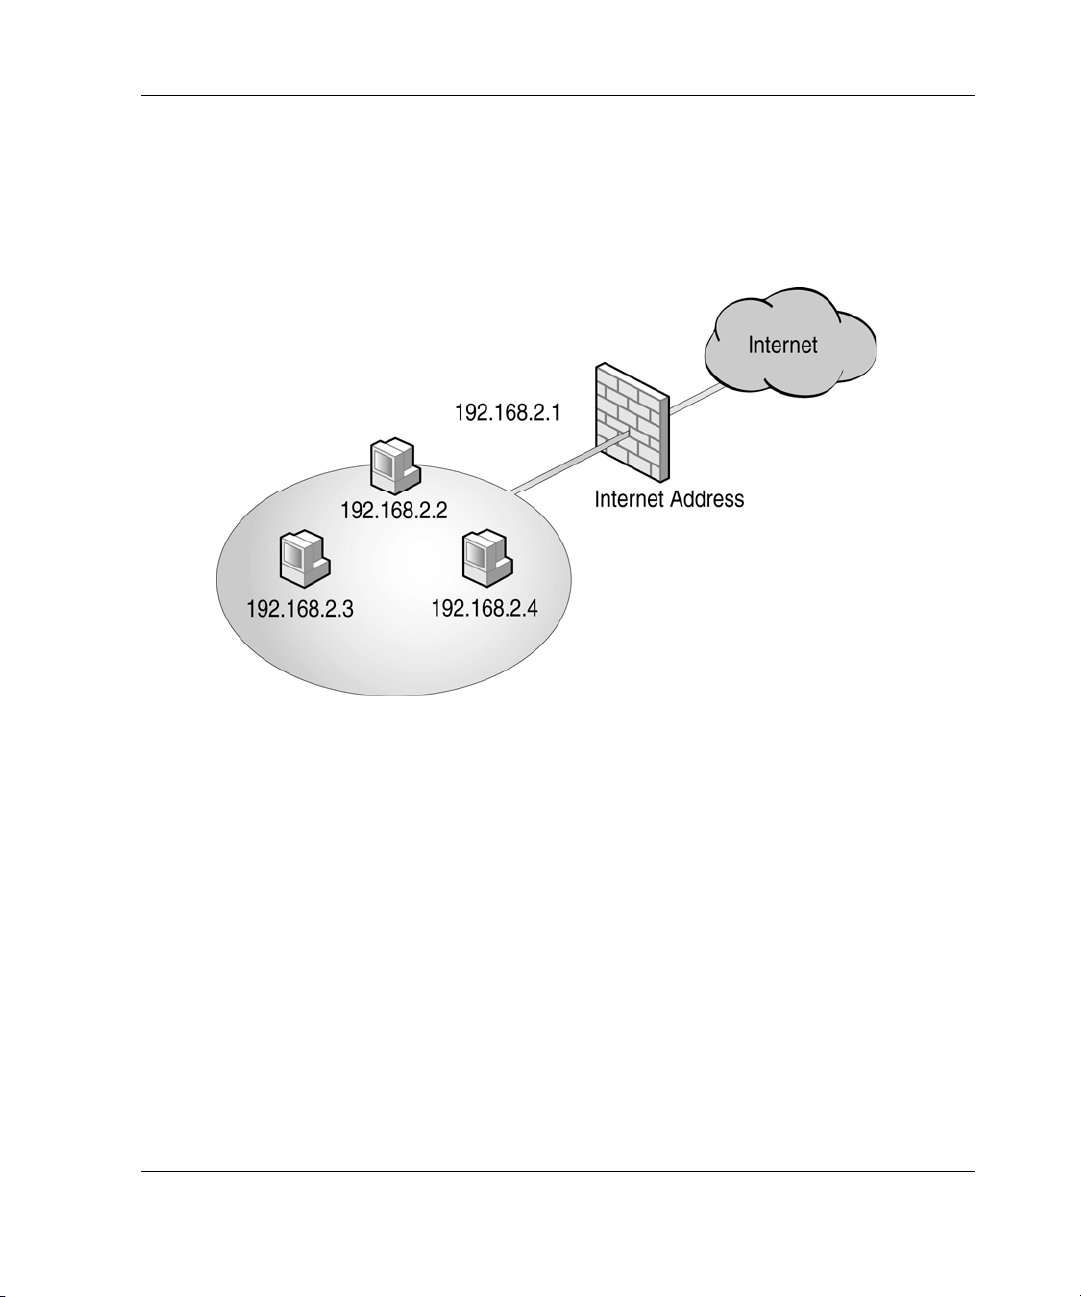
The internal interface must be placed in the same network as these computers. In this
example, this configuration is accomplished by assigning the internal interface the IP
address of 192.168.2.1. The external interface of the ProLiant DL320
Firewall/VPN/Cache server is assigned an Internet IP address that is determined by
your Internet service provider (ISP).
NOTE: IP addressing can be a complex issue. If you do not understand how the IP
addresses were assigned to computers on your LAN, consult with a networking professional
who can assist you with network IP addressing issues.
1. Before installing the ProLiant DL320 Firewall/VPN/Cache server, determine the
network ID used on the network directly connected to the internal interface.
2. Assign the internal interface of the ProLiant DL320 Firewall/VPN/Cache server
an IP address on the same network ID as the other computers on the directly
connected network of the internal interface.
If you are not sure what IP address to assign to the internal interface of the
ProLiant DL320 Firewall/VPN/Cache server, consult with a network professional
who can help with IP address issues.
HP ProLiant DL320 Firewall/VPN/Cache Server User Guide 13

DNS Server Address on the Internal Interface
The ProLiant DL320 Firewall/VPN/Cache server must resolve names to IP addresses.
For example, each time the Web browser is used to connect to a website on the
Internet, such as
match (or resolve) that name to the IP address of the website. After the Web browser
has the IP address of the website, it connects to the website using the IP address.
The ProLiant DL320 Firewall/VPN/Cache server must be configured to use a DNS
server that resolves Internet computer names to IP addresses. There are several ways
to do this:
• Install a DNS server on the LAN, configure that DNS server to resolve Internet
host names, and configure the ProLiant DL320 Firewall/VPN/Cache server to
use that DNS server.
• Use the IP address of your ISP DNS server. The DNS server at your ISP will be
able to resolve Internet computer names, but it will not be able to resolve
computer names on your LAN.
• Install and configure a DNS server on the ProLiant DL320 Firewall/VPN/Cache
server. This DNS server would be able to resolve both Internet computer names
and computer names on your LAN.
NOTE: Any network services and client applications installed on the firewall can potentially
increase the security risk.
http://www.microsoft.com, that name is sent to a DNS server to
If you are familiar with the installation and configuration of DNS servers or if a DNS
server already exists on the LAN, the best option is to configure that DNS server to
resolve Internet host names and then create an access rule on the firewall enabling
that DNS server to use the DNS protocol to connect to the Internet.
14 HP ProLiant DL320 Firewall/VPN/Cache Server User Guide

If you are not familiar with DNS server installation and configuration, or if you
choose not to install and configure a DNS server, use the ISP DNS server. The main
limitation of this option is that the ISP DNS server cannot resolve names of
computers on the LAN.
1. Determine if a DNS server already exists on the LAN.
2. If a DNS server exists on the LAN, configure that DNS server to resolve Internet
host names, and then create a firewall rule allowing this DNS server access to the
DNS protocol to all sites on the Internet.
3. If a DNS server does not exist on the LAN, install a DNS server on the
ProLiant DL320 Firewall/VPN/Cache server. For details on DNS setup and
configuration, refer to the Windows Server 2003 or Windows 2000 Help and
Support Center.
4. If a DNS server does exist on the LAN and you do not want to install a DNS
server on the ProLiant DL320 Firewall/VPN/Cache server, configure the internal
interface to use the IP address of your ISP DNS server. Consult the ISP to
determine the correct IP address of their DNS server.
HP ProLiant DL320 Firewall/VPN/Cache Server User Guide 15

Custom Network Adapter Configurations
The ProLiant DL320 Firewall/VPN/Cache server might be equipped with additional
network interfaces. In addition to the internal and external interfaces, there might be
additional LAN, partner access, perimeter network (also known as a demilitarized
zone or DMZ), and screened subnet interfaces.
Additional network interfaces can provide the following benefits:
• Additional LAN interfaces can connect several internal networks to the firewall.
The ProLiant DL320 Firewall/VPN/Cache server can control what network
traffic moves among the LANs and between the LANs and the Internet.
• Perimeter network interfaces can be used to connect perimeter networks hosting
publicly accessible servers and services. For example, you might want to host
your own e-mail or Web servers on the perimeter network.
• Partner networks enable business partners to connect to resources on a network
segment outside of the LAN and perimeter networks. These networks are not
public networks because only the partners can connect to them. Partner networks
are sometimes referred to as extranets.
IP addresses assigned to additional LAN, perimeter network, and extranet interfaces
are specific to the requirements of your unique network configuration. The only
requirement from the standpoint of the ProLiant DL320 Firewall/VPN/Cache server
is that each of these interfaces is configured with IP addresses on different network
IDs. The setup wizard enables the configuration of up to three interfaces. Additional
interfaces must be configured after setup is completed.
1. Before installing the ProLiant DL320 Firewall/VPN/Cache server, determine and
record what IP addresses and subnet masks should be configured on the
additional perimeter network or extranet interfaces.
2. If you are configuring a perimeter network, additional LAN networks, or an
extranet but do not know what IP addresses to assign the ProLiant DL320
Firewall/VPN/Cache server interfaces, consult with a network professional who
can help you determine the correct configuration.
16 HP ProLiant DL320 Firewall/VPN/Cache Server User Guide

Configuring the External IP Address
The ISP determines the IP address of the external interface of the ProLiant DL320
Firewall/VPN/Cache server. The address can be a statically assigned IP address or a
dynamically assigned IP address. Statically assigned IP addresses do not change over
time. Dynamically assigned IP addresses change over the course of hours, days, or
weeks. How frequently the address changes is determined by your ISP.
The type of address used is based on how much is spent on the Internet connection
and the level of service required. If you are using the ProLiant DL320
Firewall/VPN/Cache server only for connecting the network computers to the
Internet, a dynamically-assigned address fulfills that requirement. However, if you
are publishing servers on the internal network to the Internet or taking advantage of
the ProLiant DL320 Firewall/VPN/Cache server VPN server features, having a
permanent IP address on the firewall external interface is a benefit.
A valid IP address must be assigned to the external interface of the ProLiant DL320
Firewall/VPN/Cache server before connecting to the Internet. Assign either a static or
dynamic address to the external interface.
1. Determine if a statically or dynamically assigned external IP address exists
before installing your ProLiant DL320 Firewall/VPN/Cache server.
2. If a statically assigned IP address exists, record it for future reference.
3. If a dynamically assigned IP address exists, configure the external interface to
automatically obtain an IP address.
HP ProLiant DL320 Firewall/VPN/Cache Server User Guide 17

Setting Up the ProLiant DL320 Firewall/VPN/Cache Server
Several basic configuration tasks should be completed after the ProLiant DL320
Firewall/VPN/Cache server is installed. These include:
• Enabling the Web listener
• Enabling the firewall client listener
• Creating an Internet access rule
Enabling the Web Listener
A Web listener is software that accepts connections from Web browsers on the LAN
configured to use the ProLiant DL320 Firewall/VPN/Cache server as a Web Proxy
server. The Web browser sends requests to connect to the Internet directly to the IP
address on the ProLiant DL320 Firewall/VPN/Cache server listening for outbound
Web requests. Some advantages of configuring the Web browser to use the
ProLiant DL320 Firewall/VPN/Cache server as a Web Proxy include:
• The client computer connecting to the ProLiant DL320 Firewall/VPN/Cache
server does not rely on its default gateway configuration to connect to the Web.
The client computer must only know the route to the internal IP address of the
ProLiant DL320 Firewall/VPN/Cache server.
• Non-Microsoft operating systems can authenticate with the ProLiant DL320
Firewall/VPN/Cache server.
• You can use Remote Authentication Dial-In User Service (RADIUS) to
authenticate Web browsers connecting through the Web Proxy. Microsoft
implements RADIUS as part of its Internet Authentication Service (IAS) servers,
which is a service available on Windows Server 2003 and Windows 2000 Server
family products.
• You can configure:
— A connection time-out for Web browsers connected to the ProLiant DL320
Firewall/VPN/Cache server
— A limit on the number of simultaneous connections
18 HP ProLiant DL320 Firewall/VPN/Cache Server User Guide

To enable and configure the Web Proxy listener:
1. In the scope pane of the ISA Server 2004 management console, expand your
server name, expand the Configuration node, and then click the Networks node.
2. In the details pane on the Networks page, click the Networks tab. In the list of
networks, right-click the internal network, and click Properties.
3. In the Internal Properties dialog box, click the Web Proxy tab.
4. On the Web Proxy tab, select the Enable Web Proxy clients checkbox. Select
the Enable HTTP checkbox, and verify that the default port number in the
HTTP port text box is 8080.
5. Click the Authentication button.
6. In the Authentication dialog box, verify that the Integrated checkbox is selected.
Select the Basic checkbox. Click Yes in the ISA Server Configuration dialog box
warning you that passwords are transmitted in clear text when sent by means of
Basic authentication. Clear text communications can be captured and read by
network analyzers because they are not encrypted. However, all browsers support
Basic authentication.
7. In the Authentication dialog box, click OK.
8. In the Internal Properties dialog box, click Apply>OK.
9. Click Apply at the top of the details pane to save the changes and update the
firewall policy.
HP ProLiant DL320 Firewall/VPN/Cache Server User Guide 19

Enabling the Firewall Client Listener
The firewall client is an optional client-side software component that can be installed
to enhance the level of security and accessibility for those host systems. The firewall
client software can be installed on all 32-bit Windows operating systems. The
firewall client software provides the following benefits:
• User credentials are transparently sent to the ProLiant DL320
Firewall/VPN/Cache server, which enables user-level authentication for access
control.
• All Winsock applications are supported, including those requiring complex
protocols (such as FTP, games, and voice or video applications).
• The firewall client computer is independent of the default gateway configuration
because it forwards Internet connection requests directly to the internal IP
address of the ProLiant DL320 Firewall/VPN/Cache server.
The firewall client software is optional. However, enabling the firewall client listener
allows the ProLiant DL320 Firewall/VPN/Cache server to accept incoming
connection requests from firewall clients.
To enable the firewall client listener on the ProLiant DL320 Firewall/VPN/Cache
server:
1. In the scope pane of the ISA Server console, expand the server name, expand the
Configuration node, and click the Networks node.
2. In the details pane, click the Networks tab.
3. In the list of networks, right-click the internal network, and click Properties.
4. In the Internal Properties dialog box, click the Firewall Client tab.
5. On the Firewall Client tab, select the Enable Firewall client support for this
network checkbox. Do not change the ISA Server name or IP address default
settings. Change this setting later, depending on whether a DNS server is on the
LAN.
6. Click Apply, and then click OK in the Internal Properties dialog box.
7. Click Apply at the top of the details pane to save the changes and update the
firewall policy.
20 HP ProLiant DL320 Firewall/VPN/Cache Server User Guide

Creating an Internet Access Rule
After installing the ProLiant DL320 Firewall/VPN/Cache server, all traffic from
internal network clients to the Internet is blocked. This default configuration provides
a high level of security and prevents both internal and external users from accessing
content through the ProLiant DL320 Firewall/VPN/Cache server.
Connect to the Internet through the ProLiant DL320 Firewall/VPN/Cache server
immediately after it is installed. The simplest client configuration is the Secure NAT
client. To connect internal network clients to the Internet as quickly as possible but
still remain secure from external threats, confirm the following:
• The default gateway setting on the LAN computers is set to the IP address of the
internal interface of the ProLiant DL320 Firewall/VPN/Cache server.
• The LAN computers are configured with a DNS server address that can resolve
Internet host names. If there is not a DNS server on your LAN capable of
resolving Internet host names, configure the LAN computers to use the IP
address of your ISP DNS server. For more details, refer to the DNS discussion
later in this document.
• A firewall rule exists, allowing access to the required Internet protocols.
The default gateway address and the DNS server address used by the computer on the
LAN can be changed in the Control Panel. Create an access rule on the
ProLiant DL320 Firewall/VPN/Cache server. The access rule can be configured to
allow a limited number of protocols outbound access to the Internet, allow a selected
group of users access to a selected group of websites, or create a firewall rule
allowing all the users on your LAN access to all sites at all times using virtually
any protocol.
HP ProLiant DL320 Firewall/VPN/Cache Server User Guide 21

The following example demonstrates how to create a firewall rule that allows
everyone access to all protocols to all sites at all times. To create the firewall rule:
1. In the scope pane of the ISA Server management console, expand the computer
name, right-click the Firewall Policy node, and select New>Access Rule.
2. On the Welcome to the New Access Rule Wizard page, enter the name of the rule
in the Access rule name text box. In this example, enter
Outbound from Internal,
and click Next.
All IP Traffic
3. On the Rule Action page, select the Allow option, and click Next.
4. On the Protocols page, select the All outbound protocols option, and click Next.
5. On the Access Rule Sources page, click the Add button.
6. In the Add Network Entities dialog box, select the Networks folder.
7. Double-click the internal network, and then click Close. The internal network
should appear in the This rule applies to traffic from these sources list.
8. Click Next.
9. On the Access Rule Destinations page, click the Add button.
10. In the Add Network Entities dialog box, select the Networks folder.
11. Double-click the external network, and then click Close. The external network
should appear in the This rule applies to traffic sent to these destinations list.
12. Click Next.
13. On the User Sets page, confirm that All Users appears in the This rule applies to
requests from the following user sets, and click Next.
14. On the Completing the New Access Rule Wizard page, click Finish.
15. Click Apply at the top of the scope pane to save the changes and update the
firewall policy.
The Internet is now accessible from computers on the LAN. Consider strengthening
security for outbound connections after confirming that the ProLiant DL320
Firewall/VPN/Cache server is successfully allowing access to the Internet. An
effective method for creating a secure access policy is to use the network templates
included with ISA Server 2004. For detailed information about the network
templates, refer to the ISA Server 2004 Help file.
22 HP ProLiant DL320 Firewall/VPN/Cache Server User Guide

HP Virus Throttle
HP Virus Throttle, a network packet-filtering feature that helps slow the spread of
viruses, is automatically installed and enabled on your ProLiant DL320
Firewall/VPN/Cache server. Virus Throttle monitors all outbound connection
requests and counts the number of unique connections. It detects abnormal
(“virus-like”) behavior in the requests and slows excessive connection requests to
new hosts until you can determine if they are viral in nature and take action.
Configuring Virus Throttle
After Virus Throttle is installed, the Virus Throttle icon appears in the Windows
toolbar at the bottom of the screen. The parameters for the filter driver are set to the
defaults. Any change made to the Virus Throttle filter driver parameters is made to
all active instances of the Virus Throttle filter driver.
To configure parameters for the Virus Throttle filter driver:
1. Double-click the Virus Throttle icon to open the HP Virus Throttle Status and
Configuration Utility. If no inconsistencies are detected in the filter driver
parameters, the Status tab is displayed. The Status Tab shows overall status,
statistics, and delay queue information. If inconsistencies are detected, a warning
message displays. Click OK.
2. Click the Configuration tab. The following parameters can be modified:
— Delay Queue Size—Controls the maximum number of delayed connection
requests in the queue for each instance of the filter driver. Requests over the
queue size are dropped. The default is 200 delayed connection requests. The
valid range is 1through 1000.
— Delay Queue High Water Mark—Controls the number of connection
requests in the delay queue at which virus-like activity is considered to be
occurring for each instance of the filter driver. The default is 160 connection
requests. The valid range is 1 through Delay Queue Size.
— Delay Queue Low Water Mark—Controls the number of connection
requests in the delay queue below which virus-like activity is considered to
be stopped. The default is 100 connection requests. The valid range is 1
through High Water Mark.
HP ProLiant DL320 Firewall/VPN/Cache Server User Guide 23

— Delay Period—Controls the rate at which connection requests are removed
from the delay queue and passed down the protocol network stack. The
default is 1 second. The valid range is 1 through 10 seconds.
— Host Working Set Size—Controls the number of known machines to which
connections are established without delay. When a new connection is made,
the oldest member of the working set is replaced with the new host. The
default is 5 hosts. The valid range is 1 through 100.
3. Configure the Virus Throttle parameters as necessary, and click OK.
4. Click Yes>OK when prompted.
NOTE: If a non-virus program exhibits virus-like behavior, it might be necessary to reconfigure
the Virus Throttle configuration parameters to prevent unnecessary inconsistencies from
being reported.
For information about using Virus Throttle, refer to the HP ProLiant Essentials Intelligent
Networking Pack User Guide at
http://h18004.www1.hp.com/products/servers/proliantessentials/inp/index.html.
Available Verified Third-Party Applications and Plug-Ins
The ProLiant DL320 Firewall/VPN/Cache server functionality can be further
enhanced with ISA Server 2004 verified third-party applications and plug-ins. A list
of verified third-party applications and plug-ins, ranging from URL and content
filtering to antivirus and high availability, can be found at
http://www.microsoft.com/isaserver/partners.
24 HP ProLiant DL320 Firewall/VPN/Cache Server User Guide

Suggested Third-Party Applications
Installing and running third-party e-mail, spam, URL, and Web content filtering
applications is suggested. The following HP preferred partners offer technologically
advanced e-mail and spam or URL and Web content filtering products specifically
for ISA Server 2004.
Vircom ModusGate—An award-winning comprehensive e-mail security and
authentication solution, ModusGate seamlessly integrates with ISA Server 2004 to
provide comprehensive e-mail anti-spam, anti-virus and attachment filtering, as well
as sender authentication, e-mail caching and policy management of inbound and
outbound email. To purchase, learn more, and take advantage of a 30-day free trial
offer and other special offers, refer to
http://www.vircom.com/HPspecialoffer.
Additional Documentation Available from HP
Additional documentation taking full advantage of the various deployment scenarios
can be beneficial. The following are examples of a few of the white papers and
deployment kits available:
• VPN Deployment Kit—A step-by-step guide for a VPN deployment
• Exchange Deployment Kit—A step-by-step guide for an Exchange deployment
• Windows Hardening white paper—A document discussing Windows Server
operating system hardening and hardening options
• Caching white paper—A document discussing how to successfully optimize the
ProLiant DL320 for Web caching
These and other white papers and deployment kits are available for download at
http://www.hp.com/servers/DL320FW-VPN-Cache.
HP ProLiant DL320 Firewall/VPN/Cache Server User Guide 25

Managing and Maintaining the Firewall
The ProLiant DL320 Firewall/VPN/Cache server, like any other network device,
must be managed and maintained. Common management and maintenance
tasks include:
• Using Windows Update to keep the software updated
• Using Remote Desktop to manage the ProLiant DL320 Firewall/VPN/Cache
server from computers on the LAN and from computers located on the Internet
• Using Remote Management Console to manage the ProLiant DL320
Firewall/VPN/Cache server from a management station on the LAN
• Using Remote Assistance to obtain help with ProLiant DL320
Firewall/VPN/Cache server troubleshooting
• Configuring ProLiant DL320 Firewall/VPN/Cache server logs and monitoring
• Setting up Client Installation Share to allow firewall client software to be
installed on network client systems
• Creating a Web Proxy Automatic Discovery (WPAD) entry to support Web
browser and firewall client automatic configuration
• Configuring Time Synchronization to use the ProLiant DL320
Firewall/VPN/Cache server as a time server for the LAN
• Using a Remote Access VPN for remote management and network connectivity
26 HP ProLiant DL320 Firewall/VPN/Cache Server User Guide

Windows Update
Use the Microsoft Windows Update website to update the operating system with the
latest service packs and hot fixes. The process can be configured to download system
updates and install them automatically, or it can be configured to wait for
ProLiant DL320 Firewall/VPN/Cache server administrator approval. Configure the
Automatic Updates tab with one of the following options:
• Notify me before downloading any updates, and notify me again before installing
them on my computer.
• Download the updates automatically, and notify me when they are ready to be
installed.
• Automatically download the updates, and install them on the schedule that I
specify.
To configure the automatic update feature of the ProLiant DL320
Firewall/VPN/Cache server:
1. Select Start>Control Panel>System.
2. In the System Properties dialog box, click the Automatic Updates tab.
3. On the Automatic Updates tab, select the Keep my computer up to date
checkbox.
4. Select one of the options in the Settings frame that best meets your requirements.
Remote Desktop
The ProLiant DL320 Firewall/VPN/Cache server is preconfigured to allow a single
concurrent Remote Desktop Connection to the server. Use this connection to perform
remote management. The Remote Desktop Protocol (RDP) is used to connect to the
ProLiant DL320 Firewall/VPN/Cache server Remote Desktop, where it can be
accessed by the ISA Server 2004 management console to manage the firewall.
The ProLiant DL320 Firewall/VPN/Cache server is accessible through an internal
network computer or a computer located anywhere on the Internet by adjusting a
system policy rule.
HP ProLiant DL320 Firewall/VPN/Cache Server User Guide 27

To enable external users access to the Remote Desktop Service on the
ProLiant DL320 Firewall/VPN/Cache server:
1. In the scope pane of the ISA Server 2004 management console, expand the server
name, right-click the Firewall Policy node, and then click Edit System Policy.
2. In the System Policy Editor dialog box, locate the Remote Management group,
and then click the Terminal Server entry.
3. On the General tab, confirm that the Enable checkbox is selected.
4. Click the From tab, and click the Add button to the right of the This rule
applies to traffic from these sources list.
5. In the Add Network Entities dialog box, click the Networks folder, double-click
External, and then click Close.
6. In the System Policy Editor dialog box, click OK.
7. Click Apply to save the changes and update firewall policy.
External computers will now be able to connect to the RDP service on the
ProLiant DL320 Firewall/VPN/Cache server.
Remote ProLiant DL320 Firewall/VPN/Cache Server Management Console
Manage the ProLiant DL320 Firewall/VPN/Cache server from a management station
on the LAN by installing the ISA Server 2004 management console on the
management station. The ISA Server 2004 management console can manage virtually
any aspect of the ProLiant DL320 Firewall/VPN/Cache server configuration.
The ProLiant DL320 Firewall/VPN/Cache server management console can be
installed by placing the Companion CD into the CD-ROM drive of the management
station, and then selecting the option to install the management console from the
Autorun page. The management station will be able to connect to the
ProLiant DL320 Firewall/VPN/Cache server because there is a system policy rule in
place that allows internal network hosts to connect using the ProLiant DL320
Firewall/VPN/Cache server management console.
28 HP ProLiant DL320 Firewall/VPN/Cache Server User Guide

Remote Assistance
The Remote Assistance feature enables you to request assistance from a
ProLiant DL320 Firewall/VPN/Cache server technician who can interactively help
troubleshoot and repair problems with the firewall. Remote Assistance enables the
technician to view the desktop interface of the firewall and, with your permission,
take control of the desktop to correct the problem.
To request assistance using the Remote Assistance feature:
1. Select Start>Help and Support.
2. In the list of Support Tasks, click Remote Assistance.
3. On the Remote Assistance page, click Invite someone to help you.
4. On the Remote Assistance page, click Save invitation as a file (Advanced) at
the bottom of the page.
5. On the Remote Assistance – Save Invitation page, enter your name in the From
(the name you would like to appear on the invitation) text box.
6. In the dropdown list within the Set the invitation to expire section, set the time
that you want the invitation to be valid, and click Continue. Your assistant must
connect to the ProLiant DL320 Firewall/VPN/Cache server within this period.
7. Confirm that Require the recipient to use a password is selected.
8. Enter a password that the assistant will use to access the ProLiant DL320
Firewall/VPN/Cache server in the Type password text box, confirm the
password in the Confirm password text box, and click Save Invitation.
9. Record the location where the invitation file is saved in the Save in list box at the
top of the Save As dialog box.
10. Enter a name for the invitation file in the File name text box, and click Save. The
Remote Assistance page shows the location of the saved file.
11. Copy this file to a computer on the LAN, and send the file to your assistant.
NOTE: HP strongly recommends not using an e-mail client application on the
ProLiant DL320 Firewall/VPN/Cache server itself.
HP ProLiant DL320 Firewall/VPN/Cache Server User Guide 29

Configuring Monitoring, Reporting, and Logging
The ProLiant DL320 Firewall/VPN/Cache server has a comprehensive logging and
reporting facility. Some logging and reporting options should be configured
immediately to get the most from the ProLiant DL320 Firewall/VPN/Cache server
logging and reporting feature set. These options include:
• Configure firewall logging
• Configure Web proxy logging
Configuring Firewall Logging
The firewall log records connections from Secure NAT and firewall clients on the
internal network and external network. Firewall logging can be configured to use one
of several storage methods. Each storage method has its own advantages and
disadvantages. Firewall logging storage methods include:
• File logging
• SQL database logging
• MSDE database logging
To configure the Microsoft firewall service basic logging properties:
1. In the scope pane of the ISA Server 2004 management console, expand your
server name, and then click the Monitoring node.
2. In the details pane, click the Logging tab.
3. In the task pane, click the Tasks tab, and then click Configure Firewall
Logging. The Log tab appears in the Firewall Logging Properties dialog box.
4. Select the Log storage format that best fits. The File format option is best when
copying a log file information to a third-party application on another computer.
The SQL database format option is best when there is an SQL database on the
internal network and you have the expertise to manage an SQL database. The
MSDE database format option is an excellent option when SQL text-based
logging is not used.
30 HP ProLiant DL320 Firewall/VPN/Cache Server User Guide

5. Select the File format option. From the Format list, select the ISA Server file
format. This format will save log file entries using the local time configured on
the ProLiant DL320 Firewall/VPN/Cache server to stamp the log entries.
NOTE: When using file-based logging, the log file in real time will not be able to perform
queries.
6. Click Apply>OK.
7. Click Apply at the top of the details pane to save the changes and update the
firewall policy.
Configuring Web Proxy Logging
The Web Proxy logs contain information about connections from Web Proxy clients.
Web Proxy logging can be configured to use many different storage methods. Each
storage method has its own advantages and disadvantages. Web Proxy storage
methods include:
• File logging
• SQL database logging
• MSDE database logging
To configure the Web Proxy logging properties:
1. In the scope pane of the ISA Server 2004 management console, expand your
server name, and then click the Monitoring node.
2. In the details pane, click the Logging tab.
3. In the task pane, click the Tasks tab, and then click Configure Web Proxy
Logging. The Log tab appears in the Web Proxy Properties dialog box.
4. Select the Log storage format that best meets your needs. The File format option
is best when copying log file information to a third-party application on another
computer on the internal network. The SQL database format option is best when
a SQL database exists on the internal network and you have the expertise to
manage a SQL database. The MDSE database format option is an excellent
option when do not want to use SQL or text-based logging.
HP ProLiant DL320 Firewall/VPN/Cache Server User Guide 31

5. Select the File format option. From the Format list, select the ISA Server file
format. This format will save log file entries using the local time configured on
the ProLiant DL320 Firewall/VPN/Cache server to stamp the log entries.
NOTE: When using file-based logging, the log file will not be able to perform queries in
real time.
6. Click Apply>OK.
7. Click Apply at the top of the details pane to save the changes and update firewall
policy.
Setting Up the Client Installation Share
The Client Installation Share contains the firewall client installation files. The
firewall client software can be installed on network client systems by having the
clients connect to the Client Installation Share located on the ProLiant DL320
Firewall/VPN/Cache server or another internal network computer.
In the current ProLiant DL320 Firewall/VPN/Cache server release, the Client
Installation Share is installed on the ProLiant DL320 Firewall/VPN/Cache server.
However, network clients will not be able to access the installation files because the
Server service is disabled. The Server service must be manually enabled before
network client computers can connect to the share. However, enabling the Server
service on the firewall is not recommended.
Another option is to use the Companion CD and install the Client Installation Share
on a secure file server on the LAN. You can install the Client Installation Share on a
computer other than the ProLiant DL320 Firewall/VPN/Cache server by inserting the
Companion CD into the server’s CD-ROM drive and selecting the Install Client
Installation Share option from the Autorun menu.
32 HP ProLiant DL320 Firewall/VPN/Cache Server User Guide

Supporting Web Proxy and Firewall Client Automatic Discovery
The firewall and Web proxy client computers can be configured to automatically
obtain configuration information from the ProLiant DL320 Firewall/VPN/Cache
server. Automatic discovery enables the Web proxy and firewall client computers on
the LAN to automatically discover the location of the ProLiant DL320
Firewall/VPN/Cache server and obtain configuration information. The entire process
is transparent to users, and it allows mobile users to move to and from the LAN and
automatically obtain connection and configuration information required to connect to
the Internet through the ProLiant DL320 Firewall/VPN/Cache server.
There are two methods that support the Web proxy and firewall client automatic
discovery mechanism:
• DNS WPAD entry
• DHCP Option 252
DNS WPAD Entry
A WPAD alias entry is placed on the DNS server on your LAN. The entry maps the
name WPAD to the DNS host (A) record for the internal interface of the
ProLiant DL320 Firewall/VPN/Cache server. Requirements for the DNS WPAD
alias entry include:
• A DNS server on the LAN
• A host (A) entry for the internal interface of the ProLiant DL320
Firewall/VPN/Cache server
• An alias (CNAME) record for the name WPAD that maps to the host (A) record
for the entry in DNS of the ProLiant DL320 Firewall/VPN/Cache server
• Computers on the LAN that can correctly qualify the unqualified name WPAD
(the best way to meet this requirement is to join the LAN computers to the same
domain as the WPAD entry)
HP ProLiant DL320 Firewall/VPN/Cache Server User Guide 33

To create the DNS WPAD entry if Windows DNS server already exist on the LAN:
1. On the DNS server, from the Administrative Tools menu, open the DNS console.
2. In the left pane of the DNS management console, expand the server name,
expand the Forward Lookup Zones node, and click the domain name.
3. Right-click the domain name, and click the New Alias (CNAME) command.
4. In the Alias name (uses parent domain if left blank) text box, enter the name
wpad, and click Browse.
5. In the Browse dialog box, double-click the server name in the Records list, the
Forward Lookup Zones entry in the Records list, and then the domain name in
the Records list.
6. Select the resource record for the ProLiant DL320 Firewall/VPN/Cache server in
the Records list, and then click OK. The name of the ProLiant DL320
Firewall/VPN/Cache server now appears in the Fully qualified domain name
(FQDN) for target host text box.
7. Click OK. The WPAD alias entry now appears in the resource record list in the
results pane of the DNS console.
DHCP Option 252
Use the DHCP option 252 WPAD method for computers using DHCP to obtain IP
addressing information. Requirements for this option include:
• A DHCP server on the LAN
• Computers on the LAN use DHCP to obtain IP addressing information
• Web Proxy client users logged on as local administrators or members of the
Power Users group
34 HP ProLiant DL320 Firewall/VPN/Cache Server User Guide

If a DHCP server exist on your LAN:
1. From the Administrative Tools menu on the DHCP computer on the LAN, open
the DHCP console.
2. In the scope pane of the DHCP console, right-click the server name, and click Set
Predefined Options.
3. In the Predefined Options and Values dialog box, click the Add button.
4. In the Option Type dialog box in the Name text box, enter
5. Select String in the Data type list, enter
DHCP wpad entry in the Description text box.
252 in the Code text box, and enter
WPAD.
6. In the Predefined Options and Values text box, enter the following information in
the String text box:
http://<computer_name>:<AutoDiscoveryPortNumber>/Wpad.dat
where computer_name is the DNS name (FQDN) of the ProLiant DL320
Firewall/VPN/Cache server and AutoDiscovveryPortNumber is the port number
that the ProLiant DL320 Firewall/VPN/Cache server uses to publish automatic
discovery information (this is TCP port 80 by default).
For example, if the computer name is firewall.domain.com, the string would be:
http://firewall.domain.com/wpad.dat
7. In the Predefined Options and Values dialog box, click OK.
NOTE: To perform DHCP automatic discovery, you must be logged on as an administrator or
Power User in Windows 2000 or as an administrator, Power User, or member of the Network
Configuration Operators group in Windows XP. For more information, refer to the article
“Automatic Proxy Discovery in Internet Explorer with DHCP Requires Specific Permissions” at
http://go.microsoft.com/fwlink/?LinkID=27334.
HP ProLiant DL320 Firewall/VPN/Cache Server User Guide 35

Configuring Time Synchronization
Use the firewall as a time server for the LAN. A time server is a computer that
provides accurate time to other computers on the LAN. This server increases security
on the network by providing accurate time to all hosts on the network so that auditing
and logging entries have the correct time. In addition, many network protocols
require accurate time to function properly.
To obtain the most accurate time possible, the ProLiant DL320 Firewall/VPN/Cache
server must access a time server on the Internet. If you choose not to have the
ProLiant DL320 Firewall/VPN/Cache server as a time server for the LAN, configure
the ProLiant DL320 Firewall/VPN/Cache server to allow computers on the LAN to
contact their own Internet time servers.
For example, if a Windows domain exists on the internal network, configure the
primary domain controller (PDC) emulator to use the ProLiant DL320
Firewall/VPN/Cache server as its time server. If a Windows domain does not exist,
configure the individual clients to synchronize with the ProLiant DL320
Firewall/VPN/Cache server time server.
Create an access policy enabling both the ProLiant DL320 Firewall/VPN/Cache
server and the computers on the LAN to contact Internet time servers.
To create this access policy:
1. In the scope pane of the ISA Server 2004 management console, expand the server
name, right-click the Firewall Policy node, and select New>Access Rule.
2. On the Welcome to the New Access Rule Wizard page, enter the name for the
rule in the Access rule name text box. In this example, enter
requested by Local Host and Internal,
and click Next.
Network Time
3. On the Rule Action page, select Allow, and click Next.
4. On the Protocols page in the This rule applies to list, select Selected protocols,
and click Add.
5. In the Add Protocols text box, select the Infrastructure folder, double-click the
NTP (UDP) entry, and then click Close.
6. On the Protocols page, click Next.
36 HP ProLiant DL320 Firewall/VPN/Cache Server User Guide

7. On the Access Rule Sources page, click Add.
8. In the Add Network Entities dialog box, select Networks.
9. Double-click Local Host>Internal, and then click Close.
10. On the Access Rule Sources page, click Next.
11. On the Access Rule Destinations page, click Add.
12. Select the Networks folder, double-click the external entry, and then click Close.
13. On the Access Rule Destinations page, click Next.
14. On the User Sets page, click Next.
15. On the Completing the New Access Rule Wizard page, click Finish.
The ProLiant DL320 Firewall/VPN/Cache server can now perform time
synchronization with Internet-based time servers. If the internal network clients are to
synchronize with the ProLiant DL320 Firewall/VPN/Cache server, create an access
rule allowing the internal network access to the local host network using the Network
Time Protocol. In addition, configure the clients to use the correct time server. In
Windows XP, the time server configuration is performed in the Date and Time
properties dialog box on the Internet Time tab.
Remote Access VPN
A Remote Access VPN allows computers located virtually anywhere in the world to
connect to computers in the internal network through the ProLiant DL320
Firewall/VPN/Cache server using a VPN connection. The only requirement is that
the client computer has an Internet connection. The ProLiant DL320
Firewall/VPN/Cache server can be managed from home or any other location by
creating a VPN connection to the ProLiant DL320 Firewall/VPN/Cache server. In
addition, other computers can be accessed on the internal network protected by the
ProLiant DL320 Firewall/VPN/Cache server. For comprehensive documentation on
how to create and configure site-to-site VPN connections, refer to the
ProLiant DL320 Firewall/VPN/Cache server Help file and the Microsoft ISA
Server 2004 website at
HP ProLiant DL320 Firewall/VPN/Cache Server User Guide 37
http://go.microsoft.com/fwlink/?LinkID=27332.

Disaster Recovery and Change Management
There are many tasks to be performed that address disaster recovery and change
management issues. These tasks include:
• ProLiant DL320 Firewall/VPN/Cache server settings backup and restore
• System backup and restore
• Back to factory settings
• Scheduled backups
ProLiant DL320 Firewall/VPN/Cache Server Settings Backup and Restore
Firewall change management can be accomplished by backing up the
ProLiant DL320 Firewall/VPN/Cache server configuration settings before making
changes. The backed-up settings can be restored in the event subsequent changes
made to the firewall configuration have unexpected or undesirable results. The
ProLiant DL320 Firewall/VPN/Cache server has an integrated backup feature that
saves almost all of the configuration settings.
To back up the ProLiant DL320 Firewall/VPN/Cache server configuration:
1. In the scope pane of the ISA Server 2004 management console, right-click the
server name, and then click Back Up.
2. In the Backup Configuration dialog box, select a location for the backup file in
the Save in list, enter a name for the backup file in the File name text box, and
then click Backup.
3. In the Set Password dialog box, enter a password in the Password text box,
confirm the password in the Confirm password text box, and click OK.
4. In the Exporting dialog box, when the array data has been successfully backed
up, click OK, and copy the file to a safe location separate from the
ProLiant DL320 Firewall/VPN/Cache server.
38 HP ProLiant DL320 Firewall/VPN/Cache Server User Guide

To restore the ProLiant DL320 Firewall/VPN/Cache server to the settings contained
in the backup file:
1. In the scope pane of the ISA Server 2004 management console, right-click the
server name, and then click Restore.
2. In the Restore Configuration dialog box, locate the backup file, and click
Restore.
3. In the Open the Imported File dialog box, enter the password that was assigned to
the file, and click OK.
4. In the Importing dialog box, after the array data has been successfully restored,
click OK.
5. Click Apply to save the changes and update the firewall policy to the settings
contained in the backup file.
6. In the ISA Server warning dialog box, select Save the changes and restart the
service(s), and click OK.
System Backup and Restore
It is a good security policy to back up the entire contents of the ProLiant DL320
Firewall/VPN/Cache server hard disk, including the ProLiant DL320
Firewall/VPN/Cache server software and underlying operating system. You can use
the Windows Backup utility to accomplish this task.
To back up the contents of the ProLiant DL320 Firewall/VPN/Cache server hard
disk:
1. Select Start>Run.
2. In the Open text box, enter
ntbackup, and click OK.
3. Confirm that the Always start in wizard mode checkbox is selected, and click
Next.
4. On the Backup or Restore page, select the Back up files and settings option, and
click Next.
5. On the What to Back Up page, select the All information on this computer
option, and click Next.
HP ProLiant DL320 Firewall/VPN/Cache Server User Guide 39

6. On the Backup Type, Destination, and Name page, click the Browse button to
select a location to save the backup file. The file is copied to a management
station on the LAN and to removable media, such as a CD.
7. In the Save As dialog box, select the backup destination, and click Save.
8. In the Type a name for this backup text box, enter a name, and click Next.
9. On the Completing the Backup or Restore Wizard page, review the information.
Have a floppy disk ready that you can use to restore the system in the event of a
major failure. Click Finish.
10. Follow the prompts to complete the system backup procedure.
Back to Factory Settings
The Back to Factory Settings option allows the ProLiant DL320 Firewall/VPN/Cache
server to be returned to the original out-of-box factory settings. To return the
computer to its original factory settings:
1. Place the first Recovery CD into the ProLiant DL320 Firewall/VPN/Cache server
CD-ROM drive, and reboot the ProLiant DL320 Firewall/VPN/Cache server.
2. Follow the prompts generated by the ProLiant DL320 Firewall/VPN/Cache
server system restoration routine. In approximately eight to ten minutes, the
computer is restored to its factory settings and can be configured to connect to
the Internet.
IMPORTANT: A warning will be sent, stating that all data on the ProLiant DL320
Firewall/VPN/Cache server will be lost. Confirm continuation of the restore procedure after
receiving this warning. After completing the Back to Factory Settings routine, restore system
settings and firewall settings from previously created backups.
40 HP ProLiant DL320 Firewall/VPN/Cache Server User Guide

Scheduled Backups
An operating system backup can be scheduled to take place automatically on a
predetermined time and date. To configure a recurring backup routine:
1. Select Start>Run.
2. In the Open text box, enter
ntbackup, and click OK.
3. Confirm that the Always start in wizard mode checkbox is selected.
NOTE: The Backup or Restore Wizard starts by default, unless it is disabled.
4. On the Welcome to the Backup or Restore Wizard page, click Advanced Mode.
5. Click the Backup tab, and select Job>New.
6. Select the files and folders to back up by selecting the checkbox to the left of a
file or folder.
7. In Backup destination, select File or Tape device.
8. In Backup media or file name, enter a path and file name for the backup file, or
select a tape.
9. Select the desired backup options, such as the backup type and the log file type:
a. Select Tools>Options.
b. In the Options dialog box, select the desired options, and then click OK.
10. On the Job menu, select Save Selections to save your selections as a backup job
file (.bks).
11. Click Start Backup, and make any desired changes in the Backup Job
Information dialog box.
12. To set advanced backup options, such as data verification or hardware
compression, click Advanced.
13. Select advanced backup options, and then click OK.
14. In the Backup Job Information dialog box, click Schedule.
15. In the Set Account Information dialog box, enter the appropriate user name and
password.
HP ProLiant DL320 Firewall/VPN/Cache Server User Guide 41

16. In the Scheduled Job Options dialog box in Job name, enter a name for the
scheduled backup job.
17. On the Schedule data tab, click Properties to set the date, time, and frequency
parameters for the scheduled backup, and then click OK>OK.
ProLiant DL320 Firewall/VPN/Cache Server Network Services Support
Two network services provide important infrastructure support for the ProLiant
DL320 Firewall/VPN/Cache server and network hosts that make connections through
the ProLiant DL320 Firewall/VPN/Cache server. These network services are:
• The DNS server service
• The DHCP server service
DNS Server
The ProLiant DL320 Firewall/VPN/Cache server depends on a DNS server to resolve
Internet host names. To provide DNS server support for the ProLiant DL320
Firewall/VPN/Cache server, use:
• Your ISP DNS server
• Your own DNS server on the internal network
• A caching-only DNS server on the ProLiant DL320 Firewall/VPN/Cache server
• A caching-only DNS server on a perimeter network segment
The simplest approach is to use your ISP DNS server. During the ProLiant DL320
Firewall/VPN/Cache server setup process, set the DNS server address used by the
ProLiant DL320 Firewall/VPN/Cache server to use the IP address of the ISP DNS
server to resolve Internet host names. If using a dial-up connection to connect to the
Internet, your ISP will automatically assign both an IP address and a DNS server
address to your dial-up interface. The drawback of using only the ISP DNS server is
that DNS cannot be used to resolve computer names on the internal network.
42 HP ProLiant DL320 Firewall/VPN/Cache Server User Guide

If a DNS server already exists on the internal network, use it to resolve Internet host
names. All Active Directory domains require at least one DNS server and use that
DNS server to resolve Internet host names for your internal network clients.
Configure the internal interface of the ProLiant DL320 Firewall/VPN/Cache server to
use this DNS server after configuring the internal network DNS server to resolve
Internet names.
A caching-only DNS server does not contain DNS zone or domain information.
Instead, it queries other DNS servers on the Internet for the IP address of a given
host, and then caches the result before forwarding the answer to the computer
requesting the name resolution. A caching-only DNS server can be installed on the
ProLiant DL320 Firewall/VPN/Cache server, and then the ProLiant DL320
Firewall/VPN/Cache server can be configured to use itself as its DNS server.
Another caching-only DNS server solution takes advantage of a perimeter network
configuration. If the ProLiant DL320 Firewall/VPN/Cache server has three or more
network interfaces, one of the network interfaces can be connected to a perimeter
network. A caching-only DNS server can be installed and configured on the
perimeter network. If a DNS server exists on the internal network, it can be
configured to use the perimeter network DNS server as a forwarder.
For more information on DNS setup and configuration, refer to the Windows
Server 2003 Help and Support Center or the Windows 2000 Help.
HP ProLiant DL320 Firewall/VPN/Cache Server User Guide 43

DHCP Server
A DHCP server assigns IP addresses to computers configured as DHCP clients. In a
typical ProLiant DL320 Firewall/VPN/Cache server configuration, the DHCP server
assigns addresses to computers on the internal network and the VPN Clients network.
The DHCP server itself can be located on:
• The ProLiant DL320 Firewall/VPN/Cache server
• A computer on the internal network
The DHCP server can be installed on the ProLiant DL320 Firewall/VPN/Cache
server computer if there are no other server computers on the internal network where
a DHCP server can be installed. Installing the DHCP server on the ProLiant DL320
Firewall/VPN/Cache server is a second choice because VPN clients cannot obtain an
IP address from the DHCP server on the ProLiant DL320 Firewall/VPN/Cache server
itself. Configure a static address pool of IP addresses to assign to VPN clients when
the DHCP server is installed on the ProLiant DL320 Firewall/VPN/Cache server.
Another reason to keep the DHCP server off the firewall is to reduce the number of
applications running on the firewall, all of which create potential portals for attack.
Placing the DHCP server on a computer located on the internal network enables the
VPN clients to obtain IP addressing information from the DHCP server. In addition,
the ProLiant DL320 Firewall/VPN/Cache server can automatically define the VPN
clients network based on the IP addresses it obtains from the DHCP server. Another
advantage is that the DHCP Relay Agent routing service can optionally be installed
on the ProLiant DL320 Firewall/VPN/Cache server and DHCP options can be
assigned to the VPN clients network, such as a primary domain name.
44 HP ProLiant DL320 Firewall/VPN/Cache Server User Guide

Hardening Overview and Impact
The ProLiant DL320 Firewall/VPN/Cache server must be able to act in several
specific roles and perform 11 specific server tasks. A set of firewall and operating
system services are enabled to support the roles and tasks of the ProLiant DL320
Firewall/VPN/Cache server.
The ProLiant DL320 Firewall/VPN/Cache server was preinstalled to support the
following roles. Consequently, services were set to the proper startup mode. The
ProLiant DL320 Firewall/VPN/Cache server administrator can revise the preinstalled
choices at any time.
• Automatic Update client
• DHCP client
• DNS client
• Dynamic DNS registration
• Microsoft Networking client
• WINS client
The ProLiant DL320 Firewall/VPN/Cache server can be joined to a domain and
accordingly require the Domain Member client role. However, this configuration is
not the default. The ProLiant DL320 Firewall/VPN/Cache server requires 11
server tasks.
• Application installation locally using Windows Installer (MSI)
• Backup
• Error reporting
• Help and support
• ISA Server 2004: Client Installation Share
• ISA Server 2004: MSDE logging
• Performance Monitor background collect
• Print to a local printer
HP ProLiant DL320 Firewall/VPN/Cache Server User Guide 45

• Print to a remote computer
• Remote assistant
• Time synchronization
Startup mode shows the start-up type for the following services:
• Automatic—Specifies that the service starts automatically when the system
starts.
• Manual—Specifies that this service might be required by a dependent service
that can start it. Services with Manual startup do not start automatically when the
system starts.
• Disabled—Prevents the service from being started by the system, a user, or any
dependent service. Any services that explicitly depend on it will fail to start.
To change the start-up type for a service:
NOTE: Disabling or turning off services that are on by default might adversely affect the
functionality and performance of the server.
1. Right-click My Computer, and select Manage.
2. Click Services and Applications>Services.
3. Right-click the service to modify, and select Properties.
4. In the Startup type field, select either Automatic, Manual, or Disabled.
5. Click OK.
46 HP ProLiant DL320 Firewall/VPN/Cache Server User Guide

Table 1 lists the services required for the ProLiant DL320 Firewall/VPN/Cache
server to take on its specified roles and required server tasks, as well as other services
that are available but not automatically started.
Table 1: ProLiant DL320 Firewall/VPN/Cache Server Services
Service name Service short name Startup mode
Automatic Updates wuauserv Automatic
Cryptographic
Services
DHCP Client Dhcp Automatic
DNS Client Dnscache Automatic
Error Reporting
Service ERSvc Automatic
Event Log Eventlog Automatic
Help and Support Helpsvc Automatic
IPSEC Services PolicyAgent Automatic
Logical Disk Manager dmserver Automatic
CryptSvc Automatic
Microsoft Firewall Fwsrv Automatic
Microsoft ISA Server
Control ISACtrl Automatic
Microsoft ISA Server
Job Scheduler ISASched Automatic
Microsoft ISA Server
Storage ISASTG Automatic
MSSQL$MSFW MSSQL$MSFW Automatic
Performance Logs and
Alerts SysmonLog Automatic
Plug and Play PlugPlay Automatic
continued
HP ProLiant DL320 Firewall/VPN/Cache Server User Guide 47

Table 1: ProLiant DL320 Firewall/VPN/Cache Server Services continued
Service name Service short name Startup mode
Protected Storage ProtectedStorage Automatic
Remote Procedure
Call (RPC)
Secondary Logon seclogon Automatic
Security Accounts
Manager SamSs Automatic
System Event
Notification
Windows Management
Instrumentation winmgmt Automatic
Windows Time W32time Automatic
Wireless Configuration WZCSVC Automatic
Workstation lanmanworkstation Automatic
Background Intelligent
Transfer Service
RpcSs Automatic
SENS Automatic
BITS Manual
COM+ Event System EventSystem Manual
Logical Disk Manager
Administrative Service dmadmin Manual
Network Connections Netman Manual
Network Location
Awareness (NLA)
NTLM Security
Support Provider NtLmSsp Manual
Remote Access
Connection Manager
Remote Desktop Help
Session Manager RDSessMgr Manual
48 HP ProLiant DL320 Firewall/VPN/Cache Server User Guide
NLA Manual
RasMan Manual
continued

Table 1: ProLiant DL320 Firewall/VPN/Cache Server Services continued
Service name Service short name Startup mode
Server lanmanserver Manual
Smart Card ScardSvr Manual
Telephony TapiSrv Manual
Terminal Services TermService Manual
Virtual Disk Service
(VDS)
Volume Shadow Copy VSS Manual
Windows Installer MSIServer Manual
WMI Performance
Adapter WmiApSrv Manual
Alerter Alerter Disabled
Application Layer
Gateway Service ALG Disabled
Application
Management AppMgmt Disabled
ClipBook ClipSrv Disabled
Computer Browser Browser Disabled
COM+ System
Application
Distributed File
System
Distributed Link
Tracking Client TrkWks Disabled
Distributed Link
Tracking Server TrkSvr Disabled
Distributed
Transaction
Coordinator MSDTC Disabled
VDS Manual
COMSysApp Disabled
Dfs Disabled
continued
HP ProLiant DL320 Firewall/VPN/Cache Server User Guide 49

Table 1: ProLiant DL320 Firewall/VPN/Cache Server Services continued
Service name Service short name Startup mode
File Replication NtFrs Disabled
HTTP SSL HTTPFilter Disabled
Human Interface
Device Access
IMAPI CD-Burning
COM Service
Indexing Service CiSvc Disabled
Internet Connection
Firewall (ICF)/Internet
Connection
Intersite Messaging IsmServ Disabled
Kerberos Key
Distribution Center Kdc Disabled
License Logging LicenseService Disabled
Messenger Messenger Disabled
Microsoft Software
Shadow Copy Provider
Network Basic
Input/Output System
Net Logon* Netlogon Disabled
NetMeeting Remote
Desktop Sharing
Network DDE NetDDE Disabled
Network DDE DSDM NetDDEdsdm Disabled
Portable Media Serial
Number Service WmdmPmSN Disabled
Print Spooler Spooler Disabled
Remote Access Auto
Connection Manager RasAuto Disabled
HidServ Disabled
ImapiService Disabled
SharedAccess/
Sharing (ICS) Disabled
SWPRV Disabled
NETBIOS Disabled
Mnmsrvc Disabled
continued
50 HP ProLiant DL320 Firewall/VPN/Cache Server User Guide

Table 1: ProLiant DL320 Firewall/VPN/Cache Server Services continued
Service name Service short name Startup mode
Remote Procedure
Call (RPC) Locator
Remote Registry RemoteRegistry Disabled
Resultant Set of Policy
Provider RSoPProv Disabled
Routing and Remote
Access RemoteAccess Disabled
Shell Hardware
Detection
Special Administration
Console Helper
Task Scheduler Schedule Disabled
Telnet TlntSvr Disabled
Terminal Services
Session Directory Tssdis Disabled
Themes Themes Disabled
Transmission Control
Protocol/Internet
Protocol TCP/IP Disabled
Upload Manager uploadmgr Disabled
Uninterruptible Power
Supply UPS Disabled
WebClient WebClient Disabled
Windows Audio AudioSrv Disabled
Windows Image
Acquisition (WIA)
Windows Management
Instrumentation Driver
Extensions Wmi Disabled
WinHTTP Web Proxy
Auto-Discovery
Service
RpcLocator Disabled
ShellHWDetection Disabled
sacsvr Disabled
stisvc Disabled
WinHttpAutoProxySvc Disabled
HP ProLiant DL320 Firewall/VPN/Cache Server User Guide 51

This guide addressed several important issues that can help in getting the
ProLiant DL320 Firewall/VPN/Cache server running smoothly and reliably. For
detailed information about how to configure the firewall to meet the specific
requirements of your organization, refer to the ProLiant DL320 Firewall/VPN/Cache
server Help files.
HP Customer Support
HP Customer Support offers Software Support, Support Plus Software Support, and
Integrated Hardware and Software Support services for ISA preinstalled on the
ProLiant DL320 G3 server. The following are selected recommendations with links
to further detail:
• Software Phone Support—Includes three incidents and 9 x 5 standard telephone
support for ISA 2004 and a wide range of Microsoft applications. For more
information, refer to
• Hardware Support—A range of hardware support services are available for the
Proliant DL320 G3. For more information refer to
http://www.hp.com/hps/hardware.
• Support Plus—Includes one year of integrated hardware and software support on
the Proliant DL320 G3 server. For more information, refer to
http://www.hp.com/hps/premium
http://www.hp.com/hps/software.
.
• Warranty Support—For Proliant servers, 90 days of technical advisory support,
including installation assistance, is available for HP preinstalled third-party
software from the HP website or by telephone from the date of purchase.
To contact HP for support, go to
52 HP ProLiant DL320 Firewall/VPN/Cache Server User Guide
http://www.hp.com.
 Loading...