


HP Photosmart D7400 series
Basics Guide
Hewlett-Packard Company notices
The information contained in this document is subject to change without notice.
All rights reserved. Reproduction, adaptation, or translation of this material is prohibited without prior written permission of Hewlett-Packard, except
as allowed under copyright laws. The only warranties for HP products and services are set forth in the express warranty statements accompanying
such products and services. Nothing herein should be construed as constituting an additional warranty. HP shall not be liable for technical or editorial
errors or omissions contained herein.
© 2007 Hewlett-Packard Development Company, L.P.
Windows, Windows 2000, and Windows XP are U.S. registered trademarks of Microsoft Corporation.
Windows Vista is either a registered trademark or trademark of Microsoft Corporation in the United States and/or other countries.
Intel and Pentium are trademarks or registered trademarks of Intel Corporation or its subsidiaries in the United States and other countries.

HP Photosmart D7400 series
Basics Guide
English

Contents
1 HP Photosmart overview
The HP Photosmart at a glance.................................................................................................5
Control panel features................................................................................................................6
English
Find more information.................................................................................................................7
2Network setup
Wired network setup...................................................................................................................8
Integrated wireless WLAN 802.11 network setup.....................................................................11
Wireless ad hoc network setup.................................................................................................14
Install the software for a network connection...........................................................................17
Connect to additional computers on a network........................................................................18
Change the HP Photosmart from a USB connection to a network connection.........................18
Manage your network settings..................................................................................................19
3 Use the HP Photosmart features
Load paper...............................................................................................................................22
Avoid paper jams......................................................................................................................24
View, select, and print photos...................................................................................................24
Check the estimated ink levels.................................................................................................26
Replace the ink cartridges........................................................................................................26
4 Troubleshooting and support
Uninstall and reinstall the software...........................................................................................29
Hardware setup troubleshooting...............................................................................................29
Network troubleshooting...........................................................................................................31
Clear paper jams......................................................................................................................36
Information on ink cartridges and the print head......................................................................37
Support process.......................................................................................................................38
5 Technical information
System requirements................................................................................................................39
Product specifications...............................................................................................................39
Energy Star® notice.................................................................................................................39
Ink cartridge yield.....................................................................................................................40
Regulatory notices....................................................................................................................40
Warranty...................................................................................................................................41
4 HP Photosmart D7400 series
1 HP Photosmart overview
Use the HP Photosmart to quickly and easily accomplish tasks such as printing photos
from a memory card or storage device. You can access many HP Photosmart functions
directly from the control panel, without turning on your computer.
NOTE: This guide introduces basic operations and troubleshooting, as well as
provides information for contacting HP support and ordering supplies.
The onscreen Help details the full range of features and functions, including use of
the HP Photosmart software that came with the HP Photosmart.
The HP Photosmart at a glance
English
Label Description
1 On button
2 Ink cartridge door
3 Color graphics display (also referred to as the
4 Control panel
5 Memory card slots and Photo light
6 Front USB port
7 Photo tray
8 Main input tray (also referred to as the input tray)
9 Paper tray extender (also referred to as the tray
10 Output tray
11 Power connection
12 Ethernet port
display)
extender)
*
HP Photosmart overview 5
Chapter 1
(continued)
Label Description
13 Rear USB port
14 Rear door
* Use only with the power adapter supplied by HP.
Control panel features
English
The following diagram and related table provide a quick reference to the HP Photosmart
control panel features.
Label Name and Description
1 Display: View menus, photos, and messages. The touch screen display can be adjusted to
2 Print Photos: Depending on whether you access your photos from the View, Print, or Create
3 Wireless light: Indicates that the 802.11 b and g wireless radio is turned on.
4 Attention light: Indicates that a problem occurred. See the display for more information.
5 Cancel: Stops the current operation, exits a menu, or exits settings.
6 Red Eye Removal: Turns the Red Eye Removal feature On or Off. By default, this feature is
different positions. This enables the user to change the display angle to accommodate various
device placements and lighting conditions.
menu, the Print Photos button will display the Print Preview screen or it will print any selected
photo(s). If no photos are selected, a prompt appears asking if you want to print all the photos
on your card or storage device.
turned off. When the feature is turned on, the HP Photosmart automatically corrects red eye
coloring in the photo currently shown on the display.
6 HP Photosmart D7400 series

Find more information
A variety of resources, both printed and onscreen, provide information about setting up
and using the HP Photosmart.
• Setup Guide
The Setup Guide provides instructions for setting up the HP Photosmart and installing
software. Make sure you follow the steps in the Setup Guide in order.
If you have problems during setup, see Troubleshooting in the last section of the
Setup Guide, or see “
• Onscreen Help
The onscreen Help provides detailed instructions on features of the HP Photosmart
that are not described in this Basics Guide, including features that are only available
using the software you installed with the HP Photosmart.
•
www.hp.com/support
If you have Internet access, you can get help and support from the HP Web site. This
Web site offers technical support, drivers, supplies, and ordering information.
Troubleshooting and support” on page 29 in this guide.
English
Find more information 7

2Network setup
This section describes how to connect the HP Photosmart to a network and how to view
and manage network settings.
If you want to: See this section:
English
Connect to a wired (Ethernet) network. “Wired network setup” on page 8
Connect to a wireless network with a wireless
router (infrastructure).
Connect directly to a wireless-capable
computer without a wireless router (ad hoc).
Install the HP Photosmart software for use in a
networked environment.
Add connections to more computers on the
network.
Change the HP Photosmart from a USB
connection to a network connection.
NOTE: Use the instructions in this section if
you first installed the HP Photosmart with a USB
connection, and you now want to change to
either a wireless or Ethernet network
connection.
View or change the network settings. “Manage your network settings” on page 19
Find troubleshooting information. “Network troubleshooting” on page 31
NOTE: You can connect the HP Photosmart to either a wireless or wired network,
but not both at the same time.
Wired network setup
“Integrated wireless WLAN 802.11 network
setup” on page 11
“Wireless ad hoc network setup” on page 14
“Install the software for a network connection”
on page 17
“Connect to additional computers on a
network” on page 18
“Change the HP Photosmart from a USB
connection to a network connection”
on page 18
This section describes how to connect the HP Photosmart to a router, switch, or hub using
an Ethernet cable and how to install the HP Photosmart software for a network
connection. This is known as a wired or Ethernet network.
8 HP Photosmart D7400 series
English
To set up the HP Photosmart on a wired
network, you need to do the following:
First, collect all of the required materials. “What you need for a wired network”
Next, connect to a wired network. “Connect the HP Photosmart to the network”
Finally, install the software. “Install the software for a network connection”
What you need for a wired network
Before you connect the HP Photosmart to a network, make sure you have all of the
required materials.
A functional Ethernet network that includes a router, switch, or hub with an Ethernet
❑
port.
CAT-5 Ethernet cable.
❑
See this section:
on page 9
on page 10
on page 17
Although standard Ethernet cables look similar to standard telephone cables, they
are not interchangeable. There is a different number of wires in each one, and each
has a different connector. An Ethernet cable connector (also called an RJ-45
Wired network setup 9
Chapter 2
connector) is wider and thicker and always has 8 contacts on the end. A phone
connector has between 2 and 6 contacts.
A desktop computer or laptop with an Ethernet connection.
❑
NOTE: The HP Photosmart supports both 10 Mbps and 100 Mbps Ethernet
networks. If you are purchasing, or have purchased, a network interface card
(NIC), make sure it can operate at either speed.
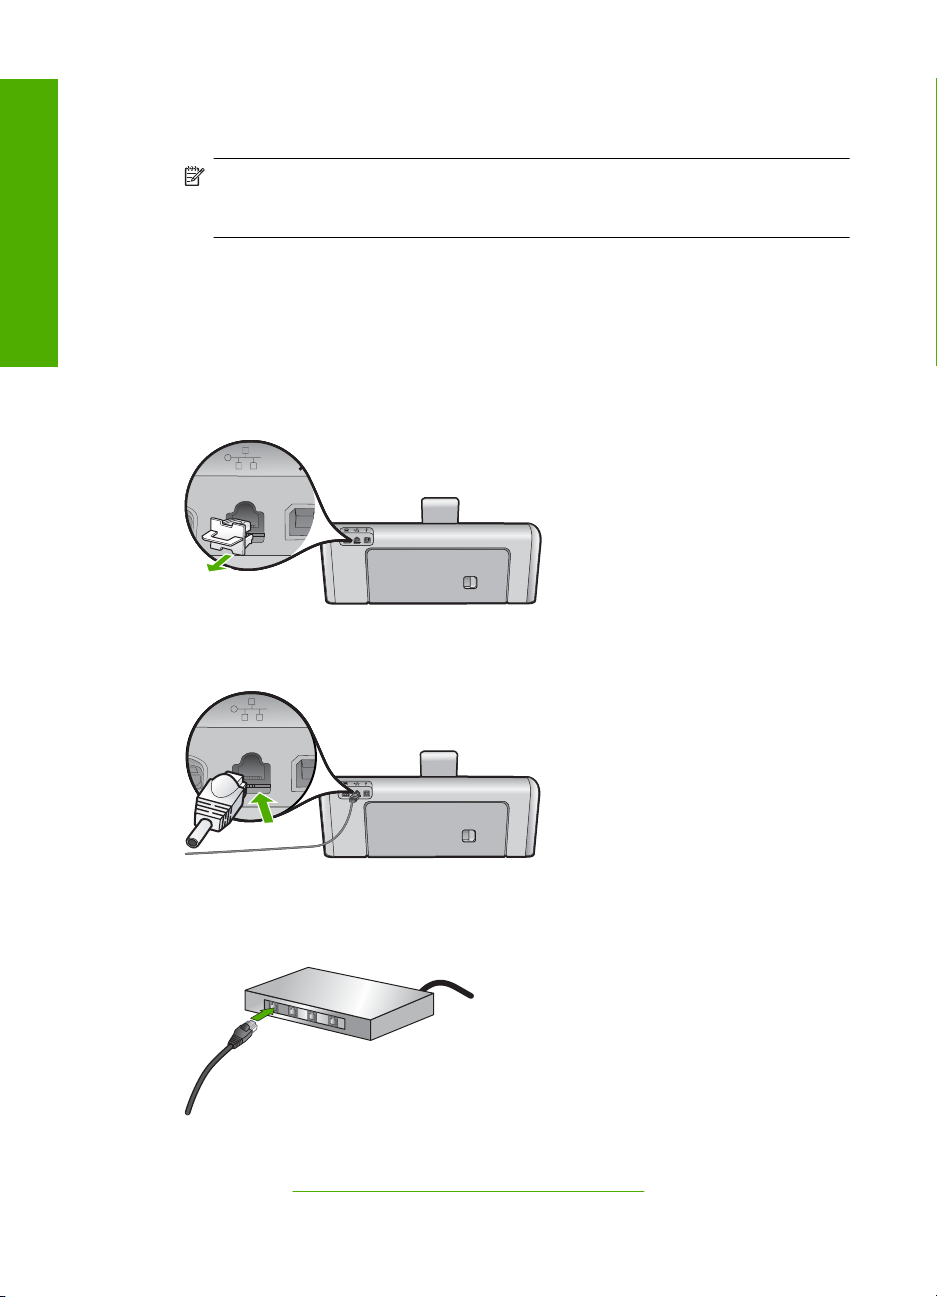
Connect the HP Photosmart to the network
English
To connect the HP Photosmart to the network, use the Ethernet port on the back of the
device.
To connect the HP Photosmart to the network
1. Remove the yellow plug from the back of the HP Photosmart.
2. Connect the Ethernet cable to the Ethernet port on the back of the HP Photosmart.
3. Connect the other end of the Ethernet cable to an available port on your Ethernet
router, switch, or wireless router.
4. Once you have connected the HP Photosmart to the network, install the software as
described in “
Install the software for a network connection” on page 17.
10 HP Photosmart D7400 series
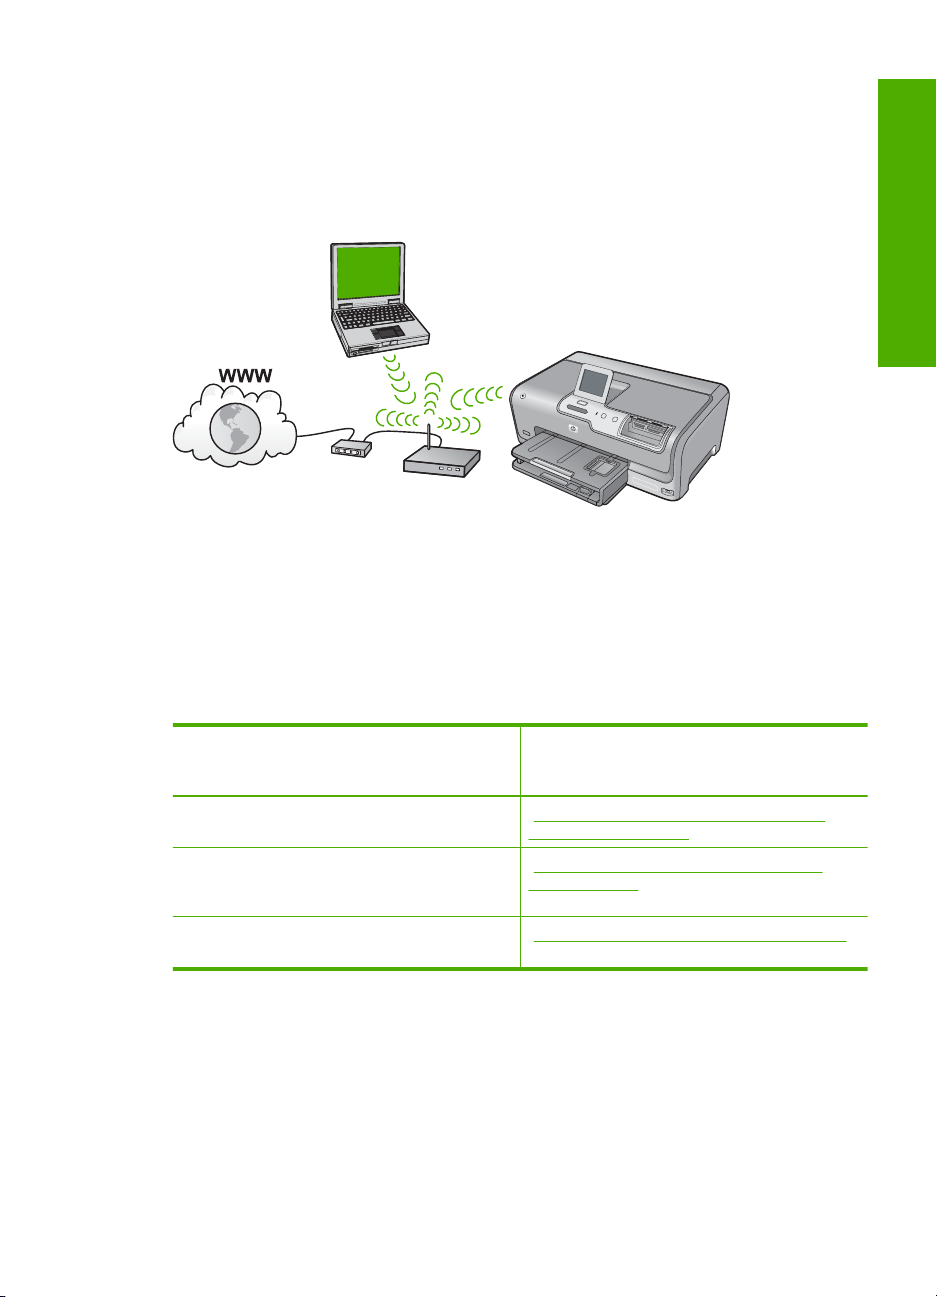
Integrated wireless WLAN 802.11 network setup
For optimal performance and security in your wireless network, HP recommends you use
a wireless router or access point (802.11) to connect the HP Photosmart and the other
network elements. When network elements are connected through a wireless router or
access point, this is called an infrastructure network.
The advantages of a wireless infrastructure network as compared to an ad hoc network
include:
• Advanced network security
• Enhanced reliability
• Network flexibility
• Better performance, especially with 802.11 g mode
• Shared Broadband Internet access
English
To set up the HP Photosmart on an
integrated wireless WLAN 802.11 network,
you need to do the following:
First, collect all of the required materials. “What you need for an integrated wireless
Next, connect the HP Photosmart to the
wireless router, and run the Wireless Setup
Wizard.
Finally, install the software. “Install the software for a network connection”
See this section:
WLAN 802.11 network” on page 11
“Connect to an integrated wireless WLAN
802.11 network” on page 12
on page 17
What you need for an integrated wireless WLAN 802.11 network
To connect the HP Photosmart to an integrated wireless WLAN 802.11 network, you will
need the following:
A wireless 802.11 network that includes a wireless router or access point.
❑
A desktop computer or laptop with either wireless networking support, or a network
❑
interface card (NIC). The computer must be connected to the wireless network that
you intend to install the HP Photosmart on.
Integrated wireless WLAN 802.11 network setup 11

Chapter 2
If you connect the HP Photosmart on a wireless network that has Internet access, HP
❑
recommends that you use a wireless router (access point or base station) that uses
Dynamic Host Configuration Protocol (DHCP).
Network name (SSID).
❑
WEP key or WPA Passphrase (if needed).
❑
Connect to an integrated wireless WLAN 802.11 network
The Wireless Setup Wizard provides an easy way to connect the HP Photosmart to your
English
network. You can also use SecureEasySetup, if your wireless router or access point
supports this feature. See the documentation that came with your wireless router or
access point to find out if it supports using EasySetup and for additional setup instructions.
CAUTION: To prevent other users from accessing your wireless network, HP
strongly recommends using a password or passphrase (WPA or WEP security) and
a unique network name (SSID) for your wireless router. Your wireless router might
have been shipped with a default network name, which is typically the manufacturer
name. If you use the default network name, your network can be easily accessed by
other users using the same default network name (SSID). It also means that the
HP Photosmart might accidently connect to a different wireless network in your area
which uses the same network name. If this happens you will not be able to access
the HP Photosmart. For more information on how to change the network name, see
the documentation that came with your wireless router.
NOTE: Before connecting to a wireless infrastructure network, ensure that the
ethernet cable is not connected to the HP Photosmart.
To connect the HP Photosmart with the Wireless Setup Wizard
1. Write down the following information about your wireless router or access point:
• Network Name (also called SSID)
• WEP Key, WPA Passphrase (if needed)
If you do not know where to find this information, see the documentation that came
with your wireless router or access point. You might be able to find the network name
(SSID) and the WEP key or WPA passphrase on the Embedded Web Server for the
wireless router.
NOTE: HP provides an online tool that might be able to find your wireless
security settings automatically. Go to:
2. Touch Setup on the display.
3. Touch Network.
NOTE: If the menu option you want is not visible on the screen, touch or
to scroll through all the menu options.
4. Touch Wireless Setup Wizard.
This runs the Wireless Setup Wizard.
12 HP Photosmart D7400 series
www.hp.com/go/networksetup.

5. Touch the name of the network you wrote down in step 1.
If you do not see your network name in the list
a. Touch Enter a New Network Name (SSID).
The visual keyboard appears.
b. Enter the network name (SSID). Touch the appropriate letters or numbers on the
visual keyboard.
NOTE: You must enter the exact uppercase (capital) and lowercase (small)
letters. Otherwise, the wireless connection will fail.
c. When you have finished entering the new network name, touch Done, and then
touch OK.
If the HP Photosmart is unable to discover the network based on the network
name you entered, you will be prompted to answer additional questions about
your network, as described in steps d and e. Before continuing, move the
HP Photosmart closer to the computer and run the Wireless Setup Wizard again
to see if the HP Photosmart can discover your network automatically.
d. Touch Infrastructure.
e. Touch WEP encryption or WPA encryption.
If you do not want to use WEP encryption, touch No, my network does not use
encryption. Go to step 7.
6. If prompted, enter your WPA or WEP key as follows:
a. Touch the appropriate letters or numbers on the visual keyboard.
NOTE: You must enter the exact uppercase (capital) and lowercase (small)
letters. Otherwise, the wireless connection will fail.
b. When you are finished entering the WPA or WEP key, touch Done.
c. Touch OK to confirm.
The HP Photosmart will attempt to connect to the network. If a message says you
entered an invalid WPA or WEP key, check the key you wrote down for your new
network, follow the prompts to correct the key, and then try again.
7. When the HP Photosmart connects successfully to the network, install the software
on each computer that will use the device over the network.
English
To connect the HP Photosmart with SecureEasySetup
1. Activate SecureEasySetup on your wireless router or access point.
2. Touch Setup on the display.
3. Touch Network.
NOTE: If the menu option you want is not visible on the screen, touch or
to scroll through all the menu options.
4. Touch Wireless Setup Wizard.
Integrated wireless WLAN 802.11 network setup 13
Chapter 2
5. Follow the onscreen prompts on the display to complete the connection.
6. When the HP Photosmart connects successfully to the network, go to your computer
to install the software on each computer that will use the network.
NOTE: If the connection fails, the wireless router or access point might have
timed out after you activated SecureEasySetup. Repeat the above task, ensuring
that you complete the steps on the control panel of the HP Photosmart
immediately after pressing the button on the wireless router or access point.
English
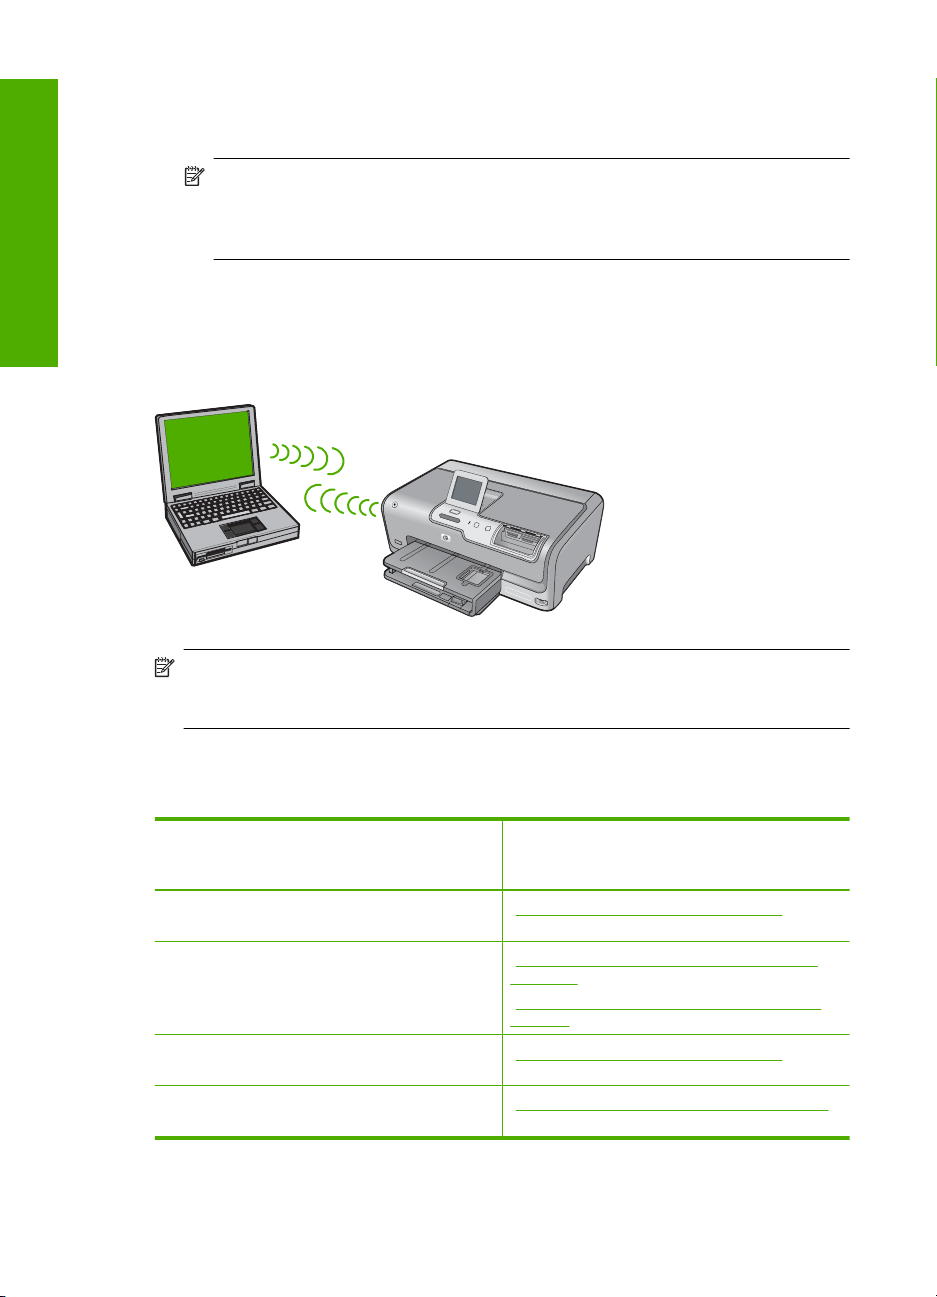
Wireless ad hoc network setup
Use this section if you want to connect the HP Photosmart to a wireless-capable computer
without using a wireless router or access point.
NOTE: An ad hoc connection is available if you do not have a wireless router or
access point. However, it provides little flexibility, a low level of network security, and
slower network performance than with a wireless router or access point.
In order to connect the HP Photosmart to your computer (ad hoc), you need to create an
ad hoc network profile on your computer. This includes choosing a network name (SSID)
and WEP security (optional but recommended) for your ad hoc network.
To set up the HP Photosmart on a wireless
ad hoc network, you need to do the
following:
First, collect all of the required materials. “What you need for an ad hoc network”
Next, prepare your computer by creating a
network profile.
Next, run the Wireless Setup Wizard. “Connect to a wireless ad hoc network”
Finally, install the software. “Install the software for a network connection”
14 HP Photosmart D7400 series
See this section:
on page 15
“Create a network profile for a Windows XP
computer” on page 15
Create a network profile for other operating
“
systems” on page 16
on page 16
on page 17

What you need for an ad hoc network
To connect the HP Photosmart to a wireless network, you will need a Windows computer
with a wireless network adapter.
Create a network profile for a Windows XP computer
Prepare your computer for an ad hoc connection by creating a network profile.
To create a network profile
NOTE: The HP Photosmart comes configured with a network profile with hpsetup
as the network name (SSID). However, for security and privacy HP recommends you
create a new network profile on your computer as described here.
1. In the Control Panel, double-click Network Connections.
2. On the Network Connections window, right-click the Wireless Network
Connection. If you see Enable on the pop-up menu, select it. Otherwise, if you see
Disable on the menu, the wireless connection is already enabled.
3. Right-click the Wireless Network Connection icon, and then click Properties.
4. Click the Wireless Networks tab.
5. Select the Use Windows to configure my wireless network settings check box.
6. Click Add, and then do the following:
a.In Network name (SSID) box, type in a unique network name of your choice.
NOTE: The network name is case sensitive, so it is important to remember
any uppercase (capital) and lowercase (small) letters.
b. If there is a Network Authentication list, select Open. Otherwise, go to the next
step.
c.In the Data encryption list, select WEP.
English
NOTE: It is possible to create a network that does not use a WEP key.
However, HP recommends using a WEP key in order to secure your network.
d. Make sure that the check box is not selected next to The key is provided for me
automatically. If it is selected, click the check box to clear it.
e.In the Network key box, type a WEP key that has exactly 5 or exactly 13
alphanumeric (ASCII) characters. For example, if you enter 5 characters, you
might enter ABCDE or 12345. Or, if you enter 13 characters, you might enter
ABCDEF1234567. (12345 and ABCDE are examples only. Select a combination
of your choosing.)
Alternatively, you can use HEX (hexadecimal) characters for the WEP key. A HEX
WEP key must be 10 characters for 40 bit encryption, or 26 characters for 128 bit
encryption.
f.In the Confirm network key box, type the same WEP key you typed in the
previous step.
Wireless ad hoc network setup 15

Chapter 2
g. Write down the WEP key exactly as you typed it, including uppercase and
lowercase letters.
NOTE: You must remember the exact uppercase (capital) and lowercase
(small) letters. If you enter your WEP key incorrectly on the HP Photosmart,
the wireless connection will fail.
h. Select the check box for This is a computer-to-computer (ad hoc) network;
wireless access points are not used.
i. Click OK to close the Wireless network properties window, and then click OK
English
again.
j. Click OK again to close the Wireless Network Properties Connection window.
Create a network profile for other operating systems
If you have an operating system other than Windows XP, HP recommends that you use
the configuration program that came with your wireless LAN card. To find the
configuration program for your wireless LAN card, access your computer's list of
programs.
Using the LAN card configuration program, create a network profile that has the following
values:
• Network name (SSID): Mynetwork (example only)
NOTE: You should create a network name that is unique and easy for you to
remember. Just remember that the network name is case-sensitive. Therefore,
you must remember which letters are uppercase and lowercase.
• Communication mode: Ad Hoc
• Encryption: enabled
Connect to a wireless ad hoc network
You can use the Wireless Setup Wizard to connect the HP Photosmart to a wireless ad
hoc network.
To connect to a wireless ad hoc network
1. Touch Setup on the display.
2. Touch Network.
NOTE: If the menu option you want is not visible on the screen, touch or
to scroll through all the menu options.
3. Touch Wireless Setup Wizard.
This runs the Wireless Setup Wizard. The setup wizard searches for available
networks, and then displays a list of detected network names (SSIDs). The
infrastructure networks appear first in the list, followed by available ad hoc networks.
The networks with the strongest signal appear first, the weakest appear last.
4. On the display, look for the network name you created on your computer (for example,
Mynetwork).
16 HP Photosmart D7400 series

5. Touch the network name.
If you found your network name and selected it, go on to step 6.
If you do not see your network name in the list
a. Touch Enter a New Network Name (SSID).
The visual keyboard appears.
b. Enter the SSID. Touch the appropriate letters or numbers on the visual keyboard.
NOTE: You must enter the exact uppercase (capital) and lowercase (small)
letters. Otherwise, the wireless connection will fail.
c. When you have finished entering the new SSID, touch Done on the visual
keyboard, and then touch OK.
If the HP Photosmart is unable to discover the network based on the network
name you entered, you will be prompted to answer additional questions about
your network, as described in steps d and e. Before continuing, move the
HP Photosmart closer to the computer and run the Wireless Setup Wizard again
to see if the HP Photosmart can discover your network automatically.
d. Touch Ad Hoc.
e. Touch Yes, my network uses WEP encryption. The visual keyboard displays.
If you do not want to use WEP encryption, touch No, my network does not use
encryption. Go to step 7.
6. If prompted, enter your WEP key as follows. Otherwise go to step 7.
a. Touch the appropriate letters or numbers on the visual keyboard.
NOTE: You must enter the exact uppercase (capital) and lowercase (small)
letters. Otherwise, the wireless connection will fail.
b. When you are finished entering the WEP key, touch Done on the visual keyboard.
7. Touch OK again to confirm.
The HP Photosmart will attempt to connect to the SSID. If a message says you
entered an invalid WEP key, check the key you wrote down for your new network,
follow the prompts to correct the WEP key, and then try again.
8. When the HP Photosmart connects successfully to the network, go to your computer
to install the software.
English
Install the software for a network connection
Use this section to install the HP Photosmart software on a computer connected to a
network. Before you install the software, make sure you have connected the
HP Photosmart to a network.
NOTE: If your computer is configured to connect to a series of network drives, make
sure that your computer is currently connected to these drives before installing the
software. Otherwise, HP Photosmart installation software might try to use one of the
reserved drive letters, and you will not be able to access that network drive on your
computer.
NOTE: Installation time can range from 20 to 45 minutes depending on your
operating system, the amount of available space, and the processor speed of your
computer.
Install the software for a network connection 17

Chapter 2
To install the Windows HP Photosmart software
1. Quit all applications running on your computer, including any virus detection software.
2. Insert the Windows CD that came with the HP Photosmart into the CD-ROM drive on
your computer and follow the onscreen instructions.
3. If a dialog box about firewalls appears, follow the instructions. If you see firewall pop-
up messages, you must always accept or allow the pop-up messages.
4. On the Connection Type screen, select Through the network, and then click
Next.
The Searching screen appears as the Setup program searches for the
English
HP Photosmart on the network.
5. On the Printer Found screen, verify that the printer description is correct.
If more than one printer is found on the network, the Printers Found screen appears.
Select the HP Photosmart you want to connect.
6. Follow the prompts to install the software.
When you have finished installing the software, the HP Photosmart is ready for use.
7. If you disabled any virus detection software on your computer, make sure to enable
it again.
8. To test your network connection, go to your computer and print a self-test report to
the HP Photosmart.
Connect to additional computers on a network
You can share the HP Photosmart on a network so that more computers can use it. If the
HP Photosmart is already connected to a computer on the network, you must install the
HP Photosmart software for each additional computer. During the installation, the
software will discover the HP Photosmart on the network for each of the computers. Once
you have set up the HP Photosmart on the network you will not need to configure it again
when you add additional computers.
NOTE: You can connect the HP Photosmart to either a wireless or wired network,
but not both at the same time.
Change the HP Photosmart from a USB connection to a network connection
If you first install the HP Photosmart with a USB connection, you can later change to either
a wireless or Ethernet network connection. If you already understand how to connect to
a network, you can use the general directions below.
NOTE: For optimal performance and security in your wireless network, use an
access point (such as a wireless router) to connect the HP Photosmart.
To change a USB connection to an integrated wireless WLAN 802.11 connection
1. Unplug the USB connection from the back of the HP Photosmart.
2. Touch Setup on the display.
18 HP Photosmart D7400 series

3. Touch Network.
NOTE: If the menu option you want is not visible on the screen, touch or
to scroll through all the menu options.
4. Touch Wireless Setup Wizard.
This runs the Wireless Setup Wizard.
5. Install the software for a network connection, choose Add a Device, and then choose
Through the network.
6. When the installation is complete, open Printers and Faxes (or Printers) in the
Control Panel and delete the printers for the USB installation.
To change a USB connection to a wired (Ethernet) connection
1. Unplug the USB connection from the back of the HP Photosmart.
2. Connect an Ethernet cable from the Ethernet port on the back of the HP Photosmart
to an available Ethernet port on the router or switch.
3. Install the software for a network connection, choose Add a Device, and then choose
Through the network.
4. When the installation is complete, open Printers and Faxes (or Printers) in the
Control Panel and delete the printers from the previous USB installation.
For more detailed instructions on connecting the HP Photosmart to a network, see:
•“
Wired network setup” on page 8
Integrated wireless WLAN 802.11 network setup” on page 11
•“
•“
Wireless ad hoc network setup” on page 14
Manage your network settings
You can manage network settings for the HP Photosmart through the HP Photosmart
control panel. Additional advanced settings are available in the Embedded Web Server,
a configuration and status tool you access from your Web browser using an existing
network connection to the HP Photosmart.
Change basic network settings from the control panel
The HP Photosmart control panel enables you to set up and manage a wireless
connection and to perform a variety of network management tasks. This includes viewing
the network settings, restoring the network defaults, turning the wireless radio on and off,
and changing the network settings.
English
Use the Wireless Setup Wizard
The Wireless Setup Wizard provides an easy way to set up and manage a wireless
connection to the HP Photosmart.
1. Touch Setup on the display.
2. Touch Network.
NOTE: If the menu option you want is not visible on the screen, touch or
to scroll through all the menu options.
3. Touch Wireless Setup Wizard.
This runs the Wireless Setup Wizard.
Manage your network settings 19

English
Chapter 2
View and print network settings
You can display a summary of the network settings on the HP Photosmart control panel,
or you can print a more detailed configuration page. The network configuration page lists
all of the important network settings such as the IP address, link speed, DNS, and mDNS.
1. Touch Setup on the display.
2. Touch Network.
NOTE: If the menu option you want is not visible on the screen, touch or
to scroll through all the menu options.
3. Touch View Network Settings.
4. Do one of the following:
• To display wired network settings, touch Display Wired Summary.
• To display wireless network settings, touch Display Wireless Summary.
• To print the network configuration page, touch Print Network Configuration
Page.
Restore network defaults
You can reset the network settings to what they were when you purchased the
HP Photosmart.
CAUTION: This will erase all wireless setup information that you have entered. In
order to restore this information, you will need to run the Wireless Setup Wizard again.
1. Touch Setup on the display.
2. Touch Network.
NOTE: If the menu option you want is not visible on the screen, touch or
to scroll through all the menu options.
3. Touch Restore Network Defaults.
4. Touch Yes or No.
Turn the wireless radio on and off
The wireless radio is off by default. In order to stay connected to a wireless network, the
radio must stay on. When the radio is on, the blue light on the front of the HP Photosmart
is lit. However, if the HP Photosmart is connected to a wired network or you have a USB
connection, the radio is not used. In this case you might want to turn the radio off.
1. Touch Setup on the display.
2. Touch Network.
NOTE: If the menu option you want is not visible on the screen, touch or
to scroll through all the menu options.
3. Touch Wireless Radio.
4. Touch On or Off.
20 HP Photosmart D7400 series

Print the wireless network test
The wireless network test performs a series of diagnostic tests to determine whether
network setup is successful. The wireless network test prints automatically when the
Wireless Setup Wizard is run. You also can print the wireless network test at any time.
1. Touch Setup on the display.
2. Touch Network.
NOTE: If the menu option you want is not visible on the screen, touch or
to scroll through all the menu options.
3. Touch Wireless Network Test.
The Wireless Network Test prints.
Change advanced network settings from the control panel settings
The advanced network settings are provided for your convenience. However, unless you
are an advanced user, you should not change any of these settings.
Change IP settings
The default setting for the IP settings is Automatic, which sets the IP settings
automatically. However, if you are an advanced user, you might want to manually change
the IP address, subnet mask, or the default gateway. To see the IP address and subnet
mask of the HP Photosmart, print a network configuration page from the HP Photosmart.
NOTE: When manually entering an IP setting, you must already be connected to an
active network, otherwise the setting will not stay when you exit from the menu.
CAUTION: Be careful when manually assigning an IP address. If you enter an invalid
IP address during the installation, your network components will not be able to connect
with the HP Photosmart.
1. Touch Setup on the display.
2. Touch Network.
English
NOTE: If the menu option you want is not visible on the screen, touch or
to scroll through all the menu options.
3. Touch Advanced Setup.
4. Touch IP Settings.
5. Touch Manual.
6. Touch one of the following IP settings.
• IP Address
• Subnet Mask
• Default Gateway
The visual keyboard appears on the display.
7. Use the visual keyboard to enter your IP settings.
Manage your network settings 21
3 Use the HP Photosmart features
This chapter includes information about how to use the HP Photosmart for basic
operations. In addition, it provides instructions about how to load paper, view, select, and
print photos, and replace the ink cartridges.
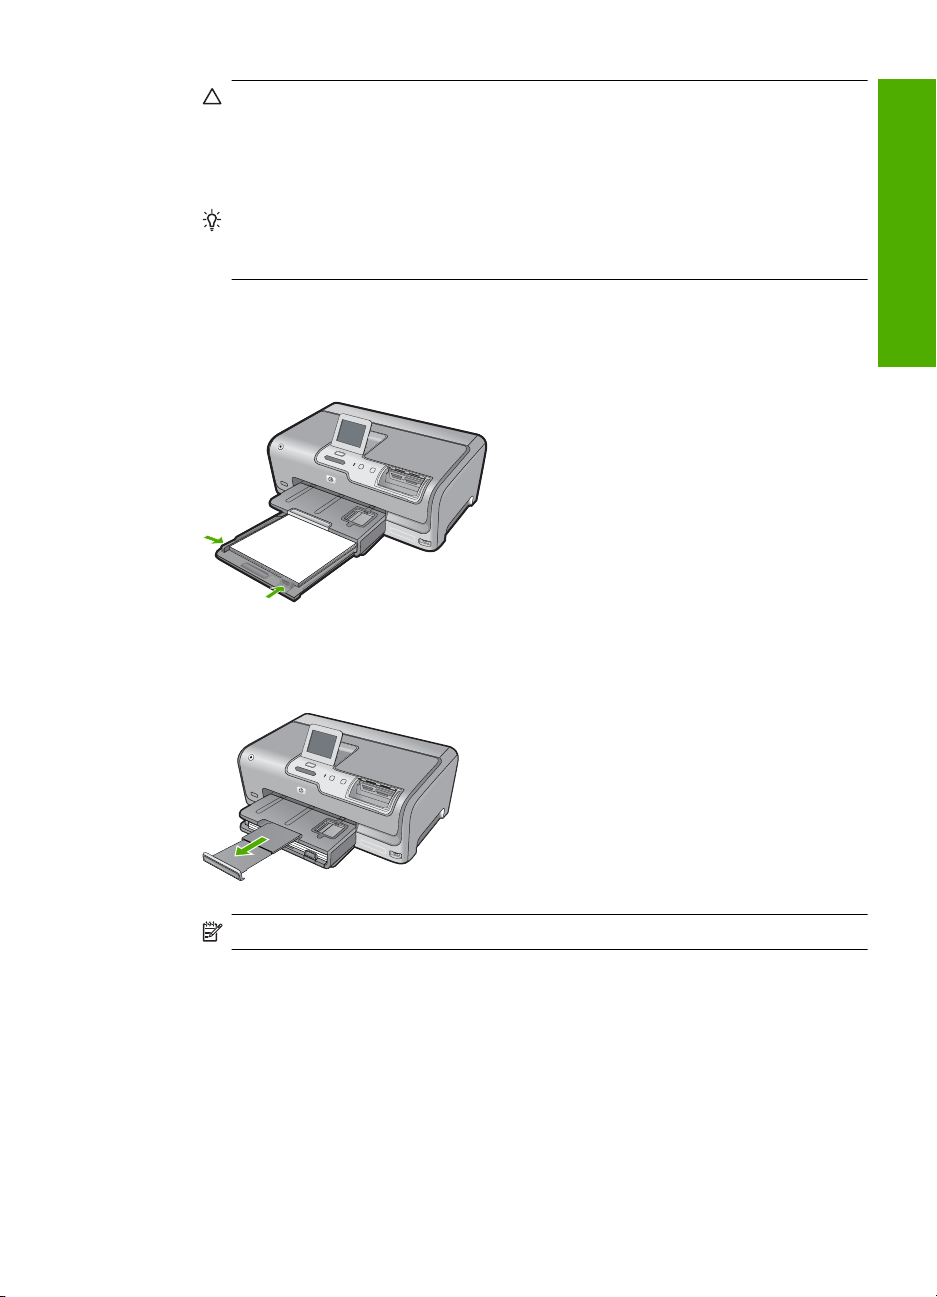
Load paper
English
Load full-size paper
This section describes the procedure for loading different types and sizes of paper into
the HP Photosmart for your printouts.
TIP: To help prevent rips, wrinkles, and curled or bent edges, store all paper flat in
a resealable bag. If the paper is not stored properly, extreme changes in temperature
and humidity might result in curled paper that does not work well in the
HP Photosmart.
You can load many types of letter or A4 paper into the main input tray of the
HP Photosmart.
To load full-size paper
1. Pull out the main input tray, and then slide the paper-width and paper-length guides
to their outermost positions.
2. Tap a stack of paper on a flat surface to align the edges, and then check the paper
for the following:
• Make sure it is free of rips, dust, wrinkles, and curled or bent edges.
• Make sure all the paper in the stack is the same size and type.
3. Insert the stack of paper into the main input tray with the short edge forward and the
print side down. Slide the stack of paper forward until it stops.
22 HP Photosmart D7400 series
CAUTION: Make sure that the HP Photosmart is idle and silent when you load
paper into the main input tray. If the HP Photosmart is servicing the ink cartridges
or otherwise engaged in a task, the paper stop inside the device might not be in
place. You could push the paper too far forward, causing the HP Photosmart to
eject blank pages.
TIP: If you are using letterhead, insert the top of the page first with the print side
down. For more help on loading full-size paper and letterhead, refer to the diagram
engraved in the base of the main input tray.
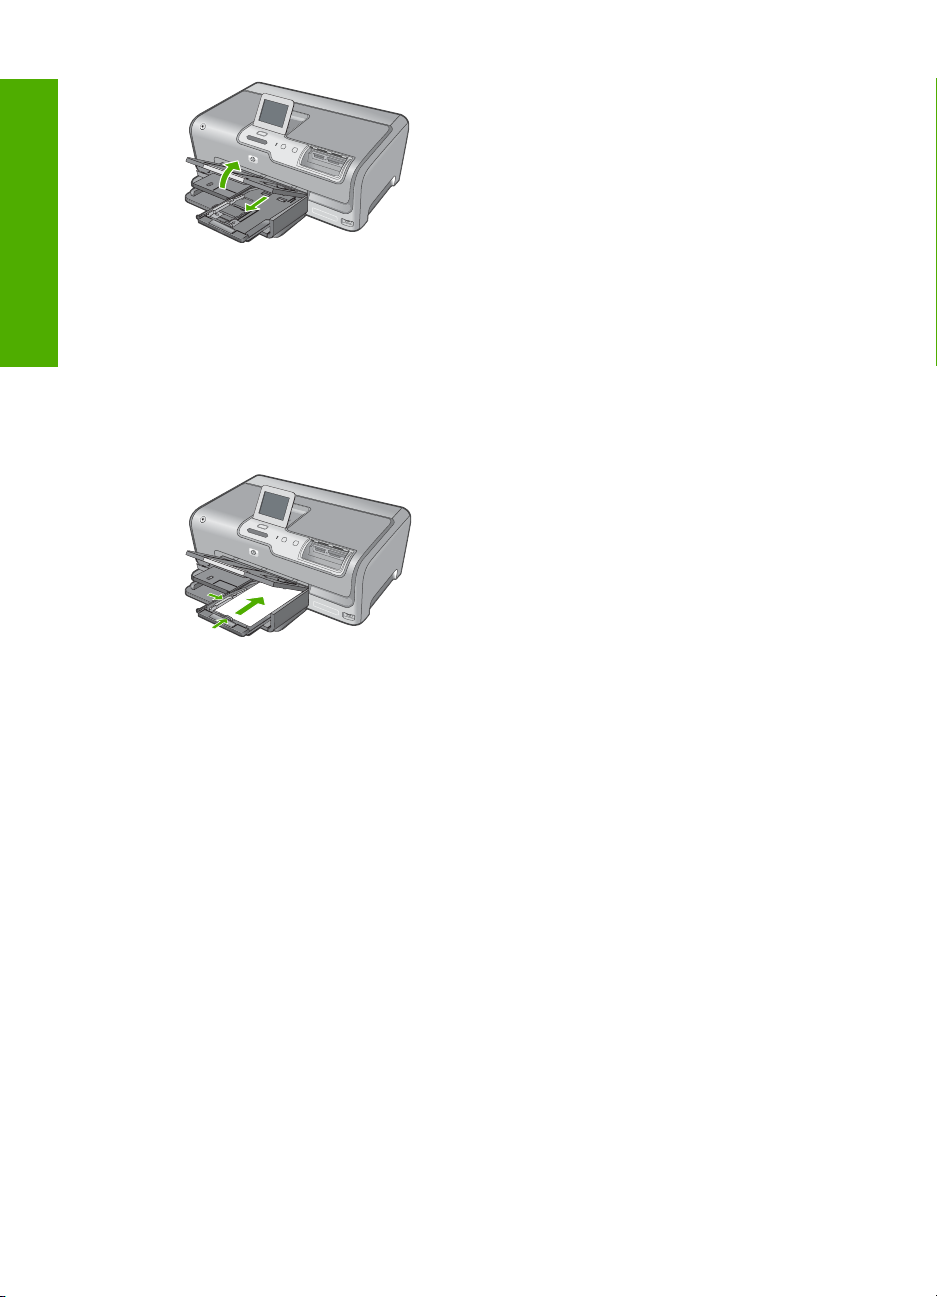
4. Slide the paper-width and paper-length guides inward until they stop at the edges of
the paper.
Do not overload the main input tray; make sure the stack of paper fits within the main
input tray and is no higher than the top of the paper-width guide.
5. Push the main input tray back into the HP Photosmart.
6. Pull the output tray extender toward you, as far as it will go.
English
NOTE: When you use legal-size paper, leave the tray extender closed.
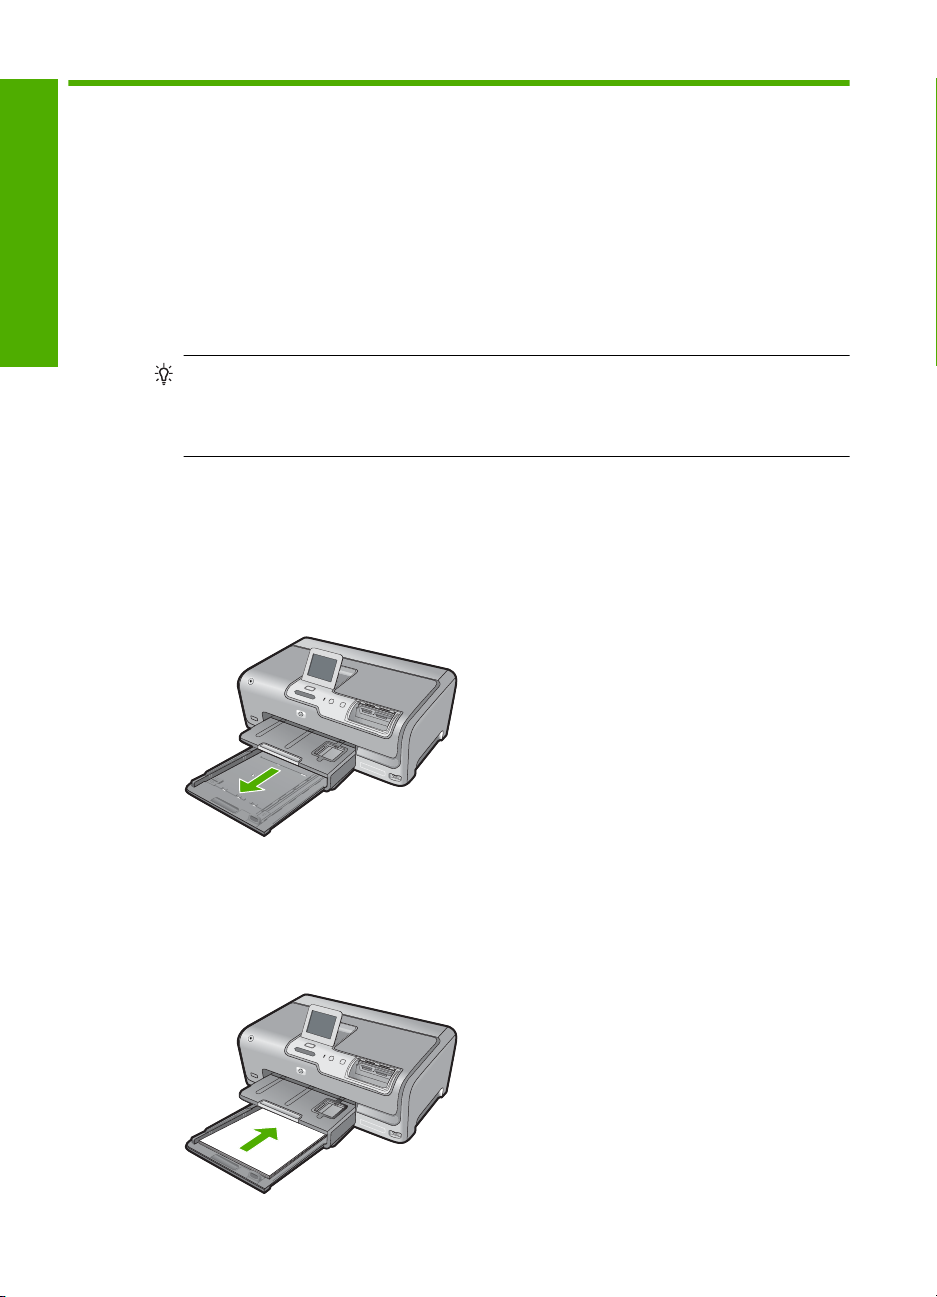
Load 10 x 15 cm (4 x 6 inch) photo paper
You can load up to 10 x 15 cm (4 x 6 inch) photo paper into the photo tray of the
HP Photosmart. For the best results, use 10 x 15 cm (4 x 6 inch) HP Premium Plus Photo
Paper or HP Premium Photo Paper.
To load 10 x 15 cm (4 x 6 inch) photo paper in the photo tray
1. Raise the output tray, and then pull out the photo tray.
Load paper 23
Chapter 3
English
2. Insert the stack of photo paper into the photo tray with the short edge forward and the
print side down. Slide the stack of photo paper forward until it stops.
If the photo paper you are using has perforated tabs, load the photo paper so that the
tabs are closest to you.
3. Slide the paper-length and paper-width guides inward against the stack of photo
paper until the guides stop.
Do not overload the photo tray; make sure the stack of photo paper fits within the
photo tray and is no higher than the top of the paper-width guide.
4. Push in the photo tray, and then lower the output tray.
Avoid paper jams
To help avoid paper jams, follow these guidelines.
• Remove printed papers from the output tray frequently.
• Prevent curled or wrinkled paper by storing all unused paper flat in a resealable bag.
• Ensure that paper loaded in the input tray lays flat and the edges are not bent or torn.
• Do not combine different paper types and paper sizes in the input tray; the entire stack
of paper in the input tray must be the same size and type.
• Adjust the paper-width guide in the input tray to fit snugly against all paper. Make sure
the paper-width guide does not bend the paper in the input tray.
• Do not force paper too far forward in the input tray.
• Use paper types that are recommended for the HP Photosmart.
View, select, and print photos
You can view and select photos on your memory card or storage device before or while
printing them.
To view, select, and print photos
1. Insert a memory card into the appropriate slot on the HP Photosmart, or connect a
storage device to the front USB port.
24 HP Photosmart D7400 series

1 xD-Picture Card
2 CompactFlash (CF) types I and II
3 Memory Stick, Memory Stick Pro, Memory Stick Select, Memory Stick Magic Gate,
Memory Stick Duo or Duo Pro (adapter optional), or Memory Stick Micro (adapter required)
4 Secure Digital (SD), Secure Digital Mini (adapter required), Secure Digital High Capacity
(SDHC), MultiMediaCard (MMC), MMC Plus, MMC Mobile (RS-MMC; adapter required),
TransFlash MicroSD Card, or Secure MultiMedia Card
The Photosmart Express menu appears, with the most recent photo shown on the
display.
2. Load up to 10 x 15 cm (4 x 6 inch) photo paper in the photo tray or full-size photo
paper in the main input tray.
3. Touch View.
The View Photos screen appears.
4. Touch
or to scroll through the thumbnails of your photos.
5. When the thumbnail of the photo you want to view appears, touch it.
6. When the photo appears by itself on the display, touch the image again.
The Photo Options screen appears.
7. Touch Print Preview.
The Print Preview screen appears, showing how your photo will look when printed.
If you want to select additional photos to view and print, touch Add More and repeat
steps 4–6.
8. (Optional) If you want to check and/or modify any of your print settings, touch
Settings.
9. To print the photo(s), touch Print or press the Print Photos button on the control
panel.
A print status screen displays the number of pages to print and the estimated time to
complete.
English
View, select, and print photos 25

Chapter 3
Check the estimated ink levels
You can easily check the ink supply level to determine how soon you might need to
replace an ink cartridge. The ink supply level shows an estimate of the amount of ink
remaining in the ink cartridges.
NOTE: The HP Photosmart can only detect the ink levels for genuine HP ink. The
ink levels in ink cartridges that are refilled or have been used in other devices might
not register accurately.
English
NOTE: Ink from the cartridges is used in the printing process in a number of different
ways, including in the initialization process, which prepares the device and cartridges
for printing, and in printhead servicing, which keeps print nozzles clear and ink flowing
smoothly. In addition, some residual ink is left in the cartridge after it is used. For more
information, see
To check the ink levels from the control panel
1. Touch Setup on the display.
2. Touch Tools.
3. Touch Display Ink Gauge.
The HP Photosmart displays a gauge that shows the estimated ink levels of all
cartridges installed.
www.hp.com/go/inkusage.
Replace the ink cartridges
Follow these instructions when you need to replace ink cartridges.
NOTE: If you are installing ink cartridges in the HP Photosmart for the first time, be
sure to use only the ink cartridges that came with the device. The ink in these
cartridges is specially formulated to mix with the ink in the print head assembly at firsttime setup.
If you do not already have replacement ink cartridges for the HP Photosmart, you can
order them by clicking the Shop for HP Supplies icon on your computer. On a Windows
computer this is located in the HP folder in the Start menu.
For more information see
To replace the ink cartridges
1. Make sure the HP Photosmart is turned on.
2. Open the ink cartridge door by lifting from the front center of the device, until the door
locks into place.
26 HP Photosmart D7400 series
www.hp.com/buy/supplies.

3. Squeeze the bottom of the latch below the ink cartridge you want to replace, and then
lift the latch.
If you are replacing the black ink cartridge, lift the latch on the far left.
If you are replacing one of the five color ink cartridges, such as yellow, light cyan
(blue), cyan, light magenta (pink), or magenta, lift the appropriate latch in the center
area.
1 Ink cartridge latch for the black ink cartridge
2 Ink cartridge latches for the color ink cartridges
4. Pull the ink cartridge toward you out of its slot to remove it.
English
Replace the ink cartridges 27

English
Chapter 3
5. Remove the new ink cartridge from its packaging, and then, holding it by the handle,
push the ink cartridge into the empty slot.
Match the color and pattern of the ink cartridge to the color and pattern on the print
carriage.
6. Close the latch and make sure it is secure.
7. Repeat steps 3 through 6 for each ink cartridge you are replacing.
8. Close the ink cartridge door.
28 HP Photosmart D7400 series

4 Troubleshooting and support
This chapter contains troubleshooting information for the HP Photosmart. Specific information is
provided for installation and configuration issues, and some operational topics. For more
troubleshooting information, see the onscreen Help that came with your software.
Many issues are caused when the HP Photosmart is connected to the computer using a USB cable
before the HP Photosmart software is installed on the computer. If you connected the HP Photosmart
to your computer before the software installation screen prompts you to do so, you must follow these
steps:
Troubleshooting common setup issues
1. Disconnect the USB cable from the computer.
2. Uninstall the software (if you have already installed it).
3. Restart your computer.
4. Turn off the HP Photosmart, wait one minute then turn it on.
5. Reinstall the HP Photosmart software.
CAUTION: Do not connect the USB cable to the computer until prompted by the software
installation screen.
For support contact information, see the inside back cover of this guide.
Uninstall and reinstall the software
If your installation is incomplete, or if you connected the USB cable to the computer before prompted
by the software installation screen, you might need to uninstall and then reinstall the software. Do
not simply delete the HP Photosmart application files from your computer. Make sure to remove
them properly using the uninstall utility provided when you installed the software that came with the
HP Photosmart.
To uninstall from a Windows computer and then reinstall
1. On the Windows taskbar, click Start, Settings, Control Panel (or just Control Panel).
2. Double-click Add/Remove Programs (or click Uninstall a program).
3. Select HP Photosmart All-in-One Driver Software, and then click Change/Remove.
Follow the onscreen instructions.
4. Disconnect the HP Photosmart from your computer.
5. Restart your computer.
English
NOTE: It is important that you disconnect the HP Photosmart before restarting your
computer. Do not connect the HP Photosmart to your computer until after you have
reinstalled the software.
6. Insert the HP Photosmart CD-ROM into your computer’s CD-ROM drive and then start the Setup
program.
7. Follow the onscreen instructions and the instructions provided in the Setup Guide that came
with the HP Photosmart.
Hardware setup troubleshooting
Use this section to solve any problems you might encounter while setting up the HP Photosmart
hardware.
The HP Photosmart will not turn on
Cause: The HP Photosmart is not properly connected to a power supply.
Troubleshooting and support 29

English
Chapter 4
Solution
• Make sure the power cord is firmly connected to both the HP Photosmart and the power
adapter. Plug the power cord into a power outlet, surge protector, or power strip.
1 Power connection
2 Power cord and adapter
3 Power outlet
• If you are using a power strip, make sure the power strip is on. Or, try plugging the
HP Photosmart directly into a power outlet.
• Test the power outlet to make sure it is working. Plug in an appliance that you know works,
and see if the appliance has power. If not, then there might be a problem with the power
outlet.
• If you plugged the HP Photosmart into a switched outlet, make sure the switch is on. If it is
switched to on but still does not work, then there might be a problem with the power outlet.
Cause: You pressed the On button too quickly.
Solution: The HP Photosmart might not respond if you press the On button too quickly. Press
the On button once. It might take a few minutes for the HP Photosmart to turn on. If you press
the On button again during this time, you might turn the device off.
CAUTION: If the HP Photosmart still does not turn on, it might have a mechanical failure.
Unplug the HP Photosmart from the power outlet and contact HP. Go to:
support. If prompted, choose your country/region, and then click Contact HP for information
on calling for technical support.
I connected the USB cable, but I am having problems using the HP Photosmart with
my computer
Cause: The USB cable was connected before the software was installed. Connecting the USB
cable before prompted can cause errors.
Solution: You must first install the software that came with the HP Photosmart before
connecting the USB cable. During installation, do not plug in the USB cable until prompted by
the onscreen instructions.
Once you have installed the software, connecting your computer to the HP Photosmart with a
USB cable is straightforward. Simply plug one end of the USB cable into the back of your
computer and the other into the back of the HP Photosmart. You can connect to any USB port
on the back of your computer.
30 HP Photosmart D7400 series
www.hp.com/

For more information on installing the software and connecting the USB cable, see the Setup
Guide that came with the HP Photosmart.
The HP Photosmart does not print
Cause: The HP Photosmart and computer are not communicating with each other.
Solution: Check the connection between the HP Photosmart and computer.
Cause: There might be a problem with one or more of the ink cartridges.
Solution: Check that the ink cartridges are installed properly and have ink.
Cause: The HP Photosmart might not be turned on.
Solution: Look at the display on the HP Photosmart. If the display is blank and the On button
is not lit, the HP Photosmart is turned off. Make sure the power cord is firmly connected to the
HP Photosmart and plugged into a power outlet. Press the On button to turn on the
HP Photosmart.
Cause: The HP Photosmart might be out of paper.
Solution: Load paper in the input tray.
Network troubleshooting
This section addresses problems you might encounter while setting up a network.
Wired network setup troubleshooting
This section addresses problems you might encounter setting up a wired network.
The computer is unable to discover the HP Photosmart
Cause: Cables are not connected properly.
Solution: Check the following cables to ensure they are connected properly.
• Cables between the HP Photosmart and the hub or router
• Cables between the hub or router and your computer
• Cables to and from your modem or HP Photosmart Internet connection (if applicable)
English
Cause: Your computer's Local Area Network card (LAN card) is not set up properly.
Network troubleshooting 31

English
Chapter 4
Solution: Make sure that your LAN card is set up properly.
To check your LAN card (Windows 2000 and XP)
1. Right-click My Computer.
2. In the System Properties dialog box, click the Hardware tab.
3. Click Device Manager.
4. Make sure your card shows up under Network Adapters.
5. Refer to the documentation that came with your card.
To check your LAN card (Windows Vista)
1. On the Windows taskbar, click Start, Computer, and then click Properties.
2. Click Device Manager.
3. Make sure your card shows up under Network Adapters.
4. Refer to the documentation that came with your card.
Cause: You do not have an active network connection.
Solution: Check to see if you have an active network connection.
To see if you have an active network connection
▲ Check the two Ethernet indicator lights on the top and bottom of the RJ-45 Ethernet jack on
the back of the HP Photosmart. The lights indicate the following:
a. Top light: If this light is a solid green, the device is properly connected to the network,
and communications have been established. If the top light is off, there is no network
connection.
b. Bottom light: This yellow light flashes when data is being sent or received by the device
over the network.
To establish an active network connection
1. Check the cable connections from the HP Photosmart to your gateway, router, or hub to
ensure connections are secure.
2. If the connections are secure, press the On button on the control panel to turn the
HP Photosmart off. Then turn off the power on your router or hub. Turn on the router or hub
first, and then press the On button to turn the HP Photosmart on.
Cause: You were able to connect the HP Photosmart to the network previously, but now it will
not connect.
Solution: Turn off the HP Photosmart, the computer, and the router. Wait 30 seconds. Turn
on the router first, and then turn on the HP Photosmart and the computer.
Cause: The HP Photosmart and computer are not connected to the same network.
Solution: Try accessing the Embedded Web Server on the HP Photosmart. To find the IP
address, print a network configuration page.
The Printer not Found screen appears during installation
Cause: The HP Photosmart is not turned on.
Solution: Turn on the HP Photosmart.
Cause: You do not have an active network connection.
32 HP Photosmart D7400 series

Solution: Make sure you have an active network connection.
To make sure your network connection is active
1. If the connections are secure, turn off the power on the HP Photosmart, and then turn it on
again. Press the On button on the control panel to turn the HP Photosmart off, and press it
again to turn the device on. Also, turn off the power on your router or hub, and then turn it
on again.
2. Check the cable connections from the HP Photosmart to your gateway, router, or hub to
ensure connections are secure.
3. Make sure the HP Photosmart is connected to the network with a CAT-5 Ethernet cable.
Cause: Cables are not connected properly.
Solution: Check the following cables to ensure they are connected properly:
• Cables between the HP Photosmart and the hub or router
• Cables between the hub or router and your computer
• Cables to and from your modem or HP Photosmart Internet connection (if applicable)
Cause: A firewall, anti-virus, or anti-spyware application is preventing the HP Photosmart from
accessing your computer.
Solution: Uninstall the HP Photosmart software, and then reboot your computer. Temporarily
disable anti-virus or anti-spyware applications, and then reinstall the HP Photosmart software.
You can re-enable your anti-virus or anti-spyware applications after installation is complete. If
you see firewall pop-up messages, you must always accept or allow the pop-up messages.
If the screen still appears, try uninstalling the HP Photosmart software, rebooting your computer,
and temporarily disabling your firewall before reinstalling the HP Photosmart software. You can
re-enable your firewall application after installation is complete. If you still see firewall pop-up
messages, you must always accept or allow the pop-up messages.
For more information, see the documentation provided with the firewall software.
English
Cause: A Virtual Private Network (VPN) is preventing the HP Photosmart from accessing your
computer.
Solution: Try temporarily disabling the VPN before proceeding with the installation.
NOTE: The HP Photosmart is not accessible during VPN sessions. However, print jobs
are saved in the print queue. When you exit the VPN session, print jobs in the print queue
will be printed.
Wireless setup troubleshooting
This section addresses problems you might encounter setting up a network. Check the device display
for specific error messages.
NOTE: HP provides an online tool that might be able to find your wireless security settings
automatically. Go to:
www.hp.com/go/networksetup.
During wireless network setup you do not see the SSID (network name)
displayed
Cause: Your wireless router is not broadcasting its network name (SSID) because the
Broadcast SSID option is turned off.
Network troubleshooting 33

English
Chapter 4
Solution: Access the router's Embedded Web Server and turn on the Broadcast SSID option.
See the user guide that came with your wireless router for information on how to access the
Embedded Web Server and check the Broadcast SSID setting.
For more information, see:
“
Connect to an integrated wireless WLAN 802.11 network” on page 12
Cause: The wireless router (infrastructure) or computer (ad hoc) is too far from the
HP Photosmart or there is interference.
Solution: In order to establish a good signal between the HP Photosmart and wireless router
(infrastructure) or computer (ad hoc), you might have to experiment a bit. Assuming the
equipment is functioning properly, try doing the following things separately or in combination:
• If there is a long distance between your computer or wireless router and the HP Photosmart,
move them closer together.
• If there are metal objects (such as a metal bookcase or refrigerator) in the transmission
path, clear the path between the HP Photosmart and the computer or wireless router.
• If a cordless telephone, microwave, or other device that emits radio signals transmitting at
2.4 GHz is nearby, move it farther away to reduce radio interference.
• If your computer or wireless router is near an external wall, move them away from the wall.
Cause: Your network name (SSID) may be at the bottom of the SSID list that is displayed
when you install the HP Photosmart on a wireless network.
Solution: Touch
hoc last.
to scroll to the bottom of the list. Infrastructure entries are listed first, ad
Weak signal
Cause: The HP Photosmart is too far away from the wireless router or there is interference.
Solution: In order to establish a good signal between the HP Photosmart and the wireless
router, you might have to experiment a bit. Assuming the equipment is functioning properly, try
doing the following things separately or in combination:
• If there is a long distance between your computer or wireless router and the HP Photosmart,
move them closer together.
• If there are metal objects (such as a metal bookcase or refrigerator) in the transmission
path, clear the path between the HP Photosmart and the computer or wireless router.
• If a cordless telephone, microwave, or other device that emits radio signals transmitting at
2.4 GHz is nearby, move it farther away to reduce radio interference.
• If your computer or wireless router is near an external wall, move them away from the wall.
Cannot connect to network during setup
Cause: The equipment is not turned on.
Solution: Turn on the networked devices, such as the wireless router for an infrastructure
network, or the computer for an ad hoc network. For more information on how to turn on the
wireless router, see the documentation that came with your wireless router.
Cause: The HP Photosmart is not receiving a signal.
Solution: Move the wireless router and the HP Photosmart closer together. Then run the
wireless setup again.
For more information, see:
Integrated wireless WLAN 802.11 network setup” on page 11
“
Cause: If you manually entered your network name (SSID), you might have entered it
incorrectly.
34 HP Photosmart D7400 series

Solution: Run the wireless setup process again and enter your network name (SSID)
carefully. Remember that the SSID is case-sensitive.
For more information, see:
“
Connect to an integrated wireless WLAN 802.11 network” on page 12
Cause: The setting for MAC address filtering might be enabled on your wireless router.
Solution: Disable MAC address filtering on your wireless router until the HP Photosmart has
successfully connected to your network. If you re-enable MAC address filtering on your wireless
router, make sure the MAC address of the HP Photosmart is on the list of acceptable MAC
addresses.
Invalid WEP key during wireless setup
Cause: If you are using WEP security, you might have entered the WEP key incorrectly during
the wireless setup process.
Solution: During the wireless setup process, you might have entered the WEP key incorrectly.
Some wireless routers provide up to four WEP keys. The HP Photosmart uses the first WEP
key (selected by the wireless router as the default WEP key). Run the wireless setup process
again and be sure to use the first WEP key provided by the wireless router. Enter the WEP key
exactly as it appears in the wireless router settings. The WEP key is case sensitive.
If you do not know the WEP key, see the documentation that came with your wireless router for
information on how to access the router's Embedded Web Server. You can find the WEP key
by logging onto the router's Embedded Web Server using a computer on the wireless network.
Invalid passphrase during wireless setup
Cause: During the wireless setup process, you might have entered the WPA passphrase
incorrectly.
Solution: Run the wireless setup process again and enter the correct passphrase. The
passphrase is case-sensitive.
English
The Printer Not Found screen appears during installation
Cause: A firewall, anti-virus, or anti-spyware application is preventing the HP Photosmart from
accessing your computer.
Solution: Uninstall the HP Photosmart software, and then reboot your computer. Temporarily
disable anti-virus or anti-spyware applications, and then reinstall the HP Photosmart software.
You can re-enable your anti-virus or anti-spyware applications after installation is complete. If
you see firewall pop-up messages, you must always accept or allow the pop-up messages.
If the screen still appears, try uninstalling the HP Photosmart software, rebooting your computer,
and temporarily disabling your firewall before reinstalling the HP Photosmart software. You can
re-enable your firewall application after installation is complete. If you still see firewall pop-up
messages, you must always accept or allow the pop-up messages.
For more information, see the documentation provided with the firewall software.
Cause: A Virtual Private Network (VPN) is preventing the HP Photosmart from accessing your
computer.
Solution: Temporarily disable the VPN before proceeding with the installation.
NOTE: The HP Photosmart functionality will be limited during VPN sessions.
Cause: The HP Photosmart is not turned on.
Solution: Turn on the HP Photosmart.
Network troubleshooting 35

Chapter 4
Clear paper jams
If the HP Photosmart has a paper jam, first check the rear door. If the jammed paper is not in the
rear rollers, check the top door.
To clear a paper jam from the rear door
1. Turn off the HP Photosmart.
2. Press in the tab on the rear door to release the door. Remove the door by pulling it away from
the HP Photosmart.
English
3. Gently pull the paper out of the rollers.
4. Replace the rear door. Gently push the door forward until it snaps into place.
5. Turn on the HP Photosmart, and then touch OK to continue the current job.
To clear a paper jam from the top door
1. Turn off the HP Photosmart.
2. Open the ink cartridge door.
CAUTION: Trying to clear a paper jam from the front of the HP Photosmart can damage
the print mechanism. Always access and clear paper jams through the rear door.
CAUTION: If the paper tears when you are removing it from the rollers, check the rollers
and wheels for torn pieces of paper that might be remaining inside the device. If you do not
remove all the pieces of paper from the HP Photosmart, more paper jams are likely to occur.
3. Lift the top door that is located behind the ink cartridges and print head assembly.
36 HP Photosmart D7400 series

4. Gently pull the paper out of the rollers.
CAUTION: If the paper tears when you are removing it from the rollers, check the rollers
and wheels for torn pieces of paper that might be remaining inside the device. If you do not
remove all the pieces of paper from the HP Photosmart, more paper jams are likely to occur.
5. Close the top door.
6. Close the ink cartridge door.
7. Turn on the HP Photosmart, and then touch OK to continue the current job.
Information on ink cartridges and the print head
The following tips help maintain HP ink cartridges and ensure consistent print quality.
• Install the ink cartridge on or before the install by date, which is printed on the ink cartridge
package.
• Keep all ink cartridges in the original sealed packages until they are needed.
• Turn off the HP Photosmart by pressing the On button located on the device. Do not turn off the
device by turning off a power strip or unplugging the power cord from the HP Photosmart. If you
improperly turn off the HP Photosmart, the print head assembly might not return to the correct
position.
• Store ink cartridges at room temperature (15.6°-26.6° C or 60°-78° F).
• HP recommends that you do not remove the ink cartridges from the HP Photosmart until you
have replacement cartridges available to install.
If you are transporting the HP Photosmart make sure you turn off the device by pressing the
On button to power it down properly. Also, make sure you leave the ink cartridges installed.
Doing these actions will prevent ink leaking from the print head assembly.
• Clean the print head (via the Printer Toolbox Software maintenance) when you notice a
significant decrease in print quality.
• Do not clean the print head unnecessarily. This wastes ink and shortens the life of the cartridges.
• Handle ink cartridges carefully. Dropping, jarring, or rough handling during installation can cause
temporary printing problems.
English
Information on ink cartridges and the print head 37

Chapter 4
Support process
If you have a problem, follow these steps:
1. Check the documentation that came with the HP Photosmart.
2. Visit the HP online support Web site at
English
3. Call HP support. Support options and availability vary by device, country/region, and language.
all HP customers. It is the fastest source for up-to-date device information and expert assistance
www.hp.com/support. HP online support is available to
and includes the following features:
• Fast access to qualified online support specialists
• Software and driver updates for the HP Photosmart
• Valuable HP Photosmart and troubleshooting information for common problems
• Proactive device updates, support alerts, and HP newsgrams that are available when you
register the HP Photosmart
For a list of support phone numbers, see the printed documentation that came with the device.
38 HP Photosmart D7400 series

5 Technical information
The technical specifications and international regulatory information for the HP Photosmart are
provided in this section.
System requirements
Software system requirements are located in the Readme file.
Product specifications
For product specifications, go to the HP Web site at www.hp.com/support.
Paper specifications
• Main input tray capacity: Plain paper sheets: Up to 100 (20 lb./75 gsm. paper)
• Output tray capacity: Plain paper sheets: Up to 50 (20 lb./75 gsm. paper)
• Photo tray capacity: Photo paper sheets: Up to 20
NOTE: For a complete list of supported media sizes, see the printer software.
Physical specifications
• Height: 17.2 cm (6.8 inches)
• Width: 46 cm (18.1 inches)
• Depth: 38.7 cm (15.2 inches)
• Weight: 7.8 kg (17.1 pounds) with supplies installed
Power specifications
• Power consumption: 25 watts maximum (average printing)
• Input voltage: AC 100 to 240 V ~ 1300 mA 50–60 Hz
• Output voltage: DC +32 V===1560 mA
English
NOTE: Use only with the power adapter supplied by HP.
Environmental specifications
• Recommended operating temperature range: 15º to 32º C (59º to 90º F)
• Allowable operating temperature range: 5º to 35º C (41º to 95º F)
• Humidity: 15% to 80% RH non-condensing
• Non-operating (Storage) temperature range: –20º to 60º C (–4º to 140º F)
• In the presence of high electromagnetic fields, it is possible the output from the HP Photosmart
may be slightly distorted
• HP recommends using a USB cable less than or equal to 3 m (10 feet) in length to minimize
injected noise due to potential high electromagnetic fields
Energy Star® notice
This product is designed to reduce power consumption and save natural resources without
compromising product performance. It has been designed to reduce total energy consumption both
during operation and when the device is not active. This product qualifies for ENERGY STAR® which
is a voluntary program established to encourage the development of energy-efficient office products.
Technical information 39

Chapter 5
ENERGY STAR is a U.S. registered service mark of the U.S. EPA. As an ENERGY STAR partner,
HP has determined that this product meets ENERGY STAR guidelines for energy efficiency.
For more information on ENERGY STAR guidelines, go to the following Web site:
www.energystar.gov
Ink cartridge yield
Ink from the cartridges is used in the printing process in a number of different ways, including in the
initialization process, which prepares the device and cartridges for printing, and in printhead
servicing, which keeps print nozzles clear and ink flowing smoothly. In addition, some residual ink
English
is left in the cartridge after it is used. For more information, see
www.hp.com/pageyield for more information on estimated cartridge yields.
Visit
Regulatory notices
The HP All-in-One meets product requirements from regulatory agencies in your country/region. For
a complete listing of regulatory notices, see the onscreen Help.
Regulatory model identification number
For regulatory identification purposes, your product is assigned a Regulatory Model Number. The
Regulatory Model Number for your product is SDGOB-0711. This regulatory number should not be
confused with the marketing name (HP Photosmart D7400 series, etc.) or product numbers
(CC247A, etc.).
www.hp.com/go/inkusage.
40 HP Photosmart D7400 series

Warranty
A. Extent of limited warranty
1. Hewlett-Packard (HP) warrants to the end-user customer that the HP products specified above will be free from defects
2. For software products, HP’s limited warranty applies only to a failure to execute programming instructions. HP does not
3. HP's limited warranty covers only those defects that arise as a result of normal use of the product, and does not cover
a. Improper maintenance or modification;
b. Software, media, parts, or supplies not provided or supported by HP;
c. Operation outside the product's specifications;
d. Unauthorized modification or misuse.
4. For HP printer products, the use of a non-HP cartridge or a refilled cartridge does not affect either the warranty to the
5. If HP receives, during the applicable warranty period, notice of a defect in any product which is covered by HP's
6. If HP is unable to repair or replace, as applicable, a defective product which is covered by HP's warranty, HP shall,
7. HP shall have no obligation to repair, replace, or refund until the customer returns the defective product to HP.
8. Any replacement product may be either new or like-new, provided that it has functionality at least equal to that of the
9. HP products may contain remanufactured parts, components, or materials equivalent to new in performance.
10. HP's Limited Warranty Statement is valid in any country where the covered HP product is distributed by HP. Contracts
B. Limitations of warranty
C. Limitations of liability
1. To the extent allowed by local law, the remedies provided in this Warranty Statement are the customer's sole and
2. TO THE EXTENT ALLOWED BY LOCAL LAW, EXCEPT FOR THE OBLIGATIONS SPECIFICALLY SET FORTH IN
SUCH DAMAGES.
D. Local law
1. This Warranty Statement gives the customer specific legal rights. The customer may also have other rights which vary
2. To the extent that this Warranty Statement is inconsistent with local law, this Warranty Statement shall be deemed
a. Preclude the disclaimers and limitations in this Warranty Statement from limiting the statutory rights of a consumer
(e.g., the United Kingdom);
b. Otherwise restrict the ability of a manufacturer to enforce such disclaimers or limitations; or
c. Grant the customer additional warranty rights, specify the duration of implied warranties which the manufacturer
3. THE TERMS IN THIS WARRANTY STATEMENT, EXCEPT TO THE EXTENT LAWFULLY PERMITTED, DO NOT
Dear Customer,
You will find below the name and address of the HP entity responsible for the performance of the HP Limited Warranty in your
country.
You may have additional statutory rights against the seller based on your purchase agreement. Those rights are not
in any way affected by this HP Limited Warranty.
Ireland: Hewlett-Packard Ireland Ltd. 30 Herbert Street IRL-Dublin 2
United Kingdom: Hewlett-Packard Ltd, Cain Road, Bracknell, GB-Berks RG12 1HN
HP product Duration of limited warranty
Software Media 90 days
Printer 1 year
Print or Ink cartridges Until the HP ink is depleted or the “end of warranty” date printed
on the cartridge has been reached, whichever occurs first. This
Accessories 1 year unless otherwise stated
in materials and workmanship for the duration specified above, which duration begins on the date of purchase by the
customer.
warrant that the operation of any product will be interrupted or error free.
any other problems, including those that arise as a result of:
customer or any HP support contract with the customer. However, if printer failure or damage is attributable to the use of
a non-HP or refilled cartridge or an expired ink cartridge, HP will charge its standard time and materials charges to
service the printer for the particular failure or damage.
warranty, HP shall either repair or replace the product, at HP's option.
within a reasonable time after being notified of the defect, refund the purchase price for the product.
product being replaced.
for additional warranty services, such as on-site service, may be available from any authorized HP service facility in
countries where the product is distributed by HP or by an authorized importer.
TO THE EXTENT ALLOWED BY LOCAL LAW, NEITHER HP NOR ITS THIRD PARTY SUPPLIERS MAKES ANY
OTHER WARRANTY OR CONDITION OF ANY KIND, WHETHER EXPRESS OR IMPLIED WARRANTIES OR
CONDITIONS OF MERCHANTABILITY, SATISFACTORY QUALITY, AND FITNESS FOR A PARTICULAR
PURPOSE.
exclusive remedies.
THIS WARRANTY STATEMENT, IN NO EVENT SHALL HP OR ITS THIRD PARTY SUPPLIERS BE LIABLE FOR
DIRECT, INDIRECT, SPECIAL, INCIDENTAL, OR CONSEQUENTIAL DAMAGES, WHETHER BASED ON
CONTRACT, TORT, OR ANY OTHER LEGAL THEORY AND WHETHER ADVISED OF THE POSSIBILITY OF
from state to state in the United States, from province to province in Canada, and from country to country elsewhere in
the world.
modified to be consistent with such local law. Under such local law, certain disclaimers and limitations of this Warranty
Statement may not apply to the customer. For example, some states in the United States, as well as some governments
outside the United States (including provinces in Canada), may:
cannot disclaim, or allow limitations on the duration of implied warranties.
EXCLUDE, RESTRICT, OR MODIFY, AND ARE IN ADDITION TO, THE MANDATORY STATUTORY RIGHTS
APPLICABLE TO THE SALE OF THE HP PRODUCTS TO SUCH CUSTOMERS.
warranty does not cover HP ink products that have been refilled,
remanufactured, refurbished, misused, or tampered with.
HP Limited Warranty
English
Warranty 41

ﻲﺑﺮﻋ
HP Photosmart D7400 series
ﻞﻴﻟد تﺎﻴﺳﺎﺳﻷا

تﺎﻳﻮﺘﺤﻤﻟا
١ةﺮﻜﻓ ﺔﻡﺎﻋ ﻦﻋ HP Photosmart
ﺔﺤﻤﻟ ﺔﻌیﺮﺳ ﻦﻋ زﺎﻬﺟ HP Photosmart.................................................................................................٣
تاﺰﻴﻡ ﺔﺡﻮﻟ ﻢﻜﺤﺘﻟا..............................................................................................................................٤
لﻮﺼﺤﻟا ﻰﻠﻋ ﺪیﺰﻤﻟا ﻦﻡ تﺎﻡﻮﻠﻌﻤﻟا............................................................................................................٤
٢داﺪﻋإ ﺔﻜﺒﺸﻟا
داﺪﻋإ ﺔﻜﺒﺷ ﺔﻴﻜﻠﺳ................................................................................................................................٦
داﺪﻋإ ﺔﻜﺒﺸﻟا ﺔﻴﻜﻠﺳﻼﻟا ﺔﻨﻤﻀﻤﻟا WLAN 802.11.........................................................................................٨
داﺪﻋإ ﺔﻜﺒﺷ ad hoc ﺔﻴﻜﻠﺳﻻ................................................................................................................١١
ﺖﻴﺒﺜﺕ ﺞﻡﺎﻥﺮﺒﻟا ﻦﻡ ﻞﺟأ ﻞﻴﺹﻮﺘﻟا ﺔﻜﺒﺸﻟﺎﺏ....................................................................................................١٤
ﻞﻴﺹﻮﺕ ةﺰﻬﺟأ ﺮﺕﻮﻴﺒﻤآ ﺔﻴﻓﺎﺽإ ﻰﻠﻋ ﺔﻜﺒﺸﻟا.................................................................................................١٤
ﻦﻡ ﻞﻴﺹﻮﺕ USB ﻰﻟإ ﻞﻴﺹﻮﺕ ﺔﻜﺒﺸﻟا................................................................١٥
ﺮﻴﻴﻐﺕ زﺎﻬﺟ HP Photosmart
ةرادإ تاداﺪﻋإ ﺔﻜﺒﺸﻟا ﺔﺹﺎﺨﻟا ﻚﺏ.............................................................................................................١٥
ﻞﻴﻤﺤﺕ قرﻮﻟا...................................................................................................................................١٨
ﺐﻨﺠﺕ رﺎﺸﺤﻥا قرﻮﻟا...........................................................................................................................٢٠
ضﺮﻋ رﻮﺼﻟا ﺎهﺪیﺪﺤﺕو ﺎﻬﺘﻋﺎﺒﻃو...........................................................................................................٢٠
ﺺﺤﻓ تﺎیﻮﺘﺴﻡ ﺮﺒﺤﻟا ةرﺪﻘﻤﻟا................................................................................................................٢١
لاﺪﺒﺘﺳا تﺎﺷﻮﻃﺮﺥ ﺮﺒﺤﻟا.....................................................................................................................٢٢
ءﺎﻐﻟإ ﺖﻴﺒﺜﺕ ﺞﻡﺎﻥﺮﺒﻟا ﻢﺙ ةدﺎﻋإ ﻪﺘﻴﺒﺜﺕ...........................................................................................................٢٥
ﻞﺡ تﻼﻜﺸﻡ ﻖﻠﻌﺘﺕ داﺪﻋﺈﺏ ةﺰﻬﺟﻷا...........................................................................................................٢٥
ﻞﺡ تﻼﻜﺸﻡ
ﻖﻠﻌﺘﺕ ﺔﻜﺒﺸﻟﺎﺏ....................................................................................................................٢٧
ﺮیﺮﺤﺕ تارﺎﺸﺤﻥا قرﻮﻟا.......................................................................................................................٣١
تﺎﻡﻮﻠﻌﻡ لﻮﺡ تﺎﺷﻮﻃﺮﺥ ﺮﺒﺤﻟا سوؤرو ﺔﻋﺎﺒﻄﻟا.........................................................................................٣٢
ﺔﻴﻠﻤﻋ ﻢﻋﺪﻟا.....................................................................................................................................٣٣
ﻲﺑﺮﻋ
٣ماﺪﺨﺘﺳا تاﺰﻴﻡ HP Photosmart
٤ﻞﺡ تﻼﻜﺸﻤﻟا ﻢﻋﺪﻟاو
٥تﺎﻡﻮﻠﻌﻤﻟا ﺔﻴﻨﻔﻟا
تﺎﺒﻠﻄﺘﻡ مﺎﻈﻨﻟا.................................................................................................................................٣٤
تﺎﻔﺹاﻮﻡ ﺞﺘﻨﻤﻟا...............................................................................................................................٣٤
رﺎﻌﺷإ Energy Star®.....................................................................................................................٣٤
ﺔﻴﺟﺎﺘﻥإ ﺔﺷﻮﻃﺮﺥ ﺮﺒﺤﻟا........................................................................................................................٣٥
تارﺎﻌﺷﻹا ﺔﻴﻤﻴﻈﻨﺘﻟا...........................................................................................................................٣٥
نﺎﻤﻀﻟا.........................................................................................................................................٣٦
٢

١ةﺮﻜﻓ ﺔﻡﺎﻋ ﻦﻋ HP Photosmart
مﺪﺨﺘﺳا زﺎﻬﺟ HP Photosmart ﺬﻴﻔﻨﺘﻟ مﺎﻬﻡ ﺔﻘیﺮﻄﺏ ﺔﻌیﺮﺳ ﺔﻠﻬﺳو ﻞﺜﻡ ﺔﻋﺎﺒﻃ رﻮﺹ ﻦﻡ ﺔﻗﺎﻄﺏ ةﺮآاذ وأ زﺎﻬﺟ ﻦیﺰﺨﺕ.
ﻦﻜﻤی لﻮﺹﻮﻟا ﻰﻟإ ﺮﻴﺜﻜﻟا ﻦﻡ ﻒﺋﺎﻇو HP Photosmart ًة ﺮ ﺷ ﺎ ﺒ ﻡ ﻦﻡ ﺔﺡﻮﻟ ﻢﻜﺤﺘﻟا ,نود ﻞﻴﻐﺸﺕ ﺮﺕﻮﻴﺒﻤﻜﻟا.
ﺔﻈﺡﻼﻡمﻮﻘی اﺬه ﻞﻴﻟﺪﻟا ﻢیﺪﻘﺘﺏ تﺎﻴﻠﻤﻋ ﺔﻴﺳﺎﺳأ تﺎﻡﻮﻠﻌﻡو لﻮﺡ ﻞﺡ تﻼﻜﺸﻤﻟا ,ﺎﻤآ ﺮﻓﻮی تﺎﻡﻮﻠﻌﻡ لﻮﺡ لﺎﺼﺕﻻا
ﻢﻋﺪﺏ HP ﺐﻠﻃو تﺎﻡﺰﻠﺘﺴﻤﻟا.
ﻒﺼﺕ تﺎﻤﻴﻠﻌﺘﻟا ةﺮهﺎﻈﻟا ﻰﻠﻋ ﺔﺷﺎﺸﻟا ﻞﻴﺼﻔﺘﺏ قﺎﻄﻨﻟا ﻞﻡﺎﻜﻟا تاﺰﻴﻤﻠﻟ ﻒﺋﺎﻇﻮﻟاو ,ﺎﻤﺏ ﻲﻓ ﻚﻟذ ماﺪﺨﺘﺳا ﺞﻡﺎﻥﺮﺏ
HP Photosmart دوﺰﻤﻟا ﻊﻡ زﺎﻬﺟ HP Photosmart.
ﻲﺑﺮﻋ
ﺔﺤﻤﻟ ﺔﻌﻳﺮﺳ ﻦﻋ زﺎﻬﺟ HP Photosmart
ﺔﻗﺎﻄﺒﻟا ﺔﻘﺻﻼﻟاﻒﺻﻮﻟا
1رز On) ﻞﻴﻐﺸﺘﻟا(
2بﺎﺏ ﺔﺷﻮﻃﺮﺥ ﺮﺒﺤﻟا
3ﺔﺷﺎﺷ تﺎﻡﻮﺳﺮﻟا ﺔﻥﻮﻠﻤﻟا) رﺎﺸی ﺎﻬﻴﻟإ ﺎًﻀیأ ﺔﺷﺎﺸآ ضﺮﻌﻟا(
4ﺔﺡﻮﻟ ﻢﻜﺤﺘﻟا
5تﺎﺤﺘﻓ تﺎﻗﺎﻄﺏ ةﺮآاﺬﻟا حﺎﺒﺼﻡو رﻮﺼﻟا
6ﺬﻔﻨﻡ USB ﻲﻡﺎﻡﻷا
7ﺔیوﺎﺡ رﻮﺼﻟا
8ﺔیوﺎﺡ لﺎﺥدﻹا ﺔﻴﺴﻴﺋﺮﻟا) رﺎﺸُی ﺎﻬﻴﻟإ ﺎًﻀیأ ﺔیوﺎﺤآ لﺎﺥدﻹا(
9ةادأ ﺔﻟﺎﻃإ ﺔیوﺎﺡ قرﻮﻟا) رﺎﺸی ﺎﻬﻴﻟإ ﺎًﻀیأ ةادﺄآ ﺔﻟﺎﻃإ ﺔیوﺎﺤﻟا(
10ﺔیوﺎﺡ جاﺮﺥﻹا
*
11ﻞﻴﺹﻮﺕ ﺔﻗﺎﻄﻟا
12ﺬﻔﻨﻡ ﺖﻥﺮﺜیإ
13ﺬﻔﻨﻡ USB ﻲﻔﻠﺨﻟا
٣ HP Photosmart D7400 series

ﺔﻗﺎﻄﺒﻟا ﺔﻘﺻﻼﻟاﻒﺻﻮﻟا
.HP ﻞﺒﻗ ﻦﻡ دوﺰﻤﻟا ﺔﻗﺎﻄﻟا لﻮﺤﻡ ﻊﻡ ﻂﻘﻓ مﺪﺨﺘﺳا
)ﻊﺏﺎﺕ(
14بﺎﺏ ﻲﻔﻠﺥ
*
تاﺰﻴﻡ ﺔﺡﻮﻟ ﻢﻜﺤﺘﻟا
ﺮﻓﻮی ﻢﺳﺮﻟا ﻲﻟﺎﺘﻟا لوﺪﺠﻟاو ﻖﻠﻌﺘﻤﻟا ﻪﺏ ﺔﻌﺟاﺮﻡ ﺔﻌیﺮﺳ تاﺰﻴﻤﻟ ﺔﺡﻮﻟ ﻢﻜﺤﺘﻟا زﺎﻬﺠﻟ HP Photosmart.
ﻲﺑﺮﻋ
ﺔﻗﺎﻄﺒﻟا ﺔﻘﺻﻼﻟاﻢﺳﻻا ﻒﺻﻮﻟاو
ضﺮﻌﻟا ﻲﻜﻟ ﻢﺋﻼﺕ تﻻاﺪﺒﺘﺳا زﺎﻬﺠﻟا ﺔﻋﻮﻨﺘﻤﻟا فوﺮﻇو ةءﺎﺽﻹا.
ﻲﻓ ﺔﻋﺎﺒﻃ ﺔﻓﺎآ رﻮﺼﻟا
)ءﺎﺸﻥإ( ,مﻮﻘی رز Print Photos) ﺔﻋﺎﺒﻃ رﻮﺼﻟا( ضﺮﻌﺏ ﺔﺷﺎﺷ Print Preview) ﺔﻨﻳﺎﻌﻡ ﺔﻋﺎﺒﻄﻟا( وأ ﻢﺘﺘﺳ ﺔﻋﺎﺒﻃ يأ
ةرﻮﺹ) رﻮﺹ (ةدﺪﺤﻡ .ﻲﻓ ﺔﻟﺎﺡ مﺪﻋ ﺪیﺪﺤﺕ يأ ﻦﻡ رﻮﺼﻟا ,ﺮﻬﻈﺘﺳ ﺔﺒﻟﺎﻄﻡ ﻚﻟﺄﺴﺕ ﺎﱠﻤﻋ اذإ ﺖﻨآ ﺐﻏﺮﺕ
ةدﻮﺟﻮﻤﻟا ﻰﻠﻋ ﺔﻗﺎﻄﺒﻟا وأ زﺎﻬﺟ ﻦیﺰﺨﺘﻟا.
ﺎﻬﻠﻴﻐﺸﺕ .ﻢﺘی فﺎﻘیإ ﻞﻴﻐﺸﺕ ﻩﺬه ةﺰﻴﻤﻟا ﺎًﻴﺽاﺮﺘﻓا .ﻲﻓ ﺔﻟﺎﺡ ﻞﻴﻐﺸﺕ ﻩﺬه ةﺰﻴﻤﻟا ,مﻮﻘی زﺎﻬﺟ HP Photosmart ﺎًﻴﺋﺎﻘﻠﺕ ﺢﻴﺤﺼﺘﺏ نﻮﻟ
نﻮﻴﻌﻟا ءاﺮﻤﺤﻟا ﻲﻓ ةرﻮﺼﻟا ﺔﺽوﺮﻌﻤﻟا ﺎًﻴﻟﺎﺡ ﻰﻠﻋ ﺔﺷﺎﺷ ضﺮﻌﻟا.
1ضﺮﻌﻟا :ضﺮﻌﻟ ﻢﺋاﻮﻘﻟا ,رﻮﺼﻟا ﻞﺋﺎﺳﺮﻟاو .ﻦﻜﻤی ﻂﺒﺽ ﺔﺷﺎﺷ ﺲﻤﻠﻟا ﻰﻠﻋ عﺎﺽوأ ﺔﻔﻠﺘﺨﻡ .ﺎﻤﻡ ﻦّﻜﻤی مﺪﺨﺘﺴﻤﻟا ﻦﻡ ﺮﻴﻴﻐﺕ ﺔیواز
2Print Photos) ﺔﻋﺎﺒﻃ رﻮﺼﻟا( :اًدﺎﻨﺘﺳا ﻰﻟإ لﻮﺹﻮﻟا رﻮﺼﻠﻟ ﻦﻡ ﺔﻤﺋﺎﻗ View) ضﺮﻋ(, Print) ﺔﻋﺎﺒﻃ( ,وأ Create
3حﺎﺒﺼﻡ ﻲﻜﻠﺳﻻ :ﺮﻴﺸی ﻰﻟإ ﻞﻴﻐﺸﺕ لﺎﺳرإ ﻲﻜﻠﺳﻻ 802.11 b و g.
4حﺎﺒﺼﻡ ﻪﻴﺒﻨﺘﻟا :ﺮﻴﺸی ﻰﻟإ ثوﺪﺡ ﺔﻠﻜﺸﻡ .ﻊﺟار ﺔﺷﺎﺷ ضﺮﻌﻟا لﻮﺼﺤﻠﻟ ﻰﻠﻋ ﺪیﺰﻤﻟا ﻦﻡ تﺎﻡﻮﻠﻌﻤﻟا.
5Cancel) ءﺎﻐﻟإ ﺮﻡﻷا( :فﺎﻘیﻹ ﺔﻴﻠﻤﻌﻟا ،ﺔﻴﻟﺎﺤﻟا جوﺮﺨﻟا ﻦﻡ ﺔﻤﺋﺎﻗ ,وأ جوﺮﺨﻟا ﻦﻡ تاداﺪﻋإ.
6Red Eye Removal) ﺔﻟازإ نﻮﻴﻌﻟا ءاﺮﻤﺤﻟا( :ﻞﻴﻐﺸﺘﻟ ةﺰﻴﻡ Red Eye Removal) ﺔﻟازإ نﻮﻴﻌﻟا ءاﺮﻤﺤﻟا( وأ فﺎﻘیإ
لﻮﺼﺤﻟا ﻰﻠﻋ ﺪﻳﺰﻤﻟا ﻦﻡ تﺎﻡﻮﻠﻌﻤﻟا
ﺮﻓﻮﺕ ﺔﻠﻴﻜﺸﺕ ﺔﻋﻮﻨﻡ ﻦﻡ ردﺎﺼﻤﻟا ﺔﻴﻌﺟﺮﻤﻟا ,ﺔﻋﻮﺒﻄﻡ ةﺮهﺎﻇو ﻰﻠﻋ ﺔﺷﺎﺸﻟا ,تﺎﻡﻮﻠﻌﻡ لﻮﺡ داﺪﻋإ زﺎﻬﺟ
HP Photosmart ﻪﻡاﺪﺨﺘﺳاو.
تاﺰﻴﻡ ﺔﺡﻮﻟ ﻢﻜﺤﺘﻟا ٤

ﻲﺑﺮﻋ
ﻞﺡ
ﺮﻓﻮی ﻞﻴﻟد داﺪﻋﻹا تادﺎﺷرإ لﻮﺡ داﺪﻋإ زﺎﻬﺟ HP Photosmart ﺖﻴﺒﺜﺕو ﺞﻡﺎﻥﺮﺒﻟا .ﺪآﺄﺕ ﻦﻡ عﺎﺒﺕا تاﻮﻄﺨﻟا
ةدﻮﺟﻮﻤﻟا ﻲﻓ ﻞﻴﻟد داﺪﻋﻹا ﺐﺴﺡ ﺐﻴﺕﺮﺘﻟا.
ﺪﻨﻋ ضﺮﻌﺘﻟا ﻰﻟإ ﻞآﺎﺸﻡ ءﺎﻨﺙأ ﺔﻴﻠﻤﻋ داﺪﻋﻹا ,ﻢﻘﻓ ﺔﻌﺟاﺮﻤﺏ ﻞﺡ تﻼﻜﺸﻤﻟا ﻲﻓ ﺮﺥﺁ ﻢﺴﻗ ﻦﻡ ﻞﻴﻟد داﺪﻋﻹا ,وأ ﻊﺟار ”
تﻼﻜﺸﻤﻟا ﻢﻋﺪﻟاو“ ﻲﻓ ﺔﺤﻔﺹ ٢٥ ﻲﻓ اﺬه ﻞﻴﻟﺪﻟا.
ﺮﻓﻮﺕ تﺎﻤﻴﻠﻌﺘﻟا ةﺮهﺎﻈﻟا ﻰﻠﻋ ﺔﺷﺎﺸﻟا تادﺎﺷرإ ﺔﻠﺼﻔﻡ لﻮﺡ تاﺰﻴﻡ زﺎﻬﺟ HP Photosmart ﻲﺘﻟا ﻻ ﻢﺘی ﺎﻬﻔﺹو ﻲﻓ
ﻞﻴﻟد تﺎﻴﺳﺎﺳﻷا اﺬه ,ﺎﻤﺏ ﻲﻓ ﻚﻟذ تاﺰﻴﻤﻟا ةﺮﻓﻮﺘﻤﻟا ﻂﻘﻓ ﺪﻨﻋ ماﺪﺨﺘﺳا ﺞﻡﺎﻥﺮﺒﻟا ﺖﺒﺜﻤﻟا ﻊﻡ HP Photosmart.
www.hp.com/support
ﺪﻨﻋ ﺔﻴﻥﺎﻜﻡإ لﻮﺹﻮﻟا ﻰﻟإ ﺔﻜﺒﺷ ،ﺖﻥﺮﺘﻥﻹا ﻚﻥﺎﻜﻡﺈﺒﻓ لﻮﺼﺤﻟا ﻰﻠﻋ ﻢﻋﺪﻟا ﻦﻡ ﻊﻗﻮﻡ ﺐیﻮﻟا ـﻟ HP .ﺮﻓﻮی ﻊﻗﻮﻡ ﺐیﻮﻟا اﺬه
ﻢﻋﺪﻟا ﻲﻨﻔﻟا ﺞﻡاﺮﺏو ﻞﻴﻐﺸﺘﻟا تﺎﻡﺰﻠﺘﺴﻤﻟاو تﺎﻡﻮﻠﻌﻡو ﺐﻠﻃ تﺎﺠﺘﻨﻤﻟا.
ﻞﺼﻔﻟا ١
•ﻞﻴﻟد داﺪﻋﻹا
•تﺎﻤﻴﻠﻌﺘﻟا ةﺮهﺎﻈﻟا ﻰﻠﻋ ﺔﺵﺎﺸﻟا
•
٥ HP Photosmart D7400 series

٢داﺪﻋإ ﺔﻜﺒﺸﻟا
ﻒﺼی اﺬه ﻢﺴﻘﻟا ﺔﻴﻔﻴآ ﻞﻴﺹﻮﺕ HP Photosmart ﺔﻜﺒﺸﻟﺎﺏ ﺔﻴﻔﻴآو ضﺮﻋ تاداﺪﻋإ ﺔﻜﺒﺸﻟا ﺎﻬﺕرادإو.
اذإ ﺖﺒﻏر ﻲﻓ:ﻊﺟار اﺬه ﻢﺴﻘﻟا:
ﻞﻴﺹﻮﺕ ﺔﻜﺒﺸﺏ) ﺖﻥﺮﺜیإ (ﺔﻴﻜﻠﺳ.”داﺪﻋإ ﺔﻜﺒﺷ ﺔﻴﻜﻠﺳ“ ﻲﻓ ﺔﺤﻔﺹ ٦
ﻲﻓ ﺔﺤﻔﺹ ٨
”داﺪﻋإ ﺔﻜﺒﺷ ad hoc ﺔﻴﻜﻠﺳﻻ“ ﻲﻓ ﺔﺤﻔﺹ ١١
”ﺮﻴﻴﻐﺕ زﺎﻬﺟ HP Photosmart ﻦﻡ ﻞﻴﺹﻮﺕ USB ﻰﻟإ
ﻞﻴﺹﻮﺕ ﺔﻜﺒﺸﻟا“ ﻲﻓ ﺔﺤﻔﺹ ١٥
ﻞﻴﺹﻮﺕ ﺔﻜﺒﺸﺏ ﺔﻴﻜﻠﺳﻻ ماﺪﺨﺘﺳﺎﺏ ﻪﺟﻮﻡ ﻲﻜﻠﺳﻻ) ﺔﻴﻨﺏ ﺔﻴﺘﺤﺕ(.”داﺪﻋإ ﺔﻜﺒﺸﻟا ﺔﻴﻜﻠﺳﻼﻟا ﺔﻨﻤﻀﻤﻟا WLAN 802.11“
ﻞﻴﺹﻮﺘﻟا ًة ﺮ ﺷ ﺎ ﺒ ﻡ زﺎﻬﺠﺏ ﺮﺕﻮﻴﺒﻡﻮآ يذ ﺔﻴﻥﺎﻜﻡإ ﺔﻴﻜﻠﺳ نوﺪﺏ ﻪﺟﻮﻡ
ﻲﻜﻠﺳﻻ )ad hoc.(
ﺖﻴﺒﺜﺕ ﺞﻡﺎﻥﺮﺏ HP Photosmart ماﺪﺨﺘﺳﻼﻟ ﻲﻓ ﺔﺌﻴﺏ ﺔﻜﺒﺷ.”ﺖﻴﺒﺜﺕ ﺞﻡﺎﻥﺮﺒﻟا ﻦﻡ ﻞﺟأ ﻞﻴﺹﻮﺘﻟا ﺔﻜﺒﺸﻟﺎﺏ“ ﻲﻓ ﺔﺤﻔﺹ ١٤
ﺔﻓﺎﺽإ تﻼﻴﺹﻮﺕ ﻰﻟإ ةﺰﻬﺟأ ﺮﺕﻮﻴﺒﻤآ ىﺮﺥأ ةدﻮﺟﻮﻡ ﻰﻠﻋ ﺔﻜﺒﺸﻟا.”ﻞﻴﺹﻮﺕ ةﺰﻬﺟأ ﺮﺕﻮﻴﺒﻤآ ﺔﻴﻓﺎﺽإ ﻰﻠﻋ ﺔﻜﺒﺸﻟا“ ﻲﻓ ﺔﺤﻔﺹ ١٤
ﺮﻴﻴﻐﺕ زﺎﻬﺟ HP Photosmart ﻦﻡ ﻞﻴﺹﻮﺕ USB ﻰﻟإ ﻞﻴﺹﻮﺕ
ﺔﻜﺒﺸﻟا.
ﺔﻈﺡﻼﻡمﺪﺨﺘﺳا تادﺎﺷرﻹا ةدﻮﺟﻮﻤﻟا ﻲﻓ اﺬه ﻢﺴﻘﻟا اذإ ﺖﻨآ ﺪﻗ
ﺖﻤﻗ ﺖﻴﺒﺜﺘﺏ زﺎﻬﺟ HP Photosmart ﻊﻡ ﻞﻴﺹﻮﺕ USB ﺎًﻘﺒﺴﻡ
ﺐﻏﺮﺕو ﻲﻓ ﺮﻴﻴﻐﺘﻟا ﺎﻡإ ﻲﻟإ ﻞﻴﺹﻮﺕ ﺔﻜﺒﺷ ﻲﻜﻠﺳﻻ وأ ﻞﻴﺹﻮﺕ ﺔﻜﺒﺷ
ﺖﻥﺮﺘﻥا.
ضﺮﻋ تاداﺪﻋإ ﺔﻜﺒﺸﻟا وأ ﺎهﺮﻴﻴﻐﺕ.”ةرادإ تاداﺪﻋإ ﺔﻜﺒﺸﻟا ﺔﺹﺎﺨﻟا ﻚﺏ“ ﻲﻓ ﺔﺤﻔﺹ ١٥
رﻮﺜﻌﻟا ﻰﻠﻋ تﺎﻡﻮﻠﻌﻡ فﺎﺸﻜﺘﺳا ءﺎﻄﺥﻷا ﺎﻬﺡﻼﺹإو.”ﻞﺡ تﻼﻜﺸﻡ ﻖﻠﻌﺘﺕ ﺔﻜﺒﺸﻟﺎﺏ“ ﻲﻓ ﺔﺤﻔﺹ ٢٧
ﻲﺑﺮﻋ
ﺔﻈﺡﻼﻡ ﻦﻜﻤی ﻞﻴﺹﻮﺕ زﺎﻬﺟ HP Photosmart ﺎﻡإ ﺔﻜﺒﺸﺏ ﺔﻴﻜﻠﺳﻻ وأ ﺔﻜﺒﺸﺏ ﺔﻴﻜﻠﺳ ,ﻦﻜﻟو ﻻ ﻦﻜﻤی لﺎﺼﺕﻻا ﺎﺘﻠﻜﺏ
ﻦﻴﺘﻜﺒﺸﻟا ﻲﻓ ﺲﻔﻥ ﺖﻗﻮﻟا.
ﻒﺼی اﺬه ﻢﺴﻘﻟا ﺔﻴﻔﻴآ ﻞﻴﺹﻮﺕ زﺎﻬﺟ HP Photosmart ﻪّﺟﻮﻤﺏ وأ ةﺪﺡو ﻢﻴﺴﻘﺕ وأ رﻮﺤﻡ ماﺪﺨﺘﺳﺎﺏ ﻞﺏﺎآ ﺖﻥﺮﺜیإ ﺖﻴﺒﺜﺕو
ﺞﻡﺎﻥﺮﺏ HP Photosmart ﻦﻡ ﻞﺟأ ﻞﻴﺹﻮﺘﻟا ﺔﻜﺒﺸﻟﺎﺏ .ﻰﻤﺴی ﻚﻟذ ﺔﻜﺒﺸﺏ ﺔﻴﻜﻠﺳ وأ ﺔﻜﺒﺷ ﺖﻥﺮﺜیإ.
داﺪﻋإ ﺔﻜﺒﺵ ﺔﻴﻜﻠﺳ
داﺪﻋإ ﺔﻜﺒﺸﻟا ٦

ﻞﺼﻔﻟا ٢
ﻲﺑﺮﻋ
ﻊﺟار اﺬه ﻢﺴﻘﻟا:
داﺪﻋﻹ زﺎﻬﺟ HP Photosmart ﻰﻠﻋ ﺔﻜﺒﺵ ﺔﻴﻜﻠﺳ ,ﺐﺠﻳ
مﺎﻴﻘﻟا ﺎﻤﺑ ﻲﻠﻳ:
ًﻻ و أ ,ﻢﻗ ﻊﻴﻤﺠﺘﺏ ﺔﻓﺎآ داﻮﻤﻟا ﺔﺏﻮﻠﻄﻤﻟا.”ﺎﻡ جﺎﺘﺤﺕ ﻪﻴﻟإ ﻦﻡ ﻞﺟأ ﺔﻜﺒﺷ ﺔﻴﻜﻠﺳ“ ﻲﻓ ﺔﺤﻔﺹ ٧
ًﺎ ﻴ ﻥ ﺎ ﺙ ﻢﻗ ﻞﻴﺹﻮﺘﻟﺎﺏ ﺔﻜﺒﺸﺏ ﺔﻴﻜﻠﺳ.”ﻞﻴﺹﻮﺕ زﺎﻬﺟ HP Photosmart ﺔﻜﺒﺸﻟﺎﺏ“ ﻲﻓ ﺔﺤﻔﺹ ٧
،ا ًﺮﻴﺥأ ﻢﻗ ﺖﻴﺒﺜﺘﺏ ﺞﻡﺎﻥﺮﺒﻟا.”ﺖﻴﺒﺜﺕ ﺞﻡﺎﻥﺮﺒﻟا ﻦﻡ ﻞﺟأ ﻞﻴﺹﻮﺘﻟا ﺔﻜﺒﺸﻟﺎﺏ“ ﻲﻓ ﺔﺤﻔﺹ ١٤
ﺎﻡ جﺎﺘﺤﺕ ﻪﻴﻟإ ﻦﻡ ﻞﺟأ ﺔﻜﺒﺵ ﺔﻴﻜﻠﺳ
ﻞﺒﻗ ﻞﻴﺹﻮﺕ زﺎﻬﺟ HP Photosmart ،ﺔﻜﺒﺸﻟﺎﺏ ﺪآﺄﺕ ﻪﻥأ ﻢﻀی ﺔﻓﺎآ داﻮﻤﻟا ﺔﺏﻮﻠﻄﻤﻟا.
ﺔﻜﺒﺷ ﺖﻥﺮﺘﻥا ﺔﻠﻡﺎﻋ يﻮﺘﺤﺕ ﻰﻠﻋ ،ﻪ ّﺟﻮﻡ وأ ةﺪﺡو ،ﻢﻴﺴﻘﺕ وأ رﻮﺤﻡ ﻊﻡ ﺬﻔﻨﻡ ﺖﻥﺮﺘﻥا.
❑
ﻞﺏﺎآ ﺖﻥﺮﺜیإ CAT-5.
❑
ﻢﻏر ﻪﺏﺎﺸﺕ تﻼﺒآ ﺖﻥﺮﺜیإ ﺔﻴﺳﺎﻴﻘﻟا ﻊﻡ تﻼﺒآ ﻒﺕﺎﻬﻟا ﺔﻴﺳﺎﻴﻘﻟا ﻻإ ﻪﻥأ ﻻ ﻦﻜﻤی نأ ﻞﺤی ﺎﻤهﺪﺡأ نﺎﻜﻡ ﺮﺥﻵا .ﺪﺟﻮی دﺪﻋ
ﻒﻠﺘﺨﻡ ﻦﻡ كﻼﺳﻷا ﻲﻓ ﻞآ ،ﺪﺡاو ﻞﻜﻟو ﺪﺡاو ﻞﺹﻮﻡ ﻒﻠﺘﺨﻡ .نإ ﻞﺹﻮﻡ ﻞﺏﺎآ ﺖﻥﺮﺜیﻹا) ﻰّﻤﺴی ﺎًﻀیأ ﻞﺹﻮﻡ
ﻪﻟ ﺎﻡ ﻦﻴﺏ ﻲﺘﻄﻘﻥ ﺲﻡﻼﺕ ﻰﻟإ 6 طﺎﻘﻥ.
RJ-45 (ضﺮﻋأ َﻚﻤﺳأو ﻪﺏو ،ﺎ ًﻤﺋاد 8 طﺎﻘﻥ ﺲﻡﻼﺕ ﻲﻓ ﻪﻓﺮﻃ. ﻞﺹﻮﻡ ﻒﺕﺎﻬﻟا
ﺮﺕﻮﻴﺒﻤآ ﺢﻄﺳ ﺐﺘﻜﻡ وأ ﺮﺕﻮﻴﺒﻤآ لﻮﻤﺤﻡ دّوﺰﻡ لﺎﺼﺕﺎﺏ ﺖﻥﺮﺘﻥا.
❑
٧ HP Photosmart D7400 series
ﺔﻈﺡﻼﻡﻢﻋﺪی HP Photosmart ﺔﻜﺒﺷ ﺖﻥﺮﺜیﻹا تاذ 10 Mbps ﺔﻜﺒﺷو ﺖﻥﺮﺘﻥﻹا تاذ 100 Mbps .اذإ
ﺖﻨآ ﺎًﻡﺪﻘﻡ ﻰﻠﻋ ءاﺮﺷ ﺔﻗﺎﻄﺏ ﺔﻬﺟاو ﺔﻜﺒﺷ )NIC(، وأ ﺖﻨآ ﺪﻗ ،ﺎﻬﺘیﺮﺘﺷا ﺪّآﺄﺕ ﻦﻡ ﺎﻬﻥأ ﻊﻴﻄﺘﺴﺕ ﻞﻤﻌﻟا ﻲﻓ ﺎﺘﻠآ
ﻦﻴﺘﻋﺮ ّﺴﻟا.
ﻞﻴﺻﻮﺕ زﺎﻬﺟ HP Photosmart ﺔﻜﺒﺸﻟﺎﺑ
ﻞﻴﺹﻮﺘﻟ زﺎﻬﺟ HP Photosmart ،ﺔﻜﺒﺸﻟﺎﺏ مﺪﺨﺘﺳا ﺬﻔﻨﻡ ﺖﻥﺮﺜیإ دﻮﺟﻮﻤﻟا ﻲﻓ ءﺰﺠﻟا ﻲﻔﻠﺨﻟا ﻦﻡ زﺎﻬﺠﻟا.
ﻞﻴﺻﻮﺘﻟ HP Photosmart ﺔﻜﺒﺸﻟﺎﺑ
١.ﻢﻗ عﺰﻨﺏ ﺲﺒﻘﻤﻟا ﺮﻔﺹﻷا ﻦﻡ ﻒﻠﺥ HP Photosmart.
٢.ﻢﻗ ﻞﻴﺹﻮﺘﺏ ﻞﺏﺎآ ﺖﻥﺮﺜیإ ﺬﻔﻨﻤﺏ ﺖﻥﺮﺜیإ ﻲﻓ ءﺰﺠﻟا ﻲﻔﻠﺨﻟا ﻦﻡ زﺎﻬﺟ HP Photosmart.

٣.ﻢﻗ ﻞﻴﺹﻮﺘﺏ فﺮﻄﻟا ﺮﺥﻵا ﻦﻡ ﻞﺏﺎآ ﺖﻥﺮﺜیﻹا ﺬﻔﻨﻤﻟﺎﺏ ﺮﻓﻮﺘﻤﻟا ﻲﻓ ﻪﺟﻮﻡ ،ﺖﻥﺮﺜیإ ةﺪﺡو ،ﻢﻴﺴﻘﺕ وأ ﻪﺟﻮﻡ ﻲﻜﻠﺳﻻ.
ﻲﺑﺮﻋ
٤.دﺮﺠﻤﺏ ﻞﻴﺹﻮﺕ زﺎﻬﺟ HP Photosmart ﺔﻜﺒﺸﻟﺎﺏ ,ﻢﻗ ﺖﻴﺒﺜﺘﺏ ﺞﻡﺎﻥﺮﺒﻟا ﺎﻤآ ﻮه ﺢﺽﻮﻡ ﻲﻓ ”ﺖﻴﺒﺜﺕ ﺞﻡﺎﻥﺮﺒﻟا ﻦﻡ ﻞﺟأ
ﻞﻴﺹﻮﺘﻟا ﺔﻜﺒﺸﻟﺎﺏ“ ﻲﻓ ﺔﺤﻔﺹ ١٤.
داﺪﻋإ ﺔﻜﺒﺸﻟا ﺔﻴﻜﻠﺳﻼﻟا ﺔﻨﻤﻀﻤﻟا WLAN 802.11
لﻮﺼﺤﻠﻟ ﻰﻠﻋ ءادﻷا نﺎﻡﻷاو ﻦﻴﻠﻀﻓﻷا ﻲﻓ ﺔﻜﺒﺸﻟا ﺔﻴﻜﻠﺳﻼﻟا ﺔﺹﺎﺨﻟا ،ﻚﺏ ﻲﺹﻮﺕ HP ماﺪﺨﺘﺳﺎﺏ ﻪﺟﻮﻡ ﻲﻜﻠﺳﻻ وأ ﺔﻄﻘﻥ
لﻮﺹو )802.11 (ﻞﻴﺹﻮﺘﻟ زﺎﻬﺟ HP Photosmart ﺮﺹﺎﻨﻋو ﺔﻜﺒﺸﻟا ىﺮﺥﻷا .ﺎﻡﺪﻨﻋ نﻮﻜﺕ ﺮﺹﺎﻨﻋ ﺔﻜﺒﺸﻟا ﺔﻠﺼﺘﻡ ﻦﻡ
لﻼﺥ ﻪﺟﻮﻤﻟا ﻲﻜﻠﺳﻼﻟا وأ ﺔﻄﻘﻥ ،لﻮﺹﻮﻟا ﻰﻤﺴﻴﻓ ﻚﻟذ ﺔﻜﺒﺸﺏ ﺔﻴﻨﺒﻟا ﺔﻴﺘﺤﺘﻟا.
ﻦﻡ ﺪﺋاﻮﻔﻟا ﺔﻜﺒﺸﻟ ﺔﻴﻨﺒﻟا ﺔﻴﺘﺤﺘﻟا ﺔﻴﻜﻠﺳﻼﻟا ﺔﻥرﺎﻘﻤﻟﺎﺏ ﺔﻜﺒﺸﺏ ad hoc:
•نﺎﻡأ ﺔﻜﺒﺷ مﺪﻘﺘﻡ
•ﺔﻴﻗاﺪﺼﻡ ﺔﻨﺴﺤﻡ
•ﺔﻥوﺮﻡ ﺔﻜﺒﺸﻟا
•ءادأ ،ﻞﻀﻓأ ًﺔﺹﺎﺥ ﻊﻡ ﻊﺽو 802.11 g
•لﻮﺹو ﺖﻥﺮﺘﻥإ ﺾیﺮﻋ قﺎﻄﻨﻟا كﺮﺘﺸﻡ
داﺪﻋإ ﺔﻜﺒﺸﻟا ﺔﻴﻜﻠﺳﻼﻟا ﺔﻨﻤﻀﻤﻟا WLAN 802.11 ٨

ﻞﺼﻔﻟا ٢
ﻲﺑﺮﻋ
ﻊﺟار اﺬه ﻢﺴﻘﻟا:
WLAN 802.11، ﺐﺠﻳ ﻚﻴﻠﻋ مﺎﻴﻘﻟا ﺎﻤﺑ ﻲﻠﻳ:
802.11“ ﻲﻓ ﺔﺤﻔﺹ ٩
”ﻞﻴﺹﻮﺘﻟا ﺔﻜﺒﺸﺏ ﺔﻴﻜﻠﺳﻻ ﺔﻨﻤﻀﻡ WLAN 802.11“
ﻲﻓ ﺔﺤﻔﺹ ٩
داﺪﻋﻹ زﺎﻬﺟ HP Photosmart ﻰﻠﻋ ﺔﻜﺒﺵ ﺔﻴﻜﻠﺳﻻ ﺔﺠﻡﺪﻡ
ًﻻ و أ ,ﻢﻗ ﻊﻴﻤﺠﺘﺏ ﺔﻓﺎآ داﻮﻤﻟا ﺔﺏﻮﻠﻄﻤﻟا.”ﺎﻡ جﺎﺘﺤﺕ ﻪﻴﻟإ ﻦﻡ ﻞﺟأ ﺔﻜﺒﺷ ﺔﻴﻜﻠﺳﻻ ﺔﻨﻤﻀﻡ WLAN
ﺎًﻴﻥﺎﺙ ,ﻢﻗ ﻞﻴﺹﻮﺘﺏ زﺎﻬﺟ HP Photosmart ﻪﺟﻮﻤﻟﺎﺏ ،ﻲﻜﻠﺳﻼﻟا
ﻢﻗو ﻞﻴﻐﺸﺘﺏ Wireless Setup Wizard) ﺞﻟﺎﻌﻡ داﺪﻋﻹا
ﻲﻜﻠﺳﻼﻟا(.
،ا ًﺮﻴﺥأ ﻢﻗ ﺖﻴﺒﺜﺘﺏ ﺞﻡﺎﻥﺮﺒﻟا.”ﺖﻴﺒﺜﺕ ﺞﻡﺎﻥﺮﺒﻟا ﻦﻡ ﻞﺟأ ﻞﻴﺹﻮﺘﻟا ﺔﻜﺒﺸﻟﺎﺏ“ ﻲﻓ ﺔﺤﻔﺹ ١٤
ﺎﻡ جﺎﺘﺤﺕ ﻪﻴﻟإ ﻦﻡ ﻞﺟأ ﺔﻜﺒﺵ ﺔﻴﻜﻠﺳﻻ ﺔﻨﻤﻀﻡ WLAN 802.11
ﻞﻴﺹﻮﺘﻟ HP Photosmart ﺔﻜﺒﺸﺏ WLAN 802.11 ﺔﻴﻜﻠﺳﻻ ،ﺔﻨﻤﻀﻡ جﺎﺘﺤﺘﺳ ﻰﻟإ ﻲﻟﺎﺘﻟا:
ﺔﻜﺒﺷ 802.11 ﺔﻴﻜﻠﺳﻻ ﻦﻤﻀﺘﺕ زﺎﻬﺟ ﻪﻴﺟﻮﺕ ﻲﻜﻠﺳﻻ ﺔﻄﻘﻥو لﻮﺹو ﺔﻴﻜﻠﺳﻻ.
❑
ﺮﺕﻮﻴﺒﻤآ ﻲﺒﺘﻜﻡ وأ ﺮﺕﻮﻴﺒﻤآ لﻮﻤﺤﻡ ﻢﻋﺪی تﺎﻜﺒﺸﻟا ﺔﻴﻜﻠﺳﻼﻟا وأ ﺔﻗﺎﻄﺏ ﺔﻬﺟاو لﺎﺼﺕا ﺔﻜﺒﺸﻟا )NIC .(ﺐﺠی نأ نﻮﻜی
❑
ﺮﺕﻮﻴﺒﻤﻜﻟا ًﻼ ﺼ ﺘ ﻡ ﺔﻜﺒﺸﻟﺎﺏ ﺔﻴﻜﻠﺳﻼﻟا ﻲﺘﻟا ﻂﻄﺨﺕ ﺖﻴﺒﺜﺘﻟ زﺎﻬﺟ HP Photosmart ﺎﻬﻴﻠﻋ.
HP Photosmart ﺔﻜﺒﺸﺏ ﺔﻴﻜﻠﺳﻻ ﺎﻬیﺪﻟ ﺔﻴﻥﺎﻜﻡإ لﻮﺹﻮﻟا ،ﺖﻥﺮﺘﻥﻹﺎﺏ ﻲﺹﻮﺕ HP ماﺪﺨﺘﺳﺎﺏ ﻪّﺟﻮﻡ
اذإ ﺖﻤﻗ ﻞﻴﺹﻮﺘﺏ
❑
ﻲﻜﻠﺳﻻ) ﺔﻄﻘﻥ لﻮﺹو وأ ﺔﻄﺤﻡ ﺔﻴﺳﺎﺳأ (مﺪﺨﺘﺴی Dynamic Host Configuration Protocol) لﻮآﻮﺕوﺮﺏ
ﻦیﻮﻜﺕ ﻒﻴﻀﻤﻟا يﻮﻴﺤﻟا( )DHCP(.
ﻢﺳا ﺔﻜﺒﺸﻟا )SSID.(
❑
حﺎﺘﻔﻡ WEP وأ WPA Passphrase) ﺪﻨﻋ ﺔﺟﺎﺤﻟا(.
❑
ﻞﻴﺻﻮﺘﻟا ﺔﻜﺒﺸﺑ ﺔﻴﻜﻠﺳﻻ ﺔﻨﻤﻀﻡ WLAN 802.11
ﺮﻓﻮی ﺞﻟﺎﻌﻡ داﺪﻋﻹا ﻲﻜﻠﺳﻼﻟا ﺔﻘیﺮﻃ ﺔﻠﻬﺳ ﻞﻴﺹﻮﺘﻟ زﺎﻬﺟ HP Photosmart ﺔﻜﺒﺸﻟﺎﺏ .ﻦﻜﻤی ﺎًﻀیأ ماﺪﺨﺘﺳا داﺪﻋﻹا ﻞﻬﺴﻟا
ﻦﻡﻵا ,ﻲﻓ ﺔﻟﺎﺡ ﻢﻋد ﻪﺟﻮﻤﻟا ﻲﻜﻠﺳﻼﻟا صﺎﺨﻟا ﻚﺏ وأ ﺔﻄﻘﻥ لﻮﺹﻮﻟا ﻩﺬﻬﻟ ةﺰﻴﻤﻟا .ﻊﺟار ﻖﺋﺎﺙﻮﻟا ةدوﺰﻤﻟا ﻊﻡ ﻪﺟﻮﻤﻟا ﻲﻜﻠﺳﻼﻟا
صﺎﺨﻟا ﻚﺏ وأ ﺔﻄﻘﻥ لﻮﺹﻮﻟا ﺔﻓﺮﻌﻤﻟ ﺎﻡ اذإ ﺖﻥﺎآ ﻢﻋﺪﺕ EasySetup لﻮﺼﺤﻠﻟو ﻰﻠﻋ تادﺎﺷرإ داﺪﻋإ ﺔﻴﻓﺎﺽإ.
ﻢﺳا
٩ HP Photosmart D7400 series
ﻪﻴﺒﻨﺕ ﻊﻨﻤﻟ ﻦﻴﻡﺪﺨﺘﺴﻡ ﻦیﺮﺥﺁ ﻦﻡ لﻮﺹﻮﻟا ﻰﻟإ ﺔﻜﺒﺸﻟا ﺔﻴﻜﻠﺳﻼﻟا ﺔﺹﺎﺨﻟا ،ﻚﺏ ﻲﺹﻮﺕ HP ةﺪﺸﺏ ماﺪﺨﺘﺳﺎﺏ ﺔﻤﻠآ روﺮﻡ
وأ ةرﺎﺒﻋ روﺮﻡ) نﺎﻡأ WEP وأ WPA (ﻢﺳاو ﺔﻜﺒﺷ ﺪیﺮﻓ )SSID (ﻪﺟﻮﻤﻠﻟ ﻲﻜﻠﺳﻼﻟا صﺎﺨﻟا ﻚﺏ .ﺎﻤﺏر ﻢﺕ ﻦﺤﺷ
ﻪﺟﻮﻤﻟا ﻲﻜﻠﺳﻼﻟا صﺎﺨﻟا ﻚﺏ ﻢﺳﺎﺏ ﺔﻜﺒﺷ ،ﻲﺽاﺮﺘﻓا يﺬﻟاو نﻮﻜی اًﺪیﺪﺤﺕ ﻢﺳا ﺔآﺮﺸﻟا ﺔﻌﻨﺼﻤﻟا .ﻲﻓ ﺔﻟﺎﺡ ماﺪﺨﺘﺳا
ﺔﻜﺒﺷ ،ﻲﺽاﺮﺘﻓا ﻊﻴﻄﺘﺴی نﻮﻡﺪﺨﺘﺴﻤﻟا نوﺮﺥﻵا لﻮﺹﻮﻟا ﻰﻟإ ﺔﻜﺒﺸﻟا ﺔﺹﺎﺨﻟا ﻚﺏ ﺔﻟﻮﻬﺴﺏ ماﺪﺨﺘﺳﺎﺏ ﺲﻔﻥ ﻢﺳا ﺔﻜﺒﺸﻟا
ﻲﺽاﺮﺘﻓﻻا )SSID .(ﺎﻤآ ﻲﻨﻌی ﻚﻟذ ﺎًﻀیأ نأ HP Photosmart ﺪﻗ ﻞﺼﺘی ةﺄﺠﻓ ﺔﻜﺒﺸﺏ ﺔﻴﻜﻠﺳﻻ ﺔﻔﻠﺘﺨﻡ ﻲﻓ ﺔﻘﻄﻨﻤﻟا
ﺔﺹﺎﺨﻟا ﻚﺏ ﻲﺘﻟا مﺪﺨﺘﺴﺕ ﺲﻔﻥ ﻢﺳا ﺔﻜﺒﺸﻟا .ﻲﻓ ﺔﻟﺎﺡ ثوﺪﺡ ﻚﻟذ ﻦﻟ ﻦﻜﻤﺘﺕ ﻦﻡ لﻮﺹﻮﻟا ﻰﻟإ HP Photosmart.
ﺪیﺰﻤﻠﻟ ﻦﻡ
تﺎﻡﻮﻠﻌﻤﻟا لﻮﺡ ﺔﻴﻔﻴآ ﺮﻴﻴﻐﺕ ﻢﺳا ،ﺔﻜﺒﺸﻟا ﻊﺟار ﻖﺋﺎﺙﻮﻟا ةدوﺰﻤﻟا ﻊﻡ ﻪﺟﻮﻤﻟا ﻲﻜﻠﺳﻼﻟا صﺎﺨﻟا ﻚﺏ.
ﺔﻈﺡﻼﻡﻞﺒﻗ ﻞﻴﺹﻮﺘﻟا ﺔﻜﺒﺸﺏ ﺔﻴﻨﺒﻟا ﺔﻴﺘﺤﺘﻟا ،ﺔﻴﻜﻠﺳﻼﻟا ﺪآﺄﺕ ﻦﻡ مﺪﻋ ﻞﻴﺹﻮﺕ ﻞﺏﺎآ ﺖﻥﺮﺜیإ ـﺏHP Photosmart.
ﻞﻴﺻﻮﺘﻟ زﺎﻬﺟ HP Photosmart ﻦﻡ لﻼﺥ ﺞﻟﺎﻌﻡ داﺪﻋﻹا ﻲﻜﻠﺳﻼﻟا
١.ﻢﻗ ﻞﻴﺠﺴﺘﺏ تﺎﻡﻮﻠﻌﻤﻟا ﺔﻴﻟﺎﺘﻟا ﺔﻘﻠﻌﺘﻤﻟا زﺎﻬﺠﺏ ﻪﻴﺟﻮﺘﻟا ﻲﻜﻠﺳﻼﻟا ﺔﺹﺎﺨﻟا ﻚﺏ:
•ﻢﺳا ﺔﻜﺒﺸﻟا) ﻰﻤﺴی ﺎًﻀیأ ـﺏSSID(
•حﺎﺘﻔﻡ WEP, WPA Passphrase) ﺪﻨﻋ ﺔﺟﺎﺤﻟا(
اذإ ﺖﻨآ ﻻ ﻢﻠﻌﺕ ﻦیأ ﻚﻨﻜﻤی رﻮﺜﻌﻟا ﻰﻠﻋ ﻩﺬه ،تﺎﻡﻮﻠﻌﻤﻟا ﻊﺟار ﻖﺋﺎﺙﻮﻟا ةدوﺰﻤﻟا ﻊﻡ زﺎﻬﺟ ﻪﻴﺟﻮﺘﻟا ﻲﻜﻠﺳﻼﻟا وأ ﺔﻄﻘﻥ
ﺔﻴﻜﻠﺳﻼﻟا .ﺪﻗ ﻦﻜﻤﺘﺕ ﻦﻡ رﻮﺜﻌﻟا ﻰﻠﻋ ﻢﺳا ﺔﻜﺒﺸﻟا )SSID (حﺎﺘﻔﻡو WEP وأ ةرﺎﺒﻋ روﺮﻡ WPA ﻰﻠﻋ ﻢﻘﻠﻡ
لﻮﺹﻮﻟا
ﺐیﻮﻟا ﻦﻤﻀﻤﻟا زﺎﻬﺠﻟ ﻪﻴﺟﻮﺘﻟا ﻲﻜﻠﺳﻼﻟا.
ﺔﻈﺡﻼﻡﺮﻓﻮﺕ HP ةادأ ﺔیرﻮﻓ ﻰﻠﻋ ﺖﻥﺮﺘﻥﻹا ﺪﻗ ﻦﻜﻤﺘﺕ ﻦﻡ فﺮﻌﺘﻟا ﻰﻠﻋ تاداﺪﻋإ نﺎﻡأ لﺎﺼﺕﻻا ﻲﻜﻠﺳﻼﻟا ﻚیﺪﻟ
www.hp.com/go/networksetup.
ﺎًﻴﺋﺎﻘﻠﺕ .ﻞﻘﺘﻥا ﻰﻟإ:
٢.ﺲﻤﻟا Setup) داﺪﻋإ( ﻰﻠﻋ ﺔﺷﺎﺷ ضﺮﻌﻟا.

٣.ﺲﻤﻟا Network) ﺔﻜﺒﺵ(.
ﺔﻈﺡﻼﻡ اذإ ﻢﻟ ﺮﻬﻈی رﺎﻴﺥ ﺔﻤﺋﺎﻘﻟا يﺬﻟا ﺐﻏﺮﺕ ﻪﻴﻓ ﻰﻠﻋ ﺔﺷﺎﺸﻟا ، ﻢﻘﻓ ﺲﻤﻠﺏ وأ ﺮیﺮﻤﺘﻠﻟ ﺮﺒﻋ ﺔﻓﺎآ
تارﺎﻴﺥ ﺔﻤﺋﺎﻘﻟا.
٤.ﺲﻤﻟا Wireless Setup Wizard) ﺞﻟﺎﻌﻡ داﺪﻋﻹا ﻲﻜﻠﺳﻼﻟا(.
يدﺆی ﻚﻟذ ﻰﻟإ ﻞﻴﻐﺸﺕ Wireless Setup Wizard) ﺞﻟﺎﻌﻡ داﺪﻋﻹا ﻲﻜﻠﺳﻼﻟا(.
٥.ﺲﻤﻟا ﻢﺳا ﺔﻜﺒﺸﻟا يﺬﻟا ﻪﺘﺒﺘآ ﻲﻓ ةﻮﻄﺨﻟا 1.
اذإ ﻢﻟ ﺮﺕ ﻢﺳا ﺔﻜﺒﺸﻟا ﻲﻓ ﺔﻤﺋﺎﻘﻟا
أ.ﺲﻤﻟا Enter a New Network Name (SSID)) لﺎﺥدإ ﻢﺳا ﺔﻜﺒﺵ ﺪﻳﺪﺟ )SSID((.
ﺮﻬﻈﺕ ﺔﺡﻮﻟ ﺢﻴﺕﺎﻔﻤﻟا ﺔّﻴﺋﺮﻤﻟا.
مﺎﻗرﻷا وأ فوﺮﺤﻟا ﺔﺒﺳﺎﻨﻤﻟا ﻰﻠﻋ ﺔﺡﻮﻟ ﺢﻴﺕﺎﻔﻤﻟا ﺔّﻴﺋﺮﻤﻟا.
ب.ﻞﺥدأ ﻢﺳا ﺔﻜﺒﺸﻟا )SSID .(ﺲﻤﻟا ﺢﻴﺕﺎﻔﻡ
ﺔﻈﺡﻼﻡﺐﺠی ﻚﻴﻠﻋ لﺎﺥدإ فوﺮﺤﻟا ةﺮﻴﺒﻜﻟا) فوﺮﺤﻟا ﺔﻴﻟﻼﻬﺘﺳﻹا (فوﺮﺤﻟاو ةﺮﻴﻐﺼﻟا ﺪﻳﺪﺤﺘﻟﺎﺑ .فﻼﺨﺏ
،ﻚﻟذ ﻞﺸﻔﻴﺳ لﺎﺼﺕﻻا ﻲﻜﻠﺳﻼﻟا.
ﻲﺑﺮﻋ
ج.ﺪﻨﻋ ءﺎﻬﺘﻥﻻا ﻦﻡ لﺎﺥدإ ﻢﺳا ﺔﻜﺒﺸﻟا ،ﺪیﺪﺠﻟا ﺲﻤﻟا Done) ﻢﺕ(، ﻢﺙ ﺲﻤﻟا OK) ﻖﻓاﻮﻡ(.
اذإ ﻢﻟ ﻦﻜﻤﺘی HP Photosmart ﻦﻡ فﺎﺸﺘآا ﺔﻜﺒﺷ لﺎﺼﺕﻻا ﺎًﻘﻓو ﻢﺳﻻ ﺔﻜﺒﺸﻟا يﺬﻟا ،ﻪﺘﻠﺥدأ فﻮﺳ ﻢﺘﺕ ﻚﺘﺒﻟﺎﻄﻡ
ﺔﺏﺎﺟﻹﺎﺏ ﻰﻠﻋ ﺾﻌﺏ ﺔﻠﺌﺳﻷا ﺔﻴﻓﺎﺽﻹا ﺔﺹﺎﺨﻟا ،ﺔﻜﺒﺸﻟﺎﺏ ﺎﻤآ ﻮه ﺢﺽﻮﻡ ﻲﻓ ﻦﻴﺕﻮﻄﺨﻟا d" د "وe" ـه ."ﻞﺒﻗ
،ﺔﻌﺏﺎﺘﻤﻟا ﻢﻗ
ﻚیﺮﺤﺘﺏ زﺎﻬﺟHP Photosmart ﺢﺒﺼﻴﻟ ﺎًﺒیﺮﻗ ﻦﻡ ﺮﺕﻮﻴﺒﻤﻜﻟا ﻢﺙ ﻢﻗ ﻞﻴﻐﺸﺘﺏ ﺞﻟﺎﻌﻡ داﺪﻋﻹا ﻲﻜﻠﺳﻼﻟا
ةﺮﻡ ىﺮﺥأ ﻖﻘﺤﺘﻠﻟ ﺎﻤﻡ اذإ نﺎآ HP Photosmart مﻮﻘﻴﺳ فﺎﺸﺘآﺎﺏ ﺔﻜﺒﺸﻟا ﺎًﻴﺋﺎﻘﻠﺕ مأ ﻻ.
د.ﺲﻤﻟا Infrastructure) ﺔﻴﻨﺒﻟا ﺔﻴﺘﺤﺘﻟا(.
ـه.ﺲﻤﻟا WEP encryption) ﺮﻴﻔﺸﺕ (WEP وأ WPA encryption) ﺮﻴﻔﺵ (WPA.
اذإ ﺖﻨآ ﻻ ﺪیﺮﺕ ماﺪﺨﺘﺳا ﺮﻴﻔﺸﺕ WEP، ﺲﻤﻟا No, my network does not use encryption) ،ﻻ
ﻻ
مﺪﺨﺘﺴﺕ ﻲﺘﻜﺒﺵ ﺮﻴﻔﺸﺘﻟا( .ﻞﻘﺘﻥا ﻰﻟإ ةﻮﻄﺨﻟا 7.
٦.ﻢﻗ لﺎﺥدﺈﺏ حﺎﺘﻔﻡ WPA وأ WEP، اذإ ﺐﻠ ُﻃ ﻚﻨﻡ ﻚﻟذ.
أ.ﺲﻤﻟا ﺢﻴﺕﺎﻔﻡ مﺎﻗرﻷا وأ فوﺮﺤﻟا ﺔﺒﺳﺎﻨﻤﻟا ﻰﻠﻋ ﺔﺡﻮﻟ ﺢﻴﺕﺎﻔﻤﻟا ﺔّﻴﺋﺮﻤﻟا.
ﺔﻈﺡﻼﻡﺐﺠی ﻚﻴﻠﻋ لﺎﺥدإ فوﺮﺤﻟا ةﺮﻴﺒﻜﻟا) فوﺮﺤﻟا ﺔﻴﻟﻼﻬﺘﺳﻹا (فوﺮﺤﻟاو ةﺮﻴﻐﺼﻟا ﺪﻳﺪﺤﺘﻟﺎﺑ .فﻼﺨﺏ
،ﻚﻟذ ﻞﺸﻔﻴﺳ لﺎﺼﺕﻻا ﻲﻜﻠﺳﻼﻟا.
ب.ﺪﻨﻋ ءﺎﻬﺘﻥﻻا ﻦﻡ لﺎﺥدإ حﺎﺘﻔﻡ وأ حﺎﺘﻔﻡ WEP وأ WAP، ﺲﻤﻟا Done) ﻢﺕ(.
ج.ﺲﻤﻟا OK) ﻖﻓاﻮﻡ( ﺪﻴآﺄﺘﻠﻟ.
لوﺎﺤﻴﺳ زﺎﻬﺟ HP Photosmart ﻞﻴﺹﻮﺘﻟا ﺔﻜﺒﺸﻟﺎﺏ .اذإ تﺮﻬﻇ ﺔﻟﺎﺳر ﺪﻴﻔﺕ ﻚﻥﺄﺏ ﺖﻠﺥدأ حﺎﺘﻔﻡ WPA وأ
WEP ﺮﻴﻏ ،ﺢﻟﺎﺹ ﻢﻗ ﺺﺤﻔﺏ حﺎﺘﻔﻤﻟا يﺬﻟا ﺖﻤﻗ ﻪﻨیوﺪﺘﺏ ﻚﺘﻜﺒﺸﻟ ،ةﺪیﺪﺠﻟا ﻊﺒﺕاو تﺎﺒﻟﺎﻄﻤﻟا ﺢﻴﺤﺼﺘﺏ ،حﺎﺘﻔﻤﻟا ﻢﺙ
ﻢﻗ
ﺔﻟوﺎﺤﻤﺏ ةدﺎﻋإ ﻪﻟﺎﺥدإ.
٧.ﺎﻡﺪﻨﻋ ﻞﺼﺘی HP Photosmart ﺔﻜﺒﺸﻟﺎﺏ ،حﺎﺠﻨﺏ ﻢﻗ ﺖﻴﺒﺜﺘﺏ ﺞﻡﺎﻥﺮﺒﻟا ﻞﻋ ﻞآ زﺎﻬﺟ ﺮﺕﻮﻴﺒﻤآ مﺪﺨﺘﺴﻴﺳ زﺎﻬﺠﻟا ﺮﺒﻋ
ﺔﻜﺒﺸﻟا.
ﻞﻴﺻﻮﺘﻟ زﺎﻬﺟ HP Photosmart ﻊﻡ SecureEasySetup
١.ﻢﻗ ءﺪﺒﺏ ﻞﻴﻐﺸﺕ SecureEasySetup ﻰﻠﻋ ﻪﺟﻮﻤﻟا ﻲﻜﻠﺳﻼﻟا صﺎﺨﻟا ﻚﺏ وأ ﺔﻄﻘﻥ لﻮﺹﻮﻟا.
٢.ﻢﻗ ﺲﻤﻠﺏ Setup) داﺪﻋإ( ﻰﻠﻋ ﺔﺷﺎﺷ ضﺮﻌﻟا.
.
٣.ﻢﻗ ﺲﻤﻠﺏ Network) ﺔﻜﺒﺵ(
ﺔﻈﺡﻼﻡ اذإ ﻢﻟ ﺮﻬﻈی رﺎﻴﺥ ﺔﻤﺋﺎﻘﻟا يﺬﻟا ﺐﻏﺮﺕ ﻪﻴﻓ ﻰﻠﻋ ﺔﺷﺎﺸﻟا ، ﻢﻘﻓ ﺲﻤﻠﺏ وأ ﺮیﺮﻤﺘﻠﻟ ﺮﺒﻋ ﺔﻓﺎآ
تارﺎﻴﺥ ﺔﻤﺋﺎﻘﻟا.
٤.ﻢﻗ ﺲﻤﻠﺏ Wireless Setup Wizard) ﺞﻟﺎﻌﻡ داﺪﻋﻹا ﻲﻜﻠﺳﻼﻟا(.
داﺪﻋإ ﺔﻜﺒﺸﻟا ﺔﻴﻜﻠﺳﻼﻟا ﺔﻨﻤﻀﻤﻟا WLAN 802.11 ١٠

ﻲﺑﺮﻋ
ﻞﺼﻔﻟا ٢
٥.ﻊﺒﺕا تﺎﺒﻟﺎﻄﻤﻟا ةﺮهﺎﻈﻟا ﻰﻠﻋ ﺔﺷﺎﺷ ضﺮﻌﻟا لﺎﻤﻜﺘﺳﻻ لﺎﺼﺕﻻا.
٦.ﺪﻨﻋ لﺎﺼﺕا زﺎﻬﺟ HP Photosmart حﺎﺠﻨﺏ ،ﺔﻜﺒﺸﻟﺎﺏ ﻞﻘﺘﻥا ﻰﻟإ زﺎﻬﺟ ﺮﺕﻮﻴﺒﻤﻜﻟا ﺖﻴﺒﺜﺘﻟ ﺞﻡﺎﻥﺮﺒﻟا ﻰﻠﻋ ﻞآ ﻦﻡ ةﺰﻬﺟأ
ﺮﺕﻮﻴﺒﻤﻜﻟا ﻲﺘﻟا مﻮﻘﺕ ماﺪﺨﺘﺳﺎﺏ ﺔﻜﺒﺸﻟا.
ﺔﻈﺡﻼﻡ اذإ ﻞﺸﻓ ،ﻞﻴﺹﻮﺘﻟا ﺪﻗ نﻮﻜﺕ ﺪﻗ ﺖﻬﺘﻥا ﺔﻠﻬﻡ ﻪﺟﻮﻤﻟا ﻲﻜﻠﺳﻼﻟا وأ ﺔﻄﻘﻥ لﻮﺹﻮﻟا ﺪﻌﺏ ﻂﻴﺸﻨﺕ
SecureEasySetup .رﺮآ ﺔﻤﻬﻤﻟا ةدﻮﺟﻮﻤﻟا ،ﻩﻼﻋأ ﺪآﺄﺘﻠﻟ ﻦﻡ ءﺎﻬﻥإ تاﻮﻄﺨﻟا ةدﻮﺟﻮﻤﻟا ﻰﻠﻋ ﺔﺡﻮﻟ ﺢﻴﺕﺎﻔﻤﻟا
ﺔﺹﺎﺨﻟا ـﺏ HP Photosmart ﻰﻠﻋ رﻮﻔﻟا ﺪﻌﺏ ﻂﻐﻀﻟا ﻰﻠﻋ رز ﻪﺟﻮﻤﻟا ﻲﻜﻠﺳﻼﻟا وأ ﺔﻄﻘﻥ لﻮﺹﻮﻟا.
داﺪﻋإ ﺔﻜﺒﺵ ad hoc ﺔﻴﻜﻠﺳﻻ
مﺪﺨﺘﺳا اﺬه ﻢﺴﻘﻟا اذإ ﺖﺒﻏر ﻲﻓ ﻞﻴﺹﻮﺕ زﺎﻬﺟ HP Photosmart زﺎﻬﺠﺏ ﺮﺕﻮﻴﺒﻤآ ﻰﻠﻋ ﺔﻜﺒﺷ ﺔﻴﻜﻠﺳﻻ نود ماﺪﺨﺘﺳا ﻪﺟﻮﻡ
ﻲﻜﻠﺳﻻ وأ ﺔﻄﻘﻥ لﻮﺹو.
ﺔﻈﺡﻼﻡ ﺮﻓﻮﺘی لﺎﺼﺕا ad hoc ﻲﻓ ﺔﻟﺎﺡ مﺪﻋ ﺮﻓﻮﺕ ﻪﺟﻮﻡ ﻲﻜﻠﺳﻻ وأ ﺔﻄﻘﻥ لﻮﺹو .ﻊﻡو ،ﻚﻟذ ﻪﻥﺈﻓ ﺮﻓﻮی ﺔﻥوﺮﻡ ،ﻞﻗأ
ىﻮﺘﺴﻡ ﺾﻔﺨﻨﻡ نﺎﻡﻷ ،ﺔﻜﺒﺸﻟا ءادأو ﺔﻜﺒﺷ ﺄﻄﺏأ ﺎﻤﻡ ﻮه ﻪﻴﻠﻋ ﻊﻡ ﻪﺟﻮﻤﻟا ﻲﻜﻠﺳﻼﻟا وأ ﺔﻄﻘﻥ لﻮﺹﻮﻟا.
ﻲﻜﻟ ﻦﻜﻤﺘﺕ ﻦﻡ ﻞﻴﺹﻮﺕ زﺎﻬﺟ HP Photosmart زﺎﻬﺠﺏ ﺮﺕﻮﻴﺒﻤﻜﻟا صﺎﺨﻟا ﻚﺏ )ad hoc(، جﺎﺘﺤﺘﺳ ﻰﻟإ ءﺎﺸﻥإ ﻊﺽو
ﺔﻜﺒﺷ )ad hoc (ﻰﻠﻋ زﺎﻬﺟ ﺮﺕﻮﻴﺒﻤﻜﻟا .ﻦﻤﻀﺘی ﻚﻟذ رﺎﻴﺘﺥا ﻢﺳا ﺔﻜﺒﺷ )SSID (نﺎﻡأو WEP) يرﺎﻴﺘﺥا ﺲﻴﻟو ﻰﺹﻮﻡ ﻪﺏ(
ﻦﻡ ﻞﺟأ ﺔﻜﺒﺷ ad hoc ﺔﺹﺎﺥ ﻚﺏ.
ﻊﺟار اﺬه ﻢﺴﻘﻟا:
Windows XP“ ﻲﻓ ﺔﺤﻔﺹ ١١
ءﺎﺸﻥإ ﻊﺽو ﺔﻜﺒﺸﻟا ﺔﻤﻈﻥﻷ ﻞﻴﻐﺸﺘﻟا ىﺮﺥﻷا“ ﻲﻓ ﺔﺤﻔﺹ ١٣
”
”ﻞﻴﺹﻮﺘﻟا ﺔﻜﺒﺸﺏ ad hoc ﺔﻴﻜﻠﺳﻻ“ ﻲﻓ ﺔﺤﻔﺹ ١٣
داﺪﻋﻹ زﺎﻬﺟ HP Photosmart ﻰﻠﻋ ﺔﻜﺒﺵ ad hoc
ﺔﻴﻜﻠﺳﻻ ,ﺐﺠﻳ مﺎﻴﻘﻟا ﺎﻤﺑ ﻲﻠﻳ:
ًﻻ و أ ,ﻢﻗ ﻊﻴﻤﺠﺘﺏ ﺔﻓﺎآ داﻮﻤﻟا ﺔﺏﻮﻠﻄﻤﻟا.”ﺎﻡ جﺎﺘﺤﺕ ﻪﻴﻟإ ﻦﻡ ﻞﺟأ ﺔﻜﺒﺷ ad hoc“ ﻲﻓ ﺔﺤﻔﺹ ١١
،ﺎًﻴﻥﺎﺙ ﻢﻗ ﺮﻴﻀﺤﺘﺏ زﺎﻬﺟ ﺮﺕﻮﻴﺒﻤﻜﻟا ﻚﻟذو ءﺎﺸﻥﺈﺏ ﻊﺽو ﺔﻜﺒﺷ.”ءﺎﺸﻥإ ﻊﺽو ﺔﻜﺒﺸﻟا زﺎﻬﺠﻟ ﺮﺕﻮﻴﺒﻤآ ﻞﻤﻌی مﺎﻈﻨﺏ ﻞﻴﻐﺸﺘﻟا
ﻢﻗ ﻞﻴﻐﺸﺘﺏ Wireless Setup Wizard) ﺞﻟﺎﻌﻡ داﺪﻋﻹا
ﻲﻜﻠﺳﻼﻟا(.
،ا ًﺮﻴﺥأ ﻢﻗ ﺖﻴﺒﺜﺘﺏ ﺞﻡﺎﻥﺮﺒﻟا.”ﺖﻴﺒﺜﺕ ﺞﻡﺎﻥﺮﺒﻟا ﻦﻡ ﻞﺟأ ﻞﻴﺹﻮﺘﻟا ﺔﻜﺒﺸﻟﺎﺏ“ ﻲﻓ ﺔﺤﻔﺹ ١٤
ﺎﻡ جﺎﺘﺤﺕ ﻪﻴﻟإ ﻦﻡ ﻞﺟأ ﺔﻜﺒﺵ ad hoc
ﻞﻴﺹﻮﺘﻟ HP Photosmart ﺔﻜﺒﺸﺏ ،ﺔﻴﻜﻠﺳﻻ فﻮﺳ جﺎﺘﺤﺕ ﻰﻟإ ﺮﺕﻮﻴﺒﻤآ ﻞﻤﻌی مﺎﻈﻨﺏ Windows يذ لﻮﺤﻡ ﺔﻜﺒﺷ ﻲﻜﻠﺳﻻ.
ءﺎﺸﻥإ ﻊﺽو ﺔﻜﺒﺸﻟا زﺎﻬﺠﻟ ﺮﺕﻮﻴﺒﻤآ ﻞﻤﻌﻳ مﺎﻈﻨﺑ ﻞﻴﻐﺸﺘﻟا Windows XP
ﻢﻗ ﺮﻴﻀﺤﺘﺏ زﺎﻬﺟ ﺮﺕﻮﻴﺒﻤﻜﻟا صﺎﺨﻟا ﻚﺏ لﺎﺼﺕﻻ ad hoc ﻚﻟذو ءﺎﺸﻥﺈﺏ ﻊﺽو ﺔﻜﺒﺷ.
١١ HP Photosmart D7400 series

ءﺎﺸﻥﻹ ﻊﺽو ﺔﻜﺒﺸﻟا
ﺔﻈﺡﻼﻡ ﻲﺕﺄی زﺎﻬﺟ HP Photosmart ﺎًﻥﻮﻜﻡ ﻊﻡ ﻊﺽو ﺔﻜﺒﺷ يذ hpsetup ﻢﺳﺎـآ ﺔﻜﺒﺸﻠﻟ )SSID .(ﻢﻏرو
،اﺬه ﻲﺹﻮﺕ HP، ﻦﻡ ﻞﺟأ نﺎﻡﻷا ،ﺔﻴﺹﻮﺼﺨﻟاو نﺄﺏ مﻮﻘﺕ ءﺎﺸﻥﺈﺏ ﻊﺽو ﺪیﺪﺟ ﺔﻜﺒﺸﻠﻟ ﻰﻠﻋ ﺮﺕﻮﻴﺒﻤﻜﻟا ﺎﻤآ ﻮه ﺢﺽﻮﻡ
ﺎﻨه.
١.ﻲﻓ Control Panel) ﺔﺡﻮﻟ ﻢّﻜﺤﺘﻟا(، ﺮﻘﻥا اًﺮﻘﻥ ﺎًﺟودﺰﻡ قﻮﻓ Network Connections) تﻻﺎﺼﺕا ﺔﻜﺒﺸﻟا(.
٢.ﻲﻓ ةﺬﻓﺎﻥ Network Connections) تﻻﺎﺼﺕا ﺔﻜﺒﺸﻟا(، ﺮﻘﻥا اًﺮﻘﻥ ﺎًﺟودﺰﻡ قﻮﻓ Wireless Network
Connection) لﺎﺼﺕا ﺔﻜﺒﺵ ﻲﻜﻠﺳﻻ( .اذإ ﺖﻨآ ىﺮﺕ رﺎﻴﺨﻟا Enable) ﻦﻴﻜﻤﺕ( ﻲﻓ ﺔﻤﺋﺎﻘﻟا ،ﺔﻘﺜﺒﻨﻤﻟا ﻢﻘﻓ ﻩﺪیﺪﺤﺘﺏ.
ﻞﻴﻄﻌﺕ( ﻲﻓ ،ﺔﻤﺋﺎﻘﻟا ﻲﻨﻌﻴﻓ ﻚﻟذ ﻪﻥأ ﺪﻗ ﻢﺕ ﻦﻴﻜﻤﺕ لﺎﺼﺕﻻا ﻲﻜﻠﺳﻼﻟا ﺎًﻘﺒﺴﻡ.
ﺎًﻓﻼﺥ ،ﻚﻟﺬﻟ اذإ ﺖﻨآ ىﺮﺕ رﺎﻴﺨﻟا Disable)
٣.ﺮﻘﻥا رﺰﺏ سوﺎﻤﻟا ﻦﻤیﻷا قﻮﻓ ﺰﻡﺮﻟا Wireless Network Connection) لﺎﺼﺕا ﺔﻜﺒﺵ ﻲﻜﻠﺳﻻ( ﻢﺙ ﺮﻘﻥأ قﻮﻓ
Properties) ﺺﺋﺎﺼﺥ(.
٤.ﺮﻘﻥا قﻮﻓ ﺔﻡﻼﻋ ﺐیﻮﺒﺘﻟا Wireless Networks) تﺎﻜﺒﺵ ﺔﻴﻜﻠﺳﻻ(.
٥.ﻢﻗ ﺪیﺪﺤﺘﺏ ﻊﺏﺮﻡ رﺎﻴﺘﺥﻻا Use Windows to configure my wireless network
.
settings) مﺪﺨﺘﺳا Windows ﻦﻳﻮﻜﺘﻟ تاداﺪﻋإ ﺔﻜﺒﺸﻟا ﺔﻴﻜﻠﺳﻼﻟا(
٦.ﺮﻘﻥا قﻮﻓ Add) ﺔﻓﺎﺽإ(، ﻢﺙ ﻢﻗ ﺎﻤﺏ ﻲﻠی:
ﻲﺑﺮﻋ
أ.ﻲﻓ ﻊﺏﺮﻡ Network name) SSID) (ﻢﺳا ﺔﻜﺒﺸﻟا )SSID((، ﻢﻗ ﺔﺏﺎﺘﻜﺏ ﻢﺳا ﺔﻜﺒﺷ ﺪیﺮﻓ ﺐﺴﺡ ﻚﺕدارإ.
ﺔﻈﺡﻼﻡﺎًﻤﻠﻋ نﺄﺏ ﻢﺳا ﺔﻜﺒﺸﻟا سﺎﺴﺡ ﺔﻟﺎﺤﻟ ،فﺮﺡﻷا ﻦﻤﻓ ﻢﻬﻤﻟا ﺮآﺬﺕ يأ فوﺮﺡ ةﺮﻴﺒآ وأ ةﺮﻴﻐﺹ.
ب.اذإ نﺎآ ﻚﻟﺎﻨه ﺔﻤﺋﺎﻗ Network Authentication) ﺔﻗدﺎﺼﻡ ﺔﻜﺒﺸﻟا(، ﻢﻗ ﺪیﺪﺤﺘﺏ Open) ﺢﺘﻓ( .ﻻإو,
ﻞﻘﺘﻥا ﻰﻟإ ةﻮﻄﺨﻟا ﺔﻴﻟﺎﺘﻟا.
ج.ﻲﻓ ﺔﻤﺋﺎﻗ Data encryption) ﺮﻴﻔﺸﺕ تﺎﻥﺎﻴﺒﻟا(، ﻢﻗ ﺪیﺪﺤﺘﺏ WEP.
ﺔﻈﺡﻼﻡﻦﻡ ﻦﻜﻤﻤﻟا ءﺎﺸﻥإ ﺔﻜﺒﺷ ﻻ مﺪﺨﺘﺴﺕ حﺎﺘﻔﻡ WEP .ﻊﻡو ،ﻚﻟذ ﻲﺹﻮﺕ HP ماﺪﺨﺘﺳﺎﺏ حﺎﺘﻔﻡ WEP
ﻦﻡ ﻞﺟأ ﻦﻴﻡﺄﺕ ﺔﻜﺒﺸﻟا.
د.ﺪآﺄﺕ ﻦﻡ مﺪﻋ ﺪیﺪﺤﺕ ﻊﺏﺮﻡ رﺎﻴﺘﺥﻻا راﻮﺠﺏ The key is provided for me automatically) ﺮﻴﻓﻮﺕ
حﺎﺘﻔﻤﻟا ﺎًﻴﺋﺎﻘﻠﺕ( .اذإ ﻢﺕ ،ﻩﺪیﺪﺤﺕ ﺮﻘﻥﺎﻓ قﻮﻓ ﻊﺏﺮﻡ رﺎﻴﺘﺥﻻا ﻪﺤﺴﻤﻟ.
ـه.ﻲﻓ ﻊﺏﺮﻡ Network key) حﺎﺘﻔﻡ ﺔﻜﺒﺸﻟا(، ﻢﻗ ﺔﺏﺎﺘﻜﺏ حﺎﺘﻔﻡ WEP يﺬﻟا ﻪﻟ ًﺪﻳﺪﺤﺕا 5 وأ اًﺪﻳﺪﺤﺕ 13 ﺎًﻓﺮﺡ
ﻚﻨﻜﻤی لﺎﺥدإ ﺎﻡإ ABCDE وأ 12345 .،وأ
ﺎﻴﺋﺎﺠه ﺎًیدﺪﻋ )ASCII .(ﻰﻠﻋ ﻞﻴﺒﺳ ،لﺎﺜﻤﻟا اذإ ﺖﻠﺥدأ 5 ،فوﺮﺡ
اذإ ﺖﻠﺥدأ 13 ،ﺎًﻓﺮﺡ ﻚﻨﻜﻤی نأ ﻞﺥﺪﺕ ABCDEF1234567) .ﺪﻌﺕ 12345 وABCDE دﺮﺠﻡ ﺔﻠﺜﻡأ .ﻢﻗ
رﺎﻴﺘﺥﺎﺏ ﺔﻋﻮﻤﺠﻡ ﻦﻡ كرﺎﻴﺘﺥا.(
،ﻚﻨﻜﻤیو ُﻻ ﺪ ﺏ ﻦﻡ ،ﻚﻟذ ماﺪﺨﺘﺳا فوﺮﺡ HEX) ﻲﺳاﺪﺳ ﺮﺸﻋ (حﺎﺘﻔﻤﻟ WEP .ﺐﺠی نأ نﻮﻜﺘی حﺎﺘﻔﻡ HEX
ﺎًﻓﺮﺡ ـﻟ 128 bit ﻦﻡ ﺮﻴﻔﺸﺘﻟا.
WEP ﻦﻡ 10 فوﺮﺡ ـﻟ 40 bit ﻦﻡ ،ﺮﻴﻔﺸﺘﻟا وأ 26
و.ﻲﻓ ﻊﺏﺮﻡ Confirm network key) ﺪﻴآﺄﺕ حﺎﺘﻔﻡ ﺔﻜﺒﺸﻟا(، ﺐﺘآا ﺲﻔﻥ حﺎﺘﻔﻡ WEP يﺬﻟا ﻪﺘﻠﺥدأ ﻲﻓ
ةﻮﻄﺨﻟا ﺔﻘﺏﺎﺴﻟا.
ز.ﻢﻗ ﺔﺏﺎﺘﻜﺏ حﺎﺘﻔﻡ WEP ﺎﻤآ ﻪﺘﻠﺥدأ ،ﺎًﻡﺎﻤﺕ ﺎﻤﺏ ﻲﻓ ﻚﻟذ فوﺮﺤﻟا ةﺮﻴﺒﻜﻟا فوﺮﺤﻟاو ةﺮﻴﻐﺼﻟا.
ﺔﻈﺡﻼﻡﺐّﺟﻮﺘی ﻚﻴﻠﻋ لﺎﺥدإ فوﺮﺤﻟا ةﺮﻴﺒﻜﻟا فوﺮﺤﻟاو ةﺮﻴﻐﺼﻟا ﺪیﺪﺤﺘﻟﺎﺏ .اذإ ﺖﻤﻗ لﺎﺥدﺈﺏ حﺎﺘﻔﻡ WEP
ﻲﻓ HP Photosmart ةرﻮﺼﺏ ﺮﻴﻏ ،ﺔﺤﻴﺤﺹ ﻞﺸﻔﻴﺳ لﺎﺼﺕﻻا ﻲﻜﻠﺳﻼﻟا.
ح.ﻢﻗ ﺪیﺪﺤﺘﺏ ﻊﺏﺮﻡ رﺎﻴﺘﺥﻻا ـﻟ This is a computer-to-computer (ad hoc) network; wireless
access points are not used) ﻩﺬه ﻲه ﺔﻜﺒﺵ ﺮﺕﻮﻴﺒﻤآ -ﻰﻟإ ﺮﺕﻮﻴﺒﻤآ )ad hoc ,(ﻢﻟ ﻢﺘﻳ ماﺪﺨﺘﺳا
طﺎﻘﻥ لﻮﺻﻮﻟا ﺔﻴﻜﻠﺳﻼﻟا(.
ط.ﺮﻘﻥا قﻮﻓ OK) ﻖﻓاﻮﻡ( ﻦﻡ ﻞﺟأ قﻼﻏإ ةﺬﻓﺎﻥ Wireless network properties) ﺺﺋﺎﺼﺥ ﺔﻜﺒﺸﻟا
ﺔﻴﻜﻠﺳﻼﻟا(، ﻢﺙ ﺮﻘﻥا قﻮﻓ OK) ﻖﻓاﻮﻡ( ًﺔﻴﻥﺎﺙ.
قﻼﻏإ ةﺬﻓﺎﻥ Wireless Network Properties
ي.ﺮﻘﻥا قﻮﻓ OK) ﻖﻓاﻮﻡ( ًﺔﻴﻥﺎﺙ ﻦﻡ ﻞﺟأ
Connection) لﺎﺼﺕا ﺺﺋﺎﺼﺥ ﺔﻜﺒﺸﻟا ﺔﻴﻜﻠﺳﻼﻟا(.
داﺪﻋإ ﺔﻜﺒﺷ ad hoc ﺔﻴﻜﻠﺳﻻ ١٢

ﻲﺑﺮﻋ
ﻞﺼﻔﻟا ٢
ءﺎﺸﻥإ ﻊﺽو ﺔﻜﺒﺸﻟا ﺔﻤﻈﻥﻷ ﻞﻴﻐﺸﺘﻟا ىﺮﺥﻷا
اذإ نﺎآ ﻚیﺪﻟ مﺎﻈﻥ ﻞﻴﻐﺸﺕ اﺪﻋ Windows XP وأ Mac OS X، ﻲﺹﻮﺕ HP ماﺪﺨﺘﺳﺎﺏ ﺞﻡﺎﻥﺮﺏ ﻦیﻮﻜﺘﻟا ةدوﺰﻤﻟا ﻊﻡ
ﺔﻗﺎﻄﺏ LAN ﻲﻜﻠﺳﻼﻟا .رﻮﺜﻌﻠﻟ ﻰﻠﻋ ﺞﻡﺎﻥﺮﺏ ﻦیﻮﻜﺘﻟا صﺎﺨﻟا ﺔﻗﺎﻄﺒﺏ LAN ،ﻲﻜﻠﺳﻼﻟا ﻢﻗ لﻮﺹﻮﻟﺎﺏ ﻰﻟإ ﺔﻤﺋﺎﻗ ﺮﺕﻮﻴﺒﻤﻜﻟا
ﺔﺹﺎﺨﻟا ﺞﻡاﺮﺒﻟﺎﺏ.
ﻢﻗ ﺔﻄﺳاﻮﺏ ماﺪﺨﺘﺳا ﺞﻡﺎﻥﺮﺏ ﻦیﻮﻜﺘﻟا صﺎﺨﻟا ﺔﻗﺎﻄﺒﺏ LAN، ءﺎﺸﻥﺈﺏ ﻊﺽو ﺔﻜﺒﺸﻟا نﻮﻜی ﻪﻟ ﻢﻴﻘﻟا ﺔﻴﻟﺎﺘﻟا:
ﻢﺳا ﺔﻜﺒﺸﻟا( )SSID( :Mynetwork) ﻰﻠﻋ ﻞﻴﺒﺳ لﺎﺜﻤﻟا ﻂﻘﻓ(
•Network name)
ﺔﻈﺡﻼﻡﺐﺠی نأ مﻮﻘﺕ ءﺎﺸﻥﺈﺏ ﻢﺳا ﺔﻜﺒﺷ ﺪیﺮﻓ ﻞﻬﺴُیو ﻩﺮآﺬﺕ .ﺮآﺬﺕ ﻂﻘﻓ نأ ﻢﺳا ﺔﻜﺒﺸﻟا ﻮه سﺎﺴﺡ ﺔﻟﺎﺤﻟ فﺮﺡﻷا.
،ﻚﻟﺬﻟ ﺐﺠی نأ ﺮآﺬﺕ ﺎﻡ ﻲه فوﺮﺤﻟا ةﺮﻴﺒﻜﻟا ﺎﻡو ﻲه فوﺮﺤﻟا ةﺮﻴﻐﺼﻟا.
•ﻊﺽو لﺎﺼﺕﻻا: Ad Hoc
•ﺮﻴﻔﺸﺘﻟا :ﻦﻴﻜﻤﺕ
ﻞﻴﺻﻮﺘﻟا ﺔﻜﺒﺸﺑ ad hoc ﺔﻴﻜﻠﺳﻻ
ﻚﻨﻜﻤی ماﺪﺨﺘﺳا ﺞﻟﺎﻌﻡ داﺪﻋﻹا ﻲﻜﻠﺳﻼﻟا ﻞﻴﺹﻮﺘﻟ HP Photosmart ﺔﻜﺒﺸﺏ ad hoc ﺔﻴﻜﻠﺳﻻ.
ﻞﻴﺻﻮﺘﻠﻟ ﺔﻜﺒﺸﺑ ad hoc ﺔﻴﻜﻠﺳﻻ
١.ﺲﻤﻟا Setup) داﺪﻋإ( ﻰﻠﻋ ﺔﺷﺎﺷ ضﺮﻌﻟا.
٢.ﺲﻤﻟا Network) ﺔﻜﺒﺵ(.
ﺔﻈﺡﻼﻡ اذإ ﻢﻟ ﺮﻬﻈی رﺎﻴﺥ ﺔﻤﺋﺎﻘﻟا يﺬﻟا ﺐﻏﺮﺕ ﻪﻴﻓ ﻰﻠﻋ ﺔﺷﺎﺸﻟا ، ﻢﻘﻓ ﺲﻤﻠﺏ وأ ﺮیﺮﻤﺘﻠﻟ ﺮﺒﻋ ﺔﻓﺎآ
تارﺎﻴﺥ ﺔﻤﺋﺎﻘﻟا.
٣.ﺲﻤﻟا Wireless Setup Wizard) ﺞﻟﺎﻌﻡ داﺪﻋﻹا ﻲﻜﻠﺳﻼﻟا(.
يدﺆی ﻚﻟذ ﻰﻟإ ﻞﻴﻐﺸﺕ Wireless Setup Wizard) ﺞﻟﺎﻌﻡ داﺪﻋﻹا ﻲﻜﻠﺳﻼﻟا( .ﺚﺤﺒی ﺞﻟﺎﻌﻡ داﺪﻋﻹا ﻦﻋ تﺎﻜﺒﺸﻟا
،ةﺮﻓﻮﺘﻤﻟا ﻢﺙ مﻮﻘی ضﺮﻌﺏ ﺔﻤﺋﺎﻗ ءﺎﻤﺳﺄﺏ تﺎﻜﺒﺸﻟا ﻲﺘﻟا ﻢﺕ ﻒﺸﻜﻟا ﺎﻬﻨﻋ )SSIDs .(ﺮﻬﻈﺕ تﺎﻜﺒﺷ ﺔﻴﻨﺒﻟا ﺔﻴﺘﺤﺘﻟا ًﻻ و أ ﻲﻓ
تاذ تارﺎﺷﻹا
ﺔﻤﺋﺎﻘﻟا ﺎﻬﻴﻠﺕ تﺎﻜﺒﺷ ad hoc ﺔﺡﺎﺘﻤﻟا .ﺮﻬﻈﺕ تﺎﻜﺒﺸﻟا تاذ ىﻮﻗأ تارﺎﺷإ ،ًﻻوأ ﺮﻬﻈﺕو تﺎﻜﺒﺸﻟا
ﻒﻌﺽﻷا اًﺮِﺥﺁ.
٤.ﻢﻗ ﺚﺤﺒﻟﺎﺏ ﻦﻋ ﻢﺳا ﺔﻜﺒﺸﻟا يﺬﻟا ﻪﺕﺄﺸﻥأ ﻰﻠﻋ ﺮﺕﻮﻴﺒﻤﻜﻟا) ﻞﺜﻡ Mynetwork (ﻰﻠﻋ ﺔﺷﺎﺸﻟا.
٥.ﺲﻤﻟا ﻢﺳا ﺔﻜﺒﺸﻟا.
اذإ تﺪﺟو ﻢﺳا ﺔﻜﺒﺸﻟا ﺖﻤﻗو ،ﻩﺪیﺪﺤﺘﺏ ﻞﻘﺘﻥا ﻰﻟإ ةﻮﻄﺨﻟا ﻢﻗر 6.
."ﻞﺒﻗ
١٣ HP Photosmart D7400 series
اذإ ﻢﻟ ﺮﺕ ﻢﺳا ﺔﻜﺒﺸﻟا ﻲﻓ ﺔﻤﺋﺎﻘﻟا
أ.ﺲﻤﻟا Enter a New Network Name (SSID)) لﺎﺥدإ ﻢﺳا ﺔﻜﺒﺸﻟا )SSID((.
ﺔّﻴﺋﺮﻤﻟا.
ﺮﻬﻈﺕ ﺔﺡﻮﻟ ﺢﻴﺕﺎﻔﻤﻟا
ب.ﻞﺥدأ SSID .ﺲﻤﻟا ﺢﻴﺕﺎﻔﻡ مﺎﻗرﻷا وأ فوﺮﺤﻟا ﺔﺒﺳﺎﻨﻤﻟا ﻰﻠﻋ ﺔﺡﻮﻟ ﺢﻴﺕﺎﻔﻤﻟا ﺔّﻴﺋﺮﻤﻟا.
ﺔﻈﺡﻼﻡﺐﺠی ﻚﻴﻠﻋ لﺎﺥدإ فوﺮﺤﻟا ةﺮﻴﺒﻜﻟا) فوﺮﺤﻟا ﺔﻴﻟﻼﻬﺘﺳﻹا (فوﺮﺤﻟاو ةﺮﻴﻐﺼﻟا ﺪﻳﺪﺤﺘﻟﺎﺑ .فﻼﺨﺏ
،ﻚﻟذ ﻞﺸﻔﻴﺳ لﺎﺼﺕﻻا ﻲﻜﻠﺳﻼﻟا.
ج.ﺪﻨﻋ ءﺎﻬﺘﻥﻻا ﻦﻡ لﺎﺥدإ SSID ،ﺪیﺪﺠﻟا ﺲﻤﻟا Done) ﻢﺕ( ﻰﻠﻋ ﺔﺡﻮﻟ ﺢﻴﺕﺎﻔﻤﻟا ﺔﻴﺋﺮﻤﻟا ﻢﺙ ﺲﻤﻟا OK) ﻖﻓاﻮﻡ(.
اذإ ﻢﻟ ﻦﻜﻤﺘی HP Photosmart ﻦﻡ فﺎﺸﺘآا ﺔﻜﺒﺷ لﺎﺼﺕﻻا ﺎًﻘﻓو ﻢﺳﻻ ﺔﻜﺒﺸﻟا يﺬﻟا ،ﻪﺘﻠﺥدأ فﻮﺳ ﻢﺘﺕ ﻚﺘﺒﻟﺎﻄﻡ
ﺔﺏﺎﺟﻹﺎﺏ ﻰﻠﻋ ﺾﻌﺏ ﺔﻠﺌﺳﻷا ﺔﻴﻓﺎﺽﻹا ﺔﺹﺎﺨﻟا ،ﺔﻜﺒﺸﻟﺎﺏ ﺎﻤآ ﻮه ﺢﺽﻮﻡ ﻲﻓ ﻦﻴﺕﻮﻄﺨﻟا d" د "وe" ـه
،ﺔﻌﺏﺎﺘﻤﻟا ﻢﻗ ﻚیﺮﺤﺘﺏ زﺎﻬﺟ HP Photosmart ﺢﺒﺼﻴﻟ ﺎًﺒیﺮﻗ ﻦﻡ ﺮﺕﻮﻴﺒﻤﻜﻟا ﻢﺙ ﻢﻗ ﻞﻴﻐﺸﺘﺏ ﺞﻟﺎﻌﻡ داﺪﻋﻹا ﻲﻜﻠﺳﻼﻟا
ةﺮﻡ ىﺮﺥأ ﻖﻘﺤﺘﻠﻟ ﺎﻤﻡ اذإ نﺎآ HP Photosmart مﻮﻘﻴﺳ فﺎﺸﺘآﺎﺏ ﺔﻜﺒﺸﻟا ﺎًﻴﺋﺎﻘﻠﺕ مأ ﻻ.
د.ﺲﻤﻟا Ad Hoc.
ـه.ﺲﻤﻟا Yes, my network uses WEP encryption) ،ﻢﻌﻥ مﺪﺨﺘﺴﺕ ﻲﺘﻜﺒﺵ ﺮﻴﻔﺸﺕ WEP( .ﺮﻬﻈﺕ
ﺔﺡﻮﻟ ﺢﻴﺕﺎﻔﻤﻟا ﺔّﻴﺋﺮﻤﻟا.
ﺲﻤﻟا No, my network does not use encryption) ،ﻻ
اذإ ﺖﻨآ ﻻ ﺪیﺮﺕ ماﺪﺨﺘﺳا ﺮﻴﻔﺸﺕ WEP،
ﻻ مﺪﺨﺘﺴﺕ ﻲﺘﻜﺒﺵ ﺮﻴﻔﺸﺘﻟا( .ﻞﻘﺘﻥا ﻰﻟإ ةﻮﻄﺨﻟا 7.

٦.ﻢﻗ لﺎﺥدﺈﺏ حﺎﺘﻔﻡ WEP اذإ ﺐﻠ ُﻃ ﻚﻨﻡ ﻚﻟذ .ﺎًﻓﻼﺥ ﻚﻟﺬﻟ ﻞﻘﺘﻥا ﻰﻟإ ةﻮﻄﺨﻟا 7.
أ.ﺲﻤﻟا ﺢﻴﺕﺎﻔﻡ مﺎﻗرﻷا وأ فوﺮﺤﻟا ﺔﺒﺳﺎﻨﻤﻟا ﻰﻠﻋ ﺔﺡﻮﻟ ﺢﻴﺕﺎﻔﻤﻟا ﺔّﻴﺋﺮﻤﻟا.
ﺔﻈﺡﻼﻡﺐﺠی ﻚﻴﻠﻋ لﺎﺥدإ فوﺮﺤﻟا ةﺮﻴﺒﻜﻟا) فوﺮﺤﻟا ﺔﻴﻟﻼﻬﺘﺳﻹا (فوﺮﺤﻟاو ةﺮﻴﻐﺼﻟا ﺪﻳﺪﺤﺘﻟﺎﺑ .فﻼﺨﺏ
،ﻚﻟذ ﻞﺸﻔﻴﺳ لﺎﺼﺕﻻا ﻲﻜﻠﺳﻼﻟا.
ب.ﺪﻨﻋ ءﺎﻬﺘﻥﻻا ﻦﻡ لﺎﺥدإ حﺎﺘﻔﻡ WEP، ﺲﻤﻟا Done) ﻢﺕ( ﻰﻠﻋ ﺔﺡﻮﻟ ﺢﻴﺕﺎﻔﻤﻟا ﺔﻴﺋﺮﻤﻟا.
٧.ﺲﻤﻟا OK) ﻖﻓاﻮﻡ( ةﺮﻡ ىﺮﺥأ ﺪﻴآﺄﺘﻠﻟ.
لوﺎﺤﻴﺳ HP Photosmart لﺎﺼﺕﻻا ـﺏ SSID .اذإ تﺮﻬﻇ ﺔﻟﺎﺳر ﺪﻴﻔﺕ ﻚﻥﺄﺏ ﺖﻠﺥدأ حﺎﺘﻔﻡ WEP ﺮﻴﻏ ،ﺢﻟﺎﺹ ﻢﻗ
ﻢﺙ ﻢﻗ ﺔﻟوﺎﺤﻤﺏ ةدﺎﻋإ
ﺺﺤﻔﺏ حﺎﺘﻔﻤﻟا يﺬﻟا ﺖﻤﻗ ﻪﻨیوﺪﺘﺏ ﻚﺘﻜﺒﺸﻟ ،ةﺪیﺪﺠﻟا ﻊﺒﺕاو تﺎﺒﻟﺎﻄﻤﻟا ﺢﻴﺤﺼﺘﺏ حﺎﺘﻔﻡ WEP،
ﻪﻟﺎﺥدإ.
٨.ﺪﻨﻋ ﻞﻴﺹﻮﺕ زﺎﻬﺟ HP Photosmart ﺔﻜﺒﺸﻟﺎﺏ ،حﺎﺠﻨﺏ ﺐهذا ﻰﻟإ زﺎﻬﺟ ﺮﺕﻮﻴﺒﻤﻜﻟا ﺖﻴﺒﺜﺘﻟ ﺞﻡﺎﻥﺮﺒﻟا.
ﺖﻴﺒﺜﺕ ﺞﻡﺎﻥﺮﺒﻟا ﻦﻡ ﻞﺟأ ﻞﻴﺻﻮﺘﻟا ﺔﻜﺒﺸﻟﺎﺑ
ﻢﻗ ماﺪﺨﺘﺳﺎﺏ اﺬه ﻢﺴﻘﻟا ﺖﻴﺒﺜﺘﻟ ﺞﻡﺎﻥﺮﺏ HP Photosmart ﻰﻠﻋ ﺮﺕﻮﻴﺒﻤآ ﻞﺼﺘﻡ ﺔﺒﻜﺸﺏ .ﻞﺒﻗ ﺖﻴﺒﺜﺕ ﺞﻡﺎﻥﺮﺒﻟا ,ﺪآﺄﺕ ﻦﻡ
ﻞﻴﺹﻮﺕ زﺎﻬﺟ ﺔﻜﺒﺸﺏ.
ﺔﻈﺡﻼﻡاذإ ﻢﺕ ﻦیﻮﻜﺕ ﺮﺕﻮﻴﺒﻤﻜﻟا ﻞﻴﺹﻮﺘﻠﻟ ﺔﻠﺴﻠﺴﺏ ﻦﻡ تﻼﻐﺸﻡ ،ﺔﻜﺒﺸﻟا ﺪآﺄﺕ ﻦﻡ ﻞﻴﺹﻮﺕ ﺮﺕﻮﻴﺒﻤﻜﻟا ﺎًﻴﻟﺎﺡ ﻩﺬﻬﺏ
تﻼﻐﺸﻤﻟا ﻞﺒﻗ ﺖﻴﺒﺜﺕ ﺞﻡﺎﻥﺮﺒﻟا .،ﻻإ ﺪﻗ لوﺎﺤی ﺞﻡﺎﻥﺮﺏ ﺖﻴﺒﺜﺕ HP Photosmart ﺬﺥأ ﺪﺡأ فوﺮﺡ كﺮﺤﻡ صاﺮﻗﻷا
ةزﻮﺠﺤﻤﻟا ﻻو ﻦﻜﻤﺘﺕ ﻦﻡ لﻮﺹﻮﻟا ﻰﻟإ كﺮﺤﻡ صاﺮﻗأ ﺔﻜﺒﺷ لﺎﺼﺕﻻا دﻮﺟﻮﻤﻟا ﻰﻠﻋ ﺮﺕﻮﻴﺒﻤﻜﻟا.
ﺔﻈﺡﻼﻡحواﺮﺘی ﻦﻡز ﺖﻴﺒﺜﺘﻟا ﻦﻴﺏ 20 ﺔﻘﻴﻗد و45 ﺔﻘﻴﻗد ﺎًﻌﺒﺕ مﺎﻈﻨﻟ ،ﻞﻴﻐﺸﺘﻟا راﺪﻘﻡو ﺔﺡﺎﺴﻤﻟا ةﺮﻓﻮﺘﻤﻟا ﺔﻋﺮﺳو ﺞﻟﺎﻌﻤﻟا
ﻲﻓ ﺮﺕﻮﻴﺒﻤﻜﻟا.
ﺖﻴﺒﺜﺘﻟ ﺞﻡﺎﻥﺮﺑ HP Photosmart ـﻟWindows
١.ﻢﻗ ءﺎﻬﻥﺈﺏ ﺔﻓﺎآ تﺎﻘﻴﺒﻄﺘﻟا ﻲﺘﻟا ﻞﻤﻌﺕ ﻰﻠﻋ زﺎﻬﺟ ،ﺮﺕﻮﻴﺒﻤﻜﻟا ﺎﻤﺏ ﻲﻓ ﻚﻟذ يأ ﺞﻡﺎﻥﺮﺏ ﻒﺸﻜﻠﻟ ﻦﻋ تﺎﺳوﺮﻴﻔﻟا.
٢.ﻢﻗ لﺎﺥدﺈﺏ صﺮﻘﻟا طﻮﻐﻀﻤﻟا ـﻟWindows دوﺰﻤﻟا ﻊﻡ زﺎﻬﺟ HP Photosmart ﻰﻟإ كﺮﺤﻡ صاﺮﻗﻷا ﺔﻃﻮﻐﻀﻤﻟا
ﻲﻓ زﺎﻬﺟ ﺮﺕﻮﻴﺒﻤﻜﻟا صﺎﺨﻟا ﻚﺏ ﻊﺒﺕاو تادﺎﺷرﻹا ةﺮهﺎﻈﻟا ﻰﻠﻋ ﺔﺷﺎﺸﻟا.
راﻮﺡ لﻮﺡ نارﺪﺟ ،ﺔیﺎﻤﺤﻟا ﻊﺒﺕا تادﺎﺷرﻹا .ﻲﻓ ﺔﻟﺎﺡ رﻮﻬﻇ يأ ﻞﺋﺎﺳر ﺔﻘﺜﺒﻨﻡ ﻖﻠﻌﺘﺕ راﺪﺠﺏ
Setup) داﺪﻋﻹا (ﻦﻋ زﺎﻬﺟ
HP Photosmart ﻲﻓ ﺔﻜﺒﺸﻟا.
٣.ﻲﻓ ﺔﻟﺎﺡ رﻮﻬﻇ ﻊﺏﺮﻡ
،ﺔیﺎﻤﺡ ﺐﺠﻴﻓ ﺎًﻡود ﺎﻬﻟﻮﺒﻗ وأ حﺎﻤﺴﻟا ﺎﻬﺏ.
٤.ﻲﻓ ﺔﺷﺎﺷ Connection Type) عﻮﻥ ﻞﻴﺻﻮﺘﻟا(، ﻢﻗ ﺪیﺪﺤﺘﺏ Through the network) ﻦﻡ لﻼﺥ ﺔﻜﺒﺸﻟا(،
ﻢﺙ ﺮﻘﻥا Next) ﻲﻟﺎﺘﻟا(.
ﺮﻬﻈﺕ ﺔﺷﺎﺷ Searching) يرﺎﺟ ﺚﺤﺒﻟا( ﻲﻓ ﺖﻗﻮﻟا يﺬﻟا ﺚﺤﺒی ﻪﻴﻓ ﺞﻡﺎﻥﺮﺏ
٥.ﺪﱠآﺄﺕ ﻦﻡ ﺔّﺤﺹ ﻒﺹو ﺔﻌﺏﺎﻄﻟا ﻰﻠﻋ ﺔﺷﺎ ّﺸﻟا Printer Found) رﻮﺜﻌﻟا ﻰﻠﻋ ﺔﻌﺑﺎﻄﻟا(.
ﺮﻬﻈﺕ ﺔﺷﺎﺷ Printers Found) تﺎﻌﺑﺎﻄﻟا ﻲﺘﻟا ﻢﺕ رﻮﺜﻌﻟا ﺎﻬﻴﻠﻋ( ﺪﻨﻋ رﻮﺜﻌﻟا ﻰﻠﻋ ﺮﺜآأ ﻦﻡ ﺔﻌﺏﺎﻃ ةﺪﺡاو ﻰﻠﻋ
ﺔﻜﺒﺸﻟا .ﻢﻗ ﺪیﺪﺤﺘﺏ زﺎﻬﺟ HP Photosmart يﺬﻟا ﺪیﺮﺕ ﻪﻠﻴﺹﻮﺕ.
٦.ﻊﺒﺕا تﺎﺒﻟﺎﻄﻤﻟا ﺖﻴﺒﺜﺘﻟ ﺞﻡﺎﻥﺮﺒﻟا.
ﺪﻨﻋ
ءﺎﻬﺘﻥﻻا ﻦﻡ ﺖﻴﺒﺜﺕ ،ﺞﻡﺎﻥﺮﺒﻟا نﻮﻜی HP Photosmart اًﺰهﺎﺟ ماﺪﺨﺘﺳﻼﻟ.
٧.ﻲﻓ ﺔﻟﺎﺡ ﻞﻴﻄﻌﺕ ﺞﻡﺎﻥﺮﺏ ﻒﺸﻜﻟا ﻦﻋ تﺎﺳوﺮﻴﻔﻟا ﻰﻠﻋ زﺎﻬﺟ ،ﺮﺕﻮﻴﺒﻤﻜﻟا ﺪآﺄﺘﻓ ﻦﻡ ﻪﻨﻴﻜﻤﺕ ةﺮﻡ ىﺮﺥأ.
٨.ﺐهذا ﻰﻟإ ﺮﺕﻮﻴﺒﻤﻜﻟا ﻢﻗو ﺔﻋﺎﺒﻄﺏ ﺮیﺮﻘﺕ رﺎﺒﺘﺥا ﻲﺕاذ زﺎﻬﺠﻟ HP Photosmart رﺎﺒﺘﺥﻻ لﺎﺼﺕا ﺔﻜﺒﺸﻟا.
ﻲﺑﺮﻋ
ﻞﻴﺻﻮﺕ ةﺰﻬﺟأ ﺮﺕﻮﻴﺒﻤآ ﺔﻴﻓﺎﺽإ ﻰﻠﻋ ﺔﻜﺒﺸﻟا
ﻚﻨﻜﻤی ﺔآرﺎﺸﻡ زﺎﻬﺟ HP Photosmart ﻰﻠﻋ ىﺪﺡإ تﺎﻜﺒﺸﻟا ﻲﻟﺎﺘﻟﺎﺏو ﻦﻜﻤُی ﻪﻡاﺪﺨﺘﺳا ﺔﻄﺳاﻮﺏ ﺮﺜآأ ﻦﻡ ﺮﺕﻮﻴﺒﻤآ .اذإ نﺎآ
زﺎﻬﺟ HP Photosmart ًﻼ ﺼ ﺘ ﻡ ﻞﻌﻔﻟﺎﺏ ﺮﺕﻮﻴﺒﻤﻜﺏ دﻮﺟﻮﻡ ﻰﻠﻋ ،ﺔﻜﺒﺷ ﺐﺠی ﺖﻴﺒﺜﺕ ﺞﻡﺎﻥﺮﺏ HP Photosmart ﻞﻜﻟ
زﺎﻬﺟ ﺮﺕﻮﻴﺒﻤآ ﻲﻓﺎﺽإ .ءﺎﻨﺙأ ﺔﻴﻠﻤﻋ ،ﺖﻴﺒﺜﺘﻟا ﻒﺸﺘﻜﻴﺳ ﺞﻡﺎﻥﺮﺒﻟا زﺎﻬﺟ HP Photosmart دﻮﺟﻮﻤﻟا ﻰﻠﻋ ﺔﻜﺒﺸﻟا ﻞﻜﻟ
ﻰﻟإ ﻪﻨیﻮﻜﺕ ﻲﻓ تاﺮﻤﻟا ﺔﻴﻟﺎﺘﻟا ﻲﺘﻟا مﻮﻘﺕ ﺎﻬﻴﻓ
ﺮﺕﻮﻴﺒﻤآ ..دﺮﺠﻤﺏ داﺪﻋإ زﺎﻬﺟ HP Photosmart ﻰﻠﻋ ،ﺔﻜﺒﺸﻟا ﻦﻠﻓ جﺎﺘﺤﺕ
ﺔﻓﺎﺽﺈﺏ ﺪیﺰﻡ ﻦﻡ ةﺰﻬﺟأ ﺮﺕﻮﻴﺒﻤﻜﻟا.
ﺖﻴﺒﺜﺕ ﺞﻡﺎﻥﺮﺒﻟا ﻦﻡ ﻞﺟأ ﻞﻴﺹﻮﺘﻟا ﺔﻜﺒﺸﻟﺎﺏ ١٤

ﻲﺑﺮﻋ
ﺔﻈﺡﻼﻡ ﻦﻜﻤی ﻞﻴﺹﻮﺕ زﺎﻬﺟ HP Photosmart ﺎﻡإ ﺔﻜﺒﺸﺏ ﺔﻴﻜﻠﺳﻻ وأ ﺔﻜﺒﺸﺏ ﺔﻴﻜﻠﺳ ,ﻦﻜﻟو ﻻ ﻦﻜﻤی لﺎﺼﺕﻻا ﺎﺘﻠﻜﺏ
ﻦﻴﺘﻜﺒﺸﻟا ﻲﻓ ﺲﻔﻥ ﺖﻗﻮﻟا.
ﺔﻈﺡﻼﻡ لﻮﺼﺤﻠﻟ ﻰﻠﻋ ﻞﻀﻓأ ءادأ نﺎﻡأو ﻲﻓ ﺔﻜﺒﺸﻟا ﺔﻴﻜﻠﺳﻼﻟا ,مﺪﺨﺘﺳا ﺔﻄﻘﻥ لﻮﺹو) ﻞﺜﻡ ﻪﺟﻮﻡ ﻲﻜﻠﺳﻻ (لﺎﺼﺕﻼﻟ
ﺔﻈﺡﻼﻡ اذإ ﻢﻟ ﺮﻬﻈی رﺎﻴﺥ ﺔﻤﺋﺎﻘﻟا يﺬﻟا ﺐﻏﺮﺕ ﻪﻴﻓ ﻰﻠﻋ ﺔﺷﺎﺸﻟا ، ﻢﻘﻓ ﺲﻤﻠﺏ وأ ﺮیﺮﻤﺘﻠﻟ ﺮﺒﻋ ﺔﻓﺎآ
تارﺎﻴﺥ ﺔﻤﺋﺎﻘﻟا.
network) ﻦﻡ لﻼﺥ ﺔﻜﺒﺸﻟا(.
Control Panel
) ﺔﺡﻮﻟ ﻢﻜﺤﺘﻟا( ﻢﺙ ﻢﻗ فﺬﺤﺏ تﺎﻌﺏﺎﻄﻟا ﺖﻴﺒﺜﺘﻟ USB.
ﻞﺼﻔﻟا ٢
ﺮﻴﻴﻐﺕ زﺎﻬﺟ HP Photosmart ﻦﻡ ﻞﻴﺻﻮﺕ USB ﻰﻟإ ﻞﻴﺻﻮﺕ ﺔﻜﺒﺸﻟا
ﺪﻨﻋ ﺖﻴﺒﺜﺕ زﺎﻬﺟ HP Photosmart ًﻻ و أ ﻊﻡ ﻞﻴﺹﻮﺕ USB ,ﻚﻨﻜﻤی ﻞیﻮﺤﺘﻟا ﻰﻟإ ﺎﻡإ ﻞﻴﺹﻮﺕ ﻲﻜﻠﺳﻻ وأ ﻞﻴﺹﻮﺕ ﺖﻥﺮﺜیإ
ﻲﻓ ﺖﻗو ﻖﺡﻻ .اذإ ﺖﻓﺮﻋ ﺔﻴﻔﻴآ ﻞﻴﺹﻮﺘﻟا ﺔﻜﺒﺸﻟﺎﺏ ﺎًﻘﺒﺴﻡ ,ﻚﻨﻜﻤﻴﻓ ماﺪﺨﺘﺳا تﺎﻬﻴﺟﻮﺘﻟا ﺔﻡﺎﻌﻟا ةدﻮﺟﻮﻤﻟا ﻩﺎﻥدأ.
ـﺏHP Photosmart.
ﺮﻴﻴﻐﺘﻟ لﺎﺼﺕا USB ﻰﻟإ لﺎﺼﺕا ﺔﻜﺒﺵ ﺔﻴﻜﻠﺳﻻ ﺔﻨﻤﻀﻡ WLAN 802.11
١.ﻢﻗ ﻞﺼﻔﺏ ﻞﻴﺹﻮﺕ USB ﻦﻡ ءﺰﺠﻟا ﻲﻔﻠﺨﻟا زﺎﻬﺠﻟ HP Photosmart.
٢.ﻢﻗ ﺲﻤﻠﺏ Setup) داﺪﻋإ( ﻰﻠﻋ ﺔﺷﺎﺷ ضﺮﻌﻟا.
٣.ﻢﻗ ﺲﻤﻠﺏ Network) ﺔﻜﺒﺵ(.
٤.ﻢﻗ ﺲﻤﻠﺏ Wireless Setup Wizard) ﺞﻟﺎﻌﻡ داﺪﻋﻹا ﻲﻜﻠﺳﻼﻟا(.
يدﺆی ﻚﻟذ ﻰﻟإ ﻞﻴﻐﺸﺕ Wireless Setup Wizard) ﺞﻟﺎﻌﻡ داﺪﻋﻹا ﻲﻜﻠﺳﻼﻟا(.
٥.ﻢﻗ ﺖﻴﺒﺜﺘﺏ ﺞﻡﺎﻥﺮﺏ ﻦﻡ ﻞﺟأ لﺎﺼﺕا ،ﺔﻜﺒﺸﻟا ﺮﺘﺥاو Add a Device) ﺔﻓﺎﺽإ زﺎﻬﺟ(، ﻢﺙ ﺮﺘﺥا Through the
٦.ﺪﻨﻋ ءﺎﻬﺘﻥﻻا ﻦﻡ ،ﺖﻴﺒﺜﺘﻟا ﺢﺘﻓا Printers and Faxes) تﺎﻌﺑﺎﻃ تﺎﺴآﺎﻓو() وأ Printers) تﺎﻌﺑﺎﻃ( (ﻲﻓ
ﻊﺟار:
١٥ HP Photosmart D7400 series
ﺮﻴﻴﻐﺘﻟ ﻞﻴﺻﻮﺕ USB ﻰﻟإ ﻞﻴﺻﻮﺕ) ﺖﻥﺮﺜﻳإ (ﻲﻜﻠﺳ
١.ﻢﻗ ﻞﺼﻔﺏ ﻞﻴﺹﻮﺕ USB ﻦﻡ ءﺰﺠﻟا ﻲﻔﻠﺨﻟا زﺎﻬﺠﻟ HP Photosmart.
٢.ﻢﻗ ﻞﻴﺹﻮﺘﺏ ﻞﺏﺎآ ﺖﻥﺮﺜیإ ﻦﻡ ﺬﻔﻨﻡ ﺖﻥﺮﺜیﻹا دﻮﺟﻮﻤﻟا ﻲﻓ ﺔﻬﺠﻟا ﺔﻴﻔﻠﺨﻟا زﺎﻬﺠﻟ HP Photosmart ﺬﻔﻨﻤﺏ ﺖﻥﺮﺜیﻹا
ﺮﻓﻮﺘﻤﻟا ﻲﻓ ﻪﺟﻮﻤﻟا وأ ةﺪﺡو ﻢﻴﺴﻘﺘﻟا.
ﻦﻡ ﻞﺟأ لﺎﺼﺕا ،ﺔﻜﺒﺸﻟا ﺮﺘﺥاو Add a Device) ﺔﻓﺎﺽإ زﺎﻬﺟ(، ﻢﺙ ﺮﺘﺥا Through the
network) ﻦﻡ لﻼﺥ ﺔﻜﺒﺸﻟا(.
Control Panel) ﺔﺡﻮﻟ ﻢﻜﺤﺘﻟا( ﻢﺙ ﻢﻗ فﺬﺤﺏ تﺎﻌﺏﺎﻄﻟا ﻦﻡ ﺖﻴﺒﺜﺕ USB ﻖﺏﺎﺴﻟا.
٣.ﻢﻗ ﺖﻴﺒﺜﺘﺏ ﺞﻡﺎﻥﺮﺏ
٤.ﺪﻨﻋ ءﺎﻬﺘﻥﻻا ﻦﻡ ،ﺖﻴﺒﺜﺘﻟا ﺢﺘﻓا Printers and Faxes) تﺎﻌﺑﺎﻃ تﺎﺴآﺎﻓو() وأ Printers) تﺎﻌﺑﺎﻃ( (ﻲﻓ
ﺪیﺰﻤﻠﻟ ﻦﻡ تادﺎﺷرﻹا ﺔﻴﻠﻴﺼﻔﺘﻟا لﻮﺡ ﻞﻴﺹﻮﺕ زﺎﻬﺟ HP Photosmart ،ﺔﻜﺒﺸﺏ
•”
داﺪﻋإ ﺔﻜﺒﺷ ﺔﻴﻜﻠﺳ“ ﻲﻓ ﺔﺤﻔﺹ ٦
داﺪﻋإ ﺔﻜﺒﺸﻟا ﺔﻴﻜﻠﺳﻼﻟا ﺔﻨﻤﻀﻤﻟا WLAN 802.11“ ﻲﻓ ﺔﺤﻔﺹ ٨
•”
•”
داﺪﻋإ ﺔﻜﺒﺷ ad hoc ﺔﻴﻜﻠﺳﻻ“ ﻲﻓ ﺔﺤﻔﺹ ١١
ةرادإ تاداﺪﻋإ ﺔﻜﺒﺸﻟا ﺔﺻﺎﺨﻟا ﻚﺑ
ﻦﻜﻤی ةرادإ تاداﺪﻋإ ﺔﻜﺒﺸﻟا زﺎﻬﺠﻟ HP Photosmart ﻦﻡ لﻼﺥ ﺔﺡﻮﻟ ﻢﻜﺤﺘﻟا ـﻟHP Photosmart .ﺮﻓﻮﺘﺕ تاداﺪﻋإ
ﺔﻡﺪﻘﺘﻡ ﺔﻴﻓﺎﺽإ ﻲﻓ Embedded Web Server) ﻢﻘﻠﻡ ﺐیﻮﻟا ﻦﻤﻀﻤﻟا ,(ةرﺎﺒﻋ ﻦﻋ ةادأ ﻦیﻮﻜﺕ ﺔﻟﺎﺡو مﻮﻘﺕ لﻮﺹﻮﻟﺎﺏ ﻪﻴﻟإ
ﻦﻡ ضﺮﻌﺘﺴﻡ ﺐیﻮﻟا صﺎﺨﻟا ﻚﺏ ماﺪﺨﺘﺳﺎﺏ ﻞﻴﺹﻮﺕ ﺔﻜﺒﺷ ﻂﺸﻥ زﺎﻬﺠﺏ HP Photosmart.
ﺮﻴﻴﻐﺕ تاداﺪﻋإ ﺔﻜﺒﺸﻟا ﺔﻴﺳﺎﺳﻷا ﻦﻡ ﺔﺡﻮﻟ ﻢﻜﺤﺘﻟا
ﻚﻨﻜﻤﺕ ﺔﺡﻮﻟ ﻢﻜﺤﺘﻟا زﺎﻬﺠﻟ HP Photosmart ﻦﻡ داﺪﻋإ ﻞﻴﺹﻮﺕ ﻲﻜﻠﺳﻻ ﻪﺕرادإو ﺬﻴﻔﻨﺕو ﺔﻠﻴﻜﺸﺕ ﺔﻋﻮﻨﻡ ﻦﻡ مﺎﻬﻡ ةرادإ
ﺔﻜﺒﺸﻟا .ﺎﻤﺏ ﻲﻓ ﻚﻟذ ضﺮﻋ تاداﺪﻋإ ﺔﻜﺒﺸﻟا ,ةدﺎﻌﺘﺳا ﻞﺋاﺪﺒﻟا ﺔﻴﺽاﺮﺘﻓﻻا ﺔﻜﺒﺸﻠﻟ ,ﻞﻴﻐﺸﺕ لﺎﺳرﻹا ﻲﻜﻠﺳﻼﻟا فﺎﻘیإو ﻪﻠﻴﻐﺸﺕ
ﺮﻴﻴﻐﺕو تاداﺪﻋإ ﺔﻜﺒﺸﻟا.

Wireless Setup Wizard) ماﺪﺨﺘﺳا ﺞﻟﺎﻌﻡ داﺪﻋﻹا ﻲﻜﻠﺳﻼﻟا(
ﺮﻓﻮی ﺞﻟﺎﻌﻡ داﺪﻋﻹا ﻲﻜﻠﺳﻼﻟا ﺔﻘیﺮﻃ ﺔﻠﻬﺳ داﺪﻋﻹ ﻞﻴﺹﻮﺕ ﻲﻜﻠﺳﻻ ﻰﻠﻋ زﺎﻬﺟ HP Photosmart ﻪﺕرادإو.
١.ﺲﻤﻟا Setup) داﺪﻋإ( ﻰﻠﻋ ﺔﺷﺎﺷ ضﺮﻌﻟا.
٢.ﺲﻤﻟا Network) ﺔﻜﺒﺵ(.
ﺔﻈﺡﻼﻡ اذإ ﻢﻟ ﺮﻬﻈی رﺎﻴﺥ ﺔﻤﺋﺎﻘﻟا يﺬﻟا ﺐﻏﺮﺕ ﻪﻴﻓ ﻰﻠﻋ ﺔﺷﺎﺸﻟا ، ﻢﻘﻓ ﺲﻤﻠﺏ وأ ﺮیﺮﻤﺘﻠﻟ ﺮﺒﻋ ﺔﻓﺎآ
تارﺎﻴﺥ ﺔﻤﺋﺎﻘﻟا.
٣.ﺲﻤﻟا Wireless Setup Wizard) ﺞﻟﺎﻌﻡ داﺪﻋﻹا ﻲﻜﻠﺳﻼﻟا(.
يدﺆی ﻚﻟذ ﻰﻟإ ﻞﻴﻐﺸﺕ Wireless Setup Wizard) ﺞﻟﺎﻌﻡ داﺪﻋﻹا ﻲﻜﻠﺳﻼﻟا(.
ضﺮﻋ تاداﺪﻋإ ﺔﻜﺒﺸﻟا ﺎﻬﺘﻋﺎﺒﻃو
ﻦﻜﻤی ضﺮﻋ ﺺﺨﻠﻡ ﻦﻡ تاداﺪﻋإ ﺔﻜﺒﺸﻟا ﻲﻓ ﺔﺡﻮﻟ ﻢﻜﺤﺘﻟا زﺎﻬﺠﻟ HP Photosmart ,وأ ﻦﻜﻤی ﺔﻋﺎﺒﻃ ﺔﺤﻔﺹ ﻦیﻮﻜﺕ ﺮﺜآأ
وmDNS.
ًﻼ ﻴ ﺼ ﻔ ﺕ .دﺮﺴﺕ ﺔﺤﻔﺹ ﻦیﻮﻜﺕ ﺔﻜﺒﺸﻟا ﺔﻓﺎآ تاداﺪﻋإ ﺔﻜﺒﺸﻟا ﺔﻡﺎﻬﻟا ﻞﺜﻡ ﻦیوﺎﻨﻋ IP، ﺔﻋﺮﺳ ،ﺔﻠﺹﻮﻟا DNS
١.ﺲﻤﻟا Setup) داﺪﻋإ( ﻰﻠﻋ ﺔﺷﺎﺷ ضﺮﻌﻟا.
ﻲﺑﺮﻋ
٢.ﺲﻤﻟا Network) ﺔﻜﺒﺵ(.
ﺔﻈﺡﻼﻡ اذإ ﻢﻟ ﺮﻬﻈی رﺎﻴﺥ ﺔﻤﺋﺎﻘﻟا يﺬﻟا ﺐﻏﺮﺕ ﻪﻴﻓ ﻰﻠﻋ ﺔﺷﺎﺸﻟا ، ﻢﻘﻓ ﺲﻤﻠﺏ وأ ﺮیﺮﻤﺘﻠﻟ ﺮﺒﻋ ﺔﻓﺎآ
تارﺎﻴﺥ ﺔﻤﺋﺎﻘﻟا.
٣.ﺲﻤﻟا View Network Settings) ضﺮﻋ تاداﺪﻋإ ﺔﻜﺒﺸﻟا(.
٤.ﻞﻤﻋا ًا ﺪ ﺡ ا و ﺎﻤﻡ ﻲﻠی:
•ضﺮﻌﻟ تاداﺪﻋإ ﺔﻜﺒﺸﻟا ﺔﻴﻜﻠﺴﻟا ,ﺲﻤﻟا Display Wired Summary) ضﺮﻋ ﺺﺨﻠﻡ ﻲﻜﻠﺳ(.
•ضﺮﻌﻟ تاداﺪﻋإ ﺔﻜﺒﺸﻟا ﺔﻴﻜﻠﺳﻼﻟا ,ﺲﻤﻟا Display Wireless Summary) ضﺮﻋ ﺺﺨﻠﻡ ﻲﻜﻠﺳﻻ(.
•ﺔﻋﺎﺒﻄﻟ ﺔﺤﻔﺹ ﻦیﻮﻜﺕ ،ﺔﻜﺒﺸﻟا ﺲﻤﻟا Print Network Configuration Page) ﺔﻋﺎﺒﻃ ﺔﺤﻔﺻ ﻦﻳﻮﻜﺕ
ﺔﻜﺒﺸﻟا(.
ةدﺎﻌﺘﺳا تﺎﻴﺽاﺮﺘﻓا ﺔﻜﺒﺸﻟا
ﺎﻡ ﺖﻥﺎآ ﻪﻴﻠﻋ ﺪﻨﻋ ءاﺮﺷ زﺎﻬﺟ HP Photosmart.
ﻦﻜﻤی ةدﺎﻋإ ﻂﺒﺽ تاداﺪﻋإ ﺔﻜﺒﺸﻟا ﻰﻟإ
ﻪﻴﺒﻨﺕمﻮﻘﻴﺳ اﺬه ﺢﺴﻤﺏ ﺔﻓﺎآ تﺎﻡﻮﻠﻌﻡ داﺪﻋﻹا ﻲﻜﻠﺳﻼﻟا ﻲﺘﻟا ﺖﻤﻗ ﺎﻬﻟﺎﺥدﺈﺏ .ةدﺎﻌﺘﺳﻻ ﻩﺬه ،تﺎﻡﻮﻠﻌﻤﻟا جﺎﺘﺤﺘﺳ ﻰﻟإ
ﻞﻴﻐﺸﺕ ﺞﻟﺎﻌﻡ داﺪﻋﻹا ﻲﻜﻠﺳﻼﻟا ًﺔﻴﻥﺎﺙ.
١.ﺲﻤﻟا Setup) داﺪﻋإ( ﻰﻠﻋ ﺔﺷﺎﺷ ضﺮﻌﻟا.
٢.ﺲﻤﻟا Network) ﺔﻜﺒﺵ(.
ﺔﻈﺡﻼﻡ اذإ ﻢﻟ ﺮﻬﻈی رﺎﻴﺥ ﺔﻤﺋﺎﻘﻟا يﺬﻟا ﺐﻏﺮﺕ ﻪﻴﻓ ﻰﻠﻋ ﺔﺷﺎﺸﻟا ، ﻢﻘﻓ ﺲﻤﻠﺏ وأ ﺮیﺮﻤﺘﻠﻟ ﺮﺒﻋ ﺔﻓﺎآ
تارﺎﻴﺥ ﺔﻤﺋﺎﻘﻟا.
٣.ﺲﻤﻟا Restore Network Defaults) ةدﺎﻌﺘﺳا تﺎﻴﺽاﺮﺘﻓا ﺔﻜﺒﺸﻟا(.
٤.ﺲﻤﻟا Yes) ﻢﻌﻥ( وأ No) ﻻ(.
ﻞﻴﻐﺸﺕ لﺎﺳرﻹا ﻲﻜﻠﺳﻼﻟا ﻢﺙ فﺎﻘﻳإ ﻪﻠﻴﻐﺸﺕ
ﻢﺕ فﺎﻘیإ لﺎﺳرﻹا ﻲﻜﻠﺳﻼﻟا ﻞﻜﺸﺏ ﻲﺽاﺮﺘﻓا .ﻲآ ﻰﻘﺒﺕ ًﻼ ﺼ ﺘ ﻡ ﺔﻜﺒﺸﺏ ،ﺔﻴﻜﻠﺳﻻ ﺐﺠی نأ ﻰﻘﺒی لﺎﺳرﻹا ﺪﻴﻗ ﻞﻴﻐﺸﺘﻟا .اذإ نﺎآ
زﺎﻬﺟ HP Photosmart .،ﻦﻜﻟو
لﺎﺳرﻹا ﻲﻓ ﻊﺽو ،ﻞﻴﻐﺸﺘﻟا ءﺎﻀﻴﺳ حﺎﺒﺼﻤﻟا قرزﻷا دﻮﺟﻮﻤﻟا ﻲﻓ ﺔﻬﺠﻟا ﺔﻴﻡﺎﻡﻷا ﻦﻡ
اذإ نﺎآ زﺎﻬﺟ HP Photosmart ﻞﺼﺘﻡ ﺔﻜﺒﺸﺏ ﺔﻴﻜﻠﺳ وأ اذإ نﺎآ ﻚیﺪﻟ لﺎﺼﺕا USB، ﻼﻓ ﻢﺘی ماﺪﺨﺘﺳا لﺎﺳرﻹا .ﻲﻓ ﺔﻟﺎﺡ
ﻞﺜﻡ ﻩﺬه ﺐﺠی ﻚﻴﻠﻋ فﺎﻘیإ ﻞﻴﻐﺸﺕ لﺎﺳرﻹا.
ةرادإ تاداﺪﻋإ ﺔﻜﺒﺸﻟا ﺔﺹﺎﺨﻟا ﻚﺏ ١٦

ﻲﺑﺮﻋ
ﻞﺼﻔﻟا ٢
١.ﺲﻤﻟا Setup) داﺪﻋإ( ﻰﻠﻋ ﺔﺷﺎﺷ ضﺮﻌﻟا.
٢.ﺲﻤﻟا Network) ﺔﻜﺒﺵ(.
ﺔﻈﺡﻼﻡ اذإ ﻢﻟ ﺮﻬﻈی رﺎﻴﺥ ﺔﻤﺋﺎﻘﻟا يﺬﻟا ﺐﻏﺮﺕ ﻪﻴﻓ ﻰﻠﻋ ﺔﺷﺎﺸﻟا ، ﻢﻘﻓ ﺲﻤﻠﺏ وأ ﺮیﺮﻤﺘﻠﻟ ﺮﺒﻋ ﺔﻓﺎآ
تارﺎﻴﺥ ﺔﻤﺋﺎﻘﻟا.
٣.ﺲﻤﻟا Wireless Radio) لﺎﺳرإ ﻲﻜﻠﺳﻻ(.
٤.ﺲﻤﻟا On) ﻞﻴﻐﺸﺕ( وأ Off) فﺎﻘﻳإ ﻞﻴﻐﺸﺘﻟا(.
ﺔﻋﺎﺒﻃ رﺎﺒﺘﺥا ﺔﻜﺒﺸﻟا ﺔﻴﻜﻠﺳﻼﻟا
ﻞﻤﻌی ﺎًﻀیأ رﺎﺒﺘﺥا ﺔﻜﺒﺸﻟا ﺔﻴﻜﻠﺳﻼﻟا ﺎًیدﺆﻡ ﺔﻋﻮﻤﺠﻡ ﻦﻡ تارﺎﺒﺘﺥا ﻖﻘﺤﺘﻟا ﺪیﺪﺤﺘﻟ ﺎﻡ اذإ نﺎآ داﺪﻋإ ﺔﻜﺒﺸﻟا ﺎًﺤﺟﺎﻥ .ﻢﺘﺕ ﺔﻋﺎﺒﻃ
ﺔﻜﺒﺸﻟا ﺔﻴﻜﻠﺳﻼﻟا ﻲﻓ يأ ﺖﻗو.
رﺎﺒﺘﺥا ﺔﻜﺒﺸﻟا ﺔﻴﻜﻠﺳﻼﻟا ﺎًﻴﺋﺎﻘﻠﺕ ﺪﻨﻋ ﻞﻴﻐﺸﺕ ﺞﻟﺎﻌﻡ داﺪﻋﻹا ﻲﻜﻠﺳﻼﻟا .ﻚﻨﻜﻤی ﺎًﻀیأ ﺔﻋﺎﺒﻃ رﺎﺒﺘﺥا
١.ﺲﻤﻟا Setup) داﺪﻋإ( ﻰﻠﻋ ﺔﺷﺎﺷ ضﺮﻌﻟا.
٢.ﺲﻤﻟا Network) ﺔﻜﺒﺵ(.
ﺔﻈﺡﻼﻡ اذإ ﻢﻟ ﺮﻬﻈی رﺎﻴﺥ ﺔﻤﺋﺎﻘﻟا يﺬﻟا ﺐﻏﺮﺕ ﻪﻴﻓ ﻰﻠﻋ ﺔﺷﺎﺸﻟا ، ﻢﻘﻓ ﺲﻤﻠﺏ وأ ﺮیﺮﻤﺘﻠﻟ ﺮﺒﻋ ﺔﻓﺎآ
تارﺎﻴﺥ ﺔﻤﺋﺎﻘﻟا.
٣.ﺲﻤﻟا Wireless Network Test) رﺎﺒﺘﺥا ﺔﻜﺒﺸﻟا ﺔﻴﻜﻠﺳﻼﻟا(.
ﻢﺘﺕ ﺔﻋﺎﺒﻃ Wireless Network Test) رﺎﺒﺘﺥا ﺔﻜﺒﺸﻟا ﺔﻴﻜﻠﺳﻼﻟا(.
ﺮﻴﻴﻐﺕ تاداﺪﻋإ ﺔﻡﺪﻘﺘﻡ ﺔﻜﺒﺸﻠﻟ ﻦﻡ ﺔﺡﻮﻟ ﻢﻜﺤﺘﻟا
ﺮﻓﻮﺘﺕ تاداﺪﻋﻹا ﺔﻡﺪﻘﺘﻤﻟا ﺔﻜﺒﺸﻠﻟ ﻦﻡ ﻞﺟأ ﻚﺘﺡار .ﻊﻡو ،ﻚﻟذ ﺐﺠی ﻚﻴﻠﻋ ﻻأ ﺮﻴﻐﺕ ﻩﺬه تاداﺪﻋﻹا ﻻإ اذإ ﺖﻨآ ﺎًﻡﺪﺨﺘﺴﻡ ﺎًﻡﺪﻘﺘﻡ.
ﺮﻴﻴﻐﺕ تاداﺪﻋإ IP
داﺪﻋإ IP ﻲﺽاﺮﺘﻓﻻا تاداﺪﻋﻹ IP ﻮه Automatic) ﻲﻟﺁ( مﻮﻘیو ﻂﺒﻀﺏ تاداﺪﻋإ IP ﺎًﻴﺋﺎﻘﻠﺕ .ﻊﻡو ﻚﻟذ ,اذإ ﺖﻨآ ﺎًﻡﺪﺨﺘﺴﻡ
عﺎﻨﻗ ﺔﻜﺒﺸﻟا ﺔﻴﻋﺮﻔﻟا ,وأ ةرﺎّﺒﻌﻟا ﺔﻴﺽاﺮﺘﻓﻻا .ﺔیؤﺮﻟ ناﻮﻨﻋ IP عﺎﻨﻗو ﺔﻜﺒﺸﻟا
ﺎًﻡﺪﻘﺘﻡ ,ﺪﻘﻓ ﺐﻏﺮﺕ ﻲﻓ ﺮﻴﻴﻐﺕ ناﻮﻨﻋ IP ﺎًیوﺪی ,
ﺔﻴﻋﺮﻔﻟا ﻦﻴﺹﺎﺨﻟا زﺎﻬﺠﺏ HP Photosmart، ﻢﻗ ﺔﻋﺎﺒﻄﺏ ﺔﺤﻔﺹ ﻦیﻮﻜﺕ ﺔﻜﺒﺸﻟا ﻦﻡ زﺎﻬﺟ HP Photosmart.
١٧ HP Photosmart D7400 series
ﺔﻈﺡﻼﻡ ﺪﻨﻋ لﺎﺥدإ داﺪﻋإ IP ،ﺎًیوﺪی ﺐﺠی ﻚﻴﻠﻋ لﺎﺼﺕﻻا ﺔﻜﺒﺸﺏ ﺔﻄﺸﻥ ،ﺎًﻘﺒﺴﻡ ،ﻻإو ﻦﻠﻓ ﻢﺘی ﻆﻔﺡ داﺪﻋﻹا ﻲﻓ ﺔﻟﺎﺡ
جوﺮﺨﻟا ﻦﻡ ﺔﻤﺋﺎﻘﻟا.
ﻪﻴﺒﻨﺕﻪﺒﺘﻥا ﺪﻨﻋ ﻦﻴﻴﻌﺕ ناﻮﻨﻋ IP ﺎًیوﺪی .ﺪﻨﻋ لﺎﺥدإ ناﻮﻨﻋ IP ﺮﻴﻏ ﺢﻟﺎﺹ ءﺎﻨﺙأ ﺔﻴﻠﻤﻋ ﺖﻴﺒﺜﺘﻟا ,ﻻ ﻦﻜﻤﺘﺕ تﺎﻥﻮﻜﻡ
ﺔﻜﺒﺸﻟا ﻦﻡ ﻞﻴﺹﻮﺘﻟا زﺎﻬﺠﺏ HP Photosmart.
١.ﺲﻤﻟا Setup) داﺪﻋإ( ﻰﻠﻋ ﺔﺷﺎﺷ ضﺮﻌﻟا.
٢.ﺲﻤﻟا Network) ﺔﻜﺒﺵ(.
ﺔﻈﺡﻼﻡ اذإ ﻢﻟ ﺮﻬﻈی رﺎﻴﺥ ﺔﻤﺋﺎﻘﻟا يﺬﻟا ﺐﻏﺮﺕ ﻪﻴﻓ ﻰﻠﻋ ﺔﺷﺎﺸﻟا ، ﻢﻘﻓ ﺲﻤﻠﺏ وأ ﺮیﺮﻤﺘﻠﻟ ﺮﺒﻋ ﺔﻓﺎآ
تارﺎﻴﺥ ﺔﻤﺋﺎﻘﻟا.
٣.ﺲﻤﻟا Advanced Setup) داﺪﻋإ مﺪﻘﺘﻡ(.
٤.ﺲﻤﻟا IP Settings) تاداﺪﻋإ IP(.
٥.ﺲﻤﻟا Manual) يوﺪﻳ(.
٦.ﺲﻤﻟا ﺪﺡأ تاداﺪﻋإ IP ﺔﻴﻟﺎﺘﻟا.
•IP Address) ناﻮﻨﻋ IP(
•Subnet Mask) عﺎﻨﻗ ﺔﻜﺒﺸﻟا ﺔﻴﻋﺮﻔﻟا(
•Default Gateway) ةرﺎّﺒﻌﻟا ﺔﻴﺽاﺮﺘﻓﻻا(
ﺮﻬﻈﺘﺳ ﺔﻤﺋﺎﻗ ﺔﺡﻮﻟ ﺢﻴﺕﺎﻔﻤﻟا ﺔﻴﺋﺮﻤﻟا ﻰﻠﻋ ﺔﺷﺎﺷ ضﺮﻌﻟا.
٧.مﺪﺨﺘﺳا ﺔﺡﻮﻟ ﺢﻴﺕﺎﻔﻤﻟا ﺔﻴﺋﺮﻤﻟا لﺎﺥدﻹ تاداﺪﻋإ IP.

٣ماﺪﺨﺘﺳا تاﺰﻴﻡ HP Photosmart
يﻮﺘﺤی اﺬه ﻞﺼﻔﻟا ﻲﻠﻋ تﺎﻡﻮﻠﻌﻡ ﻦﻋ ﺔﻴﻔﻴآ ماﺪﺨﺘﺳا HP Photosmart تﺎﻴﻠﻤﻌﻠﻟ ﺔﻴﺳﺎﺳﻷا ﺔﻓﺎﺽﻻﺎﺏ ﻲﻟإ ،ﻚﻟذ ﻪﻥﺈﻓ ﺮﻓﻮی
تﺎﻤﻴﻠﻌﺕ لﻮﺡ ﺔﻴﻔﻴآ ﻞﻴﻤﺤﺕ قرﻮﻟا ضﺮﻋو رﻮﺼﻟا ﺎهﺪیﺪﺤﺕو ﺎﻬﺘﻋﺎﺒﻃو لاﺪﺒﺘﺳاو تﺎﺷﻮﻃﺮﺥ ﺮﺒﺤﻟا.
ﻞﻴﻤﺤﺕ قرﻮﻟا
ﻒﺼی اﺬه ﻢﺴﻘﻟا ﺔﻘیﺮﻃ ﻞﻴﻤﺤﺕ عاﻮﻥأ مﺎﺠﺡأو ﺔﻔﻠﺘﺨﻡ ﻦﻡ قرﻮﻟا ﻲﻓ زﺎﻬﺟ HP Photosmart تﺎﻋﻮﺒﻄﻤﻠﻟ ﺔﺹﺎﺨﻟا ﻚﺏ.
ﺢﻴﻤﻠﺕﻊﻨﻤﻟ ثوﺪﺡ تﺎﻘﻘﺸﺘﻟا وأ تاﺪﻌﺠﺘﻟا وأ تﺎﻓﺎﻔﺘﻟﻻا وأ تﺎﻓﺎﺤﻟا ،ﺔﻴﻨﺤﻨﻤﻟا ﻢﻗ ﻦیﺰﺨﺘﺏ ﻊﻴﻤﺟ قرﻮﻟا ﻲﻓ ﻊﺽو ٍﻮﺘﺴﻡ
ﻲﻓ ﺲﻴآ ﻦﻜﻤی ةدﺎﻋإ مﺎﻜﺡإ ﻪﻘﻠﻏ .ﻲﻓ ﺔﻟﺎﺡ مﺪﻋ ﻦیﺰﺨﺕ قرﻮﻟا ﻞﻜﺸﺏ ،ﺢﻴﺤﺹ يدﺆﺕ تاﺮﻴﻐﺘﻟا ةﺪیﺪﺸﻟا ﻲﻓ ﺔﺟرد ةراﺮﺤﻟا
ﺔﺏﻮﻃﺮﻟاو ﻰﻟإ ءﺎﻨﺤﻥا ،قرﻮﻟا ﻦﻡو ﻢﺙ ﻦﻟ ﻞﻤﻌی اًﺪﻴﺟ ﻲﻓ زﺎﻬﺟ HP Photosmart.
ﻲﺑﺮﻋ
ﻞﻴﻤﺤﺕ قرو ﻢﺠﺤﺑ ﻞﻡﺎآ
ﻦﻜﻤی ﻞﻴﻤﺤﺕ عاﻮﻥأ ةﺪیﺪﻋ ﻦﻡ قرﻮﻟا ﻢﺠﺤﺏ letter وأ A4 ﻲﻓ ﺔیوﺎﺡ لﺎﺥدﻹا ﺔﻴﺴﻴﺋﺮﻟا زﺎﻬﺠﻟ HP Photosmart.
ﻞﻴﻤﺤﺘﻟ قرو ﻢﺠﺤﺑ ﻞﻡﺎآ
١.ﺐﺤﺳا ﺔیوﺎﺡ لﺎﺥدﻹا ﺔﻴﺴﻴﺋﺮﻟا ﻰﻟإ جرﺎﺨﻟا ﻢﺙ ﻊﻓدا ﺔﻟدأ ضﺮﻋ قرﻮﻟا لﻮﻃو قرﻮﻟا ﻰﺘﺡ ﺮﺥﺁ ﻊﺽو ﺎﻤﻬﻟ.
٢.ﻢﻗ بﺮﻀﻟﺎﺏ ﻰﻠﻋ قرﻮﻟا ﻰﻠﻋ ﺢﻄﺳ ٍﻮﺘﺴﻡ ةاذﺎﺤﻤﻟ ،تﺎﻓﺎﺤﻟا ﻢﺙ ﺺﺤﻓا قرﻮﻟا ﺔﻓﺮﻌﻤﻟ ﺎﻡ ﻲﻠی:
•ﺪآﺄﺕ ﻦﻡ ﻩﻮﻠﺥ ﻦﻡ تﺎﻘﻘﺸﺘﻟا ﺔﺏﺮﺕﻷاو تاﺪﻌﺠﺘﻟاو تﺎﻓﺎﺤﻟاو ﺔﻴﻨﺤﻨﻤﻟا وأ ﺔﻴﻨﺜﻨﻤﻟا.
•ﺪآﺄﺕ ﻦﻡ ﻖﺏﺎﻄﺕ ﻢﺠﺡ عﻮﻥو ﻊﻴﻤﺟ قرﻮﻟا دﻮﺟﻮﻤﻟا ﻲﻓ ﺔﻡزﺮﻟا.
مﺎﻡﻸﻟ ﻪﺟوو ﺔﻋﺎﺒﻄﻟا ﻞﻔﺳﻷ .ﻢﻗ ﺔﻟﺎﻡﺈﺏ ﺔﻡزر
٣.ﻞﺥدأ ﺔﻡزر قرﻮﻟا ﻰﻟإ ﺔیوﺎﺡ لﺎﺥدﻹا ﺔﻴﺴﻴﺋﺮﻟا ﻊﻡ ﻞﻌﺟ ﺔﻓﺎﺤﻟا ةﺮﻴﺼﻘﻟا
قرﻮﻟا مﺎﻡﻸﻟ ﻰﺘﺡ ﻒﻗﻮﺘﺕ.
ماﺪﺨﺘﺳا تاﺰﻴﻡ HP Photosmart ١٨

ﻲﺑﺮﻋ
ﻞﺼﻔﻟا ٣
ﻪﻴﺒﻨﺕ ﺪآﺄﺕ ﻦﻡ دﻮﺟو زﺎﻬﺟ HP Photosmart ﺪﻴﻗ لﻮﻤﺨﻟا ﺎًﺘﻡﺎﺹو ﺪﻨﻋ ﻞﻴﻤﺤﺕ قرﻮﻟا ﻲﻓ ﺔیوﺎﺡ لﺎﺥدﻹا
ﺔﻴﺴﻴﺋﺮﻟا .ﻲﻓ ﺔﻟﺎﺡ مﺎﻴﻗ زﺎﻬﺟ HP Photosmart ﺔﻥﺎﻴﺼﺏ تﺎﺷﻮﻃﺮﺥ ﺮﺒﺤﻟا وأ ﺬﻴﻔﻨﺕ يأ ﺔﻤﻬﻡ ,ﺪﻘﻓ ﻻ نﻮﻜی
ﺰﺟﺎﺡ قرﻮﻟا ﻲﻓ ﻪﻌﺽﻮﻡ ﻞﺥاﺪﺏ زﺎﻬﺠﻟا .ﻚﻥإ ﺪﻗ ﻊﻓﺪﺕ قرﻮﻟا ﻰﻟإ ﺮﺥﺁ ىﺪﻡ ﻪﻟ ,ﺎﻤﻡ يدﺆی ﻰﻟإ جوﺮﺥ تﺎﺤﻔﺹ
ﺔﻏرﺎﻓ ﻦﻡ
زﺎﻬﺟ HP Photosmart.
ﺢﻴﻤﻠﺕاذإ ﺖﻨآ مﺪﺨﺘﺴﺕ قرو ﻪﻴﻠﻋ ناﻮﻨﻋ ﺔآﺮﺸﻟا ,ﻞﺥدﺄﻓ ءﺰﺠﻟا يﻮﻠﻌﻟا ﻦﻡ ﺔﺤﻔﺼﻟا ًﻻ و أ ﻊﻡ ﻪﻴﺟﻮﺕ ﻪﺟﻮﻟا
ﺺﺼﺨﻤﻟا ﺔﻋﺎﺒﻄﻠﻟ ﻰﻟإ ﻞﻔﺳﻷا .لﻮﺼﺤﻠﻟ ﻰﻠﻋ ﺪیﺰﻤﻟا ﻦﻡ تﺎﻤﻴﻠﻌﺘﻟا لﻮﺡ ﻞﻴﻤﺤﺕ قرو ﻢﺠﺤﻟﺎﺏ ﻞﻡﺎﻜﻟا قروو
يﻮﺘﺤی ﻰﻠﻋ ناﻮﻨﻋ ،ﺔآﺮﺸﻟا ﻊﺟار ﻢﺳﺮﻟا ﻲﻥﺎﻴﺒﻟا رﻮﻔﺤﻤﻟا ﻲﻓ عﺎﻗ ﺔیوﺎﺡ لﺎﺥدﻹا ﺔﻴﺴﻴﺋﺮﻟا.
٤.ﻢﻗ ﺔﻟﺎﻡﺈﺏ ﻲﻠﻴﻟد ضﺮﻋ لﻮﻃو قرﻮﻟا ﻞﺥاﺪﻠﻟ ﻰﺘﺡ نﺎﻔﻗﻮﺘی ﺪﻨﻋ تﺎﻓﺎﺡ قاروﻷا.
ﻻ ﻢﻘﺕ ﻞﻴﻤﺤﺘﺏ ﺔیوﺎﺡ لﺎﺥدﻹا ﺔﻴﺴﻴﺋﺮﻟا ﺮﺜآأ ﻦﻡ مزﻼﻟا .ﺪآﺄﺕ ﻦﻡ نأ ﺔﻡزر قرﻮﻟا ﺐﺳﺎﻨﺕ ﺔیوﺎﺡ لﺎﺥدﻹا ﺔﻴﺴﻴﺋﺮﻟا نأو
ﺎﻬﻋﺎﻔﺕرا ﻻ ﺪیﺰی ﻰﻠﻋ عﺎﻔﺕرا ءﺰﺠﻟا يﻮﻠﻌﻟا ﻞﻴﻟﺪﻟ ضﺮﻋ قرﻮﻟا.
٥.ﻊﻓدا ﺔیوﺎﺡ لﺎﺥدﻹا ﺔﻴﺴﻴﺋﺮﻟا ﻞﺥاﺪﻟ HP Photosmart ةﺮﻡ ىﺮﺥأ.
٦.ﻊﻓدا ةادأ ﺔﻟﺎﻃإ ﺔیوﺎﺡ جاﺮﺥﻹا ﻚﺘﻴﺡﺎﻥ ,ﻰﻠﻋ رﺪﻗ ﺎﻡ ﺢﻤﺴُی ﻪﺏ.
١٩ HP Photosmart D7400 series
ﺔﻈﺡﻼﻡﺪﻨﻋ ماﺪﺨﺘﺳا قرو ﻢﺠﺤﺏ legal ,عد ةادأ ﺔﻟﺎﻃإ ﺔیوﺎﺤﻟا ًﺔﻘﻠﻐﻡ.
ﻞﻴﻤﺤﺕ قرو رﻮﺻ ﻢﺠﺤﺑ ١٠ × ١٥ ﻢﺳ )٤ × ٦ تﺎﺻﻮﺑ(
ﻦﻜﻤی ﻞﻴﻤﺤﺕ قرو رﻮﺼﻟا ﻰﺘﺡ ﻢﺠﺡ 10 ×15 ﻢﺳ ﻲﻓ ﺔیوﺎﺡ رﻮﺼﻟا ـﻟHP Photosmart .لﻮﺼﺤﻠﻟ ﻰﻠﻋ ﻞﻀﻓأ ،ﺞﺋﺎﺘﻨﻟا
مﺪﺨﺘﺳا ﺎًﻗرو ﻢﺠﺤﺏ 10 × 15 ﻢﺳ ﻦﻡ عﻮﻥ HP Premium Plus Photo Paper) قرو HP ﺮﺥﺎﻓ اًﺪﺟ رﻮﺼﻠﻟ( وأ
HP Premium Photo Paper) قرو HP ﺮﺥﺎﻓ رﻮﺼﻠﻟ(.
ﻞﻴﻤﺤﺘﻟ قرو رﻮﺻ ﻢﺠﺤﺑ 10 × 15 ﻢﺳ ﻲﻓ ﺔﻳوﺎﺡ رﻮﺼﻟا
ﺔیوﺎﺡ ،جاﺮﺥﻹا ﻢﺙ ﺐﺤﺳا ﺔیوﺎﺡ رﻮﺼﻟا جرﺎﺨﻠﻟ.
١.ﻢﻗ ﻊﻓﺮﺏ

٢.ﻢﻗ لﺎﺥدﺈﺏ ﺔﻡزر قرﻮﻟا ﻰﻟإ ﺔیوﺎﺡ رﻮﺼﻟا ﻊﻡ ﻪﻴﺟﻮﺕ ﺔﻓﺎﺤﻟا ةﺮﻴﺼﻘﻟا مﺎﻡﻸﻟ ﻪﺟﻮﻟاو ﺺﺼﺨﻤﻟا ﺔﻋﺎﺒﻄﻠﻟ ﻰﻟإ ﻞﻔﺳﻷا .ﻢﻗ
ﺔﻟﺎﻡﺈﺏ ﺔﻡزر قرو رﻮﺼﻟا مﺎﻡﻸﻟ ﻰﺘﺡ ﻒﻗﻮﺘﺕ.
اذإ نﺎآ قرو رﻮﺼﻟا يﺬﻟا ﻪﻡﺪﺨﺘﺴﺕ ﻪﺏ بﻮﻘﺙ ﻢﻗ ﻞﻴﻤﺤﺘﺏ قرو رﻮﺼﻟا ﺚﻴﺤﺏ نﻮﻜﺕ بﻮﻘﺜﻟا ﻲﻓ ﺔﻬﺠﻟا ﺔﺒیﺮﻘﻟا ﻚﻨﻡ.
قرﻮﻟا ﻞﺥاﺪﻠﻟ ﻰﻠﻋ ﺔﻡزر قرو رﻮﺼﻟا ﻰﺘﺡ ﻒﻗﻮﺘﺕ ﻞﺋﻻﺪﻟا.
ﺎﻬﻋﺎﻔﺕرا ﻻ ﺪیﺰی ﻰﻠﻋ ﻰﻠﻋأ عﺎﻔﺕرا ﻞﻴﻟﺪﻟ ضﺮﻋ قرﻮﻟا.
٣.ﻢﻗ ﺔﻟﺎﻡﺈﺏ ﻲﻠﻴﻟد لﻮﻃ ضﺮﻋو
ﻻ ﻢﻘﺕ ةدﺎیﺰﺏ ﻞﻴﻤﺤﺕ ﺔیوﺎﺡ رﻮﺼﻟا ,ﻚﻴﻠﻋ ﺪآﺄﺘﻟا ﻦﻡ نأ ﺔﻡزر قرو رﻮﺼﻟا ﻦﻜﻤی ﺎﻬﺘﻴﺒﺜﺕ ﻞﺥاد ﺔیوﺎﺡ رﻮﺼﻟا نأو
ﻲﺑﺮﻋ
٤.ﻊﻓدا ﺔیوﺎﺡ رﻮﺼﻟا ﻞﺥاﺪﻠﻟ ﻢﺙ ﺾﻔﺥا ﺔیوﺎﺡ جاﺮﺥﻹا.
ﺐﻨﺠﺕ رﺎﺸﺤﻥا قرﻮﻟا
ةﺪﻋﺎﺴﻤﻠﻟ ﻲﻓ ﺐﻨﺠﺕ تارﺎﺸﺤﻥا ،قرﻮﻟا ﻊﺒﺕا تﺎﻬﻴﺟﻮﺘﻟا ﺔﻴﻟﺎﺘﻟا.
•جﺮﺥأ قرﻮﻟا عﻮﺒﻄﻤﻟا ﻦﻡ ﺔیوﺎﺡ جاﺮﺥﻹا ةرﻮﺼﺏ ةرﺮﻜﺘﻡ.
•ﻊﻨﻡا ﺪﻌﺠﺕ قرﻮﻟا وأ ﻪﻴﻨﺙ ﻦیﺰﺨﺘﺏ ﻊﻴﻤﺟ قرﻮﻟا ﺮﻴﻏ مﺪﺨﺘﺴﻤﻟا ﻞﻜﺸﺏ ٍﻮﺘﺴﻡ ﻲﻓ ﺲﻴآ ﻦﻜﻤی ةدﺎﻋإ مﺎﻜﺡإ ﻪﻗﻼﻏإ.
فاﻮﺤﻟا ﻢﻟ ﻢﺘی ﺎﻬﻴﻨﺙ وأ ﺎﻬﻘیﺰﻤﺕ.
لﺎﺥدﻹا ﻞﻡﺎﻜﻟﺎﺏ ﻦﻡ ﺲﻔﻥ عﻮﻨﻟا ﻢﺠﺤﻟاو.
ﻻ مﻮﻘی ﻲﻄﺏ قرﻮﻟا ﻞﺥاد ﺔیوﺎﺡ لﺎﺥدﻹا.
•ﺪآﺄﺕ ﻦﻡ نأ قاروﻷا ﻲﺘﻟا ﻢﺕ ﺎﻬﻠﻴﻤﺤﺕ ﻲﻓ ﺔیوﺎﺡ لﺎﺥدﻹا ﻲﻓ ﻊﺽو ٍﻮﺘﺴﻡ نأو
•ﻻ ﻊﻀﺕ قاروأ عاﻮﻥﺄﺏ مﺎﺠﺡأو ﺔﻔﻠﺘﺨﻡ ﻲﻓ ﺔیوﺎﺡ ؛لﺎﺥدﻹا ﺚﻴﺡ ﺐﺠی نأ نﻮﻜﺕ ﺔﻡزر قرﻮﻟا ةدﻮﺟﻮﻤﻟا ﻲﻓ ﺔیوﺎﺡ
•ﻂﺒﺽا ﻞﻴﻟد ضﺮﻋ قرﻮﻟا ﻲﻓ ﺔیوﺎﺡ لﺎﺥدﻹا ﺚﻴﺤﺏ ﻢﺘی ﺎﻬﺘﻴﺒﺜﺕ مﺎﻜﺡﺈﺏ ﻰﻠﻋ ﻊﻴﻤﺟ عاﻮﻥأ قرﻮﻟا .ﺪآﺄﺕ ﻦﻡ نأ ﻞﻴﻟد ضﺮﻋ
قرﻮﻟا
•ﻻ مﺪﺨﺘﺴﺕ ةﻮﻘﻟا لﺎﺥدﻹ قرﻮﻟا ﺔﻓﺎﺴﻤﻟ ةﺪﻴﻌﺏ ًا ﺪ ﺟ ﻲﻓ ﺔیوﺎﺡ لﺎﺥدﻹا.
•ﻢﻗ ماﺪﺨﺘﺳﺎﺏ عاﻮﻥأ قرﻮﻟا ﻰﺹﻮﻤﻟا ﺎﻬﺏ زﺎﻬﺠﻟ HP Photosmart.
ضﺮﻋ رﻮﺼﻟا ﺎهﺪﻳﺪﺤﺕو ﺎﻬﺘﻋﺎﺒﻃو
ﻦﻜﻤی ضﺮﻋ رﻮﺼﻟا ةدﻮﺟﻮﻤﻟا ﻰﻠﻋ ﺔﻗﺎﻄﺏ ةﺮآاﺬﻟا وأ زﺎﻬﺟ ﻦیﺰﺨﺘﻟا وأ ﺎهﺪیﺪﺤﺕ ﻞﺒﻗ وأ ءﺎﻨﺙأ ﺎﻬﺘﻋﺎﺒﻃ.
ضﺮﻌﻟ رﻮﺼﻟا ﺎهﺪﻳﺪﺤﺕو ﺎﻬﺘﻋﺎﺒﻃو
١.ﻞﺥدأ ﺔﻗﺎﻄﺏ ةﺮآاﺬﻟا ﻰﻟإ ﺔﺤﺘﻔﻟا ﺔﻤﺋﻼﻤﻟا ﻲﻓ زﺎﻬﺟ HP Photosmart، وأ ﻢﻗ ﻞﻴﺹﻮﺘﺏ زﺎﻬﺟ ﻦیﺰﺨﺕ ﺬﻔﻨﻤﺏ USB
ﻲﻡﺎﻡﻷا.
ﺐﻨﺠﺕ رﺎﺸﺤﻥا قرﻮﻟا ٢٠

ﻲﺑﺮﻋ
ﻞﺼﻔﻟا ٣
١xD-Picture Card
٢CompactFlash (CF (عﻮﻨﻟا I وII
٣ﺔﻗﺎﻄﺏ ةﺮآاﺬﻟا Memory Stick Pro وأ Memory Stick Select وأ Memory Stick Magic Gate وأ Memory
Stick Duo وأ Duo Pro) لﻮﺤﻡ يرﺎﻴﺘﺥا(، وأ Memory Stick Micro) لﻮﺤﻡ ﻲﻡاﺰﻟإ(.
٤ﺔﻗﺎﻄﺏ ةﺮآاﺬﻟا Secure Digital (SD (وأ Secure Digital Mini) لﻮﺤﻡ ﻲﻡاﺰﻟإ (وأ Secure Digital High
Capacity (SDHC (وأ MultiMediaCard (MMC (وأ MMC Plus وأ MMC Mobile (RS-MMC؛
)لﻮﺤﻡ ﻲﻡاﺰﻟإ (وأ ﺔﻗﺎﻄﺏ TransFlash MicroSD وأ ﺔﻗﺎﻄﺏ Secure MultiMedia
ﺪﻨﻋ ﺎﻬﺘﻋﺎﺒﻃ.
رﻮﺼﻟا( ﻦﻡ ﻰﻠﻋ ﺔﺡﻮﻟ ﻢﻜﺤﺘﻟا.
٢١ HP Photosmart D7400 series
ﺮﻬﻈﺕ ﺔﻤﺋﺎﻘﻟا Photosmart Express ﻢﺘیو ضﺮﻋ ثﺪﺡأ ةرﻮﺹ ﻰﻠﻋ ﺔﺷﺎﺷ ضﺮﻌﻟا.
٢.ﻢﻗ ﻞﻴﻤﺤﺘﺏ قرو رﻮﺹ ﺔﻴﻓاﺮﻏﻮﺕﻮﻓ ﻰﺘﺡ 10 × 15 ﻢﺳ ﻲﻓ ﺔیوﺎﺡ رﻮﺼﻟا وأ قرو ﻢﺠﺤﺏ ﻞﻡﺎآ ﻲﻓ ﺔیوﺎﺡ لﺎﺥدﻹا
ﺔﻴﺴﻴﺋﺮﻟا.
٣.ﺲﻤﻟا View) ضﺮﻋ(.
ﺮﻬﻈﺘﺳ ﺔﺷﺎﺷ View Photos) ضﺮﻋ رﻮﺻ(.
وأ ﺮیﺮﻤﺘﻠﻟ لﻼﺥ ضوﺮﻌﻟا ةﺮﻐﺼﻤﻟا رﻮﺼﻠﻟ.
٤.ﻂﻐﺽا
٥.اذإ ﻢﺕ ﻞﻴﻠﻈﺕ ضﺮﻌﻟا ﺮﻐﺼﻤﻟا ةرﻮﺼﻠﻟ ﻲﺘﻟا ﺪیﺮﺕ ،ﺎﻬﺽﺮﻋ ﺎﻬﺴﻤﻟا.
٦.ﺎﻡﺪﻨﻋ ﺮﻬﻈﺕ ةرﻮﺼﻟا ﺎهﺪﺡو ﻰﻠﻋ ﺔﺷﺎﺷ ،ضﺮﻌﻟا ﺎﻬﺴﻤﻟا ةﺮﻡ ىﺮﺥأ.
ﺮﻬﻈﺘﺳ ﺔﺷﺎﺷ Photo Options) تارﺎﻴﺥ ةرﻮﺼﻟا(.
٧.ﺲﻤﻟا Print Preview) ﺔﻨﻳﺎﻌﻡ ﺔﻋﺎﺒﻄﻟا(.
ﺮﻬﻈﺕ ﺔﺷﺎﺸﻟا Print Preview) ﺔﻨﻳﺎﻌﻡ ﺔﻋﺎﺒﻄﻟا(، ضﺮﻌﺕو ﺔﻴﻔﻴﻜﻟا ﻲﺘﻟا وﺪﺒﺘﺳ ﺎﻬﻴﻠﻋ ةرﻮﺼﻟا
اذإ ﺖﻨآ ﺪیﺮﺕ ﺪیﺪﺤﺕ رﻮﺹ ﺔﻴﻓﺎﺽإ ﺎﻬﺽﺮﻌﻟ ،ﺎﻬﺘﻋﺎﺒﻃو ﺲﻤﻟا Add More) ﺔﻓﺎﺽإ ﺪﻳﺰﻤﻟا(، رﺮآو تاﻮﻄﺨﻟا ﻦﻡ 4
ﻰﻟإ 6.
٨.)يرﺎﻴﺘﺥا (اذإ ﺖﻨآ ﺪیﺮﺕ ﻖﻘﺤﺘﻟا ﻦﻡ و/وأ ﻞیﺪﻌﺕ يأ داﺪﻋإ ﻦﻡ تاداﺪﻋإ ،ﺔﻋﺎﺒﻄﻟا ﺲﻤﻟا Settings) تاداﺪﻋﻹا(.
٩.ﺔﻋﺎﺒﻄﻟ ،رﻮﺼﻟا ﺲﻤﻟا Print) ﺔﻋﺎﺒﻃ( وأ ﻂﻐﺽا رﺰﻟا Print Photos) ﺔﻋﺎﺒﻃ
ضﺮﻌﺕ ﺔﺷﺎﺷ ﺔﻟﺎﺡ ﺔﻋﺎﺒﻄﻟا دﺪﻋ تﺎﺤﻔﺼﻟا بﻮﻠﻄﻤﻟا ﺎﻬﺘﻋﺎﺒﻃ ﺖﻗﻮﻟاو رﺪﻘﻤﻟا مﺎﻤﺕﻹ ﺔﻤﻬﻡ ﺔﻋﺎﺒﻄﻟا.
ﺺﺤﻓ تﺎﻳﻮﺘﺴﻡ ﺮﺒﺤﻟا ةرﺪﻘﻤﻟا
ﻚﻨﻜﻤی ﺔﻟﻮﻬﺴﺏ ﺺﺤﻓ ىﻮﺘﺴﻡ ﺮﺒﺤﻟا ﺪیﺪﺤﺘﻟ ةﺪﻤﻟا ﺔﻡزﻼﻟا لاﺪﺒﺘﺳﻻ ﺔﺷﻮﻃﺮﺥ ﺮﺒﺡ .نإ ىﻮﺘﺴﻡ ﺮﺒﺤﻟا ﺢﺽﻮی ﺔﻴﻤآ ﺮﺒﺤﻟا
ةرﺪﻘﻤﻟا ﺔﻴﻘﺒﺘﻤﻟا ﻲﻓ تﺎﺷﻮﻃﺮﺥ ﺮﺒﺤﻟا.

ﺔﻈﺡﻼﻡﻦﻜﻤﺘی زﺎﻬﺟ HP Photosmart ﻦﻡ ﻒﺸﻜﻟا ﻰﻠﻋ تﺎیﻮﺘﺴﻡ ﺮﺒﺤﻟا اذإ نﺎآ ﺮﺒﺡ HP ﻲﻠﺹأ .ﺪﻗ ﻻ ﻦﻜﻤی
ﻞﻴﺠﺴﺕ تﺎیﻮﺘﺴﻡ ﺮﺒﺤﻟا ﻲﻓ تﺎﺷﻮﻃﺮﺥ ﺮﺒﺤﻟا ﻲﺘﻟا ﻢﺕ ﺎﻬﺘﺌﺒﻌﺕ وأ ﺎﻬﻡاﺪﺨﺘﺳا ﻲﻓ ةﺰﻬﺟأ ىﺮﺥأ ﺔﻗﺪﺏ.
ﺔﻈﺡﻼﻡ ﻢﺘی ماﺪﺨﺘﺳا ﺮﺒﺡ ﻦﻡ تﺎﺷﻮﻃﺮﺥ ﺔﻋﺎﺒﻄﻟا ﻲﻓ ءاﺮﺟإ ﺔﻋﺎﺒﻄﻟا ﺪیﺪﻌﻟﺎﺏ ﻦﻡ قﺮﻄﻟا ﺔﻔﻠﺘﺨﻤﻟا ,ﺎﻤﺏ ﻲﻓ ﻚﻟذ ﻲﻓ
ءاﺮﺟإ ﺔﺌﻴﻬﺘﻟا ,يﺬﻟا مﻮﻘی ﺰﻴﻬﺠﺘﺏ زﺎﻬﺠﻟا تﺎﺷﻮﻃﺮﺨﻟاو ﺔﻋﺎﺒﻄﻠﻟ ﻲﻓو ﺔﻥﺎﻴﺹ سوؤر ﺔﻋﺎﺒﻄﻟا ,ﻲﺘﻟا مﻮﻘﺕ ظﺎﻔﺤﻟﺎﺏ ﻰﻠﻋ
تﺎﺤﺘﻓ ﺔﻋﺎﺒﻄﻟا ﺔﻔﻴﻈﻥ بﺎﻴﺴﻥاو ﺮﺒﺤﻟا ﻰﻠﻋ ﺎﻡ ماﺮی .ﺔﻓﺎﺽﻹﺎﺏ ﻰﻟإ ﻚﻟذ ,ﻰﻘﺒﺕ ﺾﻌﺏ ﺎیﺎﻘﺏ ﺮﺒﺤﻠﻟ ﻲﻓ ﺔﺷﻮﻃﺮﺨﻟا ﺪﻌﺏ
ﺎﻬﻡاﺪﺨﺘﺳا .لﻮﺼﺤﻠﻟ ﻰﻠﻋ ﺪیﺰﻤﻟا ﻦﻡ تﺎﻡﻮﻠﻌﻤﻟا ,ﻊﺟار www.hp.com/go/inkusage.
ﺺﺤﻔﻟ تﺎﻳﻮﺘﺴﻡ ﺮﺒﺤﻟا ﻦﻡ ﺔﺡﻮﻟ ﻢﻜﺤﺘﻟا
١.ﻢﻗ ﺲﻤﻠﺏ Setup) داﺪﻋإ( ﻰﻠﻋ ﺔﺷﺎﺷ ضﺮﻌﻟا.
٢.ﻢﻗ ﺲﻤﻠﺏ Tools) تاودﻷا(.
٣.ﻢﻗ ﺲﻤﻠﺏ Display Ink Gauge) ضﺮﻋ سﺎﻴﻗ ﺮﺒﺤﻟا(.
مﻮﻘی زﺎﻬﺟ HP Photosmart ضﺮﻌﺏ ﺎًﺳﺎﻴﻗ ﺢﺽﻮی تﺎیﻮﺘﺴﻡ ﺮﺒﺤﻟا ةرﺪﻘﻤﻟا ﻞﻜﻟ تﺎﺷﻮﻃﺮﺨﻟا ﺔﺘﺒﺜﻤﻟا.
ﻲﺑﺮﻋ
لاﺪﺒﺘﺳا تﺎﺵﻮﻃﺮﺥ ﺮﺒﺤﻟا
ﻊﺒﺕا ﻩﺬه تﺎﻤﻴﻠﻌﺘﻟا ﺎﻡﺪﻨﻋ جﺎﺘﺤﺕ ﻲﻟإ لاﺪﺒﺘﺳا تﺎﺷﻮﻃﺮﺥ ﺮﺒﺤﻟا.
ﺔﻈﺡﻼﻡاذإ ﺖﻨآ مﻮﻘﺕ ﺖﻴﺒﺜﺘﺏ تﺎﺷﻮﻃﺮﺥ ﺮﺒﺡ ﻲﻓ HP Photosmart لوﻷ ةﺮﻡ ,ﺪآﺄﺕ ﻦﻡ ﻚﻥأ مﺪﺨﺘﺴﺕ تﺎﺷﻮﻃﺮﺥ
ﺮﺒﺤﻟا ةدوﺰﻤﻟا ﻊﻡ زﺎﻬﺠﻟا .ﻢﺕ ﻊﻴﻨﺼﺕ ﺮﺒﺤﻟا دﻮﺟﻮﻤﻟا ﻞﺥاد ﻩﺬه تﺎﺷﻮﻃﺮﺨﻟا ﺎًﺼﻴﺼﺥ طﻼﺘﺥﻼﻟ ﻊﻡ ﺮﺒﺤﻟا دﻮﺟﻮﻤﻟا ﻲﻓ
ةﺪﺡو سوؤر ﺔﻋﺎﺒﻄﻟا ﺪﻨﻋ مﺎﻴﻘﻟا ﺔﻴﻠﻤﻌﺏ داﺪﻋﻹا ةﺮﻤﻠﻟ ﻰﻟوﻷا.
اذإ ﻢﻟ ﻦﻜی ﻚیﺪﻟ ﻞﻌﻔﻟﺎﺏ تﺎﺷﻮﻃﺮﺥ ﺮﺒﺡ ﺔﻠیﺪﺏ زﺎﻬﺠﻟ HP Photosmart، ﻚﻨﻜﻤی ﺎﻬﺒﻠﻃ ﻦﻡ لﻼﺥ ﺮﻘﻨﻟا قﻮﻓ ﺰﻡﺮﻟا قﻮﺴﺘﻟا
ءاﺮﺸﻟ تﺎﻡﺰﻠﺘﺴﻡ HP) Shop for HP Supplies( ﻰﻠﻋ ﺮﺕﻮﻴﺒﻤﻜﻟا .ﺪﺟﻮیو اﺬه ﺰﻡﺮﻟا ﻰﻠﻋ ةﺰﻬﺟأ ﺮﺕﻮﻴﺒﻤﻜﻟا ﻲﺘﻟا
ﻞﻤﻌﺕ مﺎﻈﻨﺏ ﻞﻴﻐﺸﺘﻟا Windows ﻲﻓ ﺪﻠﺠﻤﻟا HP ﻲﻓ ﺔﻤﺋﺎﻘﻟا Start) أﺪﺑا(.
www.hp.com/buy/supplies.
ﺪیﺰﻤﻠﻟ ﻦﻡ تﺎﻡﻮﻠﻌﻤﻟا ﻊﺟار
لاﺪﺒﺘﺳﻻ تﺎﺵﻮﻃﺮﺥ ﺮﺒﺤﻟا
١.ﺪآﺄﺕ ﻦﻡ ﻞﻴﻐﺸﺕ زﺎﻬﺟ HP Photosmart.
٢.ﺢﺘﻓا بﺎﺏ ﺔﺷﻮﻃﺮﺥ ﺮﺒﺤﻟا ﻦﻡ لﻼﺥ ﻪﻌﻓر ﻦﻡ ﺰآﺮﻤﻟا ﻲﻡﺎﻡﻷا زﺎﻬﺠﻠﻟ ﻰﺘﺡ ﻪﺘﻴﺒﺜﺕ ﻲﻓ ﻪﻥﺎﻜﻡ مﺎﻜﺡﺈﺏ.
٣.ﻂﻐﺽا ﻰﻠﻋ ﻞﻔﺳأ جﻻﺰﻤﻟا دﻮﺟﻮﻤﻟا ﻞﻔﺳﺄﺏ ﺔﺷﻮﻃﺮﺥ ﺮﺒﺤﻟا داﺮﻤﻟا ﺎﻬﻟاﺪﺒﺘﺳا ﻢﺙ ﻢﻗ ﻊﻓﺮﺏ جﻻﺰﻤﻟا.
ﻲﻓ ﺔﻟﺎﺡ لاﺪﺒﺘﺳا ﺔﺷﻮﻃﺮﺥ ﺮﺒﺤﻟا دﻮﺳﻷا ,ﻊﻓرا جﻻﺰﻤﻟا ﻲﻓ ﻰﺼﻗأ ﺐﻥﺎﺠﻟا ﺮﺴیﻷا.
لاﺪﺒﺘﺳا تﺎﺷﻮﻃﺮﺥ ﺮﺒﺤﻟا ٢٢

ﻲﺑﺮﻋ
ﻞﺼﻔﻟا ٣
ﻲﻓ ﺔﻟﺎﺡ لاﺪﺒﺘﺳا ﺔﺷﻮﻃﺮﺥ ةﺪﺡاو ﻦﻡ ﻦﻴﺏ تﺎﺷﻮﻃﺮﺥ ﺮﺒﺤﻟا نﻮﻠﻤﻟا ﺔﺴﻡﺎﺨﻟا ,ﻞﺜﻡ نﻮﻠﻟا ﺮﻔﺹﻷا ,يوﺎﻤﺳ ﺢﺕﺎﻓ) قرزأ,(
يوﺎﻤﺳ ,ﻲﻥاﻮﺟرأ ﺢﺕﺎﻓ) يدرو ,(وأ ﻲﻥاﻮﺟرأ ,ﻊﻓرا جﻻﺰﻤﻟا ﺐﺳﺎﻨﻤﻟا ﻲﻓ ﺔﻘﻄﻨﻤﻟا ﺔیﺰآﺮﻤﻟا.
١جﻻﺰﻡ ﺔﺷﻮﻃﺮﺥ ﺮﺒﺤﻟا ﺔﺷﻮﻃﺮﺨﻟ ﺮﺒﺤﻟا دﻮﺳﻷا
٢ﺞﻴﻟاﺰﻡ ﺔﺷﻮﻃﺮﺥ ﺮﺒﺤﻟا تﺎﺷﻮﻃﺮﺨﻟ ﺮﺒﺤﻟا نﻮﻠﻤﻟا
٤.ﺐﺤﺳا ﺔﺷﻮﻃﺮﺥ ﺮﺒﺤﻟا كﻮﺤﻥ ﺎﻬﺟاﺮﺥﻹ ﻦﻡ ﺎﻬﺘﺤﺘﻓ ﺎﻬﺘﻟازإو.
٢٣ HP Photosmart D7400 series
٥.ﻢﻗ ﺔﻟازﺈﺏ ﺔﺷﻮﻃﺮﺥ ﺮﺒﺤﻟا ةﺪیﺪﺠﻟا ﻦﻡ ﺎﻬﺕﻮﺒﻋ ,ﻢﺙ ﺎﻬﻠﻤﺡا ﻦﻡ ﺎﻬﻀﺒﻘﻡ ,ﻊﻓداو ﺔﺷﻮﻃﺮﺥ ﺮﺒﺤﻟا ﻰﻟإ ﺔﺤﺘﻔﻟا ﺔﻏرﺎﻔﻟا.
ﻢﻗ ﻖﻴﻓﻮﺘﺏ نﻮﻠﻟا جذﻮﻤﻥو ﺔﺷﻮﻃﺮﺥ ﺮﺒﺤﻟا ﻊﻡ نﻮﻠﻟا جذﻮﻤﻨﻟاو ﻦیدﻮﺟﻮﻤﻟا ﻰﻠﻋ ﺔﺏﺮﻋ ﺔﻋﺎﺒﻄﻟا.

٦.ﻢﻗ قﻼﻏﺈﺏ جﻻﺰﻤﻟا ﺪآﺄﺕو ﻦﻡ ﻪﻗﻼﻏإ مﺎﻜﺡﺈﺏ.
٧.رﺮآ تاﻮﻄﺥ 3 ﻰﻟإ 6 ﻞﻜﻟ ﻦﻡ تﺎﺷﻮﻃﺮﺥ ﺮﺒﺤﻟا ﻲﺘﻟا مﻮﻘﺕ ﺎﻬﻟاﺪﺒﺘﺳﺎﺏ.
٨.ﻖﻠﻏأ بﺎﺏ ﺔﺷﻮﻃﺮﺥ ﺮﺒﺤﻟا.
ﻲﺑﺮﻋ
لاﺪﺒﺘﺳا تﺎﺷﻮﻃﺮﺥ ﺮﺒﺤﻟا ٢٤

ﻲﺑﺮﻋ
٤ﻞﺡ تﻼﻜﺸﻤﻟا ﻢﻋﺪﻟاو
يﻮﺘﺤی اﺬه ﻞﺼﻔﻟا ﻰﻠﻋ تﺎﻡﻮﻠﻌﻡ ﻞﺡ تﻼﻜﺸﻤﻟا ﺔﺒﺴﻨﻟﺎﺏ زﺎﻬﺠﻟ HP Photosmart .ﺮﻓﻮﺘﺕ تﺎﻡﻮﻠﻌﻡ ةدﺪﺤﻡ لﻮﺡ ﺎیﺎﻀﻗ ﺖﻴﺒﺜﺘﻟا ﻦیﻮﻜﺘﻟاو
ﺾﻌﺏو ﻊﻴﺽاﻮﻡ ﻞﻴﻐﺸﺘﻟا .ﺪیﺰﻤﻠﻟ ﻦﻡ تﺎﻡﻮﻠﻌﻤﻟا لﻮﺡ ﻞﺡ ،تﻼﻜﺸﻤﻟا ﻊﺟار تﺎﻤﻴﻠﻌﺘﻟا ةﺮهﺎﻈﻟا ﻰﻠﻋ ﺔﺷﺎﺸﻟا ةدوﺰﻤﻟا ﻊﻡ ﺞﻡﺎﻥﺮﺒﻟا صﺎﺨﻟا
ﻚﺏ.
ثﺪﺤﺕ ﺪیﺪﻌﻟا ﻦﻡ تﻼﻜﺸﻤﻟا ﺪﻨﻋ ﻞﻴﺹﻮﺕ زﺎﻬﺟ HP Photosmart ﺮﺕﻮﻴﺒﻤﻜﻟﺎﺏ ماﺪﺨﺘﺳﺎﺏ ﻞﺏﺎآ USB ﻞﺒﻗ ﺖﻴﺒﺜﺕ ﺞﻡﺎﻥﺮﺏ
HP Photosmart
ﻲﻓ ﺮﺕﻮﻴﺒﻤﻜﻟا .اذإ ﺖﻤﻗ ﻞﻴﺹﻮﺘﺏ HP Photosmart ﺮﺕﻮﻴﺒﻤﻜﻟﺎﺏ صﺎﺨﻟا ﻚﺏ ﻞﺒﻗ نأ ﺐﻠﻄﺕ ﻚﻨﻡ ﺔﺷﺎﺷ ﺖﻴﺒﺜﺕ
ﺞﻡﺎﻥﺮﺒﻟا مﺎﻴﻘﻟا ،ﻚﻟﺬﺏ ﺐﺠﻴﻓ ﻚﻴﻠﻋ عﺎﺒﺕا ﻩﺬه تاﻮﻄﺨﻟا:
ﻞﺡ تﻼﻜﺸﻡ ﺎﻳﺎﻀﻗ ﺔﻌﺋﺎﺵ ﻖﻠﻌﺘﺕ داﺪﻋﻹﺎﺑ
١.ﻢﻗ ﻞﺼﻔﺏ ﻞﺏﺎآ USB ﻦﻋ ﺮﺕﻮﻴﺒﻤﻜﻟا.
٢.ﻢﻗ ءﺎﻐﻟﺈﺏ ﺖﻴﺒﺜﺕ ﺞﻡﺎﻥﺮﺒﻟا) اذإ ﺖﻨآ ﺪﻗ ﺖﻤﻗ ﻪﺘﻴﺒﺜﺘﺏ ﻞﻌﻔﻟﺎﺏ(.
٣.ﺪﻋأ ﻞﻴﻐﺸﺕ ﺮﺕﻮﻴﺒﻤﻜﻟا.
٤.ﻢﻗ فﺎﻘیﺈﺏ ﻞﻴﻐﺸﺕ زﺎﻬﺟ HP Photosmart، ﺮﻈﺘﻥاو ةﺪﻤﻟ ،ﺔﻘﻴﻗد ﻢﺙ ﻢﻗ ةدﺎﻋﺈﺏ ﻪﻠﻴﻐﺸﺕ.
٥.ﻢﻗ ةدﺎﻋﺈﺏ ﺖﻴﺒﺜﺕ ﺞﻡﺎﻥﺮﺏ HP Photosmart.
ﻪﻴﺒﻨﺕﻻ ﻢﻘﺕ ﻞﻴﺹﻮﺘﺏ ﻞﺏﺎآ USB زﺎﻬﺠﺏ ﺮﺕﻮﻴﺒﻤﻜﻟا ﻰﺘﺡ ﻢﺘی ﻚﺘﺒﻟﺎﻄﻡ ﻚﻟﺬﺏ ﺔﻄﺳاﻮﺏ ﺔﺷﺎﺷ ﺖﻴﺒﺜﺕ ﺞﻡﺎﻥﺮﺒﻟا.
لﻮﺼﺤﻠﻟ ﻰﻠﻋ تﺎﻡﻮﻠﻌﻡ لﻮﺡ ﺔﻌﺟاﺮﻡ ﻢﻋﺪﻟا ,ﻊﺟار ءﺰﺠﻟا ﻲﻠﺥاﺪﻟا ءﺎﻄﻐﻠﻟ ﻲﻔﻠﺨﻟا ﻦﻡ اﺬه ﻞﻴﻟﺪﻟا.
ءﺎﻐﻟإ ﺖﻴﺒﺜﺕ ﺞﻡﺎﻥﺮﺒﻟا ﻢﺙ ةدﺎﻋإ ﻪﺘﻴﺒﺜﺕ
اذإ نﺎآ ﺖﻴﺒﺜﺘﻟا ﺮﻴﻏ ،ﻞﻡﺎآ وأ اذإ ﺖﻤﻗ ﻞﻴﺹﻮﺘﺏ ﻞﺏﺎآ USB ﺮﺕﻮﻴﺒﻤﻜﻟﺎﺏ ﻞﺒﻗ نأ ﺐﻠﻄﺕ ﻚﻨﻡ ﺔﺷﺎﺷ ﺖﻴﺒﺜﺕ ﺞﻡﺎﻥﺮﺒﻟا مﺎﻴﻘﻟا ،ﻚﻟﺬﺏ ﺪﻘﻓ جﺎﺘﺤﺕ ﻰﻟإ
ءﺎﻐﻟإ ﺖﻴﺒﺜﺕ ﺞﻡﺎﻥﺮﺒﻟا ﻢﺙ ةدﺎﻋإ ﻪﺘﻴﺒﺜﺕ .ﻻ ﻢﻘﺕ ﺔﻃﺎﺴﺒﺏ فﺬﺤﺏ تﺎﻔﻠﻡ ﻖﻴﺒﻄﺕ HP Photosmart ﻦﻡ زﺎﻬﺟ ﺮﺕﻮﻴﺒﻤﻜﻟا .ﺪآﺄﺕ ﻦﻡ ﺎﻬﺘﻟازإ ﺔﻘیﺮﻄﻟﺎﺏ
ﺞﻡﺎﻥﺮﺒﻟا دوﺰﻤﻟا ﻊﻡ زﺎﻬﺟ HP Photosmart.
Control Panel) ﺔﺡﻮﻟ ﻢﻜﺤﺘﻟا( ﻂﻘﻓ(.
ﺞﻡاﺮﺒﻟا() وأ ﺮﻘﻥا قﻮﻓ Uninstall a program
ﺔﺤﻴﺤﺼﻟا ماﺪﺨﺘﺳﺎﺏ ةادأ ءﺎﻐﻟإ ﺖﻴﺒﺜﺘﻟا ﺮﻓﻮﺘﻤﻟا ﺪﻨﻋ ﺖﻴﺒﺜﺕ
ءﺎﻐﻟﻹ ﺖﻴﺒﺜﺘﻟا ﻦﻡ زﺎﻬﺟ ﺮﺕﻮﻴﺒﻤآ ﻞﻤﻌﻳ مﺎﻈﻨﺑ ﻞﻴﻐﺸﺘﻟا Windows ﻢﺙ ةدﺎﻋإ ﺖﻴﺒﺜﺘﻟا
١.ﻲﻓ ﻂیﺮﺷ مﺎﻬﻡ Windows، ﺮﻘﻥا قﻮﻓ Start) أﺪﺑا(، ﻢﺙ Settings) تاداﺪﻋإ(، ﻢﺙ Control Panel) ﺔﺡﻮﻟ ﻢﻜﺤﺘﻟا() وأ
٢.ﺮﻘﻥا اًﺮﻘﻥ ﺎًﺟودﺰﻡ قﻮﻓ Add/Remove Programs) ﺔﻓﺎﺽإ/ﺔﻟازإ
)ءﺎﻐﻟإ ﺖﻴﺒﺜﺕ ﺞﻡﺎﻥﺮﺑ((.
٣.دﺪﺡ HP Photosmart All-in-One Driver Software) ﺞﻡﺎﻥﺮﺑ ﺞﻡﺎﻥﺮﺒﻟ ﻞﻴﻐﺸﺘﻟا HP Photosmart All-In-
One(، ﻢﺙ ﺮﻘﻥا قﻮﻓ Change/Remove) ﺮﻴﻐﺕ/ﺔﻟازإ(.
ﻊﺒﺕا تادﺎﺷرﻹا ﻲﺘﻟا ﺮﻬﻈﺕ ﻰﻠﻋ ﺔﺷﺎﺸﻟا.
٤.ﻢﻗ ﻞﺼﻔﺏ زﺎﻬﺟ HP Photosmart ﻦﻋ زﺎﻬﺟ ﺮﺕﻮﻴﺒﻤﻜﻟا.
٥.ﺪﻋأ ﻞﻴﻐﺸﺕ ﺮﺕﻮﻴﺒﻤﻜﻟا.
٢٥ HP Photosmart D7400 series
ﺔﻈﺡﻼﻡﻦﻡ ﻢﻬﻤﻟا نأ مﻮﻘﺕ ﻞﺼﻔﺏ HP Photosmart ﻞﺒﻗ ةدﺎﻋإ ﻞﻴﻐﺸﺕ ﺮﺕﻮﻴﺒﻤﻜﻟا .ﻻ ﻢﻘﺕ ﻞﻴﺹﻮﺘﺏ HP Photosmart
ﺮﺕﻮﻴﺒﻤﻜﻟﺎﺏ ﻰﺘﺡ ﻲﻬﺘﻨﺕ ﻦﻡ ةدﺎﻋإ ﺖﻴﺒﺜﺕ ﺞﻡﺎﻥﺮﺒﻟا.
٦.ﻞﺥدأ صﺮﻘﻟا طﻮﻐﻀﻤﻟا زﺎﻬﺠﻟ HP Photosmart ﻰﻟإ كﺮﺤﻡ صاﺮﻗﻷا ﺔﻃﻮﻐﻀﻤﻟا ﻲﻓ زﺎﻬﺟ ،ﺮﺕﻮﻴﺒﻤﻜﻟا ﻢﺙ ﻢﻗ ﻞﻴﻐﺸﺘﺏ ﺞﻡﺎﻥﺮﺏ
داﺪﻋﻹا.
٧.ﻊﺒﺕا تادﺎﺷرﻹا ةﺮهﺎﻈﻟا ﻰﻠﻋ ﺔﺷﺎﺸﻟا تادﺎﺷرﻹاو ةﺮﻓﻮﺘﻤﻟا ﻲﻓ ﻞﻴﻟد داﺪﻋﻹا دوﺰﻤﻟا ﻊﻡ زﺎﻬﺟ HP Photosmart.
ﻞﺡ تﻼﻜﺸﻡ ﻖﻠﻌﺘﺕ داﺪﻋﺈﺑ ةﺰﻬﺟﻷا
مﺪﺨﺘﺳا اﺬه ﻢﺴﻘﻟا ﻞﺤﻟ يأ ﺔﻠﻜﺸﻡ ﺪﻗ ﻚﻬﺟاﻮﺕ ءﺎﻨﺙأ ﻂﺒﺽ ةﺰﻬﺟأ HP Photosmart.
ﻻ ﻦﻜﻤﻳ ﻞﻴﻐﺸﺕ زﺎﻬﺟ HP Photosmart
ﺐﺒﺴﻟا:زﺎﻬﺟ HP Photosmart ﺮﻴﻏ ﻞﺼﺘﻡ رﺪﺼﻤﺏ ﺔﻗﺎﻄﻟا ﻞﻜﺸﺏ ﺢﻴﺤﺹ.
ﻞﺤﻟا
•ﺪآﺄﺕ ﻦﻡ ﻞﻴﺹﻮﺕ ﻚﻠﺳ ﺔﻗﺎﻄﻟا مﺎﻜﺡﺈﺏ ﻼﻜﺏ ﻦﻡ زﺎﻬﺟ HP Photosmart لﻮﺤﻡو ﺔﻗﺎﻄﻟا .ﻢﻗ ﻞﻴﺹﻮﺘﺏ ﻚﻠﺳ ﺔﻗﺎﻄﻟا ﺬﺥﺄﻤﺏ ﺔﻗﺎﻃ,
وأ زﺎﻬﺠﺏ ﺔیﺎﻤﺡ ﻦﻡ عﺎﻔﺕرا رﺎﻴﺘﻟا ﺊﺟﺎﻔﻤﻟا وأ عﺎﻄﻘﺏ ءﺎﺏﺮﻬآ.

١ﻞﻴﺹﻮﺕ ﺔﻗﺎﻄﻟا
٢ﻚﻠﺳ ﺔﻗﺎﻄﻟا لﻮﺤﻤﻟاو
٣ﺬﺥﺄﻡ ﺔﻗﺎﻄﻟا
ﻲﺑﺮﻋ
•اذإ ﺖﻨآ مﺪﺨﺘﺴﺕ عﺎﻄﻗ ،ءﺎﺏﺮﻬآ ﺪآﺄﺘﻓ ﻦﻡ ﻪﻥأ ﺪﻴﻗ ﻞﻴﻐﺸﺘﻟا .وأ ,لوﺎﺡ ﻞﻴﺹﻮﺕ HP Photosmart ًة ﺮ ﺷ ﺎ ﺒ ﻡ ﺬﺥﺄﻤﺏ ﺔﻗﺎﻄﻟا.
•ﺮﺒﺘﺥا ﺬﺥﺄﻡ ﺔﻗﺎﻄﻟا ﻰﺘﺡ ﺪآﺄﺘﺕ ﻪﻥأ ﻞﻤﻌی .ﻢﻗ ﻞﻴﺹﻮﺘﺏ زﺎﻬﺟ فﺮﻌﺕ ﻪﻥأ ،ﻞﻤﻌی ﻖﻘﺤﺕو ﺎﻤﻡ اذإ نﺎآ زﺎﻬﺠﻟا ًﻼ ﺼ ﺘ ﻡ ﺔﻗﺎﻄﻟﺎﺏ مأ ﻻ .اذإ
ﺔﻗﺎﻄﻟا.
ﻢﻟ ﻦﻜی ًﻼ ﺼ ﺘ ﻡ ،ﺔﻗﺎﻄﻟﺎﺏ ﺎﻤﺏﺮﻓ نﻮﻜﺕ كﺎﻨه ﺔﻠﻜﺸﻡ ﺔﻘﻠﻌﺘﻡ ﺬﺥﺄﻤﺏ
•اذإ ﺖﻤﻗ ﻞﻴﺹﻮﺘﺏ HP Photosmart ﺬﺥﺄﻤﺏ ،لّﺪﺒﻡ ﺪآﺄﺘﻓ ﻦﻡ ﻞﻴﻐﺸﺕ حﺎﺘﻔﻤﻟا .ﺪﻨﻋ ﻪﻠﻴﻐﺸﺕ راﺮﻤﺘﺳاو ﺔﻠﻜﺸﻤﻟا ,ﺪﻘﻓ نﻮﻜﺕ كﺎﻨه
ﺔﻠﻜﺸﻡ ﻲﻓ ﺬﺥﺄﻡ ﺔﻗﺎﻄﻟا.
ﺐﺒﺴﻟا:ﺪﻘﻟ ﺖﻤﻗ ﻂﻐﻀﻟﺎﺏ ﻰﻠﻋ رز On) ﻞﻴﻐﺸﺕ( ﻞﻜﺸﺏ ﻊیﺮﺳ اًﺪﺟ.
ﻞﺤﻟا:ﺪﻗ ﻻ ﺐﻴﺠﺘﺴی زﺎﻬﺟ HP Photosmart ﺪﻨﻋ ﻂﻐﻀﻟا ﻰﻠﻋ رز On) ﻞﻴﻐﺸﺕ( ﻞﻜﺸﺏ ﻊیﺮﺳ اًﺪﺟ .ﻂﻐﺽا ﻰﻠﻋ رز On
)ﻞﻴﻐﺸﺕ( ةﺮﻡ ةﺪﺡاو .ﺪﻗ قﺮﻐﺘﺴی ﻞﻴﻐﺸﺕ زﺎﻬﺟ HP Photosmart ﺾﻌﺏ ﻖﺋﺎﻗﺪﻟا .ﺪﻨﻋ ﻂﻐﻀﻟا ﻰﻠﻋ رز On) ﻞﻴﻐﺸﺕ( ةﺮﻡ ىﺮﺥأ
ءﺎﻨﺙأ اﺬه ﺖﻗﻮﻟا ,ﺪﻗو يدﺆی ﻚﻟذ ﻰﻟإ فﺎﻘیإ ﻞﻴﻐﺸﺕ زﺎﻬﺠﻟا.
ﻪﻴﺒﻨﺕاذإ ﺎﻡ ﺖﻟز رﺬﻌﺘﺕ ﻰﻠﻋ ﻞﻴﻐﺸﺕ HP Photosmart ﺪﻗو ﺪﺟﻮی ﻪﻴﻓ ﻒﻠﺕ ﻲﻜﻴﻥﺎﻜﻴﻡ .ﻞﺼﻓا HP Photosmart ﻦﻋ
www.hp.com/support.ﺪﻨﻋ ﺔﺒﻟﺎﻄﻤﻟا ,ﻢﻗ رﺎﻴﺘﺥﺎﺏ ﺪﻠﺒﻟا/،ﺔﻘﻄﻨﻤﻟا ﻢﺙ ﺮﻘﻥأ قﻮﻓ Contact
ﺬﺥﺄﻡ ءﺎﺏﺮﻬﻜﻟا ﻞﺼﺕاو ـﺏHP .رز:
HP) لﺎﺼﺕا ـﺑ HP( لﻮﺼﺤﻠﻟ ﻰﻠﻋ تﺎﻡﻮﻠﻌﻡ لﻮﺡ لﺎﺼﺕﻻا ﻢﻋﺪﻟﺎﺏ ﻲﻨﻔﻟا.
ﺪﻘﻟ ﺖﻠ ّﺻو ﻞﺑﺎآ USB، ﻲﻨﻜﻟو ﻪﺟاوأ تﻼﻜﺸﻡ ﻲﻓ ماﺪﺨﺘﺳا زﺎﻬﺟ HP Photosmart ﻊﻡ ﺮﺕﻮﻴﺒﻤﻜﻟا
ﺐﺒﺴﻟا:ﻢﺕ ﻞﻴﺹﻮﺕ ﻞﺏﺎآ USB ﻞﺒﻗ ﺖﻴﺒﺜﺕ ﺞﻡﺎﻥﺮﺒﻟا .ﻞﻴﺹﻮﺕ ﻞﺏﺎآ USB ﻞﺒﻗ نأ ﺐﻠﻄُی ﻚﻨﻡ ﻚﻟذ ﺪﻗ ﺐﺒﺴی ًءﺎﻄﺥأ.
ﻞﺤﻟا:ﺐﺠی ﻚﻴﻠﻋ ًﻻ و أ ﺖﻴﺒﺜﺕ ﺞﻡﺎﻥﺮﺒﻟا دوﺰﻤﻟا ﻊﻡ HP Photosmart ﻞﺒﻗ ﻞﻴﺹﻮﺕ ﻞﺏﺎآ USB .ءﺎﻨﺙأ ،ﺖﻴﺒﺜﺘﻟا ﻻ ﻢﻘﺕ ﻞﻴﺹﻮﺘﺏ
ﻞﺏﺎآ USB ﻰﺘﺡ ﺐﻠﻄﺕ ﻚﻨﻡ تادﺎﺷرﻹا ﻲﺘﻟا ﺮﻬﻈﺕ ﻰﻠﻋ ﺔﺷﺎﺸﻟا مﺎﻴﻘﻟا ﻚﻟﺬﺏ.
دﺮﺠﻤﺏ ﺖﻴﺒﺜﺕ
،ﺞﻡﺎﻥﺮﺒﻟا نﺈﻓ ﻞﻴﺹﻮﺕ ﺮﺕﻮﻴﺒﻤﻜﻟا زﺎﻬﺠﺏ HP Photosmart ﺔﻄﺳاﻮﺏ ﻞﺏﺎآ USB ﻮه ﺮﻡأ ﻞﻬﺳ .ﺔﻃﺎﺴﺒﺏ ,ﻢﻗ ﻞﻴﺹﻮﺘﺏ
ﺪﺡأ ﻲﻓﺮﻃ ﻞﺏﺎآ USB ءﺰﺠﻟﺎﺏ ﻲﻔﻠﺨﻟا ﻦﻡ زﺎﻬﺟ ﺮﺕﻮﻴﺒﻤﻜﻟا فﺮﻄﻟاو ﺮﺥﻵا ءﺰﺠﻟﺎﺏ ﻲﻔﻠﺨﻟا ﻦﻡ زﺎﻬﺟ HP Photosmart .ﻚﻨﻜﻤی
ﻞﻴﺹﻮﺘﻟا يﺄﺏ ﺬﻔﻨﻡ USB ﻲﻓ ءﺰﺠﻟا ﻲﻔﻠﺨﻟا ﻦﻡ ﺮﺕﻮﻴﺒﻤﻜﻟا.
ﻞﺡ تﻼﻜﺸﻡ ﻖﻠﻌﺘﺕ داﺪﻋﺈﺏ ةﺰﻬﺟﻷا ٢٦

ﻲﺑﺮﻋ
ﻞﺼﻔﻟا ٤
ﺪیﺰﻤﻠﻟ ﻦﻡ تﺎﻡﻮﻠﻌﻤﻟا لﻮﺡ ﺖﻴﺒﺜﺕ ﺞﻡﺎﻥﺮﺒﻟا ﻞﻴﺹﻮﺕو ﻞﺏﺎآ USB ,ﻊﺟار ﻞﻴﻟد داﺪﻋﻹا دوﺰﻤﻟا ﻊﻡ زﺎﻬﺟ HP Photosmart.
زﺎﻬﺟ HP Photosmart ﻻ مﻮﻘﻳ ﺔﻴﻠﻤﻌﺑ ﺔﻋﺎﺒﻄﻟا
ﺐﺒﺴﻟا:ﻻ ﻞﺼﺘی ﻞآ ﻦﻡ HP Photosmart ﺮﺕﻮﻴﺒﻤﻜﻟاو ﺎﻤﻬﻀﻌﺒﺏ ﺾﻌﺒﻟا.
ﻞﺤﻟا:ﺺﺤﻓا لﺎﺼﺕﻻا ﻦﻴﺏ HP Photosmart ﺮﺕﻮﻴﺒﻤﻜﻟاو.
ﺐﺒﺴﻟا:ﺪﻗ نﻮﻜی كﺎﻨه ﺔﻠﻜﺸﻡ ﻲﻓ ةﺪﺡاو وأ ﺮﺜآأ ﻦﻡ تﺎﺷﻮﻃﺮﺥ ﺮﺒﺤﻟا.
ﻞﺤﻟا:ﺪآﺄﺕ ﻦﻡ ﺖﻴﺒﺜﺕ تﺎﺷﻮﻃﺮﺥ ﺮﺒﺤﻟا ﻞﻜﺸﺏ ﺢﻴﺤﺹ دﻮﺟوو ﺮﺒﺤﻟا ﺎﻬﺏ.
ﺐﺒﺴﻟا:ﺪﻗ ﻻ نﻮﻜی HP Photosmart ﻲﻓ ﻊﺽو ﻞﻴﻐﺸﺘﻟا.
ﻞﺤﻟا:ﺮﻈﻥأ ﻰﻟإ ﺔﺷﺎﺷ ضﺮﻌﻟا ـﻟ HP Photosmart .اذإ ﺖﻥﺎآ ﺔﺷﺎﺷ ضﺮﻌﻟا ﺔﻏرﺎﻓ رزو On) ﻞﻴﻐﺸﺕ( ﺮﻴﻏ ،ءﺎﻀﻡ ﺮﻴﺸﻴﻓ
ﻚﻟذ ﻰﻟإ فﺎﻘیإ ﻞﻴﻐﺸﺕ زﺎﻬﺟ HP Photosmart .ﺪآﺄﺕ ﻦﻡ ﻞﻴﺹﻮﺕ ﻚﻠﺳ ﺔﻗﺎﻄﻟا ﻞﻜﺸﺏ ﺖﺏﺎﺙ ـﺏ HP Photosmart ﺬﺥﺄﻤﺏو
.
ءﺎﺏﺮﻬﻜﻟا .ﻂﻐﺽا ﻰﻠﻋ رز On) ﻞﻴﻐﺸﺕ( ﻞﻴﻐﺸﺘﻟ زﺎﻬﺟ HP Photosmart
Hardware) ةﺰﻬﺟﻷا(.
٢٧ HP Photosmart D7400 series
ﺐﺒﺴﻟا:ﺪﻗ نﻮﻜﺕ HP Photosmart ﺔﻴﻟﺎﺥ ﻦﻡ قرﻮﻟا.
ﻞﺤﻟا:ﻢﻗ ﻞﻴﻤﺤﺘﺏ قرو ﻲﻓ ﺔیوﺎﺡ لﺎﺥدﻹا.
ﻞﺡ تﻼﻜﺸﻡ ﻖﻠﻌﺘﺕ ﺔﻜﺒﺸﻟﺎﺑ
لوﺎﻨﺘی اﺬه ﻢﺴﻘﻟا ﻞآﺎﺸﻡ ﺪﻗ ضﺮﻌﺘﺕ ﺎﻬﻴﻟإ ءﺎﻨﺙأ داﺪﻋإ ﺔﻜﺒﺸﻟا.
ﻞﺡ تﻼﻜﺸﻤﻟا ﺔﺻﺎﺨﻟا داﺪﻋﺈﺑ ﺔﻜﺒﺸﻟا ﺔﻴﻜﻠﺴﻟا
لوﺎﻨﺘی اﺬه ﻢﺴﻘﻟا ﻞآﺎﺸﻡ ﺪﻗ ضﺮﻌﺘﺕ ﺎﻬﻴﻟإ ءﺎﻨﺙأ داﺪﻋإ ﺔﻜﺒﺷ ﺔﻴﻜﻠﺳ.
رﺬﻌﺕ ﺮﺕﻮﻴﺒﻤﻜﻟا رﻮﺜﻌﻟا ﻰﻠﻋ HP Photosmart
ﺐﺒﺴﻟا:تﻼﺏﺎﻜﻟا ﺖﺴﻴﻟ ﺔﻠﺼّﺘﻡ ﻞﻜﺸﺏ ﺢﻴﺤﺹ.
ﻞﺤﻟا:ﻢﻗ ﺺﺤﻔﺏ تﻼﺏﺎﻜﻟا نﺎﻤﻀﻟ ﺎﻬﻥأ ﺔﻠﺼّﺘﻡ ﺔﻘیﺮﻄﺏ ﺔﻤﻴﻠﺳ.
•تﻼﺏﺎﻜﻟا ﻦﻴﺏ HP Photosmart ﻦﻴﺏو رﻮﺤﻤﻟا وأ ﻪﺟﻮﻤﻟا.
•تﻼﺏﺎﻜﻟا ﻦﻴﺏ رﻮﺤﻤﻟا وأ ﻪّﺟﻮﻤﻟا ﻦﻴﺏو ﺮﺕﻮﻴﺒﻤﻜﻟا
•تﻼﺏﺎﻜﻟا ﻦﻡ مدﻮﻤﻟا ﻪﻴﻟإو وأ لﺎﺼﺕا HP Photosmart ﺖﻥﺮﺘﻥﻹﺎﺏ) اذإ ﺪﺟو(
ﺐﺒﺴﻟا:مﺪﻋ داﺪﻋإ ﺔﻗﺎﻄﺏ ﺔﻜﺒﺸﻟا ﺔﻴﻠﺤﻤﻟا )LAN (ﺔﺹﺎﺨﻟا زﺎﻬﺠﺏ ﺮﺕﻮﻴﺒﻤﻜﻟا ﺔﻘیﺮﻄﻟﺎﺏ ﺔﺤﻴﺤﺼﻟا.
ﻞﺤﻟا:ﺪّآﺄﺕ ﻦﻡ ﻪّﻥأ ﻢﺕ داﺪﻋإ ﺔﻗﺎﻄﺏ LAN ﻞﻜﺸﺏ ﺢﻴﺤﺹ.
ﺺﺤﻔﻟ ﺔﻗﺎﻄﺑ LAN) Windows 2000 و XP(
١.ﺮﻘﻥا رﺰﺏ سوﺎﻤﻟا ﻦﻤیﻷا قﻮﻓ My Computer) زﺎﻬﺟ ﺮﺕﻮﻴﺒﻤﻜﻟا(.
٢.ﻲﻓ ﻊﺏﺮﻡ راﻮﺤﻟا System Properties) ﺺﺋﺎﺼﺥ مﺎﻈﻨﻟا(، ﺮﻘﻥا قﻮﻓ ﺔﻡﻼﻋ ﺐیﻮﺒﺘﻟا

٣.ﺮﻘﻥا قﻮﻓ Device Manager) ةرادإ ةﺰﻬﺟﻷا(.
٤.ﺪآﺄﺕ ﻦﻡ رﻮﻬﻇ ﺔﻗﺎﻄﺒﻟا ﺖﺤﺕ Network Adapters) تﻻﻮﺤﻡ ﺔﻜﺒﺸﻟا(.
٥.ﻊﺟار ﻖﺋﺎﺙﻮﻟا ةدوﺰﻤﻟا ﻊﻡ ﺔﻗﺎﻄﺒﻟا.
ﺺﺤﻔﻟ ﺔﻗﺎﻄﺑ LAN) Windows Vista(
١.ﻲﻓ ﻂیﺮﺷ مﺎﻬﻤﻟا ـﻟ Windows ,ﺮﻘﻥا قﻮﻓ Start) أﺪﺑا(, Computer) ﺮﺕﻮﻴﺒﻤﻜﻟا( ,ﻢﺙ ﺮﻘﻥا قﻮﻓ Properties
)ﺺﺋﺎﺼﺥ(.
(.
ﺮﺒﻋ ﺔﻜﺒﺸﻟا.
زﺎﻬﺟ ﻪﻴﺟﻮﺘﻟا وأ رﻮﺤﻤﻟا ،ًﻻوأ ﻢﺙ ﻂﻐﺽا رز On) ﻞﻴﻐﺸﺕ( ﻞﻴﻐﺸﺘﻟ
HP Photosmart.
٢.ﺮﻘﻥا قﻮﻓ Device Manager) ةرادإ ةﺰﻬﺟﻷا
٣.ﺪآﺄﺕ ﻦﻡ رﻮﻬﻇ ﺔﻗﺎﻄﺒﻟا ﺖﺤﺕ Network Adapters) تﻻﻮﺤﻡ ﺔﻜﺒﺸﻟا(.
٤.ﻊﺟار ﻖﺋﺎﺙﻮﻟا ةدوﺰﻤﻟا ﻊﻡ ﺔﻗﺎﻄﺒﻟا.
ﺐﺒﺴﻟا:ﻻ ﺪﺟﻮی ﻚیﺪﻟ لﺎﺼﺕا ﺔﻜﺒﺷ لﺎّﻌﻓ.
ﻞﺤﻟا:ﻖّﻘﺤﺕ ﺔﻓﺮﻌﻤﻟ ﺎﻡ اذإ نﺎآ لﺎﺼﺕا ﺔﻜﺒﺸﻟا ًﺎ ﻄ ﺸ ﻥ مأ ﻻ.
ﺔﻳؤﺮﻟ ﺎﻡ اذإ نﺎآ ﻚﻳﺪﻟ لﺎﺼﺕا ﺔﻜﺒﺵ ًﺎ ﻄ ﺸ ﻥ مأ ﻻ
▲ﻢﻗ ﺺﺤﻔﺏ ﻲﺡﺎﺒﺼﻡ ﺮﺷﺆﻡ ﺖﻥﺮﺜیﻹا ﻲﻓ ﻰﻠﻋأ ﻞﻔﺳأو ﺲﺒﻘﻡ ﺖﻥﺮﺙإ RJ-45 ﻲﻓ ﺔﻬﺠﻟا ﺔﻴﻔﻠﺨﻟا ﻦﻡ زﺎﻬﺟ HP Photosmart.
ﺮﻴﺸی نﺎﺡﺎﺒﺼﻤﻟا ﻰﻟإ ﺎﻡ ﻲﻠی:
أ.حﺎﺒﺼﻤﻟا يﻮﻠﻌﻟا :اذإ نﺎآ اﺬه حﺎﺒﺼﻤﻟا ءﺎﻀی نﻮﻠﺏ ﺮﻀﺥأ ،ﺖﺏﺎﺙ نﻮﻜی زﺎﻬﺠﻟا ًﻼ ﺼ ّﺘ ﻡ ﺔﻜﺒﺸﻟﺎﺏ ﻞﻜﺸﺏ ،ﺢﻴﺤﺹ نﻮﻜیو ﺪﻗ
ﻢﺕ ءﺎﺸﻥإ تﻻﺎﺼﺕﻻا .اذإ نﺎآ حﺎﺒﺼﻤﻟا يﻮﻠﻌﻟا ﻊﺽﻮﺏ فﺎﻘیإ ،ﻞﻴﻐﺸﺘﻟا اﺬﻬﻓ ﻲﻨﻌی ﻪﻥأ ﻻ ﺪﺟﻮی لﺎﺼﺕا ﺔﻜﺒﺸﻟﺎﺏ.
ب.حﺎﺒﺼﻤﻟا ﻲﻠﻔﺴﻟا :ﺾﻡﻮی اﺬه حﺎﺒﺼﻤﻟا ﺮﻔﺹﻷا ﺎﻡﺪﻨﻋ ﻢﺘی لﺎﺳرإ تﺎﻥﺎﻴﺒﻟا وأ ﺎﻬﻟﺎﺒﻘﺘﺳا ﺔﻄﺳاﻮﺏ زﺎﻬﺠﻟا
ءﺎﺸﻥﻹ لﺎﺼﺕا ﺔﻜﺒﺵ ﻂﺸﻥ
١.ﻢﻗ ﺺﺤﻔﺏ تﻻﺎﺼﺕا ﻞﺏﺎﻜﻟا ﻦﻡ زﺎﻬﺟ HP Photosmart ﻰﻟإو ةرﺎﺒﻌﻟا ,ﻪﺟﻮﻤﻟا وأ رﻮﺤﻤﻟا نﺎﻤﻀﻟ نﻮآ تﻻﺎﺼﺕﻻا ﺔﻨﻡﺁ.
٢.اذإ ﺖﻥﺎآ تﻼﻴﺹﻮﺘﻟا ،ﺔﻤﻜﺤُﻡ ﻂﻐﺽا رز On) ﻞﻴﻐﺸﺕ( ﻰﻠﻋ ﺔﺡﻮﻟ ﻢﻜﺤﺘﻟا فﺎﻘیﻹ ﻞﻴﻐﺸﺕ زﺎﻬﺟ HP Photosmart .ﺪﻌﺏ ﻚﻟذ
ﻢﻗ ﻞﺼﻔﺏ ﺔﻗﺎﻄﻟا ﻦﻋ زﺎﻬﺟ ﻪﻴﺟﻮﺘﻟا وأ رﻮﺤﻤﻟا .ﻢﻗ ﻞﻴﻐﺸﺘﺏ
ﺐﺒﺴﻟا:ﺖﻨآ ﻦﻜﻤﺘﺕ ﻦﻡ ﻞﻴﺹﻮﺕ زﺎﻬﺟ HP Photosmart ﺔﻜﺒﺸﺏ لﺎﺼﺕا ﻦﻡ ﻞﺒﻗ ﻦﻜﻟو نﻵا ﻻ ﻚﻨﻜﻤی ﻚﻟذ.
ﻞﺤﻟا:ﻢﻗ فﺎﻘیﺈﺏ ﻞﻴﻐﺸﺕ HP Photosmart زﺎﻬﺟو ﺮﺕﻮﻴﺒﻤﻜﻟا زﺎﻬﺟو ﻪﻴﺟﻮﺘﻟا .ﺮﻈﺘﻥا ﻲﻟاﻮﺡ ٣٠ ﺔﻴﻥﺎﺙ .ﻢﻗ ﻞﻴﻐﺸﺘﺏ زﺎﻬﺟ ﻪﻴﺟﻮﺘﻟا
ًﻻ و أ ﻢﺙ ﻢﻗ ﻞﻴﻐﺸﺘﺏ HP Photosmart ﻢﺙ ﺮﺕﻮﻴﺒﻤﻜﻟا.
ﻲﺑﺮﻋ
ﺐﺒﺴﻟا:زﺎﻬﺟ HP Photosmart ﺮﺕﻮﻴﺒﻤﻜﻟاو ﺮﻴﻏ ﻦﻴﻠﺼﺘﻡ ﺲﻔﻨﺏ ﺔﻜﺒﺸﻟا.
ﻞﺤﻟا:لوﺎﺡ لﻮﺹﻮﻟا ﻰﻟإ ﻢﻘﻠﻡ ﺐیﻮﻟا ﻦﻤﻀﻤﻟا دﻮﺟﻮﻤﻟا ﻰﻠﻋ HP Photosmart .رﻮﺜﻌﻠﻟ ﻰﻠﻋ ناﻮﻨﻋ IP، ﻢﻗ ﺔﻋﺎﺒﻄﺏ ﺔﺤﻔﺹ
ﻦیﻮﻜﺕ ﺔﻜﺒﺸﻟا.
ﺮﻬﻈﺕ ﺔﺵﺎﺵ The Printer Not Found) رﺬﻌﺕ رﻮﺜﻌﻟا ﻰﻠﻋ ﺔﻌﺑﺎﻄﻟا (ءﺎﻨﺙأ ﺖﻴﺒﺜﺘﻟا
ﺐﺒﺴﻟا:HP Photosmart ﺲﻴﻟ ﻲﻓ ﻊﺽو ﻞﻴﻐﺸﺘﻟا.
ﻞﺤﻟا:ﻢﻗ ﻞﻴﻐﺸﺘﺏ زﺎﻬﺟ HP Photosmart.
ﺐﺒﺴﻟا:ﻻ ﺪﺟﻮی ﻚیﺪﻟ لﺎﺼﺕا ﺔﻜﺒﺷ لﺎّﻌﻓ.
ﻞﺤﻟا:ﺪّآﺄﺕ ﻦﻡ دﻮﺟو لﺎﺼﺕا ﺔﻜﺒﺷ ﻂﺸﻥ.
ﺪّآﺄﺘﻠﻟ ﻦﻡ ّنأ لﺎﺼّﺕا ﺔﻜﺒ ّﺸﻟا ﻂﺸﻥ
١.اذإ ﺖﻥﺎآ تﻻﺎﺼّﺕﻻا ،ﺔﻨﻡﺁ ﻢﻘﻓ ﻞﺼﻔﺏ ﺔﻗﺎﻄﻟا ﻦﻋ زﺎﻬﺟ HP Photosmart، ﻢﺙ ﺪﻋأ ﻞﻴﺹﻮﺘﻟا ًﺔﻴﻥﺎﺙ .ﻂﻐﺽا ﻰﻠﻋ رﺰﻟا On
HP Photosmart ,ﻢﺙ ﻂﻐﺽا ﻪﻴﻠﻋ ةﺮﻡ ىﺮﺥأ ﻞﻴﻐﺸﺘﻟ زﺎﻬﺠﻟا.
)ﻞﻴﻐﺸﺕ( دﻮﺟﻮﻤﻟا ﻰﻠﻋ ﺔﺡﻮﻟ ﻢﻜﺤﺘﻟا فﺎﻘیﻹ ﻞﻴﻐﺸﺕ زﺎﻬﺟ
،ﻚﻟﺬآ ﻢﻗ ﻞﺼﻔﺏ ﺔﻗﺎﻄﻟا ﻦﻋ ﻪﺟﻮﻤﻟا وأ رﻮﺤﻤﻟا ﻢﺙ ﺪﻋأ ﺎﻬﻠﻴﺹﻮﺕ ًﺔﻴﻥﺎﺙ.
٢.ﻢﻗ ﺺﺤﻔﺏ تﻻﺎﺼﺕا ﻞﺏﺎﻜﻟا ﻦﻡ زﺎﻬﺟ HP Photosmart ﻰﻟإو ةرﺎﺒﻌﻟا ,ﻪﺟﻮﻤﻟا وأ رﻮﺤﻤﻟا نﺎﻤﻀﻟ نﻮآ تﻻﺎﺼﺕﻻا ﺔﻨﻡﺁ.
٣.ﺪّآﺄﺕ ﻦﻡ ﻞﻴﺹﻮﺕ زﺎﻬﺟ HP Photosmart ﺔﻜﺒﺸﻟﺎﺏ ﺔﻄﺳاﻮﺏ ﻞﺏﺎآ ﺖﻥﺮﺜیإ CAT-5.
ﺐﺒﺴﻟا:تﻼﺏﺎﻜﻟا ﺖﺴﻴﻟ ﺔﻠﺼّﺘﻡ ﻞﻜﺸﺏ ﺢﻴﺤﺹ.
ﻞﺡ تﻼﻜﺸﻡ ﻖﻠﻌﺘﺕ ﺔﻜﺒﺸﻟﺎﺏ ٢٨

ﻲﺑﺮﻋ
ﻞﺼﻔﻟا ٤
ﻞﺤﻟا:ﻢﻗ ﺺﺤﻔﺏ تﻼﺏﺎﻜﻟا نﺎﻤﻀﻟ ﺎﻬﻥأ ﺔﻠﺼّﺘﻡ ﺔﻘیﺮﻄﺏ ﺔﻤﻴﻠﺳ.
•تﻼﺏﺎﻜﻟا ﻦﻴﺏ HP Photosmart ﻦﻴﺏو رﻮﺤﻤﻟا وأ ﻪﺟﻮﻤﻟا.
•تﻼﺏﺎﻜﻟا ﻦﻴﺏ رﻮﺤﻤﻟا وأ ﻪّﺟﻮﻤﻟا ﻦﻴﺏو ﺮﺕﻮﻴﺒﻤﻜﻟا
•تﻼﺏﺎﻜﻟا ﻦﻡ مدﻮﻤﻟا ﻪﻴﻟإو وأ لﺎﺼﺕا HP Photosmart ﺖﻥﺮﺘﻥﻹﺎﺏ) اذإ ﺪﺟو(
ﺐﺒﺴﻟا:ﻊﻨﻤی ﻖﻴﺒﻄﺕ راﺪﺟ ﺔیﺎﻤﺤﻟا ,ﺞﻡﺎﻥﺮﺏ ﺔﺤﻓﺎﻜﻡ تﺎﺳوﺮﻴﻔﻟا وأ ﺞﻡﺎﻥﺮﺏ ﺔﺤﻓﺎﻜﻡ ﺲﺴﺠﺘﻟا زﺎﻬﺟ HP Photosmart ﻦﻡ
لﻮﺹﻮﻟا ﻰﻟإ ﺮﺕﻮﻴﺒﻤﻜﻟا صﺎﺨﻟا ﻚﺏ.
صﺎﺨﻟا زﺎﻬﺠﺏ HP Photosmart.
ﺔﺘﻗﺆﻡ ﻞﺒﻗ ةدﺎﻋإ ﺖﻴﺒﺜﺕ ﺞﻡﺎﻥﺮﺒﻟا صﺎﺨﻟا زﺎﻬﺠﺏ HP Photosmart .ﻚﻨﻜﻤی ةدﺎﻋإ ﻦﻴﻜﻤﺕ ﻖﻴﺒﻄﺕ راﺪﺟ
ﻞﺤﻟا:ﻢﻗ ءﺎﻐﻟﺈﺏ ﺖﻴﺒﺜﺕ ﺞﻡﺎﻥﺮﺒﻟا صﺎﺨﻟا زﺎﻬﺠﺏ HP Photosmart، ﻢﺙ ﺪﻋأ ﺪﻴﻬﻤﺕ زﺎﻬﺟ ﺮﺕﻮﻴﺒﻤﻜﻟا صﺎﺨﻟا ﻚﺏ .ﺪﻌﺏ ،ﻚﻟذ ﻢﻗ
ﻞﻴﻄﻌﺘﺏ تﺎﻘﻴﺒﻄﺕ ﺔﺤﻓﺎﻜﻡ تﺎﺳوﺮﻴﻔﻟا وأ ﺔﺤﻓﺎﻜﻡ ﺲﺴﺠﺘﻟا ﻞﻜﺸﺏ ،ﺖﻗﺆﻡ ﻢﺙ ﺪﻋأ ﺖﻴﺒﺜﺕ ﺞﻡﺎﻥﺮﺒﻟا
ﻚﻨﻜﻤی ةدﺎﻋإ ﻦﻴﻜﻤﺕ تﺎﻘﻴﺒﻄﺕ ﺔﺤﻓﺎﻜﻡ تﺎﺳوﺮﻴﻔﻟا وأ ﺔﺤﻓﺎﻜﻡ ﺲﺴﺠﺘﻟا ﺪﻌﺏ ءﺎﻬﺘﻥﻻا ﻦﻡ ﺖﻴﺒﺜﺘﻟا .اذإ تﺮﻬﻇ ﺔیأ ﻞﺋﺎﺳر ﺔﻘﺜﺒﻨﻡ ﻖﻠﻌﺘﺕ راﺪﺠﺏ
ﺔیﺎﻤﺤﻟا ,ﺐﺠﻴﻓ ﻚﻴﻠﻋ ﺎًﻤﺋاد ﺎﻬﻟﻮﺒﻗ وأ حﺎﻤﺴﻟا ﺎﻬﺏ.
اذإ ﺮﻤﺘﺳا رﻮﻬﻇ ﺔﻟﺎﺳﺮﻟا ،ﺔﻘﺜﺒﻨﻤﻟا لوﺎﺡ ءﺎﻐﻟإ ﺖﻴﺒﺜﺕ ﺞﻡﺎﻥﺮﺒﻟا صﺎﺨﻟا زﺎﻬﺠﺏ HP Photosmart ةدﺎﻋإو ﺪﻴﻬﻤﺕ زﺎﻬﺟ ﺮﺕﻮﻴﺒﻤﻜﻟا
ﻞﻴﻄﻌﺕو راﺪﺟ ﺔیﺎﻤﺤﻟا ةرﻮﺼﺏ
ﺔیﺎﻤﺤﻟا ﺪﻌﺏ ءﺎﻬﺘﻥﻻا ﻦﻡ ﺖﻴﺒﺜﺘﻟا .اذإ ﺮﻤﺘﺳا رﻮﻬﻇ ﻞﺋﺎﺳر ﺔﻘﺜﺒﻨﻡ ﻖﻠﻌﺘﺕ راﺪﺠﺏ ﺔیﺎﻤﺤﻟا ,ﺐﺠﻴﻓ ﻚﻴﻠﻋ ﺎًﻤﺋاد ﺎﻬﻟﻮﺒﻗ وأ حﺎﻤﺴﻟا ﺎﻬﺏ.
ﺪیﺰﻤﻠﻟ ﻦﻡ تﺎﻡﻮﻠﻌﻤﻟا ,ﻊﺟار ﻖﺋﺎﺙﻮﻟا ةدوﺰﻤﻟا ﻊﻡ ﺞﻡﺎﻥﺮﺏ راﺪﺟ ﺔیﺎﻤﺤﻟا.
ﺐﺒﺴﻟا:ﻊﻨﻤﺕ ﺔﻜﺒﺷ ﺔﻴﺽاﺮﺘﻓا ﺔﺹﺎﺥ )VPN (زﺎﻬﺟ HP Photosmart ﻦﻡ لﻮﺹﻮﻟا ﻰﻟإ ﺮﺕﻮﻴﺒﻤﻜﻟا صﺎﺨﻟا ﻚﺏ.
ﻞﺤﻟا:لوﺎﺡ ﻞﻴﻄﻌﺕ VPN ﺎًﺘﻗﺆﻡ ﻞﺒﻗ راﺮﻤﺘﺳﻻا ﻲﻓ ﺖﻴﺒﺜﺘﻟا.
ﺔﻈﺡﻼﻡ ﻻ ﻦﻜﻤی لﻮﺹﻮﻟا ﻰﻟإ HP Photosmart ءﺎﻨﺙأ تﺎﺴﻠﺟ VPN .ﻊﻡ ،ﻚﻟذ ﻢﺘی ﻆﻔﺡ مﺎﻬﻡ ﺔﻋﺎﺒﻄﻟا ﻲﻓ ﺔﻤﺋﺎﻗ رﺎﻈﺘﻥا
ﺔﻋﺎﺒﻄﻟا .ﺪﻨﻋ جوﺮﺨﻟا ﻦﻡ ﺔﺴﻠﺟ VPN، فﻮﺳ ﻢﺘﺕ ﺔﻋﺎﺒﻃ مﺎﻬﻡ ﺔﻋﺎﺒﻄﻟا ةدﻮﺟﻮﻤﻟا ﻲﻓ ﺔﻤﺋﺎﻗ رﺎﻈﺘﻥا ﺔﻋﺎﺒﻄﻟا.
ﻞﺡ تﻼﻜﺸﻤﻟا ﺔﺻﺎﺨﻟا داﺪﻋﻹﺎﺑ ﻲﻜﻠﺳﻼﻟا
لوﺎﻨﺘی اﺬه ﻢﺴﻘﻟا ﻞآﺎﺸﻡ ﺪﻗ ضﺮﻌﺘﺕ ﺎﻬﻴﻟإ ءﺎﻨﺙأ داﺪﻋإ ﺔﻜﺒﺷ .ﻊﺟار ﺔﺷﺎﺷ زﺎﻬﺠﻟا ﺎًﺜﺤﺏ ﻦﻋ ﻞﺋﺎﺳر ﺄﻄﺥ ةدﺪﺤﻡ.
www.hp.com/go/networksetup.
ﺔﻈﺡﻼﻡﺮﻓﻮﺕ HP ةادأ ﺔیرﻮﻓ ﻰﻠﻋ ﺖﻥﺮﺘﻥﻹا ﺪﻗ ﻦﻜﻤﺘﺕ ﻦﻡ فﺮﻌﺘﻟا ﻰﻠﻋ تاداﺪﻋإ نﺎﻡأ لﺎﺼﺕﻻا ﻲﻜﻠﺳﻼﻟا ﻚیﺪﻟ ﺎًﻴﺋﺎﻘﻠﺕ .ﻞﻘﺘﻥا ﻰﻟإ:
ﻻ ﻚﻨﻜﻤﻳ ﺔﻳؤر SSID) ﻢﺳا ﺔﻜﺒﺸﻟا (ءﺎﻨﺙأ داﺪﻋإ ﺔﻜﺒﺵ ﺔﻴﻜﻠﺳﻻ
ﺐﺒﺴﻟا:ﻻ مﻮﻘی زﺎﻬﺟ ﻪﻴﺟﻮﺘﻟا ﻲﻜﻠﺳﻼﻟا ّﺚﺒﺏ ﻢﺳا ﺔﻜﺒﺸﻟا صﺎﺨﻟا ﻪﺏ )SSID (ﺐﺒﺴﺏ فﺎﻘیإ ﻞﻴﻐﺸﺕ رﺎﻴﺨﻟا Broadcast SSID
)ﺚﺑ SSID(.
ﻞﺤﻟا:ﻢﻗ لﻮﺹﻮﻟﺎﺏ ﻰﻟإ Embedded Web Server) ﻢﻘﻠﻡ ﺐیﻮﻟا ﻦﻤﻀﻤﻟا (صﺎﺨﻟا زﺎﻬﺠﺏ ﻪﻴﺟﻮﺘﻟا ﻢﺙ ﻢﻗ ﻞﻴﻐﺸﺘﺏ رﺎﻴﺨﻟا
Broadcast SSID) ﺚﺑ SSID( .ﻊﺟار ﻖﺋﺎﺙﻮﻟا ﺔﻘﻓﺮﻤﻟا ﻊﻡ زﺎﻬﺟ ﻪﻴﺟﻮﺘﻟا ﻲﻜﻠﺳﻼﻟا لﻮﺼﺤﻠﻟ ﻰﻠﻋ تﺎﻡﻮﻠﻌﻡ لﻮﺡ ﺔﻴﻔﻴآ
،ﺔﺤﻴﺤﺼﻟا لوﺎﺡ مﺎﻴﻘﻟا رﻮﻡﻷﺎﺏ ﺔﻴﻟﺎﺘﻟا
HP Photosmart زﺎﻬﺟو ﺮﺕﻮﻴﺒﻤﻜﻟا وأ ﻪﺟﻮﻤﻟا ﻲﻜﻠﺳﻼﻟا.
لﻮﺹﻮﻟا ﻰﻟإ ﻢﻘﻠﻡ ﺐیﻮﻟا ﻦﻤﻀﻤﻟا ﻖﻘﺤﺘﻟاو ﻦﻡ داﺪﻋإ Broadcast SSID) ﺚﺏ SSID.(
ﺪیﺰﻤﻠﻟ ﻦﻡ ،تﺎﻡﻮﻠﻌﻤﻟا ﻊﺟار:
”ﻞﻴﺹﻮﺘﻟا ﺔﻜﺒﺸﺏ ﺔﻴﻜﻠﺳﻻ ﺔﻨﻤﻀﻡ WLAN 802.11“ ﻲﻓ ﺔﺤﻔﺹ ٩
ﺐﺒﺴﻟا:زﺎﻬﺟ ﻪﻴﺟﻮﺘﻟا ﻲﻜﻠﺳﻼﻟا) ﺔﻴﻨﺒﻟا ﺔﻴﺘﺤﺘﻟا (وأ زﺎﻬﺟ ﺮﺕﻮﻴﺒﻤﻜﻟا) ﺮﺕﻮﻴﺒﻤآ ﺮﺕﻮﻴﺒﻤﻜﻟ (ﺪﻴﻌﺏ اًﺪﺟ ﻦﻋ زﺎﻬﺟ HP Photosmart
وأ ﺪﺟﻮی ﺶیﻮﺸﺕ.
ﻞﺤﻟا:لﻮﺼﺤﻠﻟ ﻰﻠﻋ ةرﺎﺷإ ﺔیﻮﻗ ﻦﻴﺏ HP Photosmart ﻦﻴﺏو زﺎﻬﺟ ﻪﻴﺟﻮﺘﻟا ﻲﻜﻠﺳﻼﻟا) ﺔﻴﻨﺒﻟا ﺔﻴﺘﺤﺘﻟا (وأ ﺮﺕﻮﻴﺒﻤآ ﺎﻡ )ad hoc
"ﺮﺕﻮﻴﺒﻤآ ﺮﺕﻮﻴﺒﻤﻜﻟ"(، ﺪﻗ ﻦّﻴﻌﺘی ﻚﻴﻠﻋ ﺐیﺮﺠﺘﻟا ًﻼ ﻴ ﻠ ﻗ .ﻰﻠﻋ ضﺮﻓ نأ زﺎﻬﺠﻟا ﻞﻤﻌی ﺔﻘیﺮﻄﻟﺎﺏ
ﻞﻜﺸﺏ ﻞﺼﻔﻨﻡ وأ ﻞﻜﺸﺏ ﺞﻡﺪﻡ:
•ﻲﻓ ﺔﻟﺎﺡ دﻮﺟو ﺔﻓﺎﺴﻡ ةﺪﻴﻌﺏ ﻦﻴﺏ ﺮﺕﻮﻴﺒﻤﻜﻟا وأ ﻪﺟﻮﻤﻟا ﻲﻜﻠﺳﻼﻟا ﻦﻴﺏو HP Photosmart، ﻢﻘﻓ ﺎﻤﻬﻠﻘﻨﺏ ﺢﺒﺼﺘﻟ ﺔﻓﺎﺴﻤﻟا ﺎﻤﻬﻨﻴﺏ
ﺔﺒیﺮﻗ.
•ﻲﻓ ﺔﻟﺎﺡ دﻮﺟو ﺮﺹﺎﻨﻋ ﺔﻴﻥﺪﻌﻡ) ﻞﺜﻡ ﺔﻥاﺰﺥ ﺐﺘآ ﺔﻴﻥﺪﻌﻡ وأ ﺔﺟﻼﺙ (ﻲﻓ رﺎﺴﻡ ،ﺚﺒﻟا ﻢﻗ ﺔﻟازﺈﺏ ﻖﺋاﻮﻌﻟا ةدﻮﺟﻮﻤﻟا ﻲﻓ رﺎﺴﻤﻟا ﻦﻴﺏ
زﺎﻬﺟ
•اذإ ﺖﻥﺎآ ﻒﺕاﻮه ﺔﻴﻜﻠﺳﻻ ,ناﺮﻓأ ﻒیووﺮﻜیﺎﻡ وأ ةﺰﻬﺟأ ىﺮﺥأ رﺪﺼﺕ تارﺎﺷإ لﺎﺳرإ راﺪﻘﻤﺏ 2.4 GHz ﻰﻠﻋ ،ﺔﺏﺮﻘﻡ ﻢﻘﻓ
ﺎهدﺎﻌﺏﺈﺏ ﺺﻴﻠﻘﺘﻟ ﺶیﻮﺸﺕ لﺎﺳرﻹا.
•ﻲﻓ ﺔﻟﺎﺡ دﻮﺟو ﺮﺕﻮﻴﺒﻤﻜﻟا وأ ﻪﺟﻮﻤﻟا ﻲﻜﻠﺳﻼﻟا بﺮﻘﻟﺎﺏ ﻦﻡ ﻂﺋﺎﺡ ،ﻲﺟرﺎﺥ ﻢﻗ ﻩدﺎﻌﺏﺈﺏ ﻦﻋ ﻂﺋﺎﺤﻟا.
ﺐﺒﺴﻟا:ﺪﻗ نﻮﻜی ﻢﺳا ﺔﻜﺒﺷ لﺎﺼﺕﻻا )SSID (ﻲﻓ ءﺰﺠﻟا ﻲﻠﻔﺴﻟا ﻦﻡ ﺔﻤﺋﺎﻗ SSID ﻲﺘﻟا ﺮﻬﻈﺕ ﺪﻨﻋ ﺖﻴﺒﺜﺕ HP Photosmart
ﻰﻠﻋ ﺔﻜﺒﺷ ﺔﻴﻜﻠﺳﻻ.
٢٩ HP Photosmart D7400 series

ﻞﺤﻟا:ﺲﻤﻟا لﺎﻘﺘﻥﻼﻟ ﻰﻟإ ﻞﻔﺳأ ﺔﻤﺋﺎﻘﻟا .ﻢﺘی جاردإ تﻻﺎﺥدإ ﺔﻴﻨﺒﻟا ﺔﻴﺘﺤﺘﻟا ﻲﻓ ءﺰﺠﻟا يﻮﻠﻌﻟا ﻦﻡ ﺔﻤﺋﺎﻘﻟا ﺎﻤﻨﻴﺏ ﻢﺘی جاردإ تﻻﺎﺥدإ ad
hoc" ﺮﺕﻮﻴﺒﻤآ ﺮﺕﻮﻴﺒﻤﻜﻟ "ﻲﻓ ءﺰﺠﻟا ﻲﻠﻔﺴﻟا ﺎﻬﻨﻡ.
ةرﺎﺵﻹا ﺔﻔﻴﻌﺽ
ﺐﺒﺴﻟا:زﺎﻬﺟ HP Photosmart ﺪﻴﻌﺏ اًﺪﺟ ﻦﻋ زﺎﻬﺟ ﻪﻴﺟﻮﺘﻟا ﻲﻜﻠﺳﻼﻟا وأ ﺪﺟﻮی ﺶیﻮﺸﺕ.
ﻞﺤﻟا:لﻮﺼﺤﻠﻟ ﻰﻠﻋ ةرﺎﺷإ ﺔیﻮﻗ ﻦﻴﺏ زﺎﻬﺟ HP Photosmart زﺎﻬﺟو ﻪﻴﺟﻮﺘﻟا ﻲﻜﻠﺳﻼﻟا ,ﺪﻗ ﺐﺠی ﻚﻴﻠﻋ ﺐیﺮﺠﺘﻟا ًﻼ ﻴ ﻠ ﻗ .ﻰﻠﻋ
ضﺮﻓ نأ زﺎﻬﺠﻟا ﻞﻤﻌی ﺔﻘیﺮﻄﻟﺎﺏ ،ﺔﺤﻴﺤﺼﻟا لوﺎﺡ مﺎﻴﻘﻟا رﻮﻡﻷﺎﺏ ﺔﻴﻟﺎﺘﻟا ﻞﻜﺸﺏ ﻞﺼﻔﻨﻡ وأ ﻞﻜﺸﺏ ﺞﻡﺪﻡ:
ﺮﺕﻮﻴﺒﻤﻜﻟا وأ ﻪﺟﻮﻤﻟا ﻲﻜﻠﺳﻼﻟا ﻦﻴﺏو HP Photosmart، ﻢﻘﻓ ﺎﻤﻬﻠﻘﻨﺏ ﺢﺒﺼﺘﻟ ﺔﻓﺎﺴﻤﻟا ﺎﻤﻬﻨﻴﺏ
تارﺎﺷإ لﺎﺳرإ راﺪﻘﻤﺏ 2.4 GHz ﻰﻠﻋ ،ﺔﺏﺮﻘﻡ ﻢﻘﻓ
ﺎهدﺎﻌﺏﺈﺏ ﺺﻴﻠﻘﺘﻟ ﺶیﻮﺸﺕ لﺎﺳرﻹا.
•ﻲﻓ ﺔﻟﺎﺡ دﻮﺟو ﺔﻓﺎﺴﻡ ةﺪﻴﻌﺏ ﻦﻴﺏ
ﺔﺒیﺮﻗ.
•ﻲﻓ ﺔﻟﺎﺡ دﻮﺟو ﺮﺹﺎﻨﻋ ﺔﻴﻥﺪﻌﻡ) ﻞﺜﻡ ﺔﻥاﺰﺥ ﺐﺘآ ﺔﻴﻥﺪﻌﻡ وأ ﺔﺟﻼﺙ (ﻲﻓ رﺎﺴﻡ ،ﺚﺒﻟا ﻢﻗ ﺔﻟازﺈﺏ ﻖﺋاﻮﻌﻟا ةدﻮﺟﻮﻤﻟا ﻲﻓ رﺎﺴﻤﻟا ﻦﻴﺏ
زﺎﻬﺟ HP Photosmart زﺎﻬﺟو ﺮﺕﻮﻴﺒﻤﻜﻟا وأ ﻪﺟﻮﻤﻟا ﻲﻜﻠﺳﻼﻟا.
•اذإ ﺖﻥﺎآ ﻒﺕاﻮه ﺔﻴﻜﻠﺳﻻ ,ناﺮﻓأ ﻒیووﺮﻜیﺎﻡ وأ ةﺰﻬﺟأ ىﺮﺥأ رﺪﺼﺕ
•ﻲﻓ ﺔﻟﺎﺡ دﻮﺟو ﺮﺕﻮﻴﺒﻤﻜﻟا وأ ﻪﺟﻮﻤﻟا ﻲﻜﻠﺳﻼﻟا بﺮﻘﻟﺎﺏ ﻦﻡ ﻂﺋﺎﺡ ،ﻲﺟرﺎﺥ ﻢﻗ ﻩدﺎﻌﺏﺈﺏ ﻦﻋ ﻂﺋﺎﺤﻟا.
ﻲﺑﺮﻋ
ﻻ ﻚﻨﻜﻤﻳ ﻞﻴﺻﻮﺕ ىﺪﺡإ تﺎﻜﺒﺸﻟا ءﺎﻨﺙأ داﺪﻋﻹا
ﺐﺒﺴﻟا:زﺎﻬﺠﻟا ﺲﻴﻟ ﻲﻓ ﻊﺽو ﻞﻴﻐﺸﺘﻟا.
ﻞﺤﻟا:ﻢﻗ ﻞﻴﻐﺸﺘﺏ زﺎﻬﺟ ،ﺔﻜﺒﺸﻟا ﻞﺜﻡ زﺎﻬﺟ ﻪﻴﺟﻮﺘﻟا ﻲﻜﻠﺳﻼﻟا ﺔﻜﺒﺸﻟ ﺔﻴﻨﺏ ،ﺔﻴﺘﺤﺕ وأ ﺮﺕﻮﻴﺒﻤﻜﻟا ﺔﻜﺒﺸﻟ ad hoc" ﺮﺕﻮﻴﺒﻤآ ﺮﺕﻮﻴﺒﻤﻜﻟ."
ﺪیﺰﻤﻠﻟ ﻦﻡ تﺎﻡﻮﻠﻌﻤﻟا لﻮﺡ ﺔﻴﻔﻴآ ﻞﻴﻐﺸﺕ زﺎﻬﺟ ﻪﻴﺟﻮﺘﻟا ﻲﻜﻠﺳﻼﻟا ,ﻊﺟار ﻖﺋﺎﺙﻮﻟا ﺔﻘﻓﺮﻤﻟا ﻊﻡ زﺎﻬﺟ ﻪﻴﺟﻮﺘﻟا ﻲﻜﻠﺳﻼﻟا صﺎﺨﻟا ﻚﺏ.
ﺐﺒﺴﻟا:ﻻ ﻞﺒﻘﺘﺴی زﺎﻬﺟ HP Photosmart ﺔیأ ةرﺎﺷإ.
ﻞﺤﻟا:ﻢﻗ ﺐیﺮﻘﺘﺏ ﺔﻓﺎﺴﻤﻟا ﻦﻴﺏ زﺎﻬﺟ ﻪﻴﺟﻮﺘﻟا ﻲﻜﻠﺳﻼﻟا زﺎﻬﺟو HP Photosmart .ﻢﺙ ﻢﻗ ﻞﻴﻐﺸﺘﺏ داﺪﻋﻹا ﻲﻜﻠﺳﻼﻟا ةﺮﻡ ىﺮﺥأ.
ﺪیﺰﻤﻠﻟ ﻦﻡ ،تﺎﻡﻮﻠﻌﻤﻟا ﻊﺟار:
داﺪﻋإ ﺔﻜﺒﺸﻟا ﺔﻴﻜﻠﺳﻼﻟا ﺔﻨﻤﻀﻤﻟا WLAN 802.11“ ﻲﻓ ﺔﺤﻔﺹ ٨
”
ﺐﺒﺴﻟا:اذإ ﺖﻤﻗ لﺎﺥدﺈﺏ ﻢﺳا ﺔﻜﺒﺸﻟا )SSID (،ﺎًیوﺪی ﻦﻤﻓ ﻦﻜﻤﻤﻟا نأ نﻮﻜﺕ ﺪﻗ ﺖﻤﻗ ﻪﻟﺎﺥدﺈﺏ ةرﻮﺼﺏ ﺮﻴﻏ ﺔﺤﻴﺤﺹ.
ﻞﺤﻟا:ﻢﻗ ﻞﻴﻐﺸﺘﺏ ﺔﻴﻠﻤﻋ داﺪﻋﻹا ﻲﻜﻠﺳﻼﻟا ةﺮﻡ ىﺮﺥأ ﻢﺙ ﻞﺥدأ ﻢﺳا ﺔﻜﺒﺸﻟا )SSID (ﺔیﺎﻨﻌﺏ .ﺮآﺬﺕ نأ SSID سﺎﺴﺡ ﺔﻟﺎﺤﻟ فﺮﺡﻷا.
ﺪیﺰﻤﻠﻟ ﻦﻡ ،تﺎﻡﻮﻠﻌﻤﻟا ﻊﺟار:
ﻞﻴﺹﻮﺘﻟا ﺔﻜﺒﺸﺏ ﺔﻴﻜﻠﺳﻻ ﺔﻨﻤﻀﻡ WLAN 802.11“ ﻲﻓ ﺔﺤﻔﺹ ٩
”
ﺐﺒﺴﻟا:ﻦﻡ ﻞﻤﺘﺤﻤﻟا نأ نﻮﻜی ﺪﻗ ﻢﺕ ﻦﻴﻜﻤﺕ داﺪﻋإ MAC address filtering) ﺔﻴﻔﺼﺕ ناﻮﻨﻋ MAC (زﺎﻬﺠﺏ ﻪﻴﺟﻮﺘﻟا ﻲﻜﻠﺳﻼﻟا
صﺎﺨﻟا ﻚﺏ.
ﻞﺤﻟا:ﻢﻗ ﻞﻴﻄﻌﺘﺏ داﺪﻋإ" ﺔﻴﻔﺼﺕ ناﻮﻨﻋ MAC "زﺎﻬﺠﺏ ﻪﻴﺟﻮﺘﻟا ﻲﻜﻠﺳﻼﻟا صﺎﺨﻟا ﻚﺏ ﻰﺘﺡ ﻢﺘی ﻞﻴﺹﻮﺕ HP Photosmart
MAC
ﺔﻜﺒﺸﻟﺎﺏ حﺎﺠﻨﺏ .اذإ ﺖﻤﻗ ةدﺎﻋﺈﺏ ﻦﻴﻜﻤﺕ داﺪﻋإ" ﺔﻴﻔﺼﺕ ناﻮﻨﻋ MAC "زﺎﻬﺠﺏ ﻪﻴﺟﻮﺘﻟا ،ﻲﻜﻠﺳﻼﻟا ﺪآﺄﺕ ﻦﻡ نأ دﻮﺟو ناﻮﻨﻋ
صﺎﺨﻟا زﺎﻬﺠﺏ HP Photosmart ﻲﻓ ﺔﻤﺋﺎﻗ ﻦیوﺎﻨﻋ MAC حﻮﻤﺴﻤﻟا ﺎﻬﺏ.
حﺎﺘﻔﻡ WEP ﺮﻴﻏ ﺢﻟﺎﺻ ءﺎﻨﺙأ داﺪﻋﻹا
ﺐﺒﺴﻟا:اذإ ﺖﻨآ مﺪﺨﺘﺴﺕ نﺎﻡأ WEP، ﻦﻤﻓ ﻞﻤﺘﺤﻤﻟا نأ نﻮﻜﺕ ﺪﻗ ﺖﻠﺥدأ حﺎﺘﻔﻡ WEP ﺔﻘیﺮﻄﺏ ﺮﻴﻏ ﺔﺤﻴﺤﺹ ءﺎﻨﺙأ ﺔﻴﻠﻤﻋ داﺪﻋﻹا
ﻲﻜﻠﺳﻼﻟا.
ﻞﺤﻟا:ﻦﻡ ﻞﻤﺘﺤﻤﻟا نأ نﻮﻜﺕ ﺪﻗ ﺖﻠﺥدأ حﺎﺘﻔﻡ WEP ﺔﻘیﺮﻄﺏ ﺮﻴﻏ ﺔﺤﻴﺤﺹ ءﺎﻨﺙأ ﺔﻴﻠﻤﻋ داﺪﻋﻹا ﻲﻜﻠﺳﻼﻟا .ﺮﻓﻮﺕ ﺾﻌﺏ ةﺰﻬﺟأ
WEP لوﻷا) ﻢﺘی ﻩﺪﻴﺤﺕ ﺔﻄﺳاﻮﺏ
، ﻊﺟار ﻖﺋﺎﺙﻮﻟا ةدراﻮﻟا ﻊﻡ زﺎﻬﺟ ﻪﻴﺟﻮﺘﻟا ﻲﻜﻠﺳﻼﻟا لﻮﺼﺤﻠﻟ ﻰﻠﻋ تﺎﻡﻮﻠﻌﻡ لﻮﺡ ﺔﻴﻔﻴآ لﻮﺹﻮﻟا ﻰﻟإ
ﻪﻴﺟﻮﺘﻟا ﻲﻜﻠﺳﻼﻟا ﺎﻡ بﺮﻘی ﻰﻟإ ﺔﺴﻤﺥ ﺢﻴﺕﺎﻔﻡ WEP .مﺪﺨﺘﺴی زﺎﻬﺟ HP Photosmartحﺎﺘﻔﻡ
زﺎﻬﺟ ﻪﻴﺟﻮﺘﻟا ﻲﻜﻠﺳﻼﻟا حﺎﺘﻔﻤآ WEP ﻲﺽاﺮﺘﻓا .(ﻢﻗ ﻞﻴﻐﺸﺘﺏ ﺔﻴﻠﻤﻋ داﺪﻋﻹا ﻲﻜﻠﺳﻼﻟا ةﺮﻡ ىﺮﺥأ ﻢﺙ ﺪآﺄﺕ ﻦﻡ ماﺪﺨﺘﺳا حﺎﺘﻔﻡ WEP
لوﻷا يﺬﻟا ﻩﺮﻓﻮی زﺎﻬﺟ ﻪﻴﺟﻮﺘﻟا ﻲﺋﺎﻘﻠﺘﻟا .ﻞﺥدأ حﺎﺘﻔﻡ WEP ﺎﻤآ ﺮﻬﻈی ﻲﻓ تاداﺪﻋإ زﺎﻬﺟ ﻪﻴﺟﻮﺘﻟا ﻲﻜﻠﺳﻼﻟا ﻂﺒﻀﻟﺎﺏ .حﺎﺘﻔﻡ WEP
سﺎﺴﺡ ﺔﻟﺎﺤﻟ فﺮﺡﻷا.
اذإ ﺖﻨآ ﻻ فﺮﻌﺕ حﺎﺘﻔﻡ WEP
ﻢﻘﻠﻡ ﺐیﻮﻟا ﻦﻤﻀﻤﻟا زﺎﻬﺠﻟ ﻪﻴﺟﻮﺘﻟا .ﻚﻨﻜﻤی رﻮﺜﻌﻟا ﻰﻠﻋ حﺎﺘﻔﻡ WEP ﻦﻡ لﻼﺥ لﻮﺥﺪﻟا ﻰﻟإ ﻢﻘﻠﻡ ﺐیﻮﻟا ﻦﻤﻀﻤﻟا زﺎﻬﺠﺏ ﻪﻴﺟﻮﺘﻟا
ماﺪﺨﺘﺳﺎﺏ ﺪﺡأ ةﺰﻬﺟأ ﺮﺕﻮﻴﺒﻤﻜﻟا ﺔﻠﺼﺘﻤﻟا ﺔﻜﺒﺸﻟﺎﺏ ﺔﻴﻜﻠﺳﻼﻟا.
ةرﺎﺒﻋ روﺮﻡ ﺮﻴﻏ ﺔﺤﻟﺎﺻ ءﺎﻨﺙأ داﺪﻋﻹا ﻲﻜﻠﺳﻼﻟا
ﺐﺒﺴﻟا:ﻦﻡ ﻞﻤﺘﺤﻤﻟا نأ نﻮﻜﺕ ﺪﻗ ﺖﻠﺥدأ ةرﺎﺒﻋ روﺮﻡ WPA ﺔﻘیﺮﻄﺏ ﺮﻴﻏ ﺔﺤﻴﺤﺹ ءﺎﻨﺙأ ﺔﻴﻠﻤﻋ داﺪﻋﻹا ﻲﻜﻠﺳﻼﻟا.
ﻞﺡ تﻼﻜﺸﻡ ﻖﻠﻌﺘﺕ ﺔﻜﺒﺸﻟﺎﺏ ٣٠

ﻲﺑﺮﻋ
ﻞﺼﻔﻟا ٤
ﻞﺤﻟا:ﻢﻗ ﻞﻴﻐﺸﺘﺏ ﺔﻴﻠﻤﻋ داﺪﻋﻹا ﻲﻜﻠﺳﻼﻟا ةﺮﻡ ىﺮﺥأ ﻢﺙ ﻞﺥدأ ةرﺎﺒﻋ روﺮﻤﻟا ﺔﺤﻴﺤﺼﻟا .ةرﺎﺒﻋ روﺮﻤﻟا ﺔﺳﺎﺴﺡ ﺔﻟﺎﺤﻟ فﺮﺡﻷا.
ﺮﻬﻈﺕ ﺔﺵﺎﺵ The Printer Not Found) رﺬﻌﺕ رﻮﺜﻌﻟا ﻰﻠﻋ ﺔﻌﺑﺎﻄﻟا (ءﺎﻨﺙأ ﺖﻴﺒﺜﺘﻟا
ﺐﺒﺴﻟا:ﻊﻨﻤی ﻖﻴﺒﻄﺕ راﺪﺟ ﺔیﺎﻤﺤﻟا ,ﺞﻡﺎﻥﺮﺏ ﺔﺤﻓﺎﻜﻡ تﺎﺳوﺮﻴﻔﻟا وأ ﺞﻡﺎﻥﺮﺏ ﺔﺤﻓﺎﻜﻡ ﺲﺴﺠﺘﻟا زﺎﻬﺟ HP Photosmart ﻦﻡ
لﻮﺹﻮﻟا ﻰﻟإ ﺮﺕﻮﻴﺒﻤﻜﻟا صﺎﺨﻟا ﻚﺏ.
ﻞﺤﻟا:ﻢﻗ ءﺎﻐﻟﺈﺏ ﺖﻴﺒﺜﺕ ﺞﻡﺎﻥﺮﺒﻟا صﺎﺨﻟا زﺎﻬﺠﺏ HP Photosmart، ﻢﺙ ﺪﻋأ ﺪﻴﻬﻤﺕ زﺎﻬﺟ ﺮﺕﻮﻴﺒﻤﻜﻟا صﺎﺨﻟا ﻚﺏ .ﺪﻌﺏ ،ﻚﻟذ ﻢﻗ
صﺎﺨﻟا زﺎﻬﺠﺏ HP Photosmart.
ﺔﺘﻗﺆﻡ ﻞﺒﻗ ةدﺎﻋإ ﺖﻴﺒﺜﺕ ﺞﻡﺎﻥﺮﺒﻟا صﺎﺨﻟا زﺎﻬﺠﺏ HP Photosmart .ﻚﻨﻜﻤی ةدﺎﻋإ ﻦﻴﻜﻤﺕ ﻖﻴﺒﻄﺕ راﺪﺟ
ﻞﻴﻄﻌﺘﺏ تﺎﻘﻴﺒﻄﺕ ﺔﺤﻓﺎﻜﻡ تﺎﺳوﺮﻴﻔﻟا وأ ﺔﺤﻓﺎﻜﻡ ﺲﺴﺠﺘﻟا ﻞﻜﺸﺏ ،ﺖﻗﺆﻡ ﻢﺙ ﺪﻋأ ﺖﻴﺒﺜﺕ ﺞﻡﺎﻥﺮﺒﻟا
ﻚﻨﻜﻤی ةدﺎﻋإ ﻦﻴﻜﻤﺕ تﺎﻘﻴﺒﻄﺕ ﺔﺤﻓﺎﻜﻡ تﺎﺳوﺮﻴﻔﻟا وأ ﺔﺤﻓﺎﻜﻡ ﺲﺴﺠﺘﻟا ﺪﻌﺏ ءﺎﻬﺘﻥﻻا ﻦﻡ ﺖﻴﺒﺜﺘﻟا .اذإ تﺮﻬﻇ ﺔیأ ﻞﺋﺎﺳر ﺔﻘﺜﺒﻨﻡ ﻖﻠﻌﺘﺕ راﺪﺠﺏ
ﺔیﺎﻤﺤﻟا ,ﺐﺠﻴﻓ ﻚﻴﻠﻋ ﺎًﻤﺋاد ﺎﻬﻟﻮﺒﻗ وأ حﺎﻤﺴﻟا ﺎﻬﺏ.
اذإ ﺮﻤﺘﺳا رﻮﻬﻇ ﺔﻟﺎﺳﺮﻟا ،ﺔﻘﺜﺒﻨﻤﻟا لوﺎﺡ ءﺎﻐﻟإ ﺖﻴﺒﺜﺕ ﺞﻡﺎﻥﺮﺒﻟا صﺎﺨﻟا زﺎﻬﺠﺏ HP Photosmart ةدﺎﻋإو ﺪﻴﻬﻤﺕ زﺎﻬﺟ ﺮﺕﻮﻴﺒﻤﻜﻟا
ﻞﻴﻄﻌﺕو راﺪﺟ ﺔیﺎﻤﺤﻟا ةرﻮﺼﺏ
ﺔیﺎﻤﺤﻟا ﺪﻌﺏ ءﺎﻬﺘﻥﻻا ﻦﻡ ﺖﻴﺒﺜﺘﻟا .اذإ ﺮﻤﺘﺳا رﻮﻬﻇ ﻞﺋﺎﺳر ﺔﻘﺜﺒﻨﻡ ﻖﻠﻌﺘﺕ راﺪﺠﺏ ﺔیﺎﻤﺤﻟا ,ﺐﺠﻴﻓ ﻚﻴﻠﻋ ﺎًﻤﺋاد ﺎﻬﻟﻮﺒﻗ وأ حﺎﻤﺴﻟا ﺎﻬﺏ.
ﺪیﺰﻤﻠﻟ ﻦﻡ تﺎﻡﻮﻠﻌﻤﻟا ,ﻊﺟار ﻖﺋﺎﺙﻮﻟا ةدوﺰﻤﻟا ﻊﻡ ﺞﻡﺎﻥﺮﺏ راﺪﺟ ﺔیﺎﻤﺤﻟا.
ﺐﺒﺴﻟا:ﻊﻨﻤﺕ ﺔﻜﺒﺷ ﺔﻴﺽاﺮﺘﻓا ﺔﺹﺎﺥ )VPN (زﺎﻬﺟ HP Photosmart ﻦﻡ لﻮﺹﻮﻟا ﻰﻟإ ﺮﺕﻮﻴﺒﻤﻜﻟا صﺎﺨﻟا ﻚﺏ.
ﻞﺤﻟا:ﻢﻗ ﻞﻴﻄﻌﺘﺏ VPN ﺎًﺘﻗﺆﻡ ﻞﺒﻗ راﺮﻤﺘﺳﻻا ﻲﻓ ﺖﻴﺒﺜﺘﻟا.
ﺔﻈﺡﻼﻡنﻮﻜﺕ ﻒﺋﺎﻇو زﺎﻬﺟ HP Photosmart ةدﺪﺤﻡ ءﺎﻨﺙأ تﺎﺴﻠﺟ VPN.
ﺐﺒﺴﻟا:HP Photosmart ﺲﻴﻟ ﻲﻓ ﻊﺽو ﻞﻴﻐﺸﺘﻟا.
ﻞﺤﻟا:ﻢﻗ ﻞﻴﻐﺸﺘﺏ زﺎﻬﺟ HP Photosmart.
ﺮﻳﺮﺤﺕ تارﺎﺸﺤﻥا قرﻮﻟا
ﺪﻨﻋ ثوﺪﺡ رﺎﺸﺤﻥا قرﻮﻠﻟ ﻲﻓ زﺎﻬﺟ HP Photosmart ,ﺺﺤﻓا بﺎﺒﻟا ﻲﻔﻠﺨﻟا ًﻻ و أ .ﺪﻨﻋ مﺪﻋ دﻮﺟو قرﻮﻟا ﺮﺸﺤﻨﻤﻟا ﻲﻓ تﺎﻥاﻮﻄﺳﻻا
ﺔﻴﻔﻠﺨﻟا ,ﺺﺤﻓا بﺎﺒﻟا يﻮﻠﻌﻟا.
ﺮﻳﺮﺤﺘﻟ رﺎﺸﺤﻥا قرﻮﻟا ﻦﻡ بﺎﺒﻟا ﻲﻔﻠﺨﻟا
١.ﻢﻗ فﺎﻘیﺈﺏ ﻞﻴﻐﺸﺕ HP Photosmart.
ﻦﻋ HP Photosmart.
٢.ﻢﻗ ﻂﻐﻀﻟﺎﺏ ﻰﻠﻋ ﺾﺒﻘﻤﻟا دﻮﺟﻮﻤﻟا ﻰﻠﻋ بﺎﺒﻟا ﻲﻔﻠﺨﻟا ﺮیﺮﺤﺘﻟ بﺎﺒﻟا .ﻢﻗ ﺔﻟازﺈﺏ بﺎﺒﻟا ﻦﻋ ﻖیﺮﻃ ﻪﺒﺤﺳ اًﺪﻴﻌﺏ
٣١ HP Photosmart D7400 series
ﻪﻴﺒﻨﺕنإ ﺔﻟوﺎﺤﻡ ﺮیﺮﺤﺕ رﺎﺸﺤﻥا قرﻮﻟا ﻦﻡ ﺔﻬﺠﻟا ﺔﻴﻡﺎﻡﻷا ـﻟ HP Photosmart ﺎﻬﻨﻜﻤی نأ ﻒﻠﺘﺕ ﺔﻴﻟﺁ ﺔﻋﺎﺒﻄﻟا .ﻢﻗ ﺎًﻤﺋاد
لﻮﺹﻮﻟﺎﺏ ﻰﻟإ قرﻮﻟا ﺮﺸﺤﻨﻤﻟا ﻪﺘﻟازإو ﻦﻡ بﺎﺒﻟا ﻲﻔﻠﺨﻟا.
٣.ﻢﻗ ﺐﺤﺴﺏ قرﻮﻟا ﻦﻡ تﺎﻥاﻮﻄﺳﻻا ﻒﻄﻠﺏ.
ﻪﻴﺒﻨﺕاذإ قﺰﻤﺕ قرﻮﻟا ﺪﻨﻋ ﻪﺘﻟازإ ﻦﻡ ،تﺎﻥاﻮﻄﺳﻻا ﻢﻘﻓ ﺚﺤﺒﺏ تﺎﻥاﻮﻄﺳﻻا تﻼﺠﻌﻟاو ﻦﻋ ﻊﻄﻗ قرﻮﻟا ﻲﺘﻟا ﺪﻗ نﻮﻜﺕ ﺪﻗ ﺖﻴﻘﺏ
ﻞﺥاد زﺎﻬﺠﻟا .اذإ ﻢﻟ ﻢﻘﺕ ﺔﻟازﺈﺏ ﻊﻴﻤﺟ ﻊﻄﻗ قرﻮﻟا ﻦﻡ HP Photosmart، ،ثﺪﺤﻴﺳ ﻰﻠﻋ ،ﺢﺟرﻷا ﺪیﺰﻤﻟا ﻦﻡ تارﺎﺸﺤﻥا
قرﻮﻟا.
٤.ﻢﻗ ةدﺎﻋﺈﺏ ﺖﻴﺒﺜﺕ بﺎﺒﻟا ﻲﻔﻠﺨﻟا .ﻊﻓدا بﺎﺒﻟا مﺎﻡﻸﻟ ﻖﻓﺮﺏ ﻰﺘﺡ ﺮﻘﺘﺴی مﺎﻜﺡﺈﺏ ﻲﻓ ﻪﻥﺎﻜﻡ.
٥.ﻢﻗ ﻞﻴﻐﺸﺘﺏ زﺎﻬﺟ HP Photosmart، ﻢﺙ ﺲﻤﻠﺏ OK) ﻖﻓاﻮﻡ( ﺔﻌﺏﺎﺘﻤﻟ ﺔﻤﻬﻤﻟا ﺔﻴﻟﺎﺤﻟا.

ﺮﻳﺮﺤﺘﻟ رﺎﺸﺤﻥا قرﻮﻟا ﻦﻡ بﺎﺒﻟا يﻮﻠﻌﻟا
١.ﻢﻗ فﺎﻘیﺈﺏ ﻞﻴﻐﺸﺕ HP Photosmart.
٢.ﺢﺘﻓا بﺎﺏ ﺔﺷﻮﻃﺮﺥ ﺮﺒﺤﻟا.
٣.ﻊﻓرا بﺎﺒﻟا يﻮﻠﻌﻟا دﻮﺟﻮﻤﻟا ﻒﻠﺥ تﺎﺷﻮﻃﺮﺥ ﺮﺒﺤﻟا ةﺪﺡوو سأر ﺔﻋﺎﺒﻄﻟا.
٤.ﻢﻗ ﺐﺤﺴﺏ قرﻮﻟا ﻦﻡ تﺎﻥاﻮﻄﺳﻻا ﻒﻄﻠﺏ.
ﻪﻴﺒﻨﺕاذإ قﺰﻤﺕ قرﻮﻟا ﺪﻨﻋ ﻪﺘﻟازإ ﻦﻡ ،تﺎﻥاﻮﻄﺳﻻا ﻢﻘﻓ ﺚﺤﺒﺏ تﺎﻥاﻮﻄﺳﻻا تﻼﺠﻌﻟاو ﻦﻋ ﻊﻄﻗ قرﻮﻟا ﻲﺘﻟا ﺪﻗ نﻮﻜﺕ ﺪﻗ ﺖﻴﻘﺏ
ﻞﺥاد زﺎﻬﺠﻟا .اذإ ﻢﻟ ﻢﻘﺕ ﺔﻟازﺈﺏ ﻊﻴﻤﺟ ﻊﻄﻗ قرﻮﻟا ﻦﻡ HP Photosmart، ،ثﺪﺤﻴﺳ ﻰﻠﻋ ،ﺢﺟرﻷا ﺪیﺰﻤﻟا ﻦﻡ تارﺎﺸﺤﻥا
قرﻮﻟا.
٥.ﻖﻠﻏأ بﺎﺒﻟا يﻮﻠﻌﻟا.
٦.ﻖﻠﻏأ بﺎﺏ ﺔﺷﻮﻃﺮﺥ ﺮﺒﺤﻟا.
ﻲﺑﺮﻋ
٧.ﻢﻗ ﻞﻴﻐﺸﺘﺏ HP Photosmart ,ﻢﺙ ﺲﻤﻟا OK) ﻖﻓاﻮﻡ( ﺔﻌﺏﺎﺘﻤﻟ ﺔﻤﻬﻤﻟا ﺔﻴﻟﺎﺤﻟا.
تﺎﻡﻮﻠﻌﻡ لﻮﺡ تﺎﺵﻮﻃﺮﺥ ﺮﺒﺤﻟا سوؤرو ﺔﻋﺎﺒﻄﻟا
كﺪﻋﺎﺴﺕ تﺎﺤﻴﻤﻠﺘﻟا ﺔﻴﻟﺎﺘﻟا ﻲﻓ ﺔﻥﺎﻴﺹ تﺎﺷﻮﻃﺮﺥ ﺮﺒﺤﻟا ﻦﻡ HP ﻦﻤﻀﺕو ةدﻮﺟ ﺔﻋﺎﺒﻃ ﺔﻘﺳﺎﻨﺘﻡ.
تﺎﻡﻮﻠﻌﻡ لﻮﺡ تﺎﺷﻮﻃﺮﺥ ﺮﺒﺤﻟا سوؤرو ﺔﻋﺎﺒﻄﻟا ٣٢

ﻲﺑﺮﻋ
ﻞﺼﻔﻟا ٤
•ﻢﻗ ﺖﻴﺒﺜﺘﺏ ﺔﺷﻮﻃﺮﺥ ﺮﺒﺤﻟا ﻲﻓ ﺦیرﺎﺕ" ﻢﺕ ﺖﻴﺒﺜﺘﻟا ﻦﻡ لﻼﺥ ,"وأ ﻪﻠﺒﻗ ,عﻮﺒﻄﻤﻟا ﻰﻠﻋ ﻒﻴﻠﻐﺕ ﺔﺷﻮﻃﺮﺨﻟا.
•ﻆﻔﺘﺡا ﻞﻜﺏ تﺎﺷﻮﻃﺮﺥ ﺮﺒﺤﻟا ﺔﻔﻠﻐﻡ ﻲﻓ ﺎﻬﻔﻴﻠﻐﺕ ﻰﻟإ نأ جﺎﺘﺤﺕ ﺎﻬﻴﻟإ.
كﺮﺘﺸﻤﻟا ﻲﺋﺎﺏﺮﻬﻜﻟا وأ ﻦﻋ ﻖیﺮﻃ ﻊﻄﻗ ﻞﻴﺹﻮﺕ كﻼﺳأ رﺎﻴﺘﻟا ﻦﻡ HP Photosmart .اذإ ﺖﻤﻗ فﺎﻘیﺈﺏ
ﺔﻟازإ ﺶﻴﻃاﺮﺥ ﺮﺒﺤﻟا ﻦﻡ زﺎﻬﺟ HP Photosmart ﻰﺘﺡ رﺎﻀﺡإ ﺶﻴﻃاﺮﺥ ﺔﻠیﺪﺏ ﺎﻬﺒﻴآﺮﺘﻟ.
ﺔﺤﻴﺤﺹ .ﺪآﺄﺕ ﺎًﻀیأ ﻦﻡ كﺮﺕ ﺔﺷﻮﻃﺮﺥ ﺮﺒﺤﻟا ﺔﺘﺒﺜُﻡ ﺎﻬﻥﺎﻜﻡ .يدﺆیو ﺬﻴﻔﻨﺕ ﻩﺬه تاءاﺮﺟﻹا ﻰﻟإ يدﺎﻔﺕ بﺮﺴﺕ ﺮﺒﺤﻟا ﻦﻡ ةﺪﺡو سأر
ﺔﻋﺎﺒﻄﻟا.
ﺔﻋﺎﺒﻄﻟا.
•ﻢﻗ فﺎﻘیﺈﺏ ﻞﻴﻐﺸﺕ زﺎﻬﺟ HP Photosmart ﻂﻐﻀﺏ رﺰﻟا On) ﻞﻴﻐﺸﺕ( دﻮﺟﻮﻤﻟا ﻰﻠﻋ زﺎﻬﺟ ﺮﺕﻮﻴﺒﻤﻜﻟا .ﻻ ﻢﻘﺕ فﺎﻘیﺈﺏ ﻞﻴﻐﺸﺕ زﺎﻬﺠﻟا
ﻦﻋ ﻖیﺮﻃ فﺎﻘیإ ﻞﻴﻐﺸﺕ
ﻞﻴﻐﺸﺕ HP Photosmart ﻞﻜﺸﺏ ﺮﻴﻏ ،ﺢﻴﺤﺹ ﺪﻗ ﻻ دﻮﻌﺕ ةﺪﺡو سأر ﺔﻋﺎﺒﻄﻟا ﻰﻟإ ﺎﻬﻌﺽﻮﻡ ﺢﻴﺤﺼﻟا.
•ﻢﻗ ﻦیﺰﺨﺘﺏ تﺎﺷﻮﻃﺮﺥ ﺮﺒﺤﻟا ﺔﺟرﺪﺏ ةراﺮﺡ ﺔﻓﺮﻐﻟا )15.6°-26.6 °ﺔﺟرد ﺔیﻮﺌﻡ وأ 60°-78 °ﺔﺟرد ﺖیﺎﻬﻥﺮﻬﻓ(.
•ﻲﺹﻮﺕ ﺔآﺮﺷ HP مﺪﻌﺏ
اذإ ﺖﻨآ مﻮﻘﺕ ﻞﻘﻨﺏ زﺎﻬﺟ HP Photosmart ﺪآﺄﺕ ﻦﻡ فﺎﻘیإ ﻞﻴﻐﺸﺕ زﺎﻬﺠﻟا ﻂﻐﻀﺏ رﺰﻟا On) ﻞﻴﻐﺸﺕ( فﺎﻘیﻹ ﻪﻠﻴﻐﺸﺕ ﺔﻘیﺮﻄﺏ
•ﻢﻗ ﻒﻴﻈﻨﺘﺏ سأر ﺔﻋﺎﺒﻄﻟا) ﻦﻡ لﻼﺥ ﺔﻥﺎﻴﺹ ﺞﻡﺎﻥﺮﺏ Printer Toolbox (ﺎﻡﺪﻨﻋ ﻆﺡﻼﺕ دﻮﺟو ضﺎﻔﺨﻥا ظﻮﺤﻠﻡ ﻲﻓ ةدﻮﺟ ﺔﻋﺎﺒﻄﻟا.
•ﻻ ﻢﻘﺕ ﻒﻴﻈﻨﺘﺏ سأر ﺔﻋﺎﺒﻄﻟا ﻻإ ﺪﻨﻋ ةروﺮﻀﻟا .يدﺆی ﻚﻟذ ﻰﻟإ ناﺪﻘﻓ ﺮﺒﺤﻟا ﺮﻴﺼﻘﺕو ﺮﻤﻋ تﺎﺷﻮﻃﺮﺨﻟا.
•ﻢﻗ ﻞﻡﺎﻌﺘﻟﺎﺏ ﻊﻡ تﺎﺷﻮﻃﺮﺥ ﺮﺒﺤﻟا ﻖﻓﺮﺏ .ﺪﻗ يدﺆی طﺎﻘﺳإ ,ﻚیﺮﺤﺕ تﺎﺷﻮﻃﺮﺨﻟا وأ ﻞﻡﺎﻌﺘﻟا ﺎﻬﻌﻡ ﺔﻥﻮﺸﺨﺏ ﻰﻟإ ثوﺪﺡ ﻞآﺎﺸﻡ ﺔﺘﻗﺆﻡ ﻲﻓ
ﺔﻴﻠﻤﻋ ﻢﻋﺪﻟا
ﺪﻨﻋ ضﺮﻌﺘﻟا ﻰﻟإ ،ﺔﻠﻜﺸﻡ ﻊﺒﺕا ﻩﺬه تاﻮﻄﺨﻟا:
١.ﻊﺟار ﻖﺋﺎﺙﻮﻟا ةدوﺰﻤﻟا ﻊﻡ زﺎﻬﺟ HP Photosmart.
www.hp.com/support .ﺮﻓﻮﺘی ﻢﻋﺪﻟا يرﻮﻔﻟا ﻦﻡ HP ﻊﻴﻤﺠﻟ ءﻼﻤﻋ HP.
لﻮﺼﺤﻠﻟ ﻰﻠﻋ ﺔﻤﺋﺎﻗ ﻦﻡ مﺎﻗرأ ﻢﻋﺪﻟا ﺮﺒﻋ ،ﻒﺕﺎﻬﻟا ﻊﺟار ﻖﺋﺎﺙﻮﻟا ﺔﻋﻮﺒﻄﻤﻟا ةدوﺰﻤﻟا ﻊﻡ زﺎﻬﺠﻟا.
٢.رز ﻊﻗﻮﻡ ﺐیﻮﻟا ﻢﻋﺪﻠﻟ يرﻮﻔﻟا ﻦﻡ ﻞﺒﻗ HP ﻰﻠﻋ
اﺬه ﻮه عﺮﺳأ ردﺎﺼﻤﻟا لﻮﺼﺤﻠﻟ ﻰﻠﻋ ثﺪﺡأ تﺎﻡﻮﻠﻌﻤﻟا ﻲﺘﻟا ﻖﻠﻌﺘﺕ زﺎﻬﺠﻟﺎﺏ ﻢﻋدو ءاﺮﺒﺨﻟا ﻦﻤﻀﺘیو تاﺰﻴﻤﻟا ﺔﻴﻟﺎﺘﻟا:
•لﻮﺹﻮﻟا ﻊیﺮﺴﻟا ﻰﻟإ ﻲﻴﺋﺎﺼﺥأ ﻢﻋﺪﻟا ﻦﻴﻠهﺆﻤﻟا ﻰﻠﻋ ﺖﻥﺮﺘﻥﻹا
•تﺎﺜیﺪﺤﺕ ﺞﻡاﺮﺒﻠﻟ ﺞﻡاﺮﺏو ﻞﻴﻐﺸﺘﻟا زﺎﻬﺠﻟ HP Photosmart
•تﺎﻡﻮﻠﻌﻡ تاذ ﺔﻤﻴﻗ ﺔﻴﻟﺎﻋ لﻮﺡ زﺎﻬﺟ HP Photosmart ﻞﺡو تﻼﻜﺸﻡ ﺎیﺎﻀﻘﻟ ﺔﻌﺋﺎﺷ.
•تﺎﺜیﺪﺤﺕ ﺔﻴﻠﻤﻋ زﺎﻬﺠﻠﻟ ,تﺎﻬﻴﺒﻨﺕ ﻢﻋﺪﻟا تاﻮﻨﻗو ﺔیرﺎﺒﺥإ ﻦﻡ HP ﺮﻓﻮﺘﺕ ﻚیﺪﻟ ﺪﻨﻋ ﻞﻴﺠﺴﺕ HP Photosmart.
٣.ﻞﺼﺕا ﺰآﺮﻤﺏ ﻢﻋﺪﻟا ـﻟ HP .توﺎﻔﺘی ىﺪﻡ ﺮﻓﻮﺕ تارﺎﻴﺥ ﻢﻋﺪﻟا ﺐﺴﺡ زﺎﻬﺠﻟا ,ﺪﻠﺒﻟا/ﺔﻘﻄﻨﻤﻟا ﺔﻐﻠﻟاو.
٣٣ HP Photosmart D7400 series

٥تﺎﻡﻮﻠﻌﻤﻟا ﺔﻴﻨﻔﻟا
لوﺎﻨﺘی اﺬه ﻢﺴﻘﻟا تﺎﻔﺹاﻮﻤﻟا ﺔﻴﻨﻔﻟا تﺎﻡﻮﻠﻌﻤﻟاو ﺔﻴﻤﻴﻈﻨﺘﻟا ﺔﻴﻟوﺪﻟا زﺎﻬﺠﻟ HP Photosmart.
تﺎﺒﻠﻄﺘﻡ مﺎﻈﻨﻟا
تﺎﺒﻠﻄﺘﻡ ﺞﻡﺎﻥﺮﺏ مﺎﻈﻨﻟا ةدﻮﺟﻮﻡ ﻲﻓ ﻒﻠﻡ Readme.
تﺎﻔﺻاﻮﻡ ﺞﺘﻨﻤﻟا
لﻮﺼﺤﻠﻟ ﻰﻠﻋ تﺎﻔﺹاﻮﻡ ﺞﺘﻨﻤﻟا ,رز ﻊﻗﻮﻡ ﺐیﻮﻟا ـﻟ HP ﻰﻠﻋ www.hp.com/support.
تﺎﻔﺻاﻮﻡ قرﻮﻟا
•ﺔﻌﺳ ﺔیوﺎﺡ لﺎﺥدﻹا ﺔﻴﺴﻴﺋﺮﻟا :قرو يدﺎﻋ :ﻰﺘﺡ 100 )20 ﻞﻃر/75 ﻢﻏ/م² ﻦﻡ قرﻮﻟا(
•ﺔﻌﺳ ﺔیوﺎﺡ جاﺮﺥﻹا :قرو يدﺎﻋ :ﻰﺘﺡ 50 )20 ﻞﻃر/75 ﻢﻏ/م² ﻦﻡ قرﻮﻟا(
•ﺔﻌﺳ ﺔیوﺎﺡ رﻮﺼﻟا :تﺎﺤﻔﺹ قرو رﻮﺼﻟا :ﻰﺘﺡ 20
ﺔﻈﺡﻼﻡلﻮﺼﺤﻠﻟ ﻰﻠﻋ ﺔﻤﺋﺎﻗ ﺔﻠﻡﺎآ مﺎﺠﺡﺄﺏ ﻂﺋﺎﺳﻮﻟا ،ةﺪﻤﺘﻌﻤﻟا ﻊﺟار ﺞﻡﺎﻥﺮﺏ ﺔﻌﺏﺎﻄﻟا.
تﺎﻔﺻاﻮﻤﻟا ﺔﻳدﺎﻤﻟا
•عﺎﻔﺕرﻻا: 17.2 ﻢﺳ
•ضﺮﻌﻟا: 46 ﻢﺳ
•عﺎﻔﺕرﻻا: 38.7 ﻢﺳ
•نزﻮﻟا: 7.8 ﻢﺠآ ﻊﻡ دﻮﺟو تﺎﻘﺤﻠﻤﻟا
تﺎﻔﺻاﻮﻡ ﺔﻗﺎﻄﻟا
•كﻼﻬﺘﺳا ﺔﻗﺎﻄﻟا: 25 طاو ﺪﺤﻟا ﻰﺼﻗﻷا) ﺔﻋﺎﺒﻄﻟا ﺔیدﺎﻌﻟا(
•ﺔﻴﺘﻟﻮﻓ لﻮﺥﺪﻟا: AC 100 ﻰﻟإ 240 V ~ 1300 mA 50-60 Hz
•ﺪﻬﺟ جاﺮﺥﻹا: DC +32 V===1560 mA
ﻲﺑﺮﻋ
ﺔﻈﺡﻼﻡمﺪﺨﺘﺳا ﻂﻘﻓ ﻊﻡ لﻮﺤﻡ ﺔﻗﺎﻄﻟا دوﺰﻤﻟا ﻦﻡ ﻞﺒﻗ HP.
تﺎﻔﺻاﻮﻡ ﺔﺌﻴﺒﻟا
•ىﺪﻡ ﺔﺟرد ةراﺮﺡ ﻞﻴﻐﺸﺘﻟا ﻰﺹﻮﻤﻟا ﻪﺏ: 15º ﻰﻟإ 32º ﺔﺟرد ﺔیﻮﺌﻡ )59º ﻰﻟإ 90º ﺔﺟرد ﺖیﺎﻬﻥﺮﻬﻓ(
•ىﺪﻡ ﺔﺟرد ةراﺮﺡ ﻞﻴﻐﺸﺘﻟا حﻮﻤﺴﻤﻟا ﻪﺏ: 5º ﻰﻟإ 35º ﺔﺟرد ﺔیﻮﺌﻡ )41º ﻰﻟإ 95º ﺔﺟرد ﺖیﺎﻬﻥﺮﻬﻓ(
•ﺔﺏﻮﻃﺮﻟا: 15 %ﻰﻟإ 80 %ﺔﺏﻮﻃر ﺔﻴﺒﺴﻥ ﺮﻴﻏ ﺔﻔﺜﻜﺘﻡ
ﻦیﺰﺨﺘﻟا(: -20 ﻰﻟإ 60 ﺔﺟرد ﺔیﻮﺌﻡ )-4 ﻰﻟإ 140 ﺔﺟرد ﺖیﺎﻬﻥﺮﻬﻓ(
ﺔﻴﺴﻴﻃﺎﻨﻐﻡ
ﺔﻴﻟﺎﻋ.
•ىﺪﻡ ﺔﺟرد ةراﺮﺤﻟا ﺮﻴﻏ ﺔﻴﻠﻴﻐﺸﺘﻟا)
•ﻲﻓ دﻮﺟو ﻞﻘﺡ ﻲﺴﻴﻃﺎﻨﻐﻡوﺮﻬآ ،ٍلﺎﻋ ﻦﻡ ﻦﻜﻤﻤﻟا نأ نﻮﻜی جاﺮﺥإ HP Photosmart ﺎًهﻮﺸﻡ ﻞﻜﺸﺏ ﻒﻴﻔﻃ.
•ﻲﺹﻮﺕ ﺔآﺮﺷ HP ماﺪﺨﺘﺳﺎﺏ ﻞﺏﺎآ USB ﻪﻟﻮﻃ 3 ﺮﺘﻡ )10 مﺪﻗ (وأ ﻞﻗأ ﻞﻴﻠﻘﺘﻟ ءﺎﺽﻮﻀﻟا ﺔﺠﺕﺎﻨﻟا ﻦﻋ لﺎﻤﺘﺡا دﻮﺟو تﻻﺎﺠﻡ
رﺎﻌﺵإ Energy Star®
ﻢﺕ ﻢﻴﻤﺼﺕ اﺬه ﺞﺘﻨﻤﻟا ﻞﻴﻠﻘﺘﻟ كﻼﻬﺘﺳا ﺔﻗﺎﻄﻟا ﻆﻔﺡو دراﻮﻡ ﺔﻴﻌﻴﺒﻃ نود ﺮﻴﺙﺄﺘﻟا ﻰﻠﻋ ءادأ ﺞﺘﻨﻤﻟا .ﻢﺕ ﻪﻤﻴﻤﺼﺕ ﻞﻴﻠﻘﺘﻟ كﻼﻬﺘﺳا ﺔﻗﺎﻄﻟا ﻲﻟﺎﻤﺟﻹا
ءﺎﻨﺙأ ﻞﻴﻐﺸﺘﻟا ﻲﻓو ﺔﻟﺎﺡ مﺪﻋ ﻪﻠﻴﻐﺸﺕ .نإ اﺬه ﺞﺘﻨﻤﻟا ﻞﱠهﺆﻡ ـﻟ ENERGY STAR®، ﻮهو ﺞﻡﺎﻥﺮﺏ ّﻲﻋﻮﻃ ىﺮﺟ ﻩؤﺎﺸﻥإ ﻊﻴﺠﺸﺘﻟ ﺮیﻮﻄﺕ
تﺎﺠﺘﻨﻡ ﺔّﻴﺒﺘﻜﻡ ﺔﻌﺟﺎﻥ ﻦﻡ ﺔﻴﺡﺎﻥ ﺔﻗﺎﻄﻟا.
تﺎﻡﻮﻠﻌﻤﻟا ﺔﻴﻨﻔﻟا ٣٤

ﻞﺼﻔﻟا ٥
ENERGY STAR ﻲه ﺔﻡﻼﻋ ﺔﻡﺪﺥ ﺔﻠﺠﺴﻡ ﻲﻓ تﺎیﻻﻮﻟا ةﺪﺤﺘﻤﻟا ﺔﻴﻜیﺮﻡﻷا ﻢﺳﺎﺏ ﺔﻟﺎآو ﺔﻈﻓﺎﺤﻤﻟا ﻰﻠﻋ ﺔﺌﻴﺒﻟا EPA .ﻚیﺮﺸآ ﻲﻓ ﺞﻡﺎﻥﺮﺏ
ENERGY STAR، نﺈﻓ HP ﻦﻤﻀﺕ نأ اﺬه ﺞﺘﻨﻤﻟا ﻖﺏﺎﻄﺘی ﻊﻡ ئدﺎﺒﻤﻟا ﺔﻴﺳﺎﺳﻷا ﻲﺘﻟا ﻲﺹﻮی ﺎﻬﺏ ﺞﻡﺎﻥﺮﺏ ENERGY SATR ﻦﻡ
ﻞﺟأ ﺔﺌﻴﺏ ﺔﻔﻴﻈﻥ.
ﺪیﺰﻤﻠﻟ ﻦﻡ تﺎﻡﻮﻠﻌﻤﻟا لﻮﺡ تﺎﻬﻴﺟﻮﺕ ENERGY STAR رز ﻊﻗﻮﻡ ﺐیﻮﻟا ﻲﻟﺎﺘﻟا:
www.energystar.gov
ﺔﻴﺟﺎﺘﻥإ ﺔﺵﻮﻃﺮﺥ ﺮﺒﺤﻟا
ﻢﺘی ماﺪﺨﺘﺳا ﺮﺒﺡ ﻦﻡ تﺎﺷﻮﻃﺮﺥ ﺔﻋﺎﺒﻄﻟا ﻲﻓ ءاﺮﺟإ ﺔﻋﺎﺒﻄﻟا ﺪیﺪﻌﻟﺎﺏ ﻦﻡ قﺮﻄﻟا ﺔﻔﻠﺘﺨﻤﻟا ,ﺎﻤﺏ ﻲﻓ ﻚﻟذ ﻲﻓ ءاﺮﺟإ ﺔﺌﻴﻬﺘﻟا ,يﺬﻟا مﻮﻘی ﺰﻴﻬﺠﺘﺏ
زﺎﻬﺠﻟا تﺎﺷﻮﻃﺮﺨﻟاو ﺔﻋﺎﺒﻄﻠﻟ ﻲﻓو ﺔﻥﺎﻴﺹ سوؤر ﺔﻋﺎﺒﻄﻟا ,ﻲﺘﻟا مﻮﻘﺕ ظﺎﻔﺤﻟﺎﺏ ﻰﻠﻋ تﺎﺤﺘﻓ ﺔﻋﺎﺒﻄﻟا ﺔﻔﻴﻈﻥ بﺎﻴﺴﻥاو ﺮﺒﺤﻟا ﻰﻠﻋ ﺎﻡ ماﺮی.
ﺎﻬﻡاﺪﺨﺘﺳا .لﻮﺼﺤﻠﻟ ﻰﻠﻋ ﺪیﺰﻤﻟا ﻦﻡ تﺎﻡﻮﻠﻌﻤﻟا ,ﻊﺟار www.hp.com/go/
www.hp.com/pageyield لﻮﺼﺤﻠﻟ ﻰﻠﻋ ﺪیﺰﻤﻟا ﻦﻡ تﺎﻡﻮﻠﻌﻤﻟا لﻮﺡ ﺔﻴﺟﺎﺘﻥﻹا ةرﺪﻘﻤﻟا ﺔﺷﻮﻃﺮﺨﻠﻟ.
ﺔﻓﺎﺽﻹﺎﺏ ﻰﻟإ ﻚﻟذ ,ﻰﻘﺒﺕ ﺾﻌﺏ ﺎیﺎﻘﺏ ﺮﺒﺤﻠﻟ ﻲﻓ ﺔﺷﻮﻃﺮﺨﻟا ﺪﻌﺏ
inkusage.
رز
ﻲﺑﺮﻋ
تارﺎﻌﺵﻹا ﺔﻴﻤﻴﻈﻨﺘﻟا
ﻲﻔی زﺎﻬﺟ HP All-in-One تﺎﺒﻠﻄﺘﻤﺏ ﺞﺘﻨﻤﻟا ﻦﻡ تﻻﺎآﻮﻟا ﺔﻴﻤﻴﻈﻨﺘﻟا ﻲﻓ ﺪﻠﺒﻟا/ﺔﻘﻄﻨﻤﻟا ﻲﺘﻟا ﻢﻴﻘﺕ ﺎﻬﻴﻓ .لﻮﺼﺤﻠﻟ ﻰﻠﻋ ﺔﻤﺋﺎﻗ ﺔﻠﻡﺎآ
تارﺎﻌﺷﻺﻟ ﺔﻴﻤﻴﻈﻨﺘﻟا ,ﻊﺟار تﺎﻤﻴﻠﻌﺘﻟا ةﺮهﺎﻈﻟا ﻰﻠﻋ ﺔﺷﺎﺸﻟا.
ﻢﻗر ﻒﻳﺮﻌﺕ زاﺮﻃ ﻲﻤﻴﻈﻨﺕ
ضاﺮﻏﻷ ﻒیﺮﻌﺘﻟا ﻲﻤﻴﻈﻨﺘﻟا ,ﻢﺕ ﻦﻴﻴﻌﺕ ﻢﻗر ﻲﻤﻴﻈﻨﺕ زاﺮﻄﻠﻟ .ﻢﻗﺮﻟا ﻲﻤﻴﻈﻨﺘﻟا زاﺮﻄﻠﻟ يﺬﻟا ﺺﺨی ﻚﺠﺘﻨﻤﺏ ﻮه SDGOB-0711 .ﺐﺟ مﺪﻋ
ﻂﻠﺨﻟا ﻦﻴﺏ اﺬه ﻢﻗﺮﻟا ﻲﻤﻴﻈﻨﺘﻟا ﻢﺳاو ﻖیﻮﺴﺘﻟا )HP Photosmart D7400 series ,ﺦﻟإ (وأ مﺎﻗرأ ﺞﺘﻨﻤﻟا )CC247A ,ﺦﻟإ(.
٣٥ HP Photosmart D7400 series

نﺎﻤﻀﻟا
HP ﺞﺘﻨﻣﺩﻭﺪﺤﻣ ﻥﺎﻤﻀﻟﺍ ﺓﺪﻣ
ﺎ
ً
ً
ُ
.
ﺪﺣﺍﻭ ﻡﺎﻋ
ﻭﺱﺍﺉﻁ ﺍﻝﺏﺭﺍﻡﺝ
ﺕﺎﻘﺤﻠﻤﻟﺍ
ﻲﻓ ﻭﺃ ﺔﻣﺎﺨﻟﺍ ﻲﻓ
ﻭﺃ ﺕﺎﻧﺎﻤﺿ ﺖﻧﺎﻛ
.
ً
H P
ً
ً
H P
H P
ﻭﺃ ﺭﺮﺿ ﻰﻠﻋ ﻭﺃ ﺪﻗﺎﻌﺗ ﻰﻠﻋ ﺎً ﻤﺋﺎﻗ ﻚﻟﺫ ﻥﺎﻛ ً ءﺍ
ً
H P H P
ُ
Hewlett-Packard
H P
.ءﺎﻄﺧﻷﺍ ﻦﻣ ﺎ
H P
ﻭﺃ ؛
H P
H P H P
H P
H P H P
ﺤﺘﺑ
H P
ً
H P
ً
H P
ﻣ ﺩﺍﻮﻣ ﻭﺃ ﺕﺎﻧﻮﻜﻣ ﻭﺃ ءﺍﺰﺟﺃ ﻰﻠﻋ
ُ
ﺔﻛﺮﺷ ﻡﻮﻘﺗ ﻲﺘﻟﺍ ﻥﺍﺪﻠﺒﻟﺍ ﻞﻛ ﻲﻓ
H P
ﺔﻛﺮﺷ ﻡﻮﻘﺗ ﻲﺘﻟﺍ ﻥﺍﺪﻠﺒﻟﺍ ﻲﻓ
H P
ﺔﻣﺪﺨﻟ ﺪﻤﺘﻌﻣ ﺬﻔﻨﻣ ﻱﺃ ﻦﻣ - ﻊﻗﻮﻤﻟﺍ ﻲﻓ ﺔﻣﺪﺨﻟﺍ ﻞﺜﻣ -
H P
H P
.
ﺕﺎﺠﺘﻨﻣ ﻱﻮﺘﺤﺗ ﻥﺃ ﺩﺭﺍﻮﻟﺍ ﻦﻣ -٩
H P
H P
ءﺍ ﻋ
ً
.ﻢﻟﺎﻌﻟﺍ ﻲﻓ ﺮﺧﺁ ﻥﺎﻜﻣ ﻱﺃ ﻲﻓ ﻯﺮﺧﺃ ﺔﻘﻄﻨﻣ ﻰﻟﺇ ﺔﻘﻄﻨﻣ ﻭﺃ ﺮﺧﺁ ﺪﻠﺑ ﻰﻟﺇ ﺪﻠﺑ ﻦﻣ ﻭﺃ ،ﺍﺪﻨﻛ ﻞﺧﺍﺩ ﻯﺮﺧﺃ ﺔﻌﻃﺎﻘﻣ ﻰﻟﺇ ﺔﻌﻃﺎﻘﻣ
ﺩﻭﺪﺤﻤﻟﺍ ﻥﺎﻤﻀﻟﺍ ﺩﻭﺪﺣ - ﺃ
ﺔﻛﺮﺷ ﻦﻤﻀﺗ -١
ً
ﺕﺎﺠﺘﻨﻤﻟ ﺔﺒﺴﻨﻟﺎﺑ -٤
ﺍ
ﺔﻛﺮﺷ ﺖﻘﻠﺗ ﺍﺫﺇ -٥
H P
ﺔﻛﺮﺷ ﻰﻠﻋ ﺭﺬﻌﺗ ﺍﺫﺇ -٦
H P
ﺔﻛﺮﺷ ﻞﻤﺤﺘﺗ ﻻ -٧
ﻥﺎﻤﻀﻟﺍ ﺩﻭﺪﺣ -
-١
-٢
ﺎ ﺣ ﻲﻓﻭ -٢
ﻲﺑﺮﻋ
ﺏ
ﺝ
- ﺩ
ﻻﻭ ءﻼﻤﻌﻟﺍ ﻰﻟﺇ
H P
ّ
ٍ
ّ
-٣
نﺎﻤﻀﻟا ٣٦

 Loading...