

Page 1
HP Photosmart D7300 series
ٺҢޱࡾࠒ
User Guide
Page 2

www.hp.com/support
021 672 280
Argentina (Buenos Aires)
Argentina
Australia
Österreich www.hp.com/support
17212049
België
Belgique
Brasil (Sao Paulo)
Brasil
Canada
(Mississauga Area)
Canada
Central America &
The Caribbean
Chile
Colombia (Bogotá)
Colombia
Costa Rica
Česká republika
Danmark www.hp.com/support
Ecuador (Andinatel)
Ecuador (Pacifitel)
(02) 6910602
El Salvador
España
France
Deutschland
Guatemala
Magyarország
India
Indonesia
+971 4 224 9189
+971 4 224 9189
+971 4 224 9189
+971 4 224 9189
+971 4 224 9189
Ireland
1-700-503-048
Italia
Jamaica 1-800-711-2884
54-11-4708-1600
0-800-555-5000
www.hp.com/support/
australia
www.hp.com/support
www.hp.com/support
55-11-4004-7751
0-800-709-7751
(905) 206-4663
1-800-474-6836
www.hp.com/support
800-360-999
www.hp.com/support/
china
571-606-9191
01-8000-51-4746-8368
0-800-011-1046
810 222 222
1-999-119
800-711-2884
1-800-225-528
800-711-2884
800-6160
www.hp.com/support
www.hp.com/support
www.hp.com/support
+ 30 210 6073603
801 11 75400
800 9 2654
1-800-711-2884
www.hp.com/support/
hongkong
06 40 200 629
www.hp.com/support/
india
www.hp.com/support
www.hp.com/support
www.hp.com/support
www.hp.com/support/
Japan
0800 222 47
Luxembourg
Malaysia
Mauritius
México (Ciudad de México)
México
081 005 010
Nederland
New Zealand
Nigeria 1 3204 999
Norge
24791773
Pan amá
Paraguay 009 800 54 1 0006
Per ú
Philippines
Pol ska
Portugal www.hp.com/support
Puerto Rico
República Dominicana
Reunion
România
()
(-)
800 897 1415
Singapore
Slovensko
South Africa (international)
South Africa (RSA)
Rest of West Africa
Suomi
Sverige
Switzerland www.hp.com/support
071 891 391
Trinidad & Tobago 1-800-711-2884
Türkiye
600 54 47 47
United Kingdom www.hp.com/support
United States
Uruguay 0004-054-177
Venezuela (Caracas) 58-212-278-8666
Venezuela 0-800-474-68368
Viêt Nam
www.hp.com/support/
korea
www.hp.com/support
www.hp.com/support
(262) 262 210 404
55-5258-9922
01-800-472-68368
www.hp.com/support
www.hp.com/support
www.hp.com/support
1-800-711-2884
0-800-10111
www.hp.com/support
22 5666 000
1-877-232-0589
1-800-711-2884
0820 890 323
0801 033 390
095 777 3284
812 332 4240
www.hp.com/support/
singapore
0850 111 256
+ 27 11 2589301
086 0001030
+ 351 213 17 63 80
www.hp.com/support
www.hp.com/support
www.hp.com/support/
taiwan
www.hp.com/support
+90 212 444 71 71
(044) 230-51-06
www.hp.com/support
www.hp.com/support
Page 3

HP Photosmart D7300 series 使用者指南
繁體中文
Page 4

著作權和商標
© 2006 Hewlett-Packard Development
Company, L.P.
本文件中包含的資訊如有變更,恕不另
行通知。除非著作權法允許,否則未事
先取得書面許可,不得進行重製、改編
或翻譯。
惠普科技公司通告
在此文件提供的資訊如有修改,恕不另
行通知。
版權所有,翻印必究。除版權法允許之
外,未經 Hewlett-Packard 事先書面許
可,不得對本手冊進行複製、改編或翻
譯。
HP 產品與服務的唯一擔保已在這些產
品與服務隨附的書面保固聲明中闡明。
此處的任何資訊將不會構成額外擔保的
制定。HP 將不會對本文包含的技術或
編輯錯誤或者疏忽負責。
商標
HP、HP 標誌與 Photosmart 為
Hewlett-Packard Development
Company, L.P. 之財產。
Secure Digital 標誌為 SD Association
的商標。
Microsoft 與 Windows 為 Microsoft
Corporation 的註冊商標。
CompactFlash、CF 與 CF 標誌為
CompactFlash Association (CFA) 的商
標。
Memory Stick、Memory Stick Duo、
Memory Stick PRO 與 Memory Stick
PRO Duo 為 Sony Corporation 的商標
或註冊商標。
MultiMediaCard 為德國 Infineon
Technologies AG 的商標,並授權給
MMCA (MultiMediaCard Association)。
Microdrive 為 Hitachi Global Storage
Technologies 的商標。
xD-Picture Card 是 Fuji Photo Film Co.,
Ltd.、Toshiba Corporation 與 Olympus
Optical Co., Ltd. 的商標。
Mac、Mac 標誌與 Macintosh 為 Apple
Computer, Inc. 的註冊商標。
iPod 為 Apple Computer, Inc. 的商標。
Bluetooth 商標屬於其所有者,HP 已獲
得使用該商標的授權。
PictBridge 與 PictBridge 標誌為
Camera & Imaging Products
Association (CIPA) 的商標。
其他品牌與其產品為其各自持有者之商
標或註冊商標。
法規機型識別號碼
為用於法規識別,您的產品具有一個法
規機型識別號碼 (Regulatory Model
Number)。您產品的法規機型識別號碼
為 VCVRA-0603。請勿將此法規號碼與
行銷名稱 (HP Photosmart D7300 series
等) 或產品編號 (Q7057A 等) 混淆。
如需完整的法規公告清單,請參閱螢幕
說明。
能源消耗 - Energy Star®
HP 致力於在符合環保的原則下,提供
高品質產品。如需 HP 環保產品管理方
案的詳細資訊,請參閱螢幕說明。
Page 5

目錄
1 歡迎............................................................................................................5
特殊功能.....................................................................................................5
存取螢幕 HP Photosmart 印表機說明.........................................................5
印表機零件.................................................................................................6
選用配件.....................................................................................................8
印表機功能表..............................................................................................9
列印....................................................................................................10
儲存....................................................................................................10
共享....................................................................................................10
設定....................................................................................................10
2 準備列印...................................................................................................13
放入紙張...................................................................................................13
選擇適用的紙張..................................................................................13
放入紙張.............................................................................................13
插入墨匣...................................................................................................15
購買替換墨匣.....................................................................................15
墨匣訣竅.............................................................................................16
插入或更換墨匣..................................................................................16
插入記憶卡...............................................................................................18
支援的檔案格式..................................................................................18
插入記憶卡.........................................................................................19
記憶卡類型.........................................................................................19
取出記憶卡.........................................................................................20
3 列印相片時不連接電腦.............................................................................21
列印相片...................................................................................................21
從記憶卡列印相片..............................................................................21
從數位相機列印相片...........................................................................23
從 iPod 列印相片................................................................................24
相片版面...................................................................................................25
提高相片品質............................................................................................26
使用創意...................................................................................................27
4 連接..........................................................................................................31
連接到其他裝置........................................................................................31
將相片儲存至電腦.....................................................................................33
經由「HP Photosmart 共享」連線...........................................................33
5 從電腦列印...............................................................................................35
使用印表機軟體中的創意選項...................................................................35
HP Photosmart Premier.....................................................................35
HP Photosmart Essential...................................................................36
HP Photosmart D7300 series 使用者指南 3
Page 6

HP Photosmart 共享..........................................................................36
設定列印偏好值........................................................................................36
開啟電子版說明..................................................................................37
HP Real Life 技術功能..............................................................................37
6 愛護與維護...............................................................................................39
清潔及維護印表機.....................................................................................39
清潔印表機外部..................................................................................39
校正印表機.........................................................................................39
列印樣本頁.........................................................................................39
自動清潔列印頭..................................................................................40
手動清潔墨匣的接點...........................................................................40
列印自我測試報告..............................................................................41
更新軟體...................................................................................................42
儲存及運送印表機和墨匣..........................................................................43
儲存及運送印表機..............................................................................43
儲存及運送墨匣..................................................................................43
維護相紙的品質........................................................................................43
7 疑難排解...................................................................................................45
印表機硬體問題........................................................................................45
列印問題...................................................................................................46
錯誤訊息...................................................................................................50
紙張錯誤.............................................................................................50
墨匣錯誤.............................................................................................51
記憶卡錯誤.........................................................................................55
電腦和連線列印錯誤...........................................................................58
8HP 支援中心.............................................................................................59
支援程序...................................................................................................59
致電 HP 支援中心.....................................................................................59
電話支援期限.....................................................................................59
致電....................................................................................................59
電話支援期限過後..............................................................................60
其他保固選項............................................................................................60
A 規格..........................................................................................................61
系統需求...................................................................................................61
印表機規格...............................................................................................61
BHP 保固....................................................................................................65
索引.................................................................................................................67
4 HP Photosmart D7300 series
Page 7

1
歡迎
非常感謝您購買 HP Photosmart D7300 series 印表機!使用此新型相片印表
機,不論是否使用電腦,您都可以列印精美的相片、儲存相片到電腦以及製作簡
易有趣的專案。
本手冊主要說明如何在不連接電腦的情況下列印。若要了解如何從電腦列印,請
安裝印表機軟體並檢視電子說明。如需關於利用電腦使用印表機的概述,請參
閱從電腦列印。如需安裝軟體的詳細資訊,請參閱「快速入門」指南。
家庭使用者可了解如何:
●
●
●
印表機隨附以下說明文件:
●
●
● 螢幕說明:螢幕「HP Photosmart 印表機說明」描述如何利用電腦使用本印
特殊功能
新功能與材質使製作高品質相片變得更加容易:
● 在使用新款 HP 進階相紙 (在某些國家/地區也稱為 HP 相紙) 時,印表機中
● HP Real Life 技術讓您可輕易獲得品質更佳的相片。可增強陰影中細節效果
從印表機或電腦列印無邊框相片
選擇相片版面
將彩色相片轉換成黑白相片,或套用色彩效果,如:褐色或古董色
快速入門指南:「快速入門指南」說明如何安裝印表機和印表機軟體,以及
如何開始列印您的第一張相片。
使用者指南:「使用者指南」就是您正在閱讀的這本書。描述印表機的基本
功能,說明如何在不連接電腦的情況下使用印表機,亦包含硬體疑難排解資
訊。
表機,並包含軟體疑難排解資訊。
的特殊感應器將會偵測到相紙背面的標記,並自動選擇最佳的列印設定。如
需關於此新款相紙的詳細資訊,請參閱選擇適用的紙張。
的自動消除紅眼和適應照明僅是其中一些技術。您可以從控制台和印表機軟
體中獲取許多編輯和增強選項。若要從控制台存取這些功能,請參閱提高相
片品質。若要了解如何在軟體中找到這些功能,請參閱 HP Real Life 技術功
能。
存取螢幕 HP Photosmart 印表機說明
在電腦上安裝好 HP Photosmart 印表機軟體後,您可以檢視螢幕 HP Photosmart
印表機說明:
● Windows PC:在「開始」功能選項中,選取「程式集」 (在 Windows XP
中,選取「所有程式」) > 「HP」 > 「HP Photosmart D7300 series」 >
「Photosmart 說明」。
● Macintosh:在 Finder 中,選取「輔助說明」 > 「Mac 輔助說明」,然後選
取「輔助說明中心」 > 「HP Photosmart Premier Help」(HP Photosmart
HP Photosmart D7300 series 使用者指南 5
Page 8
第 1 章
Premier 輔助說明) > 「HP Photosmart Printer」(HP Photosmart 印表機輔
助說明)。
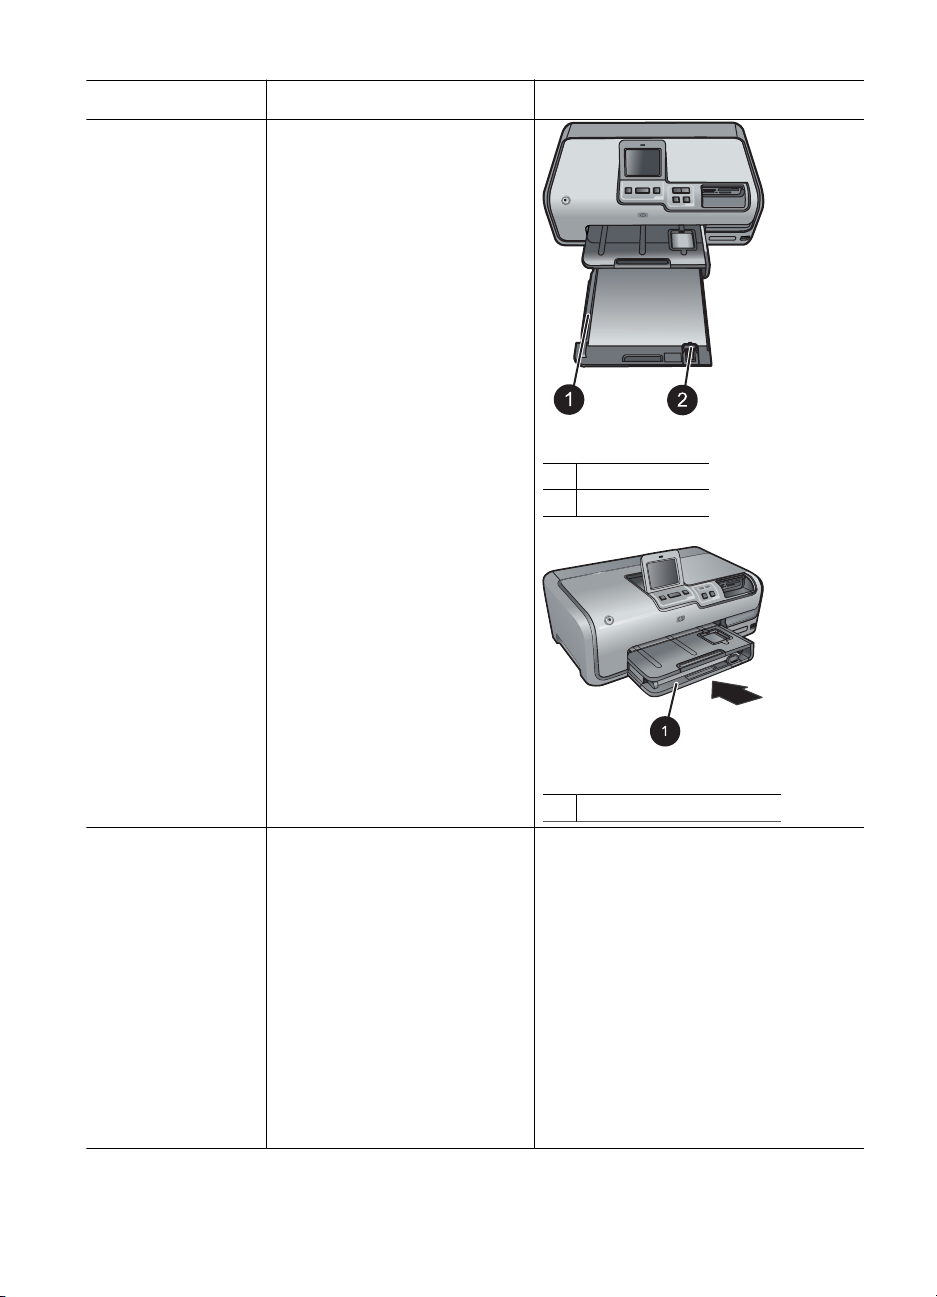
印表機零件
印表機正面
開啟:按此按鈕可以開啟印表機電源。
1
2 頂蓋:提起此蓋可以碰觸到墨匣以及清除卡紙。若要提起此蓋,請抓住 HP 標誌下
面的頂蓋並向上拉起。
觸控式螢幕顯示器:使用此螢幕可檢視與列印相片、功能選項及訊息。
3
出紙匣:此匣用於容納列印出來的相片。提起此匣可存取相片匣。
4
主紙匣:拉出此匣可放入紙張、投影片、信封或其他材質,讓列印面朝下。
5
6 相片匣:提起出紙匣,可在相片匣中放入長 10 x 15 公分 (4 x 6 英吋) 的小型相紙,
讓列印面朝下。相紙可以是含標籤或不含標籤。
記憶卡插槽:在此插入記憶卡。如需支援的記憶卡清單,請參閱插入記憶卡。
7
8 相機連接埠:連接 PictBridge™ 數位相機、可選用的 HP Bluetooth® 無線印表機轉接
器,或 iPod。
印表機的背面
電源線連接:使用此連接埠連接印表機附帶的電源線。
1
2 USB 埠:使用此連接埠將印表機連接至電腦。
3 後方機門:卸下此門可以清除卡紙或安裝可選用的 HP 自動雙面列印配件。請參閱
選用配件。
6 HP Photosmart D7300 series
Page 9

主紙匣與出紙匣
紙張寬度導板:調整此導板使其緊靠主紙匣中紙疊的邊緣。
1
出紙匣:此匣用於容納列印出來的相片。提起此匣可存取相片匣。
2
出紙匣延伸架:往您的方向拉開,可以延伸出紙匣來容納相片。
3
主紙匣:拉出此匣可放入一般紙張、投影片、信封或其他材質,讓列印面朝下。
4
主紙匣把手:往您的方向拉開來延伸主紙匣。
5
紙張長度導板:調整此導板,使其緊靠主紙匣中紙張的末端。
6
相片匣
紙張寬度導板:調整此導板,使其緊靠相片匣中紙疊的邊緣。
1
紙張長度導板:調整此導板,使其緊靠相片匣中紙張的末端。
2
HP Photosmart D7300 series 使用者指南 7
Page 10
第 1 章
控制台
開啟:開啟印表機電源或將其置入省電模式。
1
預覽列印:檢視選取相片的預覽。
2
列印:從插入的記憶卡,或連接到前方相機連接埠的相機列印選取的相片。
3
取消:取消選取相片、結束功能表或者停止您所請求的操作。
4
旋轉:旋轉相片或裁剪方塊。
5
6 縮放 (+)(-):放大或縮小相片或裁剪方塊。您也可在以正常放大倍數檢視相片時,按
縮放 (-) 一次檢視四張相片。
自動修正:自動增強並套用照明、對比、聚焦及消除紅眼功能到所有印出的相片。
7
指示燈
開啟燈號:開啟印表機電源時一直亮起為藍色,關閉電源時熄滅。
1
列印燈號:印表機開啟並準備好列印時一直亮起為藍色,印表機正在列印或忙於自
2
我維護時以藍色閃爍。
注意燈號:有錯誤狀況時即會閃爍。請參閱觸控式螢幕顯示器,以取得該錯誤的相
3
關指示或資訊。如需詳細資訊,請參閱注意燈號亮起。
自動修正燈號:「自動修正」功能開啟時一直亮起為藍色。
4
記憶卡燈號:有記憶卡插入時一直亮起為藍色,印表機存取記憶卡時閃爍,未插入
5
記憶卡或插入超過一張卡時熄滅。出現問題並且需要使用者進行操作時亮起。請參
閱印表機螢幕以取得相關指示。
選用配件
印表機有一些選用配件可增強便攜性,以便在任何時間和地點列印。配件的外觀
可能與顯示的有所不同。
8 HP Photosmart D7300 series
Page 11
要購買耗材,請瀏覽:
● www.hpshopping.com (美國)
● www.hp.com/go/supplies (歐洲)
● www.hp.com/jp/supply_inkjet (日本)
● www.hp.com/paper (亞太地區)
配件名稱
HP 自動雙面列印配件
HP Bluetooth® 無線印表機轉接器
1
將 Bluetooth 轉接器插入前方相機
連接埠
描述
此配件會自動翻轉每頁以列印雙面。
您可以節省費用 (雙面列印會減少紙張
的消耗) 和時間 (無需取出紙張再將它
重新放回),並且更容易管理大型文件。
並非在所有國家/地區都提供此配件。
HP Bluetooth® 無線印表機轉接器插入
印表機前方的相機連接埠。此轉接器
讓您從許多支援 Bluetooth 功能的裝
置 (包括數位相機、相機手機,以及
PDA) 使用 Bluetooth 無線技術列印。
如需關於使用此配件進行列印的更詳
細資訊,請瀏覽 www.hp.com/go/
bluetooth。
印表機功能表
觸碰左上角中的首頁圖示,以存取首頁畫面。您可以在首頁畫面與設定功能選項
中存取所有功能。
HP Photosmart D7300 series 使用者指南 9
Page 12

第 1 章
列印
儲存
共享
設定
「精靈」:利用精靈來引導您進行列印程序。
「4×6」:用來列印 4×6 英吋 (10 × 15 公分) 的相片。
「放大」:利用「放大」來列印不同尺寸的相片。
「全部」:選取後可列印插入印表機之記憶卡中所有的相片。
「其他專案」:利用「其他專案」來列印全景、HP CD/DVD 紋身紙、皮夾尺寸
及護照相片。
–
「全景列印」:選擇「開啟」或「關閉」(預設值) 以開啟或關閉全景列印。
選取「開啟」以 3:1 的長寬比列印所有選定的相片;在列印之前請放入 10 x
30 公分 (4 x 12 英吋) 的紙張。
–
「HP CD/DVD 紋身紙」:選取後可列印 CD/DVD 標籤。
–「皮夾尺寸列印」:利用此選項來列印皮夾尺寸的相片。
–「護照相片」:選取後可列印護照相片。
觸碰「儲存」按鈕,即可將選取的影像儲存到連接的 PC。
透過「HP Photosmart 共享」,即可使用「共享」按鈕來選取並共享相片。
「工具」:使用工具來顯示墨水容量、調整列印品質、列印樣本頁和測試
●
頁,以及清潔並校正墨匣。
– 顯示墨水容量:用於在首頁畫面上顯示墨水容量。
–
「列印品質」:選擇「最佳」(預設值) 或「一般」列印品質。
–「列印樣本頁」:選取後可列印樣本頁,這在檢查印表機的列印品質時
很有用。此功能並未在所有印表機機型上提供。
–「列印測試頁」:選取後可列印包含有關印表機疑難排解資訊的測試頁。
–「清潔列印頭」:當照片上出現白色線條或條紋時,可選取此選項來清
潔列印頭。完成清潔後,印表機將列印一份自我測試報告。如果報告顯
示列印品質有問題,您可以選擇再次清潔列印頭。
–「校正印表機」:當照片上出現白色線條或條紋時,可選取此選項來校
正印表機。
● Bluetooth
–
「裝置位址」:某些具有 Bluetooth 無線技術的裝置需要您輸入要尋找之
裝置的位址。此功能表選項會顯示印表機位址。
–
「裝置名稱」:您可以為印表機選擇名稱,讓其他具有 Bluetooth 無線技
術的裝置在找到印表機後顯示這個名稱。
–
「總金鑰」:當印表機的 Bluetooth「安全級別」設為「高」時,您必須
輸入總金鑰才能讓其他 Bluetooth 裝置可以使用印表機。預設的總金鑰
是 0000。
–
「可見性」:選取「全部可見」(預設值) 或「不可見」。當「可見性」設
為「不可見」時,只有知道印表機位址的裝置才能從印表機列印。
10 HP Photosmart D7300 series
Page 13

–
「安全級別」:選取「低」(預設值) 或「高」。「低」設定不會要求使
用 Bluetooth 無線技術之其他裝置的使用者輸入印表機總金鑰。「高」
會要求使用 Bluetooth 無線技術之其他裝置的使用者輸入印表機總金鑰。
–
「重設 Bluetooth 選項」:選取後可將 Bluetooth 功能表中的所有項目
重設為其預設值。
「說明功能選項」:利用說明功能選項以取得使用印表機的相關指示。
●
–「墨匣」:選取後可看到如何安裝墨匣的動畫。
–「放入主紙匣」:選取後可閱讀在主紙匣放入紙張的指示。
–「放入相片匣」:選取後可閱讀在相片匣放入紙張的指示。
–「卡紙」:選取後可看到如何清除卡紙的動畫。
–
「相機連接」:選取後可閱讀如何將 PictBridge 相機連接到印表機的指
示。
「偏好設定」
●
– 列印紙張尺寸:觸碰「列印前詢問」,以便在每次列印前選取紙張類型
與尺寸 (預設值)。
–
「紙張類型」:觸碰「自動」(預設值),印表機會在列印時自動偵測紙張
類型與尺寸。
–
「日期戳記」:使用此選項可將日期與/或時間加到印出的相片上。
–
色彩空間:選擇一個色彩空間。「自動選擇」(預設值) 會讓印表機使用
Adobe RGB 色彩空間 (如果可用)。如果 Adobe RGB 不可用,依預設,
印表機將會使用 sRGB。
–
PictBridge 紙匣選擇:用來選取透過 PictBridge 連線進行列印的預設紙
匣。
– 音效回應:用來在觸碰或壓下按鈕時啟用音訊聲調。
–
「視訊增強」:選擇「開啟」(預設值) 或「關閉」。當您選擇「開啟」
時,從視訊片段列印的相片品質會加以改善。
–
「還原原廠設定」:除了「選取語言」和「選取國家/地區」(在「偏好設
定」功能選項的「語言」中) 以及 Bluetooth 設定 (在印表機主功能選項
的「Bluetooth」下) 之外,將所有設定值還原為其出廠時的預設設定。
此設定不會影響「HP Instant Share」或「網路」預設值。
HP Photosmart D7300 series 使用者指南 11
Page 14

第 1 章
12 HP Photosmart D7300 series
Page 15

2
準備列印
本節包括下列主題:
放入紙張
●
插入墨匣
●
插入記憶卡
●
放入紙張
了解如何為列印工作選擇合適的紙張,以及如何將紙張放入進紙匣以進行列印。
選擇適用的紙張
使用 HP 進階相紙。它是特別設計用來搭配使用本印表機中的墨水,以製作精美
的相片。其他相紙產生的效果會比較差。
如需可用 HP 相紙的清單,或是要購買耗材,請造訪:
● www.hpshopping.com (美國)
● www.hp.com/eur/hpoptions (歐洲)
● www.hp.com/jp/supply_inkjet (日本)
● www.hp.com/paper (亞太地區)
依預設,印表機會設定為在 HP 高級相紙上列印最佳品質的相片。如果您在不同
種類的紙張上列印,請務必在印表機功能選項中變更紙張類型。請參閱印表機功
能表。
放入紙張
裝入紙張訣竅:
以列印面朝下的方式放入紙張。
●
● 您可以在各種尺寸的紙張上列印相片和文件,包括從 8 x 13 公分 (3 x 5 英
吋) 到最大 22 x 61 公分 (8.5 x 24 英吋) 的紙張。提供含標籤或不含標籤的
10 x 15 公分 (4 x 6 英吋) 相紙。
在放入紙張之前,拉出主紙匣,然後滑出紙張寬度導板與紙張長度導板,以
●
留出紙張的空間。放入紙張後,調整導板,使其緊靠紙張邊緣而不會彎曲紙
張。將紙張放入之後,再將主紙匣推回去。
一次僅在相同的紙匣中放入一種類型及尺寸的紙張。
●
放入紙張後,拉出出紙匣延伸架以接住印好的頁面。
●
請依照下表中的指示將最常用尺寸的紙張放入印表機。
紙張類型
任何支援的相片或
一般紙張材質
HP Photosmart D7300 series 使用者指南 13
裝紙方法 放入的紙匣
拉出主紙匣。
1.
將紙張寬度導板和紙張長
2.
度導板滑動到最外邊的位
置。
放入主紙匣
Page 16
第 2 章
(續)
紙張類型 裝紙方法 放入的紙匣
以列印面朝下的方式放入
3.
紙張。檢查以確定紙疊未
超過紙張長度導板的上
端。
向內調整紙張寬度導板和
4.
紙張長度導板,直到停在
紙疊的邊緣。
將主紙匣完全向內推入。
5.
放入紙張並向內調整導板
紙張寬度導板
1
紙張長度導板
2
推入主紙匣
將主紙匣完全向內推入
1
最大至 10 x 15 公
分 (4 x 6 英吋) 含標
籤或不含標籤的相
紙、Hagaki 卡、
A6 卡、L 尺寸卡
提起出紙匣,然後拉出主
1.
紙匣。
向外調整紙張寬度導板和
2.
紙張長度導板,留出紙張
的空間。
放入相片匣
3. 在相片匣中最多放入 20
張紙,讓列印面朝下。如
果使用含標籤的紙張,插
入紙張時請將標籤靠近您
的方向。
向內調整紙張寬度導板和
4.
紙張長度導板,直到停在
紙疊的邊緣。
14 HP Photosmart D7300 series
Page 17
(續)
紙張類型 裝紙方法 放入的紙匣
推入相片匣。
5.
關閉出紙匣。
6.
提起出紙匣並向外調整導板
出紙匣
1
紙張寬度導板
2
紙張長度導板
3
放入相紙並向內調整導板
紙張寬度導板
1
紙張長度導板
2
插入墨匣
在您第一次安裝與使用 HP Photosmart 印表機時,請確定安裝印表機隨附的墨
匣。這些墨匣中的墨水是特別配製與列印頭組件中的墨水混合。
購買替換墨匣
在購買替換墨匣時,請參閱本指南封底的墨匣編號。這些墨匣編號會依國家/地
區的不同而異。
HP Photosmart D7300 series 使用者指南 15
Page 18
第 2 章
墨匣訣竅
附註 如果您已數次使用印表機並且已安裝 HP Photosmart 印表機軟體,
您可以在印表機軟體中找到墨匣編號。Windows 使用者:用滑鼠右鍵按
一下 Windows 工作列中的 HP Digital Imaging Monitor 圖示,然後選取
「啟動/顯示 HP 解決方案中心」。選取「設定」、「列印設定」,然後選
取「印表機工具箱」。按一下「估計的墨水存量」標籤,然後按一下「墨
匣資訊」。若要訂購墨匣,請按一下「線上訂購」。Mac 使用者:在
Dock 中,按一下 「HP Photosmart Premier」。從「Settings」(設定) 快
顯功能表選擇「Maintain Printer」(維護印表機)。按一下「Launch
Utility」(啟動工具程式),然後從快顯功能表選擇「Supplies Status」(耗
材狀態)。
HP Vivera 墨水提供逼真的相片品質以及傑出的防褪色效果,能永保持久的鮮豔
色彩。HP Vivera 墨水是特別配製並已透過科學方法進行品質、純度和防止褪色
方面的測試。
為了獲得最佳列印品質,對於從零售商處購買的所有列印墨匣,HP 建議您在包
裝盒上的安裝有效期之前安裝。
為了獲得最佳列印效果,HP 建議您僅使用原廠 HP 墨匣進行列印。原廠 HP 墨
匣是專為 HP 印表機設計,並通過在 HP 印表機上的測試,可在多次使用後仍能
產生精美的列印效果。
附註 HP 無法保證非 HP 墨水的品質和可靠性。因使用非 HP 墨水導致
印表機故障或損壞而引起的印表機服務或維修,不在保固範圍內。
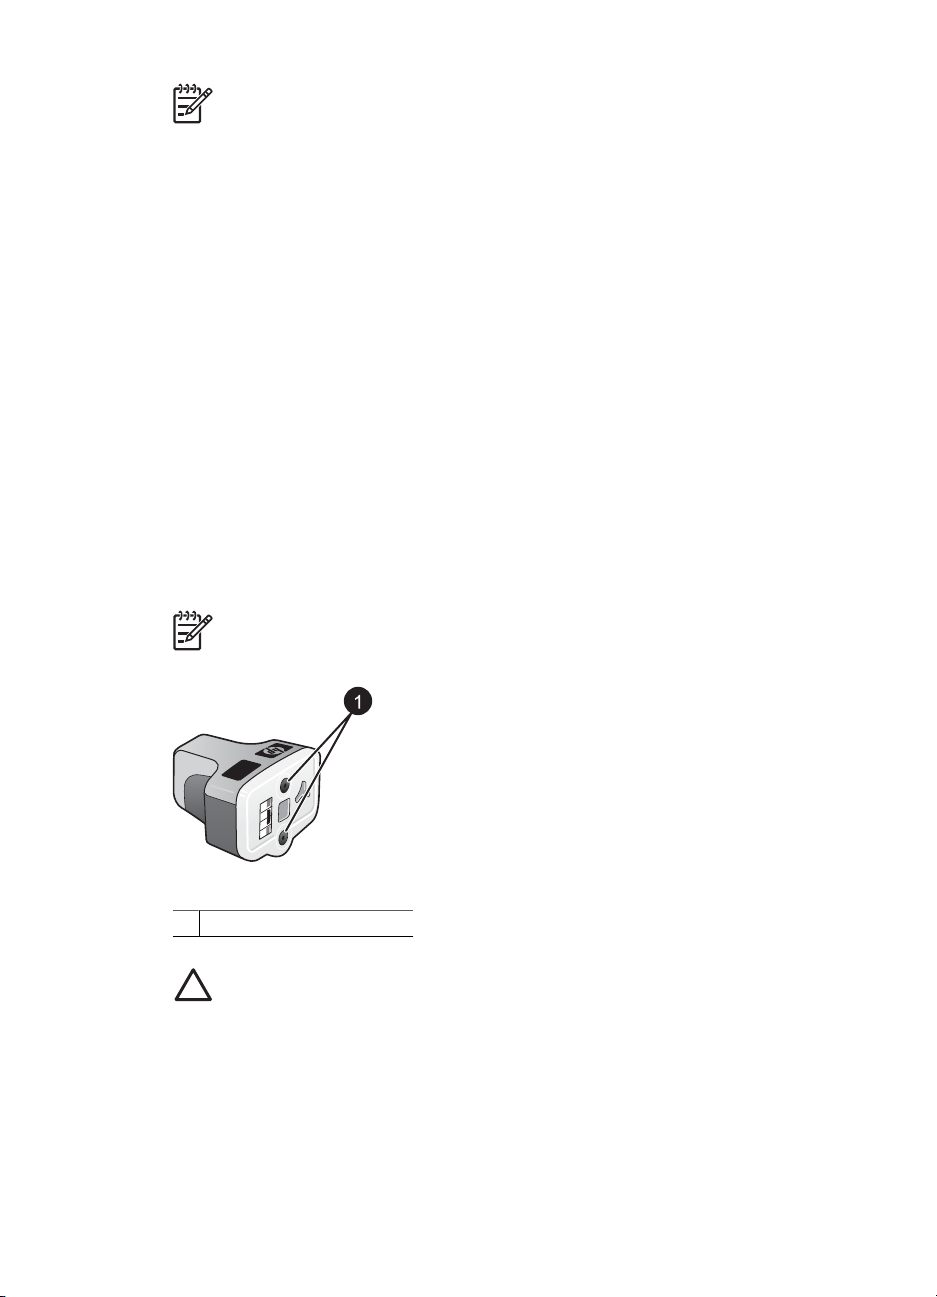
墨匣
請勿將物件插入這些孔內
1
注意 若要防止墨水遺失或溢出:運送印表機時,請將墨匣留在印表機
內,並且避免將用過的墨匣長時間留在印表機外面。
插入或更換墨匣
確定電源已開啟,然後掀開頂蓋。確定已從印表機內部取出所有包裝材料。
1.
16 HP Photosmart D7300 series
Page 19

緊壓墨匣插槽下面的灰色卡扣閂鎖以釋放印表機內部的灰色卡榫,然後提起
2.
卡榫。
墨匣區域具有顏色編碼以方便對照。提起適當顏色下面的卡榫可插入或更換
墨匣。墨匣的顏色從左到右,分別是黑色、黃色、淡青藍色、青藍色、淡洋
紅色及洋紅色。
黑色墨匣的墨匣卡榫
1
彩色墨匣的墨匣區域
2
如果您要更換墨匣,請將舊墨匣朝向您拉出插槽以將它取出。
3.
回收舊墨匣。HP 噴墨耗材回收計劃在許多國家/地區皆有提供,免費為您回
收用過的墨匣。如需更詳細的資訊,請瀏覽 www.hp.com/hpinfo/
globalcitizenship/environment/recycle/inkjet.html。
從包裝中取出新的墨匣,握住把手,將墨匣滑入空的插槽。
4.
確定您插入墨匣的插槽具有與新墨匣相同形狀的圖示與顏色。在插入墨匣時
銅色接點必須面向印表機。
附註 在您第一次安裝與使用印表機時,請確定安裝印表機隨附的墨
匣。這些墨匣中的墨水是特別配製與列印頭組件中的墨水混合。
HP Photosmart D7300 series 使用者指南 17
Page 20

第 2 章
將灰色卡榫向下壓直到它卡入到位。
5.
6. 為您要更換的每個墨匣重複步驟 2 至 5。
您必須安裝所有六個墨匣。如果有一個墨匣缺失,印表機將無法正常操作。
合上頂蓋。
7.
在偵測到墨水存量不足時,觸控式螢幕會顯示六個墨水滴圖示,其中顯示每
個墨匣的大約墨水存量。
附註 如果您使用非 HP 墨水,代表該墨匣的會是一個問號而不是墨
水滴圖示。印表機無法偵測包含非 HP 墨水之墨匣中的剩餘墨水量。
插入記憶卡
使用數位相機拍照之後,您可以從相機中取出記憶卡,將其插入印表機以檢視和
列印相片。本款印表機可以讀取下列類型的記憶卡:CompactFlash
Sticks、Microdrive
™
、MultiMediaCard™、Secure Digital™ 和 xD-Picture Card™。
注意 使用其他任何類型的記憶卡可能會損壞記憶卡和印表機。
若要了解如何用其他方法將數位相機中的相片傳輸到印表機,請參閱連接到其他
裝置。
支援的檔案格式
此印表機可辨識下列檔案格式,並可直接從記憶卡列印:JPEG、未壓縮的
TIFF、Motion JPEG AVI、Motion-JPEG Quicktime 和 MPEG-1。如果您的數位
相機以其他檔案格式儲存相片和視訊片段,請先將檔案儲存到電腦,再利用軟體
程式進行列印。如需詳細資訊,請參閱電子版說明。
18 HP Photosmart D7300 series
™
、Memory
Page 21

插入記憶卡
記憶卡類型
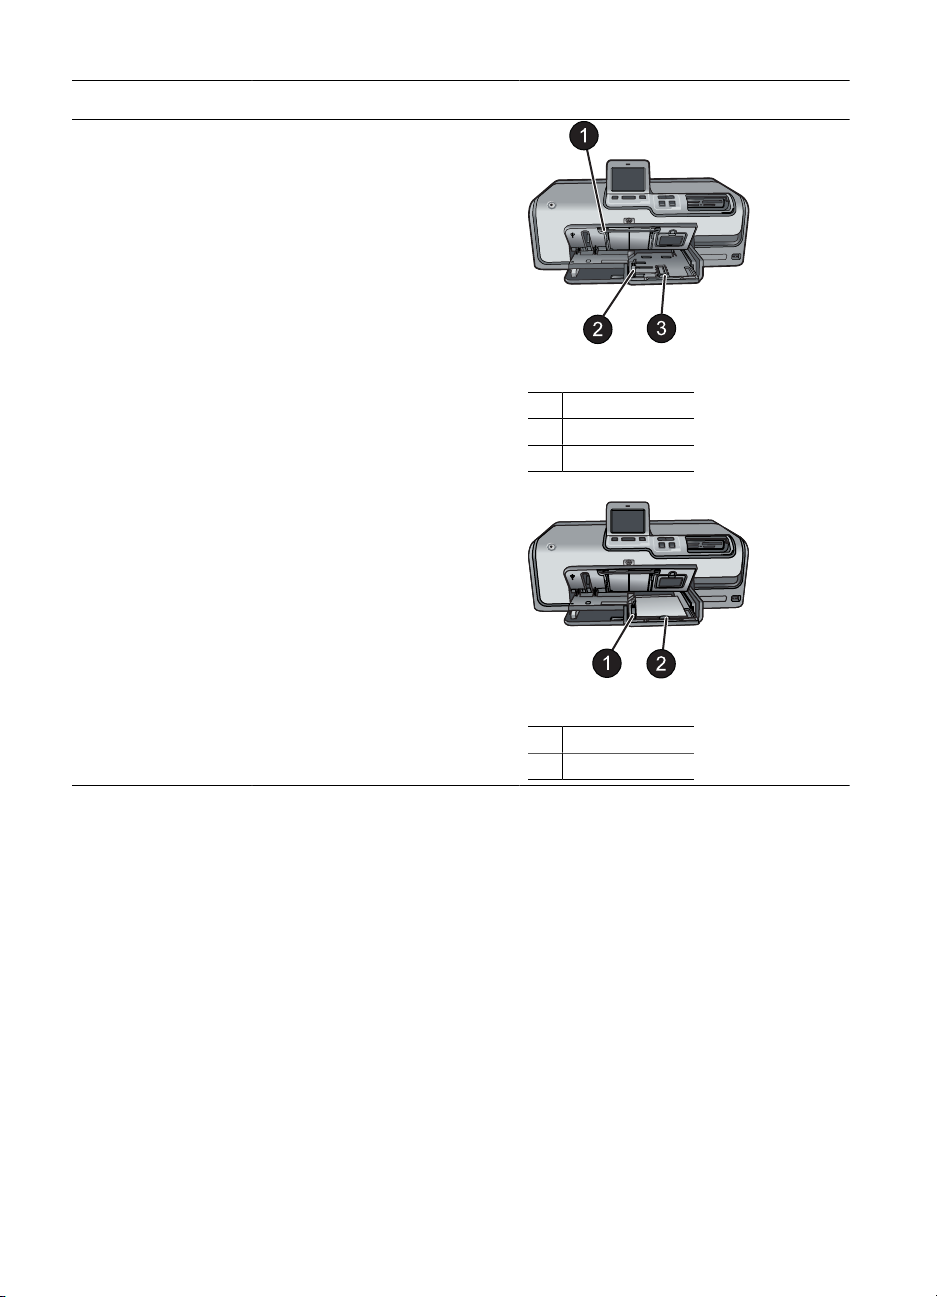
記憶卡插槽
1
xD-Picture Card
2 Compact Flash I 和 II、Microdrive
3 Memory Stick
4 Secure Digital、MultiMediaCard (MMC)
請在下表中尋找您的記憶卡,並按照相應的指示將記憶卡插入印表機。
操作指引:
請一次僅插入一張記憶卡。
●
將記憶卡輕輕推入印表機,直到卡停住為止。記憶卡插槽只允許將部份記憶
●
卡插入印表機;請勿嘗試硬將整個記憶卡插入印表機。
當記憶卡插入正確時,記憶卡燈號將會閃爍,然後持續顯示綠燈。
●
注意 1 使用任何其他方法插入記憶卡可能會損毀記憶卡和印表機。
注意 2 當記憶卡燈號閃爍綠色時,請勿拔出記憶卡。如需詳細資訊,請
參閱取出記憶卡。
記憶卡
CompactFlash ●
HP Photosmart D7300 series 使用者指南 19
記憶卡插入方式
正面標籤朝上,如果標籤有箭頭,箭頭應指向印表機
有金屬針孔的一邊先插入印表機
●
Page 22

第 2 章
(續)
記憶卡 記憶卡插入方式
Memory Stick ●
Microdrive ●
MultiMediaCard ●
Secure Digital ●
缺角在左邊
金屬接點面朝下
●
● 如果您使用 Memory Stick Duo 或 Memory Stick PRO
Duo 卡,請先連接記憶卡隨附的配接器,再將記憶卡插入印
表機
正面標籤朝上,如果標籤有箭頭,箭頭應指向印表機
有金屬針孔的一邊先插入印表機
●
缺角在右邊
金屬接點面朝下
●
缺角在右邊
金屬接點面朝下
●
xD-Picture 卡 ●
記憶卡弧形的一邊朝向您自己
金屬接點面朝下
●
取出記憶卡
請等候至記憶卡燈號停止閃爍,然後輕輕拔出以將其從印表機中取出。
注意 切勿在記憶卡燈號閃爍時取出記憶卡。記憶卡燈號閃爍表示印表機
正在存取記憶卡。在存取記憶卡上的資料時將其取出可能會損壞印表機,
或者破壞記憶卡上的資訊。
20 HP Photosmart D7300 series
Page 23

3
列印相片時不連接電腦
HP Photosmart D7300 series 印表機甚至可讓您不必開啟電腦,便能選擇、增
強及列印相片。在您依照「快速入門」指南中的指示安裝印表機後,就可以將記
憶卡插入印表機,然後使用印表機控制台上的按鈕來列印相片。
您也可以直接從數位相機列印相片。如需詳細資訊,請參閱從數位相機列印相
片。
列印相片
按照下列數種方法,不使用電腦也可以列印相片:
將內含相片的記憶卡插入印表機的記憶卡插槽
●
● 將 PictBridge 數位相機連接到印表機前方的相機埠
● 安裝可選用的 HP Bluetooth
從數位相機列印
從記憶卡列印相片
您可以將記憶卡插入印表機以從記憶卡列印相片,並且使用印表機控制台檢視、
選擇、增強以及列印相片。您也可以直接從記憶卡列印在相機中選取的相片,亦
即使用數位相機標示為要列印的相片。
從記憶卡列印會很快速且便捷,而且不會消耗數位相機的電池電力。
®
無線印表機轉接器,使用 Bluetooth 無線技術
如果您想要...
列印一張或多張相片
列印之前,請確定您已將記
憶卡插入印表機,並已在要
使用的紙匣中放入正確的紙
張。
檢查相片匣燈號以確認是否
選取了正確的紙匣:主紙匣
燈號應該熄滅,而相片匣燈
號則應亮起。
列印記憶卡上的所有相片
列印之前,請確定您已將記
憶卡插入印表機,並已在要
使用的紙匣中放入正確的紙
張。
HP Photosmart D7300 series 使用者指南 21
請遵循下列步驟:
觸碰「列印」。
1.
2. 觸碰「4×6」或「放大」,以選取想要的相
片尺寸。
觸碰想要的紙張尺寸。
3.
使用向左箭頭與向右箭頭來捲動瀏覽可用的
4.
相片。
觸碰想要的相片來選取一或多個影像。
5.
附註 按下「縮放 (-)」,以便在觸控
式螢幕顯示器上檢視 4 個影像。
按「列印」以列印選取的相片。
6.
觸碰「列印」。
1.
觸碰「全部」。
2.
觸碰想要的紙張尺寸。
3.
觸碰想要的相片尺寸。
4.
Page 24
第 3 章
(續)
如果您想要...
請遵循下列步驟:
列印記憶卡中相機選擇的相
片
當您使用數位相機選取用於
列印的相片時,相機會建立
數位影像列印格式 (DPOF)
檔案,該檔案會識別選取的
相片。印表機可以直接從記
憶卡讀取 DPOF 1.0 及 1.1 的
檔案。
使用精靈來列印
列印精靈可提供選取、調整
尺寸、編輯和列印相片的詳
細指示。
從視訊片段列印相片
您可以在觸控式螢幕顯示器
上檢視視訊片段,並選擇和
列印個別的畫面。
當您第一次插入含有視訊片
段的記憶卡時,印表機會使
用視訊片段的第一個畫面,
在印表機螢幕上用來代表該
片段。
印表機可以辨識以下列幾種
格式錄製的視訊片段:
● Motion-JPEG AVI
● Motion-JPEG
QuickTime
● MPEG-1
印表機會忽略其他格式的視
訊片段。
列印之前,請確定您已將記
憶卡插入印表機,並已在要
使用數位相機選取您要列印的相片。如需更
1.
詳細的資訊,請參閱相機隨附的文件。
如果使用相機選取「預設」作為相片版面,
2.
請觸碰「版面」來選取相片版面。
如果使用相機選取「預設」以外的相片版
面,則相片會以相機選擇的版面列印,而不
考慮印表機設定。
放入想要使用的紙張。
3.
從數位相機取出記憶卡,並將它插入印表
4.
機。
當印表機螢幕上出現詢問您是否要列印相機
5.
選定的相片訊息時,請觸碰
。
隨即便會開始列印您使用相機選擇的相片。
如果印表機找不到或無法讀取記憶卡上所有相
機選擇的相片,它將只會列印可以讀取的相片。
列印完畢後,印表機便會刪除 DPOF 檔案,並
取消相片的標記。
觸碰「列印」。
1.
觸碰「精靈」。
2.
按照提示來列印您要的相片。
3.
觸碰「列印」。
1.
2. 觸碰「4×6」或「放大」,以選取您要的相
片尺寸。
使用向左箭頭與向右箭頭來捲動選取可用的
3.
視訊。
附註 視訊會在影像的中央顯示視訊
相機圖示。
觸碰播放圖示以播放視訊。
4.
您可以觸碰向前與向後箭頭來快轉或倒轉視
訊。
若要選取要列印的畫面,請觸碰暫停圖示來
5.
暫停視訊。必須先將視訊暫停,才能選取畫
面以進行列印。
附註 觸碰向前或向後圖示,即可按
畫面依序快轉或倒轉視訊。
觸碰想要的畫面,以選取它來進行列印。
6.
觸碰「列印」以列印選擇的畫面。
7.
22 HP Photosmart D7300 series
Page 25

(續)
如果您想要...
使用的紙匣中放入正確的紙
張。
請遵循下列步驟:
列印相片索引頁
相片索引頁顯示記憶卡上最
多 2000 張相片的縮圖檢視和
索引編號。使用一般紙張而
不是相紙來列印索引頁可以
節省成本。
相片索引頁可能長達數頁。
列印之前,請確定您已將記
憶卡插入印表機,並已在要
使用的紙匣中放入正確的紙
張。
停止列印 若要停止進行中的列印工作,請按「取消」。
從數位相機列印相片
您可以使用 USB 纜線將 PictBridge 數位相機直接連接到印表機的相機連接埠進
行相片列印。 如果您的數位相機配備 Bluetooth 無線技術,您可以在印表機插入
選購的 HP Bluetooth
從數位相機進行列印時,印表機會使用您在相機上選定的設定。 如需更詳細的
資訊,請參閱相機隨附的說明文件。
觸碰「列印」。
1.
觸碰「全部」。
2.
3. 選取 8.5×11 的紙張。
觸碰索引頁圖示。
4.
®
無線印表機配接卡,並以無線的方式傳送相片至印表機。
HP Photosmart D7300 series 使用者指南 23
Page 26

第 3 章
列印相片自...
配備 Bluetooth 無線技術的
數位相機
如果您的數位相機配備
Bluetooth 無線技術,您可以
購買可選用的 HP Bluetooth
無線印表機轉接器,並使用
Bluetooth 無線連線從相機列
印。
附註 您也可以使用
請執行下列步驟
1. 使用觸控式螢幕顯示器上的 Bluetooth 功能
選項為印表機設定 Bluetooth 選項。如需詳
細資訊,請參閱 Bluetooth。
放入印表機紙張。
2.
®
3. 將 HP Bluetooth
®
無線印表機轉接器插入印
表機前方的相機連接埠。
當轉接器準備好接收資料時,轉接器上的燈
號會閃爍。
按照數位相機隨附之說明文件中的指示,將
4.
相片傳送到印表機。
Bluetooth 無線技術從
其他裝置列印,例如
PDA 或相機手機。如
需更詳細的資訊,請
參閱連接到其他裝置
與 Bluetooth 轉接器隨
附的說明文件。
配備 PictBridge 技術的數位相機1. 開啟 PictBridge 數位相機,並選取您想要列
印的相片。
放入紙張。
2.
3. 確定相機在 PictBridge 模式下,然後使用相
機隨附的 USB 纜線將相機連接到印表機前
方的相機連接埠。
印表機辨識出 PictBridge 相機後,即會自動
列印選定的相片。
從 iPod 列印相片
如果您有可以儲存相片的 iPod,則可將 iPod 連接到印表機並列印相片。
開始之前
檢查您複製到 iPod 的影像是否為 JPEG 格式。
附註 iPod 在您的國家/地區可能尚未提供。
將相片匯入 iPod
1. 使用 Belkin Media Reader for iPod 讀卡機將相片從記憶卡複製到您的
iPod。
2. 透過選取 iPod 選單上的「相片輸入」來確認相片已在 iPod 上。相片會顯示
為「捲筒」。
24 HP Photosmart D7300 series
Page 27
從 iPod 列印相片
1. 使用 iPod 隨附的 USB 纜線,將 iPod 連接到印表機前方的相機連接埠。讀
2.
相片版面
觸碰印表機功能選項中的「放大」,然後觸碰您要的紙張尺寸,為您要列印的相
片選取版面。
取相片時,印表機螢幕會顯示「正在讀取裝置」數分鐘。然後,相片會出現
在印表機螢幕上。
選擇您要列印的相片,並按「列印」。如需選取和列印相片的詳細資訊,請
參閱列印相片。
版面
每頁 1 張相片, 無邊框 4 x 6 英吋 (4 x 6 英吋)
每頁 1 張 3.5 x 5 英吋 (3.25 x 4.75 英吋)
每頁 2 張 3.5 x 5 英吋 (2.25 x 3.25 英吋)
紙張尺寸 (相片尺寸)
10 x 15 公分 (10 x 15 公分)
5 x 7 英吋 (5 x 7 英吋)
8.5 x 11 英吋 (8.5 x 11 英吋)
4 x 6 英吋 (3.75 x 5.75 英吋)
10 x 15 公分 (9.53 x 14.6 公分)
5 x 7 英吋 (4.75 x 6.75 英吋)
8 x 10 英吋 (7.75 x 9.75 英吋)
8.5 x 11 英吋 (8 x 10 英吋)
A6 (9.86 x 14.16 公分)
A4 (20 x 25 公分)
Hagaki (9.36 x 14.16 公分)
L (8.25 x 12.06 公分)
4 x 6 英吋 (2.75 x 3.75 英吋)
5 x 7 英吋 (3.25 x 4.75 英吋)
8 x 10 英吋 (4.75 x 6.5 英吋)
8.5 x 11 英吋 (5 x 7 英吋)
A6 (6.92 x 9.86 公分)
A4 (13 x 18 公分)
Hagaki (6.8 x 9.36 公分)
L (5.87 x 8.25 公分)
HP Photosmart D7300 series 使用者指南 25
Page 28
第 3 章
(續)
版面
紙張尺寸 (相片尺寸)
每頁 3 張 3.5 x 5 英吋 (1.5 x 2.25 英吋)
4 x 6 英吋 (1.75 x 2.625 英吋)
5 x 7 英吋 (2.25 x 3.375 英吋)
8 x 10 英吋 (3.33 x 5 英吋)
8.5 x 11 英吋 (4 x 6 英吋)
A6 (4.77 x 7.15 公分)
A4 (10 x 15 公分)
Hagaki (4.52 x 6.78 公分)
L (3.96 x 5.94 公分)
每頁 4 張 3.5 x 5 英吋 (1.5 x 2.25 英吋)
4 x 6 英吋 (1.75 x 2.5 英吋)
5 x 7 英吋 (2.2 x 3.25 英吋)
8 x 10 英吋 (3.5 x 4.75 英吋)
8.5 x 11 英吋 (3.5 x 5 英吋)
A6 (4.77 x 6.92 公分)
A4 (9 x 13 公分)
Hagaki (4.52 x 6.5 公分)
L (3.96 x 5.7 公分)
每頁 9 張 3.5 x 5 英吋 (1 x 1.375 英吋)
4 x 6 英吋 (1.125 x 1.5 英吋)
5 x 7 英吋 (1.5 x 2 英吋)
8 x 10 英吋 (2.25 x 3 英吋)
8.5 x 11 英吋 (2.5 x 3.25 英吋) –
皮夾尺寸
A6 (3.07 x 4.05 公分)
A4 (6.4 x 8.4 公分)
Hagaki (2.9 x 3.86 公分)
L (2.53 x 3.36 公分)
附註 印表機可能會旋轉相片以適合版面。
提高相片品質
印表機提供數種增強功能,可提高從記憶卡列印的相片品質。這些列印設定不會
變更原始相片,僅會影響列印。
26 HP Photosmart D7300 series
Page 29

問題 如何修正
亮度不足的相片
觸碰「列印」。
1.
2. 觸碰「4×6」或「放大」,以選取
您要的相片尺寸。
觸碰想要的紙張尺寸。
3.
觸碰「編輯」,然後觸碰「相片亮
4.
度」。
觸碰亮度滑動軸,將相片亮度增加
5.
或減少到想要的級別,然後觸碰
「OK」。
有紅眼的相片 當您開啟「相片修復」功能時,即會
自動啟用消除紅眼功能。啟用「相片
修復」功能會將智慧型聚焦、適應照
明及消除紅眼功能套用到選取的相片。
按「自動修正」即可啟用「相片修
➔
復」功能。
品質不佳的視訊片段
此偏好值會影響列印自視訊片段的相
片。
提高列印自視訊片段的相片品質
觸碰「設定」。
1.
觸碰箭頭以捲動和尋找「偏好設
2.
定」。
附註 此功能不會提高使用「列
印選項」功能表中的「視訊動態
列印件」功能所列印的相片品
質。此功能也不能處理以每頁 9
張相片版面所列印的相片。
觸碰「偏好設定」。
3.
使用箭頭來尋找並觸碰「視訊增
4.
強」。
5. 觸碰「開啟」,然後按「OK」。
如需關於從視訊片段列印相片的資
訊,請參閱從記憶卡列印相片。
使用創意
印表機提供多種工具與效果,可讓您更有創意地處理您的相片。這些列印設定不
會變更原始相片,僅會影響列印。
若要嘗試下列功能...
增加色彩效果
您可以設定印表機將套用到
相片的色彩選項從「彩色」
(預設值) 變更為「黑白」、
「褐色」或「古董色」。
以「褐色」效果列印的相片
呈褐色色調,看起來像二十
世紀早期拍攝的相片。以
「古董色」列印的相片呈現與
HP Photosmart D7300 series 使用者指南 27
請執行下列步驟
觸碰「列印」。
1.
2. 觸碰「4×6」或「放大」,以選取您要的相
片尺寸。
觸碰想要的紙張尺寸。
3.
觸碰想要的相片以選取一或多個影像。
4.
在選取的相片中觸碰「編輯」。
5.
使用箭頭來尋找「色彩效果」功能。觸碰
6.
「色彩效果」。
觸碰想要的色彩效果。
7.
Page 30

第 3 章
(續)
若要嘗試下列功能...
褐色列印相同的褐色色調,
但增加了一些灰白色,給人
的感覺就像是手工上色的。
請執行下列步驟
在相片上增加日期和時間
您可以在相片正面列印戳
記,顯示拍攝相片的時間。
此偏好值將影響所有列印的
相片。
變更列印品質
您可以變更相片的列印品
質。最佳品質是預設設定,
可印出品質最高的相片。一
般品質可節省墨水,並加快
列印的速度。
觸碰「設定」。
1.
觸碰「偏好設定」,然後觸碰「日期戳
2.
記」。
3. 觸碰下列其中一個日期/時間戳記選項:
「日期和時間」
–
「僅日期」
–
「關閉」
–
如果您用電腦修改相片,然後儲存變更,則最
初的日期和時間資訊將會遺失。用印表機控制
台對相片所作的變更不會影響日期和時間資訊。
將一次列印工作的列印品質變更為一般:
觸碰「設定」。
1.
觸碰「工具」,然後觸碰「列印品質」。
2.
3. 觸碰「一般」,然後觸碰「OK」。
下一次列印工作完成後,品質將還原為「最
佳」。
28 HP Photosmart D7300 series
Page 31

(續)
若要嘗試下列功能...
請執行下列步驟
裁剪相片
按「縮放 +」和「縮放
–」,以按照 1.25x 的倍率
增加或減少縮放倍數。倍數
的上限為 5.0x。
列印全景相片
觸碰「列印」。
1.
2. 觸碰「4×6」或「放大」,以選取您要的相
片尺寸。
觸碰想要的紙張尺寸。
3.
觸碰想要的相片以選取影像。
4.
5. 按「縮放 +」,以按照 1.25x 的倍率增加相
片的縮放倍數。綠色裁剪方塊將會出現。重
複按「縮放 +」直到到達所要的放大倍數
(放大相片之後,您可以透過按「縮放 –」
將它縮小)。
附註 如果以選定的放大倍數列印會
明顯降低列印品質,則裁剪方塊會從
綠色變成黃色。
在任何縮放倍數下,均可觸碰箭頭向上、
6.
下、左、右移動裁剪方塊。
要列印的影像部份在裁剪方塊中時,觸碰
7.
「裁剪」。
裁剪不會變更原始相片,僅會影響列印。
觸碰「列印」。
1.
觸碰「其他專案」,然後觸碰「全景列
2.
印」。
3. 按照提示放入 10 x 30 公分 (4 x 12 英吋) 的
材質,然後觸碰「OK」。
觸碰相片來進行選取。如有需要,請在列印
4.
前裁剪相片。裁剪方塊具有 3:1 的長寬比。
附註 所有以全景模式列印的相片將列印
為無邊框。
HP Photosmart D7300 series 使用者指南 29
Page 32

第 3 章
30 HP Photosmart D7300 series
Page 33

4
連接
使用印表機與其他裝置和個人保持聯繫。
連接到其他裝置
此印表機提供數種方式連接到電腦或其他裝置。每一種連接方式可讓您執行不同
的作業。
連線類型與需要的配件
記憶卡
記憶卡
相容數位相機記憶卡
將記憶卡插入印表機前方的適當記憶
卡插槽中。
USB
● 通用序列匯流排 (USB) 2.0 全速相
容纜線,長度不得超過 3 公尺 (10
英呎)。如需關於使用 USB 纜線連
接印表機的指示,請參閱「快速入
門」手冊。
● 可以存取網際網路的電腦 (使用
HP Photosmart 共享)。
可讓您...
直接從記憶卡列印到印表機。
●
將插入到印表機的記憶卡上的相片
●
儲存到電腦,然後使用電腦上的
HP Photosmart Premier 或其他軟
體來增強或整理相片。如需更詳細
的資訊,請參閱將相片儲存至電腦
和從記憶卡列印相片。
從電腦列印到印表機。請參閱從電
●
腦列印。
將插入到印表機的記憶卡上的相片
●
儲存到電腦,可以使用電腦上的
HP Photosmart Premier 或其他軟
體來增強或整理相片。
● 透過「HP Photosmart 共享」共
享相片。
● 從 HP Photosmart 可直接列印的
數位相機直接列印到印表機。如需
更詳細的資訊,請參閱從數位相機
列印相片與相機的說明文件。
PictBridge
PictBridge 符號
HP Photosmart D7300 series 使用者指南 31
直接從 PictBridge 相容數位相機列印
到印表機。
如需更詳細的資訊,請參閱從數位相
機列印相片與相機的說明文件。
Page 34

第 4 章
(續)
連線類型與需要的配件
PictBridge 相容數位相機與 USB 纜線。
將相機連接到印表機前方的相機埠。
可讓您...
Bluetooth
可選用的 HP Bluetooth 無線印表機轉
接器。
如果印表機附帶此配件,或者您有個
別購買此配件,請參閱隨附的說明文
件及螢幕說明以取得相關指示。
HP iPod
HP iPod 與其隨附的 USB 纜線。將
HP iPod 連接到印表機前方的相機連接
埠。
從具備 Bluetooth 無線技術的任何裝
置 (如數位相機、相機手機,或
PDA) 列印到印表機。
如果您在印表機的相機連接埠上連接
可選用的 HP Bluetooth 無線印表機轉
接器,請確定已依需要設定了
Bluetooth 印表機功能表選項。請參
閱設定。
直接從 HP iPod (有相片儲存在內) 列
印到印表機。如需詳細資訊,請參閱
從 iPod 列印相片。
32 HP Photosmart D7300 series
Page 35

將相片儲存至電腦
如果您在兩個裝置之間連接有 USB 連線,就可以將相片從插入印表機的記憶卡
儲存到電腦。
如果您使用 Windows 電腦
使用其中一種方法將相片儲存到電腦。
● 將記憶卡插入印表機。HP Photosmart Premier 傳輸軟體 (HP 傳輸與快速列
印) 會在電腦螢幕上開啟,並讓您指定要在電腦中儲存影像的位置。如需詳
細資訊,請參閱螢幕 HP Photosmart 印表機軟體說明。
● 將記憶卡插入印表機。記憶卡在 Windows 檔案總管中顯示為卸除式磁碟
機。開啟卸除式磁碟機,然後將相片從記憶卡拖放到電腦中的任何位置。
如果您使用 Macintosh
將記憶卡插入印表機。
1.
2. 等待 iPhoto 開啟並讀取記憶卡上的內容。
3. 按一下「輸入」可以將記憶卡上的相片儲存到您的 Macintosh。
附註 記憶卡也在桌面上顯示為一個磁碟機圖示。您可以開啟它並將相片
從記憶卡拖放到 Macintosh 中的任何位置。
經由「HP Photosmart 共享」連線
使用「HP Photosmart 共享」,您可以透過電子郵件、線上相簿或線上相片沖印
服務與親朋好友共享相片。印表機必須透過 USB 纜線連接到可以存取網際網路
的電腦,並且電腦上必須已安裝全部 HP 軟體。如果您嘗試使用「共享」,但是
並未安裝所有必要的軟體或進行必要的組態設定,系統會顯示訊息提示您完成所
有必要的步驟。
使用「共享」(USB) 傳送相片 (Windows 使用者):
插入記憶卡並選取一些相片。
1.
觸碰印表機螢幕上的「共享」。
2.
依照電腦上的指示與其他人共享選定的相片。
3.
使用「共享」(USB) 傳送相片 (Mac 使用者)
1. 開啟「HP Photosmart Premier」,然後選取要共享的相片。如需有關
HP Photosmart Premier 的詳細資訊,請參閱 HP Photosmart Premier。
2. 按一下「HP Photosmart Premier」中的「Applications」(應用程式) 標籤,
然後連按兩下「HP Photosmart Share」(HP Photosmart 共享)。
依照電腦上的指示與其他人共享選定的相片。
3.
如需使用「HP Photosmart 共享」的詳細資訊,請參閱螢幕軟體說明。
HP Photosmart D7300 series 使用者指南 33
Page 36

第 4 章
34 HP Photosmart D7300 series
Page 37

5
從電腦列印
若要從電腦列印,電腦中必須已安裝印表機軟體。在軟體安裝過程中,
HP Photosmart Premier (Mac 使用者和 Windows 完整安裝使用者) 或
HP Photosmart Essential (Windows 快速安裝使用者) 已安裝在您的電腦中,讓
您可以整理、共享、編輯,以及列印相片。
如需安裝軟體的詳細資訊,請參閱「快速入門」指南。經常更新軟體,可以確保
您擁有最新的功能和改善;如需指示,請參閱更新軟體。
若要處理相片,您需要將它們傳輸到與印表機相接的電腦上。請參閱將相片儲存
至電腦。
附註 Windows 使用者:HP Photosmart Premier 僅可於具備 Intel
Pentium® III (或同等級) 以及更快處理器的電腦上使用。
使用印表機軟體中的創意選項
閱讀下列如何開啟與使用 HP Photosmart Premier、HP Photosmart Essential
及 HP Photosmart 共享的訣竅。
HP Photosmart Premier
HP Photosmart Premier 是一種易於使用的軟體程式,除了基本的相片編輯和列
印功能外,它還讓您獲得相片樂趣所需的一切。此軟體也可讓您存取
HP Photosmart 共享,以便更容易地共享相片。
®
開啟 HP Photosmart Premier (Windows 使用者)
➔
連按兩下桌面上的「HP Photosmart Premier」圖示。如果您需要協助,請
參閱 HP Photosmart Premier 中的軟體說明。
開啟 HP Photosmart Premier (Mac 使用者)
在 Dock 中按一下「HP Photosmart Premier」圖示。如果您需要協助,請
➔
在「輔助說明」選單中選取「HP Photosmart Premier help」(HP
Photosmart Premier 輔助說明)。
探究 HP Photosmart Premier 的許多功能:
● 檢視 — 以多種大小和方式檢視相片。輕鬆地整理和管理相片。
● 編輯 — 裁剪相片和消除相片紅眼。將相片自動調整和增強為不同尺寸和多
種版面。
● 列印 — 列印不同尺寸和多種版面的相片。
● 共享 — 使用「HP Photosmart 共享」,以更好的方式透過電子郵件將相片
傳送給親朋好友,而不需要大型附件。
● 建立 — 輕鬆地建立相簿頁、卡片、日曆、全景相片、CD 標籤等。
● 備份 — 製作相片備份以供儲存。
HP Photosmart D7300 series 使用者指南 35
Page 38

第 5 章
HP Photosmart Essential
HP Photosmart Essential 是一種易於使用的軟體程式,可提供基本的相片編輯
和列印功能。此軟體也可讓您存取 HP Photosmart 共享,以便更容易地共享相
片。HP Photosmart Essential 只適用於 Windows 使用者。
開啟 HP Photosmart Essential (Windows 使用者)
連按兩下桌面上的「HP Photosmart Essential」圖示。如果您需要說明,請
➔
參閱 HP Photosmart Essential 中的軟體說明。
探究 HP Photosmart Essential 的許多功能:
● 檢視 — 以多種大小和方式檢視相片。輕鬆地整理和管理相片。
● 編輯 — 裁剪相片和消除相片紅眼。自動調整和增強相片讓相片更完美。
● 列印 — 列印不同尺寸和多種版面的相片。
● 共享 — 使用「HP Photosmart 共享」,以更好的方式透過電子郵件將相片
傳送給親朋好友,而不需要大型附件。
HP Photosmart 共享
HP Photosmart 共享可讓您將相片傳送給親朋好友,而不需要大型附件。如需詳
細資訊,請參閱經由「HP Photosmart 共享」連線與 HP Photosmart Premier
或 HP Photosmart Essential 的說明。
開啟 HP Photosmart 共享 (Windows 使用者)
按一下 HP Photosmart Premier 或 HP Photosmart Essential 中的
➔
「HP Photosmart 共享」標籤。
開啟 HP Photosmart 共享 (Mac 使用者)
按一下「HP Photosmart Premier」中的「Applications」(應用程式) 標籤,
➔
然後連按兩下「HP Photosmart 共享」。
設定列印偏好值
列印偏好值是預設值,但也可以更動以符合您的需要。您可以在從電腦列印時設
定特定的工作設定值。若您在列印前變更設定值,該變更將只會影嚮目前的列印
工作。在一些 Windows 軟體應用程式中,您必須按一下「列印」對話方塊中
的「內容」或「偏好設定」以存取進階列印功能。請參閱電子版說明,以取得關
於列印偏好值的詳細資訊。
存取列印偏好值 (Windows 使用者)
1. 開啟「列印」對話方塊,此操作通常透過在「檔案」功能表中選取 「列
印」執行。
2. 變更「列印」對話方塊標籤中的列印偏好值,或者按一下「內容」或 「偏
好設定」存取更多列印偏好值。
36 HP Photosmart D7300 series
Page 39

存取列印偏好值 (Mac 使用者)
1. 開啟「列印」對話方塊,此操作通常透過在「檔案」選單中選取 「列印」
執行。
透過在「份數與頁數」下拉式選單中選取您要變更的列印選項,來變更「列
2.
印」對話方塊中的列印偏好值。
如需變更列印偏好值的詳細資訊,請參閱電子版說明。
開啟電子版說明
Windows 使用者:
● 按下鍵盤上的 F1。
● 如需欄位級別說明,請按一下「列印」對話方塊右上角的「?」。
Mac 使用者:
1. 在「Finder」選單中,選取「輔助說明」,然後選取「Mac 輔助說明」。
2. 在「資料庫」中選取「HP Photosmart Premier help」(HP Photosmart
Premier 說明),然後選取「HP Photosmart printer help」(HP Photosmart
印表機說明)。
HP Real Life 技術功能
探究 HP Real Life 技術軟體功能中的眾多相片編輯和增強選項。這些功能,如
自動消除紅眼和適應照明,可以讓您更容易列印高品質的相片。
存取 Real Life 技術功能 (Windows 使用者)
開啟「列印」對話方塊,此操作通常透過在「檔案」功能選項中選取「列
1.
印」執行。
2. 按一下「紙張/品質」標籤,然後按一下「Real Life 數位攝影」按鈕 —或者
— 按一下「內容」或「偏好值」按鈕,然後按一下「Real Life 數位攝影」
按鈕。
存取 Real Life 技術功能 (Mac 使用者)
開啟「列印」對話方塊,此操作通常透過在「檔案」選單中選取「列印」執
1.
行。
2. 在「份數與頁數」下拉式選單中,選取「Real Life Digital Photography」
(Real Life 數位攝影)。
HP Photosmart D7300 series 使用者指南 37
Page 40

第 5 章
38 HP Photosmart D7300 series
Page 41

6
愛護與維護
您的印表機並不需要特別維護。只要遵守本節介紹的指引說明,就可以延長印表
機與列印耗材的使用期限,並確保最高品質的列印效果。
清潔及維護印表機
●
更新軟體
●
儲存及運送印表機和墨匣
●
維護相紙的品質
●
清潔及維護印表機
請使用本節說明的簡單程序,使印表機和列印墨匣常保清潔和最佳狀態。
清潔印表機外部
關閉印表機的電源,然後拔掉接到印表機後方的電源線。
1.
使用稍微沾濕清水的軟布擦拭印表機外部。
2.
注意 請勿使用任何種類的清潔劑,因為一般家用去污劑和清潔劑可能會
損壞印表機的表面塗漆。請勿清潔印表機的內部。切勿讓任何液體流入印
表機內部。請勿潤滑支撐列印頭滑動的金屬桿。列印頭前後滑動時產生噪
音屬於正常現象。
校正印表機
如果自我測試報告顯示色塊有條紋或白色線條,請使用下列程序。
如果校正印表機後仍然有列印品質問題,請嘗試使用愛護與維護中描述的程序來
清潔列印頭。若校正與清潔後,列印品質仍然有問題,請聯絡 HP 支援中心。
1. 將未使用的 Letter 或 A4 普通白紙放入主紙匣。
觸碰「設定」。
2.
觸碰「工具」,然後捲動和尋找「校正印表機」。
3.
觸碰「校正印表機」。
4.
印表機會校正列印頭、列印校正頁,並校準印表機。回收或丟棄校正頁。
5. 觸碰「OK」。
列印樣本頁
您可以列印樣本頁來測試印表機的相片列印品質,並確認紙張是否正確放入。
在主紙匣中放入紙張。使用一般紙張可以節省相紙。
1.
觸碰「設定」。
2.
觸碰「工具」,然後觸碰「列印樣本頁」。
3.
HP Photosmart D7300 series 使用者指南 39
Page 42

第 6 章
自動清潔列印頭
如果您發覺列印的相片上或自我測試報告上的色塊中有白色線條或條紋,請使用
此程序清潔列印頭。若非必要,請勿清潔列印頭,因為這麼做會浪費墨水以及縮
短列印頭墨水噴嘴的使用壽命。
在主紙匣中放入紙張。使用一般紙張可以節省相紙。
1.
觸碰「設定」。
2.
觸碰「工具」,然後捲動至「清潔列印頭」。
3.
觸碰「清潔列印頭」。
4.
如果清潔列印頭之後,列印品質仍然不佳,請嘗試使用校正印表機中描述的程序
來校正印表機。若清潔與校正後,列印品質仍然有問題,請聯絡 HP 支援中心。
手動清潔墨匣的接點
如果印表機螢幕上出現訊息指明墨匣找不到或損壞,請清潔墨匣的銅色接點。
清潔墨匣的接點前,先取出墨匣並確認墨匣的接點或墨匣插槽沒有被任何東西覆
蓋,然後再重新安裝墨匣。如果您繼續收到一則訊息指明墨匣找不到或損壞,請
清潔墨匣的接點。如果清潔接點後仍然收到此訊息,您就必須更換墨匣。取出有
問題的墨匣,並查看底部 YYYY/MMM/DD (年/月/日) 格式的保固到期日。若仍
在保固期限內,請聯絡 HP 支援中心,以取得替換的墨水匣。
清潔墨匣的接點:
請備齊下列物件來清潔接點:
1.
– 蒸餾水、過濾水,或瓶裝水 (自來水中可能含有會損壞墨匣的物質)
注意 請勿使用平板玻璃清潔劑或酒精來清潔墨匣的接點。這會
損壞墨匣或 HP Photosmart 印表機。
使用不會分離或留下纖維的乾泡棉橡膠棒、無棉絮擦布,或任何柔軟的
–
材料。
打開印表機頂蓋。
2.
緊壓墨匣插槽下面的灰色卡扣閂鎖以釋放印表機內部的灰色卡榫,然後提起
3.
卡榫。
注意 請勿同時取出多個墨匣。一次只取出和清潔一個墨匣。切勿將
墨匣留在印表機外超過 30 分鐘。
用清水稍微沾濕棉花棒或擦布,並擠出多餘的水份。
4.
握住墨匣的把手,用棉花棒或擦布輕輕擦拭銅色接點。
5.
40 HP Photosmart D7300 series
Page 43

1
將墨匣放回空的插槽,然後將灰色閘鎖向下壓直到它卡入到位。
6.
依需要為其他墨匣重複上述步驟。
7.
合上頂蓋。
8.
注意 墨匣內有壓力。在墨匣中插入異物將造成墨水溢出並接觸到人體或
物體。
列印自我測試報告
如果您遇到列印問題,請列印自我測試報告。這一份兩頁的報告 (標示為「擴充
自我測試診斷頁」) 可以幫助您診斷列印問題,並在您需要致電 HP 支援中心時
提供有用的資訊。您也可以使用此報告來查看墨匣中剩餘的大約墨水存量。
觸碰「設定」。
1.
觸碰「工具」,然後捲動至「列印測試頁」。
2.
觸碰「列印測試頁」。
3.
HP Photosmart 印表機所列印的兩頁自我測試報告包含以下資訊:
產品資訊:包括機型號碼、序號,以及其他產品資訊。
●
● 版本資訊:包括韌體版本編號,並指明是否已安裝 HP 雙面列印配件 (雙面
列印器)。
供墨系統資訊:顯示每個已安裝墨匣的大約墨水存量、墨匣狀態、安裝日
●
期,以及有效使用期限。
● 列印頭組件資訊:包含當您需要致電 HP 支援中心時用於診斷目的之資訊。
● 列印頭參數:包含當您需要致電 HP 支援中心時用於診斷目的之資訊。
列印品質型樣:顯示六個色塊,各代表六個已安裝的墨匣。當色塊出現條
●
紋,或遺失色塊,請使用愛護與維護中描述的程序來清潔列印頭。如果清潔
列印頭之後,色塊仍然顯示列印品質問題,請使用校正印表機中描述的程序
來校正印表機。若清潔與校正後,色塊仍顯示列印品質有問題,請聯絡
HP 支援中心。
● 歷史記錄:包含當您需要致電 HP 支援中心時用於診斷目的之資訊。
輕輕擦拭銅色接點
HP Photosmart D7300 series 使用者指南 41
Page 44

第 6 章
自我測試報告
更新軟體
請定期下載最新的印表機軟體更新程式,以確保您擁有最新的功能和改進。您可
以造訪 www.hp.com 或使用 HP 軟體更新程式,下載印表機軟體的更新程式。
附註 您從 HP 網站下載的印表機軟體更新程式並不會更新 HP Photosmart
Premier 軟體。
下載軟體 (Windows)
附註 在使用 HP 軟體更新程式之前,請確定已連線至網際網路。
1. 從 Windows「開始」功能選項中,選取「程式集」 (在 Windows XP 中,選
取「所有程式」) > 「Hewlett-Packard」 > 「HP 軟體更新程式」。
「HP 軟體更新程式」視窗即會開啟。
2. 按一下「立即檢查」。HP 軟體更新程式將會搜尋 HP 網站以進行印表機軟
體更新程式。如果電腦上沒有安裝最新版本的印表機軟體,「HP 軟體更新
程式」視窗中會顯示軟體的更新程式。
附註 如果電腦上已安裝最新版本的印表機軟體,「HP 軟體更新程
式」視窗中會顯示下列訊息:「此時沒有適用於您系統的更新程
式」。
如果有軟體更新程式,請按一下軟體更新程式旁邊的核取方塊以選取它。
3.
按一下「安裝」。
4.
依照螢幕上的指示完成安裝。
5.
42 HP Photosmart D7300 series
Page 45

下載軟體 (Mac)
附註 在使用 HP Photosmart Updater (HP Photosmart 更新工具) 之前,
請確定已連線至網際網路。
1. 在 Mac 的 Finder 中,選擇「前往」>「應用程式」。
2. 選擇「Hewlett-Packard」>「Photosmart」>「HP Photosmart Updater」
(HP Photosmart 更新工具)。
依照螢幕上的指示檢查軟體更新程式。
3.
如果系統受防火牆的保護,您需要在更新工具中輸入代理伺服器資訊。
儲存及運送印表機和墨匣
印表機和墨匣不用時,請妥善儲存以保護它們。
儲存及運送印表機
此印表機能夠短時間或長時間放置不使用。請將印表機儲存在室內,遠離直射的
日光,並避免溫度過冷過熱。
注意 若要防止墨水遺失或溢出:請勿將印表機傾斜放置, 儲存及運送印
表機時請將墨匣留在印表機內裝好。
儲存及運送墨匣
儲存及運送印表機時,一定要將所用的列印墨匣留在印表機內,以免墨水乾掉。
注意 1 若要防止墨水遺失或溢出:儲存及運送印表機時,請將墨匣留在
印表機內,並且避免將用過的墨匣長時間留在印表機外面。
注意 2 請確定印表機在拔下電源線前已完成電源關閉程序。這樣可使印
表機正確地儲存列印頭。
遵循以下訣竅將有助於維護 HP 墨匣,並確保一致的列印品質:
將所有還未使用的墨匣都儲存在原始的密封包裝盒中,直到要使用時再取出來。
請在室溫下保存墨匣 (攝氏 15–35 度或華氏 59–95 度)。
維護相紙的品質
為使相紙呈現最佳列印效果,請遵循這一節的指引說明。
儲存相紙
相紙應儲存在原始包裝袋或可重複密封的塑膠袋中。
●
封裝好的相紙應平放在乾燥涼爽處。
●
未使用的相紙應放回塑膠袋中。若將相紙留在印表機內,或暴露在空氣中,
●
相紙可能會開始捲曲。
HP Photosmart D7300 series 使用者指南 43
Page 46

第 6 章
拿取相紙
拿取相紙時只能碰觸相紙邊緣,以免留下指紋。
●
如果相紙邊緣捲曲,請將相紙放回塑膠袋中,輕輕向捲曲相反的方向折彎,
●
直到紙張平整。
44 HP Photosmart D7300 series
Page 47

7
疑難排解
HP Photosmart 印表機效能可靠,易於使用。本章回答有關使用印表機及不連接
電腦進行列印的常見問題,包含有關以下主題的資訊:
印表機硬體問題
●
列印問題
●
錯誤訊息
●
如需其他疑難排解資訊,請參閱:
軟體安裝疑難排解:印表機隨附的「快速入門」指南。
●
● 印表機軟體和從電腦列印疑難排解:螢幕 HP Photosmart 印表機說明。如
需檢視螢幕 HP Photosmart 印表機說明的詳細資訊,請參閱歡迎。Mac 使
用者也可在 Dock 的「HP Photosmart Menu」(HP Photosmart 選單) 中,
尋找疑難排解和讀我選項。
印表機硬體問題
在聯絡 HP 支援中心之前,請先閱讀本節內容以取得疑難排解訣竅,或瀏覽
www.hp.com/support 尋求線上支援服務。
附註 如果您要利用 USB 纜線將印表機連接到電腦,HP 建議使用長度不
超過 3 公尺 (10 英呎) 的 2.0 高速相容纜線。
列印燈號呈藍色閃爍,但印表機不列印
解決方案 印表機正在處理資訊;請等到它完成。
注意燈號亮起
解決方案
查看印表機螢幕以取得相關指示。如果印表機有連接數位相機,請查看
●
相機螢幕以取得相關指示。如果印表機有連接電腦,請查看電腦顯示器
以取得相關指示。
● 關閉印表機,然後拔下電源線。等候大約 10 秒鐘,然後重新插上電源
線。開啟印表機。
若在嘗試上述解決方法之後,注意燈號仍然亮起,請瀏覽 www.hp.com/
support,或聯絡 HP 支援中心,以取得協助。
HP Photosmart D7300 series 使用者指南 45
Page 48

第 7 章
印表機找不到儲存在記憶卡上的相片
解決方案 記憶卡所包含的檔案類型,可能不是印表機可以直接從記憶卡讀
取的類型。
請將相片儲存到電腦,再從電腦列印相片。如需更詳細的資訊,請參閱
●
螢幕 HP Photosmart 印表機說明和相機隨附的說明文件。
下一次拍照時,請修改數位相機的設定,使相片儲存成印表機可以直接
●
從記憶卡讀取的檔案類型。如需支援的檔案格式清單,請參閱印表機規
格。如需關於設定數位相機以將相片儲存為特定檔案格式的說明,請參
閱相機隨附的說明文件。
如果問題仍然存在,可能需要重新格式化記憶卡。
印表機已連接電源線,卻無法開啟
解決方案
● 印表機可能消耗太多電量。拔掉印表機的電源線。等候大約 10 秒鐘,
再插回電源線,然後開啟印表機。
印表機可能插入已關閉電源的插線板。請先開啟插線板的電源,再開啟
●
印表機的電源。
電源線可能已經損壞。確定電源線上的綠燈有亮起。
●
印表機在開啟電源時發出噪音,或靜置一陣子之後開始發出噪音。
印表機上的所有燈號在閃爍
列印問題
在聯絡 HP 支援中心之前,請先閱讀本節內容以取得疑難排解訣竅,或瀏覽
www.hp.com/support 尋求線上支援服務。
我從控制台列印時,印表機沒有列印無邊框相片
解決方案 當印表機靜置很長一段時間 (大約 2 個星期) 之後,或是停電又
恢復電力時,可能會發出噪音。這是正常作業。印表機正在執行自動維護程
序,以確保最佳品質的列印輸出。
解決方案 印表機遇到硬體錯誤的問題,並且可能需要維修。拔掉印表機的
電源線。等候大約 10 秒鐘,然後重新插上電源線。開啟印表機。如果燈號
仍在閃爍,請瀏覽 www.hp.com/support,或聯絡 HP 支援中心,以取得協
助。
解決方案 設定列印工作時,請確定選取的版面正確。選取相片與紙張尺寸
時,影像矩形框必須完全填滿橘色,以表示無邊框列印。
46 HP Photosmart D7300 series
Page 49

列印速度非常慢
解決方案 可能是下列其中一種情況:1) 您可能正在列印包含高解析度的圖
形或相片的 PDF 或專案;2) 您可能為列印輸出選擇了最高的解析度。列印
含有圖形或相片的大型複雜專案 (尤其是較高的解析度) 比列印純文字文件要
慢。
紙張未從主紙匣正確送入印表機
解決方案
紙匣中可能放入太多紙張。請取出一些紙張,再重新嘗試列印。
●
主紙匣可能並未完全向內推入。請將主紙匣完全向內推入。
●
紙張導板的調整可能不正確。確定紙張寬度與紙張長度導板已靠緊紙張
●
的邊緣並且沒有使紙張彎曲。
兩張或多張紙可能黏在一起。從主紙匣中取出紙張並將紙疊展成扇形以
●
分開紙張,然後重新放入紙張並再次嘗試列印。
如果紙張有皺摺或彎曲,嘗試使用不同的紙張。
●
● 紙張可能太薄或太厚。使用 HP 噴墨紙以得到最佳的列印效果。如需詳
細資訊,請參閱選擇適用的紙張。
列印頁從出紙匣中掉出
解決方案 列印時請務必將出紙匣延伸架拉出。
列印輸出皺摺或捲曲
解決方案 您正在列印的專案比一般專案耗用較多的墨水。請從電腦列印專
案,並使用印表機軟體降低墨水飽和度。如需更詳細的資訊,請參閱螢幕
HP Photosmart 印表機說明。
印出的文件歪斜,或沒有位於紙張的中央
解決方案
可能沒有正確地放入紙張。請重新放入紙張,確定紙張已按照正確的列
●
印方向放入主紙匣,並且紙張寬度與紙張長度導板緊靠紙張邊緣。如需
放入紙張的指示,請參閱放入紙張。
如果您使用了雙面列印配件,請嘗試將它取出並更換後方機門,然後再
●
次列印。
可能需要校正印表機。如需詳細資訊,請參閱校正印表機。
●
HP Photosmart D7300 series 使用者指南 47
Page 50

第 7 章
列印的色彩不太令人滿意
解決方案
其中一個彩色墨匣可能墨水量太低,造成在列印時用另一種顏色來取
●
代。觸碰首頁畫面上的墨水圖示來檢查估計的墨水存量。如果墨匣中的
墨水不足,請更換該墨匣。如需詳細資訊,請參閱插入墨匣。
可能需要校正印表機。如需詳細資訊,請參閱校正印表機。
●
可能需要清潔列印頭。如需詳細資訊,請參閱愛護與維護。
●
列印時印表機沒有出紙或卡紙
解決方案
需要檢查印表機。請查看印表機螢幕以取得相關指示。
●
電源可能關閉或連接不牢靠。請確定已開啟電源,而且電源線連接穩
●
固。
主紙匣或相片匣中可能沒有任何紙張。檢查紙張是否正確放入。如需放
●
入紙張的指示,請參閱放入紙張。
若列印時出現卡紙,請嘗試下列步驟:
●
– 關閉印表機,然後從電源插座中拔下印表機的電源線。清除印表機
中所有可能阻塞紙張路徑的紙張。取下後方機門。輕輕地取出卡在
印表機中的紙張,然後重新裝上後方機門。如果無法從印表機背面
取出所有卡住的紙張,請嘗試透過打開位於頂蓋內部的卡紙門,取
出卡在印表機中間的紙張。如需可清除卡紙的兩個位置之圖示,請
參閱紙張錯誤。當您完成清除卡紙後,請插上印表機電源線然後開
啟電源,再重新嘗試列印。
– 若是在列印標籤,請確定標籤紙通過印表機時標籤面沒有剝離。
印表機印出空白頁
解決方案
您可能已經開始列印,然後又取消了該列印工作。
●
如果在開始列印前取消列印工作,印表機中可能已經放入準備列印的紙
張。下一次列印時,印表機在開始新的列印專案前會先送出空白頁。
已傳送到印表機的列印工作可能包含大量資料。
●
請稍候,印表機維護列印頭後才會繼續列印。
印表機要求列印校正頁
解決方案 印表機必須定期執行列印頭校正以維持最佳列印品質。
出現提示時,放入 Letter 或 A4 普通紙張。丟棄或回收校正頁。
48 HP Photosmart D7300 series
Page 51

相片沒有依預設列印設定來列印
解決方案 您或許將列印設定值設定為針對選定的相片列印。您在個別相片
上套用的列印設定取代了預設列印設定。請取消選取相片,以放棄所有套用
於該個別相片的列印設定。如需詳細資訊,請參閱設定。
印表機準備列印時退出空白紙張
解決方案 日光直射會影響自動紙張感應器的運作。請將印表機移到無日光
直射的地方。
列印品質不佳
解決方案
其中一個墨匣可能墨水量太低,造成在列印時用另一種顏色來取代。觸
●
碰首頁畫面上的墨水圖示來檢查估計的墨水存量。如果墨匣中的墨水不
足,請更換該墨匣。如需詳細資訊,請參閱插入墨匣。
使用專為此印表機設計的相紙。為獲取最佳效果,請使用選擇適用的紙
●
張中建議的紙張。
您可能列印在紙張的錯誤面上。請確定以列印面朝下的方式放入紙張。
●
您可能在數位相機上選擇了低解析度設定。減少影像的大小並嘗試再次
●
列印。為在以後獲得更好的效果,請將數位相機設定為較高的相片解析
度。
墨匣或列印頭可能有問題。請嘗試執行下列步驟:
●
– 一次取出一個墨匣,然後再重新插入以確定每個墨匣都正確安裝。
– 執行自動列印頭清潔程序。如需詳細資訊,請參閱愛護與維護。
– 校正印表機。如需詳細資訊,請參閱校正印表機。
– 在嘗試上述的所有解決方法之後,如果列印品質問題仍然存在,請
聯絡 HP 支援中心。
相片未正確列印
解決方案
您可能沒有正確地放入相紙。請以列印面朝下的方式放入相紙。
●
相紙可能沒有正確地送入印表機。請嘗試執行下列步驟:
●
– 檢查是否卡紙。如需詳細資訊,請參閱紙張錯誤。
– 將相紙儘量往內插入相片匣。
– 一次只放入一張相紙。
在數位相機中標記要列印的相片沒有列印
解決方案 某些數位相機可以讓您標記相機內部記憶體和記憶卡上之相片以
進行列印。如果您在內部記憶體標記相片,然後將相片從相機的內部記憶體
HP Photosmart D7300 series 使用者指南 49
Page 52

第 7 章
錯誤訊息
在聯絡 HP 支援中心之前,請先閱讀本節內容以取得疑難排解訣竅,或瀏覽
www.hp.com/support 尋求線上支援服務。
在印表機螢幕上出現的錯誤訊息可以分為以下類型:
●
●
●
●
紙張錯誤
在聯絡 HP 支援中心之前,請先閱讀本節內容以取得疑難排解訣竅,或瀏覽
www.hp.com/support 尋求線上支援服務。
錯誤訊息:卡紙。清除卡紙,然後按「OK」。
移到記憶卡上,標記不會隨之轉移。請將相片從相機內部記憶體轉移到記憶
卡之後,再標記要列印的相片。
紙張錯誤
墨匣錯誤
記憶卡錯誤
電腦列印錯誤
解決方案 關閉印表機,然後從電源插座中拔下印表機的電源線。清除印表
機中所有可能阻塞紙張路徑的紙張。取下後方機門。輕輕地取出卡在印表機
中的紙張,然後重新裝上後方機門。
取下後方機門可以清除卡紙。
1
如果您無法從印表機後方取出所有卡住的紙張,請嘗試透過打開位於頂蓋內
部的卡紙門,取出卡在印表機中間的紙張。
50 HP Photosmart D7300 series
Page 53

墨匣錯誤
打開卡紙門可以清除印表機中間的卡紙。
1
插上印表機電源線然後開啟電源。
錯誤訊息:紙張用完。放入紙張然後按下「OK」。
解決方案 放入紙張,然後觸碰「OK」以再次列印。如需放入紙張的指
示,請參閱放入紙張。
錯誤訊息:不支援的材質尺寸。
解決方案 印表機無法使用放入紙匣中的紙張尺寸。觸碰「OK」,然後放
入支援的紙張尺寸。如需支援的紙張尺寸清單,請參閱印表機規格。
錯誤訊息:自動紙張感應器失效。
解決方案 自動紙張感應器阻塞或損壞。嘗試將印表機移到不受日光直射的
地方,然後觸碰「OK」並嘗試再次列印。如果此方法無效,請瀏覽
www.hp.com/support 或聯絡 HP 支援中心。
在聯絡 HP 支援中心之前,請先閱讀本節內容以取得疑難排解訣竅,或瀏覽
www.hp.com/support 尋求線上支援服務。
錯誤訊息:安裝了錯誤的墨匣
解決方案 在您第一次安裝與使用 HP Photosmart 印表機時,請確定安裝
印表機隨附的墨匣。這些墨匣中的墨水是特別配製與列印頭組件中的墨水混
合。
HP Photosmart D7300 series 使用者指南 51
Page 54

第 7 章
若要解決這個問題,請使用 HP Photosmart 印表機隨附的墨匣來更換有問
題的墨匣。
如需關於更換墨匣的更詳細資訊,請參閱插入墨匣。
錯誤訊息:墨水匣不正確
解決方案 裝置起始化之後無法再使用所指出的墨匣。使用 HP Photosmart
印表機的適當墨匣來更換這些墨匣。您可以在此印表機中使用的墨匣編號印
在本印刷版指南的封底頁面上。
如需關於更換墨匣的更詳細資訊,請參閱插入墨匣。
錯誤訊息:盡快更換墨水匣
解決方案 所指出的墨匣墨水不足。
您也許可以用列印頭組件中剩餘的墨水,再繼續列印一段很短的時間。請更
換指定的墨匣,或觸碰「OK」以繼續作業。
如需關於更換墨匣的更詳細資訊,請參閱插入墨匣。
錯誤訊息:墨匣是空的
解決方案 使用新墨匣替換所指出的墨匣。
如果黑色墨匣是空的,您可以透過選擇印表機螢幕提示的選項繼續以其
●
他彩色墨匣進行列印。
如果彩色墨匣是空的,您可以透過選擇印表機螢幕提示的選項繼續以黑
●
色墨匣進行列印。
視列印工作的狀態而定,您可以觸碰「OK」以繼續作業。如果 HP
Photosmart 印表機在列印工作的中途,請按「取消」然後重新開始列印工
作。
附註 文字與相片品質在使用所有墨匣列印時會有所不同。如果沒有
儘快更換空墨匣,所有列印作業將停止。
如需關於更換墨匣的更詳細資訊,請參閱插入墨匣。
錯誤訊息:無法列印
解決方案 所指出的墨匣已無墨水。
立即更換有關的墨匣以便您可以繼續列印。
HP Photosmart 印表機將無法繼續列印,直到更換有關的墨匣。所有列印作
業將停止。
如需關於更換墨匣的更詳細資訊,請參閱插入墨匣。
52 HP Photosmart D7300 series
Page 55

錯誤訊息:墨水匣問題
解決方案 所指出的墨匣找不到或損壞。
立即更換有關的墨匣以便您可以繼續列印。如果 HP Photosmart 印表機沒
有遺失墨匣,則可能需要清潔墨匣的接點。
如需關於更換墨匣的更詳細資訊,請參閱插入墨匣。如需關於清潔墨匣接點
的更詳細資訊,請參閱愛護與維護。
如果 HP Photosmart 印表機沒有遺失墨匣,而您在清潔墨匣接點後仍然收
到此訊息,您就必須更換墨匣。請取出有問題的墨匣,並查看底部 YYYY/
MMM/DD (年/月/日) 格式的保固到期日。若仍在保固期限內,請聯絡 HP 支
援中心,以取得替換的墨匣。
錯誤訊息:墨水即將過期
解決方案 如果目前日期已臨近到期日,請考慮更換墨匣以獲得最佳列印品
質。您可以觸碰「OK」以繼續列印。HP 無法保證過期墨水的品質或可靠
性。
如需關於更換墨匣的更詳細資訊,請參閱插入墨匣。
錯誤訊息:墨水匣已過期
解決方案 如果墨匣已到期,請更換墨匣以獲得最佳列印品質。您可以觸碰
「OK」以繼續列印。HP 無法保證過期墨水的品質或可靠性。
如需關於更換墨匣的更詳細資訊,請參閱插入墨匣。
附註 每個墨匣都有到期日。當您收到墨水過期的訊息時,請取出並
更換過期的墨匣,然後關閉該訊息。您也可以在墨水過期的訊息上選
取「OK」,繼續列印而不更換墨匣。HP 建議您更換過期的墨匣。HP
無法保證過期墨匣的品質和可靠性。
錯誤訊息:非 HP 墨水
解決方案 更換所指出的墨匣,或觸碰「OK」以繼續作業。
HP 建議您使用原廠 HP 墨匣。原廠 HP 墨匣是專為 HP 印表機設計,並通
過在 HP 印表機上的測試,可在多次使用後仍能產生精美的列印效果。
附註 HP 無法保證非 HP 墨水的品質和可靠性。因使用非 HP 墨水導
致印表機故障或損壞而引起的印表機服務或維修,不在保固範圍內。
如果您肯定自己購買的是原廠 HP 墨匣,請瀏覽:
www.hp.com/go/anticounterfeit
錯誤訊息:原始 HP 墨水已耗盡
解決方案 請更換所指出的墨匣,或觸碰「OK」以繼續作業。
HP Photosmart D7300 series 使用者指南 53
Page 56

第 7 章
HP 建議您使用原廠 HP 墨匣。原廠 HP 墨匣是專為 HP 印表機設計,並通
過在 HP 印表機上的測試,可在多次使用後仍能產生精美的列印效果。
附註 HP 無法保證非 HP 墨水的品質和可靠性。因使用非 HP 墨水導
致印表機故障或損壞而引起的印表機服務或維修,不在保固範圍內。
如果您肯定自己購買的是原廠 HP 墨匣,請瀏覽:
www.hp.com/go/anticounterfeit
錯誤訊息:排定的維護
解決方案 您必須校正印表機以確保絕佳的列印品質。在主紙匣中放入未使
用的 Letter 或 A4 普通白紙,觸碰「OK」。HP Photosmart 印表機將校正
列印頭,校準印表機,然後列印測試頁。回收或丟棄測試頁。
錯誤訊息:校準錯誤
解決方案
如果校正印表機時主紙匣中放入了彩色紙張或相紙,校正可能會失敗。
●
將未使用的 Letter 或 A4 普通白紙放入主紙匣,然後嘗試再次校正。如
果校正再次失敗,可能是感應器或墨匣損壞;請聯絡 HP 支援中心。
● 墨匣或感應器有瑕疵。請聯絡 HP 支援中心。
錯誤訊息:列印墨匣托架被卡住
解決方案 取出阻塞列印頭組件的任何物件。
清除列印頭組件
打開頂蓋,然後再打開卡紙門。
1.
54 HP Photosmart D7300 series
Page 57

記憶卡錯誤
打開卡紙門可以清除列印頭組件。
1
取出阻塞列印頭組件的任何物件,包括紙張和任何包裝材料。
2.
關閉印表機的電源,然後再次開啟電源。
3.
關閉卡紙門和頂蓋。
4.
錯誤訊息:墨水系統失敗
解決方案 列印頭組件或供墨系統發生故障,HP Photosmart 印表機無法繼
續列印。
關閉印表機,然後拔下電源線。等候大約 10 秒鐘,然後重新插上電源線。
如果此方法無法清除錯誤訊息,請聯絡 HP 支援中心。
在聯絡 HP 支援中心之前,請先閱讀本節內容以取得疑難排解訣竅,或瀏覽
www.hp.com/support 尋求線上支援服務。
錯誤訊息:找不到相片。—或者— 某些相片找不到。
解決方案 印表機無法讀取記憶卡上的檔案,或者,為該作業指定的一個或
多個檔案不在記憶卡上。請嘗試使用數位相機而不是記憶卡將相片儲存到電
腦中。如果是缺失一張相片,可能是您意外將該相片從記憶卡中刪除。
HP Photosmart D7300 series 使用者指南 55
Page 58

第 7 章
錯誤訊息:卡片存取錯誤。工作已取消。按「OK」。—或者— 檔案目錄結構受損。—或
者— 卡片可能受損。工作已取消。觸碰「OK」。
解決方案 印表機無法讀取記憶卡上的資料,因此無法完成目前的列印工
作。資料已損毀或記憶卡實體存在問題。
將檔案儲存至電腦,並從電腦存取。
●
若此方法無效,請使用新記憶卡或者使用數位相機重新格式化記憶卡。
●
記憶卡上的所有相片都將丟失。
● 如果此方法無效,則相片檔案或許已損毀或無法讀取。在聯絡 HP 支援
中心之前,請嘗試使用其他記憶卡來判斷是印表機還是記憶卡發生故
障。
錯誤訊息:無法列印相片。
解決方案 列印工作指定的相片有超過 10 張以上可能已損壞、找不到或是
屬於不支援的檔案類型。如需關於支援的檔案類型之更詳細資訊,請參閱印
表機規格。
使用數位相機而不是記憶卡將相片儲存到電腦中。
●
將檔案儲存至電腦,然後從電腦列印。
●
列印相片索引,然後重新選取相片。如需詳細資訊,請參閱列印相片。
●
錯誤訊息:卡片受密碼保護。無法存取卡片。
解決方案 插入的記憶卡受密碼保護,因此印表機無法讀取。請遵循下列步
驟:
從印表機中取出記憶卡。
1.
將記憶卡插入原先將密碼儲存在記憶卡的裝置內。
2.
刪除記憶卡的密碼。
3.
取出記憶卡並將其重新插入印表機的記憶卡插槽。
4.
嘗試再次列印。
5.
錯誤訊息:卡片被鎖定。無法存取卡片。
解決方案 確定記憶卡上的鎖定開關處於解鎖的位置。
錯誤訊息:卡片並未完全插入。將卡片往內推一點。
解決方案 印表機可以偵測到記憶卡但無法讀取。輕輕將記憶卡推入記憶卡
插槽,直到卡停住為止。如需詳細資訊,請參閱插入記憶卡。
56 HP Photosmart D7300 series
Page 59

錯誤訊息:一次僅能使用一張卡片。請取出一張記憶卡。—或者— 一次只能使用一部裝
置。請卸下或斷開裝置。
解決方案 印表機中同時插有兩種或更多不同類型的記憶卡,或者插入記憶
卡的同時有數位相機連接到相機連接埠。取出記憶卡或斷開相機,直到印表
機中只剩一張卡或僅連接一部相機為止。
錯誤訊息:卡片被移除。工作已取消。觸碰「OK」。
解決方案 當印表機正從記憶卡列印檔案時,您從印表機中取出了記憶卡。
請遵循下列步驟:
1. 觸碰「OK」。
重新插入記憶卡,然後再次列印選定的相片。記憶卡必須在完成列印工
2.
作前保持插入狀態。
若要避免以後損壞記憶卡,在存取記憶卡上的資料時,請勿從印表機記憶卡
插槽中將記憶卡取出。如需詳細資訊,請參閱取出記憶卡。
錯誤訊息:相機選擇的 (DPOF) 檔案有錯誤。
解決方案 由於資料損毀或記憶卡錯誤,印表機無法讀取 DPOF 檔案。請
使用印表機控制台重新選取相片。如需詳細資訊,請參閱從記憶卡列印相
片。
錯誤訊息:某些相機選擇的相片不在卡片中。
解決方案 某些相機選擇的相片找不到或者已刪除。請嘗試執行下列步驟:
確認您並未從記憶卡意外地刪除相片。
●
使用數位相機再次重新選取相片。
●
列印新的相片索引,以查看與每張相片相關的索引編號。如需詳細資
●
訊,請參閱列印相片。
錯誤訊息:無法顯示這張相片。—或者— 無法顯示所有相片。—或者— 相片已損毀。
解決方案 記憶卡上包含印表機不支援的影像格式,或者檔案已經損毀。如
需支援的影像格式清單,請參閱印表機規格。請使用電腦存取相片。如需關
於透過電腦存取相片的更詳細資訊,請參閱從電腦列印。
錯誤訊息:不支援的卡片類型。
解決方案 使用相機將相片傳輸到電腦,然後從電腦列印。
HP Photosmart D7300 series 使用者指南 57
Page 60

第 7 章
錯誤訊息:某些相片號碼不在卡片中。
解決方案 使用相機將相片傳輸到電腦,然後從電腦列印。如果某些相片仍
然找不到,它們可能已從記憶卡中刪除。
電腦和連線列印錯誤
在聯絡 HP 支援中心之前,請先閱讀本節內容以取得疑難排解訣竅,或造訪
www.hp.com/support 尋求線上支援服務。
錯誤訊息:印表機記憶體已滿。工作已取消。按「OK」。
解決方案 印表機在列印相片時遇到問題。請嘗試執行下列步驟:
若要清除印表機記憶體,請關閉印表機,然後再次開啟。
●
一次列印較少的相片。
●
將相片儲存至電腦,並從電腦列印。
●
使用讀卡機將檔案儲存到電腦,然後從電腦列印。
●
錯誤訊息:通訊錯誤。檢查電腦連線。按「OK」。—或者— 沒有收到資料。檢查電腦連
線。按「OK」以繼續作業。—或者— 電腦沒有回應。
解決方案 電腦無法與印表機進行正常通訊。可能是印表機軟體無法操作或
者纜線鬆脫。請確定 USB 纜線已穩固地連接至電腦及印表機背面的 USB 埠
上。如果纜線連接穩固,請驗證是否已安裝印表機軟體。
錯誤訊息:相機在列印工作過程中斷開。
解決方案 列印工作將被取消。將 USB 纜線重新連接到相機和印表機,然
後重新傳送列印工作。
58 HP Photosmart D7300 series
Page 61

8
HP 支援中心
支援程序
如果您遇到問題,請執行下列步驟:
1. 檢查 HP Photosmart 印表機隨附的說明文件。
2. 造訪 HP 線上支援網站:www.hp.com/support。所有的 HP 客戶都可獲得
HP 線上支援。線上支援是取得最新裝置資訊和專家協助的最快捷方式,其
中包括:
快速連絡合格的線上支援人員
–
– HP Photosmart 印表機的軟體與驅動程式更新程式
– 實用的 HP Photosmart 印表機資訊與常見問題疑難排解資訊
– 註冊 HP Photosmart 印表機後,即可自動取得該裝置的更新程式、支援
通知及 HP 新聞簡訊
3. 僅適用於歐洲地區:請聯絡您購買產品的經銷商。如果 HP Photosmart 印
表機有硬體故障,可能會要求您將該裝置送回當地的經銷商處 (在裝置的有
限保固期內,提供免費維修服務;保固期限過後,您需要支付維修費用)。
4. 致電 HP 支援中心。支援選項和可用性會因裝置、國家/地區和語言而異。
致電 HP 支援中心
如需支援電話號碼清單,請參閱封面內的電話號碼清單。
電話支援期限
北美洲、亞太地區及拉丁美洲 (包括墨西哥) 可獲得一年的電話支援。若要確定
歐洲、中東及非洲的電話支援期限,請瀏覽 www.hp.com/support。您需支付標
準電話費用。
致電
請使用電腦與 HP Photosmart 印表機旁邊的電話致電 HP 支援中心。請準備好
提供以下資訊:
● 裝置型號 (位於裝置正面的標籤上)
● 裝置序號 (位於裝置的背面或底部)
狀況發生時所顯示的訊息
●
下列問題的答案:
●
– 之前是否發生過此狀況?
– 您是否可以再現此狀況?
– 問題發生前後,您是否在電腦上新增任何新硬體或軟體?
–
在此問題出現之前是否發生過其他任何狀況 (如打雷、移動裝置等)?
HP Photosmart D7300 series 使用者指南 59
Page 62

第 8 章
電話支援期限過後
電話支援期限過後,HP 提供的支援服務將酌情收費。您也可以在 HP 線上支援
網站取得說明:www.hp.com/support。請聯絡 HP 經銷商或致電您所在國家/地
區的支援中心,以了解關於支援選項的詳細資訊。
其他保固選項
印表機的延長服務計劃可以付費取得。請瀏覽 www.hp.com/support,選擇您的
國家/地區和語言,並獲取有關延長服務計劃的服務和保固區域的資訊。
60 HP Photosmart D7300 series
Page 63

A
系統需求
規格
這一節列出安裝 HP Photosmart 印表機軟體的最低系統需求,並提供此印表機的規格。
如需印表機規格及系統需求的完整清單,請參閱螢幕 HP Photosmart 印表機說明。如需
檢視螢幕 HP Photosmart 印表機說明的詳細資訊,請參閱歡迎。
元件
作業系統
處理器
RAM 64 MB (建議 128 MB) Mac OS X 10.3、10.4 或更
可用磁碟空間
視訊顯示器
CD-ROM 光碟機 4x 4x
連接方式
Windows PC 最低需求 Macintosh 最低需求
Microsoft® Windows 98、
2000 Professional、Me、
XP Home 與 XP
Professional
Intel® Pentium® II (或同等
級) 或更快的處理器
500 MB 150 MB
800 x 600, 16 位元或更高 800 x 600, 16 位元或更高
USB:Microsoft Windows
98、2000 Professional、
Me、XP Home 與 XP
Professional
PictBridge:使用前方的相
機連接埠
Bluetooth:使用可選用的
HP Bluetooth 無線轉接器
Mac® OS X 10.3、10.4 或
更新版本
G3 或更高
新版本:128 MB
USB:前方連接埠和後方連
接埠 (Mac OS X 10.3、
10.4 或更新版本)
PictBridge:使用前方的相
機連接埠
Bluetooth:使用可選用的
HP Bluetooth 無線轉接器
瀏覽器
Microsoft Internet Explorer
5.5 或更新版本
—
印表機規格
類別 規格
連接方式
影像檔案格式
HP Photosmart D7300 series 使用者指南 61
USB:Microsoft Windows 98、2000 Professional、
Me、XP Home 與 XP Professional;Mac OS X
10.3、10.4 或更新版本
JPEG 基準
Page 64

附錄 A
(續)
類別 規格
TIFF 24 位元 RGB 未壓縮的交換格式
TIFF 24 位元 YCbCr 未壓縮的交換格式
TIFF 24 位元 RGB 封包位元交換格式
TIFF 8 位元灰階未壓縮/封包位元
TIFF 8 位元調色盤彩色、未壓縮/封包位元
TIFF 1 位元未壓縮/封包位元/1D Huffman
視訊檔案格式
Motion-JPEG AVI
Motion-JPEG QuickTime
MPEG-1
材質規格
建議的最大長度:61 公分 (24 英吋)
建議的最大紙張厚度:292 微米 (千分之 11.5 英吋)
建議的最大信封厚度:673 微米 (千分之 26.5 英吋)
支援的材質尺寸 從電腦列印時的支援尺寸
7.6 x 12.7 公分到 22 x 61 公分 (3 x 5 英吋到 8.5 x 24
英吋)
從控制台列印時的支援尺寸
公制:A6、A4、10 x 15 公分 (含標籤或不含標籤);
英制:3.5 x 5 英吋、4 x 6 英吋 (含標籤或不含標
籤)、4 x 12 英吋、5 x 7 英吋、8 x 10 英吋、
8.5 x 11 英吋;其他:Hagaki 和 L 尺寸
支援的材質類型
紙張 (普通紙、噴墨紙、相紙以及全景相紙)
信封
投影片
標籤紙
卡片:索引卡、賀卡、Hagaki 卡、A6 卡、L 尺寸卡
轉印紙
Avery C6611 和 C6612 相片貼紙:10 x 15 公分 (4 x 6
英吋),每頁有 16 張方形或橢圓形貼紙
記憶卡
CompactFlash I 和 II 型
Microdrive
MultiMediaCard
Secure Digital
Memory Sticks
xD-Picture Card
記憶卡支援的影像檔案格式 列印:請參閱此表格中的影像檔案格式部份。
儲存:所有檔案格式
62 HP Photosmart D7300 series
Page 65

(續)
類別 規格
紙匣 – 支援的材質尺寸
主紙匣
8 x 13 公分到 22 x 61 公分 (3 x 5 英吋到 8.5 x 24 英
吋)
相片匣
最大 10 x 15 公分 (4 x 6 英吋),含標籤或不含標籤
出紙匣
支援主紙匣和相片匣所支援的所有尺寸
紙匣容量 主紙匣
100 張普通紙
14 張信封
20 - 40 張卡片 (取決於卡片的厚度)
30 張標籤紙
25 張投影片、轉印紙或相紙
10 張相紙
相片匣
出紙匣
20 張相紙
50 張一般紙張
10 張卡片或信封
25 張標籤紙或轉印紙
作業環境
建議的溫度範圍:攝氏 15-30 度 (華氏 59-86 度)
最大溫度範圍:攝氏 5-40 度 (華氏 41-104 度)
儲存溫度範圍:攝氏 -40-60 度 (華氏 -40-140 度)
建議的濕度範圍:20-80% 相對濕度
最大濕度範圍:10-80% 相對濕度
實體規格
高度:16.0 公分 (6.30 英吋)
寬度:44.7 公分 (17.6 英吋)
深度:38.5 公分 (15.2 英吋)
重量:8.5 公斤 (18.7 磅)
耗電量
列印時,平均:75 W
列印時,最大:94 W
閒置時:13.3-16.6 W
電源供應器型號
電源要求
墨匣
HP Photosmart D7300 series 使用者指南 63
HP 零件編號 0957-2105
100–240 VAC (± 10%)、50–60 Hz (± 3 Hz)
HP 黃色墨匣
Page 66

附錄 A
(續)
類別 規格
HP 青藍色墨匣
HP 淡青藍色墨匣
HP 洋紅色墨匣
HP 淡洋紅色墨匣
HP 黑色墨匣
附註 您可以在此印表機中使用的墨匣編號印
在本印刷版指南的封底頁面上。如果您已多次
使用此印表機,應該也可以在印表機軟體中找
到墨匣編號。如需詳細資訊,請參閱插入墨
匣。
列印速度 (最大) 黑色列印輸出:每分鐘 32 頁
彩色列印輸出:每分鐘 31 頁
相片:每張 10 x 15 公分 (4 x 6 英吋) 相片 14 秒
USB 支援 Microsoft Windows 98、2000 Professional、Me、
XP Home 與 XP Professional
Mac OS X 10.3、10.4 或更新版本
HP 建議使用長度不超過 3 公尺 (10 英呎) 的 USB 2.0
全速相容纜線。
64 HP Photosmart D7300 series
Page 67

B
HP 保固
HP Photosmart D7300 series 使用者指南 65
Page 68

附錄 B
66 HP Photosmart D7300 series
Page 69

索引
B
Bluetooth
功能表設定 9
連接到印表機 21, 31
無線印表機轉接器 9
C
CompactFlash 18
D
DPOF 22
E
Energy Star 2
H
HP Instant Share 31
HP iPod 32
HP Photosmart Essential 35
HP Photosmart Premier 35
HP Photosmart 共享 33, 36
HP 直接列印數位相機 23
HP 軟體更新程式 42
J
JPEG 檔案格式 18
M
Memory Sticks 18
Microdrive 18
MPEG-1 檔案格式 18
MultiMediaCard 18
P
Photosmart 共享.
HP Photosmart 共享
PictBridge 相機 23
S
Secure Digital 18
Sony Memory Stick.
Memory Sticks
T
TIFF 檔案格式 18
參閱
參閱
U
USB
規格 61
連接埠 6
連線類型 31
X
xD-Picture 卡 18
四畫
支援 59
支援期限過後 60
支援程序 59
日期與時間戳記 27
五畫
古董著色 27
六畫
列印
不連接電腦 21
相片 21
相片範圍 21
從 BlueTooth 裝置 21
從 PictBridge 相機 21
從相機 23
從記憶卡 21
從電腦 35
測試頁 41
列印品質
更改 21
列印頭
卡住 54
失效 55
清潔 40
印表機
首頁 9
配件 8
清潔 39
規格 61
連接 21, 31
愛護與維護 39
零件 6
說明文件 5
錯誤訊息 50
儲存 43
印表機軟體
更新 42
印表機軟體, 更新 35
色彩效果 27
七畫
更換墨匣 16
系統需求 61
八畫
取出記憶卡 20
放入紙張 13
法規注意事項
法規機型識別號碼 2
版面與相片尺寸 25
九畫
品質
列印測試頁 41
相片 26
相紙 43
按鈕 8
相片
支援的檔案格式 18
日期與時間戳記 27
古董著色 27
列印 21
透過電子郵件傳送 33
提高品質 26
裁剪 27
增加外框 27
褐色色調 27
儲存到電腦 31
縮放 27
相機
PictBridge 23
列印來源 23
直接列印 23
連接到印表機 21, 31
連接埠 6
致電 59
致電 HP 支援中心 59
首頁, 螢幕 9
HP Photosmart D7300 series 使用者指南 67
Page 70

十畫
校正, 需要 54
校正印表機 39
校正頁 39
紙匣,紙張 6
紙張
放入 13
紙匣 6
規格 61
維護 13, 43
購買和選擇 13
能源消耗 2
記憶卡
支援類型 18
列印來源 21
取出 20
將相片儲存至電腦 33
插入 19
配件 8
配件, 雙面列印 9
十一畫
問題與解答 45
將相片儲存到電腦 31
常見問題集 45
控制台 8
清潔
列印頭 40
印表機 39
銅色接點 40
規格 61
透過電子郵件傳送相片 33
十二畫
惠普科技公司通告 2
插入
記憶卡 19
墨匣 16
測試頁 41
無邊框列印 27
視訊片段
支援的檔案格式 18
十三畫
愛護與維護 39
損壞, 墨匣 53
運送印表機 8
電腦
列印來源 35
系統需求 61
將相片儲存至 33
連接到印表機 31
電話支援 59
電話支援期限
支援期限 59
十四畫
疑難排解
錯誤訊息 50
說明 45
說明文件, 印表機 5
十五畫
數位相機.
參閱
相機
數位影像列印格式 22
範圍
列印 21
褐色色調 27
墨水
空的 52
盡快更換 52
檢查存量 41
墨水存量, 檢查 16
墨水匣
HP 墨水已耗盡 53
測試 41
損壞 53
過期 53
盡快更換 52
遺漏 53
錯誤 52
墨水匣遺失 53
墨匣
印表機校正 54
更換 16
空的 52
非 HP 墨水 53
插入 16
過期 53
墨水存量, 檢查 16
儲存 43
十六畫
燈號 8
錯誤訊息 50
十七畫
儲存
印表機 43
相紙 43
墨匣 43
檔案格式, 支援的 18, 61
獲得協助 45
十八畫
雙面列印 9
68 HP Photosmart D7300 series
Page 71

HP Photosmart D7300 series User Guide
English
Page 72

Copyrights and trademarks
© 2006 Hewlett-Packard Development
Company, L.P.
The information contained herein is
subject to change without notice.
Reproduction, adaptation, or
translation without prior written
permission is prohibited, except as
allowed under the copyright laws.
Hewlett-Packard Company
notices
The information contained in this
document is subject to change without
notice.
All rights reserved. Reproduction,
adaptation, or translation of this
material is prohibited without prior
written permission of Hewlett-Packard,
except as allowed under copyright
laws.
The only warranties for HP products
and services are set forth in the express
warranty statements accompanying
such products and services. Nothing
herein should be construed as
constituting an additional warranty. HP
shall not be liable for technical or
editorial errors or omissions contained
herein.
Trademarks
HP, the HP logo, and Photosmart are
property of Hewlett-Packard
Development Company, L.P.
The Secure Digital logo is a trademark
of the SD Association.
Microsoft and Windows are registered
trademarks of Microsoft Corporation.
CompactFlash, CF, and the CF logo are
trademarks of the CompactFlash
Association (CFA).
Memory Stick, Memory Stick Duo,
Memory Stick PRO, and Memory Stick
PRO Duo are trademarks or registered
trademarks of Sony Corporation.
MultiMediaCard is a trademark of
Infineon Technologies AG of Germany,
and is licensed to the MMCA
(MultiMediaCard Association).
Microdrive is a trademark of Hitachi
Global Storage Technologies.
xD-Picture Card is a trademark of Fuji
Photo Film Co., Ltd., Toshiba
Corporation, and Olympus Optical Co.,
Ltd.
Mac, the Mac logo, and Macintosh are
registered trademarks of Apple
Computer, Inc.
iPod is a trademark of Apple Computer,
Inc.
Bluetooth is a trademark owned by its
proprietor and used by HewlettPackard Company under license.
PictBridge and the PictBridge logo are
trademarks of the Camera & Imaging
Products Association (CIPA).
Other brands and their products are
trademarks or registered trademarks of
their respective holders.
Regulatory model
identification number
For regulatory identification purposes,
your product is assigned a Regulatory
Model Number. The Regulatory Model
Number for your product is
VCVRA-0603. This regulatory number
should not be confused with the
marketing name (HP Photosmart
D7300 series, etc.) or product numbers
(Q7057A, etc.).
For complete listing of regulatory
notices see your onscreen help.
Energy consumption Energy Star®
Hewlett-Packard Company is
committed to providing quality products
in a environmentally sound manner. For
information about the HP's
environmental product stewardship
program see the onscreen help.
Page 73

Contents
1Welcome.................................................................................................................5
Special features.......................................................................................................5
Accessing the onscreen HP Photosmart printer help..............................................5
Printer parts.............................................................................................................6
Optional accessories...............................................................................................9
Printer menu............................................................................................................9
Print................................................................................................................10
Save...............................................................................................................10
Share..............................................................................................................10
Settings..........................................................................................................10
2 Get ready to print.................................................................................................13
Load paper............................................................................................................13
Choose the right paper...................................................................................13
Load your paper.............................................................................................13
Insert ink cartridges...............................................................................................15
Purchasing replacement ink cartridges..........................................................15
Ink cartridge tips.............................................................................................16
Inserting or replacing the ink cartridges.........................................................16
Insert memory cards..............................................................................................18
Supported file formats....................................................................................19
Inserting a memory card.................................................................................19
Memory card types.........................................................................................19
Removing a memory card..............................................................................20
3 Printing photos without a computer..................................................................23
Printing photos.......................................................................................................23
Print photos from a memory card...................................................................23
Print photos from a digital camera.................................................................25
Print photos from an iPod...............................................................................26
Photo layouts.........................................................................................................27
Improving photo quality.........................................................................................28
Getting creative.....................................................................................................29
4 Getting connected...............................................................................................33
Connecting to other devices..................................................................................33
Saving photos to a computer.................................................................................35
Connecting through HP Photosmart Share...........................................................35
5 Printing from a computer....................................................................................37
Using creative options in the printer software.......................................................37
HP Photosmart Premier.................................................................................37
HP Photosmart Essential...............................................................................37
HP Photosmart Share....................................................................................38
Set print preferences.............................................................................................38
Open the electronic help................................................................................39
HP Real Life technologies features.......................................................................39
6 Care and maintenance........................................................................................41
Clean and maintain the printer..............................................................................41
HP Photosmart D7300 series User Guide 3
Page 74

Clean the outside of the printer......................................................................41
Aligning the printer.........................................................................................41
Print a sample page.......................................................................................41
Automatically clean the printhead..................................................................42
Manually clean the ink cartridge contacts......................................................42
Print a self test report.....................................................................................43
Update the software..............................................................................................44
Store and transport the printer and ink cartridges.................................................45
Store and transport the printer.......................................................................45
Store and transport the ink cartridges............................................................45
Maintain the quality of photo paper.......................................................................45
7 Troubleshooting..................................................................................................47
Printer hardware problems....................................................................................47
Printing problems...................................................................................................48
Error messages.....................................................................................................52
Paper errors...................................................................................................52
Ink cartridge errors.........................................................................................54
Memory card errors........................................................................................57
Computer and connectivity printing errors.....................................................60
8 HP support...........................................................................................................61
Support process....................................................................................................61
HP support by phone.............................................................................................61
Phone support period.....................................................................................61
Placing a call..................................................................................................61
After the phone support period.......................................................................62
Additional warranty options...................................................................................62
A Specifications......................................................................................................63
System requirements.............................................................................................63
Printer specifications.............................................................................................63
BHP Warranty.........................................................................................................67
Index............................................................................................................................69
4 HP Photosmart D7300 series
Page 75

1
Welcome
Thank you for purchasing an HP Photosmart D7300 series printer! With this new photo
printer you can print beautiful photos, save photos to a computer, and create fun and
easy projects with or without a computer.
This guide primarily explains how to print without connecting a computer. To learn how
to print from a computer, install the printer software and view the electronic Help. For an
overview of using a computer and the printer together, see Printing from a computer. For
information about installing the software, see the Quick Start guide.
Home users can learn how to:
● Print borderless photos from the printer or from a computer
● Choose a photo layout
● Convert a color photo to black and white, or apply a color effect such as Sepia or
Antique
The printer comes with the following documentation:
● Quick Start Guide: The Quick Start Guide explains how to set up the printer, install
the printer software, and print your first photo.
● User Guide: The User Guide is the book you are reading. This guide describes the
basic features of the printer, explains how to use the printer without connecting a
computer, and contains hardware troubleshooting information.
● Onscreen help: The onscreen HP Photosmart printer help describes how to use
the printer with a computer and contains software troubleshooting information.
Special features
New features and media make it easier than ever to produce high-quality photos:
● When you use the new HP Advanced Photo Paper (also called HP Photo Paper in
some countries/regions), special sensors in the printer detect a mark on the back of
the paper and automatically select the optimal print settings. For more information
about this new paper, see Choose the right paper.
● HP Real Life technologies make it easy for you to get better photos. Automatic red
eye removal and adaptive lighting to enhance detail in shadows are just a few of the
many technologies included. You can explore the many editing and enhancing
options from both the control panel and from the printer software. To access these
features from the control panel, see Improving photo quality. To learn how to find
them in the software, see HP Real Life technologies features.
Accessing the onscreen HP Photosmart printer help
After you have installed the HP Photosmart printer software on a computer, you can view
the onscreen HP Photosmart printer help:
● Windows PC: From the Start menu, select Programs (in Windows XP, select All
Programs) > HP > HP Photosmart D7300 series > Photosmart Help.
● Macintosh: Select Help > Mac Help in the Finder, then select Help Center >
HP Photosmart Premier help > HP Photosmart printer help.
HP Photosmart D7300 series User Guide 5
Page 76

Chapter 1
Printer parts
Front of printer
1 On: Press this button to turn on the printer.
2 Top cover: Lift this cover to access the ink cartridges and to clear paper jams. To lift the cover,
grasp the top cover below the HP logo and pull upward.
3 Touch Screen Display: Use this screen to view and print photos, menus, and messages.
4 Output tray: Use this tray to catch your printouts. Lift this tray to access the photo tray.
5 Main tray: Pull out this tray and load paper, transparencies, envelopes, or other media with
the side to be printed facing down.
6 Photo tray: Lift the output tray and load small-size paper up to 10 x 15 cm (4 x 6 inch) into
the photo tray for printing with the side to be printed facing down. The paper may be tabbed
or untabbed.
7 Memory card slots: Insert memory cards here. For a list of supported memory cards, see
Insert memory cards.
8 Camera port: Connect a PictBridge™ digital camera, the optional HP Bluetooth® wireless
printer adapter, or an iPod.
Back of printer
1 Power cord connection: Use this port to connect the power cord included with the printer.
2 USB port: Use this port to connect the printer to a computer.
3 Rear access door: Remove this door to clear paper jams or to install the optional
HP Automatic Two-sided Printing Accessory. See Optional accessories.
6 HP Photosmart D7300 series
Page 77

Main and Output trays
1 Paper-width guide: Adjust this guide to fit close to the edge of the paper in the main tray.
2 Output tray: Use this tray to catch your printouts. Lift this tray to access the photo tray.
3 Output tray extender: Pull towards you to extend the output tray to catch your printouts.
4 Main tray: Pull out this tray and load plain paper, transparencies, envelopes, or other media
with the side to be printed facing down.
5 Main tray grip: Pull toward you to extend the Main tray.
6 Paper-length guide: Adjust this guide to fit close to the end of the paper in the main tray.
Photo tray
1 Paper-width guide: Adjust this guide to fit close to the edge of the paper in the photo tray.
2 Paper-length guide: Adjust this guide to fit close to the end of the paper in the photo tray.
HP Photosmart D7300 series User Guide 7
Page 78

Chapter 1
Control panel
1 On: Turn on the printer or put it into power save mode.
2 Print Preview: View a preview of the selected photo or photos.
3 Print: Print the selected photos from the inserted memory card, or from a camera connected
to the front camera port.
4 Cancel: Deselect photos, exit a menu, or stop an action you have requested.
5 Rotate: Rotate a photo or a crop box.
6 Zoom (+)(-): Zoom in or out of a photo or crop box. You can also press Zoom (-) to view photos
four at a time when viewing a photo at normal magnification.
7 Autocorrect: Automatically enhances and applies lighting, contrast, focus and red eye
removal features to all printed photos.
Indicator lights
1 On light: Solid blue if the printer is on, otherwise it is off.
2 Print light: Solid blue when the printer is on and ready to print, flashes blue when the printer
is printing or busy with self-maintenance.
3 Attention light: Flashes when there is an error condition. See the touch screen display for
instructions or information about the error. For more information, see The Attention light is
on.
4 Autocorrect light: Solid blue when the Autocorrect function is turned on.
5 Memory Card light: Solid blue if a memory card is inserted, flashes if the printer is accessing
a memory card, off if no memory card is inserted or if more than one card is inserted. Turns
on when there is a problem that requires user action. See the printer screen for instructions.
8 HP Photosmart D7300 series
Page 79

Optional accessories
There are several optional accessories available for the printer that enhance its portability
for printing anywhere, anytime. The appearance of the accessories may vary from what
is shown.
To purchase supplies, go to:
● www.hpshopping.com (U.S.)
● www.hp.com/go/supplies (Europe)
● www.hp.com/jp/supply_inkjet (Japan)
● www.hp.com/paper (Asia/Pacific)
Accessory name
HP Automatic Two-sided Printing
Accessory
HP Bluetooth® wireless printer
adapter
1 Insert the Bluetooth adapter into the
front camera port
Description
This accessory automatically flips each
page to print on both sides. You will save
money (two-sided printing reduces paper
consumption) and time (no need to
remove the paper and reinsert it to print on
the back), plus you will make bulky
documents more manageable.
This accessory may not be available in all
countries/regions.
The HP Bluetooth® wireless printer
adapter goes into the camera port on the
front of the printer. This adapter lets you
use Bluetooth wireless technology for
printing from many Bluetooth-enabled
devices, including digital cameras,
camera phones, and PDAs.
For more information on printing with this
accessory, go to www.hp.com/go/
bluetooth.
Printer menu
Touch the home icon in the upper left-hand corner to access the home screen. You can
access all of the functions from the home screen as well as setup menus.
HP Photosmart D7300 series User Guide 9
Page 80

Chapter 1
Save
Share
Settings
Wizard: Use the wizard to guide you through the printing process.
4×6: Use to print 4×6 inch (10 × 15 cm) photographs.
Enlargement: Use Enlargement to print different photo sizes.
All: Select to print all the photos from the memory card inserted in the printer.
Other Projects: Use Other Projects to print panoramic, HP CD/DVD Tattoos, wallet
prints, and passport photos.
– Panorama Prints: Select to turn panoramic printing On or Off (default). Select
On to print all selected photos with a 3:1 aspect ratio; load 10 x 30 cm (4 x 12 inch)
paper before printing.
– HP CD/DVD Tattoos: Select to print labels for CD/DVDs.
– Wallet Prints: Use to print wallet-sized photos.
– Passport Photos: Select to print a passport photo.
Touch the Save button to save selected images to a connected PC.
Use the Share button to select and share photos through HP Photosmart Share.
● Tools: Use tools to display the ink gauge, adjust the print quality, print a sample
page, print a test page, and to clean and align cartridges.
– Display Ink Gauge: Use to enable an ink supply gauge on the home screen.
– Print quality: Choose either Best (default) or Normal print quality.
– Print sample page: Select to print a sample page, which is useful for checking
the print quality of the printer. This feature is not available in all printer models.
– Print test page: Select to print a test page containing information about the
printer that can help in troubleshooting problems.
– Clean Printhead: Select to clean the print head when white lines or streaks
appear in your printouts. After the cleaning finishes, the printer prints a self test
report. You have the option to clean the print head again if the report shows
print quality problems.
– Align printer: Select to align the printer when white lines or streaks appear in
your printouts.
● Bluetooth
– Device address: Some devices with Bluetooth wireless technology require you
to enter the address of the device they are trying to locate. This menu option
shows the printer address.
– Device name: You can select a name for the printer that appears on other
devices with Bluetooth wireless technology when they locate the printer.
– Passkey: When the Bluetooth Security level of the printer is set to High, you
must enter a passkey to make the printer available to other Bluetooth devices.
The default passkey is 0000.
– Visibility: Select Visible to all (default) or Not visible. When Visibility is set
to Not visible, only devices that know the printer address can print to it.
– Security level: Select Low (default) or High. The Low setting does not require
users of other devices with Bluetooth wireless technology to enter the printer
10 HP Photosmart D7300 series
Page 81

passkey. High requires users of other devices with Bluetooth wireless
technology to enter the printer passkey.
– Reset Bluetooth options: Select to reset all items in the Bluetooth menu to
their default values.
● Help Menu: Use the help menu for instructions about using the printer.
– Cartridges: Select to see an animation of how to install an ink cartridge.
– Main Tray Loading: Select to read main tray paper loading instructions.
– Photo Tray Loading: Select to read photo tray paper loading instructions.
– Paper jams: Select to see an animation of how to clear a paper jam.
– Camera connect: Select to read instructions on how to connect a PictBridge
camera to the printer.
● Preferences
– Print paper size: Touch Ask before print to select the paper type and size each
time you print (default).
– Paper Type: Touch Automatic (default) and the printer will automatically detect
the paper type and size when you print.
– Date Stamp: Use this option to include the date and/or time on your printed
photos.
– Colorspace: Choose a colorspace. The Auto-select default tells the printer to
use the Adobe RGB colorspace, if available. The printer defaults to sRGB if
Adobe RGB is not available.
– PictBridge Tray Select: Use to select the default paper tray for printing through
the PictBridge connection.
– Audio Feedback: Use to enable an audible tone when a button is touched or
pressed.
– Video enhancement: Select On (default) or Off. When you select On, the
quality of photos printed from video clips will be improved.
– Restore Factory Defaults: Restores factory settings for all menu items
except Select language and Select country/region (under Language in
Preference menu) and Bluetooth settings (under Bluetooth in the main printer
menu). This setting does not affect HP Instant Share or Network defaults.
HP Photosmart D7300 series User Guide 11
Page 82

Chapter 1
12 HP Photosmart D7300 series
Page 83

2
Get ready to print
This section includes the following topics:
● Load paper
● Insert ink cartridges
● Insert memory cards
Load paper
Learn how to choose the right paper for your print job and how to load it into the input
tray for printing.
Choose the right paper
Use HP Advanced Photo Paper. It is especially designed to work with the inks in your
printer to create beautiful photos. Other photo papers will produce inferior results.
For a list of available HP-designed photo paper, or to purchase supplies, go to:
● www.hpshopping.com (U.S.)
● www.hp.com/eur/hpoptions (Europe)
● www.hp.com/jp/supply_inkjet (Japan)
● www.hp.com/paper (Asia/Pacific)
The printer is set by default to print the best quality photos on HP Advanced Photo Paper.
If you print on a different type of paper, be sure to change the paper type from the printer
menu. See Printer menu.
Load your paper
Paper loading tips:
● Load paper with the side to be printed facing down.
● You can print photos and documents on a wide variety of paper sizes, from 8 x 13 cm
(3 x 5 inch) up to 22 x 61 cm (8.5 x 24 inch). The 10 x 15 cm (4 x 6 inch) photo paper
is available with and without tabs.
● Before loading paper, pull the out main paper tray and slide out the paper-width and
paper-length guides to make room for the paper. After loading paper, adjust the
guides to fit close to the edges of the paper without bending the paper. When finished
loading paper, push the main tray back in all the way.
● Load only one type and size of paper at a time in the same tray.
● After loading paper, extend the output tray extension to catch your printed pages.
Use the directions in the following table to load the most commonly used paper sizes into
the printer.
Paper type
Any supported photo
or plain paper media
HP Photosmart D7300 series User Guide 13
How to load Tray to load
1. Extend the main tray.
2. Slide the paper-width and
paper-length guides to their
outermost positions.
Load the main tray
Page 84

Chapter 2
(continued)
Paper type How to load Tray to load
3. Load paper with the side to
be printed facing down.
Check that the stack of
paper is no higher than the
top of the paper-length
guide.
4. Adjust the paper-width and
paper-length guides inward
until they stop at the edges
of the paper.
5. Push the main tray all the
way in.
Load paper and adjust guides inward
1 Paper-width guide
2 Paper-length guide
Push in the main tray
1 Push in the main tray all the way
Photo paper up to
10 x 15 cm
(4 x 6 inch) with or
without tabs, Hagaki
cards, A6 cards, Lsize cards
1. Lift the output tray and
extend the main paper tray.
2. Adjust the paper-width and
paper-length guides
outward to make room for
the paper.
Load the photo tray
3. Load up to 20 sheets of
paper into the photo tray
with the print side down. If
you are using tabbed
paper, insert the paper so
the tab is closer to you.
4. Adjust the paper-width and
paper-length guides inward
until they stop at the edges
of the paper.
14 HP Photosmart D7300 series
Page 85

(continued)
Paper type How to load Tray to load
5. Push in the photo tray.
6. Close the output tray.
Lift the output tray and adjust guides
outward
1 Output tray
2 Paper-width guide
3 Paper-length guide
Load photo paper and adjust guides
inward
1 Paper-width guide
2 Paper-length guide
Insert ink cartridges
The first time you set up and use your HP Photosmart printer printer, make sure to install
the ink cartridges that were shipped with your printer. The ink in these ink cartridges is
specially formulated to mix with the ink in the print head assembly.
Purchasing replacement ink cartridges
When purchasing replacement cartridges, refer to the cartridge numbers that appear on
the back cover of this guide. These cartridge numbers may vary by country/region.
HP Photosmart D7300 series User Guide 15
Page 86

Chapter 2
Note If you have already used the printer several times and you have installed
the HP Photosmart printer software, you can also find the cartridge numbers in
the printer software. Windows users: Right-click the HP Digital Imaging Monitor
icon in the Windows taskbar, and select Launch/Show HP Solution Center.
Select Settings, then Print Settings, and then Printer Toolbox. Click the
Estimated Ink Levels tab, and then click Ink Cartridge Information. To order
ink cartridges, click Shop Online. Mac users: Click HP Photosmart Premier in
the Dock. Choose Maintain Printer from the Settings pop-up menu. Click
Launch Utility, and then choose Supplies Status from the pop-up menu.
Ink cartridge tips
HP Vivera Inks deliver true-to-life photo quality and exceptional fade resistance resulting
in vivid colors that last for generations! HP Vivera Inks are specially-formulated and
scientifically tested for quality, purity and fade resistance.
For best print quality, HP recommends that you install all retail ink cartridges before the
install-by date stamped on the box.
For optimum printing results, HP recommends using only genuine HP ink cartridges.
Genuine HP ink cartridges are designed and tested with HP printers to help you easily
produce great results, time after time.
Note HP cannot guarantee the quality or reliability of non-HP ink. Printer service
or repairs required as a result of printer failure or damage attributable to the use
of non-HP ink will not be covered under warranty.
Ink cartridge
1 Do not insert objects into these holes
Caution To prevent ink loss or spillage: leave the ink cartridges installed while
transporting the printer, and avoid leaving used ink cartridge(s) out of the printer
for extended lengths of time.
Inserting or replacing the ink cartridges
1. Make sure the power is on, then lift the top cover. Make sure all packing material
has been removed from inside the printer.
16 HP Photosmart D7300 series
Page 87

2. Squeeze the gray tab below an ink cartridge slot to release the gray latch inside the
printer, then lift the latch.
The ink cartridge areas are color-coded for easy reference. Lift the latch below the
appropriate color to insert or replace a cartridge. From left to right, the ink cartridges
are black, yellow, light cyan, cyan, light magenta, and magenta.
1 Ink cartridge latch for the black ink cartridge
2 Ink cartridge area for the color ink cartridges
3. If you are replacing a cartridge, remove the old cartridge by pulling it toward you out
of its slot.
Recycle the old cartridge. The HP Inkjet Supplies Recycling Program is available in
many countries/regions and lets you recycle used ink cartridges free of charge. For
more information, go to www.hp.com/hpinfo/globalcitizenship/environment/recycle/
inkjet.html.
4. Remove the new ink cartridge from its packaging, and while holding it by the handle,
slide the ink cartridge into the empty slot.
Make sure you insert the ink cartridge into the slot that has the same shaped icon
and color as the new cartridge. The copper-colored contacts should be facing the
printer as the ink cartridge is inserted.
HP Photosmart D7300 series User Guide 17
Page 88

Chapter 2
Note The first time you set up and use the printer, make sure to install the
ink cartridges that were shipped with your printer. The ink in these ink
cartridges is specially formulated to mix with the ink in the print head
assembly.
5. Press down on the gray latch until it clicks into place.
6. Repeat steps 2 through 5 for each ink cartridge you are replacing.
You must install all six cartridges. The printer will not work if an ink cartridge is
missing.
7. Close the top cover.
The touch screen displays six ink drop icons showing the approximate ink level for
each cartridge when low ink levels are detected.
Note If you are using non-HP ink, a question mark appears instead of the
ink drop in the icon for that cartridge. The printer cannot detect the amount
of ink remaining in ink cartridges that contain non-HP ink.
Insert memory cards
After you have taken pictures with a digital camera, you can remove the memory card
from the camera and insert it into the printer to view and print your photos. The printer
can read the following types of memory cards: CompactFlash
Microdrive
™
, MultiMediaCard™, Secure Digital™, and xD-Picture Card™.
Caution Using any other type of memory card may damage the memory card
and the printer.
To learn about other ways of transferring photos from a digital camera to the printer,
see Connecting to other devices.
18 HP Photosmart D7300 series
™
, Memory Sticks,
Page 89

Supported file formats
The printer can recognize and print the following file formats directly from a memory card:
JPEG, uncompressed TIFF, Motion JPEG AVI, Motion-JPEG QuickTime, and MPEG-1.
If your digital camera saves photos and video clips in other file formats, save the files to
your computer and print them using a software program. For more information, see the
electronic Help.
Inserting a memory card
Memory card slots
1 xD-Picture Card
2 Compact Flash I and II, Microdrive
3 Memory Stick
4 Secure Digital, MultiMediaCard (MMC)
Memory card types
Find your memory card in the following table and use the instructions to insert the card
into the printer.
Guidelines:
● Insert only one memory card at a time.
● Gently push the memory card into the printer until it stops. The memory card slot
allows for only a portion of the card to insert into the printer; do not try to force the
memory card all the way into the printer.
● When the memory card is inserted correctly, the memory card light flashes and then
remains solid green.
Caution 1 Inserting the memory card any other way may damage the card and
the printer.
Caution 2 Do not pull out a memory card while the memory card light is flashing
green. For more information, see Removing a memory card.
HP Photosmart D7300 series User Guide 19
Page 90

Chapter 2
Memory card How to insert the memory card
CompactFlash ● Front label faces up, and if the label has an arrow, the arrow points
toward the printer
● Edge with metal pinholes goes into the printer first
Memory Stick ● Angled corner is on the left
● Metal contacts face down
● If you are using a Memory Stick Duo or Memory Stick PRO Duo
card, attach the adapter that came with the card before you insert
the card into the printer
Microdrive ● Front label faces up, and if the label has an arrow, the arrow points
toward the printer
● Edge with metal pinholes goes into the printer first
MultiMediaCard ● Angled corner is on the right
● Metal contacts face down
Secure Digital ● Angled corner is on the right
● Metal contacts face down
xD-Picture Card ● Curved side of card points toward you
● Metal contacts face down
Removing a memory card
Wait until the Memory Card light stops flashing, then gently pull the memory card to
remove it from the printer.
20 HP Photosmart D7300 series
Page 91

Caution Do not pull out a memory card while the Memory Card light is flashing.
A flashing light means that the printer is accessing the memory card. Removing
a memory card while it is being accessed may damage the printer and the memory
card or corrupt the information on the memory card.
HP Photosmart D7300 series User Guide 21
Page 92

Chapter 2
22 HP Photosmart D7300 series
Page 93

3
Printing photos without a computer
The HP Photosmart D7300 series printer lets you select, enhance, and print photos
without even turning on the computer. Once you've set up the printer using the
instructions in the Quick Start booklet, you can insert a memory card in the printer and
print your photos using the buttons on the printer control panel.
You can also print photos directly from a digital camera. For more information, see Print
photos from a digital camera.
Printing photos
You can print photos without a computer in several different ways:
● Insert a memory card with photos on it into one of the memory card slots on the
printer
● Connect a PictBridge digital camera to the camera port on the front of the printer
● Install the optional HP Bluetooth
camera with Bluetooth wireless technology
Print photos from a memory card
You can print photos from a memory card by inserting the card into the printer and using
the printer control panel to view, select, enhance, and print photos. You can also print
camera-selected photos—photos you marked for printing using a digital camera—
directly from a memory card.
Printing from a memory card is quick and easy, and does not drain the digital camera
batteries.
®
wireless printer adapter and print from a digital
If you want to…
Print one or more photos
Before you begin, make sure
that the memory card is inserted
in the printer and the paper tray
you want to use is loaded with
the correct paper.
Check the Photo tray light to
verify that the correct tray is
selected — the light should be
off for the Main tray and on for
the Photo tray.
Print all photos on the
memory card
Before you begin, make sure
that the memory card is inserted
in the printer and the paper tray
HP Photosmart D7300 series User Guide 23
Follow these steps:
1. Touch Print.
2. Touch 4×6 or Enlargement to select your
desired photo size.
3. Touch the desired paper size.
4. Using the left and right arrow keys, scroll
through the available photos.
5. Touch the desired photos to select one or more
images.
Note Press Zoom - to view 4 images
on the touch screen display.
6. Press Print to print the selected photographs.
1. Touch Print.
2. Touch All.
3. Touch the desired paper size.
4. Touch the desired photo size.
Page 94

Chapter 3
(continued)
If you want to… Follow these steps:
you want to use is loaded with
the correct paper.
Print camera-selected photos
from a memory card
When you select photos for
printing using a digital camera,
the camera creates a Digital
Print Order Format (DPOF)
file that identifies the selected
photos. The printer can read
DPOF 1.0 and 1.1 files directly
from a memory card.
Print using the Wizard
The print wizard provides
detailed instructions about
selecting, sizing, editing, and
printing photographs.
1. Use the digital camera to select the photos you
want to print. For more information, see the
documentation that came with the camera.
2. If you select default as the photo layout with the
camera, touch the Layout to select a photo
layout.
If you select a photo layout other than default
with the camera, photos print in the cameraselected layout regardless of the printer setting.
3. Load the desired paper.
4. Remove the memory card from the digital
camera and insert it into the printer.
5. When a message appears on the printer screen
asking if you want to print the camera-selected
photos, touch
.
The photos you selected with the camera begin
printing.
If the printer cannot find or read all of the cameraselected photos on the card, it prints the photos that
it can read.
After printing, the printer deletes the DPOF file and
unmarks the photos.
1. Touch Print.
2. Touch Wizard.
3. Follow the prompts to print your desired photo
or photos.
Print photos from video clips
You can view video clips on the
touch screen display, and select
and print individual frames.
When you first insert a memory
card containing a video clip, the
printer uses the first frame of the
video clip to represent the clip
on the printer screen.
The printer recognizes video
clips recorded in these formats:
● Motion-JPEG AVI
● Motion-JPEG QuickTime
● MPEG-1
1. Touch Print.
2. Touch 4×6 or Enlargement to select your
desired photo size.
3. Scroll to select the available videos using the left
and right arrows.
Note Videos display a video camera
icon in the center of the image.
4. Touch the play icon to play the video.
You can fast-forward or rewind the video by
touching the forward and reverse arrows.
5. To select a frame to print, pause the video by
touching the pause icon. The video must be
paused to select frames for printing.
Note Touch the forward or reverse
icons to advance or rewind the video
frame-by-frame.
24 HP Photosmart D7300 series
Page 95

(continued)
If you want to… Follow these steps:
The printer ignores video clips
in any other format.
6. Touch the desired frame to select it for printing.
7. Touch Print to print the selected frames.
Before you begin, make sure
that the memory card is inserted
in the printer and the paper tray
you want to use is loaded with
the correct paper.
Print a photo index
A photo index shows thumbnail
views and index numbers for up
to 2000 photos on a memory
card. Use plain paper instead of
photo paper to reduce costs.
A photo index may be several
pages long.
Before you begin, make sure
that the memory card is inserted
in the printer and the paper tray
you want to use is loaded with
the correct paper.
Stop printing To stop a print job in progress, press Cancel.
Print photos from a digital camera
You can print photos by connecting a PictBridge digital camera directly to the camera
port of the printer with a USB cable. If you have a digital camera with Bluetooth wireless
technology, you can insert the optional HP Bluetooth
printer and send photos to the printer wirelessly.
When you print from a digital camera, the printer uses the settings that you selected on
the camera. For more information, see the documentation that came with the camera.
To print photos from a…
1. Touch Print.
2. Touch All.
3. Select 8.5×11 paper.
4. Touch the index sheet icon.
®
wireless printer adapter in the
Follow these steps
Digital camera with Bluetooth
wireless technology
If you have a digital camera with
Bluetooth wireless technology,
you can purchase the optional
HP Bluetooth
®
wireless printer
adapter and print from a camera
using a Bluetooth wireless
connection.
1. Set the Bluetooth options for the printer using
the Bluetooth menu on the touch screen display.
For more information, see Bluetooth.
2. Load printer paper.
3. Insert the HP Bluetooth
®
wireless printer
adapter into the camera port on the front of the
printer.
The light on the adapter flashes when the
adapter is ready to receive data.
4. Follow the instructions in the documentation
that came with the digital camera to send photos
to the printer.
HP Photosmart D7300 series User Guide 25
Page 96

Chapter 3
(continued)
To print photos from a… Follow these steps
Note You can also
print from other devices
with Bluetooth wireless
technology, such as
PDAs and camera
phones. For more
information, see
Connecting to other
devices and the
documentation that
came with your
Bluetooth adapter.
Digital camera with
PictBridge technology
Print photos from an iPod
If you have an iPod that can store photos, you can connect your iPod to the printer and
print the photos.
Before you begin
Check that the images you copy to the iPod are in JPEG format.
Note iPods might not be available in your country/region.
To import photos to an iPod
1. Copy photos from a memory card to your iPod using the Belkin Media Reader for
iPod.
2. Verify that photos are on your iPod by selecting Photo Import on the iPod menu.
Photos appear as Rolls.
1. Turn on the PictBridge digital camera and select
the photos you want to print.
2. Load paper.
3. Make sure the camera is in PictBridge mode,
then connect it to the camera port on the front
of the printer using the USB cable that came
with the camera.
Once the printer recognizes the PictBridge
camera, the selected photos print automatically.
To print photos from an iPod
1. Connect the iPod to the camera port on the front of the printer using the USB cable
that came with the iPod. The printer screen displays Reading Device for several
minutes while the photos are read. Then the photos appear on the printer screen.
2. Select the photo(s) you want to print and press Print. For more information on
selecting and printing photos, see Printing photos.
26 HP Photosmart D7300 series
Page 97

Photo layouts
Touch Enlargements from the printer menu, then touch your desired paper size to select
a layout for the photos you want to print.
Layout
1 per page borderless 4 x 6 inch (4 x 6 inch)
1 per page 3.5 x 5 inch (3.25 x 4.75 inch)
2 per page 3.5 x 5 inch (2.25 x 3.25 inch)
Paper size (photo size)
10 x 15 cm (10 x 15 cm)
5 x 7 inch (5 x 7 inch)
8.5 x 11 inch (8.5 x 11 inch)
4 x 6 inch (3.75 x 5.75 inch)
10 x 15 cm (9.53 x 14.6 cm)
5 x 7 inch (4.75 x 6.75 inch)
8 x 10 inch (7.75 x 9.75 inch)
8.5 x 11 inch (8 x 10 inch)
A6 (9.86 x 14.16 cm)
A4 (20 x 25 cm)
Hagaki (9.36 x 14.16 cm)
L (8.25 x 12.06 cm)
4 x 6 inch (2.75 x 3.75 inch)
5 x 7 inch (3.25 x 4.75 inch)
8 x 10 inch (4.75 x 6.5 inch)
8.5 x 11 inch (5 x 7 inch)
A6 (6.92 x 9.86 cm)
A4 (13 x 18 cm)
Hagaki (6.8 x 9.36 cm)
L (5.87 x 8.25 cm)
3 per page 3.5 x 5 inch (1.5 x 2.25 inch)
4 x 6 inch (1.75 x 2.625 inch)
5 x 7 inch (2.25 x 3.375 inch)
8 x 10 inch (3.33 x 5 inch)
8.5 x 11 inch (4 x 6 inch)
A6 (4.77 x 7.15 cm)
A4 (10 x 15 cm)
Hagaki (4.52 x 6.78 cm)
HP Photosmart D7300 series User Guide 27
Page 98

Chapter 3
(continued)
Layout Paper size (photo size)
L (3.96 x 5.94 cm)
4 per page 3.5 x 5 inch (1.5 x 2.25 inch)
4 x 6 inch (1.75 x 2.5 inch)
5 x 7 inch (2.2 x 3.25 inch)
8 x 10 inch (3.5 x 4.75 inch)
8.5 x 11 inch (3.5 x 5 inch)
A6 (4.77 x 6.92 cm)
A4 (9 x 13 cm)
Hagaki (4.52 x 6.5 cm)
L (3.96 x 5.7 cm)
9 per page 3.5 x 5 inch (1 x 1.375 inch)
4 x 6 inch (1.125 x 1.5 inch)
5 x 7 inch (1.5 x 2 inch)
8 x 10 inch (2.25 x 3 inch)
8.5 x 11 inch (2.5 x 3.25 inch) – Wallet size
A6 (3.07 x 4.05 cm)
A4 (6.4 x 8.4 cm)
Hagaki (2.9 x 3.86 cm)
L (2.53 x 3.36 cm)
Note The printer may rotate the photos to fit the layout.
Improving photo quality
The printer provides a variety of enhancements that can improve the quality of a photo
printed from a memory card. These print settings do not change the original photo. They
only affect printing.
Problem
Photos with poor brightness 1. Touch Print.
28 HP Photosmart D7300 series
How to correct it
2. Touch 4×6 or Enlargement to select
your desired photo size.
3. Touch the desired paper size.
4. Touch Edit, then touch Photo
Brightness.
5. Touch the brightness slider to
increase or decrease the photo
brightness to the desired level, then
touch OK.
Page 99

(continued)
Problem How to correct it
Photos with red eye The automatic red eye removal feature is
enabled when you turn on the Photo fix
function. Enabling the Photo Fix function
applies Smart Focus, Adaptive Lighting,
and red eye removal features to selected
photos.
➔
Press Autocorrect to enable the
Photo Fix function.
Poor-quality video clips
This preference affects photos printed
from video clips.
Note This feature does not
improve photos printed using the
Video action prints feature in
the Print Options menu. This
feature also does not work with
photos printed in the 9-per-page
layout.
Getting creative
The printer provides a variety of tools and effects that let you use your photos in creative
ways. These print settings do not change the original photo. They only affect printing.
To try these features…
Add a color effect
You can set the printer to
change the color option applied
to a photo from Color (default)
to Black & white, Sepia, or
Antique.
Photos printed in Sepia print in
brown tones and look similar to
photos produced in the early
1900s. Photos printed in
Antique print in the same
brown tones, but with some pale
colors added to give the
appearance that the photos are
hand-colored.
Improve the quality of photos printed
from video clips
1. Touch Settings.
2. Touch the arrows to scroll and locate
Preferences.
3. Touch Preferences.
4. Using the arrows, locate then touch
Video Enhancement.
5. Touch On, then touch OK.
For information about printing photos from
video clips, see Print photos from a
memory card.
Follow these steps
1. Touch Print.
2. Touch 4×6 or Enlargements and select your
desired photo size.
3. Touch the desired paper size.
4. Touch the desired photos to select one or more
images.
5. Touch Edit from a selected photo.
6. Use the arrows to locate the Color Effect
function. Touch Color Effect.
7. Touch the desired color effect.
HP Photosmart D7300 series User Guide 29
Page 100

Chapter 3
(continued)
To try these features… Follow these steps
Add the date and time to your
prints
You can print a stamp on the
front of your photos that shows
when the photo was taken. This
preference affects all prints.
Change the print quality
You can change the print quality
for photos. Best quality is the
default and produces the
highest quality photos. Normal
quality conserves ink and prints
faster.
Crop a photo
Press Zoom + and Zoom – to
increase or decrease the
magnification by 1.25×. The
maximum level is 5.0×.
1. Touch Settings.
2. Touch Preferences, then touch Date Stamp.
3. Touch one of the following date/time stamp
options:
– Date and Time
– Date Only
– Off
If you use a computer to modify the photo and then
save your changes, the original date and time
information are lost. Changes that you make to the
photo using the printer control panel do not affect the
date and time information.
To change the print quality to Normal for one
print job:
1. Touch Settings.
2. Touch Tools, then touch Print quality.
3. Touch Normal, then touch OK.
Print quality will revert to Best after the next print job.
1. Touch Print.
2. Touch 4×6 or Enlargement to select your
desired photo size.
3. Touch the desired paper size.
4. Touch the desired photo to select the image.
5. Press Zoom + to increase the magnification of
the photo by 1.25×. The green crop box
appears. Press Zoom + repeatedly until you
reach the desired magnification. (After zooming
in, you can zoom back out by pressing Zoom
–.)
Note The crop box changes from
green to yellow if printing at the selected
magnification will noticeably reduce the
print quality.
6. At any magnification level, touch the arrows to
move the crop box left, right, up, or down.
7. Touch Crop when the portion of the image you
want to print is in the crop box.
Cropping does not change the original photo. It
only affects printing.
Print panoramic photos 1. Touch Print.
2. Touch Other Projects, then touch Panorama
Prints.
30 HP Photosmart D7300 series
 Loading...