

Page 1
快速入門手冊
Quick Start Guide
HP Photosmart D6100 series
Page 2
拆開 HP Photosmart 印表機的包裝
1
繁體中文
感謝您購買 HP Photosmart 印表機! 請仔細閱讀此手冊與其他隨附的文
件來幫助您開始使用以及獲得印表機的最佳效能。
1. Windows 使用者請注意: 等到您將光碟片放入電腦之後才連接 USB
纜線。
2. 取出印表機內部及周圍的包裝材料。
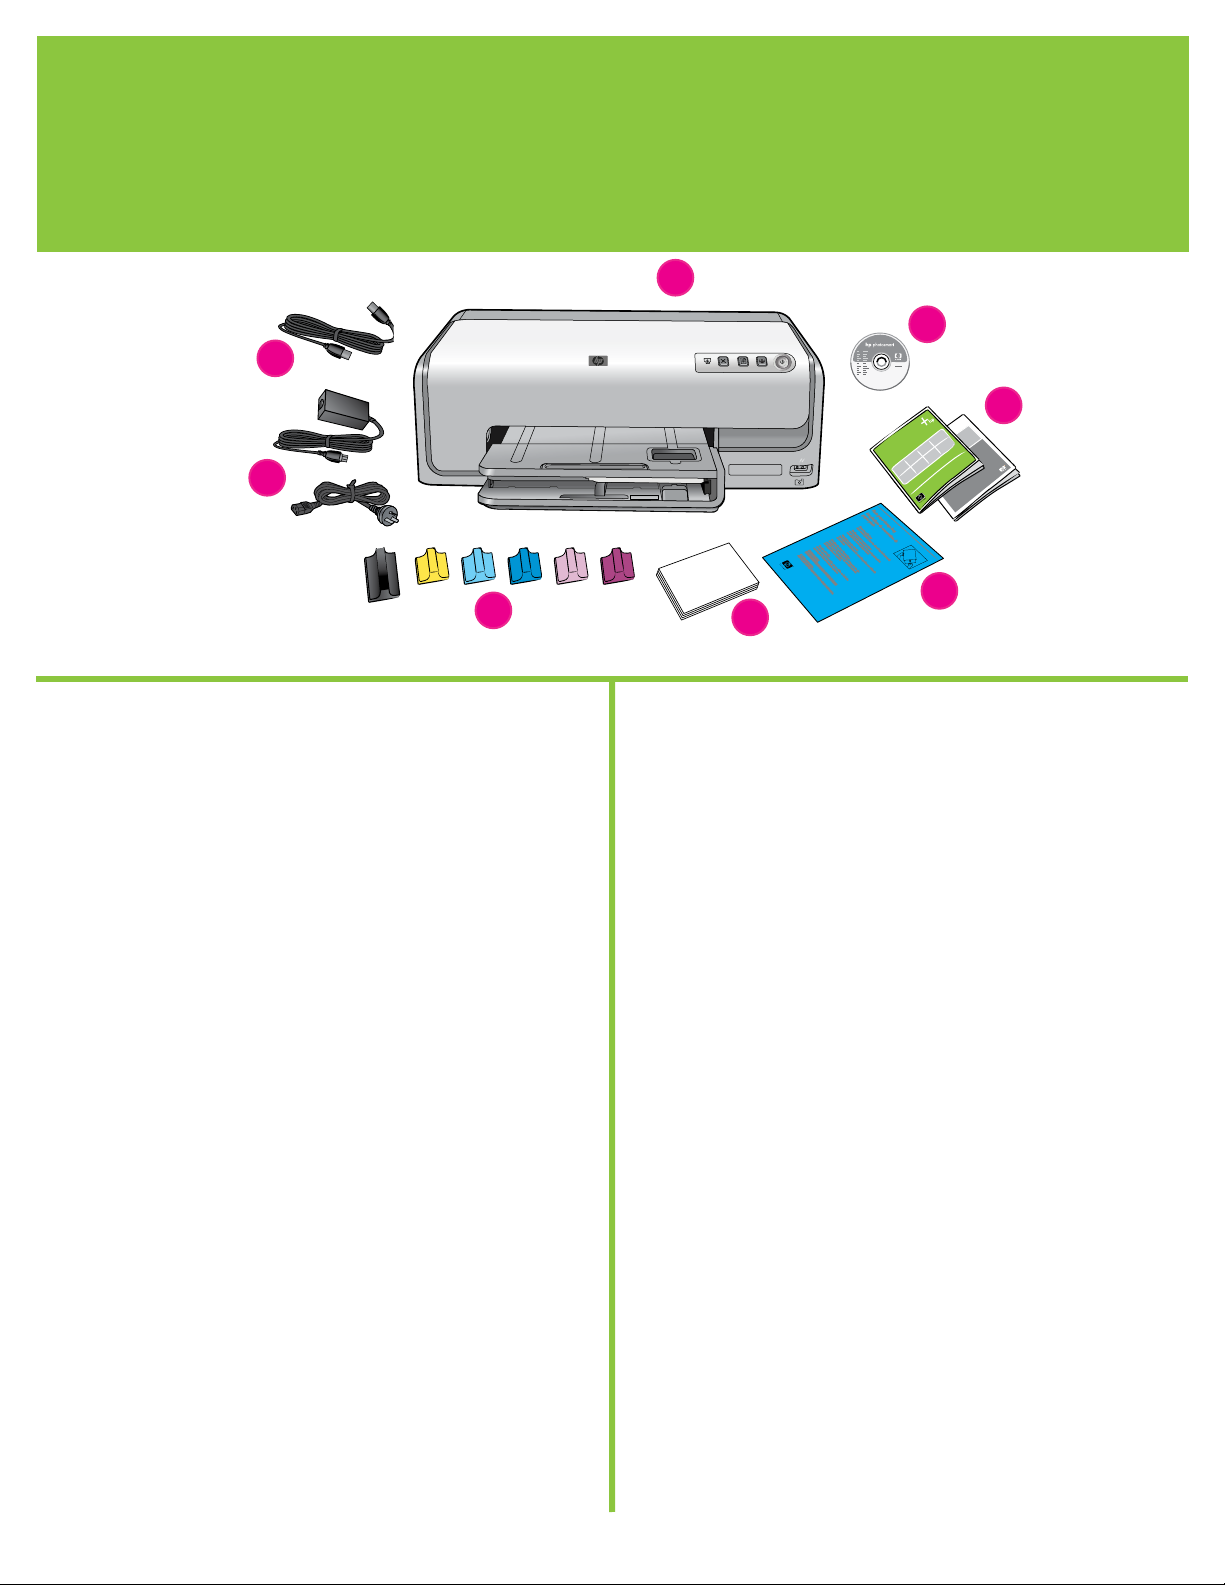
3. 檢查包裝箱內的物品。 物品可能會根據國家/地區而有所不同。 參照
包裝說明以了解實際包含的物品。
a. HP Photosmart D6100 series 印表機
b. HP Photosmart 軟體光碟片
c. 使用者說明文件:《使用者手冊》和《快速入門手冊》
d. 相紙儲存袋(僅在特定國家/地區提供)
e. 紙張樣品
f. 六個墨水匣
g. 電源線和電源供應器
h. USB 纜線(僅在特定國家/地區提供)
Unpack the HP Photosmart printer
h
g
f
a
b
c
d
e
English
Thank you for purchasing an HP Photosmart printer! Read this booklet
and other accompanying documentation to help you get started and
get the most out of your printer.
1. Attention Windows users: Wait to connect the USB cable until you
insert the CD in the computer.
2. Remove the packaging from inside and around the printer.
3. Check the contents of the box. The contents may vary by country/
region. Refer to the packaging for the actual contents.
a. HP Photosmart
b. HP Photosmart software on CD
c. User documentation: User Guide and Quick Start Guide
d. Photo paper storage bag (only available in certain countries/
regions)
e. Paper sampler
f. Six ink cartridges
g. Power cord and power supply
h. USB cable (only available in certain countriles/regions)
D6100 series printer
2
Page 3
僅連接電源
2
僅連接電源
Connect power only
1
繁體中文
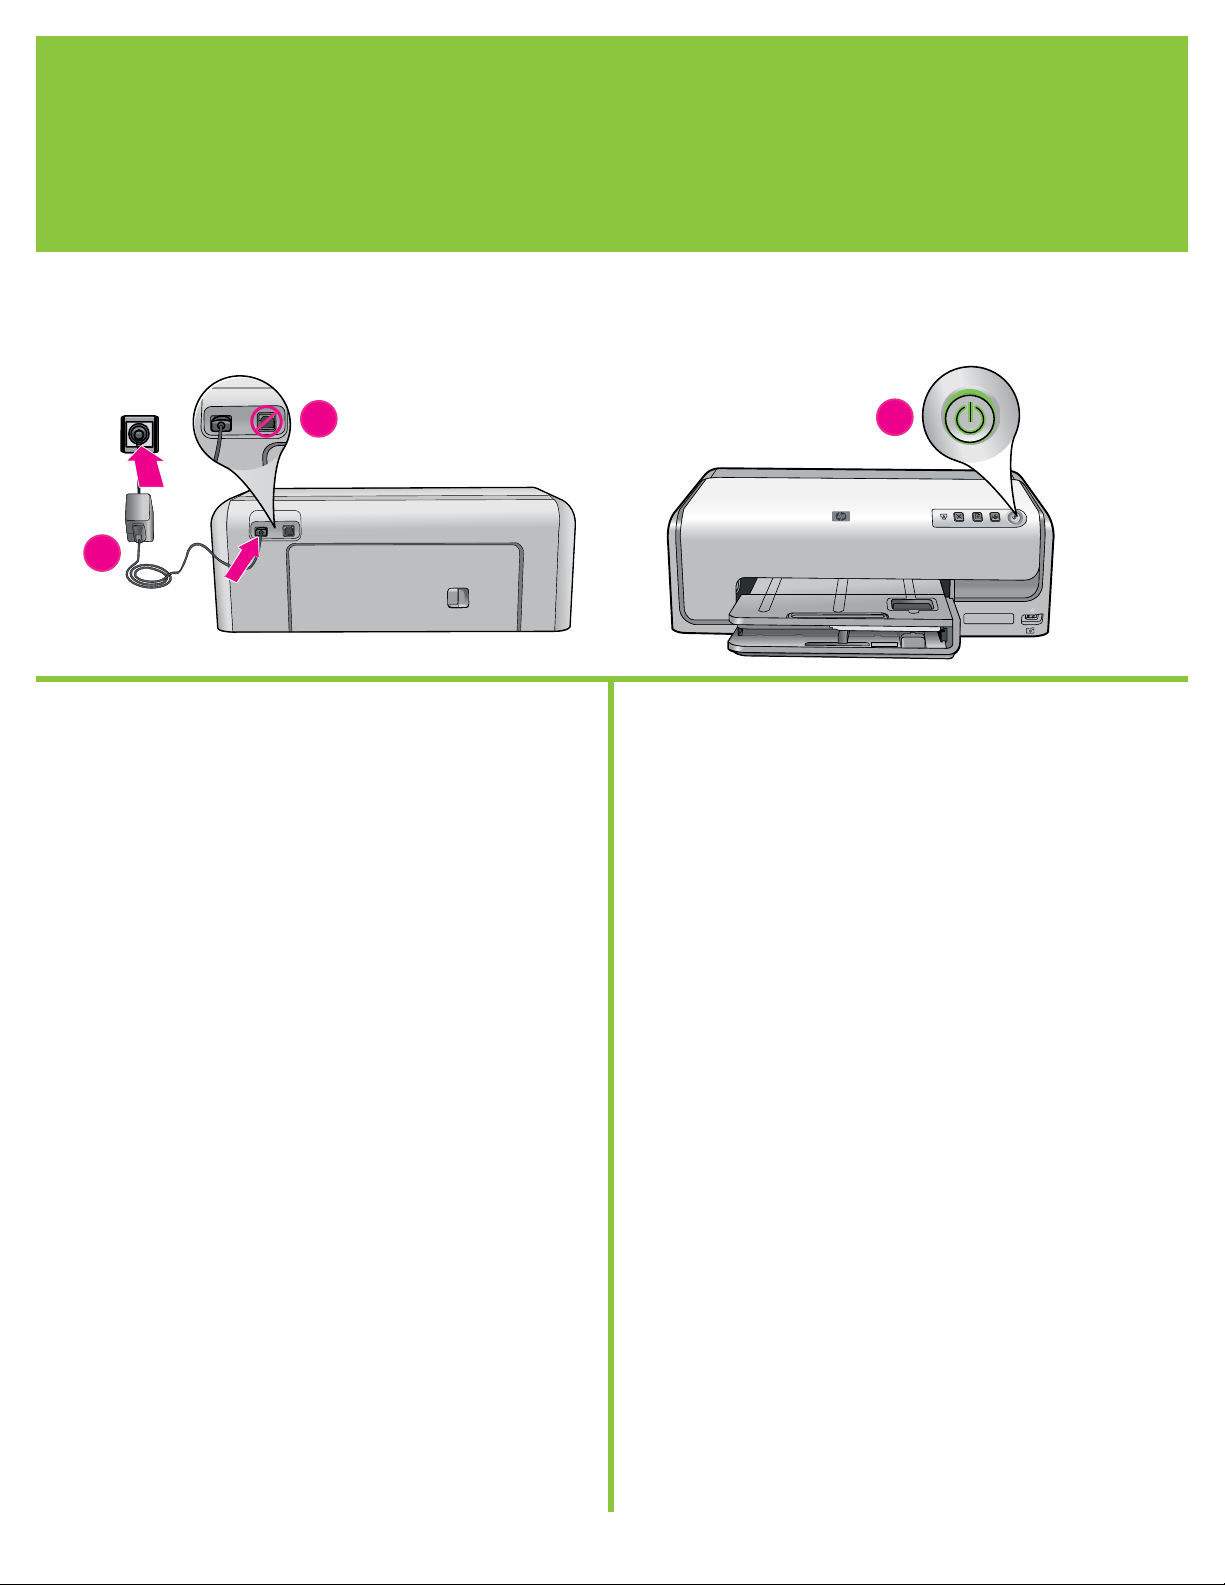
1. 將電源供應器連接到電源線。 將電源線插入印表機和牆上插座。
2. 若 USB 纜線已插入到印表機,請將它拔掉。
Windows 使用者請注意: 等到您將光碟片放入電腦之後才連接 USB
纜線。
3. 按「電源」按鈕,開啟印表機。
Connect the power only
2
「電源」按鈕
Power button
3
English
1. Connect the power supply to the power cord. Connect the power
cord to the printer and to a wall outlet.
2. Disconnect
Attention Windows users: Wait to connect the USB cable until you
insert the CD in the computer.
3. Press Power to turn on the printer.
the USB cable if it is plugged in to the printer.
3
Page 4
裝入一般紙張
3
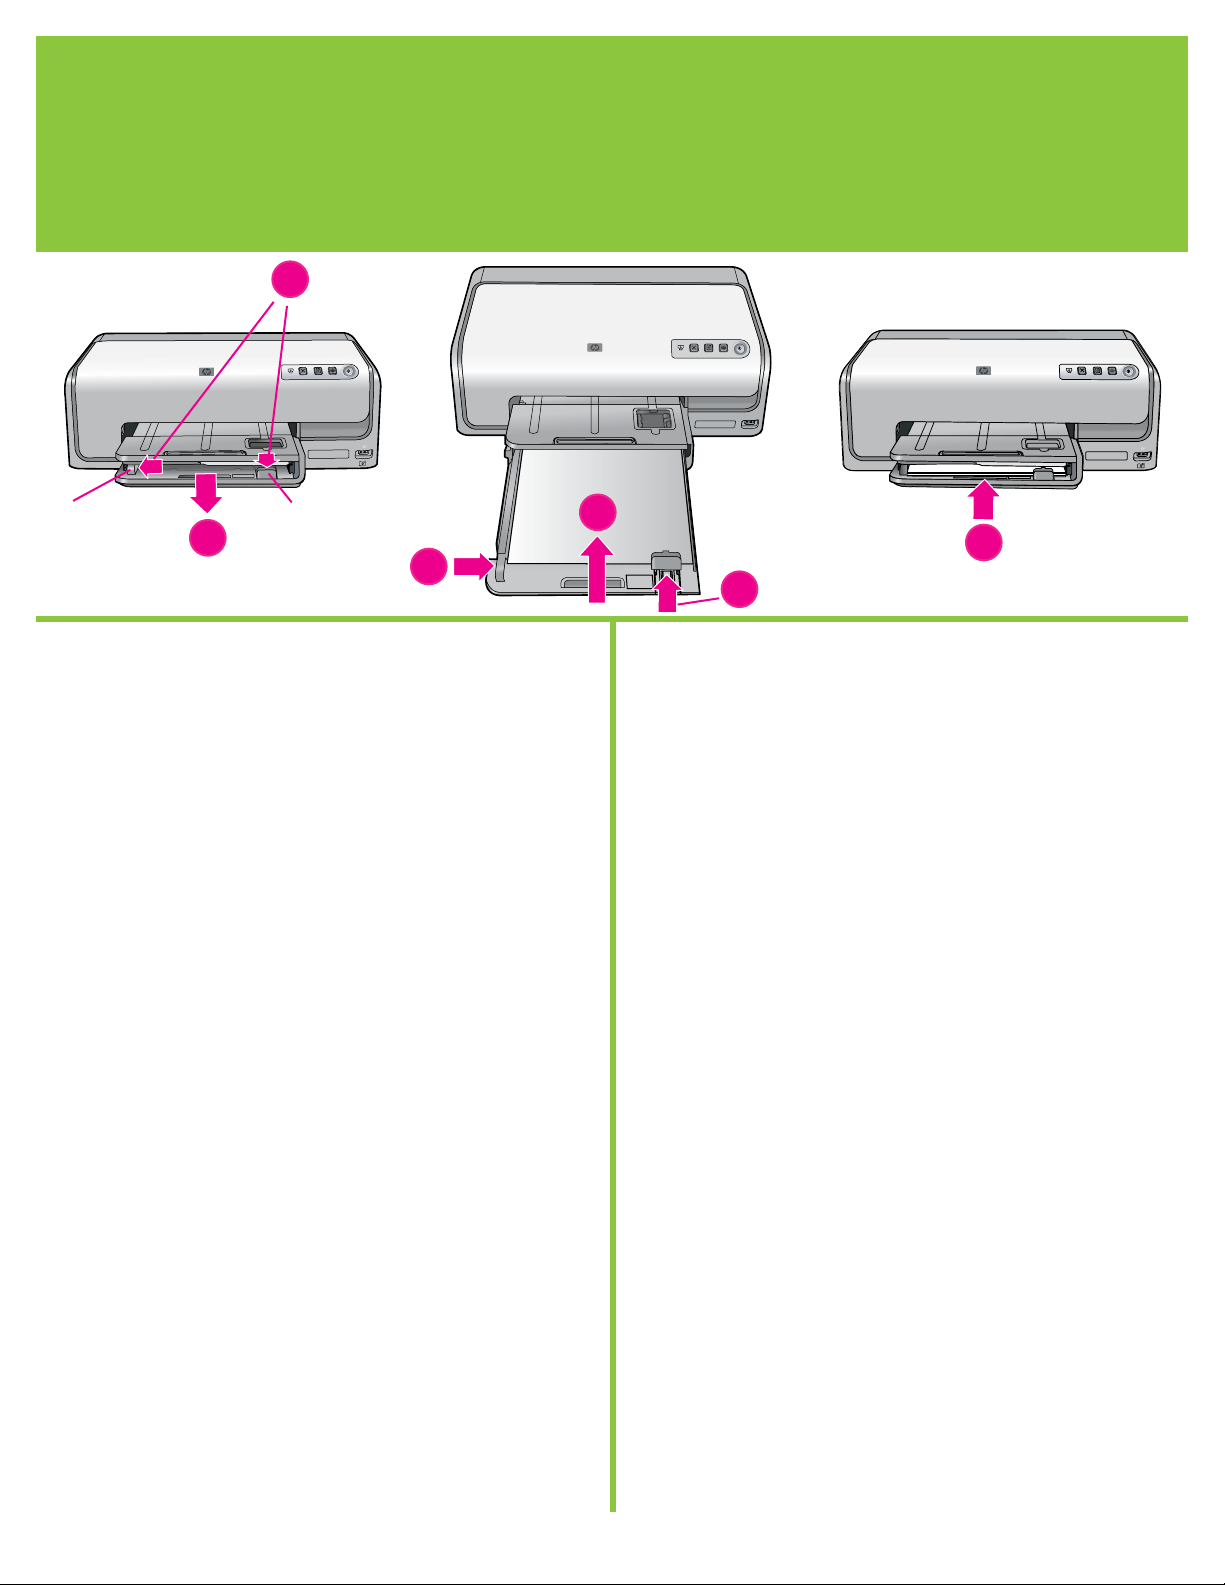
紙張寬度導板
Paper-width guide
繁體中文
為獲得最佳校準效果,裝入一般紙張準備進行印字頭校準。
1. 拉出主紙匣以將它延伸。
2. 將紙張寬度和紙張長度導板滑至它們的最遠位置。
3. 將數張一般紙張裝入主紙匣。 輕輕將紙張向前滑動並靠右側滑入直到
停止移動。
註: 僅在紙匣中裝入最多 150 張紙。
4. 將紙張寬度和紙張長度導板朝紙張滑動直到它們停止在紙張的邊緣。
5. 推入主紙匣,直到停止移動。
如需關於裝入相紙和列印相片的資訊,請翻到本手冊第 11 頁或參閱
《使用者手冊》。
Load plain paper
2
紙張長度導板
1
Paper-length guide
4
3
5
4
English
For best calibration results, load plain paper in preparation for the
print head alignment.
1. Pull to extend the main tray.
2. Slide the paper-width and paper-length guides to their outermost
positions.
3. Place a few sheets of
slide the paper forward and to the right until it stops.
Note: Only fill the tray up to 150 sheets.
4. Slide the paper-width and paper-length guides toward the paper
until they stop at the edges of the paper.
5. Push in the main tray until it stops.
For information about loading photo paper and printing photos, turn
to page 11 of this booklet or see the User Guide.
plain letter paper in the main tray. Gently
4
Page 5
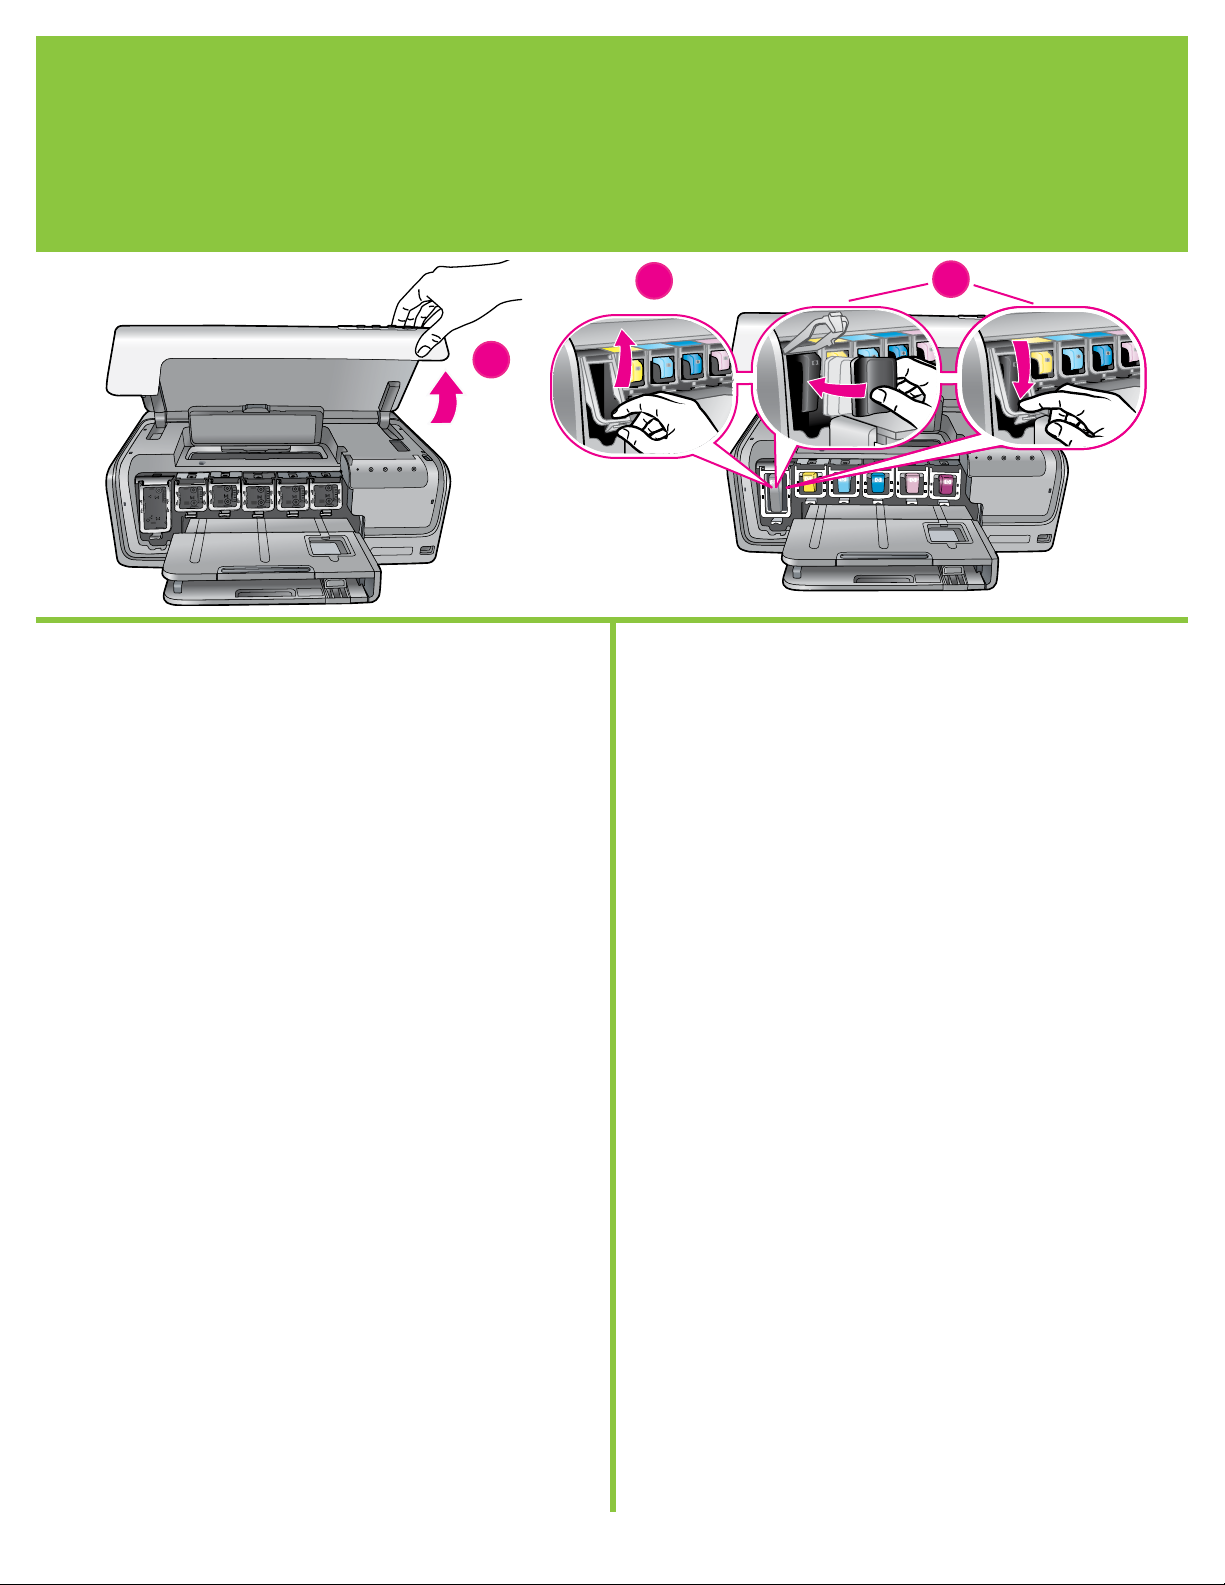
安裝墨水匣
4
繁體中文
重要! 僅使用隨印表機提供的墨水匣。 這些墨水匣中的墨水是為與印
字頭裝置中的墨水混合而特別調配。 若墨水指示燈在墨水匣安裝過程中
持續閃爍,請瀏覽 www.hp.com/support 以獲取詳細資訊。 請勿使用
任何其他墨水匣。
1. 提起主蓋。
2. 拆開其中一個墨水匣包裝。
3. 查找與墨水匣顏色匹配的底座。 然後擠壓閘鎖底部的彈片以將它
釋放。
4. 插入相符的墨水匣,然後關閉閘鎖。
5. 重複此過程來安裝其他墨水匣。
6. 放下頂蓋。 將會自動執行墨水匣起始化程序。
重要! 第一次安裝墨水匣之後,將會執行一次起始化程序。 這時發出
機械噪音是正常現象,並會持續大約 4 分鐘。 請勿關閉或斷開您的印
表機。 若發生此情況,請參閱《使用者手冊》的疑難排解一節。
Install the ink cartridges
1
3
English
Important! Use only the ink cartridges that came with the printer.
The ink in these cartridges is specially formulated to mix with the ink
in the print head assembly. If the ink light blinks continuously during
cartridge installation, browse to www.hp.com/support for more
information. Do not use any other cartridges
1. Raise the main cover.
2. Unwrap one of the ink cartridges.
3. Locate the stall that matches the color of the ink cartridge.
Squeeze the tabs at the bottom of the latch to release it.
4. Insert the matching ink cartridge, then close the latch.
5. Repeat this process to install the remaining cartridges.
6. Lower the top cover. The ink cartridge initialization process
begins automatically.
Important! A one-time initialization process begins after the first ink
cartridge installation. Mechanical noises are normal and last about
4 minutes. Do not turn off or disconnect your printer. If this happens,
see the troubleshooting section of the User Guide.
4
.
5
Page 6

安裝 HP Photosmart 軟體 (Windows)
5
Install the HP Photosmart software (Windows)
1 2 3 54
Windows
繁體中文
Windows® 98、Me、2000 Professional、XP Home、XP
Professional、x64 Edition
1.
若 USB 纜線已插入到印表機,請將它拔掉。
重要! 等到您將光碟片放入電腦之後才連接 USB 纜線。
2. 放入 HP Photosmart 光碟片。 若未顯示指示,請查找並連按兩下光
碟片上的 setup.exe 檔案。
3. 依照提示安裝軟體。
4. 當被提示安裝類型時,請選擇建議 (HP Photosmart Premier) 或透過
選擇自訂選取 HP Photosmart Essential。
註: Essential 是適用於 Windows 98 和 Me 系統的唯一選項。 某
些軟體功能僅受 HP Photosmart Premier 支援。
5. 出現提示時,將 USB 纜線連接到印表機背面。 可能需要幾分鐘來建
立連線和複製檔案。
6. 出現「恭喜」頁時,請按一下列印展示頁。
註: 若您在安裝過程中遇到問題,請參閱第 8-9 頁的「安裝疑難
排解」。
–
USB 連線
USB connection
Windows
English
Windows® 98, Me, 2000 Professional, XP Home, XP Professional,
x64 Edition
1. Disconnect the USB cable if it is plugged in to the printer.
Important! Wait to connect the USB cable until you insert the CD
in the computer.
2. Insert the HP Photosmart CD. If instructions do not appear, locate
and double-click the setup.exe file on the CD.
3. Follow the prompts to install the software.
4. When prompted for the installation type, choose
(HP Photosmart Premier) or choose Custom to select HP
Photosmart Essential.
Note: Essential is the only option for Windows 98 and Me
systems. Certain software features are supported by HP
Photosmart Premier only.
5. When prompted, connect the USB cable to the back of the
printer. It might take several minutes to establish a connection
and copy the files.
6.
When the Congratulations page appears, click Print a demo
page.
Note: If you experience problems during installation, see
Installation troubleshooting on pages 8-9.
Recommended
6
Page 7

安裝 HP Photosmart 軟體 (Mac OS X)
5
Install the HP Photosmart software (Mac OS X)
1
USB 連線
USB connection
Mac OS X
繁體中文
Mac OS X 10.3、10.4 或更新版本
1. 將 USB 纜線連接到印表機和電腦。
2. 將 HP Photosmart 光碟片放入電腦。
3. 連按兩下桌面上的「HP Photosmart CD」(HP Photosmart 光碟片)
圖示。
4.
連按兩下HP Installer(HP 安裝程式)圖示。 將會出現「Welcome」
(歡迎使用)頁。 依照安裝過程每一頁上的螢幕指示執行。
5. 出現「Congratulations」(恭喜)頁時,按一下 OK。
註: 若您在安裝過程中遇到問題,請參閱第 8-9 頁的「安裝疑難
排解」。
2 3 4
Mac OS X
English
Mac OS X 10.3, 10.4 and later
1. Connect the USB cable to the printer and to the computer.
2. Insert the HP Photosmart CD into the computer.
3. Double-click the HP Photosmart
4. Double-click the HP Installer
Follow the onscreen instructions on each page of the installation.
5. When the Congratulations page appears, click
Note: If you experience problems during installation, see Installation
troubleshooting on pages 8-9.
CD icon on the desktop.
icon. The Welcome page appears.
OK.
7
Page 8

安裝疑難排解
Installation troubleshooting
繁體中文
若印表機軟體未成功安裝,或軟體安裝之後,印表機與電腦未正確通
訊,請參閱此頁以取得可能的解決方案。
請檢查印表機與電腦之間所有纜線的連接情況,並確保您所安裝的印表
機軟體是最新的版本。 您可以瀏覽 HP 支援網站 www.hp.com/support
獲取最新的軟體更新。 若您仍需要幫助,請參閱印表機說明文件。
僅限於 Macintosh
問題:「Print Center」(列印中心)內的所有印表機在安裝印表機軟體後
消失。
解決方案: 解除安裝,然後重新安裝印表機軟體。 將印表機新增到
「Print Center」(列印中心)之前先重新啟動電腦。
僅限於 Windows
問題: 插入光碟片時,安裝軟體沒有自動啟動。
解決方案: 從 Windows「開始」功能表,選取執行。 按一下
瀏覽,然後導覽至您放入 HP Photosmart 軟體光碟片的 CD-ROM 光碟
機。 連按兩下 setup.exe 檔案。
問題: 在軟體安裝期間電腦停止回應。
解決方案: 可能是因為背景正在執行防毒軟體或其他軟體程式,減慢安
裝作業速度。 請等待軟體完成複製檔案,這可能需要數分鐘的時間。 若
數分鐘後電腦仍無回應,請重新啟動電腦、暫停或停用任何使用中的防毒
軟體、關閉所有其他的軟體程式,然後重新安裝印表機軟體。
註: 您的防毒軟體會在重新啟動電腦後自動重新開啟。
問題: 軟體安裝期間出現「系統需求」對話方塊。
解決方案: 電腦系統的其中一個元件不符合最低系統需求。 依照螢幕指
示來修正問題,然後重新安裝印表機軟體。
Windows 與 Macintosh
問題: 電腦無法讀取 HP Photosmart 光碟片。
解決方案: 請確定光碟片沒有弄髒或有刮痕。 若其他光碟片可以運作,
只有 HP Photosmart 光碟片無效,則表示您的光碟片可能已經損壞。 您
可以從 HP 支援網站下載軟體,並向 HP 支援中心索取新的光碟片。 若
其他光碟片也不能正常運作,則表示您需要維修 CD-ROM 光碟機。
問題:「發現新硬體精靈」有開啟但未能識別印表機。
解決方案: 您可能在完成軟體安裝之前連接 USB 纜線。 拔掉 USB 纜
線。 取消硬體安裝精靈。 將軟體光碟片放入您的 CD-ROM 光碟機,然
後按照畫面上的指示執行。 若未顯示指示,請查找並連按兩下光碟片上
的 setup.exe 檔案以重新啟動安裝。 如果出現一則訊息說明軟體已成功
安裝,請選取解除安裝,然後依照指示重新安裝軟體。 只有在軟體安裝
期間出現提示時重新連接 USB 纜線。
問題: 系統需求檢查指出,電腦目前所執行的是舊版 Internet Explorer。
解決方案: 按住鍵盤上的 Ctrl + Shift,並在「系統需求」對話方塊
中按一下取消,略過限制並完成軟體安裝。 您必須在安裝完成 HP
Photosmart 軟體後立即升級 Internet Explorer,否則 HP 軟體將無法正常
執行。 註: Internet Explorer 完成升級後,您無須重新安裝 HP 軟體。
8
Page 9

English
If the printer software did not install successfully, or if the printer and
computer are not communicating properly after software installation,
check this page for possible solutions.
Check all cable connections between the printer and computer, and
be sure you are using the most recent version of the printer software.
You can acquire the latest software updates by visiting the HP support
website at www.hp.com/support. If you still need help, check the
printer documentation.
Problem: The computer stops responding during software installation.
Solution: Virus protection software or another software program might
be running in the background and slowing down the installation
process. Wait while the software finishes copying files; this may
take several minutes. If the computer is still not responding after
several minutes, restart the computer, pause or disable any active
virus protection software, quit all other software programs, and then
reinstall the printer software. Note: Your virus protection software will
turn back on automatically when you restart the computer.
Macintosh only
Problem: All of the printers in Print Center disappear after printer
software installation.
Solution: Uninstall then reinstall the printer software. Restart the
computer before adding the printer in Print Center.
Windows only
Problem: The installation software does not start automatically when
the CD is inserted.
Solution: From the Windows Start menu, select Run. Click Browse,
and navigate to the CD-ROM drive where you inserted the
HP Photosmart software CD. Double-click the
setup.exe file.
Problem: The Found New Hardware Wizard opens but does not
recognize the printer.
Solution: You might have connected the USB cable before completing
the software installation. Disconnect the USB cable. Cancel the
hardware installation Wizard. Insert the software CD into your CDROM drive, and follow the onscreen instructions. If instructions do
not appear, locate and double-click the setup.exe file on the CD to
restart the installation. If a message appears saying the software has
already been successfully installed, then select Uninstall, and follow
the instructions to reinstall the software. Reconnect the USB cable only
when prompted during software installation.
Problem: The System Requirements dialog box appears during
installation.
Solution: A component of the computer system does not meet the
minimum system requirements. Follow the onscreen instuctions to
remedy the issue and then reinstall the printer software.
Windows and Macintosh
Problem: The computer could not read the HP Photosmart CD.
Solution: Make sure the CD is not dirty or scratched. If other
CDs work but the HP Photosmart CD does not, your CD might be
damaged. You can download the software from the HP support
website or request a new CD from HP Support. If other CDs do not
work, you might need to service your CD-ROM drive.
Problem: The system requirements check indicates that the computer is
running an outdated version of Internet Explorer.
Solution: Press Ctrl + Shift on the keyboard and click Cancel in the
System Requirements dialog box to bypass the block and complete the
software installation. You must update Internet Explorer immediately
after installing the HP Photosmart software, or the HP software will not
work properly. Note: You do not have to reinstall the HP software after
updating Internet Explorer.
9
Page 10

列印您的第一張無框相片
Print your first borderless photo
不連接電腦的情況下列印相片
1
繁體中文
透過使用 USB 纜線將 PictBridge 數位相機直接連接到印表機,HP
Photosmart D6100 series 印表機可讓您列印出精美的相片。
若要在不連接電腦的情況下列印,請依照以下簡單的逐步指示執行。
如需關於無須電腦即可從數位相機列印相片的詳細資訊,請參閱《使用
者手冊》。
Print photos without a computer
English
The HP Photosmart D6100 series printer allows you to print
beautiful photos by connecting a PictBridge digital camera directly
to the printer with a USB cable.
To print without connecting to a computer, follow these simple, stepby-step instructions.
For more information about printing photos from a digital camera
without using a computer, see the User Guide.
10
Page 11

裝入 10 x 15 公分(4 x 6 英吋)相紙
2
1
出紙匣
Output tray
3
Load 10 x 15 cm (4 x 6 inch) photo paper
紙張寬度導板
Paper-width guide
紙張長度導板
3
Paper-length guide
相片匣
Photo tray
2
4
5
5
6
繁體中文
1. 提起出紙匣。
2 將相片匣朝向您自己的方向拉出,直到停止為止。
3. 將相片匣紙張長度導板朝向您滑出直到停止為止,然後將紙張寬度導
板靠左側滑入直到停止移動。
4. 在相片匣中裝入多達 20 張 10 x 15 公分(4 x 6 英吋)的相紙,列
印面朝下。 輕輕將紙張向前滑動並靠右側滑入直到停止移動。
5. 滑動紙張寬度與紙張長度導板至靠緊紙張的邊緣,並且沒有使紙張
彎曲。
6. 推入相片匣,然後關上出紙匣。
提示: 使用 HP 進階相紙列印可防水和指紋的光面相片。 相紙背面的
獨特標記觸動印表機中的自動紙張類型感應器,可進行快速、保存品質
的相片列印。
如需關於列印到其他紙張尺寸的詳細資訊,請參閱第 4 頁的「裝入一般
紙張」或參閱《使用者手冊》。
English
1. Lift the output tray.
2. Pull the photo tray toward you until it stops.
3. Slide the photo tray paper-length guide toward you until it stops,
and slide the paper-width guide to the left until it stops.
4. Place up to 20 sheets of 10 x 15 cm (4 x 6 inch) photo paper
in the photo tray with the print side down. Gently slide the paper
forward and to the right until it stops.
5. Slide the paper-width and paper-length guides against the edges
of the paper without bending the paper.
6.
Push in the photo tray and close the output tray.
Tip: Use HP Advanced Photo paper to print water- and fingerprintresistant glossy photos. The unique marks on the back of the paper
trigger the automatic paper-type sensor in the printer to produce
fast, store-processed-quality photo printing.
For more information about printing on other paper sizes, see Load
plain paper on page 4 or see the User Guide.
11
Page 12

連接 PictBridge 相機
3
Connect the PictBridge camera
相機連接埠
Camera port
繁體中文
1. 確定數位相機在 PictBridge 模式下。 如需更詳細的資訊,請參閱相
機隨附的說明文件。
2. 使用相機隨附的 USB 纜線將相機連接到印表機正面的相機連接埠。
English
1. Be sure the digital camera is in PictBridge mode. For more
information, see the documentation that came with the camera.
2. Connect the camera to the camera port on the front of the printer
using the USB cable that came with the camera.
12
Page 13

選擇和列印相片
4
Select and print a photo
繁體中文
1. 開啟 PictBridge 相容型數位相機。
2. 選擇您要列印的相片。 如需更詳細的資訊,請參閱相機隨附的說明
文件。
註: 印表機辨識出 PictBridge 相容型相機後,即會自動列印選定的相
片。 從數位相機進行列印時,印表機會使用您在相機上選定的設定。
如需關於在相機上使用 PictBridge 的詳細資訊,請參閱相機隨附的說明
文件。
English
1. Turn on the PictBridge-compliant digital camera.
2. Select the photos you want to print. For more information, see the
documentation that came with the camera.
Note: When the printer recognizes the PictBridge-compliant
camera, the selected photos print automatically. When you print
from a digital camera, the printer uses the settings you selected on
the camera.
For more information on using PictBridge with your camera, see the
documentation that came with the camera.
1313
Page 14

快速提示
Quick tips
使用電腦與 HP Photosmart 軟體進行列印
1
繁體中文
使用 HP Photosmart 軟體建立相片專案,可以讓您有無限的發揮空間。
• 使用數位相片來設計日曆、小冊子和傳單。
• 建立自己的相簿和紀念品。
• 自訂的手工 T 恤、光碟片封面和相框。
• 使用 HP Photosmart Share 可透過電子郵件傳送相片和線上分享
相片。
如需關於自己建立有趣專案的詳細資訊,請參閱 HP Photosmart 軟體
說明。
Print with a computer and HP Photosmart software
English
The possibilities are endless when you use HP Photosmart software
to create your photo projects.
• Design calendars, brochures, and flyers using your digital
photos.
• Create your own photo albums and keepsakes.
• Craft custom T-shirts, CD covers, and picture frames.
• Use HP Photosmart Share to e-mail photos and to share photos
online.
For more information about creating your own fun projects, see the
HP Photosmart Software Help.
14
Page 15

使用 Photosmart Express 按鈕從電腦列印
2
4
繁體中文
您可以透過印表機上的 Photosmart Express 按鈕輕鬆快速地啟動 HP
Photosmart 軟體。
1. 確定印表機已經連接到電腦和相機。
2. 按 Photosmart Express 按鈕。
3. HP Photosmart 軟體將會在電腦螢幕上開啟以幫助您列印相片。
4. 請參閱 HP Photosmart 軟體說明以獲得關於從電腦建立有趣專案的詳
細資訊。
Use the Photosmart Express button to print with a computer
English
You can quickly and easily launch HP Photosmart software from the
Photosmart Express button on your printer.
1. Be sure your printer is connected to both your computer and your
camera.
2. Press the Photosmart Express button.
3. HP Photosmart software opens on your computer screen to help
you print your photos.
4. See the HP Photosmart Software Help for more information on
creating fun projects right from your camera.
15
Page 16

需要更多資訊?
Need more information?
請閱讀《使用者手冊》以獲得關於印表機功能的描述、疑難排解資訊,以及如何使用您的全新
HP Photosmart 印表機來執行特殊列印工作的說明。
Read the User Guide for a description of the printer features, troubleshooting information, and
explanations of how to perform specific printing tasks using your new HP Photosmart printer.
請參閱 HP Photosmart 軟體說明以獲得關於使用您的印表機隨附之軟體的資訊。 螢幕上的說明已隨您的
軟體安裝。
Check the HP Photosmart Software Help for information about using the software that came with your
printer. The onscreen help is installed with your software.
HP 支援網站與電子支援: www.hp.com/support
材質與列印耗材: www.hpshopping.com
HP support website and E-support: www.hp.com/support
Media and printing supplies: www.hpshopping.com
www.hp.com
*C9089-90016*
*C9089-90016*
C9089-90016
新加坡印製。 5/06 • v1.0.0
Printed in Singapore. 5/06 • v1.0.0
© 2006 Hewlett-Packard Development Company, L.P.
 Loading...