

HP Photosmart D5300 series
Basics Guide
Guide d’utilisation
Guia de conceitos básicos
Hewlett-Packard Company notices
The information contained in this document is subject to change without notice.
All rights reserved. Reproduction, adaptation, or translation of this material is prohibited without prior written permission of Hewlett-Packard, except
as allowed under copyright laws. The only warranties for HP products and services are set forth in the express warranty statements accompanying
such products and services. Nothing herein should be construed as constituting an additional warranty. HP shall not be liable for technical or editorial
errors or omissions contained herein.
© 2007 Hewlett-Packard Development Company, L.P.
Windows, Windows 2000, and Windows XP are U.S. registered trademarks of Microsoft Corporation.
Windows Vista is either a registered trademark or trademark of Microsoft Corporation in the United States and/or other countries.
Intel and Pentium are trademarks or registered trademarks of Intel Corporation or its subsidiaries in the United States and other countries.
Avis publiés par la société Hewlett-Packard
Les informations contenues dans ce document peuvent faire l'objet de modifications sans préavis.
Tous droits réservés. La reproduction, l'adaptation ou la traduction de ce matériel est interdite sans l'accord écrit préalable de Hewlett-Packard, sauf
dans les cas permis par la législation relative aux droits d'auteur. Les seules garanties relatives aux produits et services HP sont décrites dans les
déclarations de garantie expresse accompagnant lesdits produits et services. Aucun élément de ce document ne constitue une garantie
supplémentaire. Hewlett-Packard ne saurait être tenu pour responsable des erreurs ou omissions techniques ou rédactionnelles de ce document.
© 2007 Hewlett-Packard Development Company, L.P.
Windows, Windows 2000 et Windows XP sont des marques déposées de Microsoft Corporation aux Etats-Unis.
Windows Vista est une marque déposée ou une marque de Microsoft Corporation aux Etats-Unis et/ou dans d'autres pays.
Intel et Pentium sont des marques ou des marques déposées d'Intel Corporation ou de ses filiales aux Etats-Unis et dans d'autres pays.
Avisos da Hewlett-Packard Company
As informações contidas neste documento estão sujeitas a alterações sem aviso prévio.
Todos os direitos reservados. É proibida a reprodução, adaptação ou tradução deste material sem a permissão prévia por escrito da
Hewlett-Packard, exceto quando permitido pelas leis de direitos autorais. As únicas garantias aos produtos e serviços da HP são aquelas descritas
nas declarações de garantia expressa que acompanham os respectivos produtos e serviços. Nada aqui contido deve ser interpretado como garantia
adicional. A HP não se responsabiliza por erros técnicos ou editoriais nem por omissões aqui contidos.
© 2007 Hewlett-Packard Development Company, L.P.
Windows, Windows 2000 e Windows XP são marcas registradas da Microsoft Corporation nos Estados Unidos e/ou em outros países.
Windows Vista é uma marca comercial ou marca registrada da Microsoft Corporation nos Estados Unidos e/ou em outros países.
Intel e Pentium são marcas comerciais ou marcas registradas da Intel Corporation ou suas subsidiárias nos Estados Unidos e/ou em outros países.

HP Photosmart D5300 series
Basics Guide
English

Contents
1 HP Photosmart overview
The HP Photosmart at a glance.................................................................................................5
Control panel features................................................................................................................6
English
Find more information.................................................................................................................7
Load paper.................................................................................................................................7
Avoid paper jams........................................................................................................................9
Print directly onto a CD/DVD....................................................................................................10
Print up to 13 x 18 cm (5 x 7 inch) photos................................................................................11
Replace the print cartridges......................................................................................................13
2 Troubleshooting and support
Uninstall and reinstall the software...........................................................................................17
Hardware setup troubleshooting...............................................................................................17
Clear paper jams......................................................................................................................20
CD/DVD print troubleshooting..................................................................................................21
Print cartridge troubleshooting..................................................................................................24
Support process.......................................................................................................................25
3 Technical information
System requirements................................................................................................................26
Product specifications...............................................................................................................26
Print cartridge yield...................................................................................................................26
Regulatory notices....................................................................................................................27
Warranty...................................................................................................................................28
4 HP Photosmart D5300 series
1 HP Photosmart overview
Use the HP Photosmart to print photos from a memory card or label your CD/DVDs by
printing directly on the surface of printable CD/DVD discs. The Two-sided printing
accessory included with the HP Photosmart lets you print on both sides of the page, so
you can print brochures and booklets, or just save paper. You can access many
HP Photosmart functions directly from the control panel, without turning on your
computer.
NOTE: This guide introduces basic operations and troubleshooting, as well as
provides information for contacting HP support and ordering supplies.
The onscreen Help details the full range of features and functions, including use of
the HP Photosmart software that came with the HP Photosmart.
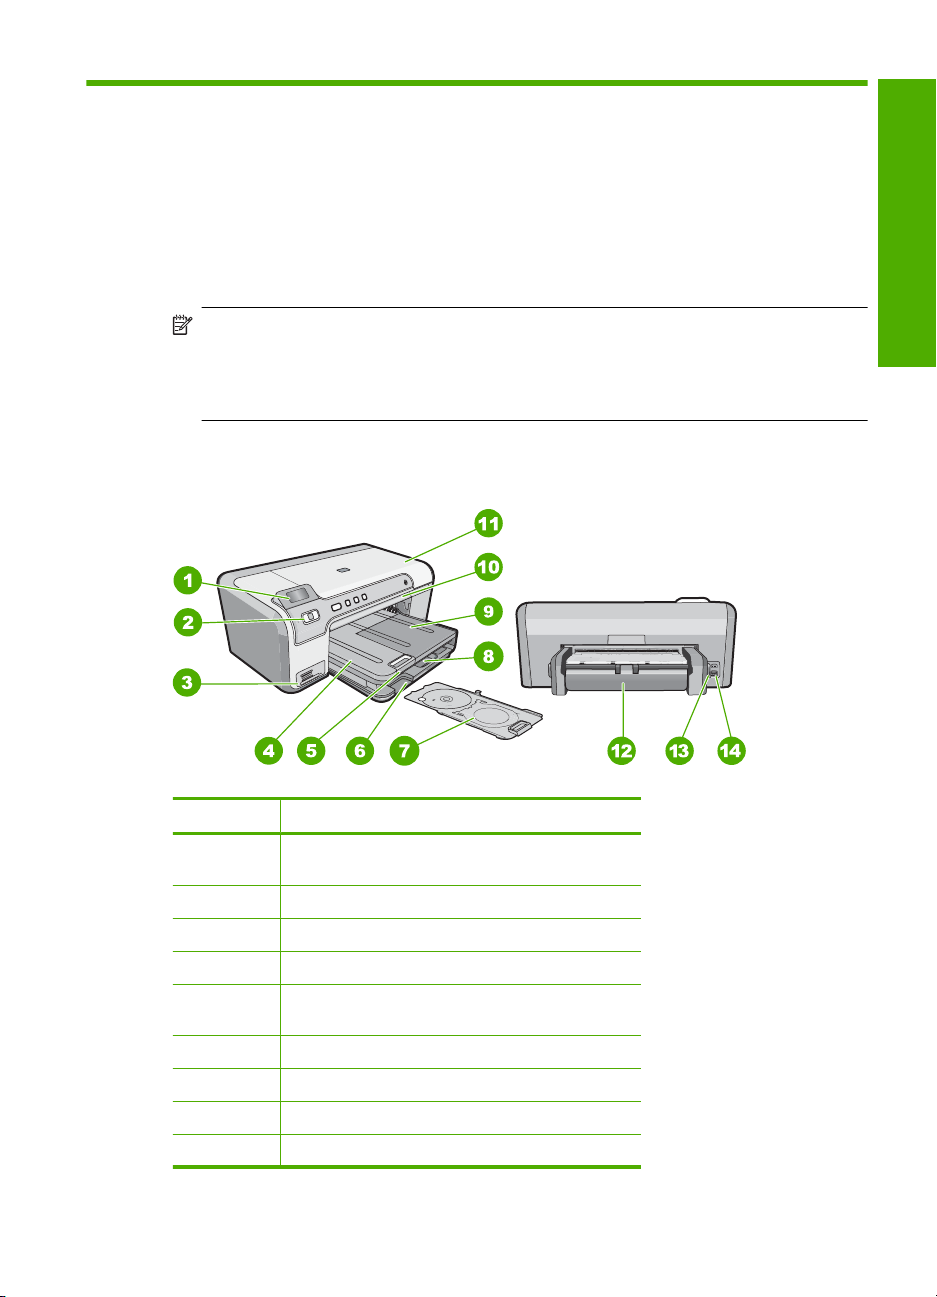
The HP Photosmart at a glance
English
Label Description
1 Color graphics display (also referred to as the
display)
2 Control panel
3 Memory card slots and Photo light
4 Output tray
5 Paper tray extender (also referred to as the tray
extender)
6 CD/DVD holder storage
7 CD/DVD holder
8 Main input tray (also referred to as the input tray)
9 Photo tray
HP Photosmart overview 5
Chapter 1
(continued)
Label Description
10 CD/DVD tray
11 Print cartridge door
12 Two-sided printing accessory
13 Rear USB port
14 Power connection
English
* Use only with the power adapter supplied by HP.
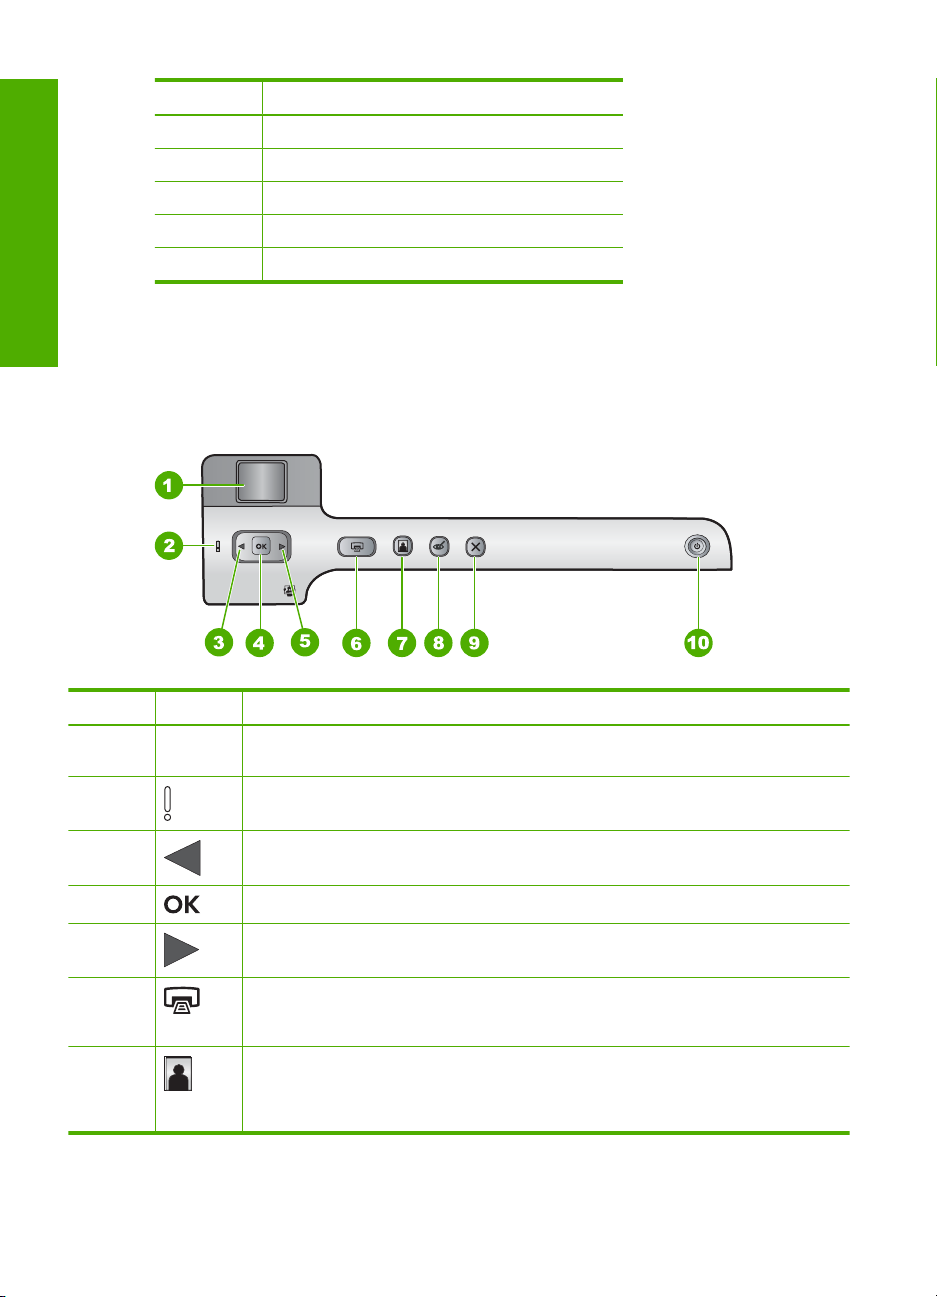
Control panel features
The following diagram and related table provide a quick reference to the HP Photosmart
control panel features.
*
Label Icon Name and Description
1 Color graphics display (also referred to as the display): Shows photos on a memory
2 Attention light: Indicates a problem occurred. See the display for more information.
3 Left arrow: The left button returns to the previous display screen or photo on the
4 OK: Selects a photo for printing or selects a menu option.
5 Right arrow: The right button will navigate to the next display screen or photo on the
6 Print Photos: Prints the photos selected on your memory card. If no photos are
7 Photo Tray: Selects or deselects the Photo Tray for the next photo you print from a
6 HP Photosmart D5300 series
card. Also shows status and error messages.
memory card.
memory card.
currently selected, the HP Photosmart prints the photo currently showing on the
display.
memory card. When the light is on, it means the photo tray is selected. When the light
is off, the HP Photosmart prints on paper from the main input tray, rather than the
photo tray.

(continued)
Label Icon Name and Description
8 Red-Eye Removal: Turns the Red-Eye Removal feature On or Off. By default, this
9 Cancel: Stops the current operation and returns to the main screen.
10 On: Turns the HP Photosmart on or off. When the HP Photosmart is off, a minimal
feature is turned off. When the feature is turned on, the HP Photosmart automatically
corrects red eye coloring in the photo currently shown on the display.
amount of power is still supplied to the device. You can further reduce power
consumption by holding down the On button for 3 seconds. This will put the
HP Photosmart in Standby/Off state. To completely remove power, turn the
HP Photosmart off, and then unplug the power cord.
Find more information
A variety of resources, both printed and onscreen, provide information about setting up
and using the HP Photosmart.
• Setup Guide
The Setup Guide provides instructions for setting up the HP Photosmart and installing
software. Make sure you follow the steps in the Setup Guide in order.
If you have problems during setup, see Troubleshooting in the last section of the
Setup Guide, or see “
• Onscreen Help
The onscreen Help provides detailed instructions on features of the HP Photosmart
that are not described in this Basics Guide, including features that are only available
using the software you installed with the HP Photosmart.
•
www.hp.com/support
If you have Internet access, you can get help and support from the HP Web site. This
Web site offers technical support, drivers, supplies, and ordering information.
Troubleshooting and support” on page 17 in this guide.
English
Load paper
This section describes the procedure for loading different types and sizes of paper into
the HP Photosmart for your printouts.
TIP: To help prevent rips, wrinkles, and curled or bent edges, store all paper flat in
a resealable bag. If the paper is not stored properly, extreme changes in temperature
and humidity might result in curled paper that does not work well in the
HP Photosmart.
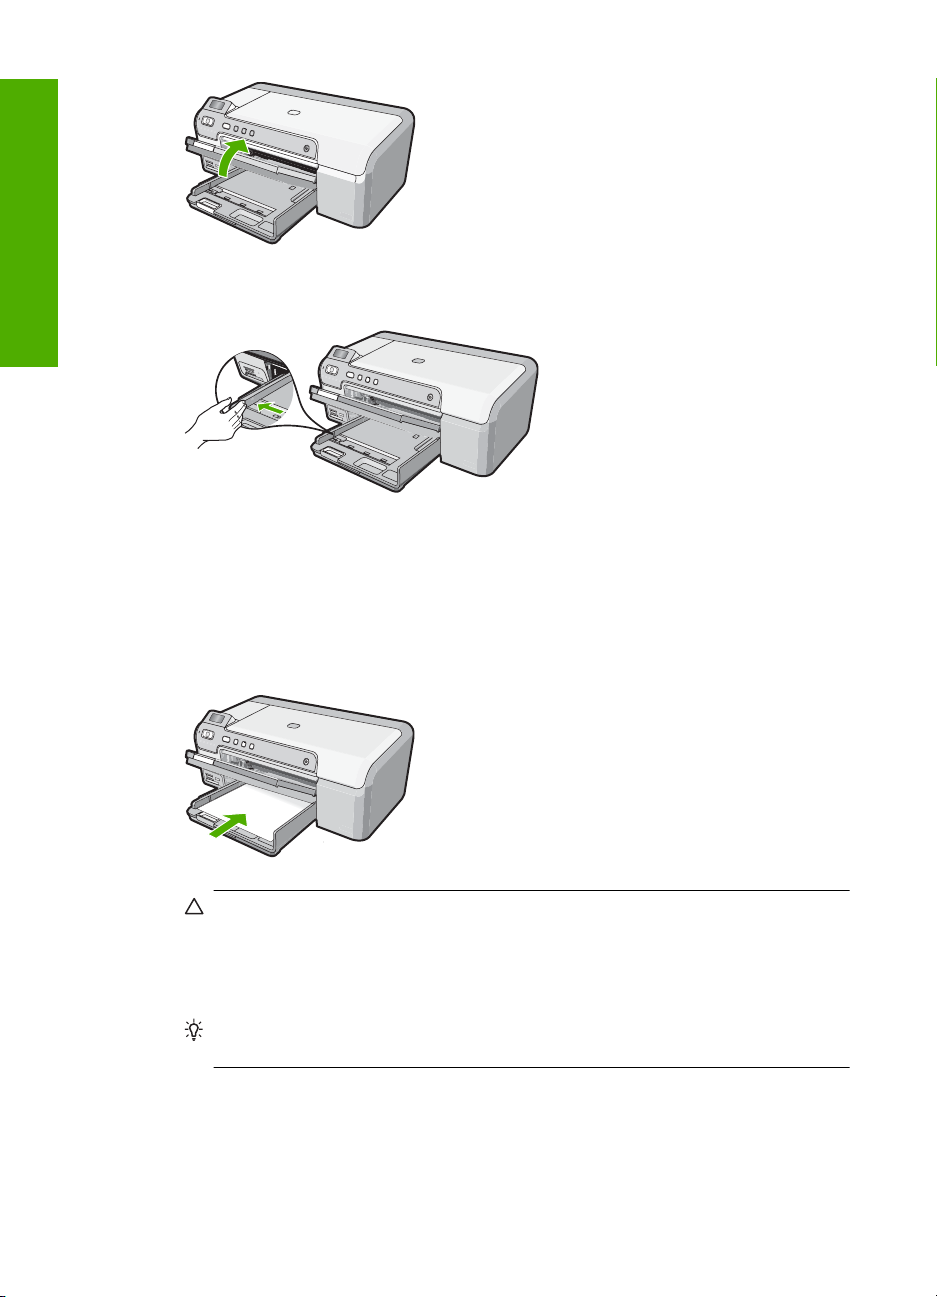
To load full-size paper
1. Raise the output tray to load paper into the main input tray.
Find more information 7
Chapter 1
English
2. Slide the paper-width guide to its outermost position.
3. Tap a stack of paper on a flat surface to align the edges, and then check the paper
for the following:
• Make sure it is free of rips, dust, wrinkles, and curled or bent edges.
• Make sure all the paper in the stack is the same size and type.
4. Insert the stack of paper into the main input tray with the short edge forward and the
print side down. Slide the stack of paper forward until it stops.
CAUTION: Make sure that the HP Photosmart is idle and silent when you load
paper into the main input tray. If the HP Photosmart is servicing the print cartridges
or otherwise engaged in a task, the paper stop inside the device might not be in
place. You could push the paper too far forward, causing the HP Photosmart to
eject blank pages.
TIP: If you are using letterhead, insert the top of the page first with the print side
down.
5. Slide the paper-width guide inward until it stops at the edge of the paper.
Do not overload the main input tray; make sure the stack of paper fits within the main
input tray and is no higher than the top of the paper-width guide.
8 HP Photosmart D5300 series
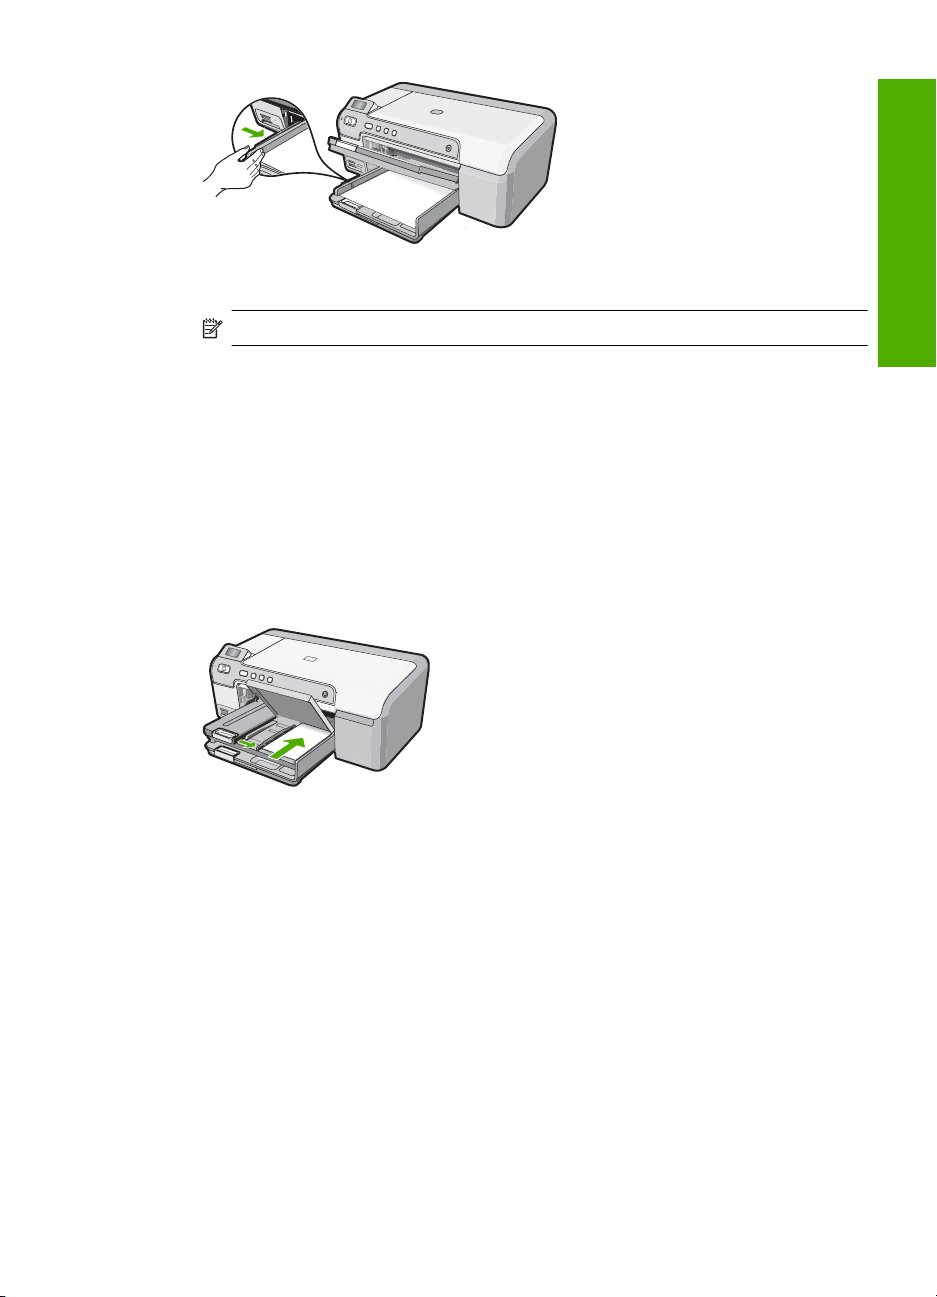
6. Lower the output tray. Pull the output tray extender towards you, as far as it will go.
NOTE: When you use legal-size paper, leave the tray extender closed.
To load up to 13 x 18 cm (5 x 7 inch) photo paper in the photo tray
1. Raise the photo tray lid to load photo paper in the photo tray.
2. Insert the stack of photo paper into the photo tray with the short edge forward and the
print side down. Slide the stack of photo paper forward until it stops.
If the photo paper you are using has perforated tabs, load the photo paper so that the
tabs are closest to you.
3. Slide the paper-width guide inward against the stack of photo paper until the guide
stops.
Do not overload the photo tray; make sure the stack of photo paper fits within the
photo tray and is no higher than the top of the paper-width guide.
4. Lower the photo tray lid.
English
Avoid paper jams
To help avoid paper jams, follow these guidelines.
• Remove printed papers from the output tray frequently.
• Prevent curled or wrinkled paper by storing all unused paper flat in a resealable bag.
• Ensure that paper loaded in the input tray lays flat and the edges are not bent or torn.
• If you are printing labels, ensure that the label sheets are no more than two years old.
Labels on older sheets might peel off when the paper is pulled through the
HP Photosmart, and cause paper jams.
• Do not combine different paper types and paper sizes in the input tray; the entire stack
of paper in the input tray must be the same size and type.
• Adjust the paper-width guide in the input tray to fit snugly against all paper. Make sure
the paper-width guide does not bend the paper in the input tray.
Avoid paper jams 9
Chapter 1
• Do not force paper too far forward in the input tray.
• Use paper types that are recommended for the HP Photosmart.
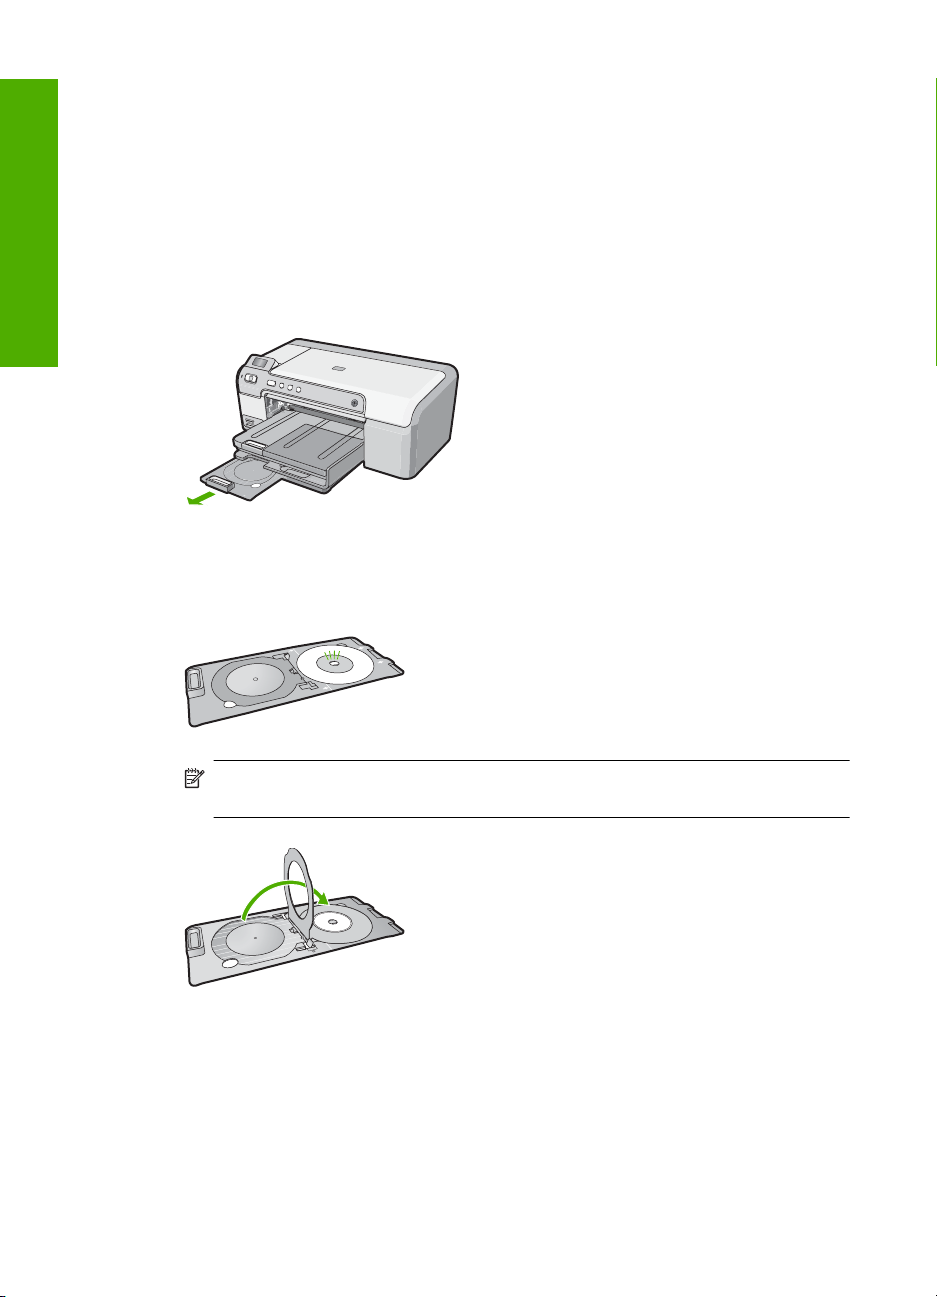
Print directly onto a CD/DVD
1. Use the software that came with the HP Photosmart to create a label and print it
directly on an inkjet printable CD/DVD.
2. When prompted, carefully remove the CD/DVD holder that came with the
HP Photosmart.
English
The CD/DVD holder is stored below the main input tray.
3. Securely snap the inkjet printable media onto the CD/DVD holder with the printable
side up. The CD/DVD should be placed on the ring at the end of the holder with the
arrows.
NOTE: If you are using a smaller-sized media, only then should you flip the CD/
DVD holder ring over the CD/DVD.
4. Lower the CD/DVD access door to access the CD/DVD tray.
The CD/DVD access door is located just below the control panel. When in its lowered
position, the CD/DVD tray sits on top of the output tray.
10 HP Photosmart D5300 series
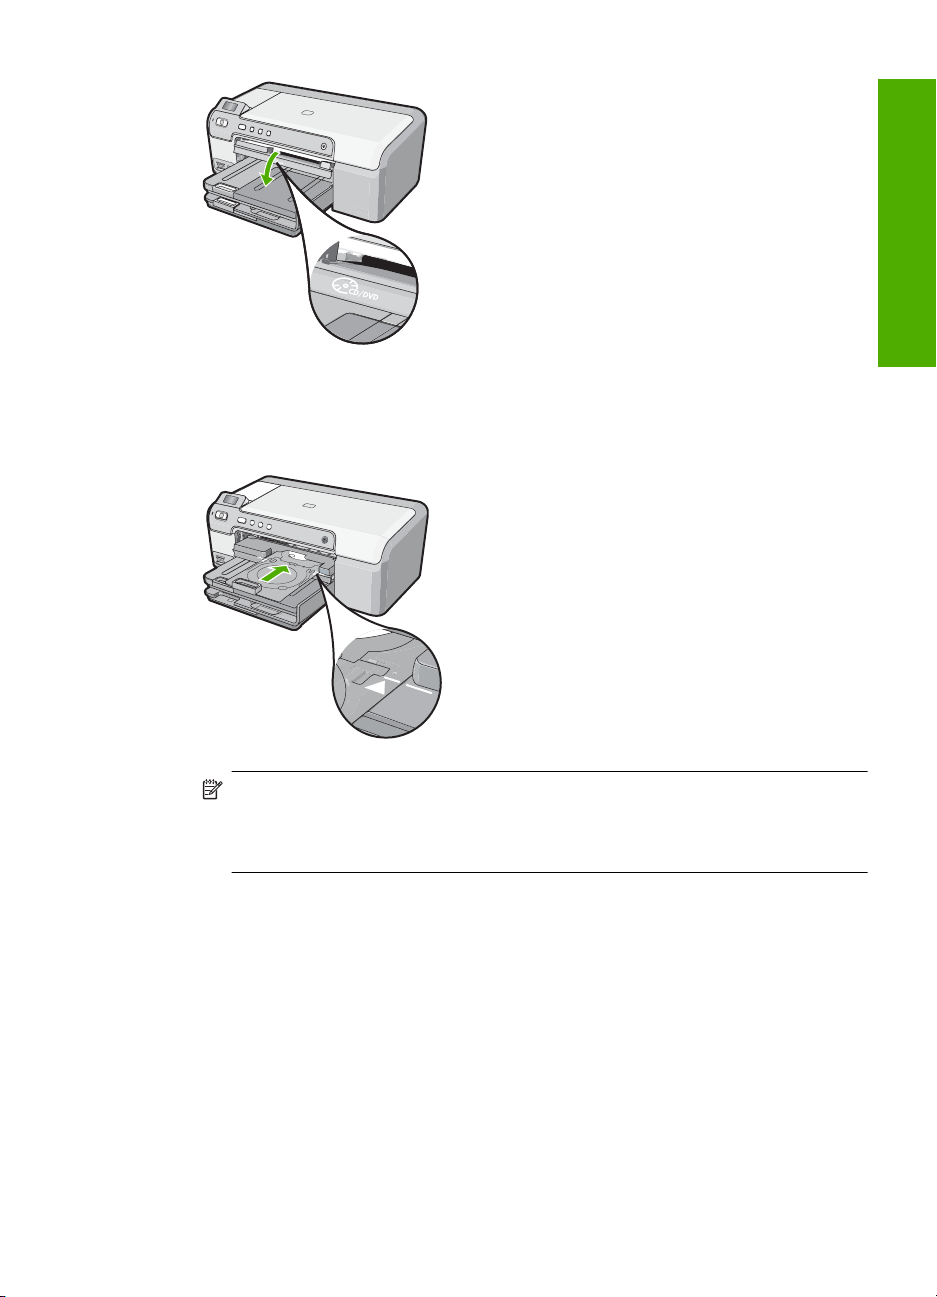
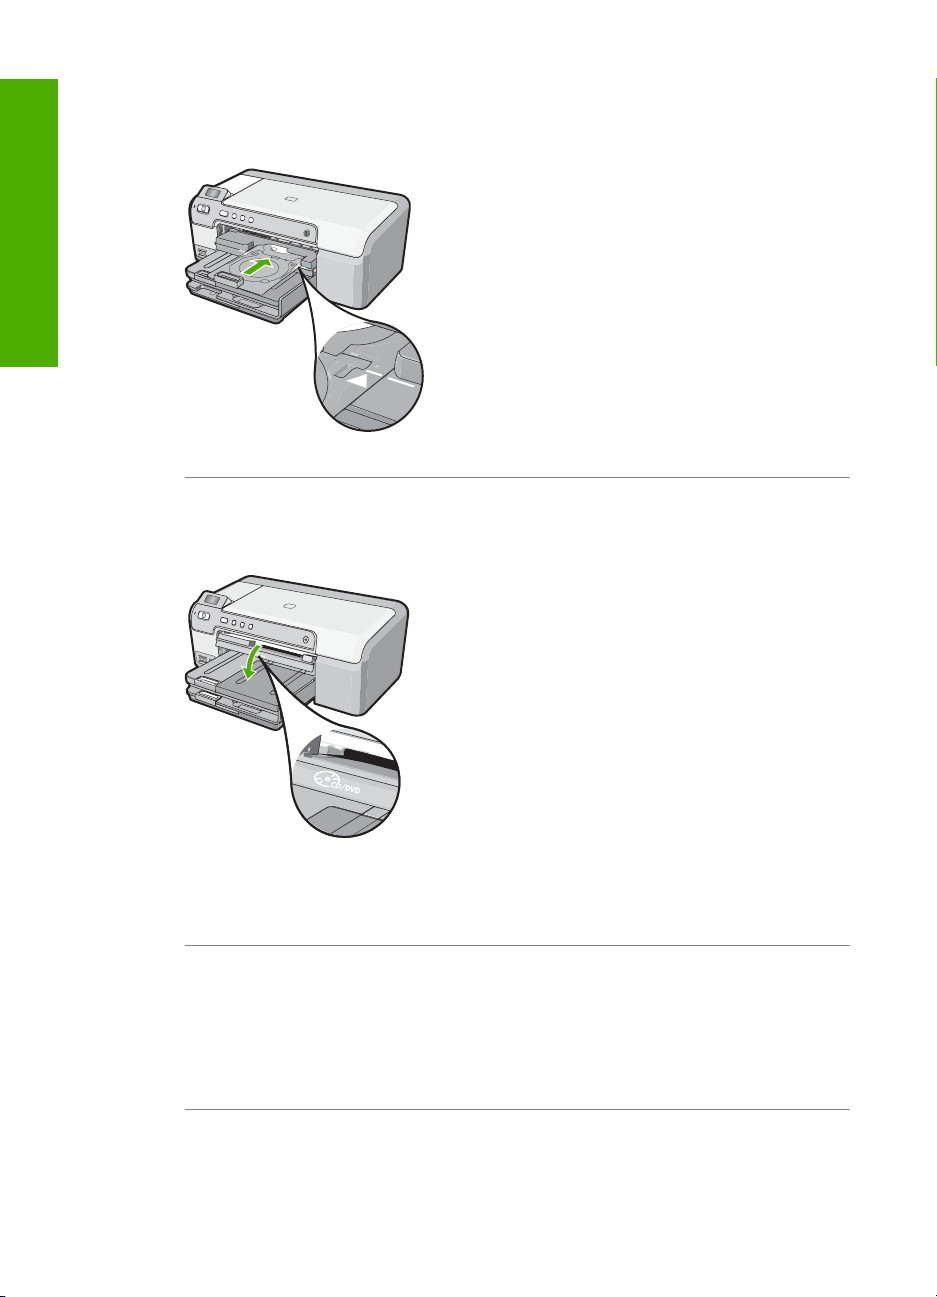
5. Push the CD/DVD holder into the HP Photosmart CD/DVD tray. Make sure that you
push the CD/DVD holder until the lines on the CD/DVD holder line up to the white
lines on the CD/DVD tray.
NOTE: The HP Photosmart pulls the CD/DVD holder while printing on the media.
The CD/DVD holder might protrude about 7.5 cm (3 inches) at the back of the
device. If the HP Photosmart is placed close to a wall, move it at least 3 inches
away from the wall.
Print up to 13 x 18 cm (5 x 7 inch) photos
English
The HP Photosmart enables you to print photos directly from your memory card without
first transferring the files to a computer. You can print borderless photos (one per sheet
of paper) or you can print multiple photos on a single sheet of paper.
By default, the HP Photosmart is set to detect the type of paper you are using
automatically. For the best results when printing photos, leave the Paper Type set to
Automatic, and load photo paper in the photo tray. You should only change the Paper
Type if you see print quality issues using the Automatic setting.
To achieve the best print quality, HP recommends using HP papers that are specifically
designed for the type of project you are printing along with genuine HP ink. HP papers
and HP ink are specifically designed to work well together to provide high-quality output.
Print up to 13 x 18 cm (5 x 7 inch) photos 11
English
Chapter 1
NOTE: All photos that you print from the control panel, rather than from your
computer, will be borderless.
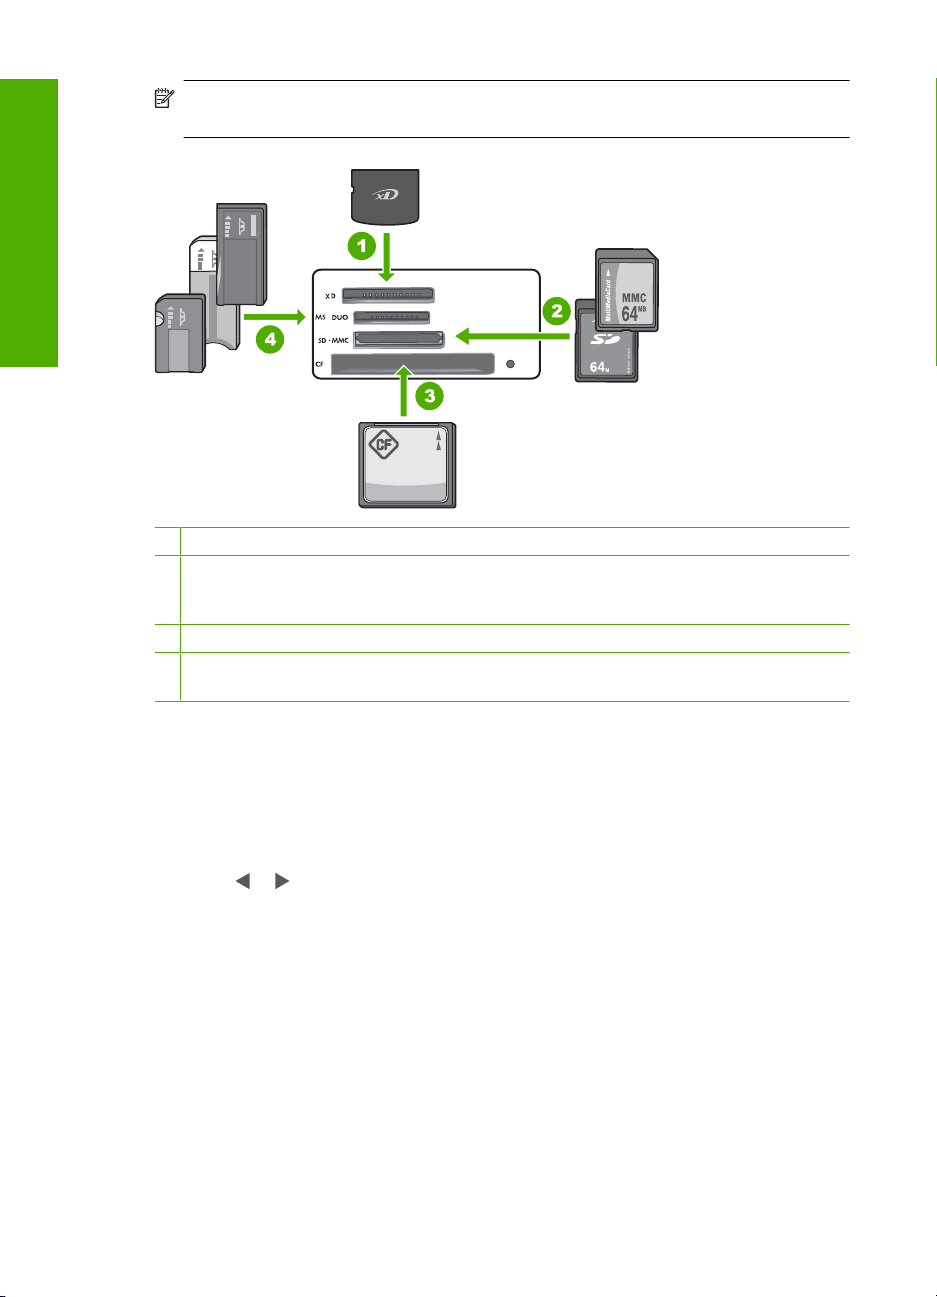
1 xD-Picture Card
2 Secure Digital (SD), Secure Digital Mini (adapter required), Secure Digital High Capacity
(SDHC), MultiMediaCard (MMC), MMC Plus, MMC Mobile (RS-MMC; adapter required),
TransFlash MicroSD Card, or Secure MultiMedia Card
3 CompactFlash (CF) types I and II
4 Memory Stick, Memory Stick Pro, Memory Stick Select, Memory Stick Magic Gate, Memory
Stick Duo or Duo Pro (adapter optional), or Memory Stick Micro (adapter required)
To print up to 13 x 18 cm (5 x 7 inch) photos
1. Insert your memory card into the appropriate slot on the HP Photosmart.
The most recent image on the card appears on the display.
2. Load up to 13 x 18 cm (5 x 7 inch) photo paper in the photo tray.
3. If the Photo Tray light is off, select the photo tray by pressing the Photo Tray button
(the light will turn on).
4. Press
or to scroll through your photos until the photo you want to print appears.
5. Press the OK button to select the photo you want to print.
Each time you press the OK button, you increment the number of copies of the
selected photo to be printed.
12 HP Photosmart D5300 series
6. Press the Print Photos button.
TIP: While the photo is printing, you can continue scrolling through the photos
on your memory card. When you see a photo you want to print, you can press the
Print Photos button to add that photo to the print queue.
7. If you increased the number of copies or selected additional photos to print, do one
of the following in the Select Format screen:
• Press the OK button to accept the default of 1-Up.
The photos will be printed on separate pages.
• Press the
The photos will be printed on the same page (up to 3 per page).
button to highlight 3-Up, and then press the OK button.
Replace the print cartridges
Follow these instructions when you need to replace print cartridges.
NOTE: When the ink level for the print cartridge is low, a message appears on the
display. You can also check the ink levels by using the Printer Toolbox available
through the HP Photosmart Software on your computer or through the Print
Properties dialog box on your computer.
If you do not already have replacement print cartridges for the HP Photosmart, you can
order them by clicking the Shop for HP Supplies icon on your computer. On a Windows
computer this is located in the HP folder in the Start menu.
For more information see
www.hp.com/buy/supplies.
English
To replace the print cartridges
1. Make sure the HP Photosmart is on.
CAUTION: If the HP Photosmart is off when you open the print cartridge door to
access the print cartridges, the HP Photosmart will not release the cartridges for
changing. You might damage the HP Photosmart if the print cartridges are not
docked safely when you try to remove them.
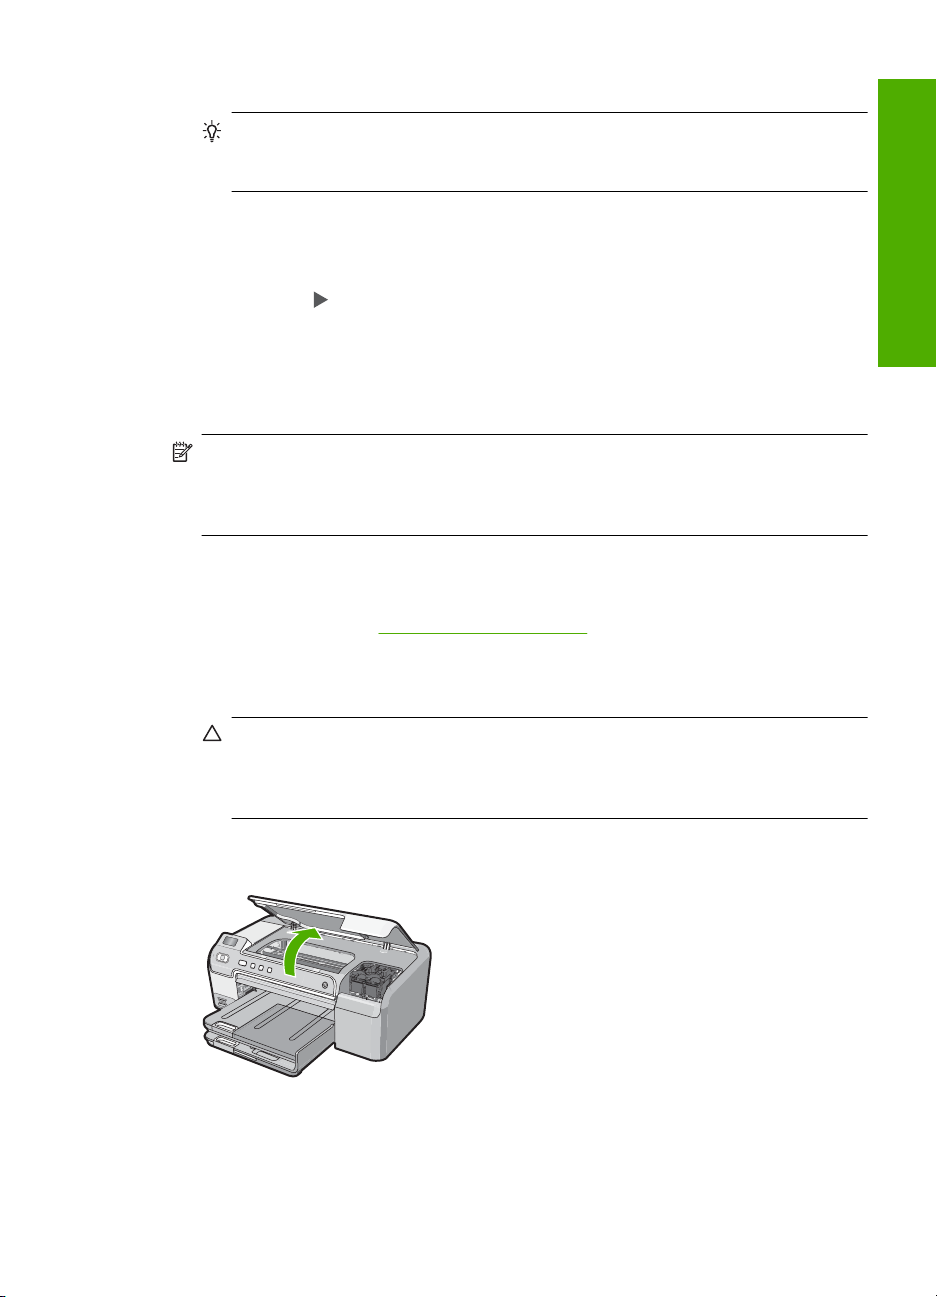
2. Open the print cartridge door.
The print carriage moves to the far right side of the HP Photosmart.
3. Wait until the print carriage is idle and silent, and then lightly press down on a print
cartridge to release it.
If you are replacing the tri-color print cartridge, remove the print cartridge from the
slot on the left.
Replace the print cartridges 13
English
Chapter 1
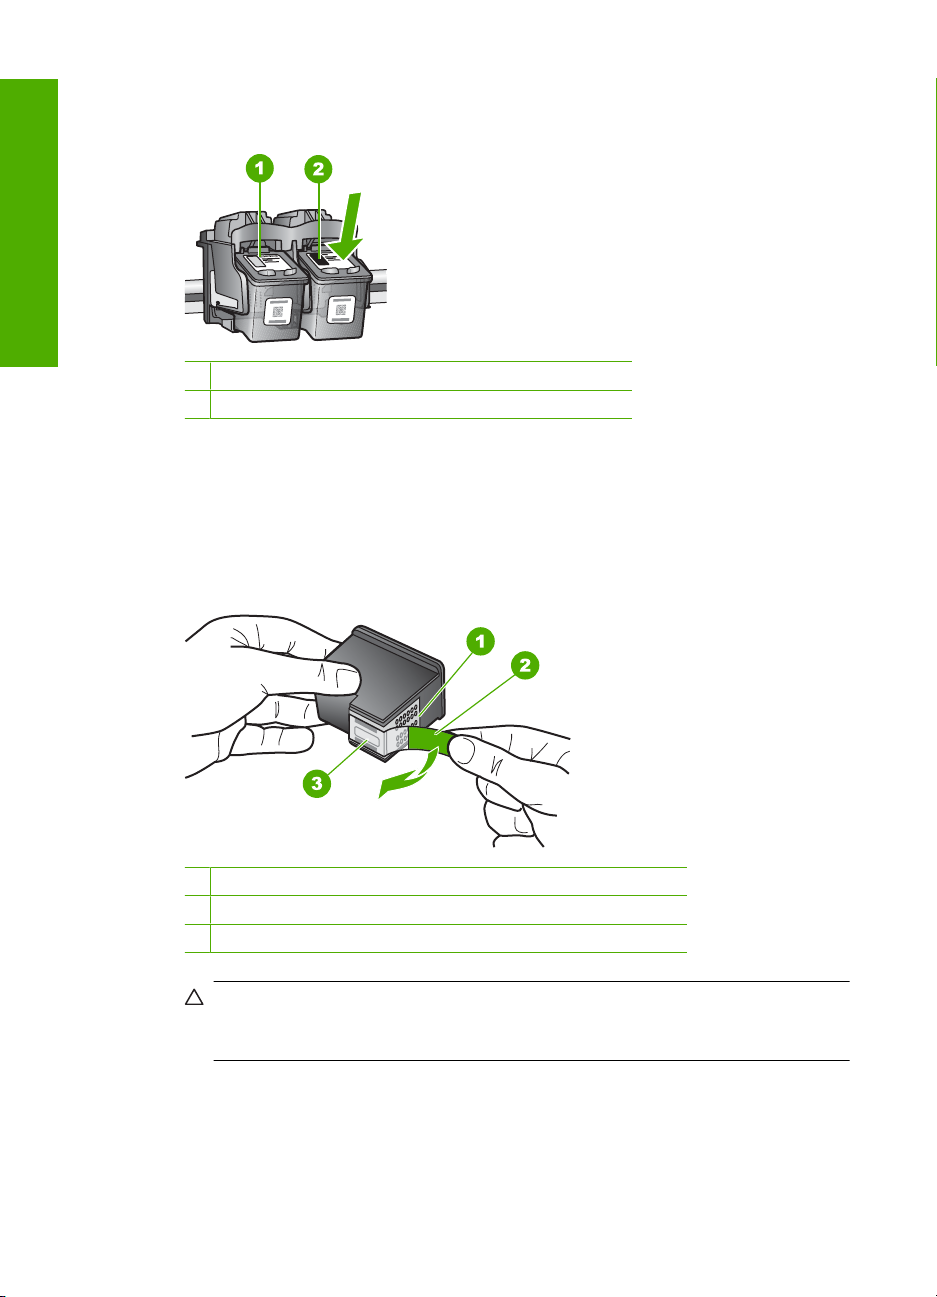
If you are replacing the black, photo, or gray photo print cartridge, remove the print
cartridge from the slot on the right.
1 Print cartridge slot for the tri-color print cartridge
2 Print cartridge slot for the black and photo print cartridges
4. Pull the print cartridge toward you out of its slot.
5. If you are removing the black print cartridge in order to install the photo or gray photo
print cartridge, store the black print cartridge in the print cartridge protector or an
airtight plastic container.
6. Remove the new print cartridge from its packaging and, being careful to touch only
the black plastic, gently remove the plastic tape by using the pink pull tab.
1 Copper-colored contacts
2 Plastic tape with pink pull tab (must be removed before installing)
3 Ink nozzles under tape
CAUTION: Do not touch the copper-colored contacts or ink nozzles. Also, do
not re-tape the print cartridges. Doing so can result in clogs, ink failure, and bad
electrical connections.
14 HP Photosmart D5300 series
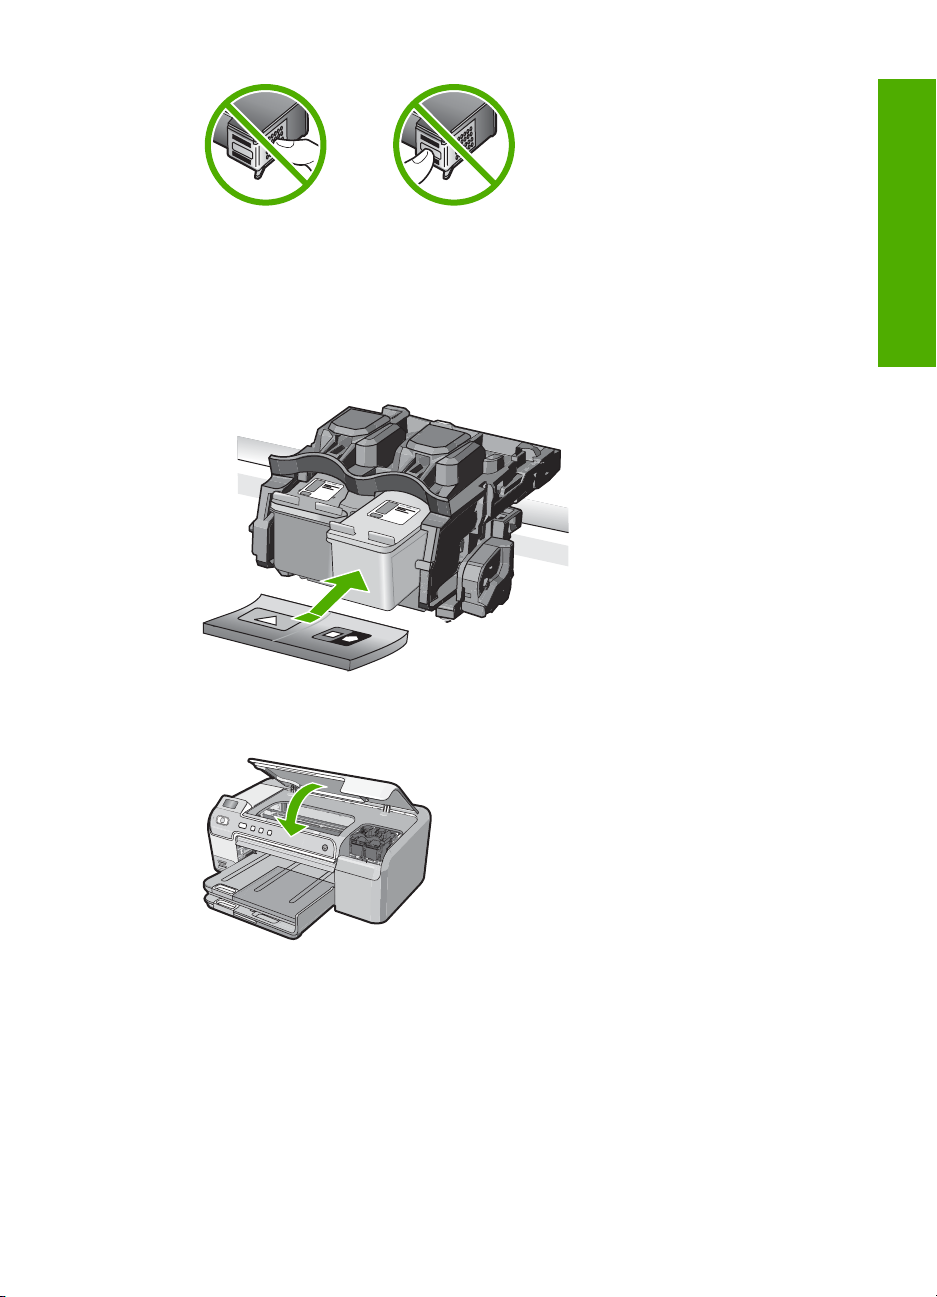
7. Hold the print cartridge with the HP logo on top, and insert the new print cartridge into
the empty cartridge slot. Make sure you push the print cartridge in firmly until it snaps
into place.
If you are installing the tri-color print cartridge, slide it into the left slot.
If you are installing a black, photo, or gray photo print cartridge, slide it into the right
slot.
8. Close the print cartridge door.
English
If you installed a new print cartridge, the HP Photosmart prints a print cartridge
alignment page.
9. When prompted, ensure plain white paper is loaded in the input tray, then press
OK.
Replace the print cartridges 15

English
Chapter 1
10. The HP Photosmart prints a test page, aligns the print head, and calibrates the printer.
Recycle or discard the page.
A success or failure message appears.
NOTE: If you have colored paper loaded in the input tray when you align the
printer, the alignment will fail. Load unused plain white paper into the input tray,
and then try the alignment again.
11. Press OK to continue.
16 HP Photosmart D5300 series

2 Troubleshooting and support
This chapter contains troubleshooting information for the HP Photosmart. Specific information is
provided for installation and configuration issues, and some operational topics. For more
troubleshooting information, see the onscreen Help that came with your software.
Many issues are caused when the HP Photosmart is connected to the computer using a USB cable
before the HP Photosmart software is installed on the computer. If you connected the HP Photosmart
to your computer before the software installation screen prompts you to do so, you must follow these
steps:
Troubleshooting common setup issues
1. Disconnect the USB cable from the computer.
2. Uninstall the software (if you have already installed it).
3. Restart your computer.
4. Turn off the HP Photosmart, wait one minute, then restart it.
5. Reinstall the HP Photosmart software.
CAUTION: Do not connect the USB cable to the computer until prompted by the software
installation screen.
For support contact information, see the inside back cover of this guide.
Uninstall and reinstall the software
If your installation is incomplete, or if you connected the USB cable to the computer before prompted
by the software installation screen, you might need to uninstall and then reinstall the software. Do
not simply delete the HP Photosmart application files from your computer. Make sure to remove
them properly using the uninstall utility provided when you installed the software that came with the
HP Photosmart.
To uninstall from a Windows computer and then reinstall
1. On the Windows taskbar, click Start, Settings, Control Panel (or just Control Panel).
2. Double-click Add/Remove Programs (or click Uninstall a program).
3. Select HP Photosmart Driver Software, and then click Change/Remove.
Follow the onscreen instructions.
4. Disconnect the HP Photosmart from your computer.
5. Restart your computer.
English
NOTE: It is important that you disconnect the HP Photosmart before restarting your
computer. Do not connect the HP Photosmart to your computer until after you have
reinstalled the software.
6. Insert the HP Photosmart CD-ROM into your computer’s CD-ROM drive and then start the Setup
program.
7. Follow the onscreen instructions and the instructions provided in the Setup Guide that came
with the HP Photosmart.
Hardware setup troubleshooting
Use this section to solve any problems you might encounter while setting up the HP Photosmart
hardware.
The HP Photosmart will not turn on
Cause: The HP Photosmart is not properly connected to a power supply.
Troubleshooting and support 17
English
Chapter 2
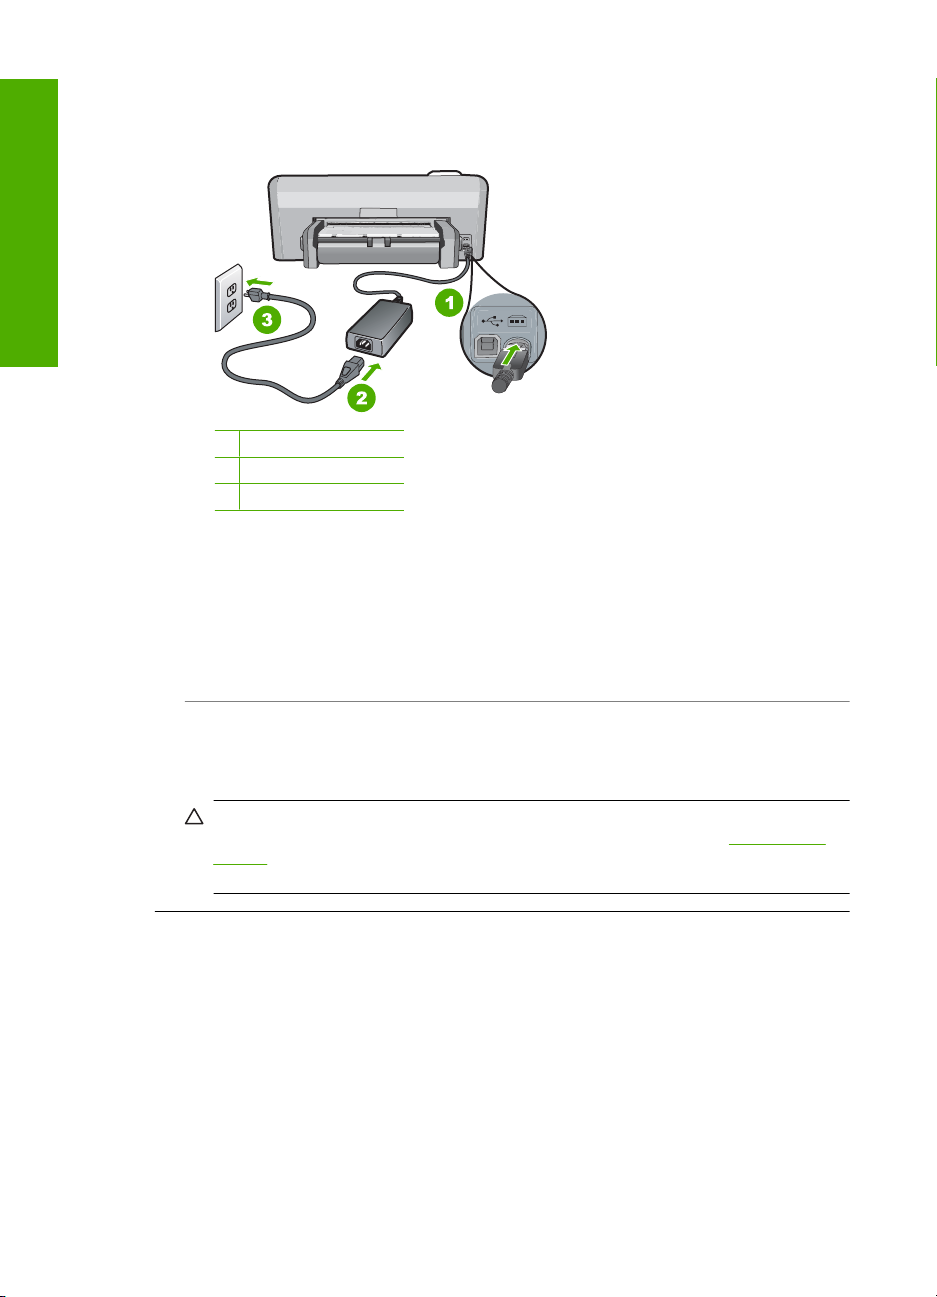
Solution
• Make sure the power cord is firmly connected to both the HP Photosmart and the power
adapter. Plug the power cord into a power outlet, surge protector, or power strip.
1 Power connection
2 Power cord and adapter
3 Power outlet
• If you are using a power strip, make sure the power strip is on. Or, try plugging the
HP Photosmart directly into a power outlet.
• Test the power outlet to make sure it is working. Plug in an appliance that you know works,
and see if the appliance has power. If not, then there might be a problem with the power
outlet.
• If you plugged the HP Photosmart into a switched outlet, make sure the switch is on. If it is
switched to on but still does not work, then there might be a problem with the power outlet.
Cause: You pressed the On button too quickly.
Solution: The HP Photosmart might not respond if you press the On button too quickly. Press
the On button once. It might take a few minutes for the HP Photosmart to turn on. If you press
the On button again during this time, you might turn the device off.
CAUTION: If the HP Photosmart still does not turn on, it might have a mechanical failure.
Unplug the HP Photosmart from the power outlet and contact HP. Go to:
support. If prompted, choose your country/region, and then click Contact HP for information
on calling for technical support.
I connected the USB cable, but I am having problems using the HP Photosmart with
my computer
Cause: The USB cable was connected before the software was installed. Connecting the USB
cable before prompted can cause errors.
Solution: You must first install the software that came with the HP Photosmart before
connecting the USB cable. During installation, do not plug in the USB cable until prompted by
the onscreen instructions.
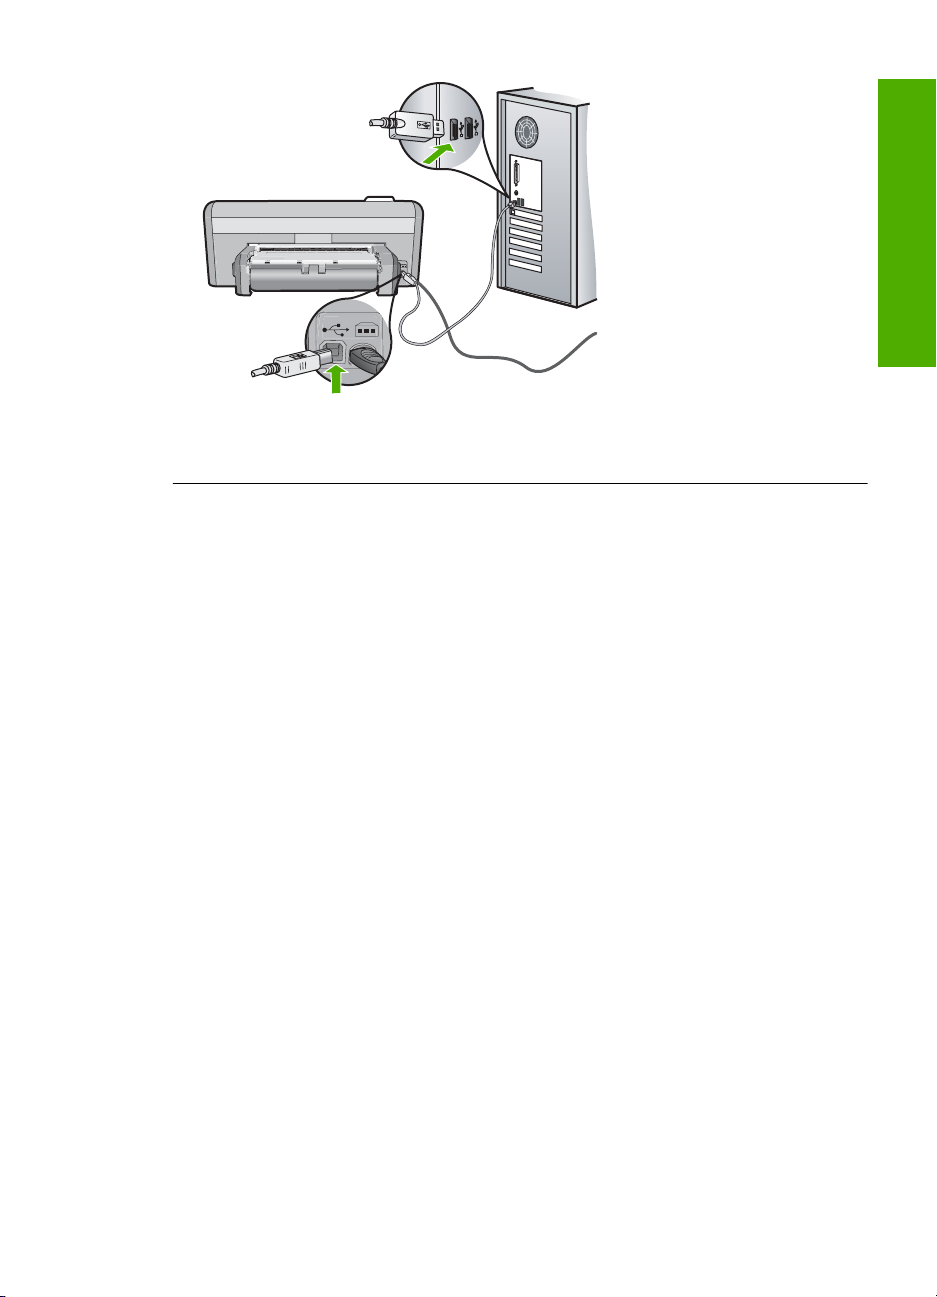
Once you have installed the software, connecting your computer to the HP Photosmart with a
USB cable is straightforward. Simply plug one end of the USB cable into the back of your
computer and the other into the back of the HP Photosmart. You can connect to any USB port
on the back of your computer.
18 HP Photosmart D5300 series
www.hp.com/
For more information on installing the software and connecting the USB cable, see the Setup
Guide that came with the HP Photosmart.
The HP Photosmart does not print
Solution: If the HP Photosmart and computer are not communicating with each other, try the
following:
• Look at the On light located on the front of the HP Photosmart. If it is not lit, the
HP Photosmart is turned off. Make sure the power cord is firmly connected to the
HP Photosmart and plugged into a power outlet. Press the On button to turn on the
HP Photosmart.
• Make sure the print cartridges are installed.
• Make sure you have paper loaded in the input tray.
• Check that the HP Photosmart does not have a paper jam.
• Check that the print carriage is not jammed.
Open the print cartridge door to access the print carriage area. Remove any objects that
are blocking the print carriage, including any packing materials. Turn the HP Photosmart off
and then turn it on again.
• Check that the HP Photosmart print queue is not paused (Windows) or stopped (Mac). If it
is, choose the appropriate setting to resume printing. For more information about accessing
the print queue, see the documentation that came with the operating system installed on
your computer.
• Check the USB cable. If you are using an older cable, it might not be working properly. Try
connecting it to another product to see if the USB cable works. If you experience problems,
the USB cable might need to be replaced. Also verify that the cable does not exceed 3
meters (9.8 feet) in length.
• Make sure your computer is USB ready. Some operating systems, such as Windows 95
and Windows NT, do not support USB connections. Check the documentation that came
with your operating system for more information.
• Check the connection from the HP Photosmart to your computer. Verify that the USB cable
is securely plugged into the USB port on the back of the HP Photosmart. Make sure the
other end of the USB cable is plugged into a USB port on your computer. After the cable is
connected properly, turn the HP Photosmart off and then on again.
• If you are connecting the HP Photosmart through a USB hub, make sure the hub is turned
on. If the hub is on, try connecting directly to your computer.
• Check other printers or scanners. You might need to disconnect older products from your
computer.
English
Hardware setup troubleshooting 19
Chapter 2
• Try connecting the USB cable to another USB port on your computer. After you check the
• If the HP Photosmart is offline, turn the HP Photosmart off and on again. Start a print job.
• If necessary, remove and then install the software you installed with the HP Photosmart
For more information on setting up the HP Photosmart and connecting it to your computer, see
the Setup Guide that came with the HP Photosmart.
Clear paper jams
English
If the HP Photosmart has a paper jam, check the Two-sided printing accessory. If paper is still
jammed, check the front door.
To clear a paper jam from the Two-sided printing accessory
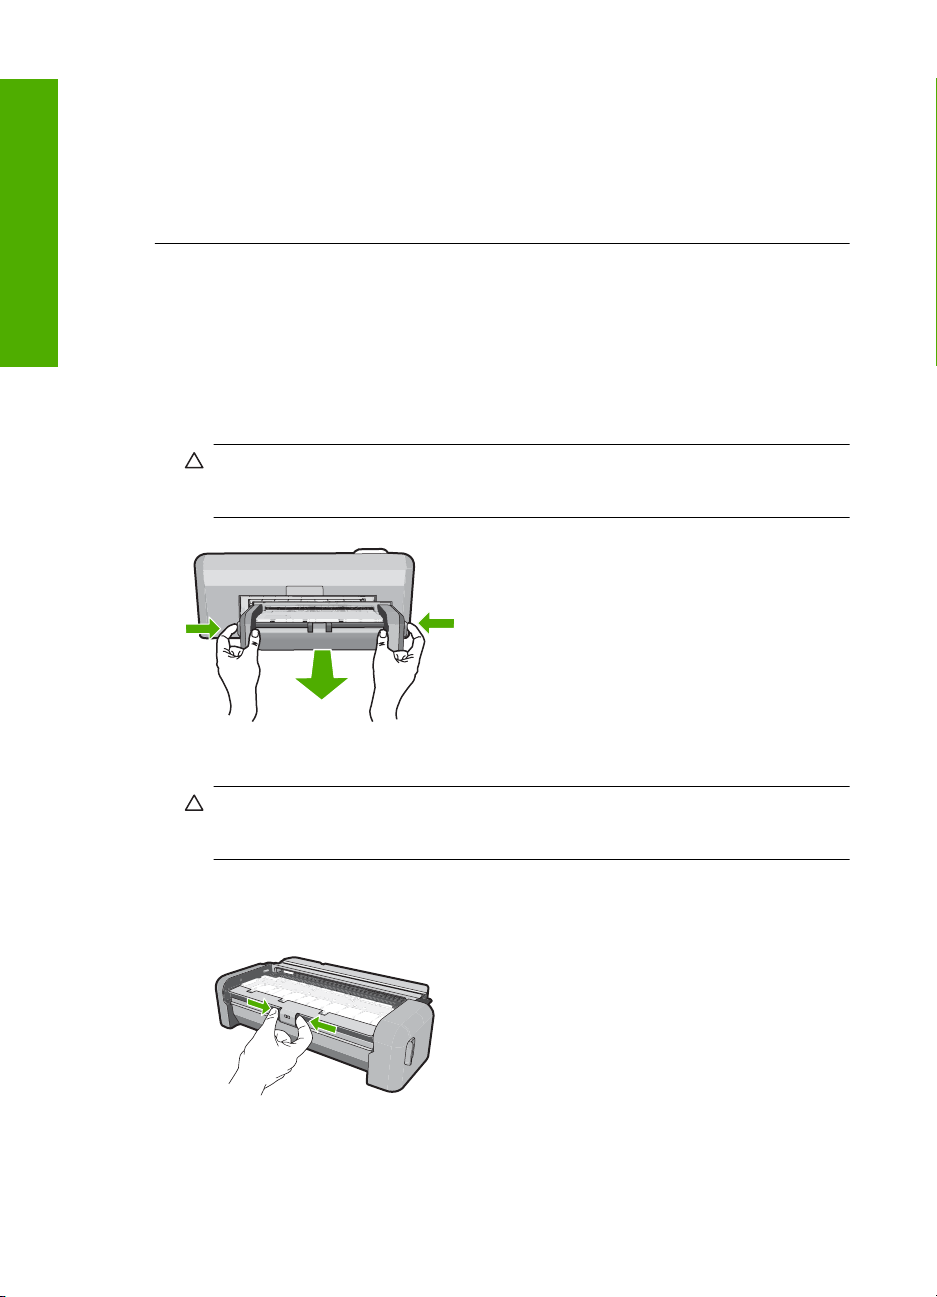
1. Turn off the HP Photosmart.
2. Press in the tabs on the left and right side of the Two-sided printing accessory. Remove the
accessory by pulling it away from the HP Photosmart.
connections, try restarting your computer. Turn the HP Photosmart off and then on again.
again.
CAUTION: Trying to clear a paper jam from the front of the HP Photosmart can damage
the print mechanism. Always access and clear paper jams from the Two-sided printing
accessory of the HP Photosmart.
3. Gently pull the paper out of the rollers.
CAUTION: If the paper tears when you are removing it from the rollers, check the rollers
and wheels for torn pieces of paper that might be remaining inside the device. If you do not
remove all the pieces of paper from the HP Photosmart, more paper jams are likely to occur.
4. If the paper jam is cleared, proceed to step 5.
If the paper jam is not cleared, do the following:
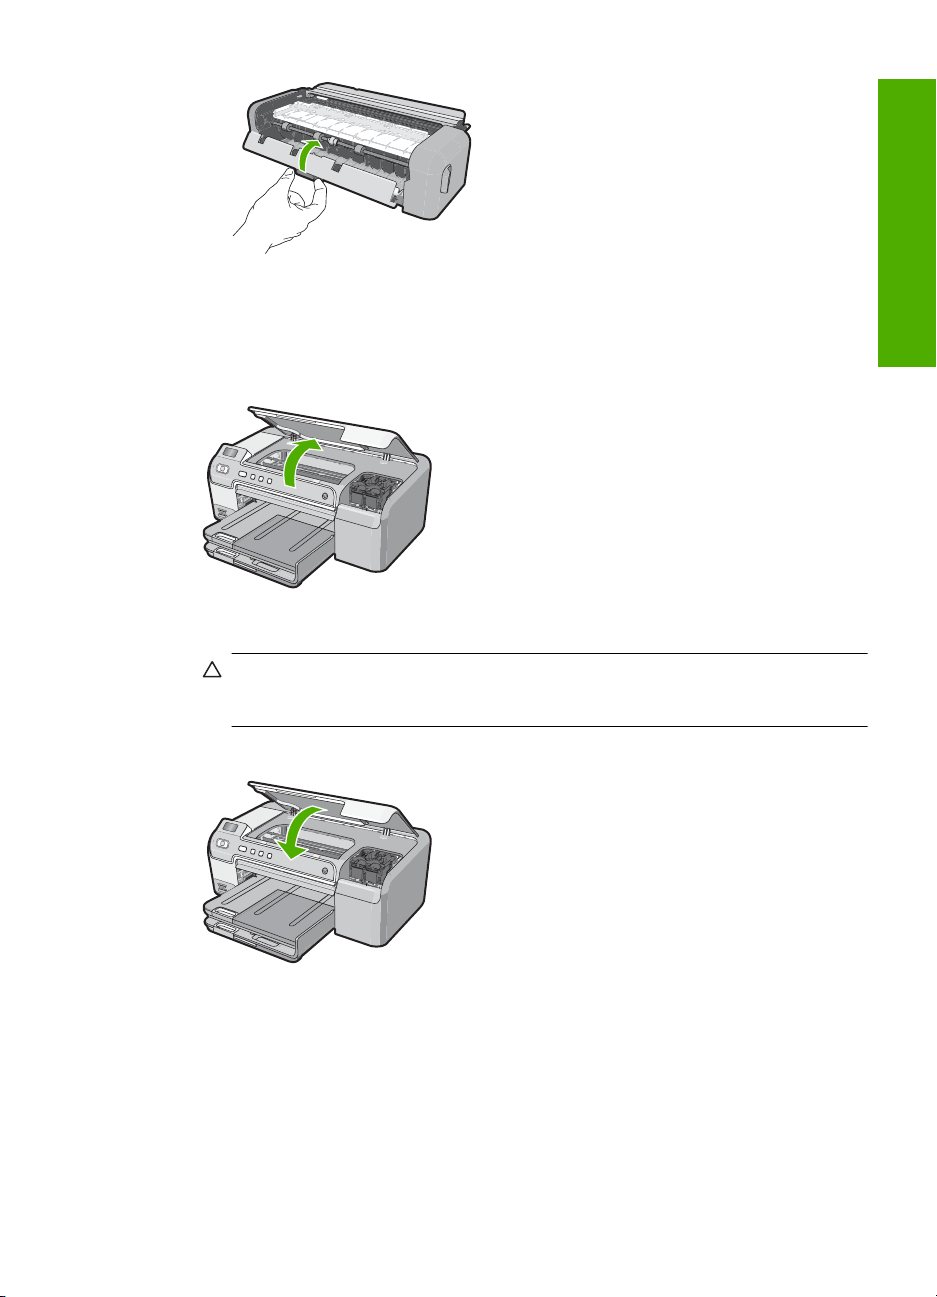
a. Open the Two-sided printing accessory by squeezing the tabs together.
b. Remove any paper from inside the accessory.
c. Close the Two-sided printing accessory cover until it locks into place.
20 HP Photosmart D5300 series
5. Replace the Two-sided printing accessory. Gently push the accessory forward until it snaps into
place.
6. Turn on the HP Photosmart, and then press OK to continue the current job.
To clear a paper jam from the front door
1. If necessary, raise the output tray. Then, raise the print cartridge door.
2. Gently pull the paper out of the rollers.
CAUTION: If the paper tears when you are removing it from the rollers, check the rollers
and wheels for torn pieces of paper that might be remaining inside the device. If you do not
remove all the pieces of paper from the HP Photosmart, more paper jams are likely to occur.
3. Lower the print cartridge door. Also, lower the output tray if it is raised.
English
4. Press OK to continue the current job.
CD/DVD print troubleshooting
Use this section to solve any problems you might encounter while printing on CD/DVD surfaces with
the HP Photosmart.
The HP Photosmart does not detect the CD/DVD holder
Cause: You might not have pushed the CD/DVD holder far enough into the CD/DVD tray.
CD/DVD print troubleshooting 21
English
Chapter 2
Solution: Push the CD/DVD holder forward into the CD/DVD tray until the lines on the holder
line up to the white lines on the tray. The end of the holder marked with arrows goes into the
CD/DVD tray first.
Cause: You might have inserted the CD/DVD holder back into the storage area.
Solution: Remove the CD/DVD holder from the storage area below the main input tray. Lower
the CD/DVD access door (located below the control panel) to access the CD/DVD tray.
Make sure you loaded a printable disc onto the CD/DVD holder with the printable side up. Push
the CD/DVD holder forward into the CD/DVD tray until the lines on the holder line up to the white
lines on the tray. The end of the holder marked with arrows goes into the CD/DVD tray first.
Cause: You might have inserted the disc directly into the CD/DVD tray without placing it on
the CD/DVD holder.
Solution: Remove the CD/DVD holder from the storage area below the main input tray.
Remove the printable disc from the CD/DVD tray and load it onto the CD/DVD holder with the
printable side up. Push the holder forward into the CD/DVD tray until the lines on the holder line
up to the white lines on the tray. The end of the holder marked with arrows goes into the CD/
DVD tray first.
Cause: The HP Photosmart prompts you to insert the next disc when printing multiple CD/
DVDs in a print job.
Solution: Remove the CD/DVD holder from the CD/DVD tray. Remove the printed CD/DVD
from the holder. Load the next disc onto the CD/DVD holder with the printable side up and
22 HP Photosmart D5300 series

reinsert the holder into the CD/DVD tray until the lines on the holder line up to the white lines
on the tray. When the HP Photosmart detects the holder, the prompt disappears.
The HP Photosmart does not detect a CD/DVD on the holder
Cause: You inserted the CD/DVD holder into the CD/DVD tray without loading a CD/DVD onto
the holder.
Solution: Remove the CD/DVD holder from the CD/DVD tray. Load a printable disc onto the
CD/DVD holder with the printable side up and reinsert the holder into the CD/DVD tray until the
lines on the holder line up to the white lines on the tray.
The HP Photosmart stalled while printing a CD/DVD
Cause: The HP Photosmart pulls the CD/DVD holder through the device while printing on the
CD/DVD. The holder can protrude about 7.5 cm (3 inches) from the back of the device. If there
is not sufficient space behind the HP Photosmart, the holder stops and printing stalls.
Solution: Ensure that there is at least 7.5 cm (3 inches) of space behind the HP Photosmart.
Also, make sure that the slot on the back of the HP Photosmart is not blocked.
The image on my printed disc is cropped and there is ink on the CD/DVD holder
Cause: You loaded the CD/DVD onto the CD/DVD holder incorrectly.
Solution: If you are loading a regular-size (120 mm) CD/DVD onto the CD/DVD holder to be
printed, do not flip the blue ring over the disc. The blue ring should only be used if you are
printing on a small-size (80 mm) CD/DVD.
Before trying again, clean the CD/DVD holder to remove ink from the holder. This avoids ink
contamination within the device, as well as protects your discs, hands, and clothing from stains
later.
After the CD/DVD holder is clean and dry, load a new printable disc onto the holder with the
printable side up. Leave the blue ring in its original location on the opposite side of the holder
from your disc, as shown below. Reinsert the holder into the CD/DVD tray until the lines on the
holder line up to the white lines on the tray and try your print again.
English
The HP Photosmart is printing on a non-printable area of my disc
Cause: Your design is not the correct size for the CD/DVD you loaded.
Solution: Make sure the design you are printing is appropriate for the size of the media loaded
in the CD/DVD holder, including the diameter of the inner and outer rings. Change the software
settings accordingly to center and size your design for the disc you are using. Refer to the
documentation or the online help of the software you are using for additional information.
Cause: You might have loaded the CD/DVD upside down on the holder.
Solution: If you have already burned your content onto the CD/DVD, you might need to burn
your contents again onto a new disc. Load the new disc onto the CD/DVD holder with the
printable side up. Reinsert the holder into the CD/DVD tray until the lines on the holder line up
to the white lines on the tray and try your print again.
The design is not centered on my disc
Cause: Your design settings might not be correct.
CD/DVD print troubleshooting 23

Chapter 2
Solution: Change the software settings to center and size your design for the disc you are
using. Refer to the documentation or the online help of the software you are using for additional
information.
The ink on the CD/DVD is not drying
Cause: The surface of the disc is not compatible for printing.
Solution: Make sure that the CD/DVD you use is compatible for inkjet printing. Inkjet printable
discs normally have a white printing surface. (Some discs also have a silver printing surface.)
English
Cause: You might have loaded the CD/DVD upside down on the holder.
Solution: If you have already burned your content onto the CD/DVD, you might need to burn
your contents again onto a new disc. Load the new disc onto the CD/DVD holder with the
printable side up. Reinsert the holder into the CD/DVD tray until the lines on the holder line up
to the white lines on the tray and try your print again.
The HP Photosmart reports a CD/DVD size mismatch error
Cause: The size of the CD/DVD currently loaded on the CD/DVD holder does not match the
size you specified when you started the print job from the computer.
Solution: Cancel the print job and replace the CD/DVD currently loaded on the CD/DVD
holder with a CD/DVD that is the same size as specified in the print job, or change the print
settings in the software.
The CD/DVD holder is stuck in the storage area
Cause: You might have inserted the CD/DVD holder back into the storage area with a CD/
DVD loaded and the blue ring flipped over the disc.
Solution: Pull the CD/DVD holder out as far as possible, until you feel resistance. Then, insert
a flat blunt object (such as a butter knife or screwdriver) into the left corner of the storage slot
and push down on the blue ring. With the blue ring pressed down, you should be able to pull the
CD/DVD holder out of the storage slot.
Print cartridge troubleshooting
If you are experiencing problems with printing, you might have a problem with one of the print
cartridges. For more information, see “
• Keep all print cartridges in the original sealed packages until they are needed.
• Store print cartridges at room temperature (15.6°-26.6° C or 60°-78° F).
• Do not reattach the protective tape once it has been removed from the print cartridge.
Reattaching the plastic tape might damage the print cartridge. Place the print cartridge in the
HP Photosmart immediately after removing the plastic tape. If this is not possible, store it in a
print cartridge protector or airtight plastic container.
• HP recommends that you do not remove the print cartridges from the HP Photosmart until you
have replacement print cartridges available to install.
• Turn off the HP Photosmart from the control panel. Do not turn off the device by turning off a
power strip or unplugging the power cord from the HP Photosmart. If you improperly turn off the
HP Photosmart, the print carriage does not return to the correct position and the print cartridges
can dry out.
• Do not open the print cartridge door unless necessary. This exposes the print cartridges to air,
which reduces the life of the print cartridges.
Replace the print cartridges” on page 13 in this guide.
NOTE: If you leave the print cartridge door open for a long period of time, the
HP Photosmart will recap the print cartridges to protect them from exposure to air.
24 HP Photosmart D5300 series

• Clean the print cartridges when you notice a significant decrease in print quality.
TIP: You might notice a decrease in print quality if the print cartridges have not been used
for a long time.
• Do not clean the print cartridges unnecessarily. This wastes ink and shortens the life of the
cartridges.
• Handle print cartridges carefully. Dropping, jarring, or rough handling during installation can
cause temporary printing problems. If print quality is poor right after cartridge installation, allow
half an hour for the print cartridge to recover.
Support process
If you have a problem, follow these steps:
1. Check the documentation that came with the HP Photosmart.
2. Visit the HP online support Web site at
all HP customers. It is the fastest source for up-to-date device information and expert assistance
and includes the following features:
• Fast access to qualified online support specialists
• Software and driver updates for the HP Photosmart
• Valuable HP Photosmart and troubleshooting information for common problems
• Proactive device updates, support alerts, and HP newsgrams that are available when you
register the HP Photosmart
3. Call HP support. Support options and availability vary by device, country/region, and language.
For a list of support phone numbers, see the inside back cover of this guide.
English
www.hp.com/support. HP online support is available to
Support process 25

3 Technical information
The technical specifications and international regulatory information for the HP Photosmart are
provided in this section.
System requirements
Software system requirements are located in the Readme file.
English
Product specifications
For product specifications, go to the HP Web site at www.hp.com/support.
Paper specifications
• Main input tray capacity: Plain paper sheets: Up to 125 (20 lb./75 gsm. paper)
• Output tray capacity: Plain paper sheets: Up to 50 (20 lb./75 gsm. paper)
• Photo tray capacity: Photo paper sheets: Up to 20
NOTE: For a complete list of supported media sizes, see the printer software.
Physical specifications
• Height: 21.6 cm (8.5 inches)
• Width: 45.2 cm (17.8 inches)
• Depth: 38.5 cm (15.2 inches)
• Weight: 6.8 kg (15 pounds)
Power specifications
• Power consumption: 25 watts maximum (average printing)
• Input voltage: AC 100 to 240 V ~ 600 mA 50-60 Hz
• DC voltage: DC 32 V===550 mA, 16 V===400 mA
NOTE: Use only with the power adapter supplied by HP.
NOTE: When the HP Photosmart is off, some amount of energy is still being consumed. Energy
consumption can be lessened by enabling the Standby/Off state. To enable the Standy/Off state,
press and hold the On button for 3 seconds until the HP Photosmart turns off. When the
HP Photosmart is in the Standby/Off state, it will take longer than usual to turn back on.
Environmental specifications
• Recommended operating temperature range: 15º to 32º C (59º to 90º F)
• Allowable operating temperature range: 5º to 35º C (41º to 95º F)
• Humidity: 15% to 80% RH non-condensing
• Non-operating (Storage) temperature range: -40º to 60º C (-4º to 122º F)
• In the presence of high electromagnetic fields, it is possible the output from the HP Photosmart
may be slightly distorted
• HP recommends using a USB cable less than or equal to 3 metres (10 feet) in length to minimize
injected noise due to potential high electromagnetic fields
Print cartridge yield
Ink from the cartridges is used in the printing process in a number of different ways, including in the
initialization process, which prepares the device and cartridges for printing, and in printhead
servicing, which keeps print nozzles clear and ink flowing smoothly. In addition, some residual ink
is left in the cartridge after it is used. For more information, see
www.hp.com/pageyield for more information on estimated cartridge yields.
Visit
26 HP Photosmart D5300 series
www.hp.com/go/inkusage.

Regulatory notices
The HP Photosmart meets product requirements from regulatory agencies in your country/region.
For a complete listing of regulatory notices, see the onscreen Help.
Regulatory model identification number
For regulatory identification purposes, your product is assigned a Regulatory Model Number. The
Regulatory Model Number for your product is SDGOB-0732. This regulatory number should not be
confused with the marketing name (HP Photosmart D5300 series, etc.) or product numbers
(Q8360A, etc.).
English
Regulatory notices 27

Chapter 3
Warranty
English
28 HP Photosmart D5300 series

HP Photosmart série D5300
Guide d'utilisation
Français

Sommaire
1 Présentation de l'appareil HP Photosmart
L'appareil HP Photosmart en un coup d'œil...............................................................................3
Fonctions du panneau de commande........................................................................................4
Recherche d'informations supplémentaires................................................................................5
Chargement du papier................................................................................................................5
Prévention des bourrages papier...............................................................................................7
Impression directe sur un CD/DVD.............................................................................................8
Impression de photos jusqu'au format 13 x 18 cm (5 x 7 pouces)...........................................10
Remplacement des cartouches d'impression...........................................................................11
2 Dépannage et assistance
Désinstallation et réinstallation du logiciel................................................................................15
Dépannage de la configuration du matériel..............................................................................15
Elimination de bourrages papier...............................................................................................18
Dépannage de l'impression sur CD/DVD.................................................................................20
Dépannage relatif aux cartouches d'impression.......................................................................23
Français
Procédure d’assistance............................................................................................................24
3 Renseignements techniques
Configurations système minimales...........................................................................................25
Spécifications de produits.........................................................................................................25
Rendement des cartouches d'impression.................................................................................26
Déclarations de conformité.......................................................................................................26
Garantie....................................................................................................................................27
2 HP Photosmart série D5300
 Loading...