

HP C200, Photosmart c200cL, Photosmart c200x User Manual

C200NORD.BOOK Page 1 Wednesday, August 18, 1999 9:28 AM

© Copyright 1999 Hewlett-Packard Company
All rights are reserved. No part of this document may be photocopied, reproduced, or translated to
another language without the prior written consent of Hewlett-Packard Company.
The information contained in this document is subject to change without notice. Hewlett-Packard
shall not be liable for errors contained herein or for consequential damages in connection with the
furnishing, performance, or use of this material.
C200NORD.BOOK Page 2 Wednesday, August 18, 1999 9:28 AM

Contents
English.............................................................................................................................................................1
Suomi.............................................................................................................................................................11
Nederlands.................................................................................................................................................21
Svenska........................................................................................................................................................31
Dansk............................................................................................................................................................41
C200NORD.BOOK Page 3 Wednesday, August 18, 1999 9:28 AM
HP PhotoSmart
software
C200NORD.BOOK Page 4 Wednesday, August 18, 1999 9:28 AM

HP PhotoSmart C200 Digital Camera User’s Guide
English
Contents
Introduction.....................................................................................2
Checking the Camera Status...................................................3
Choosing the Camera Settings..............................................3
C200NORD.BOOK Page 1 Wednesday, August 18, 1999 9:28 AM

Introduction
The HP PhotoSmart digital camera allows you to take high-quality photos that can be viewed
immediately on your PC or television. It comes with HP PhotoSmart software for manipulating,
storing and printing your photos.
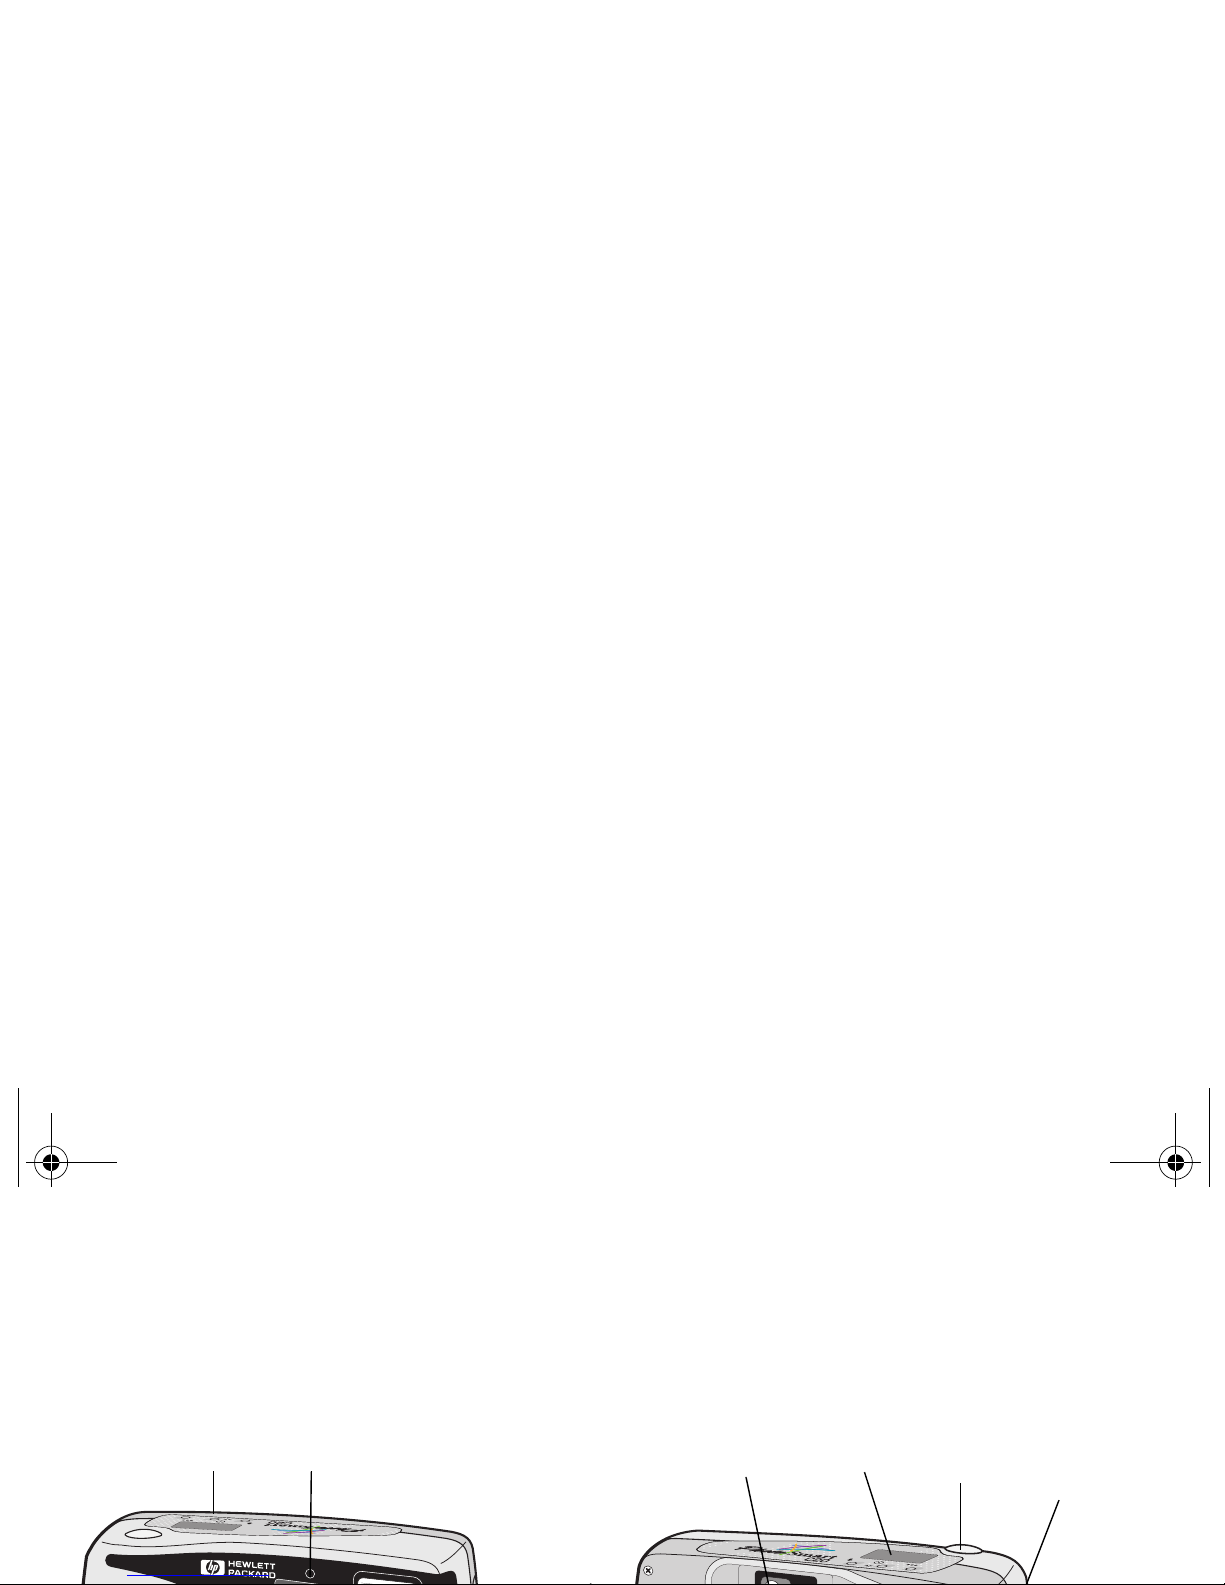
viewfinder
status
LCD
shutter
release
memory card
access light
self-timer light
status LCD controls
C200NORD.BOOK Page 2 Wednesday, August 18, 1999 9:28 AM

Checking the Camera Status
Use the status LCD on the top of the camera to check camera settings, battery level and the number
of remaining pictures. You will see some of the icons shown below, depending on your current
camera settings and status.
memory card
status
photo quality
self-timer/auto-focus
flash
battery level
C200NORD.BOOK Page 3 Wednesday, August 18, 1999 9:28 AM

Photo quality
The diamond icons on the status LCD indicate photo quality as follows:
Flash
The flash settings are indicated by icons on the status LCD:
Basic Fine Super-fine
C200NORD.BOOK Page 4 Wednesday, August 18, 1999 9:28 AM

Using the Self-Timer
1. Attach the camera to a tripod or place it on a firm surface at an appropriate distance and
height from the subject.
2. Open the lens cover to turn the camera on.
3. Frame your subject in the viewfinder.
4. When you’re ready to take the photo, press the Self-Timer button twice.
Note: This button also operates the auto-focus feature. You can continue to press the
C200NORD.BOOK Page 5 Wednesday, August 18, 1999 9:28 AM

Using the Zoom
The HP PhotoSmart digital camera includes a digital zoom feature so that you can make an image
appear to be twice as close as it really is.
1. Open the lens cover to turn the camera on.
2. Press the photo LCD on/off button to turn the photo LCD on.
Note: The photo LCD power must be turned on to use the zoom function.
3. Use the arrow buttons to select Zoom on the menu.
C200NORD.BOOK Page 6 Wednesday, August 18, 1999 9:28 AM

Downloading Photos to Your PC
To download your photos to your PC, you will need to use the HP PhotoSmart software. See the HP
PhotoSmart C200 Quick Success poster for more information.
1. Connect the camera to your computer.
2. Open the lens cover to turn the camera on. The status LCD displays PC to indicate the camera
is connected to the computer and is operating in PC mode.
3. Start the HP PhotoSmart software.
C200NORD.BOOK Page 7 Wednesday, August 18, 1999 9:28 AM

Using an AC Power Adapter (recommended)
Use an AC power adapter to preserve battery life. For example, when you connect your camera to a
computer or a television, use an AC adapter as the power source. AC power adapters are available at
most computer supply stores.
Note: An AC adapter provides power to the camera. It does not recharge the batteries.
To connect an AC power adapter:
1. Attach the plug to the adapter.
C200NORD.BOOK Page 8 Wednesday, August 18, 1999 9:28 AM

Batteries
The HP PhotoSmart digital camera operates on 4 AA alkaline batteries.
To insert new batteries:
1. Make sure the camera lens cover is closed (the camera is off).
2. To open the battery compartment, slide the battery compartment cover and remove it from the
camera.
3. Remove all of the old batteries. Use the battery release tab to lift each battery out of the
C200NORD.BOOK Page 9 Wednesday, August 18, 1999 9:28 AM

CompactFlash Memory
Use only CompactFlash Association (CFA) certified flash memory cards with
the HP PhotoSmart digital camera. These cards are manufactured by several
vendors and are available in a variety of storage capacities. Other memory
cards are not supported by Hewlett-Packard.
For a list of supported CompactFlash memory cards, see the HP PhotoSmart
Web site:
http://www.photosmart.com
C200NORD.BOOK Page 10 Wednesday, August 18, 1999 9:28 AM

Digitaalinen HP PhotoSmart C200 -kamera Käyttöopas
Suomi
Sisällysluettelo
Johdanto.........................................................................................12
Kameran tilan tarkistaminen.................................................13
Kamera-asetusten valitseminen...........................................13
C200NORD.BOOK Page 11 Wednesday, August 18, 1999 9:28 AM
Johdanto
Digitaalisella HP PhotoSmart -kameralla voit ottaa korkealaatuisia valokuvia, joita voit katsella heti
kuvaamisen jälkeen PC:stä tai televisiosta. Kameran mukana toimitetaan HP PhotoSmart -ohjelma,
jonka avulla valokuvia voi käsitellä, tallentaa ja tulostaa.
etsin
tilanäyttö
sulkimen
laukaisin
muistikortin
toimintavalo
ajastimen valo
TV (video)
tilanäytön säätimet
C200NORD.BOOK Page 12 Wednesday, August 18, 1999 9:28 AM

Kameran tilan tarkistaminen
Kameran yläosassa olevasta tilanäytöstä voit tarkistaa kamera-asetukset, paristojen varaustilan
sekä jäljellä olevien kuvien määrän. Valittujen kamera-asetusten ja kameran tilan mukaan näet
joitakin alla olevista kuvakkeista.
muistikortin tila
valokuvan laatu
ajastin / automaattinen tarkennus
salamavalo
paristojen varaustila
C200NORD.BOOK Page 13 Wednesday, August 18, 1999 9:28 AM

Valokuvan laatu
Tilanäytössä olevat vinoneliöt osoittavat valokuvan laadun seuraavasti:
Salamavalo
Tilanäytön salamavalon kuvakkeet ovat seuraavat:
Peruslaatu Hieno Erittäin hieno
C200NORD.BOOK Page 14 Wednesday, August 18, 1999 9:28 AM

Ajastimen käyttö
1. Kiinnitä kamera jalustimeen tai aseta se vakaalle alustalle sopivalle etäisyydelle ja korkeudelle
kohteeseen nähden.
2. Ota kamera käyttöön avaamalla linssin suojus.
3. Rajaa kohde etsimessä.
4. Kun olet valmis ottamaan kuvan, paina Ajastin-painiketta kahdesti.
Huom. Tällä painikkeella voit käyttää myös automaattista tarkennustoimintoa. Voit selata
C200NORD.BOOK Page 15 Wednesday, August 18, 1999 9:28 AM

Zoomin käyttäminen
Digitaalisessa HP PhotoSmart -kamerassa on digitaalinen zoomaustoiminto, jonka avulla kuvan saa
näkymään kaksi kertaa lähempänä kuin mitä se todellisuudessa on.
1. Ota kamera käyttöön avaamalla linssin suojus.
2. Ota valokuvanäyttö käyttöön painamalla valokuvanäytön virtakytkintä.
Huom. Valokuvanäytön on oltava päällä, jotta voisit käyttää zoomaustoimintoa.
3. Valitse nuolipainikkeiden avulla valikosta vaihtoehto Zoom.
C200NORD.BOOK Page 16 Wednesday, August 18, 1999 9:28 AM
 Loading...