

Page 1

Page 2

Page 3

hp photosmart 318 digital camera
user guide
Page 4

Trademark and copyright information
© Copyright 2001 Hewlett-Packard Company
All rights are reserved. No part of this document may be
photocopied, reproduced, or translated to another language
without the prior written consent of Hewlett-Packard Company.
The information contained in this document is subject to change
without notice. Hewlett-Packard shall not be liable for errors
contained herein or for consequential damages in connection with
the furnishing, performance, or use of this material.
HP, the HP logo, photosmart, and the photosmart logo are
property of Hewlett-Packard Company.
Microsoft and Windows are registered trademarks of Microsoft
Corporation.
Mac, the Mac logo, and Macintosh are registered trademarks of
Apple Computer, Inc.
CompactFlash, CF, and the CF logo are registered trademarks of
CompactFlash Association.
Other brands and their products are trademarks or registered
trademarks of their respective holders.
Page 5

Table of Contents
Chapter 1: Getting started
Camera parts . . . . . . . . . . . . . . . . . . . . . . . . . . . . . . . . . . . . . . . . . 1
Quick setup . . . . . . . . . . . . . . . . . . . . . . . . . . . . . . . . . . . . . . . . . . 3
Step 1: Attach the wrist strap. . . . . . . . . . . . . . . . . . . . . . . . . . 3
Step 2: Install the batteries . . . . . . . . . . . . . . . . . . . . . . . . . . . 3
Step 3: Turn the camera on. . . . . . . . . . . . . . . . . . . . . . . . . . . 4
Step 4: Choose the camera language . . . . . . . . . . . . . . . . . . 4
Step 5: Set the camera date and time . . . . . . . . . . . . . . . . . . . 5
Automatic power-off. . . . . . . . . . . . . . . . . . . . . . . . . . . . . . . . . 5
Using the control dial . . . . . . . . . . . . . . . . . . . . . . . . . . . . . . . . . . . 6
Storing images on a CF memory card . . . . . . . . . . . . . . . . . . . . . . 7
Chapter 2: Taking pictures
Taking a picture . . . . . . . . . . . . . . . . . . . . . . . . . . . . . . . . . . . . . . . 9
Using automatic focus and automatic exposure . . . . . . . . . . . . . 10
Using focus lock . . . . . . . . . . . . . . . . . . . . . . . . . . . . . . . . . . 10
Previewing your pictures . . . . . . . . . . . . . . . . . . . . . . . . . . . . . . . 11
Tips for taking the best pictures. . . . . . . . . . . . . . . . . . . . . . . . . . 12
Chapter 3: Reviewing your images
Viewing your images . . . . . . . . . . . . . . . . . . . . . . . . . . . . . . . . . . 15
Creating a print order. . . . . . . . . . . . . . . . . . . . . . . . . . . . . . . . . . 16
Deleting your images . . . . . . . . . . . . . . . . . . . . . . . . . . . . . . . . . . 18
Viewing small versions (thumbnails) of your images . . . . . . . . . . 19
Magnifying your images. . . . . . . . . . . . . . . . . . . . . . . . . . . . . . . . 19
Chapter 4: Adjusting the camera settings
Using the flash . . . . . . . . . . . . . . . . . . . . . . . . . . . . . . . . . . . . . . . 21
Changing the image quality . . . . . . . . . . . . . . . . . . . . . . . . . . . . . 23
Using the digital zoom . . . . . . . . . . . . . . . . . . . . . . . . . . . . . . . . . 24
Using the self-timer . . . . . . . . . . . . . . . . . . . . . . . . . . . . . . . . . . . 25
Setting the date and time . . . . . . . . . . . . . . . . . . . . . . . . . . . . . . . 26
Changing the camera language. . . . . . . . . . . . . . . . . . . . . . . . . . 27
Setting the welcome screen. . . . . . . . . . . . . . . . . . . . . . . . . . . . . 27
iiiTable of Contents
Page 6

Chapter 5: Sharing and printing images
Using the camera with a Windows computer . . . . . . . . . . . . . . . . 30
System requirements for a Windows computer . . . . . . . . . . . 30
Installing the software on a Windows computer. . . . . . . . . . . 31
Connecting the camera to a Windows computer . . . . . . . . . . 31
Unloading images to a Windows computer . . . . . . . . . . . . . . 32
Using the camera with a Windows NT 4.0 computer . . . . . . . 33
Using the camera with a Macintosh computer . . . . . . . . . . . . . . . 35
System requirements for a Macintosh computer . . . . . . . . . . 35
Changing the PC Connect Mode setting . . . . . . . . . . . . . . . . 35
Installing the software on a Macintosh computer. . . . . . . . . . 36
Connecting the camera to a Macintosh computer . . . . . . . . . 36
Unloading images to a Macintosh computer . . . . . . . . . . . . . 37
Tips for unloading images to a Macintosh computer . . . . . . . 38
Unloading images without using the software . . . . . . . . . . . . . . . 39
Using a card reader . . . . . . . . . . . . . . . . . . . . . . . . . . . . . . . . . . . 40
Printing images without a computer . . . . . . . . . . . . . . . . . . . . . . . 40
Chapter 6: Storing images in memory
Determining the number of pictures you can take . . . . . . . . . . . . 42
Using a CF memory card . . . . . . . . . . . . . . . . . . . . . . . . . . . . . . . 43
Installing a CF memory card . . . . . . . . . . . . . . . . . . . . . . . . . 44
Checking the CF memory card status . . . . . . . . . . . . . . . . . . 45
Using both internal memory and a CF memory card . . . . . . . . . . 46
Formatting memory . . . . . . . . . . . . . . . . . . . . . . . . . . . . . . . . . . . 47
Chapter 7: Powering and maintaining your camera
Powering your camera . . . . . . . . . . . . . . . . . . . . . . . . . . . . . . . . . 49
Determining if the batteries need to be changed . . . . . . . . . . 49
Replacing batteries . . . . . . . . . . . . . . . . . . . . . . . . . . . . . . . . 51
Using an AC power adapter. . . . . . . . . . . . . . . . . . . . . . . . . . 52
Caring for your camera and accessories . . . . . . . . . . . . . . . . . . . 53
Camera . . . . . . . . . . . . . . . . . . . . . . . . . . . . . . . . . . . . . . . . . 53
Memory cards . . . . . . . . . . . . . . . . . . . . . . . . . . . . . . . . . . . . 53
Safety precautions . . . . . . . . . . . . . . . . . . . . . . . . . . . . . . . . . . . . 54
Chapter 8: Troubleshooting, support, and warranties
Problems and solutions . . . . . . . . . . . . . . . . . . . . . . . . . . . . . . . . 55
Error messages . . . . . . . . . . . . . . . . . . . . . . . . . . . . . . . . . . . 60
Getting assistance . . . . . . . . . . . . . . . . . . . . . . . . . . . . . . . . . . . . 62
Visiting HP Web sites. . . . . . . . . . . . . . . . . . . . . . . . . . . . . . . 62
HP photosmart 318 User Guideiv
Page 7

Visiting related Web sites . . . . . . . . . . . . . . . . . . . . . . . . . . . 62
Contacting HP Customer Support . . . . . . . . . . . . . . . . . . . . . 63
Obtaining support within the United States . . . . . . . . . . . . . 63
Obtaining support worldwide . . . . . . . . . . . . . . . . . . . . . . . . 64
Hewlett-Packard limited warranty statement . . . . . . . . . . . . . . . . 67
Appendix A: Reference
Symbols on the status LCD . . . . . . . . . . . . . . . . . . . . . . . . . . . . . 69
Camera indicator lights . . . . . . . . . . . . . . . . . . . . . . . . . . . . . . . . 71
Camera specifications . . . . . . . . . . . . . . . . . . . . . . . . . . . . . . . . . 72
vTable of Contents
Page 8

HP photosmart 318 User Guidevi
Page 9

Getting started
1
Your HP photosmart 318 digital camera takes high-quality pictures
you can share with family and friends on the Internet or by e-mail.
It comes with software for manipulating, storing, and printing your
photos. Your camera includes the following features:
2.3 megapixel (MP) resolution
point-and-shoot simplicity
automatic exposure
automatic focus
integrated flash with red-eye reduction
universal serial bus (USB) computer connection
2x digital zoom
color image display for previewing and reviewing images
internal memory for storing images in the camera
slot for CompactFlash (CF) memory card (card not included)
self-timer
batteries
Camera parts
The following illustrations show the parts of the HP photosmart
318 digital camera.
Getting started 1
Page 10

on/off power
switch
shutter button
status LCD
self-timer
light
flash
viewfinder
lens
viewfinder
indicator light
viewfinder
image display
image quality
button
control dial
tripod mount
image quality
indicator
images
remaining
image display
on/off button
CF memory card
compartment
door
CF memory
card ejector
lever
battery compartment door
digital zoom
indicator
flash setting
indicator
digital zoom/
self-timer button
flash button
battery
level
CF card
indicator
HP photosmart 318 User Guide2
self-timer
indicator
Page 11

Quick setup
Setting up your digital camera is quick and easy—follow these
steps and you’ll be ready to take pictures.
Step 1: Attach the wrist strap
1 Thread the short loop
through the wrist strap
attachment that is
located under the CF
memory card
compartment door. You
might need to use a
pointed object, such as
a paper clip, to pull the
end of the loop through.
2 Pull the strap through
the loop, and then pull
the knot tight.
Step 2: Install the batteries
1 Open the battery compartment door by pushing it out and then
swinging it open.
2 Insert four AA batteries (supplied), making sure that the +/–
electrodes are facing the proper direction (see the diagram on
the inside of the camera’s battery compartment).
Note For replacement, use only photo-quality alkaline,
photo-lithium, or rechargeable nickel-metal hydride
(NiMH) batteries.
Getting started 3
Page 12

Step 3: Turn the camera on
To turn the camera on, slide the ON/OFF POWER ()
switch to the right and release it. The status LCD (liquid crystal
display) on top of the camera turns on and displays the camera
status.
Note The icons that appear on the status LCD are
discussed throughout this guide. For more
information, see “Appendix A: Reference” on
page 69.
To turn the camera off, slide the switch to the right
again and release it. The status LCD shuts off and goes blank.
Step 4: Choose the camera language
The first time you turn the camera
on, it prompts you to choose the
language you want to use for the
camera menus.
1 Turn the
CONTROL ( ) dial to
scroll to the language you want to
use.
2 Press the dial to select the language.
If you chose the wrong language, you can change it by using
the Setup menu.
HP photosmart 318 User Guide4
Page 13

Step 5: Set the camera date and time
After you select the camera language, the camera prompts you to
enter the current date and time. After you have set the camera’s
clock, it records the date and time at which you take each picture.
1 Turn the dial to point to the date format, and then press
the dial to change it. You can choose MDY (mm/dd/yyyy),
DMY (dd/mm/yyyy), or YMD (yyyy/mm/dd).
2 Turn the dial to point to the date, and then press
the dial.
3 Turn the dial to change the number, and then press
the dial to confirm it.
4 Set the remaining values in the same way.
5 To save your settings, select Exit. The image display turns off.
Your camera is now ready to take pictures.
Automatic power-off
To conserve battery power, the camera automatically turns off
after 5 minutes if you do not press a button.
Getting started 5
Page 14

Using the control dial
Use the dial to:
scroll through images of pictures that you have taken.
make selections from the camera menus, which allow you to
manipulate your images and adjust the camera settings.
The dial operates in two distinct ways: you can press it straight
down, or you can turn it left or right.
To review your images
1 Press the dial to begin reviewing your pictures on the
image display on the back of the camera.
2 Turn the dial to scroll through images of pictures you have
taken.
To navigate the menus
1 Press the dial again. The main menu appears as a row of
icons across the top of the image display.
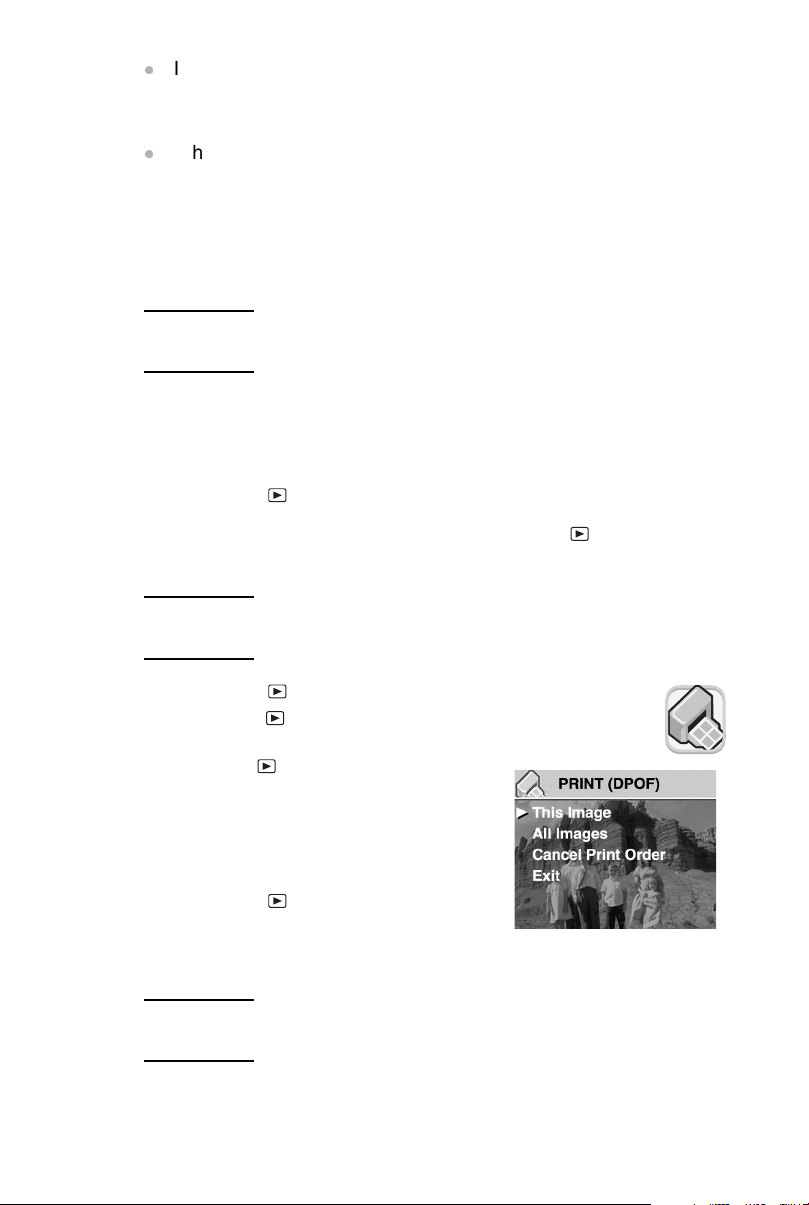
PRINT
(DPOF)
DELETE VIEW
THUMB-
NAILS
MAGNIFY SETUP EXIT
2 Turn the dial to the right until the desired icon is selected on
the image display. Each icon represents an action or a menu. A
HP photosmart 318 User Guide6
Page 15

selected icon has a yellow border and background. A text
description of the icon appears in the status line at the bottom
of the image display.
3 Press the dial to open the menu or perform the action
represented by the icon.
4 Continue turning and pressing the dial to manipulate your
images or select options.
Specific instructions about using the camera menus appear
throughout this guide.
Note To exit a menu without making a selection, select
Exit.
Storing images on a CF memory
card
Your digital camera comes with 8 megabytes (MB) of internal
memory so that you can store images directly in the camera.
However, it also has a slot for an optional CF memory card. The
CF memory card allows you to expand your camera’s memory so
you can take more pictures. Then, after you unload images to your
computer, you can reuse the card.
With a CF memory card you can also view and save images on a
computer that is equipped with a CF memory card reader, and
print images directly from a printer that has a CF memory card
slot.
Getting started 7
Page 16

HP photosmart 318 User Guide8
Page 17

Taking pictures
2
This chapter describes the basic process of taking pictures with
your digital camera and gives you tips for taking the best pictures.
When you are familiar with this process, you can use the
advanced camera functions described in later chapters.
Note If the camera is on, you can take a picture anytime,
even if the image display is off or shows a menu.
Taking a picture
1 Turn the camera on. The camera is ready to take a picture.
2 Frame your subject in the viewfinder.
3 Press and hold the
camera to adjust the focus and exposure.
4 When you see the green light to the right of the viewfinder,
press the
5 The image display on the back of the camera turns on and
displays the image for a short time.
To preserve battery power, the image display turns off after the
image has been saved to memory.
To review all the pictures you have taken, press the dial.
Tip When you are taking a picture, be careful to keep
Taking pictures 9
SHUTTER button all the way down.
your fingers away from the lens and the flash. The
following illustrations give you examples of how to
hold the camera.
SHUTTER button halfway down to allow the
Page 18

.
Using automatic focus and
automatic exposure
The camera automatically focuses and adjusts the exposure for
the current lighting conditions when you press the
halfway down.
The camera adjusts the focus and exposure automatically even if
you press the
But you are more likely to catch the perfect shot, especially when
you are photographing an active subject, if you set the camera’s
focus and exposure early. To do this, press the
halfway down, and then press the
down at the exact moment you wish to capture the image.
SHUTTER button all the way down without pausing.
SHUTTER button all the way
SHUTTER button
SHUTTER button
Note If the camera cannot find a focus or if the exposure
will be longer than 1/30 second, a yellow light
appears to the right of the viewfinder. You can still
take the picture, but the results might not be optimal.
Using focus lock
The automatic focus feature focuses on the subject in the middle
of the picture and requires good contrast within that subject area.
If you do not want your subject to be in the middle of the image or
if the subject lacks contrast, use focus lock.
HP photosmart 318 User Guide10
Page 19

1 Frame a subject that is the same distance from the lens as
your subject.
2 Press the
SHUTTER button halfway down to lock the focus. Wait
until you see the green light next to the viewfinder.
3 Keeping the
SHUTTER button pressed halfway down, move the
camera to frame your subject.
4 Press the
SHUTTER button all the way down to take the picture.
Previewing your pictures
Instead of looking through the viewfinder to frame a picture, you
can use the image display to preview a picture. The image display
shows exactly what your picture will look like, whereas the
viewfinder is slightly accurate. Preview your picture on the image
display when precise framing is important, especially when you
are taking a close-up shot.
Note Using the image display consumes a lot of battery
power. To conserve battery power, the camera
automatically turns off the image display after 60
seconds if you do not press a button.
To preview a picture
1 Turn the camera on.
2 Press the button to turn the image display on.
3 Frame your picture in the image display by pointing the camera
lens at your subject.
4 Press and hold the
SHUTTER button halfway down to allow the
camera to adjust the focus and exposure.
5 When you see the steady green light to the right of the
viewfinder, press the
SHUTTER button all the way down to take
the picture.
To turn the image display off, press the button.
Taking pictures 11
Page 20

Tips for taking the best pictures
Try to fill the entire frame with your subject and exclude
unwanted detail.
Keep the sun behind you or at your side, not directly overhead
or in front of you.
If the light is behind your subject, use the FLASH ON setting to
increase the light on the front of your subject.
When the ambient light is low, use the flash. Make sure you
keep the subject within the flash range (2.5 m, or about 8 feet).
2.5 meters
If you use the FLASH OFF setting in low light, use a tripod to
steady the camera during exposure.
The camera takes about a second to focus and adjust the
exposure when you press the
SHUTTER button halfway down.
Wait until you see the steady green light to the right of the
viewfinder, then press the
SHUTTER button all the way down to
take the picture. If this is the first time you are using a digital
camera, you might want to practice to become accustomed to
the timing.
If a yellow light appears to the right of the viewfinder when you
press the
SHUTTER button, the camera cannot find a focus or
the exposure will be longer than 1/30 second (or both). Try the
following:
• Make sure that you are not too close to your subject and
that you frame your pictures with the desired subject in the
center. The camera’s automatic focus has a range of 20 cm
HP photosmart 318 User Guide12
Page 21

(about 8 inches) to infinity and focuses on the object in the
center of the frame.
• If the light on your subject is low, wait for better natural light
or use the flash. For more information, see “Using the flash”
on page 21.
• If the light on your subject is low and you are using the
FLASH OFF setting, the exposure could be longer than
1/30 second. To steady the camera, mount it on a tripod.
• Set the camera’s automatic focus and automatic exposure
on a different subject by using focus lock.
Avoid taking flash photos in front of reflective objects like
mirrors or glass to prevent bright spots in your photos.
Although the camera has an electronic automatic focus
system, some conditions might cause the camera to focus
improperly. Some examples are in the following table.
Conditions Examples of subjects
Black or very dark objects Dark clothing
Objects that have no distinct or
consistent form
Glossy and reflective surfaces Glass, mirrors, automobiles
Multiple or flickering light sources Neon signs, fluorescent lamps,
Rapidly moving objects Baseballs, hummingbirds, race cars
Non-solid objects Wire netting or fencing, latticework
Insufficient light Sunsets, candlelight
Taking pictures 13
Fountains, waterfalls, waves, smoke,
flame, fireworks, a subject in mist or
fog
television images, sun rays through
trees
Page 22

HP photosmart 318 User Guide14
Page 23

Reviewing your
3
After you have taken some pictures and they are stored in the
camera, you can view them by using the image display. While
viewing your images, you can magnify or delete images, or create
a print order to print a set of photos.
Tip To preserve battery life, connect an AC power
images
adapter (optional) while using the image display.
Viewing your images
1 Turn the camera on.
2 Press the dial. The last picture you took or viewed appears
on the image display.
3 Turn the dial to scroll through your images.
Each time a new image appears on the display, the image quality
indicator appears in the upper left corner of the image,
represented by one, two, or three stars. The image quality
indicator disappears after two seconds.
The status line at the bottom of the image display shows the
following information about the current image:
The number of the picture and the number of images stored in
memory or on the CF memory card
If the image is selected for printing, the number of copies you
want to print and the print order icon
The date the picture was taken
Reviewing your images 15
Page 24

image
quality
indicator
status line
image number and number
of images stored in memory
print order (DPOF)
information and
print order icon
date the picture was
taken
When you have finished reviewing images, be sure to turn off the
image display to conserve battery power. To do this, press the
IMAGE DISPLAY ON/OFF ( ) button or turn the camera off.
Creating a print order
You can use your camera to select the images that you want to
print. For example, when you gather with family and friends to
view your photos, you can keep track of the photos they want
copies of and then print the photos later.
With a print order you can:
select one image, several images, or all of the images that you
have stored in the camera.
select how many copies you want of each image or of all
images.
To add an image to a print order, you select the number of copies
that you want to print.
Note When you are reviewing images on the image
display, a print order icon appears on the status line
for images that you have added to the print order.
A print order creates a Digital Print Order Format (DPOF) file. This
file is stored with your images in memory.
You can print photos from your print order in one of two ways:
HP photosmart 318 User Guide16
Page 25
If your images are stored on a CF memory card, you can insert
the memory card directly into a DPOF-compatible printer. The
printer reads the print order and prints the specified images.
When you transfer your images from the camera to a
computer, the print order is copied along with them. If you have
set up your HP Automatic Image Unload software to do so, the
computer reads the print order and prints the specified images.
For more information, see “Automated Task Options” in the
software’s Help.
Note An Apple Macintosh computer does not recognize a
DPOF print order.
To create or edit a print order
1 Turn the camera on.
2 Press the dial to begin reviewing your images.
3 If you want copies of a single image, use the dial to scroll to
the image you want to add to or remove from the print order.
Note If you want copies of all images, it does not matter
which image is displayed on the image display.
4 Press the dial to open the main menu, and then
press the dial to open the Print (DPOF) menu.
5 Turn the dial to select This
Image if you want copies of the
current image. Select All Images if
you want copies of all the images in
memory.
6 Press the dial.
7 Select the number of copies of the
image that you want.
Tip To remove an image from a print order, set the
number of copies for that image to zero.
Reviewing your images 17
Page 26

Deleting your images
You can delete a single image or all images from the camera. After
an image has been deleted, it cannot be recovered.
Note If you have a CF memory card installed, images are
deleted only from the card.
To delete images
1 Turn the camera on.
2 Press the dial to begin reviewing your images.
3 If you are deleting a single image, turn the dial to scroll to
the image you want to delete.
Note If you are deleting all images, it does not matter
which image is displayed on the image display.
4 Press the dial to open the main menu.
5 Turn the dial to scroll to the Delete icon, and press
the dial to open the Delete menu.
6 Turn the dial to select This
Image if you want to delete the
current image only or All Images if
you want to delete all images.
7 Press the dial to delete the
image or images.
8 If you chose to delete all images,
the camera asks you to confirm. To confirm, turn the dial to
select Yes, and then press the dial.
Note From the Delete menu, you can also choose to
Format Memory (or Format CF Card if a CF
memory card is installed).
HP photosmart 318 User Guide18
Page 27

Viewing small versions
(thumbnails) of your images
You can view up to nine of your images at the same time on the
image display.
To look at thumbnails of your images
1 Turn the camera on.
2 Press the dial twice to open the main menu.
3 Turn the dial to scroll to the View Thumbnails
icon, and then press the dial.
The image display shows you up to nine of your
images at one time, depending on how many images you have
stored in memory. A yellow border frames the currently
selected image.
4 Turn the dial to
select a different image.
5 Press the dial to see
the selected image in
full view.
selected
image
Magnifying
your images
While reviewing an image, you can magnify an area of the image
to three times or six times its normal size. This is helpful when you
want to view a detail of an image. For example, you can check to
see if people had their eyes closed when you took their picture.
Note Magnifying an image does not change the image
stored in memory.
To magnify an image
1 Turn the camera on.
2 Press the dial to begin reviewing your images.
Reviewing your images 19
Page 28

3 Turn the dial to scroll to the image you want to magnify.
4 Press the dial to open the main menu.
Turn the dial to scroll to the Magnify icon, and
then press the dial to magnify the image.
The camera magnifies the center of the image to
three times its normal size. Turn the dial to pan left or right
in the image.
5 Press the dial to open the Magnify menu.
6 To change the panning direction so
you can pan up and down, turn the
dial to scroll to the double arrow
icon, and then press the dial.
7 To magnify the image further, turn
the dial to scroll to the magnifying
glass icon, and then press the
dial.
The camera magnifies the center of the image to six times its
normal size.
8 Repeat steps 6 and 7 to scroll the image left and right or to
reduce the magnification.
9 To return to a full view of the image, select the Exit icon, and
then press the dial.
HP photosmart 318 User Guide20
Page 29

Adjusting the
4
You can modify the camera settings to fit the current picture-taking
conditions and your preferences. For example, you can adjust the
flash settings to fit current lighting conditions, and you can use the
self-timer to take a picture with yourself in it. This chapter
describes how to:
camera settings
use the flash.
change the image quality.
use the digital zoom.
use the self-timer.
set the date and time.
change the language.
set the welcome screen.
Using the flash
The camera offers four flash settings. The current flash setting is
indicated by an icon on the status LCD. In addition, if the image
display is on, a message appears about the flash setting in the
status line.
Each time you turn the camera off and then on again, the flash
setting automatically reverts to AUTO FLASH. If you change the
setting, it remains until you change it or until you turn the camera
off and on.
Adjusting the camera settings 21
Page 30

Note The flash recharges between pictures. This is
indicated by a blinking flash icon on the status LCD.
In addition, if the image display is on, the message
FLASH CHARGING might appear in the status line
at the bottom of the image display when you press
the
SHUTTER button. When the flash icon stops
blinking, you can take another flash picture.
.
Icon Message Description
AUTO FLASH The camera determines the need for a flash
RED-EYE The flash will be used if needed. Red-eye
FLASH ON The flash will be used in all lighting conditions.
FLASH OFF The flash will not be used, regardless of the
based on lighting conditions. The flash setting
reverts to AUTO FLASH each time you turn the
camera on.
reduction minimizes the occurrence of red-eye in
pictures of people or animals by emitting several
short flashes to condition the subject’s eyes to
the flash, followed by a final flash to take the
picture. If you are photographing people, tell
them to wait for the final flash before moving.
The amount of light provided by the flash will be
adjusted according to the current lighting
conditions. Use this setting when the lighting for
the entire picture is sufficient, but the lighting for
the subject is not, as in a backlighting situation.
This is commonly called “fill flash.”
lighting conditions. Use this setting in places
where flash photography is not permitted. If
necessary, use a tripod to hold the camera
steady.
To change the flash setting
1 Turn the camera on.
2 Press the
FLASH ( ) button repeatedly until the flash setting
you want appears on the status LCD. The button cycles
through the four available flash settings.
HP photosmart 318 User Guide22
Page 31

flash button
Changing the image quality
The camera has three image quality settings: Good, Better, and
Best. The current image quality setting is indicated by one, two, or
three stars on the status LCD. In addition, if the image display is
on, GOOD, BETTER or BEST appears in the status line.
The image quality setting determines the quality of your images
and how many images can be stored in internal memory or on the
CF memory card. Pictures taken with higher image quality take up
more space in memory; pictures taken with lower image quality
take up less space.
Image quality Description Resolution
GOOD This is the most memory-efficient
image quality setting. Use this
setting for taking pictures that you
will only send in e-mail or place on
the Internet.
BETTER This setting produces high-quality
images and requires less memory
than BEST mode. Use this setting
for taking pictures that you plan to
print 13 cm by 18 cm (5 by 7 inches)
or smaller. This is the default setting.
BEST Produces the highest-quality images
and uses the most memory. Use this
setting for taking pictures that you
plan to crop and enlarge using image
editing software, or print 20 cm by
25 cm (8 by 10 inches) or larger.
Adjusting the camera settings 23
592 by 400
(with medium
compression)
1792 by 1200
(with medium
compression)
1792 by 1200
(with low
compression)
Page 32

Here are some important notes about the image quality setting:
You can use different image quality settings for different
images.
The camera retains the current image quality setting until you
change it, even if you turn the camera off.
Because image quality affects the number of images that can
be stored in memory or on a memory card, the number of
available images (shown on the status LCD) changes as you
change the image quality.
To change the image quality
1 Turn the camera on.
2 Press the
IMAGE QUALITY ( ) button repeatedly until the
quality level you want appears on the status LCD.
image quality button image quality indicator
Using the digital zoom
You can use the camera’s digital zoom to make a subject appear
to be closer.
With digital zoom, you always use the image display to preview
your image and see the effect of the zoom. The image display
shows the image you will capture, as shown in the example below.
HP photosmart 318 User Guide24
Page 33

To use the digital zoom
1 Turn the camera on.
2 Press the
zoom. The image display comes on automatically and 2X
DIGITAL ZOOM appears in the status line.
Note Pressing the button again activates the self-
3 Use the image display to frame your subject.
To cancel the digital zoom, press the button or press the
4 Take your picture.
DIGITAL ZOOM ( ) button once to turn on the digital
timer.
button twice.
Using the self-timer
Use the self-timer to take a picture of yourself or a posed group.
After you turn the self-timer on and press the
camera waits 10 seconds before taking the picture.
To use the self-timer
1 Attach the camera to a tripod or place it on a firm surface at an
appropriate distance and height from the subject.
SHUTTER button, the
2 With the camera turned on, frame your subject in the
viewfinder. When you are ready to take the picture, press the
button twice.
Note Pressing the button once activates the digital
zoom. Pressing it again turns off the digital zoom
and turns on the self-timer.
The self-timer icon appears on the status LCD. In addition, the
message SELF-TIMER appears in the status line.
3 Press the
it.
The red self-timer indicator light on the front of the camera
blinks for 10 seconds with an increasing frequency.
Adjusting the camera settings 25
SHUTTER button all the way down, and then release
Page 34

self-timer button self-timer indicator
4 After 10 seconds, the camera takes the picture and the self-
timer turns off automatically.
To cancel the self-timer before the camera takes the picture,
press the button again.
Setting the date and time
The camera has a real-time clock that records the date and time at
which you take each picture.
The camera prompts you to enter the date and time under the
following circumstances:
When you turn the camera on for the first time.
If the camera was without battery power (the batteries lost
power or were removed from the camera) for an extended
period of time.
Note For your convenience, the camera maintains the
date and time for at least 10 minutes after you
remove old batteries.
To set the date and time
1 Turn the camera on.
2 Press the dial twice to open the main menu.
3 Turn the dial to scroll to the Setup icon, and then
press the dial to open the Setup menu.
4 Turn the dial to scroll to Date & Time, and then
press the dial.
HP photosmart 318 User Guide26
Page 35

5 Select the date format you want to use. You can choose MDY
(mm/dd/yyyy), DMY (dd/mm/yyyy), or YMD (yyyy/mm/dd).
6 Select the day, month, and year.
7 Select the hour format you want to use—12-hour or 24-hour.
8 Select the hour and minutes.
9 To save your settings, select Exit.
Changing the camera language
You can change the language used for the camera menus to one
of six languages: English, French, German, Spanish, Italian, or
Japanese.
To set the camera language
1 Turn the camera on.
2 Press the dial twice to open the main menu.
3 Turn the dial to scroll to the Setup icon, and then
press the dial to open the Setup menu.
4 Turn the dial to scroll to the row of flags, and then
press the dial.
5 Turn the dial to scroll to the language you want, and then
press the dial.
Setting the welcome screen
When you first turn the camera on, the welcome screen displays
the HP Invent logo.
You can configure the welcome screen to display an image of your
choice.
To change the image on the welcome screen
1 Turn the camera on.
2 Press the dial to begin reviewing your images.
Adjusting the camera settings 27
Page 36

3 Turn the dial to scroll to the image that you want to use as
the welcome screen.
4 Press the dial to open the main menu.
5 Turn the dial to scroll to the Setup icon, and then
press the dial to open the Setup menu.
6 Turn the dial to scroll to Welcome Screen, and
then press the dial.
7 Turn the dial to scroll to either
This Image or HP Logo, and then
press the dial.
HP photosmart 318 User Guide28
Page 37

Sharing and
5
After you have taken some pictures with your digital camera, you
can use them in many fun and creative ways. You can transfer
them to your computer for use in creative projects or for sharing
with family and friends over the Internet. If you have a printer with
a slot for a CompactFlash (CF) memory card, you can print your
images directly from a CF memory card.
Check out HP’s photosmart Web site at www.hp.com/
photosmart for great ideas and tips about how to use your
images to create fun projects.
This chapter describes how to use the camera with the following
equipment:
printing images
a Microsoft® Windows® computer
a Microsoft Windows NT® computer
an Apple Macintosh® computer
a computer on which you have not installed the HP software
a card reader
a printer equipped with a card reader
Sharing and printing images 29
Page 38

Using the camera with a Windows
computer
You can copy the images in your digital camera to a Microsoft
Windows computer.
System requirements for a Windows
computer
To work with your camera, your computer must meet or exceed
the following requirements.
Processor 166 MHz Pentium or equivalent
Memory (RAM) Windows 98, Windows Millenium Edition,
Windows 2000, and Windows XP: 32 MB
Windows NT 4.0: 64 MB
Free hard disk space 180 MB
Video display 640 by 480, 256 colors
CD-ROM any speed
Operating system Windows 98, Windows Millenium Edition,
Interface For Windows 98, Windows Millenium Edition,
Windows 2000, Windows XP, or Windows NT 4.0
Windows 2000, and Windows XP: USB port
For Windows NT 4.0: CF memory card and card
reader (purchased separately)
For updated system requirements, go to www.hp.com/
photosmart.
HP photosmart 318 User Guide30
Page 39

Installing the software on a Windows
computer
1 Insert the HP photosmart 318 CD into your computer’s CD-
ROM drive. The installation window automatically appears.
If the installation window does not appear, use Windows
Explorer or My Computer to locate your CD-ROM drive, and
then double-click the file Setup.exe.
2 Click Next, and then follow the instructions on the screen to
install the software.
The software places several icons on your desktop, including a
link to the photo imaging Quick Reference.
To install the bonus software
Certain versions of the camera are shipped with bonus software.
1 Press and hold the SHIFT key on your computer keyboard
while you insert the HP photosmart 318 CD into your
computer’s CD-ROM drive.
If the automatic installation starts, click Cancel.
2 Click Start, click Run, and in the Open box, type
X
:\Bonus\setup.exe (where X is the drive letter assigned to
your CD-ROM drive).
3 Click OK, and then follow the instructions on the screen to
install the software.
Connecting the camera to a Windows
computer
Before connecting the camera to your computer, make sure you
have installed the software.
Note The camera uses a USB connection, so you do not
need to turn the computer off when connecting or
disconnecting the camera.
Sharing and printing images 31
Page 40

To connect the camera to a Windows computer
1 Make sure the camera is turned off.
2 Plug the smaller end of the USB cable into the camera.
3 Plug the flat end of the cable into any USB port on your
computer.
Note When the camera is connected to your computer,
only the switch operates. The other
camera buttons do not respond.
Unloading images to a Windows computer
Unloading is the process of copying images from the camera’s
memory to your computer. If you have a CF memory card installed
in the camera, images will be copied from the CF memory card to
the computer.
You can unload images from your camera in one of three ways:
automatically, manually, or by mounting the camera as a disk
drive. The automatic unload procedure is the preferred method.
For descriptions of the other methods, see the online
documentation with the HP Photo Imaging software.
Tip To conserve battery power, you can use an AC
adapter (optional) when you are unloading images
to your computer.
To unload images automatically
1 Connect the camera to your computer using the USB cable.
2 Turn the camera on.
HP photosmart 318 User Guide32
Page 41

The status LCD displays PC to indicate the camera is
connected to a computer.
After a few seconds, the software starts. Follow the instructions
on your computer screen to complete the unload process.
Note To pause the automatic unload, click anywhere in
the HP Automatic Image Unload Software window.
If you have no new images in your camera when
you connect it to the computer, the automatic unload
does not take place.
You can set up the HP Automatic Image Unload software so that
certain tasks occur automatically after the images are unloaded
from the camera. You can:
automatically view your images.
automatically print your images.
automatically lay out a photo album page.
To set up the automatic tasks, in the HP Automatic Image Unload
Software window, click Task O ption s. For more information,
double-click the HP Quick Reference—Photo Imaging icon that
is installed on your desktop with the software.
Using the camera with a Windows NT 4.0
computer
Windows NT 4.0 does not support the USB interface, so you
cannot connect your camera directly to your computer. You can
save your images to a CF memory card (purchased separately)
and then transfer them from the card to the computer through
either a memory card slot in an HP printer equipped with one or
through a memory card reader.
To use an HP printer that has a memory card slot
Follow the instructions in your printer documentation to transfer
images from the memory card to your Windows NT 4.0 computer
through the printer’s memory card slot.
Sharing and printing images 33
Page 42

To use a memory card reader
1 Make sure the camera is turned off.
2 Remove the memory card from the camera.
3 Insert the memory card into the memory card slot in the
memory card reader.
4 Turn the computer on if you haven’t already.
5 Double-click the HP Photo Imaging Software icon on the
Windows desktop. The main window of the HP Photo Imaging
Software opens.
6 Click Unload Images in the main window. Because no USB
camera is found, the software displays a dialog box in which
you can select the drive letter for your memory card reader.
7 Select the drive letter (such as H:) for your memory card
reader in the dialog box.
8 Start the HP Automatic Image Unload software and complete
the steps to unload without the timer.
HP photosmart 318 User Guide34
Page 43

Using the camera with a Macintosh
computer
You can transfer the images in your digital camera to an Apple
Macintosh computer.
System requirements for a Macintosh
computer
To work with your camera, your Macintosh computer must meet or
exceed the following requirements.
Processor Power PC, 233 MHz
Memory (RAM) 64 MB
Free hard disk space 150 MB
Video display 800 by 600, 16-bit color
CD-ROM any speed
Operating system MAC OS 8.6 or later
For updated system requirements, go to www.hp.com/
photosmart.
Changing the PC Connect Mode setting
Before you can unload images from the camera to a Macintosh,
you must change the connection setting in the Setup menu.
Note On your camera, the letters “PC” stand for “personal
computer” and refer to a computer running either the
Windows or Macintosh operating system.
1 Turn the camera on.
2 Press the dial twice to open the main menu.
3 Turn the dial to scroll to the Setup icon.
Sharing and printing images 35
Page 44

4 Press the dial to open the Setup menu.
5 Turn the dial to scroll to PC Connect Mode, and then press
the dial.
6 Turn the dial to scroll to Disk Drive, and then press the
dial.
Installing the software on a Macintosh
computer
You can unload images to your computer either manually or
automatically. To use the camera’s automatic unload feature,
install the ArcSoft PhotoImpression with Automatic Image Unload
software from the camera CD.
1 Insert the HP photosmart 318 CD into your computer’s CD-
ROM drive.
2 Click the installer icon, and then follow the instructions on the
screen to install the software.
To install the bonus software
Certain versions of the camera are shipped with bonus software.
1 Insert the HP photosmart 318 CD into your computer’s CD-
ROM drive.
2 Double-click the Bonus folder icon.
3 Double-click the installer icon for Panorama Maker or
PhotoFantasy.
4 Follow the instructions on the screen to install the software.
Connecting the camera to a Macintosh
computer
Before connecting the camera to your computer, make sure you
have changed the PC Connect Mode setting, as described
earlier.
HP photosmart 318 User Guide36
Page 45

Note The camera uses a USB connection, so you do not
need to turn the computer off when connecting or
disconnecting the camera.
To connect the camera to a Macintosh computer
1 Make sure the camera is turned off.
2 Plug the smaller end of the USB cable (supplied) into the
camera.
3 Plug the flat end of the cable into any USB port on your
computer.
Note When the camera is connected to your computer,
only the switch operates. The other
camera buttons do not respond.
Unloading images to a Macintosh computer
Unloading images is the process of copying images from the
camera to your computer. If you have a CF memory card installed
in the camera, images will be copied from the CF memory card to
the computer.
You can unload images from your camera in one of two ways:
automatically or by mounting the camera as a disk drive. The
automatic unload procedure is the preferred method.
Tip To conserve battery power, you can use an AC
power adapter (optional) when you are unloading
images to your computer.
Sharing and printing images 37
Page 46

To automatically unload images to a Macintosh computer
1 Connect the camera to your computer by using the USB cable.
2 Turn the camera on.
The status LCD displays PC to indicate the camera is
connected to a computer.
3 If the welcome screen appears on your computer screen, click
OK.
4 After a few seconds, the HP Automatic Image Unload window
appears. When the countdown timer expires, the software
begins unloading new images from the camera to the
computer.
To pause the automatic unload, click Pause.
You can set up your HP Automatic Image Unload software so that
certain tasks occur automatically after the images are unloaded
from the camera. In the HP Automatic Image Unload window, click
Options.
When all the new images have been unloaded to your computer,
the ArcSoft PhotoImpression software opens and you can view,
edit, print, and create projects with your images.
For more information, see the software’s Help.
Tips for unloading images to a Macintosh
computer
When you unload images to your computer, the images are still
stored in the camera until you delete them. If you take new
pictures and then unload images again, the automatic unload
software ignores the old images. That way, you do not end up
with many copies of the same image on your computer.
If you have no new images in your camera when you connect it
to the computer, the automatic unload does not take place.
You can set up specific tasks to occur automatically after the
images have been unloaded from the camera such as deleting
images from the camera, printing the images, or putting the
images into a photo album layout. To do this, click Options in
the HP Automatic Image Unload window.
HP photosmart 318 User Guide38
Page 47

In the HP Automatic Image Unload Options window, you can
disable the automatic unload feature. To turn the feature on
again, open the Automatic Image Unload Options file in the
ArcSoft PhotoImpression folder.
The automatic unload software stores your images in a folder
called Macintosh HD:ArcSoft PI:Photos:
only the final folder (the
Make sure you know where your images are stored on your
computer’s hard disk. By default, images are stored in the
PhotoImpression folder, for example Macintosh HD:ArcSoft
PI:Photos:2002.07.04. If you ever decide to delete the ArcSoft
PI folder, you must first move your images to another folder. If
you do not, your images will be deleted from the hard disk
when you delete the PhotoImpression folder.
date
) in that path.
date.
You can change
Unloading images without using
the software
If you are away from home, you can unload images to a computer
that does not have the HP Automatic Image Unload software
installed on it.
Note Make sure that the computer has a USB port and
that its operating system is Windows 2000 or
Windows Millennium Edition or later, or Macintosh
OS 8.6 or later.
To unload images to a Windows or Macintosh computer
1 Change the camera's PC Connect Mode to Disk Drive. For
more information, see “Changing the PC Connect Mode
setting” on page 35.
2 Connect the camera to the Windows or Macintosh computer
with the USB cable.
3 Turn the camera on. The letters PC appear in the status LCD
to indicate that the camera is connected to the computer. The
computer recognizes the camera as a disk drive.
4 Use the following procedure to access your images as files:
Sharing and printing images 39
Page 48

•
Windows:
drive in My Computer or navigate to the drive letter in
Windows Explorer. Use the Copy and Paste commands to
transfer selected images to your hard drive.
•
Macintosh:
and drop the selected files to your hard drive.
Double-click the icon for the newly assigned disk
Double-click the Untitled drive icon. Then, drag
Using a card reader
You can use a CF memory card reader, such as the SanDisk
ImageMate or a PCMCIA adapter, to view and save image files on
your computer. If you have saved your images to a CF memory
card and you have a card reader installed on your computer, insert
the CF memory card into the card reader. Then, access your
images on the CF memory card just as you would access files on
a floppy disk. See your card reader’s documentation for details.
Card readers can be purchased from www.hpshopping.com
(selected countries only), or from your local digital camera or
electronics store.
Printing images without a computer
If your printer has a slot for a CF memory card, as the HP
photosmart 1000 and higher series printers do, you can print your
images directly from the card. For more information, see your
printer’s documentation.
HP photosmart 318 User Guide40
Page 49

Storing images
6
When you first unpack your digital camera and begin taking
pictures, the images are stored in the camera’s internal memory.
This makes it easier than ever to save pictures; there’s no need for
film of any kind. You can delete unwanted images from the camera
anytime, making space available for new images.
However, your camera also has a slot for digital “film” in the form
of a CompactFlash (CF) memory card (purchased separately).
The card is more economical than conventional film because you
can reuse the card over and over again. If you install a CF
memory card in your camera, images are stored on the CF
memory card rather than in the camera’s internal memory.
Note If your computer runs Windows NT or if it does not
in memory
have a USB port, you must store images on a CF
memory card. Then use a CF memory card reader
to transfer images to your computer.
This chapter describes how to use your camera with or without a
CF memory card and how to copy images from internal memory to
a CF memory card.
Tip As long as you have a CF memory card in the
camera, you can access only the images stored on
the CF memory card. For more information, see
“Using both internal memory and a CF memory
card” on page 46.
Storing images in memory 41
Page 50

Determining the number of pictures
you can take
You can store as many as 113 images in the camera’s internal
memory. The number of pictures that you can take and store in the
space remaining in memory depends on several factors. Unlike
conventional film, each digital image takes up a different amount
of space in memory. Images that are complex and contain many
details take up more space, whereas simple images take up less
space. Pictures taken full size occupy more space, whereas
pictures taken with digital zoom occupy less space. However, the
most important factor in image size is the image quality you have
selected.
The number of images remaining in memory is indicated in the
status LCD on top of the camera. It is an approximate number that
decreases as you take pictures.
Note You can take each picture with a different setting. As
you change the settings, the number of remaining
images that is indicated on the status LCD changes.
The number of images you can store in the camera depends
primarily on image quality:
Pictures taken with an image quality of BEST (three stars)
require the most memory. You can store approximately 7 such
images on the camera.
Pictures taken with an image quality of BETTER (two stars)
require less memory. You can store approximately 16 such
images on the camera.
Pictures taken with an image quality of GOOD (one star)
require the least amount of memory. You can store a maximum
of approximately 113 such images on the camera.
number of
images r emaining
in memory
HP photosmart 318 User Guide42
Page 51

If internal memory is full, “0” appears for the remaining picture
count and a red light appears to the right of the viewfinder when
you press the
on, the message MEMORY FULL appears in the status line.
To resume taking pictures, unload images to your computer and
delete them from the camera, or install a CF memory card.
Note The HP photosmart 318 digital camera is shipped
SHUTTER button. In addition, if the image display is
without a CF memory card. If you do not install a CF
memory card, all images are automatically stored in
internal memory.
Using a CF memory card
If you install a CF memory card, all images taken after installing
the CF memory card are saved to the card.
Note Even if there is space available in internal memory,
images will be stored on the CF memory card.
In addition, as long as the CF memory card is in the camera, all
camera operations involve the images that are on the CF memory
card. The remaining image count applies to the CF memory card,
and images that you review are stored on the CF memory card.
When a CF memory card is installed, the letters CF appear on the
status LCD.
CF card indicator
Storing images in memory 43
Page 52

Installing a CF memory card
Use only CompactFlash Association (CFA)
certified type 1 CF memory cards with your
digital camera. These cards are manufactured
by several vendors and are available in a variety
of memory sizes. You can purchase additional
CF memory cards from www.hpshopping.com
(selected countries only), or from your local digital camera or
electronics store.
To install a CF memory card
1 Make sure the camera is turned off.
CAUTION
2 Open the CF memory card door.
3 If there is a card already in the camera,
remove the existing card. To do this, locate
the lever on the bottom of the camera under
the CF memory card door. Slide it toward the
center of the camera. The card pops out.
4 Hold the new CF memory card so that the
tiny ledge on the top rear of the card is
between your fingers, the side with pinholes faces the camera,
and the ledge on the back of the card faces the front of the
camera.
5 Insert the card firmly all the way into the camera.
CAUTION
Inserting or removing a CF memory card while the
camera is on could damage the existing card or result
in lost images.
The card should fit easily almost all the way into the
slot. If it stops when it is only partially inserted, turn the
card over and try again. Do not force the card into the
camera.
HP photosmart 318 User Guide44
Page 53

6 Gently push the CF memory card all the way into the camera.
7 Close the CF memory card door.
Tip If you cannot close the CF memory card door, you
might not have inserted the card correctly. Remove
the card and try again.
Checking the CF memory card status
If you have a CF memory card installed in the camera, the letters
CF appear in the status LCD and in the status line of the image
display.
If the CF memory card is full, “0” appears for the remaining picture
count and a red light appears to the right of the viewfinder when
you press the
on, the message CF CARD FULL appears on the status line to
indicate that you cannot take any more pictures.
If the CF memory card is damaged or unformatted, the letters CF
appear on the status LCD and blink, and an error message
appears on the image display.
To resume taking pictures, try the following steps:
SHUTTER button. In addition, if the image display is
If you receive any card error indications immediately after
installing a new, blank CF memory card, the card might need to
be formatted.
If the message CF CARD FULL appears on the image display
after you have successfully taken and stored numerous images
on the CF memory card, the CF memory card is full.
Storing images in memory 45
Page 54

If you receive the card error indications and the card is
formatted and is not full, the card might be damaged. Try
reformatting the card, or try a different card.
Using both internal memory and a
CF memory card
If you have images stored in internal memory and you install a CF
memory card, you can no longer access the images in internal
memory. You have two options:
Turn the camera off, remove the card, and turn the camera
back on. You now have access to images in internal memory.
Copy the images from internal memory to the CF memory card
and access the images from the CF memory card.
To copy images from internal memory to a CF memory card
1 If you have not already already done so, install a CF memory
card in the camera.
2 Turn the camera on.
3 Press the dial twice to open the main menu.
4 Turn the dial to scroll to the Setup icon, and then
press the dial to open the Setup menu.
5 Turn the dial to scroll to Copy to CF Card, and
then press the dial.
Note Copying images from internal memory to a CF
memory card does not overwrite content that is
already on the CF memory card. If the CF memory
card does not have enough room to store all the
images that are in internal memory, an error
message appears. Either make room on the CF
memory card or turn the camera off and replace the
CF memory card.
6 Turn the dial to select Yes, and then press the dial.
HP photosmart 318 User Guide46
Page 55

The images are copied from internal memory to the CF
memory card. Your images are still stored in internal memory
until you delete them. If you have created a print order for
those images, the print order is copied to the CF memory card
along with the images.
Formatting memory
The internal memory installed in your digital camera is formatted
at the factory. Under ordinary circumstances, you do not need to
format it. However, if the camera does not store images properly,
you might want to try formatting the internal memory.
CAUTION
Most CF memory cards are already formatted when you buy them.
However, if you buy a CF memory card that has not been
formatted, you need to format it before you can store images on it.
If you insert a new, formatted card in the camera and it doesn’t
work, try reformatting it—it may have been formatted improperly.
Also reformat cards that were previously used in a different
camera to optimize them for use with your camera.
Note You can reuse a CF memory card that is full by
Formatting deletes everything stored in memory.
formatting it. This deletes all images and files from
the card. You can also use the Delete menu to
delete one or all images from a CF memory card.
To format internal memory or a CF memory card
1 Turn the camera on.
2 Press the dial twice to open the main menu.
3 Turn the dial to scroll to the Delete icon, and then
press the dial to open the Delete menu.
4 Turn the dial to scroll to Format Memory or, if a
CF memory card is installed, scroll to Format CF Card, and
then press the dial.
5 Turn the dial to select Yes, and then press the dial.
Storing images in memory 47
Page 56

When memory has been formatted, the message NO IMAGES
IN MEMORY (or NO IMAGES ON CF CARD) appears on the
image display.
CAUTION
Formatting deletes everything stored on the CF
memory card, including files from other devices such as
pocket computers. Make sure you are formatting the
correct card! If you’re not sure, check the contents of
the card before you format it.
HP photosmart 318 User Guide48
Page 57

Powering and
7
maintaining your
camera
This chapter describes how to use batteries or an AC power
adapter to power your camera, how to care for your camera, and
how to use your camera safely.
Powering your camera
Your digital camera can be powered by batteries or an HPapproved AC power adapter. For convenience, use batteries when
you are taking pictures. To preserve battery power, use an AC
adapter (purchased separately) when you are reviewing images
on the image display for an extended period of time, or when you
are transferring images from the camera to your computer.
Determining if the batteries need to be
changed
The battery icon on the status LCD indicates the charge level of
the batteries. There are three levels of battery charge: full,
partially-charged, and empty.
If the battery icon shows that the batteries are empty, it is time to
replace the batteries.
Note When the empty-battery icon on the status LCD
begins blinking, the power is about to shut off. You
need to replace the batteries before you can take
another picture.
Powering and maintaining your camera 49
Page 58

Full Partially-charged Empty
The life of the batteries depends on several factors. These
include:
how often and how long you use the image display.
how often you use the flash.
the number of pictures you take.
temperature conditions (operating the camera at colder
temperatures results in shorter battery life).
the type of battery (photo-lithium batteries have the longest life,
alkaline have the shortest).
To extend battery life:
When using the camera with a computer or when using the
image display for extended periods of time, use an AC power
adapter that HP has approved for use with your digital camera.
Limit your use of the image display, except when using an AC
power adapter.
Use only batteries that are designed for digital cameras, such
as photo-quality alkaline, photo-lithium, or rechargeable nickelmetal hydride (NiMH) batteries, available from various battery
manufacturers.
If you are using rechargeable batteries, be sure you fully drain
and recharge the batteries according to the manufacturer’s
instructions.
Use only batteries that are in good condition. Batteries that
show signs of leakage, corrosion, or swelling should not be
installed in the camera.
HP photosmart 318 User Guide50
Page 59

Replacing batteries
The camera uses four AA batteries. You can use photo-lithium or
photo-quality alkaline AA batteries, or rechargeable NiMH AA
batteries. You can purchase additional batteries from your local
camera or electronics store.
Note If you choose to use rechargeable batteries, you
must recharge them in a separate device, outside
the camera. The batteries do not recharge in the
camera when you connect an AC adapter.
To insert new batteries:
1 Make sure the camera is turned off.
2 To open the battery
compartment, slide the
battery compartment cover in
the direction of the arrow,
and then lift it.
3 Insert four new batteries,
making sure the + / −
electrodes are facing the
proper direction (see the
diagram inside the battery
compartment).
4 Close the battery compartment cover by sliding it into place
and then clicking it shut.
CAUTION
Powering and maintaining your camera 51
Replace all the batteries at the same time. Do not
replace the batteries individually or use batteries of
different types. Always follow the instructions on the
battery package when handling or disposing of
batteries.
Page 60

Using an AC power adapter
To extend the life of your batteries, use an AC power adapter as
your power source when connecting your camera to a computer or
when using the image display for an extended period.
Use only an AC power adapter that HP has approved for use with
the camera. Use of any other adapter will void your warranty and
can damage your camera.
AC power adapters are available at www.hpshopping.com
(selected countries only). For AC adapter specifications, see HP’s
photosmart Web site at www.hp.com/photosmart and click
support.
To connect an AC power adapter:
1 Plug the adapter into a power source (such as a wall outlet or
power strip).
2 Connect the round end of the adapter cable to the camera.
Note If you want to use battery power, remove the AC
adapter from the camera. If the AC adapter is
connected to the camera, even if it is not connected
to a power source, the camera will not use battery
power.
HP photosmart 318 User Guide52
Page 61

Caring for your camera and
accessories
Camera
Keep the lens clean to help you take sharp, clear photos with
the best possible focus. Use a dry, soft, lint-free cloth to gently
wipe the lens and status and image displays to clean off any
fingerprints and dust.
Wipe the outside surfaces of the camera with a clean, dry
cloth. Never use a rough cloth or abrasive cleaners, which can
scratch the camera.
Do not leave the camera in the sun or in a very warm location
(for example, inside a car) for long periods.
If you move the camera from a cold to a warm location or vice
versa, always allow the camera several minutes to adjust to the
current ambient temperature before you use it.
Memory cards
To avoid erasing data from a memory card or damaging the
card, do not expose it to heat, moisture, or static electricity.
Powering and maintaining your camera 53
Page 62

Safety precautions
To avoid the risk of electric shock, do not open the camera
case or attempt to repair the camera yourself. Contact an
authorized HP Service Center for repairs.
Keep the camera dry. Exposing the camera to excessive
moisture can cause it to malfunction.
If moisture gets inside the camera, stop using the camera
immediately. Allow the camera to air dry completely before
operating it again.
Your digital camera comes with four non-rechargeable
batteries. Do
mix old and new batteries or batteries of different types. Follow
the battery manufacturer’s safety instructions.
When disposing of batteries, follow the battery manufacturer’s
disposal and recycling instructions or the guidelines that are
recommended for your area. Do
batteries.
not
attempt to recharge these batteries. Do
not
incinerate or puncture
not
Use only the HP-approved AC power adapter. Failure to do so
could damage the camera or cause a fire. Use of a non-HP AC
power adapter will also void your camera’s warranty.
The image display of your digital camera contains mercury.
Disposal of this material may be regulated due to
environmental considerations. For disposal or recycling
information, please contact your local authorities or EIA:
www.eiae.org.
HP photosmart 318 User Guide54
Page 63

Troubleshooting,
8
support, and
warranties
Problems and solutions
Problem Possible cause Solution
The camera
does not turn
on.
The batteries are not
functioning correctly.
Check the following conditions:
• The type of batteries that you have
installed in the camera may not be
the appropriate type for a digital
camera. Use only four photo-quality
AA lithium, alkaline, or NiMH
batteries.
• Make sure the batteries are inserted
correctly. The positive and negative
poles may be reversed.
• The charge in the batteries may be
low or completely drained. Try
installing new or recharged
batteries.
The AC adapter is
not functioning
correctly.
Troubleshooting, support, and warranties 55
Check the following conditions:
• The AC power adapter is plugged
into an electrical outlet.
• There is power at the outlet.
• The AC power adapter is not
damaged.
Page 64

Problem Possible cause Solution
The camera
does not
respond wh en
I press a
button.
I replace the
camera
batteries
frequently.
You have an AC
power adapter
connected to the
camera, but it is not
connected to a
power source.
The camera is off. Turn the camera on.
The camera is
connected to a
computer.
The batteries are
empty.
The camera needs
to be reset.
Extended use of the
image display
consumes battery
power. Unloading
images to your
computer can also
consume a lot of
battery power.
When you have an AC adapter
connected to the camera, the camera
does not use battery power even if the
adapter is not connected to a power
source. If you want to use battery power,
disconnect the AC adapter from the
camera. If you want to use AC power,
connect the AC adapter to a working
electrical outlet.
If the status LCD displays the letters PC,
the camera buttons do not respond.
Replace the batteries.
Turn the camera off and then on again.
Remove the batteries and reinstall them.
If you are using an AC power adapter,
disconnect the adapter from the camera,
remove and reinstall the batteries, and
then reconnect the adapter.
To extend the life of your batteries:
• Always use an AC adapter to power
the camera when you are using the
image display for an extended
period of time and when you are
unloading images to your computer.
• Limit your use of the image display.
• Do not use ordinary alkaline
batteries. Purchase higher-grade
batteries, such as “ultra-” or
“premium-” grade alkaline or lithium
batteries, or switch to rechargeable
NiMH batteries. These batteries are
available from various battery
manufacturers.
The camera turns on
and consumes
battery power while
you carry it loose in
a purse or backpack.
Always carry the camera securely in a
case.
HP photosmart 318 User Guide56
Page 65

Problem Possible cause Solution
The wrong
date and/or
time is
shown.
The incorrect
language is
set on the
camera.
A long delay
occurs after I
press the
shutter button
before the
camera takes
a picture.
The NiMH batteries
you are using were
recharged
incorrectly.
The batteries were
dead or were
removed from the
camera for more
than 10 minutes.
The wrong language
was selected when
you started the
camera the first
time.
The camera is still
saving the last
picture you took.
The flash is
recharging.
The light is low and
the flash is turned
off.
You must recharge all four NiMH
batteries after fully draining them four
times for the batteries to reach their
optimum capacity and performance.
Replace the batteries and then reset the
date and time using the camera menus.
To avoid losing date and time
information, replace low batteries
promptly.
Change the camera language by using
the camera’s Setup menu.
Wait a few seconds for the camera to
finish processing the image, and then
press the
When a steady green light appears next
to the viewfinder, the camera is ready to
take another picture.
Wait until the flash icon on the status
LCD stops blinking before taking another
flash picture.
In dim light the camera requires a longer
exposure. Either hold the camera very
steady until it takes the picture; or
improve the lighting conditions or use
the flash.
SHUTTER button halfway down.
A red light
appears next
to the
viewfinder
when I press
the shutter
button.
Troubleshooting, support, and warranties 57
Space in memory is
insufficient for the
picture. (The status
LCD shows “0”
images remaining.)
Make room in memory by deleting or
unloading images, or select a lower
image quality setting.
If you do not have a CF memory card
installed, installing one will give you
room for more images. If you have a CF
memory card, remove it and see if you
have room in internal memory (the
status LCD shows a number other than
0), or install a new CF memory card. For
more information, see “Installing a CF
memory card” on page 44.
Page 66

Problem Possible cause Solution
A yellow light
appears next
to the
viewfinder
when I press
the shutter
button
halfway
down.
My image is
blurry.
The memory card
that you have in the
camera is damaged
or is not formatted.
The camera cannot
find a focus because
you are too close to
the subject.
The camera cannot
find a focus because
the subject does not
provide enough
contrast for the
automatic focus
system.
The exposure will be
longer than 1/30
second because the
light is dim and the
flash has been
turned off.
Your subject was too
close to the camera
lens.
Format the memory card or replace it
with a new, formatted card.
The camera’s automatic focus range is
20 cm (~8 inches) to infinity and focuses
on the object in the center of the frame.
Make sure you are not too close to the
subject and that you have placed the
subject in the middle of the frame.
Try a different angle or change the
lighting on your subject. You can also
use focus lock to set the focus on a
different subject. For more information,
see “Using focus lock” on page 10.
Try the following solutions:
• Use the flash.
• Wait for lighting conditions to
improve or turn on the lights in the
room.
• Use a tripod to steady the camera
for the longer exposure.
The camera’s automatic focus range is
20 cm (~8 inches) from the front of the
lens to infinity. For a clear, sharp image,
make sure your subject is within this
range.
The subject wasn’t
centered in the
frame, or the subject
did not provide
enough contrast for
the camera to focus
properly.
The subject moved
while you took the
picture.
You moved the
camera while you
took the picture.
If you do not want your subject in the
middle of the image, or if the subject
lacks contrast, use focus lock to set the
camera’s automatic focus using a
different subject. For more information,
see “Using focus lock” on page 10.
If you are photographing a moving
object, try using focus lock.
Hold the camera steady as you press
the
SHUTTER button, or use a tripod.
HP photosmart 318 User Guide58
Page 67

Problem Possible cause Solution
My image is
too dark.
My image is
too bright.
When I
connect the
camera to my
computer, the
software says
it can’t find
the camera.
There was not
enough light.
The flash was on,
but the subject was
too far away.
A light shone behind
the subject.
Your finger blocked
the flash.
The flash provided
too much light.
A natural or artificial
source other than
the flash provided
too much light.
You were too close
to the subject to use
the flash.
The camera is
turned off.
The USB cable is
not connected
correctly.
The camera is
connected to the
computer through a
USB hub and your
USB hub is not
compatible with the
camera.
Wait for natural lighting conditions to
improve, add indirect lighting, or use the
flash to illuminate your subject.
The flash can only illuminate objects that
are within 2.5 m (~8 feet) of the camera.
Make sure your subject is within range
of the flash when you take the picture.
Use FLASH ON to brighten the subject
when there is a back light.
Be sure to move your fingers away from
the flash when you are ready to take a
picture.
Change the flash setting to AUTO or
OFF.
Try taking the picture from a different
angle. Avoid pointing the camera directly
toward a bright light or reflective surface
on a sunny day. If there is light behind
your subject, use the FLASH ON
setting.
Move back from the subject or set the
flash to FLASH OFF and take the
picture again.
Turn the camera on.
Make sure that the USB cable is firmly
connected at both ends.
Connect the camera directly to a USB
port on the computer.
The camera needs
to be reset.
Troubleshooting, support, and warranties 59
Turn the camera off and then on again.
Page 68

Problem Possible cause Solution
The computer
does not
recognize the
camera and
the automatic
image unload
does not
start.
The camera is not
configured correctly
for the type of
computer you have.
You have not taken
any new pictures
since the last time
you unloaded
images to your
computer.
Your Macintosh
computer has an
older version of OS
8.6, which does not
support USB mass
storage.
Error messages
Open the Setup menu and check the
PC Connect Mode setting:
• If you are using a Windows
computer, make sure PC Connect
Mode is set to Digital Camera.
• If you are using a Macintosh
computer, make sure PC Connect
Mode is set to Disk Drive.
When you unload images to your
computer, the images are still stored in
the camera until you delete them. If you
take new pictures and then unload
images again, the automatic unload
software ignores the old images. If you
have no new images in your camera
when you connect it to the computer, the
automatic unload does not take place.
Go to the Support section of
www.apple.com and download the USB
Mass Storage Support (version 1.3.5)
update.
If an error message appears on the image display, try one of the
following solutions.
Error
Possible cause Solution
message
BAD CF CARD! The CF memory card is
damaged.
BATTERIES ARE
TOO LOW FOR
LIVE VIEW
Power in the batteries is
insufficient for you to
preview your pictures.
However, you can take
pictures or review your
images.
Reformat the CF memory
card or replace the card.
Press the button to turn
the image display off and use
the viewfinder to frame your
pictures.
HP photosmart 318 User Guide60
Page 69

Error
message
Possible cause Solution
CF CARD
REQUIRES
FORMATTING
INVALID DATE! You set an invalid date, such
NO IMAGES ON
CF CARD
NO IMAGES IN
MEMORY
NOT ENOUGH
ROOM ON CF
CARD
The CF memory card needs
to be formatted.
as February 31, 2002.
You attempted to view
images, but no images are
stored on the CF card that is
in the camera. (This
message appears
automatically when you
delete all images or format
the CF card.)
You attempted to view
images, but there are no
images stored in internal
memory. (This message
appears automatically when
you delete all images or
format the camera’s internal
memory.)
You attempted to copy
images from internal
memory to a CF card, but
space on the CF card is
insufficient for all the
images.
Format the CF memory card.
Use the dial to set a
valid date.
Take a picture or press the
button.
If you have images stored in
internal memory and you
want to view them, turn off
the camera, remove the CF
card, and turn the camera
back on. For more
information, see “Using both
internal memory and a CF
memory card” on page 46.
Take a picture or press the
button.
For more information, see
“Storing images in memory”
on page 41.
Delete some of the images
on the CF card or replace the
card with one with more
storage capacity. Or remove
the card, delete some of the
images in internal memory,
and try again.
Troubleshooting, support, and warranties 61
Page 70

Getting assistance
HP provides several resources on the World Wide Web to provide help with your
camera whenever you want.
Visiting HP Web sites
HP product support
Visit www.hp.com/go/support to find information for your camera model. After
you enter the section that covers your camera model, you will be able to choose
information about setting up and using your camera, downloading drivers, solving a
problem, ordering, and information about the warranty.
HP photosmart Web site
Visit www.hp.com/photosmart for:
Tips for using your camera more effectively and creatively.
HP digital camera driver updates and software.
HP assistance
If you cannot find an answer to your question using the sites listed above, visit
www.hp.com/cposupport/mail_support.html. From there, you can discover how
to contact HP through e-mail, phone, and other methods.
Visiting related Web sites
Links to third-party Web sites are provided solely as a convenience to you. HP has
not reviewed all of these third-party sites and does not control and is not
responsible for any of these sites or their content. Thus, HP does not endorse or
make any representations about them, or any information, software or other
products or materials found there, or any results that may be obtained from using
them. If you decide to access any of the third-party sites, you do this entirely at
your own risk.
HP photosmart 318 User Guide62
Page 71

Contacting HP Customer Support
In addition to the Web, you can contact HP by telephone or mail for support and
service for your camera. Prices, availability, and hours of support are subject to
change without notice.
How HP can help
HP's support hotline can help resolve problems with setup, installation,
configuration, and operation.
For questions about operating systems or network configurations, contact your
point of purchase or internal support department. For help with non-HP hardware
or software, please contact the manufacturer.
Before you call
Please have the following information ready before you call:
serial number (found on the bottom of your camera)
product name
date of purchase
Obtaining support within the United States
Free telephone support for one year
Within one year of your purchase, telephone support is provided to you free of
charge. If this is a long distance call for you, long distance charges will apply.
Call (208) 323-2551.
Our support staff is available from 6 am to 10 pm Mountain Time, Monday through
Friday, and 9 am to 4 pm on Saturday.
After the first year
Call (208) 323-2551.
Charges are $25.00 per issue, charged to your credit card. If you think your HP
product might need service, call the Customer Support Center, which can help
determine if service is required.
Troubleshooting, support, and warranties 63
Page 72

Upgraded warranty options
You can select one of the following upgraded warranty options (available in the
U.S. only):
Standard Next Day Exchange
Accidental Damage Protection with Next Day Exchange
Upgrade your standard factory warranty to three years with the HP SupportPack.
Service coverage begins on product purchase date and the pack must be
purchased within the first 180 days of product purchase. HP will determine the
hardware service offering based upon the outcome of system self-test programs
run by the customer through the initial call to the HP Customer Care Center. If
during your technical support call it is determined that your product needs
replacement, then HP will ship you this replacement product next business day
free of charge. Optional Accidental Damage Protection is also available. This
warranty upgrade protects against accidental breakage such as spills, drops, or
falls. Both of these warranty upgrades offer maximized uptime and productivity,
the convenience of door-to-door pickup with delivery, packaging and freight
prepaid by HP.
For more information please visit www.hp.com/go/hpsupportpack or call 1-888999-4747.
Obtaining support worldwide
If you need help with your HP product, please call the phone number listed below
for the Customer Support Center in your country. Telephone support is free for 1
year in Asia and the South Pacific and 30 days in the Middle East and Africa.
For phone support in Europe, please check for the details and conditions of phone
support in your country by consulting the following Web site: www.hp.com/go/
support. Alternatively, you can ask your dealer or call HP at the phone number
indicated in this booklet. As part of our constant efforts to improve our phone
support service, we advise you to check our Web site on a regular basis for new
information regarding service features and delivery.
If you think your HP product may need service, call the Customer Support Center,
which can help determine if service is required and direct you to a service site.
Otherwise, contact the store where you purchased the product. Or, visit
www.hp.com/cpso-support/guide/psd/repairhelp.html for the nearest sales and
service office.
If the number below has changed, visit www.hp.com/cposupport/
mail_support.html to check for a new one.
Argentina
(5411) 4778 8380
0810 555 5520 (clientes del
interior)
Australia
+63 (3) 8877 8000
Austria
+0810 00 6080
HP photosmart 318 User Guide64
Page 73

Belgium
Dutch: +32 (0)2 626 8806
French: +32 (0)2 626 8807
Greece
+30 (0)1 619 64 11
Brazil
(11) 3747 7799 (Grande São
Paulo)
0800 157 751 (Demais regioes)
Canada
905 206 4663 (for support during
the warranty period)
877 621 4722 (for support after the
warranty period)
Chile
800 22 5547 (Post-sales Business
Computing)
800 360 999 (Post-sales Home
Computing)
China
+86 (10) 6564 5959
Colombia
+9 800 919 477
Czech Republic
+42 (0)2 6130 7310
Denmark
+45 39 29 4099
Finland
+358 (0)203 47 288
Guatemala
1 800 999 5305
Hong Kong
+852 800 967729
Hungary
+36 (0)1 382 1111
India
+91 11 682 6035
Indonesia
+62 (21) 350 3408
Ireland
+353 (0)1 662 5525
Israel
+972 (0)9 952 48 48
Italy
+39 02 264 10350
Japan
+81 3 3335 8333
Korea, Republic of
+82 (2) 3270 0700 (Seoul)
080 999 0700 (outside Seoul)
France
+33 (0)1 43 62 34 34
Malaysia
+60 (3) 295 2566 (Kuala Lumpur)
1 300 88 00 28 (Penang)
Germany
+49 (0)180 52 58 143 (24 pf/min)
Troubleshooting, support, and warranties 65
Page 74

Mexico
52 58 9922 (Mexico City)
01-800-472-6684 (outside
Mexico City)
Middle East/Africa
+44 (0) 207 512 52 02
South Africa
086 000 1030 (RSA)
+27-11 258 9301 (outside RSA)
Spain
+34 902 321 123
Netherlands
+31 (0)20 606 8751
New Zealand
+64 (9) 356 6640
Norway
+47 22 11 6299
Peru
0 800 10111
Philippines
+63 (2) 867-3551
Poland
+48 22 519 06 00
Portugal
+351 21 3176333
Puerto Rico
1 877 232 0589
Sweden
+46 (0)8 619 2170
Switzerland
+41 (0)848 80 11 11
Taiwan
+886 (2) 2717 0055
Thailand
+66 (2) 661 4000 (Bankok)
+66 (53) 357990 (Chiang-Mai)
Turkey
+90 (216) 579 71 71
Ukraine
+7 (380-44) 490-3520
United Arab Emirates
971 4 883 8454
Russian Federation
+7 095 797 3520 (Moscow)
+7 812 346 7997 (St. Petersburg)
Singapore
+65 272 5300
HP photosmart 318 User Guide66
Page 75

Hewlett-Packard limited warranty
statement
HP product Duration of limited warranty
HP Photo Imaging Software One year
HP photosmart 318 digital camera One year
1 HP warrants to you, the end-user customer, that HP hardware, accessories and
supplies will be free from defects in materials and workmanship after the date of
purchase, for the period specified above. If HP receives notice of such defects
during the warranty period, HP will, at its option, either repair or replace products
which prove to be defective. Replacement products may be either new or
equivalent in performance to new.
2 HP warrants to you that HP software will not fail to execute its programming
instructions after the date of purchase, for the period specified above, due to
defects in material and workmanship when properly installed and used. If HP
receives notice of such defects during the warranty period, HP will replace software
which does not execute its programming instructions due to such defects.
3 HP does not warrant that the operation of HP products will be uninterrupted or error
free. If HP is unable, within a reasonable time, to repair or replace any product to a
condition as warranted, you will be entitled to a refund of the purchase price upon
prompt return of the product.
4 HP products may contain remanufactured parts equivalent to new in performance
or may have been subject to incidental use.
5 Warranty does not apply to defects resulting from (a) improper or inadequate
maintenance or calibration, (b) software, interfacing, parts or supplies not supplied
by HP, (c) unauthorized modification or misuse, (d) operation outside of the
published environmental specifications for the product, or (e) improper site
preparation or maintenance.
6 TO THE EXTENT ALLOWED BY LOCAL LAW, THE ABOVE WARRANTIES ARE
EXCLUSIVE AND NO OTHER WARRANTY OR CONDITION, WHETHER
WRITTEN OR ORAL, IS EXPRESSED OR IMPLIED AND HP SPECIFICALLY
DISCLAIMS ANY IMPLIED WARRANTIES OR CONDITIONS OF
MERCHANTABILITY, SATISFACTORY QUALITY, AND FITNESS FOR A
PARTICULAR PURPOSE. Some countries, states or provinces do not allow
limitations on the duration of an implied warranty, so the above limitation or
exclusion might not apply to you. This warranty gives you specific legal rights and
you might also have other rights that vary from country to country, state to state, or
province to province.
7 HP’s limited warranty is valid in any country or locality where HP has a support
presence for this product and where HP has marketed this product. The level of
warranty service you receive may vary according to local standards. HP will not
alter form, fit or function of the product to make it operate in a country for which it
was never intended to function for legal or regulatory reasons.
8 TO THE EXTENT ALLOWED BY LOCAL LAW, THE REMEDIES IN THIS
WARRANTY STATEMENT ARE YOUR SOLE AND EXCLUSIVE REMEDIES.
EXCEPT AS INDICATED ABOVE, IN NO EVENT WILL HP OR ITS SUPPLIERS
BE LIABLE FOR LOSS OF DATA OR FOR DIRECT, SPECIAL, INCIDENTAL,
CONSEQUENTIAL (INCLUDING LOST PROFIT OR DATA), OR OTHER
Troubleshooting, support, and warranties 67
Page 76

DAMAGE, WHETHER BASED IN CONTRACT, TORT, OR OTHERWISE. Some
countries, states or provinces do not allow the exclusion or limitation of incidental
or consequential damages, so the above limitation or exclusion may not apply to
you.
9 THE WARRANTY TERMS CONTAINED IN THIS STATEMENT, EXCEPT TO THE
EXTENT LAWFULLY PERMITTED, DO NOT EXCLUDE, RESTRICT OR MODIFY
AND ARE IN ADDITION TO THE MANDATORY STATUTORY RIGHTS
APPLICABLE TO THE SALE OF THIS PRODUCT TO YOU.
Hardware repair services
If you think your camera, ADF, or XPA needs repair, first call the Customer Support
Center, which can help determine if service is required and direct you to a service
site. For more information, see “Contacting HP Customer Support” on page 63.
Otherwise, contact the store where you purchased the product. Or, visit
www.hp.com/cpso-support/guide/psd/repairhelp.html for the nearest sales and
service office.
Service is free of charge during the warranty period. Beyond the warranty period,
service will be charged.
HP photosmart 318 User Guide68
Page 77

Appendix A:
A
This appendix describes:
Reference
the symbols on the status LCD.
the camera indicator lights.
the camera specifications.
Symbols on the status LCD
Icon Meaning
Batteries full
Batteries partially charged
Batteries empty; sufficient memory for a few pictures
(blinking) Batteries empty; insufficient memory for taking pictures
Automatic flash on
Flash off
Flash on
Appendix A: Reference 69
Page 78

Icon Meaning
Automatic flash with red-eye reduction on
Good photo quality
Better photo quality
Best photo quality
Photo included in DPOF print order
Self-timer on
CF memory card in camera
Digital zoom on
Pictures remaining
(blinking) CF memory card error
Camera connected to computer
HP photosmart 318 User Guide70
Page 79

Camera indicator lights
self-timer light
viewfinder indicator light
Indicator light State Meaning
Viewfinder Green The camera has achieved the best focus
and exposure and is ready to take a
photo.
Yellow The camera cannot find a focus or the
exposure will take longer than 1/30
second.
Red The camera cannot take a photo for one
Self-timer Red – blinking The self-timer is counting down 10
of the following reasons:
• internal memory is full
• the memory card is full, damaged,
unformatted, or missing
seconds and will then take the photo.
Appendix A: Reference 71
Page 80

Camera specifications
Sensor 2.31 megapixels, 1/2.6-inch CCD
Color depth 30-bit
Resolution BEST and BETTER photo quality settings: 1792 x 1200
Internal memory 8 megabytes (MB)
Memory card Compact Flash Type I; all storage sizes supported
Lens system 5-element lens; F2.8; TTL auto focus; 6.8 mm (equivalent
Zoom 2x digital zoom
Shooting modes Single shot
Exposure control Auto exposure
Aperture f/2.8 and f/8.0
Shutter speed 1.4 ms to 320 ms
Focus TTL auto focus; 20 cm (7.9 inches) to infinity
Sensitivity ISO 100
White balance Auto
Self-timer 10-second delay
Viewfinder Optical viewfinder
Flash Built-in flash with range up to 2.5 meters (8.2 feet); modes:
pixels
GOOD photo quality setting: 592 x 400 pixels
to a 43mm lens on a 35 mm conventional film camera)
auto, auto with red-eye reduction, on, off
LCD 1.8 inch color LCD with 61,600 pixels (280 x 220); 3x and
6x playback magnification
Power 4 AA batteries (included) or optional AC adapter
Interface USB
Dimensions 113 mm (4.52 inches) long by 43 mm (1.72 inches) wide by
68 mm (2.72 inches) high
Weight 186 g (6.6 oz.) without batteries
HP photosmart 318 User Guide72
Page 81

Index
Numerics
2x digital zoom
2x DIGITAL ZOOM message
2x timer button
2, 24
25
25
A
AC power adapter
adapter.
aperture
See
72
Apple Macintosh.
52
AC power adapter
See
Macintosh
computer
ArcSoft PhotoImpression
AUTO FLASH message
Auto Flash setting
AUTO icon
auto power
22
5
automatic exposure
automatic flash.
automatic focus
10, 13, 58
22
See
39
22
10
flash
Automatic Image Unload Options
window
39
B
backlighting
BAD CF CARD! message
22
60
batteries
cautions
54
charge levels
compartment door
determining replacement need
disposing of
empty
extending life
icon
49, 69
installing
need replacement frequently
removing
types to use
using rechargeable
49, 69
2
49
54
69
50, 56
3
56
51
3, 50
50
BATTERIES ARE TOO LOW FOR LIVE
VIEW message
battery level indicator
BETTER and BEST image qualities
60
2
23
blinking
battery icon
49, 69
flash icon
memory card icon
self-timer icon
bonus software
22
70
71
31, 36
C
card reader
caring for the camera
40
53
cautions
batteries
memory card
safety
54
53
54
CF (CompactFlash) memory card
capacity
45
checking status
compartment door
description
ejector lever
formatting
indicator
installing
precautions
removing
reusing
using
43
using with internal memory
CF CARD FULL message
45
2
7, 41
2
47
2, 43, 70
44
53
44
47
46
45
CF CARD REQUIRES FORMATTING
message
CF card.
61
See
CF (CompactFlash)
memory card
CF message
43
changing
date and time
exposure automatically
flash setting
focus automatically
image quality
language
PC Connect Mode
print orders
settings
Welcome screen
charge levels for batteries
5
10
22
10
23
27
35
16
21
27
49, 69
charging
Index 73
Page 82

batteries
flash
cleaning the camera
clock
color depth
50
22
53
26
72
Compact Flash memory card reader.
See
CompactFlash (CF) memory card.
card reader
See
CF (CompactFlash) memory card
connecting
AC power adapter
to Macintosh computer
to Windows computer
52
36
31
conserving power
automatically
using AC power adapter
when unloading images
control dial
Copy to CF Card
5, 9, 11
15
32
2, 6
46
copying
images from internal memory to
memory card
images to Macintosh computer
images to Windows computer
46
37
32
print orders from internal memory to
memory card
47
customer support
contacting
Web sites
63, 64
62
D
date
losing
26
picture was taken, where shown
setting
26
wrong one displayed
Date & Time menu
delay for self-timer
Delete menu
6, 18
57
26
72
15
deleting
contents of memory
images from memory
47
18
Digital Print Order Format (DPOF) file
digital zoom
button and indicator
using
24
disposing of materials
2, 70
54
downloading images
pausing
33
to Macintosh computer
to Windows computer
37
32
DPOF (Digital Print Order Format) file
16
16
driver updates
62
E
empty battery icon
enlarging images
Exit menu
exiting camera menus
exposures
automatic
control
using shutter button
extending battery life
72
49, 69
19
6
7
10
10
50, 56
F
22
fill flash
flash
button
2, 22
fill
22
icons
21, 69
location
2
provided too much light
range
59
recharging
setting indicator
setting off
using
22
2
22
12, 13, 21
FLASH CHARGING message
flash memory.
See
CF (CompactFlash)
memory card
FLASH ON and FLASH OFF messages
22
focusing
automatically
locking
10
10
reasons for improper
formatting
CF (CompactFlash) memory card
memory
47
framing images
using image display
using viewfinder
11
9
when precision is important
full memory
43
G
GOOD image quality
23
green light next to viewfinder
groups, using self-timer for
H
See
help.
holding the camera
customer support
9
59
22
13
47
11
71
25
HP photosmart 318 User Guide74
Page 83

HP photosmart Web site
HP product support Web site
62
62
HP Quic k Reference-Photo I maging icon
33
HP SupportPack
64
I
icons
AUTO FLASH
battery
flash
21, 69
FLASH ON and FLASH OFF
22
49, 69
22
HP Quick Reference-Photo Imaging
33
image quality
on status LCD
print order
RED-EYE
self-timer
image display
image number, where shown
70
69
15, 70
22
25, 70
11
15
image quality
changing
effect on memory
GOOD, BETTER, and BEST
icons
indicators
most memory-efficient
23
42
23
70
2, 15, 23
23
images
0 remaining
blurry, dark, or bright
changing quality
57
58
23
copying from internal memory to
memory card
deleting
18
46
determining number that can be stored
42
framing
9, 11
intended for cropping and enlarging
using image editing software
intended for e-mail
intended for Internet
magnifying
making appear closer
printing
16, 29
remaining
sharing
storing
2, 57
29
41
transferring
23
23
19
24
29
unloading to Macintosh computer
unloading to Windows computer
unloading without using software
23
37
32
39
6, 15
viewing
viewing thumbnails
See also
increasing memory
pictures
19
57
indicators
battery level
digital zoom
flash
flash setting
image quality
images remaining
memory card
print order
red-eye reduction
self-timer
viewfinder
inserting batteries
2
2, 70
22
2
2, 23
2, 70
2, 43, 70
70
70
2, 26, 71
71
3
installing
batteries
bonus software
memory card
software on Macintosh computer
software on Windows computer
wrist strap
INVALID DATE! message
3, 51
31, 36
44
36
31
3
61
L
language
changing
wrong one displayed
LCD specifications
27
57
72
lens
location
2
specifications
72
lighting
adjusting camera for
flash settings
22
multiple flickering sources
when behind subject
when low
lights.
locking the focus
low lighting
See
12, 13, 58
indicators
10
12, 13, 58
10
13
12
M
Macintosh computer
bonus software
connecting camera to
disabling automatic unload feature
downloading images
installing software
system requirements
36
36
39
37
36
35
Index 75
Page 84

tips for unloading to
unloading images
using camera with
Web site
60
magnification for playback
Magnify menu
magnifying images
main menu
6
maintaining the camera
38
37, 39
35
72
6, 19
19
53
memory
CF (CompactFlash) card
deleting contents
deleting images
18
effect of image quality
full
43
increasing
insufficient
57
57
internal with camera
most efficient image quality
required for images
requirement for Windows
specifications
storing images
72
41
using with memory card
MEMORY FULL message
7
47
42
7
23
42
30, 35
46
43
menus
choosing language
Copy to CF Card
Date & Time
Delete
6, 18
Exit
6
4
46
26
exiting without making a selection
illustration
Magnify
main
navigating
PC Connect Mode
Print (DPOF)
selecting
Setup
View Thumbnails
Welcome Screen
messages, error
6
6, 19
6
6
35
6, 17
6
6
6, 19
27
60
modes
flash
22
image quality
PC Connect
shooting
mount for tripod
23
35
72
2
N
NO IMAGES IN MEMORY message
7
48,
61
NO IMAGES ON CF CARD message
61
NOT ENOUGH ROOM ON CF CARD
message
61
O
on and off, turning camera
4
P
parts of camera
pausing while unloading images
PC Connect Mode
phone numbers for support
photographs.
1
35
See
images; pictures
33
63, 64
pictures
date taken, where shown
focusing and adjusting exposure
framing
11
holding the camera
previewing
11
remaining indicator
settings for light conditions
taking
9
taking for difficult subjects
tips for taking
using the flash
See also
12
21
images
playback magnification
playback menu.
port requirements
See
30
posed groups, using self-timer for
15
10
9
70
22
13
72
main menu
25
power
automatic conservation
conserving
specifications
power adapter.
power switch
9, 11, 15, 32, 49
72
See
2, 4
powering the camera
previewing.
See
viewing
Print (DPOF) menu
5
AC power adapter
49
6, 17
print orders
adding
16
copying from internal memory to
memory card
creating and editing
indicator
70
where shown
47
16
15
printing
from a memory card
images
16, 29
without a computer
29, 40
40
48,
HP photosmart 318 User Guide76
Page 85

problems, troubleshooting
processor requirements
55
30, 35
purchasing
AC power adapter
card reader
HP SupportPack
52
40
64
Q
quality of images
changing
effect on memory
good, better, and best
23
42
23
R
range
for automatic focus
for flash
59
13, 58
recharging
batteries
flash
recycling materials
red light next to viewfinder
RED-EYE message
red-eye reduction
reformatting memory card
remaining number of pictures
50
22
54
57, 71
22
22, 70
47
2, 15
removing
batteries
contents of memory
images from memory
memory card
repair services
51
47
18
44
68
replacing
batteries
camera
memory card
3, 51
64
44
needed too frequently for batteries
requirements
AC power adapter
batteries
51
Macintosh computer
memory cards
Windows computer
resetting the camera
52
35
44
30
56
resolutions
image quality
specifications
response, none from camera
reusing CF memory card
23
72
56
47
S
safety precautions
54
56
sales and service offices
saved images, viewing
68
15
saving
images using card reader
40
memory through image quality
self-timer
blinking icon
button and indicator
canceling
delay
icon
using
SELF-TIMER message
setting up the camera
Setup menu
sharing images
shooting modes
71
2, 26, 71
26
72
25, 70
25
25
3, 4, 5
6
29
72
shutter button
location
2
red light appears
57
using to set focus and exposure
yellow light appears
shutter speed
slot for memory card
58
72
7
software
bonus
31, 36
cannot find camera
59
installing on Macintosh computer
installing on Windows computer
obtaining updates
62
USB Mass Storage Support
warranty
67
specifications
AC power adapter
camera
72
speed of shutter
52
72
starting
camera
4
self-timer
25
status
battery
49
camera
4
CF (CompactFlash) memory card
status LCD
location
2, 4
symbols
status line
69
15
stopping
camera
4
self-timer
stored images, viewing
26
15
storing images
23
10
36
31
60
45
Index 77
Page 86

determining possible number
in memory
strobe.
SupportPack
See
41
flash
64
T
taking pictures
9
telephone numbers for support
third-party Web sites
thumbnails, viewing
62
19
time
losing
26
setting
26
wrong one displayed
timer.
See
self-timer
transferring images.
57
See
unloading
images
tripod mount
troubleshooting problems
turning camera on and off
2
55
4
U
unloading images
description
pausing
to Macintosh computer
to Windows computer
without using software
updates for drivers
29
33
37
32
39
62
USB
Macintosh connection
37
Mass Storage Support software
Windows connection
30, 31
Windows NT 4.0 connection
42
63, 64
33
60
Web sites
AC power adapter
camera
29, 62
52
disposal or recycling information
downloading Macintosh software
HP assistance
HP photosmart
HP product support
HP SupportPack
purchasing card readers
sales and service
sales and service offices
third parties
worldwide support details
weight of camera
Welcome screen
62
62
62
64
40
68
64
62
64
72
27
Windows computer
bonus software
connecting camera to
downloading images
installing software
31
31
32
31
operating system requirements
port requirement
system requirements
unloading images
using camera with
using camera with NT 4.0
wrist strap, attaching
30
30
32, 39
30
33
3
Y
yellow light next to viewfinder
Z
zooming
24
54
60
30, 35
12, 71
V
versions of software, obtaining
View Thumbnails menu
6, 19
viewfinder
green light next to
indicator light
red light next to
using
9
yellow light next to
71
2, 71
57, 71
12, 58, 71
viewing
images using card reader
40
images using image display
stored images
thumbnails
15
19
W
warranty information
64, 67
62
6
HP photosmart 318 User Guide78
Page 87

Page 88

www.hp.com/photosmart
Printed in Singapore 6/01
*C8900−90029*
C8900-90029
 Loading...