

Page 1
Software Package Builder 1.0
User’s Guide
for HP-UX 11i v1 and 11i v2
Edition 2
Manufacturing Part Number : 5187-4494
December 2003
United States
© Copyright 2002-2003 Hewlett-Packard Development Company, L.P. All rights reserved.
Page 2

Legal Notices
The information in this document is subject to change without notice.
Hewlett-Packard makes no warranty of any kind with regard to this
manual, including, but not limited to, the implied wa rranties of
merchantability and fitness for a particular purpose.
Hewlett-Packard shall not be held liable for errors contained herein or
direct, indirect, special, incidental or consequential damages in
connection with the furnishing, performance, or use of this material.
Warranty
A copy of the specific warranty terms applicable to your Hewlet t-P ackard
product and replacement parts can be obtai ned from your local Sales and
Service Office.
U.S. Government License
Proprietary computer software. Valid license from HP required for
possession, use or copying . Consistent with FAR 12.211 and 12.212,
Commercial Computer Software, Computer Software Documentation,
and Technical Data for Commercial Items are licensed to the U.S.
Government under vendor's standard commercial license.
Copyright Notice
Copyright 2002 - 2003 Hewlett-Packard Development Company, L.P.
All rights reserved. Reproduction, adaptation, or translation of this
document without prior written permission is prohibited, except as
allowed under the copyright laws.
Trademark Notices
Java is a US trademark of Sun Microsystems, Inc.
OSF/Motif is a trademark of The Open Group in the US and other
countries.
UNIX
is a registered trademark of The Open Group.
2
Page 3

Publication History
The manual publication date and part number indicate its current
edition. The publication date will change when a new edition is released.
The manufacturing pa rt numbe r will change wh en extensi ve chan ges are
made.
• Software Package Builder 1.0 Users Guide for HP-UX 11i v1 and 11i
v2:
December 2003, 5187-4494
• Software Package Builder 1.0 Users Guide for HP-UX 11i v1 and 11i
v2:
September 2003, 5187-3646
To ensure that you receive the new editions, you should subscribe to the
appropriate product support service. See your HP sales representative
for details.
New editions of this manual will incorporate all material updated since
the previous edition. For the latest version, see the Software Package
Builder documentation on the Web:
http://docs.hp. com/
Please use the following Web form to send us feedback:
http://docs.hp. com/assis tance/fe edback .html
About this Guide
This guide describes installing and getting started with Software
Package Builder. It also provides a basic overview of the software
packaging process and terminology. It assumes that you are an HP-UX
system administrator and familiar with installing and administering
software in these environments.
This guide applies to the December 2003 version of Software Package
Builder 1.0. If you need additional information for Software Package
Builder, visit the product Web site:
3
Page 4

http://software .hp.com/p roducts/ SPB/
Typographic Conventions
We use the following typographical conventions.
mxtool (4) HP-UX manual page. mxtool is the name and (4) is the
section. From the command line, you can enter “man
mxtool” or “man 4 mxtool” to view the manpage. See
man (1).
Book Title Title of a book. On the Web and on the Instant
Information CD, it may be a hot link to the book itself.
Command Command name or qualified command phrase.
ComputerOut Text displayed by the computer.
KeyCap Name of a keyboard key.
Term Defined use of an important wo rd or phrase.
UserInput Commands and other text that you type.
Variable Name of a variable that you may replace in a command
or function or information in a display that represents
several possible values.
[] Contents are optional in formats and command
descriptions. If the contents are a list separated by |,
you must choose one of the items.
{} Contents are required in formats and command
descriptions. If the contents are a list separated by |,
you must choose one of the items.
... Preceding element may be repeated an arbitrary
number of times.
| Separates items in a list of choices.
4
Page 5

1. Introduction to Software Package Builder
Software Package Builder Overview. . . . . . . . . . . . . . . . . . . . . . . . . . . . . . . . . . . . . . . . . 8
Software Package Builder and HP-UX Software Distributor. . . . . . . . . . . . . . . . . . . . 9
System Requirements . . . . . . . . . . . . . . . . . . . . . . . . . . . . . . . . . . . . . . . . . . . . . . . . . . . 11
Installation Overview . . . . . . . . . . . . . . . . . . . . . . . . . . . . . . . . . . . . . . . . . . . . . . . . . . . 12
Starting Software Package Builder. . . . . . . . . . . . . . . . . . . . . . . . . . . . . . . . . . . . . . . . . 13
2. Software P ackaging
Software Packaging Overview. . . . . . . . . . . . . . . . . . . . . . . . . . . . . . . . . . . . . . . . . . . . . 16
Software Packaging Lifecycle. . . . . . . . . . . . . . . . . . . . . . . . . . . . . . . . . . . . . . . . . . . . 17
Software Package Structure . . . . . . . . . . . . . . . . . . . . . . . . . . . . . . . . . . . . . . . . . . . . . . 19
Organizing Filesystems . . . . . . . . . . . . . . . . . . . . . . . . . . . . . . . . . . . . . . . . . . . . . . . . 19
Software Elements . . . . . . . . . . . . . . . . . . . . . . . . . . . . . . . . . . . . . . . . . . . . . . . . . . . . 20
Software Package Hierarchy . . . . . . . . . . . . . . . . . . . . . . . . . . . . . . . . . . . . . . . . . . . . 22
Product Specification File . . . . . . . . . . . . . . . . . . . . . . . . . . . . . . . . . . . . . . . . . . . . . . . . 25
Attributes . . . . . . . . . . . . . . . . . . . . . . . . . . . . . . . . . . . . . . . . . . . . . . . . . . . . . . . . . . . 25
Packaging Policies . . . . . . . . . . . . . . . . . . . . . . . . . . . . . . . . . . . . . . . . . . . . . . . . . . . . . . 27
3. Software P ackage Builder Features
Introduction . . . . . . . . . . . . . . . . . . . . . . . . . . . . . . . . . . . . . . . . . . . . . . . . . . . . . . . . . . . 30
Screen Regions . . . . . . . . . . . . . . . . . . . . . . . . . . . . . . . . . . . . . . . . . . . . . . . . . . . . . . . . . 31
Package Structure . . . . . . . . . . . . . . . . . . . . . . . . . . . . . . . . . . . . . . . . . . . . . . . . . . . . 31
Attribute Table . . . . . . . . . . . . . . . . . . . . . . . . . . . . . . . . . . . . . . . . . . . . . . . . . . . . . . . 31
Messages Tab . . . . . . . . . . . . . . . . . . . . . . . . . . . . . . . . . . . . . . . . . . . . . . . . . . . . . . . . 32
Policy Help Tab. . . . . . . . . . . . . . . . . . . . . . . . . . . . . . . . . . . . . . . . . . . . . . . . . . . . . . . 32
PSF View. . . . . . . . . . . . . . . . . . . . . . . . . . . . . . . . . . . . . . . . . . . . . . . . . . . . . . . . . . . . 32
Menus . . . . . . . . . . . . . . . . . . . . . . . . . . . . . . . . . . . . . . . . . . . . . . . . . . . . . . . . . . . . . . 33
Tool Bar. . . . . . . . . . . . . . . . . . . . . . . . . . . . . . . . . . . . . . . . . . . . . . . . . . . . . . . . . . . . . 33
Additional Information. . . . . . . . . . . . . . . . . . . . . . . . . . . . . . . . . . . . . . . . . . . . . . . . . 33
Contents
4. Getting Started with Software Package Builder
Getting Started Using the SPB GUI. . . . . . . . . . . . . . . . . . . . . . . . . . . . . . . . . . . . . . . . 36
Creating a New PSF . . . . . . . . . . . . . . . . . . . . . . . . . . . . . . . . . . . . . . . . . . . . . . . . . . . 36
Managing Fileset Content . . . . . . . . . . . . . . . . . . . . . . . . . . . . . . . . . . . . . . . . . . . . . . 37
Validating a PSF. . . . . . . . . . . . . . . . . . . . . . . . . . . . . . . . . . . . . . . . . . . . . . . . . . . . . . 38
Setting Attributes. . . . . . . . . . . . . . . . . . . . . . . . . . . . . . . . . . . . . . . . . . . . . . . . . . . . . 39
Using the SPB Command Line Interface . . . . . . . . . . . . . . . . . . . . . . . . . . . . . . . . . . . . 41
Editing from the CLI . . . . . . . . . . . . . . . . . . . . . . . . . . . . . . . . . . . . . . . . . . . . . . . . . . 41
5
Page 6

Contents
Validating from the CLI . . . . . . . . . . . . . . . . . . . . . . . . . . . . . . . . . . . . . . . . . . . . . . . . 41
Incorporating SPB into Automated Processes . . . . . . . . . . . . . . . . . . . . . . . . . . . . . . 42
Additional Information . . . . . . . . . . . . . . . . . . . . . . . . . . . . . . . . . . . . . . . . . . . . . . . . . . 43
5. Advanced Features
Managing Fileset Content . . . . . . . . . . . . . . . . . . . . . . . . . . . . . . . . . . . . . . . . . . . . . . . 45
Using Advanced Features. . . . . . . . . . . . . . . . . . . . . . . . . . . . . . . . . . . . . . . . . . . . . . . 47
Creating and Using a Subproduct. . . . . . . . . . . . . . . . . . . . . . . . . . . . . . . . . . . . . . . . . . 54
Creating and Using a Bundle . . . . . . . . . . . . . . . . . . . . . . . . . . . . . . . . . . . . . . . . . . . . . 55
Creating and Using a Vendor or Category . . . . . . . . . . . . . . . . . . . . . . . . . . . . . . . . . . . 56
Creating and Using Vendor Defined Attributes. . . . . . . . . . . . . . . . . . . . . . . . . . . . . . . 57
Overview of Software Specification Attributes. . . . . . . . . . . . . . . . . . . . . . . . . . . . . . . . 58
Working with Dependency Attributes . . . . . . . . . . . . . . . . . . . . . . . . . . . . . . . . . . . . . 60
Using Control Scripts. . . . . . . . . . . . . . . . . . . . . . . . . . . . . . . . . . . . . . . . . . . . . . . . . . . . 64
Additional Information . . . . . . . . . . . . . . . . . . . . . . . . . . . . . . . . . . . . . . . . . . . . . . . . . . 66
Glossary . . . . . . . . . . . . . . . . . . . . . . . . . . . . . . . . . . . . . . . . . . . . . . . . . . . . . . . . 68
Index . . . . . . . . . . . . . . . . . . . . . . . . . . . . . . . . . . . . . . . . . . . . . . . . . . . . . . . . . . . 74
6
Page 7

1 Introduction to Software
Package Builde r
The following topics are covered in this chapter:
• “Software Package Builder Overview” on page 8
• “System Requirements” on page 11
• “Installation Overview” on page 12
• “Starting Software Package Builder” on page 13
Chapter 1 7
Page 8
Introduction to Software Package Builder
Software Package Builder Overview
Software Package Builder Overview
Software Package Builder (SPB) provides a visual method to create and
edit software packages using the HP-UX Software Distributor (SD-UX)
package format. Once software is packaged, it can easily be transferred
to a distribution medium, mass produced, and installed by
administrators. The SPB graphical user interface (GUI) provides a
window into the software package structure, showing attributes that can
be set for each pac kage element. SPB loads packaging policies and
validates software package attributes against these policies. The SPB
command line interface (CLI) can also perform validation of software
package attributes against policies and can be added to an automated
process for editing and validation of a PSF.
SPB can assist with the following tasks:
• Creating a product specification file (PSF) to organize files into
products, filesets, and optionally, into bundles and subproducts
• Setting attribute values to define software package characteristics
such as revision, architecture, file permissions, and dependencies
Features
• Validating the PSF against packaging policies to ensure successful
packaging into a software depot with the swpackag e command
• Editing and validating the PSF automatically as part of a nightly
build process using SPB’s CLI
Features Benefits
Graphical User Interface (GUI)
for creating PSFs in SD-UX
format
Command Line Interface (CLI)
for automating nightly changes
to packages
Policy validator for verifying a
package’s use of legal SD-UX
syntax
Provides an easy-to-use interface,
making the complex task of
creating a PSF easier.
Provides a mechanism for easy
automation of PSF edits and
validation.
Easy to create a va lid PS F without
in-depth knowledge of all the
packaging policies.
Chapter 18
Page 9
Introduction to Software Package Builder
Software Package Builder Overview
Features Benefits
Open source software can be
packaged in SD-UX format
User-specified rules files Allows you to specify the rules file
Easy to repackage software from
various formats into SD-UX,
allowing you to manage software
with the SD-UX software
management toolset.
you want to validat e your PSF
against.
Software Package Builder and HP-UX Software
Distributor
It is important to understand the relationship between SPB and SD-UX.
SD-UX SD-UX provides a powerful set of too ls for centralized HP-UX software
management. SD-UX commands are included with th e HP-UX operating
system and allow you to package software into the SD-UX format, as well
as create, distribute, and manage software from software depots.
SD-UX provides utilities to support numerous software package
management tasks. Of these, the swpackage command creates a
software package by combining the files the user wants to deliver (which
may include control scripts) and a product specification file (PSF). The
software package is then placed in a software depot where it can be
distributed to customers and installed using the swinstall command.
The SD-UX packagin g operations are based on the at tribute v alues set in
the PSF. The PSF is a master file that is created for a given software
package to define the structure and describe all the characteristics and
file mappings. The PSF contains attribute information for all the
software elements contained in the package and must adhere to a strict,
hierarchical structure and set of packaging policy rules.
SPB SPB fits into this process by assisting with the creation and validation of
a PSF that the swpackage command uses to create the softw are package.
The structure of a software package and its softwa re elements are
largely abstract and the packaging policy rules that the software
package must adhere to can also be very complex. SPB helps simplify the
process of creating a software package by providing a visual method for
Chapter 1 9
Page 10

Introduction to Software Package Builder
Software Package Builder Overview
creating the PSF, its software elements, attributes, and structure, as well
as automatically validating the PSF against packaging policy rules. SPB
provides a default set of packaging policies that validate your PSF,
however, you can also customize your own packaging policies.
Chapter 110
Page 11

System Requirements
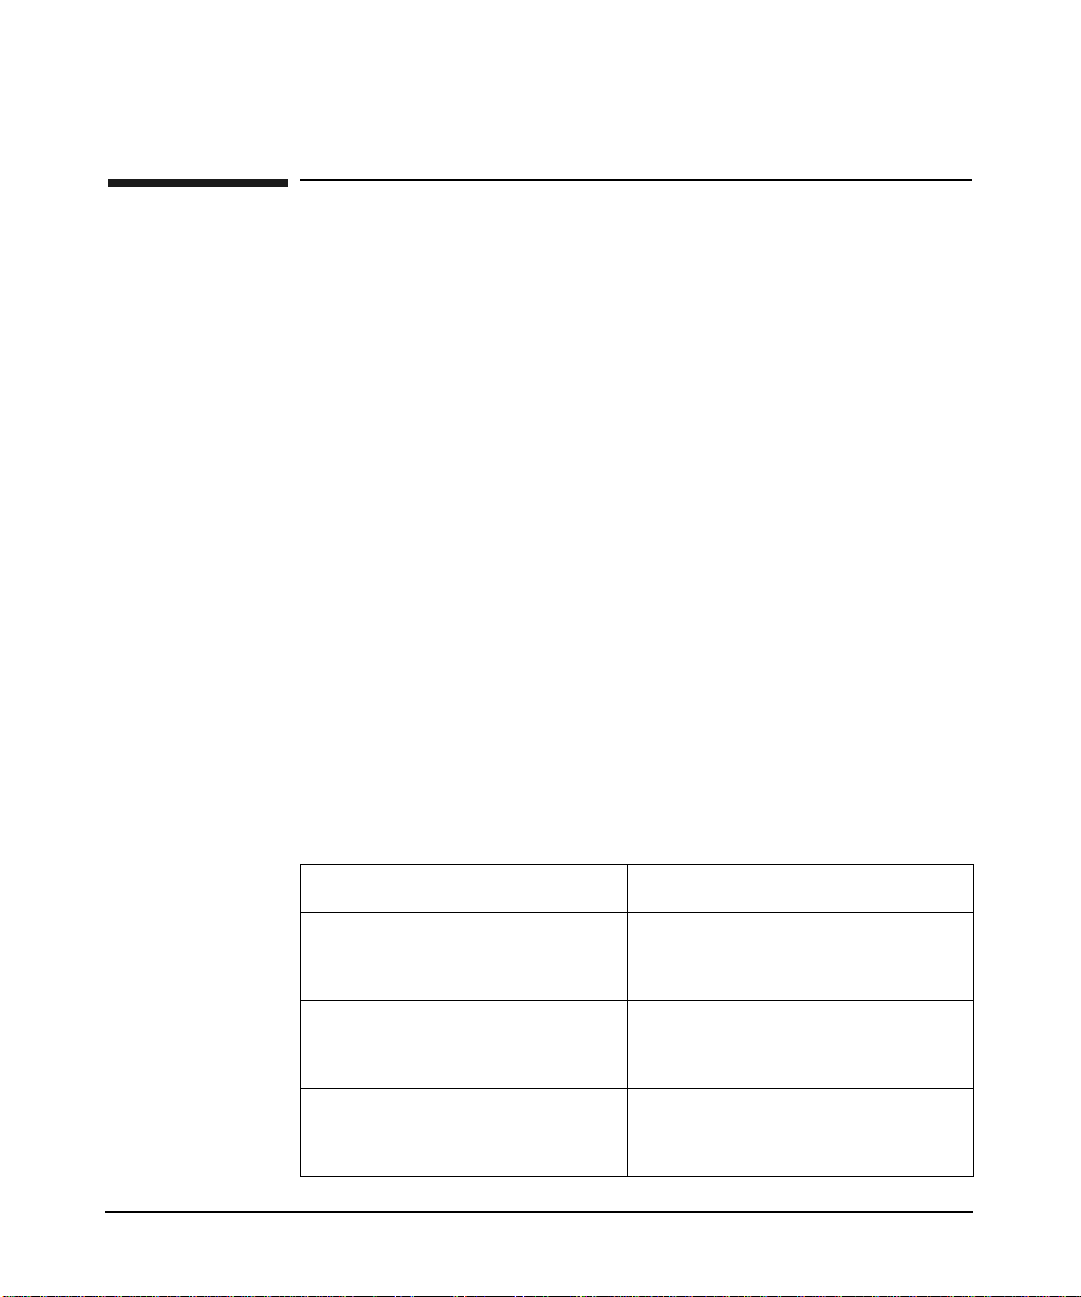
Table 1-1 identifies the hardware and software requirements for
Software Package Builder (SPB).
Table 1-1 SPB Requirements
Operating System • HP-UX 11i v1 (B.11.11)
Software Java 1.4 runtime environment (JRE) or
Free Disk Space • 6 MB minimum in the /opt directory
RAM 256 MB
For the latest system requirements, go to:
Introduction to Software Package Builder
System Requirements
• HP-UX 11i v2 (B.11.23)
later
• 1 MB minimum recommended for data
http://software .hp.com/p roducts/ SPB/
Optimizing Java To achieve optimal Java performance, run the HPjconfig tool to tune the
kernel and list any Java-specific patches that are needed.
To access Java configuration information
Step 1. Visit the Web site:
http://www.hp.c om/go/jav a/
Step 2. Locate the section on HPjconfig for tuning HP-UX kernel parameters.
Step 3. Install Java-specific patches, as needed.
Chapter 1 11
Page 12

Introduction to Software Package Builder
Installation Overview
Installation Overview
Accessing the
software
Step 1. Go to the following URL:
Step 2. Download the SPB product software.
Installation SPB is packaged in SD-UX format and can be installed with the
SPB is available as a selectable application with the release of HP-UX
11i v2 (B.11.23) and 11i v1 (B.11.11) and can also be downloaded from
the Web.
To download SPB from the Web
http://software .hp.com/p roducts/ SPB/do wnload.h tml
swinstall command.
For n etwork installation, enter:
swinstall -s <host>:</path> SwPkgBuild er
For media installation, enter:
swinstall -s <media p ath> SwPkg Build er
For depot installation, enter:
swinstall -d SwPkgBui lder @<host>:</depot path>
Chapter 112
Page 13

Introduction to Software Package Builder
Starting Software Package Builder
Starting Software Package Builder
To launch SPB from the command line, enter:
/opt/spb/bin/sp b
The SPB GUI will launch and by default, the application will use the
packaging policy rules file appropriate for the HP-UX release version you
are running on your system. The packagi ng policy rules file is an
Extensible Markup Language (XML) formatted file which describes the
legal PSF syntax and any field value constraints for your PSF. The
default policies supplied with SPB are l ocated in /opt/s pb/data and are
named as follows:
• For HP-UX 11i v2 (B.11.23) - the default policy file is
112XPolicies_SD .xml
• For HP-UX 11i v1 (B.11.11) - the default policy file is
11XPolicies_SD. xml
Specifying the
Packaging Policy
Rules File
NOTE If only a file name is given as the argument, SPB will look in the default
Chapter 1 13
You have the option of specifying a packaging policy rules file other than
the default by using the -r option from the command line.
To launch SPB and specify the policy rules file, enter:
spb -r /opt/spb/data/ <Myrules.xm l>
policy rules file directory for the specified file. You can also specify an
absolute path to the file.
For additional information on this and other SPB command line options,
refer to the spb (1M) manpage.
Page 14

14
Page 15

2 Software Packaging
If you are new to software packaging, this chapter provides an overview
of the software packaging process and basic concepts. If you are already
an experiences packager, you may want to use this chapter as a review or
move to Chapter 3, “Software Package Builder Features”.
This chapter covers the following topics:
• “Software Package Overview” on page 16
• “Software Package Structure” on page 19
• “Product Specification File” on page 25
• “Packaging Policies” on page 27
Chapter 2 15
Page 16

Software Packaging
Software Packaging Overview
Software Packaging Overview
Application software is delivered in units called software packages. A
software package is a collection of files and directories required to install
a software product. Generally, a software package i s designed and built
by the application developer after completing the development of the
application code. Building a software product into one or more software
packages gives you the ability to do the following:
• Transfer the software product to a distribution media
• Produce the software product in mass quantities
• Install the software product on numerous systems
Chapter 216
Page 17

Software Packaging Lifecycle
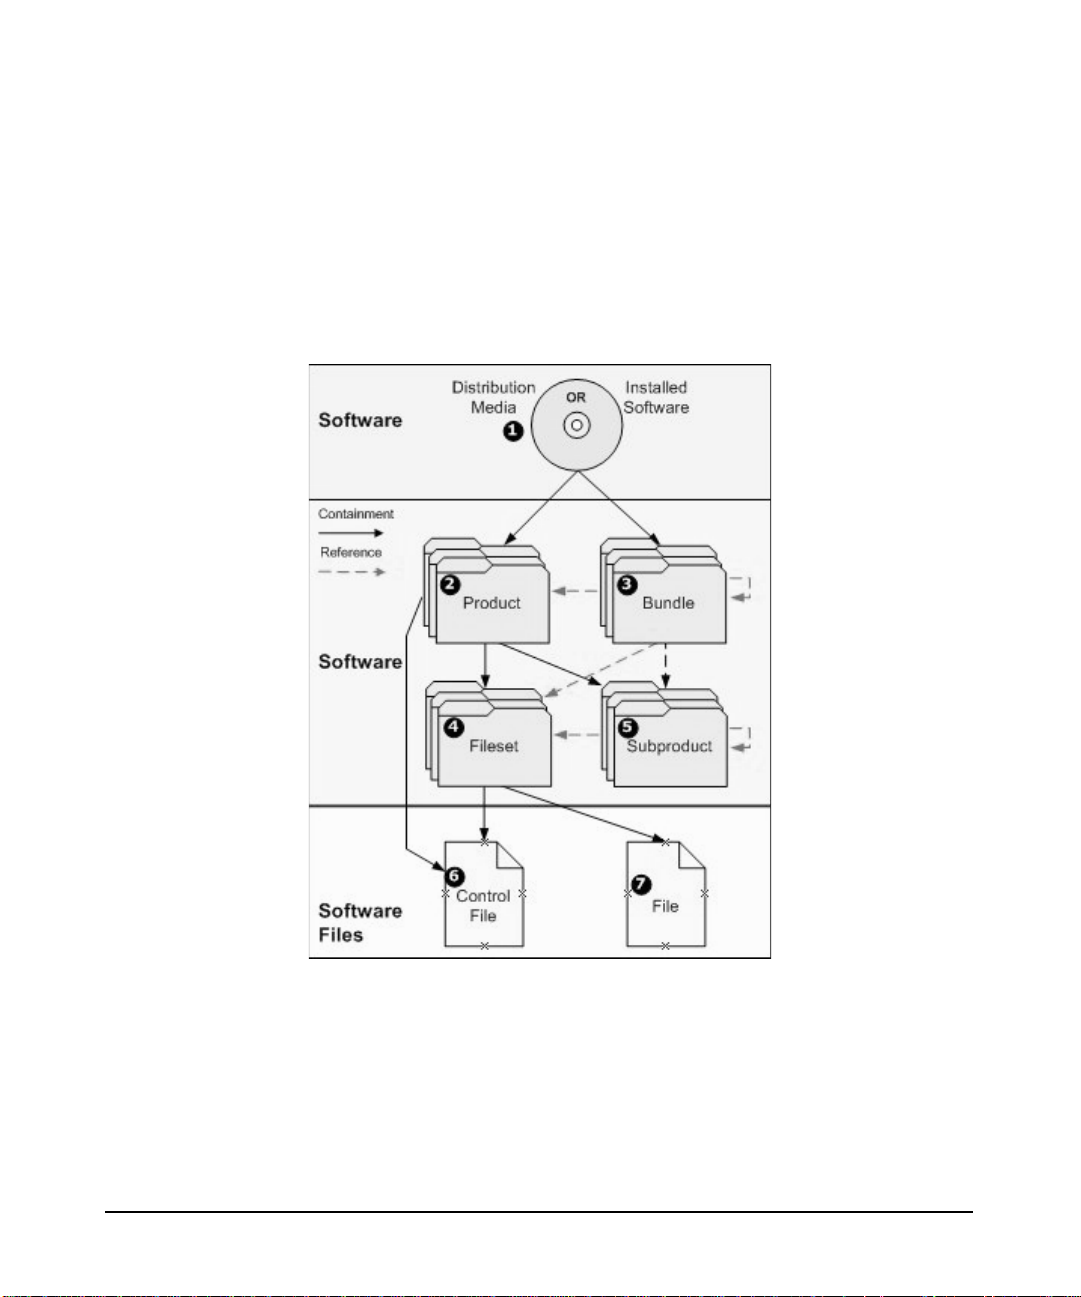
The software packaging lifecycle is displayed in Figure 2-1.
Figure 2-1 Software Packaging Lifecycle
Software Packaging
Software Packaging Overview
1. Identify the software package contents - Determine what files and
directories you want to include in your software package. Your
software package can consist of products, filesets, files, and other,
optional software elements as discussed in “Software Elements” on
page 20.
2. Identify the software package structure - Determine the software
package structure. Plan the organization of the source and
destination filesystems.
Chapter 2 17
Page 18

Software Packaging
Software Packaging Overview
3. Create a Product Specification File (PSF) - Use SPB to create a PSF
to define the software package. SPB provides a GUI for creating the
PSF.
4. Validate the PSF - Determine that the PSF is valid prior to creating
the software package. SPB uses a packaging policy rules file to
validate the PSF.
5. Create the software package - Use the SD-UX swp ackage command
to create your software package.
6. Install the software package - Use the SD-UX swinstall command
to install the contents of your software package.
7. Produce distribution media - Determine the appropriate method of
distribution.You can use the SD-UX swcopy command to create
copies of the package.
8. Test the installation - Test the installation of the software package
using the SD-UX sw verify command.
TIP For detailed information on SD-UX commands, refer to the manpage for
individual commands or the Software Distributor Administration Guide
which can be found at:
http://www.soft ware.hp.c om/produ cts/SD _AT_HP/
Chapter 218
Page 19

Software Packaging
Software Package Structure
Software Package Structure
A software package is created from a hierarchy of sof tware elements . The
hierarchy provides the structure needed by the filesystem to logically
identify packaged files. A software package also contains metadata
specific to each soft ware element. The metadata is generated by setting
attribute values. This is all accomplished through the creation of a
product specification file (PSF) which defines the software package.
Once the software package is created, you can create a softwa re depot
which acts as a repository for your software products. Software depots
can be managed using SD-UX commands.
The packaging process lets yo u create depots . The PSF is flexi ble enough
to fit many software build requirements and manufacturing process
needs.
Before you begin packaging software, ensure the following:
• SPB is installed and configured on the system where you intend to
create your software package.
• The software to be packaged is installed on the packaging system, or
the necessary files are available remotely.
Organizing Filesystems
One of the first steps in packaging software is determining what files and
directories you want included in the softw are package. The files should
follow certain guidelines to support the configuration you want.
As much as is feasible, you should group your source directories and files
so they correspond with the filesets and products you are using in the
software package. To make the maintenance of your software package
easier, when organizing your source and destinat ion filesystems use the
following guidelines:
• Create filesets with consistent file access modes (i.e., file
permissions).
• Create directories with contents that are directed to the same
filesets.
Chapter 2 19
Page 20

Software Packaging
Software Package Structure
• Group related files in the source filesystem that will directly
Software Elements
A software package is created from a hierarchy of software elements,
which are structured and defined in a PSF. The SPB-specific software
elements are as follows:
File A file is the lowest level of software element that can be
Fileset A fileset serves as a container for files, associated file
translate to the destination filesystem.
contained in a software package. Files are grouped
together to create filesets.
attributes, and separate control scripts. A fileset is
comprised of a group of files. Filesets are grouped and
contained in products. A fileset can only belong to one
product; however, a fileset may be referenced in
multiple subproducts within one product. A fileset can
also be included in multiple bundles through t he
product it is contained within. A minimum of one
fileset is required for a PSF.
Product A product is a container for filesets, subproducts,
and/or control scripts specific to a software package.
Products are collections that form a set of related
software. A product can contain one fileset or multiple
filesets. Products can contain filesets specific to
different versions of the product and different
hardware platforms. All these diffe r ent filesets can be
packaged together for distribution. A minimum of one
product is required for a PSF.
Subproduct A subproduct is a reference to groups of related filese ts
within a product. For example, you might create a
subproduct that references a fileset grouping for the
entire runtime configuration, manuals, or
demonstration versions of the product. It is important
to remember that subproducts only reference filesets
and do not physically contain the fileset. The use of
subproducts is optional and considered an advanced
feature.
Chapter 220
Page 21

Software Packaging
Software Package Structure
Bundle A bundle is a reference to filesets, subproducts and/or
products. Bundles may reference collections of filesets
that belong to several different products. Creating
bundles consisting of multiple filesets allows you to
treat several filesets as a single entity. By specifying a
bundle, all filesets under the bundle are included in the
operation. It is important to remember that bundles
only reference filesets, products, and/or subproducts
and do not physically contain these software elements.
The use of bundles is optional and considered an
advanced feature.
Vendor A vendor i s a software element that lets you add
additional, detailed information about a PSF.
Category A category is a software element that can be used as a
selection mechanism for a software package. This
software element contains additional information
about the category. The category information is
referred to by the category_tag attribute within a
product, bundle, subproduct, or fileset.
Chapter 2 21
Page 22
Software Packaging
Software Package Structure
Software Package Hierarchy
The software package hierarchy provides the structure needed by the
filesystem to identify packaged files. Figure 2-2 provides a graphical
representation of the hierarchical structure to which a valid PSF must
adhere.
Figure 2-2 Software Package Hierarchy
Containment vs.
Reference
There are two types of relationships that exist within the hierarchical
structure of a software package: containment and reference. If a
software element acts as a container, then the software element(s) it is
comprised of are physically contained. If a software element acts as a
reference, then the software element(s) it is comprised of are virtually
contained.
Chapter 222
Page 23

Software Package Structure
The difference between a containment relationship and a reference
relationship can be illustrated by the notion that a bundle can be
removed without actually removing the software elements that it
references. However, removing a product always removes the filesets it
contains, and the files contained in the filesets.
Table 2-1 provides a summary of a software package's structural
elements, their functions, and their relationship to other elements. The
structural elements are numbered to correspond with Figure 2-2 on
page 22:
Table 2-1 Structural Elements: Functions and Relationships
Software Packaging
Structural
Element
Installed
Software (1)
Product (2) A collection of related
Bundle (3) A collection of related
Fileset (4) A grouping of related
Subproduct (5) A grouping of related
Function Relationship
A delivered and
installed software
package.
filesets and optionally,
subproducts and
control scripts.
filesets, subproducts,
and/or products.
files and control
scripts.
filesets.
The installed software is a
valid and complete
software package.
A product is a container
for filesets, subproducts,
and optionally, control
scripts.
A bundle is a reference
for groups of filesets,
subproducts, or products.
A fileset is a container
for files and control
scripts.
Filesets are contained in
products.
A subproduct is a
reference for groups of
related filesets within a
single product.
Control File (6) A control file performs
checks and other t a sks
in the software
package.
Chapter 2 23
Control files (scripts) are
contained in one or more
filesets and/or products.
Page 24

Software Packaging
Software Package Structure
Table 2-1 Structural Elements: Functions and Relationships (Continued)
Structural
Element
File (7) Files serve as the
Function Relationship
building blocks for a
software package.
Files are contained in
one or more filesets.
Chapter 224
Page 25

Software Packaging
Product Specification File
Product Specification File
The product specification file (PSF) maps files in your source filesystem
area to create the destination filesystem on a customer's system. In
addition, the PSF can direct the appropriate installation for the
customer by filtering on operating system (OS) and/or machine type
attribu tes that are defined in the PSF.
A PSF defines the structure of a software package. The PSF provides a
"road map" that identifies the software package according to its
attributes, contents, compatibilities, and dependencies. SPB has a GUI
that allows you to structure your PSF and define the attributes that
apply to it.
It is required that the PSF contain:
• One or more products
• One or more filesets and files for each product
It is recommended that the PSF contain:
• Vendor information for individual or groups of products
• The computer(s) and operating system(s) the software product
supports
• A description attribute for all software elements contained in the
PSF
Attributes
Attributes define the characteristics of the software elements in the
software package. For example, the attributes defined for a software
package can identify some of the following metadata:
• Where the product is installed;
• What revision of the product is installed;
• What architecture the product supports;
• Who developed the product; and
• What operating sy stem(s) support the product.
Chapter 2 25
Page 26

Software Packaging
Product Specification File
Each of the software element classes has its own set of attributes, and
each attribute has a value that defines it. Most attributes are optional;
however, there are a few required attributes. Assigning valid attributes
to software elements provides more control and precision when the
software package is installed, updated, and removed. Table 2-2 provides
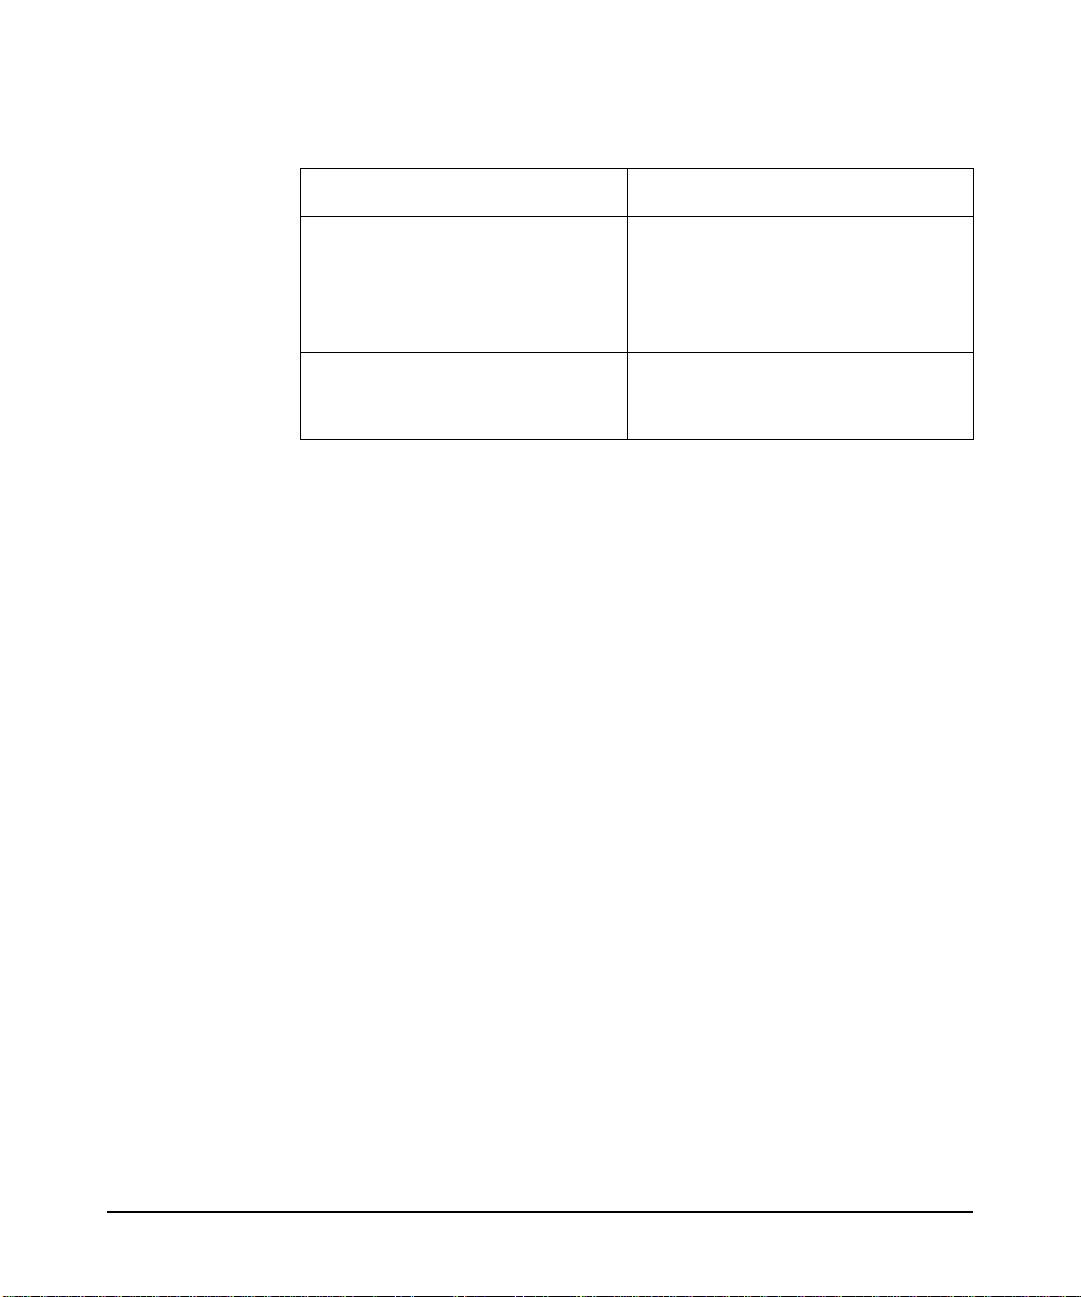
a list of attributes that are required for a valid PSF.
Table 2-2 Required At tribute Values
Software Element Required Attribute
Product tag
Fileset tag
Subproduct tag, contents
Bundle tag, contents
Vendor tag
Category tag
Additional attributes are recommended for creating a more detailed
software package. If you use one of the software elements listed in
Table 2-3, it is highly recommended to set the following attributes:
Table 2-3 Recommended Attribute Values
Software Element Recommended Attribute
Product title, revision
Fileset title, revision
Subproduct title
Bundle title, revision
Vendor title
Category title
Corequisites revision, architecture, vendor
Prerequisites revision, architecture, vendor
Chapter 226
Page 27

Software Packaging
Packaging Policies
Packaging Policies
Packaging policies are a set of rules that must be consistently followed to
create a valid software package. Packaging policies help ensure that the
softwar e package you create in SPB is consistently named and
structured.
SPB validates your PSF against packaging policies, eliminating the need
for you to learn the intricacies of software package structuring. By
following a standard set of policies, you will experience fewer problems,
problems that can turn into longer test cycles and customer defects.
Packaging policies are implemented as Extensible Markup Language
(XML) files. The default policies supplied with SPB are located in
/opt/spb/data and are named as follows:
• For HP-UX 11i v2 (B.11.23) - the default policy file is
112XPolicies_SD .xml
• For HP-UX 11i v1 (B.11.11) - the default policy file is
11XPolicies_SD. xml
Chapter 2 27
Page 28

28
Page 29

3 Software Package Builder
Features
This chapter introduces you to the graphical user interface (GUI) and its
features. The following topics are covered in this chapter:
• “Introduction” on page 30
• “Screen Regions” on page 31
Chapter 3 29
Page 30

Software Package Builder Features
Introduction
Introduction
The SPB GUI is designed to simplify the process of creating a software
package by providing a visual method for creating the PSF, its software
elements, attributes, and structure, as well as automating validation of
the PSF against packaging policy rules. Figure 3-1 displays the main
window in the SPB GUI and the regions it contains.
Figure 3-1 SPB GUI
Chapter 330
Page 31

Software Package Builder Features
Screen Regions
Screen Regions
The SPB GUI is comprised of the following main screen regions.
Package Structure
The Package Structure displays a navigable hierarchy of the software
elements contained in the PSF. From the Package Structure, you can
manage and build your PSF. From within this region you can view
attribute information, edit the software package structure, expand and
collapse nodes, view detailed information on a software element, and
view detailed information on software specification attributes and their
status.
Features • Display a Software Element Attribute Table - Select a software
element from the Package Structure to display its attribute
information in the Attribute Table.
• Display a Software Specification Attribute Table - Select a software
specification element from the Package Structure to display its
attribute information in the Software Specification table.
• Expand and Collapse Nodes - Expand or collapse software elements.
• Fo llow References - Follow a reference to the actual software eleme nt
within the Package Structure and return to the reference of origin
Attribute Table
The Attribute T able displ ays attribut e names and values for the softw are
elements contained in the PSF. The Attribute Table displays the
associated attribute information for the software element or reference
you have selected in the Package Structure.
Features • Drop-Down Lists - For attributes with boolean values, a drop-down
list appears when you click in the Attribute Value field.
• Enumerated Lists - For SD-UX specific values, an enumerated list
appears when you click in the Attribute Value field.
• Default Values - SPB provides default attribute values for a select
group of attributes.
Chapter 3 31
Page 32

Software Package Builder Features
Screen Regions
• File Browser - For specifying a file’s path and name.
Messages Tab
The Messages tab displays the messages that are generated during
validation. Corresponding information displays in the Policy Help tab to
assist you in correcting errors.
Features • Generates Messages:
— E (Error) - Indicates an inval id value provided by the packager
which may eventually prevent the product from being packaged
correctly
— N (Note) - Provides information for the packager
• Select Specific Messages - By selecting a specific message, the
software element associated with the message appears highlighted
in the Project Structure tree and the corresponding attribute appears
highlighted in the Attribute Table.
Policy Help Tab
The Policy Help tab displays detailed information on packaging policy
rules used to validate your PSF. You can use policy help information to
assist in resolving validation errors in your PSF.
Features • Display Policy Help for a Specific Attribute - Select an attribute
name from the Attribute Table and policy help information for the
selected attribute displays.
• Display Policy Help for a Validation Error - Select a validation error
and click the Policy Help tab for information to aid in error
resolution.
• Access additional attribute information - Click the SPB Help link
from the Policy Help tab to view additional information from the SPB
Help system.
PSF View
The PSF View tab allows you to view portions of the PSF as you build it.
The PSF display is read-only text.
Chapter 332
Page 33

Software Package Builder Features
Screen Regions
Select a software element from the Package Structure for which you are
interested in viewing the PSF syntax and select the PSF View tab to
display the PSF syntax.
Menus
The following is a brief overvie w of the menu options provided in the SP B
GUI:
• File Menu - Contains the standard file-related functions
• View Menu - Provides options for changing your view of the Package
Structure and filtering on various attributes
• Structure Menu - Contains commands for adding software elements
to the Package Structure. This menu provides basic editing functions
• Attributes Menu - Contains commands for adding and editing
Vendor Defined Attributes
• Help Menu - Provides access to the help system, tutorial and
context-sensitive help
Tool Bar
The icons displa yed in t he Toolbar provide shortcuts for some of th e most
commonly used commands.
Additional Information
For more information about SPB, see the SPB Help system and Quick
Start Tutorial. An example of some of the topics available in the online
help include:
• Screen Regions
• Dialog Boxes
• Menus
• Accessing Help
• Using the SPB CLI
• Using the SPB GUI
Chapter 3 33
Page 34

34
Page 35

Getting Started with Software Package Builder
4 Getting Started with Software
Package Builde r
This chapter provides tasks to introduce you with the features of SPB
using the graphical user i nterfa ce (G UI) and t he comma nd li ne inte rfa ce
(CLI). This chapter covers the following topics:
• “Getting Started Using the SPB GUI” on page 36
— “Creating a New PSF” on page 36
— “Managing Fileset Content” on page 37
— “Validating a PSF” on page 38
— “Setting Attributes” on page 39
• “Using the SPB Command Line Interface” on page 41
— “Editing from the CLI” on page 41
— “Validating from the CLI” on page 41
— “Incorporating SPB into Automated Processes” on page 42
Chapter 4 35
Page 36

Getting Started with Software Package Builder
Getting Started Using the SPB GUI
Getting Started Using the SPB GUI
Get started using SPB by familiarizing yourself with how to create a
PSF, add a product and filesets, manage fileset content, validate a PSF,
and set attributes.
This procedure walks you through the steps required to creat e a valid
PSF.
Creating a New PSF
To create a PSF
Step 1. Launch the SPB GUI.
/opt/spb/bin/sp b
Step 2. From the main menu, select File > New PSF.
Step 3. Select File > Save As to name and save the new PSF.
Step 4. Select the new PSF in the Package Structure.
Its associated attributes display in the Attribute table.
NOTE At a minimum, a valid PSF must contain one product, one fileset, and
one file.
To create a product and add filesets
Step 1. From the main menu, select Structure> Add Element(s) > Product.
The Product dialog box displays.
Step 2. Enter a product name.
Step 3. Select a predefined fileset name by selecting from the list provided
OR
Enter a new name in the Fileset Name field.
Step 4. Click Add.
Chapter 436
Page 37

Getting Started with Software Package Builder
Getting Started Using the SPB GUI
Step 5. To save and exit, click OK once all filesets have been added to the
product.
Managing Fileset Content
Step 1. From the Package Structure, highlight the fileset to which you want to
add files.
Step 2. From the Structure menu, select Add Element(s) > Files.
The Manage Fileset Content dialog appears.
To create a destination filesystem
Step 1. Click Add Directory.
A new directory, titled NewDirectory1 appears in the Destination
Filesystem.
Step 2. Double-click on the NewDirectory1.
This places you in edit mode.
Step 3. Replace NewDirectory1 by typing your new directory path and press
ENTER.
The entire path is automatically built for you.
Step 4. Repeat this process until you have created the structure for the
destination filesystem.
IMPORTANT A source path must be specified for all directories added to the
Destination Filesystem.
To map a file from the source to the destination filesystem
Step 1. From the Destination Filesystem, select the directory into which you
want to map files.
Step 2. Navigate the Source Filesystem and locate the appropriate directory
path.
Step 3. Select the directory or file(s) you want to add to the Destination
Filesystem.
Chapter 4 37
Page 38

Getting Started with Software Package Builder
Getting Started Using the SPB GUI
Step 4. Click Add. The directory or file(s) are added to the selected directory in
the Destination Filesystem.
Step 5. Repeat this process until you have mapped all the appropriate source
files to the Destination Filesystem.
Step 6. From the Destination Filesystem, select the directory you want to map
files into.
To set file (or directory) permissions
Step 1. Select the appropriate file (or directory) from the Destination Filesystem.
Step 2. From the File Attributes table (or Directory Attributes table), click in the
Mode field.
Step 3. Select the mode appropriate for your file (or directory).
Step 4. Once you have set all desired file permissions, click OK to exit and return
to the main window.
TIP You can apply a common mode across a select group of files in the File
Attributes table by right-clicking in a Mode field and selecting Apply to
All.
NOTE SPB by default assigns the file mode access for a destination file or
directory by inheriting the setting from the original source. If you wish to
accept the default settings, you need not do anything.
Validating a PSF
Within SPB, validation occurs when you:
• Open an existing PSF
•Enter data
Chapter 438
Page 39

Getting Started with Software Package Builder
Getting Started Using the SPB GUI
The results of the val idation process appear on the Messages tab. If the
PSF is valid, the message Validation Status: PS F Pass ed
Validation appears. If it is invalid, you should debug the PSF as
directed by the information provided in the Policy Help tab.
Setting Attributes
Most attributes are optional; however, there are a few required
attributes. Setting optional attributes can help to provide more control
and precision when the software package is installed, updated, and
removed.
You can filter which attributes you wa nt to display in the Att ribute T able
by selecting to view only the required and currently set attributes.
To filter the attribute display
Step 1. Highlight any software element in the Package Structure.
Step 2. From the View menu, select Show Required or Set Attributes.
Step 3. View how the Attribute Table display has changed.
The required attributes that you may have entered, along wi th any
pre-set, default attribute display.
To set attributes
Step 1. Highlight a software element in the Package Structure.
Its associated Attribute Table displays.
Step 2. In the Attribute Table, click in the desired Attrib ute Value field and
input valid data.
TIP At any time, you may select the Policy Help tab to review packaging
policy information for the attribute you have currently selected.
Step 3. Press
Step 4. Verify you have entered a valid attribute value by looking in the
Step 5. Continue this process until you have entered all desired attr ib ute value s.
Chapter 4 39
Enter.
Messages tab.
Page 40

Getting Started with Software Package Builder
Getting Started Using the SPB GUI
NOTE Remember, you are able to validate your PSF in real-time. Every time
you enter new data into the PSF, SPB re-validates the file.
Chapter 440
Page 41

Getting Started with Software Package Builder
Using the SPB Command Line Interface
Using the SPB Command Line Interface
From the command line interface, you can perform the following task s:
•Edit a PSF
• Validate a PSF
• Specify a user-defined packaging policy rules file
Editing from the CLI
You can make edits to a PSF from the command line.
To replace a n attrib ute val ue for a s pecified file at th e command lin e, us e
the following two options in combination:
•The -f option specifi e s the PSF to be edited or validated.
•The -e option specifies the attribute value(s) to be replaced in the
PSF indicated by the -f option.
NOTE The modified PSF is written to stdout unless re-directed to a file using
the -o option.
Example To replace the revision of product SPBdemo in the PSF file
/opt/SPB/demo wi th revision A.2.0, you would enter the following:
spb -f /opt/SPB/demo -e SP Bdemo revision A.2.0 -o
SPBdemoRev2.psf
Validating from the CLI
To validate a specified file from the command line, use the following two
options in combination: The -f option specifies the PSF to be edited or
validated. The -V option validates the PSF indicated by the -f option.
•The -f option specifi e s the PSF to be edited or validated.
•The -V option validates the PSF indicated by the -f option.
Chapter 4 41
Page 42

Getting Started with Software Package Builder
Using the SPB Command Line Interface
Example To validate the PSF file located in /opt/SPB/demo/demo 1, you would
type the following :
spb -f /opt/SPB/demo/ demo1 -V
Incorporating SPB i nto Automated Processes
For packagers with automated processes, the build process usually
includes generating a PSF. To take advantage of SPB's validation
capability, include the SPB validation command after the PSF
generation step in the automated process.
Example To perform validation on the generated PSF, invoke the following
command in your process:
spb -f psf_file -V 2> ps ferrors
where psf_file is the name of the generated PSF and psferrors is the
file where validation errors are stored. Packagers can then examine this
file and determine the appropriate course of action. Y ou can debug the
PSF using the SPB GUI with packaging policy help located in the Policy
Help tab. The return values of the validation also indicate which
message was the most severe message.
IMPORTANT SPB cannot read a PSF from stdin, therefore, it cannot be used in a pipe
symbol ( | ). The following command will not work correctly:
cat psf_file | spb -V
Return Values
Upon completion of the validation process using the CLI, SPB returns
one of the following values to indicate the severity of the message:
0 Normal exit. Validation performed with no errors.
1 Validation found a warning.
2 Validation found an error.
For additional information on this and other SPB command line options,
refer to the spb (1m) manpage.
Chapter 442
Page 43

Getting Started with Software Package Builder
Additional Information
Additional Information
For more information about SPB, see the SPB Help system and Quick
Start Tutorial. An example of some of the topics available in the online
help include:
• Product Dialog Box
• Manage Fileset Content Dialog Box
• Overriding Default File Permissions
• File Mapping Options
• Addressing Packaging Problems
• Restructuring the Software Package
• Modifying an Existing Package for the Next Release
Chapter 4 43
Page 44

5 Advanced Features
If you are an experienced packager, you might want to use SPB to add
advanced features to your PSF.
This chapter covers the following advanced topics:
• “Managing Fileset Content” on page 45
• “Creating and Using a Subproduct ” on page 54
• “Creating and Using a Bundle” on page 55
• “Creating and Using a Vendor or Category” on page 56
• “Creating and Using Vendor Defined Attributes” on page 57
• “Overview of Software Specification Attributes” on page 58
• “Using Control Scripts” on page 64
Chapter 5 44
Page 45

Advanced Features
Managing Fileset Content
Managing Fileset Content
This section provides additional information on the Manage Fileset
Content dialog box and its advanced features. Figure 5-1 highlights the
regions and features.
Chapter 5 45
Page 46

Advanced Features
Managing Fileset Content
Figure 5-1 Manage Fileset Content Dialog Box
The Manage Fileset Content dialog allows you to map source files and
directories to the destination filesystem and exercise control over
directory and file attributes. The following is a description of the regions
and features identified in Figure 5-1 on page 46:
Chapter 546
Page 47

Advanced Features
Managing Fileset Content
Regions and
Features
1. Source Filesystem - Allows navigation of the Source Filesystem for
selection of files and directories to be mapped to the Destination
Filesystem.
2. Add button - Adds the files or directories selected from the Source
Filesystem to the Destination Filesystem. Multiple files or
directories may be selected for addition. If the Recursive checkbox
is selected, all files or directories contained in the selected directory
will be implicitly added.
3. Move-up Directory Level button - Allows you to move up one
directory level in the Source Filesystem. The button is represented
by a folder and up arrow, located at the bottom of the Source
Filesystem.
4. Destination Filesystem - Displays the destination filesystem
structure you have created for the package.
5. Destination Filesystem buttons
• Add Directory button - Adds a new directory to the Destination
Filesystem. You can edit the directory name in the Destination
Filesystem view or in the Directory Attributes table. Multiple
directories can be added by specifying a path for the directory
name.
• Add File button - Adds a new file to the Destination Filesystem.
6. Directory Attributes and File Attributes Tables
• Directory Attributes table allows you to set permissions and
other system properties.
• Files Attributes table allows you to edit the source path, and set
permissions and other system properties.
7. Advanced Options button - Launches the Advanced Options dialog
box that allows you to customize file mode access permissions and
enable the Implicit and/or Include file mapping functionality.
Using Advanced Features
File Mapping
Options
Chapter 5 47
Numerous options are a vaila ble fro m with in th e Manage Files et Cont ent
dialog box when mapping fil es from the Source Filesystem to the
Destination Filesystem:
Page 48

Advanced Features
Managing Fileset Content
• Recursive - The recursive option adds the selected directory and all
its contents recursively. Individual filenames are listed in the PSF.
• File * - This option is similar to the Recursive option; however, all
files are implicitly added and represented only by an asterisk ( * ).
The individual filenames are not listed in the PSF using this option.
If you want to recursively include files and directories from the
Source Filesystem without explicitly listing each file and directory,
select the File * option.
• Include - This option allows you to enable the ability to map a file to
the Destination Filesystem, which consists of a list of files, in PSF
syntax, to include in the package.
IMPORTANT If File * is used to add files, you will not be able to display the individual
filenames from the Destination Filesystem. This makes it difficult to
determine if you are delivering more f iles o r directories t han intended. A
common problem encountered when using the File * option is the
accidental inclusion of source control directories (e.g., RCS, CVS) and/or
editor scratch files to the package. Selecting the Recursive option is an
alternative way to explicitly add all files and directories under a
particular directory. Using the Recursive option allows the packager to
display and verify the files and directories that will be included, avoiding
accidental inclusion of unnecessary files.
Setting File
Mapping Options
Step 1. Select the Recursive checkbox.
Step 2. Once the appropriate source and destination directories have been
Step 3. Continue adding directories recursively or clear the Recursive
You can set one of three file mapping options using the following steps:
To set the recursive option
selected, click Add.
checkbox.
Chapter 548
Page 49

To set the file * or include option
Step 1. Click the Advanced Options button.
The Advanced Options dialog box displays, as shown in Figure 5-2.
Figure 5-2 Advanced Options Dialog Box
Advanced Features
Managing Fileset Content
Chapter 5 49
Page 50

Advanced Features
Managing Fileset Content
Step 2. Select the file mapping option you want to enable by clicking in the check
box. This will enable the mapping option and display a checkbox on the
Manage Fileset Content main window., as shown in Figure 5-3.
Figure 5-3 File Mapping Options Enabled
Step 3. From the main window, select the appropriate file mapping option.
Step 4. Once the source and destination directories have been selected, click
Add.
Step 5. Continue adding directories using the selected file mapping method or
clear the checkbox.
NOTE Only one file mapping option can be applied at a time. Once you have
selected a file mapp ing option, you must c lear the c heckbox to disab le the
option.
File Mode Access
Permissions
In the Mode field of the Directory Attributes and File Attributes
tables (as shown in Figure 5-1 on page 46) a drop-down list appears that
allows you to select file mode access pe rmission s . You can select from the
following options:
For File Attributes:
• Executable (0555)
• Data (0444)
• Writable (0644)
• Inherit - File will inherit permissions from the file system. The
default mode permission is Inherit.
Chapter 550
Page 51

Advanced Features
Managing Fileset Content
• Specify - A Mode dialog box appears allowing you to set your own
permissions.
For Directory Attributes:
• Directory (0755)
• Inherit - File will inherit permissions from the directory. The default
mode permission is Inherit.
• Specify - A Mode dialog box appears allowing you to set your own
permissions.
To apply a mode to all files
Step 1. Place the cursor in any of the file's Mode fields and right-click.
A drop-down list appears.
Step 2. Select Apply to All.
A Mode dialog box appears.
Step 3. Select the appropriate mode for all files that currently appear in the File
Attributes table.
Chapter 5 51
Page 52

Advanced Features
Managing Fileset Content
To change the default representation of the Mode field
The default representation for file mode access permissions i s octal (e.g.,
0644). However, you have the option to display the symbolic
representation for permissions (e.g., rw-r--r--).
Step 1. Select the Advanced Options button.
The Advanced Options dialog box displays, as shown in Figure 5-4.
Figure 5-4 Permissions Selections
Step 2. Select Symbolic to change the mode permissions display.
Chapter 552
Page 53

Step 3. Click OK.
The Mode field now displays a symbol ic representation, as shown in
Figure 5-5.
Figure 5-5 Symbolic Permissions Representation
Advanced Features
Managing Fileset Content
Chapter 5 53
Page 54

Advanced Features
Creating and Using a Subproduct
Creating and Using a Subproduct
Using subproducts provides a way for you to organize filesets into
different groupings b eyond that provid ed within a product. A subproduct
is a reference to groups of logically related filesets. For example, you
might create a subproduct that references a fileset grouping for the
entire runtime configuration. It is important to remember that
subproducts only reference filesets and do not physically contain
them.
Specifying a subproduct lets you group filesets within a larger product
specification. Attribute values are used to define the subproduct. If a
subproduct is specified, the subproduct attributes , tag and contents are
required for a valid PSF.
To create a subproduct
Step 1. Select the appropriate product element in the Package Structure that
contains filesets.
Step 2. From the main menu, select Structure > Add Element(s) >
Subproduct.
Step 3. Enter a subproduct name.
Step 4. Select the appropriate filesets to add to the subproduct.
Step 5. Click Add.
Step 6. Continue this process until all subproduct content has been added.
Step 7. To save and exit, click OK once all contents have been added.
Chapter 554
Page 55

Advanced Features
Creating and Using a Bundle
Creating and Using a Bundle
A bundle is a reference to filesets, products, and/or subproducts . Bundles
may reference collections of filesets that belong to several different
products. Creating bundles consisting of multiple filesets allows you to
treat several filesets as a single entity. By specifying a bundle, all filesets
under the bu ndle are included in an operation. It is important to
remember that bundles only reference filesets, subproducts, and/or
products and do not physically contain these software elements.
NOTE Generally, performing a single operation on a bundle is the same as
performing it individually on all the filesets listed in the bundle.
To create a bundle
Step 1. From the main menu, select Structure > Add Element(s) > Bundle.
Step 2. Enter a bundle name.
Step 3. Select a software element from the Available Product C ontent list you
want to add to the bundle.
Step 4. Click Add.
Step 5. To save and exit, click OK once all contents have been added to the
bundle.
Chapter 5 55
Page 56

Advanced Features
Creating and Using a Vendor or Category
Creating and Using a Vendor or Category
Adding a vendor or category to your PSF provides more detail about its
contents. For example you can:
• Add a vendor to display information regarding th e PSF contents . The
vendor’s information will display when using the swlist command.
• Add a category to further identify the software package contents.
To add a vendor or category
Step 1. From the main menu, select Structure > Add Element(s) > Vendor
(or Category, as appropriate).
The new tag displays in the Package Structure and its associated
Attribute Table.
Step 2. In the At tribute Table:
• (Required) Enter a tag in the Attribute Value field.
•(Optional) Enter a title in the Attribute Value field.
•(Optional) Enter a description in the Attribute Value field.
Chapter 556
Page 57

Advanced Features
Creating and Using Vendor Defined Attributes
Creating and Using Vendor Defined Attributes
Vendor Defined Attributes (VDAs) are optional but can be useful in
providing additional informat ion about a software package. A VDA may
be created for any software element in the PSF. VDAs are noted during
packaging modification with the swmodify command. You can list any
attribute with the swlist command.
To create a vendor defined attribute
Step 1. In the Package Structure, select the software element for which you
want to create a VDA.
Step 2. From the main menu, select Attributes > Vendor Defined Attributes.
The Vendor Defined Attributes dialog displays.
Step 3. Enter an Attribute Name.
Step 4. Enter the associated Attribute Value.
Step 5. Repeat Steps 3 and 4 until you have added all the VDAs you require.
Step 6. Click OK.
The VDA displays at the bottom of the Attribute Table for the selected
software element.
To edit a vendor defined attribute
Once you have created a VDA, you can edit the attribute value as you
would any other attribute withi n the Attribute Table:
Step 1. From the main menu, navigate to Attributes > Vendor Defined
Attributes.
Step 2. From the Vendor Defined Attribute dialog box, you perform the
following tasks:
• Edit a VDA name.
• Delete a VDA.
• Arrange a VDAs order of appearance in the Attribute Table.
Chapter 5 57
Page 58

Advanced Features
Overview of Software Specification Attributes
Overview of Software Specification Attributes
Software specification attributes are used to define a relations hip or an
assignment between a designated software element and other software
element(s). Every attribute value in the PSF must use a designated
value type, for software specification attributes this value type is
software_specif ication. By using the soft ware_spec ificatio n
value type to define a software specification attribute, you gain the
ability to spec ify the software elements in greater detail.
There are three types of software specification attributes:
• Dependency attributes
— Corequisites attributes
— Prerequisites attributes
• Ancestor attributes
• Contents attributes
NOTE Software specification attributes are treated differently than other
attributes within the SPB GUI. For a software packager, it can be
important to view the real-time status of software specification
attributes. For this reason, these attributes are displayed in the Package
Structure beneath the designated software element and are preceded by
an icon which indicates its resolution status.
Software
Specification
Attributes
Dependency Attributes
A dependency attribute can only be specified for a fileset. Dependency
attribute s define a relationship between a specified fileset and another
software element (fileset or product). The specified fileset is dependent
on the other software element in the manner designated. A fileset
dependency can be defined between the dependent fileset and the
following:
• A fileset(s) residing in the same product
• A fileset(s) residing in a different product
Chapter 558
Page 59

Advanced Features
Overview of Software Specification Attributes
• An entire product
Corequisites The corequisites attribute defines a fileset dependency
that requires another fileset or product to be installed
and configured in order for the dependent fileset to
operate correctly. Multiple corequisites may be defined.
Prerequisites The prerequisites attribute defines a fileset
dependency that requires another fileset to be installed
and/or configured correctly before it can be installed or
configured. Prerequisites imply an install-time
dependency. Multiple prerequisites may be defined.
Ancestor Attribute
The ancestor attri bute def ines th e name of a previ ous v ersio n of a fi leset .
This attribute designates the list of filesets that will match the current
fileset when installed on a target system, if the m atch_tar get
installation option is specified.
Contents Attribut e
The contents attribute def ines the list of the so ftware eleme nts contained
within a subproduct or bundle. This attribute is automatically generated
when you create and add content to a bundle or subproduct . You can only
edit this attribute when it is used to define bundle contents.
Resolving
Software
Specifications
SPB and
Validation
Chapter 5 59
For a software specification attribute to be resolved with respect to other
software on the source depot, it must be:
• Complete (if the dependency is an entire product or subproduct it
must exist completely in the source depot),
• Free of errors (e.g., no incompatibility errors), and
• Available from the source depot or exist on the target host. (If the
dependency is not availa ble from the source, the dependency must
exist on the target host.)
When assigning dependencies in your PSF using the SPB GUI, you
should be aware of what SPB will and will not validate or resolve.
SPB will:
• Validate syntax for defined software specification attribute values
• Validate software specification attributes in the local PSF
Page 60

Advanced Features
Overview of Software Specification Attributes
• Validate dependency attributes contained in an OR corequisites set
or an OR prerequisites set
SPB will not:
• Resolve a s oftware specificat ion a ttr ibut e tha t is e xter nal to th e lo cal
PSF (e.g., in a depot on another system)
• Import a software specification attribute that is external to the local
PSF
Software elements and their associated software speci fication attributes
are displayed in the Package Structure. You can view the status of a
software specification attribute and where applicable, edit its associated
attributes.
SPB provides real-ti me verification for the status of software
specification attributes. Table 5-1 shows the Package Structure
representation symbols and the status each defines:
Table 5-1 Software Specification Status
Icon Representation Status
Resolved
Unresolved but may be found externally
from the local PSF and will swpackage
without an error
Unresolved and will cause an error with
swpackage
Working with Dependency Attributes
Software that depends on other software to install or run correctly is
considered to have a dependency. When you specify software for the
swconfig, swcopy, swinst all, swremo ve, swve rify commands, these
commands may automatically select additional software to meet
dependencies.
Chapter 560
Page 61

Advanced Features
Overview of Software Specification Attributes
Multiple dependency attributes may be specified for a corequisites
attribute or a prerequisites attribute. There are two types of
relationships that can be used when defining mult iple dependency
attributes:
• AND - Use the AND relationship to specify multiple dependency
attributes, each of which must be satisfied. The AND relationship is
the default.
• OR - Use the OR relationship to specify multiple dependency
attributes in a set, where only one of the set must satisfy the
dependency
NOTE The following pr ocedures ap ply to bot h core quisites or prer equisite s
dependency attributes.
To add a dependency attribute using the AND relationship
NOTE When setting a dependency attribute, the AND relationship is the
default.
Step 3. From the Package Structure, select the fileset for which you want to
add a corequisites attribute.
Step 4. Select Structure > Add Element(s) > Corequisites.
The Corequisites dialog box appears.
Step 5. From the Available Content, select the software elements you want to
add to the fileset as a corequisites attribute.
Step 6. Click Add.
Step 7. Continue adding corequisites as needed.
Step 8. Click OK once all corequisites attribute s have been added to the
fileset.
Chapter 5 61
Page 62

Advanced Features
Overview of Software Specification Attributes
To add a dependency attribute using the OR relationship
IMPORTANT Use the OR relationship when you need to specify multiple
corequisites or prerequisit es attributes in a set, where only one of
the set must satisfy the dependency. An OR relationship is specified
within an OR corequisites set (or OR prerequisite set). The software
specification value for a given OR set is comprised of the individual
software specification for each corequisites (or prerequisite s)
attribute it contains. When a new corequisite or prerequisite is added to
an OR set, the software specification value for that attribute is appended
to the OR set's software specification and separated by the pipe symbol
(|).
Step 9. From the Package Structure, select the fileset for which you want to
add an OR corequisites set.
Step 10. Select Structure > Add Element(s) > Corequisites.
The Corequisites dialog box appears.
Step 11. Select the OR Relations tab.
Step 12. Click Add Set.
A new, empty OR corequisites set is added to the Fileset Content.
Step 13. From the Fileset Content, select the appropriate OR corequisites set.
Step 14. From the Available Content, select the softw are element(s) yo u want to
add to the OR corequisites set.
Multiple software elements may be selected to add to the set.
Step 15. Click Add.
The OR corequisites set now contains the additional corequisites
attributes.
Step 16. Click OK once all OR corequisites sets and their contents have been
added.
Chapter 562
Page 63

Advanced Features
Overview of Software Specification Attributes
To add remote content as a dependency attribute
NOTE For this procedure, you will use an existing corequisites attr ib ut e a s a
template for specifying remote content as a corequisites attribute.
Step 17. From the Package Structure, select the fileset for which you want to
add remote content.
Step 18. Select Structure > Add Element(s) > Corequisites.
The Corequisites dialog box appears.
Step 19. From the Fileset Content, select the corequisites attribute you wa nt
to use as a template.
Step 20. Edit the Softw are Sp ec fie ld as approp ria te t o s pecify t he re mot e con ten t.
IMPORTANT The software specification cannot contain spaces.
Step 21. Click Add Content.
The Fileset Content now contains the new, remote corequisites
attribute.
Step 22. Continue adding corequisites attributes as needed or click OK to exit.
Chapter 5 63
Page 64

Advanced Features
Using Control Scripts
Using Control Scripts
You can use control scripts to customize the behavior of your software
package. SD-UX supports execution of both product and fileset control
scripts. These shell scripts allow you to perform customized checks and
operations as part of your regular software management tasks. The
swinstall, swconfi g, swverify, swask, and swremove commands can
execute one or more of these scripts. Control scripts are usually suppli ed
by software vendors, but you can write your own. All control scripts are
optional.
Product level control scripts are run if any fileset within that product is
selected for installation, configuration, verification, or removal. The
activities in product control scripts must pertain to all filesets in that
product, but not to any one fileset in particular.
Actions you want to apply to every fileset in a product should be in the
appropriate product level control scr ipt. Fileset scripts must pertain onl y
to the installation, configuration, or removal of that fileset, and not to
any other fileset or to a parent product.
Control scripts can perform a wide variety of customizing and
configuration tasks, such as (but not limited to):
• Verifying if someone is actively using the product and, if so,
preventing reinstallation, update or removal
• Ensuring the local host system is compatible with the software
(scripts can check beyond the compatibility enforced by th e product 's
uname attributes)
• Removing obsolete files or previously installed versions of the
product
• Creating links to, or additional copies of, files after they have been
installed
• Copying configurable files into place on first-time installation
• Conditionally copying configurable files into place on later updates
• Modifying existing configuration files for new features
• Rebuilding custom versions of configuration files
• Creating device files or custom programs
Chapter 564
Page 65

Advanced Features
Using Control Scripts
• Killing and/or starting daemons
For more detailed information, refer to Chapter 11 "Using Control
Scripts" in the Software Distributor Administration Guide loc at ed at th e
following Web site:
http://www.soft ware.hp.c om/produ cts/SD _AT_HP/
Chapter 5 65
Page 66

Advanced Features
Additional Information
Additional Information
For more information about SPB, see the SPB Help system and Quick
Start Tutorial. An example of some of the topics available in the online
help include:
• Advanced Options Dialog Box
• Bundles Dialog Box
• Subproducts Dialog Box
• Vendor Defined Attributes Dialog Box
• Dependency Attributes
• Setting an OR Relationship for Dependency Attributes
• Working with Software Specification Attributes
— Corequisites Dialog Box
— Prerequisites Dialog Box
—Ancestors Dialog Box
Chapter 566
Page 67

67
Page 68

Glossary
ancestor
Glossary
A-B
ancestor An attribute that names a
previous version of a fileset. This is used to
match filesets on a target system. If the
match_target option is set to true, SD-UX
matches the ancestor fileset name to the new
fileset name.
and relationship The default relationship
for specifying one or more dependency
attributes (corequisites or prerequisites)
where all dependencies must be satisfied.
checkremove script An optional script
associated with a fileset that is executed
during the swremove analysis phase. The
result returned by the script determines if
the fileset can be removed.
command line interface (CLI) The set of
commands that can be executed directly
from the operating system's command shell.
configure script An optional script
associated with a fileset and automatically
executed by swinstall (or manual ly
executed by swconfig) after the installation
of filesets is complete.
architecture An attribute that represents
the operating system platform on which the
product runs. (e.g., IA/PA)
attribute Information that describes a
software elements characteristics. Attributes
are an essential part of the product
specification file (PSF) , prov idin g su ch
information as a product's name, title and
description.
bundle A collection of references to filesets
and/or products grouped for a specific
purpose. By specify ing a bundle , al l products
or filesets referenced in that bundle are
automatically included in the operation.
C
category The type of sof tware being
packaged.
checkinstall script An optional script
associated with a product or fileset that is
executed by swinstall during the analysis
phase. The result returned by the script
determines if the fileset can be installed or
updated.
container A software element that
physically stores the elements it contains.
control script An optional script packaged
with software or added to software by
modifying the IPD. Control scripts are run
during swconfig, swinsta ll, swrem ove, or
swverify operations. Control scripts may
include: configure or unconfigure for
swconfig; checkinstall, preinstall,
postinstall and configure scri pts for
swinstall; the ch eckremove, unconfigure,
preremove, and postremove scripts for
swremove; and the fix or verify script for
swverify.
copyright An attribute that defines the
copyright for the destination depot (media)
being created/modified by swpackage. It
refers to the copyright information for the
software produc t.
corequisites A dependency in which a
fileset requires that another fileset be
installed and configured at the same time.
For example, if fileset A requires that fileset
B is installed at the same time, fileset B is a
corequisites.
Glossary68
Page 69

D-E
dependency A relationship between
filesets in which one requires another in a
specific manner. For example, before fileset
A can be installed, it may require fileset B to
be installed. SD-UX supports corequisite and
prerequisite dependencies.
dependent A fileset that has a dependency
on another fileset. For example, if fileset A
depends on fileset B, then B is a dependent
or has a dependency on A.
depot A repository of software products and
a catalog, organized so SD-UX commands
can use it as a software source. The contents
of a depot reside in a directory structure
with a single, common root. A depot can exist
as a directory tree on a SD-UX file system,
on a CD-ROM, or as a tar archive on a tape.
All depots share a single logical format,
independent of the type of media on which
the depot resides . Depots can reside on a
local or remote system. You can package
software directly into a depot or copy
packaged software into the depot from
elsewhere.
description An attribute for products and
filesets, usually a paragraph description of
that product or fileset.
destination The path at which a file will be
installed.
destination filesystem The filesystem
structure that will be created on the target
system when the software product is
installed.
directory An optional keyword that ends
the software element specification in a PSF.
No value is required.
Glossary
multiple architecture
end An optional keyword that ends the
software element specification in a PSF. No
value is required.
F-L
fileset A collection of related files. A fileset
serves as a container for files, associated file
attributes, and separate control scripts. Most
SD-UX operations are performed on filesets.
graphical user interface (GUI) A
program interface that takes advantage of
the computer's graphics capabilities to make
the program easier to use.
is_locatable In packaging, an attribute that
defines whether a product can be installed to
an alternate product directory or not. If
specified, the attribute is set to a value of
true. If not specified, the attribute is
assigned a value of false.
M-O
machine_type In packaging, an attribute
that describes the type of systems on which
the product will run. (If not specified, the
keyword is assigned a wildcard value (*)
meaning it will run on all machines. If there
are multiple machine platforms, you must
separate each machine designation with a
vertical bar ( | ). (e.g., IA64)
media Physical data storage media on
which software is stored, such as tape,
CD-ROM, or DVD.
multiple architecture multiple
architecture - A single product that contains
different versions of the sa me fileset which
differ by their architecture attribute.
Glossary 69
Page 70

Glossary
optional attribute
optional attribute An attribute whose
inclusion in the product specification file is
optional, will not effect the users ability to
create a software package using swpackag e.
or dependency set Used to identify
multiple corequisites or prerequisites
attributes for a fileset where only one of the
set must satisfy th e dep en d e ncy.
or corequisites set See OR dependency
set.
or prerequisites set See OR dependency
set.
P
patch Software designed to update specific
bundles, products, subproducts, filesets, or
files on your system. By definition, patch
software is packaged with the is_patch
attribute set to true.
postinstall script An optional script
associated with a fileset that is executed by
swinstall after the corresponding fileset has
been installed or updated.
postremove script An optional script
associated with a fileset that is executed by
swremove after the corres pon ding f ileset h as
been removed.
prerequisites A dependency in which one
fileset requires another fileset to be installed
and configured before the first fileset can be
installed or configured. For example, fileset
A may require that fileset B is installed
before fileset A can be installed. Therefore,
fileset B is a prerequisite for fileset A.
product A collection of filesets, subproducts
and/or control scripts that form a set of
related software.
product specification file (PSF) A file
that defines the structure of a software
package and maps your source filesystem
area to create the destination filesystem on a
target system. A PSF identifies the software
package according to its attributes, contents,
compatibilities, and dependencies.
Q-R
readme This attribute provides either the
location of the text file containing the
README information or the text value
itself.
reference A software element that vi rtually
stores (or references) the data for the
software elements it contains.
remote content A software element that is
external to the local PSF.
preinstall script An optional script
associated with a fileset that is executed by
swinstall before installing or updating the
fileset.
preremov e script An optional script
associated with a fileset that is executed by
swremove before removing the fileset.
required attribute An attribute whose
inclusion in the product specification file is
mandatory and will cause an error if the
user attempt to create a software package
using swpackage.
root The root directory of a system (/).
Glossary70
Page 71

root directory The directory on a target
system in which all the files of the selected
products will be installed. The default (/),
can be changed to install into a directory
that will eventually act as the root to
another system.
S
SD-UX HP-UX Software Distributor. The
format and syntax of SD-UX software in
depots.
software depot A SD-UX format structure
that contains one or more software products
that can be installed on other systems or
copied to other depots.
software element A product specification
file (PSF) is comprised of five software
elements that can be packaged, distributed,
installed, or managed by Software
Distributor (SD-UX). A software element
may be a file, fileset, product, subproduct, or
bundle.
software package Installable Software
Distributor format software created with
swpackage. P ackaged softw are can be placed
in a depot for distribution.
software specification attribute
Attributes that are used to define a
relationship or an assignment between a
designated software element and other
software element(s). Software specification
attributes are defined using a
software_specification value type.
software specification value type
Defines a software element in great detail
using the SD software_selection syntax,
including information such as revision,
architecture and version.
Glossary
tag
source filesystem The directory and
associated files which comprise your
software product. File s are mapped fro m the
source filesystem to create the destination
filesystem on a target system via the PSF .
subproduct A software element that
serves as a reference for groups of logically
related filesets. A subproduct can be used to
partition a product that contains many
filesets or to offer the user different views of
the filesets. Subproducts are optional and
considered an advanced packaging topic .
swinstall A SD-UX command that installs
software.
swlist A SD-UX command that lists
software elements, their attributes, and
their organization. It lists both installed
software and software contained within a
depot.
swpackage A SD-UX command that uses a
product specification file (PSF) to organize
software products and package them into a
depot. The depot can be accessed directly by
SD-UX commands or mastered onto
CD-ROM or tape.
swremove A SD-UX command that
removes previously installed software or
removes packaged software from a depot.
swverify A SD-UX command that verifies
installed software or depot software for
correctness and completeness.
T-Z
tag In packaging, an attribute that defines
the distribution tag or software element's
name attribute for the destination depot
(media).
Glossary 71
Page 72

Glossary
unconfigure script
unconfigure script An optional script
associated with a fileset that is executed by
swremove before the removal of filesets
begins.
vendor The vendor for the software being
packaged. If a vendor specification is
included in the PSF, the vendor and tag
attributes are required for swpackage.
vendor defined attribute An attribute
you define to pr o v i d e ad ditional info r m at i o n
about a software package. A vendor defined
attribute (VDA) may be created for any
software element in the product s pecification
file.
vendor tag Associates the product or
bundle with the last-defined vend or object, if
that object has a matching tag attribute.
Glossary72
Page 73

Glossary
unconfigure script
Glossary 73
Page 74

Index
A
adding
remote content
advanced options, 47
dialog box, 49, 52
ancestor attributes, 58
and dependency relationship, 61
attribute table, 31
attributes, 25
directory, 47
display, 39
file, 47
recommended, 26
required, 26
software specification, 58
B
bundle
C
category
command
command line interface (CLI), 41
commands
contents attributes, 58
control scripts, 64
corequisites attributes, 58
creating
D
dependency attribute
, 21, 55
, 21, 56
spb, 41
editing, 41
return values, 42
validation, 41
installation, 12
bundle, 55
category, 56
destination filesystem, 37
directories, 47
fileset, 36
product, 36
PSF, 36
subproduct, 54
VDAs, 57
vendor, 56
adding
corequisites, 61
prerequisites, 61
, 61
, 63
dependency attributes, 58, 60
relationships, 61
destination filesystem, 47
creating, 37
directory attributes, 47
directory permissions, 38
F
file
, 20
mapping, 37
permissions, 50
file * option, 48
file attributes, 47
file mapping, 47
file *, 47
include option, 47
recursive option, 47
file mode access permissions, 50
file permissions, 38
fileset, 20
creating, 36
fileset content, 45
filesystems
organizing, 19
G
graphical user interface (GUI)
menus, 33
screen regions, 30
toolbar, 33
I
icons
software specification attributes
include option, 48
installation, 12
J
java
optimizing
M
manage fileset content
advanced options, 47
destination filesystem, 47
dialog bo x, 45, 46
features, 47
regions, 47
source filesystem, 47
, 11
, 37
, 30
, 60
74
Page 75

Index
mapping files
menus, 33
messages
error, 32
generation, 32
note, 32
selection, 32
messages tab, 32
O
or corequisites set
or dependency relationship, 61
or prerequisites set, 62
organizing filesystems, 19
P
package structure
packaging policies, 27
default rules file, 27
policy help tab, 32
specifying rules file, 13
policy help tab, 32
prerequisites attr ibutes, 58
product, 20
creating, 36
product specification file (PSF), 25
creating, 36
PSF
validation, 38
PSF view tab, 32
R
recursive option
remote content, 63
resolving
software specification attributes
return values, 42
S
screen regions
attribute table
messages tab, 32
package structure, 31
policy help tab, 32
PSF view, 32
setting
attributes, 39
file * option, 49
file permissions display, 52
, 37
, 62
, 31
, 48
, 31
, 59
include option, 49, 50
mode field, 51
permissions, 38
recursive option, 48
software elements, 20
bundle, 21
category, 21
file, 20
fileset, 20
product, 20
subproduct, 20
vendor, 21
software packa g e
hierarchy
lifecycle, 17
structure, 19
Software Package Builder (SPB)
and SD-UX, 9
benefits, 8
installation, 12
manpage, 13
overview, 8
software specification attr ibute s
ancestors
contents, 58
dependency, 58
icons, 60
resolving, 59
status, 60
validating, 59
source filesystem, 37, 47
spb command
options, 41
structural elements, 23
subproduct, 20, 54
system requirements, 11
T
tool bar
U
using
and dependency relationship
dependency attributes, 60
or dependency relationship, 62
V
validating
CLI
, 22
, 58
, 33
, 61
, 41
75
Page 76

Index
, 38
PSF
software specification attributes, 59
validation, 38
vendor, 21, 56
vendor defined attributes (VDAs), 57
76
 Loading...