


HP OmniBook 4100
User’s Handbook
HP OMNIBOOK 4100 USER’S HANDBOOK............................................4
Using This Online Handbook.................................................................................................... 4
Finding More Information........................................................................................................4
Notice.........................................................................................................................................5
1. INTRODUCING THE OMNIBOOK ........................................................6
Identifying the Parts of the OmniBook .....................................................................................6
Learning About Windows .........................................................................................................8
Safety Information..................................................................................................................... 8
Working in Comfort.................................................................................................................. 9
2. OPERATING THE OMNIBOOK ..........................................................10
Powering the OmniBook.........................................................................................................10
To connect ac power..............................................................................................................10
Starting and Stopping the OmniBook.....................................................................................11
To start and stop the OmniBook ............................................................................................11
To reset the OmniBook..........................................................................................................12
To transport the OmniBook................................................................................................... 12
Using the OmniBook Pointing Devices ...................................................................................12
To use the built-in pointing devices .......................................................................................13
To activate full touch pad capabilities....................................................................................14
To activate full pointing stick capabilities..............................................................................14
To configure pointing devices ................................................................................................15
Using the OmniBook Display.................................................................................................. 15
To adjust the display..............................................................................................................15
To extend the life of the display.............................................................................................15
Adjusting the Sound System ....................................................................................................16
To adjust the volume manually.............................................................................................. 16
To adjust the volume in Windows ..........................................................................................16
Using the OmniBook Keyboard.............................................................................................. 16
To use the Fn hot keys...........................................................................................................17
To use the Windows keys....................................................................................................... 17
To use the embedded keypad .................................................................................................17
1

To use the Alt Gr key ............................................................................................................18
Checking the Status of the OmniBook....................................................................................18
To interpret the status lights..................................................................................................18
Protecting the OmniBook........................................................................................................19
To set or change a password..................................................................................................19
To delete a password .............................................................................................................20
To attach a security cable.......................................................................................................21
To install McAfee VirusScan.................................................................................................21
3. MANAGING BATTERY POWER......................................................... 22
Recharging and Replacing Batteries......................................................................................22
To respond to a low-battery warning......................................................................................22
To recharge the battery..........................................................................................................23
To replace the battery ............................................................................................................23
Conserving Battery Power......................................................................................................24
To optimize battery operating time ........................................................................................24
To get the most from your batteries........................................................................................25
To change a time-out setting..................................................................................................25
4. MAKING CONNECTIONS................................................................... 27
Using Plug-In Modules and Storage Media............................................................................27
To replace a plug-in module..................................................................................................27
To insert or eject a floppy disk...............................................................................................28
To insert or remove a CD ...................................................................................................... 28
Connecting External Devices ..................................................................................................29
To connect an external monitor .............................................................................................29
To connect a printer or other parallel device..........................................................................30
To connect a serial mouse or other serial device..................................................................... 30
To connect an external PS/2 keyboard or a PS/2 mouse .........................................................31
To connect a universal serial bus device................................................................................. 31
To connect an audio source, a microphone, or headphones .................................................... 32
To make an infrared connection ............................................................................................32
Using PC Cards.......................................................................................................................33
To insert a PC Card...............................................................................................................33
To remove a PC Card ............................................................................................................34
Using Docking Products..........................................................................................................34
To install a docking tray........................................................................................................34
To dock the OmniBook..........................................................................................................35
To undock the OmniBook......................................................................................................36
5. MAINTENANCE AND TROUBLESHOOTING.....................................37
Cleaning the Computer...........................................................................................................37
2

To clean the case...................................................................................................................37
To clean the display...............................................................................................................37
Solving Common Problems......................................................................................................37
Accessory Problems...............................................................................................................38
Audio Problems.....................................................................................................................39
Display Problems...................................................................................................................39
Hard Disk Drive Problems.....................................................................................................39
Infrared Problems..................................................................................................................40
Keyboard and Pointing Device Problems ............................................................................... 40
Memory Problems .................................................................................................................41
PC Card (PCMCIA) Problems............................................................................................... 41
Performance Problems...........................................................................................................42
Power and Battery Problems.................................................................................................. 42
Printing Problems..................................................................................................................43
Serial, Parallel, and USB Problems........................................................................................44
Startup Problems...................................................................................................................45
INDEX......................................................................................................47
3

HP OmniBook 4100 User’s Handbook
• Using This Online Handbook.
• Finding More Information.
• Notice.
This handbook describes how to use the OmniBook with a Microsoft® Windows®
operating system. It focuses on the special Hewlett-Packard hardware and software,
not the Windows operating system itself. For questions about the use of the
operating system, refer to the Microsoft Windows manual shipped with the
OmniBook.
Using This Online Handbook
This online User’s Handbook looks similar to a printed manual—and it works like a
printed manual in many ways, too. However, you can do several handy things you
can’t do with a manual. For example, you can make the type larger or smaller. You
can click pictures to enlarge them. You can add electronic bookmarks for marking
key information. And you can print all or part of the manual on your printer.
• Press F1. You’ll see a description of the features of this online manual.
Finding More Information
This OmniBook User’s Handbook introduces the OmniBook and shows you how to
operate and troubleshoot your OmniBook. For more information about using your
OmniBook, look in these additional places:
• The printed OmniBook Reference Guide shows how to set up the operating
system, install and connect accessories, and maintain and upgrade the
OmniBook.
• The Microsoft Windows manual, shipped with your OmniBook, contains
information about using the standard features of your Windows operating
system.
• The online Help for Windows applications provides information about those
applications. Use the Help menu or Help button, or just press F1.
• The OmniBook Notes icon gives late-breaking information available after the
online manual was completed. Click Start, Programs, OmniBook Library,
OmniBook Notes.
• Many bookstores have books about Windows for people with different levels of
experience.
• For updates to the BIOS and other technical information, connect to our website
on the Internet at http://www.hp.com/omnibook.
• You can obtain a backup copy of the OmniBook Reference Guide (which came
with your OmniBook) from our website (http://www.hp.com/omnibook). You can
view or print it using an Acrobat viewer, available free of charge through our
4

website. To re-install the User’s Handbook onto your hard drive, insert the
Recovery CD and run Omnibook\Hputils\Disk1\Setup.Exe.
• OmniBook accessories may be purchased online. For the latest information, visit
our website at http://www.hp.com/omnibook.
Notice
This manual and any examples contained herein are provided “as is” and are subject
to change without notice. Hewlett-Packard Company makes no warranty of any kind
with regard to this manual, including, but not limited to, the implied warranties of
merchantability and fitness for a particular purpose. Hewlett-Packard Co. shall not be
liable for any errors or for incidental or consequential damages in connection with
the furnishing, performance, or use of this manual or the examples herein.
Consumer transactions in Australia and the United Kingdom: The above disclaimers
and limitations shall not apply to Consumer transactions in Australia and the United
Kingdom and shall not affect the statutory rights of Consumers.
© Copyright Hewlett-Packard Company 1998. All rights reserved. Reproduction,
adaptation, or translation of this manual is prohibited without prior written permission
of Hewlett-Packard Company, except as allowed under the copyright laws.
The programs that control this product are copyrighted and all rights are reserved.
Reproduction, adaptation, or translation of those programs without prior written
permission of Hewlett-Packard Co. is also prohibited.
Portions of the programs that control this product may also be copyrighted by
Microsoft Corporation, SystemSoft Corp., Crystal Semiconductor Corporation,
Phoenix Technologies, Ltd., and NeoMagic Corporation. See the individual programs
for additional copyright notices.
Microsoft, MS, MS-DOS, and Windows are registered trademarks of Microsoft
Corporation. Pentium and the Intel Inside logo are U.S. registered trademarks and
MMX is a U.S. trademark of Intel Corporation. TrackPoint is a U.S. registered
trademark of International Business Machines.
For warranty information, see the Support and Service booklet.
Hewlett-Packard Company
Mobile Computing Division
19310 Pruneridge Ave.
Cupertino, CA 95014, U.S.A.
Edition 1 March 1998
5
1. Introducing the OmniBook
• Identifying the Parts of the OmniBook.
• Learning About Windows.
• Safety Information.
• Working in Comfort.
Keep in mind the following features as you learn about your OmniBook.
• The OmniBook’s modular design provides maximum expandability without
compromising portability.
• The high-performance Pentium® CPU with MMX™ technology and enhanced
IDE hard drive provide you with the processing power needed to handle complex
graphics and large sound files.
• Two PC Card slots give you the ability to use standard PC Cards, such as a LAN
adapter or memory cards.
• The floppy disk drive in the plug-in module bay can be replaced with a CD-ROM
drive, DVD drive, LS-120 drive, or second battery.
• You can use the floppy disk drive outside the module bay by connecting it to the
parallel port using the optional HP F1473A external floppy disk drive cable.
• Battery operating time can be doubled when you carry an additional primary
battery to be installed when the first runs down, or when you install a second
battery in the plug-in module bay.
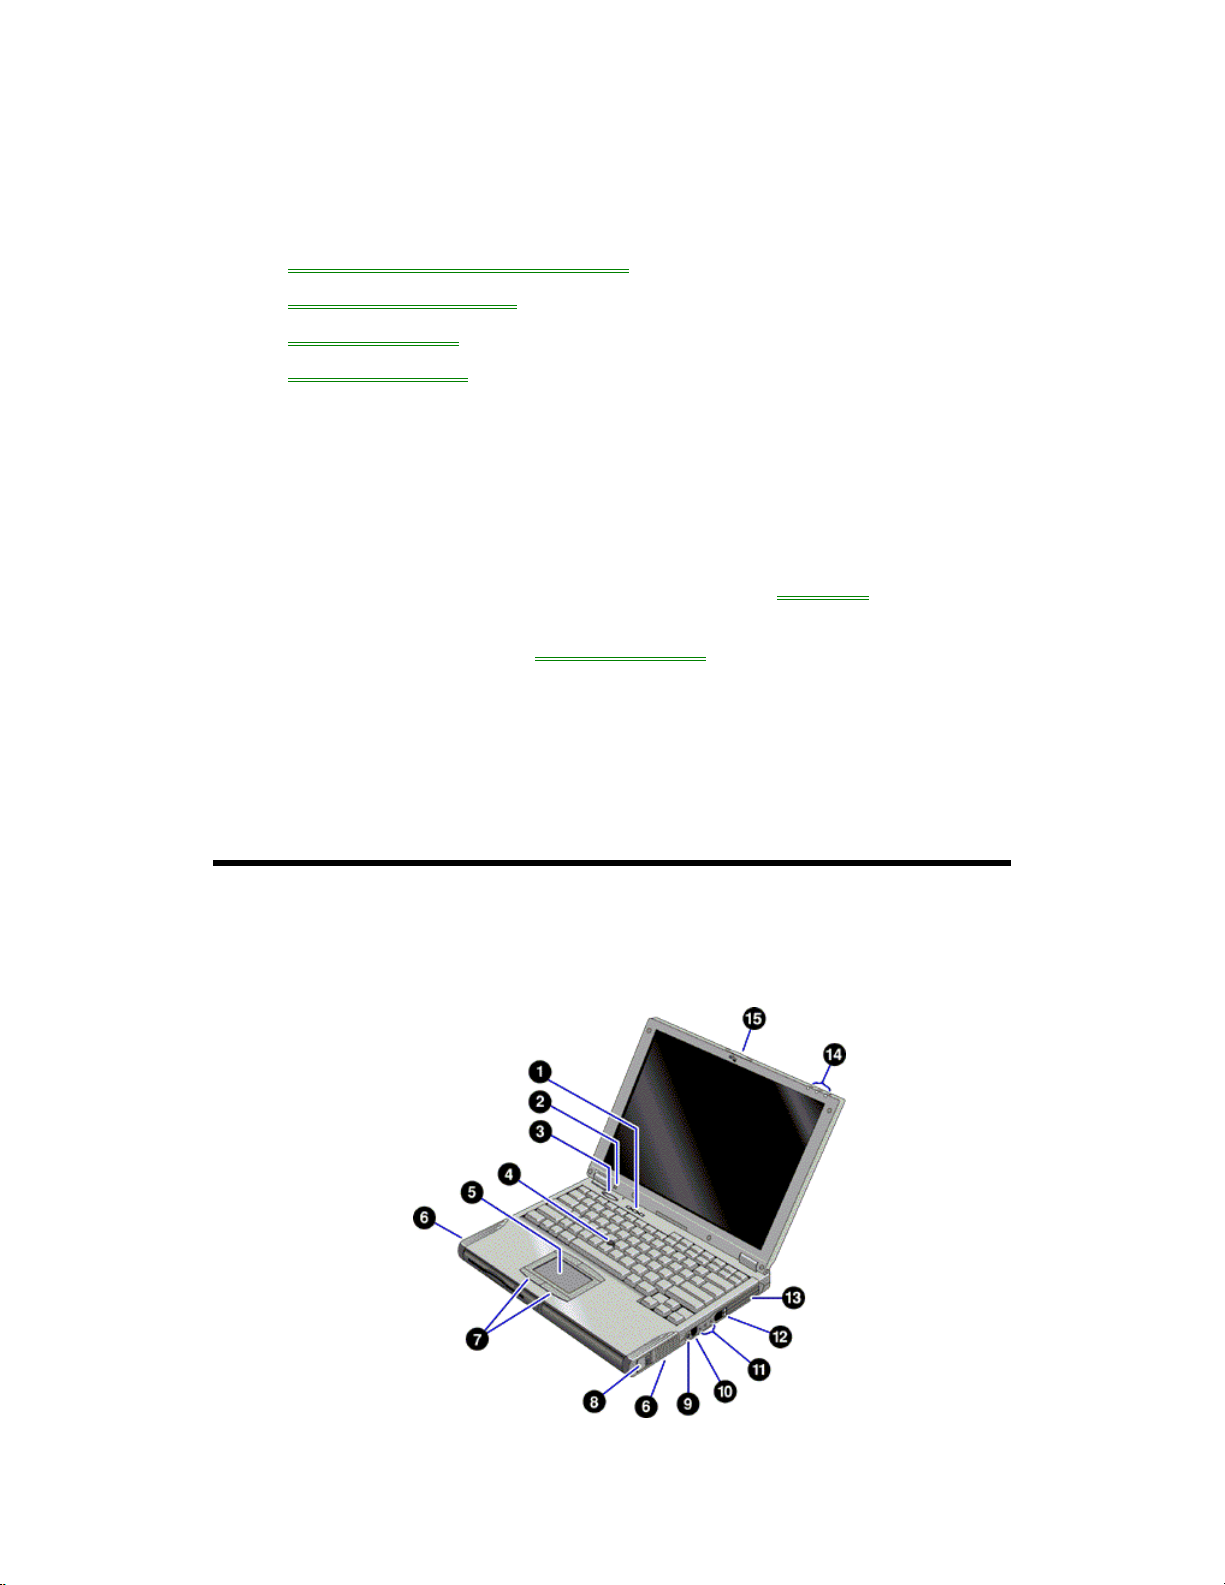
Identifying the Parts of the OmniBook
OmniBook–Front View
6

1. Keyboard status lights (left to right: caps lock, keypad lock, num lock).
2. Built-in microphone.
3. Blue power button.
Turns the OmniBook on and off.
4. Pointing stick (pointing device).
5. Touch pad (pointing device).
6. Built-in speakers.
7. Click buttons (for pointing devices).
8. Main battery release latch.
9. Mute button.
10. AC adapter jack.
11. Audio jacks (left to right): audio line-in, external microphone, audio line-out.
12. PC Card eject buttons (upper and lower PC Card slots).
Press once to pop out the button, and press again to eject the card.
13. PC Card slots (upper and lower).
Accepts two Type-II cards or one Type-III card.
14. Main status lights (left to right): power state, hard disk activity, charging status.
15. Latch to open and close the OmniBook.
OmniBook–Side View
16. PS/2 keyboard or PS/2 mouse port (supports Y-adapter).
17. Universal serial bus port (USB). Windows NT 4.0 does not support USB devices.
18. System-off button (to shut down the OmniBook).
19. Built-in speakers.
20. Module release latch.
21. Plug-in module bay.
Can contain a CD-ROM drive, floppy disk drive, LS-120 drive, DVD drive, or a
second battery.
7

22. Battery bay.
OmniBook–Rear View
23. Infrared port. Windows NT 4.0 does not support infrared communication.
Use this port for wireless data transmission between the OmniBook and another
computer or a printer with an infrared port. You must enable the port in the BIOS
Setup utility and install infrared drivers. See the OmniBook Reference Guide for
instructions.
24. Kensington lock slot (security connector).
25. Parallel port (LPT1).
Use this port for a parallel printer, other parallel device, or to connect the floppy
disk drive externally (using the optional HP F1473A external floppy disk drive
cable).
26. Serial port (COM1).
Use this port for a serial mouse, a modem, a serial printer, or other serial device.
27. External monitor port (VGA).
28. Docking port (for a port replicator or other docking product).
Learning About Windows
This OmniBook User’s Handbook does not discuss the Windows operating system.
Rather, it introduces the OmniBook and shows you how to operate it. For information
about Windows, see the following sources:
• The Windows online Help. Click Start, then Help.
• The Microsoft Windows manual shipped with your OmniBook.
• Many bookstores have books about Windows for people with different levels of
experience.
Safety Information
AC Adapter Safety
• Use only the ac adapter shipped with the OmniBook (HP part number F1454A).
Using any other ac adapter could damage the OmniBook and may void your
warranty. Refer to the warranty statement for your product.
Battery Safety
8

• To avoid risk of fire, burns, or damage to your battery, do not allow a metal
object to touch across the battery contacts.
• Use only the battery designated for use with your model of the HP OmniBook.
• Do not disassemble. There are no serviceable parts inside.
• Do not dispose of the battery in fire or water.
• Handle a damaged or leaking battery with extreme care. If you come in contact
with the electrolyte, wash the exposed area with soap and water. If it contacts
the eye, flush the eye with water for 15 minutes and seek medical attention.
• Do not expose the battery to high storage temperatures—above 60 °C (140 °F).
• When discarding a battery, contact your local waste disposal provider regarding
local restrictions on the disposal or recycling of batteries.
• To obtain a replacement battery, contact your local dealer or HP sales office.
• The battery cannot charge if the ambient temperature exceeds 45 °C (113 °F).
LED Safety
The infrared ports located on the front and rear panels of the OmniBook are
classified as a Class 1 LED (light-emitting diode) device according to International
Standard IEC 825-1 (EN60825-1). This device is not considered harmful, but the
following precautions are recommended:
• If the unit requires service, contact an authorized HP service center—see the
OmniBook Support and Service booklet.
• Do not attempt to make any adjustment of the unit.
• Avoid direct eye exposure to the infrared LED beam. Be aware that the beam is
invisible light and cannot be seen.
• Do not attempt to view the infrared LED beam with any type of optical device.
Laser Safety
The CD-ROM drive used with the OmniBook is certified as a Class 1 laser device
according to the U.S. Department of Health and Human Services (DHHS) Radiation
Performance Standard and International Standards IEC 825 / IEC 825-1 (EN60825 /
EN60825-1). This device is not considered harmful, but the following precautions are
recommended:
• Ensure proper use by reading and following the instructions carefully.
• If the unit requires service, contact an authorized HP service center—see the
OmniBook Support and Service booklet.
• Do not attempt to make any adjustment of the unit.
• Avoid direct exposure to the laser beam—do not open the unit.
Working in Comfort
Warning
9

Improper use of keyboards and other input devices has been associated with
ergonomic injury. For information about reducing your risk, see Working in
Comfort shipped with your OmniBook, or visit our ergonomics website,
http://www.hp.com/ergo.
2. Operating the OmniBook
• Powering the OmniBook.
• Starting and Stopping the OmniBook.
• Using the OmniBook Pointing Devices.
• Using the OmniBook Display.
• Adjusting the Sound System.
• Using the OmniBook Keyboard.
• Checking the Status of the OmniBook.
• Protecting the OmniBook.
Powering the OmniBook
To connect ac power
There are two ways to power the OmniBook: by ac adapter and by battery.
Caution
Use only the HP adapter intended for this product, model F1454A. Using any
other ac adapter could damage the OmniBook and may void your warranty.
Refer to the warranty statement for your product.
1. Connect the power cord to the ac adapter, then plug the cord into an ac outlet.
The light on the ac adapter shines when the adapter is powered.
2. Connect the ac adapter to the OmniBook, as shown.
10

3. Press the blue power button to turn on the OmniBook.
When the OmniBook is plugged into ac power and a battery is installed, it
automatically recharges the battery. To check the status of the battery, see
“Checking the Status of the OmniBook.”
Starting and Stopping the OmniBook
• To start and stop the OmniBook.
• To reset the OmniBook.
• To transport the OmniBook.
To start and stop the OmniBook
You can easily start and stop your OmniBook using the blue power button.
However, you may want to take advantage of the power modes, which provide
alternative methods for stopping your OmniBook—depending on power
considerations, types of active connections, or start-up time.
The OmniBook enters When you To exit this
mode
Standby mode
Saves minimal power.
Turns off only the display.
Restarts quickly.
Restores previous session.
Maintains network connections.
Suspend mode
Saves significant power.
Turns off the display.
Saves current session to RAM.
Restarts quickly.
Restores previous session.
May restore network connections.*
Hibernate mode
Saves maximum power.
Saves current session to disk, then
shuts down.
Restore previous session.
May restore network connections.*
Off mode
Saves maximum power.
Turns off without saving current
session.
Unsaved data will be lost.
Press Fn+S
–or–
allow time-out.
Press blue power button
–or–
close the lid
–or–
select Start, Suspend**
–or–
allow time-out.
Press Fn+F12
–or–
allow time-out.
Select Start, Shut Down
–or–
Press and hold the blue
power button until the
Press any key or
move a pointing
device to display
your current
session ("InstantOn").
Press the blue
power button to
display your
current session
("Instant-On").
Press the blue
power button to
restart and
restore your
previous session.
Press the blue
power button to
restart with a new
session.
11

At startup, resets everything, starts
a new session, and restores
network connections.
* Preserving network connections. A plug-and play operating system, such as
Windows 95, can restore network connections when you turn on the OmniBook.
For Windows NT 4.0 or a different operating system, you may have to reset the
OmniBook or restart the operating system to restore them.
** Windows 95 only.
display shuts down.
Hint
Time-out settings. In order to save power or, conversely, to increase speed, you
can change the time-out settings. Time-out settings specify when to shut down
various components after periods of inactivity. There are separate time-out settings
for each power mode.
To reset the OmniBook
If Windows or the OmniBook stops responding, you can reset the OmniBook and
restart Windows.
1. If possible, shut down Windows.
2. Insert a pen or a straightened paper clip into the system-off button.
–or, if this fails–
Press and hold the blue power button until the display shuts down.
3. After the computer shuts down, press the blue power button to turn it back on.
To transport the OmniBook
1. Save your work.
2. From the Start menu, click Shut Down.
3. Disconnect all external devices.
4. Close the lid.
Using the OmniBook Pointing Devices
12
• To use the built-in pointing devices.
• To activate full touch pad capabilities.
• To activate full pointing stick capabilities.
• To configure pointing devices.
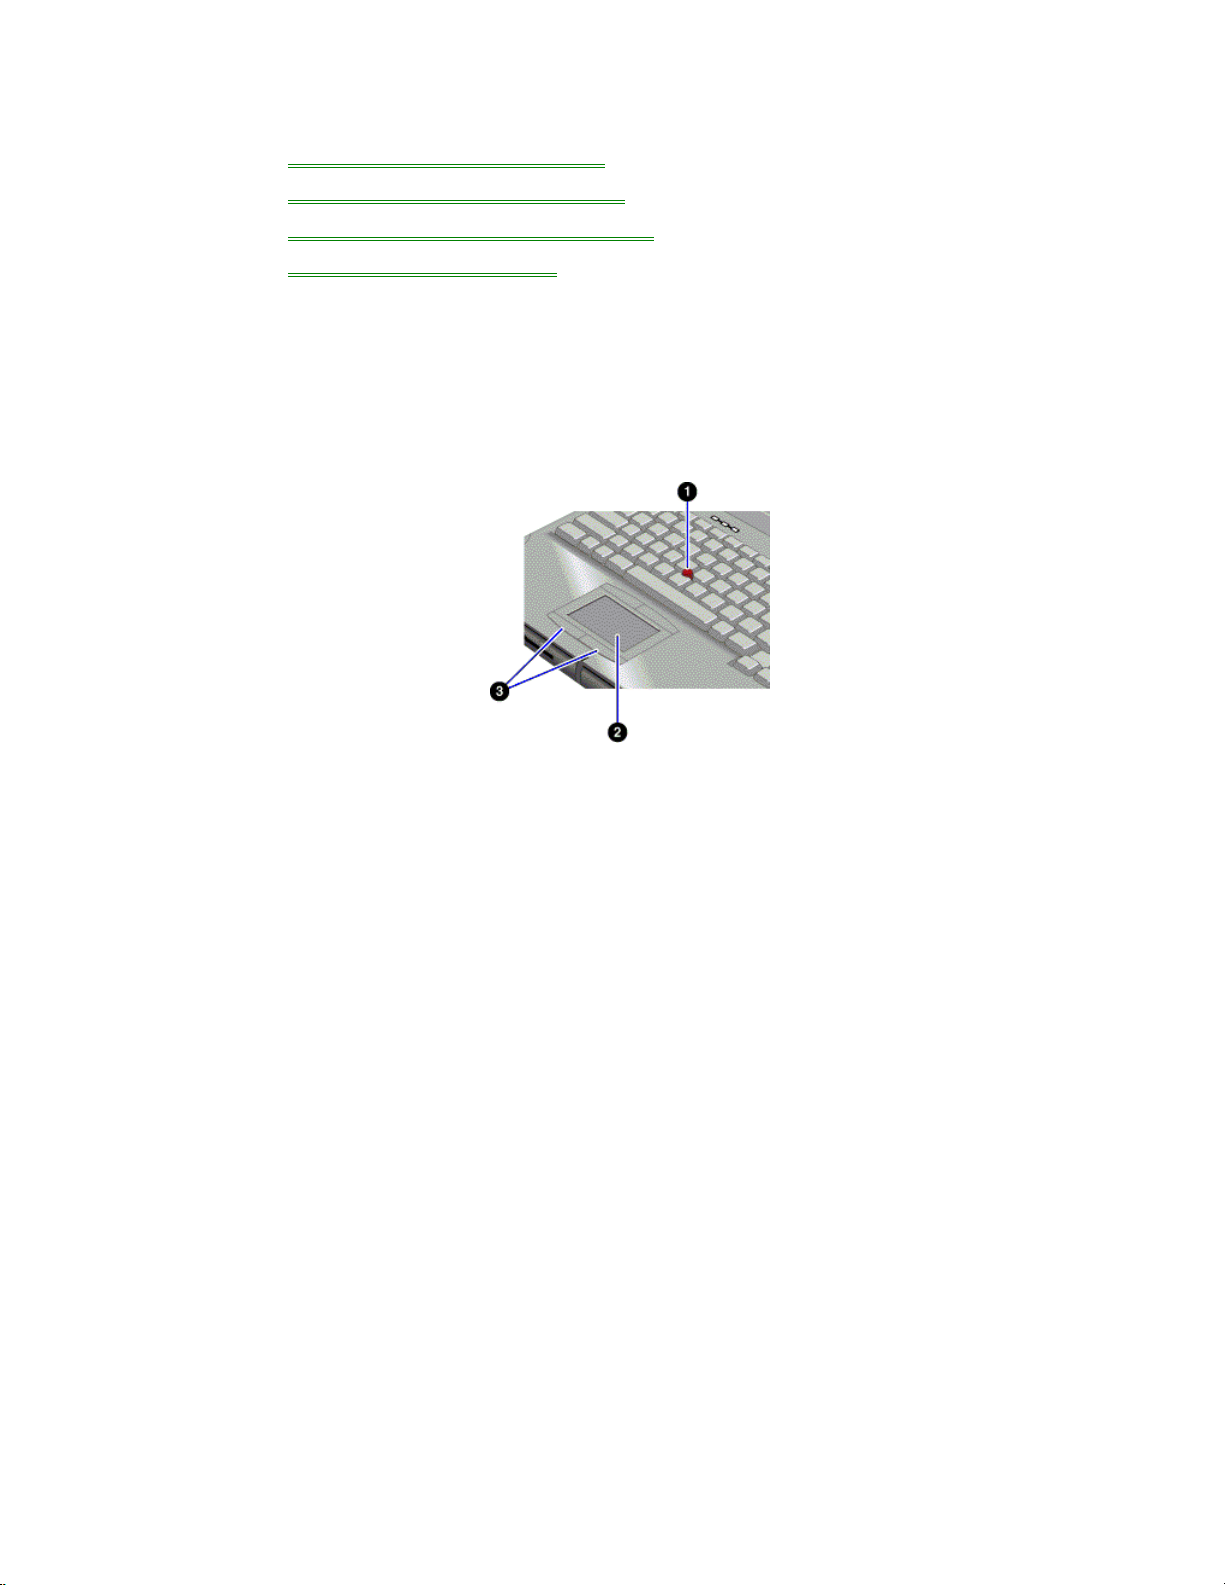
Two pointing devices (pointing stick and touch pad) are built into your OmniBook.
The default pointing device driver supports the enhanced features of the pointing
stick and basic features of the touch pad.
You can customize the OmniBook to support enhanced touch pad features. If you do
this, keep in mind that you are selecting enhanced features for the touch pad only.
You cannot activate enhanced features for both simultaneously.
1. Pointing stick (pressure-sensitive pointing device).
2. Touch pad (touch-sensitive pointing device).
3. Click buttons (two above and two below the touch pad).
Both pointing devices use these click buttons, which work like the left and right
buttons on a standard mouse. What the buttons do depends on the software
being used.
To use the built-in pointing devices
1. Place your hands in the typing position.
2. Pointing stick. With your index finger, press the pointing device in the direction
you want the pointer to move. Pressing away from you moves the pointer up the
screen; pressing toward you moves the pointer down the screen.
Touch pad. Move a thumb or finger across the touch pad in the direction you
want the pointer to move.
3. Use the left and right click buttons, which function like the left and right buttons
on a mouse, to make your selection.
• To open an application, move the pointer over the icon, then press the left
button twice rapidly.
• To make menu selections, move the pointer to the item and press the left
button once.
• To open the shortcut menu for an item, move the pointer over the item and
click the right button.
13

• To drag an item, move the pointer over the item. Press and hold the left
button while you move the pointer to the new location. Release the button.
To activate full touch pad capabilities
The built-in pointing stick driver supports only basic touch pad features. To activate
full touch pad capabilities, you have to
• Select a new mouse driver and remove the pointing stick driver.
• Disable the pointing stick.
• Install touch pad support.
Select a new mouse driver and remove the pointing stick driver
1. From the Start menu, click Settings, Control Panel.
2. Double-click Add/Remove Programs and remove IBM TrackPoint Support.
3. Double-click Mouse, then click General.
4. Click Change and then select Show All Devices.
5. Under Manufacturers, click Standard Mouse Types.
6. Under Models, change the mouse type to Standard PS/2 Port Mouse, then click
OK.
Disable the pointing stick
1. From the Start menu, shut down, then restart the OmniBook.
2. When you see the HP logo, press F2 to enter the BIOS Setup utility.
3. Select the System Devices menu.
4. Highlight Internal Pointing Devices and select Touch Pad.
5. Press F10 to save and exit.
Install touch pad support
• For Windows 95. Run c:\omnibook\drivers\win95\touchpad\setup.exe.
• For Windows NT 4.0. Run c:\omnibook\drivers\nt40\touchpad\install.exe.
To activate full pointing stick capabilities
If you have activated full touch pad capabilities, you can use this procedure to switch
back to full pointing stick capabilities. You have to
• Remove the touch pad driver (Windows 95 only).
• Enable the pointing stick.
• Install pointing stick support.
Remove the touch pad driver
• From Control Panel, click Add/Remove Programs and remove touch pad
support.
14

Enable the pointing stick
1. From the Start menu, shut down, then restart the OmniBook.
2. When you see the HP logo, press F2 to enter the BIOS Setup utility.
3. Select the System Devices menu.
4. Highlight Internal Pointing Devices and select Pointing Stick. (Choose Both if
you want basic touch pad features available.)
5. Press F10 to save and exit.
Install pointing stick support
• From Control Panel, open Mouse, General and change the mouse type--click
Have Disk and point to the directory listed below and select PS/2 TrackPoint.
For Windows 95
c:\omnibook\drivers\win95\trackpnt.
For Windows NT 4.0
c:\omnibook\drivers\nt40\ trackpnt.
To configure pointing devices
• To customize the operation of all pointing devices (pointing stick, touch pad, and
external PS/2 or serial mouse), use the Windows Control Panel Mouse icon to
access Mouse Properties. You can change left and right button actions, doubleclick speed, pointer speed and tail, and more.
• To customize special pointing stick features, click the pointing stick icon on the
taskbar or open TrackPoint in Control Panel.
Using the OmniBook Display
• To adjust the display.
• To extend the life of the display.
To adjust the display
The OmniBook uses special key combinations, called hot keys, to control brightness.
• Press Fn+F1 to decrease the brightness.
• Press Fn+F2 to increase the brightness.
Hint
Brightness affects battery life. To maximize your battery operating time, set the
brightness to the lowest comfortable setting, so that the internal light uses less
power.
To extend the life of the display
15

Observe the following guidelines to extend the life of the backlight in the OmniBook
display.
• Set the brightness to the lowest comfortable setting (Fn+F1).
• When working at your desk, connect an external monitor and turn off the internal
display (Fn+F5).
• Avoid using a screen saver or other software that prevents the OmniBook from
changing to Suspend or Standby mode after a time-out period.
• Do not disable Suspend and Standby time-outs.
• If you are using ac power and have no external monitor attached, change to
suspend or standby when not in use.
Adjusting the Sound System
• To adjust the volume manually.
• To adjust the volume in Windows.
The OmniBook supports Sound Blaster Pro-compatible sound and the Microsoft
Windows Sound System.
To adjust the volume manually
• To increase the volume, press Fn+UP-ARROW.
• To decrease the volume, press Fn+DOWN-ARROW.
• To temporarily silence the speaker without changing the volume setting, press
the mute button on the right side of the OmniBook.
To adjust the volume in Windows
1. Click the speaker symbol in the taskbar.
2. Drag the volume control bar up or down to adjust the volume.
3. To temporarily silence the speaker without changing the volume setting, click
Mute.
Using the OmniBook Keyboard
• To use the Fn hot keys.
• To use the Windows keys.
• To use the embedded keypad.
• To use the Alt Gr key.
Warning
Improper use of keyboards and other input devices has been associated with
ergonomic injury. For information about reducing your risk, see Working in
16

Comfort shipped with your OmniBook, or visit our ergonomics website,
http://www.hp.com/ergo.
To use the Fn hot keys
The combination of the Fn key plus another key creates a hot key—a
shortcut key sequence—for various system controls. Press and hold
Fn while pressing the desired key.
Hot key Does this
Fn + F1
Fn + F2
Fn + F5
Fn + F8
Fn + F12
Fn + R
Fn + S
Fn +
NmLk
Fn + UP-
ARROW
Fn +
DOWNARROW
Decreases the display’s brightness.
Increases the display’s brightness.
Switches among the built-in display, an external display, and
simultaneous displays.
Toggles the embedded keypad on and off. Does not affect an
external keyboard. If Num Lock is on, then the numeric functions are
active; otherwise, cursor control is active.
Enters Hibernate mode.
Enters Suspend mode.
Enters Standby mode.
Toggles Scroll Lock on and off.
Increases sound volume.
Decreases sound volume.
To use the Windows keys
There are two Windows keys on the keyboard.
Brings up the Windows Start menu. Located next to the Fn key.
Brings up the shortcut menu for the current application. This is the same
menu that appears when you click the right mouse button while pointing at
the application. Located at the top center of the keyboard.
To use the embedded keypad
When the embedded keypad on the OmniBook's built-in keyboard is active, two
options are possible.
Num Lock on. Keys change to the numeric or arithmetic designations printed on the
slanted faces of the keys.
17

Num Lock off. Keys change to cursor control keys.
1. Press the NmLk key to turn Num Lock on or off.
2. Press Fn+F8 to turn on the embedded keypad.
–or–
To temporarily turn on the embedded keypad, hold Fn while typing a key.
Keyboard status lights show the status of the embedded keypad and Num Lock.
Hint
Typing numbers. Consider leaving Num Lock on all the time. Then, when you want
to use the embedded keypad on your built-in keyboard, turn it on (by pressing
Fn+F8), or press Fn before each keypad key.
To use the Alt Gr key
Non-US keyboards have an Alt Gr key to the right of the spacebar. This is a shift key
providing access to certain keyboard characters.
• For a character in the lower-right corner of a key, press and hold the ALT GR to
type the character.
• For a character in the upper-right corner of a key, press and hold SHIFT and
ALT GR to type the character.
SHIFT
Unshifted
¬
‘
ALT GR
Checking the Status of the OmniBook
To interpret the status lights
Power and drive status
The OmniBook has status lights that report power status and drive activity. When the
floppy disk drive is installed in the module bay, the following lights are present on the
front of the OmniBook.
1. Floppy disk drive light
18

¨ Steady green light. Floppy disk is being read from or written to.
2. Power status light
¨ Steady green light. OmniBook is on.
¨ Steady amber light. OmniBook is in Standby or Suspend mode.
¨ No light. OmniBook is in Off or Hibernate mode.
¨ Alternating green and amber light. OmniBook failed when resuming.
3. Disk drive activity light
¨ Steady green light. OmniBook is accessing the hard disk drive (no other drive).
4. Charging status light
¨ Steady green light. AC adapter connected, battery full.
¨ Blinking green light. AC adapter connected, battery charging.
¨ No light. AC adapter not connected.
Keyboard status
The keyboard status lights, located above the keyboard, indicate the states of the
keyboard locks.
1. Caps Lock. Caps Lock is active.
2. Keypad Lock. The embedded keypad is active (Fn+F8). Num Lock must also be
on for the numeric keys—otherwise, cursor control is active.
3. Num Lock. Num Lock is active.
Battery status
The battery module has five lights that indicate its charge level. To view the lights,
remove the battery and press the pad on the back next to the connector. The
number of lights that turn on indicates the charge.
Protecting the OmniBook
• To set or change a password.
• To delete a password.
• To attach a security cable.
• To install McAfee VirusScan.
To set or change a password
19

The OmniBook provides two levels of password protection—user password
protection and administrator password protection. You cannot set the user password
until you set an administrator password.
If password protection is set, then you will be prompted to enter a password
whenever you reset or turn on the computer (depending on your setting).
To set, change, or delete password protection for this OmniBook, use the BIOS
Setup utility. This program is described fully in the Reference Guide that came with
your OmniBook.
1. From the Start menu, shut down, then restart the OmniBook.
2. When you see the HP logo, press F2 to enter the BIOS Setup utility.
• Pointing devices do not work in the BIOS Setup utility.
• Active keys are described along the bottom of the window.
• Help information for the highlighted item appears on the right side of the
window.
3. Select the Security menu.
4. Select Set Administrator Password, then press ENTER.
5. Type the new password, then press ENTER. The password can contain up to
eight alphanumeric characters, and it is not case-sensitive.
6. Type the password again to confirm, press ENTER, then press Continue.
7. Under Password Required To, choose when the password will be required.
• Select Boot to require password when booting the OmniBook.
• Select Resume to require password when resuming from Suspend or
Hibernate mode.
• Select Undock to require password when undocking the OmniBook.
8. If desired, repeat this procedure for Set User Password.
9. Press F10 to save and exit the BIOS Setup utility.
Note
If an administrator password is set, but Password On Boot is not selected, then the
administrator password is still required to get into the BIOS Setup utility.
If you forget a password, call Customer Support at the number listed in the Support
and Service booklet to determine the proper removal procedure.
To delete a password
If you delete an administrator password, the OmniBook automatically deletes the
user password as well.
1. From the Start menu, shut down, then restart the OmniBook.
2. When you see the HP logo, press F2 to enter the BIOS Setup utility.
• Pointing devices do not work in the BIOS Setup utility.
• Active keys are described along the bottom of the window.
20

• Help information for the highlighted item appears on the right side of the
window.
3. Select the Security menu.
4. Select Set Administrator Password, then press ENTER.
5. Type the current password, then press ENTER.
6. Press ENTER at the Enter New Password prompt.
7. Press ENTER at the Confirm New Password prompt.
8. Press Continue.
9. Press F10 to save and exit the BIOS Setup utility.
To attach a security cable
Your OmniBook has a built-in connector that allows you to secure the OmniBook
with a cable. The Kensington MicroSaver lock system works with this connector and
is available at many computer stores.
1. Wrap the cable around a stationary object, such as a table leg.
2. Loop the cable to create a slip knot around the stationary object—make sure it
can’t slip off.
3. Insert the lock into the OmniBook security connector and release the key. Store
the key in a safe place away from the OmniBook.
To install McAfee VirusScan
The OmniBook comes equipped with McAfee VirusScan, which currently detects
over 13,500 viruses. As an HP OmniBook owner, you are entitled to 90 days free
support from McAfee and one free upgrade to VirusScan. For details, see the
Readme file under Start, Programs, McAfee VirusScan.
Before you can use VirusScan, you need to install it.
1. From the Start menu, click Programs, McAfee VirusScan, Setup.
2. Follow the instructions as they appear on the screen.
Once installed, you can get detailed online instructions under VirusScan Help.
21

3. Managing Battery Power
• Recharging and Replacing Batteries.
• Conserving Battery Power.
The primary portable source of power for the OmniBook is its replaceable,
rechargeable battery. Your OmniBook accepts a main battery (in the battery bay)
and, if desired, a second battery (in the plug-in module bay).
In addition to the replacable battery, there is a permanent, internal backup battery,
which recharges whenever the OmniBook is on or connected to ac. It maintains
certain internal settings, such as the clock.
The OmniBook provides several safeguards so that you won’t be surprised by a
dead-battery condition.
• Built-in warnings alert you to a low battery condition.
• The OmniBook automatically turns off when the battery charge gets too low—
your session continues when you start recharging the battery or insert a fresh
battery.
• Data on any of the drives is not affected by a low battery. However, unsaved
data could be affected if the battery runs down completely while writing data to
the drive.
Recharging and Replacing Batteries
• To respond to a low-battery warning.
• To recharge the battery.
• To replace the battery.
To respond to a low-battery warning
When battery power is critically low, you are alerted by one or more of the following.
• The computer emits a warning beep. This reminds you to save your work.
• If the OmniBook has been off, you will not be able to turn it on.
The OmniBook automatically hibernates (turns off) to preserve your current session
and data. (If Hibernate is disabled in the BIOS Setup utility, then unsaved data are
not protected.)
You won’t be able to turn the computer on again until you restore power by one of
the following actions:
• Plug in the ac adapter. See “To recharge the battery.”
–or–
• Replace the main battery with one that is charged. See "To replace the battery."
–or–
22

• Install a charged second battery in the plug-in module bay. See "To replace a
plug-in module."
To recharge the battery
The ac adapter is normally warm to the touch whenever it’s plugged into an ac
outlet. The OmniBook is normally warm while it’s charging. Don’t charge it in a
briefcase or other small space.
1. Connect the power cord to the ac adapter, then plug the cord into an ac outlet.
The light on the ac adapter shines when the adapter is powered.
2. Connect the ac adapter to the ac adapter jack on the left side of the OmniBook.
Charging time. Charging the battery takes about 1.5 hours.
Battery life. When the computer is in use, typical battery life is up to 3 hours,
depending on your level of use and your power management settings. See “To
change a time-out setting.”
Optimum charging. To get the longest battery operating time, continue charging
until the battery is fully charged. The battery charging light stops blinking only when
the battery is actually full.
You can continue working while the battery is charging.
To replace the battery
You may never need to replace the rechargeable battery in ordinary use. Typically,
you simply connect the ac adapter to the OmniBook and recharge the battery while
you work. However, you can replace a low battery with another that is more fully
charged.
Caution
If you have any unsaved data, it (and your current work session) will be lost
when you remove the battery, unless the computer is connected to ac power, a
second battery is installed, or the OmniBook is in Hibernate mode.
1. Important. Save your work.
2. Plug in the ac adapter.
–or–
From the Start menu, shut down the OmniBook.
3. Slide the battery bay release latch forward as far as it will go.
4. Gently pull the release latch back until the battery pops out.
23

5. Grasp the underside of the battery firmly and pull out.
6. With the latch in the open position, slide the charged battery into the OmniBook
until it is flush with the unit.
7. Close the battery bay release latch.
Hint
The battery module fits into either the plug-in module bay or the battery bay.
Caution
Do not mutilate, puncture, or dispose of the battery in fire. The battery can
burst or explode, releasing hazardous chemicals. A rechargeable battery pack
must be recycled or disposed of properly. See “Battery Safety.”
Conserving Battery Power
• To optimize battery operating time.
• To get the most from your batteries.
• To change a time-out setting.
To optimize battery operating time
The OmniBook uses Advanced Power Management (APM) software that controls
battery charging and power drain.
If you’re using Windows 95, APM is preinstalled on the OmniBook.
24

If you’re using Windows NT 4.0, you’ll need to install APM; see the OmniBook
Reference Guide for instructions.
Follow these suggestions to optimize your battery operating time.
• Plug in the ac adapter, especially while using the CD-ROM drive, the floppy disk
drive, or any external connections.
• Put the OmniBook in Suspend mode whenever you are not using it for a short
while. Press the blue power button (or Start, Suspend).
• Put the OmniBook in Hibernate mode whenever you want to save your current
session, but will not be using the computer for several hours or more (Fn+F12).
• Shut down the OmniBook whenever you will not be using it for several hours or
more. Click Start menu, Shut Down. The current session is not saved.
• Turn down the brightness of the display to the lowest comfortable level (Fn+F1).
This reduces the backlight power and extends the life of your OmniBook display.
• Set the automatic time-out settings to emphasize saving power. See “To change
a time-out setting.”
• If you have an I/O PC Card—that is, a PC Card having an external connection,
such as a modem or network card—remove it when you’re not using it. Some I/O
cards use significant power, even while they’re inactive.
• If you work with an application that uses the serial port or an I/O PC Card, exit
the application when you’re done using it.
• Install a second battery in the plug-in module bay to double the operating time.
To get the most from your batteries
The following are some further suggestions for the best management of your
OmniBook batteries.
• Do not leave batteries unused for long periods of time. If you have more than
one, rotate them.
• If you normally use ac power, make a practice of at least once a week using the
battery as your power source.
• Unplug the ac adapter when the computer is not in use.
• To preserve the life of a battery, be sure to charge the battery regularly.
• For long-term storage, the battery must be charged at 20–50% to minimize
capacity loss by self-discharge and to avoid deterioration of battery
performance.
To change a time-out setting
The BIOS Setup utility includes settings for automatic time-outs after specified
periods of inactivity. (This program is described fully in the Reference Guide that
came with your OmniBook.) When enabled, these settings save power. There are
four time-outs, providing different levels of power conservation.
1. From the Start menu, shut down, then restart the OmniBook.
2. When you see the HP logo, press F2 to enter the BIOS Setup utility.
25

• Pointing devices do not work in the BIOS Setup utility.
• Active keys are described along the bottom of the window.
• Help information for the highlighted item appears on the right side of the
window.
3. Select the Power menu.
4. Select Power Management Mode and use the F5 (or F6) key to move through
the list of options and select one other than Disabled:
• Max. Power Savings: The time-out settings are predefined for best power
savings (using relatively short time-outs).
• Max. Performance: The time-out settings are set for fast performance with
some power conservation (using relatively long time-outs).
• Customized: You determine each setting for Smart CPU Mode, Standby
Time-out, Suspend Time-out, Hibernate Time-out, and Hard Disk Time-out.
For definitions of these power modes, see “To start and stop the OmniBook.”
5. Optional. Choose a setting for Time-out on AC. If you want the time-outs to
occur even when the OmniBook is connected to ac power, choose Enabled. To
prevent time-outs while the OmniBook is plugged in, choose Disabled.
6. Press F10 to save and exit the BIOS Setup utility.
26

4. Making Connections
• Using Plug-In Modules and Storage Media.
• Connecting External Devices.
• Using PC Cards.
• Using Docking Products.
Using Plug-In Modules and Storage Media
• To replace a plug-in module.
• To insert or eject a floppy disk.
• To insert or remove a CD.
The OmniBook Plug-In Modules User’s Guide describes OmniBook accessory
modules and shows you how to install and use them. The OmniBook’s module bay
accommodates the following:
• CD-ROM drive
• Floppy disk drive.
• LS-120 drive.
• DVD drive.
• Second battery.
To replace a plug-in module
Caution
If you are inserting or removing a CD-ROM drive, floppy disk drive, LS-120
drive, or DVD drive, shut down the OmniBook.
1. From the Start menu, shut down the OmniBook. (This is not necessary if you are
removing a battery from the plug-in module bay and inserting another battery).
2. Slide the module release latch forward as far as it will go.
3. Gently pull the release latch back until the module pops out.
27

4. Grasp the underside of the module firmly and pull out.
5. With the latch in the open position, slide the new plug-in module into the
OmniBook until it is flush with the unit.
6. Close the module release latch.
Hint
The battery module fits into either the plug-in module bay or the battery bay.
To insert or eject a floppy disk
Caution
Do not insert or remove a floppy disk while the OmniBook is actively reading
or writing data. Wait until the floppy drive is done. Otherwise, you could lose
data or the OmniBook could stop responding.
• Hold the disk with its face up, then slide it into the floppy drive slot (on the front
of the OmniBook) until it clicks into place.
• To remove the floppy disk, press the eject button next to the slot.
To insert or remove a CD
Caution
Do not insert or remove a CD while the OmniBook is actively reading data.
Wait until the CD-ROM drive is done. Otherwise, the OmniBook could stop
responding.
1. Press the button on the face of the CD-ROM drive.
2. If you are using this drive for the first time, be sure to remove the cardboard
packing insert.
28

3. Place the CD into the drive (label facing up) and gently press down to seat the
CD on the spindle.
–or–
Remove the CD.
4. Slide the CD-ROM tray back into the module to close it.
If the CD-ROM drive has no power and you need to remove a CD from it, you can
manually open the CD-ROM drive by inserting a straightened paper clip in to the
recessed hole (as shown above).
Connecting External Devices
• To connect an external monitor.
• To connect a printer or other parallel device.
• To connect a serial mouse or other serial device.
• To connect an external PS/2 keyboard or a PS/2 mouse.
• To connect a universal serial bus device.
• To connect an audio source, a microphone, or headphones.
• To make an infrared connection.
To connect an external monitor
1. From the Start menu, shut down the OmniBook.
2. Connect the monitor cable from the monitor to the VGA port on the rear of the
OmniBook.
3. Connect the monitor to a power source and turn it on.
4. Press the blue power button to turn on the OmniBook.
5. If the external monitor has a different resolution from the internal display, adjust
the display properties (Start, Settings, Control Panel, Display, Settings).
29

Hint
Switching Displays. Use Fn+F5 to switch among the built-in display, an external
display, and simultaneous displays.
To connect a printer or other parallel device
The most common parallel device is a printer.
• Connect the parallel printer cable or other parallel cable to the parallel port.
To connect a serial mouse or other serial device
• Connect the serial cable to the serial port.
30

If you are connecting a serial mouse, you need to select Standard Serial Mouse in
Control Panel, Mouse, General, Change.
To connect an external PS/2 keyboard or a PS/2 mouse
1. From the Start menu, shut down the OmniBook.
2. Plug the mouse or keyboard PS/2 cable into the PS/2 port on the OmniBook.
• To connect both a mouse and a keyboard, use the HP F1469A PS/2 Y-
adapter.
• To connect a device that has a PC-type jack, first connect its cable to an
adapter cable with a PS/2 jack.
3. Press the blue power button to turn on the OmniBook.
Hint
To use hot keys from an external keyboard, substitute CTRL+ALT for the OmniBook
Fn key. For example, to access Fn+F2, press CTRL+ALT+F2. If this does not work,
check that the setting for External Fn Key is enabled in the System Devices menu of
the BIOS Setup utility.
To connect a universal serial bus device
Note
Windows NT 4.0 does not support universal serial bus (USB) devices.
31

Universal serial bus (USB) provides a bidirectional serial interface for adding
peripheral devices, such as game controllers, serial and parallel ports, and scanners
on a single bus.
• Plug the USB cable into the USB port on the OmniBook. The device is
automatically recognized.
Note
If you have problems making this connection, contact the vendor of the peripheral
device, as well as Hewlett-Packard, for the latest versions of the USB drivers. The
USB technology is dynamic and continues to develop.
To connect an audio source, a microphone, or headphones
Your OmniBook has a built-in microphone above the keyboard and two stereo
speakers. The audio jacks allow you to plug in external audio devices:
• Plug a stereo input source (such as a CD player) into the input (left) jack.
• Plug the microphone into the microphone (middle) jack. The built-in microphone
turns off.
• Plug devices such as headphones or external (amplified) speakers into the
output (right) jack. The built-in speakers turn off.
Caution
Do not use mono audio plugs, which can damage the computer.
To make an infrared connection
Note
Windows NT 4.0 does not support infrared communication.
32

The OmniBook has an infrared port—located on the rear panel—which provides
wireless, serial communication between the OmniBook and other infrared devices
such as printers or other OmniBooks.
By default, the infrared port is not enabled. You must install the appropriate infrared
driver and enable the port in the BIOS Setup utility. Refer to the Reference Guide
and the driver’s Readme file for complete information about infrared connections.
• Line up the OmniBook’s infrared port and the other infrared port in as straight a
line as possible. The two ports should be no more than 1 meter apart, with no
obstructions in between.
• Check the status of communications (Start, Settings, Control Panel, Infrared
Monitor).
Using PC Cards
• To insert a PC Card.
• To remove a PC Card.
Note
Windows NT 4.0 does not support zoomed video.
Windows NT 4.0 requires that you install Phoenix Card Executive drivers. See
the OmniBook Reference Guide for instructions.
The OmniBook PC Card slots are available for storing data and expanding the
communication capabilities of the OmniBook. The OmniBook supports standard
Type I, II, and III PC Cards (PCMCIA and CardBus). You can use two Type I or II
cards or one Type III card. Both slots support Zoomed Video, which allows a zoomed
video card to show high-quality multimedia presentations.
For information about compatible cards, visit our website at
http://www.hp.com/omnibook. Or contact Hewlett-Packard as described in the
Support and Service booklet.
To insert a PC Card
Caution
Never remove a PC Card while the OmniBook is actively reading or writing
data.
1. Hold the card with its face up with its connector holes toward the card slot.
2. Slide the card into a PC Card slot until it won’t go any further. A double beep
signals that the card has been recognized and is successfully configured by your
computer.
33

To remove a PC Card
Caution
Never remove a PC Card while the OmniBook is actively reading or writing
data.
1. Stop the PC Card by clicking the PC Card indicator in the taskbar, then clicking
Stop (for Windows 95 only).
This protects your data and avoids unexpected problems. You can restart the
card by removing it, then inserting again.
2. Press the ejector button to pop the button out.
Using Docking Products
• To install a docking tray.
• To dock the OmniBook.
• To undock the OmniBook.
The OmniBook docking products provide external connections for the OmniBook
that you can leave in place whenever you remove the OmniBook from your desk.
Instead of disconnecting and reconnecting peripheral devices, simply undock and
dock the OmniBook.
Refer to the User’s Guide for OmniBook docking products for more information.
To install a docking tray
Your dock requires a tray that accommodates your specific OmniBook model. You
must ensure that this tray is installed prior to docking the OmniBook.
1. Select the tray labeled with the letter B.
2. Slide the rear of the tray into the dock as shown on the label on the dock.
3. Push down firmly on both sides of the tray until it snaps into place.
34

To remove a tray from the dock, pull the latch (near the center front of the dock)
towards you until the tray pops free.
To dock the OmniBook
1. From the Start menu, shut down the OmniBook.
If you have a plug-and-play operating system, such as Windows 95, you do not
need to turn off the OmniBook before inserting it into the dock.
Caution
Use only an HP F1454A ac adapter (the type shipped with your OmniBook).
Using any other ac adapter could damage the OmniBook and may void your
warranty. Refer to the warranty statement for your product.
2. Plug the power cord into the ac adapter, then into an ac outlet. Plug the ac
adapter into the dock.
3. Place the OmniBook on the dock platform, with the rear of the computer facing
the dock's docking connector.
4. Position your fingers on the platform grips as shown below. Use your thumbs to
push the computer into the dock until the computer slides into place.
35

5. For Windows 95 only. If this is the first time you have docking under Windows
95, Windows 95 creates a docking hardware profile. Follow the on-screen
instructions.
To undock the OmniBook
1. From the Start menu, shut down the OmniBook.
If you have a plug-and-play operating system, such as Windows 95, you do not
need to turn off the OmniBook before removing it from the dock.
2. Press the undock button on the front of the dock and wait for the undock light to
turn green.
3. Position your thumb as shown and pull the release lever forward.
4. Remove the OmniBook from the dock.
36

5. Maintenance and Troubleshooting
• Cleaning the Computer.
• Solving Common Problems.
Cleaning the Computer
• To clean the case.
• To clean the display.
To clean the case
Use a soft, lint-free cloth to clean the case. You can use a mild detergent, but do not
use abrasives or solvents, such as thinner, benzene, or isopropyl alcohol.
Apply the cleaner to the cloth, and not directly onto the computer.
To clean the display
Use a soft, lint-free cloth to clean the display glass. You can use a glass cleaner, but
avoid ammonia-based cleaners.
Apply the cleaner to the cloth, and not directly onto the display.
Solving Common Problems
• Accessory Problems.
• Audio Problems.
• Display Problems.
• Hard Disk Drive Problems.
• Infrared Problems.
• Keyboard and Pointing Device Problems.
• Memory Problems.
• PC Card (PCMCIA) Problems.
• Performance Problems.
• Power and Battery Problems.
• Printing Problems.
• Serial, Parallel, and USB Problems.
• Startup Problems.
If you have troubleshooting questions that this handbook doesn’t answer, you can
37

• See the printed OmniBook Reference Guide. You can obtain a backup copy of
this guide from the HP website (http://www.hp.com/omnibook).
• Check OmniBook Notes for the most current troubleshooting suggestions (Start,
Programs, OmniBook Library, OmniBook Notes).
• Look at the online Help for Windows and other applications.
• Check with your computer system administrator, if you have one.
• Check your local library or bookstore for other books about Windows, MS-DOS,
and other applications.
• Contact your dealer, or contact Hewlett-Packard. See the OmniBook Support
and Service booklet or open OmniBook Support in the online OmniBook Library.
• Click Start and Help to use the Windows “troubleshooters” provided for several
types of common problems. On the Contents tab, open the Troubleshooting
book, then start the desired troubleshooter.
Accessory Problems
If a port on a dock isn’t working
• Check that ac power is connected.
• Try using the corresponding OmniBook port while undocked.
• See the manual for the dock.
If you can’t boot from a CD in the CD-ROM drive
• Make sure the CD is a bootable CD, such as the Recovery CD.
• Press ESC twice during bootup to see if the CD-ROM drive is the first boot
device.
• Make sure the CD-ROM drive is seated correctly in the OmniBook—remove and
reinsert.
• If you always want to boot from a CD, check boot order in the BIOS Setup utility.
1. From the Start menu, shut down, then restart the OmniBook.
2. When you see the HP logo, press F2 to enter the BIOS Setup utility.
3. Open the Boot menu. The default boot order is
• Diskette Drive
• Hard Drive
• CD-ROM Drive
4. If CD-ROM Drive is not option 1, use the arrow keys to select CD-ROM
Drive.
5. Press F6 to move up (or F5 to move down) in the list.
6. Press F10 to Save and Exit the BIOS Setup utility.
• Make sure you are using an internal OmniBook CD-ROM drive module. You
cannot boot from an external CD-ROM drive, which you can connect to the
OmniBook via a PC Card SCSI connection.
38

Audio Problems
If sounds aren’t audible
• Check that the volume is not muted. Press the mute button on the right side of
the OmniBook.
• Press Fn+UP-ARROW to increase the volume.
• Check settings in BIOS Setup.
1. From the Start menu, shut down, then restart the OmniBook.
2. When you see the HP logo, press F2 to enter the BIOS Setup utility.
3. From the System Devices menu, check that Audio is enabled.
If you hear a loud high-pitched whine (feedback) from the speakers
• Try reducing the Master volume (Start, Programs, Accessories, Multimedia,
Volume Control).
• Avoid using both the built-in microphone and the built-in speakers.
If sound doesn’t record
• Check settings in the BIOS Setup utility.
1. From the Start menu, shut down, then restart the OmniBook.
2. When you see the HP logo, press F2 to enter the BIOS Setup utility.
3. From the System Devices menu, check that Audio is enabled.
• Check software controls for recording sound (click Start, Program, Accessories,
Multimedia, Sound Recorder).
Display Problems
If the OmniBook is on, but the screen is blank
• Press the space bar to see if the computer is in Standby mode.
• Press Fn+F1 or Fn+F2 to adjust the display.
• Press Fn+F5 in case the internal display was disabled. (Do this three times to
return to the state you started from.)
• If the OmniBook is cold, allow it to warm up.
If the screen is difficult to read
• Check whether the display resolution is set to its default setting, 1024 × 768
(XGA). Check this in Start, Settings, Control Panel, Display, Settings.
• Check brightness (Fn+F2 to increase brightness).
Hard Disk Drive Problems
If the OmniBook’s hard drive doesn’t spin
39

• Check the power source.
• Remove and reinsert the hard drive. If necessary, see the OmniBook Reference
Guide for instructions.
If the hard disk makes buzzing or whining noise
• Back up the drive immediately.
• Check for alternate noise sources, such as the fan or a PC Card drive.
If files are corrupted
• Run the McAfee VirusScan program; see "To install McAfee VirusScan."
• Windows 95 only. Run the Scandisk surface scan to check the platter. (This is
not available in Windows NT 4.0). From the Start menu, click Programs,
Accessories, System Tools, Scandisk.
Infrared Problems
If you have problems with infrared communications
• Windows NT 4.0 does not support infrared devices.
• Make sure the infrared light path is not blocked.
• Check settings in the BIOS Setup utility.
1. From the Start menu, shut down, then restart the OmniBook.
2. When you see the HP logo, press F2 to enter the BIOS Setup utility.
3. From the System Devices menu, check that Infrared Port is enabled.
4. Press F10 to Save and Exit the BIOS Setup utility.
• For infrared communications, an infrared driver must be installed and a BIOS
Setup setting must be enabled. For details, refer to the driver's Readme file
located in \OmniBook\drivers.
• Check that only one application is using the infrared port.
• Standard IrDA and fast-IrDA are incompatible (they use different drivers).
• For fast-IrDA, check for DMA conflict with ECP parallel port.
• Remove any PC Cards. An infrared IRQ conflict is possible if two PC Cards are
plugged in at the same time.
If an infrared printer doesn’t print
• Make sure the infrared light path is not blocked.
• An infrared driver must be installed and the BIOS Setup setting must be
enabled. For details, refer to the driver's Readme file located in
\OmniBook\drivers.
• In Windows Help, use the Print Troubleshooter.
Keyboard and Pointing Device Problems
40

If the embedded numeric keypad doesn’t work
• Make sure Num Lock is on.
• Make sure the embedded Keypad Lock (Fn+F8) is on—or that you press and
hold the Fn key to temporarily access the embedded keypad.
If the pointer is difficult to control
• To customize all pointing devices, use the Mouse icon in Control Panel to go to
Mouse Properties.
• To customize the operation of the pointing stick, use the pointing stick icon
available on the taskbar (or in the Windows Control panel) to access TrackPoint
Properties.
If the touch pad or pointing stick doesn’t work
• Make sure the touch pad or pointing stick is enabled in the BIOS Setup utility.
1. From the Start menu, shut down, then restart the OmniBook.
2. When you see the HP logo, press F2 to enter the BIOS Setup utility.
3. From the System Devices menu, check Internal Pointing Devices.
4. Select the desired pointing device.
5. Press F10 to Save and Exit the BIOS Setup utility.
• Reset the OmniBook.
Memory Problems
If a message says you are out of memory
• In Windows Help, use the memory troubleshooter.
• If you are having memory problems running MS-DOS programs, in Windows
Help use the MS-DOS troubleshooter.
PC Card (PCMCIA) Problems
If the OmniBook doesn’t recognize a PC Card
• Windows NT 4.0. Make sure the Card Executive is installed.
• Remove and reinsert the PC Card.
• If the card requires an IRQ, check that there is one available.
• If you’re using Windows 95, look in Device Manager, Properties, Interrupt
Request (IRQ).
• If you’re using Windows NT, click Start, Programs, Administrative Tools,
Windows NT Diagnostics.
• Check the OmniBook website for information about supported PC Cards.
• Try the card in another computer.
• Reset the OmniBook.
41

Performance Problems
If the OmniBook gets hot
• It is normal for the computer to get warm.
• Make sure the air vents are clear.
• DOS games and other programs that drive CPU usage toward 100% can
contribute to a temperature increase.
If the OmniBook pauses or runs sluggishly
• This may be normal Windows behavior (background processing can affect
response time).
• Check the BIOS Setup settings.
1. From the Start menu, shut down, then restart the OmniBook.
2. When you see the HP logo, press F2 to enter the BIOS Setup utility.
3. From the Power menu, set the Power Management Mode to Max.
Performance.
4. Press F10 to Save and Exit the BIOS Setup utility.
• Certain background operations (such as virus scans) can affect performance
while they’re running.
• Some file browsers may be unresponsive while they’re processing a graphic
image or waiting for broken network connections to time out.
• Install additional memory if Windows is spending a lot of time swapping to disk.
• Check amount of available free disk space.
• Try disabling Advanced Power Management.
Power and Battery Problems
If the OmniBook turns off immediately after it turns on
• Battery power is probably extremely low. Plug in the ac adapter, insert a new
charged battery module, or insert a second battery module.
If the OmniBook keeps beeping
• The OmniBook beeps for 15 seconds when the battery is low. Save your work,
quit immediately, and insert a charged battery or plug in the ac adapter.
If the OmniBook has a short operating time
• Try conserving power using any of the suggestions listed under “To optimize
battery operating time.”
• If you are running an application with an automatic save feature, such as MS
Word for Windows, disable this feature.
• If the operating time has gotten shorter and the battery is more than a year or
two old, you may need to replace the battery.
42

• Turn down the display brightness (Fn+F1).
• Heavy modem use can affect battery operating time.
• Check the Power Management settings in the BIOS Setup utility.
1. From the Start menu, shut down, then restart the OmniBook.
2. When you see the HP logo, press F2 to enter the BIOS Setup utility.
3. From the Power menu, make sure the Power Management Mode is set to
Max. Power Savings.
4. Press F10 to Save and Exit the BIOS Setup utility.
If the battery doesn’t charge
• Make sure the ac adapter is plugged into the power source.
• Check that the light on the ac adapter is on.
• Check that the battery is fully installed and locked in place.
• Turn off the OmniBook, then check that the battery contacts are clean and that
the ac adapter cables are fully plugged in.
• Move the OmniBook away from any nearby heat source. Unplug the ac adapter
and allow the battery to cool down. An elevated battery temperature prevents
charging.
• If available, try another battery and ac adapter.
If a second battery doesn’t charge
• A second battery doesn’t charge until the main battery is fully charged.
• Make sure the ac adapter is plugged into the power source.
• Check that the light on the ac adapter is on.
• Check that a second battery module is fully installed and locked in place.
If the OmniBook stops responding
• Press CTRL+ALT+DEL to end the application that is not responding.
• Press the blue power button to suspend the OmniBook. Then press the power
button again to turn the OmniBook back on.
• If nothing happens, reset the OmniBook.
If the OmniBook doesn’t suspend as expected
• If you have a connection to another computer, the OmniBook doesn’t suspend if
the connection is actively in use.
• If the OmniBook is performing an operation, it normally waits for the operation to
finish.
Printing Problems
Hint
43

For most printing problems, use the Print Troubleshooter in Windows Help.
If a serial or parallel printer doesn’t print
• Check that you are using a proper cable or cable adapter, and that the printer is
on.
• Check for paper in the printer or other printer errors.
• Make sure the printer cable is secure at both ends.
If an infrared printer doesn’t print
• Windows NT 4.0 does not support infrared devices.
• Make sure the infrared light path is not blocked.
• Check for paper in the printer or other printer errors.
• Make sure Windows is running—infrared printing is supported only while
Windows is running.
• An infrared driver must be installed and the BIOS Setup setting must be
enabled. For details, refer to the driver's Readme file (located in
\Omnibook\Drivers).
• In Windows Help, use the Print Troubleshooter.
If the left edge of printed output is missing
• If the printer you are using is a 600-dpi (dots per inch) printer, try selecting a
compatible printer driver for a 300-dpi printer. For example, for a 600-dpi
HP LaserJet printer, try using the HP LaserJet IIIsi driver (300-dpi). Certain
applications may not work properly with 600-dpi printers.
Serial, Parallel, and USB Problems
If the serial mouse doesn’t work
• First, confirm that you have followed the manufacturer’s installation instructions
completely and have installed the mouse properly.
• Check the port connection (may be loose).
• Check settings in Control Panel (and in Windows NT Diagnostics).
If a serial modem doesn’t work properly
• In Windows Help use the modem troubleshooter.
• Check the port connection (may be loose).
• Check settings in Control Panel (and in Windows NT Diagnostics).
If an I/O card stops communicating properly
• It may have been reset if the OmniBook suspended or turned off. Exit and
restart the application.
• Check settings in Control Panel (and in Windows NT Diagnostics).
44

If the serial or parallel port is not working
• Check the port connection (may be loose).
• Check settings in Control Panel (and in Windows NT Diagnostics).
• Check settings in BIOS Setup.
1. From the Start menu, shut down, then restart the OmniBook.
2. When you see the HP logo, press F2 to enter the BIOS Setup utility.
3. From the System Devices menu, check that Parallel Port or Serial Port is
enabled.
If the USB port is not working
• Windows NT 4.0 does not support USB devices.
• Check settings in Control Panel.
• Contact the vendor of the peripheral device, as well as Hewlett-Packard, for the
latest versions of the USB drivers.
Startup Problems
If the OmniBook doesn’t respond at turn-on
• Connect the ac adapter.
• Press blue power to try turning on the unit.
• Reset the OmniBook.
If you get no response, remove the battery and ac adapter—then plug in the ac
adapter and try resetting. If you still get no response, the unit requires service.
If the OmniBook doesn’t boot from battery power
• Make sure the battery is properly inserted.
• Check battery level on battery LEDs.
• Check battery contacts. If available, try another battery.
If the OmniBook doesn’t boot from the floppy disk drive
• Check the boot order in the BIOS Setup utility.
1. From the Start menu, shut down, then restart the OmniBook.
2. When you see the HP logo, press F2 to enter the BIOS Setup utility.
3. Open the Boot menu. The default boot order is
• Diskette Drive
• Hard Drive
• CD-ROM Drive
4. If Diskette Drive is not option 1, use the arrow keys to select Diskette Drive.
5. Press F6 to move up (or F5 to move down) in the list.
45

6. Press F10 to Save and Exit the BIOS Setup utility.
• Check that the Floppy Boot option in the BIOS Setup utility is enabled.
46

Index
A
ac adapter
charging battery, 23
connecting, 10, 23
docking product, 35
jack, 7
safety, 8
accessories
CD-ROM drive, 27
floppy disk drive, 27
problems, 38
second battery, 27
adjusting
brightness, 15
volume, 16
Advanced Power Management (APM), 24
Alt Gr key, 18
audio
adjusting volume, 16
connections, 32
problems, 39
audio jacks
location, 7
using, 32
B
backlight life, 15
backup battery, 22
battery
backup, 22
brightness affects, 15
charging, 23
charging time, 23
life, 23
low warning, 22
operating time, 15, 24
permanent, 22
problems, 42
replacing, 23
safety, 8
saving power, 24
status, 19
beeping, 22
BIOS Setup utility, 25
booting
from CD-ROM drive, 38
from floppy disk drive, 45
brightness, 15
C
cable
security lock, 21
CardBus, 33
cards
inserting, 33
removing, 34
CD-ROM drive
booting from, 38
inserting CDs, 28
opening manually, 28
removing CDs, 28
CDs, 28
charging
optimum, 23
starting, 23
status, 18, 23
time, 23
CHKDSK, 40
cleaning
computer, 37
display, 37
COM1 port, 8
connecting
ac adapter, 23
audio source, 32
external keyboard or mouse, 31
external monitor, 29
microphone, 32
mouse, 30
parallel device, 30
printer, 30
serial device, 30
speakers, 32
USB device, 31
corrupted files, 40
CTRL+ALT (external keyboard), 31
cursor (pointer), 12
cursor control, 17
D
disks
CDs, 28
floppy, 28
display
activating, 29
adjusting, 15
extending life, 15
external, 29
port location, 8
problems, 39
properties, 29
docking port, 8
docking products
tray, 34
using, 34
47

documentation, 4, 37
dragging items, 13
drive C
booting from, 12
E
embedded keypad
problems, 41
using, 17
external keyboard
connecting, 31
port location, 7
external monitor
connecting, 29
port location, 8
F
F1 through F12, 17
fast infrared, 32
FIR
port location, 8
using, 32
floppy disk drive
booting from, 45
inserting disks, 28
status, 18
Fn key
+ DOWN-ARROW (decrease volume), 17
+ F1 (decrease brightness), 17
+ F12 (Hibernate), 11, 17
+ F2 (increase brightness), 17
+ F5 (display selection), 15, 17, 29
+ F8 (keypad lock), 17
+ NmLk (Scroll Lock), 17
+ R (Suspend), 11, 17
+ S (Standby), 11, 17
+ UP-ARROW (increase volume), 17
external keyboard, 31
using, 17
function keys
F1 (help), 4
F2 (BIOS Setup utility), 19
hot keys, 17
G
getting help
information sources, 4
online manual, 4
H
hard disk drive
problems, 39
status, 18
headphones, 32
help
information sources, 4
online manual, 4
Windows, 8
Hibernate mode
low battery, 22
using, 24
hot keys
using, 17
I
infrared
communications, 32
light path, 40
port location, 8
printing problems, 40
problems, 40
setting up, 32
installing
PC Cards, 33
plug-in modules, 27
instant-on, 11
K
Kensington lock, 21
keyboard
embedded keypad, 17
external, 31
port location, 7
problems, 40
status, 19
keypad
cursor control, 17
embedded, 17
numeric, 17
keys
Windows, 17
L
laser safety, 9
learning Windows, 8
LED safety, 9
lid switch, 11
lights
ac adapter, 10
infrared, 40
status, 18
lock-up, 12
low battery
charging, 23
replacing, 23
warning, 22
LPT1 port, 8
M
maintenance
48

computer, 37
display, 37
McAfee VirusScan, 21
memory problems, 41
microphone
connecting, 32
location, 7
MicroSaver lock, 21
monitor
external, 29
mouse
(PS/2) port location, 7
connecting, 31
serial, 30
moving the pointer, 13
N
Num Lock
status, 19
using, 17
numeric keypad, 17
O
on/off button
action, 11
location, 7
online User’s Handbook, 4
P
parallel port
connecting device, 30
location, 8
problems, 44
password
clearing, 20
setting, 19
PC Cards
inserting, 33
problems, 41
removing, 34
saving power, 24
slots for, 7, 33, 34
types, 33
performance problems, 42
plug-in modules
CD-ROM drive, 27
floppy disk drive, 27
location, 7
replacing, 27
second battery, 27
pointer
customizing, 15
moving, 13
pointing devices
customizing, 15
location, 7
problems, 40
settings, 15
using, 12
pointing stick
disabling, 14
full function, 14
location, 7
problems, 41
settings, 15
using, 13
ports
ac (docking product), 35
locations, 8
power
button, 11
button location, 7
connecting ac, 10, 23
conserving, 25
cord, 23
modes, 11
on and off, 11
problems, 42
saving, 24
status, 18
suspending, 11
printer
connecting, 30
infrared, 40
problems, 43
protection
security cable, 21
PS/2
connection, 31
mouse port, 7
R
RAM
troubleshooting, 41
rebooting the computer, 12
recharging battery, 23
Reference Guide, 4, 37
removing
battery, 23
PC Cards, 34
plug-in modules, 27
replacing
battery, 23
plug-in modules, 27
reset, 12
restart, 12
S
safety information, 8
Scandisk, 40
second battery, 24
security cable, 21
selecting text, 13
49

serial port
connecting device, 30
conserving power, 24
location, 8
problems, 44
service, 9
Setup utility, 25
shift keys, 17, 18, 31
shortcut keys, 17
shut down, 11
slow infrared, 32
sound
connections, 32
volume, 16
Sound Blaster Pro, 16
speakers
connecting, 32
location, 7
volume, 16
Start menu, 11
startup
problems, 45
status
power, 18
status lights
interpreting, 18
location, 7
stereo input/output, 32
support, 9
suspending power, 11
system
password, 19
status, 18
system-off button
location, 7
using, 12
T
technical support, 4
time-out settings, 25
touch pad
full function, 14
location, 7
problems, 41
settings, 15
using, 13
tour of Windows, 8
transporting the computer, 12
tray
dock, 34
troubleshooting
accessory problems, 38
audio problems, 39
battery problems, 42
display problems, 39
embedded keypad, 41
hard disk drive problems, 39
infrared problems, 40
keyboard problems, 40
memory problems, 41
no response, 12
parallel problems, 44
PC Card problems, 41
performance problems, 42
pointing devices, 40
pointing stick problems, 41
power problems, 42
printing problems, 43
serial problems, 44
startup problems, 45
touch pad problems, 41
USB problems, 44
turning off
automatically, 22
manually, 11
turning on, 11
typing numbers, 17
U
undocking, 36
universal serial bus (USB), 31
USB port
location, 7
problems, 44
V
VGA output, 8
virus detection, 21, 40
volume
adjusting in Windows, 16
mute button, 16
W
warning (low battery), 22
website, 4
Windows
keys, 17
learning about, 8
Z
Zoomed Video, 33
50
 Loading...