

Hp OFFICEJET PRO L7590, OFFICEJET PRO L7580, OFFICEJET PRO L7300, OFFICEJET PRO L7500, OFFICEJET PRO L7555 User Manual [ja]

HP Officejet Pro L7300/L7500
Getting Started Guide
使用入門指南
시작 안내서
入門ガイド

Copyright Information
© 2007 Copyright Hewlett-Packard Development Company, L.P.
Edition 1, 2/2007
Reproduction, adaptation or translation without prior written permission is
prohibited, except as allowed under the copyright laws.
The information contained herein is subject to change without notice.
The only warranties for HP products and services are set forth in the express
warranty statements accompanying such products and services. Nothing
herein should be construed as constituting an additional warranty. HP shall
not be liable for technical or editorial errors or omissions contained herein.
Trademark credits
Microsoft
®
and Windows® are U.S. registered trademarks of Microsoft
Corporation.

Safety Information
安全資訊
Always follow basic safety precautions when using this product to reduce
risk of injury from fire or electric shock.
1. Read and understand all instructions in the documentation that comes
with the device.
2. Use only a grounded electrical outlet when connecting this product to a
power source. If you do not know whether the outlet is grounded, check
with a qualified electrician.
3. When connecting the device to the electrical outlet, use only the power
cord provided with the device.
4. If your device supports fax, use the phone cable included with the
device.
5. Observe all warnings and instructions marked on the device.
6. Unplug this device from wall outlets before cleaning.
7. Do not install or use this device near water, or when you are wet.
8. Install the product securely on a stable surface.
9. Install the device in a protected location where no one can step on or
trip over the line cord, and the line cord cannot be damaged.
10. If the device does not operate normally, see “Maintaining and
troubleshooting” in the onscreen user guide on the Starter CD.
11. There are no user-serviceable parts inside. Refer servicing to qualified
service personnel.
使用本產品時請務必遵守基本安全預防措施,以降低遭受火災或電擊而受
傷的危險。
1. 請詳讀並瞭解裝置所附文件中的所有說明。
2. 本產品接電時限使用接地的電源插座。插座是否接地請洽合格的電氣
人員。
3. 裝置插入電源插座時,務請使用裝置隨附的電源線。
4. 裝置支援傳真時,務請使用裝置隨附的電話線。
5. 務請遵守標示於產品上的各項警告及指令。
6. 清潔裝置前請先斷開電源。
7. 切勿在近水或身體潮濕的情況下,安裝或使用本裝置。
8. 將本產品牢固安裝於穩固平面。
9. 請將裝置安裝在封閉的區域,以免電源線因踩踏或絆扯而受損。
10. 裝置作業異常時,請參閱
解」的說明。
11. 本產品內無任何使用者可維修之零組件。維修請洽合格的服務人員。
Starter CD
線上使用手冊中 「維護及疑難排
안전 정보
본 제품을 사용할 때는 다음 기본 안전 예방책을 준수하여 화재나 감전으
로 인한 부상의 위험을 줄이십시오
1. 장치와 함께 제공되는 사용 설명서의 모든 지침을 읽고 이해하십시오
2. 이 제품을 전원에 연결할 경우 접지된 콘센트만 사용하십시오. 콘센트
가 접지되었는지 모르는 경우 공인 기술자에게 점검 받으십시오
3. 장치를 전원에 연결할 때 장치와 함께 제공되는
시오
.
4. 장치가 팩스를 지원하는 경우 장치에 포함된 전화 케이블을 사용하십
시오
.
5. 장치에 표시된 모든 경고 및 지시 사항을 준수하십시오
6. 청소하기 전에 벽면의 콘센트에서 본 장치의 플러그를 뽑으십시오
7. 본 장치를 물가나 몸이 젖은 상태에서 설치 또는 사용하지 마십시오
8. 흔들리지 않는 안정된 곳에 제품을 설치하십시오
9. 전원 코드를
에 장치를 설치하십시오
10. 장치가 정상적으로 작동하지 않을 경우
에서 "유지보수 및 문제 해결"을 참조하십시오
11. 프린터 내부에는 사용자가 수리할 수 있는 부품이 없습니다. 자격 있
는 서비스 직원에게 수리를 받으십시오
밟거나 발에 걸리지 않으며 손상을 입지 않는 보호된 장소
.
.
코드만 사용하십
전원
.
.
.
.
.
Starter CD의 화면 사용
.
.
설명서
安全性に関する情報
本製品を使用する際は常に基本的な安全上の予防措置を講じるようにし
てください。発火や感電によるけがのリスクの引き下げにつながります。
1. デバイス 付属の文書に記載されているすべての説明を読んで、十分
.
に理解してください。
2. この製品を電源に接続するときは、必ずアース付きの電源コンセン
トを使用してください。コンセントが接地されているかどうか不明
の場合は、資格のある電気技術者にお尋ねください。
3. デバイスを電源に接続するときは、必ず付属の電源コードを使用し
てください。
4. デバイスがファックスをサポートしている場合、付属の電話線を使
用してください。
5. デバイスに表示されているすべての警告と手順に従ってくだ
さい。
6. 製品のクリーニングを行う際はコンセントから外してから
行ってください。
7. このデバイスを水気のある場所に設置したり、濡れた手で
触ったりしないでください。
8. 本製品は安定した表面にしっかりと設置してください。
9. 電源コードを踏んだり、つまずいたりして損傷しないように、デバ
イスは安全な場所に設置してください。
10. デバイスが正常に動作しない場合は、スタータ
るオンライン ユーザーズ ガイドの「メンテナンスおよびトラブル
シューティング」を参照してください。
11. お客様が修理可能なパーツは含まれていません。修理については資
格のあるサービス担当者にお問い合わせください。
に収録されてい
CD


Contents
1 Set up the device
Before you begin . . . . . . . . . . . . . . . . . . . . . . 2
Set up the device . . . . . . . . . . . . . . . . . . . . . . 2
Complete the installation . . . . . . . . . . . . . . . . . 4
Finding more information. . . . . . . . . . . . . . . . . 4
2 Identify the device parts
Front view . . . . . . . . . . . . . . . . . . . . . . . . . . . 5
Back view . . . . . . . . . . . . . . . . . . . . . . . . . . . 6
Control panel. . . . . . . . . . . . . . . . . . . . . . . . . 7
3 Set up the fax (optional)
Parallel- vs. serial-type phone systems . . . . . . . . 9
Dedicated phone line . . . . . . . . . . . . . . . . . . 10
Shared phone line . . . . . . . . . . . . . . . . . . . . 10
Managing and configuring fax settings . . . . . . 15
Set up speed-dial entries . . . . . . . . . . . . . . . . 15
Test fax setup . . . . . . . . . . . . . . . . . . . . . . . . 15
4 Troubleshooting
Solving installation problems . . . . . . . . . . . . . 16
Solving network problems (some models only) . 17
Solving fax problems (some models only). . . . . 18
Troubleshooting and configuration tools . . . . . 20
Hewlett-Packard limited warranty
statement
English
1
1 Set up the device
This section summarizes the setup process for the device.
Before you begin
Prepare the location
Make sure the location where you will place the device
meets the following requirements.
• The surface must be sturdy and level.
• Make sure that you leave enough room so that you
can gain access to the back of the device and open
the flatbed scanner lid.
• Do not place the device in direct sunlight or near
chemicals. Make sure that the environment does not
experience abrupt changes in temperature or
humidity.
Temperature 15° to 35° C (59° to 95° F)
Relative humidity 10% to 80%
1.
Remove the tape and packing materials.
NOTE: Be sure to remove the cardboard
packing material from the printhead area.
2.
Install the control-panel faceplate.
3.
Install the document feeder tray.
4.
Install the ink cartridges.
NOTE: All four ink cartridges must be correctly
installed for the device to work. Ink from the
cartridges is used in the printing process in a
number of different ways, including in the
initialization process, which prepares the device
and cartridges for printing, and in printhead
servicing, which keeps print nozzles clear and
ink flowing smoothly. In addition, some residual
ink is left in the cartridge after it is used. For
more information see www.hp.com/go/
inkusage.
5.
Install the printheads.
Set up the device
This section summarizes the steps you follow to set up
the device. For more information, see the setup poster
that came with the device.
NOTE: Check the package contents and install
optional accessories.
CAUTION: Press down firmly on the printheads
to ensure proper contact before closing the
printhead latch.
6.
Connect the power cord and adapter and turn
on the device.
NOTE: Set the language and the country/
region (if needed), as well as the date and time,
on the display.
Set up the device2

7.
When prompted, load paper, and then press
the OK button.
a. Lift the output tray.
b. Insert up to 250 sheets of paper into Tray 1,
print-side down, along the right hand side of
the tray. Make sure the stack of paper aligns
with the right and back edges of the tray
and does not exceed the line marking in the
tray.
c. Slide the media guides in the tray to the size
that you are loading.
d. Lower the output tray and pull out the
extension.
To ensure the best possible print quality,
the device initializes and aligns the printheads.
This process takes approximately 12 minutes.
8.
Install software and connect the device.
You can connect the device using one of the
following types of connections:
• USB
• Ethernet network (some models only).
• Fax (some models only).
For more information about device software and
connectivity, see the onscreen user guide on the
Starter CD.
Ethernet network
a. Remove the protective cover from the
device’s network connector.
b. Connect the network cable to the connector
and to an available port on the network hub,
switch, or router. If the connector’s Link light
does not turn on, try a different port.
CAUTION: Do not plug the network cable into
a port labeled WAN, Uplink, or Internet in the
hub, switch, or router.
English
c. Insert the Starter CD, click Install (Windows)
or Install Software (Mac OS), and then
follow the onscreen instructions to complete
the software installation.
If the installation program displays more
than one instance of the device, print a
Network configuration page to select the
right device.
NOTE: If the CD menu does not start
automatically, double-click the setup icon on the
Starter CD.
USB
a. Insert the Starter CD, click Install (Windows)
or Install Software (Mac OS), and then
follow the onscreen instructions to complete
the software installation.
NOTE: If the CD menu does not start
automatically, double-click the setup icon on the
Starter CD.
b. Connect the USB cable to the computer,
when prompted.
d. Print the Network configuration page.
This page contains information needed for
setup. On the control panel, press the Setup
button, and then complete one of the
following:
• If your device has a two-line display, select
Network Setup, select Print Network Settings,
and then press OK.
• If your device has a color display, select
Network, select View Network Settings,
select Print Network Configuration Page, and
then press OK.
Fax
If you install software using the installation
program on the Starter CD, you can configure
fax settings after the device software is installed
using the Fax Setup Wizard (Windows) or
HP Device Manager (Mac OS). For more
information about setting up the fax, see “Set up
the fax (optional)” on page 9.
Set up the device 3

Complete the installation
Verify that the device is set
up correctly
1. Print a document from an application that you use
frequently.
2. Place the document in the document feeder tray with
the print-side facing up and the first page on top.
3. Adjust the width adjusters to the size of the
document.
4. Press START COPY Black or START COPY Color.
The device makes a copy of the document. If you
encounter problems, see “Solving installation
problems” on page 16.
5. Remove the document from the ADF output tray.
6. Open the flatbed scanner lid.
Verify that the device software is
installed correctly
To verify that the device software has been installed
correctly, start the software and complete basic tasks
(such as printing a document or sending a scan to your
computer).
To open the HP Photosmart software
(Windows)
1. On the Windows desktop, double-click the
HP Photosmart software icon.
2. If you have more than one HP device installed,
select the appropriate tab for your device.
To open the HP Photosmart Studio software
(Mac OS)
1. Click the HP Photosmart Studio icon in the Dock.
2. Click Device, and then choose a device.
For more information about using the device software,
see the online help for the software.
Register the device
If you have not already done so, go to
www.register.hp.com and register the device.
7. Place the first page of the document print-side down
on the scanner glass with the top-left corner of the
document located in the lower-right corner of the
glass.
8. Close the flatbed scanner.
9. Press START COPY Black or START COPY Color.
The device makes a copy of the document. If you
encounter problems, see “Solving installation
problems” on page 16.
Finding more information
For information about using the device and
troubleshooting, see the following resources:
• Onscreen user guide and readme file on the
Starter CD or at www.hp.com/support
• HP Instant Support and embedded Web server
(see the onscreen user guide)
• Product support site at www.hp.com/support
Set up the device4
2 Identify the device parts
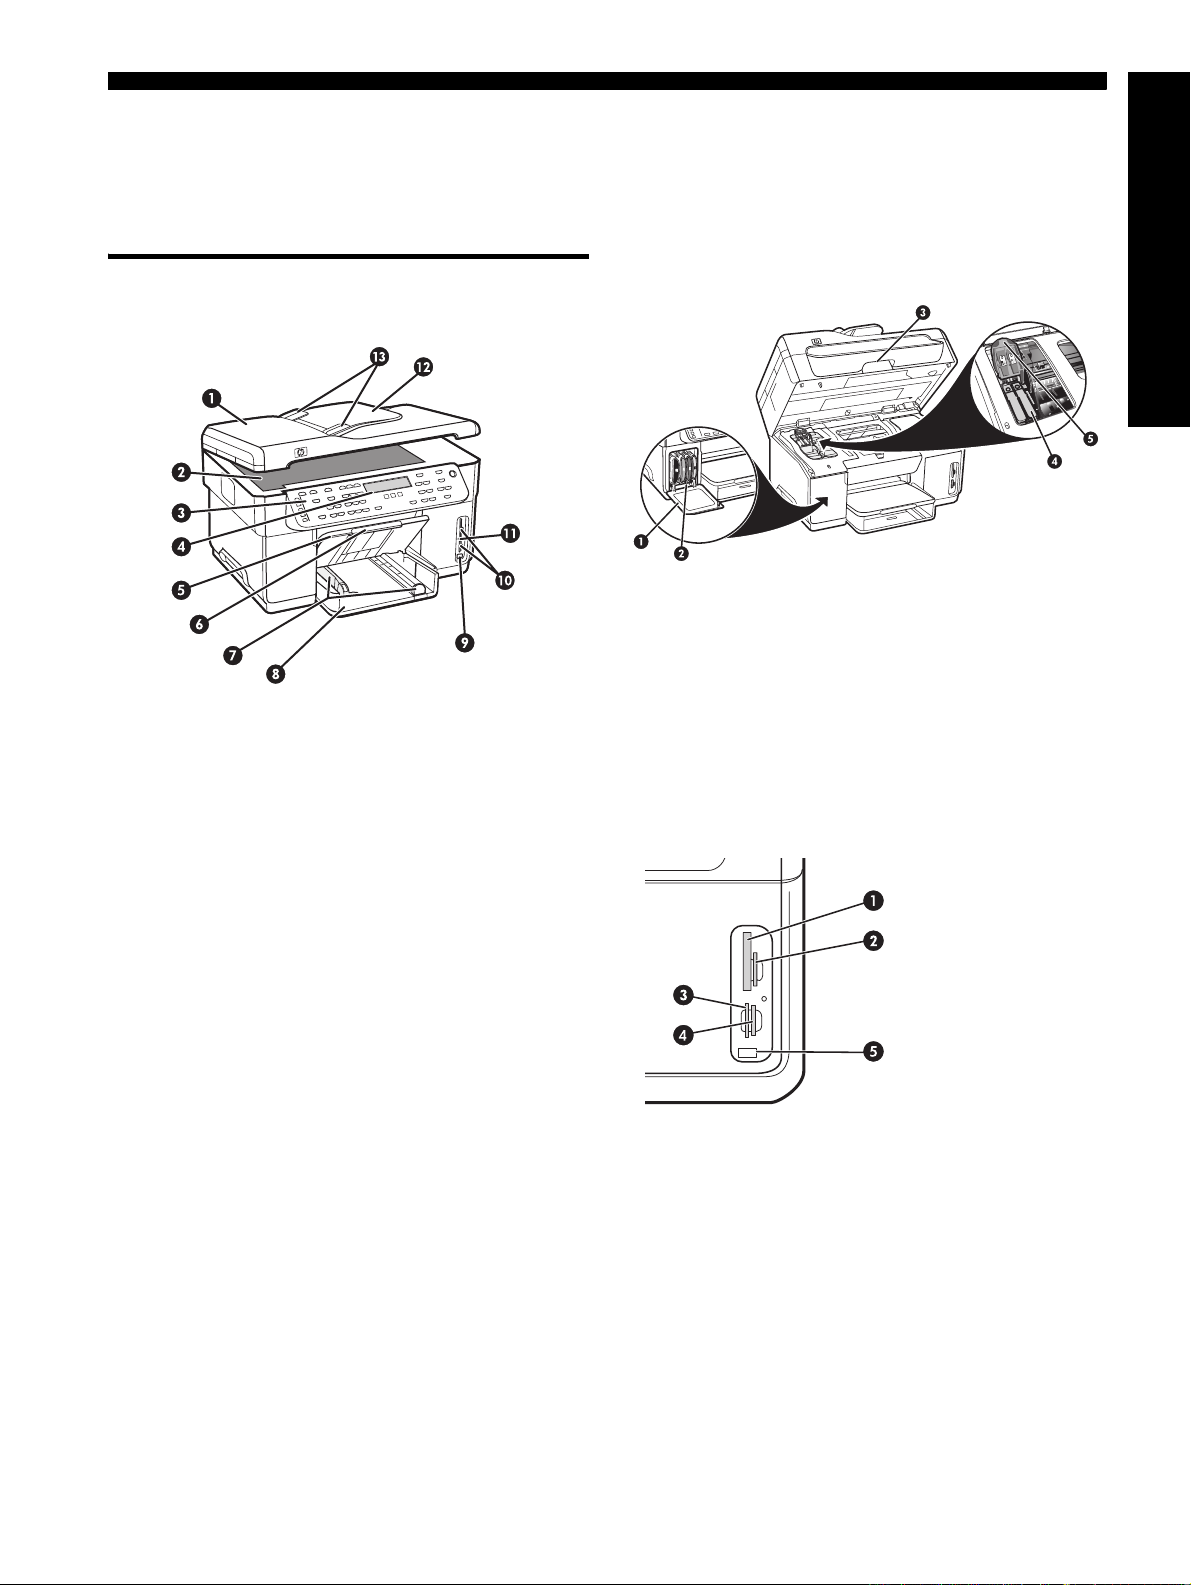
Printing supplies area
Front view
1 Ink cartridge door
2 Ink cartridges
3 Print-carriage access door
English
1 Automatic document feeder (ADF)
2 Scanner glass
3 Control panel
4 Display
5 Output tray
6 Output tray extension
7 Length/width guides
8 Tray 1
9 Front universal serial bus (USB) port
10 Memory card slots
11 Memory device light
12 Document feeder tray
13 Width guides
4 Printheads
5 Printhead latch
Memory card slots
1 Compact flash (types I and II, solid state only)
2 Secure Digital, MultimediaCard (MMC),
Secure MMC
3 xD
4 Memory Stick, Magic Gate Memory Stick,
Memory Stick Duo, and Memory Stick Pro
5 Front universal serial bus (USB) port (PictBridge-
enabled)
Front view 5
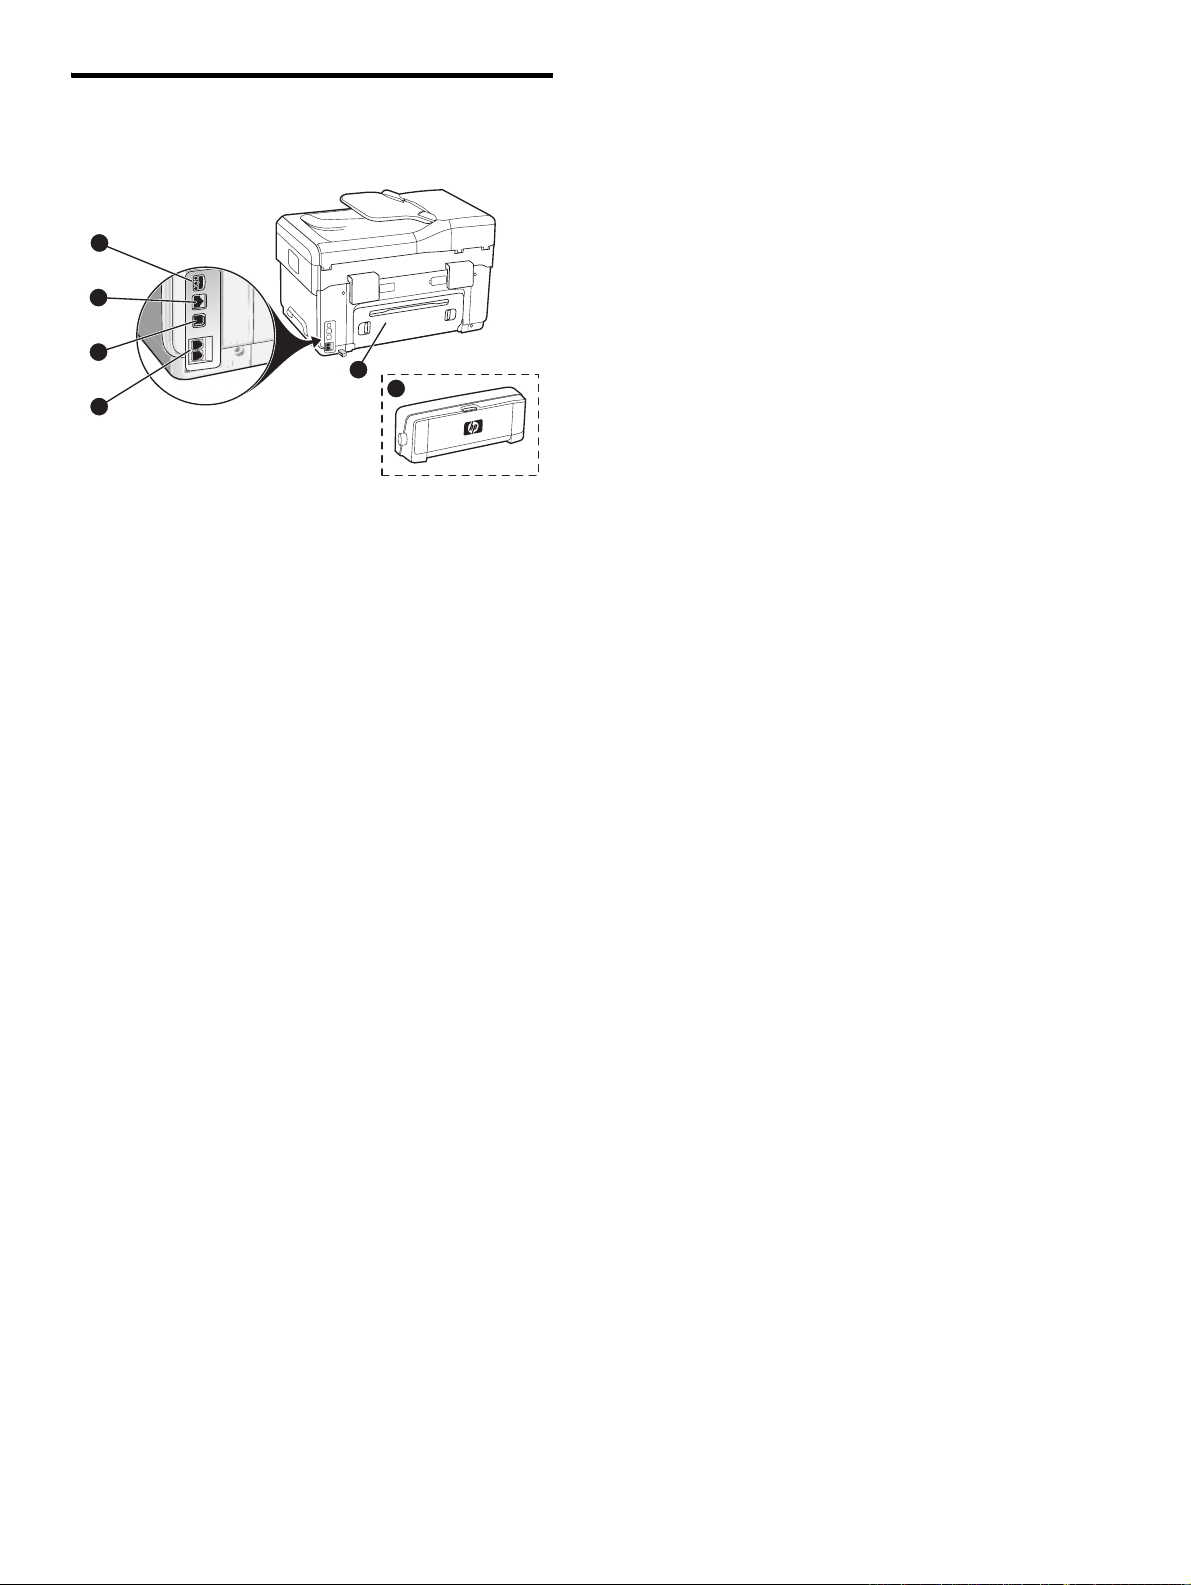
Back view
1
2
3
4
5
6
1 Power input
2 Ethernet network port (HP Officejet Pro L7500)
3 Rear USB port
4 Fax ports (1-LINE and 2-EXT)
5 Rear access panel (HP Officejet Pro L7300)
6 Automatic two-sided printing accessory (duplexer),
(HP Officejet Pro L7500)
Identify the device parts6
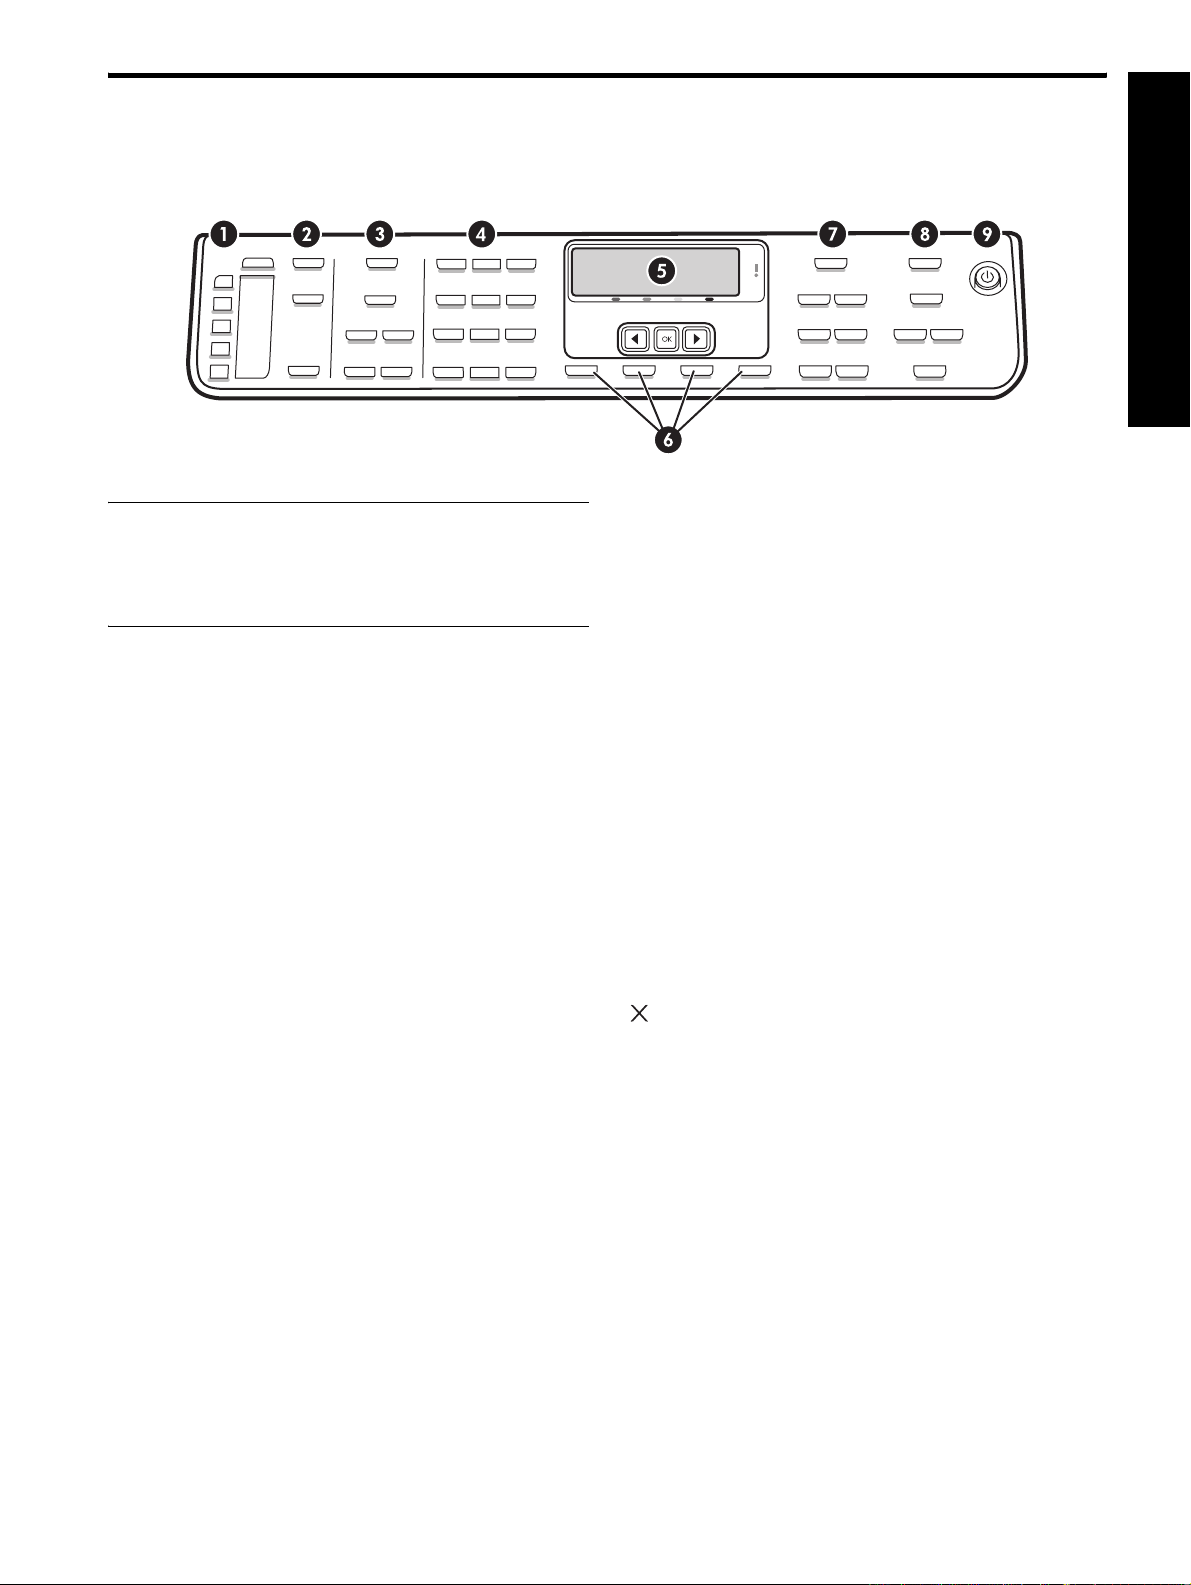
Control panel
English
NOTE: The control panel layout and features vary
depending on the model of the device that you have.
Your device might not have all of the buttons and lights
described in this section.
1 Speed Dial
Speed-dial buttons: Access the first five speed-dial
numbers. An entry might be a fax number or a group of
fax numbers.
List of speed-dial entries: Identify the speed-dial entries
that correspond to the five speed-dial buttons. You can
write the entries on the lined paper that is provided,
or print lists to insert.
2 SCAN
Scan To: Select a scan destination.
START SCAN: Start a scan job and send it to the
destination you selected using the Scan Menu button.
4 Keypad
Enter fax numbers, values, or text.
5 Display
Shows status and error messages, mode and setup
menus and their options, help information, and ink
cartridge levels.
Arrow buttons: Move through menu options or through
photos on the color display (if available).
OK: Select a menu, setting, or if the device has a color
display, select photos for printing.
6 Other buttons
Setup: Access the menu system for reports, settings,
and maintenance.
Cancel: Stop a job, exit a menu, or exit settings.
7 COPY
3 FAX
Menu: Open the menu for the fax function.
Resolution: Adjust the speed and quality of faxes that
are sent from the device.
Redial/Pause: Redial the most recently dialed fax
number.
Auto Answer: Set the fax function to answer the phone
automatically after a specified number of rings.
START FAX Black or START FAX Color: Start the fax,
in black and white or in color.
Menu: Open the menu for the copy function.
Reduce/Enlarge: Change the size of the copy.
Collate: Sequence copied output in the exact order it is
scanned from the scanner glass or ADF.
Quality: Control the speed and quality of copies.
The Quality light illuminates next to the selected copy
quality.
START COPY Black or START COPY Color: Start the copy
in black and white or in color.
Control panel 7

8 PHOTO
Menu: Open the menu for the photo function.
Proof Sheet: Print a proof sheet when a memory card
has been inserted in a memory card slot.
PRINT PHOTOS: Start the photo printing job.
9 Power button and lights
Power button: Turn the device on or off. When the
device is off, a minimal amount of power is still supplied
to the device. To completely disconnect the power
supply to the device, turn the device off, and then
unplug the power cord.
When lit, indicates that the device is on. The light blinks
while performing a job.
Network status light: Indicate the status of the
device on a network.
Attention light: When blinking, the attention light
indicates an error has occurred that requires your
attention.
Identify the device parts8

3 Set up the fax (optional)
This chapter provides instructions for setting up the fax in
a number of different setup configurations.
• Using a dedicated phone line
• Using a shared phone line
• Managing and configuring the fax
• Configuring the answer mode
• Configuring rings to answer
• Changing the answer ring pattern for distinctive
ringing
• Setting the fax header
• Testing the fax setup
For more information about fax features, see the
onscreen user guide on the Starter CD.
NOTE: Fax is supported on some models only.
CAUTION: If you do not use the supplied cord to
connect from the telephone wall jack to your device, you
might not be able to fax successfully.
This special phone cord is different from the phone
cords you might already have in your home or office.
If the supplied phone cord is too short, see the onscreen
user guide on the Starter CD for information.
If you do not see your country/region listed in the
following sections, you probably have a serial-type
phone system. If you are unsure which kind of telephone
system you have (serial or parallel), check with your
telephone company.
Countries/regions with paralleltype phone systems
In a parallel-type phone system, you are able to connect
shared telephone equipment to the phone line by using
the “2-EXT” port on the back of the device.
Argentina Australia Brazil
Canada Chile China
Colombia Greece India
Indonesia Ireland Japan
Korea Latin America Malaysia
Mexico Philippines Poland
Portugal Russia Saudi Arabia
Singapore Spain Taiwan
Thailand USA Venezuela
Vietnam
NOTE: If you have a parallel-type phone system,
HP recommends you use the 2-wire phone cord supplied
with the device to connect it to the telephone wall jack.
English
Parallel- vs. serial-type phone systems
Before you begin setting up the device for faxing,
determine which kind of phone system your country/
region uses.
NOTE: The instructions for fax setup differ depending
on whether you have a serial- or parallel-type phone
system.
Countries/regions with serial-type
phone systems
In a serial-type phone system, the connector type on
your shared telephone equipment (modems, phones,
and answering machines) does not allow a physical
connection to the “2-EXT” port on the device. Instead,
all equipment must be connected at the telephone wall
jack.
NOTE: In some countries/regions that use serial-type
phone systems, the phone cord that came with the
device might have an additional wall plug attached to
it. This enables you to connect other telecom devices to
the wall jack where you plug in the device.
Parallel- vs. serial-type phone systems 9

For information on setting up the device for faxing using
a serial-type phone system, see the Fax Configuration
Web site for your country/region.
Austria www.hp.com/at/faxconfig
Belgium (Dutch) www.hp.be/nl/faxconfig
Belgium (French) www.hp.be/fr/faxconfig
Denmark www.hp.dk/faxconfig
Finland www.hp.fi/faxconfig
France www.hp.com/fr/faxconfig
Germany www.hp.com/de/faxconfig
Ireland www.hp.com/ie/faxconfig
Italy www.hp.com/it/faxconfig
Norway www.hp.no/faxconfig
Netherlands www.hp.nl/faxconfig
Portugal www.hp.pt/faxconfig
Spain www.hp.es/faxconfig
Sweden www.hp.se/faxconfig
Switzerland (French) www.hp.com/ch/fr/faxconfig
Switzerland (German) www.hp.com/ch/de/faxconfig
United Kingdom www.hp.com/uk/faxconfig
1. Unplug any telephone devices from the phone jack
where you are connecting the device.
2. Connect the phone cord that came with the device
between the 1-LINE port on the device and the
phone jack.
1-LINE
3. If you subscribe to a distinctive ring service, change
the Answer Ring Pattern setting to the pattern that
has been assigned to your fax number by the
telephone company, for example, double rings or
triple rings.
For information on changing this setting, see the
onscreen user guide on the Starter CD.
Dedicated phone line
Use this section if you plan on using the following type
of phone line for the fax:
• Dedicated phone line (no other devices, such as a
phone or answering machine, share the line).
• Dedicated phone line without devices sharing the
line but with a subscription to a distinctive ring
service.
• Private Branch Exchange (PBX) or an Integrated
Services Digital Network (ISDN) line. For more
information about PBX and ISDN lines, see the
onscreen user guide on the Starter CD.
NOTE: You cannot receive faxes automatically if you
have a voice mail service at the same phone number
you use for fax calls. You must receive faxes manually;
this means you must be available to respond in person
to incoming fax calls. If you want to receive faxes
automatically instead, contact your telephone company
to subscribe to a distinctive ring service, or to obtain a
separate phone line for faxing.
Set up the device to answer incoming calls manually.
Press the Auto Answer button until the light is off.
NOTE: Your device is factory-set to answer all ring
patterns. If you do not set the correct ring pattern
assigned to your fax number by the telephone company,
your device might answer both voice calls and fax calls,
or it might not answer at all.
Shared phone line
If the fax is going to share the phone line with other
devices, such as a phone, answering machine,
computer/computer modem, or caller ID box, or if you
have voicemail service included with your line, you must
follow these instructions to determine how to set up your
fax.
1. Follow the steps for the “Dedicated phone line” on
page 10.
2. Plug additional devices into the 2-EXT port on the
back of the device.
2-EX T
3. Use the following tables to determine the rest of your
fax configuration.
Set up the fax (optional)10
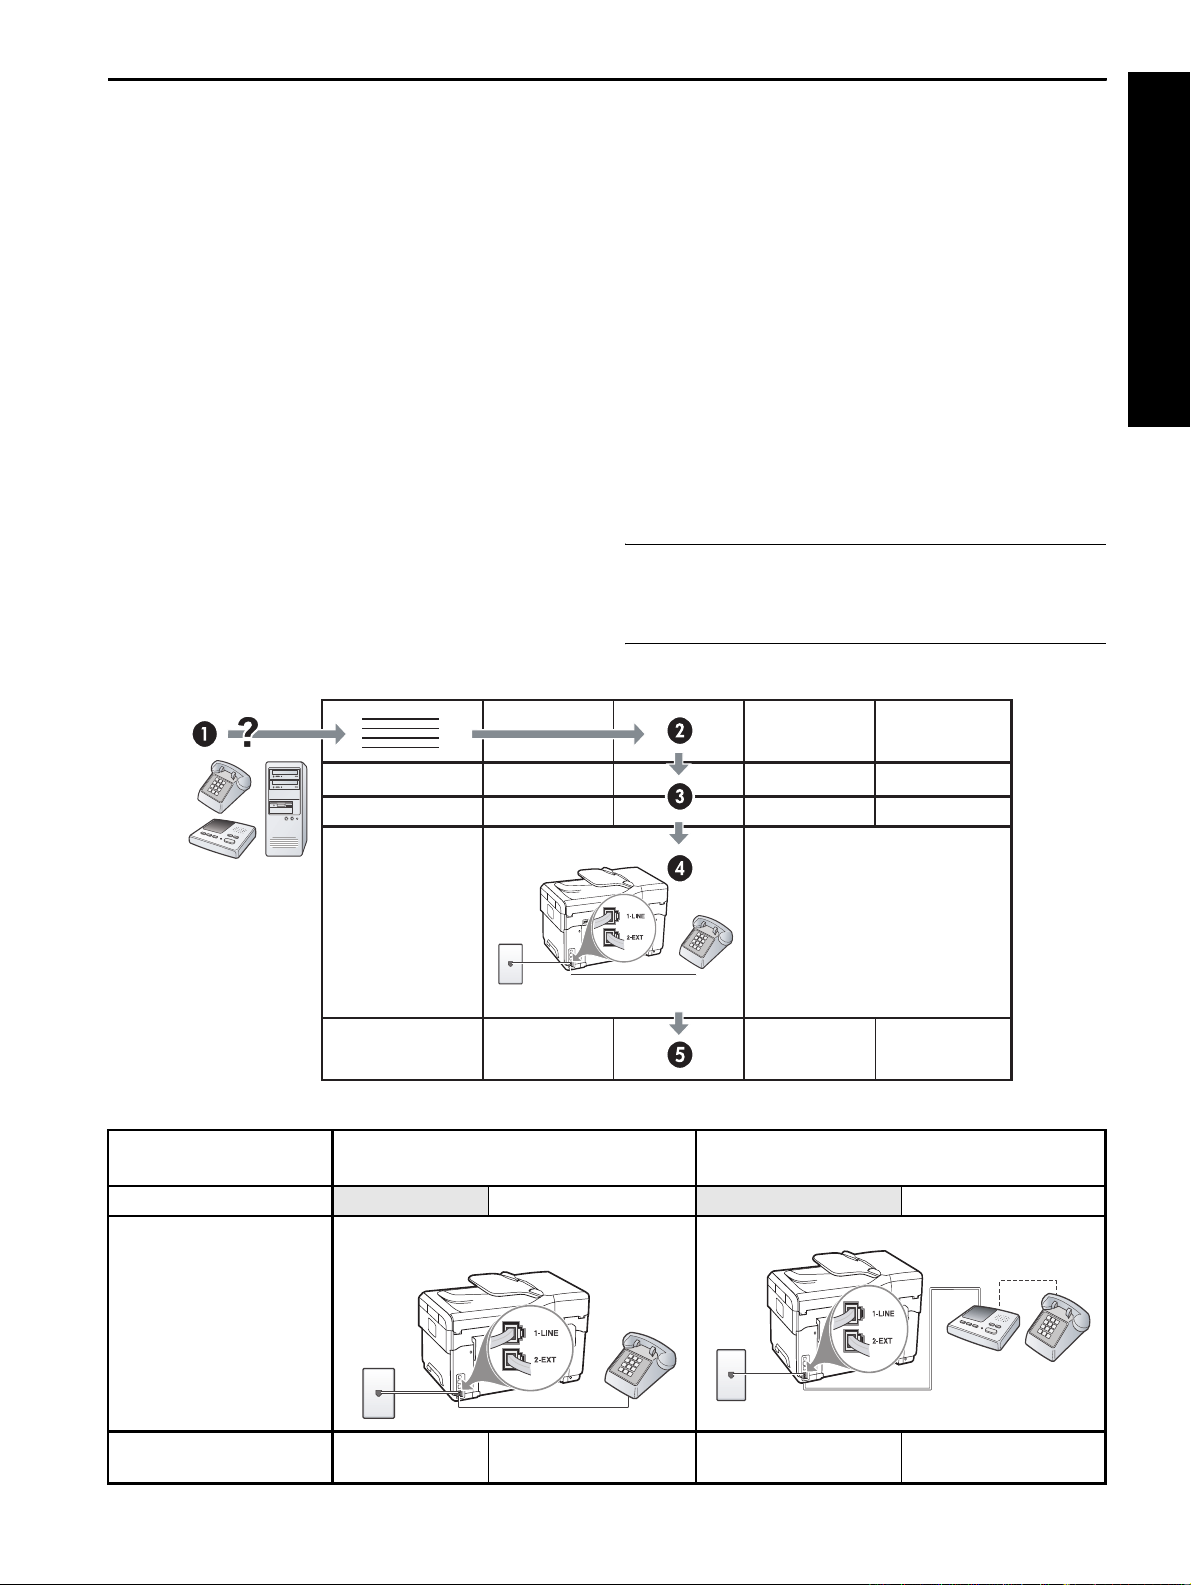
Use the fax setup tables
Use the fax setup tables to assist you in setting up the fax function on your device. To use the tables, follow these
steps:
Determine how you will use the phone line that your fax machine will be using:
• Voice and Fax (see Table 3-1) • Voice, Fax, and Internet (dial-up) (see Table 3-3)
• Fax and Internet (see Table 3-2) • Voice, Fax, and Internet (DSL) (see Table 3-4)
Once you determine how you want to use the phone line, follow these steps:
In the first row, determine what other devices will
share the phone line with the all-in-one (phone,
computer, answering machine).
In the next rows, determine if the phone line has any
special services (voicemail or distinctive ring), and, if the
phone line will be used with a computer, determine if
you have a dial-up or DSL modem.
The next row provides an example of what your fax
setup might look like in terms of how to connect various
devices to the all-in-one.
In the last row of the table are numbers that
correspond to the Configuration guideline table on
page 13. Use the Configuration guideline table to help
you set up your all-in-one so that it operates the most
effectively based on the way your all-in-one is set up.
NOTE: You must follow the numbers as they appear in
the last row of each fax setup table. Performing the steps
out of sequence may result in fax setup problems.
English
Table 3-1 Voice and Fax
What devices will you
connect to the device?
Does your line have… Distinctive ring service Distinctive ring service
Your fax setup should look
like this…
Then follow configuration #
Telephone • Telephone
• Answering machine
3 1, 9, 2 1, 7 1, 9, 7
Shared phone line 11
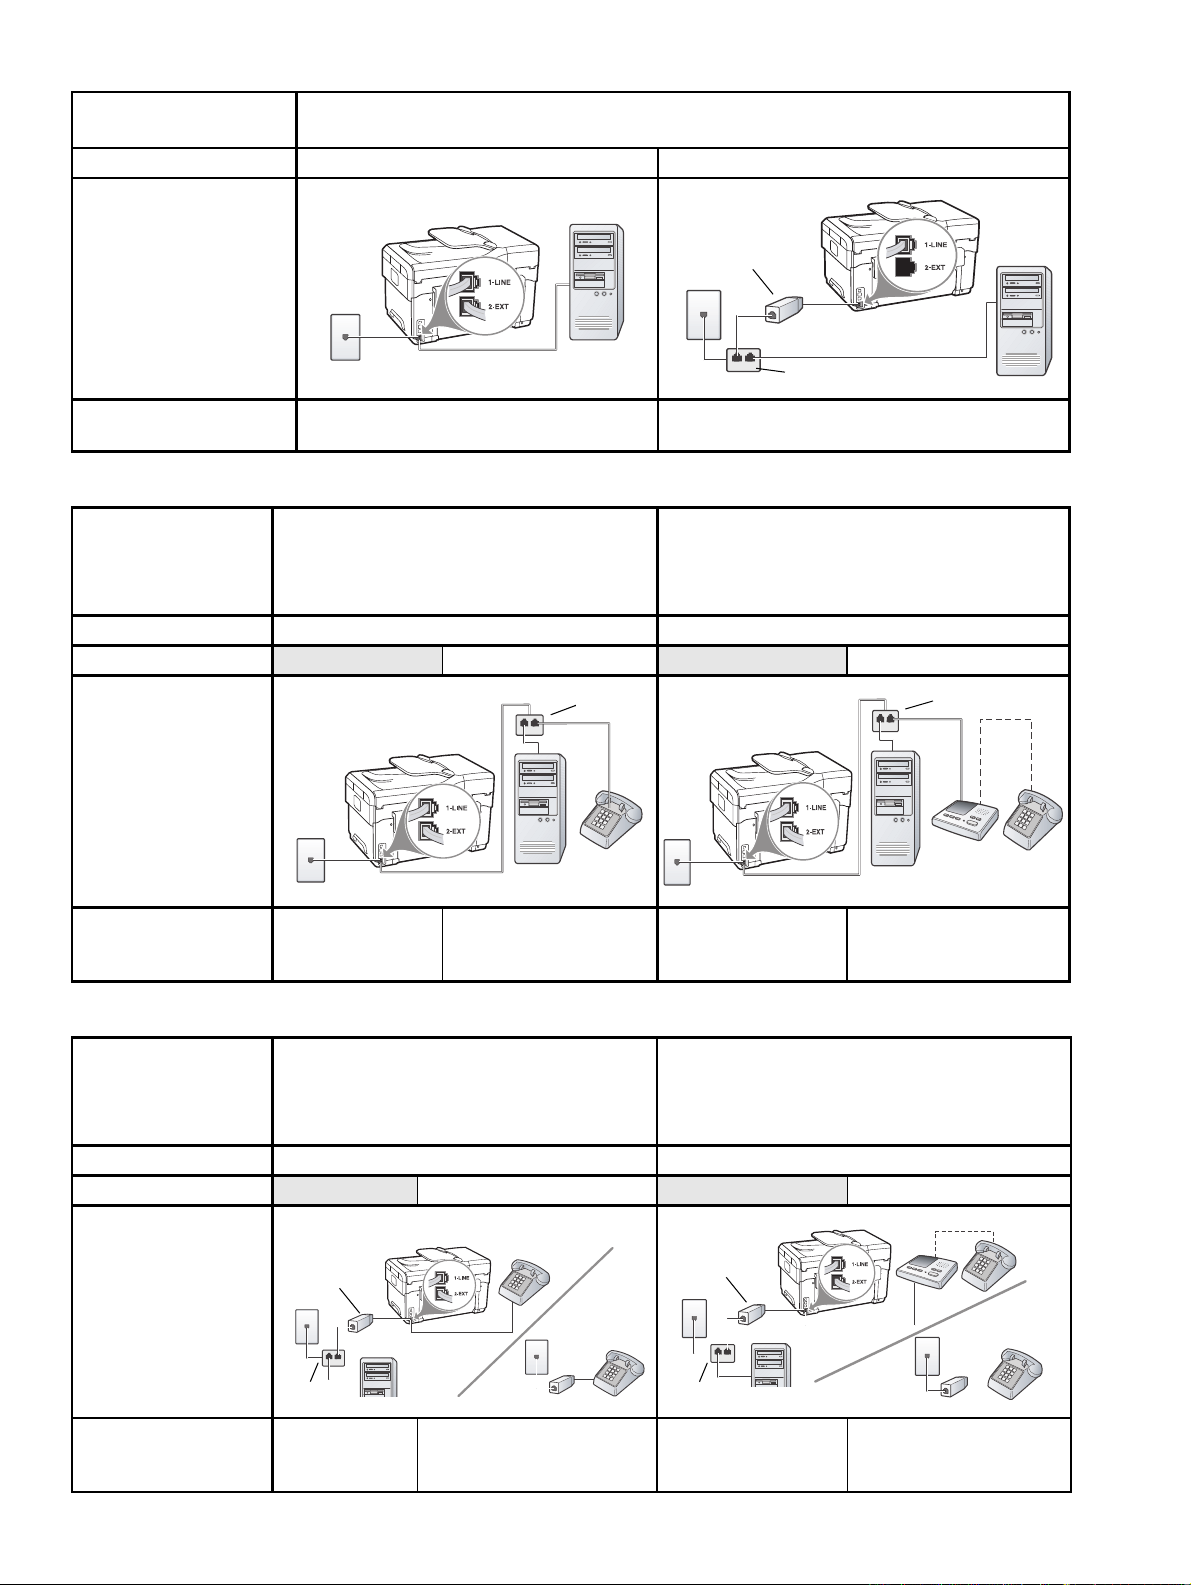
Table 3-2 Fax and Internet
What devices will you
connect to the device?
Is your line… Dial-up DSL
Your fax setup should look
like this…
• Computer
• Modem
DSL filter
Splitter
Then follow configuration #
4, 5, 1, 2, 6 8, 1, 2, 6
Table 3-3 Voice, Fax, and Internet (dial-up)
What devices will you
connect to the device?
• Telephone
• Computer
• Modem
Is your line… Dial-up Dial-up
Does your line have…
Your fax setup should
look like this…
Distinctive ring service Distinctive ring service
Splitter
Then follow
configuration # 4, 10, 5, 3 4, 10, 5, 3, 9 4, 10, 5, 1, 7 4, 10, 5, 1, 9, 7
• Telephone
• Computer
• Modem
• Answering machine
Splitter
Table 3-4 Voice, Fax, and Internet (DSL)
What devices will you
connect to the device?
Is your line… DSL DSL
Does your line have…
Your fax setup should
look like this…
Then follow
configuration # 8, 3 8, 3, 9 8, 1, 7 8, 1, 9, 7
Set up the fax (optional)12
• Telephone
• Computer
• Modem
DSL filter
3
2
Splitter
• Telephone
• Computer
• Modem
• Answering machine
Distinctive ring service Distinctive ring service
DSL filter
3
2
Splitter

Configuration guideline
Configuration # Configuration instructions
1 Set up the device to answer incoming calls automatically. Press the Auto Answer button until the light is
on.
2 (Optional) Change the Rings to Answer setting to one ring or two rings.
For information on changing this setting, see the onscreen user guide on the Starter CD.
3 Determine how you want the device to answer calls: automatically or manually.
• If you set up the device to answer calls automatically, it answers all incoming calls and receives
faxes. Your device will not be able to distinguish between fax and voice calls in this case; if you
suspect the call is a voice call, you will need to answer it before the device answers the call.
To answer fax calls automatically, press the Auto Answer button until the light is on.
• If you set up the device to answer faxes manually, you must be available to respond in person to
incoming fax calls or your device cannot receive faxes.
To answer fax calls manually, press the Auto Answer button until the light is off
4
(Dial-up modem)
5
(Dial-up modem)
6 When the phone rings, your device will answer automatically after the number of rings you set in the
7
(Answering machine)
8 DSL lines only: You will need to purchase additional DSL filters for all devices (telephone, computer) that
9
(Distinctive ring
service)
Since your PC modem shares the phone line with your device, you will not be able to use both your PC
modem and your device simultaneously. For example, you cannot use your device for faxing if you are
using your PC modem to send an e-mail or access the Internet.
If your PC modem software is set to receive faxes to your computer automatically, turn off that setting.
Caution: If you do not turn off the auto fax receive setting in your PC modem software, your device will
not be able to receive faxes.
Rings to Answer setting. Then it will begin emitting fax reception tones to the sending fax machine and
receive the fax.
Set your answering machine to answer after four or fewer rings.
Change the Rings to Answer setting on your device to six rings.
When the phone rings, your answering machine will answer after the number of rings you have set, and
then play your recorded greeting. The device monitors the call during this time, “listening” for fax tones.
If incoming fax tones are detected, the device will emit fax reception tones and receive the fax; if there
are no fax tones, the device stops monitoring the line and your answering machine can record a voice
message.
share the DSL phone line.
Change the Answer Ring Pattern setting to the pattern that has been assigned to your fax number by the
telephone company, for example, double rings or triple rings.
For information on changing this setting, see the onscreen user guide on the Starter CD.
NOTE: Your device is factory-set to answer all ring patterns. If you do not set the correct ring pattern
assigned to your fax number by the telephone company, your device might answer both voice calls and
fax calls, or it might not answer at all.
English
Shared phone line 13
10 There are two different ways to set up your device with your computer based on the number of phone
ports on your computer. You also need additional phone cords (at least three if your computer has only
one phone port and at least two if your computer has two phone ports).
Before you begin, check your computer to see if it has one or two phone ports:
Computer with one phone port
If your computer has only one phone port, you will need to purchase a parallel splitter (also called a
coupler). A parallel splitter has one RJ-11 port on the front and two RJ-11 ports on the back. Do not use
a two-line phone splitter, a serial splitter, or a parallel splitter which has two RJ-11 ports on the front and
a plug on the back. You can purchase a parallel splitter from an electronics store that carries phone
accessories.
1. Connect one end of the phone cord that came with the device to the wall jack and the other end to
the 1-LINE port on the device.
2. Connect one end of a second phone cord to the 2-EXT port on the device and the other end to the
front of the parallel splitter (the end with the single phone port).
3. Connect one end of a third phone cord to the back of the parallel splitter (the end with two phone
ports) and the other end to the computer.
4. Connect one end of a fourth phone cord to the last open port on the parallel splitter and the other
end to a telephone or answering machine. If you are connecting both a telephone and answering
machine, connect the fourth phone cord to the answering machine, and then use a fifth phone cord
to connect the answering machine to the telephone.
NOTE: If you do not connect your answering machine in this way, fax tones from a sending fax
machine might be recorded on your answering machine, and you might not be able to receive faxes
with your device.
Computer with two phone ports
If your computer has two phone ports, complete the following steps to connect the device to the
computer:
1. Connect one end of the phone cord that came with the device to the wall jack and the other end to
the 1-LINE port on the device.
2. Connect one end of a second phone cord to the 2-EXT port on the device and the other end to the
IN port on the computer.
3. Connect one end of a third phone cord to the OUT port on the computer and the other end to a
telephone or answering machine. If you are connecting both a telephone and answering machine,
connect the third phone cord to the answering machine, and then connect the answering machine
to the telephone.
NOTE: If you do not connect your answering machine in this way, fax tones from a sending fax
machine might be recorded on your answering machine, and you might not be able to receive faxes
with your device.
Set up the fax (optional)14

Managing and configuring
Test fax setup
fax settings
If you are connecting the device directly to a computer,
install the device software, and then run the Fax Setup
Wizard (Windows) or HP Device Manager (Mac OS).
You can also launch these tools from Solution Center
(Windows) or HP Device Manager (Mac OS) at a later
time. Use these tools to set the fax header, country/
region, and date and time.
In addition, you can configure the fax settings from the
embedded Web server (EWS). For information on the
EWS, see page 20.
You can also configure these settings from the control
panel. For information on the control panel, see the
onscreen user guide on the Starter CD.
Set up speed-dial entries
You can store fax numbers or groups of fax numbers as
speed-dial entries. Speed-dial entries 1 through 5 are
associated with the corresponding five speed-dial
buttons on the control panel. This lets you dial those
numbers quickly by using the control panel.
In addition to using the control panel, you can also set
up speed-dial entries using the embedded Web server
and the HP Photosmart software. For information,
see the onscreen user guide on the Starter CD.
You can test your fax setup to check the status of the
device and to make sure it is set up properly for faxing.
Perform this test after you have completed setting up the
device for faxing. The test does the following:
• Tests the fax hardware
• Verifies the correct type of phone cord is connected
to the device
• Checks that the phone cord is plugged into the
correct port
• Checks for a dial tone
• Checks for an active phone line
• Tests the status of your phone line connection
The device prints a report with the results of the test.
If the test fails, review the report for information on how
to fix the problem and rerun the test. For additional
troubleshooting information, see “Solving fax problems
(some models only)” on page 18.
To test fax setup
1. Set up the device for faxing according to your
particular home or office setup instructions.
2. Make sure the ink cartridges and printheads are
installed, and that full-size paper is loaded in the
input tray before starting the test.
3. From the control panel, press Setup.
4. Select Tools, and then select Run Fax Test.
English
To set up speed-dial entries
1. From the control panel, press Setup.
2. Select Speed Dial Setup and do one of the following:
• To add or change an entry: Select Individual
Speed Dial or Group Speed Dial and press the
arrow keys to move to an unused entry number,
or type a number on the keypad. Type the fax
number, and then press OK. Include any pauses
or other required numbers, such as an area
code, an access code for numbers outside a PBX
system (usually a 9 or 0), or a long-distance
prefix. Type the name using the numeric keypad,
and then press OK.
• To delete one entry or all entries: Select Delete
Speed Dial and press the arrow keys to move to
the speed-dial entry that you want to delete,
and then press OK.
The device displays the status of the test on the
display and prints a report.
5. Review the report.
• If the test passes and you are still having
problems faxing, check the fax settings listed in
the report to verify the settings are correct.
A blank or incorrect fax setting can cause
problems faxing.
• If the test fails, review the report for more
information on how to fix any problems found.
Managing and configuring fax settings 15

4Troubleshooting
This section provides troubleshooting suggestions for
some of the most common issues associated with
hardware and software installation.
For late-breaking information, see the readme file and
release notes on the Starter CD, or visit the product
support Web site at www.hp.com/support.
Solving installation problems
This section provides troubleshooting suggestions for
some of the most common issues associated with
hardware and software installation.
Hardware installation suggestions
Check the device
• Make sure that all packing tape and material have
been removed from outside and inside the device.
Check the printheads and ink cartridges
• Make sure that you have removed the orange caps
from the printheads.
• Make sure that all of the printheads and ink
cartridges are firmly installed in their correct,
color-coded slot. Press down firmly on each one to
ensure proper contact. The device cannot work if
they are not all installed.
• Make sure that the printhead latch and all covers are
closed.
• If the display shows a printhead error message,
clean the contacts on the printheads. For more
information, see the onscreen user guide on the
Starter CD.
Software installation suggestions
Check the computer system
• Make sure that your computer is running one of the
supported operating systems. For more information,
see the onscreen user guide on the Starter CD.
• Make sure paper is loaded correctly in the tray,
and is not jammed in the device.
• Make sure that no lights are on or blinking except
the Power light, which should be on. If the Attention
light is blinking, check for messages on the control
panel. When the device is first turned on, it takes
approximately 45 seconds to warm up.
• Make sure the rear access panel or duplexer is
locked into place.
• Make sure that the device can print a Self-test
diagnostic page. For more information, see “Self-test
diagnostic page” on page 20.
Check the hardware connections
• Make sure that any cords and cables that you are
using are in good working order.
• Make sure that the power cord is connected securely
to both the device and to a working power outlet.
• Make sure that the phone cord is connected to the
1-LINE port.
• Make sure that the computer meets at least the
minimum system requirements. For more information,
see the onscreen user guide on the Starter CD.
Verify installation preliminaries
• Make sure to use the Starter CD that contains the
correct installation software for your operating
system.
• Before installing software, make sure that all other
programs are closed.
• If the computer does not recognize the path to the
CD-ROM drive that you type, make sure that you are
specifying the correct drive letter.
• If the computer cannot recognize the Starter CD in
the CD-ROM drive, inspect the Starter CD for
damage. You can download the device driver from
www.hp.com/support.
• In the Windows device manager, make sure that the
USB drivers have not been disabled.
Troubleshooting16

• If you are using a computer running Windows,
and the computer cannot detect the device, run the
uninstallation utility (util\ccc\uninstall.bat on the
Starter CD) to perform a clean uninstallation of the
device driver. Restart your computer, and reinstall the
device driver.
Solving network problems (some models only)
NOTE: After correcting any of the following, run the
installation program again.
General network troubleshooting
• If you are unable to install the device software,
verify that:
• All cable connections to the computer and the
device are secure.
• The network is operational and the network hub
is turned on.
Right-click the device icon, click Run as
administrator, click Properties, click Continue,
and then click the Ports tab.
4) Select the TCP/IP port for the device, and then
click Configure Port.
5) Compare the IP address listed in the dialog
box and make sure it matches the IP address
listed on the Network configuration page. If the
IP addresses are different, change the IP address
in the dialog box to match the address on the
Network configuration page.
6) Click OK twice to save the settings and close
the dialog boxes.
English
Problems connecting to a
wired network
• If the Link light on the network connector does not
turn on, make sure that all of the “General network
troubleshooting” conditions listed above are met.
• Though it is not recommended that you assign the
device with a static IP address, you might resolve
some installation problems (such as a conflict with a
personal firewall) by doing so. For more information,
see the onscreen user guide on the Starter CD.
• All applications, including virus protection
programs, spyware protection programs, and
firewalls, are closed or disabled for computers
running Windows.
• Make sure the device is installed on the same
subnet as the computers that will be using the
device.
• If the installation program cannot discover the
device, print the Network configuration page
(see “To print the Network configuration page”
on page 20), and enter the IP address manually
in the installation program.
• If you are using a computer running Windows,
make sure that the network ports created in the
device driver match the device IP address:
1) Print the device’s Network configuration page.
2) From the Windows desktop, click Start,
point to Settings, and then click Printers or
Printers and Faxes.
Or
Click Start, click Control Panel, and then double-
click Printers.
3) Right-click the device icon, click Properties,
and then click the Ports tab.
Or
Solving network problems (some models only) 17

Solving fax problems (some models only)
If you ran a fax test and the test failed, see the test report for possible solutions. For more detailed information, see the
onscreen user guide on the Starter CD.
The device is having problems
sending and receiving faxes
Make sure you use the phone cord that came with the device.
Other equipment that uses the same phone line as the device might be in use. Make sure
extension phones (phones on the same phone line, but not connected to the device) or other
equipment is not in use or off the hook. For example, you cannot use the device for faxing if an
extension phone is off the hook or if you are using a computer dial-up modem to send e-mail or
access the Internet.
If you are using a phone splitter, the splitter could cause faxing problems. Try connecting the
device directly to the telephone wall jack.
Make sure that one end of the phone cord is connected to the telephone wall jack, while the
other end to port labeled “1-LINE” on the back of the device.
Try connecting a working phone directly to the telephone wall jack and check for a dial tone –if you do not hear a dial tone, please contact your telephone company to check the line.
Make sure you connect the device to an analog phone line, or you cannot send or receive faxes.
To check if your phone line is digital, connect a regular analog phone to the line and listen for a
dial tone. If you do not hear a normal-sounding dial tone, it might be a phone line set up for
digital phones. Connect the device to an analog phone line and try sending or receiving a fax.
The phone line connection might be noisy. Phone lines with poor sound quality (noise) can cause
faxing problems. Check the sound quality of the phone line by plugging a phone into the
telephone wall jack and listening for static or other noise. If you hear noise, turn Error Correction
Mode (ECM) off and try faxing again.
If you are using a digital subscriber line (DSL) service, make sure that you have a DSL filter
connected. Without the filter, you cannot fax successfully.
If you are using either a private branch exchange (PBX) or an integrated services digital network
(ISDN) converter/terminal adapter, make sure the device is connected to the correct port and the
terminal adapter is set to the correct switch type for your country/region.
Troubleshooting18

The device can send faxes, but
cannot receive faxes
If you are not using a distinctive ring service, check to make sure that the Distinctive Ring feature
on the device is set to All Rings.
If Auto Answer is set to Off, or you have a voice mail service at the same phone number you use
for fax calls, you can only receive faxes manually.
If you have a computer dial-up modem on the same phone line with the device, check to make
sure that the software that came with your modem is not set to receive faxes automatically.
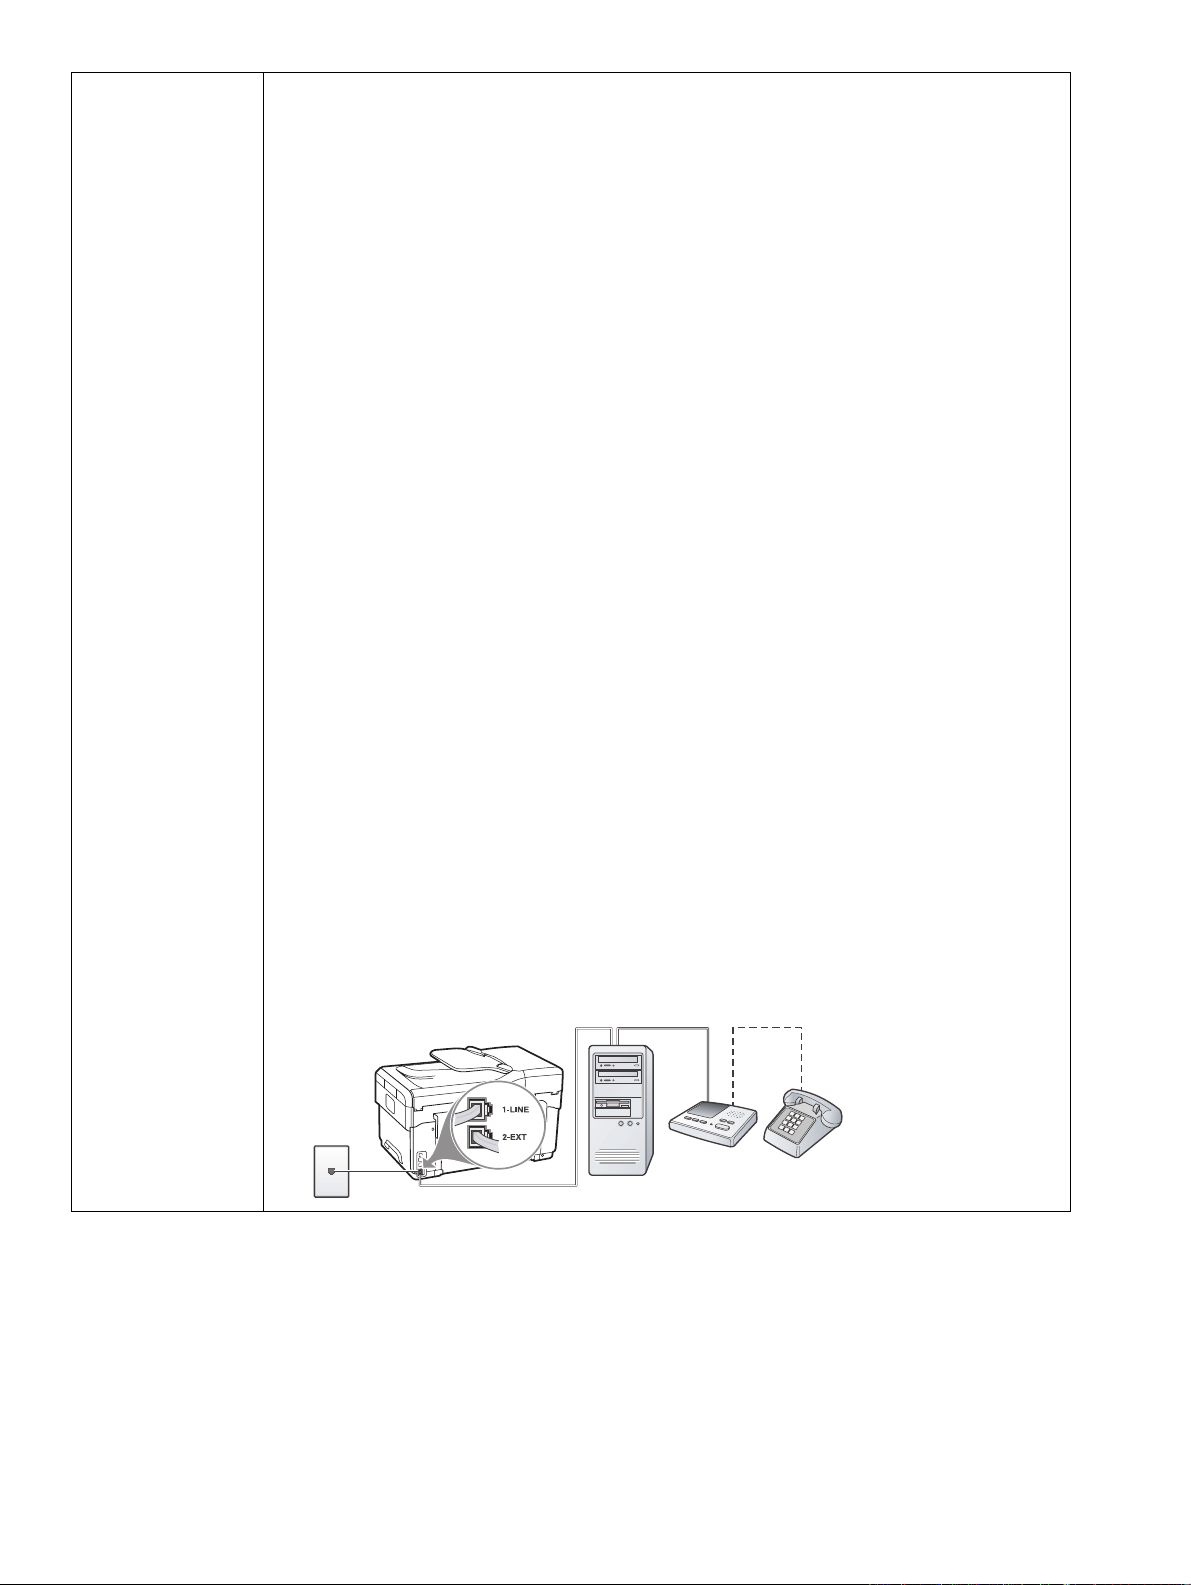
If you have an answering machine on the same phone line with the device:
• Check that the answering machine is working properly.
• Make sure your setup looks like the second example in Table 3-1 on page 11.
• Make sure the device is set to receive faxes automatically.
• Make sure the Rings to Answer setting is set to a greater number of rings than the answering
machine.
• Disconnect the answering machine and then try receiving a fax.
• Record a message that is approximately 10 seconds in duration. Speak slowly and at a low
volume when recording your message. Leave at least 5 seconds of silence at the end of the
voice message.
Other equipment that uses the same phone line might be causing the test to fail. You can
disconnect all the other devices and run the test again. If the Dial Tone Detection Test passes,
then one or more of the other equipment is causing problems. Try adding them back one at a
time and rerunning the test each time until you identify which piece of equipment is causing the
problem.
English
The device cannot send faxes,
but can receive faxes
The display always shows
Phone Off Hook
The device is having problems
sending a manual fax
Fax tones are recorded on my
answering machine
The phone cord that came with
my device is not long enough
The device might be dialing too fast or too soon. For example, if you need to access an outside
line by dialing “9”, try inserting pauses as follows: 9-XXX-XXXX (where XXX-XXXX is the fax
number you are sending to). To enter a pause press Redial/Pause, or press the Space (#) button
repeatedly, until a dash (-) appears on the display.
You are using the wrong phone cord. See the first two issues under “The device is having
problems sending and receiving faxes” on page 18.
This possible solution applies only in the countries/regions that receive a 2-wire phone cord in
the box with the device, including: Argentina, Australia, Brazil, Canada, Chile, China,
Colombia, Greece, India, Indonesia, Ireland, Japan, Korea, Latin America, Malaysia, Mexico,
Philippines, Poland, Portugal, Russia, Saudi Arabia, Singapore, Spain, Taiwan, Thailand, USA,
Venezuela, and Vietnam.
Make sure your setup looks like the first example in Table 3-1 on page 11.
If you are sending a fax manually from your phone that is connected directly to the device, you
must use the keypad on the telephone to send the fax.
See the fourth issue under “The device can send faxes, but cannot receive faxes” on page 19.
If the phone cord that came with the device is not long enough, you can use a coupler to extend
the length. You can purchase a coupler at an electronics store that carries phone accessories.
You also need another phone cord, which can be a standard phone cord that you might already
have in your home or office.
1. Using the phone cord supplied in the box with the device, connect one end to the coupler,
and then connect the other end to the port labeled 1-LINE on the back of the device.
2. Connect a second phone cord to the open port on the coupler and to the telephone wall
jack.
Solving fax problems (some models only) 19

Troubleshooting and configuration tools
The following tools are available for troubleshooting or
configuring the device. For more information, see the
onscreen user guide on the Starter CD.
Embedded Web server
A Web server provides an environment in which Web
programs can run, in much the same way that an
operating system, such as Microsoft
provides an environment in which programs can run on
your computer. A Web browser, such as Microsoft
Internet Explorer, Netscape, Opera, Mozilla Firefox,
or Safari can show output from a Web server.
®
Windows®,
Self-test diagnostic page
Use the Self-test diagnostic page to view current device
settings, to help troubleshoot device problems, and to
verify installation of optional accessories, such as the
duplexer. The Self-test diagnostic page also contains a
log of recent events. If you need to call HP, print the
Self-test diagnostic page before calling.
To print the Self-test diagnostic page
1. On the control panel, press the Setup button.
2. Select Print Report, select Self-Test Report, and then
press OK.
Network configuration page
If the device is connected to a network, you can print a
Network configuration page to view the network settings
for the device. You can use the Network configuration
page to help troubleshoot network connectivity
problems.
To print the Network configuration page
1. On the control panel, press the Setup button.
2. Select Network Setup, select Print Network Settings,
and then press OK.
An embedded Web server (EWS) resides on a
hardware product (such as a printer) or in the firmware,
rather than as software that is loaded on a network
server. The advantage of an embedded Web server is
that it provides an interface to the product that anyone
who has a network-connected computer and a standard
Web browser can open and use. No special software
needs to be installed or configured.
With the HP Embedded Web Server, you can view
product status information, change settings, and
manage the product at your computer.
To open the embedded Web server
In a supported Web browser on your computer, type the
IP address that has been assigned to the device.
For example, if the IP address is 123.123.123.123,
type the following address into the Web browser:
http://123.123.123.123
The IP address for the device is listed on the Network
configuration page.
After you open the embedded Web server, you can
bookmark it so that you can return to it quickly in the
future.
Troubleshooting20

Hewlett-Packard limited warranty statement
HP product Duration of limited warranty
Software Media 90 days
Printer 1 year
Print or Ink cartridges Until the HP ink is depleted or the “end of warranty” date printed
on the cartridge has been reached, whichever occurs first. This
warranty does not cover HP ink products that have been refilled,
remanufactured, refurbished, misused, or tampered with.
Accessories 90 days
A. Extent of limited warranty
1. Hewlett-Packard (HP) warrants to the end-user customer that the HP products specified above will be free from
defects in materials and workmanship for the duration specified above, which duration begins on the date of purchase
by the customer.
2. For software products, HP's limited warranty applies only to a failure to execute programming instructions. HP does
not warrant that the operation of any product will be interrupted or error free.
3. HP's limited warranty covers only those defects that arise as a result of normal use of the product, and does not cover
any other problems, including those that arise as a result of:
a. Improper maintenance or modification;
b. Software, media, parts, or supplies not provided or supported by HP;
c. Operation outside the product's specifications;
d. Unauthorized modification or misuse.
4. For HP printer products, the use of a non-HP cartridge or a refilled cartridge does not affect either the warranty to the
customer or any HP support contract with the customer. However, if printer failure or damage is attributable to the use
of a non-HP or refilled ink cartridge, HP will charge its standard time and materials charges to service the printer for
the particular failure or damage.
5. If HP receives, during the applicable warranty period, notice of a defect in any product which is covered by HP's
warranty, HP shall either repair or replace the product, at HP's option.
6. If HP is unable to repair or replace, as applicable, a defective product which is covered by HP's warranty, HP shall,
within a reasonable time after being notified of the defect, refund the purchase price for the product.
7. HP shall have no obligation to repair, replace, or refund until the customer returns the defective product to HP.
8. Any replacement product may be either new or like-new, provided that it has functionality at least equal to that of the
product being replaced.
9. HP products may contain remanufactured parts, components, or materials equivalent to new in performance.
10. HP's Limited Warranty Statement is valid in any country where the covered HP product is distributed by HP. Contracts
for additional warranty services, such as on-site service, may be available from any authorized HP service facility in
countries where the product is distributed by HP or by an authorized importer.
B. Limitations of warranty
TO THE EXTENT ALLOWED BY LOCAL LAW, NEITHER HP NOR ITS THIRD PARTY SUPPLIERS MAKES ANY
OTHER WARRANTY OR CONDITION OF ANY KIND, WHETHER EXPRESS OR IMPLIED WARRANTIES OR
CONDITIONS OF MERCHANTABILITY, SATISFACTORY QUALITY, AND FITNESS FOR A PARTICULAR
PURPOSE.
C. Limitations of liability
1. To the extent allowed by local law, the remedies provided in this Warranty Statement are the customer's sole and
exclusive remedies.
2. TO THE EXTENT ALLOWED BY LOCAL LAW, EXCEPT FOR THE OBLIGATIONS SPECIFICALLY SET FORTH IN
THIS WARRANTY STATEMENT, IN NO EVENT SHALL HP OR ITS THIRD PARTY SUPPLIERS BE LIABLE FOR
DIRECT, INDIRECT, SPECIAL, INCIDENTAL, OR CONSEQUENTIAL DAMAGES, WHETHER BASED ON
CONTRACT, TORT, OR ANY OTHER LEGAL THEORY AND WHETHER ADVISED OF THE POSSIBILITY OF
SUCH DAMAGES.
D. Local law
1. This Warranty Statement gives the customer specific legal rights. The customer may also have other rights which vary
from state to state in the United States, from province to province in Canada, and from country to country elsewhere
in the world.
2. To the extent that this Warranty Statement is inconsistent with local law, this Warranty Statement shall be deemed
modified to be consistent with such local law. Under such local law, certain disclaimers and limitations of this Warranty
Statement may not apply to the customer. For example, some states in the United States, as well as some
governments outside the United States (including provinces in Canada), may:
a. Preclude the disclaimers and limitations in this Warranty Statement from limiting the statutory rights of a consumer
(e.g., the United Kingdom);
b. Otherwise restrict the ability of a manufacturer to enforce such disclaimers or limitations; or
c. Grant the customer additional warranty rights, specify the duration of implied warranties which the manufacturer
cannot disclaim, or allow limitations on the duration of implied warranties.
3. THE TERMS IN THIS WARRANTY STATEMENT, EXCEPT TO THE EXTENT LAWFULLY PERMITTED, DO NOT
EXCLUDE, RESTRICT, OR MODIFY, AND ARE IN ADDITION TO, THE MANDATORY STATUTORY RIGHTS
APPLICABLE TO THE SALE OF THE HP PRODUCTS TO SUCH CUSTOMERS.
English
21


目錄
1 設定裝置
開始前
設定裝置
完成安裝
相關的其他資訊
2 裝置各部零組件說明
前視圖
後視圖
控制面板
3 設定傳真 (選項)
並行與序列型電話系統的比較
專用的電話線路
共用的電話線路
管理及配置傳真設定
設定速撥紀錄
測試傳真設定
4 疑難排解
解決安裝問題
解決網路問題 (僅限某些機型)
解決傳真問題 (限某些機型)
疑難排解及配置工具
. . . . . . . . . . . . . . . . . . . . . . . . . . . . . 2
. . . . . . . . . . . . . . . . . . . . . . . . . . . . 2
. . . . . . . . . . . . . . . . . . . . . . . . . . . . 3
. . . . . . . . . . . . . . . . . . . . . . . 4
. . . . . . . . . . . . . . . . . . . . . . . . . . . . . 5
. . . . . . . . . . . . . . . . . . . . . . . . . . . . . 6
. . . . . . . . . . . . . . . . . . . . . . . . . . . . 7
. . . . . . . . . . . . . . . . . . . . . . 10
. . . . . . . . . . . . . . . . . . . . . . 10
. . . . . . . . . . . . . . . . . . . 15
. . . . . . . . . . . . . . . . . . . . . . . . 15
. . . . . . . . . . . . . . . . . . . . . . . . 15
. . . . . . . . . . . . . . . . . . . . . . . . 16
. . . . . . . . . . . . . . . . . . . 19
. . . . . . . . . . . . . 9
繁 體 中 文
. . . . . . . . . . . 16
. . . . . . . . . . . . 18
Hewlett-Packard
有限的保固書
1

1
設定裝置
本節概要說明裝置的設定程序。
開始前
場地整備
裝置的置放地點須滿足下列條件。
地面須平坦牢固。
•
機身四週應保留足夠的空間,以便打開裝置的後蓋
•
及平板掃瞄器的上蓋。
切勿將裝置置於陽光直晒或化學品旁。印表機四週
•
的溫度溼度應避免劇烈的變化。
溫度
相對溼度
15℃ 到 35
(59℉ 到
10% 到 80%
95
℃
℉)
1.
去除包裝膠帶及包裝材料。
注意:務請去除印字頭區的包裝紙板。
2.
安裝控制面板銘板。
3.
安裝文件送紙匣。
4.
安裝墨水匣。
注意:四個墨水匣必須全都安裝好,裝置才能
能正常運作。匣中的墨水在列印程序中有多種
不同的用途,包括準備裝置及墨水匣進行列印
前的初始化作業,以及使印字頭噴嘴清潔無阻
塞的印字頭維護作業。此外,墨水匣使用後也
會有些墨水殘留。詳細的說明,請瀏覽
www.hp.com/go/inkusage
5.
安裝印字頭。
注意:向下緊壓印字頭使插入定位,然後扣上
印字頭鎖拴。
網站。
設定裝置
本節簡要說明設定裝置的步驟。詳細的說明,請參閱
裝置隨附的安裝簡冊。
注意: 檢查包裝箱內的項自並安裝選購的配件。
6.
插入電源線及電源轉換器,將裝置開機。
注意:(視需要)設定語言及國家/地區,
以及顯示幕上的日期及時間。
7.
按提示載入紙張後按
將出紙匣向上抬起。
a.
將最多
b.
側,載入紙匣 1。紙張插入後,應貼齊紙匣
右側及後側,且疊高在紙匣標示線以下。
調整印材導桿使貼齊載入的印材。
c.
將出紙匣壓回原位,再拉開出紙托板。
d.
為確保最佳的列印品質,裝置會先啟始化並校
準印字頭。整個過程需時約
8.
安裝軟體並連結裝置。
您可用下列多種方式連結裝置:
USB
•
Ethernet
•
傳真 (僅限某些機型)。
•
裝置有關軟體及連結的詳細說明,請參閱
Starter CD
張紙,列印面朝下貼齊紙匣右
250
網路 (僅限某些機型)。
的線上使用手冊。
OK
鍵。
12
分鐘。
2
設定裝置
 Loading...