

Page 1

HP Officejet 4630 e-All-in-One series
Page 2

Page 3

Table of contents
1 HP Officejet 4630 e-All-in-One series Help ....................................................................................................... 1
2 Get to know the HP Officejet 4630 series ......................................................................................................... 3
Printer parts ........................................................................................................................................................... 4
Control panel and status lights ............................................................................................................................. 6
Wireless settings ................................................................................................................................................... 8
3 Print ............................................................................................................................................................. 9
Print documents .................................................................................................................................................. 10
Print photos ......................................................................................................................................................... 12
Print envelopes .................................................................................................................................................... 14
Print Quick Forms ................................................................................................................................................ 16
Print with HP wireless direct ............................................................................................................................... 17
Print using the maximum dpi .............................................................................................................................. 19
Tips for print success ........................................................................................................................................... 21
4 Paper basics ................................................................................................................................................ 25
Recommended papers for printing ..................................................................................................................... 26
Load media .......................................................................................................................................................... 28
Load original ........................................................................................................................................................ 32
Order HP paper supplies ...................................................................................................................................... 34
5 Copy and scan .............................................................................................................................................. 35
Copy documents .................................................................................................................................................. 36
Scan to a computer .............................................................................................................................................. 39
Tips for copy success ........................................................................................................................................... 41
Tips for scan success ........................................................................................................................................... 42
6 Fax ............................................................................................................................................................. 43
Send a fax ............................................................................................................................................................ 44
Receive a fax ........................................................................................................................................................ 49
ENWW iii
Page 4

Set up speed-dial entries .................................................................................................................................... 53
Change fax settings ............................................................................................................................................. 55
Fax and digital phone services ............................................................................................................................ 59
Fax on Voice over Internet Protocol .................................................................................................................... 60
Use reports .......................................................................................................................................................... 61
Tips for fax success ............................................................................................................................................. 64
7 Use Web Services ......................................................................................................................................... 65
HP ePrint .............................................................................................................................................................. 66
Use HP Printables ................................................................................................................................................ 68
Use the HP Connected website ............................................................................................................................ 69
Tips for using Web Services ................................................................................................................................. 70
8 Work with cartridges ................................................................................................................................... 71
Check the estimated ink levels ............................................................................................................................ 72
Order ink supplies ................................................................................................................................................ 73
Choose right ink cartridges ................................................................................................................................. 74
Replace the cartridges ......................................................................................................................................... 75
Use single-cartridge mode .................................................................................................................................. 77
Cartridge warranty information .......................................................................................................................... 78
Tips for working with cartridges ......................................................................................................................... 79
9 Connectivity ................................................................................................................................................ 81
Wi-Fi Protected Setup (WPS – requires WPS router) .......................................................................................... 82
Traditional wireless connection (requires router) .............................................................................................. 83
USB connection (non-network connection) ........................................................................................................ 85
Change from a USB connection to a wireless network ....................................................................................... 86
Connect wirelessly to the printer without a router ............................................................................................ 87
Tips for setting up and using a networked printer ............................................................................................. 88
Advanced printer management tools (for networked printers) ......................................................................... 89
10 Solve a problem ......................................................................................................................................... 91
Clear a paper jam ................................................................................................................................................. 92
Improve print quality ........................................................................................................................................... 98
Unable to print ................................................................................................................................................... 103
Resolve copy and scan issues ........................................................................................................................... 108
Resolve fax issues ............................................................................................................................................. 109
Resolve networking issues ................................................................................................................................ 110
HP support ......................................................................................................................................................... 111
iv ENWW
Page 5

Appendix A Technical information ................................................................................................................. 119
Hewlett-Packard Company notices .................................................................................................................. 120
Specifications .................................................................................................................................................... 121
Environmental product stewardship program ................................................................................................. 125
Regulatory notices ............................................................................................................................................ 129
Appendix B Additional fax setup .................................................................................................................... 139
Set up faxing (parallel phone systems) ............................................................................................................ 140
Serial-type fax setup ......................................................................................................................................... 162
Test fax setup .................................................................................................................................................... 163
Index ........................................................................................................................................................... 165
ENWW v
Page 6

vi ENWW
Page 7

1 HP Officejet 4630 e-All-in-One series Help
Learn how to use your HP Officejet 4630 series
●
Printer parts on page 4
●
Control panel and status lights on page 6
●
Load media on page 28
●
Print on page 9
●
Copy documents on page 36
●
Scan to a computer on page 39
●
Replace the cartridges on page 75
●
Clear a paper jam on page 92
●
Check the estimated ink levels on page 72
ENWW 1
Page 8

2 Chapter 1 HP Officejet 4630 e-All-in-One series Help ENWW
Page 9

2 Get to know the HP Officejet 4630 series
●
Printer parts
●
Control panel and status lights
●
Wireless settings
ENWW 3
Page 10
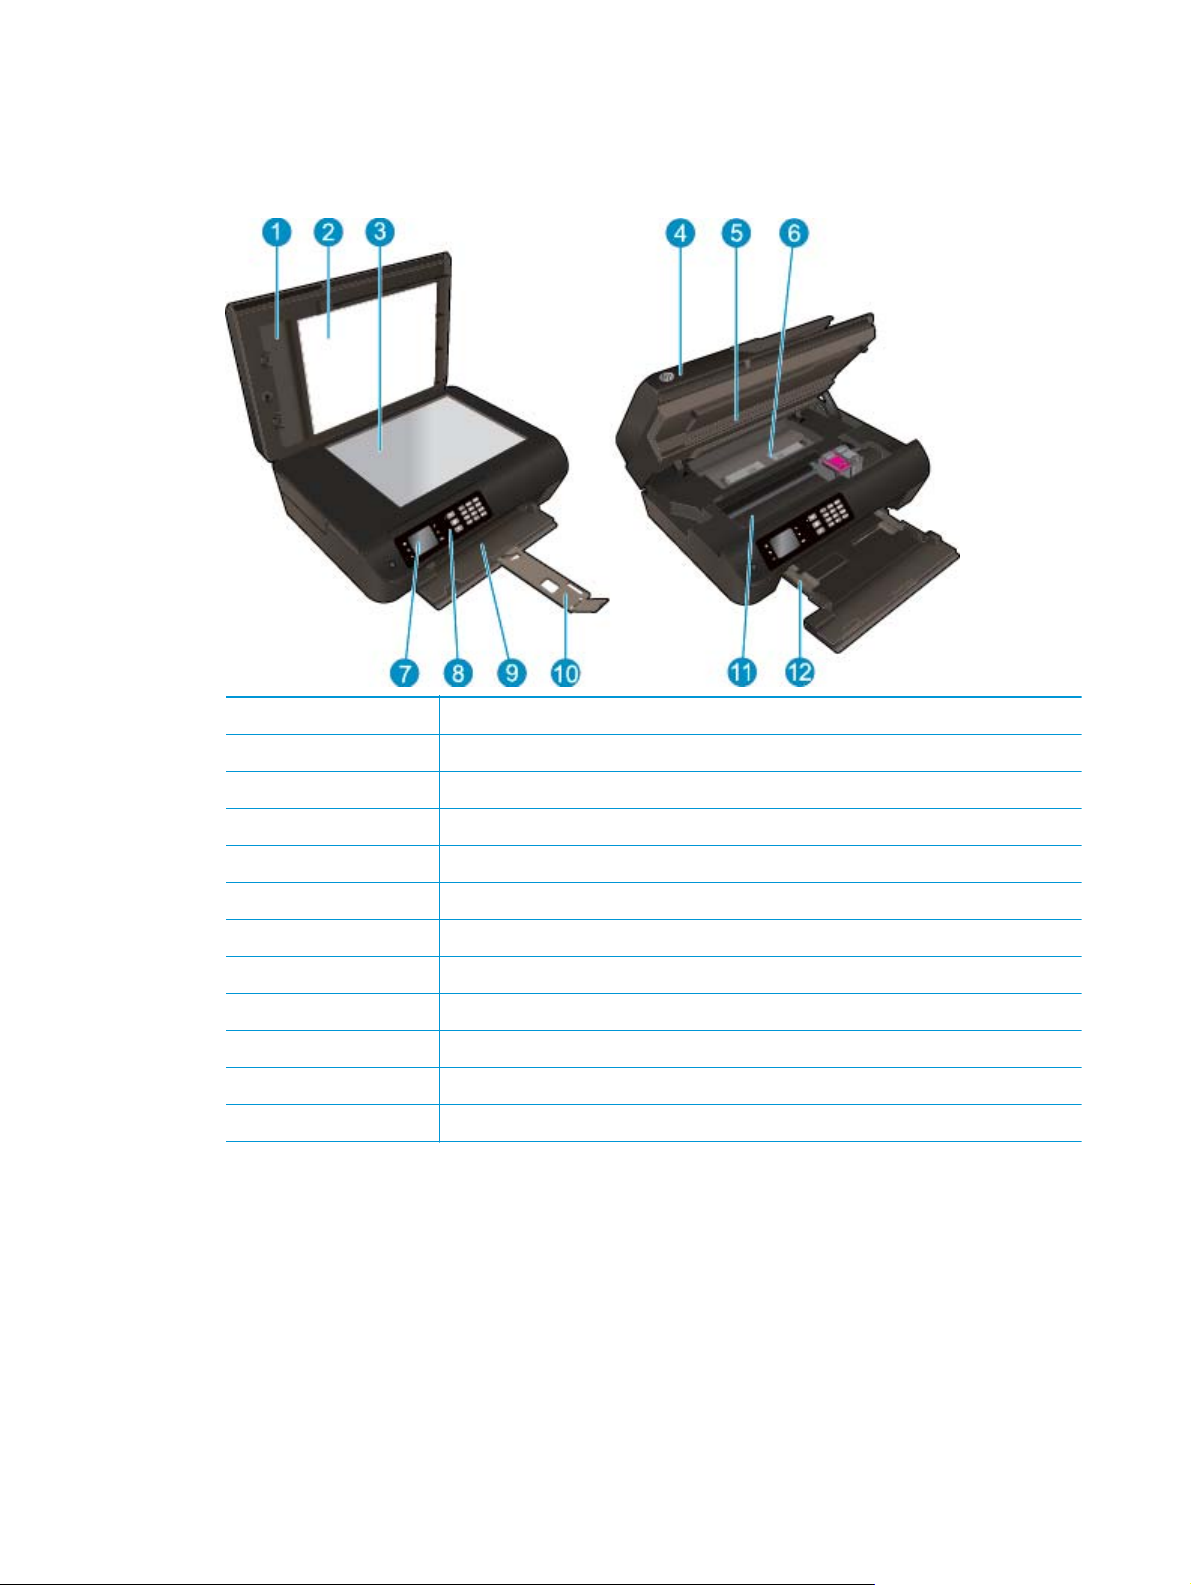
Printer parts
●
Front and top views of the HP Officejet 4630 series
1 Lid
2 Lid-backing
3 Scanner glass
4 Automatic Document Feeder (ADF)
5 Cartridge access door
6 Cleanout
7 Printer display
8 Control panel
9 Paper tray
10 Paper tray extender (also referred to as the tray extender)
11 Cartridge access area
12 Paper-width guides
4 Chapter 2 Get to know the HP Officejet 4630 series ENWW
Page 11
●
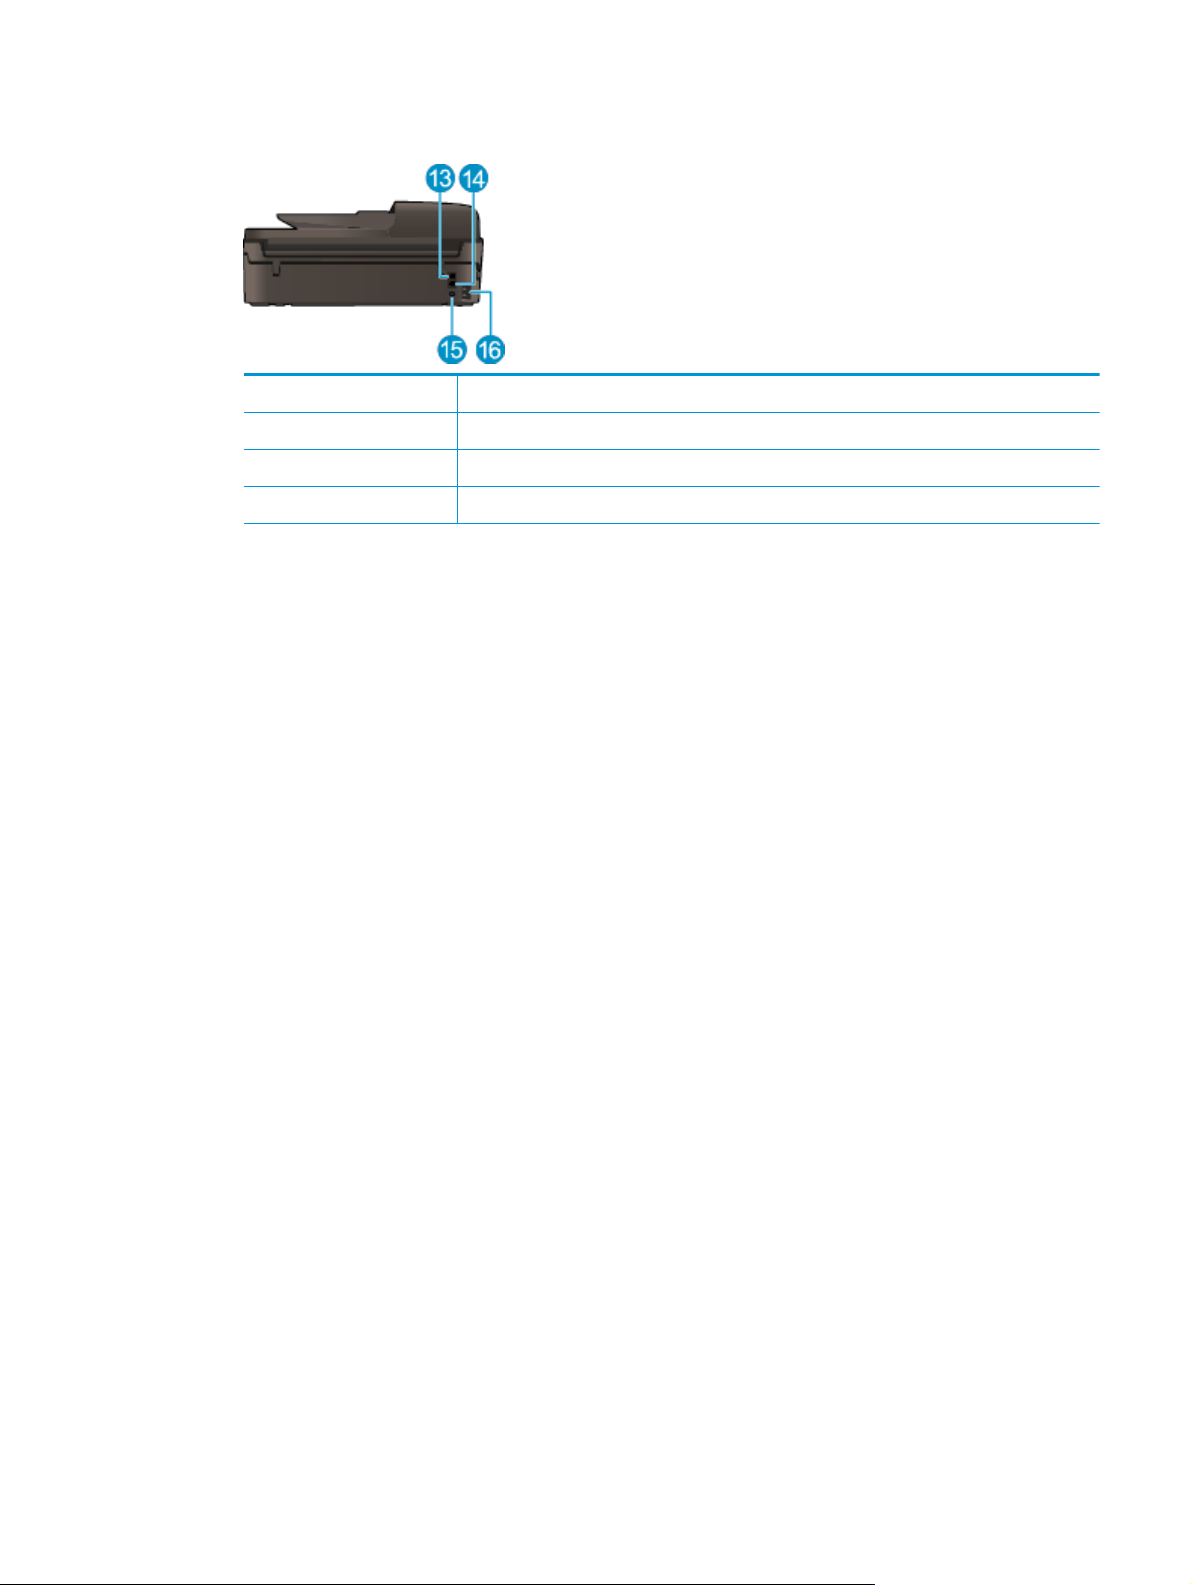
Rear view of the HP Officejet 4630 series
13 Fax port (2-EXT)
14 Fax port (1-LINE)
15 USB port
16 Power connection
ENWW Printer parts 5
Page 12
Control panel and status lights
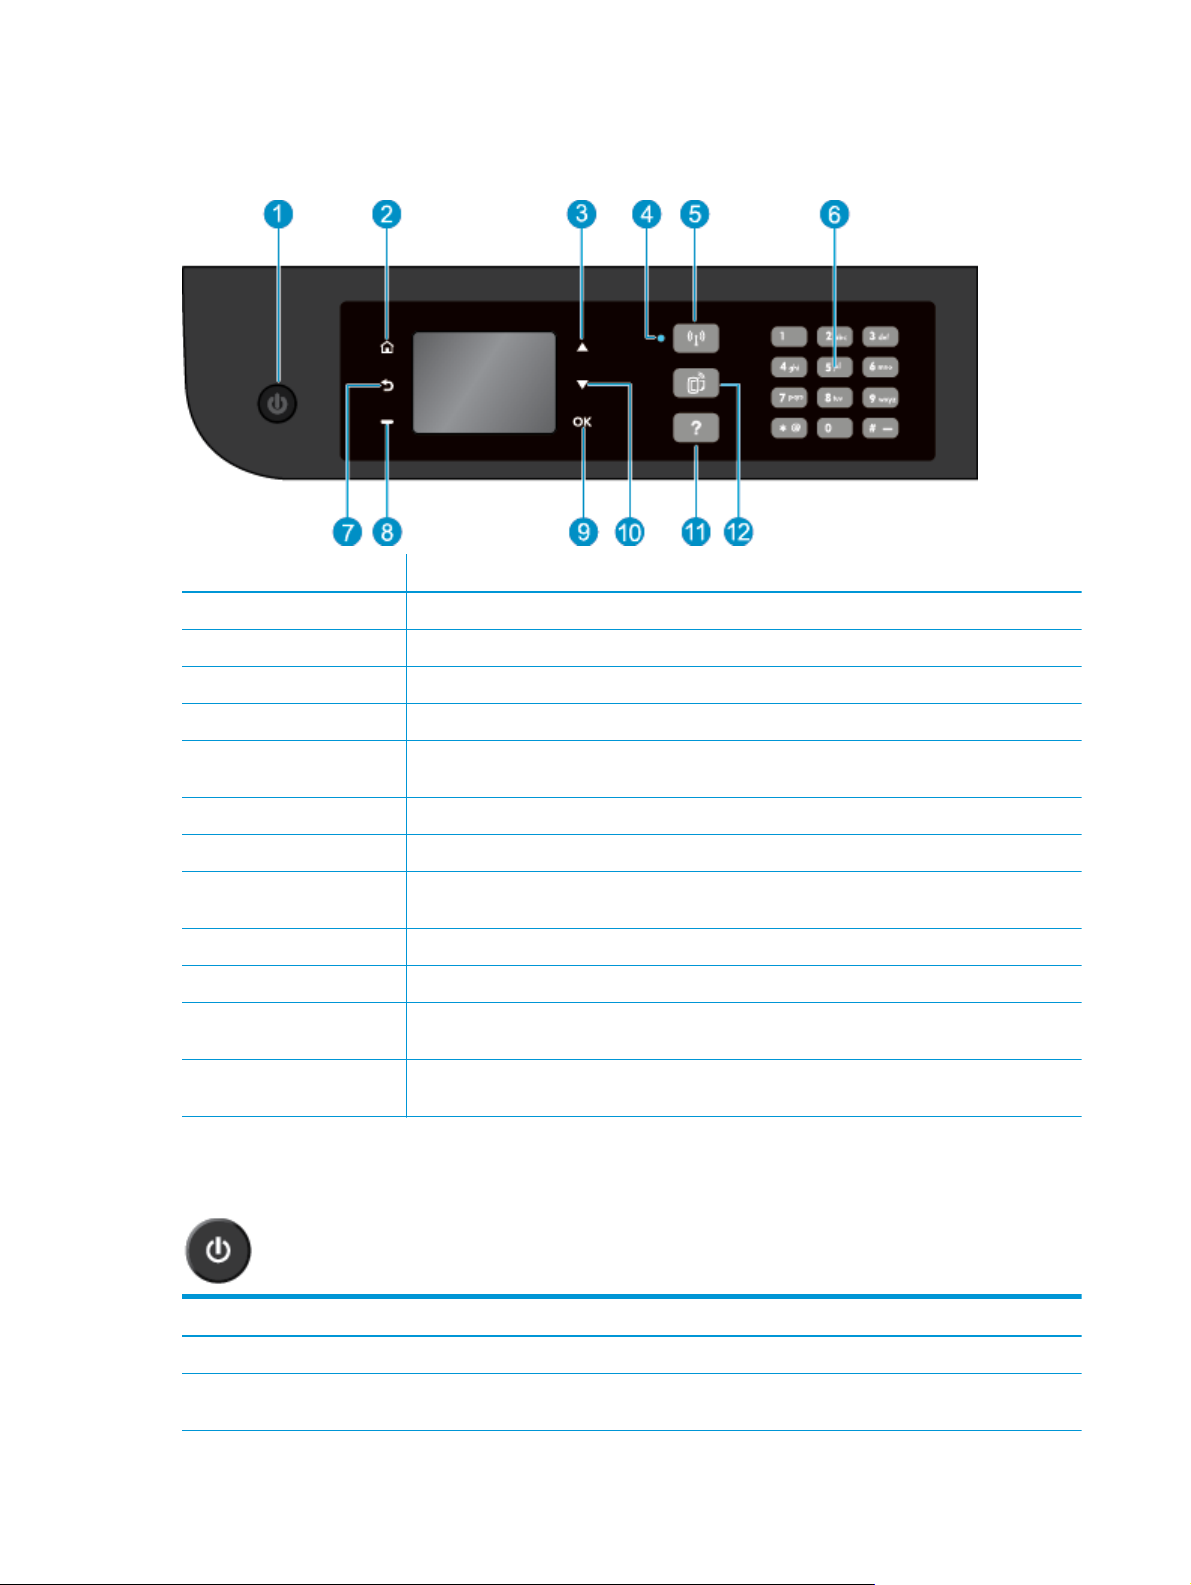
Figure 2-1 Control panel features
Feature Description
1 On button: Turns the printer on or off.
2 Home: Returns to the Home screen, the screen that is displayed when you first turn on the printer.
3 Up button: Use this button to navigate menus and select number of copies.
4 Wireless status light: Blue light indicates wireless connection.
5 Wireless button: Press the button to view wireless status and menu options. Press and hold down
6 Keypad: Use the keypad to enter numbers and text.
7 Back: Returns to the previous screen.
8 Selection button: The function of this button changes depending on what is displayed on the
9 OK: Confirms the current selection.
10 Down button: Use this button to navigate menus and select number of copies.
11 Help: On the Home screen, shows all Help topics. On another screen, shows information or
12 ePrint button: Press the button to display the Web Services Settings menu where you can view the
the button until light blinks to start Wi-Fi Protected Setup (WPS) push button mode.
printer display.
animation on the display to assist in the current operation.
printer's email address and make ePrint settings.
Figure 2-2 On button light
Light behavior Solution
Off The printer is powered off.
Dimmed Indicates the printer is in Sleep mode. The printer automatically enters Sleep mode after 5 minutes
of inactivity.
6 Chapter 2 Get to know the HP Officejet 4630 series ENWW
Page 13

Light behavior Solution
Fast blinking Error has occurred. Refer to the messages on the printer display.
Pulsing Indicates that the printer is initializing or is being shut down.
On The printer is printing, scanning, copying, or is on and ready to print.
Figure 2-3 Wireless status light
Light behavior Solution
Off Wireless is off. Press the Wireless button to access the wireless menu on the printer display. Use
Slow blinking Wireless is connecting or is on but not connected to a network. If the connection cannot be
Fast blinking A wireless error has occurred. Refer to the messages on the printer display.
On Wireless connection has been established and you can print.
the wireless menu to enable wireless printing.
established, make sure the printer is within the range of wireless signal.
ENWW Control panel and status lights 7
Page 14

Wireless settings
Press the Wireless button to view wireless status and menu options.
●
If the printer has an active connection to a wireless network, the wireless light is on solid blue and the
printer display shows Connected and the printer IP address.
●
If wireless is turned off, the wireless light is off and the display screen shows Wireless Off.
●
If wireless is enabled (wireless radio on) and a wireless connection has not been established, the
wireless light is blinking and the display screen shows Connecting or Not Connected.
You can use the printer display to retrieve information about your wireless network, establish a wireless
connection, and more.
How do I? Instructions
Print a network configuration page. The network configuration
page displays the network status, hostname, network name, and
more.
Print a wireless network test report. The wireless network test
report displays the diagnostics results for the status of the
wireless network, wireless signal strength, detected networks,
and more.
Restore network settings to default settings. 1. Press the Wireless button to access the Wireless Status
Turn wireless on or off. 1. Press the Wireless button to access the Wireless Settings
1. Press the Wireless button to access the Wireless Status
menu.
2. Press the button next to Settings to access the Wireless
Settings menu.
3. Select Print Report, and then select Configuration Page.
1. Press the Wireless button to access the Wireless Status
menu.
2. Press the button next to Settings to access the Wireless
Settings menu.
3. Select Print Report, and then select Test Report.
menu.
2. Press the button next to Settings to access the Wireless
Settings menu.
3. Select Restore Defaults.
4. Confirm the selection to restore defaults.
menu.
2. Select Wireless.
3. From the Wireless On/Off menu select On or Off.
Establish a Wi-Fi Protected Setup (WPS) connection. For more information, see
WPS router) on page 82.
Connect the printer to a wireless network. For more information, see
(requires router) on page 83.
Wi-Fi Protected Setup (WPS – requires
Traditional wireless connection
8 Chapter 2 Get to know the HP Officejet 4630 series ENWW
Page 15

3Print
●
Print documents
●
Print photos
●
Print envelopes
●
Print Quick Forms
●
Print with HP wireless direct
●
Print using the maximum dpi
●
Tips for print success
ENWW 9
Page 16
Print documents
To load paper
1. Make sure the paper tray is open.
2. Slide the paper-width guides all the way open.
3. Place the paper in the paper tray. The side to be printed on should face down.
4. Push the stack of paper into the printer until it stops.
5. Slide the paper-width guides firmly against the edge of the paper.
To print a document
1. On the File menu in your software, click Print.
2. Make sure your printer is selected.
3. Click the button that opens the Properties dialog box.
Depending on your software application, this button might be called Properties, Options, Printer
Setup, Printer Properties, Printer, or Preferences.
4. Select the appropriate options.
●
●
For more printing options, see
5. Click OK to close the Properties dialog box.
6. Click Print or OK to begin printing.
To print from software
1. From the File menu in your software, choose Print.
On the Paper/Quality tab, select the appropriate paper type from the Media drop-down list in the
Tray Selection area, and then select the appropriate print quality in the Quality Settings area.
Click the Advanced button, in the Paper/Output area, select the appropriate paper size from the
Paper Size drop-down list.
Tips for print success on page 21.
2. Make sure the HP Officejet 4630 series is the selected printer.
3. Specify the page properties.
Do the following if you do not see options on the Print dialog.
10 Chapter 3 Print ENWW
Page 17

●
OS X v10.6: Click the blue disclosure triangle next to the Printer selection to access the print
options.
●
OS X Lion and Mountain Lion: Click Show Details to access the print options.
NOTE: The following options are available for your printer. Locations for the options can vary from
one application to another.
●
Choose the paper size.
●
Select the orientation.
●
Enter the scaling percentage.
4. Click Print.
To print on both sides of the page
1. On the File menu in your software, click Print.
2. Make sure your printer is selected.
3. Click the button that opens the Properties dialog box.
Depending on your software application, this button might be called Properties, Options, Printer
Setup, Printer Properties, Printer, or Preferences.
4. Select the appropriate options.
●
On the Paper/Quality tab, select the appropriate paper type from the Media drop-down list in the
Tray Selection area, and then select the appropriate print quality in the Quality Settings area.
●
Click the Advanced button, in the Paper/Output area, select the appropriate paper size from the
Paper Size drop-down list.
For more printing options, see
5. On the Layout tab, select Flip on Long Edge or Flip on Short Edge from the Print on Both Sides drop-
down list.
6. Click OK to print.
NOTE: After one page of the document is printed, you are prompted to wait for a few seconds. Then
the printer automatically reloads the paper back to print on the other side. You do not need to manually
reload the paper.
To print on both sides of the page
1. From the File menu in your software, choose Print.
2. In the Print dialog, choose Layout from the pop-up menu.
3. Choose the type of binding you want for your two-sided pages, and then click Print.
Tips for print success on page 21.
ENWW Print documents 11
Page 18
Print photos
To load photo paper
1. Make sure the paper tray is open.
2. Slide the paper-width guides all the way open.
3. Remove all paper from the paper tray, and then load the photo paper with side to be printed on facing
down.
4. Push the stack of photo papers into the printer until it stops.
5. Slide the paper-width guides firmly against the edge of the photo papers.
To print a photo on photo paper
1. On the File menu in your software, click Print.
2. Make sure your printer is selected.
3. Click the button that opens the Properties dialog box.
Depending on your software application, this button might be called Properties, Options, Printer
Setup, Printer Properties, Printer, or Preferences.
4. Select the appropriate options.
●
On the Paper/Quality tab, select the appropriate paper type from the Media drop-down list in the
Tray Selection area, and then select the appropriate print quality in the Quality Settings area.
●
Click Advanced to select the appropriate paper size from the Paper Size drop-down list.
For more printing options, see
NOTE: For maximum dpi resolution, go to Paper/Quality tab, select Photo Paper from the Media
drop-down list, and then select Best in the Quality Settings area. Then click the Advanced button and
select Yes from the Print in Max DPI drop-down list. If you want to print max DPI in grayscale, select
High Quality Grayscale from the Print in Grayscale drop-down list.
5. Click OK to return to the Properties dialog box.
Tips for print success on page 21.
6. Click OK, and then click Print or OK in the Print dialog box.
NOTE: After the printing is finished, remove unused photo paper from the paper tray. Store the photo paper
so it does not start to curl, which could reduce the quality of your printout.
12 Chapter 3 Print ENWW
Page 19

To print a photo from the computer
1. From the File menu in your software, choose Print.
2. Make sure the HP Officejet 4630 series is the selected printer.
3. Set the print options.
Do the following if you do not see options on the Print dialog.
●
OS X v10.6: Click the blue disclosure triangle next to the Printer selection to access the print
options.
●
OS X Lion and Mountain Lion: Click Show Details to access the print options.
NOTE: The following options are available for your printer. Locations for the options can vary from
one application to another.
a. Choose the appropriate paper size in the Paper Size pop-up menu.
b. Select an Orientation.
c. From the pop-up menu, choose Paper Type/Quality, and then choose the following settings:
●
Paper Type: The appropriate photo paper type
●
Quality: Best or Maximum dpi
●
Click the Color Options disclosure triangle, and then choose the appropriate Photo Fix
option.
◦
Off: applies no changes to the image.
◦
Basic: automatically focuses the image; moderately adjusts image sharpness.
4. Select any other print settings you want, and then click Print.
ENWW Print photos 13
Page 20
Print envelopes
You can load one or more envelopes into the paper tray of the HP Officejet 4630 series. Do not use shiny or
embossed envelopes, or envelopes that have clasps or windows.
NOTE: For details on how to format on envelopes, see the help files in your word application.
To load envelopes
1. Make sure the paper tray is open.
2. Slide the paper-width guides all the way open.
3. Place the envelopes in the center of the paper tray. The side to be printed on should face down. The flap
should be on the left side.
4. Push the stack of envelopes into the printer until it stops.
5. Slide the paper-width guides firmly against the edge of the envelopes.
To print an envelope
1. On the File menu in your software, click Print.
2. Make sure your printer is selected.
3. Click the button that opens the Properties dialog box.
Depending on your software application, this button might be called Properties, Options, Printer
Setup, Printer Properties, Printer, or Preferences.
4. Select the appropriate options.
●
●
For more printing options, see
5. Click OK, and then click Print or OK in the Print dialog box.
To print envelopes
1. From the File menu in your software, choose Print.
2. Make sure the HP Officejet 4630 series is the selected printer.
On the Paper/Quality tab, select the appropriate paper type from the Media drop-down list in the
Tray Selection area, and then select the appropriate print quality in the Quality Settings area.
Click Advanced to select the appropriate paper size from the Paper Size drop-down list.
Tips for print success on page 21.
14 Chapter 3 Print ENWW
Page 21

3. Set the print options.
Do the following if you do not see options on the Print dialog.
●
OS X v10.6: Click the blue disclosure triangle next to the Printer selection to access the print
options.
●
OS X Lion and Mountain Lion: Click Show Details to access the print options.
NOTE: The following options are available for your printer. Locations for the options can vary from
one application to another.
a. Select the appropriate envelope size from the Paper Size pop-up menu.
b. From the pop-up menu, choose Paper Type/Quality, and verify the paper type setting is set to
Plain Paper.
4. Click Print.
ENWW Print envelopes 15
Page 22

Print Quick Forms
Use Quick Forms to print calendars, check lists, games, notebook paper, graph paper, music paper, and
games.
To print Quick Forms
1. From the Home screen on the printer display, press the Up and Down buttons to select Quick Forms,
and then press OK.
TIP: If the Quick Forms option does not appear on the printer display, press the Home button, and
then press the Up and Down buttons until you see Quick Forms.
2. Press the Up and Down buttons to select one of the Quick Forms options, and then press OK.
3. After you have selected the type of form that you want to print, select the number of copies, and then
press OK.
16 Chapter 3 Print ENWW
Page 23
Print with HP wireless direct
With HP wireless direct, you can print wirelessly from a computer, smart phone, tablet, or other wirelesscapable device—without connecting to an existing wireless network.
When using HP wireless direct, note the following guidelines:
●
Make sure your computer or mobile device has the necessary software.
If you are using a computer, make sure you have installed the printer software provided with the
printer.
●
If you are using a mobile device, make sure you have installed a compatible printing app. For more
information about mobile printing, visit
●
Make sure HP wireless direct is turned on in the printer and, if necessary, security is enabled. For more
information, see
●
Up to five computers and mobile devices can use the same HP wireless direct connection.
●
HP wireless direct can be used while the printer is also connected to a computer using USB cable or to a
network using a wireless connection.
●
HP wireless direct cannot be used to connect a computer, mobile device, or printer to the Internet.
Click here to go online for more information.
Connect wirelessly to the printer without a router on page 87.
www.hp.com/global/us/en/eprint/mobile_printing_apps.html.
NOTE: At this time, these websites might not be available in all languages.
This section contains the following topics:
●
Print from a wireless-capable mobile device
●
Print from a wireless-capable computer
Print from a wireless-capable mobile device
Make sure you have installed a compatible printing app on your mobile device. For more information, visit
www.hp.com/global/us/en/eprint/mobile_printing_apps.html.
1. Make sure you have turned on HP wireless direct on the printer. For more information, see
wirelessly to the printer without a router on page 87.
2. Turn on the Wi-Fi connection on your mobile device. For more information, see the documentation
provided with the mobile device.
NOTE: If your mobile device does not support Wi-Fi, you are not able to use HP wireless direct.
3. From the mobile device, connect to a new network. Use the process you normally use to connect to a
new wireless network or hotspot. Choose the HP wireless direct name from the list of wireless networks
shown such as HP-Print-**-Officejet 4630 series (where ** are the unique characters to identify your
printer).
Connect
If HP wireless direct is turned on with security, enter the password when prompted.
4. Print your document.
ENWW Print with HP wireless direct 17
Page 24

Print from a wireless-capable computer
1. Make sure you have turned on HP wireless direct on the printer. For more information, see Connect
wirelessly to the printer without a router on page 87 for more information.
2. Turn on the computer's Wi-Fi connection. For more information, see the documentation provided with
the computer.
NOTE: If your computer does not support Wi-Fi, you are not able to use HP wireless direct.
3. From the computer, connect to a new network. Use the process you normally use to connect to a new
wireless network or hotspot. Choose the HP wireless direct name from the list of wireless networks
shown such as HP-Print-**-Officejet 4630 series (where ** are the unique characters to identify your
printer).
If HP wireless direct is turned on with security, enter the password when prompted.
4. Proceed to step 5 if the printer has been installed and connected to the computer over a wireless
network. If the printer has been installed and connected to your computer with a USB cable, follow the
steps below to install the printer software using the HP wireless direct connection.
a. Depending on your operating system, do one of the following:
●
Windows 8: On the Start screen, right-click an empty area on the screen, click All Apps on
the app bar, and then click Printer Setup & Software.
●
Windows 7, Windows Vista, and Windows XP: From the computer desktop, click Start, select
All Programs, click HP, click HP OFFICEJET 4630 series, and then click Printer Setup &
Software.
b. Select Connect New Printer.
c. When the Connection Options software screen appears, select Wireless.
Select HP OFFICEJET 4630 series from the list of detected printers.
d. Follow the on-screen instructions.
5. Print your document.
1. Make sure you have turned on HP wireless direct printing on the printer.
2. Turn on AirPort.
For more information, see the documentation provided by Apple.
3. Click the AirPort icon and choose the HP wireless direct name, such as HP-Print-**-Officejet 4630 series
(where ** are the unique characters to identify your printer).
If HP wireless direct is turned on with security, enter the password when prompted.
4. Add the printer.
a. In System Preferences, select Print & Fax or Print & Scan, depending on your operating system.
b. Click + below the list of printers at the left.
c. Select the printer from the list of detected printers (the word “Bonjour” is listed the right column
beside the printer name), and click Add.
18 Chapter 3 Print ENWW
Page 25

Print using the maximum dpi
Use maximum dots per inch (dpi) mode to print high-quality, sharp images on photo paper.
Printing in maximum dpi takes longer than printing with other settings and requires a large amount of
memory.
To print in maximum dpi mode
1. From your software, select Print.
2. Make sure your printer is selected.
3. Click the button that opens the Properties dialog box.
Depending on your software application, this button might be called Properties, Options, Printer
Setup, Printer Properties, Printer, or Preferences.
4. Click the Paper/Quality tab.
5. From the Media drop-down list, select a media type from the available list.
●
Plain Paper
●
HP Photo Paper or other photo paper
●
HP Matte Brochure or Professional Paper
●
HP Glossy Brochure or Professional Paper
●
HP Iron-on Transfers or other specialty Paper
●
HP Matte Presentation or other matte paper
●
Other glossy specialty paper
6. Click the Advanced button.
7. In the Printer Features area, select Yes from the Print in Max DPI drop-down list.
8. Select the appropriate paper size from the Paper Size drop-down list.
9. Click OK to close the advanced options.
10. Confirm Orientation on the Layout tab, and then click OK to print.
To print using maximum dpi
1. From the File menu in your software, choose Print.
2. Make sure the HP Officejet 4630 series is the selected printer.
3. Set the print options.
Do the following if you do not see options on the Print dialog.
●
OS X v10.6: Click the blue disclosure triangle next to the Printer selection to access the print
options.
●
OS X Lion and Mountain Lion: Click Show Details to access the print options.
ENWW Print using the maximum dpi 19
Page 26

NOTE: The following options are available for your printer. Locations for the options can vary from
one application to another.
a. Choose the appropriate paper size in the Paper Size pop-up menu.
b. From the pop-up menu, choose Paper Type/Quality, and then choose the following settings:
●
Paper Type: The appropriate photo paper type
●
Quality: Best or Maximum dpi
4. Select any other print settings that you want, and then click Print.
20 Chapter 3 Print ENWW
Page 27

Tips for print success
To print successfully, the HP cartridges should be functioning properly with sufficient ink, the paper should
be loaded correctly, and the printer should have the appropriate settings. Print settings do not apply to
copying or scanning.
Ink tips
●
Use Original HP ink cartridges.
●
Install both the black and tri-color cartridges correctly.
For more information, see
●
Check the estimated ink levels in the cartridges to make sure there is sufficient ink.
For more information, see
●
If the print quality is not acceptable, see
●
Always turn off the printer with the On button to allow the printer to protect the nozzles.
Paper loading tips
●
Load a stack of paper (not just one page). All of the paper in the stack should be the same size and type
to avoid a paper jam.
●
Load paper with side to be printed on facing down.
●
Ensure that paper loaded in the paper tray lays flat and the edges are not bent or torn.
●
Adjust the paper-width guides in the paper tray to fit snugly against all paper. Make sure the paperwidth guides do not bend the paper in the paper tray.
For more information, see
Printer settings tips
●
To change default print settings, click Print, Scan & Fax, and then click Set Preferences in the printer
software.
Replace the cartridges on page 75.
Check the estimated ink levels on page 72.
Improve print quality on page 98 for more information.
Load media on page 28.
Depending on your operating system, do one of the following to open the printer software:
◦
Windows 8: On the Start screen, right-click an empty area on the screen, click All Apps on the app
bar, and then click the icon with the printer's name.
◦
Windows 7, Windows Vista, and Windows XP: From the computer desktop, click Start, select All
Programs, click HP, click HP Officejet 4630 series, and then click HP Officejet 4630 series.
●
To select the number of pages to print per sheet, on the Layout tab, select the appropriate option from
the Pages per Sheet drop-down list.
●
If you want to change the page orientation, set it in your application interface.
●
To view more printing settings, on the Layout or Paper/Quality tab, click the Advanced button to open
the Advanced Options dialog box.
ENWW Tips for print success 21
Page 28
◦
Print in Grayscale: Allows you to print a black and white document using the black ink only. Select
Black Ink Only, and then click the OK button.
◦
Borderless Printing: Select this feature to print photos without border. Not all media types
support this feature. You will see an alert icon beside the option if the selected media type in the
Media drop-down list does not support it.
◦
Preserve Layout: This feature only works with the duplex printing. If the image is larger than the
printable area, select this feature to scale the page content to be within the smaller margins so
that extra pages are not created.
◦
HP Real Life Technologies: This feature smooths and sharpens images and graphics for improved
print quality.
◦
Booklet: Allows you to print multiple-page document as a booklet. It places two pages on each
side of a sheet that can then be folded into a booklet in half size of the paper. Select a binding
method from the drop-down list, and then click OK.
●
Booklet-LeftBinding: The binding side after folded into a booklet appears at the left side.
Select the option if your reading habit is from left to right.
●
Booklet-RightBinding: The binding side after folded into a booklet appears at the right side.
Select the option if your reading habit is from right to left.
NOTE: The preview on the Layout tab cannot reflect what you select from the Booklet drop-
down list.
◦
●
You can use printing shortcut to save setting time. A printing shortcut stores the setting values that are
appropriate for a particular kind of job, so that you can set all the options with a single click. To use it,
go to the Printing Shortcut tab, select one printing shortcut, and then click OK.
To add a new printing shortcut, after making settings on the Layout or Paper/Quality tab, click the
Printing Shortcut tab, click Save As and enter a name, and then click OK.
To delete a printing shortcut, select it, and then click Delete.
NOTE: You cannot delete the default printing shortcuts.
Printer settings tips
●
On the Print dialog, use the Paper Size pop-up menu to select the size of paper loaded in the printer.
●
On the Print dialog, choose the Paper Type/Quality pop-up menu and select the appropriate paper type
and quality.
●
To print a black and white document using only black ink, choose the Paper Type/Quality from the popup menu and choose Grayscale from the Color pop-up menu.
Pages per Sheet Layout: Helps you specify the order of the pages if you print document in more
than two pages per sheet.
NOTE: The preview on the Layout tab cannot reflect what you select from the Pages per Sheet
Layout drop-down list.
22 Chapter 3 Print ENWW
Page 29

Notes
●
Original HP ink cartridges are designed and tested with HP printers and papers to help you easily
produce great results, time after time.
NOTE: HP cannot guarantee the quality or reliability of non-HP supplies. Product service or repairs
required as a result of using a non-HP supply will not be covered under warranty.
If you believe you purchased Original HP ink cartridges, go to
●
Ink level warnings and indicators provide estimates for planning purposes only.
NOTE: When you receive a low-ink warning message, consider having a replacement cartridge
available to avoid possible printing delays. You do not need to replace the cartridges until print quality
becomes unacceptable.
●
Software settings selected in the print driver only apply to printing, they do not apply to copying or
scanning.
●
You can print your document on both sides of the paper.
www.hp.com/go/anticounterfeit.
ENWW Tips for print success 23
Page 30

24 Chapter 3 Print ENWW
Page 31

4 Paper basics
●
Recommended papers for printing
●
Load media
●
Load original
●
Order HP paper supplies
ENWW 25
Page 32

Recommended papers for printing
If you want the best print quality, HP recommends using HP papers that are specifically designed for the type
of project you are printing.
Depending on your country/region, some of these papers might not be available.
ColorLok
●
HP recommends plain papers with the ColorLok logo for printing and copying of everyday documents.
All papers with the ColorLok logo are independently tested to meet high standards of reliability and
print quality, and produce documents with crisp, vivid color, bolder blacks, and dry faster than ordinary
plain papers. Look for papers with the ColorLok logo in a variety of weights and sizes from major paper
manufacturers.
Photo printing
●
HP Premium Plus Photo Paper
HP Premium Plus Photo Paper is HP’s highest-quality photo paper for your best photos. With HP
Premium Plus Photo Paper, you can print beautiful photos that are instant-dry so you can share them
right off the printer. It is available in several sizes, including A4, 8.5 x 11 inches, 4 x 6 inches (10 x 15
cm), 5 x 7 inches (13 x 18 cm), and 11 x 17 inches (A3), and in two finishes - glossy or soft gloss (semigloss). Ideal for framing, displaying, or gifting your best photos and special photo projects. HP Premium
Plus Photo Paper delivers exceptional results with professional quality and durability.
●
HP Advanced Photo Paper
This thick photo paper features an instant-dry finish for easy handling without smudging. It resists
water, smears, fingerprints, and humidity. Your prints have a look and feel comparable to a storeprocessed photo. It is available in several sizes, including A4, 8.5 x 11 inches, 10 x 15 cm (4 x 6 inches),
13 x 18 cm (5 x 7 inches). It is acid-free for longer lasting documents.
●
HP Everyday Photo Paper
Print colorful, everyday snapshots at a low cost, using paper designed for casual photo printing. This
affordable photo paper dries quickly for easy handling. Get sharp, crisp images when you use this paper
with any inkjet printer. It is available in glossy finish in several sizes, including A4, 8.5 x 11 inches, and
10 x 15 cm (4 x 6 inches). For longer-lasting photos, it is acid-free.
26 Chapter 4 Paper basics ENWW
Page 33

Business documents
●
HP Premium Presentation Paper 120g Matte or HP Professional Paper 120 Matt
These papers are heavy two-sided matte papers perfect for presentation, proposals, reports, and
newsletters. They are heavyweight for an impressive look and feel.
●
HP Brochure Paper 180g Glossy or HP Professional Paper 180 Glossy
These papers are glossy-coated on both sides for two-sided use. They are the perfect choice for nearphotographic reproductions and business graphics for report covers, special presentations, brochures,
mailers, and calendars.
●
HP Brochure Paper 180g Matte or HP Professional Paper 180 Matt
These papers are matte-coated on both sides for two-sided use. They are the perfect choice for nearphotographic reproductions and business graphics for report covers, special presentations, brochures,
mailers, and calendars.
Everyday printing
●
HP Bright White Inkjet Paper
HP Bright White Inkjet Paper delivers high-contrast colors and sharp text. It is opaque enough for twosided color usage with no show-through, which makes it ideal for newsletters, reports, and flyers. It
features ColorLok Technology for less smearing, bolder blacks, and vivid colors.
●
●
●
Special projects
●
HP Printing Paper
HP Printing Paper is a high-quality multifunction paper. It produces documents that look and feel more
substantial than documents printed on standard multipurpose or copy paper. It features ColorLok
Technology for less smearing, bolder blacks, and vivid colors. It is acid-free for longer lasting
documents.
HP Office Paper
HP Office Paper is a high-quality multifunction paper. It is suitable for copies, drafts, memos, and other
everyday documents. It features ColorLok Technology for less smearing, bolder blacks, and vivid colors.
It is acid-free for longer lasting documents.
HP Office Recycled Paper
HP Office Recycled Paper is a high-quality multifunction paper made with 30% recycled fiber. It features
ColorLok Technology for less smearing, bolder blacks and vivid colors.
HP Iron-On Transfers
HP Iron-on Transfers (for light or white fabrics) are the ideal solution for creating custom T-shirts from
your digital photos.
ENWW Recommended papers for printing 27
Page 34

Load media
Select a paper size to continue.
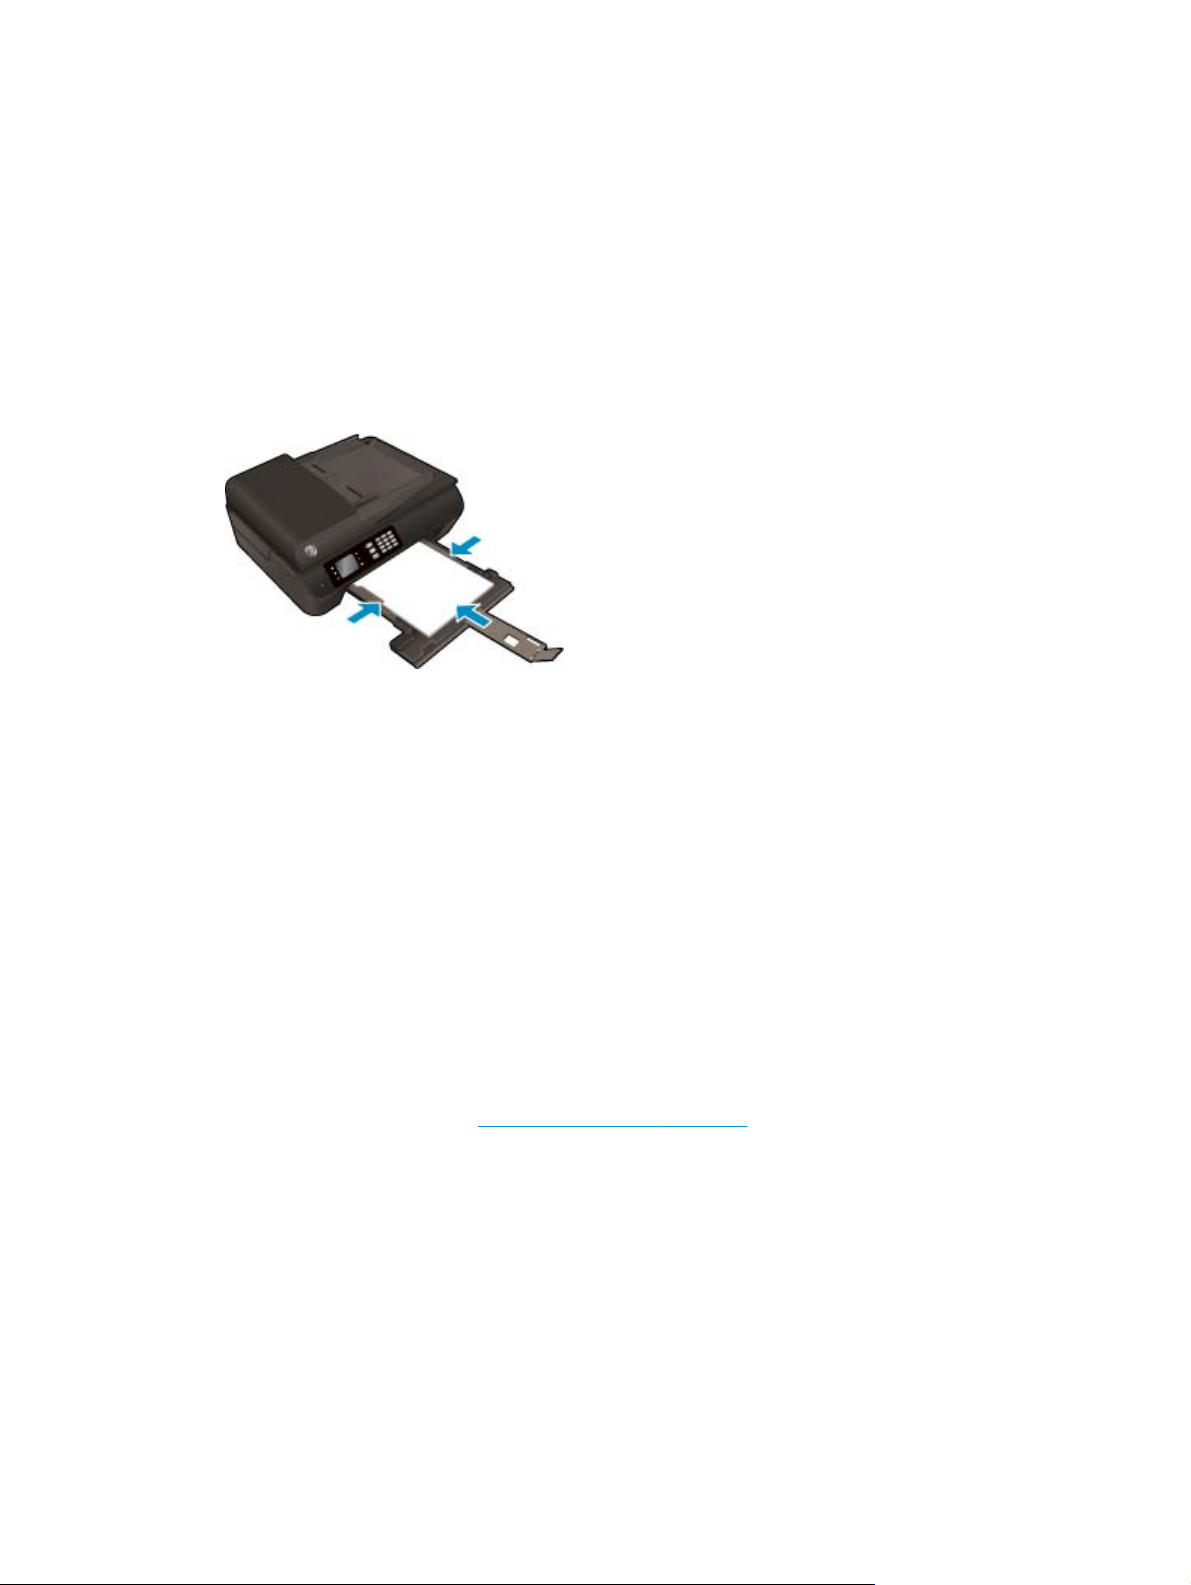
To load full-size paper
1. Lower the paper tray, and then pull out the paper tray and tray extender.
2. Slide the paper-width guides outward.
3. Load the paper.
●
Insert a stack of paper into the paper tray with the short edge forward and the print side down.
●
Slide the stack of paper forward until it stops.
28 Chapter 4 Paper basics ENWW
Page 35
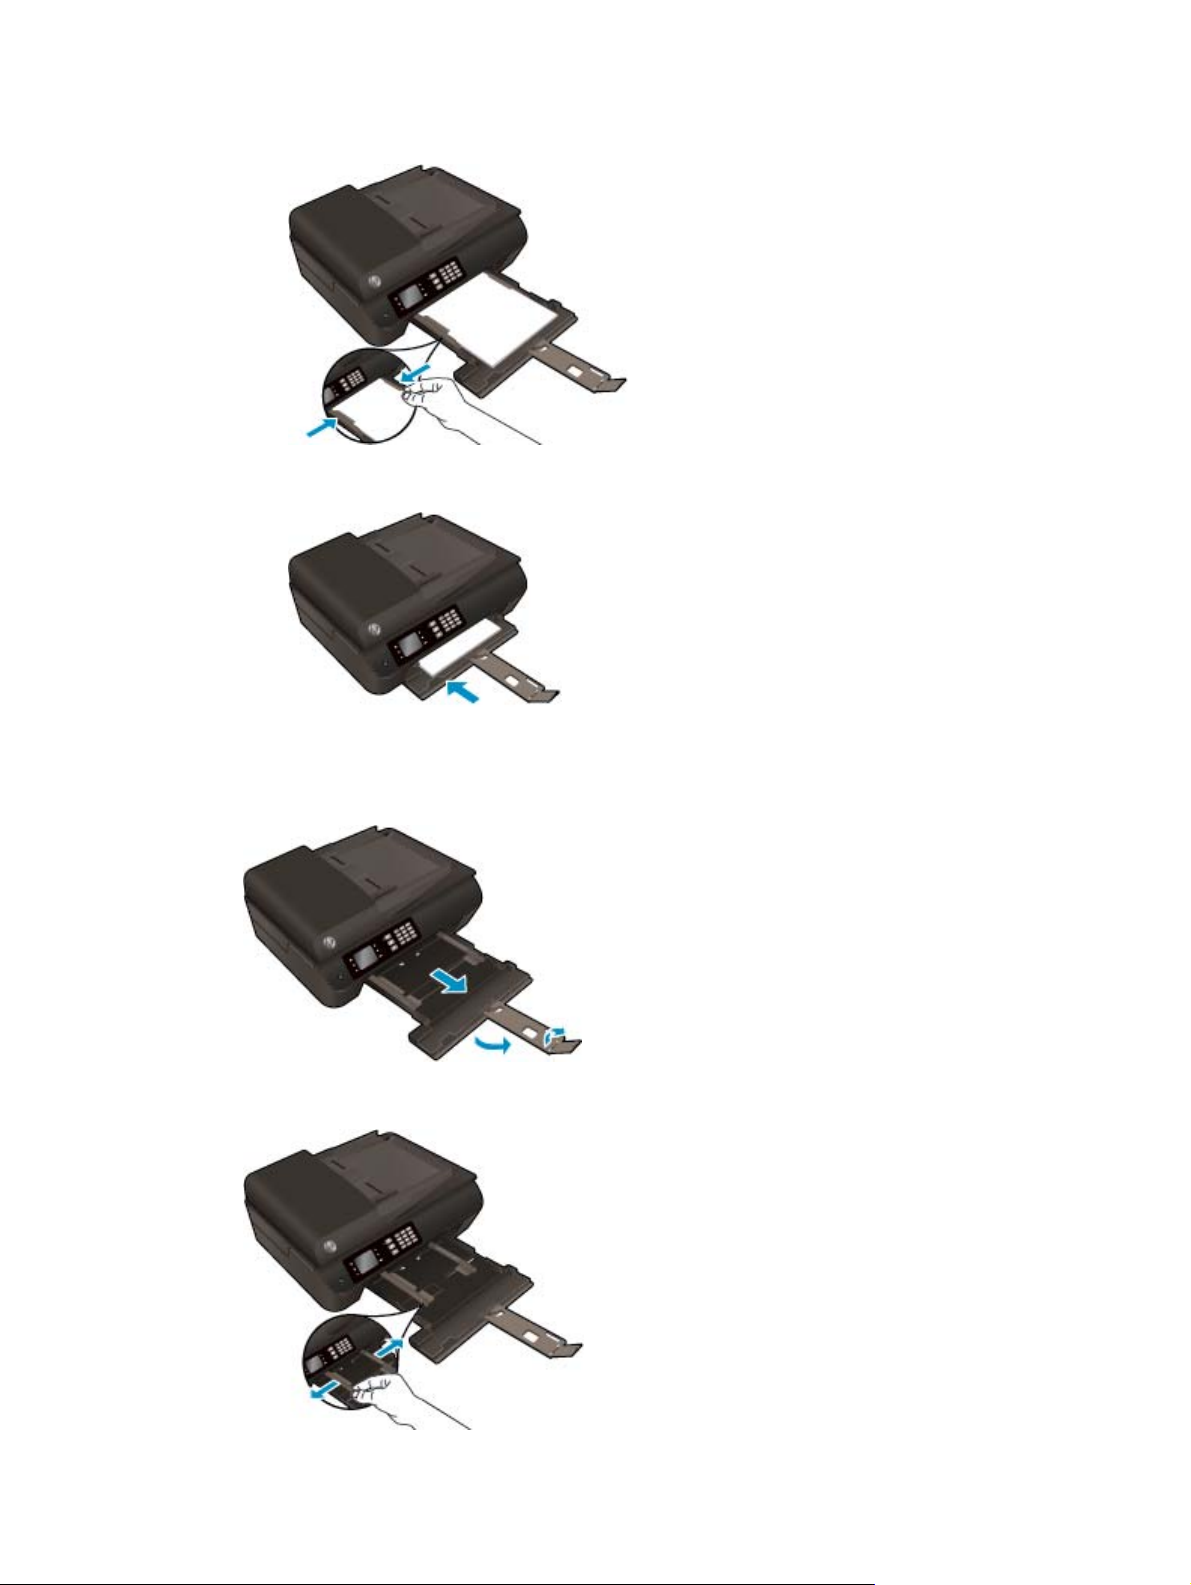
●
Adjust the paper-width guides so they fit against both sides of the stack of paper.
●
Slide the paper tray in.
To load small-size paper
1. Lower the paper tray, and then pull out the paper tray and tray extender.
2. Slide the paper-width guides outward.
ENWW Load media 29
Page 36
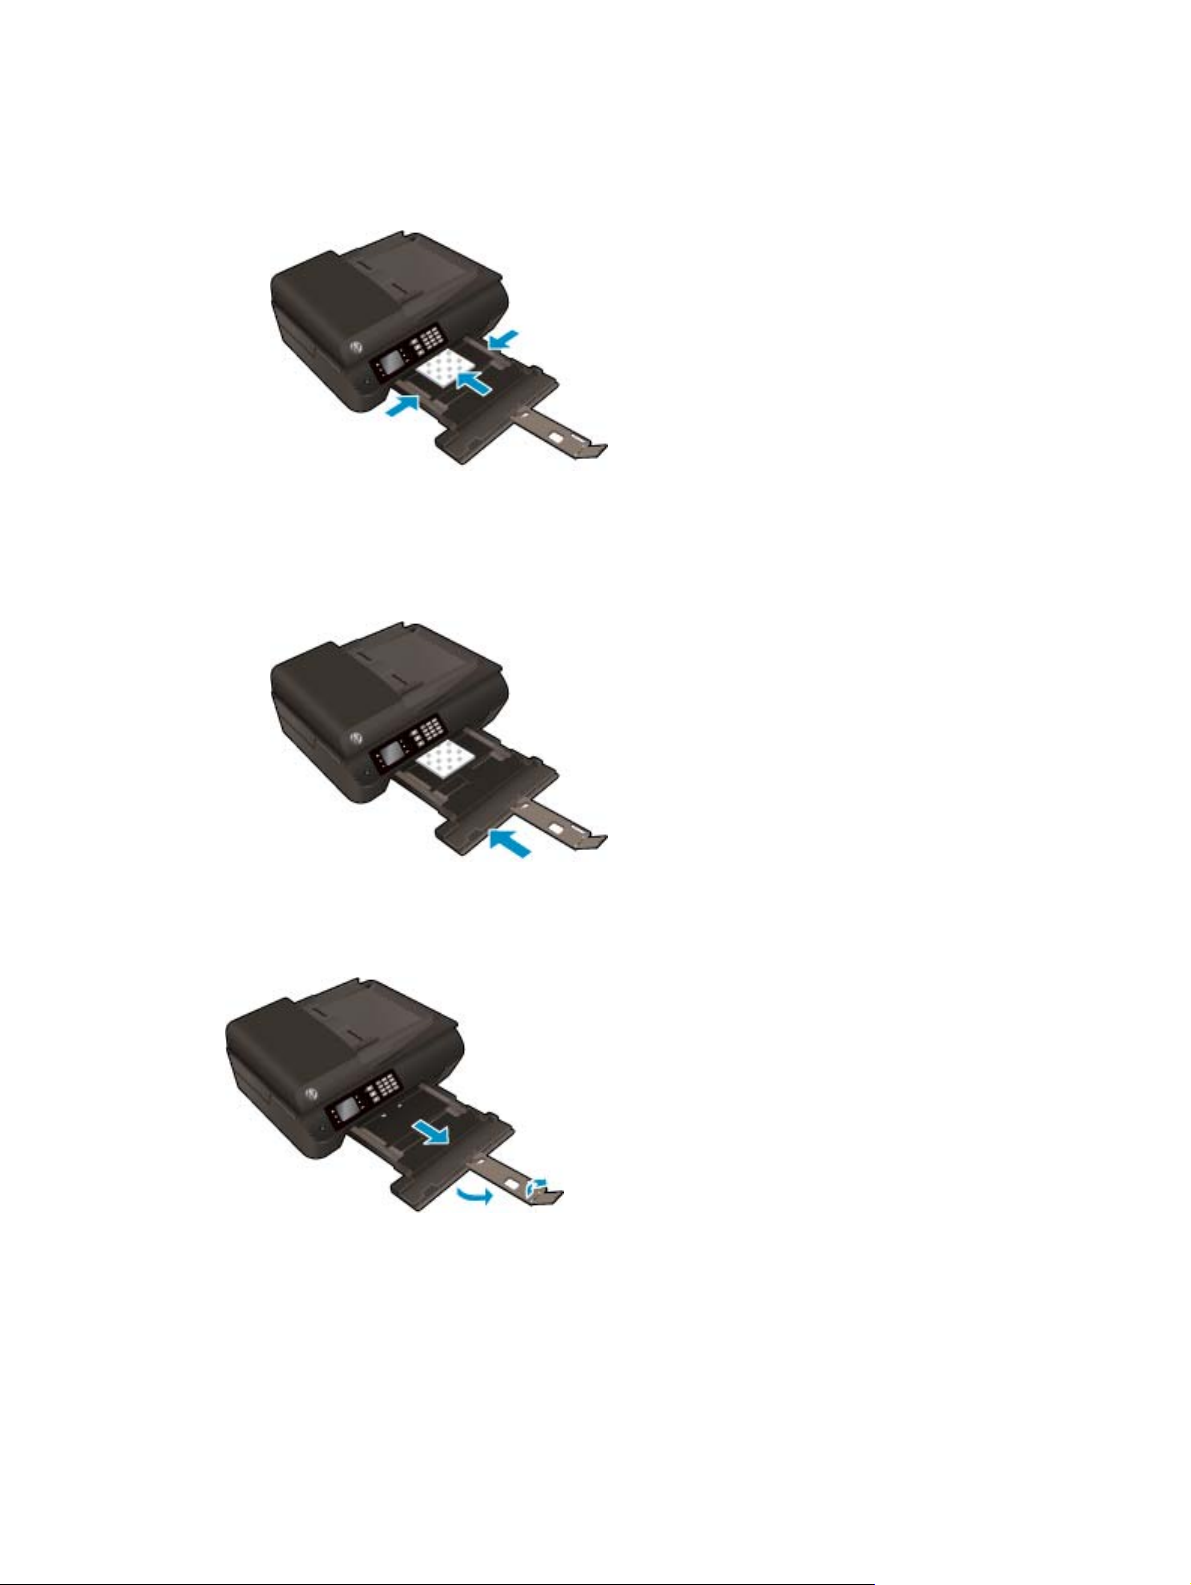
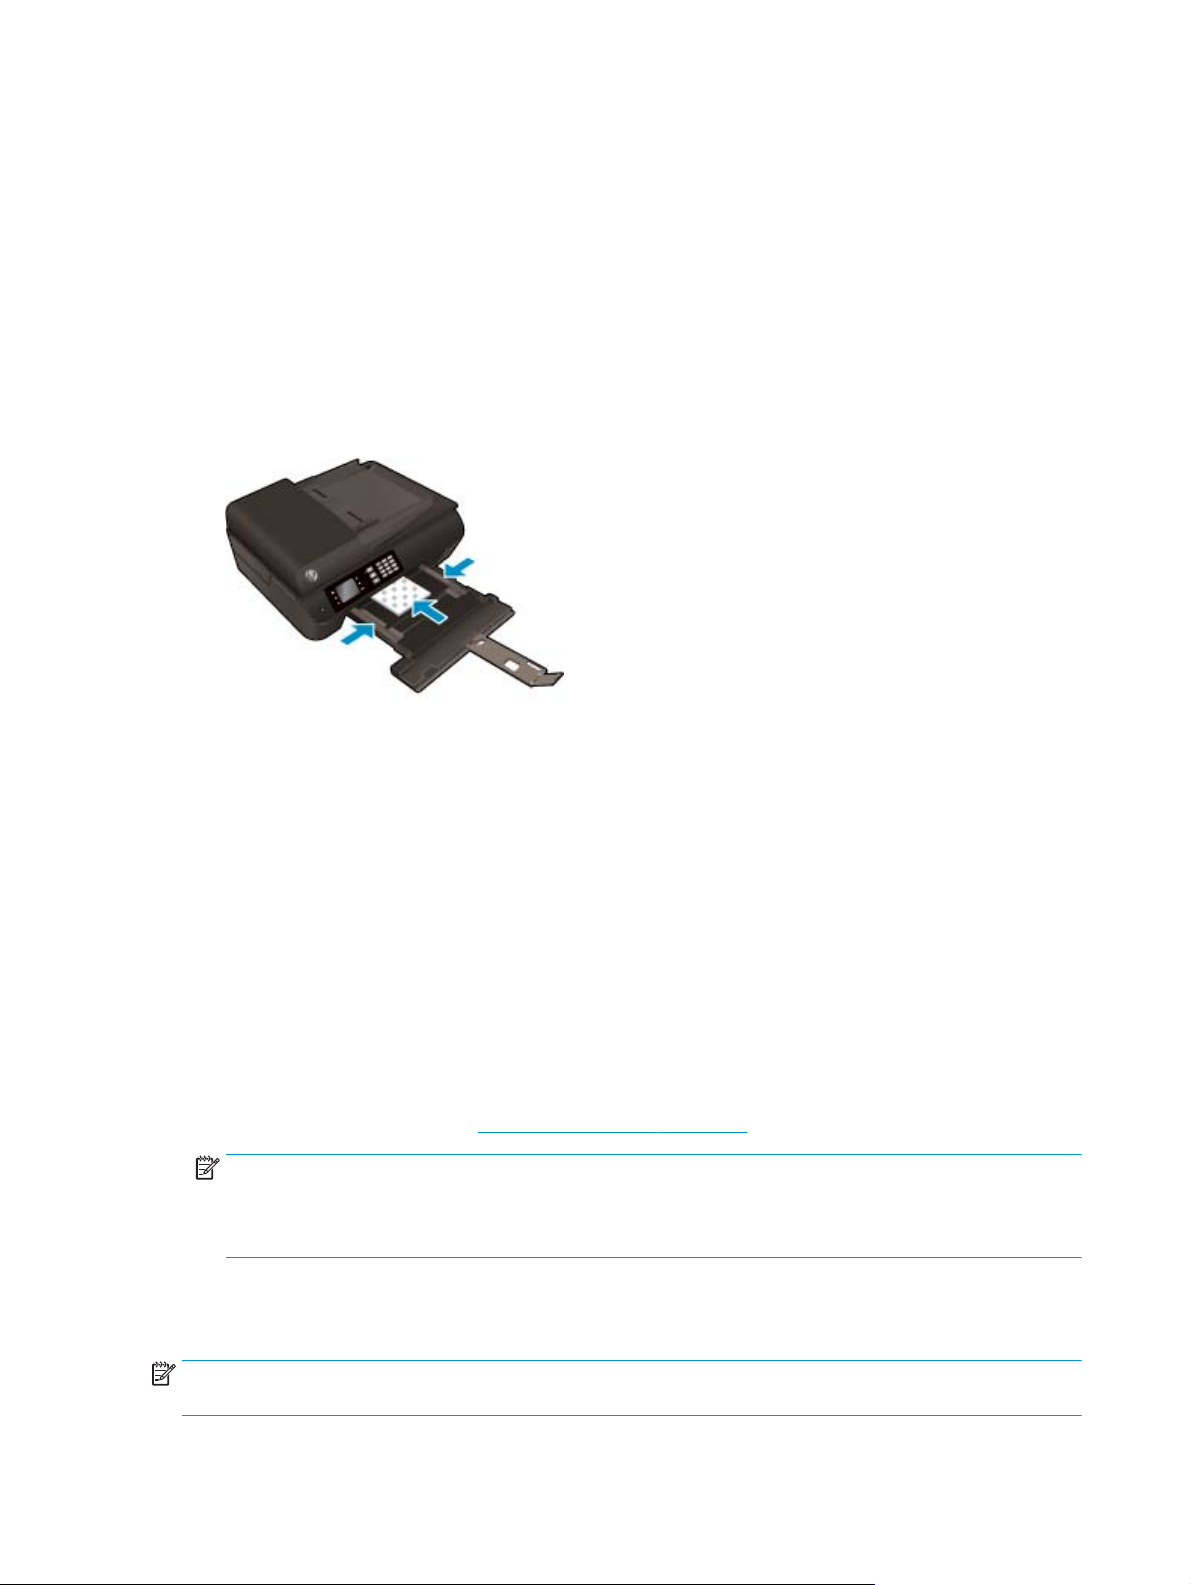
3. Load the photo paper.
●
Insert a stack of photo paper into the paper tray with the short edge forward and the print side
down.
●
Slide the stack of photo paper forward until it stops.
●
Adjust the paper-width guides so they fit against both sides of the stack of photo paper.
●
Slide the paper tray in.
To load envelopes
1. Lower the paper tray, and then pull out the paper tray and tray extender.
30 Chapter 4 Paper basics ENWW
Page 37
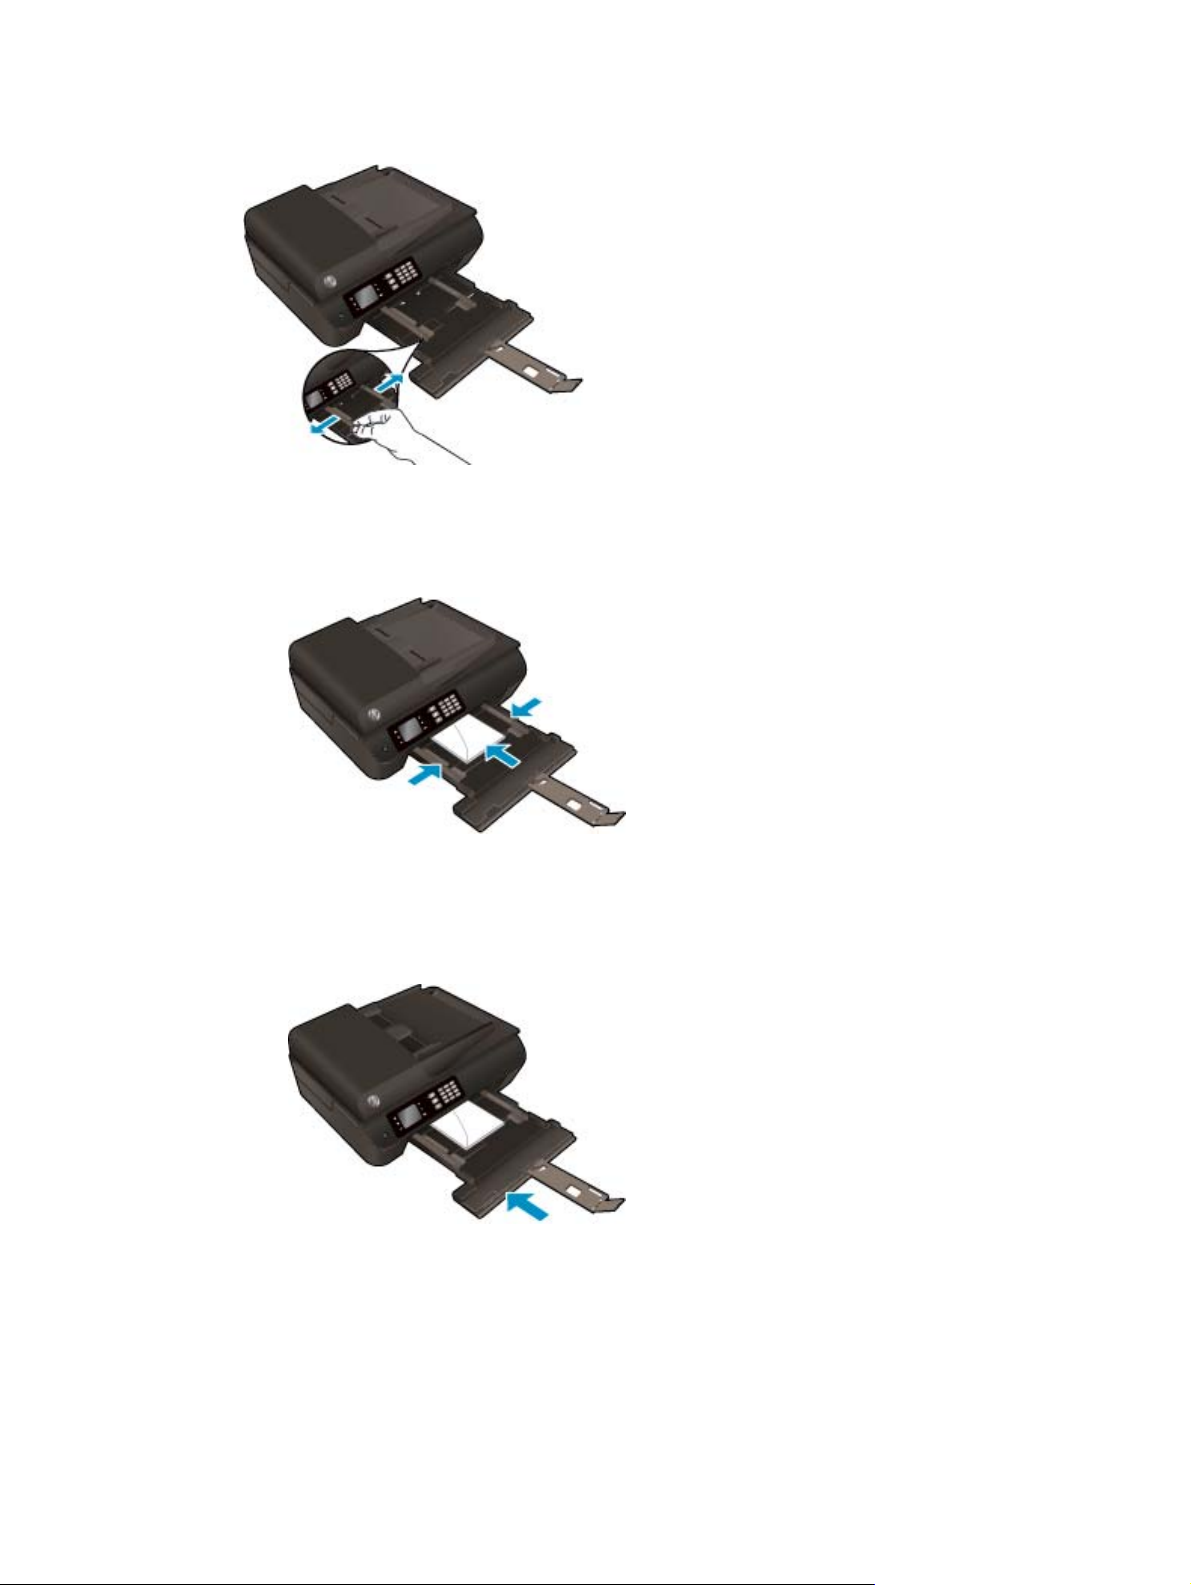
2. Slide the paper-width guides outward.
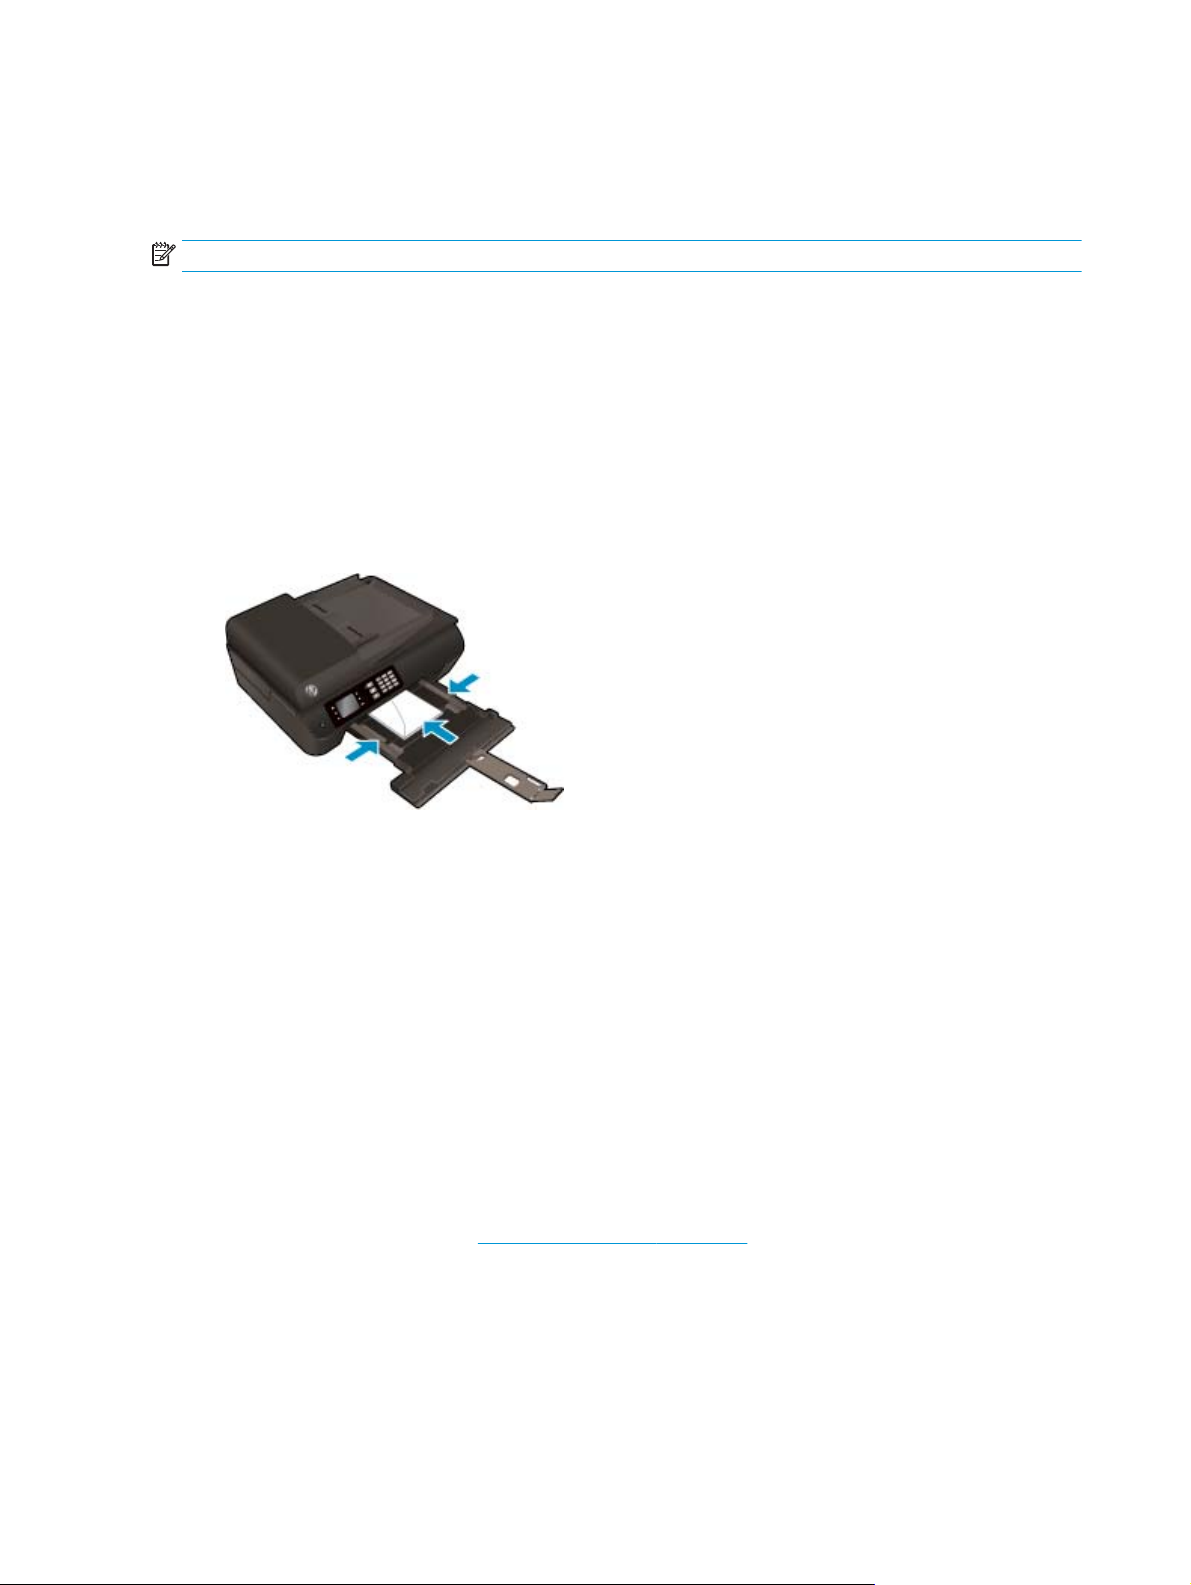
3. Load the envelopes.
●
Insert one or more envelopes in the center of the paper tray. The side to be printed on should face
down. The flap should be on the left side and facing up.
●
Slide the stack of envelopes forward until it stops.
●
Adjust the paper-width guides so they fit against both sides of the stack of envelopes.
●
Slide the paper tray in.
ENWW Load media 31
Page 38
Load original
You can load your original print-side up in the automatic document feeder or print-side down on the right
front corner of the scanner glass.
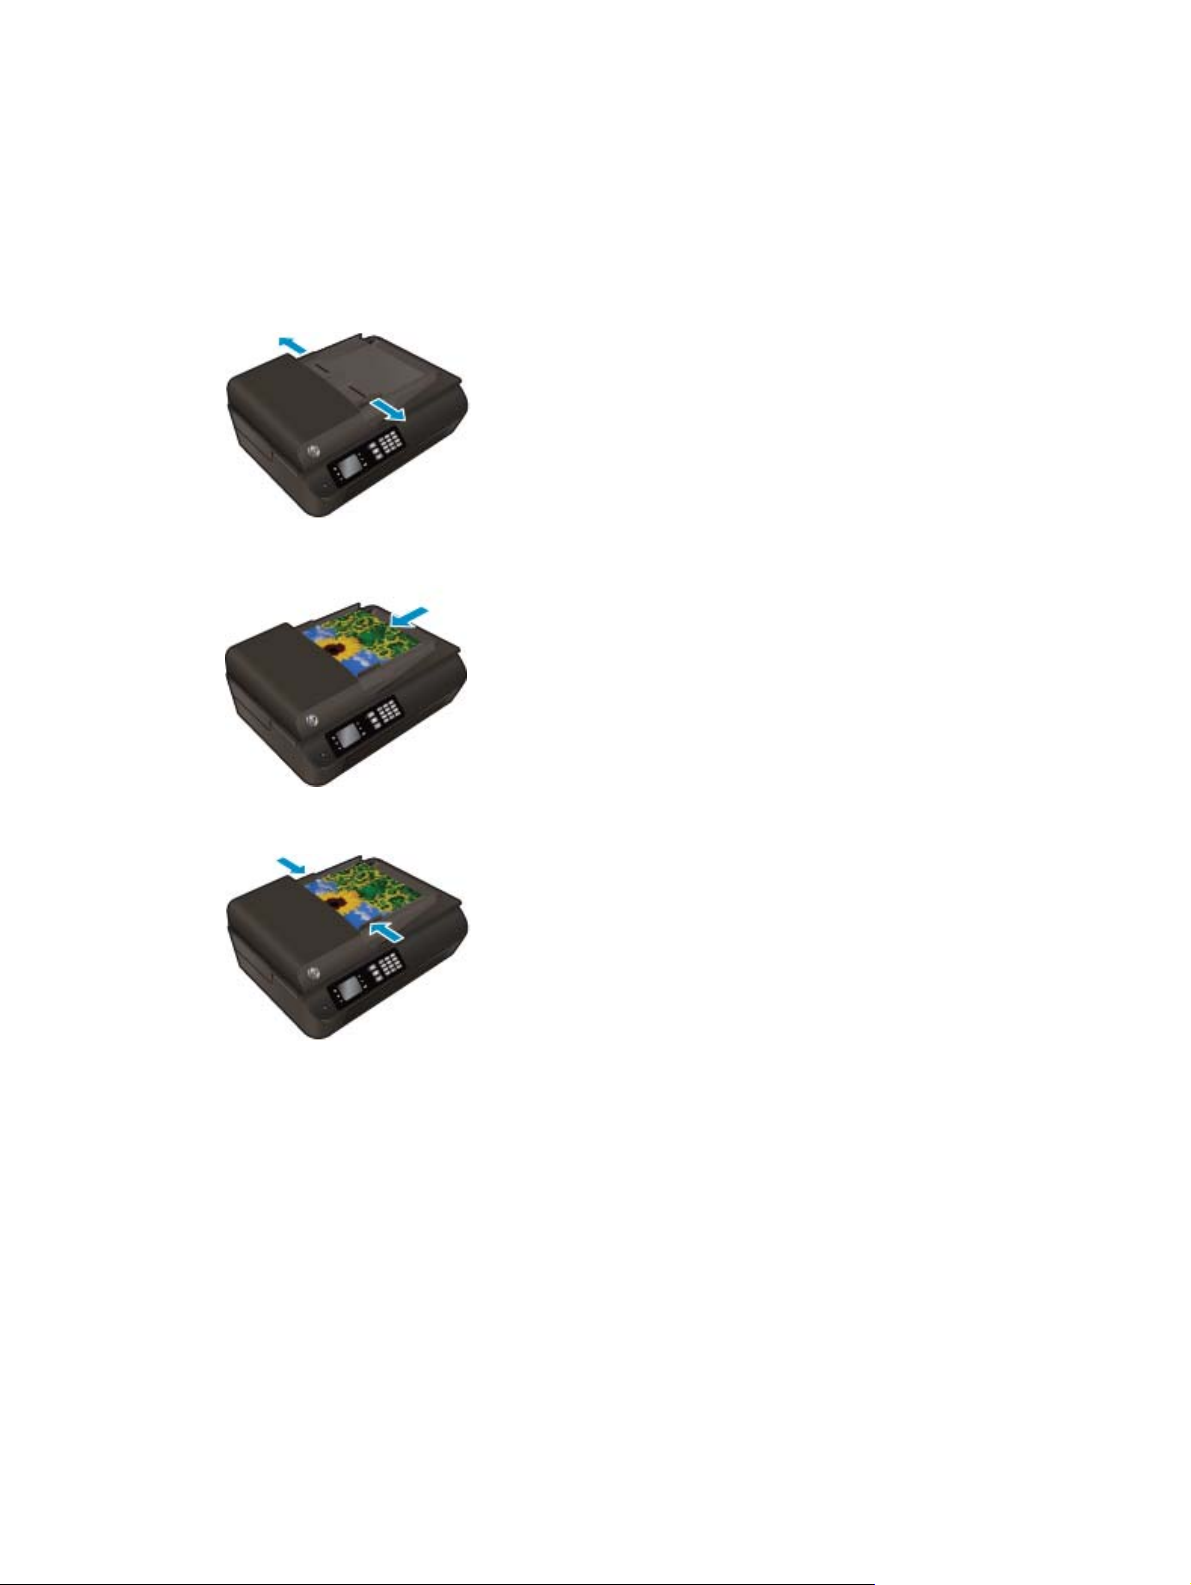
To load original in the automatic document feeder
1. Slide paper-width guides outwards.
2. Load original print-side up, head first, in the ADF.
3. Slide paper-width guides inward until they stop at the edge of paper.
To load original on the scanner glass
1. Lift the scanner lid.
32 Chapter 4 Paper basics ENWW
Page 39

2. Load original print-side down on the right corner of the scanner glass.
3. Close the scanner lid.
ENWW Load original 33
Page 40

Order HP paper supplies
The printer is designed to work well with most types of office media. Use HP media for optimum print quality.
Visit the HP website at
HP recommends plain papers with the ColorLok logo for printing and copying of everyday documents. All
papers with the ColorLok logo are independently tested to meet high standards of reliability and print
quality, and produce documents with crisp, vivid color, bolder blacks and dry faster than ordinary plain
papers. Look for papers with the ColorLok logo in a variety of weights and sizes from major paper
manufacturers.
www.hp.com for more information about HP media.
To purchase HP papers, go to
Shop for Products and Services and select ink, toner and paper.
34 Chapter 4 Paper basics ENWW
Page 41

5 Copy and scan
●
Copy documents
●
Scan to a computer
●
Tips for copy success
●
Tips for scan success
ENWW 35
Page 42

Copy documents
The Copy menu on the printer display allows you to easily select number of copies and color or black and
white for copying on plain paper. You can also easily access advanced settings, such as changing the paper
type and size, adjusting the darkness of the copy, and resizing the copy.
Make a 1-sided copy
1. Load full-size paper in the paper tray.
2. Load the original print-side up in the ADF or print-side down on the scanner glass.
For more information about loading the original, see
3. Select Copy from the Home screen on the printer display to access the copy menu.
If you do not see Copy on the printer display, press the Home button, and then press the Up and Down
buttons until you see Copy.
4. From the Copy menu, select Copies to increase or decrease the number of copies, and then press OK to
confirm.
5. Select Start Black Copy or Start Color Copy, and then press OK to make a black or color copy.
Make a 2-sided copy from the scanner glass
1. Load full-size paper in the paper tray.
2. Load the original print side down on the right front corner of the scanner glass.
Load original on page 32.
For more information about loading the original, see
3. Select Copy from the Home screen on the printer display to access the copy menu.
If you do not see Copy on the printer display, press the Home button, and then press the Up and Down
buttons until you see Copy.
4. From the Copy menu, select Copies to increase or decrease the number of copies, and then press OK to
confirm.
36 Chapter 5 Copy and scan ENWW
Load original on page 32.
Page 43

5. Select 2-Sided to enable it, and then press OK to confirm.
6. Select Start Black Copy or Start Color Copy.
7. When prompted, load the second original and press OK.
Make a 2-sided copy from the document feeder
1. Load full-size paper in the paper tray.
2. Load 1-sided originals print side up into the document feeder.
For more information about loading the original, see
●
●
3. Select Copy from the Home screen on the printer display to access the copy menu.
If you do not see Copy on the printer display, press the Home button, and then press the Up and Down
buttons until you see Copy.
4. From the Copy menu, select Copies to increase or decrease the number of copies, and then press OK to
confirm.
5. Select 2-Sided to enable it, and then press OK to confirm.
6. Select Start Black Copy or Start Color Copy.
More copy features
While in the Copy menu, press the Up and Down buttons to select among settings.
●
Paper Type: Selects paper size and paper type. A plain paper setting will print in plain paper normal
print quality. A photo paper setting will print in photo paper best quality.
●
Resize: Controls the size of the image or document to be copied.
Load original on page 32.
Use two 1-sided originals to create a 2-sided copy.
Use multiple 1-sided original pages to create several pages of 2-sided copy. For example: eight
pages of 1-sided originals make four pages of 2-sided copy.
◦
Actual size: Makes a copy that is the same as the size of the original, but the margins of the copied
image may be clipped.
◦
Fit to Page: Makes a copy that is centered with a white border around the edges. The resized
image is either enlarged or reduced to fit the size of the selected output paper.
NOTE: The scanner glass must be clean to make sure the Fit to Page feature works properly.
◦
Custom Size: Allows you to increase the size of the image by selecting values greater than 100%
or reduce the image size by selecting values less than 100%.
ENWW Copy documents 37
Page 44

●
ID Copy: Allows you to copy both sides of ID card.
●
Lighter / Darker: Adjusts the copy settings to make copies lighter or darker.
NOTE: After two minutes of inactivity the copy options will automatically return to the default settings of
plain paper A4 or 8.5” x 11” (depending on region).
38 Chapter 5 Copy and scan ENWW
Page 45

Scan to a computer
You can scan from the control panel of the printer or from your computer. Scan from the control panel if you
want to quickly scan one page to an image file. Scan from your computer if you want to scan multiple pages
into one file, define the file format of the scan, or make adjustments to the scanned image.
To prepare the scan
1. Load the original print-side up in the ADF or print-side down on the scanner glass.
For more information about loading the original, see
2. Start the scan.
To scan from the printer control panel
1. Select Scan from the Home screen on the printer display, and then press OK.
TIP: If you do not see Scan on the printer display, press the Home button, and then press the Up and
Down buttons until you see Scan.
2. Select the computer that you want to scan to from the printer display, and then press OK.
If you do not see your computer listed on the printer display make sure that your computer is connected
to the printer either wirelessly or through a USB cable. If you have a wireless connection and you have
confirmed that the connection is working, you will need to enable wireless scanning in the software.
To scan from your computer
1. Depending on your operating system, do one of the following to open the printer software.
●
Windows 8: On the Start screen, right-click an empty area on the screen, click All Apps on the app
bar, and then click the icon with the printer's name.
●
Windows 7, Windows Vista, and Windows XP: From the computer desktop, click Start, select All
Programs, click HP, click HP Officejet 4630 series, and then click HP Officejet 4630 series.
Load original on page 32.
2. In the printer software, click the Print, Scan & Fax icon, and then select Scan a Document or Photo.
3. Select the type of scan that you want from the shortcut menu and then click Scan.
NOTE: If Show Scan Preview is selected, you will be able to make adjustments to the scanned image
in the preview screen.
4. Select Save if you want to keep the application open for another scan, or select Done to exit the
application.
5. After the scan is saved, a Windows Explorer window will open in the directory where the scan was
saved.
NOTE: There is a limited number of computers that can have the scan function activated at the same time.
Select Scan on the printer display and you will see the computers that are currently available for scanning.
ENWW Scan to a computer 39
Page 46

Scan from your computer
1. Open HP Scan.
HP Scan is located in the Applications/Hewlett-Packard folder at the top level of the hard disk.
2. Choose the type of scan profile you want and follow the on-screen instructions.
40 Chapter 5 Copy and scan ENWW
Page 47

Tips for copy success
●
Clean the scanner glass and make sure that there are no foreign materials adhering to it.
●
To increase or decrease the contrast of your printed output, select Copy from the printer display and
then select Lighter/Darker to adjust the contrast.
●
To select the paper size and paper type of the printed output, select Copy from the printer display. From
the Copy menu select Paper Type to choose plain or photo paper and photo paper size.
●
To resize the image, select Copy from the printer display and then select Resize.
ENWW Tips for copy success 41
Page 48

Tips for scan success
●
Clean the scanner glass and make sure that there are no foreign materials adhering to it.
●
After you select Scan from the printer display, choose the computer that you want to scan to from the
list of printers on the printer display.
●
If you have a wireless connection from your printer to your computer, and you want to always be able to
quickly scan to your connected computer, make sure to have Scan to Computer always active.
●
If you want to scan a document with several pages into one file instead of multiple files, start the scan
with the printer software instead of selecting Scan from the printer display.
42 Chapter 5 Copy and scan ENWW
Page 49

6Fax
You can use the printer to send and receive faxes, including color faxes. You can schedule faxes to be sent at
a later time and set up speed-dials to send faxes quickly and easily to frequently used numbers. From the
printer control panel, you can also set a number of fax options, such as resolution and the contrast between
lightness and darkness on the faxes you send.
NOTE: Before you begin faxing, make sure you have set up the printer correctly for faxing. You might have
already done this as part of the initial setup, by using either the control panel or the HP software provided
with the printer. You can verify the fax is set up correctly by running the fax setup test from the control
panel. For more information on the fax test, see
●
Send a fax
●
Receive a fax
●
Set up speed-dial entries
Test fax setup on page 163.
●
Change fax settings
●
Fax and digital phone services
●
Fax on Voice over Internet Protocol
●
Use reports
●
Tips for fax success
ENWW 43
Page 50

Send a fax
You can send a fax in a variety of ways. Using the printer control panel, you can send a black-and-white or
color fax. You can also send a fax manually from an attached phone. This allows you to speak with the
recipient before sending the fax.
This section contains the following topics:
●
Send a standard fax
●
Send a standard fax from the computer
●
Send a fax manually from a phone
●
Send a fax using monitor dialing
●
Schedule a fax to send later
●
Send a fax in Error Correction Mode
Send a standard fax
You can easily send a single- or multiple-page black-and-white or color fax by using the printer control panel.
NOTE: If you need printed confirmation that your faxes were successfully sent, fax confirmation must be
enabled.
TIP: You can also send a fax manually from a phone or by using monitor dialing. These features allow you
to control the pace of your dialing. They are also useful when you want to use a calling card to charge the call
and you have to respond to tone prompts while dialing.
To send a standard fax from the printer control panel
1. Load your original print-side down on the right front corner of the glass or print-side up in the ADF.
For more information about loading the original, see
2. From the Home screen on the printer display, press the Up and Down buttons to select Fax, and then
press OK.
3. Select Black Fax or Color Fax.
If an original is loaded in the ADF, the document is sent to the number you entered. If no original is
detected in the ADF, a message appears that promts you to make a selection.
TIP: If the recipient reports issues with the quality of the fax you sent, you can try changing the
resolution or contrast of your fax.
4. Enter the fax number by using the keypad, and then press OK.
TIP: To add a pause in the fax number you are entering, press * repeatedly, until a dash (-) appears on
the display.
Load original on page 32.
Send a standard fax from the computer
You can send a document on your computer as a fax, without printing a copy and faxing it from the printer.
44 Chapter 6 Fax ENWW
Page 51

NOTE: Faxes sent from your computer by this method use the printer's fax connection, not your Internet
connection or computer modem. Therefore, make sure the printer is connected to a working telephone line
and that the fax function is set up and functioning correctly.
To use this feature, you must install the printer software using the installation program provided on the HP
software CD provided with the printer.
To send a standard fax from the computer
1. Open the document on your computer that you want to fax.
2. On the File menu in your software application, click Print.
3. From the Name list, select the printer that has “fax” in the name.
4. To change settings (such as selecting to send the document as a black fax or a color fax), click the
button that opens the Properties dialog box. Depending on your software application, this button might
be called Properties, Options, Printer Setup, Printer, or Preferences.
5. After you have changed any settings, click OK.
6. Click Print or OK.
7. Enter the fax number and other information for the recipient, change any further settings for the fax,
and then click Send Fax. The printer begins dialing the fax number and faxing the document.
Send a standard fax from the computer
1. Open the document on your computer that you want to fax.
2. From the File menu in your software, click Print.
3. Select the printer that has “(Fax)” in the name.
4. Select Fax Recipients from the pop-up menu below the Orientation setting.
NOTE: If you cannot find the pop-up menu, try clicking the disclosure triangle next to the Printer
selection.
5. Enter the fax number and other information in the boxes provided, and then click Add to Recipients.
6. Select the Fax Mode and any other fax options you want, and then click Send Fax Now to begin dialing
the fax number and faxing the document.
Send a fax manually from a phone
Sending a fax manually allows you to make a phone call and talk with the recipient before you send the fax.
This is useful if you want to inform the recipient that you are going to send them a fax before sending it.
When you send a fax manually, you can hear the dial tones, telephone prompts, or other sounds through the
handset on your telephone. This makes it easy for you to use a calling card to send your fax.
Depending on how the recipient has their fax machine set up, the recipient might answer the phone, or the
fax machine might take the call. If a person answers the phone, you can speak with the recipient before
sending the fax. If a fax machine answers the call, you can send the fax directly to the fax machine when you
hear the fax tones from the receiving fax machine.
ENWW Send a fax 45
Page 52

To send a fax manually from an extension phone
1. Load your original print-side down on the right front corner of the glass or print-side up in the ADF.
For more information about loading the original, see
2. From the Home screen on the printer display, press the Up and Down buttons to select Fax, and then
press OK.
3. Dial the number by using the keypad on the phone that is connected to the printer.
NOTE: Do not use the keypad on the control panel of the printer when manually sending a fax. You
must use the keypad on your phone to dial the recipient's number.
4. If the recipient answers the telephone, you can engage in a conversation before sending your fax.
NOTE: If a fax machine answers the call, you will hear fax tones from the receiving fax machine.
Proceed to the next step to transmit the fax.
5. When you are ready to send the fax, press OK, select Send New Fax, and then select Black or Color.
If you were speaking with the recipient before sending the fax, inform the recipient that they should
press Receive Fax Manually on their fax machine after they hear fax tones.
The telephone line is silent while the fax is transmitting. At this point, you can hang up the telephone. If
you want to continue speaking with the recipient, remain on the line until the fax transmission is
complete.
Send a fax using monitor dialing
Load original on page 32.
Monitor dialing allows you to dial a number from the printer control panel as you would dial a regular
telephone. When you send a fax using monitor dialing, you can hear the dial tones, telephone prompts, or
other sounds through the speakers on the printer. This enables you to respond to prompts while dialing, as
well as control the pace of your dialing.
TIP: If you are using a calling card and do not enter your PIN fast enough, the printer might start sending
fax tones too soon and cause your PIN not to be recognized by the calling card service. If this is the case, you
can create a speed dial entry to store the PIN for your calling card. For more information, see
dial entries on page 53.
NOTE: Make sure the volume is turned on to hear a dial tone.
To send a fax using monitor dialing from the printer control panel
1. Load your original print-side down on the right front corner of the glass or print-side up in the ADF.
For more information about loading the original, see
2. From the Home screen on the printer display, press the Up and Down buttons to select Fax, and then
press OK.
3. Select Black Fax or Color Fax.
●
If the printer detects an original loaded in the ADF, you hear a dial tone.
●
If the original is loaded on the scanner glass, select Fax from Glass.
Set up speed-
Load original on page 32.
46 Chapter 6 Fax ENWW
Page 53

4. When you hear the dial tone, enter the number by using the keypad on the printer control panel.
5. Follow any prompts that might occur.
Your fax is sent when the receiving fax machine answers.
Schedule a fax to send later
You can schedule a black-and-white fax to be sent within the next 24 hours. This enables you to send a blackand-white fax late in the evening, when phone lines are not as busy or phone rates are lower, for example.
The printer automatically sends your fax at the specified time.
You can only schedule one fax to be sent at a time. You can continue to send faxes normally, however, while
a fax is scheduled.
NOTE: You can only send a black-and-white fax from memory.
To schedule a fax from the printer control panel
1. Load your original print-side up in the ADF.
For more information about loading the original, see
2. From the Home screen on the printer display, press the Up and Down buttons to select Fax, and then
press OK.
3. Select Settings, and then select Schedule a Fax.
4. Enter the fax delay time by pressing the Up and Down buttons, and then press OK to confirm.
5. When you hear the dial tone, enter the number by using the keypad on the printer control panel.
6. Select Scan, and then select Start.
The printer scans all pages and sends the fax at the scheduled time.
To cancel a scheduled fax
1. From the Home screen on the printer display, press the Up and Down buttons to select Fax, and then
press OK.
2. Select Settings, and then select Schedule a Fax.
3. Select the scheduled fax that you want to delete, and then select Delete.
Send a fax in Error Correction Mode
Error Correction Mode (ECM) prevents loss of data due to poor phone lines by detecting errors that occur
during transmission and automatically requesting retransmission of the erroneous portion. Phone charges
are unaffected, or might even be reduced, on good phone lines. On poor phone lines, ECM increases sending
time and phone charges, but sends the data much more reliably. The default setting is On. Turn ECM off only
if it increases phone charges substantially, and if you can accept poorer quality in exchange for reduced
charges.
Load original on page 32.
Before turning the ECM setting off, consider the following. If you turn ECM off:
ENWW Send a fax 47
Page 54

●
The quality and transmission speed of faxes you send and receive are affected.
●
The Fax Speed is automatically set to Medium.
●
You can no longer send or receive faxes in color.
To change the ECM setting from the control panel
1. From the Home screen on the printer display, press the Up and Down buttons to select Fax, and then
press OK.
2. Select Settings, and then select Advanced Settings.
3. Select Error Correction.
4. Select On or Off, and then press OK.
48 Chapter 6 Fax ENWW
Page 55

Receive a fax
You can receive faxes automatically or manually. If you turn off the Auto Answer option, you must receive
faxes manually. If you turn on the Auto Answer option (the default setting), the printer automatically
answers incoming calls and receives faxes after the number of rings that are specified by the Rings to
Answer setting. (The default Rings to Answer setting is five rings.)
If you receive a Legal-size or larger fax and the printer is not currently set to use Legal-size paper, the printer
reduces the fax so that it fits on the paper that is loaded.
NOTE: If you are copying a document when a fax arrives, the fax is stored in the printer memory until the
copying finishes. This can reduce the number of fax pages stored in memory.
●
Receive a fax manually
●
Reprint received faxes from memory
●
Forward faxes to another number
●
Set the paper size for received faxes
●
Block unwanted fax numbers
Receive a fax manually
When you are on the phone, the person you are speaking with can send you a fax while you are still
connected. This is referred to as manual faxing. Use the instructions in this section to receive a manual fax.
NOTE: You can pick up the handset to talk or listen for fax tones.
You can receive faxes manually from a phone that is:
●
Directly connected to the printer (on the 2_EXT port)
●
On the same phone line, but not directly connected to the printer
To receive a fax manually
1. Make sure the printer is turned on and you have paper loaded in the main tray.
2. Remove any originals from the ADF tray.
3. Set the Rings to Answer setting to a high number to allow you to answer the incoming call before the
printer answers. Or, turn off the Auto Answer setting so that the printer does not automatically answer
incoming calls.
4. If you are currently on the phone with the sender, instruct the sender to press Send New Fax on their
fax machine.
5. When you hear fax tones from a sending fax machine, do the following:
a. From the Home screen on the printer display, press the Up and Down buttons to select Fax, press
OK, and then select Receive Fax Manually.
b. After the printer begins to receive the fax, you can hang up the phone or remain on the line. The
phone line is silent during fax transmission.
ENWW Receive a fax 49
Page 56

Reprint received faxes from memory
The received faxes, which are not printed out, are stored in memory.
NOTE: After the memory becomes full, the printer cannot receive the new fax until you print or delete the
faxes from memory. You might also want to delete the faxes in memory for security or privacy purposes.
Depending on the sizes of the faxes in memory, you can reprint up to eight of the most recently printed
faxes, if they are still in memory. For example, you might need to reprint your faxes if you lost the copy of
your last printout.
To reprint faxes in memory from the printer control panel
1. Make sure you have paper loaded in the main tray. For more information, see
2. From the Home screen on the printer display, press the Up and Down buttons to select Fax, and then
press OK.
3. Select Settings, and then select Reprint Missed Faxes.
The faxes are displayed in the reverse order from which they were received with the most recently
received fax first, and so on.
4. Select the fax you want to print, and then select Print.
5. If you want to stop reprinting the fax, select Cancel.
Forward faxes to another number
You can set up the printer to forward your faxes to another fax number. A received color fax is forwarded in
black and white.
HP recommends that you verify the number you are forwarding to is a working fax line. Send a test fax to
make sure the fax machine is able to receive your forwarded faxes.
To forward faxes from the printer control panel
1. From the Home screen on the printer display, press the Up and Down buttons to select Fax, and then
press OK.
Load media on page 28.
2. Select Settings, and then select Advanced Settings.
3. Select Fax Forwarding, and then select Select Fax Forward.
4. Select On with Print to print and forward the fax, or select On to forward the fax.
NOTE: If the printer is not able to forward the fax to the designated fax machine (for example, if it is
not turned on), the printer prints the fax. If you set up the printer to print error reports for received
faxes, it also prints an error report.
5. At the prompt, enter the number of the fax machine intended to receive the forwarded faxes, and then
select Done. Enter the required information for each of the following prompts: start date, start time,
end date, and end time.
6. Fax forwarding is activated. Select OK to confirm.
If the printer loses power when fax forwarding is set up, it saves the fax forwarding setting and phone
number. When the power is restored to the printer, the fax forwarding setting is still On.
50 Chapter 6 Fax ENWW
Page 57
NOTE: You can cancel fax forwarding by selecting Off from the Fax Forward menu.
Set the paper size for received faxes
You can select the paper size for received faxes. The paper size you select should match what is loaded in
your main tray. Faxes can be printed on Letter, A4, or Legal paper only.
NOTE: If an incorrect paper size is loaded in the main tray when you receive a fax, the fax does not print and
an error message appears on the display. Load Letter, A4, or Legal paper, and then press OK to print the fax.
To set the paper size for received faxes from the printer control panel
1. From the Home screen on the printer display, press the Up and Down buttons to select Fax, and then
press OK.
2. Select Settings.
3. Select Fax Paper Size, and then select an option.
Block unwanted fax numbers
If you subscribe to a caller ID service through your phone provider, you can block specific fax numbers so the
printer does not print faxes received from those numbers. When an incoming fax call is received, the printer
compares the number to the list of junk fax numbers to determine if the call should be blocked. If the number
matches a number in the blocked fax numbers list, the fax is not printed. (The maximum number of fax
numbers you can block varies by model.)
NOTE: This feature is not supported in all countries/regions. If it is not supported in your country/region,
Junk Fax Blocker does not appear in the Fax Options or Fax Settings menu.
NOTE: If no phone numbers are added in the Caller ID list, it is assumed that you are not subscribed to a
Caller ID service.
●
Add numbers to the junk fax list
●
Remove numbers from the junk fax list
Add numbers to the junk fax list
You can block specific numbers by adding them to the junk fax list.
To add a number to the junk fax list
1. From the Home screen on the printer display, press the Up and Down buttons to select Fax, and then
press OK.
2. Select Settings, and then select Junk Fax.
3. A message appears stating that Caller ID is required to block junk faxes. Select OK to continue.
4. Select Add a Number.
5. To select a fax number to block from the caller ID list, select From Call History.
- or -
ENWW Receive a fax 51
Page 58

To manually enter a fax number to block, select Enter New Number.
6. After entering a fax number to block, select Done.
NOTE: Make sure you enter the fax number as it appears on the control panel display, and not the fax
number that appears on the fax header of the received fax, as these numbers can be different.
Remove numbers from the junk fax list
If you no longer want to block a fax number, you can remove a number from your junk fax list.
To remove numbers from the list of junk fax numbers
1. From the Home screen on the printer display, press the Up and Down buttons to select Fax, and then
press OK.
2. Select Settings, and then select Junk Fax.
3. Select the number you want to remove, and then select Remove a Number.
4. Press OK to confirm the deletion.
52 Chapter 6 Fax ENWW
Page 59

Set up speed-dial entries
You can set up frequently used fax numbers as speed-dial entries. This lets you dial those numbers quickly
by using the printer control panel.
TIP: In addition to creating and managing speed-dial entries from the printer's control panel, you can also
use tools available on your computer, such as the HP software included with the printer and the printer's
embedded web server (EWS).
This section contains the following topics:
●
Set up and change speed-dial entries
●
Delete speed-dial entries
Set up and change speed-dial entries
You can store fax numbers as speed-dial entries.
To set up speed-dial entries
1. From the Home screen on the printer display, press the Up and Down buttons to select Fax, and then
press OK.
2. Select Settings, and then select Phone Book.
3. Select Add Contact.
4. Type the name of the entry, and then select Next.
5. Type the fax number, and then select Done.
NOTE: Be sure to include any pauses or other required numbers, such as an area code, an access code
for numbers outside a PBX system (usually a 9 or 0), or a long-distance prefix.
To change speed-dial entries
1. From the Home screen on the printer display, press the Up and Down buttons to select Fax, and then
press OK.
2. Select Settings, and then select Phone Book.
3. Select the entry you want to change, and then press OK.
4. Select Edit, and then make your changes in the fax name, and then select Next.
5. Make your changes in the fax number, and then select Done.
NOTE: Be sure to include any pauses or other required numbers, such as an area code, an access code
for numbers outside a PBX system (usually a 9 or 0), or a long-distance prefix.
ENWW Set up speed-dial entries 53
Page 60

Delete speed-dial entries
To delete speed-dial entries
1. From the Home screen on the printer display, press the Up and Down buttons to select Fax, and then
press OK.
2. Select Settings, and then select Phone Book.
3. Select the entry you want to delete, and then select Delete to confirm.
54 Chapter 6 Fax ENWW
Page 61

Change fax settings
Use the following steps to change the initial settings or to configure other options for faxing.
●
Configure the fax header
●
Set the answer mode (Auto answer)
●
Set the number of rings before answering
●
Change the answer ring pattern for distinctive ring
●
Set the dial type
●
Set the redial options
●
Set the fax speed
●
Set the fax sound volume
Configure the fax header
The fax header prints your name and fax number on the top of every fax you send. HP recommends that you
set up the fax header by using the HP software provided with the printer. You can also set up the fax header
from the printer control panel, as described here.
NOTE: In some countries/regions, the fax header information is a legal requirement.
To set or change the fax header
1. From the Home screen on the printer display, press the Up and Down buttons to select Fax, and then
press OK.
2. Select Settings, and then select Fax Header.
3. Enter your personal or company name and fax number, and then select Done.
Set the answer mode (Auto answer)
The answer mode determines whether the printer answers incoming calls.
●
Turn on the Auto Answer setting if you want the printer to answer faxes automatically. The printer
answers all incoming calls and faxes.
●
Turn off the Auto Answer setting if you want to receive faxes manually. You must be available to
respond in person to the incoming fax call or else the printer does not receive faxes.
To set the answer mode
1. From the Home screen on the printer display, press the Up and Down buttons to select Fax, and then
press OK.
2. Select Settings.
3. Select Auto Answer, select On or Off, and then press OK.
ENWW Change fax settings 55
Page 62

Set the number of rings before answering
If you turn on the Auto Answer setting, you can specify how many rings occur before incoming calls are
automatically answered.
The Rings to Answer setting is important if you have an answering machine on the same phone line as the
printer, because you want the answering machine to answer the phone before the printer does. The number
of rings to answer for the printer should be greater than the number of rings to answer for the answering
machine.
For example, set your answering machine to a low number of rings and the printer to answer in the maximum
number of rings. (The maximum number of rings varies by country/region.) In this setup, the answering
machine answers the call and the printer monitors the line. If the printer detects fax tones, it receives the fax.
If the call is a voice call, the answering machine records the incoming message.
To set the number of rings before answering
1. From the Home screen on the printer display, press the Up and Down buttons to select Fax, and then
press OK.
2. Select Settings, and then select Advanced Settings.
3. Select Ring Settings, and then select Rings to Answer.
4. Select up and down arrows to change the number of rings.
5. Select OK to accept the setting.
Change the answer ring pattern for distinctive ring
Many phone companies offer a distinctive ring feature that allows you to have several phone numbers on one
phone line. When you subscribe to this service, each number is assigned a different ring pattern. You can set
up the printer to answer incoming calls that have a specific ring pattern.
If you connect the printer to a line with distinctive ring, have your telephone company assign one ring pattern
to voice calls and another ring pattern to fax calls. HP recommends that you request double or triple rings for
a fax number. When the printer detects the specified ring pattern, it answers the call and receives the fax.
TIP: You can also use the Ring Pattern Detection feature in the printer's control panel to set distinctive ring.
With this feature, the printer recognizes and records the ring pattern of an incoming call and, based on this
call, automatically determines the distinctive ring pattern assigned by your telephone company to fax calls.
If you do not have a distinctive ring service, use the default ring pattern, which is All Rings.
NOTE: The printer cannot receive faxes when the main phone number is off the hook.
To change the answer ring pattern for distinctive ring
1. Verify that the printer is set to answer fax calls automatically.
2. From the Home screen on the printer display, press the Up and Down buttons to select Fax, and then
press OK.
3. Select Settings, and then select Advanced Settings.
4. Select Ring Settings, and then select Distinctive Ring.
56 Chapter 6 Fax ENWW
Page 63

5. A message appears stating that this setting should not be changed unless you have multiple numbers
on the same telephone line. Select Yes to continue.
6. Do one of the following:
●
●
NOTE: If the Ring Pattern Detection feature cannot detect the ring pattern or if you cancel the feature
before it finishes, the ring pattern is automatically set to the default, which is All Rings.
NOTE: If you are using a PBX phone system that has different ring patterns for internal and external
calls, you must call the fax number from an external number.
Set the dial type
Use this procedure to set tone-dialing or pulse-dialing mode. The factory-set default is Tone. Do not change
the setting unless you know that your phone line cannot use tone dialing.
NOTE: The pulse-dialing option is not available in all countries/regions.
To set the dial type
Select the ring pattern assigned by your telephone company to fax calls.
- Or -
Select Auto Detect, and then follow the instructions on the printer control panel.
1. From the Home screen on the printer display, press the Up and Down buttons to select Fax, and then
press OK.
2. Select Settings, and then select Advanced Settings.
3. Select Dial Type, select Tone Dialing or Pulse Dialing, and then press OK.
Set the redial options
If the printer was unable to send a fax because the receiving fax machine did not answer or was busy, the
printer attempts to redial based on the settings for the busy-redial and no-answer-redial options. Use the
following procedure to turn the options on or off.
●
When Busy: If this option is turned on, the printer redials automatically if it receives a busy signal. The
factory-set default for this option is Redial.
●
When No answer: If this option is turned on, the printer redials automatically if the receiving fax
machine does not answer. The factory-set default for this option is No Redial.
To set the redial options
1. From the Home screen on the printer display, press the Up and Down buttons to select Fax, and then
press OK.
2. Select Settings, and then select Auto Redial.
3. Select the appropriate option, and then press OK.
ENWW Change fax settings 57
Page 64

Set the fax speed
You can set the fax speed used to communicate between your printer and other fax machines when sending
and receiving faxes.
If you use one of the following, setting the fax speed to a slower speed might be required:
●
An Internet phone service
●
A PBX system
●
Fax on Voice over Internet Protocol (VoIP)
●
An integrated services digital
If you experience problems sending and receiving faxes, try using a lower Fax Speed. The following table
provides the available fax speed settings.
Fax speed setting Fax speed
Fast v.34 (33600 bps)
Medium v.17 (14400 bps)
Slow v.29 (9600 bps)
To set the fax speed
1. From the Home screen on the printer display, press the Up and Down buttons to select Fax, and then
press OK.
2. Select Settings, and then select Advanced Settings.
3. Select Fax Speed.
4. Select an option, and then press OK.
Set the fax sound volume
Use this procedure to increase or decrease the volume of the fax sounds.
To set the fax sound volume
1. From the Home screen on the printer display, press the Up and Down buttons to select Fax, and then
press OK.
2. Select Settings, and then select Advanced Settings.
3. Select Ring Settings, and then select Fax Sound Volume.
4. Select Soft, Loud, or Off, and then press OK.
58 Chapter 6 Fax ENWW
Page 65

Fax and digital phone services
Many telephone companies provide their customers with digital phone services, such as the following:
●
DSL: A Digital subscriber line (DSL) service through your telephone company. (DSL might be called ADSL
in your country/region.)
●
PBX: A private branch exchange (PBX) phone system.
●
ISDN: An integrated services digital network (ISDN) system.
●
VoIP: A low-cost phone service that allows you to send and receive faxes with your printer by using the
Internet. This method is called Fax on Voice over Internet Protocol (VoIP).
For more information, see
HP printers are designed specifically for use with traditional analog phone services. If you are in a digital
phone environment (such as DSL/ADSL, PBX, or ISDN), you might need to use digital-to-analog filters or
converters when setting up the printer for faxing.
NOTE: HP does not guarantee that the printer will be compatible with all digital service lines or providers, in
all digital environments, or with all digital-to-analog converters. It is always recommended that you discuss
with the telephone company directly for the correct setup options based on their line services provided.
Fax on Voice over Internet Protocol on page 60.
ENWW Fax and digital phone services 59
Page 66

Fax on Voice over Internet Protocol
You might be able to subscribe to a low cost phone service that allows you to send and receive faxes with
your printer by using the Internet. This method is called Fax on Voice over Internet Protocol (VoIP).
The following are indications you probably use a VoIP service.
●
Dial a special access code along with the fax number.
●
Have an IP converter box that connects to the Internet and provides analog phone ports for the fax
connection.
NOTE: You can only send and receive faxes by connecting a phone cord to the port labeled "1-LINE" on the
printer. This means that your connection to the Internet must be done either through a converter box (which
supplies regular analog phone jacks for fax connections) or your telephone company.
TIP: Support for traditional fax transmission over any Internet protocol telephone systems are often
limited. If you experience problems faxing, try using a slower fax speed or disabling the fax error-correction
mode (ECM). However, if you turn off ECM, you cannot send and receive color faxes.
For more information about changing the fax speed, see
about using ECM, see
If you have questions about Internet faxing, contact your Internet faxing services support department or your
local service provider for further assistance.
Send a fax in Error Correction Mode on page 47.
Set the fax speed on page 58. For more information
60 Chapter 6 Fax ENWW
Page 67

Use reports
You can set up the printer to print error reports and confirmation reports automatically for each fax you send
and receive. You can also manually print system reports as required; these reports provide useful system
information about the printer.
By default, the printer is set to print a report only if there is a problem sending or receiving a fax.
A confirmation message that indicates whether a fax was successfully sent appears briefly on the control
panel display after each transaction.
NOTE: If the reports are not legible, you can check the estimated ink levels from the control panel or the HP
software.
NOTE: Ink level alerts and indicators provide estimates for planning purposes only. When you receive
a low-ink alert, consider having a replacement cartridge available to avoid possible printing delays. You do
not need to replace the ink cartridges until prompted to do so.
NOTE: Ensure that the printheads and ink cartridges are in good conditions and installed properly. For more
information, see
This section contains the following topics:
●
Print fax confirmation reports
●
Print and view the fax log
●
Print the details of the last fax transaction
Work with cartridges on page 71.
●
Print a Caller ID Report
●
View the Call History
Print fax confirmation reports
If you require printed confirmation that your faxes were successfully sent, follow these instructions to enable
fax confirmation before sending any faxes.
The default fax confirmation setting is Error Only.
To enable fax confirmation
1. From the Home screen on the printer display, press the Up and Down buttons to select Fax, and then
press OK.
2. Select Settings, select Advanced Settings, and then select Fax Confirmation.
3. Select one of the following options, and then press OK.
Off Does not print a fax confirmation report when you send and
After Send Fax Prints a fax confirmation report for every fax you send.
After Receive Fax Prints a fax confirmation report for every fax you receive.
receive faxes successfully.
ENWW Use reports 61
Page 68

On Always Prints a fax confirmation report for every fax you send and
Error Only Prints a fax confirmation report for every fax error. This is the
Print and view the fax log
You can print a log of faxes that have been received and sent by the printer.
To print the fax log from the printer control panel
1. From the Home screen on the printer display, press the Up and Down buttons to select Fax, and then
press OK.
2. Select Settings, select Advanced Settings, and then select Fax Reports.
3. Select Fax Log, and then press OK.
Print the details of the last fax transaction
The Last Fax Transaction report prints the details of the last fax transaction to occur. Details include the fax
number, number of pages, and the fax status.
To print the Last Fax Transaction report
receive.
default setting.
1. From the Home screen on the printer display, press the Up and Down buttons to select Fax, and then
press OK.
2. Select Settings, select Advanced Settings, and then select Fax Reports.
3. Select Last Transaction Report, and then press OK.
Print a Caller ID Report
Use the following procedure to print a list of Caller ID fax numbers.
To print a Caller ID History Report
1. From the Home screen on the printer display, press the Up and Down buttons to select Fax, and then
press OK.
2. Select Settings, select Advanced Settings, and then select Fax Reports.
3. Select Caller ID Report, and then press OK.
View the Call History
Use the following procedure to print a list of all the calls placed from the printer.
62 Chapter 6 Fax ENWW
Page 69

To view the Call History
1. From the Home screen on the printer display, press the Up and Down buttons to select Fax, and then
press OK.
2. Select Settings, and then select Junk Fax.
3. Select Add a Number, select From Call History, and then press OK.
ENWW Use reports 63
Page 70

Tips for fax success
●
Load your original print-side down on the right front corner of the glass or print-side up in the ADF.
For more information about loading the original, see
●
Clean the scanner glass and make sure that there are no foreign materials adhering to it.
●
Turn on Error Correction Mode (ECM) to send color faxes.
For more information about turning on ECM, see
●
After the fax memory becomes full, the printer does not receive any faxes until you print or delete the
faxes from memory.
For more information about reprinting the faxes in the memory, see
memory on page 50.
●
You can set up the printer to answer incoming calls with a specific ring pattern. Use this feature only
when you have subscribed to the service, which allows several phone numbers on one phone line from
your phone service provider.
Load original on page 32.
Send a fax in Error Correction Mode on page 47.
Reprint received faxes from
64 Chapter 6 Fax ENWW
Page 71

7Use Web Services
●
HP ePrint
●
Use HP Printables
●
Use the HP Connected website
●
Tips for using Web Services
ENWW 65
Page 72

HP ePrint
HP ePrint is a free service from HP that allows you to print to your HP ePrint-enabled printer anytime, from
any location. It's as simple as sending an email to the email address assigned to your printer when you enable
Web Services on the printer. No special drivers or software are needed. If you can send an email, you can print
from anywhere, using HP ePrint.
Once you have signed up for an account on HP Connected (
your ePrint job status, manage your HP ePrint printer queue, control who can use your printer's HP ePrint
email address to print, and get help for HP ePrint.
HP ePrint allows you to print to your HP ePrint-enabled printer anytime, from any location.
To use HP ePrint, make sure to have the following:
●
An Internet- and email-capable computer or mobile device
●
An HP ePrint-capable printer on which Web Services has been enabled
NOTE: The email will be printed once it is received. As with any email, there is no guarantee when or
whether it will be received. You can check the print status on HP Connected (
NOTE: Documents printed with HP ePrint may appear different from the original. Style, formatting, and text
flow may differ from the original document. For documents that need to be printed with a higher quality
(such as legal documents), we recommend that you print from the software application on your computer,
where you will have more control over what your printout looks like.
TIP: For more information about managing and configuring HP ePrint settings and to learn about the latest
features, visit HP Connected (
To print using HP ePrint
1. Enable Web Services.
www.hpconnected.com), you can sign in to view
www.hpconnected.com).
www.hpconnected.com).
a. From the printer control panel, press the ePrint button.
b. Accept the Terms of Use, and then follow the on-screen instructions to enable Web Services.
c. Print the ePrint information page, and then follow the instructions on the page to sign up for an HP
ePrint account.
2. On your computer or mobile device, open your email application.
NOTE: For information about using the email application on your computer or mobile device, see the
documentation provided with the application.
3. Create a new email message, and then attach the file that you want to print.
4. Enter the printer's email address in the “To” line of the email message, and then select the option to
send the email message.
NOTE: Do not include any email address in the "Bcc" field; this field is required to be blank. If there is
an email address or printer address in the "Bcc" field the job will not be printed.
66 Chapter 7 Use Web Services ENWW
Page 73

To find the printer's email address
1. Press the ePrint button on the control panel. You will see the Web Services Settings menu on the
printer display.
2. Select Display Email Address from the printer display to view the printer’s email address.
TIP: To customize the email address, select Print Info Page from the Web Services Settings menu on
the printer display. The printer prints an information page that contains the printer code and
instructions on how to customize the email address.
To turn off ePrint
1. Press the ePrint button on the control panel. You will see the Web Services Settings menu on the
printer display.
2. Select ePrint from the printer display, and then select Off.
ENWW HP ePrint 67
Page 74

Use HP Printables
HP Printables, a free service from HP, delivers a wide range of news, recipes, business tips, coloring pages,
puzzles, personalized coupons, and more - directly to your web-connected printer, on your schedule. Browse
from a range of options, including top brands, to find the content you want and get the prints you love. You
can get the prints you want immediately or, with some printables, you can set them to be automatically
delivered on the days and times that you want.
Preformatted content designed specifically for your printer means no cut-off text and pictures and no extra
pages with only one line of text.
NOTE: To use HP Printables, the printer must be connected to a network that provides an Internet
connection, and you must register for this service. Printable availability varies by country, language, and
agreements, and might require a firmware upgrade.
For more information, visit www.hpconnected.com. On some printers and websites, HP Printables might be
called Print Apps.
68 Chapter 7 Use Web Services ENWW
Page 75

Use the HP Connected website
Use HP’s free HP Connected website to set up increased security for HP ePrint, and specify the email
addresses that are allowed to send email to your printer. You can also get product updates, more HP
Printables, and other free services.
Go to the HP Connected website for more information and specific terms and conditions:
www.hpconnected.com.
ENWW Use the HP Connected website 69
Page 76

Tips for using Web Services
Use the following tips to print HP Printables and use HP ePrint.
Tips for printing HP Printables and using HP ePrint
●
Learn about HP Printables for printing recipes, coupons, and other content from the web, simply and
Click here to go online for more information.
easily.
70 Chapter 7 Use Web Services ENWW
Page 77

8 Work with cartridges
●
Check the estimated ink levels
●
Order ink supplies
●
Choose right ink cartridges
●
Replace the cartridges
●
Use single-cartridge mode
●
Cartridge warranty information
●
Tips for working with cartridges
ENWW 71
Page 78

Check the estimated ink levels
You can easily check the ink supply level to determine how soon you might need to replace a cartridge. The
ink supply level shows an estimate of the amount of ink remaining in the cartridges.
To check the ink levels from the printer control panel
●
From the Home screen on the printer display, select Ink Levels, and then press OK. Then the printer
displays the current ink levels.
NOTE: If you do not see the Home screen, press the Home button.
To check the ink levels from the printer software
1. Depending on your operating system, do one of the following to open the printer software:
●
Windows 8: On the Start screen, right-click an empty area on the screen, click All Apps on the app
bar, and then click the icon with the printer's name.
●
Windows 7, Windows Vista, and Windows XP: From the computer desktop, click Start, select All
Programs, click HP, click HP Officejet 4630 series, and then click HP Officejet 4630 series.
2. In the printer software, click Estimated Ink Levels.
To check the ink levels from HP Utility
1. Open HP Utility.
HP Utility is located in the Hewlett-Packard folder in the Applications folder at the top level of the hard
disk.
2. Select the HP Officejet 4630 series from the list of devices at the left of the window.
3. Click Supplies Status.
The estimated ink levels appear.
4. Click All Settings to return to the Information and Support pane.
NOTE: If you have installed a refilled or remanufactured cartridge, or a cartridge that has been used in
another printer, the ink level indicator might be inaccurate or unavailable.
NOTE: Ink level warnings and indicators provide estimates for planning purposes only. When you receive a
low-ink warning message, consider having a replacement cartridge available to avoid possible printing
delays. You do not have to replace the cartridges until the print quality is unacceptable.
NOTE: Ink from the cartridges is used in the printing process in a number of different ways, including in the
initialization process, which prepares the printer and cartridges for printing, and in printhead servicing, which
keeps print nozzles clear and ink flowing smoothly. In addition, some residual ink is left in the cartridge after
it is used. For more information, see
www.hp.com/go/inkusage.
72 Chapter 8 Work with cartridges ENWW
Page 79

Order ink supplies
Before ordering cartridges, locate the correct cartridge number.
Locate the cartridge number on the printer
●
The cartridge number is located inside the cartridge access door.
Locate the cartridge number in the printer software
1. Depending on your operating system, do one of the following to open the printer software:
●
Windows 8: On the Start screen, right-click an empty area on the screen, click All Apps on the app
bar, and then click the icon with the printer's name.
●
Windows 7, Windows Vista, and Windows XP: From the computer desktop, click Start, select All
Programs, click HP, click HP Officejet 4630 series, and then click HP Officejet 4630 series.
2. In the printer software, click Shop, and then click Shop For Supplies Online.
The correct cartridge number appears when you use this link.
To find the print cartridge reorder numbers
1. Open HP Utility.
NOTE: HP Utility is located in the Hewlett-Packard folder in the Applications folder at the top level of
the hard disk.
2. Click Supplies Info.
The print cartridge ordering numbers appear.
3. Click All Settings to return to the Information and Support pane.
To order original HP supplies for the HP Officejet 4630 series, go to
choose your country/region, follow the prompts to select your product, and then click one of the shopping
links on the page.
NOTE: Ordering ink cartridges online is not supported in all countries/regions. If it is not available in your
country/region, you may still view supplies information and print a list for reference when shopping at a local
HP reseller.
www.hp.com/buy/supplies. If prompted,
ENWW Order ink supplies 73
Page 80

Choose right ink cartridges
HP recommends that you use Original HP ink cartridges. Original HP ink cartridges are designed and tested
with HP printers to help you easily produce great results, time after time.
74 Chapter 8 Work with cartridges ENWW
Page 81

Replace the cartridges
To replace the cartridges
1. Check that power is on.
2. Remove cartridge.
a. Open the cartridge access door.
Wait for print carriage to move to the right side of the printer.
b. Lift up the cartridge tab, and then remove it from the slot.
3. Insert new cartridge.
a. Remove cartridge from packaging.
ENWW Replace the cartridges 75
Page 82
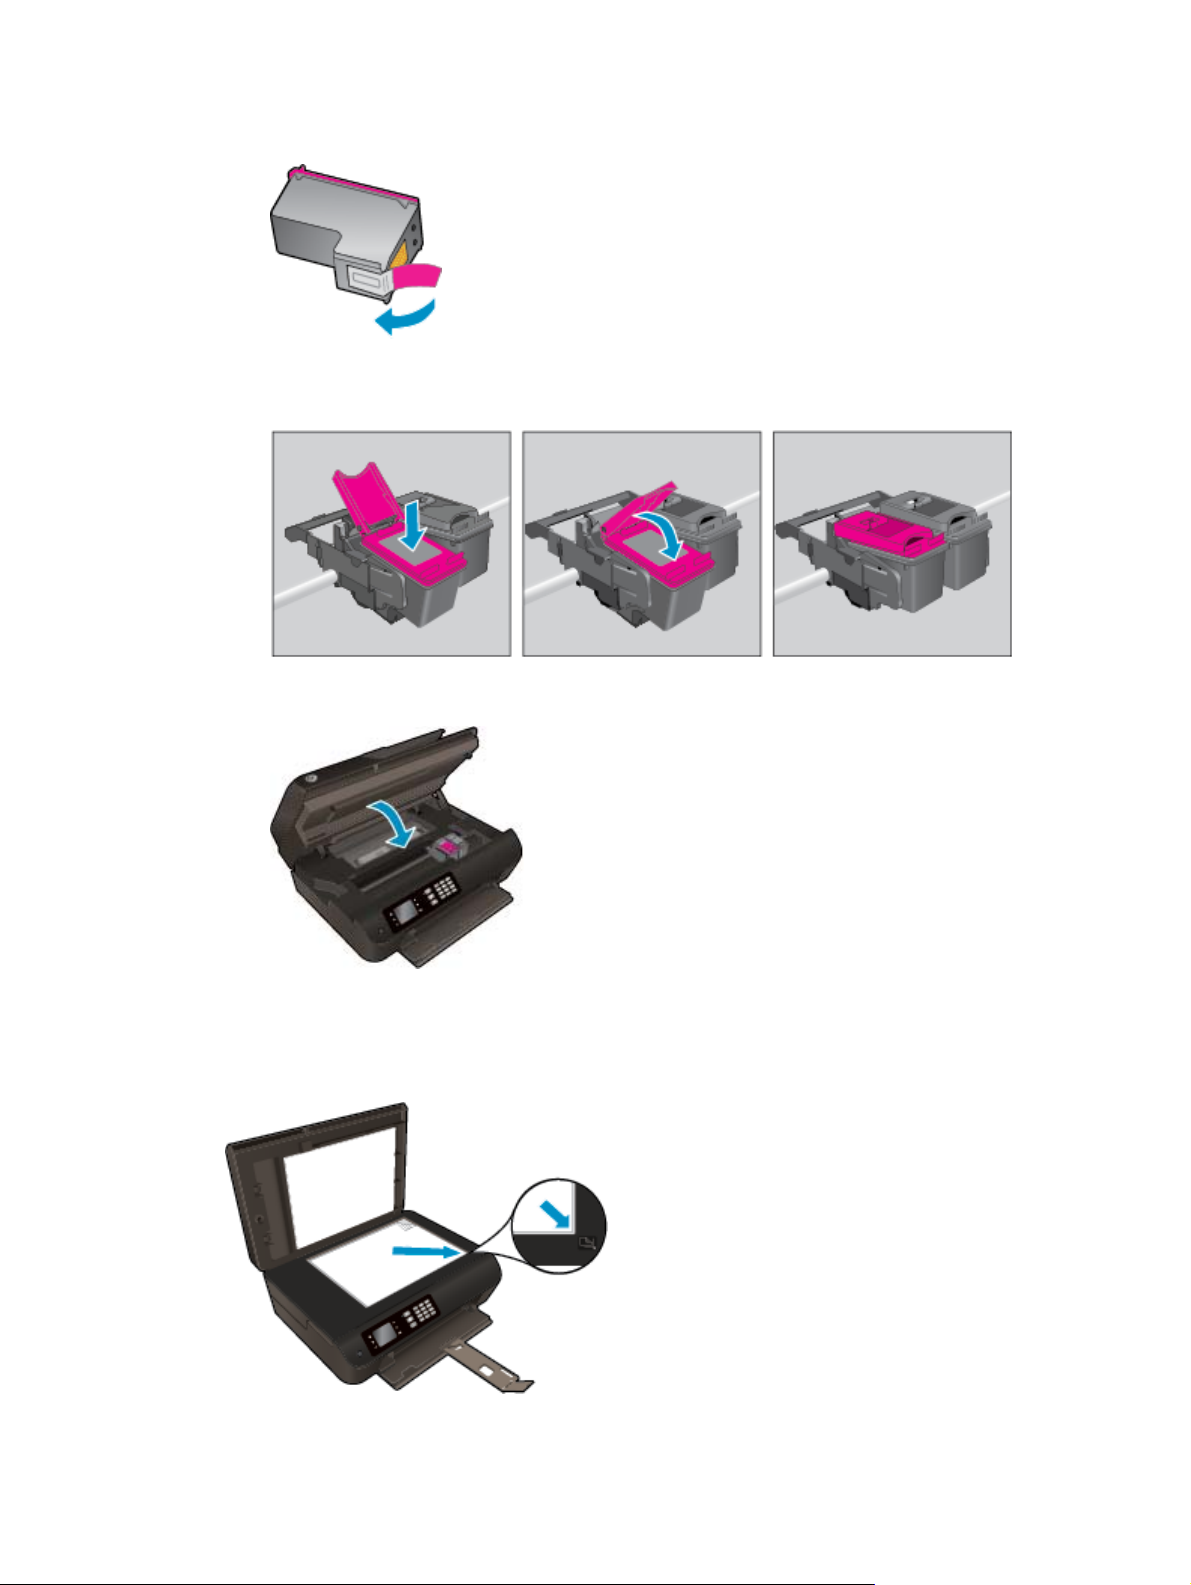
b. Remove the plastic tape using the pull tab.
c. Place new cartridge in slot at an angle under the opened tab, and then squeeze the tab closed as
the cartridge slides into place.
d. Close the cartridge access door.
4. Load plain paper and print out the alignment page.
5. Load the alignment page print-side down on the right front corner of the scanner glass, close the lid,
and then press OK to complete the alignment.
76 Chapter 8 Work with cartridges ENWW
Page 83

Use single-cartridge mode
Use the single-cartridge mode to operate the HP Officejet 4630 series with only one ink cartridge. The singlecartridge mode is initiated when an ink cartridge is removed from the ink cartridge carriage.
NOTE: When the HP Officejet 4630 series operates in single-cartridge mode, a message is displayed on the
printer display. If the message is displayed and two ink cartridges are installed in the printer, verify that the
protective piece of plastic tape has been removed from each ink cartridge. When plastic tape covers the ink
cartridge contacts, the printer cannot detect that the ink cartridge is installed.
To exit single-cartridge mode
●
Install both the black and tri-color cartridges in the HP Officejet 4630 series to exit single-cartridge
mode.
ENWW Use single-cartridge mode 77
Page 84
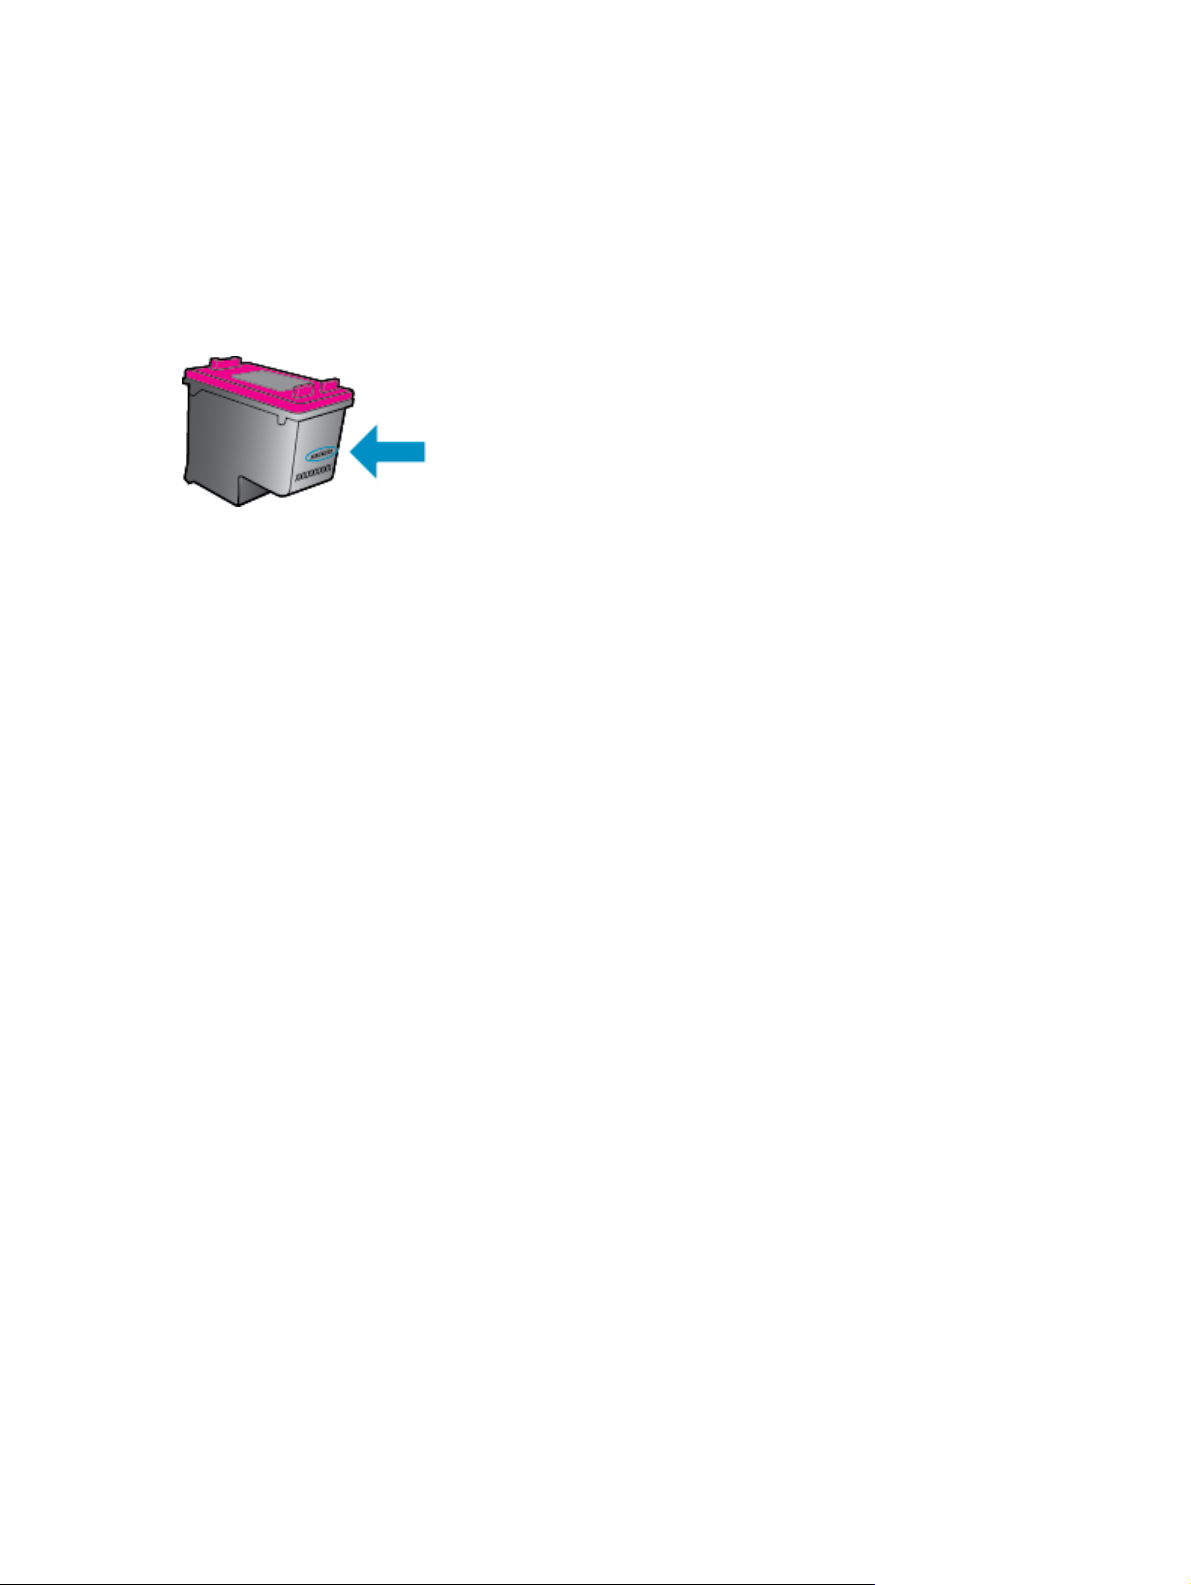
Cartridge warranty information
The HP cartridge warranty is applicable when the cartridge is used in its designated HP printing device. This
warranty does not cover HP ink cartridges that have been refilled, remanufactured, refurbished, misused, or
tampered with.
During the warranty period the cartridge is covered as long as the HP ink is not depleted and the end of
warranty date has not been reached. The end of warranty date, in YYYY/MM/DD format, may be found on the
cartridge as indicated:
For a copy of the HP Limited Warranty Statement, see the printed documentation that came with the printer.
78 Chapter 8 Work with cartridges ENWW
Page 85

Tips for working with cartridges
Use the following tips to work with cartridges:
●
To protect the cartridges from drying out, always turn the printer off using the On button, and wait until
the On button light goes out.
●
Do not open or untape cartridges until you are ready to install them. Leaving tape on the cartridges
reduces ink evaporation.
●
Insert the cartridges into the correct slots. Match the color and icon of each cartridge to the color and
icon for each slot. Make sure the cartridges snap into place.
●
Align the printer for best print quality. See
●
When the Estimated Ink Levels screen shows one or both cartridges in a low state, consider getting
replacement cartridges to avoid possible printing delays. You do not need to replace the cartridges until
print quality becomes unacceptable. See
●
If you remove a cartridge from the printer for any reason, try to replace it again as soon as possible.
Outside of the printer, if unprotected, cartridges begin to dry out.
Improve print quality on page 98 for more information.
Replace the cartridges on page 75 for more information.
ENWW Tips for working with cartridges 79
Page 86

80 Chapter 8 Work with cartridges ENWW
Page 87

9 Connectivity
●
Wi-Fi Protected Setup (WPS – requires WPS router)
●
Traditional wireless connection (requires router)
●
USB connection (non-network connection)
●
Change from a USB connection to a wireless network
●
Connect wirelessly to the printer without a router
●
Tips for setting up and using a networked printer
●
Advanced printer management tools (for networked printers)
ENWW 81
Page 88

Wi-Fi Protected Setup (WPS – requires WPS router)
NOTE: Make sure you have installed the HP software that came with the printer and the printer network
drives.
To connect the HP Officejet 4630 series to a wireless network using Wi-Fi Protected Setup (WPS), you will
need the following:
●
A wireless 802.11b/g/n network that includes a WPS-enabled wireless router or access point.
NOTE: The HP Officejet 4630 series only supports connections using 2.4GHz.
●
Routers that support WPS often have a (WPS) button.
●
If you use WPS PIN method to set up the wireless connection, the computer must be connected to the
wireless network that you intend to install the HP Officejet 4630 series on.
Push Button (PBC) method
1. Press and hold the Wireless button on the printer for at least 3 seconds until the wireless light starts
blinking. When the light blinks, you have two minutes to press the WPS button on the router.
2. Press the Wi-Fi Protected Setup (WPS) button on your router.
NOTE: The printer begins a timer for approximately two minutes while a wireless connection is established.
PIN method
1. Press the Wireless button on the printer control panel to display the Wireless menu. If the printer is
printing, in an error state, or performing a critical task, wait until the task has been completed or the
error cleared before pressing the Wireless button.
2. Select Settings from the printer display.
3. Select Wi-Fi Protected Setup from the printer display.
4. If prompted, select PIN, and then follow the on-screen instructions.
NOTE: The printer begins a timer for approximately four minutes during which the corresponding button on
the networking device needs to be pressed or the router PIN needs to be entered on the router’s
configuration page.
82 Chapter 9 Connectivity ENWW
Page 89

Traditional wireless connection (requires router)
To connect the HP Officejet 4630 series to an integrated wireless WLAN 802.11 network, you will need the
following:
●
A wireless 802.11b/g/n network that includes a wireless router or access point.
NOTE: The HP Officejet 4630 series only supports connections using 2.4GHz.
●
The computer must be connected to the wireless network that you intend to install the HP Officejet
4630 series on.
●
Network name (SSID).
●
WEP key or WPA Passphrase (if needed).
To connect the printer
1. Press the Wireless button from the printer control panel, and then select Settings.
2. Scroll to select Wireless Setup Wizard, and then press OK.
3. Follow the on-screen instructions to set up the wireless connection.
4. Insert the printer software CD in the computer CD-ROM drive.
5. Follow the on-screen instructions to install the printer software.
To connect a new printer
If you have not connected the printer to your computer, or you want to connect another new printer of the
same model to your computer, you can use the Connect a new printer function to set up the connection.
NOTE: Use this method if you have already installed the printer software.
1. Press the Wireless button from the printer control panel, and then select Settings.
2. Scroll to select Wireless Setup Wizard, and then press OK.
3. Follow the on-screen instructions to set up the wireless connection.
4. Depending on your operating system, do one of the following.
●
Windows 8: On the Start screen, right-click an empty area on the screen, click All Apps on the app
bar.
●
Windows 7, Windows Vista, and Windows XP: From the computer desktop, click Start, select All
Programs, click HP, and then click HP Officejet 4630 series.
5. Select Printer Setup & Software.
6. Select Connect a new printer. Follow the on-screen instructions.
ENWW Traditional wireless connection (requires router) 83
Page 90

Connect a new printer
1. In System Preferences, select Print & Fax.
2. Click + below the printer list on the left.
3. Select the new printer from the list.
To change network settings
To change the printer wireless settings, run the Wireless Setup Wizard.
To change more advanced settings,
NOTE: Only the person who manages your network can change the advanced settings.
1. Press the Wireless button from the printer control panel, and then select Settings.
2. Scroll to select Advanced Settings.
3. Select the item to be changed from the Advanced Settings menu.
4. Follow the on-screen instructions.
84 Chapter 9 Connectivity ENWW
Page 91

USB connection (non-network connection)
The HP Officejet 4630 series supports a rear USB 2.0 High Speed port for connection to a computer.
NOTE: Web services will not be available with a USB direct connection.
To connect the printer with the USB cable
1. Insert the printer software CD in the computer CD-ROM drive.
NOTE: Do not connect the USB cable to the printer until you are prompted to do so.
2. Follow the on-screen instructions. When you are prompted, connect the printer to the computer by
selecting USB on the Connection Options screen.
3. Follow the on-screen instructions.
If the printer software has been installed, the printer will operate as a plug-and-play printer. If the software
has not been installed, insert the CD that came with the printer and follow the on-screen instructions.
ENWW USB connection (non-network connection) 85
Page 92

Change from a USB connection to a wireless network
If you first setup your printer and installed the software with a USB cable, directly connecting the printer to
your computer, you can easily change to a wireless network connection. You will need a wireless 802.11b/g/n
network that includes a wireless router or access point.
NOTE: The HP Officejet 4630 series only supports connections using 2.4GHz.
Before changing from a USB connection to a wireless network, make sure that:
●
The printer is connected to your computer with the USB cable until you are prompted to disconnect the
cable.
●
The computer is connected to the wireless network that you intend to install the printer on.
To change from a USB connection to a wireless network
1. Depending on your operating system, do one of the following.
●
Windows 8: On the Start screen, right-click an empty area on the screen, click All Apps on the app
bar.
●
Windows 7, Windows Vista, and Windows XP: From the computer desktop, click Start, select All
Programs, click HP, and then click HP Officejet 4630 series.
2. Select Printer Setup & Software.
3. Select Convert a USB connected printer to wireless. Follow the on-screen instructions.
To change from a USB connection to a wireless network
1. Connect the printer to your wireless network.
2. Use HP Setup Assistant in Applications/Hewlett-Packard/Device Utilities to change the software
connection to wireless for this printer.
86 Chapter 9 Connectivity ENWW
Page 93

Connect wirelessly to the printer without a router
HP wireless direct allows your Wi-Fi devices such as computers, smart phones, and tablets, to connect to
your printer directly through Wi-Fi, using the process you currently use to connect your Wi-Fi device to new
wireless networks and hotspots. With wireless direct, you can print directly to the printer wirelessly, without
a wireless router, from your Wi-Fi enabled devices.
To connect wirelessly to the printer without a router
1. From the Home screen on the printer display, select Wireless Direct, and then press OK.
2. In the Wireless Direct menu, select Wireless Direct, and then press OK.
3. Using the buttons to the right, select On without Security, and then press OK.
TIP: If you would like to use HP wireless direct with greater security and if the computer or mobile
device supports WPA2 encryption, select the option that will enable security. With security enabled,
only users with the password can connect wirelessly to the printer. Without enabling security, anyone
with a wireless device within the wireless range of the printer can connect to the printer.
4. Press the button next to Display Name to display the wireless direct name.
5. If you have enabled security, press the button next to Display Password to display the wireless direct
password.
TIP: You can also turn on HP wireless direct from the embedded web server (EWS). For more
information about using the EWS, see
To open the embedded Web server on page 89.
6. After connecting to wireless direct, you need to install the printer software if you use a desktop
computer or laptop. If you use a mobile device, you need to install a compatible app on your mobile
device. You can start to use the printer over wireless direct if you have already installed the printer over
a network.
For more information about printing wirelessly, see
Print with HP wireless direct on page 17.
ENWW Connect wirelessly to the printer without a router 87
Page 94

Tips for setting up and using a networked printer
Use the following tips to set up and use a networked printer:
●
When the Wireless Setup Wizard on the printer is launched, the printer searches for wireless routers,
and then lists the detected network names on the printer display.
●
If your computer is connected to a Virtual Private Network (VPN), you need to disconnect from the VPN
before you can access any other device on your network, including the printer.
●
Learn how to find your network security settings.
●
Learn about the HP Print and Scan Doctor.
●
Learn about the network troubleshooting tips.
●
Learn how to change from a USB to wireless connection.
●
Learn how to work with your firewall and antivirus programs during printer setup.
online for more information.
Click here to go online for more information.
Click here to go online for more information.
Click here to go online for more information.
Click here to go online for more information.
Click here to go
88 Chapter 9 Connectivity ENWW
Page 95

Advanced printer management tools (for networked printers)
When the printer is connected to a network, you can use the embedded Web server to view status
information, change settings, and manage the printer from your computer.
NOTE: To view or change some settings, you might need a password.
You can open and use the embedded Web server without being connected to the Internet. However, some
features are not available.
●
To open the embedded Web server
●
About cookies
To open the embedded Web server
You can access the embedded Web server through either the network or Wireless Direct.
Open the embedded Web server through network
NOTE: The printer must be on a network and must have an IP address. The IP address for the printer can be
found by pressing the Wireless button or by printing a network configuration page.
●
In a supported Web browser on your computer, type the IP address or hostname that has been assigned
to the printer.
For example, if the IP address is 192.168.0.12, type the following address into a Web browser: http://
192.168.0.12.
To open the embedded Web server through Wireless Direct
1. Press the Wireless button from the printer control panel, and then select Settings.
2. If the display shows that wireless direct is Off, select Wireless Direct and then select On with Security
or On without Security.
3. From your wireless computer, turn wireless on, search for and connect to the wireless direct name, for
example: HP-Print-XX-Deskjet 3510 series. If you have wireless direct security on, enter the wireless
direct password when prompted.
4. In a supported Web browser on your computer, type the following address: http://192.168.223.1.
About cookies
The embedded Web server (EWS) places very small text files (cookies) on your hard drive when you are
browsing. These files let the EWS recognize your computer the next time you visit. For example, if you have
configured the EWS language, a cookie helps remember which language you have selected so that the next
time you access the EWS, the pages are displayed in that language. Some cookies (such as the cookie that
stores customer-specific preferences) are stored on the computer until you clear them manually.
You can configure your browser to accept all cookies, or you can configure it to alert you every time a cookie
is offered, which allows you to decide which cookies to accept or refuse. You can also use your browser to
remove unwanted cookies.
NOTE: Depending on your printer, if you disable cookies, you also disable one or more of the following
features:
ENWW Advanced printer management tools (for networked printers) 89
Page 96

●
Starting where you left the application (especially useful when using setup wizards)
●
Remembering the EWS browser language setting
●
Personalizing the EWS Home page
For information about how to change your privacy and cookie settings and how to view or delete cookies, see
the documentation available with your Web browser.
90 Chapter 9 Connectivity ENWW
Page 97

10 Solve a problem
This section contains the following topics:
●
Clear a paper jam
●
Improve print quality
●
Unable to print
●
Resolve copy and scan issues
●
Resolve fax issues
●
Resolve networking issues
●
HP support
ENWW 91
Page 98
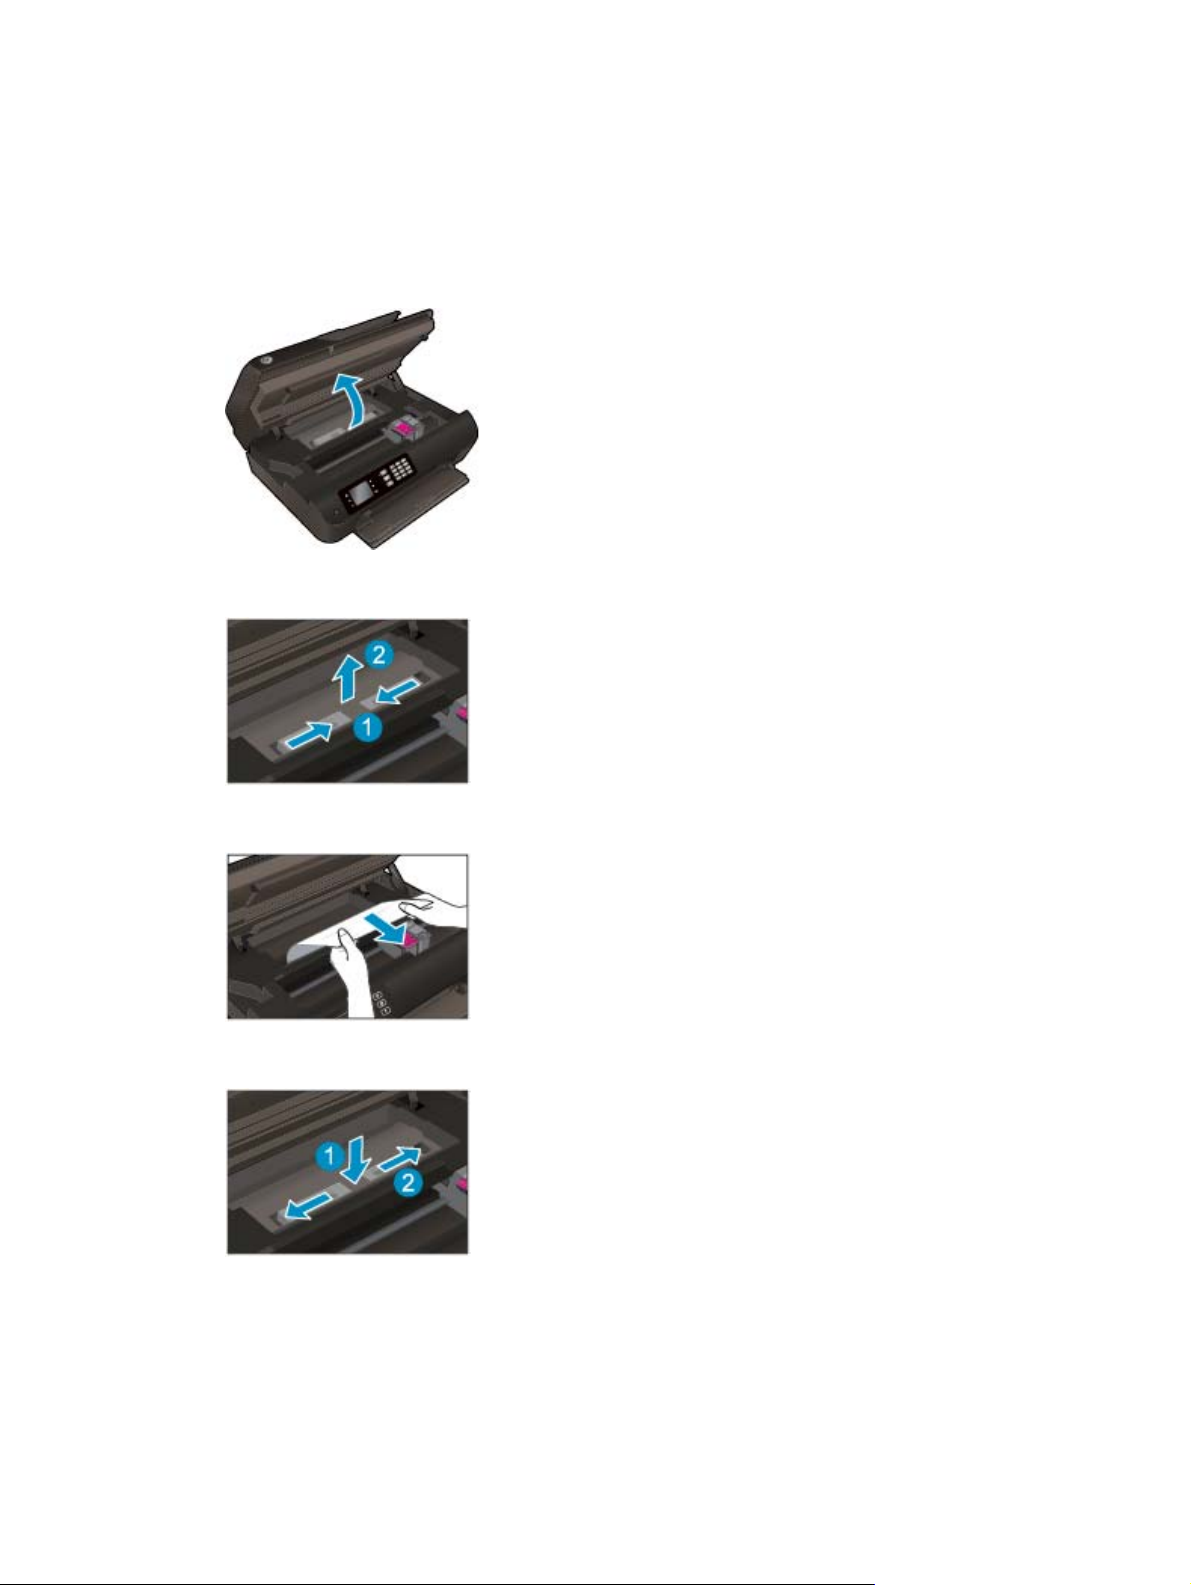
Clear a paper jam
Clear a paper jam from the paper path.
To clear a paper jam from paper path
1. Open the cartridge access door.
2. Remove the cleanout.
3. Remove the jammed paper from the rear roller.
4. Place the cleanout back.
92 Chapter 10 Solve a problem ENWW
Page 99
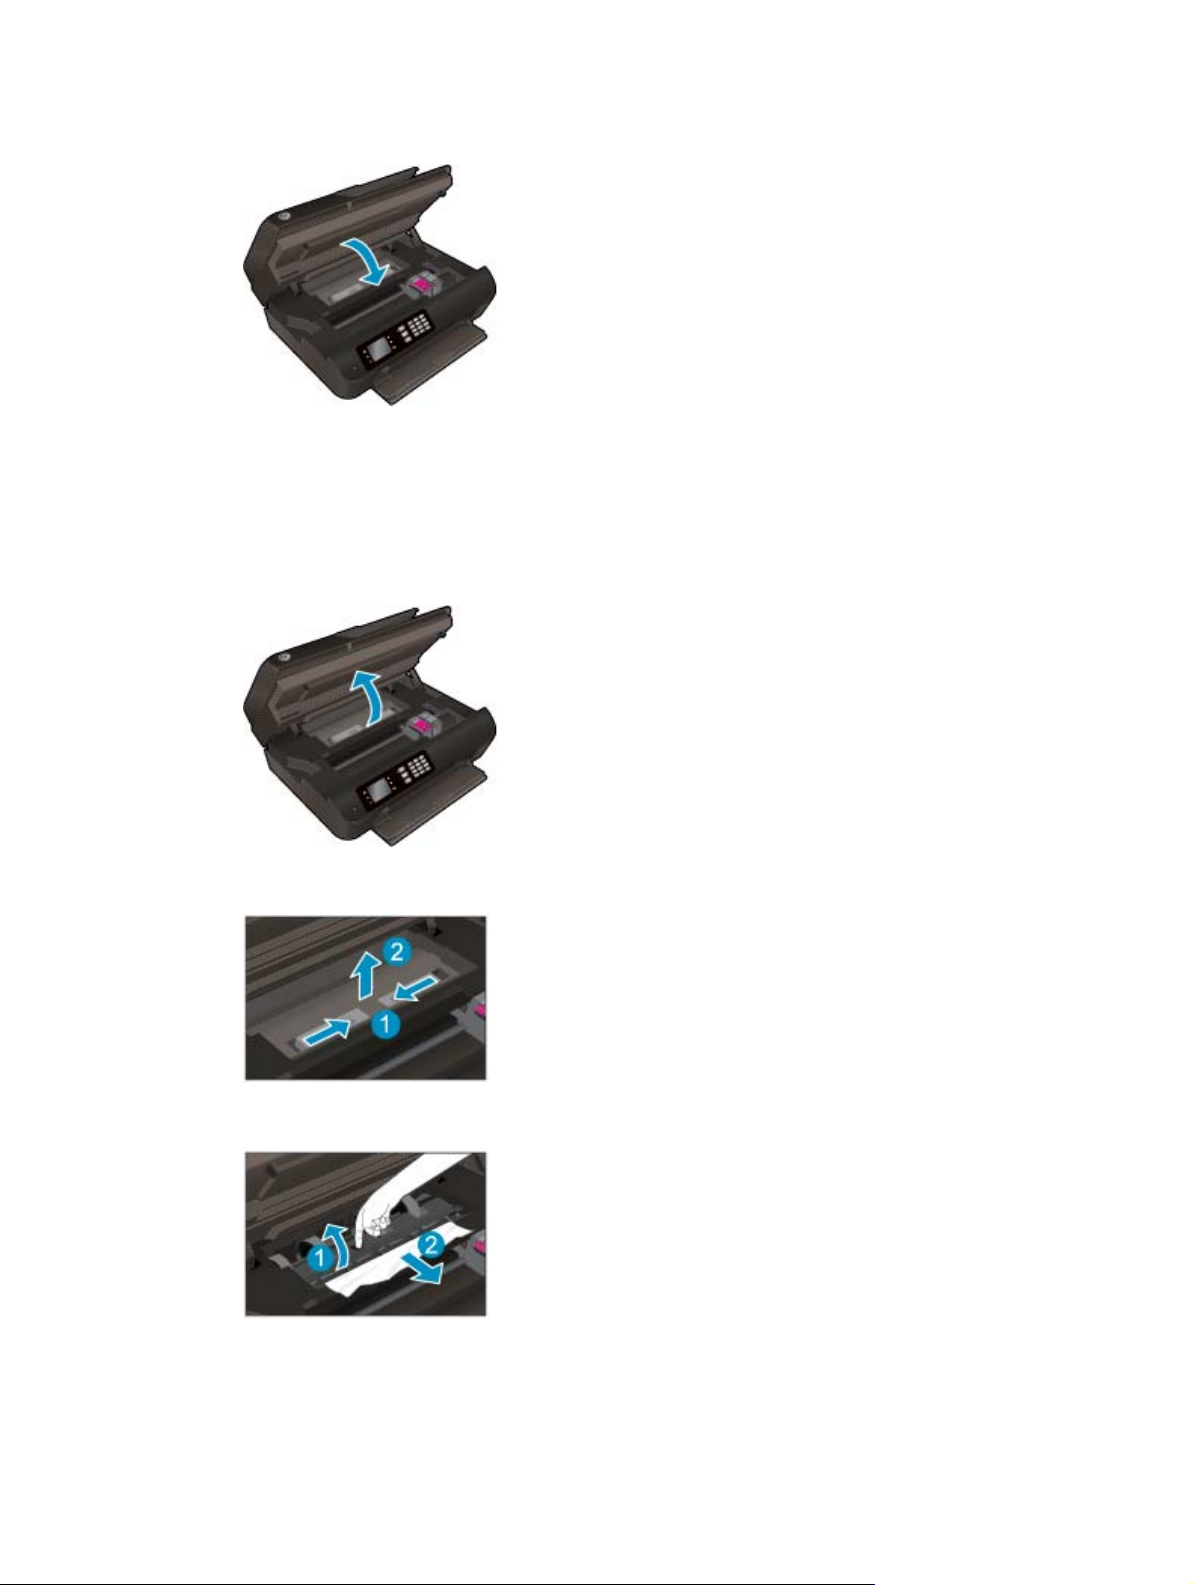
5. Close the cartridge access door.
6. Press the OK button on the control panel to continue the current job.
Clear a paper jam from the duplexer.
To clear a paper jam from duplexer
1. Open the cartridge access door.
2. Remove the cleanout.
3. Press on the hole of the duplexer path cover to lift it up. Remove the jammed paper.
ENWW Clear a paper jam 93
Page 100

4. Place the cleanout back.
5. Close the cartridge access door.
6. Press the OK button on the control panel to continue the current job.
Clear a paper jam from the print zone.
To clear a paper jam from print zone
1. Open the cartridge access door.
2. Remove the jammed paper from inside the printer.
94 Chapter 10 Solve a problem ENWW
 Loading...