

Page 1
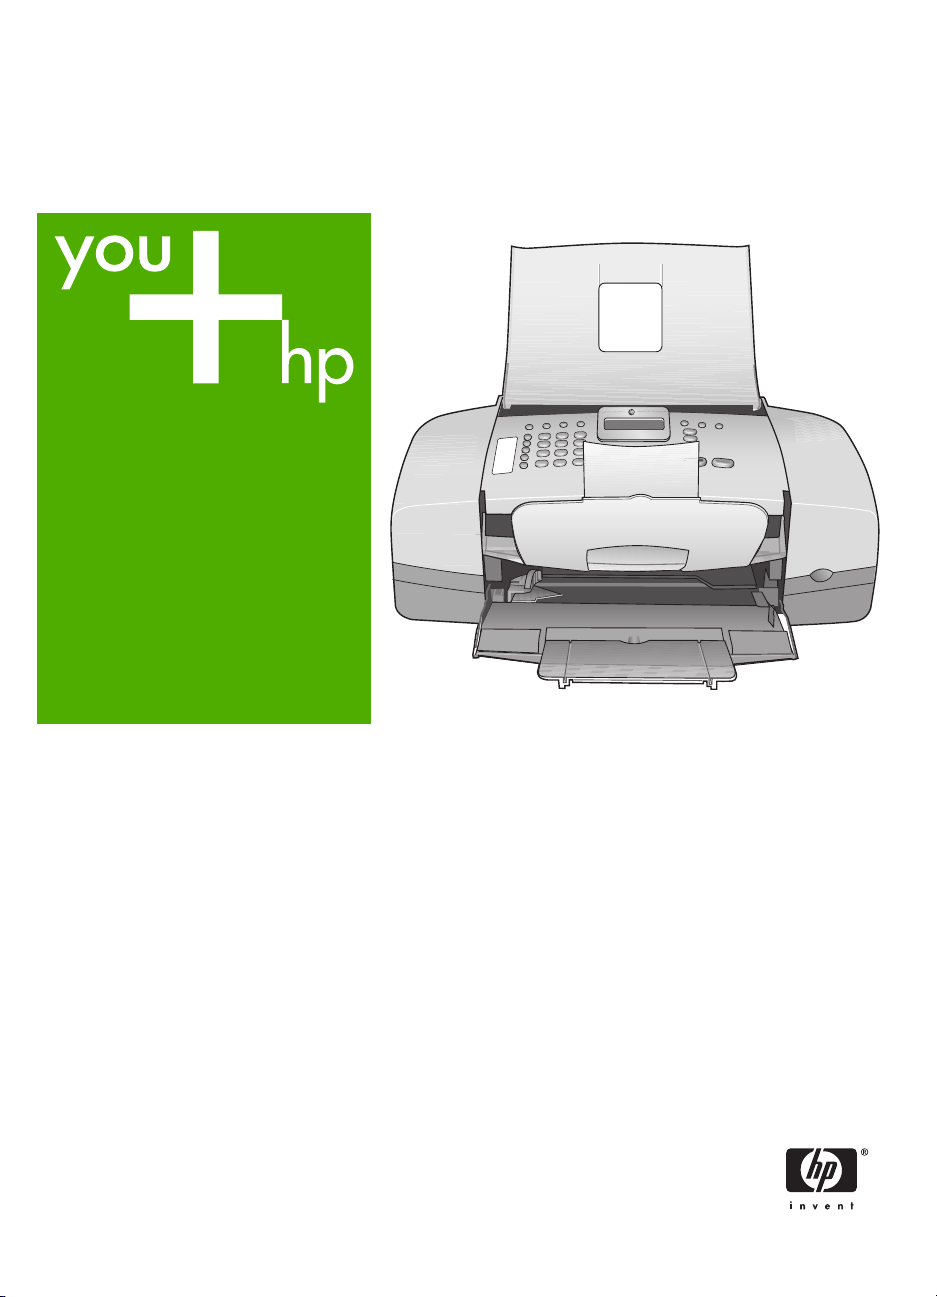
HP Officejet 4300 All-in-One series
User Guide
Page 2

HP Officejet 4300 All-in-One series
User Guide
Page 3

© Copyright 2006 Hewlett-Packard
Development Company, L.P.
The information contained herein is
subject to change without notice.
Reproduction, adaptation or
translation without prior written
permission is prohibited, except as
allowed under copyright laws.
Adobe and the Acrobat logo are either
registered trademarks or trademarks
of Adobe Systems Incorporated in the
United States and/or other countries.
Windows®, Windows NT®, Windows
ME®, Windows XP®, and Windows
2000® are U.S. registered
trademarks of Microsoft Corporation.
Intel® and Pentium® are registered
trademarks of Intel Corporation.
Energy Star® and Energy Star logo®
are US registered marks of the United
States Environmental Protection
Agency.
Publication number: Q8081-90101
February 2006
Notice
The only warranties for HP products
and services are set forth in the
express warranty statements
accompanying such products and
services. Nothing herein should be
construed as constituting an
additional warranty. HP shall not be
liable for technical or editorial errors
or omissions contained herein.
The Hewlett-Packard Company shall
not be liable for incidental or
consequential damages in connection
with, or arising out of the furnishing,
performance, or use of this document
and the program material which it
describes.
Note: Regulatory information can be
found in Technical information.
It is not lawful in many places to make
copies of the following items. When in
doubt, check with a legal
representative first.
● Governmental paper or
documents:
– Passports
– Immigration papers
– Selective service papers
– Identification badges,
cards, or insignias
● Governmental stamps:
– Postage stamps
– Food stamps
● Checks or drafts drawn on
Governmental agencies
● Paper currency, traveler’s
checks, or money orders
● Certificates of deposit
● Copyrighted works
Safety information
Warning To prevent fire or
shock hazard, do not expose
this product to rain or any
type of moisture.
Always follow basic safety
precautions when using this product
to reduce risk of injury from fire or
electric shock.
Warning Potential shock
hazard
1. Read and understand all
instructions in the Setup Guide.
2. Use only a grounded electrical
outlet when connecting the
device to a power source. If you
do not know whether the outlet
is grounded, check with a
qualified electrician.
3. Observe all warnings and
instructions marked on the
product.
4. Unplug this product from wall
outlets before cleaning.
5. Do not install or use this product
near water or when you are wet.
6. Install the product securely on a
stable surface.
7. Install the product in a protected
location where no one can step
on or trip over the power cord,
and where the power cord will
not be damaged.
8. If you have problems during
setup, see Troubleshooting in
the last section of the Setup
Guide, or see Troubleshooting
information in this User Guide.
9. No operator-serviceable parts
inside. Refer servicing to
qualified service personnel.
10. Use in a well-ventilated area.
11. Use only with the power adapter
supplied by HP.
Warning 1 This equipment
will be inoperable when
main power fails.
Warning 2 The handset
ear cap used with this
product may attract
dangerous objects like pins,
staples, or needles. Take
care to avoid harm that
might occur from the
retention of dangerous
objects on the ear piece of
the handset.
Page 4

Contents
1 HP All-in-One overview........................................................................................3
The HP All-in-One at a glance................................................................................3
Control panel features............................................................................................4
Menu overview.......................................................................................................6
Text and symbols...................................................................................................7
Use the software.....................................................................................................9
2 Find more information........................................................................................ 11
Sources of information..........................................................................................11
Use the onscreen Help.........................................................................................12
3 Finish setting up the HP All-in-One................................................................... 19
Set your preferences............................................................................................19
Connection information.........................................................................................20
Fax setup..............................................................................................................22
4 Load originals and load paper...........................................................................45
Load originals.......................................................................................................45
Choose papers for printing and copying...............................................................46
Load paper...........................................................................................................47
Avoid paper jams..................................................................................................52
5 Print from your computer..................................................................................53
Print from a software application..........................................................................53
Change the print settings......................................................................................54
Stop a print job.....................................................................................................54
6 Use the fax features...........................................................................................57
Send a fax............................................................................................................57
Receive a fax........................................................................................................60
Print reports..........................................................................................................65
Stop faxing............................................................................................................66
7 Use the copy features........................................................................................67
Make a copy.........................................................................................................67
Change the copy settings.....................................................................................67
Stop copying.........................................................................................................68
8 Use the scan features......................................................................................... 69
Scan an image......................................................................................................69
Stop scanning.......................................................................................................70
9 Maintain the HP All-in-One.................................................................................71
Clean the HP All-in-One.......................................................................................71
Print a self-test report...........................................................................................74
Work with print cartridges.....................................................................................74
10 Order supplies....................................................................................................81
Order paper, or other media.................................................................................81
Order print cartridges............................................................................................81
Order other supplies.............................................................................................82
11 Troubleshooting information.............................................................................83
View the Readme file............................................................................................83
Setup troubleshooting...........................................................................................84
User Guide
1
Page 5

Operational troubleshooting................................................................................105
12 HP warranty and support.................................................................................109
Warranty.............................................................................................................109
Get support and other information from the Internet...........................................111
Before you call HP customer support.................................................................111
Access your serial number and service ID..........................................................111
Call in North America during warranty................................................................112
Call elsewhere in the world.................................................................................112
HP Quick Exchange Service (Japan).................................................................. 114
Call HP Korea customer support........................................................................114
Prepare the HP All-in-One for shipment.............................................................114
Pack the HP All-in-One.......................................................................................116
13 Technical information......................................................................................117
System requirements..........................................................................................117
Paper specifications...........................................................................................117
Print specifications..............................................................................................118
Copy specifications.............................................................................................118
Fax specifications...............................................................................................119
Scan specifications.............................................................................................119
Physical specifications........................................................................................119
Power specifications...........................................................................................120
Environmental specifications..............................................................................120
Memory specifications........................................................................................120
Environmental product stewardship program.....................................................120
Regulatory notices..............................................................................................121
Declaration of conformity (European Economic Area)........................................125
HP Officejet 4300 All-in-One series declaration of conformity............................126
Index.........................................................................................................................127
2
HP Officejet 4300 All-in-One series
Page 6
1
HP All-in-One overview
You can access many HP All-in-One functions directly, without turning on your
computer. You can quickly and easily accomplish tasks such as making a copy or
sending a fax from the HP All-in-One.
This section describes the HP All-in-One hardware features and control panel
functions.
● The HP All-in-One at a glance
● Control panel features
● Menu overview
● Text and symbols
● Use the software
The HP All-in-One at a glance
Overview
User Guide
Label Description
1 Document feeder tray
2 Control panel display (also referred to as
the display)
3 Paper guides
4 Control panel
5 Print cartridge door
6 Input tray
7 Tray extender
8 Paper-width guide
3
Page 7
Chapter 1
(continued)
Label Description
9 Document catcher
10 Document catcher extender
Overview
11 Handset (handset model only)
12 Power connection
13 Rear USB port
14 1-LINE (fax) and 2-EXT (phone) ports
15 Rear door
16 Rear door access tab
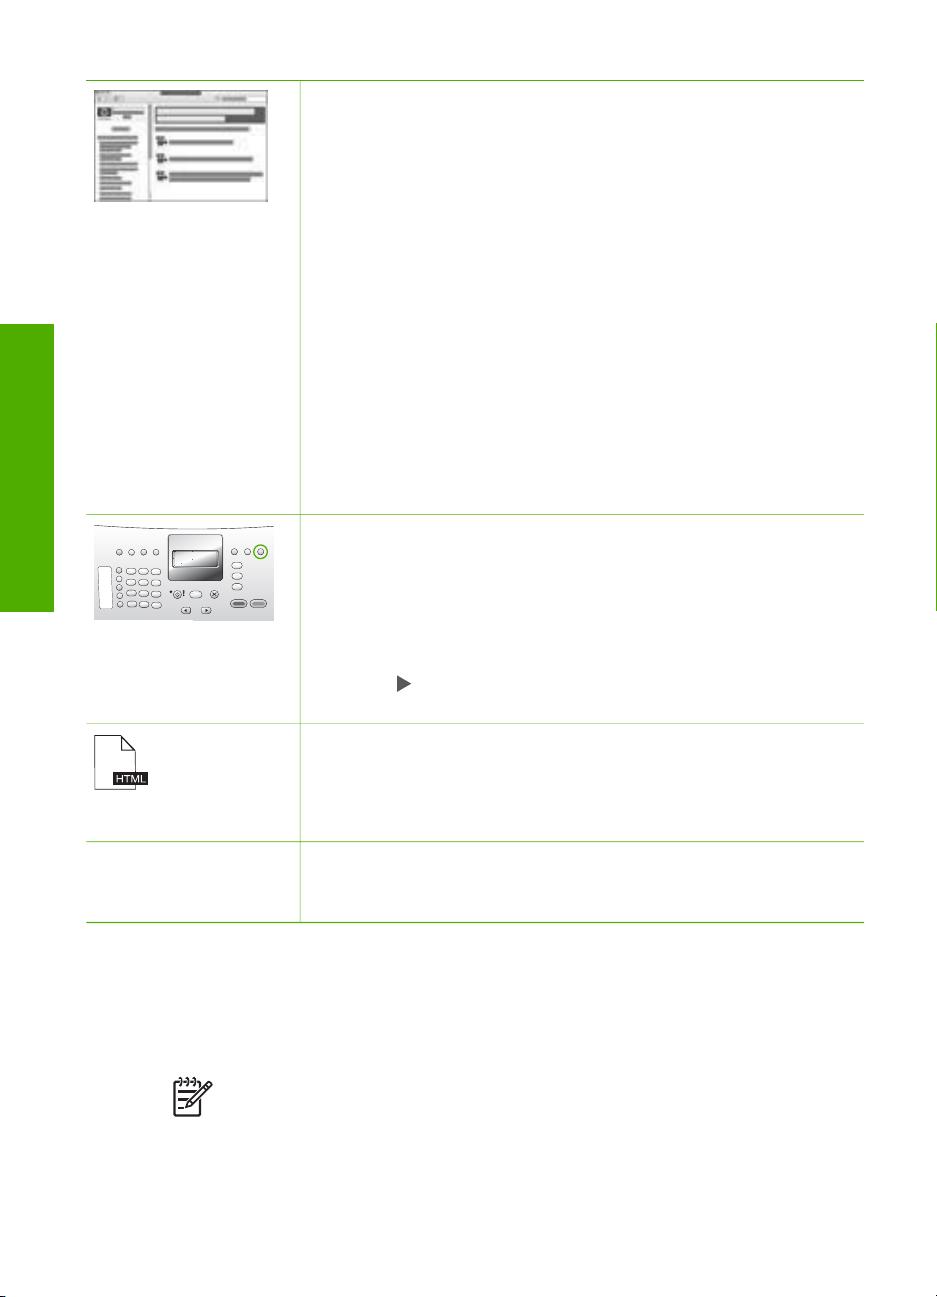
Control panel features
The following diagram and related table provide a quick reference to the HP All-inOne control panel features.
Label Name and Description
1
2 Redial/Pause: Redials the most recently dialed number or inserts a 3-second
3
4
4
Speed Dial: Selects a speed dial number.
pause in a fax number.
Lighter / Darker: Lightens or darkens black-and-white faxes being sent.
Fax Resolution: Adjusts the resolution for black-and-white faxes being sent.
HP Officejet 4300 All-in-One series
Page 8

(continued)
Label Name and Description
5 On light: Indicates, when lighted, that the HP All-in-One is on. The light blinks
when the HP All-in-One is performing a task.
6 Attention light: When blinking, the attention light indicates an error has occurred
that requires your attention.
7 Display: View menus and messages.
8 Answer Mode: Switches among the Answer Mode settings. Depending on the
setting, the HP All-in-One automatically answers incoming phone calls, requires
you to receive the fax manually, or "listens" for fax tones.
9 Flash: Cancels a fax and brings up a dial tone. Also, used to answer a call waiting
(handset model only).
10 Setup: Presents the Setup Menu for generating reports, changing fax and other
maintenance settings, and accessing the Help menu. Press
to scroll through
the Help topics available, and then press OK to select a topic. The Help topic you
select opens on your computer screen.
11 Fax: Places the HP All-in-One in fax mode and presents the Fax Menu. Press Fax
repeatedly to scroll through the options in the Fax Menu.
12 Scan: Places the HP All-in-One in scan mode and presents the Scan To menu for
selecting a scan destination.
13 Copy: Places the HP All-in-One in copy mode and presents the Copy Menu.
Press Copy repeatedly to scroll through the options in the Copy Menu.
14
Start Black: Starts a black-and-white copy, scan, or fax job.
Start Color: Starts a color copy, scan, or fax job.
Overview
15
16
17
18
Cancel: Stops a job, exits a menu, or exits settings.
Right arrow: Increases values on the display.
OK: Selects a menu or a setting on the display.
Left arrow: Decrease values on the display.
19 On: Turns the HP All-in-One on or off. The On light next to the On button is lit
when the HP All-in-One is on. The light blinks while performing a job.
When the HP All-in-One is off, a minimal amount of power is still supplied to the
device. To completely disconnect the power supply to the HP All-in-One, turn the
device off, and then unplug the power cord.
20
Keypad: Enter fax numbers, values, or text.
21 One-touch speed dial buttons: Accesses the first ten speed dial numbers. Press a
speed dial button once to select the speed dial number presented in the left
column. Press the same speed dial button a second time to select the speed dial
number in the right column.
User Guide
5
Page 9

Chapter 1
Menu overview
Overview
Copy Menu
The following topics provide a quick reference to top-level menus that appear on the
HP All-in-One display.
● Copy Menu
● Fax Menu
● Scan To menu
● Setup Menu
● Help Menu
The following options are available when you press the Copy button on the control
panel.
Number of Copies
Reduce / Enlarge
Copy Quality
Copy Paper Size
Paper Type
Lighter / Darker
Enhancements
Set New Defaults
Fax Menu
The following options are available when you press the Fax button on the control panel.
Enter Number
Resolution
Lighter / Darker
How to Fax
Set New Defaults
Scan To menu
When you press the Scan button, a list of software applications installed on your
computer appears in the menu.
HP Photosmart
Microsoft PowerPoint
Adobe Photoshop
HP Photosmart Share
6
HP Officejet 4300 All-in-One series
Page 10

Choose the application you want to use to open and edit your scanned image. The
options vary depending on the software applications installed on your computer, and
might include one or more of the applications in the following example.
Setup Menu
The following options are available when you press the Setup button on the control
panel.
1. Help
2. Print Report
3. Speed Dial Setup
4. Basic Fax Setup
5. Advanced Fax Setup
6. Tools
7. Preferences
Help Menu
The Help menu provides quick access to key help topics and is available in the Setup
Menu when you press the Setup button. The following options are available. After you
select a topic, the topic appears on your computer screen.
1. How Do I
2. Error Messages
3. Print Cartridges
4. Load Originals and Load
Paper
5. General Troubleshooting
6. Fax Troubleshooting
7. Use Fax Features
8. Use Scan Features
9. Get Support
0. Product Overview
Overview
Text and symbols
You can use the control panel keypad to enter text and symbols when you set up
speed dial entries and the fax header information.
You can also enter symbols from the keypad when you dial a fax or phone number.
When the HP All-in-One dials the number, it will interpret the symbol and respond
accordingly. For example, if you enter a dash in the fax number, the HP All-in-One will
pause before dialing the remainder of the number. A pause is useful if you need to
access an outside line before dialing the fax number.
User Guide
7
Page 11

Chapter 1
● Enter text using the keypad on the control panel
● Available symbols for dialing fax numbers
Enter text using the keypad on the control panel
Overview
You can enter text or symbols by using the keypad on the control panel.
To enter text
1. Press the keypad numbers that correspond to the letters of a name. For example,
the letters a, b, and c correspond to the number 2, as shown on the button below.
Tip Press a button multiple times to see the available characters.
Depending on your language and country/region setting, other characters
might be available in addition to the ones shown on the keypad.
2. After the correct letter appears, wait for the cursor to advance automatically to the
right, or press
. Press the number that corresponds to the next letter in the
name. Press the button multiple times until the correct letter appears. The first
letter of a word is automatically set to uppercase.
To enter a space, pause, or symbol
➔
To insert a space, press Space.
To enter a pause, press Redial/Pause. A dash appears in the number sequence.
To enter a symbol, such as @, press the Symbols button repeatedly to scroll
through the list of available symbols: asterisk (*), dash (-), ampersand (&), period
(.), slash (/), parentheses ( ), apostrophe ('), equals (=), number sign (#), at (@),
underscore (_), plus (+), exclamation (!), semicolon (;), question (?), comma (,),
colon (:), percent (%), and approximation (~).
To erase a letter, number, or symbol
➔
If you make a mistake, press
to clear it, and then make the correct entry.
After you are done entering text, press OK to store your entry.
Available symbols for dialing fax numbers
To enter a symbol, such as *, press Symbols repeatedly to scroll through the list of
symbols. The following table provides the symbols that you can use in a fax or phone
number sequence, fax header information, and speed dial entries.
Available
symbols
* Displays an asterisk symbol when
8
Description Available when entering
required for dialing.
Fax header name, speed dial
names, speed dial numbers,
fax or phone numbers, and
monitor dial entries
HP Officejet 4300 All-in-One series
Page 12

(continued)
Available
symbols
- When auto-dialing, the HP All-in-
Description Available when entering
One enters a pause in the number
sequence.
Fax header name, fax header
Overview
number, speed dial names,
speed dial numbers, and fax or
phone numbers
( ) Displays a left or right parenthesis
W When auto-dialing, W causes the
R During auto-dialing, the R functions
+ Displays a plus symbol. This
Use the software
You can use the HP Photosmart Software (Windows) or HP Photosmart Mac Software
(Mac) to access many features not available from the control panel.
The software is installed on your computer when you set up the HP All-in-One. For
further information, see the Setup Guide that came with your device.
Note Windows users: If you selected the minimum installation of the
HP Photosmart Software, the HP Photosmart Essential software is installed
rather than the full application, HP Photosmart Premier. HP Photosmart
Essential is recommended for computers with limited memory resources.
HP Photosmart Essential includes a basic set of photo editing features instead
of the standard set that is included on the full installation of HP Photosmart
Premier.
Any mention of the software in this guide and in the onscreen Help refers to
both versions of HP Photosmart Software unless otherwise noted.
to separate numbers, such as area
codes, for easier reading. These
symbols do not affect dialing.
HP All-in-One to wait for a dial tone
before continuing to dial.
the same as a Flash button on your
telephone.
symbol does not affect dialing.
Fax header name, fax header
number, speed dial names,
speed dial numbers, and fax or
phone numbers
Speed dial numbers and fax or
phone numbers
Speed dial numbers and fax or
phone numbers
Fax header name, fax header
number, speed dial names,
speed dial numbers, and fax or
phone numbers
User Guide
Access to the software differs by operating system (OS). For example, if you have a
Windows computer, the HP Photosmart Software entry point is the HP Solution
Center. If you have a Mac, the HP Photosmart Mac Software entry point is the
HP Photosmart Studio window. Regardless, the entry point serves as the launching
pad for the software and services.
9
Page 13

Chapter 1
Overview
To open the HP Photosmart Software on a Windows computer
1. Do one of the following:
– On the Windows desktop, double-click the HP Solution Center icon.
– In the system tray at the far right of the Windows taskbar, double-click the
HP Digital Imaging Monitor icon.
– On the taskbar, click Start, point to Programs or All Programs, select HP,
and then click HP Solution Center.
2. If you have more than one HP device installed, select the HP All-in-One tab.
Note On a Windows computer, the features available in the HP Solution
Center vary depending on the devices you have installed. The HP Solution
Center is customized to display icons associated with the selected device. If
the selected device is not equipped with a particular feature, then the icon for
that feature does not display in the HP Solution Center.
Tip If the HP Solution Center on your computer does not contain any icons,
an error might have occurred during the software installation. To correct this,
use the Control Panel in Windows to completely uninstall the HP Photosmart
Software; then reinstall the software. For more information, see the onscreen
Help that came with the HP All-in-One.
To open the HP Photosmart Mac Software on a Mac
1. Click the HP Photosmart Studio icon in the Dock.
The HP Photosmart Studio window appears, where you can manage, edit, and
share photos.
10
Note On a Mac, the features available in the HP Photosmart Mac
software vary depending on the chosen device.
2. In the HP Photosmart Studio task bar, click Devices.
The HP Device Manager window appears.
3. In the Select Device area, click the icon for the HP All-in-One.
From here, you can scan, make copies, and perform maintenance procedures
such as checking the ink levels for the print cartridges.
HP Officejet 4300 All-in-One series
Page 14
2
Find more information
You can access a variety of resources, both printed and onscreen, that provide
information about setting up and using the HP All-in-One.
Sources of information
Setup Guide
The Setup Guide provides instructions for setting up your HP All-inOne and installing software. Make sure you follow the steps in the
Setup Guide in order.
Note To take full advantage of the features on the HP All-in-One,
you might need to perform additional setup or set additional
preferences, described in the User Guide you are reading. For
more information, see Finish setting up the HP All-in-One.
If you have problems during setup, see Troubleshooting in the last
section of the Setup Guide, or see Troubleshooting information in
this User Guide.
User Guide
HP Photosmart
2600 series printer
User Guide
This User Guide contains information on how to use your HP All-inOne, including troubleshooting tips and step-by-step instructions. It
also provides additional setup instructions to supplement those in
the Setup Guide.
Find more information
User Guide
HP Photosmart Software Tour (Windows)
The HP Photosmart Software Tour is a fun, interactive way to get a
brief overview of the software included with your HP All-in-One.
You'll learn how the software you installed with your HP All-in-One
can help you edit, organize, and print your photos.
Onscreen Help
The onscreen Help provides detailed instructions on features of
your HP All-in-One that are not described in this User Guide,
including features that are only available using the software you
installed with your HP All-in-One.
HP Photosmart Software Help (Windows)
● The Get the most out of your help topic provides information
about using the onscreen Help to find instructions for using the
HP Photosmart Software or the HP All-in-One. The topic also
11
Page 15
Chapter 2
(continued)
provides information on how to view animated videos of
common tasks you can perform with your software and device.
● The Get step-by-step instructions topic provides information
on using the HP Photosmart Software with the HP All-in-One.
● The Explore what you can do topic provides more information
about the practical and creative things you can do with the
HP Photosmart Software and the HP All-in-One.
● If you need further assistance or want to check for HP software
updates, see the Troubleshooting and support topic.
HP Photosmart Mac Help (Mac)
● The How Do I? topic provides access to animated videos that
show you how to perform common tasks.
● The Get Started topic provides information about importing,
modifying, and sharing your images.
● The Use Help topic provides information about finding
information in the onscreen Help.
For more information, see Use the onscreen Help.
Find more information
www.hp.com/support If you have Internet access, you can get help and support from the
Use the onscreen Help
This User Guide describes a sampling of the features available, so you can get
started using the HP All-in-One. Explore the onscreen Help that came with your
device for information on all the features that the HP All-in-One supports.
Note The onscreen Help also provides troubleshooting topics to assist you in
resolving any issues you might encounter with the HP All-in-One.
Onscreen help from your device
Onscreen help is available from your device and contains additional
information on select topics.
To access onscreen help from the control panel
1. Press the Setup button.
2.
Press
press OK. The help topic opens on your computer screen.
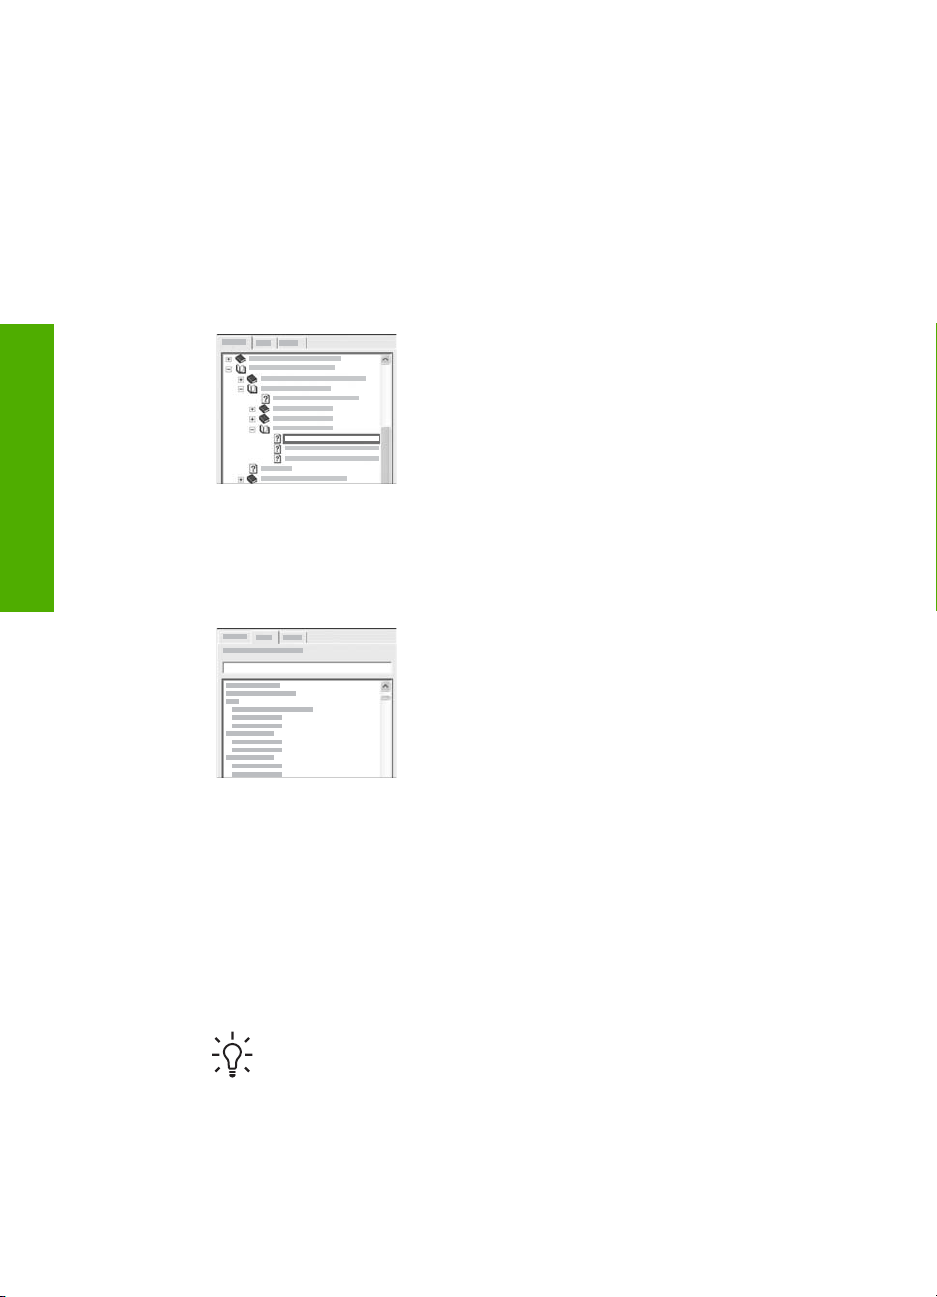
Readme
The Readme file contains the most recent information which might
not be found in other publications.
Install the software to access the Readme file.
HP website. This website offers technical support, drivers, supplies,
and ordering information.
until the appropriate help topic appears, and then
12
HP Officejet 4300 All-in-One series
Page 16

The way you access and use the onscreen Help varies slightly depending on whether
you are viewing the Help on a Windows computer or a Mac. Guidelines for using both
Help systems are included in the following sections.
Use the Help on a Windows computer
This section explains how to access the onscreen Help on a Windows computer. It
tells you how to use the navigation, search, and index features in the Help system to
find the specific information you need.
To access the HP Photosmart Software Help on a Windows computer
1. In the HP Solution Center, click the tab for the HP All-in-One.
2. In the Device Support area, click Onscreen Guide or Troubleshooting.
– If you click Onscreen Guide, a pop-up menu appears. You can choose to
open the welcome page for the entire Help system or to go specifically to the
Help for the HP All-in-One.
– If you click Troubleshooting, the Troubleshooting and support page
opens.
The following diagram highlights features for finding your way around the Help.
Find more information
User Guide
1 Contents, Index, and Search tabs
2 Display area
3 Help toolbar
Contents, Index, and Search tabs
The Contents, Index, and Search tabs enable you to find any topic in the
HP Photosmart Software Help.
● Contents
13
Page 17
Chapter 2
The Contents tab provides a top-down view of the topics in the Help, similar to
the table of contents in a book. This is a useful way to find all the information
provided about a single feature, such as printing photos.
– For information on tasks and features available from the control panel of the
HP All-in-One, open the 4300 series Help book near the bottom of the list.
– For troubleshooting information about the HP All-in-One, open the
Troubleshooting and support book, and then open the 4300 series
Troubleshooting book.
– The other books listed on the Contents tab provide information on using the
HP Photosmart Software to complete tasks on the HP All-in-One.
Sections that contain subtopics are indicated in
the list by a book icon. To view a list of the
subtopics within a book, click the + sign next to
the book icon. (The + sign changes to a - sign
when the section is already expanded.) To view
the information in a topic, click the book name or
topic name on the Contents tab. The selected
topic appears in the display area on the right.
Find more information
● Index
The Index tab provides an alphabetical list of index entries relevant to the topics
in the HP Photosmart Software Help.
You can use the scroll bar on the right side of
the list to view the different entries, or you can
begin typing keywords in the text box above the
list. As you type, the list of index entries
automatically advances to the entries that begin
with the letters you type.
When you see an index entry that relates to the information you are trying to find,
double-click the index entry.
– If there is only one topic in the Help associated with that index entry, that
topic appears in the display area on the right.
– If there are many applicable topics, the Topics Found dialog box appears.
Double-click any topic listed in the dialog box to view it in the display area.
● Search
The Search tab enables you to search the entire Help system for specific words,
such as "borderless print".
Tip If any of the words you are entering are fairly common (such as
"print", in the "borderless print" example), you might want to place
quotation marks around the combination of words for which you are
searching. This limits your search so that the results are more relevant to
the information you need. Instead of returning all topics that contain either
the word "borderless" or the word "print", the search will only return topics
that contain the phrase "borderless print".
14
HP Officejet 4300 All-in-One series
Page 18

After entering your search criteria, click List
Topics to view all the Help topics that contain
the words or phrases you entered. The results
are listed in a three-column table. Each row
contains the topic Title, the Location in the Help
where the topic is contained, and the Rank,
assigned based on its relevance to your search
criteria.
By default, the results are sorted by Rank, so that the topic containing the most
instances of your search criteria is at the top of the list. You can also sort the
results by the topic's Title or Location, by clicking the table heading for that
column. To view the contents of a topic, double-click that row in the results table.
The selected topic appears in the display area on the right.
Display area
The display area on the right side of the Help window displays the Help topic you
select from one of the tabs on the left. Help topics include descriptive text, step-bystep instructions, and illustrations, if applicable.
● Topics often include links to other topics in the Help system where you can find
additional information. Sometimes a link automatically opens the new topic in the
display area. At other times, there might be more than one applicable topic. When
this is the case, the Topics Found dialog box appears. Double-click any topic
listed in the dialog box to view it in the display area.
● Some topics include detailed instructions or additional information that is not
immediately visible on the page. Look for the words Show All or Hide All at the
top right side of the page. If these words are visible, it means there is additional
information hidden on the page. The hidden information is indicated by dark blue
text with an arrow. You can view the hidden information by clicking the dark blue
text.
● Some topics include animated videos that show you how to use a particular
feature. These animations are identified by a video camera icon, followed by the
words "Show me how". When you click the "Show me how" link text, the
animation runs in a new window.
Find more information
User Guide
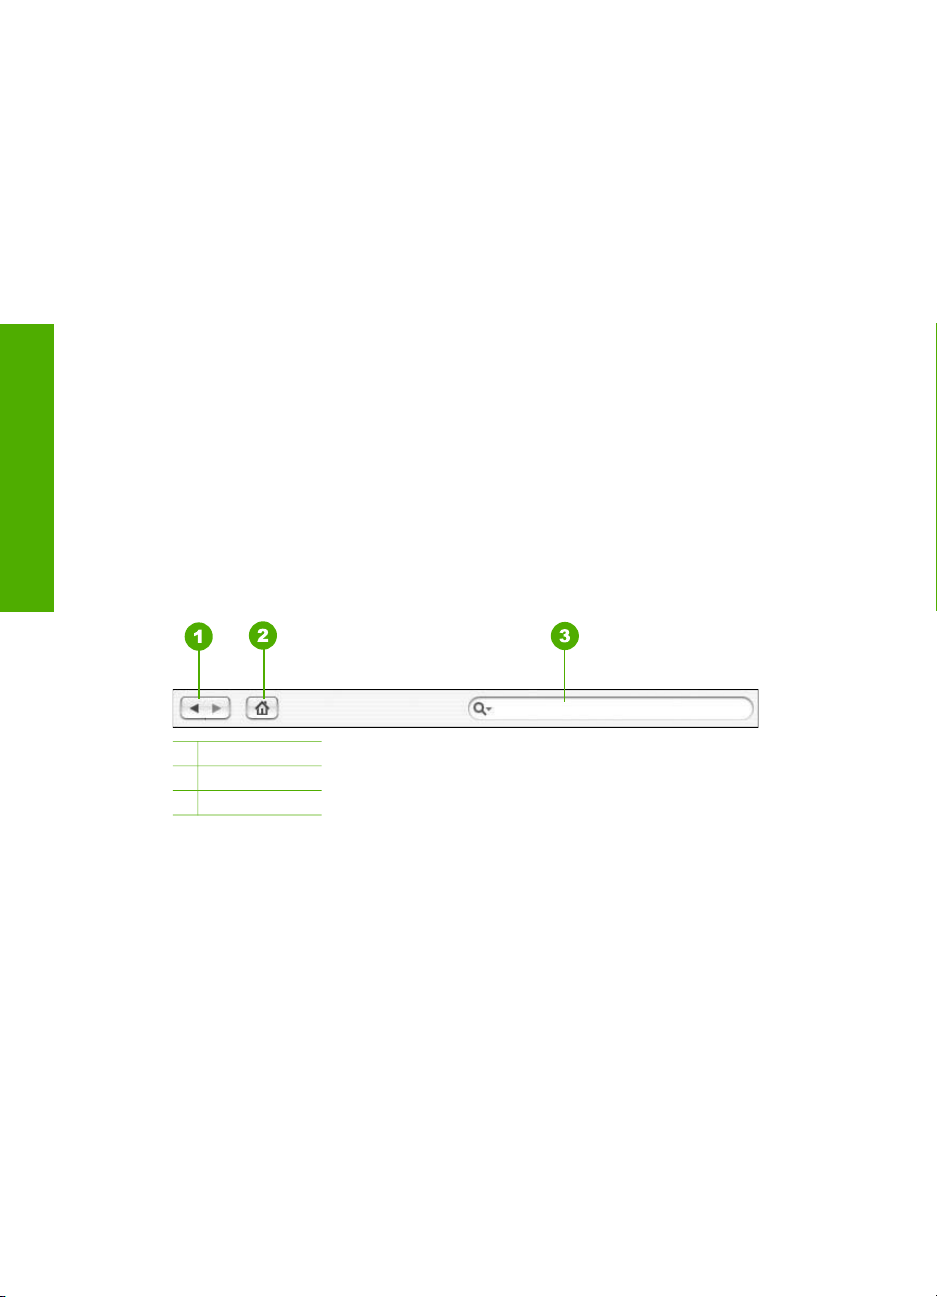
Help toolbar
The Help toolbar, shown below, contains buttons that enable you to move around the
topics in the Help. You can move backwards and forwards through topics that you
have already viewed, or you can click the Home button to return to the main page in
the HP Photosmart Software Help.
15
Page 19

Chapter 2
Find more information
1 Show/Hide
2 Back
3 Forward
4 Home
5 Print
6 Options
The Help toolbar also contains buttons for changing the way the onscreen Help
appears on your computer screen. For example, if you need more room to view the
help topics in the display area on the right, you can hide the Contents, Index, and
Search tabs by clicking the Hide button.
Finally, the Print button enables you to print the page that is currently displayed on
the computer screen. If the Contents tab is visible on the left when you click Print,
the Print Topics dialog box appears. You can choose to print just the topic you are
currently viewing in the display area, or you can print the current topic plus any
subtopics associated with it. This feature is not available if the Index or Search tab is
visible on the right side of the Help window.
Use the Help on a Mac
This section explains how to access the onscreen Help on a Mac. It tells you how to
navigate and search the Help system to find the specific information you need.
To access the HP Photosmart Mac Help
➔
On the Help menu in the HP Photosmart Studio, choose HP Photosmart Mac
Help.
The HP Photosmart Mac Help appears. The following diagram highlights
features for finding your way around the Help.
16
HP Officejet 4300 All-in-One series
Page 20
1 Contents pane
2 Display area
3 Help toolbar
Contents pane
The HP Photosmart Mac Help opens in the Help Viewer. It is divided into two panes.
When you first open the Help, the left pane contains a list of the sections in the Help
related to your HP All-in-One and software.
● For information on tasks and features available from the control panel of the
HP All-in-One, double-click the 4300 series Help section.
● For troubleshooting information about the HP All-in-One, double-click the 4300
series Troubleshooting section.
● The other sections listed on the Contents pane provide information on using the
HP Photosmart Mac Software to complete tasks.
After you select a section of the Help to view, the Contents pane changes to show a
top-down view of the topics in that section, similar to the table of contents in a book.
This is a useful way to find all the information provided about a single feature, such as
printing photos.
Display area
The display area in the right pane displays the Help topic you select from the
Contents pane. Help topics include descriptive text, step-by-step instructions, and
illustrations, if applicable.
● Many topics in the HP Photosmart Mac Help include information about how to
use a feature from the control panel on the HP All-in-One as well as from the
HP Photosmart Mac Software. Use the scroll bars to the right of the display area
Find more information
User Guide
17
Page 21
Chapter 2
Find more information
to view all the content in a particular topic. Sometimes important information is
not visible in the window without scrolling.
● Topics often include links or references to other topics in the Help system where
you can find additional information.
– If the related topic appears in the same section of the Help, the topic
automatically opens in the display area.
– If the related topic appears in a different section of the Help, the current topic
provides a reference telling you which section you need to open. To view
other sections in the Help, click Main Menu from the Contents pane on the
left, and then click the appropriate section. You can then locate the related
topic by using the list of topics that appears on the Contents pane, or you
can search for the topic, as described in the next section.
● Some topics include animated videos that show you how to use a particular
feature. These animations are identified by a video camera icon, followed by the
words "Show me how". When you click the video camera icon, the animation runs
in a new window.
Help toolbar
The Help toolbar, shown below, contains buttons that enable you to move around the
topics in the Help. You can move backwards or forwards through topics that you have
already viewed, or you can click the Home button to access other sections of the HP
Photosmart Mac Help.
18
1 Back / Forward
2 Home
3 Search area
The Help toolbar also contains a text box that enables you to search the entire Help
system for specific words, such as "borderless print".
After entering your search criteria, press R
ETURN on your keyboard to view a list of all
the topics that contain the words or phrases you entered. The results are listed in a
multi-column table. Each row contains the title of the Topic and the Relevance
(assigned based on its relevance to your search criteria). If you are using OS 10.2.8
or 10.3.x, the search results also include the Location in the Help where the topic is
contained.
By default, the results are sorted by Relevance, so that the topic that best matches
your search criteria is at the top of the list. You can also sort the results by the Topic
or Location (OS 10.2.8 or 10.3.x) by clicking the table heading for that column. To
view the contents of a topic, double-click that row in the results table. The selected
topic appears.
HP Officejet 4300 All-in-One series
Page 22

3
Finish setting up the HP All-inOne
After you have completed the steps in your Setup Guide, refer to this section to help
you finish setting up the HP All-in-One. This section contains important setup-related
information for your device, including information on setting preferences.
● Set your preferences
● Connection information
● Fax setup
Set your preferences
You can change the settings on the HP All-in-One so that it behaves according to your
preference. For example, you can set general device preferences, such as the
language used to display messages and the date and time on the display. You can
also restore the device settings to what they were when you purchased your device.
This will erase any new defaults you have set.
● Set your language and country/region
● Set the date and time
● Adjust the volume
Set your language and country/region
The language and country/region setting determines which language the HP All-inOne uses to show messages on the display. Usually, you set the language and
country/region when you first set up the HP All-in-One. However, you can change the
setting at any time by using the following procedure.
Finish setup
To set your language and country/region
1. Press Setup.
2. Press 7, and then press 1.
This selects Preferences and then selects Set Language & Country/Region.
3.
Press
use appears, press OK.
4. When prompted, press 1 for Yes or 2 for No.
5.
Press
you want to select appears, press OK.
6. When prompted, press 1 for Yes or 2 for No.
Set the date and time
You can set the date and time from the control panel. The date and time format is
based on the language and country/region setting. When you send a fax, the current
date and time are transmitted, along with your name and fax number, as part of the
fax header.
User Guide
or to scroll through the languages. When the language you want to
to scroll through the countries/regions. When the country/region
or
19
Page 23

Chapter 3
Note In some countries/regions, the date and time stamp on the fax header is
a legal requirement.
If the HP All-in-One loses power for more than 72 hours, you might need to reset the
date and time.
To set the date and time
1. Press Setup.
2. Press 6, and then press 3.
This selects Tools and then selects Date and Time.
3. Enter the month, day, and year by pressing the appropriate numbers on the
keypad. Depending on your country/region setting, you might enter the date in a
different order.
4. Enter the hours and minutes.
5. If your time is displayed in the 12-hour format, press 1 for AM, or 2 for PM.
The new date and time settings appear on the display.
Adjust the volume
The HP All-in-One provides three levels for adjusting the Ring and Beep Volume and
the Phone Line Monitor Volume.
The ring volume is the volume of the phone rings. The beep volume is the level of
button press and error beeps. The default Ring and Beep Volume setting is Soft.
The Phone Line Monitor Volume is the volume of dial tones and fax tones. The
default Phone Line Monitor Volume is Medium.
To adjust the Ring and Beep Volume from the control panel
1. Press Setup.
2. Press 4, and then press 4 again.
This selects Basic Fax Setup and then selects Ring and Beep Volume.
3.
Finish setup
Press
4. Press OK.
To adjust the Phone Line Monitor Volume from the control panel
1. Press Setup.
2. Press 4, and then press 5.
This selects Basic Fax Setup and then selects Phone Line Monitor Volume.
3.
Press
4. Press OK.
to select one of the options: Soft, Loud, or Off.
to select one of the options: Medium, High, or Low.
Connection information
The HP All-in-One comes equipped with a USB port so you can connect directly to a
computer using a USB cable. You can also share your printer over an existing
Ethernet network using a computer as a print server.
● Supported connection types
● Connect using a USB cable
20
HP Officejet 4300 All-in-One series
Page 24

● Use printer sharing
Supported connection types
Description Recommended
number of
connected
computers for best
performance
USB connection One computer
connected with a
USB cable to the rear
USB 1.1 full speed
peripheral connection
port on the HP All-inOne.
Printer sharing Five.
The host computer
must be on at all
times in order to print
from the other
computers.
Connect using a USB cable
Refer to the Setup Guide that came with the HP All-in-One for detailed instructions on
using a USB cable to connect a computer to the rear USB port.
Use printer sharing
If your computer is on a network, and another computer on the network has an HP Allin-One connected to it by a USB cable, you can print to that printer using printer
sharing.
The computer directly connected to the HP All-in-One acts as the host for the printer
and has full software functionality. The other computer, which is referred to as a
client, has access only to the print features. You must perform other functions from
the host computer or from the control panel on the HP All-in-One.
Supported software
features
All features are
supported.
All features resident
on the host computer
are supported. Only
printing is supported
from the other
computers.
Setup instructions
Follow the Setup
Guide for detailed
instructions.
Follow the
instructions in Use
printer sharing.
Finish setup
User Guide
To enable printer sharing on a Windows computer
➔
Refer to the user guide that came with your computer or see the Windows
onscreen Help.
To enable printer sharing on a Mac
1. On both the client and host computers, do the following:
a. Click System Preferences in the Dock, or, from the Apple menu, choose
System Preferences.
The System Preferences dialog appears.
21
Page 25

Chapter 3
2. On the host computer, do the following:
Fax setup
After completing all the steps in the Setup Guide, use the instructions in this section to
complete your fax setup. Please keep your Setup Guide for later use.
In this section, you will learn how to set up the HP All-in-One so that faxing works
successfully with equipment and services you might already have on the same phone
line as the HP All-in-One.
● Set up the HP All-in-One for faxing
● Change settings on the HP All-in-One to receive faxes
● Test your fax setup
● Set the fax header
b. In the Internet & Network area, click Sharing.
c. From the Services tab, click Printer Sharing.
a. Click System Preferences in the Dock, or, from the Apple menu, choose
System Preferences.
The System Preferences dialog appears.
b. In the Hardware area, click Print & Fax.
c. Do one of the following, depending on your OS:
• (OS 10.2.8 or 10.3.x) From the Printing tab, click the check box to
Share my printers with other computers.
• (OS 10.4.x) Click Sharing, click the check box to Share this printer
with other computers, and then select the printer to share.
Set up the HP All-in-One for faxing
Before you begin setting up the HP All-in-One for faxing, determine which kind of
phone system your country/region uses. The instructions for setting up the HP All-inOne for faxing differ depending on whether you have a serial- or parallel-type phone
Finish setup
22
system.
● If you do not see your country/region listed in the table below, you probably have
a serial-type phone system. In a serial-type phone system, the connector type on
your shared telephone equipment (modems, phones, and answering machines)
does not allow a physical connection to the "2-EXT" port on the HP All-in-One.
Instead, all equipment must be connected at the telephone wall jack.
Note In some countries/regions that use serial-type phone systems, the
phone cord that came with the HP All-in-One might have an additional wall
plug attached to it. This enables you to connect other telecom devices to
the wall jack where you plug in the HP All-in-One.
● If your country/region is listed in the table below, you probably have a paralleltype telephone system. In a parallel-type phone system, you are able to connect
shared telephone equipment to the phone line by using the "2-EXT" port on the
back of the HP All-in-One.
HP Officejet 4300 All-in-One series
Page 26

Note If you have a parallel-type phone system, HP recommends you use
the 2-wire phone cord supplied with the HP All-in-One to connect the
HP All-in-One to the telephone wall jack.
Countries/regions with a parallel-type phone system
Argentina
Australia Brazil
Canada Chile China
Colombia Greece India
Indonesia Ireland Japan
Korea Latin America Malaysia
Mexico Philippines Poland
Portugal Russia Saudi Arabia
Singapore Spain Taiwan
Thailand USA Venezuela
Vietnam
If you are unsure which kind of telephone system you have (serial or parallel), check
with your telephone company.
User Guide
Choose the correct fax setup for your home or office
To fax successfully, you need to know what types of equipment and services (if any)
share the same phone line with the HP All-in-One. This is important because you
might need to connect some of your existing office equipment directly to the HP All-inOne, and you might also need to change some fax settings before you can fax
successfully.
To determine the best way to set up the HP All-in-One in your home or office, first
read through the questions in this section and record your answers. Next, refer to the
table in the following section and choose the recommended setup case based on your
answers.
Make sure to read and answer the following questions in the order they are presented.
1. Do you have a digital subscriber line (DSL) service through your telephone
company? (DSL might be called ADSL in your country/region.)
❑
Yes, I have DSL.
❑
No.
If you answered Yes, proceed directly to Case B: Set up the HP All-in-One with
DSL. You do not need to continue answering questions.
If you answered No, please continue answering questions.
2. Do you have a private branch exchange (PBX) phone system or an integrated
services digital network (ISDN) system?
Finish setup
23
Page 27

Finish setup
Chapter 3
If you answered Yes, proceed directly to Case C: Set up the HP All-in-One with a
PBX phone system or an ISDN line. You do not need to continue answering
questions.
If you answered No, please continue answering questions.
3. Do you subscribe to a distinctive ring service through your telephone company
that provides multiple phone numbers with different ring patterns?
❑
Yes, I have distinctive ring.
❑
No.
If you answered Yes, proceed directly to Case D: Fax with a distinctive ring
service on the same line. You do not need to continue answering questions.
If you answered No, please continue answering questions.
Are you unsure if you have distinctive ring? Many phone companies offer a
distinctive ring feature that allows you to have several phone numbers on one
phone line.
When you subscribe to this service, each phone number will have a different ring
pattern. For example, you can have single, double, and triple rings for the
different numbers. You might assign one phone number with a single ring to your
voice calls, and another phone number with double rings to your fax calls. This
allows you to tell the difference between voice and fax calls when the phone rings.
4. Do you receive voice calls at the same phone number you will use for fax calls on
the HP All-in-One?
❑
Yes, I receive voice calls.
❑
No.
Please continue answering questions.
5. Do you have a computer dial-up modem on the same phone line as the HP All-inOne?
❑
Yes, I have a computer dial-up modem.
❑
No.
Are you unsure if you use a computer dial-up modem? If you answer Yes to any
of the following questions, you are using a computer dial-up modem:
– Do you send and receive faxes directly to and from your computer software
applications through a dial-up connection?
– Do you send and receive e-mail messages on your computer through a dial-
up connection?
– Do you access the Internet from your computer through a dial-up connection?
Please continue answering questions.
6. Do you have an answering machine that answers voice calls at the same phone
number you will use for fax calls on the HP All-in-One?
❑
Yes, I have an answering machine.
❑
No.
Please continue answering questions.
7. Do you subscribe to a voice mail service through your telephone company at the
same phone number you will use for fax calls on the HP All-in-One?
❑
Yes, I have a voice mail service.
❑
No.
After you have completed answering the questions, proceed to the next section to
select your fax setup case.
24
HP Officejet 4300 All-in-One series
Page 28

Select your fax setup case
Now that you have answered all the questions about the equipment and services that
share the phone line with the HP All-in-One, you are ready to choose the best setup
case for your home or office.
From the first column in the following table, choose the combination of equipment and
services applicable to your home or office setting. Then look up the appropriate setup
case in the second or third column based on your phone system. Step-by-step
instructions are included for each case in the sections that follow.
If you have answered all the questions in the previous section and have none of the
described equipment or services, choose "None" from the first column in the table.
Note If your home or office setup is not described in this section, set up the
HP All-in-One as you would a regular analog phone. Make sure you use the
phone cord supplied in the box to connect one end to your telephone wall jack
and the other end to the port labeled 1-LINE on the back of the HP All-in-One.
If you use another phone cord, you might experience problems sending and
receiving faxes.
Other equipment/
services sharing your
fax line
None
(You answered No to all
questions.)
DSL service
(You answered Yes to
question 1 only.)
PBX or ISDN system
(You answered Yes to
question 2 only.)
Distinctive ring service
(You answered Yes to
question 3 only.)
Voice calls
(You answered Yes to
question 4 only.)
Voice calls and voice mail
service
(You answered Yes to
questions 4 and 7 only.)
Recommended fax
setup for parallel-type
phone systems
Case A: Separate fax line
(no voice calls received)
Case B: Set up the HP Allin-One with DSL
Case C: Set up the HP Allin-One with a PBX phone
system or an ISDN line
Case D: Fax with a
distinctive ring service on
the same line
Case E: Shared voice/fax
line
Case F: Shared voice/fax
line with voice mail
Recommended fax
setup for serial-type
phone systems
Case A: Separate fax line
(no voice calls received)
Case B: Set up the HP Allin-One with DSL
Case C: Set up the
HP All-in-One with a PBX
phone system or an ISDN
line
Case D: Fax with a
distinctive ring service on
the same line
Case E: Shared voice/fax
line
Case F: Shared voice/fax
line with voice mail
Finish setup
User Guide
Computer dial-up modem Case G: Fax line shared
with computer dial-up
Not applicable.
25
Page 29

Chapter 3
(continued)
Other equipment/
services sharing your
fax line
Recommended fax
setup for parallel-type
phone systems
Recommended fax
setup for serial-type
phone systems
(You answered Yes to
question 5 only.)
Voice calls and computer
dial-up modem
(You answered Yes to
modem (no voice calls
received)
Case H: Shared voice/fax
line with computer dial-up
modem
Not applicable.
questions 4 and 5 only.)
Voice calls and answering
machine
(You answered Yes to
Case I: Shared voice/fax
line with answering
machine
Not applicable.
questions 4 and 6 only.)
Voice calls, computer dialup modem, and
answering machine
(You answered Yes to
Case J: Shared voice/fax
line with computer dial-up
modem and answering
machine
Not applicable.
questions 4, 5, and 6 only.)
Voice calls, computer dialup modem, and voice mail
service
Case K: Shared voice/fax
line with computer dial-up
modem and voice mail
Not applicable.
(You answered Yes to
questions 4, 5, and 7 only.)
For additional fax setup information, in specific countries/regions, see the Fax
Configuration website listed below.
Finish setup
26
Austria
www.hp.com/at/faxconfig
Germany www.hp.com/de/faxconfig
Switzerland (French) www.hp.com/ch/fr/faxconfig
Switzerland (German) www.hp.com/ch/de/faxconfig
United Kingdom www.hp.com/uk/faxconfig
Case A: Separate fax line (no voice calls received)
If you have a separate phone line on which you receive no voice calls, and you have
no other equipment connected on this phone line, set up the HP All-in-One as
described in this section.
HP Officejet 4300 All-in-One series
Page 30
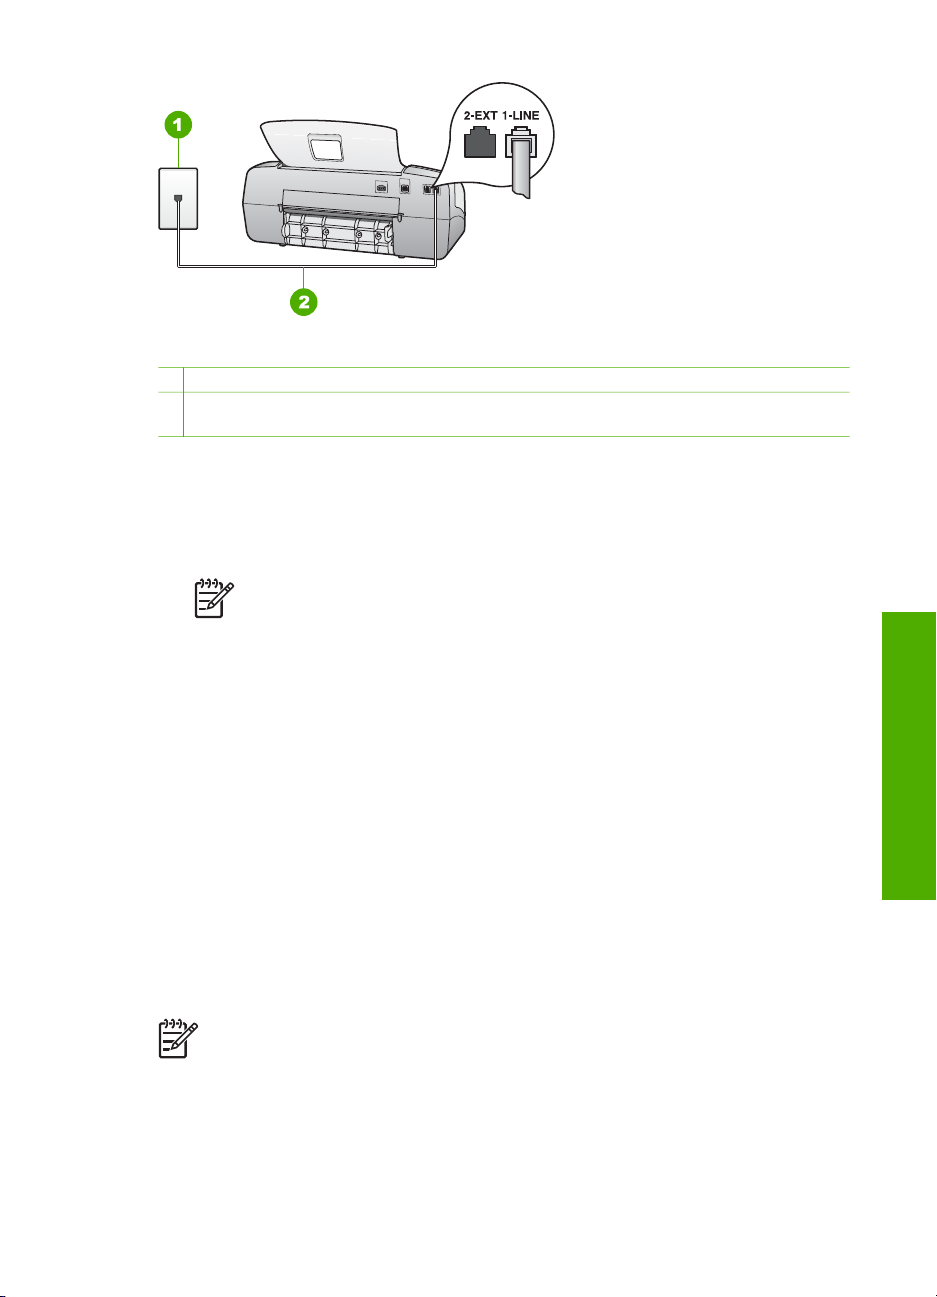
Back view of the HP All-in-One
1 Telephone wall jack
2 Use the phone cord supplied in the box with the HP All-in-One to connect to the "1-LINE"
port
To set up the HP All-in-One with a separate fax line
1. Using the phone cord supplied in the box with the HP All-in-One, connect one
end to your telephone wall jack, then connect the other end to the port labeled 1LINE on the back of the HP All-in-One.
Note If you do not use the supplied cord to connect from the telephone
wall jack to the HP All-in-One, you might not be able to fax successfully.
This special phone cord is different from the phone cords you might
already have in your home or office.
User Guide
2. Set the Answer Mode to Fax.
3. (Optional) Change the Rings to Answer setting to the lowest setting (two rings).
4. Run a fax test.
When the phone rings, the HP All-in-One will answer automatically after the number of
rings you set in the Rings to Answer setting. Then it will begin emitting fax reception
tones to the sending fax machine and receive the fax.
Case B: Set up the HP All-in-One with DSL
If you have a DSL service through your telephone company, use the instructions in
this section to connect a DSL filter between the telephone wall jack and the HP All-inOne. The DSL filter removes the digital signal that can interfere with the HP All-inOne, so the HP All-in-One can communicate properly with the phone line. (DSL might
be called ADSL in your country/region.)
Note If you have a DSL line and you do not connect the DSL filter, you will
not be able to send and receive faxes with the HP All-in-One.
Finish setup
27
Page 31

Chapter 3
Back view of the HP All-in-One
1 Telephone wall jack
2 DSL filter and cord supplied by your DSL provider
3 Use the phone cord supplied in the box with the HP All-in-One to connect to the "1-LINE"
port
To set up the HP All-in-One with DSL
1. Obtain a DSL filter from your DSL provider.
2. Using the phone cord supplied in the box with the HP All-in-One, connect one
end to your telephone wall jack, then connect the other end to the port labeled 1LINE on the back of the HP All-in-One.
Finish setup
Note If you do not use the supplied cord to connect from the telephone
wall jack to the HP All-in-One, you might not be able to fax successfully.
This special phone cord is different from the phone cords you might
already have in your home or office.
3. Connect the DSL filter cord to the telephone wall jack.
Note If you have other office equipment or services attached to this
phone line, such as a distinctive ring service, answering machine, or voice
mail, see the appropriate section in this section for additional setup
guidelines.
4. Run a fax test.
Case C: Set up the HP All-in-One with a PBX phone system or an ISDN line
If you are using either a PBX phone system or an ISDN converter/terminal adapter,
make sure you do the following:
● If you are using either a PBX or an ISDN converter/terminal adaptor, connect the
HP All-in-One to the port that is designated for fax and phone use. Also, make
sure that the terminal adapter is set to the correct switch type for your country/
region, if possible.
Note Some ISDN systems allow you to configure the ports for specific
phone equipment. For example, you might have assigned one port for
telephone and Group 3 fax and another port for multiple purposes. If you
28
HP Officejet 4300 All-in-One series
Page 32

have problems when connected to the fax/phone port of your ISDN
converter, try using the port designated for multiple purposes; it might be
labeled "multi-combi" or something similar.
● If you are using a PBX phone system, set the call waiting tone to "off".
Note Many digital PBX systems include a call-waiting tone that is set to
"on" by default. The call waiting tone will interfere with any fax
transmission, and you will not be able to send or receive faxes with the
HP All-in-One. Refer to the documentation that came with your PBX
phone system for instructions on how to turn off the call-waiting tone.
● If you are using a PBX phone system, dial the number for an outside line before
dialing the fax number.
● Make sure you use the supplied cord to connect from the telephone wall jack to
the HP All-in-One. If you do not, you might not be able to fax successfully. This
special phone cord is different from the phone cords you might already have in
your home or office. If the supplied phone cord is too short, you can purchase a
coupler from your local electronics store and extend it.
Case D: Fax with a distinctive ring service on the same line
If you subscribe to a distinctive ring service (through your telephone company) that
allows you to have multiple phone numbers on one phone line, each with a different
ring pattern, set up the HP All-in-One as described in this section.
User Guide
Finish setup
Back view of the HP All-in-One
1 Telephone wall jack
2 Use the phone cord supplied in the box with the HP All-in-One to connect to the "1-LINE"
port
To set up the HP All-in-One with a distinctive ring service
1. Using the phone cord supplied in the box with the HP All-in-One, connect one
end to your telephone wall jack, then connect the other end to the port labeled 1LINE on the back of the HP All-in-One.
Note If you do not use the supplied cord to connect from the telephone
wall jack to the HP All-in-One, you might not be able to fax successfully.
29
Page 33

Chapter 3
This special phone cord is different from the phone cords you might
already have in your home or office.
2. Set the Answer Mode to Fax.
3. Change the Distinctive Ring setting to match the pattern that the telephone
company assigned to your fax number.
Note By default, the HP All-in-One is set to answer all ring patterns. If
you do not set the Distinctive Ring to match the ring pattern assigned to
your fax number, the HP All-in-One might answer both voice calls and fax
calls or it might not answer at all.
4. (Optional) Change the Rings to Answer setting to the lowest setting (two rings).
5. Run a fax test.
The HP All-in-One will automatically answer incoming calls that have the ring pattern
you selected (Distinctive Ring setting) after the number of rings you selected (Rings
to Answer setting). Then it will begin emitting fax reception tones to the sending fax
machine and receive the fax.
Case E: Shared voice/fax line
If you receive both voice calls and fax calls at the same phone number, and you have
no other office equipment (or voice mail) on this phone line, set up the HP All-in-One
as described in this section.
Finish setup
30
Back view of the HP All-in-One
1 Telephone wall jack
2 Use the phone cord supplied in the box with the HP All-in-One to connect to the "1-LINE"
port
3 Telephone (optional)
To set up the HP All-in-One with a shared voice/fax line
1. Using the phone cord supplied in the box with the HP All-in-One, connect one
end to your telephone wall jack, then connect the other end to the port labeled 1LINE on the back of the HP All-in-One.
Note If you do not use the supplied cord to connect from the telephone
wall jack to the HP All-in-One, you might not be able to fax successfully.
HP Officejet 4300 All-in-One series
Page 34

This special phone cord is different from the phone cords you might
already have in your home or office.
2. Now you need to decide how you want the HP All-in-One to answer calls,
automatically or manually:
– If you set up the HP All-in-One to answer calls automatically, it answers all
incoming calls and receives faxes. The HP All-in-One will not be able to
distinguish between fax and voice calls in this case; if you suspect the call is
a voice call, you will need to answer it before the HP All-in-One answers the
call. To set up the HP All-in-One to answer calls automatically, set the
Answer Mode to Fax.
– If you set up the HP All-in-One to answer faxes manually, you must be
available to respond in person to incoming fax calls or the HP All-in-One
cannot receive faxes. To set up the HP All-in-One to answer calls manually,
set the Answer Mode to Tel.
3. Run a fax test.
4. Do one of the following, depending on your phone system:
– If you have a parallel-type phone system, remove the white plug from the
port labeled 2-EXT on the back of the HP All-in-One, and then connect a
phone to this port.
– If you have a serial-type phone system, you might plug your phone directly
on top of the HP All-in-One cable which has a wall plug attached to it.
If you pick up the phone before the HP All-in-One answers the call and hear fax tones
from a sending fax machine, you will need to answer the fax call manually.
Case F: Shared voice/fax line with voice mail
If you receive both voice calls and fax calls at the same phone number, and you also
subscribe to a voice mail service through your telephone company, set up the HP Allin-One as described in this section.
Finish setup
User Guide
Note You cannot receive faxes automatically if you have a voice mail service
at the same phone number you use for fax calls. You must receive faxes
manually; this means you must be available to respond in person to incoming
fax calls. If you want to receive faxes automatically instead, contact your
telephone company to subscribe to a distinctive ring service, or to obtain a
separate phone line for faxing.
31
Page 35

Chapter 3
Back view of the HP All-in-One
1 Telephone wall jack
2 Use the phone cord supplied in the box with the HP All-in-One to connect to the "1-LINE"
port
To set up the HP All-in-One with voice mail
1. Using the phone cord supplied in the box with the HP All-in-One, connect one
end to your telephone wall jack, then connect the other end to the port labeled 1LINE on the back of the HP All-in-One.
Note If you do not use the supplied cord to connect from the telephone
wall jack to the HP All-in-One, you might not be able to fax successfully.
This special phone cord is different from the phone cords you might
already have in your home or office.
Finish setup
32
2. Set the Answer Mode to Tel.
3. Run a fax test.
You must be available to respond in person to incoming fax calls, or the HP All-in-One
cannot receive faxes.
Case G: Fax line shared with computer dial-up modem (no voice calls received)
If you have a fax line on which you receive no voice calls, and you also have a
computer dial-up modem connected on this line, set up the HP All-in-One as
described in this section.
Since your computer dial-up modem shares the phone line with the HP All-in-One,
you will not be able to use both your modem and the HP All-in-One simultaneously.
For example, you cannot use the HP All-in-One for faxing if you are using your
computer dial-up modem to send an e-mail or access the Internet.
HP Officejet 4300 All-in-One series
Page 36

Back view of the HP All-in-One
1 Telephone wall jack
2 Use the phone cord supplied in the box with the HP All-in-One to connect to the "1-LINE"
port
3 Computer with modem
To set up the HP All-in-One with a computer dial-up modem
1. Remove the white plug from the port labeled 2-EXT on the back of the HP All-inOne.
2. Find the phone cord that connects from the back of your computer (your
computer dial-up modem) to a telephone wall jack. Disconnect the cord from the
telephone wall jack and plug it into the port labeled 2-EXT on the back of the
HP All-in-One.
3. Using the phone cord supplied in the box with the HP All-in-One, connect one
end to your telephone wall jack, then connect the other end to the port labeled 1LINE on the back of the HP All-in-One.
Note If you do not use the supplied cord to connect from the telephone
wall jack to the HP All-in-One, you might not be able to fax successfully.
This special phone cord is different from the phone cords you might
already have in your home or office.
4. If your modem software is set to receive faxes to your computer automatically,
turn off that setting.
Note If you do not turn off the automatic fax reception setting in your
modem software, the HP All-in-One will not be able to receive faxes.
Finish setup
User Guide
5. Set the Answer Mode to Fax.
6. (Optional) Change the Rings to Answer setting to the lowest setting (two rings).
7. Run a fax test.
When the phone rings, the HP All-in-One will answer automatically after the number of
rings you set in the Rings to Answer setting. Then it will begin emitting fax reception
tones to the sending fax machine and receive the fax.
33
Page 37

Chapter 3
Case H: Shared voice/fax line with computer dial-up modem
If you receive both voice calls and fax calls at the same phone number, and you also
have a computer dial-up modem connected on this phone line, set up the HP All-inOne as described in this section.
Since your computer dial-up modem shares the phone line with the HP All-in-One,
you will not be able to use both your modem and the HP All-in-One simultaneously.
For example, you cannot use the HP All-in-One for faxing if you are using your
computer dial-up modem to send an e-mail or access the Internet.
There are two different ways to set up the HP All-in-One with your computer based on
the number of phone ports on your computer. Before you begin, check your computer
to see if it has one or two phone ports.
● If your computer has only one phone port, you will need to purchase a parallel
splitter (also called a coupler), as shown below. (A parallel splitter has one RJ-11
port on the front and two RJ-11 ports on the back. Do not use a 2-line phone
splitter, a serial splitter, or a parallel splitter which has two RJ-11 ports on the
front and a plug on the back.)
Example of a parallel splitter
● If your computer has two phone ports, set up the HP All-in-One as described
below.
Finish setup
34
HP Officejet 4300 All-in-One series
Page 38

Back view of the HP All-in-One
1 Telephone wall jack
2 "IN" phone port on your computer
3 "OUT" phone port on your computer
4 Telephone
5 Computer with modem
6 Use the phone cord supplied in the box with the HP All-in-One to connect to the "1-
LINE" port
To set up the HP All-in-One on the same phone line as a computer with two
phone ports
1. Remove the white plug from the port labeled 2-EXT on the back of the HP All-inOne.
2. Find the phone cord that connects from the back of your computer (your
computer dial-up modem) to a telephone wall jack. Disconnect the cord from the
telephone wall jack and plug it into the port labeled 2-EXT on the back of the
HP All-in-One.
3. Connect a phone to the "OUT" port on the back of your computer dial-up modem.
4. Using the phone cord supplied in the box with the HP All-in-One, connect one
end to your telephone wall jack, then connect the other end to the port labeled 1LINE on the back of the HP All-in-One.
Note If you do not use the supplied cord to connect from the telephone
wall jack to the HP All-in-One, you might not be able to fax successfully.
This special phone cord is different from the phone cords you might
already have in your home or office.
Finish setup
User Guide
5. If your modem software is set to receive faxes to your computer automatically,
turn off that setting.
Note If you do not turn off the automatic fax reception setting in your
modem software, the HP All-in-One will not be able to receive faxes.
35
Page 39

Chapter 3
6. Now you need to decide how you want the HP All-in-One to answer calls,
automatically or manually:
– If you set up the HP All-in-One to answer calls automatically, it answers all
incoming calls and receives faxes. The HP All-in-One will not be able to
distinguish between fax and voice calls in this case; if you suspect the call is
a voice call, you will need to answer it before the HP All-in-One answers the
call. To set up the HP All-in-One to answer calls automatically, set the
Answer Mode to Fax.
– If you set up the HP All-in-One to answer faxes manually, you must be
available to respond in person to incoming fax calls or the HP All-in-One
cannot receive faxes. To set up the HP All-in-One to answer calls manually,
set the Answer Mode to Tel.
7. Run a fax test.
If you pick up the phone before the HP All-in-One answers the call and hear fax tones
from a sending fax machine, you will need to answer the fax call manually.
Case I: Shared voice/fax line with answering machine
If you receive both voice calls and fax calls at the same phone number, and you also
have an answering machine that answers voice calls at this phone number, set up the
HP All-in-One as described in this section.
Finish setup
36
Back view of the HP All-in-One
1 Telephone wall jack
2 "IN" port on your answering machine
3 "OUT" port on your answering machine
4 Telephone (optional)
5 Answering machine
6 Use the phone cord supplied in the box with the HP All-in-One to connect to the "1-LINE"
port
HP Officejet 4300 All-in-One series
Page 40

To set up the HP All-in-One with a shared voice/fax line with answering machine
1. Remove the white plug from the port labeled 2-EXT on the back of the HP All-inOne.
2. Unplug your answering machine from the telephone wall jack, and connect it to
the port labeled 2-EXT on the back of the HP All-in-One.
Note If you do not connect your answering machine directly to the HP All-
in-One, fax tones from a sending fax machine might be recorded on your
answering machine, and you probably will not be able to receive faxes
with the HP All-in-One.
3. Using the phone cord supplied in the box with the HP All-in-One, connect one
end to your telephone wall jack, then connect the other end to the port labeled 1LINE on the back of the HP All-in-One.
Note If you do not use the supplied cord to connect from the telephone
wall jack to the HP All-in-One, you might not be able to fax successfully.
This special phone cord is different from the phone cords you might
already have in your home or office.
4. (Optional) If your answering machine does not have a built-in phone, for
convenience you might want to connect a phone to the back of your answering
machine at the "OUT" port.
Note If your answering machine does not let you connect an external
phone, you can purchase and use a parallel splitter (also known as a
coupler) to connect both the answering machine and telephone to the
HP All-in-One. You can use standard phone cords for these connections.
User Guide
5. Set the Answer Mode to AnswerMachine.
6. Set your answering machine to answer after a low number of rings.
7. Change the Rings to Answer setting on the HP All-in-One to the maximum
number of rings supported by your device. (The maximum number of rings varies
by country/region.)
8. Run a fax test.
When the phone rings, your answering machine will answer after the number of rings
you have set, and then play your recorded greeting. The HP All-in-One monitors the
call during this time, "listening" for fax tones. If incoming fax tones are detected, the
HP All-in-One will emit fax reception tones and receive the fax; if there are no fax
tones, the HP All-in-One stops monitoring the line and your answering machine can
record a voice message.
Case J: Shared voice/fax line with computer dial-up modem and answering machine
If you receive both voice calls and fax calls at the same phone number, and you also
have a computer dial-up modem and answering machine connected on this phone
line, set up the HP All-in-One as described in this section.
Since your computer dial-up modem shares the phone line with the HP All-in-One,
you will not be able to use both your modem and the HP All-in-One simultaneously.
Finish setup
37
Page 41

Chapter 3
For example, you cannot use the HP All-in-One for faxing if you are using your
computer dial-up modem to send an e-mail or access the Internet.
There are two different ways to set the HP All-in-One with your computer based on
the number of phone ports on your computer. Before you begin, check your computer
to see if it has one or two phone ports.
● If your computer has only one phone port, you will need to purchase a parallel
splitter (also called a coupler), as shown below. (A parallel splitter has one RJ-11
port on the front and two RJ-11 ports on the back. Do not use a 2-line phone
splitter, a serial splitter, or a parallel splitter which has two RJ-11 ports on the
front and a plug on the back.)
Example of a parallel splitter
● If your computer has two phone ports, set up the HP All-in-One as described
below.
Finish setup
38
Back view of the HP All-in-One
1 Telephone wall jack
2 "IN" phone port on your computer
3 "OUT" phone port on your computer
4 Telephone (optional)
5 Answering machine
6 Computer with modem
7 Use the phone cord supplied in the box with the HP All-in-One to connect to the "1-
LINE" port
HP Officejet 4300 All-in-One series
Page 42

To set up the HP All-in-One on the same phone line as a computer with two
phone ports
1. Remove the white plug from the port labeled 2-EXT on the back of the HP All-inOne.
2. Find the phone cord that connects from the back of your computer (your
computer dial-up modem) to a telephone wall jack. Disconnect the cord from the
telephone wall jack and plug it into the port labeled 2-EXT on the back of the
HP All-in-One.
3. Unplug your answering machine from the telephone wall jack, and connect it to
the port labeled 2-EXT on the back of the HP All-in-One.
Note If you do not connect your answering machine directly to the HP All-
in-One, fax tones from a sending fax machine might be recorded on your
answering machine, and you probably will not be able to receive faxes
with the HP All-in-One.
4. Using the phone cord supplied in the box with the HP All-in-One, connect one
end to your telephone wall jack, then connect the other end to the port labeled 1LINE on the back of the HP All-in-One.
Note If you do not use the supplied cord to connect from the telephone
wall jack to the HP All-in-One, you might not be able to fax successfully.
This special phone cord is different from the phone cords you might
already have in your home or office.
5. (Optional) If your answering machine does not have a built-in phone, for
convenience you might want to connect a phone to the back of your answering
machine at the "OUT" port.
Note If your answering machine does not let you connect an external
phone, you can purchase and use a parallel splitter (also known as a
coupler) to connect both the answering machine and telephone to the
HP All-in-One. You can use standard phone cords for these connections.
Finish setup
User Guide
6. If your modem software is set to receive faxes to your computer automatically,
turn off that setting.
Note If you do not turn off the automatic fax reception setting in your
modem software, the HP All-in-One will not be able to receive faxes.
7. Set the Answer Mode to AnswerMachine.
8. Set your answering machine to answer after a low number of rings.
9. Change the Rings to Answer setting on the HP All-in-One to the maximum
number of rings supported by your device. (The maximum number of rings varies
by country/region.)
10. Run a fax test.
When the phone rings, your answering machine will answer after the number of rings
you have set, and then play your recorded greeting. The HP All-in-One monitors the
call during this time, "listening" for fax tones. If incoming fax tones are detected, the
HP All-in-One will emit fax reception tones and receive the fax; if there are no fax
39
Page 43

Chapter 3
tones, the HP All-in-One stops monitoring the line and your answering machine can
record a voice message.
Case K: Shared voice/fax line with computer dial-up modem and voice mail
If you receive both voice calls and fax calls at the same phone number, use a
computer dial-up modem on the same phone line, and subscribe to a voice mail
service through your telephone company, set up the HP All-in-One as described in
this section.
Note You cannot receive faxes automatically if you have a voice mail service
at the same phone number you use for fax calls. You must receive faxes
manually; this means you must be available to respond in person to incoming
fax calls. If you want to receive faxes automatically instead, contact your
telephone company to subscribe to a distinctive ring service, or to obtain a
separate phone line for faxing.
Since your computer dial-up modem shares the phone line with the HP All-in-One,
you will not be able to use both your modem and the HP All-in-One simultaneously.
For example, you cannot use the HP All-in-One for faxing if you are using your
computer dial-up modem to send an e-mail or access the Internet.
There are two different ways to set up the HP All-in-One with your computer based on
the number of phone ports on your computer. Before you begin, check your computer
to see if it has one or two phone ports.
● If your computer has only one phone port, you will need to purchase a parallel
splitter (also called a coupler), as shown below. (A parallel splitter has one RJ-11
port on the front and two RJ-11 ports on the back. Do not use a 2-line phone
splitter, a serial splitter, or a parallel splitter which has two RJ-11 ports on the
front and a plug on the back.)
Finish setup
40
Example of a parallel splitter
● If your computer has two phone ports, set up the HP All-in-One as described
below.
HP Officejet 4300 All-in-One series
Page 44

Back view of the HP All-in-One
1 Telephone wall jack
2 "IN" phone port on your computer
3 "OUT" phone port on your computer
4 Telephone
5 Computer with modem
6 Use the phone cord supplied in the box with the HP All-in-One to connect to the "1-
LINE" port
To set up the HP All-in-One on the same phone line as a computer with two
phone ports
1. Remove the white plug from the port labeled 2-EXT on the back of the HP All-inOne.
2. Find the phone cord that connects from the back of your computer (your
computer dial-up modem) to a telephone wall jack. Disconnect the cord from the
telephone wall jack and plug it into the port labeled 2-EXT on the back of the
HP All-in-One.
3. Connect a phone to the "OUT" port on the back of your computer dial-up modem.
4. Using the phone cord supplied in the box with the HP All-in-One, connect one
end to your telephone wall jack, then connect the other end to the port labeled 1LINE on the back of the HP All-in-One.
Note If you do not use the supplied cord to connect from the telephone
wall jack to the HP All-in-One, you might not be able to fax successfully.
This special phone cord is different from the phone cords you might
already have in your home or office.
Finish setup
User Guide
5. If your modem software is set to receive faxes to your computer automatically,
turn off that setting.
Note If you do not turn off the automatic fax reception setting in your
modem software, the HP All-in-One will not be able to receive faxes.
6. Set the Answer Mode to Tel.
7. Run a fax test.
41
Page 45

Chapter 3
You must be available to respond in person to incoming fax calls, or the HP All-in-One
cannot receive faxes.
Change settings on the HP All-in-One to receive faxes
In order to receive faxes successfully, you need to change some settings on the
HP All-in-One. If you are unsure which setting to choose for a specific fax option, see
the fax setup information in the previous sections.
● Set the answer mode
● Set the number of rings before answering
● Change the answer ring pattern for distinctive ringing
Set the answer mode
The answer mode determines whether the HP All-in-One answers incoming calls or
not. The following modes are available:
Finish setup
Fax
The HP All-in-One will automatically answer incoming calls and
receive faxes after the number of rings specified by the Rings to
Answer setting. This is the default setting.
FaxTel (handset
model only)
The HP All-in-One automatically answers all incoming calls
using the Rings to Answer setting. If the call is a fax call, the
HP All-in-One will receive the fax. If the call is a voice call, the
HP All-in-One will create a special ring to indicate it is a voice
call. You will need to answer the incoming voice call using the
attached handset.
Note If the HP All-in-One determines the call is a voice call,
only the HP All-in-One will ring with the special ring tone. The
other phones on the same phone line will not ring at all. You
will not be able to pick up the voice call using the other phones.
Tel The HP All-in-One will not answer calls. You will need to receive
faxes manually.
AnswerMachine The HP All-in-One will monitor the line when an incoming call is
answered by a person or by the answering machine. If the
HP All-in-One detects fax tones on the line, the HP All-in-One
receives the fax.
To set the answer mode
1. Press Answer Mode to scroll through the available modes on the HP All-in-One.
2. When the appropriate option for your setup is shown on the display, press OK to
select it.
42
Set the number of rings before answering
If you set the Answer Mode to Fax, FaxTel (handset model only), or
AnswerMachine you can specify how many rings should occur before the HP All-in-
One automatically answers the incoming call.
HP Officejet 4300 All-in-One series
Page 46

The Rings to Answer setting is important if you have an answering machine on the
same phone line as the HP All-in-One, because you want the answering machine to
answer the phone before the HP All-in-One does. The number of rings to answer for
the HP All-in-One should be greater than the number of rings to answer for the
answering machine.
For example, set your answering machine to a low number of rings and the HP All-inOne to answer in the maximum number of rings. (The maximum number of rings
varies by country/region.) In this setup, the answering machine will answer the call
and the HP All-in-One will monitor the line. If the HP All-in-One detects fax tones, the
HP All-in-One will receive the fax. If the call is a voice call, the answering machine will
record the incoming message.
To set the number of rings before answering from the control panel
1. Press Setup.
2. Press 4, and then press 2.
This selects Basic Fax Setup and then selects Rings to Answer.
3.
Enter the appropriate number of rings by using the keypad, or press
or
to
change the number of rings.
4. Press OK to accept the setting.
Change the answer ring pattern for distinctive ringing
Many phone companies offer a distinctive ringing feature that allows you to have
several phone numbers on one phone line. When you subscribe to this service, each
number will have a different ring pattern. You can set up the HP All-in-One to answer
incoming calls that have a specific ring pattern.
If you connect the HP All-in-One to a line with distinctive ringing, have your telephone
company assign one ring pattern to voice calls and another ring pattern to fax calls.
HP recommends that you request double or triple rings for a fax number. When the
HP All-in-One detects the specified ring pattern, it will answer the call and receive the
fax.
If you do not have a distinctive ring service, use the default ring pattern, which is All
Rings.
Finish setup
User Guide
To change the answer ring pattern from the control panel
1. Verify that the Answer Mode on the HP All-in-One is set to Fax or FaxTel
(handset model only).
2. Press Setup.
3. Press 5, and then press 1.
This selects Advanced Fax Setup and then selects Distinctive Ring.
4.
Press
to select an option, and then press OK.
When the phone rings with the ring pattern assigned to your fax line, the HP All-inOne answers the call and receives the fax.
43
Page 47

Chapter 3
Test your fax setup
Finish setup
You can test your fax setup to check the status of the HP All-in-One and to make sure
it is set up properly for faxing. Perform this test after you have completed setting up
the HP All-in-One for faxing. The test does the following:
● Tests the fax hardware
● Verifies the correct type of phone cord is connected to the HP All-in-One
● Checks that the phone cord is plugged into the correct port
● Checks for a dial tone
● Checks for an active phone line
● Tests the status of your phone line connection
The HP All-in-One prints a report with the results of the test. If the test fails, review the
report for information on how to fix the problem and rerun the test.
To test your fax setup from the control panel
1. Set up the HP All-in-One for faxing according to your particular home or office
setup instructions.
2. Insert the print cartridges and load full-size paper in the input tray before starting
the test.
3. Press Setup.
4. Press 6, then press 6 again.
This selects the Tools menu and then selects Run Fax Test.
The HP All-in-One displays the status of the test on the display and prints a report.
5. Review the report.
– If the test passes and you are still having problems faxing, check the fax
settings listed in the report to verify the settings are correct. A blank or
incorrect fax setting can cause problems faxing.
– If the test fails, review the report for more information on how to fix any
problems found.
6. After you pick up the fax report from the HP All-in-One, press OK.
If necessary, resolve any problems found and rerun the test.
Set the fax header
The fax header prints your name and fax number on the top of every fax you send. HP
recommends that you set up the fax header by using the software that you installed
with the HP All-in-One. You can also set up the fax header from the control panel, as
described here.
Note In some countries/regions the fax header information is a legal
requirement.
To set a default fax header from the control panel
1. Press Setup.
2. Press 4, and then press 1.
This selects Basic Fax Setup and then selects Fax Header.
3. Enter your personal or company name, and then press OK.
4. Enter your fax number by using the numeric keypad, and then press OK.
44
HP Officejet 4300 All-in-One series
Page 48

4
Load originals and load paper
You can load many different types and sizes of paper in the HP All-in-One, including
letter or A4 paper, photo paper, transparencies, and envelopes. By default, the HP Allin-One is set to detect the size and type of paper you load in the input tray
automatically and then adjust its settings to generate the highest quality output for that
paper.
If you are using special papers, such as photo paper, transparency film, envelopes, or
labels, or if you experience poor print quality using the Automatic setting, you can
manually set the paper size and type for print and copy jobs.
● Load originals
● Choose papers for printing and copying
● Load paper
● Avoid paper jams
Load originals
You can copy, scan, or fax a single- or multiple-page letter-, A4-, or legal-size
document by placing it in the document feeder tray.
Caution In areas of high humidity and temperature; avoid putting photo
originals through the automatic document feeder. They could become jammed
and damage your photos.
Tip To avoid scratches or other damage to your original photos, place your
photo in a transparent photo sleeve before loading.
User Guide
To load an original in the document feeder tray
1. Load your original print side down and top first in the center of the document
feeder tray. Slide the paper into the automatic document feeder until you hear a
beep or see a message on the display indicating that the HP All-in-One detected
the pages you loaded.
The automatic document feeder holds a maximum of 20 sheets of plain paper.
Load originals and load paper
Tip For more help on loading originals in the automatic document feeder,
refer to the diagram engraved in the document feeder tray.
45
Page 49

Chapter 4
2. Slide the paper guides inward until they stop at the left and right edges of the
paper.
Choose papers for printing and copying
You can use different types and sizes of paper in the HP All-in-One. Review the
following recommendations to get the best printing and copying quality. Whenever you
change paper types or sizes, remember to change those settings.
● Recommended papers for printing and copying
● Papers to avoid
Recommended papers for printing and copying
If you want the best print quality, HP recommends using HP papers that are
specifically designed for the type of project you are printing. If you are printing photos,
for example, load HP Premium or HP Premium Plus photo paper in the input tray.
Note 1 This device supports 10 x 15 cm (4 x 6 inch) with tab, A4-, letter-, and
legal- (US only) size paper only.
Note 2 To achieve a borderless print, you must use 10 x 15 cm (4 x 6 inch)
paper with tab. The HP All-in-One prints to the edge of three sides of the
paper. When you remove the tab from the fourth side, you have a borderless
print.
Papers to avoid
Load originals and load paper
46
To order HP papers and other supplies, go to www.hp.com/learn/suresupply. If
prompted, choose your country/region, follow the prompts to select your product, and
then click one of the shopping links on the page.
Note At this time, this portion of the HP website is available in English only.
Using paper that is too thin or too thick, paper that has a slick texture, or paper that
stretches easily can cause paper jams. Using paper that has a heavy texture or does
not accept ink can cause printed images to smear, bleed, or not fill in completely.
Papers to avoid for all print and copy jobs
● Any size paper other than those listed in the Technical specifications chapter. For
more information, see Technical information.
● Paper with cutouts or perforations (unless specifically designed for use with HP
inkjet devices).
● Highly textured stock, such as linen. It might not print evenly, and the ink can
bleed into these papers.
HP Officejet 4300 All-in-One series
Page 50

● Extremely smooth, shiny, or coated papers not specifically designed for the
HP All-in-One. They can jam the HP All-in-One or repel the ink.
● Multi-part forms, such as duplicate and triplicate forms. They can wrinkle or get
stuck, and the ink is more likely to smear.
● Envelopes with clasps or windows. They can get stuck in the rollers and cause
paper jams.
● Banner paper.
● 10 x 15 cm (4 x 6 inch) photo paper with or without tabs.
Additional papers to avoid when copying
● Envelopes.
● Transparency film other than HP Premium Inkjet Transparency Film or
HP Premium Plus Inkjet Transparency Film.
● Iron-On Transfers.
● Greeting card paper.
Load paper
This section describes the procedure for loading different types and sizes of paper
into the HP All-in-One for your copies, printouts, or faxes.
Tip To help prevent rips, wrinkles, and curled or bent edges, store all paper
flat in a resealable bag. If the paper is not stored properly, extreme changes in
temperature and humidity might result in curled paper that does not work well
in the HP All-in-One.
● Load full-size paper
● Load 10 x 15 cm (4 x 6 inch) photo paper
● Load index cards
● Load envelopes
● Load other types of paper
Load full-size paper
You can load many types of letter, A4, or legal paper into the input tray of the HP Allin-One.
To load full-size paper
1. Slide the paper-width guide to its outermost position.
User Guide
Load originals and load paper
47
Page 51

Chapter 4
2. Tap a stack of paper on a flat surface to align the edges, and then check the
paper for the following:
– Make sure it is free of rips, dust, wrinkles, and curled or bent edges.
– Make sure all the paper in the stack is the same size and type.
3. Insert the stack of paper into the input tray with the short edge forward and the
print side down. Slide the stack of paper forward until it stops.
Load originals and load paper
48
Caution Make sure that the HP All-in-One is idle and silent when you
load paper into the input tray. If the HP All-in-One is servicing the print
cartridges or otherwise engaged in a task, the paper stop inside the
device might not be in place. You could push the paper too far forward,
causing the HP All-in-One to eject blank pages.
Tip If you are using letterhead, insert the top of the page first with the
print side down. For more help on loading full-size paper and letterhead,
refer to the diagram engraved in the base of the input tray.
4. Slide the paper-width guide inward until it stops at the edge of the paper.
Do not overload the input tray; make sure the stack of paper fits within the input
tray and is no higher than the top of the paper-width guide.
HP Officejet 4300 All-in-One series
Page 52

5. Flip the tray extender up toward you.
Note When you use legal-size paper, leave the tray extender closed.
Load 10 x 15 cm (4 x 6 inch) photo paper
You can load 10 x 15 cm (4 x 6 inch) photo paper into the input tray of the HP All-inOne. For the best results, use 10 x 15 cm (4 x 6 inch) HP Premium Plus Photo Paper
or HP Premium Photo Paper with tab.
Note For borderless printing, the HP All-in-One only supports printing 10 x 15
cm (4 x 6 inch) paper with tab.
Tip To help prevent rips, wrinkles, and curled or bent edges, store all paper
flat in a resealable bag. If the paper is not stored properly, extreme changes in
temperature and humidity might result in curled paper that does not work well
in the HP All-in-One.
User Guide
To load 10 x 15 cm ( 4 x 6 inch) photo paper with tab in the input tray
1. Remove all paper from the input tray.
2. Insert the stack of photo paper into the far-right side of the input tray with the
short edge forward and the print side down. Slide the stack of photo paper
forward until it stops.
Load the photo paper so that the tabs are closest to you.
Tip For more help on loading small-size photo paper, refer to the guides
engraved in the base of the input tray for loading photo paper.
3. Slide the paper-width guide inward until it stops at the edge of the paper.
Load originals and load paper
49
Page 53

Chapter 4
Do not overload the input tray; make sure the stack of paper fits within the input
tray and is no higher than the top of the paper-width guide.
For best results, set the paper type and paper size before copying or printing.
Load index cards
You can load index cards into the input tray of the HP All-in-One to print notes,
recipes, and other text.
For best results, set the paper type and paper size before copying or printing.
Note The HP All-in-One leaves a 1.2 cm (.5 inch) border on one short edge.
Before printing many cards, print one test card to make sure that the border
does not crop your text.
Load envelopes
Load originals and load paper
To load index cards in the input tray
1. Remove all paper from the input tray.
2. Insert the stack of cards, print side down, into the far-right side of the input tray.
Slide the stack of cards forward until it stops.
3. Slide the paper-width guide inward against the stack of cards until it stops.
Do not overload the input tray; make sure the stack of cards fits within the input
tray and is no higher than the top of the paper-width guide.
For best results, set the paper type and paper size before copying or printing.
You can load one or more envelopes into the input tray of the HP All-in-One. Do not
use shiny or embossed envelopes or envelopes that have clasps or windows.
50
HP Officejet 4300 All-in-One series
Page 54

Note For specific details on how to format text for printing on envelopes,
consult the help files in your word processing software. For best results,
consider using a label for the return address on envelopes.
To load envelopes
1. Remove all paper from the input tray.
2. Insert one or more envelopes into the far-right side of the input tray with the
envelope flaps up and on the left. Slide the stack of envelopes forward until it
stops.
Tip For more help on loading envelopes, refer to the diagram engraved
in the base of the input tray.
3. Slide the paper-width guide inward against the stack of envelopes until it stops.
Do not overload the input tray; make sure the stack of envelopes fits within the
input tray and is not higher than the top of the paper-width guide.
Load other types of paper
The following papers require extra attention to load them properly.
Note Not all paper sizes and paper types are available with all the functions
on the HP All-in-One. Some paper sizes and paper types can only be used if
you are starting a print job from the Print dialog box in a software application.
They are not available for copying or faxing. Papers that are only available for
printing from a software application are indicated as such.
HP Premium Inkjet Transparency Film and HP Premium Plus Inkjet
Transparency Film
➔
Insert the film so that the white transparency strip (with arrows and the HP logo)
is on top and is going into the input tray first.
Note The HP All-in-One cannot automatically detect the paper size or
paper type. For best results, set the paper type to transparency film before
printing or copying onto transparency film.
User Guide
Load originals and load paper
51
Page 55

Chapter 4
HP Iron-On Transfers (for printing only)
1. Flatten the transfer sheet completely before using it; do not load curled sheets.
Tip To prevent curling, keep transfer sheets sealed in the original
package until you are ready to use them.
2. Locate the blue stripe on the nonprinting side of the transfer paper and then
manually feed one sheet at a time into the input tray with the blue stripe facing up.
HP Greeting Cards, HP Photo Greeting Cards, or HP Textured Greeting Cards
(for printing only)
➔
Insert a small stack of HP greeting card paper into the input tray with the print
side down; slide the stack of cards forward until it stops.
Tip Make sure the area on which you want to print is inserted first, facing
down in the input tray.
HP Inkjet labels (for printing only)
1. Always use letter or A4 label sheets designed for use with HP inkjet devices
(such as HP inkjet labels), and make sure that the labels are no more than two
years old. Labels on older sheets might peel off when the paper is pulled through
the HP All-in-One, causing subsequent paper jams.
2. Fan the stack of labels to make sure none of the pages are sticking together.
3. Place a stack of label sheets on top of full-size plain paper in the input tray, label
side down. Do not insert labels one sheet at a time.
For best results, set the paper type and paper size before copying or printing.
Avoid paper jams
To help avoid paper jams, follow these guidelines.
● Remove printed papers from the output tray frequently.
● Prevent curled or wrinkled paper by storing all unused paper flat in a resealable
● Ensure that paper loaded in the input tray lays flat and the edges are not bent or
● Do not combine different paper types and paper sizes in the input tray; the entire
● Adjust the paper-width guide in the input tray to fit snugly against all paper. Make
● Do not force paper too far forward in the input tray.
● Use paper types that are recommended for the HP All-in-One.
Load originals and load paper
52
bag.
torn.
stack of paper in the input tray must be the same size and type.
sure the paper-width guide does not bend the paper in the input tray.
HP Officejet 4300 All-in-One series
Page 56

5
Print from your computer
The HP All-in-One can be used with any software application that allows printing. You
can print a range of projects, such as borderless images, newsletters, greeting cards,
iron-on transfers, and posters.
● Print from a software application
● Change the print settings
● Stop a print job
Print from a software application
Most print settings are automatically handled by the software application you are
printing from or by HP ColorSmart technology. You need to change the settings
manually only when you change print quality, print on specific types of paper or
transparency film, or use special features.
To print from a software application (Windows)
1. Make sure you have paper loaded in the input tray.
2. On the File menu in your software application, click Print.
3. Make sure the HP All-in-One is the selected printer.
4. If you need to change settings, click the button that opens the Properties dialog
box.
Depending on your software application, this button might be called Properties,
Options, Printer Setup, Printer, or Preferences.
5. Select the appropriate options for your print job by using the features available in
the Advanced, Paper/Quality, Effects, Finishing, and Color tabs.
6. Click OK to close the Properties dialog box.
7. Click Print or OK to begin printing.
Print
User Guide
To print from a software application (Mac)
1. Make sure you have paper loaded in the input tray.
2. From the File menu in your software application, choose Page Setup.
3. Make sure the HP All-in-One is the selected printer.
4. Specify the page attributes:
– Choose the paper size.
– Select the orientation.
– Enter the scaling percentage.
5. Click OK.
6. From the File menu in your software application, choose Print.
The Print dialog box appears, and the Copies & Pages panel opens.
7. Change the print settings for each option in the pop-up menu, as appropriate for
your project.
8. Click Print to begin printing.
53
Page 57

Chapter 5
Change the print settings
You can customize the print settings of the HP All-in-One to handle nearly any print
task.
Print
Windows users
Before you change print settings, you should decide if you want to change the settings
for the current print job only, or if you want to make the settings the defaults for all
future print jobs. How you display print settings depends on whether or not you want
to apply the change to all future print jobs or just to the current print job.
To change the print settings for all future jobs
1. In the HP Solution Center, click Settings, point to Print Settings, and then click
Printer Settings.
2. Make changes to the print settings, and click OK.
To change the print settings for the current job
1. On the File menu in your software application, click Print.
2. Make sure the HP All-in-One is the selected printer.
3. Click the button that opens the Properties dialog box.
Depending on your software application, this button might be called Properties,
Options, Printer Setup, Printer, or Preferences.
4. Make changes to the print settings, and click OK.
5. Click Print or OK in the Print dialog box to print the job.
Mac users
Use the Page Setup and Print dialog boxes to change the settings for your print job.
Which dialog box you use depends on which setting you want to change.
To change the paper size, orientation, or scaling percentage
1. From the File menu in your software application, choose Page Setup.
2. Make sure the HP All-in-One is the selected printer.
3. Make changes to the paper size, orientation, and scaling percentage settings,
and click OK.
To change all other print settings
1. From the File menu in your software application, choose Print.
2. Make sure the HP All-in-One is the selected printer.
3. Make changes to the print settings, and click Print to print the job.
Stop a print job
Although you can stop a print job from either the HP All-in-One or the computer, HP
recommends you stop it from the HP All-in-One for best results.
54
HP Officejet 4300 All-in-One series
Page 58

To stop a print job from the HP All-in-One
➔
Press Cancel on the control panel. If the print job does not stop, press Cancel
again.
It can take a few moments for printing to be cancelled.
Print
User Guide
55
Page 59

Print
Chapter 5
56
HP Officejet 4300 All-in-One series
Page 60

6
Use the fax features
You can use the HP All-in-One to send and receive faxes, including color faxes. You
can set up speed dial entries to send faxes quickly and easily to frequently used
numbers. From the control panel, you can also set a number of fax options, such as
resolution and the contrast between lightness/darkness on the faxes you send.
Note Before you begin faxing, make sure you have set up the HP All-in-One
properly for faxing. You might have already done this as part of the initial
setup, by using either the control panel or the software that came with the
HP All-in-One.
You can verify the fax is set up correctly by running the fax setup test from the
control panel. You can access this test from the Setup menu.
● Send a fax
● Receive a fax
● Print reports
● Stop faxing
Send a fax
You can send a fax in a variety of ways. Using the control panel, you can send a blackand-white or color fax from the HP All-in-One. You can also send a fax manually from
an attached phone. This allows you to speak with the recipient before sending the fax.
● Send a basic fax
● Send a fax manually
● Send a fax using monitor dialing
Send a basic fax
You can easily send a single- or multiple-page black-and-white fax by using the
control panel, as described here.
Fax
Note If you need printed confirmation that your faxes were successfully sent,
enable fax confirmation before sending any faxes.
Tip You can also send a fax manually from a phone or by using monitor
dialing. These features allow you to control the pace of your dialing. They are
also useful when you want to use a calling card to charge the call and you
need to respond to tone prompts while dialing.
User Guide
To send a basic fax from the control panel
1. Load your originals print side down and top first in the center of the document
feeder tray.
2. Press Fax.
The Enter Number prompt appears.
57
Page 61

Chapter 6
Send a fax manually
Fax
3. Enter the fax number by using the keypad, press Speed Dial or a one-touch
speed dial button to select a speed dial, or press Redial/Pause to redial the last
number dialed.
Tip To add a pause in the fax number you are entering, press Redial/
Pause, or press the Symbols (*) button repeatedly, until a dash (-)
appears on the display.
4. Press Start Black.
Tip If the recipient reports issues with the quality of the fax you sent, you
can try changing the resolution or contrast of your fax.
Sending a fax manually allows you to make a phone call and talk with the recipient
before you send the fax. This is useful if you want to inform the recipient that you are
going to send them a fax before sending it. When you send a fax manually, you can
hear the dial tones, telephone prompts, or other sounds through the handset on your
telephone. This makes it easy for you to use a calling card to send your fax.
Depending on how the recipient has their fax machine set up, the recipient might
answer the phone, or the fax machine might take the call. If a person answers the
phone, you can speak with the recipient before sending the fax. If a fax machine
answers the call, you can send the fax directly to the fax machine when you hear the
fax tones from the receiving fax machine.
58
To send a fax manually from a connected phone
1. Load your originals print side down and top first in the center of the document
feeder tray.
2. Dial the number by using the keypad on the phone that is connected to the HP Allin-One.
Note Do not use the keypad on the control panel of the HP All-in-One.
You must use the keypad on your phone to dial the recipient's number.
3. If the recipient answers the telephone, you can engage in a conversation before
sending your fax.
Note If a fax machine answers the call, you will hear fax tones from the
receiving fax machine. Proceed to the next step to transmit the fax.
4. Once you are ready to send the fax, press Start Black or Start Color.
Note If prompted, press 1 to select Send Fax, and then press Start
Black or Start Color again.
If you were speaking with the recipient before sending the fax, inform the
recipient that they should press Start on their fax machine after they hear fax
tones.
HP Officejet 4300 All-in-One series
Page 62

The telephone line is silent while the fax is transmitting. At this point, you can
hang up the telephone. If you want to continue speaking with the recipient,
remain on the line until the fax transmission is complete.
To send a fax manually from a phone using the attached handset (handset
model only)
1. Load your originals print side down and top first in the center of the document
feeder tray.
2. Pick up the handset that is attached to the HP All-in-One and dial the number by
using the keypad on the control panel.
3. If the recipient answers the telephone, you can engage in a conversation before
sending your fax.
Note If a fax machine answers the call, you will hear fax tones from the
receiving fax machine. Proceed to the next step to transmit the fax.
4. Once you are ready to send the fax, press Start Black or Start Color.
Note If prompted, press 1 to select Send Fax, and then press Start
Black or Start Color again.
If you were speaking with the recipient before sending the fax, inform the
recipient that they should press Start on their fax machine after they hear fax
tones.
The telephone line is silent while the fax is transmitting. At this point, you can
hang up the telephone. If you want to continue speaking with the recipient,
remain on the line until the fax transmission is complete.
Send a fax using monitor dialing
Monitor dialing allows you to dial a number from the control panel as you would dial a
regular telephone. When you send a fax using monitor dialing, you can hear the dial
tones, telephone prompts, or other sounds through the speakers on the HP All-inOne. This enables you to respond to prompts while dialing, as well as control the pace
of your dialing.
Tip If you do not enter your calling card PIN fast enough, the HP All-in-One
might start sending fax tones too soon and cause your PIN not to be
recognized by the calling card service. If this is the case, you can create a
speed dial entry to store the PIN for your calling card.
Note Make sure the volume is turned on, or you will not hear a dial tone.
Fax
User Guide
To send a fax using monitor dialing from the control panel
1. Load your originals print side down and top first in the center of the document
feeder tray.
2. Press Start Black or Start Color.
59
Page 63

Chapter 6
Receive a fax
Fax
3. Once you hear the dial tone, enter the number by using the keypad on the control
panel.
4. Follow any prompts that might occur.
Tip If you are using a calling card to send a fax and you have your calling
card PIN stored as a speed dial, when prompted to enter your PIN, press
Speed Dial or a one-touch speed dial button to select the speed dial entry
where you have your PIN stored.
Your fax is sent when the receiving fax machine answers.
Depending on the Answer Mode you select, the HP All-in-One can receive faxes
automatically or manually. If you select the Fax (the default setting), FaxTel or
AnswerMachine mode, the HP All-in-One will automatically answer incoming calls
and receive faxes after the number of rings specified by the Rings to Answer setting.
(The default Rings to Answer setting is five rings.) If the HP All-in-One is in Tel
mode, you will need to receive faxes manually.
You can receive faxes manually from a phone that is:
● Directly connected to the HP All-in-One (on the 2-EXT port)
● On the same telephone line, but not directly connected to the HP All-in-One
If you receive a legal-size fax and the HP All-in-One is not currently set to use legalsize paper, the device reduces the fax so that it fits on the paper that is loaded in the
HP All-in-One. If you have disabled the Automatic Reduction feature, the HP All-inOne prints the fax on two pages.
● Receive a fax manually
● Set up backup fax reception
● Reprint received faxes from memory
● Forward faxes to another number
● Block junk fax numbers
Receive a fax manually
When you are on the phone, the person you are speaking with can send you a fax
while you are still connected. This is referred to as manual faxing. Use the instructions
in this section to receive a manual fax.
Note If the HP All-in-One has a handset, you can pick it up to talk or listen for
fax tones.
To receive a fax manually
1. Make sure the HP All-in-One is turned on and you have paper loaded in the input
tray.
2. Remove any originals from the document feeder tray.
3. Set the Rings to Answer setting to a high number to allow you to answer the
incoming call before the HP All-in-One answers. Or, press Answer Mode
repeatedly until the Tel mode appears so the HP All-in-One manually receives a
fax.
60
HP Officejet 4300 All-in-One series
Page 64

4. If you are currently on the phone with the sender, instruct the sender to press
Start on their fax machine.
5. When you hear fax tones from a sending fax machine, do the following:
a. Press Start Black or Start Color on the control panel of the HP All-in-One.
b. When prompted, press 2 to select Fax Receive.
c. After the HP All-in-One begins to receive the fax, you can hang up the phone
or remain on the line. The phone line is silent during fax transmission.
Set up backup fax reception
Depending on your preference and security requirements, you can set up the HP Allin-One to store all the faxes it receives, only the faxes it receives while the device is in
an error condition, or none of the faxes it receives.
The following Backup Fax Reception modes are available: On, On Error Only, and
Off.
● On is the default setting. When Backup Fax Reception is On, the HP All-in-One
stores all faxes it receives in memory. This enables you to reprint one or all of the
most recently printed faxes if they are still saved in memory.
Note 1 After the memory becomes full, the HP All-in-One overwrites the
oldest, printed faxes as it receives new faxes. If the memory becomes full
of unprinted faxes, the HP All-in-One will stop answering incoming fax calls.
Note 2 If you receive a fax that is too large, such a very detailed color
photo, it might not be stored in memory due to memory limitations.
● On Error Only causes the HP All-in-One to store faxes in memory only if there is
an error condition that prevents the HP All-in-One from printing the faxes (for
example, if the HP All-in-One runs out of paper). The HP All-in-One will continue
to store incoming faxes as long as there is memory available. (If the memory
becomes full, the HP All-in-One will stop answering incoming fax calls.) When the
error condition is resolved, the faxes stored in memory print automatically and are
then deleted from memory.
● Off means that faxes are never stored in memory. (You might want to turn off
Backup Fax Reception for security purposes, for example.) If an error condition
occurs that prevents the HP All-in-One from printing (for example, the HP All-inOne runs out of paper), the HP All-in-One will stop answering incoming fax calls.
Fax
User Guide
Note If Backup Fax Reception is enabled and you turn off the HP All-in-
One, all faxes stored in memory are deleted, including any unprinted faxes that
you might have received while the HP All-in-One was in an error condition.
You will need to contact the senders to ask them to resend any unprinted
faxes. For a list of the faxes you have received, print the Fax Log. The Fax
Log is not deleted when the HP All-in-One is turned off.
To set backup fax reception from the control panel
1. Press Setup.
2. Press 5, and then press 5 again.
This selects Advanced Fax Setup and then selects Backup Fax Reception.
61
Page 65

Chapter 6
3.
Press
to select On, On Error Only, or Off.
4. Press OK.
Reprint received faxes from memory
If you set the Backup Fax Reception mode to On, the HP All-in-One stores faxes it
receives in memory, whether the device has an error condition or not.
Note After the memory becomes full, the HP All-in-One overwrites the oldest,
printed faxes as it receives new faxes. If all the stored faxes are unprinted, the
HP All-in-One will not receive any more fax calls until you print or delete the
faxes from memory. You might also want to delete the faxes in memory for
security or privacy purposes.
You can reprint one or all of the most recently printed faxes, if they are still in memory.
For example, you might need to reprint your faxes if you lost the copy of your last
printout.
Fax
To reprint faxes in memory from the control panel
1. Make sure you have paper loaded in the input tray.
2. Press Setup.
3. Press 6, and then press 5.
This selects Tools and then selects Reprint Faxes in Memory.
The faxes are printed in the reverse order they were received with the most
recently received fax printed first, and so on.
4.
Press
until One fax or All Faxes appears and then press OK.
5. If you want to stop reprinting the faxes in memory, press Cancel.
To delete all the faxes in memory from the control panel
➔
Turn off the HP All-in-One by pressing the On button.
All faxes stored in memory will be deleted from memory when you turn off the
power to the HP All-in-One.
Note You can also delete any faxes stored in memory by selecting Clear
Fax Log from the Tools menu. To do so, press Setup, press 6, and then
press 7.
Forward faxes to another number
You can set up the HP All-in-One to forward your faxes to another fax number. If you
receive a color fax, the HP All-in-One forwards the fax in black and white.
HP recommends that you verify the number you are forwarding to is a working fax
line. Send a test fax to make sure the fax machine is able to receive your forwarded
faxes.
62
To forward faxes from the control panel
1. Press Setup.
2. Press 5, and then press 8.
This selects Advanced Fax Setup and then selects Fax Forwarding Black Only.
HP Officejet 4300 All-in-One series
Page 66

3.
Press
until On-Forward or On-Print & Forward appears, and then press OK.
– Choose On-Forward if you want to forward the fax to another number
without printing a backup copy on the HP All-in-One.
– Choose On-Print & Forward to print a backup copy of your received fax on
the HP All-in-One while forwarding the fax to another number.
4. At the prompt, enter the number of the fax machine that will receive the forwarded
faxes.
5. At the prompt, enter a start time and date and a stop time and date.
6. Press OK.
Fax Forwarding appears on the display.
If the HP All-in-One loses power when Fax Forwarding is set up, the HP All-inOne saves the Fax Forwarding setting and phone number. When power is
restored to the device, the Fax Forwarding setting is still On.
Note You can cancel fax forwarding by pressing Cancel on the control
panel when the Fax Forwarding message is visible on the display, or you
can select Off from the Fax Forwarding Black Only menu.
Block junk fax numbers
If you subscribe to a caller ID service through your phone provider, you can block
specific fax numbers, so the HP All-in-One does not print faxes received from those
numbers in the future. When an incoming fax call is received, the HP All-in-One
compares the number to the list of junk fax numbers you set up to determine if the call
should be blocked. If the number matches a number in the blocked fax numbers list,
the fax is not printed. (The maximum number of fax numbers you can block varies by
model.)
● Set the junk fax mode
● Add numbers to the junk fax list
● Remove numbers from the junk fax list
Note If the HP All-in-One is not able to forward the fax to the
designated fax machine (if it is not turned on, for example), the HP Allin-One will print the fax. If you set up the HP All-in-One to print error
reports for received faxes, it will also print an error report.
Fax
User Guide
Note This feature is not supported in all countries/regions. If it is not
supported in your country/region, Junk Fax Blocker Set Up does not appear
in the Basic Fax Setup menu.
Set the junk fax mode
By default, Block Junk Fax mode is turned On. If you do not subscribe to a caller ID
service through your phone provider, or do not want to use this feature, you can turn
off this setting.
To set the junk fax mode
1. Press Setup.
2. Press 4, and then press 6.
63
Page 67

Fax
Chapter 6
This selects Basic Fax Setup and then selects Junk Fax Blocker Set Up.
3. Press 4 to select Block Junk Fax.
4.
Press
to select On or Off, and then press OK.
Add numbers to the junk fax list
There are two ways to add a number to your junk list. You can select numbers from
your caller ID history, or you can enter new numbers. The numbers in your junk list
will be blocked if Block Junk Fax mode is set to On.
To select a number from the caller ID list
1. Press Setup.
2. Press 4 and then press 6.
This selects Basic Fax Setup and then selects Junk Fax Blocker Set Up.
3. Press 1, and then press 1.
This selects Add Number to Junk List and then selects Select Number.
4.
Press
to scroll through the numbers from which you have received faxes.
When the number you want to block appears, press OK to select it.
5. When the Select Another? prompt appears, do one of the following:
– If you want to add another number to the list of junk fax numbers, press
1 to select Yes, and then repeat step 4 for each number you want to block.
– If you are done, press 2 to select No.
To manually enter a number to block
1. Press Setup.
2. Press 4, and then press 6.
This selects Basic Fax Setup and then selects Junk Fax Blocker Set Up.
3. Press 1, and then press 2.
This selects Add Number to Junk List and then selects Enter Number.
4. Use the keypad to enter a fax number to block and then press OK.
Make sure you enter the fax number as it appears on the display, and not the fax
number that appears on the fax header of the received fax, as these numbers can
be different.
5. When the Enter Another? prompt appears, do one of the following:
– If you want to add another number to the list of junk fax numbers, press
1 to select Yes, and then repeat step 4 for each number you want to block.
– If you are done, press 2 to select No.
Remove numbers from the junk fax list
If you no longer want to block a fax number, you can remove a number from your junk
fax list.
To remove numbers from the list of junk fax numbers
1. Press Setup.
2. Press 4, and then press 6.
This selects Basic Fax Setup and then selects Junk Fax Blocker Set Up.
3. Press 2.
64
HP Officejet 4300 All-in-One series
Page 68

This selects Remove Number from Junk List.
4.
Press
want to remove appears, press OK to select it.
5. When the Delete Another? prompt appears, do one of the following:
– If you want to remove another number from the list of junk fax
– If you are done, press 2 to select No.
to scroll through the numbers you have blocked. When the number you
numbers, press 1 to select Yes, and then repeat step 4 for each number you
want to block.
Print reports
You can set up the HP All-in-One to print error reports and confirmation reports
automatically for each fax you send and receive. You can also manually print system
reports as you need them; these reports provide useful system information about the
HP All-in-One.
By default, the HP All-in-One is set to print a report only if there is a problem with
sending or receiving a fax. A confirmation message that indicates whether a fax was
successfully sent appears briefly on the display after each transaction.
● Print fax confirmation reports
● Print fax error reports
Print fax confirmation reports
If you need printed confirmation that your faxes were successfully sent, follow these
instructions to enable fax confirmation before sending any faxes. Select either On
Fax Send or Send & Receive.
The default fax confirmation setting is Off. This means that the HP All-in-One will not
print a confirmation report for each fax sent or received. A confirmation message
indicating whether a fax was successfully sent appears briefly on the display after
each transaction.
Fax
User Guide
To enable fax confirmation from the control panel
1. Press Setup.
2. Press 2, and then press 1.
This selects Print Report and then selects Fax Confirmation.
3.
Press
to select one of the following, and then press OK.
Off
On Fax Send Prints a fax confirmation report for every fax you send.
On Fax Receive Prints a fax confirmation report for every fax you receive.
Send &
Receive
Does not print a fax confirmation report when you send and
receive faxes successfully. This is the default setting.
Prints a fax confirmation report for every fax you send and
receive.
65
Page 69

Chapter 6
Tip If you choose On Fax Send or Send & Receive, and scan your fax
to send from memory, you can include an image of the first page of the fax
on the Fax Sent Confirmation report. Press Setup, press 2, and then
press 2 again. Select On from the Image on Fax Send Report menu.
Print fax error reports
You can configure the HP All-in-One so that it automatically prints a report when there
is an error during transmission or reception.
To set the HP All-in-One to print fax error reports automatically
1. Press Setup.
2. Press 2, and then press 3.
This selects Print Report and then selects Fax Error Report.
3.
Press
to select one of the following, and then press OK.
Fax
Stop faxing
Send &
Receive
Off Does not print any fax error reports.
On Fax Send Prints whenever there is a transmission error.
On Fax Receive Prints whenever there is a receiving error.
You can cancel a fax you are sending or receiving at any time.
To stop faxing from the control panel
➔
Press Cancel on the control panel to stop a fax you are sending or receiving. If
the HP All-in-One does not stop faxing, press Cancel again.
The HP All-in-One prints any pages it has already started printing and then
cancels the remainder of the fax. This can take a few moments.
To cancel a number you are dialing
➔
Press Cancel to cancel a number you are currently dialing.
Prints whenever there is any kind of fax error. This is the
default setting.
66
HP Officejet 4300 All-in-One series
Page 70

7
Use the copy features
The HP All-in-One enables you to produce high-quality color and black-and-white
copies on a variety of paper types, including transparencies. You can enlarge or
reduce the size of an original to fit a specific paper size, adjust the darkness of the
copy, and use special features to make high-quality copies of photos.
Tip For the best copy performance on standard copy projects, set the paper
size to Letter or A4, the paper type to Plain Paper, and the copy quality to Fast.
● Make a copy
● Change the copy settings
● Stop copying
Make a copy
You can make quality copies from the control panel.
To make a copy from the control panel
1. Make sure you have paper loaded in the input tray.
2. Load your originals print side down and top first in the center of the document
feeder tray.
Place the pages so that the top edge of the document goes in first.
3. Press Copy and then do one of the following:
– Press Start Black to initiate a black-and-white copy job.
– Press Start Color to initiate a color copy job.
Copy
Note If you have a color original, pressing Start Black produces a black-
and-white copy of the color original, while pressing Start Color produces
a full-color copy of the color original.
Change the copy settings
You can customize the copy settings of the HP All-in-One to handle nearly any task.
When you change copy settings, the changes are for the current copy job only. You
must set the changes as defaults for the settings to apply to all future copy jobs.
To change the copy settings for the current job only
1. Press Copy repeatedly to display the appropriate options. The following options
are available:
– Number of Copies
– Reduce / Enlarge
– Copy Quality
– Copy Paper Size
– Paper Type
– Lighter / Darker
User Guide
67
Page 71

Chapter 7
– Enhancements
– Set New Defaults
2.
Press
3. Do one of the following:
– To change more settings, press Copy.
This selects the current setting and displays the next option.
– To start the copy job, press Start Color or Start Black.
To save the current settings as defaults for future jobs
1. Make any needed changes to the settings in the Copy Menu.
2. Press Copy repeatedly until Set New Defaults appears.
3.
Press
Stop copying
To stop copying
➔
Press Cancel on the control panel.
until the appropriate setting appears.
until Yes appears and then press OK.
Copy
68
HP Officejet 4300 All-in-One series
Page 72

8
Use the scan features
Scanning is the process of converting text and pictures into an electronic format for
your computer. You can scan almost anything (photos, magazine articles and text
documents) on the HP All-in-One.
You can use the scanning features of the HP All-in-One to do the following:
● Scan text from an article into your word processor and quote it in a report.
● Print business cards and brochures by scanning a logo and using it in your
publishing software.
● Send photos to friends and relatives by scanning your favorite prints and
including them in e-mail messages.
● Create a photographic inventory of your house or office.
● Archive treasured photos in an electronic scrapbook.
● Scan an image
● Stop scanning
Scan an image
You can start a scan from your computer or from the HP All-in-One. This section
explains how to scan from the control panel of the HP All-in-One only.
To use the scan features, the HP All-in-One and computer must be connected and
turned on. The HP Photosmart Software (Windows) or HP Photosmart Mac Software
(Mac) must also be installed and running on your computer prior to scanning.
● On a Windows computer, look for the HP Digital Imaging Monitor icon in the
Windows system tray (at the lower right side of the screen, near the time) to verify
the software is running.
User Guide
Note Closing the HP Digital Imaging Monitor icon in the Windows
system tray can cause the HP All-in-One to lose some of its scan
functionality and result in the No Connection error message. If this
happens, you can restore full functionality by restarting your computer or
by starting the HP Photosmart Software.
● On a Mac, the software is always running.
Tip You can use the HP Photosmart Software (Windows) or HP Photosmart
Mac Software (Mac) to scan images, including panorama images. Using this
software, you can also edit, print, and even share your scanned images. For
more information, see the onscreen Help that came with the HP All-in-One.
Scan
To scan to a computer
1. Load your originals print side down and top first in the center of the document
feeder tray.
2. Press Scan.
69
Page 73

Chapter 8
The Scan To menu appears on the display.
3. Press OK to select the default application to receive the scan, or use the arrow
buttons to highlight a different application, and then press OK.
The HP All-in-One sends the scan to the selected application.
Stop scanning
To stop scanning
➔
Press Cancel on the control panel.
Tip To force the scan to be in black and white, press Start Black instead
of pressing OK.
Scan
70
HP Officejet 4300 All-in-One series
Page 74

Maintain the HP All-in-One
9
Maintain the HP All-in-One
The HP All-in-One requires little maintenance. Sometimes you might want to clean the
glass strip inside the automatic document feeder to ensure that your copies and scans
remain clear. You will also need to replace, align, or clean your print cartridges from
time to time. This section provides instructions for keeping the HP All-in-One in top
working condition. Perform these simple maintenance procedures as necessary.
● Clean the HP All-in-One
● Print a self-test report
● Work with print cartridges
Clean the HP All-in-One
To ensure that your copies and scans remain clear, you might need to clean the glass
strip or white strip inside the automatic document feeder. You might also want to dust
the exterior of the HP All-in-One.
● Clean the glass strip
● Clean the white strip
● Clean the exterior
Clean the glass strip
Minor debris can accumulate on the glass strip located inside the automatic document
feeder. This can cause print quality issues such as streaks or lines to appear on your
printouts.
User Guide
To clean the glass strip inside the automatic document feeder
1. Turn off the HP All-in-One, and unplug the power cord.
Note Depending how long the HP All-in-One is unplugged, the date and
time might be erased. You might need to reset the date and time later,
when you plug the power cord back in.
2. Lift the cover of the automatic document feeder.
There is a glass strip under the automatic document feeder.
71
Page 75

Chapter 9
Maintain the HP All-in-One
3. Clean the glass strip with a soft cloth or sponge slightly moistened with a
nonabrasive glass cleaner.
Caution Do not use abrasives, acetone, benzene, or carbon
tetrachloride on the glass, since they can damage it. Do not place or spray
liquid directly on the glass. The liquid might seep under the glass and
damage the device.
4. Close the automatic document feeder cover.
5. Plug in the power cord, and then turn on the HP All-in-One.
Caution Make sure you close the automatic document feeder cover before
loading any paper or originals. If you do not close the cover, you might
damage the mechanism.
Clean the white strip
Minor debris can accumulate on the white strip located inside the automatic document
feeder.
To clean the white strip
1. Turn off the HP All-in-One, and unplug the power cord.
2. Lift the cover of the automatic document feeder.
72
Note Depending how long the HP All-in-One is unplugged, the date and
time might be erased. You might need to reset the date and time later,
when you plug the power cord back in.
HP Officejet 4300 All-in-One series
Page 76

3. Clean the white strip with a soft cloth or sponge slightly moistened with a mild
soap and warm water.
Wash the strip gently to loosen debris. Do not scrub the strip.
Maintain the HP All-in-One
4. If further cleaning is needed, repeat the previous steps using isopropyl (rubbing)
alcohol, and wipe the strip thoroughly with a damp cloth to remove any residual
alcohol.
5. Close the automatic document feeder cover.
6. Plug in the power cord, and then turn on the HP All-in-One.
Caution Make sure you close the automatic document feeder cover before
loading any paper or originals. If you do not close the cover, you might
damage the mechanism.
Clean the exterior
Use a soft cloth or slightly moistened sponge to wipe dust, smudges, and stains off
the case. The interior of the HP All-in-One does not require cleaning. Keep fluids
away from the control panel and the interior of the HP All-in-One.
Caution To avoid damage to the exterior of the HP All-in-One, do not use
alcohol or alcohol-based cleaning products.
User Guide
Caution Be careful not to spill alcohol on the glass or exterior of the
HP All-in-One, as this might damage the device.
73
Page 77

Chapter 9
Print a self-test report
If you are experiencing problems with printing, print a self-test report before you
replace the print cartridges. This report provides useful information on several aspects
of your device, including your print cartridges.
To print a self-test report
1. Load letter, A4, or legal unused plain white paper into the input tray.
Maintain the HP All-in-One
2. Press Setup.
3. Press 2, then press 4.
This selects Print Report and then selects Self-Test Report.
The HP All-in-One prints a self-test report, which might indicate the source of the
printing problem. A sample of the ink test area of the report is shown below.
4. Make sure the lines of color extend across the page.
If the black line is missing, faded, streaked, or shows lines, this might indicate a
problem with the black print cartridge in the right slot.
If any of the remaining three lines are missing, faded, streaked, or show lines, this
might indicate a problem with the tri-color print cartridge in the left slot.
If the color bars do not appear as black, cyan, magenta and yellow, you might
need to clean the print cartridges. If the problem is not resolved by cleaning the
print cartridges, you might need to replace the print cartridges.
Work with print cartridges
To ensure the best print quality from the HP All-in-One, you will need to perform some
simple maintenance procedures and, when prompted by a message on the display,
replace the print cartridges.
● Handle the print cartridges
● Replace the print cartridges
● Align the print cartridges
● Clean the print cartridges
● Clean the print cartridge contacts
74
HP Officejet 4300 All-in-One series
Page 78

Handle the print cartridges
Before you replace or clean a print cartridge, you should know the part names and
how to handle the print cartridges.
1 Copper-colored contacts
2 Plastic tape with pink pull tab (must be removed before installing)
3 Ink nozzles under tape
Hold the print cartridges by their black plastic sides, with the label on top. Do not
touch the copper-colored contacts or the ink nozzles.
Maintain the HP All-in-One
Note Handle the print cartridges carefully. Dropping or jarring cartridges can
cause temporary printing problems, or even permanent damage.
Replace the print cartridges
Follow these instructions when the ink level is low.
Note When the ink level for the print cartridge is low, a message appears on
the display. You can also check the ink levels by using the software installed
with the HP All-in-One.
When you receive a low-ink warning message on the display, make sure you have a
replacement print cartridge available. You should also replace the print cartridges
when you see faded text or if you experience print quality issues related to the print
cartridges.
To order print cartridges for the HP All-in-One, go to www.hp.com/learn/suresupply. If
prompted, choose your country/region, follow the prompts to select your product, and
then click one of the shopping links on the page.
For a list of print cartridge numbers, see the back cover of this guide.
User Guide
75
Page 79

Chapter 9
Maintain the HP All-in-One
To replace the print cartridges
1. Make sure the HP All-in-One is on.
Caution If the HP All-in-One is off when you open the print cartridge door
to access the print cartridges, the HP All-in-One will not release the
cartridges for changing. You might damage the HP All-in-One if the print
cartridges are not docked safely on the right side when you try to remove
them.
2. Open the print cartridge door.
The print carriage should move to the far right side of the HP All-in-One. If the
print carriage does not move to the right side, close the door. Then, turn the
HP All-in-One off, and then on again.
3. Wait until the print carriage is idle and silent, and then lightly press down on a
print cartridge to release it.
If you are replacing the tri-color print cartridge, remove the print cartridge from the
slot on the left.
If you are replacing the black print cartridge, remove the print cartridge from the
slot on the right.
76
1 Print cartridge slot for the tri-color print cartridge
2 Print cartridge slot for the black print cartridges
4. Pull the print cartridge toward you out of its slot.
5. If you are removing the print cartridge because it is low or out of ink, recycle the
print cartridge. The HP Inkjet Supplies Recycling Program is available in many
countries/regions, and lets you recycle used print cartridges free of charge. For
more information, go to the following website:
www.hp.com/recycle
6. Remove the new print cartridge from its packaging and, being careful to touch
only the black plastic, gently remove the plastic tape by using the pink pull tab.
HP Officejet 4300 All-in-One series
Page 80

1 Copper-colored contacts
2 Plastic tape with pink pull tab (must be removed before installing)
3 Ink nozzles under tape
Caution Do not touch the copper-colored contacts or ink nozzles.
Touching these parts can result in clogs, ink failure, and bad electrical
connections.
7. Slide the new print cartridge forward into the empty slot. Then gently push on the
upper part of the print cartridge forward until it clicks into the socket.
If you are installing the tri-color print cartridge, slide it into the left slot.
If you are installing a black print cartridge, slide it into the right slot.
Maintain the HP All-in-One
User Guide
8. Close the print cartridge door.
9. If you installed a new print cartridge, the print cartridge alignment process begins.
10. Make sure you have plain paper loaded in the input tray, and then press OK.
77
Page 81

Chapter 9
11. Load the print cartridge alignment sheet print side down and top first in the center
Align the print cartridges
Maintain the HP All-in-One
The HP All-in-One prompts you to align cartridges every time you install or replace a
print cartridge. You can also align the print cartridges at any time from the control
panel or by using the software you installed with the HP All-in-One. Aligning the print
cartridges ensures high-quality output.
To align the print cartridges from the control panel when prompted
1. Load letter, A4, or legal unused plain white paper into the input tray.
The HP All-in-One prints a print cartridge alignment sheet.
of the document feeder tray, and then press OK.
The HP All-in-One aligns the print cartridges. Recycle or discard the print
cartridge alignment sheet.
Note If you remove and reinstall the same print cartridge, the HP All-in-One
will not prompt you to align the print cartridges. The HP All-in-One remembers
the alignment values for that print cartridge, so you do not need to realign the
print cartridges.
Note If you have colored paper loaded in the input tray when you align
the print cartridges, the alignment will fail. Load unused plain white paper
into the input tray, and then try the alignment again.
If the alignment fails again, you might have a defective sensor or print
cartridge. Contact HP Support. Go to www.hp.com/support. If prompted,
choose your country/region, and then click Contact HP for information on
calling for technical support.
78
The HP All-in-One prints a print cartridge alignment sheet.
2. Load the print cartridge alignment sheet print side down and top first in the center
of the document feeder tray, and then press OK.
The HP All-in-One aligns the print cartridges. Recycle or discard the print
cartridge alignment sheet.
To align the cartridges from the control panel at any time
1. Load letter, A4, or legal unused plain white paper into the input tray.
Note If you have colored paper loaded in the input tray when you align
the print cartridges, the alignment will fail. Load unused plain white paper
into the input tray, and then try the alignment again.
If the alignment fails again, you might have a defective sensor or print
cartridge. Contact HP Support. Go to www.hp.com/support. If prompted,
choose your country/region, and then click Contact HP for information on
calling for technical support.
2. Press Setup.
3. Press 6, then press 2.
This selects Tools and then selects Align Print Cartridge.
HP Officejet 4300 All-in-One series
Page 82

The HP All-in-One prints a print cartridge alignment sheet.
4. Load the print cartridge alignment sheet print side down and top first in the center
of the document feeder tray, and then press OK.
The HP All-in-One aligns the print cartridges. Recycle or discard the print
cartridge alignment sheet.
Clean the print cartridges
Use this feature when the self-test report shows streaking, white lines through any of
the lines of color or when a color is muddy after installing a print cartridge for the first
time. Do not clean print cartridges unnecessarily, as this wastes ink and shortens the
life of the ink nozzles.
To clean the print cartridges from the control panel
1. Load letter, A4, or legal unused plain white paper into the input tray.
2. Press Setup.
3. Press 6, then press 1.
This selects Tools and then selects Clean Print Cartridge.
The HP All-in-One prints a page that you can recycle or discard.
If copy or print quality still seems poor after you clean the print cartridges, try
cleaning the print cartridge contacts before replacing the affected print cartridge.
Clean the print cartridge contacts
Clean the print cartridge contacts only if you get repeated messages on the display
prompting you to check a print cartridge after you already have cleaned or aligned the
print cartridges.
Before cleaning the print cartridge contacts, remove the print cartridge and verify that
nothing is covering the print cartridge contacts, then reinstall the print cartridge. If you
continue to get messages to check the print cartridges, clean the print cartridge
contacts.
Make sure you have the following materials available:
● Dry foam rubber swabs, lint-free cloth, or any soft material that will not come
apart or leave fibers.
Maintain the HP All-in-One
User Guide
Tip Coffee filters are lint-free and work well for cleaning print cartridges.
● Distilled, filtered, or bottled water (tap water might contain contaminants that can
damage the print cartridges).
Caution Do not use platen cleaners or alcohol to clean the print
cartridge contacts. These can damage the print cartridge or the HP All-inOne.
To clean the print cartridge contacts
1. Turn on the HP All-in-One and open the print cartridge door.
79
Page 83

Chapter 9
The print carriage moves to the far right side of the HP All-in-One.
2. Wait until the print carriage is idle and silent, and then unplug the power cord
from the back of the HP All-in-One.
Note Depending how long the HP All-in-One is unplugged, the date and
time might be erased. You might need to reset the date and time later,
when you plug the power cord back in.
Maintain the HP All-in-One
3. Lightly press down on the print cartridge to release it, and then pull it toward you
out of the slot.
Note Do not remove both print cartridges at the same time. Remove and
clean each print cartridge one at a time. Do not leave a print cartridge
outside the HP All-in-One for more than 30 minutes.
4. Inspect the print cartridge contacts for ink and debris buildup.
5. Dip a clean foam rubber swab or lint-free cloth into distilled water, and squeeze
any excess water from it.
6. Hold the print cartridge by its sides.
7. Clean only the copper-colored contacts. Allow the print cartridges to dry for
approximately ten minutes.
1 Copper-colored contacts
2 Ink nozzles (do not clean)
8. Slide the print cartridge back into the slot. Push the print cartridge forward until it
clicks into place.
9. Repeat if necessary for the other print cartridge.
10. Gently close the print cartridge door and plug the power cord into the back of the
HP All-in-One.
80
HP Officejet 4300 All-in-One series
Page 84

10
Order supplies
You can order HP products, such as recommended types of paper and print
cartridges, online from the HP website.
● Order paper, or other media
● Order print cartridges
● Order other supplies
Order paper, or other media
To order HP papers and other supplies, such as HP Premium Photo Papers or HP Allin-One Paper, go to www.hp.com/learn/suresupply. If prompted, choose your country/
region, follow the prompts to select your product, and then click one of the shopping
links on the page.
Order print cartridges
For a list of print cartridge numbers, see the back cover of this guide. You can also
use the software that came with the HP All-in-One to find out the reorder number for
all the print cartridges. You can order print cartridges online from the HP website.
Additionally, you can contact a local HP reseller to find out the correct print cartridge
reorder numbers for your device and purchase print cartridges.
To order HP papers and other supplies, go to www.hp.com/learn/suresupply. If
prompted, choose your country/region, follow the prompts to select your product, and
then click one of the shopping links on the page.
Order supplies
User Guide
Note Ordering print cartridges online is not supported in all countries/regions.
If it is not supported in your country/region, contact a local HP reseller for
information about purchasing print cartridges.
To order print cartridges through the HP Photosmart Software
1. In the HP Solution Center, click Settings, point to Print Settings, and then click
Printer Toolbox.
Note You can also open the Printer Toolbox from the Print Properties
dialog box. In the Print Properties dialog box, click the Services tab, and
then click Service this device.
2. Click the Estimated Ink Levels tab.
3. Click Print Cartridge Ordering Information.
The print cartridge reorder numbers appear.
4. Click Order Online.
HP sends detailed printer information, including model number, serial number,
and ink supply levels, to an authorized online reseller. The supplies you need are
preselected; you can change quantities, add or remove items, and then check out.
81
Page 85

Chapter 10
To find out the reorder number through the HP Photosmart Mac Software
1. In the HP Photosmart Studio task bar, click Devices.
The HP Device Manager window appears.
2. Make sure the HP All-in-One is selected in the Devices pop-up menu.
3. From the Information and Settings pop-up menu, choose Maintain Printer.
The Select Printer window appears.
4. If the Select Printerdialog box appears, choose the HP All-in-One, and click
Launch Utility.
The HP Printer Utility window appears.
5. In the Configuration Settings list, click Supply Info.
The print cartridge reorder numbers appear.
6. If you want to order print cartridges, click Supplies Status in the Configuration
Settings area, and then click Order HP Supplies.
Order other supplies
To order other supplies, such as HP All-in-One software, a copy of the User Guide, a
Setup Guide, or other customer-replaceable parts, call the phone number for your
Order supplies
country/region.
Country/region
Asia Pacific (except for Japan) 65 272 5300
Australia 1300 721 147
Europe +49 180 5 290220 (Germany)
New Zealand 0800 441 147
South Africa +27 (0)11 8061030
U.S. and Canada 1-800-HP-INVENT (1-800-474-6836)
To order supplies in other countries/regions not listed in the table, go to www.hp.com/
support. If prompted, choose your country/region, and then click Contact HP for
information on calling for technical support.
Number for ordering
+44 870 606 9081 (U.K.)
82
HP Officejet 4300 All-in-One series
Page 86

11
Troubleshooting information
This chapter contains troubleshooting information for the HP All-in-One. Specific
information is provided for installation and configuration issues, and some operational
topics. For more troubleshooting information, see the onscreen Help that came with
your software.
Many issues are caused when the HP All-in-One is connected to the computer using a
USB cable before the HP All-in-One software is installed on the computer. If you
connected the HP All-in-One to your computer before the software installation screen
prompts you to do so, you must follow these steps:
Troubleshooting common setup issues
1. Disconnect the USB cable from the computer.
2. Uninstall the software (if you have already installed it).
3. Restart your computer.
4. Turn off the HP All-in-One, wait one minute, then restart it.
5. Reinstall the HP All-in-One software.
Caution Do not connect the USB cable to the computer until prompted by the
software installation screen.
For information about uninstalling and reinstalling the software, see Uninstall and
reinstall the software.
See the list below for information on other topics covered in this chapter.
Troubleshooting
Additional troubleshooting topics in this User Guide
● Setup troubleshooting: Contains information on hardware setup, software
installation, and fax setup troubleshooting information.
● Operational troubleshooting: Contains information on issues that might occur
during normal tasks when using the HP All-in-One features.
Additional sources of information are also available for helping you troubleshoot
issues you might have with the HP All-in-One or HP Photosmart Software. See Find
more information.
If you are unable to solve the problem using the onscreen Help or HP websites, call
HP Support using the number for your country/region.
View the Readme file
You might want to refer to the Readme file for information on system requirements
and possible installation problems.
● From a Windows computer, you can access the Readme file by clicking Start,
pointing to Programs or All Programs, pointing to HP, pointing to OfficeJet All-
In-One 4300 series, and then clicking Readme.
● From a Mac, you can access the Readme file by double-clicking the icon located
in the top-level folder of the HP All-in-One software CD-ROM.
User Guide
83
Page 87

Chapter 11
Setup troubleshooting
This section includes installation and configuration troubleshooting tips for some of the
most common issues associated with hardware, software, and fax setup.
Hardware setup troubleshooting
Use this section to solve any problems you might encounter while setting up the
HP All-in-One hardware.
The HP All-in-One will not turn on
Cause The HP All-in-One is not properly connected to a power supply.
Solution
● Make sure the power cord is firmly connected to both the HP All-in-One and
the power adaptor. Plug the power cord into a grounded power outlet, surge
protector, or power strip.
Troubleshooting
84
1 Power connection
2 Power cord and adaptor
3 Grounded power outlet
● If you are using a power strip, make sure the power strip is on. Or, try
plugging the HP All-in-One directly into a grounded power outlet.
● Test the power outlet to make sure it is working. Plug in an appliance that
you know works, and see if the appliance has power. If not, then there might
be a problem with the power outlet.
● If you plugged the HP All-in-One into a switched outlet, make sure the switch
is on. If it is switched to on but still does not work, then there might be a
problem with the power outlet.
Cause You pressed the On button too quickly.
Solution The HP All-in-One might not respond if you press the On button too
quickly. Press the On button once. It might take a few minutes for the HP All-inOne to turn on. If you press the On button again during this time, you might turn
the device off.
HP Officejet 4300 All-in-One series
Page 88

Warning If the HP All-in-One still does not turn on, it might have a
mechanical failure. Unplug the HP All-in-One from the power outlet and
contact HP. Go to:
www.hp.com/support
If prompted, choose your country/region, and then click Contact HP for
information on calling for technical support.
I connected the USB cable, but I am having problems using the HP All-in-One
with my computer
Solution You must first install the software that came with the HP All-in-One
before connecting the USB cable. During installation, do not plug in the USB
cable until prompted by the onscreen instructions. Connecting the USB cable
before prompted can cause errors.
Once you have installed the software, connecting your computer to the HP All-inOne with a USB cable is straightforward. Simply plug one end of the USB cable
into the back of your computer and the other into the back of the HP All-in-One.
You can connect to any USB port on the back of your computer.
User Guide
Troubleshooting
For more information on installing the software and connecting the USB cable,
see the Setup Guide that came with the HP All-in-One.
I received a message on the display to attach the control panel faceplate
Solution This might mean the control panel faceplate is not attached, or it is
attached incorrectly. Make sure to align the faceplate over the buttons on the top
of the HP All-in-One and snap it firmly into place. Ensure that there are no
buttons trapped under the cover and that all buttons are visible and extend to the
same height.
85
Page 89

Chapter 11
For more information on attaching the control panel faceplate, see the Setup
Guide that came with the HP All-in-One.
The display shows the wrong language
Solution You can change the language settings at any time from the Setup
Menu. For more information, see Set your language and country/region.
The wrong measurements are showing in menus on the display
Solution You might have selected the incorrect country/region when setting up
the HP All-in-One. The country/region you select determines the paper sizes
shown on the display.
To change the country/region, you must reset the language settings. You can
change the language settings at any time from the Setup Menu. For more
information, see Set your language and country/region.
Troubleshooting
86
I received a message on the display to align the print cartridges
Solution The HP All-in-One prompts you to align cartridges every time you
install a new print cartridge. For more information, see Align the print cartridges.
Note If you remove and reinstall the same print cartridge, the HP All-in-
One will not prompt you to align the print cartridges. The HP All-in-One
remembers the alignment values for that print cartridge, so you do not
need to realign the print cartridges.
I received a message on the display that the print cartridge alignment failed
Cause The incorrect type of paper is loaded in the input tray (for example,
colored paper, paper with text on it or, certain recycled paper).
Solution Load unused plain white letter or A4 paper into the input tray, and
then try the alignment again.
HP Officejet 4300 All-in-One series
Page 90

If the alignment fails again, you might have a defective sensor or print cartridge.
Contact HP Support. Go to www.hp.com/support. If prompted, choose your
country/region, and then click Contact HP for information on calling for technical
support.
Cause Protective tape is covering the print cartridges.
Solution Check each print cartridge. The tape might have been removed from
the copper-colored contacts, but still might cover the ink nozzles. If the tape is still
covering the ink nozzles, carefully remove the tape from the print cartridges. Do
not touch the ink nozzles or the copper-colored contacts.
Reinsert the print cartridges and verify that they are fully inserted and locked in
place.
For more information about installing print cartridges, see Replace the print
cartridges.
Cause The contacts on the print cartridge are not touching the contacts in the
print carriage.
Solution Remove and then reinsert the print cartridges. Verify that they are fully
inserted and locked in place.
For more information about installing print cartridges, see Replace the print
cartridges.
Cause The print cartridge or sensor is defective.
Solution Contact HP Support. Go to www.hp.com/support. If prompted, choose
your country/region, and then click Contact HP for information on calling for
technical support.
Troubleshooting
User Guide
The HP All-in-One does not print
Solution If the HP All-in-One and computer are not communicating with each
other, try the following:
● Look at the display on the HP All-in-One. If the display is blank and the light
next to the On button is not lit, the HP All-in-One is turned off. Make sure the
power cord is firmly connected to the HP All-in-One and plugged into a
power outlet. Press the On button to turn on the HP All-in-One.
● Make sure the print cartridges are installed.
● Make sure you have paper loaded in the input tray.
● Check that the HP All-in-One does not have a paper jam.
● Check that the print carriage is not jammed.
Open the print cartridge door to access the print carriage area. Remove any
objects that are blocking the print carriage, including any packing materials.
Turn the HP All-in-One off and then turn it on again.
● Check that the HP All-in-One print queue is not paused (Windows) or
stopped (Mac). If it is, choose the appropriate setting to resume printing. For
87
Page 91

Chapter 11
more information about accessing the print queue, see the documentation
that came with the operating system installed on your computer.
● Check the USB cable. If you are using an older cable, it might not be working
properly. Try connecting it to another product to see if the USB cable works.
If you experience problems, the USB cable might need to be replaced. Also
verify that the cable does not exceed 3 meters (9.8 feet) in length.
● Make sure your computer is USB ready. Some operating systems, such as
Windows 95 and Windows NT, do not support USB connections. Check the
documentation that came with your operating system for more information.
● Check the connection from the HP All-in-One to your computer. Verify that
the USB cable is securely plugged into the USB port on the back of the
HP All-in-One. Make sure the other end of the USB cable is plugged into a
USB port on your computer. After the cable is connected properly, turn the
HP All-in-One off and then on again.
Troubleshooting
88
● If you are connecting the HP All-in-One through a USB hub, make sure the
hub is turned on. If the hub is on, try connecting directly to your computer.
● Check other printers or scanners. You might need to disconnect older
products from your computer.
● Try connecting the USB cable to another USB port on your computer. After
you check the connections, try restarting your computer. Turn the HP All-inOne off and then on again.
● After you check the connections, try restarting your computer. Turn the
HP All-in-One off and then on again.
● If necessary, remove and then install the software you installed with the
HP All-in-One again. For more information, see Uninstall and reinstall the
software.
For more information on setting up the HP All-in-One and connecting it to your
computer, see the Setup Guide that came with the HP All-in-One.
I received a message on the display about a paper jam or a blocked carriage
Solution If either a paper jam or blocked carriage error message appears on
the display, there might be some packing material inside the HP All-in-One. Look
inside the device, including the print cartridge door.
HP Officejet 4300 All-in-One series
Page 92

If you remove any packaging material, turn off the HP All-in-One, and then turn it
on again.
Software installation troubleshooting
If you encounter a problem during software installation, see the topics below for a
possible solution. If you encounter a hardware problem during setup, see Hardware
setup troubleshooting.
During a normal installation of the HP All-in-One software, the following events occur:
1. The HP All-in-One software CD-ROM runs automatically.
2. The software installs.
3. Files are copied to your computer.
4. You are requested to connect the HP All-in-One to your computer.
5. A green OK and check mark appear on an installation wizard screen.
6. You are requested to restart your computer.
7. The Fax Setup Wizard (Windows) or Fax Setup Utility (Mac) runs.
8. The registration process runs.
If any of these things did not occur, there might be a problem with the installation.
To check the installation on a Windows computer, verify the following:
● Start the HP Solution Center and check to make sure the following buttons
appear: Scan Picture, Scan Document, Send a Fax. If the icons do not appear
immediately, you might need to wait a few minutes for the HP All-in-One to
connect to your computer. Otherwise, see Some of the buttons are missing in the
HP Solution Center (Windows).
● Open the Printers dialog box and check to see that the HP All-in-One is listed.
● Look in the system tray at the far right of the Windows taskbar for an HP All-in-
One icon. This indicates that the HP All-in-One is ready.
Troubleshooting
User Guide
When I insert the CD-ROM into my computer’s CD-ROM drive, nothing happens
Solution If the installation does not run automatically, you can start it manually.
To start the installation from a Windows computer
1. From the Windows Start menu, click Run.
2. In the Run dialog box, enter d:\setup.exe, and then click OK.
If your CD-ROM drive is not assigned to drive letter D, enter the appropriate
drive letter.
To start the installation from a Mac
1. Double-click the CD icon on your desktop to view the contents of the CD.
2. Double-click the installation icon.
89
Page 93

Chapter 11
The minimum system checks screen appears (Windows)
Solution Your system does not meet the minimum requirements to install the
software. Click Details to see what the specific problem is, and then correct the
problem before attempting to install the software.
You can also try installing HP Photosmart Essential instead. HP Photosmart
Essential provides less functionality than the HP Photosmart Premier software,
but it requires less space and memory on your computer.
For more information about installing the HP Photosmart Essential software, see
the Setup Guide that came with the HP All-in-One.
A red X appears on the USB connect prompt
Solution Normally, a green check appears indicating that the plug and play is
successful. A red X indicates that the plug and play failed.
Do the following:
1. Verify that the control panel faceplate is firmly attached, unplug the HP All-inOne power cord, and then plug it in again.
2. Verify that the USB cable and power cord are plugged in.
Troubleshooting
90
3. Click Retry to retry the plug and play setup. If this does not work, continue to
the next step.
4. Verify that the USB cable is set up properly as follows:
– Unplug the USB cable and plug it in again.
– Do not attach the USB cable to a keyboard or non-powered hub.
– Verify that the USB cable is 3 meters (9.8 feet) or less in length.
– If you have several USB devices attached to your computer, you might
want to unplug the other devices during the installation.
5. Continue with the installation and restart the computer when prompted.
6. If you are using a Windows computer, open the HP Solution Center and
check for the essential icons (Scan Picture, Scan Document, and Send a
Fax). If the essential icons do not appear, remove the software and then
reinstall it. For more information, see Uninstall and reinstall the software.
HP Officejet 4300 All-in-One series
Page 94

I received a message that an unknown error has occurred
Solution Try to continue with the installation. If that does not work, stop and
then restart the installation, and follow the directions on the screen. If an error
occurs, you might need to uninstall and then reinstall the software. Do not simply
delete the HP All-in-One application files from your computer. Make sure to
remove them properly using the uninstall utility provided when you installed the
software that came with the HP All-in-One.
For more information, see Uninstall and reinstall the software.
Some of the buttons are missing in the HP Solution Center (Windows)
If the essential icons (Scan Picture, Scan Document, and Send a Fax) do not
appear, your installation might not be complete.
Solution If your installation is incomplete, you might need to uninstall and then
reinstall the software. Do not simply delete the HP All-in-One application files
from your hard drive. Make sure to remove them properly using the uninstall utility
provided in the HP All-in-One program group. For more information, see Uninstall
and reinstall the software.
The Fax Setup Wizard (Windows) or Fax Setup Utility (Mac) does not start
Solution You can manually start the Fax Setup Wizard (Windows) or Fax
Setup Utility (Mac) to finish setting up the HP All-in-One.
User Guide
To start the Fax Setup Wizard (Windows)
➔
In the HP Solution Center, click Settings, point to Fax Settings & Setup,
and then click Fax Setup Wizard.
To start the Fax Setup Utility (Mac)
1. In the HP Photosmart Studio task bar, click Devices.
The HP Device Manager window appears.
2. In the Devices pop-up menu, choose the HP All-in-One.
3. In the Information and Settings pop-up menu, choose Fax Setup Utility.
The registration screen does not appear (Windows)
Solution You can access the registration (Sign up now) screen from the
Windows taskbar by clicking Start, pointing to Programs or All Programs, HP,
OfficeJet All-In-One 4300 series, and then clicking Product Registration.
The HP Digital Imaging Monitor does not appear in the system tray (Windows)
Solution If the HP Digital Imaging Monitor does not appear in the system tray
(normally located at the lower-right corner of the desktop), start the HP Solution
Center to check whether or not the essential icons are there.
Troubleshooting
91
Page 95

Chapter 11
For more information about missing essential buttons in the HP Solution Center,
see Some of the buttons are missing in the HP Solution Center (Windows).
Uninstall and reinstall the software
If your installation is incomplete, or if you connected the USB cable to the computer
before prompted by the software installation screen, you might need to uninstall and
then reinstall the software. Do not simply delete the HP All-in-One application files
from your computer. Make sure to remove them properly using the uninstall utility
provided when you installed the software that came with the HP All-in-One.
A reinstall can take from 20 to 40 minutes. There are three methods to uninstall the
software on a Windows computer, and one method to uninstall on a Mac.
To uninstall from a Windows computer, method 1
1. Disconnect the HP All-in-One from your computer. Do not connect the HP All-inOne to your computer until after you have reinstalled the software.
2. Press the On button to turn off the HP All-in-One.
3. On the Windows taskbar, click Start, Programs or All Programs, HP, OfficeJet
All-In-One 4300 series, Uninstall.
4. Follow the onscreen instructions.
5. If you are asked whether you would like to remove shared files, click No.
Other programs that use these files might not work properly if the files are deleted.
6. Restart your computer.
Troubleshooting
Note It is important that you disconnect the HP All-in-One before
restarting your computer. Do not connect the HP All-in-One to your
computer until after you have reinstalled the software.
7. To reinstall the software, insert the HP All-in-One CD-ROM into your computer’s
CD-ROM drive, and follow the onscreen instructions and the instructions provided
in the Setup Guide that came with the HP All-in-One.
8. After the software is installed, connect the HP All-in-One to your computer.
9. Press the On button to turn the HP All-in-One on.
After connecting and turning on the HP All-in-One, you might have to wait several
minutes for all of the Plug and Play events to complete.
10. Follow the onscreen instructions.
When the software installation is complete, the HP Digital Imaging Monitor icon
appears in the Windows system tray.
To verify that the software is properly installed, double-click the HP Solution Center
icon on the desktop. If the HP Solution Center shows the essential icons (Scan
Picture, Scan Document, and Send a Fax), the software has been properly installed.
92
HP Officejet 4300 All-in-One series
Page 96

To uninstall from a Windows computer, method 2
Note Use this method if Uninstall is not available in the Windows Start menu.
1. On the Windows taskbar, click Start, Settings, Control Panel.
2. Double-click Add/Remove Programs.
3. Select HP PSC & Officejet 6.0, and then click Change/Remove.
Follow the onscreen instructions.
4. Disconnect the HP All-in-One from your computer.
5. Restart your computer.
Note It is important that you disconnect the HP All-in-One before
restarting your computer. Do not connect the HP All-in-One to your
computer until after you have reinstalled the software.
6. Insert the HP All-in-One CD-ROM into your computer’s CD-ROM drive and then
start the Setup program.
7. Follow the onscreen instructions and the instructions provided in the Setup Guide
that came with the HP All-in-One.
To uninstall from a Windows computer, method 3
Note Use this method if Uninstall is not available in the Windows Start menu.
1. Insert the HP All-in-One CD-ROM into your computer’s CD-ROM drive and then
start the Setup program.
2. Select Uninstall and follow the onscreen directions.
3. Disconnect the HP All-in-One from your computer.
4. Restart your computer.
Troubleshooting
User Guide
Note It is important that you disconnect the HP All-in-One before
restarting your computer. Do not connect the HP All-in-One to your
computer until after you have reinstalled the software.
5. Start the Setup program for the HP All-in-One again.
6. Select Reinstall.
7. Follow the onscreen instructions and the instructions provided in the Setup Guide
that came with the HP All-in-One.
To uninstall from a Mac
1. Disconnect the HP All-in-One from your Mac.
2. Double-click the Applications:Hewlett-Packard folder.
3. Double-click HP Uninstaller.
Follow the onscreen instructions.
4. After the software is uninstalled, disconnect the HP All-in-One, and then restart
your computer.
93
Page 97

Chapter 11
5. To reinstall the software, insert the HP All-in-One CD-ROM into your computer’s
CD-ROM drive.
6. On the desktop, open the CD-ROM and then double-click HP All-in-One Installer.
7. Follow the onscreen instructions and the instructions provided in the Setup Guide
that came with the HP All-in-One.
Fax setup troubleshooting
This section contains fax setup troubleshooting information for the HP All-in-One. If
the HP All-in-One is not set up properly for faxing, you might experience problems
when sending faxes, receiving faxes, or both.
If you are having faxing problems, you can print a fax test report to check the status of
the HP All-in-One. The test will fail if the HP All-in-One is not set up properly for
faxing. Perform this test after you have completed setting up the HP All-in-One for
faxing. For more information, see Test your fax setup.
If the test fails, review the report for information on how to fix any problems found. For
more information, you can also see the next section, The fax test failed.
The fax test failed
If you ran a fax test and the test failed, review the report for basic information about
the error. For more detailed information, check the report to see which part of the test
failed, and then review the appropriate topic in this section for solutions to try.
● The "Fax Hardware Test" failed
● The "Fax Connected to Active Telephone Wall Jack" test failed
● The "Phone Cord Connected to Correct Port on Fax" test failed
● The "Using Correct Type of Phone Cord with Fax" test failed
Troubleshooting
● The "Dial Tone Detection" test failed
● The "Fax Line Condition" test failed
Note It is important that you disconnect the HP All-in-One before
restarting your computer. Do not connect the HP All-in-One to your
computer until after you have reinstalled the software.
94
The "Fax Hardware Test" failed
Solution
● Turn off the HP All-in-One by using the On button located on the control
panel and then unplug the power cord from the back of the HP All-in-One.
After a few seconds, plug the power cord back in and turn the power on. Run
the test again. If the test fails again, continue reviewing the troubleshooting
information in this section.
● Try to send or receive a test fax. If you can send or receive a fax
successfully, there might not be a problem.
● If you are running the test from the Fax Setup Wizard (Windows) or Fax
Setup Utility (Mac), make sure the HP All-in-One is not busy completing
another task, such as receiving a fax or making a copy. Check the display for
HP Officejet 4300 All-in-One series
Page 98

a message indicating that the HP All-in-One is busy. If it is busy, wait until it
is finished and in the idle state, before running the test.
● Make sure you use the phone cord that came with the HP All-in-One. If you
do not use the supplied phone cord to connect from the telephone wall jack
to the HP All-in-One, you might not be able to send or receive faxes. After
you plug in the phone cord that came with the HP All-in-One, run the fax test
again.
● If you are using a phone splitter, this can cause faxing problems. (A splitter is
a two-cord connector that plugs into a telephone wall jack.) Try removing the
splitter and connecting the HP All-in-One directly to the telephone wall jack.
After you resolve any problems found, run the fax test again to make sure it
passes and the HP All-in-One is ready for faxing. If the Fax Hardware Test
continues to fail and you experience problems faxing, contact HP Support. Go to
www.hp.com/support. If prompted, choose your country/region, and then click
Contact HP for information on calling for technical support.
The "Fax Connected to Active Telephone Wall Jack" test failed
Solution
● Check the connection between the telephone wall jack and the HP All-in-One
to make sure the phone cord is secure.
● Make sure you use the phone cord that came with the HP All-in-One. If you
do not use the supplied phone cord to connect from the telephone wall jack
to the HP All-in-One, you might not be able to send or receive faxes. After
you plug in the phone cord that came with the HP All-in-One, run the fax test
again.
● Make sure you have correctly connected the HP All-in-One to the telephone
wall jack. Using the phone cord supplied in the box with the HP All-in-One,
connect one end to your telephone wall jack, then connect the other end to
the port labeled 1-LINE on the back of the HP All-in-One. For more
information on setting up the HP All-in-One for faxing, see Fax setup.
● If you are using a phone splitter, this can cause faxing problems. (A splitter is
a two-cord connector that plugs into a telephone wall jack.) Try removing the
splitter and connecting the HP All-in-One directly to the telephone wall jack.
● Try connecting a working phone and phone cord to the telephone wall jack
that you are using for the HP All-in-One and check for a dial tone. If you do
not hear a dial tone, contact your telephone company and have them check
the line.
● Try to send or receive a test fax. If you can send or receive a fax
successfully, there might not be a problem.
After you resolve any problems found, run the fax test again to make sure it
passes and the HP All-in-One is ready for faxing.
Troubleshooting
User Guide
95
Page 99

Chapter 11
Troubleshooting
The "Phone Cord Connected to Correct Port on Fax" test failed
Solution Plug the phone cord into the correct port.
1. Using the phone cord supplied in the box with the HP All-in-One, connect
one end to your telephone wall jack, then connect the other end to the port
labeled 1-LINE on the back of the HP All-in-One.
Note If you use the 2-EXT port to connect to the telephone wall jack,
you will not be able to send or receive faxes. The 2-EXT port should
only be used to connect other equipment, such as an answering
machine or a telephone.
Back view of the HP All-in-One
1 Telephone wall jack
2 Use the phone cord supplied in the box with the HP All-in-One to connect to the
"1-LINE" port
2. After you have connected the phone cord to the port labeled 1-LINE, run the
fax test again to make sure it passes and the HP All-in-One is ready for faxing.
3. Try to send or receive a test fax.
● Make sure you use the phone cord that came with the HP All-in-One. If you
do not use the supplied phone cord to connect from the telephone wall jack
to the HP All-in-One, you might not be able to send or receive faxes. After
you plug in the phone cord that came with the HP All-in-One, run the fax test
again.
● If you are using a phone splitter, this can cause faxing problems. (A splitter is
a two-cord connector that plugs into a telephone wall jack.) Try removing the
splitter and connecting the HP All-in-One directly to the telephone wall jack.
96
The "Using Correct Type of Phone Cord with Fax" test failed
Solution
● Make sure you used the phone cord supplied in the box with the HP All-inOne to connect to the telephone wall jack. One end of the phone cord should
be connected to the port labeled 1-LINE on the back of the HP All-in-One
and the other end to your telephone wall jack, as shown below.
HP Officejet 4300 All-in-One series
Page 100

1 Telephone wall jack
2 Use the phone cord supplied in the box with the HP All-in-One to connect to the
"1-LINE" port
If the supplied phone cord is not long enough, you can extend it. For
information, see The phone cord that came with my HP All-in-One is not long
enough.
● Check the connection between the telephone wall jack and the HP All-in-One
to make sure the phone cord is secure.
● Make sure you use the phone cord that came with the HP All-in-One. If you
do not use the supplied phone cord to connect from the telephone wall jack
to the HP All-in-One, you might not be able to send or receive faxes. After
you plug in the phone cord that came with the HP All-in-One, run the fax test
again.
● If you are using a phone splitter, this can cause faxing problems. (A splitter is
a two-cord connector that plugs into a telephone wall jack.) Try removing the
splitter and connecting the HP All-in-One directly to the telephone wall jack.
The "Dial Tone Detection" test failed
Solution
● Other equipment, which uses the same phone line as the HP All-in-One,
might be causing the test to fail. To find out if other equipment is causing a
problem, disconnect everything from the phone line, and then run the test
again. If the Dial Tone Detection Test passes without the other equipment,
then one or more pieces of the equipment is causing problems; try adding
them back one at a time and rerunning the test each time, until you identify
which piece of equipment is causing the problem.
● Try connecting a working phone and phone cord to the telephone wall jack
that you are using for the HP All-in-One and check for a dial tone. If you do
not hear a dial tone, contact your telephone company and have them check
the line.
● Make sure you have correctly connected the HP All-in-One to the telephone
wall jack. Using the phone cord supplied in the box with the HP All-in-One,
connect one end to your telephone wall jack, then connect the other end to
the port labeled 1-LINE on the back of the HP All-in-One.
Troubleshooting
User Guide
97
 Loading...