

Page 1

HP NC-Series ServerEngines iSCSISelect User Guide
Part Number 609163-001
March 2010 (First Edition)
Page 2

© Copyright 2010 Hewlett-Packard Development Company, L.P.
The information contained herein is subject to change without notice. The only warranties for HP products and services are set forth in the express
warranty statements accompanying such products and services. Nothing herein should be construed as constituting an additional warranty. HP
shall not be liable for technical or editorial errors or omissions contained herein.
Confidential computer software. Valid license from HP required for possession, use or copying. Consistent with FAR 12.211 and 12.212,
Commercial Computer Software, Computer Software Documentation, and Technical Data for Commercial Items are licensed to the U.S.
Government under vendor’s standard commercial license.
Intended audience
This document is for the person who installs, administers, and troubleshoots servers and storage systems.
HP assumes you are qualified in the servicing of computer equipment and trained in recognizing hazards
in products with hazardous energy levels.
Page 3

Contents
Overview ..................................................................................................................................... 5
iSCSI Overview............................................................................................................................................ 5
Constructing a basic iSCSI SAN .................................................................................................................... 5
Managing an iSCSI session ........................................................................................................................... 5
iSCSISelect .................................................................................................................................. 7
Overview of iSCSISelect ............................................................................................................................... 7
Configuring and managing the iSCSI Initiator .................................................................................. 8
iSCSI Initiator ............................................................................................................................................... 8
Configuring the iSCSI Initiator name .............................................................................................................. 8
Selecting a controller .................................................................................................................................... 9
Configuring network properties ................................................................................................................... 10
Configuring VLAN ID/Priority ...................................................................................................................... 13
Confirming network settings ........................................................................................................................ 15
Target discovery through DHCP ................................................................................................................... 16
Configuring and managing iSCSI targets ....................................................................................... 17
iSCSI targets .............................................................................................................................................. 17
Methods to add iSCSI targets ...................................................................................................................... 17
Configuring an iSCSI target ........................................................................................................................ 18
Managing an iSCSI target .......................................................................................................................... 21
Editing a target configuration ............................................................................................................ 22
Setting an ISID value ........................................................................................................................ 23
Enabling CHAP authentication ........................................................................................................... 23
Pinging a target ............................................................................................................................... 25
Displaying advanced target properties ............................................................................................... 27
Configuring LUN settings .................................................................................................................. 27
Removing a target ............................................................................................................................ 28
Booting the system...................................................................................................................................... 28
Erasing the configuration ............................................................................................................................ 28
Configuring iSCSI boot support .................................................................................................... 30
Setting up a basic iSCSI boot configuration .................................................................................................. 30
Setting up an iSCSI MPIO boot configuration ................................................................................................ 34
iSCSI MPIO boot .............................................................................................................................. 34
Linux ............................................................................................................................................... 34
Windows Server .............................................................................................................................. 35
ESX Server 3.5 ................................................................................................................................ 35
Troubleshooting .......................................................................................................................... 37
Technical support ........................................................................................................................ 39
Before you contact HP ................................................................................................................................ 39
HP contact information ................................................................................................................................ 39
Acronyms and abbreviations ........................................................................................................ 40
Index ......................................................................................................................................... 42
Page 4

Page 5

Overview
iSCSI Overview
The Internet Small Computer System Interface (iSCSI) is an IP-based standard for linking data storage
devices over a network and transferring data by carrying SCSI commands over IP networks.
An iSCSI network consists of one or more iSCSI storage units (targets) connected through a copper or
optical networking cable to 10Gb Ethernet network switches or IP routers. To this network one or more
servers are connected, which are responsible for transferring data to or from the storage units.
When an operating system receives a request it generates the SCSI command and then sends an IP
packet over an Ethernet connection. At the receiving end, the SCSI commands are separated from the
request, and the SCSI commands and data are sent to the SCSI controller and then to the SCSI storage
device. iSCSI also returns a response to the request using the same protocol.
All storage protocols including iSCSI have two ends in the connection; the initiator and the target. In
iSCSI, they are known as the iSCSI initiator and the iSCSI target. Each server or machine directly
accessing an iSCSI target requires an iSCSI initiator. It is the initiator that allows the host system to
communicate directly with iSCSI targets.
Constructing a basic iSCSI SAN
There are three main components that make up an iSCSI SAN:
• iSCSI Targets. An iSCSI SAN has one or more iSCSI targets, which house and make available the
storage used within the SAN. The iSCSI target is the storage device itself or an appliance that
controls and serves volumes or virtual volumes. The target is the device that performs the SCSI
command or bridges it to an attached storage device. iSCSI targets can be disks, RAID arrays, or
even Fibre Channel (FC) fabrics.
• Networking infrastructure. The networking infrastructure in an iSCSI SAN uses Ethernet transport. HP
NC-Series ServerEngines uses the BladeEngine 2 controller. The configuration and complexity of the
storage network depends on its intended function and features required.
• iSCSI Initiators. The initiator allows a given machine access to the storage available in the iSCSI
SAN. It requests all SCSI operations like read or write. An initiator is usually located on the
host/server side either as hardware (iSCSI host bus adapter (HBA)) or software (iSCSI software
initiator). To transport block (SCSI) commands over the IP network, an iSCSI driver must be installed
on the iSCSI host. An iSCSI driver is included with HP NC-Series ServerEngines BE2 adapter.
Managing an iSCSI session
To transmit information from an initiator to the target, the initiator must first establish a session with the
target through an iSCSI login process. The login process:
• Starts a TCP/IP connection
• Verifies that the initiator has access to the target (authentication)
Overview 5
Page 6

• Allows negotiation of various parameters
iSCSI Login
An iSCSI session has two phases:
• Login Phase. iSCSI parameters are negotiated using login requests and responses.
• Full Featured Phase. After security or authentication has occurred and operational parameters have
been set, the initiator performs SCSI I/Os.
Security
Security is a necessary and critical party of the iSCSI protocol because it operates within the Internet
environment.
CHAP Authentication
Challenge Handshake Authentication Protocol (CHAP) is used to periodically verify the identity of the
initiator by the target by using a challenge/response mechanism. This is accomplished upon initial link
establishment and may be repeated any time after the link has been established. For the
challenge/response method to work, the target must know the initiator's secret key and the initiator must
be set up to respond to a challenge.
Although the authentication is only one-way, you can negotiate CHAP in both directions for mutual
authentication with the help of the same secret set.
Overview 6
Page 7

iSCSISelect
Overview of iSCSISelect
The HP NC-Series ServerEngines iSCSISelect is an Int 13h option ROM resident utility used to configure
and manage the HP NC-Series ServerEngines adapter in an iSCSI SAN environment. By configuring your
initiator, you can use iSCSISelect to automatically contact network devices and set up iSCSI boot targets.
With iSCSISelect you can:
• Configure an iSCSI initiator on the network
• Ping targets to determine connectivity with the iSCSI initiator
• Discover and display iSCSI targets and corresponding LUNs
• Initiate boot target discovery through Dynamic Host Configuration Protocol (DHCP)
• Manually configure bootable iSCSI targets
• View initiator properties
• View connected target properties
iSCSISelect 7
Page 8

Configuring and managing the iSCSI Initiator
iSCSI Initiator
Before you begin, gather the following facts about your network:
• Target IP address (for at least your bootable target)
• Initiator IQN name
• Initiator IP address
• Initiator Subnet Mask
In addition, you need to verify that the initiator’s IQN name you choose is listed in the target’s Access
Control List (ACL) so that the targets are configured to recognize the iSCSI initiator name.
If using target discovery through DHCP, you need to add the root path to the DHCP server. See "Target
discovery through DHCP (on page 16)."
Initiator
The iSCSI initiator or host (also known as the iSCSI client or host) is a system such as a server, which
attaches to an IP network and initiates requests and receives responses from an iSCSI target. Each iSCSI
host is identified by a unique iSCSI qualified name (IQN).
Once you have an initiator host system running, you must configure the initiator to allow access to the
iSCSI SAN. To do this, you need to:
• Configure the iSCSI Initiator Name
• Select your controller
• Configure Network Properties
• Verify network settings
Configuring the iSCSI Initiator name
The iSCSI Initiator name is a unique identifier for the initiator on the network and configures target access.
It must be unique to that system on the network and is identified by an IQN. The iSCSI Initiator name is
global to the entire system. The iSCSI Initiator Name must also match the target’s Access Control List
(ACL).
After you log into iSCSISelect, you will be able to configure the iSCSI Initiator Name from the iSCSI
Initiator Configuration menu.
Configuring and managing the iSCSI Initiator 8
Page 9

1.
Log into HP NC-Series ServerEngines iSCSISelect by pressing Ctrl+S when prompted at boot. The
iSCSI Initiator Configuration menu displays.
2. Tab to iSCSI Initiator Name and press Enter.
If there are multiple controllers in your system, the iSCSI Initiator name may be different for each
controller. When this occurs a POST error message indicating an Initiator iSCSI Name mismatch
displays.
You must Save a new initiator name on this menu so that the iSCSI Initiator Name on all the
controllers match. After you exit iSCSISelect and reboot, all logins from the multiple controllers use
the new name.
3. Tab to Boot Support and select Enabled (default) to manually set an iSCSI boot configuration. Or, if
a DHCP server is used to discover boot targets, select Disabled. For more information about boot
support see, "Setting up a basic iSCSI boot configuration (on page 30)."
4. Tab to Save and press Enter to save your selections.
Selecting a controller
Select a controller on which to configure your iSCSI target. This is completed on the Controller Selection
menu. If you are running iSCSISelect with multiple adapters, they all appear on this menu.
Because the HP NC-Series ServerEngines BE2 is a dual-port chip, there are two controllers for each
adapter. Therefore, the Controller Selection Menu always shows two controllers (dual ports) for each
physical adapter.
Configuring and managing the iSCSI Initiator 9
Page 10
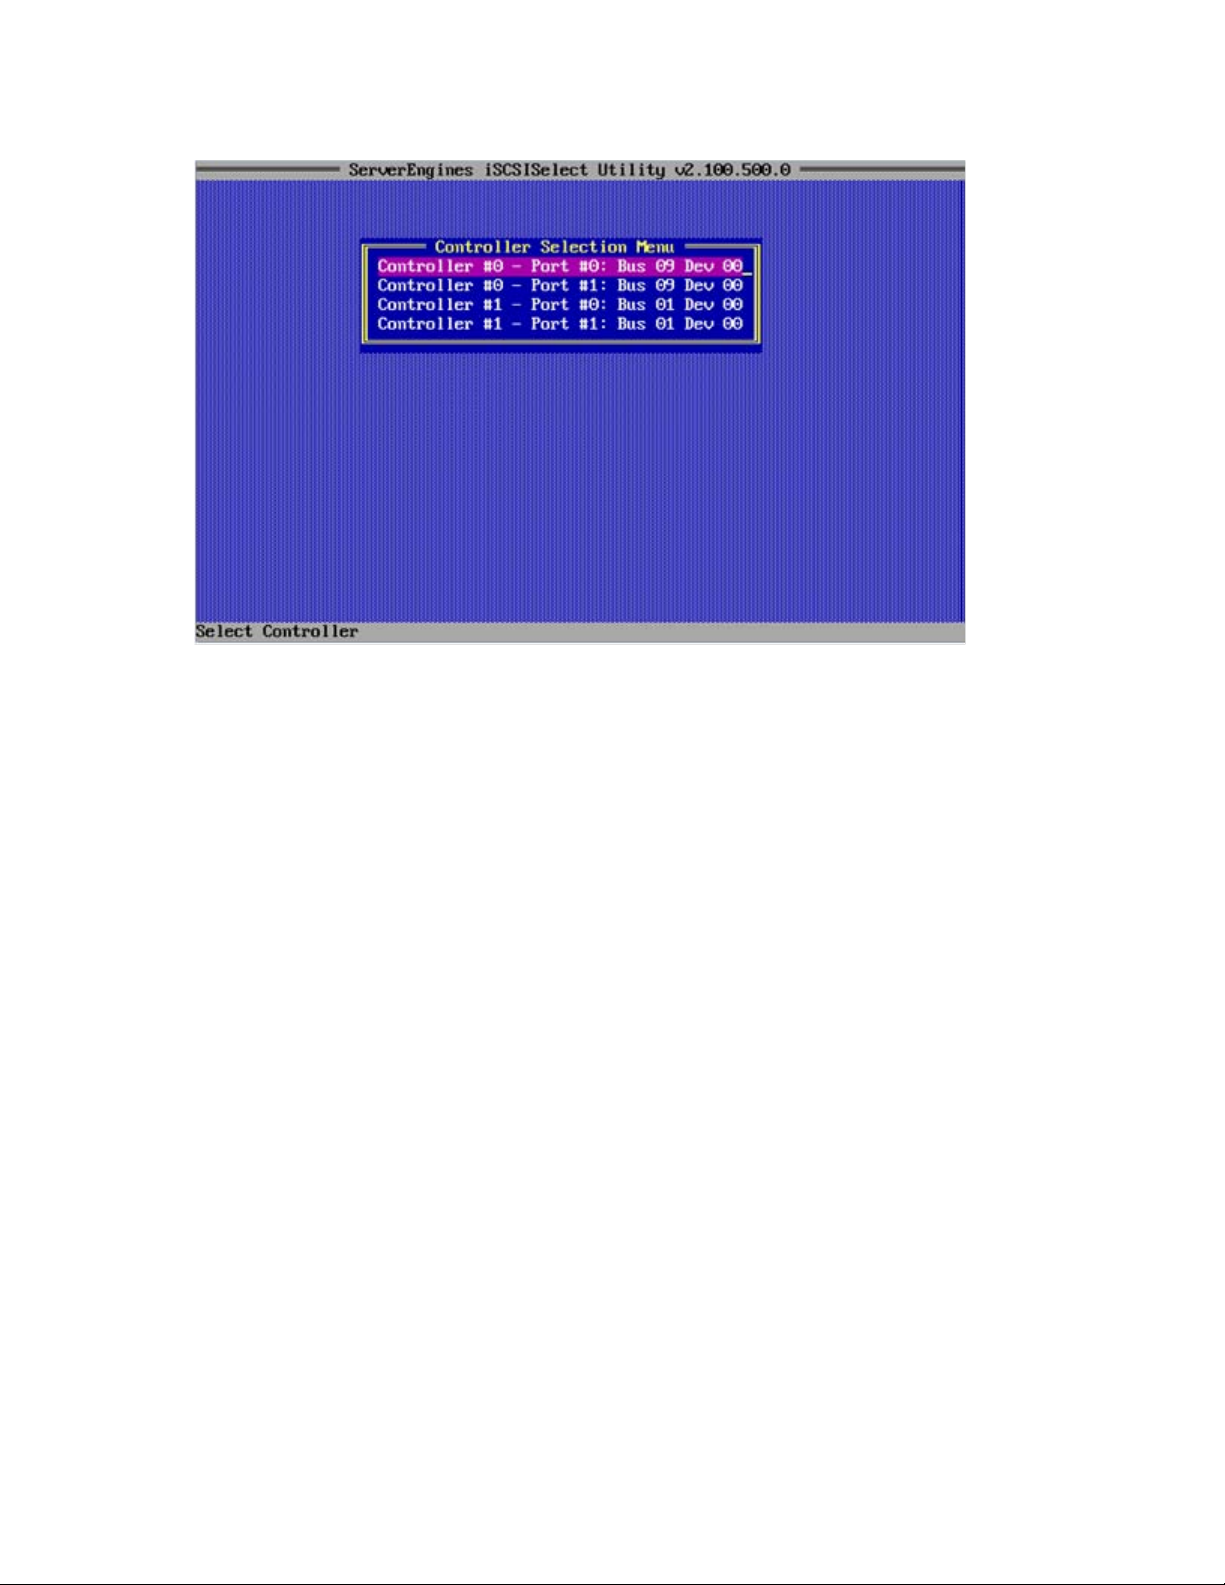
The following is an example of the Controller Configuration menu showing two physical adapters with
two controllers (dual-port) each.
1. To select a controller, select Controller Configuration and press Enter. The Controller Selection Menu
displays.
2. Select a controller and press Enter. The Configuration Controller menu displays. From this menu, you
can continue to configure and manage your iSCSI Initiator and target by selecting the options.
3. If you have selected your controller but are not certain if you are configuring the correct port, verify
the port by completing either of these options:
o Performing Port Identification
See Port Identification in "Configuring VLAN ID/Priority (on page 13)."
o Checking Link Status in the Network Configuration menu
If you plug a cable into your controller, check the Link Status in the Network Configuration menu.
If the status is Link up, it is the correct controller/port. Make sure you back out of the Network
Configuration menu to the Controller Configuration menu before checking the Network
Configuration menu. This allows Link Status to update when you plug your cable in and out of the
controller.
Configuring network properties
The IP Address is a logical address for your controller and uniquely identifies your system on a TCP/IP
network. The IP address can be determined dynamically (by using the DHCP Server to obtain an IP
address) or statically (manually assigned).
The method that you choose depends on your network configuration. If your network uses a DHCP
configuration, then you can enable DHCP and get an IP address from the DHCP server. If there is no
DHCP server available, you can configure a static IP address.
If using target discovery through DHCP, you need to add the root path to the DHCP server and enable
DHCP discovery through iSCSISelect. For more information, see "Target discovery through DHCP (on
page 16)."
Configuring and managing the iSCSI Initiator 10
Page 11
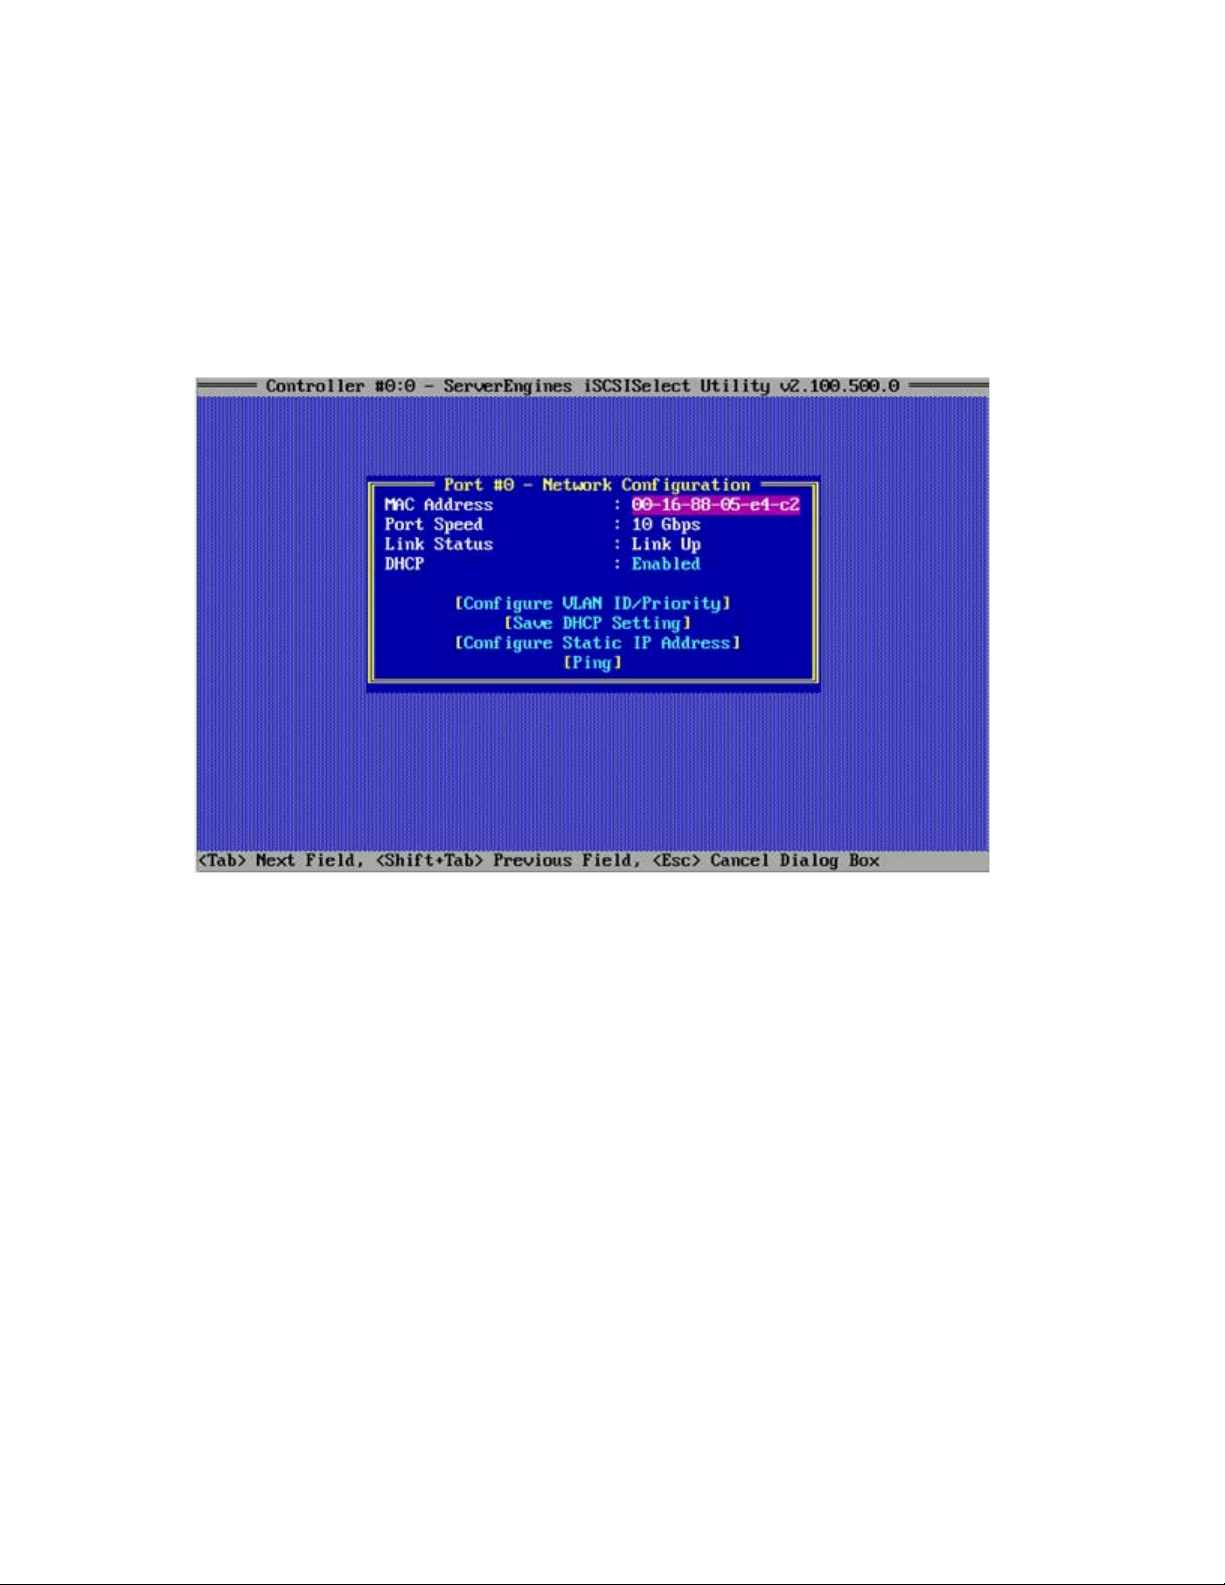
Enabling DHCP
You can use DHCP to provide the initiator with an IP address by enabling DHCP from the Network
Configuration menu.
If you are using the DHCP server to obtain an IP address for your iSCSI Initiator, it is recommended that
you set up a reservation. A reservation assigns a specific IP address based on the MAC address of your
iSCSI function. If you do not reserve an IP Address through DHCP, then you must set the lease length for
the iSCSI Initiator IP address to unlimited. This allows the IP address lease not to expire.
1. After you have selected a controller, the Configuration Controller menu displays. Select Network
Configuration and press Enter.
2. Tab to DHCP, select Enabled, and press Enter.
3. Tab to Save DHCP Setting and press Enter. If you have previously set a Static IP Address, a warning
displays that the Static IP Address will be lost. Press Y to continue.
Configuring and managing the iSCSI Initiator 11
Page 12
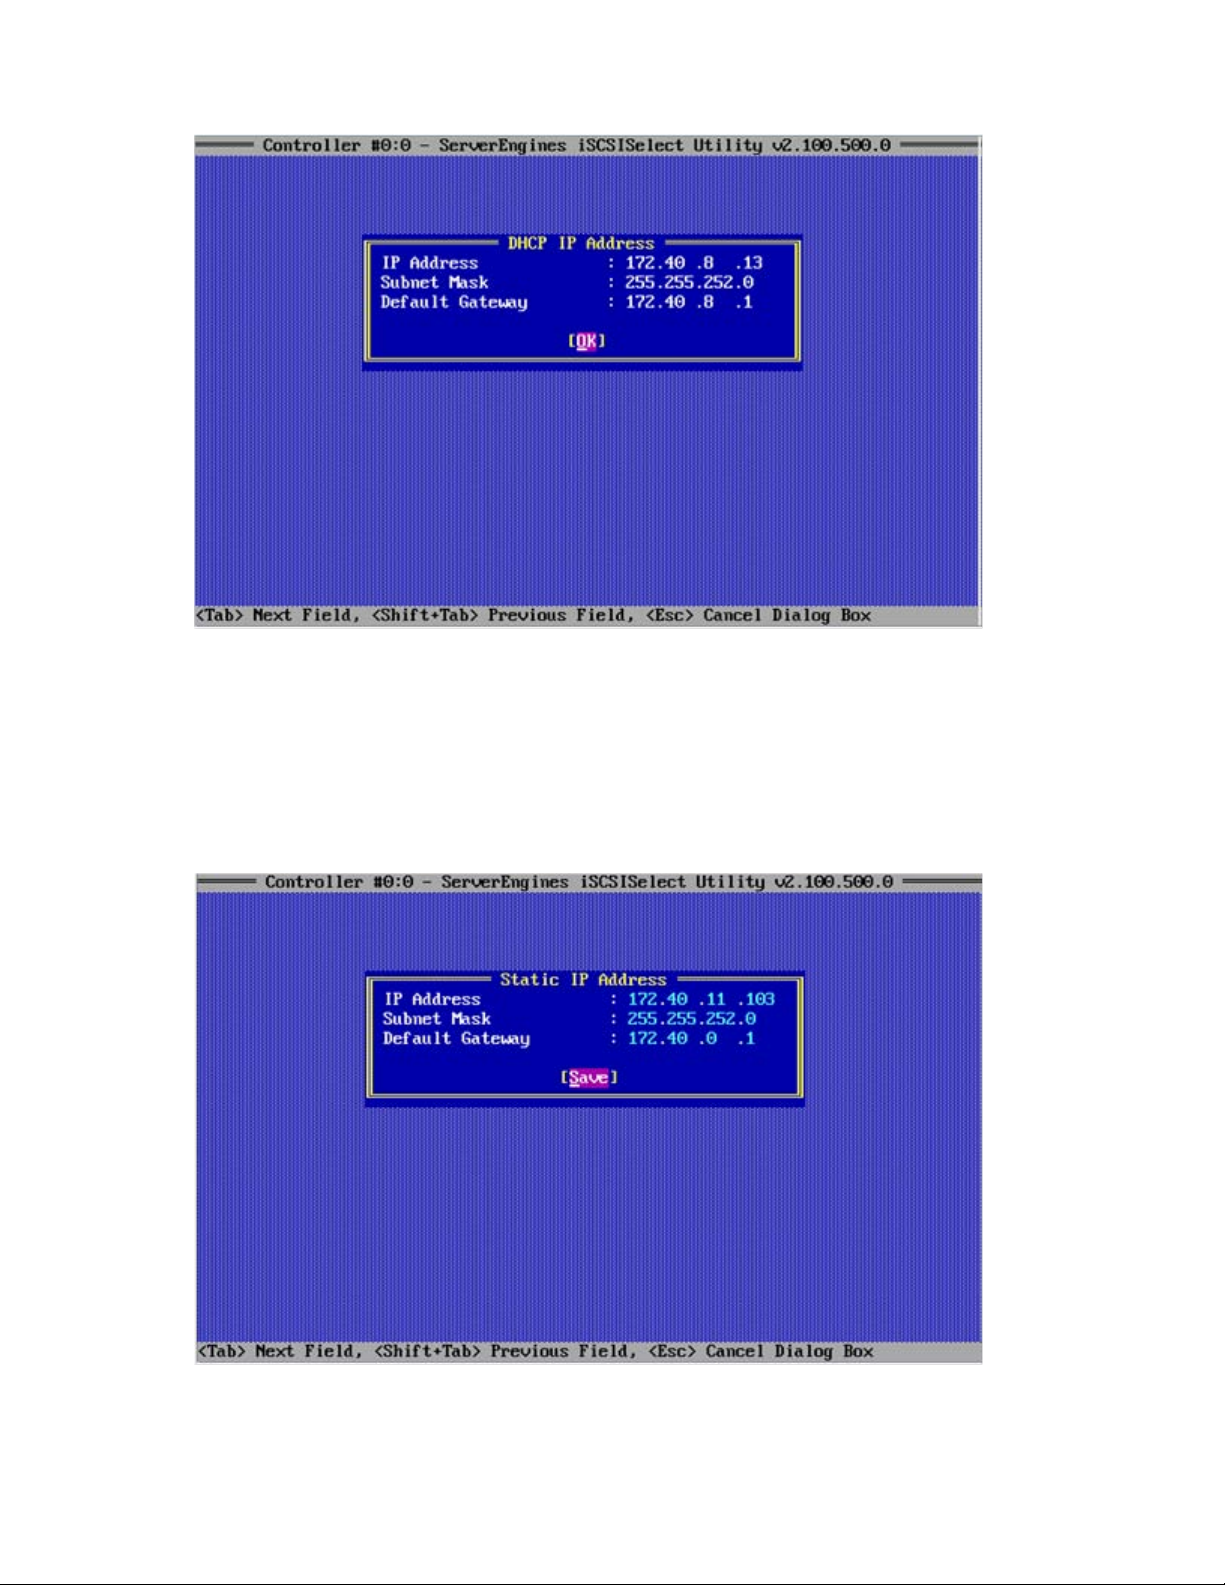
The DHCP IP Address displays the IP address settings.
4. Press Enter to select OK and Esc to return to the Network Configuration menu.
Configuring a Static IP Address
If there is no DHCP server available, you must statically configure an IP address by completing these
steps:
1. From the Network Configuration menu, tab to Configure Static IP Address and press Enter.
If you have a DHCP Enabled, a warning displays that the DHCP IP Address will be lost. Press Y to
continue.
2. From the Static IP Address menu, enter the IP Address.
3. Enter the Subnet Mask.
Configuring and managing the iSCSI Initiator 12
Page 13
4.
Enter the Default Gateway information, if necessary.
5. Tab to Save and press Enter to save the settings and then press Y to confirm that you want to save
the changes.
6. Press Esc to return to the Network Configuration menu.
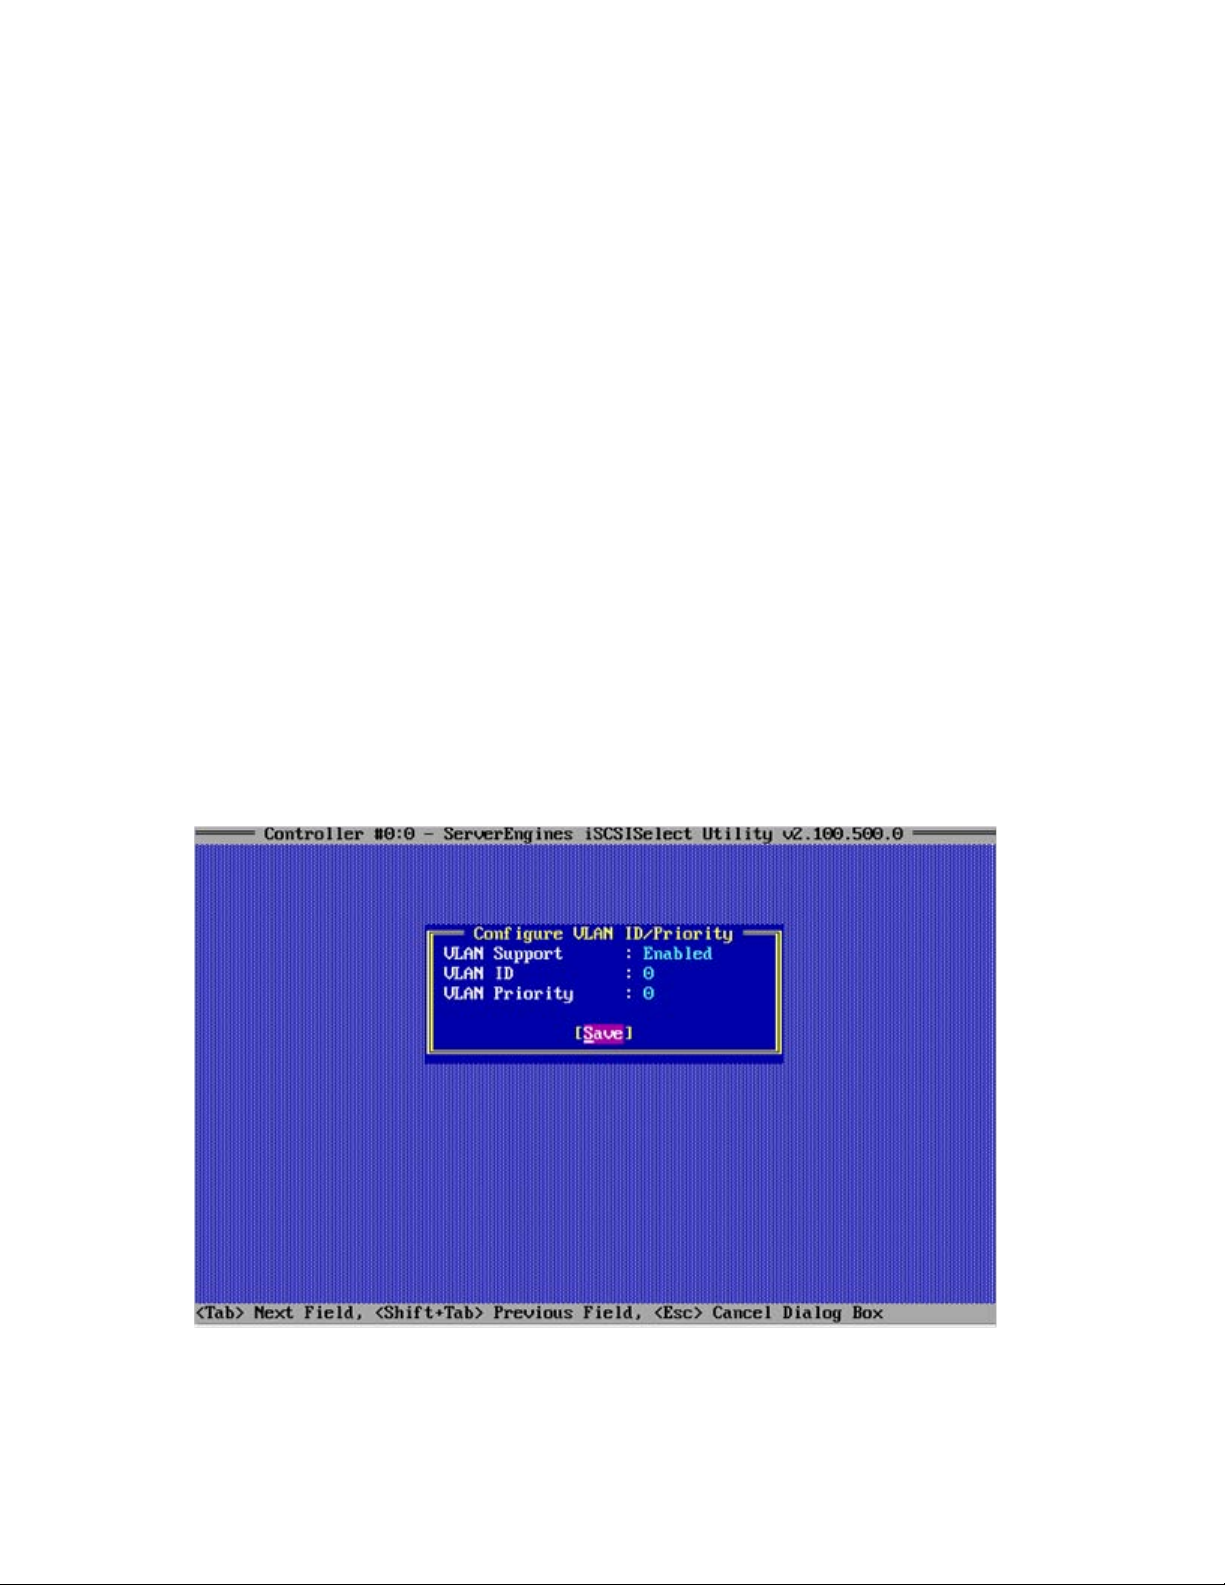
Configuring VLAN ID/Priority
A Virtual Local Area Network (VLAN) is a way of partitioning the network. If the LAN is made up of all
devices within a broadcast domain, a VLAN is a broadcast domain made up of switches.
You first create a VLAN and then assign what port goes in which VLAN. All ports in a single VLAN are in
a single broadcast domain.
You do not have to configure VLANs unless your network is already using them. Some reasons why
VLANs are used include:
• A LAN gets really large with lots of devices
• A LAN has lots of broadcast traffic on it
• Groups of users on a LAN need more security
A VLAN ID like an IP Address or Initiator Name, is assigned a value to uniquely identify it on a network.
A VLAN priority is set to determine what packet gets priority order within a VLAN.
To configure a VLAN ID/Priority through Network Configuration, follow these steps:
1. From the Network Configuration menu, tab to Configure VLAN ID/Priority and press Enter.
2. From the Configure VLAN ID/Priority menu, select VLAN Support and select Enabled.
3. Set a VLAN ID number from 0-4094 or priority level from 0-7.
4. Tab to Save and press Enter, and then press Esc to return to the Network Configuration menu.
Property definitions
Configuring and managing the iSCSI Initiator 13
Page 14

• IP Address. The unique address that specifies the location of each device or workstation in the
Network.
This address is required for communication to the iSCSI SAN. An initiator with its own network
interface must be assigned an IP address in the same range as the iSCSI SAN.
• Subnet Mask. Provides a way of segmenting networks. All hosts (iSCSI initiators or targets) on the
same physical network will usually have the same subnet mask. For instance, in the above example,
the initiator is in the subnet 172.40.2.xxx. The hosts (initiators or targets) on this network have IP
addresses with this prefix.
• Default Gateway. A router on a computer network that serves as an access point to another network.
An initiator uses it by default (any data to addresses not on the initiator’s subnet is sent through the
default gateway).
• VLAN ID. A unique value assigned to each VLAN on a single device. There are a maximum of 4095
possible values ranging from 0 to 4094.
• VLAN Priority. A unique value, which allows you to assign a priority to outbound packets containing
a specified VLAN ID. To specify a single VLAN priority, select possible values ranging from 0 to 7,
with 0 being the highest priority level.
Port Identification
Because your HP NC-Series ServerEngines controller has multiple ports, it may become confusing as to
what port on which controller is working at any given time. Port identification or beaconing, is a method
that helps you physically determine which port you are configuring by blinking both the link and activity
LEDS of that port.
The Port Identification feature helps you determine where to plug in your cable or to find which cable is
plugged into which port. It does this by blinking the LEDs on the back of the server so that there is no
confusion as to which physical port you are configuring with iSCSISelect. Port Identification allows you to
correlate the iSCSI software configuration with the hardware port itself.
To use Port Identification, from the Controller Configuration menu select Port Identification and press Enter
to begin blinking the LEDs. The LED status indicators for the selected port blink on your controller until you
press Done on the Port Identification menu.
Configuring and managing the iSCSI Initiator 14
Page 15

Not all controllers have LEDs that are visible externally. If you are using an add-in card in a blade server
environment, the Port Identification or beaconing feature will not work.
Confirming network settings
After you have configured the initiator, confirm the network settings to verify the connection to the
network. You can do this easily with the ping feature.
Ping verifies that the IP address is on the network. If there is any entity at that address on the network, you
will get a verification reply back. Ping can be used as a diagnostic tool but it is also a validation that your
network is set up properly prior to target login.
To verify that a target is accessible and that you are connected to the network, follow these steps:
1. From the Network Configuration menu, tab to Ping and press Enter.
2. From the Ping Target menu, enter the IP address of the iSCSI device to ping.
If your ping is unsuccessful a failed message is relayed. Otherwise, you are notified that your ping is
successful.
The Ping command works for any IP Address that supports ICMP (Echo).
The following is an example of a successful ping:
If verification of network interface fails
If you have completed your initiator configuration correctly and are connected to the network properly,
you should be able to successfully ping your device. However, if your ping fails there may be a number of
reasons why.
• Not being connected to the network
• Cables are loose
• You are connected to the wrong port
• IP address assigned is not valid
Configuring and managing the iSCSI Initiator 15
Page 16

• Check VLAN settings
For more information on what to do if a target verification fails, see "Troubleshooting (on page 37)."
Target discovery through DHCP
If using target discovery through DHCP, you must add the root path to the DHCP server.
When you have finished adding the root path to the DHCP server, you can enable the Discover Boot
Target via the DHCP option through iSCSISelect.
If the DHCP network and your DHCP server support the DHCP Discovery option, you can use it to provide
the boot path from the DHCP server.
You must manually configure iSCSI boot if you leave the DHCP option Disabled (the default).
1. After you have configured the iSCSI Initiator Name, from the Controller Configuration menu, tab to
Controller Properties and press Enter.
2. From the Controller Properties menu, tab to Discover Boot Target via DHCP and select Enabled.
3. Tab to Save and press Enter.
Configuring and managing the iSCSI Initiator 16
Page 17

Configuring and managing iSCSI targets
iSCSI targets
An iSCSI target is any device that receives iSCSI commands. The device can be an end node, such as a
storage device, or it can be an intermediate device, such as a bridge between IP and Fibre Channel
devices.
Each iSCSI target is identified by a unique IQN, and each port on the controller (or on a bridge) is
identified by one or more IP addresses.
As the client system, the initiator initiates disk I/O. It communicates with the target and the target serves
the initiator by providing resources to the initiator.
After you have configured your iSCSI initiator and verified that your network interface is working and that
you can access your target, you need to log into your target to establish your connection.
To do this, you must:
• Perform a login to the target (adding a target)
• Reboot the system
Methods to add iSCSI targets
After your initiator has been configured you need a process that shows how to make an iSCSI target
available to that initiator host. The Discovery process presents an initiator with a list of available targets.
The discovery method is the way in which the iSCSI targets can be found.
The discovery methods used for discovering targets are:
• SendTargets discovery
• Manually configured targets
Using SendTargets to add an iSCSI target
SendTargets is a method that asks an iSCSI target to provide the list of Target names that can be logged
into by the Initiator. The iSCSI initiator then uses the SendTargets feature to perform the device discovery.
Use this method if an iSCSI node has a large number of targets.
When adding an iSCSI Target, if you leave the iSCSI Target Name option blank, you can use the iSCSI
SendTargets mechanism to add a target.
Manually configuring an iSCSI target
Use this method if an iSCSI node has a small number of targets, or you want to restrict the targets that an
initiator can access. To manually configure a target, you must supply the iSCSI Target Name.
Configuring and managing iSCSI targets 17
Page 18

Configuring an iSCSI target
With iSCSISelect, you can easily configure an iSCSI target by selecting and enabling values on the
Add/Ping iSCSI Target menu. From this menu, you can configure your target and perform a login to the
target to establish your iSCSI network connection.
Before you begin your login session, you must know the following:
• iSCSI Target Name (only for manual configuration). The name of the target to be added.
The iSCSI Target Name is not entered if you are using SendTargets discovery. This name should be
known to you based on how you configured your iSCSI target.
• iSCSI Target IP Address. The IP address of the target that you are logging into.
• TCP Port Number. The TCP port number of the target portal. Typically this is 3260, which is the well-
known port number defined for use by iSCSI.
Follow the steps in the next sections to configure an iSCSI target by using either SendTargets discovery or
by manually configuring the target.
Using SendTargets Discovery to add an iSCSI target
1. From the Controller Configuration menu, select iSCSI Target Configuration, and then select Add New
iSCSI Target.
2. From the Add/Ping iSCSI Target menu, leave the iSCSI Target Name option blank for a SendTargets
response.
Only the first 48 sessions are returned during a single discovery session. If more than 48 sessions
are returned, a message displays.
3. Enter the iSCSI Target IP Address.
4. Enter the TCP Port number (the default target port number is 3260).
5. Tab to Boot Target and accept the default No, even if you want to enable the target as a Boot
Target. For more information about the Boot Target, see "Setting up a basic iSCSI boot configuration
(on page 30)."
Configuring and managing iSCSI targets 18
Page 19
You must enable Boot Target after you have added the target via SendTargets (see the last step in
this section).
6. Enter an ISID Qualifier, if needed. A unique ISID value is needed if you are connecting dual sessions
to the same target portal group. You can enter a number up to 65535. For more information, see
"Setting an ISID value (on page 23)."
7. If you want to enable Header Digest, tab to Header Digest and press Yes. For more information
about the Header Digest, see "Editing a target configuration (on page 22)."
8. Tab to Data Digest and press Yes to enable Data Digest. For more information about the Data
Digest, see "Editing a target configuration (on page 22)."
9. Optional step. Tab to Authentication Method and press Yes. Enter the CHAP configuration. For more
information, see "Enabling CHAP authentication (on page 23)."
10. Tab to Save/Login and press Enter.
11. A message displays reminding you that you have left the iSCSI Target name blank and that the
SendTargets mechanism is enabled. Press Y to continue.
If the firmware logs into the target, the Targets Discovered Via SendTargets menu displays. If the
Login is unsuccessful, a failed message is displayed.
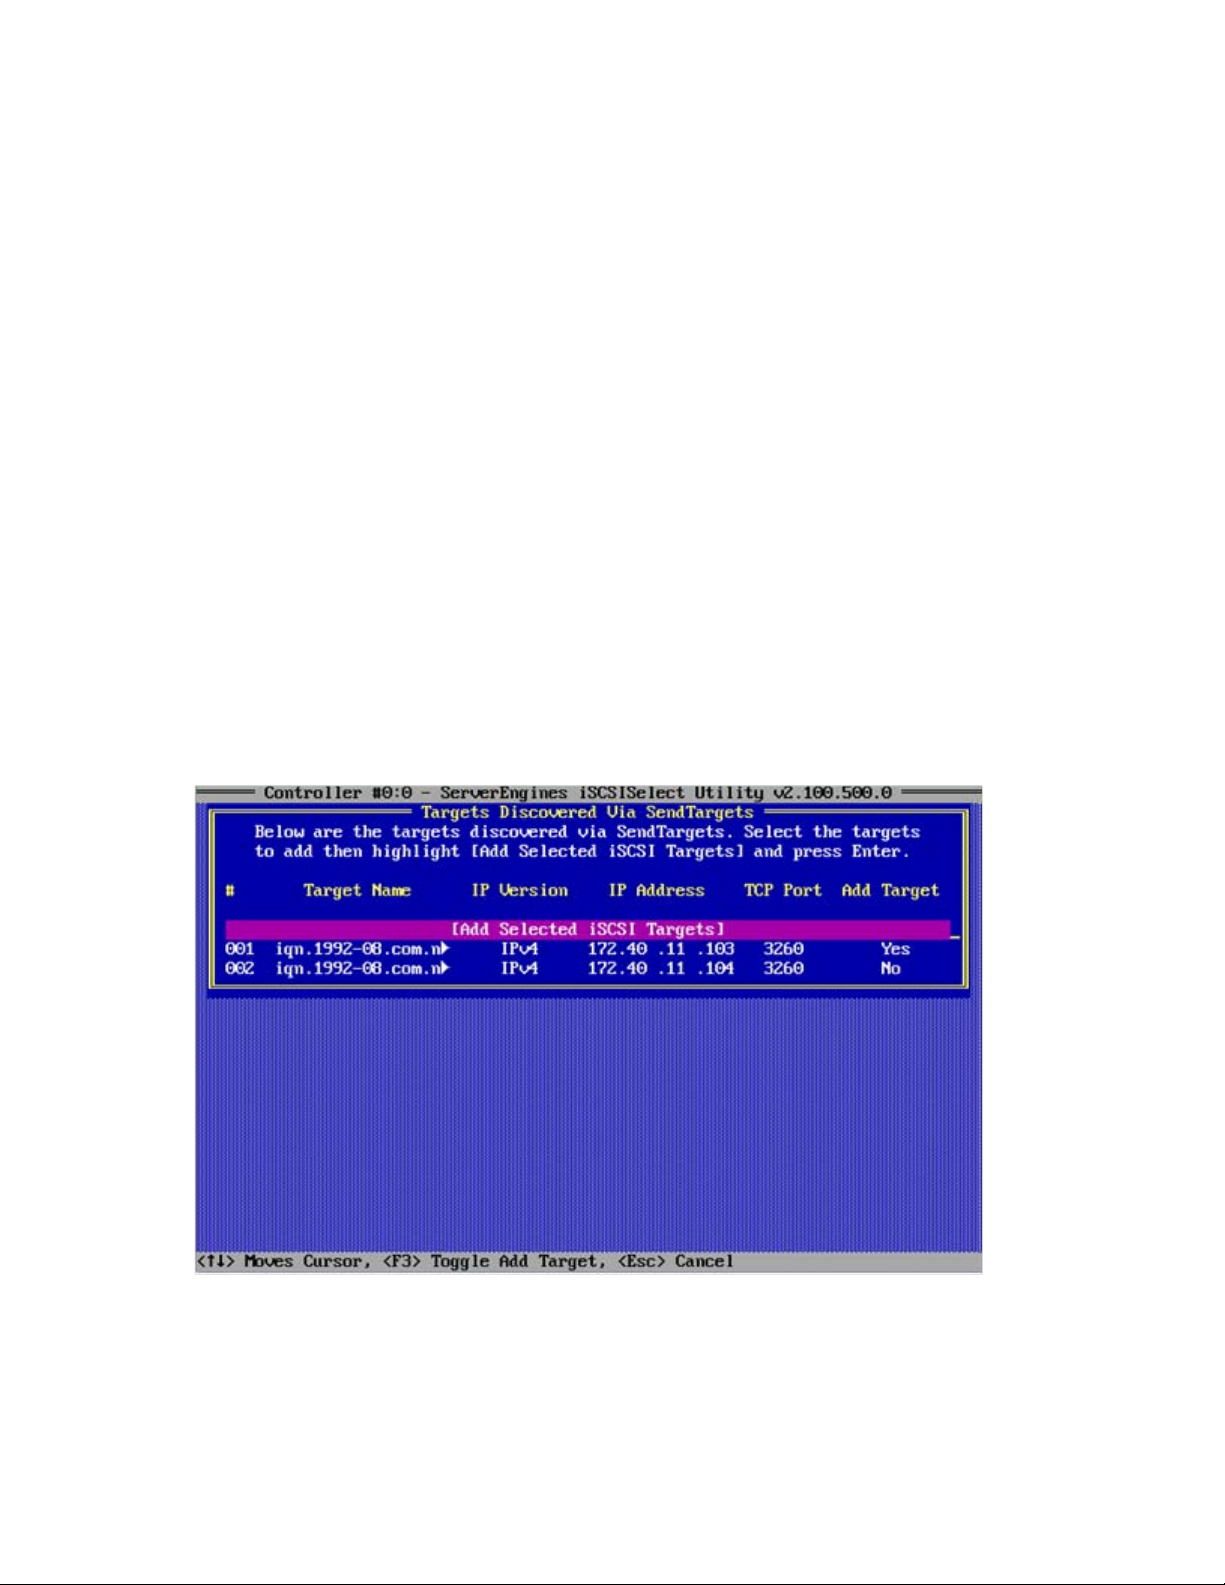
12. After you have sent your SendTargets request to the target, a list of targets displays that you can log
into from the Targets Discovered Via SendTargets menu. From the list of targets on this menu, you
must specify which targets to add. To do this, select the target or targets you want to add from the
menu and press F3.
13. After you have selected your targets to add, you can add the targets. To do this, move the cursor to
Add Selected iSCSI Targets and press Enter. If you enabled CHAP Authentication, you are prompted
to enter CHAP configuration for each target, one at a time.
Configuring and managing iSCSI targets 19
Page 20

After you have added your targets, the iSCSI Target Configuration menu displays and you can view
your newly added Target information.
14. If you set the Boot Target option (in an earlier step) before adding the target, Boot Target registers
No on this menu. To enable Boot Target or make other changes to your target or targets, select the
target and press Enter. The Edit/Ping iSCSI Target menu displays and from this menu, you can edit
the target.
Using manual configuration to add an iSCSI target
1. From the Controller Configuration menu, select iSCSI Target Configuration, and then select Add New
iSCSI Target.
2. From the Add/Ping iSCSI Target menu, enter the iSCSI Target Name.
3. Enter the iSCSI Target IP Address.
Configuring and managing iSCSI targets 20
Page 21

4.
Enter the TCP Port number (the default target port number is 3260).
5. Tab to Boot Target and select Yes, if you want to enable the target as a Boot Target.
6. Enter an ISID Qualifier if needed. A unique ISID value is needed if you are connecting dual sessions
to the same target portal group. You can enter a number up to 65535. For more information, see
"Setting an ISID value (on page 23)."
7. Tab to Header Digest and press Y if you want to enable Header Digest. For more information about
the Header Digest, see "Editing a target configuration (on page 22)."
8. Tab to Data Digest and press Yes if you want to enable Data Digest. For more information about the
Header Digest, see "Editing a target configuration (on page 22)."
9. Select the Authentication Method. For more information, see "Enabling CHAP authentication (on
page 23)."
10. Tab to Save/Login and press Enter. If the firmware logs into the target successfully, a successful login
message displays.
11. Press Esc to exit to the iSCSI Target Configuration menu where the newly added target information is
displayed.
12. To enable Boot Target or make any other changes to your target or targets, select the target and
press Esc to display the Edit/Ping iSCSI Target menu. Edit your target as needed.
Managing an iSCSI target
With iSCSISelect you can manage a target by viewing target details or by editing your target
configuration.
Viewing target information
After you have successfully logged into the target, you can view the details of the newly added target or
manage it.
From the Controller Configuration menu, select iSCSI Target Configuration to display the target
information. The iSCSI Target Configuration menu displays information for the first 128 targets. The
functions keys located at the bottom of the menu help you manage your target configuration.
Configuring and managing iSCSI targets 21
Page 22

The following is an example of a target detail menu.
Editing a target configuration
After you have added a target, you can edit your iSCSI target configuration or apply other management
options to your target.
1. From the iSCSI Target Configuration menu select a target and press Enter. The Edit/Ping iSCSI
Target menu displays for the target you selected. From this menu you can view the properties for any
target you have added and you can edit any of the properties displayed in the blue font.
2. To enable the target as a boot target, tab to Boot Target and press Yes.
3. If the ISID Qualifier has not been previously set, you can set it on this menu by tabbing to ISID
Qualifier and typing a number value.
Configuring and managing iSCSI targets 22
Page 23

A unique ISID value is needed if you are connecting dual sessions to the same target portal group.
You can enter a number up to 65535. See "Setting an ISID value (on page 23)."
4. If you want to enable the Header Digest, tab to Header Digest and press Yes.
When set to Yes and the iSCSI Initiator is set accordingly, the integrity of an iSCSI PDUs’ header
segment is protected by CRC32C checksum. No, is the default.
5. If you want to enable the Data Digest, tab to Data Digest and press Yes.
When set to Yes and the iSCSI Initiator is set accordingly, the integrity of an iSCSI PDUs’ data
segment is protected by CRC32C checksum. No, is the default.
6. If you want to select an authentication method to use when logging into the target, tab to
Authentication Methods and select an authentication method. See "Enabling CHAP authentication
(on page 23)."
7. If you want to verify your target connection, tab to Ping and press Enter. See "Pinging a target (on
page 25)."
8. If you want to view more target properties, tab to Advanced and press Enter. See "Displaying
advanced target properties (on page 27)."
9. To save your changes, tab to Save/Login and press Enter. The iSCSI Target Configuration menu
displays with target information.
Setting an ISID value
The ISID Qualifier is a unique ISID value that is used if connecting dual sessions to the same target portal
group.
This value ensures that you are not logging into the same session twice. A combination of the initiator
name, ISID Qualifier, target name, and target portal group defines an iSCSI session. For the ISID
Qualifier, enter a number up to 65535.
1. From the Controller Configuration menu, select iSCSI Target Configuration, and select Add New iSCSI
Target.
2. From the Add/Ping iSCSI Target menu, tab to ISID Qualifier and type in a number value.
For more information on when an ISID value should be used, see "Setting up an iSCSI MPIO Boot
configuration (on page 34)."
Enabling CHAP authentication
HP NC-Series ServerEngines iSCSISelect uses the Challenge Handshake Authentication Protocol (CHAP) to
authenticate initiators and targets for added network security.
By using a challenge/response security mechanism, CHAP periodically verifies the identity of the initiator.
This authentication method depends on a secret known only to the initiator and the target.
Although the authentication can be One-Way, you can negotiate CHAP in both directions by using the
same secret set for Mutual authentication. However, you must ensure that the configuration on the target
matches the configuration on the initiator.
One-Way CHAP
With one-way CHAP authentication, the target authenticates the initiator for a one-way
challenge/response security method.
Configuring and managing iSCSI targets 23
Page 24
1.
From the Controller Configuration menu, select iSCSI Target Configuration, then select Add New
iSCSI Target.
2. Follow steps 2 -8 in "Configuring an ISCSI target (on page 18)."
3. From the Add/Ping iSCSI Target menu, tab to Authentication Method, and select One-Way Chap
and press Enter.
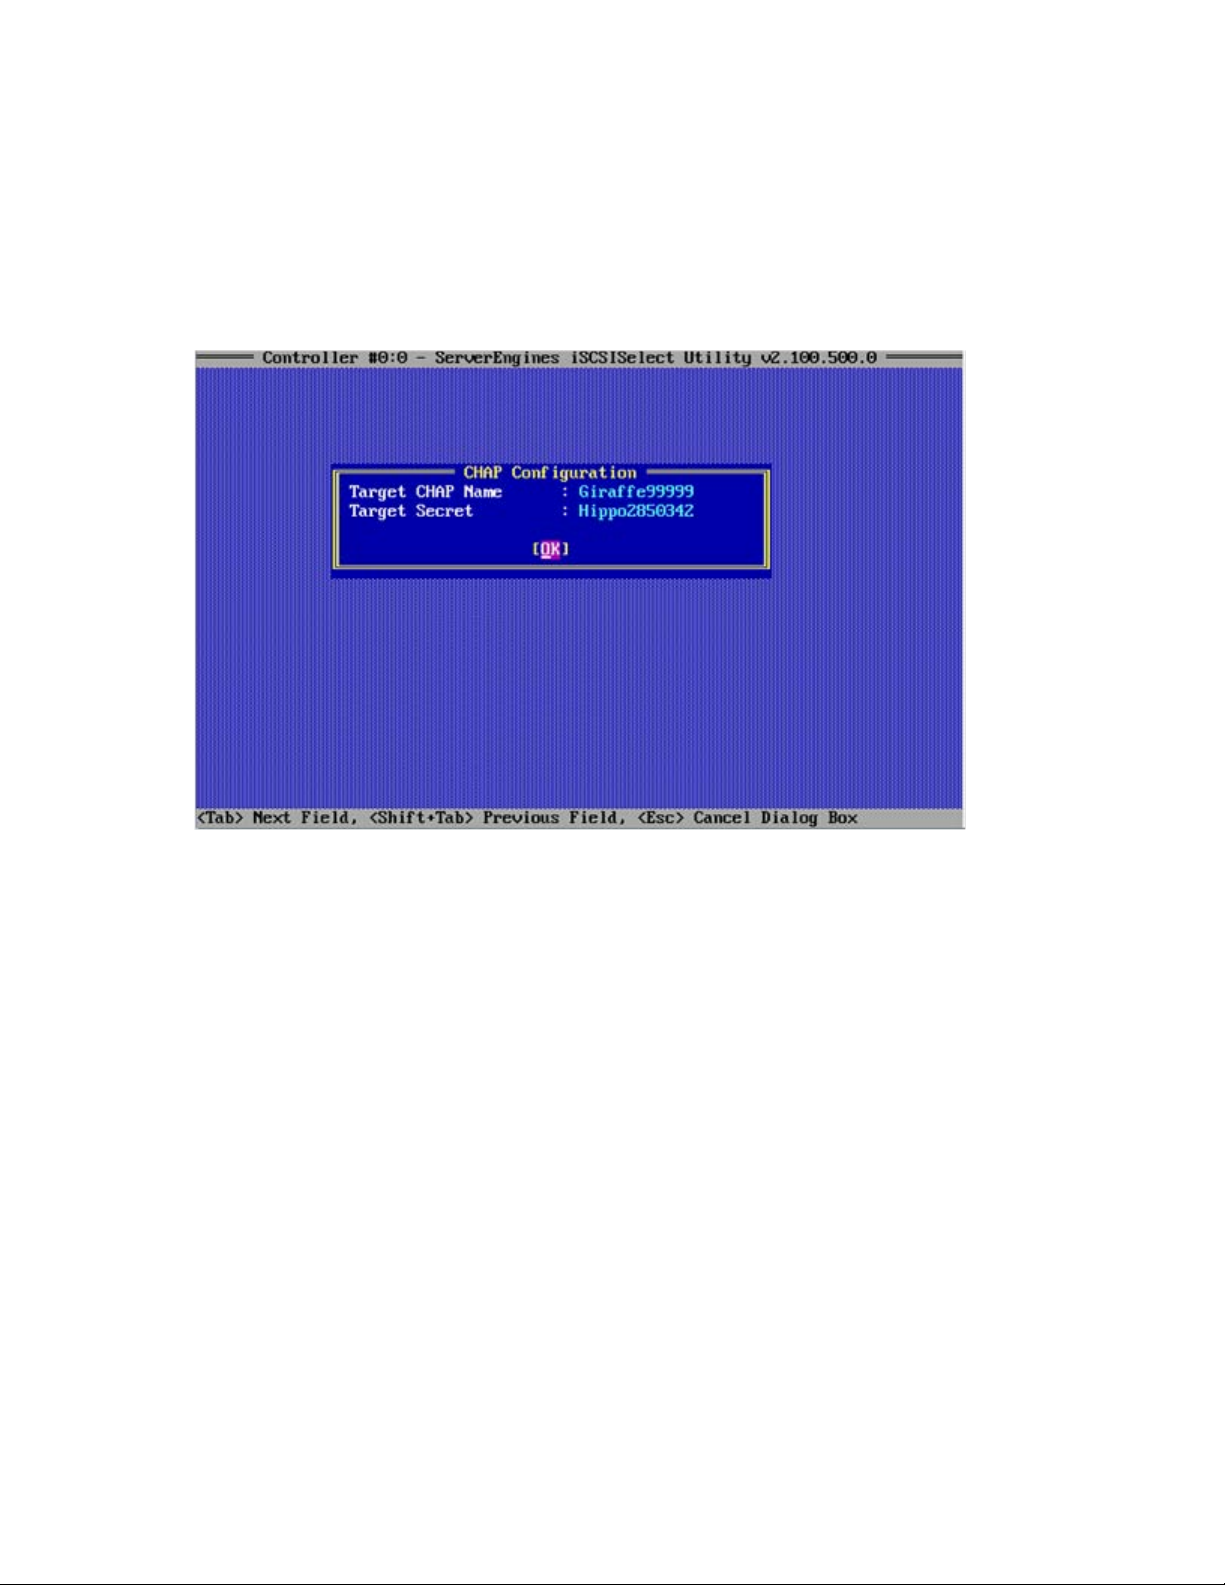
4. Tab to enter the Target CHAP Name and Target Secret, and press OK.
The Target CHAP Name and Target Secret can be any name or sequence of numbers over 12
characters but less than 16 characters.
When you have successfully enabled the CHAP authentication, the Add/Ping iSCSI Target menu displays.
Mutual CHAP
With Mutual CHAP authentication, the target authenticates the initiator and the initiator authenticates the
target for a two-way challenge/response security method.
1. From the Controller Configuration menu, select iSCSI Target Configuration, and select Add New iSCSI
Target.
2. Follow steps 2-8 in "Configuring an iSCSI target (on page 18)."
3. From the Add/Ping iSCSI Target menu, tab to Authentication Method, select Mutual Chap, and press
Enter.
4. Tab to enter the Target CHAP Name, Target Secret, Initiator CHAP Name, Initiator Secret, and then
press OK.
Configuring and managing iSCSI targets 24
Page 25

The Target/Initiator CHAP Name and Target/Initiator Secret can be any name or sequence of
numbers over 12 characters but less than 16 characters. However, the name and secret on the
Target side must match the name and secret on the Initiator side.
After you have successfully enabled the CHAP authentication, the Add/Ping iSCSI Target menu displays.
Pinging a target
Before you add a target, you may want to verify that you can connect to the target. You can do this by
using the Ping option through HP NC-Series Server Engines iSCSISelect.
1. From the Add/Ping iSCSI Target menu, tab to Ping and press Enter.
If you want to verify that you can connect to the target before you login, you must ping the target
before you Save/Login your configuration on the Add/Ping iSCSI Target menu.
Configuring and managing iSCSI targets 25
Page 26

2.
From the Ping Target menu, enter the IP address of the target you want to ping, tab to Ping and press
Enter.
3. If your ping is unsuccessful you will receive a failed message. Otherwise, you are notified that your
ping is successful.
The following is an example of a Successful Ping.
After you have added your target, you should see the target status as Connected on the iSCSI
Configuration menu. If the target is listed as Disconnected, ping the target from the Edit/Ping iSCSI
Target menu.
If ping is successful but you are unable to access the target, check the initiator name and target
name and make sure they are properly specified and that the target ACL can verify the initiator IQN.
Configuring and managing iSCSI targets 26
Page 27

Displaying advanced target properties
After you have logged into a target, you can display more information about that target in the advanced
target properties.
From the Edit/Ping iSCSI Target menu, tab to Advanced and press Enter.
Configuring LUN settings
A LUN represents an individually addressable logical device that is part of a target. An initiator
negotiates with a target to establish connectivity to a LUN.
To configure a LUN, from the iSCSI Target Configuration menu, press F7 to display the LUNs associated
with the iSCSI node.
Configuring and managing iSCSI targets 27
Page 28

By pressing F3, you can set the Boot LUN if the target is a boot target. By setting the LUN to bootable you
can confirm that you have the boot target configured properly and see from which LUN you are booting.
By reviewing the LUN size, you can determine the LUN order. The target gives the LUN order in the LUN
order listed.
The BladeEngine 2 controller supports a maximum of 8 LUNs on a boot target. If you select LUNs further
down on the list, the first LUN is used as the boot LUN.
If there are no LUNs available, the following message displays:
No LUN available, please check your configuration on the Target.
Removing a target
After a target is configured, it may need to be removed or you may just want to log out of the target.
To remove or delete a target means to log out of the target and remove it from the list of targets. To log
out of a target means to log out of the target but the target is still listed in the target list with the connection
status of Disconnected.
To delete a target, logout, or login, complete the following:
1. To delete the target, from the iSCSI Target Configuration menu, select the target and press Delete.
2. To log out of the target, from the iSCSI Target Configuration menu, select the target and press F6.
3. To log into the target, from the iSCSI Target Configuration menu, select the Disconnected target and
press F5 to establish the target session.
Booting the system
After you have successfully configured the iSCSI initiator and target, you must reboot the system for the
configurations to take affect.
When you exit HP NC-Series ServerEngines iSCSISelect, the system automatically reboots and during
system startup, the adapter's BIOS displays.
ServerEngines iSCSI Initiator BIOS v2.100.500.0
(c) 2005-2009 ServerEngines Corporation. All Rights Reserved.
(c) 1998-2005 Adaptec, Inc. All Rights Reserved.
Controller#0 Port#0 Base 0xFCE60000 at Bus:01 Dev:00 Fun:02
Controller#0 Port#1 Base 0xFCEA0000 at Bus:01 Dev:00 Fun:03
Press <Ctrl><S> for iSCSISelect(TM) Utility
Initiator iSCSI Name: iqn.2004-05.com.serverengines.be2
Initiator IP Address: 172. 40. 1.41
Initiator IP Address: 172. 40. 1.62
BIOS Not Installed.
The iSCSI BIOS logs into the configured iSCSI boot target and displays its target/LUN information in the
BIOS sign-on banner only if an iSCSI boot target is configured.
Erasing the configuration
With the Erase Configuration option, you can erase the configuration of a single controller.
Configuring and managing iSCSI targets 28
Page 29

Configuration data is erased for both ports on the selected controller. The Initiator Name and Boot
support are global for all HP NC-Series ServerEngines adapters in the system.
If you have more than one adapter and you erase the configuration on the first adapter, the Erase
Configuration resets the initiator name and boot support back to their default values.
If you perform an Erase Configuration on the second adapter, the default values are only reset for the
second adapter and are not reset globally on both adapters.
1. From the Controller Configuration menu, select Erase Configuration and press Enter.
2. When prompted to erase the current configuration, press Y.
3. When cautioned that any existing configurations will be removed permanently, press Y.
When your controller configuration is erased, the Controller Configuration menu displays.
Configuring and managing iSCSI targets 29
Page 30

Configuring iSCSI boot support
Setting up a basic iSCSI boot configuration
This section provides an overview on how to set up a basic boot configuration.
For more detailed information on setting up an iSCSI initiator and adding an iSCSI target, see
"Configuring and managing the iSCSI Initiator (on page 8)" and "Configuring and managing iSCSI
targets (on page 17)."
1. Log into HP NC-Series ServerEngines iSCSISelect by pressing Ctrl+S when prompted.
2. From the iSCSI Configuration menu, set the initiator name.
3. Verify the Boot Support value is Enabled.
4. Tab to Save and press Enter to save your initiator name.
5. Tab to Controller Configuration then press Enter to display the Controller Selection menu.
Configuring iSCSI boot support 30
Page 31

6.
From the Controller Selection menu, select your controller and port and press Enter.
7. After you have selected a controller, the Controller Configuration menu displays. Tab to select
Network Configuration and press Enter.
8. Set up an IP Address by either enabling DHCP or setting up a Static IP Address.
If using target discovery through DHCP, add the root path to the DHCP server and enable DHCP
discovery through iSCSISelect.
To enable DHCP,
o Tab to DHCP , select Enabled, and then press Enter.
o Tab to Save DHCP Settings and press Enter. The DHCP IP Address menu displays.
Configuring iSCSI boot support 31
Page 32

o
If you have a Static IP Address configured, a warning displays that the Static IP Address will be
lost. Press Y to continue.
Or, to enable a Static IP Address,
o From the Network Configuration menu, tab to Configure Static IP Address and press Enter.
o If you have DHCP Address configured, a message displays that the DHCP address will be lost.
Press Y to continue.
o Enter the IP address and the Subnet Mask.
o Enter the Default Gateway, if needed.
o Tab to Save and press Enter. A prompt displays asking if you want to save the changes. Press Y
to continue.
o Press Esc to return to the Network Configuration menu.
9. Optional step. From the Network Configuration menu, tab to Configure VLAN ID/Priority and press
Enter.
o From the Configure VLAN ID/Priority menu, select VLAN support and then select Enabled. Set a
VLAN ID number from 0-4094 or priority level from 0-7.
o Tab to Save and press Enter.
10. From the Controller Configuration menu, tab to iSCSI Target Configuration, and select Add a New
iSCSI Target. The Add/Ping iSCSI Target menu displays.
11. Enter the iSCSI Target Name.
If using the SendTargets Discovery method, leave this field blank. See Using SendTargets Discovery
to Add an iSCSI Target in "Configuring an iSCSI target (on page 18)".
12. Enter the Target IP address.
13. Enter the TCP Port number (the default is 3260).
14. Tab to Boot Target and select Yes.
15. Optional step. If you want to verify that you can connect to your target before you login, tab to Ping
and press Enter.
Configuring iSCSI boot support 32
Page 33

16.
Tab to Save/Login and press Enter. If the firmware logs in the target, a Login Successful message is
displayed.
The iSCSI Target Configuration menu displays with the newly added Target information.
17. After you have successfully configured the iSCSI initiator and target, reboot the system.
Configuring iSCSI boot support 33
Page 34

Setting up an iSCSI MPIO boot configuration
iSCSI MPIO boot
MPIO support allows the initiator to login dual sessions to the same target. In this way I/O can be sent
over either TCP/IP connection to the target. If one connection fails another connection can continue
processing I/O without interruption to the application. In iSCSI target configuration, you have the option
of setting dual network paths to a single boot LUN.
To perform a successful MPIO Boot configuration, complete the following steps in this order for each
operating system.
1. Use HP NC-Series iSCSISelect to configure a boot target.
2. Complete normal operating system installation.
3. Install third-party MPIO software for your operating system.
4. Configure dual paths to a single boot LUN through iSCSISelect
The following section describes the steps to install and configure MPIO on Windows Server, Linux, and
ESX Server 3.5.
Linux
1. Log into HP NC-Series ServerEngines iSCSISelect by pressing Ctrl+S when prompted
2. Use iSCSISelect to log into a target from one HBA and configure it for boot by following the steps in
"Setting up a basic iSCSI boot configuration (on page 30)."
If iSCSISelect is configured properly, a message displays during boot that the iSCSI disk was
successfully connected.
3. Install a Linux operating system over the iSCSI LUN.
4. Once Linux is installed, install MPIO software and reboot the system.
5. After rebooting, ensure that the boot LUN is detected by the MPIO driver. This can be done either by
entering:
# /sbin/multipath
6. To see if the multipath daemon is running enter:
# ps -aelf | grep multipathd
7. To see the current multipath topology enter:
# /sbin/multipath -l
8. Reboot your system and log into iSCSISelect by pressing Ctrl+S when prompted.
9. You can now use iSCSISelect to add an additional boot path to the same iSCSI LUN. To do this,
follow these steps:
a. Follow the steps in "Setting up a basic iSCSI boot configuration" to set up your second path.
b. When you get to the Add/Ping iSCSI Target menu, make sure you set an ISID Qualifier before
adding your target.
c. After you have logged into the target, from the iSCSI Target Configuration menu, set the Boot
Target option for the second target to Yes.
d. Press F7 to display the LUNs behind the target.
Configuring iSCSI boot support 34
Page 35

e.
Select the same LUN you chose for your initial boot LUN, then press F3 to set it to bootable.
10. After Linux boots up, the MPIO installs drivers on the second path and then prompts you to reboot.
Reboot the system.
Windows Server
1. Log into HP NC-Series ServerEngines iSCSISelect by pressing Ctrl+S when prompted.
2. Log into a target from one HBA and configure it for boot by following the steps in "Setting up a
basic iSCSI boot configuration (on page 30)."
If iSCSISelect is configured properly, you will get an indication during boot time that the iSCSI disk
was successfully connected.
Only one instance of the boot LUN must be visible to the server during the installation. The
installation might fail if multiple instances of the boot LUN are available to the server.
It is recommended that the Spanning Tree Protocol be disabled on any ports that are connected to
Windows Server 2008 hosts booting using iSCSI. The Spanning Tree Protocol is used to calculate
the best path between switches where there are multiple switches and multiple paths through the
network.
3. Install a Windows Server operating system over the iSCSI LUN.
4. Once Windows Server is installed, install MPIO software (such as Microsoft iSCSI Initiator), and
reboot the system.
5. After rebooting, ensure that the boot LUN is detected by the MPIO driver. This can be done by
either:
o Looking at the driver name for the disk device from Device Manager
o Using Microsoft iSCSI Initiator to navigate to:
MS iSCSI Initiator GUI -> Boot tgt-> Boot LUN -> MPIO capable
6. Reboot your system and log into iSCSISelect by pressing Ctrl+S when prompted.
7. You can now add an additional boot path with iSCSISelect. To add an additional boot path to the
same iSCSI LUN, do the following:
a. Follow the steps in "Setting up a basic iSCSI boot configuration (on page 30)" to set up your
second path.
b. When you get to the Add/Ping iSCSI Target menu, make sure you set an ISID Qualifier before
adding your target.
c. After you have logged into the target, from the iSCSI Target Configuration menu, set the Boot
Target option for the second target to Yes.
d. Press F7 to display the LUNs behind the target.
e. Select the same LUN you chose for your initial boot LUN, and then press F3 to set it to bootable.
8. After Windows Server boots up, the MPIO will install drivers on the second path and you are
prompted to reboot. Reboot the system.
ESX Server 3.5
1. Log into iSCSISelect by pressing Ctrl+S when prompted.
2. Use iSCSISelect to log into a target from one HBA and configure it for boot.
Configuring iSCSI boot support 35
Page 36

3.
If iSCSISelect is configured properly, a message displays at boot that the iSCSI disk was successfully
connected.
4. Install an ESX Server 3.5 operating system over the iSCSI LUN.
5. After ESX Server is installed, install MPIO software and reboot the system. ESX Server is set to MPIO
by default.
6. Using iSCSISelect add an additional boot path to the same iSCSI LUN. To do this, follow these steps:
a. Follow the steps in Setting up a basic iSCSI boot configuration (on page 30) to set up your
second path.
b. When you get to the Add/Ping iSCSI Target menu, make sure you set an ISID Qualifier before
adding your target.
c. After you have logged into the target, from the iSCSI Target Configuration menu, set the Boot
Target option for the second target to Yes.
d. Press F7 to display the LUNs behind the target.
e. Select the same LUN you chose for your initial boot LUN, then press F3 to set it to bootable.
7. After ESX boots up, the MPIO will install drivers on the second path and then prompt you to reboot.
Reboot the system.
Configuring iSCSI boot support 36
Page 37

Troubleshooting
•
•
•
•
•
•
•
•
•
•
•
•
•
•
•
•
•
•
Problem Solution
1 ServerEngines iSCSI BIOS
banner is not displayed
during system post
2 Unable to Ping iSCSI target
IP address
Go to your motherboard BIOS configuration and make sure that Option
ROM is enabled is set for the PCI-E slot into which the BladeEngine 2
board is inserted.
Check cable connections and make sure they are securely connected
at both ends. Make sure the link light is on at both ends of the cable.
Verify that you have assigned a valid IP address with the correct
subnet mask to the interfaces that are connected to the network.
Check for Duplicate IP addresses.
If the IP address is coming from DHCP, check that the DHCP server is
up and available.
Is the target on a different subnet? Check the default gateway and
make sure that the IP addresses of both the default gateway and the
remote host are correct.
Check link status under Network Configuration. If you try changing the
initiator link status, you can back out one screen then go back to
Network Configuration to see updated view of your current link status.
3 Login to iSCSI target fails or
Login succeeds but no LUNs
are available.
Check initiator IQN name and target IQN name. Verify that they are
properly specified.
Check target’s ACL settings (if any) to verify that the initiator’s IQN
name is listed and can be recognized.
Make sure that the target login parameters are compatible with the
initiator’s parameters.
4 Login to iSCSI target is
successful, but iSCSI I/O
causes the system to hang
or freeze.
5 You are unable to boot
from your iSCSI target
Check the jumbo frame settings on the iSCSI target. If enabled, change
the frame size to 1514 and retry. This isolates any problems in the
network related to jumbo frames. Jumbo frames, when supported by the
entire network, provide increased performance.
Check the target setup, check Target ACL to verify that the initiator’s
iSCSI name is listed and can be recognized.
Check Initiator name and make sure it is correct.
If applicable, verify that you have selected the iSCSI LUN as the boot
LUN in your system BIOS setting.
Check the system BIOS for boot device priority order.
Make sure that the ServerEngines boot device is at the top (SE-
xxxxxx).
If using DHCP:
If Boot Support is not enabled, enable it on the iSCSI Initiator menu.
If DHCP boot support is enabled, check the DHCP setup and also
6 BIOS post displays “BIOS
Not Installed” message
verify that you have added the root path to the DHCP server. For more
information see Target Discovery Through DHCP.
If you have not configured an iSCSI boot target, this is proper normal
behavior.
If you have configured an iSCSI boot target and the BIOS cannot find
Troubleshooting 37
Page 38

Problem Solution
•
•
•
a bootable LUN, then refer to the solutions provided in #5.
7 If Problems 1-3, and 5-6 all
fail
8 You get this POST error
message: "Initiator iSCSI
Name mismatch, please use
iSCSISelect to set a single
name for all controllers.
Press <Ctrl><S> to enter
iSCSISelect. (Reboot
required)"
Use the iSCSISelect utility to erase the Controller Configuration.
From the Controller Configuration menu select Erase Configuration,
then press Enter.
A message appears asking if you want to erase the current
configuration. Press Y.
You are cautioned that the operation removes any existing
configuration permanently. Press Y.
If you have multiple controllers, erase the configuration of each controller
separately.
After you erase the Controller Configuration, reboot the system and then
reconfigure controller.
In the iSCSI BIOS, the ServerEngines iSCSI Initiator Name may be
different if there are more than one NC-Series ServerEngines controllers in
the system. If the iSCSI Initiator name is different on multiple controllers,
you will receive a POST error message indicating an iSCSI Name
mismatch. You must enter iSCSISelect and “Save” a new initiator name on
the first iSCSISelect menu screen so that the iSCSI Initiator Name on all
controllers match. All logins from the multiple controllers use the new
name.
Troubleshooting 38
Page 39

Technical support
Before you contact HP
Be sure to have the following information available before you call HP:
• Technical support registration number (if applicable)
• Product serial number
• Product model name and number
• Product identification number
• Applicable error messages
• Add-on boards or hardware
• Third-party hardware or software
• Operating system type and revision level
HP contact information
For the name of the nearest HP authorized reseller:
• See the Contact HP worldwide (in English) webpage
(http://welcome.hp.com/country/us/en/wwcontact.html
For HP technical support:
• In the United States, for contact options see the Contact HP United States webpage
(http://welcome.hp.com/country/us/en/contact_us.html
o Call 1-800-HP-INVENT (1-800-474-6836). This service is available 24 hours a day, 7 days a
week. For continuous quality improvement, calls may be recorded or monitored.
o If you have purchased a Care Pack (service upgrade), call 1-800-633-3600. For more
information about Care Packs, refer to the HP website (http://www.hp.com/hps
• In other locations, see the Contact HP worldwide (in English) webpage
(http://welcome.hp.com/country/us/en/wwcontact.html
).
). To contact HP by phone:
).
).
Technical support 39
 Loading...