

Page 1

HP NC51xx PCIe 10 Gigabit Server Adapter Software and Configuration Guide
Part Number 436047-00E
October 2007 (Fifth Edition)
Page 2

© Copyright 2006-2007 Hewlett-Packard Development Company, L.P.
The information contained herein is subject to change without notice. The only warranties for HP products and services are set forth in the express
warranty statements accompanying such products and services. Nothing herein should be construed as constituting an additional warranty. HP
shall not be liable for technical or editorial errors or omissions contained herein.
Confidential computer software. Valid license from HP required for possession, use or copying. Consistent with FAR 12.211 and 12.212,
Commercial Computer Software, Computer Software Documentation, and Technical Data for Commercial Items are licensed to the U.S.
Government under vendor’s standard commercial license.
Microsoft and Windows are U.S. registered trademarks of Microsoft Corporation. Windows Server 2003 is a trademark of Microsoft
Corporation.
Audience assumptions
This document is for the person who installs, administers, and troubleshoots servers and storage systems.
HP assumes you are qualified in the servicing of computer equipment and trained in recognizing hazards
in products with hazardous energy levels.
Page 3

Contents
Overview..................................................................................................................................... 4
HP PCIe 10 Gigabit server adapters ............................................................................................................ 4
System requirements .................................................................................................................................. 4
Installation and configuration ......................................................................................................... 6
Windows installation and configuration .......................................................................................................6
Downloading and installing the driver................................................................................................ 6
Upgrading the firmware ................................................................................................................... 6
Verifying the Windows installation..................................................................................................... 8
Modifying NC51xx 10 Gigabit adapter properties in Windows.......................................................... 11
Modifying adapter properties using the NCU.................................................................................... 14
Linux installation...................................................................................................................................... 15
Setting up the kernel source code ....................................................................................................16
Red Hat and SLES RPM installations ................................................................................................. 16
Upgrading firmware for Red Hat and SLES ....................................................................................... 17
Driver settings ............................................................................................................................... 19
Driver message log........................................................................................................................ 20
Uninstalling the adapter driver ........................................................................................................20
Configuring multiple NC510x PCIe 10 GbE adapters.................................................................................. 21
Configuring multiple ports on 10GbE adapters ........................................................................................... 21
Boot options ........................................................................................................................................... 21
PXE boot process requirements........................................................................................................ 21
Linux Socket Acceleration ............................................................................................................ 23
Using the Linux Socket Accelerator driver ...................................................................................................23
Installing the LSA driver .................................................................................................................. 23
LSA driver configuration ................................................................................................................. 24
Running LSA .................................................................................................................................26
Uninstalling the LSA driver .............................................................................................................. 29
Troubleshooting.......................................................................................................................... 30
Unable to boot host system on Windows or Linux ........................................................................................ 30
Gathering system information and error checks for Linux .............................................................................. 30
Unable to ping the network adapter installed on a Linux host ........................................................................ 31
Diagnostics ................................................................................................................................ 32
Diagnostic utility...................................................................................................................................... 32
Diagnostic test descriptions....................................................................................................................... 33
Technical support........................................................................................................................ 34
Before you contact HP.............................................................................................................................. 34
HP contact information............................................................................................................................. 34
Free automated customer support services ..................................................................................................34
Acronyms and abbreviations........................................................................................................ 36
Index......................................................................................................................................... 38
Contents 3
Page 4

Overview
HP PCIe 10 Gigabit server adapters
This guide describes the system requirements, installation, and setup required for the following adapters:
• HP NC510F PCIe 10 Gigabit Server Adapter
• HP NC510C PCIe 10 Gigabit Server Adapter
• HP NC512m Dual Port 10 GbE Multifunction BL-c Adapter
System requirements
Before installing the product, be sure that the minimum system configuration requirements have been met.
Supported Windows operating systems
• Windows Server 2003 Standard Edition SP2 (x32 and x64)
• Windows Server 2003 Enterprise Edition SP2 (x32 and x64)
Supported Linux operating systems
• Red Hat Enterprise Linux 4 AS/ES Update 3 for AMD64/EM64T
• Red Hat Enterprise Linux 4 AS/ES Update 3 for x86
• Red Hat Enterprise Linux 4 AS/ES Update 4 for AMD64/EM64T
• Red Hat Enterprise Linux 4 AS/ES Update 4 for x86
• Red Hat Enterprise Linux 5 AS/ES for AMD64/EM64T
• Red Hat Enterprise Linux 5 AS/ES for x86
• SUSE LINUX Enterprise Server 9 SP3 for x86
• SUSE LINUX Enterprise Server 9 SP3 for AMD64/EM64T
• SUSE LINUX Enterprise Server 10 SP1 for x86
• SUSE LINUX Enterprise Server 10 SP1 for AMD64/EM64T
Memory requirements
• Windows or Linux operating systems require a minimum 2 GB of system memory per 10 Gigabit
Ethernet port.
NOTE: Windows 32 bit may require the Physical Address Extension (PAE) option to utilize 4
GB or more of memory. PAE is a memory address extension that enables support of greater
than 4 GB of physical memory for most 32-bit (IA-32) Intel Pentium Pro and later platforms. For
more information, see PAE Memory and Windows information on the Microsoft
(http://www.microsoft.com
) website.
Overview 4
Page 5

• Latest HP System ROM
Overview 5
Page 6

Installation and configuration
Windows installation and configuration
The following sections describe how to install the latest driver and firmware upgrade for HP NC51xx PCIe
10 Gigabit server adapters in supported Windows environments. You must install the driver before you
update the firmware.
HP updates networking software frequently to include new functionality and features. For the latest driver,
firmware, and documentation updates go to the HP website
(http://h18004.www1.hp.com/products/servers/networking/index.html
Downloading and installing the driver
Download the driver
).
1. Go to the HP website (http://www.hp.com).
2. Click Software & Driver Downloads from the left menu bar.
3. Type the product name in the For product box and press Enter. For example, type NC510F.
4. Select an operating system.
5. Select the Driver-Network option appropriate for your operating system. For example, click HP NC-
Series NetXen Driver for Windows Server 2003 for Microsoft Windows Server 2003.
6. Click download and save the Component Pack file (cp######.exe) to a directory on your hard
drive. The Component Pack is a self-extracting file used to install the driver.
Install the driver
1. Click the cp######.exe file to run the self-extracting executable file.
2. Click Install to proceed with the installation or click Extract to copy the installation files to your hard
drive.
3. If you chose to extract the files, change to the directory where the files were extracted and double-
click cpqsetup.exe to display the installation window and then click Install.
If prompted to reboot the system, reboot and then continue with the firmware upgrade after the
system reboots.
Upgrading the firmware
The HP NC-Series NetXen Online Firmware Upgrade Utility for Windows upgrades the flash memory for
HP NC51xx PCIe 10 Gigabit server adapters. Use the following steps to upgrade the firmware.
NOTE: Driver and firmware compatibility must be maintained to ensure proper functionality.
Make sure that the driver and firmware versions match for this release.
Installation and configuration 6
Page 7

Downloading the firmware utility and upgrading the firmware
Download the firmware utility
1. Go to the HP website (http://www.hp.com).
2. Click Software & Driver Downloads from the left menu bar.
3. Type the product name in the For product box and press Enter. For example, type NC510F.
4. Select an operating system.
5. Select the Firmware-Network option appropriate for your operating system. For example, click HP
NC-Series NetXen Online Firmware Upgrade Utility for Windows for Microsoft Windows Server
2003.
6. Click download and save the softpaq file (sp#####.exe) to a directory on your hard drive. The
softpaq is a self-extracting file used to install the firmware.
Upgrading the firmware
1. Click the sp#####.exe file to run the self-extracting executable file. One of the extracted files is the
nxflash.exe. This utility upgrades the firmware.
2. Navigate to where the files were downloaded. Ensure that the following binaries are located in the
directory.
nxflash.exe
nxudiag.exe
cx4_hp_romimage
xfp_hp_romimage
hmez_romimage
3. To upgrade the firmware for a specific adapter, launch the nxflash.exe by typing the following
command line syntax in a DOS command window:
nxflash -i NX_NIC --all
where,
o -i indicates the interface command
o NX_NIC specifies the interface, NX_NIC, NX_NIC1, etc. (must be upper case)
o --all updates all of the firmware
While upgrading, you should notice that a back up file of the current firmware is generated. If a
restore is required, use this back up file to restore the adapter to its previous state.
4. After installing the firmware, reboot the system to complete the firmware installation.
Command line arguments
The HP NC51xx Series Online Firmware Upgrade Utility for Windows (nxflash.exe) recognizes the
following command line arguments. The command and its arguments are case sensitive.
Command Definition Description
-i interface Specifies the interface [NX_NIC,
NX_NIC1, etc.]
--info information Displays board type, board chip
revision, serial ID, firmware version,
BIOS version, MAC address and
subsystem ID.
Installation and configuration 7
Page 8

Command Definition Description
-a, --all Update all of
firmware
-r, --restore <image
file>
--opt-rom-on Enable
--opt-rom-off Disable
-h, --help help Displays the help menu.
-v, --version Version Displays the nxflash utility's version
Restore flash
memory
expansion
ROM
expansion
ROM
Updates the flash memory using
appropriate romimage file. The tool
determines which rom image file to
use.
Restores flash memory using backup
romimage. The romimage is
contained in the image file.
Enables the adapter's PXE
functionality.
Disables the adapter's PXE
functionality.
information
Verifying the Windows installation
To verify the HP NC51xx 10 Gigabit Ethernet adapter driver was properly installed:
1. On the desktop, click Start and select Settings > Control Panel > Administrative Tools > Computer
Management to display the Computer Management window.
2. Click Device Manager and then scroll down the list of hardware devices to Network Adapters and
click the plus (+). This expands the list of adapters currently configured.
Installation and configuration 8
Page 9
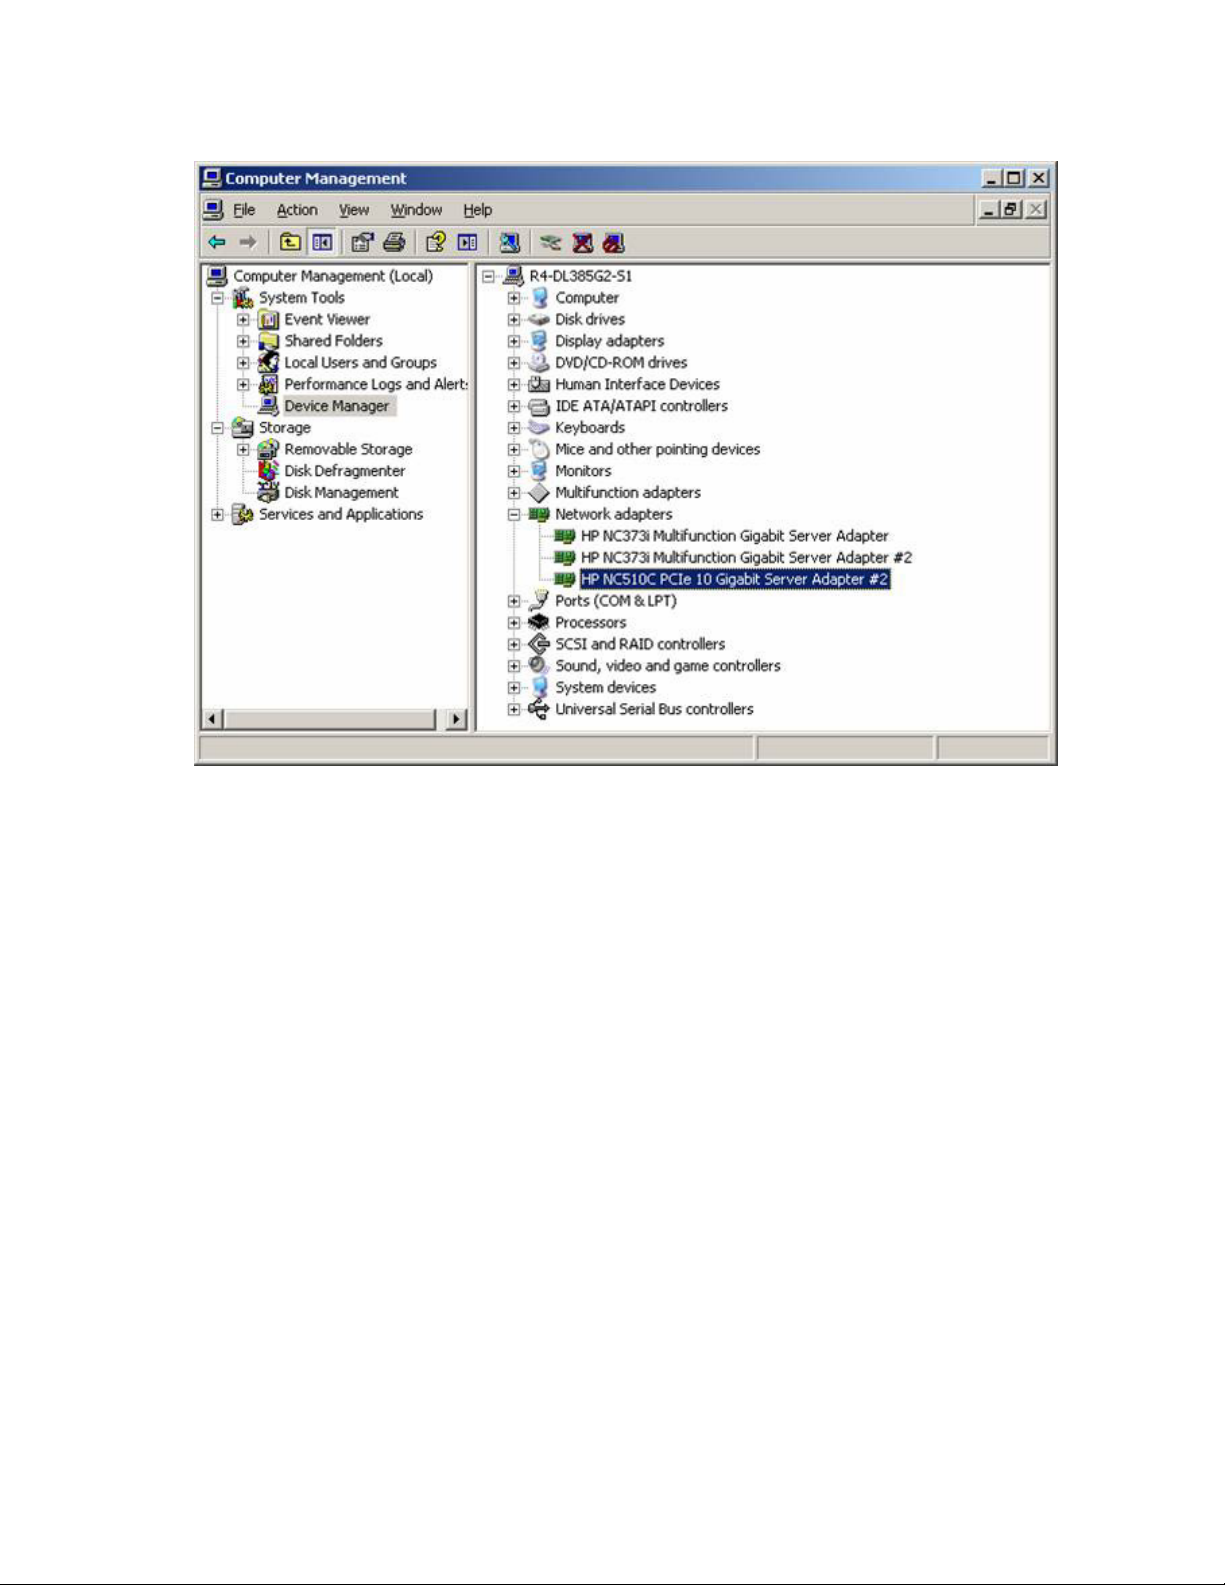
For an HP NC510x PCIe 10 Gigabit Server Adapter, verify that it is listed under Network adapters
as shown in the following example.
Installation and configuration 9
Page 10

For a dual port 10 GbE multifunction adapter, verify that it is listed under Network adapters as
shown in the following example (two ports are displayed in the list for this dual port adapter: HP
NC512m Dual Port 10 GbE Multifunction BL-c Adapter and HP NC512m Dual Port 10 GbE
Multifunction BL-c Adapter #2).
Installation and configuration 10
Page 11
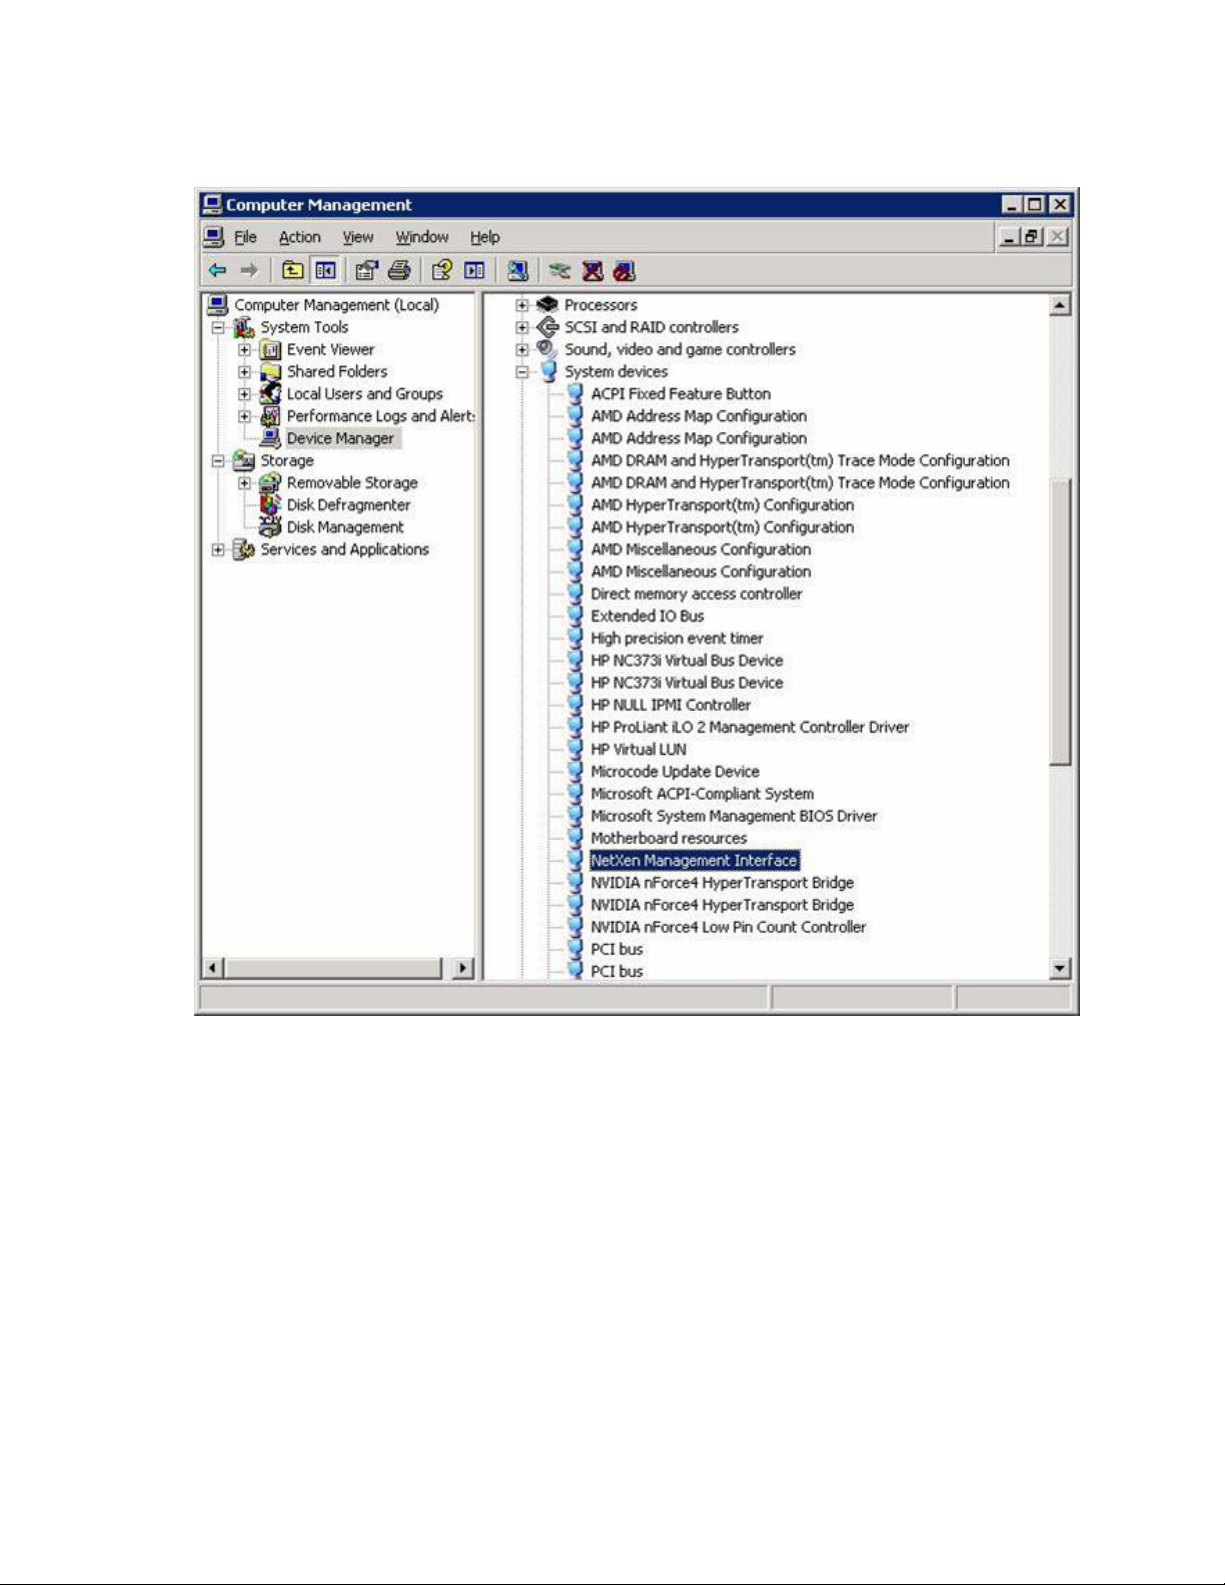
As shown in the following example, a NetXen Management Interface entry is also listed in the
Device Manager under System devices. This is a logical device. Do Not execute tests against the
NetXen Management Interface.
Modifying NC51xx 10 Gigabit adapter properties in Windows
Although the default values should be appropriate in most cases, you can change any of the available
options to meet the requirements of your specific system. Use the following procedure to verify or change
the properties after the adapter driver is installed.
To change the HP NC51xx 10 Gigabit Ethernet adapter properties in Windows, display the Adapter
Properties Advanced tab as follows:
1. On the desktop, click Start and select Settings > Control Panel > Administrative Tools > Computer
Management to display the Computer Management window.
2. Click Device Manager and then scroll down the list of hardware devices to Network Adapters and
click the plus (+). This expands the list of adapters currently configured.
3. Right-click the HP NC51xx PCIe 10 Gigabit Adapter and select Properties. The Adapter Properties
window appears.
Installation and configuration 11
Page 12

4.
Select the Advanced tab. The list of properties and current values for the adapter appears.
5. Select the property to modify and adjust the Value as needed.
6. Save the settings by completing the following steps.
a. When the adapter property configuration is complete, click OK to accept the settings. Close the
Computer Management window.
b. If prompted to restart your computer, click Yes. Rebooting the system for new adapter properties
to take effect is not required; however, rebooting is recommended to re-initialize all registers.
Advanced properties in Windows
The following describes the available advanced properties.
Property Parameter
Flow Control Enables the Ethernet controller to send out pause frames or accept pause frames at
Ethernet level so that traffic is moderated and packets are not dropped.
• Default: Enabled
• Values: Enabled/Disabled
Large Send Offload Enables offloading of TCP Large Send Offload packets.
• Default: Enabled
• Values: Enabled/Disabled
Installation and configuration 12
Page 13

Property Parameter
Locally Administered
Address
Enables users or administrators to set the Locally Administered Address. This address
overrides the permanent address of the adapter (that may have been flashed to the
hardware).
• Format: Hex
• Values: Valid/Not Valid (if Valid, enter the 12 hex characters of MAC address)
If an invalid MAC address is entered, an error message is logged in the event log. If
the MAC Address entered by the user is determined to be invalid, the user input
value is ignored and the MAC address used will be the physical address burned on
the card. The following addresses are invalid:
• 000000000000
• FFFFFFFFFFFF
• Multicast MAC address
Max Ethernet Frame
Size
Sets the Ethernet frame size for packet transmission and receive (does not include
MAC Header).
• Default: 1500 (corresponds to 1514 bytes on the wire + 4 bytes of CRC)
• Min: 1500
• Max: 8000
Max Jumbo Buffers Specifies the number of 8K (jumbo) buffers for receive, in addition to the standard
frame size buffers specified by "Max Receive Buffers." This is a separate pool of
buffers used by the network adapter when the incoming frame is more than the
standard frame size.
• Default: 4096
• Value: 1024/2048/4096/8192
If the MaxFrameSize is set to 1500, the Max Jumbo Buffers parameter is ignored.
Maximum Receive
Buffers
Sets the number of packet buffers on the receive (DMA memory and stack). Size of
each buffer is 1536 bytes.
• Default: 8192
• Value: 1024/2048/4096/8192/16384
QoS Packet Tagging Specifies support for 802.1p (priority) tagging or 802.1q (Vlan) tagging by the
Ethernet controller on a per-packet basis.
• Default: Enabled
• Values: Enabled/Disabled
Receive IP Checksum
Offload
Enables the receive IP checksum offload.
• Default: Enabled
• Values: Enabled/Disabled
Receive TCP/UDP
Checksum Offload
Enables the receive TCP and receive UDP checksum offload.
• Default: Enabled
• Values: Enabled/Disabled
Installation and configuration 13
Page 14

Property Parameter
Status Ring Size A descriptor ring size (queue size) for the status given by the network adapter to the
driver. Setting this value too low will impact the throughput because the network
adapter will start dropping packets. This parameter only affects receive operations
and does not affect transmit operations.
• Default: 8192
• Value: 1024/2048/4096/8192/16384/32768
Transmit IP Checksum
Offload
Enables the transmit IP checksum offload.
• Default: Enabled
• Values: Enabled/Disabled
Transmit Ring Size A descriptor ring size (queue size) for the transmit commands given by the driver to
the network adapter. It describes how many transmit operations can be given by the
host/driver to the network adapter at one time without overflowing the transmit
queue. Each of the entries in this queue describes one transmit/send operation by
the driver.
• Default: 1024
• Value: 1024/2048
Transmit TCP/UDP
Checksum Offload
Enables the transmit TCP and transmit UDP checksum offload.
• Default: Enabled
• Values: Enabled/Disabled
Vlan Id Sets the VLAN ID for this interface (also exposed through the standard OID). QoS
Packet Tagging must be enabled or the VLAN ID parameter is ignored.
• Default: 0 (no VLAN)
• Range: 0 – 4095
If multiple VLANs are set, the value is set to 0 (zero) and an intermediate driver is
used to set each VLan.
Modifying adapter properties using the NCU
The following section describes HP NC51xx 10 GbE server adapter properties that can be modified using
the HP Network Configuration Utility (NCU).
• Locally Administered Address. Specifies the user-defined MAC Address of the adapter, which
overrides the burned-in MAC Address. This box is disabled if the selected adapter has been teamed.
o Default = NULL
o Range = Valid unicast MAC Address
• 802.1p QoS Packet Tagging. Enables or disables IEEE 802.1p tagging to send network traffic with
different priority levels.
o Default = Enabled
o Range = Disabled; Enabled
• Maximum Frame Size. Specifies the maximum number of bytes in a single packet. Larger frames can
increase throughput and decrease CPU use by putting more data in each packet, thereby sending
out fewer packets. This is equivalent to Jumbo Frames and must comply with switch limitations.
o Default = 1500 bytes
Installation and configuration 14
Page 15

o
Range = 1500|4074|8014 bytes
• Flow Control. Specifies the type of flow control that is needed.
o Default = Enabled
o Range = Disabled; Enabled
• Tx TCP Checksum Offload. Offloads the task of computing the checksum for outgoing TCP or UDP
packets, thereby improving performance.
o Default = On
o Range = Off; On
• Rx TCP Checksum Offload. Offloads the task of computing the checksum for incoming TCP or UDP
packets, thereby improving performance.
o Default = On
o Range = Off; On
• Large Send Offload. Enables offloading of large TCP packets. Large send offload cannot be enabled
on a port that has IPMI enabled (if IPMI is supported for your adapter).
o Default = Enabled
o Range = Disabled; Enabled
• Number of Transmit Descriptors: Minimum/Maximum. Specifies the number of descriptors to allocate
per Transmit Control Block (TCB). This value directly affects the number of map registers allocated for
the adapter (the higher the number, the more map registers are allocated). Transmit Descriptors
determine how many resources are allocated to transmit packets.
o Default = 1024
o Range = 1024|2048
• Number of Receive Descriptors: Minimum/Maximum. In high network load situations, increasing
receive descriptors can increase performance. The tradeoff is that this also increases the amount of
system memory used by the driver. If too few receive descriptors are used, performance suffers. If too
many receive descriptors are used, the driver unnecessarily consumes memory resources. Receive
Descriptors determine how many resources are allocated to receive packets.
o Default = 8192
o Range = 1024|2048|4096|8192|16384
• Number of Receive Descriptors (Jumbo). Receive Descriptors determine how many resources are
allocated to receive packets. This property is only applicable if Max Frame Size is greater than
1500.
o Default = 4096
o Range = 1024|2048|4096|8192
Linux installation
The nx_nic-<version>.src.rpm driver is released in a source RPM format. The package is dependent on the
kernel source code. The following sections describe how to install the driver using Red Hat and SUSE
distributions.
For SUSE installations, you must install the kernel source code or set up the source tree on your Linux
system before installing the driver.
Installation and configuration 15
Page 16

HP updates networking software frequently to include new functionality and features. For the latest driver,
firmware, and documentation updates go to the HP website
(http://h18004.www1.hp.com/products/servers/networking/index.html
Setting up the kernel source code
The nx_intercept and nx_lsa drivers require that the kernel source code be installed and configured before
building the drivers.
Installing the kernel source code
Install the kernel source code as described in the SUSE documentation.
NOTE: The kernel source code setup is not required for Red Hat EL4 or Red Hat EL5.
Setting up the kernel source code
To configure the kernel source code, complete the following steps once for each kernel that is booted.
For example:
If the current kernel is UP (uni-processor), complete the following steps to boot an SMP (symmetrical-multi-
processor) kernel.
).
1. After installing the kernel source code, verify that the /usr/src/linux-<kernel-version> source code
directory exists by executing the following command.
# cd /usr/src/linux-<kernel-version>
2. If the kernel source code directory does not exist, execute the following commands to configure the
kernel source tree.
# cd /usr/src/linux-<kernel_version>
# make mrproper
# make cloneconfig
# make dep
Red Hat and SLES RPM installations
This package requires the kernel source code as well as setting up the source tree.
1. Verify the source code /usr/src/linux-<kernel-version> directory exists:
# cd /usr/src/linux-<kernel-version>
If the kernel source code is not present, see Setting up the kernel source code (on page 16).
2. Remove the loaded unm_nic or nx_nic module.
# rmmod unm_nic
or
# rmmod nx_nic
Check for the existence of a current version of the unm_nic or nx_nic package as follows:
# rpm -q unm_nic
or
# rpm -q nx_nic
If an old version of the package exists, the RPM package should be removed.
# rpm -e unm_nic
or
# rpm -e nx_nic
Installation and configuration 16
Page 17

Verify that the old package has been removed as follows:
# rpm -q unm_nic
or
# rpm -q nx_nic
3. Install the nx_nic source rpm.
# rpm -ivh nx_nic-<version>.src.rpm
4. Build the binary RPM for the nx_nic driver.
Red Hat installation:
# cd /usr/src/redhat
# rpmbuild -bb SPECS/nx_nic-<version>.spec
SLES 9/10 installation:
# cd /usr/src/packages
# rpmbuild -bb SPECS/nx_nic-<version>.spec
If you get an error during the build process, see Setting up the kernel source code (on page 16) to
correctly setup the source tree.
5. Install the new RPM package by executing the following:
# rpm -ivh RPMS/<arch>/nx_nic-<version>.<arch>.rpm
The driver is installed in the following path:
/lib/modules/<kernel_version>/kernel/drivers/net/nx_nic.ko
6. Configure your network setting and address. You may need to refer to your Linux vendor
documentation. Helpful network configuration tools such as yast2 for SUSE or linuxconf/redhatconfig-network/netconfig for RedHat may be used to automate the configuration. For SLES 9/10,
you must specify the module as nx_nic when configuring the network. The module can be specified
in the Hardware Details of Advanced configuration.
7. Be sure that the /etc/modules.conf file is configured similar to the example listed below. The
example below is presented as if more than one adapter is present. If so, one eth# instance should
exist for each Ethernet port. See the modules.conf man page for more information.
alias eth0 nx_nic
alias eth1 nx_nic
alias eth# nx_nic
For SLES 9/10, the configuration file is /etc/modprobe.conf or /etc/modprobe.conf.local. If the
entry does not exist, add it in the configuration file.
Uninstalling the nx_nic RPM
The following command uninstalls the nx_nic RPM.
# rpm -e nx_nic-<version>
Upgrading firmware for Red Hat and SLES
The HP NC51xx Online Firmware Upgrade Utility is used to modify the contents of the flash memory for
HP NC51xx PCIe 10 Gigabit server adapters.
Download the drivers as described in Installation and configuration (on page 6) before proceeding to
install the nx_tools RPM.
NOTE: Driver and firmware compatibility must be maintained to ensure proper functionality.
Make sure that the driver and firmware versions match for this release.
Installation and configuration 17
Page 18

Installing the nx_tools RPM
The nx_tools RPM contains the nxflash firmware upgrade tool and the nxudiag user diagnostic tool (see
Diagnostic utility (on page 32) for nxudiag functionality information). Complete the following steps to
install this RPM.
1. Check for the existence of a current version of the nx_tools package:
# rpm -q nx_tools
If an old version of the package exists, remove the RPM package:
# rpm -e nx_tools
Verify that the old nx_tools package has been removed:
# rpm -q nx_tools
2. Install the new nx_tools binary rpm.
# rpm -ivh nx_tools-<version>.rpm
The RPM contents will be installed in /opt/netxen.
Upgrading the firmware
1. Make sure that the nx_nic driver is loaded into the system before proceeding with the firmware
upgrade.
2. Change to the installation directory:
# cd /opt/netxen
3. Update the firmware and BIOS for the specified interface:
# ./nxflash -i eth<x> --all
4. Verify firmware and BIOS version:
# ./nxflash -i eth<x> --info
5. Reboot the system to use the new firmware.
Command line arguments
The HP NC51xx Online Firmware Upgrade Utility recognizes the following command line arguments. The
command and its arguments are case sensitive.
Command Definition Description
-i interface Specifies the interface type [eth0,
eth1, etc.]
--info information Displays board type, board chip
revision, serial ID, firmware version,
BIOS version, MAC address and
subsystem ID.
-a, --all Update all of
firmware
-r, --restore <image
file>
--opt-rom-on Enable
--opt-rom-off Disable
-h, --help help Displays the help menu.
Restore flash
memory
expansion
ROM
expansion
ROM
Burn flash memory using romimage
Restore flash memory using backup
romimage. The romimage is
contained in the image file.
Enables the adapter's PXE
functionality.
Disables the adapter's PXE
functionality.
Installation and configuration 18
Page 19

Uninstalling the nx_tools RPM
The following command uninstalls the nx_tools RPM.
# rpm -e nx_tools
Driver settings
The following settings are the default and optional parameters that the driver can set for the adapter.
• Speed
o 10,0000 Mbps, full-duplex
• MTU
o Default: 1500
o Range: 0-8000
Example: The following command illustrates how to set the MTU value.
# ifconfig eth<x> mtu 8000
• TSO
o Default: On
o Range: On or Off
Example: The following command illustrates how to change the TSO parameter to off.
# ethtool -K eth<x> tso off
The following optional parameters can be passed to the driver with the modprobe command.
• tx_desc—sets the size of the command descriptor rings (tx).
o Default: 1024
o Range: 256-4096 (must be power of two)
Example: The following command illustrates how to use the modprobe command to set the tx_desc
parameter option.
# modprobe nx_nic tx_desc=2048
• jumbo_desc—sets the size of the receive ring for jumbo frames.
o Default: 1024
o Range: 64-1024 (must be power of two)
Example: The following command illustrates how to use the modprobe command to set the
jumbo_desc parameter option.
# modprobe nx_nic jumbo_desc=1024
• rdesc_10g—sets the size of the receive ring for normal packets (10 GbE ports).
o Default: 32768
o Range: 64-32768 (must be power of two)
Example: The following command illustrates how to use the modprobe command to set the
rdesc_10g parameter option.
# modprobe nx_nic rdesc_10g=32768
• use_msi—enables or disables Message Signal Interrupt.
o Default: Enable (1)
Installation and configuration 19
Page 20

o
Range: Disable (0) or Enable (1)
Example: The following command illustrates how to use the modprobe command to disable MSI with
the use_msi option.
# modprobe nx_nic use_msi=0
Driver message log
Messages are logged in the following file.
/var/log/messages
Some Linux distributions may not display messages to the console.
To set messages to display on the console, use the following command to control the level that messages
display on the console.
# dmesg -n x
The x is a variable representing the level. Most systems are set to level 6 by default.
For example, to set the system to level 6, type the following command:
# dmesg -n 6
Uninstalling the adapter driver
To uninstall the HP NC51xx PCIe 10 Gigabit Server Adapter driver software in Windows, perform the
following steps:
1. On the desktop, click Start and select Settings > Control Panel > Administrative Tools > Computer
Management to display the Computer Management window.
2. Click Device Manager and then scroll down the list of hardware devices to Network Adapters and
click the plus (+). This expands the list of adapters currently configured. For example, HP NC510x
PCle 10 Gigabit Server Adapter is listed in the example above and is removed with the following
step.
3. Right-click HP NC510x PCIe 10 Gigabit Server Adapter and select Uninstall.
To uninstall dual port 10GbE adapter driver software in Windows, perform the following steps:
1. On the desktop, click Start and select Settings > Control Panel > Administrative Tools > Computer
Management to display the Computer Management window.
2. Click Device Manager and then scroll down the list of hardware devices to Network Adapters and
click the plus (+). This expands the list of adapters currently configured.
3. Locate the two ports listed under Network adapters.
For example, HP NC 512m Dual Port 10GbE Multifunction BL-c Adapter and HP NC 512m Dual
Port 10GbE Multifunction BL-c Adapter #2 are listed in the Computer Management window shown
above and are removed with the following steps.
4. Right-click HP NC 512m Dual Port 10GbE Multifunction BL-c Adapter and select Uninstall.
5. Right-click HP NC 512m Dual Port 10GbE Multifunction BL-c Adapter #2 and select Uninstall.
6. Locate the NetXen Management Interface listed under System devices in the Device Manager
display.
7. Right-click NetXen Management Interface and select Uninstall.
Installation and configuration 20
Page 21

Configuring multiple NC510x PCIe 10 GbE adapters
Multiple NC510x PCIe 10 GbE stand up adapters can be configured in a single system.
• Requirements—HP recommends installing 2 GB of system memory per 10 GbE port. Each NC510x
PCIe 10 GbE adapter installed must have a unique IP address assigned.
NOTE: Windows 32 bit may require the Physical Address Extension (PAE) option to utilize 4
GB or more of memory. PAE is a memory address extension that enables support of greater
than 4 GB of physical memory for most 32-bit (IA-32) Intel Pentium Pro and later platforms. For
more information, see PAE Memory and Windows information on the Microsoft
(http://www.microsoft.com
• Installing—Install additional NC510x PCIe 10 GbE stand up adapters in any empty PCI Express slot
on the system. In a Windows or Linux operating system, when the NC510x driver is installed, the
driver automatically loads for any additional NC510x adapters that are added.
• Enabling—Each adapter can be enabled independently. The user assigns an IP address to each
adapter in the system.
) website.
• Disabling—Each adapter can be disabled independently.
Configuring multiple ports on 10GbE adapters
HP multiple port adapters—such as the NC512m Dual Port 10 GbE Multifunction BL-c Adapter—have
multiple ports on a single card.
• Requirements: Each port requires a separate IP address, and each port should be on a separate
subnet for proper network stack functioning.
• Installing: If the driver is installed, it is automatically loaded for each port.
• Enabling: Each port appears as a separate device. Ports can be enabled individually without
interfering with the other ports.
• Disabling: Ports can be disabled individually without interfering with other enabled ports.
Please note that multiple HP NC512m Dual Port 10 GbE Multifunction BL-c Adapters are NOT supported
in a single system.
Boot options
Pre-boot Execution Environment (PXE) allows a server to boot from a remote system using the NC51xx 10
Gigabit Ethernet interface. Through the PXE interface, the server's operating system image is downloaded
from a configured boot server.
PXE boot process requirements
The PXE boot process has the following requirements.
• An HP NC51xx network adapter enabled to support PXE boot.
Installation and configuration 21
Page 22

• A Dynamic Host Configuration Protocol (DHCP) server — Used to assign an IP address to the
network adapter and to specify a boot image to download and load. Typically, a system
administrator configures a DHCP server to provide boot parameters.
• A Trivial File Transfer Protocol (TFTP) server — Used by the network adapter to download a PXE boot
loader.
• System BIOS enabled for PCI Expansion ROM scanning of the PCI slot where the network adapter is
installed. PCI Expansion ROM scanning allows the network adapter's PXE driver to be loaded and
executed during system boot time.
Configuring PCI behavior is system BIOS dependent but usually requires accessing the BIOS setup
screen and configuring the PCI advanced or boot properties. Also, the system BIOS must be enabled
to boot from the NC51xx network adapter.
• Desired boot order selected to insure that the appropriate boot sequence occurs.
When PCI Expansion ROM scanning is enabled and the NC51xx network adapter is installed
correctly, the NC51xx network adapter displays as a boot option in the system BIOS boot order
menu.
PXE functionality in the firmware is disabled by default.
Complete the following steps to enable or disable PXE functionality for Windows.
1. Execute the following command to enable PXE functionality:
nxflash -i NX_NIC<Device #> --opt-rom-on
2. Execute the following command to disable PXE functionality:
nxflash -i NX_NIC<Device #> --opt-rom-off
Complete the following steps to enable or disable PXE functionality for Linux.
1. Execute the following command to enable PXE functionality:
nxflash -i eth<#> --opt-rom-on
2. Execute the following command to disable PXE functionality:
nxflash -i eth<#> --opt-rom-off
Currently, the PXE interface for NC51xx adapters DOES NOT support the Proliant Essentials Rapid
Deployment Pack (RDP).
Installation and configuration 22
Page 23

Linux Socket Acceleration
Using the Linux Socket Accelerator driver
Linux Socket Accelerator (LSA) offloads a significant amount of TCP network processing to the HP
NC51xx network adapter, which can greatly reduce host CPU utilization. LSA does not require the user to
rebuild the Linux kernel because simple, loadable driver modules are used.
Offload control can be based on the application name, local TCP port number, or remote TCP port
number. These options provide exceptional control for what can be offloaded.
Packaging
The driver file name for the LSA package is:
nx_lsa-<version>.src.rpm
It is dependent on the kernel source code.
If you have not installed the kernel source code or setup the source tree on your Linux system, see Setting
up the kernel source code (on page 16).
Installing the LSA driver
This package requires the kernel source code as well as setting up the source tree. Complete the following
steps using command options provided for each step.
1. Verify that the nx_nic driver and firmware have been updated to the latest version. See Red Hat and
SLES RPM installations (on page 16) to determine if the nx_nic driver needs to be updated. See
Upgrading firmware for Red Hat and SLES (on page 17) to determine if the firmware needs to be
updated.
2. Verify the source code /usr/src/linux-<kernel-version> directory exists.
# cd /usr/src/linux-<kernel-version>
If the kernel source code is not present, see Setting up the kernel source code (on page 16).
3. Check for the existence of a loaded nx_lsa and nx_intercept driver.
# lsmod
4. If the drivers are loaded, remove the nx_lsa driver.
# rmmod nx_lsa
The nx_intercept driver cannot be removed using rmmod.
5. Check for the existence of a current version of the nx_lsa package.
# rpm -q nx_lsa
6. If an old version of the package exists, remove the RPM package.
# rpm -e nx_lsa
7. Verify that the old nx_lsa package has been removed.
# rpm -q nx_lsa
8. Remove the nx_intercept module by rebooting the system.
# reboot
Linux Socket Acceleration 23
Page 24

9.
Install the source RPM package.
# rpm -ivh nx_lsa-<version>.src.rpm
10. Build the binary RPM for the nx_lsa package.
Red Hat Installation:
# cd /usr/src/redhat
# rpmbuild -bb SPECS/nx_lsa-<version>.spec
SLES 9/10 Installation:
# cd /usr/src/packages
# rpmbuild -bb SPECS/nx_lsa-<version>.spec
If you get an error during the build process, see Setting up the kernel source code (on page 16) for
information to configure the source tree correctly.
11. Install the new RPM package.
# rpm -ivh RPMS/<arch>/nx_lsa-<version>.<arch>.rpm
The drivers is installed in the following path:
/lib/modules/<kernel_version>/kernel/drivers/net/nx_lsa.ko
/lib/modules/<kernel_version>/kernel/drivers/net/nx_intercept.ko
The nxoffload utility is installed in the following path:
/usr/local/bin/nxoffload
12. Reboot the server. The network should start with the nx_lsa and nx_intercept drivers loaded.
13. Use the following command to verify that the drivers are loaded.
# lsmod
If the drivers are not loaded, load them with modprobe command.
# modprobe nx_intercept
# modprobe nx_lsa
The nx_lsa requires the nx_intercept driver to be loaded.
14. Use the ifconfig command to bring up the network.
# ifconfig eth# up
The LSA Intercept driver must be running in order for the LSA driver to function properly. When the server
is rebooted and before using the LSA driver, use the lsmod command to ensure that the NC51xx network
adapter and Intercept driver are running.
LSA driver configuration
The LSA driver can be configured using the nxoffload utility. This utility works by maintaining a list of rules
that dictate which applications to offload.
Each rule can take one of the following parameters:
• Application name
• Local TCP port number
• Local and remote TCP port number
LSA driver configuration options
The following table provides LSA driver configuration usage options for the nxoffload utility (nxoffload
<command>).
Linux Socket Acceleration 24
Page 25

Command Definition Comments
-h, -help Displays a list of parameters
for the nxoffload utility
-p Port number to be offloaded
-n Application name to be
offloaded
-t TCP tuple to be offloaded Format: local IP, local port, remote OP,
-a Add an offload rule
-r Remove an offload rule
-z Enable zero copy
-s List all ports and applications
offloaded
remove port.
Example:
./nxoffload -a -t'0, 0, 0, 5001'
./nxoffload -a -t'0, 2000, 0, 5001'
Configuration examples:
To offload the application iperf type:
nxoffload -a -n iperf
To offload the application that uses local TCP port 80 type:
nxoffload -a -p80
To remove the application that uses local TCP port 80 type:
nxoffload -r -p80
To list the current offload rules type:
nxoffload -s
To offload an application with zero copy enabled then type:
nxoffload -a -z -n <application name>
LSA driver caveats
HP Linux Socket Acceleration has the following caveats:
• The nx_intercept module cannot be removed with rmmod. However, the object is removed from the
system when the nx_lsa package is removed with rpm -e nx_lsa. Reboot the system and the
nx_intercept module is removed completely.
• There are build warnings when building the objects with rpmbuild. Please ignore these build
warnings.
• Requires root access to add or remove offload rules.
• Rules may be added or removed at any time. However, the addition or removal of a rule will not
affect connections that have already been established.
For example:
If the user starts a non-offloaded iperf application and then types nxoffload - a -n iperf, this
instantiation of iperf is NOT subsequently offloaded. However, future instantiations will be offloaded.
• TCP tuple is not implemented in this release.
Linux Socket Acceleration 25
Page 26

• LSA does not support jumbo frames in this release. If the Maximum Transmission Unit (MTU) is set to
jumbo, LSA will default back to a 1500 byte payload.
• Newer versions of the Linux kernel will contain the netxen_nic driver, which supports the same
devices as nx_nic except without the LSA interface. The netxen_nic driver must be manually removed
and then the nx_nic driver must be installed prior to installing the nx_lsa driver. The following
command sequence can be used to remove the netxen_nic driver.
# rmmod netxen_nic
# rm /lib/modules/<kernel version>/kernel/drivers/net/netxen_nic.ko
Running LSA
After the appropriate rule is entered into nxoffload, no further user intervention is required and the offload
LSA statistics
occurs automatically.
LSA offloaded statistics can be viewed at the following location:
/proc/net/nx_nic/lsa_x/stats
Where: x defines the port number
The following output is an example of the collected statistics:
% cat /proc/net/nx_nic/lsa_1/stats
TCP/IP Statistics Port0 Port1 Port2 Port3
TcpMaxConn 0 0 0 0
TcpActiveOpens 20 0 0 0
TcpPassiveOpens 0 0 0 0
TcpAttemptFails 0 0 0 0
TcpEstabResets 0 0 0 0
TcpCurrEstab 12 0 0 0
TcpInSegs 10094835 0 0 0
TcpSlowOutSegs 131 0 0 0
TcpRetransSegs 33 0 0 0
TcpInErrs 0 0 0 0
TcpOutRsts 0 0 0 0
TcpOutCollapsed 0 0 0 0
The following list identifies and defines each statistic:
• TcpMaxConn: The limit on the total number of TCP connections that the entity can support. In entities
where the maximum number of connections is dynamic, this object should contain the value -1.
STATUS—Not supported
• TcpActiveOpens: The number of times TCP connections have made a direct transition from the
CLOSED state to the SYN-SENT state.
STATUS—Supported
• TcpPassiveOpens: The number of times TCP connections have made a direct transition from the
LISTEN state to the SYN-RCVD state.
Linux Socket Acceleration 26
Page 27

STATUS—Not supported
• TcpAttemptFails: The number of times TCP connections have made a direct transition from either the
SYN-SENT state or the SYN-RCVD state to the CLOSED state plus the number of times TCP
connections have made a direct transition from the SYN-RCVD state to the LISTEN state.
STATUS—Supported
• TcpEstabResets: The number of times TCP connections have made a direct transition from either the
ESTABLISHED state or the CLOSE-WAIT state to the CLOSED state.
STATUS—Not supported
• TcpCurrEstab: The number of TCP connections for which the current state is either ESTABLISHED or
CLOSE-WAIT.
STATUS—Supported
• TcpInSegs: The total number of segments received, including those received in error. This count
includes segments received on currently established connections.
STATUS—Supported
• TcpOutSegs: The total number of segments sent, including those on current connections but excluding
those containing only retransmitted octets.
STATUS—Supported
• TcpSlowOutSegs: A subset of TcpOutSegs that provides the total number of segments sent in the slow
path.
STATUS—Supported
• TcpRetransSegs: The total number of segments retransmitted (the number of TCP segments transmitted
that contain one or more previously transmitted octets).
STATUS—Supported
• TcpInErrs: The total number of TCP segments received in error (for example, a bad TCP header).
Checksum errors are not included in this counter.
STATUS—Supported
• TcpOutRsts: The number of TCP segments sent that contain the reset (RST) flag.
STATUS—Supported
• TcpOutRsts: The number of TCP segments sent that contain the reset (RST) flag.
STATUS—Supported
• TcpOutCollapsed: The total number of times that two outgoing packets were collapsed to form a
single packet during retransmission.
STATUS—Supported
• TcpTimeWaitConns: The total number of connections that are currently in the TIME_WAIT state.
STATUS—Supported
• IpInReceives: The total number of input datagrams received from interfaces, including those received
in error.
STATUS—Supported
• IpInHdrErrors: The number of input datagrams discarded due to errors in their IP headers (including
bad checksums, version number mismatch, other format errors, time-to-live exceeded, errors
discovered in processing their IP options, and so forth).
Linux Socket Acceleration 27
Page 28

STATUS—Supported
• IpInAddrErrors: The number of input datagrams discarded because the IP address in their IP header's
destination field was not a valid address to be received at this entity. This count includes invalid
addresses (for example, 0.0.0.0) and addresses of unsupported Classes (for example, Class E). For
entities that are not IP routers and therefore do not forward datagrams, this counter includes
datagrams discarded because the destination address was not a local address.
STATUS—Supported
• IpInNoRoutes: Number of input datagrams discarded because there was a problem with
determination of inbound interface or a problem with determination of a route back to the source of
the datagram [not in the IP Management Information Base (ip-mib)].
STATUS—Supported
• IpInDiscards: The number of input IP datagrams for which no problems were encountered to prevent
their continued processing, but they were discarded (for example, discarded for lack of buffer
space). This counter does not include any datagrams discarded while awaiting reassembly.
STATUS—Not supported
• IpInDelivers: The total number of input datagrams successfully delivered to IP user-protocols
[including Internet Control Message Protocol (ICMP)].
STATUS—Supported
• IpOutRequests: The total number of IP datagrams that local IP user-protocols [including Internet
Control Message Protocol (ICMP)] supplied to IP in requests for transmission. This counter does not
include any datagrams counted in ipForwDatagrams.
STATUS—Supported
• IpOutDiscards: The number of output IP datagrams for which no problem was encountered to prevent
their transmission to their destination, but they were discarded (for example, output IP datagrams
discarded for lack of buffer space). This counter includes datagrams counted in ipForwDatagrams, if
any of the packets met this (discretionary) discard criterion.
STATUS—Supported
• IpOutNoRoutes: The number of IP datagrams discarded because no route could be found to transmit
them to their destination. This counter includes any packets counted in ipForwDatagrams that meet
this `no-route' criterion. This includes any datagrams that a host cannot route because all of its
default routers are down.
STATUS—Supported
• IpReasmTimeout: The maximum number of seconds for which received fragments are held while they
are awaiting reassembly at this entity.
STATUS—Not supported
• IpReasmReqds: The number of IP fragments received that required reassembly at this entity.
STATUS—Not supported
• IpReasmOKs: The number of IP datagrams successfully reassembled.
STATUS—Not supported
• IpReasmFails: The number of failures detected by the IP reassembly algorithm (for example: timed
out, errors, and so forth). This is not necessarily a count of discarded IP fragments because some
algorithms (notably the algorithm in RFC 815) can lose track of the number of fragments by
combining them as they are received.
Linux Socket Acceleration 28
Page 29

STATUS—Not supported
• IpFragOKs: The number of IP datagrams that have been successfully fragmented at this entity.
STATUS—Not supported
• IpFragFails: The number of IP datagrams that have been discarded because they needed to be
fragmented, but could not be at this entity (could not be fragmented because the Don't Fragment flag
was set).
STATUS—Not supported
• IpFragCreates: The number of IP datagram fragments generated as a result of fragmentation at this
entity.
STATUS—Not supported
Uninstalling the LSA driver
Use the following command to uninstall the nx_lsa RPM.
# rpm -e nx_lsa-<version>
Linux Socket Acceleration 29
Page 30

Troubleshooting
Unable to boot host system on Windows or Linux
Problem:
Unable to boot the host system with the network adapter installed on Windows or Linux operating
systems.
Troubleshooting:
• Remove the network adapter and reboot. Verify that the system is able to boot without the network
adapter.
• Verify that the required minimum 2 GB of system memory per 10 Gigabit Ethernet port is installed on
the host system.
NOTE: Windows 32 bit may require the Physical Address Extension (PAE) option to utilize 4
GB or more of memory. PAE is a memory address extension that enables support of greater
than 4 GB of physical memory for most 32-bit (IA-32) Intel Pentium Pro and later platforms. For
more information, see PAE Memory and Windows information on the Microsoft
(http://www.microsoft.com
) website.
• Verify that you have met the system requirements for your operating system.
• Verify that no error messages occurred during the OS boot sequence.
• Verify that the ROM scan is disabled in the BIOS.
• Verify that no system error messages occurred in the following:
o eventvwr.exe (Windows event viewer)
o dmesg (Linux)
Gathering system information and error checks for Linux
Use the following commands in Linux to assist in your troubleshooting efforts.
Gathering system information
To gather system information and to look for error messages, execute the following on a Linux host.
cat /proc/modules | grep -i nx
cat /proc/pci
cat /proc/interrupts
ethtool -i <network interface>
lspci -v
lspci -vt
Troubleshooting 30
Page 31

Kernel messages
To look for error messages occurred from the kernel, execute the following.
dmesg
cat /var/log/messages
Miscellaneous troubleshooting tasks
To look for routing table, gateway, or IP Address conflicts for all interfaces execute the following.
route
To verify network interface TX and RX counts during pings, execute the following.
ifconfig <network interface>
Use ethereal, tethereal, nospace, or tcpdump utilities to capture packets then analyze the ping packets.
Unable to ping the network adapter installed on a Linux host
Problem:
Unable to ping the network adapter installed on a Linux host
Possible solutions:
• Type lspci -v and look for vendor ID ‘4040’. Verify that the network adapter is visible on the PCI bus.
• Verify that the network adapter is placed in the PCIe x8 slot.
Troubleshooting 31
Page 32

Diagnostics
Diagnostic utility
Please note that network traffic will be interrupted while you are running diagnostic tests.
The diagnostic utilities for Windows and Linux operating systems perform the following tests:
• Control registers test
• Flash memory test
• Interrupt loop-back test
• Internal loop-back test
• External full duplex loop-back test
• Link test
• LED test
• All tests
Windows
To execute the user diagnostic utility in a Windows operating system, complete the following steps:
1. Change to the folder where the softpaq was expanded.
2. Enter the following diagnostic command:
nxudiag.exe -i NX_NIC<Device #>
Where: NX_NIC<Device #> = an interface
Linux
To execute the user diagnostic utility for a Linux operating system, complete the following steps:
1. Change to the installation directory using the following command:
# cd /opt/netxen
2. Enter the following diagnostic command:
./nxudiag -i eth[n]
Where: [n] = an interface
The following diagnostic tests are not supported on the NC512m adapter:
• Internal loop-back test
• External full duplex loop-back test
• LED test
Diagnostics 32
Page 33

Diagnostic test descriptions
The diagnostic tests are described in the following section.
Control registers. Reads the values stored in the control registers. The setting or clearing of specific bits
during the initialization process indicates whether the board has been configured correctly. Performs a
write/read back/compare operation to selected registers to verify each register's accessibility.
Flash memory. Reads the contents of the flash memory, calculates the checksum, and then compares the
calculated checksum to the value stored in memory.
Interrupt loop-back test. Communicates with the driver to force the hardware to generate selected
interrupts. Then, the utility reads the interrupt status register to verify that the interrupt was generated and
processed.
Internal loopback. Sets the Ethernet core (Media Access Control) to perform a loop-back operation. Sends
packets to itself and then compares the contents of the packets to verify that the sent and received values
are the same. No external hardware is required for the internal loop-back test.
External loopback. Sends packets to itself through the optical transmit lane, reads the contents on the
receive lane, and then compares the contents of the packets to verify that the sent and received values are
the same.
For CX4 (copper interface) applications an external module is required to connect the four transmit lanes
to the four corresponding receive lanes. This module must contain all of the associated handshake signals
required to redirect the four transmit lanes to the four receive lanes.
For XFP (10 Gigabit small form factor pluggable module) applications, an 850 nm multi-mode cable with
LC connectors is required to connect the transmit lane to the receive lane externally.
Link. Reports the status of the link as up or down.
LED. Interactive test that causes the LEDs to blink. The software/driver has no auto-detect mechanism for
checking LEDs. Visually inspect the LEDs on the adapter. The LEDs should blink for several seconds. No
blinking LEDs indicates that the test failed.
All Tests. Runs all of the diagnostic tests described in this section by using the single command.
Diagnostics 33
Page 34

Technical support
Before you contact HP
Be sure to have the following information available before you call HP:
• Technical support registration number (if applicable)
• Product serial number
• Product model name and number
• Product identification number
• Applicable error messages
• Add-on boards or hardware
• Third-party hardware or software
• Operating system type and revision level
HP contact information
For the name of the nearest HP authorized reseller:
• In the United States, see the HP US service locator webpage (http://www.hp.com/service_locator).
• In other locations, see the Contact HP worldwide (in English) webpage
(http://welcome.hp.com/country/us/en/wwcontact.html
For HP technical support:
• In the United States, for contact options see the Contact HP United States webpage
(http://welcome.hp.com/country/us/en/contact_us.html
o Call 1-800-HP-INVENT (1-800-474-6836). This service is available 24 hours a day, 7 days a
week. For continuous quality improvement, calls may be recorded or monitored.
o If you have purchased a Care Pack (service upgrade), call 1-800-633-3600. For more
information about Care Packs, refer to the HP website (http://www.hp.com
• In other locations, see the Contact HP worldwide (in English) webpage
(http://welcome.hp.com/country/us/en/wwcontact.html
).
). To contact HP by phone:
).
).
Free automated customer support services
The following sites offer troubleshooting information, compatibility notes, and software upgrades
(including Softpaqs and drivers).
HP Worldwide Web Server
Technical support 34
Page 35

• Navigate to a specific product, and then look for support information from the list of support
resources at the HP support website (http://h18007.www1.hp.com/support/files/server
).
• For downloadable support software for HP Digital Networking Products, Hubs, Integrated Access
Devices, Modems and ISDN, Adapters, Remote Access Concentrators/Servers, Software, and
Switches, go to the HP software and drivers website
(http://h18007.www1.hp.com/support/files/server
).
• All SoftPaqs sorted by SoftPaq number can be found at the HP ftp support website
(ftp://ftp.compaq.com/pub/softpaq/
An ASCII version of a SoftPaq can be found by selecting a SoftPaq at the HP ftp support website.
(ftp://ftp.compaq.com/pub/softpaq/
).
)
• An index of available software sorted by product can be found at the HP software and drivers
website (http://h18007.www1.hp.com/support/files/server
HP FTP Server
Navigate to a specific product, and then look for support information from the list of support resources at
the HP ftp support website (ftp://ftp.compaq.com/pub/softpaq/
).
).
Technical support 35
Page 36

Acronyms and abbreviations
BIOS
Basic Input/Output System
CRC
cyclic redundant checks
DHCP
Dynamic Host Configuration Protocol
DMA
direct memory access
IP
Internet Protocol
LAA
locally administered address
LSA
Linux socket acceleration
LSO
large send offload
MAC
Media Access Control
QoS
Quality of Service
ROM
read-only memory
RPM
Red Hat Package Manager
Acronyms and abbreviations 36
Page 37

TCP
Transmission Control Protocol
UDP
User Datagram Protocol
VLAN
virtual local-area network
Acronyms and abbreviations 37
Page 38

Index
A
adapter properties 12
D
diagnostics 32
diagnostics utility 32
driver installation procedures 6
F
firmware 7, 17
L
Linux installation 15
P
PXE (preboot execution environment) 21
T
technical support 34
W
Windows 6
Index 38
 Loading...