


HP LaserJet M4349x MFP
User Guide


HP LaserJet M4349x MFP
User Guide

Copyright and License
© 2009 Copyright Hewlett-Packard
Development Company, L.P.
Trademark Credits
®
, Acrobat®, and PostScript® are
Adobe
trademarks of Adobe Systems Incorporated.
Reproduction, adaptation, or translation
without prior written permission is prohibited,
except as allowed under the copyright laws.
The information contained herein is subject
to change without notice.
The only warranties for HP products and
services are set forth in the express warranty
statements accompanying such products
and services. Nothing herein should be
construed as constituting an additional
warranty. HP shall not be liable for technical
or editorial errors or omissions contained
herein.
Part number: CE796-90904
Edition 1, 06/2009
Linux is a U.S. registered trademark of Linus
Torvalds.
Microsoft
®
, Windows®, and Windows NT
®
are U.S. registered trademarks of Microsoft
Corporation.
®
is a registered trademark of The Open
UNIX
Group.
®
ENERGY STAR
®
logo
are U.S. registered marks of the United
and the ENERGY STAR
States Environmental Protection Agency.

Table of contents
1 Device basics
Device introduction ............................................................................................................................... 2
Features comparison ............................................................................................................................ 3
Walkaround .......................................................................................................................................... 7
Accessories and supplies .................................................................................................... 8
Interface ports ...................................................................................................................... 9
Locking and unlocking optional accessories ........................................................................ 9
Device software .................................................................................................................................. 11
Supported operating systems ............................................................................................ 11
Supported printer drivers ................................................................................................... 11
Select the correct printer driver .......................................................................................... 12
Universal printer drivers .................................................................................... 12
Driver Autoconfiguration .................................................................................... 12
Update Now ...................................................................................................... 13
HP Driver Preconfiguration ............................................................................... 13
Priority for print settings ..................................................................................................... 13
Open the printer drivers ..................................................................................................... 14
Software for Macintosh computers .................................................................................... 15
Remove software from Macintosh operating systems ...................................... 15
Utilities ............................................................................................................................... 16
HP Web Jetadmin ............................................................................................. 16
Embedded Web server ..................................................................................... 16
Other components and utilities .......................................................................... 16
2 Control Panel
Use the control panel ......................................................................................................................... 18
Control-panel layout ........................................................................................................... 18
Home screen ..................................................................................................................... 19
Buttons on the touchscreen ............................................................................................... 20
Control-panel help system ................................................................................................. 20
Navigate the Administration menu ..................................................................................................... 21
Information menu ............................................................................................................................... 22
Default Job Options menu .................................................................................................................. 23
Default Options for Originals .............................................................................................. 23
ENWW iii

Time/Scheduling menu ....................................................................................................................... 29
Management menu ............................................................................................................................ 31
Initial Setup menu ............................................................................................................................... 32
Device Behavior menu ....................................................................................................................... 44
Print Quality menu .............................................................................................................................. 48
Troubleshooting menu ........................................................................................................................ 50
Resets menu ...................................................................................................................................... 54
Service menu ..................................................................................................................................... 55
3 Input/output (I/O)
USB configuration .............................................................................................................................. 58
Network configuration ......................................................................................................................... 59
Default Copy Options ......................................................................................................... 24
Default Fax Options ........................................................................................................... 25
Default E-mail Options ....................................................................................................... 26
Default Send to Folder Options ......................................................................................... 27
Default Print Options .......................................................................................................... 28
Networking and I/O ............................................................................................................ 32
Fax Setup .......................................................................................................................... 40
E-mail Setup ...................................................................................................................... 43
Send Setup menu .............................................................................................................. 43
Configure TCP/IPv4 parameters ........................................................................................ 59
Set an IP address .............................................................................................. 59
Set the subnet mask ......................................................................................... 60
Set the default gateway ..................................................................................... 60
Configure TCP/IPv6 parameters ........................................................................................ 61
Disable network protocols (optional) .................................................................................. 61
Disable IPX/SPX ............................................................................................... 61
Disable AppleTalk ............................................................................................. 62
Disable DLC/LLC .............................................................................................. 62
HP Jetdirect EIO print servers ........................................................................................... 62
4 Media and trays
General media specifications ............................................................................................................. 64
General guidelines for media ............................................................................................................. 65
Paper to avoid .................................................................................................................... 65
Paper that can damage the device .................................................................................... 65
General media specifications ............................................................................................. 66
Media considerations ......................................................................................................................... 67
Envelopes .......................................................................................................................... 67
Envelopes with double side seams ................................................................... 67
Envelopes with adhesive strips or flaps ............................................................ 68
Envelope margins ............................................................................................. 68
iv ENWW

Envelope storage .............................................................................................. 68
Labels ................................................................................................................................ 68
Label construction ............................................................................................. 69
Transparencies .................................................................................................................. 69
Card stock and heavy media ............................................................................................. 69
Card stock construction ..................................................................................... 69
Card stock guidelines ........................................................................................ 69
Letterhead and preprinted forms ....................................................................................... 70
Select the correct fuser mode ............................................................................................ 70
Select print media ............................................................................................................................... 72
Printing and paper-storage environment ............................................................................................ 77
Load media ......................................................................................................................................... 78
Load the flatbed scanner ................................................................................................... 78
Load the ADF ..................................................................................................................... 78
Load tray 1 ......................................................................................................................... 78
Load trays 2, 3, 4 and 5 ..................................................................................................... 79
Load special media ............................................................................................................ 83
Load envelopes ................................................................................................. 83
Load labels ........................................................................................................ 84
Load transparencies ......................................................................................... 85
Load letterhead, prepunched, or preprinted paper ........................................... 85
Load paper that has a special finish .................................................................. 86
Load small sizes, custom sizes, or heavy paper ............................................... 87
Weight and sizes .............................................................................. 87
Guidelines for heavy paper ............................................................... 87
Guidelines for custom-size paper ..................................................... 87
Additional guidelines for small or narrow paper ................................ 87
Control print jobs ................................................................................................................................ 88
Select output bins ............................................................................................................................... 89
Select an output location ................................................................................................... 89
3-bin mailbox output bins ................................................................................................... 89
Selecting face-up or face-down output for copy jobs ......................................................... 89
5 Use device features
Use the stapler ................................................................................................................................... 92
Configure the printer driver to recognize the optional stapler ............................................ 92
Staple media ...................................................................................................................... 92
Load staples ...................................................................................................................... 94
Use job storage features .................................................................................................................... 96
Gain access to the job storage features ............................................................................ 96
Use the proof and hold feature .......................................................................................... 96
Create a proof and hold job ............................................................................... 96
Print the remaining copies of a proof and hold job ............................................ 97
ENWW v

6 Print
Delete a proof and hold job ............................................................................... 97
Use the private job feature ................................................................................................. 98
Create a private job ........................................................................................... 98
Print a private job .............................................................................................. 98
Delete a private job ........................................................................................... 98
Use the QuickCopy feature ................................................................................................ 99
Create a QuickCopy job .................................................................................... 99
Print additional copies of a QuickCopy job ........................................................ 99
Delete a QuickCopy job .................................................................................... 99
Use the stored job feature ............................................................................................... 100
Create a stored copy job ................................................................................. 100
Create a stored print job .................................................................................. 100
Print a stored job ............................................................................................. 100
Delete a stored job .......................................................................................... 101
Use features in the Windows printer driver ...................................................................................... 104
Create and use quick sets ............................................................................................... 104
Use watermarks ............................................................................................................... 104
Resize documents ........................................................................................................... 105
Set a custom paper size from the printer driver ............................................................... 106
Use different paper and printing covers ........................................................................... 106
Print a blank first page ..................................................................................................... 106
Print multiple pages on one sheet of paper ..................................................................... 107
Print on both sides of the paper ....................................................................................... 108
Use automatic duplex printing ......................................................................... 108
Print on both sides manually ........................................................................... 109
Layout options for printing on both sides ........................................................ 109
Use features in the Macintosh printer driver ..................................................................................... 110
Create and use presets ................................................................................................... 110
Print a cover page ............................................................................................................ 111
Print multiple pages on one sheet of paper ..................................................................... 111
Print on both sides of the paper ....................................................................................... 112
Cancel a print job ............................................................................................................................. 113
Stop the current print job from the control panel .............................................................. 113
Stop the current print job from the software program ...................................................... 113
7 Copy
Use the Copy screen ........................................................................................................................ 116
Set the default copy options ............................................................................................................. 117
Basic copy instructions ..................................................................................................................... 118
Copy from the scanner glass ........................................................................................... 118
Copy from the document feeder ...................................................................................... 118
vi ENWW

Adjust the copy settings ................................................................................................................... 119
Copy two-sided documents .............................................................................................................. 120
Copying two-sided documents manually ......................................................................... 120
Copy two-sided documents automatically (duplex models only) ..................................... 120
Copy mixed-size originals ................................................................................................................ 122
Change the copy-collation setting .................................................................................................... 123
Copy photos and books .................................................................................................................... 124
Combine copy jobs by using Job Build ............................................................................................. 125
Cancel a copy job ............................................................................................................................. 126
8 Scan and send to e-mail
Configure e-mail settings .................................................................................................................. 128
Supported protocols ......................................................................................................... 128
Configure e-mail server settings ...................................................................................... 128
Find gateways .................................................................................................................. 129
Use the Send E-mail screen ............................................................................................................. 130
Perform basic e-mail functions ......................................................................................................... 131
Load documents .............................................................................................................. 131
Send documents .............................................................................................................. 131
Use the address book ...................................................................................................................... 133
Create a recipient list ....................................................................................................... 133
Use the local address book ............................................................................................. 133
Change e-mail settings for the current job ....................................................................................... 135
Scan to a folder ................................................................................................................................ 136
Scan to a workflow destination ......................................................................................................... 137
Find the SMTP gateway from the device control panel ................................... 129
Find the SMTP gateway from an e-mail program ........................................... 129
Send a document ............................................................................................ 131
Use the auto-complete function ...................................................................... 132
Add e-mail addresses to the local address book ............................................ 134
Delete e-mail addresses from the local address book .................................... 134
9 Fax
Analog fax ........................................................................................................................................ 140
Install the fax accessory .................................................................................................. 140
Connect the fax accessory to a phone line ...................................................................... 142
Configure and use the fax features .................................................................................. 142
Digital fax .......................................................................................................................................... 143
10 Manage and maintain the device
Use information pages ..................................................................................................................... 146
Configure e-mail alerts ..................................................................................................................... 148
Use the embedded Web server ........................................................................................................ 149
ENWW vii

Open the embedded Web server by using a network connection ................................... 149
Embedded Web server sections ...................................................................................... 150
Use HP Web Jetadmin software ...................................................................................................... 152
Use the HP Printer Utility for Macintosh ........................................................................................... 153
Open the HP Printer Utility ............................................................................................... 153
HP Printer Utility features ................................................................................................ 153
Manage supplies .............................................................................................................................. 154
Supplies life expectancy .................................................................................................. 154
Change the print cartridge ............................................................................................... 154
Manage the print cartridge ............................................................................................... 154
Print-cartridge storage ..................................................................................... 154
Use genuine HP print cartridges ..................................................................... 154
HP policy on non-HP print cartridges .............................................................. 154
Print-cartridge authentication .......................................................................... 155
HP fraud hotline and Web site ........................................................................ 155
Clean the device ............................................................................................................................... 156
Clean the exterior ............................................................................................................ 156
Clean the scanner glass .................................................................................................. 156
Clean the scanner lid backing .......................................................................................... 157
Clean the paper path ....................................................................................................... 157
Clean the document feeder ............................................................................................. 157
Clean the document feeder delivery system ................................................... 158
Clean the document feeder-rollers .................................................................. 158
Calibrate the scanner ....................................................................................................................... 161
11 Problem solving
Problem-solving checklist ................................................................................................................. 164
Problem-solving flowchart ................................................................................................................ 165
Solve general device problems ........................................................................................................ 170
Control-panel message types ........................................................................................................... 173
Control-panel messages .................................................................................................................. 174
Common causes of jams .................................................................................................................. 183
Clear jams ........................................................................................................................................ 184
Factors that affect performance ....................................................................................... 164
Clear jams from the top-cover and print-cartridge areas ................................................. 185
Clear jams from the optional envelope-feeder area ......................................................... 187
Clear jams from the tray 1 area ....................................................................................... 188
Clear jams from the tray 2, 3, 4, or 5 areas ..................................................................... 190
Clear jams from the optional duplexer ............................................................................. 191
Clear jams from the output areas .................................................................................... 193
Clear jams from the fuser ................................................................................................ 194
Clear jams from the document feeder ............................................................................. 197
Solve repeated jams ........................................................................................................ 198
viii ENWW

Paper-path test ................................................................................................................ 198
Clear staple jams .............................................................................................................................. 199
Solve print-quality problems ............................................................................................................. 201
Print-quality problems associated with media .................................................................. 201
Print-quality problems associated with the environment .................................................. 201
Print-quality problems associated with jams .................................................................... 201
Image defect examples .................................................................................................... 201
Light print (partial page) .................................................................................................. 203
Light print (entire page) ................................................................................................... 203
Specks ............................................................................................................................ 203
Dropouts ......................................................................................................................... 204
Lines ............................................................................................................................... 204
Gray background ............................................................................................................ 204
Toner smear ................................................................................................................... 205
Loose toner ..................................................................................................................... 205
Repeating defects ........................................................................................................... 206
Repeating image .............................................................................................................. 206
Misformed characters ..................................................................................................... 206
Page skew ....................................................................................................................... 207
Curl or wave .................................................................................................................... 207
Wrinkles or creases ........................................................................................................ 208
Vertical white lines .......................................................................................................... 20 8
Tire tracks ....................................................................................................................... 208
White spots on black ....................................................................................................... 209
Scattered lines ................................................................................................................ 209
Blurred print .................................................................................................................... 210
Random image repetition ................................................................................................ 210
Solve network printing problems ...................................................................................................... 211
Solve copy problems ........................................................................................................................ 212
Prevent copy problems .................................................................................................... 212
Image problems ............................................................................................................... 212
Media-handling problems ................................................................................................ 213
Performance problems .................................................................................................... 214
Solve fax problems ........................................................................................................................... 216
Solve sending problems .................................................................................................. 216
Solve receiving problems ................................................................................................. 217
Solve e-mail problems ...................................................................................................................... 219
Validate the SMTP gateway address ............................................................................... 219
Validate the LDAP gateway address ............................................................................... 219
Solve common Windows problems ................................................................................................. 220
Solve common Macintosh problems ................................................................................................ 221
Solve Linux problems ....................................................................................................................... 224
Solve PostScript problems ............................................................................................................... 225
General problems ............................................................................................................ 225
ENWW ix

Appendix A Accessories and consumables
Order parts, accessories, and supplies ............................................................................................ 228
Part numbers .................................................................................................................................... 229
Accessories ..................................................................................................................... 229
Print cartridges ................................................................................................................. 229
Maintenance kits .............................................................................................................. 230
Memory ............................................................................................................................ 230
Cables and interfaces ...................................................................................................... 230
Print media ....................................................................................................................... 230
Appendix B Specifications
Physical specifications ..................................................................................................................... 234
Electrical specifications .................................................................................................................... 234
Acoustic specifications ..................................................................................................................... 235
Operating environment ..................................................................................................................... 235
Appendix C Regulatory information
FCC regulations ............................................................................................................................... 238
Environmental product stewardship program ................................................................................... 239
Protecting the environment .............................................................................................. 239
Ozone production ............................................................................................................ 239
Power consumption ......................................................................................................... 239
Toner consumption .......................................................................................................... 239
Paper use ........................................................................................................................ 239
Plastics ............................................................................................................................ 239
HP LaserJet print supplies ............................................................................................... 240
HP print supplies returns and recycling program information .......................................... 240
Paper ............................................................................................................................... 240
Material restrictions .......................................................................................................... 241
Disposal of waste equipment by users in private households in the European Union ... . 241
Material Safety Data Sheet (MSDS) ................................................................................ 242
For more information ....................................................................................................... 242
Telecom statement ........................................................................................................................... 243
Declaration of conformity .................................................................................................................. 244
Safety statements ............................................................................................................................. 245
Laser safety ..................................................................................................................... 245
Canadian DOC regulations .............................................................................................. 245
VCCI statement (Japan) .................................................................................................. 245
Power cord statement (Japan) ......................................................................................... 245
EMC statement (Korea) ................................................................................................... 245
Laser statement for Finland ............................................................................................. 245
x ENWW

Appendix D Working with memory and print server cards
Overview .......................................................................................................................................... 248
Adding printer memory ..................................................................................................................... 249
Installing printer memory ................................................................................................. 249
Checking DIMM installation .............................................................................................................. 252
Save resources (permanent resources) .......................................................................................... 25 3
Enabling memory for Windows ......................................................................................................... 254
Using HP Jetdirect print server cards ............................................................................................... 255
Install an HP Jetdirect print server card ........................................................................... 255
Remove an HP Jetdirect print server card ....................................................................... 256
Index ................................................................................................................................................................. 257
ENWW xi

xii ENWW

1 Device basics
Device introduction
●
Features comparison
●
Walkaround
●
Device software
●
ENWW 1

Device introduction
Figure 1-1 HP LaserJet M4349x MFP
The HP LaserJet M4349x comes standard with the following items:
100-sheet input tray (tray 1)
●
500-sheet input tray (tray 2)
●
Automatic document feeder (ADF) that holds up to 50 pages
●
HP Jetdirect embedded print server for connecting to a 10/100Base-T network
●
256 megabytes (MB) synchronous dynamic random access memory (SDRAM)
●
Automatic duplex printing accessory (duplexer)
●
Additional 500-sheet feeder (tray 3)
●
33.6 kbps analog-fax accessory
●
2 Chapter 1 Device basics ENWW

Features comparison
Feature HP LaserJet M4349x
Functions
Speed and throughput
Resolution
Two-sided copying (duplexing)
●
Image modification
●
Color digital sending
●
Document finishing
●
45 pages per minute (ppm) when scanning and printing
●
on letter-size paper; 43 ppm when copying and printing
on A4-size paper
25% to 400% scalability when using the scanner glass
●
25% to 200% scalability when using the automatic
●
document feeder (ADF)
Less than 10 seconds to print the first page
●
Transmit Once, Raster Image Processing (RIP) ONCE
●
technology
Duty cycle of up to 200,000 pages per month
●
1200 dots per inch (dpi) with Resolution Enhancement
●
technology (REt)
FastRes1200 provides 1200 dpi quality at full speed
●
Up to 220 levels of gray
●
Memory
User interface
Drivers HP provides the following drivers for downloading:
256 megabytes (MB) of random-access memory (RAM),
●
expandable to 512 MB by using an industry standard 100pin double data rate memory module (DDR SDRAM
DIMM)
Memory Enhancement technology (MEt) that
●
automatically compresses data to use RAM more
efficiently
Graphical touchscreen control panel
●
An embedded Web server to gain access to support (for
●
network-connected products)
HP Universal Print Driver (UPD): Postscript, PCL 6, PCL
●
5
Mac Driver
●
Linux
●
SAP
●
UNIX Model Script
●
To download the drivers, to go
ljm4349mfp_software
www.hp.com/go/
ENWW Features comparison 3

Language and fonts
HP PCL 6
●
HP PCL 5
●
Printer Management Language
●
PDF
●
XHTML
●
80 scalable TrueType typefaces
●
HP Postscript 3 emulation
●
Copying and sending
Modes for text, graphics, and mixed text and graphics
●
formats
A job-interrupt feature (at copy boundaries)
●
Xenon lamp for instant-on copying
●
Multiple pages per sheet
●
Operator attendance animations (for example, jam
●
recovery)
E-mail compatibility
●
A sleep feature that saves energy
●
Automatic duplex (two-sided) scanning
●
NOTE: An automatic duplex printing accessory is required
for two-sided copying.
NOTE: To use e-mail functionality, the device must be
connected to an IP-based server that has simple mail transfer
protocol (SMTP). This server can be on the local area network
or at an outside Internet service provider (ISP). HP
recommends that the device be located on the same local area
network (LAN) as the SMTP server. If you are using an ISP,
you must connect to the ISP by using a digital subscriber line
(DSL) connection. If you obtain e-mail services from an ISP,
ask the ISP to provide the correct SMTP address.
Dial-up connections are not supported. If you do not have an
SMTP server on your network, you can purchase third-party
software that allows you to create an SMTP server.
Print cartridge
Prints up to 18,000 pages at 5% coverage.
●
No-shake cartridge design
●
Authentic HP print cartridge detection
●
4 Chapter 1 Device basics ENWW

Paper Input
Tray 1 (multipurpose tray): A multipurpose tray for
●
paper, transparencies, labels, and envelopes. Holds up
to 100 sheets of paper or 10 envelopes.
Tray 2 and optional trays 3, 4, and 5: 500-sheet trays.
●
These trays automatically detect standard paper sizes up
to Legal and accommodate printing on custom-size
paper.
Automatic document feeder (ADF): Holds up to 50
●
sheets of paper.
Duplex printing and copying: With the optional
●
duplexing accessory, provides two-sided printing and
copying (printing on both sides of the paper).
ADF duplex scanning: The ADF has an automatic
●
duplex feature for scanning two-sided documents.
Optional envelope feeder: Holds up to 75 envelopes.
●
Paper output
Connectivity
Standard output bin: The standard output bin is located
●
on the left side of the device. This bin can hold up to 500
sheets of paper.
ADF output bin: The ADF output bin is underneath the
●
ADF input tray. The bin holds up to 50 sheets, and the
device automatically stops when this bin is full.
Optional stapler/stacker: The stapler/stacker staples up
●
to 30 sheets and stacks up to 500 sheets.
Optional 3-bin mailbox: One bin stacks up to 500
●
sheets, and two bins stack up to 100 sheets each for a
total capacity of 700 sheets.
Local area network (LAN) connector (RJ-45) for the
●
embedded HP Jetdirect print server
Optional analog-fax card
●
Optional HP Digital Sending Software (DSS)
●
High-speed USB 2.0
●
Jetlink for paper handling solutions
●
Optional HP Jetdirect enhanced input/output (EIO) print
●
server cards:
LocalTalk
◦
Fast Ethernet 10/100TX
◦
Ethernet 802.11b wireless
◦
Bluetooth wireless printer adapter
◦
Infrared adapter
◦
ENWW Features comparison 5

Environmental features
The Sleep setting saves energy (meets ENERGY STAR
●
guidelines).
Security features
Secure Disk Erase
●
Security lock
●
Job retention
●
DSS authentication
●
6 Chapter 1 Device basics ENWW

Walkaround
1 Document-feeder assembly
2 Document-feeder top cover
3 Document-feeder input tray
4 Top cover (provides access to the print cartridge)
5 Top-cover lever
6 Tray 1 (multipurpose tray)
7 Jam-access lever
8 Tray-number indicator
9 Paper-level indicator
10 Control-panel keypad
11 Control-panel display
12 Control-panel status lights
13 Scanner lock
ENWW Walkaround 7
14 Output bin
15 Optional duplexer
16 On/off switch
17 Power connection
18 Interface ports
19 Formatter cover (provides access to the memory DIMM slot, hard disk, and analog-fax accessory)
Accessories and supplies
1 500-sheet feeder (Q5968A) (See the note that follows)
2 Duplexer (Q5969A)
3 Envelope feeder (Q2438B)
4 Stapler/stacker (Q5691A)
8 Chapter 1 Device basics ENWW
5 Memory DIMM
6 HP Jetdirect print server (EIO card)
7 Hard-disk accessory (EIO card)
8 Storage cabinet/stand (Q5970A)
9 3-bin mailbox (Q5692A)
10 Staple cartridge (C8091A)
11 Print cartridge (CE267C)
12 HP LaserJet Analog Fax Accessory 300 (Q3701A)
See Order parts, accessories, and supplies on page 228 for information about ordering accessories
and supplies.
NOTE: The device accommodates up to three optional 500-sheet feeders. HP recommends using a
cabinet when using the optional 500-sheet feeders.
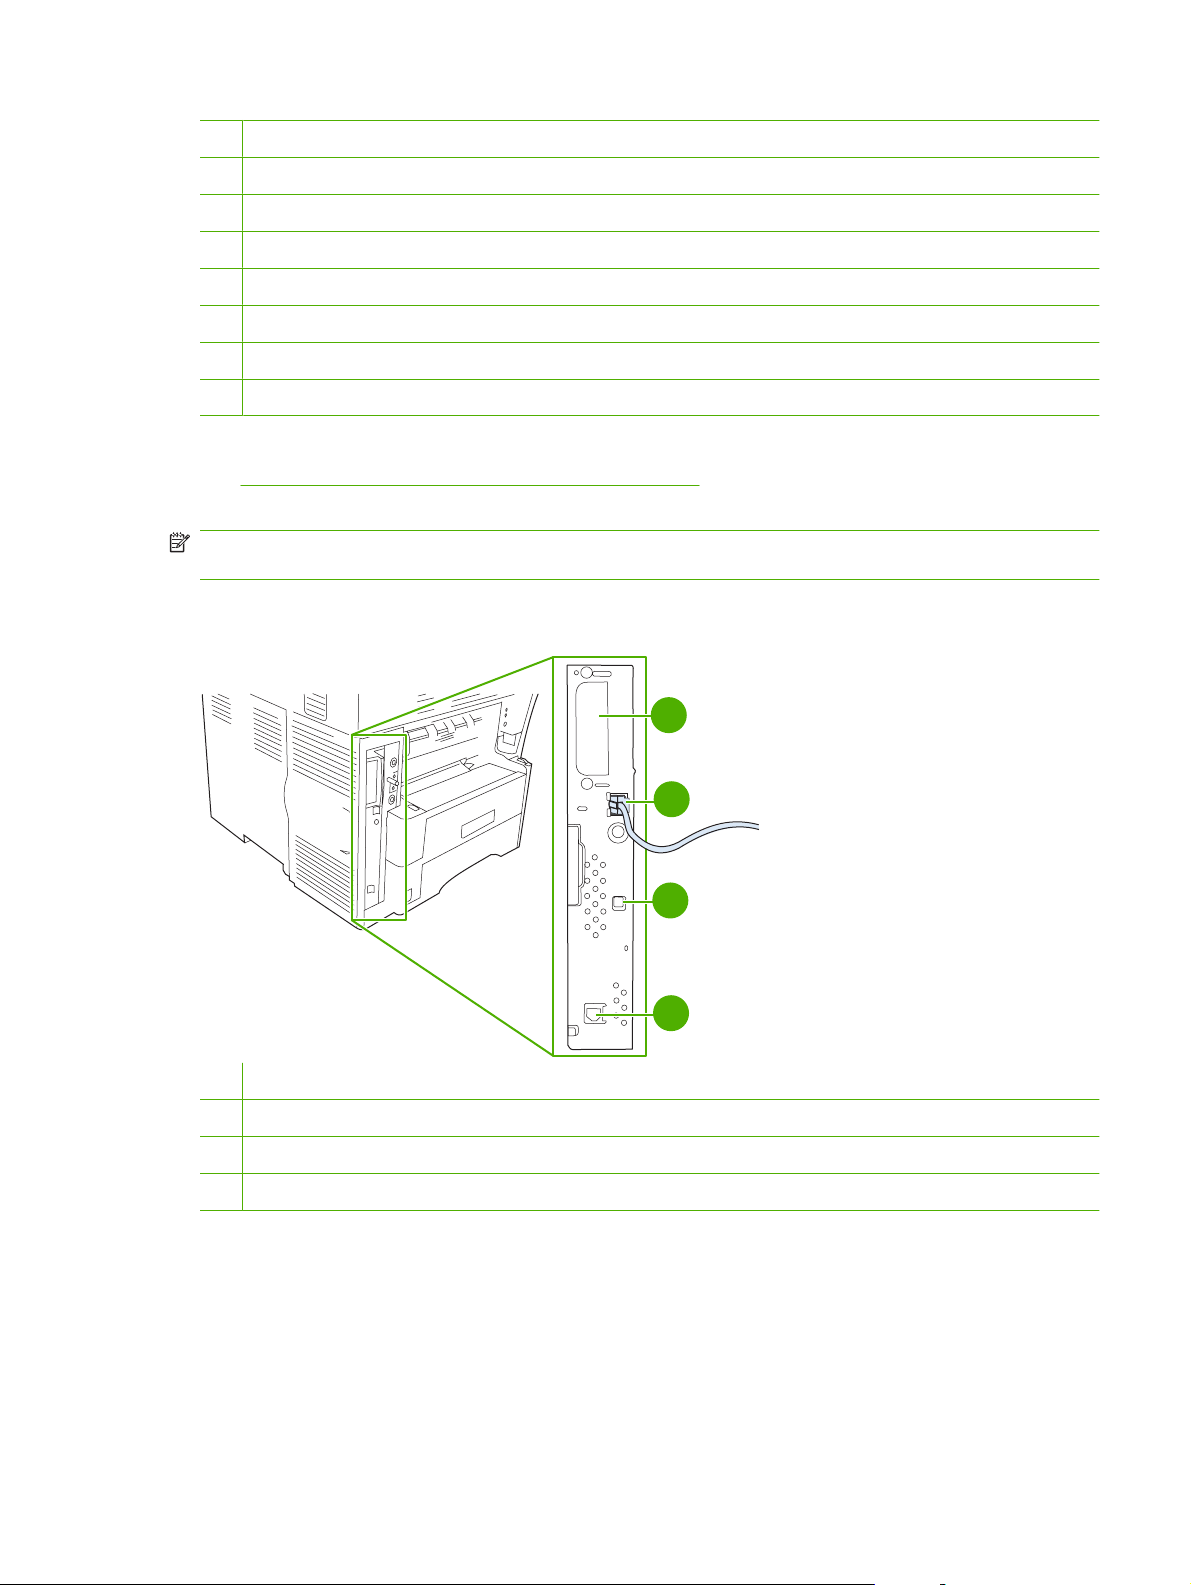
Interface ports
1
2
3
4
1 EIO slot
2 Network connection (embedded HP Jetdirect print server)
3 High-speed USB 2.0 device port
4 Telephone-line connection (for the optional analog-fax accessory)
Locking and unlocking optional accessories
For more stability to prevent the device from tipping over, the optional 500-sheet feeders and the cabinet
are automatically locked to the bottom of the device. When accessories are installed, verify that the lock
on each accessory is in the rear (locked) position.
To unlock the accessories, slide the lever to the forward (unlocked) position.
ENWW Walkaround 9

10 Chapter 1 Device basics ENWW
Device software
The printing-system software is only available for download from the Web. See the getting started guide
for installation instructions.
The printing system includes software for end users and network administrators, and printer drivers for
access to the features and communication with the computer.
NOTE: For a list of printer drivers and updated software, go to www.hp.com/go/
ljm4349mfp_software.
Supported operating systems
The device supports the following operating systems:
Full software installation
Windows XP (32-bit and 64-bit)
●
Windows Server 2003 (32-bit and 64-bit)
●
Windows Server 2008 (32-bit and 64-bit)
●
Windows 2000
●
Mac OS X V10.3, V10.4 and later
●
NOTE: For Mac OS V10.4 and later, PPC and Intel Core Processor Macs are supported.
Supported printer drivers
Operating system PCL 5 PCL 6 Postscript level 3
Windows
Mac OS X V10.3, V10.4 and later
1
Linux
1
For Linux, download the postscript level 3 emulation driver from www.hp.com/go/linuxprinting.
Printer driver only
Linux (Web only)
●
UNIX model scripts (Web only)
●
emulation
The printer drivers include online Help that has instructions for common printing tasks and also describes
the buttons, checkboxes, and drop-down lists that are in the printer driver.
ENWW Device software 11

Select the correct printer driver
Printer drivers allow you to gain access to the device features and allow the computer to communicate
with the device (using a printer language).
The device uses the PCL 5, PCL 6, and HP postscript level 3 emulation printer description language
(PDL) drivers.
Use the PCL 6 printer driver for the best overall performance.
●
Use the PCL 5 printer driver for general office printing.
●
Use the HP postscript level 3 emulation driver for printing from postscript level 3 emulation needs,
●
or for postscript flash font support.
Universal printer drivers
The HP Universal Print Driver Series for Windows includes separate HP postscript level 3 emulation
and HP PCL 5 versions of a single driver that provides access to almost any HP device while providing
system administrator with tools to manage devices more effectively. For more information, go to
www.hp.com/go/universalprintdriver.
Driver Autoconfiguration
The HP LaserJet PCL 5, PCL 6, and PS level 3 emulation drivers for Windows 2000 and Windows XP
feature automatic discovery and driver configuration for device accessories at the time of installation.
Some accessories that the Driver Autoconfiguration supports are the duplexing unit, optional paper
trays, and dual inline memory modules (DIMMs).
12 Chapter 1 Device basics ENWW

Update Now
If you have modified the device configuration since installation, the driver can be automatically updated
with the new configuration. In the Properties dialog box (see
on the Device Settings tab, click the Update Now button to update the driver.
HP Driver Preconfiguration
HP Driver Preconfiguration is a software architecture and set of tools that you can use to customize and
distribute HP software in managed corporate printing environments. Using HP Driver Preconfiguration,
information technology (IT) administrators can preconfigure the printing and default settings for
HP printer drivers before installing the drivers in the network environment. For more information, see
the HP Driver Preconfiguration Support Guide, which is available at
Priority for print settings
Changes to print settings are prioritized depending on where the changes are made:
NOTE: The names of commands and dialog boxes might vary depending on your software program.
Page Setup dialog box: Click Page Setup or a similar command on the File menu of the program
●
you are working in to open this dialog box. Settings changed here override settings changed
anywhere else.
Print dialog box: Click Print, Print Setup, or a similar command on the File menu of the program
●
you are working in to open this dialog box. Settings changed in the Print dialog box have a lower
priority and do not override changes made in the Page Setup dialog box.
Open the printer drivers on page 14),
www.hp.com/go/hpdpc_sw.
Printer Properties dialog box (printer driver): Click Properties in the Print dialog box to open
●
the printer driver. Settings changed in the Printer Properties dialog box do not override settings
anywhere else in the printing software.
Default printer driver settings: The default printer driver settings determine the settings used in
●
all print jobs, unless settings are changed in the Page Setup, Print, or Printer Properties dialog
boxes.
Printer control panel settings: Settings changed at the printer control panel have a lower priority
●
than changes made anywhere else.
ENWW Device software 13

Open the printer drivers
Operating System To change the settings for all
print jobs until the software
program is closed
Windows 2000, XP,
Server 2003, and
Server 2008
Mac OS X V10.3,
V10.4 and later
1. On the File menu in the
software program, click
Print.
2. Select the driver, and then
click Properties or
Preferences.
The steps can vary; this
procedure is most common.
1. On the File menu, click
Print.
2. Change the settings that
you want on the various
pop-up menus.
To change the default settings
for all print jobs
1. Click Start, click Settings,
and then click Printers or
Printers and Faxes.
2. Right-click the driver icon,
and then select Printing
Preferences.
1. On the File menu, click
Print.
2. Change the settings that
you want on the various
pop-up menus.
3. On the Presets pop-up
menu, click Save as and
type a name for the preset.
These settings are saved in the
Presets menu. To use the new
settings, you must select the
saved preset option every time
you open a program and print.
To change the device
configuration settings
1. Click Start, click Settings,
and then click Printers or
Printers and Faxes.
2. Right-click the driver icon,
and then select
Properties.
3. Click the Device Settings
tab.
1. In the Finder, on the Go
menu, click Applications.
2. Open Utilities, and then
open Printer Setup Utility.
3. Click on the print queue.
4. On the Printers menu, click
Show Info.
5. Click the Installable
Options menu.
NOTE: Configuration settings
might not be available in Classic
mode.
14 Chapter 1 Device basics ENWW

Software for Macintosh computers
The HP installer provides PostScript Printer Description (PPD) files, Printer Dialog Extensions (PDEs),
and the HP Printer Utility for use with Macintosh computers.
For network connections, use the embedded Web server (EWS) to configure the device. See
Web server on page 16.
The printing system software includes the following components:
PostScript Printer Description (PPD) files
●
The PPDs, in combination with the Apple PostScript printer drivers, provide access to device
features. Use the Apple PostScript printer driver that comes with the computer.
HP Printer Utility
●
Use the HP Printer Utility to set up device features that are not available in the printer driver:
Name the device.
◦
Assign the device to a zone on the network.
◦
Assign an internet protocol (IP) address to the device.
◦
Download files and fonts.
◦
Configure the device for IP or AppleTalk printing.
◦
You can use the HP Printer Utility when your device uses a universal serial bus (USB) cable or is
connected to a TCP/IP-based network. For more information, see
Macintosh on page 153.
Use the HP Printer Utility for
Embedded
NOTE: The HP Printer Utility is supported for Mac OS X V10.3 or later.
Remove software from Macintosh operating systems
To remove the software from a Macintosh computer, drag the PPD files to the trash can.
ENWW Device software 15

Utilities
The device is equipped with several utilities that make it easy to monitor and manage the device on a
network.
HP Web Jetadmin
HP Web Jetadmin is a browser-based management tool for HP Jetdirect-connected printers within your
intranet, and it should be be installed only on the network administrator’s computer.
NOTE: HP Web Jetadmin 10.0 or later is required for full support of this product.
To download a current version of HP Web Jetadmin and for the latest list of supported host systems,
visit
www.hp.com/go/webjetadmin.
When installed on a host server, any client can gain access to HP Web Jetadmin by using a supported
Web browser (such as Microsoft® Internet Explorer 4.x or Netscape Navigator 4.x or later) by navigating
to the HP Web Jetadmin host.
Embedded Web server
The device is equipped with an embedded Web server, which provides access to information about
device and network activities. This information appears in a Web browser, such as Microsoft Internet
Explorer or Netscape Navigator.
The embedded Web server resides on the device. It is not loaded on a network server.
The embedded Web server provides an interface to the device that anyone who has a networkconnected computer and a standard Web browser can use. No special software is installed or
configured, but you must have a supported Web browser on your computer. To gain access to the
embedded Web server, type the IP address for the device in the address line of the browser. (To find
the IP address, print a configuration page. For more information about printing a configuration page,
see
Use information pages on page 146.)
For a complete explanation of the features and functionality of the embedded Web server, see
Embedded Web server on page 16.
Other components and utilities
Windows Macintosh OS
Software installer — automates the printing system
●
installation
Online Web registration
●
PostScript Printer Description files (PPDs) — use with the
●
Apple PostScript drivers that come with the Mac OS
The HP Printer Utility — change device settings, view
●
status, and set up printer-event notification from a Mac.
This utility is supported for Mac OS X V10.3 and later.
16 Chapter 1 Device basics ENWW

2 Control Panel
Use the control panel
●
Navigate the Administration menu
●
Information menu
●
Default Job Options menu
●
Time/Scheduling menu
●
Management menu
●
Initial Setup menu
●
Device Behavior menu
●
Print Quality menu
●
Troubleshooting menu
●
Resets menu
●
Service menu
●
ENWW 17
Use the control panel
The control panel has a VGA touchscreen that provides access to all device functions. Use the buttons
and numeric keypad to control jobs and the device status. The LEDs indicate overall device status.
Control-panel layout
The control panel includes a touchscreen graphical display, job-control buttons, a numeric keypad, and
three light-emitting diode (LED) status lights.
1 Attention light The Attention light indicates that the device has a condition that requires
2 Data light The Data light indicates that the device is receiving data.
3 Ready light The Ready light indicates that the device is ready to begin processing any
4 Brightness-adjustment dial Turn the dial to control the brightness of the touchscreen.
5 Touchscreen graphical display Use the touchscreen to open and set up all device functions.
6 Numeric keypad Allows you to type numeric values for number of copies required and other
7 Sleep button If the device is inactive for a long period of time, it automatically enters a
8 Reset button Resets the job settings to factory or user-defined default values.
9 Stop button Stops the active job. While stopped, the control panel shows the options for
10 Start button Begins a copy job, starts digital sending, or continues a job that has been
intervention. Examples include an empty paper tray or an error message
on the touchscreen.
job.
numeric values.
sleep mode. To place the device into sleep mode or to reactivate the device,
press the Sleep button.
the stopped job (for example, if you press the Stop button while the device
is processing a print job, the control panel message prompts you to cancel
or resume the print job).
interrupted.
18 Chapter 2 Control Panel ENWW
Home screen
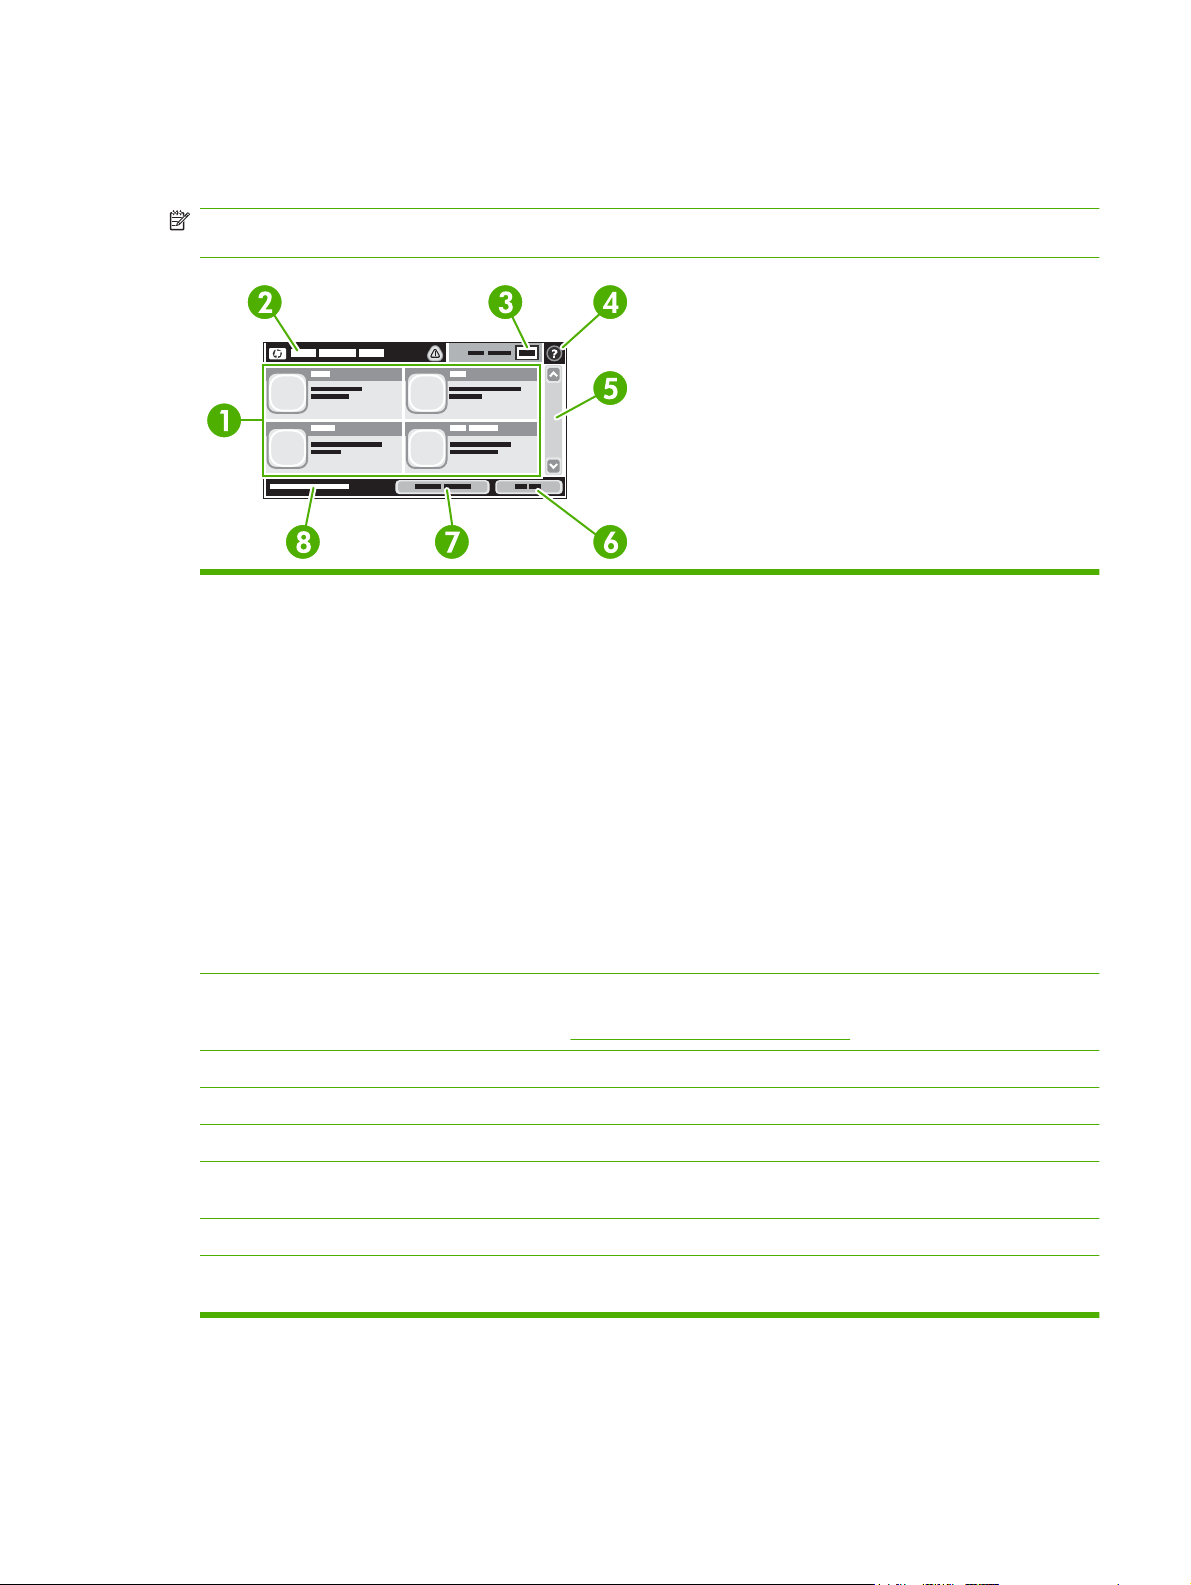
The home screen provides access to the device features, and it indicates the current status of the device.
NOTE: Depending on how the system administrator has configured the device, the features that
appear on the home screen can vary.
1 Features Depending on how the system administrator has configured the device, the features that appear
in this area can include any of the following items:
Copy
●
Fax
●
E-mail
●
Secondary E-mail
●
Network Folder
●
Job Storage
●
Workflow
●
Supplies Status
●
Administration
●
2 Device status line The status line provides information about the overall device status. Various buttons appear in
3 Copy count The copy count box indicates the number of copies that the device is set to make.
4 Help button Touch the Help button to open the embedded help system.
5 Scroll bar Touch the up or down arrows on the scroll bar to see the complete list of available features.
6 Sign Out Touch Sign Out to sign out of the device if you have signed in for access to restricted features.
7 Network Address Touch Network Address to find information about the network connection.
8 Date and time The current date and time appear here. The system administrator can select the format that
this area, depending on the current status. For a description of each button that can appear in
the status line, see
After you sign out, the device restores all options to the default settings.
the device uses to show the date and time, for example 12-hour format or 24-hour format.
Buttons on the touchscreen on page 20.
ENWW Use the control panel 19
Buttons on the touchscreen
The status line on the touchscreen provides information about the status of the device. Various buttons
can appear in this area. The following table describes each button.
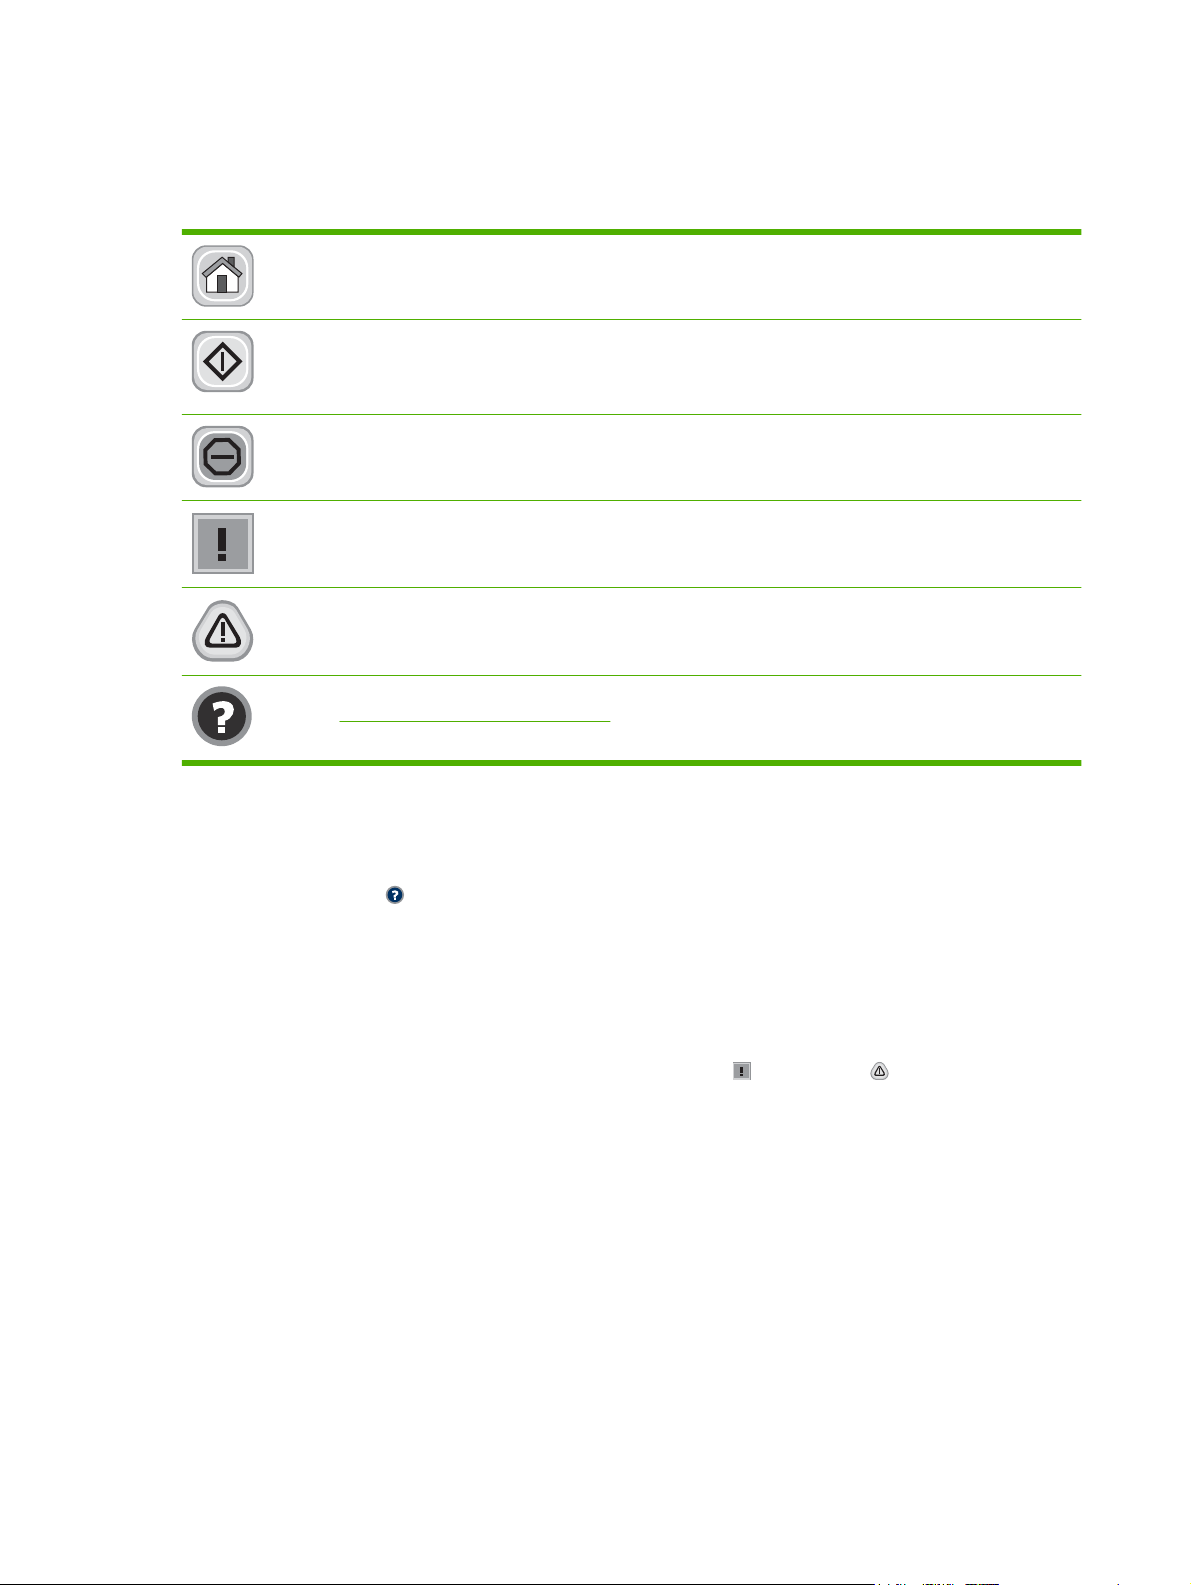
Home button. Touch the home button to go to the Home screen from any other screen.
Start button. Touch the Start button to begin the action for the feature that you are using.
NOTE: The name of this button changes for each feature. For example, in the Copy feature, the button
is named Start Copy.
Stop button. If the device is processing a print or fax job, the Stop button appears instead of the Start
button. Touch the Stop button to halt the current job. The device prompts you to cancel the job or to resume
it.
Error button. The error button appears whenever the device has an error that requires attention before
it can continue. Touch the error button to see a message that describes the error. The message also has
instructions for solving the problem.
Warning button. The warning button appears when the device has a problem but can continue
functioning. Touch the warning button to see a message that describes the problem. The message also
has instructions for solving the problem.
Help button. Touch the help button to open the built-in online Help system. For more information, see
Control-panel help system on page 20.
Control-panel help system
The device has a built-in Help system that explains how to use each screen. To open the Help system,
touch the Help button (
For some screens, the Help opens to a global menu where you can search for specific topics. You can
browse through the menu structure by touching the buttons in the menu.
For screens that contain settings for individual jobs, the Help opens to a topic that explains the options
for that screen.
If the device alerts you of an error or warning, touch the error (
message that describes the problem. The message also contains instructions to help solve the problem.
) in the upper-right corner of the screen.
) or warning ( ) button to open a
20 Chapter 2 Control Panel ENWW

Navigate the Administration menu
From the Home screen, touch Administration to open the menu structure. You might need to scroll to
the bottom of the Home screen to see this feature.
The Administration menu has several sub-menus, which are listed on the left side of the screen. Touch
the name of a menu to expand the structure. A plus sign (+) next to a menu name means that it contains
sub-menus. Continue opening the structure until you reach the option that you want to configure. To
return to the previous level, touch Back.
To exit the Administration menu, touch the Home button (
The device has built-in Help that explains each of the features that are available through the menus.
Help is available for many menus on the right-hand side of the touchscreen. Or, to open the global Help
system, touch the Help button (
The tables in the sections that follow indicate the overall structure of each menu.
) in the upper-right corner of the screen.
) in the upper-left corner of the screen.
ENWW Navigate the Administration menu 21

Information menu
Use this menu to print information pages and reports that are stored internally on the device.
Table 2-1 Information menu
Menu item Sub-menu item Sub-menu item Values Description
Configuration/Status
Pages
Fax Reports Fax Activity Log Print (button) Contains a list of the faxes that have been
Administration Menu
Map
Configuration Page Print (button) A set of configuration pages that show the
Supplies Status
Page
Usage Page Print (button) Shows information about the number of
File Directory Print (button) A directory page that contains information for
Fax Call Report Fax Call Report Print (button) A detailed report of the last fax operation,
Thumbnail on Report Yes
When to Print Report Never auto print
Print (button) Shows the basic structure of the
Administration menu and current
administration settings.
current device settings.
Print (button) Shows the status of supplies such as
cartridges, maintenance kits, and staples.
pages that have been printed on each paper
type and size.
any mass-storage devices, such as flash
drives, memory cards, or hard disks, that are
installed in this device.
sent from or received by this device.
either sent or received.
Choose whether or not to include a thumbnail
of the first page of the fax on the report.
No (default)
Print after any fax job
Print after fax send jobs
Print after any fax error
Print after send errors only
Print after receive errors only
Billing Codes Report
Blocked Fax List Print A list of phone numbers that are blocked from
Speed Dial List Print Shows the speed dials that have been set up
Sample Pages/Fonts PCL Font List Print A list of printer control language (PCL) fonts
PS Font List Print A list of PostScript (PS) fonts that are
Print A list of billing codes that have been used for
outgoing faxes. This report shows how many
sent faxes were billed to each code.
sending faxes to this device.
for this device.
that are currently available on the device.
currently available on the device.
22 Chapter 2 Control Panel ENWW

Default Job Options menu
Use this menu to define the default job options for each function. If the user does not specify the job
options when creating the job, the default options are used.
The Default Job Options menu contains the following sub-menus:
Default Options for Originals
●
Default Copy Options
●
Default Fax Options
●
Default E-mail Options
●
Default Send To Folder Options
●
Default Print Options
●
Default Options for Originals
Table 2-2 Default Options for Originals menu
Menu item Values Description
Paper Size Select a paper size from the list. Select the paper size that is most often used for copy or scan
Number of Sides 1 Select whether copy or scan originals are most often single-sided or
2
Orientation Portrait Select the orientation that is most often used for copy or scan
Landscape
Optimize Text/Picture Manually Adjust Use this setting to optimize the output for a particular type of original.
Text
Photograph
Darkness Select a value.
originals.
double-sided.
originals. Select Portrait if the short edge is at the top or select
Landscape if the long edge is at the top.
You can optimize the output for text, pictures, or a mixture.
If you select Manually Adjust, you can specify the mix of text and
pictures that will most often be used.
ENWW Default Job Options menu 23

Default Copy Options
Table 2-3 Default Copy Options menu
Menu item Sub-menu item Values Description
Number of Copies Type the number of
copies. The factory
default setting is 1.
Number of Sides 1
2
Staple/Collate Staple None (default)
One left angled
Collate Off
On (default)
Image Adjustment Background Cleanup Adjust the value within the
range.
Sharpness Adjust the value within the
range.
Output Bin Output Bin <Binname> Select the default output bin, if applicable, for copies.
Paper Path Face-up (straightest path)
Face-down (correct order)
Edge-To-Edge Normal (recommended)
(default)
Edge-To-Edge Output
Set the default number of copies for a copy job.
Set the default number of sides for copies.
Set up options for stapling and collating sets of copies.
If collation is selected, the device prints a complete
copy before starting on the next copy. If collation is not
selected, the device prints page 1 for all copies, then
page 2 for all copies, etc.
Increase the Background Cleanup setting to remove
faint images from the background or to remove a light
background color.
Adjust the Sharpness setting to clarify or soften the
image.
Select the default paper path for copies.
If the original document is printed close to the edges,
use the Edge-To-Edge feature to avoid shadows that
can appear along the edges. Combine this feature with
the Reduce/Enlarge feature to ensure that the entire
page is printed on the copies.
24 Chapter 2 Control Panel ENWW

Default Fax Options
Table 2-4 Fax Send menu
Menu item Sub-menu item Values Description
Resolution Standard (100x200dpi)
(default)
Fine (200x200dpi)
Superfine (300x300dpi)
Image Adjustment Background Cleanup Adjust the value within the
range.
Sharpness Adjust the value within the
range.
Fax Header Prepend
Overlay
Table 2-5 Fax Receive menu
Menu item Values Description
Use this feature to set the resolution for sent
documents. Higher resolution images have more dots
per inch (dpi), so they show more detail. Lower
resolution images have fewer dots per inch and show
less detail, but the file size is smaller.
Increase the Background Cleanup setting to remove
faint images from the background or to remove a light
background color.
Adjust the Sharpness setting to clarify or soften the
image.
Use this feature to select the position of the fax header
on the page.
Select Prepend to print the fax header above the fax
content and move the fax content down on the page.
Select Overlay to print the fax header over the top of
the fax content without moving the fax content down.
Using this option could prevent a single-page fax from
flowing onto another page.
Forward Fax Fax Forwarding
Change PIN
Stamp Received Faxes Enabled
Disabled (default)
Fit to Page Enabled
Disabled
Fax Paper Tray Select from the list of trays. Select the tray that holds the size and type of paper that you want to
Output Bin <Binname> Select the default output bin, if applicable, to use for faxes.
To forward received faxes to another fax device, select Fax
Forwarding and Custom. You can then type the number of the other
fax device into the Fax Forwarding Number field. When you select
this menu item for the fist time, you are prompted to set up a PIN. You
will be prompted to enter that PIN every time you try to use this menu.
This is the same PIN that is used to access the Fax Printing menu.
Use this option to add the date, time, senders phone number, and
page number to each page of the faxes that this device receives.
Use this feature to shrink faxes that are larger than Letter-size or A4size so that they can fit onto a Letter-size or A4-size page. If it this
feature set to Disabled, faxes larger than Letter or A4 will be flow
across multiple pages.
use for incoming faxes.
ENWW Default Job Options menu 25

Default E-mail Options
Use this menu to set default options for e-mails that are sent from the device.
Menu item Values Description
Document File Type PDF (default)
JPEG
TIFF
M-TIFF
Output Quality High (large file)
Medium (default)
Low (small file)
Resolution 75 DPI
150 DPI (default)
200 DPI
300 DPI
Color/Black Color scan (default)
Black/white scan
TIFF Version TIFF 6.0 (default)
TIFF (Post 6.0)
Choose the file format for the e-mail.
Choosing higher quality for output increases the size of the
output file.
Use this feature to select the resolution. Use a lower setting to
create smaller files.
Specify whether the e-mail will be in black or in color.
Use this feature to specify the TIFF version to use when saving
scanned files.
26 Chapter 2 Control Panel ENWW

Default Send to Folder Options
Use this menu to set default options for scan jobs sent to the computer.
Menu item Values Description
Color/Black Color scan
Black/white scan (default)
Document File Type PDF (default)
M-TIFF
TIFF
JPEG
TIFF version TIFF 6.0 (default)
TIFF (post 6.0)
Output Quality High (large file)
Medium (default)
Low (small file)
Resolution 75 DPI
150 DPI (default)
200 DPI
300 DPI
400 DPI
Specify whether the file will be in black or in color.
Choose the file format for the file.
Use this feature to specify the TIFF version to use when saving
scanned files.
Choosing higher quality for output increases the size of the
output file.
Use this feature to select the resolution. Use a lower setting to
create smaller files.
600 DPI
ENWW Default Job Options menu 27

Default Print Options
Use this menu to set default options for jobs that are sent from a computer.
Table 2-6 Default Print Options menu
Menu item Sub-menu item Values Description
Copies Per Job Type a value. Use this feature to set the default number of copies for
print jobs.
Default Paper Size (List of supported sizes.) Choose a paper size.
Default Custom Paper
Size
Output Bin Output Bin <binname> Select the default output bin, if applicable, for print jobs.
Print Sides 1-sided
2-Sided Format Book style
Unit of measure Millimeters
Inches
X Dimension Configure the width measurement for the Default
Y Dimension Configure the height measurement for the Default
Paper Path Face-up (straightest path)
Face-down (correct order)
2-sided
Flip style
Configure the default paper size that is used when the
user selects Custom as the paper size for a print job.
Custom Paper Size.
Custom Paper Size.
Select the default paper path for print jobs.
Use this feature to select whether print jobs should be
single-sided or double-sided by default.
Use this feature to configure the default style for 2sided print jobs. If Book style is selected, the back side
of the page is printed the right way up. This option is
for print jobs that are bound along the left edge. If Flip
style is selected, the back side of the page is printed
upside-down. This option is for print jobs that are bound
along the top edge.
28 Chapter 2 Control Panel ENWW

Time/Scheduling menu
Use this menu to set options for setting the time and for setting the device to enter and exit sleep mode.
NOTE: Values shown with "(default)" are the factory-default values. Some menu items have no default.
Table 2-7 Time/Scheduling menu
Menu item Sub-menu item Sub-menu item Values Description
Date/Time Date Format YYYY/MMM/DD
(default)
MMM/DD/YYYY
DD/MMM/YYYY
Date Month
Day
Year
Time Format 12 hour (AM/PM)
Time Hour
Minute
AM
PM
Sleep Delay 20 minutes
(default)
24 hour
30 minutes (default)
45 minutes
Use this feature to set the current date and
time, and to set the date format and time
format that are used to time-stamp outgoing
faxes.
Use this feature to select the time interval that
the device should remain inactive before
entering Sleep Mode.
1 hour (60 minutes)
90 minutes
2 hours
4 hours
Wake Time Monday
Tuesday
Wednesday
Thursday
Friday
Saturday
Sunday
Off (default)
Custom
Select Custom to set a wake time for each
day of the week. The device exits sleep mode
according to this schedule. Using a sleep
schedule helps conserve energy and
prepares the device for use so that users do
not have to wait for it to warm up.
ENWW Time/Scheduling menu 29

Table 2-7 Time/Scheduling menu (continued)
Menu item Sub-menu item Sub-menu item Values Description
Fax Printing Fax Printing Mode Store all received
faxes
Print all received
faxes
Use Fax Printing
Schedule
Change PIN
If you have concerns about the security of
private faxes, use this feature to store faxes
rather than having them automatically print by
creating a printing schedule.
For the fax printing schedule, the control
panel prompts you to select days and times
to print faxes.
Select Change PIN to change the PIN
number that users must provide to print faxes.
30 Chapter 2 Control Panel ENWW

Management menu
Use this menu to set up global device-management options.
NOTE: Values shown with "(default)" are the factory-default values. Some menu items have no default.
Table 2-8 Management menu
Menu item Sub-menu item Values Description
Stored Job Management Quick Copy Job Storage
Limit
Quick Copy Job Held
Timeout
Sleep mode Disable
Manage Supplies Supply Low/Order
Threshold
Replace Black Cartridge Stop at low
Select the maximum
number of jobs to store
1 Hour
4 Hours
1 Day
1 Week
Use Sleep Delay (default)
Select a value in the
range.
Stop at out
Override at out (default)
Use this menu to view and manage any jobs that are
stored on the device.
Use this feature to customize the sleep mode settings
for this device.
Select Use Sleep Delay to set the device to enter sleep
mode after the delay that is specified in the Time/
Scheduling menu.
Use this menu to carry out administrative supply
management tasks such as changing the threshold
when supplies should be ordered.
ENWW Management menu 31

Initial Setup menu
The Initial Setup menu contains the sub-menus shown:
Networking and I/O menu
●
Fax Setup menu
●
E-mail Setup menu
●
NOTE: Values shown with "(default)" are the factory-default values. Some menu items have no default.
Networking and I/O
Table 2-9 Networking and I/O
Menu item Sub-menu item Values Description
I/O Timeout Select a value in the
Parallel Input
NOTE: This item
appears only if an EIO
accessory is installed.
Embedded Jetdirect See Table 2-10 Jetdirect menus on page 32 for the list of options.
EIO <X> Jetdirect
High Speed No
Advanced Functions Enabled (default)
range. The factory default
setting is 15 seconds.
Yes (default)
Disabled
I/O timeout refers to the elapsed time before a print job
fails. If the stream of data that the device receives for
a print job gets interrupted, this setting indicates how
long the device will wait before it reports that the job
has failed.
Use the High Speed setting to configure the speed that
the parallel port uses to communicate with the host.
Use the Advanced Functions setting to enable or
disable bidirectional parallel communication.
Table 2-10 Jetdirect menus
Menu item Sub-menu item Sub-menu item Values and Description
TCP/IP Enable Off: Disable the TCP/IP protocol.
On (default): Enable the TCP/IP protocol.
Host Name An alphanumeric string, up to 32 characters, used to
identify the device. This name is listed on the
HP Jetdirect configuration page. The default host name
is NPIxxxxxx, where xxxxxx is the last six digits of the
LAN hardware (MAC) address.
32 Chapter 2 Control Panel ENWW

Table 2-10 Jetdirect menus (continued)
Menu item Sub-menu item Sub-menu item Values and Description
IPV4 Settings Config Method Specifies the method that TCP/IPv4 parameters will be
configured on the HP Jetdirect print server.
Bootp: Use BootP (Bootstrap Protocol) for automatic
configuration from a BootP server.
DHCP: Use DHCP (Dynamic Host Configuration
Protocol) for automatic configuration from a DHCPv4
server. If selected and a DHCP lease exists, DHCP
Release and DHCP Renew menus are available to set
DHCP lease options.
Auto IP: Use automatic link-local IPv4 addressing. An
address in the form 169.254.x.x is assigned
automatically.
Manual: Use the Manual Settings menu to configure
TCP/IPv4 parameters.
DHCP Release This menu appears if Config Method was set to
DHCP Renew This menu appears if Config Method was set to
Manual Settings (Available only if Config Method is set to Manual)
DHCP and a DHCP lease for the print server exists.
No (default): The current DHCP lease is saved.
Yes: The current DHCP lease and the leased IP
address are released.
DHCP and a DHCP lease for the print server exists.
No (default): The print server does not request to renew
the DHCP lease.
Yes: The print server requests to renew the current
DHCP lease.
Configure parameters directly from the printer control
panel:
IP Address: The unique IP address of the printer
(n.n.n.n), where n is a value from 0 to 255.
Subnet Mask: The subnet mask for the printer
(m.m.m.m), where m is a value from 0 to 255.
Syslog Server: The IP address of the syslog server
used to receive and log syslog messages.
Default Gateway: The IP address of the gateway or
router used for communications with other networks.
Idle Timeout: The time period, in seconds, after which
an idle TCP print data connection is closed (default is
270 seconds, 0 disables the timeout).
ENWW Initial Setup menu 33

Table 2-10 Jetdirect menus (continued)
Menu item Sub-menu item Sub-menu item Values and Description
Default IP Specify the IP address to default to when the print
server is unable to obtain an IP address from the
network during a forced TCP/IP reconfiguration (for
example, when manually configured to use BootP or
DHCP).
Auto IP: A link-local IP address 169.254.x.x is set.
Legacy: The address 192.0.0.192 is set, consistent
with older HP Jetdirect devices.
Primary DNS Specify the IP address (n.n.n.n) of a Primary DNS
Secondary DNS Specify the IP address (n.n.n.n) of a Secondary
IPV6 Settings Enable Use this item to enable or disable IPv6 operation on the
Address Use this item to manually configure an IPv6 address.
DHCPV6 Policy Router Specified: The stateful auto-configuration
Server.
Domain Name System (DNS) Server.
print server.
Off (default): IPv6 is disabled.
On: IPv6 is enabled.
Manual Settings: Use the Manual Settings menu to
enable and manually configure a TCP/ IPv6 address.
method to be used by the print server is determined by
a router. The router specifies whether the print server
obtains its address, its configuration information, or
both from a DHCPv6 server.
Router Unavailable: If a router is not available, the print
server should attempt to obtain its stateful
configuration from a DHCPv6 server.
Always: Whether or not a router is available, the print
server always attempts to obtain its stateful
configuration from a DHCPv6 server.
Primary DNS Use this item to specify an IPv6 address for a primary
DNS server that the print server should use.
Manual Settings Use this item to manually set IPv6 addresses on the
print server.
Enable: Select this item and choose On to enable
manual configuration, or Off to disable manual
configuration.
Address: Use this item to type a 32 hexadecimal digit
IPv6 node address that uses the colon hexadecimal
syntax.
34 Chapter 2 Control Panel ENWW

Table 2-10 Jetdirect menus (continued)
Menu item Sub-menu item Sub-menu item Values and Description
Proxy Server Specifies the proxy server to be used by embedded
applications in the device. A proxy server is typically
used by network clients for Internet access. It caches
Web pages, and provides a degree of Internet security,
for those clients.
To specify a proxy server, enter its IPv4 address or
fully-qualified domain name. The name can be up to
255 octets.
For some networks, you may need to contact your
Independent Service Provider (ISP) for the proxy
server address.
Proxy Port Type the port number used by the proxy server for
IPX/SPX Enable Off: Disable the IPX/SPX protocol.
Frame Type Selects the frame-type setting for your network.
AppleTalk Enable Off (default): Disable the AppleTalk protocol.
DLC/LLC Enable Off (default): Disable the DLC/LLC protocol.
client support. The port number identifies the port
reserved for proxy activity on your network, and can be
a value from 0 to 65535.
On (default): Enable the IPX/SPX protocol.
Auto: Automatically sets and limits the frame type to
the first one detected.
EN_8023, EN_II, EN_8022, and EN_SNAP: Frame-
type selections for Ethernet networks.
On: Enable the AppleTalk protocol.
On: Enable the DLC/LLC protocol.
ENWW Initial Setup menu 35

Table 2-10 Jetdirect menus (continued)
Menu item Sub-menu item Sub-menu item Values and Description
Security Print Sec Page Yes: Prints a page that contains the current security
settings on the HP Jetdirect print server.
No (default): A security settings page is not printed.
Secure Web For configuration management, specify whether the
IPsec or Firewall Specify the IPsec or Firewall status on the print server.
Reset Security Specify whether the current security settings on the
Diagnostics Embedded Test This menu provides tests to help diagnose network
embedded Web server will accept communications
using HTTPS (Secure HTTP) only, or both HTTP and
HTTPS.
HTTPS Required: For secure, encrypted
communications, only HTTPS access is accepted. The
print server will appear as a secure site.
HTTP/HTTPS optional: Access using either HTTP or
HTTPS is permitted.
Keep: IPsec/Firewall status remains the same as
currently configured.
Disable: IPsec/Firewall operation on the print server is
disabled.
print server will be saved or reset to factory defaults.
No*: The current security settings are maintained.
Yes: Security settings are reset to factory defaults.
hardware or TCP/IP network connection problems.
Embedded tests help to identify whether a network fault
is internal or external to the device. Use an embedded
test to check hardware and communication paths on
the print server. After you select and enable a test and
set the execution time, you must select Execute to
initiate the test.
Depending on the execution time, a selected test runs
continuously until either the device is turned off, or an
error occurs and a diagnostic page is printed.
LAN HW Test CAUTION: Running this embedded test will erase
HTTP Test This test checks operation of HTTP by retrieving
your TCP/IP configuration.
This test performs an internal loopback test. An internal
loopback test will send and receive packets only on the
internal network hardware. There are no external
transmissions on your network.
Select Yes to choose this test, or No to not choose it.
predefined pages from the device, and tests the
embedded Web server.
Select Yes to choose this test, or No to not choose it.
36 Chapter 2 Control Panel ENWW

Table 2-10 Jetdirect menus (continued)
Menu item Sub-menu item Sub-menu item Values and Description
SNMP Test This test checks operation of SNMP communications
by accessing predefined SNMP objects on the device.
Select Yes to choose this test, or No to not choose it.
Select All Tests Use this item to select all available embedded tests.
Select Yesto choose all tests. Select No to select
individual tests.
Data Path Test This test helps to identify data path and corruption
Execution Time [H] Use this item to specify the length of time (in hours) that
Execute No*: Do not initiate the selected tests.
Ping Test This test is used to check network communications.
Dest Type Specify whether the target device is an IPv4 or IPv6
Dest IP IPV4: Type the IPv4 address.
problems on an HP postscript level 3 emulation device.
It sends a predefined PS file to the device, However,
the test is paperless; the file will not print.
Select Yes to choose this test, or No to not choose it.
an embedded test will be run. You can select a value
from 1 to 60 hours. If you select zero (0), the test runs
indefinitely until an error occurs or device is turned off.
Data gathered from the HTTP, SNMP, and Data Path
tests is printed after the tests have completed.
Yes: Initiate the selected tests.
This test sends link-level packets to a remote network
host, then waits for an appropriate response. To run a
ping test, set the following items:
node.
IPV6 : Type the IPv6 address.
Packet Size Specify the size of each packet, in bytes, to be sent to
the remote host. The minimum is 64 (default) and the
maximum is 2048.
Timeout Specify the length of time, in seconds, to wait for a
Count Specify the number of ping test packets to send for this
Print Results If the ping test was not set for continuous operation,
Execute Specify whether to initiate the ping test. Select Yes to
response from the remote host. The default is 1 and
the maximum is 100.
test. Select a value from 1 to 100. To configure the test
to run continuously, select 0.
you can choose to print the test results. Select Yes to
print results. If you select No (default), results are not
printed.
initiate the test, or No to not run the test.
ENWW Initial Setup menu 37

Table 2-10 Jetdirect menus (continued)
Menu item Sub-menu item Sub-menu item Values and Description
Ping Results Use this item to view the ping test status and results
using the control panel display. You can select the
following items:
Packets Sent Shows the number of packets (0 - 65535) sent to the
Packets Received Shows the number of packets (0 - 65535) received from
Percent Lost Shows the percent of ping test packets that were sent
RTT Min Shows the minimum detected roundtrip- time (RTT),
RTT Max Shows the maximum detected roundtrip- time (RTT),
RTT Average Shows the average round-trip-time (RTT), from 0 to
Ping In Progress Shows whether a ping test is in progress. Yes indicates
Refresh When viewing the ping test results, this item updates
remote host since the most recent test was initiated or
completed.
the remote host since the most recent test was initiated
or completed.
with no response from the remote host since the most
recent test was initiated or completed.
from 0 to 4096 milliseconds, for packet transmission
and response.
from 0 to 4096 milliseconds, for packet transmission
and response.
4096 milliseconds, for packet transmission and
response.
a test in progress, and No indicates that a test
completed or was not run.
the ping test data with current results. Select Yes to
update the data, or No to maintain the existing data.
However, a refresh automatically occurs when the
menu times out or you manually return to the main
menu.
38 Chapter 2 Control Panel ENWW

Table 2-10 Jetdirect menus (continued)
Menu item Sub-menu item Sub-menu item Values and Description
Link Speed The link speed and communication mode of the print
server must match the network. The available settings
depend on the device and installed print server. Select
one of the following link configuration settings:
CAUTION: If you change the link setting, network
communications with the print server and network
device might be lost.
Auto (default): The print server uses auto-negotiation
to configure itself with the highest link speed and
communication mode allowed. If auto-negotiation fails,
either 100TX HALF or 10TX HALF is set depending on
the detected link speed of the hub/switch port. (A
1000T half-duplex selection is not supported.)
10T Half: 10 Mbps, half-duplex operation.
10T Full: 10 Mbps, Full-duplex operation.
100TX Half: 100 Mbps, half-duplex operation.
100TX Full: 100 Mbps, full-duplex operation.
100TX Auto: Limits auto-negotiation to a maximum link
speed of 100 Mbps.
1000TX Full: 1000 Mbps, full-duplex operation.
Print Protocols Use this item to print a page that lists the configuration
of the following protocols: IPX/SPX, Novell NetWare,
AppleTalk, DLC/LLC.
ENWW Initial Setup menu 39

Fax Setup
Table 2-11 Fax Setup menu
Menu item Sub-menu item Sub-menu item Values Description
Required Settings Location (Countries/regions
listed)
Date/Time
Fax Header
Information
PC Fax Send Disabled
Phone Number
Company Name
Enabled (default)
Configure the settings that are legally
required for outgoing faxes.
Use this feature to enable or disable PC Fax
Send. PC Fax Send enables users to send
faxes through the device from their
computers if they have the correct driver
installed.
40 Chapter 2 Control Panel ENWW

Table 2-11 Fax Setup menu (continued)
Menu item Sub-menu item Sub-menu item Values Description
Fax Send Settings Fax Dial Volume Off
Medium (default)
High
Error Correction
Mode
JBIG Compression Disabled
Maximum Baud Rate Select a value from
Dialing Mode Tone (default)
Redial On Busy The range is between
Enabled (default)
Disabled
Enabled (default)
the list.
Pulse
0 and 9. The factory
default is 3 times.
Use this feature to set the volume of the tones
that you hear while the device dials the fax
number.
When Error Correction Mode is enabled and
an error occurs during fax transmission, the
device sends or receives the error portion
again.
The JBIG Compression reduces faxtransmission time, which can result in lower
phone charges. However, using JBIG
Compression sometimes causes
compatibility problems with older fax
machines. If this occurs, turn off the JBIG
Compression.
Use this feature to set the maximum baud
rate for receiving faxes. This can be used as
a diagnostic tool for troubleshooting fax
problems.
Select whether the device should use tone or
pulse dialing.
Type the number of times the device should
attempt to redial if the line is busy.
Redial On No Answer Never (default)
Once
Twice
Redial Interval The range is between
1 and 5 minutes. The
factory default is 5
minutes.
Detect Dial Tone Enabled
Disabled (default)
Dialing Prefix Off (default)
Custom
Billing Codes Off (default)
Custom
Minimum Length The range is between 1 and 16 digits. The default is 1 digit.
Use this feature to specify the number of
times the device should attempt to dial if the
recipient fax number does not answer.
NOTE: Twice is available in locations other
than the United States and Canada.
Use this feature to specify the number of
minutes between dialing attempts if the
recipient number is busy or not answering.
Use this feature to specify whether the device
should check for a dial tone before sending a
fax.
Use this feature to specify a prefix number
that must be dialed when sending faxes from
the device.
When billing codes are enabled, a prompt
appears that asks the user to enter the billing
code for an outgoing fax.
ENWW Initial Setup menu 41

Table 2-11 Fax Setup menu (continued)
Menu item Sub-menu item Sub-menu item Values Description
Fax Receive Settings Rings To Answer The range varies by
location. The factory
default is 2 rings.
Ring Interval Default (default)
Custom
Ringer Volume Off
Low (default)
High
Blocked Fax
Numbers
Add Blocked
Numbers
Remove Blocked
Numbers
Clear All Blocked
Numbers
Type the fax number
to add.
Select a fax number
to remove.
No (default)
Yes
Use this feature to specify the number of rings
that must occur before the fax modem
answers.
Use this feature to control the time between
rings for incoming faxes.
Set the volume for the fax ring-tone.
Use this feature to add or delete numbers
from the blocked fax list. The blocked fax list
can contain up to 30 numbers. When the
device receives a call from one of the blocked
fax numbers, it deletes the incoming fax. It
also logs the blocked fax in the activity log
along with job-accounting information.
42 Chapter 2 Control Panel ENWW

E-mail Setup
Use this menu to enable the e-mail feature and to configure basic e-mail settings.
NOTE: To configure advanced e-mail settings, use the embedded Web server. For more information,
see
Embedded Web server on page 16.
Table 2-12 E-mail Setup menu
Menu item Values Description
Address Validation On (default)
Off
Find Send Gateways Search the network for SMTP gateways that the device can use to
SMTP Gateway Enter a value. Specify the IP address of the SMTP gateway that is used to send e-
Test Send Gateway Test the configured SMTP gateway to see if it is functional.
This option enables the device to check e-mail syntax when you type
an e-mail address. Valid e-mail addresses require the "@" sign and
a ".".
send e-mail.
mail from the device.
Send Setup menu
Table 2-13 Send Setup menu
Menu item Values Description
Replicate MFP Enter a value (IP Address). Copy the local Send settings from one device to another.
Allow Transfer to New DSS Use this feature to allow the transfer of the device from one HP Digital
Sending Software (DSS) server to another.
HP DSS is a software package that handles digital sending tasks such
as faxing, e-mail, and sending a scanned document to a network
folder.
Allow Use of Digital Send Service This feature allows you to configure the device for use with an
HP Digital Sending Software (DSS) server.
ENWW Initial Setup menu 43

Device Behavior menu
NOTE: Values shown with "(default)" are the factory-default values. Some menu items have no default.
Table 2-14 Device Behavior menu
Menu item Sub-menu item Sub-menu item Values Description
Language Select the language
from the list.
Key Press Sound On (default)
Off
Inactivity Timeout Type a value
Warning/Error
Behavior
Clearable Warnings On
Continuable Events Auto continue (10
Jam Recovery Auto (default)
between 10 and 300
seconds. The factory
default is 60
seconds.
Job (default)
seconds) (default)
Touch OK to
continue
On
Off
Use this feature to select a different language
for control-panel messages. When you select
a new language, the keyboard layout might
also change.
Use this feature to specify whether you hear
a sound when you touch the screen or press
buttons on the control panel.
Use this feature to specify the amount of time
that elapses between any activity on the
control panel and the device resetting to the
default settings.
Use this feature to set the amount of time that
a clearable warning appears on the control
panel.
Use this option to configure the device
behavior when the device encounters certain
errors.
Use this feature to configure how the device
handles pages that are lost during a jam.
Tray Behavior Use Requested Tray Exclusively (default)
First
Manually Feed
Prompt
PS Defer Media Enabled (default)
Use Another Tray Enabled (default)
Size/Type Prompt Display
Duplex Blank Pages Auto (default)
Always (default)
Unless Loaded
Disabled
Disabled
Do not display
(default)
Yes
Use this feature to control how the device
handles jobs that have specified a specific
input tray.
Use this feature to indicate whether a prompt
should appear when the type or size for a job
does not match the specified tray and the
device pulls from the multipurpose tray
instead.
Use this feature to choose either the
PostScript (PS) or HP paper-handling model.
Use this feature to turn on or off the controlpanel prompt to select another tray when the
specified tray is empty.
Use this feature to control whether the tray
configuration message appears whenever a
tray is opened or closed.
Use this feature to control how the device
handles two-sided jobs (duplexing).
44 Chapter 2 Control Panel ENWW

Table 2-14 Device Behavior menu (continued)
Menu item Sub-menu item Sub-menu item Values Description
Stapler/Stacker Staple None
One
Staples Out Continue (default)
Stop
MBM-3
Configuration
General Copy
Behavior
Operation Mode Function Separator
Mailbox
Stacker
Scan Ahead Enabled (default)
Disabled
Auto Print Interrupt Enabled
Disabled
Copy Interrupt Enabled
Disabled
If the optional stapler/stacker is installed, use
this feature to set stapling characteristics for
the device.
Use this feature to configure the optional 3bin mailbox accessory.
Use this feature to turn on no-wait scanning.
With Scan Ahead enabled, the pages in the
original document are scanned to disk and
held until the device becomes available.
When this feature is enabled, copy jobs can
interrupt print jobs that are set to print multiple
copies.
The copy job is inserted into the print queue
at the end of one copy of the print job. After
the copy job is complete, the device
continues printing the remaining copies of the
print job.
When this feature is enabled, a copy job that
is currently printing can be interrupted when
a new copy job is started. You are prompted
to confirm that you want to interrupt the
current job.
First Copy Speed No early warm up
Early warm up
ENWW Device Behavior menu 45

Table 2-14 Device Behavior menu (continued)
Menu item Sub-menu item Sub-menu item Values Description
General Print
Behavior
Default Paper Size Select from the list of
paper sizes.
Override A4/Letter No
Yes (default)
Manual Feed Enabled
Disabled (default)
Courier Font Regular (default)
Dark
Wide A4 Enabled
Disabled (default)
Print PS Errors Enabled
Disabled (default)
Print PDF Errors Enabled
Disabled (default)
Use this feature to configure the default paper
size used for print jobs.
Use this feature to print on letter-size paper
when an A4 job is sent but no A4-size paper
is loaded in the device (or to print on A4 paper
when a letter-size job is sent but no letter-size
paper is loaded). This option will also override
A3 with ledger-size paper and ledger with A3size paper.
When this feature is enabled, the user can
select manual feed from the control panel as
the paper source for a job.
Use this feature to select which version of the
Courier font you want to use.
Use this feature to change the printable area
of A4-size paper. If you enable this option,
eighty 10-pitch characters can be printed on
a single line of A4 paper.
Use this feature to select whether a
PostScript (PS) error page is printed when
the device encounters a PS error.
Use this feature to select whether a PDF error
page is printed when the device encounters
a PDF error.
Personality Auto (default)
PCL
PDF
PS
Select the printer language that the device
should use.
Normally you should not change the
language. If you change the setting to a
specific language, the device does not
automatically switch from one language to
another unless specific software commands
are sent to the device.
46 Chapter 2 Control Panel ENWW

Table 2-14 Device Behavior menu (continued)
Menu item Sub-menu item Sub-menu item Values Description
PCL Form Length Type a value
between 5 and 128
lines. The factory
default is 60 lines.
Orientation Portrait (default)
Landscape
Font Source Select the source
from the list.
Font Number Type the font
number. The range is
between 0 and 999.
The factory default is
0.
Font Pitch Type a value
between 0.44 and
99.99. The factory
default is 10.00.
PCL Font Point Size Type a value
between 4.00 and
999.75. The factory
default is 12.00.
PCL is a set of printer commands that
Hewlett-Packard developed to provide
access to printer features.
Select the orientation that is most often used
print jobs. Select Portrait if the short edge is
at the top or select Landscape if the long edge
is at the top.
Use this feature to select the font source for
the user-soft default font.
Use this feature to specify the font number for
the user-soft default font using the source that
is specified in the Font Source menu item.
The device assigns a number to each font
and lists it on the PCL font list (available from
the Administration menu).
If Font Source and Font Number indicate a
contour font, then use this feature to select a
default pitch (for a fixed-spaced font).
If Font Source and Font Number indicate a
contour font, then use this feature to select a
default point size (for a proportional-spaced
font).
Symbol Set PC-8 (default)
(50 additional symbol
sets from which to
choose)
Append CR to LF No (default)
Yes
Suppress Blank
Pages
Media Source
Mapping
No (default)
Yes
Standard (default)
Classic
Use this feature to select any one of several
available symbol sets from the control panel.
A symbol set is a unique grouping of all the
characters in a font.
Use this feature to configure whether a
carriage return (CR) is appended to each line
feed (LF) encountered in backwardscompatible PCL jobs (pure text, no job
control).
This option is for users who are generating
their own PCL, which could include extra form
feeds that would cause blank pages to be
printed. When Yes is selected, form feeds are
ignored if the page is blank.
Use this feature to select and maintain input
trays by number when you are not using the
device driver, or when the software program
has no option for tray selection.
ENWW Device Behavior menu 47

Print Quality menu
NOTE: Values shown with "(default)" are the factory-default values. Some menu items have no default.
Table 2-15 Print Quality menu
Menu item Sub-menu item Values Description
Set Registration Test Page Print (button) Use Set Registration to shift the margin alignment to
center the image on the page from top to bottom and
from left to right. You can also align the image on the
front with the image printed on the back.
Print a test page for setting the registration.
Source All trays
Tray <X>: <contents>
(choose a tray)
Adjust Tray <X> Shift from -20 to 20 along
the X or Y axes. 0 is the
default.
Fuser Modes <Paper Type> Configure the fuser mode associated with each media
Restore Modes Restore (button) Restore the fuser modes to the default settings.
Optimize High Transfer Normal (default)
Increased
Line Detail Off (default)
On
Resolution 300
Select the source input tray for printing the Set
Registration page.
Perform the alignment procedure for each tray.
When it creates an image, the device scans across the
page from side to side as the sheet feeds from top to
bottom into the device.
The scan direction is referred to as X. X1 is the scan
direction for the first side of a 2-sided page. X2 is the
scan direction for the second side of a 2-sided page.
The feed direction is referred to as Y.
type.
Optimizes certain parameters for all jobs rather than (or
in addition to) optimizing by paper path.
Use this feature to select the print resolution.
600
FastRes 1200 (default)
ProRes 1200
REt Off
Light
Medium (default)
Dark
Economode Enabled
Disabled
Toner Density Choose from a range of 1
to 5. 3 is the default.
Enable Resolution Enhancement technology (REt),
which produces print output with smooth angles,
curves, and edges. All print resolutions, including
FastRes 1200, benefit from REt.
When Economode is enabled, the device prints with a
reduced amount of toner per page; however, the print
quality of the page is slightly reduced.
Lighten or darken the print on the page. 1 is the lightest
and 5 is the darkest.
48 Chapter 2 Control Panel ENWW

Table 2-15 Print Quality menu (continued)
Menu item Sub-menu item Values Description
Calibration/Cleaning Auto Cleaning Enabled
Disabled
Cleaning Interval 1000
2000
5000
10000
20000
Auto Cleaning Size Letter
A4
Process Cleaning Page Process (button) Use this feature to create and process a cleaning page
When auto-cleaning is on, the device prints a cleaning
page when the page count reaches the value that is set
in Cleaning Interval.
Set the interval when the cleaning page should be
printed. The interval is measured by the number of
pages printed.
Select the size of paper used for the cleaning page.
for cleaning excess toner off the pressure roller in the
fuser. The process takes up to 2.5 minutes.
ENWW Print Quality menu 49

Troubleshooting menu
NOTE: Values shown with "(default)" are the factory-default values. Some menu items have no default.
Table 2-16 Troubleshooting menu
Menu item Sub-menu item Sub-menu item Values Description
Event Log Print (button) This feature shows the event codes and their
corresponding engine cycles on the display,
and it allows you to print the full event log.
Calibrate Scanner Calibrate (button) Use this feature to compensate for offsets in
the scanner imaging system (carriage head)
for ADF and flatbed scans.
You might need to calibrate the scanner if it
is not capturing the correct sections of
scanned documents.
Fax T.30 Trace Print T.30 Report Use this feature to print or configure the fax
When to Print Report Never auto print
Print after any fax job
Print after fax send
jobs
Print after any fax
error
T.30 trace report. T.30 is the standard that
specifies handshaking, protocols, and error
correction between fax machines.
Print after send
errors only
Print after receive
errors only
Fax Transmit Signal
Loss
Fax V.34 Normal (default)
Fax Speaker Mode Normal (default)
Paper Path Sensors Initiate a test of the paper path sensors.
A value between 0
and 30.
Off
Diagnostic
Use this feature to set loss levels to
compensate for phone line signal loss. You
should not modify this setting unless
requested to do so by an HP service
representative because it could cause the fax
to stop functioning.
Use this feature to disable V.34 modulations
if several fax failures have occurred or if
phone line conditions require it.
This feature can be used by a technician to
evaluate and diagnose fax issues by listening
to the sounds of fax modulations. The factory
default setting is Normal.
50 Chapter 2 Control Panel ENWW

Table 2-16 Troubleshooting menu (continued)
Menu item Sub-menu item Sub-menu item Values Description
Paper Path Test Test Page Print (button) Generate a test page for testing paper
handling features. You can define the path
that is used for the test in order to test specific
paper paths.
Source All trays
Tray 1
Tray 2
(Additional trays are
shown, if applicable.)
Destination All bins
Stacker Bin
Standard Output Bin
Duplex Off (default)
On
Copies Range: 2-30,
Default=2
Specify whether the test page will be printed
from all trays or from a specific tray.
Select the output option for the test page. You
can choose to send the test page to all output
bins or only to a specific bin.
Select whether the duplexer should be
included in the Paper Path test.
Select how many pages should be sent from
the specified source as part of the Paper Path
test.
ENWW Troubleshooting menu 51

Table 2-16 Troubleshooting menu (continued)
Menu item Sub-menu item Sub-menu item Values Description
Finishing Paper Path
Test
Staples Finishing Options Choose from a list of
available options.
Media Size Letter
Legal
A4
Executive (JIS)
8.5 x 13
Media Type Select the paper type for the Finishing Paper
Copies Range: 2-30,
Default=2
Duplex Off
On
Print Test Page Print (button) Print a test page to use for the Finishing
Stack Media Size Letter
Legal
Test paper handling features for the finisher.
Select the option that you want to test.
Select the paper size for the Finishing Paper
Path Test.
Path Test.
Select the number of copies to include in the
Finishing Paper Path Test.
Select whether to use the duplexer in the
Finishing Paper Path Test.
Paper Path Test.
Select the options that you want to use to test
the stacker.
A4
Executive (JIS)
8.5 x 13
Media Type Select from a list of
types.
Copies 1
10
50
100
500
Duplex Off
On
Print Test Page Print (button) Print a test page to use for the Finishing
Manual Sensor Test Test the device sensors and switches for
Select the type of media to use for the
Finishing Paper Path Test.
Select the number of copies to include in the
Finishing Paper Path Test.
Select whether to use the duplexer in the
Finishing Paper Path Test.
Paper Path Test.
correct operation. Each sensor is displayed
on the control-panel screen, along with its
status. Manually trip each sensor and watch
for it to change on the screen. Press the Stop
button to abort the test.
52 Chapter 2 Control Panel ENWW

Table 2-16 Troubleshooting menu (continued)
Menu item Sub-menu item Sub-menu item Values Description
Component Test Exercise individual parts independently to
isolate noise, leaking, or other issues. To start
the test, select one of the components. The
test will run the number of times specified by
the Repeat option. You might be prompted to
remove parts from the device during the test.
Press the Stop button to abort the test.
Print/Stop Test Continuous value
Scanner Tests This menu item is used by a service
Control Panel LEDs Use this feature to make sure the
Display
Buttons
Touchscreen
from 0 to 60,000
milliseconds. The
default is 0
milliseconds.
Isolate faults by stopping the device during
the print cycle and observing where in the
process the image degrades. To run the test,
specify a stop time. The next job that is sent
to the device will stop at the specified time in
the process.
technician to diagnose potential problems
with the device scanner.
components of the control panel are
functioning correctly.
ENWW Troubleshooting menu 53

Resets menu
Table 2-17 Resets menu
Menu item Values Description
Clear Local Address Book Clear (button) Use this feature to clear all addresses from the address books that
Clear Fax Activity Log Yes
No (default)
Restore Factory Telecom Setting Restore (button) Use this option to restore the telephone-related settings that are in
Restore Factory Settings Restore (button) Use this feature to restore all device settings to their factory defaults.
Clear Maintenance Message Clear (button) Clear the Order Maintenance Kit and Replace Maintenance Kit
Clear Document Feeder
Message
Reset Supplies New Maintenance Kit (Yes/No)
Clear (button) Use this feature to clear the Order Document Feeder Kit and Replace
New Document Feeder Kit (Yes/
No)
are stored on the device.
Use this feature to clear all events from the Fax Activity Log.
the Initial Setup menu to factory default values.
warning messages.
Document Feeder Kit warning messages.
Notify the device that a new maintenance kit or document feeder kit
has been installed.
54 Chapter 2 Control Panel ENWW

Service menu
The Service menu is locked and requires a PIN for access. This menu is intended for use by authorized
service personnel.
ENWW Service menu 55

56 Chapter 2 Control Panel ENWW

3 Input/output (I/O)
This chapter describes how to configure certain network parameters on the device. The following topics
are covered:
USB configuration
●
Network configuration
●
ENWW 57
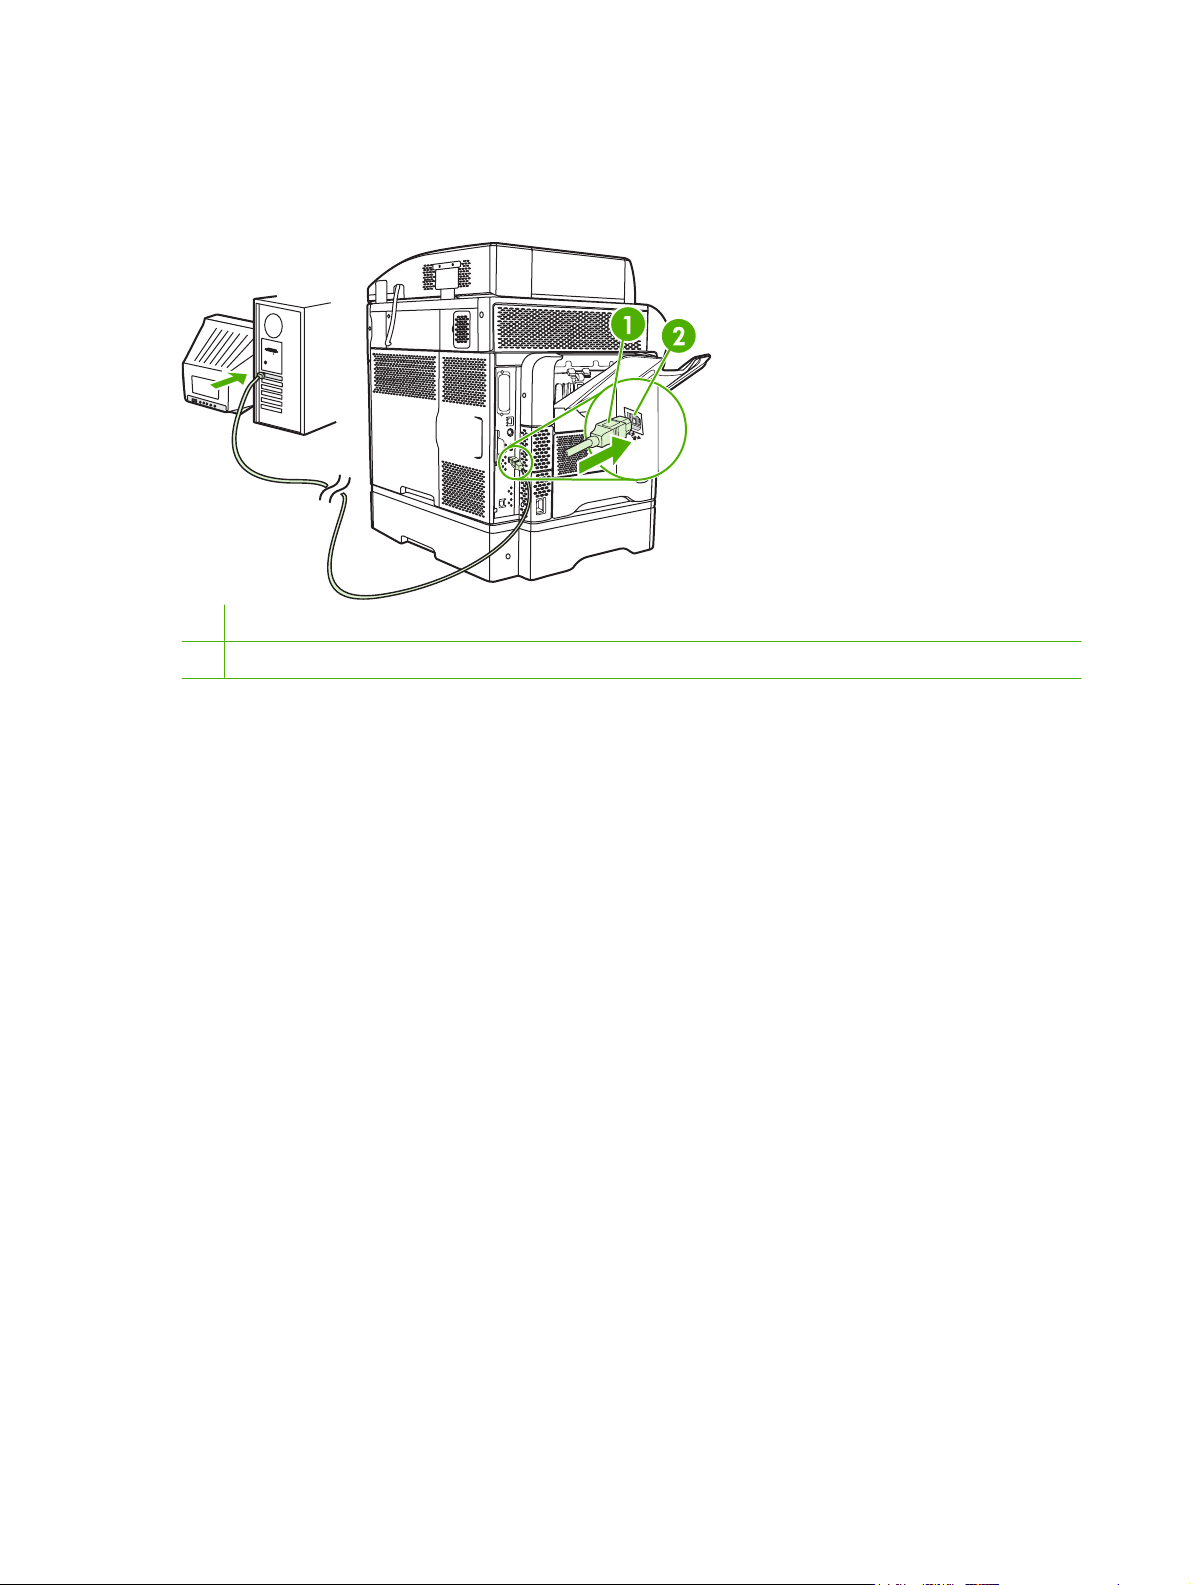
USB configuration
This device supports a USB 2.0 connection. You must use an A-to-B type USB cable for printing.
Figure 3-1 USB connection
1 USB connector
2 USB port (type B)
58 Chapter 3 Input/output (I/O) ENWW

Network configuration
You might need to configure certain network parameters on the device. You can configure these
parameters in the following locations:
Installation software
●
Device control panel
●
Embedded Web server
●
Management software (HP Web Jetadmin or HP LaserJet Utility for Macintosh)
●
NOTE: For more information about using the embedded Web server, see Embedded Web server
on page 16
For more information on supported networks and network configuration tools, see the HP Jetdirect Print
Server Administrator’s Guide. The guide comes with printers in which an HP Jetdirect print server is
installed.
This section contains the following information about configuring network parameters:
Configure TCP/IPv4 parameters
●
Configure TCP/IPv6 parameters
●
Disable network protocols (optional)
●
HP Jetdirect EIO print servers
●
Configure TCP/IPv4 parameters
If your network doesn't provide automatic IP addressing through DHCP, BOOTP, RARP, or another
method, you might need to enter the following parameters manually before you can print over the
network:
IP address (4 bytes)
●
Subnet mask (4 bytes)
●
Default gateway (4 bytes)
●
Set an IP address
You can view the current IP address of the device from the control-panel Home screen by touching
Network Address.
Use the following procedure to change the IP address manually.
1. Scroll to and touch Administration.
2. Scroll to and touch Initial Setup.
3. Touch Networking and I/O.
4. Touch Embedded Jetdirect.
5. Touch TCP/IP.
ENWW Network configuration 59

6. Touch IPV4 Settings.
7. Touch Config Method.
8. Touch Manual.
9. Touch Save.
10. Touch Manual Settings.
11. Touch IP Address.
12. Touch the IP Address text box.
13. Use the touchscreen keypad to type the IP address.
14. Touch OK.
15. Touch Save.
Set the subnet mask
1. Scroll to and touch Administration.
2. Scroll to and touch Initial Setup.
3. Touch Networking and I/O.
4. Touch Embedded Jetdirect.
5. Touch TCP/IP.
6. Touch IPV4 Settings.
7. Touch Config Method.
8. Touch Manual.
9. Touch Save.
10. Touch Manual Settings.
11. Touch Subnet Mask.
12. Touch the Subnet Mask text box.
13. Use the touchscreen keypad to type the subnet mask.
14. Touch OK.
15. Touch Save.
Set the default gateway
1. Scroll to and touch Administration.
2. Scroll to and touch Initial Setup.
3. Touch Networking and I/O.
4. Touch Embedded Jetdirect.
60 Chapter 3 Input/output (I/O) ENWW

5. Touch TCP/IP.
6. Touch IPV4 Settings.
7. Touch Config Method.
8. Touch Manual.
9. Touch Save.
10. Touch Manual Settings.
11. Touch Default Gateway.
12. Touch the Default Gateway text box.
13. Use the touchscreen keyboard to type the default gateway.
14. Touch OK.
15. Touch Save.
Configure TCP/IPv6 parameters
For information about configuring the device for a TCP/IPv6 network, see the HP Jetdirect Print Server
Administrator's Guide.
Disable network protocols (optional)
By factory default, all supported network protocols are enabled. Disabling unused protocols has the
following benefits:
It decreases device-generated network traffic.
●
It prevents unauthorized users from printing to the device.
●
It provides only pertinent information on the configuration page.
●
It allows the device control panel to display protocol-specific error and warning messages.
●
Disable IPX/SPX
NOTE: Do not disable this protocol in Windows-based systems that print to the printer through IPX/
SPX.
1. Scroll to and touch Administration.
2. Scroll to and touch Initial Setup.
3. Touch Networking and I/O.
4. Touch Embedded Jetdirect.
5. Touch IPX/SPX.
6. Touch Enable.
7. Touch Off.
8. Touch Save.
ENWW Network configuration 61

Disable AppleTalk
1. Scroll to and touch Administration.
2. Scroll to and touch Initial Setup.
3. Touch Networking and I/O.
4. Touch Embedded Jetdirect.
5. Touch AppleTalk.
6. Touch Enable.
7. Touch Off.
8. Touch Save.
Disable DLC/LLC
1. Scroll to and touch Administration.
2. Scroll to and touch Initial Setup.
3. Touch Networking and I/O.
4. Touch Embedded Jetdirect.
5. Touch DLC/LLC.
6. Touch Enable.
7. Touch Off.
8. Touch Save.
HP Jetdirect EIO print servers
HP Jetdirect print servers (network cards) can be installed in the EIO slot. These cards support multiple
network protocols and operating systems. HP Jetdirect print servers facilitate network management by
allowing you to connect a printer directly to your network at any location. HP Jetdirect print servers also
support the Simple Network Management Protocol (SNMP), which provides remote printer management
and troubleshooting through the HP Web Jetadmin software.
NOTE: Configure the card through the control panel, the printer installation software, or HP Web
Jetadmin. Refer to the HP Jetdirect print server documentation for more information.
62 Chapter 3 Input/output (I/O) ENWW

4 Media and trays
This chapter contains the following sections:
General media specifications
●
General guidelines for media
●
Media considerations
●
Select print media
●
Printing and paper-storage environment
●
Load media
●
Control print jobs
●
Select output bins
●
ENWW 63

General media specifications
For complete paper specifications for all HP LaserJet devices, see the HP LaserJet Printer Family Print
Media Guide (available at
Category Specifications
Acid content 5.5 pH to 8.0 pH
Caliper 0.094 to 0.18 mm (3.0 to 7.0 mils)
Curl in ream Flat within 5 mm (0.02 in)
Cut edge conditions Cut with sharp blades with no visible fray.
www.hp.com/support/ljpaperguide) .
Fusing compatibility Must not scorch, melt, offset, or release hazardous emissions when heated to 200°
Grain Long grain
Moisture content 4% to 6% by weight
Smoothness 100 to 250 Sheffield
C (392°F) for 0.1 second.
64 Chapter 4 Media and trays ENWW

General guidelines for media
Before purchasing any paper or specialized forms in quantity, verify that your paper supplier has
obtained and understands the print-media requirements that are specified in the HP LaserJet Printer
Family Print Media Guide.
To download a copy of the HP LaserJet Printer Family Print Media Guide, go to
ljpaperguide.
It is possible that paper could meet all of the guidelines in this chapter or the HP LaserJet Printer Family
Print Media Guide and still not print satisfactorily. This can result from abnormal characteristics of the
printing environment or other variables over which HP has no control (for example, extremes in
temperature and humidity).
Hewlett-Packard Company recommends testing any paper before buying it in large quantities.
CAUTION: Using paper that does not conform to the specifications listed here or in the print media
guide can cause problems that require service. This service is not covered by the Hewlett-Packard
warranty or service agreements.
Paper to avoid
The product can handle many types of paper. Using paper that does not meet specifications will cause
lower print quality and increase the chance of jams.
Do not use paper that is too rough. Use paper with a tested smoothness rating of 100–250 Sheffield.
●
Do not use paper, other than standard 3-hole punched paper, that contains cutouts or perforations.
●
Do not use multipart forms.
●
Do not use paper that has already been printed on, or that has been fed through a photocopier.
●
www.hp.com/support/
Do not use paper that contains a watermark if you are printing solid patterns.
●
Do not use heavily embossed or raised-letterhead papers.
●
Do not use papers that have heavily textured surfaces.
●
Do not use offset powders or other materials that prevent printed forms from sticking together.
●
Do not use paper that has a colored coating that was added after the paper was produced.
●
Paper that can damage the device
In rare circumstances, paper can damage the device. The following paper must be avoided to prevent
possible damage to the device:
Do not use paper with staples attached.
●
Do not use transparencies, labels, or photo or glossy paper designed for Inkjet printers or other
●
low temperature printers. Use only media that is specified for use with HP LaserJet printers.
ENWW General guidelines for media 65

Do not use any media that produces hazardous emissions, or that melts, offsets, or discolors when
●
exposed to the temperature of the fuser.
Do not use paper that is embossed or coated, or any media that is not designed to withstand the
●
fusing temperature of the device. Do not use letterhead paper or preprinted forms that are made
with dyes or inks that cannot withstand the heat of the fuser.
To order HP LaserJet printing supplies, see
General media specifications
For complete paper specifications for all HP LaserJet devices, see the HP LaserJet Printer Family Print
Media Guide (available at
Category Specifications
Acid content 5.5 pH to 8.0 pH
Caliper 0.094 to 0.18 mm (3.0 to 7.0 mils)
Curl in ream Flat within 5 mm (0.02 in)
Cut edge conditions Cut with sharp blades with no visible fray.
Fusing compatibility Must not scorch, melt, offset, or release hazardous emissions when heated to 200°
Grain Long grain
Moisture content 4% to 6% by weight
Smoothness 100 to 250 Sheffield
www.hp.com/support/ljpaperguide) .
Order parts, accessories, and supplies on page 228.
C (392°F) for 0.1 second.
66 Chapter 4 Media and trays ENWW

Media considerations
Envelopes
Envelope construction is critical. Envelope fold lines can vary considerably, not only between
manufacturers, but also within a box from the same manufacturer. Successful printing on envelopes
depends upon the quality of the envelopes. When selecting envelopes, consider the following
components:
Weight: The weight of the envelope paper should not exceed 105g/m
●
occur.
Construction: Prior to printing, envelopes should lie flat with less than 6mm (0.25 inch) curl, and
●
should not contain air.
Condition: Envelopes should not be wrinkled, nicked, or otherwise damaged.
●
Temperature: You should use envelopes that are compatible with the heat and pressure of the
●
printer.
Size: You should use only envelopes within the following size ranges.
●
Minimum: 76 x 127mm (3 x 5 inches)
◦
Maximum: 216 x 356mm (8.5 x 14 inches)
◦
NOTE: Use only tray 1 or the optional envelope feeder to print envelopes. You might experience some
jams when using any media with a length less than 178mm (7 inches). This might be caused by paper
that has been affected by environmental conditions. For optimum performance, make sure you are
storing and handling the paper correctly. Also, choose envelopes in the printer driver (see
printer drivers on page 11).
Envelopes with double side seams
Double side-seam construction has vertical seams at both ends of the envelope rather than diagonal
seams. This style might be more likely to wrinkle. Be sure the seam extends all the way to the corner
of the envelope as illustrated below.
2
(28lb) or jamming might
Supported
ENWW Media considerations 67
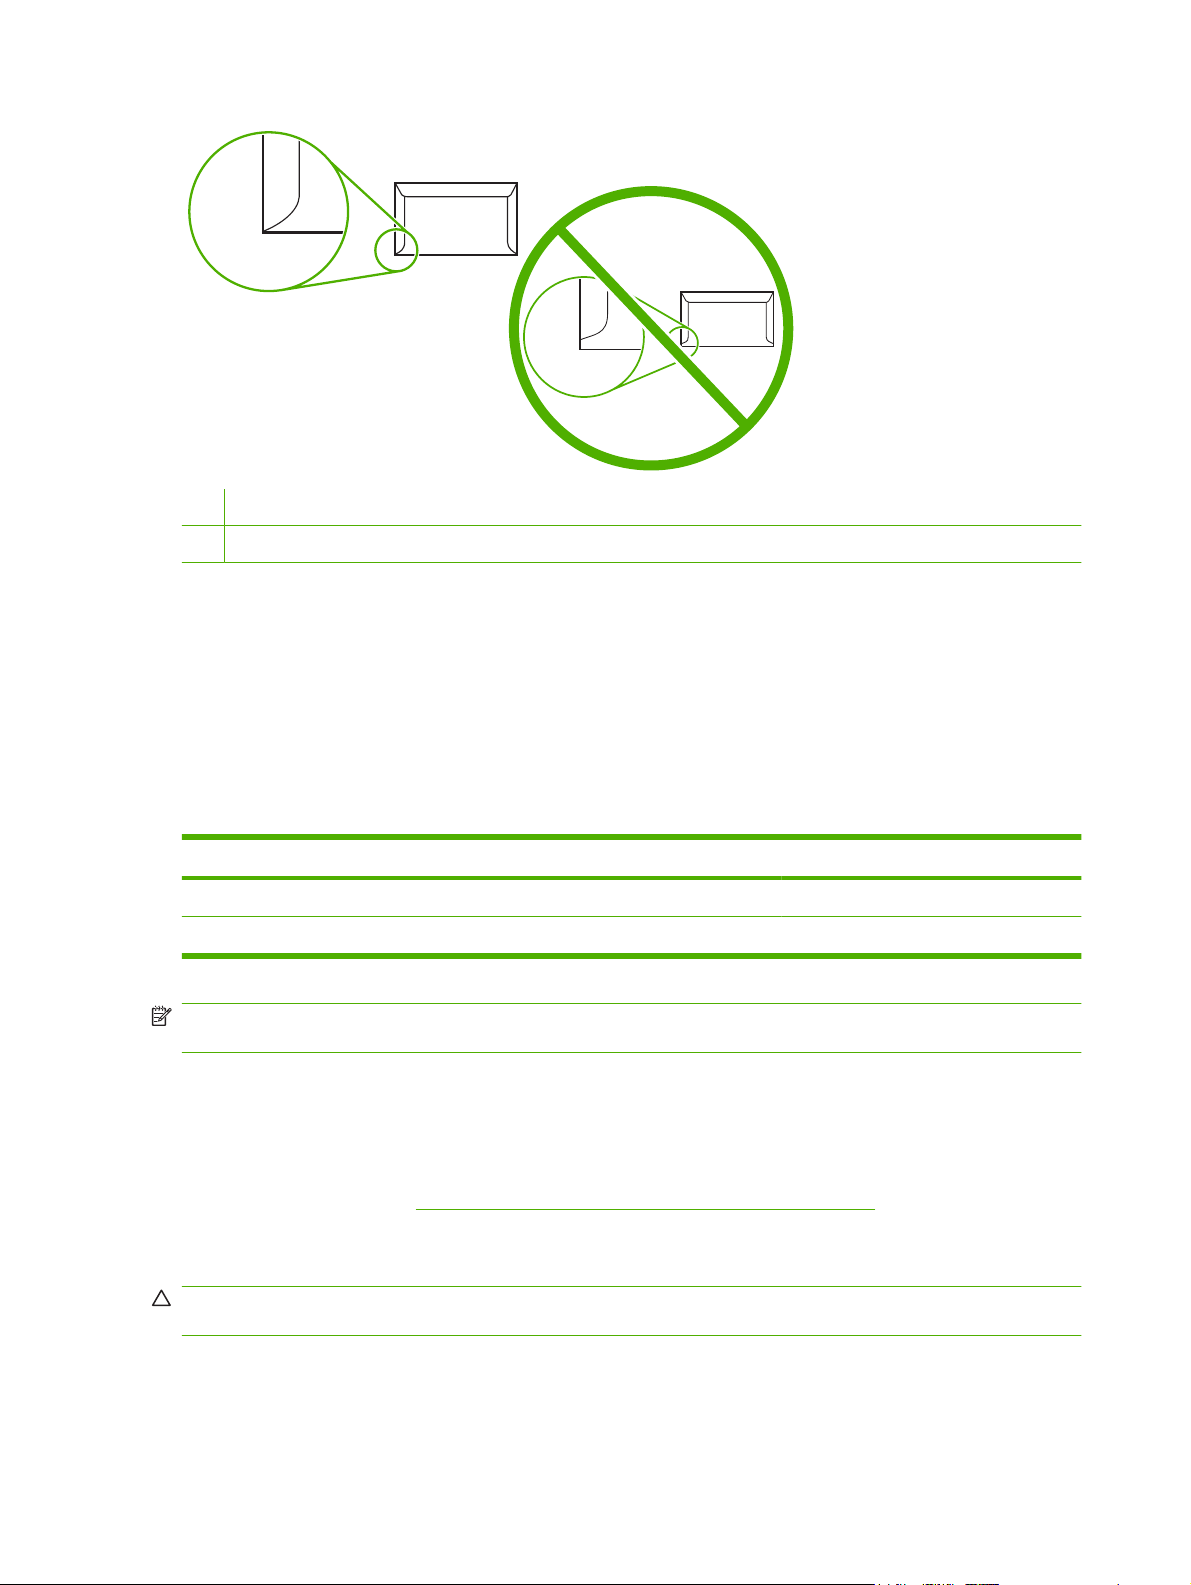
1 Acceptable envelope construction
2 Unacceptable envelope construction
Envelopes with adhesive strips or flaps
Envelopes with a peel-off adhesive strip or with more than one flap that folds over to seal must use
adhesives compatible with the heat and pressure in the printer. The extra flaps and strips might cause
wrinkling, creasing, or even jams and might even damage the fuser.
Envelope margins
The following gives typical address margins for a commercial #10 or DL envelope.
Type of address Top margin Left margin
Return address 15mm (0.6 inch) 15mm (0.6 inch)
Delivery address 51mm (2.0 inches) 89mm (3.5 inches)
NOTE: For the best print quality, position margins no closer than 15mm (0.6 inch) from the edges of
the envelope. Avoid printing over the area where the envelope's seams meet.
Envelope storage
Proper storage of envelopes helps contribute to print quality. Envelopes should be stored flat. If air is
trapped in an envelope, creating an air bubble, then the envelope might wrinkle during printing.
For more information, see
Printing and paper-storage environment on page 77.
Labels
CAUTION: To avoid damaging the MFP, use only labels recommended for laser printers. Never print
on the same sheet of labels more than once or print on a partial sheet of labels.
68 Chapter 4 Media and trays ENWW

Label construction
When selecting labels, consider the quality of each component:
Adhesives: The adhesive material should be stable at 200°C (392°F), the printer's fusing
●
temperature.
Arrangement: Only use labels with no exposed backing between them. Labels can peel off sheets
●
with spaces between the labels, causing serious jams.
Curl: Prior to printing, labels must lie flat with no more than 13mm (0.5 inch) of curl in any direction.
●
Condition: Do not use labels with wrinkles, bubbles, or other indications of separation.
●
NOTE: Choose labels in the printer driver (see Supported printer drivers on page 11).
Transparencies
Transparencies used in the printer must be able to withstand 200°C (392°F), the printer's fusing
temperature.
CAUTION: To avoid damaging the MFP, use only transparencies recommended for use in HP
LaserJet printers, such as HP-brand transparencies.
NOTE: Choose transparencies in the printer driver (see Supported printer drivers on page 11).
Card stock and heavy media
You can print many types of card stock from the paper input tray, including index cards and postcards.
Some card stock performs better than others because its construction is better suited for feeding through
a laser printer.
For optimum printer performance, do not use paper heavier than 157g/m
might cause misfeeds, stacking problems, paper jams, poor toner fusing, poor print quality, or excessive
mechanical wear.
NOTE: You might be able to print on heavier paper if you do not fill the input tray to capacity and if
you use paper with a smoothness rating of 100-180 Sheffield.
Card stock construction
Smoothness: 135-157g/m
●
Sheffield. 60-135g/m
Construction: Card stock should lie flat with less than 5mm (0.2in.) of curl.
●
Condition: Make sure that the card stock is not wrinkled, nicked, or otherwise damaged.
●
Sizes: Only use card stock within the following size ranges:
●
Minimum: 76 x 127mm (3 x 5in.)
◦
Maximum: 216 x 356mm (8.5 x 14.0in.)
◦
2
(16-36lb) card stock should have a smoothness rating of 100-250 Sheffield.
2
(42lb). Paper that is too heavy
2
(36-42lb) card stock should have a smoothness rating of 100-180
Card stock guidelines
Set margins at least 2mm (0.08in.) away from the edges.
ENWW Media considerations 69

Letterhead and preprinted forms
Many manufacturers now offer premium paper advertised as laser-compatible or laser-guaranteed.
Some of the rougher surface finishes, such as cockle, laid, or linen, might require the special fuser
modes that are available on some printer models in order to achieve adequate toner adhesion.
NOTE: Some page-to-page variation is normal when printing with laser printers. This variation cannot
be observed when printing on plain paper. However, this variation is obvious when printing on preprinted
forms because the lines and boxes are already placed on the page.
To avoid problems when using preprinted forms, embossed paper, and letterhead, observe the following
guidelines:
Avoid using low-temperature inks (the kind used with some types of thermography).
●
Use preprinted forms and letterhead paper that have been printed by offset lithography or
●
engraving.
Use forms that have been created with heat-resistant inks that will not melt, vaporize, or release
●
undesirable emissions when heated to 200°C (392°F) for 0.1 second. Typically, oxidation-set or
oil-based inks meet this requirement.
When the form is preprinted, be careful not to change the moisture content of the paper, and do
●
not use materials that change the paper's electrical or handling properties. Seal the forms in
moisture-proof wrap to prevent moisture changes during storage.
Avoid processing preprinted forms that have a finish or coating.
●
Avoid using heavily embossed or raised-letterhead papers.
●
Avoid papers that have heavily textured surfaces.
●
Avoid using offset powders or other materials that prevent printed forms from sticking together.
●
Select the correct fuser mode
The device automatically adjusts the fuser mode based on the media type to which the tray is set. For
example, heavy paper, such as card stock, might need a higher fuser-mode setting in order to make the
toner adhere better to the page, but transparencies need a lower fuser-mode setting to avoid damage
to the device. The default setting generally provides the best performance for most print-media types.
The fuser mode can be changed only if the media type has been set for the tray that you are using. See
Control print jobs on page 88. After the media type has been set for the tray, then the fuser mode for
that type can be changed on the Administration menu in the Print Quality submenu at the device control
panel. See
NOTE: Using the High 1 or High 2 fuser mode setting improves the ability of the toner to adhere to
paper, but it might cause other problems, such as excessive curl. The device might print at a slower
speed when the fuser mode is set to High 1 or High 2. The table below describes the ideal fuser mode
setting for supported media types.
Media type Fuser mode setting
Plain Normal
Print Quality menu on page 48.
Preprinted Normal
Letterhead Normal
70 Chapter 4 Media and trays ENWW

Media type Fuser mode setting
Transparency Low 2
Prepunched Normal
Labels Normal
Bond Normal
Recycled Normal
Color Normal
Light Low 1
Card stock Normal
Rough High 1
Envelope Normal
To reset the fuser modes to the default settings, touch the Administration menu at the device control
panel. Touch Print Quality, touch Fuser Modes, and then touch Restore Modes.
ENWW Media considerations 71

Select print media
Table 4-1 Supported types of media
Type of media Tray 1 Trays 2, 3,
4, and 5
Optional duplexer Optional
envelope feeder
3-bin mailbox or
stacker part of
Stapler part of
stapler/stacker
stapler/stacker
Plain X X X X X X
Preprinted X X X X X X
Letterhead X X X X X X
Transparency X X X
Prepunched X X X X X
Labels X X X X X
Bond X X X X X X
Recycled X X X X X X
Color X X X X X X
Cardstock X X X 1
2
Rough X X X X X X
Envelope X X X
1
Face-up delivery only.
2
If a 3-bin mailbox is installed, select the bottom bin when printing on cardstock. Media weights that are 200g/m2 or greater are
1
supported only in the bottom bin.
Table 4-2 Tray 1 supported sizes and weights
Size Dimensions
Letter 216 x 279mm (8.5 x 11 inches)
A4
210 x 297mm (8.3 x 11.7 inches)
Legal 216 x 356mm (8.5 x 14 inches)
Executive 184 x 267mm (7.3 x 10.5 inches)
Statement 140 x 216mm (5.5 x 8.5 inches)
8.5 x 13 216 x 330mm (8.5 x 13 inches)
A5 148 x 210mm (5.8 x 8.3 inches)
B5 (JIS) 182 x 257mm (7.2 x 10.1 inches)
Executive (JIS) 216 x 330mm (8.5 x 13 inches)
D Postcard (JIS) 148 x 200mm (5.8 x 7.9 inches)
16K 197 x 273mm (7.75 x 10.75 inches)
3
Custom
Minimum: 76 x 127mm (3 x 5 inches)
Maximum: 216 x 356mm (8.5 x 14
inches)
1
Weight Capacity
2
60 to 200g/m2 (16 to 53lb) 100 sheets of 75g/m2 (20lb)
paper
72 Chapter 4 Media and trays ENWW

Table 4-2 Tray 1 supported sizes and weights (continued)
Size Dimensions
1
Weight Capacity
2
Envelope Commercial #10 105 x 241mm (4.1 x 9.5 inches)
EnvelopeDL ISO
110 x 220mm (4.3 x 8.7 inches)
EnvelopeC5 ISO 162 x 229mm (6.4 x 9.0 inches)
EnvelopeB5 ISO 176 x 250mm (6.9 x 9.8 inches)
EnvelopeMonarch #7-3/4 98 x 191mm (3.9 x 7.5 inches)
1
The MFP supports a wide range of sizes. Check the MFP software for supported sizes.
2
Capacity can vary depending on paper weight and thickness, as well as environmental conditions.
3
To print on custom-size paper, see Load small sizes, custom sizes, or heavy paper on page 87.
Table 4-3 Trays 2, 3, 4, and 5 supported sizes and weights
Size Dimensions
Letter 216 x 279mm (8.5 x 11 inches)
A4
210 x 297mm (8.3 x 11.7 inches)
Executive 184 x 267mm (7.3 x 10.5 inches)
Legal 216 x 356mm (8.5 x 14 inches)
B5 (JIS) 182 x 257mm (7.2 x 10.1 inches)
A5 148 x 210mm (5.8 x 8.3 inches)
1
75 to 105g/m2 (20 to 28lb)
Weight Capacity
10 envelopes
2
60 to 120g/m2 (16 to 32lb) 500 sheets of 75g/m2 (20lb)
paper
8.5 x 13 216 x 330mm (8.5 x 13 inches)
Executive (JIS) 216 x 330mm (8.5 x 13 inches)
16K 197 x 273mm (7.75 x 10.75 inches)
3
Custom
Minimum: 148 x 210mm (5.8 x 8.3
inches)
Maximum: 216 x 356mm (8.5 x 14
inches)
1
The MFP supports a wide range of sizes. Check the MFP software for supported sizes.
2
Capacity can vary depending on paper weight and thickness, as well as environmental conditions.
3
To print on custom-size paper, see Load small sizes, custom sizes, or heavy paper on page 87.
ENWW Select print media 73

Table 4-4 Optional duplexer supported sizes and weights
Size Dimensions Weight
Letter 216 x 279mm (8.5 x 11 inches)
A4
Executive 184 x 267mm (7.3 x 10.5 inches)
Legal 216 x 356mm (8.5 x 14 inches)
B5 (JIS) 182 x 257mm (7.2 x 10.1 inches)
A5 148 x 210 mm (5.8 x 8.3 inches)
8.5 x 13 216 x 330mm (8.5 x 13 inches)
Executive (JIS) 216 x 330mm (8.5 x 13 inches)
16K 197 x 273mm (7.75 x 10.75 inches)
210 x 297mm (8.3 x 11.7 inches)
60 to 120g/m2 (16 to 32lb)
Table 4-5 Optional envelope feeder supported sizes and weights
Size Dimensions Weight Capacity
Monarch #7-3/4 98 x 191mm (3.9 x 7.5 inches)
Commercial#10
DL ISO 110 x 220mm (4.3 x 8.7 inches)
C5 ISO 162 x 229mm (6.4 x 9.0 inches)
105 x 241mm (4.1 x 9.5 inches)
75 to 105g/m2 (20 to 28lb)
75 envelopes
B5 ISO 176 x 250mm (6.9 x 9.8 inches)
74 Chapter 4 Media and trays ENWW

Table 4-6 Optional 3-bin mailbox or stacker part of the stapler/stacker supported sizes and weights
Size Dimensions
1
Weight Capacity
2
Letter 216 x 279mm (8.5 x 11 inches) For the stacker on the stapler/
stacker or the lower bin on the 3-
A4
Executive 184 x 267mm (7.3 x 10.5 inches)
Legal 216 x 356mm (8.5 x 14 inches)
B5 (JIS) 182 x 257mm (7.2 x 10.1 inches)
210 x 297mm (8.3 x 11.7 inches)
bin mailbox: 500 sheets of 75g/
2
m
(20lb) paper
For the top two bins on the 3-bin
mailbox: each can hold 100
sheets of 75g/m
2
(20lb) paper.
A5 148 x 210mm (5.8 x 8.3 inches)
Statement 140 x 216mm (5.5 x 8.5 inches)
8.5 x 13 216 x 330mm (8.5 x 13 inches)
Executive(JIS) 216 x 330mm (8.5 x 13 inches)
DPostcard(JIS) 148 x 200mm (5.8 x 7.9 inches)
16K 197 x 273mm (7.75 x 10.75 inches)
Envelope #10
Envelope Monarch #7-3/4
Envelope C5 ISO
Envelope DL ISO
Envelope B5 ISO
Custom
4
4
4
4
4
3
105 x 241mm (4.1 x 9.5 inches)
98 x 191mm (3.9 x 7.5 inches)
162 x 229mm (6.4 x 9.0 inches)
110 x 220mm (4.3 x 8.7 inches)
176 x 250mm (6.7 x 9.8mm)
Minimum: 76 x 127mm (3 x 5 inches)
Maximum: 216 x 356mm (8.5 x 14
inches)
1
The MFP supports a wide range of sizes. Check the MFP software for supported sizes.
2
Capacity can vary depending on paper weight and thickness, as well as environmental conditions.
3
To print on custom-size paper, see Load small sizes, custom sizes, or heavy paper on page 87.
4
Face-up delivery only.
Table 4-7 Stapler part of the optional stapler/stacker supported sizes and weights
Size Dimensions Weight Capacity
2
Letter 216 x 279mm (8.5 x 11 inches)
A4
210 x 297mm (8.3 x 11.7 inches)
Legal 216 x 356mm (8.5 x 14 inches)
8.5 x 13 216 x 330mm (8.5 x 13 inches)
Executive(JIS) 216 x 330mm (8.5 x 13 inches)
For plain media: 60 to 120g/m
(16 to 32lb)
For thick media: 128 to 199g/
2
(34 to 53lb)
m
For plain media: 30 sheets of 75g/
2
m
(20lb) paper
For glossy media: 20 sheets
For thick media: the stack height
must not exceed 7mm (0.27 inch)
ENWW Select print media 75

Table 4-8 ADF supported sizes and weights
Size Dimensions Weight Capacity
Letter 216 x 279mm (8.5 x 11 inches)
A4
A5 148 x 210mm (5.8 x 8.3 inches)
Legal 216 x 356mm (8.5 x 14 inches)
210 x 297mm (8.3 x 11.7 inches)
60 to 120g/m2 (16 to 32lb) 50 sheets of 75g/m2 (20lb) paper
76 Chapter 4 Media and trays ENWW

Printing and paper-storage environment
Ideally, the printing and paper-storage environment should be at or near room temperature, and not too
dry or too humid. Remember paper is hygroscopic; it absorbs and loses moisture rapidly.
Heat works with humidity to damage paper. Heat causes the moisture in paper to evaporate, while cold
causes it to condense on the sheets. Heating systems and air conditioners remove most of the humidity
from a room. As paper is opened and used, it loses moisture, causing streaks and smudging. Humid
weather or water coolers can cause the humidity to increase in a room. As paper is opened and used
it absorbs any excess moisture, causing light print and dropouts. Also, as paper loses and gains moisture
it can distort. This can cause jams.
As a result, paper storage and handling are as important as the paper-making process itself. Paper
storage environmental conditions directly affect the feed operation.
Care should be taken not to purchase more paper than can be easily used in a short time (about 3
months). Paper stored for long periods might experience heat and moisture extremes, which can cause
damage. Planning is important to prevent damage to a large supply of paper.
Unopened paper in sealed reams can remain stable for several months before use. Opened packages
of paper have more potential for environmental damage, especially if they are not wrapped with a
moisture-proof barrier.
The paper-storage environment should be properly maintained to ensure optimum product performance.
The required condition is 20° to 24°C (68° to 75°F), with a relative humidity of 45% to 55%. The following
guidelines should be helpful when evaluating the paper's storage environment:
Paper should be stored at or near room temperature.
●
The air should not be too dry or too humid (due to the hygroscopic properties of paper).
●
The best way to store an opened ream of paper is to rewrap it tightly in its moisture-proof wrapping.
●
If the product environment is subject to extremes, unwrap only the amount of paper to be used
during the day's operation to prevent unwanted moisture changes.
Proper storage of envelopes helps contribute to print quality. Envelopes should be stored flat. If air
●
is trapped in an envelope, creating an air bubble, then the envelope might wrinkle during
printing.
ENWW Printing and paper-storage environment 77

Load media
This section contains information about loading standard- and custom-size media into the input trays.
CAUTION: To avoid a jam, never add or remove paper from a tray while printing or copying from that
tray. To avoid damaging the MFP, print labels and envelopes from tray 1 only. Print on only one side of
labels, envelopes, and transparencies.
Load the flatbed scanner
Place the document face-down on the scanner glass.
Load the ADF
Load the document face-up in the ADF.
Load tray 1
Tray 1 holds up to 100 sheets of paper or 10 envelopes. For more information about supported media,
see
Select print media on page 72.
Use the following procedure if tray 1 is loaded continually with the same type of media, and the media
is not usually removed from tray 1 between print jobs. The following procedure can also increase the
MFP performance when printing from tray 1.
CAUTION: To avoid a jam, never add or remove media from a tray while printing from that tray.
1. Touch Copy.
2. Touch Paper Selection.
3. Touch Tray 1 Any Size.
4. Touch the correct media size.
NOTE: If you select Custom as the media size, also select the unit of measure and the X and Y
dimensions.
5. Touch OK.
6. Touch OK again.
7. Open tray 1.
8. Load paper according to size and finishing options. See Select print media on page 72 for
information about loading preprinted, letterhead, and prepunched paper.
CAUTION: To avoid jams, print sheets of labels one sheet at a time.
78 Chapter 4 Media and trays ENWW

9. Adjust the media guides so they lightly touch the media stack, but do not bend the media.
10. Make sure the media fits under the tabs on the guides and not above the load level indicators.
NOTE: If printing on long media also pull out the tray extension until it stops.
11. Touch Start Copy.
Load trays 2, 3, 4 and 5
Trays 2 , 3, 4, and 5 hold up to 500 sheets of standard media. For information about paper specifications,
see
Select print media on page 72.
The following are the detectable standard sizes, which are marked inside the tray:
A4
●
Letter
●
Legal
●
Executive
●
B5 (JIS)
●
A5
●
The following are the undetectable standard sizes:
16K
●
Executive (JIS)
●
8.5 x 13 (216 x 330 mm).
●
When loading undetectable sizes, you need to manually set the size at the control panel. For information
about loading custom-size media, see
CAUTION: To avoid a jam, never add or remove paper from a tray while printing from that tray.
Load custom-size media in trays 2, 3, 4, and 5 on page 81.
ENWW Load media 79

Load standard-size media in trays 2, 3, 4, and 5
NOTE: Do not load envelopes in trays 2, 3, 4, or 5. Use only tray 1 for printing on envelopes.
1. Open the tray until it stops.
2. Load the media into the tray.
NOTE: See Load letterhead, prepunched, or preprinted paper on page 85for information about
loading preprinted, letterhead, and prepunched paper.
3. Adjust the media-length guide by pressing the tab on the guide and moving it until it touches the
media stack.
4. Adjust the media-width guide by pressing the tab on the guide and moving it until it touches the
media stack.
80 Chapter 4 Media and trays ENWW

5. Close the tray.
NOTE: Depending on the size that you selected, the MFP might prompt you to move the media guides.
Follow the instructions on the control panel.
Load custom-size media in trays 2, 3, 4, and 5
1. Open the tray until it stops.
2. Press the tab on the left media guide and slide the guide all the way out.
3. Press the tab on the front media guide and slide the guide all the way out.
ENWW Load media 81
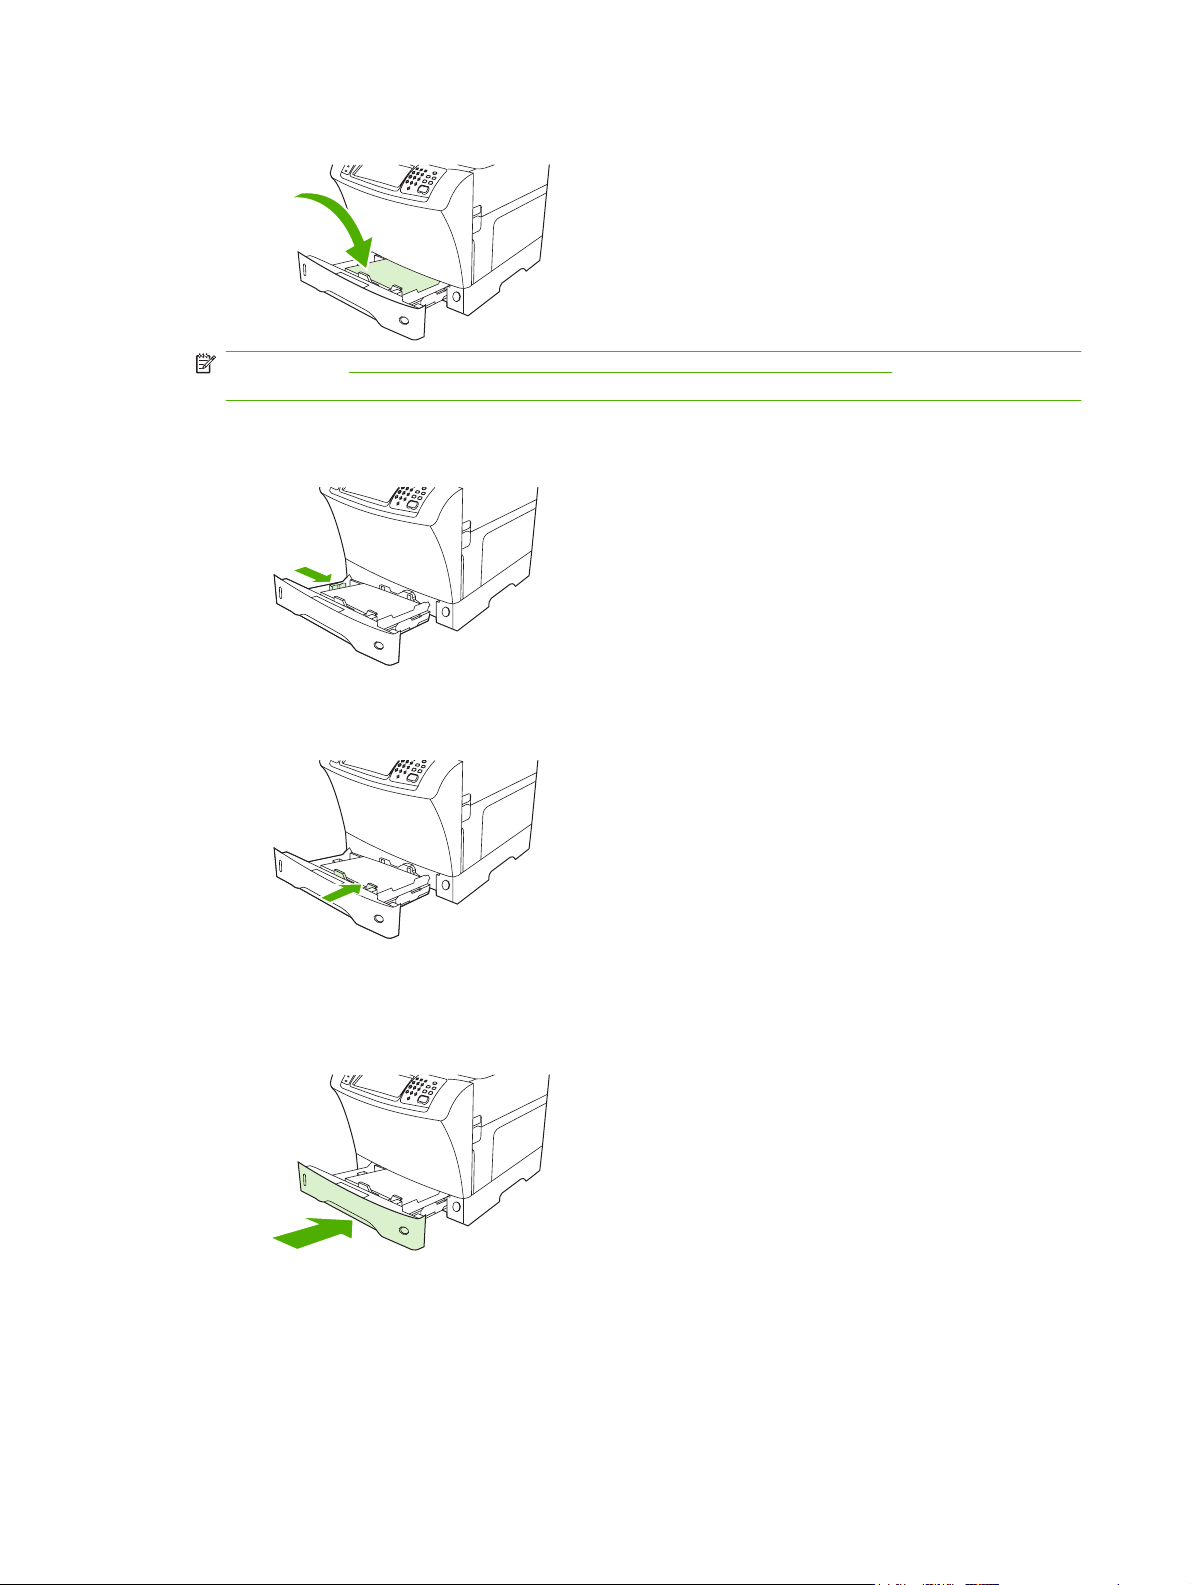
4. Load the media into the tray.
NOTE: See Load letterhead, prepunched, or preprinted paper on page 85for information about
loading preprinted, letterhead, and prepunched paper.
5. Adjust the left media guide by pressing the tab on the guide and sliding the guide until it gently
touches the media stack
6. Adjust the front media guide by pressing the tab on the guide and sliding the guide until it gently
touches the media stack.
7. Look at the package for the ream of paper. Note the value of the width (X dimension) and the length
(Y dimension). You will need this information for a later step.
8. Close the tray.
9. If the size that appears on the control panel is Custom, then the tray size is set to ANY
CUSTOM. The tray will match any custom-size print job, even if the print-job dimensions are
different from the dimensions of the media that is loaded in the tray. If you prefer, you can specify
the exact dimensions of the custom-size media that is loaded in the tray. When you specify exact
dimensions, the dimensions appear as the size, rather than Custom.
82 Chapter 4 Media and trays ENWW

Touch Custom. The UNIT OF MEASURE menu appears.
NOTE: The MFP might prompt you to move the media guides. Follow the instructions on the
control panel.
10. Touch MILLIMETERS or touch INCHES.
11. Use the numeric keypad to select the X dimension (short edge).
12. Touch OK.
13. Use the numeric keypad to select the Y dimension (long edge).
14. Touch OK. SETTING SAVED appears on the control-panel display for a moment. The tray size
then appears.
15. Touch EXIT to accept the settings. The tray is ready to use.
Load special media
Load envelopes
You can print on envelopes from tray 1 or the optional envelope feeder. Tray 1 holds up to 10 envelopes
and supports standard or custom sizes. The optional envelope feeder holds up to 75 envelopes and
supports only standard envelope sizes.
For printing on any size of envelope, make sure to set the margins in your program at least 15mm (0.6
inch) from the edge of the envelope.
Printing performance depends on the construction of the envelope. Always test a few sample envelopes
before purchasing a large quantity. For envelope specifications, see
WARNING! Never use envelopes that contain coated linings, exposed self-stick adhesives, or other
synthetic materials. These items can emit noxious fumes.
CAUTION: Envelopes that have clasps, snaps, windows, coated linings, exposed self-stick adhesives,
or other synthetic materials can severely damage the MFP. To avoid jamming and possible MFP
damage, never try to print on both sides of an envelope. Before you load envelopes, make sure that
they are flat and are not damaged or stuck together. Do not use envelopes that have pressure-sensitive
adhesive.
NOTE: The MFP prints at a slower speed when printing on envelopes.
Many types of envelopes can be printed on from tray 1. Up to 10 can be stacked in the tray. See Select
print media on page 72 for specifications.
Select print media on page 72.
ENWW Load media 83
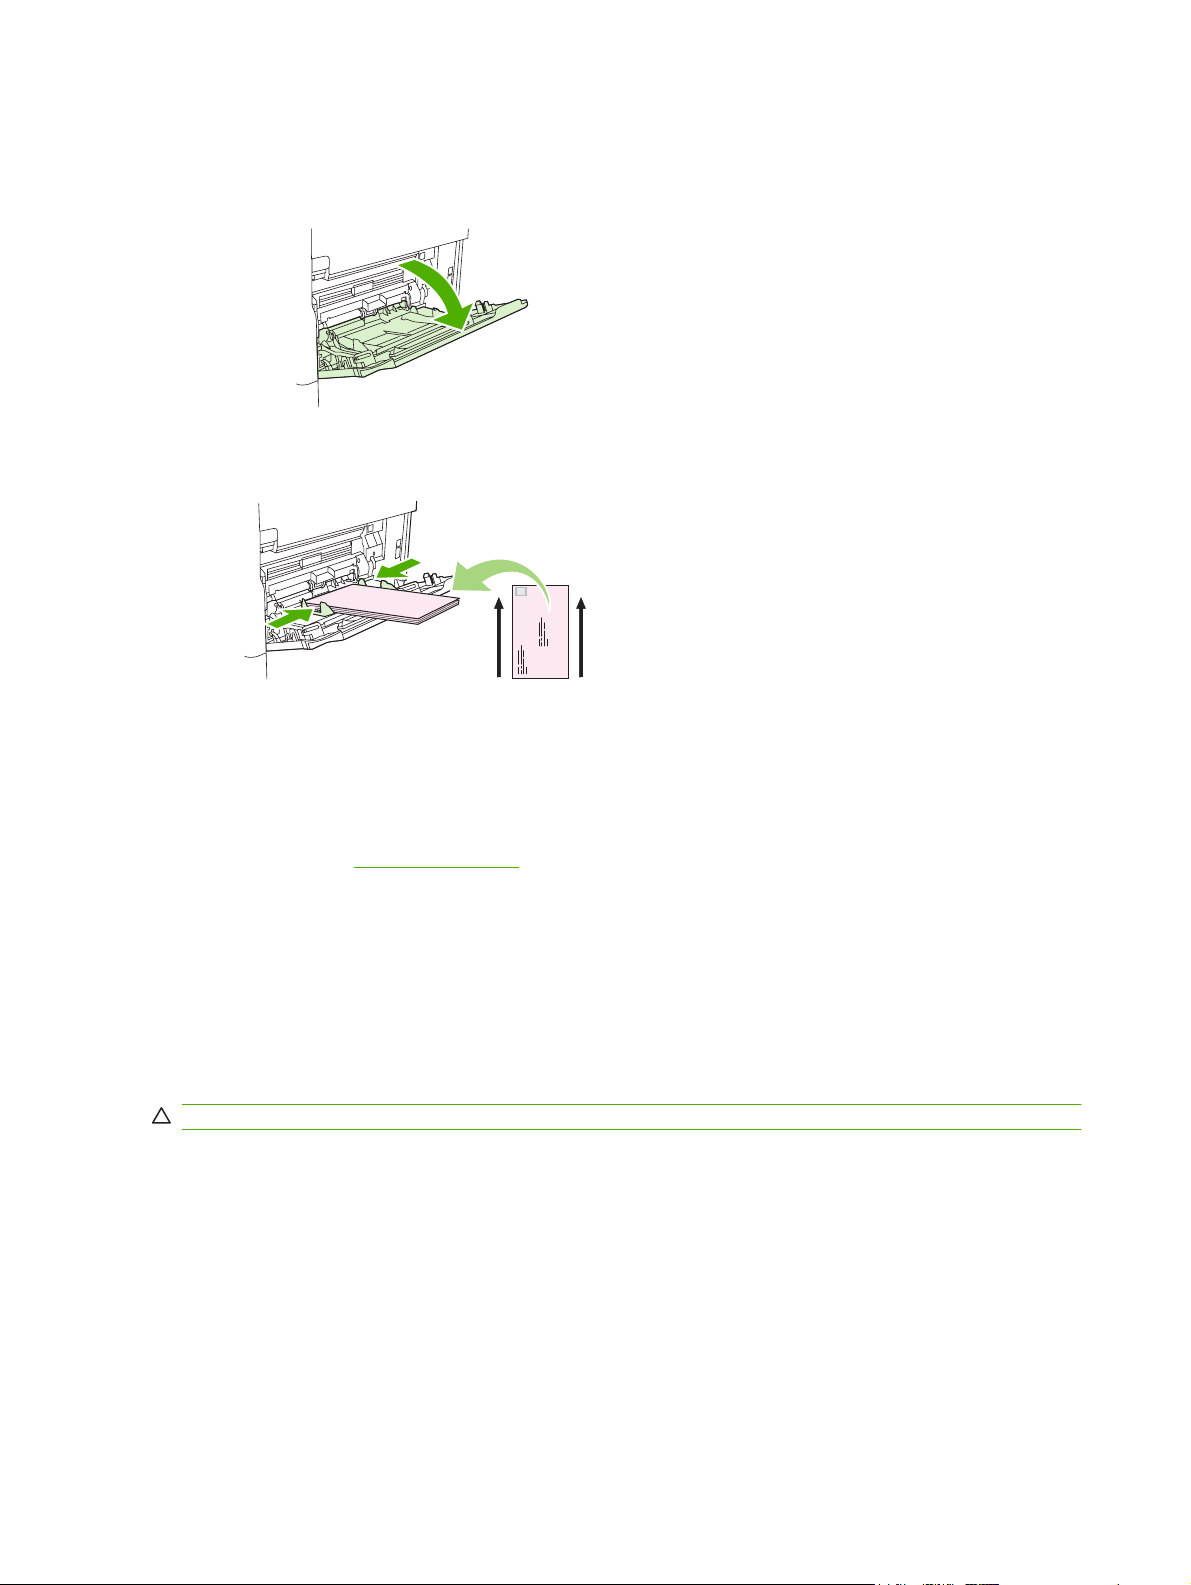
Load envelopes in tray 1
1. Open tray 1, but do not pull out the extension. Most envelopes feed best without the extension.
However, oversize envelopes might need the extension.
2. Load up to 10 envelopes in the center of tray 1 with the front side facing up, and the postage-end
toward the MFP. Slide the envelopes into the MFP as far as they will go without forcing them.
3. Adjust the guides to touch the envelope stack without bending the envelopes. Make sure that the
Load labels
Use only labels that are recommended for use in laser printers. Make sure that labels meet the correct
specifications. See
Follow these guidelines when printing on labels:
●
●
Do not load or print on labels in the following ways:
CAUTION: Failure to follow these instructions can damage the MFP.
●
●
●
envelopes fit under the tabs and maximum-height indicators on the guides.
Labels on page 68.
Print on a stack of up to 50 label sheets from tray 1 or a stack of up to 100 label sheets from other
trays.
Load labels in tray 1 with the front side facing up, and the top, short edge toward the MFP. For
other trays, load media with the front side facing down, and the top edge toward the right.
Do not load the trays to maximum capacity, because labels are heavier than paper.
Do not use labels that are separating from the backing sheet, wrinkled, or damaged in any way.
Do not use labels that have the backing sheet exposed. (Labels must cover the entire backing
sheet, leaving no exposed spaces.)
Do not feed a sheet of labels through the MFP more than once. The adhesive backing is designed
●
for only one pass through the MFP.
Do not print on both sides of labels.
●
Do not print on sheets from which labels have been removed.
●
84 Chapter 4 Media and trays ENWW

Load transparencies
Use only transparencies that are recommended for use in laser printers. For transparency specifications,
see
Transparencies on page 69.
At the control panel, scroll to and touch Administration, scroll to and touch Print Quality, touch
●
Fuser Modes, touch Transparency, and touch Low2.
CAUTION: Failure to set the fuser mode to Low2 can permanently damage the MFP and fuser.
In the printer driver, set the paper type to Transparency.
●
At the control panel, touch Copy, touch Paper Selection, select the desired tray, and touch
●
Transparency.
Load transparencies face up in tray 1 with the top toward the MFP. Up to 50 transparencies can
●
be loaded in tray 1.
A stack of up to 100 transparencies can be printed from tray 2 and the optional trays (although
●
stacking more than 50 at a time is not recommended).
Because transparencies are heavier than paper, do not load trays to maximum capacity.
●
Load transparencies in tray 2 or the optional trays with the side to be printed on facing down, and
●
the top, short edge toward the right.
To prevent transparencies from becoming too hot or from sticking together, remove each
●
transparency from the output bin before printing another.
Print on only one side of a transparency.
●
Place transparencies on a flat surface to cool after removing them from the MFP.
●
If two or more transparencies feed at the same time, try fanning the stack.
●
Do not feed transparencies through the MFP more than once.
●
Load letterhead, prepunched, or preprinted paper
When printing on letterhead, prepunched, or preprinted paper, it is important to orient the paper correctly.
For most printing situations, follow the guidelines in this section for printing on one side only. For
duplexing guidelines, see
NOTE: If you want to always load letterhead or preprinted paper the same way for all print jobs,
whether you are printing on one side of the sheet or on both sides of the sheet, use the Alternative
Letterhead Mode setting in the printer driver. Load the paper as you would for printing on both sides.
When this option is selected, the MFP speed slows to the speed that is required for printing on both
sides. The information presented in this section is for printing without using Alternative Letterhead Mode.
NOTE: For more information about paper that has a special finish, such as laid or bond paper, see
Load paper that has a special finish on page 86.
For tray 1, load the paper with the front side facing up, and the top, short edge toward the MFP.
Print on both sides of the paper on page 108.
ENWW Load media 85

For tray 2 and the optional 500-sheet trays, load the paper with the front side facing down, and the top,
short edge toward the right.
Load paper that has a special finish
Some paper has a special finish, such as laid paper, bond paper, and cockled paper. These types of
paper can cause issues in regard to toner adhesion and print quality. Follow these guidelines when
printing on paper that has a special finish.
At the control panel, scroll to and touch Administration, touch Print Quality, and touch Fuser
●
Modes. Touch the paper type that you are using (such as Bond). Set the fuser mode to High1 or
High2. High2 provides better toner adhesion and optimal print quality for paper that has a highly
textured finish. At the control panel home screen, touch Copy, touch Paper Selection, select the
desired tray, and touch the type of paper that you are using (such as Bond) to turn on the
appropriate fuser mode.
NOTE: The MFP might print at a slower speed when set at High1 or High2. Use the High1 and
High2 settings only if you are experiencing toner-adhesion problems. The High1 and High2 settings
might increase problems with curl and jams.
Some makers of these types of paper are now coating one side of the paper to enhance toner
●
adhesion and print quality. To take advantage of this feature, make sure to load the paper correctly.
The side on which you can read the watermark correctly is the front side, or the side to be printed
on.
For tray 1, load paper with the front side facing up, and the top, short edge toward the MFP.
For tray 2 and the optional 500-sheet trays, load paper with the front side facing down, and the top, short
edge toward the right.
86 Chapter 4 Media and trays ENWW
 Loading...