

Page 1
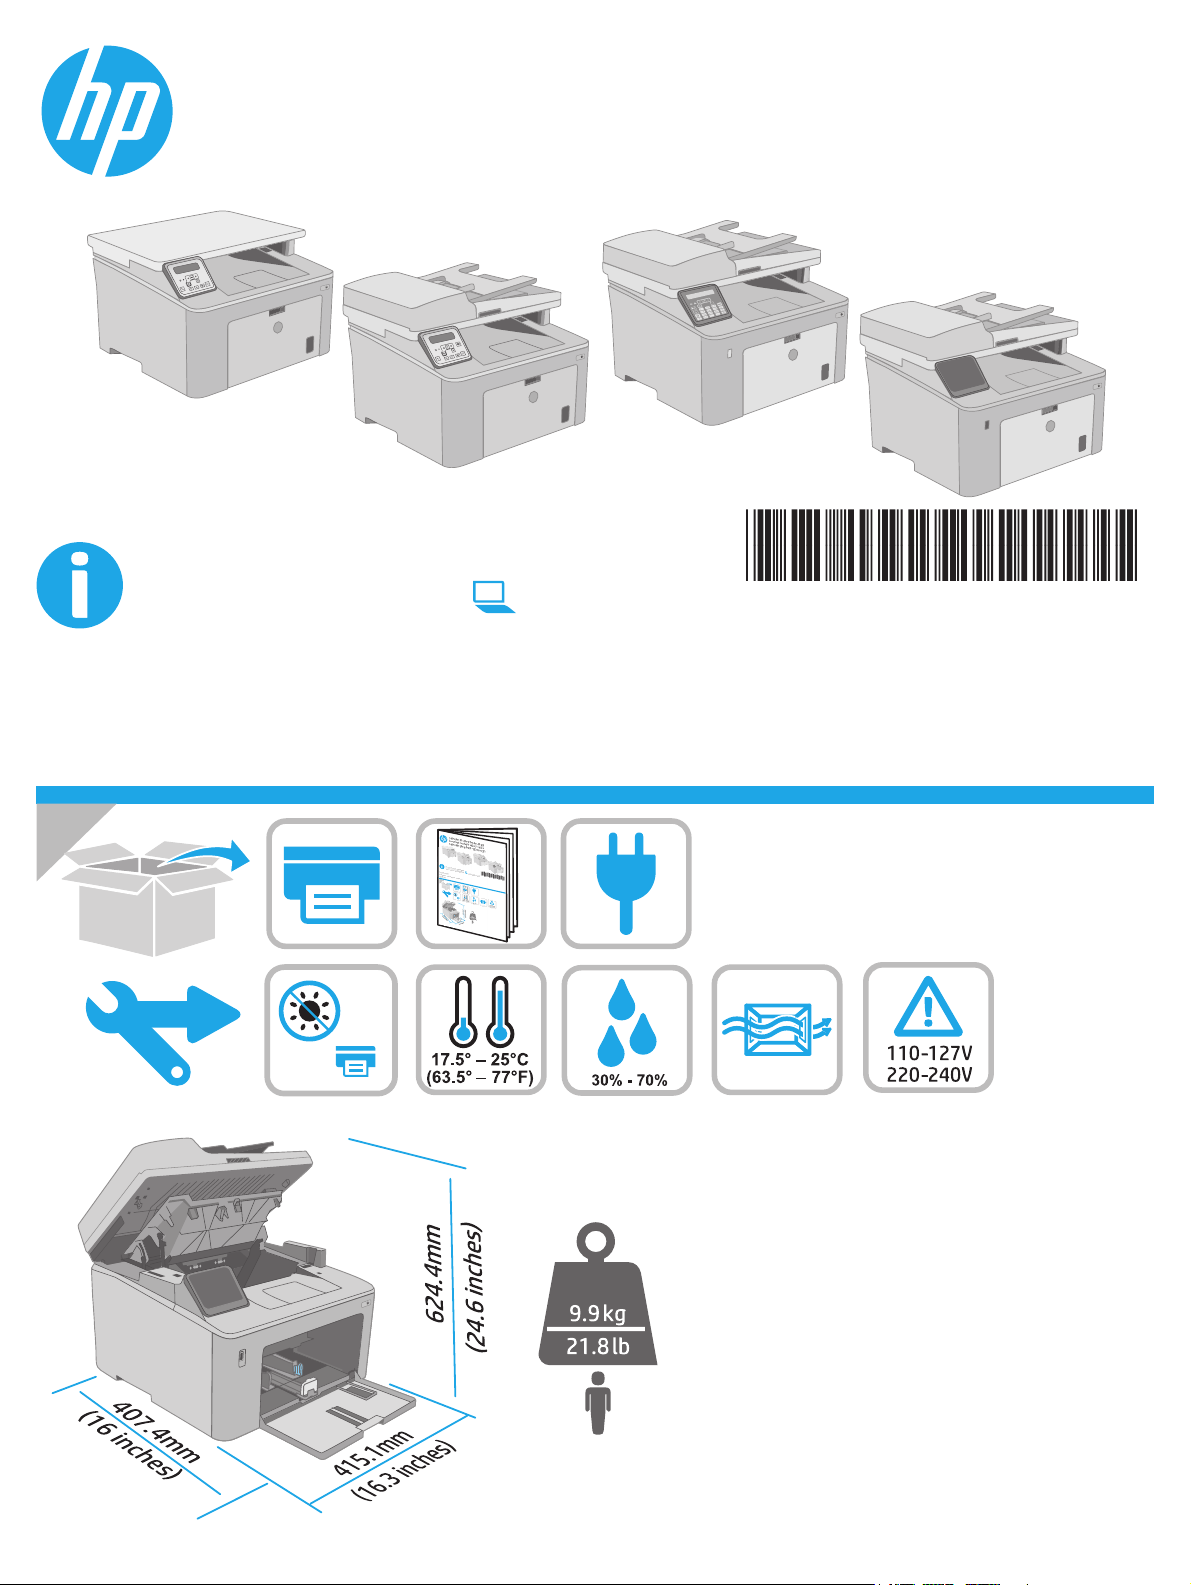
LaserJet Pro MFP M148-M149
LaserJet Pro MFP M227-M229
LaserJet Ultra MFP M230-M231
www.hp.com/support/ljM148MFP
www.hp.com/support/ljM227MFP
www.register.hp.com
G3Q74-90981
© Copyright 2018 HP Development Company, L.P.
www.hp.com
Page 2
1
2
2.1 2.2
.
2
3
3.1
2.3 2.4
3.2
2.
4
HP Smart
HP Smart
2
Page 3
1
LaserJet Pro MFP M148-M149
LaserJet Pro MFP M227-M229
LaserJet Ultra MFP M230-M231
English.........................3
Bahasa Indonesia ........7
한국어 ...................... 11
ไทย ............................ 15
Reference Guide
Need Help? - FAQ
For frequently asked questions, go to
www.hp.com/support/ljM227MFPFAQ
or scan the QR code.
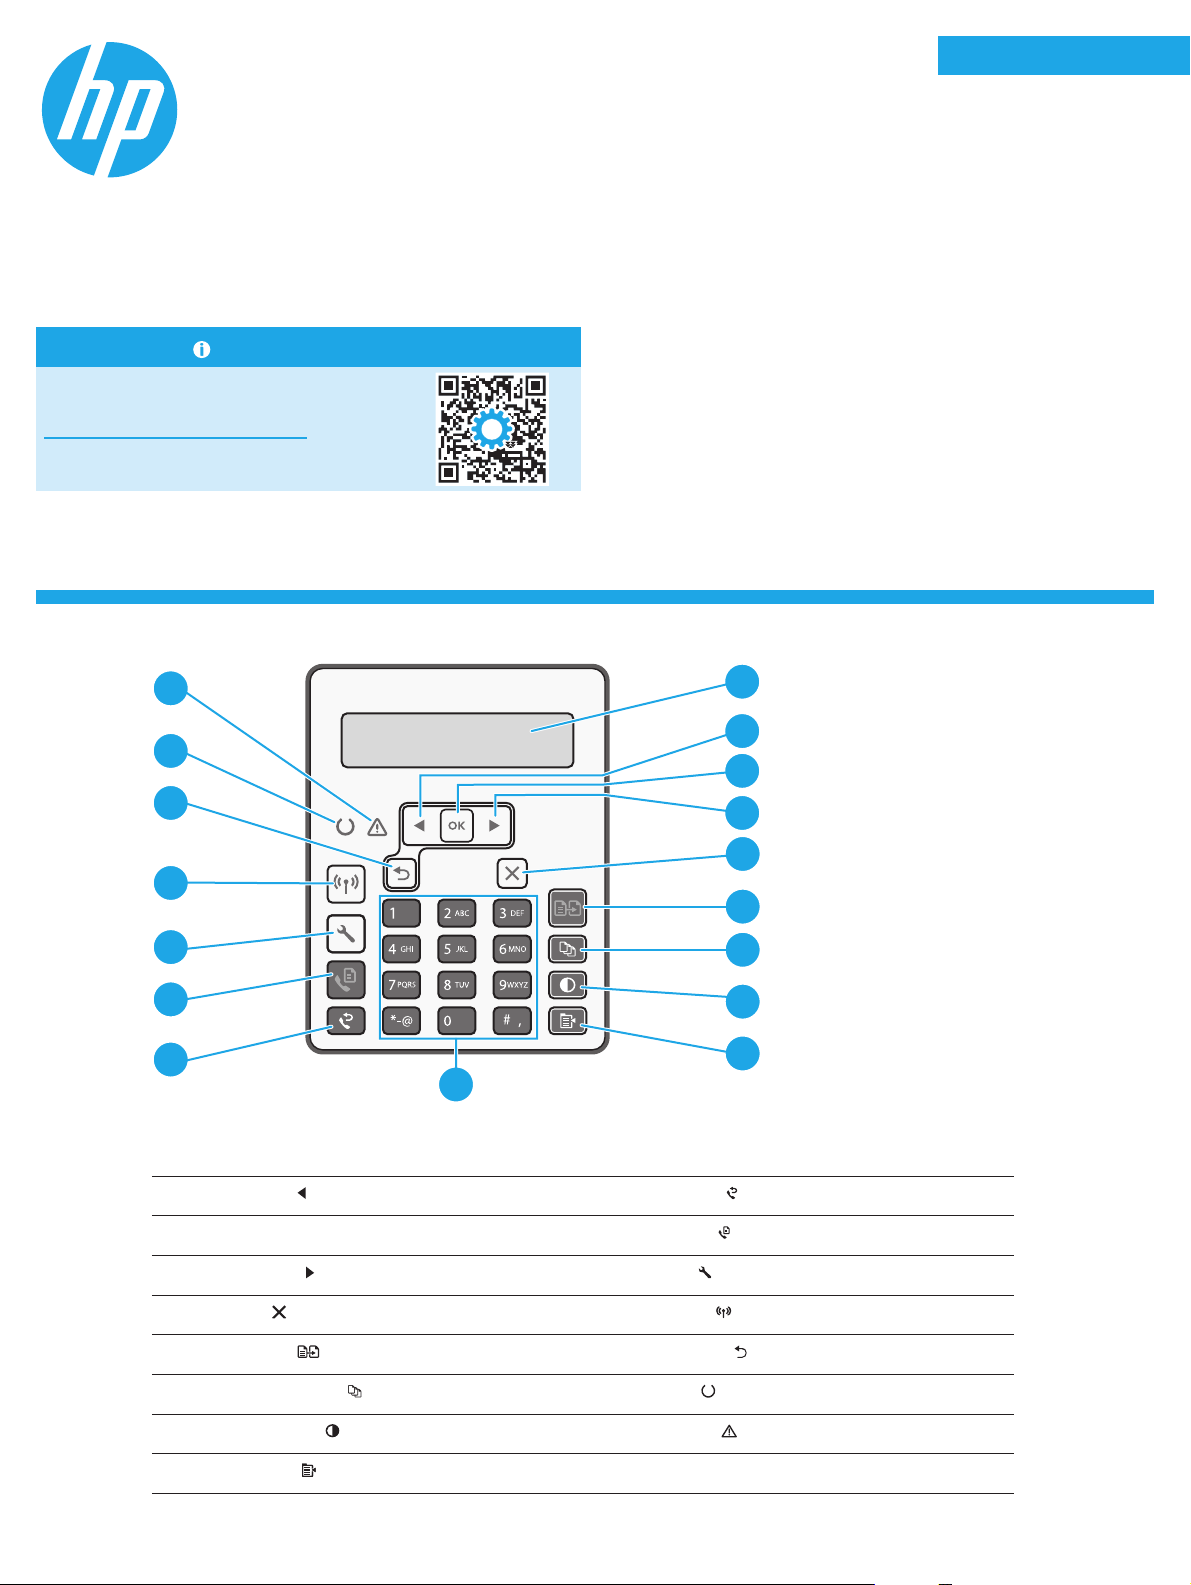
2-line LCD control panel view
17
16
15
繁體中文.................. 19
Tiếng Việt ................. 23
2
3
4
14
13
12
11
10
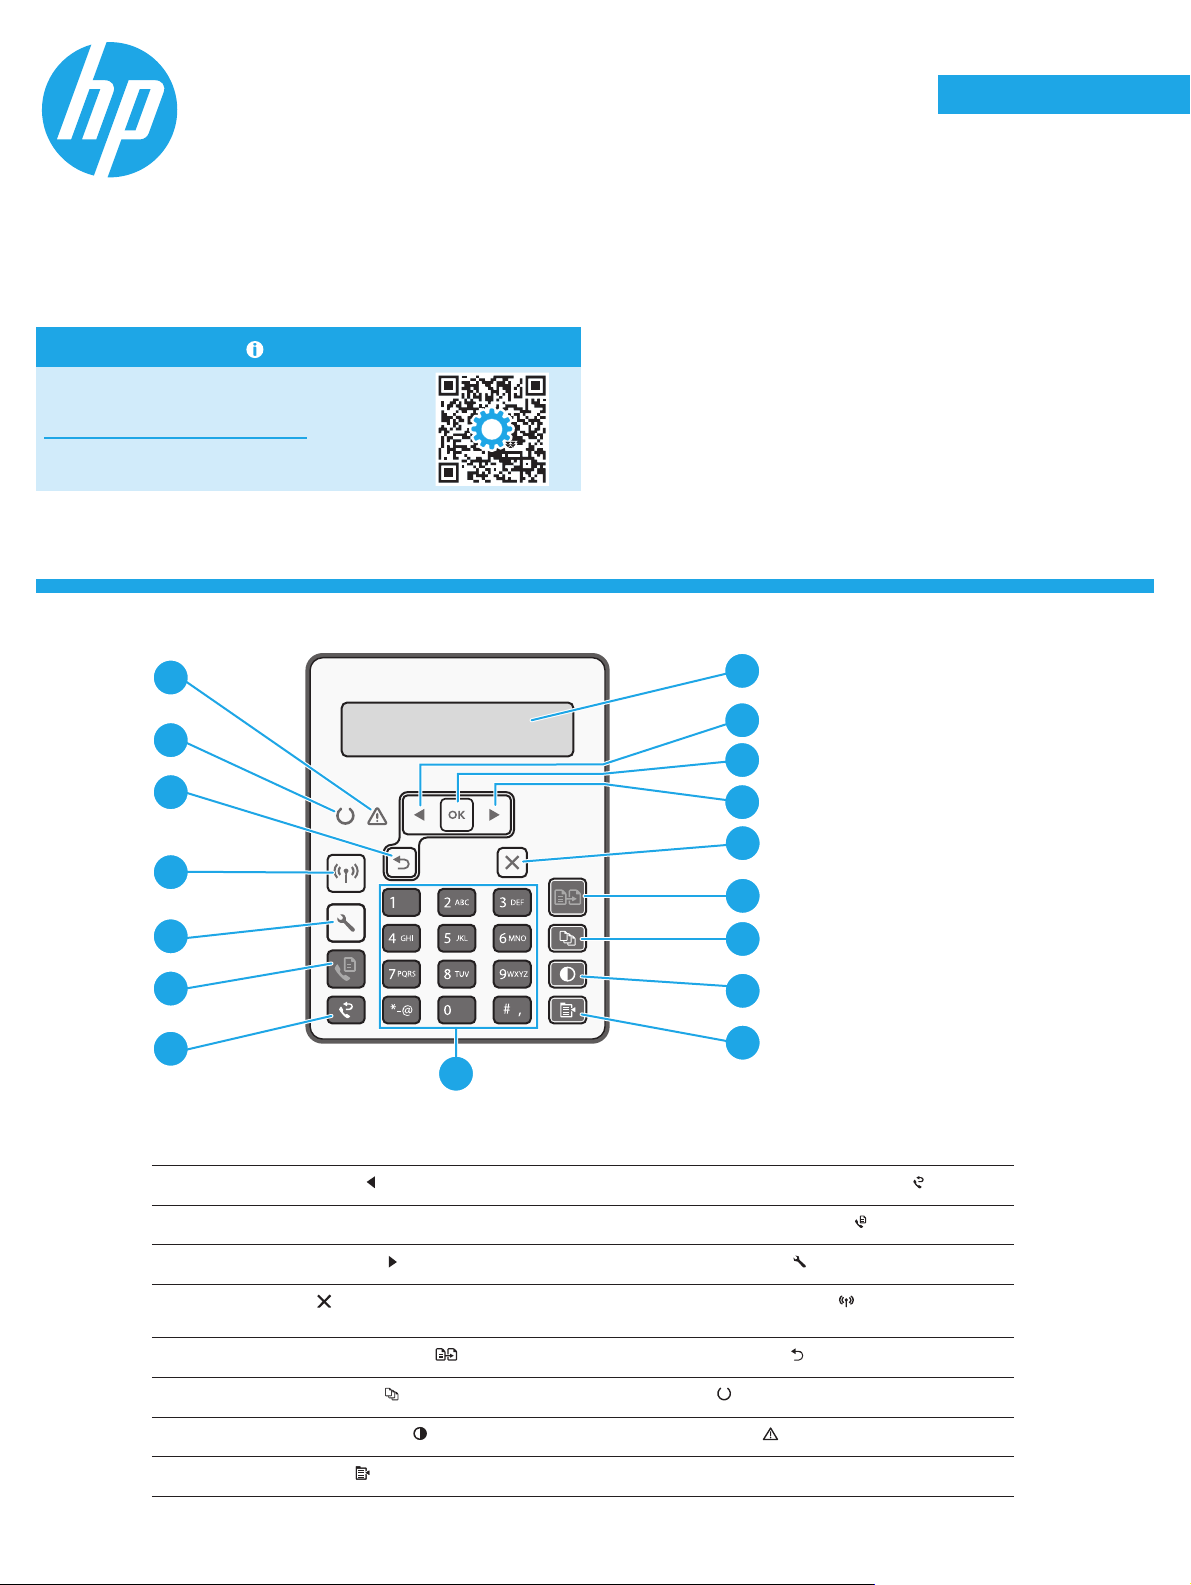
2-line control panel display 10 Alphanumeric keypad
1
Left arrow
2
OK button 12 Start Fax
3
Right arrow
4
Cancel
5
Start Copy
6
Number of Copies
7
Lighter/Darker
8
button 11 Fax Redial button
button 13 Setup button
button 14 Wireless button (wireless model only)
button 15 Back arrow but ton
button 16 Ready LED
button 17 Attention LED
5
6
7
8
9
button
9
Copy Menu
button
3
Page 4
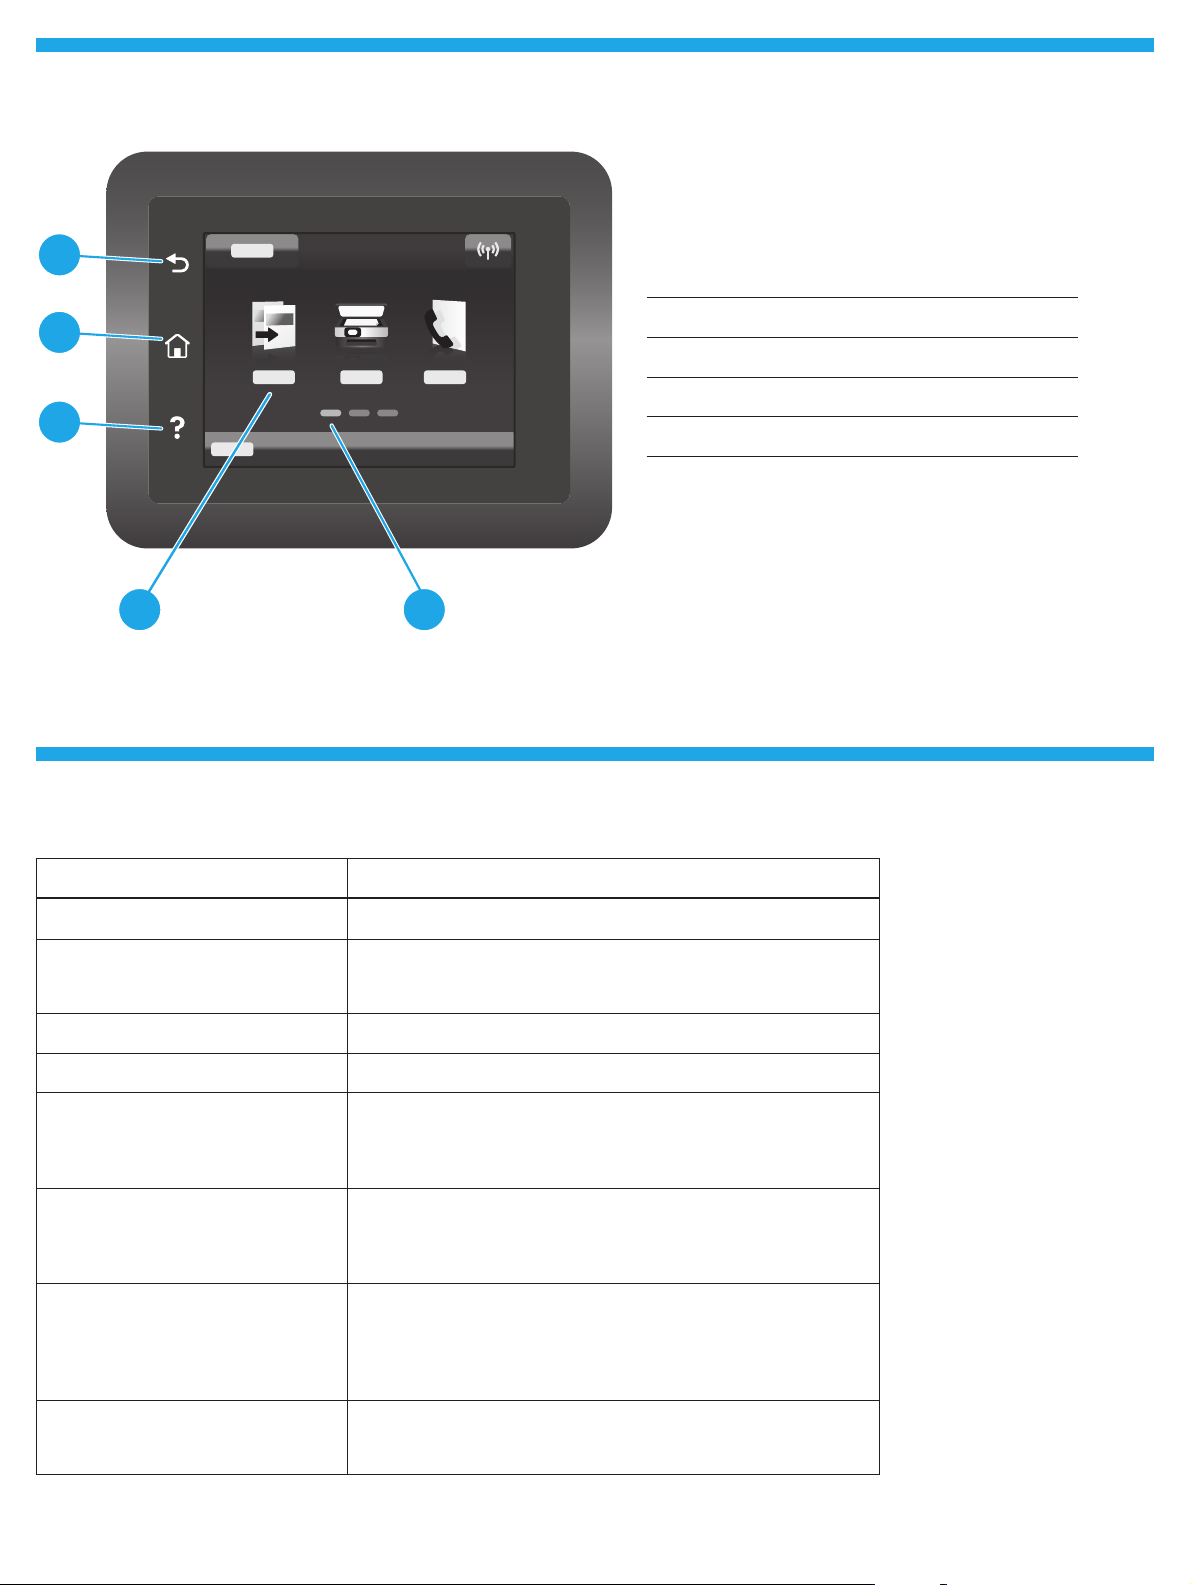
Touchscreen control panel view
4 5
1
2
3
Control panel error message
Back button
1
Home button
2
Help button
3
Color touchscreen
4
Home page screen indicator
5
Error Message Solution
Load Paper Insert paper.
• Initializing...
• Cleaning...
• Printing... Cool down mode
Fatal Error 65 Power cycle. If error still appears, call HP customer service.
Door is open Secure all doors.
• Jam in tray1. Clear jam and then
pressOK.
• Jam in cartridge area. Open top cover
and remove cartridge. Clear jam.
• Manual Feed. Plain, Letter. Or press OK
to use available media.
• Manual Duplex. Load tray 1. Press OK
to continue.
• Supply Memory Error.
• Install black cartridge.
• Incompatible black cartridge.
• Protected black cartridge.
• Unauthorized black cartridge.
• Black cartridge is very low.
• Used or counterfeit black cartridge
inuse.
No action to take.
Refer to User Guide.
Press the OK button on the 2-line control panel or tap OK on the touchscreen
control panel when ready.
Take out and reinsert the toner cartridge or imaging drum. If error still
appears, call HP customer service.
Replace with a new cartridge or imaging drum.
4
Page 5
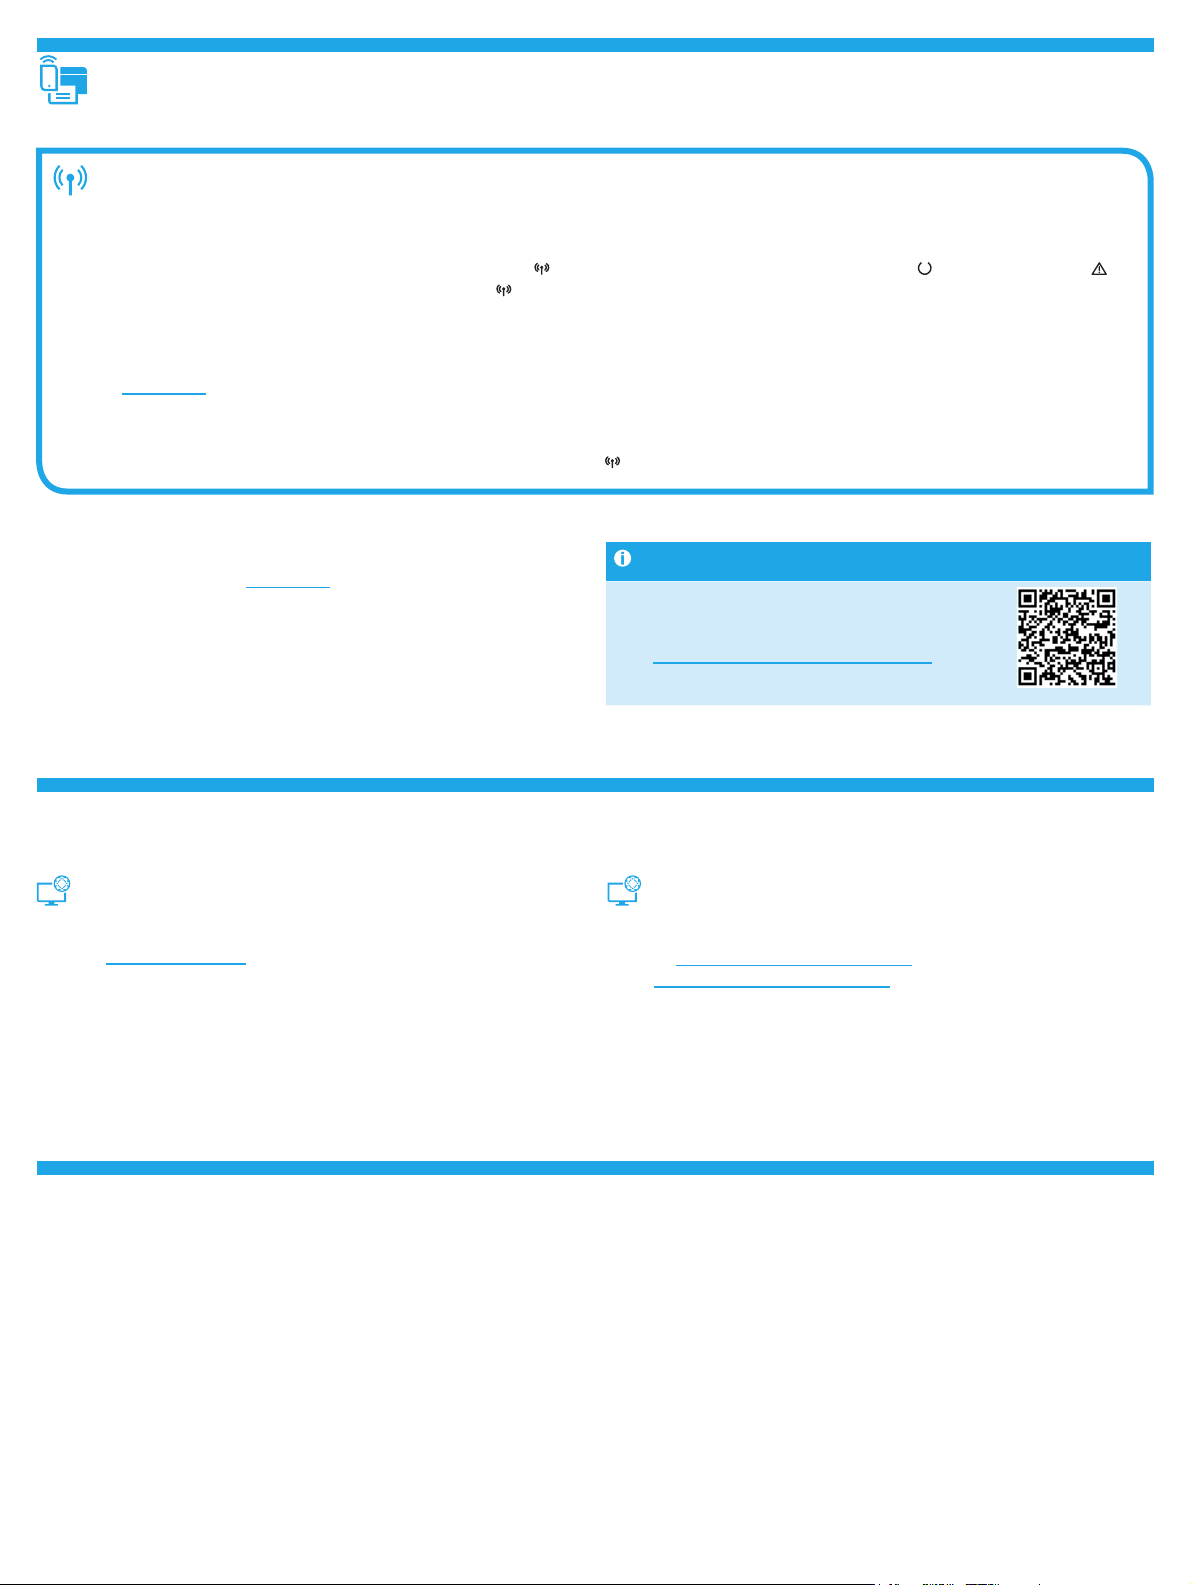
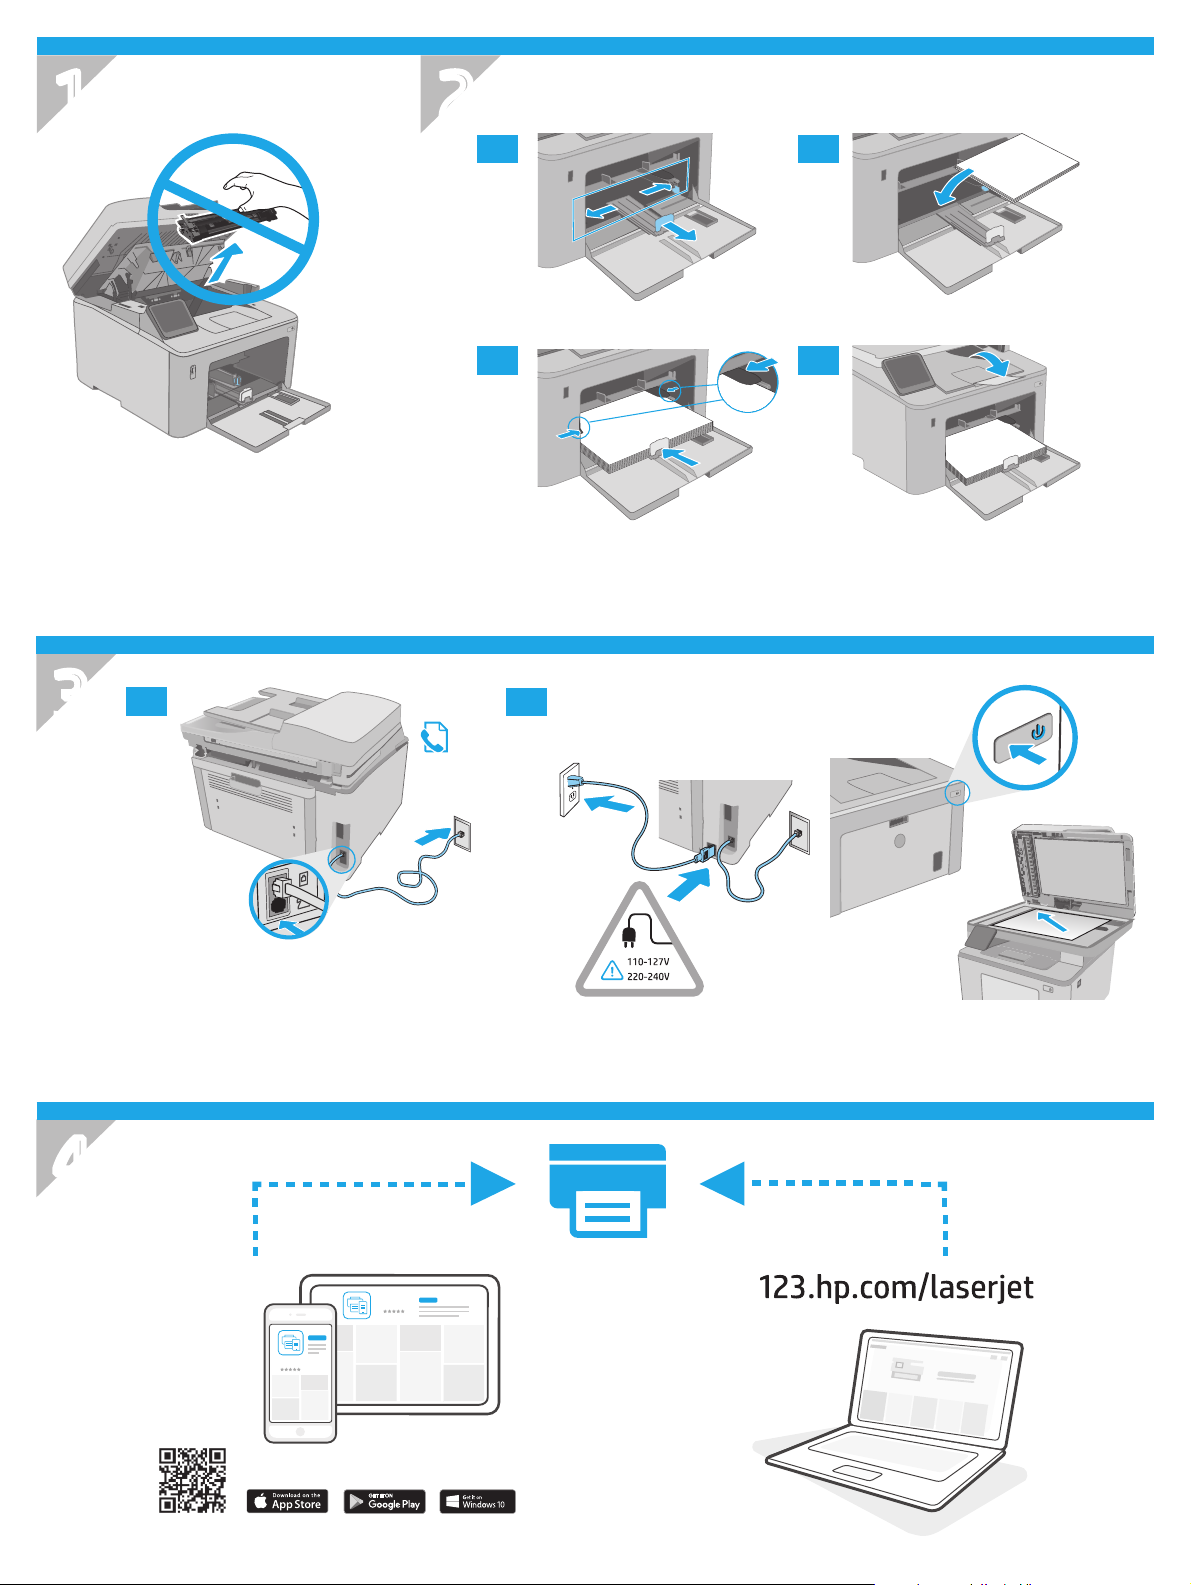
Mobile printing
Wireless setup using the mobile HP Smart app (wireless models only)
1. Disconnect the Ethernet cable and USB cable from your printer.
2. Follow one of these steps:
a. For a 2-line control panel printer: Press and hold the Wireless
LED start blinking simultaneously, release the Wireless
b. For a touchscreen control panel printer: Go to the Setup menu on your printer, select Network Setup, and then select Restore Defaults/Restore
Network Settings.
The printer will restore network default automatically and restart.
3. Go to 123.hp.com to install the HP Smart app on your mobile device.
4. Run the HP Smart app. Follow the onscreen instructions to select the name of your printer (e.g.,“HP-setup-XXX”) and connect it to your wireless network.
For more information, scan FAQ QR code.
5. After the printer connects to the wireless network successfully, the Wireless
button on the printer control panel. When the Ready LED and the Attention
button.
LED stops blinking and stays on.
Use the HP Smart app to set up, print, and more.
1. Scan the QR code or go to 123.hp.com.
2. Install the HP Smart app.
3. Run the HP Smart app and follow the onscreen instructions to connect,
setup, print, and more.
Download and install the software
NOTE: Do not connect the USB cable until you are prompted to do so.
Method 1: Download HP Easy Start
(WindowsandMac OS)
1. Go to 123.hp.com/laserjet, and click Download.
2. Follow the onscreen instructions and then prompts to save the le to the
computer.
3. Launch the software le from the folder where the le was saved.
4. Follow the onscreen instructions to install the software.
5. When prompted to select a connection type, select the appropriate option
for the type of connection.
Learn more about mobile printing
For further information about these and other
operating systems (Chrome/Google Cloud Print),
goto www.hp.com/go/LaserJetMobilePrinting
orscan the QR code.
Method 2: Download from printer support website
(Windows and Mac OS)
1. Go to www.hp.com/support/ljM148MFP
orwww.hp.com/support/ljM227MFP.
2. Select Software and Drivers.
3. Download the software for your printer model and operating system.
4. Launch the software le from the folder where the le was saved.
5. Follow the onscreen instructions to install the software.
6. When prompted to select a connection type, select the appropriate option
for the type of connection.
Wi-Fi Direct printing (optional)
Wi-Fi Direct allows Wi-Fi capable devices, such as smart phones, tablets, or computers, to connect directly to the printer wirelessly without using a wireless router
or access point. Place the device close to the printer to ensure successful connection and printing.
NOTE: The following steps temporarily disconnect your remote device from the Internet. If you are printing web-based content such as emails, web pages,
orcloud-based documents, open them before proceeding.
1. Make sure the printer is turned on and in a ready state, and paper is loaded in the main input tray.
2. From the control panel, open the Reports menu, and then select Network Summary to print a network summary report. In the Wi-Fi Direct Setup section,
you’ll nd Wi-Fi Direct Password.
3. On the remote device, open the Wi-Fi menu, and then tap the printer with DIRECT in the name (Example: DIRECT-72-HP xxx) from the list of available
networks.
4. When prompted for a password, use the password from the Network Summary report.
5. Open the item you want to print, and then tap Print from the app or action menu.
6. Select your printer from the list of available printers, and then tap Print.
7. Reconnect to your local Wi-Fi network after the print job completes.
5
Page 6
Use the scan feature
Use the HP Scan software on your computer to start a scan job at the printer.
Windows
Click Start, select Programs or All Programs, select HP, and then select
HPScan.
Mac OS
Go to the Applications folder and open HP Easy Scan.
Troubleshooting
Wireless connection troubleshooting
NOTE: Both 2.4 GHz and 5 GHz bands are supported.
Verify that the printer is within the range of the wireless network. For most networks, the printer must be within 30 m (100 ft) of the wireless access
point (wireless router). A USB cable might be required for temporary connection between the printer and the computer. To ensure that the wireless setup
information synchronizes correctly, do not connect the USB cable until prompted to do so.
Follow these steps to restore the network settings:
1. Remove the USB cable from the printer.
2. Follow one of these steps:
a. For a 2-line control panel printer: Press and hold the Wireless
LED start blinking simultaneously, release the Wireless button.
b. For a touchscreen control panel printer: Go to the Setup menu on your printer, select Network Setup, and then select Restore Defaults/Restore
Network Settings.
The printer will restore network default automatically and restart.
3. When the Ready
LED is on, continue to install the software.
button on the printer control panel. When the Ready LED and the Attention
If your router supports Wi-Fi Protected Setup (WPS) mode, try to connect
through this mode:
1. Press the WPS
2. Within two minutes, press and hold the Wireless
three seconds and then release the button (2-line control panel printer),
oropen the Setup menu, select Network Setup, select Wireless, select
Wi-Fi Protected Setup, and then tap the Push button from touchscreen
controlpanel.
3. The Wireless
Wait while the printer establishes the network connection automatically.
4. This process takes up to two minutes. When the network connection is
established, the Wireless
toinstall the software.
button on your router.
button for at least
LED and the Ready LED start blinking simultaneously.
LED stops blinking and remains on. Continue
Wireless printing
For more information about wireless
printing and wireless setup, go to
www.hp.com/go/wirelessprinting.
User guide and additional support resources
The user guide includes printer usage and troubleshooting information.
It is available on the web:
orwww.hp.com/support/ljM227MFP.
Go to www.hp.com/support/ljM148MFP
Check the Wireless LED status from the printer control panel:
1. If the Wireless
established.
a. Press the Wireless button on the printer control panel or select the
Wireless on option from the Wireless menu on the control panel.
b. After the Wireless LED starts blinking, continue to install
thesoftware. When the network connection is established,
theWireless LED stops blinking and remains on.
2. If the Wireless LED is on, it means that the wireless connection
isestablished.
a. Check the network name (SSID) info on the Conguration
Report/Network Summary: From the Reports menu, select
NetworkSummary. Verify the network name (SSID) on the report.
b. Make sure the computer is connected to the same wireless network
to which you are connecting the printer.
c. Continue to install the software.
3. If the Wireless LED is blinking, it means that the wireless connection
isnot established.
a. Restart the printer and the router.
b. Manually connect the printer to your wireless network. Use Wi-Fi
Protected Setup (WPS) to connect the printer if the router supports
WPS, or continue to the next step.
c. Uninstall and reinstall the HP software.
Control panel help (touchscreen models only)
Touch the Help
LED is o, it means that the wireless connection is not
button on the printer control panel to access help topics.
Check for rmware updates
1. Go to www.hp.com/support/ljM148MFP
orwww.hp.com/support/ljM227MFP.
2. Select a printer or category from the list, and then click Drivers.
3. Select the operating system, and click the Next button.
4. Select Firmware, and click the Download button.
6
Page 7
LaserJet Pro MFP M148-M149
LaserJet Pro MFP M227-M229
LaserJet Ultra MFP M230-M231
English.........................3
Bahasa Indonesia ........7
한국어 ...................... 11
ไทย ............................ 15
Panduan Referensi
Butuh Bantuan? - FAQ
Untuk pertanyaan umum, kunjungi
www.hp.com/support/ljM227MFPFAQ
ataupindaikode QR.
Tampilan panel kontrol LCD 2 baris
17
16
15
繁體中文.................. 19
Tiếng Việt ................. 23
1
2
3
4
14
13
12
11
5
6
7
8
9
10
Tampilan panel kontrol 2 baris 10 Papan tombol alfanumerik
1
Tombol panah ke kiri
2
Tombol OK 12 Tombol Start Fax (Mulai Faks)
3
Tombol panah ke kanan
4
Tombol Batal 14 Tombol Wireless (Nirkabel)
5
Tombol Start Copy (Mulai Salin)
6
Tombol Jumlah Salinan
7
11 Tombol Fax Redial (Panggil Ulang Fax)
13 Tombol Pengaturan
(hanyamodelnirkabel)
15 Tombol panah balik
16 LED Siap
Tombol Lebih Terang/Gelap
8
Tombol Menu Salin
9
17 LED Peringatan
7
Page 8

Tampilan panel kontrol layar sentuh
4 5
1
2
3
Pesan kesalahan panel kontrol
Tombol Kembali
1
Tombol Home (Awal)
2
Tombol Help (Bantuan)
3
Layar sentuh warna
4
Indikator layar halaman awal
5
Pesan Kesalahan Solusi
Muat Kertas Masukkan kertas.
• Menginisialisasi...
• Membersihkan...
• Mencetak... Mode pendinginan
Kesalahan Fatal 65 Siklus daya Jika kesalahan masih ada, hubungi layanan pelanggan HP.
Pintu terbuka Tutup semua pintu.
• Macet di baki 1. Atasi kemacetan, lalu
tekan OK.
• Macet di area kartrid. Buka penutup
atas dan keluarkan kartrid. Atasi
kemacetan.
• Pengisian Manual. Polos, Letter. Atau
tekan OK untuk menggunakan media
yang tersedia.
• Dupleks Manual. Muat baki 1. Tekan
OK untuk melanjutkan.
• Kesalahan Memori Persediaan.
• Pasang kartrid hitam.
• Kartrid hitam tidak kompatibel.
• Kartrid hitam diproteksi.
• Kartrid hitam palsu.
• Kartrid hitam sangat rendah.
• Kartrid hitam bekas atau palsu sedang
digunakan.
Tidak perlu dilakukan tindakan.
Lihat Panduan Pengguna.
Tekan tombol OK pada panel kontrol 2 baris atau ketuk OK pada panel
kontrol layar sentuh bila siap.
Keluarkan dan masukkan kembali kartrid toner atau drum olahgambar.
Jikakesalahan masih ada, hubungi layanan pelanggan HP.
Ganti dengan kartrid atau drum olahgambar yang baru.
8
Page 9
Pencetakan mobile
Penyiapan nirkabel menggunakan aplikasi seluler HP Smart (hanya model nirkabel)
1. Putuskan sambungan kabel Ethernet dan kabel USB dari printer.
2. Ikuti salah satu langkah-langkah ini:
a. Untuk panel kontrol 2 baris printer: Tekan dan tahan tombol Nirkabel
berkedip bersamaan, lepas tombol Nirkabel
b. Untuk panel kontrol layar sentuh printer: Kunjungi menu Kongurasi pada printer, pilih Kongurasi Jaringan, lalu pilih Pulihkan Standar/Pulihkan
Pengaturan Jaringan.
Printer akan memulihkan jaringan standar secara otomatis dan melakukan start ulang.
3. Kunjungi 123.hp.com untuk menginstal aplikasi HP Smart di perangkat seluler Anda.
4. Jalankan aplikasi HP Smart. Ikuti petunjuk di layar untuk memilih nama printer (mis., “penyiapan HP-XXX”) dan sambungkan printer ke jaringan nirkabel.
Untuk informasi lebih lanjut, pindai kode QR pada Pertanyaan Umum.
5. Setelah printer berhasil tersambung ke jaringan nirkabel, LED Nirkabel
.
pada panel kontrol printer. Bila LED Siap dan LED Peringatan mulai
berhenti berkedip dan terus menyala.
Gunakan aplikasi HP Smart untuk mengongurasi, mencetak, dan lainnya.
1. Pindai kode QR atau kunjungi 123.hp.com.
2. Instal aplikasi HP Smart.
3. Jalankan aplikasi HP Smart dan ikuti petunjuk di layar untuk
menyambungkan, mengongurasi, mencetak, dan lainnya.
Selengkapnya tentang pencetakan seluler
Untuk informasi lebih lanjut tentang
hal ini dan sistem operasi lainnya
(Chrome/Google Cloud Print), kunjungi
www.hp.com/go/LaserJetMobilePrinting
ataupindai kode QR.
Mendownload dan menginstal perangkat lunak
CATATA N: Jangan sambungkan kabel USB hingga diminta untuk melakukannya.
Metode 1: Download HP Easy Start
(WindowsdanMac OS)
1. Kunjungi 123.hp.com/laserjet, dan klik Download.
2. Ikuti petunjuk di layar dan perintah untuk menyimpan le di komputer.
3. Jalankan le perangkat lunak dari folder tempat menyimpan le.
4. Ikuti petunjuk di layar untuk menginstal perangkat lunak.
5. Bila diminta untuk memilih jenis sambungan, gunakan pilihan yang tepat
untuk jenis sambungan.
1. Kunjungi www.hp.com/support/ljM148MFP
atauwww.hp.com/support/ljM227MFP.
2. Pilih Software and Drivers (Perangkat lunak dan Driver).
3. Download perangkat lunak untuk model printer dan sistem operasi Anda.
4. Jalankan le perangkat lunak dari folder tempat menyimpan le.
5. Ikuti petunjuk di layar untuk menginstal perangkat lunak.
6. Bila diminta untuk memilih jenis sambungan, gunakan pilihan yang tepat
untuk jenis sambungan.
Metode 2: Download dari situs web dukungan
printer (Windowsdan Mac OS)
Pencetakan Wi-Fi Direct (opsional)
Wi-Fi Direct memungkinkan perangkat yang mendukung Wi-Fi, misalnya smartphone, tablet, atau komputer, untuk terhubung langsung ke printer tanpa
menggunakan router atau jalur akses nirkabel. Tempatkan perangkat dekat ke printer untuk memastikan koneksi dan pencetakan yang lancar.
CATATA N: Langkah-langkah berikut secara temporer memutuskan sambungan perangkat jarak jauh Anda dari internet. Jika Anda mencetak konten berbasis
web seperti email, halaman web, atau dokumen berbasis cloud, buka konten tersebut sebelum melanjutkan.
1. Pastikan printer dinyalakan dan dalam status siap, dan kertas dimuat dalam baki masukan utama.
2. Dari panel kontrol, buka menu Laporan, lalu pilih Ringkasan Jaringan untuk mencetak laporan ringkasan jaringan. Di bagian Kongurasi Wi-Fi Direct, Anda
akan menemukan Kata sandi Wi-Fi Direct.
3. Pada perangkat jarak jauh, buka menu Wi-Fi, lalu ketuk printer dengan DIRECT pada namanya (Contoh: DIRECT-72-HP xxx) dari daftar jaringan yang tersedia.
4. Bila diminta kata sandi, gunakan kata sandi dari laporan Ringkasan Jaringan.
5. Buka item yang ingin Anda cetak, lalu ketuk Print (Cetak) dari aplikasi atau menu tindakan.
6. Pilih printer dari daftar printer yang tersedia, lalu ketuk Print (Cetak).
7. Sambungkan kembali ke jaringan Wi-Fi lokal setelah tugas cetak selesai.
9
Page 10

Menggunakan tur pindai
Gunakan perangkat lunak HP Scan di komputer untuk memulai tugas pindai
pada printer.
Windows
Klik Start (Mulai), pilih Programs (Program) atau All Programs
(SemuaProgram), pilih HP, lalu pilih HP Scan.
Mac OS
Buka folder Applications (Aplikasi) dan buka HP Easy Scan.
Mengatasi masalah
Pemecahan masalah koneksi nirkabel
CATATA N: Kedua pita 2,4 GHz dan 5 GHz didukung.
Pastikan printer telah berada dalam jangkauan jaringan nirkabel. Untuk sebagian besar jaringan, printer harus berada dalam jarak 30 m (100 kaki) dari jalur
akses nirkabel (router nirkabel). Kabel USB mungkin diperlukan untuk membuat sambungan sementara antara printer dan komputer. Untuk memastikan
bahwa informasi kongurasi nirkabel telah disinkronisasi dengan benar, jangan sambungkan kabel USB hingga Anda diminta untuk melakukannya.
Ikuti langkah-langkah ini untuk memulihkan pengaturan jaringan:
1. Lepaskan kabel USB dari printer.
2. Ikuti salah satu langkah-langkah ini:
a. Untuk panel kontrol 2 baris printer: Tekan dan tahan tombol Nirkabel
berkedip bersamaan, lepas tombol Nirkabel .
b. Untuk panel kontrol layar sentuh printer: Kunjungi menu Kongurasi pada printer, pilih Kongurasi Jaringan, lalu pilih Pulihkan Standar/Pulihkan
Pengaturan Jaringan.
Printer akan memulihkan jaringan standar secara otomatis dan melakukan start ulang.
3. Bila LED Siap
menyala, lanjutkan dengan menginstal perangkat lunak.
pada panel kontrol printer. Bila LED Siap dan LED Peringatan mulai
Jika router mendukung mode WPS (Wi-Fi Protected Setup), coba
sambungkan melalui mode ini:
1. Tekan tombol WPS
2. Dalam dua menit, tekan dan tahan tombol Nirkabel
sekurangnya tiga detik, lalu lepas tombol (panel kontrol 2 baris printer),
atau buka menu Kongurasi, pilih Kongurasi Jaringan, pilih Nirkabel, pilih
Wi-Fi Protected Setup, lalu ketuk tombol Tekan dari panel kontrol layar
sentuh.
3. LED Nirkabel
sementara printer menetapkan sambungan jaringan secara otomatis.
4. Proses ini berlangsung hingga 2 menit. Setelah sambungan jaringan
ditetapkan, LED Nirkabel
Lanjutkan dengan menginstal perangkat lunak.
pada router.
selama
dan LED Siap mulai berkedip secara bersamaan. Tunggu
akan berhenti berkedip dan tetap menyala.
Pencetakan nirkabel
Untuk informasi lebih lanjut tentang
pencetakan dan kongurasi nirkabel, kunjungi
www.hp.com/go/wirelessprinting.
Panduan pengguna dan informasi berguna untuk dukungan tambahan
Panduan pengguna mencakup informasi tentang penggunaan dan
cara mengatasi masalah printer. Informasi ini tersedia di web: Kunjungi
www.hp.com/support/ljM148MFP atau www.hp.com/support/ljM227MFP.
Periksa status LED Nirkabel dari panel kontrol printer:
1. Jika LED Nirkabel
a. Tekan tombol Nirkabel pada panel kontrol printer atau pilih opsi
Nirkabel aktif dari menu Nirkabel pada panel kontrol.
b. Setelah LED Nirkabel mulai berkedip, lanjutkan untuk menginstal
perangkat lunak. Setelah sambungan jaringan ditetapkan, LED
Nirkabel akan berhenti berkedip dan tetap menyala.
2. Jika LED Nirkabel
ditetapkan.
a. Periksa informasi nama jaringan (SSID) pada Laporan Kongurasi/
Ringkasan Jaringan: Dari menu Laporan, pilih Ringkasan Jaringan.
Verikasikan nama jaringan (SSID) pada laporan.
b. Pastikan komputer telah tersambung ke jaringan nirkabel yang sama
seperti yang digunakan untuk menyambungkan printer.
c. Lanjutkan dengan menginstal perangkat lunak.
3. Jika LED Nirkabel
ditetapkan.
a. Hidupkan ulang printer dan router.
b. Sambungkan printer secara manual ke jaringan nirkabel. Gunakan
WPS (Wi-Fi Protected Setup) untuk menyambungkan printer jika
router mendukung WPS, atau lanjutkan ke langkah berikutnya.
c. Hapus kemudian instal ulang perangkat lunak HP.
Bantuan panel kontrol (hanya model layar sentuh)
Sentuh tombol Help (Bantuan)
topik bantuan.
mati, berarti sambungan nirkabel tidak ditetapkan.
menyala, ini berarti sambungan nirkabel telah
berkedip, ini berarti sambungan nirkabel tidak
pada panel kontrol printer untuk mengakses
Memeriksa pembaruan rmware
1. Kunjungi www.hp.com/support/ljM148MFP
atauwww.hp.com/support/ljM227MFP.
2. Pilih printer atau kategori dari daftar, lalu klik Drivers (Driver).
3. Pilih sistem operasi, lalu klik tombol Next (Berikutnya).
4. Pilih Firmware, lalu klik tombol Download.
10
Page 11

LaserJet Pro MFP M148-M149
LaserJet Pro MFP M227-M229
LaserJet Ultra MFP M230-M231
English.........................3
Bahasa Indonesia ........7
한국어 ...................... 11
ไทย ............................ 15
설명서
도움말 정보? - FAQ
자주 묻는 질문은
www.hp.com/support/ljM227MFPFAQ
에서 확인하거나 QR 코드를 스캔하십시오.
2줄 LCD 제어판 보기
17
16
15
繁體中文.................. 19
Tiếng Việt ................. 23
1
2
3
4
14
13
12
11
10
2줄 제어판 디스플레이 10
1
왼쪽 화살표
2
OK 버튼 12
3
오른쪽 화살표
4
취소
5
복사 시작
6
복사 매수
7
밝게/어둡게
8
버튼
버튼
버튼
버튼
버튼
버튼 17 주의 LED
5
6
7
8
9
영숫자 키패드
팩스 재다이얼 버튼
11
팩스 시작
설정 버튼
13
14 무선 버튼(무선 모델만 해당)
뒤로 가기 화살표 버튼
15
16 준비
버튼
LED
9
복사 메뉴
버튼
11
Page 12

터치스크린 제어판에만 해당
4 5
1
2
3
제어판 오류 메시지
뒤로 가기 버튼
1
홈 버튼
2
도움말 버튼
3
컬러 터치스크린
4
홈페이지 화면 표시기
5
오류 메시지 해결 방법
용지 넣기 용지 끼우기.
• 초기화 중...
• 청소 중...
• 인쇄 중... 냉각 모드
치명적 오류 65
도어가 열려 있음
• 용지함 1의 용지 걸림. 용지 걸림을
해결한 다음 OK를 누릅니다.
• 카트리지 영역에 용지가 걸려 있습니
다. 덮개를 열고 토너 카트리지를 분
리합니다. 용지 걸림을 해결합니다.
• 수동으로 공급합니다. 일반 용지,
Letter. 또는 OK를 눌러 사용 가능한
미디어를 사용합니다.
• 수동 양면 인쇄. 용지함 1 적재. 계속
하려면 OK를 누릅니다.
• 소모품 메모리 오류.
• 검은색 카트리지를 설치합니다.
• 비정품 카트리지.
• 검정색 카트리지 보호.
• 승인되지 않은 검은색 카트리지.
• 검은색 카트리지가 매우 부족합니다.
• 중고 또는 위조품 검정색 카트리지
가 사용됨.
취해야 할 조치 없음.
전원 껐다 켜기. 계속해서 오류가 나타나면, HP 고객 서비스센터에
문의하십시오.
모든 도어를 고정합니다.
사용 설명서를 참조합니다.
2줄 제어판에서 OK를 누르거나 준비가 되면 터치스크린 제어판에서 OK
을 누릅니다.
토너 카트리지 또는 이미징 드럼을 꺼낸 다음 다시 삽입합니다. 계속해서
오류가 나타나면, HP 고객 서비스센터에 문의하십시오.
새 토너 카트리지 또는 이미징 드럼으로 교체합니다.
12
Page 13

모바일 인쇄
모바일 HP 스마트 앱을 사용한 무선 설치(무선 모드만 해당)
1. 프린터에서 이더넷 케이블과 USB 케이블을 분리합니다.
2. 다음 단계 중 하나를 따릅니다.
a. 2줄 제어판 프린터의 경우: 프린터 제어판에 있는 무선
버튼을 해제합니다.
b. 터치스크린 제어판 프린터의 경우: 프린터의 설치 메뉴로 이동한 다음 네트워크 설치 및 기본값 복구/네트워크 설정 복구를 차례로
선택합니다.
프린터가 자동으로 네트워크 기본값을 복구하여 다시 시작합니다.
3. 123.hp.com로 이동하여 모바일 장치에 HP 스마트 앱을 설치합니다.
4. HP 스마트 앱을 실행합니다. 화면의 안내에 따라 프린터의 이름(예, “HP-setup-XXX”)을 선택한 다음 무선 네트워크에 연결합니다. 자세한 내용은
FAQ QR 코드를 스캔하십시오.
5. 프린터를 무선 네트워크에 연결하면, 무선
LED의 깜빡임이 중지되고 켜진 상태가 됩니다.
버튼을 길게 누릅니다. 준비 LED와 주의 LED가 동시에 깜박이면 무선
HP 스마트 앱을 사용하여 연결, 설정 및 인쇄 등을 실시합니다.
1. QR 코드를 스캔하거나 123.hp.com으로 이동합니다.
2. HP 스마트 앱을 설치합니다.
3. HP 스마트 앱을 실행하여 화면에 표시되는 안내에 따라 연결, 설정 및
인쇄 등을 실시합니다.
소프트웨어 다운로드 및 설치
참고: 알림이 표시되기 전까지는 USB 케이블을 연결하지 마십시오.
방법 1: HP Easy Start 다운로드(Windows 및 Mac OS)
1. 123.hp.com/laserjet으로 이동한 다음 다운로드를 클릭합니다.
2. 화면의 안내와 알림에 따라 컴퓨터에 파일을 저장합니다.
3. 파일이 저장된 폴더에서 소프트웨어 파일을 실행합니다.
4. 화면의 지시에 따라 소프트웨어를 설치합니다.
5. 연결 유형을 선택하라는 메시지가 표시되면 연결 유형에 적합한
옵션을 선택합니다.
모바일 인쇄에 대해 자세히 알아보기
이들 운영 체제 및 기타 운영 체제
(Chrome/Google Cloud Print)에 대한 추가 정보는
www.hp.com/go/LaserJetMobilePrinting
으로 이동하거나 QR 코드를 스캔하십시오.
방법 2: 프린터 지원 웹사이트에서 다운로드
(Windows 및 Mac OS)
1. www.hp.com/support/ljM148MFP
또는 www.hp.com/support/ljM227MFP으로 이동합니다.
2. 소프트웨어 및 드라이버를 선택합니다.
3. 해당 프린터 모델 및 운영 체제용 소프트웨어를 다운로드합니다.
4. 파일이 저장된 폴더에서 소프트웨어 파일을 실행합니다.
5. 화면의 지시에 따라 소프트웨어를 설치합니다.
6. 연결 유형을 선택하라는 메시지가 표시되면 연결 유형에 적합한
옵션을 선택합니다.
Wi-Fi Direct 인쇄(옵션)
Wi-Fi Direct를 통해 스마트폰, 태블릿, 컴퓨터와 같은 Wi-Fi 케이블 장치를 무선 라우터나 액세스 지점을 사용하지 않고 무선으로 프린터에 직접 연결할 수
있습니다. 장치를 연결 및 인쇄할 수 있도록 프린터와 가까운 위치에 둡니다.
참고: 다음 단계에서는 원격 장치를 일시적으로 인터넷에서 분리합니다. 이메일, 웹 페이지 또는 클라우드 기반 문서와 같은 웹 기반 콘텐츠를 인쇄하는
경우에는 계속하기 전에 해당 콘텐츠를 엽니다.
1. 프린터가 준비 상태로 켜져 있는지 확인한 다음 용지를 주 입력 용지함에 넣습니다.
2. 제어판에서 보고서 메뉴를 열고 네트워크 요약을 선택하여 네트워크 요약 보고서를 인쇄합니다. Wi-Fi 직접 설치 선택에서 Wi-Fi 직접 암호를
확인합니다.
3. 원격 장치에서 Wi-Fi 메뉴를 연 다음 사용 가능한 네트워크의 이름(예: DIRECT-72-HP xxx)에서 프린터의 DIRECT를 누릅니다.
4. 암호를 입력하라는 메시지가 표시되면, 네트워크 요약 보고서의 암호를 사용합니다.
5. 인쇄하려고 하는 항목을 연 다음 앱 또는 조치 메뉴에서 인쇄를 누릅니다.
6. 사용 가능한 프린터 목록에서 프린터를 선택한 다음 인쇄를 입력합니다.
7. 인쇄 작업이 완료되면 로컬 Wi-Fi 네트워크에서 분리합니다.
13
Page 14

스캔 기능 사용
프린터에서 스캔 작업을 시작하려면 컴퓨터의 HP Scan 소프트웨어를
사용하십시오.
Windows
시작을 클릭한 다음, 프로그램 또는 모든 프로그램, HP, HP Scan을 차례로
선택합니다.
Mac OS
Applications 폴더로 이동한 다음 HP Easy Scan을 엽니다.
문제 해결
무선 연결 문제해결
참고: 2.4GHz 및 5GHz 대역이 지원됩니다.
프린터가 무선 네트워크 범위 내에 있는지 확인합니다. 대부분의 네트워크에서는 프린터가 무선 액세스 지점(무선 라우터)의 30m(100ft) 이내에 있어야
합니다. USB 케이블을 사용하여 임시로 프린터와 컴퓨터를 연결해야 할 수도 있습니다. 무선 설정 정보가 제대로 동기화되도록 알림이 표시되기 전에는
USB 케이블을 연결하지 마십시오.
네트워크 설정을 복원하려면 다음 단계를 수행하십시오.
1. USB 케이블을 프린터에서 분리합니다.
2. 다음 단계 중 하나를 따릅니다.
a. 2줄 제어판 프린터의 경우: 프린터 제어판에 있는 무선
버튼을 해제합니다.
b. 터치스크린 제어판 프린터의 경우: 프린터의 설치 메뉴로 이동한 다음 네트워크 설치 및 기본값 복구/네트워크 설정 복구를 차례로
선택합니다.
프린터가 자동으로 네트워크 기본값을 복구하여 다시 시작합니다.
3. 준비
LED가 켜져 있으면 소프트웨어 설치를 진행합니다.
버튼을 길게 누릅니다. 준비 LED와 주의 LED가 동시에 깜박이면 무선
라우터가 Wi-Fi 보호 설정(WPS) 모드를 지원하는 경우에는 다음 모드를
통해 연결해 보십시오.
1. 라우터에서 WPS
2. 2분 안에 최소한 3초 동안 무선
(2줄 제어판 프린터)을 풀거나 설치 메뉴를 열고 네트워크 설치, 무선,
Wi-Fi 보호 설치를 차례로 입력한 다음 터치스크린 제어판에서 누름
버튼을 누릅니다.
3. 무선
4. 처리하는 데 최대 2분이 걸립니다. 네트워크 연결이 설정되면 무선
LED 및 준비 LED가 동시에 깜박이기 시작합니다. 프린터가
네트워크 연결을 설정하는 동안 기다립니다.
LED가 깜박임을 멈추고 계속 켜져 있는 상태를 유지합니다.
소프트웨어 설치를 진행합니다.
버튼을 누릅니다.
버튼을 길게 누른 다음 버튼
무선 인쇄
무선 인쇄 및 무선 설정에 대한 자세한 내용은
www.hp.com/go/wirelessprinting으로 이동합니다.
사용 설명서 및 추가 지원 리소스
사용 설명서에 프린터 사용법 및 문제 해결 정보가 포함되어 있습니다.
웹에서 사용할 수 있습니다: www.hp.com/support/ljM148MFP
또는 www.hp.com/support/ljM227MFP으로 이동합니다.
프린터 제어판의 무선 LED 상태를 확인합니다.
1. 무선
2. 무선
3. 무선
제어판 도움말(터치스크린 모델만 해당)
도움말을 보려면 프린트 제어판의 도움말
LED가 꺼져 있으면 무선 연결이 설정되지 않았다는
의미입니다.
a. 프린터 제어판에서 무선 버튼을 누르거나 제어판의 무선
메뉴에서 무선 켜기를 선택합니다.
b. 무선 LED가 깜박이면 소프트웨어 다운로드 및 설치를
진행합니다. 네트워크 연결이 설정되면 무선 LED가 깜박임을
멈추고 계속 켜져 있는 상태를 유지합니다.
LED가 켜져 있으면 무선 연결이 설정되었다는 의미입니다.
a. 구성 보고서/네트워크 요약에서 네트워크 이름(SSID) 정보를
확인합니다. 보고서 메뉴에서 네트워크 요약을 선택합니다.
보고서에서 네트워크 이름(SSID)을 확인합니다.
b. 컴퓨터가 프린터를 연결할 동일한 무선 네트워크에 연결되어
있어야 합니다.
c. 소프트웨어 설치를 진행합니다.
LED가 깜박인다면 무선 연결이 설정되지 않았다는 의미입니다.
a. 프린터와 라우터를 다시 시작합니다.
b. 무선 네트워크에 프린터를 수동으로 연결합니다. 라우터가 Wi-Fi
보호 설정(WPS)을 지원하는 경우에는 WPS를 사용하여 프린터를
연결하고, 그 외의 경우에는 다음 단계를 진행합니다.
c. HP 소프트웨어를 제거 및 재설치하십시오.
버튼을 누르십시오.
펌웨어 업데이트 확인
1. www.hp.com/support/ljM148MFP
또는 www.hp.com/support/ljM227MFP으로 이동합니다.
2. 목록에서 프린터 또는 카테고리를 선택한 다음 드라이버를 클릭합니다.
3. 운영 체제를 선택하고 다음 버튼을 클릭합니다.
4. 펌웨어를 선택하고 다운로드 버튼을 클릭합니다.
14
Page 15

English.........................3
Bahasa Indonesia ........7
한국어 ...................... 11
ไทย ............................ 15
繁體中文.................. 19
Tiếng Việt ................. 23
17
16
15
14
13
12
11
1
2
3
4
5
6
7
8
9
10
15
Page 16

4 5
1
2
3
16
Page 17

171819
Page 18

Page 19

LaserJet Pro MFP M148-M149
LaserJet Pro MFP M227-M229
LaserJet Ultra MFP M230-M231
English.........................3
Bahasa Indonesia ........7
한국어 ...................... 11
ไทย ............................ 15
參考指南
需要協助?- 常見問題解答
如需常見問題解答,請前往
www.hp.com/support/ljM227MFPFAQ,
或掃描 QR 代碼。
雙行 LCD 控制面板視圖
17
16
15
繁體中文.................. 19
Tiếng Việt ................. 23
1
2
3
4
14
13
12
11
10
雙行控制面板顯示幕
1
左箭頭
2
OK (確定) 按鈕 12
3
右箭頭
4
取消
5
開始影印
6
份數
7
調淺/加深
8
按鈕
按鈕
按鈕
按鈕
按鈕
按鈕 17 注意 LED
5
6
7
8
9
英數字元鍵盤
10
重撥傳真 按鈕
11
開始傳真
設定 按鈕
13
14 無線 按鈕 (僅限無線機型)
返回箭號 按鈕
15
16 就緒
按鈕
LED
9
影印功能表
按鈕
Page 20

觸控螢幕控制面板視圖
4 5
1
2
3
控制面板錯誤訊息
返回按鈕
1
首頁按鈕
2
說明按鈕
3
彩色觸控螢幕
4
首頁畫面指示器
5
錯誤訊息 解決方案
裝入紙張 放 入紙 張。
• 正在初始化...
• 正在清潔...
• 列印中...冷卻模式
嚴重錯誤 65
擋門已開啟 關 上 所 有擋門。
• 1 號紙匣卡紙。清除卡紙,然後按
OK (確定)。
• 碳粉匣區域卡紙。打開上蓋板,
並取出碳粉匣。清除夾紙。
• 手動送紙。Plain、Letter。或按 OK
(確定),使用可用紙材。
• 手動雙面列印。裝入 1 號紙匣。
按下 OK (確定) 以繼續作業。
• 耗材記憶體錯誤。
• 安裝黑色碳粉匣。
• 偵測到非 HP 黑色碳粉匣。
• 偵測到原廠保護碳粉匣。
• 未經授權的黑色碳粉匣。
• 黑色碳粉匣嚴重不足。
• 使用的是已用過、或盜版的黑色
碳粉匣。
沒有 動作需 要執 行。
關閉電源再重新開啟。如果錯誤仍然存在,請致電與 HP 客戶服務
聯 繫。
請 參閱 使 用指 南。
當準備就緒時,在雙行控制面板上按下 OK (確定) 按鈕,或是輕按觸控
螢幕控制面板上的 OK (確定)。
取出碳粉匣或感光鼓,並接著重新放入。如果錯誤仍然存在,請致電與
HP 客戶 服務聯 繫。
更 換新 的碳 粉匣 或感 光 鼓。
20
Page 21

行動列印
無線設定,使用行動版 HP Smart 應用程式 (僅限無線機型)
1. 從印表機上拔下乙太連接線和 USB 連接線。
2. 請選擇下列一個步驟執行:
a. 使用雙行控制面板的印表機機型時:按住印表機控制面板上的無線
放開 無線
b. 使用觸控螢幕控制面板的印表機機型時:移至印表機上的 Setup (設定) 功能表,接著依序選取 Network Setup (網路設定) 和
Restore Defaults/Restore Network Settings (還原預設值/還原網路設定)。
印表機將自動還原成網路預設值,並且重新開機。
3. 前往 123.hp.com,並在您的行動裝置上安裝 HP Smart 應用程式。
4. 執行 HP Smart 應用程式。請依照螢幕上的指示,選擇印表機的名稱 (例如,「HP-setup-XXX」),並將其連接到無線網路。如需詳細資
訊,請掃描 FAQ QR 碼。
5. 印表機成功連接至無線網路之後,無線
按鈕。
LED 指示燈就會停止閃爍,並開始維持恆亮。
按鈕。當 就緒 LED 和 注意 LED 指示燈開始一起閃爍時,
使用 HP Smart 應用程式,進行設定、列印和其他動作。
1. 掃描 QR 碼或前往 123.hp.com。
2. 安裝 HP Smart 應用程式。
3. 執行 HP Smart 應用程式,然後依照畫面上的指示,
進行連線、設定、列印和其他動作。
下載與安裝軟體
附註:在接獲提示前,請勿連接 USB 連接線。
方法 1:下載 HP Easy Start (Windows 和 Mac OS)
1. 前往 123.hp.com/laserjet,然後按一下 Download (下載)。
2. 請依照螢幕上的指示和提示,將檔案儲存至電腦。
3. 從儲存軟體檔案的資料夾中,啟動軟體檔案。
4. 請依照螢幕上的指示,安裝軟體。
5. 在出現選擇連線類型的提示時,選擇適合連線類型的選項。
進一步了解行動列印
如需有關這些和其他作業系統
(Chrome/Google 雲端列印) 的更多資訊,
請前往 www.hp.com/go/LaserJetMobilePrinting,
或掃描 QR 碼。
方法 2:從印表機支援網站下載
(Windows 和 Mac OS)
1. 前往 www.hp.com/support/ljM148MFP
或 www.hp.com/support/ljM227MFP。
2. 選擇軟體和驅動程式。
3. 下載適用於您印表機型號和作業系統的軟體。
4. 從儲存軟體檔案的資料夾中,啟動軟體檔案。
5. 請依照螢幕上的指示,安裝軟體。
6. 在出現選擇連線類型的提示時,選擇適合連線類型的選項 。
Wi-Fi Direct 列印 (選用)
Wi-Fi Direct 可讓具備 Wi-Fi 功能的裝置 (例如智慧型手機、平板電腦或電腦) 在沒有使用無線路由器或存取點的情況下,直接與印表機進行連線。將
裝置放在靠近印表機的地方,確保成功達成連線及列印。
附註:下面步驟會使您的遠端裝置與網際網路暫時中斷連線。若您要列印的是電子郵件、網頁等網站類型的內容,或是雲端類型的文件,請先開
啟這些內容後,再進行列印。
1. 請確定印表機電源已開啟並處於就緒狀態,而且紙張已放入主要進紙匣。
2. 從控制面板中,開啟 Reports (報告) 功能表,並接著選取 Network Summary (網路摘要),即可列印網路摘要報告。您可以在 Wi-Fi Direct Setup
(Wi-Fi Direct 設定) 區段中,找到 Wi-Fi Direct Password (Wi-Fi Direct 密碼)。
3. 在遠端裝置上,開啟 Wi-Fi 功能表,並接著從可用網路清單中,輕按名稱包含 DIRECT 的印表機 (例如:DIRECT-72-HP xxx)。
4. 在收到密碼提示時,使用 Network Summary (網路摘要) 報告中所提供的密碼。
5. 打開您要列印的項目,接著從應用程式或動作功能表中輕按 Print (列印)。
6. 從可用印表機清單中選擇印表機,然後輕按 Print (列印)。
7. 在列印工作完成後,重新連結到您的本機 Wi-Fi 網路。
21
Page 22

使用掃描功能
使用電腦上的 HP Scan 軟體,啟動印表機的掃描工作。
Windows
按一下開始,選取程式集或所有程式,接著選取 HP,再選擇 HP Scan
(HP 掃描)。
Mac OS
移至 Applications (應用程式) 資料夾,並開啟 HP Easy Scan。
疑難排解
無線連線設定疑難排解
附註:同時支援 2.4 GHz 和 5 GHz 頻寬。
確認印表機位於無線網路範圍內。對多數網路而言,印表機必須是在距離無線存取點 (無線路由器) 30 公尺 (100 英呎) 以內的位置。可能需要使用
USB 纜線暫時連接印表機與電腦。為確保正確同步無線設定資訊,在出現提示前,請勿連接 USB 纜線。
按照這些步驟來還原網路設定:
1. 從印表機拔下 USB 連接線。
2. 請選擇下列一個步驟執行:
a. 使用雙行控制面板的印表機機型時:按住印表機控制面板上的無線
放開 無線 按鈕。
b. 使用觸控螢幕控制面板的印表機機型時:移至印表機上的 Setup (設定) 功能表,接著依序選取 Network Setup (網路設定) 和 Restore
Defaults/Restore Network Settings (還原預設值/還原網路設定)。
印表機將自動還原成網路預設值,並且重新開機。
3. 當 就緒
LED 亮起時,繼續執行安裝軟體。
按鈕。當 就緒 LED 和 注意 LED 指示燈開始一起閃爍時,
如果您的路由器支援 Wi-Fi Protected Setup (WPS) 模式,請嘗試透過此
模式連線:
1. 按下路由器上的 WPS
2. 在 2 分鐘內,持續至少 3 秒鐘按住 無線
開該按鈕 (雙行控制面板印表機),或是依序開啟 Setup (設定) 功
能表、Network Setup (網路設定)、Wireless (無線)、Wi-Fi Protected
Setup,並接著從觸控螢幕控制面板中輕按 Push (推入) 按鈕。
3. 無線
4. 這個過程最久費時 2 分鐘。建立網路連線後,無線
LED 燈和 就緒 LED 燈會一起開始閃爍。等待印表機自動建
立網路連線。
閃爍並持續亮起。繼續執行安裝軟體。
按鈕。
(無線) 按鈕,並接著放
LED 燈會停止
無線列印
如需關於無線列印及無線設定的詳細資訊,
請前往 www.hp.com/go/wirelessprinting。
使用指南和其他支援資源
使用指南包含印表機使用方式及疑難排解資訊。使用指
南也有提供網路版:前往 www.hp.com/support/ljM148MFP
或 www.hp.com/support/ljM227MFP。
在印表機控制面板上檢查 Wireless (無線) LED 燈的狀態:
1. 如果 無線
a. 按下印表機控制面板上的 無線 按鈕,或是從控制面板上的
b. 在 無線 LED 開始閃爍之後,繼續執行安裝軟體。建立網路連
2. 如果 無線
a. 檢查 Conguration Report/Network Summary (組態報告/網路摘要)
b. 確定電腦所連線的無線網路與印表機要連線的無線網路相同。
c. 繼續執行安裝軟體。
3. 如果 無線
a. 請重新啟動印表機和路由器。
b. 手動將印表機連線至無線網路。使用 Wi-Fi Protected Setup (WPS)
c. 請解除 HP 軟體,然後再重新安裝。
控制面板說明 (僅限觸控螢幕機型)
輕觸印表機控制面板上的 Help (說明)
LED 燈熄滅,表示並未建立無線通訊連線。
無線 功能表中選取 Wireless on (開啟無線) 選項。
線後,無線 LED 燈會停止閃爍並持續亮起。
LED 燈亮起,表示已建立無線通訊連線。
上的網路名稱 (SSID) 資訊:從 Reports (報告) 功能表中,選取
Network Summary (網路摘要)。驗證報告上的網路名稱 (SSID)。
LED 燈閃爍,表示並未建立無線通訊連線。
連線印表機 (如果路由器支援 WPS),或繼續進行下一個步驟。
按鈕,即可存取說明主題。
查看韌體更新
1. 前往 www.hp.com/support/ljM148MFP
或 www.hp.com/support/ljM227MFP。
2. 從清單選擇印表機或類別,然後按一下 Drivers (驅動程式)。
3. 選擇作業系統,然後按一下 Next (下一步) 按鈕。
4. 選擇 Firmware (韌體),然後按一下 Download (下載) 按鈕。
22
Page 23

English.........................3
Bahasa Indonesia ........7
한국어 ...................... 11
ไทย ............................ 15
繁體中文.................. 19
Tiếng Việt ................. 23
17
16
15
14
13
12
11
1
2
3
4
5
6
7
8
9
10
23
Page 24

4 5
1
2
3
24
Page 25

25
Page 26

26
Page 27

Page 28

© Copyright 2018 HP Development Company, L.P.
Reproduction, adaptation or translation without prior written permission is
prohibited, except as allowed under the copyright laws.
The information contained herein is subject to change without notice.
The only warranties for HP products and services are set forth in the express
warranty statements accompanying such products and services. Nothing herein
should be construed as constituting an additional warranty. HP shall not be liable for
technical or editorial errors or omissions contained herein.
Trademark Credits
Windows® is a U.S. registered trademark of Microsoft Corporation.
Apple and the Apple logo are trademarks of Apple Inc., registered in the U.S. and
other countries.
App Store is a service mark of Apple Inc. Android, Google Play, and the Google Play
logo are trademarks of Google Inc.
Mac OS is a trademark of Apple Inc., registered in the U.S. and other countries.
AirPrint is a trademark of Apple Inc., registered in the U.S. and other countries.
www.hp.com
 Loading...