

Page 1
hp LaserJet 2400 series
use
Page 2

Page 3

HP LaserJet 2400 series printer
User Guide
Page 4

Copyright and License
© 2004 Copyright Hewlett-Packard
Development Company, L.P.
Reproduction, adaptation, or translation
without prior written permission is
prohibited, except as allowed under the
copyright laws.
The information contained in this document
is subject to change without notice.
The only warranties for HP products and
services are set forth in the express
warranty statements accompanying such
products and services. Nothing herein
should be construed as constituting an
additional warranty. HP shall not be liable
for technical or editorial errors or omissions
contained herein.
Part number Q5956-90941
Edition 1, 11/2004
Trademark Credits
®
and PostScript® are trademarks of
Adobe
Adobe Systems Incorporated.
Linux is a U.S. registered trademark of
Linus Torvalds.
Microsoft
®
, Windows®, and Windows NT
®
are U.S. registered trademarks of Microsoft
Corporation.
®
UNIX
is a registered trademark of The
Open Group.
ENERGY STAR
®
logo
are U.S. registered marks of the
®
and the ENERGY STAR
United States Environmental Protection
Agency.
Page 5

HP customer care
Online services
For 24-hour access to information by using a modem or Internet connection
World Wide Web: Updated HP printer software, product and support information, and printer
drivers in several languages can be obtained from www.hp.com/support/lj2410,
http://www.hp.com/support/lj2420, or http://www.hp.com/support/lj2430. (The site is in
English.)
Online troubleshooting tools
HP Instant Support Professional Edition (ISPE) is a suite of Web-based troubleshooting tools
for desktop computing and printing products. ISPE helps you quickly identify, diagnose, and
resolve computing and printing problems. The ISPE tools are available at
http://instantsupport.hp.com.
Telephone support
Hewlett-Packard Company provides free telephone support during the warranty period.
When you call, you will be connected to a responsive team that is waiting to help you. For
the telephone number for your country/region, see the flyer that came in the box with the
product, or visit http://www.hp.com/support/callcenters. Before calling HP, have the following
information ready: the product name and serial number, the date of purchase, and a
description of the problem.
You can also find support on the Internet at http://www.hp.com. Click the support & drivers
block.
Software utilities, drivers, and electronic information
Go to http://www.hp.com/go/lj2410_software, http://www.hp.com/go/lj2420_software, or
http://www.hp.com/go/lj2430_software. (The site is in English, but printer drivers can be
downloaded in several languages.)
For information over the telephone, see the flyer that came in the box with the printer.
HP direct ordering for accessories or supplies
Order supplies from the following Web sites:
United States: http://www.hp.com/sbso/product/supplies
Canada: http://www.hp.ca/catalog/supplies
Europe: http://www.hp.com/go/supplies
Asia-Pacific: http://www.hp.com/paper/
Order accessories from www.hp.com/support/lj2410, http://www.hp.com/support/lj2420, or
http://www.hp.com/support/lj2430. For more information, see
and supplies.
To order supplies or accessories over the telephone, call the following numbers:
United States businesses: 800-282-6672
Ordering parts, accessories,
United States small and medium businesses: 800-888-9909
United States home and home offices: 800-752-0900
Canada: 800-387-3154
To find the phone numbers for other countries/regions, see the flyer that came in the box
with the printer.
ENWW iii
Page 6

HP service information
To locate HP-Authorized Dealers in the United States or Canada, call 800-243-9816 (United
States) or 800-387-3867 (Canada). Or, go to http://www.hp.com/go/cposupportguide.
For service for your HP product in other countries/regions, call the customer support number
for your country/region. See the flyer that came in the box with the printer.
HP service agreements
Call: 800-HPINVENT [800-474-6836 (U.S.)] or 800-268-1221 (Canada).
Out-of-Warranty Service: 800-633-3600.
Extended Service: Call: 800-HPINVENT [800-474-6836 (U.S.)] or 800-268-1221 (Canada).
Or, go to the HP Care Pack Services Web site at http://www.hpexpress-services.com.
HP Toolbox
To check the printer status and settings and to view troubleshooting information and online
documentation, use the HP Toolbox software. You can view the HP Toolbox when the
printer is directly connected to your computer or when it is connected to a network. You must
have performed a complete software installation to use the HP Toolbox. See
Using the
HP Toolbox.
HP support and information for Macintosh computers
Visit: http://www.hp.com/go/macosx for Macintosh OS X support information and HP
subscription service for driver updates.
Visit: http://www.hp.com/go/mac-connect for products designed specifically for the Macintosh
user.
iv ENWW
Page 7

Table of contents
1 Printer basics
Quick access to printer information ...........................................................................................2
User guide links ..................................................................................................................2
Where to look for more information ....................................................................................2
Printer configurations ................................................................................................................3
Feature designations for the HP LaserJet 2400 series printer ...........................................3
Printer features ..........................................................................................................................4
Printer parts ...............................................................................................................................8
Interface ports .....................................................................................................................9
Control panel ...........................................................................................................................10
Control-panel layout .........................................................................................................10
Control-panel buttons .......................................................................................................11
Control-panel lights ...........................................................................................................11
Printing control-panel menus ............................................................................................12
Using the printer Help system ..........................................................................................12
Changing printer-control-panel configuration settings .....................................................13
Software ..................................................................................................................................23
Operating systems and printer components ....................................................................23
Printer drivers ...................................................................................................................24
Software for Macintosh computers ...................................................................................27
Installing the printing system software .............................................................................28
Uninstalling the software ..................................................................................................33
Selecting print media ...............................................................................................................34
Supported types and sizes of print media ........................................................................34
2 Printing tasks
Selecting which tray is used for printing .................................................................................38
Understanding tray order ..................................................................................................38
Customizing tray 1 operation ............................................................................................38
Printing by type and size of media (locking trays) ............................................................39
Manually feeding media from tray 1 .................................................................................40
Selecting the correct fuser mode ............................................................................................41
Loading trays ...........................................................................................................................42
Loading tray 1 (multipurpose tray) ....................................................................................42
Loading tray 2 (250-sheet tray) ........................................................................................43
Loading optional tray 3 (500-sheet tray) ...........................................................................45
Understanding media output options ......................................................................................47
Printing on envelopes ..............................................................................................................48
To load envelopes in tray 1 ..............................................................................................48
Printing on special media ........................................................................................................50
Printing on labels ..............................................................................................................50
Printing on transparencies ................................................................................................51
Printing on custom-sized media or cardstock ..................................................................51
Printing on letterhead, prepunched, or preprinted paper (single-sided) ..........................52
Printing on both sides (duplexing) ...........................................................................................54
ENWW v
Page 8

Paper orientation for printing on both sides .....................................................................54
Layout options for printing on both sides ..........................................................................55
To duplex by using the built-in duplexer ...........................................................................55
To duplex manually ..........................................................................................................56
Canceling a print job ...............................................................................................................57
Using the printer driver ............................................................................................................58
Changing the settings for a print job .................................................................................58
Changing default settings .................................................................................................58
Using printer-driver features ...................................................................................................61
Printing watermarks ..........................................................................................................61
Printing multiple pages on one sheet of paper .................................................................62
Setting a custom paper size .............................................................................................62
Using EconoMode (draft) printing ...................................................................................63
Selecting print-quality settings ..........................................................................................63
Using reduce/enlarge options ...........................................................................................64
Selecting a paper source ..................................................................................................64
Printing a cover, a different first or last page, or a blank page .........................................65
Using job-storage features ......................................................................................................66
Proofing and holding a job ................................................................................................66
Deleting a held job ............................................................................................................6 6
Printing a private job .........................................................................................................6 7
Deleting a private job ........................................................................................................67
3 Managing and maintaining the printer
Using the embedded Web server ...........................................................................................70
Opening the embedded Web server ................................................................................70
Information tab ..................................................................................................................71
Settings tab .......................................................................................................................71
Networking tab ..................................................................................................................72
Other links .........................................................................................................................72
Using HP Web Jetadmin software ..........................................................................................73
Using the HP Toolbox .............................................................................................................74
Supported operating systems ...........................................................................................74
Supported browsers .........................................................................................................74
To view the HP Toolbox ...................................................................................................75
Status tab ..........................................................................................................................75
Troubleshooting tab ..........................................................................................................75
Alerts tab ...........................................................................................................................76
Documentation tab ...........................................................................................................76
Device Settings window ....................................................................................................76
Toolbox links .....................................................................................................................77
Other links .........................................................................................................................77
Uninstalling the HP Toolbox ....................................................................................................78
To uninstall the HP Toolbox by using the Windows desktop shortcut .............................78
To uninstall the HP Toolbox by using Add/Remove Programs in the Windows
control panel...................................................................................................................7 8
Managing and configuring printer drivers ...............................................................................79
HP Web Jetadmin software plug-in ..................................................................................79
Customization utility ..........................................................................................................80
Configuring e-mail alerts .........................................................................................................81
Setting the real-time clock .......................................................................................................82
Setting the date and time ..................................................................................................82
Checking the printer configuration ..........................................................................................85
Menu map .........................................................................................................................85
Configuration page ...........................................................................................................85
vi ENWW
Page 9

Supplies status page ........................................................................................................87
PS or PCL font list ............................................................................................................87
Managing the print cartridge ...................................................................................................89
HP print cartridges ............................................................................................................8 9
Non-HP print cartridges ....................................................................................................89
Print-cartridge authentication ............................................................................................89
Print-cartridge storage ......................................................................................................89
Print-cartridge life expectancy ..........................................................................................90
Checking the supply level .................................................................................................90
Cartridge-low and cartridge-out conditions ......................................................................90
Cleaning the printer .................................................................................................................92
Cleaning the outside .........................................................................................................92
Cleaning the paper path and print-cartridge areas ...........................................................92
Cleaning the fuser ............................................................................................................93
4 Problem solving
Troubleshooting flowchart .......................................................................................................96
1 Does the control panel display read READY? ..............................................................96
2 Can you print a configuration page? .............................................................................97
3 Can you print from a program? .....................................................................................98
4 Does the job print as expected? ..................................................................................100
5 Does the printer select the proper trays? ....................................................................102
Solving general printing problems .........................................................................................104
Guidelines for using paper ....................................................................................................108
Printing special pages ...........................................................................................................109
Clearing jams ........................................................................................................................110
Typical jam locations ......................................................................................................110
Understanding printer messages ..........................................................................................116
Using the printer online Help system ..............................................................................116
Resolving persistent messages ......................................................................................116
Correcting print-quality problems ..........................................................................................128
Print-quality checklist ......................................................................................................128
Image defect examples ..................................................................................................128
Light print (partial page) ..................................................................................................130
Light print (entire page) ..................................................................................................130
Specks ............................................................................................................................130
Dropouts .........................................................................................................................131
Lines ...............................................................................................................................131
Gray background ............................................................................................................131
Toner smear ...................................................................................................................132
Loose toner .....................................................................................................................132
Repeating defects ...........................................................................................................133
Repeating image ............................................................................................................133
Misformed characters .....................................................................................................133
Page skew ......................................................................................................................134
Curl or wave ....................................................................................................................134
Wrinkles or creases ........................................................................................................135
Vertical white lines ..........................................................................................................135
Tire tracks .......................................................................................................................135
White spots on black ......................................................................................................136
Scattered lines ................................................................................................................136
Blurred print ....................................................................................................................136
Random image repetition ...............................................................................................137
Troubleshooting network printing problems ..........................................................................138
Troubleshooting common Windows problems .....................................................................139
ENWW vii
Page 10

Troubleshooting common Macintosh problems ....................................................................140
Troubleshooting common PostScript problems ....................................................................146
General problems ...........................................................................................................146
Specific errors .................................................................................................................146
Appendix A Supplies and accessories
Ordering parts, accessories, and supplies ............................................................................150
Ordering directly from HP ...............................................................................................150
Ordering through service or support providers ...............................................................150
Ordering directly through the embedded Web server (for printers that are
connected to a network) ..............................................................................................150
Ordering directly through the HP Toolbox software (for printers that are directly
connected to a computer) ...........................................................................................151
Part numbers .........................................................................................................................152
Paper-handling accessories ...........................................................................................152
Print cartridges ................................................................................................................152
Memory ...........................................................................................................................152
Cables and interfaces .....................................................................................................153
Print media ......................................................................................................................153
Appendix B Control panel menus
Retrieve Job menu ................................................................................................................158
Information menu ..................................................................................................................160
Paper Handling menu ...........................................................................................................161
Configure Device menu .........................................................................................................165
Printing submenu ............................................................................................................165
Print Quality submenu ....................................................................................................168
System Setup submenu .................................................................................................172
I/O submenu ...................................................................................................................175
Resets submenu .............................................................................................................176
Diagnostics menu ..................................................................................................................178
Service menu ........................................................................................................................179
Appendix C Specifications
HP LaserJet 2400 series physical specifications ..................................................................181
Electrical specifications .........................................................................................................182
Acoustic emissions ................................................................................................................183
Operating environment ..........................................................................................................184
Paper specifications ..............................................................................................................185
Printing and paper storage environment ........................................................................185
Envelopes .......................................................................................................................186
Labels .............................................................................................................................188
Transparencies ...............................................................................................................188
Appendix D Printer memory and expansion
Overview ...............................................................................................................................190
Printer memory ......................................................................................................................191
To install printer memory ................................................................................................191
Installing CompactFlash cards ..............................................................................................195
To install a CompactFlash card ......................................................................................195
Checking DIMM or CompactFlash installation ......................................................................198
To verify that DIMMs or CompactFlash cards are installed correctly ............................198
Saving resources (permanent resources) .............................................................................199
viii ENWW
Page 11

Installing an EIO card ............................................................................................................200
To install an EIO card .....................................................................................................200
To remove an installed EIO card ....................................................................................201
Appendix E Printer commands
Understanding PCL 6 and PCL 5e printer command syntax ................................................204
Combining escape sequences .......................................................................................204
Using escape characters ................................................................................................205
Selecting PCL 6 and PCL 5 fonts ...................................................................................205
Common PCL 6 and PCL 5 printer commands ..............................................................206
Appendix F Regulatory information
Introduction ............................................................................................................................211
FCC regulations ....................................................................................................................212
Environmental Product Stewardship program ......................................................................213
Protecting the environment .............................................................................................213
Ozone production ...........................................................................................................213
Energy consumption .......................................................................................................213
HP LaserJet printing supplies .........................................................................................213
Material safety data sheet ..............................................................................................214
For more information ......................................................................................................215
Declaration of conformity ......................................................................................................216
Country-/region-specific safety statements ...........................................................................217
Laser safety statement ...................................................................................................217
Canadian DOC statement ..............................................................................................217
Japanese VCCI statement ..............................................................................................217
Korean EMI statement ....................................................................................................217
Finnish laser statement ..................................................................................................218
Appendix G Service and support
Hewlett-Packard limited warranty statement ........................................................................219
Print Cartridge Limited Warranty Statement .........................................................................221
Availability of support and service .........................................................................................222
HP maintenance agreements ...............................................................................................222
Onsite service agreements .............................................................................................222
HP Express Exchange (U.S. and Canada only) ...................................................................223
To use HP Express Exchange .......................................................................................223
Repacking the printer ............................................................................................................224
To repack the printer ......................................................................................................224
Service information form .......................................................................................................225
Index
ENWW ix
Page 12

x ENWW
Page 13

1
Printer basics
Thank you for purchasing an HP LaserJet 2400 series printer. If you have not done so, see
the getting started guide (start) provided with the printer for setup instructions.
Now that the printer is set up and ready to use, take a few moments to familiarize yourself
with the printer. This section provides information about the following topics:
●
Quick access to printer information
●
Printer configurations
●
Printer features
●
Printer parts
●
Control panel
●
Software
●
Selecting print media
ENWW 1
Page 14

Quick access to printer information
This section summarizes the resources that are available to learn more about setting up and
using the printer.
User guide links
● Part numbers
Control-panel layout
●
Troubleshooting flowchart
●
Where to look for more information
Several references are available for use with this printer. See www.hp.com/support/lj2410,
http://www.hp.com/support/lj2420, or http://www.hp.com/support/lj2430.
Setting up the printer
Getting started guide—Provides step-by-step instructions for installing and setting up the
printer. This hard-copy guide is included with each printer.
Network installation guide—Contains instructions to set up the printer on a network. This
hard-copy guide is included with printers that come with an HP Jetdirect embedded print
server.
HP Jetdirect Embedded Print Server Administrator's Guide—Contains information for
configuring and troubleshooting an HP Jetdirect embedded print server. You can print a
copy from the CD-ROM that came with the printer. (Available with models that include an
HP Jetdirect embedded print server.)
Accessory installation guides—Provides step-by-step instructions for installing
accessories, such as an optional tray. A hard-copy guide is supplied with each accessory.
Using the printer
User guide—Contains detailed information for using the printer and for troubleshooting
problems. This guide is available on the CD-ROM that came with the printer. It is also
available through the HP Toolbox software.
Online Help—Contains information about the printer options that are available from within
the printer drivers. To view a Help file, open the online Help through the printer driver.
HTML (online) user guide—Contains detailed information for using the printer and for
troubleshooting problems. Go to www.hp.com/support/lj2410, http://www.hp.com/support/
lj2420, or http://www.hp.com/support/lj2430. After connecting, click Manuals.
Printer control-panel Help—This printer features a Help system at the control panel that
provides instructions for resolving most printer errors. To view Help for a message (if
(H
ELP
available), press
button).
2 Chapter 1 Printer basics ENWW
Page 15

Printer configurations
The HP LaserJet 2400 series printer is available in several configurations.The letters that
follow the printer name indicate the differences between the configurations. Each letter
refers to a specific feature. Use the information in this section to determine which features
your model has.
NOTE
Not all models are available in all configurations.
Feature designations for the HP LaserJet 2400 series printer
Letter Description
no letter This is the base model.
d
n Models with this designation include an embedded HP Jetdirect print server for
t
Models with this designation include a duplexing unit for automatic two-sided printing.
connecting to a 10/100Base-T network.
Models with this designation include an additional paper tray.
ENWW Printer configurations 3
Page 16
Printer features
The following tables describe the features for the HP LaserJet 2400 series printers.
Speed
HP LaserJet 2410 printer HP LaserJet 2420 series
printer
Prints on letter-size paper at
25 pages per minute (ppm).
Prints on A4-size paper at
24 ppm.
Prints on letter-size paper at
30 pages per minute (ppm).
Prints on A4-size paper at
28 ppm.
Resolution
HP LaserJet 2410 printer HP LaserJet 2420 series
printer
FastRes 1200—produces 1200dpi print quality for fast, highquality printing of business text
and graphics.
ProRes 1200—produces 1200dpi printing for the best quality
in line art and graphic images.
HP LaserJet print cartridges for
crisp, sharp output.
FastRes 1200—produces 1200dpi print quality for fast, highquality printing of business text
and graphics.
ProRes 1200—produces 1200dpi printing for the best quality
in line art and graphic images.
HP LaserJet print cartridges for
crisp, sharp output.
HP LaserJet 2430 series
printer
Prints on letter-size paper at
35 pages per minute (ppm).
Prints on A4-size paper at
33 ppm.
HP LaserJet 2430 series
printer
FastRes 1200—produces 1200dpi print quality for fast, highquality printing of business text
and graphics.
ProRes 1200—produces 1200dpi printing for the best quality
in line art and graphic images.
HP LaserJet print cartridges for
crisp, sharp output.
Paper handling
HP LaserJet 2410 printer HP LaserJet 2420 series
printer
Includes a 100-sheet manualfeed input tray and a 250-sheet
input tray.
Compatible with an optional
500-sheet paper feeder.
Includes a 100-sheet manualfeed input tray and a 250-sheet
input tray.
Compatible with an optional
500-sheet paper feeder.
HP LaserJet 2420d and dn
models include a duplexprinting accessory for
automatic two-sided printing.
HP LaserJet 2430 series
printer
Includes a 100-sheet manualfeed input tray and a 250-sheet
input tray. The HP LaserJet
2430t, tn, and dtn models also
include a 500-sheet input tray.
HP LaserJet 2430dtn model
includes a duplex-printing
accessory for automatic twosided printing.
4 Chapter 1 Printer basics ENWW
Page 17
Memory and processor
HP LaserJet 2410 printer HP LaserJet 2420 series
printer
Includes 32 MB of randomaccess memory (RAM).
Expandable up to 288 MB
maximum memory.
400-megahertz (MHz)
processor speed.
HP LaserJet 2420 printer
includes 32 MB of randomaccess memory (RAM),
expandable up to 288 MB
maximum memory.
HP LaserJet 2420d printer
includes 48 MB RAM,
expandable up to 304 MB
maximum memory.
HP LaserJet 2420n and dn
models include 64 MB RAM,
expandable up to 320 MB
maximum memory.
400-megahertz (MHz)
processor speed.
Interface connections and networking
HP LaserJet 2410 printer HP LaserJet 2420 series
printer
HP LaserJet 2430 series
printer
HP LaserJet 2430t printer
includes 48 MB of randomaccess memory (RAM),
expandable up to 304 MB
maximum memory.
HP LaserJet 2430n, tn, and dtn
models include 64 MB RAM,
expandable up to 320 MB
maximum memory.
400-megahertz (MHz)
processor speed.
HP LaserJet 2430 series
printer
Includes a bidirectional,
extended capabilities (ECP)
type-B (IEEE 1284-compliant)
parallel connection.
Includes a universal serial bus
(USB) 2.0 connection (full and
high speed).
Includes one PCI-based
enhanced input/output (EIO)
expansion slot.
Includes a bidirectional, ECP
type-B (IEEE 1284-compliant)
parallel connection.
Includes a USB 2.0 connection
(full and high speed).
Includes one PCI-based
enhanced input/output (EIO)
expansion slot.
HP LaserJet 2420n and dn
models include an embedded
HP Jetdirect print server for
connecting to a 10/100Base-TX
network.
Language and fonts
HP LaserJet 2410 printer HP LaserJet 2420 series
printer
HP PCL6, PCL 5e, and
HP PostScript
®
(PS) 3
emulation.
80 fonts for Microsoft
®
Windows®.
Additional fonts can be added
by installing a CompactFlash
font card.
HP PCL6, PCL 5e, and
HP PostScript
®
(PS) 3
emulation.
80 fonts for Microsoft
®
Windows®.
Additional fonts can be added
by installing a CompactFlash
font card.
Includes a bidirectional, ECP
type-B (IEEE 1284-compliant)
parallel connection.
Includes a USB 2.0 connection
(full and high speed).
Includes one PCI-based
enhanced input/output (EIO)
expansion slot.
HP LaserJet 2430n, tn, and dtn
models include an embedded
HP Jetdirect print server for
connecting to a 10/100Base-TX
network.
HP LaserJet 2430 series
printer
HP PCL6, PCL 5e, and
HP PostScript
®
(PS) 3
emulation.
80 fonts for Microsoft
®
Windows®.
Additional fonts can be added
by installing a CompactFlash
font card.
ENWW Printer features 5
Page 18
Print cartridge
HP LaserJet 2410 printer HP LaserJet 2420 series
printer
Standard print cartridge prints
up to 6,000 pages.
HP smart printing supplies
program automatically alerts
when toner is low.
Standard print cartridge prints
up to 6,000 pages.
HP smart printing supplies
program automatically alerts
when toner is low.
Energy savings
HP LaserJet 2410 printer HP LaserJet 2420 series
printer
The printer automatically
conserves electricity by
reducing power consumption
when it is not printing.
As an ENERGY STAR
®
partner, Hewlett-Packard
Company has determined tha
this product meets ENERGY
®
STAR
guidelines for energy
efficiency.
The printer automatically
conserves electricity by
reducing power consumption
when it is not printing.
As an ENERGY STAR
partner, Hewlett-Packard
Company has determined tha
this product meets ENERGY
®
STAR
guidelines for energy
efficiency.
HP LaserJet 2430 series
printer
Standard print cartridge prints
up to 6,000 pages.
HP smart printing supplies
program automatically alerts
when toner is low.
HP LaserJet 2430 series
printer
The printer automatically
conserves electricity by
reducing power consumption
when it is not printing.
®
As an ENERGY STAR
®
partner, Hewlett-Packard
Company has determined tha
this product meets ENERGY
®
STAR
guidelines for energy
efficiency.
Economical printing
HP LaserJet 2410 printer HP LaserJet 2420 series
printer
N-up printing (multiple pages
on one sheet) saves paper.
Duplex printing (for models that
include a duplex-printing
accessory) saves paper.
Printing in EconoMode saves
toner.
N-up printing (multiple pages
on one sheet) saves paper.
Duplex printing (for models that
include a duplex-printing
accessory) saves paper.
Printing in EconoMode saves
toner.
HP LaserJet 2430 series
printer
N-up printing (multiple pages
on one sheet) saves paper.
Duplex printing (for models that
include a duplex-printing
accessory) saves paper.
Printing in EconoMode saves
toner.
6 Chapter 1 Printer basics ENWW
Page 19
Accessibility
HP LaserJet 2410 printer HP LaserJet 2420 series
printer
The online user guide is
compatible with text screenreaders.
The print cartridge can be
inserted and removed by using
one hand.
All doors and covers can be
opened by using one hand.
The 250-sheet input tray is
easy to open and close.
All media-width guides can be
adjusted by using one hand.
The online user guide is
compatible with text screenreaders.
The print cartridge can be
inserted and removed by using
one hand.
All doors and covers can be
opened by using one hand.
The 250-sheet input tray is
easy to open and close.
All media-width guides can be
adjusted by using one hand.
HP LaserJet 2430 series
printer
The online user guide is
compatible with text screenreaders.
The print cartridge can be
inserted and removed by using
one hand.
All doors and covers can be
opened by using one hand.
The 250-sheet and 500-sheet
input trays are easy to open
and close.
All media-width guides can be
adjusted by using one hand.
ENWW Printer features 7
Page 20
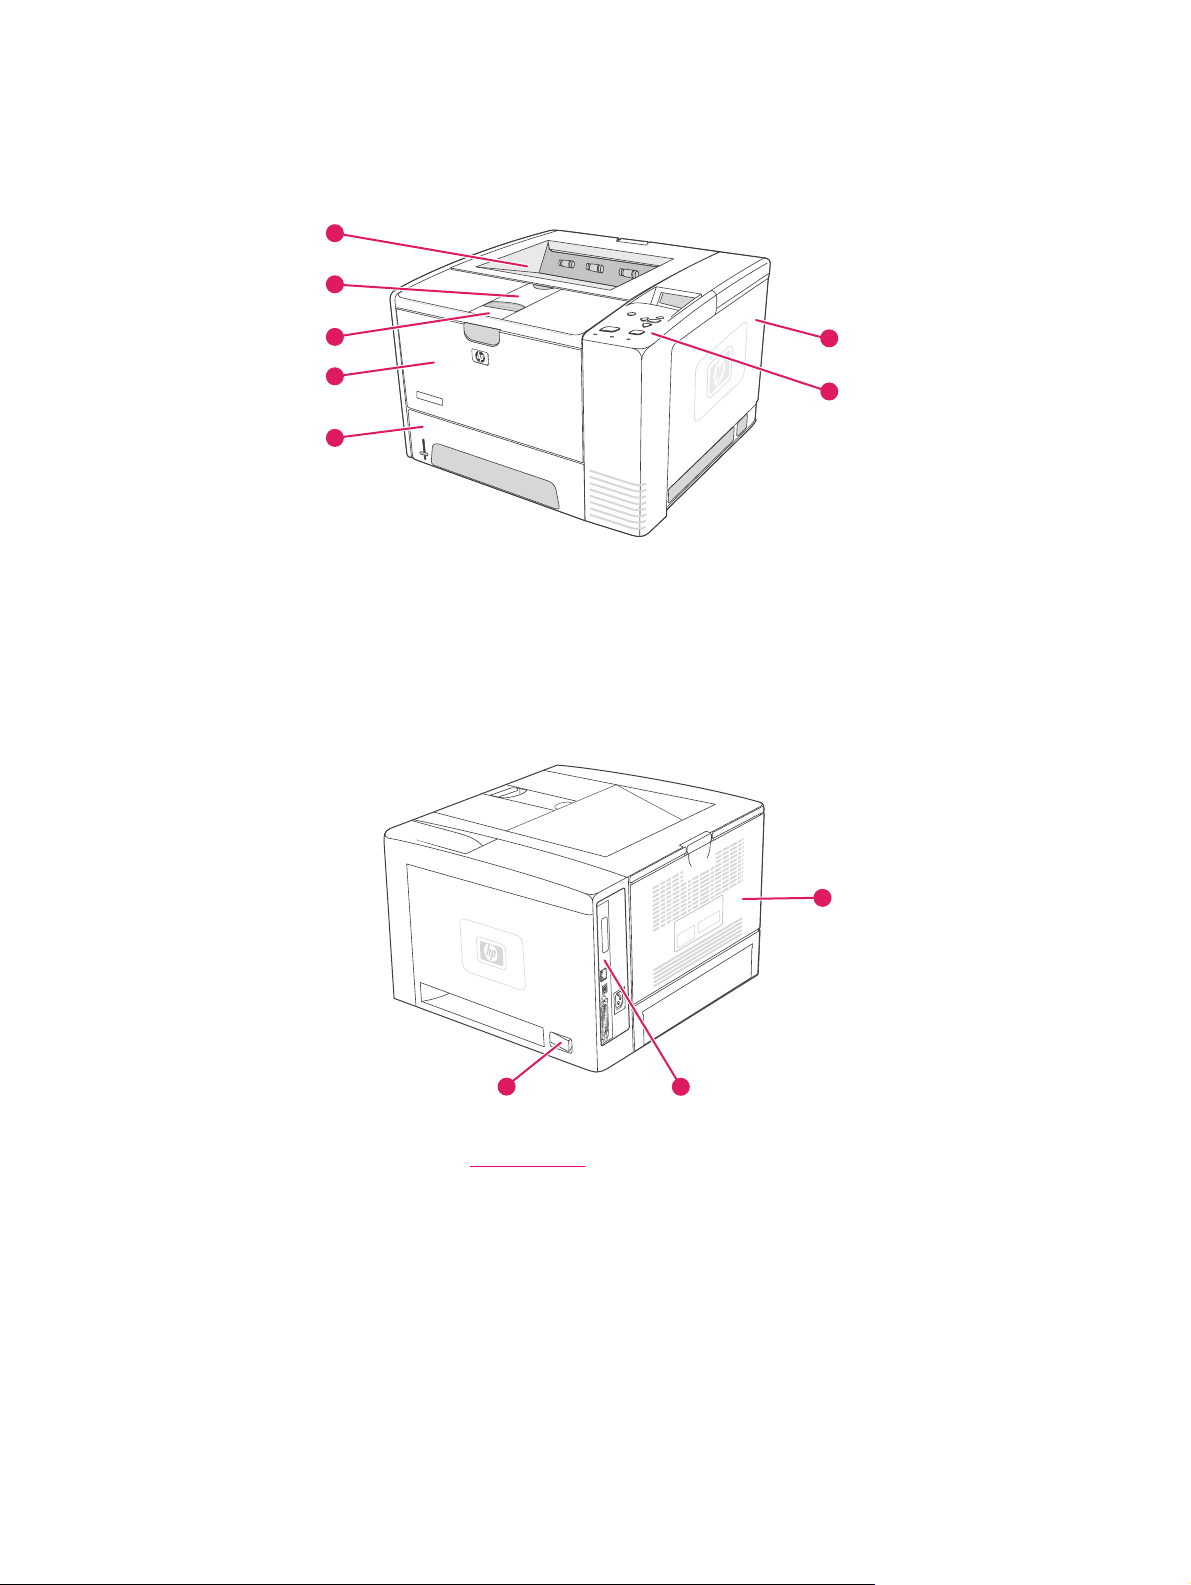
Printer parts
Before using the printer, familiarize yourself with the parts of the printer.
1
2
3
4
5
7
6
1 Top output bin
2 Long-media extension
3 Latch to open the front cover (provides access to the print cartridge)
4 Tray 1 (pull to open)
5 Tray 2
6 Control panel
7 Right-side cover (provides access to DIMMs and CompactFlash cards)
10
8
9
8 On/off switch
9 Interface ports (see
Interface ports)
10 Rear output bin (pull to open)
8 Chapter 1 Printer basics ENWW
Page 21
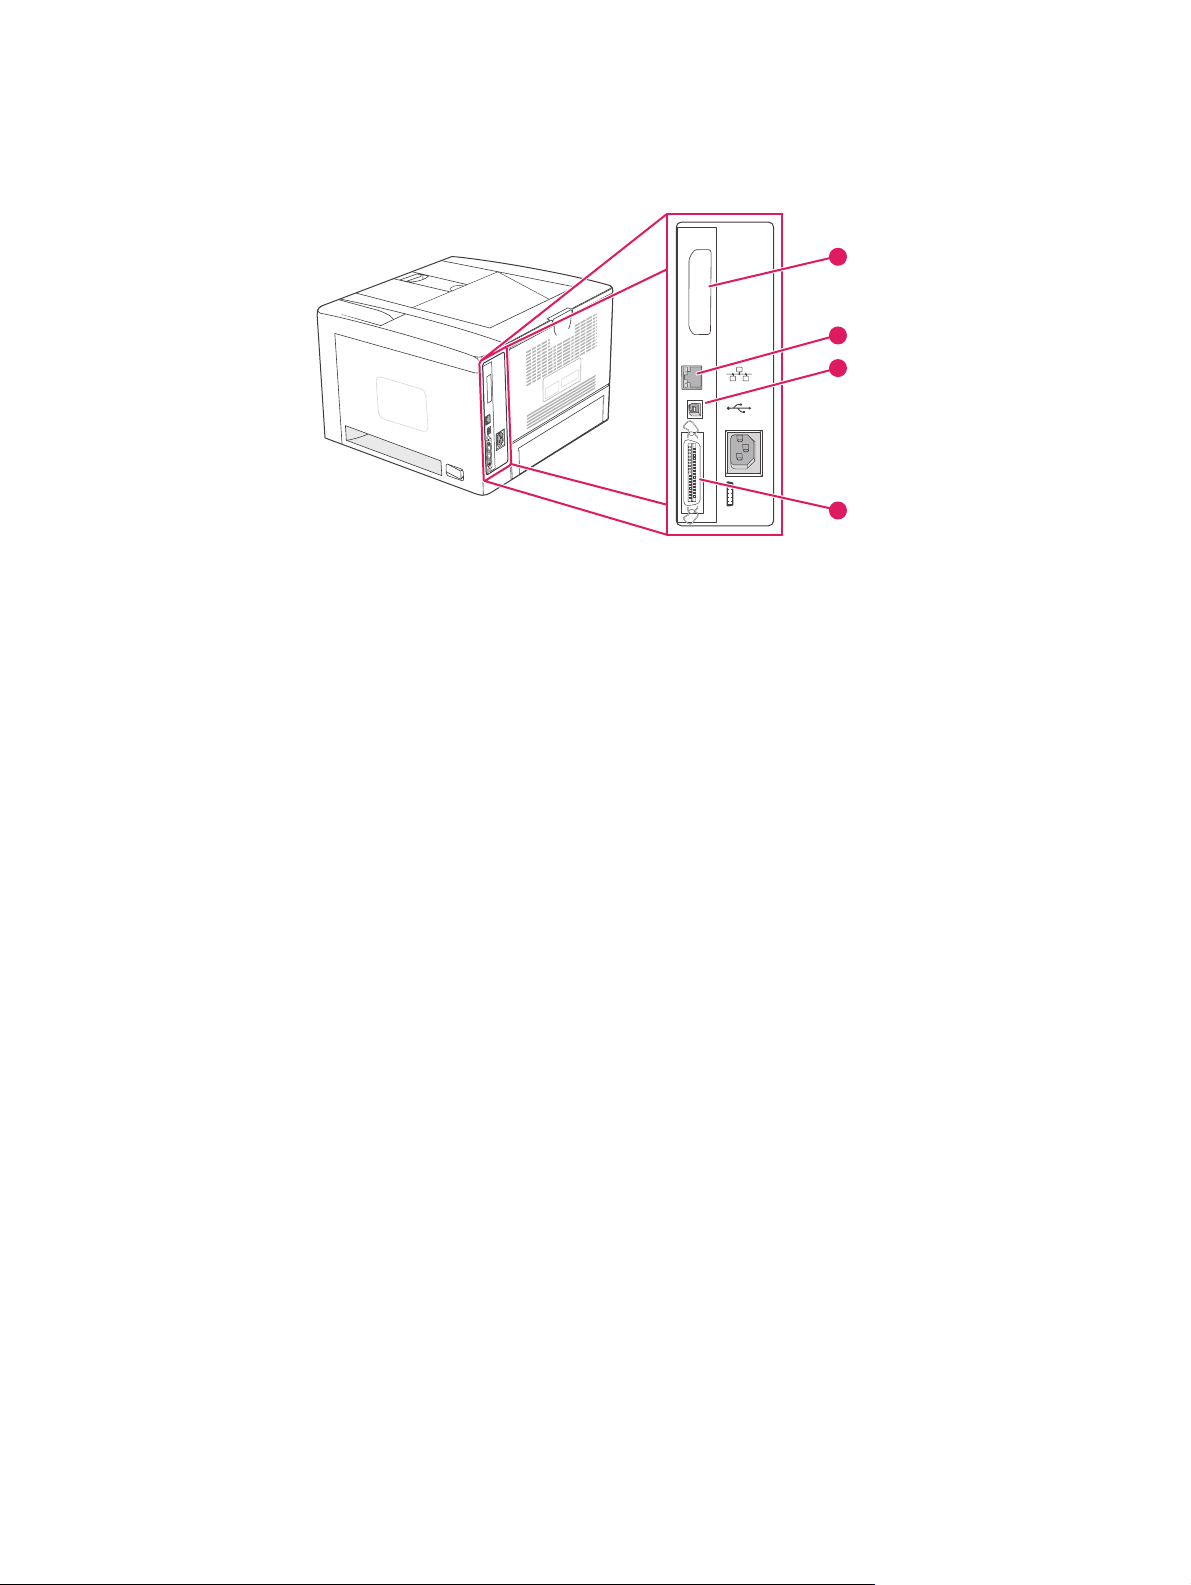
Interface ports
The printer has four interface ports: one EIO slot and three ports for connecting to a
computer or a network.
1
EIO
2
3
4
1 EIO slot
2 Embedded HP Jetdirect print server (HP LaserJet 2420n, 2420dn, 2430tn, and 2430dtn models
only)
3 USB 2.0 connection
4 IEEE 1284B-compliant parallel connection
ENWW Printer parts 9
Page 22
Control panel
This section provides information about the control panel and its features:
●
●
●
●
●
●
The control panel is located on the top of the printer.
See Interpreting control-panel messages to identify and troubleshoot control-panel messages.
Control-panel layout
Control-panel buttons
Control-panel lights
Printing control-panel menus
Changing printer-control-panel configuration settings
Using the printer Help system
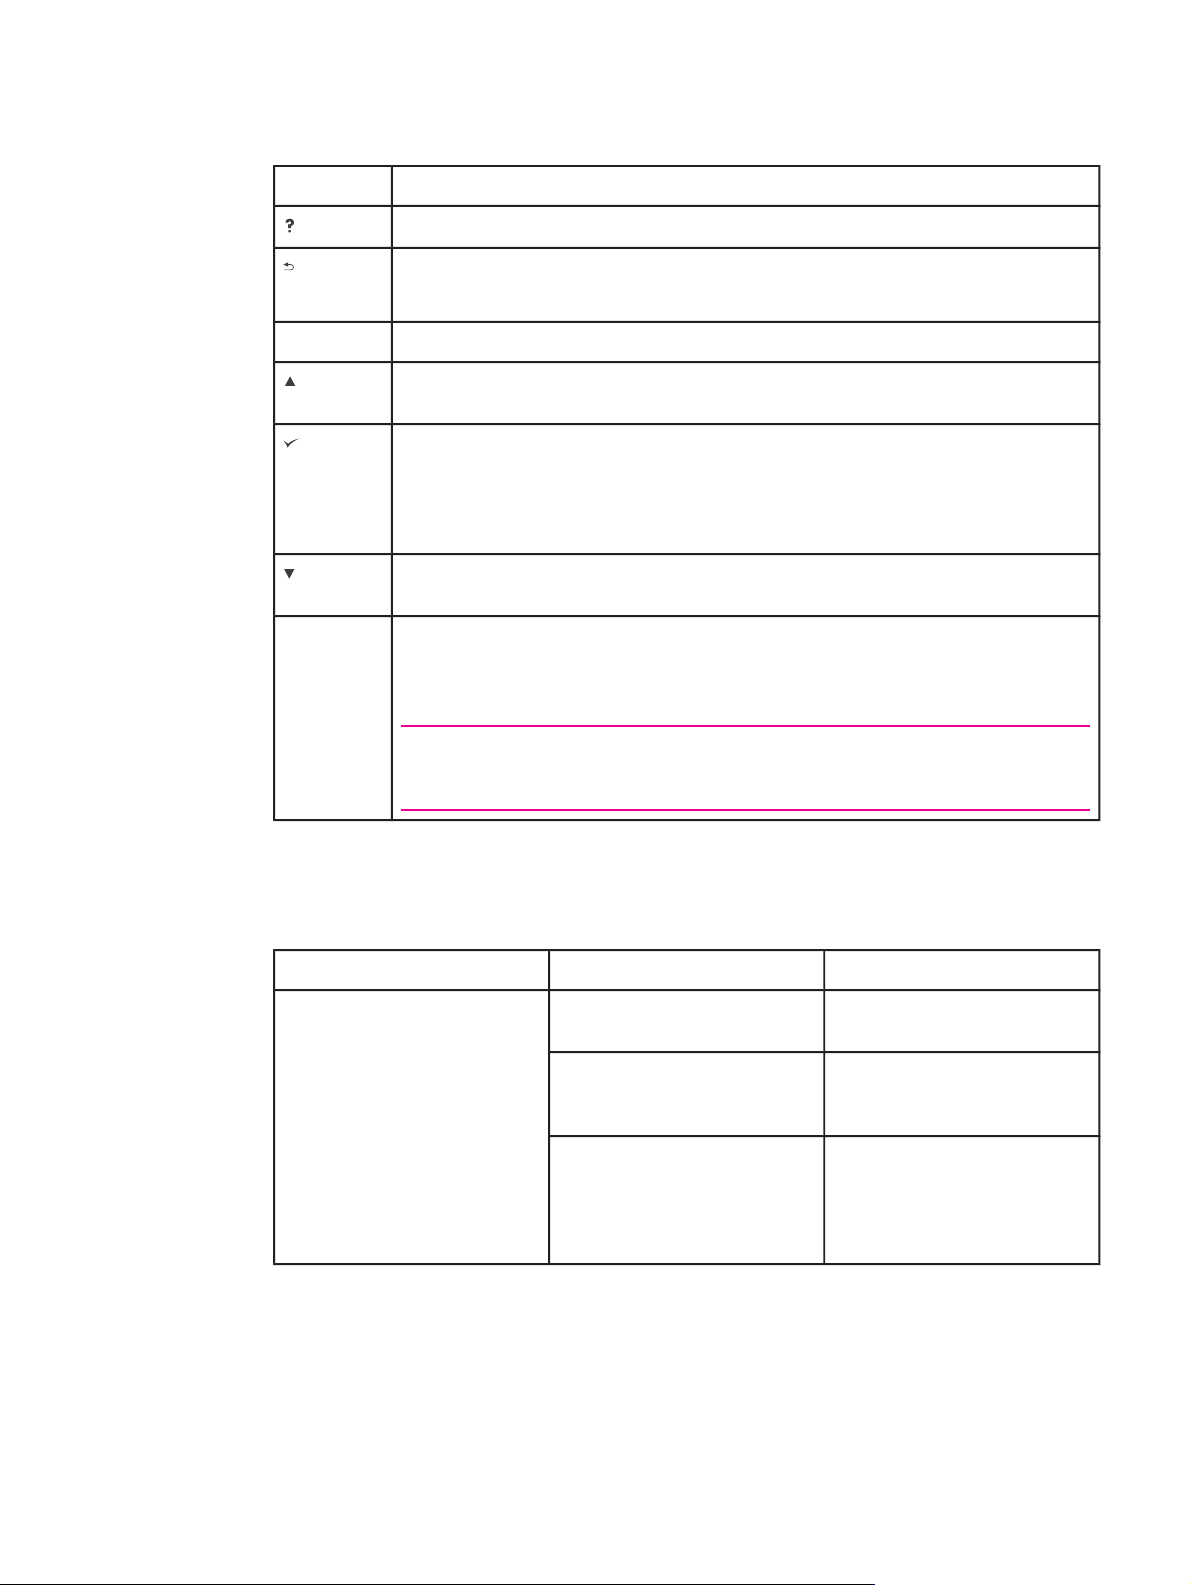
?
Stop
Menu
Attention
Data
Ready
Control-panel layout
1
2
3
1 Graphical display
2 H
ELP
button
3 M
ENU
button
4 Ready light
5 Data light
6 Attention light
7 S
TOP
button
8 D
OWN
button
9 B
ACK
button
10 S
ELECT
button
11 U
P
button
?
Menu
Ready
4 5 6
Data
11
10
9
8
Stop
7
Attention
10 Chapter 1 Printer basics ENWW
Page 23
Control-panel buttons
Button Function
●
(H
ELP
)
Provides information about the message on the graphical display.
M
S
(B
ENU
(UP)
(S
(D
TOP
ACK
ELECT
OWN
● Backs up one level in the menu tree or backs up one numeric entry.
)
● Exits menus if held down for more than 1 second.
●
Enters and exits the menus.
● Navigates to the previous item in the list, or increases the value of items that are
numerical in nature.
● Clears an error condition when the condition is clearable.
)
● Saves the selected value for an item.
● Performs the action that is associated with the item that is highlighted on the
graphical display.
● Navigates to the next item in the list, or decreases the value of items that are
)
numerical in nature.
● Cancels the current print job in process and expels all of the active pages from
the paper path. The time that it takes to cancel the job depends on the size of the
print job. (Press the button only once.) Also clears continuable errors that are
associated with the canceled job.
NOTE
The control panel lights cycle while the print job is cleared from both the printer and
the computer, and then the printer returns to the ready state (Ready light on).
Control-panel lights
Light State Indication
Ready On
Off The printer cannot accept data
Blinking The printer is going offline. The
The printer is online and ready
to accept data to print.
because it is offline (paused) or
has experienced an error.
printer stops processing the
current print job and expels all
of the active pages from the
paper path.
ENWW Control panel 11
Page 24
Light State Indication
Data
Attention
On The printer has data to print,
but is waiting to receive all of
the data.
Off The printer has no data to print.
Blinking The printer is processing or
printing the data.
On The printer has experienced a
problem. Note the message on
the control-panel display, and
then turn the printer off and on.
See
Interpreting control-panel
messages for help in resolving
problems.
Off The printer is functioning
without error.
Blinking Action is required. See the
control-panel display.
Printing control-panel menus
To see the current settings for the menus and items that are available at the control panel,
print a control-panel menu map. You might want to store the menu map near the printer for
reference.
NOTE
For a complete list of the items that are available in the control-panel menus, see Control
panel menus.
To print a control-panel menu map
1. Press M
2.
Use
(S
3.
Use
(S
ENU
to open the menus.
(UP button) or (D
ELECT
button).
(UP button) or (D
ELECT
button).
OWN
button) to scroll to INFORMATION, and then press
OWN
button) to scroll to PRINT MENU MAP, and then press
Using the printer Help system
This printer features a Help system at the control panel that provides instructions for
resolving most printer errors.
(H
ELP
To view Help for a message (if available), press
than four lines, use the
To exit the Help system, press
(UP button) or (D
(H
ELP
button) again.
OWN
button). If the Help topic is longer
button) to scroll through the entire topic.
12 Chapter 1 Printer basics ENWW
Page 25

Changing printer-control-panel configuration settings
By using the printer control panel, you can make changes to general printer configuration
default settings such as tray size and type, sleep delay, printer personality (language), and
jam recovery.
The printer-control-panel settings can also be changed from a computer by using the setting
page of the embedded Web server. The computer shows the same information that the
control panel shows. For more information, see
Using the embedded Web server.
CAUTION
Configuration settings seldom need to be changed. Hewlett-Packard Company recommends
that only the system administrator change configuration settings.
Changing control-panel settings
For a complete list of menu items and possible values, see Control panel menus. Certain
menu options appear only if the associated tray or accessory is installed. For example, the
EIO menu appears only if an EIO card is installed.
To change a control-panel setting
ENU
1. Press M
2.
Use
(S
3.
Some menus might have several submenus. Use
scroll to the submenu item that you want, and then press
4.
Use
button). Some settings change rapidly if (UP button) or (D
An asterisk (*) appears next to the selection on the display, indicating that it is now the
default.
5. Press M
to open the menus.
(UP button) or (D
ELECT
button).
(UP button) or (D
ENU
to exit the menu.
OWN
button) to scroll to the menu that you want, and then press
(UP button) or (D
(S
ELECT
OWN
button) to scroll to the setting, and then press (S
OWN
OWN
button) to
button).
button) is held down.
ELECT
NOTE
Printer-driver settings override control-panel settings. Software program settings override
both printer-driver settings and control-panel settings. If you cannot gain access to a menu
or item, it is either not an option for the printer or you have not turned on the associated
higher-level option. See your network administrator if a function has been locked (Access
denied menus locked appears on the printer control-panel display).
Show address
This item determines whether the printer's IP address appears on the display with the Ready
message.
ENWW Control panel 13
Page 26

To show the IP address
ENU
1. Press M
to open the menus.
2.
Press
3.
Press
4.
Press
5.
Press
6.
Press
7.
Press
8.
Press
9.
Press
10. Press M
(D
OWN
button) to highlight CONFIGURE DEVICE.
(S
ELECT
button) to select CONFIGURE DEVICE.
(D
OWN
button) to highlight SYSTEM SETUP.
(S
ELECT
button) to select SYSTEM SETUP.
(D
OWN
button) to highlight SHOW ADDRESS.
(S
ELECT
button) to select SHOW ADDRESS.
(UP button) or (D
(S
ELECT
button) to select the option.
ENU
to exit the menu.
OWN
button) to select the desired option.
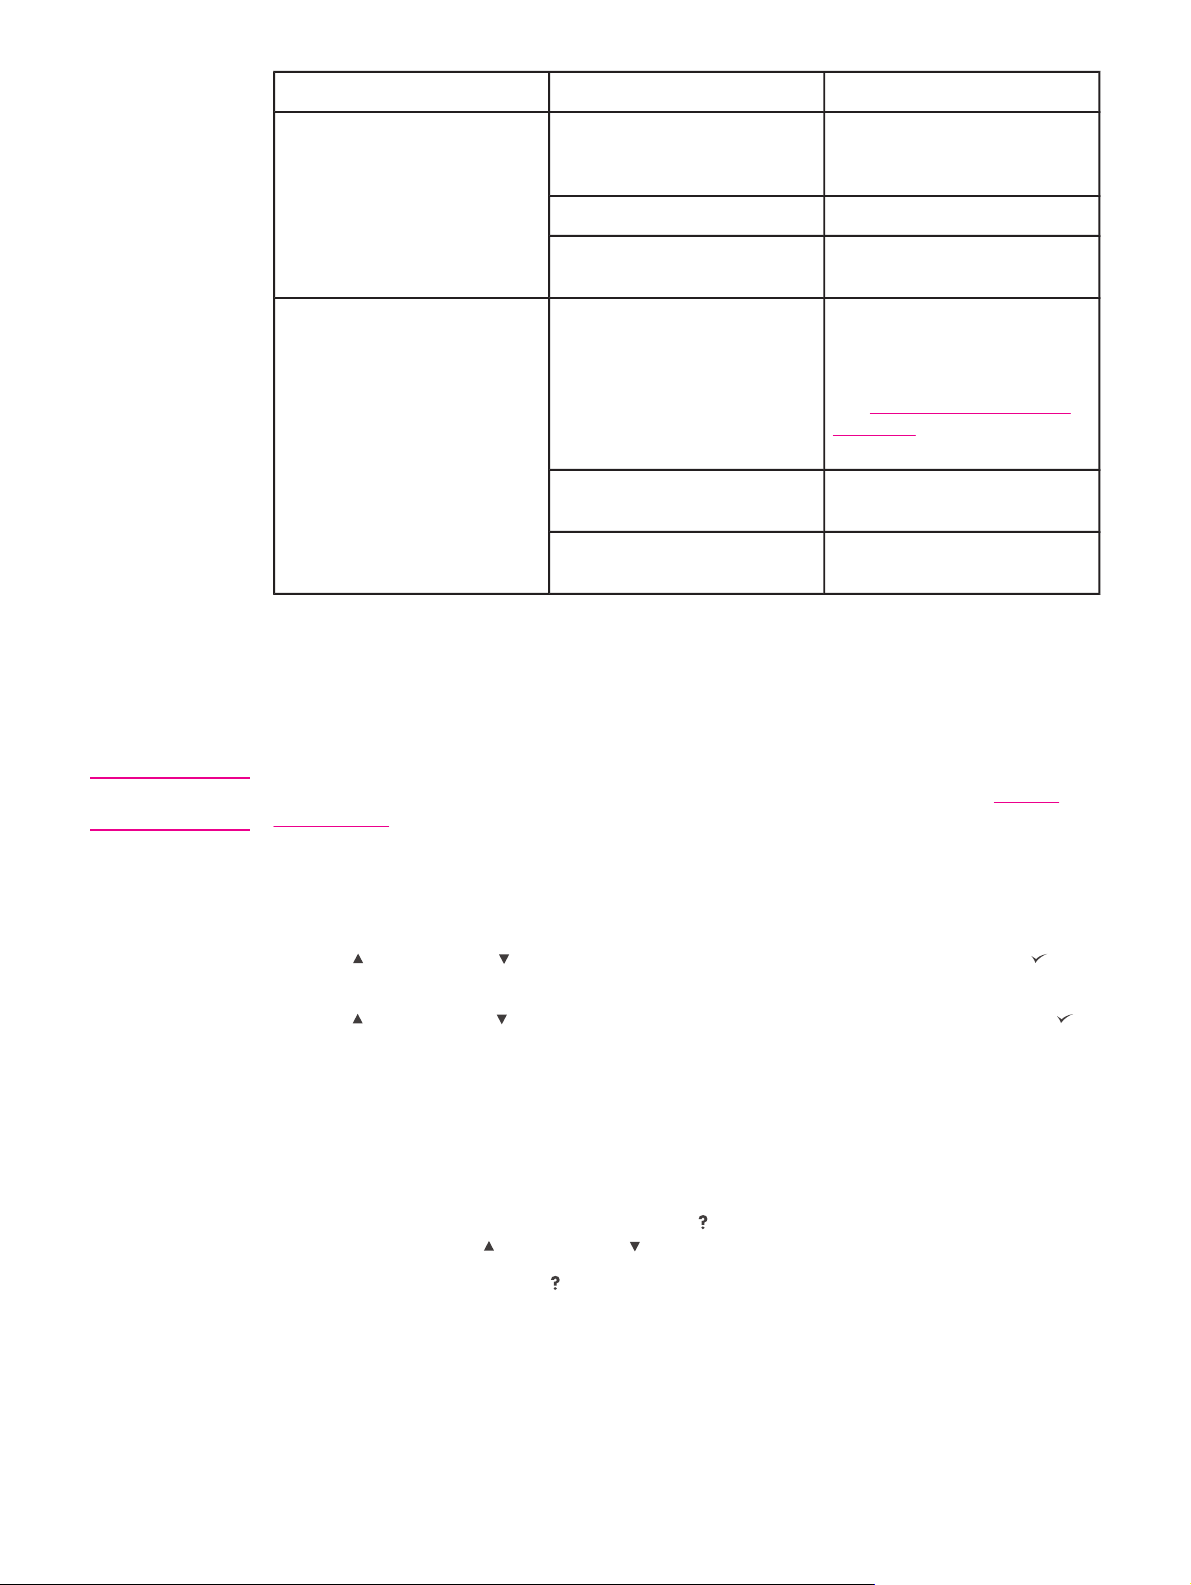
Tray behavior options
Four user-defined options are available for tray behavior:
● USE REQUESTED TRAY. Selecting EXCLUSIVELY ensures that the printer does not
automatically select another tray when you indicate that a specific tray should be used.
Selecting FIRST allows the printer to pull from a second tray if the specified tray is
empty. EXCLUSIVELY is the default setting.
● MANUALLY FEED PROMPT. If you select ALWAYS (the default value), the system
always shows a prompt before pulling from the multipurpose tray. If you select UNLESS
LOADED, the system displays the prompt only if the multipurpose tray is empty.
● PS DEFER MEDIA. This setting affects how non-HP PostScript drivers behave with the
printer. You do not need to change this setting if you use the drivers that HP supplies. If
set to ENABLED, non-HP PostScript drivers use the same HP tray selection method as
the HP drivers. If set to DISABLED, some non-HP PostScript drivers use the PostScript
tray selection method instead of the HP method.
● SIZE/TYPE PROMPT. Use this item to control whether the tray configuration message
and its corresponding prompts are shown whenever a tray is opened and closed. These
prompts instruct you to change the type or size if the tray is configured for a different
type or size than is loaded in the tray.
14 Chapter 1 Printer basics ENWW
Page 27

To set Use Requested Tray
ENU
1. Press M
to open the menus.
2.
Press
3.
Press
4.
Press
5.
Press
6.
Press
7.
Press
8.
Press
9.
Press
10.
Press
11. Press M
(D
OWN
button) to highlight CONFIGURE DEVICE.
(S
ELECT
button) to select CONFIGURE DEVICE.
(D
OWN
button) to highlight SYSTEM SETUP.
(S
ELECT
button) to select SYSTEM SETUP.
(D
OWN
button) to highlight TRAY BEHAVIOR.
(S
ELECT
button) to select TRAY BEHAVIOR.
(S
ELECT
button) to select USE REQUESTED TRAY.
(UP button) or (D
(S
ELECT
button) to set the behavior.
ENU
to exit the menu.
To set Manually Feed Prompt
1.
2.
3.
4.
5.
Press M
Press
Press
Press
Press
ENU
to open the menus.
(D
OWN
button) to highlight CONFIGURE DEVICE.
(S
ELECT
button) to select CONFIGURE DEVICE.
(D
OWN
button) to highlight SYSTEM SETUP.
(S
ELECT
button) to select SYSTEM SETUP.
OWN
button) to select EXCLUSIVELY or FIRST.
6.
Press
7.
Press
8.
Press
9.
Press
10.
Press
11.
Press
12. Press M
(D
OWN
button) to highlight TRAY BEHAVIOR.
(S
ELECT
button) to select TRAY BEHAVIOR.
(D
OWN
button) to highlight MANUALLY FEED PROMPT.
(S
ELECT
button) to select MANUALLY FEED PROMPT.
(UP button) or (D
(S
ELECT
button) to set the behavior.
ENU
to exit the menu.
OWN
button) to select ALWAYS or UNLESS LOADED.
ENWW Control panel 15
Page 28

To set the printer default for PS Defer Media
1.
Press M
2.
Press
3.
Press
4.
Press
5.
Press
6.
Press
7.
Press
8.
Press
9.
Press
10.
Press
11. Press M
ENU
to open the menus.
(D
OWN
button) to highlight CONFIGURE DEVICE.
(S
ELECT
button) to select CONFIGURE DEVICE.
(D
OWN
button) to highlight SYSTEM SETUP.
(S
ELECT
button) to select SYSTEM SETUP.
(D
OWN
button) to highlight TRAY BEHAVIOR.
(S
ELECT
button) to select TRAY BEHAVIOR.
(S
ELECT
button) to select PS DEFER MEDIA.
(UP button) or (D
(S
ELECT
button) to set the behavior.
ENU
to exit the menu.
To set Size/type prompt
1. Press M
2.
Press
3.
Press
4.
Press
ENU
to open the menus.
(D
OWN
button) to highlight CONFIGURE DEVICE.
(S
ELECT
button) to select CONFIGURE DEVICE.
(D
OWN
button) to highlight SYSTEM SETUP.
OWN
button) to select ENABLED or DISABLED.
NOTE
5.
Press
6.
Press
7.
Press
8.
Press
9.
Press
10.
Press
11. Press M
(S
ELECT
button) to select SYSTEM SETUP.
(D
OWN
button) to highlight TRAY BEHAVIOR.
(S
ELECT
button) to select TRAY BEHAVIOR.
(S
ELECT
button) to select SIZE/TYPE PROMPT.
(UP button) or (D
(S
ELECT
button) to set the behavior.
ENU
to exit the menu.
OWN
button) to select DISPLAY or DO NOT DISPLAY.
Sleep Delay
The adjustable Sleep Delay feature reduces power consumption when the printer has been
inactive for an extended period. You can set the length of time before the printer goes into
sleep mode to 1 MINUTE, 15 MINUTES, 30 MINUTES, or to 60 MINUTES, 90 MINUTES, 2
HOURS, or 4 HOURS. The default setting is 30 MINUTES.
The printer control-panel display dims when the printer is in sleep mode. Sleep mode does
not affect printer warm-up time unless the printer was in sleep mode for more than 8 hours.
16 Chapter 1 Printer basics ENWW
Page 29

To set the Sleep Delay
ENU
1. Press M
to open the menus.
2.
Press
3.
Press
4.
Press
5.
Press
6.
Press
7.
Press
8.
Press
9.
Press
10. Press M
(D
OWN
button) to highlight CONFIGURE DEVICE.
(S
ELECT
button) to select CONFIGURE DEVICE.
(D
OWN
button) to highlight SYSTEM SETUP.
(S
ELECT
button) to select SYSTEM SETUP.
(D
OWN
button) to highlight SLEEP DELAY.
(S
ELECT
button) to select SLEEP DELAY.
(UP button) or (D
(S
ELECT
button) to set the time period.
ENU
to exit the menu.
OWN
To turn the Sleep Mode on or off
1. Press M
2.
Press
3.
Press
4.
Press
5.
Press
6.
Press
ENU
to open the menus.
(D
OWN
button) to highlight CONFIGURE DEVICE.
(S
ELECT
button) to select CONFIGURE DEVICE.
(D
OWN
button) to highlight RESETS.
(S
ELECT
button) to select RESETS.
(D
OWN
button) to highlight SLEEP MODE.
button) to select the appropriate time period.
7.
Press
8.
Press
9.
Press
10. Press M
(S
ELECT
button) to select SLEEP MODE.
(UP button) or (D
(S
ELECT
button) to set the selection.
ENU
to exit the menu.
OWN
button) to select ON or OFF.
Personality
This printer features automatic personality (printer language) switching.
● AUTO configures the printer to automatically detect the type of print job and configure its
personality to accommodate that job. This is the default setting. Use this setting unless
you are experiencing problems.
● PCL configures the printer to use Printer Control Language.
● PDF configures the printer to print .PDF files. (This option is only available the printer
has sufficient memory.)
● PS configures the printer to use PostScript emulation.
ENWW Control panel 17
Page 30

To set the personality
ENU
1. Press M
to open the menus.
2.
3.
4.
5.
6.
7.
8.
Press
Press
Press
Press
Press
Press
Press
(D
OWN
button) to highlight CONFIGURE DEVICE.
(S
ELECT
button) to select CONFIGURE DEVICE.
(D
OWN
button) to highlight SYSTEM SETUP.
(S
ELECT
button) to select SYSTEM SETUP.
(D
OWN
button) to highlight PERSONALITY.
(S
ELECT
button) to select PERSONALITY.
(UP button) or (D
OWN
button) to select the appropriate personality (AUTO, PS,
PCL, or PDF).
9.
Press
10. Press M
(S
ELECT
button) to set the personality.
ENU
to exit the menu.
Clearable warnings
You can determine the display time for control-panel clearable warnings with this option by
selecting ON or JOB. The default value is JOB.
●
Select ON to show clearable warnings until you press
● Select JOB to show clearable warnings until the end of the job in which they were
generated.
(S
ELECT
button).
To set the clearable warnings
ENU
1. Press M
2.
Press
3.
Press
4.
Press
5.
Press
6.
Press
7.
Press
8.
Press
9.
Press
10. Press M
to open the menus.
(D
OWN
button) to highlight CONFIGURE DEVICE.
(S
ELECT
button) to select CONFIGURE DEVICE.
(S
ELECT
button) to highlight SYSTEM SETUP.
(S
ELECT
button) to select SYSTEM SETUP.
(D
OWN
button) to highlight CLEARABLE WARNINGS.
(S
ELECT
button) to select CLEARABLE WARNINGS.
(UP button) or (D
(S
ELECT
button) to set the selection.
ENU
to exit the menu.
OWN
button) to select the appropriate setting.
Auto continue
You can determine printer behavior when the system generates an Auto Continuable error.
ON is the default setting.
● Select ON if you want an error message to appear for ten seconds before the printer
automatically continues to print.
●
Select OFF to pause printing any time an error message appears and until you press
(S
ELECT
button).
18 Chapter 1 Printer basics ENWW
Page 31

To set the auto continue
ENU
1. Press M
to open the menus.
2.
Press
3.
Press
4.
Press
5.
Press
6.
Press
7.
Press
8.
Press
9.
Press
10. Press M
(D
OWN
button) to highlight CONFIGURE DEVICE.
(S
ELECT
button) to select CONFIGURE DEVICE.
(D
OWN
button) to highlight SYSTEM SETUP.
(S
ELECT
button) to select SYSTEM SETUP.
(D
OWN
button) to highlight AUTO CONTINUE.
(S
ELECT
button) to select AUTO CONTINUE.
(UP button) or (D
(S
ELECT
button) to set the selection.
ENU
to exit the menu.
OWN
button) to select the appropriate setting.
Cartridge low
The printer has two options for reporting that print cartridge life is low: CONTINUE is the
default value.
● Select CONTINUE to allow the printer to continue printing while a warning appears and
until the print cartridge is replaced.
● Select STOP if you want the printer to pause printing until you replace the used print
(S
ELECT
cartridge or press
appears.
button), which allows the printer to print while the warning
To set supplies-low reporting
ENU
1. Press M
2.
Press
3.
Press
4.
Press
5.
Press
6.
Press
7.
Press
8.
Press
9.
Press
10. Press M
to open the menus.
(D
OWN
button) to highlight CONFIGURE DEVICE.
(S
ELECT
button) to select CONFIGURE DEVICE.
(D
OWN
button) to highlight SYSTEM SETUP.
(S
ELECT
button) to select SYSTEM SETUP.
(D
OWN
button) to highlight CARTRIDGE LOW.
(S
ELECT
button) to select CARTRIDGE LOW.
(UP button) or (D
(S
ELECT
button) to set the selection.
ENU
to exit the menu.
OWN
button) to select the appropriate setting.
ENWW Control panel 19
Page 32

Cartridge out
The printer has two options for this menu item.
● Select CONTINUE to allow the printer to continue printing. A REPLACE CARTRIDGE
warning message appears until the print cartridge is replaced. Printing in this mode can
continue only for a specific number of pages. After that, the printer stops printing until
you replace the empty print cartridge. This is the default setting.
● Select STOP if you want the printer to stop printing until the empty print cartridge is
replaced.
To set the cartridge-out response
ENU
1. Press M
to open the menus.
2.
Press
3.
Press
4.
Press
5.
Press
6.
Press
7.
Press
8.
Press
9.
Press
10. Press M
(D
OWN
button) to highlight CONFIGURE DEVICE.
(S
ELECT
button) to select CONFIGURE DEVICE.
(D
OWN
button) to highlight SYSTEM SETUP.
(S
ELECT
button) to select SYSTEM SETUP.
(D
OWN
button) to highlight CARTRIDGE OUT.
(S
ELECT
button) to select CARTRIDGE OUT.
(UP button) or (D
(S
ELECT
button) to set the selection.
ENU
to exit the menu.
OWN
button) to select the appropriate setting.
Jam recovery
Use this option to configure the printer response to jams, including how the printer handles
the pages involved. AUTO is the default value.
● AUTO. The printer automatically turns jam recovery on when sufficient memory is
available.
● ON. The printer reprints any page that is involved in a jam. Additional memory is
allocated to store the last few pages that were printed, and this might cause overall
printer performance to suffer.
● OFF. The printer does not reprint any page that was involved in a jam. Because no
memory is used to store the most recent pages, overall printer performance might be
optimized.
20 Chapter 1 Printer basics ENWW
Page 33

To set the jam-recovery response
ENU
1. Press M
to open the menus.
2.
Press
3.
Press
4.
Press
5.
Press
6.
Press
7.
Press
8.
Press
9.
Press
10. Press M
(D
OWN
button) to highlight CONFIGURE DEVICE.
(S
ELECT
button) to select CONFIGURE DEVICE.
(D
OWN
button) to highlight SYSTEM SETUP.
(S
ELECT
button) to select SYSTEM SETUP.
(D
OWN
button) to highlight JAM RECOVERY.
(S
ELECT
button) to select JAM RECOVERY.
(UP button) or (D
(S
ELECT
button) to set the selection.
ENU
to exit the menu.
OWN
button) to select the appropriate setting.
RAM disk
This option determines how the RAM disk feature is configured. This option is only available
if the printer has at least 8 MB of free memory. The default is AUTO.
● AUTO. The printer determines the optimal RAM disk size based on the amount of
available memory.
● OFF. The RAM disk is disabled, but a minimal RAM disk is still active (sufficient to scan
one page).
To set the RAM disk
ENU
1. Press M
2.
Press
3.
Press
4.
Press
5.
Press
6.
Press
7.
Press
8.
Press
9.
Press
10. Press M
to open the menus.
(D
OWN
button) to highlight CONFIGURE DEVICE.
(S
ELECT
button) to select CONFIGURE DEVICE.
(D
OWN
button) to highlight SYSTEM SETUP.
(S
ELECT
button) to select SYSTEM SETUP.
(D
OWN
button) to highlight RAM DISK.
(S
ELECT
button) to select RAM DISK.
(UP button) or (D
(S
ELECT
button) to set the selection.
ENU
to exit the menu.
OWN
button) to select the appropriate setting.
Language
If LANGUAGE appears in English on the control panel, use the following procedure.
Otherwise, turn the printer off and then on again. When XXX MB appears, press and hold
(S
ELECT
button). When all three control panel lights are lit, release (S
the following procedure to set the language.
ELECT
button) and use
ENWW Control panel 21
Page 34

To select the language
1.
When SELECT LANGUAGE appears in English, press
LANGUAGE appears in English.
2.
3.
Press
Press
(D
OWN
button) until the preferred language appears.
(S
ELECT
button) to save the preferred language.
(S
ELECT
button), and wait until
22 Chapter 1 Printer basics ENWW
Page 35

Software
The printer comes with helpful software, including printer drivers and optional software. For
easy printer setup and access to the full range of printer features, HP recommends that you
install the software that is provided.
Check the installation notes and Readme files on the printer CD-ROM for additional software
and languages. HP software is not available in all languages.
Operating systems and printer components
The printer CD-ROM contains the software components and drivers for users and network
administrators. The printer drivers that are provided on the CD-ROM must be installed in
order to take full advantage of printer features. The other programs are recommended, but
are not required for operation. Check the installation notes and Readme files on the printer
CD-ROM for more information.
The CD-ROM includes software that is designed for users and network administrators who
are operating in the following environments:
●
Microsoft
●
Microsoft Windows NT
● Microsoft Windows 2000, Windows XP, and Windows Server 2003
®
Windows® 98 and Windows Millennium Edition (Me)
®
4.0 (parallel and network connections only)
● Apple Mac OS version 9.1 and later, and OS X version 10.1 or later
The most recent printer drivers for all supported operating systems are available at
http://www.hp.com/go/lj2410_software, http://www.hp.com/go/lj2420_software, or
http://www.hp.com/go/lj2430_software. If you do not have access to the Internet, see the
support flyer that came in the printer box for information about obtaining the most recent
software.
The following table lists the available software for the printer.
Software Windows
98/Me
Windows Installer x x x
PCL 6 x x x
PCL 5 x x x
PostScript emulation x x x
HP Web Jetadmin* x x x
Macintosh Installer x
Windows
NT 4.0
Windows
2000/XP/
Server
2003
Mac OS
UNIX®/
Linux
OS/2
Macintosh PostScript
Printer Description
(PPD) files
IBM drivers* x
x
ENWW Software 23
Page 36

Software Windows
98/Me
Model scripts* x
Windows
NT 4.0
Windows
2000/XP/
Server
2003
Mac OS
UNIX®/
Linux
OS/2
*Available only on the World Wide Web.
Printer drivers
Printer drivers provide access to the printer features and allow the computer to communicate
with the printer (by using a printer language). Check the install notes, Readme, and latebreaking Readme files on the printer CD-ROM for additional software and languages.
The following printer drivers are included with the printer. The most recent drivers are
available at http://www.hp.com/go/lj2410_software, http://www.hp.com/go/lj2420_software,
or http://www.hp.com/go/lj2430_software. Depending on the configuration of Windowsbased computers, the installation program for the printer software automatically checks the
computer for Internet access to obtain the latest drivers.
NOTE
NOTE
Operating system
Windows 98, Me x x x x
Windows NT 4.0 x x x x
Windows 2000, XP, Server 2003 x x x x
Macintosh OS x x
1
Not all printer features are available from all drivers or operating systems. See the context-
1
PCL 6 PCL 5 PS
PPD
2
sensitive help in the printer driver for available features.
2
PostScript (PS) Printer Description files (PPDs)
If your system did not automatically check the Internet for the latest drivers during software
installation, download them from http://www.hp.com/go/lj2410_software, http://www.hp.com/
go/lj2420_software, or http://www.hp.com/go/lj2430_software. After you are connected, click
Downloads and Drivers to find the driver that you want to download.
You can obtain Model Scripts for UNIX and Linux by downloading them from the Internet or
by requesting them from an HP-authorized service or support provider. For Linux support
see http://www.hp.com/go/linux. For UNIX support see http://www.hp.com/go/
jetdirectunix_software. For additional information see the support flyer that came in the
printer box.
If the printer driver that you want is not on the printer CD-ROM or is not listed here, check
the install notes, Readme, and late-breaking Readme files to see if the printer driver is
supported. If it is not supported, contact the manufacturer or distributor of the program that
you are using and request a driver for the printer.
Additional drivers
The following drivers are not included on the CD-ROM, but are available from the Internet.
● OS/2 PCL 5 or PCL 6 printer driver.
● OS/2 PS printer driver.
24 Chapter 1 Printer basics ENWW
Page 37

● UNIX model scripts.
● Linux drivers.
● HP OpenVMS drivers.
NOTE
NOTE
The OS/2 drivers are available from IBM and are packaged with OS/2. They are not
available for Simplified Chinese, Korean, Japanese, or Traditional Chinese.
Select the correct printer driver for your needs
Select a printer driver based on the way that you use the printer. Certain printer features are
available only in the PCL 6 drivers. See the printer driver Help for available features.
● Use the PCL 6 driver to take full advantage of printer features. For general office
printing, the PCL 6 driver is recommended to provide optimum performance and print
quality.
● Use the PCL 5 driver if backward compatibility with previous PCL printer drivers or older
printers is necessary.
● Use the PS driver if you are printing primarily from PostScript-specific programs such as
®
Adobe
and Corel, for compatibility with PostScript Level 3 needs, or for PS
CompactFlash font support.
The printer automatically switches between PS and PCL printer languages.
Printer driver Help
Each printer driver has Help screens that can be activated by using the Help button, the F1
button on the computer keyboard, or a question-mark symbol in the upper-right corner of the
printer driver (depending on the Windows operating system that you are using). You can
also open printer-driver Help by right-clicking any item in the driver, and then clicking What's
This? These Help screens give detailed information about the specific driver. Printer driver
Help is separate from your program Help.
Using the printer drivers
Use one of the following methods to open the printer drivers from your computer:
Operating
System
Windows 98, NT
4.0, and ME
ENWW Software 25
To change the settings
for all print jobs until
the software program
is closed
On the File menu in the
software program, click
Print. Select the printer,
and then click
Properties.
The steps can vary; this
procedure is most
common.
To change the print
job default settings
(for example, turn on
Print on Both Sides by
default)
Click Start, click
Settings, and then click
Printers. Right-click the
printer icon, and then
select Properties
(Windows 98 and ME)
or Document Defaults
(Windows NT 4.0).
To change the
configuration settings
(for example, add a
physical option such
as a tray or enable/
disable a driver feature
such as Allow Manual
Duplexing)
Click Start, click
Settings, and then click
Printers. Right-click the
printer icon, and then
select Properties. Click
the Configure tab.
Page 38

Operating
System
To change the settings
for all print jobs until
the software program
is closed
To change the print
job default settings
(for example, turn on
Print on Both Sides by
default)
To change the
configuration settings
(for example, add a
physical option such
as a tray or enable/
disable a driver feature
such as Allow Manual
Duplexing)
Windows 2000,
XP, and Server
2003
Macintosh OS
V9.1
Macintosh OS X
V10.1
On the File menu in the
software program, click
Print. Select the printer,
and then click
Properties or
Preferences.
The steps can vary; this
procedure is most
common.
On the File menu, click
Print. Change the
settings that you want
on the various pop-up
menus.
On the File menu, click
Print. Change the
settings that you want
on the various pop-up
menus.
Click Start, click
Settings, and then click
Printers or Printers
and Faxes. Right-click
the printer icon, and
then select Printing
Preferences.
On the File menu, click
Print. As you change
settings on the pop-up
menu, click Save
Settings.
On the File menu, click
Print. Change the
settings that you want
on the various pop-up
menus, and then on the
main pop-up menu, click
Save Custom Setting.
These settings are
saved as the Custom
option. To use the new
settings, you must select
the Custom option
every time that you open
a program and print.
Click Start, click
Settings, and then click
Printers or Printers
and Faxes. Right-click
the printer icon, and
then select Properties.
Click the Device
Settings tab.
Click the desktop printer
icon. From the Printing
menu, click Change
Setup.
Delete the printer and
reinstall it. The driver will
be auto-configured with
the new options when it
is reinstalled.
NOTE
Use this procedure for
AppleTalk connections
only. Configuration
settings might not be
available in Classic
mode.
Macintosh OS X
V10.2
On the File menu, click
Print. Change the
settings that you want
on the various pop-up
menus.
On the File menu, click
Print. Change the
settings that you want
on the various pop-up
menus, and then, on the
Presets pop-up menu,
click Save as and type a
name for the preset.
These settings are
saved in the Presets
menu. To use the new
settings, you must select
the saved preset option
every time you open a
program and print.
Open Print Center by
selecting the hard drive,
clicking Applications,
clicking Utilities, then
double-clicking Print
Center. Click on the
print queue. On the
Printers menu, click
Show Info. Click the
Installable Options
menu.
NOTE
Configuration settings
might not be available in
Classic mode.
26 Chapter 1 Printer basics ENWW
Page 39

Operating
System
To change the settings
for all print jobs until
the software program
is closed
To change the print
job default settings
(for example, turn on
Print on Both Sides by
default)
To change the
configuration settings
(for example, add a
physical option such
as a tray or enable/
disable a driver feature
such as Allow Manual
Duplexing)
Macintosh OS X
V10.3
On the File menu, click
Print. Change the
settings that you want
on the various pop-up
menus.
On the File menu, click
Print. Change the
settings that you want
on the various pop-up
menus, and then, on the
Presets pop-up menu,
click Save as and type a
name for the preset.
These settings are
saved in the Presets
menu. To use the new
settings, you must select
the saved preset option
every time that you open
a program and print.
Open Printer Setup
Utilityby select ing the
hard drive, clicking
Applications, clicking
Utilities, then double-
clicking Printer Setup
Utility. Click on the print
queue. On the Printers
menu, click Show Info.
Click the Installable
Options menu.
Software for Macintosh computers
The HP installer provides PostScript Printer Description (PPD) files, Printer Dialog
Extensions (PDEs), and the HP LaserJet Utility for use with Macintosh computers.
The embedded Web server can be used with Macintosh computers if the printer is
connected to a network. See
Using the embedded Web server for more information.
NOTE
PPDs
Use PPDs in combination with the Apple PostScript drivers to gain access to the printer
features and to allow the computer to communicate with the printer. An installation program
for the PPDs, PDEs, and other software is provided on the CD-ROM. Use the appropriate
PS driver that comes with the operating system.
HP LaserJet Utility
Use the HP LaserJet Utility to control features that are not available in the driver. The
illustrated screens make selecting printer features easy. Use the HP LaserJet Utility to
perform the following tasks:
● Name the printer, assign it to a zone on the network, and download files and fonts.
● Configure and set the printer for Internet protocol (IP) printing.
The HP LaserJet Utility is not currently supported for OS X, but the utility is supported for the
Classic environment.
ENWW Software 27
Page 40

Installing the printing system software
The printer comes with printing system software and printer drivers on a CD-ROM. The
printing system software on the CD-ROM must be installed in order to take full advantage of
the printer features.
If you do not have access to a CD-ROM drive, you can download the printing system
software from the Internet at http://www.hp.com/go/lj2410_software, http://www.hp.com/go/
lj2420_software, or http://www.hp.com/go/lj2430_software.
NOTE
Sample model scripts for UNIX (HP-UX®, Sun Solaris) and Linux networks are available for
download from the World Wide Web. For Linux support see http://www.hp.com/go/linux. For
UNIX support see http://www.hp.com/go/jetdirectunix_software.
You can download the latest software free of charge at http://www.hp.com/go/
lj2410_software, http://www.hp.com/go/lj2420_software, or http://www.hp.com/go/
lj2430_software.
After you have followed the installation instructions and loaded the software, see
printer-driver features to get the most out of your printer.
Using
Printer driver Help
Each printer driver has Help screens that can be activated by using either the Help button,
the F1 button on the computer keyboard, or a question-mark symbol in the upper-right
corner of the printer driver (depending on the Windows operating system that you are using).
These Help screens give detailed information about the specific driver. Printer driver Help is
separate from your program Help.
Installing Windows printing system software for direct connections
This section explains how to install the printing system software for Microsoft Windows 98,
Windows Me, Windows NT 4.0, Windows 2000, Windows XP, and Windows Server 2003.
When installing the printing software in a direct-connect environment, always install the
software before connecting the parallel or USB cable. If the parallel or USB cable was
connected before the software installation, see
USB cable has been connected.
Installing the software after the parallel or
Either a parallel or USB cable can be used for the direct connection. Use an IEEE 1284compatible cable or a standard 2-meter USB cable.
CAUTION
NOTE
28 Chapter 1 Printer basics ENWW
Do not connect parallel and USB cables at the same time.
Windows NT 4.0 does not support USB cable connections.
To install the printing system software
1. Close all software programs that are open or running.
2. Insert the printer CD-ROM into the CD-ROM drive.
If the welcome screen does not open, start it by using the following procedure:
1. On the Start menu, click Run.
2.
Type the following (where X is the letter of the CD-ROM drive): X:\setup
3. Click OK.
Page 41

3. When prompted, click Install Printer and follow the instructions on the computer screen.
4. Click Finish when the installation has completed.
5. Restart the computer.
6. Print a page from any software program to make sure that the software is correctly
installed.
If installation fails, reinstall the software. If this fails, check the installation notes and Readme
files on the printer CD-ROM or the flyer that came in the printer box, or go to
http://www.hp.com/go/lj2410_software, http://www.hp.com/go/lj2420_software, or
http://www.hp.com/go/lj2430_software for help or more information.
Installing Windows printing system software for networks
The software on the printer CD-ROM supports network installation with a Microsoft network
(except Windows 3.1x). For network installation on other operating systems, go to
http://www.hp.com/go/lj2410_software, http://www.hp.com/go/lj2420_software, or
http://www.hp.com/go/lj2430_software.
NOTE
Windows NT 4.0 drivers must be installed through the Windows Add-Printer Wizard.
The HP Jetdirect print server that is included with printer models that feature the letter "n" in
the model name has a 10/100Base-TX network port. For other options, see
accessories, and supplies or contact your local HP dealer. See HP customer care.
The installer does not support printer installation or printer object creation on Novell servers.
It supports only direct-mode network installations between Windows computers and a
printer. To install your printer and create objects on a Novell server, use an HP utility, such
as HP Web Jetadmin, or a Novell utility, such as NWadmin.
To install the printing system software
1. If you are installing the software on Windows NT 4.0, Windows 2000, Windows XP, or
Windows Server 2003 make sure that you have administrator privileges.
Print a configuration page to make sure that the HP Jetdirect print server is configured
correctly for the network. See
printer IP address. You might need this address to complete network installation.
2. Close all software programs that are open or running.
3. Insert the printer CD-ROM into the CD-ROM drive.
4. If the welcome screen does not open, start it by using the following procedure:
1. On the Start menu, click Run.
Configuration page. On the second page, locate the
Ordering parts,
2.
Type the following (where X is the letter of the CD-ROM drive): X:\setup
3. Click OK.
5. When prompted, click Install Printer and follow the instructions on the computer screen.
6. Click Finish when the installation is complete.
7. Restart the computer.
8. Print a page from any software program to make sure that the software is correctly
installed.
ENWW Software 29
Page 42

If installation fails, reinstall the software. If this fails, check the installation notes and Readme
files on the printer CD-ROM or the flyer that came in the printer box, or go to
http://www.hp.com/go/lj2410_software, http://www.hp.com/go/lj2420_software, or
http://www.hp.com/go/lj2430_software for help or more information.
To set up a Windows computer to use the network printer with Windows-sharing
You can share the printer on the network so that other network users can print to it.
See your Windows documentation to set up Windows-sharing. After the printer is shared,
install the printer software on all computers that share the printer.
Installing Macintosh printing system software for networks
This section describes how to install Macintosh printing system software. The printing
system software supports Apple Mac OS 9.x and later and OS X V10.1 and later.
The printing system software includes the following components:
● PostScript Printer Description files. The PostScript (PS) Printer Description files
(PPDs), in combination with the Apple LaserWriter 8 printer driver, provide access to the
printer features and allow the computer to communicate with the printer. An installation
program for the PPDs and other software is provided on the CD-ROM that came with the
printer. In addition, use the Apple LaserWriter 8 printer driver that comes with the
computer.
● HP LaserJet Utility. The HP LaserJet Utility provides access to features that are not
available in the printer driver. Use the illustrated screens to select printer features and
complete tasks with the printer:
– Name the printer, assign it to a zone on the network, download files and fonts, and
change many of the printer settings.
– Set a password for the printer.
– Check the levels of printer consumables.
– Configure and set the printer for Internet Protocol (IP) or AppleTalk printing.
To install printer drivers in Mac OS 9.x
1. Connect the network cable between the HP Jetdirect print server and a network port.
2. Insert the CD-ROM into the CD-ROM drive. The CD-ROM menu runs automatically. If
the CD-ROM menu does not run automatically, double-click the CD-ROM icon on the
desktop, and then double-click the Installer icon. This icon is located in the Installer/
<language> folder of the Starter CD-ROM, where <language> is your language
preference. For example, the Installer/English folder contains the Installer icon for the
English printer software.
3. Follow the instructions on the screen.
4. From HD, click Applications, click Utilities, and then open the Apple Desktop Printer
Utility.
5. Double click Printer (AppleTalk).
6. Next to AppleTalk Printer Selection, click Change.
7. Select the printer, click Auto Setup, and then click Create.
8. On the Printing menu, click Set Default Printer.
30 Chapter 1 Printer basics ENWW
Page 43

To install printer drivers in Mac OS X V10.1 and later
1. Connect the network cable between the HP Jetdirect print server and a network port.
2. Insert the CD-ROM into the CD-ROM drive. The CD-ROM menu runs automatically. If
the CD-ROM menu does not run automatically, double-click the CD-ROM icon on the
desktop, and then double-click the Installer icon. This icon is located in the Installer/
<language> folder of the Starter CD-ROM, where <language> is your language
preference. For example, the Installer/English folder contains the Installer icon for the
English printer software.
3. Double-click the HP LaserJet Installers folder.
4. Follow the instructions on the computer screen.
5. Double-click the Installer icon for the appropriate language.
NOTE
NOTE
NOTE
NOTE
If OS X and OS 9.x (Classic) are installed on the same computer, the installer will show both
the Classic and the OS X installation options.
6. On your computer hard drive, double-click Applications, double-click Utilities, and then
double-click Print Center or Print Setup Utility.
If you are using OS X V10.3, "Print Setup Utility" has replaced "Print Center".
7. Click Add Printer.
8. Select your connection type.
9. Select the printer name.
10. Click Add Printer.
11. Close the Print Center or the Print Setup Utility by clicking the close button in the upperleft corner.
Macintosh computers cannot be connected directly to the printer with a parallel port.
Installing Macintosh printing system software for direct connections
Macintosh computers do not support parallel port connections.
This section explains how to install the printing system software for OS 9.x and later and
OS X V10.1 and later.
The Apple LaserWriter driver must be installed in order to use the PPD files. Use the Apple
LaserWriter 8 driver that came with your Macintosh computer.
To install the printing system software
1. Connect a USB cable between the USB port on the printer and the USB port on the
computer. Use a standard 2-meter USB cable.
2. Close all software programs that are open or running.
3. Insert the printer CD-ROM into the CD-ROM drive and run the installer.
The CD-ROM menu runs automatically. If the CD-ROM menu does not run
automatically, double-click the CD-ROM icon on the desktop, and then double-click the
Installer icon. This icon is located in the Installer/<language> folder of the Starter CDROM, where <language> is your language preference.
4. Follow the instructions on the computer screen.
ENWW Software 31
Page 44

5. Restart the computer.
6. For Mac OS 9.x:
1. From HD, click Applications, click Utilities, and then open the Apple Desktop
Printer Utility.
2. Double-click Printer (USB), and then click OK.
3. Next to USB Printer Selection, click Change.
4. Select the printer, and then click OK.
5. Next to Postscript Printer Description (PPD) File, click Auto Setup, and then click
Create.
6. On the Printing menu, click Set Default Printer.
For Mac OS X:
1. From HD, click Applications, then click Utilities, and then click Print Center or
Printer Setup Utility to start the Print Center or Printer Setup Utility.
2. If the printer appears in the Printer list, delete the printer.
3. Click Add.
4. On the drop-down menu at the top, click USB.
5. In the Printer Model List, click HP.
6. Under Model Name, click HP LaserJet 2400 series, and then click Add.
7. Print a page from any software program to make sure that the software is correctly
installed.
If installation fails, reinstall the software. If this fails, see the installation notes or Readme
files on the printer CD-ROM or the flyer that came in the printer box, or go to
http://www.hp.com/go/lj2410_software, http://www.hp.com/go/lj2420_software, or
http://www.hp.com/go/lj2430_software for help or more information.
Installing the software after the parallel or USB cable has been connected
If you have already connected a parallel or USB cable to a Windows computer, the New
Hardware Found dialog box appears when you turn on the computer.
To install the software for Windows 98 or Windows Me
1. In the New Hardware Found dialog box, click Search CD-ROM drive.
2. Click Next.
3. Follow the instructions on the computer screen.
4. Print a page from any software program to make sure that the printer software is
correctly installed.
If installation fails, reinstall the software. If this fails, check the installation notes and Readme
files on the printer CD-ROM or the flyer that came in the printer box, or go to
http://www.hp.com/go/lj2410_software, http://www.hp.com/go/lj2420_software, or
http://www.hp.com/go/lj2430_software for help or more information.
To install the software for Windows 2000, Windows XP, or Windows Server 2003
1. In the New Hardware Found dialog box, click Search.
32 Chapter 1 Printer basics ENWW
Page 45

2. On the Locate Driver Files screen, select the Specify a Location check box, clear all
other check boxes, and then click Next.
3.
Type the following text, where X is the letter of the CD-ROM drive: X:\2000XP
4. Click Next.
5. Follow the instructions on the computer screen.
6. Click Finish when installation is complete.
7. Select a language and follow the instructions on the computer screen.
8. Print a page from any software program to make sure that the software is correctly
installed.
If installation fails, reinstall the software. If this fails, check the installation notes and Readme
files on the printer CD-ROM or the flyer that came in the printer box, or go to
http://www.hp.com/go/lj2410_software, http://www.hp.com/go/lj2420_software, or
http://www.hp.com/go/lj2430_software for help or more information.
Uninstalling the software
This section explains how to uninstall the printing system software.
To remove software from Windows operating systems
Use the Uninstaller to select and remove any or all of the Windows HP printing-system
components.
1. Click Start and then point to Programs.
2. Point to HP LaserJet 2400 series, and then click Uninstaller.
3. Click Next.
4. Select the HP printing-system components that you want to uninstall.
5. Click OK.
6. Follow the instructions on the computer screen to complete the uninstallation.
To remove software from Macintosh operating systems
Drag the HP LaserJet folder and PPDs to the trash can:
● For Mac OS 9, the folders are in hard drive/HP LaserJet and in hard drive/system folder/
extensions/printer descriptions.
● For Mac OS X, the folders are in hard drive/Library/Printers/PPDs/Contents/Resources/
EN.lproj.
ENWW Software 33
Page 46

Selecting print media
This printer accepts a variety of media, such as cut-sheet paper, including up to 100%
recycled fiber content paper; envelopes; labels; transparencies; and custom-size paper.
Properties such as weight, composition, grain, and moisture content are important factors
that affect printer performance and output quality. Paper that does not meet the guidelines
that are outlined in this manual can cause the following problems:
● Poor print quality
● Increased jams
● Premature wear on the printer, requiring repair
NOTE
CAUTION
Some paper might meet all of the guidelines in this manual and still not produce satisfactory
results. This might be the result of improper handling, unacceptable temperature and
humidity levels, or other variables over which Hewlett-Packard has no control. Before
purchasing large quantities of media, make sure that it meets the requirements that are
specified in this User guide and in the HP LaserJet Printer Family Print Media Guide, which
is available for download at http://www.hp.com/support/ljpaperguide. Always test paper
before buying large quantities.
Using media that does not meet HP specifications can cause problems for the printer,
requiring repair. This repair is not covered by the HP warranty or service agreements.
Supported types and sizes of print media
Tray 1
Minimum size (custom) 76 x 127 mm
Maximum size (custom) 216 x 356 mm
Transparency Same as minimum
Dimensions
(3 x 5 inches)
(8.5 x 14 inches)
and maximum paper
sizes listed above.
1
Weight
60 to 199 g/m
(16 to 53 lb)
Thickness: 0.10
to 0.14 mm (0.0039 to
0.0055 inch)
2
Capacity
100 sheets of 75 g/m
(20 lb) paper
75 typical
2
2
3
Labels
Envelopes
1
The printer supports a wide range of sizes. See the printer software for supported sizes. To
print on custom-size paper see
2
Capacity can vary depending on media weight and thickness, as well as environmental
Printing on custom-sized media or cardstock.
Thickness:
0.10 to 0.14 mm
(0.0039 to 0.005 inch)
Up to 90 g/m
(16 to 24 lb)
2
50 typical
Up to 10
conditions.
3
Smoothness: 100 to 250 (Sheffield).
34 Chapter 1 Printer basics ENWW
Page 47

NOTE
You might experience some jams when using any media that is less than 178 mm (7 inches)
long. These jams might be caused by paper that has been affected by environmental
conditions. For optimum performance, make sure that you are storing and handling the
media correctly (see
Printing and paper storage environment).
Tray 2 (250-sheet tray)
Dimensions
1
Weight
Capacity
2
and tray 3 (500-sheet
tray)
Letter 216 x 279 mm
(8.5 x 11 inches)
60 to 120 g/m
(16 to 32 lb)
2
250 sheets of 75 g/m
(20 lb) paper
A4 210 x 297 mm
(8.3 x 11.7 inches)
Executive 191 x 267 mm
(7.3 x 10.5 inches)
Legal 216 x 356 mm
(8.5 x 14 inches)
B5 (JIS) 182 x 257 mm
(7.2 x 10 inches)
A5 148 x 210 mm
(5.8 x 8.3 inches)
8.5 x 13 inches 216 x 330 mm
(8.5 x 13 inches)
1
The printer supports a wide range of sizes. See the printer software for supported sizes. To
print on custom-size paper see
2
Capacity can vary depending on media weight and thickness, as well as environmental
Printing on custom-sized media or cardstock.
conditions.
2
Built-in duplexer
1
Dimensions
Letter 216 x 279 mm
(8.5 x 11 inches)
2
Weight
60 to 105 g/m
2
(16 to 28 lb Bond)
A4 210 x 297 mm
(8.3 x 11.7 inches)
Legal 216 x 356 mm
(8.5 x 14 inches)
8.5 x 13 inches 216 x 330 mm
(8.5 x 13 inches)
1
The built-in duplexer is included only with the HP LaserJet 2420d, 2420dn, and 2430dtn
printers.
2
The printer supports a wide range of sizes. See the printer software for supported sizes. To
print on custom-size paper see
Printing on custom-sized media or cardstock.
ENWW Selecting print media 35
Page 48

For more information about using print media, see Paper specifications.
36 Chapter 1 Printer basics ENWW
Page 49

2
Printing tasks
This section provides information about common printing tasks.
●
Selecting which tray is used for printing
●
Selecting the correct fuser mode
●
Loading trays
●
Understanding media output options
●
Printing on envelopes
●
Printing on special media
●
Printing on both sides (duplexing)
●
Canceling a print job
●
Using the printer driver
●
Using printer-driver features
●
Using job-storage features
ENWW 37
Page 50

Selecting which tray is used for printing
You can select how the printer pulls media from the trays. The following sections provide
information about configuring the printer to pull media from specific trays.
Understanding tray order
Customizing tray 1 operation
Printing by type and size of media (locking trays)
Manually feeding media from tray 1
Understanding tray order
When the printer receives a print job, it selects the tray by trying to match the requested
paper type and size with what has been loaded in the trays. Using an "autoselect" process, it
searches all available trays for the paper that satisfies the request, starting with the bottom
tray and ending with the top tray (tray 1). The printer begins printing the job as soon as it
finds the correct type and size.
NOTE
The "autoselect" process occurs only if no specific tray is requested for the job. If a specific
tray is requested, the job prints from the requested tray.
● If media is loaded in tray 1 and tray 1 is set TRAY 1 TYPE=ANY and TRAY 1
SIZE=ANY on the PAPER HANDLING menu, the printer will always pull media from
tray 1 first. See
● If the search fails, a message appears on the printer control-panel display requesting
that you load the correct media type and size. You can load that media type and size, or
you can override the request by selecting a different type and size at the printer control
panel.
● If a tray runs out of media during a print job, the printer automatically switches to any
tray that contains the same media type and size.
The autoselect process changes somewhat if you customize tray 1 operation (as explained
Customizing tray 1 operation) or if you set tray 1 for manual feed (as explained in
in
Manually feeding media from tray 1).
Customizing tray 1 operation for more information.
Customizing tray 1 operation
The printer can be set to print from tray 1 if it is loaded, or to print only from tray 1 if the type
of media that is loaded is specifically requested. See
Paper Handling menu.
Setting Explanation
TRAY 1 TYPE=ANY
TRAY 1 SIZE=ANY
38 Chapter 2 Printing tasks ENWW
The printer usually pulls media from tray 1 first
unless it is empty or closed. If you do not keep
media in tray 1 all the time, or if you use tray 1
only to manually feed media, keep the default
setting of TRAY 1 TYPE=ANY and TRAY 1
SIZE=ANY on the Paper Handling menu.
Page 51

Setting Explanation
TRAY 1 TYPE= or TRAY 1 SIZE= a type other
than ANY
The printer treats tray 1 like the other trays.
Instead of looking for media in tray 1 first, the
printer pulls media from the tray that matches
type and size settings that are selected in the
software.
In the printer driver, you can select media from
any tray (including tray 1) by type, size, or
source. To print by type and size of paper, see
Printing by type and size of media (locking trays).
You can also determine whether the printer shows a prompt to ask if it can pull media from
tray 1 if it cannot find the type and size that you requested in another tray. You can set the
printer to always prompt you before pulling from tray 1 or only prompt you if tray 1 is empty.
Set the USE REQUESTED TRAY setting on the System Setup submenu of the Configure
Device menu.
Printing by type and size of media (locking trays)
Printing by type and size is a way to be sure that print jobs always print on the media that
you want. You can configure the trays for the type, such as plain or letterhead, and size,
such as letter or A4, that is loaded in them.
If you configure the trays this way and then select a certain type and size in the printer
driver, the printer automatically selects the tray loaded with that type or size. You do not
have to select a specific tray (selecting by source). Configuring the printer this way is
especially helpful if the printer is shared, and more than one person loads or removes media
frequently.
NOTE
Some older model printers have a feature that "locks out" trays to prevent printing on the
wrong media. Printing by type and size eliminates the need to lock trays. For more
information about types and sizes that each tray supports, see
Supported types and sizes of
print media.
To print by type and size from tray 2 or tray 3, it might be necessary to unload tray 1 and
close it, or set TRAY 1 TYPE and TRAY 1 SIZE to types other than ANY on the PAPER
HANDLING menu at the printer control panel. For more information, see
Customizing tray 1
operation. Settings in a program or the printer driver override control-panel settings.
(Program settings generally override printer-driver settings.)
ENWW Selecting which tray is used for printing 39
Page 52

To print by type and size of paper
1. Be sure to load the trays correctly. See Loading trays.)
2. At the printer control panel, open the PAPER HANDLING menu. Select the paper type
for each tray. If you are unsure aboutwhich type you are loading, such as bond or
recycled, check the label on the media package.
3. Select the paper-size settings at the printer control panel.
● Tray 1: Set the paper size on the PAPER HANDLING menu if the printer is set to
TRAY 1 TYPE= a type other than ANY. If custom paper is loaded, also set the
custom-paper size on the PAPER HANDLING menu. (For more information, see
Printing on custom-sized media or cardstock.)
● Tray 2 and optional tray 3: Set the paper size on the PAPER HANDLING menu.
These trays do not support custom sizes.
4. In the program or printer driver, select a type other than Auto Select.
NOTE
NOTE
The type and size settings can also be configured in the HP Web Jetadmin software for
networked printers.
Manually feeding media from tray 1
The manual feed feature is another way of printing on special media from tray 1. Setting
MANUAL FEED to ON either in the printer driver or at the printer control panel stops the
printer after each job is sent, allowing you time to load special paper or other print media in
(S
ELECT
tray 1. Press
If tray 1 contains media when you send the print job, and the printer control panel has
TRAY 1 TYPE=ANY and TRAY 1 SIZE=ANY as the default configuration for tray 1
operation, the printer will not stop and wait for media to be loaded. To have the printer wait,
set TRAY 1 TYPE and TRAY 1 SIZE to types other than ANY on the PAPER HANDLING
menu.
If the SIZE and TYPE are set to ANY, and MANUAL FEED PROMPT is set to UNLESS
LOADED, then the media will be pulled from tray 1 without prompting. If MANUAL FEED
PROMPT is set to ALWAYS, then the printer will prompt you to load media, even if tray 1 is
set to TYPE=ANY and SIZE=ANY.
If you have selected MANUAL FEED=ON at the printer control panel, this setting will
override the printer driver, and all print jobs that you send to the printer will request manually
fed paper in tray 1 unless a specific tray has been selected in the printer driver. If this feature
is to be used only occasionally, it is best to set MANUAL FEED=OFF at the printer control
panel and to select the manual feed option in the printer driver on a job-by-job basis.
button) to continue printing.
40 Chapter 2 Printing tasks ENWW
Page 53

Selecting the correct fuser mode
The printer automatically adjusts the fuser mode based on the media type to which the tray
is set. For example, heavy paper, such as card stock, might need a higher fuser-mode
setting in order to make the toner adhere better to the page, but transparencies need the
LOW fuser-mode setting to avoid damage to the printer. The default setting generally
provides the best performance for most print-media types.
The fuser mode can be changed only if the media type has been set for the tray that you are
using. (See
been set for the tray, then the fuser mode for that type can be changed on the CONFIGURE
DEVICE menu in the PRINT QUALITY submenu at the printer control panel. (See
Quality submenu.)
Printing by type and size of media (locking trays).) After the media type has
Print
NOTE
Using a higher fuser mode, such as HIGH 1 or HIGH 2, improves the ability of the toner to
adhere to paper, but it might cause other problems, such as excessive curl. The printer
might print at a slower speed when the fuser mode is set to HIGH 1 or HIGH 2.
To reset the fuser modes to the default settings, open the CONFIGURE DEVICE menu at
the printer control panel. On the PRINT QUALITY submenu, select FUSER MODES, and
then select RESTORE MODES.
ENWW Selecting the correct fuser mode 41
Page 54

Loading trays
Load special print media, such as envelopes, labels, and transparencies, in tray 1 only. Load
only paper in tray 2 or optional tray 3.
Loading tray 1 (multipurpose tray)
Tray 1 holds up to 100 sheets of paper, up to 75 transparencies, up to 50 sheets of lables, or
up to 10 envelopes. See the following sections for information aboutprinting on special media:
● Preprinted material—
sided)
● Envelopes—
● Labels—
Printing on envelopes
Printing on labels
Printing on letterhead, prepunched, or preprinted paper (single-
To load tray 1
1. Open tray 1 by pulling the front cover down.
2. Slide out the plastic tray extender. If the media that is being loaded is longer than
229 mm (9 inches), also flip open the additional tray extender.
3. Slide the media-width guides slightly wider than the media.
42 Chapter 2 Printing tasks ENWW
Page 55

4. Place media into the tray (short-edge in, print-side up). The media should be centered
between the media-width guides and under the tabs on the media-width guides.
5. Slide the media-width guides inward until they lightly touch the media stack on both
sides without bending it. Make sure that the media fits under the tabs on the media-width
guides.
NOTE
Do not add media to tray 1 while the printer is printing. This could cause a jam. Do not close
the front door when the printer is printing.
Loading tray 2 (250-sheet tray)
Tray 2 supports only paper (A4, A5, B5 JIS, Letter, Legal, Executive, and 8.5 x 13 inches).
To load tray 2
1. Pull the tray out of the printer and remove any paper.
ENWW Loading trays 43
Page 56

2. Adjust the media-width guides outward so that the pointer matches the paper size that
you are loading.
3. On the rear paper-length guide, press on the blue tab and adjust it so that the pointer
matches the paper size that you are loading.
EXECUTIVE
LETTER
8.5"X13"
B5 ISO
LEGAL
B5J IS
A4
4. Place the paper in the tray and make sure that it is flat at all four corners. Keep the
paper below the height tabs on the paper-length guide in the rear of the tray.
5. Push down on the paper to lock the metal paper-lift plate in place.
6. Slide the tray into the printer.
44 Chapter 2 Printing tasks ENWW
Page 57

NOTE
Whenever you remove tray 2 from the printer, always push down on the paper to lock the
metal paper-lift plate in place before you replace the tray. The metal paper-lift plate releases
and lifts the paper when you push the tray into the printer.
Loading optional tray 3 (500-sheet tray)
Tray 3 supports only paper (A4, A5, B5 JIS, Letter, Legal, Executive, and 8.5 x 13 inches).
NOTE
The tray 3 500-sheet feeder comes standard with some HP Color LaserJet 2460 printer
models.
To load tray 3
1. Pull the tray out of the printer and remove any paper.
2. Adjust the rear length guide for the correct paper size.
EXECUTIVE
LETTER
8.5"X13"
B5ISO
LEGAL
B5JIS
A4
3. Adjust the side width guide for the correct paper size.
ENWW Loading trays 45
Page 58

4. Place the paper in the tray and make sure that it is flat at all four corners. Keep the
paper below the hooks on the side and rear of the tray.
5. Slide the tray into the printer.
46 Chapter 2 Printing tasks ENWW
Page 59

Understanding media output options
The printer comes with two output bins. The top output bin is used when the rear output bin
is closed. The rear output bin is used when the rear output bin is open.
1
1 Top output bin (face down)
2 Rear output bin (face up)
2
NOTE
When tray 1 and the rear output bin are used together, they provide a straight-through paper
path for your print job. Using a straight-through paper path can sometimes reduce curling.
ENWW Understanding media output options 47
Page 60

Printing on envelopes
You can print envelopes from tray 1. Tray 1 holds up to 10 envelopes and supports standard
or custom sizes.
For printing on any size of envelope, make sure to set the margins in your program at least
15.0 mm (0.6 inch) from the edge of the envelope.
The printer might print at a slower speed when printing envelopes. In addition, printing
performance depends on the construction of the envelope. Always test a few sample
envelopes before purchasing a large quantity. For envelope specifications, see
Envelopes.
WARNING!
CAUTION
Never use envelopes that contain coated linings, exposed self-stick adhesives, or other
synthetic materials. These items can emit noxious fumes.
Envelopes that have clasps, snaps, windows, coated linings, exposed self-stick adhesives,
or other synthetic materials can severely damage the printer. To avoid jamming and possible
printer damage, never try to print on both sides of an envelope. Before you load envelopes,
make that sure they are flat and not damaged or stuck together. Do not use envelopes that
contain pressure-sensitive adhesive.
To load envelopes in tray 1
Many types of envelopes can be printed from tray 1. Up to 10 can be stacked in the tray.
1. Open tray 1 by pulling the front cover down, then pull out the media support and fold out
the media extension.
2. Open the rear output bin by pulling down on the top section of the bin. Slide out the
extender until it extends fully.
NOTE
48 Chapter 2 Printing tasks ENWW
Using the rear output bin reduces envelope curl.
Page 61

3. Slide the width guides on tray 1 outward to a position that is slightly wider than the
envelopes.
4. Place the envelopes into the tray short-edge in, print-side up. The stamp end must enter
the printer first.
5. Slide the width guides inward until they lightly touch the envelope stack without bending
it. The envelopes should be centered between the paper guides and under the tabs on
the paper-width guides.
NOTE
If the envelope has a flap on the short edge, this edge must enter the printer first. You might
experience some jams when using any media that is less than 178 mm (7 inches) long.
Shrinkage might be the result of environmental conditions. For optimum performance, make
sure that you are storing and handling the paper correctly. For more information see
Printing
and paper storage environment. Using media from another manufacturer might also help.
ENWW Printing on envelopes 49
Page 62

Printing on special media
This section discusses printing on types of media that require special handling:
Printing on labels
●
Printing on transparencies
●
Printing on custom-sized media or cardstock
●
Printing on letterhead, prepunched, or preprinted paper (single-sided)
●
Printing on labels
Use only labels that are recommended for laser printers. For label specifications, see Labels.
Guidelines for printing on labels
● Print labels from tray 1.
● Load labels print-side up.
● Use the rear output bin for labels.
● Remove label sheets from the output bin as they are printed to prevent them from
sticking together.
CAUTION
● Do not use labels that are separating from the backing sheet or are wrinkled or damaged
in any way.
● Do not use label sheets that have the backing sheet exposed, and do not reuse partially
used label sheets.
● Do not feed a sheet of labels through the printer more than once. The adhesive backing
is designed for one pass through the printer.
If a sheet of labels becomes jammed in the printer, see Clearing jams.
50 Chapter 2 Printing tasks ENWW
Page 63

Printing on transparencies
Use only transparencies that are recommended for use in laser printers. For transparency
specifications, see
Guidelines for printing on transparencies
● Print transparencies from tray 1.
● Use the top output bin to reduce curling (this is for transparencies only; for other media
use the rear output bin to reduce curling).
● Remove transparencies from the output bin as they are printed to prevent them from
sticking.
● Place transparencies on a flat surface after removing them from the printer.
Transparencies.
● Set the printer driver for transparencies. See
trays).
● For Macintosh computers, go to the HP LaserJet Utility and select transparencies.
Printing by type and size of media (locking
Printing on custom-sized media or cardstock
Postcards, 3 x 5 inch (index) cards, and other custom-sized media can be printed from
tray 1. The minimum media size is 76 x 127 mm (3 x 5 inches) and the maximum media size
is 216 x 356 mm (8.5 x 14 inches).
NOTE
ENWW Printing on special media 51
You might experience some jams when using any media that is less than 178 mm (7 inches)
long. Shrinkage might be the result of environmental conditions. For optimum performance,
make sure that you are storing and handling the paper correctly. See
storage environment. Using media from another manufacturer might also help. Printing on
odd sizes or weights of media (for example, small, long, or narrow paper) can decrease print
speed. The decreased speed helps to prolong the life of internal printer parts. It also
improves print quality with these types of media.
Printing and paper
Page 64

Guidelines for printing on custom-sized media and cardstock
● Always insert the short-edge first into tray 1. If you want to print in landscape mode,
make this selection through your software. Inserting paper long-edge first might cause a
jam.
● Use the rear output bin to reduce curl.
● Do not print on media that is smaller than 76 mm (3 inches) wide or 127 mm (5 inches)
long.
● In the software program, set margins at least 6.40 mm (0.25 inch) away from the edges
of the media.
Printing on letterhead, prepunched, or preprinted paper (single-sided)
When printing letterhead, prepunched, or preprinted paper, it is important to orient the paper
correctly. Follow the guidelines in this section for printing on one side only. For duplexing
guidelines, see
Tray 1 orientation: print-side up, top edge toward the printer.
Printing on both sides (duplexing).
52 Chapter 2 Printing tasks ENWW
Page 65

Tray 2 or tray 3 orientation: print-side down, top edge toward you.
NOTE
When Alternative Letterhead mode is enabled in the printer driver, and Letterhead or
Preprinted is selected as the media type, you must orient the media for two-sided (duplex)
printing.
Guidelines for printing on letterhead or preprinted forms
● Do not use letterhead paper that is printed with low-temperature inks, such as those
used in some types of thermography.
● Do not use raised or embossed letterhead.
● The printer uses heat and pressure to fuse toner to the paper. Make sure that any
colored paper or preprinted forms use inks that are compatible with this fusing
temperature (200°C or 392°F for 0.1 second).
ENWW Printing on special media 53
Page 66

Printing on both sides (duplexing)
You can print on both sides of a sheet of paper (called duplexing or two-sided printing) in
two ways—automatic and manual. The following paper sizes are supported for automatic
duplexing: Letter, A4, Legal, and 8.5 x 13 inches. Manual duplexing supports all paper sizes.
● Automatic duplexing: The built-in, automatic duplexer is included only with the
HP LaserJet 2420d, 2420dn, and 2430dtn printer models.
● Manual duplexing: All printer models are capable of manual duplex printing. The printer
prints the first side of each page, waits for you to reinsert the paper into the printer, and
then prints the second side of each page. Other documents cannot be printed while the
printer waits for you to insert the paper for the second side to be printed.
Even if the printer includes a built-in duplexer, manual duplexing is necessary for the
following situations:
CAUTION
● When duplexing paper other than the supported sizes or weights—for example, paper
heavier than 105 g/m
● When you select Straight Paper Path in the printer driver
Do not print on both sides of labels, transparencies, or vellum. Damage to the printer and
jams might result.
2
(28 lb) or very thin paper.
Paper orientation for printing on both sides
Print on the second side of the sheet of paper first. The paper needs to be oriented as
shown in the following illustration.
● For tray 1, load the first side facing down with the bottom, short edge toward the printer.
● For all other trays, load the first side facing up with the top, short edge toward the printer.
1
2
1 Tray 1
2 All other trays
54 Chapter 2 Printing tasks ENWW
Page 67

Layout options for printing on both sides
The following illustration shows the four print-orientation options. These options are available
when Print on Both Sides is selected on the Finishing tab in the printer driver.
1
2
25
3
5
1. Long-edge landscape* This layout is often used in accounting, data processing, and
2. Short-edge landscape Each printed image is oriented right-side-up. Facing pages are
3. Long-edge portrait This is the default printer setting, and the most common layout
2
3
spreadsheet programs. Every other printed image is oriented
upside-down. Facing pages are read continuously from top to
bottom.
read from top to bottom on the left page, then from top to bottom
on the right page.
used, with every printed image oriented right-side-up. Facing
pages are read from top to bottom on the left page, then from top
to bottom on the right page.
3
3
2
5
4
2
3
5
CAUTION
4. Short-edge portrait* This layout is often used with clipboards. Every other printed
image is oriented upside-down. Facing pages are read
continuously from top to bottom.
* When using Windows drivers, select Flip Pages Up to get the designated binding options.
To duplex by using the built-in duplexer
The built-in duplexer is included only with the HP LaserJet 2420d, 2420dn, and 2430dtn
models.
1. Insert enough paper into one of the trays to accommodate the print job. If you are
loading special paper such as letterhead, load it in one of the following ways:
● For tray 1, load the letterhead paper with the front side down, bottom-edge first.
● For all other trays, load the letterhead paper with front side facing up, and the top
edge toward the back of the tray.
Do not load paper that is heavier than 105 g/m2 (28 lb bond). Jamming could result.
2. Open the printer driver (see
3. On the Finishing tab, select Print on Both Sides.
Changing the settings for a print job).
ENWW Printing on both sides (duplexing) 55
Page 68

4. Click OK.
5. Send the print job to the printer.
NOTE
The paper you are printing on will partially come out of the top output bin during the
duplexing. Do not pull on the paper until duplexing is complete. During duplexing, the
duplexer will not function if the rear output bin is open.
To duplex manually
1. Insert enough paper into one of the trays to accommodate the print job. If you are
loading special paper such as letterhead, load it in one of the following ways:
● For tray 1, load the letterhead paper with the front side down, bottom-edge first.
● For all other trays, load the letterhead paper with first side up, top edge toward the
back of the tray.
2. Open the printer driver (see
3. On the Finishing tab, select Print on Both Sides.
4. Click OK.
5. Send the print job to the printer.
6. Go to the printer. Remove any blank paper that is in tray 1. Insert the printed stack with
the blank side up, with the top-edge feeding into the printer first. You must print the
second side from tray 1.
7.
If prompted by a message at the control panel-display, press
Changing the settings for a print job).
(S
ELECT
button).
NOTE
If the number of total sheets exceeds the tray 1 capacity for manual duplex jobs, you must
repeat steps 6 and 7 each time that paper is inserted, until the duplexing job is complete.
56 Chapter 2 Printing tasks ENWW
Page 69

Canceling a print job
You can cancel a print job from a software program or a print queue, or by pressing the S
TOP
button on the printer control panel.
● If the printer has not started printing, first try to cancel the job within the software
program that sent the print job.
● If the print job is waiting in a print queue or print spooler such as the Printers group on a
Windows computer or Print Monitor on a Macintosh computer, delete the job there.
TOP
● If the print job is already printing, press the S
button. The printer will finish printing
any pages that are already moving through the printer and delete the rest of the print job.
If the control-panel status lights continue to cycle after a job has been canceled, the
computer is still sending the job to the printer. Either delete the job from the print queue or
wait until the computer has finished sending data (the printer will return to the ready state,
with the Ready light on).
TOP
Pressing S
printer memory, S
cancels only the current job in the printer. If more than one print job is in
TOP
must be pressed once for each job.
ENWW Canceling a print job 57
Page 70

Using the printer driver
The printer driver provides access to the printer features and allows the computer to
communicate with the printer. This section provides instructions for printing when setting
options are set from the printer driver.
If possible, try to set printing features from the software program in which you are working or
from the Print dialog box. You can set the printer features this way for most Windows and
Macintosh software programs. If a setting is not available in the software program or printer
driver, you must set it at the printer control panel.
For more information about printer-driver features, see the printer-driver online Help. For
more information about printing from a specific software program, see the documentation for
the program.
NOTE
Printer-driver settings override control panel settings. Software program settings override
both printer-driver settings and control panel settings.
Changing the settings for a print job
If you want printing settings to be used only in the software program you are using, change
the settings from the program. After you quit the program, the printer settings return to the
defaults that are configured in the printer driver.
To change print settings for a print job on Windows computers
1. In the software program, click File.
2. Click Print.
3. Click Setup or click Properties. (The options might be different for your program.)
4. Change the print settings.
5. When you are finished, click OK.
To change print settings for a print job on Macintosh computers
1.
In the software program, click File.
2. Click Print.
3. In the dialog box that appears, select the print settings that you want to change and
make the changes.
4. When you are finished, click OK.
Changing default settings
If you want printing settings to be used in all software programs you use on the computer,
change the default settings in the printer driver.
Choose the procedure for your operating system:
●
To change default settings in Windows 98 and Windows Me
To change default settings in Windows NT 4.0
●
58 Chapter 2 Printing tasks ENWW
Page 71

● To change default settings in Windows 2000, Windows XP, and Windows Server 2003
To change default settings in Macintosh operating systems
●
To change default settings in Windows 98 and Windows Me
1. Click the Start button.
2. Click Settings.
3. Click Printers.
4. Right-click the HP LaserJet 2400 series printer icon.
5. Click Properties.
6. Change any of the settings on the tabs. These settings are now the defaults for the
printer.
7. Click OK to save your settings and to close the printer driver.
To change default settings in Windows NT 4.0
1. Click the Start button.
2. Click Settings.
3. Click Printers.
4. Right-click the HP LaserJet 2400 series series printer icon.
5. Click Document Defaults.
6. Change any of the settings on the tabs. These settings are now the defaults for the
printer.
7. Click OK to save your settings and to close the printer driver.
To change default settings in Windows 2000, Windows XP, and
Windows Server 2003
1. Click the Start button.
2. Click Settings.
3. Click Printers (Windows 2000) or Printers and Faxes (Windows XP and Windows
Server 2003).
4. Right-click the HP LaserJet 2400 series printer icon.
5. Click Properties.
6. On the Advanced tab, click Printing Defaults.
7. Change any of the settings on the tabs. These settings are now the defaults for the
printer.
8. Click OK to return to the Advanced tab.
9. Click OK to save your settings and to close the printer driver.
ENWW Using the printer driver 59
Page 72

To change default settings in Macintosh operating systems
Depending on the Macintosh operating system version that you have, use either the Apple
Desktop Printer Utility, the Print Center, or the Print Setup Utility to change printer driver
defaults.
60 Chapter 2 Printing tasks ENWW
Page 73

Using printer-driver features
This section provides instructions for common printing features that are controlled through
the printer driver.
Printing watermarks
●
Printing multiple pages on one sheet of paper
●
Setting a custom paper size
●
Using EconoMode (draft) printing
●
Selecting print-quality settings
●
Using reduce/enlarge options
●
Selecting a paper source
●
Printing a cover, a different first or last page, or a blank page
●
Printing watermarks
A watermark is a marking, such as "Top Secret," "Draft," or someone's name, printed in the
background of selected pages in a document.
NOTE
NOTE
If you are using Windows NT 4.0, Windows 2000, Windows XP, or Windows Server 2003
you must have administrator privileges to create watermarks.
To print a watermark on Windows computers (all versions)
1. Open the printer driver (see Changing the settings for a print job).
2. On the Effects tab, select a watermark from the Watermarks drop-down list. To edit or
create a watermark, click Edit.
3. Click OK.
To print a watermark on Macintosh computers
Select Custom and specify the text that you want, depending on your printer-driver version.
Watermarks are supported only for Mac OS 9.x. Watermarks are not supported for
Mac OS X V10.1 and later.
ENWW Using printer-driver features 61
Page 74

Printing multiple pages on one sheet of paper
You can print more than one document page on a single sheet of paper (this is sometimes
called 2-up, 4-up, or n-up printing). The pages will appear decreased in size and arranged
on the sheet. You can specify that up to 16 pages are to be printed on a single sheet. This
feature provides a cost-effective and environmentally friendly way to print draft pages,
especially when combined with duplex printing (see
To print multiple pages on one side of a sheet of paper on Windows
computers (all versions)
Printing on both sides (duplexing)).
1. Open the printer driver (see Changing the settings for a print job).
2. On the Finishing tab, select the number of pages per sheet from the Pages per sheet
drop-down menu.
3. If you want borders around the pages, click Print Page Borders.
4. Select the page order from the Page Order drop-down list.
5. Click OK.
Setting a custom paper size
Use the custom paper feature to print on paper sizes other than standard sizes.
To set a custom paper size on Windows computers
1. Open the printer driver (see Changing the settings for a print job).
2. On the Paper/Quality tab, click Custom.
3. Specify the custom width and height.
4. Click Close.
5. Click OK.
62 Chapter 2 Printing tasks ENWW
Page 75

To set a custom paper size on Macintosh computers
For Mac OS 9
1. On the File menu, select Page Setup.
2. From the Page Attributes drop-down menu, select Custom Page Size.
3. Click New to create a named custom page size. The new custom page is automatically
added to the Page Size menu in Page Setup.
For Mac OS X
1. On the File menu, select Page Setup.
2. On the Settings drop-down menu, click Page Attributes, and then click Custom Paper
Size.
3. Click New, and type in a name for the custom paper size.
4. Type the height and width for the custom paper size. Click Save
5. On the Settings drop-down menu, click Page Attributes. Make sure that the Format
for drop-down menu is set for Any Printer.
6. In the Page Attributes window, click Paper Size, and then select the new custom paper
size. Verify that the dimensions are correct.
7. Click OK.
Using EconoMode (draft) printing
Use EconoMode (draft) printing to print with less toner on each page. Selecting this option
might extend the life of your print cartridge and reduce your cost per page, but will reduce
print quality.
HP does not recommend full-time use of EconoMode. If Economode is used full-time when
the average toner coverage is significantly less than five percent, it is possible that the toner
supply will outlast the mechanical parts in the print cartridge. If print quality begins to
degrade under these circumstances, you will need to install a new print cartridge, even if
toner remains in the cartridge,
To use EconoMode (draft) printing on Windows computers
1. Open the printer driver (see Changing the settings for a print job).
2. On the Paper/Quality tab, click EconoMode.
3. Click OK.
Selecting print-quality settings
If you need advanced print quality, you can select from custom settings.
ENWW Using printer-driver features 63
Page 76

Resolution options
● Best Quality - use ProRes 1200 for the best print quality.
● Faster Printing - use FastRes 1200 as an alternative resolution for complex graphics or
faster output.
● Custom - use this option to specify print-quality settings.
NOTE
Changing resolution can change the formatting of your text.
To select print-quality settings on Windows computers
1. Open the printer driver. See Changing the settings for a print job.
2. On the Paper/Quality tab, select the resolution or print-quality settings that you want
from the Print Quality drop-down menu.
3. Click OK.
Using reduce/enlarge options
Use the reduce/enlarge options to scale your document to a percentage of its normal size.
You can also choose to scale your document to fit on any size of paper that the printer
supports.
To set reduce/enlarge options on Windows computers
1. Open the printer driver. See Changing the settings for a print job.
2. On the Effects tab, click % of Normal Size.
3. Use the number box or slider scale to reduce or enlarge the scale.
4. Click OK.
Selecting a paper source
If your software program supports printing paper by source, make the selections from the
program. Program settings override printer-driver settings.
To select a paper source on Windows computers
1. Open the printer driver. See Changing the settings for a print job.
2. On the Paper/Quality tab, select the source from the Source is drop-down list.
3. Click OK.
To select a paper source on Macintosh computers
For Mac OS 9: Select a paper source from the General options in the printer driver.
For Mac OS X: Click File, then click Print, and then click Paper Feed.
64 Chapter 2 Printing tasks ENWW
Page 77

Printing a cover, a different first or last page, or a blank page
Use the following procedure to print the covers of a document on a different media type than
the rest of the document or to print the first or last page of a document on different media.
For example, to print the first page of a document on letterhead paper and the rest on plain
paper, or to print a cover on card stock and the subsequent pages on plain paper. You can
also use this feature to insert blank pages between documents when printing several copies.
This option might not be available in all printer drivers.
To print covers or different pages on Windows computers
NOTE
This procedure changes the printer's settings for one print job. To change the printer's
default settings, see
1. Open the printer driver (see
2. On the Paper/Quality tab, click Use different paper/Covers.
3. To print covers or to insert a blank page between documents, select Front Cover or
Back Cover from the drop-down list. Click Add a Blank or Preprinted Cover. Select
the Source is and Type is for the cover or blank page. The blank page can be either a
front cover or a back cover. Click OK.
4. To print a different first or last page, select First Page, Other Pages, or Last Page from
the drop-down list. Select the Source is and Type is for the different pages. Click OK.
Changing default settings.
Changing the settings for a print job).
To print covers or different pages on Macintosh computers
For Mac OS 9: In the Print dialog box, select First from and Remaining from.
For Mac OS X: Click File, then click Print, and then click Paper Feed.
ENWW Using printer-driver features 65
Page 78

Using job-storage features
The printer supports two distinct job-storage features that you can use to initiate printing
from the printer control panel after the print job is sent from the computer:
● Proof and hold jobs
● Private jobs
Make sure that you identify your jobs in the printer driver before printing. Using default
names might override previous jobs that have the same default name or cause the job to be
deleted.
NOTE
NOTE
The job-storage features require 48 MB of RAM. For printer models that have less than
48 MB of RAM, you can add memory so that they can support the features, see
Memory. If
you turn the printer power off, all quick copy, proof and hold, and private jobs are deleted. A
job can also be deleted at the printer control panel.
Proofing and holding a job
The proof and hold feature provides a quick and easy way to print one copy of a job for
proofing before printing the additional copies.
If you turn the printer power off, all quick copy, proof and hold, and private jobs are deleted.
To print the remaining copies of a held job
1.
2.
3.
4.
Press
Use
(S
Use
(S
Use
(S
(S
ELECT
(UP button) or (D
ELECT
button).
(UP button) or (D
ELECT
button).
(UP arrow) or (D
ELECT
button).
button) to open the menus.
OWN
button) to scroll to RETRIEVE JOB, and then press
OWN
button) to scroll to the user name, and then press
OWN
button) to scroll to the user or job name, and then press
5.
(UP button) or (D
Use
OWN
button) to scroll to PRINT, and then press (S
ELECT
button).
6.
(UP button) or (D
Use
(S
ELECT
button).
OWN
button) to scroll to the number of copies, and then press
Deleting a held job
When you send a proof and hold job, the printer automatically deletes your previous proof
and hold job. If no proof and hold job already exists with that job name, and the printer
needs additional space, the printer might delete other proof and hold jobs starting with the
oldest one.
NOTE
66 Chapter 2 Printing tasks ENWW
If you turn the printer power off, all quick copy, proof and hold, and private jobs are deleted.
A held job can also be deleted at the printer control panel.
Page 79

To delete a held job
1.
2.
3.
4.
5.
Press
Use
(S
Use
(S
Use
(S
Use
(S
ELECT
button) to open the menus.
(UP button) or (D
ELECT
button).
(UP button) or (D
ELECT
button).
(UP button) or (D
ELECT
button).
(UP button) or (D
OWN
button) to scroll to RETRIEVE JOB, and then press
OWN
button) to scroll to the user name, and then press
OWN
button) to scroll to the user or job name, and then press
OWN
button) to scroll to DELETE, and then press (S
ELECT
button).
Printing a private job
Use the private printing feature to specify that a job is not printed until you release it by
typing a four-digit personal identification number (PIN) at the printer control panel. You
specify the PIN in the printer driver, and it is sent to the printer as part of the print job.
To specify a private job
To specify in the driver that a job is private, select the Private Job option and type a 4digit PIN.
To print a private job
1.
Press
2.
Use
(S
3.
Use
(S
4.
Use
(S
5.
Use
PRINT. Press
6.
You are prompted to type the PIN number. Use
change the first number of the PIN, and then press
(*) appears in place of the number. Repeat these steps to change the remaining three
numbers of the PIN.
7.
Use
(S
ELECT
(UP button) or (D
ELECT
button).
(UP button) or (D
ELECT
button).
(UP button) or (D
ELECT
button).
(UP button) or (D
(UP button) or (D
(S
ELECT
button).
button) to open the menus.
OWN
button) to scroll to RETRIEVE JOB, and then press
OWN
button) to scroll to the user name, and then press
OWN
button) to scroll to the user or job name, and then press
OWN
button) to scroll to PRINT. A lock symbol appears next to
(S
ELECT
button).
OWN
button) to scroll to the number of copies, and then press
(UP button) or (D
(S
ELECT
button). An asterisk
OWN
button) to
Deleting a private job
A private job is automatically deleted after the user releases it for printing, unless the user
selects the Stored Job option in the printer driver.
NOTE
If you turn the printer power off, all quick copy, proof and hold, and private jobs are deleted.
A private job can also be deleted at the printer control panel before it is ever printed.
ENWW Using job-storage features 67
Page 80

To delete a private job
1.
2.
3.
4.
5.
Press
Use
(S
Use
(S
Use
(S
Use
(S
ELECT
(UP button) or (D
ELECT
button).
(UP button) or (D
ELECT
button).
(UP button) or (D
ELECT
button).
(UP button) or (D
button) to open the menus.
OWN
button) to scroll to RETRIEVE JOB, and then press
OWN
button) to scroll to the user name, and then press
OWN
button) to scroll to the user or job name, and then press
OWN
button) to scroll to DELETE, and then press (S
button). (A lock symbol appears next to DELETE.)
6.
You are prompted to type the PIN number. Use
change the first number of the PIN, and then press
(UP button) or (D
(S
ELECT
button). An asterisk (*)
OWN
appears in place of the number. Repeat these steps to change the remaining three
numbers of the PIN.
ELECT
button) to
68 Chapter 2 Printing tasks ENWW
Page 81

Managing and maintaining the
3
printer
This chapter contains information about these topics:
●
Using the embedded Web server
●
Using HP Web Jetadmin software
●
Using the HP Toolbox
●
Uninstalling the HP Toolbox
●
Managing and configuring printer drivers
●
Configuring e-mail alerts
●
Setting the real-time clock
●
Checking the printer configuration
●
Managing the print cartridge
●
Cleaning the printer
ENWW 69
Page 82

Using the embedded Web server
Use the embedded Web server to view printer and network status and to manage printing
functions from your computer instead of from the printer control panel. The following are
examples of what you can do using the embedded Web server:
● View printer-control status information.
● Set the type of media that is loaded in each tray.
● Determine the remaining life for all supplies and order new ones.
● View and change tray configurations.
● View and change the printer control-panel menu configuration.
● View and print internal pages.
● Receive notification of printer and supplies events.
● View and change network configuration.
The embedded Web server feature requires at least 48 MB of RAM and an HP Jetdirect print
server in order to connect to your network.
To use the embedded Web server, you must have Microsoft Internet Explorer 5.01 or later or
Netscape 6.2 or later for Windows, Mac OS, and Linux (Netscape only). Netscape Navigator
4.7 is required for HP-UX 10 and HP-UX 11. The embedded Web server works when the
printer is connected to an IP-based network. The embedded Web server does not support
IPX-based printer connections. You do not have to have Internet access to open and use the
embedded Web server.
NOTE
When the printer is directly connected to a computer, the embedded Web server is
supported for Windows 98 and later. In order to use the embedded Web server with a direct
connection, you must select the Custom installation option when you install the printer driver.
Select the option to load the HP Toolbox. The proxy server is installed as part of the
HP Toolbox software.
When the printer is connected to the network, the embedded Web server is automatically
available.
Another option for access to the embedded Web server is the HP Printer Access Tool. The
HP Printer Access Tool software provides a single point of access to the embedded Web
server (EWS) for all of the networked printers in each user’s local Printers folder. By using a
Web browser, users can view the supplies-status information, control print jobs, and manage
product configuration through the EWS.
Opening the embedded Web server
1. In a supported Web browser on your computer, type the IP address for the printer. To
find the IP address, print a configuration page. For more information about printing a
configuration page, see
After you open the URL, you can bookmark it so that you can return to it quickly in the future.
2. The embedded Web server has three tabs that contain settings and information about
the printer: the Information tab, the Settings tab, and the Networking tab. Click the tab
that you want to view.
Configuration page.
3. See the following sections for more information about each tab.
70 Chapter 3 Managing and maintaining the printer ENWW
Page 83

Information tab
The Information pages group consists of the following pages.
● Device Status. This page shows the printer status and shows the life remaining of HP
supplies, with 0% representing that a supply is empty. The page also shows the type
and size of print media set for each tray. To change the default settings, click Change
Settings.
● Configuration page. This page shows the information that is found on the printer
configuration page.
● Supplies Status. This page shows the life remaining of HP supplies, with 0%
representing that a supply is empty. This page also provides supplies part numbers. To
order new supplies, click Order Supplies in the Other Links area of the window. To
visit any Web site, you must have Internet access.
● Event log. This page shows a list of all printer events and errors.
● Device information. This page also shows the printer network name, address, and
model information. To change these entries, click Device Information on the Settings
tab.
● Control panel. Click this button to view the current status of the printer control panel.
Settings tab
Use this tab to configure the printer from your computer. The Settings tab can be password
protected. If this printer is networked, always consult with the printer administrator before
changing settings on this tab.
The Settings tab contains the following pages.
● Configure Device. Configure all printer settings from this page. This page contains the
traditional menus found on printers that use a control-panel display. These menus
include Information, Paper Handling, and Configure Device.
● Alerts. Network only. Set up to receive e-mail alerts for various printer and supplies
events.
● Email. Network only. Used in conjunction with the Alerts page to set up incoming and
outgoing e-mail.
● Security. Set a password that must be typed in order to gain access to the Settings and
Networking tabs. Turn on and off certain features of the EWS.
● Other Links. Add or customize a link to another Web site. This link is shown in the
Other Links area on all embedded Web server pages. These permanent links always
appear in the Other Links area: HP Instant Support, Order Supplies, and Product
Support.
● Device Information. Name the printer and assign an asset number to it. Type the name
and e-mail address for the primary contact who will receive information about the printer.
● Language. Determine the language in which to show the embedded Web server
information.
● Time Services. Set the printer to retrieve the date and time from a network server at
regular intervals.
ENWW Using the embedded Web server 71
Page 84

Networking tab
The network administrator can use this tab to control network-related settings for the printer
when it is connected to an IP-based network. This tab will not appear if the printer is directly
connected to a computer, or if the printer is connected to a network with anything other than
an HP Jetdirect print server.
Other links
This section contains links that connect you to the Internet. You must have Internet access in
order to use any of these links. If you use a dial-up connection and did not connect when
you first opened the embedded Web server, you must connect before you can visit these
Web sites. Connecting might require that you close the embedded Web server and reopen it.
● HP Instant Support. Connects you to the HP Web site to help you find solutions. This
service analyzes your printer error log and configuration information to provide
diagnostic and support information specific to your printer.
● Order Supplies. Click this link to connect to an ordering Web site and order genuine HP
supplies, such as print cartridges and media.
● Product Support. Connects to the support site for the HP LaserJet 2400 series printer.
Then, you can search for help regarding general topics.
72 Chapter 3 Managing and maintaining the printer ENWW
Page 85

Using HP Web Jetadmin software
HP Web Jetadmin is a Web-based software solution for remotely installing, monitoring, and
troubleshooting network-connected peripherals. The intuitive browser interface simplifies
cross-platform management of a wide range of devices, including HP and non-HP printers.
Management is proactive, allowing network administrators the ability to resolve printer issues
before users are affected. Download this free, enhanced-management software at
http://www.hp.com/go/webjetadmin_software.
To obtain plug-ins to HP Web Jetadmin, click plug-ins, and then click the download link
that is next to the name of the plug-in that you want. The HP Web Jetadmin software can
automatically notify you when new plug-ins are available. On the Product Update page,
follow the directions to automatically connect to the HP Web site.
If installed on a host server, HP Web Jetadmin is available to any client through a supported
Web browser, such as Microsoft Internet Explorer 6.0 for Windows or Netscape
Navigator 7.1 for Linux. Browse to the HP Web Jetadmin host.
NOTE
Browsers must be Java-enabled. Browsing from an Apple PC is not supported.
ENWW Using HP Web Jetadmin software 73
Page 86

Using the HP Toolbox
HP Toolbox is a Web application that you can use for the following tasks:
● Check the printer status.
● Configure the printer settings.
● View troubleshooting information.
● View online documentation.
You can view the HP Toolbox when the printer is directly connected to your computer or
when it is connected to the network. You must perform a complete software installation in
order to use the HP Toolbox.
NOTE
You do not have to have Internet access to open and use the HP Toolbox. However, if you
click a link in the Other Links area, you must have Internet access to go to the site that is
associated with the link. See
Other links for more information.
Supported operating systems
The HP Toolbox is supported for the following operating systems:
● Windows 98, 2000, Me, XP, and Server 2003
● Mac OS X, Version 10.2 or higher
Supported browsers
To use the HP Toolbox, you must have one of the following browsers:
Windows
● Microsoft Internet Explorer 5.5 or higher
● Netscape Navigator 7.0 or higher
● Opera Software ASA Opera 6.05 or higher
Macintosh (OS X only)
● Microsoft Internet Explorer 5.1 or higher
● Netscape Navigator 7.0 or higher
All pages can be printed from the browser.
74 Chapter 3 Managing and maintaining the printer ENWW
Page 87

To view the HP Toolbox
1.
Open the HP Toolbox in one of these ways:
● On the Windows desktop, double-click the HP Toolbox icon.
● From the Windows Start menu, click Programs, and then click HP Toolbox.
● For Macintosh OS X, on the hard drive, click Applications, and then click the
Utilitites folder. Double-click the HP Toolbox icon.
NOTE
After you open the URL, you can bookmark it so that you can return to it quickly in the future.
2. The HP Toolbox opens in a Web browser. The HP Toolbox software contains the
following sections:
Status tab
●
Troubleshooting tab
●
Alerts tab
●
Documentation tab
●
Device Settings window
●
Toolbox links
●
Other links
●
Status tab
The Status tab has links to the following main pages:
● Device Status. View printer status information. This page indicates printer conditions
such as a jam or an empty tray. After you correct a problem with the printer, click the
Refresh button to update the device status.
● Supplies Status. View detailed supplies status such as the percent of life remaining in
the print cartridge and the number of pages that have been printed with the current print
cartridge. This page also has links to order supplies and to find recycling information.
● Print Info. Print the configuration page and various other information pages that are
available for the printer, such as the supplies status page, the demo page, and the menu
map.
Troubleshooting tab
The Troubleshooting tab has links to the following main pages:
● Print Quality Tools. View general troubleshooting information, view information about
troubleshooting print-quality problems, and calibrate the printer to maintain color print
quality.
● Maintenance. View information about managing printer supplies, view information about
replacing the print cartridges, and view information about replacing other printer supplies.
● Error Messages. View information about error messages.
● Paper Jams. View information on locating and clearing jams.
ENWW Using the HP Toolbox 75
Page 88

● Supported Media. View information about media that the printer supports, view
information about configuring the trays, and view information about solving problems
that are related to print media.
● Printer Pages. Print various pages that are useful for troubleshooting printer problems
including the configuration page, the supplies page, the event log page, and the usage
page.
Alerts tab
Use the Alerts tab to configure the printer to automatically notify you of printer alerts. The
Alerts tab has links to the following main pages:
● Set up status alerts
● Administrative settings
Set up status alerts page
On the Set up status alerts page, you can choose to turn alerts on or off, specify when the
printer should send an alert, and select from two different types of alerts:
● Pop-up message
● System tray icon
NOTE
Click Apply to activate the settings.
Administrative settings page
On the Administrative settings page, you can set the frequency of how often the HP Toolbox
checks for printer alerts. Three settings are available:
● Less Often. The HP Toolbox checks for alerts once per minute (every 60 seconds).
● Normal. The HP Toolbox checks for alerts twice per minute (every 30 seconds).
● More Often. The HP Toolbox checks for alerts twenty times per minute (every 3
seconds).
If you want to reduce network input/output (I/O) traffic, reduce the frequency at which the
printer checks for alerts.
Documentation tab
The Documentation tab contains links to these information sources:
● Install Notes. Provides specific installation instructions and information regarding your
product before you install and use the printing system.
● User Guide. Contains the information about the printer usage, warranty, specifications,
and support that you are currently reading. The user guide is available in both HTML
and PDF format.
Device Settings window
When you click the Device Settings button, the embedded Web server opens in a new
window. See
76 Chapter 3 Managing and maintaining the printer ENWW
Using the embedded Web server.
Page 89

Toolbox links
The toolbox Links item at the left of the screen provides links to the following options:
● Select a device. Select from all of the HP Toolbox-enabled devices.
● View current alerts. View the current alerts for all printers that have been set up. (You
must be printing to view the current alerts.)
● Text only page. View HP Toolbox as a site map with links to all of the individual pages
within HP Toolbox and the Device Settings window.
Other links
This section contains links that connect you to the Internet. You must have Internet access in
order to use any of these links. If you use a dial-up connection and did not connect when
you first opened the HP Toolbox, you must connect before you can visit these Web sites.
Connecting might require that you close the HP Toolbox and reopen it.
● HP instant support. Connects to the HP instant support page for the product.
● Product Registration. Connects to the HP product registration Web site.
● Product Support. Connects to the support site for the printer. Then, you can search for
help with a specific problem.
ENWW Using the HP Toolbox 77
Page 90

Uninstalling the HP Toolbox
This section explains how to uninstall the HP Toolbox.
To uninstall the HP Toolbox by using the Windows desktop shortcut
1. Click Start.
2. Point to Programs.
3. Point to Hewlett-Packard or to the HP LaserJet 2400 series program group, and then
click Uninstall hp LaserJet Toolbox.
4. Follow the onscreen instructions.
To uninstall the HP Toolbox by using Add/Remove Programs in the Windows control panel
1. Click Start.
2. Click Control Panel.
NOTE
In some versions of Windows, point to Settings, and then click Control Panel.
3. Double-click Add or Remove Programs.
4. Select hp LaserJet Toolbox from the list of programs, and then follow the onscreen
instructions.
78 Chapter 3 Managing and maintaining the printer ENWW
Page 91

Managing and configuring printer drivers
Your system or network administrator can use the driver management and configuration
solution to configure printer drivers before you install and deploy them within your
environment. This is helpful when you configure printer drivers for multiple workstations or
printers that share the same configuration.
When you preconfigure your printer driver to match the printer hardware, you can gain
access to all of the printer accessories through the driver. You can also configure most driver
feature settings. Five of the driver features can be "locked." This means that you can choose
not to allow users to change the duplex, print color as gray, input tray, output tray, and
media type settings. (Some features might not apply to all printers. For example, some
printers do not include color printing or duplexing.)
The driver management and configuration solution saves time and reduces management
costs. Previously, if an administrator wanted to configure printer drivers, the configuration
had to be completed at each client workstation. Because the driver management and
configuration solution offers multiple configuration options, administrators can create a single
configuration, in a central location, that best fits their software installation and deployment
strategy.
The driver management and configuration solution also gives administrators more control
over their printing environment, because they can deploy drivers that share the same
configuration across an entire organization. They can use the "lock" feature to support
organization initiatives. For example, if a printer includes a duplexer, locking the duplex
setting ensures that all print jobs are printed on two sides to save paper. All of the controls
can be deployed from a single computer.
Two methods are available:
● HP Web Jetadmin software plug-in
● Customization utility
Regardless of the configuration method that is used, one configuration can be shared by all
printer drivers for a given printer model with one pass through either the plug-in or the utility.
The single configuration provides support for multiple operating systems, printer driver
languages, and localized language versions.
A single configuration file is associated with all supported drivers, and can be modified by
using either the plug-in or the utility.
HP Web Jetadmin software plug-in
A driver management and configuration plug-in is available for the HP Web Jetadmin
software. You can use the plug-in to configure the printer drivers before installation and
deployment. This method for managing and controlling printer drivers provides a complete,
end-to-end solution that you can use to set up and configure the printer, the print path
(queue), and the client computers or workstations. The following activities are included in the
workflow:
● Discover and configure the printer(s).
● Discover and configure the print path on the server(s). You can have multiple servers
configured in a batch, or multiple printers (of the same model type) using a single server.
● Obtain the printer driver(s). You can install multiple drivers for each print queue that is
connected to a server in environments that support multiple operating systems.
● Run the configuration editor (the editor is not supported for some older drivers).
ENWW Managing and configuring printer drivers 79
Page 92

● Deploy the configured printer drivers to the server(s).
● Instruct the end-users to connect to the print server. The configured driver for their
operating system is automatically deployed to their computer.
Administrators can use the HP Web Jetadmin software plug-in to deploy configured printer
drivers using a silent, batch, or remote process. Obtain the HP Web Jetadmin software plugin from http://www.hp.com/go/webjetadmin_software.
Customization utility
Administrators can use a customization utility to create a custom installation package that
includes only the components that are needed within a specific organization or operating
environment. The customization utility is available in two places:
● On the CD-ROM that comes with the printer (the utility is one of the installer options)
● In the printing system software that is available for downloading from the HP Web site
for the printer model.
The installation procedure prompts the administrator to select components from the contents
of the printing system. During this process, the administrator is prompted to configure the
printer driver settings, if the selected drivers support preconfiguration. The process yields a
customized installation package that the administrator can deploy to install the configured
printer drivers on the client computers and workstations. The customization utility supports
silent and batch operations.
80 Chapter 3 Managing and maintaining the printer ENWW
Page 93

Configuring e-mail alerts
You can use HP Web Jetadmin or the embedded Web server to configure the system to
alert you to problems with the printer. The alerts take the form of e-mail messages to the email account or accounts that you specify.
You can configure the following information:
● The device that you want to monitor (in this case, the printer)
● What alerts are to be received (for example, alerts for jams, paper out, ORDER
CARTRIDGE, REPLACE CARTRIDGE, and cover open)
● The e-mail account to which the alerts should be forwarded
Utitlity Information source
HP Web Jetadmin ● See Using HP Web Jetadmin software for
Embedded Web server ● See Using the embedded Web server for
general information about HP Web Jetadmin.
● See HP Web Jetadmin online Help for
details about alerts and how to set them up.
general information about the
embedded Web server.
● See the Embedded Web server online Help
for details about alerts and how to set them
up.
ENWW Configuring e-mail alerts 81
Page 94

Setting the real-time clock
Use the real-time clock feature to set the date and time settings. The date and time
information is attached to stored print jobs, so you can identify the most recent versions of
stored print jobs.
Setting the date and time
When setting the date and time you can set the date format, date, time format, and time.
Setting the date format
1. Press M
2.
Use
3.
Use
(S
4.
Use
ENU
to open the menus.
(UP button) or (D
(S
ELECT
button).
(UP button) or (D
ELECT
button).
(UP button) or (D
OWN
button) to scroll to CONFIGURE DEVICE, and then press
OWN
button) to scroll to SYSTEM SETUP, and then press
OWN
button) to scroll to DATE/TIME, and then press (S
button).
5.
6.
(UP button) or (D
Use
(S
ELECT
button).
(UP button) or (D
Use
(S
ELECT
button).
OWN
button) to scroll to DATE FORMAT, and then press
OWN
button) to scroll to the desired format, and then press
7. The settings are saved and the control panel returns to the DATE/TIME submenu.
ENU
8. Press M
to exit the menu.
ELECT
82 Chapter 3 Managing and maintaining the printer ENWW
Page 95

Setting the date
NOTE
1. Press M
2.
Use
3.
Use
(S
4.
Use
ENU
to open the menus.
(UP button) or (D
(S
ELECT
button).
(UP button) or (D
ELECT
button).
(UP button) or (D
OWN
button) to scroll to CONFIGURE DEVICE, and then press
OWN
button) to scroll to SYSTEM SETUP, and then press
OWN
button) to scroll to DATE/TIME, and then press (S
ELECT
button).
5.
(UP button) or (D
Use
OWN
button) to scroll to DATE, and then press (S
ELECT
button).
6.
(UP button) or (D
Use
(S
ELECT
button).
OWN
button) to scroll to the appropriate year, and then press
The order of modifying the YEAR, MONTH, and DAY depends upon the date format setting.
YEAR, MONTH, or DAY could be the first selection.
7.
8.
(UP button) or (D
Use
(S
ELECT
button).
(UP button) or (D
Use
(S
ELECT
button).
OWN
button) to scroll to the appropriate month and then press
OWN
button) to scroll to the appropriate day and then press
9. The settings are saved and the control panel returns to the DATE/TIME submenu.
ENU
10. Press M
to exit the menu.
Setting the time format
1. Press M
2.
Use
3.
Use
(S
4.
Use
button).
5.
Use
(S
6.
Use
7. The settings are saved and the control panel returns to the DATE/TIME submenu.
8. Press M
ENU
to open the menus.
(UP button) or (D
(S
ELECT
button).
(UP button) or (D
ELECT
button).
(UP button) or (D
(UP button) or (D
ELECT
button).
(UP button) or (D
(S
ELECT
button).
ENU
to exit the menu.
OWN
button) to scroll to CONFIGURE DEVICE, and then press
OWN
button) to scroll to SYSTEM SETUP, and then press
OWN
button) to scroll to DATE/TIME, and then press (S
OWN
button) to scroll to TIME FORMAT, and then press
OWN
button) to scroll to the desired time format, and then press
ELECT
ENWW Setting the real-time clock 83
Page 96

Setting the time
1. Press M
2.
Use
3.
Use
(S
4.
Use
ENU
to open the menus.
(UP button) or (D
(S
ELECT
button).
(UP button) or (D
ELECT
button).
(UP button) or (D
OWN
button) to scroll to CONFIGURE DEVICE, and then press
OWN
button) to scroll to SYSTEM SETUP, and then press
OWN
button) to scroll to DATE/TIME, and then press (S
button).
5.
6.
7.
(UP button) or (D
Use
(UP button) or (D
Use
(S
ELECT
button).
(UP button) or (D
Use
(S
ELECT
button).
OWN
button) to scroll to TIME, and then press (S
OWN
button) to scroll to the appropriate hour, and then press
OWN
button) to scroll to the appropriate minute, and then press
ELECT
8. The settings are saved and the control panel returns to the DATE/TIME submenu.
ENU
9. Press M
to exit the menu.
ELECT
button).
84 Chapter 3 Managing and maintaining the printer ENWW
Page 97

Checking the printer configuration
At the printer control panel, you can print pages that give details about the printer and its
current configuration. The following information pages are described here:
Menu map
●
Configuration page
●
Supplies status page
●
PS or PCL font list
●
For a complete list of printer information pages, see the INFORMATION menu at the printer
control panel (see
Keep these pages nearby for troubleshooting. They are also useful if you contact
HP Customer Care.
Menu map
Print the menu map to see the current settings for the menus and items that are available at
the printer control panel.
To print a menu map
Information menu).
NOTE
1.
2.
3.
Press
Use
(S
Use
(S
(S
ELECT
(UP button) or (D
ELECT
button).
(UP button) or (D
ELECT
button).
button) to open the menus.
OWN
button) to scroll to INFORMATION, and then press
OWN
button) to scroll to PRINT MENU MAP, and then press
You might want to store the menu map near the printer for reference. The content of the
menu map varies, depending on the options currently installed in the printer. (Many of these
values can be overridden in the program or printer driver.)
For a complete list of control panel items and possible values, see
change a control panel setting, see
Changing printer-control-panel configuration settings.
Control panel menus. To
Configuration page
Use the configuration page to view current printer settings, to help troubleshoot printer
problems, or to verify installation of optional accessories, such as memory (DIMMs), trays,
and printer languages.
If an HP Jetdirect print server is installed, an HP Jetdirect configuration page prints as well.
The IP address of the HP Jetdirect print server appears on this page.
To print a configuration page at the control panel
1.
2.
Press
Use
(S
(S
ELECT
(UP button) or (D
ELECT
button).
button) to open the menus.
OWN
button) to scroll to INFORMATION, and then press
ENWW Checking the printer configuration 85
Page 98

3.
(UP button) or (D
Use
press
(S
ELECT
button).
OWN
button) to scroll to PRINT CONFIGURATION, and then
An example of the configuration page follows. The content of the configuration page varies,
depending on the options currently installed in the printer.
NOTE
You can also obtain configuration information in the embedded Web server or the
HP Toolbox. For details, see
Using the embedded Web server or see Using the HP Toolbox.
hp LaserJet 2400 printers
1
3
1
4
2
5
6
1
2
3
4
5
6
Printer Information
Installed Personalities and Options
Memory
Event Log
Security
Paper Trays and Options
Lists the model, serial number, page
counts, and other information for the
printer.
Lists all printer languages that are
installed (such as PS and PCL) and lists
options that are installed in each DIMM
slot and EIO slot.
Lists printer memory, PCL Driver Work
Space (DWS), and resource saving
information.
Lists the number of entries in the event
log, the maximum number of entries
viewable, and the last three entries.
Lists the status of the printer control
panel lock, control panel password, and
disk drive (if one is installed in the printer).
Lists the size settings for all trays and
lists optional paper-handling accessories
that are installed.
86 Chapter 3 Managing and maintaining the printer ENWW
Page 99

Supplies status page
Use the supplies status page to obtain information about the print cartridge that is installed in
the printer, the amount of life left in the print cartridge, and the number of pages and jobs
that have been processed.
NOTE
You can also obtain configuration information in the embedded Web server or the
HP Toolbox. For details, see
Using the embedded Web server or see Using the HP Toolbox.
To print a supplies status page at the control panel
1.
Press
2.
Use
(S
3.
Use
and then press
(S
ELECT
(UP button) or (D
ELECT
button).
(UP button) or (D
hp LaserJet
1
button) to open the menus.
OWN
button) to scroll to INFORMATION, and then press
OWN
button) to scroll to PRINT SUPPLIES STATUS PAGE,
(S
ELECT
button).
2400 printers
100%
1
2
3
1 Information about the print cartridge, including estimated pages remaining
2 Information about ordering replacement supplies
3 Information about recycling supplies
PS or PCL font list
Use the font lists to see which fonts are currently installed in the printer. The font lists also
show which fonts are resident on an optional hard disk accessory or flash DIMM.
To print a PS or PCL font list
1.
Press
ENWW Checking the printer configuration 87
(S
ELECT
button) to open the menus.
Page 100

2.
(UP button) or (D
Use
(S
ELECT
button).
OWN
button) to scroll to INFORMATION, and then press
NOTE
3.
(UP button) or (D
Use
OWN
FONT LIST, and then press
button) to scroll to PRINT PS FONT LIST or PRINT PCL
(S
ELECT
button).
The PS font list shows the PS fonts that are installed, and gives a sample of those fonts. The
following information can be found on the PCL font list:
● Font gives the font names and samples.
● Pitch/Point indicates the pitch and point size of the font.
● Escape Sequence (a PCL programming command) is used to select the designated
font. (See the legend at the bottom of the font list page.)
For information about using printer commands to select a font with MS-DOS® programs, see
Selecting PCL 6 and PCL 5 fonts.
● Font # is the number used to select fonts at the printer control panel (not in the
program). Do not confuse the font # with the font ID. The number indicates the
CompactFlash slot where the font is stored.
● SOFT: Downloaded fonts, which stay resident in the printer until other fonts are
downloaded to replace them, or until the printer power is turned off.
● INTERNAL: Fonts that permanently reside in the printer.
● Font ID is the number you assign to soft fonts when you download them through
software.
88 Chapter 3 Managing and maintaining the printer ENWW
 Loading...