

Page 1

Additional Product Information
User Guide
Page 2

© Copyright 2006 Hewlett-Packard
Development Company, L.P.
Microsoft, Windows, the Windows logo,
Outlook, and ActiveSync are trademarks of
Microsoft Corporation in the U.S. and other
countries.
HP iPAQ Products are Powered by Microsoft
Windows Mobile®
TM
Version 5.0 for Pocket
PC.
SD Logo is a trademark of its proprietor.
Bluetooth® is a trademark owned by its
proprietor and used by Hewlett-Packard
Development Company, L.P. under license.
All other product names mentioned herein
may be trademarks of their respective
companies.
The information contained herein is subject
to change without notice. The only
warranties for HP products and services are
set forth in the express warranty statements
accompanying such products and services.
Nothing herein should be construed as
constituting an additional warranty. HP shall
not be liable for technical or editorial errors
or omissions contained herein.
This document contains proprietary
information that is protected by copyright. No
part of this document may be photocopied,
reproduced, or translated to another
language without the prior written consent of
Hewlett-Packard Development Company,
L.P.
First Edition September 2006
Document Part Number: 433176-001
Page 3

Table of contents
1 Registering the iPAQ
Registering your HP iPAQ .................................................................................................................... 1
2 Box Contents
Box Contents ........................................................................................................................................ 2
3 Components
Top Components .................................................................................................................................. 4
Front Components ................................................................................................................................ 5
Back Components ................................................................................................................................ 6
Left and Right Side Components ......................................................................................................... 7
4 Learning The Basics
HP Quick Launch ................................................................................................................................. 9
Today Screen ..................................................................................................................................... 10
Status Icons ....................................................................................................................... 10
iPAQ Wireless .................................................................................................................... 11
Entering Owner Information ............................................................................................................... 12
HP Help and Support ......................................................................................................................... 13
Using TodayPanel Lite ....................................................................................................................... 14
Viewing the Operating System Information ........................................................................................ 15
Performing a Soft Reset ..................................................................................................................... 16
Protecting Your HP iPAQ with a Password ........................................................................................ 17
Using Asset Viewer ............................................................................................................................ 18
Changing the Regional Settings ................................................................................................
Adjusting the Volume ......................................................................................................................... 20
Configuring Audio Options ................................................................................................................. 21
Changing Power Management Settings ............................................................................................. 22
Dimming or Adjusting the Brightness of the Backlight ........................................................................ 23
Installing and Removing Programs .................................................................................................... 24
Opening and Closing Programs ......................................................................................................... 25
Changing the Device Name ............................................................................................................... 26
Setting Alarms .................................................................................................................................... 27
Shortcut Menus .................................................................................................................................. 28
Creating and Assigning a Category .................................................................................................... 29
Adjusting the Speed for Scrolling Through Items in a List .................................................................. 30
Screen Orientation ............................................................................................................................. 31
Obtaining Services for a Cracked or Damaged Screen ..................................................................... 32
......... 19
iii
Page 4

Protecting the HP iPAQ Screen from Cracking or Damage ............................................................... 33
Battery Saving Tips ............................................................................................................................ 34
Checking the Battery Charge Level .................................................................................................... 35
5 GPS
GPS General Information ................................................................................................................... 36
Navigation Quick Start ........................................................................................................................ 37
Managing GPS Automatically ............................................................................................................. 42
Using an External Antenna with your GPS Receiver ......................................................................... 43
Losing the GPS Signal While in My Car ............................................................................................. 44
Losing the GPS Signal Frequently ..................................................................................................... 45
Common Reasons For Interference When Using GPS Software ....................................................... 46
6 WorldMate
WorldMate Standard Edition .............................................................................................................. 47
WorldMate ActiveSync Settings ......................................................................................................... 48
Screen Navigation .............................................................................................................................. 48
Clocks ................................................................................................................................................. 49
Using the Alarm .................................................................................................................................. 50
World Map .....................................................................................................................
City List ............................................................................................................................................... 52
Weather Service ................................................................................................................................. 53
Currency Converter Service ............................................................................................................... 54
Updating Currency Rates ................................................................................................................... 55
Measurement Converter Service ........................................................................................................ 56
Country and Area Codes .................................................................................................................... 57
Clothing Sizes .................................................................................................................................... 58
Packing List ....................................................................................................................................... 59
Installing the Battery .......................................................................................................... 37
Powering On and Setting Up ............................................................................................. 38
Navigation Setup ............................................................................................................... 39
Car Kit Setup ..................................................................................................................... 39
..................... 51
7 Entering Text
Entering Text Using Block Recognizer ............................................................................................... 60
Entering Text Using the On-screen Keyboard .................................................................................... 61
Entering Text Using Letter Recognizer .............................................................................................. 62
Writing with Transcriber ...................................................................................................................... 63
8 Synchronizing
Copying (or Transferring) Files ........................................................................................................... 67
Migrating Data from Palm Desktop to Microsoft Windows Mobile 5.0 ................................................ 68
9 Connections
Connections ....................................................................................................................................... 69
WLAN ................................................................................................................................................. 70
WLAN ................................................................................................................................ 70
WLAN Terms ....................................................................................................................
. 70
iv
Page 5

Turning WLAN On or Off ................................................................................................... 71
Automatically Connecting to a WLAN Network .................................................................. 71
Searching for WLAN Networks to Access ......................................................................... 71
Manually Connecting to a WLAN Network ......................................................................... 72
Finding an IP Address ....................................................................................................... 72
Configuring Network Security Settings .............................................................................. 72
Deleting Wireless Network Settings ................................................................................... 73
Configuring 802.1x Authentication Settings ....................................................................... 73
Bluetooth ............................................................................................................................................ 74
Bluetooth Terms ................................................................................................................ 74
Working with Bluetooth Manager ....................................................................................... 74
Using Bluetooth Phone Manager ....................................................................................... 75
Connecting to a Computer via Bluetooth ........................................................................... 75
Bluetooth Device Profiles ................................................................................................... 75
Creating, Ending, and Accepting a Bluetooth Partnership ................................................. 76
Renaming a Bluetooth Partnership .................................................................................... 77
Making a Device Discoverable .......................................................................................... 77
Opening Bluetooth Settings ............................................................................................... 77
Setting Up an Incoming or Outgoing Bluetooth Serial (COM) Port .................................... 77
Connecting to Intranet URLs .............................................................................................................. 79
Changing an Intranet URL .................................................................................................................. 80
Setting Up an Automatic Choice for Connections .............................................................................. 8
Setting Up Proxy Server Settings ....................................................................................................... 82
Configuring Advanced Proxy Settings ................................................................................................ 83
Using Advanced Connection Settings ................................................................................................ 84
Setting Up a VPN Server Connection ................................................................................................ 85
Changing a Connection Group Name ................................................................................................ 86
Ending a Connection .......................................................................................................................... 87
1
10 HP Photosmart Mobile
HP Photosmart Mobile ....................................................................................................................... 88
Attaching a Voice Note to a Picture .................................................................................................... 89
E-mailing Pictures .............................................................................................................................. 90
Viewing a Slideshow .......................................................................................................................... 91
View Pictures Stored on the HP iPAQ ................................................................................................ 92
Add a Picture to a Contact ................................................................................................................. 93
Print Pictures ...................................................................................................................................... 94
Assign a Picture to the Today Screen Background ............................................................................ 95
11 Windows Media Player 10 Mobile
Windows Media Player ....................................................................................................................... 96
Listening to Music and Watching Videos ............................................................................................ 97
Clearing the Now Playing List ............................................................................................................ 98
Updating a Library ............................................................................................................
12 Mobile Office
Internet Explorer Mobile ................................................................................................................... 100
Word Mobile ..................................................................................................................................... 101
Excel Mobile ..................................................................................................................................... 102
.................. 99
v
Page 6

PowerPoint Mobile ........................................................................................................................... 103
13 Messaging
Understanding Messaging ................................................................................................................ 104
Using Folders ................................................................................................................................... 105
Synchronizing E-mail ........................................................................................................................ 106
Setting Up Messaging Accounts ...................................................................................................... 107
Using Messaging .............................................................................................................................. 109
Different Ways to Access E-mail Messages ..................................................................................... 112
Setting up an E-mail Account on an Exchange Server .................................................................... 113
Setting up a POP3, HTTP, or IMAP4 E-mail Account ...................................................................... 114
Composing and Sending Outlook E-mail Messages ........................................................................ 115
Replying to or Forwarding an Outlook E-mail Message ................................................................... 116
Sorting the Message List .................................................................................................................. 117
Receiving Attachments .................................................................................................... 107
Receiving Meeting Requests ........................................................................................... 107
Creating or Changing a Signature ................................................................................... 108
Composing and Sending Messages ................................................................................ 109
Replying to or Forwarding a Message ............................................................................. 109
Adding an Attachment to a Message ............................................................................... 109
Downloading Messages ................................................................................................... 110
Downloading Messages from a Server ............................................................................ 110
Installing an Online Address Book ................................................................................... 110
14 Calendar
Accessing Calendar ............................................................................................................
Changing the Display of the Work Week .......................................................................................... 118
Viewing Today's Agenda .................................................................................................................. 118
Viewing Appointments ...................................................................................................................... 119
Scheduling an Appointment ............................................................................................................. 120
Sending a Meeting Request ............................................................................................................. 120
Setting a Default Reminder for All New Appointments ..................................................................... 121
Updating an Appointment ................................................................................................................. 122
Canceling an Appointment ............................................................................................................... 123
15 Contacts
Accessing Contacts .......................................................................................................................... 124
Creating a Contact ........................................................................................................................... 124
Finding a Contact ............................................................................................................................. 125
Deleting a Contact ............................................................................................................................ 125
Changing Contact Information .......................................................................................................... 126
Copying a Contact ............................................................................................................................ 127
Sending an E-mail Message to a Contact ........................................................................................ 128
Adding and Removing a Picture ....................................................................................................... 129
Working with the Contact List ........................................................................................................... 130
............. 118
16 Notes
Writing a Note ................................................................................................................
Converting a Handwritten Note to Typed Text ................................................................................. 132
................... 131
vi
Page 7

Creating a Copy of a Note ................................................................................................................ 133
17 Secure Digital (SD) Cards
Using Secure Digital (SD) Cards ...................................................................................................... 134
Installing a Secure Digital (SD) Card ................................................................................................ 135
Removing a Secure Digital (SD) Card .............................................................................................. 136
Viewing Content of a Secure Digital (SD) Card ................................................................................ 137
18 Tasks
Creating a Task ................................................................................................................................ 138
Locating a Task ................................................................................................................................ 138
Setting the Start and Due Dates for a Task ...................................................................................... 138
Showing Start and Due Dates in the Task List ................................................................................. 139
Setting Options for Displaying Tasks on the Today Screen ............................................................. 140
Marking a Task as Completed .......................................................................................................... 141
19 Product Specifications
System Specifications ...................................................................................................................... 142
Physical Specifications ..................................................................................................................... 144
Operating Environment .................................................................................................................... 145
20 Regulatory Notices
Federal Communications Commission Notice ................................................................................. 146
Modifications .................................................................................................................... 146
Cables .............................................................................................................................. 146
Declaration of Conformity for Products Marked with the FCC Logo (United States
Only) .........................................................................................................................
Canadian Notice ............................................................................................................................... 147
Avis Canadien .................................................................................................................................. 147
European Union Notice .................................................................................................................... 147
Products with 2.4-GHz Wireless LAN Devices ................................................................ 149
Battery Warning ................................................................................................................................ 149
Equipment Warning .......................................................................................................................... 150
Airline Travel Notice ......................................................................................................................... 151
Medical Electronic Equipment .......................................................................................................... 152
Wireless Notices ............................................................................................................................... 153
U.S. Regulatory Wireless Notice ..................................................................................... 153
Canadian Regulatory Wireless Notice ............................................................................. 153
Brazilian Notice ................................................................................................................ 153
Japanese Notice ............................................................................................................................... 154
Wireless LAN 802.11b Devices ....................................................................................... 154
Wireless LAN 802.11g Devices ....................................................................................... 154
Bluetooth Devices ............................................................................................................ 154
Taiwan DGT Notice .......................................................................................................................... 155
Korean Notice .................................................................................................................
Battery Disposal ............................................................................................................................... 156
French Acoustics Warning ............................................................................................................... 156
....... 147
France ............................................................................................................. 149
Italy .................................................................................................................. 149
.................. 156
vii
Page 8

Index ................................................................................................................................................................. 157
viii
Page 9

1 Registering the iPAQ
Registering your HP iPAQ
When you register your HP iPAQ with Hewlett-Packard, you receive e-mail regarding special offers and
promotions. Take time now to register your HP iPAQ online at
If your mailing or e-mail address needs to be updated after registering, enter your user ID and registration
password to edit your online profile at
http://www.register.hp.com.
http://www.register.hp.com.
1Chapter 1 Registering your HP iPAQ
Page 10
2Box Contents
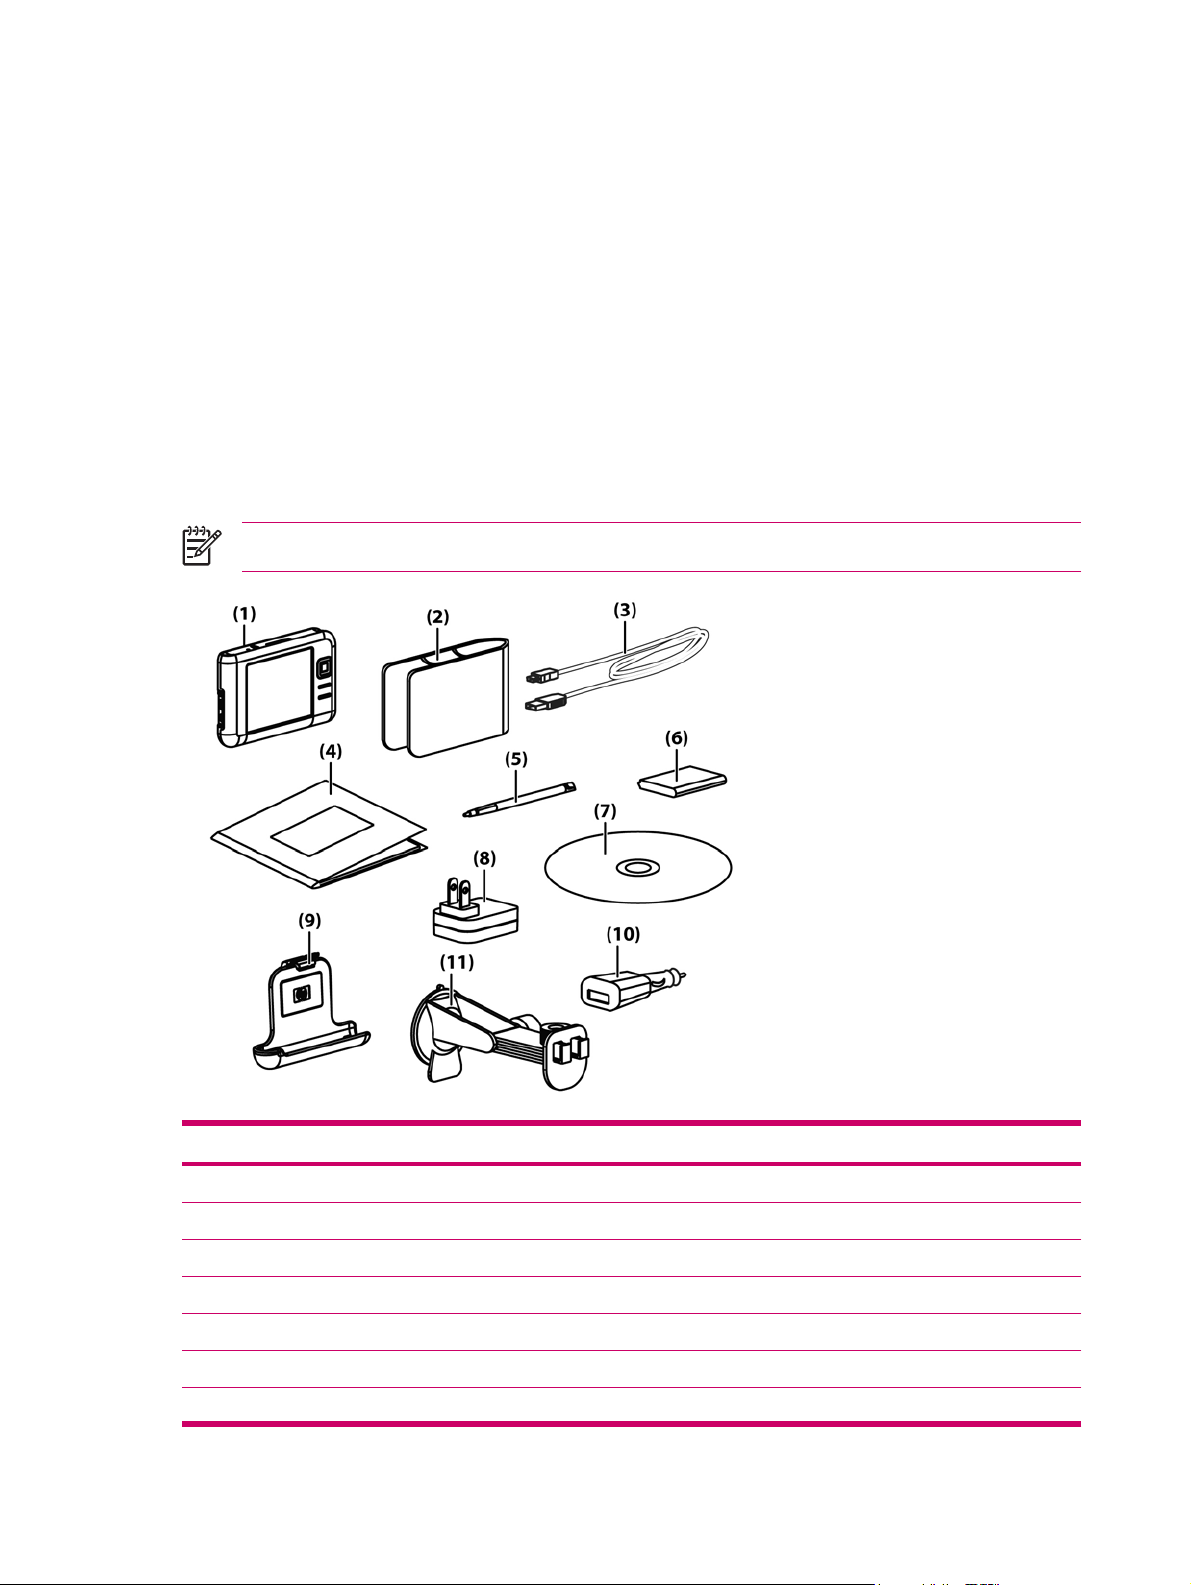
Box Contents
This illustration depicts the items that come in the box with the Travel Companion. Use this illustration
to become more familiar with the device.
NOTE Box contents vary by model.
Box Contents
(1) HP iPAQ
(2) Case
(3) Mini-USB synchronization cable/power cable (2 ea)
(4) HP iPAQ Documentation
(5) Stylus
(6) 1,700mAH li-ion removable/rechargeable battery
(7) Getting Started CD with special software
2Chapter 2 Box Contents
Page 11

Box Contents
(8) AC adapter with interchangeable plug
(9) Car kit — holder
(10) Car kit — Travel power adapter
(11) Car kit — windshield mounting bracket
Box Contents 3
Page 12

3 Components
Top Components
Component Function
(1) Reset Button Press to perform a soft reset of the Travel Companion.
(2) Record Button Press to record voice or sound.
(3) SD Slot Insert a Secure Digital (SD) storage card for data storage or a Secure Digital
Input/Output card (SDIO) card to extend the functionality of the Travel
Companion.
4Chapter 3 Components
Page 13
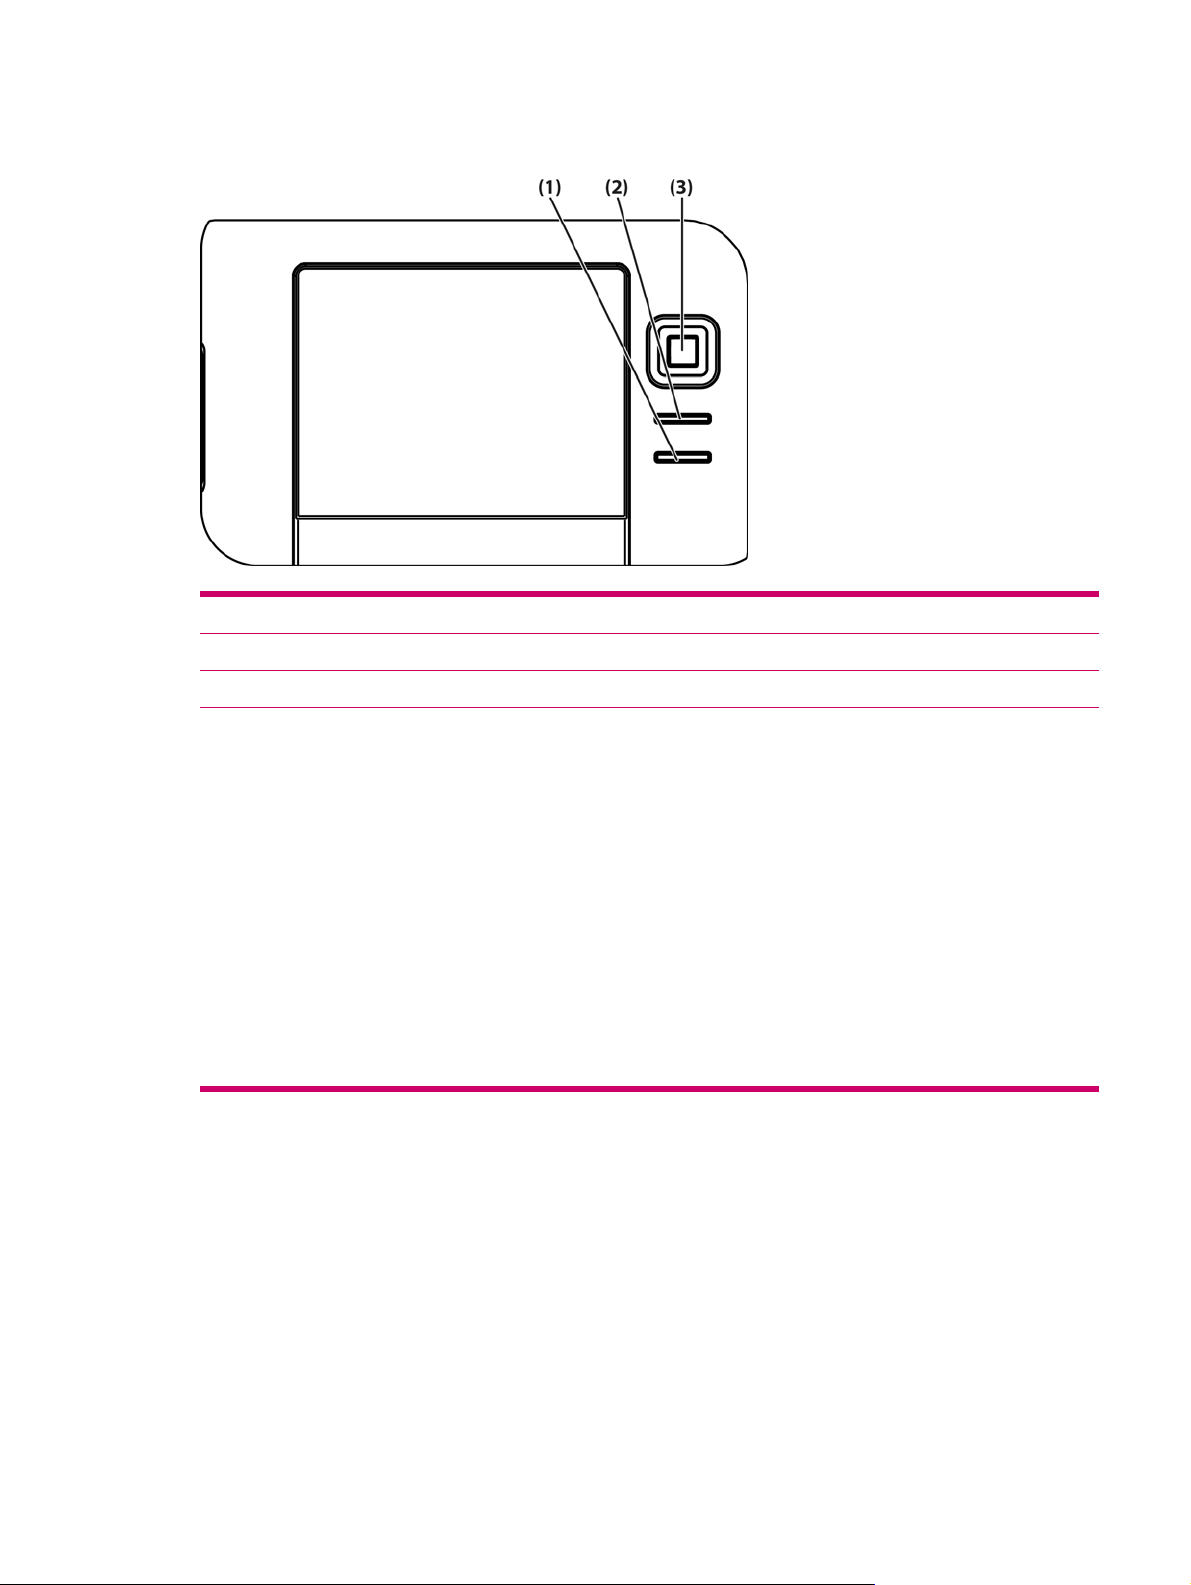
Front Components
Component Function
(1) Start Menu Button Press to open the Start menu.
(2) OK Button Press to close the current window or exit the current application.
(3) 9–Way Navigation Button
When in Standard mode:
●
Top — Scroll up
●
Bottom — Scroll down
●
Left — Scroll left
●
Right — Scroll right
●
When using GPS:
●
Top — Zoom in
●
Bottom — Zoom out
●
Left — Volume down
●
Right — Volume up
●
Front Components 5
Page 14
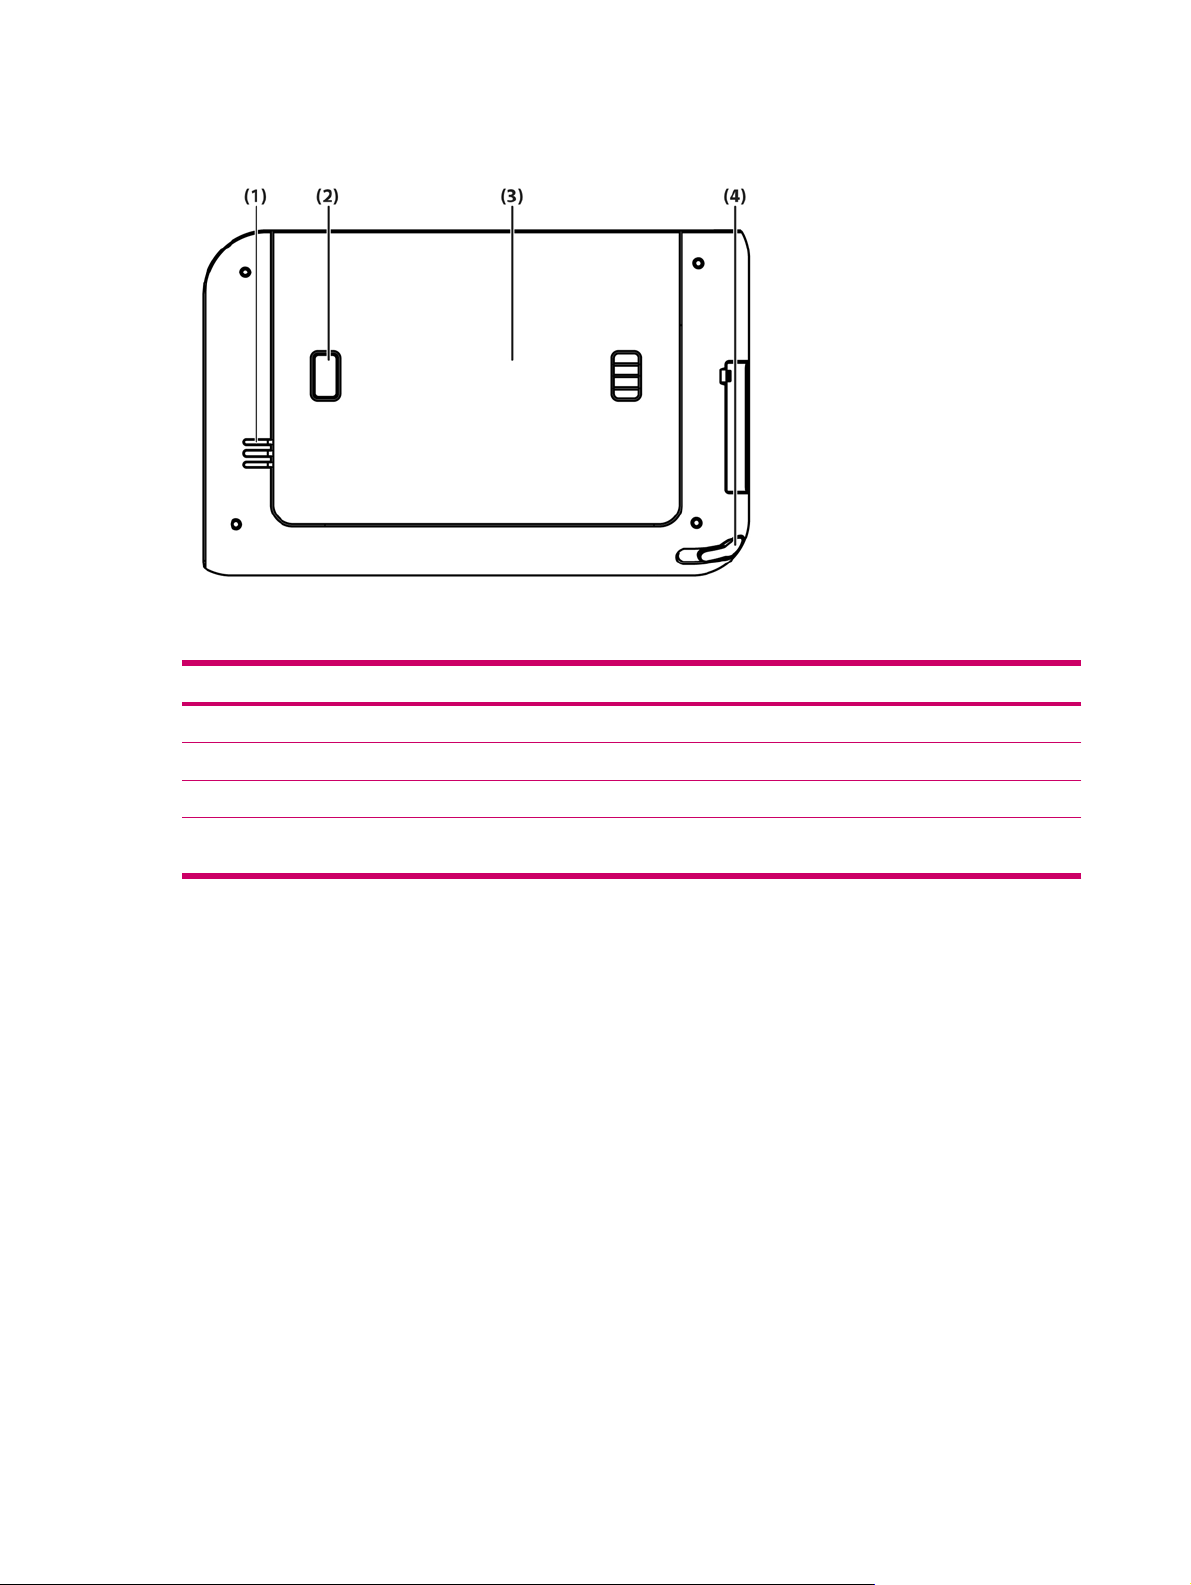
Back Components
Component Function
(1) Speaker Use the speaker to get spoken navigation instructions.
(2) Battery Cover Release Button Press to remove the battery cover.
(3) Battery Cover Remove to install or remove the battery.
(4) Stylus Use to input information. Slide out to remove the stylus. Slide in to replace
the stylus.
6Chapter 3 Components
Page 15
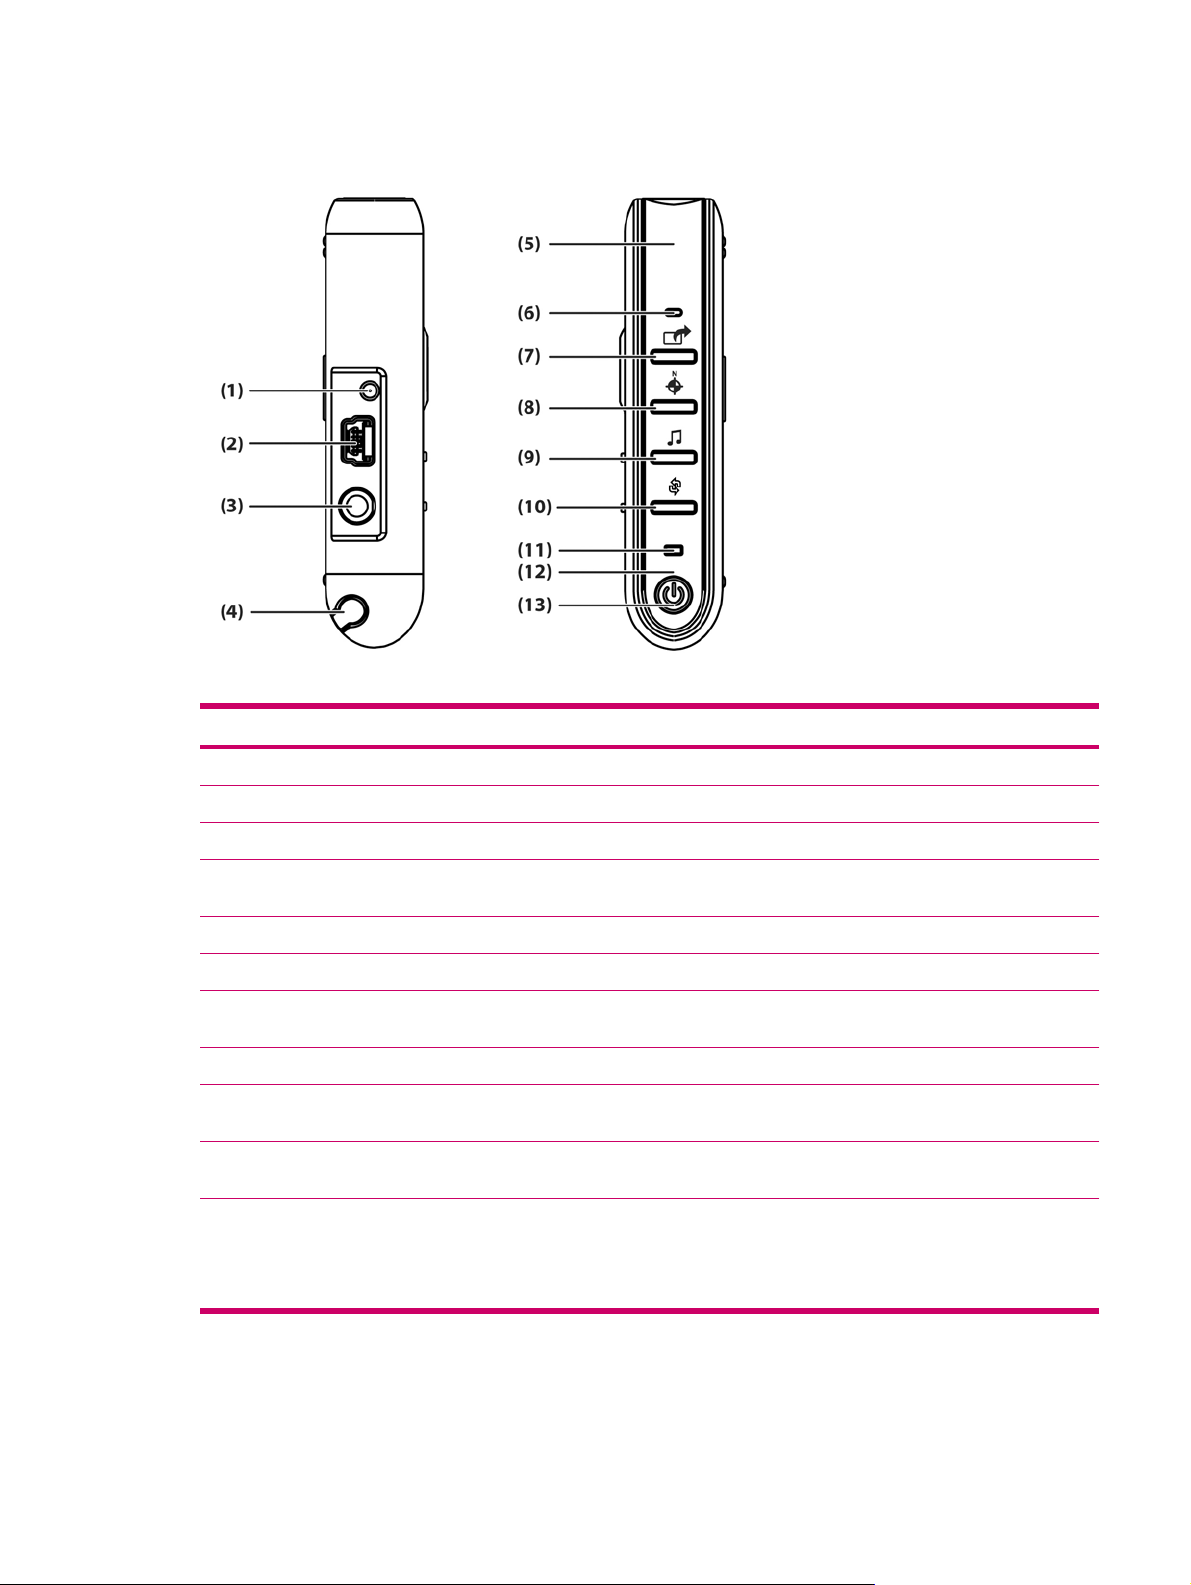
Left and Right Side Components
Component Function
(1) MMCX External Antenna Port Connects to 3V active external GPS antenna.
(2) Charging/Communications Port Connects to mini-USB synchronization cable.
(3) Headset Connector Plug a headset into this connector to listen to music.
(4) Stylus Use to input information. Slide out to remove the stylus. Slide in to replace
the stylus.
(5) Internal WLAN Antenna* Allows connection to wireless networks. (rx5900 series models only)
(6) Microphone Speak into the microphone to record voice notes.
(7) Quick Launch Button Press to access the HP Quick Launch screen. Press and hold to launch
Calendar.
(8) Navigation Button Press to launch GPS navigation. Press and hold to launch Contacts.
(9) Windows Media Player Button Press to launch Windows Media Player. Press and hold to launch Pocket
(10) Rotate Screen Button Press to rotate the screen to portrait or landscape orientation. Press and
(11) Wireless LED
Internet Explorer.
hold to launch Photosmart Mobile.
Blue LED—WLAN*, Bluetooth, or GPS is on.
●
LED off—WLAN*, Bluetooth, or GPS is off.
●
*WLAN is available on rx5900 series models only.
Left and Right Side Components 7
Page 16

Component Function
(12) Internal Bluetooth Antenna Allows connection to other Bluetooth devices.
(13) Power Button and LED Press to turn the unit on and off.
Solid amber light — Battery is charging
●
Solid green light — Battery is fully charged
●
Flashing amber light — Reminder or alarm
●
8Chapter 3 Components
Page 17

4 Learning The Basics
HP Quick Launch
HP Quick Launch is a simple way to open the most frequently used programs on the Travel Companion.
Tap the Today icon to access the Today page.
●
Tap the Travel Assistant icon to access WorldMate travel applications, Calendar, Contacts, and
●
the Calculator.
Tap the Entertainment icon to access entertainment applications like Windows Media Player 10,
●
Photosmart Mobile, and games.
Tap the Internet icon to access the Internet browser.
●
Tap the Navigation icon to use GPS navigation.
●
HP Quick Launch is configured by default to be the home screen of the Travel Companion. Switch to
use the Today screen as the home screen by tapping Menu> Settings and clearing the check boxes.
You can also access the Today screen from the Start menu.
You can also configure Quick Launch by tapping Menu > Settings and:
Selecting Launch On Reset to automatically start Quick Launch every time the device is soft reset.
●
Selecting Launch on Wakeup to automatically start Quick Launch every time the device is
●
switched on.
To learn more about the capabilities of the Travel Companion, refer to this guide as well as the Additional
Product Information on the Getting Started CD. To begin navigation, proceed to the next step.
HP Quick Launch 9
Page 18

Today Screen
Access the Today screen by tapping Start > Today.
The Today screen shows appointments, active tasks, and information about e-mail messages. Along
the top of the Today screen are the connectivity indicators, Volume icon, the battery level indicator,
and the clock.
Tap a section of the Today screen to open the program that is associated with that section.
To customize the Today screen:
1. Tap Start > Settings > Today.
2. On the Appearance tab, select the desired theme for the background of the Today screen.
3. On the Items tab, select the items to appear on the Today screen.
Tip To change the order of items displayed on the Today screen, tap the item, and tap Move
Up or Move Down.
NOTE There are two default softkeys on the bottom of the Today screen: Calendar and
Contacts. On the Today screen, the Calendar softkey is also the Notification softkey. Any type
of alert, such as a meeting reminder is displayed on the Today screen as a notification.
Status Icons
The following status icons are displayed on the Navigation or Command bar. Tap the icon on the HP
iPAQ screen to view more information related to the item.
Icon Status
Indicates that one or more networks are present. Tap the icon to access an available network.
Indicates connection to a wireless network.
Indicates connection to ActiveSync, but not currently synchronizing.
Inactive connection to computer or wireless network.
Microsoft ActiveSync is synchronizing.
Speaker is on.
Speaker is off (or in mute position).
10Chapter 4 Learning The Basics
Page 19

Icon Status
iPAQ Wireless
Tap Start > iPAQ Wireless or tap the iPAQ Wireless icon on the Today screen to launch iPAQ
Wireless, which provides a control center to turn WLAN and Bluetooth on and off, and to configure their
settings. The GPS software controls the GPS receiver.
Icon Status
Battery power is low.
Battery power is very low.
E-mail has been received.
Instant messages received.
WLAN is on.
WLAN is off.
Bluetooth is on.
Bluetooth is off.
GPS receiver is on.
GPS receiver is off.
*WLAN is available on rx5900 series models only.
The iPAQ Wireless screen has two power buttons to turn wireless features on and off. The WLAN
and Bluetooth tabs allow you to access each wireless activity individually. Configure wireless
connections by tapping View WLAN Networks on the WLAN tab or Bluetooth Settings on the
Bluetooth tab.
Today Screen 11
Page 20

Entering Owner Information
Enter your owner information so your HP iPAQ can be returned to you if it is lost.
1. Tap Start > Settings > Personal tab > Owner Information.
2. On the Identification tab, enter your personal information.
Tip If owner information is displayed on the Today screen, you can open and edit the
information directly from the Today screen.
12Chapter 4 Learning The Basics
Page 21

HP Help and Support
For detailed information on your HP iPAQ and instructions on performing common tasks, tap Start >
HP Help and Support. HP Help and Support provides the following information:
Serial and model numbers - provides your HP iPAQ serial number, model and product IDs, and
●
operating system version.
HP Quick Start Tour - provides basic information about the tasks and activities you can perform
●
using your HP iPAQ. As you go through the tutorial, try each feature. You can then return to the
same position in the QuickStart Tour by tapping Start > Programs > HP Help and Support > HP
QuickStart Tour.
How Do I - a list of topics and quickly explain how to perform common tasks.
●
Help Topics - provides a comprehensive list of help topics for the HP iPAQ.
●
Customer Support - provides various different sources of information about your HP iPAQ.
●
Asset Viewer - provides information about your HP iPAQ, including serial number, memory, version
●
number, display type, and wireless information.
HP Help and Support 13
Page 22
Using TodayPanel Lite
NOTE TodayPanel Lite is available only when HP Quick Launch is not running. See the HP
Quick Launch section for configuration information.
Icon Name Description
TodayPanel Lite Change the TodayPanel Lite options or
the Today screen settings.
Battery power View the amount of battery power
Main memory View the amount of main memory
Storage memory View the amount of storage memory
Backlight View and change the backlight options
remaining.
Set the time duration for turning off your
HP iPAQ.
available on your HP iPAQ. View,
activate, and stop all running programs
from this screen.
available in iPAQ File Store or on a
storage card. View, activate, and stop all
running programs from this screen.
on your HP iPAQ.
To use TodayPanel Lite, tap the desired icon, make the appropriate changes, and tap OK.
You can change the TodayPanel Lite icons to compact mode, which allows more space on the Today
screen. You can also change memory and storage settings to display as percentages instead of file
sizes.
To change to compact mode:
1. Tap the TodayPanel Lite icon > Options to open the TodayPanel Lite application.
2. Tap the Display Mode list box and select Compact.
To display memory and storage as percentages:
1. Tap the TodayPanel Lite icon > Options to open the TodayPanel Lite application.
2. Tap the Display Memory as list box or the Display Storage as list box and select the percentage
listed.
3. Tap OK.
To remove the TodayPanel Lite application from the Today screen:
1. Tap Start > Settings > Today icon > Items tab.
2. Clear the TodayPanel check box and tap OK.
14Chapter 4 Learning The Basics
Page 23

Viewing the Operating System Information
Tap Start > Settings > System tab > About.
▲
The operating system version displays near the top of the screen.
Viewing the Operating System Information 15
Page 24

Performing a Soft Reset
A soft reset stops all running applications, but does not erase any programs or saved data.
NOTE Be sure to close all running applications before performing a soft reset.
To perform a soft reset:
1. Locate the recessed Reset button on your HP iPAQ.
2. Use the stylus to lightly press the Reset button.
The HP iPAQ restarts.
16Chapter 4 Learning The Basics
Page 25

Protecting Your HP iPAQ with a Password
Keep your data more secure by requiring a password every time you turn on your HP iPAQ.
1. Tap Start >Settings > Personal tab > Lock > Password tab.
2. Select the Prompt if device unused for check box, and select the amount of time from the list
box that your HP iPAQ must be unused before the password is required.
3. In the Password type field, select the type of password you would like to use. Enter the password
and confirm the password.
4. On the Hint tab, enter a phrase to help you remember your password. Be sure that your hint doesn't
allow others to guess your password. The hint is displayed after the wrong password is entered
five times.
5. When prompted, tap OK. The next time your HP iPAQ is unused for the specified amount of time,
you are prompted to enter your password.
Tip Use the same steps as above to change or reset your password.
Protecting Your HP iPAQ with a Password 17
Page 26

Using Asset Viewer
System Details - provides detailed information about your HP iPAQ, including:
Identity - Lists the device serial number, as well as owner information.
●
Memory - Provides system ROM and RAM size and other relevant information about device
●
memory.
Version - Lists system image and operating system information.
●
Display - Provides detailed information about the device display.
●
System - List unit identification numbers and processor information.
●
Bluetooth - Provides information about the Bluetooth receiver, including firmware, hardware,
●
software, and driver versions, as well as MAC address.
WLAN - Lists information about the WLAN receiver, including firmware, hardware, software, and
●
driver versions, as well as IP and MAC address.
GPS - Provides information about the GPS receiver, including status, revision level, and
●
manufacturer, as well as firmware, software, and driver versions.
18Chapter 4 Learning The Basics
Page 27

Changing the Regional Settings
The style in which numbers, currency, dates, and times are displayed is specified in regional settings.
To change the regional settings:
1. Tap Start > Settings > System tab > Regional Settings > Region tab.
2. Select a region.
The region you select determines which options are available on the other tabs.
3. To customize additional settings, tap the appropriate tabs and select the desired options.
To change the date and time display, follow steps 1 through 3 above then perform one of the following:
On the Time tab, select the desired time display options.
●
On the Date tab, select the desired date display options.
●
On the Region tab, select the desired region display options.
●
On the Number tab, select the desired number display options.
●
On the Currency tab, select the desired currency display options.
●
Changing the Regional Settings 19
Page 28

Adjusting the Volume
You can change the volume for various sounds, such as the sound you hear when you tap program
names and menu options.
1. Tap the Speaker icon at the top of the screen.
2. Move the system volume slider on the screen, or roll the scroll wheel on your HP iPAQ to the desired
volume level.
3. To mute system sounds, tap Off.
You can also specify the sound you want to hear for a notification.
1. Tap Start > Settings > Personal tab > Sounds & Notifications.
2. On the Sounds tab, choose how you want to be notified by selecting the appropriate check boxes.
3. On the Notifications tab, in Event, tap an event name and choose how you want to be notified by
selecting the appropriate check boxes. You can choose from several options, such as a special
sound, a message, or a flashing light.
NOTE Turning off sounds and the LED notification helps conserve battery power.
20Chapter 4 Learning The Basics
Page 29

Configuring Audio Options
If you are using headphones, you can enable the equalizer and 3D sound. You can also enable
automatic gain control (AGC) or create your own settings for the microphone.
To modify audio settings, tap Start > Settings > System tab > Audio.
To enable the headphone equalizer:
1. Tap the Equalizer tab.
2. Select Enable Headphone Equalizer.
3. Adjust the equalizer sliders individually, or select preconfigured sound settings from the Mode list.
To save your own equalizer settings:
1. Tap New.
2. Name your configuration.
3. Set the equalizer.
4. Tap Save.
To enable headphone 3D sound:
1. Tap the 3D Sound.
2. Select Enable 3D.
3. Move the slider to the right to increase the 3D sound effect.
By default, AGC is enabled. To create your own customized microphone settings:
1. Tap Mic tab.
2. Clear Enable AGC.
3. Move the microphone sensitivity slider to the meet your preference, or select preconfigured settings
from the Mode list.
4. Tap Save.
Configuring Audio Options 21
Page 30

Changing Power Management Settings
1. Tap Start > Settings > System tab > Power.
2. Tap the Advanced tab to select the length of time your HP iPAQ stays on when using battery power
or external power.
22Chapter 4 Learning The Basics
Page 31

Dimming or Adjusting the Brightness of the Backlight
You can set the backlight to dim after a specified amount of time has elapsed.
1. Tap Start > Settings > System tab > Backlight.
2. Tap the Battery Power tab or the External Power tab.
3. Select the desired backlight options.
You can also increase or decrease the brightness of the backlight.
1. Tap Start > Settings > System tab > Backlight > Brightness tab.
2. Move the sliders up to increase and down to decrease the brightness.
NOTE To conserve battery power on your HP iPAQ, keep the backlight only as bright as
required to view the screen easily.
Dimming or Adjusting the Brightness of the Backlight 23
Page 32

Installing and Removing Programs
To install programs on your HP iPAQ:
1. Use the mini-USB synchronization cable to connect your HP iPAQ to a personal computer.
2. Follow the instructions in the Installation Wizard provided with the program you want to install.
3. Check the screen on your HP iPAQ to see if any further steps are necessary to complete the
program installation.
To remove programs from your HP iPAQ:
1. Tap Start > Settings > System tab > Remove Programs.
2. Select the check box for the program(s) you want to remove, then tap Remove.
NOTE By removing a program from your HP iPAQ, you may increase available memory on the
device.
If programs are lost from your HP iPAQ for any reason, most of them can be re-installed using
ActiveSync. On your personal computer, click Tools > Add/Remove Programs > check the program
to be added > click OK.
24Chapter 4 Learning The Basics
Page 33

Opening and Closing Programs
You do not need to exit a program to open another or to conserve memory. The system manages
memory automatically.
To open a program, tap Start, then tap the desired program from the list. If you don't see the desired
program, tap Start > Programs.
In most cases, the system closes programs that are no longer in use to free needed memory. However,
you can close programs manually if you prefer.
1. Tap Start > Settings > System tab > Memory > Running Programs tab.
2. In the Running Programs list, tap the desired program, then tap Stop, or tap Stop All to close all
open programs
Opening and Closing Programs 25
Page 34

Changing the Device Name
To get detailed information:
Tap Start > Settings > System tab > About.
▲
The Version tab displays important device information, including the type of processor and the amount
of memory installed.
The device name is used to identify your HP iPAQ in the following situations:
Synchronizing with a computer
●
Connecting to a network
●
NOTE If you synchronize multiple devices with the same computer, each device must have a
unique name.
To change the device name:
1. Tap Start > Settings > System > About > Device ID tab.
2. Enter a name. The device name must begin with a letter, consist of letters from A to Z and numbers
from 0 to 9, and cannot contain spaces.
26Chapter 4 Learning The Basics
Page 35

Setting Alarms
1. Tap Start > Settings > System tab > Clock & Alarms > Alarms tab.
2. Tap <Description> and enter a name for the alarm.
3. Tap the day of the week for the alarm. You can select multiple days by tapping each desired day.
4. Tap the time to open a clock and set the time for the alarm. Then tap OK.
5. Tap the Alarm icon to specify the type of alarm. You can choose a flashing light, a single sound,
or a repeating sound.
6. If you choose to play a sound, tap the list next to the Play sound check box, then tap the sound
you want.
NOTE You can also set alarms in WorldMate Standard Edition.
Setting Alarms 27
Page 36

Shortcut Menus
A shortcut menu appears when you tap and hold an item. The menu displays the most common
commands for the specific item. For example, you can delete an appointment or send an e-mail message
to a contact by using commands on a shortcut menu.
To use a shortcut menu, tap and hold the item. When the menu appears, tap the desired action.
To close a shortcut menu without performing an action, tap anywhere outside the menu.
28Chapter 4 Learning The Basics
Page 37

Creating and Assigning a Category
In the Calendar, Contacts, and Tasks programs, you can use categories to help you organize and group
appointments, contacts, and tasks.
1. From the program, tap an existing item or create a new one.
2. Do one of the following:
For an existing item in Calendar and Tasks, tap Edit > Categories.
●
For an existing item in Contacts, tap Menu > Edit > Categories.
●
For a new item in Calendar, Contacts, and Tasks, tap Categories.
●
3. Tap New, enter the category name, then tap Done. The new category is automatically assigned
to the item.
4. Tap OK to return to the appointment, contact, or task.
NOTE Categories are shared between appointments, contacts, and tasks. A category remains
in the list of shared categories as long as it is assigned to at least one appointment, contact, or
task.
Creating and Assigning a Category 29
Page 38

Adjusting the Speed for Scrolling Through Items in a List
You can scroll through items in a list by rolling the scroll wheel or by using the soft keys on the screen
of your HP iPAQ. To change the speed at which scrolling with the soft keys occurs:
1. Tap Start > Settings > Personal tab > Buttons > Up/Down Control tab.
2. Under Delay before first repeat, move the slider to shorten or lengthen the time that elapses
before scrolling begins.
3. Under Repeat rate, move the slider to change the time it takes to scroll from one item to the next.
30Chapter 4 Learning The Basics
Page 39

Screen Orientation
Tap Start> Settings > System tab Screen Orientation to change the orientation of the screen on your
HP iPAQ. Use the Rotate screen button as well to change the screen orientation.
Screen Orientation 31
Page 40

Obtaining Services for a Cracked or Damaged Screen
NOTE HP is not responsible for damage that occurs as a result of failure to follow the
instructions that came with the HP branded product. Refer to the warranty document included
with your HP iPAQ for more information.
If you have a nonwarranty event occur such as a damaged or cracked screen and want your device
repaired, contact HP Customer Support at
customer service on a nonwarranty event results in a charge for the repair.
www.hp.com/support for service. However, contacting HP
32Chapter 4 Learning The Basics
Page 41

Protecting the HP iPAQ Screen from Cracking or Damage
CAUTION The screen of your HP iPAQ is made of glass and can be damaged or broken by
drops, impacts, or pressure.
To reduce the risk of damage to the internal components, do not spray liquid directly on the
screen, or allow excess liquid to drip inside your HP iPAQ. Using soap or other cleaning products
on the screen might discolor the finish and damage it.
Observe the following practices to protect the screen of your HP iPAQ from damage:
●
Do not sit on your HP iPAQ.
●
When transporting your HP iPAQ in a purse, pocket, briefcase, etc., ensure the device does
●
not get compressed, bent, dropped, or hit.
When not in use, use the protective screen cover (if one is available) on your HP iPAQ and
●
store it in a case. Select from a wide variety of case options at
ipaq or www.casesonline.com.
Do not place anything on top of your HP iPAQ.
●
Do not bang your HP iPAQ against hard objects.
●
Never use any device other than the stylus that comes with the HP iPAQ or an approved
●
replacement to tap or write on the screen. If you lose or break your stylus, order extras at
www.hp.com/accessories/ipaq.
www.hp.com/accessories/
Clean your HP iPAQ by wiping the screen and the exterior with a soft, damp cloth lightly moistened
●
only with water.
Protecting the HP iPAQ Screen from Cracking or Damage 33
Page 42

Battery Saving Tips
The HP iPAQ is as individual as you are. Adjust the settings on your HP iPAQ to fit your individual needs
and to help the battery last as long as possible between charges. Here are some recommendations for
how to conserve battery life.
Dim the Backlight – Keep the display only as bright as required to view the screen easily. On
●
the Today screen, use the stylus to adjust the Backlight Brightness Level slider, near the Light
bulb icon.
Auto Turn Off the Backlight – On the Today screen, tap the Light bulb icon and make sure the
●
first box is checked. Specify a short amount of time to wait before turning off the backlight.
Keep Wireless Features Off – Always turn off the WLAN and Bluetooth power when they are not
●
in use. Tap Start > iPAQ Wireless, and then tap the WLAN or Bluetooth button to turn the features
off. WLAN is available on rx5900 series models only.
Sounds & Notifications – Every time you are notified of an event, battery power is consumed. Go
●
to Start > Settings > Sounds & Notifications > Notifications tab and turn off any notification
types that are unnecessary.
Auto Turn Off Device – On the Today screen, tap the Battery icon, and then tap the Advanced
●
tab. Make sure the first box is checked, so the device automatically powers off when not in use.
Specify a short amount of time to wait before automatically powering off your HP iPAQ.
Turn GPS off – Always turn off the GPS receiver when you are not using GPS. Close the GPS
●
application to turn off the receiver.
To keep your HP iPAQ charged, remember to use the car charger when using your HP iPAQ in the car.
34Chapter 4 Learning The Basics
Page 43

Checking the Battery Charge Level
To monitor the battery power, tap either the Battery icon on the TodayPanel Lite or tap Start >
Settings > System tab > Power.
If the battery charge level is low, connect to AC power.
Checking the Battery Charge Level 35
Page 44

5GPS
GPS General Information
NOTE To reduce connection time, you should not be moving the first time you attempt to
establish a GPS connection.
Satellite signal reception for your GPS-enabled HP iPAQ Travel Companion generally requires that you
go outdoors to start the GPS navigation software. Place the Travel Companion where there is a clear
view of the sky or on the dashboard of a vehicle that does not have thermal glass windshields or windows.
NOTE Interference might take place close to tall buildings or large trees, which can block the
satellite signal from reaching the HP iPAQ. Try to avoid these obstructions before using GPS.
WARNING! When using hardware and software navigation aids, in a vehicle or elsewhere, it
is your sole responsibility to place, secure, and use these aids in a manner that will not cause
accidents, personal injury, property damage or obstruct your view. You are solely responsible for
observing safe driving practices. Do not operate this product while driving. Park the vehicle first.
If you are going to use GPS navigation in your vehicle for an extended period of time, charge your Travel
Companion using the Auto adapter.
For information about GPS accessories, visit
www.hp.com/go/ipaqnavigation.
36Chapter 5 GPS
Page 45

Navigation Quick Start
The Travel Companion is designed for use right out of the box. The sections that follow provide
instruction to prepare and use the Travel Companion immediately after purchase.
Installing the Battery
The battery provides power for the Travel Companion to operate. The Travel Companion comes with a
mini-USB synchronization cable, which you must use with a power adapter to charge the device.
To install the battery:
1. Turn the Travel Companion over so you can see the back battery cover.
2. Press the battery release button (1).
3. Slide the battery compartment cover down about 1/2 inch, and then lift the cover off the Travel
Companion (2).
4. Insert the battery into the compartment (1) so that the connectors on the battery mate with the pins
in the battery compartment, and then press down until the battery locks into place (2). As you insert
the battery, be sure to pull the battery removal tab out so it is on the outside of the battery.
Navigation Quick Start 37
Page 46

5. Replace the cover by first laying the cover on the battery compartment opening, aligning the tabs,
and then sliding the cover until it locks into place.
Do not attempt to insert the battery cover tabs into the compartment slots without first placing the cover
onto the compartment and sliding it closed.
Powering On and Setting Up
NOTE If the Travel Companion does not come on when you press the power button after first
installing or replacing the battery, press and hold the Reset button for at least two seconds, or
connect to power (AC or travel adapter).
38Chapter 5 GPS
Page 47

The first time you turn on the Travel Companion, follow the on-screen set up instructions. After
completing this initial setup, the Travel Companion displays the Quick Start Tour, which provides
information about using the Travel Companion. View as much of the Quick Setup Tour as needed. When
exiting the tour, the Travel Companion initiates the HP Quick Launch screen, which provides the ability
quickly and easily open applications on your iPAQ.
Navigation Setup
If you do not want to navigate now, continue learning about the Travel Companion and refer back to this
section when you do want to use navigation.
You can use the navigation features of the Travel Companion right out of the box. The easiest way to
open the GPS application is from the HP Quick Launch screen. When launching the GPS application
for the first time, follow the on-screen instructions to configure and set up personal preferences.
The Travel Companion includes a built-in GPS receiver. To navigate to a destination, the GPS
application must determine your current position, for which it uses the Global Positioning System (GPS).
Available for free and without subscription, GPS uses satellites to transmit signals to GPS receivers.
GPS signals work in all weather, anywhere in the world.
To establish a GPS signal, use the GPS receiver outdoors with a clear view of the sky. The GPS
application can take several minutes to find your current position during its first use. If it takes longer,
make sure that you are in an open place without tall buildings or trees nearby. In subsequent uses, the
GPS application will find your position much faster. Once the GPS application locates your current
position, the application shows your position on the map.
If you want to immediately start navigating:
1. Press the power button to power on the Travel Companion. If this is the first time powering on the
Travel Companion, you must either press the Reset button or connect to power for the unit to power
on.
2. Start the GPS application by tapping Navigation from the HP Quick Launch screen.
3. Place the Travel Companion in a location with a clear view of the sky.
4. Install the car kit.
5. Insert the Travel Companion and plug it in using the travel power adapter.
Car Kit Setup
The car kit allows you to mount the Travel Companion in a location in your car that provides the best
access to a GPS signal.
Navigation Quick Start 39
Page 48

To install the car kit:
1. Plug the power cable into the Travel Power Adapter, and then plug the adapter into a vehicle power
outlet.
2. Attach the power cable to the clips on the back of the Travel Companion holder. Be sure to leave
enough cable to plug into the Travel Companion, and that the connector is turned the correct way
to plug into the unit.
3. Install the holder onto the windshield mounting bracket.
40Chapter 5 GPS
Page 49

4. Place the car kit assembly onto the windshield (1), and then press the locking lever (2) to securely
mount the assembly into place.
5. To install the Travel Companion:
a. Insert the Travel Companion into the mounted car kit holder (1).
b. Insert the securing clip into the slot on the top of the Travel Companion (2).
c. Plug the power cable into the Travel Companion (3).
Navigation Quick Start 41
Page 50

6. Use the knobs to adjust the vertical and horizontal orientation of the Travel Companion.
Managing GPS Automatically
Your GPS-enabled HP iPAQ uses Microsoft Windows Mobile® 5.0, so the operating system
automatically manages access to the HP iPAQ GPS receiver to allow multiple programs to
simultaneously access GPS data.
42Chapter 5 GPS
Page 51

Using an External Antenna with your GPS Receiver
The GPS receiver in your Travel Companion is the SiRFstarIII from SiRF. The SiRFstarIII is a high
sensitivity GPS receiver with rapid time-to-first fix technology that provides superior location
performance. Therefore, under normal use there is no need for an external antenna.
An optional 3V active external antenna is available if you want to use your Travel Companion in locations
that do not provide ideal GPS reception, such as inside of a car away from the windshield. Plug this
antenna into the gold MMCX connector on your Travel Companion.
Using an External Antenna with your GPS Receiver 43
Page 52

Losing the GPS Signal While in My Car
GPS performance on the Travel Companion may be affected if the vehicle has thermal glass windows
and windshields, which can block the HP iPAQ from receiving a GPS signal from satellites.
To improve GPS signal strength, place the HP iPAQ where there is a clear view of the sky or on the
dashboard of a vehicle that does not have thermal glass windshields. A direct line of sight is required
between the HP iPAQ and the GPS satellites to access information from the satellites.
If your vehicle has thermal glass, consider using the optional external GPS antenna placed on top of
the vehicle to receive the GPS signal.
44Chapter 5 GPS
Page 53

Losing the GPS Signal Frequently
To improve the satellite signal to the GPS-enabled Travel Companion, go outdoors to start the GPS
navigation software. Place the HP iPAQ where there is a clear view of the sky or on the dashboard of
a vehicle that does not have thermal glass windshields or windows.
NOTE Interference may exist close to tall buildings or large trees, which can block the satellite
signal from reaching the Travel Companion. Try to avoid these obstructions before using GPS.
Losing the GPS Signal Frequently 45
Page 54

Common Reasons For Interference When Using GPS Software
Interference Type How to Avoid
Vehicles with thermal glass windows and windshields Place the HP iPAQ where there is a clear view of the sky or on
the dashboard of a vehicle that does not have thermal glass
windows. If your vehicle has thermal glass, consider using the
optional external GPS antenna placed on top of the vehicle to
receive the GPS signal.
Cell Phones or other equipment radiating Radio Frequency
(RF) energy or emitting strong electromagnetic radiation. For
example, microwave ovens, high-power cordless phones, CB
radios, Walkie-talkies, HAM equipment, X-ray and MRI
machines, etc.
Tall buildings, large trees, and very cloudy or overcast skies. Move away from interference source so there is a clear view
Move away from interference source or switch off the
interference source.
of the sky.
46Chapter 5 GPS
Page 55

6WorldMate
WorldMate Standard Edition
The Travel Companion comes pre-installed with WorldMate Standard Edition. This travel assistant
provides a world clock, currency converters, weather, and other travel organizing tools.
WorldMate Standard Edition 47
Page 56

WorldMate ActiveSync Settings
The Getting Started CD includes WorldMate software for your PC. Install this software to your PC to
sync and update WorldMate information on your Travel Companion. The WorldMate ActiveSync
component updates currency rates and weather forecasts, as well as your Travel Companion clock with
Atomic time whenever you synchronize your Travel Companion while your computer is connected to
the Internet.
The WorldMate ActiveSync component is fully configurable.
To access the WorldMate ActiveSync component set up screen on your PC:
1. Right-click ActiveSync located on the system tray.
2. Select Open Microsoft ActiveSync.
3. Scroll the list of ActiveSync components for WorldMate.
4. Right-click WorldMate and select Settings.
Online Content Updates: WorldMate PC Sync can check for updates every 6, 12, or 24 hours. Select
zero for WorldMate ActiveSync to update every time you connect your Travel Companion to your PC.
Network Settings: Use the Network Settings to configure WorldMate PC Sync to work behind a firewall
or proxy server. Consult a network administrator for the correct settings.
Screen Navigation
WorldMate Standard contains several screens that you can access using the icons on the right side of
the screen. Tap the icons to switch between the clocks, weather, maps, currencies, and more.
48Chapter 6 WorldMate
Page 57

Clocks
The Clocks screen displays your home clock plus four other pre-selected clocks. To change a displayed
city, tap the city name and select a new city from the list. To view the weather forecast for that city, tap
the sun/cloud icon. Sync your Travel Companion with a personal computer running WorldMate software
to get updated forecasts.
Clocks 49
Page 58

Using the Alarm
To set the alarm:
1. Tap the bell icon on the Clocks screen to access the alarm settings screen.
2. Select Set alarm for, and then set the alarm time.
3. If you want a sound to play when the alarm goes off, select Play sound, and then select an alarm
sound from the list.
4. If you want a message to display when the alarm goes off, type the message in the Message box.
5. Tap OK.
Icons indicating the alarm is on display around the bell icon after you turn on the alarm.
Your Travel Companion displays the Alarm screen when the alarm sounds.
50Chapter 6 WorldMate
Page 59

World Map
World Map provides a map of the world that shows where it is currently daylight and dark, as well as
global city locations and current time and weather forecasts for the selected city.
To view a city location:
Tap the city name below the map to display a list of cities, and then select a city to see the city's
●
location on the map.
- or -
Tap the map to display the closest city.
●
Tap the Sun/Cloud icon to display the weather forecast for the selected city. Note that you must sync
with a PC that is online running the WorldMate software to get weather forecasts.
World Map 51
Page 60

City List
To view WorldMate's city list, from either the World Map screen or the Clocks screen, tap Menu >
Cities.
To sort the list of cities by either city name or offset from GMT, tap the appropriate label at the top of
the list.
Tap a city name to display information about the city including country, longitude, latitude, and time
zone.
52Chapter 6 WorldMate
Page 61

Weather Service
You can access the weather from either the World Map screen, the Weather screen, or the Clocks
screen. From the World Map screen and the Clocks screen, tap the Sun/Cloud icon to get a 5-day
forecast for the selected city.
You can see a quick forecast from the Weather screen. Tap Detailed to see a detailed weather forecast.
To change the default cities displayed on the Weather screen tap the city name to display a list of cities
to choose from.
NOTE WorldMate supports only cities that are in its database for weather updates.
To get current forecasts, update the WorldMate software on your PC, sync your Travel Companion with
your PC, and then tap Get Updated Forecast .
Weather Service 53
Page 62

Currency Converter Service
This easy-to-use converter allows you to simultaneously calculate the sum of values in up to three
different currencies, as well as receive updated rates online or insert them manually.
To convert currencies:
1. Tap the arrow in each heading cell to display a list from which you can select a currency.
2. Type a value to convert in the editable fields below the heading fields. Currency values are
automatically computed for each selected currency.
Tap Menu > Get Updated Rates to update WorldMate with the latest exchange rates. This function
requires either an Internet connection or that you sync your Travel Companion.
54Chapter 6 WorldMate
Page 63

Updating Currency Rates
To manually update currency rates:
1. TapMenu > Edit Currencies.
2. Tap on the currency to update.
3. Type the rate relative to the base currency (the value of the base currency in terms of what you
are editing).
NOTE Updating a Euro-based currency affects all other Euro-based currencies. You cannot
change exchange rates between two Euro-based currencies.
Sync your Travel Companion to automatically update currency rates.
Updating Currency Rates 55
Page 64

Measurement Converter Service
To use the Measurements screen:
1. Select the type of measurement (length, temperature, etc.) from the Convert list.
2. Select the measurements (meters, feet, etc.) from the two lists below the Convert list.
3. Type a number to convert in the box to the left of the measurements. The converted value
automatically displays below the box you typed the number into.
4. Tap Clear to delete field values.
56Chapter 6 WorldMate
Page 65

Country and Area Codes
Tap the Area Codes list to switch between international dialing prefixes, U.S., and Canadian area codes.
The table provides:
Country/State names
●
Dialing prefixes
●
Local time offset from GMT in hours (this table does not update for Daylight Saving Time)
●
Tap a column heading to sort according to the column.
Use the Find box to look up prefixes according to the currently selected column. For example, type “I”
to locate the first country that starts with the letter I, or select the Code column and type “2” to find the
first country with an area code that starts with the number 2.
Country and Area Codes 57
Page 66

Clothing Sizes
This table shows the clothing sizes to buy when traveling overseas. Use the different categories with
the man-woman-child icons to quickly find the size you need.
NOTE Use the size table only as a guideline. Different manufacturers have slightly different
size tables.
58Chapter 6 WorldMate
Page 67

Packing List
Use the Packing List screen to create and keep track of a list of items you need to pack. A list of items
is provided in categories that you select at the top of the screen.
To create a packing list:
1. Select the category of items you want from the category drop-down list at the top of the screen.
2. Select the items you want to pack from the All Items list. WorldMate automatically moves items
you select to My List. You can then use the My List items as a checklist.
3. Tap an item to change its description, category, or list location.
4. To add or edit a category, select Edit Categories from the category drop-down list .
Packing List 59
Page 68

7 Entering Text
Entering Text Using Block Recognizer
1. From any program, tap the Input Selector arrow, and then Block Recognizer.
2. Write characters, numbers, and symbols in the designated writing area.
Enter letters by writing in the abc (left) area of the box.
●
Enter numbers by writing in the 123 (right) area of the box.
●
Enter symbols and punctuation by tapping in either area of the box and then writing the desired
●
character.
NOTE Block Recognizer is available when text entry is possible.
Tip For help with writing characters with Block Recognizer, tap the question mark near the
writing area.
60Chapter 7 Entering Text
Page 69

Entering Text Using the On-screen Keyboard
1. From any program, tap the Input Selector arrow, and then Keyboard.
2. Tap on the appropriate characters, numbers, and symbols on the on-screen keyboard.
Increase the size of the on-screen keyboard keys to make them easier to tap.
1. Tap Start > Settings > Personal tab > Input.
2. On the Input Method tab, select Keyboard as the input method, and tap Large keys.
3. Tap OK.
NOTE Enlarge the keys even more by selecting the Use gestures for the following keys
check box. Fewer keys appear on the keyboard, but you can do gestures for Space,
Backspace, Enter, and Shift+key.
Entering Text Using the On-screen Keyboard 61
Page 70

Entering Text Using Letter Recognizer
1. From any program, tap the Input Selector arrow, and then Letter Recognizer.
2. Write characters, numbers, and symbols in the designated writing area.
Enter capital letters by writing in the ABC (left) area of the box.
●
Enter lowercase letters by writing in the abc (middle) area of the box.
●
Enter numbers by writing in the 123 (right) area of the box.
●
Enter punctuation and symbols by tapping in either area of the box and then writing the desired
●
character.
NOTE Letter Recognizer is available when text entry is possible.
Tip For help with writing characters with Letter Recognizer, tap the question mark near the
writing area.
62Chapter 7 Entering Text
Page 71

Writing with Transcriber
Transcriber works transparently in the background of programs, recognizing words with its integrated
dictionary. When Transcriber is turned on, it interprets stylus movement anywhere on the screen as
handwriting input.
To write with Transcriber:
1. From any program, position the cursor where you want the text to appear.
2. Use the stylus to write anywhere on the screen.
The handwriting is converted to text shortly after you lift the stylus from the screen.
Writing with Transcriber 63
Page 72

8 Synchronizing
Synchronizing your HP iPAQ with your personal computer
Synchronization
Microsoft ActiveSync software, located on the Getting Started CD, allows your HP iPAQ and your
personal computer to communicate with each other.
For synchronization to work properly, install Microsoft ActiveSync on your personal computer before
connecting your HP iPAQ to your computer.
Use Microsoft ActiveSync to:
Synchronize information between your HP iPAQ and up to two computers or one server so that
●
the latest information is in all locations.
Change synchronization settings and the synchronization schedule.
●
Copy files between your HP iPAQ and computer.
●
Install applications on your HP iPAQ.
●
Synchronize links.
●
Send and receive e-mail.
●
Request meetings.
●
Synchronizing your HP iPAQ with a personal computer keeps the same information (such as calendar,
contacts, and e-mails) on both units, making it available when you work on your personal computer or
when you take your HP iPAQ on the go. Synchronize your HP iPAQ with a personal computer using
one of the following methods:
Mini-USB synchronization cable
●
Bluetooth
●
To synchronize your HP iPAQ and a personal computer using the mini-USB synchronization cable:
1. Be sure ActiveSync 4.1 or later is installed on your personal computer.
2. Plug the USB end of the synchronization cable into your personal computer.
3. Connect the mini-USB end on the synchronization cable to the charging/communications port on
your HP iPAQ.
64Chapter 8 Synchronizing
Page 73

CAUTION To avoid damaging your HP iPAQ or the AC adapter, check to be sure all
connectors are properly aligned before connecting them.
Synchronization begins automatically.
4. Click Next on the Synchronization Setup Wizard screen.
5. Perform one of the following:
By default, the check box is selected to synchronize directly with a Microsoft Exchange Server.
●
Clear this check box if you do not want to synchronize directly with a Microsoft Exchange
server, and then click Next.
Click Next to synchronize directly with a Microsoft Exchange server.
●
6. When the Synchronization Options screen displays, select the items to synchronize between
your HP iPAQ and your computer, and then click Next.
7. After the items have been synchronized, click Finish. The Synchronization Setup Wizard starts
synchronizing the items you checked.
If ActiveSync does not begin synchronizing, start it manually:
On your personal computer, open ActiveSync by selecting the Start menu > Programs > Microsoft
▲
ActiveSync.
Troubleshooting Help for Synchronization Issues
Following is a list of symptoms that may indicate synchronization issues are occurring:
No ActiveSync chimes sound (or a gray icon displays), and there is no activity in the ActiveSync
●
window on your personal computer.
ActiveSync chimes sound, and the ActiveSync icon on your personal computer changes to a
●
swirling green icon. The “retrieving settings” message appears on your personal computer, but the
ActiveSync connection drops prior to establishing the partnership.
ActiveSync is searching for a connection but none occurs. (The green icon on your personal
●
computer continues to spin.)
Synchronization has been established between your HP iPAQ and personal computer but
●
connection is dropped. (The green icon on your personal computer stops spinning and grays out.)
Firewall or other network protection software message box is displayed for ActiveSync to access
●
the network or Internet.
Synchronizing your HP iPAQ with your personal computer 65
Page 74

If you experience difficulty while synchronizing your HP iPAQ and personal computer, try the following
solutions to troubleshoot any synchronization issues:
Confirm that you are running ActiveSync on your personal computer with a supported operating
●
system (OS).
To get more information about the supported OS versions, visit:
●
windowsmobile.
The latest version of ActiveSync is at:
●
If you are running ActiveSync 4.1 or later and personal firewall software on your personal computer,
●
please add ActiveSync to the firewall program’s exception list.
(Firewall software, such as Sygate Personal Firewall, TrendMicro PC-cillin Internet Security, Norton
Personal Firewall, McAfee Personal Firewall, or Zone Alarm Security Suite may block
synchronization.) Refer to the documentation that came with your firewall program to determine
how to add ActiveSync 4.1 or later to the program’s exception list. To further troubleshoot a firewall
application and enable ActiveSync 4.1 or later, visit:
activesync.
During the ActiveSync installation, if you inadvertently left the Microsoft Exchange Server option
●
box checked and are not planning to connect to an Exchange server, follow these steps:
Connect your HP iPAQ to your personal computer. Be sure an ActiveSync connection is
●
established.
On your personal computer, click Start > All Programs > Microsoft ActiveSync.
●
Click Tools > Options > Sync Options tab.
●
Uncheck the boxes for the sync items listed under the Server group.
●
www.microsoft.com/windowsmobile/downloads.
www.microsoft.com/windowsmobile/help/
www.microsoft.com/
Place a checkmark in the boxes under the Desktop group for those items to synchronize.
●
Disconnect your HP iPAQ from your personal computer and wait for the ActiveSync message
●
confirming that your device is no longer connected. Reconnect your HP iPAQ to your personal
computer. Wait for about two minutes to see if your HP iPAQ connects to your personal computer.
On your personal computer, in ActiveSync, select File > Connection Settings. Confirm that USB
●
is selected as a connection method.
Connect your HP iPAQ to a different USB port on your personal computer.
●
Check your mini-USB synchronization cable. Consider using another mini-USB synchronization
●
cable if one is available.
Try synchronizing via a Bluetooth connection.
●
Restart your personal computer and perform a soft reset on your HP iPAQ. (A soft reset does not
●
erase any settings, programs or data.) Use the stylus to lightly press the Reset button. Your HP
iPAQ restarts and displays the HP QuickStart Tour. Once your personal computer and HP iPAQ
restart, reconnect your HP iPAQ to your personal computer.
66Chapter 8 Synchronizing
Page 75

Uninstall ActiveSync from your personal computer and then reinstall it. To uninstall ActiveSync
●
from your personal computer, click Start > Control Panel > Add or Remove Programs >
Microsoft ActiveSync. Then click the Remove button and click Yes.
After trying the above solutions without any success in solving the connection problem, perform a
●
factory reset on your HP iPAQ. (A factory reset clears all user-installed settings, programs, and
data and restores your HP iPAQ to factory settings.)
Reinstall applications on your HP iPAQ once the factory reset is complete by using ActiveSync on your
personal computer. Once your HP iPAQ is synchronized properly, go to ActiveSync on your personal
computer and select Tools > Add/Remove Programs and select any programs to reinstall.
Copying (or Transferring) Files
You can copy (transfer) files to and from the computer using Explore in ActiveSync and Windows
Explorer.
To copy (transfer) files:
1. Connect your HP iPAQ to the personal computer via the mini-USB synchronization cable.
2. On the personal computer, select Start > Programs > Microsoft ActiveSync.
3. Select Explore.
4. Double-click Windows Mobile-Based Device.
5. Right-click the Start menu, and select Explore.
6. Locate the file to be moved.
NOTE You cannot copy preinstalled files or system files.
7. Drag and drop the files between your HP iPAQ and the personal computer. ActiveSync converts
the files so that they can be used by the Office Mobile programs, if necessary.
Move the files directly into My Documents on your HP iPAQ (or into a folder inside My Documents), so
the programs on the device can locate them.
Copying (or Transferring) Files 67
Page 76

Migrating Data from Palm Desktop to Microsoft Windows Mobile 5.0
If you used a Palm Operating System (OS) based device before purchasing your HP iPAQ, you need
to migrate the data from the Palm Desktop software to Microsoft Windows Mobile 5.0.
NOTE You must have Microsoft Outlook 98 or higher installed on your personal computer
before you can migrate your data.
To migrate data from Palm Desktop to Windows Mobile 5.0:
1. Insert the Companion CD that came with the Palm unit into the personal computer's CD-ROM drive.
From the Discover your device screen, select Change your synchronization method, and then
select either Use Palm Desktop to manage calendar, contacts, tasks, and notes/memos or
Use Microsoft Outlook to manage calendar, contacts, tasks, and notes. Alternatively, you may
reinstall the Palm Desktop software. During the configuration process, select Synchronize your
handheld with Microsoft Outlook and Palm Desktop software.
NOTE Microsoft Outlook must be set as the default e-mail program to properly synchronize
with the Palm Desktop software. If you need to change the settings, open Microsoft Outlook,
then click Tools > Options > Other tab and check the Make Outlook the default program
for E-mail, Contacts, and Calendar check box. Click Apply > OK, and then restart the
personal computer.
2. Use the HotSync software located on the Companion CD that came with the Palm unit to
synchronize the Palm information with Outlook. Refer to the instructions that came with the Palm
unit for help installing or using HotSync.
3. When Outlook is synchronized with the Palm device, uninstall HotSync from the personal computer.
Click Start > Control Panel > double-click Add or Remove Programs. Select Palm, then click
Remove. Follow the on-screen instructions.
4. Insert the Getting Started CD into the personal computer's CD-ROM drive and follow the on-screen
instructions to install ActiveSync on the personal computer and create a partnership between your
HP iPAQ and the personal computer.
68Chapter 8 Synchronizing
Page 77

9 Connections
Connections
Use your HP iPAQ to connect to and exchange information with other handheld devices, your computer,
various network types, or the Internet. You can connect using:
WLAN*
●
Bluetooth
●
Access these connection types by tapping Start > Settings > Connections tab.
*WLAN is available on rx5900 series models only.
Connections 69
Page 78

WLAN
WLAN
With wireless access, cables are not needed to connect your HP iPAQ to the Internet. Instead, access
points transmit data to and from the wireless device. Your HP iPAQ can connect to an 802.11b/g WLAN
or connect directly to other WLAN-enabled devices. With WLAN, you can:
●
●
●
●
●
Tap Start > Today > iPAQ Wireless to access the WLAN features.
NOTE WLAN is available on rx5900 series models only.
Access the Internet
Send and receive e-mail
Access corporate network information
Use Virtual Private Networks (VPNs) for secure remote access
Use hotspots for wireless connectivity
NOTE Use of dial-up and wireless Internet, e-mail, corporate networks, and other wireless
communications, such as Bluetooth devices, may require separately purchased additional
hardware and other compatible equipment, in addition to a standard WLAN infrastructure and a
separately purchased service contract. Check with your service provider for availability and
coverage in your area. Not all web content may be available. Some web content may require
installation of additional software.
WLAN Terms
You should become familiar with the following terms as you begin to use WLAN technology.
Term Definition
802.11 standard An approved standard specification of radio technology from
Device-to-computer or ad-hoc A mode that does not use access points. It provides
Domain Name System (DNS) The way that Internet domain names are located and
Encryption An alphanumeric (letters and/or numbers) conversion process
Hotspots Public or private areas where you can access WLAN service.
Infrastructure This connection mode uses wireless access points to connect
the Institute of Electrical and Electronic Engineers (IEEE) used
for wireless local area networks (WLANs).
independent peer-to-peer connectivity in a wireless LAN.
translated into IP addresses. It is an easy to remember name
for an Internet address. Every web site has its own specific IP
address on the Internet.
of data primarily used for protection against any unauthorized
people.
These wireless connections can be located, for example, at a
library, cyber cafe, hotel, airport lounge, or convention center.
This service can be free or sometimes requires a fee.
to networks.
70Chapter 9 Connections
Page 79

Turning WLAN On or Off
To turn WLAN on or off:
1. Tap Start > Today > iPAQ Wireless.
2. Tap the WLAN icon on the iPAQ Wireless screen.
When WLAN is on:
The WLAN icon on the iPAQ Wireless screen turns amber or green.
●
The wireless light-emitting diode (LED) on your HP iPAQ flashes blue.
●
NOTE Even though the indicator is blue to indicate WLAN is turned on, it does not necessarily
mean a connection has been established with another device or access point.
Turn WLAN off when you are not using it by tapping the WLAN icon again.
When WLAN is off, the WLAN icon turns gray, and the blue LED turns off.
Automatically Connecting to a WLAN Network
When you connect to a WLAN network, your HP iPAQ automatically detects WLAN networks that are
broadcasting their signal. If your WLAN network isn't set to broadcast, then you must connect to it
manually. Before trying to connect to a WLAN network, determine if authentication information is needed
by contacting your network administrator.
1. Tap Start > Today > iPAQ Wireless.
2. Tap the WLAN icon to turn WLAN on.
3. Once your HP iPAQ detects a WLAN network, you may be asked to choose if you want to connect.
Select the desired network and tap Connect.
Searching for WLAN Networks to Access
Networks that have been already configured are preferred networks. Choose whether to connect only
to preferred networks or to have your HP iPAQ search for and connect to any available network
(preferred or not).
1. Tap Start > Today > iPAQ Wireless.
2. Tap the WLAN icon to turn on WLAN.
3. Tap View WLAN Networks.
4. In the Networks to access box, tap the type of network to connect to (All Available, Only access
points, or Only computer-to-computer).
5. Tap the wireless network to which you want to connect.
WLAN 71
Page 80

Manually Connecting to a WLAN Network
A wireless network can be added manually by entering the settings information to add the network.
Before trying to connect to a WLAN network, determine if authentication information is needed by
contacting your network administrator.
1. Tap Start > Today > iPAQ Wireless.
2. Tap the WLAN icon to turn WLAN on.
3. On the WLAN tab, tap View WLAN Networks.
4. Tap Add New.
5. Enter the network name.
6. Choose a connection method. Select The Internet to connect to the Internet through an Internet
Service Provider (ISP) or select Work to connect to a company network. Choose Work only if the
network requires a proxy server.
7. Tap the Network Key tab.
To use authentication, select the authentication method from the Authentication list.
●
To use data encryption, select an encryption method from the Data encryption list.
●
To automatically use a network key, tap The key is automatically provided. Otherwise, enter
●
the network key.
NOTE To delete a connection, tap Start > Today > iPAQ Wireless > WLAN tab > View
WLAN Networks. Tap and hold the desired connection, and then tap Remove Settings.
Finding an IP Address
1. Tap Start > Today > iPAQ Wireless.
2. Tap the WLAN icon to turn WLAN on.
3. Do one of the following:
Connect to a network automatically.
●
Connect to a network manually by tapping View WLAN Networks on the WLAN tab, selecting
●
a WLAN network, and tapping OK.
The WLAN IP Address is shown here, as well as other detailed information about your current WLAN
connection.
Configuring Network Security Settings
A wireless network can be added when the network is automatically detected. Or, manually enter the
settings information to add the network. To determine if authentication information is needed, check with
your Network Administrator or Hotspot Service Provider.
1. Tap Start > Today > iPAQ Wireless.
2. Turn on WLAN by tapping the WLAN icon.
72Chapter 9 Connections
Page 81

3. Tap View WLAN Networks to choose an available network.
4. In Configure Wireless Networks, select the network to configure.
5. To use authentication, tap the Network Key tab and select the authentication method from the
Authentication list.
6. To use data encryption, select an encryption method from the Data Encryption list.
7. To automatically use a network key, tap The key is automatically provided. Otherwise, enter the
network key manually.
Deleting Wireless Network Settings
You can delete network settings you manually entered. However, if a network was automatically
detected, your HP iPAQ may continue to automatically detect the network.
To delete existing or available wireless network settings:
1. Tap Start > Today > iPAQ Wireless.
2. Tap the WLAN icon to turn WLAN on.
3. Tap the WLAN tab > View WLAN Networks > Wireless tab.
4. In the Configure Wireless Networks box, tap and hold the desired network settings.
5. Tap Remove Settings.
Configuring 802.1x Authentication Settings
Before performing these steps, determine if authentication information is needed by contacting your
network administrator.
1. To manually enter information, tap Start > Today > iPAQ Wireless > WLAN tab > View WLAN
Networks > Wireless tab.
2. In Configure Wireless Networks, select the desired network.
3. For increased security, tap 802.1X tab > Use IEEE 802.1x network access control. Then select
the appropriate EAP type.
NOTE The only two EAP types supported are PEAP and Smart Card or Certificate. Additional
EAP types may be obtained from your network administrator or a third party.
WLAN 73
Page 82

Bluetooth
Bluetooth Terms
You should become familiar with the following terms as you begin to use Bluetooth technology.
Term Definition
Authentication Verification of a numeric passkey before a connection or
Authorization Approval of a connection, access, or activity before it can be
Bonding (Paired devices) Creating a trusted connection between your HP iPAQ and
Device address Unique electronic address of a Bluetooth device.
Device discovery Location and recognition of another Bluetooth device.
Device ID Name that a Bluetooth device provides when discovered by
Encryption Method of protecting data.
Passkey Code you enter to authenticate connections or activities
Personal Information Manager (PIM) Collection of programs used to manage daily business tasks
Profiles Collection of Bluetooth settings.
Service discovery Determination of which programs you have in common with
activity can be completed.
completed.
another device. After a bond is created, the two devices
become paired.
A paired device does not require authentication or
authorization.
another device.
requested by other devices.
(for example: Contacts, Calendar, and Tasks).
other devices.
Working with Bluetooth Manager
Use Bluetooth Manager to:
Establish connections
●
Exchange business cards
●
Display shortcuts
●
1. Tap Start > Today > iPAQ Wireless.
2. Tap the Bluetooth tab > Bluetooth Connections. The first screen that displays is My
Shortcuts.
When you are required to locate a device and connect to it, the Bluetooth browser searches for other
Bluetooth devices.
74Chapter 9 Connections
Page 83

Using Bluetooth Phone Manager
Use Bluetooth Phone Manager to connect your HP iPAQ to a Bluetooth-enabled cell phone, which allows
use of the phone as a modem to browse the Internet or transfer other information. To do this, create a
Bluetooth connection between your HP iPAQ and the cell phone, and then send information to the phone
using Bluetooth. The phone relays the information over the phone line and then sends back to your HP
iPAQ any information requested over the connection.
NOTE Ensure both your HP iPAQ and the cell phone are turned on, discoverable, and within
close range.
To establish a connection between your HP iPAQ and a cell phone using Bluetooth Phone Manager:
1. Tap Start > Settings > Connections tab > BT Phone Manager.
2. If using the application for the first time, tap Yes to set up a pairing with a Bluetooth phone.
3. Follow the on-screen instructions to create a pairing between your HP iPAQ and the phone.
For more information, open Bluetooth Phone Manager and tap Tools > Help.
Connecting to a Computer via Bluetooth
For best results, connect your HP iPAQ to the computer using USB to establish a synchronization
relationship before connecting via Bluetooth.
1. Follow the instructions in ActiveSync Help on the computer for configuring Bluetooth to support
ActiveSync.
2. On your HP iPAQ, tap Start > Today > iPAQ Wireless > Bluetooth tab > Bluetooth
Connections > New > ActiveSync via Bluetooth.
3. Follow the instructions on your HP iPAQ to complete the connection wizard. Your HP iPAQ will
attempt to connect to the Bluetooth computer.
4. After your HP iPAQ is connected, follow the instructions on the Bluetooth computer.
To disconnect your HP iPAQ from the Bluetooth computer, tap Start > Today > iPAQ Wireless >
Bluetooth tab > Bluetooth Connections > Active Connections tab, and then tap and hold the
computer name and select Disconnect.
To reconnect your HP iPAQ to the Bluetooth computer, tap Start > Today > iPAQ Wireless >
Bluetooth tab > Bluetooth Connections > Active Connections tab, and then tap and hold the
computer name and select Connect.
NOTE To preserve battery power, turn Bluetooth off when you are not using it.
Bluetooth Device Profiles
The functions that Bluetooth supports are called services or profiles. You can communicate only with
Bluetooth devices that support at least one of the following profiles:
ActiveSync—Uses SPP to connect to ActiveSync on a computer
●
Audio Video Remote Control Profile (AVRCP)
●
Bluetooth 75
Page 84

Basic Imaging Profile (BIP)
●
Basic Printer Profile (BPP)
●
File Transfer Protocol (FTP)
●
Generic Access Profile (GAP)
●
Hands Free Profile (HFP)
●
Headset Support Profile (HSP)
●
Human Interface Device Profile (HID)
●
LAN Access Profiles (LAN Client, PAN, Ad-Hoc, and GN profiles)
●
Object Exchange (OBEX) Protocol
●
Object Push Protocol (OPP)
●
Personal Area Network (PAN)
●
Serial Port Profile (SPP)
●
Service Discovery Application Profile (SDAP)
●
Dial-up Networking Client (DUN)
●
Hard Copy Replacement Profile (HCRP)
●
Creating, Ending, and Accepting a Bluetooth Partnership
You can create a partnership between your HP iPAQ and another device that has Bluetooth capabilities.
Once you do this, the devices must have Bluetooth turned on but do not need to be discoverable to
exchange information between them.
1. Be sure the two devices are turned on, discoverable, and within close range.
2. Tap Start > Today > iPAQ Wireless > Bluetooth tab > Bluetooth Connections.
3. Tap New.
4. Follow the instructions on the screen.
To end a Bluetooth Partnership:
1. Tap Start > Today > iPAQ Wireless > Bluetooth tab > Bluetooth Connections.
2. Tap and hold the desired partnership.
3. Tap Delete.
76Chapter 9 Connections
Page 85

To accept a Bluetooth Partnership:
1. Be sure your HP iPAQ is turned on, discoverable, and within close range.
2. When prompted to accept a partnership with the device that is requesting the relationship, tap
Yes.
3. If a passkey is requested, enter an alphanumeric passkey between 1 and 16 characters in
Passkey, and tap Next. Enter the same passkey in the device requesting the partnership. Using
a passkey provides greater security.
If you cannot discover another device, try the following:
Be sure Bluetooth is turned on.
●
Move closer to the device.
●
Be sure the device you are attempting to connect to is on and allows access to being discovered
●
by other devices.
Renaming a Bluetooth Partnership
1. Tap Start > Today > iPAQ Wireless > Bluetooth tab > Bluetooth Connections.
2. Tap and hold the desired partnership on the My Shortcuts tab.
3. Tap Rename.
4. Enter a new name for the partnership.
Making a Device Discoverable
When your HP iPAQ is discoverable, other devices with Bluetooth capabilities can detect, or discover,
your HP iPAQ and attempt to beam information to it, establish a partnership, or use a Bluetooth service.
1. Tap Start > Today > iPAQ Wireless > Bluetooth tab > Bluetooth Settings > Accessibility tab.
2. Select the Allow other devices to connect and the Other devices can discover me check boxes.
3. Tap OK.
NOTE If you no longer want your HP iPAQ to be discoverable, clear the check boxes.
Opening Bluetooth Settings
1. Tap Start > Today > iPAQ Wireless.
2. Tap the Bluetooth icon to turn on Bluetooth.
3. Tap the Bluetooth tab > Bluetooth Settings.
Setting Up an Incoming or Outgoing Bluetooth Serial (COM) Port
1. Be sure your HP iPAQ is connected to the other device via Bluetooth.
2. Tap Start > Today > iPAQ Wireless > Bluetooth tab > Bluetooth Settings > Services tab.
3. Select Serial Port in the list.
Bluetooth 77
Page 86

4. Select the Enable service check box.
5. To limit communication on this COM port to only devices with which your HP iPAQ has a Bluetooth
partnership, select the Authentication (Passkey) required check box.
6. Tap OK.
78Chapter 9 Connections
Page 87

Connecting to Intranet URLs
To connect to intranet sites that have periods in their URLs (for example, intranet.companyname.com),
add them to the Work URL Exceptions list.
1. Tap Start > Settings > Connections tab.
2. Tap Connections > Advanced tab > Exceptions.
3. Tap Add new URL.
4. In Work URL, enter the intranet URL.
NOTE If you use many URLs that share the same root company name, avoid entering them
individually by entering *.companyname.com.
Connecting to Intranet URLs 79
Page 88

Changing an Intranet URL
1. Tap Start > Settings > Connections tab > Connections > Advanced tab > Exceptions.
2. Tap the intranet URL exception you want to change, then make the desired changes.
NOTE To delete a work URL exception, tap and hold it in the list, then tap Delete.
80Chapter 9 Connections
Page 89

Setting Up an Automatic Choice for Connections
If you have already created more than one connection, you can set up your HP iPAQ to connect to the
best available connection automatically.
1. Tap Start > Settings > Connections tab > Connections.
2. Under My ISP or My Work Network, tap Manage existing connections.
3. Tap Auto pick.
Setting Up an Automatic Choice for Connections 81
Page 90

Setting Up Proxy Server Settings
If you are connected to your Internet Service Provider (ISP) or private network during synchronization,
your HP iPAQ should download proper proxy settings during synchronization from your computer. If
these settings are not on your computer or need to be changed, you can change them manually.
Before you begin, obtain the following information from your Internet Service Provider (ISP) or network
administrator:
User name
●
Password
●
Server type
●
Proxy server name
●
Port
●
Type of Socks protocol used
●
To set up proxy server settings:
1. Tap Start > Settings > Connections tab > Connections.
2. If a proxy server has not been set up, tap Set up my proxy server. Otherwise, tap Edit my proxy
server.
3. Select the This network connects to the Internet and This network uses a proxy server to
connect to the Internet check boxes.
4. In the Proxy server box, enter the proxy server name.
5. To change such settings as port number or proxy server type, tap Advanced and change desired
settings.
82Chapter 9 Connections
Page 91

Configuring Advanced Proxy Settings
1. For the appropriate server type, enter the proxy server name and port.
2. If necessary, enter the credentials for connecting with your proxy server.
3. If you are configuring a Socks proxy, select Socks 4 or Socks 5. If using Socks 5, enter the
credentials for connecting with your proxy server.
Configuring Advanced Proxy Settings 83
Page 92

Using Advanced Connection Settings
1. Tap Start > Today > iPAQ Wireless.
2. Tap the WLAN icon to turn on WLAN.
3. Connect to a network by tapping the WLAN tab > VPN & Proxy Settings > Advanced tab > Select
Networks button.
4. Select My ISP to connect to the Internet through an Internet Service Provider (ISP) or select My
Work Network to connect to a company network. Choose My Work Network only if the network
requires a proxy server. To change or create a new network management name, tap the Edit or
New button and OK.
5. Tap the Advanced tab on the Connections screen to set up Dialing Rules and Exceptions and
tap OK.
84Chapter 9 Connections
Page 93

Setting Up a VPN Server Connection
A Virtual Private Network (VPN) connection helps to securely connect to servers, such as a corporate
network, via the Internet.
Before you begin, obtain the following information from your network administrator:
User name
●
Password
●
Domain name
●
TCP/IP settings
●
Host name or IP address of the VPN server
●
To set up a VPN server connection:
1. Tap Start > Settings > Connections tab > Connections.
2. Under My Work Network, tap Add a new VPN server connection and follow the instructions in
the New Connection wizard.
3. Under most circumstances, you should not need to change any advanced settings. However, you
need to change advanced settings when:
The server to which you are connecting does not use dynamically assigned addresses, and
●
you need to enter TCP/IP settings.
You need to change server DNS or WINS settings.
●
If either of these circumstances applies, from the My VPN screen, tap the Advanced button and
fill in the appropriate information. Tap OK to save the changes and return to the My VPN screen.
4. To view additional information for any screen in the wizard or while changing settings, tap the
Help question mark.
NOTE To change existing settings, under My Work Network, tap Manage existing
connections > VPN tab. Select the desired VPN connection, tap Edit, then follow the instructions
on the screen.
To manually start a connection, tap and hold the connection, then tap Connect.
To delete a connection, tap and hold the desired connection, then tap Delete.
Setting Up a VPN Server Connection 85
Page 94

Changing a Connection Group Name
Your HP iPAQ is already set up with two groups of connection settings: My ISP and My Work Network.
You can change the name of these groups to something more meaningful. For example, if you put all
of your corporate settings under My Work Network connections, you can change the name to your
company's name.
1. Tap Start > Settings > Connections tab > Connections.
2. Under My ISP or My Work Network, tap Manage Existing Connections.
3. Tap the General tab.
4. Enter a name for the settings group.
86Chapter 9 Connections
Page 95

Ending a Connection
It can be useful to end a connection when you are done using it. This frees resources on your HP iPAQ
and can save connection charges.
When connected via a modem or Virtual Private Network (VPN), tap Connections icon >
●
Disconnect.
When connected via a cable, detach your HP iPAQ from the cable.
●
When connected via Bluetooth, tap Start > Today > iPAQ Wireless > Bluetooth tab > Bluetooth
●
Connections > Active Connections tab. Tap and hold the connection name, and then tap
Delete.
When connected via a network (Ethernet) card, remove the card from your HP iPAQ.
●
NOTE A modem is not included with your HP iPAQ but may be purchased separately. Visit
www.hp.com/accessories/ipaq for more information.
Ending a Connection 87
Page 96

10 HP Photosmart Mobile
HP Photosmart Mobile
Use HP Photosmart Mobile to:
View pictures stored on the HP iPAQ or a storage card.
●
Add voice or text notes to pictures.
●
Print pictures.
●
View a slideshow.
●
Send pictures by e-mail attachments.
●
Associate a picture with a Contact.
●
Assign a picture to the Today screen background.
●
88Chapter 10 HP Photosmart Mobile
Page 97

Attaching a Voice Note to a Picture
To attach a sound file to a picture:
1. Tap Start > Programs > Photosmart Mobile.
2. Tap the thumbnail picture in which you want to add a voice note.
3. Tap the Cassette icon.
4. Tap the Record button on the Recording toolbar.
5. Speak into the microphone to record the sound file and tap the Stop button when finished.
6. Tap the Cassette icon again to close the Recording toolbar.
Attaching a Voice Note to a Picture 89
Page 98

E-mailing Pictures
1. Tap Start > Programs > Photosmart Mobile.
2. Tap the thumbnail picture to be e-mailed.
NOTE If you cannot view or hear the media file to be e-mailed, the file may be protected
by Digital Rights Management (DRM). DRM is software that enables secure distribution and
prevents illegal distribution of pictures, videos, music, movies, and ring tones over the
Internet. For more information on DRM, refer to the on-screen Help by tapping Start >
Help and search on DRM.
3. Tap Menu > Send.
4. Tap E-mail Attachment.
5. Tap the Reduce sent photo size to check box and select the reduction percentage desired.
6. Tap Next.
7. Enter the appropriate e-mail address or use Contacts by tapping Menu > Add Recipient.
8. Enter other appropriate information, such as an e-mail title and message.
9. Tap Send.
90Chapter 10 HP Photosmart Mobile
Page 99

Viewing a Slideshow
To view a slideshow:
1. Tap Start > Programs > Photosmart Mobile.
2. Tap the slideshow icon at the bottom of the screen.
3. Tap the screen to view the Pause, Forward, Backward, and Stop buttons.
Viewing a Slideshow 91
Page 100

View Pictures Stored on the HP iPAQ
To view pictures using HP Photosmart Mobile:
1. Tap Start> Programs > Photosmart Mobile.
2. Tap the thumbnail (a smaller representation of the larger picture).
HP Photosmart Mobile displays the picture and file information associated with it.
NOTE Tap the zoom icon at the bottom of the screen to view the picture full-screen. Tap the
zoom in icon to view a close up of the picture. Use the zoom out icon to return the picture to
normal.
To view pictures in a different folder:
1. While in the HP Photosmart Mobile program, tap the file folder icon at the bottom of the screen.
2. Tap a different folder where pictures reside.
3. Tap OK.
HP Photosmart Mobile displays the pictures from the selected folder.
92Chapter 10 HP Photosmart Mobile
 Loading...