

Page 1
Addendum A
iPAQ Music Center
Page 2

Notice
© 2002 Compaq Computer Corporation
COMPAQ and the Compaq logo Registered in U.S. Patent and Trademark Office.
Microsoft and Windows are trademarks of Microsoft Corporation.
All other product names mentioned herein may be trademarks or registered trademarks of
their respective companies.
Compaq shall not be liable for technical or editorial errors or omissions contained herein.
The information in this document is subject to change without notice.
The information in this publication is subject to change without notice and is provided "AS
IS" WITHOUT WARRANTY OF ANY KIND. THE ENTIRE RISK ARISING OUT OF THE USE OF THIS
INFORMATION REMAINS WITH RECIPIENT. IN NO EVENT SHALL COMPAQ BE LIABLE FOR ANY
DIRECT, CONSEQUENTIAL, INCIDENTAL, SPECIAL, PUNITIVE OR OTHER DAMAGES WHATSOEVER (INCLUDING WITHOUT LIMITATION, DAMAGES FOR LOSS OF BUSINESS PROFITS, BUSINESS INTERRUPTION OR LOSS OF BUSINESS INFORMATION), EVEN IF COMPAQ HAS BEEN
ADVISED OF THE POSSIBILITY OF SUCH DAMAGES. THE FOREGOING SHALL APPLY REGARDLESS OF THE NEGLIGENCE OR OTHER FAULT OF EITHER PARTY AND REGARDLESS OF
WHETHER SUCH LIABILITY SOUNDS IN CONTRACT, NEGLIGENCE, TORT, OR ANY OTHER THEORY OF LEGAL LIABILITY, AND NOTWITHSTANDING ANY FAILURE OF ESSENTIAL PURPOSE OF
ANY LIMITED REMEDY.
The limited warranties for Compaq products are exclusively set forth in the documentation
accompanying such products. Nothing herein should be construed as constituting a further
or additional warranty.
iPAQ Music Center Addendum A, Rev 1.2
First Edition (April 2002)
Part Number 225345-001
Page 3

Contents
Introduction . . . . . . . . . . . . . . . . . . . . . . . . . . . . . . . . . . . . . . . . . . . . . . 1-1
Who Should Read this Addendum?. . . . . . . . . . . . . . . . . . . . . . . . . . . . . . 1-2
Where Can I Find More Information? . . . . . . . . . . . . . . . . . . . . . . . . . . . . 1-3
What’s New in Version 1.2 . . . . . . . . . . . . . . . . . . . . . . . . . . . . . . . . . 2-1
Remote Control . . . . . . . . . . . . . . . . . . . . . . . . . . . . . . . . . . . . . . . . . . . . . . . . 2-2
Home Networking. . . . . . . . . . . . . . . . . . . . . . . . . . . . . . . . . . . . . . . . . . . . . .2-3
CD Changers . . . . . . . . . . . . . . . . . . . . . . . . . . . . . . . . . . . . . . . . . . . . . . . . . . .2-4
Recording . . . . . . . . . . . . . . . . . . . . . . . . . . . . . . . . . . . . . . . . . . . . . . . . . . . . . . 2-5
Accessories. . . . . . . . . . . . . . . . . . . . . . . . . . . . . . . . . . . . . . . . . . . . . . . . . . . . .2-6
Home Networking . . . . . . . . . . . . . . . . . . . . . . . . . . . . . . . . . . . . . . . . 3-1
C
Choosing an Address . . . . . . . . . . . . . . . . . . . . . . . . . . . . . . . . . . . . . . . . . . . 3-2
HPNA . . . . . . . . . . . . . . . . . . . . . . . . . . . . . . . . . . . . . . . . . . . . . . . . . . . . . . . . . .3-3
Ethernet . . . . . . . . . . . . . . . . . . . . . . . . . . . . . . . . . . . . . . . . . . . . . . . . . . . . . . . 3-6
Checking Settings . . . . . . . . . . . . . . . . . . . . . . . . . . . . . . . . . . . . . . . . . . . . . .3-8
Having Trouble? . . . . . . . . . . . . . . . . . . . . . . . . . . . . . . . . . . . . . . . . . . . . . . . . 3-9
IPAQ MUSIC CENTER–ADDENDUM A CONTENTS I
Page 4

Using a CD Changer . . . . . . . . . . . . . . . . . . . . . . . . . . . . . . . . . . . . . . . 4-1
Connecting Cables. . . . . . . . . . . . . . . . . . . . . . . . . . . . . . . . . . . . . . . . . . . . . .4-2
A/V Connections . . . . . . . . . . . . . . . . . . . . . . . . . . . . . . . . . . . . . . . . . . . . . . . 4-2
Using a CD Changer . . . . . . . . . . . . . . . . . . . . . . . . . . . . . . . . . . . . . . . . . . . .4-4
Having Trouble? . . . . . . . . . . . . . . . . . . . . . . . . . . . . . . . . . . . . . . . . . . . . . . . . 4-6
Recording from External Sources . . . . . . . . . . . . . . . . . . . . . . . . . . . 5-1
A/V Connections . . . . . . . . . . . . . . . . . . . . . . . . . . . . . . . . . . . . . . . . . . . . . . . 5-2
Recording . . . . . . . . . . . . . . . . . . . . . . . . . . . . . . . . . . . . . . . . . . . . . . . . . . . . . . 5-3
Recording from a CD Changer. . . . . . . . . . . . . . . . . . . . . . . . . . . . . . . . . . . 5-4
Managing the Music Center from your PC . . . . . . . . . . . . . . . . . . . 6-1
Using Media Manager . . . . . . . . . . . . . . . . . . . . . . . . . . . . . . . . . . . . . . . . . .6-2
CONTENTS II IPAQ MUSIC CENTER–A DDENDUM A
Page 5
Introduction
Congratulations on the purchase of your new Compaq
In This Chapter
Who Should Read this
Addendum? 1-2
Symbols Used in This
Guide 1-3
Where Can I Find More
Information? 1-3
iPAQ™ Music Center.
This is an Addendum to the Getting Started Guide. It
describes changes and new features added in the latest
version of the Music Center software.
This addendum describes:
• What’s new in version 1.2
• Home networking
• Controlling a CD Changer
• Recording from CD Changers and analog devices
• Managing the Music Center from a PC
IPAQ MUSIC CENTER—ADDENDUM A INTRODUCTION 1-1
Page 6
Who Should
Using Your iPAQ Music Center Addendum
Read this
Addendum?
Whether you are a new
owner of the Music
Center, or you already
own a Music Center and
you want to learn how to
use the new features
available in version 1.2,
you will find this
Addendum helpful.
This easy-to-use guide helps you find the information you
want as quickly as possible.
The page layout enables you to see at a glance how the
information is organized. The left column lists the most
important topics. It explains why the topic is important to
you and what the topic is. This column also contains
warnings and useful tips and tells you about other reference
materials.
The right column explains how to perform a procedure. It
contains step-by-step instructions.
Graphics help you visualize the task and validate what you
are doing as you do it. Detailed graphics may span both
columns.
1-2 INTRODUCTION IPAQ MUSIC CENTER—ADDENDUM A
Page 7

Symbols Used
Symbol Information Boxes
in This Guide
Throughout this guide,
symbol information
boxes provide important
information.
Where Can I Find More Information?
Information is available
in the printed guides as
well as on the Compaq
Web page. Use the iPAQ
Music Center Getting
Started guide as your
first point of reference
and then refer to the
following documents:
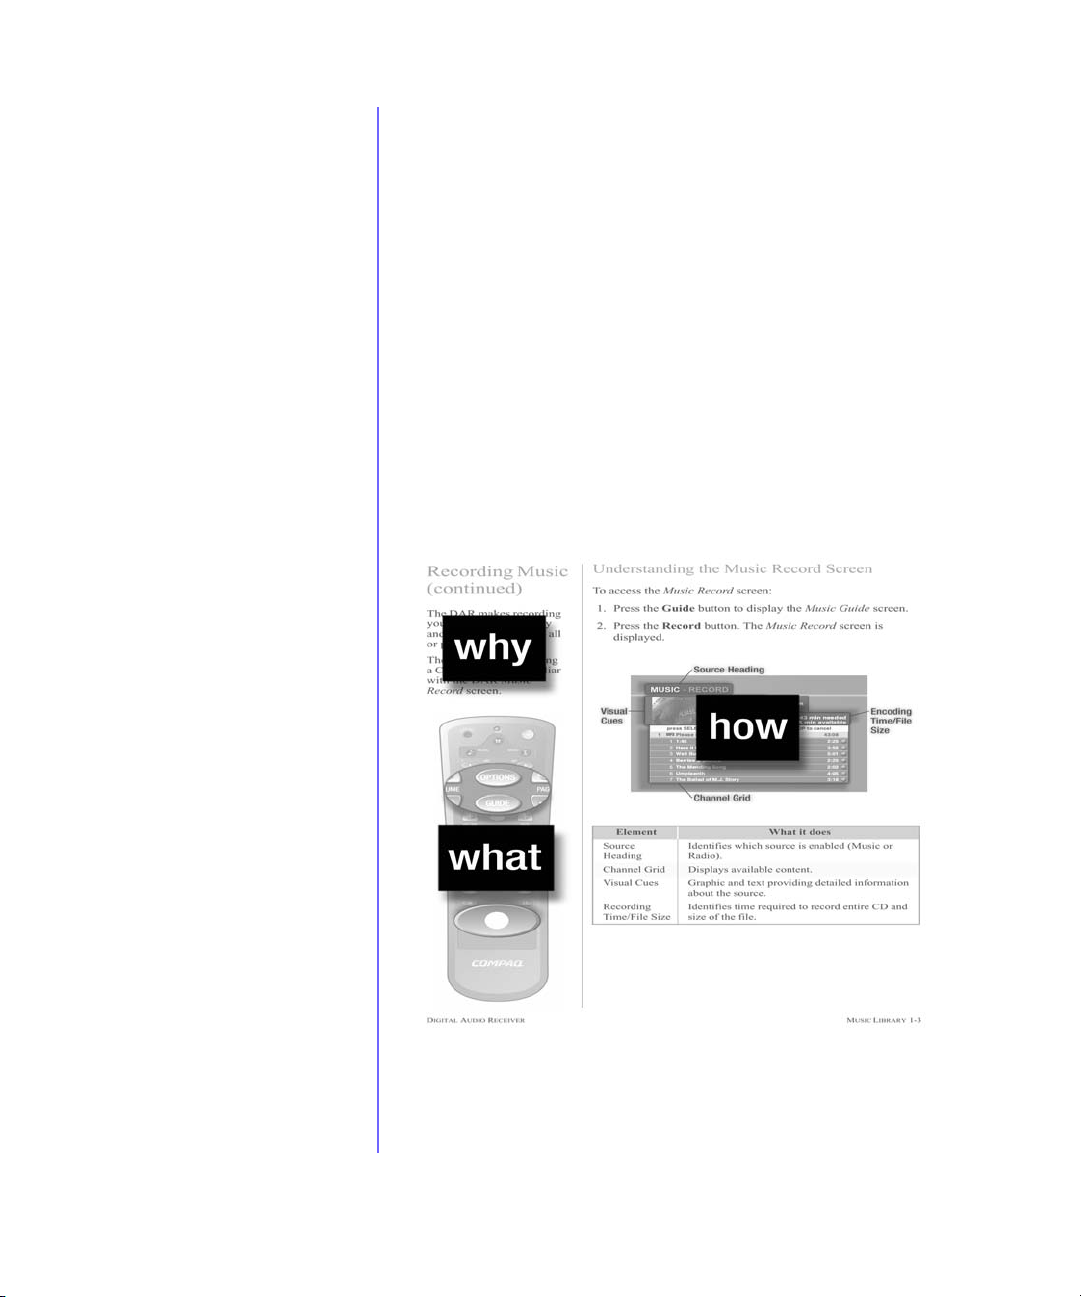
Understanding the
Did you know ...
Tip
See also ...
background or concept may
help you solve a problem.
Helpful hints make using your
iPAQ Music Center easier and
faster.
Another document or another
page in this document has
related information.
Accessing More Information
You can use your PC to access the following information on
the Compaq Web site:
• The online iPAQ Music Center Getting Started guide
• The online iPAQ Music Center Addendum
• Frequently Asked Questions (FAQs)
• Service and Support information
• Warranty
• Links for purchasing iPAQ Music Center options and
accessories
• Other exciting links to products, services, and
information
Quick Setup Poster
•
• Online Help
• Phone# 1-888-302-7358
• compaq.com/ipaqaudio
IPAQ MUSIC CENTER—ADDENDUM A INTRODUCTION 1-3
Page 8

1-4 INTRODUCTION IPAQ MUSIC CENTER—ADDENDUM A
Page 9
What’s New
in Version 1.2
Version 1.2 contains several useful and important new
In This Chapter
Remote Control 2-2
Home Networking 2-3
CD Changers 2-4
Recording 2-5
Accessories 2-6
features.
This chapter helps you get acquainted with the new features
of the iPAQ Music Center. Additional information is provided
in the following chapters.
IPAQ MUSIC CENTER—ADDENDUM AWHAT’S NEW IN VERSION 1.2 2-1
Page 10

Remote Control
What’s New on the Remote Control?
The following remote control buttons have changed or
provide new functions:
See also ...
For a complete listing of the
remote control button
functions, see Chapter 3 of the
original Music Center Getting
Started Guide.
Erase All Text
Push the Play button to erase all the text in a field.
Quick Jump
When viewing the music guide, you can quickly jump
to a CD or song title by using the number pad. For
example, the 5 button is used for the letters J, K, and L.
Press the 5 button once to jump to the first CD or song that
starts with J. Quickly press it again to jump to the first CD or
song that starts with K, and again to jump to L.
All of the number keys can be used to jump to the letters
stenciled above them. To jump to songs that start with B,
press the 1 (ABC) button twice. It is a quick and easy way to
navigate your CD collection without scrolling through long
lists.
Select or Unselect All Songs
When selecting songs to record, use the Change
Repeat Mode button to select or unselect all the songs
on the CD.
2-2 WHAT’S NEW IN VERSION 1.2 IPAQ MUSIC CENTER—ADDENDUM A
Page 11

Home
What’s New in Home Networking?
Networking
Did you know ...
AOL, Compuserve, and free
internet services use a
proprietary method of Internet
connectivity and are not
compatible with your iPAQ
Music Center.
The Music Center now supports many new networking
devices. This includes several new USB-to-Ethernet adapters,
Ethernet routers and bridges, and HPNA options.
For a list of supported networking devices, see “Accessories”
on page 2-6.
For additional instructions on using the Music Center with
your Ethernet or HPNA home network, see “Home
Networking” on page 3-1.
Managing Music Content from your PC
If you have a home network, you can manage your Music
Center from another PC on the network. Once you have
installed the Music Center Media Manager software, you can
copy songs between the Music Center and your PC, create
and edit playlists, edit song titles, change album artwork,
and more.
For more information about the Media Manager, see “Using
Media Manager” on page 6-2.
IPAQ MUSIC CENTER—ADDENDUM AWHAT’S NEW IN VERSION 1.2 2-3
Page 12

CD Changers
Tip
You can use the Music Center
to control and play all the CDs
in your CD Changer...you
don’t have to rip them to the
Music Center to play them.
With an Internet connection,
the Music Center can look up
all of your CDs, providing you
with a Guide for your CD
changer!
What’s New in CD Changers?
High-capacity CD changers can now be attached to the
Music Center.
CD Lookup
The Music Center can look up all of the CDs in your CD
Changer. You’ll have access to album art and song lists for all
your CDs, plus the ability to play the CDs using the Music
Center interface, create play lists, and more.
To learn more about using CD Changers with the Music
Center, see “Using a CD Changer” on page 4-1.
Recording
If you have several CDs to record, use your CD Changer to rip
an entire batch of CDs to your Music Center.
For more information about recording, see “Recording” on
page 5-3.
2-4 WHAT’S NEW IN VERSION 1.2 IPAQ MUSIC CENTER—ADDENDUM A
Page 13

Recording
Did you know ...
You can record from your
stereo, your DVD player, your
old album collection, or
anything else that has an
analog or digital audio output
connection.
What’s New in Recording?
Version 1.2 adds several new recording options.
External Audio Recording
The Music Center can now record content from analog input,
Digital Coax, and Digital Optical inputs. Recorded content
will be stored as MP3 files.
CD Changers
Load and rip your CD collection to your Music Center with
your CD Changer. Simply use an S-Link cable to connect your
CD Changer to the Music Center, load up a batch of CDs, and
record them.
For more information about recording, see “Recording” on
page 5-3.
IPAQ MUSIC CENTER—ADDENDUM AWHAT’S NEW IN VERSION 1.2 2-5
Page 14

Accessories
What Options and Accessories does the iPAQ
Music Center Support?
Your Music Center currently supports the following:
USB Keyboards:
• Compaq USB Keyboard Part # 179355-007
• Microsoft Internet Keyboard Pro # RT9441
Wireless Keyboards:
• Logitech Cordless Freedom iTouch #Y-RF21
• Logitech Cordless Keyboard #Y-RC14
CD Changers:
• Sony MegaStorage 200/300/400 CD Changers with
S-Link or Control A1 II Interface. This includes models
CDP-CX235, CDP-CX335, CDP-CX400, and CDP-CX450.
Portable Music Players:
• Compaq Personal Audio Player PA-1 or PA-2
• Rio 600 Digital Audio Player
USB to Ethernet Dongles:
• Compaq iPAQ Networking HNE-200
• LinkSys USB100TX
• D-Link DSB-650 TX
• Belkin F5D5050
• CATC Netmate
Ethernet Routers:
• Linksys BEFSR41
• Compaq CP-2W
HPNA to Ethernet Bridges:
• Netgear PE102
• Linksys HPES03
USB to HPNA Connectivity:
• Linksys USB200HA
2-6 WHAT’S NEW IN VERSION 1.2 IPAQ MUSIC CENTER—ADDENDUM A
Page 15

Home Networking
A network is a group of computers and other devices
In This Chapter
Choosing an Address 3-2
HPNA 3-3
Ethernet 3-6
Checking Settings 3-8
Having Trouble? 3-9
connected together to enable communication between
them. The iPAQ Music Center can be connected to your home
network.
Adding the Music Center to your home network has several
advantages:
• If your network provides access to the internet, CD
lookup is performed a lot faster than a dial-up
connection
• You can manage the content on your Music Center from
a PC on the network
IPAQ MUSIC CENTER—ADDENDUM AHOME NETWORKING 3-1
Page 16

Choosing an
Choosing an IP address
Address
Before you can set up the Music Center on your Home
Network, you will have to know whether your network uses
dynamic or static IP addressing.
Dynamic Addressing
When your network uses Dynamic IP addresses, it uses a
range of addresses to connect to the Internet. A server or
router assigns one of the addresses to each device that asks
for one. This saves you from having to assign and remember
the IP address for every device in your home... the server or
router manages them automatically.
Static Addressing
When your network uses a Static IP address, each device
always connects using the same IP address that you
assigned. This is not as convenient and it requires that you
know a lot more about your network (addresses, masks,
gateways, etc.).
What if I don’t know?
If you're not sure what type of IP address your network uses,
select Dynamic.
3-2 HOME NETWORKING IPAQ MUSIC CENTER—ADDENDUM A
Page 17

HPNA
Home Phoneline Networking Alliance
One type of wired network is called HPNA (short for Home
Phoneline Networking Alliance, and also known as
HomePNA). This type of network uses the telephone wiring
in your home, while not interfering with normal telephone
operation. This allows you to set up a network without
having to worry about running additional wiring. Your iPAQ
Music Center supports HomePNA 2.0, which allows for
transfer speeds of up to 10 Mbps...the same speed as many
Ethernet networks.
A communications gateway can be a PC running Internet
sharing software such as Microsoft’s Internet Connection
Sharing (“ICS” is included with Windows 98 second edition,
and later versions of Windows). The communications
gateway can also be a dedicated device such as Compaq’s
Connection Point. Refer to your ICS or equivalent
documentation to set up your PC or device as a
communication gateway.
Connecting the Music Center to HPNA
1. Disconnect the telephone cable (if any) between the
See also ...
For more details, see Step 2
(HPNA Setup) in the Quick
Setup Poster.
IPAQ MUSIC CENTER—ADDENDUM AHOME NETWORKING 3-3
modem jack on the iPAQ Music Center and the telephone
wall jack.
2. Connect a telephone cable between the HPNA jack on
the iPAQ Music Center and the telephone wall jack
(optimal home phoneline networking performance
requires a minimum telephone cable of 6 ft.).
Page 18

HPNA
Setting up the Music Center for HPNA
(continued)
Tip
Once the iPAQ Music Center is
connected to the home
network, it will no longer
connect to the Internet using
its dial-up modem. Make sure
that there is a PC or other
device on your home network
which is acting as a
communications gateway to
the internet.
Tip
In most cases, the Primary
and Secondary network
connection method is the
same (both set to homePNA
or both set to ethernet).
However, in custom
situations, you could access
both homePNA and ethernet
networks.
1. Press the Setup
button on the
remote control. The
System Setup screen
is displayed.
2. Use the navigation arrows to highlight internet
configuration, and press the Select button.
3. From the Setup - Internet Configuration screen select
network connections, and press the Select button.
4. Under Primary
Network Connection,
use the navigation
arrows to highlight
homePNA, and press
the Select button.
This is the
connection used by
the Music Center for
internet access (CD
lookup, E-Commerce, etc).
5. Under Secondary Network Connection, use the navigation
arrows to highlight homePNA, and press the Select
button. The Music Center will use this connection for LAN
access (connecting to the Media Manager program using
a PC on the network).
6. Highlight save and press Select.
7. From the Setup - Internet Configuration screen highlight
primary tcp/ip settings and press Select.
3-4 HOME NETWORKING IPAQ MUSIC CENTER—ADDENDUM A
Page 19

8. For Primary TCP/IP Settings, highlight dynamic (or static if
you’re sure your network uses static addressing) and
press Select. Then highlight save and press Select.
9. If you selected static addressing, fill out the static IP
addressing fields. The IP address, subnet mask, gateway
address, and DNS 1 entries are required.
10. From the Setup - Internet Configuration screen highlight
secondary tcp/ip settings and press Select.
11. For Secondary TCP/IP Settings, highlight dynamic or static
and press Select. Then highlight save and press Select.
12. If you selected static addressing, fill out the static IP
addressing fields. The IP address, subnet mask, gateway
address, and DNS 1 entries are required.
13. Press Setup to exit the setup screens.
Your iPAQ Music Center is now configured to access the
Internet using your home network.
IPAQ MUSIC CENTER—ADDENDUM AHOME NETWORKING 3-5
Page 20

Ethernet
See also ...
For a list of supported
USB-to-Ethernet adapters, See
“Accessories” on page 2-6.
Ethernet Networking
Another type of wired network is Ethernet. This is the most
common form of networking. It uses wiring similar to a
telephone cable, but it contains more wires and uses a larger
connector. If you have a DSL or Cable modem, chances are it
uses an Ethernet cable and network card to connect to your
computer.
An Ethernet network is capable of transfer speeds from 10 to
100 Mbps.
Connecting the Music Center to Ethernet
1. Disconnect the telephone cable (if any) between the
modem jack on the iPAQ Music Center and the telephone
wall jack.
2. Connect a supported USB-to-Ethernet adapter to a USB
port on the back of the Music Center.
3. Connect one end of an Ethernet cable to the adapter, and
the other end to your network hub, switch, or router.
4. Reset the Music Center (hold down the power button
until the power LED starts to blink).
The Music Center will identify the new USB-to-Ethernet
adapter when it restarts.
3-6 HOME NETWORKING IPAQ MUSIC CENTER—ADDENDUM A
Page 21

Ethernet
Setting up the Music Center for Ethernet
(continued)
Tip
Once the iPAQ Music Center is
connected to the home
network, it will no longer
connect to the Internet using
its dial-up modem. Make sure
that there is a PC or other
device on your home network
which is acting as a
communications gateway to
the internet.
Tip
In most cases, the Primary
and Secondary network
connection method is the
same (both set to homePNA
or both set to ethernet).
However, in custom
situations, you could access
both homePNA and ethernet
networks.
1. Press the Setup
button on the
remote control. The
System Setup screen
is displayed.
2. Use the navigation arrows to highlight internet
configuration, and press the Select button.
3. From the Setup - Internet Configuration screen select
network connections, and press the Select button.
4. Under Primary
Network Connection,
use the navigation
arrows to highlight
ethernet, and press
the Select button.
This is the
connection used by
the Music Center for
internet access (CD
lookup, E-Commerce, etc).
5. Under Secondary Network Connection, use the navigation
arrows to highlight ethernet, and press the Select button.
The Music Center will use this connection for LAN access
(connecting to the Media Manager program using a PC
on the network).
6. Highlight save and press Select.
7. From the Setup - Internet Configuration screen highlight
primary tcp/ip settings and press Select.
IPAQ MUSIC CENTER—ADDENDUM AHOME NETWORKING 3-7
Page 22

8. For Primary TCP/IP Settings, highlight dynamic (or static if
you’re sure your network uses static addressing) and
press Select. Then highlight save and press Select.
9. If you selected static addressing, fill out the static IP
addressing fields. The IP address, subnet mask, gateway
address, and DNS 1 entries are required.
10. From the Setup - Internet Configuration screen highlight
secondary tcp/ip settings and press Select.
11. For Secondary TCP/IP Settings, highlight dynamic or static
and press Select. Then highlight save and press Select.
12. Press Setup to exit the setup screens.
Your iPAQ Music Center is now configured to access the
Internet using your ethernet network.
Checking Settings
3-8 HOME NETWORKING IPAQ MUSIC CENTER—ADDENDUM A
Verifying your Network Settings
You can verify your network settings by viewing the system
information screen. This is especially useful when
troubleshooting network problems. If you are using dynamic
addressing, your assigned IP address will be shown on this
screen.
To view your system information:
1. Press the Setup button on the remote control. The
System Setup screen is displayed.
2. Use the navigation arrows to highlight utilities, and press
Select.
3. Highlight system information and press Select.
Your network settings are displayed at the bottom of the
page. If your IP address for your network type (Ethernet or
HomePNA) is 0.0.0.0, then see “Having Trouble?” on
page 3-9.
Page 23

Having
Troubleshooting Problems
Trouble?
I found out my internet service provider is not supported
You cannot use AOL, Compuserve, or a free ISP account with
the Music Center. To obtain a supported account, you can
call the toll-free number on your setup screen, or you can get
an account on your own. Once you have an account, use the
information from your ISP to configure the Music Center.
It says I have no Ethernet adapter detected
If you are connecting the Music Center to your Ethernet
network (for instance, you’re using DSL, a Cable Modem, or a
LAN), you must purchase a compatible USB-to-Ethernet
adapter. For a list of adapters, see “Accessories” on page 2-6.
I can’t connect to the Internet (CD Lookup fails)
Make sure:
• You have configured the Music Center properly for your
network. If you have selected Dynamic addressing, verify
you are getting a valid IP address by viewing the Music
Center System Information screen.
• You are NOT using a proprietary internet service provider
like AOL and Compuserve, or free services like Juno or
Yahoo. The Music Center is not compatible with these
services.
• Your ISP may be experiencing a temporary network
outage. Use your PC to make sure you can still access the
internet. If you cannot connect, contact your ISP.
Then try resetting the Music Center. See “Resetting the
Music Center” on page 3-10.
The front panel or remote control is not responding
Reset the Music Center. See “Resetting the Music Center” on
page 3-10.
IPAQ MUSIC CENTER—ADDENDUM AHOME NETWORKING 3-9
Page 24

Resetting the Music Center
To reset the Music Center, press and hold the power button
on the front of the Music Center until the power LED starts
flashing, then release the button. When the power LED stops
flashing, press the power button again to turn the Music
Center on.
3-10 HOME NETWORKING IPAQ MUSIC CENTER—ADDENDUM A
Page 25

Using a CD Changer
If you have a supported CD Changer (see “Accessories” on
In This Chapter
Connecting Cables 4-2
page 2-6), you can control it from the Music Center.
Familiarize yourself with the following:
1. Digital audio from an optical source
A/V Connections 4-2
Using a CD Changer 4-4
Having Trouble? 4-6
IPAQ MUSIC CENTER—ADDENDUM AUSING A CD CHANGER 4-1
2. Digital audio from a coaxial source
3. Analog audio
4. S-Link or Control A1 II jack
These connections are located on the back of the Music
Center.
Page 26

Connecting
Connecting the Music Center to the Changer
Cables
Did you know ...
You can use a regular mini
stereo or mono cable as an
S-Link / Control A1 cable.
They are functionally
equivalent.
A/V Connections
To connect the Music Center to your CD Changer, follow
these steps:
1. Choose which audio input you will use. In most cases, the
changer came with an analog stereo cable. Hook the
cable from the Changer audio out to the Music Center
audio input (callout 3 in the previous picture). If you have
a digital cable, use it instead.
2. Attach an S-Link or Control A1 cable between the
Changer and the Music Center.
3. If there is an ID switch on the CD Changer, make certain
it is set to ID 1.
Once your CD Changer is physically connected, you must
configure the Music Center A/V Connections in Setup.
Setting up your A/V Connections
Before you can use your CD Changer with the Music Center,
you must tell the Music Center you have attached one. You
do this with the A/V connections screen.
To set up your CD Changer connection:
1. Press the Setup
button on the
remote control. The
System Setup screen
is displayed.
2. Use the navigation
arrows to highlight
A/V connections, and
press the Select
button.
3. From the Setup - A/V Connections screen, highlight audio
& video connections and press Select.
4-2 USING A CD CHANGER IPAQ MUSIC CENTER—ADDENDUM A
Page 27

4. On the Audio Input
Selection screen,
press the Select
button repeatedly
until your device
appears. For a CD
Changer, select the
changer CD1 device
for the analog or
digital connection
you are using. If a connection is not used, select not used.
5. Highlight save and press Select.
6. Exit Setup
Power Cycle
The first time you connect your CD Changer, it is best to turn
the CD Changer off and reset power to the Music Center.
To reset the power, press and hold the power button until
the power LED starts flashing, then release it.
When the Music Center restarts, it will recognize the CD
Changer.
Finding your Changer
Once you have set up your A/V connections for a CD
Changer, a group will appear in your guide called External.
This lists all of the external devices you have attached to your
Music Center, and your changer should appear on that list.
All your changer CDs will appear in the CDs group.
IPAQ MUSIC CENTER—ADDENDUM AUSING A CD CHANGER 4-3
Page 28

Using a CD
Using the CD Changer
Changer
Now that your CD Changer is attached to the Music Center,
you are ready to begin using it.
Turning the Changer On and Off
The Music Center will automatically turn the CD Changer on
or off when the Music Center is powered on or off.
Changer Management
To manage the CD Changer, follow these steps:
1. Press the Setup
button on the
remote control. The
System Setup screen
is displayed.
2. Highlight changer
management, and
press the Select
button.
3. On the Setup - Changer Management screen, you can set
the lookup options or view the changer statistics.
Changer Lookup Options
The Music Center can look up the CDs in your changer using
three different methods: quick lookup, range lookup, or
lookup all.
Quick Lookup looks only for slots which have become empty
or have been filled since the last time they were checked. The
CDs in newly filled slots are then identified.
Range Lookup verifies each slot in a range even if the CD in
the slot is already known. This is sometimes used when a set
of CDs is removed and then reloaded to the same slots.
Lookup All reads each slot in the changer and identifies it.
4-4 USING A CD CHANGER IPAQ MUSIC CENTER—ADDENDUM A
Page 29

Did you know ...
If you have changed a large
number of CDs, the lookup
process can take some time. A
status screen will show you
the progress of the lookup.
When you close the access door on your CD Changer, the
Music Center will automatically search for added or removed
CDs and look them up.
Playing a CD from the CD Changer
You play a CD located on the CD Changer in exactly the same
way as you play a CD located in the front tray of the Music
Center.
1. Navigate to the CD group. All of your CD Changer CDs
will appear there.
2. Highlight a CD and push Play to play the entire CD, or
push Select to see a song list and select individual songs.
Selecting and playing your favorite songs from your CD
Changer just got a lot easier!
Recording from the CD Changer
Recording CDs from a changer is a quick and easy way to
record a large number of CDs at one time. “Recording from
External Sources” on page 5-1.
IPAQ MUSIC CENTER—ADDENDUM AUSING A CD CHANGER 4-5
Page 30

Having
Troubleshooting your CD Changer
Trouble?
This section contains some tips for troubleshooting
problems with your CD Changer hookup.
My CD Changer does not appear in the Music Center
Make sure:
1. You have a supported CD Changer. See “Accessories” on
page 2-6.
2. You have attached all the cables. You need more than just
audio cables. The S-Link / Control cable is required for the
Music Center to control the Changer.
3. You have identified the Changer in A/V Connections.
4. You have set the ID on the back of the Changer to ID1.
5. You have turned the Changer off and reset power to the
Music Center.
I can see my CDs, but I can’t hear them
Make sure:
1. Your speakers are on. Try playing an MP3 file or a CD from
the front tray.
2. You have connected an audio cable between the Changer
and the Music Center. The Music Center uses an S-Link or
Control cable to control the Changer, but you still need an
audio cable for the music.
3. You have connected the audio cable from an audio
output connection on the Changer, and to an audio input
connection on the Music Center.
4. You have specified the right setup connection in A/V
Connections. If you have hooked up the Changer to one of
your Music Center digital inputs, make sure you have set
it up on a digital input and not the analog rec in.
4-6 USING A CD CHANGER IPAQ MUSIC CENTER—ADDENDUM A
Page 31

Recording from External Sources
The iPAQ Music Center records music content from the front
In This Chapter
A/V Connections 5-2
Recording 5-3
Recording from a CD
Changer 5-4
CD tray, but it can also record content from several other
external sources.
This includes recording:
1. Digital audio from an optical source
2. Digital audio from a coaxial source
3. Analog audio
These connections are located on the back of the Music
Center.
IPAQ MUSIC CENTER—ADDENDUM ARECORDING FROM EXTERNAL SOURCES 5-1
Page 32

A/V
Setting up your A/V Connections
Connections
Before you can record from your external sources, you must
tell the Music Center what devices you have attached. You do
this with the A/V connections screen.
To set up your connections:
1. Press the Setup
button on the
remote control. The
System Setup screen
is displayed.
2. Use the navigation arrows to highlight A/V connections, and press the Select button.
3. From the Setup - A/V Connections screen, highlight audio
& video connections and press Select.
4. On the Audio Input
Selection screen,
identify the devices
you have attached
to each Music
Center input. Press
the Select button
repeatedly until your
device appears. This
is just a name for
your device...if there is not an exact match, pick one that
is similar. If a connection is not used, select not used.
5. Highlight save and press Select.
Once you have set up your A/V connections, a group will
appear in your guide called External. This lists all of the
external devices you have attached to your Music Center.
5-2 RECORDING FROM EXTERNAL SOURCES IPAQ MUSIC CENTER—ADDENDUM A
Page 33

Recording
Recording Music from External Sources
To record music from one of your external devices, navigate
to the External group in the Music Center guide and press
Record.
Tip
To get the best recording
from the analog audio source
(rec in), set the volume on the
playing device to an average
volume level.
Tip
If you don’t like the default
values for artist, etc, the Play
button erases all the text in
the field.
Tip
If you want to stop the record
time manually, simply press
Stop while recording.
Tip
To record from a large
number of CDs, attach an
external CD changer. See the
next section for details.
External Record Options
The External Record Options screen will appear.
1. Optionally fill in the
fields for artist, title,
year, and track.
2. Enter the amount
time you will record,
from one second up
to a maximum of 80
minutes.
3. Highlight the record
source, and press Select until the source you wish to
record from appears.
4. Press Record.
Record Progress
While the music is recording, a status screen will be
displayed, showing the elapsed time and time remaining.
Where to Find your Recorded Music
When the recording time has elapsed, the guide will
reappear. Your recorded music will be placed in the
appropriate group. For instance, if you had recorded from an
external CD player, your music will appear under ExternalCD.
IPAQ MUSIC CENTER—ADDENDUM ARECORDING FROM EXTERNAL SOURCES 5-3
Page 34

Recording from a CD Changer
Did you know ...
The CD Changer has to play
the CD for the Music Center
to record it. That means
recording is done in real
time...it is not as fast as
ripping a CD using the Music
Center’s own CD player.
Recording from a CD Changer
Recording CDs from a changer is an easy way to record a
group of CDs at one time. The process is similar to recording
from the single CD tray on the Music Center.
1. Select the tracks from the CDs you wish to record from
the CDs group. You can select multiple tracks from
multiple CDs.
2. Press Record.
A Music Record Progress screen will appear, showing you the
currently recording song, elapsed time, and time remaining.
If you need help setting up your CD Changer for use with the
Music Center, see “Connecting Cables” on page 4-2.
An average CD holds 45 to 60
minutes of music. If you select
ten entire CDs, it will take ten
hours to record them.
You can select and record up
to 299 tracks per recording
session.
Using the Music Center to Control your CD Changer
If you plan on leaving your CD Changer attached to the Music
Center, there is no reason to transfer the music content to
the Music Center (unless you want to transfer some of the
tracks to a portable MP3 player).
A Music Center with a CD Changer is a great combination!
The Music Center can index and look up all of the CDs in the
changer, allowing you to quickly and easily select songs and
create playlists. See “Using a CD Changer” on page 4-4.
5-4 RECORDING FROM EXTERNAL SOURCES IPAQ MUSIC CENTER—ADDENDUM A
Page 35

Managing the Music Center from your PC
If you have connected your Music Center to your Home
In This Chapter
Using Media Manager 6-2
Network, you can manage your music content from a PC on
your network using the Media Manager utility.
Using the Media Manager, you can:
• Transfer songs from your PC to the Music Center
• Create Playlists and Groups
• Delete Albums or Songs
• Edit song titles, album names, and track information
• Change Album cover artwork
IPAQ MUSIC CENTER—ADDENDUM AMANAGING THE MUSIC CENTER FROM YOUR PC 6-1
Page 36

Using Media
Using Media Manager
Manager
Tip
You can also drag-and-drop
songs directly onto the Media
Manager window.
Once you have installed Media Manager, select the Compaq
Media Manager entry from your Start Menu (look under
Program Files).
Media Manager will search for any Music Center devices
attached to your network. If any are found, a listbox will be
displayed with their serial numbers.
Select the Music Center serial number you wish to manage
and press Ok.
Media Manager will synchronize the music database
between the PC and the Music Center.
Transferring Songs to the Music Center
To transfer a song on your PC to your Music Center, select
File - Import Music File. Browse for your music using the File
Import dialog.
Tip
A good place to start looking
for your music files is the My
Music directory, usually
located in C:/My Music.
6-2 MANAGING THE MUSIC CENTER FROM YOUR PC IPAQ MUSIC CENTER—ADDENDUM A
Page 37

Did you know ...
If you transfer a playlist, all
the songs in the playlist will
be transferred, too.
Did you know ...
If you forget to synchronize,
you will be reminded when
you exit the program.
If you choose not to
synchronize, your music files
will not be transferred to the
Music Center!
Select the music files you wish to import by clicking on them.
To select multiple files, hold down the Ctrl key when clicking
the mouse.
Click on the Open button when you are ready to import the
files.
Transferring Playlists
To transfer a playlist from your PC to your Music Center,
select File - Import Playlist.
Synchronizing
When files or playlists are imported, the files are not actually
transferred...they are only marked for transfer. Once you are
done importing your songs, you must synchronize your PC
with the Music Center to physically transfer the song data.
To synchronize, select File - Synchronize Library.
While it is synchronizing, a dialog is displayed that shows the
progress of the file transfer. This can take several minutes if a
large number of files are being transferred.
Creating a Playlist
To create a new playlist, select Media - Playlist - New Playlist.
Type a name for your playlist and click Ok.
To add songs to your new playlist, browse your music list.
When you find a song you wish to add, drag-and-drop it onto
your playlist, located at the bottom of the left-side tree view
under Playlists.
IPAQ MUSIC CENTER—ADDENDUM AMANAGING THE MUSIC CENTER FROM YOUR PC 6-3
Page 38

Editing Track Information
To edit album and track information, click on the track in the
track list. Edit the fields that appear at the bottom of the
window for Artist, Album, Genre, etc. Click on the Track Info
tab to edit track information, such as the track number and
track name (the song title).
Changing or Adding an Album Cover
When editing the track information, you can change the
album cover artwork. Double-click on the album artwork to
select a new album cover graphics file from your computer.
Design your own album covers for your favorite CDs!
Updating the Media Manager Software
To check for software updates, make sure your PC is
connected to the internet. Then select Help - Check for
Update from the Media Manager help menu.
Getting More Help
For more detailed help and information on the Compaq
Media Manager, see the Media Manager help file. Select
Help - Media Manager Help to view a listing of online help
topics.
6-4 MANAGING THE MUSIC CENTER FROM YOUR PC IPAQ MUSIC CENTER—ADDENDUM A
 Loading...