

Page 1
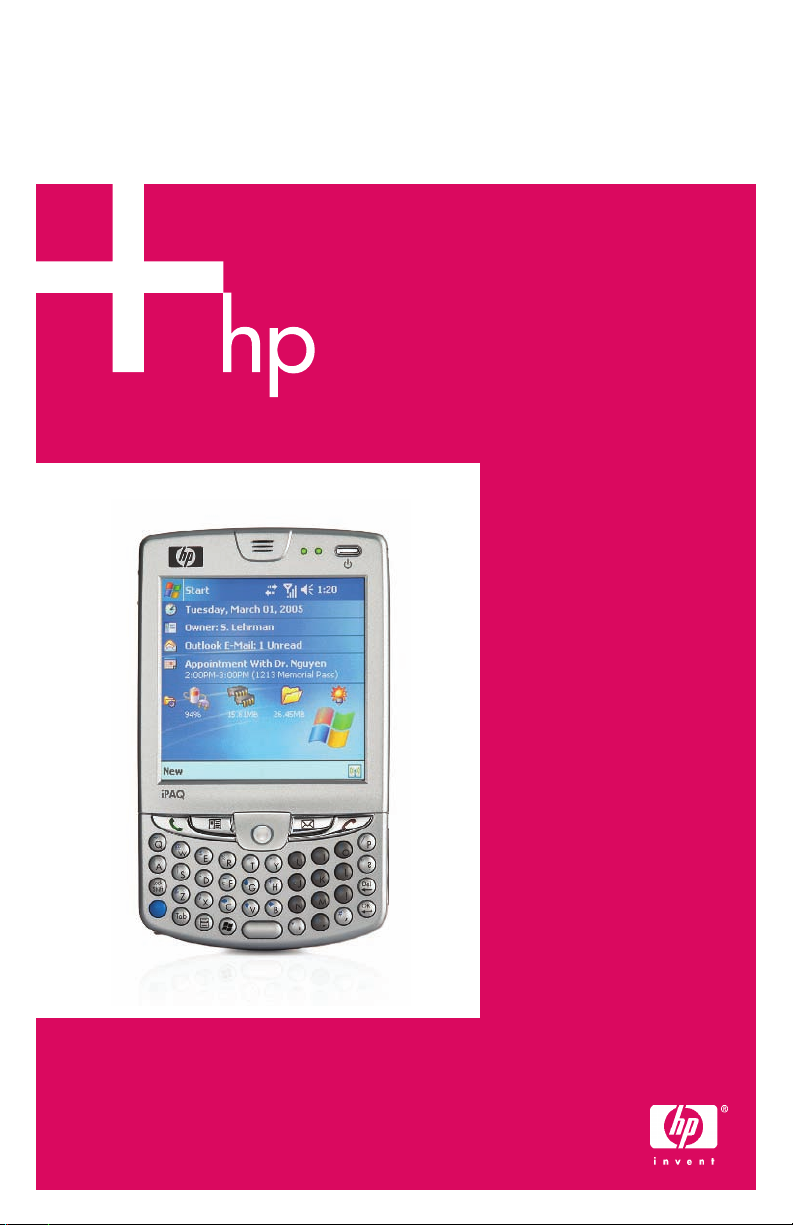
User’s Guide
HP iPAQ hw6500 Mobile Messenger series
Sådan kommer du i gang
Aan de slag
Komme i gang
Aloitusopas
Komma igång
Page 2

© 2005 Hewlett-Packard Development Company, L.P.
iPAQ is a trademark of Hewlett-Packard Development Company, L.P. in the U.S.
and other countries.
Microsoft, Windows, the Windows logo, Outlook, and ActiveSync are trademarks
of Microsoft Corporation in the U.S. and other countries.
HP iPAQ hw6500 Mobile Messenger series is Powered by Windows Mobile™
2003 Second Edition software for Pocket PC.
SD Logo is a trademark of Secure Digital.
Bluetooth is a trademark owned by its proprietor and used by Hewlett-Packard
Company under license.
Hewlett-Packard Company shall not be liable for technical or editorial errors or
omissions contained herein or for incidental or consequential damages in
connection with the furnishing, performance, or use of this material. The information
in this document is provided “as is” without warranty of any kind, including, but not
limited to, the implied warranties of merchantability and fitness for a particular
purpose, and is subject to change without notice. The warranties for HP products
are set forth in the express limited warranty statements accompanying such
products. Nothing herein should be construed as constituting an
additional warranty.
This document contains proprietary information that is protected by copyright. No
part of this document may be photocopied, reproduced, or translated to another
language without the prior written consent of Hewlett-Packard Company.
WARNING! Text set off in this manner indicates that failure to follow
directions could result in bodily harm or loss of life.
CAUTION: Alerts the user that failure to follow a procedure exactly as
described can result in either loss of data or damage to hardware
or software.
User’s Guide
HP iPAQ hw6500 Mobile Messenger series
First Edition (June 2005)
Document Part Number: 378871-031
Page 3

Contents
1 Getting to Know Your
HP iPAQ Mobile Messenger
Using the Stylus . . . . . . . . . . . . . . . . . . . . . . . . . . . . . . . . . . 1–3
Setting the Date and Time . . . . . . . . . . . . . . . . . . . . . . . . . . . 1–4
Setting the Time for Home and Locations You Are Visiting. . . 1–4
Setting the Date. . . . . . . . . . . . . . . . . . . . . . . . . . . . . . . . 1–4
Entering Owner Information. . . . . . . . . . . . . . . . . . . . . . . . . . 1–5
Setting a Password . . . . . . . . . . . . . . . . . . . . . . . . . . . . . 1–5
Resetting the Unit . . . . . . . . . . . . . . . . . . . . . . . . . . . . . . . . . 1–6
Performing a Soft Reset. . . . . . . . . . . . . . . . . . . . . . . . . . . 1–6
Performing a Hard Reset. . . . . . . . . . . . . . . . . . . . . . . . . . 1–7
Aligning the Screen . . . . . . . . . . . . . . . . . . . . . . . . . . . . . . . 1–7
Routine Care . . . . . . . . . . . . . . . . . . . . . . . . . . . . . . . . . . . . 1–8
Protecting the Screen . . . . . . . . . . . . . . . . . . . . . . . . . . . . . . 1–8
Traveling with Your HP iPAQ . . . . . . . . . . . . . . . . . . . . . . . . . 1–9
2 Learning the Basics
Using the Today Screen. . . . . . . . . . . . . . . . . . . . . . . . . . . . . 2–1
Navigation Bar . . . . . . . . . . . . . . . . . . . . . . . . . . . . . . . . 2–2
Command Bar. . . . . . . . . . . . . . . . . . . . . . . . . . . . . . . . . 2–2
TodayPanel. . . . . . . . . . . . . . . . . . . . . . . . . . . . . . . . . . . 2–2
Status Icons . . . . . . . . . . . . . . . . . . . . . . . . . . . . . . . . . . . . . 2–3
Pop-Up Menus. . . . . . . . . . . . . . . . . . . . . . . . . . . . . . . . . 2–5
Creating information . . . . . . . . . . . . . . . . . . . . . . . . . . . . 2–5
Customizing the Today Screen . . . . . . . . . . . . . . . . . . . . . 2–6
Customizing the Application Buttons . . . . . . . . . . . . . . . . . 2–7
Locking the Application Buttons . . . . . . . . . . . . . . . . . . . . . 2–7
Using Applications . . . . . . . . . . . . . . . . . . . . . . . . . . . . . . . . 2–8
Opening Applications . . . . . . . . . . . . . . . . . . . . . . . . . . . 2–8
Using the ContextMenu Key . . . . . . . . . . . . . . . . . . . . . . . 2–8
Minimizing Applications. . . . . . . . . . . . . . . . . . . . . . . . . . 2–8
Closing Applications . . . . . . . . . . . . . . . . . . . . . . . . . . . . 2–8
Installing Applications . . . . . . . . . . . . . . . . . . . . . . . . . . . 2–9
Backing Up Information . . . . . . . . . . . . . . . . . . . . . . . . . . 2–9
Using iPAQ File Store Folder. . . . . . . . . . . . . . . . . . . . . . 2–10
iii
Page 4

3 Using ActiveSync
Connecting to a Computer. . . . . . . . . . . . . . . . . . . . . . . . . . . 3–1
Installing ActiveSync and Synchronizing with Your Computer 3–1
Using Microsoft Exchange ActiveSync. . . . . . . . . . . . . . . . . . . 3–3
Using the Serial Infrared (IR) Connection . . . . . . . . . . . . . . 3–4
Changing Synchronization Settings . . . . . . . . . . . . . . . . . . 3–5
Copying Files. . . . . . . . . . . . . . . . . . . . . . . . . . . . . . . . . . . . 3–5
Installing Programs . . . . . . . . . . . . . . . . . . . . . . . . . . . . . . . . 3–6
Backing up and Restoring . . . . . . . . . . . . . . . . . . . . . . . . . . . 3–6
Synchronizing Links . . . . . . . . . . . . . . . . . . . . . . . . . . . . . . . 3–6
Using ActiveSync to Send and
Receive E-mail . . . . . . . . . . . . . . . . . . . . . . . . . . . . . . . . . . . 3–7
Requesting Meetings . . . . . . . . . . . . . . . . . . . . . . . . . . . . . . . 3–7
4 Learning Input Methods
Using the Thumb Keyboard . . . . . . . . . . . . . . . . . . . . . . . . . . 4–1
Keyboard Components. . . . . . . . . . . . . . . . . . . . . . . . . . . 4–2
Using the Function and Shortcut Keys . . . . . . . . . . . . . . . . . 4–2
Special Keys . . . . . . . . . . . . . . . . . . . . . . . . . . . . . . . . . . 4–3
Accent Characters . . . . . . . . . . . . . . . . . . . . . . . . . . . . . . 4–3
Using the On-Screen Keyboard . . . . . . . . . . . . . . . . . . . . . . . 4–6
Writing with the Stylus and the Letter Recognizer . . . . . . . . . . . 4–6
Writing with the Stylus and Microsoft Transcriber . . . . . . . . . . . 4–7
Writing with the Stylus and Block Recognizer. . . . . . . . . . . . . . 4–7
Drawing and Writing on the Screen. . . . . . . . . . . . . . . . . . 4–8
Changing Word Suggestion Options . . . . . . . . . . . . . . . . . . . 4–9
5 Using the Phone Features
SIM Card . . . . . . . . . . . . . . . . . . . . . . . . . . . . . . . . . . . . . . 5–1
Inserting a SIM Card . . . . . . . . . . . . . . . . . . . . . . . . . . . . 5–2
Removing the SIM Card . . . . . . . . . . . . . . . . . . . . . . . . . . 5–3
Activating Your Phone Service . . . . . . . . . . . . . . . . . . . . . . . . 5–4
Phone Features . . . . . . . . . . . . . . . . . . . . . . . . . . . . . . . . 5–4
Your PIN . . . . . . . . . . . . . . . . . . . . . . . . . . . . . . . . . . . . . . . 5–4
Phone Buttons and Icons . . . . . . . . . . . . . . . . . . . . . . . . . . . . 5–5
Checking Your Connection
and Signal Strength . . . . . . . . . . . . . . . . . . . . . . . . . . . . . . . 5–6
Automatic Frequency Band Selection . . . . . . . . . . . . . . . . . 5–7
Turning the Phone On and Off . . . . . . . . . . . . . . . . . . . . . . . . 5–7
HP Profiles . . . . . . . . . . . . . . . . . . . . . . . . . . . . . . . . . . . . . . 5–8
Setting a Profile. . . . . . . . . . . . . . . . . . . . . . . . . . . . . . . . 5–8
Switching a Profile. . . . . . . . . . . . . . . . . . . . . . . . . . . . . . 5–9
iv
Page 5

Making and Receiving Phone Calls. . . . . . . . . . . . . . . . . . . . . 5–9
Making a Call. . . . . . . . . . . . . . . . . . . . . . . . . . . . . . . . 5–10
Answering a Call. . . . . . . . . . . . . . . . . . . . . . . . . . . . . . 5–10
Ending a Call . . . . . . . . . . . . . . . . . . . . . . . . . . . . . . . . 5–10
Making a Call from Contacts . . . . . . . . . . . . . . . . . . . . . 5–10
Making a Call Using Speed Dial . . . . . . . . . . . . . . . . . . . 5–11
Making a Call From Call History . . . . . . . . . . . . . . . . . . . 5–12
Making a Conference Call . . . . . . . . . . . . . . . . . . . . . . . 5–12
Adjusting Phone Volume. . . . . . . . . . . . . . . . . . . . . . . . . 5–12
Enabling the Mute Function. . . . . . . . . . . . . . . . . . . . . . . 5–12
Setting Ring Tones . . . . . . . . . . . . . . . . . . . . . . . . . . . . . 5–12
Enabling Speakerphone Mode . . . . . . . . . . . . . . . . . . . . 5–13
Taking Notes During a Call . . . . . . . . . . . . . . . . . . . . . . 5–14
Using Voicemail . . . . . . . . . . . . . . . . . . . . . . . . . . . . . . 5–14
Putting a Call on Hold . . . . . . . . . . . . . . . . . . . . . . . . . . 5–14
Using Call Waiting . . . . . . . . . . . . . . . . . . . . . . . . . . . . 5–14
Displaying Caller ID. . . . . . . . . . . . . . . . . . . . . . . . . . . . 5–15
Blocking Calls . . . . . . . . . . . . . . . . . . . . . . . . . . . . . . . . 5–15
Forwarding Calls. . . . . . . . . . . . . . . . . . . . . . . . . . . . . . 5–15
Changing the System Volume . . . . . . . . . . . . . . . . . . . . . 5–16
Change the Ringer Volume . . . . . . . . . . . . . . . . . . . . . . . 5–16
Changing the Phone Settings . . . . . . . . . . . . . . . . . . . . . . . . 5–16
Changing Service Settings . . . . . . . . . . . . . . . . . . . . . . . . . . 5–17
Viewing Available GSM/GPRS/EDGE Networks . . . . . . . . . . 5–17
Using International Roaming . . . . . . . . . . . . . . . . . . . . . . . . 5–17
Changing Network Settings . . . . . . . . . . . . . . . . . . . . . . . . . 5–18
Manually Selecting a Network . . . . . . . . . . . . . . . . . . . . 5–18
Configuring Your HP iPAQ for Your SIM Card . . . . . . . . . . . . 5–19
Modifying the GSM/GPRS Network Settings . . . . . . . . . . . . . 5–19
Editing Network Properties . . . . . . . . . . . . . . . . . . . . . . . 5–20
Creating a New Connection . . . . . . . . . . . . . . . . . . . . . . 5–22
Failed Automatic SIM Detection . . . . . . . . . . . . . . . . . . . . . . 5–23
TTY Functionality for the Hearing-Impaired. . . . . . . . . . . . . . . 5–23
6 Managing Multiple Wireless Connections
Using the iPAQ Wireless Manager . . . . . . . . . . . . . . . . . . . . . 6–1
Power Buttons . . . . . . . . . . . . . . . . . . . . . . . . . . . . . . . . . 6–2
Settings Buttons . . . . . . . . . . . . . . . . . . . . . . . . . . . . . . . . 6–2
Managing Data Connections . . . . . . . . . . . . . . . . . . . . . . 6–3
7 Making Data Connections
Impact of Data Connection When a
Phone Call is Received . . . . . . . . . . . . . . . . . . . . . . . . . . . . . 7–2
v
Page 6

Using GSM/GPRS/EDGE Connections . . . . . . . . . . . . . . . . . . 7–2
Creating a GPRS/EDGE Connection . . . . . . . . . . . . . . . . . 7–2
Setting Up a WAP Browser . . . . . . . . . . . . . . . . . . . . . . . . . . 7–3
Viewing WAP Pages . . . . . . . . . . . . . . . . . . . . . . . . . . . . 7–3
Connecting to a Private Network . . . . . . . . . . . . . . . . . . . . . . 7–4
Setting Up VPN Server Connections . . . . . . . . . . . . . . . . . . 7–4
Setting Up Proxy Server Settings . . . . . . . . . . . . . . . . . . . . 7–4
Managing Your E-mail . . . . . . . . . . . . . . . . . . . . . . . . . . . . . 7–5
Entering an Internet Address . . . . . . . . . . . . . . . . . . . . . . . . . 7–5
Using a Favorites List . . . . . . . . . . . . . . . . . . . . . . . . . . . . . . 7–6
8Using GPS Navigation
Getting Acquainted . . . . . . . . . . . . . . . . . . . . . . . . . . . . . . . 8–1
Getting Started with GPS Navigation . . . . . . . . . . . . . . . . . . . 8–1
Setting Up Your HP iPAQ . . . . . . . . . . . . . . . . . . . . . . . . . 8–2
Using HP iPAQ Quick GPS Connection Utility . . . . . . . . . . . 8–2
Verifying Date and Time on Your HP iPAQ . . . . . . . . . . . . . 8–3
Downloading the Quick GPS Connection Data File . . . . . . . 8–4
Starting GPS Navigation . . . . . . . . . . . . . . . . . . . . . . . . . 8–4
Downloading a Map . . . . . . . . . . . . . . . . . . . . . . . . . . . . 8–5
Accessing the Internet on Your HP iPAQ . . . . . . . . . . . . . . . 8–8
Viewing the Main Screen . . . . . . . . . . . . . . . . . . . . . . . . 8–10
Operating the Main Screen . . . . . . . . . . . . . . . . . . . . . . 8–11
Using the Menu. . . . . . . . . . . . . . . . . . . . . . . . . . . . . . . 8–12
Setting a Destination . . . . . . . . . . . . . . . . . . . . . . . . . . . 8–13
Adding a Favorite . . . . . . . . . . . . . . . . . . . . . . . . . . . . . 8–14
Using the Route Summary Screen. . . . . . . . . . . . . . . . . . . 8–15
Using the Map Browser . . . . . . . . . . . . . . . . . . . . . . . . . 8–15
Switching to a Schematic View . . . . . . . . . . . . . . . . . . . . 8–17
Using the Browsers . . . . . . . . . . . . . . . . . . . . . . . . . . . . . . . 8–17
Selecting Locations . . . . . . . . . . . . . . . . . . . . . . . . . . . . . . . 8–18
Selecting your Home Location . . . . . . . . . . . . . . . . . . . . . 8–19
Selecting a Favorite . . . . . . . . . . . . . . . . . . . . . . . . . . . . 8–19
Selecting a Recent Destination. . . . . . . . . . . . . . . . . . . . . 8–19
Selecting your GPS Position . . . . . . . . . . . . . . . . . . . . . . 8–19
Selecting a Point of Interest . . . . . . . . . . . . . . . . . . . . . . . 8–20
Finding an Address . . . . . . . . . . . . . . . . . . . . . . . . . . . . 8–20
Setting Your Preferences . . . . . . . . . . . . . . . . . . . . . . . . . . . 8–21
Setting Your Vocal Preference . . . . . . . . . . . . . . . . . . . . . 8–23
GPS Navigation Tips . . . . . . . . . . . . . . . . . . . . . . . . . . . 8–23
vi
Page 7

9Using Bluetooth
Getting Acquainted with Bluetooth . . . . . . . . . . . . . . . . . . . . . 9–1
Understanding Terms . . . . . . . . . . . . . . . . . . . . . . . . . . . . 9–2
Supported Services . . . . . . . . . . . . . . . . . . . . . . . . . . . . . 9–2
Working with Bluetooth Settings . . . . . . . . . . . . . . . . . . . . . . . 9–3
Turning On Bluetooth . . . . . . . . . . . . . . . . . . . . . . . . . . . . 9–3
Opening Bluetooth Settings. . . . . . . . . . . . . . . . . . . . . . . . 9–3
Setting Accessibility Properties. . . . . . . . . . . . . . . . . . . . . . 9–4
Enabling Bluetooth Services . . . . . . . . . . . . . . . . . . . . . . . 9–4
Setting a Shared Folder . . . . . . . . . . . . . . . . . . . . . . . . . . 9–6
Understanding Profiles . . . . . . . . . . . . . . . . . . . . . . . . . . . 9–6
Working with Bluetooth Manager. . . . . . . . . . . . . . . . . . . . . . 9–8
Opening Bluetooth Manager. . . . . . . . . . . . . . . . . . . . . . . 9–8
Locating and Selecting a Device . . . . . . . . . . . . . . . . . . . . 9–8
Connecting to Other Devices . . . . . . . . . . . . . . . . . . . . . . . . . 9–9
Identifying the Communications Port. . . . . . . . . . . . . . . . . . 9–9
Establishing a Headset Connection . . . . . . . . . . . . . . . . . 9–10
Establishing a Headphone or Stereo Speakers Connection . 9–10
Establishing an ActiveSync Connection. . . . . . . . . . . . . . . 9–10
Establishing a Serial Connection . . . . . . . . . . . . . . . . . . . 9–13
Dial-Up Networking Service . . . . . . . . . . . . . . . . . . . . . . 9–13
Using Dial-Up Networking Service . . . . . . . . . . . . . . . . . . 9–13
Joining a Personal Area Network . . . . . . . . . . . . . . . . . . 9–14
Working with Files . . . . . . . . . . . . . . . . . . . . . . . . . . . . . . . 9–14
Creating a File Transfer Connection . . . . . . . . . . . . . . . . . 9–15
Sending Files . . . . . . . . . . . . . . . . . . . . . . . . . . . . . . . . 9–15
Creating a Folder on a Remote Device . . . . . . . . . . . . . . . 9–15
Receiving a File from a Remote Device . . . . . . . . . . . . . . . 9–15
Deleting a File from a Remote Device . . . . . . . . . . . . . . . . 9–15
Using Business Card Exchange . . . . . . . . . . . . . . . . . . . . 9–16
Setting Up Your Business Card Information . . . . . . . . . . . . 9–16
Opening a Connection . . . . . . . . . . . . . . . . . . . . . . . . . . . . 9–17
Viewing Connection Status . . . . . . . . . . . . . . . . . . . . . . . 9–18
Closing a Connection. . . . . . . . . . . . . . . . . . . . . . . . . . . 9–18
Viewing Connection Information . . . . . . . . . . . . . . . . . . . 9–18
Working with Connections . . . . . . . . . . . . . . . . . . . . . . . 9–18
10Using the Camera Features
Camera Components . . . . . . . . . . . . . . . . . . . . . . . . . . . . . 10–2
Taking a Photo. . . . . . . . . . . . . . . . . . . . . . . . . . . . . . . . . . 10–3
Ending Your Photo Session . . . . . . . . . . . . . . . . . . . . . . . . . 10–5
Taking a Video Clip . . . . . . . . . . . . . . . . . . . . . . . . . . . . . . 10–5
Adjusting the Camera Settings . . . . . . . . . . . . . . . . . . . . . . . 10–5
vii
Page 8

White Balance . . . . . . . . . . . . . . . . . . . . . . . . . . . . . . . 10–6
Color . . . . . . . . . . . . . . . . . . . . . . . . . . . . . . . . . . . . . . 10–6
Compression. . . . . . . . . . . . . . . . . . . . . . . . . . . . . . . . . 10–6
Resolution . . . . . . . . . . . . . . . . . . . . . . . . . . . . . . . . . . . 10–6
Flicker Filter . . . . . . . . . . . . . . . . . . . . . . . . . . . . . . . . . 10–7
Setting Up Other Features . . . . . . . . . . . . . . . . . . . . . . . . . . 10–7
Camera Sounds. . . . . . . . . . . . . . . . . . . . . . . . . . . . . . . 10–7
Configuring Instant Review . . . . . . . . . . . . . . . . . . . . . . . 10–7
Using the Self-Timer . . . . . . . . . . . . . . . . . . . . . . . . . . . . 10–7
Configuring File Settings. . . . . . . . . . . . . . . . . . . . . . . . . 10–8
Configuring Video Format. . . . . . . . . . . . . . . . . . . . . . . . 10–8
Using HP Image Zone . . . . . . . . . . . . . . . . . . . . . . . . . . . . . 10–9
Viewing Thumbnail Photos . . . . . . . . . . . . . . . . . . . . . . 10–10
Viewing a Photo Full-Screen . . . . . . . . . . . . . . . . . . . . . 10–10
Recording Sound With a Picture . . . . . . . . . . . . . . . . . . 10–10
Viewing a Slideshow . . . . . . . . . . . . . . . . . . . . . . . . . . 10–11
E-mailing a Picture . . . . . . . . . . . . . . . . . . . . . . . . . . . . 10–12
Exiting HP Image Zone. . . . . . . . . . . . . . . . . . . . . . . . . 10–13
HP Image Transfer . . . . . . . . . . . . . . . . . . . . . . . . . . . . . . 10–13
Tips for Taking Better Pictures. . . . . . . . . . . . . . . . . . . . . . . 10–15
11Expansion Cards
Installing a Secure Digital (SD) Expansion Card . . . . . . . . . . . 11–2
Removing a Secure Digital (SD) Expansion Card . . . . . . . . . . 11–3
Viewing the Content of Memory Cards . . . . . . . . . . . . . . . . . 11–3
12Using Messaging
Understanding Messaging . . . . . . . . . . . . . . . . . . . . . . . . . . 12–1
Using Folders . . . . . . . . . . . . . . . . . . . . . . . . . . . . . . . . 12–1
Synchronizing Inbox . . . . . . . . . . . . . . . . . . . . . . . . . . . 12–2
Setting Up Messaging Accounts . . . . . . . . . . . . . . . . . . . . . . 12–3
Internet E-mail . . . . . . . . . . . . . . . . . . . . . . . . . . . . . . . . 12–3
Text Messaging . . . . . . . . . . . . . . . . . . . . . . . . . . . . . . . 12–6
Multimedia Messaging Service (MMS) . . . . . . . . . . . . . . . 12–7
Using Messaging . . . . . . . . . . . . . . . . . . . . . . . . . . . . . . . . 12–7
Composing and Sending Messages . . . . . . . . . . . . . . . . . 12–7
Replying to or Forwarding a Message . . . . . . . . . . . . . . . 12–8
Sending Text Messages . . . . . . . . . . . . . . . . . . . . . . . . . 12–8
Receiving Text Messages . . . . . . . . . . . . . . . . . . . . . . . . 12–8
Sending MMS Messages . . . . . . . . . . . . . . . . . . . . . . . . 12–9
Viewing MMS Messages . . . . . . . . . . . . . . . . . . . . . . . 12–11
Downloading Messages . . . . . . . . . . . . . . . . . . . . . . . . 12–11
Downloading Messages From a Server . . . . . . . . . . . . . 12–11
viii
Page 9

13Managing the Battery
Inserting the Battery . . . . . . . . . . . . . . . . . . . . . . . . . . . . . . 13–2
Removing the Battery . . . . . . . . . . . . . . . . . . . . . . . . . . . . . 13–3
Charging the Battery. . . . . . . . . . . . . . . . . . . . . . . . . . . . . . 13–4
Charging with the AC Adapter . . . . . . . . . . . . . . . . . . . . 13–5
Charging with the HP iPAQ Cradle and AC Adapter . . . . . 13–6
Charging Over a USB Connection . . . . . . . . . . . . . . . . . . 13–6
Changing the Backlight Settings . . . . . . . . . . . . . . . . . . . 13–7
Disabling the Application Buttons. . . . . . . . . . . . . . . . . . . 13–8
Maximizing Battery Life and Checking Battery Charge Levels. . 13–8
Checking Your Battery . . . . . . . . . . . . . . . . . . . . . . . . . . 13–9
14Troubleshooting
Self-Test Diagnostics . . . . . . . . . . . . . . . . . . . . . . . . . . . . . . 14–1
Common Problems . . . . . . . . . . . . . . . . . . . . . . . . . . . . . . . 14–1
ActiveSync. . . . . . . . . . . . . . . . . . . . . . . . . . . . . . . . . . . . . 14–5
Phone . . . . . . . . . . . . . . . . . . . . . . . . . . . . . . . . . . . . . . . . 14–7
Expansion Cards . . . . . . . . . . . . . . . . . . . . . . . . . . . . . . . . 14–8
Bluetooth . . . . . . . . . . . . . . . . . . . . . . . . . . . . . . . . . . . . . . 14–9
GPS Navigation . . . . . . . . . . . . . . . . . . . . . . . . . . . . . . . . 14–10
A Regulatory Notices
Federal Communications Commission Notice. . . . . . . . . . . . . . A–1
Declaration of Conformity for products marked with the
FCC logo—United States only . . . . . . . . . . . . . . . . . . . . . . A–1
Canadian Notice . . . . . . . . . . . . . . . . . . . . . . . . . . . . . . . . . A–2
Avis Canadien . . . . . . . . . . . . . . . . . . . . . . . . . . . . . . . . A–2
European Union Regulatory Notice. . . . . . . . . . . . . . . . . . . . . A–2
Notice for Italy for use of
2.4 GHz wireless communication: . . . . . . . . . . . . . . . . . . . A–3
Battery Warning. . . . . . . . . . . . . . . . . . . . . . . . . . . . . . . . . . A–3
Equipment Warning . . . . . . . . . . . . . . . . . . . . . . . . . . . . . . . A–3
Airline Travel Notice. . . . . . . . . . . . . . . . . . . . . . . . . . . . . . . A–3
Medical Electronic Equipment . . . . . . . . . . . . . . . . . . . . . . . . A–4
Wireless Notices . . . . . . . . . . . . . . . . . . . . . . . . . . . . . . . . . A–4
U.S. Regulatory Wireless Notice . . . . . . . . . . . . . . . . . . . . A–4
Health and Safety Information . . . . . . . . . . . . . . . . . . . . . . A–4
Canadian Regulatory Wireless Notice . . . . . . . . . . . . . . . . A–5
Australian Wireless Notice . . . . . . . . . . . . . . . . . . . . . . . . A–5
Brazilian Regulatory Wireless Notice . . . . . . . . . . . . . . . . . A–5
Singaporean Wireless Notice . . . . . . . . . . . . . . . . . . . . . . A–5
Taiwanese Wireless Notice. . . . . . . . . . . . . . . . . . . . . . . . A–6
ix
Page 10

B Environmental Notices
Battery Warning. . . . . . . . . . . . . . . . . . . . . . . . . . . . . . . . . . B–1
Taiwan Battery Recycling Notice . . . . . . . . . . . . . . . . . . . . B–1
Disposal of Waste Equipment by Users in Private
Household in the European Union . . . . . . . . . . . . . . . . . . . . . B–1
Likvidace zaízení soukromými domácími uživateli
v Evropské unii. . . . . . . . . . . . . . . . . . . . . . . . . . . . . . . . . . . B–1
Bortskaffelse af brugt udstyr hos brugere i private hjem i EU . . . B–2
Seadmete jäätmete kõrvaldamine eramajapidamistes
Euroopa Liidus . . . . . . . . . . . . . . . . . . . . . . . . . . . . . . . . . . . B–2
Laitteiden hävittäminen kotitalouksissa Euroopan
unionin alueella . . . . . . . . . . . . . . . . . . . . . . . . . . . . . . . . . . B–2
Élimination des appareils mis au rebut par les ménages
dans l'Union européenne. . . . . . . . . . . . . . . . . . . . . . . . . . . . B–3
Entsorgung von Altgeräten aus privaten Haushalten in der EU . . B–3
μ
. . . . . . . . . . . . . . . . . . . . . B–3
Készülékek magánháztartásban történ selejtezése
az Európai Unió területén . . . . . . . . . . . . . . . . . . . . . . . . . . . B–4
Smaltimento delle apparecchiature da parte di privati
nel territorio dell'Unione Europea . . . . . . . . . . . . . . . . . . . . . . B–4
Vartotoj iš privači nam ki rangos atliek šalinimas
Europos Sjungoje . . . . . . . . . . . . . . . . . . . . . . . . . . . . . . . . B–4
Nolietotu iekrtu izncinšanas noteikumi lietotjiem Eiropas
Savienbas privtajs mjsaimniecbs . . . . . . . . . . . . . . . . . . B–5
Verwijdering van afgedankte apparatuur door
privé-gebruikers in de Europese Unie . . . . . . . . . . . . . . . . . . . B–5
Eliminering av utstyr i privathusholdningen i Den europeiske
unions medlemsland . . . . . . . . . . . . . . . . . . . . . . . . . . . . . . . B–5
Pozbywanie si zuytego sprztu przez uytkowników
w prywatnych gospodarstwach domowych w Unii Europejskiej . B–6
Destruição, por Utilizadores na União Europeia, de
Equipamento Usado no Lixo Doméstico . . . . . . . . . . . . . . . . . . B–6
Bortskaffande av avfallsprodukter från användare i
privathushåll inom Europeiska Unionen . . . . . . . . . . . . . . . . . . B–6
Odstranjevanje odslužene opreme uporabnikov v zasebnih
gospodinjstvih v Evropski uniji . . . . . . . . . . . . . . . . . . . . . . . . B–7
Likvidácia vyradených zariadení v domácnostiach
v Európskej únii . . . . . . . . . . . . . . . . . . . . . . . . . . . . . . . . . . B–7
x
Page 11

Eliminación de residuos de equipos eléctricos y electrónicos
por parte de usuarios particulares en la Unión Europea . . . . . . B–7
C Specifications
System Specifications . . . . . . . . . . . . . . . . . . . . . . . . . . . . . . C–1
Physical Specifications . . . . . . . . . . . . . . . . . . . . . . . . . . . . . C–3
Operating Environment . . . . . . . . . . . . . . . . . . . . . . . . . . . . . C–4
xi
Page 12

1 Getting to Know Your
HP iPAQ Mobile Messenger
Congratulations on purchasing the HP iPAQ hw6500 Mobile Messenger
series. This device includes the following features - a Mobile phone,
Global System for Mobile Communications/General Packet Radio
Service/Enhanced Data Rates for Global Evolution (GSM/GPRS/EDGE)
technology, Bluetooth, Pocket PC software, Digital camera on certain
models, and capable of using Global Positioning System (GPS)
Navigation. Use this chapter to find out about setting up your HP iPAQ
Mobile Messenger and to learn how it works.
The software programs described below are preinstalled on your HP iPAQ
or included on the Companion CD. The preinstalled programs are not
deleted if your HP iPAQ loses power.
You can find detailed information for using these programs in the Help files
on your HP iPAQ. To access these Help files, from the Start menu, tap
Help and select a program.
In addition, Microsoft Pocket PC Basics provides instructions on operating
the HP iPAQ. To locate Pocket PC Basics, go to the Today screen and tap
Start > Help > Pocket PC Basics.
HP iPAQ Software To Access Functions
HP Asset Viewer From the Start menu, tap
Settings > System tab >
HP Asset Viewer.
HP Photosmart From the Start menu, tap
Programs >
HP Photosmart.
HP Image Transfer This software is included on
the Companion CD.
HP Image Zone From the Start menu, tap
Programs > HP
Image Zone.
HP Profiles From the Start menu, tap
Settings > System tab >
HP Profiles.
Lists detailed information about
your system and its
configuration.
Take digital photographs and
modify settings with your HP
iPAQ Camera.
Transfer digital photographs
from the HP iPAQ to your
personal computer.
Display individual images and
run slideshows on your HP
iPAQ. Also print, send, record
and e-mail images from your HP
iPAQ.
Set different profiles for ring
type or loudness, turning on
wireless settings, screen
brightness or battery settings.
Getting to Know Your HP iPAQ Mobile Messenger 1–1
Page 13

HP iPAQ Software To Access Functions
iPAQ Backup From the Start menu, tap
Programs >
iPAQ Backup.
iPAQ Wireless From the Today screen, tap
the Wireless icon in the
bottom right of the screen.
Self-Test From the Start menu, tap
Settings > System tab >
Self Test.
Back up your data to protect it
from loss due to a drained
battery, accidental deletion, or
hardware failure.
Provides a centralized control to
wireless features on your HP
iPAQ. It allows you to turn all
wireless features on and off and
configure settings for phone and
data functions using GSM/
GPRS/EDGE and Bluetooth.
Run a basic diagnostic test on
the device.
(continued)
Microsoft Pocket PC
Functions
Software
ActiveSync Synchronize information between your HP iPAQ and personal
Calculator Perform calculations.
Calendar Schedule appointments, meetings, and other events, and set an
Connections Connect your HP iPAQ to the Internet and intranet to browse
Contacts Keep an updated list of friends and colleagues to
Inbox Receive and send Internet e-mail, Text and MMS messages
Notes Create handwritten or typed notes, drawings, and recordings.
Pocket Excel Create and edit workbooks or view and edit Excel workbooks
Pocket Internet Explorer Browse the Internet and download pages through
Pocket Word Create new documents or view and edit Word documents
Ring Tones Select different sounds to notify you of incoming calls.
computer so you have the latest information in both locations.
Be sure you install ActiveSync on your personal computer
before connecting the cradle and HP iPAQ to your computer.
alarm to remind you of the appointments. Appointments for the
day are displayed on the Today screen.
Web sites, send and receive e-mail, and synchronize
information using ActiveSync.
e-mail, message, and telephone.
in Inbox on your HP iPAQ or from your computer if ActiveSync
is installed or if synchronizing with Exchange ActiveSync over
the air. You must have an e-mail address provided by your
Internet Service Provider (ISP) or employer to send and
receive e-mail.
created on your computer.
synchronization or by connecting to the Internet.
created on your computer.
Getting to Know Your HP iPAQ Mobile Messenger 1–2
Page 14
Microsoft Pocket PC
Functions
(continued)
Software
Settings Obtain quick access to settings for the backlight, clock,
Tasks Keep track of your to-do list.
Terminal Services Client Log onto your computer and use all the programs available on
Windows Media Player
10 Mobile
memory, power, regional settings, Today screen, password,
sounds and notifications, etc.
that computer from your HP iPAQ (Windows 2000 and XP
or later).
Play digital audio and video files in Windows Media or MP3
format on your device.
Using the Stylus
Your HP iPAQ comes with a stylus that you should use to tap or write on
your screen.
NOTE: Use the stylus to tap and write on the screen, and use your fingers
to press the Power button, application buttons on the bottom of the
device, and the camera’s on-screen shutter button.
CAUTION: To prevent damage to your HP iPAQ screen, never use
any device other than the stylus that comes with the HP iPAQ or an
approved replacement to tap or write on the screen. If you lose or break
your stylus, you can order extras at www.hp.com/go/ipaqaccessories.
You can perform three basic actions using the stylus:
Tap—Lightly touch the screen to select or open an item. Lift the stylus after
you tap an item. Tapping is equivalent to clicking an item with the mouse
on your computer.
Getting to Know Your HP iPAQ Mobile Messenger 1–3
Page 15

Drag—Place the point of the stylus on the screen and drag an item across
the screen without lifting the stylus until you have completed the selection.
Dragging is equivalent to dragging with the left mouse button pressed on
your computer.
Tap and hold—Hold the stylus pointer on an item for a short time until
a menu displays. Tapping and holding is equivalent to right-clicking your
computer mouse button. When you tap and hold, a circle of blue dots
appears around the stylus to indicate that the menu will soon pop up.
Setting the Date and Time
When you turn on your HP iPAQ for the first time, you are requested to
select your time zone. After setting the time zone, you still need to set the
time and date on your unit. Tap the Clock icon on the Today screen
to set the time and date. All three settings are located in the Clock Settings
screen and can be set at the same time.
NOTE: By default, the time on the HP iPAQ is synchronized with your
computer each time the two devices connect using ActiveSync.
Setting the Time for Home and Locations You Are Visiting
From the Start menu, tap Settings > System tab > Clock &
Alarms icon.
SHORTCUT: From the Today screen, tap the Clock icon to set
the time.
1. Tap either Home or Visiting.
2. Tap the time-zone down arrow, and select the appropriate
time
3. Tap the hour, minutes, or seconds, and use the up and down arrows
to adjust the time.
SHORTCUT: You can also adjust the time by moving the hands of the
clock with the stylus.
4. Tap AM or PM.
5. Tap OK.
6. Tap Yes to save the time.
Setting the Date
1. From the Start menu, tap Settings > System tab > Clock &
Alarms icon.
SHORTCUT: From the Today screen, tap the Clock icon to set
the date.
2. Tap the down arrow by the date.
zone.
Getting to Know Your HP iPAQ Mobile Messenger 1–4
Page 16

3. Tap the left or right arrow to select a month and year.
4. Tap a day.
5. Tap OK.
6. Tap Yes to save the date settings.
You will need to reset your time zone, time, and date if:
• The location time (Home or Visiting) needs to be changed.
• All power to the HP iPAQ is lost, which removes all saved settings.
• You perform a full reset of your HP iPAQ.
SHORTCUT: From the Today screen, tap the Clock icon to set the
time zone, time, and date.
Entering Owner Information
You can personalize your HP iPAQ by entering owner information. To enter
owner information:
1. From the Today screen, tap Start > Settings > Personal tab >
Owner Information.
SHORTCUT: From the Today screen, tap Tap here to set owner
information.
2. Tap in the Name field. A keyboard appears at the bottom of the
screen. Tap on the characters to enter your name.
NOTE: If you prefer, you can use Letter Recognizer, Microsoft Transcriber,
or Block Recognizer to input information. Refer to Chapter 4, “Learning
Input Methods” for more information.
3. Tap the Tab key on the keyboard to move the cursor to the
next
field.
4. Continue entering whatever information you want to include.
5. To display owner information or notes at startup, tap the Options
tab and place a checkmark in the Identification Information
and Notes check boxes.
6. Tap the Notes tab to enter any notes.
7. Tap OK to save the information and return to the Today screen.
Setting a Password
You can set a password to prevent unauthorized access to or use of your
HP iPAQ.
1. From the Start menu, tap Settings > Personal tab
>
Password.
2. On the Password screen, tap the box next to Prompt if device
unused for, then set the timed prompt.
Getting to Know Your HP iPAQ Mobile Messenger 1–5
Page 17
3. In the Password Type box, tap the down arrow to display the dropdown box and select either Simple 4 digit or Strong
alphanumeric as the password type you want to use.
4. Enter your password in the Password box using the screen keyboard
and tap OK.
NOTE: Keep a record of your password in a safe place in case you forget
it. If you are unable to retrieve your password, you must perform a hard
reset on your HP iPAQ and will lose settings and information that are not
saved in ROM. See ”Performing a Hard Reset” for more information.
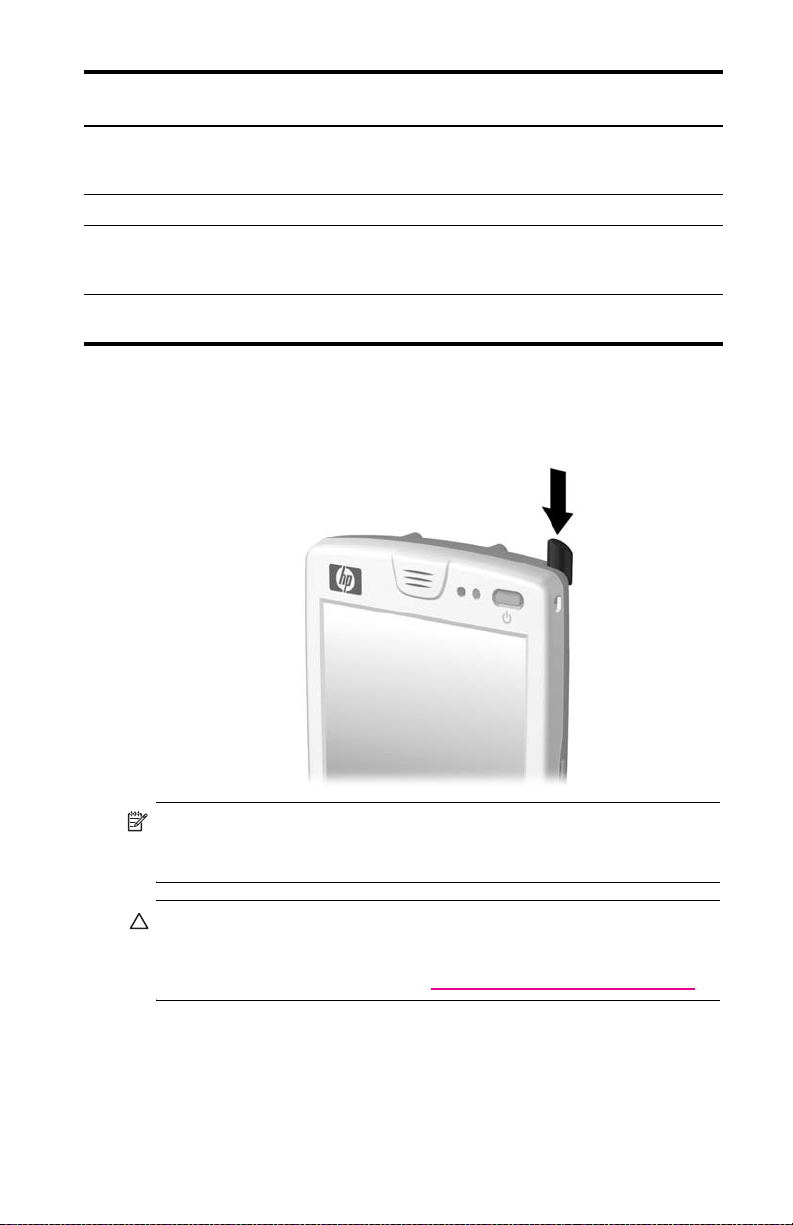
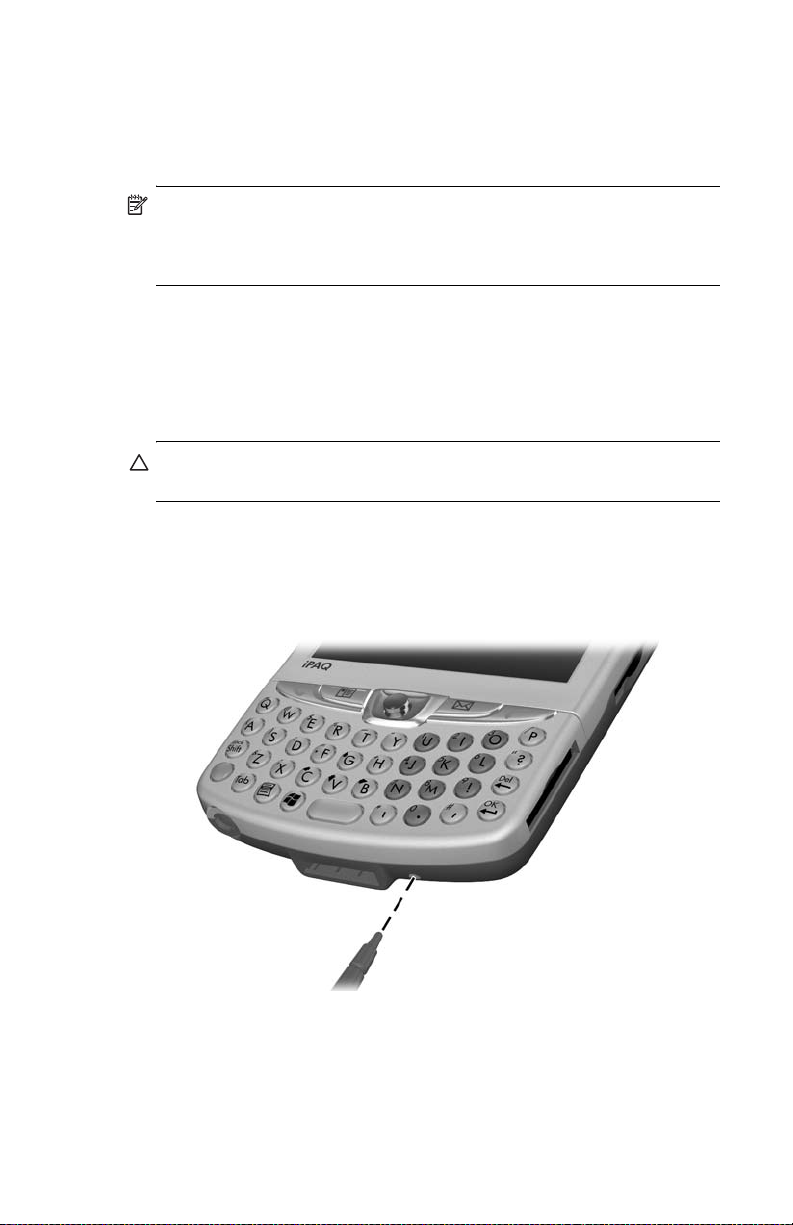
Resetting the Unit
Performing a Soft Reset
A soft reset (also known as a normal reset) stops all running applications,
but does not erase any programs or saved data.
CAUTION: Be sure to save any unsaved data before performing a soft
reset since a soft reset erases all unsaved data.
To perform a soft reset:
1. Locate the recessed Reset button on the bottom of the device to the
right of the communications port.
2. Use the stylus to lightly press the Reset button until the
screen
fades.
3. Remove the stylus to restart the HP iPAQ.
The HP iPAQ restarts and displays the Today screen.
Getting to Know Your HP iPAQ Mobile Messenger 1–6
Page 18
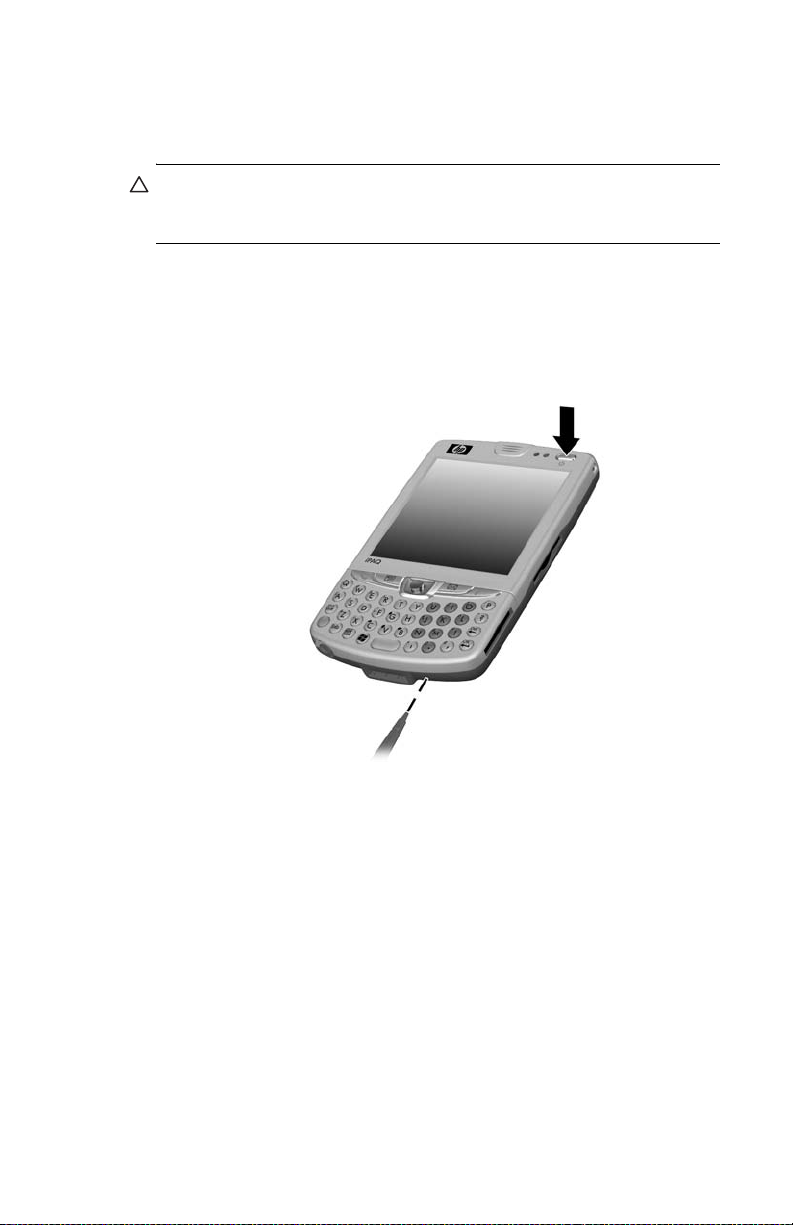
Performing a Hard Reset
Perform a hard reset (also known as a full reset) when you want to clear
all settings, programs, and data from RAM.
CAUTION: If you perform a hard reset, your HP iPAQ returns to its default
settings and loses all information that is not recorded in ROM or iPAQ
File Store.
To perform a hard reset:
1. Press and hold down the Power button.
2. While holding the Power button, use the stylus to lightly press the
recessed Reset button on the bottom of the HP iPAQ for about
five seconds.
3. The HP iPAQ screen fades and the device resets. Once the device
resets and the screen comes back on, release the Power button
and remove the stylus from the Reset button.
Aligning the Screen
When the HP iPAQ is turned on for the first time, you are guided through
a screen alignment process. You must realign your screen if:
• The HP iPAQ does not respond accurately to your taps.
• You perform a hard reset of your HP iPAQ.
To realign the HP iPAQ screen:
1. From the Start menu, tap Settings > System tab >
Screen
2. Tap the Align Screen button.
icon.
Getting to Know Your HP iPAQ Mobile Messenger 1–7
Page 19

SHORTCUT: To access the Align Screen application without tapping on
the screen, push down and hold the 5-Way Navigation button and the
Contacts application button located to the left of the Navigation button.
3. Tap the cross-hair object at each location. Be precise when tapping
the cross-hair object.
4. Tap OK.
Routine Care
To keep your HP iPAQ in good condition and working properly, follow
these guidelines:
• Keep your HP iPAQ away from excessive moisture and
temperature
• Do not expose your HP iPAQ to liquids or precipitation.
• Avoid exposing your HP iPAQ to direct sunlight or strong ultraviolet
light for extended periods of time.
• When not in use, store your HP iPAQ in a case. You can select from
a wide variety of case options at
ipaqaccessories.
extremes.
Protecting the Screen
CAUTION: The screen and camera lens of your HP iPAQ is made of glass
and can be damaged or broken by drops, impacts, or pressure.
www.hp.com/go/
NOTE: HP is not responsible for damage that occurs as a result of your
failure to follow the instructions that came with the HP branded product.
Refer to the warranty document included with your HP iPAQ for
more information.
You should observe the following practices to protect the screen and
camera lens of your HP iPAQ from damage.
• When transporting your HP iPAQ in a purse, pocket, briefcase, etc.,
ensure the device does not get compressed, bent, dropped, hit, or
sat on.
• When not in use, close the flip cover on your HP iPAQ and store it
in a case. You can select from a wide variety of case options at
www.hp.com/go/ipaqaccessories.
• Do not place anything on top of your HP iPAQ to prevent damage
to the screen.
• Avoid exposing your HP iPAQ to direct sunlight or strong ultraviolet
light for extended periods of time.
• Avoid scratching the surface of the screen and the camera lens and
banging them against hard objects.
Getting to Know Your HP iPAQ Mobile Messenger 1–8
Page 20

• Use only the stylus that comes with your HP iPAQ or an approved
replacement on the screen to prevent scratching it. If you lose or
break your stylus, you can order extras at www.hp.com/go/
ipaqaccessories.
• Clean your HP iPAQ by wiping the screen, the camera lens, a nd
the exterior with a soft, damp cloth lightly moistened only
with water.
CAUTION: To reduce the risk of damage to the internal components, do
not spray liquid directly on the screen, or allow excess liquid to drip
inside your HP iPAQ. Using soap or other cleaning products on the
screen may discolor the finish and damage it.
Traveling with Your HP iPAQ
Use the following guidelines when traveling with your HP iPAQ:
• Back up your information.
• Take a copy of your backup with you on an SD memory card.
• Disconnect all external devices.
• Take the AC Adapter and AC Charger Adapter with you.
• Keep your HP iPAQ in a protective case and keep it in your carry-
on
luggage.
• For air travel, be sure to turn off the Phone and Bluetooth. To turn off
all wireless features, from the Today screen, tap the iPAQ
Wireless icon in the Command bar, then tap the ALL OFF button
on the iPAQ Wireless screen to turn off all wireless features.
• If you are traveling internationally, be sure you have the plug
adapter appropriate for the country you are visiting.
NOTE: If you are planning on traveling abroad with your HP iPAQ, you
may need to set up your phone features for international calling. For this
purpose, refer to the information in Chapter 5, in the section “Using
International Roaming.”
Getting to Know Your HP iPAQ Mobile Messenger 1–9
Page 21
2 Learning the Basics
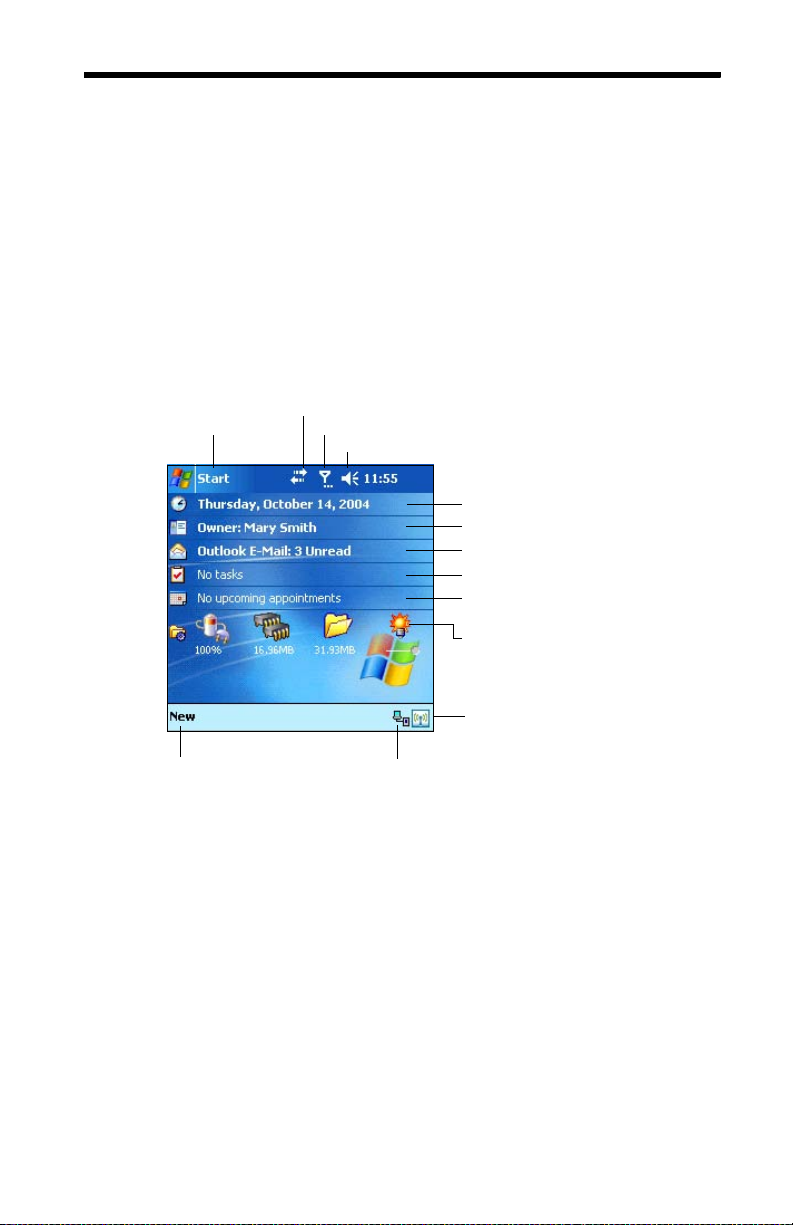
Using the Today Screen
When you first turn on your HP iPAQ, the Today screen displays. Also you
can display it by tapping Start > Today. Use the Today screen to view:
• Date and time
• Owner information
• Upcoming appointments
• Unread and unsent messages
• Tasks that need to be completed
Tap to set Wireless connections.
Start Menu
Tap to change Phone settings.
Tap to change volume or mute all sounds.
Tap to change date and time.
Tap to set owner information.
Tap to read e-mail.
Tap to view or create tasks.
Tap to set appointment or
view existing appointments.
TodayPanel
Tap to create a new item.
Tap to launch the iPAQ
Wireless screen.
Indicates HP iPAQ is connected
to your personal computer.
Learning the Basics 2–1
Page 22
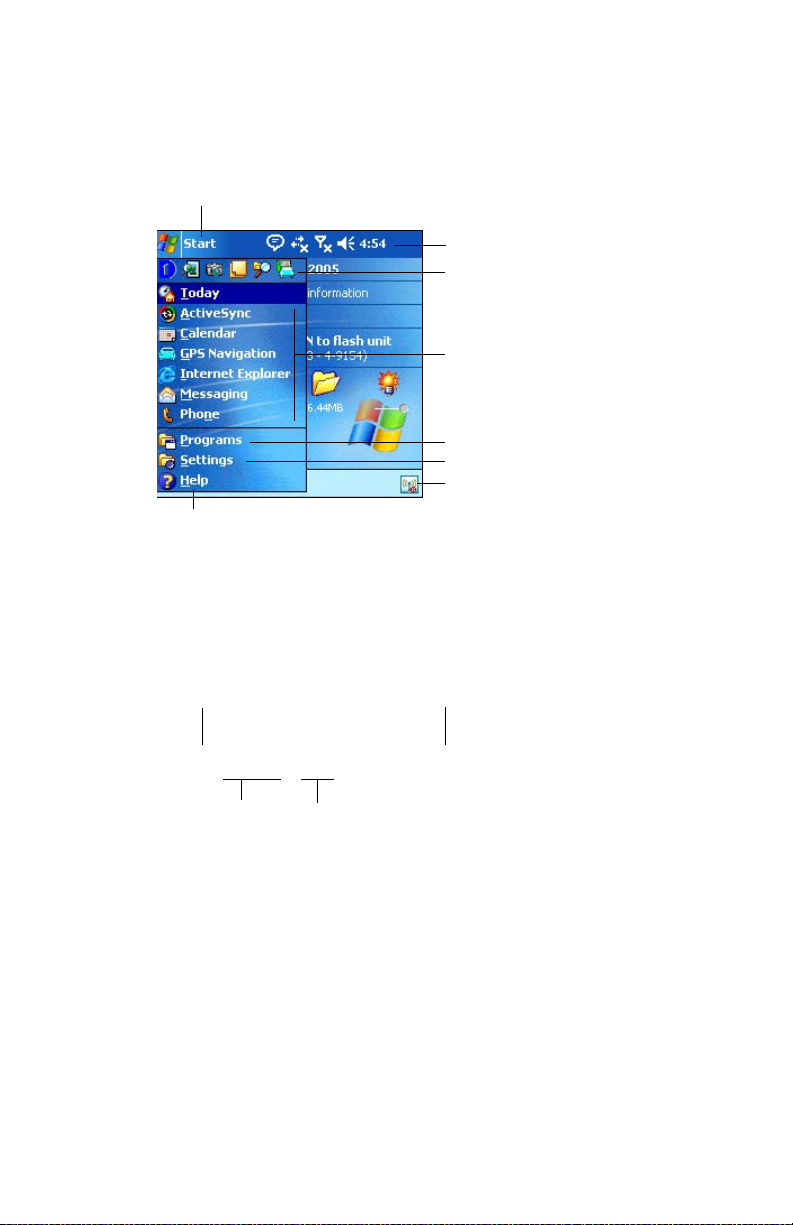
Navigation Bar
.
The Navigation bar is located at the top of the screen. It displays the active
program, wireless, phone and volume status, the current time, and allows
you to open programs. Tap on the Start menu to select a program.
Start menu
Tap for Help Information.
Command Bar
Within each program, use the Command bar located at the bottom of the
screen to perform tasks. Tap New to create a new item in the
current program.
Navigation Bar
Tap to select a program you used
recently.
Tap anywhere to select a program
Tap to see additional programs.
Tap to customize the settings.
Tap to launch the iPAQ
Wireless screen.
TodayPanel
The TodayPanel is located on the Today screen above the Command bar
and displays shortcuts to the following settings:
• Options and Today Settings—Tap to access Options or
• Battery power settings—Tap to view battery power remaining or to
• Memory allocation settings—Tap to view or adjust memory
Create new item
Menu
actions
Today
adjust battery power settings.
allocations, memory available for iPAQ File Store folder, and to
activate or stop a running program.
Record or write
a note.
Settings.
Input panel button
Learning the Basics 2–2
Page 23
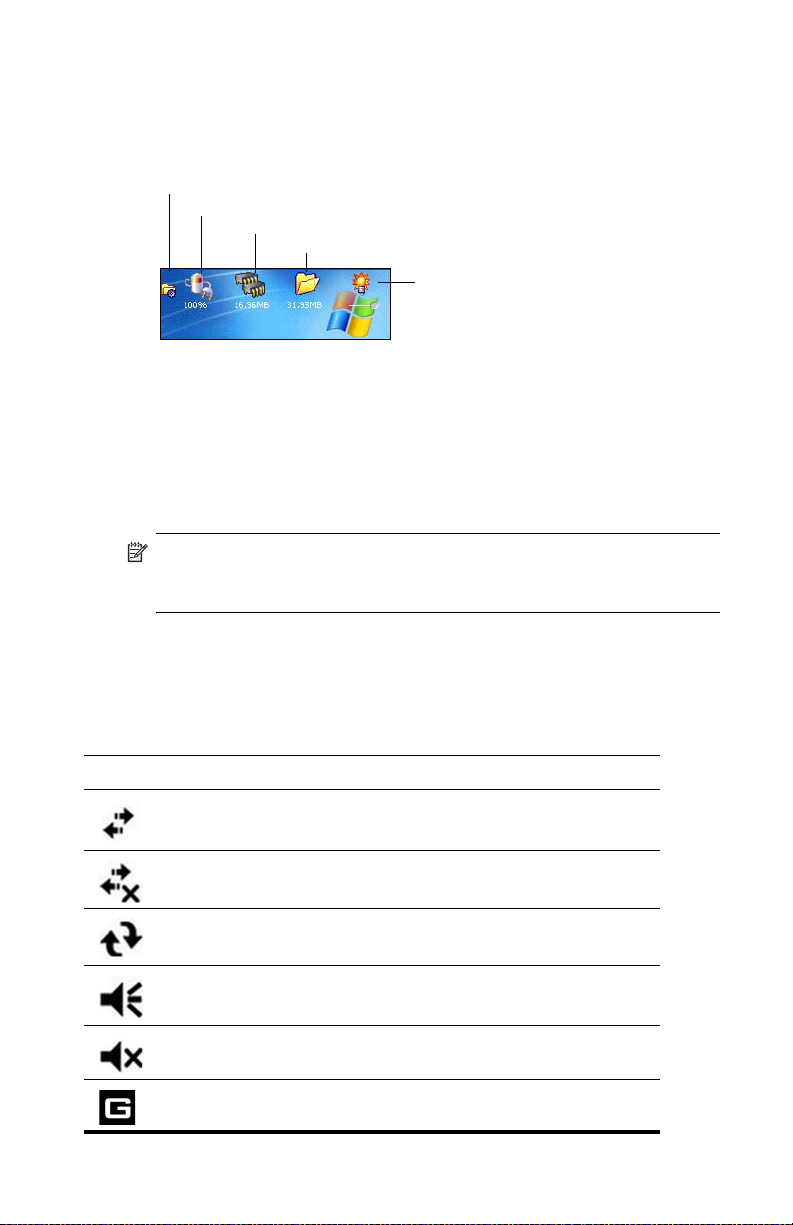
• Storage card settings—Tap to view memory available for iPAQ File
Store folder.
• Backlight settings—Tap to adjust backlight settings.
Options and Today settings
Battery power settings
When you first power on your HP iPAQ, the TodayPanel is set to display
on the Today screen. To turn it off:
1. In the TodayPanel, tap the Options and Today Settings icon >
Today Settings.
2. On the Today Settings screen, scroll down and uncheck the
TodayPanel box.
3. Tap OK to close the program.
NOTE: To turn on the TodayPanel again, tap Start > Settings >
Today icon > Items tab. On the Today Settings screen, scroll down and
place a checkmark in the TodayPanel box.
Status Icons
Memory allocation settings
Storage card settings
Backlight settings
You may see the following status icons displayed on the Navigation or
Command bar. Tap the icon on the screen to view more information
related to the item.
Icon Definition
Active connection to computer or wireless network.
Inactive connection to computer or wireless network.
Microsoft ActiveSync is synchronizing.
Speaker is on.
Speaker is off or in mute position.
GPRS service is registered and available if you are subscribed to the
GPRS service.
Learning the Basics 2–3
Page 24
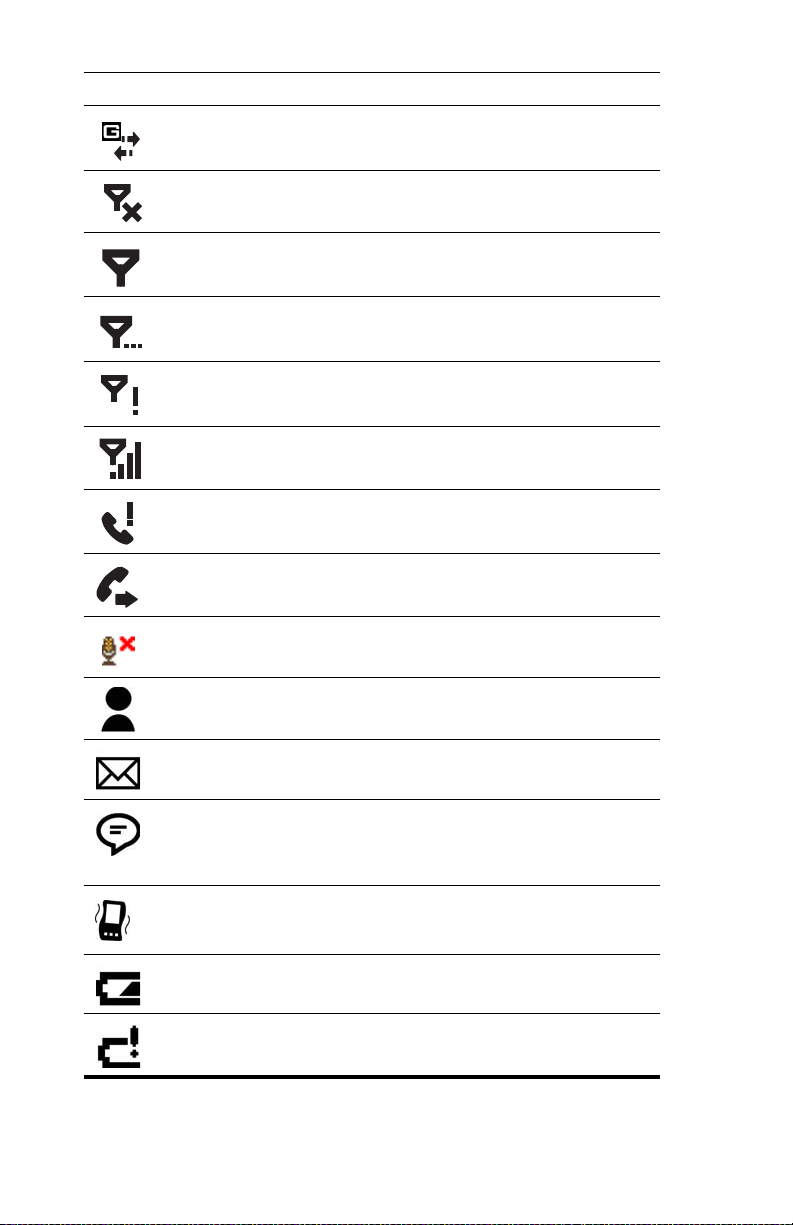
Icon Definition
Active data connection to GPRS network.
Phone is powered off.
Phone is powered on.
Network is searching or unavailable.
Phone connection unavailable or network error.
Signal strength indicator for phone functions.
A missed call. Tap this screen icon to view missed calls.
Call Forwarding Active.
Tap to mute your phone conversation. Tap it again to continue the
phone conversation.
(continued)
One or more instant messages have been received. Tap this screen
icon to view the messages.
One or more e-mail/SMS/MMS, or voice messages have been
received. Tap this screen icon to view the messages.
Message Center indicates messages received from different
communication areas such as phone or voice messages, e-mail/
SMS/MMS, announcements, etc. Tap this screen icon to view all
messages in the message center.
Event notification set to vibrate instead of alarm. To set to vibrate:
Tap the Speaker icon in the Navigation bar and, in the pop-up
menu, tap Vibrate.
Battery power is low.
Battery power is very low.
Learning the Basics 2–4
Page 25
Icon Definition
Your HP iPAQ is connected to your personal computer. This icon
appears in the Command bar only when there is an
active connection.
iPAQ Wireless icon—Tap to launch the iPAQ Wireless screen. The
iPAQ Wireless screen provides a control center to turn all wireless
activities on and off, and to configure their settings. When this icon
displays with a red X, all wireless activities are off; when this icon
displays without the red X, one or more of the wireless activities
are on.
Pop-Up Menus
Pop-up menus allow you to quickly perform an action. Use the pop-up
menu to cut, copy, rename, and delete an item, also send an e-mail or
send a file to another device.
To access a pop-up menu, tap and hold the stylus on the item on which
you want to perform the action. When the menu appears, tap the desired
action, or tap anywhere outside the menu to close it without performing
an action.
(continued)
Tap and hold to display
the pop-up menu.
Tap the action you want.
Creating information
From the Today screen, you can create new information, including:
• Appointments
• Contacts
• Excel Workbooks
• Messages
• Notes
• Tasks
• Word documents
1. Tap , or from the Start menu, tap Today > New.
2. Tap an option to create a new item.
Tap outside the menu to close
without performing an action.
Learning the Basics 2–5
Page 26

3. Tap OK after you finish creating a new item.
Customizing the Today Screen
From the Settings Today screen, you can:
• Add a picture as the background.
• Select information displayed on the Today screen.
• Set the order of the information.
• Set when to see the Today screen.
1. Tap , or from the Start menu, tap Settings > Today icon.
2. Select Use this picture as the background check box.
3. Tap Browse to select a picture from File Explorer.
4. Tap the Items tab to select or reorder the information on the
Today screen.
5. Tap an item to highlight it.
6. Tap Move Up or Move Down to change the order of items on
the Today screen.
NOTE: You cannot change the placement of the Date on the
Today screen.
Learning the Basics 2–6
Page 27

7. Tap the down arrow in the check box next to Today timeout and
select the timeout period for the Today screen.
8. Tap OK.
Customizing the Application Buttons
You can change the Contacts and Messaging programs currently assigned
to two of the application buttons on the bottom of the HP iPAQ. You can
replace these assignments with two programs that you use the most.
NOTE: The Phone application buttons cannot be reassigned.
To change the Button assignment:
1. From the Start menu, tap Settings > Personal tab > Buttons.
2. Under Select a button: highlight the button to be changed, for
instance - Button 1.
3. Tap the down arrow in the Assign a program: box and select
your preferred program.
4. Tap OK.
Locking the Application Buttons
To prevent the application buttons on your HP iPAQ from accidentally
turning on and discharging the battery, the Buttons Settings include a Lock
feature and a Keyguard feature to disable the buttons.
Use the Lock feature to disable the buttons when the HP iPAQ is in standby:
1. From the Start menu, tap Settings > Personal tab > Buttons.
2. Tap the Lock tab.
3. Tap the check box next to Disable all buttons except power
button.
4. Tap OK.
NOTE: The next time your HP iPAQ is in standby, press one of the
application buttons to test this feature. With the Lock feature enabled,
your HP iPAQ will not power on until the Power button is pressed.
IMPORTANT: To make an emergency phone call while your HP iPAQ is in
standby with the Lock feature enabled, press the Power button > tap the
iPAQ Wireless icon > Phone button > Phone Keypad button, enter
your phone number, and tap Talk.
Use the Keyguard feature to disable the buttons when the HP iPAQ is
turned off:
1. From the Start menu, tap Settings > Personal tab > Buttons.
2. Tap the Lock tab.
3. Tap the check box next to Enable Keyguard.
Learning the Basics 2–7
Page 28

4. Tap OK.
NOTE: The next time your HP iPAQ is powered off, press one of the
application buttons to test this feature. With the Keyguard feature
enabled, your HP iPAQ will not power on until you press the Contacts
button, and then the Messaging button on the Thumb Keyboard.
Using Applications
Opening Applications
Open any application on your HP iPAQ from the Start menu.
NOTE: You can also open an application by assigning it to one of the
two available Application Buttons. The Phone Application Buttons
cannot be reassigned. To assign the Application Buttons, from the
Today screen, tap Start > Settings > Buttons.
To open an application:
1. Tap Start > Programs.
2. Tap the desired application title or logo.
Using the ContextMenu Key
Press the ContextMenu key for quick access to a drop-down context menu
when you are using one of the following applications—Calendar, File
Explorer, Messaging, Pocket Word, Notes, and Tasks. The context menu
provides functions such as Copy, Cut, Delete, Select All, Send via
E-mail..., Beam File..., Rename/Move..., Send via Bluetooth..., or Set as
Ringtone. The menus are different in each application.
The ContextMenu key is the second key to the left of the space bar on the
Thumb Keyboard. To see an illustration of its location, refer to Chapter 4,
in the section “Keyboard Components.”
Minimizing Applications
To minimize an open application, tap the x at the top right of the screen.
Closing Applications
Applications automatically close based on available memory. However, if
your HP iPAQ is running slowly, you can close applications by manually
closing them.
1. From the Start menu, tap Settings > System tab > Memory >
Running Programs tab.
2. Tap Stop All or select a particular application, then tap Stop.
SHORTCUT: On the TodayPanel, tap the Memory icon > Running
Programs tab, select an application and tap Stop.
Learning the Basics 2–8
Page 29

NOTE: To bring a currently running program to the foreground,
tap Activate.
Installing Applications
Install applications on your HP iPAQ from your:
• Computer by using Microsoft ActiveSync.
• Device if the application file has a .cab extension.
• Device or your computer by copying an application file that has an
.exe or .cef extension.
When installing applications, look for the correct version for your device
model or Windows Mobile™ 2003 Second Edition software for Pocket PC
Edition.
• Follow the instructions provided with the application and by the
Installation Wizard to install applications from your computer.
• Tap the application file in File Explorer on your HP iPAQ and follow
the instructions on the Installation Wizard to install applications on
your HP iPAQ.
Backing Up Information
Use iPAQ Backup or Microsoft ActiveSync Backup to back up and restore
information on your HP iPAQ.
NOTE: iPAQ Backup is already installed on the HP iPAQ. You must install
ActiveSync on your computer before using ActiveSync Backup.
To help reduce the chance of losing information, you should back up
information on a regular schedule.
Backup/Restore using iPAQ Backup
iPAQ Backup saves your data in a backup file. You may designate a file
name and a location for the file to be saved. iPAQ Backup backs up to a
memory card, main memory, or the iPAQ File Store folder. Close all
programs on your HP iPAQ before backing up or restoring
your information.
CAUTION: Restoring your information replaces the current information on
your HP iPAQ with the information saved in your backup.
If you perform a hard reset on your HP iPAQ, any user installed
information stored in main memory including backup files will be deleted.
For this reason, it is suggested that backup files always be saved to a
memory card or to the iPAQ File Store folder.
To backup/restore using iPAQ Backup:
1. From the Start menu, tap Programs > iPAQ Backup.
Learning the Basics 2–9
Page 30

2. Tap Options > Switch to Advanced Mode and select the files
and folders to be backed up or restored.
3. Tap the ... box next to File to select the name, location, and folder
name for backed-up data.
4. Tap OK.
5. Press the Backup or Restore button, and press the Start button
on the next screen.
Backup/Restore Using ActiveSync
Close all programs on your HP iPAQ before backing up or restoring
your information.
CAUTION: Restoring your information replaces the current information on
your HP iPAQ with the information saved in your backup.
To backup/restore using ActiveSync:
1. Be sure the HP iPAQ is connected to your computer.
2. From your computer, open Microsoft ActiveSync. From the Start
menu, click Programs > Microsoft
3. From the Tools menu in ActiveSync, click Backup/Restore.
4. Click the Backup or Restore tab, and select your options.
5. Click Backup Now or Restore Now.
Using iPAQ File Store Folder
You can install programs and save files to the iPAQ File Store folder, which
is accessed from File Explorer on your HP iPAQ.
Programs and files stored in iPAQ File Store are stored in ROM and are
saved if you perform a full reset of your HP iPAQ or if the battery
discharges completely.
To save to iPAQ File Store:
1. Copy the files to be saved to the iPAQ File Store folder.
2. From the Start menu, tap Programs > File Explorer > My HP
iPAQ > iPAQ File Store.
3. Tap Edit > Paste.
ActiveSync.
NOTE: Before saving files to the iPAQ File Store folder, it is a good idea
to determine how much memory is available in the folder. To view the
amount of memory, from the Start menu, tap Settings > System tab >
Memory > Storage Card tab, then select iPAQ File Store from the
drop-down menu.
Learning the Basics 2–10
Page 31

3 Using ActiveSync
You can use Microsoft ActiveSync to:
• Synchronize information between your HP iPAQ model and up to
two computers or one server so that you have the latest information
in all locations.
• Change synchronization settings and the synchronization schedule.
• Copy files between your unit and computer.
• Install applications on your HP iPAQ.
• Back up and restore unit information.
• Synchronize links.
• Send and receive e-mail.
• Request meetings.
CAUTION: For synchronization to work properly, install Microsoft
ActiveSync on your computer before you connect your HP iPAQ to
your computer.
Connecting to a Computer
Connect your HP iPAQ to your computer using Microsoft ActiveSync and
the HP iPAQ Cradle, a wireless infrared connection, a Wi-Fi connection or
Bluetooth. For more information on using ActiveSync with Bluetooth, refer
to Chapter 9, “Using Bluetooth.”
NOTE: When using Microsoft ActiveSync to synchronize e-mail on your
computer with your HP iPAQ, you must have Microsoft Outlook 98 or
later installed on your personal computer. If you do not have Outlook,
install the Microsoft Outlook 2002 software from the Companion CD.
Microsoft Outlook Express will not work with the HP iPAQ
and ActiveSync.
Installing ActiveSync and Synchronizing with Your Computer
CAUTION: For synchronization to work properly, install Microsoft
ActiveSync version 3.8 or greater on your computer before you connect
your HP iPAQ to your personal computer. ActiveSync 3.7.1 can be used
with this product; however, earlier versions of ActiveSync will not work
with the HP iPAQ hw6500 Mobile Messenger series.
To install Microsoft ActiveSync on your personal computer:
1. Insert the Companion CD into the CD tray or slot on your computer.
2. When the CD displays on your computer screen, click on the Start
Here tab, then select the link to install Microsoft ActiveSync.
Using ActiveSync 3–1
Page 32

NOTE: If the Companion CD does not automatically start on your
personal computer, you may need to manually start it by clicking on the
Microsoft Windows Start menu in the lower left corner of the monitor
screen, and then clicking on Run. In the Run dialog box, navigate to
your CD drive and double-click on SETUP.EXE to start the
Companion CD.
3. Install Microsoft Outlook 2002 from the Companion CD to your
personal computer, if you do not already have it installed.
NOTE: To synchronize Calendar, Tasks, Contacts, and E-mail with your
HP iPAQ, you must have Microsoft Outlook 98 or later installed on your
personal computer. Microsoft Outlook Express does not work with the
HP iPAQ and ActiveSync.
4. Install ActiveSync 3.8 from the Companion CD onto your personal
computer by following the instructions in the installation wizard. For
more help, click the ActiveSync Help button during installation.
5. After installing ActiveSync on your computer and, when prompted,
connect the HP iPAQ to the computer using the HP iPAQ Cradle.
a. Connect the USB connector on the cradle 1 to the USB port on
your computer.
b. Connect one end of the AC Adapter 2 to the cradle and
connect the other end to an electrical outlet to charge the unit.
c. Insert the HP iPAQ in the cradle 3.
6. Follow the on-screen ActiveSync instructions on your personal
computer to establish a connection between your HP iPAQ and
your personal computer.
Using ActiveSync 3–2
Page 33

After you have installed ActiveSync and connected your HP iPAQ to your
personal computer, you can:
• Create partnerships that enable you to synchronize information with
up to two computers.
• Select information to be synchronized with your HP iPAQ (for
example, Contacts, Calendar, Inbox, Tasks, Favorites, Files, Notes,
and AvantGo).
NOTE: When you synchronize files, you can drag and drop the selected
files from your computer to the synchronized folder on your HP iPAQ. If
you named your HP iPAQ “PC1” when you created your partnership,
then the synchronized folder is named “PC1.” When you synchronize, the
files move to and from your HP iPAQ.
There are many error messages that can be received when synchronizing.
For the best answers to troubleshooting these errors, refer to the Microsoft
Windows Mobile Web site at www.microsoft.com/windowsmobile.
Under Help and How To on the left side of the screen, select For
Pocket PC. Fill in your region, select your HP iPAQ name and your
operating system; then, click the Get Support button. Under Support
Topics on the left side of the screen, select ActiveSync.
Using Microsoft Exchange ActiveSync
If your company is using Microsoft Exchange Server 2003, you can
synchronize Calendar, Contacts, and E-mail with your HP iPAQ wirelessly
without connecting to a desktop cradle. Exchange ActiveSync in Microsoft
Exchange Server 2003 allows the HP iPAQ to access corporate
information on a server running Exchange server software. It allows
ActiveSync-enabled HP iPAQs to synchronize mailbox items over the air
(GPRS or wireless connection) without using a desktop computer, cradle,
and desktop synchronization software.
You can also synchronize your mobile device with the Exchange server
using the desktop pass-through option present in all Windows Mobilebased devices. Desktop pass-through allows your cradled HP iPAQ to use
the desktop computer’s Internet connection to connect directly to Exchange
ActiveSync. You can then perform tasks such as browsing the Internet or
downloading IMAP/POP3 e-mail messages.
After Exchange ActiveSync creates a connection and a partnership
between the HP iPAQ and the desktop computer, desktop pass-through is
enabled by default, even if the desktop is locked or protected with a
password or PIN.
Exchange ActiveSync enables you to synchronize the following items in
your Exchange Server 2003 mailbox over the air:
• Calendar
• Contacts list
• E-mail messages
Using ActiveSync 3–3
Page 34

You can receive update notifications by means of the Always-up-to-date
(AUTD) feature in Exchange Server 2003. Up-to-date notifications
generated by Exchange Server 2003 initiate Exchange ActiveSync
synchronization between your HP iPAQ and your Exchange mailbox.
NOTE: To set up Exchange ActiveSync, you will first need to contact your
corporate IT team for the name of the corporate server with Exchange
Server 2003 installed.
To set up Exchange ActiveSync synchronization after you have the
server information:
1. On your personal computer, click the Microsoft ActiveSync
application in your system tray.
2. Click Options > Sync Options tab.
3. Under Server, click in the Enable Synchronization with a
Server box to enable it, then click Configure.
4. Place a checkmark in the boxes next to the features to be enabled
(Calendar, Contacts, Inbox).
5. Follow the on-screen instructions to set up Exchange ActiveSync.
NOTE: For more information, refer to the Microsoft Windows Mobile
Web site at www.microsoft.com/windowsmobile.
Using the Serial Infrared (IR) Connection
As an alternative to using the HP iPAQ Cradle or Exchange ActiveSync,
you can synchronize your HP iPAQ and your computer using an infrared
connection if you have an infrared port or an infrared USB adapter
installed on your computer. The infrared connection option works only on
computers that have Microsoft Windows 98SE, Me, 2000, or XP
operating systems installed.
To set up an infrared connection to a computer:
1. Synchronize your HP iPAQ with your computer using the HP iPAQ
Cradle before the first time you establish an ActiveSync connection
via infrared.
2. Follow your computer manufacturer’s instructions to install and set
up an infrared port.
3. Remove the HP iPAQ from the cradle and line up the infrared port
with the computer infrared port so they are unobstructed and within
30.5 cm (12 inches) of each other.
4. Initiate a connection by tapping Start > ActiveSync > Tools >
Connect via IR. Synchronization begins on your HP iPAQ.
5. To disconnect, move the devices away from each other or tap X in
the upper right of the screen to turn off.
Using ActiveSync 3–4
Page 35

Changing Synchronization Settings
You can modify your synchronization settings for Microsoft ActiveSync to:
• Change when your HP iPAQ synchronizes with your computer
or
server.
• Change the type of connection from your HP iPAQ to your
computer (for example, USB or infrared connections).
NOTE: The HP iPAQ hw6500 Mobile Messenger series does not support
synchronization with a personal computer using a serial cable.
• Select the files and information to synchronize with your computer.
• Select the files and information you do not want to synchronize with
your computer (for example, e-mail attachments).
• Determine how conflicts between information on your HP iPAQ and
information on your computer are handled.
To change synchronization settings:
1. From the Start menu on your computer, click Programs >
Microsoft ActiveSync > Tools > Options.
a. On the Sync Options tab, select the files and information to
synchronize with your computer.
b. On the Schedule tab, select when your HP iPAQ synchronizes
with your computer.
c. On the Rules tab, determine how conflicts between
information on your HP iPAQ and information on your
computer are handled.
2. Tap OK when you are finished.
3. From the File menu, click Connection Settings. Select the
type of connection to be allowed between the HP iPAQ and
the
computer.
Copying Files
You can copy files to and from your computer using Explore in
ActiveSync and Windows Explorer.
To copy files:
1. Insert your HP iPAQ into the cradle.
2. From the Start menu on your computer, click Programs >
Microsoft ActiveSync.
3. Click Explore.
4. Double-click the My Pocket PC icon.
5. On your computer, right-click the Start menu, and select Explore.
6. Locate the file(s) to be moved.
NOTE: You cannot copy preinstalled files or system files.
Using ActiveSync 3–5
Page 36

7. Drag and drop your files between your HP iPAQ and your
computer. ActiveSync converts the files so that they can be used by
the Pocket Office applications, if necessary.
NOTE: Move your files directly into My Documents on your HP iPAQ (or
into a folder inside My Documents), so the applications on your HP iPAQ
can locate them.
NOTE: Some files may lose some of their format during the conversion
process to an application on the HP iPAQ.
Installing Programs
Use ActiveSync to install programs on your HP iPAQ from your computer:
1. Use the HP iPAQ Cradle to connect your HP iPAQ to your
personal
2. Follow the instructions in the Installation Wizard provided with
the
3. Check the screen on your HP iPAQ to see if any further steps are
necessary to complete the program installation.
computer.
program.
Backing up and Restoring
To help reduce the chance of losing information, you should back up
information to your computer on your HP iPAQ regularly. For more
information on backing up and restoring information using Microsoft
ActiveSync, refer to Chapter 2, in the section “Backing Up Information.”
Synchronizing Links
You can synchronize links to Web sites from your Favorites list on your
computer to view them offline with Pocket Internet Explorer.
1. From the Start menu on your computer, click Programs
and
double-click the Internet Explorer icon.
2. Click Favorites to see the list of links to your favorite Web sites.
3. To save a Web site link to Mobile Favorites, open the Web site,
and click Create Mobile Favorite.
4. If you select “Favorites” as an information type to be synchronized,
ActiveSync copies your mobile favorite to
time you synchronize.
5. Follow the instructions in Synchronize information to manually
synchronize your favorite links.
your HP iPAQ the next
Using ActiveSync 3–6
Page 37

Using ActiveSync to Send and Receive E-mail
You can send and receive e-mail messages by synchronizing your
HP iPAQ with your computer using ActiveSync. If you are using ActiveSync
to send and receive e-mail messages, the name of the folder you are using
is displayed at the bottom of the screen. For more information on sending
and receiving e-mail using ActiveSync, from the Start menu, tap Help
> Messaging.
Requesting Meetings
You can schedule a meeting and send a meeting request through
ActiveSync. For more information, from the Start menu, tap Help
> Calendar.
Using ActiveSync 3–7
Page 38

4 Learning Input Methods
CAUTION: To avoid damaging your HP iPAQ screen, always use the
stylus that comes with the HP iPAQ or an approved replacement to tap or
write on the screen. If you lose or break your stylus, you can order extras
at www.hp.com/go/ipaqaccessories
metal pointer on the screen.
To input information to your HP iPAQ, you can use the Thumb Keyboard,
tap the soft keyboard on the screen, or write with the Letter Recognizer,
Microsoft Transcriber, or Block Recognizer in any application. You can use
the stylus to draw and write on the screen in the Notes application and
from any Notes tab in the Calendar, Contacts, and Tasks applications.
t
Using the Thumb Keyboard
The integrated Thumb Keyboard is a convenient input device on your
HP iPAQ product and uses a very small amount of power from your unit.
With the Thumb Keyboard, you can:
• Easily type text into your HP iPAQ.
• Quickly access your favorite HP iPAQ applications.
• Enter commands with special function keys.
• Use the numeric keypad to dial phone numbers.
• Use the ContextMenu key to launch a drop-down context menu from
within an application.
• Launch the Start menu.
. Never use a pen or any type of
Learning Input Methods 4–1
Page 39

Keyboard Components
Blue Key Use this function key in conjunction with Blue symbols
1
ContextMenu Key Press to display a drop-down context menu when
2
Start menu Key Press to display the Start menu.
3
on the upper left of the keyboard keys to type
symbols and to type numbers on the numeric keypad.
working within applications such as Calendar,
Messaging, Pocket Word, Notes, and Tasks.
Using the Function and Shortcut Keys
The Thumb Keyboard keys perform additional functions when pressed in
the combinations indicated.
The Blue Key is a function (Fn) key on the left side of the keyboard. Blue
symbols used in conjunction with the Blue Key are located on the upper
left of the keys.
Keystroke Combination Action
Blue Key + any key Enters characters printed on the upper
left of the key (indicated in blue).
Blue Key pressed twice Toggles on blue keys. Press Blue Key
once to toggle off.
Blue Key + down arrow Page down
Blue Key + up arrow Page up
Blue Key + left arrow Scrolls left
Learning Input Methods 4–2
Page 40

Keystroke Combination Action
Blue Key + right arrow Scrolls right
Blue Key + OK Closes program
(continued)
“Sticky” Keys
The integrated keyboard uses a “Sticky Key” feature for the Shift and
Blue (Fn) keys (known as “key modifiers”). This means that when you
enter a number or symbol requiring a combination of keys to be pressed,
the key modifier will stay engaged until you press the second key. It is not
necessary to press both keys at the same time.
Special Keys
Key Function Description
Function (Fn) key “Sticky Key” for invoking
+
NOTE: To type a backslash (\) on the Thumb keyboard, first press the
Blue (Fn) Key + P to create a forward slash (/), then the Symbol/
Space Bar key to modify it as necessary. Refer to the following “Accent
Characters” section for more information on modifying characters.
Function (Fn) key and
space bar key (English
only)
alternate functions or symbols on
most keys.
Used for selecting alternate
characters and symbols to
replace a character.
Accent Characters
To type any of the accent characters, press the letter you require to be
accented, then press the Blue (Fn) Key and the Symbol/Space bar.
Continue pressing the Blue (Fn) Key and the Space bar until you reach the
desired special character. For example, if you press a, then the Blue Key
and the Symbol/Space Bar, the a will result in à
(Fn) Key and Space Bar again, the à
press the Blue (Fn) Key and the Space Bar, the accent mark over the a will
continue to change.
To type a capital letter with an accent, press and hold down the Shift key
and press the desired letter, then press the Blue (Fn) Key and the Space
Bar. For example, press Shift + a, then press the Blue (Fn) Key and
the Space Bar, the A will result in À.
will change to á. If you continue to
. If you press the Blue
Learning Input Methods 4–3
Page 41

Refer to the following table for a list of special characters.
À
Ð
NOTE: It is recommended that you print this table for future reference.
Special Character Table
Original
Character
a
A
c
C
d
D
e
E
i
I
l
L
n
N
o
O
p
P
r
R
Modified Character
à á â ä å ą ã ă æ
Á Â Ä Å Ą Ã Ă Æ
ç ć č ©
Ç Ć Č ©
ð
è é ê ë ę
È É Ê Ë Ę
ì í î ï
Ì Í Î Ï
ł
Ł
ñ
Ñ
ò ó ô õ ö ő ø œ
Ò Ó Ô Õ Ö Ő Ø Œ
þ 
þ 
®
®
Learning Input Methods 4–4
Page 42

Special Character Table (continued)
ţ Ţ
€
Original
Character
s
S
t
T
u
U
y
Y
z
Z
$
/
“
(
)
+
!
.
*
@
%
Modified Character
ş š ß
Ş Š ß
ù ú û ü ű
Ù Ú Û Ü Ű
ý
Ý
ź ż
Ź Ż
£ ¥
' « »
[ { < «
] } > »
± & - _
¡ ? ¿
: , ;
#
~
^
Learning Input Methods 4–5
Page 43

Using the On-Screen Keyboard
Use the stylus to tap letters, numbers, and symbols on the on-screen
keyboard to enter typed text directly onto the screen.
NOTE: A question mark within a program indicates a Help file. Tap
the ? to open the Help file.
1. From any application, tap the up arrow next to the Input
Panel
icon.
2. Tap Keyboard to display a keyboard on the screen.
NOTE: To see symbols on the keyboard, tap the 123 or Shift key.
3. Tap a letter, symbol, or number to enter information.
4. Tap OK.
Writing with the Stylus and the Letter Recognizer
Use the stylus and Letter Recognizer to write letters, numbers, and symbols
on the screen. Create words and sentences by writing in uppercase (ABC),
lowercase (abc), and symbols (123) as instructed here.
To write with the stylus and Letter Recognizer:
1. From any application, tap the up arrow next to the Input
2. Tap Letter Recognizer.
3. Write a letter or symbol between the dashed line and baseline.
What you write will be converted to text.
icon.
Panel
a. To display in uppercase, write a letter between the hatch marks
labeled ABC.
b. To display in lowercase, write a letter between the hatch marks
labeled abc.
c. Write a number or draw a symbol between the hatch marks
labeled 123.
Learning Input Methods 4–6
Page 44

NOTE: For the Letter Recognizer to work effectively, write characters
between the dashed line and baseline.
• If you are writing a letter like “p,” write the top portion within the
dashed line and baseline, and the tail portion below the baseline.
• If you writing a letter like “b,” write the bottom portion within the
dashed line and baseline, and the top portion above the
dashed
line.
Writing with the Stylus and Microsoft Transcriber
Use the stylus and Microsoft Transcriber to write words, letters, numbers,
and symbols anywhere on the screen.
1. From any application, tap the up arrow next to the Input
Panel
icon.
2. Tap Transcriber to display the Transcriber Intro screen.
3. Tap OK.
4. Tap New at the bottom of the screen.
5. Begin writing on the screen. What you write will be converted
to
text.
NOTE: To “teach” Transcriber your style of writing, tap on the “a” icon at
the bottom of the screen to display the Letter Shapes screen and follow
the instructions.
Writing with the Stylus and Block Recognizer
Write letters, numbers, and symbols using the stylus and Block Recognizer.
Create words and sentences by writing letters and numbers in
specific areas.
1. From any application, tap the up arrow next to the Input
Panel
button.
2. Tap Block Recognizer.
NOTE: For online Help, tap the ?.
3. Write a word, letter, or symbol between the hatch marks.
a. To type text, write a letter between the hatch marks
labeled
“abc.”
Learning Input Methods 4–7
Page 45

b. To type numbers or symbols, write a number or symbol between
the hatch marks labeled “123.”
What you write will be converted to text.
Drawing and Writing on the Screen
Use the stylus as a pen to draw and write on the screen in the Notes
program or from the Notes tab in Calendar, Contacts, or Tasks.
1. From the Start menu, tap Notes > New.
2. Draw and write on the screen.
3. Tap the Pen icon.
4. Tap OK.
Converting Writing to Text
You can convert your writing to text when you write with the stylus in the
Notes program or from the Notes tab in:
• Calendar
• Contacts
• Tasks
To convert writing to text:
1. From the Start menu, tap Notes.
NOTE: Otherwise, tap the Notes tab in Calendar, Contacts, or Tasks.
2. Tap a note to open it.
3. Tap Tools.
4. Tap Recognize.
NOTE: To convert a particular word or phrase, highlight it before you tap
Recognize. If a word is not recognized, it will not be converted.
5. Tap OK.
Learning Input Methods 4–8
Page 46

Changing Word Suggestion Options
As you type or write, the HP iPAQ suggests words for you in a box above
the soft keyboard, Letter Recognizer, or Block Recognizer.
NOTE: This feature is unavailable when you use the Thumb Keyboard
or Transcriber.
You determine:
• If words are suggested.
• The number of letters you enter before a word is suggested.
• The number of words that are suggested per entry.
To change settings for word suggestions:
1. From the Start menu, tap Settings > Personal tab > Input.
2. Tap the Word Completion tab.
SHORTCUT: From within any application, tap the up arrow next to the
Input Panel icon and tap Options > Word Completion tab.
Learning Input Methods 4–9
Page 47

3. Tap the down arrow associated with letters and select the number of
letters you want to type before a word is suggested.
t
4. Tap the down arrow associated with words and select the number
of words you want suggested.
5. Tap OK.
NOTE: If you do not want any words suggested, uncheck Suggest
words when entering text.
Learning Input Methods 4–10
Page 48

5 Using the Phone Features
Use the HP iPAQ Mobile Messenger phone to make and receive telephone
calls and send and receive Text and MMS (Multimedia Message Service)
messages. Your mobile phone service provider may provide other useful
services such as voicemail.
The phone can also be used to connect to an Internet Ser vice Provider (ISP)
or work network so you can browse the Web and read e-mail. You can
connect to the Internet or work network over GPRS/EDGE (General Packet
Radio Service/Enhanced Data Rates for Global Evolution), or you can use
GSM (Global System for Mobile Communications) for dial-up access.
For information on establishing GSM/GPRS/EDGE data connections,
refer to Chapter 7, ”Making Data Connections.”
NOTE: EDGE is an enhancement to GPRS technology and enables higher
speed data connections than GPRS. This means faster phone multimedia
capabilities such as sending and receiving SMS/MMS messages, and
sharing video clips. Check with your service provider to see if they
support EDGE technology. If your service provider does not support the
EDGE network, the HP iPAQ defaults to GPRS.
SIM Card
A Subscriber Identity Module (SIM) card is required to operate the phone
features on your HP iPAQ. The SIM card is a plastic card embedded with
a computer chip that stores and transacts data. After the SIM card is
activated by your mobile phone service provider, the computer chip will
contain information about your phone number, service, registration
information, and contacts, as well as memory to store speed dial numbers
and text or SMS/MMS messages that you receive.
With the exception of emergency calls, the SIM card must be inserted into
the SIM slot under the battery on the back of the HP iPAQ for voice/data
calls to work.
To dial an emergency number from the Phone keypad, tap the emergency
number appropriate for your region, and then tap Talk.
NOTE: tSee your local telephone directory for emergency numbers used
in your area. Emergency numbers can be dialed without a SIM card
being inserted in the HP iPAQ and there is no charge for emergency
calls.
Using the Phone Features 5–1
Page 49

Inserting a SIM Card
To insert the SIM card into the HP iPAQ, you must first remove the battery
cover and the battery from the HP iPAQ.
1. On the back of your HP iPAQ, press down the battery
cover
latch 1.
2. Use your thumb to slide the battery cover down and away from the
HP iPAQ 2.
3. Remove the battery.
NOTE: If the battery is already installed, you must remove it before
inserting the SIM card. For more information on removing the battery, see
Chapter 13, ”Managing the Battery.”
Using the Phone Features 5–2
Page 50

4. Insert the SIM card into the SIM slot by aligning the notched corner
on the card with the notched corner in the SIM slot, then push the
SIM card into the SIM slot. Be sure to push it in all the way.
NOTE: The gold side of the SIM card should be facing down when it is
inserted into the SIM slot.
Removing the SIM Card
1. Repeat the previous steps to remove the battery cover and battery.
2. Insert the stylus 1 into the right side of the SIM slot opening 2 and
nudge or push the SIM card out of the slot 3. Do not touch the
metal contacts.
Using the Phone Features 5–3
Page 51

Activating Your Phone Service
Before you are able to use the phone feature on your HP iPAQ, you need
to subscribe with a mobile phone service provider.
NOTE: If you purchased your HP iPAQ from a mobile service provider,
phone service may be activated at time of purchase or the mobile service
provider may include activation instructions.
If you have purchased a prepaid SIM card to use with your HP iPAQ or, if
your service provider issued you a SIM card with a preset PIN, the
following information is not applicable.
After you select a service provider, you must place a phone call to the
service provider to activate your mobile phone service. Your carrier may
require the following information to activate your card:
• SIM Card Serial Number (printed on the box label or on the
back of the SIM card)
• IMEI Number (printed on the system label under the
removable
Your mobile phone service representative will give you your wireless phone
number and walk you through setting up your service.
Phone Features
The following features are supported on your HP iPAQ; however, these
features must be activated by your mobile phone service provider:
• Call Forwarding
• CSD—Circuit Switched Data
• GPRS—General Packet Radio Service
• International Dialing
•International Roaming
•Internet access
• Text Message/MMS—Text Message Service/Multimedia
Message Service
•Voicemail
• VPN—Virtual Private network
You can obtain additional information on these services from your mobile
phone service provider.
battery)
Your PIN
After your SIM card is activated, it may be configured with a PIN (Personal
Identification Number) to prevent unauthorized use of your mobile phone.
NOTE: Emergency phone calls do not require entering a PIN.
Using the Phone Features 5–4
Page 52

You can disable your PIN; however, for security reasons, it is
recommended that you keep it enabled. While enabled, you must enter
your PIN every time you turn on your phone features.
CAUTION: After three consecutive, incorrect PINs are entered, the SIM
card locks to prevent further use. If the letters PUK (PIN Unblocking Key)
display on your HP iPAQ screen, you have locked your SIM card and
must enter your PIN Unblocking Key on the screen to unlock it. If you did
not receive a PIN Unblocking Key with your SIM card, you must contact
your service provider to unlock it.
If your HP iPAQ is ever stolen or lost, the PIN safeguards your phone
against fraudulent use.
To enable your PIN:
1. From the Phone keypad, tap Tools > Options > Phone tab.
2. Select Require PIN when phone is used.
3. Enter the PIN number given to you from your mobile phone service
provider along with the SIM card, or enter the default PIN code of
1234.
4. Press ENTER to enable your PIN.
NOTE: To change the PIN at any time, tap CHANGE PIN.
NOTE: To safeguard your HP iPAQ from unauthorized use, see the
section Setting a Password in Chapter 1, ”Getting to Know Your HP iPAQ
Mobile Messenger.”
Phone Buttons and Icons
Phone Icons Definition
Press this green Answer/Send Application
Button to answer a call, access the phone keypad,
and send a call.
Press and hold this Button to activate the
speakerphone function during a phone call.
Press and hold this red End Call
Application Button to end a call.
Phone is powered off.
Phone is powered on.
Network is searching or unavailable.
Using the Phone Features 5–5
Page 53

Phone Icons Definition
Phone connection unavailable or network error.
Signal strength indicator for phone functions.
Call missed. Tap this icon to view missed calls.
Call Forwarding Active.
Phone Volume is active.
Microphone is in mute position.
GPRS Service is available.
Active data connection to GPRS network.
Event notifications set to vibrate instead of alarm. To
set to vibrate: Tap Speaker icon in the Navigation
bar and in the pop-up menu, tap Vibrate.
One or more instant messages have been received.
Tap this icon to view messages.
(continued)
One or more e-mail/SMS/MMS or voicemail
messages have been received. Tap this icon to
view messages.
Message Center indicates messages received from
different communication areas such as phone or
voice messages, e-mail/SMS/MMS,
announcements, etc. Tap this screen icon to view all
messages in the message center.
Checking Your Connection and Signal Strength
After you insert the activated SIM card into your HP iPAQ, your unit
connects to your service provider’s network.
The powered on icon indicates that you are connected to your service
provider’s network. After that, full strength connection is indicated by the
signal strength icon . The number of vertical bars in the icon diminish
as the signal strength diminishes. The phone icon indicates no signal.
Using the Phone Features 5–6
Page 54

Automatic Frequency Band Selection
Your HP iPAQ has an integrated GSM/GPRS/EDGE feature that supports
four different frequency bands which allow for international roaming.
When traveling between countries and wireless network operators, the
automatic selection feature changes the frequency bands of the GSM/
GPRS/EDGE connection settings. It does this by initiating an automatic
search for network frequency bands when your home bands are not
available. This automatic selection feature is the default setting on your
HP iPAQ.
Turning the Phone On and Off
You can turn your Phone on and off while keeping your HP iPAQ
powered on.
There are several ways to turn on your Phone:
• From the Today screen, tap the iPAQ Wireless icon in the
Command bar at the bottom of the screen, then tap the Phone
button on the iPAQ Wireless screen.
• From the Today screen, use the numeric keypad on the Thumb
Keyboard to enter a phone number. After the first or second number
is entered, the phone keypad displays. Tap Yes when asked if you
want to turn on the phone.
• Press the green Answer/Send Phone button to display the phone
keypad. Enter a phone number on the keypad and tap Yes when
asked if you want to turn on the phone.
• From the Today screen, tap the phone icon in the Navigation
bar and, from the pop-up menu, tap Turn off flight mode.
NOTE: Flight mode turns on/off all wireless functions on your
HP iPAQ. Turn on Flight mode when you are traveling by air to
prevent a wireless function from turning on automatically.
There are two ways to turn off your phone:
• From the Today screen, tap the iPAQ Wireless icon in the
Command bar, then tap the Phone button to turn off the phone.
• On the Today Screen, tap the icon in the Navigation bar and,
from the pop-up menu, tap Turn on flight mode.
NOTE: Leave the phone turned on to receive calls when your HP iPAQ is
powered off.
You can use other programs on your HP iPAQ during a call. To quickly
switch back to Phone, tap the green Answer/Send application
button, or tap Start > Programs > Phone.
Using the Phone Features 5–7
Page 55

HP Profiles
HP Profiles allows you to create system profiles for alerts, display power,
and wireless settings to match your current environment or location. You
can set up and name profiles to use at different times and for different
functions. For example, you can set a certain Ring type or tone to be silent
or vibrate when you are in a meeting, or loud when you are outdoors in
a crowd.
You can select pre-defined profiles for specific situations. These predefined profiles have common settings for Alerts, Display Settings, Power,
and Wireless.
• To access HP Profiles, from the Start menu, tap Settings >
There are four button icons that allow you to modify settings for Alert,
Display, Power, and Wireless.
System tab > HP Profiles.
Alert
Display
Power
Wireless
Setting a Profile
To set a profile:
1. From the Start menu, tap Settings > System tab >
HP Profiles icon.
2. Tap Tools > Select Profile and, from the drop-down list, select a
profile name.
NOTE: Tapping the Rename selection brings up a dialog box. Enter the
new name in the dialog box and tap OK.
3. On the right of the screen, tap the icon button that you want to set
(Alert, Display, Power, or Wireless).
4. Select the desired settings:
a. Use Alert to select a ring type and tone, set the type to On,
Tap to select Profile
Vibrate, or Off, and set the volumes for HP iPAQ and phone.
Using the Phone Features 5–8
Page 56

b. Use Display to adjust backlight brightness and set a timer to
turn off the backlight, if HP iPAQ is not used.
c. Use Power to set a timer to turn off the power if HP iPAQ is
not
used.
d. Use Wireless to keep wireless settings On or Off (Phone
and
5. Tap OK when you have finished setting the profile.
6. Tap Yes to save your changes to the selected profile.
Switching a Profile
To quickly switch a profile from within any application:
1. Press and hold the Power button to bring up the quick
NOTE: The quick access menu includes five tasks and a shortcut to Profile
Settings, in addition to the profile selections that allow you to switch tasks.
2. Tap the desired profile.
access
menu.
Bluetooth).
NOTE: The quick access menu disappears after 10 seconds.
NOTE: When the Backlight is adjusted to its lowest setting, it cannot be
turned on from the quick access menu. It can only be turned back on by
accessing the Start menu > Settings > System tab > Backlight >
Brightness tab and adjusting the brightness level. The brightness level
can also be accessed from the battery icon if the TodayPanel
is displayed.
Making and Receiving Phone Calls
You can now make local or long distance domestic calls and, if you
requested the setup, you can also make international calls.
Using the Phone Features 5–9
Page 57

Making a Call
1. From the Today screen, tap the iPAQ Wireless button in the
Command bar.
2. Tap the Phone icon on the iPAQ Wireless screen.
Alternate: Tap the icon in the Navigation bar >
Turn off flight mode (activates the wireless radio which turns on
your phone).
3. Press the green Answer/Send button on the Thumb
keyboard or from the Today screen, tap Start > Phone.
4. Tap the number you want to call, and then tap Talk or press the
green
NOTE: Press the Blue key to access the numbers on the Thumb Keyboard.
Refer to the following sections for alternate ways to make a call:
• ”Making a Call from Contacts”
• ”Making a Call Using Speed Dial”
• ”Making a Call From Call History”
• ”Making a Conference Call”
Answering a Call
When you receive a phone call, the HP iPAQ rings or vibrates and a
message appears on the screen, giving you an option to either answer or
ignore the incoming call.
• Tap Answer on the Phone keypad or press the green
Answer/Send button on the Thumb keyboard to receive
the call.
Answer/Send button from the Thumb keyboard.
NOTE: To silence the phone and reject the call, tap Ignore. This may
send the caller to your voicemail or send out a busy signal, depending on
your service provider.
Ending a Call
When your phone call is finished, tap End on the Phone keypad or press
and hold the red End Call button to end the call.
Making a Call from Contacts
• Tap on the Contacts icon located on the Thumb keyboard, tap
and hold the contact’s phone number, and then tap Call Work,
Call Home, or Call Mobile.
• To make a call from an open contact, tap the number you want
to
call.
Using the Phone Features 5–10
Page 58

Copying Contacts to a SIM
If you need to copy important contacts from another device to your
HP iPAQ, use SIM Manager.
1. Insert the SIM card (which has the important contacts on it) in the
HP iPAQ. For detailed instructions, refer to the
Card” section in this chapter.
2. From the Start menu, tap Programs > SIM Manager. SIM
Manager loads the SIM data from the card.
3. Tap and hold the contact you want to copy to your HP iPAQ and
tap Copy to Contacts.
4. Verify your contacts have been copied to your HP iPAQ by tapping
Contacts and search for the added contacts.
NOTE: This feature may not be available on all models.
Making a Call Using Speed Dial
From the Phone keypad, tap Speed Dial, and then select the speed dial
location number of the desired contact. You can also press and hold the
speed dial location number assigned to a contact directly from the
Phone keypad.
NOTE:
• To dial a one-digit speed dial number from the Phone keypad, tap
and hold a single keypad key.
• To dial a two-digit speed dial number from the Phone keypad, tap
the first digit, then tap and hold the second digit.
”Inserting a SIM
Creating a Speed Dial Entry
You can create up to 99 speed dial entries to call frequently-dialed
numbers. Before you can create a speed dial entry for a phone number,
that number must already exist in Contacts.
1. From the Phone keypad, tap Speed Dial > New.
2. Tap the desired contact name and number.
3. In the Location field, tap the Up/Down arrows to select an
available location to assign as the new speed dial entry. The first
speed dial location is reserved for your voicemail.
4. Tap OK.
Creating a Speed Dial Entry From Contacts
1. Tap and hold the contact name.
2. Tap Add to Speed Dial.
3. Tap the Up/Down arrows to select an available location to assign
as the new speed dial entry.
Using the Phone Features 5–11
Page 59

4. Tap OK.
Editing a Speed Dial Entry
1. From the Speed Dial list, tap and hold the contact name in the
box to the right of the assigned speed dial number.
2. Tap Edit or Delete.
3. Enter your changes and tap OK.
Making a Call From Call History
From the Phone keypad, tap Call History, and then tap the icon next to
the desired number.
Making a Conference Call
You can create a three-way conference call between yourself and two
other parties.
From the Phone keypad, dial the first number, tap Talk and after the call
is initiated, tap Hold, dial the second number, tap Talk and then
tap Conference.
Adjusting Phone Volume
During a phone call, push the Phone volume slider on the top, left side of
the HP iPAQ up (+) or down (-).
NOTE: The Phone volume can only be adjusted during a phone call.
Enabling the Mute Function
Duri ng a call, you can mute yo ur microphone so that the pers on wit h whom
you are speaking cannot hear you, but you can still hear him or her. This
is useful if you do not want the other person to hear a conversation or
background noise on your side of the call.
From the Phone keypad, tap the microphone icon in the Command
bar to mute or unmute a call.
Setting Ring Tones
1. Tap > Settings > System tab > HP Profiles.
2. Tap the Alert icon and tap the drop-down list under Ring
type to select the type of ring to be used.
3. Tap the drop-down list under Ring tone and select the ring tone to
be used.
4. To listen to the selected sounds, tap the Play icon. When you are
finished listening, tap the red Stop icon.
NOTE: You can also select Ring Tones by tapping Start > Settings >
Phone icon.
Using the Phone Features 5–12
Page 60

NOTE: To use custom.wav, .mid, or .wma files as ring tones, use
ActiveSync on your personal computer to copy the file to the My HP
iPAQ\Windows\Rings folder on your HP iPAQ. Then, select the sound
from the Ring tone list.
To control tapping sounds for the keypad:
1. From the Start menu, tap Settings > Personal tab > Sounds
& Notifications.
2. Place a checkmark in the box next to Screen taps and select Soft or
Loud. If there is no checkmark in the Screen taps box, a tone is
not
played.
3. Tap OK to save the settings.
Changing Ring Tones
You can select a different sound to notify you of incoming calls.
1. From the Phone keypad, tap Tools > Options.
2. Tap the Ring tone listbox, and select the sound you want to use.
Changing Keypad Tone
You can change the tone you hear when entering a phone number on the
keypad. If set to Tones, the tone is heard continuously for as long as the
number on the keypad is pressed. If set to Beep, the tone is heard only for
one or two seconds.
1. From the Phone keypad, tap Tools > Options.
2. Tap the Keypad list, and select the option you want.
To prevent tones from being heard when entering a phone number,
select Off.
Adding Ring Tones
You can add different sounds to notify you of different events on your
HP iPAQ.
1. From the Start menu, tap Settings > System tab >
Add Ring Tone.
2. Tap the Ring tone list, and select the event sound you want to use,
and tap the Add button.
3. Tap OK when you are finished adding ring tones to your HP iPAQ.
Enabling Speakerphone Mode
Your HP iPAQ has a speakerphone mode that allows you to talk hands-free
or allows other people to listen to the caller.
To enable the speakerphone mode:
1. First make a phone call.
Using the Phone Features 5–13
Page 61

2. Hold down the green Answer/Send button until the
speakerphone dialog box comes on and the speakerphone icon
appears in the top Navigation bar.
SHORTCUT: From the Phone keypad, tap Tools > Speakerphone.
3. To turn off the speakerphone, hold down the Answer/Send
button again.
WARNING! Do not leave the phone in speakerphone mode and hold it
to your ear, the sound may temporarily impair your hearing.
Taking Notes During a Call
To create a note during a call, tap the Note icon in the Command bar
and enter or record your note.
Using Voicemail
The first speed dial location is set as a default for your voice mailbox
number. When you insert your SIM card into your HP iPAQ, it sets as
default the voice mailbox number of your mobile service provider. You may
need to configure your phone to the Voicemail setting by dialing or setting
the Voicemail dial number or password.
To retrieve your voicemail:
• With the phone turned on and the phone keypad visible on the
screen, press and release the left side of the 5-way navigation
button, select 1 Voicemail, then press
.
Putting a Call on Hold
During a phone call, tap Hold on the Phone keypad to put the call on
hold. The call on hold appears on the top right of the dialer screen. You
may switch between calls by tapping the call on hold.
Using Call Waiting
Call waiting notifies you of incoming calls when you are already in a
phone session.
To activate Call Waiting:
1. From the Phone keypad, tap Tools > Options > Services tab.
2. Tap Call Waiting > Get Settings.
3. Select Notify me.
4. Tap OK.
NOTE: To stop using call waiting, select Do not notify me.
Using the Phone Features 5–14
Page 62

To use Call Waiting to answer an incoming call during a phone
conversation, tap Answer to move the current phone call to Call
Waiting. The phone call on Call Waiting displays on the screen. Tap
Ignore if you do not want to answer the incoming call.
Displaying Caller ID
You can display your caller ID when placing a phone call.
1. From the Phone keypad, tap Tools > Options > Services tab.
2. Tap Caller ID > Get Settings.
3. Select Everyone.
4. Tap OK.
NOTE: To prevent your caller ID from being displayed to others, select
No One.
Blocking Calls
Use call barring to block certain types of incoming and/or outgoing calls.
1. From the Phone keypad, type Tools > Options > Services tab.
2. Tap Call Barring > Get Settings.
3. Select the type of incoming and/or outgoing calls you want to
block such as barring incoming call when you phone is in roaming
mode or block all outgoing international calls.
4. Tap OK to close the program.
Forwarding Calls
Use call forwarding to forward all incoming calls to a different number.
1. From the Phone keypad, tap Tools > Options > Services tab.
2. Tap Call Forwarding > Get Settings.
3. Select Forward all incoming phone calls, and specify the
phone number to receive forwarded calls.
You can also use call forwarding to forward incoming calls to a different
number based on your situation.
• Select Unavailable to forward calls only when your phone is
turned off or you are unreachable.
• Select Busy to forward calls only when the line is busy.
• Select No answer to forward calls only when you can’t
answer your phone.
NOTE: To stop using Call Forwarding, clear the box next to Forward
all incoming phone calls.
Using the Phone Features 5–15
Page 63

Changing the System Volume
You can adjust the volume for system sounds, such as the sound you hear
when you tap on program names and menu options.
•Tap the icon in the Navigation bar.
• In the pop-up volume box, move the system volume slider
to the desired volume level.
Select On, Vibrate, or Off to quickly change both the system and ringer
volume settings.
NOTE: You can also move the volume control on your HP iPAQ to quickly
change the ringer settings. The volume slider is located on the top, left
side of the HP iPAQ. Press up (+) or down (-) to adjust volume.
Change the Ringer Volume
There may be times when you want to change the ringer volume on your
HP iPAQ. For example, you may want to increase the ringer volume when
you're anticipating an important call, or immediately silence the ringer
when you receive a call during a meeting or when you're in a
quiet environment.
• Tap the icon in the Navigation bar.
• In the pop-up volume box, move the ringer volume slider to the
desired volume level.
Select On, Vibrate, or Off to quickly change both the ringer and system
volume settings.
NOTE: You can also move the volume control on your HP iPAQ to quickly
change the system volume settings.
Changing the Phone Settings
To change the phone settings, from the Start menu,
tap Settings > Phone.
You can customize phone settings such as the ring type and ring tone to
be used for incoming calls, and the keypad tone to be used when entering
phone numbers. You can also protect your phone from unauthorized use
with a PIN.
• To change phone settings from the Phone keypad, tap Tools in the
Command bar > Options > Phone tab.
From the Phone tab, you can change the following items:
• Ring type—Tap the Ring type list and select the
desired
option.
• Ring tone—Tap the Ring tone list and select the sound
want.
you
Using the Phone Features 5–16
Page 64

NOTE: To use custom .wav, .mid, or .wma files as ring tones, use
ActiveSync on your personal computer to copy the file to the /Windows/
Rings folder on your HP iPAQ. Then, select the sound from the
Ring tone list.
• Keypad tone—Tap the Keypad list, and select the option
you
want.
• Secure your Phone by placing a checkmark in the Require
PIN when phone is used box.
NOTE: Your mobile service provider may already have given you a PIN
to use with the Phone. After entering that PIN, you may change the PIN at
any time by tapping Change PIN.
Changing Service Settings
You can change service settings by either of the following methods:
• From the Start menu, tap Settings > Phone > Services tab,
tap a service, and then tap Get Settings.
• From the Phone keypad, tap Tools > Options > Services tab,
tap a service, and then tap Get Settings.
You can configure settings for phone services you subscribe to through
your mobile phone service provider. For example, you may want to block
certain types of incoming and/or outgoing calls, forward incoming calls
to a different phone number based on your situation, be notified of
incoming calls when you’re already in a phone session, or let others know
your identity when making calls.
Viewing Available GSM/GPRS/EDGE Networks
You can view all Global System for Mobile Communications /General
Packet Radio Service/Enhanced Data Rates for Global Evolution (GSM/
GPRS/EDGE) wireless networks available to you.
1. From the Phone keypad, tap Tools > Options > Network tab.
2. Tap Find Network.
Using International Roaming
When you are planning on traveling abroad or to foreign countries, you
will be able to use your HP iPAQ to call home or anywhere by first setting
it up for international roaming.
At least 24 hours before you go away on your trip, you need to do
the following:
NOTE: Depending on your mobile phone service provider, it may not be
necessary to complete all of the following items to set up your phone for
international roaming.
Using the Phone Features 5–17
Page 65

Contact your mobile phone service provider for the following information
and services:
• Have them activate your phone for International Roaming.
Depending on your mobile phone service provider, there may be
an additional charge for this feature.
NOTE: Once your HP iPAQ has been activated, it is set up permanently
for you to use abroad.
• Check with your mobile phone service provider to make sure your
HP iPAQ will work in the country you are going to and find out
what kind of coverage you will receive.
• Find out if you will need to purchase another SIM card with the
correct international format on it, or if your mobile phone service
provider may be able to reformat the SIM card you already have
into the correct format.
• Since your HP iPAQ has GPRS and EDGE capability, you may want
to ask your mobile phone service provider for an up-to-date list of
foreign operators that enable you to use data functionality abroad
and added costs for the service plan. Once you know which
network to connect to in the country you are traveling through,
you can connect to that network manually using the
following
instructions.
Changing Network Settings
You can change Network Settings by either of the following methods:
• From the Start menu, tap Settings > Phone > Network tab.
• From the Phone keypad, tap Tools > Options > Network tab.
The GSM/GPRS connection your HP iPAQ is currently using will be
listed at the top of the screen.
You can view available networks, determine the order in which your phone
accesses another network if the current one is unavailable, and specify
whether you want to change networks manually or automatically. The
current network remains active until you change it, lose your signal, or
change your SIM card.
Manually Selecting a Network
NOTE: HP highly recommends leaving the HP iPAQ set to its automatic
network settings.
At times, you may want to manually select a different wireless network to
use, instead of your HP iPAQ automatically doing this for you. For
example, if you want to connect to a specific network for a specific
purpose, and you are authorized to use this specific network, then
complete the following instructions:
1. From the Phone keypad, tap Tools > Options > Network tab.
Using the Phone Features 5–18
Page 66

2. Under Network selection, select Manual and select the network
you want to use.
NOTE: When your current network is unavailable, tap Select
Network, and manually select a different network to use.
NOTE: In the event you are unable to locate a network, you must reset the
HP iPAQ by tapping Start > Settings > Phone > Network tab and
under Network Selection, tap Automatic > Find network.
Configuring Your HP iPAQ for Your SIM Card
When the SIM card connects to your service provider’s network, it may be
updated by your service provider to include new network parameters for
faster connection. The GSM/GPRS Settings Manager automatically
updates your HP iPAQ files with the new network parameters on your
SIM card.
At times, you may need to manually edit the network settings or create
your own personal network settings. To do that, you will need to modify
the GSM/GPRS Settings.
The GSM/GPRS Settings Manager has the following features:
• Automatically detects the carrier and sets up the GPRS, MMS, and
WAP connection information.
• Automatically detects the carrier and updates network settings on
all hard and soft resets.
• Provides the User with the ability to edit network settings including
GPRS, CSD, SMS, MMS, and WAP information.
• Provides the User with the ability to create their own network
settings and save them under a user defined name in the iPAQ File
Store folder.
Modifying the GSM/GPRS Network Settings
The first time you use your SIM Card, the GSM/GPRS Manager
automatically detects the phone network and operator and sets up the
GPRS connection information for you. You can modify these settings to
your own preference or create your own network settings.
NOTE: If the automatic network detection fails, you can manually
relaunch it by pressing the Automatic detection button on the GSM/
GPRS Parameters screen.
Using the Phone Features 5–19
Page 67

• To access the GPRS Settings, from the Start menu, tap Settings >
Connections tab > GSM/GPRS Manager icon. If your
operator name appears in the drop-down list, it is recommended
that you use that connection and, if needed, edit the
default
settings.
NOTE: In the event the automatic detection setting fails, complete one of
the two following items:
• Select the appropriate country and operator name, then tap OK.
The settings automatically update.
• If your operator name does not appear in the drop-down list, you
must manually add it to the list by tapping the down arrow in the
Operator box and tapping “Create New . . .”. For more
information, refer to the
this chapter.
”Creating a New Connection” section in
Editing Network Properties
CAUTION: Editing Network Properties is not recommended unless you
are being accompanied by service provider Help.
Tapping on the Edit network Parameters bar on the GSM/GPRS
Settings screen gives you access to the following areas:
• Internet Connection Information—Walks you through the
different settings for GPRS (General Packet Radio Service) and
CSD (Circuit Switched Data) connections.
• MMS Multimedia Messages—Allows you to modify the
Multimedia Message Service Center (MMSC) address.
Using the Phone Features 5–20
Page 68

•WAP Information
Editing an Internet Connection
If you tapped Internet Connection Information on the Edit
properties screen:
1. Select the connection to edit by tapping the appropriate box and
tap OK.
2. Enter a name for the connection such as the carrier name.
3. Tap Next.
4. After APN: enter the Access Point Name of the server you are
attempting to connect.
5. After Name: enter the Log on for your connection.
6. After Password: enter the password for your connection.
7. Tap Next.
8. On the next screen, tap one of the following:
• Dynamic IP address
• Static IP address
9. Tap Next.
10. On the next screen, tap one of the following:
• Dynamic DNS addresses
• Static DNS addresses
11. Tap OK.
Editing MMS Multimedia Messages Settings
If you tapped MMS Multimedia Messages on the Edit
properties screen:
1. Under Enter the MMS Center Address, enter the URL where
all MMS messages are sent for delivery by the network (for
example, enter http://mms.mobilelife.co.th).
Using the Phone Features 5–21
Page 69

2. Enter the following information:
• APN: Access Point Name of the MMS server being connected.
• Name: Log on name for the MMS server.
• Password: Password for the MMS server.
3. Tap OK.
4. Enter the IP address and the Port number for the WAP MMS
Gateway and tap Finished.
Editing WAP Information Settings
If you tap WAP Information on the Edit properties screen:
1. Enter the IP address and the Port information for the WAP Gateway.
2. Tap Next.
3. Enter the IP address and the Port information for the secure WAP
Gateway.
4. Tap Finish.
Creating a New Connection
Before creating a new connection, you must obtain the following
information from your service provider:
• To make a GPRS Connection:
•APN
• Username/Password
•DNS address
• IP address
• To make an MMS Connection:
• MMS Center Address
• APN (for MMS server if different than Internet connection)
•User Name/Password
•IP Address/Port
• To make a WAP connection:
•IP Address
•Port
•WAP Gateway
•Secure WAP Gateway—IP and Port
To create a new connection:
1. Tap the down arrow under Country and select the appropriate
country name.
Using the Phone Features 5–22
Page 70

2. Tap the down arrow under Operator, and tap “Create new ...”.
3. Tap the down arrow under Country and select the appropriate
country name.
4. Enter the new service provider name.
5. Tap Next.
Failed Automatic SIM Detection
If the SIM card is not detected by the application:
• Check to see if the SIM card is present in the HP iPAQ. If it is not
present, insert the SIM card and relaunch the application.
• Create a new connection.
• Ensure that the contacts on your SIM card and your SIM slot are not
covered with a residue or dust that would inhibit a connection.
TTY Functionality for the Hearing-Impaired
This HP iPAQ supports TTY (Tele-typewriter) functionality. This functionality
allows hearing-impaired persons to communicate using existing telephony
infrastructure, including cellular phones. To achieve this, separately
purchased TTY devices must be connected to the telephones on both ends
of a telephone call session, and the TTY software application must be
downloaded from the Companion CD onto the HP iPAQ. The sending TTY
Using the Phone Features 5–23
Page 71

device generates a distinct audio tone for every supported character, and
these tones are decoded and converted back into text on the receiving
TTY device.
Due to the use of audio compression codecs in modern digital cellular
telephones, these TTY audio tones may be unintentionally distorted while
being transmitted through cellular telephones. In order for TTY devices to
continue to work in cellular networks, the cellular telephone must be set
into a mode that optimizes the compression codec to handle TTY tones
instead of the human voice.
NOTE: For information on connecting TTY devices to the HP iPAQ, refer
to the TTY device manufacturer’s documentation.
Enabling TTY Support
Before connecting the optional TTY device to the phone, you must enable
TTY support in order to prepare the HP iPAQ Phone to expect a TTY device
to be connected.
To enable TTY support:
1. From the Start menu, tap Phone > Tools > Options > TTY tab.
2. Place a checkmark in the Enable TTY support box by tapping it.
3. Tap OK. The TTY icon displays in the Navigation bar when it is
enabled.
4. Connect the optional TTY device or plug into the headphones as
stated in the TTY manufacturer’s documentation and connect the
headphones to the HP iPAQ. This connection activates the TTY
audio mode.
Making a Phone Call Using the TTY HP iPAQ
To make a phone call:
1. Press the green Answer/Send phone button on the front of the
HP iPAQ to launch the phone keypad.
Using the Phone Features 5–24
Page 72

2. Dial the phone number of the person you are trying to reach who
also has a TTY device connected to their phone. If the prompt
displays asking if you want to turn on the phone, tap Yes.
3. When the phone call is answered, start typing onto the
TTY
keyboard.
The letters typed into the machine are turned into electrical signals
that travel over regular telephone lines. When the signals reach
their destination (another TTY device), they are converted back into
letters which appear on a display screen, are printed out on paper,
or both.
When you are finished typing your phone conversation, the person
on the other end of the line may begin typing their answers or
comments to you.
4. To end a phone call, press and hold the red End Call phone
button on the front of the HP iPAQ.
NOTE: TTY audio mode activation may not be possible while a telephone
call is already in progress.
NOTE:
• If a normal headset is connected while TTY support is enabled, the
audio quality may be decreased.
• If a Bluetooth headset is connected while TTY support is enabled,
the audio quality will not change because TTY audio mode has not
been activated.
• However, if you make a phone call using a Bluetooth headset while
TTY mode is enabled AND a plug has been inserted into the
headphone jack, TTY audio mode will be activated and voice
quality will decrease.
Deactivating TTY Audio Mode
To deactivate TTY audio mode:
• Remove the plug from the headphone jack or
• Uncheck the Enable TTY support check box in the Start menu
> Phone > Tools > Options > TTY tab.
Disabling TTY Support
To disable TTY support:
1. From the Start menu, tap Phone > Tools > Options >
TTY tab.
2. Uncheck the Enable TTY support box.
NOTE: It has not been determined if deactivation by either method is
possible while a TTY telephone call is in progress.
Using the Phone Features 5–25
Page 73

6 Managing Multiple Wireless
Connections
Using the iPAQ Wireless Manager
The iPAQ Wireless Manager application provides a centralized control for
you to manage wireless features on the HP iPAQ.
The iPAQ Wireless screen has two individual power buttons to turn wireless
features on and off—one at a time, and one All Off button to turn off all
wireless features at the same time. The screen also includes Settings
buttons to configure Phone and Bluetooth.
• To access the iPAQ Wireless screen, from the Today screen, tap
the iPAQ Wireless icon
the screen.
The iPAQ Wireless screen displays showing the current state of the
wireless activities (an icon with an
T
in the Command bar at the bottom of
X indicates it is off).
• To power on one or more wireless activities, tap the desired buttons.
• To power off one or more wireless activities, tap the desired buttons
or tap the All Off button
Managing Multiple Wireless Connections 6–1
to power off both activities.
Page 74

Power Buttons
The two Power buttons display:
• Gray background with an x when they are powered off.
• Amber background when they are powered on and signals are
available, but not connected.
• Green background when they are powered on and connected or
associated with another HP iPAQ.
NOTE: If a button does not immediately respond when tapped, it may be
busy performing a task you requested.
The All Off button displays:
• Gray background with the x when all wireless
features are powered off.
• Green background when one or more wireless features are
powered on.
Settings Buttons
The Settings buttons—Phone Settings, Bluetooth Settings, and Bluetooth
Manager— only function when the Power buttons are enabled. With the
Power button turned on, press the Settings button to open a page with
information about configuration and settings for that particular
wireless feature.
NOTE: You cannot access these configuration pages if you press the
Settings buttons while in a disabled state.
Phone Settings Button
First, tap the Phone Power button to power it on; then press the
Settings button to open the configuration screen.
NOTE: For information on configuring the Phone settings, refer to
Chapter 5, ”Using the Phone Features”, and Chapter 7, ”Making Data
Connections.”
Bluetooth Settings and Manager Buttons
First press the Bluetooth Power button to power it on; then press either
the Settings or Manager button to open the Bluetooth settings and
configuration screens.
NOTE: For information on configuring Bluetooth settings or manager,
refer to Chapter 9, ”Using Bluetooth.”
Managing Multiple Wireless Connections 6–2
Page 75

Managing Data Connections
When you tap a data connectivity icon in the Navigation bar, it opens a
drop-down connectivity box that displays the status of your wireless data
connections and information about which service is connected. From this
drop-down box, you can also create new connections, access wireless
settings menus, and turn on or off the wireless features.
Data Connectivity Icons
Inactive connection to computer or wireless network.
Active connection to computer or wireless network.
GPRS service is registered and available if you are subscribed to
the GPRS service.
Active data connection to GPRS network.
NOTE: For information on configuring data connections, refer to Chapter
7, ”Making Data Connections.”
Managing Multiple Wireless Connections 6–3
Page 76

7 Making Data Connections
The HP iPAQ hw6500 Mobile Messenger series offers you a
comprehensive set of wireless capabilities to keep you connected in or out
of the office. With Global System for Mobile Communications/General
Packet Radio Service/Enhanced Data Rates for Global Evolution (GSM/
GPRS/EDGE), and Bluetooth integrated into a single HP iPAQ, you have
broad coverage offering high speed access to the Internet, and to business
and personal information.
NOTE: EDGE is a global standard for wireless wide-area data
communication being rapidly deployed by GSM carriers worldwide.
Actual download speeds may vary. Coverage is subject to transmission
limitations and terrain, system capacity and other limitations. Not all
features and service options are available in all areas.
Use the following options to get connected:
• Use the GPRS/EDGE technology integrated on your HP iPAQ to
connect to a Virtual Private Network (VPN) or to remotely connect
to your mobile Internet Service Provider (ISP).
• Make a wireless GSM/GPRS/EDGE connection to place a phone
call or send or receive e-mail, text message, or Multimedia
Message Service (MMS) messages.
NOTE: EDGE technology delivers faster data speed than GPRS to mobile
devices. It allows users to connect to the Internet and send and receive
data, including digital images, Web pages and photographs faster than
with a GSM/GPRS network. If a network provider does not have EDGE
technology deployed, the HP iPAQ defaults to GPRS data transfer rates.
Because EDGE is integrated into GPRS technology when it is enabled by
your service provider, there is no visible means of identifying when it is
being used. You will only receive faster data transmission.
• Transfer information between Bluetooth enabled devices.
• Transfer information between two Infrared (IrDA) enabled ports.
NOTE: Use of dial-up and wireless Internet, e-mail, corporate networks,
and other wireless communications, such as Bluetooth-enabled devices,
may require separately purchased additional hardware and other
compatible equipment, in addition to a separately purchased service
contract. Check with your service provider for availability and coverage
in your area. Not all Web content may be available. Some Web content
may require installation of additional software. GPRS may not be
available in all networks. GPRS data transmission speeds may vary
based upon network capabilities and other conditions. The establishment
and continuation of a GPRS connection depends on network availability,
provider support, and signal strength.
Making Data Connections 7–1
Page 77

For more information on this subject, refer to the Help file on your HP iPAQ
by tapping Start > Help > Connections.
Impact of Data Connection When a Phone Call is Received
Class B mobile phones may be attached to both GPRS and GSM services,
using one service at a time. Class B enables making/receiving a voice
call, or sending/receiving a text message during a GPRS connection.
During voice calls or text messaging, GPRS services are suspended and
then resumed automatically after the call or text message session
has ended.
Using GSM/GPRS/EDGE Connections
GSM/GPRS/EDGE technology is integrated into your HP iPAQ. To send
or receive data over a GSM/GPRS/EDGE network, you must have an
account with a mobile telephone service provider that supports GSM/
GPRS/EDGE data services and an activated SIM card. The service
provider must enable the GPRS data features on your account to activate
it and must have EDGE technology on the network for this capability to be
used on the HP iPAQ. If EDGE is not enabled, the HP iPAQ defaults
to GPRS.
Creating a GPRS/EDGE Connection
A GPRS/EDGE connection provides high-speed data transfer and is
typically used for Web browsing and to send and receive small bursts of
data such as e-mail and MMS messages.
To create a GPRS/EDGE connection, you must subscribe with a GSM
service provider that supports GPRS/EDGE. After you configure your
GPRS/EDGE connection and connect to the GPRS network, you may be
required to authenticate GPRS.
NOTE: Your service provider must enable the GPRS/EDGE features on
your account.
Manually Configuring your GPRS connection on your HP iPAQ
NOTE: Use this manual process only if the built-in automatic detection is
not working and you are unable to make a connection.
1. From the Start menu, tap Settings > Connections tab >
Connections icon.
2. Select Add a new modem connection from either My ISP or
My Work Network sections.
3. Enter a descriptive name for the connection (for example, Phone
Dialup or anything you want).
4. In the Select a modem list, tap Cellular Line (GPRS).
Making Data Connections 7–2
Page 78

5. Tap Next.
6. Under Access Point Name, enter the APN provided by your
GPRS service provider.
7. Tap Next.
8. If required, enter your User name, Password and, if provided
by your ISP or network administrator, your Domain name.
You should not need to change any settings in Advanced. Most ISPs
now use a dynamically assigned address. If your GPRS service
provider specified the IP addresses for your DNS servers, tap
Advanced, then tap the Name Servers tab. Select Use
specific server address, and then enter the DNS addresses
provided by your GPRS service provider. Tap OK.
9. Tap Finish.
Connecting to the GPRS Network
To connect to a GPRS/EDGE network:
S Tap the Connectivity icon in the Navigation bar and, from
the pop-up menu, tap Connect GPRS.
Your service provider can provide additional information on connecting to
the Internet using GPRS.
Setting Up a WAP Browser
Wireless Application Protocol (WAP) delivers content in a reduced format
to fit the HP iPAQ screen. WAP protocol can accommodate the low
memory limitations of handheld devices and the low-bandwidth limitations
of a wireless-handheld connection.
NOTE: This protocol requires a GPRS/EDGE connection.
To set up the WAP browser:
1. From the Start menu, tap Settings > Connections tab >
Connections icon > Tasks tab.
2. Under My Work Network, select Manage Existing
Connections > Proxy Settings tab.
3. Place a checkmark in the two boxes on the My Work Network
screen and tap Advanced.
4. Next to WAP enter the Server and Port information supplied by
your Mobile Service Provider, and tap OK.
Viewing WAP Pages
Once you have set up your WAP browser, you can view WAP pages by
starting a GSM or GPRS/EDGE connection and using Pocket Internet
Explorer. When you enter a Web site using Pocket Internet Explorer,
remember WAP addresses are prefixed by “wsp” not “http” (example:
wsp://www.xxx.com).
Making Data Connections 7–3
Page 79

Connecting to a Private Network
Setting Up VPN Server Connections
A VPN connection enables you to securely connect to a private or a
corporate network, via the Internet. To set up a VPN server connection:
1. Contact your network administrator for your user name, password,
domain name, TCP/IP settings, and host name or
VPN server.
2. From the Today screen on the HP iPAQ, tap Start > Settings >
Connections tab > Connections icon > Tasks tab.
3. Under My Work Network, tap Add a new VPN
server
connection.
4. Follow the instructions in the Make New Connection wizard.
NOTE: For online Help for any screen in the New Connection wizard or
while changing settings, tap the ?.
Setting Up Proxy Server Settings
If you are connected to your ISP or private network by a dial-up or
broadband connection, the ISP provides these settings for you. If you are
at work you might have to access the Internet through a proxy server. If
these settings are not on your computer or need to be changed, you will
need to set them up manually.
To set up proxy server settings on your HP iPAQ:
1. Contact your ISP or network administrator for the proxy server
name, server type, port, type of Socks protocol used, and your user
name and password.
2. From the Today screen on the HP iPAQ, tap Start > Settings >
Connections tab > Connections icon > Tasks tab.
3. Under My Work Network, tap Edit my proxy server >
Proxy Settings tab.
4. Tap the This network connects to the Internet and This
network uses a proxy server to connect to the Internet
check boxes.
IP address of the
Making Data Connections 7–4
Page 80

5. In the Proxy server box, enter the proxy server name.
6. To change port number, tap the Advanced button and enter the
number in the HTTP proxy box.
7. Tap OK to exit the program.
Depending on where you are in the program, you may have to tap
OK several times to exit.
Managing Your E-mail
You can send and receive e-mail messages by connecting directly to an email server using GSM/GPRS. If you have already created a connection
to a network or an ISP, you must still set up an e-mail account in
Messaging. To set up your e-mail account, see Chapter 12, ”Using
Messaging.”
NOTE: The network or ISP connection must use a POP3 or IMAP4 e-mail
server and an SMTP gateway.
Entering an Internet Address
With Pocket Internet Explorer and a connection to the Internet, you can
view Web sites on your HP iPAQ by typing an Internet address in the
Address bar.
NOTE: Some Web content may require installation of
additional software.
To enter an Internet address on your HP iPAQ:
1. From the Start menu, tap Internet Explorer > Address Bar.
NOTE: If the Address Bar is not visible, tap the View tab > Address
Bar to turn it on.
2. Enter the Internet address in the Address bar.
Making Data Connections 7–5
Page 81

3. Tap the Go icon.
Using a Favorites List
With Pocket Internet Explorer and a connection to the Internet, you can
view Web sites on your HP iPAQ by selecting one from your
Favorites list.
To select a Web site from your Favorites list:
1. From the Start menu, tap Internet Explorer.
2. Tap the Favorites icon located in the Command bar, and then
tap the Web site you want to view.
Making Data Connections 7–6
Page 82

8 Using GPS Navigation
Getting Acquainted
NOTE: GPS Navigation is not available in all countries.
Your HP iPAQ includes Global Positioning System (GPS) Navigation
technology. This technology is based on a worldwide system of GPS
satellites orbiting the earth that continuously transmit digital radio signals.
These radio signals contain data on the satellites’ locations and their exact
clock time and are used to determine your location on the earth.
The GPS Navigation software uses this location data to provide turn-byturn driving directions between your current location and your destination.
You can also use the software to look up and navigate to nearby
restaurants, hotels, movie theaters, gas stations, museums, and other
points of interest. However, before you can do this, you must load a map
onto your HP iPAQ or memory card. Use your HP iPAQ to download one
free city map from the Internet from a pre-selected list of cities in the United
States, Canada, and Western Europe. You can purchase full map sets of
these regions from www.tomtom.com/gpsnavigation
NOTE: To access GPS satellites and establish your exact position, a line
of sight is required. This means your position must be situated outdoors
or close to a window.
NOTE: Some recently developed suburbs and country areas may not be
included on the downloaded maps and will not be discernible on
the screen.
.
Instructions for downloading are included in the ”Downloading a Map”
section in this chapter.
NOTE: To quickly access the phone while you are using GPS
Navigation, press the green Answer/Send Phone button to
display the phone keypad. To access GPS Navigation again, tap the
GPS Navigation icon located in the Command bar.
Getting Started with GPS Navigation
When you launch GPS Navigation, the radio turns on and begins
searching for satellites. When you exit GPS Navigation, the radio turns off.
If you install additional GPS software on the HP iPAQ, the GPS radio still
behaves in the same manner.
Using GPS Navigation 8–1
Page 83

WARNING! When using hardware and software navigation aids, in a
vehicle or elsewhere, it is your sole responsibility to place, secure, and
use these aids in a manner that will not cause accidents, personal injury,
property damage or obstruct your view.
You are solely responsible for observing safe driving practices. Do not
operate this product while driving. Park the vehicle first.
GPS Navigation is intended for automotive use. It’s not appropriate for
use as an Aviation, Maritime, or pedestrian navigation system.
Setting Up Your HP iPAQ
First follow the instructions in the printed
until you complete creating a partnership with your personal
computer. This includes installing the Subscriber Identity Module (SIM)
and battery, synchronizing your HP iPAQ with your personal computer,
and establishing a partnership.
IMPORTANT: If you have completed the steps in the Getting started
guide, you may proceed to the next section, “Setting Up Internet Access
on Your HP iPAQ.”
Setting Up Internet Access on Your HP iPAQ
Now that you have completed the steps in the Getting started guide, verify
you have Internet access on your HP iPAQ by visiting a web site such as
www.google.com or www.yahoo.com. If you cannot access the Internet,
refer to the instructions under “Accessing the Internet on Your HP iPAQ.”
Using HP iPAQ Quick GPS Connection Utility
Quick GPS Connection is a software application residing on the HP iPAQ
that enables a faster connection time for the GPS radio to locate and lock
onto overhead GPS satellites. To improve connection performance, you
need to enable the HP iPAQ Quick GPS Connection Data Utility and
download the latest data file. Even though the GPS radio on your
HP iPAQ is able to connect to the GPS satellites without enabling the
Quick GPS Connection Utility, it may take a few minutes longer and even
up to five minutes to locate the satellites if you do not use this utility.
Due to GPS satellites constantly moving through the sky, it is
recommended that you download updated satellite locations to your
HP iPAQ every two to three days. To download updated satellite
locations, tap in the Command bar > Download Now.
The default settings on the HP iPAQ Quick GPS Connection Utility are set
where the device cannot receive automatic updates unless you enable
the update feature.
To change the default settings:
1. From the Start menu, tap Settings > Connections > Quick
GPS Connection icon.
Getting started
guide
Using GPS Navigation 8–2
Page 84

2. In the Settings tab, tap the check boxes to enable or disable the
following settings:
• Enable updates—This setting allows you to enable or
completely disable the Quick GPS Connection capability. If
you disable it, then your HP iPAQ will no longer receive Quick
GPS Connection updates and your GPS start-up times could
take a few minutes in unfavorable conditions.
• Initiate GPRS Connection for updates—This setting allows
Quick GPS Connection updates to your device over the air
when enabled.
• Show expiration reminders and warnings—This setting reminds
you by notification when your satellite location file is out-ofdate. If this setting is not enabled, notifications do not occur.
• Show tray icon on today screen—This setting turns on a Quick
GPS Connection icon in the Command bar that notifies you by
its color if your satellite location file is up-to-date.
• Blue icon—Up-to-date settings
• Blue/Gray icon—Less than 50% time remaining until
settings expire
• Gray icon—Expired settings
NOTE: For more information, tap the Help icon in the Quick GPS
Connection settings application.
The Quick GPS Connection data on your HP iPAQ can be automatically
updated using a wireless (GPRS) connection or by using ActiveSync to
synchronize your cradled HP iPAQ with your personal computer. Since
the update files are small, you should be able to download them
wirelessly with little impact to HP iPAQ performance.
NOTE: To download files by synchronizing your cradled HP iPAQ with
your personal computer, you may install the Quick GPS Connection
software from the Companion CD onto your personal computer.
Verifying Date and Time on Your HP iPAQ
Verify the correct date and time on your HP iPAQ. If the date and time are
not correct, tap the Clock icon on the Today screen to adjust.
Using GPS Navigation 8–3
Page 85

Downloading the Quick GPS Connection Data File
1. Access your Quick GPS Connection status by tapping Start >
Settings > Connections > Quick GPS Connection
icon .
2. If your HP iPAQ shows that the file has expired, verify the date and
time on the HP iPAQ is correct and press Download Now.
3. Tap OK to close the program.
After the GPS Quick Connection data file has been downloaded, GPS
performance improves. Over time, the GPS Quick Connection data file
automatically updates (once you enable updates) when your HP iPAQ is
connected to the Internet. However, you can force a manual update by
tapping Start > Settings > Connections > Quick GPS Connection
icon > Download Now.
Also, the Quick GPS Connection Utility icon turns gray within a few
days letting you know when to update your satellite locations again.
Starting GPS Navigation
The first time you launch GPS Navigation, the application asks you to
specify your preferences.
To do specify these preferences:
1. From the Start menu, tap GPS Navigation.
2. Tap the language of your choice.
3. On the second screen, tap anywhere to begin.
4. Tap an option to set up the application for Right-handed or Left-
handed operation, and then tap Done.
5. Tap the unit of measure to use to specify to how to display
distances (e.g., Miles or Kilometers), and then tap Done.
6. Tap to specify your preferred clock format (18:00, 6:00pm, or
6:00), and then tap Done.
7. Select the voice to be used for driving instructions. To do this:
a. Browse through the voices by tapping the forward or
backward arrows.
b. Tap the Test button to hear a sample of the current voice.
Using GPS Navigation 8–4
Page 86

c. Tap the Select button to select the voice you want to use.
NOTE: To change the volume of the vocal instructions, use the volume
slider located on the top, left side of the HP iPAQ. Press up (+) or down
(-) to adjust volume. Or to use an alternate method of changing the
volume, tap the Change Volume icon under GPS Navigation >
Change Preferences. To turn off the vocal instructions, tap the
Speaker icon under GPS Navigation > Change Preferences.
Next, you are going download ONE free map of a city in the United
States, Canada, or Western Europe. To download your map, your
HP iPAQ must be connected to your personal computer so that your
HP iPAQ can access the Internet.
Downloading a Map
IMPORTANT: A good policy to follow is to download all GPS maps to
an SD memory card or to iPAQ File Store folder for safekeeping. This
prevents you from losing your map from possible power losses to the HP
iPAQ, or from loss of software should it be necessary to perform a hard
reset on the HP iPAQ.
1. Place the HP iPAQ in the cradle (if you have taken it out) and
connect the HP iPAQ Cradle to your personal computer.
At this point in the process you have not downloaded a map. Once
you have completed selecting your preferences, your HP iPAQ
notifies you “No maps found. To download one free city map
connect your iPAQ to your PC via ActiveSync.”
2. Tap Next to continue.
Internet Explorer automatically launches to start the process of
downloading your map.
3. Tap Next once the screen says “Welcome to Get a Map. Here
you can download a trial map for GPS Navigation...”
4. Select USA and Canada or Europe and tap Next.
5. Select a state or country from the list box and tap Next.
6. Select a city map from the list box and tap Next.
NOTE: Be sure to select your city carefully because you are allowed to
download only ONE map free-of-charge. To download additional maps
to your HP iPAQ, visit www.tomtom.com/gpsnavigation.
7. Tap Search to find the city of your choice and use City List to
view the list of cities included in the map of your choice.
8. Tap Download to start downloading the map or tap Back to
change your city selection.
Using GPS Navigation 8–5
Page 87

9. Tap Yes to confirm the map will be downloaded to the /My
Documents folder in main memory on your HP iPAQ. To change
the folder or save to iPAQ File Store, tap Change.
If you selected Change, tap the down arrow under Location on
the next screen and select iPAQ File Store or memory card if
there is a memory card inserted in the HP iPAQ.
I
NOTE: Although it is possible to download your preferred map using a
GPRS connection, it is recommended to use the cradled connection since
map files are large and can be corrupted if the GPRS connection is lost
during the download process.
Using GPS Navigation 8–6
Page 88

10. After downloading your free map, a GPS Navigation Voucher
code appears. Write the code on paper and keep it in a safe
place. Use the code when you purchase more maps to receive a
discount.
If you choose not to write the code on a piece of paper, you can
access the voucher number later by tapping, from the Start menu,
Programs > Get a Map & Voucher.
11. Tap X to close the application.
12. Disconnect your HP iPAQ from your personal computer and go
outdoors to start GPS Navigation. Place the HP iPAQ where there
is a clear view of the sky or on the dashboard of a vehicle.
13. Tap Start > GPS Navigation and wait until GPS Navigation
locates you.
Initially, this process may take several minutes.
NOTE: To quickly access the Today screen while you are using GPS
Navigation, press the red End Call button. To access GPS
Navigation again, tap the GPS Navigation icon located in the
Command bar.
IMPORTANT: In certain situations the GPS signal strength drops so low
that the GPS receiver cannot help you navigate. When this happens, you
may see a “spinning” effect in the 3D view where the screen can rotate
up to 180 degrees. To address this situation, tap on the map >
Change preferences > Turn off 3D display.
14. Once the application has your location, the next screen asks
“Would you like to specify your ‘Home’ address now?”
Tap No or Yes.
NOTE: Providing a home address is useful. For example, you can plan a
route back home from anywhere with a single tap on the screen. If you
tap No, you can add it later.
Using GPS Navigation 8–7
Page 89

If you tap Yes, perform the following steps:
a. At the top of the next screen, after the word City:, enter the
first few letters of your home city (example: Hou for Houston)
by tapping the keyboard letters on the screen.
b. From the list that displays, tap your city.
c. At the top of the screen, after the word Street:, enter the first
few letters of your street name by tapping the keyboard letters
on the screen.
d. From the list that displays, tap your street name.
e. At the top of the screen, after the words House nr:, enter your
house number.
f. Tap Done.
15. After setting your home address, tap the middle of the Main
screen to display the Options screen and tap Navigate to... >
Home to display the route home.
NOTE: If you are going to use GPS Navigation in your vehicle for an
extended period of time, connect your HP iPAQ to an Auto adapter to
save battery power. If you don’t have an Auto adapter, you can order
one at www.hp.com/go/ipaqaccessories.
Accessing the Internet on Your HP iPAQ
You must have Internet access on your HP iPAQ to be able to download
the one free GPS city map (approximately 2 MB) and the Quick GPS
Connection data file (approximately 40 KB). To do this:
1. Place the HP iPAQ in the cradle and make sure it is connected to
ActiveSync, as described in the Getting started guide.
2. Verify you have an Internet connection by using Internet Explorer.
To do this:
a. Keep the HP iPAQ in its cradle.
b. Tap Start > Internet Explorer.
c. In the text box at the top of the screen, enter your favorite web
site such as
the green arrow to the right.
If you have an Internet connection, you may skip to the “Verifying
Date and Time on Your HP iPAQ” section in this chapter.
If you do not have an Internet connection, Internet Explorer displays
an error message and you may have to access the Internet through
a proxy server.
www.google.com or www.yahoo.com and tap on
Using GPS Navigation 8–8
Page 90

To find out if you are using a proxy server, launch Internet Explorer
on your personal computer and click Tools > Internet
Options > Connections tab > LAN Settings button.
If the “Use automatic configuration script” option is selected and
the associated “Address” field is filled in, then you may be
accessing the Internet through a proxy server. Contact your
network administrator for the proxy server name and port number.
If the “Proxy server” option is selected, write the proxy server
“Address” and “Port” number on a sheet of paper. You will need to
enter this information into your HP iPAQ.
To set up proxy server settings on your HP iPAQ:
1. From the Today screen on the HP iPAQ, tap Start > Settings >
Connections tab > Connections icon > Tasks tab.
2. Under My Work Network, tap Edit my proxy server >
Proxy Settings tab.
3. Tap the This network connects to the Internet and This
network uses a proxy server to connect to the Internet
check boxes.
4. In the Proxy server box, enter the proxy server name.
5. To change port number, tap the Advanced button and enter the
number in the HTTP proxy box.
6. Tap OK to exit the program.
Using GPS Navigation 8–9
Page 91

Depending on where you are in the program, you may have to tap
OK several times to exit.
NOTE: At this point, be sure your HP iPAQ is cradled and you have
synchronized with your personal computer using ActiveSync.
7. Again verify if you have Internet access on your HP iPAQ by
visiting a web site such as
If you still cannot access the Internet, take your HP iPAQ out of the cradle
and use a GPRS connection. For details, refer to Chapter 7, in the section
”Creating a GPRS/EDGE Connection.”
Viewing the Main Screen
When you launch GPS Navigation, the main screen displays. Use the
main screen to navigate to your destination. Your position displays on the
map using your GPS receiver.
IMPORTANT: If your GPS receiver has not yet determined a clear
position from the GPS satellites, the main screen displays your last known
position. To indicate that your actual position is unknown, the screen will
display in black and white instead of the standard colors.
NOTE: If you frequently use your HP iPAQ’s GPS Navigation capability
while driving, you could consider connecting the HP iPAQ to your
automobile’s power outlet. An Auto adapter for your HP iPAQ can be
purchased separately at www.hp.com/go/ipaqaccessories.
www.google.com or www.yahoo.com.
1 “Zoom in” button
2 “Zoom out” button
3 “Next highway” indicator
4 Your current GPS location
5 “Sound Off” warning
indicator
6 Signal Strength bars
7 Journey information
8 Name of the next street
9 Next instruction
The dark red path indicates the calculated route. The instructions guide
you along this path to reach your destination.
Using GPS Navigation 8–10
Page 92

No. Explanation
1 + Zoom In button. This button is always located in the same position.
2 - Zoom out button. This button is always located in the same position.
3
Indicates the next highway on the current map.
4
5
6
7
8
9
Your current GPS location.
“Sound off” warning indicator. If this indicator is not shown,
displayed instructions will be accompanied by voice instructions. Use
the Sound preference to turn on/off voice instructions.
Signal strength bars indicate the strength of the GPS signal.
The journey information shows the current time, estimated time of
arrival and the time left to reach the destination.
The bottom of the screen shows the street name you will reach if you
follow the current driving instruction.
Your next driving instruction shows an arrow for the direction to
follow and a distance indicator to that point.
NOTE: If you make a turn other than the one in the instructions (by
mistake or on purpose), the GPS Navigation adjusts almost instantly
to the new situation. It keeps guiding you to your current destination
as fast as it can calculate.
NOTE: When the battery is low, a low battery warning blinks in the area
where you normally see your current speed.
Operating the Main Screen
2
11
1 Tap somewhere in the middle
of the map to open the menu.
2 Tap the instruction area to
repeat the last spoken
instruction (if still available
and if volume is turned on).
3 Tap the journey information
area to open the detailed
route summary.
3
Using GPS Navigation 8–11
Page 93

Using the Menu
The menu provides access to all Navigation functions and consists of two
screens. Use the button to browse the menu screens.
1. To open the menu, tap in the middle of the Main screen.
2. To select an icon, tap it.
NOTE: If an icon is dimmed, it is not available.
1 Menu command bar
5 Relevant information
(if available)
2 Current time
3 Menu options
4 Next page button
6 Cancel button
Option Function
Navigate to . . .—Tap to calculate a route from your current
position to a destination. The destination can be anything
except your current position.
Find alternative—Tap to recalculate a new route if you do
not like the original route.
Clear route—Tap to remove the calculated route. The screen
shows your position on the map without providing route
instructions or indicators.
Note: Clear route is not available when there is no
calculated route.
Add favorite—Add a location to your Favorites list. Use any
type of location except another favorite. Use the Picking
locations menu to enter the location.
Change preferences—Change night/day screen colors, 3D
Display mode, map display, volume, voice selection, mute
sound, points of interest, etc.
Using GPS Navigation 8–12
Page 94

Option Function
Plan from A to B—Without a valid GPS signal, you can still
use this to calculate a route. When you want to prepare for
your trip in advance and you are not in your car, this is a
valuable function. Use it to find out how long a trip would take,
or how long it would take someone to travel to your home. The
difference between this function and the Navigate to...
function is that Navigate to... uses your current GPS location
as the departure, and this function requires you to enter the
departure location manually.
Browse map—Use to explore and search for locations in the
map browser. This is a digital version of your paper map with
detailed information available.
Show route instructions—Shows the calculated route as
written instructions. This icon is not available when there is no
route calculated.
Guided tour—Use for a brief guided tour of the application,
the most important menu options, and the map browser.
Exit application—Tap to exit the GPS program.
NOTE: Use the Next page icon to cycle through the two-page menu.
Setting a Destination
To set a destination from your home address or current location to a
new address:
1. Tap the middle of the map or main screen to open the
Options
2. Tap the icon Navigate to... on the Options screen.
3. Tap the icon Address on the Navigate to... screen to enter a
new
screen.
address.
(continued)
NOTE: After you add your frequently used addresses to your Favorites
list, you will be able to tap the Favorite icon in place of the Address
icon and tap the address from your Favorites list instead of re-entering it
on the screen.
4. Use the keyboard to enter the first few letters of the city name and
select the city from the list on the screen.
5. Use the keyboard to enter the first few letters of the Street name
and select the street from the list on the screen.
6. Enter the House or street number or specify a precise location on a
long street.
7. Tap Done when you are finished and the main screen will display.
Using GPS Navigation 8–13
Page 95

NOTE: You must first tap the Navigate to... icon on the main
menu to select any of the following items: Home, Favorite, Address,
GPS Position, Recent destination, or Point of interest.
Adding a Favorite
To quickly access the addresses that you frequently use, add them to the
Favorites list:
1. Tap in the middle of the main screen to display the Options screen.
2. Tap Add favorite.
3. Tap one of the following icons on the Add as favorite screen
and complete the instructions after each item below to add
a
favorite:
• Home—If the appropriate home address displays, use the on-
screen keypad to enter a name for the address, and tap
Done.
• Address—Enter the City, Street, and House nr. and tap
Done. Enter a name for the address and tap Done.
• GPS position—Shows your current location.
• Recent destination—Tap the appropriate address from the
displayed list, enter a name for the address, and tap Done.
• Point of interest—Tap the selection icon (Pharmacy, Gas
Station, Doctor, Restaurant, or Hotel/Motel) and tap the name
or address from the displayed list or, if the selection you are
looking for does not display, enter the first few letters of the
name at the top of the screen. Tap Done.
Selecting a Favorite Address
After you have added your favorite addresses to the Favorite list, you will
be able to quickly select them for GPS directions.
To select a Favorite address:
1. Tap in the middle of the main screen to open the Options screen.
2. Tap Navigate to... , then tap Favorite.
Using GPS Navigation 8–14
Page 96

3. Tap your favorite address from the list and the main screen with the
directions to the selected address displays.
NOTE: To rename or delete an address from your Favorite list, on the
Option screen, tap Change preferences > Maintain favorites.
Tap the address to be renamed or deleted, and tap the Rename or
Delete button.
Using the Route Summary Screen
The route summary screen gives you an overview of the calculated route.
From this screen, you decide how to use the route. The route summary
screen displays immediately after calculating a route. For example, it
displays after using Navigate to..., Plan from A to B, or Find
alternative... .
1 Current destination
2 Battery and GPS
indicators
3 Map showing the
calculated route
4 GPS location
5 Application version
6 Journey summary
9 Route
button
• Tap the Route button 9 to display a complete list of
• Tap the Map button 8 to browse around on the map of your route.
• Tap the Done button 7 to start navigating in the main screen.
instructions.
route
8 Map
Using the Map Browser
Use the map browser to browse the map. You will find the same items on
the screen map as on a paper map, for example - cities, town, roads,
streets, rivers and lakes, points of interest (such as gas stations,
restaurants, hospitals, lodging, parks, etc.).
You will also be able to find your current GPS position, favorite locations,
or current departure and destination.
To access the Map browser:
1. Tap in the middle of the Main screen.
2. Tap Browse map on the Options screen.
button
7 Done
button
Using GPS Navigation 8–15
Page 97

1 Scale bar
2 GPS button
3 Zoom slider
4 Cursor position
5 Your current GPS
location
6 Done button
9 Options 8 Search 7 Cursor
button
The blinking icon (No. 4) represents your cursor position. Tap the
map anywhere to place the cursor at that position.
button
button
1
2
3
4
5
6
7
8
9
Option Function
Scale bar Indicates scale ratio to screen display
Tap the GPS button (located on the top, right corner of the
screen) to re-center the map around your current
GPS location.
Zoom Slider To zoom in, move the slider down
To zoom out, move the slider up
Cursor Position Current cursor position
GPS Location Your current GPS location
Done Tap Done to return to the main screen.
Use the cursor button to calculate a route from your current
location, find a point of interest, center the map around the
cursor location, or turn the cursor location into a favorite.
Use the search button to search for a specific location.
Options Use the Options button to change items currently displayed
on the map:
Show the number of roads and streets
Show the number of street names
Show or hide all points of interest
Show or hide favorites
Using GPS Navigation 8–16
Page 98

Switching to a Schematic View
Instead of viewing the main screen, you can switch to an at-a-glance
schematic view to display driving instructions. To switch to the schematic
view, from the Options menu, tap Change preferences > Turn
Off Map display .
NOTE: You can also set the menu to hide the map only when you go
faster than a certain speed.
1 “Sound off”
6
warning indicator
2 Next instruction
5
3 Journey information
4 Name of the street
you are currently on
5 The schematic
4
instruction arrow
6 The name of the next
street
1
2
Using the Browsers
• On any screen, tap a line to select it. To go back to the previous
screen without selecting anything, press the BACK or
CANCEL
• If there are more lines than are able to fit on the screen, you can
browse to the other lines or pages by tapping
button.
3
or .
Using GPS Navigation 8–17
Page 99

• When a line has too much text to fit on a screen, it is abbreviated.
When you tap an item and keep your finger or stylus on the
screen, the item adjusts in size to show the complete text.
To browse for items with a particular name, type the first few letters of the
name by tapping the buttons on the Thumb keyboard.
To remove a character, tap the Del key on the keyboard.
To enter digits and special symbols, tap the Blue Function key first, then
press the key with the special digit or symbol on it.
Selecting Locations
Use the following procedure to select an item on the
Navigate to... screen:
1. Tap in the middle of the map main screen.
2. Tap the Navigate to... icon and tap one of the
following icons:
• Home—your home location
• Favorite—favorite locations
• Address—a city, street and house number
• GPS position—Your current location
• Recent destination—a recently traveled location
Using GPS Navigation 8–18
Page 100

• Point of Interest (POI)—points of interest such as a restaurant,
hotel, hospital, park, hospital, etc.
Selecting your Home Location
• On the Options screen, tap Navigate to... , then tap the
Home icon and the main screen displays showing the way home
if you have already entered your home address.
• On the Options screen, change your Home location by tapping
Change Preferences
Location preference. See the section on ”Setting Your Preferences”
in this chapter.
NOTE: If you do not specify a Home location, the home icon in the
location menu will remain dimmed.
, then tapping the Change Home
Selecting a Favorite
1. Tap the middle of the Main screen.
2. Tap the Navigate to... icon, then tap Favorite and select an
address from the displayed list.
Selecting a Recent Destination
1. Tap the middle of the Main screen.
2. Tap the Navigate to... icon, then tap Recent destination and
select a recent destination from the displayed list.
Selecting your GPS Position
1. Tap in the middle of the Main screen.
2. Tap the Navigate to... icon, then tap GPS position.
When you tap the GPS Position icon in the location menu, you are
selecting your current location.
Using GPS Navigation 8–19
 Loading...