

HP IPAQ HW6500 User Manual

HP iPAQ hw6500
Mobile Messenger series
How Do I...?
Look inside to find answers to frequently asked
questions about product setup, features, and more.

© 2005 Hewlett-Packard Development Company, L.P.
Microsoft, Windows, the Windows logo, Outlook, and ActiveSync are trademarks of
Microsoft Corporation in the U.S. and other countries.
HP iPAQ hw6500 Mobile Messenger series is Powered by Windows® Mobile™
2003 Second Edition software for Pocket PC.
All other product names mentioned herein may be trademarks of their respective
companies.
Hewlett-Packard Company shall not be liable for technical or editorial errors or
omissions contained herein. The information is provided “as is” without warranty of
any kind and is subject to change without notice. The warranties for Hewlett-Packard
products are set forth in the express limited warranty statements accompanying such
products. Nothing herein should be construed as an additional warranty.
WARNING! Text set off in this manner indicates that failure to follow
directions could result in bodily harm or loss of life.
CAUTION: Alerts the user that failure to follow a procedure exactly as
described can result in either loss of data or damage to hardware or
software.
How Do I ...?
HP iPAQ hw6500 Mobile Messenger series
First Edition (June 2005)
Document Part Number: 378870-001

How Do I
Find Out What’s On My CD? . . . . . . . . . . . . . . . . . . . . . . . . . . 1
Install Microsoft ActiveSync? . . . . . . . . . . . . . . . . . . . . . . . . . . . 1
Create an ActiveSync Partnership? . . . . . . . . . . . . . . . . . . . . . . . 5
Synchronize My HP iPAQ to a Personal Computer? . . . . . . . . . . . 8
Perform a Soft (“Normal”) Reset? . . . . . . . . . . . . . . . . . . . . . . . 11
Perform a Hard (“Full”) Reset? . . . . . . . . . . . . . . . . . . . . . . . . . 12
Use the TodayPanel to Monitor My System Resources? . . . . . . . . 13
Migrate Data from Palm Desktop Software to Windows
Mobile 2003? . . . . . . . . . . . . . . . . . . . . . . . . . . . . . . . . . . . . 14
Keep Files Synchronized on My Personal Computer and
My HP iPAQ? . . . . . . . . . . . . . . . . . . . . . . . . . . . . . . . . . . . . 15
Insert the Subscriber Identity Module (SIM) Card Correctly? . . . . . 16
Manage Available Storage? . . . . . . . . . . . . . . . . . . . . . . . . . . 17
Insert and Remove My Battery Correctly?. . . . . . . . . . . . . . . . . . 19
Maximize Battery Life and Check Battery Charge Levels? . . . . . . 20
Place and Receive Phone Calls? . . . . . . . . . . . . . . . . . . . . . . . . 22
Set Up and Access My Voicemail? . . . . . . . . . . . . . . . . . . . . . . 24
Make a Conference Call? . . . . . . . . . . . . . . . . . . . . . . . . . . . . 25
Use the HP iPAQ Phone Outside of Your Home Country? . . . . . . 25
Change My Phone Services Settings? . . . . . . . . . . . . . . . . . . . . 25
Change the Call Forwarding Settings? . . . . . . . . . . . . . . . . . . . 26
Send, Receive, and Reply to Text Messages? . . . . . . . . . . . . . . . 26
Set Up And Manage an E-mail Account on My HP iPAQ? . . . . . . 28
E-mail Using My HP iPAQ? . . . . . . . . . . . . . . . . . . . . . . . . . . . 29
Use GSM, GPRS and EDGE? . . . . . . . . . . . . . . . . . . . . . . . . . . 30
Turn on GSM? . . . . . . . . . . . . . . . . . . . . . . . . . . . . . . . . . . . . 31
Connect to a GPRS/EDGE Network? . . . . . . . . . . . . . . . . . . . . 31
Get Started Using GPS Navigation on the HP iPAQ? . . . . . . . . . 32
Use the Built-in Digital Camera to Take and Send Pictures? . . . . . 36
View Pictures That I’ve Already Taken? . . . . . . . . . . . . . . . . . . . 38
Save Pictures to a Memory Card?. . . . . . . . . . . . . . . . . . . . . . . 39
Send Pictures Using Multimedia Messaging Service (MMS)
or E-mail? . . . . . . . . . . . . . . . . . . . . . . . . . . . . . . . . . . . . . . . 39
Find Out More About Expansion Cards? . . . . . . . . . . . . . . . . . . 41
Communicate If I am Using a Headset? . . . . . . . . . . . . . . . . . . . 41
Use Bluetooth? . . . . . . . . . . . . . . . . . . . . . . . . . . . . . . . . . . . . 42
iii

How Do I
Turn Bluetooth On and Off? . . . . . . . . . . . . . . . . . . . . . . . . . . . 42
Make My HP iPAQ Invisible to Other Bluetooth Devices?. . . . . . . 43
Use Bluetooth to Transfer Files to a Pocket PC, Computer
or Printer? . . . . . . . . . . . . . . . . . . . . . . . . . . . . . . . . . . . . . . . 44
Protect My HP iPAQ from Screen Damage or Cracking? . . . . . . . 45
Find the Product ID, Serial Number, and IMEI Number on
My HP iPAQ? . . . . . . . . . . . . . . . . . . . . . . . . . . . . . . . . . . . . 46
Find Information On Topics Not Covered in This Booklet? . . . . . . 48
iv

How Do I...?
This document is intended to answer the most frequently asked questions
regarding the HP iPAQ hw6500 Mobile Messenger series. For complete
setup and installation instructions, refer to the printed Getting Started
document in the box or the User’s Guide located on the Companion CD.
To receive further support from a qualified technical support specialist in
the United States, choose from the following:
• Contact Cingular at 1.866.Cingular (1.866.246.4852) or dial
611 from your Cingular phone (available 24 hours a day, 7 days
week)
a
• Visit www.cingular.com
If you purchased the product in the United States but are traveling
internationally and need support, call 1.916.843.4685 (available 24
hours a day, 7 days a week).
How Do I Find Out What’s On My CD?
The Companion CD is located in the box and contains:
• Microsoft ActiveSync 3.8
• Microsoft Outlook 2002
• HP Add-On Software Applications
• HP iPAQ hw6500 Mobile Messenger series User’s Guide
• How Do I...? Guide (this document)
• Know Your Options (Accessories Information)
• Important Safety Information
NOTE: All of the documents located on the Companion CD are in
printable format, if you prefer a hardcopy document.
All of the software and documents are designed to be installed on your
pers o n a l c o m p u t er to en h a n c e your ability to use your HP iPAQ to its ful lest
potential. The CD also contains software and drivers that can be installed
directly onto your HP iPAQ for use on the go.
NOTE: Save the original packaging for the CD because the Microsoft
product key for installing Microsoft Outlook is located on the sticker on
the CD packaging. You need that information if you ever need to reinstall
Outlook on your personal computer.
How Do I Install Microsoft ActiveSync?
Microsoft ActiveSync, located on the Companion CD, is the software that
allows your HP iPAQ and your personal computer to communicate with
each other.
1

Before you connect your HP iPAQ to your computer, insert the Companion
CD into your computer and let the HP iPAQ Setup Wizard guide you
step-by-step in setting up your HP iPAQ and computer.
NOTE: If the HP iPAQ Setup Wizard detects an earlier version of
ActiveSync or Outlook on your computer, it prompts you to install the most
recent version from the Companion CD. It is recommended that you do
so; however, be sure to back up your files before installation begins.
To run the HP iPAQ Setup Wizard and install Microsoft ActiveSync:
1. Insert the Companion CD that came with your HP iPAQ into the CDROM drive on your computer. The HP iPAQ Setup Wizard
starts
automatically.
2. Select Start Here.
3. Read the Welcome page, make sure your HP iPAQ is not yet
connected to your computer, and select Next.
4. Select Next again and the Steup Wizard starts scanning your
system. When the Setup Wizard scans your system, it
recommends programs for you to load.
NOTE: If you want to synchronize your calendar, contacts, inbox, notes,
and/or tasks, it is recommended that you allow the Setup Wizard to
install Outlook 2002. Microsoft Outlook Express does not work with the
HP iPAQ and ActiveSync.
5. Likewise, the Setup Wizard scans your system to detect earlier
versions of Windows Media Player and HP Image Zone. It is
recommended that you allow the Wizard to install these programs
in order to take advantage of all functions on your HP iPAQ. Select
Next to continue.
2

6. When the Connecting your HP iPAQ to your PC screen
displays, connect your HP iPAQ to your personal computer. The
Setup Wizard automatically takes you to the next step after you
connect your HP iPAQ with your personal computer.
7. Follow the online screen instructions.
8. When the Set Up Microsoft ActiveSync window displays,
click
Next.
3
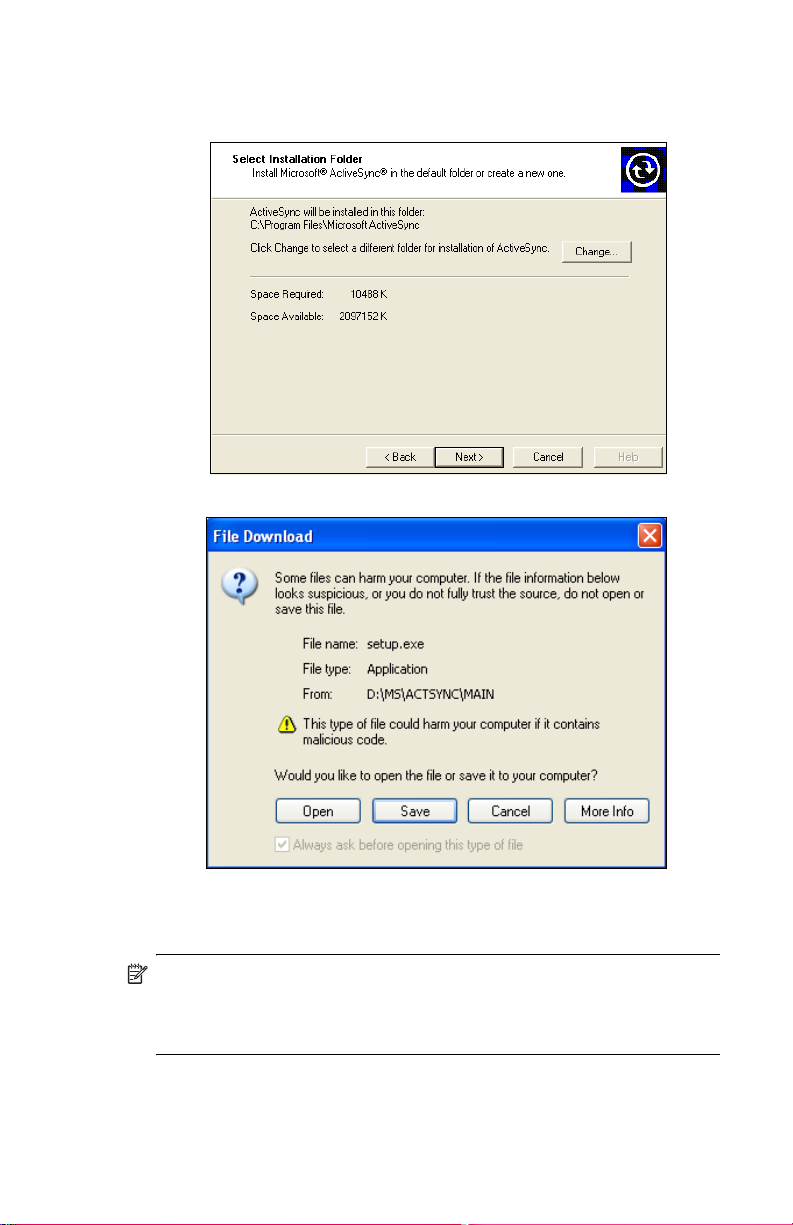
9. When the Select Installation Folder for Microsoft ActiveSync
window displays, accept the default location offered, or select
Change... to specify a different location.
10. When the File Download window displays, click Open.
You will know ActiveSync installed successfully when you see the Set Up
a Partnership screen. Proceed to the next section, ”How Do I Create an
ActiveSync Partnership?”
NOTE: If you are having trouble installing ActiveSync and have firewall
software installed, try disabling the firewall software before the
ActiveSync installation and enabling it again after the installation
is complete.
4

Using Microsoft Exchange ActiveSync
Exchange ActiveSync in Microsoft Exchange Server 2003 allows the
HP iPAQ to access corporate information on a server running Exchange
server software. It allows ActiveSync enabled devices to synchronize
mailbox items over a GPRS or wireless connection without using a desktop
computer, cradle, and desktop synchronization software.
You can also synchronize your mobile device with the Exchange server
using the desktop pass-through option present in all Windows Mobilebased devices. For more information on Microsoft Exchange ActiveSync,
refer to “Using ActiveSync” in Chapter 3 of the User’s Guide located on
the Companion CD.
How Do I Create an ActiveSync Partnership?
A Microsoft ActiveSync partnership allows your HP iPAQ and your
personal computer to communicate with each other. To synchronize your
HP iPAQ and your personal computer, you must first create a partnership
using ActiveSync. You only need to create a partnership once.
These instructions provide information on creating a basic partnership.
Other partnership options are available. For more detailed instructions,
refer to “Using ActiveSync” in Chapter 3 of the User’s Guide located on
the Companion CD.
To create an ActiveSync partnership between your HP iPAQ and your
personal computer:
1. When the Get Connected screen is displayed during
ActiveSync
personal computer by attaching the free end of the USB cable to the
USB port on your personal computer. Then connect one end of the
AC adapter to the cradle and the other end to an electrical outlet.
2. Turn on your HP iPAQ by pressing the Power button, and then
insert it into the cradle.
installation, connect the HP iPAQ Cradle to your
5
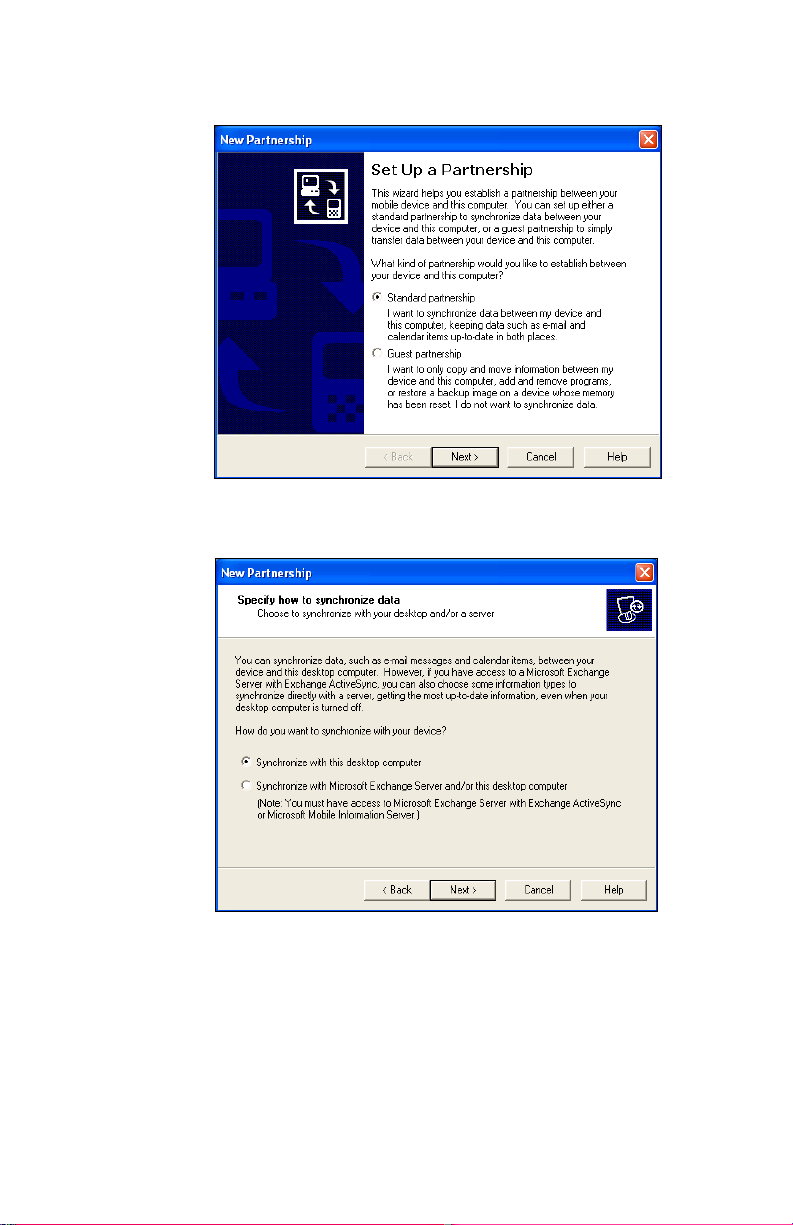
3. When the Set Up a Partnership screen displays, select
Standard Partnership and click Next.
4. When the New Partnership screen displays, select
Synchronize with this desktop computer, and then
Next.
click
6

5. When the Select Number of Partnerships screen displays,
choose whether you want to synchronize with one computer or two
(e.g., home and office).
6. When the Select Synchronization Settings screen displays,
check the items you want to synchronize between your HP iPAQ
and your personal computer.
7. When the Setup Complete screen displays, click Finish.
ActiveSync immediately begins synchronizing.
7

Do you want to learn more about:
• setting up a guest partnership?
• setting up a partnership with a server?
• setting up a partnership with two computers?
• setting up a partnership for two handheld devices?
• setting up and using AvantGo?
Refer to the Microsoft Windows Mobile Web site at www.microsoft.com/
windowsmobile. Under Help and How To on the left side of the
window, select For Pocket PC. Fill in your region, your device, and your
operating system; then click the Get Support button. Under Support
Topics on the left side of the window, select ActiveSync.
How Do I Synchronize My HP iPAQ to a Personal Computer?
Synchronizing your HP iPAQ and your personal computer allows you to
keep the same information (such as calendar, contacts, and e-mails) in
both places, making it available when you work on your personal
computer or when you take your HP iPAQ on the go. There are several
ways to synchronize your HP iPAQ with your personal computer:
• HP iPAQ Cradle
• Autosync cable
• Bluetooth
• Infrared
• GPRS/EDGE
To synchronize your personal computer and your HP iPAQ using
the cradle:
1. Be sure ActiveSync is installed on your personal computer. Refer to
”How Do I Install Microsoft ActiveSync?” in this document for
more information.
8
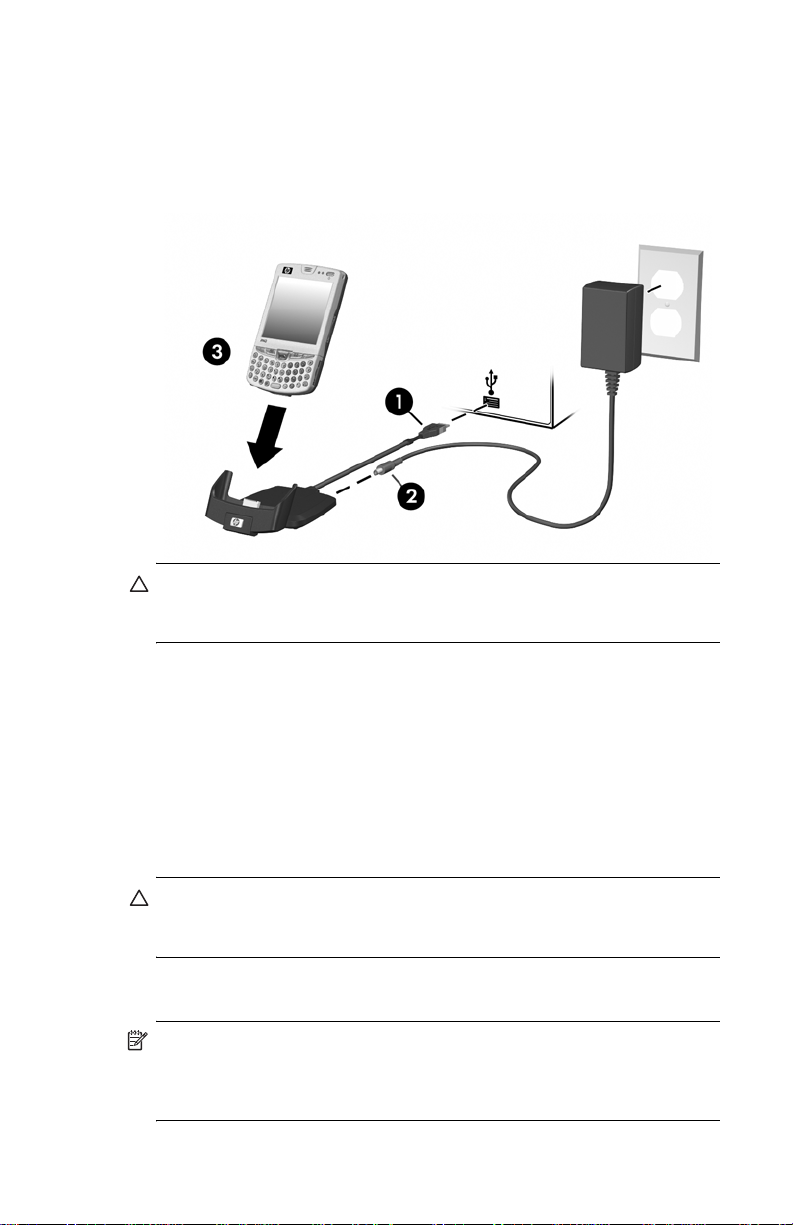
2. Connect the USB connector on the cradle 1 to the USB port on
3. Connect one end of the AC Adapter 2 to the cradle and connect
4. Insert the HP iPAQ in the cradle 3 and push firmly to seat it.
CAUTION: To avoid damaging your HP iPAQ or the cradle, check to be
sure the HP iPAQ and cradle connectors are properly aligned before
pushing the unit into the cradle.
computer.
your
the other end to an electrical outlet to charge the unit.
Synchronization begins automatically.
To synchronize your personal computer and your HP iPAQ using the
autosync cable:
1. Be sure ActiveSync is installed on your personal computer. Refer to
”How Do I Install Microsoft ActiveSync?” in this document for
more information.
2. Plug the AC adapter into an electrical outlet, then connect the other
end of the AC adapter to the AC connector on the autosync cable.
3. Connect the 22-pin connector on the autosync cable to the universal
sync connector on the bottom of your HP iPAQ.
CAUTION: To avoid damaging your HP iPAQ or the autosync cable, be
sure the HP iPAQ and cable connectors are properly aligned before
pushing the cable into the universal sync connector.
4. Connect the other end of the autosync cable to the USB port on
your computer. Synchronization begins automatically.
NOTE: If you must log onto a server such as your company’s Virtual
Private Network (VPN), you might receive a message from ActiveSync
telling you it is unable to synchronize. You must first log onto the server for
ActiveSync to synchronize.
9

If ActiveSync does not begin synchronizing, start it manually:
On your personal computer, open ActiveSync by clicking Start >
Programs > Microsoft ActiveSync > Sync.
Occasionally when attempting to synchronize to a personal computer, you
might receive an “Unable to Detect Device” error message. This usually
means your cradle is not properly connected to the USB port on your
computer or your HP iPAQ is not seated firmly in the cradle.
If you get this error:
1. Make sure the USB connector is securely connected to your cradle
and your personal computer.
2. Make sure that your HP iPAQ is connected to the communications
port in the cradle.
Once the connection issue is resolved, ActiveSync begins
synchronizing automatically.
NOTE: If you have numerous e-mails and contacts on your personal
computer, you may have to synchronize your HP iPAQ with your PC
several times before all of the information downloads to your HP iPAQ.
To find out how to resolve other error messages, refer to “Troubleshooting”
in Chapter 14 of the User’s Guide located on the Companion CD.
There are many error messages that can be received when synchronizing.
For the best answers to troubleshooting these errors, refer to the Microsoft
Windows Mobile Web site at www.microsoft.com/windowsmobile
Under Help and How To on the left side of the window, select For
Pocket PC . Fill in your region, your device, and your operating system;
then click the Get Support button. Under Support Topics on the left
side of the window, select the Support Topic that best applies to the error
message you received.
.
Do you want to learn more about:
• synchronizing using Bluetooth?
• synchronizing using Infrared?
• synchronizing using GPRS/EDGE?
• troubleshooting synchronization connection problems?
Refer to the User’s Guide located on the Companion CD.
10

How Do I Perform a Soft (“Normal”) Reset?
A soft reset (also known as a normal reset) stops all running applications,
but does not erase any programs or saved data.
Perform a soft reset when:
• you want to stop all running applications
• after installing a new application
• if your HP iPAQ “locks up”
CAUTION: Be sure to save your data in all currently open applications
before performing a soft reset since a soft reset erases all unsaved data.
To perform a soft reset:
1. Locate the recessed Reset button on the bottom right side of your
HP iPAQ.
2. Use the stylus to lightly press and release the Reset button.
The HP iPAQ restarts and displays the Today screen.
NOTE: A soft reset does not change any Bluetooth or ActiveSync settings
on your HP iPAQ.
11

How Do I Perform a Hard (“Full”) Reset?
Perform a hard reset (also known as a full reset) when you want to clear
all settings, programs, and data from Random-Access Memory (RAM).
CAUTION: If you perform a hard reset, your HP iPAQ returns to its default
settings and loses all information (files, settings, etc.) that is not recorded
in Read-Only Memory (ROM). However, information stored in iPAQ File
Store will not be lost. For more information on using iPAQ File Store, refer
to “Using iPAQ File Store Folder” in Chapter 2 of the User’s Guide
located on the Companion CD.
To perform a hard reset:
1. Press and hold the Power button.
2. While holding the Power button, use the stylus to lightly press the
Reset button on the bottom right side of the HP iPAQ for about
five
seconds.
3. Once the HP iPAQ screen fades, release the Power button and
remove the stylus from the Reset button.
12
 Loading...