

Page 1

Smart Setup Guide
HP Integrity Servers for Microsoft Windows Server 2003
Manufacturing Part Number: 5990-8222
January 2005
© Copyright 2005
Hewlett-Packard Development Company, L.P.
Page 2

Legal Notices
© Copyright 2005 Hewlett-Packard Development Company, L.P
Confidential computer software. Valid license from HP required for possession, use or
copying. Consistent with FAR 12.211 and 12.212, Commercial Computer Software,
Computer Software Documentation, and Technical Data for Commercial Items are
licensed to the U.S. Government under vendor's standard commercial license.
The information contained herein is subject to change without notice. The only
warranties for HP products and services are set forth in the express warranty
statements accompanying such products and services. Nothing herein should be
construed as constituting an additional warranty. HP shall not be liable for technical or
editorial errors or omissions contained herein.
Microsoft and Windows are U.S. registered trademarks of Microsoft Corporation. Intel
and Itanium are registered trademarks of Intel Corporation or its subsidiaries in the
United States and other countries. Linux is a U.S. registered trademark of Linus
Torvalds.
ii
Page 3

1. Planning the installation
Overview. . . . . . . . . . . . . . . . . . . . . . . . . . . . . . . . . . . . . . . . . . . . . . . . . . . . . . . . . . . . . . . . . . . . . . . . . . . . 6
Choosing an installation scenario . . . . . . . . . . . . . . . . . . . . . . . . . . . . . . . . . . . . . . . . . . . . . . . . . . . . . . . . 7
Choosing an installation environment . . . . . . . . . . . . . . . . . . . . . . . . . . . . . . . . . . . . . . . . . . . . . . . . . . . . 8
Using a local console. . . . . . . . . . . . . . . . . . . . . . . . . . . . . . . . . . . . . . . . . . . . . . . . . . . . . . . . . . . . . . . . . 9
Using a remote console . . . . . . . . . . . . . . . . . . . . . . . . . . . . . . . . . . . . . . . . . . . . . . . . . . . . . . . . . . . . . . 10
Using PXE/RIS . . . . . . . . . . . . . . . . . . . . . . . . . . . . . . . . . . . . . . . . . . . . . . . . . . . . . . . . . . . . . . . . . . . . 11
Using the HP Smart Setup media . . . . . . . . . . . . . . . . . . . . . . . . . . . . . . . . . . . . . . . . . . . . . . . . . . . . . 12
Using the Microsoft RTM media . . . . . . . . . . . . . . . . . . . . . . . . . . . . . . . . . . . . . . . . . . . . . . . . . . . . . . 12
Using the HP Reinstallation media . . . . . . . . . . . . . . . . . . . . . . . . . . . . . . . . . . . . . . . . . . . . . . . . . . . . 12
Using EFI . . . . . . . . . . . . . . . . . . . . . . . . . . . . . . . . . . . . . . . . . . . . . . . . . . . . . . . . . . . . . . . . . . . . . . . . . . 12
EFI Boot Manager . . . . . . . . . . . . . . . . . . . . . . . . . . . . . . . . . . . . . . . . . . . . . . . . . . . . . . . . . . . . . . . . . 13
EFI Shell . . . . . . . . . . . . . . . . . . . . . . . . . . . . . . . . . . . . . . . . . . . . . . . . . . . . . . . . . . . . . . . . . . . . . . . . . 13
Installation Process . . . . . . . . . . . . . . . . . . . . . . . . . . . . . . . . . . . . . . . . . . . . . . . . . . . . . . . . . . . . . . . . . . 14
2. Preparing for installation
Ensuring platform compatibility. . . . . . . . . . . . . . . . . . . . . . . . . . . . . . . . . . . . . . . . . . . . . . . . . . . . . . . . 18
Check system firmware version . . . . . . . . . . . . . . . . . . . . . . . . . . . . . . . . . . . . . . . . . . . . . . . . . . . . . . . 18
Check hardware compatibility . . . . . . . . . . . . . . . . . . . . . . . . . . . . . . . . . . . . . . . . . . . . . . . . . . . . . . . . 18
Preparing servers with 4GB DIMMs . . . . . . . . . . . . . . . . . . . . . . . . . . . . . . . . . . . . . . . . . . . . . . . . . . . 18
Back up existing data . . . . . . . . . . . . . . . . . . . . . . . . . . . . . . . . . . . . . . . . . . . . . . . . . . . . . . . . . . . . . . . 19
Setting up a console . . . . . . . . . . . . . . . . . . . . . . . . . . . . . . . . . . . . . . . . . . . . . . . . . . . . . . . . . . . . . . . . . . 20
Set up a remote console . . . . . . . . . . . . . . . . . . . . . . . . . . . . . . . . . . . . . . . . . . . . . . . . . . . . . . . . . . . . . 20
Set up a local console . . . . . . . . . . . . . . . . . . . . . . . . . . . . . . . . . . . . . . . . . . . . . . . . . . . . . . . . . . . . . . . 21
Setting up PXE/RIS . . . . . . . . . . . . . . . . . . . . . . . . . . . . . . . . . . . . . . . . . . . . . . . . . . . . . . . . . . . . . . . . . . 22
Set up RIS server . . . . . . . . . . . . . . . . . . . . . . . . . . . . . . . . . . . . . . . . . . . . . . . . . . . . . . . . . . . . . . . . . . 22
Set up PXE on the HP Integrity server . . . . . . . . . . . . . . . . . . . . . . . . . . . . . . . . . . . . . . . . . . . . . . . . . 22
Preparing the server hardware . . . . . . . . . . . . . . . . . . . . . . . . . . . . . . . . . . . . . . . . . . . . . . . . . . . . . . . . . 24
Set up the boot drive. . . . . . . . . . . . . . . . . . . . . . . . . . . . . . . . . . . . . . . . . . . . . . . . . . . . . . . . . . . . . . . . 24
Locate the DVD/CD drive . . . . . . . . . . . . . . . . . . . . . . . . . . . . . . . . . . . . . . . . . . . . . . . . . . . . . . . . . . . . 24
Set ACPI flag to windows (cell-based servers only) . . . . . . . . . . . . . . . . . . . . . . . . . . . . . . . . . . . . . . . 25
Set Cell Local Memory to 100% (cell-based servers only). . . . . . . . . . . . . . . . . . . . . . . . . . . . . . . . . . . 26
Locating the Microsoft Certificate of Authenticity. . . . . . . . . . . . . . . . . . . . . . . . . . . . . . . . . . . . . . . . . . 26
Contents
3. Installing the OS
Installing from a local console . . . . . . . . . . . . . . . . . . . . . . . . . . . . . . . . . . . . . . . . . . . . . . . . . . . . . . . . . . 32
Run EBSU . . . . . . . . . . . . . . . . . . . . . . . . . . . . . . . . . . . . . . . . . . . . . . . . . . . . . . . . . . . . . . . . . . . . . . . . 32
Run Windows Setup . . . . . . . . . . . . . . . . . . . . . . . . . . . . . . . . . . . . . . . . . . . . . . . . . . . . . . . . . . . . . . . . 35
Set NOVESA option (cell-based server with Graphics USB combo) . . . . . . . . . . . . . . . . . . . . . . . . . . 37
Specify server settings . . . . . . . . . . . . . . . . . . . . . . . . . . . . . . . . . . . . . . . . . . . . . . . . . . . . . . . . . . . . . . 38
Installing from a remote console . . . . . . . . . . . . . . . . . . . . . . . . . . . . . . . . . . . . . . . . . . . . . . . . . . . . . . . . 39
Run EBSU . . . . . . . . . . . . . . . . . . . . . . . . . . . . . . . . . . . . . . . . . . . . . . . . . . . . . . . . . . . . . . . . . . . . . . . . 39
Run Windows Setup . . . . . . . . . . . . . . . . . . . . . . . . . . . . . . . . . . . . . . . . . . . . . . . . . . . . . . . . . . . . . . . . 42
Set NOVESA option (cell-based server with Graphics USB combo) . . . . . . . . . . . . . . . . . . . . . . . . . . 44
Enter the product key. . . . . . . . . . . . . . . . . . . . . . . . . . . . . . . . . . . . . . . . . . . . . . . . . . . . . . . . . . . . . . . 45
Installing from PXE . . . . . . . . . . . . . . . . . . . . . . . . . . . . . . . . . . . . . . . . . . . . . . . . . . . . . . . . . . . . . . . . . . 45
iii
Page 4

Contents
Reinstalling from a local console . . . . . . . . . . . . . . . . . . . . . . . . . . . . . . . . . . . . . . . . . . . . . . . . . . . . . . . . 47
Load the system image . . . . . . . . . . . . . . . . . . . . . . . . . . . . . . . . . . . . . . . . . . . . . . . . . . . . . . . . . . . . . . 48
Specify server settings . . . . . . . . . . . . . . . . . . . . . . . . . . . . . . . . . . . . . . . . . . . . . . . . . . . . . . . . . . . . . . 48
Reinstalling from a remote console . . . . . . . . . . . . . . . . . . . . . . . . . . . . . . . . . . . . . . . . . . . . . . . . . . . . . . 49
Load the system image . . . . . . . . . . . . . . . . . . . . . . . . . . . . . . . . . . . . . . . . . . . . . . . . . . . . . . . . . . . . . . 49
Specify server settings . . . . . . . . . . . . . . . . . . . . . . . . . . . . . . . . . . . . . . . . . . . . . . . . . . . . . . . . . . . . . . 50
Verifying the installation. . . . . . . . . . . . . . . . . . . . . . . . . . . . . . . . . . . . . . . . . . . . . . . . . . . . . . . . . . . . . . 52
Check hardware status. . . . . . . . . . . . . . . . . . . . . . . . . . . . . . . . . . . . . . . . . . . . . . . . . . . . . . . . . . . . . . 52
Install new device drivers . . . . . . . . . . . . . . . . . . . . . . . . . . . . . . . . . . . . . . . . . . . . . . . . . . . . . . . . . . . 52
Set up a Remote Desktop Connection . . . . . . . . . . . . . . . . . . . . . . . . . . . . . . . . . . . . . . . . . . . . . . . . . . 53
4. Updating the server
Updating your system . . . . . . . . . . . . . . . . . . . . . . . . . . . . . . . . . . . . . . . . . . . . . . . . . . . . . . . . . . . . . . . . 56
Install updates from the HP Smart Update CD . . . . . . . . . . . . . . . . . . . . . . . . . . . . . . . . . . . . . . . . . . 56
Install updates from the HP Smart Setup CD . . . . . . . . . . . . . . . . . . . . . . . . . . . . . . . . . . . . . . . . . . . 56
Install updates from the web . . . . . . . . . . . . . . . . . . . . . . . . . . . . . . . . . . . . . . . . . . . . . . . . . . . . . . . . . 57
Register for HP support notifications . . . . . . . . . . . . . . . . . . . . . . . . . . . . . . . . . . . . . . . . . . . . . . . . . . 57
Register for Microsoft security notifications . . . . . . . . . . . . . . . . . . . . . . . . . . . . . . . . . . . . . . . . . . . . . 57
Register for Microsoft Windows Update . . . . . . . . . . . . . . . . . . . . . . . . . . . . . . . . . . . . . . . . . . . . . . . . 57
Administering the system remotely . . . . . . . . . . . . . . . . . . . . . . . . . . . . . . . . . . . . . . . . . . . . . . . . . . . . . 58
Special Administration Console (SAC) . . . . . . . . . . . . . . . . . . . . . . . . . . . . . . . . . . . . . . . . . . . . . . . . . 58
iv
Page 5

1 Planning the installation
Installing a Microsoft Windows Server 2003 64-bit version operating system on an
HP Integrity server involves preparing the hardware for the OS installation, loading the
OS, and updating the system with the latest OS patches. This chapter helps you plan the
installation based on the server model, the OS edition, and the source of the OS media,
and your network environment. Subsequent chapters guide you through the installation
process.
Chapter 1
5
Page 6

Planning the installation
Overview
Overview
The HP Integrity server family, based on the Intel Itanium 2 processor, supports
64-bit Windows Server 2003 on a full range of server models, from entry-level servers
such as the 2-processor rx1620, through mid-range servers such as the rx7620 and
rx8620, up to the high-end 128-processor Superdome. Some HP Integrity servers, such
as rx7620, rx8620, and Superdome, are based on the HP Super-Scalable Processor
chipset (sx1000). They are composed of basic building blocks known as cells. These
cell-based servers can be set up either as a single system or divided into multiple
partitions, where each partition is assigned memory, processors, and I/O resources for its
exclusive use. Each partition can execute its own OS image.
The Windows Server 2003 operating system family consists of several product editions
which share core functionality but offer varying levels of features and scalability. HP
Integrity servers support the following editions:
• Datacenter Edition is designed for servers running mission-critical applications
such as databases, enterprise resource planning, high-volume real-time transaction
processing, and server consolidation. The 64-bit version supports up to 64 processors,
512 GB memory, and the ability to cluster up to 8 nodes.
• Enterprise Edition is recommended for servers running applications such as
networking, messaging, inventory and customer service systems, databases, and
e-commerce Web sites in medium and large enterprises. The 64-bit version supports
up to 8-processors, 64 GB memory, and the ability to cluster up to 8 nodes.
The following table shows the certification matrix for HP Integrity server models and
Windows Server 2003 OS editions:
Model Enterprise Edition Datacenter Edition
rx1600
rx1620
rx2600
rx2620
rx4640
rx5670
Asia-Pacific region only
✔
✔
✔
✔
✔
Cell-based servers
rx7620
rx8620
Superdome
6
✔✔
✔✔
✔
Chapter 1
Page 7

Planning the installation
Choosing an installation scenario
Choosing an installation scenario
When you purchase an HP Integrity server, you can order additional hardware, support
options, and an OS enablement kit (such as the HP Integrity Essentials Foundation Pack
for Windows). You can also order factory-installation of the OS. Depending on your order
(or subsequent use), your system may be in one of the following states:
• Factory-installed Windows Server 2003
The Windows Server 2003, Datacenter edition is always factory-installed. To get the
system up and running, verify the OS was installed correctly, set up the system, and
update the system with the latest firmware, drivers, and Microsoft QFEs (patches
and fixes) available at the HP Integrity servers support web site or from the latest
HP Smart Setup media.
• Factory-installed OS other than Windows Server 2003
If you choose to run Windows Server 2003 instead of an alternate factory-installed
OS, you can perform the migration yourself on an entry-level server or engage an HP
customer engineer (CE) to perform the migration on a mid-range or high-end server.
Contact HP support or sales to engage the CE.
When migrating to Windows Server 2003 from another OS, pay close attention to the
differences in supported hardware between the two operating systems. You must
replace incompatible components with those supported on Windows Server 2003. If
you want to keep the data residing on the server hard disk, you must back up the
data and verify that you can restore it elsewhere.
You can now prepare the server hardware for installation. Use the HP Smart Setup
media and the Microsoft Windows Server 2003 RTM (released-to-manufacturing)
media to load the OS files on the server (just as in a fresh installation). After
installation, set up the system, and update it with the latest firmware, drivers, and
Microsoft QFEs (patches and fixes) available at the HP Integrity servers support web
site or from the latest HP Smart Setup media.
• No operating system installed
Prepare the server hardware for installation. Use the HP Smart Setup media and the
Microsoft Windows Server 2003 media to load the OS files on the server. After
installation, verify that the OS was installed correctly, configure the system, and
update it with the latest firmware, drivers, and Microsoft QFEs (patches and fixes)
available at the HP Integrity servers support web site or from the latest HP Smart
Setup media.
• Installed Windows Server 2003 incorrect or inoperable
Prepare the server hardware for installation. Use the HP Re-installation media to
copy the OS files, firmware, drivers, and QFEs onto the server. After re-installation,
verify that the OS was installed correctly, configure the system, and update it with
the latest firmware, drivers, and Microsoft QFEs (patches and fixes) available at the
HP Integrity servers support web site or from the latest HP Smart Setup media.
Chapter 1
7
Page 8

Planning the installation
Choosing an installation environment
Choosing an installation environment
The installation environment consists of the server model, the OS edition, a local console
or a remote console, and the media you need to perform the installation. In addition to
installing from Smart Setup and Microsoft RTM media or Re-installation media, you can
automate the installation of Windows Server 2003 using a Remote Installation Service
(RIS) server on the network and a Pre-Boot eXecution Environment (PXE) client on the
HP Integrity server.
Table 1-1 lists the HP Integrity server models, the OS edition supported on those models,
the console options, and relevant media choices.
Table 1-1 Installation matrix
Server OS Edition Console Media
rx1620
rx2600
rx2620
rx4640
rx5670
Cell-based servers
rx7620
rx8620
Enterprise Local HP Smart Setup and
Enterprise
Datacenter
(factoryinstalled)
Microsoft RTM
HP Reinstallation
Remote
(headless server)
PXE/RIS
Local HP Smart Setup and
Remote
(headless server)
PXE/RIS
Local HP Reinstallation
Remote
(headless server)
HP Smart Setup and
Microsoft RTM
HP Reinstallation
Microsoft RTM
HP Reinstallation
HP Smart Setup and
Microsoft RTM
HP Reinstallation
HP Reinstallation
Superdome Datacenter
(factoryinstalled)
8
Local HP Reinstallation
Remote
(headless server)
HP Reinstallation
Chapter 1
Page 9

Using a local console
A local console is a VGA monitor, a USB keyboard, and a USB mouse connected to the
server. (You may use a USB-to-PS2 dongle to connect to a console switch). If a VGA card
is not already installed, you must install the HP Graphics and USB Combo Adapter
(A6869A) to use a local console. No other graphics card is supported by HP Integrity
servers.
Figure 1-1 shows a local console connected to an HP Integrity rx4640 server:
Figure 1-1 Local console configuration
p
5
2
8
h
1
TO
A
U
U
IN
T
P
U
E
N
M
Choosing an installation environment
HP Integrity rx4640 server (rear)
System Input Power
VAC 200-240 8 A ma x
01
50/60 Hz
!
!
y
r
a
li
i
e
x
t
o
u
a
m
e
r
l
a
c
o
l
P
M
10 00T LAN
PCI- X 66 ( SCS I)
PCI-X 66 (LAN)
Dual SCSI
2
1
N
LA
P
M
1
B
S
U
2
B
S
U
PCI-X 133
PCI-X 66
PCI-X 66
PCI-X 66
PCI-X 66
7
6
5
4
3
Planning the installation
PCI-X 133
8
USB
A local console provides complete access to all the installation and administration tasks
that can be performed on the server. You can use the local console to prepare the server
for installation, install the OS, and check server status after installation.
Advantages • Can specify server settings at the time of installation
• Can log on immediately to Windows after installation completes
• Can perform any administrative tasks directly
Disadvantages • Requires a graphics card to be installed in the server (which may not be the norm in
your server environment)
Chapter 1
9
Page 10
Planning the installation
Choosing an installation environment
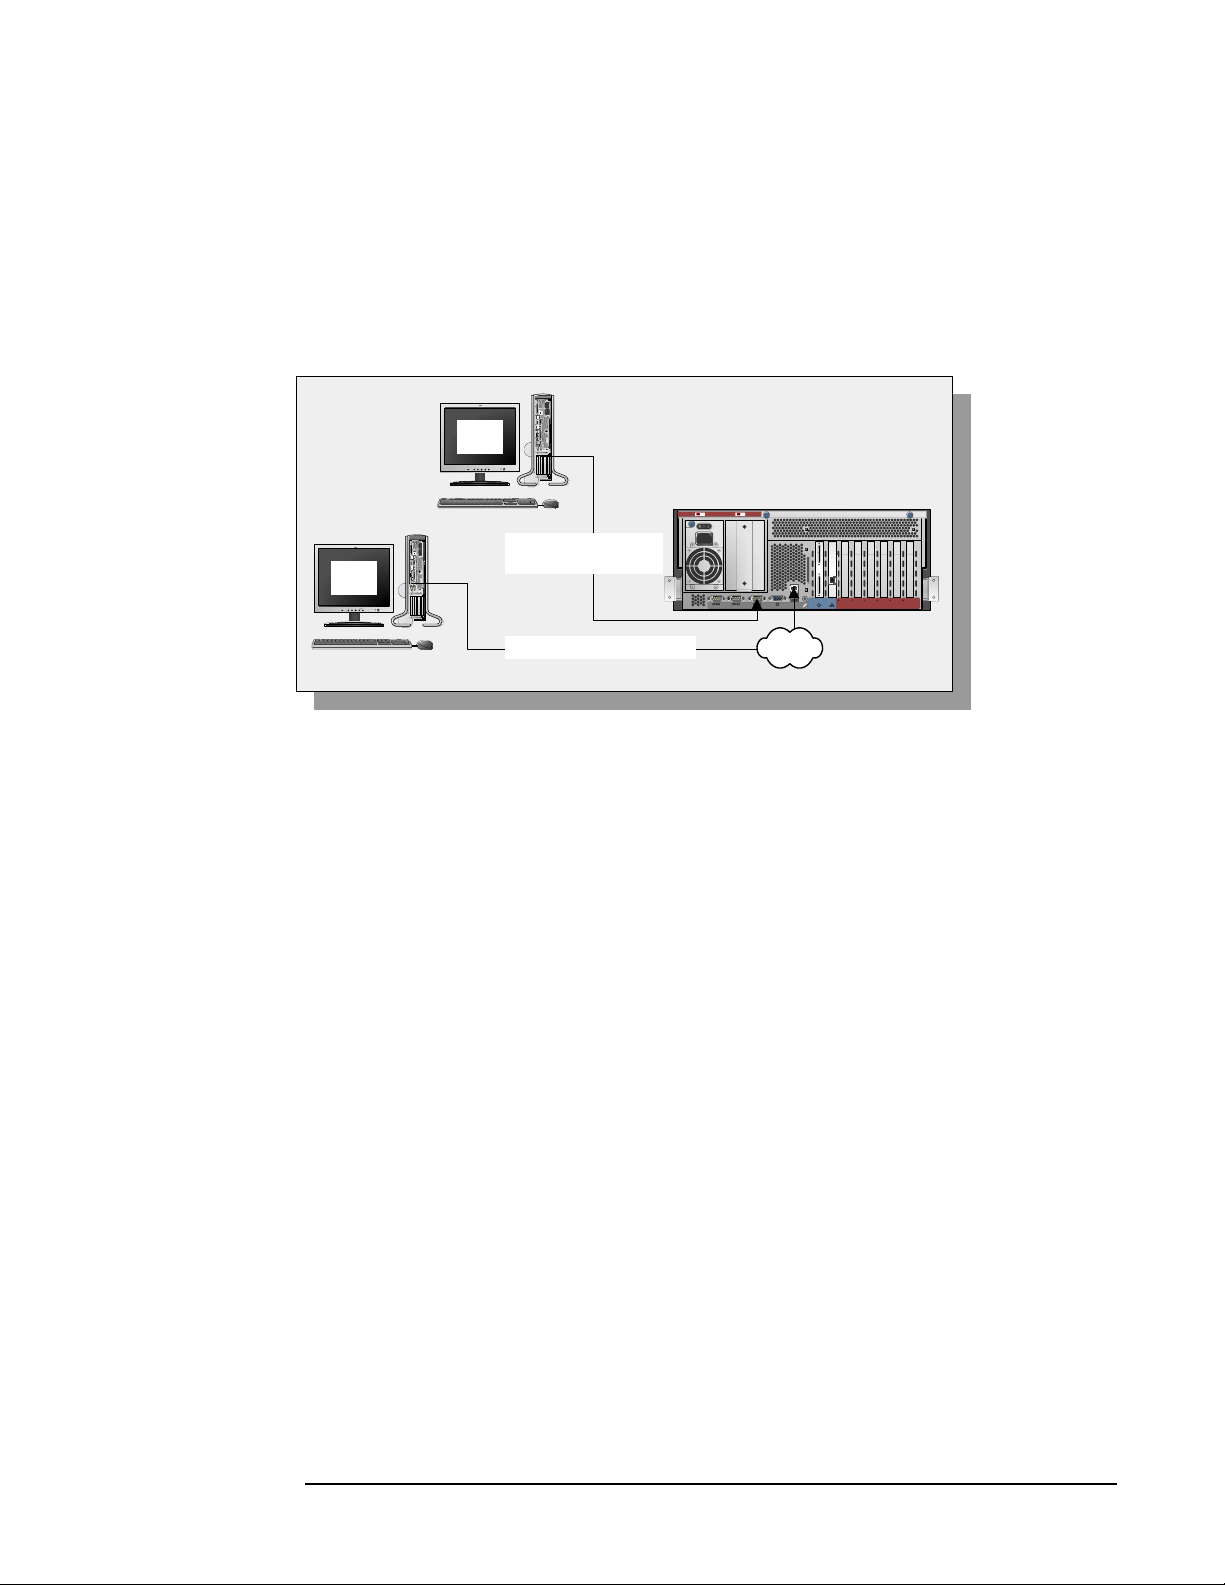
Using a remote console
A remote console is a PC running terminal emulation software, such as PuTTY (can be
installed from the Smart Setup media or from the Web) or
the server via the Management Processor (MP) serial port or LAN port.
Figure 1-2 shows remote consoles connected to an HP Integrity rx4640 server:
Figure 1-2 Remote console configurations
SCSI
LVD/SE USB
LAN 10/
100
Management Card
PWR1PWR2
LAN Gb
VGA
RESETSSOF
100
GSP
T
HAR
D
CONSOLE /
REMOTE / UPS
TOC
CONSOLE
SERIAL A
SERIAL B
PCI-X 133
PCI-X 133
PCI-X 133LAN 10/
hp
M
25
18
NU
PUT
E
AGP
null modem cable to
remote serial port
putty
25
hp
18
AUT
O
INP
UT
EN
M
putty
A
IN
U
TO
LVD/SEUSB
SCSI
LAN 10/
100
Management Card
PWR1PWR2
LAN Gb
VGA
SOFTHARD
100
GSPRESETS
CONSOLE /
REMOTE / UPS
TOC
SERIAL A
SERIAL B
CONSOL
E
PCI-X 133
PCI-X 133
PCI-X 133LAN 10/
U
AGP
HyperTerminal, connected to
HP Integrity rx4640 server (rear)
System Input Power
VAC 200-240 8 A max
01
50/60 Hz
!
!
P
M
l
a
c
o
l
a
li
i
x
u
a
y
r
e
t
o
m
e
r
10 00T LAN
PCI- X 66 ( SCS I)
PCI-X 66 (LAN)
PCI-X 66
Dual SCSI
3
2
1
N
LA
P
M
1
B
S
U
2
B
S
U
PCI-X 133
PCI-X 133
PCI-X 66
PCI-X 66
PCI-X 66
8
7
6
5
4
cat5 cable to MP LAN port
network
You can install Windows using a remote console. You cannot, however, specify the
operating system settings during the installation process.
Advantages • Do not need to install a local console (enables installation of headless server)
Disadvantages • Cannot specify operating system settings at the time of installation
• If you use the MP LAN port, you must assign an IP address to the MP LAN interface.
To assign the IP address, you must connect the workstation to the MP serial port,
access the MP command menu, enable LAN access, and specify the LAN password.
10
Chapter 1
Page 11
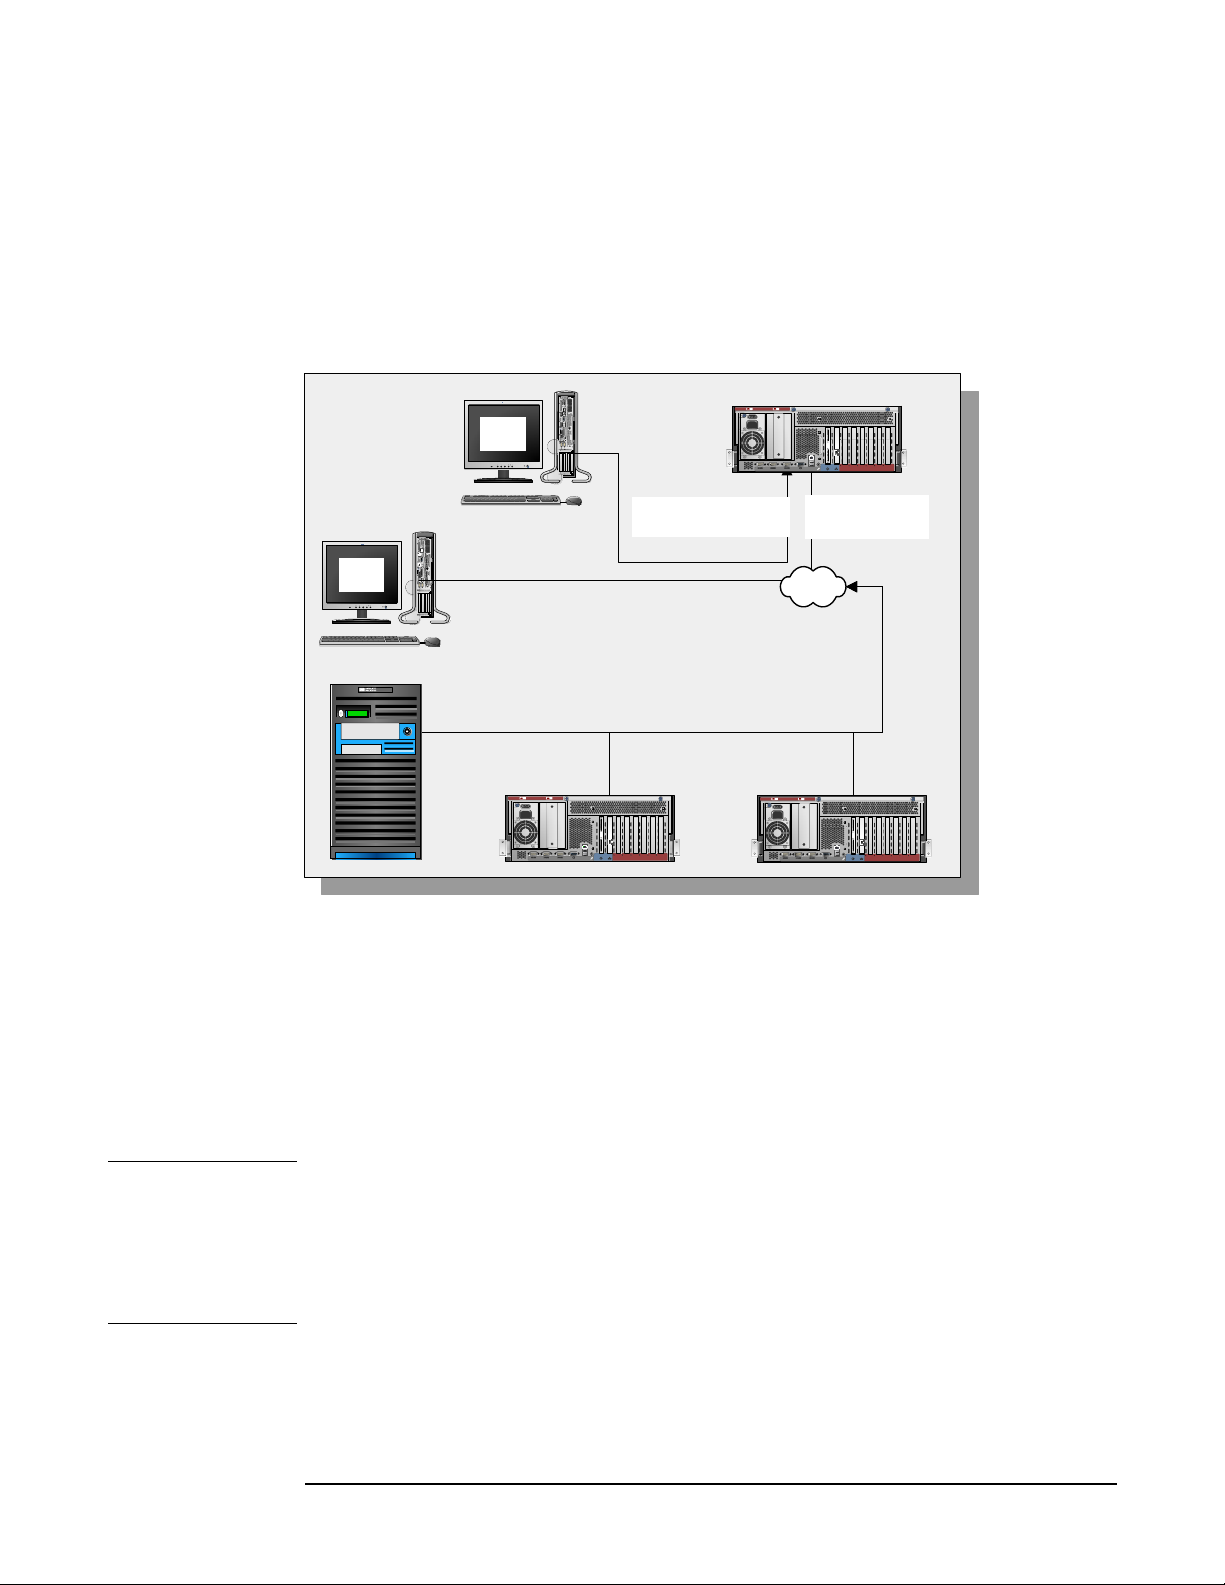
Using PXE/RIS
A Remote Install Server (RIS) is a specialized Windows server used to perform multiple
software installations across a network. The RIS server, working in conjunction with an
agent (the PXE client) residing on target systems, performs automated installations.
Figure 1-3 shows a sample PXE/RIS setup:
Figure 1-3 PXE/RIS configuration
Planning the installation
Choosing an installation environment
HP Integrity rx4640 server (rear)
System Input Power
VAC 200-240 8 A max
01
50/60 Hz
!
!
P
o
M
l
a
c
l
a
x
u
li
i
r
a
y
r
o
m
e
e
t
null modem cable to
remote serial port
HP Integrity rx4640 server (rear)
PCI-X 133
PCI-X 133
PCI-X 66
PCI-X 66
5
6
7
8
System Input Power
01
VAC 200-240 8 A max
50/60 Hz
!
!
P
M
l
c
o
l
a
1000T LAN
PCI-X 66 (S CS I)
PCI-X 66 (LAN)
PCI-X 66
PCI-X 66
PCI-X 66
Dual SCSI
2
1
4
5
3
M
P
LA
N
U
S
B
1
U
S
B
2
cat5 cable
to MP LAN port
LAN
1000T LAN
PCI-X 66 (SCSI)
PCI-X 66 (LAN)
Dual SCSI
1
2
M
P
LA
N
U
S
B
1
U
S
B
2
i
x
u
a
a
li
y
r
r
o
m
e
e
t
putty
25
hp
18
AUT
O
INP
M
UT
EN
RIS
PWR
2
LAN 10/
100
Management Card
PWR
1
LAN GbSCSILVD/SE USB
VGA CONSOLE /REMOTE / UPS
LAN 10/100
RESETSSOF
GSP
T
HAR
D
putty
A
I
UT
O
LVD/SEUSB
SCSI
LAN 10/
100
Management Card
PWR1PWR2
LAN Gb
VGA
SOFTHARD
100
GSPRESETS
CONSOLE /
REMOTE / UPS
TOC
SERIAL A
SERIAL B
CONSOL
E
PCI-X 133
PCI-X 133
PCI-X 133LAN 10/
U
AGP
VISUALIZE
HP Integrity rx4640 server (rear)
TOC
CONSOLESERIAL A
SERIAL B
PCI-X 133
PCI-X 133
PCI-X 133
System Input Power
01
VAC 200-240 8 A max
50/60 Hz
!
!
M
P
l
o
c
a
l
AGP
1000T LAN
PCI-X 66 (SCSI)
PCI-X 66 (LAN)
PCI-X 66
PCI-X 66
Dual SCSI
1
2
3
4
M
P
LA
N
U
S
B
1
U
S
B
2
a
x
u
i
li
e
o
a
m
t
r
e
y
r
h
p
N
5
M
1
82
P
UT
EN
U
Advantages • Installations are automated; no user intervention is needed
PCI-X 66
6
PCI-X 66
345
PCI-X 133
PCI-X 133
7
8
PCI-X 133
PCI-X 133
PCI-X 66
PCI-X 66
PCI-X 66
6
7
8
• Multiple servers can be installed in one batch job
• Installations are standardized; each server receives the same image
• Installations can be done from anywhere on the intranet
Disadvantages • Cannot customize individual installations
• Not supported with Windows Server 2003, Datacenter edition
NOTE Avoid connecting your RIS server to your Integrity server using your intranet during
initial Windows OS installation. You should set up a small “private” network, populated
with your RIS server, a hub, and the system LAN NIC on your HP Integrity server. This
protects your intranet from errors that might occur during the Windows install process.
After you are satisfied the installation process runs smoothly, connect the RIS to target
Integrity servers using your intranet.
Chapter 1
11
Page 12

Planning the installation
Using EFI
Using the HP Smart Setup media
The HP Integrity Essentials Foundation Pack for Windows includes the HP Smart Setup
media. You can use the HP Smart Setup media both before and after the OS is installed:
• Before installing the OS, boot the server with the Smart Setup media in the
CD/DVD drive. The server boots to the EFI-Based Setup Utility (EBSU). EBSU
provides an easy-to-use interface for offline setup and configuration tasks such as
creating hard disk partitions and updating the firmware. Moreover, EBSU provides a
utility called Express Setup, which guides you through the process of installing the
OS. EBSU works in conjunction with the Microsoft RTM media, which holds the OS
image. We strongly recommend that you use EBSU to install the OS.
• After installing the OS, use the Smart Setup media to install drivers, utilities, and
important fixes that will ensure the stability and performance of the system.
Using the Microsoft RTM media
You can purchase the Microsoft RTM media, which contains the OS image, either with
the HP Integrity Essentials Foundation Pack for Windows from HP or separately from a
Windows reseller. Or, your organization may have a volume license for Windows Server
2003, 64-bit version. You will need this media and the license key to install Windows
Server 2003 (if Windows is not factory-installed) on HP Integrity servers.
The OS, regardless of source, can easily be installed using the EFI-Based Setup Utility
(EBSU) available on the HP Smart Setup media. To access the EBSU, simply boot your
server from the HP Smart Setup media, automatically loading the EBSU.
Using the HP Reinstallation media
HP Integrity servers factory-installed with the Windows Server 2003 OS provide the HP
Reinstallation media, which allows you to restore the server to its factory condition if
necessary. You need the corresponding license key to re-install Windows Server 2003.
Using EFI
The Intel Extensible Firmware Interface (EFI) specification defines a new model
for the interface between the operating system, the firmware, and the hardware. EFI
serves the same purpose on Itanium-based computers as BIOS on x86-based computers.
EFI provides a standard environment for running pre-boot applications and for booting
an OS.
HP Integrity servers use EFI to initialize the platform firmware and load the operating
system. After the system is initialized, EFI provides two interfaces with which you can
interact:
12
Chapter 1
Page 13
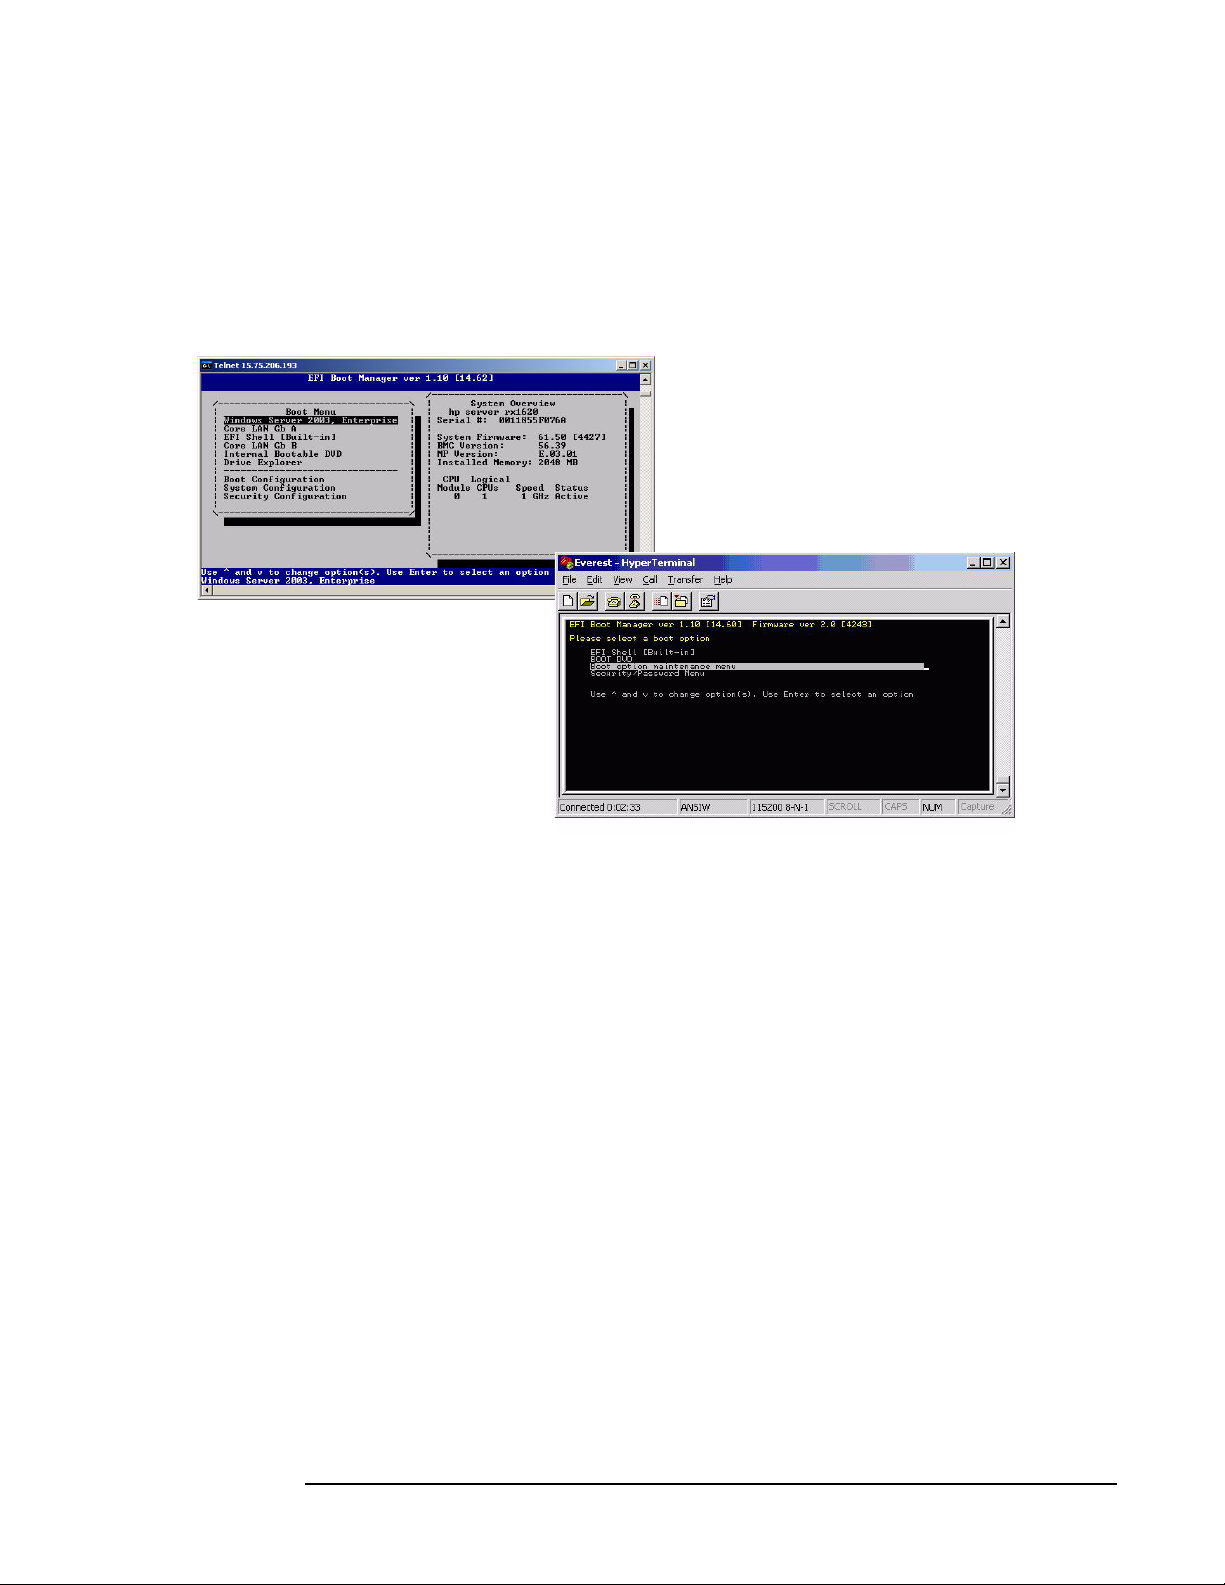
EFI Boot Manager
First displayed when you power on the server, the EFI Boot Manager provides a
menu-based interface (use arrow keys to traverse menus) with options for booting the
OS, loading EFI applications, configuring the server, and other pre-boot operations.
Figure 1-4 EFI Boot Manager
Planning the installation
Using EFI
EFI Shell
Available as a selection from the EFI Boot Manager, the EFI Shell provides a
command-line interface from which you can get information about the system, install an
OS, boot the OS, execute batch scripts, launch EFI applications, load EFI drivers, and
manage files and system variables.
See Also • EFI Documentation: http://developer.intel.com/technology/efi/help/efidocs.htm
• EFI Shell commands: From the EFI Shell, type
help or ?
Chapter 1
13
Page 14
Planning the installation
Installation Process
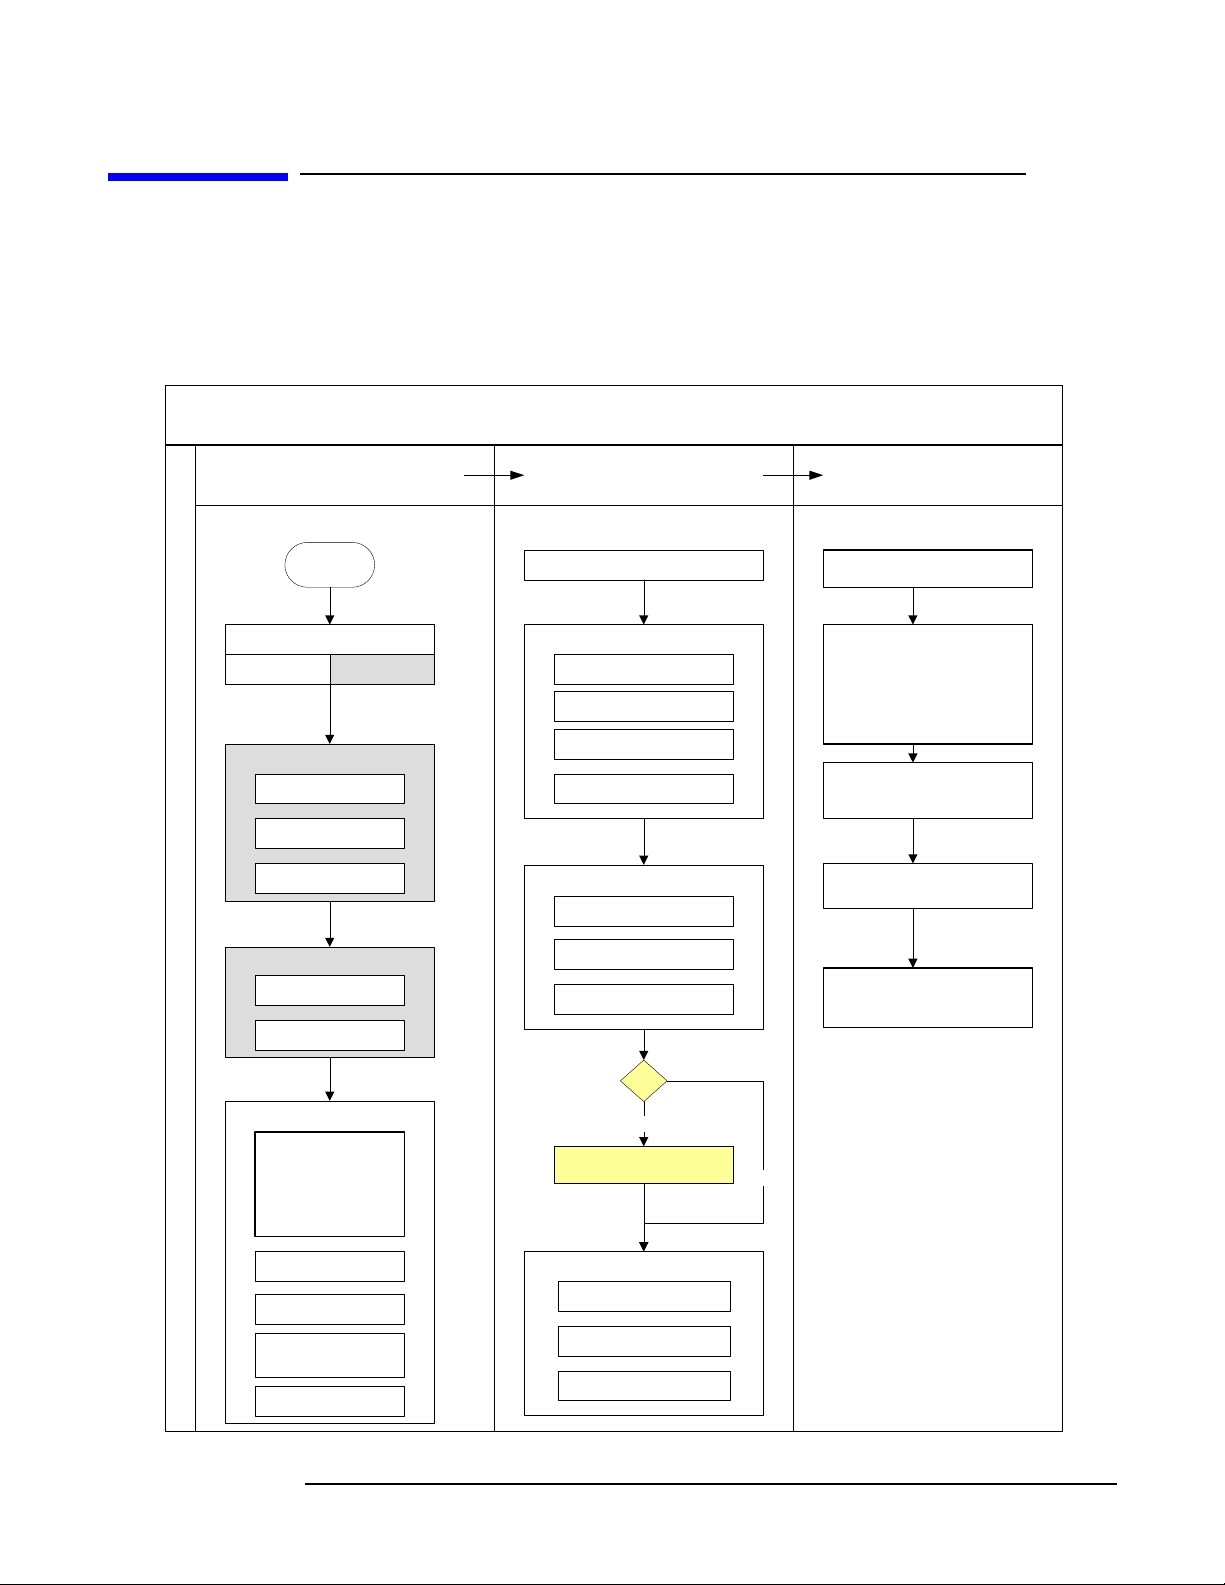
Installation Process
The installation process involves preparing the server for the OS, loading the OS on the
server, and updating the system with the latest firmware, drivers, utilities, security
fixes, and OS fixes. Figure 1-5 shows the main tasks involved in each stage.
Figure 1-5 Installation Overview
Install Microsoft Windows Server 2003 on an HP Integrity server
PREPARE
Start Run setupldr
Set up a console
remote local
Ensure platform compatibility
Check har dw ar e
Check firmware
Back up data
Set u p PXE/RIS
Set up RIS server
Inst all PXE client
LOAD UPDATE
Install OS fixes and security
fixes from the Smart Update CD
Run EBSU
Expr ess/C ustom
Update firmwar e
Create disk partitions
Install diagnostic tools
Run Windows Installer
Expr ess/C ustom
Format syst em p ar tit ion
Copy installer files
Download and install latest OS
fixes , security fixes , and updates
to drivers and documentation at
HP Integrity servers support site:
http://www.hp.com/support/
Subscribe to update notifications
at the HP Integrity support site
Run Integrity Support Pack
from the Smart Setup CD
Install nPartition Man agement
Utilities f rom the Smart Setup
itaniumservers/
CD
Prepare hardware
Flash the firmware and
install the latest u tilities
available at the HP
Integrity support site:
http://www.hp.com/
support/itaniumservers/
Set up boot drive
Set up CD/DVD drive
Verify acpi flag is set to
windows
Set CLM to 100%
14
cell-based
server with
graphics/USB
combo car d?
Specify /novesa Osloa d
Set up Windows
Boot to Windows
Complete installation
Specif y system settings
yes
option
no
Chapter 1
Page 15

Planning the installation
Installation Process
In practice, there are minor differences—based on the choice of console and installation
media—in the sequence of tasks or the interface you would use to perform them. Before
perfoming these tasks, refer to the detailed task instructions in the following chapters,
noting any warnings or cautions that applying to a given task.
Chapter 1
15
Page 16

Planning the installation
Installation Process
16
Chapter 1
Page 17

2 Preparing for installation
Getting your server ready to undergo an operating system install involves setting up a
console (either local or remote, or both), optionally setting up a PXE/RIS environment, if
applicable, and preparing the hardware for installation. If you are migrating from
another OS, you must also ensure that the server platform and its peripheral cards are
compatible with Windows Server 2003 before proceeding. This chapter provides detailed
instructions for each task.
Chapter 2
17
Page 18

Preparing for installation
Ensuring platform compatibility
Ensuring platform compatibility
If you are migrating from another operating system to Windows Server 2003, ensure
that the firmware is up to date, that the hardware is compatible, and any data on the
server disk is backed up.
Check system firmware version
To check the system firmware version:
Step 1. Boot the server to EFI.
Step 2. At the EFI Shell prompt, type info fw.
The EFI shell lists the firmware version as follows:
FIRMWARE INFORMATION
Firmware Revision:
All CELLS - 1.12 Thu Oct 16 08:10:32 2003
Step 3. Check the installed version against the version present on the HP Smart Setup media or
on the HP Integrity support site at http://www.hp.com/support/itaniumservers/.
NOTE For rx7620, rx8620, and Superdome servers, contact HP support or an HP CE to obtain
the latest firmware.
Check hardware compatibility
To verify that your existing hardware is compatible with Windows Server 2003:
Step 1. Refer to the Supplies and Accessories page for each server to check supported hardware
configurations. For example, the Supplies and Accessories page for the rx8620 server at
http://www.hp.com/products1/servers/integrity/mid_range/rx8620/supplies.html lists the
processors, memory, adapters, cards, and controllers that are available for that server.
Step 2. Verify existing device compatibility at the HP Integrity server connectivity site at
http://www.hp.com/products1/serverconnectivity/index.html.
Step 3. Verify storage compatibility by reviewing the HP Integrity Server-Storage support
matrices at http://www.hp.com/products1/serverconnectivity/support_matrices.html.
This list is not exhaustive because storage vendors may support more configurations
than those indicated at the site. As a general rule, check with your storage vendor and
an HP sales representative for a definitive statement on server-storage compatibility.
Preparing servers with 4GB DIMMs
You must install a Microsoft QFE (KB867582) for a successful Windows Server 2003
install. To install the OS on a server with 4GB DIMMs, you install the OS, then install
the Microsft QFE (the QFE is installed automatically if you install your OS using the HP
Re-install CD).
18
Chapter 2
Page 19

Preparing for installation
Ensuring platform compatibility
Back up existing data
If you want to restore the data on the hard disk of the server after migrating to Windows,
you must back up the data and verify that you are able to restore it:
Step 1. Perform a server-wide backup using your existing backup utilities.
Step 2. Verify the integrity of the backup by restoring samples of data to another server.
Step 3. Store the backup in a safe place.
Chapter 2
19
Page 20

Preparing for installation
Setting up a console
Setting up a console
You can install the operating system and administer the server from either a local
console, a remote console, or both:
•A remote console is a terminal or a PC running terminal emulation software, such as
PuTTY or HyperTerminal, connected to the server via the Management Processor (MP)
serial port or LAN port. A remote console provides access to the EFI shell, MP
commands, and, after Windows boots, to the Special Administration Console (SAC).
•A local console is a VGA monitor, a USB keyboard, and a USB mouse connected to the
server. If a VGA card is not already installed, you must install the HP Graphics and
USB Combo Adapter (A6869A) to use a local console. The local console provides a
graphical user interface, allowing you to use the EFI, the MP commands, and—after
Windows boots—the Windows user interface.
Set up a remote console
From the remote console, you can access the EFI shell, the Management Processor (MP),
and the Microsoft Special Administration Console (SAC). You can use these utilities
while installing and administering Windows Server 2003 on HP Integrity servers.
You can configure a remote console in two ways:
• Connect a PC to the Management Processor (MP) port via a null modem cable.
• Connect a PC to the LAN port via a cat5 LAN cable.
On the remote PC, execute a terminal emulation application such as HyperTerminal or
PuTTY. PuTTY is a free implementation of Telnet and SSH for 32-bit Windows and
UNIX, and provides an xterm terminal emulator. We recommend that you run PuTTY
version 0.55 or higher, available on the Smart Setup media or from the PuTTY web site
at http://www.chiark.greenend.org.uk/~sgtatham/putty/download.html.
To set up a remote console:
Step 1. Connect a PC via null modem cable to the MP serial port or a cat5 cable to the LAN port.
Step 2. Install PuTTY on the PC and specify these port settings:
• Bits per second: 9600
• Data bits: 8
• Parity: none
• Stop bits: 1
• Flow Control: Xon/Xoff
Step 3. Use the Keyboard Configuration Panel to map the Backspace character to Control-H.
Step 4. Boot the server.
Step 5. Run PuTTY and press Enter.
The MP prompt is displayed.
20
Chapter 2
Page 21

Set up a local console
On servers configured with internal graphics card, you can connect a monitor, keyboard
and mouse directly to the appropriate ports. On servers without internal graphics card,
you must first install an HP Graphics and USB Combo card (A6869A) and connect the
console to the appropriate ports. Then, from an existing remote console, modify system
configuration to redirect the output to the local console.
Table 2-1 Graphics Support on Server Models
Server Model Graphics Card
rx1600, rx2600, rx4640 internal graphics card
Preparing for installation
Setting up a console
rx5670, rx7620, rx8620,
Superdome
To install the HP Graphics and USB Combo card:
Step 1. Install the HP Graphics and USB Combo card card in an open PCI slot of the server.
Step 2. Connect a VGA monitor, USB keyboard, and USB mouse to the appropriate ports.
Step 3. Boot the server to EFI.
Step 4. At the remote console, from the EFI Boot Manager, select System Configuration.
Figure 2-1 EFI Boot Manager
optional HP Graphics and USB Combo card
(A6869A)
Step 5. Select Select Active Console Output Devices.
Step 6. Highlight the line with the graphics card PCI device.
If there is no asterisk at the start of the line, the device is disabled. Use the space bar to
toggle the state of the card from disabled to enabled (as indicated by the asterisk).
Step 7. Select Save Settings to NVRAM and then Exit.
The video display is now directed to the local console.
Chapter 2
21
Page 22

Preparing for installation
Setting up PXE/RIS
Setting up PXE/RIS
Remote Installation Services (RIS) enables you to create, maintain, and quickly install
identical OS and software configurations on multiple remote systems with a predefined
level of user interaction. RIS uses the Pre-boot eXecution Environment (PXE) to enable
client computers without an operating system to boot remotely to a RIS server. The RIS
server then installs the operating system over a TCP/IP network connection. You can
create different sets of RIS images for different groups of client computers. You can also
use Group Policy settings to limit the installation options that RIS presents to clients. In
addition, you can configure RIS for either interactive or fully-automated installations.
Set up RIS server
Setting up one or more RIS servers in your network requires careful planning, design,
and implementation. The following checklist provides an overview of the tasks involved
in setting up a RIS server.
• Ensure that both your RIS server and client (Integrity server) hardware meet the
Remote Installation Services (RIS) hardware requirements.
• Ensure that your network is based on TCP/IP, and that a Domain Name System
(DNS) server exists on the network. You do not need to use the Microsoft version of
DNS.
• Ensure that a Dynamic Host Configuration Protocol (DHCP) server exists on the
network. You do not need to use the Microsoft version of DHCP.
• Ensure that Active Directory exists on the network.
• Install the Remote Installation Services component on the RIS server.
• Run the Remote Installation Services Setup Wizard.
See Also Refer to the Microsoft Windows Server 2003 Technical Reference web site for detailed
descriptions of the concepts, tasks, best practices, and troubleshooting tips for setting up
a RIS server: http://www.microsoft.com/windowsserver2003/proddoc/default.mspx.
Set up PXE on the HP Integrity server
PXE is built on common Internet protocols and services, including TCP/IP, DHCP, and
TFTP. PXE extensions to the DHCP protocol allow RIS servers to communicate with the
network-bootable HP Integrity servers.
To enable PXE on the HP Integrity server, you must specify the network interface card
(NIC) that it should use to communicate with the RIS server. When the HP Integrity
server boots from this NIC, it effectively boots from the remote RIS server. Working in
conjunction with the RIS server, PXE installs a new image of the Windows Server 2003
on the HP Integrity server.
To enable PXE on the HP Integrity server:
Step 1. From the EFI Boot Manager, select Boot Option Maintenance menu.
22
Chapter 2
Page 23

Figure 2-2 EFI Boot Option Menu
Step 2. Select Add a Boot Option.
Step 3. Select a NIC from the list of supported boot controllers.
Figure 2-3 Select the PXE Boot NIC
Preparing for installation
Setting up PXE/RIS
Step 4. Enter a description for the NIC.
Figure 2-4 Describe the NIC
Step 5. Press Enter to select the default options.
Step 6. Enter Yes to save the settings.
Chapter 2
23
Page 24

Preparing for installation
Preparing the server hardware
Preparing the server hardware
To set up the server hardware for OS installation, set up the boot drive, set up the
CD/DVD drive, and—if the server is cell-based—verify that the ACPI boot option is set to
windows.
Set up the boot drive
The operating system installs through the boot controller detected as adapter zero to the
drive detected as drive zero.
CAUTION If you do not disconnect all other drives, the OS may install to an unintended drive.
To set up the boot drive:
Step 1. Power down the server.
Step 2. Make a note listing all device connections so you can reconnect them after installation
completes.
Step 3. Disconnect all mass storage devices from all controllers except the boot controller.
Step 4. Configure the boot controller and boot drive.
NOTE If you are using a RAID controller, prepare the controller and select the RAID type
according to instructions in the RAID controller documentation.
If you are using a Storage Area Network (SAN), see the Boot from SAN Application Note
on the HP Smart Setup media.
Locate the DVD/CD drive
When hardware (for example, HDD, USB device, DVD-ROM drive) is added to a system
after it has booted to EFI, the EFI shell environment does not automatically detect the
new device. You must reconnect the device driver for the EFI shell to recognize the
device.
Also, the EFI shell environment creates default mappings for all the device handles that
support a recognized file system. After you change the system configuration or add a new
device, you must regenerate these mappings.
To enable the EFI shell to detect and and access the DVD/CD drive:
Step 1. From the EFI shell, type reconnect –r.
The reconnect command reconnects one or more drivers from a device, disconnecting all
the drivers from all the devices and then reconnecting them. If a device handle is not
specified, the reconnect operation is performed on all the handles in the system. If a
device handle is specified, only device handle and the devices below it are reconnected.
Step 2. From the EFI shell, type map -r.
The -r option regenerates all the mappings in a system. EFI shell displays the device
mapping table, as follows.
24
Chapter 2
Page 25

Preparing for installation
Preparing the server hardware
fs0 : Acpi(PNP0A03,0)/Pci(2|0)/Ata(Primary,Master)/CDROM(Entry1)
blk0 : Acpi(PNP0A03,1)/Pci(1|0)/Scsi(Pun0,Lun0)
blk1 : Acpi(PNP0A03,0)/Pci(2|0)/Ata(Primary,Master)
blk2 : Acpi(PNP0A03,0)/Pci(2|0)/Ata(Primary,Master)/CDROM(Entry1
Step 3. Note the device name of the CD-ROM device (fs0). You will use this to explore the
contents of the CD or DVD.
See also The map command displays or defines a mapping between a user-defined name and a
device handle. The most common use of this command is to assign drive letters to device
handles that support a file system protocol. Once these mappings are created, the drive
letters can be used with all the file manipulation commands.
The map command can be used to create new mappings or delete an existing mapping
with the -d option. If the map command is used without any parameters, all the current
mappings are listed. If the -v option is used, the mappings are shown with additional
information on each mapped handle.
Set ACPI flag to windows (cell-based servers only)
On cell-based servers, such as rx7620, rx8620, and the Superdome, the Advanced
Configuration and Power Interface (ACPI) flag must be set to the flag appropriate for the
operating system it boots. For the server to boot to Windows Server 2003, the ACPI flag
must be set to
windows.
If you purchased your server with a Windows operating system option (such as the
Microsoft retail media or the HP Smart Setup media), this flag is set to
windows in the
factory. If you purchased the server with a different or no operating system, you must set
this flag to
windows.
CAUTION If the server is booted to Windows Server 2003 without setting the ACPI flag to windows,
the OS displays a blue screen error.
To set the ACPI flag:
Step 1. From EFI shell, type acpiconfig.
EFI displays the current ACPI settings. If the flag is set to
windows, EFI displays
acpiconfig: windows
Step 2. If the flag is not set to
windows, type acpiconfig windows.
Step 3. Type acpiconfig to display the settings again and verify that the flag is set correctly.
Windows Server 2003 implements the ACPI 1.0b specification with some extensions
from version 2.0, whereas HP-UX and Linux implement ACPI 2.0. As a result, the
firmware has to be prompted by this flag to recognize that the operating system to be
booted is Windows Server 2003.
NOTE If you update the system firmware, this flag may be reset to default. Verify that the flag is
set to windows after you flash the system firmware.
Chapter 2
25
Page 26

Preparing for installation
Locating the Microsoft Certificate of Authenticity
Set Cell Local Memory to 100% (cell-based servers only)
HP recommends that you set the Cell Local Memory (CLM) parameter to 100% to
maximum server performance. This setting allocates all available local cell RAM for the
use of that cell only, preventing unnecessary RAM reads and writes to physical RAM
accessed over the server backplane.
Modify CLM settings for each nPartitition using the nPartition command mangement
tool (parmodify). You must first install nPartition on the server to be modified, or on a
remote management station. See the nPartition Guide for detailed information on how to
install these tools.
To set the CLM parameter:
Step 1. From the server console, run the “parmodify” command with -p# and -m# options to
modify each cell’s attributes in each nPar you modify.
For example:
parmodify -p0 m0::::100%
where: -p is the partition number and -m is the cell number in that partition
sets cell local memory to 100% in cell 0, partition 0.
Step 2. Restart the server to make the changes active.
Locating the Microsoft Certificate of Authenticity
The certificate contains the CD-key for the Microsoft Windows Server 2003 OS. You must
enter this key as part of the installation procedure. Where the Certificate of Authority
(COA) is physically located depends on the HP Integrity server model.
26
Chapter 2
Page 27

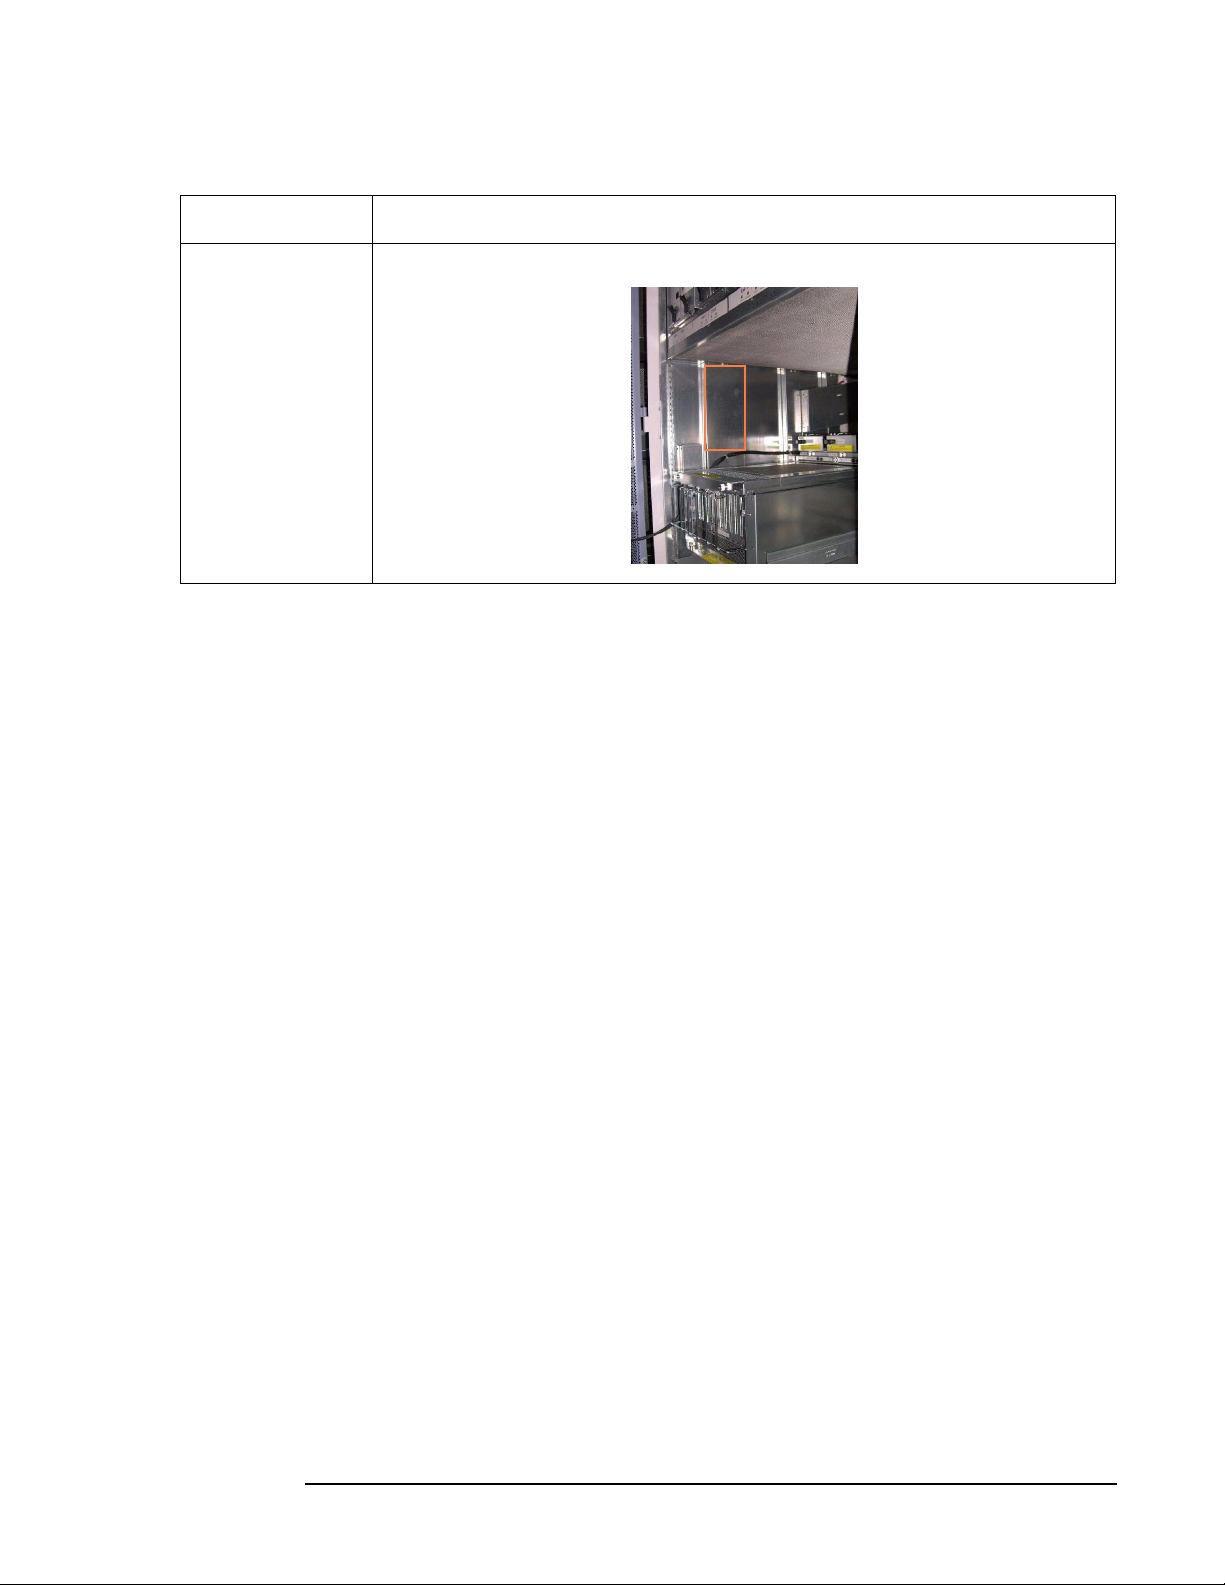
To locate the COA, reference the table below.
Table 2-2 Locating the Microsoft COA
Integrity server Location
1600 and 1620 COA is located on the underside of the pullout strip, as shown in the
illustration below.
Preparing for installation
Locating the Microsoft Certificate of Authenticity
2620 COA is located on the front of the system as shown in the illustration below.
4640 COA is located as shown in the illustration below.
Chapter 2
27
Page 28

Preparing for installation
Locating the Microsoft Certificate of Authenticity
Table 2-2 Locating the Microsoft COA (Continued)
Integrity server Location
5670 COA is located on the front of the system as shown in the illustration below.
7620 COA is located on the front of the system, as shown in the illustration below.
If additional COAs are installed, the location is shown in the second
illustration below.
8620 COA is located on the front of the system, as shown in the first illustration
below. If additional COAs are required, they are located as shown in the
second illustration below.
28
Chapter 2
Page 29
Locating the Microsoft Certificate of Authenticity
Table 2-2 Locating the Microsoft COA (Continued)
Integrity server Location
Superdome The COA is located as shown in the illustration below.
Step 3.
Preparing for installation
Chapter 2
29
Page 30

Preparing for installation
Locating the Microsoft Certificate of Authenticity
30
Chapter 2
Page 31

3 Installing the OS
This chapter provides instructions for installing the OS using a local console, a remote
console, or a PXE-enabled NIC. This chapter also shows you how to re-install Windows.
Each method comprises a series of tasks, concluding with two tasks that verify that the
OS was installed correctly. You must install the HP Smart Update Cd and the HP
Support Pack after installing the OS.
Chapter 3
31
Page 32

Installing the OS
Installing from a local console
Installing from a local console
This task involves using EBSU to prepare the server, using Windows Setup to prepare
the OS, loading the OS on the server, and specifying system settings.
Run EBSU
EBSU provides an easy-to-use interface to flash the firmware, partition the hard disk,
install diagnostic tools, configure storage controllers, and run other EFI utilities.
Step 1. Power on the server. The server boots to EFI.
Figure 3-1 Boot to EFI
Step 2. Load the HP Smart Setup media into the server DVD drive.
Step 3. From the EFI Boot Menu, select
Step 4. EBSU starts and displays the Welcome screen. Select
Figure 3-2 Enter EBSU
Internal Bootable DVD and press Enter.
OK and press Enter to continue.
32
Chapter 3
Page 33

Step 5. From the main menu, select Express Setup and press Enter.
Figure 3-3 Select Express Setup
Step 6. EBSU displays the Express Setup introduction. Press Enter to continue.
Installing the OS
Installing from a local console
Step 7. EBSU displays the firmware update screen, listing each device, its installed firmware
version, and the firmware version on the Smart Setup media. Select the device(s) whose
firmware you want to update. To continue, select
Next and press Enter.
Figure 3-4 Update firmware
NOTE You may not be able to use EBSU to flash the firmware of some devices. You cannot flash
the firmware if the installed version is the same or higher than the version on the Smart
Setup media. Also, you cannot use EBSU to flash the Management Processor (MP)
firmware. You must download the latest MP firmware from the HP Integrity support site
(http://www.hp.com/support/itaniumservers/) and flash it separately.
Chapter 3
33
Page 34

Installing the OS
Installing from a local console
Step 8. Specify the disk partitions you want to create (
recommend the default—ESP + HPSP + MSR—as a means to simplify the maintenance
of your server. Also, specify the option to install the Drive Explorer utility, which enables
you to browse a drive in EFI. Select
Figure 3-5 Partition disk
Step 9. Specify the option to install offline diagnostic tools (from the HP Itanium Processor
Family offline diagnostics and utilities CD). Also, specify the option to launch the
Windows OS installer. Select
ESP Only or ESP + HPSP + MSR). We
Next and press Enter.
Setup and press Enter.
Figure 3-6 Install diagnostic tools
Step 10. EBSU displays the partition confirmation window. Select Continue and press Enter.
34
Chapter 3
Page 35

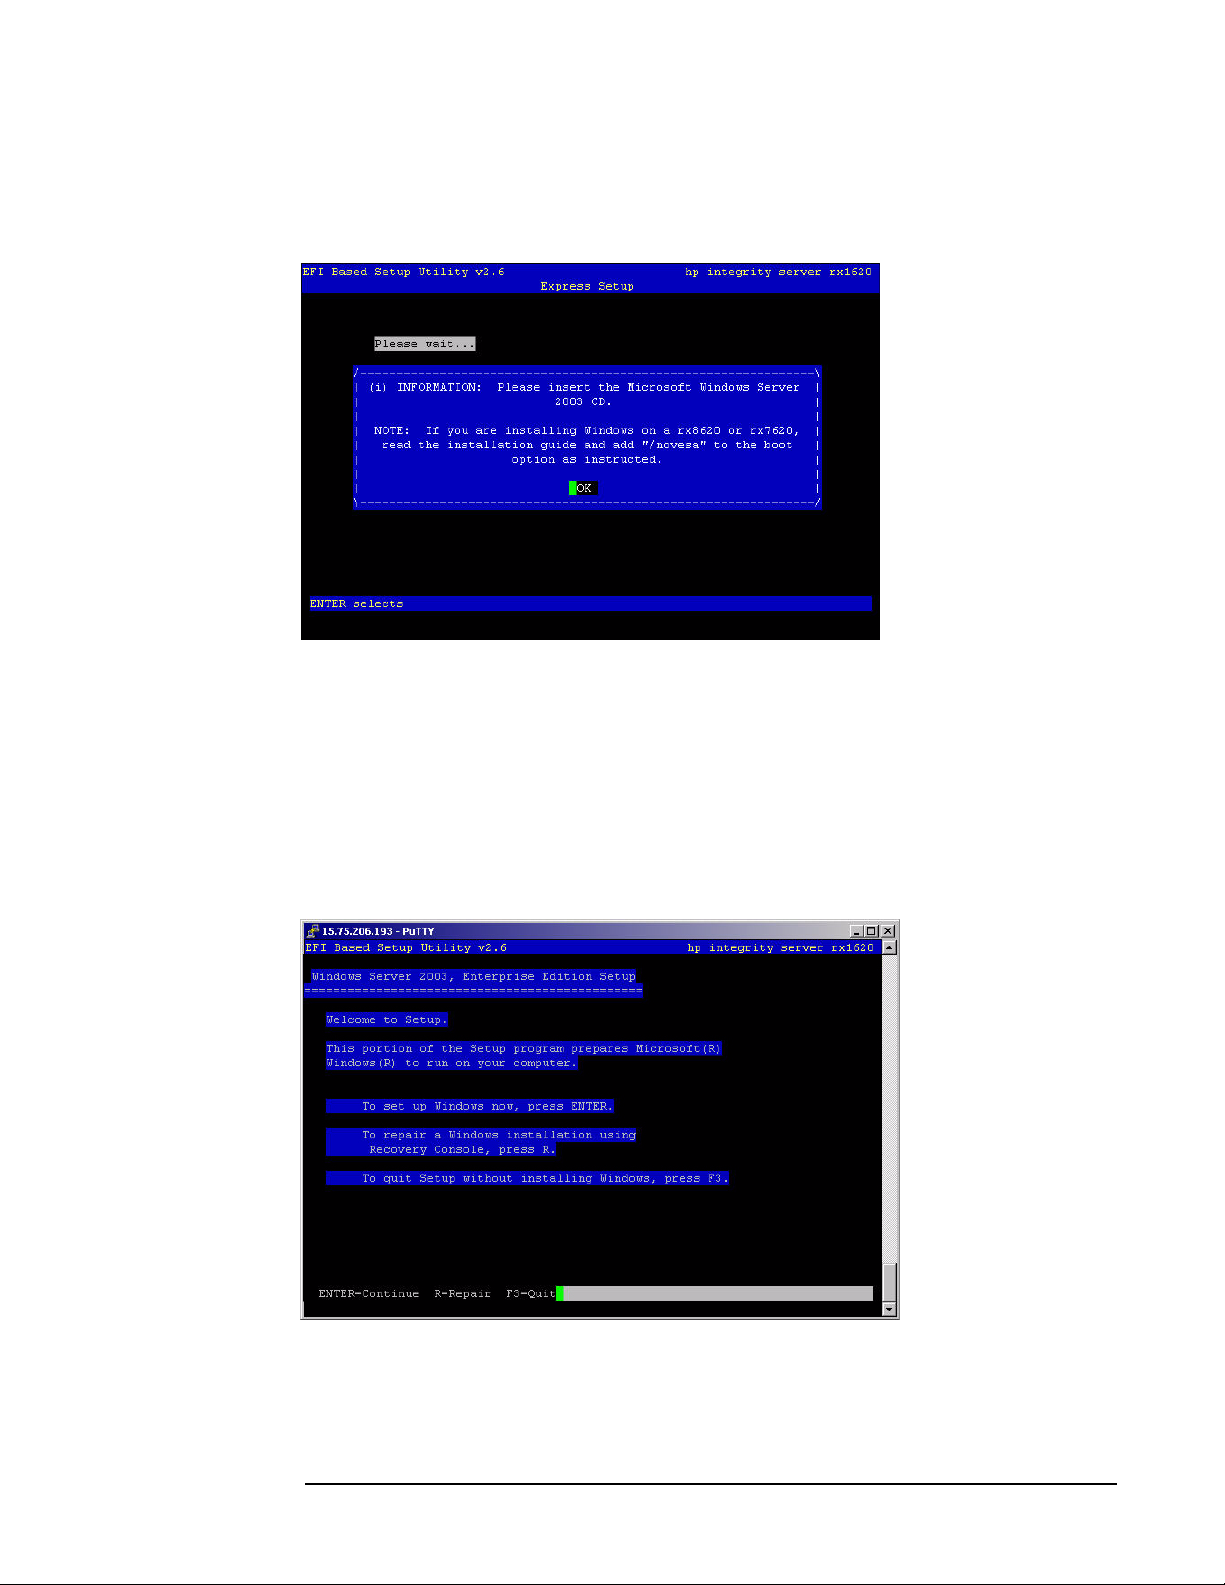
Step 11. EBSU prompts you to insert the Microsoft Windows Server 2003 CD in the DVD drive.
Insert the Microsoft Windows Server 2003 CD and press
Figure 3-7 Insert the Microsoft Windows Server 2003 CD
Installing the OS
Installing from a local console
Enter.
Run Windows Setup
Windows Setup prompts you to create a system partition on the boot disk if needed,
copies the operating system files on to that partition, and attempts to reboot from the
boot disk.
Step 1. When you insert the Microsoft Windows Server 2003 CD in the DVD drive, it launches
Windows Setup. Press Enter to start the installation.
Figure 3-8 Launch Windows Setup
Chapter 3
Step 2. Windows Setup prompts you to select Express Install or Custom Install. Express Install
minimizes user interaction, selecting various installation options on your behalf. Select
Express Install by pressing Enter.
35
Page 36

Installing the OS
Installing from a local console
Figure 3-9 Choose install type
Step 3. If Windows Setup cannot find a system partition, it prompts you to create one. Press
Enter to continue. Windows creates a partition and then prompts you to format it.
Step 4. Select the partition in which you want to install the OS and press
formats the partition if necessary, checks the partition for errors, and begins to copy the
OS files.
Figure 3-10 Choose install partition
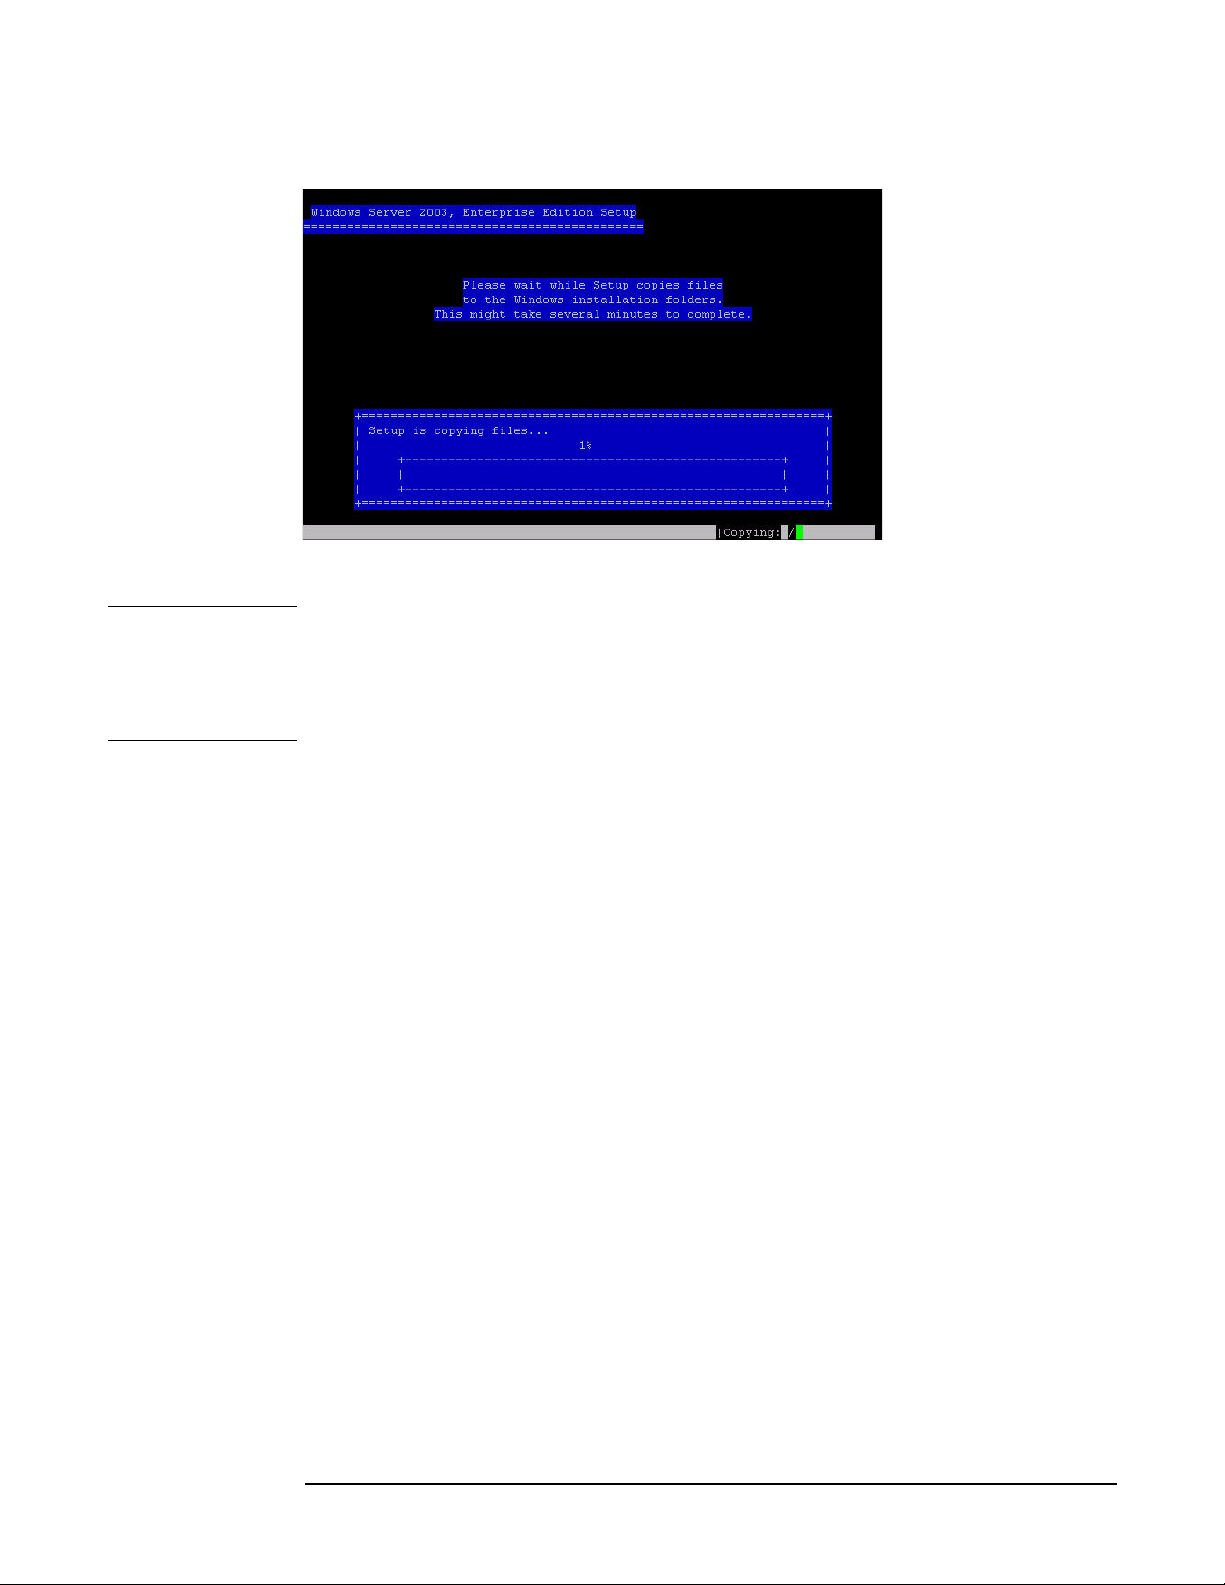
Step 5. Monitor the copy process until it completes.
Enter. Windows
36
Chapter 3
Page 37

Installing the OS
Installing from a local console
Figure 3-11 Copy installer files to disk
Upon completion, Windows Setup counts down to a reboot. Allow the system to reboot.
NOTE If your server is cell-based and has an HP Graphics and USB Combo card installed, you
must set the NOVESA OS load option. To set the NOVESA load option, break into the
boot sequence by pressing any key before the Boot Manager menu is displayed. If your
server is not cell-based or does not have the HP Graphics and USB Combo card, skip
ahead to “Specify server settings” on page 38.
Set NOVESA option (cell-based server with Graphics USB combo)
Because of issues with the legacy VGA driver in Windows Server 2003, you must disable
the extended VESA modes during installation by setting the /NOVESA boot option:
Step 1. From the EFI shell, go to the MSUTIL directory:
fs1: cd msutil
Step 2. Run nvrboot.efi utility:
fs1: nvrboot
EFI displays the Boot Options menu:
NVRBOOT: OS Boot Options Maintenance Tool [Version 5.2.3683]
* 1. Windows Server 2003, Enterprise
2. EFI Shell [Built-in]
* = Windows OS boot option
(D) isplay (M)odify (C)opy E(x)port (I)mport (E)rase (P)ush (H)elp (Q)uit
Step 3. Type M to Modify.
EFI prompts you to select an OS boot option to modify.
Step 4. Select the first option—
Windows Server 2003, Enterprise—by typing 1.
Chapter 3
EFI prompts you to specify the loader variable to modify:
37
Page 38

Installing the OS
Installing from a local console
Enter VAR to modify:
LoadIdentifier = Windows Server 2003, Enterprise
OsLoadOptions = /redirect
EfiOsLoaderFilePath = cf5f2ddc-b885-11d7-b831-000000000000 ::
\efi\microsoft\winnt50\ia64ldr.efi
OsLoaderFilePath = e605a034-b885-11d7-b831-000000000000 :: \windows
Step 5. Select the second option—OsLoadOptions—by typing 2.
Step 6. Type OsLoadOptions = /redirect /NOVESA.
The EFI displays the boot loader options again (with the NOVESA option):
Enter VAR to modify:
LoadIdentifier = Windows Server 2003, Enterprise
OsLoadOptions = /redirect /novesa
EfiOsLoaderFilePath = cf5f2ddc-b885-11d7-b831-000000000000 ::
\efi\microsoft\winnt50\ia64ldr.efi
OsLoaderFilePath = e605a034-b885-11d7-b831-000000000000 :: \windows
Step 7. Exit, return to the EFI Boot Manager and boot from the OS.
Specify server settings
To set up Windows Server 2003 after initial boot from the local console:
Step 1. When the system boots, Windows displays a screen indicating that an EMS channel (MP
remote port) is present. It may take 2 to 15 minutes for the mouse and keyboard to start
operating in this mode.
Step 2. When prompted to enter server settings, click OK.
Step 3. From the Windows Setup Wizard, enter the following setup information:
1. In the License Agreement window, click Accept and then Next.
2. In the Regional and Language Options window, click Next.
3. In the Your Product Key window, enter the product key.
The product key is located on the label attached to the server.
4. In the Licensing Modes window, select the license you purchased.
5. In the Administrator Password window, enter the server name and a password.
6. In the Date and Time window, select the appropriate timezone, and click Next.
The server reboots to the EFI Boot Manager.
Step 4. From the EFI Boot Menu, select Windows Server 2003. The server boots to Windows.
Step 5. Log in to the system with the administrator password you specified earlier.
Step 6. Install the HP Update CD and the HP Support Pack after installing the OS.
38
Chapter 3
Page 39

Installing from a remote console
Installing from a remote console involves booting from the HP Smart Setup media,
running EBSU, launching Windows Setup, loading OS files to the boot disk, and then
booting the server from the boot disk.
To install the OS using the remote console:
Run EBSU
EBSU provides an easy-to-use interface to flash the firmware, partition the hard disk,
install diagnostic tools, configure storage controllers, and run other EFI utilities.
Step 1. Power on the server. The server boots to EFI.
Figure 3-12 Boot to EFI
Installing the OS
Installing from a remote console
Step 2. Load the HP Smart Setup media into the server DVD drive.
Step 3. From the EFI Boot Menu, select
Step 4. EBSU starts and displays the Welcome screen. Select
Figure 3-13 Enter EBSU
Chapter 3
Internal Bootable DVD and press Enter.
OK and press Enter to continue.
39
Page 40

Installing the OS
Installing from a remote console
Step 5. From the main menu, select
Figure 3-14 Select Express Setup
Step 6. EBSU displays the Express Setup introduction. Press Enter to continue.
Step 7. EBSU displays the firmware update screen, listing each device, its installed firmware
version, and the firmware version on the Smart Setup media. Select the device(s) whose
firmware you want to update. To continue, select
Express Setup and press Enter.
Next and press Enter.
Figure 3-15 Update firmware
NOTE You may not be able to use EBSU to flash the firmware of some devices. You cannot flash
the firmware if the installed version is the same or higher than the version on the Smart
Setup media. Also, you cannot use EBSU to flash the Management Processor (MP)
firmware. You must download the latest MP firmware from the HP Integrity support site
(http://www.hp.com/support/itaniumservers/) and flash it separately.
40
Chapter 3
Page 41

Step 8. Specify the disk partitions you want to create (ESP Only or ESP + HPSP + MSR). We
recommend the default—ESP + HPSP + MSR—as a means to simplify the maintenance
of your server. Also, specify the option to install the Drive Explorer utility, which enables
you to browse a drive in EFI. Select
Figure 3-16 Partition disk
Installing the OS
Installing from a remote console
Next and press Enter.
Step 9. Specify the option to install offline diagnostic tools (from the HP Itanium Processor
Family offline diagnostics and utilities CD). Also, specify the option to launch the
Windows OS installer. Select
Figure 3-17 Install diagnostic tools
Step 10. EBSU displays the partition confirmation window. Select Continue and press Enter.
Setup and press Enter.
Chapter 3
41
Page 42
Installing the OS
Installing from a remote console
Step 11. EBSU prompts you to insert the Microsoft Windows Server 2003 CD in the DVD drive.
Insert the Microsoft Windows Server 2003 CD and press
Figure 3-18 Insert the Microsoft Windows Server 2003 CD
Enter.
Run Windows Setup
Windows Setup prompts you to create a system partition on the boot disk if needed,
copies the operating system files on to that partition, and attempts to reboot from the
boot disk.
Step 1. When you insert the Microsoft Windows Server 2003 CD in the DVD drive, it launches
Windows Setup. Press Enter to start the installation.
Figure 3-19 Launch Windows Setup
Step 2. Windows Setup prompts you to select Express Install or Custom Install. Express Install
minimizes user interaction, selecting various installation options on your behalf. Select
Express Install by pressing Enter.
42
Chapter 3
Page 43

Figure 3-20 Choose install type
Step 3. If Windows Setup cannot find a system partition, it prompts you to create one. Press
Enter to continue. Windows creates a partition and then prompts you to format it.
Installing the OS
Installing from a remote console
Step 4. Select the partition in which you want to install the OS and press
formats the partition if necessary, checks the partition for errors, and begins to copy the
OS files.
Figure 3-21 Choose install partition
Step 5. Monitor the copy process until it completes.
Enter. Windows
Chapter 3
43
Page 44
Installing the OS
Installing from a remote console
Figure 3-22 Copy installer files to disk
Upon completion, Windows Setup counts down to a reboot. Allow the system to reboot.
NOTE If your server is cell-based and has an HP Graphics and USB Combo card installed, you
must set the NOVESA OS load option. To set the NOVESA load option, break into the
boot sequence by pressing any key before the Boot Manager menu is displayed. If your
server is not cell-based or does not have the HP Graphics and USB Combo card, skip
ahead to “Specify server settings” on page 38.
Set NOVESA option (cell-based server with Graphics USB combo)
Because of issues with the legacy VGA driver in Windows Server 2003, you must disable
the extended VESA modes during installation by setting the /NOVESA boot option:
Step 1. From the EFI shell, go to the MSUTIL directory:
fs1: cd msutil
Step 2. Run nvrboot.efi utility:
fs1: nvrboot
EFI displays the Boot Options menu:
NVRBOOT: OS Boot Options Maintenance Tool [Version 5.2.3683]
* 1. Windows Server 2003, Enterprise
2. EFI Shell [Built-in]
* = Windows OS boot option
(D) isplay (M)odify (C)opy E(x)port (I)mport (E)rase (P)ush (H)elp (Q)uit
Step 3. Type M to Modify.
EFI prompts you to select an OS boot option to modify.
Step 4. Select the first option—
Windows Server 2003, Enterprise—by typing 1.
EFI prompts you to specify the loader variable to modify:
44
Chapter 3
Page 45

Enter VAR to modify:
LoadIdentifier = Windows Server 2003, Enterprise
OsLoadOptions = /redirect
EfiOsLoaderFilePath = cf5f2ddc-b885-11d7-b831-000000000000 ::
\efi\microsoft\winnt50\ia64ldr.efi
OsLoaderFilePath = e605a034-b885-11d7-b831-000000000000 :: \windows
Step 5. Select the second option—OsLoadOptions—by typing 2.
Step 6. Type OsLoadOptions = /redirect /NOVESA.
The EFI displays the boot loader options again (with the NOVESA option):
Enter VAR to modify:
LoadIdentifier = Windows Server 2003, Enterprise
OsLoadOptions = /redirect /novesa
EfiOsLoaderFilePath = cf5f2ddc-b885-11d7-b831-000000000000 ::
\efi\microsoft\winnt50\ia64ldr.efi
Installing the OS
Installing from PXE
OsLoaderFilePath = e605a034-b885-11d7-b831-000000000000 :: \windows
Step 7. Exit, return to the EFI Boot Manager and boot from the OS.
Enter the product key
Step 1. At the SAC prompt, press Esc+Tab to switch to a new command channel.
Step 2. When prompted, type the product key and press
Enter.
Installing from PXE
Support for PXE/RIS installations is limited to the following HP Integrity servers:.
Table 3-1 Integrity servers supporting PXE/RIS installations
Server PXE/RIS support
rx1620, rx2600, rx2620, rx4640, rx5670 Yes
rx7620, rx8620 Yes — Enterprise edition only
Chapter 3
Superdome No
To install Windows Server 2003 from PXE:
Step 1. From EFI, select the
Step 2. At the
Boot Manager, select the Boot Options menu.
Boot Manager.
45
Page 46
Installing the OS
Installing from PXE
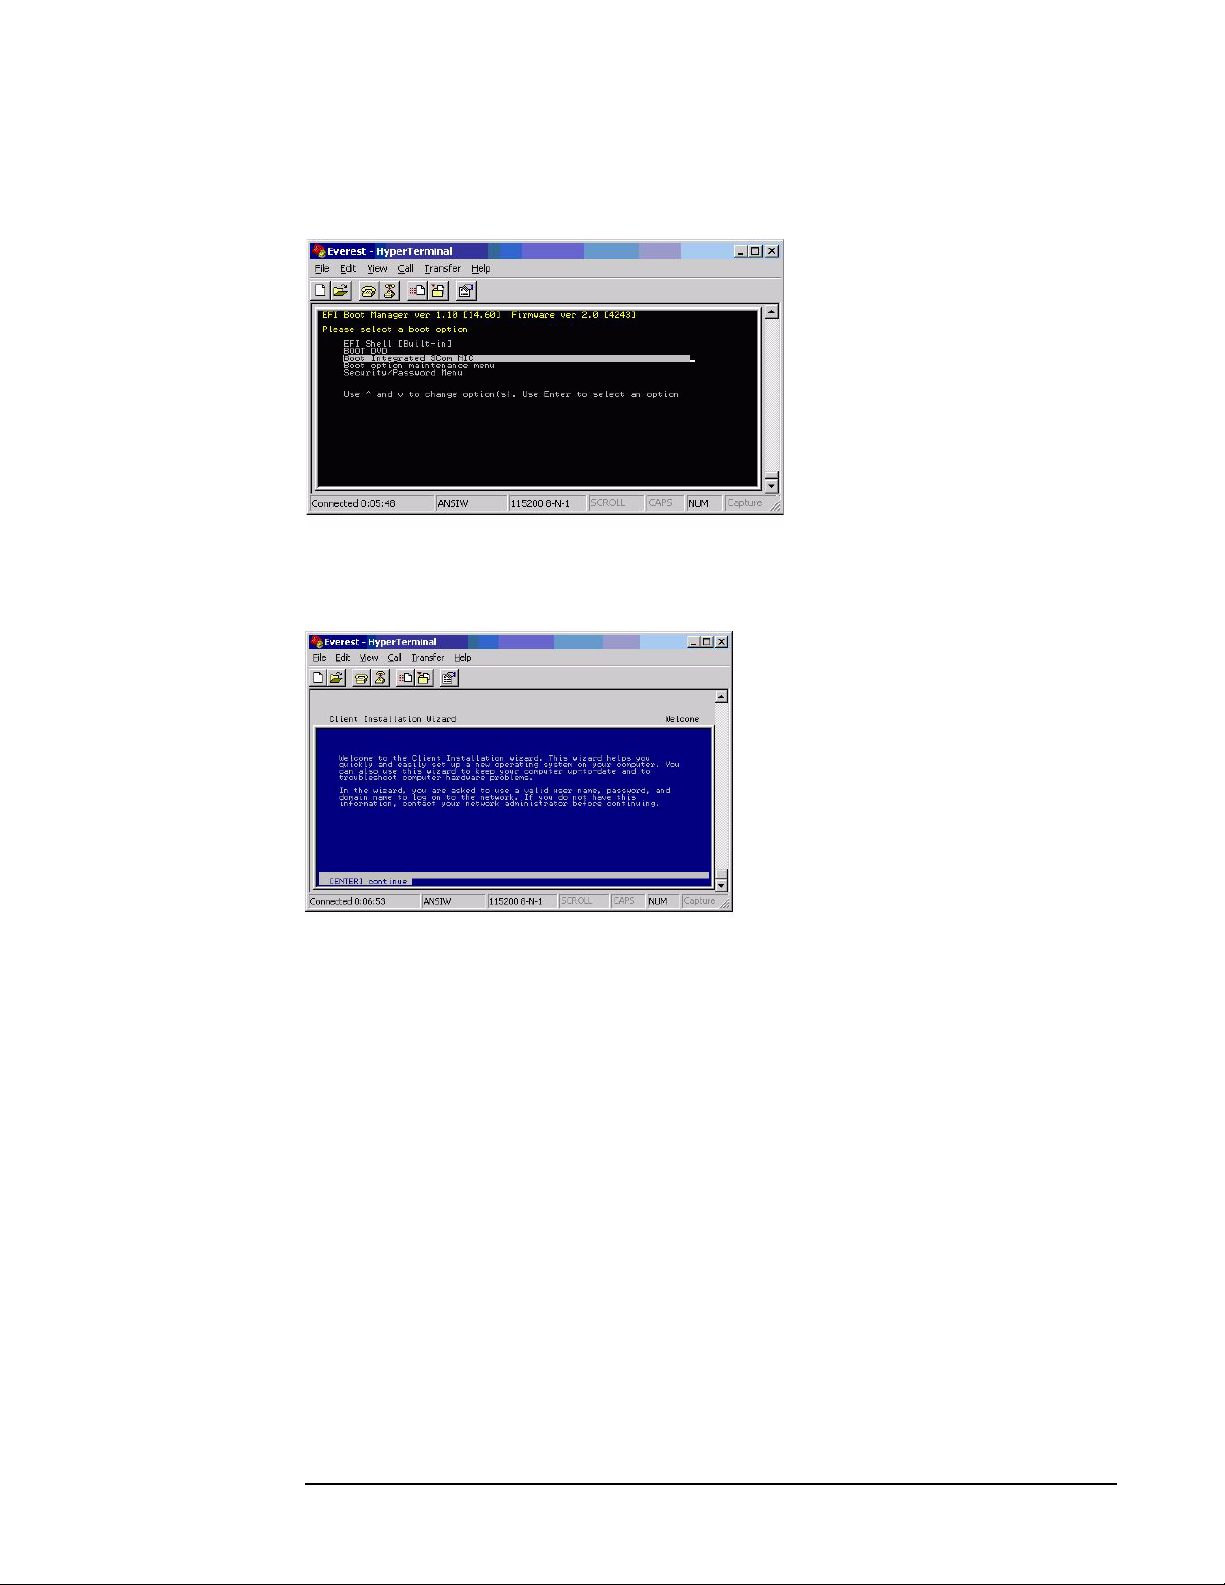
Step 3. From the list of available boot sources, select the NIC to boot from and press Enter.
Figure 3-23 Select NIC
Step 4. At the PXE boot status window, press Enter to continue.
Figure 3-24 Review PXE boot status
Step 5. At the login screen, type a valid user name and password, and press Enter.
46
Chapter 3
Page 47

Figure 3-25 Log in to RIS server
Step 6. At the OS selection screen, select the OS (Windows Server 2003, Enterprise Edition) to
be installed and press Enter to start the installation.
Figure 3-26 Select the OS to install
Installing the OS
Reinstalling from a local console
Chapter 3
Step 7. Complete the installation by following the instructions on screen.
Reinstalling from a local console
HP Integrity servers that are factory-installed with Windows Server 2003 are shipped
with the HP Re-Installation media, which allows you to restore the system to its factory
settings if needed. Reinstalling the operating system involves loading the image from the
Re-Installation media on to the boot disk and, after Windows Server 2003 is loaded,
specifying the server settings.
47
Page 48

Installing the OS
Reinstalling from a local console
WARNING Reinstallation overwrites all files on the Boot Disk. Please note the Boot Disk
is determined by bus search order and may not be the disk you expect it to be.
HP recommends disconnecting or unplugging ALL drives from the server
except the Boot Disk. This includes all SAN storage too.
Load the system image
To install the Windows Server 2003 operating system on the server from the local
console:
Step 1. Power on the server. The server boots to EFI.
Figure 3-27 Boot to EFI
Step 2. Insert the HP Re-Installation media in the DVD drive.
Step 3. From the EFI Boot Menu, select
from the Re-Installation media.
Step 4. At the Recovery Console, click
Step 5. When prompted to confirm the re-installation, click
Step 6. Select the partition size and click OK to continue.
NOTE The installation process copies files to the hard disk. It may display 99% complete for a
long time. Do not power off the server.
Step 7. When the installation process displays a dialog box, click OK to continue.
Step 8. Click Exit.
The server reboots to the Windows Server 2003 operating system. Set up the system
according the instructions in the following section.
Internal Bootable DVD and press Enter. The server boots
Re-Install.
OK.
Specify server settings
To set up Windows Server 2003 after initial boot from the local console:
48
Chapter 3
Page 49

Reinstalling from a remote console
Step 1. Start the server.
Windows displays a pop-up screen indicating that an EMS channel (headless server MP
port) is present. It may take 2 to 15 minutes for the mouse and keyboard to start
operating in this mode.
Step 2. When prompted to enter setup information at the local console, click OK.
Step 3. From the Windows Setup Wizard, enter the following setup information:
1. In the License Agreement window, click Accept and then Next.
2. In the Regional and Language Options window, click Next.
3. In the Your Product Key window, enter the product key.
The product key is located on the label attached to the server.
4. In the Licensing Modes window, select the license you purchased.
5. In the Administrator Password window, enter the server name and a password.
6. In the Date and Time window, select the appropriate timezone, and click Next.
The server reboots to the EFI Boot Manager and then boots up Windows Server 2003.
You can now log in to the server using the administrator password you selected.
Installing the OS
Reinstalling from a remote console
HP Integrity servers that are factory-installed with Windows Server 2003 are shipped
with the HP Re-Installation media, which allows you to restore the system to its factory
settings if needed. Reinstalling the operating system involves loading the image from the
Re-Installation media on to the boot disk and, after Windows Server 2003 is loaded,
specifying the server settings.
WARNING Reinstallation overwrites all files on the Boot Disk. Please note the Boot Disk
is determined by bus search order and may not be the disk you expect it to be.
HP recommends disconnecting or unplugging ALL drives from the server
except the Boot Disk. This includes all SAN storage too.
Load the system image
To re-install Windows Server 2003 from a remote console:
Step 1. Power on the server. The server boots to EFI.
Chapter 3
49
Page 50

Installing the OS
Reinstalling from a remote console
Figure 3-28 Boot to EFI
Step 2. Insert the HP Re-Installation media in the DVD drive.
Step 3. Connect to the target system partition with the terminal emulator.
Step 4. From the EFI Boot Menu, select
Internal Bootable DVD and press Enter. The server boots
from the Re-Installation media.
Step 5. At the SAC> prompt, type cmd.
Step 6. Switch to a new command prompt channel by pressing Esc+Tab.
Step 7. Invoke the installation menu by typing txtrestore.
Step 8. Select the partition size (32 GB recommended) and click OK to continue.
The installation process copies files to the hard disk. It may display 99% complete for a
long time. Do not power off the server.
Step 9. When the installation process completes, the local console displays a screen indicating
that the EMS was detected. When prompted to use the local console, do NOT click OK.
Step 10. Return to the remote console and perform system setup as indicated in the following
section.
Specify server settings
To set up Windows Server 2003 after initial boot from a remote console:
Step 1. At the SAC> prompt, switch to channel one by pressing Esc+Tab.
The system displays the following screen:
*****************************************************************
Name: Unattended Setup Channel
Description: Provide parameters to automate Setup
Type: VT-UTF8
Channel GUID: 0cfc0ee2-3a27-11d7-8484-806e6f6e6963
Application Type GUID: 00000000-0000-0000-0000-000000000000
50
Chapter 3
Page 51

Press <esc><tab> for next channel.
Press <esc><tab>0 to return to the SAC channel.
Use any other key to view this channel.
*****************************************************************
Step 2. Press any key and then press Page Down.
Step 3. Accept the license agreement by pressing F8.
On the Windows default terminal emulator, F8 is <Esc>8. Press 8 within two seconds
after pressing Esc. Otherwise, the system will register only Esc and reboot.
Step 4. Enter the product key.
The product key is located on the Microsoft Certificate of Authenticity attached to the
server.
Step 5. Enter the administrator password and re-enter to confirm.
The mini-setup process continues automatically and after completion, reboots the
system. Wait for the SAC> prompt to reappear.
Installing the OS
Reinstalling from a remote console
Step 6. Open a terminal server client and connect to your server’s IP address.
Change the computer name and IP address, if needed.
Step 7. On the desktop, open the OnlineReference page, scroll to the bottom, and click on the
link to c:\hputils\usercompanyname.com.
Step 8. When prompted, enter company and user name, and click
OK to complete setup.
Chapter 3
51
Page 52

Installing the OS
Verifying the installation
Step 1. From Windows, right-click on the My Computer icon.
Step 2. Click the Properties button, displaying the System Properties window.
Step 3. Click the Hardware tab, displaying the Hardware Properties window.
Verifying the installation
This section provides two tasks that verify that the OS is up and running. Both of these
tasks should be performed before you connect your server to your intranet.
Check hardware status
The Windows Device Manager is a comprehensive tool for detecting and evaluating
problems with installed hardware devices and resource conflicts.
To check server hardware status:
Step 4. Click Device Manager, displaying the Manager window.
Step 5. Scan the listed devices, verifying that no device displays a yellow bang (!) or a question
mark (?).
•A yellow bang (exclamation mark) indicates either a hardware problem, device
driver, missing .ini file or resource conflict with the flagged device.
•A question mark indicates that Windows has been arbitrarily “told” that the
flagged device is installed but cannot find it or recognize it.
Step 6. If a device is flagged with either fault indicator (bang or question mark), double-click
that device, displaying the
View menu and select Print to obtain a hardcopy report of all device statuses.
NOTE A yellow bang might appear under Non-Plug and Play Drivers in the Device Manager
when hidden devices are enabled. The yellow bang appears only if the Show hidden
devices is enabled under the Non-Plug and Play Drivers in the Device Manager.
If no serial legacy device is found in the system, the OS generates a yellow bang for the
Serial option. HP Integrity rx8620 and rx7620 servers do not have legacy serial devices
so this error always occurs. The bang does not indicate faulty hardware in this case.
Device Properties dialog box. If a printer is available, open the
Install new device drivers
If you installed the OS from Microsoft RTM media, you must also install device drivers
for the HP Integrity server for all devices displaying a yellow “bang” icon in the system
device manager. These drivers are available on the HP Smart Setup CD.
52
Chapter 3
Page 53

Installing the OS
Verifying the installation
To install adevice driver from the Smart Setup CD:
Step 1. Insert the HP Smart Setup CD in the server CD/DVD drive.
Step 2. Run the Windows Device Manager and use a menu path of View > Devices by Type to
list the system devices
Step 3. Expand the entry named Other devices.
This shows a list of all devices whose drivers were not found during installation of the
operating system. Some of these devices may have a specific name, while others are
shown simply as “Unknown Device”. Each item is indicated by a yellow “bang” icon (a
small yellow exclamation mark) next to its name.
Step 4. Right-click on the first item and select Update Driver from the context menu.
Step 5. In the Hardware Update Wizard screen, select Install the software automatically
and click Next.
Step 6. If you see a warning dialog stating the driver is not digitally signed, ignore it. This is not
an issue, so click Next to continue.
Step 7. When successful installation is indicated, click Finish.
Set up a Remote Desktop Connection
By establishing a Remote Desktop Connection (RDC), you can verify that the operating
system on the remote computer is up and running.
NOTE The remote administration mode is enabled by default on Windows Server 2003 if you
are using the OS supplied as part of the HP Re-install media. If you are installing or
re-installing using Microsoft RTM media, the Remote Desktop functionality is not
enabled. You must enable this from the My Computer properties tab. Users must have
unique user names. Windows does not permit two users with the same name to log on
simultaneously.
To set up an RDC:
Step 1. Click Start > Programs > Accessories > Communications > Remote Desktop
Connection.
Step 2. Click the Computer dropdown list.
Step 3. Select Browse for more.
Step 4. Select the HP Integrity server with which you want to establish a connection.
Step 5. Click OK.
Step 6. Click Connect.
Chapter 3
Step 7. Log on to the remote server.
Windows displays the desktop of the server.
53
Page 54

Installing the OS
Verifying the installation
54
Chapter 3
Page 55

4 Updating the server
This chapter provides instructions for performing administration tasks on Windows
Server 2003 remotely. This chapter also provides links to web sites that enable you to
keep your server up to date with the latest patches, fixes, and updates to utilities and
documentation. You can also sign up for automated notifications to stay informed of
available updates.
Chapter 4
55
Page 56

Updating the server
Updating your system
Updating your system
There are three phases in updating your system after installing the OS:
• Installing updates from the HP Smart Update CD
• Installing updates from the HP Smart Setup CD
• Installing the latest updates from the HP website
NOTE Firmware updates for Superdome, rx8620, and rx7620 servers must be performed by HP
CEs in compliance with the support agreement.
You must update your system using the Smart Update CD if you installed the OS from
a source other than HP.
Install updates from the HP Smart Update CD
To install system updates from the Smart Update CD:
Step 1. Log into the server as administrator using an RDC connection from another PC.
Step 2. Make the CD drive on your local machine available to the server (part of the RDC
configuration).
Step 3. Insert the HP Smart Update CD in the remote PC CD/DVD drive.
The Smart Update CD starts automatically and offers two choices:
• Operating System QFEs
•Security QFEs
Step 4. Click Install under Operating System QFEs to install all Windows OS QFEs onto the
server.
Step 5. Click Install under Security QFEs to install all security related QFEs onto the server.
Install updates from the HP Smart Setup CD
To install updates from the HP Smart Setup CD:
Step 1. Log into the server as administrator using an RDC connection from another PC.
Step 2. Make the CD drive on your local machine available to the server (part of the RDC
configuration).
Step 3. Insert the HP Smart Setup CD in the remote PC CD/DVD drive.
The Smart Update CD starts automatically and displays the license agreement screen.
Step 4. Click Accept to continue.
Step 5. Click Install Support Pack.
Step 6. Click Install ISP, starting the HP Remote Deployment Utility.
56
Chapter 4
Page 57

Updating the server
Updating your system
Step 7. Type in the machine name or IP address of the server you are updating in the Target
Machine field.
Step 8. Select the appropriate support pack from the Support Pack pulldown list.
Step 9. Click Install.
Install updates from the web
The latest software updates are available on the HP website. Go to:
http://www.hp.com/products1/servers/integrity/index.html
and select Support and Drivers.
Register for HP support notifications
HP recommends that you register for alerts and notifications to stay informed of updates
to the drivers, patches, and other components specific to your server.
Go to http://www.hp.com/united-states/subscribe/gateway/
Register for Microsoft security notifications
HP recommends that you register for Microsoft security notifications to stay informed of
patches that may be applicable to your operating system.
Go to http://www.microsoft.com/technet/security/bulletin/notify.mspx
Register for Microsoft Windows Update
HP recommends that you use the Microsoft Windows Update feature to download the
latest patches and hot fixes to the operating system.
Go to http://support.microsoft.com/
Chapter 4
57
Page 58

Updating the server
Administering the system remotely
Administering the system remotely
When a server is running normally, you can connect to the server over the network and
administer it using tools such as Windows Management Instrumentation (WMI),
Terminal Services Remote Desktop for Administration, Microsoft Management Console
(MMC), Telnet, Microsoft Script Host, and other third-party tools:
• WMI: A management infrastructure in Windows that supports monitoring and
controlling system resources through a common set of interfaces and provides a
logically organized, consistent model of Windows operation, configuration, and
status.
• Terminal Services: The underlying technology that enables Remote Desktop,
Remote Assistance, and Terminal Server.
• MMC: A framework for hosting administrative tools called snap-ins. A console might
contain tools, folders or other containers, World Wide Web pages, and other
administrative items.
• Telnet: A protocol that enables an Internet user to log on to and enter commands on
a remote computer linked to the Internet, as if the user were using a text-based
terminal directly attached to that computer. Telnet is part of the TCP/IP suite of
protocols. The term telnet also refers to the software (client or server component) that
implements this protocol.
When a server is not functioning normally, you must access the server without relying on
the network. you must establish a secure connection through a phone line or serial port,
or through an additional network connection (possibly on a secondary network).
For servers equipped with the proper firmware, Emergency Management Services
provides functionality that you can use to administer a server remotely. Except for
hardware maintenance and replacement, all administrative functions that you can
accomplish locally are also available remotely. This includes starting your system and
performing system-recovery tasks.
Emergency Management Services consists of components that are standard features of
Windows Server 2003, and to which console redirection functionality has been added.
Emergency Management Services also includes a remote-management console that is
unique to it: Special Administration Console (SAC). You access this console from a
remote system using terminal emulation software such as telnet, PuTTY, and
HyperTerminal.
Special Administration Console (SAC)
Special Administration Console (SAC) is the primary Emergency Management Services
command-line environment hosted by Windows Server 2003. It is separate from the
command-line environment and provides different functionality.
Because SAC is available early in the boot process, you can use it to manage the server
during normal system operation and initiation. You can also use it when the system is in
Safe Mode and during GUI-mode Setup. When Emergency Management Services is
enabled, SAC remains active as long as the kernel is running.
58
Chapter 4
Page 59

Updating the server
Administering the system remotely
When SAC is active, it displays the SAC prompt: SAC>. SAC provides a set of commands
you can use to perform a number of management tasks that help return your system to a
normally functioning state:
• restart: Restart the server.
• shutdown: Shut down the computer. Do not use this command unless you can be
physically present at the computer when you are ready to restart it.
• T: List the processes and threads that are currently running.
• K<PID>: End the given process. PID is the process identification number you specify.
• I: Set or view the Internet Protocol (IP) address of the server. If no parameters are
passed, this command lists IP information. You can display or set the IP address,
subnet mask, and gateway of a given network interface device by providing the
network number, IP address, and subnet information. To do so, use the following
format: I <network#><IPaddress><subnet>
• crashdump: Manually generates a Stop error message and forces a memory dump
file to be created. A stop error is a serious error that affects the operating system and
that could place data at risk. The operating system generates an obvious message, a
screen with the Stop error, rather than continuing on and possibly corrupting data.
Also called a fatal system error.
• cmd: Creates Windows command-prompt channels. To use a command-prompt
channel, you must provide valid logon credentials. You must log on to each
command-prompt instance. Press ESC+TAB to switch back and forth between the
command prompt channels and SAC. If a command prompt channel becomes
unresponsive, use the K (end) command to close it; you can then open another
command prompt channel.
• ch: Lists all channels.
TIP To list all available SAC commands, type ? or help at the SAC prompt as follows:
SAC>help
To list the subset of SAC commands available for managing command channels, type:
SAC>ch -?
SAC also provides access to the setup logs during GUI-mode Setup. You can press
ESC+TAB to switch between the setup logs and SAC. When accessing the setup logs
from Emergency Management Services, you can see which portions of Setup have
completed and whether any errors have occurred. This is a very useful way to check the
progress of your setup and to diagnose setup failures.
The three setup log channels are as follows:
• setuplog.txt: Monitors setup progress.
• setupact.log: Displays any warnings during setup.
Chapter 4
• setuperr.log: Displays any errors that might occur during setup.
59
Page 60

Updating the server
Administering the system remotely
60
Chapter 4
Page 61

Index
C
Check hardware status
Check Windows compatibility of existing I/O, boot
device, and external Storage
Checking OS functionality after the installation, 52
D
DVD/CD drive
mapping
H
hardware status
checking
I
Install a PXE client on the server
installation methods, 8
Installing the OS, 31
Installing Windows using a local console (custom and
express mode)
Installing Windows using a PXE client and a RIS
server
L
Locate and map the DVD/CD drive
, 24
, 52
, 11
, 52
, 18
, 22
, 9
, 24
checking
, 18
M
map the DVD/CD drive
migrating to Windows, 18
O
OS
installing
OS functionality
checking after the installation, 52
P
preparing for the installation
PXE client
installing Windows
R
Remote Desktop Connection (IA64 Computer)
setting up
S
Set Up Remote Desktop Connection (IA64
Computer)
T
Task
Check hardware status
Set up a remote console, 20
, 31
, 53
, 53
, 24
, 17
, 11
, 52
W
Windows compatibility of existing I/O, boot device,
and external Storage
61
Page 62

Index
62
 Loading...