

Page 1

nPartition Guide
HP Integrity Servers with Microsoft® Windows® Server 2003
Manufacturing Part Number: 5991-3684
September 2006
© Copyright 2006
Hewlett-Packard Development Company, L.P.
All rights reserved.
Page 2

Legal Notices
© 2006 Hewlett-Packard Development Company, L.P.
Microsoft and Windows are trademarks of Microsoft Corporation in the U.S. and other
countries.
Hewlett-Packard Company shall not be liable for technical or editorial errors or
omissions contained herein. The information in this document is provided “as is” without
warranty of any kind and is subject to change without notice. The warranties for HP
products are set forth in the express limited warranty statements accompanying such
products. Nothing herein should be construed as constituting an additional warranty.
ii
Page 3

1. Introduction
Quick Start . . . . . . . . . . . . . . . . . . . . . . . . . . . . . . . . . . . . . . . . . . . . . . . . . . . . . . . . . . . . . . . . . . . . . . . . . . 9
Getting to know nPartitions . . . . . . . . . . . . . . . . . . . . . . . . . . . . . . . . . . . . . . . . . . . . . . . . . . . . . . . . . . . 10
Partitioning continuum . . . . . . . . . . . . . . . . . . . . . . . . . . . . . . . . . . . . . . . . . . . . . . . . . . . . . . . . . . . . . 10
Cell structure of nPartitions . . . . . . . . . . . . . . . . . . . . . . . . . . . . . . . . . . . . . . . . . . . . . . . . . . . . . . . . . 11
Properties of nPartitions . . . . . . . . . . . . . . . . . . . . . . . . . . . . . . . . . . . . . . . . . . . . . . . . . . . . . . . . . . . . 11
Cell and nPartition boot process . . . . . . . . . . . . . . . . . . . . . . . . . . . . . . . . . . . . . . . . . . . . . . . . . . . . . . 13
Cell boot phase . . . . . . . . . . . . . . . . . . . . . . . . . . . . . . . . . . . . . . . . . . . . . . . . . . . . . . . . . . . . . . . . . . 13
nPartition boot phase . . . . . . . . . . . . . . . . . . . . . . . . . . . . . . . . . . . . . . . . . . . . . . . . . . . . . . . . . . . . . 13
Choosing a management tool . . . . . . . . . . . . . . . . . . . . . . . . . . . . . . . . . . . . . . . . . . . . . . . . . . . . . . . . . . 15
Management interface options . . . . . . . . . . . . . . . . . . . . . . . . . . . . . . . . . . . . . . . . . . . . . . . . . . . . . . . . . 16
Intelligent Platform Management Interface (IPMI). . . . . . . . . . . . . . . . . . . . . . . . . . . . . . . . . . . . . . . 16
IPMI Block Transfer (IPMI BT) . . . . . . . . . . . . . . . . . . . . . . . . . . . . . . . . . . . . . . . . . . . . . . . . . . . . . 16
IPMI over LAN . . . . . . . . . . . . . . . . . . . . . . . . . . . . . . . . . . . . . . . . . . . . . . . . . . . . . . . . . . . . . . . . . . 16
Managing nPartitions using IPMI over LAN . . . . . . . . . . . . . . . . . . . . . . . . . . . . . . . . . . . . . . . . . . 17
Running Partition Manager using IPMI over LAN . . . . . . . . . . . . . . . . . . . . . . . . . . . . . . . . . . . 17
Running nPartition commands using IPMI over LAN. . . . . . . . . . . . . . . . . . . . . . . . . . . . . . . . . 18
Web-Based Enterprise Management (WBEM) . . . . . . . . . . . . . . . . . . . . . . . . . . . . . . . . . . . . . . . . . . . 18
Securing the WBEM connection. . . . . . . . . . . . . . . . . . . . . . . . . . . . . . . . . . . . . . . . . . . . . . . . . . . . . 18
Managing nPartitions using WBEM . . . . . . . . . . . . . . . . . . . . . . . . . . . . . . . . . . . . . . . . . . . . . . . . . 19
Running Partition Manager using WBEM . . . . . . . . . . . . . . . . . . . . . . . . . . . . . . . . . . . . . . . . . . 19
Running nPartition commands using WBEM. . . . . . . . . . . . . . . . . . . . . . . . . . . . . . . . . . . . . . . . 20
Choosing a management mode . . . . . . . . . . . . . . . . . . . . . . . . . . . . . . . . . . . . . . . . . . . . . . . . . . . . . . . . . 21
Local management . . . . . . . . . . . . . . . . . . . . . . . . . . . . . . . . . . . . . . . . . . . . . . . . . . . . . . . . . . . . . . . . . 21
Remote management via IPMI . . . . . . . . . . . . . . . . . . . . . . . . . . . . . . . . . . . . . . . . . . . . . . . . . . . . . . . 22
Remote management via WBEM . . . . . . . . . . . . . . . . . . . . . . . . . . . . . . . . . . . . . . . . . . . . . . . . . . . . . . 22
Authentication and authorization issues . . . . . . . . . . . . . . . . . . . . . . . . . . . . . . . . . . . . . . . . . . . . . . . 22
Local management . . . . . . . . . . . . . . . . . . . . . . . . . . . . . . . . . . . . . . . . . . . . . . . . . . . . . . . . . . . . . . . 22
Remote management via IPMI. . . . . . . . . . . . . . . . . . . . . . . . . . . . . . . . . . . . . . . . . . . . . . . . . . . . . . 23
Remote management via WBEM . . . . . . . . . . . . . . . . . . . . . . . . . . . . . . . . . . . . . . . . . . . . . . . . . . . . 23
Setting up the management station . . . . . . . . . . . . . . . . . . . . . . . . . . . . . . . . . . . . . . . . . . . . . . . . . . . . . 25
Controlling the management station remotely . . . . . . . . . . . . . . . . . . . . . . . . . . . . . . . . . . . . . . . . . . . 25
Remote Control . . . . . . . . . . . . . . . . . . . . . . . . . . . . . . . . . . . . . . . . . . . . . . . . . . . . . . . . . . . . . . . . . . 25
Terminal Services . . . . . . . . . . . . . . . . . . . . . . . . . . . . . . . . . . . . . . . . . . . . . . . . . . . . . . . . . . . . . . . . 25
Remote Desktop. . . . . . . . . . . . . . . . . . . . . . . . . . . . . . . . . . . . . . . . . . . . . . . . . . . . . . . . . . . . . . . . . . 26
Telnet . . . . . . . . . . . . . . . . . . . . . . . . . . . . . . . . . . . . . . . . . . . . . . . . . . . . . . . . . . . . . . . . . . . . . . . . . . 26
Performing nPartition management tasks . . . . . . . . . . . . . . . . . . . . . . . . . . . . . . . . . . . . . . . . . . . . . . . . 27
Listing the status of an nPartition or complex . . . . . . . . . . . . . . . . . . . . . . . . . . . . . . . . . . . . . . . . . . . 27
Using the Partition Manager . . . . . . . . . . . . . . . . . . . . . . . . . . . . . . . . . . . . . . . . . . . . . . . . . . . . . . . 27
Using the nPartition commands. . . . . . . . . . . . . . . . . . . . . . . . . . . . . . . . . . . . . . . . . . . . . . . . . . . . . 27
Using the Management Processor Command menu . . . . . . . . . . . . . . . . . . . . . . . . . . . . . . . . . . . . . 28
Using the EFI Shell. . . . . . . . . . . . . . . . . . . . . . . . . . . . . . . . . . . . . . . . . . . . . . . . . . . . . . . . . . . . . . . 28
Creating nPartitions. . . . . . . . . . . . . . . . . . . . . . . . . . . . . . . . . . . . . . . . . . . . . . . . . . . . . . . . . . . . . . . . 28
Creating the first nPartition in a server complex . . . . . . . . . . . . . . . . . . . . . . . . . . . . . . . . . . . . . . . 28
Creating a Genesis Partition for a server complex . . . . . . . . . . . . . . . . . . . . . . . . . . . . . . . . . . . . . . 29
Creating additional nPartitions in a server complex . . . . . . . . . . . . . . . . . . . . . . . . . . . . . . . . . . . . 29
Contents
iii
Page 4

Contents
Modifying nPartitions. . . . . . . . . . . . . . . . . . . . . . . . . . . . . . . . . . . . . . . . . . . . . . . . . . . . . . . . . . . . . . . 29
Booting and resetting nPartitions . . . . . . . . . . . . . . . . . . . . . . . . . . . . . . . . . . . . . . . . . . . . . . . . . . . . . 30
Using the Management Processor Command menu . . . . . . . . . . . . . . . . . . . . . . . . . . . . . . . . . . . . . 31
Using the EFI Shell. . . . . . . . . . . . . . . . . . . . . . . . . . . . . . . . . . . . . . . . . . . . . . . . . . . . . . . . . . . . . . . 31
Using Microsoft Windows commands. . . . . . . . . . . . . . . . . . . . . . . . . . . . . . . . . . . . . . . . . . . . . . . . . 31
2. Installing nPartition Management Utilities
nPartition Commands . . . . . . . . . . . . . . . . . . . . . . . . . . . . . . . . . . . . . . . . . . . . . . . . . . . . . . . . . . . . . . . . 35
Install nPartition Commands bundle from the Smart Setup media . . . . . . . . . . . . . . . . . . . . . . . . . . 35
Partition Manager . . . . . . . . . . . . . . . . . . . . . . . . . . . . . . . . . . . . . . . . . . . . . . . . . . . . . . . . . . . . . . . . . . . 36
Install Partition Manager Bundle from the Smart Setup media . . . . . . . . . . . . . . . . . . . . . . . . . . . . . 36
Verifying the installation. . . . . . . . . . . . . . . . . . . . . . . . . . . . . . . . . . . . . . . . . . . . . . . . . . . . . . . . . . . . . . 38
Verifying nPartition Commands . . . . . . . . . . . . . . . . . . . . . . . . . . . . . . . . . . . . . . . . . . . . . . . . . . . . . . 38
Verifying Partition Manager . . . . . . . . . . . . . . . . . . . . . . . . . . . . . . . . . . . . . . . . . . . . . . . . . . . . . . . . . 38
Miscellaneous installation issues . . . . . . . . . . . . . . . . . . . . . . . . . . . . . . . . . . . . . . . . . . . . . . . . . . . . . . . 40
Configuring for secure WBEM communications . . . . . . . . . . . . . . . . . . . . . . . . . . . . . . . . . . . . . . . . . . 40
Upgrading service packs later (after installation) . . . . . . . . . . . . . . . . . . . . . . . . . . . . . . . . . . . . . . . . 41
3. Using Partition Manager
4. Using Other Tools for Managing nPartitions
Complex-level tasks . . . . . . . . . . . . . . . . . . . . . . . . . . . . . . . . . . . . . . . . . . . . . . . . . . . . . . . . . . . . . . . . . . 53
Rename a server complex. . . . . . . . . . . . . . . . . . . . . . . . . . . . . . . . . . . . . . . . . . . . . . . . . . . . . . . . . . . . 53
Unlock complex profile entries. . . . . . . . . . . . . . . . . . . . . . . . . . . . . . . . . . . . . . . . . . . . . . . . . . . . . . . . 53
Cancel pending changes to the complex profile . . . . . . . . . . . . . . . . . . . . . . . . . . . . . . . . . . . . . . . . . . 54
List product and serial numbers . . . . . . . . . . . . . . . . . . . . . . . . . . . . . . . . . . . . . . . . . . . . . . . . . . . . . . 55
nPartition-level tasks. . . . . . . . . . . . . . . . . . . . . . . . . . . . . . . . . . . . . . . . . . . . . . . . . . . . . . . . . . . . . . . . . 56
Boot configuration options for nPartition systems . . . . . . . . . . . . . . . . . . . . . . . . . . . . . . . . . . . . . . . . 56
Find bootable devices . . . . . . . . . . . . . . . . . . . . . . . . . . . . . . . . . . . . . . . . . . . . . . . . . . . . . . . . . . . . . . . 57
List nPartition configurations . . . . . . . . . . . . . . . . . . . . . . . . . . . . . . . . . . . . . . . . . . . . . . . . . . . . . . . . 58
List the local (current) nPartition number . . . . . . . . . . . . . . . . . . . . . . . . . . . . . . . . . . . . . . . . . . . . . . 58
List memory configurations . . . . . . . . . . . . . . . . . . . . . . . . . . . . . . . . . . . . . . . . . . . . . . . . . . . . . . . . . . 59
Configure boot paths and options . . . . . . . . . . . . . . . . . . . . . . . . . . . . . . . . . . . . . . . . . . . . . . . . . . . . . 60
Configure autoboot options . . . . . . . . . . . . . . . . . . . . . . . . . . . . . . . . . . . . . . . . . . . . . . . . . . . . . . . . . . 62
Configure boot-time system tests. . . . . . . . . . . . . . . . . . . . . . . . . . . . . . . . . . . . . . . . . . . . . . . . . . . . . . 64
Boot Windows Server 2003. . . . . . . . . . . . . . . . . . . . . . . . . . . . . . . . . . . . . . . . . . . . . . . . . . . . . . . . . . . 65
Boot over a network . . . . . . . . . . . . . . . . . . . . . . . . . . . . . . . . . . . . . . . . . . . . . . . . . . . . . . . . . . . . . . . . 66
Shut down Windows Server 2003 . . . . . . . . . . . . . . . . . . . . . . . . . . . . . . . . . . . . . . . . . . . . . . . . . . . . . 68
Reboot and reset . . . . . . . . . . . . . . . . . . . . . . . . . . . . . . . . . . . . . . . . . . . . . . . . . . . . . . . . . . . . . . . . . . . 69
Reboot for reconfiguration . . . . . . . . . . . . . . . . . . . . . . . . . . . . . . . . . . . . . . . . . . . . . . . . . . . . . . . . . . . 73
Shut down to a shutdown for reconfig (inactive) state . . . . . . . . . . . . . . . . . . . . . . . . . . . . . . . . . . . . . 74
Boot an inactive nPartition . . . . . . . . . . . . . . . . . . . . . . . . . . . . . . . . . . . . . . . . . . . . . . . . . . . . . . . . . . 77
Perform a transfer of control (TOC) reset . . . . . . . . . . . . . . . . . . . . . . . . . . . . . . . . . . . . . . . . . . . . . . . 78
Create a genesis nPartition . . . . . . . . . . . . . . . . . . . . . . . . . . . . . . . . . . . . . . . . . . . . . . . . . . . . . . . . . . 79
Create a new nPartition . . . . . . . . . . . . . . . . . . . . . . . . . . . . . . . . . . . . . . . . . . . . . . . . . . . . . . . . . . . . . 81
Remove (delete) an nPartition . . . . . . . . . . . . . . . . . . . . . . . . . . . . . . . . . . . . . . . . . . . . . . . . . . . . . . . . 84
iv
Page 5

Contents
Add cells to an nPartition. . . . . . . . . . . . . . . . . . . . . . . . . . . . . . . . . . . . . . . . . . . . . . . . . . . . . . . . . . . . 86
Set core cell choices. . . . . . . . . . . . . . . . . . . . . . . . . . . . . . . . . . . . . . . . . . . . . . . . . . . . . . . . . . . . . . . . . 89
Rename an nPartition . . . . . . . . . . . . . . . . . . . . . . . . . . . . . . . . . . . . . . . . . . . . . . . . . . . . . . . . . . . . . . 90
Cell-level tasks . . . . . . . . . . . . . . . . . . . . . . . . . . . . . . . . . . . . . . . . . . . . . . . . . . . . . . . . . . . . . . . . . . . . . . 92
List processor configurations . . . . . . . . . . . . . . . . . . . . . . . . . . . . . . . . . . . . . . . . . . . . . . . . . . . . . . . . . 92
List cell configurations . . . . . . . . . . . . . . . . . . . . . . . . . . . . . . . . . . . . . . . . . . . . . . . . . . . . . . . . . . . . . . 92
Unassign (remove) cells from an nPartition . . . . . . . . . . . . . . . . . . . . . . . . . . . . . . . . . . . . . . . . . . . . . 93
Set cell attributes . . . . . . . . . . . . . . . . . . . . . . . . . . . . . . . . . . . . . . . . . . . . . . . . . . . . . . . . . . . . . . . . . . 95
Power-, status-, and hardware-level tasks . . . . . . . . . . . . . . . . . . . . . . . . . . . . . . . . . . . . . . . . . . . . . . . . 98
List input/output (I/O) configurations . . . . . . . . . . . . . . . . . . . . . . . . . . . . . . . . . . . . . . . . . . . . . . . . . . 98
List cabinets in a server complex. . . . . . . . . . . . . . . . . . . . . . . . . . . . . . . . . . . . . . . . . . . . . . . . . . . . . . 98
List power status and power supplies . . . . . . . . . . . . . . . . . . . . . . . . . . . . . . . . . . . . . . . . . . . . . . . . . . 99
List fan and blower status . . . . . . . . . . . . . . . . . . . . . . . . . . . . . . . . . . . . . . . . . . . . . . . . . . . . . . . . . . . 99
Turn attention indicators (LEDs) on and off. . . . . . . . . . . . . . . . . . . . . . . . . . . . . . . . . . . . . . . . . . . . 100
Power server cabinets on and off . . . . . . . . . . . . . . . . . . . . . . . . . . . . . . . . . . . . . . . . . . . . . . . . . . . . . 102
Power cells and I/O chassis on and off . . . . . . . . . . . . . . . . . . . . . . . . . . . . . . . . . . . . . . . . . . . . . . . . . 104
Configure and deconfigure cells . . . . . . . . . . . . . . . . . . . . . . . . . . . . . . . . . . . . . . . . . . . . . . . . . . . . . . 105
Configure and deconfigure processors (CPUs) . . . . . . . . . . . . . . . . . . . . . . . . . . . . . . . . . . . . . . . . . . 106
Configure and deconfigure memory (DIMMs). . . . . . . . . . . . . . . . . . . . . . . . . . . . . . . . . . . . . . . . . . . 107
5. nPartition Commands Reference
parcreate. . . . . . . . . . . . . . . . . . . . . . . . . . . . . . . . . . . . . . . . . . . . . . . . . . . . . . . . . . . . . . . . . . . . . . . . . . 110
parmodify . . . . . . . . . . . . . . . . . . . . . . . . . . . . . . . . . . . . . . . . . . . . . . . . . . . . . . . . . . . . . . . . . . . . . . . . . 115
parremove. . . . . . . . . . . . . . . . . . . . . . . . . . . . . . . . . . . . . . . . . . . . . . . . . . . . . . . . . . . . . . . . . . . . . . . . . 121
parstatus. . . . . . . . . . . . . . . . . . . . . . . . . . . . . . . . . . . . . . . . . . . . . . . . . . . . . . . . . . . . . . . . . . . . . . . . . . 124
parunlock . . . . . . . . . . . . . . . . . . . . . . . . . . . . . . . . . . . . . . . . . . . . . . . . . . . . . . . . . . . . . . . . . . . . . . . . . 127
fruled. . . . . . . . . . . . . . . . . . . . . . . . . . . . . . . . . . . . . . . . . . . . . . . . . . . . . . . . . . . . . . . . . . . . . . . . . . . . . 129
frupower . . . . . . . . . . . . . . . . . . . . . . . . . . . . . . . . . . . . . . . . . . . . . . . . . . . . . . . . . . . . . . . . . . . . . . . . . . 132
cplxmodify. . . . . . . . . . . . . . . . . . . . . . . . . . . . . . . . . . . . . . . . . . . . . . . . . . . . . . . . . . . . . . . . . . . . . . . . . 135
6. Troubleshooting
Installation problems. . . . . . . . . . . . . . . . . . . . . . . . . . . . . . . . . . . . . . . . . . . . . . . . . . . . . . . . . . . . . . . . 139
Services (WMI Mapper + nPartition Provider) fail to start during installation . . . . . . . . . . . . . . . . 139
nPartition Provider fails to start during installation . . . . . . . . . . . . . . . . . . . . . . . . . . . . . . . . . . . . . 139
Checking component installation and operation . . . . . . . . . . . . . . . . . . . . . . . . . . . . . . . . . . . . . . . . . . 140
Verify WMI Mapper installation . . . . . . . . . . . . . . . . . . . . . . . . . . . . . . . . . . . . . . . . . . . . . . . . . . . . . 140
Verify WMI Mapper service with HTTP connection . . . . . . . . . . . . . . . . . . . . . . . . . . . . . . . . . . . . . . 141
Verify WMI Mapper service with HTTPS connection . . . . . . . . . . . . . . . . . . . . . . . . . . . . . . . . . . . . . 142
Verify WMI nPartition Provider registration . . . . . . . . . . . . . . . . . . . . . . . . . . . . . . . . . . . . . . . . . . . 143
Verify WMI nPartition Provider operation . . . . . . . . . . . . . . . . . . . . . . . . . . . . . . . . . . . . . . . . . . . . . 145
Operational problems . . . . . . . . . . . . . . . . . . . . . . . . . . . . . . . . . . . . . . . . . . . . . . . . . . . . . . . . . . . . . . . 147
All commands: ordinal not found . . . . . . . . . . . . . . . . . . . . . . . . . . . . . . . . . . . . . . . . . . . . . . . . . . . . . 147
All commands: required data unavailable or locked. . . . . . . . . . . . . . . . . . . . . . . . . . . . . . . . . . . . . . 147
Fruled: LED error messages (mid-range servers only). . . . . . . . . . . . . . . . . . . . . . . . . . . . . . . . . . . . 147
Frupower: cannot power off error . . . . . . . . . . . . . . . . . . . . . . . . . . . . . . . . . . . . . . . . . . . . . . . . . . . . 147
Parcreate and parmodify: cell local memory warnings. . . . . . . . . . . . . . . . . . . . . . . . . . . . . . . . . . . . 148
v
Page 6

Contents
Parcreate, parmodify, and parremove: failure to update stable complex configuration data (SCCD) . .
148
Parremove: shutdown and reset instructions . . . . . . . . . . . . . . . . . . . . . . . . . . . . . . . . . . . . . . . . . . . 149
Parstatus -c -V: apparent incorrect output . . . . . . . . . . . . . . . . . . . . . . . . . . . . . . . . . . . . . . . . . . . . . 149
Parstatus -p -V: apparent incorrect output . . . . . . . . . . . . . . . . . . . . . . . . . . . . . . . . . . . . . . . . . . . . . 149
Parstatus: local partition error . . . . . . . . . . . . . . . . . . . . . . . . . . . . . . . . . . . . . . . . . . . . . . . . . . . . . . 150
Parstatus: unable to get read lock error . . . . . . . . . . . . . . . . . . . . . . . . . . . . . . . . . . . . . . . . . . . . . . . 150
Using WMIOP.EXE to pinpoint problems . . . . . . . . . . . . . . . . . . . . . . . . . . . . . . . . . . . . . . . . . . . . . . . 151
Error messages and corrective actions . . . . . . . . . . . . . . . . . . . . . . . . . . . . . . . . . . . . . . . . . . . . . . . . . . 153
nPartition commands messages. . . . . . . . . . . . . . . . . . . . . . . . . . . . . . . . . . . . . . . . . . . . . . . . . . . . . . 153
Application Event Log messages . . . . . . . . . . . . . . . . . . . . . . . . . . . . . . . . . . . . . . . . . . . . . . . . . . . . . 155
Index . . . . . . . . . . . . . . . . . . . . . . . . . . . . . . . . . . . . . . . . . . . . . . . . . . . . . . . . . . . . . . . . . . . . . . 159
vi
Page 7

1Introduction
A cell-based HP Integrity server (such as the rx7620 or rx7640, the rx8620 or rx8640, or
Superdome) can be configured either as a single system or partitioned into several
independent systems. Partitioning provides hardware and software isolation, where each
partition is assigned memory, processors, I/O resources for its exclusive use, and
Chapter 1
7
Page 8

Introduction
executes its own operating system image. This chapter introduces node partitions
(nPartitions) on cell-based HP Integrity servers running Microsoft® Windows® Server
2003 and the tools to manage them.
8
Chapter 1
Page 9
Quick Start
This section provides an overview of the installation and configuration steps needed to
get you up and running as quickly as possible.
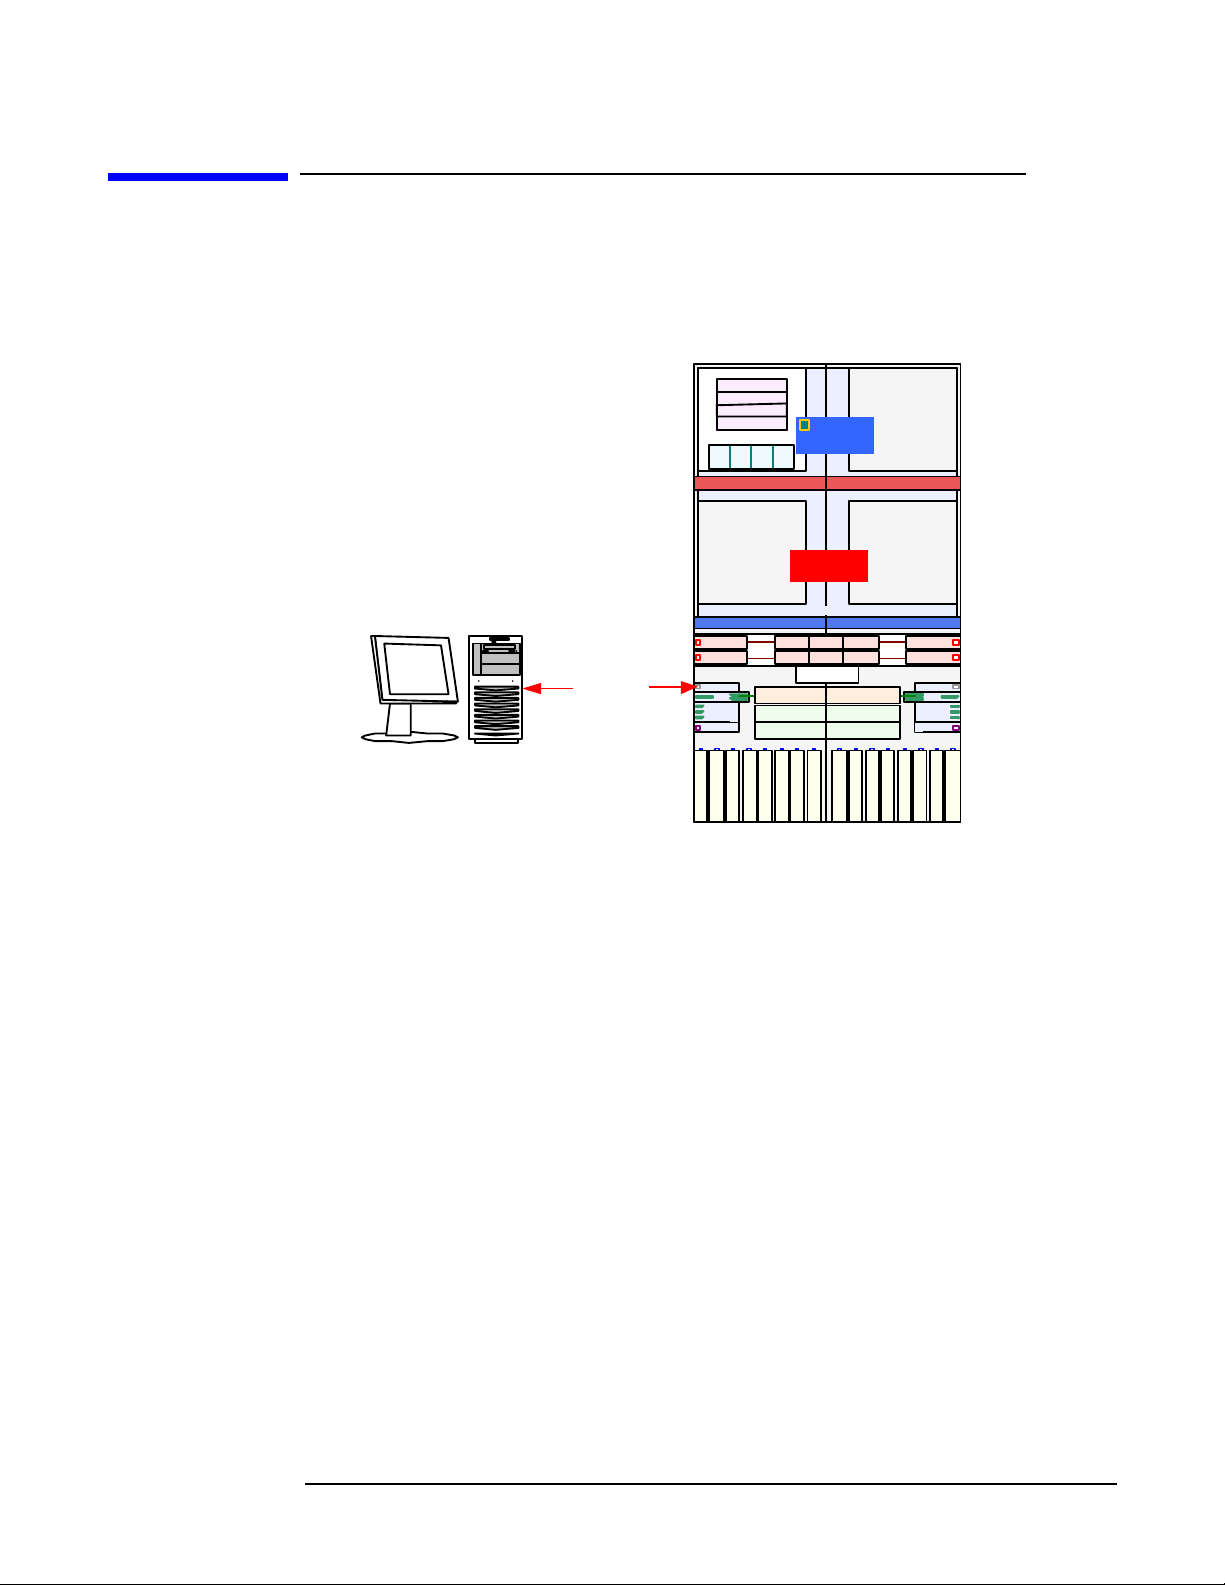
Figure 1-1 System overview
Partit ion Manager
nPartition Commands
M P Com m ands
managem ent station
IPMI / LAN
CPU
CPU 0
CPU 1
CPU 2
CPU 3
Memory
Cell 0
HP-UX
Cell 2
Optional Cell
Board
Partition 0Partition 0
Cell 3
Cell 1
Optional
Ce ll Board
Partition 1 Partiti on 1
PDCA B1
PDCA B0
Cell 0 Core I/O Cell 1 Core I/O
Console
LAN
LVD
SCSI
Serial
Modem
Console
UPS
1000t LAN
1 2 3 4 5 6 7
Twi nTurb o PCI-X
Twi nTurb o PCI-X
Twi nTurb o PCI-X
Windows
Chipset HP SX1000
BPS3 BPS5
BPS 1
BPS 0
BPS2 BPS4
rx8620
DVD / DDS DVD / DDS
u320 Disk Sl ot u320 Disk Slot
u320 Disk Sl ot u320 Disk Slot
8
Twi nTurb o PCI-X
Twi nTurb o PCI-X
Twi nTurb o PCI-X
Twi nTurb o PCI-X
Turbo PCI-X
Optional
Cell Bo ar d
PDCA A1
PDCA A0
Console LAN
LVD
SCSI
Serial
Modem
Console
UPS
1 2 3 4 5 6 7 8
Twi nTurb o PCI-X
Twi nTurb o PCI-X
1000t LAN
Twi nTurb o PCI-X
Twi nTurb o PCI-X
Twi nTurb o PCI-X
Twi nTurb o PCI-X
Twi nTurb o PCI-X
Introduction
Quick Start
Turbo PCI-X
HP I ntegrit y rx8620 s erv er
Figure 1-1 shows the hardware, software, and most commonly used connection method.
All components are described in greater detail later in this chapter.
The most common setup for nPartition management of HP Integrity servers running
Windows involves a remote management station. This dedicated management station
hosts the management tools and issues commands over a network connection to the
server’s management processor, allowing the complex to be managed even if no
nPartitions exist on the complex yet.
To set up and configure the management station:
Step 1. Establish a dedicated management station for your HP Integrity server.
See “Setting up the management station” on page 25.
Step 2. Install the nPartition tools.
See “Install nPartition Commands bundle from the Smart Setup media” on page 35 and
“Install Partition Manager Bundle from the Smart Setup media” on page 36.
Step 3. Verify installation of the management software.
See “Verifying the installation” on page 38.
Chapter 1
9
Page 10
Introduction
Getting to know nPartitions
Getting to know nPartitions
Partitions are physical or logical mechanisms for demarcating operational environments
within a single system or across multiple systems. Partitioning lets you consolidate
systems, allocate computing resources in response to fluctuations in demand, maximize
resource utilization, and protect operating environments from disruptive events.
Partitioning continuum
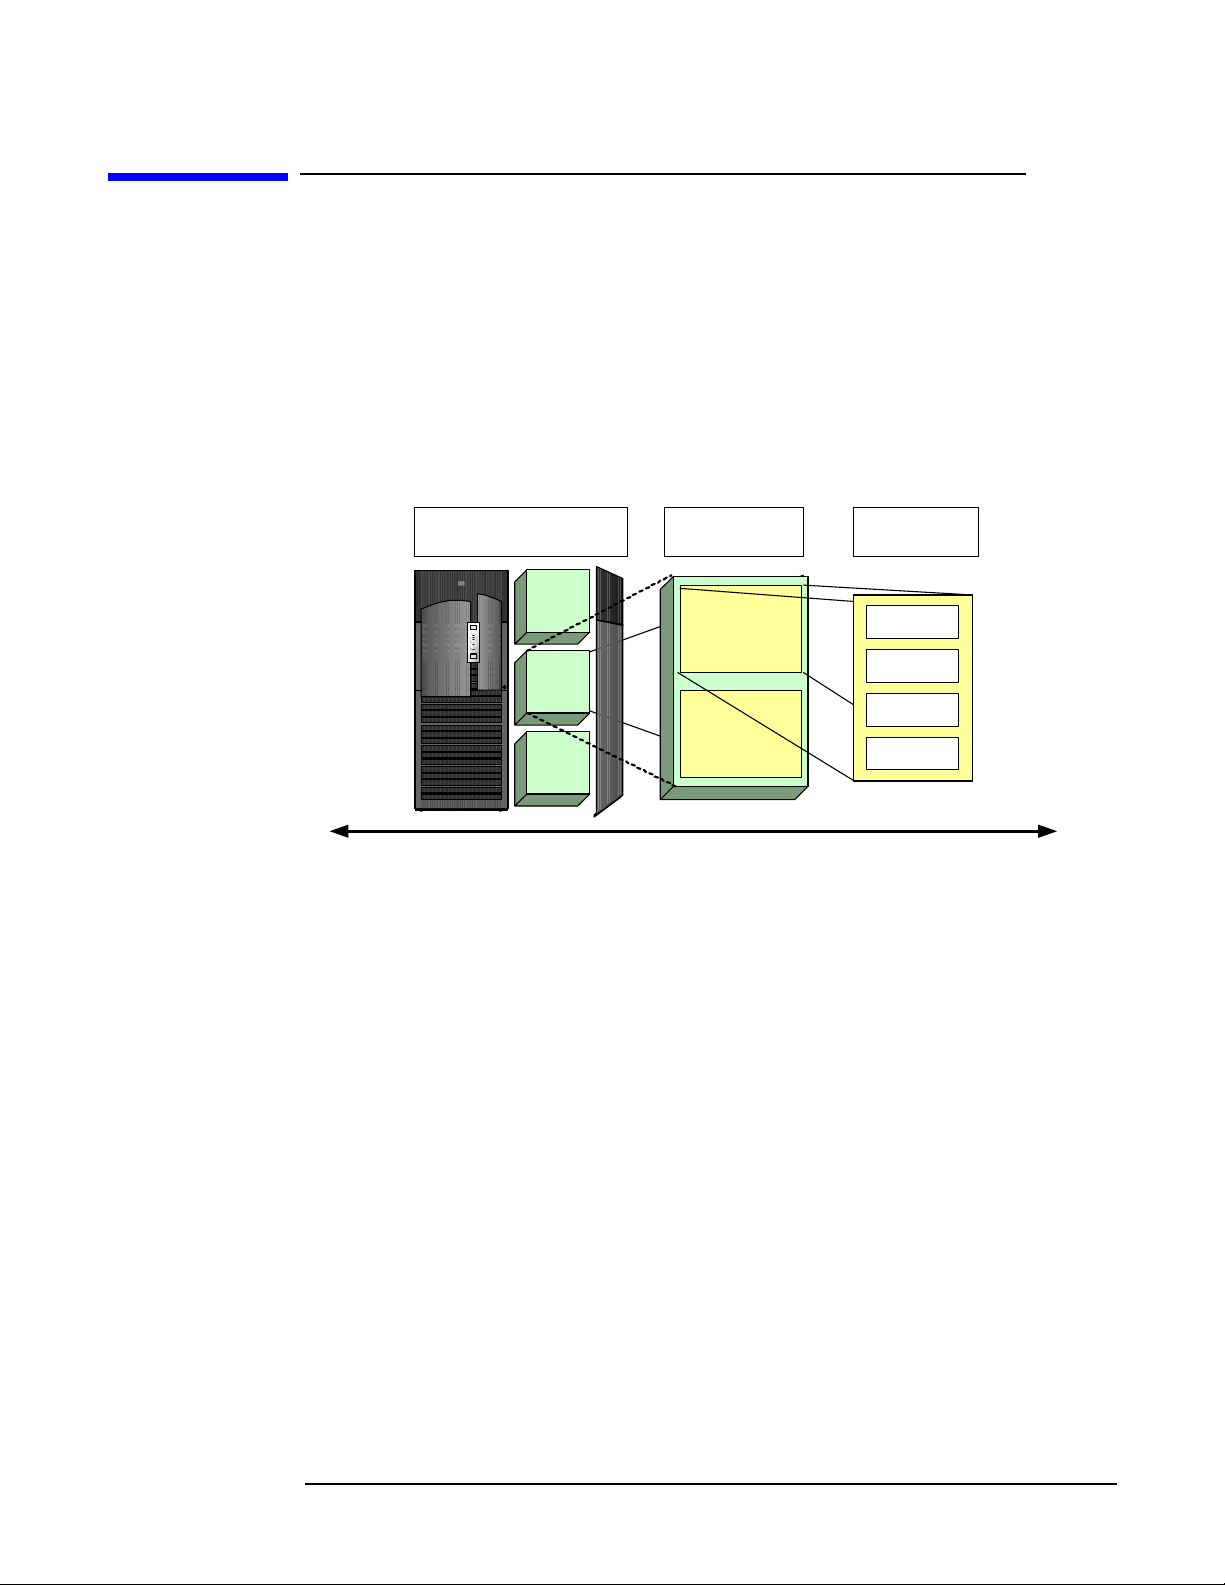
HP offers a continuum of partitioning technologies, as shown in Figure 1-2.
Figure 1-2 Partitioning continuum
Hard
Partitions
withi n a node
nPartition
nPartition
nPartition
Virtual Partitions
withi n a hard
partition
virtual
partition
virtual
partition
Resource
Partitions
withi n an OS
application
application
application
application
Isolation
Partitioning
Continuum
Flexibility
node Partition An node partition (nPartition) is a hard partition within a cell-based
server. Cell-based servers can be configured either as a single large
symmetric multiprocessor or as several independent systems. An
nPartition has exclusive use of the memory, processor, and I/O
resources belonging to the cells that are assigned to that partition, and
can execute its own operating system image.
virtual Partition A virtual partition is a soft partition within a node or an nPartition. A
virtual partition uses a subset of the system processor, memory, and
I/O resources, and includes OS and application-related software.
Windows Server 2003 is not supported in a virtual partition.
resource Partition A resource partition is a soft partition within either hard partitions or
virtual partitions and is controlled by workload management services
within the operating system. Resource partitions allow an OS instance
to allocate resources between competing applications. Windows Server
2003 does not support resource partitions.
This document focuses on nPartitions running Microsoft Windows Server 2003.
10
Chapter 1
Page 11

Introduction
Getting to know nPartitions
Cell structure of nPartitions
HP Integrity mid-range and high-end servers (rx7620/rx7640, rx8620/rx8640, and
Superdome) are composed of basic building blocks known as cells or cell boards. A cell
consists of up to four processor modules, contains memory modules (up to 32 DIMMs for
Superdome cells, up to 16 DIMMs for rx7260 and rx8620 cells), and may connect to an
I/O chassis that has I/O cards. A server cabinet may have several I/O chassis. Some
cell-based servers support I/O expansion cabinets to provide additional I/O chassis.
The hardware of a cell-based server—including all cells, I/O expansion cabinets, cables,
cabinet hardware, fans, and power and utilities components—is known as a server
complex.
• A Superdome server complex can consist of one or two server cabinets, and can also
include one or two I/O expansion cabinets (which provide additional I/O chassis).
• An rx8620 or rx8640 server complex consists of a single server cabinet. It may include
one I/O expansion cabinet (which provides two additional I/O chassis).
• An rx7620 or rx7640 server complex consists of a single server cabinet only.
An nPartition is a partition of the server complex that you can reconfigure without
physically modifying the server hardware. An nPartition contains one or more cells
communicating coherently over a high-bandwidth, low-latency, crossbar fabric. Special
firmware in each cell defines the boundaries of an nPartition to ensure isolation from
other nPartitions.
Each nPartition has exclusive use of the memory, processor, and I/O resources belonging
to the cells that are assigned to that nPartition. An nPartition must have at least one
core I/O card to support console services, booting, and management operations. Each
nPartition has its own system boot interface, boots independently, and executes its own
operating system image.
Properties of nPartitions
An nPartition has the following properties:
Partition Numbers
Each nPartition is identified by a unique partition number. When you
create an nPartition, it is assigned the lowest available number. That
is, the first nPartition always is partition number 0 and the second
nPartition is partition number 1.
When you remove an nPartition, its partition number is released and
can be reused while creating a new nPartition. Consider a server with
partitions numbered 0, 1, 2, and 3. When you remove partition 2, for
example, and then create a new nPartition, the new nPartition is
identified as partition 2.
Assigned and Unassigned Cells
If a cell in a server complex is not assigned to an nPartition, the cell is
considered unassigned. If an I/O chassis is attached to an assigned cell,
then the chassis is likewise assigned to that nPartition. Cells that are
unassigned are considered to be available resources; they are free to be
assigned to any existing nPartition or used to create a new nPartition.
Chapter 1
11
Page 12

Introduction
Getting to know nPartitions
Base Cells All cells within an nPartition are base cells. If you do not specify the
Active and Inactive Cells
Core Cell The core cell is an active cell that is attached to an I/O chassis with a
cell type, the nPartition administration tools automatically set the cell
type to base cell.
Active cells are assigned cells that boot to form an nPartition whose
resources (processors, memory, and any attached I/O) can be actively
used by software running in that nPartition.
Cells that are inactive are either not assigned to an nPartition or have
not participated in partition rendezvous to form an nPartition with
other cells in the nPartition. (Partition rendezvous is the event during
the nPartition boot process when all available cells in an nPartition
join to determine which cells are active for the current boot of the
nPartition.) The resources belonging to inactive cells are not actively
used by an nPartition.
functional core I/O. Each nPartition must have one core cell. Although
an nPartition can have multiple core-capable cells (any assigned cell
that has an I/O chassis with core I/O), only one core I/O is actively used
in an nPartition.
The core cell is selected by system firmware in the early stages of the
nPartition boot process. When none of the core cell choices can serve as
the active core cell, the nPartition attempts to select an eligible cell.
The core I/O in the I/O chassis connected to the core cell provides
console access for the nPartition through the management processor.
The monarch processor in the core cell runs the Extensible Firmware
Interface (EFI) while all other processors are idle until an operating
system is booted.
Cell Local Memory (CLM)
CLM is a portion of the memory in a cell that can be accessed quickly
by processors residing on the same cell. You can configure CLM for
each cell either as a percentage of the total memory in the cell or as an
absolute number of gigabytes.
For nPartitions running Microsoft Windows, HP recommends
assigning 100% CLM for each cell in the nPartition. However, when
running other operating systems the appropriate CLM assignment will
likely differ, depending on the nPartition configuration and workloads
running.
Cell Property Details
Cells in an nPartition have various properties that determine how the
cells can be used and managed.
Active and Inactive nPartition Boot States
Each nPartition has a boot state of either active or inactive. The boot
state indicates whether the nPartition has booted so that it may be
interactively accessed through its console (active nPartitions).
12
An nPartition that is active has at least one core-capable cell that is
active (not in a boot-is-blocked state). When an nPartition is active, one
or more of the cells assigned to the nPartition have completed partition
Chapter 1
Page 13

Introduction
Getting to know nPartitions
rendezvous, and the system boot interface (EFI) has loaded and been
displayed through the nPartition console. An operating system may be
loaded and run from the system boot interface on an active nPartition.
An inactive nPartition is considered to be in the shutdown for reconfig
state because all cells assigned to the nPartition either remain at a
boot-is-blocked state or are powered off.
Cell and nPartition boot process
The nPartition boot process on HP Integrity servers involves two phases:
Cell boot phase
The cell boot phase occurs when cells are powered on or reset. The main activities that
occur during the cell boot phase are power-on-self-test activities. During this phase, each
cell operates independent of other cells in the complex. Cells do not necessarily proceed
through this phase at the same pace, because each cell may have a different amount of
hardware to test and discover, or cells might be reset or powered on at different times.
The main steps that occur during the cell boot phase are as follows:
1. A cell is powered on or reset, and the cell boot-is-blocked (BIB) flag is set. BIB is a
hardware flag on the cell board. When BIB is set, the cell is considered to be inactive.
2. Firmware on the cell performs self-tests and discovery operations on the hardware
components of the cell. Operations at this point include processor self-tests, memory
tests, I/O discovery, and discovery of interconnecting fabric (connections between the
cell and other cells, I/O, and system crossbars).
3. The firmware completes self-tests and discovery, reports the hardware configuration
of the cell to the management processor, informs the management processor the cell
is “waiting at BIB”, and then waits for the cell BIB flag to be cleared.
nPartition boot phase
After its cells have completed their self-tests, the nPartition is booted. The “nPartition
rendezvous” occurs during this phase. Not all cells assigned to the nPartition need to
participate in the rendezvous. Only one core-capable cell that has completed its cell boot
phase is needed for the nPartition boot phase to begin. By default, all cells assigned to
the nPartition that have a “y” use-on-next-boot value are expected to participate in
rendezvous. The management processor waits for up to ten minutes for such cells to
reach the “waiting at BIB” state. Cells that have a “n” use-on-next-boot value do not
participate in rendezvous and remain waiting at BIB. The main steps that occur during
the nPartition boot phase are as follows:
1. The management processor provides a copy of the relevant Complex Profile data to
the cells assigned to the nPartition. This data includes a copy of the Stable Complex
Configuration Data and a copy of the Partition Configuration Data for the nPartition.
(The “Complex Profile” represents the configurable aspects of a server complex. The
Stable Complex Configuration Data contains complex-wide configuration details and
the Partition Configuration Data contains details specific to the nPartition. See the
HP System Partitions Guide for more information.)
Chapter 1
13
Page 14

Introduction
Getting to know nPartitions
2. The management processor releases BIB for all cells assigned to the nPartition that
have a “y” use-on-next-boot value and complete the cell boot phase in time. The
management processor does not release BIB for any cell with a “n” use-on-next-boot
value, or for any cell that did not complete the cell boot phase within ten minutes of
the first cell to do so. Once BIB is release for a cell, the cell is considered to be active.
3. nPartition rendezvous begins, with the system firmware on each active cell using its
copy of complex profile data to contact other active cells in the nPartition.
4. The active cells in the nPartition negotiate to select a core cell.
5. The chosen core cell manages the rest of the nPartition boot process. A processor on
the core cell runs the nPartition system boot environment (EFI). The core cell hands
off control to an operating system loader when the OS boot process is initiated.
14
Chapter 1
Page 15

Choosing a management tool
You can manage nPartitions using the following tools:
Partition Manager
Partition Manager provides a graphical interface for managing
nPartitions. You can run Partition Manager on the complex itself, or
on management stations used to remotely manage the complex.
nPartition commands
You can manage nPartitions using commands such as parcreate,
parmodify, parremove, parstatus, parunlock, fruled, frupower,
and cplxmodify. As with Partition Manager, nPar commands can be
run directly on the complex nPartitions, or from a management station
used to remotely manage the complex. Also, setting the admin IP
address for individual nPartitions must be done using the nPar
commands. It cannot be done with any other tool.
EFI Boot Manager and EFI Shell commands
Extensible Firmware Interface (EFI) provides support for nPartition
management. The EFI interfaces are accessible from an nPartition
console when the nPartition is in an active state but has not booted an
operating system.
Introduction
Choosing a management tool
Management Processor (MP) menus
Management processor menus provide a service interface that allows
access to all hardware and nPartitions in the complex. The MP is
always available, whether or not any nPartitions are configured or
booted in the server complex.
Chapter 1
15
Page 16

Introduction
Management interface options
Management interface options
You can manage nPartitions remotely using one of two management interfaces:
Intelligent Platform Management Interface (IPMI) and Web-Based Enterprise
Management infrastructure (WBEM). This section provides a brief overview of these
interfaces.
Intelligent Platform Management Interface (IPMI)
On cell-based HP Integrity servers, the management processor supports the Intelligent
Platform Management Interface (IPMI). IPMI is an industry-standard interface that
defines common, message-based interfaces to platform management hardware and
common records for describing devices and their characteristics. The IPMI specification
supports extensions, such as the nPartition and server complex management features
introduced by HP. On cell-based servers, the management processor supports two of the
communication paths defined by the IPMI specification: Block Transfer and IPMI
over LAN.
IPMI Block Transfer (IPMI BT)
IPMI Block Transfer (IPMI BT) provides a communication path between the MP and the
operating system running on an nPartition. IPMI BT uses the MP device driver and a
hardware buffer on each cell to establish a private path (using the block transfer
hardware on the core cell) from each nPartition to the MP. On Windows, the device
driver that provides the IPMI BT interface is called the “HP Health Driver”.
The nPartition Configuration Privilege setting allows you to control the access of a
user managing an nPartition on a complex. To set the nPartition Configuration
Privilege, run the PARPERM command at the MP. The nPartition Configuration Privilege
has two settings:
Unrestricted The default, which allows the user to manage other nPartitions in the
complex.
Restricted Restricts use of the IPMI BT interface to the following capabilities:
• Retrieving information about the server, including everything
displayed by Partition Manager and the parstatus command.
• Changing the local nPartition’s Partition Configuration Data.
• Manipulating any of the attention indicators (LEDs).
• Powering cells and I/O chassis belonging to the local nPartition.
The nPartition Configuration Privilege does not restrict deallocation of processors across
nPartition boundaries. When the nPartition Configuration Privilege is restricted, some
management tasks require IPMI over LAN instead.
IPMI over LAN
IPMI over LAN enables the management tool to communicate directly (without going
through an nPartition) with the MP via its LAN port. To enable IPMI LAN access to the
MP, use the SA command at the MP Command menu. The MP accepts IPMI requests at
its LAN port only if the request is accompanied by the correct password. To set the
IPMI password use the SO command at the MP Command menu.
16
Chapter 1
Page 17

Introduction
Management interface options
To secure communication between the client and the server, the IPMI specification uses
the MD5 algorithm (RFC1321) to encrypt the IPMI password and to authenticate both
the server and the client. Other security mechanisms protect against replay attacks.
When the management tool sends a request, the nPartition Provider first downloads a
large data structure containing static configuration information about the server from
the MP. This allows the Provider to request dynamic information about the server.
When an nPartition command accesses a particular complex for the first time using
IPMI over LAN, it can take a long time (two minutes or more) to complete, depending on
network latency between the PC and the server MP.
The nPartition Provider caches the static data and reuses it for subsequent requests so
that future command usage will not incur that initial overhead. If the PC is rebooted or
the nPartition Provider is restarted, the cached data is lost. The first request to the MP
after the restart requires the same initial overhead.
Also, IPMI specifies that data be sent as UDP datagrams over the LAN. Note that UDP
does not guarantee delivery of individual datagrams. If datagrams fail to arrive in a
reasonable amount of time, the nPartition Provider retries a number of times. But if the
network connection between the PC and MP is too unreliable or too slow, the provider
eventually times out and returns an error. The error is often seen as the message: [X]
data is not available, where [X] is a cell, I/O chassis, cabinet, or other element in
the complex.
The speed and reliability of the network between the management station and the MP
has a large effect on the reliability of command execution. When managing remotely via
IPMI over a LAN, the management station should be on the same subnet as and
physically close to the target complex. If you cannot access the management station
directly, you can use a Remote Desktop application or equivalent tool to connect to it
from a remote terminal.
Managing nPartitions using IPMI over LAN
Using IPMI over LAN, you can manage remote nPartitions via the MP. The
management tool on the management station communicates directly with the local
nPartition Provider. The nPartition Provider then communicates with the MP on the
remote complex using IPMI over LAN.
NOTE You must use IPMI over LAN to manage nPartitions remotely if none of the nPartitions
on the target server have been booted or configured yet.
To use IPMI over LAN, you must enable IPMI LAN Access at the MP, set the MP IPMI
password, and install the nPar tools on your management station. You can then use any
of the nPartition management tools to manage your remote nPartitions.
Running Partition Manager using IPMI over LAN You can run Partition Manager
using IPMI over LAN in one of two ways:
• If running Partition Manager on an nPartition:
From the
Too ls menu, select the Switch Complexes task. In the Switch Complexes
dialog, enter the hostname or IP address of the MP in the target complex, and type
that MP’s IPMI password.
Chapter 1
17
Page 18

Introduction
Management interface options
• If running Partition Manager on another system (not an nPartition):
Running nPartition commands using IPMI over LAN To run nPartitions
commands remotely using IPMI over LAN, you must include two command-line options
with each command:
• -g [password]
• -h hostname | IPaddress
When you use the -g... -h... set of options, the command sends appropriate WBEM
requests to the local nPartition Provider, which in turn uses IPMI over LAN to
communicate with the management processor in the target complex.
Web-Based Enterprise Management (WBEM)
Partition Manager automatically displays the
hostname or IP address of the MP in the target complex, and type that MP’s IPMI
password.
The password is the management processor’s IPMI password.
The -h option specifies the hostname or IP address of the management processor in
the target complex.
Switch Complexes dialog. Enter the
Web-Based Enterprise Management (WBEM) is an industry initiative that establishes
management infrastructure standards and provides a way to combine data from various
hardware and software management systems. WBEM specifies standards that enable
access to data from various technologies and platforms, and the presentation of that data
in a consistent fashion. Client applications can then use this information to manage an
enterprise computing environment.
Because WBEM supports a distributed management architecture, client applications
(nPartition management tools, for example) can run on a remote system and use the
WBEM infrastructure to send requests to the managed servers.
Partition Manager is one such WBEM client application. Partition Manager uses WBEM
when retrieving information about a server complex. Partition Manager uses the
nPartition commands for all other operations. The nPartition commands are also WBEM
client applications.
The nPartition commands for Windows are supported by several software components.
The Windows operating system provides the Windows Management Instrumentation
(WMI) software, which is an implementation of the WBEM standards. HP provides a
WMI-based nPartition Provider and WMI Mapper for converting CIM/XML WBEM
requests from clients (like the nPar Commands and Partition Manager) into WMI
requests.
The nPartition commands and Partition Manager send management messages to the
nPartition Provider. The nPartition Provider handles all communication with the MP
using the IPMI protocol, either locally via an IPMI/BT device driver, or remotely using
the MP's IPMI/LAN interface.
Securing the WBEM connection
WBEM secures the management connection using an SSL authentication process, which
involves the following files:
18
Chapter 1
Page 19

Introduction
Management interface options
• WBEM SSL Certificate (cert.pem file)
The WBEM SSL Certificate file resides on the system that is being managed and
contains the local WBEM server’s certificate.
On a Windows system, the WBEM SSL Certificate file is in the location specified by
the sslCertificateFilePath entry in the
%PEGASUS_HOME%\cimserver_current.conf file, and is usually
%SystemDrive%\hp\sslshare\cert.pem.
• WBEM Trusted Certificate Store (known_hosts.pem file)
The Trusted Certificate Store file resides on the system from which WBEM remote
management commands are issued. On a Windows system, the WBEM Trusted
Certificate Store file resides in the %SystemDrive%\hp\sslshare directory.
• Partition Manager Trusted Certificate Store (parmgr.keystore file)
The Partition Manager Certificate Store file resides on the system from which
Partition Manager is run. It is used by Partition Manager to validate server
certificates. On a Windows system, the Partition Manager Trusted Certificate Store
file resides in the %SystemDrive%\hp\sslshare directory.
In order for remote WBEM SSL connections to succeed, the WBEM SSL server
certificate from the remote system you are connecting to (the WBEM server) must first
be imported into the trusted certificate store(s) on the system where the remote WBEM
commands are issued from (the client system). For a description of how to do this, see
“Configuring for secure WBEM communications” on page 40.
Managing nPartitions using WBEM
Using WBEM, you can manage remote nPartitions indirectly, via an existing nPartition
on the server.
NOTE You cannot use WBEM to manage nPartitions remotely if none of the nPartitions on the
target server have been booted or configured yet, or if the nPar Provider or MP device
driver components have not been installed yet.
To use WBEM, install the WMI Mapper and the nPartition commands software on your
management station. After you install the tools, enable secure WBEM communications
by referring to “Configuring for secure WBEM communications” on page 40. You can
then use Partition Manager or the nPartition commands to manage your remote
nPartitions.
Running Partition Manager using WBEM You can run Partition Manager with
WBEM in one of two ways:
• If running Partition Manager on an nPartition:
Select the
Switch Complexes task from the To ols menu. In the resulting dialog enter
the hostname or IP address of the remote nPartition, and supply a username and
that user’s password.
To merely display information about the target complex, specify any user defined on
the remote nPartition. To make changes to the target complex, specify a user with
superuser privileges on the remote nPartition.
Chapter 1
19
Page 20

Introduction
Management interface options
• If running Partition Manager on another system (not an nPartition):
Running nPartition commands using WBEM To manage nPartitions remotely
using WBEM, you must include two command-line options with each nPartition
command:
• -u username:[password]
• -h hostname | IPaddress
Partition Manager automatically displays the
Switch Complexes dialog.
The -u option specifies a valid username on the remote nPartition.
For the parstatus and fruled commands, you can specify any username on the
remote nPartition, whereas for the other commands you must select a user with
superuser privileges on the remote nPartition. If the password is not specified, you
are prompted to enter a password after executing the command. This is more secure,
since the password is not displayed on the command line.
The -h option specifies either the hostname or IP address of the remote nPartition.
20
Chapter 1
Page 21

Introduction
Choosing a management mode
Choosing a management mode
As stated previously, the most common method for managing nPartitions involves a
remote management station. This dedicated management station hosts the management
tools and issues commands over a network connection to the server’s management
processor, allowing the complex to be managed even if no nPartitions exist on the
complex yet. This is called the “remote management” mode.
The other option is to install the nPar tools onto an existing nPartition on the server,
and then use them to manage the other nPartitions in the system. This is called the
“local management” mode.
When the nPar tools run on an nPartition in the local mode, they default to managing
the local complex using the IPMI/BT interface to the MP. This may be the simplest mode
to use. Since the tools run on the system being managed, there is no need to provide
additional authentication/remote connection information to make them work.
For example, when running the nPartition Commands in the local mode, no -g, -u, or -h
options are required to manage the local complex. And when running Partition Manager
in the local mode, the connection to the local complex is made automatically (no
additional connection/authentication information is required).
Interestingly, it is even possible to manage another complex remotely, from an
nPartition configured to run in the local mode, by using the -g or -u options with the
nPartition commands, or by using a
Manager.
A list of the advantages and disadvantages of the different management modes and
connection methods follows. Also included are a listing of the authentication and
authorization issues associated with each mode.
Tools > Switch Complexes menu path in Partition
Local management
Some of the advantages of local management are:
• Simple installation: install all components on an nPartition (also, fewer components
need to be installed manually when reinstall media is used).
• Simple connection: login to SMH and run Partition Manager; or, run nPar
Commands with no -g/-u options. No additional authentication/login steps are
required to manage the local complex.
• Allows configuration of specific nPartitions to be controlled by use of the nPartition
Config Privilege option (users can be restricted to configuration of certain
nPartitions).
Some of the disadvantages of local management are:
• Requires at least one nPar to be configured already and booted to Windows (or other
OS supporting the nPar tools).
• Requires nPar tools to be installed on at least one nPar in each partitionable complex.
• Requires login to an nPar in each complex to be managed, either via the SMH web (in
the case of Partition Manager) or telnet or Remote Desktop (in the case of the
nPartition Commands).
Chapter 1
21
Page 22

Introduction
Choosing a management mode
Remote management via IPMI
Some of the advantages of remote management via IPMI are:
• Simple installation: install all components onto a remote management station and
you are ready to manage all complexes in the data center.
• Allows a complex to be managed even if no nPars are currently configured in the
complex.
• Allows all complexes in the data center to be managed from a single management
station.
Some of the disadvantages of remote management via IPMI are:
•Does not allow configuration of specific nPartitions to be controlled by use of the
nPartition Config Privilege option (all users logging in via remote IPMI will have
configuration privileges for all nPartitions in the complex).
• Requires the additional login step of providing the MP hostname/address and IPMI
password in order to connect to the MP remotely.
• IPMI/LAN connections are slightly less secure than remote WBEM connections
(using SSL). For this reason, HP recommends that the network connection between
the management station and the MP be on a private network.
Remote management via WBEM
Some of the advantages of remote management via WBEM are:
• Secure HTTPS/SSL connection between the remote management station and the
nPartition.
• Allows configuration of specific nPartitions to be controlled by use of the nPartition
Config Privilege option (users can be restricted to configuration of certain
nPartitions).
• Allows all complexes in the data center to be managed from a single management
station.
Some of the disadvantages of remote management via WBEM are:
• Requires at least one nPar to be configured already and booted to Windows (or other
OS) and running the WBEM/WMI nPartition Provider.
• Requires copying SSL certificates from the nPartition to the management station’s
trusted certificate store (currently not automated, but a series of manual steps).
• Requires the additional login step of providing a username and password for the
remote nPartition being connected to.
Authentication and authorization issues
A list of the authentication and authorization issues associated with each of the
management modes and connection methods follows.
Local management
Authentication issues associated with the local management mode include:
22
Chapter 1
Page 23

Introduction
Choosing a management mode
• Authentication implemented solely by the OS login to the nPartition (the account
used to login to Windows on the nPartition where the tools are run).
• In the case of Partition Manager (a web application), you are asked for login
credentials when first accessing an SMH or Partition Manager web page (either
locally or from a remote browser).
• The credentials you provide are the same as the OS credentials used to login to the
nPartition directly (for example, in Windows, you would use your local or domain
Windows account to login to SMH).
Authorization issues associated with the local management mode include:
• Authorization is based on the OS authorization “group” that the account used to login
belongs to.
• In Windows, if the login account is a member of the local or domain “Administrators”
group, you are given full permission to view and modify nPartition configurations.
Accounts that do not belong to the local or domain Administrators group are given
read-only access to the nPar tools.
• If the nPartition Config Privilege option is enabled for the complex, users logging into
a given nPartition with full privileges are only able to modify the configuration of
that nPartition. All other nPartition configurations are read-only for them.
• HP SMH lets you grant read-only and read/write permissions to any OS group. Only
Windows Administrators are automatically given full permissions. Other groups
must be configured in SMH on the local nPartition, in order to give those groups
read-only or read/write permissions (applies to Partition Manager only – when using
the nPartition Commands, the rule is this: Administrators have full access, and all
other authenticated accounts have read-only access).
Remote management via IPMI
Authentication issues associated with the remote via IPMI management mode include:
• You must first login to the local OS in order to access the tools (however local OS
permissions do not apply when using the remote modes of the nPar tools).
• Next, you must specify a remote MP hostname/IP address and IPMI password in
order to make the remote IPMI connection to the MP.
Authorization issues associated with the remote via IPMI management mode include:
• Since there is only one remote IPMI account (which is fixed as “Admin”, and therefore
not specified in the tools) and password, this account always has full (read/write)
access to all nPartition configurations in the complex.
• The nPartition Config Privilege setting has no affect when using remote IPMI to
manage the complex (users logged in via remote IPMI have full access to all
nPartitions, regardless of the current nPartition Config Privilege setting.
Remote management via WBEM
Authentication issues associated with the remote via WBEM management mode include:
• You must first login to the local OS in order to access the tools (however local OS
permissions do not apply when using the remote modes of the nPar tools).
Chapter 1
23
Page 24

Introduction
Choosing a management mode
• Next, you must specify a remote nPartition’s hostname/IP address and an OS account
and password that are used to login to that remote nPartition.
Authorization issues associated with the remote via WBEM management mode include:
• Authorization is based on the OS authorization “group” that the account used for the
remote login belongs to.
• In Windows, if the login account is a member of the local or domain “Administrators”
group of the remote nPartition, you are given full permission to view and modify
nPartition configurations. Accounts that do not belong to the local or domain
Administrators group are given read-only access to the nPar tools.
• If the nPartition Config Privilege option is enabled for the complex, users logging into
a given nPartition with full privileges are only able to modify the configuration of
that nPartition. All other nPartition configurations are read-only for them.
24
Chapter 1
Page 25

Introduction
Setting up the management station
Setting up the management station
A management station is often used to configure and administer nPartitions on an HP
Integrity server.
NOTE The nPar tools can also be installed on, and run from, an nPartition on the server being
managed.
If your management station was provided by HP (for example, the PC-SMS management
system supplied with Superdome servers), then all of the nPartition tools and support
components have already been installed on that system.
However, if you are providing your own PC as a management station (for example, you
have an HP Integrity mid-range server) then you must install the tools and components
on that system, using the Smart Setup media provided with your server. Refer to
Chapter 2, “Installing nPartition Management Utilities,” on page 33, for more
information on how to do this.
nPartition tools and components are supported on management stations running one of
the following operating systems:
• Windows 2000, SP3 or later
•Windows XP
• Windows Server 2003 (both 32- and 64-bit editions)
Controlling the management station remotely
The management station running the nPartition tools should be located close to the
server being managed in order to minimize the likelihood of UDP datagrams being lost
in transmission. If, as a result, you cannot access the management station directly, you
can use a remote desktop control or telnet application to access the management station
remotely. To connect to the management station remotely, you can use any of the
following applications.
Remote Control
To view the desktop of the management station from a remote terminal running an OS
other than Windows Server 2003, Windows XP, or Windows Server 2000, use third-party
remote control software such as the free VNC (www.realvnc.com) or Symantec's
pcAnywhere™.
Terminal Services
Windows Server 2000 and Windows Server 2003 include a Terminal Services feature
that allows you to create a login session different from the console, leaving the console
available for other administration tasks.
To enable Terminal Services on the management station, click its checkbox in Add
Windows Components. Windows 2000 Professional and some Windows Server
editions do not include a client for Terminal Services. Download the free client from
www.microsoft.com.
Chapter 1
25
Page 26

Introduction
Setting up the management station
Remote Desktop
If you are running Windows Server 2000 with Terminal Services, Windows Server 2003,
or Windows XP on the management station and Windows Server 2003 or Windows XP on
the remote terminal, you can take advantage of the remote desktop display feature
provided by these operating systems.
The Remote Desktop Connection feature is not enabled by default in Windows XP or
Windows Server 2003. To enable Remote Desktop Connections on the management
station:
Step 1. Click
My Computer > System Properties > Remote > Remote Desktop.
Step 2. Select Allow users to connect remotely to this computer.
To connect to the management station from the remote terminal:
• On Windows XP, click
Desktop Connection
• On Windows Server 2003, click
Start > All Programs > Accessories > Communications > Remote
.
Start > Administrative > Tools > Remote Desktops.
To connect to a Windows 2003 console, use the /console switch with the Remote
Desktop Connection application. This is present on the latest version available at
www.microsoft.com and on Windows Server 2003 (This version is a 32-bit program
available on both the 32-bit and 64-bit Windows Server 2003 operating systems).
Telnet
Because the nPartition commands are executed from a command prompt, you can use a
telnet application (either the telnet command in Windows or a third-party application
such as Reflection® 1) to open a command prompt on the management station. The
management station must have the Telnet service installed and started.
To execute nPartition commands via a telnet connection to the management station:
Step 1. Invoke telnet on the remote terminal, providing the hostname or IP address of the
management station.
Step 2. Login to the telnet server with a valid username and password.
Step 3. From the command prompt, execute nPartition commands as usual.
NOTE There may be limitations on the number of telnet connections permitted into the
management station by its host operating system. Also, you cannot use nPartition
management tools with a GUI such as Partition Manager using this method.
26
Chapter 1
Page 27

Introduction
Performing nPartition management tasks
Performing nPartition management tasks
This section provides an overview of common nPartition management tasks.
Listing the status of an nPartition or complex
To list server complex hardware details and nPartition configuration details:
Using the Partition Manager
Nearly every aspect of the complex — the status of its nPartitions, cells, and other
hardware — can be viewed on a single page from within Partition Manager. To access
this information:
Step 1. Open a web browser and enter the URL for the web server supporting the target system.
Step 2. At the login page, enter a username and password and click Login to access the System
Management Homepage (SMH). This may take several minutes as information about
the complex is loaded.
Step 3. Go to the SMH Tools tab and click the Partition Manager link in the “nPartition
Management” box.
Step 4. In the Partition Manager’s Home tab, use a menu path of
Details
to produce a summary of the status and configuration of the complex, its
nPartitions, cells, and hardware.
Using the nPartition commands
nPartition Commands for listing hardware and nPartition status are as follows:
parstatus -C
List cell configurations.
parstatus -V -c#
List detailed cell information.
parstatus -I
List I/O chassis and card slot details.
parstatus -B
List server cabinet summaries for the complex.
parstatus -V -b#
List detailed server cabinet status.
parstatus -X
List product and serial numbers.
Complex > Show Complex
parstatus -P
List a configuration summary for all nPartitions.
parstatus -V -p#
List detailed nPartition configuration information.
parstatus -w
List the local nPartition number.
Chapter 1
27
Page 28

Introduction
Performing nPartition management tasks
frupower -d -C or frupower -d -I
Using the Management Processor Command menu
You can list hardware and nPartition status with the following commands, which are
available from the management processor Command menu.
CP List nPartition configurations, including all assigned cells.
PS List cabinet, power, cell, processor, memory, I/O, and other details.
IO List connections from cells to I/O chassis on HP Superdome servers.
ID List product and serial numbers.
Using the EFI Shell
EFI Shell methods for listing hardware and nPartition status include the following
commands. Hardware and nPartition information displayed by the EFI Shell is limited
to the local nPartition.
info sys List the local nPartition number and active cell details.
info io List the I/O configuration.
List power status for all cells (-C) or all I/O chassis (-I).
info mem List memory details.
info cpu List processor details.
Creating nPartitions
Creating an nPartition involves using an nPartition administration tool to assign one or
more cells in a complex to the new nPartition. At the time an nPartition is created you
also can optionally specify various configuration options for the nPartition, such as its
name, cell use-on-next-boot values, and other details.
NOTE When creating an nPartition, follow the HP nPartition requirements and guidelines. HP
recommends only specific sets of nPartition configurations. For nPartition configuration
requirements and recommendations, see the chapter Planning nPartitions in the HP
System Partitions Guide.
The method you choose for creating an nPartition depends on whether you are creating
the first nPartition in a complex, creating a “Genesis Partition” for a complex, or creating
an additional nPartition in a complex that already has one or more nPartitions defined.
Creating the first nPartition in a server complex
To create the first nPartition in a complex you can do one of the following tasks:
• From a remote management station, run Partition Manager (connected to the remote
management processor) and use the
nPartition > Create nPartition task.
• From a remote management station, use the parcreate command (with the
-g and -h options to connect to the remote management processor).
• Create a Genesis partition (as described below) from the management processor
console.
28
Chapter 1
Page 29

Introduction
Performing nPartition management tasks
Creating a Genesis Partition for a server complex
To create a Genesis Partition, use the management processor CC command to specify
that an initial, one-cell nPartition be created within the server complex. The complex
must not have any nPartitions defined or all nPartitions must be shutdown for reconfig
(inactive).
Creating additional nPartitions in a server complex
You can use one of two methods to create nPartitions in a complex where one or more
nPartitions already are defined:
Create a new nPartition locally
Login to an nPartition in the same complex where the new nPartition
will be created and use Partition Manager’s Create Partition task, or
issue the parcreate command.
Create a new nPartition remotely
Login to an nPartition in the same complex where the new nPartition
will be created and use Partition Manager’s Create Partition task.
You can also execute the parcreate command using either the WBEM
or with IPMI-over-LAN method. For remote administration using
WBEM, the tool accesses the nPar Provider running on an nPartition
in the target complex (for example, with the -u... -h... options). For
remote administration using IPMI over LAN, the tool accesses the
management processor (for example, with the -g... -h... options).
Modifying nPartitions
Modifying an nPartition involves using an nPartition administration tool to revise one or
more parts of the server Complex Profile data, which determines how hardware is
assigned to and used by nPartitions.
•Use parmodify or Partition Manager from an nPartition running in the same
complex as the nPartition. Some nPartition details can also be modified locally from
an nPartition console by using EFI Shell commands.
•Use parmodify or Partition Manager running on a remote management station or
Windows system.
— Using WBEM, the tool accesses the nPar Provider running on an nPartition in the
target complex. Use the -u... -h... set of parmodify options (or equivalent
Partition Manager login options).
— Using IPMI over LAN, the tool accesses the management processor of the target
complex. Use the -g... -h... set of parmodify options (or equivalent Partition
Manager login options).
Modifying nPartitions includes the following tasks:
Assign (add) or unassign (remove) cells from an nPartition:
In the Partition Manager Hardware tab, select the desired nPartition
and cell and use a menu path of
cell(s)
or nPartition > Unassign cell(s) / Cell > Unassign cell(s).
nPartition > Assign cell(s) / Cell > Assign
Chapter 1
Or, use the parmodify -p# -a#... command to add a cell or the
parmodify -p# -d#... command to remove a cell from the specified
nPartition (-p#, where # is the partition number).
29
Page 30

Introduction
Performing nPartition management tasks
Remove (delete) an nPartition:
Renaming an nPartition:
Setting cell attributes:
Shutdown all open applications on the target nPartition. Shutdown
Windows on the target nPartition. Then, in the Partition Manager
Hardware tab, select the desired nPartition and use a menu path of
nPartition > Delete nPartition.
Or, use the parremove -p# command to remove a specified nPartition
(-p#, where # is the partition number).
In the Partition Manager Hardware tab, select the desired nPartition
and use a menu path of
nPartition > Modify nPartition. Then, in the
General tab, enter a new name in the nPartition Name text box and
click OK.
Or, use the parmodify -p# -P name command to set the name for a
specified nPartition (-p#, where # is the partition number).
In the Partition Manager Hardware tab, select the nPartition that the
target cell belongs to. Use a menu path of
nPartition > Modify nPartition.
Click on the Set Cell Options tab, change the Use On Next Boot
attribute as desired, and click OK.
Or, use the parmodify -p# -m#... command to modify cell attributes
for a specified nPartition (-p#, where # is the partition number). Or,
use the EFI Shell cellconfig command to set use-on-next-boot values.
Setting core cell choices:
In the Partition Manager Hardware tab, select the nPartition that the
target cell belongs to. Use a menu path of
Click on the Set Cell Options tab, change the Core Cell Choice
attribute as desired, and click OK.
Or, use the parmodify -p# -r# -r#... command to specify up to four
core cell choices in priority order for a specified nPartition (-p#, where
# is the partition number). Or, use the EFI Shell rootcell command to
set core cell choices.
Setting cell local memory (vs. interleaved memory) values:
In the Partition Manager Hardware tab, select the nPartition that the
target cell belongs to. Use a menu path of
Click on the Configure Memory tab, change the Requested CLM
attribute as desired (either as a fraction of total available memory, or
as a fixed amount), and click OK.
Or, use the parmodify -p# -m#::::% command (-p#, where # is the
partition number, and -m#, where # is the cell number and % is the
desired cell local memory value, expressed as a percentage).
Setting nPartition boot paths:
You must use the EFI Shell bcfg command to configure boot paths.
nPartition > Modify nPartition.
nPartition > Modify nPartition.
Booting and resetting nPartitions
This section gives a brief overview of the boot process for cells and nPartitions and lists
the main nPartition boot commands and tasks.
30
Chapter 1
Page 31

Introduction
Performing nPartition management tasks
Using the Management Processor Command menu
The management processor provides the following commands, available from the
Command menu, to support boot and reset operations:
RS Reset an nPartition. Reset an nPartition only after all self tests and
partition rendezvous have completed.
RR Perform a shutdown for reconfig of an nPartition. Reset an nPartition
only after all self tests and partition rendezvous have completed.
BO Boot the cells assigned to an nPartition past the “waiting at BIB” state
and thus begin the nPartition boot phase.
TC Perform a transfer of control reset of an nPartition.
PE Power on or power off a cabinet, cell, or I/O chassis. On HP Integrity
mid-range servers, nPartition power on and power off also is
supported, to manage power of all cells and I/O chassis assigned to the
nPartition using a single command.
Using the EFI Shell
EFI Shell provides the following commands to support boot and reset operations:
bcfg List and configure the boot options list for the local nPartition.
autoboot List, enable, or disable the nPartition autoboot configuration value.
acpiconfig List and configure the nPartition ACPI configuration setting, which
determines whether HP-UX, Windows, or Linux can boot on the
nPartition.
To boot Windows Server 2003, the ACPI configuration setting for the
nPartition must be set to windows.
acpiconfig enable softpowerdown
When set, causes nPartition hardware to be powered off when the
operating system issues a shutdown for reconfig command. On
mid-range servers with a windows ACPI configuration setting, this is
the default behavior. Available only on mid-range servers.
acpiconfig disable softpowerdown
When set, causes nPartition cells to remain at BIB when the operating
system issues a shutdown for reconfig command. In this case an OS
shutdown for reconfig makes the nPartition inactive. Available only on
mid-range servers.
reset Resets the local nPartition, resetting all cells and then proceeding with
the nPartition boot phase.
reconfigreset Performs a shutdown for reconfig of the local nPartition, resetting all
cells and then holding them at the “wait at BIB” state, making the
nPartition inactive.
Using Microsoft Windows commands
Microsoft Windows includes the following commands for shutting down and rebooting an
nPartition:
Chapter 1
31
Page 32

Introduction
Performing nPartition management tasks
shutdown /r Shuts down Windows and performs a reboot for reconfig of the
shutdown /s Shuts down Windows and performs a shutdown for reconfig of the
nPartition. All cells are reset and nPartition reconfiguration occurs as
needed. The nPartition then proceeds with the nPartition boot phase.
nPartition. The default behavior differs on HP Integrity Superdome
servers and HP Integrity mid-range servers.
On HP Integrity Superdome servers, shutdown /s causes all cells to be
reset and nPartition reconfiguration to occur as needed. All cells then
remain at a “wait at BIB” state and the nPartition is inactive
On mid-range servers, the default behavior is for shutdown /s to cause
nPartition hardware to be powered off. You can use the EFI Shell
command acpiconfig disable softpowerdown instead to make all
cells remain at a “wait at BIB” state.
32
Chapter 1
Page 33

2 Installing nPartition Management
Utilities
HP provides two utilities — nPartition Commands and Partition Manager — that enable
you to manage nPartitions on cell-based servers such as HP Integrity rx7620, rx7640,
rx8620, rx8640, or Superdome. You can install nPartition commands and Partition
Chapter 2
33
Page 34

Installing nPartition Management Utilities
Manager on the server you want to manage or on a remote management station. The
remote management station may be another HP Integrity server, a PC running a
supported OS, or the HP SMS accompanying the Superdome.
This chapter provides installation instructions for nPartition Commands and Partition
Manager designed for the Microsoft Windows operating systems. Read the instructions
carefully before you install the software. The sequence of steps indicated here is critical
for a successful installation.
NOTE Some of the file paths specified in this chapter assume that the Smart Setup CD is
mounted in the D: drive on your system. If your DVD drive is not mapped to the D: drive,
you should substitute the correct drive letter where necessary.
34
Chapter 2
Page 35

Installing nPartition Management Utilities
nPartition Commands
nPartition Commands
The nPartition commands provide a simple command-line interface that enables you to
manage nPartitions on a cell-based HP Integrity server. You can run the nPartition
commands either locally (from an nPartition on the server) or remotely (from a
management station networked with the server). The remote management station may
be another HP Integrity server, an HP SMS accompanying the Superdome, or any PC
running a supported version of Windows.
The nPartition Commands software is available in two bundles tailored to the platforms
on which the commands run:
1. nPartition Commands Bundle (32-bit):
This bundle provides software components designed for any PC running Microsoft
Windows XP, Windows Server 2000 with Service Pack 3, or Windows Server 2003,
32-bit Edition. This bundle is available on the Smart Setup CD. The latest version of
this bundle is available at the HP Integrity support site
(http://www.hp.com/support/itaniumservers). This bundle is not available on
the HP Reinstallation media or a factory-installed HP Integrity server because this
software does not run on an HP Integrity server.
2. nPartition Commands Bundle (64-bit):
This bundle provides software components designed for HP Integrity servers running
Microsoft Windows Server 2003, 64-bit, Enterprise Edition or Datacenter Edition.
This bundle is included on the Smart Setup CD and the latest version is available at
the HP Integrity support site (http://www.hp.com/support/itaniumservers). The
contents of this bundle are included on the HP Reinstallation media and on the hard
disk of a factory-installed HP Integrity server.
Install nPartition Commands bundle from the Smart Setup media
Before you install the nPartition Commands Bundle from the Smart Setup media:
Step 1. Install all the OS fixes and security fixes on the Smart Update media. The Smart Update
DVD is found in your Integrity Essentials Foundation Pack kit, along with the Smart
Setup CD. To verify that all fixes were installed, select Control Panel > Add/Remove
Programs and scan the list of installed software.
Step 2. Install the Integrity Support Pack from the Smart Setup CD. Integrity Support Pack
includes software, drivers, and management agents optimized for your Integrity server.
Integrity Support Pack also installs some of the components needed to run nPartition
Commands and starts them as services.
To install the nPartition Commands bundle, complete the following steps:
Step 1. Insert the Smart Setup CD and click on the Software tab.
Step 2. In the left column, click on the model number of your target server.
Step 3. In the left column of the next page, click on the Partitioning Tools link.
Step 4. In the “Partitioning Tools” section, click one of the following:
Chapter 2
35
Page 36

Installing nPartition Management Utilities
Partition Manager
• If you are installing onto a 32-bit client machine that will be used to remotely
administer the target server, click on HP nPartition Commands Bundle for
Windows XP or Windows Server 2000/2003.
• If you are installing onto the target server itself, click on HP nPartition
Commands Bundle for Windows Server 2003 on Itanium-based systems.
Step 5. At the top of the next page, click on the Download button.
Step 6. In the File Download window, click Run.
Step 7. In the Security Warning window, click Run.
Step 8. In the HP Package Setup window, click Install.
Step 9. In the command window, press any key to begin the installation.
Step 10. When the installation finishes, press any key again to exit and close the command
window.
Partition Manager
This section is an overview of the installation and use of the nPartition Commands
bundle and nPartition Manager bundle. The nPartition Commands bundle must be
installed before the nPartition Manager bundle.
Install Partition Manager Bundle from the Smart Setup media
Before installing the Partition Manager bundle you must install the nPartition
Commands bundle first, as described in the previous section.
To install the nPartition Manager bundle, complete the following steps:
Step 1. Insert the Smart Setup CD and click on the Software tab.
Step 2. In the left column, click on the model number of your target server.
Step 3. In the left column of the next page, click on the Partitioning Tools link.
Step 4. In the “Partitioning Tools” section, click on HP Partition Manager Bundle for
Windows.
Step 5. At the top of the next page, click on the Download button.
Step 6. In the File Download window, click Run.
Step 7. In the Security Warning window, click Run.
Step 8. In the HP Package Setup window, click Install.
Step 9. In the command window, press any key to begin the installation.
Step 10. In the HP System Management Homepage (SMH) installation wizard screen, click Next.
36
Chapter 2
Page 37

Installing nPartition Management Utilities
Partition Manager
Step 11. Through the next several screens, configure your SMH administrator and security
settings as prompted, and the SMH installation begins.
Step 12. When the SMH installation finishes, click Next in the HP Servlet Container for SMH
wizard screen. Then click Next two more times to begin the installation.
Step 13. Click Finish to complete the servlet container installation.
Step 14. The HP Partition Manager installation starts next. When it finishes, press any key in
the command window to exit.
NOTE If this is the first time you have ever installed Partition Manager on the target system,
you must reboot before using it the first time.
Step 15. Verify that the installation succeeded.
Chapter 2
37
Page 38

Installing nPartition Management Utilities
Verifying the installation
Verifying the installation
To verify correct server configuration and software installation, perform the following
simple tests:
Verifying nPartition Commands
Step 1. Perform a local management test by opening a command prompt window and issuing the
following command:
C:\Documents and Settings> parstatus -X
If this command is run on an nPartition, information about the local server’s nPartition
Configuration should be displayed, and no error messages should be returned. If this
command is run on a non-nPartition, however, the following message should display
(which is the expected response in this situation, and not an error):
Error: unsupported platform
Step 2. To verify access and communication with the server, as well as installation of the
nPartition commands, enter the following command:
C:\Windows> parstatus -X -h <mp> -g <password>
where <mp> is either the IP address or the hostname of the server’s management
processor, and <password> is the management processor IPMI password. This command
should result in the display of approximately 10 server attributes, including the server
name, model number, and so on. There may be a delay of a few seconds, or even a minute
or more, depending on network distance between the management station and the
server.
NOTE The above example only works with the IPMI over LAN connection method. If using
WBEM/WMI, substitute the -u option (for the -g option shown above). This also requires
copying of the remote nPartition’s WBEM certificate into the WBEM trusted certificate
store on the system where the command is being run (see “Configuring for secure WBEM
communications” on page 40 for details about how to do this).
Verifying Partition Manager
NOTE Partition Manager depends on the presence of the nPartition Commands. Before
proceeding you should first check that the commands are installed correctly by following
the procedure in the previous section. This way, if there is a problem, you will know if it
exists in the Commands layer, or the Par Manager layer.
Step 1. Verify the installation by launching a web browser and logging in to SMH on the system
where Partition Manager is installed. For example, if you are testing on the local server,
the URL would be: https://localhost:2381.
38
Chapter 2
Page 39

Installing nPartition Management Utilities
Verifying the installation
Step 2. To continue the verification at the SMH, under the Tools tab, click View and Manage
Complex. If Partition Manager is running, you will go directly to the top-level view of
the local complex (no additional login is required). If Partition Manager is not running on
an nPartition, you will be presented with a dialog asking for either the hostname/IP and
login/password for a remote nPartition (for remote WBEM connections) or the
hostname/IP and IPMI password of an MP (for remote IPMI connections).
If running Partition Manager on an nPartition, go directly to Step 5 to verify correct
installation and operation.
Step 3. In order to test remote WBEM connections, you must first copy the remote nPartitions
WBEM certificate into the local WBEM trusted certificate store (see “Configuring for
secure WBEM communications” on page 40). Then, you must enter the hostname/IP
address of the remote nPartition that you wish to connect to, along with an account &
password with Administrative privileges on the remote nPartition in the top half of the
Partition Manager login screen, then click OK. Then, go to Step 5 to verify correct
installation and operation.
Step 4. In order to test remote IPMI connections, you must enter the hostname/IP address of the
remote Management Processor that you wish to connect to, along with the IPMI
password for that MP in the bottom half of the Partition Manager login screen, then click
OK. Then, go to Step 5 to verify the correct installation and operation.
Step 5. Finally, verify correct operation of Partition Manager:
After logging into Partition Manager, a message should display for several seconds to a
minute or so: “Loading complex information”. After that, Partition Manager should
display top-level information about the complex, including all currently configured
nPartitions and their associated cells and I/O chassis.
Step 6. Once Partition Manager is up and running, you can verify that the complex information
looks correct, and that no error messages are displayed. For example, in the Action menu
on the right side of the screen, click Complex to expand the complex-level submenu.
Click on Show Complex Details to display a complete listing of the complex
configuration. Verify that this information looks correct, and that no error messages are
displayed. Then close the Complex Details window by clicking OK in the upper-left
corner of the window.
Step 7. In the same “Complex” menu, click on Clear All LEDs. A dialog box should display,
stating that the command ran successfully. If possibly, verify that all server LED’s are
now off, by looking at the server.
If these tests do not give the desired results, you can perform additional tests to help
pinpoint the problem. See “Checking component installation and operation” on page 140.
Chapter 2
39
Page 40

Installing nPartition Management Utilities
Miscellaneous installation issues
Miscellaneous installation issues
The installation-related issues described in this section may or may not apply to you,
depending on your connection method and mode.
Configuring for secure WBEM communications
To configure for secure WBEM communications:
Part 1 — On the Server:
Step 1. Locate the WBEM SSL Certificate file (cert.pem) on the remote nPartition that you
want to connect to.
Step 2. To verify you are copying the correct certificate file, open the CIM Server/WMI Mapper
configuration file (%PEGASUS_HOME%\cimserver_current.conf) on the remote nPar, and
look for the sslCertificateFilePath entry. This entry indicates the server certificate
file currently configured for use by the CIM Server/WMI Mapper (on a Windows system,
this entry is usually: %SystemDrive%\hp\sslshare\cert.pem).
NOTE If there is no sslCertificateFilePath entry, the default server certificate file is found
here: %PEGASUS_HOME%\server.pem.
Step 3. Copy the certificate file located in Step 2 (cert.pem or server.pem) to the client system.
Part 2 — On the Client:
Step 1. Import the certificate (cert.pem) into the parmgr keystore (parmgr.keystore) by
entering the following command at the command line (all one line):
%JAVA_HOME%\bin\keytool -import -alias server_hostname
-file cert.pem -keystore %SystemDrive%\hp\sslshare\parmgr.keystore
Step 2. When prompted, enter the password to the keystore. If the parmgr.keystore file does
not yet exist (in other words, if this is the first certificate you have tried to import), the
keytool -import command creates a new keystore file and any password you enter
becomes the assigned password for this new keystore.
NOTE Use a password that you will remember. You will need it the next time you import a
certificate into the keystore.
Step 3. To enable certificate validation for the commands used by Partition Manager, append the
contents of cert.pem to the end of the file:
%SystemDrive%\hp\sslshare\known_hosts.pem.
NOTE Earlier versions of the nPartition commands used client.pem, instead of
known_hosts.pem. Consult the nPartition Commands release notes to determine which
file you should use.
Step 4. Finally, restart the JSP/Servlet Container by restarting the HP System Management
Homepage service (SysMgmtHP), or by rebooting Windows.
40
Chapter 2
Page 41

Installing nPartition Management Utilities
Miscellaneous installation issues
Upgrading service packs later (after installation)
Until the required patches and hotfixes are incorporated into Windows service packs, it
is possible that upgrading the service pack level of the OS after installing nPartition
components could affect operation. The following are known issues:
• Windows XP Professional: Upgrading from Windows XP to Windows XP Service Pack
1 can overwrite a file replaced by the Q332207 hotfix with an older version.
Reinstalling the hotfix corrects the problem.
Chapter 2
41
Page 42

Installing nPartition Management Utilities
Miscellaneous installation issues
42
Chapter 2
Page 43

3 Using Partition Manager
Partition Manager (parmgr) is a Web-based application for system administrators that
gives you a convenient graphical user interface (GUI) for creating, configuring, and
managing the nPartitions on your HP Integrity server. Partition Manager generates a
graphical representation of all your system's hardware components, nPartitions, and
available resources.
Chapter 3
43
Page 44

Using Partition Manager
Partition Manager helps you perform complex configuration tasks without having to
remember commands and parameters. You select the nPartitions, cells, I/O chassis, or
other components from the graphical display, then select an action from a menu. The
actions available to you are always appropriate to the current view and the selected
objects.
Partition Manager also displays the command(s) it uses to perform your management
tasks. You can use this feature to help you learn the par commands syntax, or to
construct scripts for automation of frequently-performed tasks. With Partition Manager
you can also view your server's hardware inventory and status. All changes are tracked
and logged to a log file for viewing later. Partition Manager even detects and reports on
several different kinds of configuration problems that can affect your server.
Use Partition Manager to:
• view the configuration and status of all nPartitions, cells, cpu's, memory,
and I/O devices in a complex
• create, remove, and modify nPartitions
• power on and off individual cells and I/O chassis
• manage cell and I/O chassis attention indicators
• modify the CLM settings for cells
To run Partition Manager:
Step 1. On the management station or local nPartition desktop, double-click on the HP System
Management Homepage (SMH) icon. This icon is added to the desktop by the HP
System Management Homepage installer. It is a link to the System Management
Homepage on the local system. Administrative access is not required (normal Windows
login accounts should allow you to access SMH). If the icon is not on the desktop, or has
been deleted somehow, you can also access SMH with the following URL:
https://localhost:2381.
Step 2. Once you are logged into SMH, go to the Tools tab and click View and Manage
Complex in the “nPartition Management” category. If Partition Manager is running on
a partitionable system (like a Superdome partition), you are immediately logged into the
local complex, and all views displayed are of that local complex. If Partition Manager is
running on a management station, a screen for logging into a remote partition displays,
and you must enter an IP address and password to continue. For context-sensitive help
about available connection options, click on the Help button.
44
Chapter 3
Page 45

After logging in, Partition Manager displays a high-level view of the cells and I/O chassis
in the complex, and how they are currently configured into nPartitions (see Figure 3-1).
Figure 3-1 Partition Manager (Hardware tab)
Using Partition Manager
As shown above, a graphical representation of the entire complex displays on the left
side of the Hardware tab. Additional tabs include nPartitions, Power and Cooling,
Cells, I/O, and General. Each tab provides a component-level view of all the similar
hardware in the system, such as nPartitions, cooling fans, cells, I/O slots, and cards.
The Actions menu consists of six different submenus: Complex, nPartitions, Cell, I/O,
Tools, and Help. It is always on the right side of your screen. You can expand each of
the submenus by clicking on it. Expanding an Action submenu reveals the “actions” or
tasks that can be performed on the devices in your system.
However, before you can perform an action on one of your devices, you have to select it
first. To select a device, click the checkbox next to its picture on the left side of the
screen. For example, in the complex shown above, the nPartition named “rex01” is
selected.
Chapter 3
45
Page 46

Using Partition Manager
Once a device is selected you can do something to it. For example, now that “rex01” is
selected, you can expand the nPartition action item and see that the Delete
nPartition and Modify nPartition submenu items are now available (see Figure 3-2).
The other items remain greyed-out because they are inactive. They are either
inappropriate at this time, or inappropriate for the device you have selected.
Figure 3-2 Actions menu (nPartitions submenu expanded)
To perform an action, click on the submenu item. This often brings up additional tabs or
screens that require further input or narrowing of scope. For example, clicking Modify
nPartition brings up additional tabs (see Figure 3-3).
Figure 3-3 Actions menu (nPartition > Modify nPartition, General tab)
46
Chapter 3
Page 47

Using Partition Manager
The General tab is the default here. Use it to name or rename the selected nPartition.
Clicking on the Add/Remove Cells tab lets you add cells to the selected nPartition or
remove cells from it (see Figure 3-4).
Figure 3-4 Actions menu (nPartition > Modify nPartition, General tab)
Once again, your choices here are context-sensitive. You can only select cells (in this
case, Cell 0) that either belong to the nPartition you selected earlier (rex01) or are
currently unassigned and available. The other cells in the system are greyed out because
they belong to other nPartitions.
Chapter 3
47
Page 48

Using Partition Manager
In this view you can even click on the cell itself to find out more information about it (see
Figure 3-5).
Figure 3-5 Actions menu (nPartition > Modify nPartition, Add/Remove Cells >
Cells > General tab)
48
Chapter 3
Page 49

Finally, you can determine the current status of any device or component in the system
simply by looking at its status icon. The meaning of these status icons is defined in the
hardware status legend which is usually located on the right side of the view (see Figure
3-6).
Figure 3-6 Hardware status icons and legend
Using Partition Manager
In the example above, a quick glance shows that all of the cells and I/O chassis in
Cabinet 0 (cab0) Cabinet 8 (cab8) are powered on and active, and that no faults are
detected. This condition is indicated by the green-arrow icons next to each of them.
For detailed descriptions about how to use Partition Manager to perform specific
management tasks, refer to Partition Manager’s on-line help. It is much more extensive
and detailed than the brief overview given here. To access help information, click the
Help menu item to expand its submenu, which includes a context-sensitive Current
View link, and the Overview and About links. There is also context-sensitive help
available in most of the dialog screens, in the form of a Help button.
Chapter 3
49
Page 50

Using Partition Manager
50
Chapter 3
Page 51

4 Using Other Tools for Managing
nPartitions
This chapter describes some of the other tools and methods for managing nPartitions on
HP Integrity servers. In nearly every case you can use Partition Manager to perform
these tasks, and HP recommends that you do so whenever possible.
Chapter 4
51
Page 52

Using Other Tools for Managing nPartitions
HP also recommends that you put the target nPartition into a Shutdown for Reconfig
state before changing any of its cell assignments, such as adding cells to the nPartition
or deleting cells from it.
In addition, the ACPI flag must be enabled for modified and newly-created nPartitions
after (not before) performing management tasks on them, by running the EFI’s
acpiconfig windows command, followed by a reset. See “ACPI configuration for
Windows must be “windows”” on page 65 for details about how to do this.
Because the scope of this document is limited to HP Integrity Servers running Microsoft
Windows Server 2003, emphasis is placed on the tools provided with that platform (like
nPartition commands), even when other tools might also exist. For those procedures that
can be performed with an nPartition command, that is the only method presented.
However, for procedures that cannot be performed using an nPartition command, the
alternate methods are provided (such as issuing commands from the MP or EFI Shell
menus).
For a complete and comprehensive description of all the HP Integrity nPartitioning
procedures, tools, and topics, on all supported platforms, refer to HP System Partitions
Guide: Administration for nPartitions, found at:
http://docs.hp.com/hpux/multiOS/index.html.
52
Chapter 4
Page 53

Using Other Tools for Managing nPartitions
Complex-level tasks
Complex-level tasks
The following section describes tasks you can perform for the entire complex.
Rename a server complex
You can assign a name for each server complex in order to better identify the complex as
you work with it. The server complex name serves as a helpful identifier; changing the
name does not affect the way in which commands and utilities interact with the complex.
Several commands and utilities display the server complex name as part of their output
and interfaces. For example, some nPartition commands and Partition Manager list the
complex name.
Each server complex name has up to 20 characters, which can include upper- and
lowercase letters; numbers; and dashes, underscores, periods, and spaces (“-” “_” “.” and “
”).
The server complex name is stored as part of the Complex Profile for the server (part of
its Stable Complex Configuration Data).
Rename a server complex using the following procedure:
Renaming a server complex [par commands]
From the command line, use the cplxmodify -N name command to rename a server
complex.
Step 1. Login to Windows on the Management Station PC.
Step 2. Issue the cplxmodify -N name command to rename the local server complex.
To list the current complex name, issue the parstatus -X command.
NOTE You must include the correct remote administration options when issuing par commands
(-h and -g for IPMI over LAN connections; -h and -u for WBEM/WMI connections). For
a complete explanation of these options, refer to the command description in “nPartition
Commands Reference” on page 109.
Unlock complex profile entries
The Complex Profile is a set of data that determines how hardware is assigned to and
used by nPartitions in an nPartition-capable server complex. Each Complex Profile entry
has its own lock which is used to restrict access to the entry.
In certain situations you might need to manually unlock a Complex Profile entry, for
example when an nPartition configuration tool such as Partition Manager has
prematurely exited before it sends revised Complex Profile entries and corresponding
lock keys back to the management processor.
CAUTION You should generally avoid manually unlocking Complex Profile entries because doing so
can result in the loss of configuration changes.
Chapter 4
53
Page 54

Using Other Tools for Managing nPartitions
Complex-level tasks
Unlock a Complex Profile entry using the following procedure:
Complex profile unlocking [par commands]
This procedure unlocks a Complex Profile entry by using the parunlock nPartition
configuration command.
Step 1. Login to Windows on the Management Station PC.
Step 2. Issue the parunlock command with the command-line option appropriate for the
Complex Profile entry or entries you want to unlock.
NOTE You must include the correct remote administration options when issuing par commands
(-h and -g for IPMI over LAN connections; -h and -u for WBEM/WMI connections). For
a complete explanation of these options, refer to the command description in “nPartition
Commands Reference” on page 109.
parunlock options for Windows
The Windows parunlock command supports the following options:
-s Unlock the Stable Complex Configuration Data. On HP Integrity
servers the -s option unlocks the “read lock” that controls read access
to the current Stable Complex Configuration Data. See also the -P
option.
-d Unlock the Dynamic Complex Configuration Data.
-p# Unlock the Partition Configuration Data for the nPartition whose
number (#) is specified.
-P Cancel any pending changes to the Stable Complex Configuration
Data. On HP Integrity servers the -P option unlocks the “write lock”
that controls write access to a modifiable copy of the Stable Complex
Configuration Data. See also the -s option.
-A Unlock the Stable Complex Configuration Data, Dynamic Complex
Configuration Data, and the Partition Configuration Data for all
nPartitions in the complex. On HP Integrity servers the -A option
unlocks both the “read lock” and “write lock” for the Stable Complex
Configuration Data.
Cancel pending changes to the complex profile
You can cancel a pending change to the Stable Complex Configuration Data for an
nPartition-capable server by unlocking the Stable Complex Configuration Data before
the management processor has pushed out the revised data for the entry.
For example, you can abort a cell assignment change when you have issued a request to
unassign an active cell but manually unlock the effected Complex Profile entries before
performing a reboot for reconfig of the nPartition to which the cell originally is assigned.
CAUTION You should generally avoid manually unlocking Complex Profile entries because doing so
can result in the loss of configuration changes.
54
Chapter 4
Page 55

Using Other Tools for Managing nPartitions
Complex-level tasks
Aborting cell assignment changes
You can cancel a pending change to an active cell by using this procedure. Only changes
involving the unassignment (deletion) of an active cell from an nPartition can practically
be canceled.
Step 1. After issuing a request to unassign an active cell from its nPartition, do not perform a
shutdown or reset of the nPartition.
When the cell assignment of an active cell is pending, the Stable Complex Configuration
Data is not pushed out until the cell is at the boot is blocked (BIB) state, which occurs
during a reboot for reconfig or shutdown for reconfig of its nPartition.
Step 2. Issue a request to unlock the Stable Complex Configuration Data for the server where
the cell assignment change is pending.
Use the procedure given in “Unlock complex profile entries” on page 53.
List product and serial numbers
Product and serial number information is stored in the Stable Complex Configuration
Data portion of the Complex Profile for an nPartition-capable server.
List product and serial numbers using the following procedure:
Listing product and serial numbers [par commands]
From the command line, issue the parstatus -X command to display the product
number and serial number for the server complex.
Step 1. Login to Windows on the Management Station PC.
Step 2. Issue the parstatus -X command to display the product number and serial number.
NOTE You must include the correct remote administration options when issuing par commands
(-h and -g for IPMI over LAN connections; -h and -u for WBEM/WMI connections). For
a complete explanation of these options, refer to the command description in “nPartition
Commands Reference” on page 109.
Chapter 4
55
Page 56

Using Other Tools for Managing nPartitions
nPartition-level tasks
nPartition-level tasks
The following section describes tasks you can perform on individual nPartitions within
the complex.
Boot configuration options for nPartition systems
This section briefly discusses the system boot options you can configure on
nPartition-capable servers. You can configure boot options that are specific to each
nPartition in the server complex.
HP Integrity boot configuration options
On nPartition-capable HP Integrity servers you must properly specify the ACPI
configuration value, which affects the OS startup process and on some servers can affect
the shutdown behavior. You can also configure boot device paths and the autoboot setting
for the nPartition. Details are given in the following list.
• Boot options list
You can manage the boot options list for each nPartition either by using the bcfg
command at the EFI Shell, or by using the
and
Change Boot Order menu items at the EFI Boot Option Maintenance menu.
• Autoboot setting
You can configure the autoboot setting for each nPartition either by using the
autoboot command at the EFI Shell, or by using the
item at the EFI
• ACPI configuration value
You must set the proper ACPI configuration for the OS that will be booted on the
nPartition. To check the ACPI configuration value, issue the acpiconfig command
with no arguments at the EFI Shell. To boot or install the Windows operating system
an nPartition must have its ACPI configuration value set to windows.
For details, see “ACPI configuration for Windows must be “windows”” on page 65.
• ACPI “softpowerdown” configuration—mid-range server OS shutdown behavior
On HP rx7620, rx7640, rx8620, and rx8640 servers you can configure the nPartition
behavior when an OS is shutdown and halted. The two options are to have hardware
power off when the OS is halted, or to have the nPartition be made inactive (all cells
are in a boot-is-blocked state). The normal OS shutdown behavior on mid-range
servers depends on the ACPI configuration for the nPartition.
Boot Option Maintenance menu.
Add a Boot Option, Delete Boot Option(s),
Set Auto Boot TimeOut menu
You can run the acpiconfig command with no arguments to check the current ACPI
configuration setting; however, softpowerdown information is displayed only when
different from normal behavior.
56
Chapter 4
Page 57

Using Other Tools for Managing nPartitions
nPartition-level tasks
To change the nPartition behavior when an OS is shutdown and halted use either the
acpiconfig enable softpowerdown EFI Shell command or the acpiconfig
disable softpowerdown command and then reset the nPartition to make the ACPI
configuration change take effect.
— acpiconfig enable softpowerdown
When set, acpiconfig enable softpowerdown causes nPartition hardware to be
powered off when the operating system issues a shutdown for reconfig command
(for example, shutdown -h or shutdown /s).
This is the normal behavior on mid-range servers with a windows ACPI
configuration setting.
When softpowerdown is enabled on a mid-range server, if one nPartition is defined
in the server then halting the operating system powers off the server cabinet
(including all cells and I/O chassis). On a mid-range server with multiple
nPartitions, halting the operating system from an nPartition with softpowerdown
enabled causes only the resources on the local nPartition to be powered off.
To power on hardware that has been powered off, use the PE command at the
management processor command menu.
— acpiconfig disable softpowerdown
When set, acpiconfig disable softpowerdown causes nPartition cells to
remain at a boot-is-blocked state when the operating system issues a shutdown
for reconfig command (for example, shutdown -h or shutdown /s). In this case an
OS shutdown for reconfig makes the nPartition inactive.
This is the normal behavior on mid-range servers with an ACPI configuration
setting of default or single-pci-domain.
To make an inactive nPartition active, use the management processor BO
command to boot the nPartition past the boot-is-blocked state.
Find bootable devices
Find bootable devices using the following procedure:
Find bootable devices [EFI shell]
From the EFI Shell environment, issue the map command to list bootable devices.
Step 1. Access the EFI Shell environment for the nPartition whose bootable devices you want to
list.
Login to the management processor and enter CO to access the Console list. Select the
nPartition console.
When accessing the console, confirm that you are at the EFI Boot Manager menu (the
main EFI menu). If at another EFI menu, select the
you return to the screen with the EFI Boot Manager heading.
From the EFI Boot Manager menu, select the
Shell environment.
Step 2. At the EFI Shell, issue the map command to list all disk devices with a potentially
bootable EFI System Partition.
Chapter 4
Exit option from the sub-menus until
EFI Shell menu option to access the EFI
57
Page 58

Using Other Tools for Managing nPartitions
nPartition-level tasks
For details see the help map command. Also see the help search command for details
on using the search command to load drivers for bootable devices.
Step 3. Exit the console and management processor interfaces if finished using them.
To exit the EFI environment type
returns to the management processor Main Menu. To exit the management processor,
type X at the Main Menu.
^B (Control-B); this exits the nPartition console and
List nPartition configurations
nPartition configuration information includes a list of which cells are assigned to which
nPartitions, and additional details such as the core cell choices, boot device paths, and
nPartition names.
List nPartition configurations using the following procedure:
Listing nPartition configurations [par commands]
From the command line, issue the parstatus -P command to list a summary of all
nPartitions in the server complex. For detailed information issue the parstatus -V -p#
command for more information about a specific nPartition (-p# where # is the nPartition
number).
Step 1. Login to Windows on the Management Station PC.
Step 2. Issue the parstatus -P command to list a summary of all nPartitions in the server
complex.
For detailed information issue the parstatus -V -p# command for more information
about a specific nPartition (-p# where # is the nPartition number).
NOTE You must include the correct remote administration options when issuing par commands
(-h and -g for IPMI over LAN connections; -h and -u for WBEM/WMI connections). For
a complete explanation of these options, refer to the command description in “nPartition
Commands Reference” on page 109.
List the local (current) nPartition number
The local nPartition number is the numerical identifier for the nPartition currently
being accessed (where the command executes).
List the local nPartition number using the following procedure:
Listing the local (current) nPartition number [par commands]
From the command line, issue the parstatus -w command to list the local nPartition
number.
Step 1. Login to Windows on the Management Station PC.
Step 2. Issue the parstatus -w command to list the local nPartition number.
58
Chapter 4
Page 59

Using Other Tools for Managing nPartitions
nPartition-level tasks
NOTE You must include the correct remote administration options when issuing par commands
(-h and -g for IPMI over LAN connections; -h and -u for WBEM/WMI connections). For
a complete explanation of these options, refer to the command description in “nPartition
Commands Reference” on page 109.
List memory configurations
Memory configuration details include summaries of the total memory in a cell or
nPartition, the amounts of interleaved memory and cell local memory (where supported)
per cell or nPartition, and the number and locations of memory modules (DIMMs) within
the cells in a server complex.
List memory configurations using the following procedure:
Listing memory configurations [par commands]
From the command line, issue the parstatus -C command for memory summaries for
all cells; use parstatus -V -c# for detailed memory information for the specified cell
(-c# where # is the cell number); or use parstatus -V -p# for detailed memory
information for the specified nPartition (-p# where # is the nPartition number).
Step 1. Login to Windows on the Management Station PC.
Step 2. Issue the command to list memory details.
• parstatus -C — Cell and memory summaries for all cells in the server complex.
• parstatus -V -c# — Detailed memory information for the specified cell (-c# where
# is the cell number), including memory module (DIMM) locations and sizes. For HP
Integrity servers, this includes details about the interleaved memory in the cell as
well as the requested and allocated cell local memory (CLM) amounts.
• parstatus -V -p# — Detailed information about the specified nPartition (-p# where
# is the nPartition number), including summaries for all assigned cells including
their amounts of memory. For HP Integrity servers, the nPartition details include the
total good memory size, total interleaved memory, and the total requested and
allocated cell local memory (CLM) amounts.
NOTE You must include the correct remote administration options when issuing par commands
(-h and -g for IPMI over LAN connections; -h and -u for WBEM/WMI connections). For
a complete explanation of these options, refer to the command description in “nPartition
Commands Reference” on page 109.
Chapter 4
59
Page 60

Using Other Tools for Managing nPartitions
nPartition-level tasks
Configure boot paths and options
CAUTION On HP Integrity servers, when configuring Windows boot options you must do so from
EFI by using the MSUtil\nvrboot.efi utility to import boot options from the
EFI\Microsoft\WINNT50\Boot00... file on the device from which Windows is to be
loaded.
CAUTION With HP Integrity mid-range systems, if Windows is installed on a drive attached to an
IO chassis (rather than the core IO card), you must run the “search all” command from
the EFI prompt any time the partition is reset (for example, using the management
processor RS command), otherwise the boot drive will not be found when the partition
boots.
Configure boot paths and boot options using any of the following procedures:
Configuring boot paths and options [EFI boot manager]
From the EFI Boot Manager environment, use the use
operations to add or delete boot options, or to change the order of items in the boot
options list.
Step 1. Access the EFI Boot Manager menu for the nPartition whose boot paths (the EFI boot
options list items) and options you want to configure.
Login to the management processor and enter CO to access the Console list. Select the
nPartition console.
When accessing the console, confirm that you are at the EFI Boot Manager menu (the
main EFI menu). If at another EFI menu, select the
you return to the screen with the EFI Boot Manager heading.
Step 2. Select the
Boot option maintenance menu option from the main EFI Boot Manager menu.
Step 3. At the Boot Option Maintenance menu use the
and
Change Boot Order menu items to add or delete boot options or change the order of
items in the boot options list.
EFI Boot Maintenance Manager ver 1.10 [14.60]
Main Menu. Select an Operation
Boot from a File
Add a Boot Option
Delete Boot Option(s)
Change Boot Order
Boot option maintenance menu
Exit option from the sub-menus until
Add a Boot Option, Delete Boot Option(s),
Manage BootNext setting
Set Auto Boot TimeOut
Select Active Console Output Devices
Select Active Console Input Devices
Select Active Standard Error Devices
60
Chapter 4
Page 61

Cold Reset
Exit
Step 4. Exit the console and management processor interfaces if finished using them.
Using Other Tools for Managing nPartitions
nPartition-level tasks
To exit the EFI environment type
^B (Control-B); this exits the nPartition console and
returns to the management processor Main Menu. To exit the management processor,
type X at the Main Menu.
Configuring boot paths and options [EFI shell]
From the EFI Shell environment, use the bcfg command to add or delete boot options, or
to change the order of items in the boot options list.
Step 1. Access the EFI Shell environment for the nPartition whose boot paths (the EFI boot
options list items) and options you want to configure.
Login to the management processor and enter CO to access the Console list. Select the
nPartition console.
When accessing the console, confirm that you are at the EFI Boot Manager menu (the
main EFI menu). If at another EFI menu, select the
Exit option from the sub-menus until
you return to the screen with the EFI Boot Manager heading.
From the EFI Boot Manager menu, select the
EFI Shell menu option to access the EFI
Shell environment.
Step 2. At the EFI Shell environment, use the bcfg command to manage the boot options list for
the local nPartition.
The bcfg command include the following options for managing the boot options list:
• bcfg boot dump — Display all items in the boot options list for the local nPartition.
• bcfg boot rm # — Remove the item number specified by # from the boot options list.
• bcfg boot mv #a #b — Move the item number specified by #a to the position
specified by #b in the boot options list.
• bcfg boot add # file.efi "Description" — Add a new boot option to the
position in the boot options list specified by #. The new boot option references
file.efi and is listed with the title specified by Description.
See the help bcfg command for details.
Step 3. Exit the console and management processor interfaces if finished using them.
To exit the EFI environment type
^B (Control-B); this exits the nPartition console and
returns to the management processor Main Menu. To exit the management processor,
type X at the Main Menu.
Chapter 4
61
Page 62

Using Other Tools for Managing nPartitions
nPartition-level tasks
Configure autoboot options
Configure autoboot options using any of the following procedures:
Configuring autoboot options [EFI boot manager]
From the EFI Boot Manager environment use the
Auto Boot TimeOut
menu operation to configure an nPartitions autoboot setting.
Boot option maintenance menu > Set
Step 1. Access the EFI Boot Manager menu for the nPartition whose autoboot options you want
to configure.
Login to the management processor and enter CO to access the Console list. Select the
nPartition console.
When accessing the console, confirm that you are at the EFI Boot Manager menu (the
main EFI menu). If at another EFI menu, select the
Exit option from the sub-menus until
you return to the screen with the EFI Boot Manager heading.
Step 2. Select the
Step 3. Select the
Boot option maintenance menu option from the main EFI Boot Manager menu.
Set Auto Boot TimeOut menu operation from the Boot Option Maintenance
menu.
Step 4. At the Set Auto Boot TimeOut menu, either disable autoboot by selecting the
Delete/Disable Timeout menu item, or enable autoboot by setting the autoboot timeout
through the
Set Timeout Value menu item.
When autoboot is enabled on an HP Integrity server, the local nPartition boot options are
attempted to be loaded automatically at boot time, starting with the first item in the boot
options list.
See the
Help menu for details.
EFI Boot Maintenance Manager ver 1.10 [14.60]
Set Auto Boot Timeout. Select an Option
Set Timeout Value
Delete/Disable Timeout
Help
Exit
Step 5. Exit the console and management processor interfaces if finished using them.
To exit the EFI environment type
^B (Control-B); this exits the nPartition console and
returns to the management processor Main Menu. To exit the management processor,
type X at the Main Menu.
Configuring autoboot options [EFI shell]
From the EFI Shell environment configure the autoboot setting for the local nPartition
by using the autoboot command.
62
Chapter 4
Page 63

Using Other Tools for Managing nPartitions
nPartition-level tasks
Step 1. Access the EFI Shell environment for the nPartition whose autoboot options you want to
configure.
Login to the management processor and enter CO to access the Console list. Select the
nPartition console.
When accessing the console, confirm that you are at the EFI Boot Manager menu (the
main EFI menu). If at another EFI menu, select the
Exit option from the sub-menus until
you return to the screen with the EFI Boot Manager heading.
From the EFI Boot Manager menu, select the
EFI Shell menu option to access the EFI
Shell environment.
Step 2. At the EFI Shell environment, use the autoboot command to enable or disable autoboot
for the nPartition.
When autoboot is enabled for an nPartition in an HP Integrity server, items in the boot
options list are attempted to be loaded automatically at boot time, starting with the first
item in the boot options list.
Enter the autoboot command with no arguments to list the current autoboot
configuration for the local nPartition.
You also can specify off to disable autoboot, or specify a timeout duration to enable
autoboot with a specific number of seconds during which automatic booting from the boot
options list can be canceled.
For example: autoboot off to disable autoboot, or autoboot 60 to enable autoboot with
a 60-second timeout period.
See the help autoboot command for details.
Step 3. Exit the console and management processor interfaces if finished using them.
To exit the EFI environment type
^B (Control-B); this exits the nPartition console and
returns to the management processor Main Menu. To exit the management processor,
type X at the Main Menu.
Chapter 4
63
Page 64

Using Other Tools for Managing nPartitions
nPartition-level tasks
Configure boot-time system tests
Configure boot-time system tests (self tests) for an nPartition by using the following
procedure:
Configuring boot-time system tests [EFI shell]
From the EFI Shell environment use the boottest command to manage the self test
configuration for the local nPartition.
Step 1. Access the EFI Shell environment for the nPartition whose boot-time tests you want to
configure.
Login to the management processor and enter CO to access the Console list. Select the
nPartition console.
When accessing the console, confirm that you are at the EFI Boot Manager menu (the
main EFI menu). If at another EFI menu, select the
you return to the screen with the EFI Boot Manager heading.
Exit option from the sub-menus until
From the EFI Boot Manager menu, select the
EFI Shell menu option to access the EFI
Shell environment.
Step 2. At the EFI Shell environment use the boottest command to list, enable, or disable
boot-time system tests for the local nPartition.
To display the list of supported boot-time system tests, enter the boottest -h command
at the EFI Shell prompt.
Shell> boottest -h
Usage: BOOTTEST [on|off] | [[test] [on|off]]
test : early_cpu, late_cpu, platform, chipset
io_hw, mem_init, mem_test
Shell>
You can enable or disable any of the boot-time tests by specifying the name of the test to
boottest. The test names include: early_cpu, late_cpu, platform, chipset, io_hw,
mem_init, and mem_test.
System tests: Configuring and deconfiguring tests from the EFI Shell
• boottest — Display the current boot-time system test configuration.
• boottest testname — Display the current setting for the specified test (testname).
For example: boottest mem_test displays the memory selftest settings.
• boottest on — Enable all boot-time system tests.
Enabling all tests is recommended.
• boottest off — Disable all boot-time system tests.
Disabling all selftests is usually not recommended; ordinarily all tests are enabled.
64
Chapter 4
Page 65

Using Other Tools for Managing nPartitions
nPartition-level tasks
• boottest testname on — Enable the specified test (testname).
For example: boottest io_hw on enables I/O hardware selftests.
• boottest testname off — Disable the specified test (testname).
For example: boottest io_hw off disables I/O hardware selftests.
Step 3. Exit the console and management processor interfaces if finished using them.
To exit the EFI environment type
returns to the management processor Main Menu. To exit the management processor,
type X at the Main Menu.
^B (Control-B); this exits the nPartition console and
Boot Windows Server 2003
You can boot the Windows Server 2003 operating system on an HP Integrity server by
using the EFI Boot Manager to select the appropriate Windows item from the boot
options list.
CAUTION ACPI configuration for Windows must be “windows”
On nPartition-capable HP Integrity servers, to boot the Windows operating system an
nPartition must have its ACPI configuration value set to windows.
At the EFI Shell, enter the acpiconfig command with no arguments to list the current
ACPI configuration. If the acpiconfig value is not set to windows, then Windows cannot
boot; in this situation you must reconfigure acpiconfig or else booting will be
interrupted with a panic when launching Windows.
To set the ACPI configuration for Windows: at the EFI Shell enter the acpiconfig
windows command, and then enter the reset command for the nPartition to reboot with
the proper (windows) configuration for Windows.
NOTE Microsoft Windows booting on HP Integrity servers
The recommended method for booting Windows is to use the EFI Boot Manager menu to
select a Windows entry from the boot options list. Using the ia64ldr.efi Windows
loader from the EFI Shell is not recommended.
Booting Windows Server 2003 [EFI boot manager]
From the EFI Boot Manager menu, select an item from the boot options list to boot
Windows using the selected boot option. See “ACPI configuration for Windows must be
“windows”” on page 65 for required configuration details.
Step 1. Access the EFI Boot Manager menu for the system on which you want to boot Windows.
Login to the management processor and enter CO to access the Console list. Select the
nPartition console.
When accessing the console, confirm that you are at the EFI Boot Manager menu (the
main EFI menu). If at another EFI menu, select the
you return to the screen with the EFI Boot Manager heading.
Step 2. At the EFI Boot Manager menu, select an item from the boot options list.
Chapter 4
Exit option from the sub-menus until
65
Page 66

Using Other Tools for Managing nPartitions
nPartition-level tasks
Each item in the boot options list references a specific boot device and provides a specific
set of boot options or arguments to be used when booting the device.
Step 3. Press
Return or Enter to initiate booting using the selected boot option.
Step 4. Once Windows begins loading, wait for the Special Administration Console (SAC) to
become available.
The SAC interface provides a text-based administration tool that is available from the
nPartition console. For details see the SAC online help (type ? at the SAC> prompt).
Loading.: Windows Server 2003, Datacenter
Starting: Windows Server 2003, Datacenter
Starting Windows...
********************************************************************************
Computer is booting, SAC started and initialized.
Use the "ch -?" command for information about using channels.
Use the "?" command for general help.
SAC>
Step 5. Exit the console and management processor interfaces if finished using them.
To exit the console environment type
^B (Control-B); this exits the console and returns to
the management processor Main menu. To exit the management processor, type X at the
Main menu.
Boot over a network
Boot over a network by using one of the following procedures:
Booting over a network [EFI boot manager]
From the EFI Boot Manager, to boot from a network device select the
maintenance menu
> Boot from a File menu option and then select the “Load File” option
for the LAN card that has the desired MAC address.
Step 1. Access the EFI Boot Manager menu for the nPartition that you want to boot over a
network.
Login to the management processor and enter CO to access the Console list. Select the
nPartition console.
When accessing the console, confirm that you are at the EFI Boot Manager menu (the
main EFI menu). If at another EFI menu, select the
Exit option from the sub-menus until
you return to the screen with the EFI Boot Manager heading.
Step 2. At the EFI Boot Manager menu, select the
Step 3. At the Boot Options Maintenance menu, select the
Boot option maintenance menu option.
Boot from a File menu option and then
select the network card whose MAC address you want to use when booting.
Highlight the desired network card, then press
Return or Enter to initiate booting using
the selected card.
Boot option
66
Chapter 4
Page 67

Using Other Tools for Managing nPartitions
EFI Boot Maintenance Manager ver 1.10 [14.60]
Boot From a File. Select a Volume
IA64_EFI [Acpi(000222F0,269)/Pci(0|0)/Scsi(Pun8,Lun0)/HD(Part1,S
Removable Media Boot [Acpi(000222F0,2A8)/Pci(0|1)/Scsi(Pun2,Lun0
Load File [Acpi(000222F0,200)/Pci(1|0)/Mac(001083FD5D9B)]
Load File [EFI Shell [Built-in]]
Exit
Step 4. Exit the console and management processor interfaces if finished using them.
nPartition-level tasks
To exit the EFI environment type
^B (Control-B); this exits the nPartition console and
returns to the management processor Main Menu. To exit the management processor,
type X at the Main Menu.
Booting over a network [EFI shell]
From the EFI Shell environment, use the lanboot command or lanboot select
command to boot over a network.
Step 1. Access the EFI Shell environment for the nPartition that you want to boot over a
network.
Login to the management processor and enter CO to access the Console list. Select the
nPartition console.
When accessing the console, confirm that you are at the EFI Boot Manager menu (the
main EFI menu). If at another EFI menu, select the
Exit option from the sub-menus until
you return to the screen with the EFI Boot Manager heading.
From the EFI Boot Manager menu, select the
EFI Shell menu option to access the EFI
Shell environment.
Step 2. At the EFI Shell, issue the lanboot command or the lanboot select command to boot
from the selected networking card.
For details see the help lanboot command.
Shell> lanboot select
01 Acpi(000222F0,0)/Pci(1|0)/Mac(00306E0E5268)
02 Acpi(000222F0,800)/Pci(1|0)/Mac(00108327549F)
Select Desired LAN: 1
Selected Acpi(000222F0,0)/Pci(1|0)/Mac(00306E0E5268)
Running LoadFile()
CLIENT MAC ADDR: 00 30 6e 0e 52 68
Step 3. Exit the console and management processor interfaces if finished using them.
To exit the EFI environment type
^B (Control-B); this exits the nPartition console and
returns to the management processor Main Menu. To exit the management processor,
type X at the Main Menu.
Chapter 4
67
Page 68

Using Other Tools for Managing nPartitions
nPartition-level tasks
Shut down Windows Server 2003
You can shut down the Windows Server 2003 operating system on HP Integrity servers
using the
CAUTION Do not shut down Windows using Special Administration Console (SAC) restart or
shutdown commands under normal circumstances.
Issuing restart or shutdown at the SAC> prompt causes the system to restart or
shutdown immediately and can result in the loss of data.
Instead use the Windows Start menu or the shutdown command to shut down gracefully.
To shut down Windows use either of the following methods.
Start menu or the shutdown command.
• Select
Shut Down from the Start menu and choose either Restart or Shut down from the
pull-down menu.
The
Restart menu item shuts down and restart the system. The Shut down menu item
shuts down the system.
You can use this method when using a graphical interface to the system.
• Issue the shutdown command from the Windows command line.
See the procedure “Shutting Windows down from the command line” on page 68 for
details.
You can issue this command from a command prompt through the Special
Administration Console (SAC) or from any other command line.
The Windows shutdown command includes the following options:
/s Shut down the system. This is the equivalent of
Shut down
.
Start > Shut Down >
/r Shut down and restart the system. This is the equivalent of
Shut Down > Restart
.
/a Abort a system shutdown.
/t xxx Set the timeout period before shutdown to xxx seconds. The timeout
period can be 0–600, with a default of 30.
Refer to the help shutdown Windows command for details.
Start >
NOTE On HP Integrity mid-range servers, performing a shutdown using shutdown /s (or the
equivalent
Start > Shut Down > Shut down) powers off the server cabinet or powers off the
cells and I/O chassis assigned to the nPartition. On these two servers the behavior can be
customized.
On HP Integrity Superdome servers, the Windows shutdown /s command shuts down
the system and keeps all cells at BIB (the boot is blocked, inactive state).
Shutting Windows down from the command line
From the Windows command line, issue the shutdown command to shut down the
operating system.
Step 1. Login to Windows running on the system that you want to shut down.
68
Chapter 4
Page 69

Using Other Tools for Managing nPartitions
nPartition-level tasks
For example, access the system console and use the Windows SAC interface to start a
command prompt, from which you can issue Windows commands to shut down the
system.
Step 2. Check to see whether any users are logged in.
Use the query user or query session command.
Step 3. Issue the shutdown command and the appropriate options to shut down the Windows
Server 2003 on the system.
You have the following options when shutting down Windows:
• To shut down Windows and reboot:
shutdown /r
or select the
• To shut down Windows and not reboot (either power down server hardware or put an
nPartition into a shutdown for reconfig state):
shutdown /s
or select the
• To abort a shutdown (stop a shutdown that has been initiated): shutdown /a
Start > Shut Down action and choose Restart from the pull-down menu.
Start > Shut Down action and choose Shut down from the pull-down menu.
For example:
shutdown /r /t 60 /c "Shut down in one minute."
This command initiates a Windows system shutdown-and-reboot after a timeout period
of 60 seconds. The /c option specifies a message that is broadcast to any other users of
the system.
Reboot and reset
When you perform a reboot or reset of an nPartition, all active cells in the nPartition
reboot and the nPartition returns to the system boot environment (EFI).
NOTE If possible shut down the operating system before resetting an nPartition.
Reboot and reset nPartitions by using any one of the following procedures:
Rebooting and resetting nPartitions [management processor]
From the management processor issue the RS command to reset an nPartition. Under
normal operation you first shut down the operating system.
Step 1. Login to the management processor and enter CM to access the Command Menu.
Step 2. At the Command menu, enter the RS command, specify which nPartition is to be reset,
and confirm whether to reset it.
The RS command resets all active cells in the nPartition and reboots them past partition
rendezvous to the system boot environment (EFI) or an operating system.
Chapter 4
69
Page 70

Using Other Tools for Managing nPartitions
nPartition-level tasks
NOTE On HP Integrity servers you should reset an nPartition only after all self tests and
partition rendezvous have completed. For example, when the nPartition is inactive (all
cells are at BIB) or is at EFI.
Be certain to correctly select which nPartition to be reset.
GSP:CM> RS
This command resets the selected partition.
WARNING: Execution of this command irrecoverably halts all system
processing and I/O activity and restarts the selected
partition.
# Name
--- ----
0) jules00
1) jules01
Select a partition number: 1
Do you want to reset partition number 1? (Y/[N]) y
-> The selected partition will be reset.
GSP:CM>
If you are accessing the management processor using a single-partition-user account, the
RS command selects which nPartition is to be reset: the nPartition that your account
allows you to access.
If using an operator or administrator management processor account, you can select
which of the nPartitions in the server complex you want to reset.
Step 3. To exit the management processor Command Menu, enter MA to return to the
management processor Main Menu.
At the Main Menu, enter X to exit the management processor interface.
Rebooting and resetting nPartitions [EFI boot manager]
From the EFI Boot Manager menu, select the
Boot option maintenance menu > Cold Reset
menu to reset the local nPartition.
Step 1. Access the EFI Boot Manager menu for the nPartition that you want to reboot.
Login to the management processor and enter CO to access the Console list. Select the
nPartition console.
When accessing the console, confirm that you are at the EFI Boot Manager menu (the
main EFI menu). If at another EFI menu, select the
Exit option from the sub-menus until
you return to the screen with the EFI Boot Manager heading.
Step 2. From the EFI Boot Manager menu, select the
the Boot Option Maintenance menu select the
Boot option maintenance menu. Then from
Cold Reset menu to reset the local
nPartition.
The
Cold Reset menu item resets all active cells in the nPartition and reboots them.
Step 3. Exit the console and management processor interfaces if finished using them.
70
Chapter 4
Page 71

Using Other Tools for Managing nPartitions
nPartition-level tasks
To exit the EFI environment type ^B (Control-B); this exits the nPartition console and
returns to the management processor Main Menu. To exit the management processor,
type X at the Main Menu.
Rebooting and resetting nPartitions [EFI shell]
From the EFI Shell environment, issue the reset command to reset the local nPartition.
Step 1. Access the EFI Shell environment for the nPartition that you want to reboot.
Login to the management processor and enter CO to access the Console list. Select the
nPartition console.
When accessing the console, confirm that you are at the EFI Boot Manager menu (the
main EFI menu). If at another EFI menu, select the
Exit option from the sub-menus until
you return to the screen with the EFI Boot Manager heading.
From the EFI Boot Manager menu, select the
EFI Shell menu option to access the EFI
Shell environment.
Step 2. From the EFI Shell environment, issue the reset command to reset the local nPartition.
The reset command resets all active cells in the nPartition and reboots them.
Step 3. Exit the console and management processor interfaces if finished using them.
To exit the EFI environment type
^B (Control-B); this exits the nPartition console and
returns to the management processor Main Menu. To exit the management processor,
type X at the Main Menu.
Rebooting and resetting nPartitions [Windows]
To reset the local nPartition from Windows issue the shutdown /r command (or select
the
Start > Shut Down action and choose Restart from the pull-down menu).
CAUTION Do not shut down Windows using Special Administration Console (SAC) restart or
shutdown commands under normal circumstances.
Issuing restart or shutdown at the SAC> prompt causes the system to restart or
shutdown immediately and can result in the loss of data.
Instead use the Windows Start menu or the shutdown command to shut down gracefully.
Step 1. Login to Windows running on the nPartition that you want to shut down.
For example, access the nPartition console and use the Windows SAC interface to start a
command prompt, from which you can issue Windows commands to shut down the
nPartition.
Step 2. Issue the shutdown /r command to shut down the Windows Server 2003 operating
system on the nPartition and reboot. You also can perform this procedure by selecting
the
Start > Shut Down action and choosing Restart from the pull-down menu
For example:
shutdown /r /t 60 /c "Shut down and reboot."
Chapter 4
71
Page 72

Using Other Tools for Managing nPartitions
nPartition-level tasks
This command initiates a Windows system shutdown-and-reboot after a timeout period
of 60 seconds. The /c option specifies a message that is broadcast to any other users of
the system.
For more details use the help shutdown command.
72
Chapter 4
Page 73

Using Other Tools for Managing nPartitions
nPartition-level tasks
Reboot for reconfiguration
During a reboot for reconfig of an nPartition, the command that you issue performs the
following tasks:
1. Shuts down the operating system and resets all cells that are assigned to the
nPartition, including any inactive cells.
2. Reconfigures the nPartition if necessary (if there is a pending change to the Stable
Complex Configuration Data, it occurs during the reboot for reconfig).
3. Boots all cells in the nPartition. Any cells with a “n” use-on-next-boot value remain
inactive at BIB, and all other cells can rendezvous to form the nPartition.
Perform a reboot for reconfig of an nPartition whenever you add cells or remove active
cells from the nPartition, and whenever you need to allow an inactive cell to join the
nPartition (such as after changing a cell use-on-next-boot value from “n” to “y”).
Perform a reboot for reconfig using the following procedure:
Reboot for reconfig from Windows [Windows]
From the Windows command line use the shutdown /r command (or select the
Shut Down
action and choose Restart from the pull-down menu) to perform a reboot for
Start >
reconfig for an nPartition.
CAUTION Do not shut down Windows using Special Administration Console (SAC) restart or
shutdown commands under normal circumstances.
Issuing restart or shutdown at the SAC> prompt causes the system to restart or
shutdown immediately and can result in the loss of data.
Instead use the Windows Start menu or the shutdown command to shut down gracefully.
Step 1. Login to Windows running on the nPartition that you want to shut down.
For example, access the nPartition console and use the Windows SAC interface to start a
command prompt, from which you can issue Windows commands to shut down the
nPartition.
Step 2. Issue the shutdown /r command to shut down the Windows Server 2003 operating
system on the nPartition and reboot. You also can perform this task by selecting the
> Shut Down
action and choosing Restart from the pull-down menu.
For example:
shutdown /r /t 60 /c "Reboot for reconfig."
This command initiates a Windows system shutdown-and-reboot after a timeout period
of 60 seconds. The /c option specifies a message that is broadcast to any other users of
the system.
Start
For more details use the help shutdown command.
Chapter 4
73
Page 74

Using Other Tools for Managing nPartitions
nPartition-level tasks
Shut down to a shutdown for reconfig (inactive) state
NOTE On HP Superdome servers, performing a shutdown for reconfig always keeps all cells
assigned to the nPartition at a boot-is-blocked state.
NOTE On HP Integrity mid-range servers you can configure the nPartition behavior when an
OS shuts down to the shutdown for reconfig state. The two options are to have hardware
power off when the OS is halted, or to have the nPartition be made inactive (all cells are
in a boot-is-blocked state).
On HP Integrity mid-range servers, the normal Windows shutdown for reconfig
(shutdown /s) behavior is for the nPartition hardware to be powered off.
When you use any of the methods to hold an nPartition at the shutdown for reconfig
state, the command you issue performs the following tasks:
1. Shut down the operating system (if using the shutdown command) and reset all cells
that are assigned to the nPartition, including any inactive cells.
2. Reconfigure the nPartition if necessary (if there is a pending change to the Stable
Complex Configuration Data, it occurs during the reboot for reconfig).
3. Either keep all cells at a boot-is-blocked state (the nPartition and all cells assigned to
it are inactive) or power off all cells and I/O chassis assigned to the nPartition.
Only mid-range servers can be configured to power off hardware upon shutdown for
reconfig. For details, see “ACPI “softpowerdown” configuration—mid-range server OS
shutdown behavior” on page 56.
You can reset an nPartition to shutdown for reconfig whenever you need for the
nPartition and its cells to be inactive.
Shut down to a shutdown for reconfig (inactive) state using any one of the following
procedures:
Shutting down to shutdown for reconfig [management processor]
From the management processor Command Menu, issue the RR command to shut an
nPartition down to a shutdown for reconfig (inactive) state. Under normal operation you
first shut down the operating system.
Step 1. Login to the management processor and enter CM to access the Command Menu.
Step 2. At the management processor Command menu, enter the RR command, specify which
nPartition is to be reset, and confirm whether to reset it to the shutdown for reconfig
state.
The management processor RR command resets all cells in the nPartition, performs any
nPartition reconfigurations, and halts all cells at a boot-is-blocked state, thus making
the nPartition and all its cells inactive.
Be certain to select the correct nPartition to be reset.
74
Chapter 4
Page 75

Using Other Tools for Managing nPartitions
GSP:CM> RR
This command resets for reconfiguration the selected partition.
WARNING: Execution of this command irrecoverably halts all system
processing and I/O activity and restarts the selected
partition in a way that it can be reconfigured.
# Name
--- ----
0) jules00
1) jules01
Select a partition number: 1
Do you want to reset for reconfiguration partition number 1? (Y/[N]) y
-> The selected partition will be reset for reconfiguration.
GSP:CM>
If you are accessing the management processor using a single-partition-user account, the
RR command selects which nPartition is to be reset: the nPartition that your account
allows you to access.
nPartition-level tasks
If using an operator or administrator account, you can select which nPartition in the
server complex you want to reset.
Step 3. To exit the management processor Command Menu, enter MA to return to the
management processor Main Menu.
At the Main Menu, enter X to exit the management processor interface.
Shutting down to shutdown for reconfig [EFI shell]
From the EFI Shell environment issue the reconfigreset command to shut an
nPartition down to a shutdown for reconfig (inactive) state.
Step 1. Access the EFI Shell environment for the nPartition that you want to shut down to a
shutdown for reconfig (inactive) state.
Login to the management processor and enter CO to access the Console list. Select the
nPartition console.
When accessing the console, confirm that you are at the EFI Boot Manager menu (the
main EFI menu). If at another EFI menu, select the
Exit option from the sub-menus until
you return to the screen with the EFI Boot Manager heading.
From the EFI Boot Manager menu, select the
EFI Shell menu option to access the EFI
Shell environment.
Step 2. At the EFI Shell environment, issue the reconfigreset command to reset the local
nPartition to a shutdown for reconfig state.
The reconfigreset command resets all cells in the nPartition, performs any nPartition
reconfigurations, and halts all cells at a boot-is-blocked state, thus making the
nPartition and all its cells inactive.
Step 3. Exit the console and management processor interfaces if finished using them.
Chapter 4
75
Page 76

Using Other Tools for Managing nPartitions
nPartition-level tasks
To exit the EFI environment type
^B (Control-B); this exits the nPartition console and
returns to the management processor Main Menu. To exit the management processor,
type X at the Main Menu.
Shutting down to shutdown for reconfig [Windows]
From the Windows command line issue the /sbin/shutdown /s command (or select the
Start > Shut Down action and choose Shut down from the pull-down menu) to shut an
nPartition down to a shutdown for reconfig (inactive) state or power off the nPartition
hardware.
CAUTION Do not shut down Windows using Special Administration Console (SAC) restart or
shutdown commands under normal circumstances.
Issuing restart or shutdown at the SAC> prompt causes the system to restart or
shutdown immediately and can result in the loss of data.
Instead use the Windows Start menu or the shutdown command to shut down gracefully.
NOTE On HP Integrity mid-range servers, performing a shutdown using shutdown /s (or the
equivalent
Start > Shut Down > Shut down) powers off the server cabinet or powers off the
cells and I/O chassis assigned to the nPartition. On these two servers the behavior can be
customized. For details, see “ACPI “softpowerdown” configuration—mid-range server OS
shutdown behavior” on page 56.
On HP Integrity Superdome servers, the Windows shutdown /s command shuts down
the system and keeps all cells at BIB (the boot is blocked, inactive state).
Step 1. Login to Windows running on the nPartition that you want to shut down.
For example, access the nPartition console and use the Windows SAC interface to start a
command prompt, from which you can issue Windows commands to shut down the
nPartition.
Step 2. Issue the shutdown /s command to shut down the Windows Server 2003 operating
system on the nPartition and reset the nPartition to the shutdown for reconfig state. You
also can perform this task by selecting the
down
from the pull-down menu.
Start > Shut Down action and choosing Shut
For example:
shutdown /s /c "Shut down for reconfig (inactive)."
This command initiates a Windows system shutdown-and-stop after a timeout period of
60 seconds. The /c option specifies a message that is broadcast to any other users of the
system.
The shutdown /s command and option shuts down Windows, reset all cells in the
nPartition, perform any nPartition reconfigurations, and halt all cells at a
boot-is-blocked state, thus making the nPartition and all its cells inactive.
For more details use the help shutdown command.
76
Chapter 4
Page 77

Using Other Tools for Managing nPartitions
Boot an inactive nPartition
When all cells in an nPartition are at boot-is-blocked, the nPartition is inactive. This is
the case, for example, when an nPartition is held at the shutdown for reconfig state.
You can boot an nPartition past the shutdown for reconfig state to make it active by
using the BO (boot) command at the management processor Command menu.
To determine whether an nPartition is in a boot-is-blocked (shutdown for reconfig) state,
use the Virtual Front Panel for the nPartition to check the nPartition boot status. If all
cells assigned to the nPartition are at boot-is-blocked, the nPartition is halted at the
shutdown for reconfig state.
Boot an inactive nPartition using the following procedure:
Booting an Inactive nPartition [Par Commands]
You can cause an inactive nPartition to be booted (made active) by using the parmodify
command with the -B option when changing the configuration of an inactive nPartition.
Step 1. Login to a Windows system where the Par Commands tool is installed.
nPartition-level tasks
NOTE You must include the correct remote administration options when issuing par commands
(-h and -g for IPMI over LAN connections; -h and -u for WBEM/WMI connections). For
a complete explanation of these options, refer to the command description in “nPartition
Commands Reference” on page 109.
Step 2. When modifying an inactive nPartition, specify the -B option when using the
/usr/sbin/parmodify command to reconfigure the inactive nPartition.
For example, when adding or removing cells from an inactive nPartition, specifying the
-B option causes the nPartition to boot (become active) immediately following the
nPartition modification.
Chapter 4
77
Page 78

Using Other Tools for Managing nPartitions
nPartition-level tasks
Perform a transfer of control (TOC) reset
You can perform a transfer of control (TOC) reset by using the management processor TC
command, as described in the following procedure.
If crash dump is configured for the operating system on the nPartition and you TOC the
nPartition while it is running the operating system, then the nPartition performs a crash
dump.
Performing a transfer of control (TOC) reset [management processor]
Use the Command menu TC command to perform a transfer-of-control (TOC) reset of an
nPartition.
Step 1. Login to the management processor and enter CM to access the Command Menu.
Step 2. At the Command menu, enter the TC command, specify which nPartition is to be reset,
and confirm whether to TOC the nPartition.
The TC command performs a transfer-of-control reset on the specified nPartition.
If you are accessing the management processor using a single-partition-user account,
then the TC command selects which nPartition is to be reset: the nPartition that your
account allows you to access.
If using an operator or administrator account, you can select which nPartitions in the
server complex you want to TOC.
Be certain to select the correct nPartition to be reset.
GSP:CM> TC
This command TOCs the selected partition.
WARNING: Execution of this command irrecoverably halts all system
processing and I/O activity and restarts the selected
partition.
# Name
--- ----
0) jules00
1) jules01
Select a partition number: 0
Do you want to TOC partition number 0? (Y/[N]) y
-> The selected partition will be TOCed.
GSP:CM>
Step 3. After you initiate the TOC, you can observe its progress and select the type of crash
dump through the nPartition console.
Once the nPartition completes the dump, or once you cancel it, the nPartition reboots.
78
Chapter 4
Page 79

Using Other Tools for Managing nPartitions
******* Unexpected TOC. Processor HPA FFFFFFFF’FC07C000 *******
GENERAL REGISTERS:
r00/03 00000000’00000000 00000000’0099CA2C 00000000’00000000 00000000’010BB790
r04/07 00000000’00000002 00000000’010BC140 00000000’0080F000 00000000’00AA2490
r08/11 00000000’00000001 00000000’0099A800 00000000’0099A800 00000000’0099C800
....
Processor 8 TOC: pcsq.pcoq = 0’0.0’12675c
isr.ior = 0’10340004.0’2f8bfd30
Boot device reset done.
*** The dump will be a SELECTIVE dump: 457 of 4080 megabytes.
*** To change this dump type, press any key within 10 seconds.
*** Proceeding with selective dump.
*** The dump may be aborted at any time by pressing ESC.
*** Dumping: 7% complete (32 of 457 MB) (device 64:0x2)
Create a genesis nPartition
Creating a Genesis Partition overwrites all nPartition-related complex profile data for
the server and establishes one single-cell nPartition.
nPartition-level tasks
Creating a genesis nPartition [management processor]
Use the CC command and G option at the management processor Command menu to
create a Genesis Partition on an HP nPartition server.
As a result of this procedure, all existing nPartition configurations are deleted and are
replaced with a single, one-cell nPartition (the Genesis Partition).
You can revert to the previous nPartition configuration—if any existed before you
created the Genesis Partition—by using the CC command and L option to restore the last
configuration.
Step 1. Save all current nPartition configuration details, if any nPartitions are configured in the
complex.
Saving the current nPartition information provides you the details you would need to
re-create all nPartitions as they currently exist.
Use the parstatus -V -p# command (or an equivalent Partition Manager procedure) to
save configuration details about each nPartition.
For each nPartition, enter the parstatus -V -p# command to display detailed
information about the partition number (-p#) specified.
Step 2. Determine which cell will be configured as the Genesis Partition.
The cell must be connected to an I/O chassis. The I/O chassis must have a core I/O card
installed, and it should have a bootable disk (or a method for installing an operating
system and a disk onto which it can be installed).
Step 3. Ensure that all nPartitions within the complex are in the shutdown for reconfig
(inactive) state.
Chapter 4
79
Page 80

Using Other Tools for Managing nPartitions
nPartition-level tasks
You can put it in a shutdown for reconfig state by using the shutdown /s command in
Windows, the reconfigreset command at the EFI Shell, or the RR command at the
management processor Command menu.
Step 4. Login to the management processor for the server complex.
Login as a user with administrator privileges, which are required for creating a Genesis
Partition.
Step 5. Enter CM to access the management processor Command menu.
Step 6. Issue the CC command, select G for Genesis Complex Profile, and specify the cabinet and
cell slot for the cell that will comprise the Genesis Partition.
GSP:CM> CC
This command allows you to change the complex profile.
WARNING: You must shut down all Protection Domains before executing
this command.
G - Genesis Complex Profile
L - Last Complex Profile
Select Profile: g
Enter Cabinet number: 0
Enter Slot number: 0
Do you want to modify the complex profile? (Y/[N]) y
-> The complex profile will be modified.
GSP:CM>
You can confirm that the Genesis Partition was successfully created if the CC command
reports that the “complex profile will be modified”.
If the CC command reports “Sorry, command failed”, then the Genesis Partition was not
created, possibly because one or more nPartitions are not at the shutdown for reconfig
state. If this is the case, go back to Step 3 and ensure all nPartitions are inactive at the
shutdown for reconfig state.
Step 7. Issue the BO command to boot the Genesis Partition past its shutdown for reconfig state
and make it an active nPartition.
When a Genesis Partition is created, it remains at boot-is-blocked (in an inactive,
shutdown for reconfig state), so you must boot it manually.
The Genesis Partition always is assigned partition number 0, because when it is created
it is the first and only nPartition in the server complex.
Using the BO command to boot partition 0 will boot the Genesis Partition to its EFI
system boot environment.
GSP:CM> BO
This command boots the selected partition.
# Name
80
Chapter 4
Page 81

Using Other Tools for Managing nPartitions
nPartition-level tasks
--- ----
0) Partition 0
Select a partition number : 0
Do you want to boot partition number 0,
named Partition 0 ? (Y/[N]) y
-> The selected partition will be booted.
GSP:CM>
Step 8. Access the console for the Genesis Partition and configure the nPartition as appropriate
and necessary.
From the management processor Command menu, enter MA to return to the Main menu,
then enter CO to access the Console menu. The Genesis Partition is partition 0 and by
default is named “Partition 0”.
You will need to set the boot paths or options, any core cell choices, the nPartition name,
and other settings as appropriate. You also may need to add cells to the Genesis Partition
if you want it to have more than one cell.
Create a new nPartition
Creating a new nPartition involves specifying one or more cells in a server complex,
setting various attributes for the cells, and optionally specifying other nPartition
settings. The settings you specify then are used to create a new nPartition, which has
assigned to it the cells you selected.
At least one cell in each nPartition must be connected to an I/O chassis that has core I/O
attached. To boot an operating system from disk, the nPartition also must have a boot
device and associated PCI card.
When creating an nPartition, follow the HP nPartition requirements and guidelines. HP
recommends only specific sets of nPartition configurations.
Create a new nPartition using the following procedure:
Creating a new nPartition [par commands]
From the command line, use the parcreate command to create a new nPartition. You
also can use the parstatus and parmodify commands to list nPartition and complex
details and modify nPartition settings.
Step 1. Login to Windows on the Management Station PC. Plan your nPartition configuration by
selecting which cells will comprise the new nPartition.
Use the parstatus -AC command to list all unassigned (available) cells in the server
complex.
NOTE You must include the correct remote administration options when issuing par commands
(-h and -g for IPMI over LAN connections; -h and -u for WBEM/WMI connections). For
a complete explanation of these options, refer to the command description in “nPartition
Commands Reference” on page 109.
Chapter 4
81
Page 82

Using Other Tools for Managing nPartitions
nPartition-level tasks
# parstatus -AC
[Cell]
CPU Memory Use
OK/ (GB) Core On
Hardware Actual Failed/ OK/ cell Next Par
Location Usage Max Failed Connected To Capable Boot Num
========== ============ ======= ======= =================== ======= ==== ===
cab0,cell1 absent - - - - - cab0,cell3 absent - - - - - cab0,cell4 power on 4/0/4 2.0/0.0 cab 0,bay0,chassis3 yes - cab0,cell5 absent - - - - - cab0,cell6 power on 4/0/4 2.0/0.0 cab 0,bay1,chassis1 yes - cab0,cell7 absent - - - - - -
#
You can select any of the cells listed to create the new nPartition; only the cells that are
not “absent” are present within the server complex.
All cells that you choose must meet the hardware requirements for nPartitions (for
example, they all must have the same firmware revision). The cells also must form an
HP-recommended nPartition configuration. At least one cell must have an I/O chassis
with core I/O.
Step 2. After confirming that cells you have chosen would establish a valid nPartition
configuration, use the parcreate -c... command to create a new nPartition with the
cells.
When using the parcreate command, only specify the -B option if you want the
nPartition to be booted and become active. The -B option causes parcreate to
immediately boot the newly-created nPartition past the default shutdown for reconfig
state.
By not specifying -B, the new nPartition can be further modified because it will remain
inactive at the shutdown for reconfig state (until you boot it using the BO command at
the management processor Command Menu).
If creating a single-cell nPartition, use just one -c option.
To create a multiple-cell nPartition, specify the -c option multiple times (once for each
cell) issuing a single command line.
When parcreate successfully creates a new nPartition, it reports “Partition Created”
and reports the nPartition number (“partition number is...”).
If parcreate detects any problems or issues when creating an nPartition, it lists them in
its output. If it cannot create the nPartition, parcreate reports “Command failed” along
with more details.
parcreate command: cell attributes explanation
The parcreate command’s -c... option specifies the cell number(s) and attributes to be
used when creating the new nPartition. The cell local memory attribute is optional.
• -c cell:[cell_type]:[use_on_next_boot]:[failure_usage][:clm]
This option specifies the cell ID (cell) to be assigned to the nPartition.
— The only valid cell_type value is: base (base cell, the default).
82
Chapter 4
Page 83

Using Other Tools for Managing nPartitions
nPartition-level tasks
— The valid use_on_next_boot values for cells are:
y Participate in reboot (the default).
n Do not participate in reboot.
— The only valid failure_usage value is: ri (reactivate with interleave, the
default).
— You can specify the clm value in either of two forms: percentage or absolute
amount of memory.
— Percentage cell-local memory (CLM).
The percent number can be any number in the range 0–100 with a suffix of %.
This number is rounded to 12.5%, 25%, 37.5%, 50%, 62.5%, 75%, 87.5% or
100%. If the cell contains less than 4 GBytes of memory, then the percentage is
rounded to 25%, 50%, 75% or 100%. Percentages are rounded up or down to the
nearest value, but are not rounded up to 100%.
— Absolute CLM specification. (The default.)
The absolute number is interpreted as an absolute number of gigabytes of
memory and can optionally have a suffix of GB.
As needed, an absolute CLM specification is rounded up to the nearest 0.5
GBytes.
If the clm value is rounded, the command reports the final value used.
Step 3. Use the parmodify command to modify the configuration of the new nPartition
configuration and set the nPartition name (-P), boot paths (-b, -s, and -t), and any core
cell choices (-r). On HP Integrity servers, nPartition boot paths must be set from the
local nPartition.
When using the parmodify command, you must use the -p# option to specify the
partition number for the nPartition. Use the partition number that the parcreate
command reported in the previous step.
# parmodify -p1 -P "hostname05"
Command succeeded.
# parmodify -p1 -r0/4 -r0/6
Command succeeded.
# parmodify -p1 -b 4/0/1/0/0.9
Command succeeded.
#
When each modification takes place, parmodify reports “Command succeeded”.
Otherwise it reports any problems.
You can specify each configuration option on a separate command line or can combine all
options into a single, longer command line.
Step 4. Use the parstatus -V -p# command to list all details about your newly created and
configured nPartition.
If any configuration details need to be modified, use the parmodify command before you
boot the nPartition in the next step.
Chapter 4
83
Page 84

Using Other Tools for Managing nPartitions
nPartition-level tasks
# parstatus -V -p1
[Partition]
Partition Number : 1
Partition Name : hostname05
Status : inactive
IP address :
Prmary Boot Path : 4/0/1/0/0.9
ALternate Boot Path : 0/0/0/0/0/0/0/0.0.0
HA Alternate Boot Path : 0/0/0/0/0/0/0/0.0.0
PDC Revision : 104.1
IODCH Version : 23664
CPU Speed : 552 MHz
Core Cell : ?
Core Cell Alternate :
0. cab0,cell4
1. cab0,cell6
[Cell]
CPU Memory Use
OK/ (GB) Core On
Hardware Actual Failed/ OK/ cell Next Par
Location Usage Max Failed Connected To Capable Boot Num
========== ============ ======= ========= =================== ======= ==== ===
cab0,cell4 inactive 4/0/4 2.0/ 0.0 cab 0,bay0,chassis3 yes yes 1
cab0,cell6 inactive 4/0/4 2.0/ 0.0 cab 0,bay1,chassis1 yes yes 1
....
Step 5. Boot your newly-created nPartition past boot-is-blocked to make it active and make its
system boot environment available.
Use the BO command at the management processor Command menu to boot the
nPartition.
Once the nPartition is booted, you can access its system boot environment through its
console. Use the management processor Console menu (enter CO at the management
processor Main Menu).
Remove (delete) an nPartition
Deleting an nPartition causes all cells (and any I/O resources connected to the cells) that
were assigned to the nPartition to be unassigned. As a result, all of these cells become
available resources which can be assigned to any nPartition in the server complex.
When removing an active nPartition, you must complete the procedure by performing a
shutdown for reconfig (shutdown /s command) as soon as possible after initiating the
nPartition removal.
Unless you use the remote administration features supported by the Windows nPartition
tools, you can delete only the local nPartition and inactive remote nPartitions.
Remove an nPartition using the following procedure:
Deleting an nPartition [par commands]
From the command line, use the parremove command to delete (remove) an nPartition.
Step 1. Use the parstatus -P command to list all nPartitions, and check the status (active or
inactive) for the nPartition you plan to remove.
84
Chapter 4
Page 85

Using Other Tools for Managing nPartitions
nPartition-level tasks
NOTE You must include the correct remote administration options when issuing par commands
(-h and -g for IPMI over LAN connections; -h and -u for WBEM/WMI connections). For
a complete explanation of these options, refer to the command description in “nPartition
Commands Reference” on page 109.
To check the local partition number, use the parstatus -w command.
If you are planning to remove a remote nPartition, check to see whether the remote
nPartition is inactive.
• To make a remote nPartition inactive, you can perform any of the following tasks:
— Login to Windows running on the remote nPartition and issue the shutdown /s
command.
— Access the console for the remote nPartition and use the reconfigreset
command at the EFI Shell.
—Use the RR command at the management processor Command Menu to reset the
nPartition to a shutdown for reconfig state.
• To remove an active remote nPartition, you must use the Windows nPartition tools
remote administration options.
Step 2. Save all current configuration details about the nPartition you plan to remove.
Use the parstatus -V -p# command to display all current configuration information
related to the nPartition you plan to remove.
Save this information, as you can use it to manually recreate the nPartition if necessary
at a later time.
Step 3. Remove the nPartition.
Use one of the following procedures to remove the nPartition: Removing an inactive
remote nPartition, Removing a local nPartition, or Removing an active remote
nPartition.
• Removing an inactive remote nPartition
1. Issue the parremove -p# command to remove the inactive remote nPartition (-p#
where # is the nPartition number). For example:
# parremove -p1
2. Issue the parstatus -P command to confirm that the nPartition was removed.
If the nPartition was removed, it no longer is listed in the parstatus command
output.
• Removing a local nPartition
To remove the local nPartition (the nPartition on which you currently are issuing
commands), perform the following steps.
1. Shut down all applications and warn users. Follow the same procedures you would
use if you were to reboot the nPartition.
Chapter 4
85
Page 86

Using Other Tools for Managing nPartitions
nPartition-level tasks
2. Issue the parremove -F -p# command to force-remove (-F) the local nPartition
(-p# where # is the number of the local nPartition).
Note that the local nPartition remains active following the parremove -F -p#
command, until you perform a shutdown for reconfig to complete the removal.
As soon as possible proceed with the shutdown for reconfig because the server
Complex Profile will remain locked—and no other changes can occur—until the
pending nPartition removal is completed.
3. Perform a shutdown for reconfig (Windows shutdown /s) of the local nPartition.
The shutdown for reconfig command shuts down the nPartition and all cells so
that the configuration changes occur and the nPartition is deleted.
• Removing an active remote nPartition
To remove an active remote nPartition, you must use the Windows nPartition tools.
1. Shut down all applications and warn users. Follow the same procedures you would
use if you were to reboot the nPartition.
2. Issue the parremove -F -p# command and specify either the -u... -h...
options or -g... -h... options.
You must specify both the force-remove option (-F) and the nPartition number
(-p# where # is the number for the nPartition being removed).
3. Perform a shutdown for reconfig of the nPartition that is being removed.
Use any one of the following commands, as appropriate, to perform the shutdown
for reconfig: shutdown /s from Windows on the nPartition being removed,
reconfigreset from the EFI Shell for the nPartition, or RR from the management
processor Command Menu for the server complex where the nPartition resides.
After you complete the nPartition removal, the nPartition no longer exists. All cells (and
associated I/O chassis) that used to be assigned to the deleted nPartition now are
unassigned and can be assigned for other uses.
Add cells to an nPartition
Adding cells to an nPartition involves selecting available cells (those not currently
assigned to an nPartition) and assigning them to an existing nPartition. Both the
selected cells and any I/O chassis connected to the cells are assigned to the designated
nPartition.
NOTE Adding or removing cells from an nPartition will change the amount of memory available
to the nPartition, possibly significantly. You should consider how the memory change
may affect the amount of swap space necessary for the nPartition and if needed adjust
the swap space size.
You can add cells to the local nPartition or to any remote nPartitions in the same server
complex.
86
Chapter 4
Page 87

Using Other Tools for Managing nPartitions
nPartition-level tasks
Reboot for reconfig guidelines for adding cells
In some situations, you must immediately perform a reboot for reconfig of a modified
nPartition after adding cells to it.
• You must perform a reboot for reconfig of an active nPartition after you have added a
cell to it. The reboot for reconfig enables the newly assigned cell to rendezvous and be
actively used when the nPartition reboots.
• Perform a reboot for reconfig of an nPartition as soon as possible after you have added
a cell to an active nPartition and have specified a “y” use-on-next-boot value for the
new cell.
• You need not perform a reboot for reconfig of an nPartition in these situations:
— When you have added a cell to an inactive nPartition.
— When you have added a cell with a “n” use-on-next-boot value and you did not
specify the -B option to the parmodify command.
Add cells to an nPartition using the following procedure:
Adding cells to an nPartition [par commands]
From the command line, use the parmodify command to add cells to an nPartition. You
also can use the parstatus command to list nPartition and complex details, such as
available cells.
Step 1. Use the parstatus -A -C command to list all available cells (the unassigned cells) in
the server complex.
NOTE You must include the correct remote administration options when issuing par commands
(-h and -g for IPMI over LAN connections; -h and -u for WBEM/WMI connections). For
a complete explanation of these options, refer to the command description in “nPartition
Commands Reference” on page 109.
Step 2. Choose one or more eligible cells from the list to add to the nPartition.
Adding the cell(s) to the nPartition must create a configuration that meets the hardware
requirements and performance guidelines.
Step 3. Modify the nPartition by issuing the parmodify -p# -a#... command to add the cell
(-a#... where # is the cell number) to the specified nPartition (-p# where # is the
nPartition number).
To add multiple cells, you can specify the -a option multiple times in the same command.
parmodify command: -a attribute explanation
The parmodify command’s -a... option specifies a cell number and attributes, which
are used when adding the cell to an existing nPartition. An additional cell local memory
attribute is optional.
• For Windows Server 2003, the parmodify command’s -a... option is as follows:
-a cell:[type]:[use]:[fail][:clm]
where:
Chapter 4
87
Page 88

Using Other Tools for Managing nPartitions
nPartition-level tasks
cell The cell to be added to the nPartition. You can specify the cell in
type The cell type: base is the only supported cell type and it is the
use The cell use-on-next-boot value: y or n. Use y (the default) if the cell
fail The cell failure usage: ri (reactivate with interleave) is the only
For HP Integrity servers, the clm value specifies the amount of memory that will be
configured as cell local memory for the cell.
You can specify the clm value in either of two forms: percentage or absolute amount of
memory.
— Percentage cell-local memory (CLM).
The percent number can be any number in the range 0–100 with a suffix of %.
global (cell) format or in hardware location (cabinet/slot)
format.
default.
is to be an active member of the nPartition, or use n if the cell is to
remain an inactive member.
supported failure usage policy and it is the default.
This number is rounded to 12.5%, 25%, 37.5%, 50%, 62.5%, 75%, 87.5% or 100%. If
the cell contains less than 4 GBytes of memory, then the percentage is rounded to
25%, 50%, 75% or 100%. Percentages are rounded up or down to the nearest value,
but are not rounded up to 100%.
— Absolute CLM specification. (The default.)
The absolute number is interpreted as an absolute number of gigabytes of memory
and can optionally have a suffix of GB.
As needed, an absolute CLM specification is rounded up to the nearest 0.5 GBytes.
If the clm value is rounded, the command reports the final value used.
parmodify command: -B option for nPartition booting
You can optionally specify the parmodify command’s -B option to require that the
modified nPartition be rebooted.
• When you specify -B to modify an inactive nPartition, the changes to the inactive
nPartition are completed immediately and the nPartition then boots and becomes
active.
• When you specify -B to modify an active nPartition, you must perform a reboot for
reconfig for the changes to be completed. After the reboot for reconfig occurs the
nPartition boots and becomes active (because the parmodify command’s -B option
was specified).
Step 4. As needed, perform a reboot for reconfig on the modified nPartition.
See “Reboot for reconfig guidelines for adding cells” on page 87 for details on when to
perform a reboot for reconfig.
88
Chapter 4
Page 89

Using Other Tools for Managing nPartitions
nPartition-level tasks
Set core cell choices
The core cell choice settings for an nPartition are optional preferences that establish
which cells in the nPartition are preferred to be selected as the core cell for the
nPartition.
NOTE You do not need to specify core cell choices for a valid core cell to be chosen.
By default on HP Superdome and rx8620/rx8640 servers, system firmware selects the
lowest numbered eligible cell to be the active core cell for the nPartition.
By default on HP rx7620/rx7640 servers, cell 1 is selected as the core cell.
Set the core cell choices for an nPartition using the following procedure:
Setting core cell choices [par commands]
From the command line, use the parmodify command to configure the core cell choices
for an nPartition. You also can use the parstatus -V -p# command to list the core cell
choices for an nPartition (-p# where # is the nPartition number).
Step 1. Login to Windows on the Management Station PC.
Step 2. Issue the parstatus -V -p# command to list the current core cell choices and core cell
use for an nPartition.
NOTE You must include the correct remote administration options when issuing par commands
(-h and -g for IPMI over LAN connections; -h and -u for WBEM/WMI connections). For
a complete explanation of these options, refer to the command description in “nPartition
Commands Reference” on page 109.
The parstatus -V -p# command lists detailed status for the specified nPartition (-p#
where # is the nPartition number).
The nPartition status includes the current active core cell (“Core Cell”), and any core cell
choice settings.
The core cell choice preferences are listed by parstatus as the “Core Cell Alternate”
settings with “1” being the highest priority and “2” through “4” as the lower priority core
cell choices.
# parstatus -V -p0
[Partition]
Partition Number : 0
Partition Name : jules00
Status : active
IP address : 0.0.0.0
Primary Boot Path : 0/0/2/0/0.13.0
Alternate Boot Path : 0/0/2/0/0.0.0
HA Alternate Boot Path : 0/0/2/0/0.14.0
PDC Revision : 6.0
IODCH Version : 23664
CPU Speed : 552 MHz
Core Cell : cab0,cell0
Core Cell Alternate [1]: cab0,cell0
Core Cell Alternate [2]: cab0,cell2
....
Chapter 4
89
Page 90

Using Other Tools for Managing nPartitions
nPartition-level tasks
Core Connected Par
Hardware Location Usage IO To Num
=================== ============ ==== ========== ===
cab0,bay0,chassis1 active yes cab0,cell0 0
cab0,bay1,chassis3 active yes cab0,cell2 0
#
Step 3. Modify the nPartition core cell choices using the parmodify -p# -r#... command.
You can modify the core cell choices for the local nPartition or any remote nPartition in
the server complex.
Use the following command: parmodify -p# -r# -r#...
Specify the nPartition number (-p#) and the cell ID (-r#) for all cells you wish to
designate as core cell choices.
# parmodify -p0 -r2 -r0
Command succeeded.
#
The order in which you list the cells is the order in which the nPartition core cell choices
are established; the first cell listed is the first preferred core cell (choice 1), and the
subsequent cells are lower-priority core cell choices (choices 2 through 4, if specified).
Rename an nPartition
Each nPartition has both an nPartition name and an nPartition number. The nPartition
name is a short description useful for identifying the nPartition. You can customize
nPartition names to help you distinguish among the nPartition in a server complex. (You
cannot change the nPartition number, which is a permanent unique identifier that is
automatically assigned for each nPartition in a server complex.)
Each nPartition name can have from 1 to 64 characters, including upper- and lowercase
letters; numbers; and dashes, underscores, and spaces (“-” “_” and “ ”).
nPartition names are displayed (along with nPartition numbers) in various reports and
menus provided by the management processor and other nPartition tools. Note that
some tools display only the first 30 characters of nPartition names.
Change the name of an nPartition using the following procedure:
Renaming an nPartition [par commands]
From the command line, rename an nPartition by using the parmodify -p# -P name
command, where -P name specifies the new name for the nPartition (-p#, where # is the
nPartition number).
Step 1. Login to Windows on the Management Station PC.
Step 2. Use the parmodify -p# -P name command to set the nPartition name for any of the
nPartitions in the server complex.
90
Chapter 4
Page 91

Using Other Tools for Managing nPartitions
nPartition-level tasks
NOTE You must include the correct remote administration options when issuing par commands
(-h and -g for IPMI over LAN connections; -h and -u for WBEM/WMI connections). For
a complete explanation of these options, refer to the command description in “nPartition
Commands Reference” on page 109.
Specify both the nPartition number (-p#, where # is the nPartition number) and the new
name for the nPartition (-P name).
If the nPartition name contains spaces then quotation marks must surround the name.
# parmodify -p1 -P "New Name"
Command succeeded.
#
You can list the new name of the nPartition by using the parstatus -p# command
(where # is the nPartition number) or parstatus -P.
Chapter 4
91
Page 92

Using Other Tools for Managing nPartitions
Cell-level tasks
Cell-level tasks
The following section describes tasks you can perform on individual cells within an
nPartition.
List processor configurations
Processor (CPU) configuration details include the CPU population, CPU type, and the
clock speed.
List processor configurations using the following procedure:
Listing processor configurations [par commands]
From the command line, use parstatus -C for processor summaries for all cells in the
server complex; or use parstatus -V -c# for detailed processor information for the
specified cell (-c# where # is the cell number).
Step 1. Login to Windows on the Management Station PC.
Step 2. Issue the command to list processor details.
• parstatus -C — Cell and processor summaries for all cells in the server complex.
• parstatus -V -c# — Detailed processor information for the specified cell (-c# where
# is the cell number).
NOTE You must include the correct remote administration options when issuing par commands
(-h and -g for IPMI over LAN connections; -h and -u for WBEM/WMI connections). For
a complete explanation of these options, refer to the command description in “nPartition
Commands Reference” on page 109.
List cell configurations
Cell configuration details include the list of the cells installed in the server, and cell
assignments to nPartitions.
List the cell configurations in an nPartition-capable server using one of the following
procedures:
Listing cell configurations [par commands]
From the command line, use the parstatus -C command to list cell configuration
details.
Step 1. Login to Windows on the Management Station PC.
Step 2. Issue the parstatus -C command to list details about the cells installed in the server
complex and their nPartition assignments.
92
Chapter 4
Page 93

Using Other Tools for Managing nPartitions
Cell-level tasks
NOTE You must include the correct remote administration options when issuing par commands
(-h and -g for IPMI over LAN connections; -h and -u for WBEM/WMI connections). For
a complete explanation of these options, refer to the command description in “nPartition
Commands Reference” on page 109.
Unassign (remove) cells from an nPartition
Removing a cell from an nPartition involves unassigning the cell from the nPartition to
which it is assigned and, if necessary, performing a reboot for reconfig of the nPartition.
NOTE Adding or removing cells from an nPartition will change the amount of memory available
to the nPartition, possibly significantly. You should consider how the memory change
may affect the amount of swap space necessary for the nPartition and if needed adjust
the swap space size.
When not using remote administration features, you can remove any cell from the local
nPartition and can remove inactive cells from remote nPartitions in the same server
complex. However, at least one core-capable cell must remain in each nPartition.
The remote administration features supported by Windows nPartition tools also enable
you to remove any cell from any nPartition in an HP Integrity server complex. Still, at
least one core-capable cell must remain in each nPartition.
Reboot for reconfig guidelines for removing cells
In some situations, you must immediately perform a reboot for reconfig of a modified
nPartition after removing cells from it. Performing a required reboot for reconfig
completes cell assignment changes and unlocks the Complex Profile for the server.
• You must immediately perform a reboot for reconfig of an nPartition when you have
removed an active cell from the nPartition.
• You must immediately perform a reboot for reconfig of an nPartition when you have
removed a cell from an active nPartition and specified the -B option to the parmodify
command.
• You need not perform a reboot for reconfig of an nPartition when you have removed
an inactive cell from an nPartition and did not specify the -B option to the parmodify
command.
In the cases where you must immediately perform a reboot for reconfig after removing a
cell, not doing so will leave the Complex Profile locked and thus will prevent any other
changes to the server complex configuration. In these cases, the reboot for reconfig is
required to complete the cell assignment changes and permit other changes to occur.
You can remove cells from an nPartition by using the following procedure:
Removing cells from an nPartition [par commands]
From the command line, use the parmodify command to remove cells from an
nPartition. You also can use the parstatus command to list current nPartition details
such as cell assignments.
Step 1. Login to the Windows system.
Chapter 4
93
Page 94

Using Other Tools for Managing nPartitions
Cell-level tasks
NOTE You must include the correct remote administration options when issuing par commands
(-h and -g for IPMI over LAN connections; -h and -u for WBEM/WMI connections). For
a complete explanation of these options, refer to the command description in “nPartition
Commands Reference” on page 109.
If using remote administration features to modify an nPartition, you can login to any
Windows system.
If removing an active cell from an nPartition and not using remote administration
features, you must login to the nPartition from which the cell is to be removed.
Step 2. Issue the parstatus -c#... command to list the current nPartition assignments and
status for each cell (-c# where # is the cell number) that you plan to remove from its
assigned nPartition.
Specify each cell you plan to remove with a separate -c option. For example, to list
details on cells 0, 1, and 2, issue the parstatus -c0 -c1 -c2 command.
The cells must all be assigned to the same nPartition in order to remove them using a
single procedure. Otherwise, if the cells are assigned to different nPartitions, you must
perform this procedure separately for each nPartition.
Step 3. Remove the cell from the nPartition to which it is assigned by using the parmodify -p#
-d#... command.
Specify the nPartition (-p# where # is the nPartition number) and each cell (-d# where #
is the cell number) that you want to remove from the nPartition.
If you are performing this task using a Windows system to remotely administer a server,
also specify the -u... -h... options or the -g... -h... options as appropriate.
If removing multiple cells from an nPartition, specify each cell with a separate -d#
option on the same command line (such as: parmodify -p1 -d0 -d2... to remove cells
0 and 2 from partition number 1).
Slightly different procedures are required for removing active cells and inactive cells.
See the following information for details.
If at least one of the cells you plan to remove is currently active, then follow the
guidelines for removing active cells.
• Guidelines for removing an active cell
Specify the -B option to parmodify when removing an active cell from an nPartition
if you want the nPartition to become active following its reboot for reconfig.
For example, the following command removes cell 4 from partition 0 and the -B
option ensures that the nPartition will be active following its reboot for reconfig.
# parmodify -p0 -d4 -B
Cell 4 is active.
Use shutdown -R to shutdown the system to ready for reconfig state.
Command succeeded.
#
You must perform a reboot for reconfig after you issue the parmodify command to
remove active cell(s) from the nPartition. (This is covered in the step that follows.)
94
Chapter 4
Page 95

Using Other Tools for Managing nPartitions
• Guidelines for removing an inactive cell
When removing an inactive cell from an nPartition you do not need to specify the -B
option to parmodify and do not need to perform a reboot for reconfig of the nPartition
to which the cell is assigned.
When you use parmodify to remove an inactive cell, the cell is immediately
unassigned from its nPartition.
If you specify the -B option when removing an inactive cell from an inactive
nPartition, then the cell is immediately removed and the modified nPartition is
booted past its inactive shutdown for reconfig state and becomes an active nPartition.
For example, the following command removes cell 2 from partition 0. Because cell 2 is
inactive, it is immediately unassigned.
# parmodify -p0 -d2
Command succeeded.
#
Step 4. As needed, perform a reboot for reconfig of the nPartition being modified.
Cell-level tasks
You must perform a reboot for reconfig if you have removed an active cell or have
specified the -B option when modifying an active nPartition.
See the “Reboot for reconfig guidelines for removing cells” on page 93 for details on
when to perform a reboot for reconfig.
This reboot for reconfig enables the cell removal to complete and the Complex Profile to
be unlocked.
If you have removed an active cell and you did not specify the -B option to parmodify,
then the nPartition will remain inactive in the shutdown for reconfig state after you
perform the reboot for reconfig. To make the inactive nPartition active, use the BO (boot)
command at the management processor Command menu.
Set cell attributes
Each cell assigned to an nPartition has attributes including use-on-next-boot that
determine how the cell is used within the nPartition. On nPartition-capable HP Integrity
servers, each cell also has a cell local memory attribute that determines the amount of
memory on the cell that is not interleaved.
NOTE After changing cell attributes you must reboot the nPartition to which the cell is
assigned in order to use the new settings. If modifying an inactive cell to be active,
perform a reboot for reconfig.
Set the attributes for a cell using any one of the following procedures:
Setting cell attributes [par commands]
From the command line, use the parmodify -p# -m#... command to configure cell
attributes. You also can use the parstatus -V -c# command to list attribute details for
a specific cell (-c# where # is the cell number).
Chapter 4
95
Page 96

Using Other Tools for Managing nPartitions
Cell-level tasks
Step 1. Login to Windows on the Management Station PC.
Step 2. To list current cell attribute settings, use the parstatus -C command to list the
use-on-next-boot values for all cells, or use the parstatus -V -c# command to list all
attribute values for a specific cell (-c# where # is the cell number)
NOTE You must include the correct remote administration options when issuing par commands
(-h and -g for IPMI over LAN connections; -h and -u for WBEM/WMI connections). For
a complete explanation of these options, refer to the command description in “nPartition
Commands Reference” on page 109.
Step 3. To modify cell attribute values, use the parmodify -p# -m#... command and specify
the new attributes for a cell as part of the -m option.
You must specify both the nPartition (-p# where # is the nPartition number) and the cell
(-m#... where # is the cell number).
To modify multiple cells, you can specify the -m option multiple times in the same
command.
parmodify command: -m attribute explanation
The parmodify command’s -m... option specifies a cell number and attributes, which
are used to modify the configuration of the specified cell.
• For Windows Server 2003, the parmodify command’s -m... option is as follows:
-m cell:[type]:[use]:[fail][:clm]
where:
cell The cell to be added to the nPartition. You can specify the cell in
global (cell) format or in hardware location (cabinet/slot)
format.
type The cell type: base is the only supported cell type and it is the
default.
use The cell use-on-next-boot value: y or n. Use y (the default) if the cell
is to be an active member of the nPartition, or use n if the cell is to
remain an inactive member.
fail The cell failure usage: ri (reactivate with interleave) is the only
supported failure usage policy and it is the default.
The clm value specifies the amount of memory that will be configured as cell local
memory for the cell.
Cell local memory specification
You can specify the clm value in either of two forms: percentage or absolute amount of
memory.
— Percentage cell-local memory (CLM).
The percent number can be any number in the range 0–100 with a suffix of %.
96
Chapter 4
Page 97

Using Other Tools for Managing nPartitions
This number is rounded to 12.5%, 25%, 37.5%, 50%, 62.5%, 75%, 87.5% or 100%. If
the cell contains less than 4 GBytes of memory, then the percentage is rounded to
25%, 50%, 75% or 100%. Percentages are rounded up or down to the nearest value,
but are not rounded up to 100%.
— Absolute CLM specification. (The default.)
The absolute number is interpreted as an absolute number of gigabytes of memory
and can optionally have a suffix of GB.
As needed, an absolute CLM specification is rounded up to the nearest 0.5 GBytes.
If the clm value is rounded, the command reports the final value used.
Step 4. Reboot the nPartition to use the cells’ new attribute values.
If you have changed cell local memory (CLM) values then you must reboot the nPartition
whose CLM values have changed. If you also are changing use-on-next-boot values then
also use the following guidelines.
If you have changed any cell use-on-next-boot settings for the nPartition then reboot the
nPartition in either of two ways:
Cell-level tasks
• To perform a standard reboot use the Windows shutdown /r command (or the
Shut Down
action and Restart pull-down menu option).
If you have only changed use-on-next-boot values from y to n, then perform a reboot.
Any cells set to not be used will still be assigned to the nPartition but will not be used
(will not rendezvous) in the nPartition.
• To perform a reboot for reconfig use the Windows shutdown /r command (or the
> Shut Down
action and Restart pull-down menu option).
If you have changed any use-on-next-boot values from n (do not use on next boot) to y
(use the cell on next boot), then you must perform a reboot for reconfig to allow the
currently inactive cells to reboot and rendezvous when the nPartition reboots.
Start >
Start
Chapter 4
97
Page 98

Using Other Tools for Managing nPartitions
Power-, status-, and hardware-level tasks
Power-, status-, and hardware-level tasks
The following section describes tasks you can perform in order to manage or view the
status of I/O components or other hardware within the complex, or individual
nPartitions, or individual cells.
List input/output (I/O) configurations
nPartition input/output (I/O) configuration details include the I/O chassis population,
cell-to-chassis connections, PCI card slot capabilities, and PCI card details.
List I/O configurations using the following procedure:
Listing input/output (I/O) configurations [par commands]
From the command line, use the parstatus -I command to list details about all I/O
chassis in the server complex.
Step 1. Login to Windows on the Management Station PC.
To list details about the cards and slots in an I/O chassis you must login to the nPartition
to which the cell connected to the I/O chassis is assigned. If using the parstatus -I
command you can login to any nPartition in the complex or remotely list details from
Windows.
Step 2. Issue the command to list details about I/O chassis and PCI slots.
• parstatus -I — List details about all I/O chassis in the server complex, including
the usage (absent, active, inactive), whether the chassis has Core I/O, and which cell
the I/O chassis is connected to.
NOTE You must include the correct remote administration options when issuing par commands
(-h and -g for IPMI over LAN connections; -h and -u for WBEM/WMI connections). For
a complete explanation of these options, refer to the command description in “nPartition
Commands Reference” on page 109.
List cabinets in a server complex
Cabinet details include the cabinet type, a list of cells, I/O chassis, power supplies,
utilities, fans, firmware components, interconnecting hardware. Other information such
as the power status, faults, and LED states also are given.
List the cabinets in a server complex using the following procedure:
Listing cabinets in a server complex [par commands]
From the command line, use the parstatus -B command to list all cabinets in the
server complex, or use the parstatus -V -b# command to view a detailed status for the
specified cabinet (-b# where # is the cabinet number).
Step 1. Login to Windows on the Management Station PC.
Step 2. Issue commands to list details about cabinets in the target complex.
98
Chapter 4
Page 99

Using Other Tools for Managing nPartitions
Power-, status-, and hardware-level tasks
• parstatus -B — List all cabinets in the server complex.
• parstatus -V -b# — View a detailed status for the specified cabinet (-b# where # is
the cabinet number).
NOTE You must include the correct remote administration options when issuing par commands
(-h and -g for IPMI over LAN connections; -h and -u for WBEM/WMI connections). For
a complete explanation of these options, refer to the command description in “nPartition
Commands Reference” on page 109.
List power status and power supplies
Power status and power supply information includes the power status (on or off) for
cabinets, cells, and I/O chassis; the status (ok or failed) for power supplies; and related
details.
List the power status and supplies using the following procedure:
Listing power status and power supplies [par commands]
From the command line, issue the parstatus -B command for a power status summary
for all cabinets, or parstatus -V -b# for detailed power status for the specified cabinet
(-b#, where # is the cabinet number). You also can issue the frupower -d -C command
for cell power status, or the frupower -d -I command for I/O chassis power status.
Step 1. Login to Windows on the Management Station PC.
Step 2. Issue commands to list details about system power status.
• parstatus -B — Power status summary for all cabinets.
• parstatus -V -b# — Detailed power status for the specified cabinet (-b#, where # is
the cabinet number).
• frupower -d -C — Cell power status.
• frupower -d -I — I/O chassis power status.
NOTE You must include the correct remote administration options when issuing par commands
(-h and -g for IPMI over LAN connections; -h and -u for WBEM/WMI connections). For
a complete explanation of these options, refer to the command description in “nPartition
Commands Reference” on page 109.
List fan and blower status
Fan and blower status includes lists of cabinet blowers and I/O fans, and their status
(whether ok or failed).
List fan and blower status using the following procedure:
Listing fan and blower status [par commands]
From the command line, issue the parstatus -B command for a fan and blower status
summary for all cabinets, or parstatus -V -b# for detailed fan and blower status for
the specified cabinet (-b#, where # is the cabinet number).
Chapter 4
99
Page 100

Using Other Tools for Managing nPartitions
Power-, status-, and hardware-level tasks
Step 1. Login to Windows on the Management Station PC.
Step 2. Issue commands to list details about system power status.
• parstatus -B — Fan and blower status summary for all cabinets.
• parstatus -V -b# — Detailed fan and blower status for the specified cabinet (-b#,
where # is the cabinet number).
NOTE You must include the correct remote administration options when issuing par commands
(-h and -g for IPMI over LAN connections; -h and -u for WBEM/WMI connections). For
a complete explanation of these options, refer to the command description in “nPartition
Commands Reference” on page 109.
Turn attention indicators (LEDs) on and off
HP’s nPartition systems provide attention indicators (LEDs) to help you to visually
select and confirm which hardware you want to perform operations on. Attention
indicators are amber (orange) lights.
Table 4-1 lists the meanings for the various attention indicator states. When all
components of a system are functioning and no service operations are occurring, every
attention indicator should be turned off. (HP Superdome cabinet number LCDs remain
lit or blinking when cabinet power is on.)
Table 4-1 Attention indicator (LED) states and meanings
Attention
Indicator State
OFF Not selected.
BLINKING Selected to be used in a service operation.
ON Supported for PCI card slot LEDs only.
Meaning
Service required, problems have been identified with the component.
LEDs for hardware components
You can control (turn off, blink, and/or turn on) attention indicators for the following
hardware components.
• Cell LEDs
Each cell or cell slot has its own attention indicators.
— On HP Superdome servers, each cell attention indicator is located on the server
cabinet hardware below the cell slot, just to the right of the power LED for the cell
slot.
— On other nPartition-capable servers, each cell attention indicator is located on the
cell hardware, to the outside of the power LEDs for the cell.
• I/O chassis LEDs
On HP Superdome servers only, each I/O chassis has a attention indicator, which is
located on the cabinet above the I/O chassis.
100
Chapter 4
 Loading...