

Page 1

Installation Guide
for the
®
Intel
Server Control
HP Part Number A6153-96006
Printed in June 2001
Page 2

Notice
The information contained in this document is subject to change without notice.
Hewlett-Packard makes no warranty of any kind with regard to this material, including, but not
limited to, the implied warranties of merchantability and fitness for a particular purpose.
Hewlett-Packard shall not be liable for errors contained herein or for incidental or consequential
damages in connection with the furnishing, performance, or use of this material.
This guide has been reprinted with the permission of Intel Corporation. Hewlett-Packard assumes no
responsibility for the use or reliability of this software on equipment that is not furnished by
Hewlett-Packard.
Information in this document is provided in connection with Intel® products. No license, express or
implied, by estoppel or otherwise, to any intellectual property rights is granted by this document.
Except as provided in Intel's Terms and Conditions of Sale for such products, Intel assumes no liability
whatsoever, and Intel disclaims any express or implied warranty, relating to sale and/or use of Intel
products including liability or warranties relating to fitness for a particular purpose, merchantability, or
infringement of any patent, copyright or other intellectual property right. Intel products are not
designed, intended or authorized for use in any medical, life saving, or life sustaining applications or
for any other application in which the failure of the Intel product could create a situation where
personal injury or death may occur. Intel may make changes to specifications and product descriptions
at any time, without notice. No part of this document may be copied or reproduced in any form or by
any means without prior consent of Intel.
This document contains proprietary information that is protected by copyright. All rights are reserved.
No part of this document may be photocopied, reproduced, or translated to another language without
the prior written consent of Hewlett-Packard Company.
Intel, Pentium, and Itanium are trademarks or registered trademarks of Intel Corporation or its
subsidiaries in the United States and other countries.
†
All other brand and product names are trademarks of, and are used to identify products of, their
respective owners.
Hewlett-Packard Company
Network Server Division
Technical Communications/ MS 45SLE
10955 Tantau Avenue
Cupertino, California 95014 USA
© Copyright 2001, Hewlett-Packard Company.
Audience Assumptions
This guide is for the person who installs, administers, and troubleshoots LAN servers. Hewlett-Packard
Company assumes you are qualified in the servicing of computer equipment and trained in recognizing
hazards in products with hazardous energy levels.
ii
Page 3

Contents
1 System Requirements..................................................................................... 1
Client Workstation.............................................................................................. 1
Managed Server ................................................................................................ 2
2 Installing and Upgrading ISC ......................................................................... 3
Preparing the System ........................................................................................ 4
Client Workstation ......................................................................................... 4
Managed Servers .......................................................................................... 5
Installing the Software ....................................................................................... 6
Interactive Installation Process ..................................................................... 6
Silent Installation Process ............................................................................. 7
Upgrading ISC ................................................................................................. 10
3 Uninstalling ISC ............................................................................................. 11
Using the Add/Remove Program..................................................................... 11
Using the ISC Setup Program ......................................................................... 11
iii
Page 4

Page 5

1 System Requirements
ISC consists of console software and instrumentation software. You install and
run console software on the system from which you are going to monitor and
control other servers referred to as managed servers. A managed server is an
®
Intel
Architecture (IA) platform with ISC Platform Instrumentation software
installed and running. The system running the console software is sometimes
referred to as the client workstation or client.
Client Workstation
The client workstation runs console software. The console software is installed
during ISC installation. Table 1 lists the system configurations on which the ISC
installation process installs console software and also lists the client workstation’s
configuration requirements and restrictions:
Table 1. Client Workstation Configuration Requirements and Restrictions
System Configuration Requirements
IA-32 platforms running
Windows 2000
Itanium™ - based
platforms running
Microsoft Windows
64-bit Advanced Server
IA-32 platforms running
Windows NT† 4.0 server
or workstation, Enterprise
Edition
• Intel Pentium microprocessor or higher.
• At least 64 MB of RAM.
• At least 150 MB of available disk space.
• Microsoft Windows compatible modem must be used
if you connect to the server by modem.
• Service Pack 2 must be installed.
• Supported console for DPC only.
• Intel® Itanium microprocessor.
• At least 512 MB of RAM.
• At least 150 MB of available disk space.
• Microsoft Windows compatible modem must be used
if you connect to the server by modem.
• Supported console for DPC only.
• Windows 2000/NT Server, or Workstation 4.0 (Service
Pack 6a), or Enterprise Edition.
• Intel Pentium microprocessor or higher.
• At least 64 MB of RAM.
• At least 150 MB of available disk space.
• For Windows NT, Remote Access Service must also
be installed. If it is not installed, the Direct Platform
Control (DPC) component will not install.
• Microsoft Windows compatible modem must be used
if you connect to the server by modem.
• No support for Java-based Platform Instrumentation
Control (PIC).
1
Page 6

Chapter 1 System Requirements
To monitor and control managed servers, you can use either the ISC Stand-alone
Console that is included during ISC installation or a supported Enterprise System
Management Console (ESMC). Two supported ESMC applications exist:
• Hewlett-Packard OpenView
• Computer Associates Unicenter
†
Network Node Manager 6.2 for Windows NT
†
The Next Generation 2.2.1 for Windows NT
NOTE Platform Instrumentation software on managed servers does
not support Simple Network Management Protocol (SNMP)
traps. Consequently, supported ESMCs will not receive these
traps from managed servers.
Also, Itanium - based platforms running Microsoft Windows
64-bit Advanced Server do not support the integration of either
the Hewlett-Packard OpenView Network Node Manager
Console or the Computer Associates Unicenter The Next
Generation.
The ISC Stand-alone Console can monitor and control managed servers without a
third-party management application. This console is implemented as an ActiveX
control that runs within its own container or within a third-party container
application such as Microsoft Management Console (MMC), Internet Explorer
†
v5.0 or later, or Netscape Navigator
v4.0 or later with the ActiveX snap-in.
The ISC Stand-alone Console can exist and run separately on the client
workstation even if it have a supported ESMC application installed.
NOTE Client workstation requirements can change beyond those
listed in Table 1 when you use ISC with a supported ESMC.
Please refer to the ESMC application’s installation
requirements for additional information.
Managed Server
The managed server runs instrumentation software (platform instrumentation).
Console software running on the client workstation communicates with
instrumentation software to monitor and control the managed server. Table 2 lists
the system configuration on which the ISC installation process installs
instrumentation software and also lists the managed server’s configuration
requirements:
Table 2. Managed Server System Requirements
System Configuration Requirements
Itanium - based platform running
Microsoft Windows 64-bit
Advanced Server
• At least 512 MB of RAM.
•
At least 150 MB of available disk space.
†
†
2
Page 7

2 Installing and Upgrading ISC
The ISC installation process is designed to enable you to install the software over
several machines at once. The process also allows you to choose which ISC
features you want to include as part of the installation. For the latest ISC
installation information, refer to the README.TXT and ERRATA.TXT files that
reside on the Resource CD.
NOTE The amount of hard drive space required to install ISC varies
depending on the number of components selected for
installation. To install all ISC components, be sure that the
target hard drive has between 150 and 200 Mbytes of free disk
space.
The following list presents installation features:
1. You can install ISC on a single machine or on multiple machines during a
single installation session.
2. You can perform a local installation of ISC to any supported configuration.
3. You can interactively install ISC by using the Resource CD that comes with
your system.
4. You can install ISC using a non-interactive method called silent installation.
This method employs command-line options and an external file that directs
the installation process.
5. The installation software detects the operating system running on each target
system and determines whether each system should be used as a client
running console software or as a managed server.
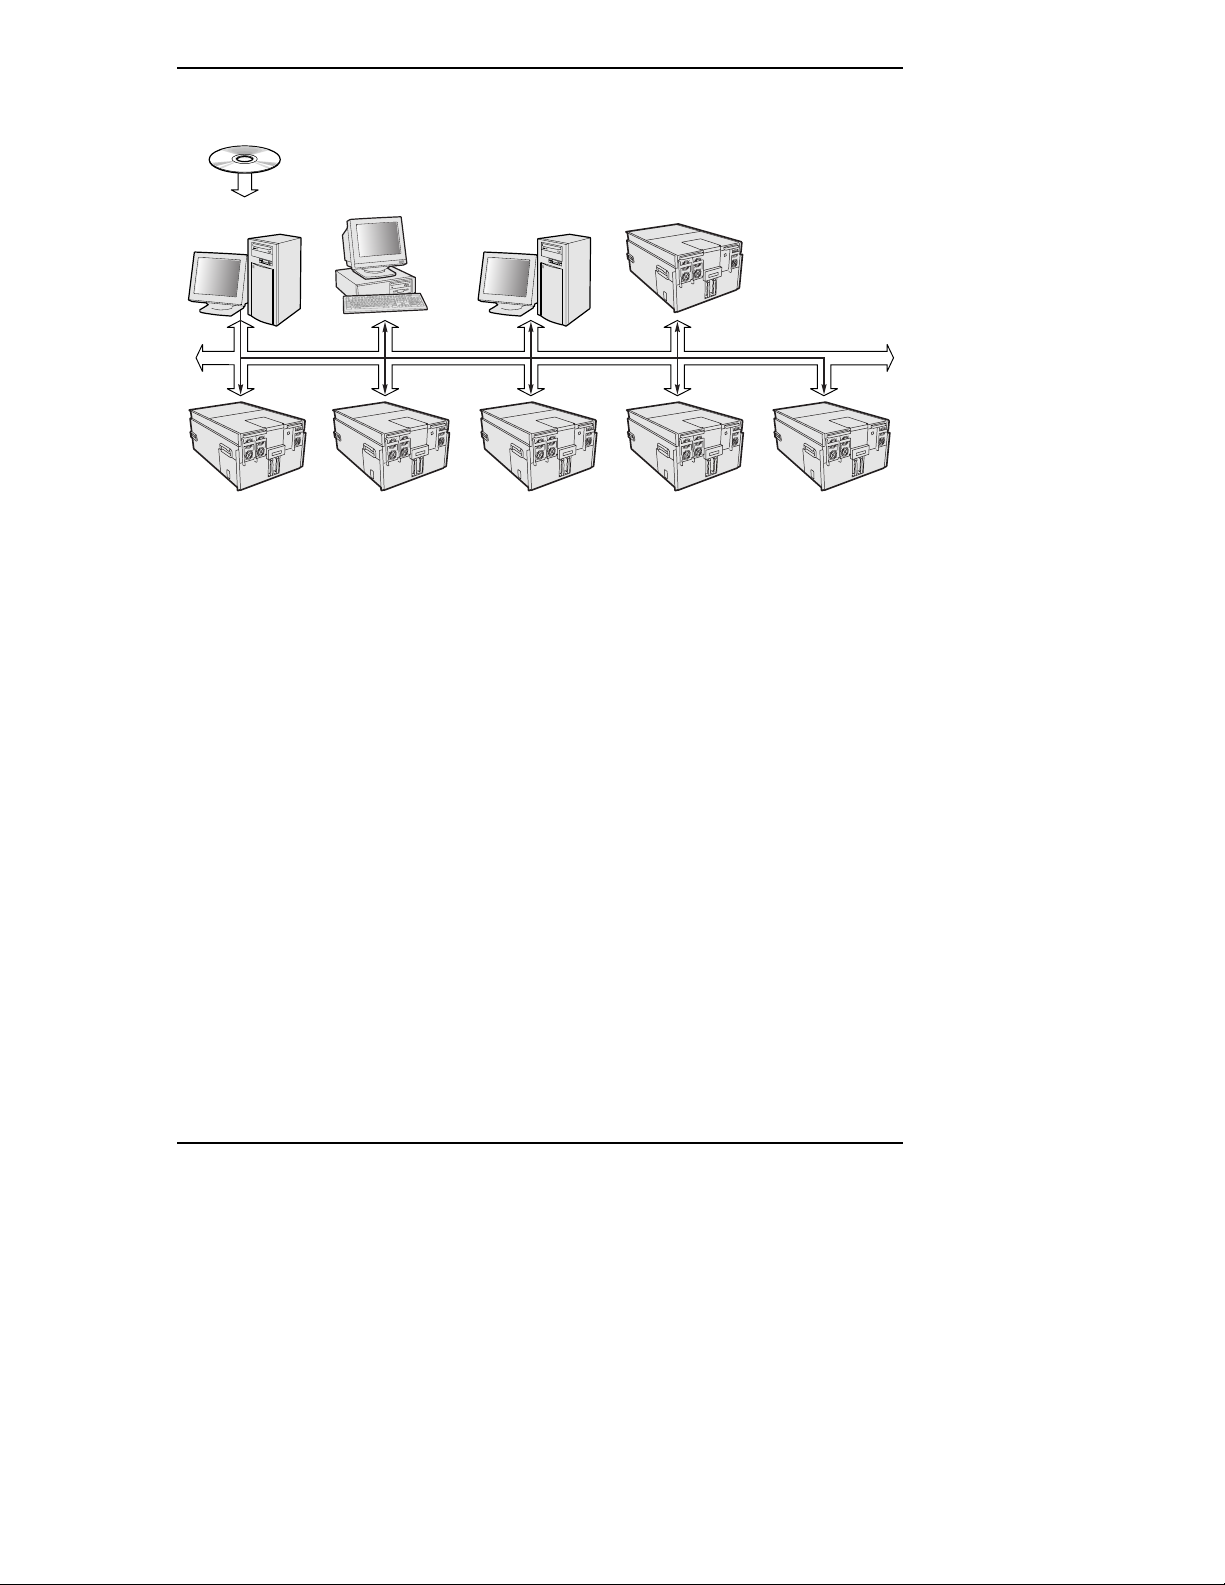
Figure 1 on page 4 illustrates how you can interactively install ISC into several
managed servers and consoles. In this example, the Resource CD is loaded into a
machine running Windows NT. After loading the CD, the user selects the
machines shown in the figure; four consoles and five managed servers running
various supported operating systems. During installation, the installation software
detects the resident operating system for each machine and determines if it can
function as a client or as a managed server. In this case, the installation process
successfully installs ISC on all the systems.
3
Page 8
Chapter 2 Installing and Upgrading ISC
System
Resource CD
Console
Windows 2002
for Itanium
platforms
TM
-based
Network
Console
Windows NT
Console
Windows NT
Console
32-bit Version
of Windows 2000
Managed
Server
Windows 2002
for Itanium
platforms
TM
-based
Managed
Server
Windows 2002
for Itanium
platforms
TM
-based
Managed
Server
Windows 2002
for Itanium
platforms
TM
-based
Managed
Server
Windows 2002
for Itanium
platforms
TM
-based
for Itanium
Figure 1. ISC Installation Scenario
Installing ISC consists of the following three areas:
1. Preparing the system.
2. Installing the software.
3. Examining the log file.
Preparing the System
Depending on whether your system is going to be used as a client or as a managed
server you need to be aware of some considerations before you run the application
that installs the ISC software.
Client Workstation
Table 3 lists conditions for client preparation based on the operating system the
workstation is running.
Managed
Server
Windows 2002
TM
-based
platforms
OM11617
4
Page 9

Chapter 2 Installing and Upgrading ISC
Table 3. Client Workstation Preparation
Operating System Conditions
Windows NT 4.0
server or workstation,
Enterprise Edition
• Supported client console for DPC only.
• You must be connected as a user with
administrator rights.
• The ISC installation program automatically
reboots remote servers as necessary.
• Remote Access Service (RAS) must be installed
before ISC in order to connect to a managed
server through a modem.
Windows 2000 with
Service Pack 2
• You must be connected as a user with
administrator rights.
• The ISC installation program automatically
reboots remote servers as necessary.
• Remote Access Service (RAS) must be installed
before ISC in order to connect to a managed
server through a modem.
Microsoft Windows
64-bit Advanced
Server on an Itanium based platform
• Supported client console for DPC only.
• You must be connected as a user with
administrator rights.
• The ISC installation program automatically
reboots remote servers as necessary.
• Remote Access Service (RAS) must be installed
before ISC in order to connect to a managed
server through a modem.
Managed Servers
Table 4 lists the condition you must satisfy for managed servers.
Table 4. Managed Server Preparation
Operating System Condition
Microsoft Windows
64-bit Advanced
Server on an Itanium based platform
• You must enable the event-logging feature of the
BIOS for system management status and
information. To enable the event-logging feature,
follow these steps:
a. Power on the server and, when prompted, press
the <F2> key to enter the BIOS setup.
b. Use the arrow keys to highlight the
Advanced menu.
5
Page 10

Chapter 2 Installing and Upgrading ISC
Operating System Condition
c. Use the arrow keys to select Event Log
Configuration and press the <Enter> key.
d. Ensure that the Events Logging option is set to
Enabled.
e. Press the <F10> key to save your settings.
f. Exit the BIOS Setup utility.
g. Reboot the server.
Installing the Software
CAUTION Remote install/uninstall does not work in this release of the
software. Please download the latest release from the HP web
site at http://www.hp.com/.
Two types of installation processes exist: interactive and non-interactive. The
non-interactive method is referred to as a silent installation. This section describes
the steps for both types of installation.
Interactive Installation Process
Follow these steps to install ISC on client workstations and managed servers:
1. Login with system administrator rights.
2. Begin the installation by using Windows NT Explorer to find and run the
setup.exe program under the \Software\ISC directory of the Resource
CD.
3. In the dialog box that appears, select the option to Install/Upgrade Intel
Server Control and click the OK button.
4. Click Next in the Welcome Screen to continue.
5. Accept the license agreement by clicking Accept at the next screen.
6. Using the destination systems selection screen editing features, add the
systems on which you want to install ISC. To add a system to the list, click
Add and use the interface that lets you select and place system names on the
list.
6
®
Page 11

Chapter 2 Installing and Upgrading ISC
7. After adding all the systems to the list, click OK to return to the screen with
your list of systems and their respective default paths. You can edit
individual paths by right-clicking on a system and supplying a new path in
the subsequent dialog box.
8. Supply an administrative login and password for each system.
9. Select the ISC features you want to install on the list of servers by
completing the check-off dialog box that appears.
10. Press Accept to confirm your installation destinations and options.
11. Monitor the file transfer process.
12. When the dialog box appears that informs you that the file transfer is
complete and the local setup application has been launched, click Next.
13. After files have been transferred, all remote systems are rebooted. The
installation program provides you with a list of these systems. You can
choose when to reboot the local system.
14. Click Done from the installation complete screen.
15. View the files named “logfile.log” found in the “install” directories of the
local machine or of the remote machines on which ISC has been installed.
These files provide a list of features successfully installed, a list of installed
components, a list of copied or replaced files, and lists any error messages for
the respective machine.
NOTE After the installation process completes, managed servers are
automatically rebooted. If a local machine needs to be
rebooted, the installation process presents a dialog box that
allows you to perform the reboot operation immediately, later,
or in 90 seconds.
Silent Installation Process
Silent installation requires you to run setup.exe from a command line and
supply an external file that specifies the systems on which you are installing ISC.
During silent installation, the installation program uses command-line options and
information in the external file to target systems and gain administrative logon
privileges. The following sections describe the command-line syntax you use to
start the install and the file format you must follow when creating the external file.
7
Page 12

Chapter 2 Installing and Upgrading ISC
Command-line Syntax
Use the following command-line syntax when invoking setup.exe:
Setup.exe /silent:textfile [[/username:username]
[/password:password]] \
[/log:logfile]
Where:
textfile
A user-supplied file that specifies the systems on which to
install ISC. You must supply this text file during a silent
installation. You can supply a full path and filename or just
the filename if the text file resides in the same directory as
setup.exe. For information on the format you must
follow when creating this file see “Silent Installation Text
File” on page 9.
username
The account name that has administrative rights for all the
systems on which ISC is being installed. The /username
command-line option is optional and can be overridden by
username supplied in textfile. If you do not supply a
username at either the command line or in textfile, the
installation program attempts to use the username currently
logged into the local system.
password
The password for username. The /password commandline option is optional and can be overridden by password
supplied in textfile. If you do not supply a password at
either the command line or in textfile, the installation
program attempts to use the password of the username
currently logged into the local system.
logfile
The path and filename of the log file documenting the
progress of the silent installation process.
The following example invokes setup.exe from the CD-ROM in its default
directory Software. The text file Silentwin64.txt resides in the same
directory as setup.exe. The command line supplies no usernames or
passwords. The installation program looks in the accompanying text file for this
information. If usernames and passwords are not found in Silentwin64.txt,
the installation program attempts to use the username and password of the
currently logged on user.
D:\>E:\CD\Software\setup.exe
/silent:D:\Silentwin64.txt
D:\>
8
Page 13
Chapter 2 Installing and Upgrading ISC
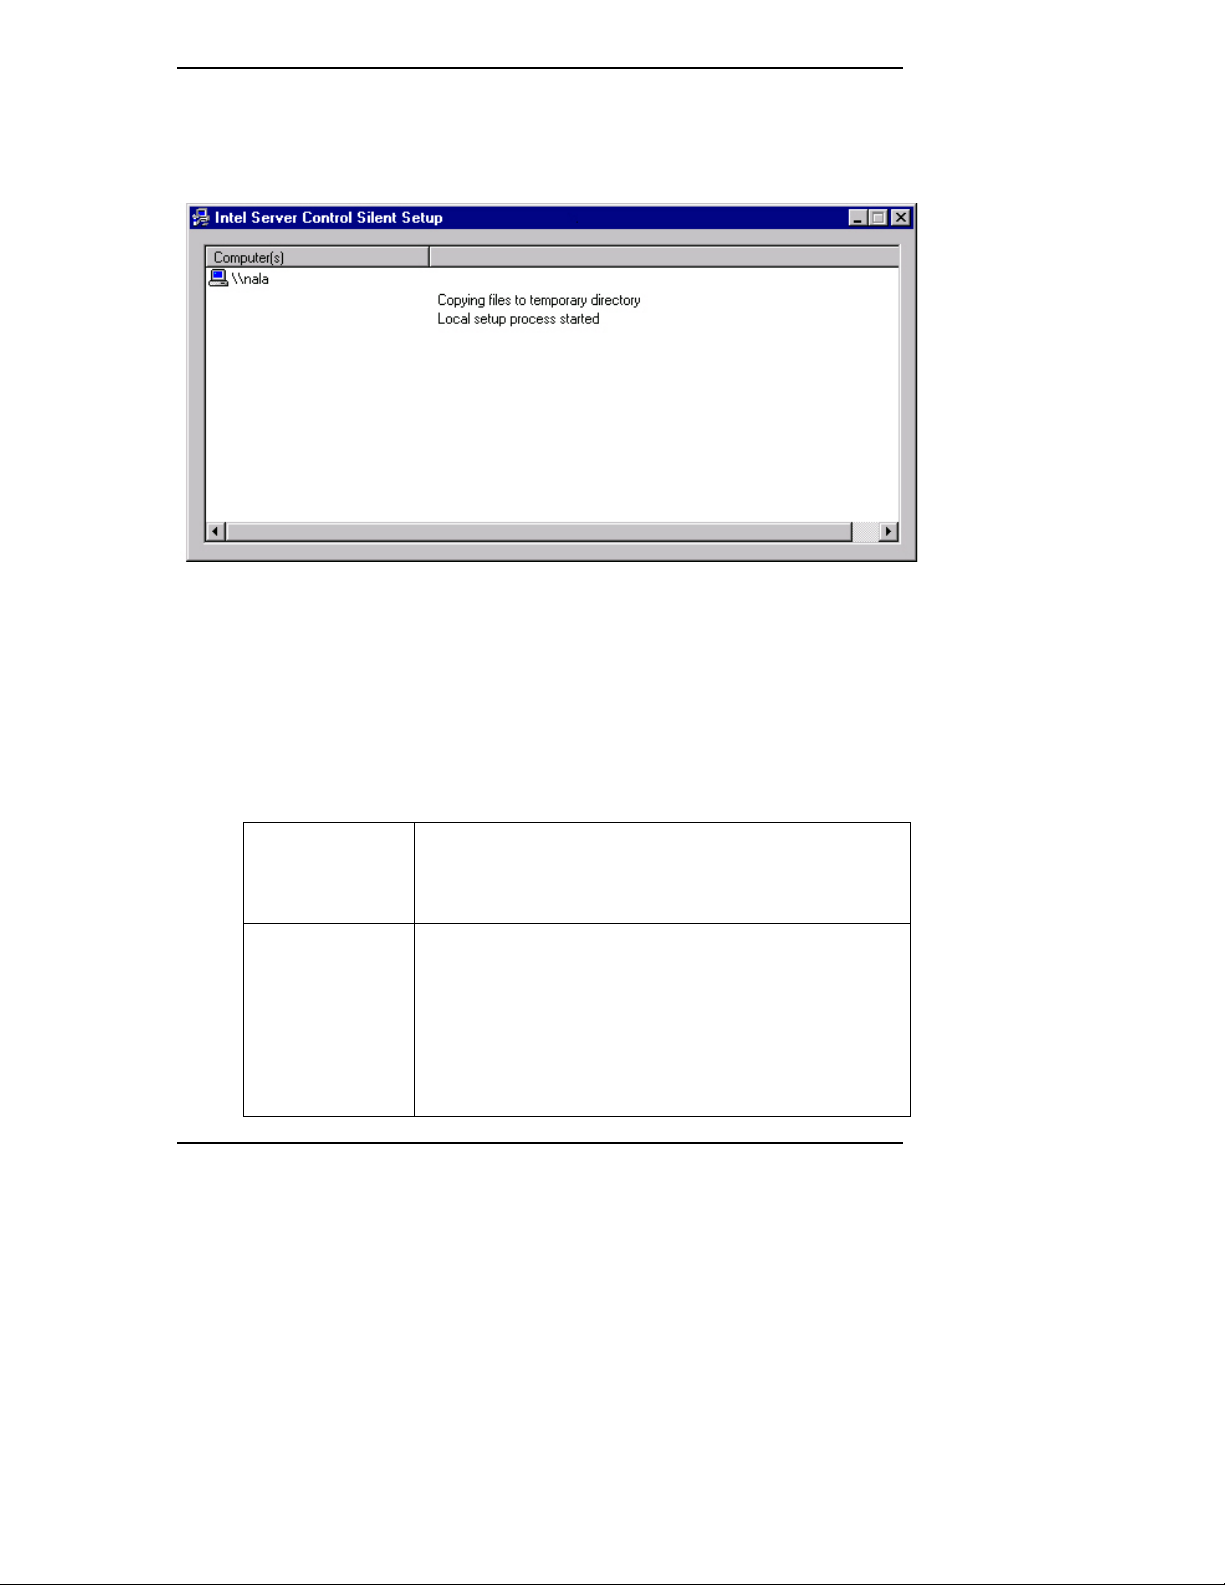
When the silent installation process is complete, a dialog box appears that provides
status about each of the systems on which you attempted to install ISC. For
example, Figure 2 could appear after successfully installing ISC on a single
system:
Figure 2. Silent Installation Results Screen
Silent Installation Text File
Use the following format when creating a silent installation file:
[Destination]
destination-1, [username-1], [password-1]
destination-2, [username-2], [password-2]
.
.
.
destination-n, [username-n], [password-n]
Where:
destination
A remote or local system name. You must use the
Universal Name Convention (UNC) when supplying a
name. If you are installing on a local system, you can use
the keyword “local” for destination.
username
The account name that has administrative rights for the
associated system on which ISC is being installed.
Supplying a username is optional. If you do not supply
one in the text file, the installation program looks for a
username in the command line. If the installation program
finds no username, it attempts to use the username
currently logged into the local system from which you are
running the silent installation.
9
Page 14

Chapter 2 Installing and Upgrading ISC
password
The password for the username that has administrative
rights for the associated system on which ISC is being
installed. Supplying a password is optional. If you do not
supply one in the text file, the installation program looks
for a password in the command line. If the installation
program finds no password, it attempts to use the password
associated with the username currently logged into the
local system from which you are running the silent
installation.
The following listing shows an example of a silent installation text file. In this
example, the installation program attempts to install ISC on the local system as
well as on the remote systems identified by the UNC “\\sayoung-desk and
the UNC \\fred-nt.” The example also uses a [Version] section to define
two variables.
[Version]
Signature="$Windows NT$"
Provider="Intel Corporation, ESG"
[Destinations]
\\sayoung-desk, sueyoung, @password
\\fred-nt, MyUser, password2
Local, eric, password10
NOTE After the installation process completes, remote managed
servers are automatically rebooted. If a local machine needs to
be rebooted, the installation process presents a dialog box that
allows you to perform the reboot operation immediately, later,
or in 90 seconds.
Upgrading ISC
To upgrade ISC software you must reinstall the new version across the network of
consoles and managed servers. If a previous installation of ISC tools is detected
on a target system the installation process upgrades the software during the install
session. If you want a completely new installation on a system that has an outdated
version of ISC already loaded, you should first uninstall the older version of ISC.
For information on how to uninstall ISC software, refer to the next chapter
"Uninstalling ISC."
10
Page 15

3 Uninstalling ISC
CAUTION Remote install/uninstall does not work in this release of the
software. Please download the latest release from the HP web
site at http://www.hp.com/.
You can uninstall ISC from single systems one of two ways:
1. The Operating system’s Add/Remove Program applet from the Control Panel
2. The uninstall feature built into the ISC setup program
The following two sections describe each process.
Using the Add/Remove Program
This method limits you to removing the local version of ISC in its entirety. You
cannot remove specific features of ISC with this method. Furthermore, you cannot
remove ISC from a remote system using this method.
To remove ISC using this program follow these steps:
1. Open the Control Panel on your system.
2. Invoke the Add/Remove Program.
3. Select the version of Intel Server Control in the list box.
4. Initiate the program in accordance to your particular operating system’s
requirements.
Using the ISC Setup Program
Follow these steps to uninstall ISC software from either the local system or from a
remote system:
1. Login with system administrator access.
2. Begin the uninstall by using Windows NT Explorer to find and run the
setup.exe program under the \Software\ISC directory of the Resource
CD.
3. In the dialog box that appears, select the option to Uninstall Intel Server
Control Components and click the OK button.
11
Page 16

Chapter 3 Uninstalling ISC
4. Click Next in the Welcome Screen to continue.
5. Select the system from which you want to remove ISC. You can select a
remote system or the local system. However, you are limited to removing
ISC from a single system.
6. Click Next in the System Selection Screen to continue.
7. View and modify the list of ISC features you want to remove. Clicking on a
feature to place a checkmark in the box indicates removal of the feature.
8. Click Next in the Feature Selection Screen to continue.
9. Verify the system and the features you have decided to remove in the System
and Feature Verification Screen.
10. Click Accept to start the uninstall procedure.
11. The uninstall procedure launches and its progress appears.
12
 Loading...