


開始安裝
準備相關物品
1
重要資料!
軟體未顯示螢幕提示前,請勿連接 USB 纜線!
安裝
2
1 2
HP Deskjet D5500 Printer series
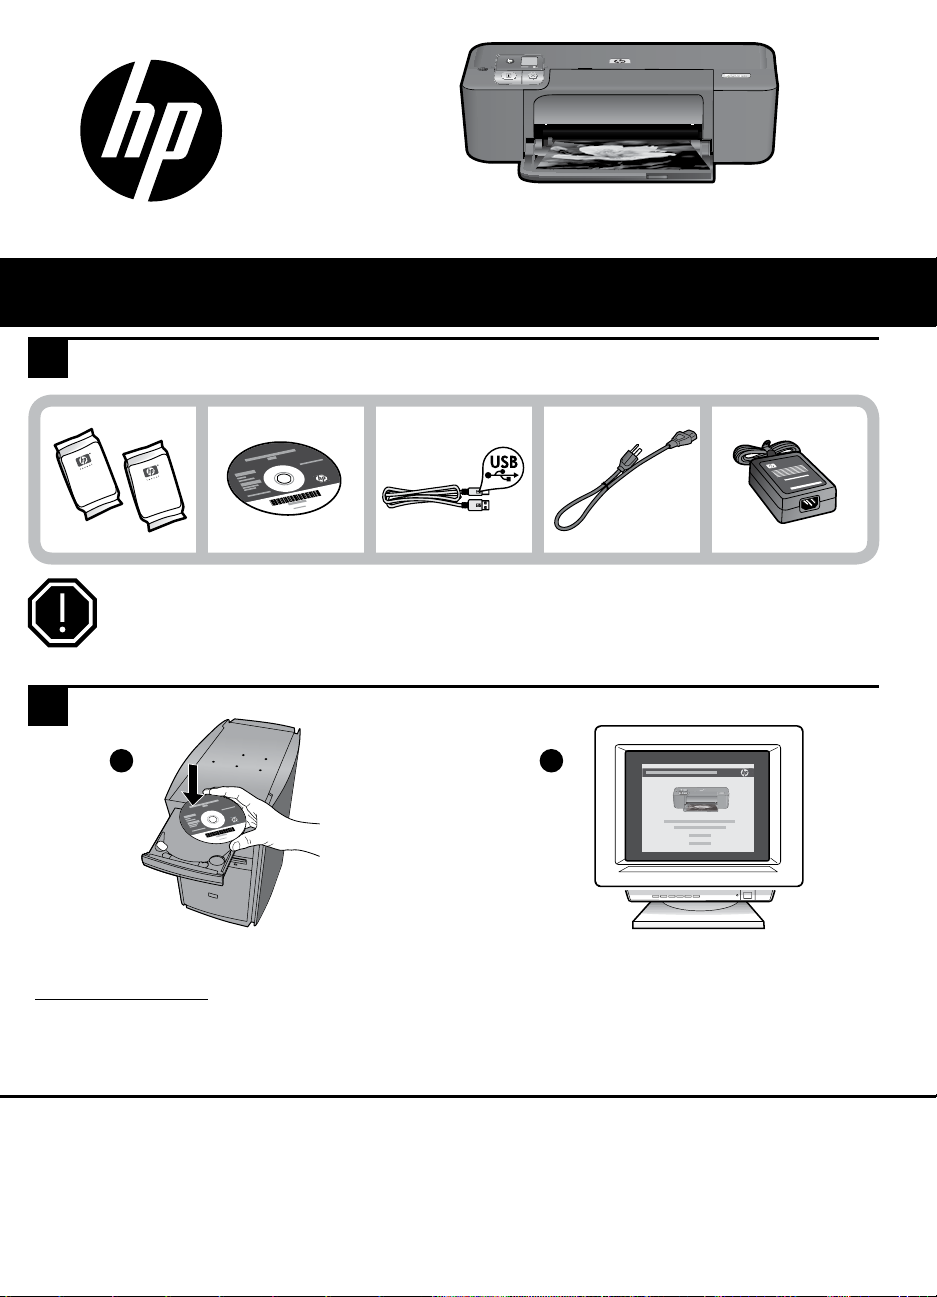
請按照動畫安裝指南安裝軟體。 插入軟體 CD 開始安裝。對於沒有 CD/DVD 光碟機
的電腦,請前往 www.hp.com/support 下載並安裝
印表機軟體。
註: 動畫安裝指南包含安裝印表機的相關重要資訊,如 一鍵式無線設定 。
*CB774-90035*
*CB774-90035*
CB774-90035
ZHTW
KO
ZHCN
EN
© 2009 Hewlett-Packard Development Company, L.P.
Printed in [English]
Printed in [Korean] Printed in [Simplifi ed Chinese]

繁體中文
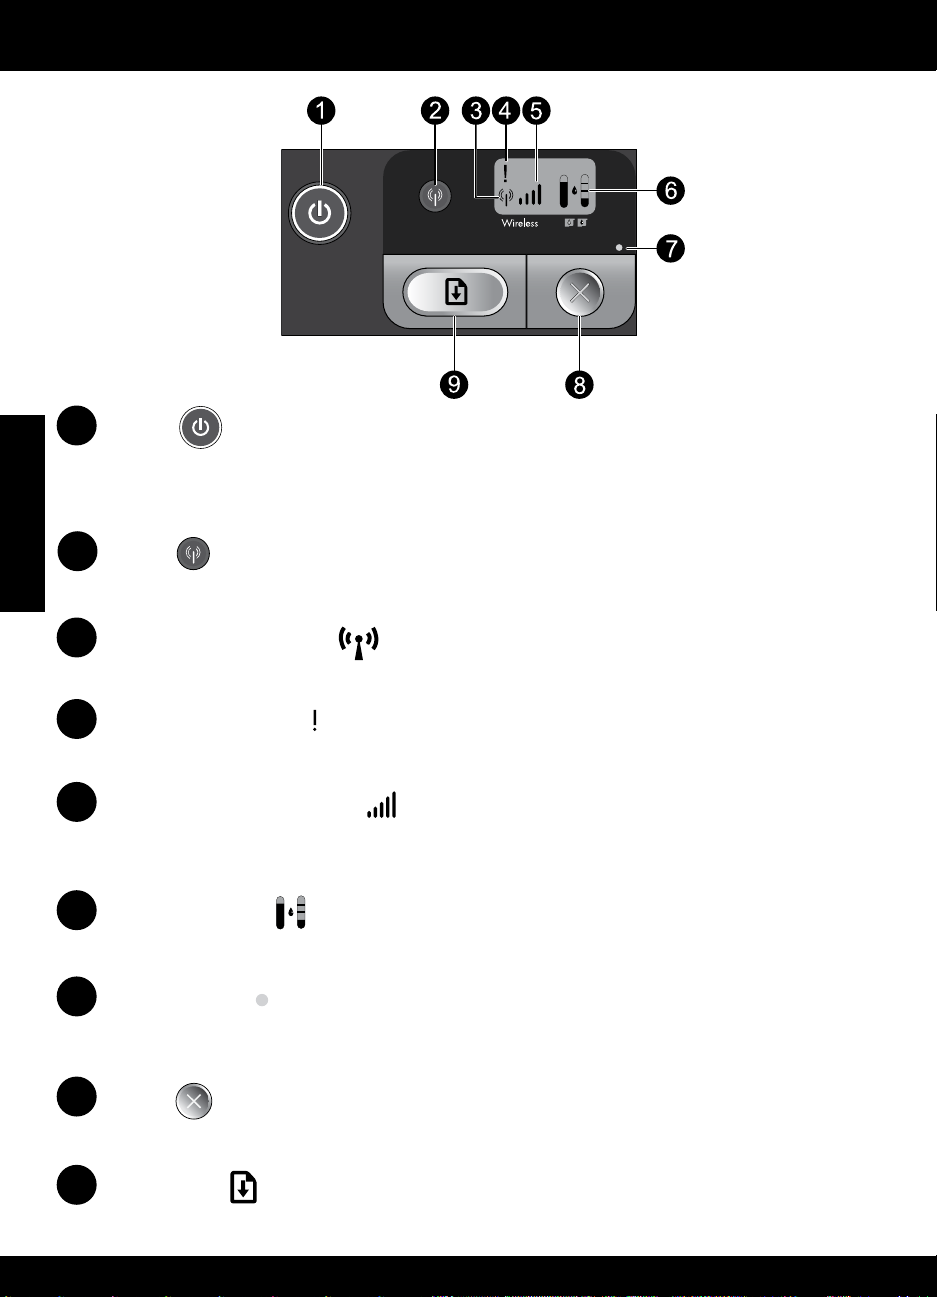
控制台
1
開啟:
開啟或關閉產品。產品關閉時,仍然會使用最少量的電力。若要完全中斷電源,請關閉產品,等待指
示燈熄滅,然後拔掉電源線。
2
無線:
開啟或關閉無線廣播。無線按鈕指示燈指示無線廣播處於開啟還是關閉狀態。
3
無線天線圖示:
指示 HP 印表機是否已連接到無線網路。
4
無線錯誤圖示:
如果出現無線連接錯誤,則會閃爍。
5
無線訊號強度圖示:
指示無線網路連接的訊號強度。訊號條越少,表示訊號強度越低。印表機嘗試連接時,訊號強度條會
從左至右交替閃爍。
6
墨水存量 LCD:
顯示預估墨水存量。
7
錯誤燈號:
如果 HP 印表機出現錯誤(例如存在開啟的列印墨匣門或停止的列印墨匣),則會閃爍。
8
取消:
取消目前進行中的列印、校正作業或 WPS 程序。
9
重新開始:
指示 HP 印表機在解決問題之後繼續運作。「重新開始」按鈕指示燈閃爍以指示出現卡紙和紙張用完
錯誤。
2

關於網路連線
將 HP Deskjet 從 USB 連線切換為網路連線
如果最初是採用 USB 連線安裝 HP Deskjet,您日後可以切換到無線網路連線。
將 USB 連線切換至整合式無線 WLAN 802.11 連線
Windows Mac
拔掉產品背面的 USB 連線。
1.
將產品 CD 放入電腦的 CD-ROM 光碟機中。
2.
選取新增裝置,然後按照螢幕指示進行無線
3.
網路安裝。
拔掉產品背面的 USB 連線。
1.
按一下無線按鈕以開啟無線廣播。
2.
開啟 Airport 並與裝置建立連線。
3.
將產品 CD 放入電腦的 CD-ROM 光碟機中。
4.
在桌面上開啟 CD-ROM,然後按兩下 HP
5.
Installer 並按照螢幕指示操作。
連接到網路上的其他電腦
您可以將 HP Deskjet 連接至小型電腦網路上的多台電腦。
如果 HP Deskjet 已連接到網路上的一台電腦,則其他每台電腦都必須安裝 HP Photosmart 軟體。在無線連線
的安裝過程中,軟體會自動搜尋網路上的產品。在網路上設定完 HP Deskjet 後,當您新增其他電腦時,就無
需再對其進行設定。
繁體中文
無線設定提示
插入軟體 CD,然後按照動畫安裝指南操作。
•
如果您具有 WPS (WiFi Protected Setup) 路由器,則可以使用一鍵式無線設定。開啟印表機後,只需按
•
住路由器上的 WPS 按鈕即可與印表機建立安全的無線連線。
印表機和路由器之間建立無線連線後,無線按鈕上的藍色指示燈會亮起,帶有訊號強度條的無線天線圖
•
示會顯示在印表機螢幕上。
3

尋找詳細資訊
其他所有產品資訊可以在電子檔的「說明」和「讀我檔案」中找到。在印表機軟體安裝期間會自動安裝電子
檔的「說明」。電子檔的「說明」包括產品功能與疑難排解的相關指示,另外還提供產品規格、法律注意事
項、環保資訊、法規及支援資訊。「讀我檔案」包含 HP 支援的連絡資訊、作業系統需求,以及您產品資訊
的最新更新。
繁體中文
Windows Mac
存取電子說明
Windows:按一下開始 > 所有程式 > HP >
•
Deskjet D5500 series > 說明。
尋找讀我檔案
軟體安裝之前,放入軟體 CD,並在選項出現在
螢幕上時按一下讀我檔案。完成軟體安裝後,
按一下開始 > 所有程式 > HP > Deskjet D5500
series > 讀我檔案。
Windows 7
可從線上取得 Windows 7 支援資訊:
www.hp.com/go/windows7。
存取電子說明
Mac OS X v10.4:按一下說明 >
•
Mac 說明,資料庫 > HP 產品說明。
Mac OS X v10.5:按一下說明 >
•
Mac 說明。在說明檢視器中,選取 HP 產品
說明。
尋找讀我檔案
您可以放入軟體 CD,然後按兩下軟體 CD 最上
層的 Read Me 資料夾,即可存取讀我檔案。
墨水用量
註:墨水匣中的墨水可以透過數種不同的方式用於列印程序,包括初始化程序(準備裝置和墨水匣進行列印
的程序),以及列印頭維修(保持列印噴嘴清潔,以及墨水流動順暢的程序)。此外,使用過後有些墨水還
會殘留在墨匣中。如需詳細資訊,請瀏覽 www.hp.com/go/inkusage。
電源規格:
電源變壓器: 0957-2269
輸入電壓: 100-240Vac (+/- 10%)
輸入頻率: 50/60 Hz (+/- 3Hz)
耗電量:最大 xx 瓦(平均列印)= 14W(無線功能關閉)15W(無線功能開啟)
註:僅使用 HP 提供的電源轉接器。
4

安裝問題疑難排解
Windows Mac
如果您無法列印,請確保將產品設定為預設列
印裝置:
Windows Vista:在 Windows 工作列上,依
•
序按一下開始、控制台以及印表機。
Windows XP:在 Windows 工作列上,依序
•
按一下開始、控制台以及印表機和傳真。
確認在產品旁邊的圓圈中有勾選您的產品。如果
您的產品未選取為預設印表機,以滑鼠右鍵按一
下印表機圖示,然後從功能表中選擇「設成預設
的印表機」。
若仍無法列印,或 Windows 軟體安裝失敗:
從電腦的 CD-ROM 光碟機中取出 CD,接著
1.
斷開 USB 纜線與電腦間的連線。
重新啟動電腦。
2.
暫時停用所有軟體防火牆,並關閉所有防毒
3.
軟體。安裝完產品軟體後,重新啟動這些程
式。
在電腦 CD-ROM 光碟機中放入產品軟體
4.
CD,然後按照畫面指示安裝產品軟體。在提
示您連接 USB 纜線之前請不要這樣做。
安裝完畢之後重新啟動電腦。
5.
如果您仍無法列印,請解除安裝軟體後再重新
安裝:
註:解除安裝程式會移除裝置專用的所有 HP 軟
體元件。解除安裝程式不會移除其他產品或程
式共用的元件。
解除安裝軟體:
中斷 HP Deskjet 與電腦的連線。
1.
開啟 Applications:Hewlett-Packard 資料夾。
2.
連按兩下 HP Uninstaller。依照螢幕上的指
3.
示進行。
安裝軟體:
若要安裝軟體,請將 HP 軟體 CD 放入您電腦
1.
的 CD 光碟機中。
在桌面上開啟 CD,然後按兩下 HP Installer。
2.
依照螢幕上的指示進行。
3.
繁體中文
5

網路疑難排解
在軟體安裝期間找不到此產品
如果 HP 軟體在軟體安裝期間,於網路上找不到您的產品,請嘗試下列疑難排解步驟。如果您有無線連線,
請從步驟 1 開始,並在必要時繼續進行到步驟 4。
繁體中文
無線連線
1: 透過執行「無線網路測試」和下列提供的任何說明判斷產品是否已連接到網路。
執行「無線網路測試」
按住重新開始按鈕啟動無線測試,以及列印無線網路測試頁與網路設定頁。
2: 如果您在步驟 1 中確定產品未連接至網路,並且這是您第一次安裝產品,則在軟體安裝期間需要按照螢
幕上的說明將產品連接至網路。
將產品連接至網路
將產品的軟體 CD 放入電腦的 CD-ROM 光碟機中。
1.
按照螢幕上的指示進行。出現提示時,使用包裝盒內的 USB 安裝纜線將產品與電腦連接。產品將嘗試連
2.
接網路。如果連線失敗,請依照提示修正問題,然後再試一次。
完成設定後,會提示您拔下 USB 纜線,並測試無線網路連線。一旦產品與網路的連線成功,請將軟體安
3.
裝在網路上要使用該產品的每一部電腦。
如果裝置無法加入網路,請檢查這些常見問題:
您可能選擇了錯誤的網路,或在網路名稱 (SSID) 中輸入錯誤。檢查這些設定,確認設定無誤。
•
您可能在 WEP 金鑰或 WPA 加密金鑰中輸入錯誤(如果您使用加密)
•
註: 如果在安裝期間沒有自動找到網路名稱或 WEP/WPA 金鑰,並且您不知道這些資訊,則可以從
www.hp.com/go/networksetup 下載應用程式,可協助您找出這些資訊。此應用程式僅適用於 Windows
Internet Explorer,而且僅提供英文版。
您的路由器有問題。同時關閉產品和路由器的電源,然後再次開啟其電源,以嘗試重新啟動它們。
•
6

網路疑難排解
3: 確認並解決下列可能的狀況:
您的電腦可能沒有連接到您的網路。請確認電腦連線到 HP Deskjet 所連線的相同網路。如果您進行無線
•
連線,可能會誤將電腦連線到鄰近的網路。
您的電腦可能連線到虛擬私有網路 (VPN)。繼續安裝前請先暫時停用 VPN。連線到 VPN 就像是在不同的
•
網路上連線一樣;您需要中斷 VPN 的連線,以透過家用網路存取產品。
安全性軟體可能封鎖了通訊。安裝在電腦上的安全性軟體 (防火牆、防毒、反間諜程式) 可能會封鎖產品
•
和電腦之間的通訊。HP 診斷會在安裝期間自動執行,並且可以提供防火牆封鎖了什麼的訊息。請嘗試暫
時禁用防火牆、防毒或反間諜程式應用程式的連線,看看是否可以成功完成安裝。
安裝完成後,可重新啟用防火牆應用程式。請確認下列檔案包含在防火牆的例外清單中:
C:\Program Files\HP\Digital Imaging\bin\hpqtra08.exe。
•
C:\Program Files\HP\Digital Imaging\bin\hpqdstcp.exe。
•
提示: 設定您的防火牆軟體,允許經由 UDP 埠 427 的通訊。
4: 使用進階搜尋功能。
按住重新開始按鈕啟動無線測試,以及列印網路設定頁。
1.
從網路設定報告中找出 HP Deskjet 的 IP 位址。檢查並確保產品 IP 位址與 PC 和路由器屬於同一範
2.
圍內。
使用軟體安裝期間提供的進階搜尋選項,並按一下依 IP 位址搜尋,然後輸入產品的 IP 位址。
3.
繁體中文
Windows only
軟體安裝後的其他網路問題
如果已成功安裝 HP Deskjet,而且您碰到的是無法列印之類的問題,請嘗試下列解決方案:
關閉路由器、產品和電腦,然後以下列順序重新將它們開啟:首先是路由器,然後是產品,最後是電
•
腦。有時,通過關閉然後再開啟電源的動作可以修復網路通訊問題。
如果前一個步驟沒有解決問題,而且您已經在電腦上成功安裝 HP Photosmart 軟體,請執行網路診斷
•
工具。
執行網路診斷工具
> 依序按一下解決方案中心中的設定、其他設定、網路工具箱。在公用程式標籤上,按一下執行網路診斷。
7
HP 印表機有限保固聲明
ЕОᐝ!)่ዋϡٺЕОᐝΞֻމആೱ۞யݡ*
설치 시작
컨텐츠 찾기
1
주의!
소프트웨어에 의해 화면에 메시지가 나타나기 전까지 USB 케이블을 연결하
지 마십시오.
설정
2
1 2
HP Deskjet D5500 Printer series
소프트웨어 CD를 넣어 시작합니다. CD/DVD 드라이
브가 없는 컴퓨터를 사용하는 경우에는
www.hp.com/support 으로 이동하여 프린터 소프트
웨어를 다운로드 받아 설치하십시오.
참고: 애니매이션으로 제작된 설치 안내서에는 One Button Wireless Setup(원 버튼 무선 설정) 을 포함하여
프린터를 설정하는 데 필요한 중요한 정보가 포함되어 있습니다.
소프트웨어를 설치하는 동안 애니매이션으
로 제작된 설치 안내서에 따르십시오.
한국어
제어판
1
켜짐:
제품을 켜거나 끕니다. 제품 전원을 꺼도 아주 적은 양의 전원이 여전히 장치에 의해 사용됩니다. 전
원을 완전히 차단하려면 제품을 끈 다음 전원 표시등이 꺼질때까지 기다렸다가 전원 코드를 분리합
니다.
2
무선:
무선 통신을 켜거나 끕니다. 무선 버튼 표시등이 무선 기능이 켜져있는지, 꺼져있는지 표시해 줍니다.
3
무선 안테나 아이콘:
HP 프린터가 무선 네트워크에 연결되어 있는지 표시합니다.
4
무선 오류 아이콘:
무선 연결 오류가 발생한 경우 깜박입니다.
5
무선 신호 강도 아이콘:
무선 네트워크 연결의 신호 강도를 나타냅니다. 신호 막대기가 작으면 작을수록 신호 강도가 약함을
가리킵니다. 프린터를 연결할 때, 신호 강도 막대기들이 왼쪽에서 오른쪽으로 교대로 깜박입니다.
6
잉크 잔량 LCD:
잉크 잔량 예상치를 보여줍니다.
7
오류 표시등:
HP 프린터에 프린터 카트리지 덮개가 열리거나 프린트 캐리지가 고장나는 등의 오류가 발생하는 경
우 깜박입니다.
8
취소:
현재 활성화되어 있는 인쇄 작업, 정렬 작업이나 진행중인 WPS 세션을 취소합니다.
9
다시 시작:
문제가 해결된 후에 HP 프린터를 계속하여 작동시킵니다. 다시 시작 버튼 표시등은 용지 걸림 및 용
지 부족 등의 오류 발생 시에 깜박입니다.
10

네트워킹 정보
HP Deskjet 연결을 USB 연결에서 네트워크 연결로 전환합
니다
HP Deskjet을 USB 연결로 먼저 설치하는 경우 나중에 무선 네트워크 연결로 변경할 수 있습니다.
USB 연결을 통합 무선 WLAN 802.11 연결로 변경하려면
Windows Mac
제품의 뒷면에서 USB 연결을 분리합니다.
1.
컴퓨터 CD-ROM 드라이브에 제품 CD를 넣
2.
습니다.
Add a Device(장치 추가)를 선택한 다음 무
3.
선 네트워크 설정을 위한 화면 도움말에 따
릅니다.
제품의 뒷면에서 USB 연결을 분리합니다.
1.
Wireless button(무선 버튼)을 눌러 무선 기능
2.
을 활성화시킵니다.
Airport를 켜고 장치와 연결시킵니다.
3.
컴퓨터 CD-ROM 드라이브에 제품 CD를 삽
4.
입합니다.
바탕 화면에서 CD-ROM을 열고 HP
5.
Installer(HP 설치 관리자)를 두 번 누르고 화
면 도움말에 따릅니다.
한국어
네트워크의 다른 컴퓨터에 연결
HP Deskjet을 소규모 컴퓨터 네트워크를 구성하는 여러 대의 컴퓨터로 연결할 수 있습니다.
HP Deskjet이 이미 네트워크 상의 컴퓨터에 연결되어 있는 경우, 각각의 추가 컴퓨터에 HP Photosmart 소프
트웨어를 설치해야 합니다. 무선 연결을 설치하는 동안 자동으로 소프트웨어가 네트워크에서 제품을 찾
습니다. HP Deskjet이 네트워크에 설치된 경우, 다른 컴퓨터를 추가할 때 다시 HP Deskjet을 구성할 필요가
없습니다.
무선 설정 도움말
소프트웨어 CD를 넣고 애니매이션으로 제작된 설치 안내서에 따릅니다.
•
WPS (WiFi Protected Setup) 라우터가 있는 경우, One Button Wireless Setup(원 버튼 무선 설정)을 사용
•
할 수 있습니다. 프린터의 전원을 켠 후 바로 라우터의 WPS 버튼을 잠시 누르고 있으면 프린터에 보안
무선 연결이 설정됩니다.
프린터와 라우터 간의 무선 연결이 설정된 경우, 무선 버튼 위의 파란색 표시등에 불이 들어오고 신호
•
강도 막대기와 함께 무선 안테나 아이콘이 프린터 화면에 표시됩니다.
11

자세한 정보 알아보기
그 외의 제품 정보는 전자 도움말과 Readme에서 확인할 수 있습니다. 프린터 소프트웨어가 설치되는 동안
전자 도움말이 자동으로 설치됩니다. 제품 기능과 문제 해결에 관한 지침도 전자 도움말에 포함되어 있습
니다. 또한 제품 사양, 법적 통지, 환경, 규정 및 지원 정보를 제공합니다. Readme 파일에는 HP 지원 연락
처, 운영체제 요구 조건과 제품 정보의 최근 업데이트 내용이 포함되어 있습니다.
Windows Mac
화면 도움말에 액세스하려면
Windows: Start(시작) > All Programs(전체
•
프로그램) > HP > Deskjet D5500 series > 도
움말을 차례로 클릭합니다.
Readme 보기
소프트웨어를 설치하기 전에 소프트웨어 CD를
넣어 옵션이 화면에 나타나면 Readme를 클릭합
한국어
니다. 소프트웨어 설치를 마친 후에 Start(시작)
> All Programs(전체 프로그램) > HP > Deskjet
D5500 series > Readme를 차례로 클릭합니다.
Windows 7
Windows 7 지원 정보는 온라인으로 제공됩니
다. www.hp.com/go/windows7.
화면 도움말에 액세스하려면
Mac OS X v10.4: 도움말 > Mac 도움말, 라
•
이브러리 > HP 제품 도움말을 차례로 클릭
합니다.
Mac OS X v10.5: 도움말 > Mac 도움말을
•
차례로 클릭합니다. Help Viewer(도움말 뷰
어)에서, HP 제품 도움말을 선택합니다.
Readme 보기
소프트웨어 CD를 넣은 다음 소프트웨어 CD의
최상위에 저장된 Read Me 폴더를 두 번 클릭하
여 Readme 파일을 액세스할 수 있습니다.
잉크 사용
참고: 카트리지의 잉크는 장치와 카트리지의 인쇄를 준비하는 초기화 프로세스와 인쇄 노즐을 깨끗이 유지
하고 잉크 흐름을 부드럽게 하는 프린트 헤드 서비스 작업 등 인쇄 프로세스에서 여러 방식으로 이용됩니
다. 또한 사용 후 카트리지에는 일부 잔류 잉크가 남습니다. 자세한 내용은 www.hp.com/go/inkusage를 참
조하십시오.
전원 사양:
전원 어댑터: 0957-2269
입력 전압: 100-240Vac (+/- 10%)
입력 주파수: 50/60 Hz (+/- 3Hz)
소비 전력: 최대 xxW(평균 인쇄) = 14W (무선 해제 시) 15W (무선 연결 시)
참고: HP의 전원 어댑터만 사용하십시오.
12

설치 문제 해결
Windows Mac
인쇄할 수 없는 경우 제품이 기본 인쇄 장치로
설정되었는지 확인합니다:
Windows Vista: Windows 작업 표시줄에서,
•
Start(시작), Control Panel(제어판)을 차례로
클릭한 다음, Printers(프린터)를 클릭합니다.
Windows XP: Windows 작업 표시줄에서,
•
Start(시작), Control Panel(제어판)을 차례로
클릭한 다음, Printers and Faxes(프린터 및
팩스)를 클릭합니다.
프린터 옆의 확인란에 체크 표시가 되었는지 확
인합니다. 제품이 기본 프린터로 선택되어 있
지 않은 경우, 프린터 아이콘을 마우스 오른
쪽 버튼으로 클릭하여 메뉴의“Set as default
printer(기본 프린터로 설정)”을 선택합니다.
계속 인쇄할 수 없거나 Windows 소프트웨어 설
치를 실패한 경우:
컴퓨터의 CD-ROM 드라이브에서 CD를 꺼
1.
낸 다음 컴퓨터에서 USB 케이블을 분리합
니다.
컴퓨터를 다시 시작합니다.
2.
잠시 소프트웨어 방화벽을 모두 비활성화시
3.
켜 모든 바이러스 퇴치 프로그램을 닫으십
시오. 제품 소프트웨어가 설치된 후에 이 프
로그램들을 다시 시작시킵니다.
프린터의 CD-ROM 드라이브에 프린터 소프
4.
트웨어를 넣은 다음 화면 도움말에 따라 프
린터 소프트웨어를 설치합니다. USB 케이블
을 연결하라는 메시지가 나타날 때까지 케
이블을 연결하지 마십시오.
설치를 마쳤으면 컴퓨터를 다시 시작하십
5.
시오.
여전히 인쇄가 안 될 경우, 제품 소프트웨어를
제거한 후 다시 설치하십시오:
참고: 설치 제거 관리자는 이 장치에 해당되는
모든 HP 소프트웨어 구성 요소를 제거합니다.
설치 제거 관리자는 다른 제품 또는 프로그램과
공유하는 구성 요소를 제거하지 않습니다.
소프트웨어 설치를 제거하려면:
컴퓨터에서 HP Deskjet을 분리합니다.
1.
응용프로그램 열기: Hewlett-Packard 폴더
2.
를 엽니다.
HP Uninstaller(HP 설치 제거 관리자)를 두
3.
번 누릅니다. 화면 도움말에 따릅니다.
소프트웨어를 설치하려면:
소프트웨어를 설치하려면 HP 소프트웨어
1.
CD를 컴퓨터의 CD 드라이브에 넣습니다.
바탕 화면에서 CD를 연 후 HP Installer(HP
2.
설치 관리자)를 두 번 클릭합니다.
화면 도움말에 따릅니다.
3.
한국어
13

네트워크 문제 해결
소프트웨어가 설치되는 동안엔 제품이 검색되지 않을 수 있습니다.
소프트웨어를 설치하는 동안 HP 소프트웨어가 네트워크에서 제품을 찾지 못할 경우, 다음 문제 해결 절
차에 따릅니다. 무선 연결이 설정되어 있는 경우, 지시에 따라 단계 1에서 시작하여 단계 4까지 진행시
킵니다.
무선 연결
1: 무선 네트워크 테스트를 실행하여 제공되는 다음 도움말에 따라 제품이 네트워크에 연결되어 있는지 확
인합니다.
무선 네트워크 테스트를 실행하려면
Resume(계속) 버튼을 눌러 무선 테스트를 초기화하고 무선 네트워크 테스트 및 네트워크 구성 페이지를 인
쇄합니다.
2: 단계 1에서는 제품이 네트워크에 연결되어 있지 않은지 확인하고 제품 설치가 이번이 처음인 경우, 소
프트웨어가 설치되는 동안 화면 도움말에 따라 제품을 네트워크에 연결합니다.
한국어
네트워크에 제품을 연결하려면
컴퓨터 CD-ROM 드라이브에 제품 소프트웨어 CD를 삽입합니다.
1.
화면에 표시되는 지시를 따릅니다. 메시지에 따라 상자에 함께 들어있는 USB 설치 케이블을 사용하여
2.
제품을 컴퓨터에 연결합니다. 제품이 네트워크 연결을 시도합니다. 연결에 실패하면 메시지에 따라 문
제를 해결하고 다시 시도하십시오.
설치가 끝났으면 USB 케이블을 분리하고 무선 네트워크 연결을 테스트하라는 메시지가 나타납니다. 제
3.
품을 성공적으로 네트워크에 연결했으면 네트워크 상에서 이 제품을 사용할 각 컴퓨터에 소프트웨어를
설치합니다.
장치가 네트워크에 나타나지 않는 경우, 다음의 일반적인 문제에 대해 확인합니다:
잘못된 네트워크에 연결했거나 네트워크 이름(SSID)을 올바르지 않게 입력하였을 수 있습니다. 이러한
•
설정을 확인하여 이 설정들이 올바른지 확인합니다.
WEP 키나 WPA 암호화 키를 올바르지 않게 입력했을 수 있습니다 (암호화를 사용할 경우).
•
참고: 설치되는 동안 네트워크 이름 또는 WEP/WPA 키가 자동으로 검색되지 않는 경우 및 알지 못하는
경우엔 www.hp.com/go/networksetup에서 네트워크 이름 또는 WEP/WPA 키를 찾을 수 있도록 지원
하는 애플리케이션을 다운로드할 수 있습니다. 이 애플리케이션은 Windows Internet Explorer에서만 구
동되며 영어 버전으로만 제공됩니다.
라우터에 문제가 있을 수 있습니다. 각 해당 제품 및 라우터의 전원을 껐다가 다시 켜서 제품과 라우터
•
를 모두 재시작 시킵니다.
14

네트워크 문제 해결
3: 다음의 발생할 수 있는 문제들에 대해 점검하고 해결 방법을 확인합니다:
컴퓨터가 네트워크에 연결되어 있지 않을 수 있습니다. 컴퓨터가 HP Deskjet이 연결되어 있는 동일한 네
•
트워크에 연결되어 있는지 확인합니다. 예를 들어, 무선으로 연결된 경우에 컴퓨터가 근방의 네트워크
에 잘못 연결될 수도 있습니다.
컴퓨터가 부가 가치 네트워크(VPN)에 연결될 수 있습니다. 설치를 계속하기 전에 VPN을 일시적으로 해
•
제하십시오. VPN에 연결시키는 것은 다른 네트워크와 동일합니다. 홈네트워크 상의 전체 제품의 VPN
연결을 해제할 필요가 있습니다.
보안 소프트웨어가 통신을 차단하고 있을 수 있습니다. 컴퓨터에 설치된 보안 소프트웨어(방화벽, anti-
•
virus, anti-spyware)가 제품과 컴퓨터 간의 통신을 차단하고 있을 수 있습니다. 설치되는 동안 자동으로
HP 진단 프로그램이 실행되어 방화벽에 의해 차단된 제품 및 프로그램에 대한 정보를 제공합니다. 잠
시 방화벽, 안티 바이러스(anti-virus), 또는 안티 스파이웨어(anti-spyware)를 해제하고 설치가 성공적으
로 종료되는지 확인합니다.
설치가 끝나면 방화벽 응용 프로그램을 다시 가동할 수 있습니다. 다음 파일이 방화벽의 제외 목록에 포
함되는지 확인합니다:
C:\Program Files\HP\Digital Imaging\bin\hpqtra08.exe.
•
C:\Program Files\HP\Digital Imaging\bin\hpqdstcp.exe.
•
추가 정보: 방화벽 소프트웨어를 UDP 포트 427을 통해 통신할 수 있도록 구성합니다.
4: 고급 검색 기능을 사용합니다.
Resume(계속) 버튼을 눌러 무선 테스트를 초기화하고 네트워크 구성 페이지를 인쇄합니다.
1.
네트워크 구성 보고서에서 HP Deskjet의 IP 주소를 확인합니다. 제품 IP 주소가 PC 및 라우터와 동일한
2.
범위 안에 있는지 확인합니다.
소프트웨어가 설치되는 동안 지원되는 고급 검색 옵션을 사용하여 Search by IP address(IP 주소로 검
3.
색)을 클릭한 다음 제품의 IP 주소를 입력합니다.
Windows only
소프트웨어 설치 후 발생할 수 있는 기타 네트워크 문제들
HP Deskjet이 성공적으로 설치된 다음 인쇄하지 못하는 문제가 발생한 경우 다음에 절차에 따릅니다.
라우터, 제품 및 컴퓨터를 끄고 같은 순서대로 다시 켭니다. 먼저 라우터를 켜고 제품을 켠 다음 마
•
지막으로 컴퓨터를 켭니다. 때로는 전원을 껐다가 다시 켜면 네트워크 통신 문제가 해결될 수도 있
습니다.
이전 단계로도 문제를 해결하지 못했지만 컴퓨터에 HP Photosmart 소프트웨어를 성공적으로 설치했
•
다면 네트워크 진단 도구를 실행합니다.
네트워크 진단 도구를 실행하려면
> Solution Center(솔루션 센터)에서, Settings(설정),Other Settings(기타 설정)을 클릭한 다음 Network
Toolbox(네트워크 도구상자)를 클릭합니다. 유틸리티탭에서 네트워크 진단 실행을 클릭합니다.
한국어
15

HP 프린터 제한 보증서
稊庶瞾竪姢処儣櫖冒剖熺儆垫穢稊庶瞾竪姢
儆沎垚洢禎櫖廒空埿

开始安装
查找内容
1
重要提示!
屏幕上软件没有提示之前,请勿连接 USB 连接线!
安装
2
1 2
HP Deskjet D5500 Printer series
插入软件 CD 开始安装。对于没有 CD/DVD 驱动器
的计算机,请转至 www.hp.com/support 下载并安装
打印机软件。
备注: 动画安装手册包含有关设置打印机的重要信息,包括 单键无线设置 。
安装软件时,请按照动画安装手册上的说明
进行操作。

控制面板
1
开启:
打开或关闭产品。关闭产品后,仍会消耗少量电力。要完全移除电源,请关闭产品,等待指示灯熄
灭,然后拔下电源线。
2
无线:
打开或关闭无线广播。无线按钮指示灯指示无线广播是否已打开或已关闭。
3
无线天线图标:
指示 HP 打印机是否已连接到无线网络。
简体中文
4
无线错误图标:
如果发生无线连接错误,则图标将闪烁。
5
无线信号强度图标:
指示无线网络连接的信号强度。信号条越短表示信号强度越弱。当打印机尝试进行连接时,信号强度
条将从左至右交替闪烁。
6
墨水量 LCD:
显示估计的墨水量。
7
错误指示灯:
如果 HP 打印机出现诸如墨盒门打开或墨盒无法使用等错误,则指示灯将闪烁。
8
取消:
取消当前活动打印或校准作业,或正在进行的 WPS 会话。
9
重新开始:
指示 HP 打印机在问题解决之后继续工作。“重新开始”按钮指示灯闪烁时,表示出现卡纸或缺纸等
错误。
18

关于网络
将 HP Deskjet 从 USB 连接更改为网络连接
如果最初安装 HP Deskjet 时使用了 USB 连接,则以后可以更改为无线网络连接。
将 USB 连接更改为集成无线 WLAN 802.11 连接
Windows Mac
拔掉产品背面的 USB 连接线。
1.
将产品 CD 插入计算机的 CD-ROM 驱动器
2.
中。
选择添加设备,然后按照屏幕上的说明进行
3.
无线网络安装。
拔掉产品背面的 USB 连接线。
1.
按无线按钮打开无线广播。
2.
打开 Airport,建立与设备的连接。
3.
将产品 CD 插入计算机的 CD-ROM 驱动器
4.
中。
在桌面上,打开 CD-ROM,然后双击
5.
HP 安装程序,并按照屏幕上的说明操作。
连接到网络上的其他计算机
可以将 HP Deskjet 连接到小型网络中的多台计算机上。
如果已经将 HP Deskjet 连接到网络中的计算机,则必须为每台其他计算机安装 HP Photosmart 软件。在无线
连接安装期间,该软件会自动从网络上搜索产品。在网络中安装 HP Deskjet 之后,当添加其他计算机时便无
需再次对其进行配置。
无线设置提示
插入软件 CD 并按照动画安装手册上的说明操作。
•
如果有 WPS(WiFi 保护设置)路由器,则可以使用单键无线设置。启动打印机后,只需按住路由器上
•
的 WPS 按钮,即可建立与打印机的安全无线连接。
在打印机和路由器之间建立无线连接之后,无线按钮上的蓝色指示灯将常亮,打印机屏幕上也会显示无
•
线天线图标和信号强度条。
19
简体中文

查找更多信息
可从电子版帮助和自述文件中找到所有其他产品信息。打印机软件安装期间将自动安装电子版帮助。电子版
帮助包括有关产品功能和疑难排解的说明。另外还提供产品规格、法律声明、环境、管制和支持信息。自述
文件中包含 HP 技术支持联系信息、操作系统要求和产品信息的最新更新。
Windows Mac
访问电子版帮助
Windows:单击开始 > 所有程序 > HP >
•
Deskjet D5500 series > 帮助。
查找自述文件
在软件安装之前插入软件 CD,当屏幕上显示选
项时单击自述文件。软件安装之后,单击
开始 > 所有程序 > HP > Deskjet D5500 series >
自述文件。
Windows 7
Windows 7 支持信息可从该网站获得:
www.hp.com/go/windows7。
访问电子版帮助
Mac OS X v10.4:单击帮助 > Mac 帮助,
•
库 > HP 产品帮助。
Mac OS X v10.5:单击帮助 > Mac 帮助。
•
在帮助查看器中,选择 HP 产品帮助。
查找自述文件
可以通过插入软件 CD,然后双击位于软件 CD
顶层的 Read Me 文件夹来访问自述文件。
简体中文
墨水使用
备注:在打印过程中可使用很多方法来使用墨盒中的墨水,例如在初始化过程中,准备设备和墨盒进行打
印,以及在打印头维护过程中,可使打印喷嘴保持清洁,使墨水畅通。此外,当墨盒用完后,墨盒中还会残
留一些墨水。有关详情,请访问 www.hp.com/go/inkusage。
电源规格:
电源适配器: 0957-2269
输入电压: 100-240Vac (+/- 10%)
输入频率: 50/60 Hz (+/- 3Hz)
功耗:最大 xx 瓦特(平均打印)= 14W(无线关闭)15W(无线开启)
备注:请仅使用 HP 提供的电源适配器。
20

安装问题疑难排解
Windows Mac
如果无法进行打印,请确保产品已设置为默认
打印设备:
Windows Vista:在 Windows 任务栏上,依
•
次单击开始、控制面板、打印机。
Windows XP:在 Windows 任务栏上,依次
•
单击开始、控制面板、打印机和传真。
确保勾选了产品旁边的圆圈。如果您的产品没有
被选定为默认打印机,请右键单击打印机图标,
然后从菜单中选择“设为默认打印机”。
如果您仍无法打印,或 Windows 软件安装失败:
从计算机的 CD-ROM 驱动器中取出 CD,然
1.
后断开 USB 连接线与计算机的连接。
重新启动计算机。
2.
暂时禁用所有软件防火墙并关闭所有防病毒
3.
软件。在安装完产品软件后,重新启动这些
程序。
将产品软件 CD 插入计算机 CD-ROM 驱动
4.
器中,然后按照屏幕上的说明安装产品软
件。请勿在没有提示的情况下连接 USB 连
接线。
安装完成后,重新启动计算机。
5.
如果无法打印,请卸载并重新安装软件:
备注:卸载程序会删除所有设备特定的 HP 软件
组件。卸载程序不会删除与其他产品或程序共
享的组件。
卸载软件:
断开 HP Deskjet 与计算机的连接。
1.
打开 Applications:Hewlett-Packard 文件夹。
2.
双击 HP 卸载程序。按照屏幕上的说明执行
3.
操作。
安装软件:
要安装软件,请将 HP 软件 CD 插入计算机
1.
的 CD 驱动器。
在桌面上,打开 CD,然后双击 HP 安装程
2.
序。
按照屏幕上的说明执行操作。
3.
简体中文
21

网络问题疑难排解
软件安装期间无法找到产品
如果在软件安装期间 HP 软件无法在网络上找到您的产品,请尝试执行下列疑难排解步骤。如果您进行了无
线连接,请执行步骤 1 至步骤 4(如有必要)。
无线连接
1: 通过运行无线网络测试并按照提供的所有说明来确定产品是否已连接到网络。
运行无线网络测试
按住重新开始按钮以启动无线测试并打印无线网络测试和网络配置页。
2: 如果您在步骤 1 中已确定产品尚未连接到网络且这是您第一次安装该产品,则需要在软件安装期间按照
屏幕上的说明将产品连接到网络。
将产品连接到网络
将产品软件 CD 插入计算机的 CD-ROM 驱动器中。
1.
随后按照屏幕上的说明操作即可。看到提示后,使用包装盒中提供的 USB 设置连接线将产品连接到计算
2.
机。产品将尝试连接此网络。如果连接失败,请按照提示更正该问题,然后重试。
设置完成后,系统将提示您断开 USB 连接线连接并测试无线网络连接。将产品成功连接到网络后,可在
3.
要在线使用产品的每台计算机上安装软件。
如果设备无法加入网络,请检查以下常见问题:
简体中文
您可能选择了错误的网络或没有正确键入网络名称 (SSID)。检查这些设置以确保设置正确。
•
您可能没有正确键入 WEP 密钥或 WPA 加密密钥不正确(如果使用加密)。
•
备注:如果在安装期间没有自动找到网络名称或 WEP/WPA 密钥,并且您也不知道这些信息,则可以
从 www.hp.com/go/networksetup 网站下载可帮助您查找这些信息的应用程序。此应用程序仅适用于
Windows Internet Explorer 且只有英文版本。
可能路由器存在问题。先关闭然后再打开产品和路由器的电源,以尝试重新启动产品和路由器。
•
22

网络问题疑难排解
3: 检查并解决下列可能的情况:
您的计算机可能没有连接到网络。确保将计算机与 HP Deskjet 连接到同一网络。例如,如果是无线连接,
•
则可能是将计算机错误地连接到相邻网络中。
您的计算机可能连接到虚拟专用网络 (VPN)。在继续安装前临时禁用 VPN。连接到 VPN 如同位于其他网
•
络;需要断开与 VPN 的连接以访问主网络上的产品。
安全软件可能会阻止通信。安装在计算机上的安全软件(防火墙、防病毒、反间谍软件)可能会阻止产
•
品与计算机之间的通信。HP Diagnostic 在安装期间将自动运行并提供可能被防火墙阻止的内容的有关信
息。请尝试暂时禁用防火墙、防病毒或反间谍应用程序以查看能否成功完成安装。
安装完成后,可重新启用防火墙应用程序。确保下列文件包括在防火墙的例外列表中:
C:\Program Files\HP\Digital Imaging\bin\hpqtra08.exe。
•
C:\Program Files\HP\Digital Imaging\bin\hpqdstcp.exe。
•
提示:可以配置防火墙软件以允许 UDP 端口 427 上的通信。
4: 使用高级搜索功能。
按住重新开始按钮以启动无线测试并打印网络配置页。
1.
通过网络配置报告识别 HP Deskjet 的 IP 地址。检查以确保产品 IP 地址与计算机和路由器处于相同的
2.
范围中。
在软件安装期间使用可用的高级搜索选项,然后单击按 IP 地址搜索,并输入产品的 IP 地址。
3.
Windows only
软件安装之后的其他网络问题
如果 HP Deskjet 已成功安装,而您遇到了诸如无法打印之类的问题,请尝试执行下列操作:
关闭路由器、打印机和计算机,然后再按此顺序将其一一打开:首先是路由器,然后是打印机,最
•
后是计算机。在部分情况下,可以通过关闭电源然后再将其打开的方式来修复网络通信故障。
如果上述步骤未能解决问题,且您已在计算机上成功安装 HP Photosmart 软件,请运行网络诊断工
•
具。
运行网络诊断工具
> 在解决方案中心中,依次单击设置、其他设置、网络工具箱。在实用工具选项卡上单击运行网络
诊断。
23
简体中文

打印机有限保修声明
⫓䇂㵘㆗㬫䇤䇻㡅⫓䇂㵘㋪⹊㋮⿈ⷝ⭥⥛㠘
HP

Begin Setup
Locate contents
1
Important!
Do NOT connect the USB cable until prompted onscreen by the software!
Setup
2
1 2
HP Deskjet D5500 Printer series
Insert the software CD to start. For computers without
a CD/DVD drive, please go to www.hp.com/support
to download and install the printer software.
Note: The animated setup guide contains important information on setting up the printer, including One
Button Wireless Setup .
Follow the animated setup guide,
while the software installs.

Control panel
1
On:
Turns the product on or off. When the product is off, a minimal amount of power is still used. To
completely remove power, turn off the product, wait for the light to go out, then unplug the power cord.
2
Wireless:
Turns the wireless radio on or off. The wireless button light indicates if the wireless radio is turned on or
off.
3
Wireless antenna icon:
Indicates if the HP Printer is connected to a wireless network.
English
Wireless error icon:
4
Flashes if there is a wireless connection error.
Wireless signal strength icon:
5
Indicates the signal strength of the wireless network connection. Fewer signal bars indicate lower signal
strength. When the printer is trying to connect, the signal strength bars will alternately flash from left to
right.
6
Ink level LCD:
Shows estimated ink level.
Error light:
7
Flashes if the HP Printer has an error such as an open print cartridge door or a stalled print carriage.
8
Cancel:
Cancels the current active printing, or alignment job, or WPS session in progress.
Resume:
9
Instructs the HP Printer to continue after a problem is solved. The Resume button light flashes to indicate
errors such as paper jam and out of paper.
26

About networking
Change the HP Deskjet from a USB connection to a
network connection
If you first install the HP Deskjet with a USB connection, you can later change to a wireless network
connection.
To change a USB connection to an integrated wireless WLAN 802.11 connection
Windows Mac
Unplug the USB connection from the back of
1.
the product.
Insert the product CD in the computer
2.
CD-ROM drive.
Select Add a Device, and then follow the
3.
onscreen instructions for a wireless network
installation.
Unplug the USB connection from the back of
1.
the product.
Press the Wireless button to turn on the
2.
wireless radio.
Turn on Airport and establish a connection
3.
with the device.
Insert the product CD in the computer CD
4.
CD-ROM drive.
On the desktop, open the CD-ROM and
5.
then double-click HP Installer and follow the
onscreen instructions.
Connect to additional computers on a network
You can connect the HP Deskjet to more than one computer on a small network of computers.
If the HP Deskjet is already connected to a computer on a network, for each additional computer you must
install the HP Photosmart Software. During installation of a wireless connection, the software will automatically
discover the product on the network. Once you have set up the HP Deskjet on the network you will not need
to configure it again when you add additional computers.
Wireless setup tips
Insert the software CD and follow the animated setup guide.
•
If you have a WPS (WiFi Protected Setup) router, then you can use One Button Wireless Setup. After
•
the printer has been powered on, just press and hold the WPS button on the router to establish a secure
wireless connection to your printer.
When a wireless connection between the printer and the router has been established, the blue indicator
•
light on the wireless button will be lit and the wireless antenna icon with the signal strength bars are
displayed on the printer screen.
27
English

Find more information
All other product information can be found in the electronic Help and Readme. The electronic Help is
automatically installed during printer software installation. Electronic Help includes instructions on product
features and troubleshooting. It also provides product specifications, legal notices, environmental, regulatory,
and support information. The Readme file contains HP support contact information, operating system
requirements, and the most recent updates to your product information.
Windows Mac
To access the Electronic Help
Windows: Click Start > All Programs > HP >
•
Deskjet D5500 series > Help.
Find Readme
Before software installation, insert the software
CD, click Readme when the option appears
onscreen. After software installation, click Start
> All Programs > HP > Deskjet D5500 series >
Readme.
Windows 7
Windows 7 support information is available
online: www.hp.com/go/windows7.
To access the Electronic Help
Mac OS X v10.4: Click Help > Mac Help,
•
Library > HP Product Help.
Mac OS X v10.5: Click Help > Mac Help. In
•
the Help Viewer, select HP Product Help.
Find Readme
You can access the Readme file by inserting the
software CD, then double-clicking the Read Me
folder located at the top-level of the software CD.
Ink usage
Note: Ink from the cartridges is used in the printing process in a number of different ways, including in the
initialization process, which prepares the device and cartridges for printing, and in printhead servicing, which
keeps print nozzles clear and ink flowing smoothly. In addition, some residual ink is left in the cartridge after
it is used. For more information see www.hp.com/go/inkusage.
English
Power specifications:
Power adapter: 0957-2269
Input voltage: 100-240Vac (+/- 10%)
Input frequency: 50/60 Hz (+/- 3Hz)
Power consumption: xx watts maximum (average printing) = 14W (Wireless Off) 15W (Wireless On)
Note: Use only with the power adapter supplied by HP.
28

Installation troubleshooting
Windows Mac
If you are unable to print make sure the product
is set as your default printing device:
Windows Vista: On the Windows taskbar,
•
click Start, click Control Panel, and then click
Printers.
Windows XP: On the Windows taskbar,
•
click Start, click Control Panel, and then click
Printers and Faxes.
Make sure that your product has a check mark in
the circle next to it. If your product is not selected
as the default printer, right-click the printer icon
and choose “Set as default printer” from the
menu.
If you are still unable to print, or the Windows
software installation fails:
Remove the CD from the computer’s
1.
CD-ROM drive, and then disconnect the USB
cable from the computer.
Restart the computer.
2.
Temporarily disable any software firewall
3.
and close any anti-virus software. Restart
these programs after the product software is
installed.
Insert the product software CD in the
4.
computer’s CD-ROM drive, then follow the
onscreen instructions to install the product
software. Do not connect the USB cable until
you are told to do so.
After the installation finishes, restart the
5.
computer.
If you are unable to print, uninstall and reinstall
the software:
Note: The uninstaller removes all of the HP
software components that are specific to
the device. The uninstaller does not remove
components that are shared by other products or
programs.
To uninstall the software:
Disconnect the HP Deskjet from your
1.
computer.
Open the Applications: Hewlett-Packard
2.
folder.
Double-click HP Uninstaller. Follow the
3.
onscreen instructions.
To install the software:
To install the software, insert the HP software
1.
CD into your computer’s CD drive.
On the desktop, open the CD and then
2.
double-click HP Installer.
Follow the onscreen instructions.
3.
29
English

Network troubleshooting
The product cannot be found during software installation
If the HP software is unable to find your product on the network during software installation, try the following
troubleshooting steps. If you have a wireless connection, start with step 1 and proceed through step 4 as
necessary.
Wireless connections
1: Determine if the product is connected to the network by running the Wireless Network Test and following
any instructions provided.
To run the Wireless Network Test
Press and hold the Resume button to initiate the wireless test and print the wireless network test and network
configuration pages.
2: If you determined in Step 1 that the product is not connected to a network and this is the first time you are
installing the product, you will need to follow the onscreen instructions during software installation to connect
the product to the network.
To connect the product to a network
Insert the product Software CD in the computer CD-ROM drive.
1.
Follow the instructions on the screen. When you are prompted, connect the product to the computer
2.
using the USB setup cable included in the box. The product will attempt to connect to the network. If the
connection fails, follow the prompts to correct the problem, and then try again.
When the setup is finished, you will be prompted to disconnect the USB cable and test the wireless
3.
network connection. Once the product connects successfully to the network, install the software on each
computer that will use the product over the network.
If the device is unable to join your network, check for these common issues:
You may have picked the wrong network or typed in your network name (SSID) incorrectly. Check these
•
settings to ensure they are correct.
You may have typed in your WEP key or your WPA encryption key incorrectly (if you are using
•
encryption).
Note: If the network name or the WEP/WPA keys are not found automatically during installation, and if
you don’t know them, you can download an application from www.hp.com/go/networksetup that may
help you locate them. This application works for only Windows Internet Explorer and is only available in
English.
You may have a router problem. Try restarting both the product and the router by turning the power for
•
each of them off, and then on again.
English
30

Network troubleshooting
3: Check for and resolve the following possible conditions:
Your computer may not be connected to your network. Make sure that the computer is connected to the
•
same network to which the HP Deskjet is connected. If you are connected wirelessly, for example, it is
possible that your computer is connected to a neighbor’s network by mistake.
Your computer may be connected to a Virtual Private Network (VPN). Temporarily disable the VPN before
•
proceeding with the installation. Being connected to a VPN is like being on a different network; you will
need to disconnect the VPN to access the product over the home network.
Security software may be blocking communication. Security software (firewall, anti-virus, anti-spyware)
•
installed on your computer may be blocking communication between the product and the computer. An
HP diagnostic runs automatically during installation and can provide messaging about what may be
blocked by the firewall. Try temporarily disabling your firewall, anti-virus, or anti-spyware applications to
see if you can successfully finish the installation.
You can re-enable your firewall application after installation is complete. Make sure the following files are
included in the exceptions list of the firewall:
C:\Program Files\HP\Digital Imaging\bin\hpqtra08.exe.
•
C:\Program Files\HP\Digital Imaging\bin\hpqdstcp.exe.
•
Tip: Configure your firewall software to allow communication over UDP port 427.
4: Use the advanced search feature.
Press and hold the Resume button to initiate the wireless test and print the network configuration page.
1.
Identify the IP address of the HP Deskjet from the network configuration report. Check to make sure that
2.
the Product IP address is in the same range as the PC and router.
Use the advanced search option available during software installation, then click on Search by IP
3.
address and enter the product’s IP address.
Windows only
Other network problems after software installation
If the HP Deskjet has been successfully installed, and you are experiencing problems such as not being able
to print, try the following:
Turn off the router, product, and computer, and then turn them back on in this order: router first, then the
•
product, and finally the computer. Sometimes, cycling the power will recover a network communication
issue.
If the previous step does not solve the problem and you have successfully installed the HP Photosmart
•
Software on your computer, run the Network Diagnostic tool.
To run the Network Diagnostic tool
> In the Solution Center, click Settings, click Other Settings, and then click Network Toolbox. On the
Utilities tab, click Run Network Diagnostics.
31
English

HP printer limited warranty statement
A. Extent of limited warranty
1. Hewlett-Packard (HP) warrants to the end-user customer that the HP products specified above will be free from
defects in materials and workmanship for the duration specified above, which duration begins on the date of purchase
by the customer.
2. For software products, HP's limited warranty applies only to a failure to execute programming instructions. HP does
not warrant that the operation of any product will be interrupted or error free.
3. HP's limited warranty covers only those defects that arise as a result of normal use of the product, and does not cover
any other problems, including those that arise as a result of:
a. Improper maintenance or modification;
b. Software, media, parts, or supplies not provided or supported by HP;
c. Operation outside the product's specifications;
d. Unauthorized modification or misuse.
4. For HP printer products, the use of a non-HP cartridge or a refilled cartridge does not affect either the warranty to the
customer or any HP support contract with the customer. However, if printer failure or damage is attributable to the use
of a non-HP or refilled ink cartridge, HP will charge its standard time and materials charges to service the printer for
the particular failure or damage.
5. If HP receives, during the applicable warranty period, notice of a defect in any product which is covered by HP's
warranty, HP shall either repair or replace the product, at HP's option.
6. If HP is unable to repair or replace, as applicable, a defective product which is covered by HP's warranty, HP shall,
within a reasonable time after being notified of the defect, refund the purchase price for the product.
7. HP shall have no obligation to repair, replace, or refund until the customer returns the defective product to HP.
8. Any replacement product may be either new or like-new, provided that it has functionality at least equal to that of the
product being replaced.
9. HP products may contain remanufactured parts, components, or materials equivalent to new in performance.
10. HP's Limited Warranty Statement is valid in any country where the covered HP product is distributed by HP. Contracts
for additional warranty services, such as on-site service, may be available from any authorized HP service facility in
countries where the product is distributed by HP or by an authorized importer.
B. Limitations of warranty
TO THE EXTENT ALLOWED BY LOCAL LAW, NEITHER HP NOR ITS THIRD PARTY SUPPLIERS MAKES ANY
OTHER WARRANTY OR CONDITION OF ANY KIND, WHETHER EXPRESS OR IMPLIED WARRANTIES OR
CONDITIONS OF MERCHANTABILITY, SATISFACTORY QUALITY, AND FITNESS FOR A PARTICULAR
PURPOSE.
C. Limitations of liability
1. To the extent allowed by local law, the remedies provided in this Warranty Statement are the customer's sole and
exclusive remedies.
2. TO THE EXTENT ALLOWED BY LOCAL LAW, EXCEPT FOR THE OBLIGATIONS SPECIFICALLY SET FORTH IN
THIS WARRANTY STATEMENT, IN NO EVENT SHALL HP OR ITS THIRD PARTY SUPPLIERS BE LIABLE FOR
DIRECT, INDIRECT, SPECIAL, INCIDENTAL, OR CONSEQUENTIAL DAMAGES, WHETHER BASED ON
CONTRACT, TORT, OR ANY OTHER LEGAL THEORY AND WHETHER ADVISED OF THE POSSIBILITY OF
SUCH DAMAGES.
D. Local law
1. This Warranty Statement gives the customer specific legal rights. The customer may also have other rights which vary
from state to state in the United States, from province to province in Canada, and from country to country elsewhere
in the world.
2. To the extent that this Warranty Statement is inconsistent with local law, this Warranty Statement shall be deemed
modified to be consistent with such local law. Under such local law, certain disclaimers and limitations of this Warranty
Statement may not apply to the customer. For example, some states in the United States, as well as some
governments outside the United States (including provinces in Canada), may:
a. Preclude the disclaimers and limitations in this Warranty Statement from limiting the statutory rights of a consumer
(e.g., the United Kingdom);
b. Otherwise restrict the ability of a manufacturer to enforce such disclaimers or limitations; or
c. Grant the customer additional warranty rights, specify the duration of implied warranties which the manufacturer
cannot disclaim, or allow limitations on the duration of implied warranties.
3. THE TERMS IN THIS WARRANTY STATEMENT, EXCEPT TO THE EXTENT LAWFULLY PERMITTED, DO NOT
EXCLUDE, RESTRICT, OR MODIFY, AND ARE IN ADDITION TO, THE MANDATORY STATUTORY RIGHTS
APPLICABLE TO THE SALE OF THE HP PRODUCTS TO SUCH CUSTOMERS.
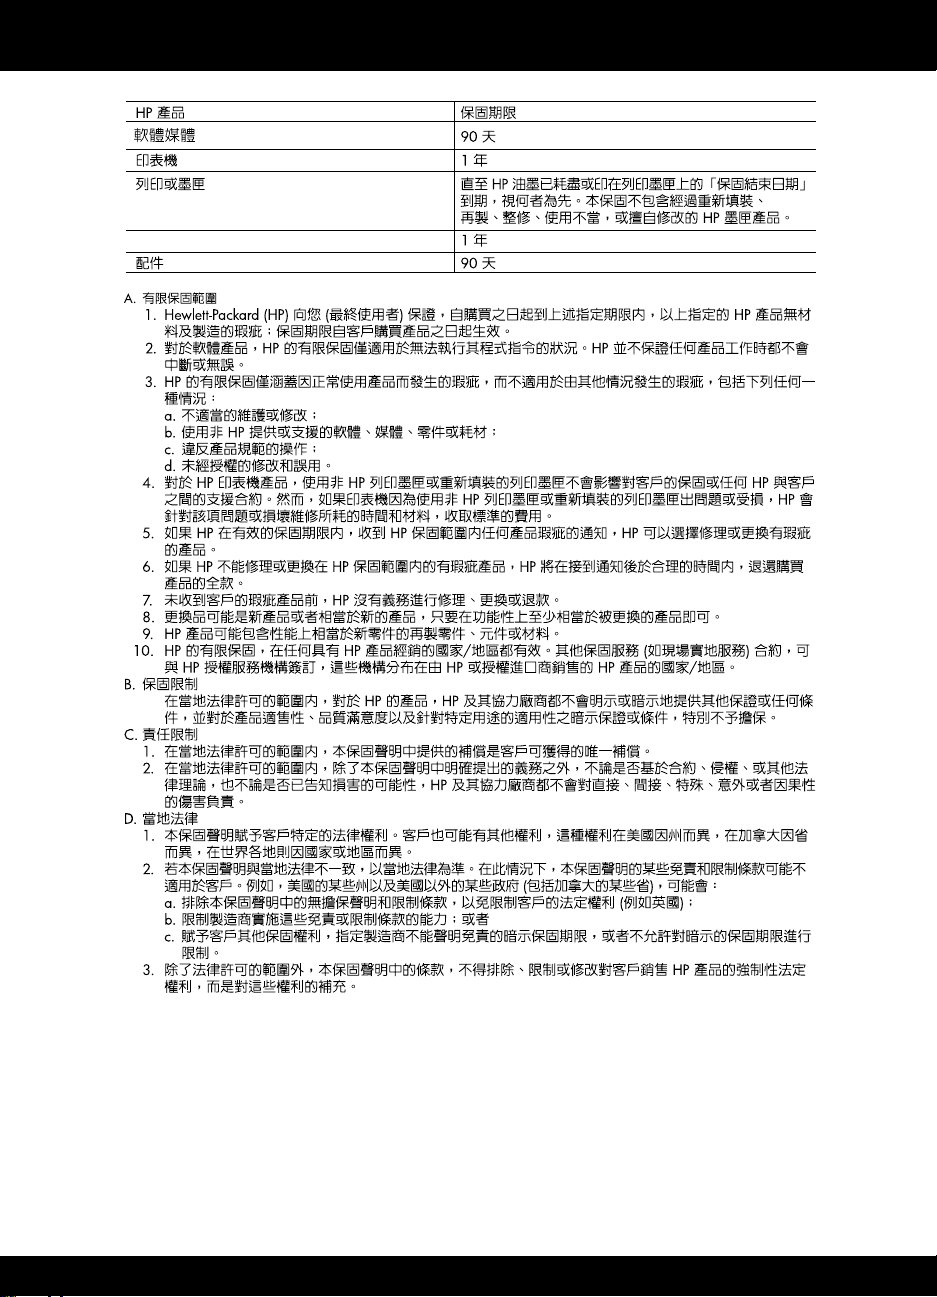
HP product Duration of limited warranty
Software Media 90 days
Printer 1 year
Print or Ink cartridges Until the HP ink is depleted or the “end of warranty” date printed
on the cartridge has been reached, whichever occurs first. This
warranty does not cover HP ink products that have been refilled,
remanufactured, refurbished, misused, or tampered with.
Printheads (only applies to products with customer 1 year
replaceable printheads)
Accessories 90 days
 Loading...