

Page 1

hp deskjet 9600 series
user's guide
Page 2

hp deskjet 9600 series
user’s guide
Page 3

Copyright Information
© 2003 Copyright
Hewlett-Packard Development
Company, L.P.
Reproduction, adaptation or
translation without prior written
permission is prohibited,
except as allowed under the
copyright laws.
Edition 1.1, 11/2003
Notice
The information contained
herein is subject to change
without notice.
The only warranties for HP
products and services are set
forth in the express warranty
statements accompanying
such products and services.
Nothing herein should be
construed as constituting an
additional warranty. HP shall
not be liable for technical or
editorial errors or omissions
contained herein.
A user of the Hewlett-Packard
product associated with this
guide is granted a license to:
a) print hard copies of this user
guide for PERSONAL,
INTERNAL, or COMPANY use
subject to the restriction not to
sell, resell, or otherwise
distribute the hard copies; and
b) place an electronic copy of
this user guide on a network
server, provided access to the
electronic copy is limited to
PERSONAL, INTERNAL users
of the Hewlett-Packard product
associated with this guide.
Acknowledgements
HP ColorSmart III and HP
PhotoREt IV are trademarks of
Hewlett-Packard Company.
Microsoft
Windows NT
®
, Windows®,
®
, and MS-DOS®
are U.S.-registered trademarks
of Microsoft Corporation.
®
Pentium
is a U.S.-registered
trademark of Intel Corporation.
TrueType™ is a U.S.
trademark of Apple Computer,
Inc.
®
UNIX
is a registered
trademark of the Open Group.
Safety Information
Always follow basic safety
precautions when using this
product to reduce risk of injury
from fire or electric shock.
1 Read and understand all
instructions in the
documentation that
comes with the printer.
2 Use only a grounded
electrical outlet when
connecting this product to
a power source. If you do
not know whether the
outlet is grounded, check
with a qualified electrician.
3 Observe all warnings and
instructions marked on
the product.
4 Unplug this product from
wall outlets before
cleaning.
5 Do not install or use this
product near water, or
when you are wet.
6 Install the product
securely on a stable
surface.
7 Install the product in a
protected location where
no one can step on or trip
over the line cord, and the
line cord cannot be
damaged.
8 If the product does not
operate normally, see
“Troubleshooting”.
9 There are no
user-serviceable parts
inside. Refer servicing to
qualified service
personnel.
ENWW
Page 4

Contents
Welcome
Special features . . . . . . . . . . . . . . . . . . . . . . . . . . . . . . . . . . . . . . . . . . . . . . . . . . . . . . .1-1
Using this guide . . . . . . . . . . . . . . . . . . . . . . . . . . . . . . . . . . . . . . . . . . . . . . . . . . . . . . .1-2
Getting more information . . . . . . . . . . . . . . . . . . . . . . . . . . . . . . . . . . . . . . . . . . . . . . . .1-2
Accessibility . . . . . . . . . . . . . . . . . . . . . . . . . . . . . . . . . . . . . . . . . . . . . . . . . . . . . . . . . .1-3
Visual. . . . . . . . . . . . . . . . . . . . . . . . . . . . . . . . . . . . . . . . . . . . . . . . . . . . . . . . . . . .1-3
Mobility . . . . . . . . . . . . . . . . . . . . . . . . . . . . . . . . . . . . . . . . . . . . . . . . . . . . . . . . . .1-3
Support . . . . . . . . . . . . . . . . . . . . . . . . . . . . . . . . . . . . . . . . . . . . . . . . . . . . . . . . . .1-3
Getting started
Understanding the printer parts and functions . . . . . . . . . . . . . . . . . . . . . . . . . . . . . . . .2-1
Front view . . . . . . . . . . . . . . . . . . . . . . . . . . . . . . . . . . . . . . . . . . . . . . . . . . . . . . . .2-1
Back view . . . . . . . . . . . . . . . . . . . . . . . . . . . . . . . . . . . . . . . . . . . . . . . . . . . . . . . .2-2
Auto-duplex unit. . . . . . . . . . . . . . . . . . . . . . . . . . . . . . . . . . . . . . . . . . . . . . . . . . . .2-3
Connecting the printer . . . . . . . . . . . . . . . . . . . . . . . . . . . . . . . . . . . . . . . . . . . . . . . . . .2-4
Connecting directly using a USB or parallel cable (Windows). . . . . . . . . . . . . . . . .2-5
Sharing the printer on a locally shared network (Windows). . . . . . . . . . . . . . . . . . .2-8
Connecting directly using a USB cable (Mac OS). . . . . . . . . . . . . . . . . . . . . . . . .2-10
Connecting to a network . . . . . . . . . . . . . . . . . . . . . . . . . . . . . . . . . . . . . . . . . . . .2-11
Uninstalling the printer software. . . . . . . . . . . . . . . . . . . . . . . . . . . . . . . . . . . . . . . . . .2-14
Customizing the printer software setup program . . . . . . . . . . . . . . . . . . . . . . . . . . . . .2-15
Installing other software . . . . . . . . . . . . . . . . . . . . . . . . . . . . . . . . . . . . . . . . . . . . . . . .2-15
To complete a software-first installation (recommended) . . . . . . . . . . . . . . . . .2-6
To complete a hardware-first installation . . . . . . . . . . . . . . . . . . . . . . . . . . . . .2-7
To share a printer connected to your computer (the server). . . . . . . . . . . . . . .2-8
To use a printer connected to another computer (clients). . . . . . . . . . . . . . . . .2-9
To share the printer on a peer-to-peer network (Mac OS) . . . . . . . . . . . . . . .2-10
To install the printer driver on the PC or server (Windows) . . . . . . . . . . . . . .2-11
To install the printer driver on a client . . . . . . . . . . . . . . . . . . . . . . . . . . . . . . .2-12
To add a network port to the printer . . . . . . . . . . . . . . . . . . . . . . . . . . . . . . . .2-12
Connecting to a network (Mac OS). . . . . . . . . . . . . . . . . . . . . . . . . . . . . . . . .2-13
Using print cartridges and accessories
Using the auto-duplex unit . . . . . . . . . . . . . . . . . . . . . . . . . . . . . . . . . . . . . . . . . . . . . . .3-1
Installing the auto-duplex unit . . . . . . . . . . . . . . . . . . . . . . . . . . . . . . . . . . . . . . . . .3-1
Using the print cartridges. . . . . . . . . . . . . . . . . . . . . . . . . . . . . . . . . . . . . . . . . . . . . . . .3-2
Installing or replacing the print cartridges . . . . . . . . . . . . . . . . . . . . . . . . . . . . . . . .3-2
Aligning the print cartridges. . . . . . . . . . . . . . . . . . . . . . . . . . . . . . . . . . . . . . . . . . .3-5
Cleaning the print cartridges . . . . . . . . . . . . . . . . . . . . . . . . . . . . . . . . . . . . . . . . . .3-6
To clean the print cartridges automatically . . . . . . . . . . . . . . . . . . . . . . . . . . . .3-6
To clean the print cartridges manually . . . . . . . . . . . . . . . . . . . . . . . . . . . . . . .3-7
Maintaining the print cartridges . . . . . . . . . . . . . . . . . . . . . . . . . . . . . . . . . . . . . . . .3-8
Storing the print cartridges . . . . . . . . . . . . . . . . . . . . . . . . . . . . . . . . . . . . . . . .3-8
Printing with a single print cartridge. . . . . . . . . . . . . . . . . . . . . . . . . . . . . . . . . . . . .3-9
Printing and loading media
Selecting print media . . . . . . . . . . . . . . . . . . . . . . . . . . . . . . . . . . . . . . . . . . . . . . . . . . .4-1
Tips for selecting and using print media . . . . . . . . . . . . . . . . . . . . . . . . . . . . . . . . .4-1
Understanding specifications for supported media . . . . . . . . . . . . . . . . . . . . . . . . .4-2
Understanding supported media sizes . . . . . . . . . . . . . . . . . . . . . . . . . . . . . . .4-2
Understanding supported media types . . . . . . . . . . . . . . . . . . . . . . . . . . . . . . .4-4
Understanding supported media weights and capacities . . . . . . . . . . . . . . . . .4-5
ENWW iii
Page 5

Setting minimum margins . . . . . . . . . . . . . . . . . . . . . . . . . . . . . . . . . . . . . . . . . . . .4-6
Loading media in the input tray . . . . . . . . . . . . . . . . . . . . . . . . . . . . . . . . . . . . . . . . . . .4-7
Using the automatic paper-type sensor . . . . . . . . . . . . . . . . . . . . . . . . . . . . . . . . . . . . .4-9
Changing default print settings. . . . . . . . . . . . . . . . . . . . . . . . . . . . . . . . . . . . . . . . . . .4-10
Understanding smart software features . . . . . . . . . . . . . . . . . . . . . . . . . . . . . . . . . . . .4-11
Printing a document . . . . . . . . . . . . . . . . . . . . . . . . . . . . . . . . . . . . . . . . . . . . . . . . . . .4-13
Printing with the front or rear manual feed slot . . . . . . . . . . . . . . . . . . . . . . . . . . . . . .4-14
Printing on various media types. . . . . . . . . . . . . . . . . . . . . . . . . . . . . . . . . . . . . . . . . .4-16
Printing on custom-sized paper . . . . . . . . . . . . . . . . . . . . . . . . . . . . . . . . . . . . . . . . . .4-17
Printing on envelopes. . . . . . . . . . . . . . . . . . . . . . . . . . . . . . . . . . . . . . . . . . . . . . . . . .4-18
Printing on cards and smaller-sized media . . . . . . . . . . . . . . . . . . . . . . . . . . . . . . . . .4-19
Printing digital photographs . . . . . . . . . . . . . . . . . . . . . . . . . . . . . . . . . . . . . . . . . . . . .4-21
Printing with six-ink color . . . . . . . . . . . . . . . . . . . . . . . . . . . . . . . . . . . . . . . . . . . .4-21
Guidelines for printing photographs . . . . . . . . . . . . . . . . . . . . . . . . . . . . . . . .4-21
Understanding digital photography technologies. . . . . . . . . . . . . . . . . . . . . . . . . .4-22
PhotoREt printing . . . . . . . . . . . . . . . . . . . . . . . . . . . . . . . . . . . . . . . . . . . . . .4-22
4800 x 1200 optimized dpi . . . . . . . . . . . . . . . . . . . . . . . . . . . . . . . . . . . . . . .4-22
Printing Exif Print-enhanced photographs. . . . . . . . . . . . . . . . . . . . . . . . . . . .4-22
HP photo imaging software . . . . . . . . . . . . . . . . . . . . . . . . . . . . . . . . . . . . . . . . . .4-23
Printing borderless . . . . . . . . . . . . . . . . . . . . . . . . . . . . . . . . . . . . . . . . . . . . . . . . . . . .4-24
Printing on both sides (duplexing) . . . . . . . . . . . . . . . . . . . . . . . . . . . . . . . . . . . . . . . .4-26
Guidelines for printing on both sides of the paper. . . . . . . . . . . . . . . . . . . . . . . . .4-26
Performing manual duplexing . . . . . . . . . . . . . . . . . . . . . . . . . . . . . . . . . . . . . . . .4-27
Performing auto-duplexing . . . . . . . . . . . . . . . . . . . . . . . . . . . . . . . . . . . . . . . . . .4-28
Advantages of using the auto-duplex unit. . . . . . . . . . . . . . . . . . . . . . . . . . . .4-28
Printing multiple pages on a single sheet of paper . . . . . . . . . . . . . . . . . . . . . . . . . . .4-29
Printing booklets. . . . . . . . . . . . . . . . . . . . . . . . . . . . . . . . . . . . . . . . . . . . . . . . . . . . . .4-30
Performing manual booklet printing. . . . . . . . . . . . . . . . . . . . . . . . . . . . . . . . . . . .4-30
Performing automatic booklet printing. . . . . . . . . . . . . . . . . . . . . . . . . . . . . . . . . .4-31
Printing posters . . . . . . . . . . . . . . . . . . . . . . . . . . . . . . . . . . . . . . . . . . . . . . . . . . . . . .4-32
Printing banners. . . . . . . . . . . . . . . . . . . . . . . . . . . . . . . . . . . . . . . . . . . . . . . . . . . . . .4-33
Printing labels. . . . . . . . . . . . . . . . . . . . . . . . . . . . . . . . . . . . . . . . . . . . . . . . . . . . . . . .4-34
Printing iron-on transfers . . . . . . . . . . . . . . . . . . . . . . . . . . . . . . . . . . . . . . . . . . . . . . .4-35
Cancelling a print job . . . . . . . . . . . . . . . . . . . . . . . . . . . . . . . . . . . . . . . . . . . . . . . . . .4-36
Printing from MS-DOS software programs. . . . . . . . . . . . . . . . . . . . . . . . . . . . . . . . . .4-37
Using the Toolbox
Printer Status tab . . . . . . . . . . . . . . . . . . . . . . . . . . . . . . . . . . . . . . . . . . . . . . . . . . . . . .5-1
Information tab . . . . . . . . . . . . . . . . . . . . . . . . . . . . . . . . . . . . . . . . . . . . . . . . . . . . . . . .5-2
HP Instant Support . . . . . . . . . . . . . . . . . . . . . . . . . . . . . . . . . . . . . . . . . . . . . . . . .5-2
Using myPrintMileage . . . . . . . . . . . . . . . . . . . . . . . . . . . . . . . . . . . . . . . . . . . . . . .5-3
To access the myPrintMileage website. . . . . . . . . . . . . . . . . . . . . . . . . . . . . . .5-3
To enable myPrintMileage AutoSend . . . . . . . . . . . . . . . . . . . . . . . . . . . . . . . .5-3
Printer Services tab . . . . . . . . . . . . . . . . . . . . . . . . . . . . . . . . . . . . . . . . . . . . . . . . . . . .5-4
Using the HP Inkjet Toolbox (Macintosh). . . . . . . . . . . . . . . . . . . . . . . . . . . . . . . . . . . .5-5
Troubleshooting
Starting troubleshooting. . . . . . . . . . . . . . . . . . . . . . . . . . . . . . . . . . . . . . . . . . . . . . . . .6-1
Printing a demo page. . . . . . . . . . . . . . . . . . . . . . . . . . . . . . . . . . . . . . . . . . . . . . . . . . .6-3
Printing a diagnostic page . . . . . . . . . . . . . . . . . . . . . . . . . . . . . . . . . . . . . . . . . . . . . . .6-3
Troubleshooting installation issues . . . . . . . . . . . . . . . . . . . . . . . . . . . . . . . . . . . . . . . .6-4
Hardware installation issues . . . . . . . . . . . . . . . . . . . . . . . . . . . . . . . . . . . . . . . . . .6-4
Software installation issues . . . . . . . . . . . . . . . . . . . . . . . . . . . . . . . . . . . . . . . . . . .6-4
USB installation failed or nothing prints through USB . . . . . . . . . . . . . . . . . . . . . . .6-5
Clearing jams . . . . . . . . . . . . . . . . . . . . . . . . . . . . . . . . . . . . . . . . . . . . . . . . . . . . . . . . .6-6
Tips for avoiding paper jams . . . . . . . . . . . . . . . . . . . . . . . . . . . . . . . . . . . . . . . . . .6-7
Calibrating color . . . . . . . . . . . . . . . . . . . . . . . . . . . . . . . . . . . . . . . . . . . . . . . . . . . . . . .6-8
iv ENWW
Page 6

Resolving printer problems . . . . . . . . . . . . . . . . . . . . . . . . . . . . . . . . . . . . . . . . . . . . . .6-9
Printer shuts down unexpectedly. . . . . . . . . . . . . . . . . . . . . . . . . . . . . . . . . . . . . . .6-9
Power cannot be turned on . . . . . . . . . . . . . . . . . . . . . . . . . . . . . . . . . . . . . . . . . . .6-9
Printer is not responding (nothing prints). . . . . . . . . . . . . . . . . . . . . . . . . . . . . . . .6-10
Printer lights are on or blinking . . . . . . . . . . . . . . . . . . . . . . . . . . . . . . . . . . . . . . .6-12
Printer takes a long time to print . . . . . . . . . . . . . . . . . . . . . . . . . . . . . . . . . . . . . .6-13
Printer does not print after switching ports . . . . . . . . . . . . . . . . . . . . . . . . . . . . . .6-14
Resolving printing problems. . . . . . . . . . . . . . . . . . . . . . . . . . . . . . . . . . . . . . . . . . . . .6-15
A blank page printed . . . . . . . . . . . . . . . . . . . . . . . . . . . . . . . . . . . . . . . . . . . . . . .6-15
Something on the page is missing or incorrect . . . . . . . . . . . . . . . . . . . . . . . . . . .6-16
Placement of the text or graphics is wrong . . . . . . . . . . . . . . . . . . . . . . . . . . . . . .6-16
Printout is slanted or skewed. . . . . . . . . . . . . . . . . . . . . . . . . . . . . . . . . . . . . . . . .6-16
Ink is smearing . . . . . . . . . . . . . . . . . . . . . . . . . . . . . . . . . . . . . . . . . . . . . . . . . . .6-17
Ink is not filling the text or graphics completely . . . . . . . . . . . . . . . . . . . . . . . . . . .6-18
Text is jagged at the edges (not smooth) . . . . . . . . . . . . . . . . . . . . . . . . . . . . . . .6-19
Text or graphics are cut off at page edges . . . . . . . . . . . . . . . . . . . . . . . . . . . . . .6-19
Meaningless characters are printed . . . . . . . . . . . . . . . . . . . . . . . . . . . . . . . . . . .6-20
Wrong fonts are printed. . . . . . . . . . . . . . . . . . . . . . . . . . . . . . . . . . . . . . . . . . . . .6-20
Resolving color problems. . . . . . . . . . . . . . . . . . . . . . . . . . . . . . . . . . . . . . . . . . . . . . .6-21
Printout is faded or colors are dull. . . . . . . . . . . . . . . . . . . . . . . . . . . . . . . . . . . . .6-21
Colors are bleeding into each other. . . . . . . . . . . . . . . . . . . . . . . . . . . . . . . . . . . .6-21
Colors are different than they should be . . . . . . . . . . . . . . . . . . . . . . . . . . . . . . . .6-22
Resolving photo printing problems. . . . . . . . . . . . . . . . . . . . . . . . . . . . . . . . . . . . . . . .6-23
Resolving borderless printing problems. . . . . . . . . . . . . . . . . . . . . . . . . . . . . . . . . . . .6-24
Resolving banner printing problems. . . . . . . . . . . . . . . . . . . . . . . . . . . . . . . . . . . . . . .6-25
Resolving media handling problems . . . . . . . . . . . . . . . . . . . . . . . . . . . . . . . . . . . . . .6-26
Media feed problems . . . . . . . . . . . . . . . . . . . . . . . . . . . . . . . . . . . . . . . . . . . . . . .6-26
Media output problem . . . . . . . . . . . . . . . . . . . . . . . . . . . . . . . . . . . . . . . . . . . . . .6-26
Resolving automatic two-sided printing problems . . . . . . . . . . . . . . . . . . . . . . . . . . . .6-27
Resolving network printing problems . . . . . . . . . . . . . . . . . . . . . . . . . . . . . . . . . . . . . .6-28
Printer lights reference
HP supplies and accessories
Ordering printing supplies through the Toolbox . . . . . . . . . . . . . . . . . . . . . . . . . . . . . . .8-1
Accessories . . . . . . . . . . . . . . . . . . . . . . . . . . . . . . . . . . . . . . . . . . . . . . . . . . . . . . . . . .8-2
Supplies . . . . . . . . . . . . . . . . . . . . . . . . . . . . . . . . . . . . . . . . . . . . . . . . . . . . . . . . . . . . .8-3
Customer support
Toolbox . . . . . . . . . . . . . . . . . . . . . . . . . . . . . . . . . . . . . . . . . . . . . . . . . . . . . . . . . . . . .9-1
HP Instant Support. . . . . . . . . . . . . . . . . . . . . . . . . . . . . . . . . . . . . . . . . . . . . . . . . . . . .9-1
World Wide Web . . . . . . . . . . . . . . . . . . . . . . . . . . . . . . . . . . . . . . . . . . . . . . . . . . . . . .9-1
HP telephone support . . . . . . . . . . . . . . . . . . . . . . . . . . . . . . . . . . . . . . . . . . . . . . . . . .9-2
Hewlett-Packard Limited Warranty Statement . . . . . . . . . . . . . . . . . . . . . . . . . . . . . . . .9-3
Printer specifications
Regulatory information
FCC statement. . . . . . . . . . . . . . . . . . . . . . . . . . . . . . . . . . . . . . . . . . . . . . . . . . . . . . . A-1
Power cord statement . . . . . . . . . . . . . . . . . . . . . . . . . . . . . . . . . . . . . . . . . . . . . . . . . A-1
LEDs classification. . . . . . . . . . . . . . . . . . . . . . . . . . . . . . . . . . . . . . . . . . . . . . . . . . . . A-2
Energy consumption . . . . . . . . . . . . . . . . . . . . . . . . . . . . . . . . . . . . . . . . . . . . . . . . . . A-2
EMI statement (Korea). . . . . . . . . . . . . . . . . . . . . . . . . . . . . . . . . . . . . . . . . . . . . . . . . A-2
EMI statement (Japan). . . . . . . . . . . . . . . . . . . . . . . . . . . . . . . . . . . . . . . . . . . . . . . . . A-2
Declaration of Conformity statement/Normes de sécurité (Canada) . . . . . . . . . . . . . . A-2
Regulatory model number . . . . . . . . . . . . . . . . . . . . . . . . . . . . . . . . . . . . . . . . . . . . . . A-2
Index
ENWW v
Page 7

Welcome
1
Thank you for buying the hp deskjet 9600 series printer, which is equipped with several
exciting features.
Special features
Six-ink color printing – Enhance photo printing with a photo print cartridge.
Borderless printing – Use the entire page surface when printing photos and cards using
the borderless printing feature.
Digital photo printing – Print with digital photo printing capabilities.
Auto-duplex unit – Print two-sided documents automatically. The auto-duplex unit is a
standard part in the hp deskjet 9670. It may be purchased separately in some countries/
regions (see “HP supplies and accessories”).
Ink backup mode – Continue printing with one print cartridge when the other print
cartridge runs out of ink.
Print multiple pages on a single sheet of paper – Use the printer software to print up to
16 pages on a single sheet of paper.
Cancel button – Cancel unwanted print jobs at the touch of a button.
Auto-on printing – The printer turns on automatically when you send a print job via the
USB or parallel port.
Power-saving mode – The printer goes into a low-power, energy-efficient mode after it is
turned off for 30 seconds; this enables the printer to turn on automatically when you send
a print job.
Automatic paper-type sensor – The printer automatically selects the print settings
appropriate for the media in the printer, particularly when used with HP media.
Toolbox – Get status and maintenance information about your printer. It also provides
access to the myPrintMileage website, documentation, and online help tools for solving
printer problems.
1-1 ENWW
Page 8

Using this guide
This guide includes the following sections:
Getting started – Describes the printer parts and explains how to connect using a USB or
a parallel cable, how to install the printer software, how to connect to a network, and how
to connect to an external print server.
Using print cartridges and accessories – Explains how to use the print cartridges and
how to install the auto-duplex unit.
Printing and loading media – Describes and illustrates how to load print media and
explains how to print on various media types and sizes. Explains six-ink printing, which
enhances the print quality of photographs, and how to use the borderless printing feature.
Also describes the printer driver features.
Using the Toolbox – Describes the features of the Toolbox (such as ink level information,
print cartridge maintenance, and links to troubleshooting instructions), HP Instant Support,
and the myPrintMileage website (which keeps track of printer usage information). Also
explains how to order printing supplies directly through the Toolbox.
Troubleshooting – Helps you solve common printer problems such as paper jams or
software installation issues, and printing problems such as borderless or photo printing
problems.
Printer lights reference – Describes and illustrates printer light combinations, what they
indicate, and what action to take if necessary.
HP supplies and accessories – Lists part numbers of the accessories, media, and print
cartridges that can be purchased and used with the printer.
Customer support – Lists support services to obtain assistance for your printer.
Printer specifications – Lists information such as print speeds, tray capacity, and system
requirements.
Getting more information
See the following resources for more information:
Getting Started Guide – Contains easy-to-follow instructions and illustrations to quickly
set up your printer and identify printer parts.
Setup Poster – Contains easy-to-follow illustrations to quickly set up your printer.
Toolbox – Contains “how-to” and troubleshooting instructions and allows access to printer
maintenance functions and HP information.
HP Instant Support – A web-based tool that provides product-specific services,
troubleshooting tips, and information about your printer’s ink and media usage. This
e-service can be accessed via the Toolbox
Website – http://www.hp.com/support/dj9600 links to the HP Support website for the
latest printer software, product, operating system, and support information.
Starter CD – Includes printer software, a utility that lets you create customized installation
packages, an electronic copy of this user’s guide, and ordering information.
If the suggestions in these resources do not help you solve your printing problems, see
“Troubleshooting” for a list of resources available to you for the support and maintenance of
your printer. Or, ask for assistance from your local HP Customer Care Center.
.
ENWW 1-2
Page 9

Accessibility
Your printer provides a number of features that make it accessible for people with disabilities.
Visual
The printer software is accessible for users with visual impairments or low vision through the
use of Windows accessibility options and features. It also supports most assistive technology
such as screen readers, Braille readers, and voice-to-text applications. For users who are
color blind, the printer has simple text or icon labels that convey the appropriate action.
Mobility
For users with mobility impairments, the printer software functions can be executed through
keyboard commands. The software also supports Windows accessibility options such as
StickyKeys, ToggleKeys, FilterKeys, and MouseKeys. The printer doors, buttons, paper trays,
and paper width guides can be operated by users with limited strength and reach. For
example, the paper width guide can be easily adjusted by applying slight pressure and sliding
it left or right.
Support
For more details about the accessibility of this product and HP's commitment to product
accessibility:
Visit HP's Web site at: http://www.hp.com/accessibility
E-mail HP at: accessibility@hp.com
1-3 ENWW
Page 10
Getting started
2
Understanding the printer parts and functions
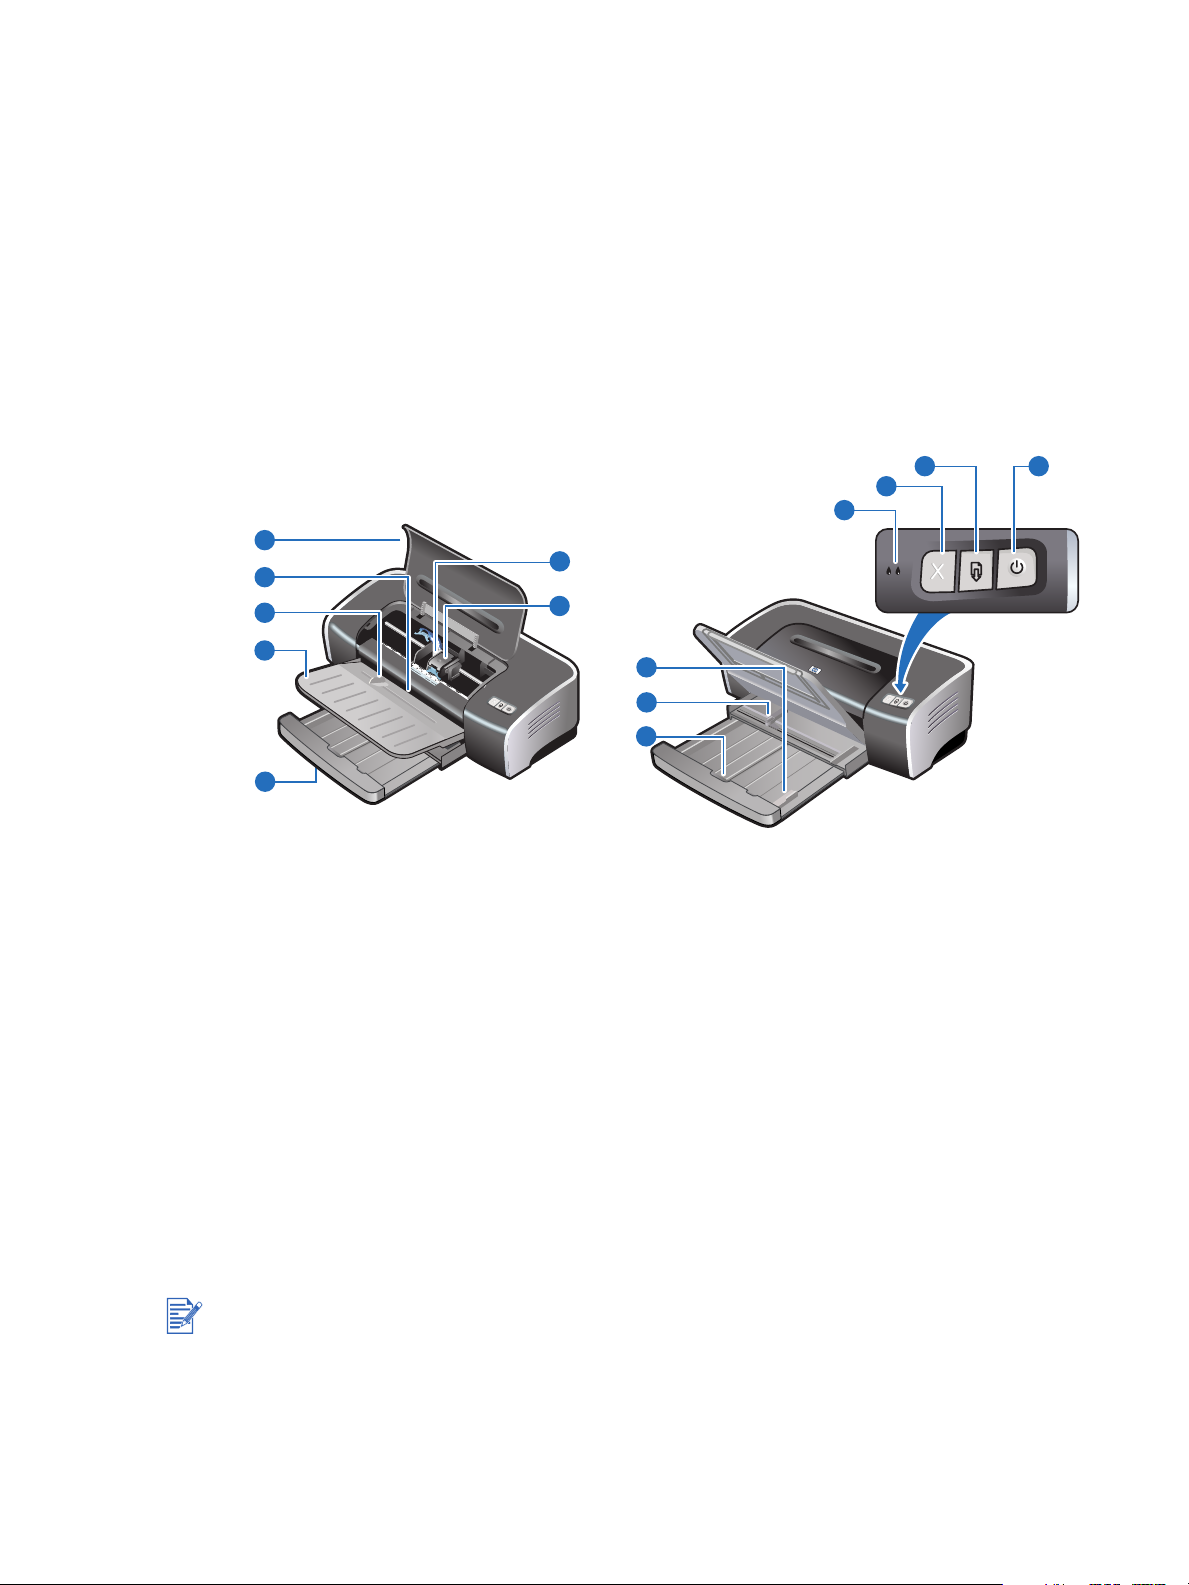
Front view
5
4
3
6
7
13 14
12
11
2
1
1 Extendable input tray
2 Extendable output tray
3 Front manual feed slot
4 Front manual feed paper guide
5 Top c ov e r
6 Print cartridge cradle
7 Print cartridge latch
8 Input tray lock – Press to extend or retract the input tray.
9 Paper width guide
10 Small media guide – Extend to guide smaller-sized media into the printer. See “Printing
on cards and smaller-sized media” and “Printing on envelopes” for details.
10
9
8
The printer lights provide visual cues about the status of the printer. For descriptions of printer
lights and what they indicate, see “Printer lights reference”.
11 Left and right print cartridge lights
12 Cancel button
13 Resume button and light
14 Power button and light
ENWW 2-1
Page 11
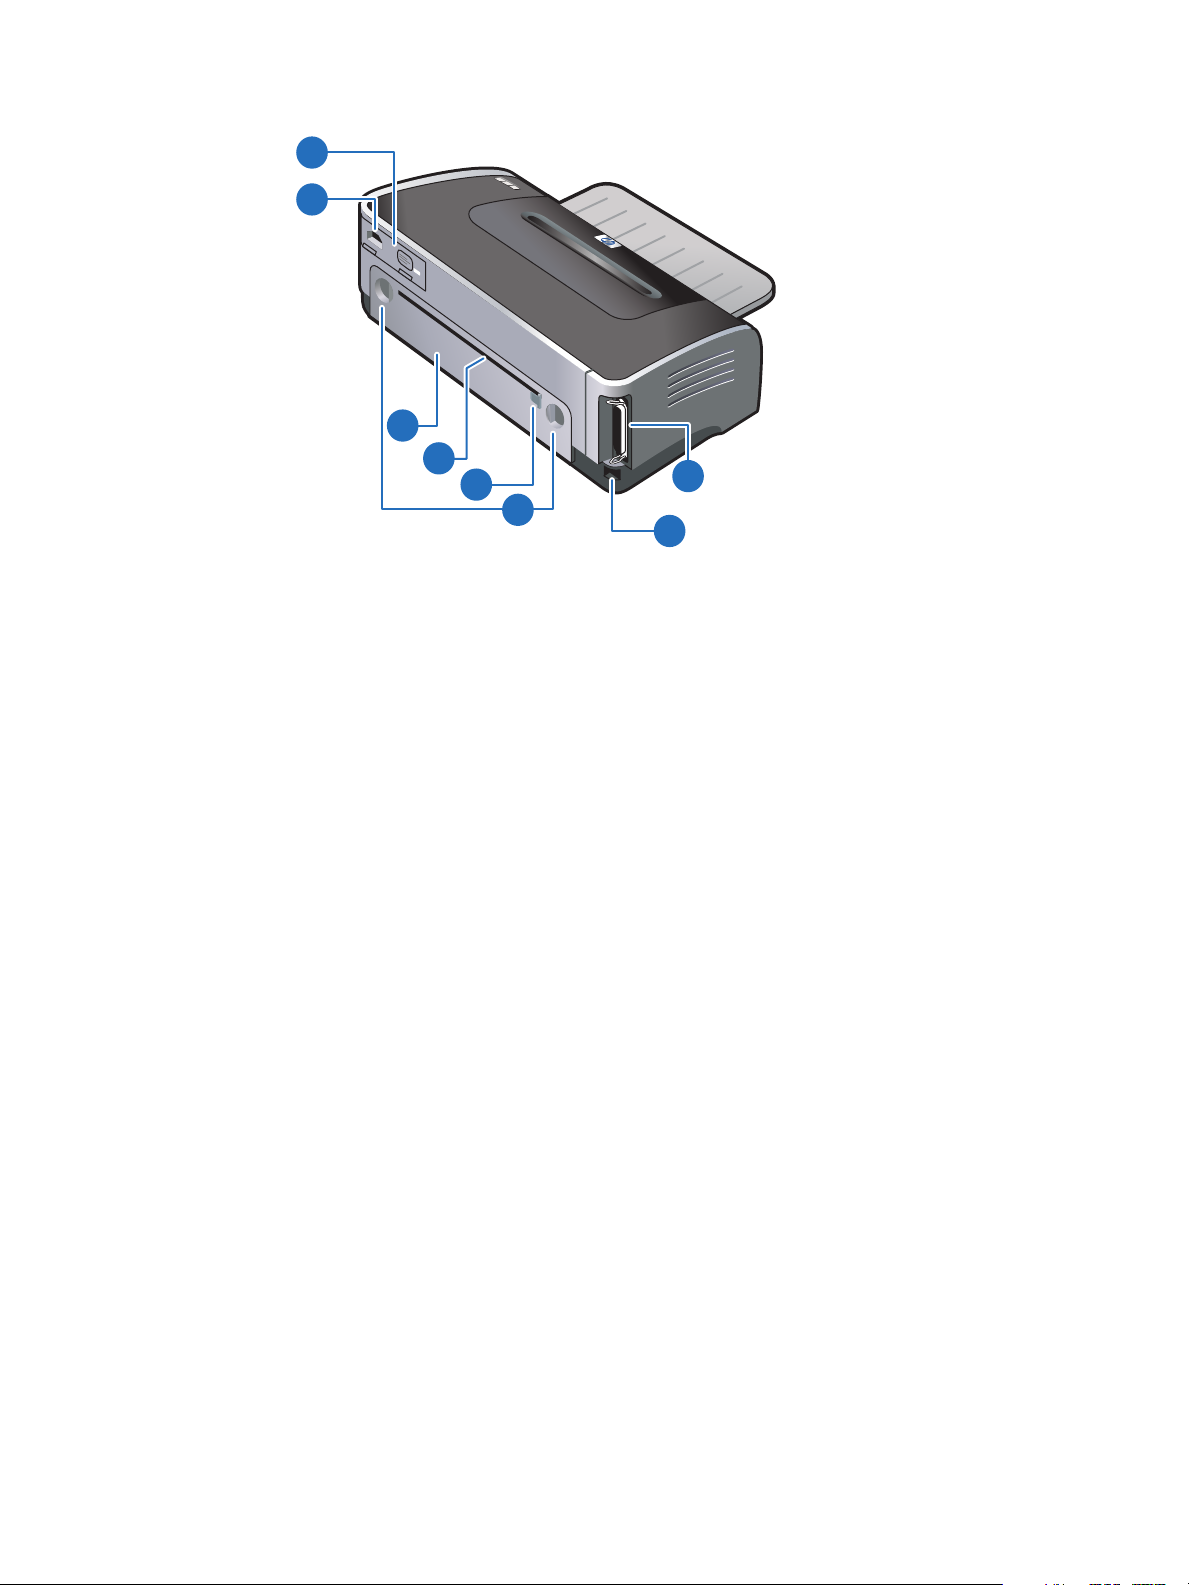
Back view
2
1
3
4
5
1 Power input
2 Power supply module
8
6
7
3 Rear access panel – Remove to clear any jammed paper.
4 Rear manual feed slot – Manually feed thick paper (like cardstock) or thick photo paper
that requires a straight paper path. See “Printing with the front or rear manual feed slot” for
details.
5 Rear manual feed paper guide
6 Rear access panel release buttons
7 Universal serial bus (USB) port
8 Parallel port
2-2 ENWW
Page 12

Auto-duplex unit
The printer can automatically print on both sides of a sheet of paper when the auto-duplex unit
is attached to the back of the printer.
The auto-duplex unit is a standard part in the hp deskjet 9670. It may be purchased separately
in some countries/regions (see “HP supplies and accessories”).
For instructions on installing and using the auto-duplex unit, see “Using the auto-duplex unit”
and “Printing on both sides (duplexing)”.
2
3
1
1 Buttons – Push these buttons in to remove the auto-duplex unit from the printer.
2 Rear cover – Remove this cover to clear any jammed paper from the auto-duplex unit.
3 Rear cover release buttons
ENWW 2-3
Page 13

Connecting the printer
It is recommended that you install the software before you connect the printer to the
computer. See “To complete a software-first installation (recommended)”. Only do a
hardware-first installation if you have already connected the cable and started the
software. See “To complete a hardware-first installation”.
If you encounter difficulties installing the software, see “Troubleshooting installation
issues”.
Make sure you have completed the printer setup steps in the Getting Started Guide before
installing the printer software and connecting the printer.
If you are using Windows NT 4.0, Windows 2000, or Windows XP, you must have
administrator privileges to install the printer software.
If your system is not running Windows 2000 (Service Pack 3 and above) or Windows XP,
you must restart the system to complete the printer software installation when prompted.
Your printer supports local printing and network printing. For local printing, you can connect
the printer using a USB cable or parallel cable.
For network printing, you can share the printer in these ways:
Windows
You can use a simple form of networking, known as locally shared networking, if you use a
USB cable or parallel cable to connect the printer to a computer running Windows. Using
this method, you can share the printer with other Windows users. See “Connecting direct ly
using a USB or parallel cable (Windows)” and “Sharing the printer on a locally shared
network (Windows)”.
You can do peer-to-peer networking via an optional HP external print server. See
“Connecting to a network”. For information on purchasing HP accessories, see “HP
supplies and accessories”.
Macintosh
You can use a simple form of networking, known as locally shared networking, if you use a
USB cable to connect the printer to a computer running a Mac OS. Using this method, you
can share the printer with other Mac OS users. See “Connecting directly using a USB
cable (Mac OS)”.
2-4 ENWW
Page 14
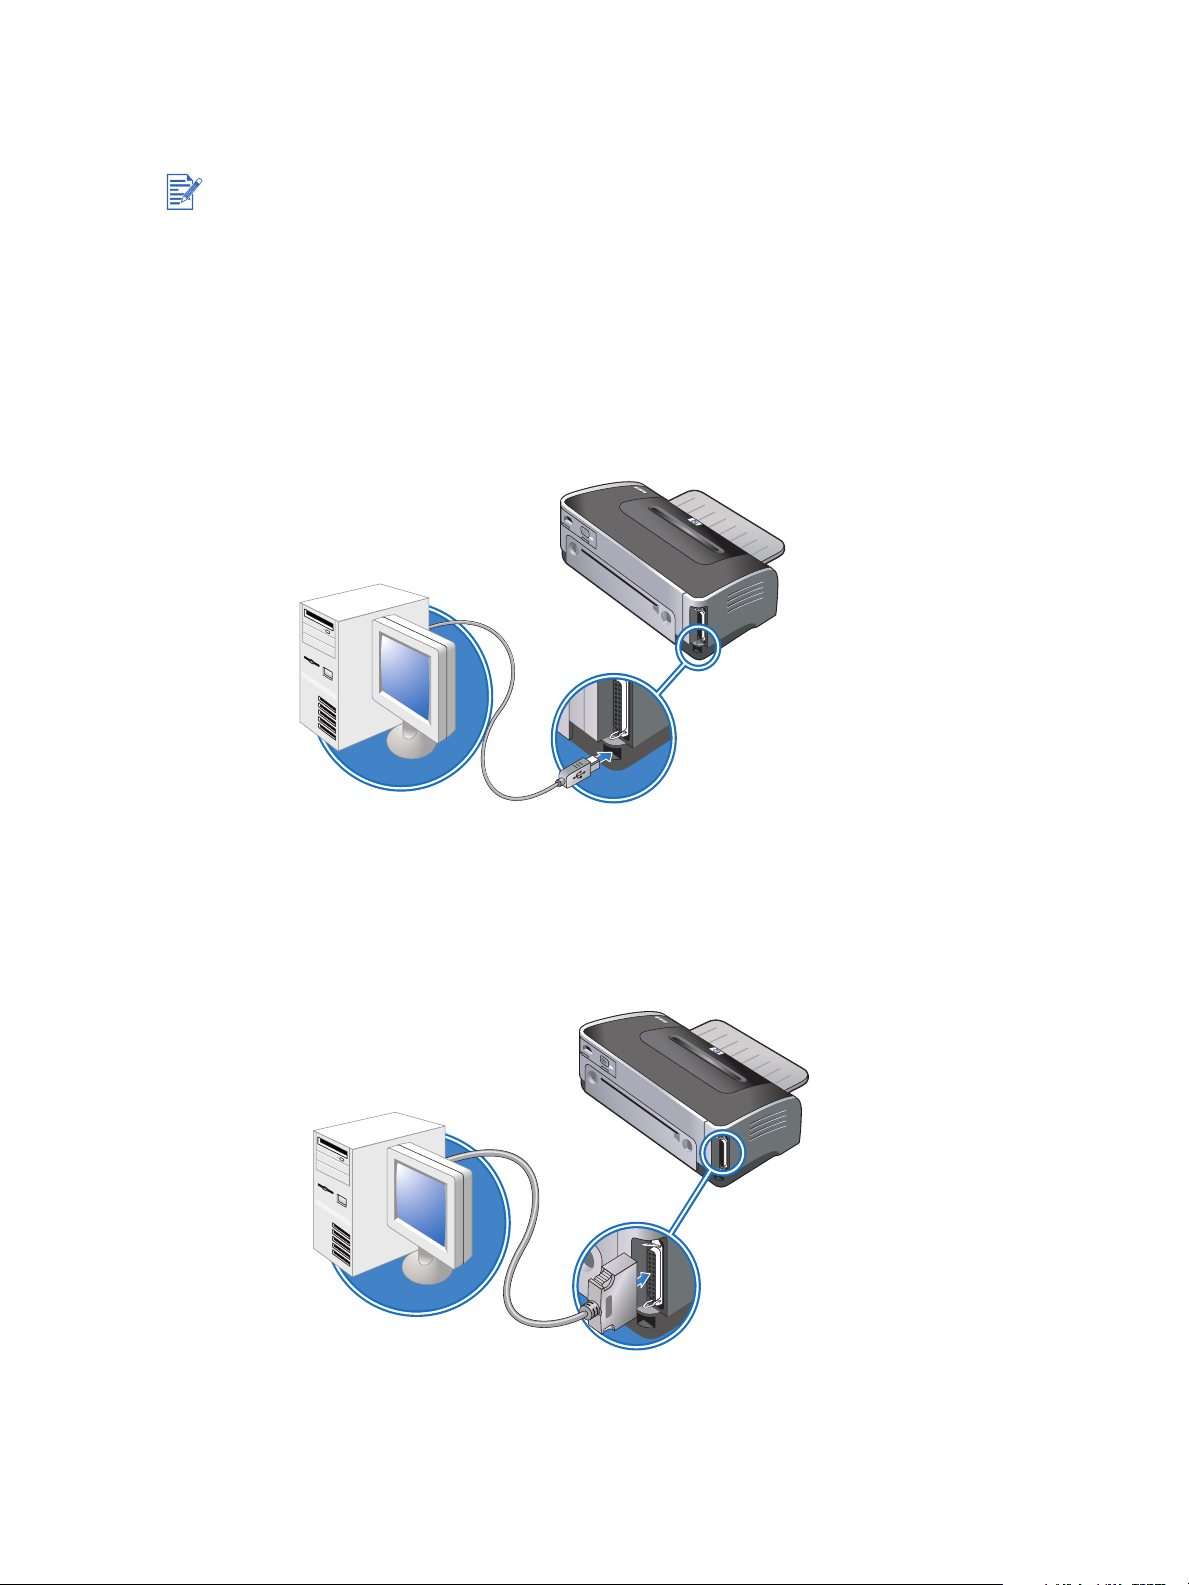
Connecting directly using a USB or parallel cable (Windows)
In the Windows environment, you can connect directly using either a USB or a parallel cable.
Do not connect a USB and a parallel cable to the printer at the same time during installation.
USB connection
You can use a USB cable to connect the printer to the computer if the computer has a
USB port and is running Microsoft
®
Windows 98, Me, 2000, or XP. (Windows NT®4.0
does not support USB.) If your computer does not meet these specifications, connect the
printer to your computer using a parallel cable.
In most cases, after you install the printer software and connect a printer to the computer,
you can install additional printers with USB cables without reinstalling the printing
software.
Parallel connection
You can use a parallel cable to connect the printer to the computer if the computer has a
parallel port.
ENWW 2-5
Page 15

To complete a software-first installation (recommended)
Complete the setup using these instructions if you have not yet connected a USB or parallel
cable.
1 Close any application that is running.
2 Insert the Starter CD into your CD-ROM drive. The CD menu runs automatically.
If the CD menu does not run automatically, click Start, click Run, and in the command line
box, type the letter of your computer's CD-ROM drive followed by :\setup (for example,
type D:\setup).
3 On the CD menu, click Install Printer Driver.
4 Choose the language you want and click OK.
5 Follow the onscr ee n inst ruc tion s.
If the installation program detects that the printer is already connected to the computer using a
parallel cable (before running the program), it will provide you with the option to install the
printer using the same port. In addition, if you select the express install check box, the
installation program uses the default settings.
6 In the printer connection dialog box, select Connected directly to this computer and
click Next.
7 Do one of the following:
• For a USB connection: Select USB Cable and click Next.
• For a parallel connection: Select Parallel Cable and use the drop-down list to select
the parallel port to which the printer is connected (usually LPT1).
It is recommended to install the Toolbox, which is installed by selecting Typical Installation
(Recommended). If you select Custom Installation, you can still choose to install the
Toolbox from the list of options to install. The Toolbox provides status and maintenance
information about your printer. It also provides access to documentation and online help tools
for solving printer problems. If you do not install the Toolbox you will not see printer error
messages on your computer screen and will not have access to the myPrintMileage website.
See “Using the Toolbox” for more information.
8 Follow the onscreen instructions to complete the installation.
9 When prompted, connect the USB or parallel cable to the computer and the printer.
The Found New Hardware wizard appears on the computer screen and the printer icon is
created in the Printers folder.
If you did not share the printer using the setup program but would like to do so later, see
“Sharing the printer on a locally shared network (Windows)”.
2-6 ENWW
Page 16

To complete a hardware-first installation
Complete the setup using these instructions if you have already connected a USB or parallel
cable to the printer and computer, and the Found New Hardware wizard appears.
If you have connected the parallel or USB cable to your printer and turned on the printer, do
not turn off the printer or unplug the cable from the printer when the printer setup program is
running. If you do so, the setup program will not finish.
1 On the screen that allows you to select a method to locate the driver, select the advanced
option and click Next.
Do not allow the hardware wizard to perform an automatic search for the driver.
2 Select the check box that allows you to specify the driver location, and ensure the other
check boxes are cleared.
3 Insert the Starter CD into your CD-ROM drive. If the CD menu appears, click Exit twice to
close the CD menu.
4 Browse to locate the root directory on the Starter CD (for example, D:), and then click OK.
5 Click Next and follow the onscreen instructions.
6 Click Finish to close the Found New Hardware wizard.
Upon completion of the installation process, the hardware wizard will automatically launch
the printer setup program. This may take more than a minute. For Windows 98 and Me,
you must complete the setup program at this point if you wish to install a non-English
driver.
The setup program provides options to install non-driver components such as the Toolbox,
which is recommended to install. For instructions on completing the setup program, see
“To complete a software-first installation (recommended)”.
If you did not share the printer using the setup program and wish to do so later, see
“Sharing the printer on a locally shared network (Windows)”.
ENWW 2-7
Page 17
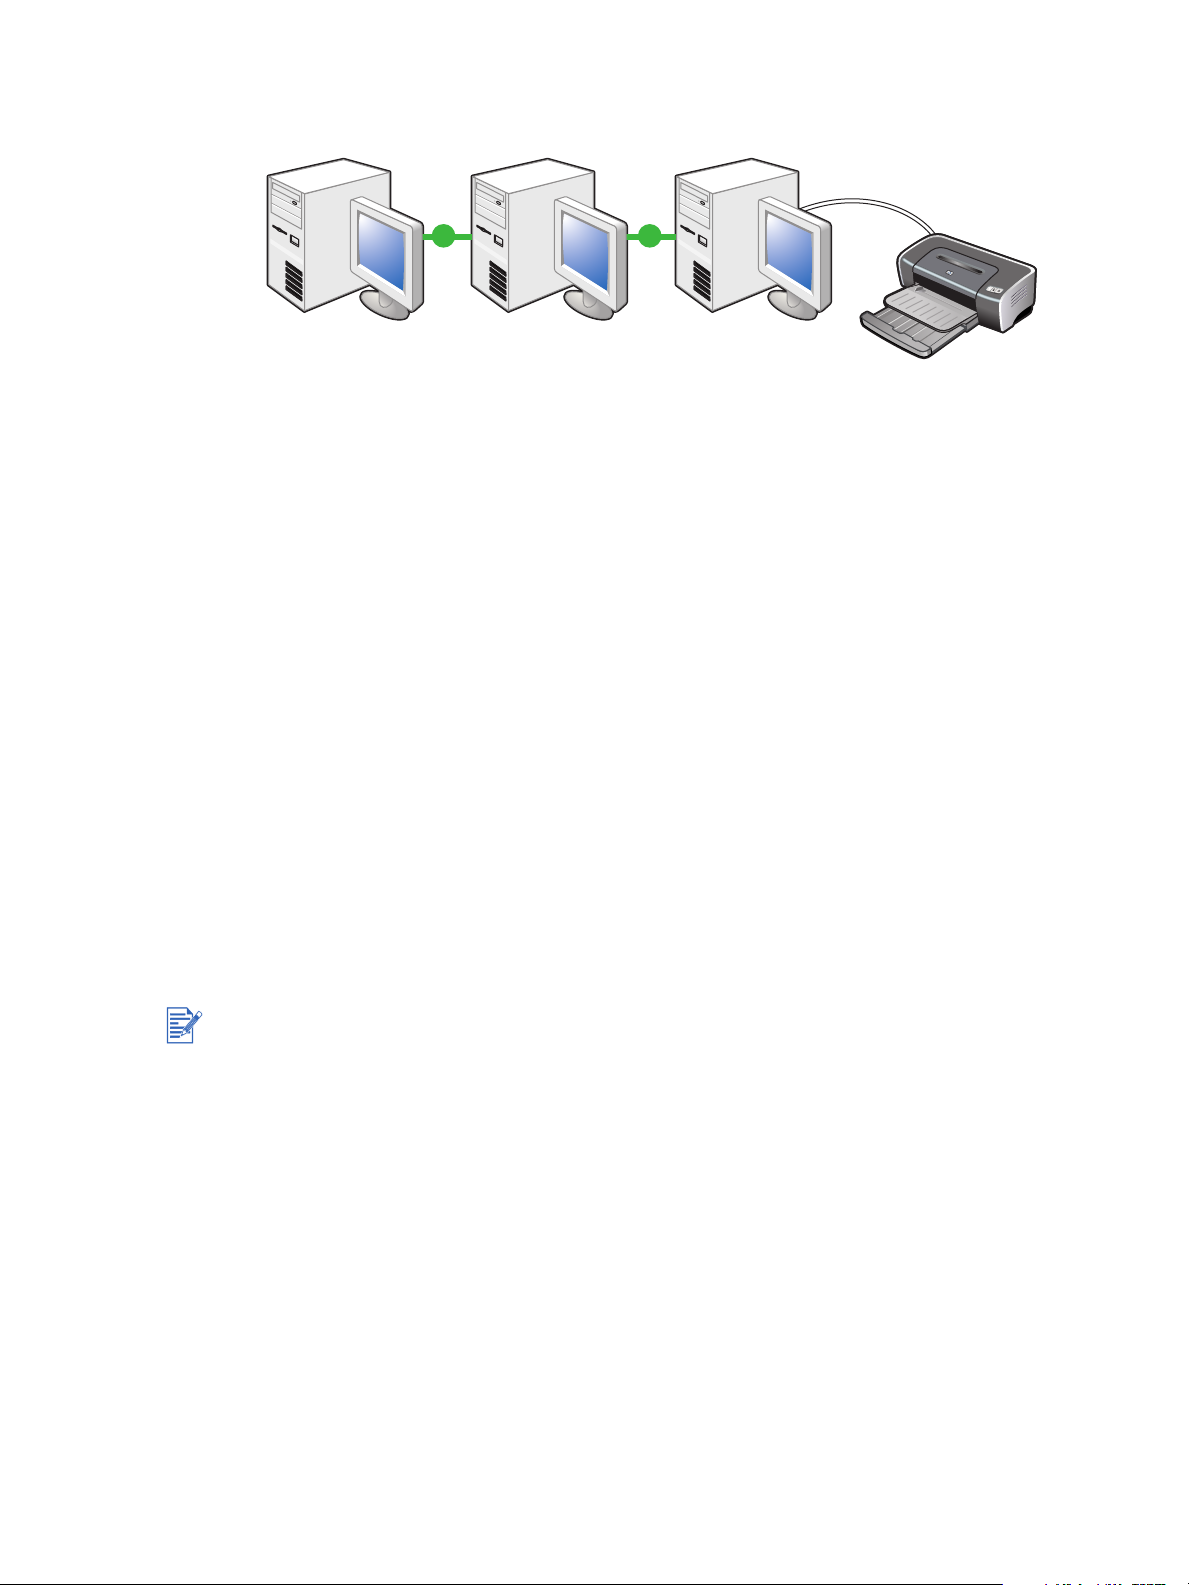
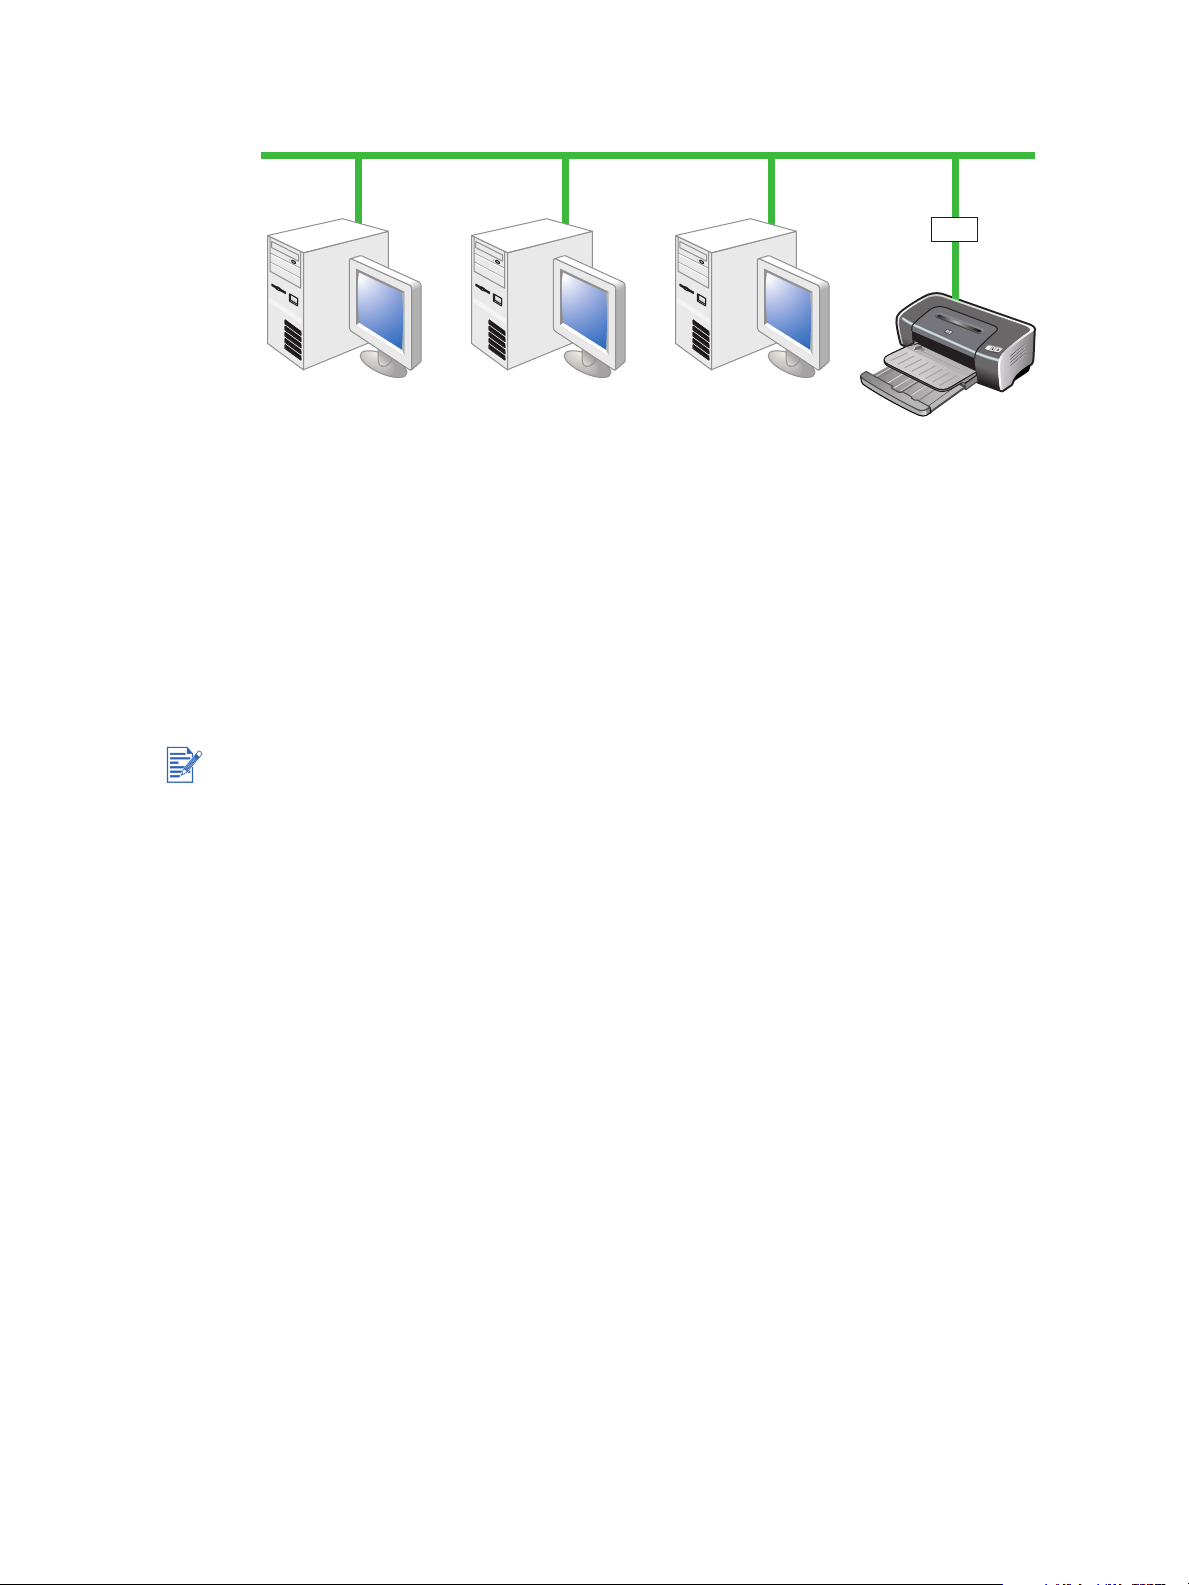
Sharing the printer on a locally shared network (Windows)
In a locally shared network, the printer is connected directly to the USB or parallel port of a
selected computer (known as the server) and is shared by other computers (clients). Use this
configuration only in small groups or when usage is low. When many users print to the shared
printer, this will slow down the server.
You can share the printer on a locally shared network when:
The computer connected to the printer is running Windows.
The printer will be shared with other Windows users.
To share a printer connected to your computer (the server)
1 Click Start, point to Settings, and then click Printers (Windows NT 4.0, 98, Me,
and 2000) or Printers and Faxes (Windows XP).
(If Printers and Faxes is not found on the Start menu in Windows XP, click Start, click
Control Panel, and then click Printers and Faxes.)
2 In the Printers folder, right-click the printer icon and then click Properties.
3 On the Sharing tab, select the “share the printer” option and give the printer a share
name.
4 Optional. If you are sharing the printer with users of other versions of Windows, click
Additional Drivers to install their drivers as a convenience to those users. This step
requires you to have the Starter CD in your CD-ROM drive.
When sharing a locally connected printer, use the newest operating system as the server.
It is recommended to use Windows 2000 or Windows XP as the server.
If Windows NT 4.0 is the server, administrators need to install the Windows 2000 and
Windows XP user mode driver on the server. This is because Windows 2000 and
Windows XP cannot print using the Windows NT 4.0 kernel mode driver.
To install the Windows 2000 and Windows XP user mode driver on the Windows NT 4.0
server:
i In the driver properties dialog box on the server, click the General tab and then click
the New Driver button.
ii When prompted for files, locate the Windows 2000 and Windows XP folder on the
printer Starter CD and select the user mode driver.
2-8 ENWW
Page 18

To use a printer connected to another computer (clients)
Clients can connect to the printer in three different ways:
Install the printer software from the Starter CD. When prompted, select Connected via
the network, and then select Client setup for client-server printing.
Browse to the printer on the network and drag the printer to your Printers folder.
Add the printer and install the software from the INF file that has been saved to a location
on your network. Ask the network administrator where the INF file is located.
On the Starter CD, the INF files are stored in folders using the following format:
<CD>:\Setup\Drivers\PCL3\<operating system>\<language>.
For example, if your CD-ROM drive letter is D:, then
D:\Setup\Drivers\PCL3\Win2k_XP\English would contain the English Windows 2000/XP
PCL 3 INF file.
ENWW 2-9
Page 19

Connecting directly using a USB cable (Mac OS)
Install the software first, and then connect the printer to the computer. You may share the
printer with other Mac OS users when you are finished.
1 Insert the Starter CD into your CD-ROM drive. The CD menu runs automatically.
If the CD menu does not run automatically, double-click the CD icon on the desktop, and
then double-click the Setup icon.
2 Click Install Driver.
3 Follow the onscr ee n inst ruc tion s.
4 Connect the USB cable to the computer and the printer.
5 Complete the installation in one of these ways.
Mac OS 9.1.x and 9.2.x
i When prompted, restart the co mpu ter.
ii Select Chooser from the Apple menu.
iii Select hp inkjet xx in the upper-left window of the Chooser window, where xx
represents the version of the current printer driver.
iv Select deskjet 9600 in the right window of the Chooser screen.
v Close the Chooser.
vi To share the printer , see “To share the printer on a peer-to-peer network (Mac OS)”
below.
Mac OS X (10.1 and later)
i Open the Print Center, which is located in the Applications\Utilities folder.
ii Click Add.
iii Select USB from the menu.
iv Select deskjet 9600 from the printer list, and then click Add.
A dot appears beside the printer name, indicating that this printer is now the default
printer.
v Close the Print Center.
To share the printer on a peer-to-peer network (Mac OS)
1 On the computer that is connected to the printer, open USB Printer Sharing from Control
Panels and share the printer. Then, list the printer in a network neighborhood. For more
information, see Mac Help.
2 For other users who want to print, preselect the printer in the USB Printer Sharing control
panel. Then, choose the neighborhood where the printer is shared and choose the printer.
2-10 ENWW
Page 20
Connecting to a network
Your printer can be shared in a network environment by connecting it directly to a network via
an optional HP Jetdirect external print server. This configuration provides better performance
than printing through a computer, flexibility in preparing a location for the printer, and the
ability to share the printer with both Windows and Mac OS users.
For information about setting up HP Jetdirect external print servers, see your HP Jetdirect
hardware and software installation guides. For information on purchasing HP Jetdirect
external print servers, see “HP supplies and accessories”.
To install the printer driver on the PC or server (Windows)
You must install the HP Jetdirect external print server first, then connect the printer to the
network and install the printer software on the computer that will send print jobs directly to the
network printer.
1 After setting up the HP Jetdirect external print server, start Windows and make sure no
Windows applications are running.
2 Insert the Starter CD into your CD-ROM drive. The CD menu runs automatically.
If the CD menu does not run automatically, click Start, and then click Run. At the
command line box, type the letter of your computer's CD-ROM drive followed by :\setup
(for example, type D:\setup).
3 On the CD menu, click Install Printer Driver.
4 Choose your language and click OK.
5 Follow the onscr ee n inst ruc tion s.
6 In the printer connection dialog box, select Connected via the network and click Next.
Then select Basic network setup for a PC or server (recommended) and click Next.
7 Follow the onscreen instructions to complete the installation.
8 If you wish to set up the computer as a server, do the following:
i Select the option to share the printer, and then select to install printer drivers for
Windows clients.
The installation program installs the printer driver for the server and copies the client
drivers to a location on the server for vending to users (clients).
ii Follow the onscreen instructions to complete the installation.
ENWW 2-11
Page 21

To install the printer driver on a client
Once you have connected the printer to the network and installed the printer driver on the
network computer acting as the server, you can share the printer. Individual Windows users,
known as clients, can connect to the printer in these ways:
In the Printers folder, double-click the Add Printer icon and follow the instructions for a
network printer installati on. See “To install the printer driver using Add Printer”.
Install the printer software from the Starter CD. When prompted, select Connected via
the network, and then select Client setup for client-server printing.
On the network, browse to the printer and drag it to your Printers folder.
Add the printer and install the software from the INF file that has been saved to a location
on your network. Ask the network administrator where the INF file is located.
On the Starter CD, the INF files are stored in folders using the following format:
<CD>:\Setup\Drivers\PCL3\<operating system>\<language>.
For example, if your CD drive letter is D:, then D:\Setup\Drivers\PCL3\Win2k_XP\English
would contain the English Windows 2000/XP PCL 3 INF file.
To install the printer driver using Add Printer
1 Click Start, point to Settings, and then click Printers (Windows NT 4.0, 98, Me, and
2000) or Printers and Faxes (Windows XP).
(If Printers and Faxes is not found on the Start menu in Windows XP, click Start, click
Control Panel, and then click Printers and Faxes.)
2 Double-click Add Printer, and then click Next.
3 For Windows 98, Me, 2000, or XP, select Network Printer.
-Or-
For Windows NT 4.0, select Network Printer Server.
4 Click Next.
5 Do one of the following steps:
• Type in the network path or queue name of the shared printer and click Next. Click
Have Disk when prompted to select the printer model.
•Click Next and locate the printer in the Shared printers list.
6 Click Next and follow the onscreen instructions to complete the installation.
To add a network port to the printer
If you have already installed the printer software using the printer setup program, and you
want to create a port to connect through the network to the printer via an HP Jetdirect external
print server, follow these instructions:
1 After installing the print server software, right-click hp deskjet 9600 series in the Printers
folder and select Properties.
2 For Windows NT 4.0, 2000, and XP: Click the Ports tab, and then click Add Port.
-Or-
For Windows 98 and Me: Click the Details tab, and then click Add Port.
3 Select a new HP standard port and assign it to the printer.
4 Click OK.
2-12 ENWW
Page 22

Connecting to a network (Mac OS)
You must install the HP Jetdirect external print server first, then connect the printer to the
network and install the printer software on the computer.
1 After setting up the HP Jetdirect external print server and a network port on your
computer, start your computer and make sure no applications are running.
2 Insert the Starter CD into your CD-ROM drive. The CD menu runs automatically.
If the CD menu does not run automatically, double-click the CD icon on the desktop, and
then double-click the Setup icon.
3 Click Install Driver.
4 Follow the onscr ee n inst ruc tion s .
5 Mac OS 9.1.x and 9.2.x
i When prompted, restart the co mpu ter.
ii Select Chooser from the Apple menu.
iii Select hp inkjet xx in the upper-left window of the Chooser window, where xx
represents the version of the current printer driver.
iv Select deskjet 9600 in the right window of the Chooser screen.
v Close the Chooser.
Mac OS X (10.1 and later)
i Open the Print Center, which is located in the Applications\Utilities folder.
ii Click Add.
iii Do one of the following steps:
• If you are using an AppleTalk network, select AppleTalk on the pop-up menu.
• If you are using an IP network, select hp IP Printing on the pop-up menu and then
type the IP address for the printer.
iv If necessary, select the Zone.
vSelect deskjet 9600 from the printer list, and then click Add.
A dot appears beside the printer name, indicating that this printer is now the default
printer.
vi Close the Print Center.
ENWW 2-13
Page 23

Uninstalling the printer software
For Windows
The steps to uninstall the printer software will depend on the operating system. In general,
follow these steps to uninstall the software:
1 Make sure no Windo ws appl ic at ion s are runn ing .
2 Click Start, point to Programs, hp deskjet 9600 series, and then click Uninstall
hp deskjet 9600 series.
3 Follow the onscreen instructions to remove the printer software.
Alternatively, uninstall the software through Add/Remove Programs:
1 Make su re no Windows applic at ion s are running .
2 Open Control Panel.
3 Double-click Add/Remove Programs.
4 Select hp deskjet 9600 series.
5 Follow the onscreen instructions to remove the printer software.
If you are using Windows NT 4.0, Windows 2000, or Windows XP, you must have
administrator privileges to uninstall the printer software.
If the software was not successfully uninstalled or the Uninstaller could not be found,
restart the system and run the scrubber utility from the Starter CD. For Windows 98 and
Windows Me, use the scrub9x.exe file located in the Utils\Scrubber\Win9x_Me folder. For
Windows 2000 and Windows XP, use the scrub2k.exe file located in the
Utils\Scrubber\Win2k_XP folder. This utility does not remove non-driver components from
the computer, such as the Toolbox. Repeat the whole installation process again after this
is done.
For Macintosh
1 If you have not restarted the computer since installing the software, restart the computer.
If you do not restart the computer before you uninstall the software, some files will not be
removed from your computer when you run the Uninstall option.
2 Insert the Starter CD into your CD-ROM drive and double-click the CD icon on the
desktop.
3 Double-click the installer icon and follow the onscreen instructions.
4 When the Main Installation dialog box appears, select Uninstall from the drop-down list
located in the upper-left part of the dialog box.
5 Follow the onscreen instructions to remove the printer software.
2-14 ENWW
Page 24

Customizing the printer software setup program
The Starter CD contains a utility that allows system administrators to create customized
installation packages that can be launched silently. System administrators can then distribute
a customized installation package by sharing it from a local or network drive.
To access the uti lity, select Customization Utility from the CD menu.
Installing other software
HP photo imaging software – Lets you view and edit photos and image files in Windows.
To install this software, insert the Starter CD, click the HP Photo Imaging Software
button on the CD browser menu, and select it from the list of software shown. See also
“HP photo imaging software”.
HP Deskjet Control Panel for DOS – Allows you to configure print settings in an
MS-DOS
software. See also “Printing from MS-DOS software programs”.
Linux driver – Visit http://www.linuxprinting.org to download the software. For information
about using Linux with HP printers, visit http://hp.sourceforge.net
IBM PostScript 3 emulation printer driver for IBM OS/2 –
Visit h
information on using the driver.
®
environment. Visit http://www.hp.com/support/dj9600 to download the
ttp://www7.software.ibm.com/2bcprod.nsf to download the software and for
.
If you are using Windows NT 4.0, Windows 2000, or Windows XP, you must have
administrator privileges to install a printer driver.
ENWW 2-15
Page 25
Using print cartridges and
3
accessories
Using the auto-duplex unit
You can print on both sides of a sheet of paper automatically when the auto-duplex unit is
installed on the printer.
The auto-duplex unit is a standard part in the hp deskjet 9670. It may be purchased separately
in some countries/regions (see “HP supplies and accessories”).
For instructions on printing with the auto-duplex unit, see “Printing on both sides (duplexing)”.
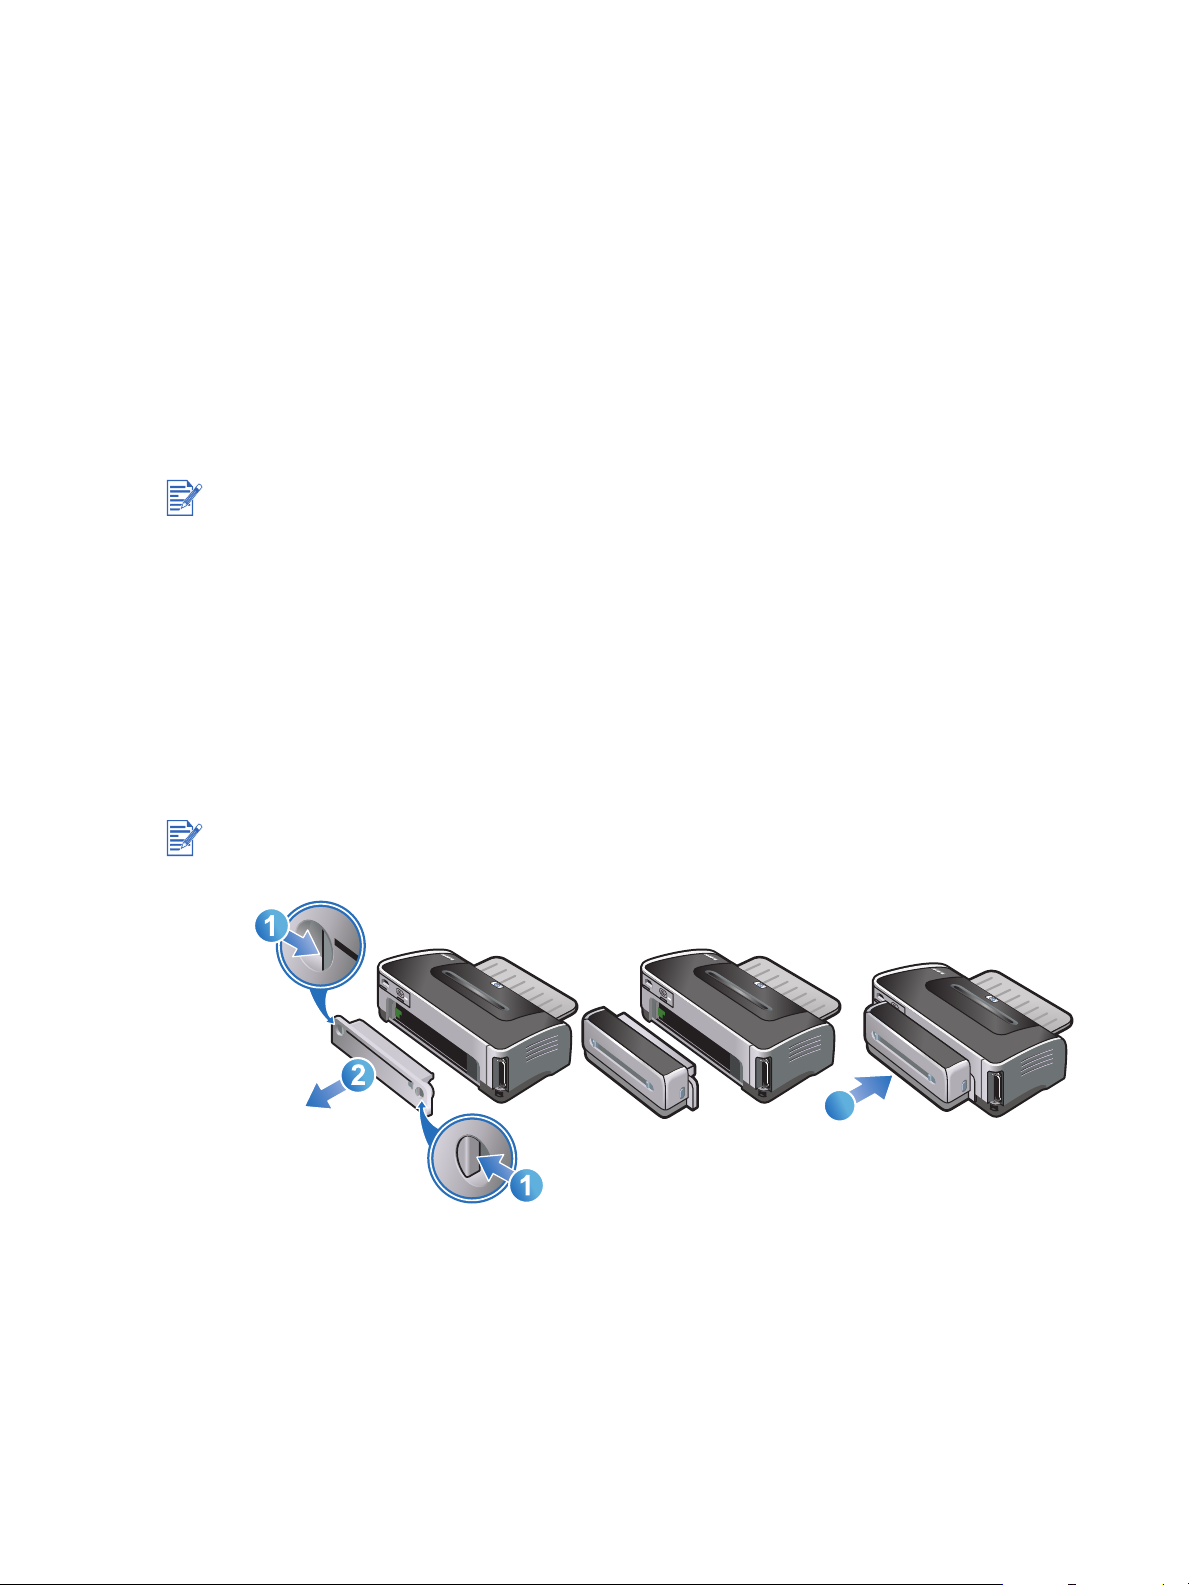
Installing the auto-duplex unit
1 Remove the rear access panel by pushing the release buttons towards each other and
pulling the rear access panel out of the printer.
2 Insert the auto-duplex unit straight into the back of the printer until both sides snap into
place.
Do not press the buttons on either side of the auto-duplex unit when installing it. Use these
buttons only for removing the auto-duplex unit from the printer.
3
3-1 ENWW
Page 26
Using the print cartridges
Installing or replacing the print cartridges
Use only the specified print cartridges. See “HP supplies and accessories” for part numbers
and ordering information.
For four-ink color printing, install the black and the color print cartridges.
For six-ink color printing, install the photo and the color print cartridges to enhance the print
quality of photographs. See “Printing with six-ink color”.
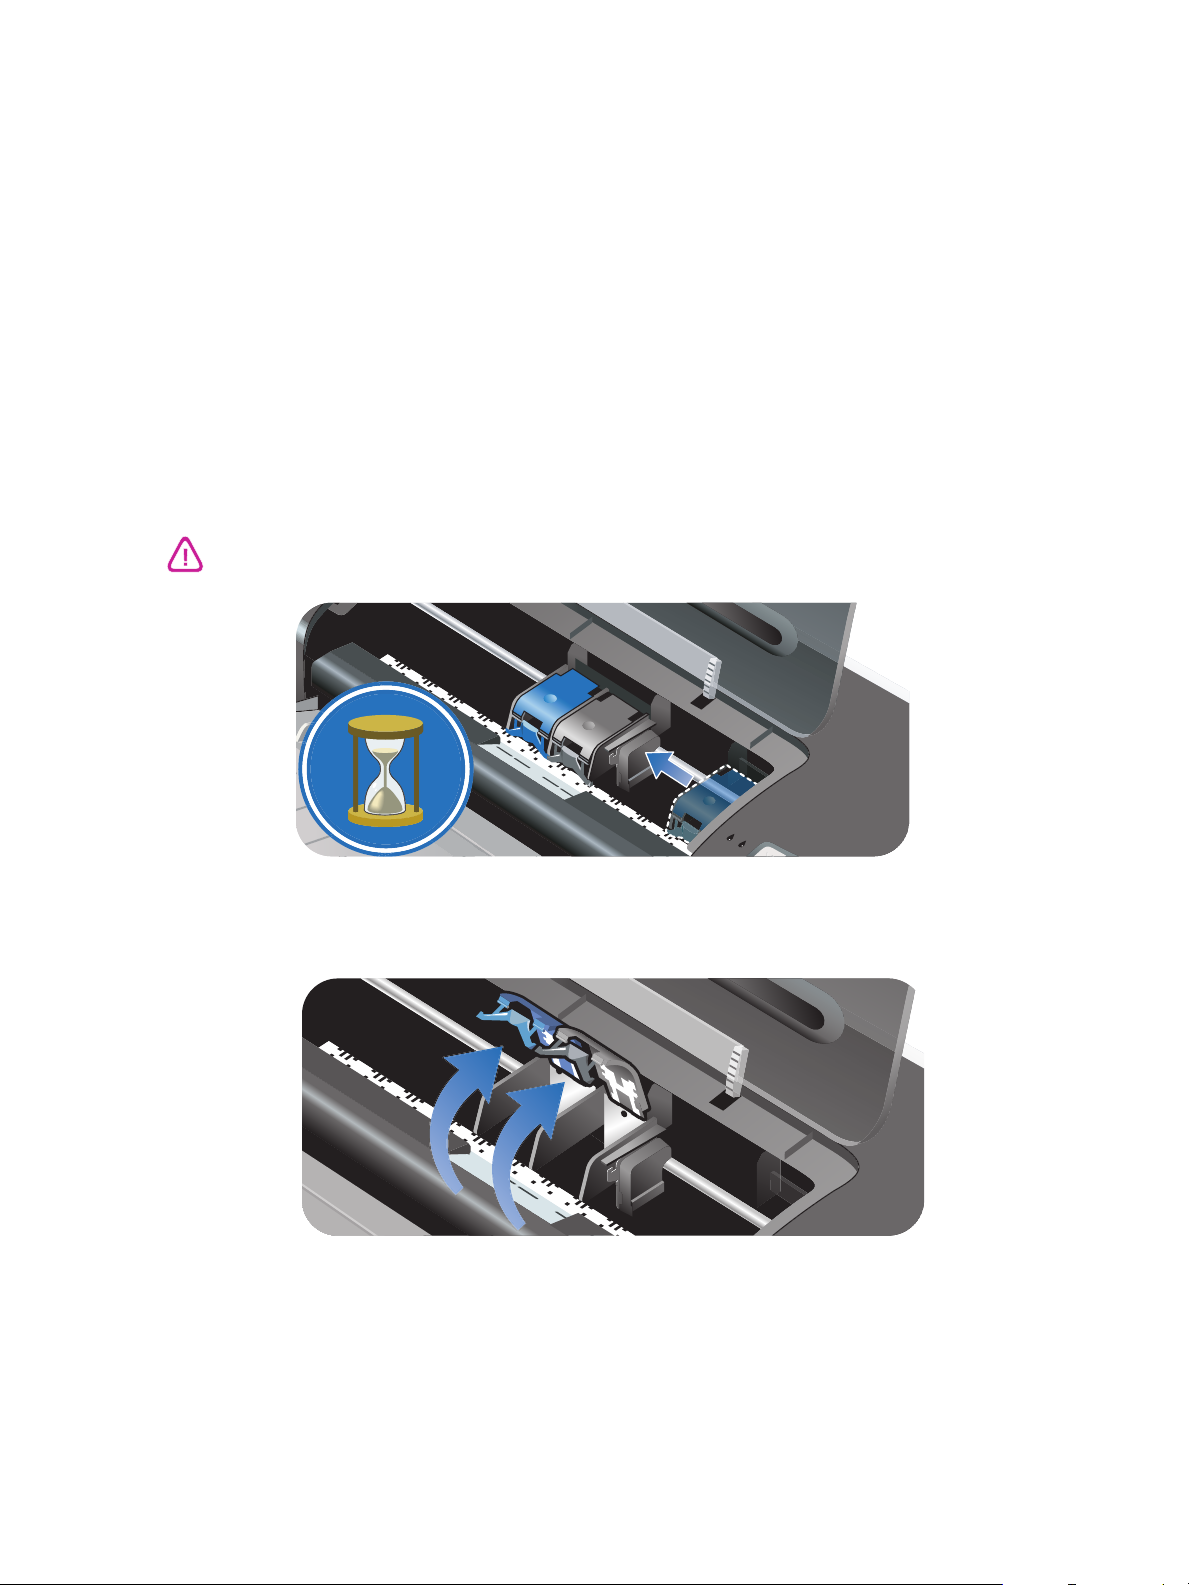
To install or replace a print cartridge
1 Turn on the printer and open the top cover.
The print cartridge carriage moves to the middle of the printer.
Only remove or install print cartridges when the print cartridge carriage stops moving.
2 Lift the print cartridge latch.
ENWW 3-2
Page 27
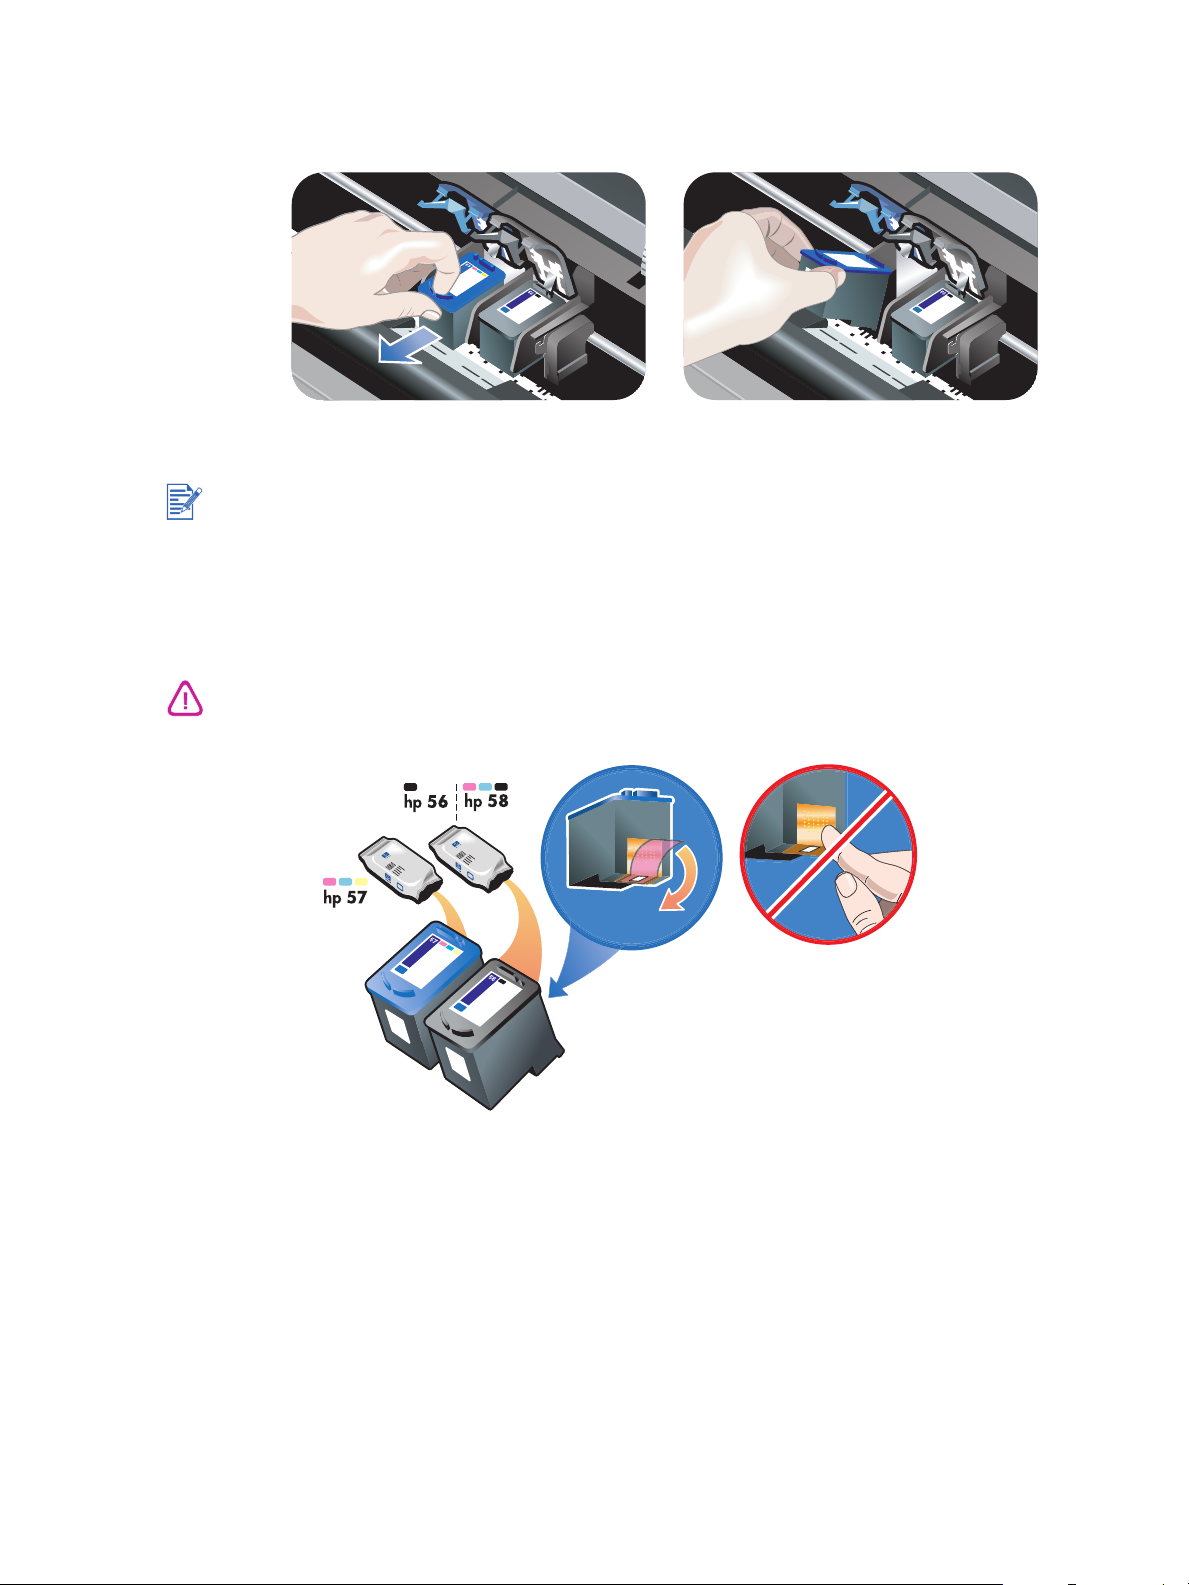
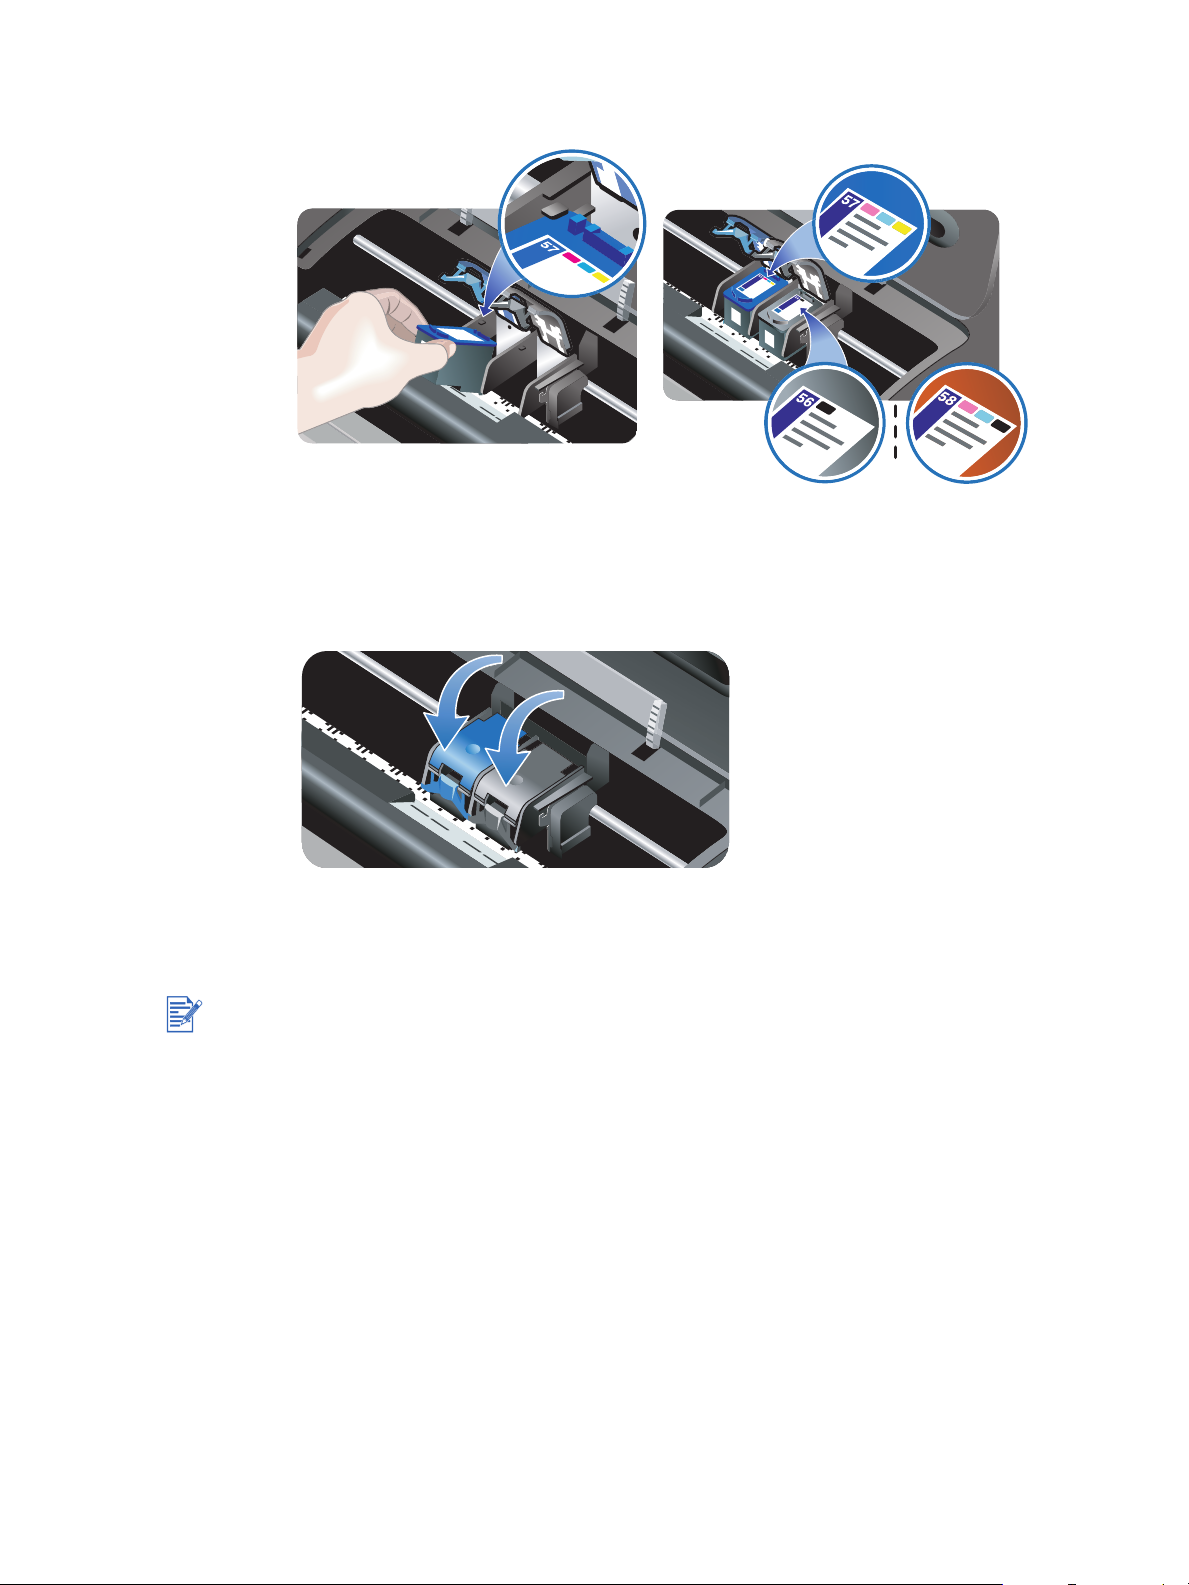
3 If you are replacing a print cartridge, hold the top of the installed print cartridge and
slide it out of its cradle. Check the number on the latch against the number on the new
print cartridge to make sure you are removing the correct print cartridge.
If you are installing a new print cartridge, the printer will automatically align the print cartridges
and use one sheet of paper to print an alignment page. If you have higher-quality photo media
loaded in the input tray, you may want to load a sheet of plain paper before installing the new
print cartridge.
If you are installing a new print cartridge, remove the print cartridge from its package,
and then remove the plastic tape with the pink tab from the print cartridge.
To prevent clogs, ink failure, and bad electrical connections, do not touch the print cartridge ink
nozzles or copper contacts, and do not remove the copper contacts.
3-3 ENWW
Page 28
4 Hold the print cartridge with the copper contacts facing the printer, and then slide the print
cartridge into the cradle.
5 Push down on the print cartridge latch until it snaps closed. Make sure the latch does not
spring back open.
6 Close the top c over.
If you installed a new print cartridge, the printer aligns the print cartridges and prints an
alignment page. If no alignment page prints, make sure there is paper in the input tray.
Do not open the top cover when the printer is aligning the print cartridges.
ENWW 3-4
Page 29

Aligning the print cartridges
The printer automatically aligns print cartridges whenever a new print cartridge is installed.
However, if your printout is grainy, has stray dots, jagged edges, or the ink is bleeding into
another color on the page, you can realign the print cartridges.
For Windows
You can align the print cartridges from the Toolbox or the printer driver.
1 Load plain paper into the input tray (see “Loading media in the input tray”).
2 Open the Toolbox: Click Start, point to Programs, hp deskjet 9600 series, and then click
hp deskjet 9600 series Toolbox.
-Or-
Open the printer driver (see “Changing default print settings”).
3 Click the Printer Services tab (Toolbox ) or Services tab (printer driver).
4 Click Align Print Cartridges and follow the onscreen instructions.
For Macintosh
1 Load plain paper into the input tray (see “Loading media in the input tray”).
2 Open the HP Inkjet Toolbox.
3 Open the Calibrate panel.
4 Click Align.
3-5 ENWW
Page 30

Cleaning the print cartridges
To clean the print cartridges automatically
The print cartridges have microscopic nozzles that can clog when exposed to air for too long.
In addition, if a print cartridge is not used for long periods of time it can also clog, resulting in a
noticeable decrease in print quality. Cleaning the print cartridges unclogs the nozzles.
Clean the print cartridges if the printed characters are incomplete, or if dots or lines are
missing from the printed text or graphics.
Cleaning the print cartridges when it is not necessary wastes ink and reduces the life of the
print cartri dge s.
For Windows
You can clean the print cartridges from the Toolbox or the printer driver.
1 Load plain paper into the input tray (see “Loading media in the input tray”).
2 Open the Toolbox: Click Start, point to Programs, hp deskjet 9600 series, and then click
hp deskjet 9600 series Toolbox.
-Or-
Open the printer driver (see “Changing default print settings”).
3 Click the Printer Services tab (Toolbox ) or Services tab (printer driver).
4 Click Clean Print Cartridges and follow the onscreen instructions.
5 If you still find a problem in the printout, repeat this cleaning process.
6 If there is still a problem in the printout, the print cartridge may have expired. In this case,
replace it with a new print cartridge.
For Macintosh
1 Load plain paper into the input tray (see “Loading media in the input tray”).
2 Open the HP Inkjet Toolbox.
3 Open the Clean panel.
4 Click Clean.
5 If you still find a problem in the printout, repeat this cleaning process.
6 If there is still a problem in the printout, the print cartridge may have expired. In this case,
replace it with a new print cartridge.
ENWW 3-6
Page 31
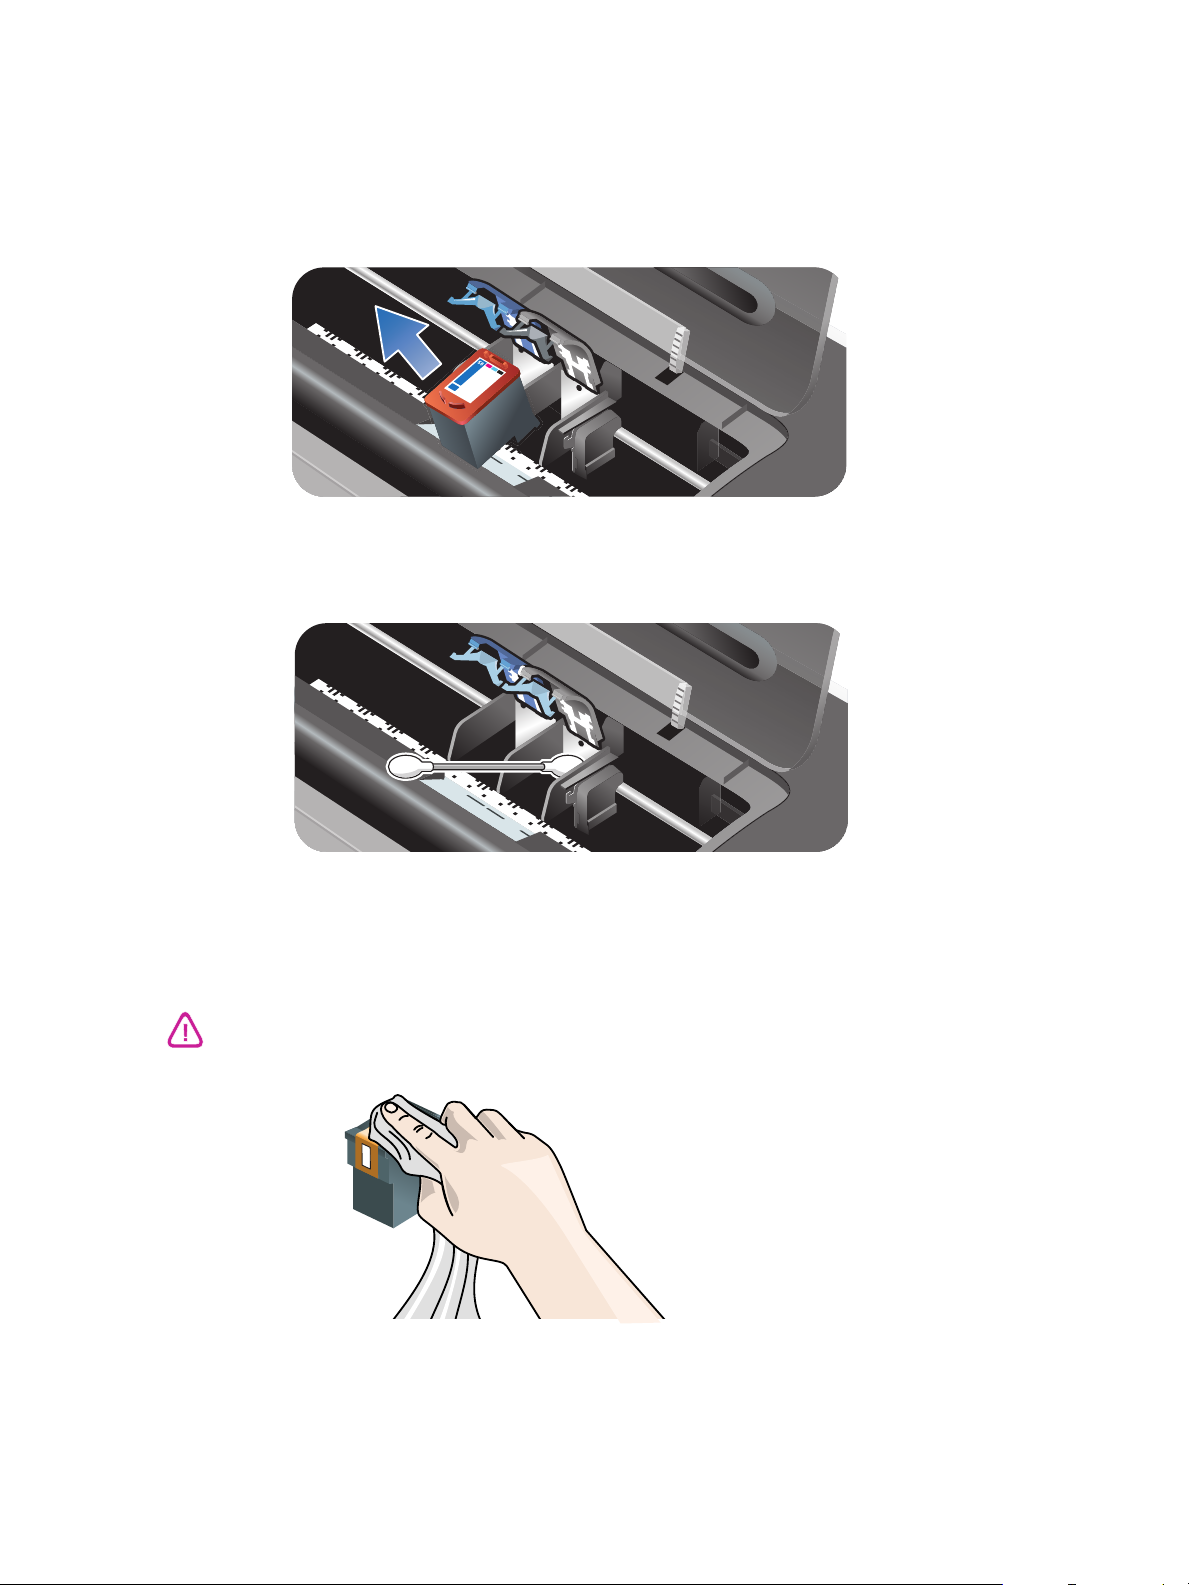
To clean the print cartridges manually
Poor contact between the print cartridges and print cartridge cradles may also affect the
quality of the printout. When this occurs, try cleaning the electrical contacts on the print
cartridges and print cartridge cradles:
1 Remove the print cartridge from the printer (see “Installing or replacing the print
cartridges”).
2 Clean the electrical contacts on the print cartridge cradle with a dry cotton swab.
3 Carefully clean the electrical contacts on the print cartridge with a soft, dry, lint-free cloth.
To prevent damage to the electrical contacts, you should wipe the contacts only once. Do not
wipe the ink nozzles on the print cartridge.
4 Reinstall the print cartridge.
3-7 ENWW
Page 32
Maintaining the print cartridges
56
The following tips will help maintain HP print cartridges and ensure consistent print quality:
Keep all print cartridges in their sealed packages until they are needed. Print cartridges
should be stored at room temperatures between 15° to 35° C (59° to 95° F).
Do not remove the plastic tape covering the ink nozzles until you are ready to install the
print cartridge in the printer. If the plastic tape has been removed from the print cartridge,
do not attempt to reattach it. Reattaching the tape damages the print cartridge.
Do not drop the print cartridge. Dropping the print cartridge may damage it.
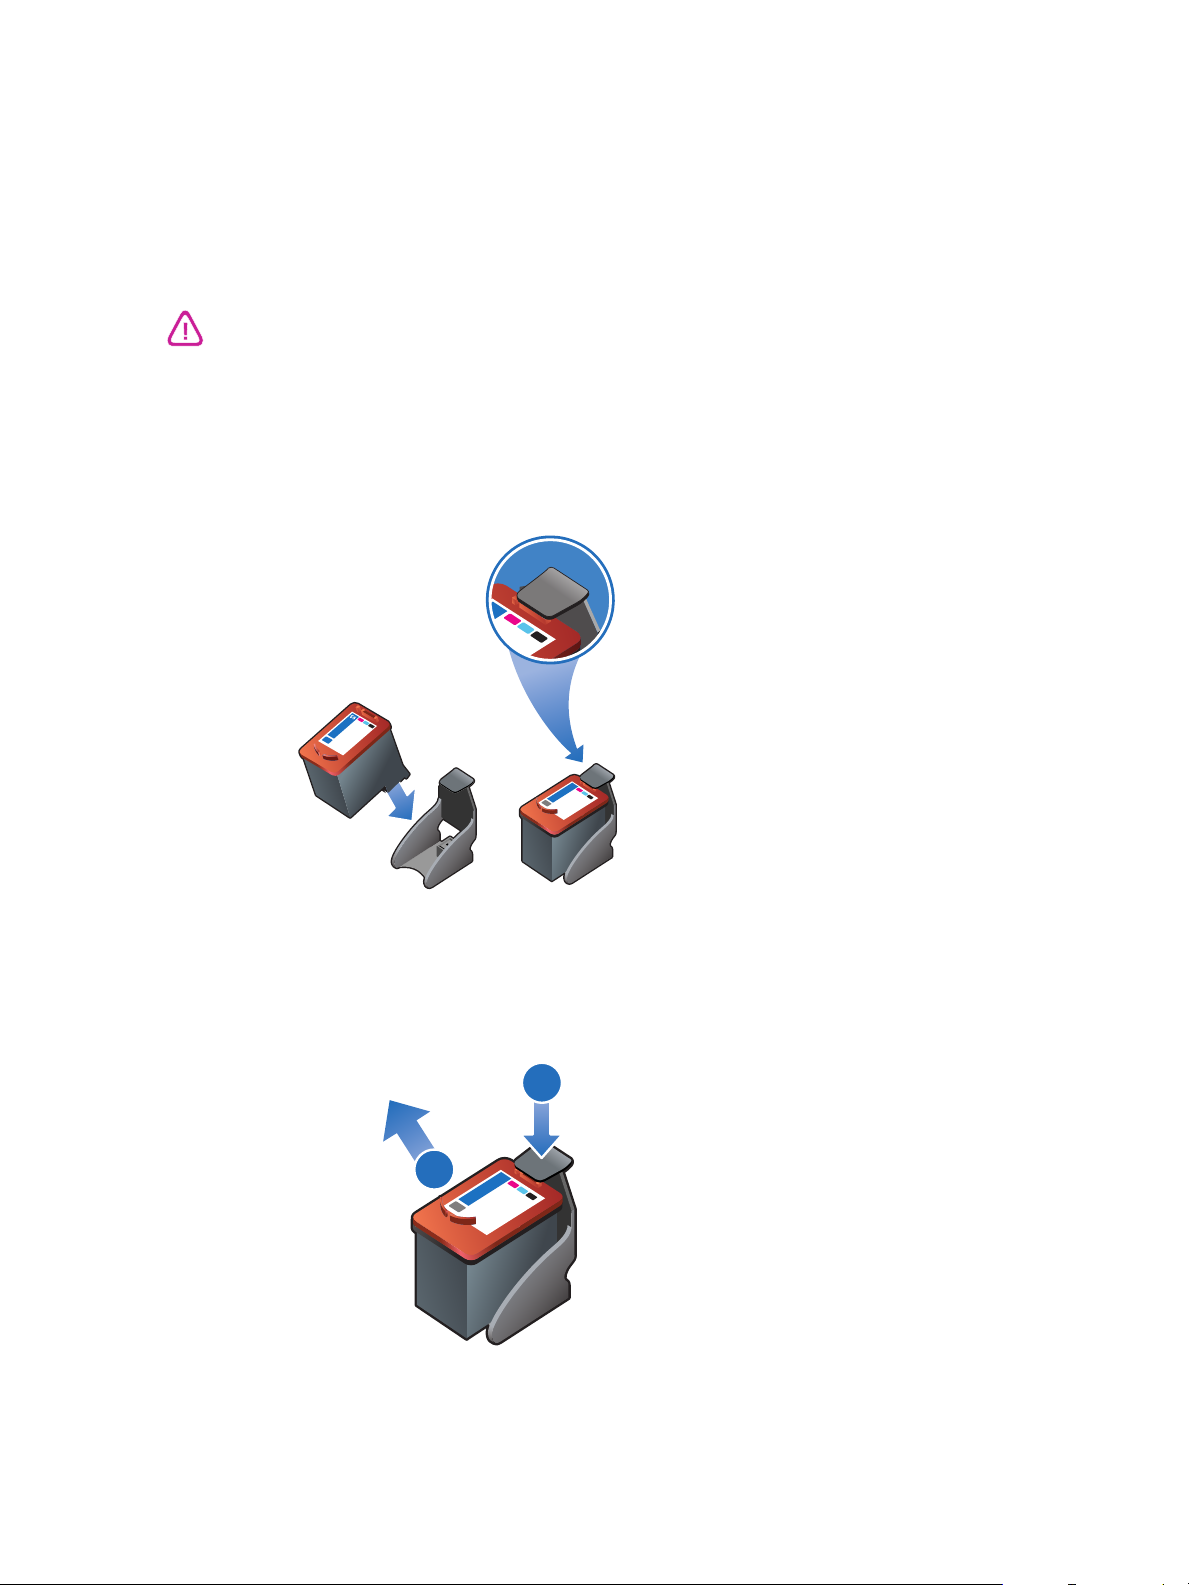
Storing the print cartridges
When the black or photo print cartridge is removed from the printer, store it in the Print
Cartridge Protector.
1 Insert the print cartridge at a slight angle into the protector and snap it securely in place.
56
2 To remove the print cartridge from the protector, press down and back on the tab inside
the protector to release the print cartridge, and then remove the print cartridge.
1
2
56
ENWW 3-8
Page 33

Printing with a single print cartridge
If one of the print cartridges runs out of ink before you can replace it, you can still print with a
single print cartridge .
If you do not have a replacement black print cartridge available, you can remove the black
print cartridge and print with only the color print cartridge.
If you do not have a replacement color print cartridge available, you can remove the color
print cartridge and print with only the black or photo print cartridge. Documents will print in
grayscale.
If you do not have a replacement photo print cartridge available, you can remove the
photo print cartridge and print with only the color print cartridge.
Printing from one print cartridge, rather than two, may be slower and the print quality may be
affected. It is recommended to print with both print cartridges.
For borderless printing, the color print cartridge must be installed.
3-9 ENWW
Page 34

Printing and loading media
4
Selecting print media
Your printer is designed to print on a variety of media types (such as plain paper, photo paper,
envelopes, and transparencies) and sizes. The printer works well with most office paper types,
and provides the best results on paper that accepts ink well. Always use media that conforms
with the types, sizes, and weights listed in “Understanding specifications for supported media”.
It is best to test a variety of media types before buying large quantities. Find a media type that
works well.
Use HP media for optimum print quality. These print media types are specifically designed to
work well with the printer. For ordering information and part numbers, see “HP supplies and
accessories”.
Tips for selecting and using print media
Paper that is too thin, has a slick texture, or “stretches” easily can feed improperly through
the printer's paper path.
Paper that is heavily textured or does not accept ink well can cause poorly filled graphics
or text.
To ensure that media feeds properly, load only one type of media at a time in the input tray
or the manual feed slots.
Do not use media that is damaged, curled, or wrinkled. It is recommended not to use
paper with cutouts or perforations or paper that is heavily textured or embossed.
Try to use a paper type that has previously worked well with your printer.
If you are printing more than one page on transparencies, photo paper, or other special
paper, the printing pauses and the Resume light blinks after each page is printed. This
allows the printed page to dry before printing the next page. You can press the Resume
button if you do not want to wait for the printed page to dry before printing the following
page; however, it is recommended to allow each page to dry.
ENWW 4-1
Page 35

Understanding specifications for supported media
This section provides information regarding the sizes, types, and weights of media that the
printer supports.
Understanding supported media sizes
The following table lists the sizes of media you can use with each paper path.
Media size Input tray Front manual
feed slot
US Letter (8.5 by 11 inches;
216 by 279 mm)
Tabloid (11 by 17 inches;
279 by 432 mm)
A4 (8.3 by 11.7 inches;
210 by 297 mm)
A3 (11.7 by 16.5 inches;
297 by 420 mm)
B4 (10.12 by 14.3 inches;
257 by 364 mm)
B5 (6.9 by 9.9 inches;
176 by 250 mm)
Statement (5.5 by 8.5 inches;
140 by 216 mm)
Executive (7.25 by 10.5 inches;
184 by 267 mm)
Legal (8.5 by 14 inches;
216 by 356 mm)
Super B (13 by 19 inches;
330 by 482 mm)
A3+ (13 by 19 inches;
330 by 482 mm)
Rear manual
feed slot
Auto-duplex
unit
A5 (5.8 by 8.3 inches;
148.5 by 210 mm)
Index card (5 by 8 inches;
127 by 203.2 mm)
No. 10 Envelope (4.12 by
9.5 inches; 104.6 by 241.3 mm)
C5 Envelope (6.4 by 9 inches;
162 by 229 mm)
DL Envelope (4.3 by
8.7 inc hes ; 110 by 220 mm)
Monarch Envelope (3.87 by
7.5 inches; 98.3 by 190.5 mm)
Banner, US Letter (8.5 by
11 inches; 216 by 279 mm)
Banner, A4 (8.3 by 11.7 inc hes;
210 by 297 mm)
Banner, A3 (11.7 by
16.5 inches; 297 by 420 mm)
Banner, Tabloid (11 by
17 inches; 279 by 432 mm)
4-2 ENWW
Page 36

Media size Input tray Front manual
feed slot
Borderless Photo (8 by
10 inches; 203.2 by 254 mm)
Borderless Photo (8.5 by
11 inches; 216 by 279 mm)
Borderless A4 (8.3 by
11.7 inches; 210 by 297 mm)
Borderless Tabloid (11 by
17 inches; 279 by 432 mm)
Borderless A3 (11.7 by
16.5 inches; 297 by 420 mm)
A6 card (4.13 by 5.83 inches;
105 by 148.5 mm)
Index card (4 by 6 inches;
101.6 by 152.4 mm)
Photo (4 by 6 inches;
101.6 by 152.4 mm)
Photo with tab (4 by 6 inches;
101.6 by 152.4 mm)
A2 Envelope (4.37 by
5.75 inches; 111 by 146 mm)
C6 Envelope (4.5 by
6.4 inc hes ; 114 by 162 mm)
HP Greeting Card Envelope
(4.38 by 6 inches; 111.3 by
152.4 mm)
Borderless Photo (4 by
6 inch es; 101.6 by 152 .4 mm )
Borderless Photo with tab (4 by
6 inch es; 101.6 by 152 .4mm)
Borderless Photo (5 by
7 inches; 127 by 177.8 mm)
Borderless A6 card (4.13 by
5.83 inches; 105 by 148.5 mm)
Rear manual
feed slot
Auto-duplex
unit
Custom-size media between
3.54 to 13 inch es wide and 5.75
to 50 inches long (89.9 to
330.2 mm wide and 146.05 to
1,270 mm long)
ENWW 4-3
Page 37

Understanding supported media types
The following table lists the types of media you can use.
Media type Input tray and
front and rear
manual feed slots
Plain paper
HP bright white paper
HP premium inkjet paper
Other inkjet papers
HP photo paper
Other photo papers
Thick photo paper
HP premium high-gloss
film
HP transparency film
Manual
duplex
Auto
duplex
Maximum dpi
(4800 x 1200
optimized dpi*)
Borderless
printing
Other transparency films
HP banner paper
HP iron-on transfers
HP brochure paper
Other brochure papers
Other spec ialty papers
HP cards
Other greeting cards
Thick plain paper
*Up to 4800 x 1200 optimize d dpi for c olor pri nting an d 1200 in put dpi . This se tting wil l tempo rarily use a
large amount of hard disk space (400 MB or more) and will print slower. Photo cartridge, if present,
further enhances the print quality.
4-4 ENWW
Page 38

Understanding supported media weights and capacities
The following table provides information about the media weights and capacity that the paper
paths can support.
Tray Type Weight Capacity
Input tray Paper, envelopes,
cards
Transparencies or
labels
Front manual
feed slot
Paper, envelopes,
cards
65 to 135 g/m
2
(17 to 36 lb bond)
65 to 135 g/m
2
(17 to 36 lb bond)
Up to 19 mm (0.75 inches) or up to
150 sheets plain paper; up to
15 envelopes; up to 60 cards
Up to 30
Up to 10 sheets plain paper; up to
5 envel op es or cards
Transparencies or
Up to 8
labels
Rear manual
feed slot
Paper, envelopes,
cards
Transparencies or
Up to 280 g/m
(74 lb bond)
2
One at a time; thick media (up to
0.3 mm)
One at a time
labels
Auto-duplex
unit
Paper
(Does not support
Up to 135 g/m
(36 lb bond)
2
banners, index
cards, or envelopes.)
Output tray Up to 75 sheets
ENWW 4-5
Page 39

Setting minimum margins
The document margins must match (or exceed) these minimum margin settings in portrait
orientation.
Media Left and right
margins
Letter, Tabloid, A4, A3, A5, B4, B5, Statement,
Executive, Legal, Super B, A3+, Cards, Envelopes
Photo (4 by 6 inches; 101.6 by 152.4 mm) 3.2 mm
Photo with tab (4 by 6 inches; 101.6 by 152.4 mm) 3.2 mm
Banner 3.1 mm
Custom-sized media 6.4 mm
3.1 mm
(0.12 inch)
(0.13 inch)
(0.13 inch)
(0.12 inch)
(0.25 inch)
Top margin Bottom
margin
1.8 mm
(0.07 inch)
3.2 mm
(0.13 inch)
3.2 mm
(0.13 inch)
0 mm
(0 inch)
1.8 mm
(0.07 inch)
11.7 mm
(0.46 inch)
3.2 mm
(0.13 inch)
3.0 mm
(0.12 inch)
0 mm
(0 inch)
11.7 mm
(0.46 inch)
4-6 ENWW
Page 40
Loading media in the input tray
This section explains how to load plain paper and standard media sizes and types into the
input tray.
If you are printing on thick or photo paper, you can use the rear manual feed slot.
See “Printing with the front or rear manual feed slot”.
If you are print ing cards or en velope s, see “Printing on cards and smaller-sized media” and
“Printing on envelopes”.
If you are printing one or just a few envelopes or sheets of paper, you can use the front
manual feed slot and leave your regular media in the input tray. See “Printing with the front
or rear manual feed slot”.
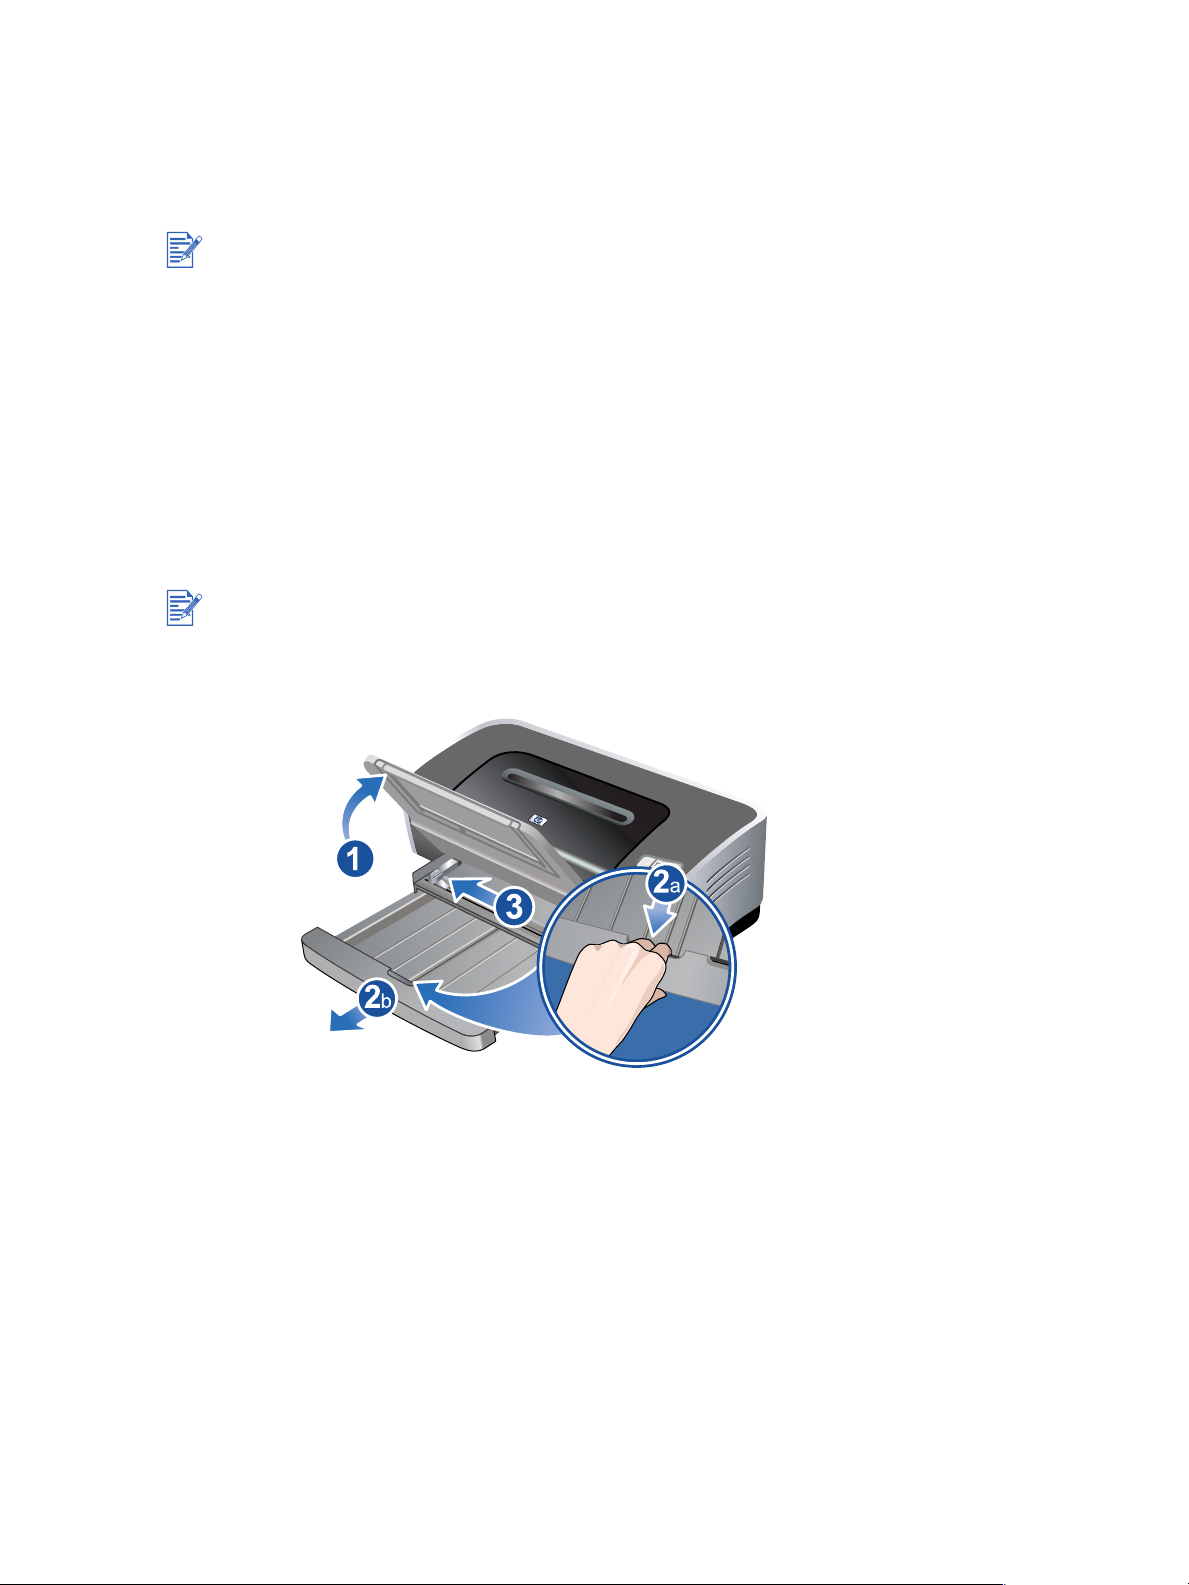
To load media in the input tray
1 Raise the output tray. If the output tray is extended, close the tray.
2 Press the input tray lock and extend the input tray.
If the small media guide is in its open position, close it by moving it 90 degrees
counterclockwise.
3 Press the button on top of the paper width guide and slide the guide to the left to its
outermost position.
4 Insert up to 150 sheets of paper or a stack of media that does not exceed the height of the
paper width guide, print-side down along the right side of the input tray until it stops.
Transparencies: Insert up to 30 transparencies, rough-side down and the adhesive strip
pointing forward, along the right side of the input tray until it stops.
5 Press the button on top of the paper width guide and slide the guide to the right until it
stops at the edge of the media.
ENWW 4-7
Page 41

6 Press the input tray lock and retract the tray until it stops at the edge of the media.
When 8.5-by-11 inch paper is loaded in the input tray, the tray extension will close to the edge
of the paper and leave a slight gap between the extension and the tray. The tray extends
further to accommodate larger-sized media.
7 Lower the output tray to its horizontal position.
8 Extend the output tray if necessary.
4-8 ENWW
Page 42

Using the automatic paper-type sensor
The automatic paper-type sensor automatically selects the print settings appropriate for the
media in the printer, particularly when used with HP media.
The sensor scans the first page of a document, selects the media type and the most suitable
print quality for your document, and then prints the document.
When printing with higher-quality media, it is recommended that you select the specific
paper type in the printer driver.
Do not place the printer in direct sunlight. Direct sunlight can interfere with the automatic
paper-type sensor.
If you want to set the automatic paper-type sensor as your default setting, see “Changing
default print settings”.
For Windows
1 Open the printer driver (see “Printing a document”).
2 Click the Paper/Quality tab.
3 Select Automatic from the Type is drop-down list.
4 Change any other desired print settings and click OK.
For Macintosh
1 Click File, and then click Print.
2 Open the Paper Type/Quality panel.
3 Mac OS 9.1.x and 9.2.x:
•Select Automatic from Paper Type.
Mac OS X (10.1 and later):
i Click the Paper tab.
ii Select Automatic from the Paper type drop-down list.
4 Change any other desired print settings and click OK or Print.
ENWW 4-9
Page 43

Changing default print settings
You can change the default print settings in the printer driver. The default print settings apply
to all documents printed by the printer.
If you do not wish to change the default print settings, access the printer driver from the
application you are using. See “Printing a document”.
For descriptions of the printer driver features, see “Understanding smart software features”.
For Windows
1 Click Start, point to Settings, and then click Printers (Windows NT 4.0, 98, Me,
and 2000) or Printers and Faxes (Windows XP).
(If Printers and Faxes is not found on the Start menu in Windows XP, click Start, click
Control Panel, and then click Printers and Faxes.)
2 In the Printers folder, right-click the printer icon and then click Properties
(Windows 98 or Me), Document Defaults (Windows NT 4.0), or Printing Preferences
(Windows 2000 or XP).
3 Select the options you want to use as the default print settings.
4 Click OK to save the new default print settings.
To restore the default print settings, click the Print Task Quick Sets drop-down menu and
select Default Print Settings.
For Macintosh
1 Click File, and then click Print.
2 Select the options you want to use as the default print settings.
3 Mac OS 9.1.x and 9.2.x: S el ec t Save Current Settings from the lower-left drop-down list.
Mac OS X (10.1 and later): Select Save As from the Presets drop-down list.
4 Type a name for these settings.
5 Mac OS 9.1.x and 9.2.x: Click Save to save the new default print settings.
Mac OS X (10.1 and later): Click OK to save the new default print settings.
To restore the default print settings, select Default.
4-10 ENWW
Page 44

Understanding smart software features
The printer driver provides the following smart software features. To access the printer driver,
see “Printing a document”.
Some features are only available in Windows. To find more information on a specific feature in
the Windows printer driver, right-click the feature and select What's This?
Borderless Printing: Use the entire page surface when printing photos and cards using
the borderless printing feature. See “Printing borderless”.
Resizing Options: Enlarge or reduce the size of your documents with virtually no loss in
print quality or resolution. On the Effects tab, select the Print Document On check box,
and then select the desired document size, followed by the Scale to Fit check box. You
can also select Center On Page to center your document on the printed page.
Alternatively, you can use the % of Normal Size scroll bar to adjust the document size.
You can zoom from 25 to 400 percent of the original document size, but page content may
get truncated at times.
Print on Both Sides: Print on both sides of the paper to create professional looking
brochures and catalogs. See “Printing on both sides (duplexing)”.
Minimize Margins: Print closer to the bottom edge of the page. On the Paper/Quality
tab, select the Minimize Margins check box, and then reduce the document margins by
adjusting the page setup settings in the application being used.
HP Digital Photography: Use a variety of settings to improve the quality of your printed
photographs. The HP Digital Photography features should be used for high-resolution
images (600 dpi or higher) printed on photo-quality paper. On the Paper/Quality tab, click
HP Digital Photography after you have selected a photo media.
Booklet Layout: Produce booklets without worrying about pagination. All you need to do
is fold the pages and bind them into a booklet. You can choose to bind the booklet on the
left or right side by selecting left or right edge binding. See “Printing booklets”.
Pages per Sheet: Arrange up to 16 pages on a single sheet of paper to reduce printing
costs. You can arrange the order of the layout. See “Printing multiple pages on a single
sheet of paper”.
Tiling: Take a one-page document and enlarge it up to five times (5 x 5) for documents up
to A3+ (13-by-19 inch) size. The enlarged document can be printed on several sheets and
assembled to form a large billboard. See “Printing posters”.
Mirror Image: Flip a page horizontally. This lets you write on the underside of a
transparency film, leaving the top side available for annotations with marker pens. On the
Basics tab, select the Mirror Image check box.
Banner printing: Print large images and bold, oversized fonts on continuous feeds of
paper. See “Printing banners”.
Print in Sepia: Print images in a brownish tone to give them an antique look. On the
Color tab, select the Print in Sepia check box.
Print in Grayscale: Both black and white and color documents can be converted to
grayscale. On the Color tab, select the Print in Grayscale check box.
ENWW 4-11
Page 45

Print All Text as Black: Print all text characters as black while retaining colored graphics.
On the Color tab, select the Print All Text as Black check box.
Watermarks: Display short text such as CONFIDENTIAL as the background for your
document's main text. You can customize and rotate the watermark according to your
preference. This feature is found on the Effects tab.
Optimize for Photocopy or Fax: Color images sometimes translate into poor printouts
when put through a black and white facsimile or photocopier. The Optimize for Photocopy
or Fax feature prints images using high-contrast shades of gray, making them ideal for
faxing and photocopying. On the Color tab, select the Print in Grayscale check box, and
then select Optimize for Photocopy or Fax.
Ink Volume Control: Adjust the amount of ink printed on a page. On the Basics tab, click
Advanced Features, and then drag the slider to the left for lighter images (less ink) or to
the right for darker images (more ink). The lighter the ink volume, the faster the printout
will dry.
4-12 ENWW
Page 46

Printing a document
The steps to print a document vary depending on the software program. In general, follow
these steps to print a document:
1 Open the file you wish to print.
2 Click File, and then click Print.
3 To print with the printer's default print settings, click OK or Print.
-Or-
To change the print settings for the document, open the printer driver:
• Windows: Click Properties or Setup.
• Macintosh: Click Print or Page Setup.
The path to the printer driver will vary depending on the software program.
4 Change any desired print settings and click OK or Print.
For descriptions of the printer driver features, see “Understanding smart software
features”.
To make print settings apply to all documents printed by the printer, see “Changing default
print settings”.
For more specific printing instructions, see other sections in this chapter.
ENWW 4-13
Page 47

Printing with the front or rear manual feed slot
If you are printing one or just a few photos, envelopes, or sheets of paper, you can use the
front manual feed slot and leave your regular media in the input tray.
The rear manual feed slot uses a straight paper path and is designed for printing single sheets
on thick paper (up to 280 g/m
For information on media types and sizes supported by the manual feed slots, see
“Understanding specifications for supported media”.
If the auto-duplex unit is installed and you want to print using the rear manual feed slot, replace
the auto-duplex unit with the rear access panel.
To print using the front or rear manual feed slot
1 For Windows:
i Open the printer driver (see “Printing a document”).
ii Click the Paper/Quality tab.
iii Select the manual feed option from the Source is drop-down list.
iv Change any other desired print settings and click OK.
v Print your document.
2
) like cardstock and photo paper.
For Macintosh:
iClick File, and then click Page Setup.
ii Select the media size.
iii Click File, and then click Print.
iv Mac OS 9.1.x and 9.2.x: In the General panel, select the manual feed option from the
Paper Source drop-down list.
v Open the Paper Type/Quality panel.
vi Mac OS 9.1.x and 9.2.x: Select the media group from the Category drop-down list and
media type from the Paper Type drop-down list.
Mac OS X (10.1 and later): Click the Paper tab and select the media type and source.
vii Change any other desired print settings and click OK or Print.
2 When the Res ume light blink s, do the followi ng :
4-14 ENWW
Page 48

Front manual feed slot
If there are any printouts on the output tray, remove them before using the front manual feed
slot.
i Extend the output tray.
ii Slide the paper guide to the left to its outermost position.
iii Insert up to 10 sheets of paper or 5 cards or envelopes, print-side down into the right
side of the slot until the media stops. Insert envelopes with the flaps facing up and to
the right.
iv Slide the paper guide to the right until it stops at the edge of the paper.
v Press the Resume button to proceed with printing.
To resume printing from the input tray, remove the paper from the front manual feed slot.
Rear manual feed slot
i Before you load the paper, adjust the paper guide to the size of paper you are printing
by aligning it with the appropriate icon below the rear manual feed slot.
ii Insert a single sheet of paper print-side up into the left side of the rear manual feed
slot.
The printer grips the paper.
iii Press the Resume button to proceed with printing.
If you are printing more than one page, press the Resume button after inserting each
sheet of paper.
ENWW 4-15
Page 49

Printing on various media types
Use HP media for optimum print quality. These media types are specifically designed to
work with your printer. See “HP supplies and accessories” for part numbers and ordering
information.
If you are printing transparencies, it is recommended to remove each transparency as it
prints and set it aside to dry.
For Windows
1 Load the print media (see “Loadi ng med ia in the inp ut tray”).
2 Open the printer driver (see “Printing a document”).
3 Click the Paper/Quality tab.
4 Select the media type from the Type is drop-down list.
5 Select the media size from the Size is drop-down list.
6 Select the paper source from the Source is drop-down list.
7 Change any other desired print settings and click OK.
8 Print your document.
For Macintosh
1 Load the print media (see “Loadi ng med ia in the inp ut tray”).
2 Click File, and then click Page Setup.
3 Select the media size.
4 Click File, and then click Print.
5 Mac OS 9.1.x and 9.2.x: I n the General panel, select the paper source from the
Paper Source drop-down list.
6 Open the Paper Type/Quality panel.
7 Mac OS 9.1.x and 9.2.x: Select the media group from the Category drop-down list and
media type from the Paper Type drop-down list.
Mac OS X (10.1 and later): Click the Paper tab and select the media type and source.
8 Change any other desired print settings and click OK or Print.
4-16 ENWW
Page 50

Printing on custom-sized paper
The paper width must be between 89.9 mm and 330.2 mm (3.54 inches and 13 inches); the
paper length must be between 146.05 mm and 1,270 mm (5.75 inches and 50 inches).
For Windows
1 Load the print media (see “Loadi ng med ia in the inp ut tray”).
2 Open the printer driver (see “Printing a document”).
3 Click the Paper/Quality tab.
4 Click the Custom button beneath the Size is drop-down list.
5 In the custom paper size dialog box, type values for the width and length.
6 Choose any of the predefined names from the Name drop-down list and click Save to
save the custom settings.
7 Click OK.
8 Select the name of the custom paper size just created from the Size is drop-down list.
9 Select the paper source from the Source is drop-down list.
10 Change any other desired print settings and click OK.
11 Print your document.
For Macintosh
1 Load the print media (see “Loadi ng med ia in the inp ut tray”).
2 Click File, and then click Page Setup.
3 Mac OS 9.1.x and 9.2.x: Select the custom size option from the media size
drop-down list.
Mac OS X (10.1 and later): Select the custom size option from the Settings
drop-down list.
4 Click New, and then type values for the width and height.
5 Select the custom paper size just created.
6 Change any other desired print settings and click OK or Print.
ENWW 4-17
Page 51

Printing on envelopes
If you are printing one or just a few envelopes, you can use the front manual feed slot. See
“Printing with the front or rear manual feed slot”.
Avoid using envelopes that have clasps or windows; have thick, irregular, or curled edges;
are shiny or embossed; or are wrinkled, torn, or otherwise damaged.
1 Raise the output tray and remove any media from the input tray.
2 Insert up to 15 envelopes along the right side of the input tray, with the flaps facing up and
to the right, until they stop.
3 Open the small media guide by moving it 90 degrees clockwise from start to end position.
4 Press the button on top of the paper width guide and slide the guide to the right until it
stops at the edge of the envelopes.
1
4
3
5 Press the input tray lock and retract the tray until the small media guide stops at the edge
of the envelopes.
6 Lower the output tray.
2
6
5
7 For Windows:
i Open the printer driver (see “Printing a document”).
ii Click the Paper/Quality tab.
iii Select the envelope size from the Size is drop-down list.
iv Change any other desired print settings and click OK.
v Print your file.
For Macintosh:
iClick File, and then click Page Setup.
ii Select the envelope size.
iii Change any other desired print settings and click OK or Print.
4-18 ENWW
Page 52

Printing on cards and smaller-sized media
If you are printing on thick paper (such as cardstock), you can use the rear manual feed slot.
See “Printing with the front or rear manual feed slot”.
1 Raise the output tray and remove any media from the input tray.
2 Insert up to 60 cards, or a stack of media that does not exceed the height of the paper
width guide, print-side down along the right side of the input tray until it stops.
3 Open the small media guide by moving it 90 degrees clockwise from start to end position.
4 Press the button on top of the paper width guide and slide the guide to the right until it
stops at the edge of the cards.
1
4
3
5 Press the input tray lock and retract the tray until the small media guide stops at the edge
of the cards.
6 Lower the output tray.
6
5
2
ENWW 4-19
Page 53

7 For Windows:
i Open the printer driver (see “Printing a document”).
ii Click the Paper/Quality tab.
iii Select the size of the cards from the Size is drop-down list.
For instructions on printing custom-sized cards, see “Printing on custom-sized paper”.
iv Select the paper type from the Type is drop-down list.
v Change any other desired print settings and click OK.
vi Print your file.
For Macintosh:
iClick File, and then click Page Setup.
ii Select the size of the cards.
For instructions on printing custom-sized cards, see “Printing on custom-sized paper”.
iii Click File, and then click Print.
iv Open the Paper Type/Quality panel.
v Mac OS 9.1.x and 9.2.x: Select the media group and type.
Mac OS X (10.1 and later): Click the Paper tab and select the media type and source.
vi Change any other desired print settings and click OK or Print.
If you wish to print to the edge of the cards, see “Printing borderless”.
4-20 ENWW
Page 54

Printing digital photographs
Printing with six-ink color
Your printer can print with six-ink color to enhance the quality of printed photographs. To do
six-ink color printing, a photo and a color print cartridge must be installed together.
To replace the black print cartridge with the photo print cartridge, see “Installing or replacing
the print cartridges”.
After you install a new print cartridge, the printer will automatically align the print cartridges and
use one sheet of paper to print an alignment page. If you have higher-quality photo media
loaded in the input tray, you may want to load a sheet of plain paper before installing the new
print cartridge.
Guidelines for printing photographs
For the best results when printing photographs and images, choose Best mode and select
an HP photo paper in the printer driver. Best mode uses HP's unique PhotoREt IV
color-layering technology and ColorSmart III color optimization technology to create
realistic photo images, vivid color output, and extremely sharp text. With PhotoREt IV, a
greater range of colors, lighter tones, and smoother gradations between tones can be
achieved, ensuring the best photo and image print quality.
Alternatively, select Maximum dpi, which provides up to 4800
x 1200 optimized dpi* for
optimum print quality. See “4800 x 1200 optimized dpi”.
*Up to 4800 x 1200 optimized dpi for color printing and 1200 input dpi. This setting will
temporarily use a large amount of hard disk space (400 MB or more) and will print slower.
Photo cartridge, if present, further enhances the print quality.
To print borderless photographs, see “Printing borderles s ”.
It is recommended to remove each sheet of paper as it prints and set it aside to dry.
If the printed colors visibly shift towards yellow, cyan or magenta, or there is a tinge of
color in the gray shades, you need to calibrate the color. See “Calibrating color”.
If you install the photo print cartridge, align the print cartridges for best possible print
quality. It is not necessary to align the print cartridges every time you install the photo print
cartridge, only when necessary. See “Aligning the print cartridge s”.
To store a print cartridge, see “Storing the print cartridges”.
Always hold photo paper by the edges. Fingerprints on photo paper reduce print quality.
Photo paper should be flat before printing. If the corners of the photo paper curl more than
10 mm or 3/8 inch, flatten the paper by putting it in the resealable storage bag, then rolling
the bag on a table edge until the paper is flat.
To print digital photographs
1 Load the photo paper:
• If you are loading a stack of photo paper, see “Loading media in the input tray”.
• If you are printing one or just a few sheets, you can use the front manual feed slot. If
you are printing on thick paper and desire a straight paper path, you can use the rear
manual feed slot. If you are using either manual feed slot, load paper in a later step.
• If you are printing 4-by-6 inch photos, you can use the input tray or rear manual feed
slot.
2 Print your photographs. See “Printing a document” .
Also see “Guidelines for printing photographs”.
3 If you are using the front or rear manual feed slot, see “Printing with the front or rear
manual feed slot” for media loading instructions.
ENWW 4-21
Page 55

Understanding digital photography technologies
In addition to six-ink color printing, the printer software offers several features for printing
digital photographs.
PhotoREt printing
4800 x 1200 optimized dpi
Printing Exif Pri nt- enh anced photographs
PhotoREt printing
PhotoREt offers the best combination of print speed and quality for your image.
To print with PhotoREt technology, select Best as the print quality on the Paper/Quality tab in
the printer driver. See “Printing a document” for instructions on changing settings in the printer
driver.
4800 x 1200 optimized dpi
4800 x 1200 optimized dpi* is the highest-quality resolution for this printer. When
Maximum dpi is selected as the print quality, the color print cartridge prints in the 4800 x 1200
optimized dpi mode.
To print with 4800 x 1200 optimized dpi, select Maximum dpi as the print quality on the
Paper/Quality tab in the printer driver. See “Printing a document” for instructions on changing
settings in the printer driver.
*Up to 4800 x 1200 optimized dpi for color printing and 1200 input dpi. This setting will
temporarily use a large amount of hard disk space (400 MB or more) and will print slower.
Photo cartridge, if present, further enhances the print quality.
Printing Exif Print-enhanced photographs
Exif (Exchangeable Image File Format 2.2) Print is an international digital imaging standard
that simplifies digital photography and enhances printed photographs. When a photograph is
taken with an Exif Print-enabled digital camera, Exif Print captures information such as
exposure time, type of flash, and color saturation, and stores it in the image's file. The printer
software then uses this information to automatically perform image-specific enhancements,
resulting in outstanding photographs.
Printing Exif Print-enhanced photos requires:
A digital camera that supports Exif Print
Exif Print-enabled photo software
HP deskjet printer software that supports Exif Print
Windows 2000 or XP
To print Exif Print-enhanced photographs:
1 Open the file you wish to print using Exif Print-enabled photo software.
2 See “Printing with six-ink color” for printing instructions.
4-22 ENWW
Page 56

HP photo imaging software
HP photo imaging software is a Windows software application for viewing and editing image
files. You can print images, send images by e-mail or fax, upload images to a website, or use
images in printing projects with the HP Photo View Center. To install it, insert the Starter CD,
click the HP Photo Imaging Software button on the CD browser menu, and select it from the
list of software shown.
When you save photos to your computer, the HP photo imaging software opens automatically
and displays thumbnails (small versions) of your images. If you want to open the HP photo
imaging software at a later time, open the HP Director and click the View Images icon, which
is located in the middle of the Director window.
ENWW 4-23
Page 57

Printing borderless
Borderless printing lets you print to the edges of certain paper types and a range of standard
paper sizes from A6 (105 by 148 mm) to A3 (297 by 420 mm). The printer can also print on
4-by-6 inch photo paper.
If you are printing photos, you can enhance them by printing in six-ink color printing mode. See
“Printing with si x- i nk color”.
Open the file in a software application and assign the image size. Make sure the size
corresponds to the paper size on which you are printing the image.
For Windows
1 Load the appropriate paper:
• If you are printing one or just a few sheets, you can use the front or rear manual feed
slot. If so, continue with the steps below and load the paper in a later step.
• If you are using the input tray, see “Loading media in the input tray”.
2 Open the file you wish to print.
3 Open the printer driver (see “Printing a document”).
4 Click the Paper/Quality tab.
5 Select the paper size from the Size is drop-down list.
6 Select the Borderless Printing check box.
7 Select the paper source from the Source is drop-down list. If you are printing on thick or
photo paper, select the manual feed option.
8 Select the paper type from the Type is drop-down list. Do not select Automatic.
9 Select the Borderless Auto Fit check box to automatically resize the image to print
without a border.
10 If you are printing photos, select Best from the Print Quality drop-down list. Alternatively,
select Maximum dpi, which provides up to 4800
quality.
*Up to 4800 x 1200 optimized dpi for color printing and 1200 input dpi. This setting will
temporarily use a large amount of hard disk space (400 MB or more) and will print slower.
Photo cartridge, if present, further enhances the print quality.
11 Change any other desired print settings and click OK.
12 Print your document.
13 If you are using the front or rear manual feed slot, see “Printing with the front or rear
manual feed slot”.
14 If you printed on photo paper with a tear-off tab, remove the tab to make the document
completely borderless.
x 1200 optimized dpi* for optimum print
4-24 ENWW
Page 58

For Macintosh
1 Load the appropriate paper:
• If you are printing one or just a few sheets, you can use the front or rear manual feed
slot. If so, continue with the steps below and load the paper in a later step.
• If you are using the input tray, see “Loading media in the input tray”.
2 Open the file you wish to print.
3 Click File, and then click Page Setup.
4 Select the borderless paper size.
5 Click File, and then click Print.
6 Open the Paper Type/Quality panel.
7 Mac OS 9.1.x and 9.2.x: Select the media group and type.
Mac OS X (10.1 and later): Click the Paper tab and select the media type and source.
8 If you are printing photos, select Best print quality. Alternatively, select Maximum dpi,
which provides up to 4800
*Up to 4800 x 1200 optimized dpi for color printing and 1200 input dpi. This setting will
temporarily use a large amount of hard disk space (400 MB or more) and will print slower.
Photo cartridge, if present, further enhances the print quality.
9 Change any other desired print settings and click OK or Print.
x 1200 optimized dpi* for optimum print quality.
10 If you are printing on thick or photo paper, insert paper into the rear manual feed slot at the
back of the printer. (For instructions on feeding paper manually, see “Printing with the front
or rear manual feed slot”.)
11 If you printed on photo paper with a tear-off tab, remove the tab to make the document
completely borderless.
ENWW 4-25
Page 59

Printing on both sides (duplexing)
Guidelines for printing on both sides of the paper
See “Understanding specifications for supported media” for sizes and types of media
supported by the auto-duplex unit. For unsupported media types, print on both sides
manually.
Increasing the dry time may prevent ink smudges when printing on both sides.
For Windows, adjust the ink dry time by selecting Advanced Features from the Basics
tab in the printer driver.
For Macintosh, adjust the ink dry time by selecting the Ink tab in the Paper Type/Quality
panel.
For best results, do not print on paper heavier than 135 g/m
labels or transparencies, or on both sides of pages that are covered densely with ink.
Jams may occur when using these types of media for printing on both sides, and damage
to the printer may occur when printing on both sides of labels.
2
(36 lb bond), on both sides of
4-26 ENWW
Page 60

Performing manual duplexing
You can print on both sides of a sheet of paper by manually turning the paper over and feeding
it into the printer again.
Manual duplexing is available when the printer is connected directly to your system and is not
shared on a network.
For Windows
1 Load the appropriate paper (see “Loading media in the input tray”).
2 Open the printer driver (see “Printing a document”).
3 Click the Finishing tab.
4 Select the Print on Both Sides check box, and ensure Use Auto-Duplex Unit is cleared.
5 Select Flip Pages Up to change the page orientation, if desired.
6 Choose a booklet layout from the Booklet Layout is drop-down list, if desired.
7 Change any other desired print settings and click OK.
8 Print your document.
9 Follow the onscreen instructions to complete the printing.
After one side of the page is printed, you need to reload the paper to print on the other
side.
For Macintosh (Mac OS 9.1.x and 9.2.x)
1 Load the appropriate paper (see “Loading media in the input tray”).
2 Click File, and then click Print.
3 Open the Layout panel.
4 Select Print Both Sides, and then select Manual if the auto-duplex unit is installed.
5 Select the desired binding orientation by clicking the appropriate icon.
6 Change any other desired print settings and click OK or Print.
7 Follow the onscreen instructions to complete the printing.
After one side of the page is printed, you need to reload the paper to print on the other
side.
ENWW 4-27
Page 61

Performing auto-duplexing
You can print on both sides of a sheet of paper automatically when the auto-duplex unit is
installed on the printer (see “Installing the auto-duplex unit”).
The auto-duplex unit is a standard part in the hp deskjet 9670. It may be purchased
separately in some countries/regions (see “HP supplies and accessories”).
To make automatically printing on both sides the default setting for your printer, see
“Changing default print settings”.
Advantages of using the auto-duplex unit
Print on both sides of a page without manually reloading the page.
Print long documents quickly and efficiently.
Use less paper by printing on both sides of paper.
Create professional-looking brochures, reports, newsletters, and other special items.
After the first side of the page is printed, the printer pauses while the ink dries. Once the ink is
dry, the paper is pulled back into the auto-duplex unit and the reverse side of the page is
printed.
For Windows
1 Load the appropriate paper (see “Loading media in the input tray”).
2 Open the printer driver (see “Printing a document”).
3 Click the Finishing tab.
4 Select the Print on Both Sides check box, and ensure that Use Auto-Duplex Unit is
selected.
5 To automatically resize each page to match the document's onscreen layout, select
Preserve Layout. Clearing this option may result in unwanted page breaks.
6 Select Flip Pages Up to change the page orientation, if desired.
7 Choose a booklet layout from the Booklet Layout is drop-down list, if desired.
8 Change any other desired print settings and click OK.
9 Print your document.
For Macintosh
1 Load the appropriate paper (see “Loading media in the input tray”).
2 Click File, and then click Print.
3 Mac OS 9.1.x and 9.2.x:
i Open the Layout panel.
ii Select Print Both Sides, and then select Automatic.
Mac OS X (10.1 and later):
i Open the Two Sided Printing panel.
ii Select Print Both Sides.
4 Select the desired binding orientation by clicking the appropriate icon.
5 Change any other desired print settings and click OK or Print.
4-28 ENWW
Page 62

Printing multiple pages on a single sheet of paper
You can print multiple pages of a document on a single sheet of paper. The printer software
automatically resizes the document text and images to fit on the printed page.
For Windows
1 Load the appropriate paper (see “Loading media in the input tray”).
2 Open the printer driver (see “Printing a document”).
3 Click the Finishing tab.
4 Select the number of pages you want to appear on each sheet of paper from the Pages
Per Sheet drop-down list.
5 If you want a border to appear around each page image printed on the sheet of paper,
select the Print Page Borders check box.
6 Select a layout for each sheet of paper from the Page Order is drop-down list.
7 Change any other desired print settings and click OK.
8 Print your document.
For Macintosh
1 Load the appropriate paper (see “Loading media in the input tray”).
2 Click File, and then click Print.
3 Open the Layout panel.
4 Mac OS 9.1.x and 9.2.x: Select Multiple Pages Per Sheet from the drop-down list.
5 Select the number of pages you wish to appear on each sheet of paper from the Pages
Per Sheet drop-down list.
6 Change any other desired print settings and click OK or Print.
ENWW 4-29
Page 63

Printing booklets
Booklet printing automatically arranges and resizes the pages of a document so when the
document is folded into a booklet, the page order is correct.
Manual duplexing is available when the printer is connected directly to your system and is not
shared on a network.
Performing manual booklet printing
For Windows
1 Load the appropriate paper (see “Loading media in the input tray”).
2 Open the printer driver (see “Printing a document”).
3 Click the Finishing tab.
4 Select t he Print on Both Sides check box, and ensure that Use Auto-Duplex Unit is
cleared.
5 Select a binding opti on in the Booklet Layout is drop-down list.
6 Do one of the following:
• To leave every other page of the booklet blank, select Print on One Side.
• To print on all pages in the booklet, clear the Print on One Side check box (if it is
selected).
7 Change any other desired print settings and click OK.
For Macintosh (Mac OS 9.1.x and 9.2.x)
1 Load the appropriate paper (see “Loading media in the input tray”).
2 Click File, and then click Print.
3 Open the Layout panel.
4 Select the booklet option from the Multiple Pages Per Sheet drop-down list.
5 Select Print Both Sides, and then select Manual if the auto-duplex unit is installed.
6 Click the binding icon for Book (binding at the side) or Tablet (binding at the top).
7 Change any other desired print settings and click OK or Print.
4-30 ENWW
Page 64

Performing automatic booklet printing
You can print booklets automatically when the auto-duplex unit is installed on the printer (see
“Installing the auto-duplex unit”).
The auto-duplex unit is a standard part in the hp deskjet 9670. It may be purchased separately
in some countries/regions (see “HP supplies and accessories”).
For Windows
1 Load the appropriate paper (see “Loading media in the input tray”).
2 Open the printer driver (see “Printing a document”).
3 Click the Finishing tab.
4 Select the Print on Both Sides check box, and ensure that Use Auto-Duplex Unit is
selected.
5 Select Preserve Layout.
6 Select a binding opti on in the Booklet Layout is drop-down list.
7 Do one of the following:
• To leave every other page of the booklet blank, select Print on One Side.
• To print on all pages in the booklet, clear the Print on One Side check box (if it is
selected).
8 Change any other desired print settings and click OK.
9 Print your document.
For Macintosh
1 Load the appropriate paper (see “Loading media in the input tray”).
2 Click File, and then click Print.
3 Mac OS 9.1.x and 9.2.x:
i Open the Layout panel.
ii Select the booklet option from the Multiple Pages Per Sheet drop-down list.
iii Select Print Both Sides, and then select Automatic.
Mac OS X (10.1 and later):
i Open the Two Sided Printing panel.
ii Select Print Both Sides.
4 Select the desired binding orientation by clicking the appropriate icon.
5 Change any other desired print settings and click OK or Print.
ENWW 4-31
Page 65

Printing posters
You can enlarge your document from a single page to multiple tiles that can be pasted
together into a poster. You can use this feature to enlarge a single-page document to many
tiles depending on the size of your document.
For Windows
1 Load the appropriate media into the input tray (see “Loading media in the input tray”).
2 Open the printer driver (see “Printing a document”).
3 Click the Finishing tab.
4 Select the number of sheets for your poster from the Tiling drop-down list.
5 To print specific tiles in the poster, click Select Tiles.
6 Change any other desired print settings and click OK.
7 Print your document.
After the sections of a poster have been printed, trim the edges of the sheets, then tape the
sheets together.
For Macintosh (Mac OS 9.1.x and 9.2.x)
1 Load the appropriate media into the input tray (see “Loading media in the input tray”).
2 Click File, and then click Print.
3 Open the Layout panel.
4 Select Tiling from the Multiple Pages Per Sheet drop-down list.
5 Select the number of sheets for your poster from the Tiling Size drop-down list.
6 Change any other desired print settings and click OK or Print.
After the sections of a poster have been printed, trim the edges of the sheets, then tape the
sheets together.
4-32 ENWW
Page 66

Printing banners
You can print large images and bold, oversized fonts on continuous feeds of paper.
Use HP banner paper for great results.
Remove any perforated strips from the banner paper before loading it in the input tray.
Input tray capacity: up to 20 continuous sheets.
For Windows
1 Load the appropriate media (see “Loading media in the input tray”).
Make sure the unattached edge is on top of the paper stack pointing towards the printer.
2 If your software program includes a banner-printing feature, follow the instructions
provided with the software program. Otherwise, follow the instructions below.
3 Open the printer driver (see “Printing a document”).
4 Click the Paper/Quality tab.
5 Select HP Banner Paper from the Type is drop-down list.
6 Change any other desired print settings and click OK.
7 Print your document.
For Macintosh
1 Load the appropriate media (see “Loading media in the input tray”).
Make sure the unattached edge is on top of the paper stack pointing towards the printer.
2 If your software program includes a banner-printing feature, follow the instructions
provided with the software program. Otherwise, follow the instructions below.
3 Click File, and then click Page Setup.
4 Select the correct banner paper size.
5 Change any other desired print settings and click OK or Print.
ENWW 4-33
Page 67

Printing labels
Use only paper labels that are designed specifically for your printer.
Use only full sheets of labels.
Verify that the labels are not sticky, wrinkled, or pulling away from the protective backing.
Do not use plastic or clear labels. The ink will not dry on these labels.
Input tray capacity: Up to 20 continuous sheets.
For Windows
1 Fan the edges of the label sheets to separate them, and then align the label edges.
2 Load up to 20 label sheets, label side down, in the input tray (see “Loading media in the
input tray”).
3 Open the printer driver (see “Printing a document”).
4 Select A4 or US Letter paper size.
5 Select Automatic or the appropriate paper type.
6 Ensure the option to print on both sides is cleared.
7 Change any other desired print settings and click OK.
8 Print your document.
For Macintosh
1 Fan the edges of the label sheets to separate them, and then align the label edges.
2 Load up to 20 label sheets, label side down, in the input tray (see “Loading media in the
input tray”).
3 Click File, and then click Page Setup.
4 Select A4 or US Letter paper size.
5 Click File, and then click Print.
6 Open the Paper Type/Quality panel.
7 Select Automatic or the appropriate paper type.
8 Change any other desired print settings and click OK or Print.
4-34 ENWW
Page 68

Printing iron-on transfers
Use HP iron-on t-shirt transfer paper for great results.
When printing a mirror image, the text and pictures are horizontally reversed from what
appears on the computer screen.
Input tray capacity: Up to 20 sheets.
Iron-on transfers are available in Windows only.
To print iron-on transfers
1 Load iron-on transfer paper in the input tray print-side down (see “Loading media in the
input tray”).
2 If your software program includes a iron-on transfer feature, follow the instructions
provided with the software program. Otherwise, follow the instructions below.
3 Open the printer driver (see “Printing a document”).
4 Click the Paper/Quality tab.
5 Select HP Iron-On Transfer from the Type is drop-down list.
6 Click the Basics tab.
7 Select Mirror Image.
8 Change any other desired print settings and click OK.
9 Print your document.
ENWW 4-35
Page 69

Cancelling a print job
You can cancel a print job in two ways:
Press the Cancel button on the front panel of the printer. The print job stops immediately.
Pressing the Cancel button clears the job currently being processed by the printer. It does
not affect jobs wai ting to be processed.
It is also possible to cancel print jobs in the print queue. See the Windows or Macintosh
online help for more information.
4-36 ENWW
Page 70

Printing from MS-DOS software programs
When printing from MS-DOS, you can adjust printer settings in two ways: in HP Deskjet
Control Panel for DOS and from within your DOS application’s printer driver.
HP Deskjet Control Panel for DOS can be downloaded from
http://www.hp.com/support/dj9600
You have access to many printer features through application-specific DOS printer drivers;
however, some software manufacturers do not develop printer drivers for their DOS
applications. Use HP Deskjet Control Panel for DOS to specify the default printer settings for
printing from DOS applications.
.
ENWW 4-37
Page 71

Using the Toolbox
5
The Toolbox provides status and maintenance information about your printer. It also provides
access to documentation and online help tools for solving printer problems.
The Toolbox is available for Windows only. For Macintosh, see “Using the HP Inkjet Toolbox
(Macintosh)”.
After installing the printer software, you can open the Toolbox by clicking Start, pointing to
Programs, hp deskjet 9600 series, and then clicking hp deskjet 9600 series Toolbox. Or in
the status area of the Windows taskbar (near the clock), click the Toolbox icon.
Printer Status tab
The Printer Status tab displays ink level information for each print cartridge and also printer
status.
The printer selection drop-down list lets you select the printer you wish to use with the Toolbox
utilities. It lists printers that are compatible with the Toolbox. The status window displays
messages rela ted to current printer status, such as Printing job, Top cover open, and Print
cartridge empty.
Click this button... To...
Order Supplies Purchase pri nting suppli es, such as print cartridges, online. You must
have Internet access to perform this operation. See “Ordering printing
supplies through the Toolbox” for more information.
Supplies Information View information on HP supplies, as well as ordering information.
Preferences Open a dialog box where you can select the types of printer error or
warning messages that will appear on your computer screen when
problems occur. You can choose to be notified by an audio alert when
this happens. You can also choose to enable myPrintMileage
AutoSend, which will provide you with a closer forecast of your printer
usage in the myPrintM ileage website.
5-1 ENWW
Page 72

Information tab
The Information tab lets you register the printer and display printer hardware information. It
also provides access to online troubleshooting through HP Instant Support, as well as
information about your printer usage, using the printer, troubleshooting, and contacting HP.
Click this button... To...
myPrintMileage Access the myPrintMileage website and your printer usage
Printer Hardware Display the printer model and firmware version number.
HP Instant Support Access the HP Instant Support website for support services and
Register Your Printer Register your printer online. You must have Interne t access to per form
How Do I... Display help for performing co mm on printer tasks.
Troubleshooting View help for solutions to common printer problems such as paper
Contact HP Obtain information on how to contact HP.
information. You must have Internet access to perform this operation.
troubleshooting tips. You must have Internet access to perform this
operation.
this operation.
jams or software installation issues, and printing problems such as
borderless or photo printing problems.
HP Instant Support
HP Instant Support is a Web-based tool that provides you with product-specific services,
troubleshooting tips, and information about your printer's ink and media usage (via
myPrintMileage). With this information, you can diagnose and solve printer problems and
manage your printing activities and printer supplies more effectively.
HP Instant Support provides the following services for your printer:
Easy access to troubleshooting tips – To help you quickly resolve printer problems or
prevent some problems from happening, HP Instant Support provides tips that are
customized for your printer.
Notification of driver and firmware updates – When a firmware or driver update for your
printer is available, a notification message will appear on the HP Instant Support
homepage. You can access the download site from the web page.
Access to hp services – From the website, you can find out more about the support
services available for your printer (such as maintenance programs), obtain information
about service providers, and also make online purchase of printer supplies and
accessories.
Notification of warranty expiration – When the printer warranty is expiring, a notification
message will appear on the HP Instant Support homepage.
To provide current information on the website, the web pages are created dynamically.
Bookmarking a web page and connecting via the bookmark will not display the page. Instead,
connect from the Toolbox by clicking the HP Instant Support button on the Information tab.
ENWW 5-2
Page 73

Using myPrintMileage
myPrintMileage allows you to keep track of your printer usage information, such as ink and
media usage patterns. This can help you plan your purchase of supplies.
myPrintMileage consists of two parts:
myPrintMileage website
myPrintMileage AutoSend. This is a utility that periodically updates your printer usage
information to the myPrintMileage website. This will provide you with a closer forecast of
your printer usage.
From the myPrintMileage website, you can find out the following information about your
printer:
The amount of ink that has been used. myPrintMileage forecasts how many print
cartridges you might use in one year.
Whether you use more black or color ink.
The average quantity of media you use per month for each media type.
The number of pages that have been printed, and the estimated number of pages that can
be printed with the amount of ink remaining.
To access the myPrintMileage website
Click myPrintMileage on the Information tab in the Toolbox
Do not bookmark Web pages used to display myPrintMileage. If you bookmark this site and
connect to it using the bookmark, the pages will not display the current information. Instead
connect to myPrintMileage as described above.
To enable myPrintMileage AutoSend
1 On the Printer Status tab in the Toolbox, click the Preferences button.
2 Select the Enable myPrintMileage AutoSend check box.
3 Click OK.
You can disable the utility at any time through the Toolbox or the myPrintMileage icon on the
Windows taskbar.
In order to use the myPrintMileage website and myPrintMileage AutoSend, you must have the
following:
The Toolbox installed.
An Internet connection.
The printer connected.
5-3 ENWW
Page 74

Printer Services tab
The Printer Services tab provides utilities that help you maintain and test your printer. You
can align and clean your print cartridges, or print a demo page.
Click this button... To...
Align Print Cartridges Align the print cartridges. See “Aligning the print cartridges” for more
Clean Print Cartridges Clean the print cartridge s. See “C leani ng the print ca rtridges” for more
Calibrate Color Balance color tints on printed pages. See “Calibrating color” for more
Print a Demo Page Send a demo page to the printer to verify that the printer is connected
information.
information.
information.
to the computer correctly and is working properly.
ENWW 5-4
Page 75

Using the HP Inkjet Toolbox (Macintosh)
For Mac OS 9.2 and OS X (10.1 and later), the HP Inkjet Toolbox contains tools to calibrate
the printer, clean the print cartridges, print a test page, and find website support information.
Displaying the HP Inkjet Toolbox
1 Double-click the Macintosh HD icon on the desktop.
2 Mac OS 9.2: Select Applications, Utilities, and then hp.
Mac OS X (10.1 and later): Select Library, Printers, hp, and then Utilities.
3 Select hp inkjet toolbox.
Viewing the HP Inkjet Toolbox panels
The following options are available on the HP Inkjet Toolbox Panel menu:
WOW!: Prints a sample page to view the print output quality.
Ink Levels: Displays print cartridge ink levels.
Test: Prints a test page or a diagnostic page.
Clean: Cleans the print cartridges.
Calibrate: Aligns the print cartridges.
Color Calibrate: Adjusts color to correct problems with tint. Color calibration only occurs
when the color and photo print cartridges are installed.
Support: Provides access to the HP website where you can find support for the printer
and information about HP products and supplies.
Register: Accesses the HP website to register the printer.
5-5 ENWW
Page 76

Troubleshooting
6
This chapter provides solutions to common printer problems such as paper jams or software
installation issues, and printing problems such as borderless or photo printing problems. If
your printer is not operating properly and these suggestions do not solve the problem, try to
print a diagnostic page and then contact the HP Customer Care Center (see “Printing a
diagnostic page” and “Customer support”).
Starting troubleshooting
Start in this section if you are having a problem with the printer.
If you have a jam, see “Clearing jams”.
If you have a different type of media-feed problem, such as the media is skewing or is not
being picked up, see “Resolving media handling problems”.
Otherwise, if the printer is not working properly or if the print quality is not what you expect,
try the following steps first.
• Check that no error messages appear on the computer screen.
• Check that you do not have too many programs open when your are trying to perform
a task. Close programs that are not in use, or restart the computer before attempting
the task again.
• Check the printer lights. If the Power light is blinking, the printer is processing
information. If other lights are on or blink in g, see “Printer lights reference” for
descriptions of printer lights and what they indicate.
• Check that the power cord is securely connected to the printer and plugged into a live
electrical outlet.
• Try printing a demo page to see if the printer is set up correctly. Make sure the printer
is turned on, press and hold the Power button, press the Resume button once, and
then release the Power button. The printer prints a demo page.
• Check that the network cable and the printer cable connections are firmly in place. If
you are using an HP Jetdirect external print server, print its configuration page to
check the operation of the print server and to verify network configuration settings.
Please refer to the Jetdirect Administrator's Guide that comes with the print server.
ENWW 6-1
Page 77

After you have tried these steps, see the following sections for information about more specific
problems.
Troubleshooting installation issues
Calibrat ing color
Resolving printer problems
Resolving printing problems (includes print-quality issues)
Resolving color problems
Resolving photo printing problems
Resolving borderless printing problems
Resolving banner printing pr oblems
Resolving media handling problems
Resolving automatic two-sided printing problems
Resolving network printing problems
If none of the solutions work, see “Customer support”.
For more information about how to troubleshoot Macintosh printing problems, see the release
notes on the Starter CD.
6-2 ENWW
Page 78

Printing a demo page
Printing a demo page without being connected to a computer verifies whether the printer is set
up correctly.
1 Make sure the printer is turned on.
2 Press and hold the Power button, press the Resume button once, and then release the
Power button.
The printer prints a demo page.
Printing a diagnostic page
This page is useful to HP Technical Support if you have a printer problem.
1 Make sure the printer is turned on.
2 Press and hold the Power button, press the Resume button four times, and then release
the Power button.
The printer prints a diagnostic page.
ENWW 6-3
Page 79

Troubleshooting installation issues
If you had trouble installing the printer, check the following items.
Hardware installation issues
Press the Power button to turn off the printer, wait a few seconds, and then press the
Power button to turn it on again.
Also see “Power cannot be turned on” for other power-related troubleshooting steps.
Make sure all packing tapes have been removed from the printer.
Make sure the print cartridges are properly installed.
• Check each print cartridge and make sure the protective tape is removed from the ink
nozzles.
• Make sure the print cartridges are in the correct cradle.
• Make sure the print cartridges are firmly installed into the cradles. Press down firmly
on each one to ensure proper contact.
• Make sure the print cartridge latches are properly closed.
Make sure the printer is loaded with paper.
Make sure no lights are on or blinking except the Power light, which should be on. If any
other lights are on, see “Printe r lights reference” for a list of light patterns and what they
indicate.
Make sure the rear access panel or auto-duplex unit is correctly installed and locked into
place.
Make sure the printer cable is in good working order and that it is securely connected
between the appropriate connector on the printer and the computer or a network
connection.
Try printing a demo page to see if the printer is set up correctly. Make sure the printer is
turned on, press and hold the Power button, press the Resume button once, and then
release the Power button. The printer prints a demo page.
Software installation issues
Make sure your computer is running one of these operating systems: Windows 98,
NT 4.0, Me, 2000, or XP. Windows NT 4.0 must have Service Pack 6.0 or later installed to
use the setup program (the driver can be installed without the service pack).
If you are using a Macintosh, it must be running Mac OS 9.1 or later.
Make sure the computer meets at least the minimum system requirements. See “Pr inter
specifications”.
Before installing software on a Windows computer, make sure all other programs are
closed.
If the computer does not recognize the path that you type to the Starter CD, make sure
you are specifying the correct drive letter for the CD-ROM drive.
If the computer cannot recognize the Starter CD in the CD-ROM drive, inspect the CD for
damage. You can download the printer driver from http://www.hp.com/support/dj9600
6-4 ENWW
.
Page 80

USB installation failed or nothing prints through USB
Make sure your computer has a USB port and is properly configured to use a USB
connection.
Make sure your operating system supports USB connection, such as Windows 98, Me,
2000, or XP. Windows NT 4.0 does not support USB connection.
Make sure the USB cable is properly connected to the computer and the printer.
Make sure the printer is turned on.
Restart the system and send the print job again.
Connect the USB cable to the computer and printer and turn on the printer. Verify that
Windows is able to detect the printer. Windows will display the Found New Hardware
wizard if it detects the printer.
If the installation failed, uninstall the printer software and try to install again. See
“Uninstalling the printer software”.
ENWW 6-5
Page 81

Clearing jams
Use the following methods to locate and clear a paper jam. For information on how to avoid
jams, see “Tips for avoiding paper jams”.
To prevent jammed paper from tearing off inside the printer, try to grasp jammed paper with
both hands and exert even pressure on both sides while pulling the paper towards you.
Remove the rear access panel, pull out any jammed paper, and then reinsert the rear
access panel.
Remove the rear cover from the auto-duplex unit (if installed), remove any paper, and
replace the rear cover. If the paper jam is not visible by removing the rear cover, remove
the auto-duplex unit to locate the jam.
6-6 ENWW
Page 82

Lift up the output tray and remove any jammed paper from the input tray.
Open the top cover. The print cartridge carriage should return to the right side of the
printer. If the carriage does not return to the right side, turn off the printer, and then move
the carriage to the right. Pull any jammed paper towards you.
Do not reach into the printer when the printer is on and the print cartridge carriage is stuck.
After you clear the jam, close all covers, turn on the printer (if you turned it off), and press the
Resume button. The printer will continue the print job on the next page. You will need to
resend any pages that were jammed in the printer.
Tips for avoiding paper jams
Make sure nothing blocks the paper path.
Do not use media that is damaged, curled, or wrinkled. It is recommended not to use
paper with cutouts or perforations or paper that is heavily textured or embossed.
To ensure that media feeds properly, load only one type of media at a time in the input tray
or the manual feed slots.
Make sure media is loaded correctly. See “Loading media in the input tray”.
For the input tray and front manual feed slot, load the media print-side down with the right
edge of the media aligned against the right edge of the tray or slot. Make sure the paper
width guide and tray extension fit against the edges of the media. For the rear manual
feed slot, load the media print-side up.
Do not load more than 150 sheets of paper, or 15 envelopes, or a stack of media that
exceeds the height of the paper width guide into the input tray. Do not load more than 10
sheets of paper into the front manual feed slot. Load only one sheet of paper at a time into
the rear manual feed slot.
Always use media that conforms with the types, sizes, and weights listed in “Selecting
print media”. This section also lists tips and guidelines on recommended media.
ENWW 6-7
Page 83

Calibrating color
Calibrating color is only necessary when printed colors have visibly shifted towards yellow,
cyan, or magenta, or there is a tinge of color in the gray shades.
Calibrate the color only when the color and photo print cartridges are installed together.
It is not necessary to calibrate the color when printing using the color print cartridge in
combination with the black print cartridge or when printing with a single print cartridge. See
“Printing with a single print cartridge”.
If the color-related problem still persists after performing a color calibration, the problem may
be caused by a low or empty print cartridge. Check the ink levels, replace any low or empty
print cartridges (see “Installing or replacing the print cartridges”), and then print again.
To check the print cartridge ink levels:
Windows: See “Using the T oolbox”.
Macintosh: See “Displaying the HP Inkjet Toolbox”.
For Windows
You can calibrate the color from the Toolbox or the printer driver.
1 Load plain paper into the input tray (see “Loading media in the input tray”). The process
uses one sheet of paper.
2 Open the Toolbox (see “Using the Toolbox”).
-Or-
Open the printer driver (see “Changing default print settings”).
3 Click the Printer Services tab (Toolbox ) or Services tab (printer driver).
4 Click Calibrate Color.
5 Follow the onscr ee n inst ruc tion s.
For Macintosh
1 Load plain paper into the input tray (see “Loading media in the input tray”). The process
uses one sheet of paper.
2 Open the HP Inkjet Toolbox and click Color Calibrate.
3 Follow the onscr ee n inst ruc tion s.
6-8 ENWW
Page 84

Resolving printer problems
Printer shuts down unexpectedly
Check the power
See “Power cannot be turned on”.
Check the printer vents
The printer vents are located on the sides of the printer. If the printer vents are covered
and the printer overheats, it automatically turns off. Make sure the vents are not covered
and the printer is in a cool, dry location.
Check the rear access panel or auto-duplex unit
Make sure the rear access panel or auto-duplex unit is correctly installed and locked into
place.
Power cannot be turned on
Check the Power light
The Power light on the printer should be green.
Check the power supply module light
Make sure the power supply module is firmly connected to the back of the printer. The
light on the module should be lit.
Check the power cord
• Make sure the power cord is firmly connected to the printer and to a working outlet.
• Disconnect the power cord from the electrical outlet, wait a few seconds, and then
reconnect the power cord. Then press the Power button to turn on the printer.
If the power still cannot be turned on, call the HP Customer Care Center for help (see
“Customer support”).
ENWW 6-9
Page 85

Printer is not responding (nothing prints)
Check the printer lights
If the Power light is blinking, be patient. Complex documents containing many fonts,
graphics, or color photos take longer to begin printing. If the Power light is blinking, the
printer i s processing information.
See “Printer lights reference” for descriptions of printer lights and what they indicate.
Check the power
See “Power cannot be turned on”.
Check the cables
• Make sure the printer cable (USB, parallel, or network) is firmly connected between
the printer and the computer.
• Do not connect a USB and a parallel cable to the printer at the same time. If two
cables are connected, turn off the printer and disconnect the cable you are not using.
• Make sure the cable is not damaged or frayed. If it is, contact the manufacturer of the
cable and have it replaced.
Make sure the media is loaded correctly
Make sure media is loaded correctly in the input tray and that the media is not jammed in
the printer. See “ Lo ading med ia in the inp ut tray” and “Clearing jams”.
Make sure the correct-sized media is loaded and press the Resume button to continue.
Make sure the printer is selected
When you print your file, make sure the printer is selected in the printer menu.
To set the printer as the default printer, right-click the printer name or icon in the Printers
folder and select the option to set as default printer. For more information about setting the
default printer, see the online Help for your computer’s operating system.
Check the Chooser (Mac OS 9.1.x and 9.2.x only)
Make sure you have installed the printer software and the printer is selected. The printer
version should be visible on the left panel of the Chooser. When you click the printer icon,
the printer name should be available on the right panel of the Chooser. Select the printer’s
name.
Make sure the printer is not paused
• Windows: Make sure Pause Printing is not selected in the Printer menu.
iClick Start, point to Settings, and then click Printers (Windows NT 4.0, 98, Me,
and 2000) or Printers and Faxes (Windows XP).
(If Printers and Faxes is not found on the Start menu in Windows XP, click Start,
click Control Panel, and then click Printers and Faxes.)
ii Right-click the printer icon.
iii If Pause Printing is selected in the drop-down menu, click it to clear it.
• Macintosh: Make sure Stop Print Queue is not selected in the Mac desktop’s
Printing menu.
6-10 ENWW
Page 86

Make sure the print to file option is not selected in the printer driver
If the print to file option is selected in the printer driver, the print job is saved to a file on
your computer and not printed on paper.
• Windows: From the software application, click File, and then click Print. Make sure
the Print to file option is not selected.
• Macintosh: On the main pop-up menu in the Print dialog box, make sure the Print to
file option is not selected.
Check the rear access panel and top cover
Make sure the rear access panel or auto-duplex unit is correctly installed and locked into
place, and that the top cover is closed.
Check the print cartridges
• If the print cartridge lights are on or blinking, see “Printer lights reference”.
• If you are printing with a single print cartridge, see “Printing with a single print
cartridge”.
Try printing a demo page
Try printing a demo page to see if the printer is set up correctly. Make sure the printer is
turned on, press and hold the Power button, press the Resume button once, and then
release the Power button. The printer prints a demo page.
Try printing a test page (Windows)
To print a generic Windows test page:
1 Click Start, point to Settings, and then click Printers (Windows NT 4.0, 98, Me, and
2000) or Printers and Faxes (Windows XP).
(If Printers and Faxes is not found on the Start menu in Windows XP, click Start, click
Control Panel, and then click Printers and Faxes.)
2 Right-click the printer icon and select Properties.
3 Click the General tab, and then click Print Test Page.
If the test page prints, then the problem is not with the connection between the printer and
the computer. Make sure the application you are trying to print from has the correct printer
selected.
If the test page prints and the printer previously worked with the same software application
you are using, try printing another file using the software. If this file prints, the file you were
previously trying to print may be damaged. If you have a backup copy of the file, try
printing it. If none of the above solutions work, this problem is likely caused by your
software application's inability to properly interpret print settings. Check the release notes
on the Starter CD for known software conflicts. Otherwise, check your software application
manual, or call the software manufacturer to get more specific help for this problem.
If the test page does not print, make sure the correct port (USB, LPTx) is selected and that
the printer is connected directly to your computer. If your printer is connected to a switch
box, make sure you have selected the correct switch. When printing the test page, the
printer Power light should blink. If the Power light does not blink, print a diagnostic page
(see “Printing a diagnostic page”).
Try printing from another application
Try printing from other applications to see if this problem recurs.
ENWW 6-11
Page 87

Check the USB port
Unplug the printer from the USB port, wait a few seconds, and then plug it back in. If that
does not help, try plugging the cable into another USB port.
Check for conflicts with port-sharing devices
If you are using a parallel cable, make sure your printer is connected directly to the parallel
port. Avoid sharing the port with other devices such as a Zip drive or other printers.
Check the network setup
If you are sharing the printer, make sure it is properly set up in your network environment.
See “Connecting to a network” and the documentation provided by your network vendors.
Also see “Resolving network printing problems” for additional troubleshooting information.
Try restarting the system
Turn off the computer and the printer, wait a few seconds, and then turn them on again.
Try printing again.
Printer lights are on or blinking
The printer lights indicate printer status and are useful for diagnosing printing problems. For a
list of printer light combinations, what they indicate, and what action to take if necessary, see
“Printer lights reference”.
For a description of the printer lights, see “Front view”.
6-12 ENWW
Page 88

Printer takes a long time to print
To enhance the performance of your printer, check the following:
Multiple software applications are open
If multiple applications are open, the computer may not have sufficient resources for the
printer to print at its optimum speed. To increase printer speed, close all unused software
applications when printing. If necessary, restart your system, and then resend your print
job.
Complex documents, graphics, or photographs are printing
Documents containing graphics or photographs print slower than text documents.
For Windows, if your computer does not have enough memory or disk space to print the
document under normal conditions, you can use Low Memory Mode. Using this option
may reduce the quality of the printout. Low Memory Mode also disables 4800 x 1200
optimized dpi* printing.
To activate Low Memory Mode:
i Open the printer driver (see “Printing a document”).
ii Click the Basics tab, and then click the Advanced Features button.
iii Select Low Memory Mode.
iv Print the document.
*Up to 4800 x 1200 optimized dpi for color printing and 1200 input dpi. This setting will
temporarily use a large amount of hard disk space (400 MB or more) and will print slower.
Photo cartridge, if present, further enhances the print quality.
Check the print quality
The printer prints slower when Best or Maximum dpi is selected as the print quality. To
increase the printer speed, select a different print quality mode in the printer driver.
Automatic paper type option is enabled
When the automatic paper type option is enabled (see “Using the automatic paper-type
sensor”), it takes a few seconds for the printer to scan the first page of the print job to
determine the appropriate paper type.
To increase the print speed, select the specific paper type in the printer driver.
Check your system configuration
•See “Printe r sp eci fi cations” for recommended system requirements.
• There may be insufficient virtual memory in your system. Increase the size of your
system’s virtual memory. See the Windows or Macintosh help.
Check your port and cable settings (Windows 98/Me only)
• If you are using a parallel connection, use an IEEE-1284 parallel cable to enable
bidirectional communication.
• If you are using a parallel connection, try switching to a USB connection. See
“Connecting the printer”.
• The port setting configuration in your system may not be set to ECP. See the manual
that comes with your computer for information on how to change your port setting or
contact your computer manufac turer.
ENWW 6-13
Page 89

Check the print cartridges
• If the print cartridge lights are on or blinking, see “Printer lights reference”.
• A print cartridge may be low or out of ink. Check the print cartridge ink levels.
• Windows: See “Using the Toolbox”.
• Macintosh: See “Displaying the HP Inkjet Toolbox”.
Replace any low or empty print cartridges (see “Installing or replacing the print
cartridges”) and then print again.
• If you are printing with a single print cartridge, the print speed may be slower than
normal. See “Printing with a single print cartridge”.
Check for conflicts with port-sharing devices
If you are using a parallel cable, make sure your printer is connected directly to the parallel
port. Avoid sharing the port with other devices such as a Zip drive or other printers.
Printer does not print after switching ports
Do not connect both the parallel cable and the USB cable to the printer simultaneously. Only
use one type of connection to the printer at a time.
Check the cable
Make sure the cable you are using is properly connected to the computer and the printer.
Make sure the printer is turned off when you switch ports
If the printer was not turned off, turn it off, wait a few seconds, and then turn it on again.
Make sure the port setting matches the physical connection
iClick Start, point to Settings, and then click Printers (Windows NT 4.0, 98, Me, and
2000) or Printers and Faxes (Windows XP).
(If Printers and Faxes is not found on the Start menu in Windows XP, click Start, click
Control Panel, and then click Printers and Faxes.)
ii Right-click the printer icon and select Properties.
iii Click the Details tab (Windows 98 and Me) or the Ports tab (Windows NT 4.0, 2000,
and XP) and check the port setting.
Print a test page
To print a generic Windows test page:
iClick Start, point to Settings, and then click Printers (Windows NT 4.0, 98, Me, and
2000) or Printers and Faxes (Windows XP).
(If Printers and Faxes is not found on the Start menu in Windows XP, click Start, click
Control Panel, and then click Printers and Faxes.)
ii Right-click the printer icon and select Properties.
iii Click the General tab, and then click Print Test Page.
If the test page prints, then the problem is not with the connection between the printer and
the computer. Make sure the application you are trying to print from has the correct printer
selected.
6-14 ENWW
Page 90

Resolving printing problems
A blank page printed
Check the print cartridges
• If the print cartridge lights are on or blinking, see “Printer lights reference”.
• Each new print cartridge is packaged with protective tape covering the ink nozzles.
Check each print cartridge and make sure the protective tape is removed from the ink
nozzles.
• If you are printing black text and a blank page prints, your black print cartridge may be
empty. Check the print cartridge ink level.
• Windows: See “Using the Toolbox”.
• Macintosh: See “Displaying the HP Inkjet Toolbox”.
Replace the empty black print cartridge (see “Installing or replacing the print
cartridges”) and then print again.
• If one print cartridge is empty, you can still print with the other print cartridge. See
“Printing with a single print cartridge”.
Make sure the printer is selected
When you print your file, make sure the printer is selected in the printer menu.
To set the printer as the default printer, right-click the printer name or icon in the Printers
folder and select the option to set as default printer. For more information about setting the
default printer, see the online Help for your computer’s operating system.
Check for conflicts with port-sharing devices
If you are using a parallel cable, make sure your printer is connected directly to the parallel
port. Avoid sharing the port with other devices such as a Zip drive or other printers.
Check the network setup
If you are sharing the printer, make sure it is properly set up in your network environment.
See “Connecting to a network” and the documentation provided by your network vendors.
Also see “Resolving network printing problems” for additional troubleshooting information.
Check paper size
Load the correct-sized paper and press the Resume button to continue.
ENWW 6-15
Page 91

Something on the page is missing or incorrect
Check the margin settings
Make sure the margin settings for the document do not exceed the printable area of the
printer.
Make sure the printer is selected
When you print your file, make sure the printer is selected in the printer menu.
To set the printer as the default printer, right-click the printer name or icon in the Printers
folder and select the option to set as default printer. For more information about setting the
default printer, see the online Help for your computer’s operating system.
Check the color print settings
If colors are printing in shades of gray or black and white, or the color tone is off, see
“Colors are different than they should be”.
Placement of the text or graphics is wrong
Check the paper size and orientation settings
Make sure the paper size and page orientation selected in the software application match
the settings in the printer driver.
Make sure the media is loaded correctly
See “Loading media in the input tray” or “Printing with the front or rear manual feed slot”.
Check the margin settings
If the text or graphics are cut off at the edges of the page, make sure the margin settings
for the document do not exceed the printable area of the printer.
Printout is slanted or skewed
Media is skewed
• If media is twisting as it feeds or margins appear crooked, make sure the media is
loaded correctly. See “Loading media in the input tray” or “Printing with the front or
rear manual feed slot”.
• Make sure there is sufficient paper in the input tray. If you are printing one or just a few
sheets, you can also use the front or rear manual feed slot.
• Make sure the paper width guide and tray extension fit against the edges of the
media.
• Make sure the rear access panel or auto-duplex unit is correctly installed and locked
into place.
• Do not load more than 150 sheets of paper, or 15 envelopes, or a stack of media that
exceeds the height of the paper width guide into the input tray. Do not load more than
10 sheets of paper into the front manual feed slot. Load only one sheet of paper at a
time into the rear manual feed slot.
6-16 ENWW
Page 92

Ink is smearing
Make sure the printout has time to dry
When printing documents that use a lot of ink, you must allow the document more time to
dry before handling it. This is especially true for transparencies.
The Normal print quality setting in the printer driver is designed to optimize both dry time
and speed. This mode allows the printout to dry completely in most situations.
Check immediately after printing whether smearing occurs in the printout. You can
increase the amount of dry time in the printer driver.
• Windows: Adjust the ink dry time by selecting Advanced Features from the Basics
tab in the printer driver.
• Macintosh: Adjust the ink dry time by selecting the Ink tab in the Paper Type/Quality
panel.
Check the paper type
Some paper types do not accept ink well, which causes the ink to dry more slowly and
results in smearing. See “Selecting print media” for tips on using print media.
Check the paper type selection
Make sure the paper type selected in the printer driver matches the paper you are printing
on.
The page is wrinkling with too much ink
Color documents with rich, blended colors can use excess ink, which can wrinkle the page
during printing and cause smearing. Select Normal or Fast print quality in the printer
driver to reduce ink, or use HP Premium Paper designed for inkjet printing of vivid color
documents.
Check for excess ink buildup on the print cartridge
An ink buildup problem can be solved by cleaning the cartridges. See “Cleaning the print
cartridges”.
The media has been exposed to a humid environment
If media has been exposed to a humid environment, it may be difficult to achieve the
correct dry time. especially when printing with heavy color saturation. Print on a fresh
ream of media that has been stored in a cool, dry place.
ENWW 6-17
Page 93

Ink is not filling the text or graphics completely
Check the print cartridges
• If the print cartridge lights are on or blinking, see “Printer lights reference”.
• A print cartridge may be low or out of ink. Check the print cartridge ink levels.
• Windows: See “Using the Toolbox”.
• Macintosh: See “Displaying the HP Inkjet Toolbox”.
Replace any low or empty print cartridges (see “Installing or replacing the print
cartridges”) and then print again.
• The print cartridges may have poor contact. Try removing and then reinstalling the
print cartridges, making sure to snap them firmly into place (see “Installing or replacing
the print cartridges”). To clean the electrical contacts, see “Cleaning the print
cartridges”.
• If you are printing with only one print cartridge, see “Printing with a single print
cartridge”.
• Whenever print quality deteriorates, it is a good idea to clean the print cartridges. See
“Cleaning the print cartridges”.
Check that all the lines on the test page are connected and printed properly. If the
lines are broken, your print cartridge is probably out of ink. Replace your print
cartridge with a new one (see “Installing or replaci ng the pr int cartri dge s” ). See “HP
supplies and accessories” for replacement information.
Check the paper type
Some paper types are not suitable for use with your printer. See “Selecting print media” for
tips on using print media.
Check the print quality setting
The Fast options use less ink and print at a faster rate, which is good for printing drafts. To
achieve a better colored printout, select Normal, Best, or Maximum dpi print quality in
the printer driver.
6-18 ENWW
Page 94

Text is jagged at the edges (not smooth)
Check the type of font chosen
Some software applications use custom fonts that have jagged edges when enlarged or
printed. If you are printing a bitmap image of text, it may have jagged edges when skewed,
enlarged or printed. By using TrueType
™
fonts you can ensure that the printer will print
smooth fonts. When selecting a font, look for the TrueType icon.
TrueType is a technology that can create fonts of any size from a basic font outline.
TrueType fonts are scalable, meaning they can be scaled for use on the computer screen
or the printer. This is the standard font-scaling technology in Windows.
Check the paper type
Paper that is heavily textured or does not accept ink well can cause graphics and text to
print poorly. See “Selecting print media” for tips on using print media.
If none of the above solutions work
The problem is likely a conflict related to the software application you are using. Check the
release notes on the Starter CD for known software conflicts. Otherwise, check your
software application manual or call the software manufacturer to get more specific help for
this problem.
Text or graphics are cut off at page edges
Check the page orientation setting
The page orientation selected (for example, landscape or portrait) may not be correct for
the document you are printing. See “Printing a document”.
Check the margin settings
Make sure margin settings for the document do not exceed the printable area of the
printer.
Make sure the content fits on the page
• Content that is cut off may be outside the printable area of the printer. Or, the size of
the document you are printing is larger than the paper size in the input tray.
• You can use the built-in print preview feature to check the document before it prints.
Check the graphics in the document to make sure their current size (scale) fits within
the printable area of the printer.
• If the layout of the document you are trying to print will fit on a paper size supported by
the printer, then load the correct-sized paper. Make sure to select the correct page
orientation in the printer driver.
• You can scale the document to fit on the paper size you are using. See “Resizing
options” under “Understanding smart software features” for more information.
Make sure the media is loaded correctly
See “Loading media in the input tray” or “Printing with the front or rear manual feed slot”.
If none of the above solutions work
The problem is likely a conflict related to the software application you are using. Check the
release notes on the Starter CD for known software conflicts. Otherwise, check your
software application manual or call the software manufacturer to get more specific help for
this problem.
ENWW 6-19
Page 95

Meaningless characters are printed
Check the cable connection
A common cause for nonsense characters is a poor cable connection between the printer
and computer.
Make sure the printer is selected
When you print your file, make sure the printer is selected in the printer menu.
To set the printer as the default printer, right-click the printer name or icon in the Printers
folder and select the option to set as default printer. For more information about setting the
default printer, see the online Help for your computer’s operating system.
The document file may be damaged
Occasionally a document file can become damaged. If you can print other documents
from the same software application, try to print using a backup copy of your document.
Check for conflicts with port-sharing devices
If you are using a parallel cable, make sure your printer is connected directly to the parallel
port. Do not share the port with other devices such as a Zip drive or other printers.
Try restarting the system
Turn off the computer and the printer, wait a few seconds, and then turn them on again.
Try printing again.
Wrong fonts are printed
Make sure fonts are used correctly in the document
Make sure you correctly apply the font you want to use. For example, in a graphics
application place the words in the desired size and do not enlarge by dragging and sizing.
Make sure the font is available in your computer
The fonts used in the document may not match the fonts currently available in your
computer, or the type of font used is not designed to be printed. Make sure the font is
available in the font selection box of your software application, and make sure it is a
TrueType font.
TrueType is a technology that can create fonts of any size from a basic font outline.
TrueType fonts are scalable, meaning they can be scaled for use on the computer screen
or the printer. This is the standard font-scaling technology in Windows.
Make sure the printer is selected
When you print your file, make sure the printer is selected in the printer menu.
To set the printer as the default printer, right-click the printer name or icon in the Printers
folder and select the option to set as default printer. For more information about setting the
default printer, see the online Help for your computer’s operating system.
If none of the above solutions work
The problem is likely a conflict related to the software application you are using. Check the
release notes on the Starter CD for known software conflicts. Otherwise, check your
software application manual or call the software manufacturer to get more specific help for
this problem.
6-20 ENWW
Page 96

Resolving color problems
Printout is faded or colors are dull
Check the print quality setting
The Fast options use less ink and print at a faster rate, which is good for printing drafts. To
achieve a better colored printout, select Normal, Best, or Maximum dpi print quality in
the printer driver.
Check the paper type setting
When printing on transparencies or other special paper types, select the corresponding
paper type in the printer driver.
Check the paper type
Some paper types are not suitable for use with your printer. See “Selecting print media” for
tips on using print media.
Check the print cartridges for low ink or clogs
• If the print cartridge lights are on or blinking, see “Printer lights reference”.
• A print cartridge may be low or out of ink. Check the print cartridge ink levels.
• Windows: See “Using the Toolbox”.
• Macintosh: See “Displaying the HP Inkjet Toolbox”.
Replace any low or empty print cartridges (see “Installing or replacing the print
cartridges”) and then print again.
• Whenever print quality deteriorates, it is a good idea to clean the print cartridges. See
“Cleaning the print cartridges”.
• Check that all the lines on the test page are connected and printed properly. If the
lines are broken, your print cartridge is probably out of ink. Replace your print
cartridge with a new one. See “Installing or replacing the print cartridges” and “HP
supplies and accessories”.
• If you are printing with a single print cartridge, see “Printing with a single print
cartridge”.
Make sure you are printing on the correct side of the media
• Load media print-side down in the input tray and front manual feed slot.
• Load media print-side up in the rear manual feed slot.
Colors are bleeding into each other
Check the paper type and print quality settings
Some paper type settings (such as Transparency) and print quality settings (such as Best)
require more ink than others. Choose different settings in the printer driver. Also, make
sure you have selected the correct paper type in the printer driver.
Check the paper type
Some paper types are not suitable for use with your printer. See “Selecting print media” for
tips on using print media.
ENWW 6-21
Page 97

Check the print cartridges
• If you refilled your print cartridges, HP does not recommend or support refilled print
cartridges. Refilling processes and the use of incompatible inks may disrupt the
intricate printing system, potentially resulting in reduced print quality and even printer
damage. To order an original HP print cartridge, see “HP supplies and accessories”.
• If the print cartridge lights are on or blinking, see “Printer lights reference”.
When printing on photo paper and transparency film
• Load media print-side down in the front manual feed slot or input tray.
• Load media print-side up in the rear manual feed slot.
• Use only HP Inkjet Transparency Films listed in “HP supplies and accessories”.
Colors are different than they should be
Check the print cartridges
• If the print cartridge lights are on or blinking, see “Printer lights reference”.
• When colors are completely wrong (for example, when green prints as blue or yellow),
the color print cartridge may have run out of one or more colors of ink. Check the print
cartridge ink levels.
• Windows: See “Using the Toolbox”.
• Macintosh: See “Displaying the HP Inkjet Toolbox”.
Replace any low or empty print cartridges (see “Installing or replacing the print
cartridges”) and then print again.
• If you have the color and photo print cartridges installed, and the color does not print
out as expected or there is a tinge of color in gray shades, calibrate the color. See
“Calibrating color”.
• Whenever print quality deteriorates, it is a good idea to clean the print cartridges. See
“Cleaning the print cartridges”.
• If you are printing with only one print cartridge, see “Printing with a single print
cartridge”.
Check the color print settings
• If colors are printing in shades of gray or black and white, check the color print
settings.
• Windows: Open the printer driver (see “Printing a document”), click the Color tab,
and make sure the grayscale and black and white options in the Color Options
area are not selected.
• Mac OS 9.1.x and 9.2.x: Click File, and then click Print. Open the Color panel,
click the Image drop-down list, and make sure Grayscale is not selected.
• Mac OS X (10.1 and later): Click File, and then click Print. Open the Paper Type/
Quality panel and click the Paper tab. Click the Color drop-down list and make
sure Grayscale is not selected.
• If the hue or tone of color is shifted, the wrong setting may be selected in the printer
driver. Click the Color tab and make sure the color sliders are centered.
• If you are printing with only the black or photo print cartridge, the printout will be
printed in grayscale. See “Printing with a single print cartridge”.
Check the paper type
Colored paper may cause the mismatch in the printout. Try printing on plain white paper.
6-22 ENWW
Page 98

Resolving photo printing problems
Also see “Resolving color problems” for additional troubleshooting information.
Make sure you are printing on the correct side of the media
• Load media print-side down in the input tray and front manual feed slot.
• Load media print-side up in the rear manual feed slot.
Check the print settings
1 Open the printer driver (see “Printing a document”).
2 From the Paper/Quality tab (Windows) or the Paper Type/Quality panel (Macintosh),
check the following settin gs :
• Select the appropriate photo paper type.
• Select the highest resolution option such as Best or Maximum dpi on the print
quality drop-down list.
Colors are tinted or incorrect
If colors in photographs appear tinted or incorrect, follow these steps:
1 Calibrate the color (see “Calibrating color”). A photo print cartridge must be installed
for color calibration.
2 Reprint the photograph.
3 If colors are still tinted or incorrect, try the following steps and check the color settings:
• Windows: Open the printer driver (see “Printing a document”) and click the Color
tab.
• Mac OS 9.1.x and 9.2.x: Click File, and then click Print. Open the Color panel.
• Mac OS X (10.1 and later): Click File, and then click Print. Open the Paper Type/
Quality panel and check the color options.
4 Adjust the color tone sliders:
If the colors are too yellow, move the color tone slider towards Cooler.
If the colors are too blue, move the color tone slider towards Warmer.
5 Reprint the photograph.
ENWW 6-23
Page 99

Resolving borderless printing problems
Check the print settings
1 Open the printer driver (see “Printing a document”).
2 From the Paper/Quality tab (Windows) or the Paper Type/Quality panel (Macintosh),
check the following settin gs :
• Verify that the paper size specified in the driver matches the size of the paper
loaded in the input tray.
• Select the appropriate paper type.
Streaks appear in a light portion of a printout
If streaks appear in a light portion approximately 2.5 inches from one of the long edges of
a photograph, try the following:
• Install a photo print cartridge (see “Installing or replacing the print cartridges”).
• Clean the print cartridges (s ee “Cleaning the print cartridges”).
Image is printed at an angle
If paper is twisting as it feeds or margins appear crooked, make sure the paper width
guide and tray extension fit against the edges of the paper.
Printing with a single print cartridge
To do borderless printing with a single print cartridge, the color print cartridge must be
installed. See “Printing with a single print cartridge”.
6-24 ENWW
Page 100

Resolving banner printing problems
Make sure the paper is loaded correctly
• Unfold and refold the paper when several sheets feed into the printer at once.
• Make sure the unattached edge of the banner paper stack is on top and facing the
printer.
• Verify that the correct paper for banner printing is used.
Check the print settings
1 Open the printer driver (see “Printing a document”).
2 From the Paper/Quality tab, check the following settings:
• Make sure hp banner paper is selected as the paper type.
• Make sure the appropriate banner size is selected.
Check the software
• Verify that the software application you are using prints banners. Not all software
applications print banners.
• If gaps appear at the ends of the sheets, verify that the printer software is operating
correctly.
ENWW 6-25
 Loading...