

Page 1

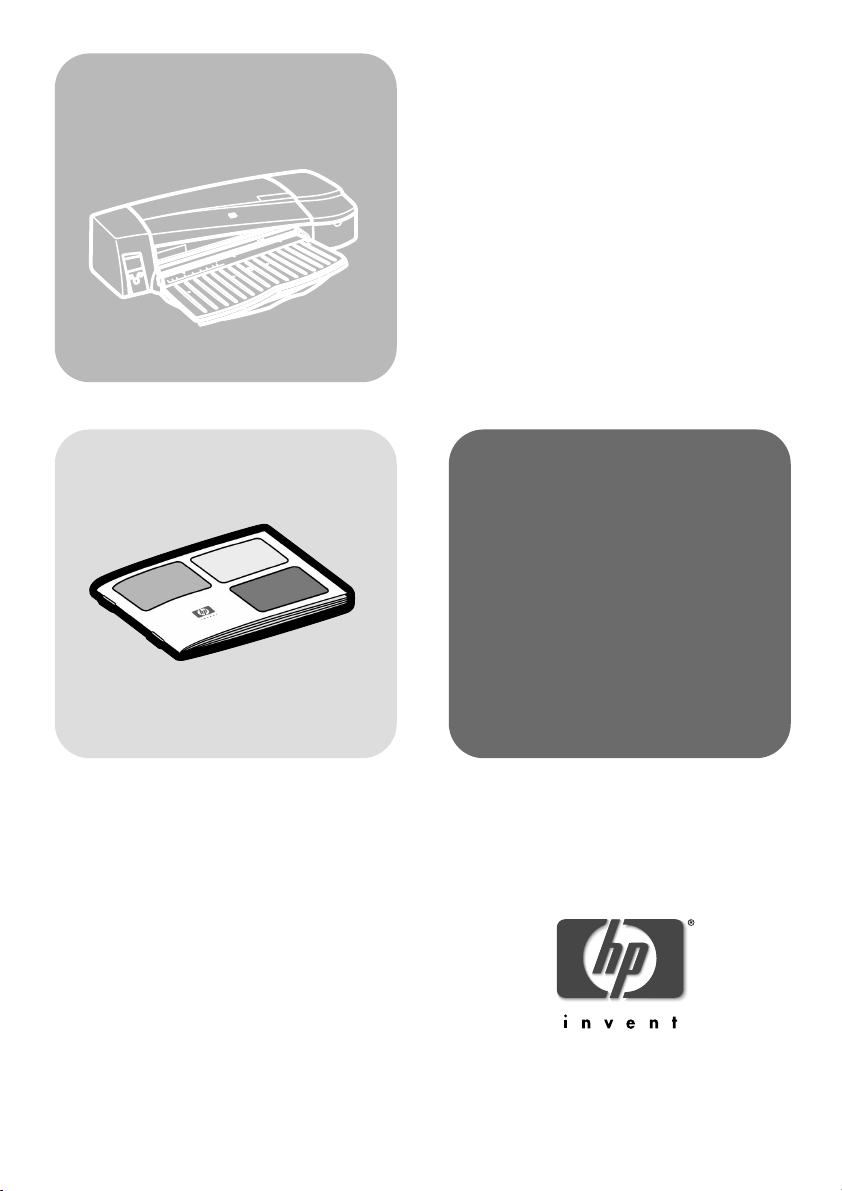
HP Designjet 110plus series
Quick reference guide
Part number: C7796-90239
Languages: EFIGS
Size: A5
Paper: 80 g. recycling paper recommended, but we leave it up to each DC to use
the most cost efficient paper according to their Paper strategy.
Color: B+W
Binding: Saddle stitch
Pages: 132 + cover front and back.
Covers: 200 gr. recycling paper recommended, but we leave it up to ech DC to use
the most cost efficient paper according to their Paper strategy.
File: pdf format.
DO NOT PRINT THIS PAGE!
DO NOT PRINT THIS PAGE. THIS PAGE IS FOR REFERENCE ONLY!
Page 2
HP Designjet 110 plus/110plus nr
Quick reference guide
Guide de référence rapide
Guida di riferimento rapido
Kurzübersicht
Guía de referencia rápida
Page 3

HP Designjet 110 plus/110plus nr—Quick Reference Guide
How do I…?
How do I load sheets of paper? (general guidance).................................2
How do I load paper using the front path? .............................................3
How do I unload paper from the front path? ...........................................3
How do I load paper into the input tray?................................................4
How do I print on large sheets?.............................................................6
How do I load a roll of paper? .............................................................8
How do I unload a roll of paper? ........................................................10
How do I replace ink cartridges?.........................................................11
The problem is…
The problem is a paper jam................................................................12
The problem is a roll of paper is jammed..............................................13
The problem is that the printer has stopped...........................................14
The problem is that the printer has not received the job ..........................15
The problem is… something else .........................................................16
Tell me about…
Tell me about the front panel...............................................................17
Tell me about the icons on the front panel.............................................18
Tell me about combinations of flashing icons.........................................19
Legal information
HP limited warranty statement .............................................................21
Regulatory notices.............................................................................24
More information
For more details of how to use your printer,
additional information about your printer (including
drivers and networking), and troubleshooting printer
problems, see the Using Your Printer CD or the on-
line help for the printer driver.
1
Page 4
HP Designjet 110plus/110 plus nr printer—
Quick Reference Guide
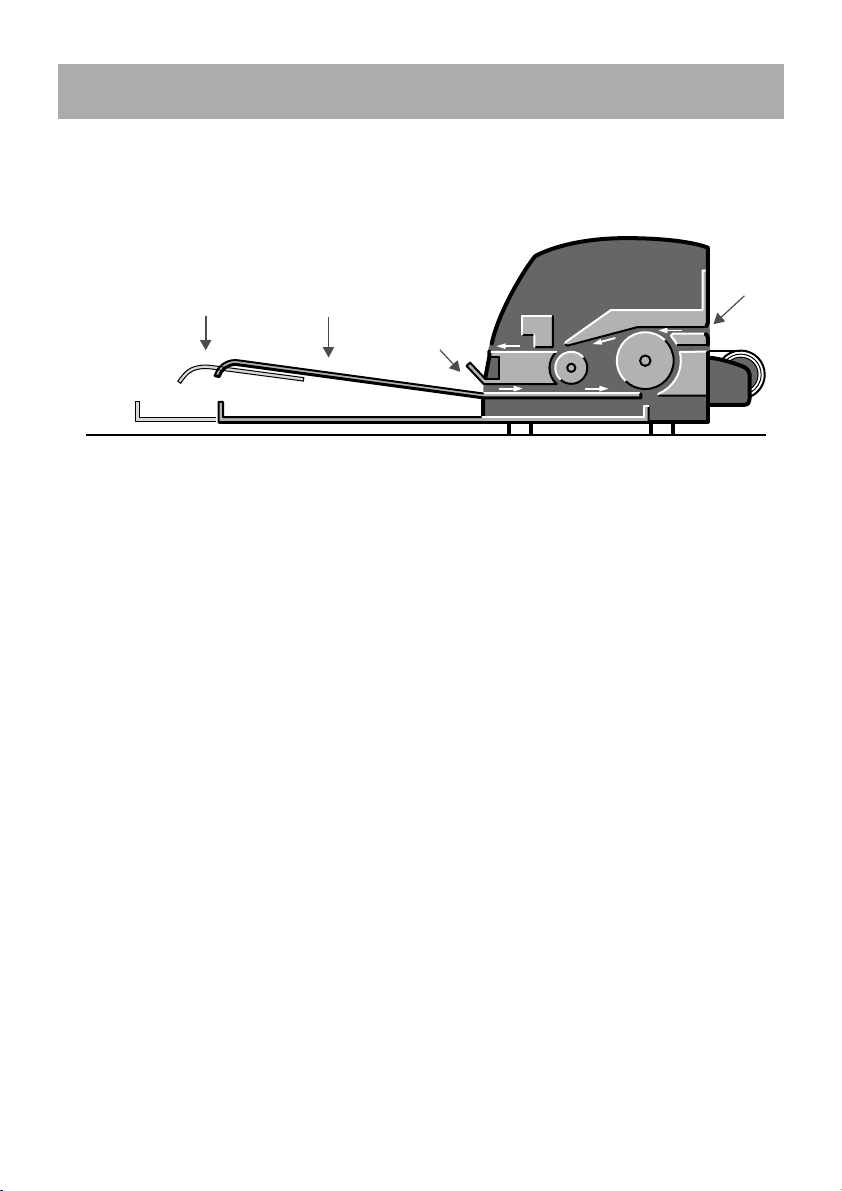
How do I load sheets of paper? (general guidance)
There are three ways of loading sheets of paper into the printer:
extensions
to support
paper
output tray
front path
input tray
rear
path
•The input tray at the front of the printer for multiple sheets of paper between
76×142mm (3×5.6inches) and 457×610 mm (18×24inches) (C+).
You can load up to 50 sheets of paper of 0.2 mm thickness (or 150 g/m²) in
the unextended tray, or 25 sheets of the same thickness in the extended tray.
Envelopes can also be loaded in the input tray.
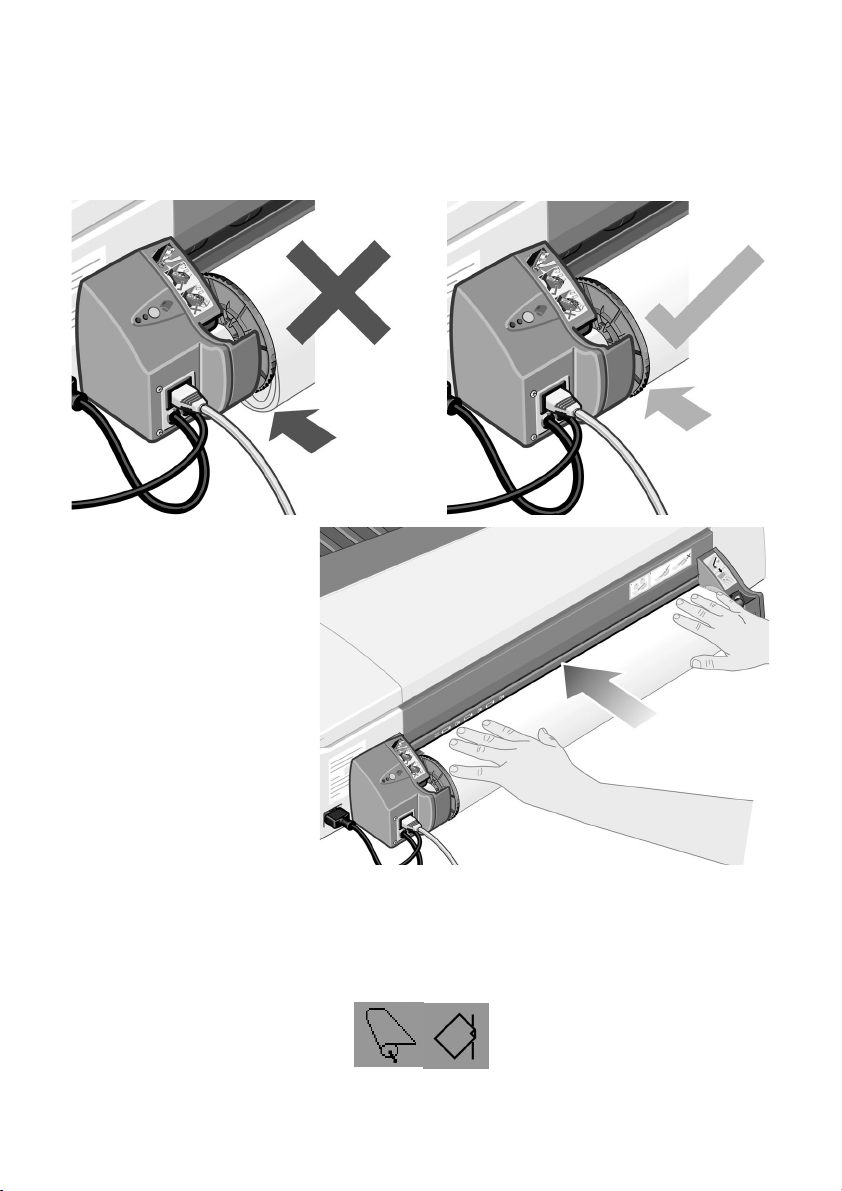
•The front path for single sheets of paper between 110 × 205 mm
(4.3×8.1inches) and 625×1625mm (24.6×63.9inches) (A1 oversize).
•The rear path (upper slot) for single sheets of thick paper or other media
between 110×205 mm (4.3×8.1inches) and 625×1625mm
(24.6×63.9inches) (A1 oversize). The rear path (lower slot) is used for roll
input.
• The automatic roll feed enables you to load roll paper into the rear path. When
roll paper is loaded into the printer, it obstructs the paper path; therefore roll
paper must always be unloaded before printing on sheet paper (see page 8).
However the paper is loaded, it should always be loaded in portrait mode: the
leading edge of the paper should be the shorter edge.
The output tray extensions may be used to support sheets of paper up to 19 inches
in length. For sheets longer than 19 inches, close the output tray extensions and use
the extended input tray to support the paper as it emerges from the printer.
2
Page 5
HP Designjet 110plus/110 plus nr printer—
Quick Reference Guide
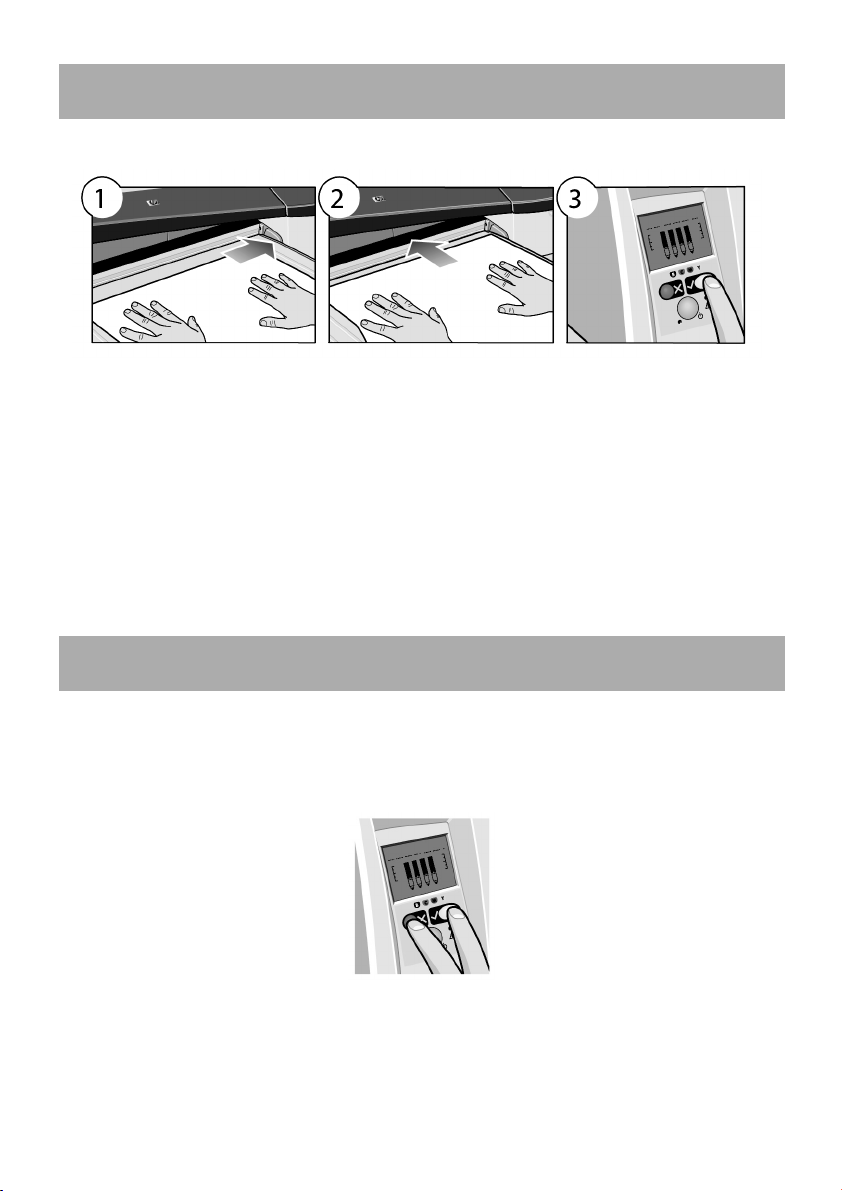
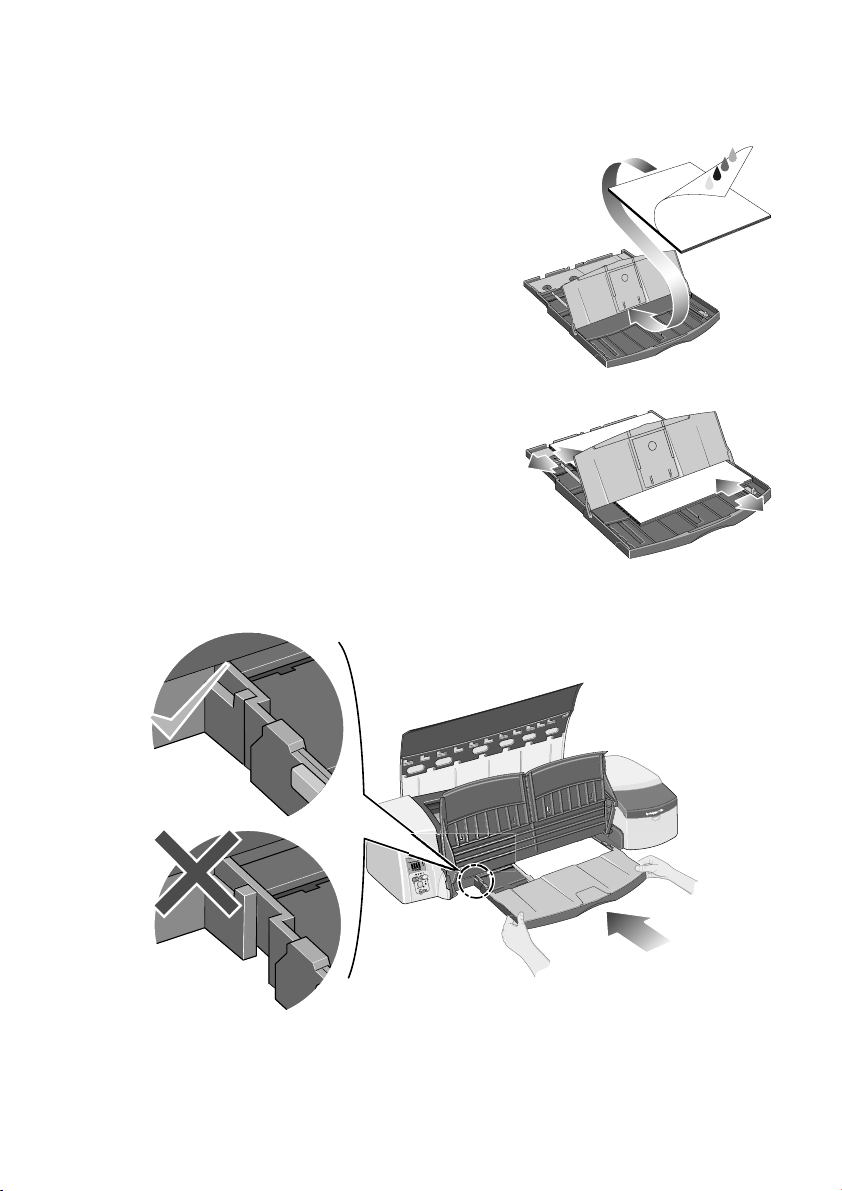
How do I load paper using the front path?
1. Place a single sheet of paper in the output tray, aligning it on the right of the
output tray, with the side that is to be printed on facing down. Do not stack
multiple sheets here.
2. Push the paper as far as it will go into the printer, maintaining its alignment to
the right.
3. Press the OK key (the upper right key) on the front panel.
The printer will check the alignment of the paper, and if it is misaligned, it will eject
the paper; in that case you will have to reload the paper.
How do I unload paper from the front path?
In case you want to change or remove the paper that you have loaded before
printing, for example to change the type of paper or to use a different input path:
• Press the Cancel and OK keys at the same time, to eject the paper.
3
Page 6
HP Designjet 110plus/110 plus nr printer—
Quick Reference Guide
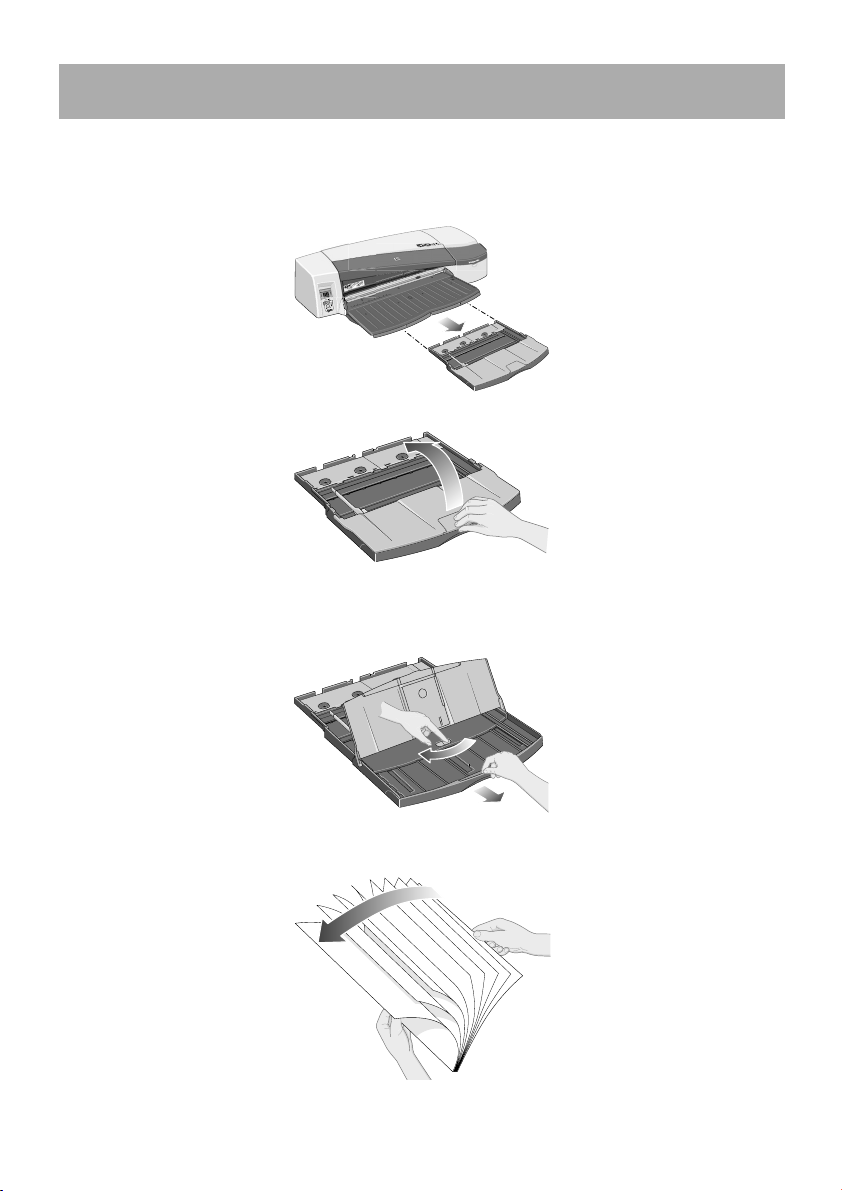
How do I load paper into the input tray?
Note that the input tray should be extended only when necessary: when using
paper larger than Legal- or A4-size.
1. Remove the input tray.
2. Lift up the tray cover.
3. If the paper you are using is larger than Legal- or A4-size, move the small tab
in the centre towards the left so that you can lengthen the tray. Then let go of
the tab and pull the tray extension out as far as it will go.
4. Riffle the paper. This helps to prevent adjacent sheets of paper from sticking to
each other.
4
Page 7
HP Designjet 110plus/110 plus nr printer—
5. Slide the paper into the tray under the tray
cover, ensuring that it touches the sides of the
tray on the right and on the printer side.
6. Push in the small tab on the right of the tray so
that it fits snugly against the paper. Move the
larger tab on the left of the tray to the right so
that it too fits snugly against the paper.
7. Close the tray cover.
8. Lift up the output tray and insert the input tray
into the printer, keeping it straight and pushing it in as far as it will go. The left
inside corner must be aligned with the plastic paper tray guide.
Quick Reference Guide
9. Lower the output tray. Note that if the input tray is extended, it will extend out
beyond the output tray.
5
Page 8
HP Designjet 110plus/110 plus nr printer—
4
5
6
1
2
3
3
Quick Reference Guide
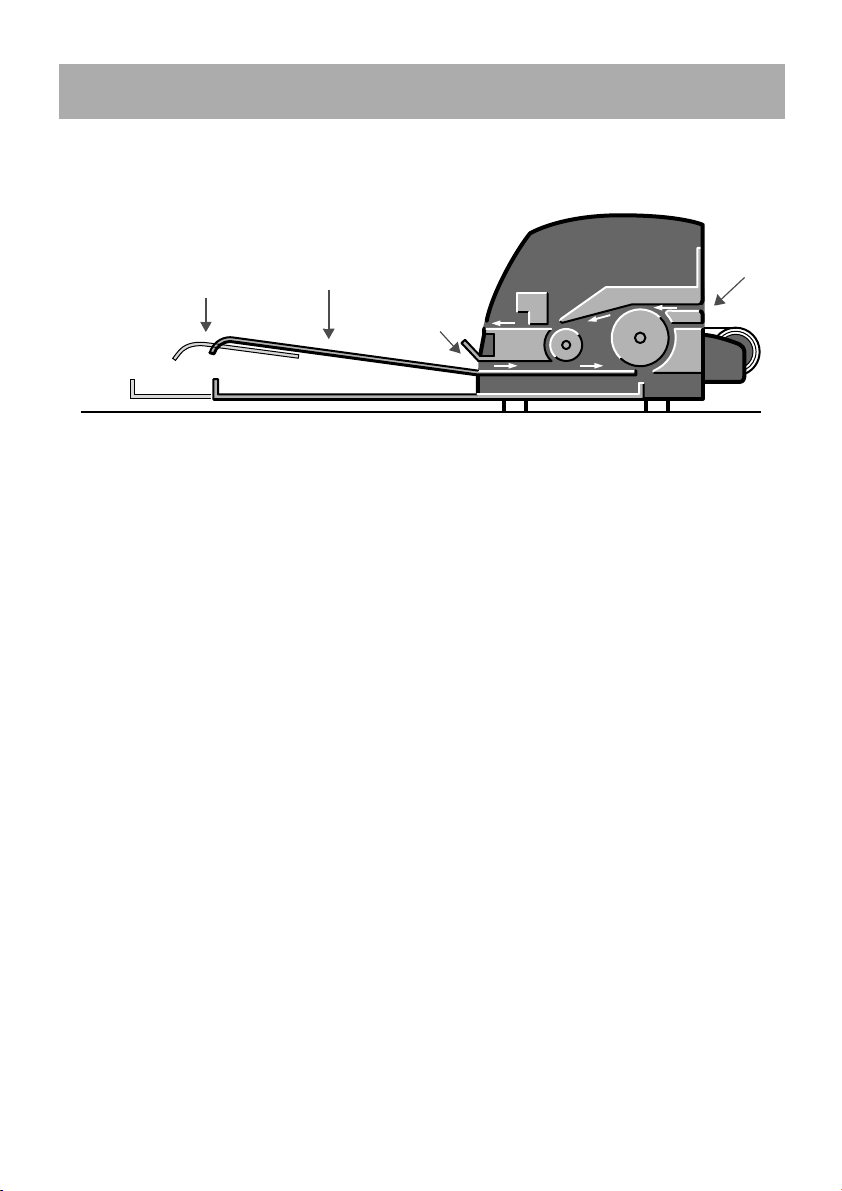
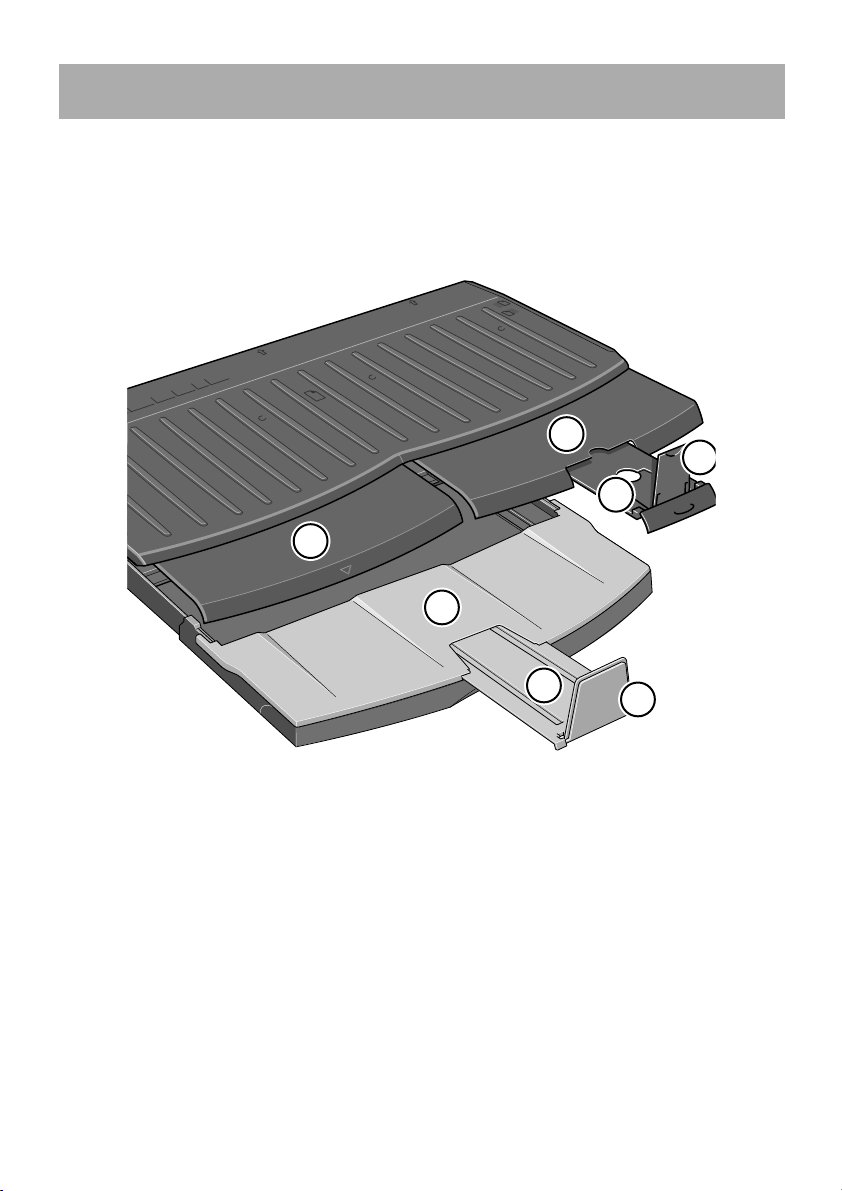
How do I print on large sheets?
The printer output system has several adjustable components. When printing on
large sheets of paper, it is important that you use the correct printer output
configuration. The following diagram shows adjustable parts of the printer output
system:
.
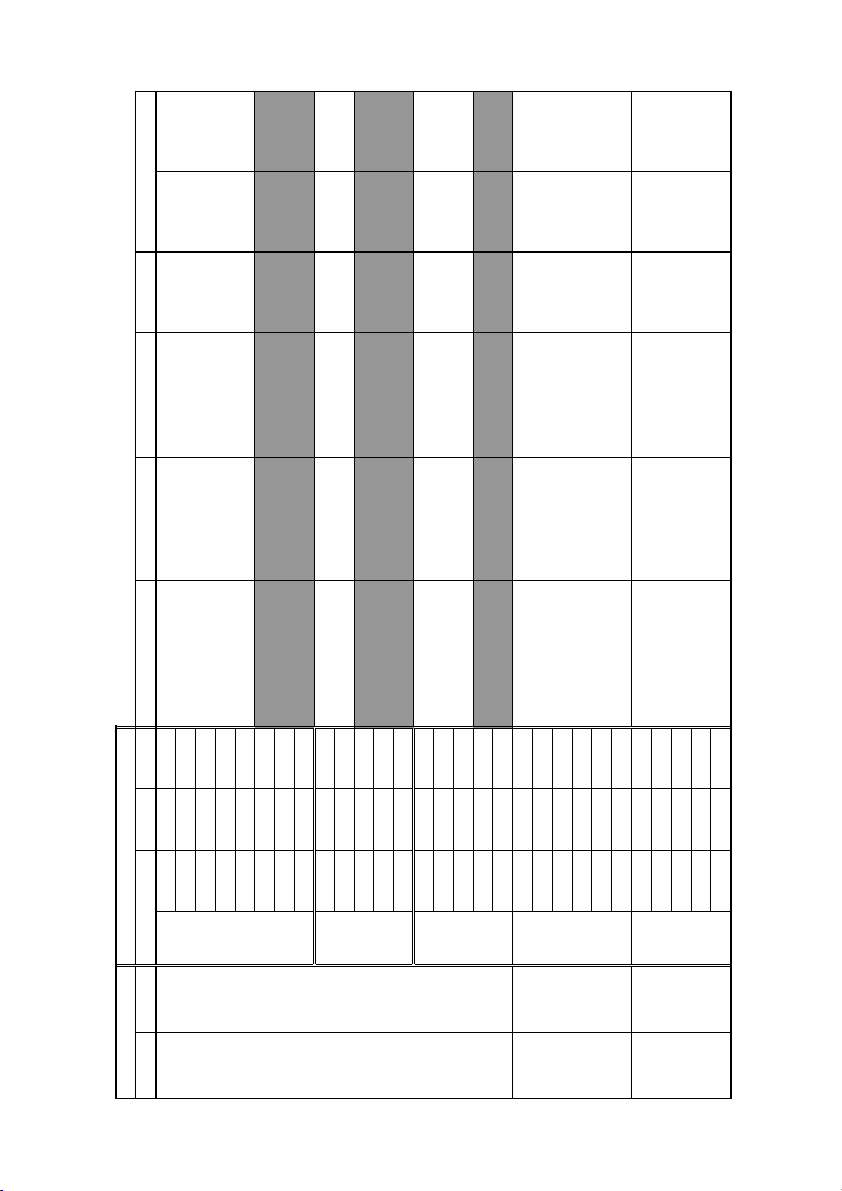
The table on the next page gives the output system configuration required for
various paper sizes.
Note:
• When using the main tray or roll feedback as source, make the necessary
adjustments to the output system to enable output to be stacked.
• If the output tray has prints stacked in it and you want to print from the roll feed,
empty the output tray and adjust it as necessary before printing.
...continued on next page...
6
Page 9
HP Designjet 110plus/110 plus nr printer—
Source Destination Width Length
1
23456
JIS B5 182mm 257mm
ANSI A 8.5" 11"
ISO A4 210mm 297mm
ARCH A 9" 12"
DIN C4 229mm 324mm
ISO B4 250mm 353mm
LEGAL 8.5" 14"
JIS B4 257mm 364mm
ISO A3 297mm 420mm
ANSI B 11" 17"
ARCH B 12" 18"
DIN C3 324mm 458mm
ANSI B+ 13" 19"
ISO B3 353mm 500mm
JIS B3 264mm 515mm
ANSI C 17" 22"
ISO A2 420mm 594mm
ARCH C 18" 24"
DIN C2 458mm 648mm
ISO B2 500mm 707mm
JIS B2 515mm 728mm
ISO A1 594mm 841mm
ANSI D 22" 34"
ARCH D 24" 36"
Custom Up to 24" Up to 12"
Custom Up to 24" Up to 18"
Custom Up to 24" Up to 24"
Custom Up to 24" Up to 36"
Custom Up to 24" > 36"
Media
Size
Position A3,... Closed DOWN
C-Size Tray Output Tray
A-Size
B-Size
C-Size
Closed N/A
UP
Position B4,... Closed DOWN Closed N/A
UP
N/A
UP
Position B4,... Position A3,... DOWN Closed N/A
UP
Position A3,...
Closed Closed UP
ClosedPosition A3,... DOWN
Position 17x22 Open
DOWN
Closed Closed UP Position A2,... Open
DOWN
Manual feed,
front or rear
Output Bin D-Size
DOWN
Closed Position Roll icon DOWN
DOWN
Closed Position Roll icon DOWN
Roll
accessory
Output Bin Custom Closed N/A
Closed N/A
Quick Reference Guide
7
Page 10
HP Designjet 110plus/110 plus nr printer—
Quick Reference Guide
How do I load a roll of paper?
Only one source of paper can be used by the printer at any one time, so if a roll
of paper is loaded in the printer and you want to print to a sheet of paper, you
must first unload the roll. The roll is automatically reloaded the next time printing
to the roll is requested.
You can cut a roll without unloading it by pressing the OK key (top right key on
the front panel); the paper first advances about 1 cm or 0.4 inch.
1. Set your application to pick paper from the roll feed.
2. Select Print from your application.
3. Load a roll of the required paper onto the spindle. Ensure that the roll is the
right way round and that the blue stop on the spindle is pushed in against the
paper.
4. Insert the spindle into its retaining slots, with the blue stop on the right and the
black stop on the left as seen from the rear of the printer.
If the paper is glossy, we recommend that you wear gloves to avoid smearing
the surface of the paper.
5. Make sure that the leading edge of the roll is straight and perpendicular to its
side edges and has no irregularities.
...continued on next page...
8
Page 11
HP Designjet 110plus/110 plus nr printer—
Quick Reference Guide
How do I print on large sheets?
...continued from previous page...
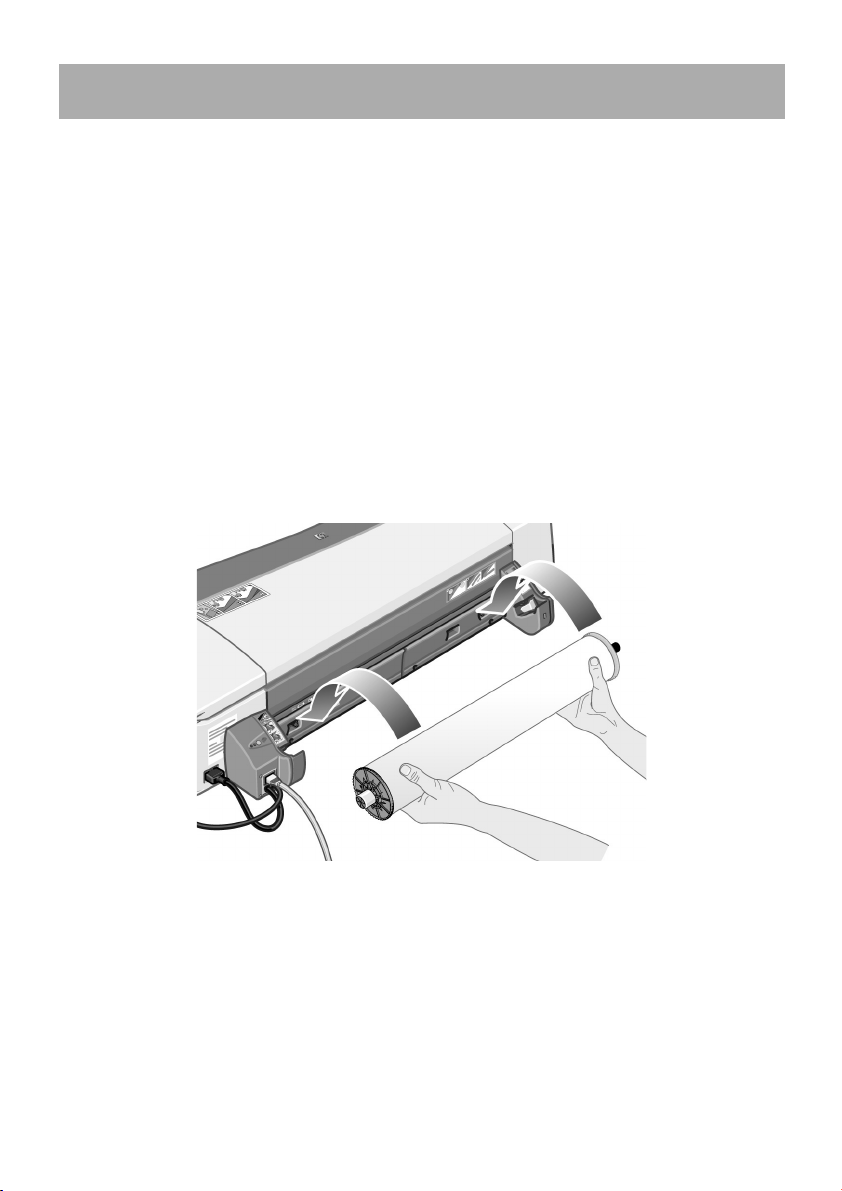
6. Rewind any excess paper so that the paper is rolled tightly onto the spindle.
7. Insert the leading
edge of the paper into
the lower slot in the
rear of the printer.
Push the paper in until
it encounters
resistance, keeping
the sides of the paper
rolled tightly so that
the paper is not
skewed.
8. After emitting a
‘beep’, the printer will
take up the paper.
9. The printer will check
the alignment of the paper. If the paper is properly aligned, the roll icon will
appear on the display, indicating that the printer is ready to print.
If the paper is misaligned, the printer will eject the paper and the display will
show the misaligned and roll icons; you will have to reload the paper.
Repeat Step 6, so that the paper is tightly rolled onto the spindle.
9
Page 12

HP Designjet 110plus/110 plus nr printer—
Quick Reference Guide
How do I unload a roll of paper?
Important: Do not pull on the roll of paper once it is taken up by the printer,
that is, if there is any resistance.
There are two ways of unloading a roll of paper:
• If you want to unload the roll in order to feed a single sheet through the
printer, press the Cancel and OK keys on the front panel at the same time (see
below). If you later request printing to the roll, the Automatic Roll Feed will
then automatically reload the roll.
• If you want to unload the roll in order to completely remove it (for example,
you no longer wish to use this roll of paper):
1. Push the Eject button on the left roll feed support at the rear of the printer.
Avoid pressing the Eject button several times, as this can damage the paper.
2. Pull the roll towards you and remove the paper completely from the rear
paper path of the printer. The icons shown below will flash until the paper is
completely out, because if the paper is only partially removed, paper jams
may subsequently occur. Sometimes the paper may fall away from the rear
path by itself.
You do not need to remove the spindle from its supports in the printer.
10
Page 13
HP Designjet 110plus/110 plus nr printer—
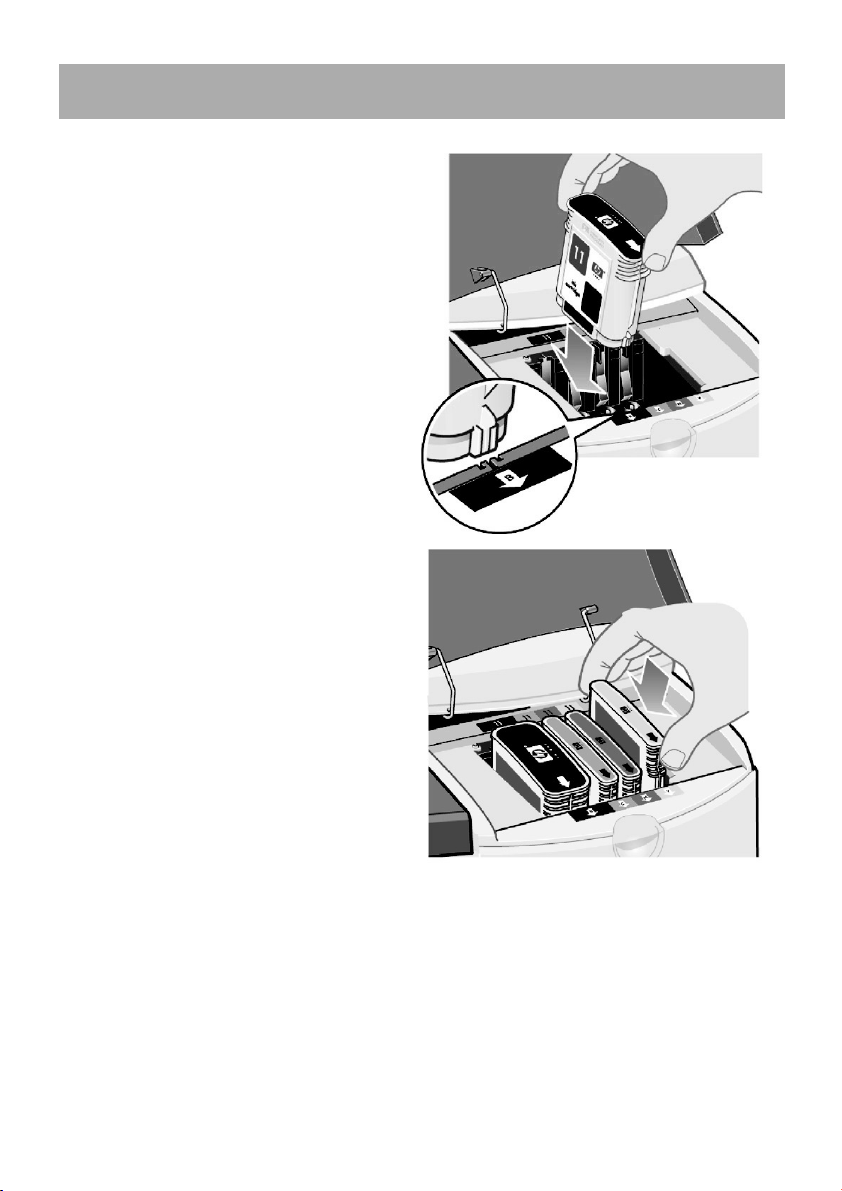
How do I replace ink cartridges?
1. Open the front hinged flap at the
right of the printer.
2. For each ink cartridge that needs to
be replaced:
• Gripping it by its shorter top
edges, lift the ink cartridge
vertically up and out of the
printer.
• Lower the new ink cartridge into
its slot until it clicks into place
and is quite secure.
Quick Reference Guide
3. Finally close the outer flap.
11
Page 14
HP Designjet 110plus/110 plus nr printer—
Rear path
Quick Reference Guide
The problem is a paper jam
1. Try pressing the OK key (the upper right key) on the printer’s front panel.
If this doesn't solve the problem…
2. Turn off the printer.
3. Remove all media from the tray. Pull out any paper that is visibly stuck.
4. Lift the top cover and pull out any paper that may be stuck.
Be careful when you lift the cover not to damage or disturb any of the tubes or
other internal parts of the printer.
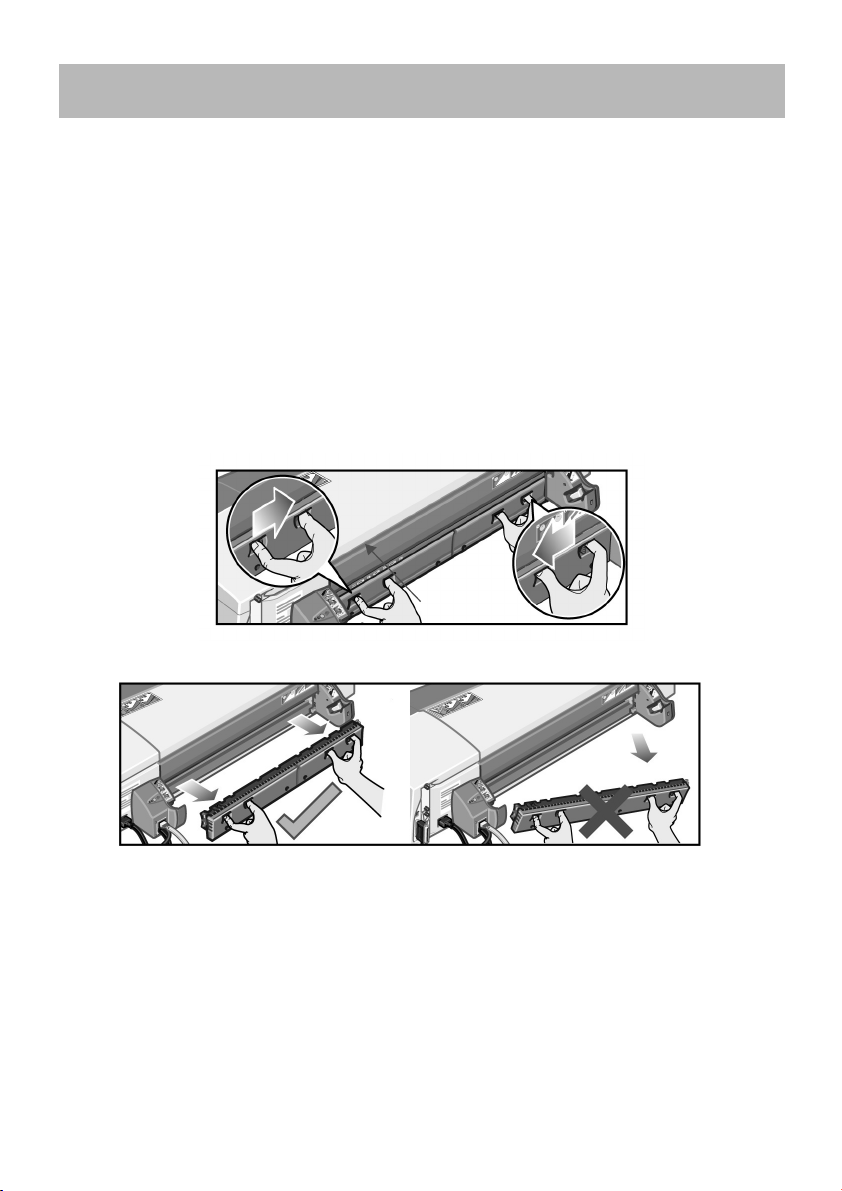
5. Remove the rear path carefully by pressing the buttons on each of its sides and
pulling it straight out. If you don’t pull it straight out, you may damage the
paper sensor.
Removing the rear path gives access to the inside of the printer from the rear.
Pull out any paper that may be stuck inside or is accessible from the rear.
Replace the rear path and make sure it fits securely.
6. Turn on the printer.
7. We recommend that after clearing a paper jam you align the printheads to
avoid problems of poor print quality. To align printheads, start HP Designjet
System Maintenance (see page 16) and select Align printhead.
12
Page 15

HP Designjet 110plus/110 plus nr printer—
Quick Reference Guide
The problem is a roll of paper is jammed
If paper from the roll is jammed:
1. Turn off the printer.
2. Check in all places where the roll could be trapped:
• Remove the front paper tray. This will allow you to see inside the printer
through a slot in the front. Release and remove any trapped paper that is
accessible.
• Lift the top cover, being careful not to damage or disturb any of the tubes or
other internal parts of the printer. If there is any paper trapped in the wheels
inside the printer, release and remove the paper.
• Remove the rear path by pressing the buttons on each of its sides and pulling
it straight out. If you don't pull it straight out, you may damage the paper
sensor. If there is any paper trapped in the rollers inside the printer, release
and remove the paper.
3. Once the paper jam has been cleared, replace any parts of the printer
(paper tray, top cover, rear path) that you have removed/opened, making
sure they fit securely.
4. Turn on the printer.
5. Before reloading the paper roll, you must trim the leading edge of the roll
such that this edge is perfectly straight and at right-angles to the sides of the
roll.
13
Page 16
HP Designjet 110plus/110 plus nr printer—
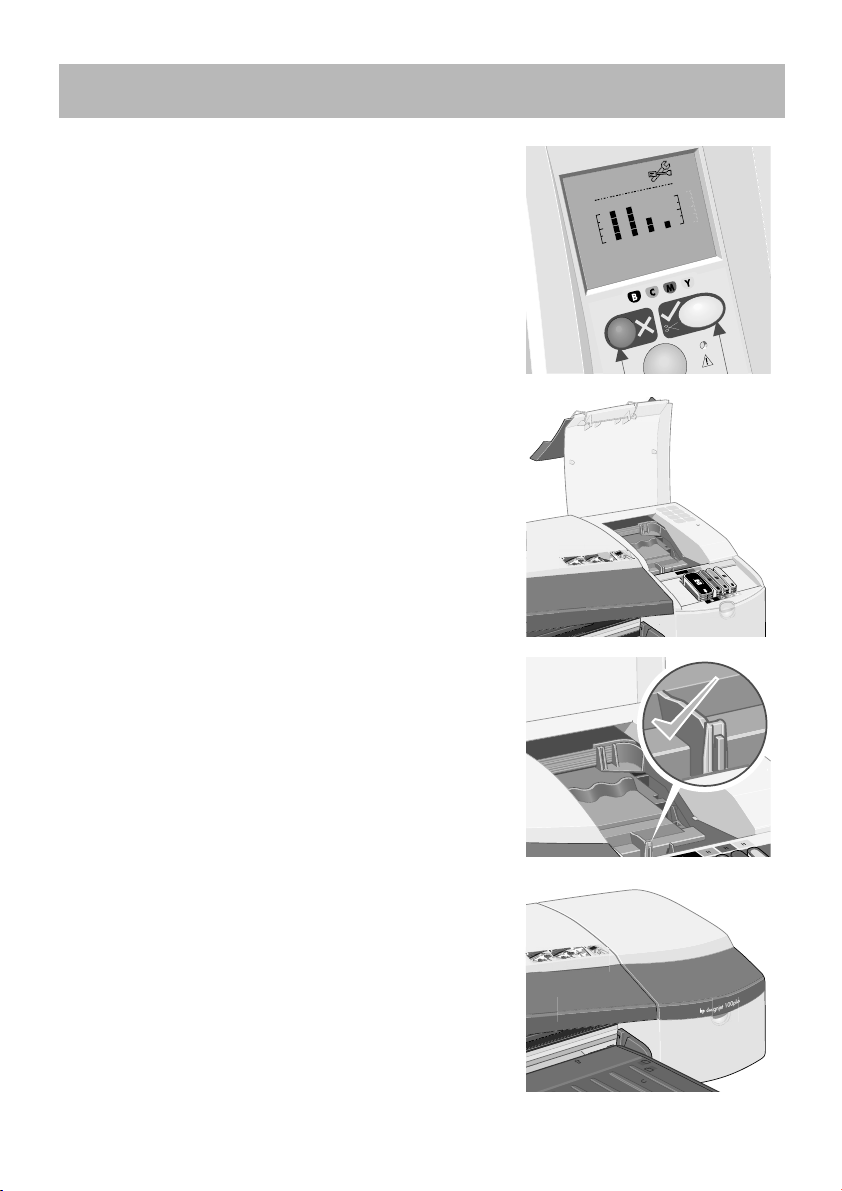
The problem is that the printer has stopped
If the front panel looks like this and the yellow light
is flashing:
1. Open both parts of the hinged flap at the right
of the printer, lifting it right back so that you can
see the print carriage. Check that all packaging
material has been removed from around the
print carriage.
The carriage may move at this point. Wait until
it has stopped moving.
Quick Reference Guide
2. Check that the printhead cover is latched down.
The printer will not work if the latch is not
properly engaged.
3. Close the rear part and then the front part of the
hinged flap. The printer will not work if it is not
properly closed.
4. If the yellow light has not turned off, see the
Using Your Printer CD.
14
Page 17

HP Designjet 110plus/110 plus nr printer—
Quick Reference Guide
The problem is that the printer has not received the job
If your printer seems to be ignoring the printing job you have sent to it:
1. Check that the printer is correctly connected to the computer.
If the connection is through a network, print the printer’s configuration pages
(hold down the Power key while pressing the OK key four times), and check in
the TCP/IP section that the Status is shown as Ready. Make a note of the
printer’s IP address and subnet mask, which are in the same section.
• If the IP address is 0.0.0.0 or 192.0.0.192, refer to your printer’s setup
poster.
• If the Status is Ready, you can use a Web browser to check the network
connection between printer and computer. Simply type your printer’s IP
address into your browser, where you would normally type a URL. If you get
a reply from the printer, then the network connection between the printer
and the computer is working.
• If the Status is Not Ready, or if the printer does not reply to the Web
browser, check that the printer’s IP address and subnet mask belong to your
network.
• If necessary, consult your network administrator.
2. Check that the printer queue is not paused.
3. If you are using Mac OS X, make sure you selected “HP IP Printing” when you
created your printer, and not “IP Printing”.
15
Page 18

HP Designjet 110plus/110 plus nr printer—
Quick Reference Guide
The problem is… something else
The HP Designjet System Maintenance utility gives you access to support and
troubleshooting facilities on the Web, if you have an Internet connection. Even
without an Internet connection, it provides several facilities that may help to solve
printer problems.
To start HP Designjet System Maintenance under Windows:
1. From the Windows taskbar, select Start > Settings > Printers.
2. Right-click your printer’s icon and select Printing Preferences (Windows 2000
or XP), Document Defaults (Windows NT 4), or Properties (Windows 98 or
Me) from the pop-up menu.
3. Select the Advanced tab and click the Maintenance button.
To start HP Designjet System Maintenance under Mac OS, double-click the HP
Designjet System Maintenance icon on your desktop. Alternatively, under Mac OS
X you can select your printer in the Print Center and click Configure.
Under Windows or Mac OS, your Web browser should be started automatically
when you have followed the instructions above.
If you cannot follow these instructions successfully…
• …it may be that your computer does not manage the printer. In this case, use
HP Designjet System Maintenance from the printer server.
• …or it may be that the printer is managed by your computer but HP Designjet
System Maintenance has not been installed. In this case, install it from the HP
Designjet Software Setup CD.
For much more about
troubleshooting printer
problems, see the
section ‘The Problem
Is…’ on the
Printer
16
Using Your
CD.
Page 19
HP Designjet 110plus/110 plus nr printer—
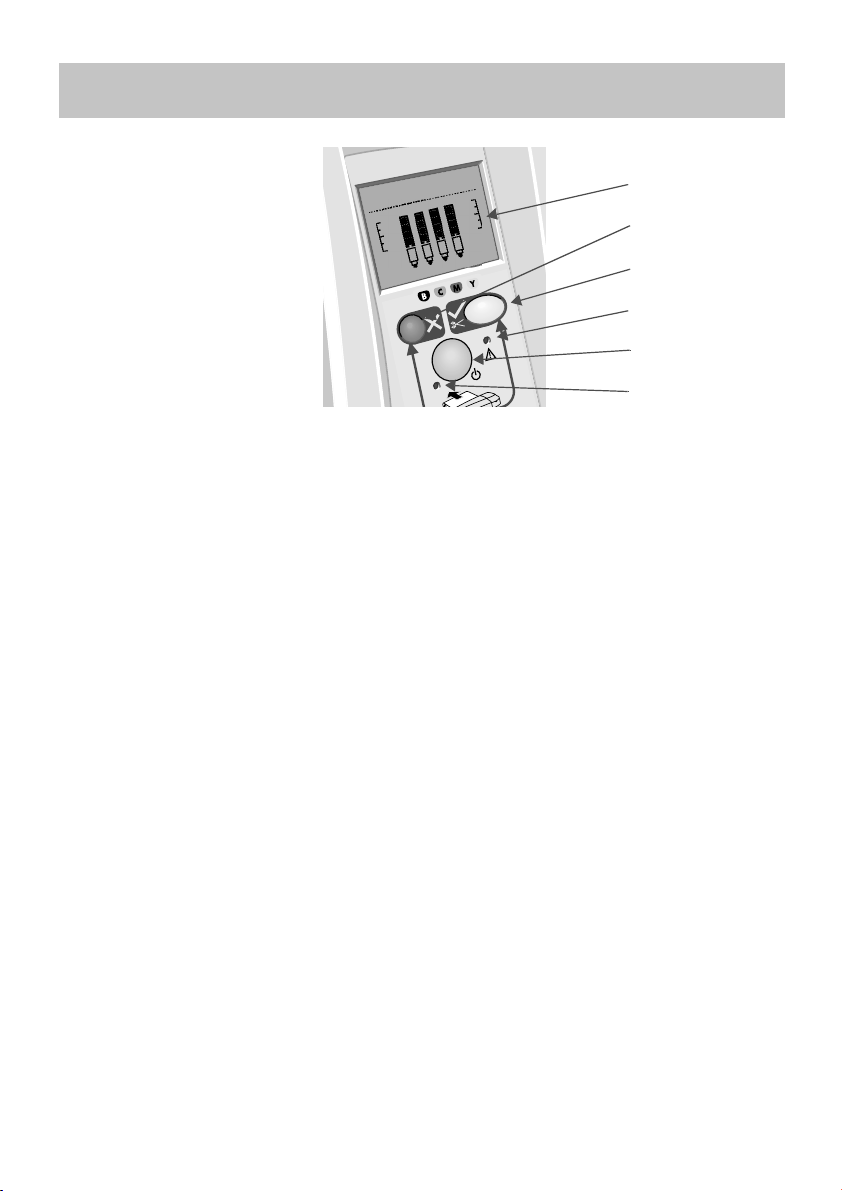
Display
Cancel key
OK key
Attention light
Power key
Power light
Quick Reference Guide
Tell me about the front panel
The front panel (or control
panel) of the printer gives
information about the state
of the printer, and also has
three keys (or buttons) that
let you control the actions of
the printer.
The keys are:
• Power: Turns the power
on and off.
• Cancel: Cancels the
current operation.
• OK: Indicates to the printer:
• that you have now loaded paper in the appropriate tray or feed, and the
printer may start printing;
• that you have corrected a problem—for example, you have removed
jammed paper or replaced a failing printhead—and that the printer should
continue with its activity—for example, it should resume printing;
The lights are:
• Power: The Power (green) light is on when the printer is switched on.
• Attention: The Attention (yellow) light is on when the printer requires a user
action—for example, to close the top cover (if the display is blank).
The printer’s front panel has a Display area that gives information about the printer.
The sets of icons in the lower two-thirds of the display refer respectively to the Black,
Cyan, Magenta, and Yellow components of the ink system.
17
Page 20
HP Designjet 110plus/110 plus nr printer—
Quick Reference Guide
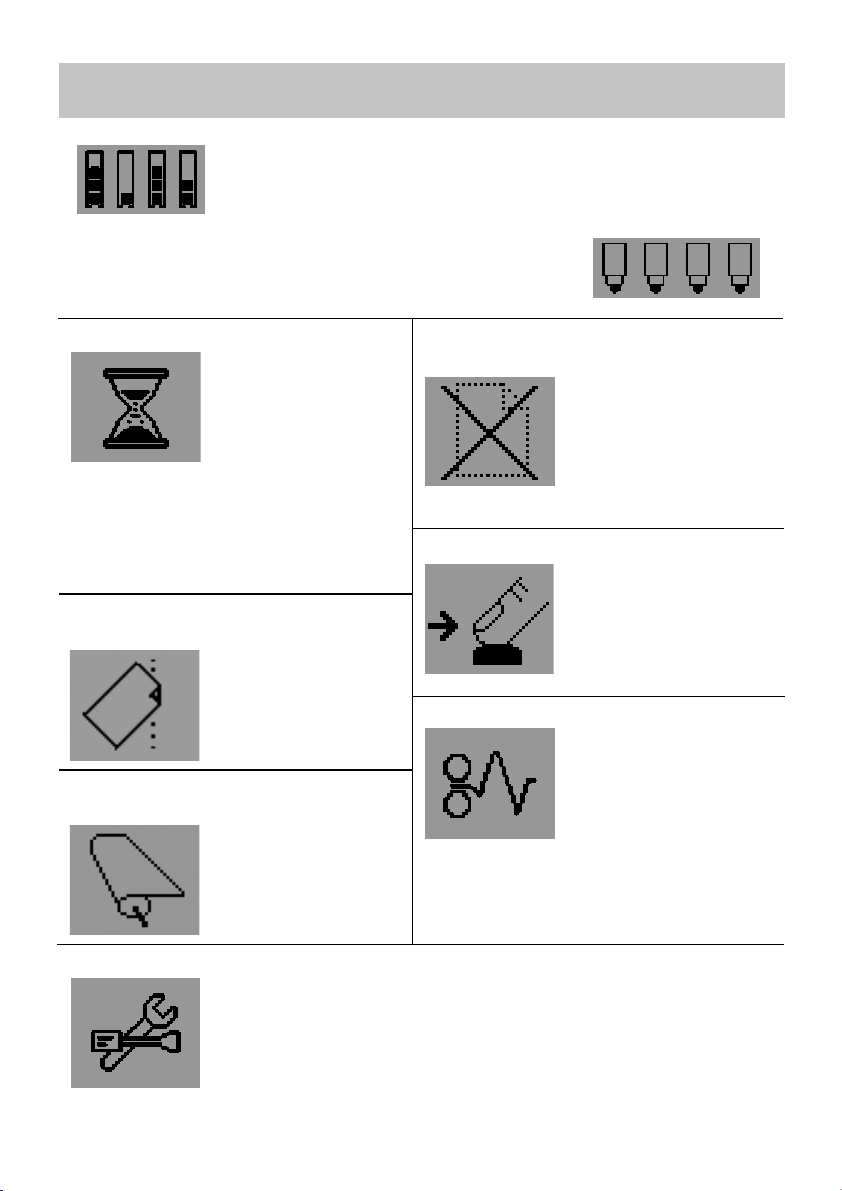
Tell me about the icons on the front panel
The four icons shown here refer to the amount of ink in each of
the ink cartridges.
A flashing printhead icon (at the bottom) indicates a
problem with that printhead.
Busy: When flashing:
Printing, cancelling
job, drying, powering
off. The icon flickers if
the top or side cover is
open. Action: close the
top cover or close the
side cover.
When off: Printer is
powered off, idle, or
awaiting user action.
Paper When flashing:
misaligned: The paper is
misaligned and must
be reloaded to print.
Action: Reload the
paper.
When off: Normal.
State of the When on:
roll: The roll is loaded.
When flashing: The
roll is empty or stuck.
Action: Load roll.
When off: There is no
roll loaded.
Use HP Designjet System Maintenance:
When flashing: Hardware error.
Action: Run the HP Designjet System Maintenance utility for the
printer (see page 16). Make sure that the printer is connected.
When off: Normal.
State of When flashing:
Sheet Paper: Out of paper or
paper stalled.
Action: Add paper or
clear the paper path.
When off: Normal.
Press a Key: When flashing:
Printer waiting.
Action: Press the OK
key.
When off: Normal.
Paper jam: When flashing:
Paper jammed, paper
stalled or carriage
stalled.
Action: Clear the
paper jam.
See page 12.
When off: Normal.
18
Page 21
HP Designjet 110plus/110 plus nr printer—
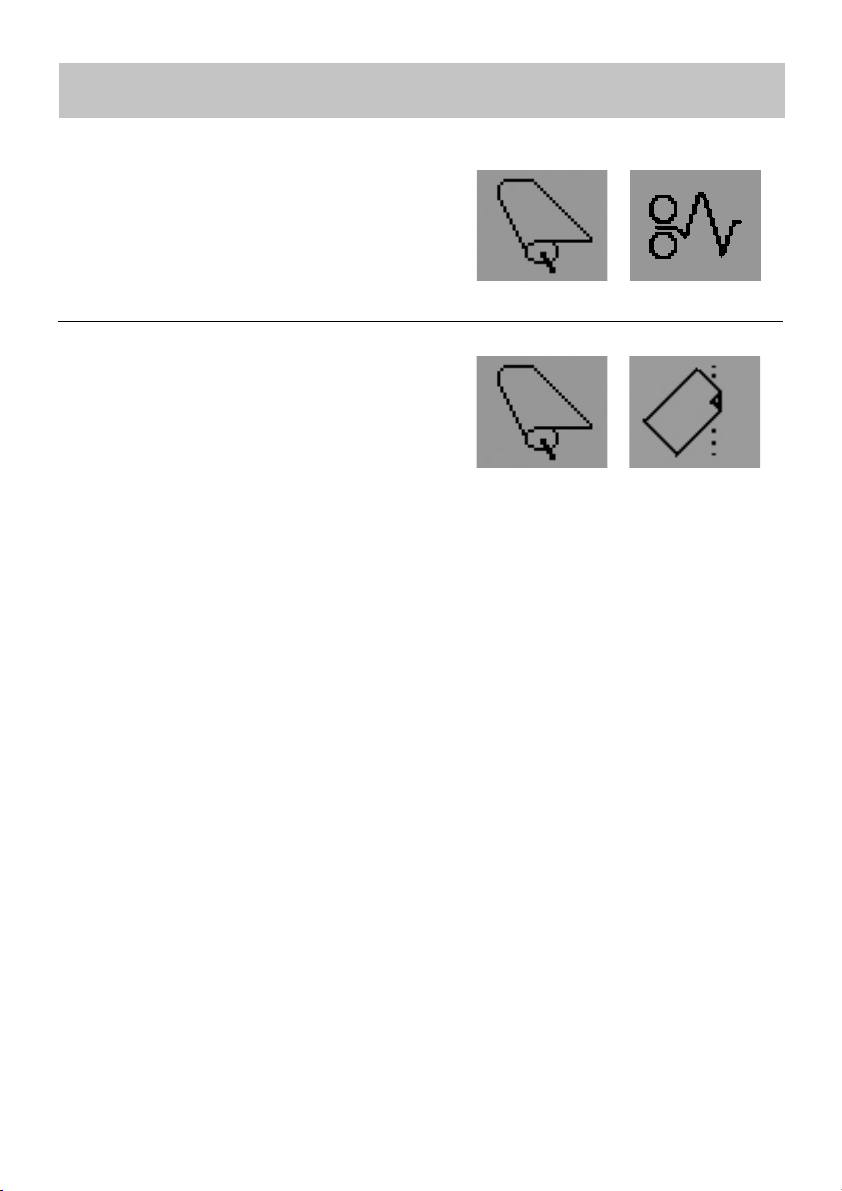
Tell me about combinations of flashing icons
Unload roll
When flashing: The printer is waiting for you
to unload the roll manually.
Action: Unload the roll completely; you do
not need to remove the spindle from the
printer.
When off: Normal.
Roll misaligned
When flashing: The roll of paper is
misaligned and must be reloaded.
Action: Unload the roll and reload it, paying
special attention to alignment.
When off: Normal.
Quick Reference Guide
19
Page 22

HP Designjet 110plus/110 plus nr printer—
For much more about…
• how to use your printer
• additional information about your printer
• troubleshooting printer problems
…see the Using Your Printer CD or (under
Windows only) the online help for the
printer driver.
Quick Reference Guide
20
Page 23

HP Designjet 110plus/110 plus nr printer—
Quick Reference Guide
HP limited warranty statement
HP Designjet 110plus/110 plus nr
HP product Duration of limited warranty
Printer and related HP hardware: 1 year (from the date of purchase by the customer)
Software: 90 days (from the date of purchase by the customer)
Black printhead: Until the “end of warranty” date printed on the product
is reached, or 530 cm³ of HP ink have been cycled
through the printhead, whichever occurs first
Cyan, magenta, and yellow
printheads:
Ink cartridge: Until the genuine HP ink is depleted as indicated by the
Until the “end of warranty” date printed on the product
is reached, or 200 cm³ of HP ink have been cycled
through the printhead, whichever occurs first
printer, or the “end of warranty” date printed on the
product is reached, whichever occurs first
A: Extent of limited warranty
1. Hewlett-Packard (HP) warrants to the end-user customer that the HP products specified
above will be free from defects in materials and workmanship for the duration specified
above. Customer is responsible for maintaining proof of date of purchase.
2. For software products, HP’s limited warranty applies only to a failure to execute
programming instructions. HP does not warrant that the operation of any product will be
uninterrupted or error free.
3. HP’s limited warranty covers only those defects which arise as a result of appropriate
use of the product, and does not apply to any:
a. Improper or inadequate maintenance or modification;
b. Software, interfacing, media, parts, or supplies not provided or supported by HP; or
c. Operation outside the product’s specifications.
Routine printer maintenance operations in the HP Designjet 110plus/110 plus nr, such
as cleaning and preventive maintenance services (including parts contained in any
preventive maintenance kit and HP service engineer visits), are not covered by HP’s
limited warranty, but in some countries may be covered under a separate support
contract.
4. For HP printer products, the use of a refilled or non-original HP consumable product (ink,
printhead or ink cartridge) does not affect either the warranty to the customer or any HP
support contract with the customer. However, if printer failure or damage is attributable
to the use of a non-HP or refilled ink cartridge, HP will charge its standard time and
materials charges to service the printer for the particular failure or damage.
5. If HP receives, during the applicable warranty period, notice of a defect in any
software, media, or consumable product which is covered by HP’s warranty, HP shall
deliver another product to customer to replace the defective one. If HP receives, during
the applicable warranty period, notice of a defect in any hardware product which is
21
Page 24

HP Designjet 110plus/110 plus nr printer—
covered by HP’s warranty, HP shall either repair or replace the defective product, at
HP’s option. A replacement part, in return for a defective one and remote part
installation assistance, if needed, may be provided to the customer, at HP’s option. HP
may, at its option, waive the requirement for the customer to return the defective part.
6. If HP is unable to repair or replace, as applicable, a defective product which is covered
by HP’s warranty, HP shall, within a reasonable time after being notified of the defect,
refund the purchase price for the product.
7. HP shall have no obligation to repair, replace, or refund until the customer returns the
defective product to HP.
8. Any replacement product may be either new or like-new, provided that it has
functionality at least equal to that of the product being replaced.
9. HP products may contain remanufactured parts or components equivalent to new in
performance or may have been subject to incidental use.
10.HP’s limited warranty is valid in any country or locality where HP has a support
presence for this product and where HP has marketed this product. The level of warranty
service you receive may vary according to local standards. HP will not alter form, fit or
function of the product to make it operate in a country for which it was never intended to
function for legal or regulatory reasons. Contracts for additional services may be
available for any authorized HP service facility where the listed HP product is distributed
by HP or an authorized importer.
11.Any applicable print cartridge warranty shall not apply to HP print cartridges that have
been refilled, remanufactured, refurbished, misused, or tampered with in any way.
Quick Reference Guide
B. Limitations of warranty
1. TO THE EXTENT ALLOWED BY LOCAL LAW, NEITHER HP NOR ITS THIRD PARTY
SUPPLIERS MAKE ANY OTHER WARRANTY OR CONDITION OF ANY KIND,
WHETHER EXPRESS OR IMPLIED, WITH RESPECT TO THE HP PRODUCTS, AND
SPECIFICALLY DISCLAIM THE IMPLIED WARRANTIES OR CONDITIONS OF
MERCHANTABILITY, SATISFACTORY QUALITY, AND FITNESS FOR A PARTICULAR
PURPOSE.
C. Limitations of liability
1. To the extent allowed by local law, the remedies provided in this Warranty Statement
are the customer’s sole and exclusive remedies.
2. TO THE EXTENT ALLOWED BY LOCAL LAW, EXCEPT FOR THE OBLIGATIONS
SPECIFICALLY SET FORTH IN THIS WARRANTY STATEMENT, IN NO EVENT SHALL HP
OR ITS THIRD PARTY SUPPLIERS BE LIABLE FOR DIRECT, INDIRECT, SPECIAL,
INCIDENTAL, OR CONSEQUENTIAL DAMAGES, WHETHER BASED ON CONTRACT,
TORT, OR ANY OTHER LEGAL THEORY AND WHETHER ADVISED OF THE POSSIBILITY
OF SUCH DAMAGES.
22
Page 25

HP Designjet 110plus/110 plus nr printer—
Quick Reference Guide
D. Local law
1. This Warranty Statement gives the customer specific legal rights. The customer may also
have other rights which vary from state to state in the United States, from province to
province in Canada, and from country to country elsewhere in the world.
2. To the extent that this Warranty Statement is inconsistent with local law, this Warranty
Statement shall be deemed modified to be consistent with such local law. Under such
local law, certain disclaimers and limitations of this Warranty Statement may not apply
to the customer. For example, some states in the United States, as well as some
governments outside the United States (including provinces in Canada), may:
a. Preclude the disclaimers and limitations in this Warranty Statement from limiting the
statutory rights of a consumer (e.g. the United Kingdom);
b. Otherwise restrict the ability of a manufacturer to enforce such disclaimers or
limitations; or
c. Grant the customer additional warranty rights, specify the duration of implied
warranties which the manufacturer cannot disclaim, or not allow limitations on the
duration of implied warranties.
3. FOR CONSUMER TRANSACTIONS IN AUSTRALIA AND NEW ZEALAND, THE TERMS
IN THIS WARRANTY STATEMENT, EXCEPT TO THE EXTENT LAWFULLY PERMITTED,
DO NOT EXCLUDE, RESTRICT, OR MODIFY, AND ARE IN ADDITION TO, THE
MANDATORY STATUTORY RIGHTS APPLICABLE TO THE SALE OF HP PRODUCTS TO
SUCH CUSTOMERS.
Revision: February 10th, 2003
23
Page 26

HP Designjet 110plus/110 plus nr printer—
Quick Reference Guide
Regulatory notices
You can obtain current Material Safety Data Sheets for the ink systems used in the printer by
mailing a request to this address: Hewlett-Packard Customer Information Center, 19310
Pruneridge Avenue, Dept. MSDS, Cupertino, CA 95014, U.S.A.
There is also a Web page:
http://www.hp.com/hpinfo/community/environment/productinfo/psis_inkjet.htm
Regulatory Model Number
For regulatory identification purposes, your product is assigned a Regulatory Model
Number. The Regulatory Model Number for your product is BCLAA-0302. This regulatory
number should not be confused with the marketing name (Designjet 100 series printer) or
product numbers (C7791X, C7796X).
24
Page 27
HP Designjet 110plus/110 plus nr printer—
DECLARATION OF CONFORMITY
according to ISO/IEC Guide 22 and EN 45014
Manufacturer's Name: Hewlett-Packard Española S.A.
Manufacturer's Address: Inkjet Commercial Division
Declares that the product
Product Name: HP Designjet 100 Series Inkjet Printers
Model Numbers: C7791X and C7796X (where X represents any single letter)
Product Accessory: All
Regulatory Model: BCLAA-0302
Conforms to the following Product Specifications
Safety: IEC 60950:1999
EMC:
Supplementary Information
The product herewith complies with the requirements of the Low-Voltage Directive 73/23/EEC and
the EMC Directive 89/336/EEC and carries the CE marking accordingly.
(1)
The product exhibits class A operation when connected to LAN cables using print server
accessories.
(2)
The product was tested in a typical user configuration
(3)
This Device complies with part 15 of the FCC Rules. Operation is subject to the following two
Conditions:
1. this device may not cause harmful interference, and
2. this device must accept any interference received, including interference that may cause
undesired operation
Sant Cugat del Vallès (Barcelona),
October 24
th
, 2003
Avenida Graells, 501
08714 Sant Cugat del Vallès
Barcelona, Spain
EN 60950:2000
IEC 60825-1:1993 + A1
EN 60825-1:1994 + A11 Class 1 for Laser/LED
CISPR 22:1997 / EN 55022:1998 Class B
CISPR 24:1997 +A1 / EN 55024:1998 +A1
IEC 61000-3-2:2001 / EN 61000-3-2:2000
IEC 61000-3-3:2002 / EN 61000-3-3:1995 +A1
FCC Title 47 CFR, Part 15 Class B
Quick Reference Guide
(1)(2)
(1)(3)
Josep-Maria Pujol,
Product Regulations Manager
European contact: your local Hewlett-Packard Sales and Service Office or Hewlett-Packard GmbH,
Department HQ TRE, Herrenberger Strasse 140, D-71034 Böblingen, Germany (Fax: +49 7031
143143)
25
Page 28

HP Designjet 110 plus/110plus nr printer—
Quick Reference Guide
© 2005 Hewlett-Packard Company
Avenida Graells 501
08174 Sant Cugat del Vallès
Barcelona
Spain
26
Page 29

HP Designjet 110plus/110plus nr—Guide de référence rapide
Comment...?
Comment charger des feuilles de papier ? (Conseils généraux)..................2
Comment charger du papier en utilisant le chemin avant ?........................3
Comment décharger du papier du chemin avant ?...................................3
Comment charger du papier dans le bac d'entrée ? ................................4
Comment imprimer sur de grandes feuilles ? ...........................................6
Comment charger un rouleau de papier ?...............................................8
Comment décharger un rouleau de papier ?.........................................10
Comment remplacer les cartouches d'encre ?........................................11
Problème...
Le problème est dû à un bourrage papier .............................................12
Le problème est que le rouleau de papier est bloqué..............................13
Le problème est dû au fait que l'imprimante s'est arrêtée ........................14
Le problème est que l'imprimante n'a pas reçu le travail.........................15
Le problème est dû à autre chose.........................................................16
Pour en savoir plus sur...
Pour en savoir plus sur le panneau avant..............................................17
Pour en savoir plus sur les icônes du panneau avant ..............................18
Signification du clignotement de plusieurs icônes...................................19
Informations légales
Déclaration de garantie HP ................................................................21
Réglementations................................................................................24
Informations supplémentaires
Pour des informations supplémentaires sur
l'utilisation de votre imprimante, sur votre
imprimante même (y compris les pilotes et le réseau)
et les problèmes de dépannage de l'imprimante,
reportez-vous au CD Utilisation de votre imprimante
ou à l'aide en ligne du pilote d'imprimante.
1
Page 30
Imprimante HP Designjet 110plus/110plus nr—
Guide de référence rapide
Comment charger des feuilles de papier ? (Conseils généraux)
Les feuilles de papier peuvent être chargées de trois manières différentes
dans l'imprimante :
extensions
pour prendre en charge
le papier
bac de sortie
bac d'entrée
chemin
avant
chemin
arrière
•Le bac d'entrée à l'avant de l'imprimante pour plusieurs feuilles de papier entre
76 × 142 mm et 457 × 610 mm (C+). Vous pouvez charger jusqu'à
50 feuilles de papier de 0,2 mm d'épaisseur (ou 150 g/m²) dans le bac
non déployé, ou 25 feuilles de la même épaisseur dans le bac déployé.
Des enveloppes peuvent également être chargées dans le bac d'entrée.
•Le chemin avant pour les feuilles de papier uniques entre 110 × 205 mm
et 625 × 1625 mm (au-delà de la taille A1).
•Le chemin arrière (emplacement supérieur) pour les feuilles séparées de papier
épais ou un autre support entre 110 × 205 mm et 625 × 1625 mm (au-delà
de la taille A1). Le chemin arrière (emplacement inférieur) est utilisé pour l'entrée
de rouleau.
• Le dispositif d'alimentation en rouleau automatique vous permet de charger
du papier en rouleau dans le chemin arrière. Lorsque du papier en rouleau
est chargé dans l'imprimante, il obstrue le chemin papier. Ce type de papier
doit donc toujours être déchargé avant d'imprimer sur des feuilles séparées
(voir page 8).
Quelle que soit la façon dont le papier est chargé, il doit toujours être chargé
en mode portrait : le bord d'attaque du papier doit être le bord le plus court.
Les extensions du bac de sortie peuvent être utilisées pour prendre en charge des
feuilles de papier pouvant mesurer jusqu'à 48 cm de long. Pour des feuilles de plus
de 48 cm de long, fermez les extensions du bac de sortie et utilisez le bac d'entrée
déployé pour les prendre en charge lorsqu'elles sortent de l'imprimante.
2
Page 31

Imprimante HP Designjet 110plus/110plus nr—
Guide de référence rapide
Comment charger du papier en utilisant le chemin avant ?
1. Placez une feuille de papier dans le bac de sortie, en l'alignant à la droite du
bac de sortie, le côté à imprimer vers le bas. Ne superposez pas plusieurs pages.
2. Poussez le papier le plus loin possible dans l'imprimante, en le maintenant bien
aligné à droite.
3. Appuyez sur la touche OK (coin supérieur droit) du panneau avant.
L'imprimante va vérifier l'alignement du papier et, s'il est mal aligné, rejettera
le papier. Dans ce cas, rechargez le papier.
Comment décharger du papier du chemin avant ?
Si vous souhaitez changer ou enlever le papier que vous avez chargé avant
impression, par exemple pour changer de type de papier ou pour utiliser
le chemin d'entrée différemment :
• Appuyez sur les touches Annuler et OK en même temps pour éjecter le papier.
3
Page 32

Imprimante HP Designjet 110plus/110plus nr—
Guide de référence rapide
Comment charger du papier dans le bac d'entrée ?
Veuillez noter que le bac d'entrée ne doit être déployé que lorsque cela est nécessaire :
lorsque vous utilisez des formats de papier plus grands que les formats A4 ou Légal.
1. Retirez le bac d'entrée.
2. Soulevez le capot du bac.
3. Si le papier que vous utilisez est plus grand que le format Légal ou A4,
déplacez la petite languette bleue du centre vers la gauche afin d'allonger
le bac. Relâchez le bord et tirez l'extension du bac au maximum.
4. Eventez le papier. Cela évitera que les feuilles restent collées les unes aux autres.
4
Page 33

Imprimante HP Designjet 110plus/110plus nr—
5. Faites glisser le papier dans le bac sous
le couvercle, en vous assurant qu'il touche
les côtés du bac à droite et du côté
de l'imprimante.
6. Poussez la petite languette à la droite du bac
afin qu'elle soit bien collée contre le papier.
Déplacez le grand bord de gauche du bac vers
la droite afin qu'il soit bien collé contre le papier.
7. Refermez le capot du bac.
8. Soulevez le bac de sortie et insérez le bac
d'entrée dans l'imprimante, en le maintenant droit et l'enfonçant le plus
loin possible. Le coin intérieur gauche doit être aligné avec le guide
du bac à papier en plastique.
Guide de référence rapide
9. Abaissez le bac de sortie. Veuillez noter que si le bac d'entrée est déployé,
il s'étendra au delà du bac de sortie.
5
Page 34

Imprimante HP Designjet 110plus/110plus nr—
Guide de référence rapide
Comment imprimer sur de grandes feuilles ?
Le système de sortie de l'imprimante comporte plusieurs composants réglables. Lors
d'une impression sur des grandes feuilles de papier, il est important d'utiliser la
bonne configuration de sortie de l'imprimante. Les éléments réglables du système
de sortie de l'imprimante sont illustrés sur le schéma suivant :
.
3
1
2
3
6
5
Le tableau de la page suivante indique la configuration de sortie requise selon
divers formats de papier.
Remarque :
• Lorsque l'imprimante est alimentée à partir du bac principal ou du chargeur de
rouleau, veillez à régler le système de sortie de façon à ce que les impressions
puissent être empilées.
• Si le bac de sortie contient des impressions empilées et si vous voulez imprimer à
partir de papier en rouleau, videz le bac de sortie puis effectuez les réglages
nécessaires avant de lancer l'impression.
...voir la page suivante...
6
4
Page 35

Imprimante HP Designjet 110plus/110plus nr—
N/A
Guide de référence rapide
Closed N/A
23456
Position A3,... Closed DOWN
1
UP
Position B4,... Closed DOWN Closed N/A
UP
ClosedPosition A3,... DOWN
Position A3,...
UP
Position B4,... Position A3,... DOWN Closed N/A
UP
Position 17x22 Open
Closed Closed UP
DOWN
Closed Closed UP Position A2,... Open
DOWN
Closed N/A
Closed Position Roll icon DOWN
DOWN
Closed Position Roll icon DOWN
DOWN
Media
Size
Source Destination Width Length
JIS B5 182mm 257mm
ANSI A 8.5" 11"
ISO A4 210mm 297mm
ARCH A 9" 12"
DIN C4 229mm 324mm
A-Size
ISO B4 250mm 353mm
LEGAL 8.5" 14"
JIS B4 257mm 364mm
ISO A3 297mm 420mm
ANSI B 11" 17"
C-Size Tray Output Tray
ARCH B 12" 18"
B-Size
DIN C3 324mm 458mm
ANSI B+ 13" 19"
7
ISO B3 353mm 500mm
JIS B3 264mm 515mm
C-Size
ANSI C 17" 22"
ISO A2 420mm 594mm
ARCH C 18" 24"
DIN C2 458mm 648mm
JIS B2 515mm 728mm
ISO B2 500mm 707mm
Manual feed,
ISO A1 594mm 841mm
Output Bin D-Size
front or rear
ANSI D 22" 34"
ARCH D 24" 36"
Custom Up to 24" Up to 12"
Custom Up to 24" Up to 18"
Custom Up to 24" Up to 24"
Output Bin Custom Closed N/A
Roll
accessory
Custom Up to 24" Up to 36"
Custom Up to 24" > 36"
Page 36

Imprimante HP Designjet 110plus/110plus nr—
Guide de référence rapide
Comment charger un rouleau de papier ?
L'imprimante ne peut utiliser qu'une seule source de papier à la fois ; par conséquent,
si un rouleau de papier est chargé dans l'imprimante et que vous souhaitez
imprimer sur une feuille de papier, vous devez d'abord décharger le rouleau.
Le rouleau est automatiquement rechargé dès que vous en avez besoin.
Vous pouvez couper un rouleau sans le décharger en appuyant sur la touche OK
(touche supérieure droite du panneau avant) ; le papier avance d'abord
d'environ 1 cm.
1. Configurez votre application de telle sorte que le papier soit prélevé à partir
de l'alimentation en rouleau.
2. Sélectionnez l'option d'impression à partir de votre application.
3. Chargez un rouleau du papier requis dans la bobine. Assurez-vous que
le rouleau est inséré dans le bon sens et que le taquet bleu de la bobine
est poussé contre le papier.
4. Insérez la bobine à sa place, le taquet bleu à droite et le taquet noir
à gauche lorsque vous vous placez à l'arrière de l'imprimante.
Si le papier est glacé, nous vous conseillons de porter des gants pour éviter
d'en maculer la surface.
5. Assurez-vous que le bord avant du rouleau est droit et perpendiculaire
à ses côtés et qu'il n'y a pas d'irrégularités.
...voir la page suivante...
8
Page 37

Imprimante HP Designjet 110plus/110plus nr—
Guide de référence rapide
Comment imprimer sur de grandes feuilles ?
...suite de la page précédente...
6. Réenroulez tout le papier supplémentaire de façon à ce que le papier soit
bien enroulé autour de la bobine.
7. Insérez le bord
du papier dans
l'emplacement inférieur
situé à l'arrière de
l'imprimante. Poussez le
papier jusqu'à ce qu'il
rencontre une résistance
et faites en sorte que les
bords du papier soient
bien enroulés afin que
le papier reste droit.
8. Après avoir émis un
“ bip ”, l'imprimante
prendra le papier.
9. L'imprimante vérifiera
l'alignement du papier. Si le papier est aligné correctement, l'icône du rouleau
apparaît pour indiquer que l'imprimante est prête à imprimer. Si le papier n'est pas
bien aligné, l'imprimante éjectera le papier et les icônes de mauvais alignement et de
rouleau s'afficheront. Dans ce cas, vous devrez recharger le papier.
Répétez l'étape 6 de façon à ce que le papier soit bien enroulé sur la bobine.
9
Page 38

Imprimante HP Designjet 110plus/110plus nr—
Guide de référence rapide
Comment décharger un rouleau de papier ?
Important : Ne poussez pas le rouleau de papier une fois qu'il a été accepté
par l'imprimante, c'est-à-dire si vous percevez une résistance.
Deux méthodes vous permettent de décharger un rouleau de papier :
• Si vous voulez décharger le rouleau pour insérer une feuille dans
l'imprimante, appuyez simultanément sur les touches Annuler et OK sur
le panneau avant (voir ci-dessous). Si vous souhaitez ensuite imprimer
sur le rouleau, le dispositif d'alimentation en rouleau automatique rechargera
automatiquement le rouleau.
• Si vous souhaitez décharger le rouleau pour le retirer (par exemple, si vous
ne souhaitez plus l'utiliser) :
1. Appuyez sur le bouton Ejecter à gauche du support d'alimentation en rouleau
à l'arrière de l'imprimante. Evitez d'appuyer plusieurs fois sur ce bouton, car
cela risque d'endommager le papier.
2. Tirez le rouleau vers vous et retirez complètement le papier du chemin arrière
de l'imprimante. Les icônes ci-dessous clignoteront jusqu'à ce qu'il n'y ait plus
du tout de papier. Si le papier n'est pas complètement retiré, des bourrages
papier peuvent avoir lieu. Parfois le papier peut tomber lui-même du chemin
arrière.
Il n'est pas nécessaire de retirer la bobine de son support sur l'imprimante.
10
Page 39

Imprimante HP Designjet 110plus/110plus nr—
Comment remplacer les cartouches d'encre ?
1. Ouvrez le volet avant sur le côté
droit de l'imprimante.
2. Pour chaque cartouche d'encre
à remplacer :
• En la tenant par les petits
rebords supérieurs, retirez
la cartouche d'encre de
l'imprimante en la tirant
vers le haut.
• Placez la nouvelle cartouche
d'encre dans son logement
jusqu'à ce qu'elle soit
correctement maintenue
en place.
Guide de référence rapide
3. Fermez le volet extérieur.
11
Page 40

Imprimante HP Designjet 110plus/110plus nr—
Guide de référence rapide
Le problème est dû à un bourrage papier
1. Appuyez sur la touche OK (coin supérieur droit) du panneau avant.
Si cela ne résout pas le problème...
2. Eteignez l'imprimante.
3. Retirez tous les supports du bac. Tirez sur le papier coincé s'il est à portée de main.
4. Soulevez le capot supérieur et retirez le papier coincé.
Lorsque vous soulevez le capot, faites attention de ne pas endommager
ni déplacer les tubes ou d'autres pièces internes de l'imprimante.
5. Retirez avec précaution le chemin arrière en appuyant sur les boutons
de chaque côté et en tirant droit dessus. Si vous ne le retirez pas droit,
vous risquez d'endommager le capteur de papier.
Chemin
arrière
Une fois le chemin arrière retiré, vous avez accès à l'intérieur de l'imprimante
par l'arrière.
Retirez tout le papier coincé à l'intérieur ou qui est accessible par l'arrière.
Remettez le chemin arrière, en veillant à ce qu'il soit bien en place.
6. Allumez l'imprimante.
7. Une fois que vous avez éliminé le bourrage papier, il est recommandé d'aligner
les têtes d'impression afin d'éviter une impression de mauvaise qualité.
Pour aligner les têtes d'impression, lancez l'outil Maintenance du système
HP Designjet (voir page 16) et sélectionnez Aligner les têtes d'impression.
12
Page 41

Imprimante HP Designjet 110plus/110plus nr—
Guide de référence rapide
Le problème est que le rouleau de papier est bloqué
Si la papier du rouleau est bloqué.
1. Eteignez l'imprimante :
2. Vérifiez tous les endroits où le rouleau pourrait être coincé :
• Retirez le bac de papier avant. Cela vous permettra de voir l'intérieur
de l'imprimante à travers un emplacement à l'avant. Dégagez et retirez
tout le papier coincé que vous pouvez atteindre.
• Soulevez le capot en faisant attention de ne pas endommager ni déplacer
les tubes ou d'autres pièces internes de l'imprimante. Si du papier est coincé
dans les roues à l'intérieur de l'imprimante, dégagez-le et retirez-le.
• Retirez le chemin arrière en appuyant sur les boutons de chaque côté et en
tirant dessus. Si vous ne le retirez pas droit, vous risquez d'endommager
le capteur de papier. Si du papier est coincé dans les rouleurs à l'intérieur
de l'imprimante, dégagez-le et retirez-le.
3. Une fois que le bourrage papier a été éliminé, remettez toutes les pièces
de l'imprimante (bac de papier, couvercle, chemin arrière) que vous avez
retirées ou ouvertes en vous assurant qu'elles sont bien en place.
4. Allumez l'imprimante.
5. Avant de recharger le rouleau de papier, vous devez couper le bord avant du
rouleau de sorte que celui-ci soit parfaitement droit et bien perpendiculaire aux
côtés du rouleau.
13
Page 42

Imprimante HP Designjet 110plus/110plus nr—
Le problème est dû au fait que l'imprimante s'est arrêtée
Si le panneau avant ressemble à cela et si la lumière
jaune clignote :
1. Ouvrez les deux côtés du volet à droite
de l'imprimante, en les soulevant de sorte
que vous puissiez voir le support de cartouche.
Vérifiez que tout l'emballage a été enlevé
autour du support de cartouche.
Il est possible que le support bouge à ce moment.
Attendez qu'il s'immobilise.
Guide de référence rapide
2. Vérifiez que le couvercle des têtes d'impression
est bien fermé. L'imprimante ne fonctionnera pas
si le loquet n'est pas correctement enclenché.
3. Fermez la partie arrière puis la partie avant
du volet. L'imprimante ne fonctionnera pas
s'il n'est pas correctement fermé.
4. Si la lumière jaune ne s'est pas éteinte, consultez
le CD Utilisation de votre imprimante.
14
Page 43

Imprimante HP Designjet 110plus/110plus nr—
Guide de référence rapide
Le problème est que l'imprimante n'a pas reçu le travail
Si l'imprimante semble ignorer le travail d'impression que vous lui avez envoyé :
1. Vérifiez que l'imprimante est bien connectée à l'ordinateur.
Si la connexion se fait par un réseau, imprimez les pages de configuration
de l'imprimante (maintenez enfoncé la touche d'alimentation tout en appuyant
sur la touche OK quatre fois), et vérifiez dans la section TCP/IP que l'Etat
indiqué est Prêt. Notez le masque de sous-réseau et l'adresse IP de l'imprimante
(qui se trouvent dans la même section).
• Si l'adresse IP est 0.0.0.0 ou 192.0.0.192, consultez le poster d'installation de
votre imprimante.
• Si l'Etat est Prêt, vous pouvez utiliser un navigateur Web pour vérifier la
connexion entre l'imprimante et l'ordinateur. Entrez simplement l'adresse IP
de votre imprimante dans votre navigateur, à l'endroit où vous entreriez
normalement une URL. Si vous recevez une réponse de la part de
l'imprimante, cela signifie que la connexion entre l'imprimante et
l'ordinateur fonctionne.
• Si vous n'obtenez aucune réponse de la part de l'imprimante ou si l'Etat
est Non prêt, assurez-vous que le masque de sous-réseau et l'adresse IP
de l'imprimante appartiennent au réseau.
• Le cas échéant, consultez votre administrateur réseau.
2. Vérifiez que la file d'attente d'impression n'a pas été suspendue.
3. Si vous utilisez Mac OS X, assurez-vous que vous avez sélectionné
“ Impression IP HP ”, et pas “ Impression IP ”, lorsque vous avez créé
votre imprimante.
15
Page 44

Imprimante HP Designjet 110plus/110plus nr—
Guide de référence rapide
Le problème est dû à autre chose
L'utilitaire Entretien du système HP Designjet vous donne accès à des services
de dépannage et d'assistance sur le Web, si vous avez une connexion Internet.
Même si vous ne disposez pas d'une connexion Internet, il vous propose divers
outils qui peuvent vous aider à résoudre vos problèmes d'impression.
Pour lancer l'outil Entretien du système HP Designjet sous Windows :
1. Dans la barre des tâches Windows, sélectionnez Démarrer > Paramètres >
Imprimantes.
2. Cliquez avec le bouton droit de la souris sur l'icône de votre imprimante
et sélectionnez Options d'impression… (Windows 2000 ou XP), Valeurs par
défaut du document… (Windows NT 4) ou Propriétés (Windows 98 ou Me)
dans le menu déroulant.
3. Sélectionnez l'onglet Avancé et cliquez sur le bouton Entretien.
Pour lancer l'utilitaire Entretien du système HP Designjet sous Mac OS, cliquez deux
fois sur l'icône Entretien du système HP Designjet sur votre bureau. Dans Mac OS
X vous pouvez également sélectionner votre imprimante dans le Centre
d'impression et cliquer sur Configuration.
Sous Windows ou Mac OS, votre navigateur Web doit démarrer automatiquement
lorsque vous avez suivi les instructions ci-dessus.
Si vous ne parvenez pas à suivre ces instructions…
• ...il est possible que votre ordinateur ne gère pas l'imprimante. Dans ce cas,
utilisez Entretien du système HP Designjet depuis le serveur d'imprimante.
• …ou il est possible que l'imprimante soit gérée par votre ordinateur mais
que l'outil Entretien du système HP Designjet ne soit pas installé.
Dans ce cas, installez-le depuis le CD HP Designjet Software Setup (Installation
du logiciel HP Designjet).
Pour davantage
d'informations
sur la résolution
de problèmes
d'imprimante,
reportez-vous à la
section “ Problème… ”
16
Page 45

Imprimante HP Designjet 110plus/110plus nr—
Pour en savoir plus sur le panneau avant
Le panneau avant (ou
panneau de configuration)
de l'imprimante fournit des
informations sur l'état de
l'imprimante et comporte
également trois touches
(ou boutons) qui vous
permettent de contrôler les
actions de l'imprimante.
Guide de référence rapide
Affichage
Touche d'annulation
Touche OK
Voyant d'avertissement
Touche d'alimentation
Les touches sont les
Voyant d'alimentation
suivantes :
• Alimentation : Met l'imprimante sous tension ou hors tension.
• Annuler : Annule l'opération en cours.
• OK : Indique à l'imprimante :
• que vous avez à présent chargé du papier dans le bac ou le module
d'alimentation approprié et que l'imprimante peut commencer l'impression.
• que vous avez corrigé le problème (par exemple, vous avez retiré du papier
coincé ou remplacé une tête d'impression défectueuse) et que l'imprimante
peut continuer son activité (comme par exemple, reprendre l'impression).
Les voyants sont les suivants :
• Alimentation : Le voyant d'alimentation (vert) s'allume lorsque l'imprimante
est sous tension.
• Avertissement : Le voyant d'avertissement (jaune) est allumé lorsque
l'imprimante nécessite une intervention de l'utilisateur, par exemple
pour fermer le capot supérieur (si l'affichage est vide).
Le panneau avant présente une zone d'affichage qui fournit des informations
sur l'imprimante. Les ensembles d'icônes dans la partie inférieure de l'affichage
font référence respectivement aux composants jaune, magenta, cyan et noir
du kit encreur.
17
Page 46

Imprimante HP Designjet 110plus/110plus nr—
Pour en savoir plus sur les icônes du panneau avant
Les quatre icônes affichées ici indiquent le niveau d'encre
dans chacune des cartouches d'encre.
Une icône de tête d'impression clignotante (au bas)
indique un problème avec cette tête d'impression.
Guide de référence rapide
Occupé : Lorsque le voyant clignote :
Impression, annulation du
travail, séchage, mise hors
tension. L'icône clignote si
le capot supérieur ou latéral
est ouvert.
Action : Fermez le capot
supérieur ou latéral.
Lorsque le voyant est éteint :
L'imprimante est hors tension,
inactive ou en attente d'une
intervention de l'utilisateur.
Papier Lorsque le voyant
mal aligné : clignote :
Le papier est
mal aligné et doit être
rechargé pour l'impression.
Action : Rechargez le papier.
Lorsque le voyant
estéteint: Normal.
Etat du Lorsque le voyant est allumé :
rouleau : Le rouleau est chargé.
Lorsque le voyant clignote :
Le rouleau est vide ou coincé.
Action : Charger le rouleau.
Lorsque le voyant est éteint :
Aucun rouleau n'est chargé.
Utiliser l'utilitaire Entretien du système HP Designjet :
Lorsque le voyant clignote : Erreur matérielle.
Action : Lancez l'utilitaire Entretien du Système HP Designjet
pour l'imprimante (voir page 16). Vérifiez que l'imprimante
est connectée.
Lorsque le voyant est éteint : Normal.
Etat des Lorsque le voyant
Feuilles clignote :
de papier : Il n'y a plus de papier ou
Appuyer sur Lorsque le voyant
une touche : clignote :
Bourrage Lorsque le voyant
papier : clignote :
le papier est coincé.
Action : Ajoutez
du papier ou dégagez
le chemin du support.
Lorsque le voyant est
éteint : Normal.
L'imprimante
est en attente.
Action : Appuyez
sur la touche OK.
Lorsque le voyant
estéteint: Normal.
Le papier ou le chariot
est coincé.
Action : Eliminez
le bourrage papier.
Voir page 12.
Lorsque le voyant
est éteint : Normal.
18
Page 47

Imprimante HP Designjet 110plus/110plus nr—
Signification du clignotement de plusieurs icônes
Décharger le rouleau
Lorsque le voyant clignote : L'imprimante
attend que vous déchargiez le rouleau
manuellement.
Action : Déchargez complètement le rouleau.
Il est inutile d'enlever la bobine de l'imprimante.
Lorsque le voyant est éteint : Normal.
Rouleau mal aligné :
Lorsque le voyant clignote : Le rouleau de
papier est mal aligné et doit être rechargé.
Action : Déchargez le rouleau et rechargez-le
en veillant tout particulièrement à bien
l'aligner.
Lorsque le voyant est éteint : Normal.
Guide de référence rapide
19
Page 48

Imprimante HP Designjet 110plus/110plus nr—
Pour davantage d'informations sur...
• l'utilisation de votre imprimante
• votre imprimante elle-même
• les résolutions de problèmes d'imprimante
...reportez-vous au CD Utilisation de votre
imprimante ou (sous Windows uniquement)
à l'aide en ligne du pilote d'imprimante.
Guide de référence rapide
20
Page 49

Imprimante HP Designjet 110plus/110plus nr—
Guide de référence rapide
Déclaration de garantie HP
HP Designjet 110plus/110plus nr
Produit HP Durée de garantie des produits
Imprimante et matériel HP : 1 an (à compter de la date d'achat par le client).
Logiciel : 90 jours (à compter de la date d'achat par le client).
Tête d
'impression noire : Jusqu'à la date de “ fin de garantie ” qui apparaît sur le
produit, ou une fois que 530 cm³ d'encre HP est passé
par la tête d'impression (quel que soit l'ordre dans lequel
se produisent ces événements).
'impression cyan,
Têtes d
magenta et jaune :
Cartouche d
'encre : Jusqu'à épuisement du niveau d'encre HP comme
Jusqu'à la date de “ fin de garantie ” qui apparaît sur le
produit, ou une fois que 200 cm³ d'encre HP est passé
par la tête d'impression (quel que soit l'ordre dans lequel
se produisent ces événements).
indiqué par l'imprimante, ou jusqu'à la date de
“ fin de garantie ” figurant sur le produit, selon
lequel de ces événements se produit en premier.
A. Limite de la garantie des produits
1. Hewlett-Packard (HP) garantit à l'utilisateur final que les produits HP spécifiés ci-dessus
seront exempts de vices de matériel et de fabrication pendant la durée indiquée
ci-dessus. Le client doit être en mesure de fournir une preuve de la date d'acquisition.
2. En ce qui concerne les logiciels, la garantie HP garantit seulement qu'ils exécuteront
les instructions du programme. HP ne garantit pas que les logiciels seront totalement
exempts d'erreurs ou que leur fonctionnement ne sera jamais interrompu.
3. La garantie HP ne couvre que les problèmes survenant au cours d'une utilisation
appropriée du produit et ne s'applique pas en cas de :
a. Mauvais entretien ou modification non autorisée
b. Utilisation de logiciel, d'interface, de support, de pièces ou de fournitures
non fournies ou agréées par HP ou
c. Exploitation en dehors des conditions spécifiées.
Les opérations d'entretien de routine de l'imprimante HP Designjet 110plus/110plus nr,
telles que le nettoyage et les services de maintenance préventive (y compris les
composants contenus dans les kits de maintenance préventive et les visites de l'ingénieur
de service HP), ne sont pas couvertes par la garantie HP, mais peuvent être couvertes
par un contrat de support distinct dans certains pays.
4. Dans le cas des imprimantes HP, l'utilisation de produits consommables de marque
autre que HP ou reconditionnés (encre, tête d'impression ou kit encreur) n'a pas de
conséquences sur la garantie ou les contrats d'assistance HP auxquels le client a souscrit.
Cependant, si une panne d'imprimante ou des dégâts causés sur celle-ci peuvent être
attribués à l'utilisation d'une cartouche de marque autre que HP ou reconditionnée,
HP facturera au client la réparation de cette panne ou de ces dégâts au tarif standard
de la main d'œuvre et des pièces détachées.
21
Page 50

Imprimante HP Designjet 110plus/110plus nr—
5. Si pendant la période de garantie, HP se voit notifier un défaut de logiciel, de support
ou de produit consommable couverts par la garantie HP, HP s'engage à livrer un autre
produit au client en remplacement du produit défectueux. Si, pendant la période
de garantie, HP se voit notifier un défaut d'un produit matériel, HP procédera, à sa
discrétion, à la réparation ou au remplacement du produit en question. Une pièce de
remplacement et une assistance d'installation à distance, peuvent être fournies par HP
en échange de la pièce défaillante. HP peut, à sa seule discrétion, accepter de ne pas
recevoir la pièce défaillante du client en échange.
6. Si HP n'est pas en mesure de procéder, selon le cas, à la réparation ou au remplacement
d'un produit défectueux couvert par la garantie HP, HP remboursera son prix d'achat
dans un délai raisonnable après avoir reçu notification du problème.
7. HP n'est tenu à aucune obligation de réparation, de remplacement ou de remboursement
tant que le client n'a pas retourné à HP le produit défectueux.
8. Le produit de remplacement peut être neuf ou “ comme neuf ”, si ses fonctionnalités
sont au moins égales à celles du produit qu'il remplace.
9. Les produits HP peuvent contenir des pièces ou des composants remanufacturés aux
performances équivalentes à celles de pièces et de composants neufs ou pouvant avoir
été utilisés accessoirement.
10.La garantie de HP est valable dans tous les pays ou localités où HP possède un service
d'assistance pour ce produit et où HP a commercialisé ce produit. Le niveau de services
de garantie que vous recevez peut varier en fonction des normes locales. HP ne pourra
modifier la forme ou les fonctionnalités du produit pour lui permettre de fonctionner
dans un pays pour lequel il n'a jamais été destiné pour des raisons légales ou de
réglementation. Des contrats prévoyant des services supplémentaires peuvent être
obtenus auprès des centres de maintenance HP agréés là où le produit HP listé est
distribué par HP ou un importateur agréé.
11.Aucune garantie inhérente aux cartouches d'imprimante ne s'appliquera aux cartouches
d'encre HP reconditionnées, remanufacturées, remises à neuf, utilisées de manière non
conforme ou altérées de quelque manière que ce soit.
Guide de référence rapide
B. Limites de garantie
1. DANS LA LIMITE DES LEGISLATIONS LOCALES, NI HP NI SES FOURNISSEURS TIERS
N'OFFRENT QUELQUE AUTRE RECOURS OU GARANTIE QUE CE SOIT, EXPRESSE
OU IMPLICITE CONCERNANT LES PRODUITS HP, ET REJETTENT EXPRESSEMENT
TOUTE GARANTIE IMPLICITE DE COMMERCIALISATION, D'ASSURANCE DE QUALITE
ET D'ADAPTATION A UN USAGE PARTICULIER.
22
Page 51

Imprimante HP Designjet 110plus/110plus nr—
Guide de référence rapide
C. Limites de responsabilité
1. Dans les limites permises par la législation locale, les recours fournis par cette garantie
sont les seuls et uniques recours du consommateur.
2. DANS LA LIMITE DES LEGISLATIONS LOCALES, A L'EXCEPTION DES OBLIGATIONS
EXPRESSEMENT ENONCEES DANS CETTE GARANTIE, HP ET SES FOURNISSEURS NE
POURRONT ETRE TENUS RESPONSABLES DE QUELQUE DOMMAGE DIRECT,
INDIRECT, SPECIAL, MINEUR OU CONSEQUENT, QUEL QUE SOIT LE LIEU D'OU
EMANE LA RECLAMATION, QU'ELLE SOIT FONDEE SUR UN CONTRAT OU UN
PREJUDICE SUBI, OU QUELLE QUE SOIT LA RAISON LEGALE INVOQUEE, MEME
SI HP A ETE AVISE DU RISQUE DE CE DOMMAGE.
D. Législations locales
1. Cette déclaration de garantie donne au client des droits spécifiques. Il est également
possible que le client ait des droits supplémentaires, variables aux Etats-Unis d'un Etat à
l'autre, au Canada d'une province à l'autre et dans le reste du monde d'un pays à l'autre.
2. Si cette déclaration de garantie entre en conflit avec la législation locale en vigueur, elle
est réputée modifiée pour se conformer à ladite législation. Selon certaines législations
locales, certains des refus et limites de garantie exposés dans cette déclaration peuvent
ne pas s'appliquer au client. Par exemple, certains Etats américains, de même
que certains gouvernements en dehors des Etats-Unis (y compris certaines provinces
canadiennes), peuvent :
a. Interdire aux refus et limites de garantie exposés dans cette déclaration de restreindre
les droits légaux d'un consommateur (comme c'est le cas au Royaume-Uni) ;
b. Restreindre la capacité pour un fabricant d'imposer de tels refus ou limites
de garantie ; ou
c. Accorder au client des droits supplémentaires à titre de la garantie, spécifier
des durées de garantie implicites que le fabricant ne peut pas refuser ou lui interdire
de limiter la durée d'une garantie implicite.
3. DANS LE CAS DES TRANSACTIONS EFFECTUEES PAR DES CONSOMMATEURS EN
AUSTRALIE ET EN NOUVELLE-ZELANDE, LES CONDITIONS DE CETTE DECLARATION
DE GARANTIE, DANS LES LIMITES LEGALES, N'EXCLUENT, NE RESTREIGNENT, NI NE
MODIFIENT LES DROITS LEGAUX OBLIGATOIRES RELATIFS A LA VENTE DE PRODUITS
HP A CES CLIENTS, MAIS S'Y AJOUTENT.
Révision : 10 février 2003
23
Page 52

Imprimante HP Designjet 110plus/110plus nr—
Guide de référence rapide
Réglementations
Vous pouvez obtenir les Fiches techniques sur la sécurité d'emploi des produits
(Material Safety Data Sheets) relatives aux kits encreurs utilisés par l'imprimante en envoyant
un courrier à l'adresse suivante : Hewlett-Packard Customer Information Center,
19310 Pruneridge Avenue, Dept. MSDS, Cupertino, CA 95014, Etats-Unis.
Vous pouvez également consulter la page Web suivante :
http://www.hp.com/hpinfo/community/environment/productinfo/psis_inkjet.htm
normes de sécurité (Canada)
Le présent appareil numérique n’émet pas de bruits radioélectriques dépassant les limites
applicables aux appareils numériques de Classe B prescrites dans le réglement sur
le brouillage radioélectrique édicté par le Ministére des Communications du Canada.
Connecté à un réseau par des accessoires de serveur, l’appareil n’émet pas de bruits
radioélectriques dépassant les limites applicables aux appareils numériques de Classe A
prescrites dans le réglement sur le brouillage radioélectrique édicté par le Ministère
des Communications du Canada.
Numéro de modèle réglementaire
Pour des raisons d'identification inhérentes à la réglementation en vigueur, un numéro
de modèle réglementaire a été attribué à votre produit. Il s'agit du numéro BCLAA-0302.
Ce numéro de modèle réglementaire ne doit pas être confondu avec le nom commercial
du produit (imprimante Designjet série 100) ni avec son numéro d'identification
(C7791X, C7796X).
24
Page 53

Imprimante HP Designjet 110plus/110plus nr—
DECLARATION DE CONFORMITE
aux normes ISO/IEC Guide 22 et EN 45014
Nom du fabricant : Hewlett-Packard Española S.A.
Adresse du fabricant : Inkjet Commercial Division
Avenida Graells, 501
08714 Sant Cugat del Vallès
Barcelone, Espagne
Déclare que le produit
Nom du produit : Imprimante jet d'encre HP Designjet série 100
Numéros de modèle : C7791X et C7796X (X représentant n'importe quelle lettre)
Accessoire(s) produit : Tous
Numéro de modèle
réglementaire :
est conforme aux spécifications suivantes :
Sécurité : IEC 60950:1999
EMC :
Informations supplémentaires
Le produit mentionné ci-dessus est conforme à la directive 73/23/EEC relative aux basses tensions
ainsi qu'à la directive EMC 89/336/EEC, et porte par conséquent la mention CE.
(1)
Le produit fonctionne comme un appareil de catégorie A lorsqu'il est connecté à des câbles LAN
reliés à des accessoires de serveur d'impression.
(2)
Le produit a été testé dans une configuration utilisateur classique.
(3)
Cet appareil est conforme à l'article 15 de la réglementation FCC. Son utilisation est soumise aux
deux conditions suivantes :
1. il ne doit pas provoquer d'interférences nuisibles, et
2. il doit supporter toute interférence extérieure, pouvant notamment entraîner un fonctionnement imprévu.
Sant Cugat del Vallès (Barcelone),
24 octobre 2003
BCLAA-0302
EN 60950:2000
IEC 60825-1:1993 + A1
EN 60825-1:1994 + A11 Catégorie 1 pour Laser/LED
CISPR 22:1997 / EN 55022:1998 Catégorie B
CISPR 24:1997 +A1 / EN 55024:1998 +A1
IEC 61000-3-2:2001 / EN 61000-3-2:2000
IEC 61000-3-3:2002 / EN 61000-3-3:1995 +A1
FCC : Titre 47 CFR, Article 15 Catégorie B
Guide de référence rapide
(1)(2)
(1)(3)
Josep-Maria Pujol,
Responsable des réglementations produits
Contact en Europe : Votre agence commerciale et de service Hewlett-Packard locale
ou Hewlett-Packard GmbH, Department HQ TRE, Herrenberger Strasse 140, D-71034 Böblingen,
Allemagne (Fax : +49 7031 143143)
25
Page 54

Imprimante HP Designjet 110plus/110plus nr—
Guide de référence rapide
© 2005 Hewlett-Packard Company
Avenida Graells 501
08174 Sant Cugat del Vallès
Barcelone
Espagne
26
Page 55

HP Designjet 110 plus/110plus nr - Guida di riferimento rapido
Procedura passo passo...
Procedura passo passo per caricare i fogli (indicazioni generali)...............2
Procedura passo passo per caricare la carta utilizzando il percorso frontale..3
Procedura passo passo per scaricare la carta dal percorso frontale ...........3
Procedura passo passo per caricare la carta nel cassetto di alimentazione....4
Procedura passo passo per stampare su fogli di formato grande ...............6
Procedura passo passo per caricare un rotolo di carta .............................8
Procedura passo passo per scaricare un rotolo di carta..........................10
Procedura passo passo per sostituire le cartucce di inchiostro..................11
Il problema riguarda...
Il problema riguarda l'inceppamento della carta...................................12
Il problema riguarda un rotolo di carta inceppato..................................13
Il problema riguarda l'arresto della stampante ......................................14
Il problema riguarda la mancata ricezione del processo.........................15
Altri problemi....................................................................................16
Informazioni su...
Informazioni sul pannello di controllo frontale .......................................17
Informazioni sulle icone nel pannello frontale........................................18
Informazioni sulle combinazioni delle icone lampeggianti.......................19
Note legali
Limitazioni di garanzia HP .................................................................21
Normative........................................................................................24
Ulteriori informazioni
Per maggiori dettagli sull'utilizzo della stampante,
altre informazioni sulla stampante (inclusi i driver e
la connessione remota) e la risoluzione dei problemi
relativi alla stampante, consultate il CD Utilizzo
della stampante o la guida in linea del driver della
stampante.
1
Page 56

Stampante HP Designjet 110plus/110 plus nr -
Guida di riferimento rapido
Procedura passo passo per caricare i fogli (indicazioni generali)
Sono disponibili tre modi per caricare i fogli nella stampante:
estensioni
per supportare
la carta
cassetto di alimentazione
raccoglitore esterno
percorso frontale
percorso
posteriore
•Il cassetto di alimentazione sulla parte anteriore della stampante per caricare
più fogli compresi tra 76 × 142 mm (3 × 5,6 pollici) e 457 × 610 mm
(18 × 24 pollici) (C+). Potete caricare fino a 50 fogli dello spessore di 0,2 mm
(o 150 g/m²) nel cassetto non esteso o 25 fogli dello stesso spessore nel
cassetto esteso. Nel cassetto di alimentazione è possibile caricare anche le
buste.
•Il percorso frontale per singoli fogli compresi tra 110 x 205 mm
(4,3 x 8,1 pollici) e 625 x 1625 mm (24,6 x 63,9 pollici) (dimensione
massima A1).
•Il percorso posteriore (alloggiamento superiore) per singoli fogli di carta spessi
o altri supporti compresi tra 110 × 205 mm (4,3 × 8,1 pollici) e
625 × 1625 mm (24,6 × 63,9 pollici) (dimensione massima A1). Il percorso
posteriore (alloggiamento inferiore) viene utilizzato per caricare il rotolo.
• L'alimentatore automatico a rotolo consente di caricare un rotolo di carta nel
percorso posteriore. Quando viene caricato nella stampante un rotolo di carta,
il percorso posteriore viene ostruito ed è pertanto necessario scaricare tale
rotolo prima di stampare su fogli (vedere pagina 8).
La carta deve comunque essere caricata in modalità verticale: il lato superiore del
foglio deve essere quello più corto.
Le estensioni del raccoglitore esterno possono essere utilizzate per sostenere fogli
della lunghezza massima di 482,5 mm (19 pollici). Se i fogli superano questa
lunghezza, chiudete le estensioni del raccoglitore esterno e utilizzate il cassetto di
alimentazione esteso per sostenere la carta se fuoriesce dalla stampante.
2
Page 57

Stampante HP Designjet 110plus/110 plus nr -
Guida di riferimento rapido
Procedura passo passo per caricare la carta
utilizzando il percorso frontale
1. Posizionate un singolo foglio di carta sul raccoglitore esterno, allineandolo
sulla destra con il lato su cui stampare rivolto verso il basso. Non impilate più
fogli in questa posizione.
2. Spingete la carta fino in fondo nella stampante, mantenendo l'allineamento a
destra.
3. Premete il tasto OK, in alto a destra nel pannello frontale.
La stampante controlla l'allineamento della carta e la espelle se è disallineata. In
questo caso, è necessario caricarla nuovamente.
Procedura passo passo per scaricare la carta dal percorso frontale
In caso desideriate sostituire o rimuovere la carta che era stata caricata per la
stampa, ad esempio per cambiare il tipo di carta o utilizzare un diverso percorso
di alimentazione, procedete nel modo seguente:
• Premete i tasti Annulla e OK contemporaneamente per espellere la carta.
3
Page 58

Stampante HP Designjet 110plus/110 plus nr -
Guida di riferimento rapido
Procedura passo passo per caricare la carta
nel cassetto di alimentazione
Tenete presente che il cassetto di alimentazione dovrebbe essere esteso solo se
necessario, ad esempio quando utilizzate carta più grande del formato Legale o A4.
1. Rimuovete il cassetto di alimentazione.
2. Sollevate il coperchio del cassetto.
3. Se la carta che utilizzate è più grande del formato Legale o A4, spostate verso
sinistra la linguetta centrale in modo da allungare il cassetto. Quindi lasciate
andare la linguetta ed estraete completamente l'estensione del cassetto.
4. Smazzate la carta per evitare che i fogli troppo vicini rimangano attaccati.
4
Page 59

Stampante HP Designjet 110plus/110 plus nr -
5. Fate scorrere la carta nel cassetto sotto il
coperchio, accertandovi che aderisca ai lati del
cassetto a destra e sulla parte laterale della
stampante.
6. Spingete la piccola linguetta sulla destra del
cassetto fino a farla aderire perfettamente alla
carta. Spostate verso destra la guida più grande
che si trova sulla sinistra del cassetto fino a farla
accostare perfettamente alla carta.
7. Chiudete il coperchio superiore.
8. Sollevate il raccoglitore esterno e inserite il cassetto di alimentazione nella
stampante, mantenendolo in posizione orizzontale e spingendolo fino in
fondo. L'angolo interno sinistro deve essere allineato con la guida di plastica
del vassoio della carta.
Guida di riferimento rapido
9. Abbassate il raccoglitore esterno. Notate che se il cassetto di alimentazione
viene esteso, supererà il raccoglitore esterno.
5
Page 60

Stampante HP Designjet 110plus/110 plus nr -
Guida di riferimento rapido
Procedura passo passo per stampare su fogli di formato grande
Il sistema di output della stampante dispone di alcuni componenti regolabili.
Quando stampate su fogli di carta di grandi dimensioni, è importante che
utilizziate la configurazione corretta per l'output della stampante. Il diagramma
seguente illustra le parti regolabili del sistema di output della stampante:
.
3
1
2
3
6
5
La tabella nella pagina seguente riporta la configurazione del sistema di output in
base ai differenti formati.
Nota:
• quando utilizzate il cassetto principale o il rotolo per l'alimentazione,
applicate le necessarie regolazioni al sistema di uscita affinché i fogli vengano
impilati.
• Se nel cassetto di uscita vi sono già dei fogli e si desidera stampare dal rotolo,
svuotate prima il cassetto di uscita e regolatelo, se necessario, prima di
stampare.
...continua alla pagina successiva...
6
4
Page 61

Stampante HP Designjet 110plus/110 plus nr -
N/A
Guida di riferimento rapido
257mm
182mm
Chiusa N/A
Posizione A3,... Chiusa BASSO
ALTO
297mm
11 poll.
210mm
8.5 poll.
12 poll.
9 poll.
324mm
229mm
ALTO Posizione B4,... Chiusa BASSO Chiusa N/A
353mm
250mm
364mm
14 poll.
257mm
8.5 poll.
ChiusaPosizione A3,... BASSO
ALTO Posizione A3,...
420mm
17 poll.
18 poll.
297mm
11 poll.
12 poll.
ALTO Posizione B4,... Posizione A3,... BASSO Chiusa N/A
458mm
324mm
19 poll.
13 poll.
Posizione 17x22 Apri
Chiusa Chiusa ALTO
BASSO
500mm
353mm
515mm
264mm
22 poll.
17 poll.
BASSO Chiusa Chiusa ALTO Posizione A2,... Apri
594mm
420mm
24 poll.
18 poll.
648mm
458mm
707mm
500mm
Chiusa N/A
BASSO
Icona posizione rullo
728mm
841mm
34 poll.
36 poll.
515mm
594mm
22 poll.
24 poll.
Chiusa N/A
BASSO
Icona posizione rullo
BASSO Chiusa
Fino a 12 poll.
Fino a 18 poll.
Fino a 24 poll.
Fino a 24 poll.
Fino a 24 poll.
Fino a 24 poll.
> 36 poll.
Fino a 36 poll.
Fino a 24 poll.
Fino a 24 poll.
JIS B5
ISO A4
ANSI A
Dimensioni
Origine Destinazione Larghezza Lunghezza 1 2 3 4 5 6
Configurazione supporti
DIN C4
ARCH A
Formato A
ISO B4
LEGAL
JIS B4
ANSI B
ISO A3
Cassetto
di output
Vassoio C
DIN C3
ARCH B
Formato B
ISO B3
ANSI B+
7
JIS B3
ISO A2
ANSI C
Formato C
DIN C2
ARCH C
JIS B2
ISO B2
Formato D BASSO Chiusa
Contenitore
Alimentazione
manuale,
frontale o
ISO A1
ANSI D
di output
posteriore
ARCH D
Personalizzata
Personalizzata
Personalizzata
Personalizzata
Personalizzata
Contenitore
di output
Rotolo
accessorio
Personalizzata
Page 62

Stampante HP Designjet 110plus/110 plus nr -
Guida di riferimento rapido
Procedura passo passo per caricare un rotolo di carta
La stampante è in grado di utilizzare un solo tipo di alimentazione carta alla volta.
Per tale motivo, se desiderate stampare un foglio singolo mentre è caricato un
rotolo, dovrete rimuovere il rotolo prima di poter proseguire. Il rotolo verrà
ricaricato automaticamente alla successiva richiesta di stampa su rotolo.
Per tagliare un rotolo senza scaricarlo, premete il tasto OK (in alto a destra nel
pannello frontale); la carta avanzerà di circa 1 cm.
1. Impostate l'applicazione in modo che la carta venga prelevata
dall'alimentatore a rotolo.
2. Selezionate Stampa dall'applicazione.
3. Caricate un rotolo di carta di formato appropriato sul perno. Assicuratevi che
il rotolo sia posizionato correttamente e che il fermo blu del perno sia
premuto contro la carta.
4. Inserite il perno negli appositi alloggiamenti con il fermo blu sulla destra e
quello nero sulla sinistra, visti dalla parte posteriore della stampante.
Se caricate carta lucida, vi consigliamo di indossare dei guanti per non
danneggiare la superficie della carta.
5. Assicuratevi che il bordo iniziale della carta sia diritto, perpendicolare ai
bordi del rotolo stesso e che non presenti irregolarità.
...continua alla pagina successiva...
8
Page 63

Stampante HP Designjet 110plus/110 plus nr -
Guida di riferimento rapido
Procedura passo passo per stampare su fogli di formato grande
...continua dalla pagina precedente...
6. Riavvolgete l'eventuale carta in eccesso affinché sia ben tesa sul perno.
7. I n s e r ite il b o rd o
iniziale della carta
nell'alloggiamento
inferiore sul retro della
stampante finché non si
avverte resistenza, tenendo
la carta per i bordi per
evitare che prenda una
direzione obliqua.
8. Dopo l'emissione di un
segnale acustico, la
stampante inizierà a
raccogliere la carta.
9. La stampante controllerà l'allineamento della carta. Se la carta è allineata
correttamente, sul display viene visualizzata l'icona del rotolo, che indica che
la stampante è pronta per la stampa.
Se la carta non è allineata correttamente, la stampante la espelle e sul
display vengono visualizzate l'icona del rotolo e quella relativa al
disallineamento. In questo caso dovrete ricaricare la carta.
Ripetete il passaggio 6, in modo che la carta sia ben tesa sul perno.
9
Page 64

Stampante HP Designjet 110plus/110 plus nr -
Guida di riferimento rapido
Procedura passo passo per scaricare un rotolo di carta
Importante: non tirate il rotolo dopo che la stampante ha iniziato a
raccogliere la carta, ovvero se avvertite resistenza.
Sono disponibili due modi per scaricare il rotolo di carta:
• Per scaricare un rotolo di carta per inserire un foglio nella stampante, premete
contemporaneamente i tasti Annulla e OK sul pannello frontale, come
illustrato di seguito. Se successivamente inviate una richiesta di stampa su
rotolo, l'alimentatore automatico a rotolo ricaricherà il rotolo.
• Se desiderate scaricare il rotolo per rimuoverlo del tutto (ad esempio, nel caso
non si desideri più utilizzarlo):
1. Premete il pulsante Espulsione sul supporto di sinistra dell'alimentatore a
rotolo nella parte posteriore della stampante. Evitate di premere ripetutamente
il pulsante Espulsione per non danneggiare la carta.
2. Tirate verso di voi il rotolo e rimuovete completamente la carta dal percorso
posteriore della stampante. Le icone mostrate di seguito lampeggiano finché
la carta non viene completamente estratta, poiché una rimozione parziale
potrebbe in seguito causare inceppamenti. Talvolta è possibile che la carta
fuoriesca da sola dal percorso posteriore.
Non rimuovete il perno dai supporti della stampante.
10
Page 65

Stampante HP Designjet 110plus/110 plus nr -
Guida di riferimento rapido
Procedura passo passo per sostituire le cartucce di inchiostro
1. Aprite il coperchio anteriore
cernierato alla destra della
stampante.
2. Per ogni cartuccia di inchiostro da
sostituire:
• Sollevate verticalmente la
cartuccia di inchiostro,
tenendola dalle estremità
superiori più corte, quindi
estraetela dalla stampante.
• Inserite la nuova cartuccia di
inchiostro nell'alloggiamento
finché non scatta in posizione e
si blocca.
3. Infine, chiudete lo sportello esterno.
11
Page 66

Stampante HP Designjet 110plus/110 plus nr -
Guida di riferimento rapido
Il problema riguarda l'inceppamento della carta
1. Provate a premere il tasto OK, in alto a destra sul pannello frontale della
stampante.
Se il problema persiste...
2. Spegnete la stampante.
3. Rimuovete tutti i supporti dal cassetto. Estraete i fogli che appaiono inceppati.
4. Sollevate il coperchio superiore ed estraete la carta che appare inceppata.
Quando sollevate il coperchio, fate attenzione a non danneggiare o spostare i
tubi o altri componenti interni della stampante.
5. Rimuovete con cautela il percorso posteriore premendo i pulsanti ai lati ed
estraetelo tirandolo orizzontalmente. Se non estraete il percorso posteriore in
questo modo, il sensore carta potrebbe venire danneggiato.
Percorso
posteriore
Rimuovendo il percorso posteriore potrete accedere all'interno della stampante
dal retro.
Estraete i fogli che potrebbero essere rimasti inceppati all'interno o che sono
accessibili solo dal retro.
Rimontate il percorso posteriore e assicuratevi che sia posizionato
correttamente.
6. Accendete la stampante.
7. Dopo la rimozione dei fogli inceppati, vi consigliamo di allineare le testine di
stampa per evitare problemi relativi alla qualità di stampa. Per allineare le
testine di stampa, avviate HP Designjet System Maintenance (vedete
pagina 16) e selezionate Allinea testine di stampa.
12
Page 67

Stampante HP Designjet 110plus/110 plus nr -
Guida di riferimento rapido
Il problema riguarda un rotolo di carta inceppato
Se la carta del rotolo è inceppata:
1. Spegnete la stampante.
2. Controllate il punto in cui la carta si è inceppata.
• Rimuovete il cassetto anteriore. In questo modo potrete vedere l'interno della
stampante attraverso l'alloggiamento frontale. Rimuovete tutta la carta
inceppata a cui potete accedere.
• Sollevate il coperchio superiore facendo attenzione a non danneggiare o
spostare i tubi o altri componenti interni della stampante. Rimuovete, se
presente, la carta inceppata tra gli ingranaggi della stampante.
• Rimuovete il percorso posteriore premendo i pulsanti ai lati ed estraetelo
perpendicolarmente. Se non estraete il percorso posteriore, il sensore della
carta potrebbe venire danneggiato. Rimuovete, se presente, la carta
inceppata tra gli ingranaggi della stampante.
3. Dopo aver risolto il problema, riposizionate correttamente i componenti della
stampante che sono stati rimossi (cassetto carta, coperchio superiore,
percorso posteriore).
4. Accendete la stampante.
5. Prima di ricaricare il rotolo di carta, posizionate il bordo iniziale della carta
ad angolo retto rispetto ai lati del rotolo.
13
Page 68

Stampante HP Designjet 110plus/110 plus nr -
Il problema riguarda l'arresto della stampante
Se il pannello frontale appare come nella figura a
lato e la spia di colore giallo lampeggia, effettuate
le seguenti operazioni:
1. Aprite entrambi i lati del coperchio cernierato
sul lato destro della stampante, tirandolo verso il
basso in modo che si possa vedere il carrello di
stampa. Verificate che tutto il materiale di
imballaggio sia stato rimosso dal carrello della
stampante.
A questo punto il carrello potrebbe spostarsi.
Attendete finché il movimento non si interrompe.
Guida di riferimento rapido
2. Verificate che il coperchio della testina di
stampa sia fissato in posizione. Se il fermo non
è agganciato correttamente, la stampante non
funzionerà.
3. Chiudete la parte posteriore e la parte anteriore
del coperchio cernierato. Se la stampante non è
chiusa correttamente non funzionerà.
4. Se la spia gialla non si spegne, consultate il CD
Utilizzo della stampante.
14
Page 69

Stampante HP Designjet 110plus/110 plus nr -
Guida di riferimento rapido
Il problema riguarda la mancata ricezione del processo
Se la stampante sembra ignorare il processo di stampa inviato, effettuate le
seguenti operazioni:
1. Verificate che la stampante sia correttamente collegata al computer.
Se la connessione è stabilita mediante una rete, stampate le pagine di
configurazione della stampante (tenendo premuto il tasto di alimentazione
contemporaneamente al tasto OK per quattro volte), quindi controllate nella
sezione TCP/IP che lo stato visualizzato indichi che la stampante è pronta.
Prendete nota dell'indirizzo IP della stampante e della subnet mask, situate
nella stessa sezione.
• Se l'indirizzo IP è 0.0.0.0 o 192.0.0.192, fate riferimento al poster di
installazione della stampante.
• Se lo stato è Pronto, potrete utilizzare un browser Web per verificare la
connessione di rete tra stampante e computer. È sufficiente digitare
l'indirizzo IP nel browser, nella posizione in cui normalmente vengono
digitati gli URL. Se ottenete una risposta dalla stampante, significa che la
connessione di rete tra la stampante e il computer funziona.
• Se lo Stato è Non pronto o se la stampante non risponde al browser Web,
verificate che l'indirizzo IP della stampante e la subnet mask appartengano
alla rete utilizzata.
• Se necessario, rivolgetevi al vostro amministratore di rete.
2. Verificate che la coda della stampante non sia in pausa.
3. Se utilizzate Mac OS X, accertatevi di aver selezionato "Stampante IP HP", e
non "Stampante IP", durante la creazione della stampante.
15
Page 70

Stampante HP Designjet 110plus/110 plus nr -
Guida di riferimento rapido
Altri problemi...
L'utility HP Designjet System Maintenance vi consente di accedere al supporto e ai
servizi per la risoluzione dei problemi disponibili sul Web, se disponete di una
connessione a Internet. Anche senza la connessione a Internet, questa utility rende
disponibili numerosi servizi per la risoluzione dei problemi della stampante.
Per avviare HP Designjet System Maintenance in Windows effettuate le seguenti
operazioni:
1. Dalla barra delle applicazioni di Windows, selezionate Start/Avvio >
Impostazioni > Stampanti.
2. Fate clic con il pulsante destro del mouse sull'icona della stampante, quindi
selezionate Preferenze stampa (Windows 2000 o XP), Impostazioni predefinite
documento (Windows NT 4) o Proprietà (Windows 98 o Me) dal menu a
comparsa.
3. Selezionate la scheda Avanzate e fate clic sul pulsante Manutenzione.
Per avviare HP Designjet System Maintenance in Mac OS, fate doppio clic
sull'icona HP Designjet System Maintenance sul desktop. In alternativa, in Mac OS
X potete selezionare la stampante in Centro stampa, quindi fate clic suConfigura.
Se le istruzioni indicate sono state seguite correttamente, il browser Web dovrebbe
avviarsi automaticamente sia in Windows sia in Mac OS.
Se non riuscite ad eseguire queste istruzioni, potrebbe essersi verificata una delle
seguenti condizioni:
• la stampante non è gestita dal computer in uso. In tal caso, eseguite l'utility HP
Designjet System Maintenance dal server della stampante;
• la stampante è gestita dal computer ma HP Designjet System Maintenance non
è stato installato. In tal caso, installate l'utility dal CD di installazione del
software di HP Designjet.
Per ulteriori informazioni
sulla risoluzione dei
problemi relativi alla
stampante, consultate la
sezione "Il problema
riguarda..." sul CD-ROM
Utilizzo della stampante
16
.
Page 71

Stampante HP Designjet 110plus/110 plus nr -
Guida di riferimento rapido
Informazioni sul pannello di controllo frontale
Il pannello frontale (o
pannello di controllo) della
stampante fornisce
informazioni sullo stato
della stampante e dispone
inoltre di tre tasti (o
pulsanti) che consentono di
controllare le operazioni
della stampante.
Di seguito sono elencati i
tasti.
• Accensione: consente di accendere e spegnere la stampante.
• Annulla: annulla l'operazione corrente.
• OK: indica alla stampante che:
•avete caricato la carta nel cassetto o nell'alimentatore appropriato e che
può essere avviato il processo di stampa;
•avete risolto un problema, ad esempio avete rimosso la carta inceppata o
sostituito una testina di stampa difettosa. La stampante può quindi
continuare la sua attività, ad esempio riprendere un processo di stampa
interrotto.
Display
Tasto Annulla
Tasto OK
Spia di attenzione
Pulsante di accensione
Spia di alimentazione
Di seguito sono elencate le spie.
• Accensione: quando la stampante è accesa la spia verde di alimentazione è
illuminata.
• Spia di attenzione: questa spia di colore giallo si accende quando la
stampante richiede un intervento da parte dell'utente, ad esempio per chiudere
il coperchio superiore (se il display è vuoto).
Nel pannello frontale della stampante è presente un display in cui sono disponibili
informazioni sulla stampante. I gruppi di icone nella parte inferiore del display si
riferiscono rispettivamente ai componenti nero, ciano, magenta e giallo del sistema
inchiostro.
17
Page 72

Stampante HP Designjet 110plus/110 plus nr -
Guida di riferimento rapido
Informazioni sulle icone nel pannello frontale
Le quattro icone illustrate a lato indicano la quantità di inchiostro
in ciascuna delle cartucce.
L'icona lampeggiante di una testina di stampa (nella parte
inferiore) indica un problema con tale testina.
Occupato: Lampeggiante:
è in corso un'operazione
di stampa, l'annullamento
di un processo,
l'asciugatura o lo
spegnimento. L'icona
tremola se il coperchio
superiore o laterale è
aperto. Operazione da
eseguire: chiudete il
coperchio superiore o
quello laterale.
Spenta: stampante
spenta, inattiva o in attesa
di impulso da parte
dell'utente.
Carta Lampeggiante:
non allineata la carta non è allineata.
Dovrete ricaricare la carta
per eseguire la stampa.
Operazione da eseguire:
ricaricate la carta.
Spenta: situazione
normale.
Stato del Accesa:
rotolo: il rotolo è stato caricato.
Lampeggiante: Il rotolo è
vuoto o inceppato.
Operazione da eseguire:
caricate il rotolo.
Spenta: il rotolo non è
stato caricato.
Stato della Lampeggiante:
carta carta esaurita o
carta bloccata.
Operazione da eseguire:
aggiungete fogli o
rimuovete la carta
bloccata.
Spenta: situazione
normale.
Pressione di Lampeggiante:
un tasto stampante in attesa.
Operazione da eseguire:
premete il tasto OK.
Spenta: situazione
normale.
Carta Lampeggiante:
inceppata la carta è inceppata o
bloccata oppure il carrello
è bloccato.
Operazione da eseguire:
rimuovete la carta.
Vedete pagina 12.
Spenta: situazione
normale.
Esecuzione di HP Designjet System Maintenance:
Lampeggiante: errore hardware.
Operazione da eseguire: eseguite l'utility HP Designjet System
Maintenance per la stampante (vedete pagina 16). Assicuratevi che la
stampante sia collegata.
Spenta: situazione normale.
18
Page 73

Stampante HP Designjet 110plus/110 plus nr -
Guida di riferimento rapido
Informazioni sulle combinazioni delle icone lampeggianti
Scaricamento del rotolo
Lampeggiante: la stampante è in attesa che
scarichiate manualmente il rotolo di carta.
Operazione da eseguire: scaricate
completamente il rotolo; non è necessario
rimuovere il perno dalla stampante.
Spenta: situazione normale.
Rotolo non allineato
Lampeggiante: il rotolo di carta non è
allineato e deve essere ricaricato.
Operazione da eseguire: scaricate e
ricaricate il rotolo, allineandolo in maniera
corretta.
Spenta: situazione normale.
19
Page 74

Stampante HP Designjet 110plus/110 plus nr -
Per altre informazioni su...
• come utilizzare la stampante
• funzioni della stampante
• risoluzione dei problemi di stampa
...consultate il CD Utilizzo della stampante
o la guida in linea relativa al driver della
stampante (disponibile solo sui sistemi
Windows).
Guida di riferimento rapido
20
Page 75

Stampante HP Designjet 110plus/110 plus nr -
Guida di riferimento rapido
Limitazioni di garanzia HP
HP Designjet 110plus/110 plus nr
Prodotto HP Durata della garanzia limitata
Stampante e relativo hardware HP: 1 anno (dalla data di acquisto da parte del cliente)
Software: 90 giorni (dalla data di acquisto da parte del cliente)
Testina di stampa, nero: Fino alla data di "scadenza della garanzia" riportata sul
prodotto o fino a quando 530 cm³ di inchiostro colore
HP non sono passati attraverso la testina di stampa,
qualunque evento si verifichi prima
Testine di stampa, ciano, magenta
e giallo:
Cartuccia di inchiostro: Fino all'esaurimento dell'inchiostro HP originale secondo
Fino alla data di "scadenza della garanzia" riportata sul
prodotto o fino a quando 200 cm³ di inchiostro colore
HP non sono passati attraverso la testina di stampa,
qualunque evento si verifichi prima
quanto indicato dalla stampante o fino alla data di
"scadenza della garanzia" riportata sul prodotto,
qualunque evento si verifichi prima
A: durata della garanzia limitata
1. Hewlett-Packard (HP) garantisce all'utente finale che i prodotti HP sopramenzionati
saranno privi di difetti di materiale e lavorazione per la durata sopra indicata. Il cliente
è responsabile per il mantenimento della prova della data di acquisto.
2. Per i prodotti software, la garanzia limitata di HP si applica unicamente all'impossibilità
di eseguire le istruzioni di programma. HP non garantisce che le operazioni di qualsiasi
prodotto siano ininterrotte o prive di errori.
3. La garanzia limitata HP si applica solo agli eventuali difetti derivanti dall'uso normale
del prodotto e non da:
a. modifiche oppure manutenzione inadeguata o impropria;
b. software, interfacce, supporti, parti o ricambi non messi in commercio o non
approvati da HP;
c. utilizzo del prodotto senza rispettare le specifiche del prodotto.
Le operazioni di routine per la manutenzione della stampante HP Designjet 110plus/
110 plus nr, come la pulizia e i servizi di assistenza preventiva (inclusi i componenti
contenuti in ogni kit di assistenza preventiva e gli interventi di assistenza dei tecnici HP),
non sono coperti dalla garanzia HP, ma in alcuni Paesi possono essere coperti da
contratto di assistenza separato.
4. Per le stampanti HP, l'utilizzo di prodotti consumabili ricaricati o non originali HP
(inchiostro, testine o cartucce) non ha effetto sulla garanzia al cliente né su qualsiasi
contratto di supporto stipulato tra HP e il cliente. Tuttavia, se il guasto o il danno alla
stampante è attribuibile all'utilizzo di materiale non HP o a cartucce ricaricate, HP
applicherà le proprie normali tariffe per il tempo e i materiali impiegati nel servizio di
supporto per quel determinato guasto o danno.
21
Page 76

Stampante HP Designjet 110plus/110 plus nr -
5. Se HP riceve, nel periodo della garanzia applicabile, avviso di un difetto riscontrato in
qualsiasi prodotto software, di supporto o consumabile coperto da garanzia HP, HP si
impegna a sostituire il prodotto difettoso con un nuovo prodotto. Se HP riceve, nel
periodo della garanzia applicabile, avviso di un difetto riscontrato in qualsiasi prodotto
hardware coperto da garanzia HP, HP si impegna a riparare o a propria discrezione
sostituire il prodotto difettoso. A discrezione di HP potrebbe essere fornita al cliente una
parte sostitutiva o assistenza remota all'installazione di una parte difettosa, la quale
andrà riconsegnata ad HP. HP può, a propria discrezione, rinunciare alla richiesta di
consegna da parte del cliente della parte difettosa.
6. Se HP non fosse in grado di riparare o sostituire adeguatamente un prodotto difettoso
coperto dalla garanzia HP, rimborserà il prezzo di acquisto del prodotto entro un
tempo ragionevole dalla notifica.
7. HP non avrà alcun obbligo di riparare o sostituire un prodotto difettoso o rimborsarne
il prezzo di acquisto prima della restituzione di tale prodotto difettoso ad HP.
8. I prodotti sostitutivi possono essere nuovi o come nuovi, a condizione sufficiente che le
relative funzionalità siano uguali a quelle del prodotto da sostituire.
9. I prodotti HP possono contenere parti rilavorate oppure componenti equivalenti ai nuovi
in termini di prestazioni o possono essere stati soggetti ad un uso incidentale.
10.La garanzia limitata HP è valida in qualsiasi Paese/regione o località in cui HP offra
supporto o abbia commercializzato il prodotto. Il livello del servizio di garanzia offerto
al cliente potrebbe variare in base a standard locali. HP non applicherà modifiche alla
forma, né alle funzioni del prodotto per renderlo utilizzabile in paesi per i quali non ne
sia stato previsto il funzionamento per motivi legali o normativi. I contratti per servizi
aggiuntivi possono essere disponibili per qualsiasi centro di assistenza HP autorizzato
in Paesi/regioni in cui i prodotti HP elencati sono distribuiti da HP o da un importatore
autorizzato.
11.Qualsiasi garanzia applicabile a cartucce di stampa non verrà applicata a cartucce di
stampa HP che siano state ricaricate, riassemblate, rifornite, utilizzate per uso improprio
o manomesse in qualsiasi modo.
Guida di riferimento rapido
B. Limitazioni della garanzia
1. IN BASE A QUANTO CONSENTITO DALLA LEGISLAZIONE LOCALE, NÉ HP NÉ I
SUOI FORNITORI POTRANNO OFFRIRE QUALSIASI ALTRA GARANZIA O
CONDIZIONE DI OGNI TIPO, ESPRESSA O IMPLICITA, IN RELAZIONE AI PRODOTTI
HP ED ESCLUDERE IN MODO SPECIFICO GARANZIE IMPLICITE O CONDIZIONI DI
COMMERCIABILITÀ, QUALITÀ SODDISFACENTE E IDONEITÀ PER UN USO
SPECIFICO.
C. Limitazioni di responsabilità
1. In base a quanto consentito dalla legislazione locale, le azioni offerte dalla presente
garanzia sono le sole a disposizione del cliente.
22
Page 77

Stampante HP Designjet 110plus/110 plus nr -
2. IN BASE A QUANTO STABILITO DALLA LEGISLAZIONE LOCALE, FATTO SALVO PER
GLI OBBLIGHI ENUNCIATI IN QUESTA GARANZIA, IN NESSUN CASO NÉ HP NÉ I
SUOI FORNITORI SARANNO RITENUTI RESPONSABILI DI DANNI DIRETTI, INDIRETTI,
SPECIALI, INCIDENTALI O CONSEGUENTI SIA IN BASE AL CONTRATTO, DOLO O
QUALSIASI ALTRA TEORIA LEGALE, SIA SE AVVISATI DELLA POSSIBILITÀ DI TALI
DANNI.
Guida di riferimento rapido
D. Legislazione locale
1. La presente dichiarazione di garanzia concede al cliente specifici diritti legali. Il cliente
potrebbe disporre di altri diritti legali, differenti in base allo stato o alla regione di
appartenenza.
2. Nel caso in cui la presente dichiarazione di garanzia sia in conflitto con le leggi locali
in vigore, dovrà essere considerata uniforme in base a tali leggi. In base alle leggi
locali, alcune limitazioni o dichiarazioni di non responsabilità nella presente
dichiarazione di garanzia potrebbero non essere applicabili. Ad esempio, alcuni stati
degli Stati Uniti, alcune province del Canada o altri governi potrebbero:
a. vietare che le limitazioni di responsabilità e le limitazioni contenute nella presente
garanzia limitino i diritti spettanti a un consumatore, ad esempio nel Regno Unito, per
legge;
b. limitare in altro modo la facoltà di un produttore di imporre tali limitazioni o
dichiarazioni di non responsabilità;
c. concedere al cliente ulteriori diritti di garanzia, specificare la durata di garanzie
implicite che il produttore non può rifiutare o vietare limitazioni della durata di garanzie
implicite.
3. PER TRANSAZIONI CON I CLIENTI CHE SI SVOLGANO IN AUSTRALIA E IN NUOVA
ZELANDA, I TERMINI DELLA PRESENTE GARANZIA, ENTRO I LIMITI DI LEGGE, NON
ESCLUDONO, LIMITANO O MODIFICANO LE NORME APPLICABILI ALLA VENDITA
DEI PRODOTTI HP A TALI CLIENTI E SI AGGIUNGONO ALLA PRESENTE GARANZIA.
Revisione: 10 febbraio 2003
23
Page 78

Stampante HP Designjet 110plus/110 plus nr -
Guida di riferimento rapido
Normative
Potete ottenere schede tecniche sulla sicurezza degli inchiostri utilizzati nella stampante
scrivendo all'indirizzo: Hewlett-Packard Customer Information Center, 19310 Pruneridge
Avenue, Dept. MSDS, Cupertino, CA 95014, Stati Uniti.
Pagina Web:
http://www.hp.com/hpinfo/community/environment/productinfo/psis_inkjet.htm
Numero identificativo di modello normativo
A scopi di identificazione in materia di normative, al presente prodotto viene assegnato un
numero di modello normativo. Il numero di modello normativo per il prodotto è BCLAA-0302.
Questo numero non deve essere confuso con il nome di commercializzazione (stampante
serie Designjet 100) o con i numeri di prodotto (C7791X, C7796X).
24
Page 79

Stampante HP Designjet 110plus/110 plus nr -
DICHIARAZIONE DI CONFORMITÀ
in base a ISO/IEC Guide 22 e EN 45014
Nome del produttore: Hewlett-Packard Española S.A.
Indirizzo del produttore: Inkjet Commercial Division
Avenida Graells, 501
08714 Sant Cugat del Vallès
Barcellona, Spagna
Dichiara che il prodotto
Nome del prodotto Stampanti a getto d'inchiostro HP Designjet serie 100
Numeri modello: C7791X e C7796X (dove X rappresenta qualsiasi singola
lettera)
Accessori del prodotto: Tutti
Modello normativo: BCLAA-0302
È conforme alle seguenti specifiche di prodotto
Sicurezza: IEC 60950:1999
EN 60950:2000
IEC 60825-1:1993 + A1
EN 60825-1:1994 + A11 Classe 1 per Laser/LED
EMC:
Informazioni supplementari
Il presente prodotto è conforme ai requisiti delle direttive 73/23/EEC (Bassa tensione) e 89/336/
EEC (Compatibilità elettromagnetica) ed è conseguentemente dotato di marchio CE.
(1)
Il prodotto rientra nei limiti operativi di Classe A se connesso a cavi LAN tramite accessori di
stampa server.
(2)
Il prodotto è stato sottoposto a test in un ambiente tipico per l'utente finale.
(3)
Questo dispositivo è conforme all'articolo 15 delle norme FCC. L'operabilità è soggetta alle
seguenti condizioni:
1. il presente dispositivo non deve provocare interferenze dannose, e
2. deve assorbire qualsiasi interferenza ricevuta, incluse interferenze provocate da operazioni
non desiderate
Sant Cugat del Vallès (Barcellona),
24 ottobre 2003
CISPR 22:1997 / EN 55022:1998 Classe B
CISPR 24:1997 +A1 / EN 55024:1998 +A1
IEC 61000-3-2:2001 / EN 61000-3-2:2000
IEC 61000-3-3:2002 / EN 61000-3-3:1995 +A1
FCC Titolo 47 CFR, Parte 15 Classe B
Guida di riferimento rapido
(1)(2)
(1)(3)
Josep-Maria Pujol,
Gestione normative prodotti
Contatti per l'Europa: Uffici vendite e servizi Hewlett-Packard della vostra zona oppure HewlettPackard GmbH, Department HQ TRE, Herrenberger Strasse 140, D-71034 Böblingen, Germania
(Fax: +49 7031 143143)
25
Page 80

Stampante HP Designjet 110 plus/110plus nr-
Guida di riferimento rapido
© 2005 Hewlett-Packard Company
Avenida Graells 501
08174 Sant Cugat del Vallès
Barcellona
Spagna
26
Page 81

HP Designjet 110 plus/110plus nr – Kurzübersicht
Vorgehensweisen
Zuführen von Papier (Allgemeine Anleitung) ............................................2
Laden von Papier über den vorderen Pfad...............................................3
Entladen von Papier aus dem vorderen Pfad............................................3
Einlegen von Papier in das Zufuhrfach....................................................4
Drucken auf großen Blättern..................................................................6
Laden von Papierrollen .........................................................................8
Entladen von Papierrollen ...................................................................10
Wechseln von Tintenpatronen .............................................................11
Probleme
Problem: Papierstau ...........................................................................12
Problem: Eine Papierrolle ist gestaut .....................................................13
Problem: Der Drucker hat angehalten...................................................14
Problem: Der Drucker hat den Druckauftrag nicht erhalten.......................15
Problem: Unbekannt ..........................................................................16
Nähere Informationen
Nähere Informationen zum Bedienfeld .................................................17
Nähere Informationen zu den Symbolen auf dem Bedienfeld...................18
Nähere Informationen zu Kombinationen von blinkenden Symbolen.........19
Rechtliche Hinweise
Erklärung zur eingeschränkten Gewährleistung von HP...........................21
Zulassungshinweise ...........................................................................24
Weitere Informationen
Weitere Einzelheiten zur Verwendung des Druckers,
zusätzliche Druckerinformationen (einschließlich
Treiber und Netzwerkbetrieb) und Hinweise zur
Behebung von Druckerproblemen finden Sie auf der
CD Verwenden des Druckers oder in der
Online-Hilfe des Druckertreibers.
1
Page 82

HP Designjet 110plus/110 plus nr –
Kurzübersicht
Zuführen von Papier (Allgemeine Anleitung)
Es gibt drei Möglichkeiten, dem Drucker Papier zuzuführen:
Erweiterungen
zum Stützen von
Papier
Ausgabefach
Vorderer Pfad
Zufuhrfach
Hinterer
Pfad
•In das Zufuhrfach an der Vorderseite des Druckers können mehrere Seiten im
Format 76 × 142 mm bis 457 × 610 mm (C+) eingelegt werden. Sie können
bis zu 50 Blatt Papier mit einer Stärke von 0,2 mm (Papiergewicht 150 g/m²)
einlegen, wenn das Fach nicht ausgezogen ist. Das ausgezogene Fach fasst 25
Blatt derselben Stärke. Sie können aus diesem Zufuhrfach auch Briefumschläge
bedrucken.
•Der vordere Pfad ist für Einzelblätter im Format 110 × 205 mm bis
625 × 1625 mm (A1 Übergröße) geeignet.
•Der hintere Pfad kann für Einzelblätter mit einer hohen Stärke oder andere
Medien im Format 110 × 205 mm bis 625 × 1625 mm (A1 Übergröße)
verwendet werden. Der untere Schacht des hinteren Pfads wird für
Rollenpapier verwendet.
• Mit Hilfe der automatischen Rollenzufuhr kann Rollenpapier in den hinteren
Pfad geladen werden. Nach dem Laden einer Rolle ist jedoch der Papierpfad
belegt. Sie müssen daher erst das Rollenpapier entladen, wenn Sie wieder auf
Blattpapier drucken möchten (siehe Seite 8).
Laden Sie das Papier immer im Hochformat (kurze Kante zuerst) in den Drucker.
Dies gilt für alle Zufuhrmethoden.
Die Ausgabefachverlängerungen können zum Stützen von Blattpapier mit einer
Länge von bis zu 483 mm verwendet werden. Wenn Sie längere Blätter bedrucken
möchten, schließen Sie die Verlängerungen des Ausgabefachs, und ziehen Sie das
Zufuhrfach aus.
2
Page 83

HP Designjet 110plus/110 plus nr –
Kurzübersicht
Laden von Papier über den vorderen Pfad
1. Legen Sie ein Blatt Papier mit der zu bedruckenden Seite nach unten
rechtsbündig in das Ausgabefach. Legen Sie hier immer nur ein Blatt ein.
2. Schieben Sie das Papier so weit wie möglich in den Drucker hinein, und achten
Sie darauf, dass es weiterhin rechts anliegt.
3. Drücken Sie auf dem Bedienfeld die Taste OK (oben rechts).
Der Drucker überprüft nun die Ausrichtung des Papiers. Falls das Papier nicht richtig
ausgerichtet ist, wird es ausgeworfen, und Sie müssen es erneut laden.
Entladen von Papier aus dem vorderen Pfad
Wenn Sie das geladene Papier vor dem Drucken austauschen bzw. herausnehmen
möchten, beispielsweise um eine andere Papiersorte oder einen anderen
Zufuhrpfad zu verwenden, gehen Sie wie folgt vor:
• Drücken Sie gleichzeitig die Tasten Abbrechen und OK, um das Papier
auszuwerfen.
3
Page 84

HP Designjet 110plus/110 plus nr –
Kurzübersicht
Einlegen von Papier in das Zufuhrfach
Ziehen Sie das Zufuhrfach nur aus, wenn dies nötig ist, d. h. wenn Sie ein größeres
Papierformat als Legal oder A4 verwenden.
1. Nehmen Sie das Zufuhrfach heraus.
2. Klappen Sie die Fachabdeckung nach hinten..
3. Wenn das Papier ein größeres Format als Legal oder A4 hat, schieben Sie die
kleine blaue Zunge in der Mitte nach links, damit Sie das Fach verlängern
können. Lassen Sie die Zunge los, und ziehen Sie die Fachverlängerung so
weit wie möglich heraus.
4. Fächern Sie das Papier auf. Damit verhindern Sie, dass Blätter aneinander
haften.
4
Page 85

HP Designjet 110plus/110 plus nr –
5. Schieben Sie das Papier unter die Abdeckung
des Fachs. Die Seiten müssen rechts und hinten
anliegen.
6. Schieben Sie die kleine Zunge auf der rechten
Seite des Fachs nach innen, bis sie am Papier
anliegt. Schieben Sie die größere Zunge auf der
linken Seite des Fachs nach rechts, bis auch sie
direkt am Papier anliegt.
7. Schließen Sie die Fachabdeckung.
8. Klappen Sie das Ausgabefach nach oben, und schieben Sie das Zufuhrfach bis
zum Anschlag in den Drucker, ohne es zu verkanten. Die linke innere Ecke
muss mit der Kunststoffführung des Papierfachs ausgerichtet sein.
Kurzübersicht
9. Klappen Sie das Ausgabefach wieder nach unten. Wenn das Zufuhrfach
ausgezogen wird, ragt es über das Ausgabefach hinaus.
5
Page 86

HP Designjet 110plus/110 plus nr –
Kurzübersicht
Drucken auf großen Blättern
Das Ausgabesystem des Druckers verfügt über mehrere verstellbare Komponenten.
Beim Bedrucken großer Blätter ist es wichtig, die richtige
Druckerausgabekonfiguration zu verwenden. Die Abbildung unten zeigt die
verstellbaren Teile des Druckerausgabesystems:
.
3
1
2
3
6
5
In der Tabelle auf der nächsten Seite ist die erforderliche
Ausgabesystemkonfiguration für verschiedene Papierformate aufgeführt.
Hinweis:
• Wenn Sie das Hauptfach oder die Rollenzufuhr als Papierquelle verwenden,
müssen Sie das Ausgabesystem entsprechend einstellen, damit die gedruckten
Medien gestapelt werden.
• Wenn sich Ausdrucke im Ausgabefach befinden und Sie die Rollenzufuhr
verwenden möchten, leeren Sie das Ausgabefach vor dem Drucken und stellen
es entsprechend ein.
…Fortsetzung auf der nächsten Seite…
6
4
Page 87

HP Designjet 110plus/110 plus nr –
–
Kurzübersicht
Geschlossen –
Position A3,... Geschlossen AB
AUF
GeschlossenPosition A3,... AB
AUF Position B4,... Geschlossen AB Geschlossen –
AUF Position A3,...
Position 17x22 Offen
Geschlossen Geschlossen AUF
AB Geschlossen Geschlossen AUF Position A2,... Offen
AB
AUF Position B4,... Position A3,... AB Geschlossen –
Geschlossen –
AB Geschlossen Position Rollensymbol AB
Medien
Format
Quelle Ziel Breite Länge 1 2 3 4 5 6
JIS B5 182mm 257mm
ANSI A 8.5 Zoll 11 Zoll
ISO A4 210mm 297mm
ARCH A 9 Zoll 12 Zoll
Format A
DIN C4 229mm 324mm
ISO B4 250mm 353mm
LEGAL 8.5 Zoll 14 Zoll
JIS B4 257mm 364mm
ANSI B 11 Zoll 17 Zoll
ISO A3 297mm 420mm
C-Format-Fach Ausgabefach
ARCH B 12 Zoll 18 Zoll
Format B
DIN C3 324mm 458mm
ANSI B+ 13 Zoll 19 Zoll
7
ISO B3 353mm 500mm
JIS B3 264mm 515mm
ISO A2 420mm 594mm
ANSI C 17 Zoll 22 Zoll
Format C
ARCH C 18 Zoll 24 Zoll
DIN C2 458mm 648mm
JIS B2 515mm 728mm
ISO B2 500mm 707mm
Ausgabefach Format D AB Geschlossen Position Rollensymbol AB
Manuelle Zufuhr,
vorne oder hinten
ISO A1 594mm 841mm
ANSI D 22c" 34c"
ARCH D 24 Zoll 36 Zoll
Benutzerdefiniert Bis zu 24 Zoll Bis zu 12 Zoll
Benutzerdefiniert Bis zu 24 Zoll Bis zu 18 Zoll
Benutzerdefiniert Bis zu 24 Zoll Bis zu 24 Zoll
Benutzerdefiniert Bis zu 24 Zoll Bis zu 36 Zoll
Ausgabefach Benutzerdefiniert Geschlossen –
Rolle
Zubehör
Benutzerdefiniert Bis zu 24 Zoll > 36 Zoll
Page 88

HP Designjet 110plus/110 plus nr –
Kurzübersicht
Laden von Papierrollen
Der Drucker kann immer nur eine Papierquelle verwenden. Wenn eine Papierrolle
in den Drucker geladen ist und Sie auf Blattpapier drucken möchten, müssen Sie
die Rolle zuerst entladen. Die Rolle wird dann für den nächsten Druckauftrag auf
Rollenpapier automatisch wieder geladen.
Sie können eine Rolle abschneiden, ohne sie zu entladen, indem Sie die Taste
“OK” drücken (obere rechte Taste des Bedienfelds). Das Papier wird dann
zunächst um 1 cm weitertransportiert.
1. Stellen Sie in der Anwendung, aus der Sie drucken möchten, die Rollenzufuhr
als Papierquelle ein.
2. Wählen Sie in der Anwendung “Drucken”.
3. Bringen Sie eine Rolle des gewünschten Papiers auf die Spindel auf.
Vergewissern Sie sich, dass Sie die Rolle richtig herum aufgebracht haben
und dass der blaue Anschlag auf der Spindel gegen das Papier drückt.
4. Setzen Sie die Spindel so in die Halterungen ein, dass sich der blaue
Anschlag von der Rückseite des Druckers aus gesehen rechts und der
schwarze Anschlag links befindet.
Wenn Sie glänzendes Papier benutzen, empfehlen wir Ihnen das Tragen von
Handschuhen, damit die Oberfläche des Papiers nicht verschmiert.
5. Vergewissern Sie sich, dass der Anfang der Rolle gerade abgeschnitten ist
und senkrecht zu den seitlichen Rändern verläuft.
…Fortsetzung auf der nächsten Seite…
8
Page 89

HP Designjet 110plus/110 plus nr –
Kurzübersicht
Drucken auf großen Blättern
…Fortsetzung von der vorherigen Seite…
6. Drehen Sie überstehendes Papier zurück, damit das Papier fest auf die Rolle
gewickelt ist.
7. Führen Sie die Vorderkante
des Papiers in den unteren
Schacht auf der Rückseite
des Druckers ein. Schieben
Sie das Papier hinein, bis
ein Widerstand zu spüren
ist. Achten Sie darauf, dass
die Seiten der Rolle fest
aufgerollt bleiben, damit
das Papier nicht schief
eingezogen wird.
8. Der Drucker gibt einen
Signalton aus und zieht
das Papier ein.
9. Der Drucker prüft die Ausrichtung des Papiers. Wenn das Papier richtig
ausgerichtet ist, wird das Rollensymbol auf dem Bedienfeld angezeigt. Sie
erkennen daran, dass der Drucker einsatzbereit ist.
Wenn das Papier nicht richtig ausgerichtet ist, wird es vom Drucker
ausgeworfen. Auf dem Bedienfeld wird dann das Rollensymbol zusammen mit
dem Symbol für falsche Papierausrichtung angezeigt. Sie müssen dann das
Papier erneut laden.
Führen Sie Schritt 6 erneut aus, damit das Papier fest auf die Rolle gewickelt ist.
9
Page 90

HP Designjet 110plus/110 plus nr –
Kurzübersicht
Entladen von Papierrollen
Wichtig: Ziehen Sie auf keinen Fall an der Papierrolle, nachdem sie vom
Drucker eingezogen wurde, d. h. ein Widerstand zu spüren ist.
Sie haben zwei Möglichkeiten, eine Papierrolle zu entladen:
• Wenn Sie die Rolle entladen möchten, um ein Einzelblatt zu bedrucken,
drücken Sie auf dem Bedienfeld gleichzeitig die Tasten Abbrechen und OK
(siehe unten). Die Rolle wird automatisch für den nächsten Druckauftrag auf
Rollenpapier von der automatischen Rollenzufuhr erneut geladen.
• Wenn Sie die Rolle entladen möchten, um sie komplett zu entfernen (z. B.
wenn Sie die Papierrolle nicht mehr verwenden möchten), gehen Sie wie folgt
vor:
1. Drücken Sie an der Rückseite des Druckers auf der linken Rollenhalterung die
Taste Auswerfen. Drücken Sie die Auswurftaste auf keinen Fall mehrmals, da
dies zu einer Beschädigung des Papiers führen kann.
2. Ziehen Sie die Rolle in Ihre Richtung, und entfernen Sie das Papier vollständig
aus dem hinteren Pfad des Druckers. Die unten gezeigten Symbole blinken,
bis kein Papier mehr im Drucker ist. Wenn das Papier nur teilweise entfernt
wird, kann es später zu Papierstaus kommen. Manchmal fällt das Papier auch
von selbst aus dem hinteren Pfad heraus.
Sie müssen die Spindel nicht aus ihren Halterungen nehmen.
10
Page 91

HP Designjet 110plus/110 plus nr –
Wechseln von Tintenpatronen
1. Öffnen Sie den vorderen Teil der
Klappe rechts am Drucker.
2. Führen Sie für jede
auszuwechselnde Tintenpatrone die
folgenden Schritte aus:
• Fassen Sie die Tintenpatrone an
den kürzeren oberen Rändern,
und ziehen Sie sie gerade nach
oben aus dem Drucker heraus.
• Setzen Sie die neue
Tintenpatrone in den Schacht
ein, und drücken Sie sie nach
unten, bis sie hörbar einrastet.
Kurzübersicht
3. Schließen Sie wieder die Klappe.
11
Page 92
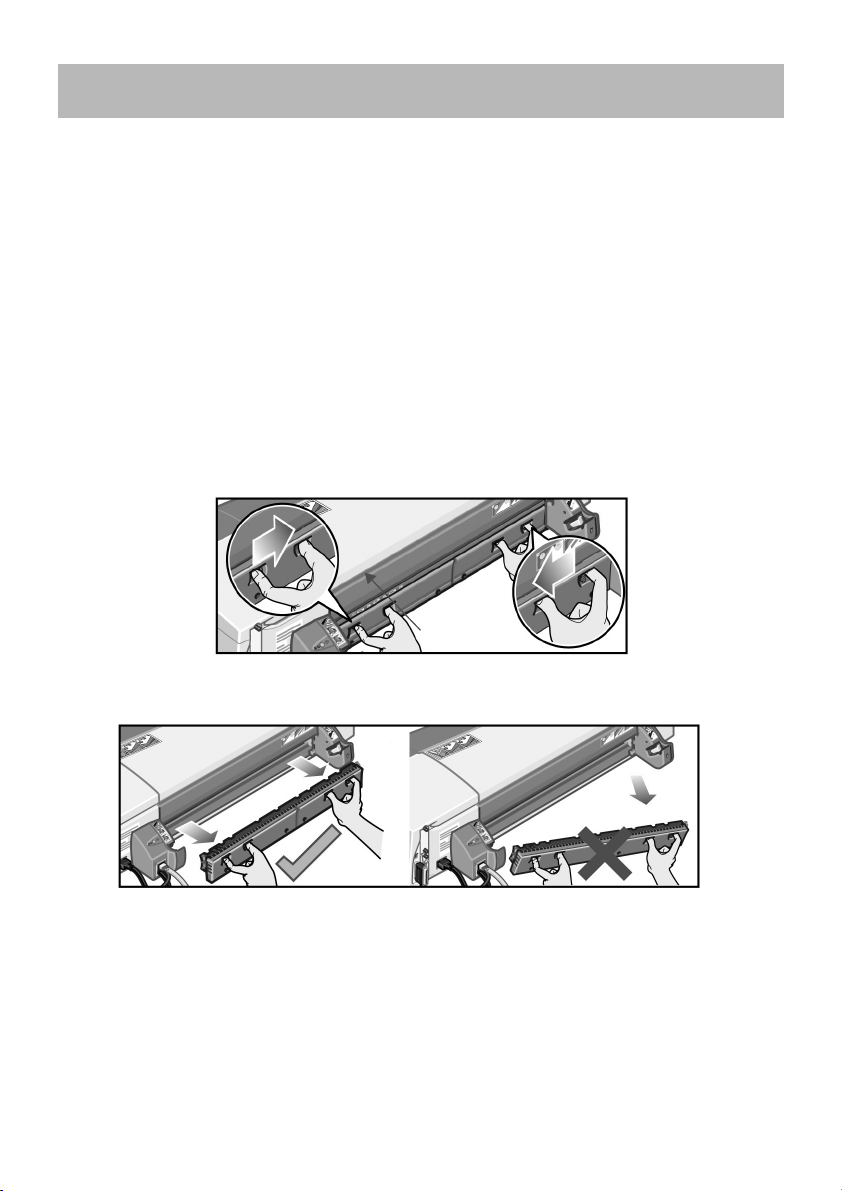
HP Designjet 110plus/110 plus nr –
Kurzübersicht
Problem: Papierstau
1. Drücken Sie am Bedienfeld des Druckers die Taste OK (oben rechts).
Wenn das Problem dadurch nicht gelöst wird, fahren Sie wie folgt fort:
2. Schalten Sie den Drucker aus.
3. Nehmen Sie alle Medien aus dem Fach. Wenn gestautes Papier zu sehen ist,
ziehen Sie es heraus.
4. Öffnen Sie die obere Abdeckung, und ziehen Sie stecken gebliebenes Papier
heraus.
Achten Sie dabei darauf, dass Sie nicht die Tintenzuleitungen oder andere
interne Komponenten des Druckers beschädigen oder bewegen.
5. Nehmen Sie den hinteren Pfad vorsichtig ab, indem Sie die Tasten an beiden
Seiten drücken und ihn dann gerade herausziehen. Wenn Sie den Pfad nicht
gerade herausziehen, könnten Sie den Papiersensor beschädigen.
Hinterer Pfad
Nach der Abnahme des hinteren Pfads können Sie von der Rückseite aus in
das Innere des Druckers fassen.
Ziehen Sie Papier heraus, das im Drucker stecken geblieben ist und das Sie von
der Rückseite aus erreichen können.
Bringen Sie den hinteren Pfad wieder fest an.
6. Schalten Sie den Drucker ein.
7. Richten Sie nach dem Beseitigen des Papierstaus die Druckköpfe aus, damit keine
Druckqualitätsprobleme auftreten. Starten Sie dazu das HP Designjet
Systemwartungsprogramm (siehe Seite 16), und wählen Sie die Option
Druckköpfe ausrichten.
12
Page 93

HP Designjet 110plus/110 plus nr –
Kurzübersicht
Problem: Eine Papierrolle ist gestaut
Wenn Rollenpapier gestaut ist, gehen Sie wie folgt vor:
1. Schalten Sie den Drucker aus.
2. Überprüfen Sie alle Stellen, an denen die Rolle eingeklemmt sein könnte:
• Nehmen Sie das vordere Papierfach ab. Sie können nun durch einen Schlitz
in der Vorderseite in den Drucker hineinsehen. Lösen und entfernen Sie das
eingeklemmte Papier, das Sie erreichen können.
• Öffnen Sie die obere Abdeckung, und achten Sie darauf, dass Sie nicht die
Tintenzuleitungen oder andere interne Komponenten des Druckers
beschädigen oder bewegen. Wenn Papier in den Rädern des Druckers
eingeklemmt ist, lösen und entfernen Sie es.
• Nehmen Sie den hinteren Pfad ab, indem Sie die Tasten an beiden Seiten
drücken und ihn dann gerade herausziehen. Wenn Sie den Pfad nicht gerade
herausziehen, könnten Sie den Papiersensor beschädigen. Wenn Papier in
den Walzen des Druckers eingeklemmt ist, lösen und entfernen Sie es.
3. Bringen Sie nach dem Beseitigen des Papierstaus das Papierfach und den
hinteren Pfad wieder richtig an, und schließen Sie die obere Abdeckung.
4. Schalten Sie den Drucker ein.
5. Bevor Sie die Papierrolle erneut laden, müssen Sie die Vorderkante der Rolle
so abschneiden, dass sie absolut gerade und senkrecht zu den Rollenseiten
ist.
13
Page 94

HP Designjet 110plus/110 plus nr –
Problem: Der Drucker hat angehalten
Wenn auf dem Bedienfeld Folgendes angezeigt
wird und die gelbe Lampe blinkt, gehen Sie wie folgt
vor:
1. Öffnen Sie beide Teile der Klappe rechts am
Drucker, und schwenken Sie sie nach hinten,
damit Sie den Druckwagen sehen können.
Vergewissern Sie sich, dass sich in der Nähe
des Druckwagens kein Verpackungsmaterial
mehr befindet.
Der Druckwagen bewegt sich möglicherweise
bei diesem Schritt. Warten Sie dann, bis er
anhält.
Kurzübersicht
2. Prüfen Sie, ob die Druckkopfabdeckung
verriegelt ist. Der Drucker funktioniert nicht,
wenn die Abdeckung nicht richtig verriegelt ist.
3. Schließen Sie zuerst den hinteren und dann den
vorderen Teil der Klappe. Der Drucker
funktioniert nicht, wenn die Klappe nicht richtig
geschlossen ist.
4. Wenn die gelbe Lampe weiterhin blinkt, suchen
Sie auf der CD Verwenden des Druckers nach
weiteren Informationen.
14
Page 95

HP Designjet 110plus/110 plus nr –
Kurzübersicht
Problem: Der Drucker hat den Druckauftrag nicht erhalten
Wenn der Druckauftrag, den Sie an den Drucker gesendet haben, nicht
ausgegeben wird, verfahren Sie wie folgt:
1. Überprüfen Sie, ob der Drucker richtig an den Computer angeschlossen ist.
Wenn die Verbindung über ein Netzwerk hergestellt wird, drucken Sie die
Seiten mit der Druckerkonfiguration aus, indem Sie die Netztaste gedrückt
halten und dann vier Mal die Taste “OK” drücken. Überprüfen Sie
anschließend, ob im TCP/IP-Abschnitt der Status “Bereit” angezeigt wird.
Notieren Sie sich die IP-Adresse und die Teilnetzmaske des Druckers, die sich
auch in diesem Abschnitt befinden.
• Wenn die IP-Adresse 0.0.0.0 oder 192.0.0.192 lautet, konfigurieren Sie
die Adresse entsprechend den Anweisungen auf dem Installationsposter
Ihres Druckers.
• Wenn der Status “Bereit” lautet, können Sie mit einem Web-Browser die
Netzwerkverbindung zwischen Drucker und Computer überprüfen. Geben
Sie dazu einfach die IP-Adresse Ihres Druckers in die Adresszeile des
Browsers ein. Wenn der Drucker antwortet, funktioniert die
Netzwerkverbindung zwischen Drucker und Computer.
• Wenn der Status “Nicht bereit” lautet oder der Drucker nicht mit dem
Web-Browser angesprochen werden kann, überprüfen Sie, ob die
IP-Adresse und die Teilnetzmaske des Druckers tatsächlich zu Ihrem
Netzwerk gehören.
• Wenden Sie sich ggf. an Ihren Netzwerkadministrator.
2. Vergewissern Sie sich, dass die Druckwarteschlange nicht angehalten wurde.
3. Wenn Sie Mac OS X verwenden, vergewissern Sie sich, dass der Drucker mit
der Option “HP IP-Druck” und nicht mit “IP-Druck” konfiguriert wurde.
15
Page 96

HP Designjet 110plus/110 plus nr –
Kurzübersicht
Problem: Unbekannt
Mit dem HP Designjet Systemwartungsprogramm können Sie über das Internet auf
verschiedene Support- und Fehlerbehebungsdienste zugreifen. Aber auch ohne
Internetverbindung stehen mehrere Funktionen zur Behebung von
Druckerproblemen zur Verfügung.
So starten Sie das HP Designjet Systemwartungsprogramm in Windows:
1. Klicken Sie in der Windows-Taskleiste auf Start > Einstellungen > Drucker.
2. Klicken Sie mit der rechten Maustaste auf das Symbol Ihres Druckers, und
wählen Sie Druckeinstellungen (Windows 2000 oder XP),
Standardeinstellungen für Dokumente (Windows NT 4) oder Eigenschaften
(Windows 98 oder Me).
3. Klicken Sie auf die Registerkarte Erweitert und danach auf die Schaltfläche
Wartung.
Wenn Sie mit Mac OS arbeiten, doppelklicken Sie auf dem Schreibtisch auf das
Symbol des HP Designjet Systemwartungsprogramms. Unter Mac OS X können Sie
auch den Drucker in der Druckerauswahl auswählen und auf Konfigurieren klicken.
Wenn Sie die obigen Anweisungen befolgt haben, muss nun in Windows oder
Mac OS automatisch der Web-Browser gestartet werden.
Wenn diese Anweisungen nicht zum Erfolg führen...
• ...wird der Drucker möglicherweise nicht vom Computer verwaltet. Verwenden
Sie in diesem Fall das HP Designjet Systemwartungsprogramm auf dem
Druckserver.
• ...wird der Drucker möglicherweise von Ihrem Computer verwaltet, dort ist
jedoch das HP Designjet Systemwartungsprogramm nicht installiert. Installieren
Sie es in diesem Fall von der CD HP Designjet Software Setup.
Auf der CD
des Druckers
im Abschnitt
“Probleme…” viele
weitere Hinweise zur
Behebung von
Druckerproblemen.
16
Verwenden
finden Sie
Page 97

HP Designjet 110plus/110 plus nr –
Nähere Informationen zum Bedienfeld
Das Bedienfeld des
Druckers enthält eine
Anzeige für
Statusinformationen, zwei
Lampen sowie drei Tasten,
mit denen Sie den
Druckerbetrieb steuern
können.
Tasten:
Kurzübersicht
Anzeige
Taste “Abbrechen”
Taste “OK”
Warnlampe
Netztaste
• Netztaste: Ein- und
Netzlampe
Ausschalten des
Druckers
• Abbrechen: Abbrechen der aktuellen Operation.
• OK: Diese Taste meldet dem Drucker,
• dass jetzt in das entsprechende Fach oder in die Papierzufuhr Papier
eingelegt ist und dass er mit dem Drucken beginnen kann.
•dass ein Problem behoben (z. B. ein Papierstau beseitigt oder ein defekter
Druckkopf ausgetauscht) wurde und die Operation, beispielsweise die
Druckausgabe, fortgesetzt werden soll.
Lampen:
• Netzlampe: Die grüne Netzlampe leuchtet, wenn der Drucker eingeschaltet ist.
• Warnlampe: Die gelbe Warnlampe leuchtet, wenn der Benutzer eine
Maßnahme durchführen muss, beispielsweise die obere Abdeckung schließen
(wenn die Anzeige leer ist).
Das Bedienfeld enthält einen Anzeigebereich, in dem Informationen über den
Drucker angezeigt werden. Die Symbole in den unteren zwei Dritteln des
Anzeigebereichs beziehen sich auf die Komponenten des Tintensystems für die
Farben Schwarz, Zyan, Magenta und Gelb.
17
Page 98

HP Designjet 110plus/110 plus nr –
Kurzübersicht
Nähere Informationen zu den Symbolen auf dem Bedienfeld
Die hier gezeigten vier Symbole geben den Tintenstand in den
einzelnen Tintenpatronen an.
Ein blinkendes Druckkopfsymbol (unten) weist auf ein
Problem mit diesem Druckkopf hin.
Belegt: Symbol blinkt:
Beim Drucken, beim
Abbrechen eines
Druckauftrags, beim
Trocknen und beim
Ausschalten. Das Symbol
blinkt schnell, wenn die
obere oder die seitliche
Abdeckung geöffnet ist.
Maßnahme: Schließen
Sie die obere oder
seitliche Abdeckung.
Symbol leuchtet nicht: Der
Drucker ist ausgeschaltet,
bereit oder wartet auf
einen Benutzereingriff.
Falsche Symbol blinkt:
Papierausrichtung:Das Papier ist
falsch ausgerichtet und
muss erneut geladen
werden. Maßnahme:
Laden Sie das Papier
erneut.
Symbol leuchtet nicht:
Normal.
Status der Symbol leuchtet:
Papierrolle: Die Rolle ist geladen.
Symbol blinkt: Die
Papierrolle ist
aufgebraucht oder
stecken geblieben.
Maßnahme: Laden Sie
eine neue Rolle, oder
beseitigen Sie den
Papierstau.
Symbol leuchtet nicht: Es
ist keine Rolle geladen.
Status des Symbol blinkt:
Blattpapiers: Kein Papier im Drucker
oder Papierstau.
Maßnahme: Legen Sie
Papier ein, oder beseitigen
Sie den Stau.
Symbol leuchtet nicht:
Normal.
Taste drücken: Symbol blinkt:
Der Drucker wartet.
Maßnahme: Drücken Sie
die Taste “OK”.
Symbol leuchtet nicht:
Normal.
Papierstau: Symbol blinkt:
Papier ist gestaut oder
das Papier bzw. der
Wagen ist stecken
geblieben.
Maßnahme: Beseitigen
Sie den Papierstau.
Siehe Seite 12.
Symbol leuchtet nicht:
Normal.
HP Designjet Systemwartung ausführen:
Symbol blinkt:
Hardwarefehler.
Maßnahme: Führen Sie
das HP Designjet
Systemwartungprogramm
aus (siehe Seite 16). Der
Drucker muss dazu
angeschlossen sein.
Symbol leuchtet nicht:
Normal.
18
Page 99

HP Designjet 110plus/110 plus nr –
Kurzübersicht
Nähere Informationen zu Kombinationen von blinkenden Symbolen
Rolle entladen
Symbol blinkt: Der Drucker wartet darauf,
dass die Rolle manuell entladen wird.
Maßnahme: Entladen Sie die Rolle
vollständig. Sie müssen die Spindel dazu
nicht abnehmen.
Symbol leuchtet nicht: Normal.
Rolle falsch ausgerichtet
Symbol blinkt: Die Papierrolle ist falsch
ausgerichtet und muss erneut geladen
werden.
Maßnahme: Entladen Sie die Papierrolle,
und laden Sie sie erneut. Achten Sie
besonders auf die richtige Ausrichtung.
Symbol leuchtet nicht: Normal.
19
Page 100

HP Designjet 110plus/110 plus nr –
Weitere Informationen
• zur Verwendung des Druckers
•zum Drucker
• zur Behebung von Druckerproblemen
...finden Sie auf der CD Verwenden des
Druckers oder (nur unter Windows) in der
Online-Hilfe des Druckertreibers.
Kurzübersicht
20
 Loading...