

Page 1

HP Designjet 110plus series
Quick reference guide
Part number: C7796-90245
Languages: ET
Size: A5
Paper: 80 g. recycling paper recommended, but we leave it up to each DC to use
the most cost efficient paper according to their Paper strategy.
Color: B+W
Binding: Saddle stitch
Pages: 52 + cover front and back.
Covers: 200 gr. recycling paper recommended, but we leave it up to ech DC to use
the most cost efficient paper according to their Paper strategy.
File: pdf format.
DO NOT PRINT THIS PAGE!
DO NOT PRINT THIS PAGE. THIS PAGE IS FOR REFERENCE ONLY!
Page 2
HP Designjet 110plus/110plus nr
Panduan Referensi Singkat
Page 3

HP Designjet 110 plus/110plus nr—Quick Reference Guide
How do I…?
How do I load sheets of paper? (general guidance).................................2
How do I load paper using the front path? .............................................3
How do I unload paper from the front path? ...........................................3
How do I load paper into the input tray? ................................................4
How do I print on large sheets?.............................................................6
How do I load a roll of paper? .............................................................8
How do I unload a roll of paper? ........................................................10
How do I replace ink cartridges?.........................................................11
The problem is…
The problem is a paper jam................................................................12
The problem is a roll of paper is jammed..............................................13
The problem is that the printer has stopped...........................................14
The problem is that the printer has not received the job ..........................15
The problem is… something else .........................................................16
Tell me about…
Tell me about the front panel...............................................................17
Tell me about the icons on the front panel .............................................18
Tell me about combinations of flashing icons.........................................19
Legal information
HP limited warranty statement .............................................................21
Regulatory notices .............................................................................24
More information
For more details of how to use your printer,
additional information about your printer (including
drivers and networking), and troubleshooting printer
problems, see the Using Your Printer CD or the on-
line help for the printer driver.
1
Page 4
HP Designjet 110plus/110 plus nr printer—
Quick Reference Guide
How do I load sheets of paper? (general guidance)
There are three ways of loading sheets of paper into the printer:
extensions
to support
paper
output tray
front path
input tray
rear
path
•The input tray at the front of the printer for multiple sheets of paper between
76×142mm (3×5.6inches) and 457×610 mm (18×24inches) (C+).
You can load up to 50 sheets of paper of 0.2 mm thickness (or 150 g/m²) in
the unextended tray, or 25 sheets of the same thickness in the extended tray.
Envelopes can also be loaded in the input tray.
•The front path for single sheets of paper between 110 × 205 mm
(4.3×8.1inches) and 625×1625mm (24.6×63.9inches) (A1 oversize).
•The rear path (upper slot) for single sheets of thick paper or other media
between 110×205 mm (4.3×8.1inches) and 625×1625mm
(24.6×63.9inches) (A1 oversize). The rear path (lower slot) is used for roll
input.
• The automatic roll feed enables you to load roll paper into the rear path. When
roll paper is loaded into the printer, it obstructs the paper path; therefore roll
paper must always be unloaded before printing on sheet paper (see page 8).
However the paper is loaded, it should always be loaded in portrait mode: the
leading edge of the paper should be the shorter edge.
The output tray extensions may be used to support sheets of paper up to 19 inches
in length. For sheets longer than 19 inches, close the output tray extensions and use
the extended input tray to support the paper as it emerges from the printer.
2
Page 5
HP Designjet 110plus/110 plus nr printer—
Quick Reference Guide
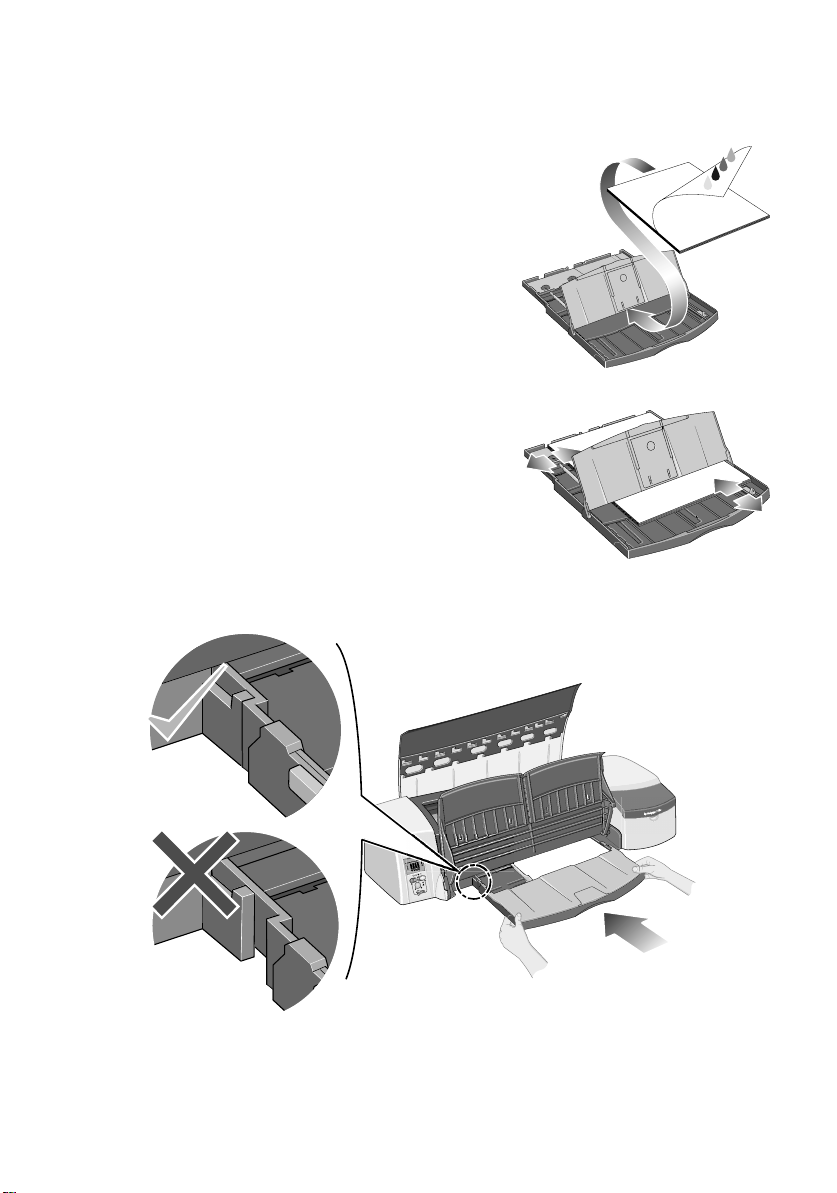
How do I load paper using the front path?
1. Place a single sheet of paper in the output tray, aligning it on the right of the
output tray, with the side that is to be printed on facing down. Do not stack
multiple sheets here.
2. Push the paper as far as it will go into the printer, maintaining its alignment to
the right.
3. Press the OK key (the upper right key) on the front panel.
The printer will check the alignment of the paper, and if it is misaligned, it will eject
the paper; in that case you will have to reload the paper.
How do I unload paper from the front path?
In case you want to change or remove the paper that you have loaded before
printing, for example to change the type of paper or to use a different input path:
• Press the Cancel and OK keys at the same time, to eject the paper.
3
Page 6
HP Designjet 110plus/110 plus nr printer—
Quick Reference Guide
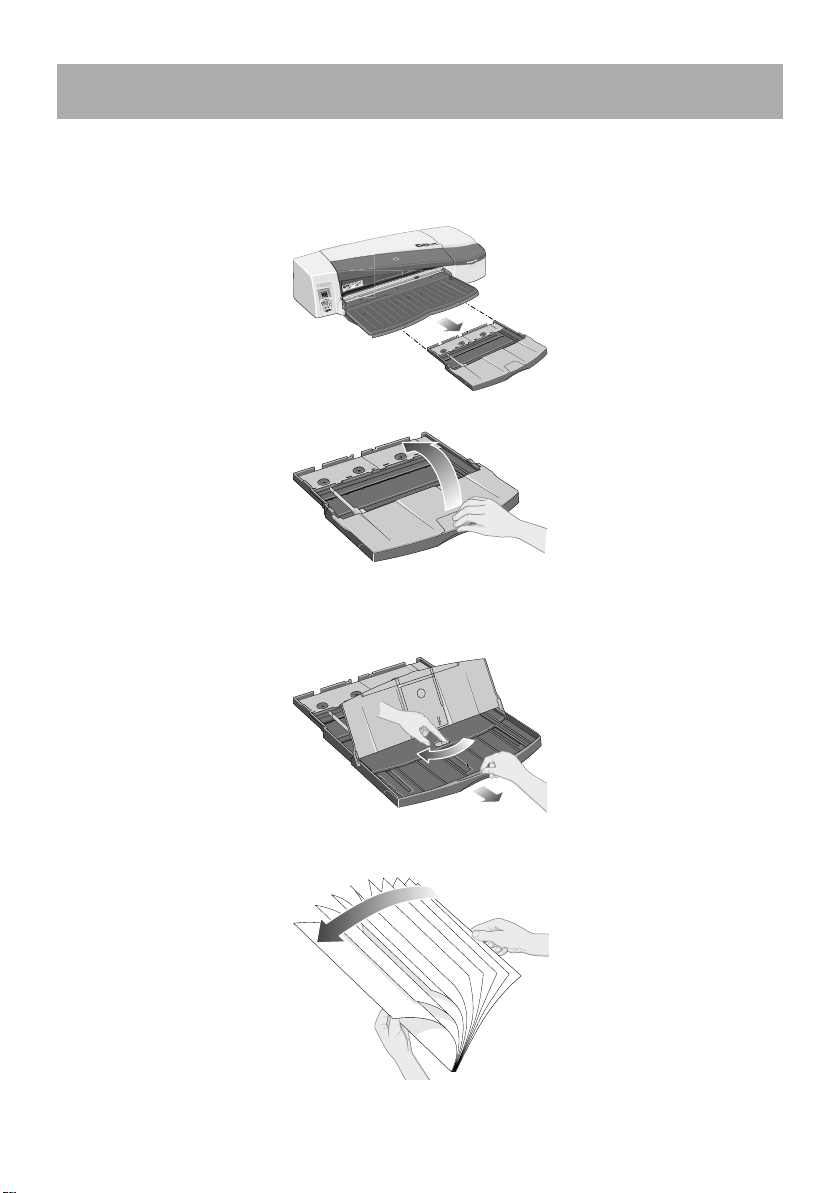
How do I load paper into the input tray?
Note that the input tray should be extended only when necessary: when using
paper larger than Legal- or A4-size.
1. Remove the input tray.
2. Lift up the tray cover.
3. If the paper you are using is larger than Legal- or A4-size, move the small tab
in the centre towards the left so that you can lengthen the tray. Then let go of
the tab and pull the tray extension out as far as it will go.
4. Riffle the paper. This helps to prevent adjacent sheets of paper from sticking to
each other.
4
Page 7
HP Designjet 110plus/110 plus nr printer—
5. Slide the paper into the tray under the tray
cover, ensuring that it touches the sides of the
tray on the right and on the printer side.
6. Push in the small tab on the right of the tray so
that it fits snugly against the paper. Move the
larger tab on the left of the tray to the right so
that it too fits snugly against the paper.
7. Close the tray cover.
8. Lift up the output tray and insert the input tray
into the printer, keeping it straight and pushing it in as far as it will go. The left
inside corner must be aligned with the plastic paper tray guide.
Quick Reference Guide
9. Lower the output tray. Note that if the input tray is extended, it will extend out
beyond the output tray.
5
Page 8
HP Designjet 110plus/110 plus nr printer—
4
5
6
1
2
3
3
Quick Reference Guide
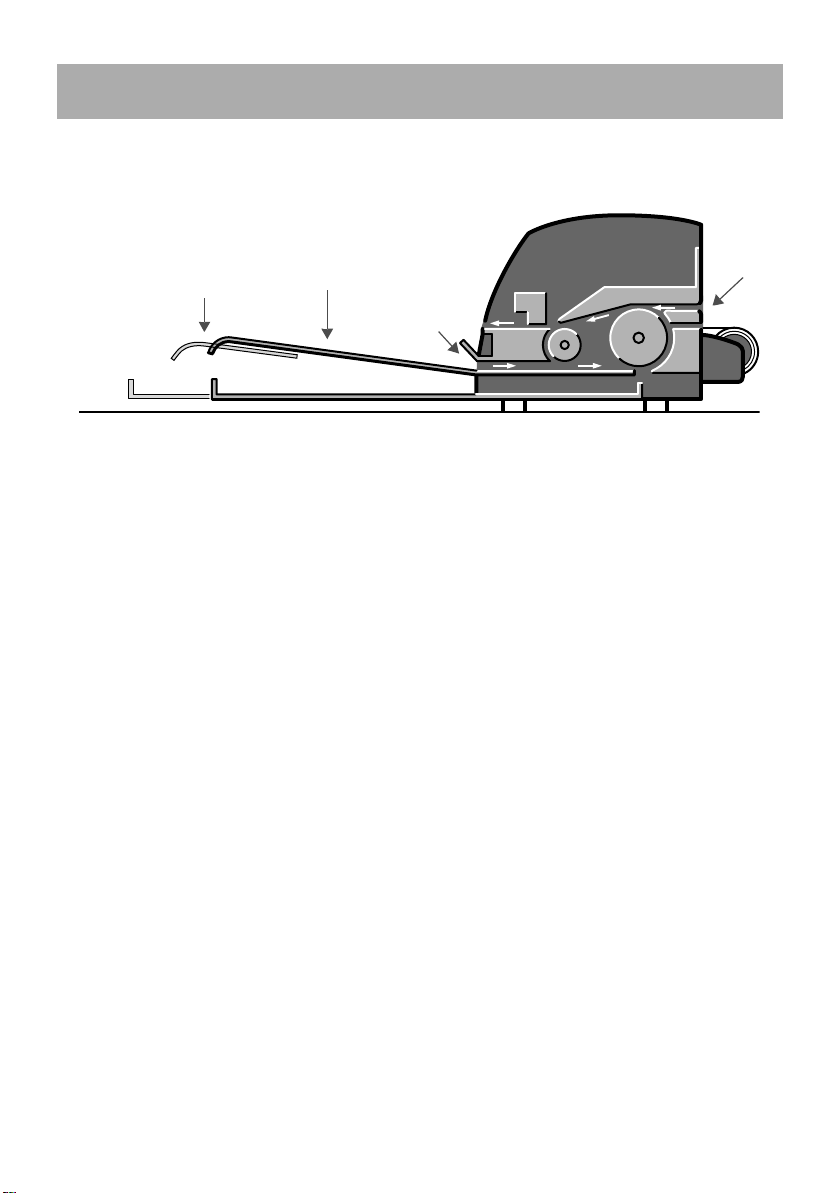
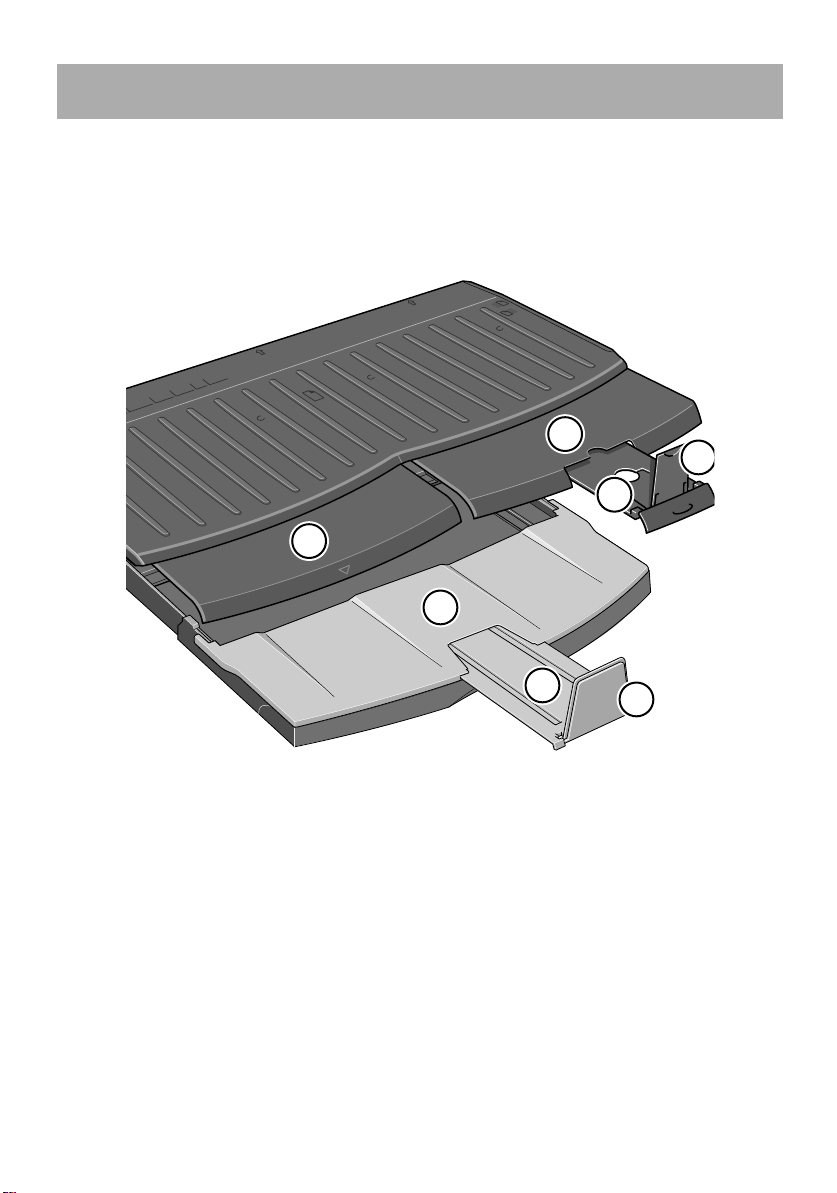
How do I print on large sheets?
The printer output system has several adjustable components. When printing on
large sheets of paper, it is important that you use the correct printer output
configuration. The following diagram shows adjustable parts of the printer output
system:
.
The table on the next page gives the output system configuration required for
various paper sizes.
Note:
• When using the main tray or roll feedback as source, make the necessary
adjustments to the output system to enable output to be stacked.
• If the output tray has prints stacked in it and you want to print from the roll feed,
empty the output tray and adjust it as necessary before printing.
...continued on next page...
6
Page 9
HP Designjet 110plus/110 plus nr printer—
Source Destination Width Length
1
23456
JIS B5 182mm 257mm
ANSI A 8.5" 11"
ISO A4 210mm 297mm
ARCH A 9" 12"
DIN C4 229mm 324mm
ISO B4 250mm 353mm
LEGAL 8.5" 14"
JIS B4 257mm 364mm
ISO A3 297mm 420mm
ANSI B 11" 17"
ARCH B 12" 18"
DIN C3 324mm 458mm
ANSI B+ 13" 19"
ISO B3 353mm 500mm
JIS B3 264mm 515mm
ANSI C 17" 22"
ISO A2 420mm 594mm
ARCH C 18" 24"
DIN C2 458mm 648mm
ISO B2 500mm 707mm
JIS B2 515mm 728mm
ISO A1 594mm 841mm
ANSI D 22" 34"
ARCH D 24" 36"
Custom Up to 24" Up to 12"
Custom Up to 24" Up to 18"
Custom Up to 24" Up to 24"
Custom Up to 24" Up to 36"
Custom Up to 24" > 36"
Media
Size
Position A3,... Closed DOWN
C-Size Tray Output Tray
A-Size
B-Size
C-Size
Closed N/A
UP
Position B4,... Closed DOWN Closed N/A
UP
N/A
UP
Position B4,... Position A3,... DOWN Closed N/A
UP
Position A3,...
Closed Closed UP
ClosedPosition A3,... DOWN
Position 17x22 Open
DOWN
Closed Closed UP Position A2,... Open
DOWN
Manual feed,
front or rear
Output Bin D-Size
DOWN
Closed Position Roll icon DOWN
DOWN
Closed Position Roll icon DOWN
Roll
accessory
Output Bin Custom Closed N/A
Closed N/A
Quick Reference Guide
7
Page 10
HP Designjet 110plus/110 plus nr printer—
Quick Reference Guide
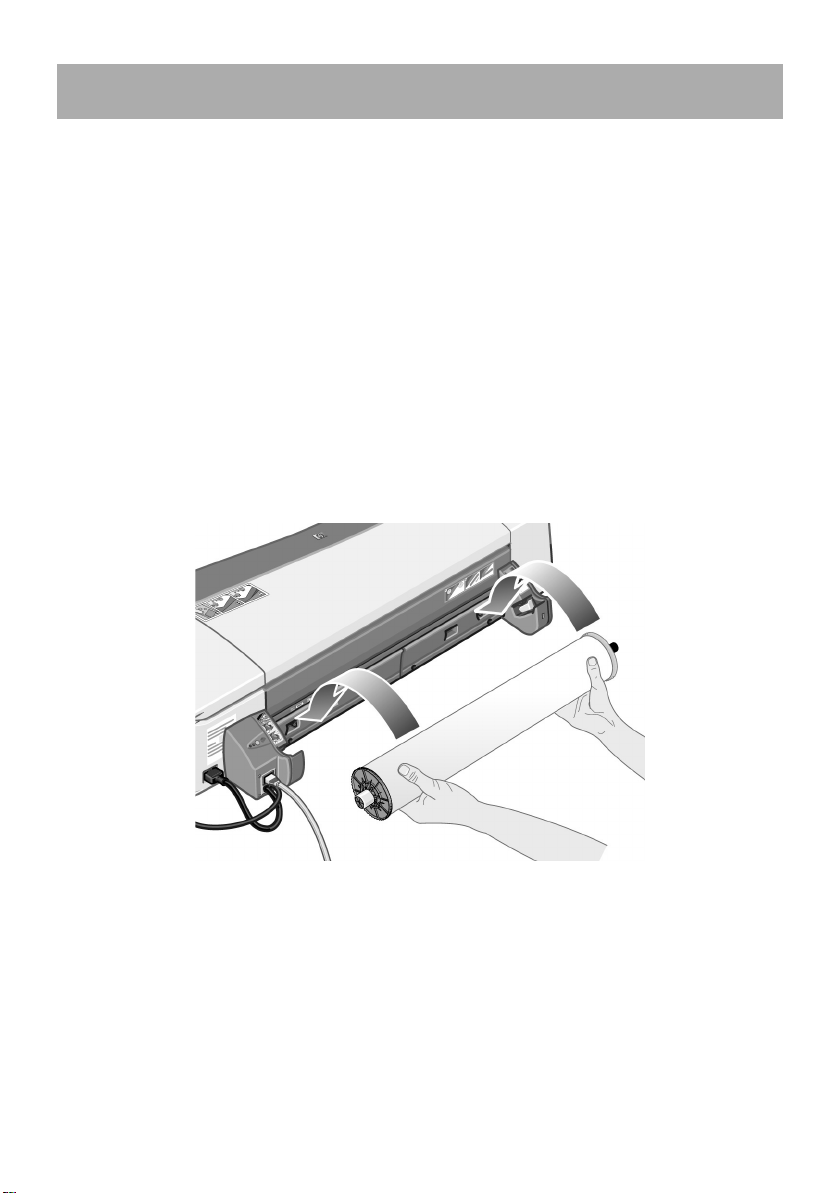
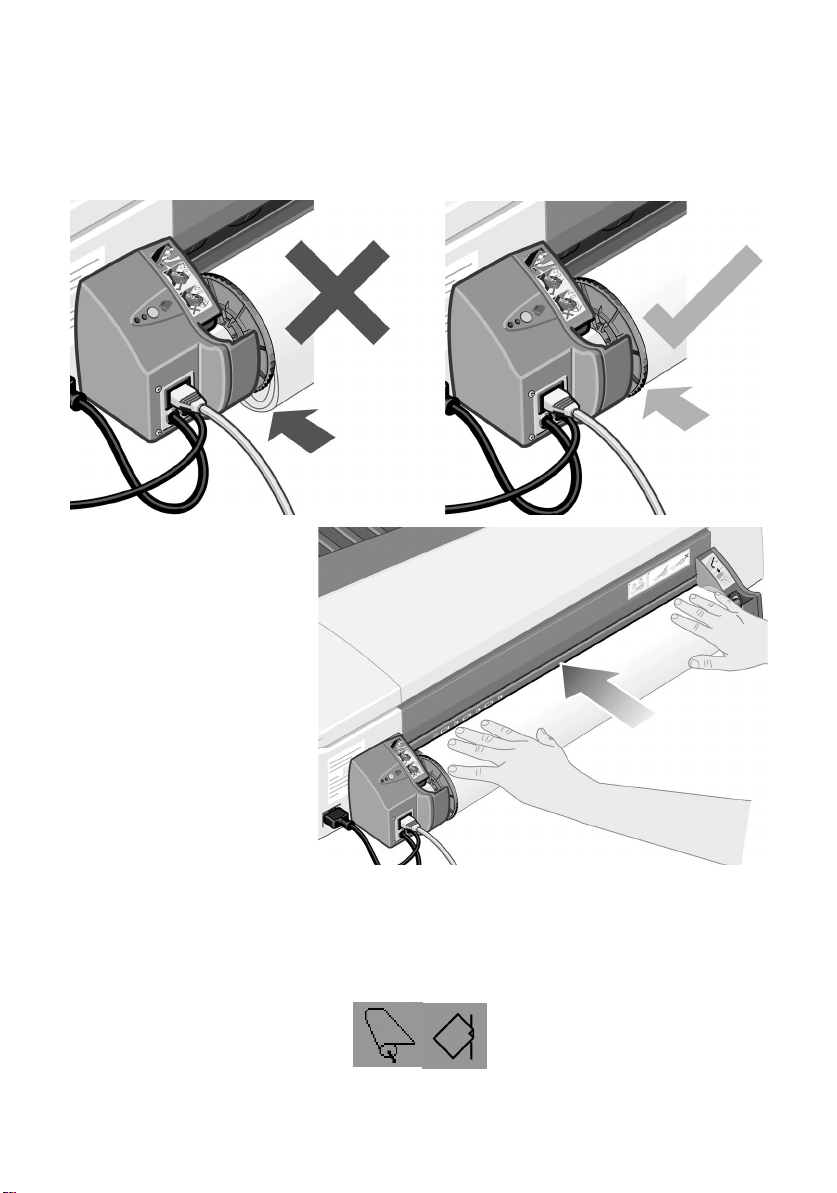
How do I load a roll of paper?
Only one source of paper can be used by the printer at any one time, so if a roll
of paper is loaded in the printer and you want to print to a sheet of paper, you
must first unload the roll. The roll is automatically reloaded the next time printing
to the roll is requested.
You can cut a roll without unloading it by pressing the OK key (top right key on
the front panel); the paper first advances about 1 cm or 0.4 inch.
1. Set your application to pick paper from the roll feed.
2. Select Print from your application.
3. Load a roll of the required paper onto the spindle. Ensure that the roll is the
right way round and that the blue stop on the spindle is pushed in against the
paper.
4. Insert the spindle into its retaining slots, with the blue stop on the right and the
black stop on the left as seen from the rear of the printer.
If the paper is glossy, we recommend that you wear gloves to avoid smearing
the surface of the paper.
5. Make sure that the leading edge of the roll is straight and perpendicular to its
side edges and has no irregularities.
...continued on next page...
8
Page 11
HP Designjet 110plus/110 plus nr printer—
Quick Reference Guide
How do I print on large sheets?
...continued from previous page...
6. Rewind any excess paper so that the paper is rolled tightly onto the spindle.
7. Insert the leading
edge of the paper into
the lower slot in the
rear of the printer.
Push the paper in until
it encounters
resistance, keeping
the sides of the paper
rolled tightly so that
the paper is not
skewed.
8. After emitting a
‘beep’, the printer will
take up the paper.
9. The printer will check
the alignment of the paper. If the paper is properly aligned, the roll icon will
appear on the display, indicating that the printer is ready to print.
If the paper is misaligned, the printer will eject the paper and the display will
show the misaligned and roll icons; you will have to reload the paper.
Repeat Step 6, so that the paper is tightly rolled onto the spindle.
9
Page 12
HP Designjet 110plus/110 plus nr printer—
Quick Reference Guide
How do I unload a roll of paper?
Important: Do not pull on the roll of paper once it is taken up by the printer,
that is, if there is any resistance.
There are two ways of unloading a roll of paper:
• If you want to unload the roll in order to feed a single sheet through the
printer, press the Cancel and OK keys on the front panel at the same time (see
below). If you later request printing to the roll, the Automatic Roll Feed will
then automatically reload the roll.
• If you want to unload the roll in order to completely remove it (for example,
you no longer wish to use this roll of paper):
1. Push the Eject button on the left roll feed support at the rear of the printer.
Avoid pressing the Eject button several times, as this can damage the paper.
2. Pull the roll towards you and remove the paper completely from the rear
paper path of the printer. The icons shown below will flash until the paper is
completely out, because if the paper is only partially removed, paper jams
may subsequently occur. Sometimes the paper may fall away from the rear
path by itself.
You do not need to remove the spindle from its supports in the printer.
10
Page 13
HP Designjet 110plus/110 plus nr printer—
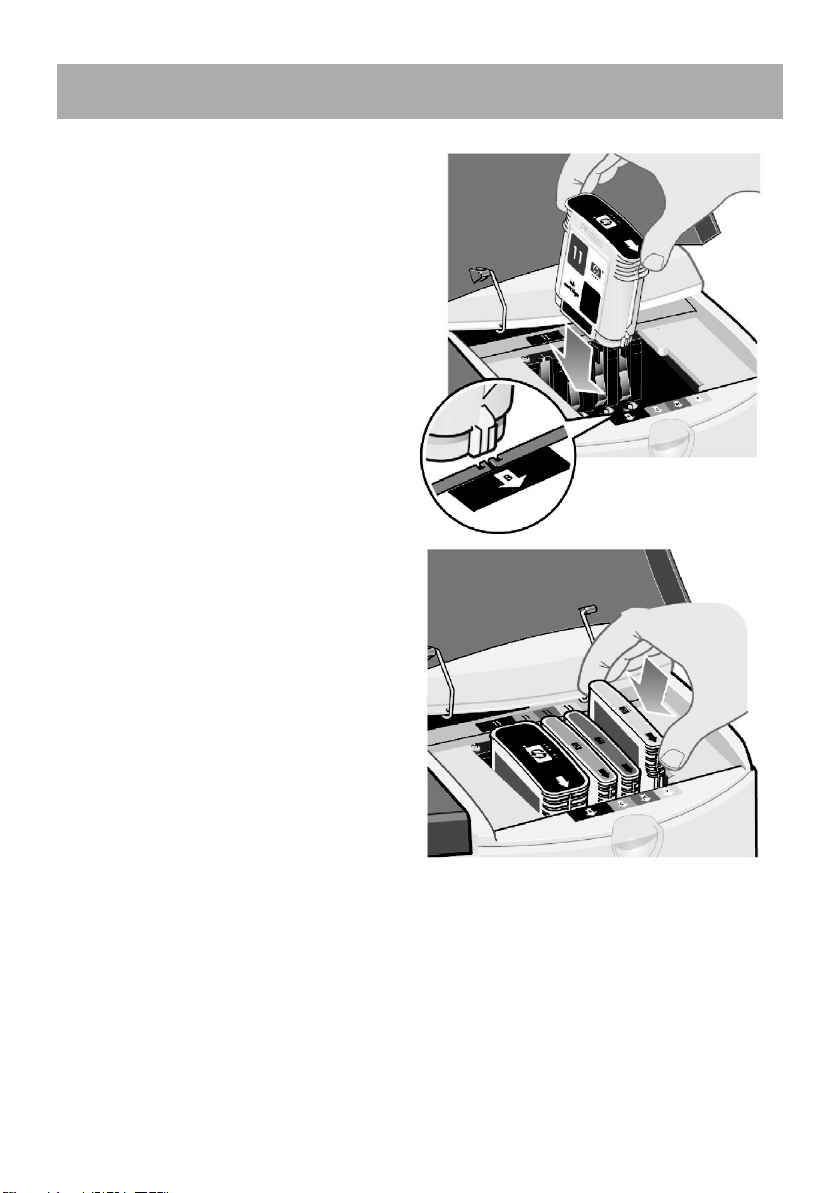
How do I replace ink cartridges?
1. Open the front hinged flap at the
right of the printer.
2. For each ink cartridge that needs to
be replaced:
• Gripping it by its shorter top
edges, lift the ink cartridge
vertically up and out of the
printer.
• Lower the new ink cartridge into
its slot until it clicks into place
and is quite secure.
Quick Reference Guide
3. Finally close the outer flap.
11
Page 14

HP Designjet 110plus/110 plus nr printer—
Rear path
Quick Reference Guide
The problem is a paper jam
1. Try pressing the OK key (the upper right key) on the printer’s front panel.
If this doesn't solve the problem…
2. Turn off the printer.
3. Remove all media from the tray. Pull out any paper that is visibly stuck.
4. Lift the top cover and pull out any paper that may be stuck.
Be careful when you lift the cover not to damage or disturb any of the tubes or
other internal parts of the printer.
5. Remove the rear path carefully by pressing the buttons on each of its sides and
pulling it straight out. If you don’t pull it straight out, you may damage the
paper sensor.
Removing the rear path gives access to the inside of the printer from the rear.
Pull out any paper that may be stuck inside or is accessible from the rear.
Replace the rear path and make sure it fits securely.
6. Turn on the printer.
7. We recommend that after clearing a paper jam you align the printheads to
avoid problems of poor print quality. To align printheads, start HP Designjet
System Maintenance (see page 16) and select Align printhead.
12
Page 15

HP Designjet 110plus/110 plus nr printer—
Quick Reference Guide
The problem is a roll of paper is jammed
If paper from the roll is jammed:
1. Turn off the printer.
2. Check in all places where the roll could be trapped:
• Remove the front paper tray. This will allow you to see inside the printer
through a slot in the front. Release and remove any trapped paper that is
accessible.
• Lift the top cover, being careful not to damage or disturb any of the tubes or
other internal parts of the printer. If there is any paper trapped in the wheels
inside the printer, release and remove the paper.
• Remove the rear path by pressing the buttons on each of its sides and pulling
it straight out. If you don't pull it straight out, you may damage the paper
sensor. If there is any paper trapped in the rollers inside the printer, release
and remove the paper.
3. Once the paper jam has been cleared, replace any parts of the printer
(paper tray, top cover, rear path) that you have removed/opened, making
sure they fit securely.
4. Turn on the printer.
5. Before reloading the paper roll, you must trim the leading edge of the roll
such that this edge is perfectly straight and at right-angles to the sides of the
roll.
13
Page 16

HP Designjet 110plus/110 plus nr printer—
The problem is that the printer has stopped
If the front panel looks like this and the yellow light
is flashing:
1. Open both parts of the hinged flap at the right
of the printer, lifting it right back so that you can
see the print carriage. Check that all packaging
material has been removed from around the
print carriage.
The carriage may move at this point. Wait until
it has stopped moving.
Quick Reference Guide
2. Check that the printhead cover is latched down.
The printer will not work if the latch is not
properly engaged.
3. Close the rear part and then the front part of the
hinged flap. The printer will not work if it is not
properly closed.
4. If the yellow light has not turned off, see the
Using Your Printer CD.
14
Page 17

HP Designjet 110plus/110 plus nr printer—
Quick Reference Guide
The problem is that the printer has not received the job
If your printer seems to be ignoring the printing job you have sent to it:
1. Check that the printer is correctly connected to the computer.
If the connection is through a network, print the printer’s configuration pages
(hold down the Power key while pressing the OK key four times), and check in
the TCP/IP section that the Status is shown as Ready. Make a note of the
printer’s IP address and subnet mask, which are in the same section.
• If the IP address is 0.0.0.0 or 192.0.0.192, refer to your printer’s setup
poster.
• If the Status is Ready, you can use a Web browser to check the network
connection between printer and computer. Simply type your printer’s IP
address into your browser, where you would normally type a URL. If you get
a reply from the printer, then the network connection between the printer
and the computer is working.
• If the Status is Not Ready, or if the printer does not reply to the Web
browser, check that the printer’s IP address and subnet mask belong to your
network.
• If necessary, consult your network administrator.
2. Check that the printer queue is not paused.
3. If you are using Mac OS X, make sure you selected “HP IP Printing” when you
created your printer, and not “IP Printing”.
15
Page 18

HP Designjet 110plus/110 plus nr printer—
Quick Reference Guide
The problem is… something else
The HP Designjet System Maintenance utility gives you access to support and
troubleshooting facilities on the Web, if you have an Internet connection. Even
without an Internet connection, it provides several facilities that may help to solve
printer problems.
To start HP Designjet System Maintenance under Windows:
1. From the Windows taskbar, select Start > Settings > Printers.
2. Right-click your printer’s icon and select Printing Preferences (Windows 2000
or XP), Document Defaults (Windows NT 4), or Properties (Windows 98 or
Me) from the pop-up menu.
3. Select the Advanced tab and click the Maintenance button.
To start HP Designjet System Maintenance under Mac OS, double-click the HP
Designjet System Maintenance icon on your desktop. Alternatively, under Mac OS
X you can select your printer in the Print Center and click Configure.
Under Windows or Mac OS, your Web browser should be started automatically
when you have followed the instructions above.
If you cannot follow these instructions successfully…
• …it may be that your computer does not manage the printer. In this case, use
HP Designjet System Maintenance from the printer server.
• …or it may be that the printer is managed by your computer but HP Designjet
System Maintenance has not been installed. In this case, install it from the HP
Designjet Software Setup CD.
For much more about
troubleshooting printer
problems, see the
section ‘The Problem
Is…’ on the
Printer
16
Using Your
CD.
Page 19

HP Designjet 110plus/110 plus nr printer—
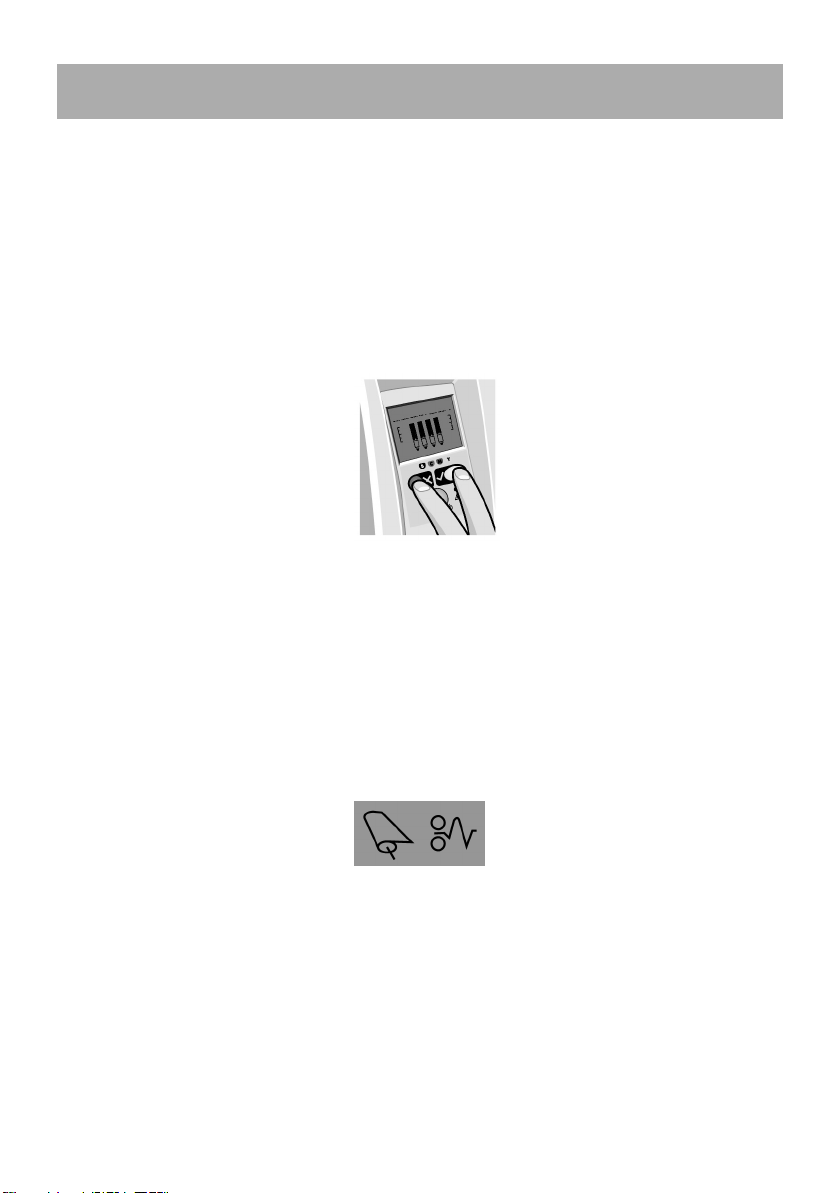
Display
Cancel key
OK key
Attention light
Power key
Power light
Quick Reference Guide
Tell me about the front panel
The front panel (or control
panel) of the printer gives
information about the state
of the printer, and also has
three keys (or buttons) that
let you control the actions of
the printer.
The keys are:
• Power: Turns the power
on and off.
• Cancel: Cancels the
current operation.
• OK: Indicates to the printer:
• that you have now loaded paper in the appropriate tray or feed, and the
printer may start printing;
• that you have corrected a problem—for example, you have removed
jammed paper or replaced a failing printhead—and that the printer should
continue with its activity—for example, it should resume printing;
The lights are:
• Power: The Power (green) light is on when the printer is switched on.
• Attention: The Attention (yellow) light is on when the printer requires a user
action—for example, to close the top cover (if the display is blank).
The printer’s front panel has a Display area that gives information about the printer.
The sets of icons in the lower two-thirds of the display refer respectively to the Black,
Cyan, Magenta, and Yellow components of the ink system.
17
Page 20

HP Designjet 110plus/110 plus nr printer—
Quick Reference Guide
Tell me about the icons on the front panel
The four icons shown here refer to the amount of ink in each of
the ink cartridges.
A flashing printhead icon (at the bottom) indicates a
problem with that printhead.
Busy: When flashing:
Printing, cancelling
job, drying, powering
off. The icon flickers if
the top or side cover is
open. Action: close the
top cover or close the
side cover.
When off: Printer is
powered off, idle, or
awaiting user action.
Paper When flashing:
misaligned: The paper is
misaligned and must
be reloaded to print.
Action: Reload the
paper.
When off: Normal.
State of the When on:
roll: The roll is loaded.
When flashing: The
roll is empty or stuck.
Action: Load roll.
When off: There is no
roll loaded.
Use HP Designjet System Maintenance:
When flashing: Hardware error.
Action: Run the HP Designjet System Maintenance utility for the
printer (see page 16). Make sure that the printer is connected.
When off: Normal.
State of When flashing:
Sheet Paper: Out of paper or
paper stalled.
Action: Add paper or
clear the paper path.
When off: Normal.
Press a Key: When flashing:
Printer waiting.
Action: Press the OK
key.
When off: Normal.
Paper jam: When flashing:
Paper jammed, paper
stalled or carriage
stalled.
Action: Clear the
paper jam.
See page 12.
When off: Normal.
18
Page 21

HP Designjet 110plus/110 plus nr printer—
Tell me about combinations of flashing icons
Unload roll
When flashing: The printer is waiting for you
to unload the roll manually.
Action: Unload the roll completely; you do
not need to remove the spindle from the
printer.
When off: Normal.
Roll misaligned
When flashing: The roll of paper is
misaligned and must be reloaded.
Action: Unload the roll and reload it, paying
special attention to alignment.
When off: Normal.
Quick Reference Guide
19
Page 22

HP Designjet 110plus/110 plus nr printer—
For much more about…
• how to use your printer
• additional information about your printer
• troubleshooting printer problems
…see the Using Your Printer CD or (under
Windows only) the online help for the
printer driver.
Quick Reference Guide
20
Page 23

HP Designjet 110plus/110 plus nr printer—
Quick Reference Guide
HP limited warranty statement
HP Designjet 110plus/110 plus nr
HP product Duration of limited warranty
Printer and related HP hardware: 1 year (from the date of purchase by the customer)
Software: 90 days (from the date of purchase by the customer)
Black printhead: Until the “end of warranty” date printed on the product
is reached, or 530 cm³ of HP ink have been cycled
through the printhead, whichever occurs first
Cyan, magenta, and yellow
printheads:
Ink cartridge: Until the genuine HP ink is depleted as indicated by the
Until the “end of warranty” date printed on the product
is reached, or 200 cm³ of HP ink have been cycled
through the printhead, whichever occurs first
printer, or the “end of warranty” date printed on the
product is reached, whichever occurs first
A: Extent of limited warranty
1. Hewlett-Packard (HP) warrants to the end-user customer that the HP products specified
above will be free from defects in materials and workmanship for the duration specified
above. Customer is responsible for maintaining proof of date of purchase.
2. For software products, HP’s limited warranty applies only to a failure to execute
programming instructions. HP does not warrant that the operation of any product will be
uninterrupted or error free.
3. HP’s limited warranty covers only those defects which arise as a result of appropriate
use of the product, and does not apply to any:
a. Improper or inadequate maintenance or modification;
b. Software, interfacing, media, parts, or supplies not provided or supported by HP; or
c. Operation outside the product’s specifications.
Routine printer maintenance operations in the HP Designjet 110plus/110 plus nr, such
as cleaning and preventive maintenance services (including parts contained in any
preventive maintenance kit and HP service engineer visits), are not covered by HP’s
limited warranty, but in some countries may be covered under a separate support
contract.
4. For HP printer products, the use of a refilled or non-original HP consumable product (ink,
printhead or ink cartridge) does not affect either the warranty to the customer or any HP
support contract with the customer. However, if printer failure or damage is attributable
to the use of a non-HP or refilled ink cartridge, HP will charge its standard time and
materials charges to service the printer for the particular failure or damage.
5. If HP receives, during the applicable warranty period, notice of a defect in any
software, media, or consumable product which is covered by HP’s warranty, HP shall
deliver another product to customer to replace the defective one. If HP receives, during
the applicable warranty period, notice of a defect in any hardware product which is
21
Page 24

HP Designjet 110plus/110 plus nr printer—
covered by HP’s warranty, HP shall either repair or replace the defective product, at
HP’s option. A replacement part, in return for a defective one and remote part
installation assistance, if needed, may be provided to the customer, at HP’s option. HP
may, at its option, waive the requirement for the customer to return the defective part.
6. If HP is unable to repair or replace, as applicable, a defective product which is covered
by HP’s warranty, HP shall, within a reasonable time after being notified of the defect,
refund the purchase price for the product.
7. HP shall have no obligation to repair, replace, or refund until the customer returns the
defective product to HP.
8. Any replacement product may be either new or like-new, provided that it has
functionality at least equal to that of the product being replaced.
9. HP products may contain remanufactured parts or components equivalent to new in
performance or may have been subject to incidental use.
10.HP’s limited warranty is valid in any country or locality where HP has a support
presence for this product and where HP has marketed this product. The level of warranty
service you receive may vary according to local standards. HP will not alter form, fit or
function of the product to make it operate in a country for which it was never intended to
function for legal or regulatory reasons. Contracts for additional services may be
available for any authorized HP service facility where the listed HP product is distributed
by HP or an authorized importer.
11.Any applicable print cartridge warranty shall not apply to HP print cartridges that have
been refilled, remanufactured, refurbished, misused, or tampered with in any way.
Quick Reference Guide
B. Limitations of warranty
1. TO THE EXTENT ALLOWED BY LOCAL LAW, NEITHER HP NOR ITS THIRD PARTY
SUPPLIERS MAKE ANY OTHER WARRANTY OR CONDITION OF ANY KIND,
WHETHER EXPRESS OR IMPLIED, WITH RESPECT TO THE HP PRODUCTS, AND
SPECIFICALLY DISCLAIM THE IMPLIED WARRANTIES OR CONDITIONS OF
MERCHANTABILITY, SATISFACTORY QUALITY, AND FITNESS FOR A PARTICULAR
PURPOSE.
C. Limitations of liability
1. To the extent allowed by local law, the remedies provided in this Warranty Statement
are the customer’s sole and exclusive remedies.
2. TO THE EXTENT ALLOWED BY LOCAL LAW, EXCEPT FOR THE OBLIGATIONS
SPECIFICALLY SET FORTH IN THIS WARRANTY STATEMENT, IN NO EVENT SHALL HP
OR ITS THIRD PARTY SUPPLIERS BE LIABLE FOR DIRECT, INDIRECT, SPECIAL,
INCIDENTAL, OR CONSEQUENTIAL DAMAGES, WHETHER BASED ON CONTRACT,
TORT, OR ANY OTHER LEGAL THEORY AND WHETHER ADVISED OF THE POSSIBILITY
OF SUCH DAMAGES.
22
Page 25

HP Designjet 110plus/110 plus nr printer—
Quick Reference Guide
D. Local law
1. This Warranty Statement gives the customer specific legal rights. The customer may also
have other rights which vary from state to state in the United States, from province to
province in Canada, and from country to country elsewhere in the world.
2. To the extent that this Warranty Statement is inconsistent with local law, this Warranty
Statement shall be deemed modified to be consistent with such local law. Under such
local law, certain disclaimers and limitations of this Warranty Statement may not apply
to the customer. For example, some states in the United States, as well as some
governments outside the United States (including provinces in Canada), may:
a. Preclude the disclaimers and limitations in this Warranty Statement from limiting the
statutory rights of a consumer (e.g. the United Kingdom);
b. Otherwise restrict the ability of a manufacturer to enforce such disclaimers or
limitations; or
c. Grant the customer additional warranty rights, specify the duration of implied
warranties which the manufacturer cannot disclaim, or not allow limitations on the
duration of implied warranties.
3. FOR CONSUMER TRANSACTIONS IN AUSTRALIA AND NEW ZEALAND, THE TERMS
IN THIS WARRANTY STATEMENT, EXCEPT TO THE EXTENT LAWFULLY PERMITTED,
DO NOT EXCLUDE, RESTRICT, OR MODIFY, AND ARE IN ADDITION TO, THE
MANDATORY STATUTORY RIGHTS APPLICABLE TO THE SALE OF HP PRODUCTS TO
SUCH CUSTOMERS.
Revision: February 10th, 2003
23
Page 26

HP Designjet 110plus/110 plus nr printer—
Quick Reference Guide
Regulatory notices
You can obtain current Material Safety Data Sheets for the ink systems used in the printer by
mailing a request to this address: Hewlett-Packard Customer Information Center, 19310
Pruneridge Avenue, Dept. MSDS, Cupertino, CA 95014, U.S.A.
There is also a Web page:
http://www.hp.com/hpinfo/community/environment/productinfo/psis_inkjet.htm
Regulatory Model Number
For regulatory identification purposes, your product is assigned a Regulatory Model
Number. The Regulatory Model Number for your product is BCLAA-0302. This regulatory
number should not be confused with the marketing name (Designjet 100 series printer) or
product numbers (C7791X, C7796X).
24
Page 27

HP Designjet 110plus/110 plus nr printer—
DECLARATION OF CONFORMITY
according to ISO/IEC Guide 22 and EN 45014
Manufacturer's Name: Hewlett-Packard Española S.A.
Manufacturer's Address: Inkjet Commercial Division
Declares that the product
Product Name: HP Designjet 100 Series Inkjet Printers
Model Numbers: C7791X and C7796X (where X represents any single letter)
Product Accessory: All
Regulatory Model: BCLAA-0302
Conforms to the following Product Specifications
Safety: IEC 60950:1999
EMC:
Supplementary Information
The product herewith complies with the requirements of the Low-Voltage Directive 73/23/EEC and
the EMC Directive 89/336/EEC and carries the CE marking accordingly.
(1)
The product exhibits class A operation when connected to LAN cables using print server
accessories.
(2)
The product was tested in a typical user configuration
(3)
This Device complies with part 15 of the FCC Rules. Operation is subject to the following two
Conditions:
1. this device may not cause harmful interference, and
2. this device must accept any interference received, including interference that may cause
undesired operation
Sant Cugat del Vallès (Barcelona),
October 24
th
, 2003
Avenida Graells, 501
08714 Sant Cugat del Vallès
Barcelona, Spain
EN 60950:2000
IEC 60825-1:1993 + A1
EN 60825-1:1994 + A11 Class 1 for Laser/LED
CISPR 22:1997 / EN 55022:1998 Class B
CISPR 24:1997 +A1 / EN 55024:1998 +A1
IEC 61000-3-2:2001 / EN 61000-3-2:2000
IEC 61000-3-3:2002 / EN 61000-3-3:1995 +A1
FCC Title 47 CFR, Part 15 Class B
Quick Reference Guide
(1)(2)
(1)(3)
Josep-Maria Pujol,
Product Regulations Manager
European contact: your local Hewlett-Packard Sales and Service Office or Hewlett-Packard GmbH,
Department HQ TRE, Herrenberger Strasse 140, D-71034 Böblingen, Germany (Fax: +49 7031
143143)
25
Page 28

HP Designjet 110 plus/110plus nr printer—
Quick Reference Guide
© 2005 Hewlett-Packard Company
Avenida Graells 501
08174 Sant Cugat del Vallès
Barcelona
Spain
26
Page 29

HP Designjet 110 plus/110plus nr
如何使用…?
印表機 — 快速參考指南
如何裝入單張紙?(一般指引
如何使用正面送紙匣裝入紙張?
如何從正面送紙通道中取出紙張?
如何將紙張裝入進紙匣?
如何在大型單張紙上列印?
如何裝入捲筒紙?
如何取出捲筒紙?
如何更換墨水匣?
故障排除
…
印表機夾紙之故障排除
捲筒紙夾紙之故障排除
印表機停止之故障排除
印表機無法接收工作之故障排除
其他問題之故障排除
.......................................................................................8
.....................................................................................10
.....................................................................................11
.................................................................................16
關於…
關於前控制面板
關於前控制面板上的圖示
關於閃爍圖示的組合
........................................................................................17
.................................................................................19
) .......................................................................2
...................................................................3
................................................................3
.............................................................................4
..........................................................................6
..............................................................................12
..............................................................................13
..............................................................................14
.................................................................15
...........................................................................18
法律資訊
有限保固聲明
HP
法規資訊
..................................................................................................23
......................................................................................21
更多資訊
如需有關如何使用印表機、印表機 (包括驅動程式
與網路) 的相關附加資訊及排除印表機故障之更多
詳細資料,請參閱
式的線上說明。
使用印表機
CD 或印表機驅動程
1
Page 30

HP Designjet 110plus/110 plus nr
印表機 —
快速參考指南
如何裝入單張紙?(一般指引
將單張紙裝入印表機的方法共有以下三種:
延伸板
承接紙張
• 印表機前面的進紙匣用於裝入
釐
(18 x 24
張
0.2
英吋
公釐厚 (或
紙張。也可以在進紙匣中裝入信封。
• 正面送紙通道用於裝入
(24.6 x 63.9
英吋
• 背面送紙通道 (上方插槽) 用於裝入較厚單張紙或
英吋) 與
625 x 1625
質。背面送紙通道 (下方插槽) 用於捲筒進紙。
出紙匣
正面送紙通道
進紙匣
公釐
(4.3 x 8.1
公釐
英吋
(3 x 5.6
) (A1
76 x 142
之間的多張紙。您可以在非延伸式紙匣中裝入多達
) (C+)
150 g/m²)
的紙,或在延伸式紙匣中裝入
110 x 205
特大尺寸) 之間的單張紙。
) (A1
公釐
(24.6 x 63.9
)
英吋) 與
英吋) 與
110 x 205
特大尺寸) 之間的其他材
457 x 610
張相同厚度的
25
625 x 1625 公釐
公釐
(4.3 x 8.1
背面送
紙通道
公
50
• 自動捲筒進紙器可讓您將捲筒紙裝入背面送紙通道。捲筒紙裝入印表機時,會
堵塞送紙通道;因此在單張紙上列印之前,務必取出捲筒紙 (請參閱第
8 頁)
但是,務必以直向模式裝入紙張:紙張的前緣應為較短的邊緣。
出紙匣延伸板可用於承接長達
英吋的單張紙。對於長度超過
19
英吋的單張
19
紙,請合上出紙匣延伸板,使用延伸式進紙匣承接從印表機中輸出的紙張。
2
。
Page 31

HP Designjet 110plus/110 plus nr
印表機 —
快速參考指南
如何使用正面送紙匣裝入紙張?
在出紙匣中放入單張紙,使其與出紙匣的右側對齊,且列印面向下。請勿在
1.
此處堆疊多張紙。
將紙張推入印表機,並儘可能往裡推,同時保持紙張與右側對齊。
2.
確定
按下前控制面板上的
3.
鍵 (右上方的按鍵)。
印表機將檢查紙張是否對齊,如果未對齊,印表機會退出紙張。在此情況下,
您必須重新裝入紙張。
如何從正面送紙通道中取出紙張?
如果您要在列印之前更換或取出已裝入的紙張,例如更換紙張類型或使用不同的
送紙匣,請執行以下步驟:
•
同時
按下取消與確定鍵,以退出紙張。
3
Page 32

HP Designjet 110plus/110 plus nr
如何將紙張裝入進紙匣?
印表機 —
快速參考指南
請記住,只在需要時才打開進紙匣:使用大於
卸下進紙匣。
1.
打開紙匣護蓋。
2.
如果使用的紙張大於
3.
以便加長紙匣。然後,鬆開槽片,然後儘可能拉出紙匣延伸板。
Legal 或 A4
尺寸,請將中央的小槽片向左移動,
Legal 或 A4
尺寸的紙張時。
快速翻動紙張,以免部分紙張黏在一起。
4.
4
Page 33

HP Designjet 110plus/110 plus nr
將紙張滑入紙匣護蓋下的紙匣中,並確保紙張
5.
觸及紙匣的右側與印表機一側。
推動紙匣右側的小槽片,使其剛好緊靠紙張。
6.
將紙匣左側的較大槽片移至右側,使其
剛好緊靠紙張。
合上紙匣護蓋。
7.
提起出紙匣,然後將進紙匣插入印表機,並保
8.
持平直且儘可能向內推。左側內角必須與塑膠
進紙匣導板對齊。
印表機 —
快速參考指南
放下出紙匣。請注意,如果拉開進紙匣,它會比出紙匣還長。
9.
5
Page 34

HP Designjet 110plus/110 plus nr
印表機 —
快速參考指南
如何在大型單張紙上列印?
印表機輸出系統具有多個可調整的元件。在大型單張紙上列印時,請務必使用正
確的印表機輸出設定。下圖顯示印表機輸出系統的可調整零件:
3
1
2
3
6
5
下頁中的表格提供各種紙張尺寸所需的輸出系統設定。
註:
• 在將主要紙匣或捲筒進紙器作為來源時,請對輸出系統進行必要的調整,
以便使列印輸出能夠堆疊。
• 如果出紙匣中已有圖件堆疊,而您要從捲筒進紙器列印,請清空出紙匣
並在列印前進行必要的調整。
...
6
續下頁
4
...
Page 35

HP Designjet 110plus/110 plus nr
印表機 —
快速參考指南
7
Page 36

HP Designjet 110plus/110 plus nr
印表機 —
快速參考指南
如何裝入捲筒紙?
印表機在任何時候只能使用一種紙張來源。因此,如果印表機中裝入捲筒紙,而
您要列印單紙張,則您必須先取出捲筒紙。當下次需要列印捲筒紙時,印表機將
自動重新裝入捲筒紙。
您可以按下 「確定」鍵 (前控制面板的右上角按鍵),以便不取出捲筒紙而進行裁
切;紙張首先前移約
將應用程式設定為從捲筒進紙器拾取紙張。
1.
在應用程式中選擇 「列印」。
2.
將所需的捲筒紙裝在捲軸上。確定捲筒紙的捲繞方向正確,且捲軸上的藍色
3.
止動器已緊靠紙張推入。
將捲軸插入固定槽,使藍色止動器位於右側,黑色止動器位於左側 (面對印
4.
表機背面時)。
1
公分或
0.4
英吋。
如果紙張是光面紙,建議您戴上手套以免弄髒紙張表面。
請確定捲筒紙前緣平直且與邊緣垂直,沒有任何不規則現象。
5.
8
續下頁
...
...
Page 37

HP Designjet 110plus/110 plus nr
如何在較大單張紙上列印?
續上頁
...
6.
7.
...
將多出的紙張繞回,使紙張緊緊地捲繞在捲軸上。
將紙張前緣插入印表
機背面的
將紙張往裡推直至
遇到阻力,並使紙張
兩邊緊緊捲繞,防止
歪斜。
下方
插槽。
印表機 —
快速參考指南
發出 「嗶」聲後,
8.
印表機會拾取紙張。
印表機會檢查紙張是
9.
否已對齊。如果紙張
已正確對齊,下列捲
筒紙圖示將出現在顯
示幕中,表示印表機
已就緒並準備列印。
如果紙張未對齊,印
表機將退出紙張,且顯示幕上將顯示下列未對齊的捲筒紙圖示;您必須重新
裝入紙張。
重複步驟 6,使紙張緊緊地捲繞在捲軸上。
9
Page 38

HP Designjet 110plus/110 plus nr
印表機 —
快速參考指南
如何取出捲筒紙?
重要事項: 請勿在有任何阻力的情況下,用力拉印表機已拾取的捲筒紙。
取出捲筒紙的方法有以下兩種:
• 如果您要取出捲筒紙以便將單張紙送入印表機,請
的
取消
與
確定
鍵 (請參見下圖)。如果稍後您要在捲筒紙上列印,自動捲筒
同時
按下前控制面板上
進紙器則會自動重新裝入捲筒紙。
• 如果您要完全取出捲筒 (例如,您不想再使用此捲筒紙):
按下印表機後面左側捲筒進紙器托架上的退出按鈕。
1.
鈕,否則可能會損壞紙張
將捲筒紙朝自己的方向拉動,然後取出印表機背面送紙通道中的所有紙張。
2.
。
避免多次按下退出按
下面顯示的圖示將會閃爍,直至取出全部紙張,因為如果僅取出部分紙張,
以後還可能會夾紙。有時紙張可能會從背面送紙通道中自行退出。
您無需從印表機的捲軸托架上取出捲軸。
10
Page 39

HP Designjet 110plus/110 plus nr
如何更換墨水匣?
打開印表機右側的前鉸接折翼。
1.
對每個需要更換的墨水匣,請執行
2.
下列步驟:
• 握住墨水匣的較短頂端邊緣,
將之垂直向上提出印表機。
• 將新印字頭放入插槽,直至其卡
入定位並且非常穩固。
最後合上外部折翼。
3.
印表機 —
快速參考指南
11
Page 40

HP Designjet 110plus/110 plus nr
印表機夾紙之故障排除
嘗試按下印表機前控制面板上的
1.
印表機 —
確定
鍵 (右上方的按鍵)。
快速參考指南
如果問題仍無法解決
關閉印表機電源。
2.
取出紙匣中的所有材質,拉出任何卡住的紙張。
3.
提起頂蓋並拉出任何可能卡住的紙張。
4.
…
提起護蓋時請小心,切勿損壞或弄亂任何墨水管或印表機的其他內部零件。
平直
按下背面送紙匣兩側的按鈕,將其
5.
不是平直拉出,可能會損壞紙張感應器
拉出,小心地卸下背面送紙匣。
。
背面送紙通道
卸下背面送紙通道,可讓您從背面操作印表機內部零件。
如果
拉出任何可能卡在裡面或可從背面取出的紙張。
重新裝上背面送紙通道,並確定其穩固安裝。
開啟印表機電源。
6.
我們建議您在清除夾紙之後校正印字頭,以免出現較差的列印品質問題。要
7.
校正印字頭,請啟動
印字頭
。
HP Designjet
系統維護
請參閱第
(
16 頁)
,然後選擇
12
校正
Page 41

HP Designjet 110plus/110 plus nr
印表機 —
快速參考指南
捲筒紙夾紙之故障排除
如果捲筒紙夾紙:
關閉印表機電源。
1.
檢查可能會夾住捲筒紙的所有地方:
2.
• 卸下正面供紙匣。這樣可讓您透過前面的插槽查看印表機內容。鬆開並清除
任何可接觸到的夾紙。
• 提起頂蓋,請小心不要損壞或弄亂任何墨水管或印表機的其他內部零件。
如果印表機內的導輪中有任何夾紙,請鬆開並清除夾紙。
• 按下背面送紙通道兩側的按鈕,將其平直拉出,小心地卸下背面送紙通道。
如果不是平直拉出,可能會損壞紙張感應器。如果印表機內的滾筒中有任何
夾紙,請鬆開並清除夾紙。
清除夾紙後,重新裝回已卸下/打開的任何印表機零件 (供紙匣、頂蓋、背面
3.
送紙通道),並確定將其穩固地安裝。
開啟印表機電源。
4.
重新裝入捲筒紙之前,您必須修整捲筒紙的前緣,使前緣完全平直且與捲筒
5.
紙的側邊成直角。
13
Page 42

HP Designjet 110plus/110 plus nr
印表機 —
印表機停止之故障排除
如果前控制面板如圖所示,且黃色指示燈閃爍,請:
從印表機右側打開鉸接折翼的兩個部分,然後
1.
將其推回原位以便查看墨水匣。檢查墨水匣的
所有包裝材料是否均已去除。
此時,墨水匣可能會移動。請等到移動停止。
快速參考指南
檢查印字頭護蓋是否已鎖定。如果閂鎖未正確
2.
扣住,印表機將無法工作。
依次合上折翼的背面部分與前面部分。如果未
3.
正確合上,印表機將無法工作。
如果黃色指示燈未熄滅,請參閱
4.
。
CD
使用印表機
14
Page 43

HP Designjet 110plus/110 plus nr
印表機 —
快速參考指南
印表機無法接收工作之故障排除
如果印表機似乎忽略了您傳送的列印工作,請:
檢查印表機是否已正確連接至電腦。
1.
如果透過網路連線,請列印印表機設定頁 (按住電源鍵的同時按四下 「確定」
鍵),然後參閱 「狀態」顯示為 「就緒」的
中的印表機
位址與子網路遮罩。
IP
TCP/IP
部分。記下位於相同部分
• 如果
• 如果狀態是就緒,您可以使用
連線。只需在瀏覽器中通常鍵入
收到印表機的回應,則表示印表機與電腦之間的網路連線工作正常。
• 如果狀態是尚未就緒,或者如果印表機未回應
機的
• 如有必要,請諮詢網路管理員。
檢查印表機佇列是否暫停。
2.
如果使用的是
3.
而不是 「
位址是
IP
IP
IP
0.0.0.0 或 192.0.0.192
瀏覽器檢查印表機與電腦之間的網路
Web
的位置鍵入印表機的
URL
位址與子網路遮罩是否屬於您的網路。
Mac OS X
列印」。
,請確定在建立印表機時已選擇 「
,請參閱印表機的安裝海報。
瀏覽器,請檢查印表
Web
位址。如果
IP
HP IP
列印」,
15
Page 44

HP Designjet 110plus/110 plus nr
其他問題之故障排除
印表機 —
快速參考指南
如果已連線到網際網路,
支援與故障排除工具。即使沒有網際網路連線,也有數種可協助解決印表機問題
的工具供您使用。
要啟動
Windows
1.在 Windows
在印表機圖示上按一下滑鼠右鍵,然後從快顯功能表中選擇
2.
(Windows 2000 或 XP)
或
選擇
3.
要啟動
系統維護
機,然後按一下
在
Windows 或 Mac OS
啟動。
如果無法成功按照這些說明進行
• …可能是印表機不是由您的電腦管理。在此情況下,請使用印表機伺服器中
的
•
…或者印表機雖然由您的電腦管理,但未安裝
情況下,請從
。
Me)
進階
Mac OS
圖示。另外,您可以在
HP Designjet
下的
工作列上選擇開始
標籤,然後按一下
下的
設定
HP Designjet
HP Designjet
HP Designjet
、
文件預設值
維護
HP Designjet
。
下,如果已按照以上說明進行,
系統維護
。
軟體安裝程式
系統維護
系統維護
設定
>
(Windows NT 4)
按鈕。
系統維護
Mac OS X
…
公用程式可讓您存取
,請:
印表機。
>
Web
列印喜好設定
或
內容
(Windows 98
,請連按兩下桌面上的
下,在 「列印中心」選擇您的印表
Web
HP Designjet
安裝該軟體。
CD
HP Designjet
瀏覽器應會自動
系統維護
。在此
上的
如需有關排除印表機故
障的更多資訊,請參閱
使用印表機
「故障排除…」部分。
16
CD
上的
Page 45

HP Designjet 110plus/110 plus nr
印表機的前控制面板 (或控
制面板) 可提供關於印表機
狀態的資訊,亦有三個可
讓您控制印表機操作的按
鍵 (或按鈕)。
這些按鍵分別是:
•
電源:
開啟與關閉電源。
•
取消:
可取消目前操作。
印表機 —
關於前控制面板
快速參考指南
顯示幕
取消鍵
確定鍵
注意指示燈
電源鍵
•
確定:
通知印表機:
電源指示燈
• 已在適當紙匣或進
紙匣中裝入紙張,印表機可以開始列印;
• 您已解決問題 (例如,您已取出夾紙或已更換有故障的印字頭),印表機應
繼續其作業 (例如,它應繼續列印);
這些指示燈分別是:
•
•
電源:
注意:
開啟印表機電源時,電源 (綠色) 指示燈會亮起。
印表機需要使用者執行動作時,注意 (黃色) 指示燈會亮起,例如,
合上頂蓋 (如果顯示幕空白)。
印表機前控制面板可提供關於印表機資訊的
顯示
區域。顯示幕下部 (佔顯示幕三
分之二) 的幾組圖示分別表示墨水系統的黑色、青色、洋紅色及黃色元件。
17
Page 46

HP Designjet 110plus/110 plus nr
印表機 —
關於前控制面板上的圖示
此處所示的四個圖示代表每個墨水匣的墨水量。
閃爍的印字頭圖示 (在底部) 表示該印字頭出現問題。
快速參考指南
忙碌中: 此圖示閃爍時:
表示正在列印、正在取
消工作、正在乾燥及正
在關閉電源。如果打開
頂蓋或側蓋,圖示也會
閃爍。
更正措施:
頂蓋或側蓋。
此圖示熄滅時:
印表機電源已關閉、
印表機處於閒置狀態
或正在等待使用者的
指示。
紙張未對齊: 此圖示閃爍時:
表示紙張未對齊,必
須重新裝入才能進行
列印。
解決方法:
新裝入紙張。
熄滅時:
狀態。
捲筒紙狀態: 此圖示亮起時
表示已裝入捲筒紙。
此圖示閃爍時
捲筒紙已空或夾紙。
更正措施:
筒紙。
表示正常
:
:表示
裝入捲
此圖示熄滅時:
未裝入捲筒紙。
合上
表示
重
表示
單張紙的 此圖示閃爍時:
狀態:
表示紙張用完或
卡紙。
更正措施:
或清理送紙通道。
新增紙張
此圖示熄滅時:
正常狀態。
按下按鍵: 此圖示閃爍時:
表示印表機等候中。
解決方法:
定鍵。
按下確
此圖示熄滅時:
正常狀態。
夾紙: 此圖示閃爍時:
表示夾紙、卡紙或托
架卡住。
更正措施:
請參閱第
清除夾紙。
頁。
12
此圖示熄滅時:
正常狀態。
表示
表示
表示
18
Page 47

HP Designjet 110plus/110 plus nr
關於閃爍圖示的組合
印表機 —
快速參考指南
使用
HP Designjet
取出捲筒紙
此圖示閃爍時:
捲筒紙。
更正措施:
機上取出捲軸。
完全取出捲筒紙;您無需從印表
此圖示熄滅時:
捲筒紙未對齊
此圖示閃爍時:
新裝入。
更正措施:
注意將其對齊。
取出捲筒紙並重新裝入,請特別
此圖示熄滅時:
系統維護:
此圖示閃爍時:
更正措施:
請參閱第
(
此圖示熄滅時:
印表機正在等候您手動取出
表示正常狀態。
表示捲筒紙未對齊,必須重
表示正常狀態。
表示硬體錯誤。
執行用於印表機的
16 頁)
。確定印表機已連接。
表示正常狀態。
HP Designjet
系統維護公用程式
19
Page 48

HP Designjet 110plus/110 plus nr
印表機 —
快速參考指南
關於更多資訊
• 如何使用印表機
• 有關印表機的附加資訊
• 排除印表機故障
…請參閱
Windows 下)
說明。
…
使用印表機
印表機驅動程式的線上
CD 或 (
僅在
20
Page 49

HP Designjet 110plus/110 plus nr
有限保固聲明
HP
印表機 —
快速參考指南
HP Designjet 110plus/110 plus nr
HP 產品 有限保固期限
印表機及相關的
軟體:
黑色印字頭: 直至印在產品上的 「保固期結束」日,或者印字頭已
青色、洋紅色及黃色印字頭: 直至印在產品上的 「保固期結束」日,或者印字頭已
墨水匣: 直至印表機指示原裝
:有限保固範圍
A
1. Hewlett-Packard (HP)
指定的期限內,其材料與成品沒有瑕疵。顧客需妥善保管購買日期證明。
對於軟體產品,
2.
證任何產品的操作均不會中斷或完全無錯。
的有限保固僅包括在正常情況下使用產品所引發的瑕疵,由下列原因所造成的瑕
3. HP
疵不包括在保固範圍內:
不正確或不適當的維護或修改;
a.
使用不是由
b.
在不符合產品規格的情況下操作。
c.
HP Designjet 110plus/110 plus nr
包括任何預防性維護套件與
(
的有限保固範圍內,但在某些國家/地區可能會按照個別的支援服務合約而享有這
HP
些服務。
對於
4.
會影響
用非
依其標準工時與材料費來收取費用。
在保固期內,如果
5.
疵,則
固範圍內的任何硬體產品有瑕疵,則
外,
安裝協助。
如果
6.
的合理時間內,按照該產品的購買價格退款。
顧客將有瑕疵的產品退回給
7.
印表機產品,使用填充式或非原裝
HP
HP
或填充式的墨水匣而引發印表機故障或損壞,
HP
HP
亦有權選擇更換零件以替換顧客確有瑕疵的產品,如有必要亦提供遠端零件
HP
無法維修或更換在
HP
硬體:
HP
HP
對顧客的保固或任何與顧客簽訂的
會為顧客更換該確有瑕疵的產品。在保固期內,如果
亦可選擇放棄要求顧客退回有瑕疵的零件。
HP
1
向其產品的最終使用者 (顧客) 保證,以上指定的
的有限保固僅在軟體不能執行程式指令的情況下適用。
HP
提供或支援的軟體、介面、材質、零件或耗材;或
獲悉包括在
HP
年 (自顧客購買之日起
自顧客購買之日起
90 天 (
循環使用完
循環使用完
品上的 「保固期結束」日,以先發生的為準
的例常印表機維護工作,如清潔與預防性維護服務
維修工程師的到府服務中所包含的部分),並不包括在
HP
HP
保固範圍內確有瑕疵的產品,則會在獲悉該瑕疵之後
HP
之前,
HP
530
200
耗材產品 (墨水、印字頭或墨水匣) 不
HP
HP
保固範圍內的任何軟體、材質或耗材產品有瑕
有權選擇維修或更換該確有瑕疵的產品。此
HP
沒有維修、更換該產品或退款的義務。
HP
)
)
cm³ 的
cm³ 的
支援服務合約。然而,如果由於使
墨水,以先發生的為準
HP
墨水,以先發生的為準
HP
墨水已用盡,或者到達印在產
HP
在維修該故障或損壞時,將
HP
獲悉包括在
HP
產品在上述
HP
HP
並不保
HP
保
21
Page 50

HP Designjet 110plus/110 plus nr
任何更換的產品可能是全新或類似新的產品,且其功能至少與被替換的產品相同。
8.
產品中可能包含效能與新零件或元件相等的再製零件或元件,或產品可能曾被偶
9. H P
爾使用過。
10.如果 HP
享有有效的
HP
國家/地區操作。關於附加的保固服務合約,只要該列出的
進口商分銷的,則適用於任何授權的
任何有效的墨水匣保固均不適用於重新裝填、再製造、再整修、使用不當或以任何方
11.
式改造的
有限保固
B.
在地方法令允許的範圍內,
1.
包括明示或隱含) 的保固或條件,並特別否認對有關適銷性、滿意的品質以及適用於
(
某一用途的隱含保固或條件。
有限之賠償責任
C.
在地方法令允許的範圍內,本保固聲明中的補償為顧客唯一專有的補償。
1.
在地方法令允許的範圍內,除本保固聲明中提供的義務之外,在任何情況下,
2.
協力廠商供應商對於任何直接、間接、特殊、偶然或引發的損害概不負責;不論這是
基於合約、侵權或其他法律理論,也不管是否曾獲悉有該類損毀的可能性。
產品由
HP
不會由於法律或法規原因而改變產品的樣式、外觀或功能,以使其能在不適用的
HP
在某個國家/地區行銷或支援,則使用該產品所在的國家/地區
HP
有限保固。您所享有的保固服務等級可能會因當地標準的不同而異。
HP
墨水匣。
或其協力廠商供應商對
HP
印表機 —
維修機構。
快速參考指南
產品是由
HP
產品不提供任何其他形式
HP
HP
或授權
HP
或其
地方法令
D.
本保固聲明賦予顧客具體的法律權利。另外,顧客也可享有其他的權利,這些權利可
1.
能在美國因州而異、在加拿大因省而異、在世界各地則因國家/地區而異。
如果本保固聲明與地方法令不一致,則可能需修改本保固聲明而使它與地方法令一
2.
致。根據此地方法令,本保固聲明的部分免責聲明與限制可能不適用於顧客。例如,
美國的部分州或美國以外的部分政府 (包括加拿大的部分省份),可能會:
排除本保固聲明中限制顧客法定權利的免責聲明與限制 (例如,英國);
a.
否則,會限制製造廠商實施這類承擔責任之聲明或限制的能力;
b.
賦予顧客其他的保固權利,指定製造廠商無法否認的隱含保固期限,或者不容許
c.
限制隱含保固期限。
對於澳洲或紐西蘭進行的消費性交易:除法律允許之限度內,本聲明中包含的保固
3.
條款並未排除、限制或修改適用於銷售
其上。
修訂日期:
2003 年 2 月 10
日
產品給此類顧客的法定權利,並應附加於
HP
22
Page 51

HP Designjet 110plus/110 plus nr
印表機 —
快速參考指南
法規資訊
只要將函索郵件寄到以下地址,您就可以獲得印表機使用的供墨系統之最新材料安全資料
單:
Hewlett-Packard Customer Information Center, 19310 Pruneridge Avenue,
Dept.MSDS, Cupertino, CA 95014, U.S.A
您也可以瀏覽以下的網頁:
http://www.hp.com/hpinfo/community/environment/productinfo/psis_inkjet.htm
。
管制型號:
您的產品已指定有一個管制型號,作為管制識別號。您產品的管制型號為
此管制型號不得與行銷名稱
混淆。
(Designjet 100
系列印表機) 或產品編號
(C7791X、C7796X)
BCLAA-0302
。
23
Page 52

HP Designjet 110plus/110 plus nr
DECLARATION OF CONFORMITY
according to ISO/IEC Guide 22 and EN 45014
Manufacturer's Name: Hewlett-Packard Española S.A.
Manufacturer's Address: Inkjet Commercial Division
Avenida Graells, 501
08714 Sant Cugat del Vallès
Barcelona, Spain
Declares that the product
Product Name: HP Designjet 100 Series Inkjet Printers
Model Numbers: C7791X and C7796X (where X represents any single letter)
Product Accessory: All
Regulatory Model: BCLAA-0302
Conforms to the following Product Specifications
Safety: IEC 60950:1999
EMC:
Supplementary Information
The product herewith complies with the requirements of the Low-Voltage Directive 73/23/EEC and
the EMC Directive 89/336/EEC and carries the CE marking accordingly.
(1)
The product exhibits class A operation when connected to LAN cables using print server
accessories.
(2)
The product was tested in a typical user configuration
(3)
This Device complies with part 15 of the FCC Rules. Operation is subject to the following two
Conditions:
1. this device may not cause harmful interference, and
2. this device must accept any interference received, including interference that may cause
undesired operation
Sant Cugat del Vallès (Barcelona),
October 24
th
, 2003
EN 60950:2000
IEC 60825-1:1993 + A1
EN 60825-1:1994 + A11 Class 1 for Laser/LED
CISPR 22:1997 / EN 55022:1998 Class B
CISPR 24:1997 +A1 / EN 55024:1998 +A1
IEC 61000-3-2:2001 / EN 61000-3-2:2000
IEC 61000-3-3:2002 / EN 61000-3-3:1995 +A1
FCC Title 47 CFR, Part 15 Class B
印表機 —
快速參考指南
(1)(2)
(1)(3)
Josep-Maria Pujol,
Product Regulations Manager
European contact: your local Hewlett-Packard Sales and Service Office or Hewlett-Packard GmbH,
Department HQ TRE, Herrenberger Strasse 140, D-71034 Böblingen, Germany (Fax: +49 7031
143143)
24
Page 53

Page 54

Page 55

Printed on recycled
paper
© Hewlett-Packard Company, 2005
03/2005
C7796-90245
Product of
Hewlett Packard Company
Avenida Graells, 501
08174 Sant Cugat del Vallés
Barcelona
Spain
 Loading...