

Page 1
4500, 4500 N, 4500 DN Printer
User Guide
How to Use This Online User Guide
Where to Look for More Information
Locating Printer Components
Locating Consumables
HP Product Support
HP Customer Support
Contents
Index
♦
♦
♦
♦
♦
♦
♦
♦
English
Page 2
Page 3

HP Color LaserJet 4500,
4500 N, 4500 DN Printer
User Guide _________________
Page 4

© Copyright Hewlett-Packard
Company, 1998
All Rights Reserved.
Reproduction, adaptation, or
translation without prior written
permission is prohibited, except
as allowed under the copyright
laws.
Part number: C4084-90937
First edition, 6/98
Warranty
The information contained in
this document is subject to
change without notice.
Hewlett-Packard makes no
warranty of any kind with
respect to this information.
HEWLETT-PACKARD
SPECIFICALLY DISCLAIMS
THE IMPLIED WARRANTY OF
MERCHANTABILITY AND
FITNESS FOR A PARTICULAR
PURPOSE.
Hewlett-Packard shall not be
liable for any direct, indirect,
incidental, consequential, or
other damage alleged in
connection with the furnishing or
use of this information.
Trademark Credits
Adobe is a trademark of Adobe
Systems Incorporated which
may be registered in certain
jurisdictions.
Arial is a U.S. registered
trademark of the Monotype
Corporation.
CompuServe is a U.S.
trademark of CompuServe, Inc.
®
Microsoft
is a U.S. registered
trademark of Microsoft
Corporation.
®
PANTONE
* *Pantone, Inc.’s
check-standard trademark for
color.
PostScript is a trademark of
Adobe Systems Incorporated
which may be registered in
certain jurisdictions.
TrueType is a U.S. trademark of
Apple Computer, Inc.
UNIX is a registered trademark
in the United States and other
countries, licensed exclusively
through X/Open Company
Limited.
Windows, MS Windows, and
Windows NT are U.S. registered
trademarks of Microsoft
Corporation.
Hewlett-Pack ard Company
11311 Chinden Boulevard
Boise, Idaho 83714-1021 U.S.A.
Page 5

Contents
Where to Look for More Information . . .. . . . . . . . . . . . . . . . . . . . . .11
Setting Up the Printer . . . . . . . . . . . . . . . . . . . . . . . . . . . . . . . .11
Using the Printer . . . . . . . . . . . . . . . . . . . . . . . . . . . . . . . . . . . .12
How to Use This Online User Guide . . . . . . . . . . . . . . . . . . . . . . . .13
Finding Information in .pdf Documents . . . . . . . . . . . . . . . . . . .13
Viewing .pdf Documents . . . . . . . . . . . . . . . . . . . . . . . . . . . . . .13
Finding Words . . . . . . . . . . . . . . . . . . . . . . . . . . . . . . . . . . . . . .14
1 The HP Color LaserJet 4500 Printer
Overview . . . . . . . . . . . . . . . . . . . . . . . . . . . . . . . . . . . . . . . . . . . . .15
Using Your Printer . . . . . . . . . . . . . . . . . . . . . . . . . . . . . . . . . . .15
Printer Features . . . . . . . . . . . . . . . . . . . . . . . . . . . . . . . . . . . . . . . .16
Factors Affecting Printer Performance. . . . . . . . . . . . . . . . . . . .18
Managing Memory . . . . . . . . . . . . . . . . . . . . . . . . . . . . . . . . . . . . . .19
Effects of Printer Features. . . . . . . . . . . . . . . . . . . . . . . . . . . . .19
Locating Printer Components. . . . . . . . . . . . . . . . . . . . . . . . . . . . . .20
Controlling Print Jobs. . . . . . . . . . . . . . . . . . . . . . . . . . . . . . . . . . . .22
Printer Supplies and Accessories. . . . . . . . . . . . . . . . . . . . . . . . . . .23
HP JetSend Communications . . . . . . . . . . . . . . . . . . . . . . . . . . . . .24
EN
2 Using the Printer Control Panel
Overview . . . . . . . . . . . . . . . . . . . . . . . . . . . . . . . . . . . . . . . . . . . . .25
When to Use the Printer Control Panel . . . . . . . . . . . . . . . . . . . . . .26
Locating Printer Control Panel Features . . . . . . . . . . . . . . . . . . . . .27
Using Printer Control Panel Keys . . . . . . . . . . . . . . . . . . . . . . .28
Using the Printer Online Help System . . . . . . . . . . . . . . . . . . . .28
Interpreting Control Panel Indicator Lights . . . . . . . . . . . . . . . .29
Using Printer Control Panel Menus . . . . . . . . . . . . . . . . . . . . . . . . .30
Menu Locking . . . . . . . . . . . . . . . . . . . . . . . . . . . . . . . . . . . . . .30
Information Menu. . . . . . . . . . . . . . . . . . . . . . . . . . . . . . . . . . . .30
Printing a Menu Map . . . . . . . . . . . . . . . . . . . . . . . . . . . . . . . . .31
Interpreting the Menu Map. . . . . . . . . . . . . . . . . . . . . . . . . . . . .31
Printing a Printer Configuration Page . . . . . . . . . . . . . . . . . . . .32
Interpreting the Printer Configuration Page. . . . . . . . . . . . . . . .32
Paper Handling Menu . . . . . . . . . . . . . . . . . . . . . . . . . . . . . . . .34
Configuration Menu . . . . . . . . . . . . . . . . . . . . . . . . . . . . . . . . . .35
Contents 5
Page 6

Printing Menu. . . . . . . . . . . . . . . . . . . . . . . . . . . . . . . . . . . . . . .36
I/O Menu . . . . . . . . . . . . . . . . . . . . . . . . . . . . . . . . . . . . . . . . . .37
EIO Menu. . . . . . . . . . . . . . . . . . . . . . . . . . . . . . . . . . . . . . . . . .37
Calibration Menu . . . . . . . . . . . . . . . . . . . . . . . . . . . . . . . . . . . .38
Resets Menu . . . . . . . . . . . . . . . . . . . . . . . . . . . . . . . . . . . . . . .39
Using the Printer Control Panel in Shared Environments. . . . . . . . .40
Changing Printer Control Panel Configuration Settings . . . . . . . . . .41
Changing PowerSave Settings . . . . . . . . . . . . . . . . . . . . . . . . .41
Switching Printer Personalities . . . . . . . . . . . . . . . . . . . . . . . . .42
Setting the I/O Timeout . . . . . . . . . . . . . . . . . . . . . . . . . . . . . . .43
Disabling the High-Speed Parallel Interface . . . . . . . . . . . . . . .44
Setting Advanced Functions . . . . . . . . . . . . . . . . . . . . . . . . . . .45
Resetting Printer Memory . . . . . . . . . . . . . . . . . . . . . . . . . . . . .45
Resetting the Printer to Factory Default Settings. . . . . . . . . . . .46
3 Common Printing Tasks
Overview . . . . . . . . . . . . . . . . . . . . . . . . . . . . . . . . . . . . . . . . . . . . .47
Selecting Print Media . . . . . . . . . . . . . . . . . . . . . . . . . . . . . . . . . . . .48
Supported Media Weights and Sizes. . . . . . . . . . . . . . . . . . . . .49
Media to Avoid. . . . . . . . . . . . . . . . . . . . . . . . . . . . . . . . . . . . . .51
Printing on Special Media. . . . . . . . . . . . . . . . . . . . . . . . . . . . . . . . .52
Printing on Transparencies . . . . . . . . . . . . . . . . . . . . . . . . . . . .52
Printing on Glossy Paper. . . . . . . . . . . . . . . . . . . . . . . . . . . . . .52
Printing on Colored Paper . . . . . . . . . . . . . . . . . . . . . . . . . . . . .52
Printing Envelopes. . . . . . . . . . . . . . . . . . . . . . . . . . . . . . . . . . .53
Printing on Labels . . . . . . . . . . . . . . . . . . . . . . . . . . . . . . . . . . .53
Heavy Paper . . . . . . . . . . . . . . . . . . . . . . . . . . . . . . . . . . . . . . .54
Preprinted Forms and Letterhead . . . . . . . . . . . . . . . . . . . . . . .54
Recycled Paper . . . . . . . . . . . . . . . . . . . . . . . . . . . . . . . . . . . . .54
Controlling Print Jobs . . . . . . . . . . . . . . . . . . . . . . . . . . . . . . . . . . . .55
Selecting Output Bins . . . . . . . . . . . . . . . . . . . . . . . . . . . . . . . .55
Selecting Media by Type . . . . . . . . . . . . . . . . . . . . . . . . . . . . . .56
Configuring Input Trays . . . . . . . . . . . . . . . . . . . . . . . . . . . . . . . . . .57
Configuring Tray 1 as a Cassette . . . . . . . . . . . . . . . . . . . . . . .57
Configuring Trays 2 and 3 by Media Type. . . . . . . . . . . . . . . . .58
Tray Priority . . . . . . . . . . . . . . . . . . . . . . . . . . . . . . . . . . . . . . . .58
Printing from Tray 1 (Multipurpose Tray) . . . . . . . . . . . . . . . . . . . . .59
Loading Media into Tray 1 . . . . . . . . . . . . . . . . . . . . . . . . . . . .60
Loading Envelopes into Tray 1 . . . . . . . . . . . . . . . . . . . . . . . . .61
Printing from Tray 2 . . . . . . . . . . . . . . . . . . . . . . . . . . . . . . . . . . . . .63
Loading Media into Tray 2 . . . . . . . . . . . . . . . . . . . . . . . . . . . .64
Printing from Tray 3 (500-Sheet Paper Feeder). . . . . . . . . . . . . . . .66
Loading Media into Tray 3 . . . . . . . . . . . . . . . . . . . . . . . . . . . . 67
6 Contents
EN
Page 7

Using the Duplex Printing Accessory for Two-Sided Printing. . . . . .70
Control Panel Settings for Duplex Printing . . . . . . . . . . . . . . . .71
Options for Binding Duplex Printing Jobs . . . . . . . . . . . . . . . . .72
Special Printing Situations . . . . . . . . . . . . . . . . . . . . . . . . . . . . . . . .73
Printing a Different First Page . . . . . . . . . . . . . . . . . . . . . . . . . .73
Printing on Custom-Size Media. . . . . . . . . . . . . . . . . . . . . . . . .73
Stopping a Print Request . . . . . . . . . . . . . . . . . . . . . . . . . . . . . . . . .74
4 Using Color
Overview . . . . . . . . . . . . . . . . . . . . . . . . . . . . . . . . . . . . . . . . . . . . .75
Customizing Color Output Through Printer Drivers . . . . . . . . . . . . .76
Halftone Options . . . . . . . . . . . . . . . . . . . . . . . . . . . . . . . . . . . .76
HP ColorSmart II . . . . . . . . . . . . . . . . . . . . . . . . . . . . . . . . . . . .77
Print in Grayscale . . . . . . . . . . . . . . . . . . . . . . . . . . . . . . . . . . .77
Matching Colors . . . . . . . . . . . . . . . . . . . . . . . . . . . . . . . . . . . . . . . .78
Color-Matching Factors . . . . . . . . . . . . . . . . . . . . . . . . . . . . . . .78
Matching PANTONE
Adjusting Color Balance. . . . . . . . . . . . . . . . . . . . . . . . . . . . . . . . . .79
®
* Colors. . . . . . . . . . . . . . . . . . . . . . . . . .78
5 Using Fonts
Overview . . . . . . . . . . . . . . . . . . . . . . . . . . . . . . . . . . . . . . . . . . . . .83
Using HP FontSmart . . . . . . . . . . . . . . . . . . . . . . . . . . . . . . . . . . . .84
Using Internal TrueType Fonts. . . . . . . . . . . . . . . . . . . . . . . . . . . . .85
Understanding Printer Default Fonts . . . . . . . . . . . . . . . . . . . . . . . .86
Font Selection Priority . . . . . . . . . . . . . . . . . . . . . . . . . . . . . . . .86
Selecting Fonts. . . . . . . . . . . . . . . . . . . . . . . . . . . . . . . . . . . . . . . . .87
Selecting Fonts from Software Applications . . . . . . . . . . . . . . .87
Selecting PCL Fonts Through the Printer Control Panel. . . . . .88
Printing a List of Available Printer Fonts . . . . . . . . . . . . . . . . . . . . .90
Interpreting the Font Lists . . . . . . . . . . . . . . . . . . . . . . . . . . . . .91
Using Typefaces for PostScript Emulation in the Printer . . . . . . . . .92
Using Fonts on a Network . . . . . . . . . . . . . . . . . . . . . . . . . . . . . . . .93
Adding Support for Accessory Fonts to a Printer Driver. . . . . . . . . .94
Verifying Software Application Support for Fonts . . . . . . . . . . .94
Using Special Type Effects . . . . . . . . . . . . . . . . . . . . . . . . . . . . . . .95
Hewlett-Packard Custom Font Services. . . . . . . . . . . . . . . . . . . . . .96
EN
6 Printer Interfaces
Overview . . . . . . . . . . . . . . . . . . . . . . . . . . . . . . . . . . . . . . . . . . . . .97
Parallel Configuration. . . . . . . . . . . . . . . . . . . . . . . . . . . . . . . . . . . .98
Parallel Cable Pin Configuration . . . . . . . . . . . . . . . . . . . . . . . .99
Contents 7
Page 8

Enhanced I/O (EIO) Configuration . . . . . . . . . . . . . . . . . . . . . . . . .100
HP JetDirect Print Servers. . . . . . . . . . . . . . . . . . . . . . . . . . . .100
Available Enhanced I/O Interfaces. . . . . . . . . . . . . . . . . . . . . .101
NetWare 3.x- and 4.x-Based Products . . . . . . . . . . . . . . . . . .101
Windows and Windows NT Networks . . . . . . . . . . . . . . . . . . .101
IBM OS/2 LAN Server and Warp Server Networks . . . . . . . . .102
UNIX Networks . . . . . . . . . . . . . . . . . . . . . . . . . . . . . . . . . . . .103
Setting Network Security on the Printer. . . . . . . . . . . . . . . . . .103
Configuring the Printer for the Network at the
Printer Control Panel . . . . . . . . . . . . . . . . . . . . . . . . . . . . . . . .104
Configuring Novell NetWare Frame Type Parameters . . . . . .104
Configuring TCP/IP Parameters . . . . . . . . . . . . . . . . . . . . . . .106
Disabling Network Protocols (Optional). . . . . . . . . . . . . . . . . .108
7 Consumables and Cleaning
Overview . . . . . . . . . . . . . . . . . . . . . . . . . . . . . . . . . . . . . . . . . . . .111
Making Room for Replacing Consumables . . . . . . . . . . . . . . . . . .112
Consumable Replacement Guidelines. . . . . . . . . . . . . . . . . . .113
Approximate Replacement Intervals for Consumable Items . . . . .114
Locating Consumables. . . . . . . . . . . . . . . . . . . . . . . . . . . . . . . . . .115
Environmental Collection Program. . . . . . . . . . . . . . . . . . . . . . . . .116
Cleaning the Toner Density Sensor . . . . . . . . . . . . . . . . . . . . . . . .117
8 Printer Control Panel Messages
8 Contents
Overview . . . . . . . . . . . . . . . . . . . . . . . . . . . . . . . . . . . . . . . . . . . .119
Message Types . . . . . . . . . . . . . . . . . . . . . . . . . . . . . . . . . . . . . . .120
Status Messages . . . . . . . . . . . . . . . . . . . . . . . . . . . . . . . . . . .120
Warning Messages . . . . . . . . . . . . . . . . . . . . . . . . . . . . . . . . .120
Attention Messages . . . . . . . . . . . . . . . . . . . . . . . . . . . . . . . . .120
Critical Error Messages . . . . . . . . . . . . . . . . . . . . . . . . . . . . . .120
Printer Control Panel Messages. . . . . . . . . . . . . . . . . . . . . . . . . . .121
9 Solving Problems with the Printer
Overview . . . . . . . . . . . . . . . . . . . . . . . . . . . . . . . . . . . . . . . . . . . .133
Basic Troubleshooting Checklist . . . . . . . . . . . . . . . . . . . . . . . . . .134
Paper Jam Locations . . . . . . . . . . . . . . . . . . . . . . . . . . . . . . . . . . .135
Paper Jam Recovery . . . . . . . . . . . . . . . . . . . . . . . . . . . . . . . . . . .136
Common Causes of Paper Jams . . . . . . . . . . . . . . . . . . . . . . . . . .137
Paper Jam Messages. . . . . . . . . . . . . . . . . . . . . . . . . . . . . . . . . . .138
EN
Page 9

Clearing Paper Jams . . . . . . . . . . . . . . . . . . . . . . . . . . . . . . . . . . .139
Tips for Avoiding Paper Jams . . . . . . . . . . . . . . . . . . . . . . . . .139
Clearing Jams in the Middle Front Drawer Area . . . . . . . . . . .140
Clearing Jams in the Tray 2 Area . . . . . . . . . . . . . . . . . . . . . .141
Clearing Jams in the Optional Tray 3 Area . . . . . . . . . . . . . . .142
Clearing Jams in the Rear Door Areas . . . . . . . . . . . . . . . . . .143
Clearing Jams in the Front Duplex Drawer Area . . . . . . . . . .145
Media-Handling Problems . . . . . . . . . . . . . . . . . . . . . . . . . . . . . . .146
Printer Response Problems . . . . . . . . . . . . . . . . . . . . . . . . . . . . . .150
Printer Control Panel Problems . . . . . . . . . . . . . . . . . . . . . . . . . . .154
Solving Print Quality Problems. . . . . . . . . . . . . . . . . . . . . . . . . . . .155
Color Printing Problems . . . . . . . . . . . . . . . . . . . . . . . . . . . . . . . . .163
Incorrect Printer Output . . . . . . . . . . . . . . . . . . . . . . . . . . . . . . . . .165
Software Application Problems . . . . . . . . . . . . . . . . . . . . . . . . . . .167
Appendix A DIMM Installation
Overview . . . . . . . . . . . . . . . . . . . . . . . . . . . . . . . . . . . . . . . . . . . .169
DIMM Configuration. . . . . . . . . . . . . . . . . . . . . . . . . . . . . . . . .170
Installing DIMMs. . . . . . . . . . . . . . . . . . . . . . . . . . . . . . . . . . . . . . .171
Verifying DIMM Installation . . . . . . . . . . . . . . . . . . . . . . . . . . .174
Appendix B PCL Commands
Overview . . . . . . . . . . . . . . . . . . . . . . . . . . . . . . . . . . . . . . . . . . . .175
Interpreting PCL Printer Command Syntax . . . . . . . . . . . . . . . . . .177
Combining Escape Sequences in PCL Printer
Command Syntax . . . . . . . . . . . . . . . . . . . . . . . . . . . . . . .178
Entering Escape Characters . . . . . . . . . . . . . . . . . . . . . . . . . .179
Selecting PCL Fonts. . . . . . . . . . . . . . . . . . . . . . . . . . . . . . . . . . . .180
Common PCL Commands. . . . . . . . . . . . . . . . . . . . . . . . . . . .181
EN
Appendix C Specifications
Electrical Specifications . . . . . . . . . . . . . . . . . . . . . . . . . . . . . . . . .187
Operating Environment Specifications. . . . . . . . . . . . . . . . . . . . . .187
Acoustic Emissions . . . . . . . . . . . . . . . . . . . . . . . . . . . . . . . . . . . .188
Environmental Product Stewardship Program . . . . . . . . . . . . . . . .189
Regulatory Statements. . . . . . . . . . . . . . . . . . . . . . . . . . . . . . . . . .193
FCC Regulations . . . . . . . . . . . . . . . . . . . . . . . . . . . . . . . . . . .193
Canadian DOC Regulations . . . . . . . . . . . . . . . . . . . . . . . . . .194
VCCI Statement (Japan) . . . . . . . . . . . . . . . . . . . . . . . . . . . . .194
Korean EMI Statement . . . . . . . . . . . . . . . . . . . . . . . . . . . . . .194
Declaration of Conformity . . . . . . . . . . . . . . . . . . . . . . . . . . . .195
Contents 9
Page 10

Safety Information . . . . . . . . . . . . . . . . . . . . . . . . . . . . . . . . . . . . .197
Laser Safety. . . . . . . . . . . . . . . . . . . . . . . . . . . . . . . . . . . . . . .197
Material Safety Data Sheet (MSDS) . . . . . . . . . . . . . . . . . . . .197
Laser Statement for Finland. . . . . . . . . . . . . . . . . . . . . . . . . . .198
Appendix D Warranty and Support Information
Hewlett-Packard Warranty Statement . . . . . . . . . . . . . . . . . . . . . .201
HP Maintenance Agreements . . . . . . . . . . . . . . . . . . . . . . . . . . . .203
On-Site Service Agreements . . . . . . . . . . . . . . . . . . . . . . . . . .203
Support Information . . . . . . . . . . . . . . . . . . . . . . . . . . . . . . . . . . . .204
Customer Support Options Worldwide. . . . . . . . . . . . . . . . . . .206
Worldwide Sales and Service Offices . . . . . . . . . . . . . . . . . . . . . .208
Index
10 Contents
EN
Page 11

Where to Look for More Information . . .
Several references are available for use with this printer. For
additional copies of the guides below, contact HP Direct at
1-800-538-8787 (U.S.) or contact your HP-authorized dealer.
Additional information is available at http://www.hp.com.
Setting Up the Printer
Getting Started Guide
Step-by-step instructions for
installing and setting up
the printer.
HP JetDirect Print Server
Software Installation Guide*
Step-by-step instructions for configuring
the HP JetDirect print server.
EN
*Accompanies printers that include an HP JetDirect print server (network
card).
Contents 11
Page 12
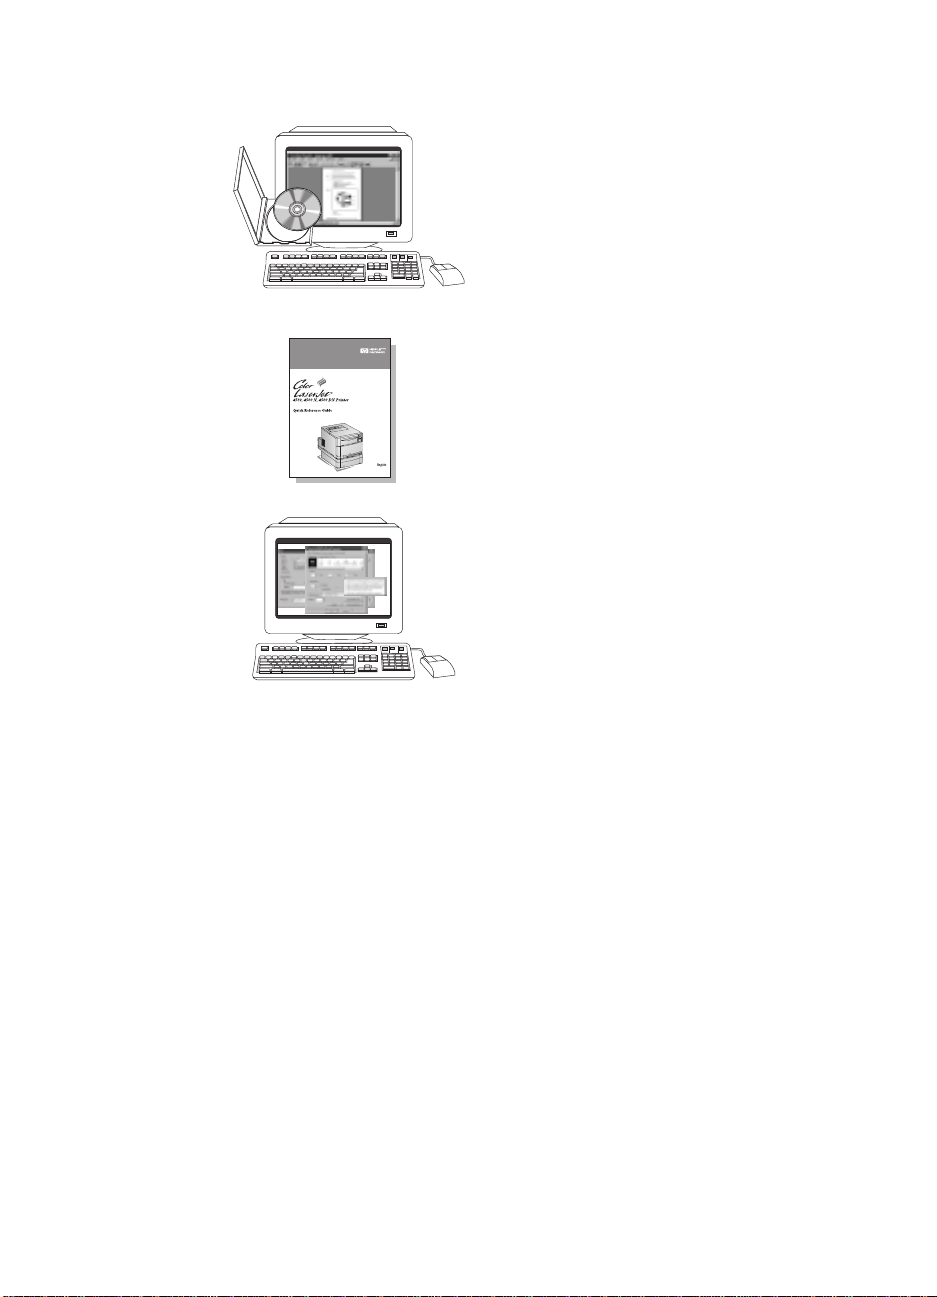
Using the Printer
Online User Guide
Detailed information on using and
troubleshooting the printer. Available for
installation on your computer from the
CD-ROM that came with the printer.
Quick Reference Guide
Tips and quick information in a booklet
to keep by the printer . See y our network
administrator for the copy that came
with the printer.
Online Help
Information on printer options that are
available from within printer drivers. To
view a Help file, access the online Help
through the printer driver.
12 Contents
EN
Page 13

How to Use This Online User Guide
This user guide is provided as an Adobe™ Acrobat Reader .pdf
document. This section will help familiarize you with using .pdf
documents.
Finding Information in .pdf Documents
To find specific inf ormation in a .pdf document, click Contents or Index
in the upper-left corner of the Acrobat Reader window, and then click
the topic you want.
Viewing .pdf Documents
For complete instructions on how to view .pdf documents, see the
online Help included with Acrobat Reader.
Magnifying the Page View
You can use the zoom tool, the magnification box in the status bar, or
the toolbar buttons to change the screen magnification. When you
zoom in on a document, you can use the hand tool to move the page
around.
EN
Acrobat Reader also offers magnification level choices that control
how the page fits on-screen:
Fit Page scales the page to fit within the main window.
Fit Width scales the page to fit the width of the main window.
Fit Visible fills the window with the page’s content area only.
To increase magnification: Select the zoom tool and click on the
document page to double the current magnification.
To decrease magnification: Select the zoom tool while holding down
Ctrl (Windows and UNIX) or Option (Macintosh), and click the center of
the area you want to reduce.
Contents 13
Page 14
Paging Through a Document
The following options are available for paging through a document.
To go to the next page: Click the Next Page button in the toolbar, or press
the Right Arrow or Down Arrow.
To return to the previous page: Click the Previous Page button in the
toolbar, or press the Left Arrow or Up Arrow.
To go to the first page: Click the First Page button in the toolbar.
To go to the last page: Click the Last Page button in the toolbar.
To jump to a specific numbered page: Click the page number box in the
status bar at the bottom of the main window , type the page number , and clic k
OK.
Browsing with Thumbnails
A thumbnail is a miniature view of each document page. You can
display thumbnails in the overview area. Use a thumbnail to jump
quickly to a page and to adjust the view of the current page.
14 Contents
Click on a thumbnail to move to the page it represents.
Finding Words
Use the Find command to find part of a word, a complete word, or
multiple words in the active document.
Click on the find button, or choose Find from the Tools menu.
EN
Page 15

The HP Color
1
LaserJet 4500 Printer
Overview
This chapter describes the features and specifications of the
HP Color LaserJet 4500, 4500 N, or 4500 DN printer. The
chapter includes the following sections:
Printer Features
●
Managing Memory
●
Locating Printer Components
●
Controlling Print Jobs
●
Printer Supplies and Accessories
●
HP JetSend Communications
●
Using Your Printer
EN
Information on using the printer to perform common tasks is
presented throughout this guide. Some specific tasks and the
chapters describing them are listed below.
Using the Printer Control Panel (Chapter 2)
●
Loading Media into the Printer (Chapter 3)
●
Optimizing Color Quality (Chapter 4)
●
Clearing Paper Jams (Chapter 9)
●
Chapter 1 15
Page 16

Printer Features
This printer combines the quality and reliability of Hewlett-Packard
printers with the features listed below . F or more inf ormation on printer
features, see the Hewlett-Packard website at http://www.hp.com.
Performance
Memory
Supported
Printer
Personalities
Fonts
Paper Handling
(Input)
Paper Handling
(Output)
●
16 pages per minute (ppm) in black and white
●
4 ppm in color
●
Transparencies and glossy paper (8 ppm in black and white, 2 ppm in
color)
●
32 megabytes (MB) of random access memory (RAM)
(40 MB in the HP Color LaserJet 4500 DN Printer)
●
Memory Enhancement Technology (MEt), which automatically
compresses data to use RAM more efficiently
●
HP PCL5c
●
PostScript Emulation
●
Auto language switching
●
80 internal fonts
●
HP FontSmart
●
150-sheet multipurpose tray. Use for paper, transparencies, labels,
heavy media, and envelopes
●
250-sheet standard cassette
●
500-sheet paper feeder (included with the HP Color LaserJet 4500 DN
Printer)
●
Top output bin holds up to 250 sheets of standard paper
●
Rear output bin holds up to 100 sheets of standard paper
16 The HP Color LaserJet 4500 Printer
EN
Page 17

Duplex Printing
●
Duplex printing accessory mounts directly beneath the printer for
two-sided printing (included with the HP Color LaserJet 4500 DN
Printer)
Connectivity
Environmental
Features
●
Bidirectional parallel port requires a “C” connector
●
Two Enhanced Input/Output (EIO) slots
●
HP JetDirect print server (EIO network card) (included with the
HP Color LaserJet 4500 N and 4500 DN Printers)
●
PowerSave setting (meets E
●
High content of recyclable components and materials
NERGY STAR
guidelines)
EN
Chapter 1 17
Page 18

Factors Affecting Printer Performance
Several factors affect the time it takes to print a job. Among these is
printer speed, measured in pages per minute (ppm). Factors that
affect printer speed include special media (such as transparencies,
glossy media, and heavy media) and custom-size media.
The time required to download a print job from the computer to the
printer also affects print speed. Among the factors that affect
download time are:
●
complex or large graphics
●
color versus black and white
●
the printer’s I/O configuration (network versus parallel speed)
●
the speed of the computer you are using
●
the amount of printer memory installed
●
the network operating system and configuration (if applicable)
●
printer personality (PCL or PostScript Emulation)
Note Adding additional printer memory may resolve memory problems,
improve how the printer handles complex graphics, and improve
download times, but will not increase printer speed.
18 The HP Color LaserJet 4500 Printer
EN
Page 19

Managing Memory
This printer supports up to 208 MB of memory. Y ou can add additional
memory by installing Dual Inline Memory Modules (DIMMs). To allow
for memory expansion, the printer has three available DIMM slots,
which accept 4, 8, 16, 32, or 64 MB of RAM each. For information on
installing printer memory, see Appendix A.
The printer features Memory Enhancement Technology (MEt), which
automatically compresses page data to provide the most efficient use
of the printer’s RAM.
Note If memory problems occur when you are printing complex graphics, y ou
can make more memory available b y removing downloaded fonts, style
sheets, and macros from printer memory . Reducing the complexity of
a print job from within an application or printer driver can help in
avoiding memory problems.
Effects of Printer Features
Certain printer features require printer memory. These features can
be disabled to save printer memory resources. For information on
disabling these resources, see the chapter on using the printer control
panel.
EN
Chapter 1 19
Page 20
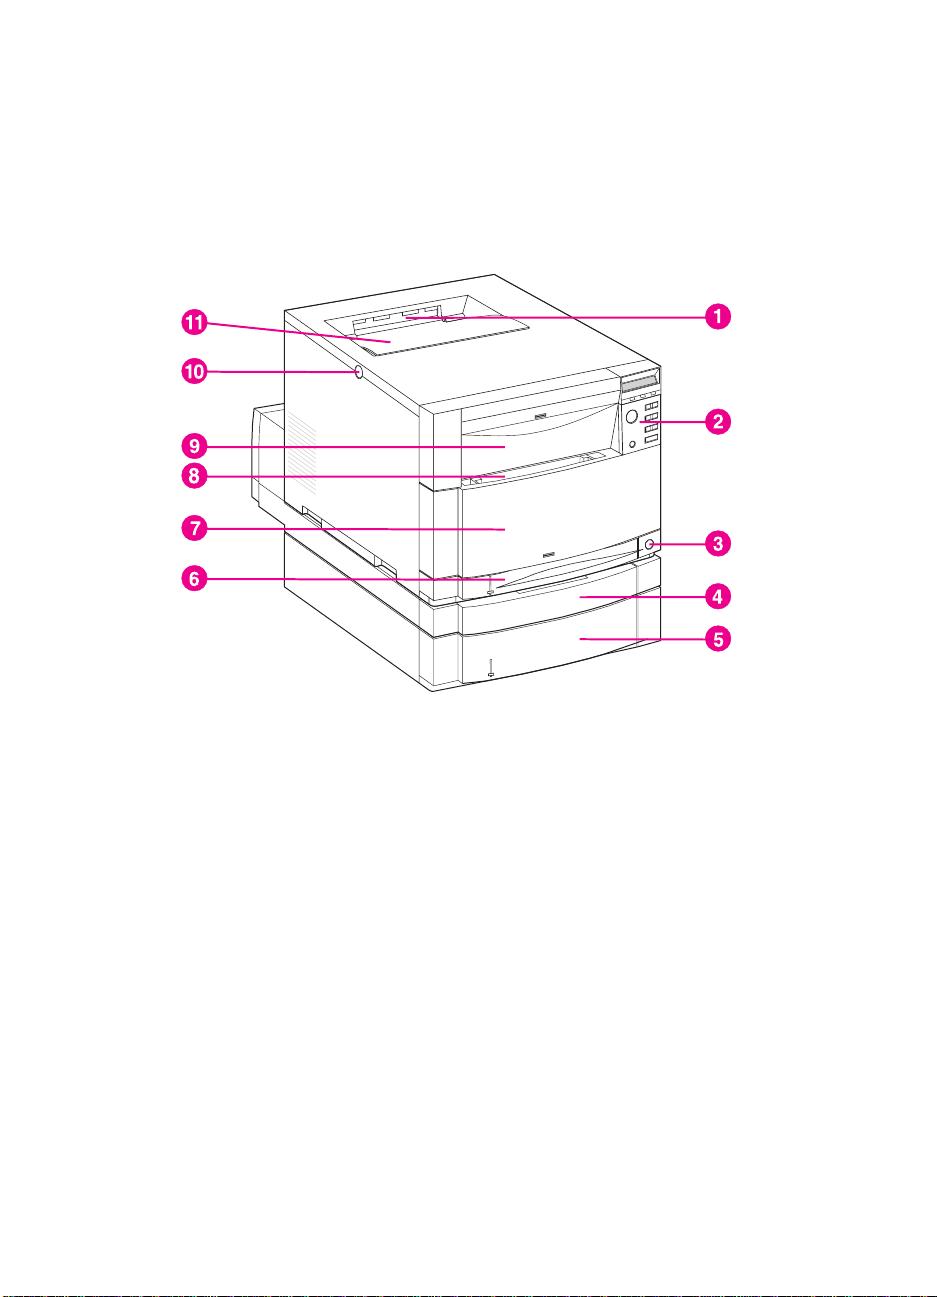
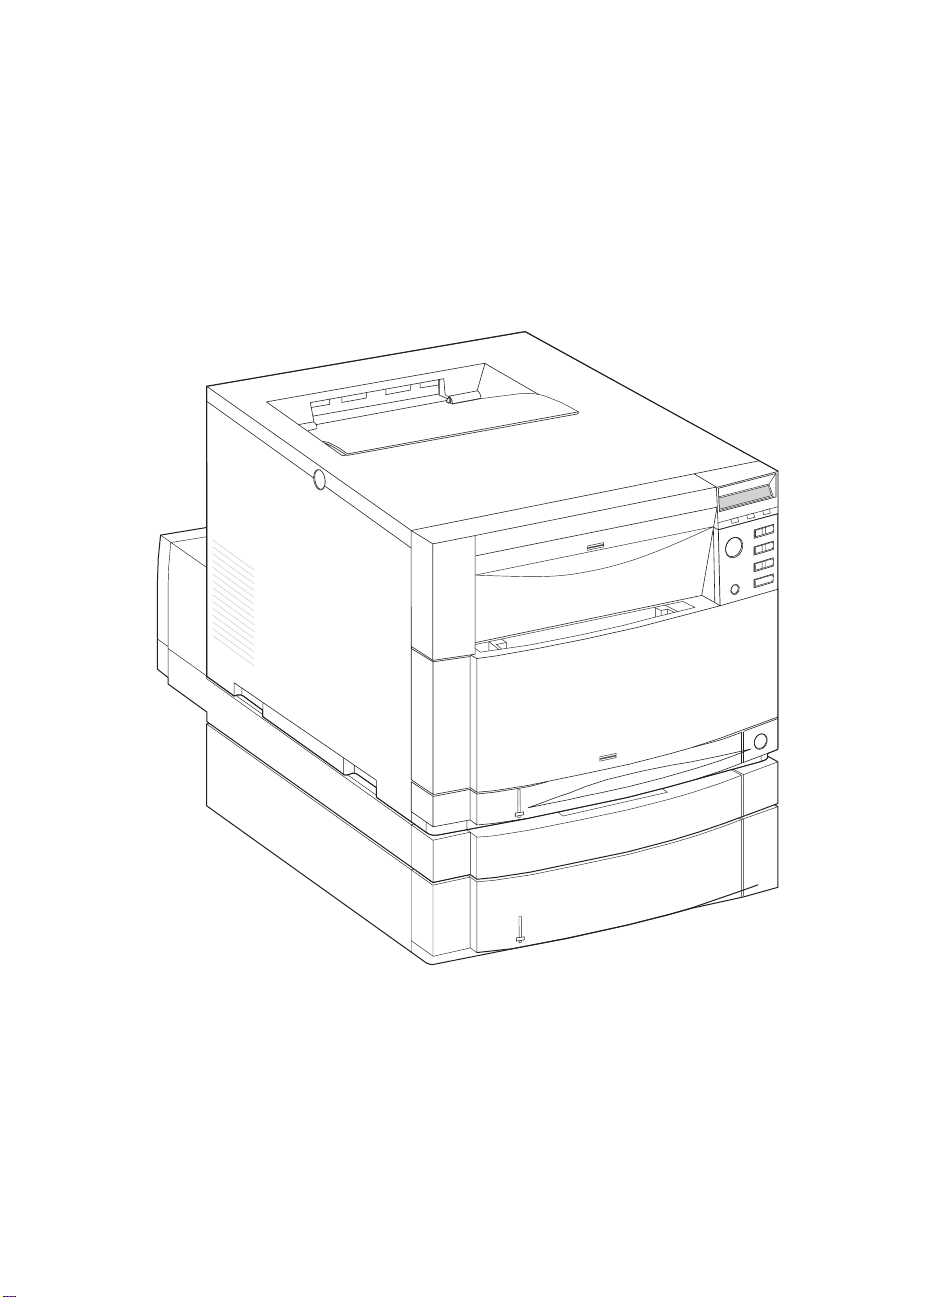
Locating Printer Components
The following illustrations identify the locations and names of key
components of this printer.
Figure 1-1 Front View
accessory)
(shown with 500-sheet paper feeder and duplex printing
1 Top Output Bin
2 Printer Control Panel
3 Power Switch (standby button)
4 Optional Duplex Printing Accessory Drawer
5 Tray 3 (optional 500-sheet paper feeder)
6 Tray 2 (250 sheets of standard paper)
7 Middle Front Drawer (transfer belt access)
8 Tray 1 (150-sheet multipurpose tray)
9 Upper Front Drawer (imaging drum access)
10 Top Cover Door Release Button
11 Top Cover Door (toner cartridge access)
20 The HP Color LaserJet 4500 Printer
EN
Page 21
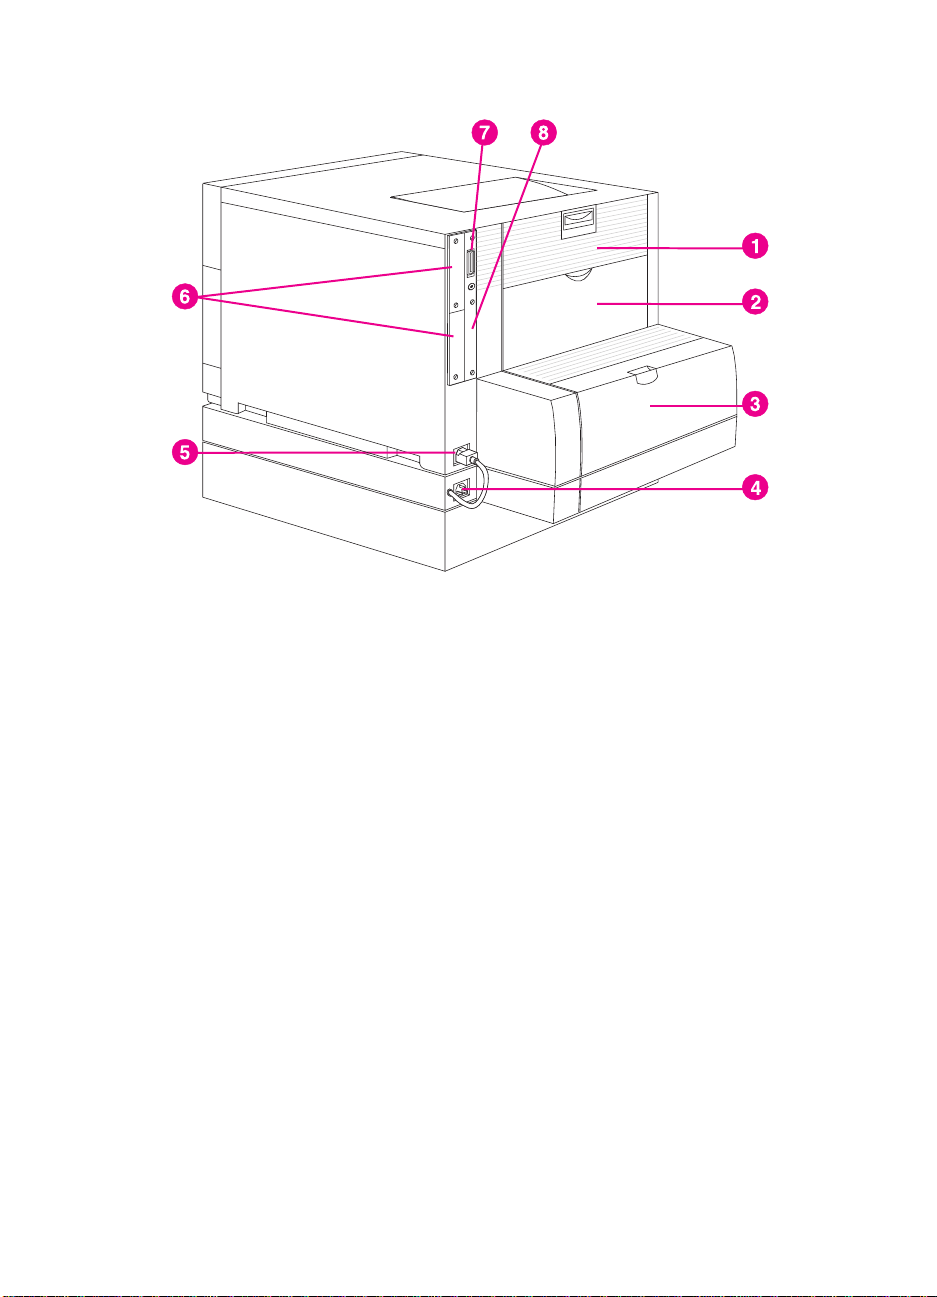
Figure 1-2 Rear View
1 Rear Door (fuser access)
2 Rear Output Bin Door
3 Optional Duplex Printing Accessory Cover
4 Optional Duplex Printing Accessory Power Receptacle
5 Printer Power Receptacle
6 EIO slots
7 Parallel Connector (“C” connector)
8 Memory Access
(shown with 500-sheet paper feeder and duplex printing accessory)
EN
Chapter 1 21
Page 22

Controlling Print Jobs
Three options are available for controlling print jobs:
●
Select printer settings through your software application or the
printer driver (recommended method)
●
Select printer settings using the printer control panel
●
Enter printer commands directly into files
Select printer settings through your software
application or the printer driver
The optimal way to control the printer is through your software
application or the printer driver. Changing these settings affects only
your
print job. Most software applications allow y ou to choose printing
selections from menus within the software application. These
selections override the selections on the printer control panel.
Select printer settings using the printer control panel
You can also control the printer through the keys and menus of the
printer control panel. Changing these settings affects all print jobs. If
you are sharing the printer, coordinate control panel changes with
other users. For more information, see the chapter on using the
printer control panel.
Note Software application and printer driver settings override printer control
panel settings.
Enter printer commands directly into files
Some software applications allow you to enter printer commands (for
example, escape sequences) directly into files. However, this method
of controlling your printer requires that you learn printer PCL
commands. For information on PCL printer commands, see
Appendix C or the
You can purchase the guide through HP Direct. (See Appendix D for
ordering information.)
22 The HP Color LaserJet 4500 Printer
PCL Technical Reference Package
for this printer.
EN
Page 23
Printer Supplies and Accessories
You can increase the capabilities of your printer by adding
accessories. To order printer accessory products, call
Hewlett-Packard’s Direct Marketing Division. (See the Warranty and
Support chapter of this guide for phone numbers.)
Accessory Product
Description Additional Information
Number
Memory (DIMMs) C4140A
500-Sheet Paper
Feeder
Duplex Printing
Accessory
Printer Cabinet C4235A HP Color LaserJet 4500
Toner Supplies C4191A
Consumable Items C4195A
Media C2934A
Network Connectivity J3110A
Cables C2946A
Reference Materials 5021-0368
Localized Font
DIMMS
C4141A
C4142A
C4143A
C4144A
C4082A Optional 500-sheet input tray
C4083A Optional two-sided printing
C4192A
C4193A
C4194A
C4196A
C4197A
C4198A
C2936A
J3111A
J3112A
J3113A
92215N
92215S
5021-0337
5967-0831
5062-4667
5062-4668
5062-4669
5062-4670
C4292A (CAS)
C4293A (CAS)
YS-90210
4 MB
8 MB
16 MB
32 MB
64 MB
accessory
Printer Cabinet
Black
Cyan
Magenta
Yellow
Drum Kit
Transfer Kit
Fuser Kit (110V)
Fuser Kit (220V)
HP Transparency Film (letter)
HP Transparency Film (A4)
HP JetDirect 600N for Ethernet (10Base-T [RJ-45])
HP JetDirect 600N for Ethernet (10Base-T [RJ-45] and
10Base-2 [BNC]) and LocalTalk (DIN-8)
HP JetDirect 600N for Token Ring (DB9, RJ-45)
HP JetDirect 600N for Fast Ethernet (10/100 Base-TX [RJ-45])
10 m (30 ft) parallel cable (IEEE-1284 compliant) with a 25-pin
DB male to a (IEEE-1284C) male “C” connector
LocalTalk Cable Kit
DIN-8 printer cable (for Macintosh computers)
HP LaserJet Printer Family Paper Specification Guide
PCL/PJL Technical Reference Package
HP JetDirect Print Server Software Installation Guide
Greek
Hebrew
Cyrillic
Arabic
Traditional Chinese
Simplified Chinese
Japanese
This printer uses dual inline
memory modules (DIMMs)
exclusively.
(1MB)
(8MB)
EN
Chapter 1 23
Page 24

HP JetSend Communications
HP JetSend is a new technology from Hewlett-Packard that allows
network devices to communicate directly with each other. Devices
that feature the HP JetSend technology can exchange information
directly with other devices that are connected via an intranet.
Sending devices include JetSend-enabled scanners and PCs.
Receiving devices include JetSend-enabled PCs.
HP JetSend technology enables flexible, direct communications
between network devices. HP JetSend enables simple, targeted,
information exchange that is independent of both servers and
applications. This means that users can easily exchange information
directly between intranet-connected devices like printers and
scanners (and other devices in the future).
HP JetSend capabilities can be integrated into the Microsoft Windows
environment. For example, using PCs that have been JetSendenabled by installing HP JetSend for Windows software, you can
distribute information via an intranet to several users. Users can
receive the document in their JetSend-enabled PC’s Inbox or print
directly to their JetSend-enabled printer. In addition to sending and
receiving documents, you can view documents in the HP JetSend
Viewer. HP JetSend for Windows software can be installed through
an installer on the compact disc.
24 The HP Color LaserJet 4500 Printer
EN
Page 25

Using the Printer
2
Control Panel
Overview
This chapter helps you use the printer control panel to maximize
printer performance. This chapter includes the following sections:
When to Use the Printer Control Panel
●
Locating Printer Control Panel Features
●
Using Printer Control Panel Menus
●
Using the Printer Control Panel in Shared Environments
●
Changing Printer Control Panel Configuration Settings
●
Note Unless otherwise specified, “control panel” refers to the printer’s
control panel. Keys on the control panel are indicated b y the KEY font.
EN
Chapter 2 25
Page 26

When to Use the Printer Control Panel
Hewlett-Packard has designed the printer control panel to facilitate
making printing selections when your software does not provide them.
Use the printer control panel for over all configuration requirements, to
obtain printer status information, and to perform the following
procedures:
●
configure input trays for media type and size
●
take the printer online or offline
●
print configuration pages and menu maps
●
change printer default settings
●
verify available fonts
Software applications that provide commands for selecting printing
options allow you to control print jobs through the software application
rather than by changing control panel settings at the printer. The
degree of control varies among applications. Software commands
override printer control panel settings for all Print Menu and most
Configuration Menu items.
Note For information about controlling the printer in a network environment,
see the
see the online Help files provided with HP JetAdmin software and the
HP LaserJet utility.
HP JetDirect Print Server Software Installation Guide
. Also,
26 Using the Printer Control Panel
EN
Page 27
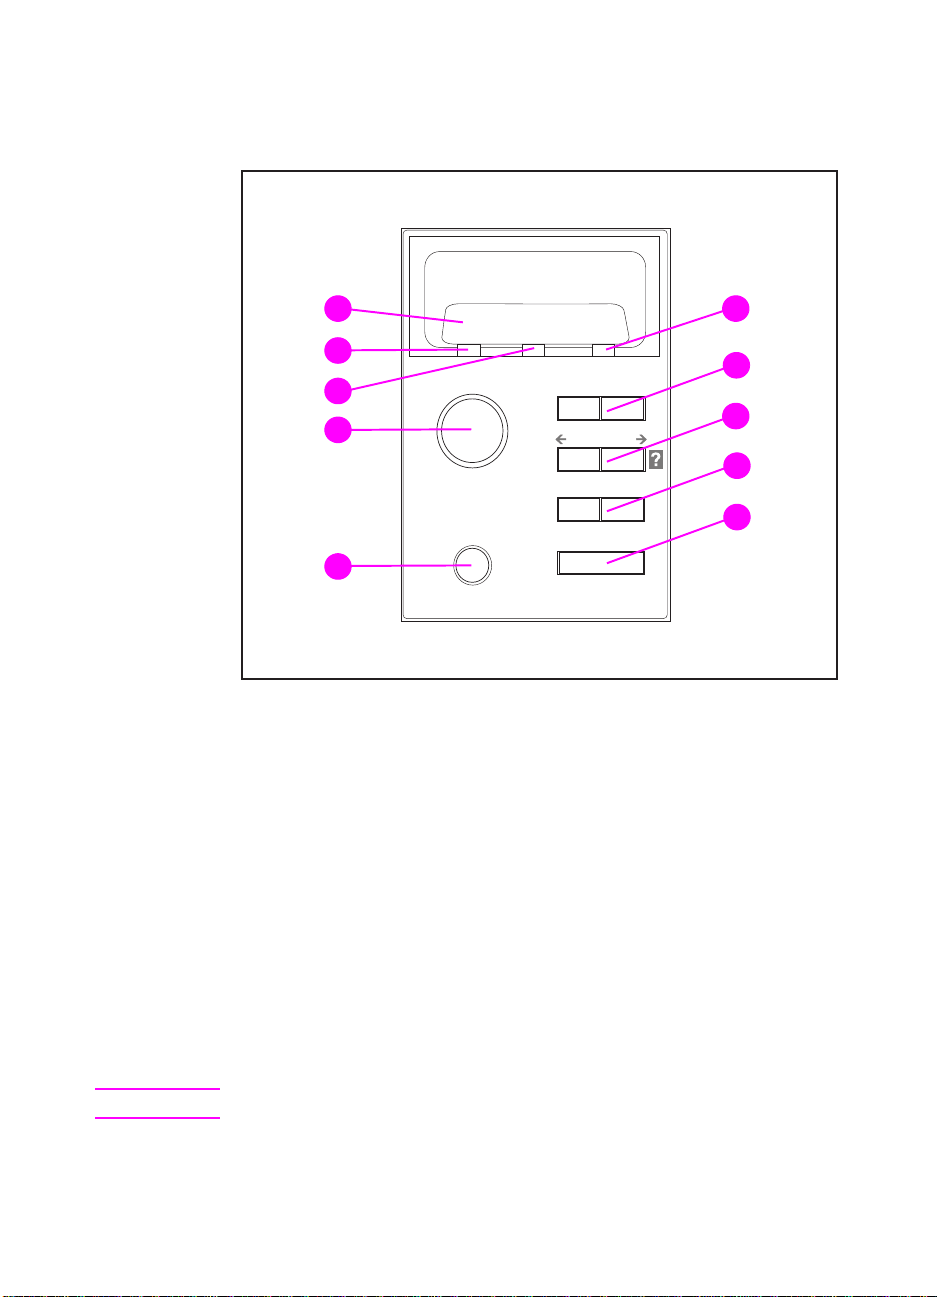
Locating Printer Control Panel Features
10
9
8
7
6
Figure 2-1 Printer Control Panel
1 Attention Indicator Light
2 Menu Key*
3 Item Key*
4 Value Key*
5 Select Key
6 Cancel Job Key
7 Go Key
8 Data Indicator Light
9 Ready Indicator Light
10 Printer Control Panel Display
*Rocker keys
1
2
3
4
5
Note The Item key is also used to navigate through the online Help system.
EN
Chapter 2 27
Page 28
Using Printer Control Panel Keys
The following table summarizes the function of each printer control
panel key.
Key Function
G
O
C
ANCEL JOB
M
ENU
I
TEM
V
ALUE
S
ELECT
Dependent upon the status of the printer. Normally, GO activates printing
using current settings or directs the printer to proceed with the process
designated on the control panel. If the printer is offline, pressing G
return the printer to the READY state.
T e rminates the job that is currently printing. The printer stops and purges all
input until a new job is detected.
Displays a menu system for obtaining printer status inf ormation or changing
the printer’s configuration settings.
Cycles through items in the selected menu. Menu items vary depending on
the options installed and on the configuration of other menu choices. The
key is also used to navigate through the printer’s online Help system.
I
TEM
Cycles through the value choices for a particular menu item.
Selects the value that is currently shown on the display.
Using the Printer Online Help System
This printer features an online Help system that provides instructions
for resolving most printer errors. Certain control panel error
messages alternate with instructions on accessing the online help
system.
O
will
Whenever a ? appears in an error message , or a message alternates
with “FOR HELP PRESS THE ? KEY,” press the I
through a sequence of instructions.
Note To exit the online Help system, press either G
28 Using the Printer Control Panel
O
TEM
key to navigate
ELECT
or S
.
EN
Page 29
Interpreting Control Panel Indicator Lights
The following table explains the meaning of the printer control panel
indicator lights.
Indicator On Off Flashing
Ready
(green)
Data
(green)
Attention
(amber)
Printer is online (able to
accept and process
data).
Processed data is
present in the printer,
but more data is
needed to complete the
job.
A critical error has
occurred. Printer
requires attention.
Printer is offline. Printer is attempting to
stop printing and go
offline.
No data is being
received or processed.
No conditions exist
that require attention.
Data is being received
and processed by the
printer.
An error has occurred.
Printer requires
attention.
EN
Chapter 2 29
Page 30
Using Printer Control Panel Menus
The printer control panel menus allow you to change printer settings
and to access printer status information. This section outlines the
printer control panel menus and the selections available within each
menu.
Menu Locking
Menu selections can be locked out by a system administrator. If you
are unable to access a particular menu, contact your system
administrator.
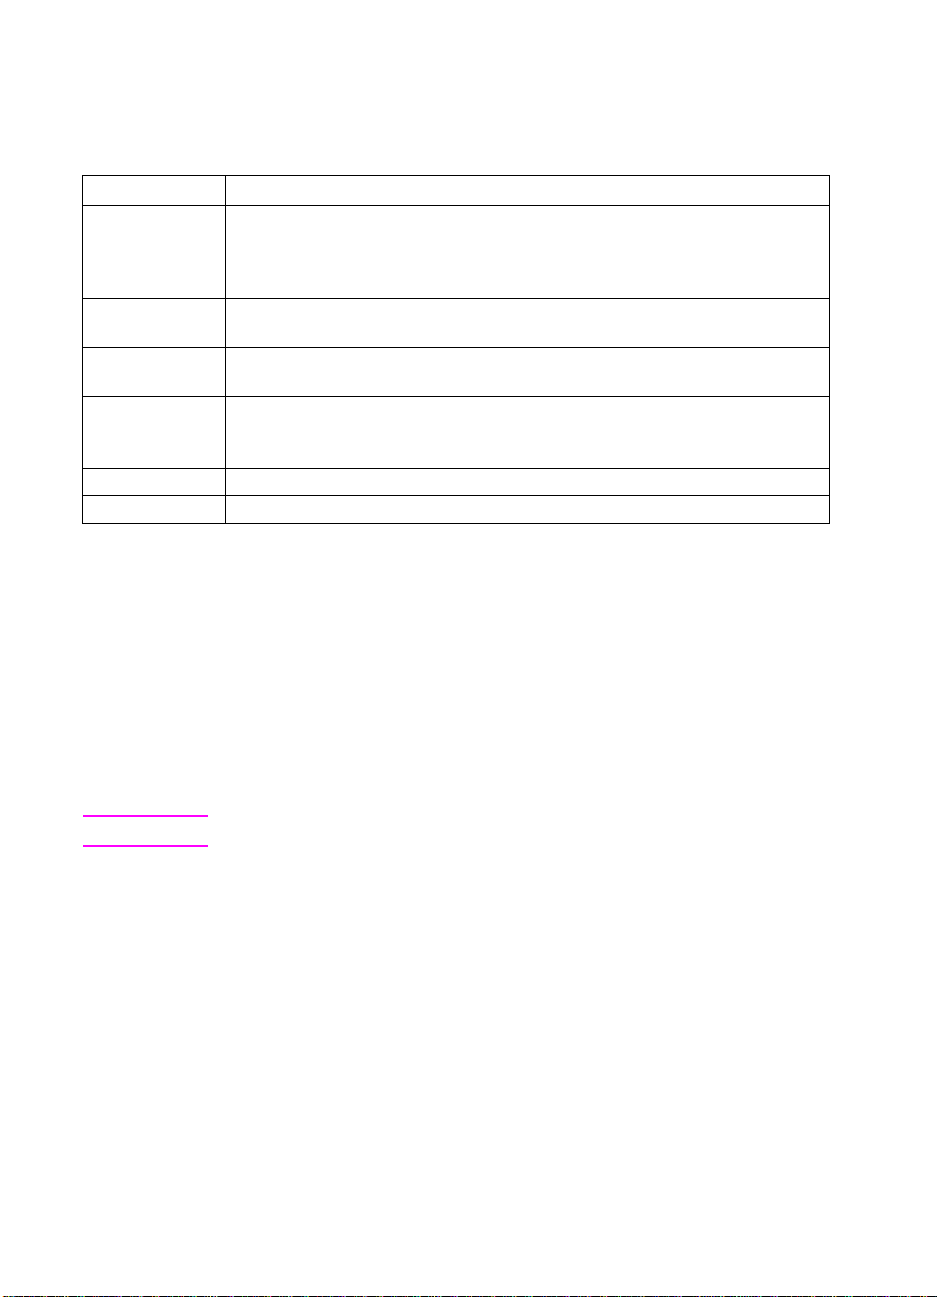
Information Menu
The Information Menu selections are used for accessing and printing
specific printer information.
Menu Item Description
PRINT MENU MAP Prints the control panel menu map.
PRINT
CONFIGURATION
PRINT CONFIG
CONTINUOUS
PRINT
FONT LIST
SHOW EVENT LOG Prints a historical list of printer events.
REMAINING LIFE Displays the projected remaining life f or the
Prints the printer configuration page.
Continuously prints the configuration page
until C
ANCEL JOB
Prints the available PCL and PS (emulated
PostScript) font samples.
Transfer Belt, Fuser, and Imaging Drum.
is pressed.
30 Using the Printer Control Panel
EN
Page 31

Printing a Menu Map
Printing a menu map can help you navigate through control panel
menus. See the menu map sample that follows.
To print a menu map
ENU
1 On the printer control panel, press M
MENU displays.
TEM
2 Press I
3 Press S
map, the printer will return to the READY state.
until PRINT MENU MAP displays.
ELECT
to print the menu map. After printing the menu
until INFORMATION
Interpreting the Menu Map
The following sample illustrates a menu map.
Figure 2-2 Menu Map
1 Information Menu
2 Paper Handling Menu
3 Configuration Menu
4 Printing Menu
5 I/O Menu
6 Calibration Menu
7 Resets Menu
EN
Chapter 2 31
Page 32

Printing a Printer Configuration Page
Printing out a printer configuration page can help you verify that the
printer is configured properly. This can be useful in troubleshooting
printer problems.
To print a printer configuration page
1 On the printer control panel, press M
MENU displays.
2 Press I
3 Press S
return to the READY state.
Note If the printer is configured with EIO cards (for example, an HP JetDirect
Print Server), an additional configuration page will print that provides
interface configuration information.
TEM
until PRINT CONFIGURATION displays.
ELECT
to print the configuration page. The printer will
ENU
until INFORMATION
Interpreting the Printer Configuration Page
The following sample illustrates a printer configuration page.
Figure 2-3 Printer Configuration Page
32 Using the Printer Control Panel
EN
Page 33

1 Printer Information—Lists the printer serial number, PCL/PS
firmware revision, total number of pages printed during the life of
the printer, and total number of color pages printed during the life
of the printer.
2 Consumables: % of Life Remaining—Lists the percentage of
the estimated remaining life for the transfer kit, fuser kit, and the
drum kit.
3 Security—Shows whether the printer control panel is locked or
unlocked. Also shows whether the printer control panel passw ord
is enabled or disabled.
4 Density Settings—Lists the current density settings.
5 Configuration Menu—Lists the current settings of the
configuration menu items.
6 I/O Menu—Lists the current settings of the I/O menu items.
7Paper Trays—Lists the size and type of media currently
configured for each input tray. Also lists the current Tray 1 mode,
A4/letter override setting, and default size setting.
8 Installed Options—Lists installed options such as EIO cards,
DIMMs, duplex printing accessory, and 500-sheet paper feeder.
9Memory—Shows the total memory installed and the total
memory available in the printer. Also lists the memory allocation
settings.
10 Printing Menu—Lists the current settings of the printing menu
items.
11 Event Log—Lists the last five printer events, including printer
jams, service errors, and other printer conditions.
EN
Chapter 2 33
Page 34

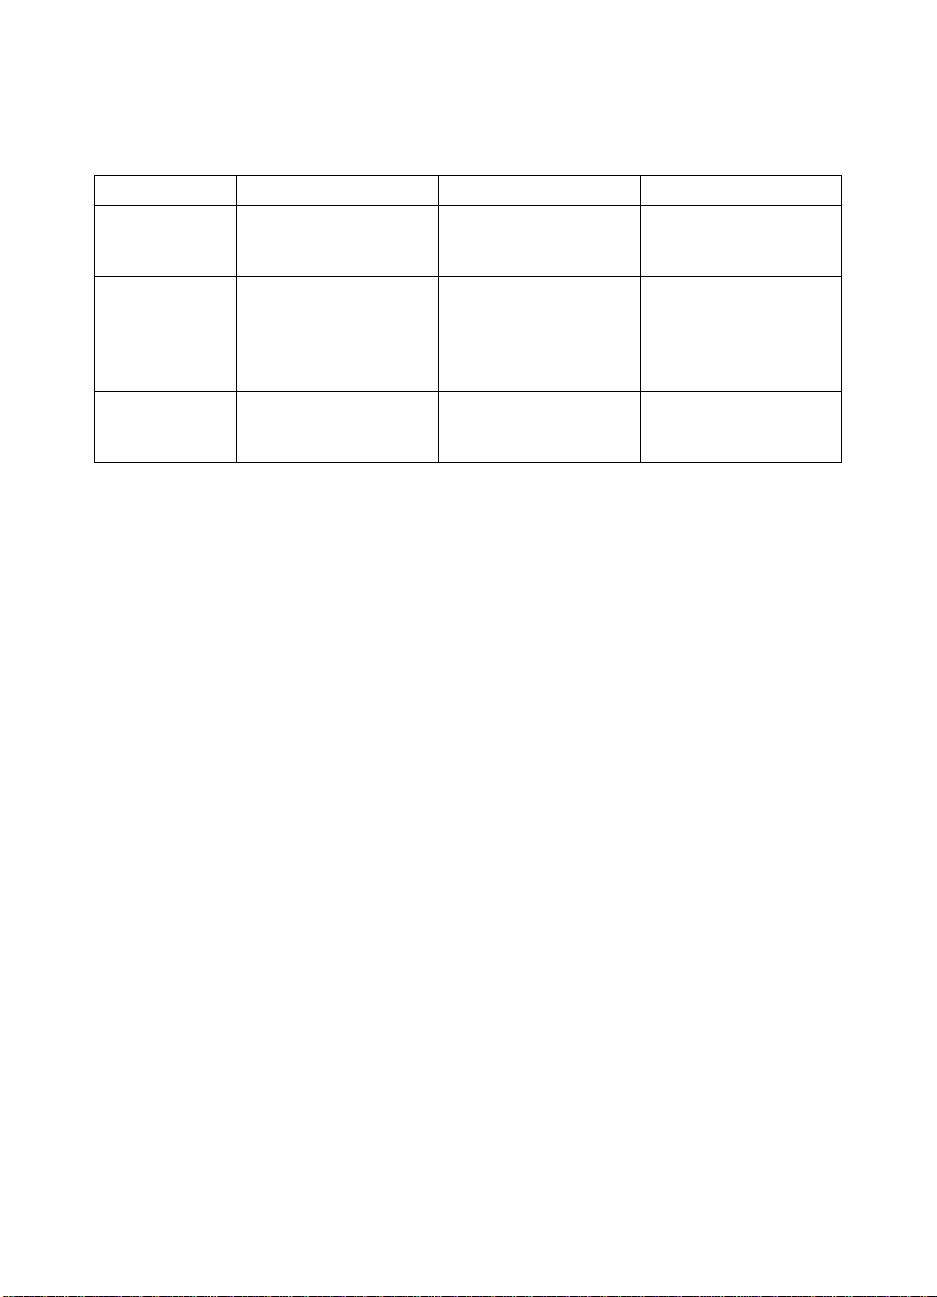
Paper Handling Menu
The Paper Handling Menu allows you to configure input trays by size
and type. This menu can also be used to set the default media size
and type.
Note The default mode for Tray 1 is TRAY 1 MODE=FIRST. In this mode, if
media is loaded in Tray 1, and no other tray is requested, the printer
will pull media from Tray 1 regardless of the size and type of media
loaded in the tray. To configure Tray 1 by size or type, it must be
configured as TRAY 1 MODE=CASSETTE.
Menu Item Values
TRAY 1 MODE FIRST*
TRAY 1 SIZE
(appears only if Tray 1 mode is set to
TRAY 1 MODE=CASSETTE)
TRAY 1 TYPE
(appears only if Tray 1 mode is set to
TRAY 1 MODE=CASSETTE)
TRAY 2 TYPE (same choices as TRAY 1 TYPE except
TRAY 3 TYPE (same choices as TRAY 1 TYPE except
A4/LETTER
OVERRIDE
DEFAULT SIZE (same choices as TRAY 1 SIZE)
*Denotes default setting
**In certain countries/regions, A4 is the default setting
CASSETTE
LETTER*/A4**
LEGAL
EXEC
JIS B5
A5
CUSTOM
B5
COM10
C5
DL
MONARC
PLAIN*
PREPRINTD
LTRHEAD
TRNSPRNCY
GLOSS
PREPUNCHD
LABELS
BOND
RECYCLED
COLOR
HEAVY
CARDSTOCK
LABELS and CARDSTOCK)
LABELS and CARDSTOCK)
NO*
YES
34 Using the Printer Control Panel
EN
Page 35

Configuration Menu
The Configuration Menu is used to set general printer default settings.
CAUTION Hewlett-Packard recommends that configuration settings only be
changed by a system administrator. Configuration settings seldom
need to be changed.
Menu Item Values Description
POWERSAVE OFF
PERSONALITY AUTO*
CLEARABLE
WARNINGS
AUTO CONTINUE ON*
TONER LOW CONTINUE*
TONER OUT STOP*
JAM RECOVERY OFF*
PRINT PS ERRORS OFF*
*Denotes default setting
1 MIN (used for
troubleshooting)
30 MIN
1 HR*
2 HRS
4 HRS
8 HRS
PCL
PS
JOB*
ON
OFF
STOP
OVERRIDE
ON
ON
The length of time before the
printer goes into power-saving
mode.
The personality (language) the
printer uses to process a print job.
If ON, message is displayed until
is pressed. If JOB, message is
G
O
displayed until end of print job.
Determines whether the printer
continues printing when certain
errors occur. If ON, printer returns
to the READY state. If OFF, printer
remains offline until G
Determines whether the printer
continues or stops printing when a
TONER LOW condition is
detected.
Determines whether the printer
continues printing when G
pressed after a TONER OUT
condition is detected.
Printer attempts to recover from
jams and reprints affected pages.
Prints out an error page when
emulated PostScript errors occur.
is pressed.
O
is
O
EN
Chapter 2 35
Page 36

Printing Menu
The Printing Menu is used to set default settings for a specific print
job.
Menu Item Values Description
COPIES 1 to 999 (default:1) Number of copies.
ORIENTATION PORTRAIT*
LANDSCAPE
FORM LENGTH 5 to 128 lines
(default: 60)
DUPLEX
1
OFF*
ON
BINDING
2
LONG EDGE*
SHORT EDGE
PCL FONT SOURCE INTERNAL*
SOFT
SLOT n (n = 1,2,3)
PCL FONT NUMBER 0 to 999 (default: 0) Specifies a default PCL
PCL FONT PITCH
3
0.44 to 99.99
(default: 10)
PCL FONT
POINT SIZE
4
4 to 999.75
(default: 12)
PCL SYMBOL SET PC-8 (default) Used to select an
COURIER REGULAR*
DARK
APPEND CR TO LF NO*
YES
*Denotes default setting
1
Only displays when the Duplex Printing Accessory is attached
2
Only displays when DUPLEX is selected
3
Only displays when a fixed space font is specified
4
Only displays when a proportional space font is specified
Determines the default
page orientation.
Maximum lines on a page
before a formfeed occurs.
Enables two-sided
printing.
Prints pages for specified
binding type.
Instructs the printer
where to look for PCL
fonts.
font number.
Specifies a default pitch
for PCL fonts.
Specifies a default font
size for PCL fonts.
appropriate symbol set.
See the appendix on PCL
commands.
Dark Courier was used in
older LaserJet printers.
Appends a carriage
return to each line feed
character in the data
stream. (UNIX)
36 Using the Printer Control Panel
EN
Page 37

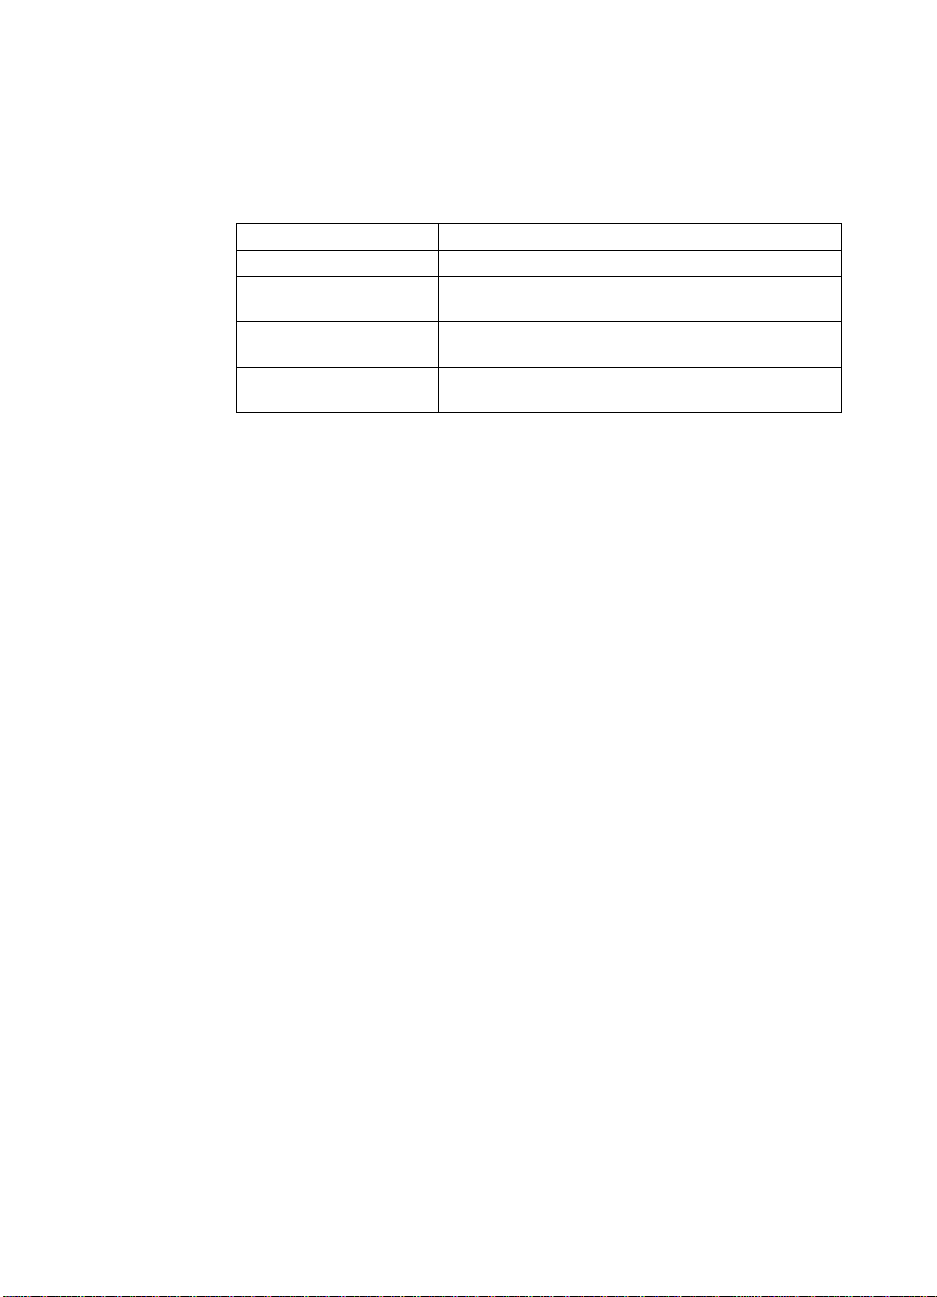
I/O Menu
The I/O Menu allows you to make changes to printer interface
settings. The following table lists the selections that appear for each
item in this menu. (See chapter 6 for additional information.)
Menu Item Values Description
I/O TIMEOUT 5 to 300 SECONDS
I/O BUFFER AUTO*
I/O BUFFER SIZE
PARALLEL HIGH
SPEED
PARALLEL
ADV FUNCTIONS
*Denotes default setting
1
Only appears if I/O BUFFER is ON
1
(default: 15)
OFF
ON
nnnnnnK
(default: 100K)
YES*
NO
ON*
OFF
Amount of time the printer waits to
receive data before switching to
another port.
Allocates memory to I/O ports.
Amount of memory allocated to the
I/O ports.
Allows faster parallel
communications supported by
newer computers.
Turns bidirectional parallel
communication on and off.
EIO Menu
If an Enhanced Input Output (EIO) card (for example , an HP JetDirect
Print Server) has been installed in the printer, an additional menu is
available. This additional menu provides a way to configure the EIO
accessory and to adjust network interface settings. For inf ormation on
HP JetDirect EIO menus, see the
Installation Guide
. This guide is included with the HP Color LaserJet
4500 N and 4500 DN printers and is also available through HP Direct.
(For ordering information, see Appendix D.)
HP JetDirect Print Server Software
EN
Chapter 2 37
Page 38

Calibration Menu
This printer features automatic, internal calibration to produce
optimum color for most print jobs. The Calibration Menu pro vides finetuning for critical color-matching requirements.
For information on using this menu for setting toner densities, see
chapter 4.
CAUTION Calibrating toner densities changes the color balance of your printer by
altering halftones. It affects all print jobs. Notify your network
administrator before performing this procedure.
Menu Item Values Description
PRINT
CALIBRATION PAGE
CYAN
DENSITY
MAGENTA
DENSITY
YELLOW
DENSITY
BLACK
DENSITY
RESET DENSITY
VALUES
-5 to +5
(default: 0)
-5 to +5
(default: 0)
-5 to +5
(default: 0)
-5 to +5
(default: 0)
Prints out the color calibration
page.
Used for increasing or decreasing
cyan toner density.
Used for increasing or decreasing
magenta toner density.
Used for increasing or decreasing
yellow toner density.
Used for increasing or decreasing
black toner density.
Resets density values back to
default settings. Press S
reset values.
ELECT
to
38 Using the Printer Control Panel
EN
Page 39
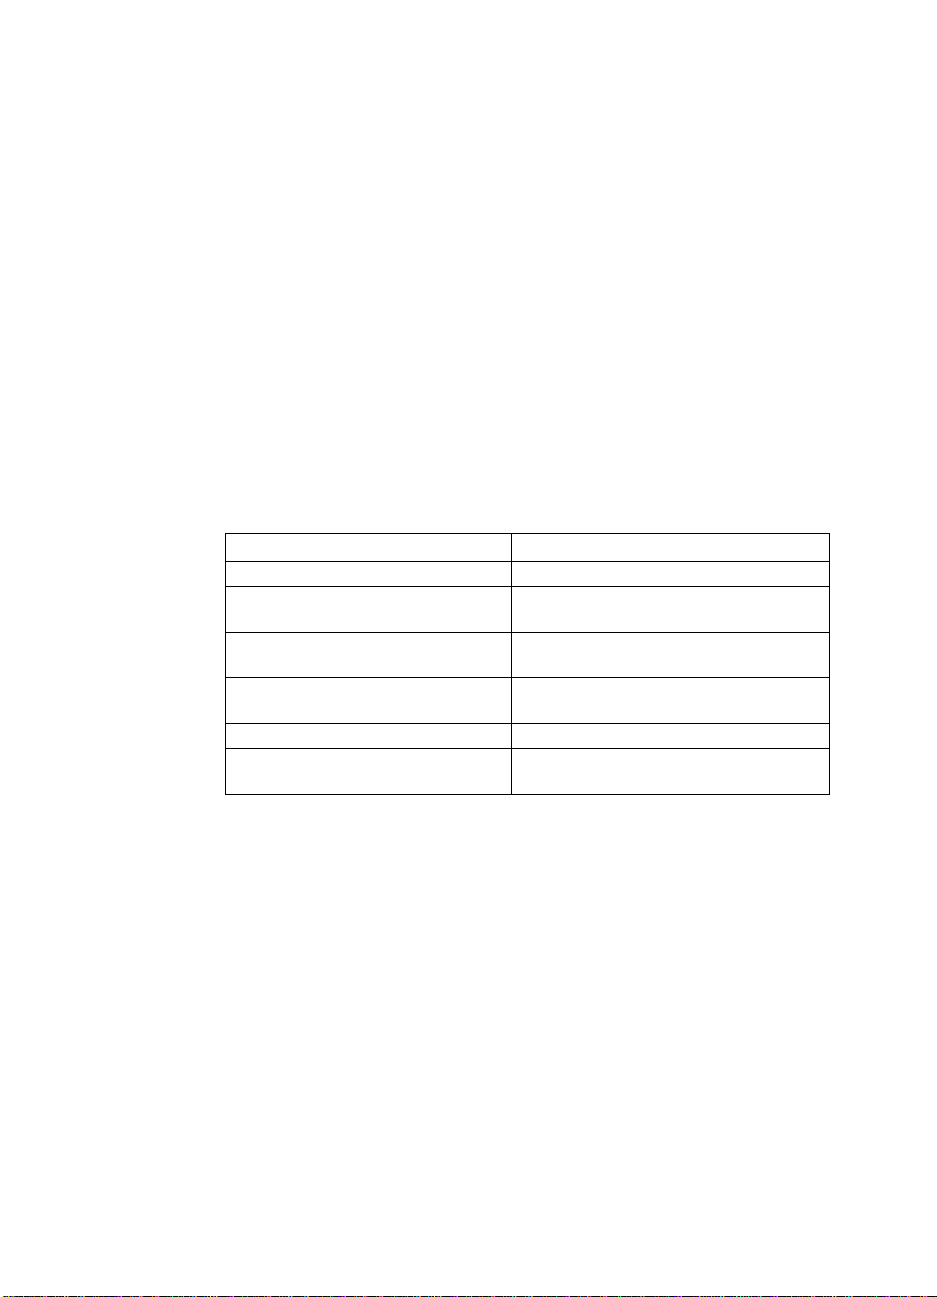
Resets Menu
The Resets Menu is used for resetting the printer’s memory and for
returning the printer to its factory default settings. It is also used to
clear maintenance messages following the replacement of certain
consumable items.
Menu Item Description
RESET MEMORY Resets the printer to user-specified default settings.
RESTORE FACTORY
SETTINGS
NEW TRANSFER KIT
SELECT IF DONE
NEW FUSER KIT
SELECT IF DONE
Resets the printer to factory default settings.
Clears the maintenance message after the transfer kit
has been replaced.
Clears the maintenance message after the fuser kit has
been replaced.
EN
Chapter 2 39
Page 40

Using the Printer Control Panel in
Shared Environments
The printer control panel functions essentially the same in shared
printer environments as it does when connected to a standalone
computer. If problems occur, contact your network administrator.
Because your printer is shared with other users, adhering to the
following guidelines will help ensure successful printer operation:
●
Consult your system administrator before making changes to
control panel settings. Changing control panel settings could
affect other print jobs.
●
Coordinate with other users before changing the default printer
font and downloading soft fonts. Coordinating these operations
conserves memory and avoids unexpected printer output.
●
Be aware that switching printer personalities, such as Emulated
PostScript or PCL, affects the printed output of other users.
Note Your network operating system may automatically protect each user’ s
print job from the effects of other print jobs. Consult your system
administrator for more information.
40 Using the Printer Control Panel
EN
Page 41

Changing Printer Control Panel Configuration
Settings
By using the printer control panel, you can make changes to general
printer configuration default settings such as PowerSave, printer
personality (language) and jam recovery.
CAUTION Hewlett-Pac kard recommends that configur ation settings be changed
only by a system administrator. Configuration settings very seldom
need to be changed.
To change printer control panel configuration
settings
ENU
1 Press M
2 Press I
3 Press V
4 Press S
5 Press G
until CONFIGURATION MENU displays.
TEM
until the item that you want to change displays.
ALUE
until the appropriate setting displays.
ELECT
to save the setting.
O
to return the printer to the READY state.
EN
Changing PowerSave Settings
The adjustable P owerSa v e f eature reduces pow er consumption when
the printer has been inactive for an extended period. The printer
display dims when the printer is in PowerSave mode. You can set the
length of time before the printer goes into PowerSave mode to OFF,
1 minute, 30 minutes or to 1, 2, 4, or 8 hours. The default setting is
1 hour.
Chapter 2 41
Page 42

To change PowerSave setting
1 Press M
2 Press I
3 Press V
4 Press S
5 Press G
ENU
until CONFIGURATION MENU displays.
TEM
until POWERSAVE displays.
ALUE
until the appropriate setting displays.
ELECT
to save the setting.
O
. The printer will return to the READY state within a few
minutes.
If you want to disable PowerSave, select OFF in step 3.
Note This printer qualifies as E
U.S. Environmental Protection Agency (EPA).
Switching Printer Personalities
This printer features automatic personality (printer language)
switching. In A UT O mode, the printer automatically detects the type of
print job and configures its personality to accommodate that job. You
also can change the personality mode to either PCL or PostScript
Emulation (PS).
To switch printer personality
1 Press M
ENU
until CONFIGURATION MENU displays.
NERGY STAR
compliant, as determined by the
2 Press I
3 Press V
4 Press S
5 Press G
TEM
until PERSONALITY displays.
ALUE
until the appropriate setting displays.
ELECT
to save the setting.
O
to return the printer to the READY state.
42 Using the Printer Control Panel
EN
Page 43

Setting the I/O Timeout
I/O Timeout sets the number of seconds that the printer waits to
receive additional data from the computer before switching I/O ports.
The default setting for the printer is 15 seconds.
Note Setting the I/O Timeout too high may cause a single I/O port to remain
active and prohibit data from being received through other ports.
Setting I/O Timeout too low may result in missing characters, out-oforder print jobs, or other print problems.
To set the I/O Timeout
ENU
1 Press M
2 Press I
3 Press V
Holding the key down will change the value more quickly.
4 Press S
5 Press G
until I/O MENU displays.
TEM
until I/O TIMEOUT displays.
ALUE
to increase or decrease the I/O Timeout value.
ELECT
to save the setting.
O
to return the printer to the READY state.
EN
Chapter 2 43
Page 44

Disabling the High-Speed Parallel Interface
This printer features a high-speed, bi-directional parallel interface.
The interface supports high and low speed access. The high-speed
access may not be compatible with some computers. Through the I/O
Menu, you can enable and disable high speed parallel interface. The
default setting is enabled.
To disable the high speed parallel interface
1 Press M
2 Press I
3 Press V
ENU
until I/O MENU displays.
TEM
until PARALLEL HIGH SPEED displays.
ALUE
until NO displays. (To enable high-speed parallel
interface, set the value to YES.)
4 Press S
5 Press G
ELECT
to save the setting.
O
to return the printer to the READY state.
44 Using the Printer Control Panel
EN
Page 45

Setting Advanced Functions
This printer supports bidirectional parallel communication. You can
turn this feature on and off through the I/O Menu.
To enable bidirectional parallel communication
ENU
1 Press M
2 Press I
3 Press V
4 Press S
5 Press G
until I/O MENU displays.
TEM
until PARALLEL ADV FUNCTIONS displays.
ALUE
until ON displays.
ELECT
to save the setting.
O
to return the printer to the READY state.
Resetting Printer Memory
CAUTION Resetting memory clears the page buffer , removes downloaded f onts
and macros, and returns all print menu settings to user-selected
defaults.
To reset printer memory
ENU
1 Press M
until RESETS MENU displays.
EN
TEM
2 Press I
3 Press S
until RESET MEMORY displays.
ELECT
. RESETTING MEMORY appears on the printer
control panel display, and then the printer automatically returns to
the READY state.
Chapter 2 45
Page 46

Resetting the Printer to Factory Default Settings
Resetting the printer to factory default settings can be useful when
you are troubleshooting with the printer.
CAUTION Resetting factory defaults clears the page buff er, remov es downloaded
fonts and macros, and returns all print menu settings to factory defaults.
To reset the printer to factory default settings
1 Press M
2 Press I
3 Press S
This message displays until the printer has completed the
initialization process. The printer automatically returns to the READY
state.
ENU
until RESETS MENU displays.
TEM
until RESTORE FACTORY SETTINGS displays.
ELECT
until the following message appears:
RESTORING
FACTORY SETTINGS
46 Using the Printer Control Panel
EN
Page 47

Common
3
Printing Tasks
Overview
This chapter helps you perform common printing tasks. The
chapter includes the following sections:
Selecting Print Media
●
Printing on Special Media
●
Controlling Print Jobs
●
Configuring Input Trays
●
Printing from Tray 1 (Multipurpose Tray)
●
Printing from Tray 2
●
Printing from Tray 3 (optional 500-Sheet Paper Feeder)
●
Using the Duplex Printing Accessory for Two-Sided Printing
●
Special Printing Situations
●
Stopping a Print Request
●
EN
Chapter 3 47
Page 48

Selecting Print Media
You can use many types of paper and other print media with this
printer. This section provides guidelines and specifications for
selecting and using different print media.
Before purchasing any media or specialized forms in quantity, verify
that your paper supplier obtains and understands the print media
requirements specified in the
Guide
. The guide is available through HP Direct. See Appendix D for
ordering information.
It is possible that media could meet all of the guidelines in this chapter
and still not print satisfactorily. This may be due to abnormal
characteristics of the printing environment or to other variables over
which Hewlett-Packard has no control (for example, extremes in
temperature and humidity).
Hewlett-Packar d recommends testing an y media before b uying it
in large quantities.
CAUTION Using media that does not conform to the specifications listed here or
in the paper specification guide can cause problems that require
service. This service is not covered by the Hewlett-Packard warranty
or service agreements.
HP LaserJet Family Paper Specification
48 Common Printing Tasks
EN
Page 49

Supported Media Weights and Sizes
For optimum results, use conventional 75 g/m2 (20 lb) xerographic
paper. Verify that the paper is of good quality and is free of cuts,
nicks, tears, spots, loose particles, dust, wrinkles, curls, or bent
edges.
Tray Supported Media
Tray 1 Paper
A4/Letter
Legal
Executive
JIS B5
A5
Custom
Minimum Size:
76 x 127 mm (3 x 5 in)
Maximum Size:
216 x 356 mm (8.5 x 14)
Transparencies
Glossy Paper
Envelopes
(Tray 1 only)
Com10
Monarch
C5
DL
B5 (JIS)
Labels
(Tray 1 only)
Cardstock (Postcards)
(Tray 1 only)
Media
Specifications
Single-sided:
2
2
(24 lb)
2
g/m
(47 lb)
60 to 159
(16 to 42 lb)
Two-sided:
64 to 105 g/m
(17 to 28 lb)
0.13 mm (5 mil)
120 g/m
(32 lb/80 lb text)
Maximum weight:
90 g/m
Maximum weight:
176 g/m
Maximum size:
200mm x 148mm
(7.87 in x 5.82 in)
Capacity
150 sheets of 75 g/m
2
(20 lb) paper
Do not load more than
the maximum stack
2
height of 15 mm (0.6 in).
Limit of 50
Limit of 50 sheets
Limit of 10
Limit of 50
Do not load more than
the maximum stack
height of
15 mm (0.6 in)
2
EN
Chapter 3 49
Page 50

Tray Supported Media
Tray 2 Paper
A4/Letter
Media
Specifications
60 to 105 g/m
(16 to 28 lb)
2
Capacity
250 sheets of 75 g/m2
(20 lb) paper
Legal
Executive
JIS B5
A5
Custom (B5 ISO)*
Transparencies
Glossy Paper
0.13 mm (5 mil)
120 g/m
2
Limit of 50
Limit of 200 sheets
(32 lb/80 lb text)
Tray 3
(optional)
Pap e r
A4/Letter
60 to 105 g/m
(16 to 28 lb)
2
500 sheets of 75 g/m
(20 lb) paper
2
Legal
Executive
JIS B5
Custom (B5 ISO)*
Transparencies
Glossy Paper
0.13 mm (5 mil)
120 g/m
2
Limit of 50
Limit of 500 sheets
(32 lb/80 lb text)
Duplex
Printing
Accessory
(optional)
Paper
A4/Letter
Legal
Executive
64 to 105 g/m
(17 to 28 lb)
2
JIS B5
*Trays 2 and 3 use “Custom” size specifically for B5 ISO. Trays 2 and 3 do not support the range of custom
sizes available in Tray 1.
50 Common Printing Tasks
EN
Page 51

Media to Avoid
Use the following guidelines to avoid poor print quality or damage to
your printer:
Do not use paper that is too rough.
●
Do not use paper that is embossed or coated unless it is
●
specifically recommended for use in this printer.
Do not use paper with cutouts or perforations other than standard
●
3-hole punched paper.
Do not use multipart forms.
●
Do not use paper with irregularities such as tabs or staples.
●
Do not use letterhead paper with low temperature dyes or
●
thermography. Preprinted forms or letterhead must use inks that
can tolerate temperatures of 190° C (374° F) for 0.1 second.
Do not use any media that produces hazardous emissions, or
●
that melts, offsets, or discolors when exposed to 190° C (374° F)
for 0.1 second.
Do not use paper that has already been printed on or that has
●
been fed through a photocopier.
Do not use paper with a watermark if you are printing solid
●
patterns.
EN
Chapter 3 51
Page 52

Printing on Special Media
Use these guidelines when printing on special types of media.
Printing on Transparencies
When printing on transparencies, use the following guidelines:
CAUTION T o pre vent transparencies from bonding together , always send them to
the top output bin.
●
Handle transparencies using the edges. Oils from your fingers
that are deposited on the transparency can cause print quality
problems.
CAUTION Use only overhead transparencies recommended f or use in this printer.
Hewlett-Packard recommends using HP Color LaserJet
Transparencies with this printer. HP products are designed to work
together for optimum printing results.
Printing on Glossy Paper
When printing on glossy paper, select the glossy print setting in the
printer driver. You can also use the printer control panel to set the
media type to GLOSS for the input tray you are using. Because this
affects all print jobs, it is important to return the printer back to its
original settings once your job has printed. See the section later in
this chapter on configuring input trays.
Printing on Colored Paper
Colored paper should be of the same high quality as white
xerographic paper. Pigments used must be able to withstand the
printer’s fusing temperature of 190° C (374° F) f or 0.1 second without
deterioration. Do not use paper with a colored coating that was added
after the paper was produced.
The printer creates colors by printing patterns of dots, overlaying and
varying their spacing to produce various colors. Varying the shade or
color of your paper will affect the shades of your printed colors.
52 Common Printing Tasks
EN
Page 53

Printing Envelopes
Note Envelopes can only be printed from Tray 1. Hewlett-Packard
recommends configuring Tray 1 as a cassette and setting the tray’s
media type to the specific envelope size. See the section later in this
chapter on loading envelopes.
Adhering to the following guidelines will help ensure proper printing of
envelopes and help prevent printer jams:
Do not load more than 10 envelopes into Tray 1.
●
The weight rating of envelopes should not exceed
●
●
●
●
●
2
90 g/m
(24 lb).
Envelopes should be flat.
Do not use envelopes with windows or clasps.
Envelopes must not be wrinkled, nicked, or otherwise damaged.
Envelopes with peel-off adhesive strips must use adhesives that
can withstand the heat and pressures of the printer’s fusing
process.
Envelopes should be loaded with the flaps facing away from the
●
printer and toward the right side of the printer.
Printing on Labels
Note For printing labels, Hewlett-P ackard recommends configuring T ray 1 as
a cassette and setting the tray’s media type to LABELS in the printer
control panel. See the section later in this chapter on configuring input
trays.
When printing labels, use the following guidelines:
V erify that the labels’ adhesive material can tolerate temperatures
●
of 190° C (374° F) for 0.1 second.
Verify that there is no exposed adhesive material between the
●
labels. Exposed areas can cause labels to peel off during
printing, which can cause printer jams. Exposed adhesive can
also cause damage to printer components.
Do not re-feed a sheet of labels.
●
Verify that labels lie flat.
●
Do not use labels that are wrinkled, bubbled, or otherwise
●
damaged.
EN
Chapter 3 53
Page 54

Heavy Paper
Use Tray 1 for paper that is heavier than 105 g/m2 (28 lb). For
optimum results when printing on heavy paper, use the printer control
panel to configure Tray 1 as a cassette and then set the media type
for the tra y to HEA VY. Because this aff ects all print jobs, it is important
to return the printer back to its original settings once your job has
printed. See the section later in this chapter on configuring input
trays.
CAUTION Do not use paper that is heavier than the media specification
recommended for this printer. Doing so can cause misfeeds, paper
jams, reduced print quality, and excessive mechanical wear.
Preprinted Forms and Letterhead
Observe the following guidelines f or best results with preprinted forms
and letterhead:
●
Forms and letterhead must be printed with heat-resistant inks
that will not melt, vaporize, or release hazardous emissions when
subjected to the printer’s fusing temperature of approximately
190° C (374° F) for 0.1 second.
●
Inks must be non-flammable and should not adversely affect any
printer rollers.
●
Forms and letterhead should be sealed in a moisture-proof
wrapping to prevent changes during storage.
●
Before you load preprinted paper such as forms and letterhead,
verify that the ink on the paper is dry. During the fusing process,
wet ink can come off of preprinted paper.
Recycled Paper
This printer supports the use of recycled paper. Recycled paper must
meet the same specifications as standard paper. (See the
HP LaserJet Family Paper Specification Guide
available through HP Direct. See Appendix D f or ordering inf ormation.
Hewlett-Packard recommends that recycled paper contain no more
than 5 percent ground wood.
54 Common Printing Tasks
.) The guide is
EN
Page 55

Controlling Print Jobs
Among the aspects of a print job that you can control are the tray from
which the printer pulls media, the bin to which you send the job, and
the configuration for type and size of media for each tray. You can
control print jobs through the printer driver, your software application,
or the printer control panel.
CAUTION To avoid affecting print jobs of other users, whenever possible, make
printer setup changes through your software application or the printer
driver. Printer setup changes made through the control panel become
default settings for subsequent jobs. Changes made through an
application or printer driver affect only that specific job.
Selecting Output Bins
This printer has two media output bins. The position of the door to the
rear output bin determines the bin used: If the door to the rear output
bin is open, media is directed to that bin. If it is closed, media is
directed to the top output bin. There are no driver or software options
for selecting an output bin. Figure 3-1 illustrates the top and rear
output bins.
The top output bin holds up to 250 sheets of standard paper in
●
correct order, facing down. When the bin is full, a sensor directs
the printer to stop printing. Printing resumes when you remove
paper from the bin.
The rear output bin holds up to 100 sheets of standard paper in
●
reverse order, facing up. When the door to the rear output bin is
open, media is directed to this bin. When this door is closed,
media is directed to the top output bin. Because there is no
sensor at this output bin, you should monitor the bin and empty it
when it is full.
Note If the rear output bin is open, duplex printing is not possible. Close the
rear output bin when duplex printing.
When printing on transparencies, close the rear output bin. This causes
the transparencies to be sent to the top output bin and reduces the risk
of jamming.
EN
Chapter 3 55
Page 56

Figure 3-1 Rear view
accessory)
1 Top Output Bin
2 Rear Output Bin
Selecting Media by Type
If you want to select media for your job by type of media rather than
by the input tray (source), y ou must first configure a printer tra y f or the
media type you are using, and then specify that media type in the
printer driver.
Selecting media by type rather than source is similar to locking out
trays and helps protect special media from accidental use. For
example, if a tray is configured for letterhead, and you specify in your
driver to print on plain paper, the printer will not pull the letterhead
from that tray. Instead, it will pull from a tray that has plain paper
loaded and that has been configured for plain paper on the printer
control panel.
(shown with the optional 500-sheet paper feeder and duplex printing
56 Common Printing Tasks
EN
Page 57

Configuring Input Trays
This printer allows you to configure input trays by type and size. This
allows you to load different media types and siz es in the printer’ s input
trays and then request media by type or size.
When the printer is used as a standalone printer, it might be
●
beneficial to configure the printer as TRAY 1 MODE=FIRST. In
this mode, if media is loaded in Tray 1 and no other tray is
specified, media will be pulled from Tray 1 regardless of the type
or size of media loaded in the tray.
When the printer is used in a network environment, it might be
●
beneficial to configure Tray 1 as TRAY 1 MODE=CASSETTE. In
this mode, the tray acts as a cassette-style tray and can then be
configured for media type and size.
Note When Tray 1 is in FIRST mode, be sure that the media loaded meets
the specifications for duplex printing. (See the supported media weights
and sizes section earlier in this chapter.)
Configuring Tray 1 as a Cassette
Tray 1 is designed to accommodate printing on a variety of media
types.
EN
To configure Tray 1 as a cassette
ENU
1 Press M
2 Press I
3 Press V
4 Press S
5 Press I
6 Press V
7 Press S
8 Press I
9 Press V
10 Press S
11 Press G
until PAPER HANDLING MENU displays.
TEM
until TRAY 1 MODE displays.
ALUE
until CASSETTE displays.
ELECT
to save the setting.
TEM
until TRAY 1 SIZE displays.
ALUE
until the proper media size displays.
ELECT
to save the setting.
TEM
until TRAY 1 TYPE displays.
ALUE
until the proper media type displays.
ELECT
to save the setting.
O
to return the printer to the READY state.
Chapter 3 57
Page 58

Configuring Trays 2 and 3 by Media Type
Trays 2 and 3 are cassette-style trays. You can select them by media
size and type through your software application or the printer driver.
Note Tray 2 has an internal media-size sensor and does not need to be
configured on the printer control panel for media size. The media-size
knob on the side of Tray 3 must be set to the correct media size.
To configure Trays 2 or 3
1 Press M
2 Press I
ENU
until PAPER HANDLING MENU displays.
TEM
until TRAY 2 TYPE displays (or TRAY 3 TYPE when
configuring Tray 3).
3 Press V
4 Press S
5 Press G
ALUE
until the proper media type displays.
ELECT
to save the setting.
O
to return the printer to the READY state.
Tray Priority
When all trays hav e the same siz e and type media loaded, the printer
pulls media from input trays in the following order:
When Tray 1 is configured as TRAY 1 MODE=FIRST
●
Tray 1
●
Tray 3 (if attached)
●
Tray 2
When Tray 1 is configured as TRAY 1 MODE=CASSETTE
●
Tray 3 (if attached)
●
Tray 2
●
Tray 1
58 Common Printing Tasks
EN
Page 59

Printing from Tray 1 (Multipurpose Tray)
Tray 1, the multipurpose tray, can print on all supported sizes and
types of media and envelopes.
EN
Chapter 3 59
Page 60

Loading Media into Tray 1
1
2
3
To load media into Tray 1
CAUTION
To avoid jams, never add or remove
media from a tray during printing. To
avoid damaging the printer, place labels
and paper heavier than 105 g/m
only in Tray 1.
1 Pull up the tray extension.
2 Slide the media-width guides all the
way open.
3 Load media into the tray with the
side to be printed facing the printer.
Slide the media in until it sits
squarely in the bottom of the tray.
4 Slide the media-width guides in until
they hold the media firmly in place
without bending it.
Note
For proper paper feeding, custom media
must be at least 76 mm (3 in) wide and
127 mm (5 in) long.
2
(28 lb)
4
60 Common Printing Tasks
Note
Load prepunched paper with the holes
toward the side of the printer as
illustrated. For two-sided printing, load
media with the front side facing away
from the printer.
EN
Page 61
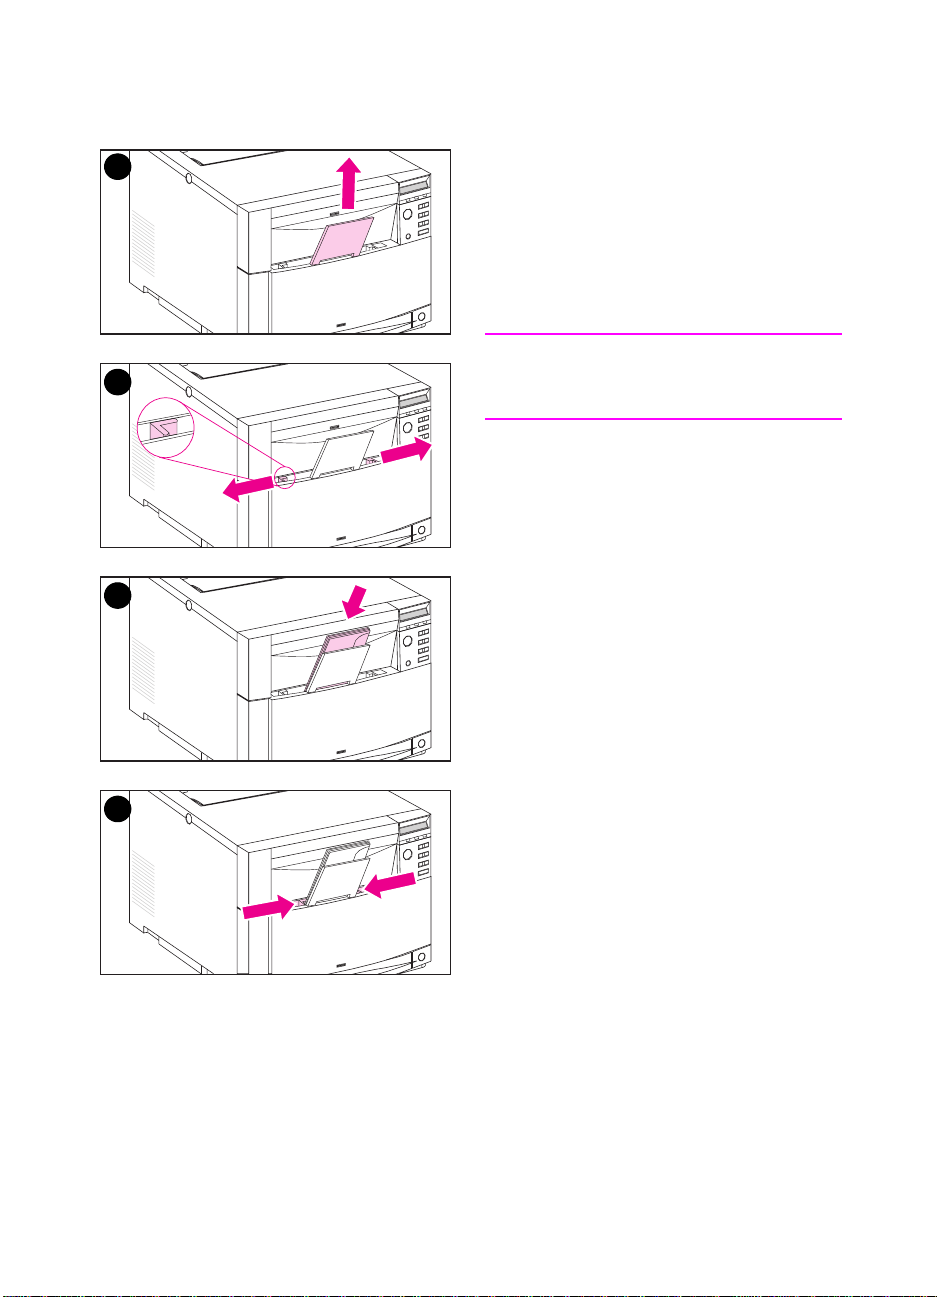
Loading Envelopes into Tray 1
1
Envelopes can only be printed from
Tray 1. This tray holds up to 10
envelopes. For envelope specifications,
see the “Supported Media Weights and
Sizes” section earlier in this chapter.
To load envelopes into Tray 1
CAUTION
2
3
To avoid jams, do not remove or insert
envelopes during printing.
1 Pull up the tray extension.
2 Slide the media-width guides all the
way open.
3 Load up to 10 envelopes into Tray 1
with their back flap facing a way from
the printer. Slide the envelopes in
until they sit squarely in the bottom
of the tray as illustrated.
4 Slide the media-width guides in until
they hold the envelopes firmly in
place without bending them.
EN
4
Chapter 3 61
Page 62

Printing envelopes when TRAY 1 MODE=CASSETTE
For the best results when printing envelopes, Tray 1 should be
configured as TRAY 1 MODE=CASSETTE and media size should be
set to the size corresponding to the envelopes you are printing on.
1 Set the media size for Tray 1 in the printer control panel. (See
“Configuring Tray 1” earlier in this chapter.)
2 Specify Tray 1 or select media source by size (for example,
COM 10 or DL).
3 If your software does not automatically format an envelope,
specify Landscape for page orientation in your software
application or printer driver. Use the following guidelines to set
margins for return and destination addresses on Commercial #10
or DL envelopes.
Address Type Left Margin Top Margin
Return 15 mm (0.6 in) 15 mm (0.6 in)
Destination 102 mm (4.0 in) 51 mm (2.0 in)
Note For envelopes of other sizes, adjust the margin settings appropriately.
4 Select Print from the software application or printer driver.
Printing envelopes when TRAY 1 MODE=FIRST
If Tray 1 is configured as TRAY 1 MODE=FIRST (default), select
Tray 1 or use autoselect and then print the file from your software
application or the printer driver. In this mode, the printer will pull
media from the tray regardless of the size and type of media loaded. If
your software does not automatically format an envelope, follow the
instructions provided in the previous section.
62 Common Printing Tasks
EN
Page 63

Printing from Tray 2
Tray 2 holds up to 250 sheets of standard paper. The tray adjusts for
Letter, Legal, A4, A5, JIS B5, Custom (B5 ISO), and Ex ecutive paper.
The printer automatically detects the media size in Tray 2 based on
the tray’s paper guide configuration.
EN
Chapter 3 63
Page 64

Loading Media into Tray 2
1
2
3
To load media into Tray 2
CAUTION
Do not print cardstock, labels,
envelopes, and unsupported sizes of
media from Tray 2. These media types
should be printed only from Tray 1.
Do not overfill the input tray. Overfilling
trays can cause jams in the printer.
To avoid causing jams, never open the
tray while it is in use.
1 Remove Tray 2 from the printer and
place it on a flat surface.
2 Set the rear media-length guide by
squeezing the guide adjustment
latch and sliding the back of the tray
to the length of media you are
loading.
3 Slide the media-width guides all the
way open by squeezing the release
latch.
4
64 Common Printing Tasks
4 Load media with the print side facing
down into the tray.
EN
Page 65

5
5 Verify that media lies flat in the tray
and that it fits under the metal tabs.
6 Slide the media-width guides in until
they hold the media firmly in place
without bending it.
7 Insert Tray 2 into the printer.
Note
6
Load prepunched paper as illustrated.
For two-sided printing, load media with
the front side facing up.
7
EN
Chapter 3 65
Page 66

Printing from Tray 3 (500-Sheet Paper Feeder)
The printer supports an optional 500-sheet paper feeder (Tray 3).
Tray 3 attaches to the bottom of the printer and serves as the printer’s
base. When the optional duplex printing accessory is installed, the
duplex unit must be positioned between the printer and the 500-sheet
paper feeder. The printer’s internal sensors detect the presence or
absence of Tray 3, and the printer control panel options automatically
adjust to reflect the current configuration.
Figure 3-2 Tray 3 (optional 500-Sheet Paper Feeder)
The following are features of the 500-sheet paper feeder (Tray 3):
●
The tray has a capacity of 500 sheets of standard paper.
●
It is adjustable for specific media sizes, with corresponding stop
positions.
●
The printer automatically detects media size based on Tray 3’s
physical configuration and the position of the media-size knob
located on the side of the tray.
●
A user-configurable software setting identifies the media type that
the printer expects to be loaded in Tray 3.
●
An internal sensor automatically detects when Tray 3 is empty.
●
A paper level indicator is provided on the front face of the tray.
Note The paper path for the 500-sheet paper feeder passes through Tray 2.
If T ra y 2 is partially pulled out or removed, media from the paper feeder
cannot feed into the printer. This causes the printer to go offline and
generates a message that Tray 2 must be installed.
66 Common Printing Tasks
EN
Page 67

Loading Media into Tray 3
1
Tray 3 adjusts for Letter, Legal, A4, JIS
B5, Custom (B5 ISO), and Executive
paper. The printer automatically detects
the media size in Tray 3 based on the
tray’s physical configuration and the
position of the media-size knob.
To load media into Tray 3
2
3
CAUTION
Do not print cardstock, labels, and
envelopes from Tray 3. This media
should be printed only from Tray 1.
Do not overfill the input tray. Overfilling
trays can cause jams in the printer.
1 Remove Tray 3 and place it on a flat
surface.
2 Set the rear media-length guide by
squeezing the release latch and
sliding the guide to the length of
media you are loading.
3 For special-size media, flip up the
special media guide.
EN
4
4 Squeezing the release latch, slide
the media-width guides all the way
open.
Chapter 3 67
Page 68

5
5 Load media into Tray 3 with the print
side facing down. Do not overfill the
tray.
6 Slide the media-width guides in until
they hold the media firmly in place
without bending it.
7 Verify that media lies flat in the tray
and that it fits under the metal tabs.
6
8 Set the media-size knob on the side
of the tray to the size of media
loaded in the tray.
7
8
68 Common Printing Tasks
EN
Page 69

9
9 Insert Tray 3 into the printer.
10 Verify that the printer driver is
configured to recognize Tray 3. (For
instructions, see the online Help for
the printer driver.)
Note
Load prepunched paper with holes
toward the side of the tray as illustrated.
For two-sided printing, load media with
the front side facing up.
EN
Chapter 3 69
Page 70

Using the Duplex Printing Accessory for
Two-Sided Printing
The optional duplex printing accessory (figure 3-3), enables you to
print on both sides of a page. In two-sided printing, known as duplex
printing or duplexing, the back side of the page is printed first. Then
the page is sent through the duplex printing accessory, where it is
flipped over and sent back through the printer for printing on the front.
Note Although the printer detects the presence of the duplex printing
accessory , to print on two sides of the page, you must still specify duplex
options in your software application or in the printer driver.
Figure 3-3 Duplex Printing Accessory
70 Common Printing Tasks
EN
Page 71

To use the duplex printing accessory successfully:
Be sure that the duplex printing accessory is installed correctly. If
●
the 500-sheet paper feeder (Tray 3) is installed, the duplex unit
must be positioned between the printer and Tray 3.
Verify that the printer driver is configured to recognize the duplex
●
printing accessory. (For instructions, see the online Help for the
printer driver.)
Close the door to the rear output bin. The rear output bin is
●
located at the back of the printer.
Select the appropriate duplex options in the printer driver
●
software. Duplex options include the page and binding
orientation.
Duplex printing is not supported for certain media types, including
●
transparencies, labels, and cardstock.
Control Panel Settings for Duplex Printing
Many software applications allow you to change duplex printing
settings. If your software application or printer driver does not allow
you to adjust duplex printing settings, you can adjust these settings
through the control panel.
CAUTION Do not open the door to the rear output bin during duplex printing. Doing
so can cause jams or misprints.
To set duplex printing from the printer control panel
Note Changing duplex settings through the printer control panel affects all
print jobs. Whenever possible, change duplex settings through your
software application or printer driver.
ENU
1 Press M
2 Press I
3 Press V
4 Press S
5 Press I
6 Press V
binding (see figure 3-4).
7 Press S
8 Press G
EN
until PRINTING MENU displays.
TEM
until DUPLEX displays.
ALUE
until ON displays.
ELECT
to save the setting.
TEM
until BINDING displays.
ALUE
to select either LONG EDGE or SHORT EDGE
ELECT
to save the setting.
O
to return the printer to the READY state.
Chapter 3 71
Page 72

9 From your software application or printer driver, select duplex
printing.
10 Print the job.
Note To select duplex printing from the printer driver, the driver must first be
configured to recognize the duplex printing accessory . (For instructions,
see the online Help for the printer driver.)
Options for Binding Duplex Printing Jobs
Before printing in duplex mode, decide on which edge you will be
binding your finished document. The binding setup options are:
●
Long-edge (book) binding
in book binding. (See 1 in figure 3-4)
●
Short-edge (tablet) binding
calendars. (See 2 in figure 3-4)
, which is the conventional layout used
, which is the type often used with
Figure 3-4 Binding Options
1 Long-Edge Binding
2 Short-Edge Binding
72 Common Printing Tasks
EN
Page 73

Special Printing Situations
Use these guidelines when printing on special types of media.
Printing a Different First Page
Use the following procedure to print the first page of a document on a
different media type than the rest of the document, One example is
printing the first page of a letter on letterhead paper and the rest of
the letter on plain paper.
1 From your application, specify a tr a y f or the first page (letterhead)
and another tray for the remaining pages.
2 Load the letterhead into the tray that you specified in step 1.
3 Load the paper for the remaining pages of the document into
another tray.
You can also print on a different first page by using the printer control
panel to set the types of media that are loaded in the trays and then
selecting the first and remaining pages by media type.
Printing on Custom-Size Media
EN
The printer supports single-sided printing on custom-size media. Tray
1 supports media sizes from 76 x 127 mm (3 x 5 in) to 216 x 356 mm
(8.5 x 14 in), including B5 ISO. The only custom size supported by
Trays 2 and 3 is B5 ISO.
When printing on custom-size media, if Tray 1 is configured in the
printer control panel as TRA Y 1 MODE=CASSETTE, you must set the
media size for Tray 1 to CUST OM in the printer control panel. If Tray 1
is configured as TRAY 1 MODE=FIRST, the printer will print on
whatever media is loaded in the tray. When printing on custom size
(B5 ISO) media from Trays 2 or 3, adjust the paper guides on the tray
to the Custom (B5 ISO) marking.
Some software applications and printer drivers allow you to specify
custom paper-size dimensions. Be sure to set the correct paper size
in both the page setup and print dialog boxes.
If your software application requires you to calculate margins for
custom-size paper, see the online Help for that application.
Chapter 3 73
Page 74

Stopping a Print Request
You can stop a print request either from the printer control panel or
from your software application. To stop a print request from a
computer on a network, see the online Help for the specific network
software.
Note It may take some time f or all printing to clear after a print job is canceled.
To stop the current print job from the printer control
panel
Press C
currently printing. Pressing C
print jobs that are stored in the printer buffer.
ANCEL JOB
on the printer control panel to cancel the job that is
ANCEL JOB
does not affect subsequent
To stop the current print job from your software
application
If several requests have been sent to the printer through your
software, they may be waiting in a print queue (in Windows Print
Manager, for example). See your software documentation for specific
instructions on canceling a print request from the computer.
74 Common Printing Tasks
EN
Page 75

4
Using Color
Overview
The printer is designed to provide outstanding color output. This
chapter provides information to help you obtain the best color
quality from this printer. The chapter includes the following
sections:
Customizing Color Output Through Printer Drivers
●
Matching Colors
●
Adjusting Color Balance
●
EN
Chapter 4 75
Page 76

Customizing Color Output Through Printer Drivers
The printer driver, which is installed with your printer software,
enables your software applications to use the f eatures of the printer . It
also gives you customized control of color text, graphics, and photos.
The method of accessing your printer driver depends on your
computer’s operating system. For specific instructions on accessing
printer drivers, see the printer driver’s Readme file, which is included
on the printing system CD-ROM.
The following color control features are available only through your
HP printer driver. See the printer driver’s online Help for details on
color settings and their effect on printed output.
Halftone Options
Halftone options affect the resolution and clarity of your color output.
You can select halftone settings for text, graphics, and photos
independently. The two halftone options are Smooth and Details.
The Smooth option provides better results for large, solid-filled print
areas. It also enhances photos by smoothing out fine color
gradations.
76 Using Color
The Detail option is useful for text and graphics that require sharp
distinctions among lines or colors, such as images that contain a
pattern or a high level of detail.
EN
Page 77

HP ColorSmart II
HP ColorSmart II default settings will produce optimum results for
most color printing needs. However, you can also manually adjust
color settings through the printer driver’s Vivid Color and Screen
Match color control options.
Vivid Color
Vivid Color produces colors that are very bright and vivid. When you
use Vivid Color, your color output is brighter than the colors that
appear on your screen.
Screen Match
Screen Match (sRGB) (standard red-green-blue) prints colors that are
close to those you see on your screen. Screen Match can be useful
for retouching photographs or when you have created colors on your
screen that you wish to reproduce, such as special colors for a
company logo.
Note Factors such as the type of monitor y ou use and the room’s lighting can
affect the appearance of colors on your screen.
EN
Print in Grayscale
The Print in Grayscale option in the printer driver allows you to print
documents using shades of gray in place of colors. This option is ideal
for printing proofs of color documents, or for printing documents that
will later be faxed or photocopied.
Chapter 4 77
Page 78

Matching Colors
The process of matching printer output color to your monitor is quite
complex because printers and computer monitors use different
methods of producing color. Monitors
using an RGB (red, green, blue) color process, but printers
colors using a CMYK (cyan, magenta, yellow, and black) process.
Color-Matching Factors
Several factors can influence your ability to match printed colors to
those on your monitor. These factors include:
●
print media
●
overhead lighting
●
personal differences in perception
●
software applications
●
operating system palettes
●
monitors
●
video cards and drivers
display
colors by light pixels
print
Matching PANTONE®* Colors
In addition to controlling color through the printer driver, you can
control color through PANTONE
®
PANTONE
the PANTONE
* colors are certified RGB and CMYK values specified in
®
* color-matching system, which is supported in many
graphics software applications. This color-matching system is useful
for matching printer output to a specific color (for example, a logo).
See the documentation for your software application for instructions
on using PANTONE
®
* colors.
For more information on using PANTONE
file for the PANTONE
®
* color-matching system included on the
printing system CD-ROM.
Note Color settings, halftone settings, and print media affect the appearance
of PANTONE
®
* colors. To achieve true PANTONE®*-certified colors,
all components used, including the video driver, software application
or printer driver, and the print media, must be PANTONE®*-certified.
78 Using Color
®
* color matching.
®
* colors, see the Readme
EN
Page 79

Adjusting Color Balance
This printer features automatic color calibration to provide high-quality
color output. In situations that require critical color control, you can
manually adjust the density balance of the printer’s four toner colors.
CAUTION This procedure should only be performed by your network
administrator. P erf orming this procedure changes the color balance of
the printer by altering halftones and affects
To adjust color balance
Step 1: Print a color balance calibration page.
The color balance calibration page displays current color settings and
provides a record of the printer’s initial settings before any
adjustments are made.
ENU
1 Press M
2 Press I
3 Press S
page consists of four color bars (cyan, magenta, yellow, and
black) and a box containing gray balance circles (see figure 4-1).
The factory default setting for each color is zero. The range of
settings is -5 to +5.
until CALIBRATION MENU displays.
TEM
until PRINT CALIBRATION PAGE displays.
ELECT
to print the color balance calibration page. The
print jobs.
all
Note Adjusting densities using the four color bars provides coarse color
balance adjustments. After making these adjustments, you can finetune color densities by adjusting the gray balance. (See step 7 for
instructions.)
EN
Chapter 4 79
Page 80

Figure 4-1 Color Balance Calibration Page
Step 2: Adjust the cyan (C) density setting.
Examine the cyan density bar (C) on the color balance calibration
page (see figure 4-1) from a distance of 2 meters (6 ft). If the center
oval matches the background pattern more than the other ovals, the
cyan density does not need to be adjusted and you should continue
on to the magenta (M) setting. If an oval left of center or right of center
matches the background more than the center ov al, use the following
steps to enter the number:
80 Using Color
1 Press I
2 Press the right side of the V
TEM
until CYAN DENSITY displays.
ALUE
key to increase the value, or
press the left side to decrease it, until the number corresponding
to the oval that most closely matches the background pattern is
displayed.
3 Press S
ELECT
to save the value. An asterisk (*) displays next to
the selected setting.
EN
Page 81

Step 3: Adjust the magenta (M) density setting.
Examine the magenta density bar (M). If the center oval matches the
background pattern more than the other ovals, the magenta density
does not need to be adjusted and you should continue with the next
step. If not, use the following steps to adjust the density:
1 Press I
2 Press the right side of the V
TEM
until MAGENTA DENSITY displays.
ALUE
key to increase the value, or
press the left side to decrease it, until the number corresponding
to the oval that most closely matches the background pattern is
displayed.
ELECT
3 Press S
to save the value. An asterisk (*) displays next to
the selected setting.
Step 4: Adjust the yellow (Y) density setting.
Examine the yellow density bar (Y). If the center oval matches the
background pattern more than the other ovals, the yellow density
does not need to be adjusted and you should continue with the next
step. If not, use the following steps to adjust the density:
TEM
1 Press I
2 Press the right side of the V
until YELLOW DENSITY displays.
ALUE
key to increase the value, or
press the left side to decrease it, until the number corresponding
to the oval that most closely matches the background pattern is
displayed.
ELECT
3 Press S
to save the value. An asterisk (*) displays next to
the selected setting.
EN
Chapter 4 81
Page 82

Step 5: Adjust the black (K) density setting.
Examine the black density bar (K). If the center oval matches the
background pattern more than the other ovals, the b lac k density does
not need to be adjusted and you should continue with the next step. If
not, use the following steps to adjust the density:
1 Press I
2 Press the right side of the V
TEM
until BLACK DENSITY displays.
ALUE
key to increase the value, or
press the left side to decrease it, until the number corresponding
to the oval that most closely matches the background pattern is
displayed.
3 Press S
ELECT
to save the value. An asterisk (*) displays next to
the selected setting.
Step 6: Reprint the color balance calibration page. (See step 1.)
Step 7: Adjust Gray Balance.
Note Adjusting densities using the gray balance pattern allows you to fine-
tune color balance. This process affects all four color bars.
Examine the gray balance circles in the box at the bottom of the color
balance calibration page (see figure 4-1). If the circle in the center
most closely matches the background pattern, then the gray balance
does not need to be adjusted. If the circle does not match, use the
following steps to adjust gray balance.
1 Locate the gray circle that most closely matches the background.
The magenta (M) and yellow (Y) numbers associated with this circle indicate the optimum gray balance settings for these colors.
82 Using Color
2 Adjust the magenta and yellow settings to the numbers indicated
(see the steps on adjusting magenta and yellow settings).
3 After making adjustments to the magenta and yellow settings,
press G
O
to return the printer to the READY state.
EN
Page 83

5
Using Fonts
Overview
This chapter provides information on various fonts. The chapter
includes the following sections:
Using HP FontSmart
●
Using Internal TrueType Fonts
●
Understanding Printer Default Fonts
●
Selecting Fonts
●
Printing a List of Available Printer Fonts
●
Using Typefaces for PostScript Emulation in the Printer
●
Using Fonts on a Network
●
Adding Support for Accessory Fonts to a Printer Driver
●
Using Special Type Effects
●
Hewlett-Packard Custom Font Services
●
EN
Chapter 5 83
Page 84

Using HP FontSmart
HP FontSmart is a font management utility (for Windows only), that is
included with the printing software that came with your printer. When
you install the printing software, you can install HP FontSmart through
the Custom installation option.
Fonts must first be installed in your computer’s operating system
before you can use them in an application. The HP FontSmart utility
manages fonts and makes them available to Windows applications.
Using HP FontSmart can improve Windows performance by allowing
you to install and make available only the fonts you need.
HP FontSmart searches your disk(s) for all fonts , allowing y ou to vie w
font samples and to remove any duplicate or unneeded fonts.
When you run HP FontSmart, two lists are displayed. The list on the
left displays fonts available to install, and the list on the right displays
the fonts that are currently installed in Windows. You can install,
uninstall, or delete any font that appears on the lists.
For more information, see the online Help for HP FontSmart.
Note To save disk space and system resources, install only those fonts that
you plan to use.
Accessing HP FontSmart from Windows 95 and
Windows NT 4.0
1 From the Start menu, click Programs.
2 Click HP LaserJet.
3 From the HP LaserJet group, click HP FontSmart.
Accessing HP FontSmart from Windows 3.1 and
Windows NT 3.51
1 From the Program Manager, select the HP LaserJet group.
2 Double-click on the HP FontSmart icon.
Note For help with HP FontSmart, select the Help menu in FontSmart.
84 Using Fonts
EN
Page 85

Using Internal TrueType Fonts
TrueType fonts are typefaces developed jointly by Microsoft®
Corporation and Apple Computer, Inc. Hewlett-Packard has included
80 TrueType fonts with this printer.
You do not need to download these TrueType fonts because they are
already installed in your printer. The printer driver automatically uses
internal fonts when it can. This results in increased printing
performance.
See the Microsoft Windows documentation for specific instructions on
using TrueType fonts with Windows.
EN
Chapter 5 85
Page 86

Understanding Printer Default Fonts
The default font for this printer is 12 point Courier in the PC-8 symbol
set. The printer uses the default font only if another font has not been
specified.
Changing the Default Font
You can select a different default font from the printer control panel.
See the section later in this chapter on selecting PCL default fonts
through the control panel.
Selecting a Font Other than the Default
●
You can request a font from within most software applications.
●
You can send a PCL printer command requesting a font different
from the default. For information on printer PCL commands, see
Appendix B or the
printer.
Font Selection Priority
The printer selects printer fonts in the following order:
PCL Technical Reference Package
for this
86 Using Fonts
1 soft fonts (downloaded fonts)
2 fonts on DIMMs
3 internal fonts
In order to select a font, the font must be available from one of these
sources. If the font you request is not a vailable, the printer selects the
closest match based on individual font characteristics (PCL only).
EN
Page 87

Selecting Fonts
You can select fonts either from a software application or through the
printer control panel.
Note A font request from a software application or printer driver overrides
font settings in the printer control panel.
Selecting Fonts from Software Applications
For information on changing font selection, base font, printer setup,
print options, and font appearance from a software application, see
the documentation for your application.
Selecting Symbol Sets
If you want to print a symbol such as Ω while the printer is in
PCL mode, you must first select the symbol set that contains that
character. See the
PCL Comparison Guide
and printer commands. Contact HP Direct to obtain these guides.
(See Appendix D for ordering information.)
PCL Color Technical Reference Guide
for a complete listing of av ailable symbol sets
or the
EN
Symbol Set Availability
Many software applications allow you to specify a symbol set from the
printer setup menu. You should consider two things when using
symbol sets:
Software applications may not support all of the printer’s symbol
●
sets.
Typefaces are designed to work with specific symbol sets.
●
Entering Symbols into Text
The documentation for your software application should contain
instructions for entering special symbols into text. See the
documentation’s index for phrases such as
composite characters, symbol sets, character sets, code pages, and
extended characters.
compose feature,
Chapter 5 87
Page 88

Selecting PCL Fonts Through the
Printer Control Panel
If your software application does not allow y ou to select fonts through
its menus, you can select PCL f onts through the printer control panel.
Only one font can be selected for a particular print job.
Note A font selected through the printer control panel becomes the default
font for all subsequent print jobs.
You must specify several items when selecting a font through the
printer control panel. These items are listed on the printer’s font page
and include:
●
the font source
●
the font number
●
the point size or pitch
●
a symbol set
Note A font request from a software application ov errides font settings in the
printer control panel.
88 Using Fonts
EN
Page 89

T o select PCL default fonts thr ough the printer control
panel
1 Print a list of available PCL printer f onts. (F or instructions, see the
following section.)
2 On the printed font list, locate the font source and number that
correspond to the font you wish to use.
ENU
3 Press M
4 Press I
5 Press V
are available:
• INTERNAL
• SOFT
• DIMM SLOT
6 Press S
to your selection.
7 Press I
8 Press V
9 Press S
to your selection.
until PRINTING MENU displays.
TEM
until PCL FONT SOURCE displays.
ALUE
until the font source displays. The following sources
= 1,2,3)
n(n
ELECT
to save your selection. An asterisk (*) appears ne xt
TEM
until PCL FONT NUMBER displays.
ALUE
until the correct font number displays.
ELECT
to save your selection. An asterisk (*) appears ne xt
EN
TEM
10 Press I
until PCL FONT POINT SIZE displays (or, for
proportional fonts, until PITCH displays). This selection is not
available for bitmapped fonts.
ALUE
11 Press V
12 Press S
until the correct point size or pitch displays.
ELECT
to save your selection. An asterisk (*) appears ne xt
to your selection.
O
13 Press G
to return the printer to the READY state.
Chapter 5 89
Page 90

Printing a List of Available Printer Fonts
You can use the Information Menu on the printer control panel to print
a list of available fonts.
To print a list of available fonts
1 Press M
2 Press I
3 Press S
ENU
until INFORMATION MENU displays.
TEM
until PRINT FONT LIST displays.
ELECT
to print the font list.
4 After the list has printed, the printer returns to the READY state.
Note T emporary soft fonts (fonts that y our software downloaded for a specific
document) do not appear on the printout. Permanent soft fonts do
appear on the printout.
The font list displays all available typefaces for installed cards
(DIMMs), permanent downloaded soft fonts, and internal fonts.
Figure 5-1 Font List
90 Using Fonts
EN
Page 91

Interpreting the Font Lists
The PCL font list displays samples of available fonts. The following is
a description of the elements of the font list:
1Font
The name of the typeface family.
2 Pitch/Pt
Pitch indicates the number of characters per inch of a fixed-space
font. Point Size is the height of the font, measured in points, and
is used to describe scalable fonts.
3 ESC Sequence
Escape Sequence (a PCL command) is used to select the
designated font. Fill in Pitch or Point Size and Symbol Set in the
boxes as required. The escape sequence contains a shaded box
followed by “v” or “h.” This indicates that you must enter the point
size (for example, 14.25v) or pitch (for example, 12.00h).
4Font #
The number you use to select internal or downloaded soft fonts
from the control panel. The source of the font is also listed.
Note: Do not confuse the font number with the soft font ID.
5Font ID
The identification number you assign to soft fonts when you
download them through your software.
EN
See the
downloading fonts.
The font list for PostScript Emulation displays all fonts installed in the
printer’s firmware. Although the characters are listed in only one size,
you can scale the typefaces to any size.
PCL Technical Reference Manual
for instructions on
Chapter 5 91
Page 92

Using Typefaces for PostScript Emulation in the
Printer
The printer is configured with 80 scalable fonts that are available for
PCL and PostScript Emulation. Since these typefaces require
software application support, refer to your software documentation f or
information about using these typefaces.
92 Using Fonts
EN
Page 93

Using Fonts on a Network
Consult with your network administrator or with other network users
before using the printer control panel to change the default font and
before downloading or removing soft fonts and typefaces.
To conserve memory and avoid unexpected printer output, use the
guidelines that follow. Your network operating system might
automatically protect each user’s print job from the effects of other
print jobs in the network. Consult a network administrator for more
information.
Guidelines for printing with different fonts
The 80 internal fonts are available in PostScript Emulation (PS)
●
and PCL mode. In order to use a font, your software application
must support it.
To conserve printer memory, download only those fonts that are
●
needed.
If you require several downloaded fonts, consider installing
●
additional printer memory.
Some software applications automatically download fonts at the
●
beginning of each print job. It might be possible to configure those
applications to download only soft fonts that are not already
resident in the printer. See your software application’s
documentation for more information.
EN
Chapter 5 93
Page 94

Adding Support for Accessory Fonts to a Printer
Driver
When you are using typefaces on DIMMs, your printer driver might
require information about the size, shape, and style of the type
characters so that it can format your text correctly.
Verifying Software Application Support for Fonts
Many current software applications support the typefaces that are
included with this printer.
If fonts are listed in a software application’s menu, the software
contains support for that font. To download those fonts, follow the
instructions provided with the fonts.
Note Although your software lists typefaces in its menus, it does not
necessarily confirm that the typefaces are installed in the printer. You
might need to download the typeface into the printer’s memory by
following the instructions that came with the typeface.
94 Using Fonts
EN
Page 95

Using Special Type Effects
The printer can create special type effects, such as patterns, reverse
printing, mirrored text, and font rotation. See the user guide for your
application to verify that the application supports these features.
Developers can find complete instructions for using special type
effects in the
through HP Direct.
PCL Technical Reference Package
, which is available
EN
Chapter 5 95
Page 96

Hewlett-Packard Custom Font Services
Hewlett-Packard offers fonts on disk, cartridge, or DIMMs. You can
design a custom font package to fit your particular needs. The items
below are examples of available custom fonts:
●
fonts or typefaces from any Hewlett-Packard standard font
product or typeface collection
●
bar codes, including 3 of 9, 128, Interleaved 2 of 5, UPC, USPS
Zip, and others
●
custom symbol set mappings
●
signatures and logos
For custom fonts (such as signature fonts and logos) and also
discontinued font products (such as Barcodes & More, Tax 1, and
Pro Collection), contact:
Hewlett-Packard LaserJet Font Solutions
(541) 715-5757
Information on obtaining font products is available through HP FIRST
at (800) 333-1917. For information on discontinued font products,
request document number 1306. For custom font inf ormation, request
document number 1034.
96 Using Fonts
Outside the U.S., contact your local HP dealer.
EN
Page 97

6
Printer Interfaces
Overview
This chapter provides information on available printer interfaces.
The chapter includes the following sections:
Parallel Configuration
●
Enhanced I/O (EIO) Configuration
●
Configuring the Printer for the Network at the Printer Control
●
Panel
EN
Chapter 6 97
Page 98

Parallel Configuration
If your printer is not configured with a network interface card, connect
the printer to your computer using a bidirectional parallel cable
(IEEE-1284C compliant) with a “C” connector (see figure 6-1)
plugged into the printer’s parallel port. The cable can be a maximum
of 10 meters (30 feet). For ordering information, see the printer
supplies and accessories table in chapter 1.
When used to describe a parallel interface, the term
indicates that the printer is able to both receive data from the
computer and to send data to the computer through the parallel port.
Figure 6-1 Parallel Cable with a “C” Connector
Note To use the enhanced capabilities of the bidirectional parallel interface,
such as bidirectional communication between the computer and
printer, faster transfer of data, and automatic configuration of printer
drivers, your software application must support these capabilities.
bidirectional
When you are using multiple ports, you can adjust automatic I/O
switching to maximize performance by using the timeout feature. If
data from other ports appears in the middle of your print job, increase
the I/O Timeout value. (See the section on setting I/O Timeout in
chapter 2.)
98 Printer Interfaces
EN
Page 99

Parallel Cable Pin Configuration
To take advantage of the enhanced bidirectional parallel interface,
use a 10 meter (30 ft) parallel cable (IEEE-1284 compliant) with a 25pin DB male to a (IEEE-1284C) male “C” connector. Use the f ollowing
table to verify correct pin configuration.
Signal Name Printer Pin #
nSTROBE 15 1
DATA 0 6 2
DATA 1 7 3
DATA 2 8 4
DATA 3 9 5
DATA 4 10 6
DATA 5 11 7
DATA 6 12 8
DATA 7 13 9
nACKNLG 3 10
BUSY 1 11
CALL (PE) 5 12
SELECT 2 13
NAutoFd 17 14
O VDC (GND) 19 – 35 18 – 25
nFAULT 4 15
nSe/In 16 17
nINIT 14 16
PERIPHLH 36
N.C. 18
Computer
Port #
EN
Chapter 6 99
Page 100

Enhanced I/O (EIO) Configuration
This printer comes equipped with two enhanced input/output (EIO)
slots. These slots hold compatible external devices such as the
HP JetDirect print server network cards. Plugging EIO network cards
into the slots increases the number of network interfaces available to
the printer.
EIO network cards can maximize printer performance when you are
printing from a network. In addition, they provide the ability to place
the printer anywhere on a network. This eliminates the need to attach
the printer directly to a server or a workstation and enables you to
place the printer closer to your network users.
The printer control panel will have an additional menu (EIO Menu) if
the printer is configured with EIO network cards.
HP JetDirect Print Servers
HP JetDirect print servers (network cards) can be installed in one of
the printer’s EIO slots. These cards support multiple network
protocols and operating systems. HP JetDirect print servers facilitate
network management by allowing you to connect a printer directly to
your network at any location. HP JetDirect print servers also support
the Simple Network Management Protocol (SNMP), which provides
network managers with remote printer management and
troubleshooting through HP JetAdmin software.
Note Installation of these cards and network configuration should be
performed by a network administrator.
100 Printer Interfaces
EN
 Loading...