

HP Color LaserJet 3000/3600/3800 Series printers
Getting Started Guide
Panduan Persiapan Awal
Terdaftar di Deperindag Provinsi DKI Jakarta No : 0001/1.824.51

Copyright and License
© 2008 Copyright Hewlett-Packard De velopment Company , L.P.
Reproduction, adaptation or translation without prior written permission is
prohibited, except as allowed under the copyright laws.
The information contained herein is subject to change without notice.
版权与许可
© 2008 版权所有 Hewlett -P ackard Dev elopment Compan y, L.P.
未经事先书面许可,严禁进行任何形式的复制、改编或翻
译,除非版权法另有规定。
The only warranties for HP products and services are set forth in the
express warranty statements accompanying such products and services.
Nothing herein should be construed as constituting an additional warranty .
HP shall not be liable for technical or editorial errors or omissions
contained herein.
Part number: Q5982-91043
Edition 1, 5/2008
FCC Regulations
This equipment has been tested and found to comply with the limits for a
Class B digital device, pursuant to Part 15 of the FCC rules. These limits
are designed to provide reasonable protection against harmful
interference in a residential installation. This equipment generates, uses,
and can radiate radio-frequency energy. If this equipment is not installed
and used in accordance with the instructions, it may cause harmful
interference to radio communications. Howe ver, there is no guarantee that
interference will not occur in a particular installation. If this equipment does
cause harmful interference to radio or television reception, which can be
determined by turning the equipment off and on, correct the interference
by one or more of the following measures:
• Reorient or relocate the receiving antenna. Increase separation
between equipment and receiver.
• Connect equipment to an outlet on a circuit different from that to
which the receiver is located.
• Consult your dealer or an experienced radio/TV technician.
Any changes or modifications to the printer that are not expressly
approved by HP could void the user’s authority to operate this equipment.
Use of a shielded interface cable is required to comply with the Class B
limits of Part 15 of FCC rules. For more regulatory information, see the
HP Color LaserJet 3000/3600/3800 Series printer electronic user guide.
Hewlett-Packard shall not be liable for any direct, indirect, incidental,
consequential, or other damage alleged in connection with the furnishing
or use of this information.
Trademark Credits
PostScript® is a trademark of Adobe Systems Incorporated.
Windows® is a U.S. registered trademark of Microsoft Cor poration.
此处包含的信息如有更改,恕不另行通知。
HP 产品和服务的所有保修事项已在产品和服务所附带的保
修声明中列出,此处内容不代表任何额外保修。 HP 公司对
此处任何技术性或编辑性的错误或遗漏概不负责。
部件号:Q5982-91043
Edition 1, 5/2008
FCC 规则
经测试,本设备符合 FCC 规则第 15 部分对 B 类数字设备
的限制规定。这些限制旨在合理地避开居住环境中的有害干
扰。本设备可以产生、利用并发射无线射频能量。如果不按
说明中的要求安装和使用本设备,有可能对无线电通信产生
有害干扰。但也不能保证在特定的安装中不会产生干扰的问
题。如果本设备确实对无线电或电视接收造成干扰 (可以
通过开关设备来确定),用户可以采取以下一种或多种措施
排除干扰:
• 重新调整接收天线的方向或位置。增加设备和接收器之
间的距离。
• 将本设备电源插座与接收器电源的插座设在不同的电
路上。
• 咨询代理商或经验丰富的无线电 / 电视技术人员。
未经 HP 公司的明确同意而擅自更改或改动本打印机,将取
消用户对此设备的操作权限。使用屏蔽的接口电缆时必须遵
循 FCC 规则第 15 部分中的 B 类限制。有关更多的管制
信息,请参阅 HP Color LaserJet 3000/3600/3800 系列打印
机电子用户指南。对于由本信息的提供或使用所引起的任何
直接、间接、偶然、继发性或其它损坏, Hewlett-Packard
概不负责。
商标声明
PostScript® 是 Adobe Systems Incorporated 的商标。
Windows® 是 Microsoft Corporation 在美国的注册商标。
1
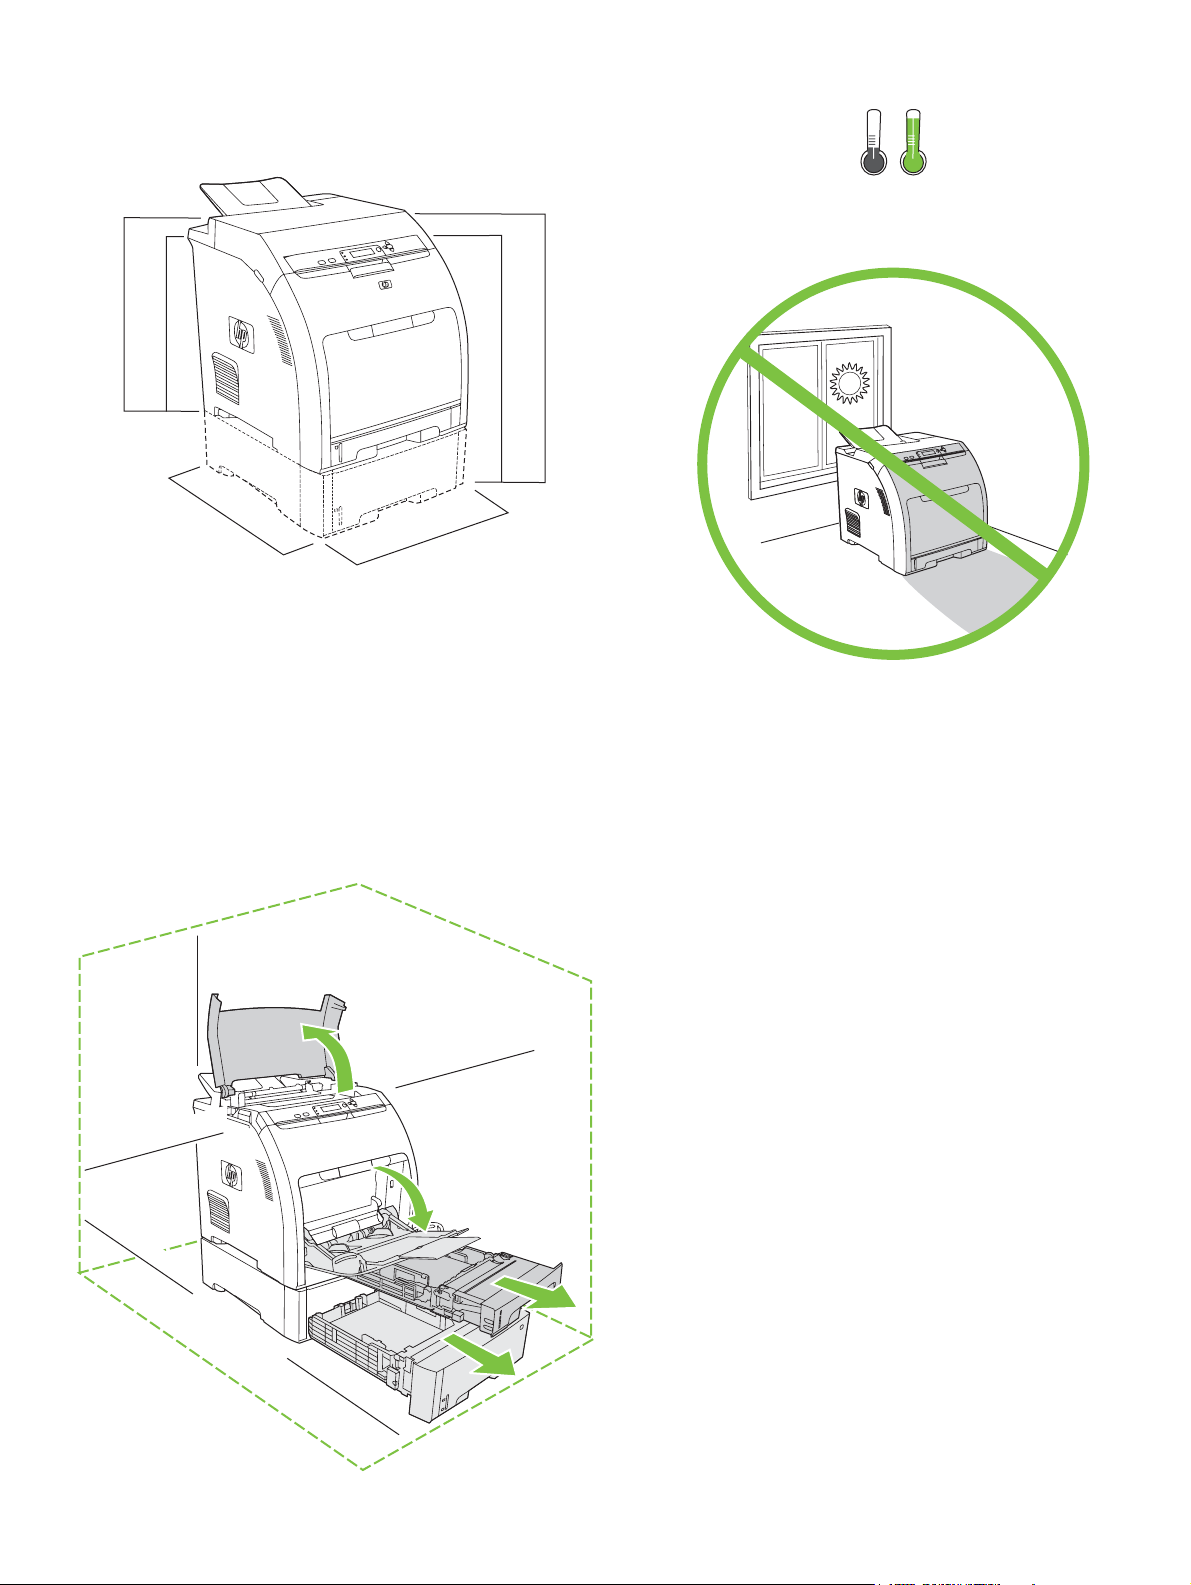
423 mm (16.65 in)
400 mm (15.75 in)
450 mm (17.7 in)
400 mm (15.75 in)
540 mm (21.25 in)
17° - 25°C
(62.6° - 77°F)
563 mm (22 in)
89 mm (3.5 in)
178 mm (7 in)
229 mm (9 in)
356 mm (14 in)
89 mm (3.5 in)
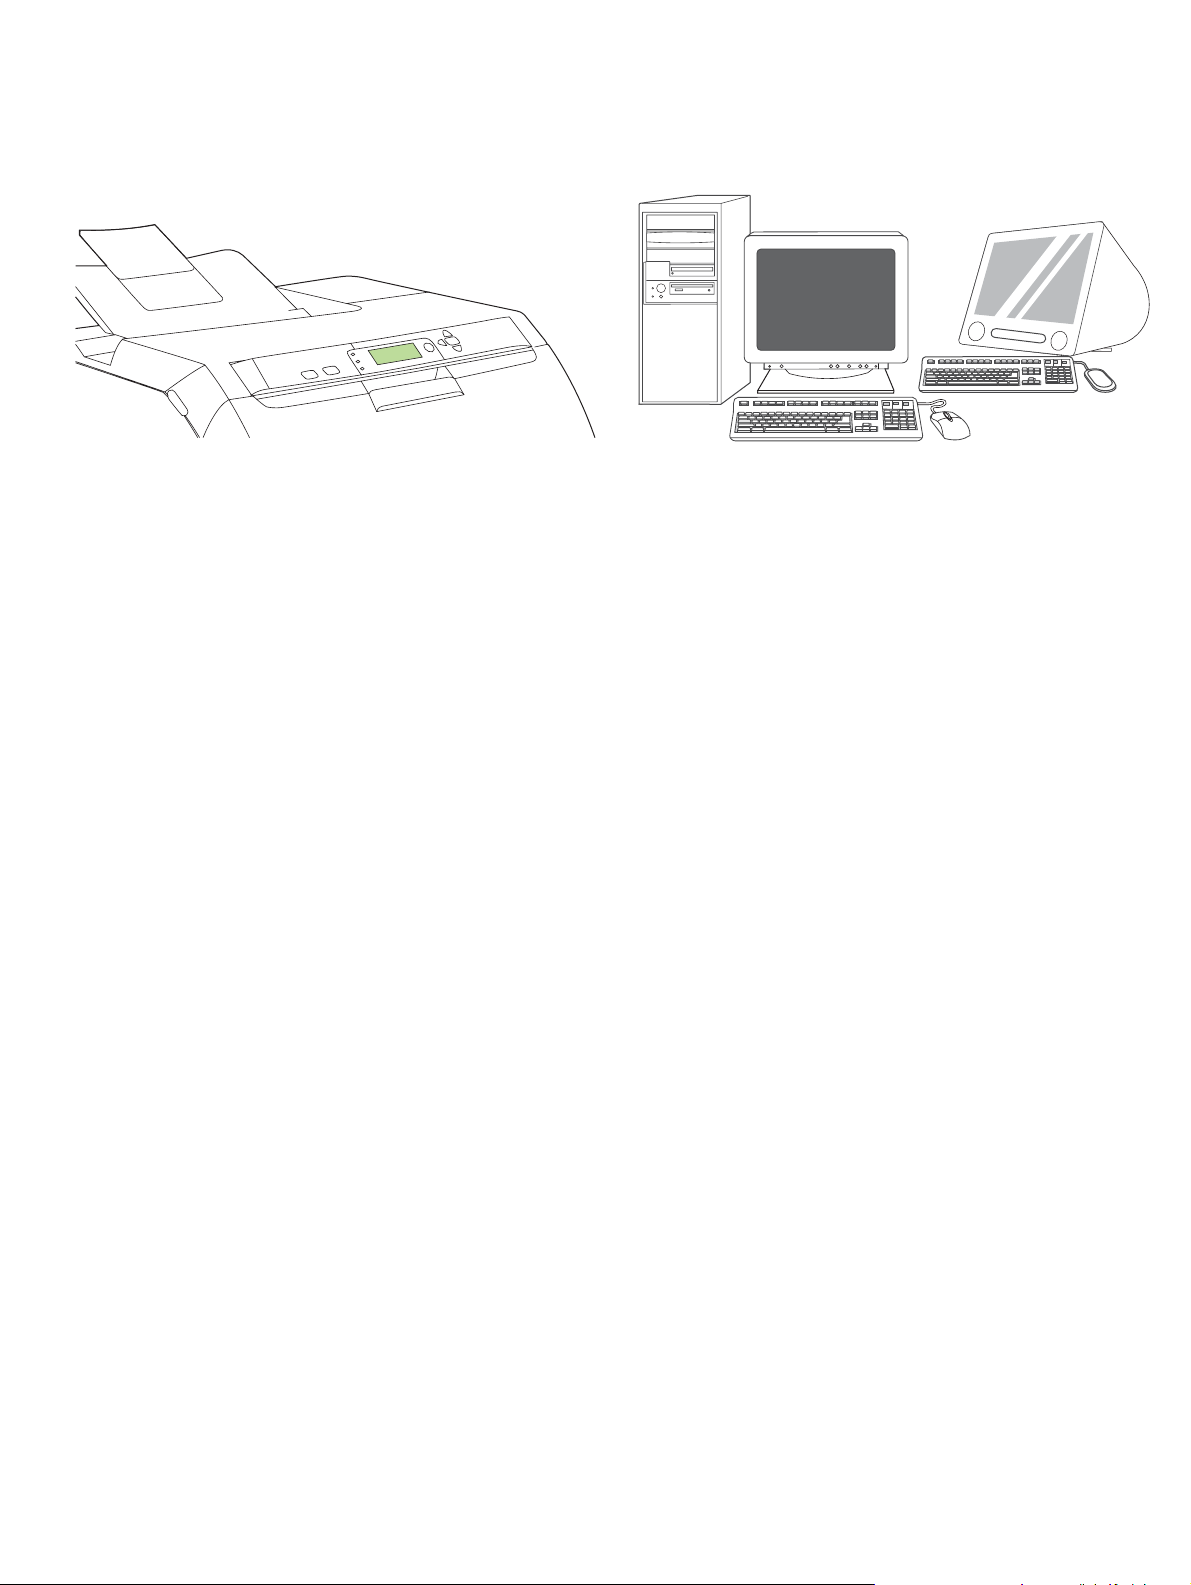
Select a sturdy, well-ventilated, dust-free area to
position the printer.
选择一个稳固、通风良好且无尘的位置
放置打印机。
Pilih tempat yang kokoh, berventilasi baik dan
bebas debu untuk menempatkan printer.
換気の良い、埃が発生しない場所で、しっかり
した土台の上にプリンタを設置します。
환기가 잘 되고 먼지가 없는 장소에서 표면이 단
단한 곳에 프린터를 설치하십시오 .
เลือกบริเวณที่ตั้งของเครื่องพิมพที่ไมมีฝุน ระบายอากาศไดดี
และมั่นคง
2
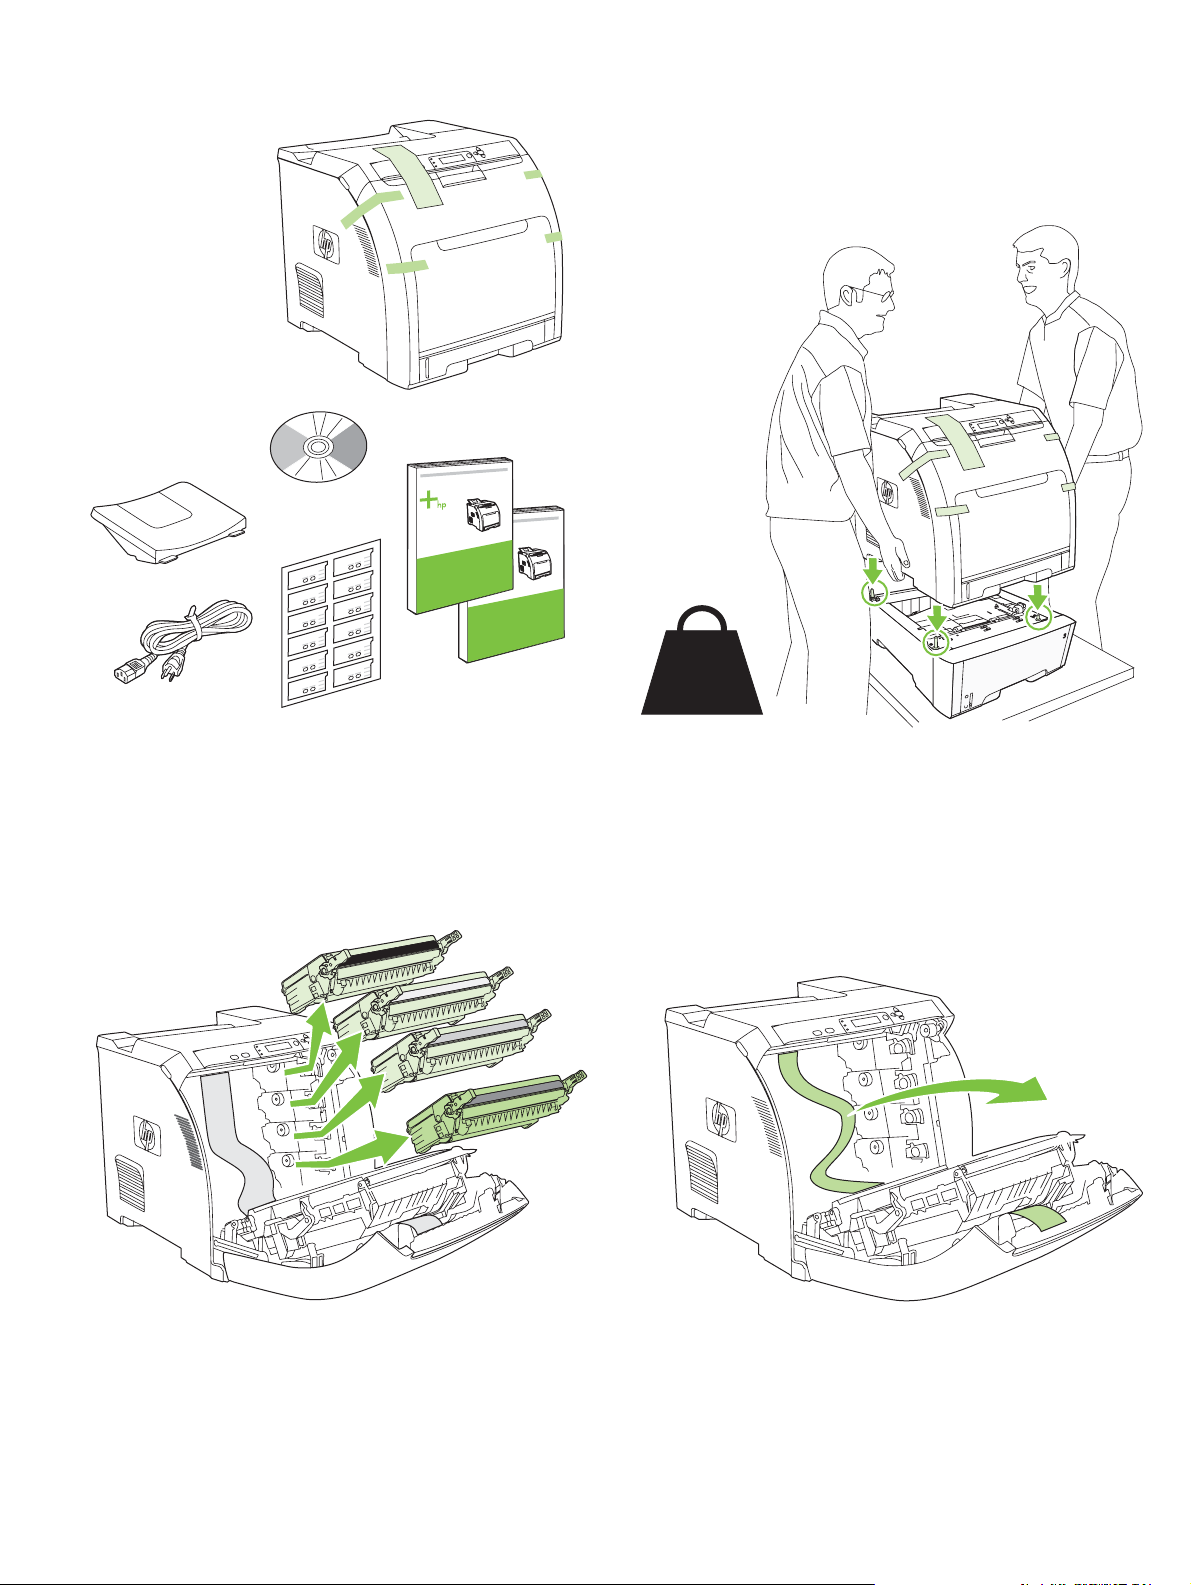
Check the contents of the box. •
检查包装箱中的
If th
ith
出打印碳粉盒
装运胶带
Periksa isi kemasan. • 梱包内容を確認します。
포장 내용물을 확인하십시오 .•
ตรวจดูสิ่งของที่ใหมาในกลอง
1
物品。
e printer came w
如果打印机随附纸盘 3,请将打印机放在纸盘 3 上面。
Jika printer dilengkapi dengan baki 3, letakkan printer di atasnya.
プリンタにトレイ 3 が付属している場合は、プリンタをトレイ 3 の上に
置きます。
용지함 3 이 프린터와 함께 제공되면 , 그 위에 프린터를 부착하십시오 .
หากเครื่องพิมพมาพรอมกับถาด 3 ใหวางเครื่องพิมพไวดานบน
a tray 3, place the printer on top of it.
2
Remove the print cartridges. • 取
Keluarkan kartrid cetak. • プリント カートリッジを取り外します。
카트리지를 빼내십시오 .•
ถอดตลับหมึกพิมพออก
。
21.5 Kg.
47.4 lbs.
Remove the shipping tape. • 撕下
Lepaskan pita pengiriman. • 保護テープをはがします。
포장용 테이프를 떼어 내십시오 .•
ลอกเทปที่ติดมากับการขนสง
。
3
4
3

R
emove the shipping locks and tape from the print cartridges.
装打印碳粉盒
装出纸槽
装
取下打印碳粉盒上的装运锁,撕下胶带。
Lepaskan pengunci dan pita pengiriman dari kartrid cetak.
プリント カートリッジから保護ロックを外し、保護テープをはがします。
카트리지에 달린 포장용 자물쇠와 테이프를 떼어 내십시오 .
ถอดตัวล็อคที่ใชในการขนสงและลอกเทปออกจากตลับหมึกพิมพ
5
Reinstall the print cartridges. • 重新安
Pasang kembali kartrid cetak. • プリント カートリッジを取り付け直し
ます。 • 카트리지를 다시 넣으십시오 .•
ติดตั้งตลับหมึกพิมพอีกครั้ง
。
6
Install the output bin. • 安
Pasang nampan keluaran. • 排紙ビンを取り付けます。
출력 용지함을 설치하십시오 .•
。
ติดตั้งถาดกระดาษออก
Load paper. •
Isikan kertas. • 用紙をセットします。
용지를 넣으십시오 .•
入纸张。
ใสกระดาษ
7
8
4
9
10
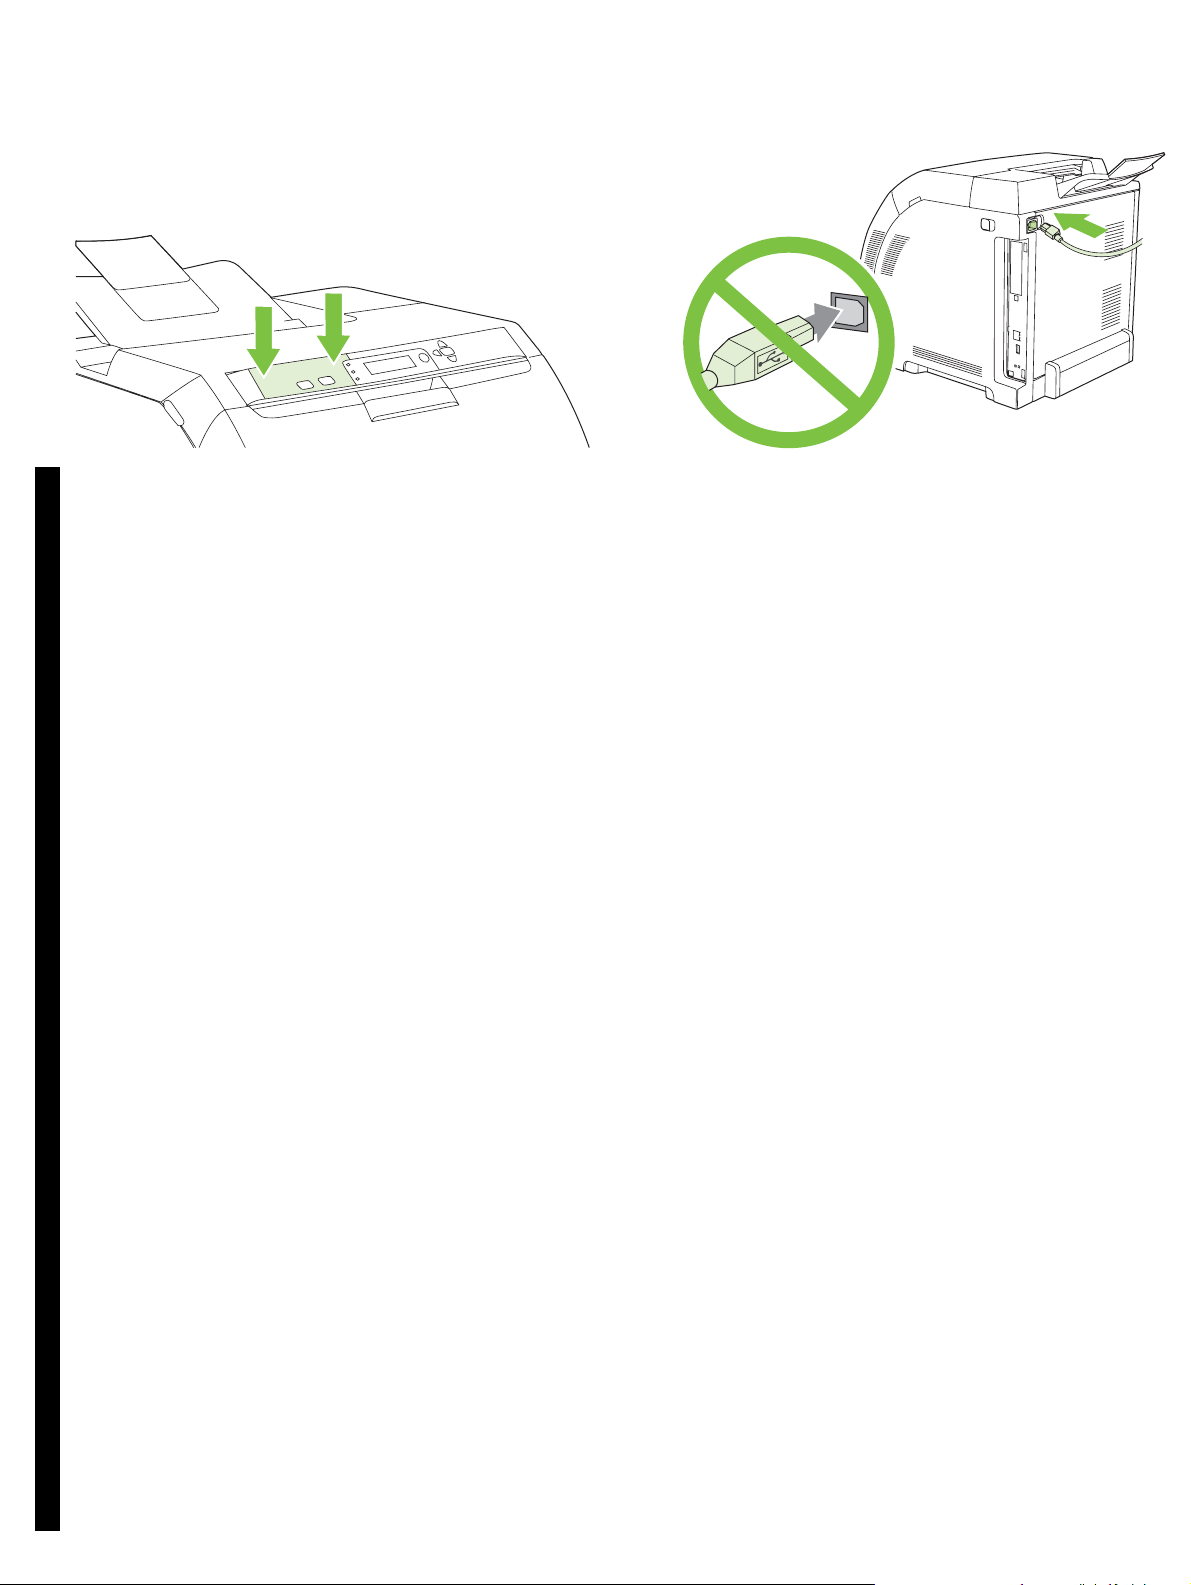
Install the control-panel overlay (if necessary). Press the ends of the
overlay straight down onto the printer and then move your hands toward
the center of the overlay until it completely adheres to the printer.
English
安装控制面板贴面 (如有必要)。将贴面两端竖直向下按在
打印机上,然后将双手移至贴面中间,直至贴面完全粘附在
打印机上。
简体中文
Instal lapisan panel kontrol (jika perlu). T ekan ujung lapisan langsung pada
printer kemudian pindahkan tangan Anda ke bagian tengah lapisan
sampai seluruh lapisan menempel pada printer.
Bahasa indonesia
必要に応じてコントロール パネル カバーを取り付けます。カバーの両端
をプリンタにまっすぐ押し込みます。次に両手をカバーの中央にずらし
ながらカバーをプリンタにしっかり固定します。
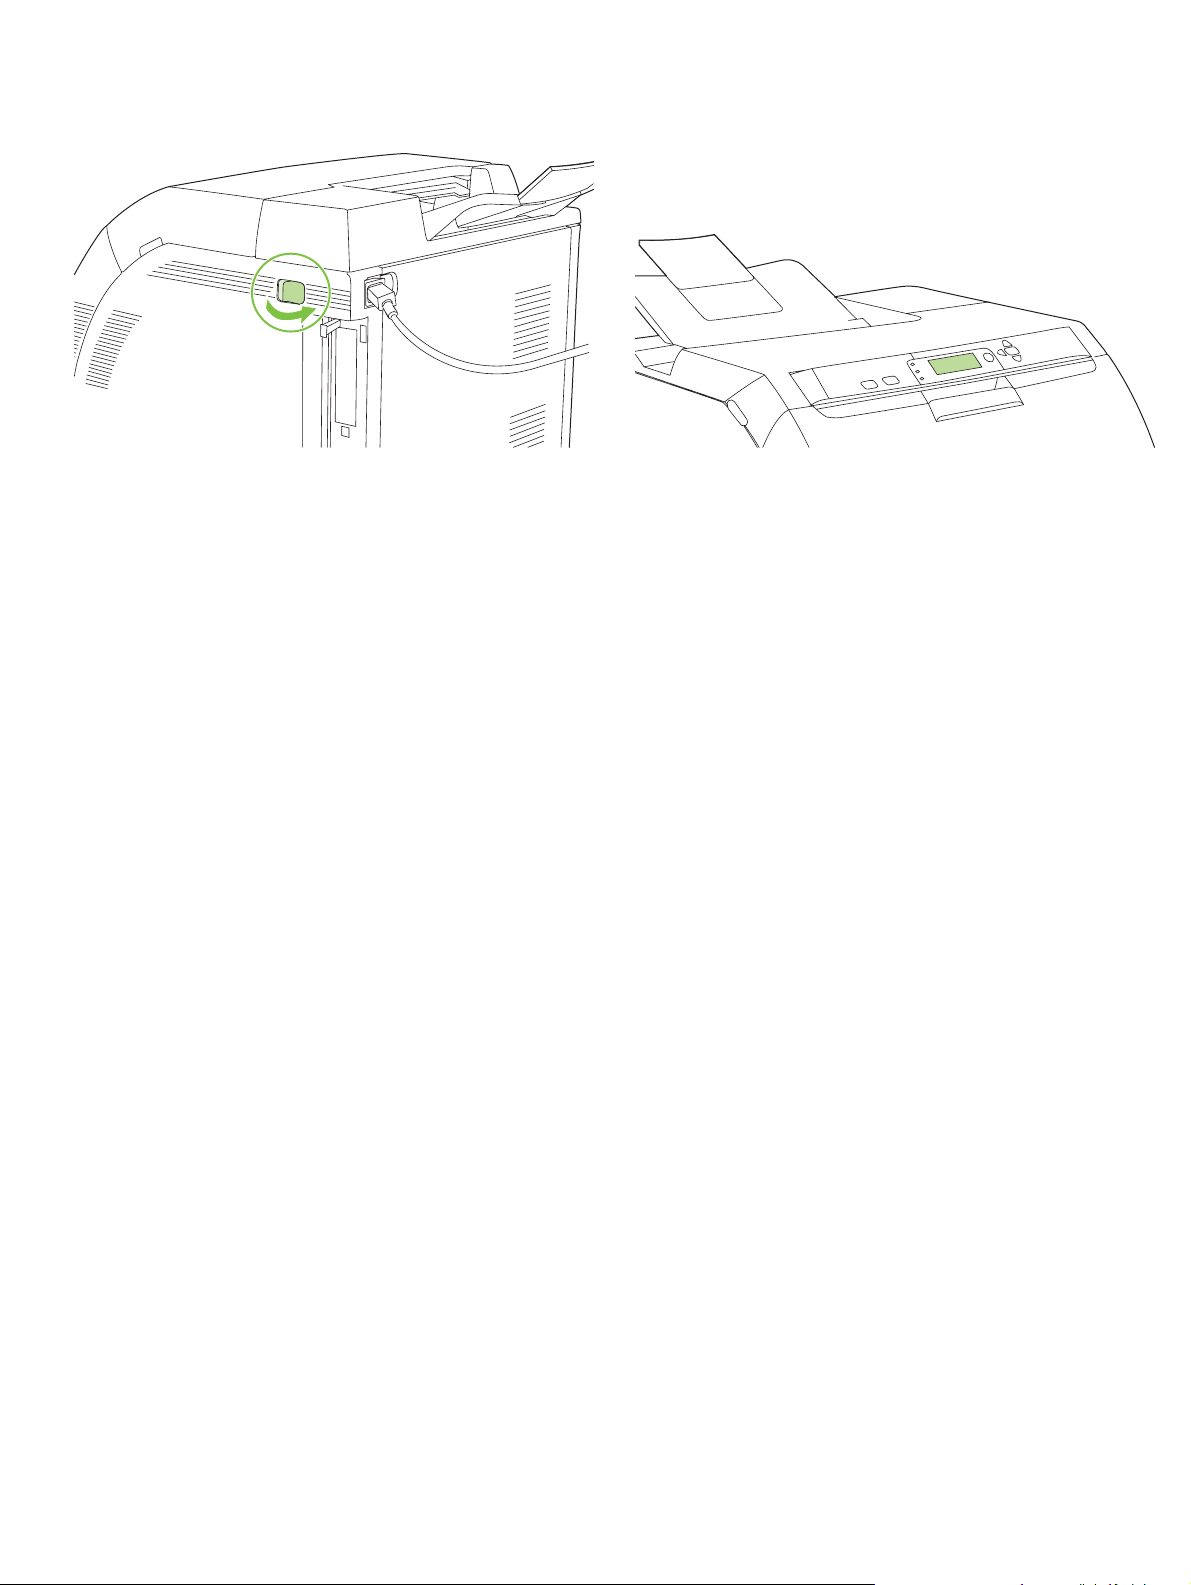
10.1 Plug in the power cord. Do not plug in the USB cable until you are
prompted to in step 14.
Note Plug the power cord directly into a wall outlet only.
10.1 插入电源线。在步骤 14 给出提示之前,请勿插入
USB 电缆。
注 请
只
将电源线直接插入墙上插座。
10.1 Colokkan kabel listrik. Jangan colokkan kabel USB sampai Anda
diminta pada langkah 14.
Catatan Secara langsung, colokkan kabel listrik hanya ke stopkontak
dinding.
10.1 電源コードを差し込みます。USB ケーブルは手順 14 で指示がある
まで差し込まないでください。
注意:電源コードは必ず壁のコンセントに直接差し込んでください。
日本語한국어
제어판 오버레이를 설치하십시오 ( 필요한 경우 ). 오버레이의 양끝을 똑바
로 눌러 프린터에 끼운 후 오버레이 가운데 부분을 양손으로 눌러 프린터에
완전히 부착하십시오 .
ติดตั้งฝาครอบแผงควบคุม (หากจําเปน) กดดานลางของฝาครอบลงบนเครื่องพิมพตรงๆ
และเลื่อนมือมากดที่กลางฝาครอบจนกระทั่งติดแนบกับเครื่องพิมพ
ไทย
10.1 전원 코드를 꽂으십시오 .14 단계에서 해당 지침이 표시될 때까지
USB 케이블을 꽂지
주 벽면 콘센트
10.1 เสียบปลั๊กไฟ อยาเสียบสายเคเบิล USB
จนกวาเครื่องจะพรอมตใหคุณดําเนินการในขั้นตอนที่ 14
หมายเหตุ เสียบสายไฟในเตาเสียบที่ผนังโดยตรงเทานั้น
5
마십시오
에만
전원 코드를 직접 꽂을 수 있습니다 .
.
11
10.2 Turn on the printer.
Note Printer calibration and start-up noises are normal.
10.2 打开打印机电源。
注 打印机校准和启动时有噪音属于正常现象。
10.2 Hidupkan printer.
Catatan Suara derau saat kalibrasi printer dan saat mulai adalah normal.
10.2 プリンタの電源を入れます。
注意:プリンタから校正および起動を行う音がしますが、正常な状態で
異常ではありません。
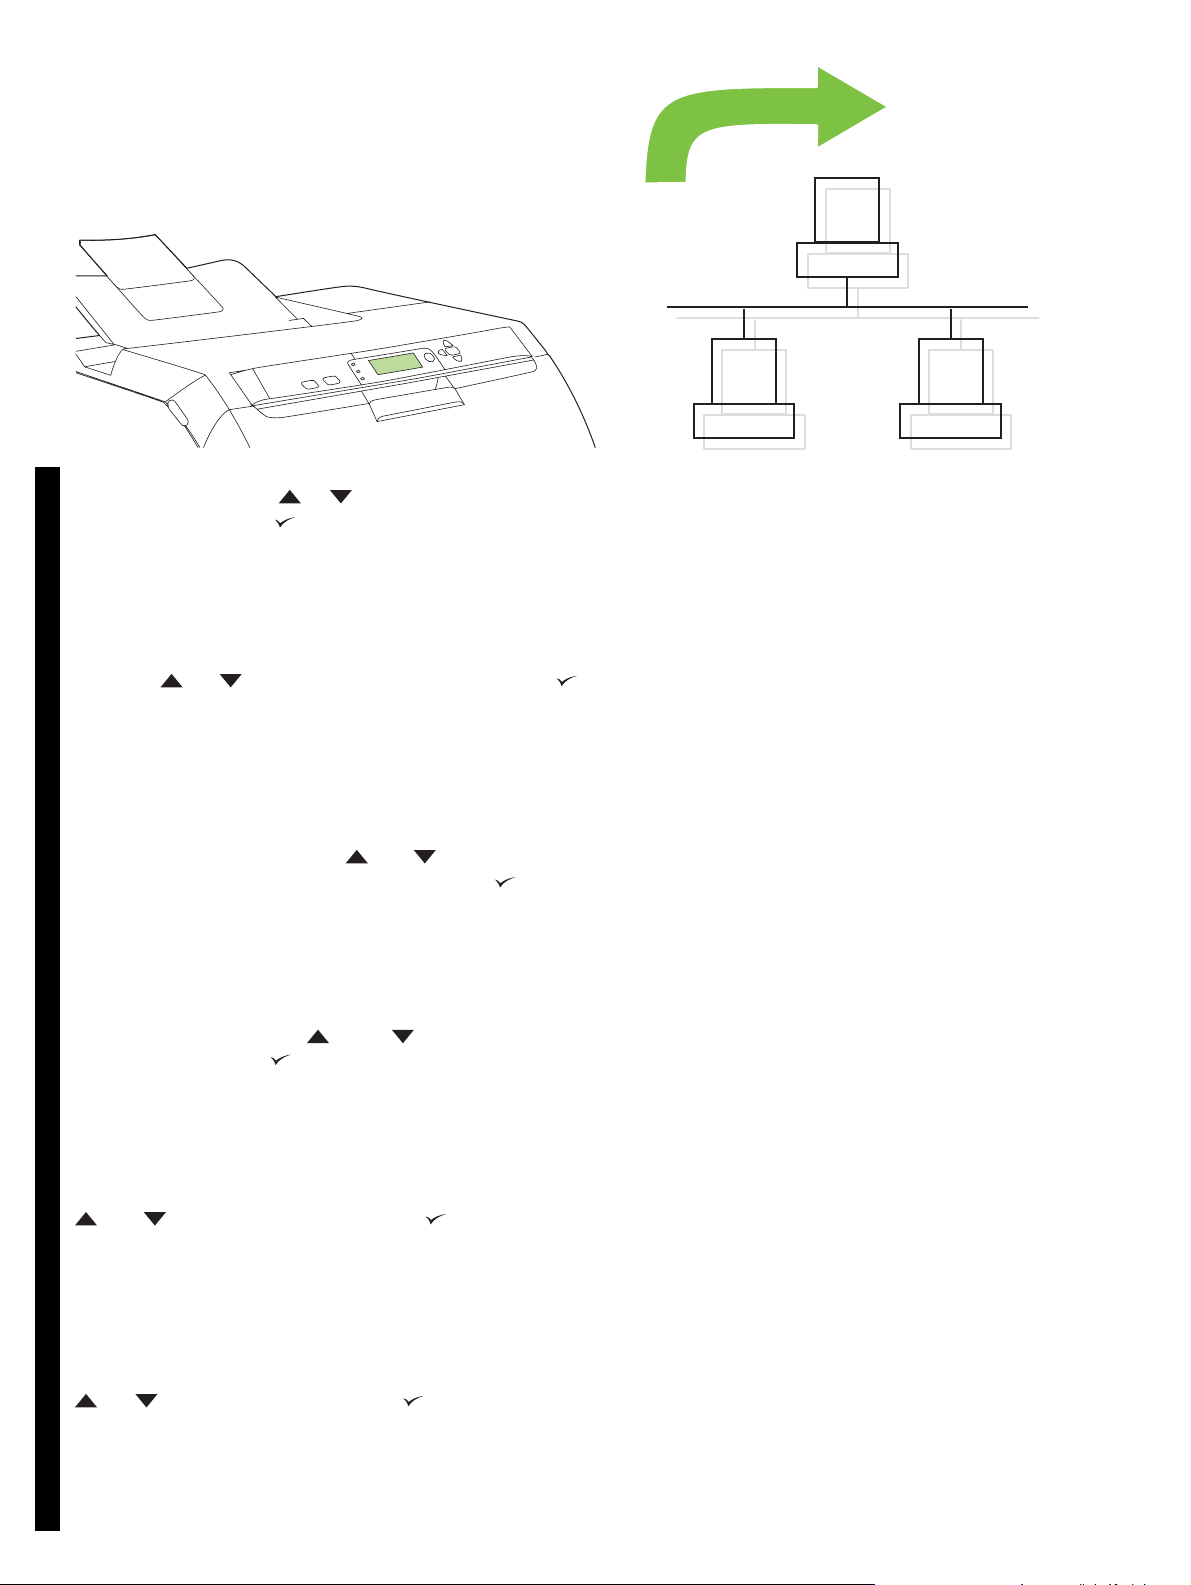
Set the language/date/time (if necessary). If prompted, select your
language and date/time. Follow the instructions on the control panel.
设置语言 / 日期 / 时间 (如有必要)。如果出现提示,则选
择语言和日期 / 时间。请按照控制面板的说明进行操作。
Setel bahasa/tang gal /waktu (ji ka perl u). Jika diminta, pil ih bahasa Anda
berikut tanggal/waktu. Ikuti petunjuk pada panel kontrol.
必要に応じて言語と日付 / 時刻を設定します。プロンプトが表示された
場合は、言語と日付 / 時刻を選択します。コントロール パネルの指示に
従います。
10.2 프린터를 켜십시오 .
주 프린터를 교정하고 시작할 때 소음이 발생합니다 .
10.2 เปดเครื่องพิมพ
หมายเหตุ เสียงในขณะปรับเทียบมาตรฐานเครื่องพิมพและการเริ่มเปดเครื่องพิมพเปนเรื่องปกติ
언어 / 날짜 / 시간 ( 필요한 경우 ) 설정 . 해당 창이 표시되면 언어와 날짜 /
시간을 선택하십시오 . 제어판에 표시되는 지침에 따르십시오 .
ตั้งคาภาษา/วันที่/เวลา (หากจําเปน) หากเครื่องพรอมต ใหเลือกภาษาและวัน/เวลาของคุณ
ทําตามคําแนะนําบนแผงควบคุม
6
12
13
LAN
Set the media size and type for the input trays. At the printer control
panel, press MENU, use the or button to highlight PAPER
HANDLING, and then press . Use the control panel buttons to highlight
and select media sizes and types for each input tray. For more information,
see the online user guide.
English
为进纸盘设置介质尺寸和类型。在打印机控制面板上按下菜
单,使用 或 按钮突出显示纸张处理,然后按下 。
使用控制面板按钮突出显示并选择每个进纸盘的介质尺寸和
类型。有关详细信息,请参阅联机用户指南。
简体中文
Atur ukuran dan jenis media untuk ba k i m a s uk a n. Pada panel kontrol
printer, tekan MENU, gunakan tombol atau untuk menyorot
PAPER HANDLING [PENANGANAN KERTAS], lalu tekan . Gunakan
tombol panel kontrol untuk menyorot dan memilih ukuran dan jenis media
untuk setiap baki masukan. Untuk informasi lebih lanjut, lihat panduan
pengguna online.
Bahasa indonesia
給紙トレイの用紙のサイズと種類を設定します。プリンタのコントロー
ル パネルで [ メニュー ] を押し、 または ボタンを操作して [ 用紙
処理 ] をハイライトした後、 を押します。コントロール パネルのボタ
ンを使用し、各給紙トレイの用紙のサイズと種類をハイライトして選択
します。詳細については、オンライン ユーザーズ ガイドを参照してくだ
日本語한국어
さい。
To connect to a network, go to step 13 on page 9.
要连接至网络,请转至第 9 页的步骤 13。
Untuk menghubung ke jaringan, lanjutkan ke langkah 13 pada halaman 9.
ネットワークに接続するには、9 ページの手順 13 に進みます。
입력 용지함의 용지 크기 및 종류 설정 . 프린터 제어판에서 메뉴를 누르고
또는 버튼을 눌러 용지 취급을 선택한 후를 누르십시오 . 제어
판 버튼을 눌러 용지함마다 용지 크기와 종류를 선택하십시오 . 자세한 내
용은 온라인 사용 설명서를 참조하십시오 .
ตั้งขนาดและประเภทกระดาษสําหรับถาดเขา ที่แผงควบคุมเครื่องพิมพ กด MENU ใชปุม
หรือ เพื่อไฮไลตที่ PAPER HANDLING และกด ใชปุมบนแผงควบคุมเพื่อ
ไฮไลตและเลือกขนาดและประเภทกระดาษสําหรับถาดเขาแตละถาดสําหรับขอมูลเพิ่มเติม
โปรดดูที่คูมือผูใชแบบออนไลน
ไทย
네트워크에 연결하려면 13 단계 (9페이지 참조 ) 에 따르십시오 .
ในการเชื่อมตอกับเครือขาย ใหไปที่ขั้นตอนที่ 13 ใน หนา 9
7
14
15
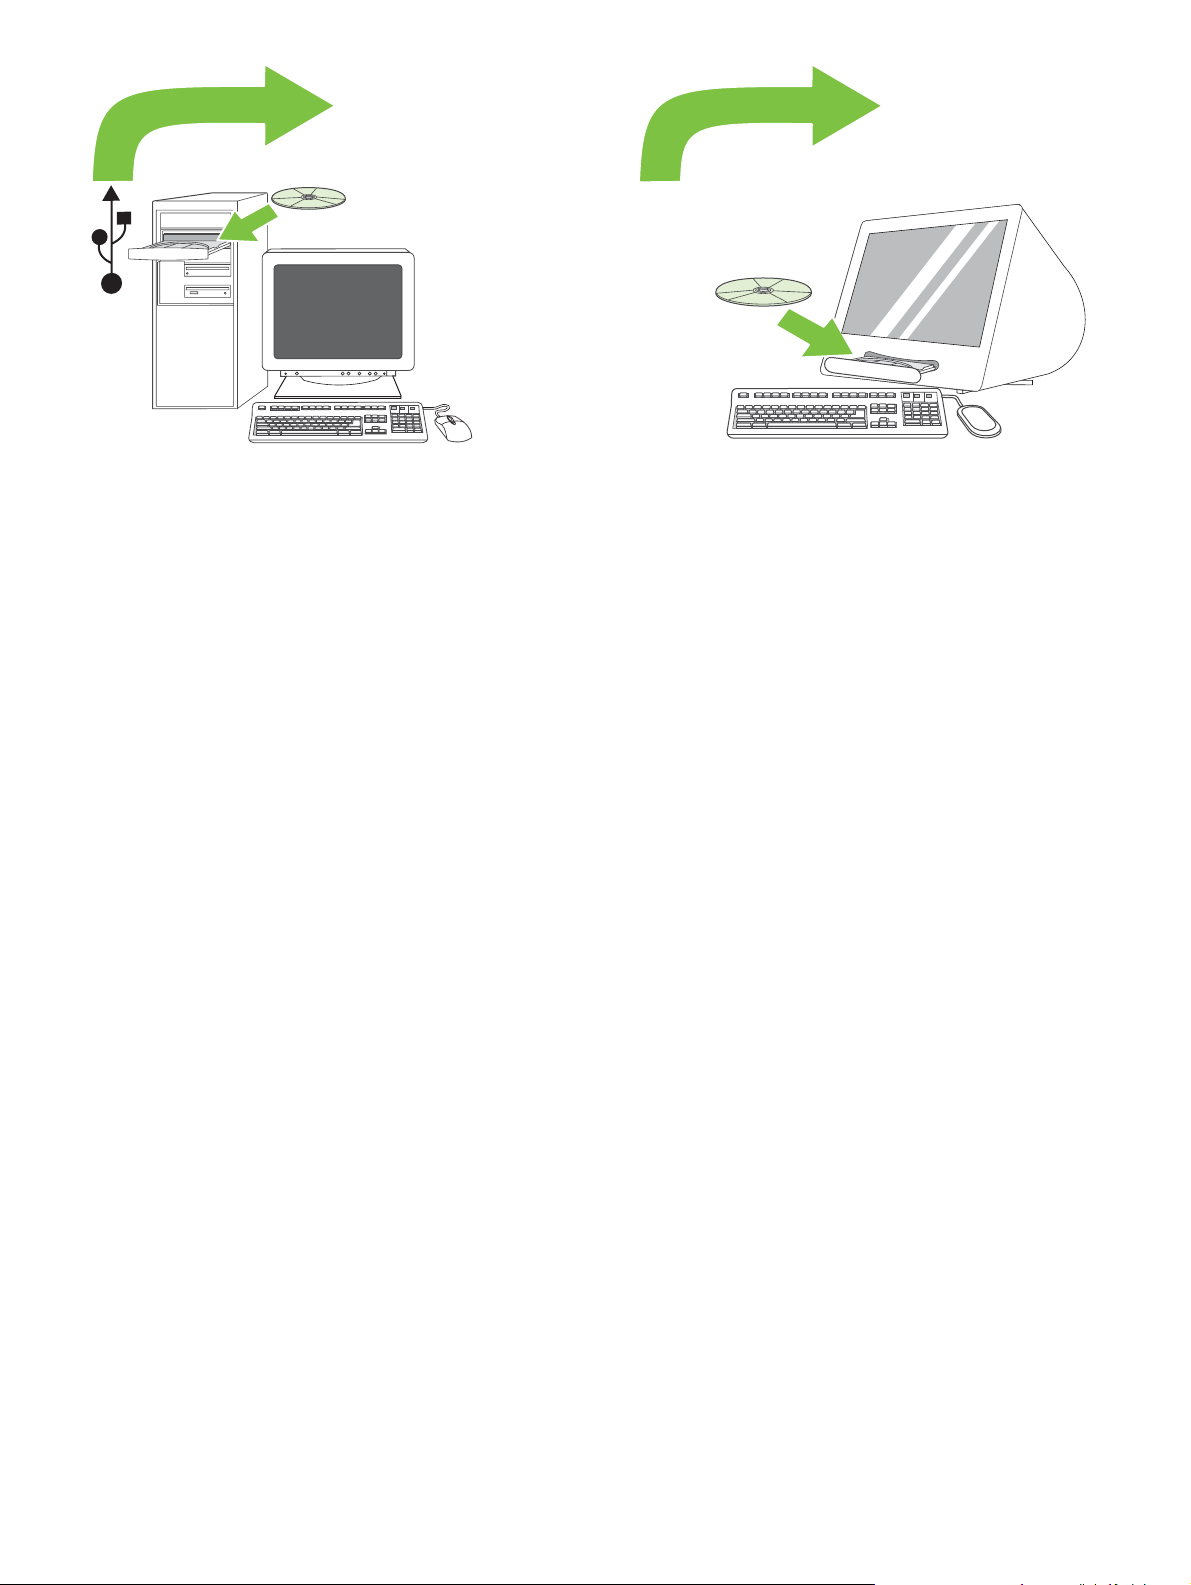
To install software for Windows® with a direct connection (USB), go to
step 14 on page 12.
要为直接连接 (USB) 的 Windows® 计算机安装软件,请转
至第 12 页的步骤 14。
Untuk menginstal perangkat lunak untuk Windows® dengan sambungan
langsung (USB), lanjutkan ke langkah 14 pada halaman 12.
直接接続 (USB) を使用するための Windows® 用ソフトウェアをインス
トールするには、12 ページの手順 14 に進みます。
To install software for Macintosh with a direct connection (USB), go to step
15 on page 15.
要为直接连接 (USB) 的 Macintosh 计算机安装软件,请转
至第 15 页的步骤 15。
Untuk menginstal perangkat lunak untuk Macintosh dengan sambungan
langsung (USB), lanjutkan ke langkah 15 pada halaman 15.
直接接続 (USB) を使用するための Macintosh 用ソフトウェアをインス
トールするには、15 ページの手順 15 に進みます。
직접 연결 (USB) 하여 Windows® 컴퓨터에 소프트웨어를 설치하려면 14
단계 (12페이지 참조 ) 에 따르십시오 .
ในการติดตั้งซอฟตแวรสําหรับ Windows® ที่ใชการเชื่อมตอ (USB) โดยตรง
ใหไปยังขั้นตอนที่ 14 ใน หนา 12
직접 연결 방식 (USB) 으로 Macintosh 컴퓨터에 소프트웨어를 설치하려면
15 단계 (15페이지 참조 ) 에 따르십시오 .
ในการติดตั้งซอฟตแวรสําหรับ Macintosh ที่ใชการเชื่อมตอ (USB) โดยตรง
ใหไปยังขั้นตอนที่ 15 ใน หนา 15
8
13
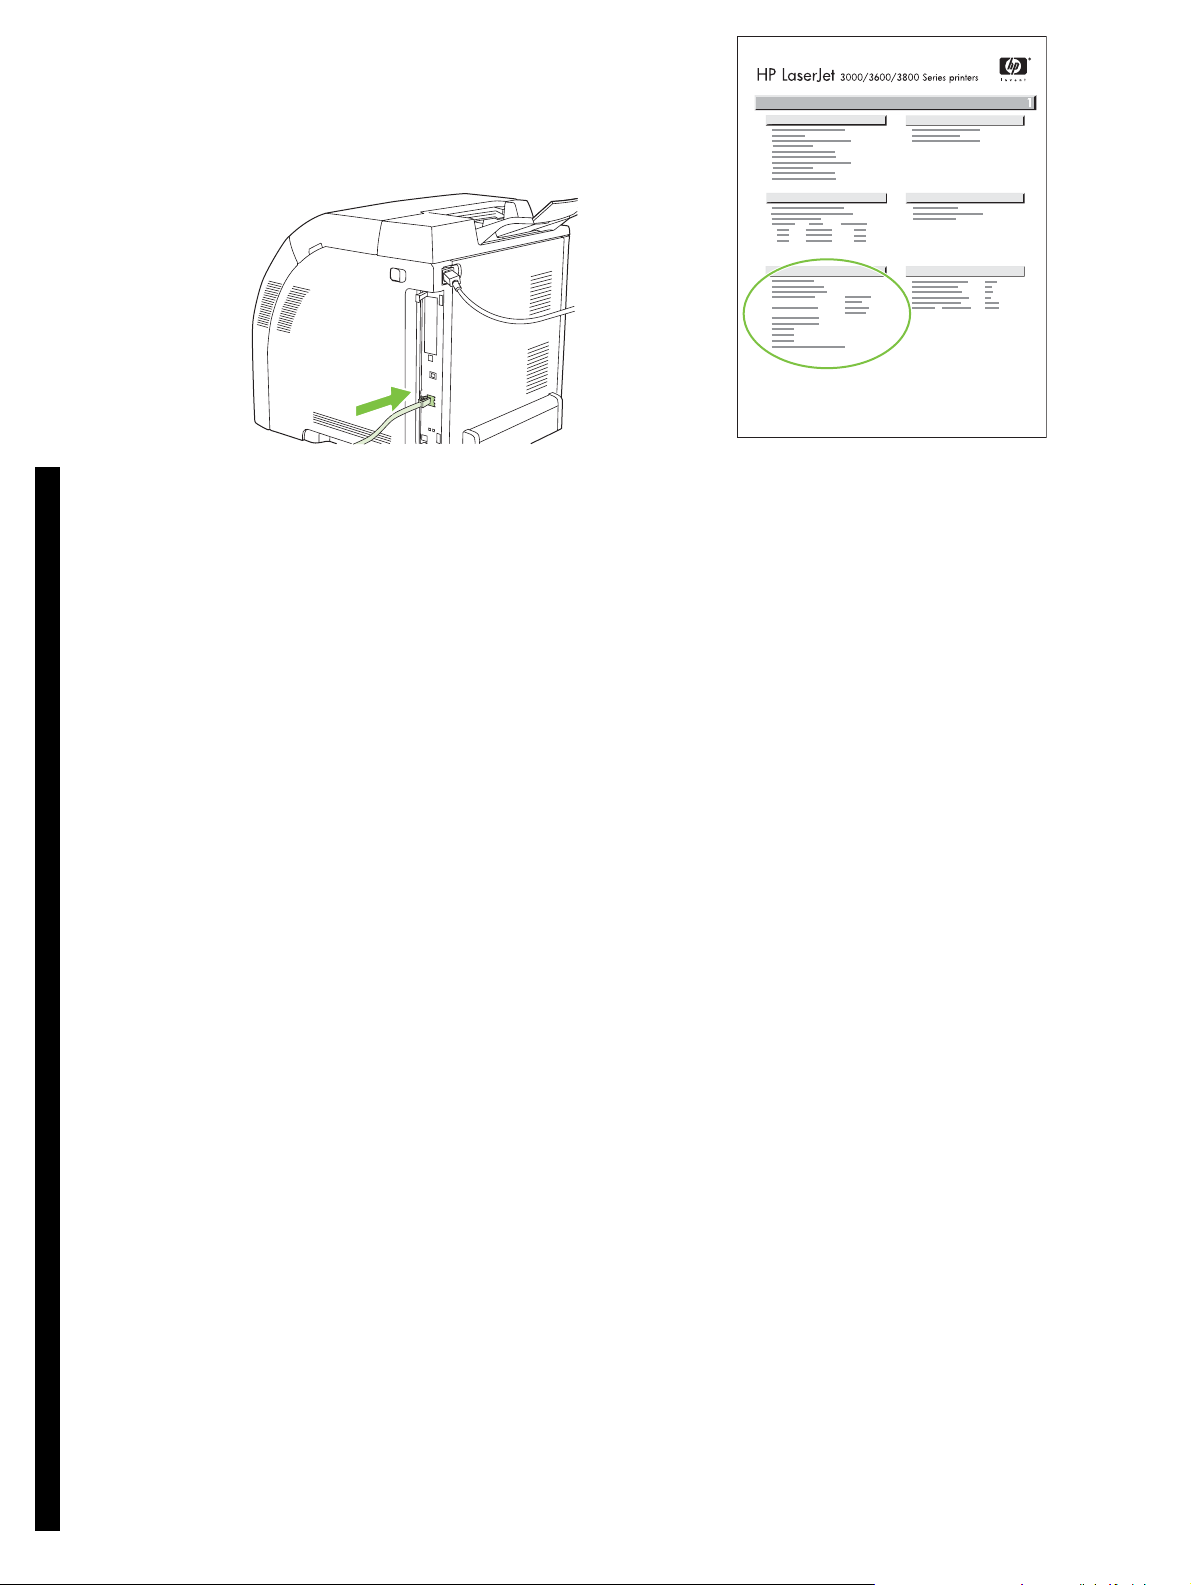
13.1 Connect to a network. Connect the network cable to the printer.
Note Ensure that all cables are HP-compliant.
English
13.1 连接至网络。 将网线连接至打印机。
注 确保所有电缆都符合 HP 标准。
简体中文
13.1 Menghubungkan ke jaringan. Hubungkan kabel jaringan ke printer.
Catatan Pastikan semua kabel sesuai standar HP.
Bahasa indonesia
13.1 ネットワークに接続します。ネットワーク ケーブルをプリンタに接
続します。
注意:HP の仕様に準拠したケーブルのみを使用してください。
日本語한국어
13.2 Find the IP address. On the control panel, press Menu. Select
INFORMATION, and then select PRINT CONFIGURATION. The IP
address is on the Jetdirect page, under “TCP/IP”.
Note You might need to assign an IP address depending on the type of
network that is installed. See “Configure an IP address (if necessary)” on
page 10 for more information.
13.2 查找 IP 地址。在控制面板上按下菜单。选择信息,然
后选择打印配置页。 IP 地址位于 Jetdirect 页的 “TCP/IP”
下方。
注 您可能需要根据所安装的网络类型来指定一个 IP 地址。
有关更多信息,请参阅第 10 页的 “配置 IP 地址 (如有必
要)”。
13.2 Menemukan alamat IP. Pada panel kontrol, tekan Menu. Pilih
INFORMATION [INFORMASI], kemudian pilih PRINT CONFIGURATION
[CET AK K ONFIGURASI]. Alamat IP ada pada halaman Jetdirect, di bawah
“TCP/IP”.
Catatan Anda mungkin perlu menentukan alamat IP tergantung jenis
jaringan yang diinstal. Lihat “Mengkonfigurasi alamat IP (jika perlu)” pada
halaman 10 untuk informasi lebih lanjut.
13.2 IP アドレスを調べます。コントロール パネルで [ メニュー ] を押し
ます。[ 情報 ] を選択し、[ 設定の印刷 ] を選択します。Jetdirect ページ
の「TCP/IP」の欄に IP アドレスが表示されます。
注意:接続しているネットワークの種類によっては、IP アドレスの割り
当てが必要になることがあります。詳細については、10 ページの「必要
に応じて IP アドレスを設定します」の項目を参照してください。
13.1 네트워크 연결 . 네트워크 케이블을 프린터에 꽂으십시오 .
주 HP 제품과 호환되는 케이블을 사용해야 합니다 .
13.1 เชื่อมตอเขากับเครือขาย เชื่อมตอสายเคเบิลเครือขายเขากับเครื่องพิมพ
หมายเหตุ ตรวจดูใหแนใจวาสายเคเบิลทั้งหมดตรงตามขอกําหนดของ HP
ไทย
13.2 IP 주소 검색 . 제어판에서 메뉴를 누르십시오
례로 선택하십시오 .IP 주소는 Jetdirect 페이지의 'TCP/IP' 부분에 나와 있
습니다 .
주 설치된 네트워크 유형에 따라 IP 주소 할당이 필요할 수 있습니다 . 자세
한 내용은 10 페이지의 'IP 주소 구성 ( 필요한 경우 )' 부분을 참조하십시오 .
13.2 คนหา IP แอดเดรส ในแผงควบคุม กด Menu เลือก INFORMATION และเลือก PRINT
CONFIGURATION IP แอดเดรสอยูในหนา Jetdirect ในหัวขอ “TCP/IP”
หมายเหตุ คุณอาจตองกําหนด IP แอดเดรส ขึ้นอยูกับประเภทของเครือขายที่ติดตั้งไวโ
ปรดดูที่ “การกําหนดคา IP แอดเดรส (หากจําเปน)”
9
ใน หนา 10 สําหรับขอมูลเพิ่มเติม
. 정보 , 구성 인쇄를 차
13.3 Configure an IP address (if necessary). On the control panel,
press MENU. Select CONFIGURE DEVICE, select I/O, and then select
EMBEDDED JETDIRECT. Select TCP/IP, select CONFIG METHOD,
select MANUAL, and then select MANUAL SETTINGS. Use the control-
panel buttons to specify the IP address.
13.4 Prepare for software installation. Quit all of the programs (including
terminate-and-stay resident [TSR], antivirus, and firewall programs) on the
print server or on each computer that will use the printer.
13.3 配置 IP 地址 (如有必要)。在控制面板上按下菜单。
选择配置设备、 I/O,然后选择嵌入式 JETDIRECT。依次选
择 TCP/IP、配置方法、手动,然后选择手动设置。使用控
制面板按钮指定 IP 地址。
13.3 Mengkonfigurasi alamat IP (jika perlu). Pada panel kontrol, tekan
MENU. Pilih CONFIGURE DEVICE [KONFIGURASI PERANGKAT], pilih
I/O, lalu pilih EMBEDDED JETDIRECT [JETDIRECT TERPADU]. Pilih
TCP/IP, pilih CONFIG METHOD [MET ODE K ONFIG.] , pilih MANUAL, lalu
pilih MANUAL SETTINGS [PENGATURAN MANUAL]. Gunakan tombol
panel kontrol untuk menentukan alamat IP.
13.3 必要に応じて IP アドレスを設定します。コントロール パネルで
[ メニュー ] を押します。[ デバイスの設定 ] を選択し、[I/O]、[ 内蔵
JETDIRECT] の順に選択します。[TCP/IP] を選択し、[CONFIG
METHOD ( 設定方法 )]、[ 手動 ]、[MANUAL SETTINGS (手動設定 )] の
順に選択します。コントロール パネルのボタンを使用して、IP アドレス
を指定します。
13.3 IP 주소 구성 ( 필요한 경우 ). 제어판에서 메뉴를 누르십시오
구성 , I/O, 내장 JETDIRECT를 차례로 선택하십시오 .TCP/IP, 구성 방법 ,
수동 , 수동 설정을 차례로 선택하십시오 . 제어판 버튼을 눌러 IP 주소를
지정하십시오 .
. 장치
13.4 准备安装软件。 退出打印服务器或将使用该打印机的
每台计算机上的所有程序,包括内存驻留程序 (TSR)、防病
毒程序和防火墙程序。
13.4 Persiapan untuk instalasi perangkat lunak. Tutup semua program
(termasuk program terminate-and-st ay resident [TSR], antivirus, dan
firewall) pada server cetak di setiap komputer yang akan menggunakan
printer.
13.4 ソフトウェアをインストールする準備をします。プリント サーバま
たはプリンタを使用する各コンピュータで、常駐プログラム (TSR)、ウ
イルス対策プログラム、ファイアウォール プログラムを含むすべてのプ
ログラムを終了します。
13.4 소프트웨어 설치 준비 . 프린터 서버나 프린터를 사용하는 컴퓨터마다
설치된 프로그램 [TSR(terminate-and-stay resident ), 바이러스 퇴치 프로
그램 , 방화벽 프로그램 ] 을 모두 종료하십시오 .
13.3 การกําหนดคา IP แอดเดรส (หากจําเปน) ในแผงควบคุม กด MENU เลือก
CONFIGURE DEVICE เลือก I/O และเลือก EMBEDDED JETDIRECTเลือก TCP/IP เลือก
CONFIG METHOD เลือก MANUAL และเลือก MANUAL SETTINGS
ใชปุมบนแผงควบคุมเพื่อระบุ IP แอดเดรส
13.4 เตรียมพรอมสําหรับการติดตั้งซอฟตแวร ออกจากโปรแกรมทั้งหมด (รวมทั้งโปรแกรม
terminate-and-stay resident [TSR], แอนตี้ไวรัส และไฟรวอลล) ในเซิรฟเวอรการพิมพ
หรือคอมพิวเตอรแต
10
ละเครื่องที่จะใชเครื่องพิมพ

13.5 Install the software. 1) Insert the CD that came with the printer.
2) On the welcome screen, click Install Printer. (If the welcome screen
does not appear, run SETUP.EXE from the root directory of the CD.)
English
3) Follow the onscreen instructions. When prompted, select Wired
Networking. The installer shows a v ailab le printers. Select the appropriate
IP address.
13.5 安装软件。 1) 插入打印机随附的 CD。 2) 在欢迎使用
屏幕上,单击安装打印机。(如果未出现 “欢迎使用”
屏幕,请从 CD 的根目录下运行 SETUP.EXE。)
简体中文
13.5 Menginstal perangkat lunak. 1) Masukkan CD yang terdapat dalam
kemasan printer. 2) Pada layar pembuka, klik Install Printer. (Jika layar
sambutan tidak muncul, jalankan SETUP.EXE dari direktori akar CD.)
Bahasa indonesia
13.5 ソフトウェアをインストールします。1) プリンタに同梱の CD を挿
入します。2) ようこそ画面で、[ プリンタのインストール ] をクリックし
ます ( この画面が表示されない場合は、CD のルート ディレクトリにあ
る SETUP. EXE を実行します )。
日本語한국어
13.5 소프트웨어 설치 .1) 프린터와 함께 제공된 CD 를 넣으십시오 .2) 시작
화면에서 프린터 설치를 누르십시오 . 시작 화면이 표시되지 않으면 CD 의
최상위 폴더에 있는 SETUP.EXE 를 실행하십시오 .
3) 请按照屏幕说明进行操作。如果出现提示,请选择有线
网络。安装程序将显示可用打印机。选择相应的 IP 地址。
3) Ikuti petunjuk pada layar . Apabila diminta pilih Wired Networking
[Jaringan Berkabel]. Installer [Penginstal] akan menampilkan printer
yang tersedia. Pilih alamat IP yang sesuai.
3) 画面の指示に従います。プロンプトが表示されたら、[ 有線ネット
ワーク ] を選択します。使用可能なプリンタが表示されます。適切な IP
アドレスを選択します。
3) 화면에 표시되는
Networking( 유선 네트워크 ) 을 선택하십시오 . 프린터 목록이 표시됩니다 .
해당 IP 주소를 선택하십시오 .
지침에 따르십시오 . 해당 창이 표시되면 Wired
13.5 ติดตั้งซอฟตแวร 1) ใสแผนซีดีที่มาพรอมกับเครื่องพิมพ 2) ในหนาจอยินดีตอนรับ ใหคลิก
Install Printer (หากหนาจอยินดีตอนรับไมปรากฏขึ้น ใหรัน SETUP.EXE
จากไดเรคทอรีหลักของซีดี)
ไทย
3) ทําตามคําแนะนําบนหนาจอเมื่อเครื่องพรอมต เลือก Wired Networking
โปรแกรมติดตั้งจะแสดงเครื่องพิมพที่ใชได เลือก IP แอดเดรสที่เหมาะสม
11

14
Windows
4) On the Installation Type screen select Full Installation to install the
most common drivers and software (recommended), select Basic
Installation to install the minimum set of drivers and software, or select
Custom Installation. 5) Allow the installation to finish. 6) Go to step 16 on
page 19.
4) 在安装类型屏幕上选择完全安装以安装推荐的最常用的
驱动程序和软件,选择基本安装以安装所需的最少驱动程序
和软件,或者选择自定义安装。 5) 等待安装完成。 6) 转至
第 19 页的步骤 16。
4) Pada layar Installation Type [Jenis Instalasi] pilih Full Inst a llation
[Instalasi Lengk a p] untuk menginstal driver dan perangkat lunak yang
paling umum (dianjurkan), pilih Basic Installation [Instalasi Dasar] untuk
menginstal driver dan perangkat lunak minimal, atau pilih Custom
Installation [Instalasi Tersesuaikan]. 5) Bi ar kan instalasi berlangsu ng
hingga selesai. 6) Lanjutkan ke langkah 16 pada halaman 19.
4) [ インストールの種類 ] 画面で、最も一般的なドライバとソフトウェア
をインストールする場合は [完全インストール ] を選択し ( 推奨 )、最小
限のドライバとソフトウェアをインストールする場合は [ 基本インス
トール ] を選択します。または、[カスタム インストール ] を選択しま
す。5) インストールを完了します。6) 19 ページの手順 16 に進みます。
Windows® with a direct connection (USB). 1) Install the software from
the CD before connecting the cable to the printer.
直接连接 (USB) 的 Windows® 计算机 1) 将电缆连接至打
印机之前,先从 CD 上安装软件。
Windows® de n gan sambunga n langsung (USB). 1) Instal perangkat
lunak dari CD sebelum menghubungkan kabel ke printer.
Windows® で直接接続 (USB) を使用する場合:1) プリンタとコン
ピュータをケーブルで接続する前に、CD からソフトウェアをインストー
ルします。
4) 설치 유형 화면에서 , 가장 많이 사용되는 드라이버와 소프트웨어를 설치
( 권장 ) 하려면 Full Installation( 전체 설치 ) 을
트웨어를 가장 필요한 것만 설치하려면 Basic I nst allation(기본 설치 ) 을
선택하거나 Custom Installatio n(맞춤 설치 ) 을 선택하십시오 . 5) 설치가
끝날 때까지 기다리십시오 .6) 16 단계 (19페이지 참조 ) 에 따르십시오 .
4) ในหนาจอ Installation Type เลือก Full Installation
เพื่อติดตั้งไดรเวอรและซอฟตแวรทั่วไป (แนะนําใหเลือก), เลือก Basic Installation
เพื่อติดตั้งชุดไดรเวอรและซอฟตแวรขั้นต่ําสุด หรือเลือก Custom Installation
5) รอจนการติดตั้งเสร็จสมบูรณ 6) ไปยังขั้นตอนที่ 16 ใน หนา 19
선택하고 드라이버와 소프
Windows® 직접 연결 (USB).1) CD 에 있는 소프트웨어를 설치한 후 케이
블을 프린터에 꽂으십시오 .
Windows
® ที่ใชการเชื่อมตอ (USB) โดยตรง
1) ติดตั้งซอฟตแวรจากแผนซีดีกอนเชื่อมตอสายเคเบิลเขากับเครื่องพิมพ
12

Windows
Windows
Note If the Ne w Ha rdware Found message appears, insert the CD.
Follow the onscreen instructions, accept the default selections, and then
go to step 16 on page 19.
English
注 如果显示找到新硬件消息,请插入 CD。请按照屏幕说明
进行操作,接受默认选项,然后转至第 19 页的步骤 16。
简体中文
Catatan Jika muncul pesan New Hardware Found [Ditemukan Perangkat
Keras Baru], masukkan CD. Ikuti petunjuk pada layar, terima pilihan
standar, kemudian lanjutkan ke langkah 16 pada halaman 19.
Bahasa indonesia
注意: 「新しいハードウェア」というメッセージが表示されたら、CD を
挿入します。画面に表示される手順に従ってデフォルトの選択を選び、
19 ページの手順 16 に進みます。
日本語한국어
2) On the welcome screen, click Install Printer. The Setup Wizard
appears.
Note If the welcome screen does not appear, click Start, and then click
Run. Type X:SETUP, replace X with the CD-ROM drive letter, and then click
OK.
2) 在欢迎使用屏幕上,单击安装打印机。此时,将显示
“安装向导”。
注 如果未显示欢迎使用屏幕,则单击开始,然后单击运行。
键入 X:SETUP (其中 X 为 CD-ROM 驱动器的盘符),然后
单击确定。
2) Pada layar pembuka, klik Install Printer. Wizard Pengaturan akan
muncul.
Catatan Jika layar pembuka tidak muncul, klik Start, kemudian klik Run.
Ketik X :SETUP, ganti X dengan huruf drive CD-ROM, kemudian klik OK.
2) ようこそ画面で、[ プリンタのインストール ] をクリックします。
セットアップ ウィザードが表示されます。
注意:ようこそ画面が表示されない場合は、[ スタート ] メニューの
[ ファイル名を指定して実行 ] をクリックし、「X:SETUP」と入力します。
X を CD-ROM ドライブ名に置き換えて、[OK] をクリックします。
주 새 하드웨어 발견 메시지가 표시되면 CD를 넣으십시오 . 화면에 표시되
는 지침에 따라 , 선택되어 있는 대로
에 따르십시오 .
사용하고 16 단계 (19페이지 참조 )
หมายเหตุ หากขอความ New Hardware Found ปรากฏขึ้น ใหใสแผนซีดี
ใหปฏิบัติตามคําแนะนําที่ปรากฏบนหนาจอ, ตอบรับคาตัวเลือกที่กําหนดไวลวงหนา
แลวไปที่ขั้นตอนที่ 16 ใน หนา 19
ไทย
2) 시작 화면에서 프린터 설치를 누르십시오 . 설치 마법사가 나타납니다 .
주 시작 화면이 표시되지 않으면 시작 , 실행을 차례로 누르십시오 .X:SE TUP
을 입력하고 X 를 CD-ROM 드라이브 문자로 바꾼 후 확인을 누르십시오 .
2) ในหนาจอยินดีตอนรับ ใหคลิก Install Printer Setup Wizard (ตัวชวยในการติดตั้ง)
จะปรากฏขึ้น
หมายเหตุ หากหนาจอยินดีตอนรับไมปรากฏขึ้น ใหคลิก Start แล
วคลิก Run ปอน X:SETUP
โดยเปลี่ยน X เปนอักษรประจําไดรฟซีดีรอม แลวคลิก OK
13

Windows Windows
3) Follow the onscreen instructions. When prompted, connect a USB cable
between the printer and the computer.
Note HP does not recommend using USB hubs. Use a USB cable that is
no longer than 2 meters (6.5 feet).
3) 请按照屏幕说明进行操作。根据提示,使用 USB 电缆连
接打印机和计算机。
注 HP 不推荐使用 USB 集线器。使用的 USB 电缆长度不能
超过 2 米(6.5 英尺)。
3) Ikuti petunjuk pada layar. Apabila diperintahkan, hubungkan kabel USB
antara printer dan komputer.
Catatan HP tidak menganjurkan penggunaan hub USB. Gunakan kabel
USB yang panjangnya tidak lebih dari 2meter (6,5 kaki).
3) 画面の指示に従います。プロンプトが表示されたら、USB ケーブルで
プリンタとコンピュータを接続します。
注意:HP では USB ハブの使用はお勧めしません。長さ 2m (6.5 フィー
ト ) 以下の USB ケーブルを使用してください。
4) Click Finish. If prompted, restart the computer. 5) Go to step 16 on
page 19.
4) 单击完成。如果出现提示,则重新启动计算机。 5) 转至
第 19 页的步骤 16。
4) Klik Finish [Selesai]. Jika diminta, hidupkan ulang komputer.
5) Lanjutkan ke langkah 16 pada halaman 19.
4) [ 完了 ] をクリックします。プロンプトが表示されたら、コンピュータ
を再起動します。5) 19 ページの手順 16 に進みます。
3) 화면에 표시되는 지침에 따르십시오 . 해당 창이 표시되면 USB 케이블
로 프린터와 컴퓨터를 연결하십시오 .
주 USB 허브는 사용하지 않는 것이 좋습니다 .USB 케이블 길이는 최대
2m(6.5ft.)이어야 합니다 .
3) ทําตามคําแนะนําบนหนาจอ เมื่อเครื่องพรอมต ใหเชื่อมตอสายเคเบิล USB
ระหวางเครื่องพิมพและคอมพิวเตอร
หมายเหตุ HP ไมแนะนําใหใชฮับ USB ใชสาย USB ที่ยาวไมเกิน 2 เมตร (6.5 ฟุต)
4) 완료를 누르십시오 . 해당 창이 표시되면
5) 16 단계 (19페이지 참조 ) 에 따르십시오 .
컴퓨터를 다시 시작하십시오 .
4) คลิก Finish เมื่อเครื่องพรอมต ใหรีสตารทคอมพิวเตอรอีกครั้ง 5) ไปยังขั้นตอนที่ 16 ใน
หนา 19
14

15
Macintosh
Macintosh
Connect to a Macintosh computer. 1) Connect a USB cable between
the printer and the computer.
Note HP does not recommend using USB hubs. Use a USB cable that is
not longer than 2 m eters (6.5 feet).
English
连接至 Macintosh 计算机。1) 使用 USB 电缆连接打印机和
计算机。
注 HP 不推荐使用 USB 集线器。使用的 USB 电缆长度不能
超过 2 米(6.5 英尺)。
简体中文
Menghubungkan ke komputer Macintosh. 1) Hubungkan kabel USB
antara printer dan komputer.
Catatan HP tidak menganjurkan penggunaan hub USB. Gunakan kabel
USB yang panjangnya tidak lebih dari 2meter (6,5 kaki).
Bahasa indonesia
Macintosh コンピュータに接続します。1) USB ケーブルでプリンタとコ
ンピュータを接続します。
注意:HP では USB ハブの使用はお勧めしません。長さ 2m (6.5 フィー
ト ) 以下の USB ケーブルを使用してください。
日本語한국어
2) Place the CD in the CD-ROM drive. For OS 9.1 to 9.2.x, go to A on
page 16. For OS X, go to B on page 17.
2) 将 CD 放入 CD-ROM 驱动器中。对于 OS 9.1 至 9.2.x,
请转至第 16 页的步骤 A。对于 OS X,请转至第 17 页的步
骤 B。
2) Masukkan CD ke dalam drive CD-ROM. Untuk OS 9.1 s/d 9.2.x,
lanjutkan ke A pada halaman 16. Untuk OS X, lanjutkan ke B pada
halaman 17.
2) CD を CD-ROM ドライブに挿入します。OS 9.1 〜 9.2.x をお使いの場
合は、16 ページの A に進みます。OS X をお使いの場合は、17 ページの
B に進みます。
Macintosh 컴퓨터 연결 .1) USB 케이블로 프린터와 컴퓨터를
연결하십시오 .
주 USB 허브는 사용하지 않는 것이 좋습니다 .USB 케이블 길이는 최대
2m(6.5ft.)이어야 합니다 .
เชื่อมตอเขากับเครื่อง Macintosh 1) เชื่อมตอสายเคเบิล USB
ระหวางเครื่องพิมพและคอมพิวเตอร
หมายเหตุ HP ไมแนะนําใหใชฮับ USB ใชสาย USB ที่ยาวไมเกิน 2 เมตร (6.5 ฟุต)
ไทย
2) CD-ROM 드라이브에 CD 를 넣으십시오 .OS 9.1 - 9.2.x
우 A( 16 페이지 참조 ) 에 따르고 OS X 를 사용하는 경우 B( 17 페이지 ) 에
따르십시오 .
2) ใสแผนซีดีในไดรฟซีดีรอมสําหรับ OS 9.1 ถึง 9.2x ใหไปที่ A ใน หนา 16 สําหรับ OS X
ใหไปที่ B ใน หนา 17
15
를 사용하는 경

A
Macintosh Macintosh
OS 9.1 to 9.2.x: 1) Run the Installer. Complete a custom install. 2) Select
all options, including USB Components (Classic). 3) When prompted,
restart the computer.
OS 9.1 至 9.2.x:1) 运行安装程序。完成自定义安装。 2) 选
择所有选项,包括 USB 组件 (Classic)。 3) 出现提示时,
重新启动计算机。
OS 9.1 s.d 9.2.x: 1) Jalankan Installer [Penginstal]. Selesaikan
penginstalan custom [tersesuai]. 2) Pilih semua opsi, termasuk USB
Components [Komponen USB] (Classic). 3) Jika diminta, hidupkan
ulang komputer.
OS 9.1 〜 9.2.x をお使いの場合:1) インストーラを実行します。この場
合はカスタム インストールを行います。2) [USB コンポーネント
(Classic)] を含むすべてのオプションを選択します。3) プロンプトが表
示されたら、コンピュータを再起動します。
4) Run the Apple Desktop Printer Utility from HD/Applications/Utilities.
5) Double-click HP Printer (USB), and then click OK. 6) Next to the USB
Printer Sele c tion, click Change.
4) 从硬盘 / 应用程序 / 实用程序运行 “Apple 桌面打印机实
用程序”。5) 双击 HP 打印机 (USB),然 后 单 击 好。6) 单击
USB 打印机选项旁边的更改。
4) Jalankan Apple Desktop Printer Utility dari HD/Applications/Utilities.
5) Klik dua kali HP Printer (USB), lalu klik OK. 6) Di samping USB Printer
Selection [Pemilihan Printer USB], klik Ubah.
4) MacintoshHD/Applications/Utilities ディレクトリにある Apple Desktop
Printer Utility を実行します。5) [HP プリンタ (USB)] をダブルクリック
し、[OK] をクリックします。6) [USB プリンタの選択 ] の横にある [ 変
更 ] をクリックします。
OS 9.1 - 9.2.x: 1) 인스톨러를 실행하십시오 . 사용자 지정 설치를 완료하십
시오 . 2) USB 구성 요소 ( 클래식 ) 등 ,
창이 표시되면 컴퓨터를 다시 시작하십시오 .
OS 9.1 ถึง 9.2x: 1) เรียกใชตัวติดตั้ง ทําการติดตั้งแบบกําหนดเองใหเสร็จสมบูรณ
2) เลือกตัวเลือกทั้งหมด รวมทั้ง USB Components (Classic) 3) เมื่อไดรับขอความแจง
ใหรีสตารทคอมพิวเตอรอีกครั้ง
옵션을 모두 선택하십시오 . 3) 해당
4) HD/Applications/Utilities 에서 Apple 데스크탑 프린터 유틸리티를 실행
하십시오 . 5) HP 프린터 (USB) 를 두 번 누른 후 승인을 누르십시오 .
6) USB 프린터 선택 옆에 있는 변경을 누르십시오 .
4) เรียกใช Apple Desktop Printer Utility จาก HD/Applications/Utilities 5) ดับเบิลคลิกที่
HP Printer (USB) แลวคลิก OK 6) ถัดจาก USB Printer Selection ใหคลิก Change
16

Macintosh
Macintosh
B
7) Select the printer, and then click OK. 8) Next to Postscript® Printer
Description (PPD) File, click Auto Setup, and then click Create. 9) Save
the printer setup. 10) On the desktop, highlight the printer. 11) Click the
Printing menu, and then click Set Default Printer. 12) Go to step 16 on
page 19.
English
7) 选择打印机,然后单击好。 8) 单击 Postscript® 打印机
说明 (PPD) 文件旁边的自动设置,然后单击建立。 9) 保存
打印机设置。 10) 在桌面上高亮度显示该打印机。 11) 单击
打印菜单,然后单击设置默认打印机。 12) 转至第 19 页的
简体中文
步骤 16。
7) Pilih printer, kemudian klik OK. 8) Di samping Postscript® Printer
Description (PPD) File, klik Auto Setup [P enga turan Otomat is], lalu k lik
Create [Buat]. 9) Simpan pengaturan printer. 10) Pada desktop, sorot
printer. 11) Klik menu Printing [Mencetak], lalu klik Set Default Printer
[Setel Printer Standar]. 12) Lanjutkan ke langkah 16 pada halaman 19.
Bahasa indonesia
7) プリンタを選択し、[OK] をクリックします。8) [Postscript® Printer
Description (PPD) ファイル ] の横にある [ 自動設定 ] をクリックし、
[ 作成 ] をクリックします。9) プリンタのセットアップ情報を保存します。
10) デスクトップ上のプリンタ アイコンをクリックしてハイライトしま
す。11) [ 印刷 ] メニューをクリックし、[ 省略時のプリンタを設定 ] をク
日本語한국어
リックします。12) 19 ページの手順 16 に進みます。
OS X: 1) Run the Installer. Complete an easy install.
Note If OS X and OS 9.1 (Classic) to 9.2.x (Classic) are installed on the
same computer, the installer shows both the Classic and the OS X
installation options.
OS X:1) 运行安装程序。完成简易安装。
注 如果在同一台计算机上安装了 OS X 和 OS 9.1 (Classic)
至 9.2.x (Classic),安装程序将一同显示 Classic 和 OS X 安
装选项。
OS X: 1) Jalankan Installer [Penginstal]. Selesaikan penginstalan cepat.
Catatan Jika OS X dan OS 9.1 (Classic) s/d 9.2.x (Classic) diinstal di
komputer yang sama, penginstal akan menampilkan kedua pilihan
penginstalan Classic dan OS X.
OS X:1) インストーラを実行します。この場合は簡易インストールを行
います。
注意:OS X と OS 9.1 (Classic) 〜 9.2.x (Classic) が同じコンピュータに
インストールされている場合は、Classic と OS X の両方のインストール
オプションが表示されます。
7)
프린터를 선택하고 승인을 누르십시오 . 8) PPD (Postscript® Printer
Description) 파일 옆에 있는 자동 설치를 누른 후 생성을 누르십시오 .
9) 프린터 설정을 저장하십시오 .10) 바탕화면에서 프린터를 선택하십시오 .
11) 프린팅 메뉴를 누른 후 기본 프린터 설정을 누르십시오 . 12) 16 단계
(19페이지 참조 ) 에 따르십시오 .
7) เลือกเครื่องพิมพ แลวคลิก OK 8) ถัดจากขอความ PostScript® Printer Description
(PPD) File ใหคลิก Auto Setup แลวคลิก Create 9) บันทึกการตั้งคาเครื่องพิมพ
10) บนเดสกทอป ใหเลื่อนไปไฮไลตที่เครื่องพิมพ 11) คลิกเมนู Printing แลวคลิก Set Default
Printer 12) ไปยังขั้นตอนที่ 16 ใน หนา 19
ไทย
OS X:1) 인스톨러를 실행하십시오 . 간편 설치를 완료하십시오 .
주 OS X 와 OS 9.1( 클래식 ) - 9.2.x( 클래식 ) 가 한
으면 클래식과 OS X 설치 옵션이 모두 표시됩니다 .
OS X: 1) เรียกใชตัวติดตั้ง ทําการติดตั้งอยางงายใหสมบูรณ
หมายเหตุ หากติดตั้งระบบปฏิบัติการ X และระบบปฏิบัติการ 9.1 (Classic) ถึง 9.2
ลงในคอมพิวเตอรเครื่องเดียวกัน ตัวติดตั้งจะแสดงตัวเลือกการติดตั้งทั้งสําหรับ
ระบบปฏิบัติการแบบ Classic และ X
17
컴퓨터에 설치되어 있
x (Classic)

Macintosh Macintosh
2) From HD/Applications/Utilities/Print Center, start the Print Center. 3) If
the printer appears in the Printer List, delete the printer. Click Add. 4) On
the next page, click the drop-down menu, and then select USB.
2) 从硬盘 / 应用程序 / 实用程序 / 打印中心,启动 “打印中
心”。 3) 如果该打印机出现在打印机列表中,则删除该打印
机。单击添加。 4) 在下一页上,单击下拉菜单,然后选择
USB。
2) Dari HD/Applications/Utilities/Print Center, jalankan Print Center [Pusat
Cetak]. 3) Jika printer muncul dalam Printer List [Daftar Printer], hapus
printer tersebut. Klik Add [Tam bah]. 4) Pada halaman berikutnya, klik
menu buka-bawah, kemudian pilih USB.
2) MacintoshHD/Applications/Utilities/Print Center にあるプリントセン
ターを起動します。3) プリンタが [ プリンタリスト ] に表示された場合
は、このプリンタを削除します。[追加 ] をクリックします。4) 次のペー
ジでドロップダウン メニューをクリックし、[USB] を選択します。
5) From the Printer Model drop-down list, select HP. 6) Under Model
Name, select the printer, and then click Add. 7) Go to step 16 on page 19.
5) 从打印机型号下拉列表中选择 HP。 6) 在型号名称下,选
择该打印机,然后单击添加。 7) 转至第 19 页的步骤 16。
5) Dari daftar buka-bawah Printer Model [Model Printer ] , pilih HP. 6) Di
kolom Model Name [Nama Model], pilih printer, kemudian klik Add
[Tambah]. 7) Lanjutkan ke langkah 16 pada halaman 19.
5) [ プリンタの機種 ] ドロップダウン リストから、[HP] をクリックしま
す。6) [ 機種名 ] でプリンタを選択し、[ 追加 ] をクリックします。
7) 19 ページの手順 16 に進みます。
2) HD/Applications /Utilit ies/Print Cent er에서 프린터 관리자를 실행하십시오 .
3) 해당 프린터가 프린터 목록
추가를 누르십시오 . 4) 다음 페이지에서 드롭다운 메뉴를 누른 후 USB 를 선
택하십시오 .
에 표시되면 삭제하십시오 .
2) จาก HD/Applications/Utilities/Print Center ใหเริ่มตนการทํางานของ Print Center
3) หากเครื่องพิมพปรากฏขึ้นใน Printer List ใหลบเครื่องพิมพออก คลิก Add 4) ในหนาถัดไป
ใหคลิกที่เมนูแบบดรอปดาวนแลวเลือก USB
5) 프린터 모델 드롭다운 목록에서 HP를 선택하십시오 . 6) 모델 이름에서
프린터를 선택한 후 추가를 누르십시오 . 7) 16 단계 (19페이지 참조 ) 에
따르십시오 .
5) จากรายการแบบดรอปดาวน Printer Model เลือก HP 6) ในหัวขอ Model Name
ใหเลือกเครื่องพิมพ และคลิก Add 7) ไปยังขั้นตอนที่ 16 ใน หนา 19
18

16
17
Test the software installation. Print a page from any program to make
sure that the software is correctly installed.
Note If the installation failed, reinstall the software.
English
测试软件的安装是否成功。 通过任意程序打印一页,以确保
软件的安装正确无误。
注 如果安装失败,请重新安装该软件。
简体中文
Menguji penginstalan perangkat lunak. Cetak halaman dari program
apa saja untuk memastikan, bahwa perangkat lunak tersebut sudah
diinstal dengan benar.
Catatan Jika penginstalan ini gagal, instal ulang perangkat lunak.
Bahasa indonesia
ソフトウェアのインストール状態をテストします。任意のアプリケー
ションを使用してページを印刷し、ソフトウェアが正常にインストール
されていることを確認します。
注意:正常にインストールされていない場合は、インストールをやり直
します。
日本語한국어
Congratulations! The printer is ready to use. The user guide is located on
the CD and in the HP Easy Printer Care Software.
Note Save the boxes and the packing materials in case you need to
transport the printer.
祝贺您!打印机已准备就绪,可投入使用了。在 CD 和
HP Easy Printer Care Software 中可以找到相应的用户指
南。
注 请妥善保管好包装箱和包装材料,以备日后装运该打印
机。
Selamat! Printer siap digunakan. Buku panduan pengguna ini terdapat
pada CD dan dalam perangkat lunak HP Ea sy Printer Care .
Catatan Simpan kotak dan materi kemasan untuk digunakan kembali
apabila Anda ingin membawa printer ini.
これで操作が完了しました。印刷を開始できます。ユーザーズ ガイドは
CD または HP Easy Printer Care Software (簡易プリンタ管理ソフトウェ
ア ) に付属しています。
注意:プリンタの梱包箱や梱包材は、後日利用するときのために保管し
ておいてください。
소프트웨어 설치 테스트 . 프로그램에서 인쇄해보고 소프트웨어가 제대로
설치되었는지 확인하십시오 .
주 제대로 설치되지 않은 경우 다시 설치하십시오 .
ทดสอบการติดตั้งซอฟตแวร พิมพงานจากโปรแกรมใดก็ได
เพื่อใหแนใจวาติดตั้งซอฟตแวรอยางถูกตอง
หมายเหตุ หากการติดตั้งเกิดขอบกพรอง ใหติดตั้งซอฟตแวรอีกครั้ง
ไทย
축하합니다 ! 이제 프린터를 사용할 수 있습니다 . 사용 설명서는 CD 와
HP Easy Printer Care 소프트웨어에 포함되어 있습니다 .
주 포장 상자와 포장재는 보관해두고
사용하십시오 .
ขอแสดงความยินดี! เครื่องพิมพพรอมใชงานแล วคูมือการใชงานจะใหไวในแผนซีดีและ
ในซอฟตแวร HP Easy Printer Care
หมายเหตุ เก็บกลองและวัสดุบรรจุภัณฑไวในกรณีที่คุณตองขนสงเครื่องพิมพ
19
프린터를 반송해야 할 때

18
Register your printer. Register at www.register.hp.com. This is the
quickest and easiest way for you to register to receive the following
information: technical support updates, enhanced support options, ideas
and ways to use your new HP printer, and news about emerging
technologies.
注册打印机。 在 www.register.hp.com 注册,这是最方便快
捷的注册方式。一经注册,便可获得以下信息:技术支持更
新、改进的支持选项、有关使用新 HP 打印机的一些创意和
方法以及最新的技术动态等。
Mendaftarkan printer. Daftarkan di www.register.hp.com. Ini adalah cara
tercepat dan termudah untuk mendaftar agar Anda dapat menerima
informasi berikut: pembaruan dukungan teknis penambahan opsi
dukungan, berbagai gagasan dan cara untuk menggunakan printer HP
Anda, serta berita tentang teknologi yang bermunculan.
プリンタを登録します。プリンタの登録は www.register.hp.com で行いま
す。登録はとても簡単です。登録していただくと、テクニカル サポート
のアップデート、高機能サポート オプション、ご購入の HP プリンタの
使用方法に関するヒント、および最新ニュースを定期的にお届けします。
For additional help for the printer, go to www.hp.com/support/clj3000,
www.hp.com/support/clj3600, www.hp.com/support/clj3800, or http://
instantsupport.hp.com.
要获得有关该打印机的更多帮助,请访问
www.hp .com/support/clj3000、
www.hp .com/support/clj3600、
www.hp .com/support/clj3800 或
http://instantsupport.hp.com。
Untuk bantuan tambahan bagi printer, kunjungilah
www.hp.com/support/clj3000, www.hp .com/support/clj3600,
www.hp.com/support/clj3800, atau http://instantsupport.hp.com.
その他の情報については、www.hp.com/support/clj3000、
www.hp.com/support /c lj3600、www.hp.com/support/clj3800、または
http://instantsupport.hp.com にアクセスしてください。
프린터 등록 . www.register.hp.com 에서 등록하는 것이 가장 빠르고 간편
하며 등록하면 기술 지원 관련 소식 , 향상된 지원 옵션 , HP 프린터의 사용
요령 및 방법 , 최신 기술 동향 등에 대한 정보를 제공 받을 수 있습니다 .
ลงทะเบียนเครื่องพิมพของคุณ ลงทะเบียนที่ www.register.hp.com
ซึ่งเปนวิธีการที่รวดเร็วและงายที่สุดในการลงทะเบียนเพื่อรับขอมูลตอไปนี้: ขอมูลปรับปรุง
เกี่ยวกับการสนับสนุนทางเทคนิค, ตัวเลือกการสนับสนุนที่ปรับปรุงใหดีขึ้น,
แนวคิดและวิธีการใชเครื่องพิมพ HP เครื่องใหมของคุณ และขาวสารเกี่ยวกับเทคโนโลยีใหมๆ
프린터에 대한
www.hp.com/support/clj3600, www.hp .com/support/clj3800,
http://instantsupport.hp.com 등에서 확인할 수 있습니다 .
สําหรับความชวยเหลือเพิ่มเติมสําหรับเครื่องพิมพ ใหไปที่ www.hp.com/support/clj3000,
www.hp.com/support/clj3600, www.hp.com/support/clj3800 หรื
http://instantsupport.hp.com
20
기타 정보는 www.hp.com/support/clj3000,
อ

21

Paper sizes • 纸张尺寸 • Ukuran kertas • 用紙のサイズ
용지 크기 •
ขนาดกระดาษ • 紙張尺寸
216 x 356 mm
(8.5 x 14 inches)
216 x 356 mm
(8.5 x 14 inches)
216 x 356 mm
(8.5 x 14 inches)
76 x 127 mm
(3 x 5 inches)
148 x 210 mm
(5.83 x 8.26 inches)
148 x 210 mm
(5.83 x 8.26 inches)
For supplies, please visit www.hp.com/support/clj3000 •
Untuk persediaan, silakan kunjungi www.hp.com/support/clj3000 • サプライ品については、www.hp.com/support/clj3000 をご覧ください。
소모품에 대한 자세한 내용은 www.hp.com/support/clj3000 을 참조하십시오 .•
如需耗材資訊 請造訪 www.hp.com/support/clj3000
Part numbers •
부품 번호 •
,
部件号 • Nomor komponen • 製品番号
หมายเลขชิ้นสวน • 零件編號
有关耗材信息,请访问 www.hp.com/support/clj3000
สําหรับอุปกรณสิ้นเปลือง โปรดไปที่ www.hp.com/support/clj3000
3000 3600 3800
Black •
검정색 •
Cyan •
시안색 •
Yellow •
노랑색 •
Magenta •
마젠타색 •
黑色 • Hitam • 黒
สีดํา • 黑色
青色 •Cyan•シアン
สีน้ําเงิน • 青色
黄色 • Kuning • イエロー
สีเหลือง • 黃色
品红色 • Magenta • マゼンタ
สีแดง • 洋紅色
Q7560A Q6470A Q6470A
Q7561A Q6470A Q7581A
Q7562A Q6472A Q7582A
Q7563A Q6473A Q7583A
22

HP Color LaserJet 3000/3600/3800
Clearing jams • 清除卡纸 • Membersihkan macet • 紙詰まりの解消方法
걸린 용지 제거 •
การนํากระดาษติดออก • 清除夾紙
1
2
Questions? •
문의 •
หากมีคําถาม • 如有疑問
3
问题? • Pertanyaan? • 質問がある場合
http://www.hp.com/support/go/clj3000
http://www.hp.com/support/go/clj3600
http://www.hp.com/support/go/clj3800
23

423 mm (16.65 in)
400 mm (15.75 in)
450 mm (17.7 in)
400 mm (15.75 in)
540 mm (21.25 in)
17° - 25°C
(62.6° - 77°F)
563 mm (22 in)
89 mm (3.5 in)
178 mm (7 in)
選擇堅固、通風良好且無灰塵的區域來放置
印表機。
229 mm (9 in)
89 mm (3.5 in)
356 mm (14 in)
24

檢查包裝箱中的內容
物。
印表機
請將印表機
1
如果
隨附 3
號紙匣
2
,
置於其上。
取出碳粉匣。
21.5 Kg.
47.4 lbs.
撕下裝運膠帶。
3
4
25

從碳粉匣上取下裝運鎖並撕下裝運膠帶。
裝出紙盤
裝入紙
5
重新裝入碳粉匣。
6
安
。
張。
7
8
26

9
10
安裝控制面板說明卡 ( 如有必要 )。將說明卡的各端平直地按下在印表機
上 然後把雙手朝說明卡的中央移動 直至說明卡完全附著在印表機上。
,,
繁體中文繁體中文
10.1 插入電源線。請勿插入 USB
注意 請僅將電源線插入牆上插座。
電纜 直到步驟 14 中提示您做此動作。
,
11
10.2 開啟印表機電源。
注意 印表機校準與啟動時的噪音是正常的。
設定語言 / 日期 / 時間 ( 如有必要 )。如果出現提示,請選擇您使用的語言
與日期 / 時間。請依照控制面板上的指示進行。
27

12
13
LAN
設定進紙匣的材質尺寸與類型。
用 或 按鈕反白標示 PAPER HANDLING ( 紙張處理 )
下 。使用控制面板按鈕反白標示各進紙匣的材質尺寸與類型 並加以選
擇。如需更多資訊 請參閱線上使用者指南。
,
在印表機的控制面板上 按下功能表、使
,
然後按
,
,
14
要連線至網路 請繼續第 29 頁的步驟 13。
,
15
要在使用直接連接 (USB) 下安裝 Windows® ,軟體 請繼續第 30 頁的步
驟 14。
要在使用直接連接 (USB) 下安裝 Macintosh ,軟體 請繼續第 32 頁的步
驟 15。
28

13
13.1 連接至網路。 將網路電纜連接至印表機。
注意 請確保所有電纜符合 HP 規範。
繁體中文繁體中文
13.2 尋找 IP 位址。 ,在控制面板上 按下功能表。選擇 ( 資訊 )
( 列印組態 )。IP 位址位於 Jetdirect 頁的 「TCP/IP」中。
注意
視安裝的網路類型而定 您可能需要指定 IP 位址。請參閱第 29 頁的
「設定 IP 位址 ( 如有必要 )」以取得更多資訊。
,
然後選擇
,
13.3 設定 IP 位址 ( 如有必要 )。 在控制面板上按下功能表。依序選擇
CONFIGURE DEVICE ( 設定裝置 )、I/O 及 EMBEDDED JETDIRECT ( 嵌
入式 JETDIRECT)。依序選擇 TCP/IP、CONFIG METHOD ( 設定方式 )、
MANUAL (手動 ) 及 MANUAL SETTINGS ( 手動設定值 )。使用控制面板
按鈕指定 IP 位址。
13.4 準備安裝軟體。 將列印伺服器的所有程式結束,或每台即將使用印表
機之電腦的所有程式結束 ( 包括常駐 [TSR]、防毒及防火牆程式 )。
29

13.5 安裝軟體。1) 放入印表機隨附的 CD。2)
安裝印表機。(
SETUP.EXE。)
如果未出現歡迎使用畫面 請執行 CD 根目錄中的
,
在歡迎使用畫面上 按一下
,
依照畫面上的指示進行。在出現提示時 選擇有線網路。安裝程式會顯
3)
示可用印表機。選擇適當的 IP 位址。
,
Windows
14
4) 在安裝類型
( 建議選項 )
訂安裝。5) 等候安裝完成。6) 繼續第 33 頁的步驟 16。
畫面上 選擇完整安裝可安裝最常見的驅動程式與軟體
,
選擇基本安裝,可安裝最低所需的驅動程式與軟體 或選擇自
,
Windows® 使用直接連接 (USB)。1) 先安裝 CD
至印表機。
30
中的軟體 再將電纜連接
,

Windows
Windows
注意 如果出現找到新硬體,訊息 請放入 CD
接受預設的選項 然後繼續第 33 頁的步驟 16。
繁體中文繁體中文
,
。請依照畫面上的指示執行
,
在歡迎使用畫面上 按一下安裝印表機。「安裝精靈」會出現。
2)
注意
如果未出現歡迎使用畫面 請按一下開始
X:SETUP
以光碟機代號取代 X
,
,
,
然後按一下確定。
,
然後按一下執行。鍵入
,
Windows Windows
依照畫面上的指示進行。出現提示時 連接印表機與電腦之間的 USB
3)
電纜。
注意 HP 不建議使用 USB 集線器。使用長度 2公尺 (6.5 英呎 ) 以下的
USB 電纜。
,
4) 按一下完成,。如果出現提示 請重新啟動電腦。5) 繼續第 34 頁的步
驟 16。
31

A
15
Macintosh
Macintosh
連接至 Macintosh 電腦。1) 連接印表機與電腦之間的 USB 電纜。
注意 HP 不建議使用 USB 集線器。使用長度 2公尺 (6.5 英呎 ) 以下的
USB 電纜。
Macintosh Macintosh
2) 將 CD 放在光碟機中。對於 OS 9.1 至 9.2.x
OS X
請繼續第 33 頁的 B。
,
請繼續第 32 頁的 A。對於
,
OS 9.1 至 9.2.x:1) 執行安裝程式。完成自訂安裝。2)
括 USB 元件 (Classic)。3)
選擇所有選項 包
出現提示時 請重新啟動電腦。
,
,
4) 執行 「硬碟 / 應用程式 / 工具程式」中的 「蘋果桌面印表機工具程
式」。5) 連按兩下 HP 印表機 (USB),然後按一下好。6) 在 USB 印表機選
項
的旁邊 按一下變更。
,
32
Macintosh
Macintosh
B
7),選擇印表機 然後按一下好。8) 在 Postscript® 印表機描述 (PPD) 檔案
的旁邊 按一下自動設定,然後按一下建立。9) 儲存印表機設定。10) 在
,
桌面上 反白標示印表機。11) 按一下列印,功能表 然後按一下設定預設
,
印表機。12) 繼續第 34 頁的步驟 16。
繁體中文繁體中文
Macintosh Macintosh
OS X:1) 執行安裝程式。完成簡單安裝。
注意 如果 OS X 與 OS 9.1 (Classic) 至 9.2.x (Cl assi c ) 安裝在同一台電腦
上 安裝程式會顯示 「Classic」與 「OS X」安裝選項。
,
2) 從「硬碟/ 應用程式 / 工具程式 /
果您的印表機出現在印表機列表
下一頁 按一下下拉式功能表 然後選擇 USB。
,,
列印中心」 啟動 「列印中心」。3) 如
中 請刪除該印表機。按一下新增。4) 在
,
,
5) 從印表機型號
機然後按一下新增。7) 繼續第 34 頁的步驟 16。
,
33
下拉式清單中 選擇 HP。6) 在型號名稱
,
下選擇印表
,

16
17
測試軟體安裝。 從任何程式列印一頁以確定已正確安裝軟體。
注意
如果安裝失敗 請重新安裝軟體。
,
恭喜!印表機已就緒可以使用了。使用者指南在 CD 與 HP Easy Printer
Care 軟體中。
請保留包裝箱與包裝材料 以便日後搬運印表機時使用。
注意
,
18
註冊您的印表機。在 www.register.hp.com 註冊。這是最快且最容易的註冊
方式 讓您能夠獲得下列資訊 技術支援更新、進階支援選項、使用新 HP
,:
印表機的點子與方法及技術新知。
如需印表機的其他說明 請瀏覽 www.hp.com/support/clj3000、
www.hp.com/support /c lj3600、www.hp.com/support/clj3800 或
http://instantsupport.hp.com。
34
,

© 2008 Hewlett-Packard Development Company, L.P.
www.hp.com
*Q5982-91043*
*Q5982-91043*
Q5982-91043
 Loading...