

Page 1

HP Eight-Port SAS/SATA RAID Host Bus Adapter
Installation Guide
June 2006 (Second edition)
Part Number 377610-002
Page 2

2
Legal notices
© Copyright 2005, 2006 Hewlett-packard Development Company, L.P.
The information contained herein is subject to change without notice. The only warranties for HP products and services are set forth in the
express warranty statements accompanying such products and services. Nothing herein should be construed as constituting an additional
warranty. HP shall not be liable for technical or editorial errors or omissions contained herein.
Microsoft and Windows are U.S. registered trademarks of Microsoft Corporation.
June 2006 (Second edition)
Part Number 377610-002
Audience assumptions
This document is for the person who installs, administers, and troubleshoots servers and storage systems. HP assumes you are qualified in
the servicing of computer equipment and trained in recognizing hazards in products with hazardous energy levels.
Page 3

Contents 3
Contents
1 Adapter features
Connectors on the adapter board .............................................................................................................. 4
Summary of specifications......................................................................................................................... 4
2 Installation procedure
Preparing the server ................................................................................................................................. 5
Installing the adapter hardware ................................................................................................................. 5
Connecting the adapter to other devices ..................................................................................................... 6
Completing the adapter installation procedure............................................................................................. 6
3 SAS BIOS configuration utility
SAS BIOS features ................................................................................................................................... 7
Boot initialization with the BBS.............................................................................................................. 7
Starting the SAS BIOS configuration utility................................................................................................... 7
Configuration utility screens....................................................................................................................... 8
Adapter List screen.............................................................................................................................. 8
Global Properties screen...................................................................................................................... 9
Adapter Properties screen .................................................................................................................. 10
RAID Properties screens ..................................................................................................................... 10
SAS Topology screen ........................................................................................................................ 13
Device Properties screen .................................................................................................................... 13
Exit screen ....................................................................................................................................... 15
Performing configuration tasks ................................................................................................................. 15
Creating a RAID 0 array.................................................................................................................... 15
Creating a RAID 1 array.................................................................................................................... 16
Viewing RAID array properties ........................................................................................................... 17
Managing an array........................................................................................................................... 17
Locating a disk drive ......................................................................................................................... 18
Selecting a boot disk ......................................................................................................................... 18
Moving arrays....................................................................................................................................... 18
4 Electrostatic discharge
Preventing electrostatic discharge............................................................................................................. 19
Grounding methods to prevent electrostatic discharge ................................................................................ 19
5 Regulatory compliance notices
European Union regulatory notice ............................................................................................................ 20
BSMI notice........................................................................................................................................... 20
Korean notice........................................................................................................................................ 20
Page 4
Adapter features 4
1 Adapter features
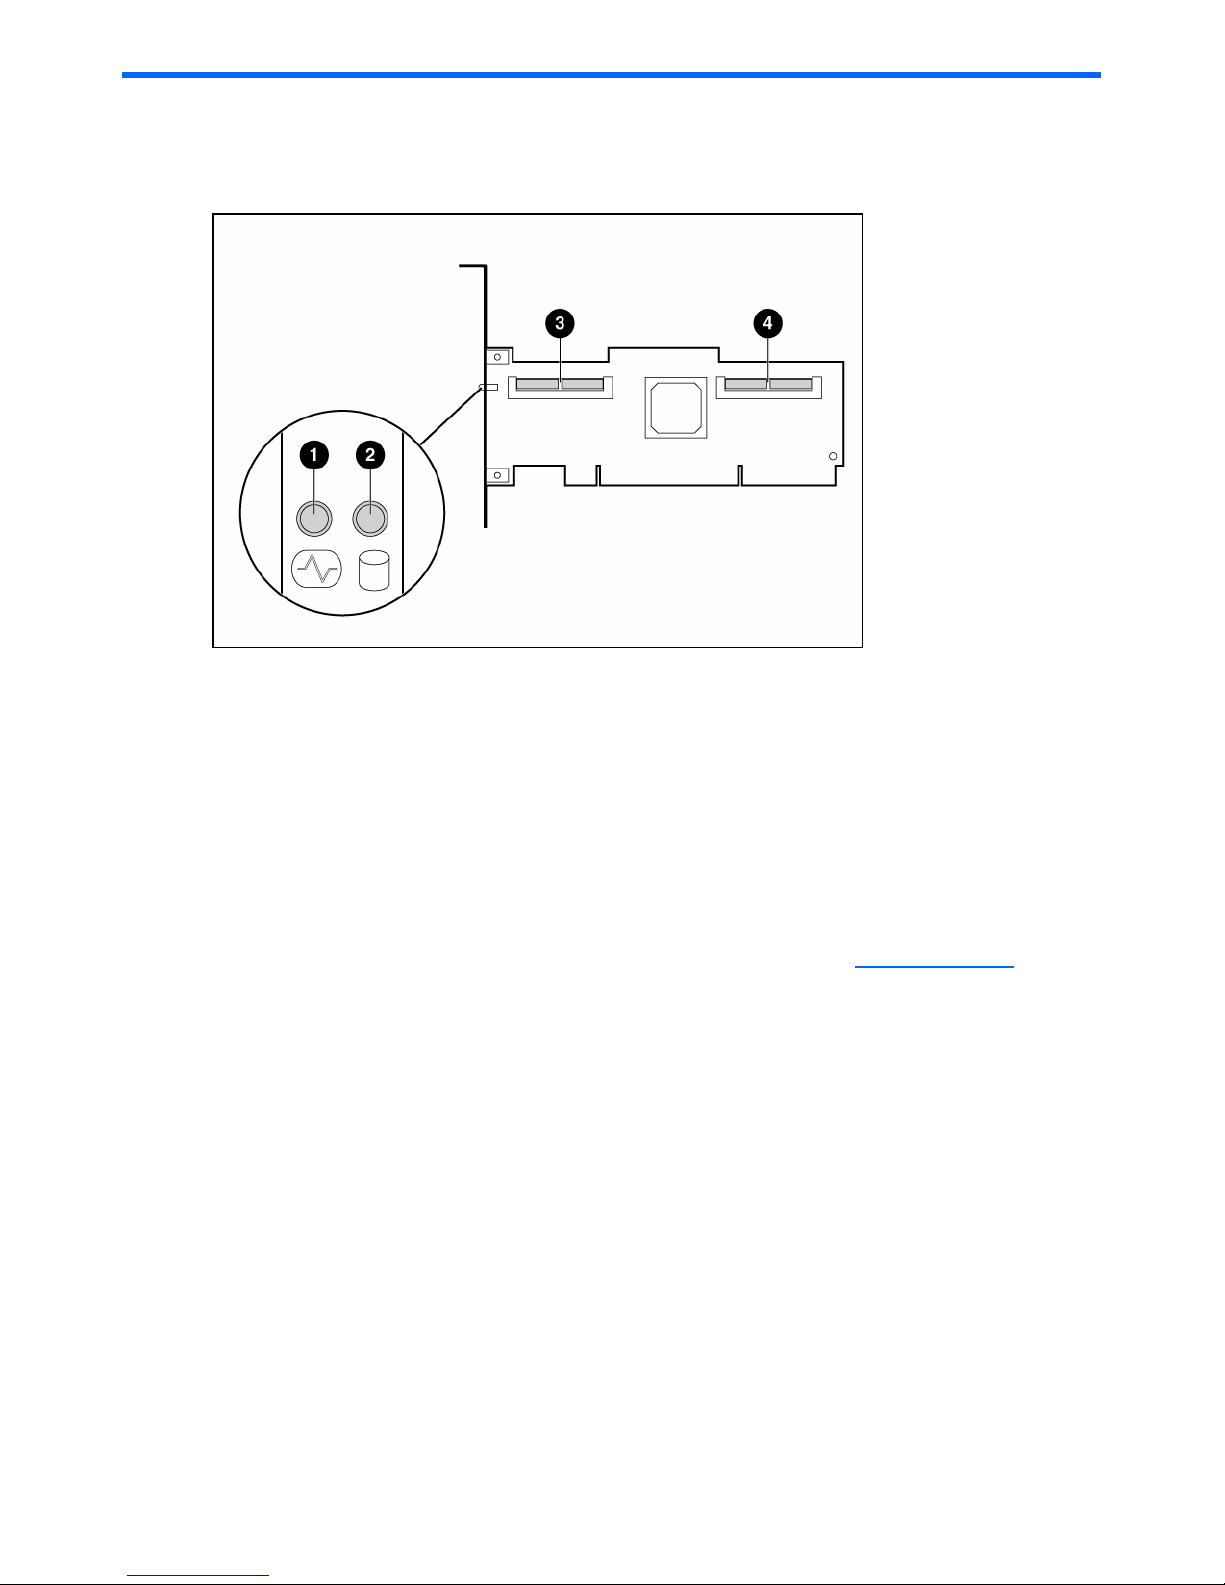
Connectors on the adapter board
1 Health LED (blinks green during normal operation, glows
amber if HBA has failed)
2 Port activity LED (blinks green during data transfer)
3 Internal 4x SAS connector, port 1I
4 Internal 4x SAS connector, port 2I
Summary of specifications
The HP Eight-Port SAS/SATA RAID Host Bus Adapter is a low-profile, 64-bit, 133-MHz PCI-X host bus adapter. It
supports SAS data transfer rates of up to 3 Gb/s, and SATA data transfer rates of up to 1.5 Gb/s.
For more information about the features and specifications of the adapter, and for information about
compatibility, see the QuickSpecs on the product-specific page of the HP website, http://www.hp.com
.
Page 5
Installation procedure 5
2 Installation procedure
WARNING! To reduce the risk of personal injury or damage to the equipment, consult the safety information
and user documentation provided with the server before attempting the installation. Many servers are capable
of producing energy levels that are considered hazardous and are intended to be serviced only by qualified
personnel who have been trained to deal with these hazards. Do not remove enclosures or attempt to bypass
any interlocks that may be provided for the purpose of removing these hazardous conditions.
WARNING! When working with equipment installed in a rack, be sure that the equipment and rack are stable
before beginning the installation procedure.
The installation procedure involves the following steps:
• Preparing the server
• Installing the adapter hardware
• Connecting the adapter to other devices
• Completing the adapter installation procedure, including updating the firmware and installing drivers
These steps are described in more detail in the following sections.
Preparing the server
1. Perform a normal system shutdown.
2. Power down the server.
3. Power down all peripheral devices attached to the server.
4. Unplug the AC power cord from the outlet, and then unplug it from the server.
5. Disconnect all peripheral devices attached to the server.
Installing the adapter hardware
CAUTION: Electrostatic discharge (ESD) can damage electronic components. Be sure that you are properly
grounded before beginning this procedure. For more information, see the “Electrostatic Discharge” section of
this guide.
1. Remove or open the server access panel and locate the PCI/PCI-X bus expansion slots. (For detailed
instructions, see the documentation that was provided with the server.)
WARNING! To reduce the risk of personal injury from hot surfaces, allow the internal system components
to cool before touching them.
2. Remove or open the server access panel and locate the PCI/PCI-X bus expansion slots. (For detailed
instructions, see the documentation that was provided with the server.)
3. Select the expansion slot that you want to use.
4. Depending on the server model, remove the retaining screw or open the expansion slot latch that secures
the PCI/PCI-X slot.
5. Remove the slot cover. Save it to use for if you later decide to remove the adapter and leave the slot empty.
6. Insert the adapter into the slot, and press it firmly into place. The contacts on the adapter edge should be
fully seated in the system board connector.
7. Depending on the server model, secure the adapter by replacing the retaining screw or by closing the slot
latch.
Page 6

Installation procedure 6
Connecting the adapter to other devices
The cables that are required to connect the adapter to other devices are provided with most HP server products
that need them. Table 1 lists some cables that can be used with this adapter. All HP cables are keyed so that they
cannot be installed incorrectly.
Table 1 Cable kit part numbers
Type of cable Description Part number
Internal SAS/SATA Multi-lane A cable 389647-B21
Internal SAS/SATA Host fan cable 389650-B21
Internal SAS/SATA Target fan cable 389653-B21
Internal SAS/SATA Multi-lane B cable 389659-B21
Internal SAS/SATA Multi-lane 76-cm (30-in) cable 389662-B21
Internal SAS/SATA Multi-lane 48-cm (19-in) cable 391330-B21
You can order extra cables from an authorized HP reseller or authorized HP service provider. If the cable that
you need is not listed here, or if you need additional ordering information, see http://www.hp.com
.
Completing the adapter installation procedure
1. Verify that all cables are routed correctly and are not restricting or being pinched by other components. For
the correct routing of the cables, see the server documentation.
2. Reconnect any peripheral devices to the server.
3. Plug the AC power cord into the server, and then into a grounded AC outlet.
4. Power on any peripheral devices attached to the server.
5. Power up the server.
6. If necessary, update the server ROM. The required firmware files are on either a CD in the adapter kit or
the HP website, http://www.hp.com
. Instructions are provided with the files (in the case of the CD, in a
booklet provided with the CD).
7. Install the adapter drivers. The drivers are also on either the CD in the adapter kit or the HP website, and
instructions are again provided with the files.
Page 7

SAS BIOS configuration utility 7
3 SAS BIOS configuration utility
SAS BIOS features
The SAS BIOS is the bootable ROM code that manages SAS hardware resources. It is specific to a family of SAS
controllers or processors. The SAS BIOS integrates with a standard system BIOS, extending the standard disk
service routine provided through INT13h.
During the boot time initialization, the SAS BIOS determines if the system BIOS has already installed other hard
disks, such as an IDE drive. If the drives are already installed, the SAS BIOS maps any SAS or SATA drives it
finds behind these drives. Otherwise, the SAS BIOS installs drives starting with the system boot drive. In this case,
the system boots from a drive controlled by the SAS BIOS.
Boot initialization with the BBS
The SAS BIOS supports the BIOS boot specification (BBS), which enables you to choose which device to boot
from by selecting the priority.
If the system supports the BBS, use the system BIOS setup menu to select the boot order and drive order. In the
system BIOS setup, the Boot Connection Devices menu lists the available boot options. Use that menu to select the
device and rearrange the order. Exit to continue the boot process.
Starting the SAS BIOS configuration utility
If using SAS BIOS 6.xx and it includes the SAS BIOS configuration utility, you can change the default
configuration of the SAS host adapters. The default values might change if there is a conflict between device
settings or if the system performance needs optimizing. The version number of the SAS BIOS appears in a banner
displayed on the computer monitor during bootup. If the configuration utility is available, the following message
also appears during bootup:
Press F8 to start LSI Logic Configuration Utility...
NOTE: The exact key sequence might be different for different version numbers.
This message remains on the screen for five seconds, giving you time to start the utility. If you press the F8 key,
the message changes to:
Please wait, invoking LSI Logic Configuration Utility...
After a pause, the SAS BIOS configuration utility opens.
The following messages might appear during the boot process:
• Adapter removed from boot order!
This message appears when an adapter was removed from the system or was relocated behind a PCI
bridge.
• Adapter configuration may have changed, reconfiguration is suggested!
This message appears when the information in the non-volatile random access memory (NVRAM) is invalid.
• Updating Adapter List!
This message appears when fewer than four adapters are in the boot order list and more adapters exist
than are shown.
NOTE: The SAS BIOS configuration utility can sometimes detect devices that the SAS BIOS cannot control (for
example, tape drives and scanners require their own specific drivers). However, you can still use the
configuration utility to modify some parameters for these devices.
Page 8

SAS BIOS configuration utility 8
Configuration utility screens
All SAS BIOS configuration utility screens contain the following areas, starting at the top of the screen:
• Header area—Identifies the utility and version number.
• Menu area—Gives the title of the current screen. On screens other than the Adapter List screen, also
identifies the adapter.
• Main area—The main area for presenting data. This area has a cursor for item selection, and horizontal
and vertical scroll bars if necessary.
• Footer area—Provides general help information text.
Adapter List screen
The Adapter List screen is the first screen to appear when the SAS BIOS configuration utility opens. This screen
provides information about each adapter installed in the system.
If this host bus adapter is configured as the active boot controller in RBSU, you can change the adapter boot
order sequence, add an adapter to the boot order, or remove an adapter from the boot order.
• To change the position of an adapter in the boot order sequence, move the cursor to the Boot Order field
for that adapter and then press the - or + key.
• To add an adapter to the boot order list, move the cursor to the Boot Order field of the adapter and then
press the Ins key.
• To remove an adapter from the boot order list, move the cursor to the Boot Order field of the adapter and
then press the Del key.
The configuration utility prompts you to save the changes before you exit the screen.
The Adapter List screen is also the gateway to three other screens:
• The Global Properties screen, which enables you to change the way in which the BIOS displays information
during the bootup procedure.
To access this screen, press the Alt+N key combination.
• The Adapter Properties screen, which enables you to view adapter information and modify the boot support
setting. This screen also provides access to most other screens in the utility, which you can use to perform
RAID array configuration and management tasks, view device information, or format or verify devices.
To access this screen, use the arrow keys to move the cursor to an adapter in the Adapter List field and then
press the Enter key.
• The Exit Menu screen.
To access this screen, press the Esc key.
Each of these screens is described in more detail in the rest of this section.
Page 9

SAS BIOS configuration utility 9
Global Properties screen
The Global Properties screen enables you to change the global scope settings. To access the Global Properties
screen, press the Alt+N key combination while on the Adapter List screen.
Table 2 Global properties field descriptions
Field Description
Pause when Boot
Alert Displayed
This option specifies whether the BIOS pauses for user acknowledgement after displaying an alert
message during the boot process. To continue after displaying a message, select No. To wait for the
user to press a key, select Yes.
Boot information
display mode
This option controls how much information the BIOS displays about adapters and devices during the
boot process. Possible values are:
• Display adapters only
• Display adapters and all devices
• Display minimal information
• Display adapters and installed devices
Support interrupt This option enables you to prevent a hook on INT40, if required. Possible values are:
• Hook interrupt (default)
• Bypass interrupt hook
Restore Defaults If you press the Enter key while this field is selected, the values in the other fields on this screen revert
to their default settings.
When you have finished on the Global Properties screen, you can:
• Return to the Adapter List screen by pressing the Alt+N key combination (this combination toggles between
the Adapter List screen and the Global Properties screen).
• Access the Exit Menu screen by pressing the Esc key.
Page 10

SAS BIOS configuration utility 10
Adapter Properties screen
The Adapter Properties screen lists information about the adapter.
From this screen, you can access other screens in the utility that enable you to perform RAID array configuration
and management tasks or view information about the SAS topology of the adapter.
• To perform RAID array configuration and management tasks, move the cursor to the RAID Properties field
and then press the Enter key.
The screen that is then displayed depends on whether the adapter has a RAID array configured. For more
information, see “RAID Properties screens” on page 10.
• To view information about the devices connected to the adapter, move the cursor to the SAS Topology field
and then press the Enter key.
The SAS Topology screen also provides access to screens deeper in the hierarchy of the configuration utility
that enable you to format or verify devices.
RAID Properties screens
The screen that is displayed when you select the RAID Properties link on the Adapter Properties screen depends
on whether the adapter has a RAID array configured.
• If no RAID arrays are currently configured, the Select New Array Type screen is displayed.
• If at least one RAID array is currently configured, the View Array screen is displayed.
Page 11

SAS BIOS configuration utility 11
Select New Array Type screen
This screen describes the types of RAID arrays that you can create, and enables you to select the type that you
want to use.
When you make your selection, the Create New Array screen opens.
Create New Array screen
The Create New Array screen enables you to select the disk drives for the new array.
For a RAID 1 array, you are prompted to choose one of the following options when you add the first disk:
• Press the M key to keep the existing data and migrate to a RAID 1 array. Disk synchronization occurs.
• Press the D key to overwrite existing data and create a new RAID 1 array. No synchronization occurs.
CAUTION: If you press the D key, the data on all disks in the array will be deleted.
After you have configured the array, press the C key to create the array. You are prompted to save changes,
which creates the array. When array creation is complete, the utility returns to the Adapter Properties screen.
Page 12

SAS BIOS configuration utility 12
View Array screen
The View Array screen displays the current array configuration and provides access to the array management
screen.
• To view the next array, press the Alt+N key combination.
• To perform management tasks on this array, move the cursor to the Manage Array field and press the Enter
key.
• To create a new array, press the C key.
Manage Array screen
The Manage Array screen enables you to modify certain features of the currently selected array.
If you select Manage Hot Spare, the utility displays a hot spare management screen that has the same layout as
the Create New Array screen. If you select Synchronize Array, Activate Array, or Delete Array, an alert prompts
you to press the Y key to confirm the selection or press the N key to reject the selection before beginning the
process.
Page 13

SAS BIOS configuration utility 13
SAS Topology screen
The SAS Topology screen provides basic information about each device that is connected to the adapter. (To
view all the information listed for a device, scroll horizontally.) This screen also provides a means for you to
identify the physical device in the system that corresponds to a device in the list.
To view detailed information about a device, move the cursor to the appropriate Device Identifier field and then
press the Alt+D keys. The Device Properties screen opens.
To identify the physical device corresponding to a listed device, move the cursor to the appropriate Device
Identifier field and then press the Enter key. The locator LED on the device glows.
To clear Device Mappings for missing devices, press the C key at any time while on this screen.
Device Properties screen
The Device Properties screen displays information about a specific device. To access this screen, press the Alt+D
key combination when the cursor is in the Device Identifier field of a device on the SAS Topology screen.
To cycle to the next or previous device, press the Alt+N or Alt+P key combinations at any time while on this
screen.
This screen also provides access to the Format and Verify screens. To access either of these screens, move the
cursor to the appropriate field and then press the Enter key.
Page 14

SAS BIOS configuration utility 14
Device Format screen
This screen enables you to format a particular device. To access the Format screen, press the Enter key in the
appropriate field on the Device Properties screen.
To begin the format, press the F key.
CAUTION: When you have started a format, you cannot pause or cancel it.
NOTE: The formatting procedure sets the sector size to 512 bytes, even if the drive was previously formatted to
another sector size. This is the only sector size that the SAS BIOS configuration utility supports on RAID arrays.
Device Verify screen
This screen enables you to verify a particular device. To access the Verify screen, press the Enter key in the
appropriate field on the Device Properties screen.
To begin the verify process, press the Enter key. You can cancel the verify process at any time by pressing the Esc
key.
If the
logical block addresses (LBAs) can be reassigned or must be reassigned, the following prompt appears
after you have pressed the Enter key:
Reassign the block?
(Yes, No, All, nonE, Cancel)
Page 15

SAS BIOS configuration utility 15
The reassignment options are as follows:
• Yes—Reassign only this block. If another block must be reassigned in the future, display the prompt again.
• No—Do not reassign this block. If another block must be reassigned in the future, display the prompt again.
• All—Reassign the current block, and automatically reassign other blocks that must be reassigned, without
displaying the prompt again.
• nonE—Do not reassign the current block, and do not automatically reassign any other blocks that must be
reassigned. Do not display the prompt again.
• Cancel—Do not reassign anything, and stop the Verify process.
Exit screen
You must exit the SAS BIOS configuration utility properly because some changes take effect only during the exit
process.
To access the Exit screen, press the Esc key while in any screen in the utility.
If an option is not relevant or unavailable, it is deactivated.
Performing configuration tasks
This section explains how to use the configuration utility to perform configuration tasks.
Creating a RAID 0 array
In a RAID 0 array, data is striped across multiple disk drives, combining the drives into one logical volume. This
procedure maximizes storage capacity and performance.
IMPORTANT: RAID 0 does not provide any data protection if a drive fails.
To create a RAID 0 array:
1. Open the configuration utility.
2. On the Adapter List screen, select an adapter.
3. On the Adapter Properties screen, select RAID Properties.
• If the adapter already has a configured array, the View Array screen appears. Press the C key to create
a new array, and then continue with the next step.
• If the adapter does not yet have a configured array, the Select New Array Type screen appears.
Continue with the next step.
4. On the Select New Array Type screen, select Create RAID 0 Array.
The Create New Array screen appears. This screen lists the drives that you can use to create the RAID 0
array.
Page 16

SAS BIOS configuration utility 16
When selecting drives for the RAID 0 array, remember the following limitations:
• Every drive in the array must be of the same type, either SATA (with extended command set support) or
SAS (with SMART support).
• Each drive must have 512-byte blocks.
• Drives with removable media are not supported.
• The array must have at least two drives but no more than eight drives.
• RAID 0 arrays cannot have hot spare drives.
5. For each drive that you want in the array, move the cursor to the RAID Disk column for that drive and then
press the + key, - key, or space bar.
The No in that field changes to Yes, and the value in the Array Size field changes to reflect the new size of
the array.
6. When you have finished configuring the array, press the C key and select Save changes.
IMPORTANT: Be sure that the configuration is exactly as you want it. You cannot change the array after
the number of drives in a RAID array is set.
The configuration utility pauses while the array is created, and then returns to the Adapter Properties
screen.
7. (Optional) To set this RAID 0 array as the boot volume, select the SAS Topology option on the Adapter
Properties screen and then, on the screen that opens, set the boot volume. For more information, see
“Selecting a boot disk” on page 18.
Creating a RAID 1 array
In a RAID 1 array, data is mirrored from one disk drive onto another one. This procedure increases reliability by
providing protection against the failure of a single drive.
For an even greater level of protection, you can configure a RAID 1 array with a hot spare. Then, if a drive fails,
data that was on the failed drive is rebuilt to the hot spare from the mirrored drive.
To create a RAID 1 array:
1. Open the configuration utility.
2. On the Adapter List screen, select an adapter.
3. On the Adapter Properties screen, select RAID Properties.
• If the adapter already has a configured array, the View Array screen appears. Press the C key to create
a new array, and then continue with the next step.
• If the adapter does not yet have a configured array, the Select New Array Type screen appears.
Continue with the next step.
4. On the Select New Array Type screen, select Create RAID 1 Array.
The Create New Array screen appears. This screen lists the drives that you can use to create the RAID 1
array.
When selecting drives for the RAID 1 array, remember the following limitations:
• Every drive in the array must be of the same type, either SATA (with extended command set support) or
SAS (with SMART support).
• Each drive must have 512-byte blocks.
• Drives with removable media are not supported.
• A RAID 1 array must have two drives (three if you use a hot spare).
5. For each drive that you want in the array, move the cursor to the RAID Disk column for that drive and then
press the + key, - key, or space bar. The No in that field changes to Yes, and the value in the Array Size
field changes to reflect the new size of the array.
When you add the first drive, the utility prompts you to keep existing data or overwrite existing data.
• To keep any existing data on the first drive, press the M key.
• To overwrite any data on the first drive, press the D key.
Page 17

SAS BIOS configuration utility 17
6. (Optional) To add a hot spare to the array, move the cursor to the Hot Spr column and press the + key, -
key, or space bar. The drive that you select as the hot spare conforms to the same limitations as other drives
in the array.
IMPORTANT: Although you can create two arrays per adapter, you can have only one hot spare per
adapter. This hot spare acts a global hot spare for both arrays. However, if you configure one SAS
RAID 1 array and one SATA RAID 1 array and then add a SAS hot spare, the hot spare will work only
for the SAS array.
7. When you have finished configuring the array, press the C key and select Save changes.
The configuration utility pauses while the array is created, and then returns to the Adapter Properties
screen.
8. (Optional) To set this RAID 1 array as the boot volume, select the SAS Topology option on the Adapter
Properties screen and then, on the screen that opens, set the boot volume. For more information, see
“Selecting a boot disk” on page 18.
Viewing RAID array properties
1. Open the configuration utility.
2. On the Adapter List screen, select an adapter.
3. On the Adapter Properties screen, select the RAID Properties option. The View Array screen opens,
displaying the properties of the first array on the adapter.
4. If the adapter has more than one array configured, view the properties of the next array by pressing the
Alt+N key combination.
Managing an array
1. Open the configuration utility.
2. On the Adapter List screen, select an adapter.
3. On the Adapter Properties screen, select RAID Properties.
4. On the View Array screen, select Manage Array.
From this screen, you can:
• Manage hot spares
• Synchronize an array
• Activate an array
• Delete an array
Managing hot spares
1. On the Manage Array screen, select Manage Hot Spare, and then perform one of the following actions:
• To remove an existing hot spare, move the cursor to the hot spare and then press the + key, - key, or
space bar.
• To add a hot spare, move the cursor to a disk in the list and then press the + key, - key, or space bar.
IMPORTANT: For a drive to be suitable as a hot spare, it must be valid RAID drive. For more information
about the limitations, see the “Creating a RAID 1 array” section.
IMPORTANT: Although you can create two arrays per adapter, you can have only one hot spare per
adapter. This hot spare acts a global hot spare for both arrays. However, if you configure one SAS
RAID 1 array and one SATA RAID 1 array and then add a SAS hot spare, the hot spare will work only
for the SAS array.
2. Press the C key.
3. Select Save changes.
4. Exit this menu to enable the changes.
The configuration utility pauses while the hot spare configuration is changed.
Synchronizing an array
When a RAID 1 array is synchronized, the data on the secondary drive of the mirror is updated by copying
changed data from the primary drive.
Page 18

SAS BIOS configuration utility 18
To start a synchronization, select Synchronize Array on the Manage Array screen and then press the Y key. (To
cancel a synchronization, press the N key.)
Activating an array
An array becomes inactive if, for example, it is removed from one controller or computer and moved to another
one. The Activate Array option enables you to reactivate an inactive array that has been added to a system. This
option is only available when the selected array is currently inactive.
To activate an array, select Activate Array on the Manage Array screen and then press the Y key. (To cancel the
activation, press the N key.)
After a pause, the array becomes active.
Deleting an array
CAUTION: If the array contains any data that you want to keep, back up the data before deleting the array.
To delete an array, select Delete Array on the manage Array screen, and then press the Y key. (To cancel the
deletion, press the N key.)
After a pause, the firmware deletes the array.
NOTE: When an array has been deleted, you cannot recover it. When a RAID 1 array is deleted, the data is
preserved on the primary disk. The master boot records of other disks in the array are deleted. For other RAID
types, the master boot records of all disks are deleted.
Locating a disk drive
There are two ways to physically locate a disk drive:
• On the Create New Array screen, the locator LED on the drive glows when you select a drive to be part of
a RAID array. When the RAID array is created, or if you deselect the drive from the array, the locator LED
is extinguished.
• On the SAS Topology screen, move the cursor to the drive and press the Enter key. The locator LED on the
drive remains lit until you press another key.
Selecting a boot disk
1. Open the configuration utility.
2. On the Adapter List screen, select an adapter.
3. On the Adapter Properties screen, select SAS Topology. The SAS Topology screen opens. If selection of a
boot device is supported, the Alt+B option is listed at the bottom of the screen. If a device is currently
configured as the boot device, the Device Info column displays the word Boot.
• To remove the boot disk designator, move the cursor to the current boot disk and press the Alt+B key
combination. The adapter no longer has a designated boot device.
• To select a boot disk, move the cursor to the disk and press the Alt+B key combination. The selected
disk moves to scan ID 0 on the next boot and remains at this position. There can be only one boot disk.
Moving arrays
When you remove an array and install it into another system (or reinstall it into the same system), the array is
initially inactive and must be reactivated. To reactivate an array, follow the procedure described in “Activating
an array” on page 18.
If the moved or reinstalled volume is the boot volume, you will see a non-system disk message and the system will
not boot. To enable the system to boot, restart the system and then press the F8 key when prompted during
system initialization. When the BIOS configuration utility opens, activate the array as described previously and
then restart the system.
You can have only one hot spare per adapter. If you install a RAID 1 array with a hot spare into an adapter that
already has an active RAID 1 array and a hot spare, the SAS Topology screen of the BIOS configuration utility
reports the hot spare in the added array as Not Responding. In this case, after you have activated the added
RAID 1 array, restart the system and then open the BIOS configuration utility and delete the second hot spare.
The SAS Topology screen then reports the drive as Responding.
Page 19

Electrostatic discharge 19
4 Electrostatic discharge
Preventing electrostatic discharge
To prevent damaging the system, be aware of the precautions you must follow when setting up the system or
handling parts. A discharge of static electricity from a finger or other conductor can damage system boards or
other static-sensitive devices. This type of damage can reduce the life expectancy of the device.
To prevent electrostatic damage:
• Avoid hand contact by transporting and storing products in static-safe containers.
• Keep electrostatic-sensitive parts in their containers until they arrive at static-free workstations.
• Place parts on a grounded surface before removing them from their containers.
• Avoid touching pins, leads, or circuitry.
• Be sure you are properly grounded when touching a static-sensitive component or assembly.
Grounding methods to prevent electrostatic discharge
Several methods are used for grounding. Use one or more of the following methods when handling or installing
electrostatic-sensitive parts:
• Use a wrist strap connected by a ground cord to a grounded workstation or computer chassis. Wrist straps
are flexible straps with a minimum of 1 megohm ± 10 percent resistance in the ground cords. To provide
proper ground, wear the strap snug against the skin.
• Use heel straps, toe straps, or boot straps at standing workstations. Wear the straps on both feet when
standing on conductive floors or dissipating floor mats.
• Use conductive field service tools.
• Use a portable field service kit with a folding static-dissipating work mat.
If you do not have any of the suggested equipment for proper grounding, have an authorized HP reseller install
the part.
For more information on static electricity or assistance with product installation, contact an authorized reseller.
Page 20

Regulatory compliance notices 20
5 Regulatory compliance notices
European Union regulatory notice
This product complies with the following EU Directives:
• Low Voltage Directive 73/23/EEC
• EMC Directive 89/336/EEC
Compliance with these directives implies conformity to applicable harmonized European standards (European
Norms) which are listed on the EU Declaration of Conformity issued by Hewlett-Packard for this product or
product family.
This compliance is indicated by the following conformity marking placed on the product:
This marking is valid for non-Telecom products and EU harmonized Telecom products (e.g., Bluetooth).
This marking is valid for EU non-harmonized Telecom products.
*Notified body number (used only if applicable—refer to the product label).
BSMI notice
Korean notice
 Loading...