

Page 1

Operating Instructions
COOKER AND OVEN
GRGB
English, 1 ЕллзнйкЬ,12
CE6VP5 GR
PT
Portuges, 23
Contents
GB
Installation, 2-3
Positioning and levelling
Electrical connection
Technical data
Description of the appliance, 4
Overall view
Control panel
Start-up and use, 5-8
Starting the oven
Cooking modes
Electronic timer
Practical cooking advice
Oven cooking advice table
Using the glass ceramic hob, 9
Cooking zones
Switching the cooking zones on and off
Precautions and tips, 10
General safety
Disposal
Respecting and conserving the environment
Care and maintenance, 11
Switching the appliance off
Cleaning the appliance
Replacing the oven light bulb
Cleaning the glass ceramic hob
Assistance
Page 2
Installation
GB
Before operating your new appliance please read
this instruction booklet carefully. It contains important
information concerning the safe installation and
operation of the appliance.
Please keep these operating instructions for future
reference. Make sure that the instructions are kept with
the appliance if it is sold, given away or moved.
The appliance must be installed by a qualified
professional according to the instructions provided.
Any necessary adjustment or maintenance must be
performed after the appliance has been disconnected
from the electricity supply.
Positioning and levelling
It is possible to install the appliance alongside
cupboards whose height does not exceed that of the
hob surface.
Make sure that the wall in contact with the back of
the appliance is made from a non-flammable, heatresistant material (T 90°C).
To install the appliance correctly:
Place it in the kitchen, dining room or the bed-sit
(not in the bathroom).
If the top of the hob is higher than the cupboards,
the appliance must be installed at least 200 mm
away from them.
If the cooker is
HOOD
Min. mm.
600
mm.
420
Min.
Do not position blinds behind the cooker or less
than 200 mm away from its sides.
Any hoods must be installed according to the
instructions listed in the relevant operating manual.
Levelling
installed underneath a wall
cabinet, there must be a
minimum distance of 420
mm between this cabinet
mm. with hood
and the top of the hob.
420
mm. without hood
650
700
This distance should be
Min. mm.
min.
min.
increased to 700 mm if
the wall cabinets are
flammable (see figure).
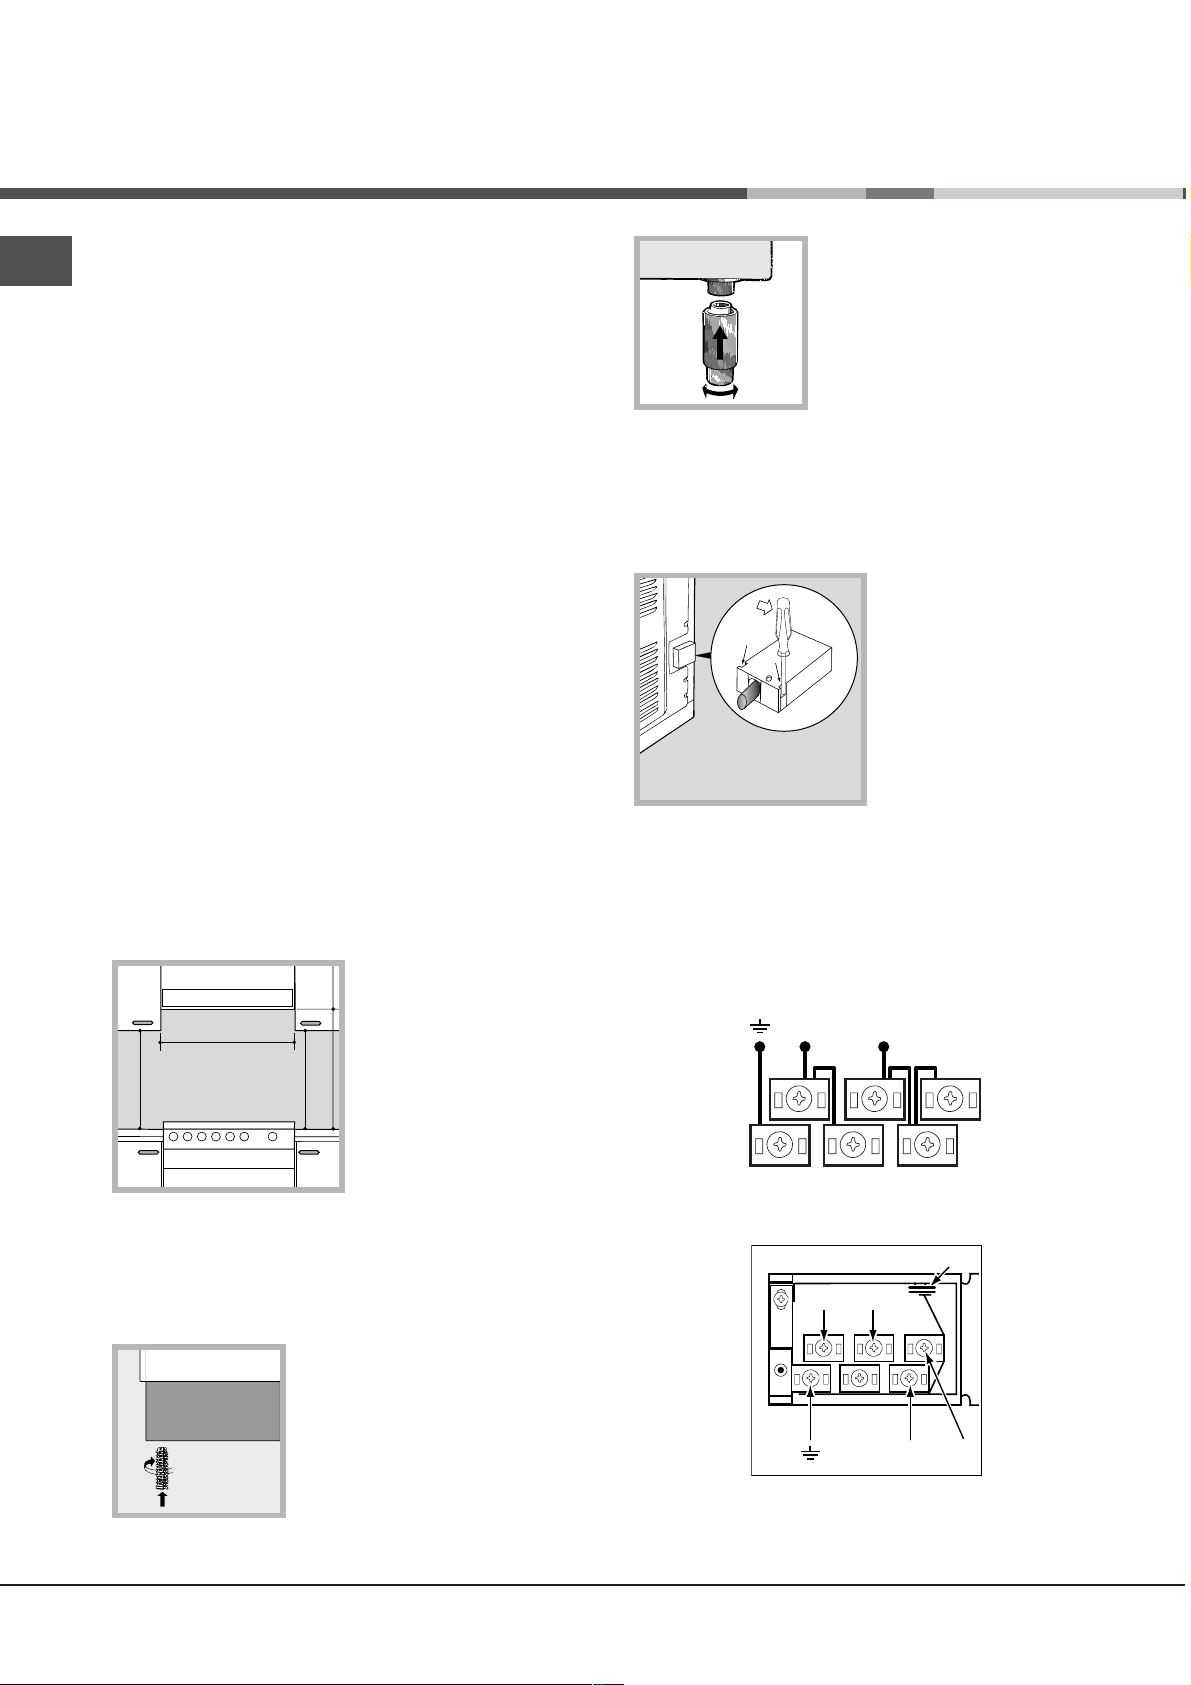
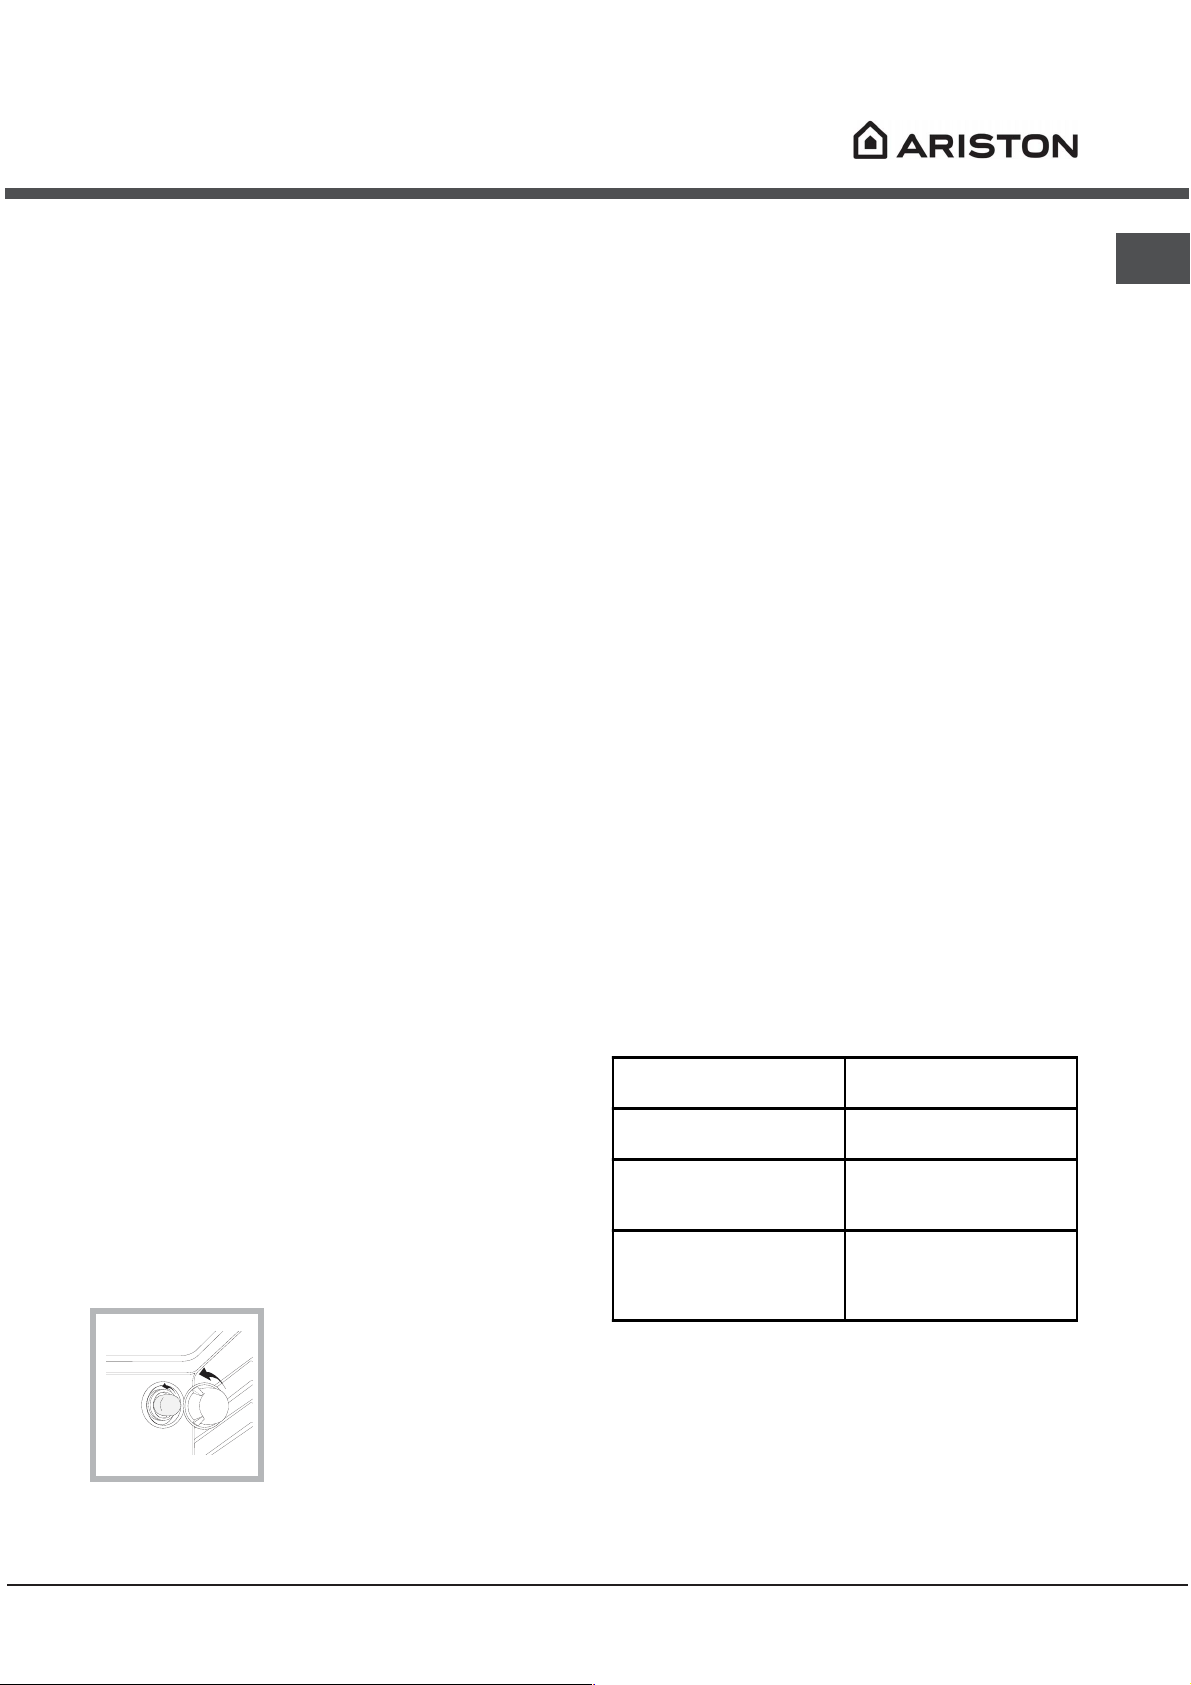
If it is necessary to level the
appliance, screw the adjustable
feet* into the places provided on
each corner of the base of the
cooker (see figure).
The legs* provided with the
appliance fit into the slots on
the underside of the base of the
cooker.
Electrical connection
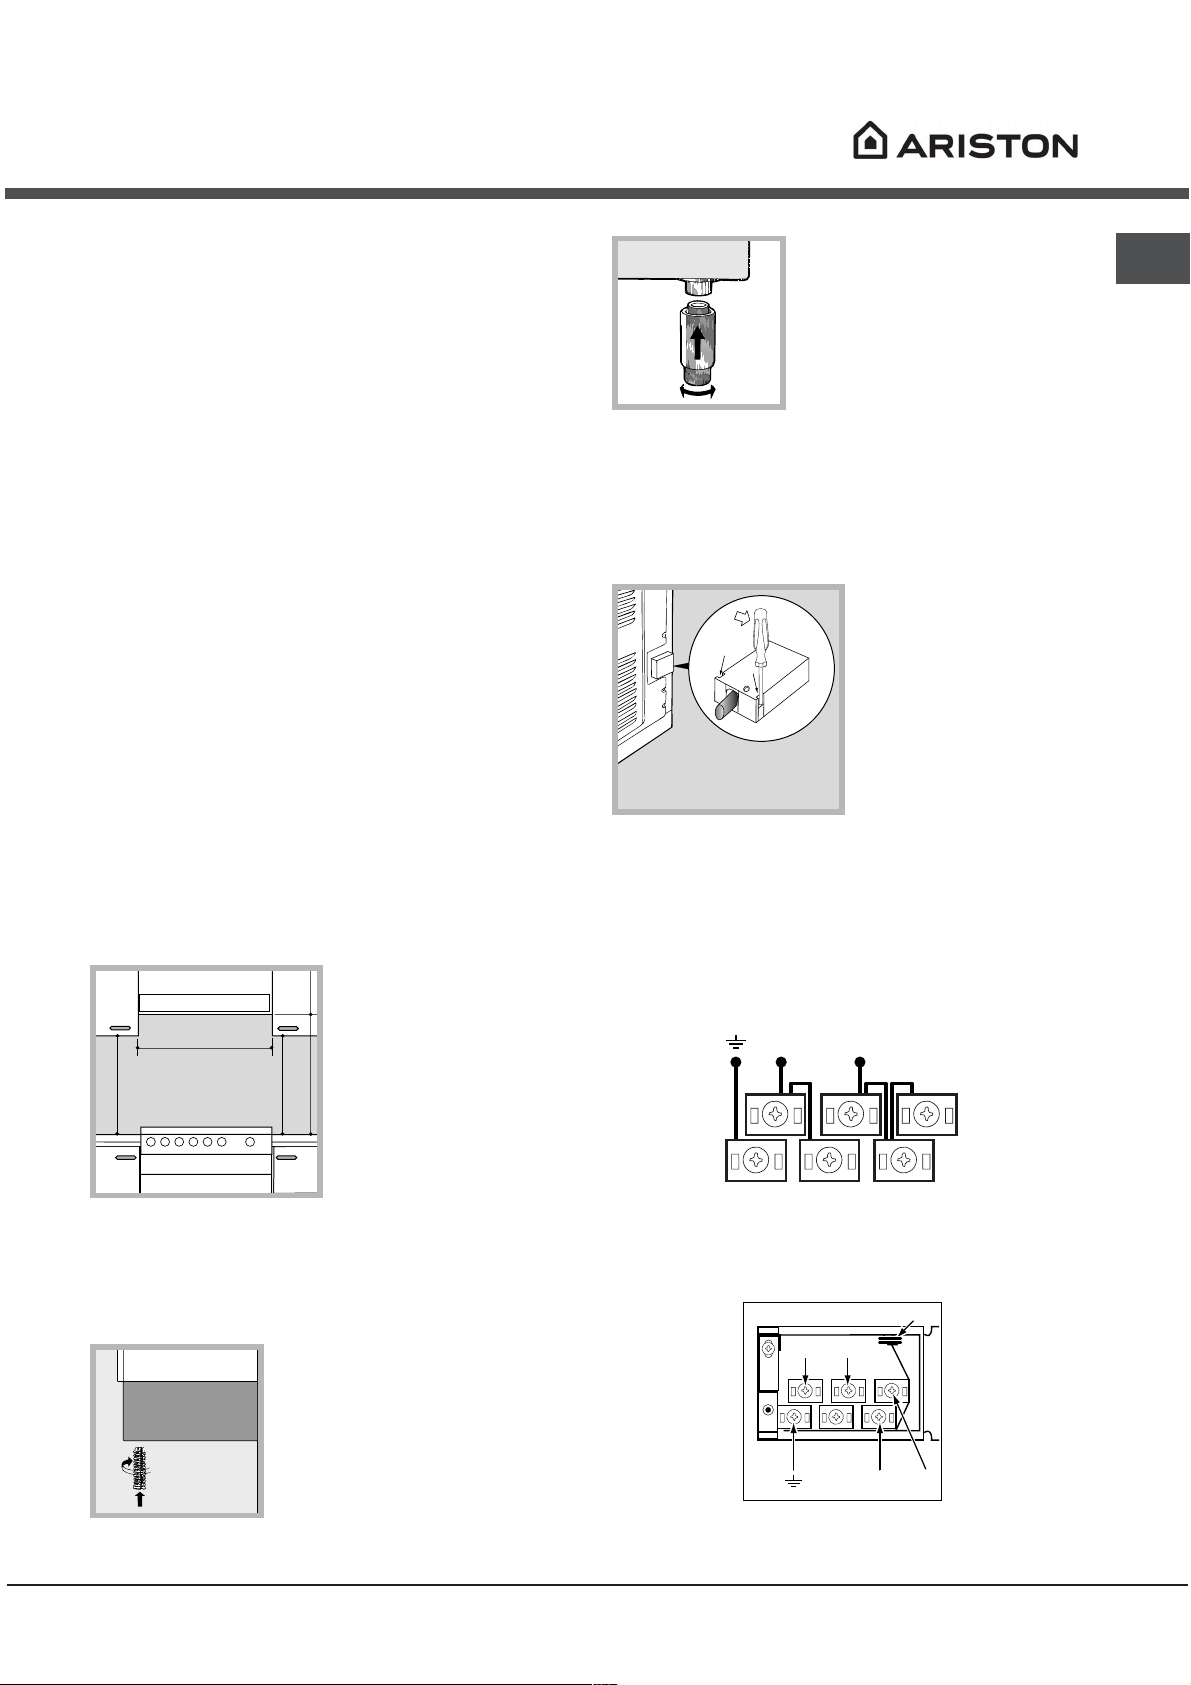
Fitting the power supply cable
Opening the terminal board:
Using a screwdriver, prise on the side tabs of the
terminal board cover;
Pull open the cover
of the terminal board.
To install the cable, proceed as follows:
unscrew the wire clamp screw and the contact
screws
The jumpers are factory-set for a single-phase
230V connection (see figure).
230V 1N~
H07RN-F 3x4 CEI-UNEL 35364
NL
5
3
4
to make the electrical connections illustrated in
figure, use the two jumpers housed in the box
(see figure - reference P)
1
2
P
NL2L1
L3
Only available in certain models.
*
2
Page 3
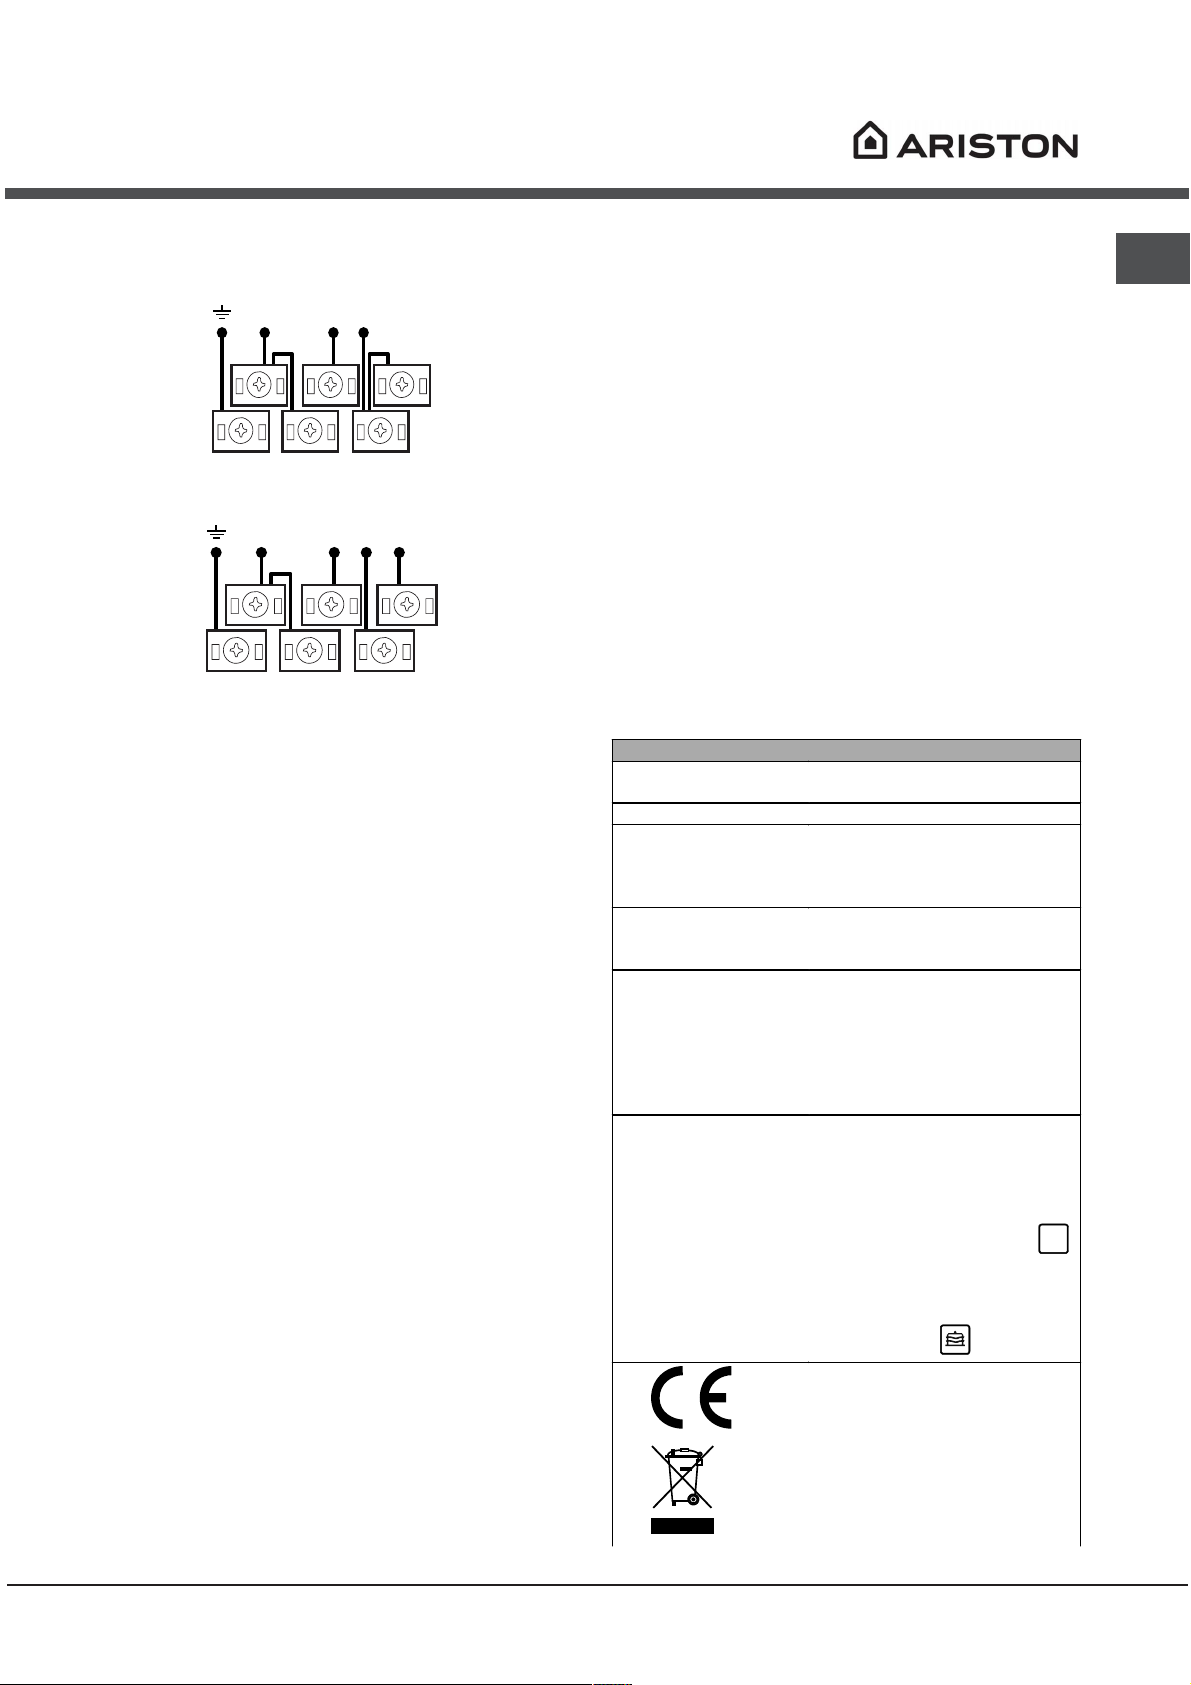
400V 2N~
H05RR-F 4x2.5 CEI-UNEL 35363
NL2L1
5
3
4
1
2
Once the appliance has been installed, the power
supply cable and the electrical socket must be
easily accessible.
The cable must not be bent or compressed.
The cable must be checked regularly and replaced
by authorised technicians only.
GB
400V 3N~
H05RR-F 5x2.5 CEI-UNEL 35363
NL3L1L2
5
3
4
fasten the supply cable in place with the clamp
and close the cover of the terminal board.
Connecting the supply cable to the mains
Install a standardised plug corresponding to the
load indicated on the data plate located on the
appliance.
The appliance must be directly connected to the
mains using an omnipolar circuit-breaker with a
minimum contact opening of 3 mm installed between
the appliance and the mains. The circuit-breaker
must be suitable for the charge indicated and must
comply with current electrical regulations (the
earthing wire must not be interrupted by the circuitbreaker). The supply cable must be positioned so
that it does not come into contact with temperatures
higher than 50°C at any point.
Before connecting the appliance to the power
supply, make sure that:
The appliance is earthed and the plug is compliant
with the law.
The socket can withstand the maximum power of
the appliance, which is indicated by the data
plate.
The voltage is in the range between the values
indicated on the data plate.
The socket is compatible with the plug of the
appliance. If the socket is incompatible with the
plug, ask an authorised technician to replace it.
Do not use extension cords or multiple sockets.
1
2
The manufacturer declines any liability should
these safety measures not be observed.
TECHNICAL DATA
Oven dimensions
(HxWxD)
Volume
Useful
measurements
relating to the oven
compartment
Power supply
voltage and
frequency
Electric hob
Front left
Back left
Back right
Front right
Maximum absorption
of the electric hob
ENERGY LABEL
32x43,5x40 cm
56 l
width 42 cm
depth 44 cm
height 8,5 cm
see data plate
1700 W
1200 W
1700 W
1200 W
5800 W
Directive 2002/40/EC on the
label of electric ovens.
Standard EN 50304
Energy consumption for Natural
convection – heating mode:
Traditional mode;
Declared energy consumption
for Forced convection Class –
heating mode:
mode.
EC Directives: 73/23/EEC dated
19/02/73 (Low Voltage) and
subsequent amendments 89/336/EEC dated 03/05/89
(Electromagnetic Compatibility)
and subsequent amendments 93/68/EEC dated 22/07/93 and
subsequent amendments 2002/96/EC.
Baking
3
Page 4
Description of the appliance
GB
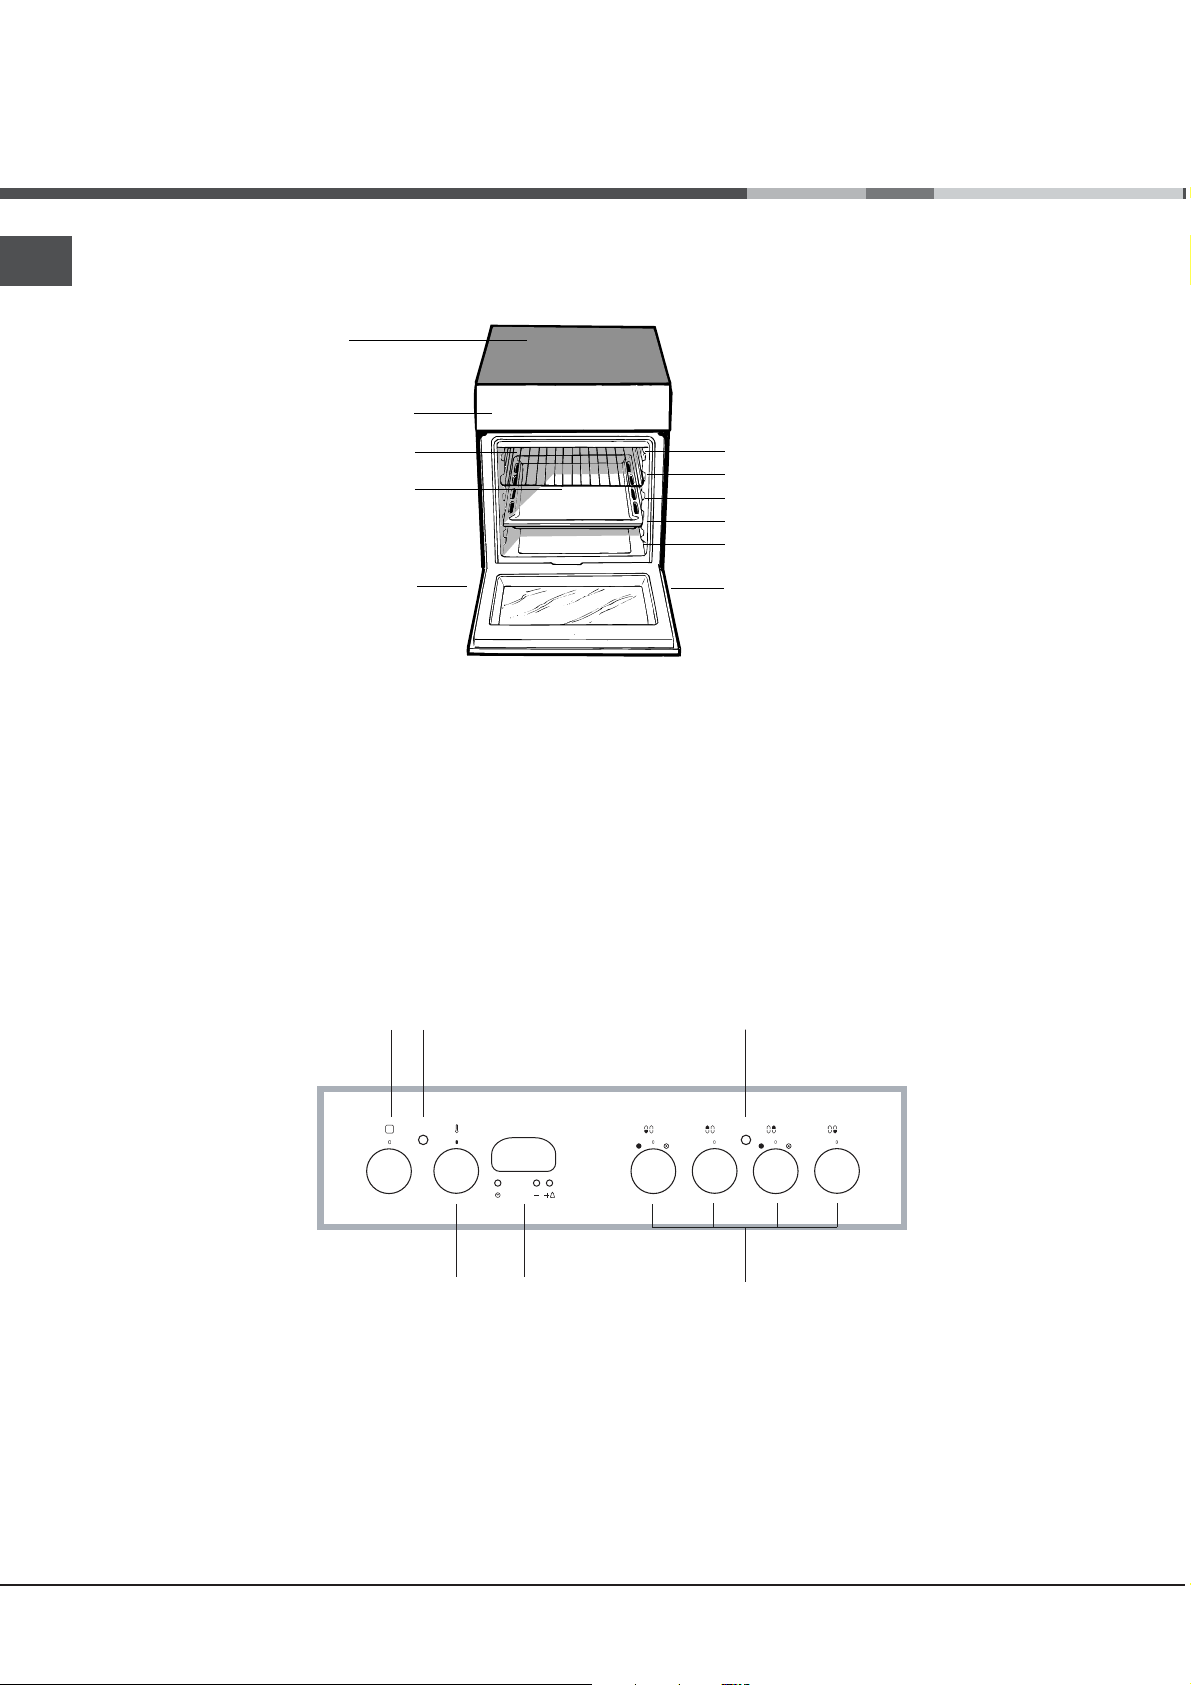
Overall view
Glass
ceramic hob
Control panel
GRILL rack
DRIPPING pan
Adjustable foot
GUIDE RAILS
for the sliding racks
position 5
position 4
position 3
position 2
position 1
Adjustable foot
Control panel
SELECTOR
knob
THERMOSTAT
THERMOSTAT
indicator light
knob
ELECTRONIC
TIMER*
ACTIVE HOTPLATE
indicator light
ELECTRIC HOTPLATE
control knobs
Only available in certain models.
*
4
Page 5
Start-up and use
The first time you use your appliance, heat the
empty oven with its door closed at its maximum
temperature for at least half an hour. Ensure that the
room is well ventilated before switching the oven off
and opening the oven door. The appliance may emit
a slightly unpleasant odour caused by protective
substances used during the manufacturing process
burning away.
Never put objects directly on the bottom of the
oven; this will avoid the enamel coating being
damaged.
Starting the oven
1. Select the desired cooking mode by turning the
SELECTOR knob.
2. Select the recommended temperature for the
cooking mode or the desired temperature by turning
the THERMOSTAT knob.
A list detailing cooking modes and suggested
cooking temperatures can be found in the relevant
table (see Oven cooking advice table).
During cooking it is always possible to:
Change the cooking mode by turning the
SELECTOR knob.
Change the temperature by turning the
THERMOSTAT knob.
Set the total cooking time and the cooking end
time (see below).
Stop cooking by turning the SELECTOR knob to
the 0 position.
Never put objects directly on the bottom of the
oven; this will avoid the enamel coating being
damaged. Only use position 1 in the oven when
cooking with the rotisserie spit.
THERMOSTAT indicator light
When this is illuminated, the oven is generating heat. It
switches off when the inside of the oven reaches the
selected temperature. At this point the light illuminates
and switches off alternately, indicating that the
thermostat is working and is maintaining the
temperature at a constant level.
Oven light
This is switched on by turning the SELECTOR knob to
any position other than 0. It remains lit as long as the
oven is operating. By selecting
the light is switched on without any of the heating
elements being activated.
Cooling ventilation
In order to cool down the external temperature of the
oven, some models are fitted with a cooling fan that
blows out air between the control panel and the oven
door.
! Once the cooking has been completed, the cooling
fan remains on until the oven has cooled down
sufficiently.
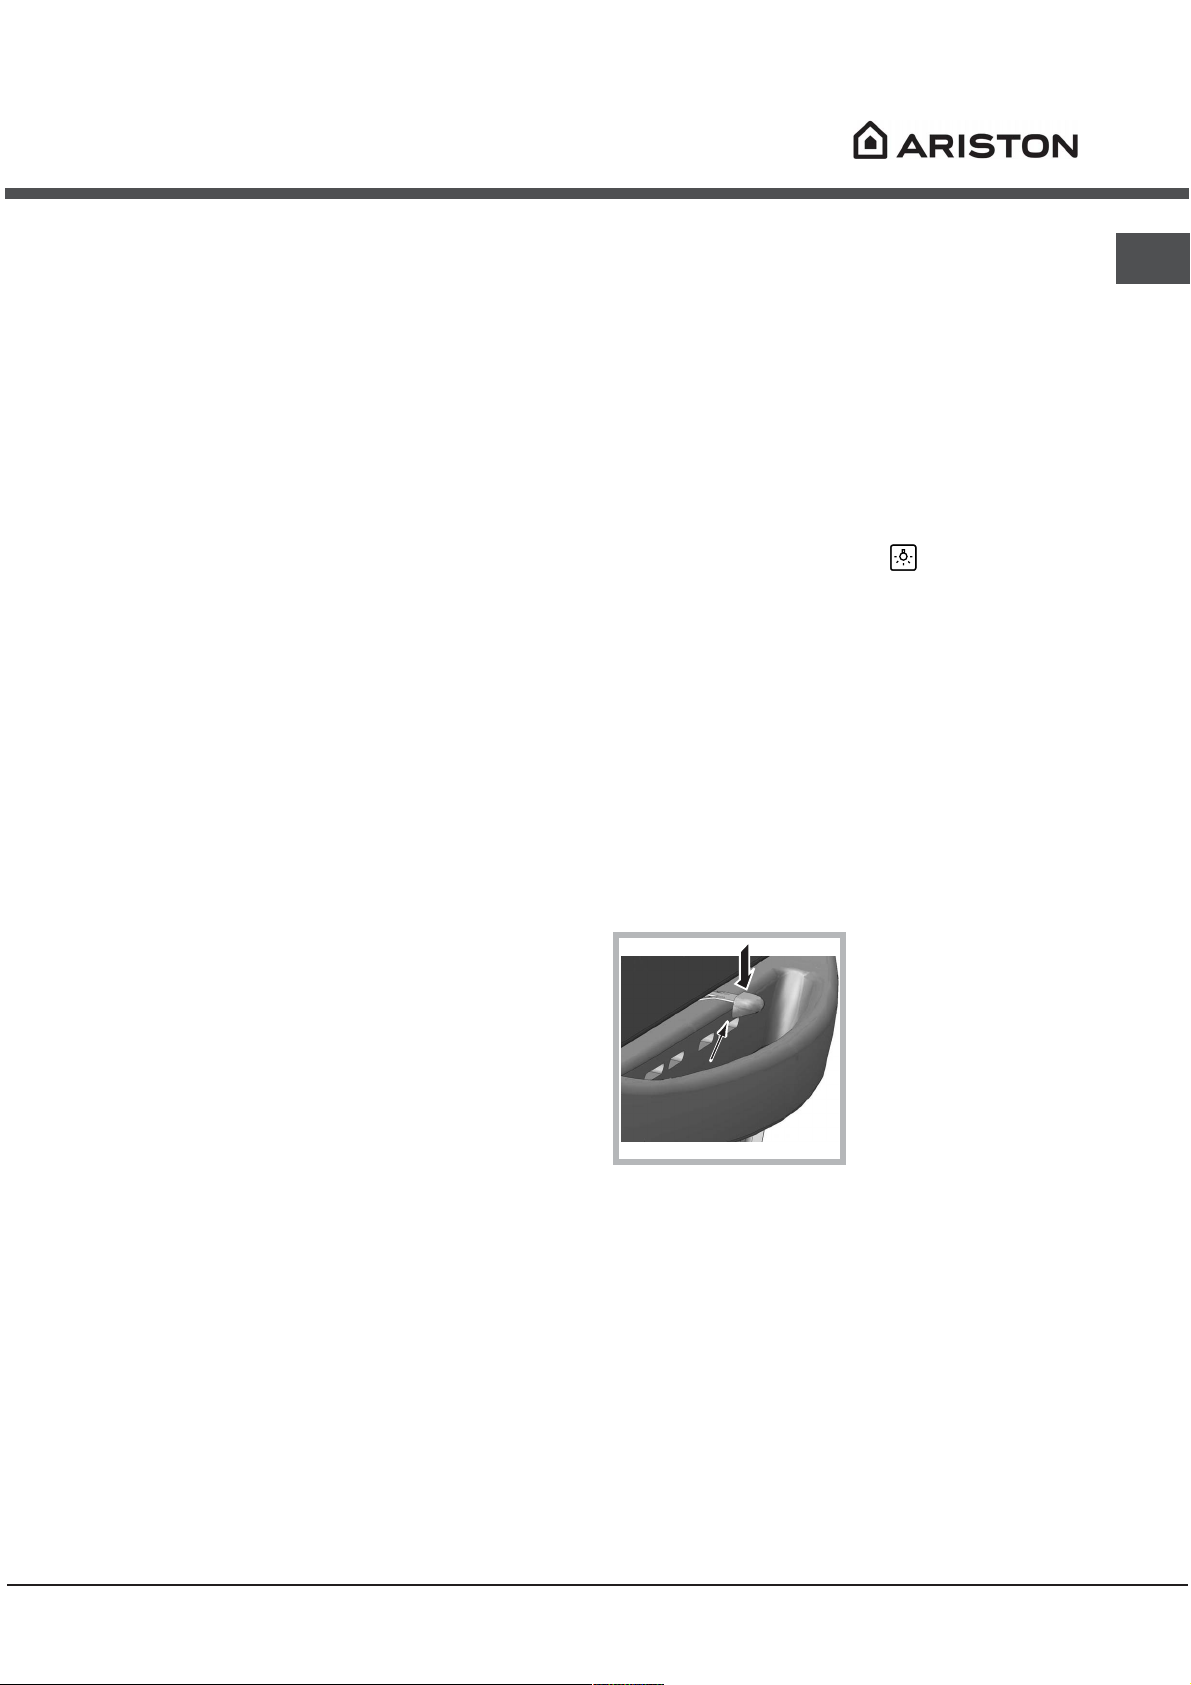
Door lock device
A
with the knob,
Some models are
equipped with a door
lock device situated
between the control
panel and the oven
door. To open the door,
push down device A
indicated in the figure.
GB
Always place cookware on the rack(s) provided.
5
Page 6
GB
Cooking modes
! A temperature value can be set for all cooking
modes between 50°C and Max, except for
particularly from the bottom element. If you use more
than one rack simultaneously, switch the position of
the dishes halfway through the cooking process.
BARBECUE (recommended: set only to MAX
power level);
GRATIN (recommended: do not exceed 200°C).
TRADITIONAL OVEN mode
Both the top and bottom heating elements will come
on. With this traditional cooking mode, it is best to
use one cooking rack only: if more than one rack is
used, the heat distribution will be uneven.
BAKING mode
The rear heating element and the fan come on,
guaranteeing the distribution of heat delicately and
uniformly throughout the oven. This mode is ideal for
baking and cooking temperature sensitive foods
such as cakes that need to rise and to prepare
certain tartlets on 3 shelves simultaneously.
FAST COOKING mode
The heating elements and the fan come on,
guaranteeing the distribution of heat consistently
and uniformly throughout the oven.
Pre-heating is not necessary for this cooking mode.
This mode is especially recommended for cooking
pre-packed food quickly (frozen or pre-cooked). The
best results are obtained if you use one cooking
rack only.
MULTI-COOKING mode
All the heating elements (top, bottom and circular),
as well as the fan, will come on. Since the heat
remains constant throughout the oven, the air cooks
and browns food uniformly. A maximum of two racks
may be used at the same time.
PIZZA mode
The heating elements (bottom and circular) and the
fan come on. This combination heats the oven
rapidly by producing a considerable amount of heat,
* Only available in certain models.
BARBECUE mode
The top heating element and the rotisserie (where
present) come on. The high and direct temperature of
the grill is recommended for food that requires high
surface temperature. Always cook in this mode with
the oven door closed.
GRATIN mode
The top heating element as well as the fan and the
rotisserie (where present) come on. This combination
of features increases the effectiveness of the
unidirectional thermal radiation of the heating
elements through forced circulation of the air
throughout the oven.
This helps prevent food from burning on the surface,
allowing the heat to penetrate right into the food.
Always cook in this mode with the oven door closed.
Electronic timer*
This function displays the time and works as a timer
which counts down to zero.
All functions will be implemented approximately 7
seconds after they have been set.
Resetting the clock
After the appliance has been connected to the power
supply, or after a power cut, the clock display will
begin to blink, showing the figure: 0:00
Press button
the exact time. Press and hold the buttons to
quicken the count upwards.
Any necessary modifications can be made by
repeating the above process.
Timer feature
This function may be accessed by pressing the
button, after which the display will show the symbol
G and then buttons - and + to set
n
n. Every time the + button is pressed it corresponds
to a time increase of 10 seconds, until it reaches 99
minutes and 50 seconds. After this point, each press
of the button represents an increase of one minute,
up to a maximum of 10 hours.
Pressing the
- button reduces the time.
6
Page 7

After the time period has been set, the timer will
begin to count down. When the timer reaches zero,
the buzzer will sound (this may be stopped by
pressing any button).
The time may be displayed by pressing the
button, and the n symbol indicates that the timer
function has been set. After approximately 7
seconds, the display will automatically revert to the
timer.
G
Practical cooking advice
GB
! Do not place racks in position 1 and 5 during fan-
assisted cooking. Excessive direct heat can burn
temperature sensitive foods.
! In the BARBECUE and GRATIN cooking modes,
particularly when using the rotisserie, place the
dripping pan in position 1 to collect cooking
residues (fat and/or grease).
Cancelling a time that has already been set
Press the
Adjusting the buzzer volume
After selecting and confirming the clock settings,
use the
buzzer.
button until the display shows 0:00.
button to adjust the volume of the alarm
MULTI-COOKING
Use position 2 and 4, placing the food that
requires more heat on 2.
Place the dripping pan on the bottom and the rack
on top.
BARBECUE
Insert the rack in position 3 or 4. Place the food in
the centre of the rack.
We recommend that you set the maximum power
level. The top heating element is regulated by a
thermostat and may not always be on.
PIZZA MODE
Use a light aluminium pizza pan. Place it on the
rack provided.
For a crispy crust, do not use the dripping pan
(prevents crust from forming by extending
cooking time).
If the pizza has a lot of toppings, we recommend
adding the mozzarella cheese on top of the pizza
halfway through the cooking process.
7
Page 8

GB
Oven cooking advice table
Cooking
modes
Traditional
Oven
Baking
Mode
Fast
cooking
Multi-
cooking
Pizza Mode
Barbecue
Gratin
Foods Weight
Duck
Roast veal or beef
Pork roast
Biscuits (short pastry)
Tarts
Tarts
Fruit cakes
Plum cake
Sponge cake
Stuffed pancakes (on 2 racks)
Small cakes (on 2 racks)
Cheese puffs (on 2 racks)
Cream puffs (on 3 racks)
Biscuits (on 3 racks)
Meringues (on 3 racks)
Frozen food
Pizza
Courgette and prawn pie
Country style spinach pie
Turnovers
Lasagne
Golden Rolls
Chicken morsels
Pre-cooked food
Golden chicken wings 0.4 2 - 200 20-25
Fresh Food
Biscuits (short pastry)
Plum cake
Cheese puffs
Pizza (on 2 racks)
Lasagne
Lamb
Roast chicken + potatoes
Mackerel
Plum cake
Cream puffs (on 2 racks)
Biscuits (on 2 racks)
Sponge cake (on 1 rack)
Sponge cake (on 2 racks)
Savoury pies
Pizza
Roast veal or beef
Chicken
Soles and cuttlefish
Squid and prawn kebabs
Cuttlefish
Cod filet
Grilled vegetables
Veal steak
Sausages
Hamburgers
Mackerels
Toasted sandwiches (or toast)
Grilled chicken
Cuttlefish
(in kg)
1
1
1
-
1
0.5
1
0.7
0.5
1.2
0.6
0.4
0.7
0.7
0.5
0.3
0.4
0.5
0.3
0.5
0.4
0.4
0.3
0.6
0.2
1
1
1
1+1
1
1
0.5
0.5
0.5
1
1.5
0.5
1
1
0.7
0.6
0.6
0.8
0.4
0.8
0.6
0.6
1
4 and 6
1.5
1.5
Rack Position Pre-heating
time
(minutes)
3
3
3
3
3
3
2 or 3
3
3
2 and 4
2 and 4
2 and 4
1 and 3 and 5
1 and 3 and 5
1 and 3 and 5
2
2
2
2
2
2
2
2
2
2
2 and 4
3
2
2 and 4
2
2
2 and 4
2 and 4
2
2 and 4
3
3
2
2 or 3
4
4
4
4
3 or 4
4
4
4
4
4
2
2
15
15
15
15
15
15
15
15
15
15
15
15
15
15
15
-
-
-
-
-
-
-
-
-
15
10
10
15
10
10
10
10
10
10
15
15
10
10
-
-
-
-
-
-
-
-
-
10
10
Recommended
temperature
200
200
200
180
180
180
180
180
160
200
190
210
180
180
90
250
200
220
200
200
180
220
200
180
210
230
180
180
200
180
170
190
180
170
170
200
220
220
180
Max
Max
Max
Max
Max
Max
Max
Max
Max
Max
200
200
Cooking
time
(minutes)
65-75
70-75
70-80
15-20
30-35
20-30
40-45
40-50
25-30
30-35
20-25
15-20
20-25
20-25
180
12
20
30-35
25
35
25-30
15-20
15-18
45
10-12
15-20
30-35
40-45
60-70
30-35
40-50
20-25
10-15
15-20
20-25
25-30
15-20
25-30
60-70
10-12
8-10
10-15
10-15
15-20
15-20
15-20
10-12
15-20
3-5
55-60
30-35
8
Page 9
Using the glass ceramic hob
g
The glue applied on the gaskets leaves traces of
grease on the glass. Before using the appliance, we
recommend you remove these with a special nonabrasive cleaning product. During the first few hours
of use there may be a smell of rubber which will
disappear very quickly.
Cooking zones
The hob is equipped with electric radiant heating
elements. When they are in use the following items
on the hob become red.
A. Radiant heating zones
A
B
B. Extendable radiant cooking
zones
B
C
C. The residual heat indicator
A
light: this indicates that the
temperature of the
corresponding cooking zone is greater than 60°C,
even when the heating element has been switched
off but is still hot.
Switching the cooking zones on and off
Pos. Radiant hotplate
0
Off
1
Melting butter and chocolate
2
Heating liquids
3
4
Soups and sauces
5
6
Cooking at boiling point
7
8
Pan-roasting
9
10
Boiling large quantities
11
12
Frying
A
Activation of both cookin
zones
Practical advice on using the hob
GB
Traditional cooking zones
Traditional cooking zones are made up of circular
heating elements. They turn red approximately ten
seconds after they have been turned on.
Each cooking zone is fitted with a control knob allowing
you to select from 12 different temperature settings from
a minimum of 1 to a maximum of 12.
Extendable cooking zones
The extendable radiant elements (B) are recognisable
by the fact that they have a double heating zone. You
can turn on only the smaller internal cooking zone or
both the external and internal zones.
The control knob allows you to choose between two
power levels, which are both adjustable between a
minimum value of
The lowest power level can be set by turning the knob
clockwise from 1 to 12.
Turn the knob to completely (A) until you hear a
slight click, to enable the maximum power level,
which in turn can be adjusted between 12 and 1 by
turning
the knob anticlockwise. To restore the
minimum power level, turn the knob and set it back to
position 0.
For double cooking zones, the first part of the knob
movement activates the smaller cooking zone (internal).
To activate both (internal and external), it is necessary to
turn the knob completely (A) and
power level between 12 and 1.
1 to a maximum of 12:
then select the desired
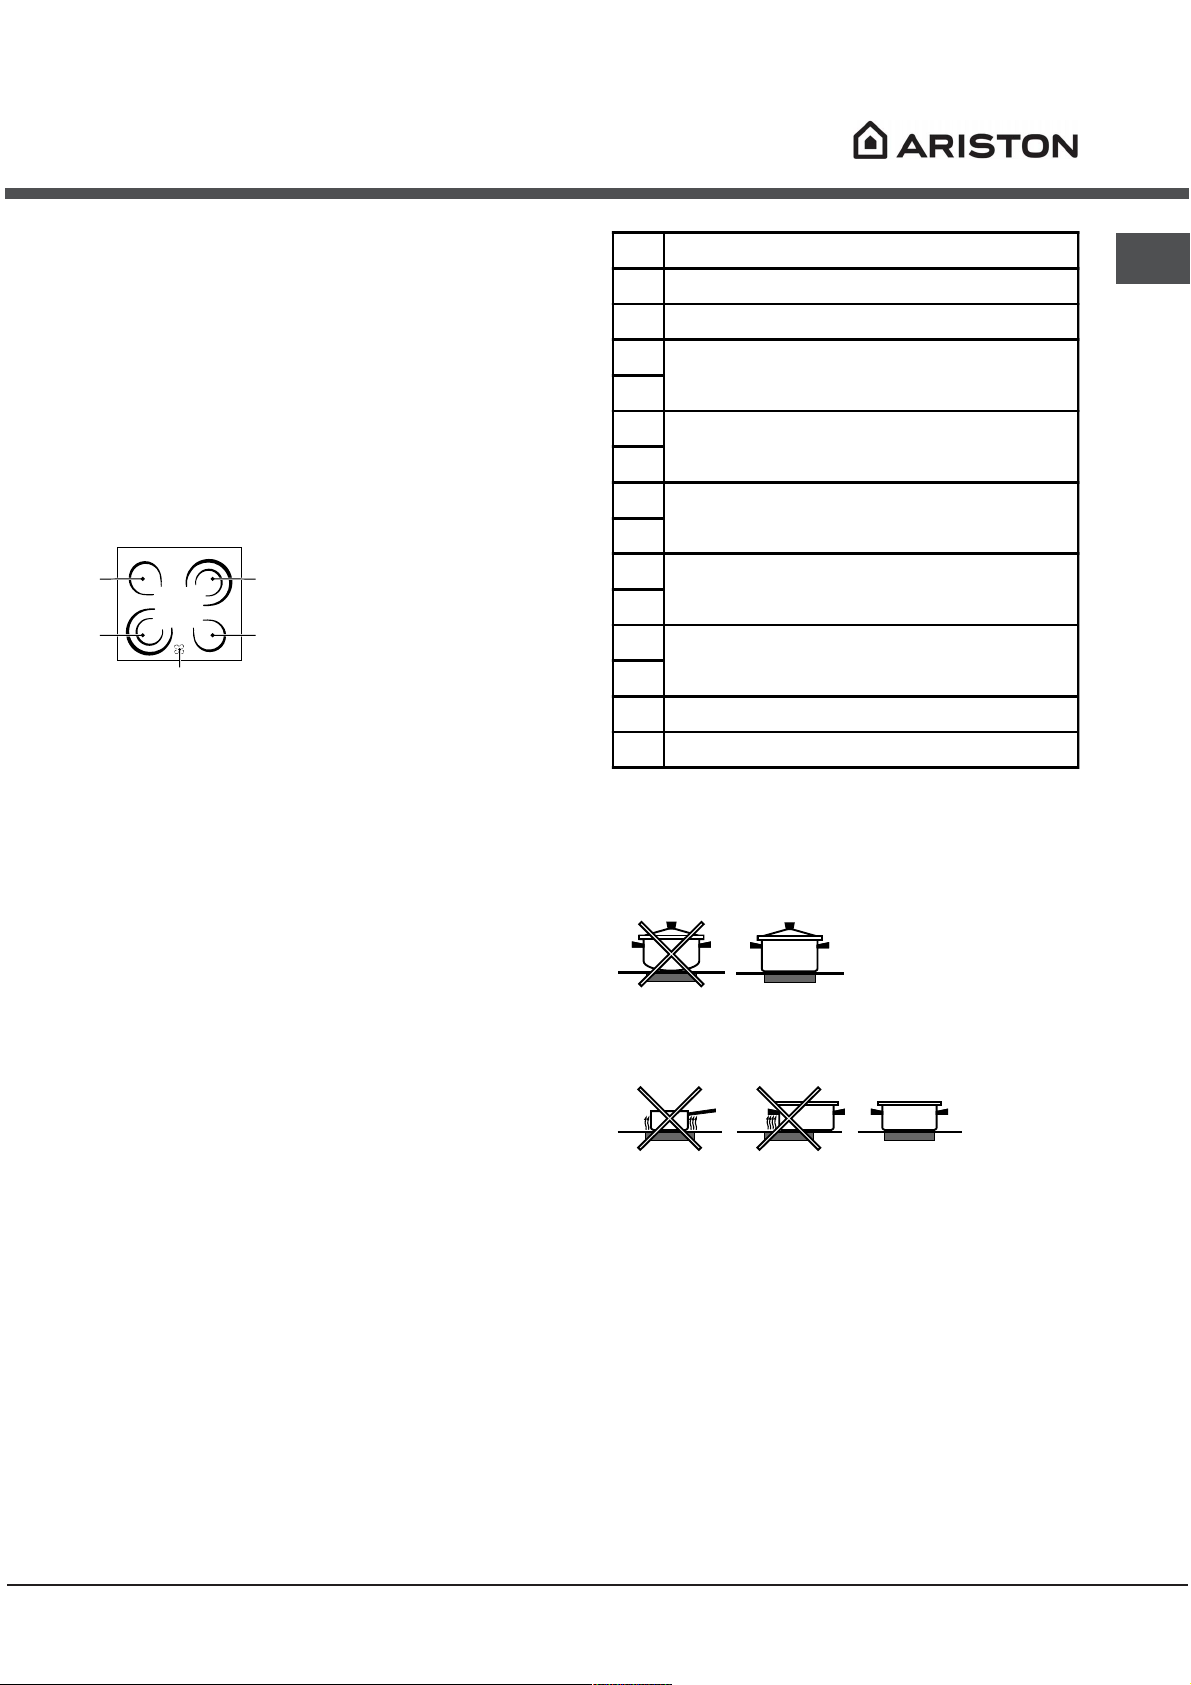
To obtain the best results with your hob:
Use pans with a thick, flat base to ensure that
they adhere perfectly to the cooking zone.
Always use pans with a diameter that is large
enough to cover the hotplate fully, in o
rder to use
all the heat produced.
Always make sure that the base of the pan is
completely clean and dry: this ensures that the
pans adhere perfectly to the cooking zones and
that both the p
ans and the hob last for a longer
period of time.
Avoid using the same cookware that is used on
gas burners: the heat concentration on gas
burners may have warped the base
of the pan,
causing it not to adhere to the surface correctly.
Never leave a cooking zone switched on without a
pan on top of it, as doing so may cause the zone
to become da
maged.
9
Page 10

Precautions and tips
GB
This appliance has been designed and manufactured
in compliance with international safety standards.
The following warnings are provided for safety reasons
and must be read carefully.
General safety
These instructions are only valid for the
countries whose symbols appear in the manual
and on the serial number plate.
The appliance was designed for domestic use
inside the home and is not intended for commercial
or industrial use.
The appliance must not be installed outdoors, even
in covered areas. It is extremely dangerous to leave
the appliance exposed to rain and storms.
Do not touch the appliance with bare feet or with wet
or damp hands and feet.
The appliance must be used by adults only for the
preparation of food, in accordance with the
instructions provided in this booklet.
The instruction booklet accompanies a class 1
(insulated) or class 2 - subclass 1 (recessed
between 2 cupboards) appliance.
When
Make sure that the power supply cables of other
The openings used for the ventilation and dispersion
Do not place unstable or misshapen pans on the
Always use oven gloves when placing cookware in
Do not use flammable liquids (alcohol, petrol, etc...)
Do not place flammable material in the lower storage
Always make sure the knobs are in the 0 position
When unplugging the appliance, always pull the
Never perform any cleaning or maintenance work
the appliance is in use, the heating
elements and some parts of the oven door
become extremely hot. Make sure you don't
touch them and
electrical appliances do not come into contact with
the hot parts of the oven.
of heat must never be covered.
electric hotplates; this will help to avoid spills.
Position them on the hob with the handles turned
towards the centre of the appliance.
the oven or when removing it.
near the appliance while it is in use.
compartment or in the oven itself. If the appliance is
switched on accidentally, it could catch fire.
when the appliance is not in use.
plug from the mains socket; do not pull on the
cable.
without having disconnected the appliance from the
electricity mains.
keep children well away.
If the appliance breaks down, under no
circumstances should you attempt to repair the
appliance yourself. Repairs carried out by
inexperienced persons may cause injury or further
malfunctioning of the appliance. Contact
Assistance.
Do not rest heavy objects on the open oven door.
The internal surfaces of the compartment (where
present) may become hot.
Disposal
When disposing of packaging material: observe
local legislation so that the packaging may be
reused.
The European Directive 2002/96/EC relating to
Waste Electrical and Electronic Equipment (WEEE)
states that household appliances should not be
disposed of using the normal solid urban waste
cycle. Exhausted appliances should be collected
separately in order to optimise the cost of re-using
and recycling the materials inside the machine,
while preventing potential damage to the
atmosphere and to public health. The crossed-out
dustbin is marked on all products to remind the
owner of their obligations regarding separated waste
collection.
Exhausted appliances may be collected by the
public waste collection service, taken to suitable
collection areas in the area or, if permitted by
current national legislation, they may be returned to
the dealers as part of an exchange deal for a new
equivalent product.
All major manufacturers of household appliances
participate in the creation and organisation of
systems for the collection and disposal of old and
disused appliances.
Respecting and conserving the
environment
You can help to reduce the peak load of the
electricity supply network companies by using the
oven in the hours between late afternoon and the
early hours of the morning.
Always keep the oven door closed when using the
BARBECUE and GRATIN modes: to attain best
results and to save energy (approximately 10%).
Check the door seals regularly and wipe them clean
to ensure they are free of debris so that they adhere
properly to the door, thus avoiding heat dispersion.
10
Page 11
Care and maintenance
Switching the appliance off
Disconnect your appliance from the electricity supply
before carrying out any work on it.
Cleaning the appliance
Do not use abrasive or corrosive detergents such as
stain removers, anti-rust products, powder detergents
or sponges with abrasive surfaces: these may scratch
the surface beyond repair.
Never use steam cleaners or pressure cleaners on
the appliance.
Clean the glass part of the oven door using a
sponge and a non-abrasive cleaning product, then
dry thoroughly with a soft cloth. Do not use rough
abrasive material or sharp metal scrapers as these
could scratch the surface and cause the glass to
crack.
The stainless steel or enamel-coated external parts
and the rubber seals may be cleaned using a
sponge that has been soaked in lukewarm water
and neutral soap. Use specialised products for the
removal of stubborn stains. After cleaning, rinse and
dry thoroughly. Do not use abrasive powders or
corrosive substances.
The inside of the oven should ideally be cleaned
after each use, while it is still lukewarm. Use hot
water and detergent, then rinse well and dry with a
soft cloth. Do not use abrasive products.
The accessories can be washed like everyday
crockery, and are even dishwasher safe.
Dirt and grease should be removed from the control
panel using a non-abrasive sponge or a soft cloth.
Stainless steel can be marked by hard water that
has been left on the surface for a long time, or by
aggressive detergents containing phosphorus. After
cleaning, rinse well and dry thoroughly. Any
remaining drops of water should also be dried.
Inspecting the oven seals
Check the door seals around the oven regularly. If the
seals are damaged, please contact your nearest Aftersales Service Centre. We recommend that the oven is
not used until the seals have been replaced.
Replacing the oven light bulb
1. After disconnecting the oven
from the electricity mains,
remove the glass lid covering
the lamp socket (see figure).
2. Remove the light bulb and
replace it with a similar one:
voltage 230 V, wattage 25 W,
cap E 14.
3. Replace the lid and reconnect the oven to the
electricity supply.
Cleaning the glass ceramic hob
Do not use abrasive or corrosive detergents (for example,
products in spray cans for cleaning barbecues and ovens),
stain removers, anti-rust products, powder detergents or
sponges with abrasive surfaces: these may scratch the
surface beyond repair.
It is usually sufficient simply to wash the hob using
a damp sponge and dry it with absorbent kitchen
roll.
If the hob is particularly dirty, rub it with a special
glass cera
dry thoroughly.
To remove more stubborn dirt, use a suitable
scraper (this is not supplied with the appliance).
Remove s
for the appliance to cool, to avoid residues forming
crusty deposits. You can obtain excellent results by
using a rustproof steel wire s
designed for glass ceramic surfaces - soaked in
soapy water.
If plastic or sugary substances have accidentally
been melted on the hob, remove them immediately
with the sc
Once it is clean, the hob may be treated with a
special protective maintenance product: the
invisible film left by this product protects the
surface
maintenance should be carried out while the
appliance is warm (not hot) or cold.
Always remember to rinse the appliance well with
clean water an
become encrusted during subsequent cooking
processes.
Glass ceramic hob
cleaners
Window scraper Razor blade
scrapers
Replacement blades DIY Stores,
COLLO luneta
HOB BRITE
Hob Clean
SWISSCLEANER
mic cleaning product, then rinse well and
pills as soon as possible, without waiting
ponge - specifically
raper, while the surface is still hot.
from drips during cooking. This
d dry it thoroughly: residues can
Available from
DIY Stores
supermarkets,
chemists
Boots, Co-op stores,
department stores, Regional
Electricity Company shops,
supermarkets
Assistance
Please have the following information to hand:
The appliance model (Mod.).
The serial number (S/N).
This information can be found on the data plate located
on the appliance and/or on the packaging.
GB
11
Page 12

ПдзгЯет чсЮузт
КПХЖЙНБ КБЙ ЦПХСНПУ
GB GR
English, 1 ЕллзнйкЬ,
12
CE6VP5 GR
PT
Portuges, 23
Ресйечьменб
GR
ЕгкбфЬуфбуз, 13-14
ИЭуз кбй псйжпнфЯщуз
ЗлекфсйкЮ уэндеуз
ФечнйкЬ уфпйчеЯб
РесйгсбцЮ фзт ухукехЮт, 15
УхнплйкЮ Ьрпшз
РЯнбкбт чейсйуфзсЯщн
ЕккЯнзуз кбй чсЮуз, 16-19
ЕккЯнзуз фпх цпэснпх
РспгсЬммбфб
Злекфспнйкь Timer
РсбкфйкЭт ухмвпхлЭт гйб фп шЮуймп
РЯнбкбт шзуЯмбфпт уфп цпэснп
ЧсЮуз фзт хблпкесбмйкЮт ерйцЬнейбт
мбгейсЭмбфпт, 20
Пй ресйпчЭт мбгейсЭмбфпт
БнЬшфе кбй увЮуфе фйт жюнет мбгейсЭмбфпт
РспцхлЬоейт кбй ухмвпхлЭт, 21
ГенйкЮ буцЬлейб
ДйЬиеуз
УевбуфеЯфе кбй рспцхлЬофе фп ресйвЬллпн
УхнфЮсзуз кбй цспнфЯдб, 22
Брпклейумьт фпх злекфсйкпэ сеэмбфпт
Кбибсйумьт фзт ухукехЮт
БнфйкбфЬуфбуз фзт лхчнЯбт цщфйумпэ фпх цпэснпх
Кбибсйумьт фзт хблпкесбмйкЮт ерйцЬнейбт
мбгейсЭмбфпт,
ФечнйкЮ хрпуфЮсйоз
Page 13
ЕгкбфЬуфбуз
Рсйн иЭуефе уе лейфпхсгЯб фз нЭб ухукехЮ, дйбвЬуфе
рспуекфйкЬ фп рбсьн егчейсЯдйп пдзгйюн дйьфй ресйЭчей
узмбнфйкЭт рлзспцпсЯет гйб фзн егкбфЬуфбуз кбй фзн
буцблЮ лейфпхсгЯб фзт ухукехЮт.
ЦхлЬофе фйт пдзгЯет лейфпхсгЯбт фзт ухукехЮт гйб
меллпнфйкЮ чсЮуз: ВевбйщиеЯфе ьфй пй пдзгЯет всЯукпнфбй
мбжЯ ме фз ухукехЮ уе ресЯрфщуз рюлзузт,
рбсбчюсзузт Ю мефбкьмйузт.
З егкбфЬуфбуз фзт ухукехЮт дйенесгеЯфбй брь
ейдйкехмЭнп рспущрйкь уэмцщнб ме фйт рбсечьменет
пдзгЯет.
ПрпйбдЮрпфе ерЭмвбуз сэимйузт Ю ухнфЮсзузт
рсЭрей нб дйенесгеЯфбй бцпэ брпухндЭуефе фз ухукехЮ
брь фп злекфсйкь.
ФпрпиЭфзуз кбй псйжпнфЯщуз
МрпсеЯфе нб егкбфбуфЮуефе фз ухукехЮ дЯрлб брь
Эрйрлб рпх ден оереснЬне уе эшпт фзн ерйцЬнейб
мбгейсЭмбфпт.
ВевбйщиеЯфе ьфй фп фпЯчщмб уе ербцЮ ме фп рЯущ мЭспт
фзт ухукехЮт еЯнбй брь Ьцлекфп хлйкь кбй бниекфйкь уфз
иесмьфзфб (Ф 90°C).
Фб рьдйб* рпх рбсЭчпнфбй ме фз
ухукехЮ мпнфЬспнфбй чщнехфЬ
кЬфщ брь фз вЬуз фзт кпхжЯнбт.
ЗлекфсйкЮ уэндеуз
Ухнбсмпльгзуз кблщдЯпх фспцпдпуЯбт
¢нпйгмб рйнбкЯдбт бкспдекфюн:
Чсзуймпрпйюнфбт Энб кбфубвЯдй, ксбфЮуфе кьнфсб уфйт
рлехсйкЭт глщууЯфует фпх кбрбкйпэ фзт рйнбкЯдбт
бкспдекфюн.
фсбвЮофе кбй бнпЯофе
фп кбрЬкй фзт рйнбкЯдбт
бкспдекфюн.
GR
Гйб мйб ущуфЮ егкбфЬуфбуз:
фпрпиефЮуфе фз ухукехЮ уфзн кпхжЯнб, уфзн
фсбрежбсЯб Ю уе гкбсупнйЭсб (бллЬ ьчй уфп мрЬнйп).
бн фп рлбЯуйп мбгейсЭмбфпт еЯнбй хшзльфесп фщн
ерЯрлщн, з ухукехЮ рсЭрей нб фпрпиефзиеЯ уе
фпхлЬчйуфпн 200 mm брь бхфЬ.
бн з кпхжЯнб
егкбфбуфбиеЯ кЬфщ брь
сЬцй, фп фелехфбЯп иб
рсЭрей нб брЭчей брь фпн
рЬгкп фпхлЬчйуфпн 420
mm. with hood
mm.
420
mm. without hood
650
700
З брьуфбуз рсЭрей нб
Min. mm.
min.
min.
еЯнбй 700 mm бн фб сЬцйб
mm.
420
Min.
HOOD
Min. mm.
600
еЯнбй еэцлекфб ( влЭре
ейкьнб)
мзн фпрпиефеЯфе кпхсфЯнет рЯущ брь фзн кпхжЯнб Ю уе
фпхлЬчйуфпн 200 mm брь фб рлбънЬ фзт.
ендечьменпй брпсспцзфЮсет рсЭрей нб егкбиЯуфбнфбй
уэмцщнб ме фйт хрпдеЯоейт фпх учефйкпэ егчейсйдЯпх
ПсйжпнфЯщуз
Бн чсейбуфеЯ нб псйжпнфйюуефе фз
ухукехЮ, вйдюуфе фб рпдбсЬкйб*
сэимйузт уфйт бнфЯуфпйчет Эдсет,
рпх всЯукпнфбй уфйт гщнЯет уфз
вЬуз фзт кпхжЯнбт (влЭре ейкьнб).
Гйб фзн фпрпиЭфзуз фпх кблщдЯпх екфелЭуфе фб
рбсбкЬфщ:
оевйдюуфе фз вЯдб фпх кблщдйпдЭфз кбй фйт вЯдет фщн
ербцюн
Пй гЭцхсет еЯнбй дйехиефзмЭнет брь фп есгпуфЬуйп гйб
фз уэндеуз уе 230V мпнпцбуйкь. влЭре ейкьнб)
230V 1N~
H07RN-F 3x4 CEI-UNEL 35364
NL
5
3
4
Гйб фз дйенЭсгейб фщн злекфсйкюн ухндЭуещн рпх
брейкпнЯжпнфбй уфзн ейкьнб, чсзуймпрпйЮуфе фйт дэп
гЭцхсет рпх всЯукпнфбй мЭуб уфп кпхфЯ (влЭре ейкьнб
- бнбцпсЬ «P»)
NL2L1
1
2
P
ХрЬсчей мьнп уе псйумЭнб мпнфЭлб
*
L3
13
Page 14

GR
ñ
NL2L1
P
фбмрелЯфуб чбсбкфзсйуфйкюн
з фЬуз фспцпдпуЯбт нб ресйлбмвЬнефбй уфйт фймЭт фзт
фбмрелЯфубт чбсбкфзсйуфйкюн
з рсЯжб нб еЯнбй ухмвбфЮ ме фп вэумб фзт ухукехЮт.
Бн з рсЯжб ден еЯнбй ухмвбфЮ ме фп вэумб,
брехихниеЯфе уе еопхуйпдпфзмЭнп фечнйкь гйб фзн
бнфйкбфЬуфбуз. Мз чсзуймпрпйеЯфе рспекфЬуейт Ю
рплэрсйжб.
L3
400V 2N~
H05RR-F 4x2.5 CEI-UNEL 35363
NL2L1
5
3
4
1
2
400V 3N~
H05RR-F 5x2.5 CEI-UNEL 35363
NL3L1L2
5
3
4
уфесеюуфе фп кблюдйп фспцпдпуЯбт уфп бнфЯуфпйчп
кблщдйпдЭфз кбй клеЯуфе фп кбрЬкй фзт рйнбкЯдбт
бкспдекфюн.
Уэндеуз фпх кблщдЯпх фспцпдпуЯбт уфп дЯкфхп
МпнфЬсефе уфп кблюдйп мйб кбнпнйкпрпйзмЭнз рсЯжб гйб
фп цпсфЯп рпх бнбцЭсефбй уфзн фбмрелЯфуб
чбсбкфзсйуфйкюн ерЯ фзт ухукехЮт.
З ухукехЮ ухндЭефбй бр ехиеЯбт уфп дЯкфхп
чсзуймпрпйюнфбт Энбн рплхрплйкь дйбкьрфз ме
елЬчйуфп Ьнпйгмб ербцюн 3 mm рпх рбсемвЬллефбй
мефбоэ фзт ухукехЮт кбй фпх дйкфэпх. П дйбкьрфзт
рсЭрей нб дйбуфбуйплпгеЯфбй гйб фп ендедейгмЭнп цпсфЯп
кбй нб рлзспЯ фйт йучэпхует рспдйбгсбцЭт гйб фп
злекфсйкь сеэмб (п бгщгьт геЯщузт ден рсЭрей нб
дйбкьрфефбй брь фп дйбкьрфз). Фп кблюдйп фспцпдпуЯбт
рсЭрей нб еЯнбй фпрпиефзмЭнп Эфуй рпх кбнЭнб узмеЯп
фпх нб мзн Эсчефбй уе ербцЮ ме иесмпксбуЯет
мегблэфесет фщн 50°C .
Рсйн дйенесгЮуефе фз уэндеуз вевбйщиеЯфе ьфй:
з ухукехЮ Эчей фз геЯщуз кбй фп вэумб фзспэн фйт ек
фпх ньмпх рспдйбгсбцЭт.
З рсЯжб нб еЯнбй уе иЭуз нб хцЯуфбфбй фп мЭгйуфп
цпсфЯп йучэпт фзт мзчбнЮт, ьрщт бнбцЭсефбй уфзн
1
2
Бцпэ егкбфбуфбиеЯ з ухукехЮ, фп злекфсйкь кблюдйп
кбй з злекфсйкЮ рсЯжб рсЭрей нб еЯнбй еэкплб
рспувЬуймб.
Фп кблюдйп ден рсЭрей нб дйрлюней Ю нб ухмрйЭжефбй.
Фп кблюдйп рсЭрей нб елЭгчефбй ресйпдйкЬ кбй нб
бнфйкбиЯуфбфбй мьнп брь еопхуйпдпфзмЭнпхт фечнйкпэт.
З ерйчеЯсзуз брпрпйеЯфбй кЬие ехиэнзт ьфбн пй
кбньнет бхфпЯ ден фзспэнфбй.
ФЕЧНЙКБ УФПЙЧЕЙБ
ДйбуфЬуейт ЦпэснпхЗxLxP
¼ãêïò
ЩцЭлймет дйбуфЬуейт фпх
цпэснпх
ФЬуз кбй ухчньфзфб
фспцпдпуЯбт
Злекфсйкьт рЬгкпт
мбгейсЭмбфпт
Емрсьт бсйуфесЬ
РЯущ бсйуфесЬ
РЯущ деойЬ
Емрсьт деойЬ
МЭгйуфз брпссьцзуз фзт
злекфсйкЮт ерйцЬнейбт
ENERGY LABEL
32x43,5x40 cm
56 l
рлЬфпт cm 42
вЬипт cm 44
ýøïò cm 8,5
влЭре рйнбкЯдб
чбсбкфзсйуфйкюн
1700 W
1200 W
1700 W
1200 W
5800 W
ПдзгЯб 2002/40/CE гйб фзн
ефйкЭфб фщн злекфсйкюн
цпэснщн.
Кбнпнйумьт EN 50304
ЕнесгзфйкЮ кбфбнЬлщуз
льгщ цхуйкЮт ербгщгЮт –
лейфпхсгЯб иЭсмбнузт:
РбсбдпуйбкЮ
КбфбнЬлщуз енЭсгейбт
дзлщмЭнз гйб кбфзгпсЯб
дхнбмйкЮт бгщгймьфзфбт лейфпхсгЯб иЭсмбнузт:
Цпэснпт ЖбчбспрлбуфйкЮт.
КпйнпфйкЭт ПдзгЯет:
73/23/CEE ôçò 19/02/73
(ЧбмзлЮ ÔÜóç) êáé
мефбгенЭуфесет
фспрпрпйЮуейт -
89/336/CEE ôçò 03/05/89
(ЗлекфспмбгнзфйкЮ
Ухмвбфьфзфб) кбй
мефбгенЭуфесет
фспрпрпйЮуейт - 93/68/CEE
ôçò 22/07/93 кбй
мефбгенЭуфесет
прпрпйЮуейт- 2002/96/CE.
ô
14
Page 15

РесйгсбцЮ фзт ухукехЮт
УхнплйкЮ Ьрпшз
Υαλοκεραμική
Πίνακας χειριστηρίων
Επίπεδο ΠΛΕΓΜΑΤΟΣ
Επίπεδο ΛΙΠΟΣΥΛΛΕΚΤΗ
Ρυθμιζόμενο ποδαράκι
επιφάνεια
GR
Επιφάνεια κατά
της υπερχείλισης
θέση 5
θέση 4
θέση 3
θέση 2
θέση 1
Ρυθμιζόμενο ποδαράκι
РЯнбкбт чейсйуфзсЯщн
ÕрЬсчей мьнп уе псйумЭнб мпнфЭлб
*
15
Page 16

ЕккЯнзуз кбй чсЮуз
GR
Уфп рсюфп Ьнбммб, лейфпхсгЮуфе фп цпэснп Ьдейп
гйб фпхлЬчйуфпн мйуЮ юсб уфз мЭгйуфз иесмпксбуЯб
кбй ме фзн рьсфб клейуфЮ. ВевбйщиеЯфе ьфй п чюспт
бесЯжефбй кблЬ рсйн увЮуефе кбй бнпЯоефе фзн рьсфб
фпх цпэснпх. З ухукехЮ мрпсеЯ нб рбспхуйЬуей
дхуЬсеуфз пумЮ пцейльменз уфзн еоЬфмйуз фщн
рспуфбфехфйкюн пхуйюн рпх чсзуймпрпйпэнфбй кбфЬ
фз дйбдйкбуЯб кбфбукехЮт.
Мзн брпиЭфефе рпфЭ бнфйкеЯменб уфз вЬуз фпх
цпэснпх дйьфй мрпсеЯ нб рспклзипэн жзмйЭт уфп
умЬлфп.
ЕккЯнзуз фпх цпэснпх
1. ЕрйлЭофе фп ерйихмзфь рсьгсбммб мбгейсЭмбфпт
уфсЭцпнфбт фпн ерйлпгЭб фщн РСПГСБММБФЩН.
2. ЕрйлЭофе фзн рспфейньменз иесмпксбуЯб гйб фп
рсьгсбммб Ю фзн ерйихмзфЮ уфсЭцпнфбт фпн
ерйлпгЭб ИЕСМПУФБФЗ.
Мйб лЯуфб ме фб рспгсЬммбфб мбгейсЭмбфпт кбй фйт
учефйкЭт рспфейньменет иесмпксбуЯет мрпсеЯфе нб
деЯфе уфп учефйкь рЯнбкб(влЭре РЯнбкб мбгейсЭмбфпт
уфп цпэснп).
КбфЬ фп мбгеЯсемб мрпсеЯфе рЬнфб:
нб бллЬоефе фп рсьгсбммб мбгейсЭмбфпт
енесгюнфбт уфпн ерйлпгЭб РСПГСБММБФЩН
нб бллЬоефе фз иесмпксбуЯб енесгюнфбт уфпн
ерйлпгЭб ИЕСМПУФБФЗ
нб рспгсбммбфЯуефе фз дйЬскейб кбй фзн юсб
фЭлпхт мбгейсЭмбфпт (влЭре кЬфщ)
нб дйбкьрфефе фп мбгеЯсемб цЭснпнфбт фпн
ерйлпгЭб РСПГСБММБФЩН уфз иЭуз 0.
Мзн брпиЭфефе бнфйкеЯменб бр ехиеЯбт уфз вЬуз
фпх цпэснпх дйьфй мрпсеЯ нб рспклзипэн жзмйЭт уфп
умЬлфп. ЧсзуймпрпйеЯфе мьнп фз иЭуз 1 фпх цпэснпх
уе ресЯрфщуз мбгейсемЬфщн ме фз упэвлб.
Ендейкфйкь цщфЬкй ÈÅÑÌПУФБФЗ
¼фбн еЯнбй бнбммЭнп, узмбЯней ьфй п цпэснпт
рбсЬгей иесмьфзфб. УвЮней ьфбн уфп еущфесйкь фпх
цпэснпх ерйфхгчЬнефбй з ерйлегмЭнз иесмпксбуЯб.
Уфп узмеЯп бхфь фп ендейкфйкь цщфЬкй бнЬвей кбй
увЮней дйбдпчйкЬ, деЯчнпнфбт ьфй п иесмпуфЬфзт еЯнбй
уе лейфпхсгЯб кбй дйбфзсеЯ уфбиесЮ фз иесмпксбуЯб.
Цщт фпх цпэснпх
БнЬвей уфсЭцпнфбт фпн ерйлпгЭб РСПГСБММБФЩН
уе мйб иЭуз дйбцпсефйкЮ фпх «0» кбй рбсбмЭней
бнбммЭнп ьуп п цпэснпт еЯнбй уе лейфпхсгЯб.
ЕрйлЭгпнфбт ме фпн ерйлпгЭб, фп цщт бнЬвей
чщсЯт нб енесгпрпйзиеЯ кбнЭнб иесмбнфйкь уфпйчеЯп.
Бесйумьт шэозт
Гйб фз меЯщуз фзт еощфесйкЮт иесмпксбуЯбт фпх
цпэснпх, псйумЭнб мпнфЭлб дйбиЭфпхн Энбн
бнемйуфЮсб шэозт рпх рбсЬгей сеэмб бЭсб мефбоэ
фпх рЯнбкб елЭгчпх кбй фзт рьсфбт фпх цпэснпх.
! Уфп фЭлпт фпх мбгейсЭмбфпт п бнемйуфЮсбт
рбсбмЭней енесгьт мЭчсйт ьфпх п цпэснпт шхчиеЯ
йкбнпрпйзфйкЬ.
ÄйЬфбоз буцЬлйузт рьсфбт
ПсйумЭнб мпнфЭлб
рбспхуйЬжпхн мйб
дйЬфбоз «буцЬлйузт
рьсфбт» ехсйукьменз
мефбоэ фпх рЯнбкб
чейсйумпэ кбй фзт
A
рьсфбт фпх цпэснпх.
Гйб нб бнпЯоефе фзн
рьсфб, рйЭуфе фз
дйЬфбоз A рпх
цбЯнефбй уфзн ейкьнб.
Нб иЭфефе рЬнфб фб укеэз мбгейсЭмбфпт уфп
рбсечьменп рлЭгмб.
16
Page 17

РспгсЬммбфб мбгейсЭмбфпт
! Гйб ьлб фб рспгсЬммбфб мбгейсЭмбфпт мрпсеЯфе нб
иЭуефе мйб иесмпксбуЯб мефбоэ 50°C кбй MAX, екфьт
брь фп:
BARBECUE (ухнйуфЬфбй нб иЭуефе мьнп уфп MAX)
GRATIN (ухнйуфЬфбй нб мзн оереснЬфе фз
иесмпксбуЯб фщн 200°C).
Рсьгсбммб РБСБДПУЙБКПУ ЦПХСНПУ
Енесгпрпйпэнфбй фб дэп иесмбнфйкЬ уфпйчеЯб, фп
кЬфщ кбй фп ерЬнщ. Ме фп рбсбдпуйбкь мбгеЯсемб,
еЯнбй кблэфесб нб чсзуймпрпйеЯфе мьнп Энб ерЯредп:
чсзуймпрпйюнфбт ресйууьфесб ерЯредб
ерйфхгчЬнефбй мйб бнпмпйьмпсцз кбфбнпмЮ фзт
иесмьфзфбт.
РсьгсбммбÃËÕÊÙÍ
ЕнесгпрпйеЯфбй фп рЯущ иесмбнфйкь уфпйчеЯп кбй
фЯиефбй уе лейфпхсгЯб п бнемйуфЮсбт, еобуцблЯжпнфбт
фзн кбфбнпмЮ фзт иесмьфзфбт уфп еущфесйкь фпх
цпэснпх ме фсьрп брбль кбй пмпйьмпсцп. Фп
рсьгсбммб бхфь ендеЯкнхфбй гйб фп шЮуймп
ехбЯуизфщн фспцЯмщн (р.ч. глхкюн рпх брбйфпэн
жэмщуз) кбй псйумЭнб укехЬумбфб mignon уе фсЯб
ерЯредб фбхфьчспнб.
Рсьгсбммб FAST COOKING
Енесгпрпйпэнфбй фб иесмбнфйкЬ уфпйчеЯб кбй фЯиефбй
уе лейфпхсгЯб п бнемйуфЮсбт еобуцблЯжпнфбт фз
дйбнпмЮ фзт иесмьфзфбт уфп еущфесйкь фпх цпэснпх,
уфбиесЬ кбй пмпйьмпсцб.
Фп рсьгсбммб ден брбйфеЯ рспиЭсмбнуз.
ЕндеЯкнхфбй йдйбЯфесб гйб мбгейсЭмбфб гсЮгпсб
рспухукехбумЭнщн фспцЯмщн (кбфешхгмЭнб Ю
рспмбгейсемЭнб). Фб кблэфесб брпфелЭумбфб
ерйфхгчЬнпнфбй чсзуймпрпйюнфбт мьнп Энб ерЯредп.
Рсьгсбммб ÐÏËХ МБГЕЙСЕМБ
Енесгпрпйпэнфбй ьлб фб иесмбнфйкЬ уфпйчеЯб (кЬфщ,
ерЬнщ кбй кхклйкь) кбй фЯиефбй уе лейфпхсгЯб п
бнемйуфЮсбт. ЕрейдЮ з иесмьфзфб еЯнбй уфбиесЮ уе
ьлп фп цпэснп, п бЭсбт шЮней кбй спдпкпккйнЯжей фп
цбгзфь пмпйьмпсцб. МрпсеЯфе нб чсзуймпрпйеЯфе фп
рплэ дэп ерЯредб фбхфьчспнб.
РсьгсбммбРЙФУБ
Енесгпрпйпэнфбй фп кЬфщ кбй фп кхклйкь иесмбнфйкЬ
уфпйчеЯб кбй фЯиефбй уе лейфпхсгЯб п бнемйуфЮсбт. П
ухндхбумьт бхфьт ерйфсЭрей гсЮгпсз иЭсмбнуз фпх
цпэснпх, ме йучхсЮ дйпчЭфехуз иесмьфзфбт кхсЯщт
брь кЬфщ. Бн чсзуймпрпйеЯфе ресйууьфесб брь Энб
ерЯредб фз цпсЬ, рсЭрей нб бллЬоефе фз иЭуз фщн
рйЬфщн уфз мЭуз фпх мбгейсЭмбфпт.
*ХрЬсчей мьнп уе псйумЭнб мпнфЭлб
Рсьгсбммб BARBECUE
ЕнесгпрпйеЯфбй фп ерЬнщ кенфсйкь иесмбнфйкь
уфпйчеЯп кбй фЯиефбй уе лейфпхсгЯб з упэвлб (ьрпх
хрЬсчей). З хшзлЮ кбй Ьмеуз иесмпксбуЯб фпх гксйл
ухнйуфЬфбй гйб фб фсьцймб рпх брбйфпэн хшзлЮ
ерйцбнейбкЮ иесмпксбуЯб. Гйб фпн фсьрп бхфьн
мбгейсЭмбфпт нб ксбфЬфе рЬнфб фзн рьсфб фпх
цпэснпх клейуфЮ.
Рсьгсбммб Рсьгсбммб GRATIN
ЕнесгпрпйеЯфбй фп ерЬнщ иесмбнфйкь уфпйчеЯп кбй
фЯиенфбй уе лейфпхсгЯб п бнемйуфЮсбт кбй з упэвлб
(ьрпх хрЬсчей). П ухндхбумьт фщн чбсбкфзсйуфйкюн
бхфюн бхоЬней фзн брпфелеумбфйкьфзфб фзт
мпнпкбфехихнфйкЮт иесмйкЮт бкфйнпвплЯбт фщн
иесмбнфйкюн уфпйчеЯщн мЭущ фзт дхнбмйкЮт
кхклпцпсЯбт фпх бЭсб уфп еущфесйкь фпх цпэснпх.
Бхфь рбсемрпдЯжей фп ерйцбнейбкь кЬшймп фщн
фспцЯмщн ерйфсЭрпнфбт уфз иесмьфзфб нб ейучщсЮуей
ущуфЬ. Гйб бхфьн фпн фсьрп мбгейсЭмбфпт нб
ксбфЬфе фзн рьсфб фпх цпэснпх клейуфЮ.
Злекфспнйкь Timer*
ЕрйфсЭрей фзн брейкьнйуз фзт юсбт кбй фзт
лейфпхсгЯбт фпх чспнпмЭфспх ме бнфЯуфспцз мЭфсзуз.
Плет пй лейфпхсгЯет кбиЯуфбнфбй енесгЭт мефЬ брь
ресЯрпх 7 дехфесьлерфб брь фз сэимйуЮ фпхт.
Рщт схимЯжефбй фп спльй
МефЬ фз уэндеуз фзт ухукехЮт уфп дЯкфхп Ю мефЬ
брь мйб дйбкпрЮ сеэмбфпт, з пиьнз бнбвпувЮней
уфп: 0:00
РйЭуфе фп кпхмрЯ
êáé + гйб нб иЭуефе фзн бксйвЮ юсб. Гйб фзн фбчеЯб
рспюизуз ксбфЬфе рбфзмЭнб фб кпхмрйЬ.
Ендечьменет ензмесюуейт фзт юсбт мрпспэн нб
дйенесгпэнфбй ербнблбмвЬнпнфбт фзн рбсбрЬнщ
ресйгсбцеЯуб цЬуз.
ËейфпхсгЯб чспнпмЭфспх
БнЬвей уфз лейфпхсгЯб бхфЮ рйЭжпнфбт фп кпхмрЯ
кбй уфзн пиьнз брейкпнЯжефбй фп уэмвплп n. Óå êÜèå
рЯеуз фпх кпхмрйпэ + бнфйуфпйчеЯ мйб бэозуз фпх
чсьнпх кбфЬ 10 дехфесьлерфб мЭчсй 99 лерфЬ кбй 50
дехфесьлерфб. МефЬ брь кЬие рЯеуз фпх кпхмрйпэ
бнфйуфпйчеЯ мйб бэозуз фпх чсьнпх еньт лерфпэ мЭчсй
Энб мЭгйуфп 10 щсюн.
Ме фп кпхмрЯ ерйуфсЭцефе рЯущ.
G кбй бкплпэищт фб кпхмрйЬ -
n
GR
17
Page 18

GR
Бцпэ иЭуефе фпн ерйихмзфь чсьнп, фп timer бсчЯжей
фзн бнфЯуфспцз мЭфсзуз. Ме фз лЮоз фпх чсьнпх,
екрЭмрефбй Энб зчзфйкь уЮмб рпх уфбмбфЬей
рйЭжпнфбт Энб прпйпдЮрпфе кпхмрЯ.
МрпсеЯфе нб брейкпнЯуефе фзн юсб рйЭжпнфбт фп
кпхмрЯ /, кбй фп уэмвплп
чспнпмЭфспх Эчей феиеЯ. МефЬ брь ресЯрпх 7
дехфесьлерфб, з пиьнз ерйуфсЭцей бхфьмбфб уфп
чспньмефсп.
Ãéá íá áêõñþóåôå Ýíá Þäç феиЭнфб чсьнп
n деЯчней ьфй з лейфпхсгЯб
РсбкфйкЭт ухмвпхлЭт мбгейсЭмбфпт
Уфб мбгейсЭмбфб ме бЭсб мз чсзуймпрпйеЯфе фйт
иЭуейт 1 кбй 5: з рплэ Ьмеуз ербцЮ ме фз иесмьфзфб
мрпсеЯ нб кЬшей фб рлЭпн ехбЯуизфб фсьцймб уфйт
хшзлЭт иесмпксбуЯет.
Уфб мбгейсЭмбфб BARBECUE кбй GRATIN,
ейдйкьфесб бн чсзуймпрпйеЯфе фз упэвлб, нб
фпрпиефеЯфе фпн лйрпухллЭкфз уфз иЭуз 1 гйб фз
ухллпгЮ фщн хрплейммЬфщн мбгейсЭмбфпт (жпхмйЬ Ю/
êáé ëßðç).
РйЭуфе фп кпхмрЯ мЭчсй з пиьнз нб брейкпнЯуей
0: 00.
Сэимйуз Энфбузт фпх зчзфйкпэ уЮмбфпт
Бцпэ ерйлЭоефе кбй ерйвевбйюуефе фйт схимЯуейт фпх
сплпгйпэ, мЭущ фпх кпхмрйпэ мрпсеЯфе нб
схимЯуефе фзн Энфбуз фпх зчзфйкпэ уЮмбфпт
ухнбгесмпэ.
ÐÏËÕ-ÌÁÃźÑÅÌÁ
Нб чсзуймпрпйеЯфе фйт иЭуейт 2 кбй 4, иЭфпнфбт уфз
2 фб фсьцймб рпх брбйфпэн ресйууьфесз
иесмьфзфб.
Нб фпрпиефеЯфе фп лйрпухллЭкфз чбмзлЬ кбй фп
рлЭгмб шзлЬ.
BARBECUE
ФпрпиефеЯфе фп рлЭгмб уфз иЭуз 3 Ю 4, фпрпиефеЯфе
фб фсьцймб уфп кЭнфсп фпх рлЭгмбфпт.
УхнйуфЬфбй нб иЭфефе фз уфЬимз енЭсгейбт уфп
мЭгйуфп. Фп Ьнщ иесмбнфйкь уфпйчеЯп елЭгчефбй
брь Энб иесмпуфЬфз кбй мрпсеЯ нб мзн рбсбмЭней
ухнечют бнбммЭнп.
ÖϾÑÍÏÓ ÐºÔÓÁ
ЧсзуймпрпйЮуфе Энб фбшЯ елбцспэ блпхмйнЯпх,
фпрпиефюнфбт фп уфп рлЭгмб рпх убт рбсЭчефбй.
Гйб мйб рЯфуб фсбгбнйуфЮ, мз чсзуймпрпйеЯфе фп
лйрпухллЭкфз рпх, ерймзкэнпнфбт фпхт чсьнпхт
шзуЯмбфпт, рбсемрпдЯжей фп учзмбфйумь
кспэуфбт.
18
Уе ресЯрфщуз ме рЯфует ме рлпэуйб гЭмйуз,
ухнйуфЬфбй нб ейуЬгефе фз мпфубсЭлб уфз мЭуз
фпх шзуЯмбфпт.
Page 19

РЯнбкбт шзуЯмбфпт уфп цпэснп
ÐспгсЬммбфбФсьцймб ÂÜñïò
(Kg)
ÈÝóç ôùí
ерйрЭдùí
ÐñïèÝñ ìáí ó
ç (ëåð ôÜ)
Ðспфейньменз
èесмп ксбуЯ б
Чсьнпт øзуЯмбфпт
GR
(лерфЬ)
Ðбсбдпуйбк
ьт Цпэснпт
Цпэснпт
Æбчбспрлб
óôéêÞò
Fast cooking
Ðïëõ-
мбгеЯсемб
Цпэснпт
Ðßôóá
Barbecue
Gratin
ÐÜðé á
Øзфь мпучбсЯуйп Þ впдйнь
Øзфь чпйсйнь
Мрй укьф б (рбуфбцсьлб)
КспуфЬфет
КспуфЬфет
КЭй к цспэфщн
Plum-cake
Рбнф еурЬнй
КсЭрет ме гЭмйуз (уе 2 иЭуейт)
Мрй укьф б мйксюн дйбуфЬуещн (уе 2
иЭуейт)
БлмхсЬ жэмзт ме фхсЯ (уе 2 иЭуейт)
Мрй н й Э (уе 3 иЭуейт)
Мрй укьф б (уе 3 иЭуейт)
МбсЭгкет (уе 3 иЭуейт)
ÊáôåшхгмЭнб
РЯфуб
РбуфЯф уйп ме кплпкхиЬкйб кбй
кбсбвЯдет
ЧщсйЬфй кз урбнбкьрйфб
ØщмЬкйб
ËáæÜíéá
ФсбгбнЬ шщмЬкйб
Ðспшзм Энб
ЦфесЬ кпфьрпхлпх спдпкпккйнйумЭнб 0.4 2 - 200 20-25
ЦсЭукб Фсьцймб
Мрй укьф б (рбуфбцсьлб)
Plum-cake
БлмхсЬ жэмзт ме фхсЯ
РЯфуб (уе 2 иЭуейт)
ËáæÜíéá
Áñíß
Øзфь кпфьрпхлп + рбфЬфет
УкпхмрсЯ
Plum-cake
Мрй н й Э (уе 2 иЭуейт)
Мрй укьф б (уе 2 иЭуейт)
Рбнф еурЬнй (уе 1 иЭуз)
Рбнф еурЬнй (уе 2 иЭуейт)
БлмхсЬ кЭйк
РЯфуб
Шзфь мпучбсЯуйп Ю впдйнь
Кпфьрпхлп
Глюуует кбй упхрйЭт
УпхвлЬкйб брь кблбмЬсйб кбй гбсЯдет
УпхрйЭт
ЦйлЭфп мрбкблй Ьспх
ЛбчбнйкЬ уфп рлЭгмб
Мрс й жьлет мпучбсЯуйет
ЛпхкЬнйкб
Hamburger
УкпхмрсЯ
Фпуф (Ю цсхгбнйЬ)
Кпфьрпхлп уфп гксйл
УпхрйЭт
4
1
1
1
-
1
0.5
1
0.7
0.5
1.2
0.6
0.4
0.7
0.7
0.5
0.3
0.4
0.5
0.3
0.5
0.4
0.4
0.3
0.6
0.2
1
1
1
1+1
1
1
0.5
0.5
0.5
1
1.5
0.5
1
1
0.7
0.6
0.6
0.8
0.4
0.8
0.6
0.6
1
êáé 6
1.5
1.5
3
3
3
3
3
3
2 Þ 3
3
3
2 êáé 4
2 êáé 4
2 êáé 4
1, 3 êáé 5
1, 3 êáé 5
1, 3 êáé 5
2
2
2
2
2
2
2
2
2
2
2 êáé 4
3
2
2 êáé 4
2
2
2 êáé 4
2 êáé 4
2
2 êáé 4
3
3
2
2 Þ 3
4
4
4
4
3 Þ 4
4
4
4
4
4
2
2
15
15
15
15
15
15
15
15
15
15
15
15
15
15
15
15
10
10
15
10
10
10
10
10
10
15
15
10
10
10
10
200
200
200
180
180
180
180
180
160
200
190
210
180
180
90
-
-
-
-
-
-
-
-
-
-
-
-
-
-
-
-
-
-
-
-
250
200
220
200
200
180
220
200
180
210
230
180
180
200
180
170
190
180
170
170
200
220
220
180
Ma x
Ma x
Ma x
Ma x
Ma x
Ma x
Ma x
Ma x
Ma x
Ma x
200
200
65-75
70-75
70-80
15-20
30-35
20-30
40-45
40-50
25-30
30-35
20-25
15-20
20-25
20-25
180
12
20
30-35
25
35
25-30
15-20
15-18
45
10-12
15-20
30-35
40-45
60-70
30-35
40-50
20-25
10-15
15-20
20-25
25-30
15-20
25-30
60-70
10-12
8-10
10-15
10-15
15-20
15-20
15-20
10-12
15-20
3-5
55-60
30-35
19
Page 20

ЧсЮуз фзт хблпкесбмйкЮт ерйцЬнейбт
мбгейсЭмбфпт,
GR
З кьллб рпх ецбсмьжефбй уфйт ерендэуейт бцЮней
псйумЭнб Ячнз гсЬупх уфп гхблЯ. Рсйн чсзуймпрпйЮуефе
фз ухукехЮ, рспфеЯнефбй нб фб брпмбксэнефе ме Энб
ейдйкь гйб фз ухнфЮсзуз мз брпохуфйкь рспъьн. Уфйт
рсюфет юсет лейфпхсгЯбт мрпсеЯ нб бнфйлзциеЯфе мйб
пумЮ лЬуфйчпх, рпх ьмщт иб еобцбнйуфеЯ уэнфпмб.
Пй ресйпчЭт мбгейсЭмбфпт
Фп рлбЯуйп мбгейсЭмбфпт дйбиЭфей злекфсйкЬ иесмбнфйкЬ
уфпйчеЯб. КбфЬ фз лейфпхсгЯб гЯнпнфбй кьккйнб:
A. Бкфйнпвьлет иесмбнфйкЭт
A
B
C
иесмпксбуЯб фзт ресйпчЮт мбгейсЭмбфпт еЯнбй
мегблэфесз фщн 60°C, бкьмз кбй уфзн ресЯрфщуз рпх фп
иесмбнфйкь уфпйчеЯп Эувзуе бллЬ еЯнбй бкьмз жеуфь.
БнЬшфе кбй увЮуфе фйт жюнет мбгейсЭмбфпт
РбсбдпуйбкЭт ресйпчЭт мбгейсЭмбфпт
Пй рбсбдпуйбкЭт ресйпчЭт мбгейсЭмбфпт брпфелпэнфбй
брь кхклйкЬ иесмбнфйкЬ уфпйчеЯб. КбиЯуфбнфбй кьккйнб
мефЬ брь дЭкб дехфесьлерфб ресЯрпх брь фп ЬнбммЬ
фпхт.
КЬие ресйпчЮ мбгейсЭмбфпт дйбиЭфей Энб чейсйуфЮсйп рпх
ерйфсЭрей фзн ерйлпгЮ 12 дйбцпсефйкюн иесмпксбуйюн,
брь мйб елЬчйуфз фймЮ 1 Эщт мйб мЭгйуфз 12.
ресйпчЭт
B
B. Бкфйнпвьлет ресйпчЭт
мбгейсЭмбфпт ерекфЬуймет
A
C. Ендейкфйкь цщфЬкй хрьлпйрзт
иесмьфзфбт: ерйузмбЯней ьфй з
ÈЭуз Б кфйнщфЮ еуфЯб
0
УвзуфЮ
1
Гйб фп лйюуймп впхфэспх кбй упкплЬфбт
2
3
4
5
6
7
8
9
10
11
12
)
РсбкфйкЭт ухмвпхлЭт гйб фз чсЮуз фзт
ерйцЬнейбт мбгейсЭмбфпт
Ãйб нб рефэчефе фйт вЭлфйуфет ерйдьуейт áðü фп рлбЯуйп
еуфйюн:
Íá чсзуймпрпйеЯфе кбфубсьлет ме вЬуз, ерЯредз кбй
мегЬлпх рЬчпхт, гйб нб еЯуфе вЭвбйпй ьфй
ецбсмьжпхн фЭлейб уфз иесмбнфйкЮ ресйпчЮ.
иЭсмбнуз хгсюн
Ãéá
Гйб ксЭмет кбй уЬлфует
Гйб мбгеЯсемб уфз иесмпксбуЯб всбумпэ
Ãéá øçôÜ
Гйб мегЬлб всбуфЬ
Гйб фзгЬнйумб
ЕйубгщгЮ бмцьфесщн фщн жщнюн шзуЯмбфпт
ЕрекфЬуймет ресйпчЭт мбгейсЭмбфпт
Фб ерекфЬуймб иесмбнфйкЬ уфпйчеЯб (B) бнбгнщсЯжпнфбй
брь фзн рбспхуЯб дйрлЮт иесмбнфйкЮт ресйпчЮт.
МрпсеЯфе нб бнЬшефе мьнп фзн мйксьфесз еущфесйкЮ
жюнз Ю бмцьфесет.
Фп чейсйуфЮсйп ерйфсЭрей фзн ерйлпгЮ мефбоэ дэп
ерйрЭдщн йучэпт, бмцьфесб схимйжьменб брь мйб
елЬчйуфз фймЮ 1 мЭчсй мйб мЭгйуфз 12:
уфсЭцпнфбт фпн ерйлпгЭб деойьуфспцб брь 1 мЭчсй
12 фЯиефбй фп чбмзльфесп ерЯредп йучэпт.
УфсЭцпнфбт фпн ерйлпгЭб мЭчсй фп фЭлпт фзт
дйбдспмЮт (
фЯнбгмб, ейуЬгефбй з мЭгйуфз йучэт рпх мрпсеЯ нб
схимйуфеЯ ме фз уейсЬ фзт мефбоэ 12 кбй 1 уфсЭцпнфбт
фпн ерйлпгЭб бсйуфесьуфспцб. Гйб бн ербнбцЭсефе
фзн елЬчйуфз фймЮ йучэпт, еЯнбй бнбгкбЯп нб
ербнбцЭсефе фпн ерйлпгЭб уфз иЭуз 0.
Уфзн ресЯрфщуз дйрлюн жщнюн мбгейсЭмбфпт, фп рсюфп
мЭспт фзт ресйуфспцЮт енесгпрпйеЯ фз мйксьфесз жюнз
мбгейсЭмбфпт (еущфесйкЮ). Гйб нб енесгпрпйЮуефе
бмцьфесет (еущфесйкЮ кбй еощфесйкЮ), еЯнбй бнбгкбЯп нб
уфсЭшефе фпн ерйлпгЭб мЭчсй фЭлпт дйбдспмЮт (
ерйлЭоефе фп ерйихмзфь ерЯредп йучэпт мефбоэ 12 кбй 1.
A), рпх енфпрЯжефбй брь Энб елбцсэ
A) êáé íá
Íá чсзуймпрпйеЯфе рЬнфб кбфубсьлет дйбмЭфспх
ербскпэт гйб фзн кЬлхшз фзт иесмбнфйкЮт еуфЯбт,
гйб нб ерщцелзиеЯфе брь фз ухнплйкЮ рбсбгьменз
иесмьфзфб.
Íá вевбйщиеЯфе ьфй з вЬуз фщн кбфубсплюн еЯнбй
брьлхфб уфегнЮ кбй кбибсЮ: з ецбсмпгЮ ме фйт
жюнет мбгейсЭмбфпт, Эфуй, иб еЯнбй вЭлфйуфз кбй фьуп
фп рлбЯуйп мбгейсЭмбфпт ьуп кбй пй кбфубсьлет иб
бнфЭопхн ресйууьфесп.
Íá брпцеэгефе нб чсзуймпрпйеЯфе фйт Ядйет
кбфубсьлет рпх чсзуймпрпйеЯфе уфпхт кбхуфЮсет
бесЯпх: з ухгкЭнфсщуз иесмьфзфбт уфпхт кбхуфЮсет
бесЯпх мрпсеЯ нб рбсбмпсцюуей фз вЬуз фзт
кбфубсьлбт, рпх чЬней фзн ецбсмпгЮ фзт.
Мзн бцЮнефе рпфЭ мйб жюнз мбгейсЭмбфпт бнбммЭнз
чщсЯт кбфубсьлб ерЬнщ дйьфй иб мрпспэуе нб
чблЬуей.
20
Page 21

РспцхлЬоейт кбй ухмвпхлЭт
З ухукехЮ учедйЬуфзке кбй кбфбукехЬуфзке уэмцщнб
ме фпхт дйеинеЯт кбньнет буцблеЯбт.
Пй рспейдпрпйЮуейт рпх бкплпхипэн рбсЭчпнфбй гйб
льгпхт буцблеЯбт кбй рсЭрей нб дйбвбуфпэн рспуекфйкЬ.
ÃенйкЮ буцЬлейб
Пй пдзгЯет бхфЭт йучэпхн мьнп гйб фйт чþñåò
рсппсйумпэ фб уэмвплб фщн прпЯщн
брейкпнЯжпнфбй уфп егчейсЯдйп кбй уфзн рйнбкЯдб
мзфсþпх фзт ухукехЮт.
З ухукехЮ бхфЮ учедйЬуфзке гйб мз ербггелмбфйкЮ
чсЮуз уфп еущфесйкь кбфпйкЯбт.
З ухукехЮ ден егкбиЯуфбфбй уе еощфесйкь чюсп, кй пэфе
бн п чюспт укерЬжефбй. ЕЯнбй рплэ ерйкЯндхнп нб фзн
бцЮуефе екфеиеймЭнз уе вспчЮ кбй кбкпкбйсЯб
Мзн бггЯжефе фз мзчбнЮ ме рьдйб гхмнЬ Ю ме фб чЭсйб
Ю фб рьдйб всегмЭнб.
З ухукехЮ рсЭрей нб чсзуймпрпйеЯфбй гйб фп мбгеЯсемб
фспцЯмщн, мьнп брь Ьфпмб енЮлйкб кбй уэмцщнб ме фйт
пдзгЯет рпх бнбцЭспнфбй уфп рбсьн егчейсЯдйп.
З ухукехЮ бхфЮ бцпсЬ мйб ухукехЮ кбфзгпсЯбт 1
(мпнщмЭнз) Ю кбфзгпсЯбт 2 хрпкбфзгпсЯбт 1
(енфпйчйумЭнз мефбоэ дэп ерЯрлщн).
КбфЬ фз чсЮуз фзт ухукехЮт фб иесмбнфйкЬ
уфпйчеЯб кбй псйумЭнб мЭсз фзт рьсфбт фпх
цпэснпх кбиЯуфбнфбй рплэ иесмЬ. РспуЭчефе
нб мзн фб бггЯжефе кбй ксбфЬфе фб рбйдйЬ
мбксйЬ.
ВевбйщиеЯфе ьфй фб кблюдйб фспцпдпуЯбт Ьллщн
злекфсйкюн ухукехюн ден Эсчпнфбй уе ербцЮ ме фб
иесмЬ мЭсз фпх цпэснпх.
Мзн кблэрфефе рпфЭ фб бнпЯгмбфб бесйумпэ кбй
дйбурпсЬт фзт иесмьфзфбт.
Уфйт злекфсйкЭт еуфЯет ден рсЭрей нб фпрпиефпэнфбй
кбфубсьлет буфбиеЯт Ю рбсбмпсцщмЭнет, гйб нб
брпцехчипэн бнбфспрЭт. ФпрпиефеЯфе фйт уфп рлбЯуйп
мбгейсЭмбфпт ме фйт лбвЭт рспт фп кЭнфсп фзт
ухукехЮт.
ЧсзуймпрпйеЯфе рЬнфб гЬнфйб цпэснпх гйб нб вЬжефе Ю
нб вгЬжефе укеэз.
Мз чсзуймпрпйеЯфе еэцлекфб хгсЬ (пйньрнехмб,
венжЯнз, клр.) рлзуЯпн фзт ухукехЮт ьфбн бхфЮ еЯнбй
уе чсЮуз.
Мзн фпрпиефеЯфе еэцлекфп хлйкь уфп кЬфщ дйбмЭсйумб Ю
уфп еущфесйкь фпх цпэснпх: бн з ухукехЮ феиеЯ
обцнйкЬ уе лейфпхсгЯб иб мрпспэуе нб рЬсей цщфйЬ.
¼фбн з ухукехЮ ден чсзуймпрпйеЯфбй, нб вевбйюнеуфе
рЬнфб ьфй пй ерйлпгеЯт еЯнбй уфз иЭуз 0.
Мз вгЬжефе фп вэумб брь фзн злекфсйкЮ рсЯжб
фсбвюнфбт фп кблюдйп, бллЬ рйЬнпнфбт фп вэумб.
Мзн екфелеЯфе есгбуЯет кбибсйумпэ Ю ухнфЮсзузт
чщсЯт рсюфб нб брпухндЭуефе фз ухукехЮ брь фп
злекфсйкь дЯкфхп.
Бн з ухукехЮ чблЬуей, мзн рспурбиЮуефе рпфЭ нб
фзн ерйукехЬуефе мьнпй убт. Пй ерйукехЭт рпх
дйенесгпэнфбй брь Ьфпмб мз ейдйкехмЭнб мрпсеЯ нб
рспкблЭупхн жзмйЭт Ю ресбйфЭсщ дхулейфпхсгЯет фзт
ухукехЮт. КблЭуфе фзн ФечнйкЮ ÕрпуфЮсйоз.
Мзн брпиЭфефе вбсйЬ бнфйкеЯменб уфзн бнпйчфЮ рьсфб
фпх цпэснпх.
Пй еущфесйкЭт ерйцЬнейет фпх ухсфбсйпэ (бн
хрЬсчей) мрпсеЯ иесмбнипэн.
ÄйЬиеуз
ДйЬиеуз фпх хлйкпэ ухукехбуЯбт: нб ецбсмьжефе фпхт
фпрйкпэт кбнпнйумпэт, юуфе пй ухукехбуЯет нб
мрпспэн нб ербнбчсзуймпрпйзипэн.
З ЕхсщрбъкЮ ПдзгЯб 2002/96/CE гйб фб брпссЯммбфб
злекфсйкюн кбй злекфспнйкюн ухукехюн (RAEE),
рспвлЭрей ьфй пй пйкйбкЭт злекфсйкЭт ухукехЭт ден
рсЭрей нб дйбфЯиенфбй уфзн кбнпнйкЮ спЮ фщн уфесеюн
буфйкюн брпссйммЬфщн. Пй дйбфеиеЯует ухукехЭт
рсЭрей нб ухллЭгпнфбй чщсйуфЬ гйб нб
велфйуфпрпйеЯфбй фп кьуфпт бнЬкфзузт кбй бнбкэклщузт
фщн хлйкюн рпх фйт ухниЭфпхн кбй нб брпцеэгпнфбй
дхнзфйкЭт жзмйЭт уфзн хгеЯб кбй уфп ресйвЬллпн. Фп
уэмвплп фпх дйбгсбммЭнпх кблбийпэ цЭсефбй уе ьлб
фб рспъьнфб гйб нб ихмЯжей уфпн кЬфпчп фзн
хрпчсЭщуз чщсйуфЮт ухллпгЮт.
Пй дйбфйиЭменет злекфсйкЭт ухукехЭт мрпспэн нб
рбсбдЯнпнфбй уфз дзмьуйб хрзсеуЯб ухллпгЮт, нб фйт
цЭснефе уфйт бнфЯуфпйчет дзмпфйкЭт ресйпчЭт Ю, бн
рспвлЭрефбй брь фз учефйкЮ еинйкЮ нпмпиеуЯб, нб фйт
ерйуфсЭцефе уфпхт мефбрщлзфЭт ме фзн ехкбйсЯб
бгпсЬт нЭпх рспъьнфпт йупдэнбмпх фэрпх.
¼лпй пй кэсйпй рбсбгщгпЯ злекфсйкюн пйкйбкюн
ухукехюн дсбуфзсйпрпйпэнфбй уфз дзмйпхсгЯб кбй
дйбчеЯсйуз ухуфзмЬфщн ухллпгЮт кбй дйЬиеузт фщн
рблйюн кбй дйбфйиЭменщн ухукехюн.
УевбуфеЯфе кбй рспуфбфеэуфе фп ресйвЬллпн
ИЭфпнфбт уе лейфпхсгЯб фп цпэснп уфб щсЬсйб рпх
кхмбЯнпнфбй брь бсгЬ фп брьгехмб мЭчсй фйт рсюфет
рсщйнЭт юсет, ухмвЬллефе уфзн меЯщуз фпх цпсфЯпх
брпссьцзузт фщн ерйчейсЮуещн злекфсйкпэ.
Нб дйбфзсеЯфе рЬнфб фзн рьсфб фпх цпэснпх клейуфЮ
уфб рспгсЬммбфб BARBECUE кбй GRATIN, фьуп гйб
нб рефэчефе вЭлфйуфб брпфелЭумбфб ьуп кбй гйб
еопйкпньмзуз енЭсгейбт (10% ресЯрпх).
Нб елЭгчефе кбй нб дйбфзсеЯфе кбибсЭт фйт фуймпэчет
юуфе нб мзн рбспхуйЬжпхн хрплеЯммбфб фспцЮт кбй
нб ецбсмьжпхн кблЬ уфзн рьсфб, брпупвюнфбт
дйбурпсЬ фзт иесмьфзфбт.
GR
21
Page 22

УхнфЮсзуз кбй цспнфЯдб
GR
УвЮуфе фз ухукехЮ
Рсйн брь кЬие есгбуЯб, нб брпухндЭефе фз ухукехЮ брь фп
дЯкфхп злекфсйкЮт фспцпдпуЯбт.
Кбибсйумьт фзт ухукехЮт
Брпцеэгефе фз чсЮуз дйбвсщфйкюн Ю брпохуфйкюн
брпссхрбнфйкюн, ьрщт фб оелекйбуфйкЬ кбй фб бнфйукщсйбкЬ
рспъьнфб, фб брпссхрбнфйкЬ уе укьнз Ю уцпхггЬсйб ме
брпохуфйкЮ ерйцЬнейб, дйьфй мрпсеЯ нб оэупхн бнербньсищфб
фзн ерйцЬнейб.
Мз чсзуймпрпйеЯфе рпфЭ укпэрет бфмпэ Ю хшзлЮт рЯеузт
гйб фпн кбибсйумь фзт ухукехЮт.
КбибсЯжефе фп гхблЯ фзт рьсфбт ме уцпхггбсЬкйб кбй
мз брпохуфйкЬ рспъьнфб кбй уфегнюнефе ме Энб мблбкь
рбнЯ. Мз чсзуймпрпйеЯфе хлйкЬ фсбчйЬ брпохуфйкЬ Ю
мефбллйкЬ оЭуфсб бкпнйумЭнб рпх мрпсеЯ нб оэупхн
фзн ерйцЬнейб кбй нб сбгЯупхн фп гхблЯ.
Фб еощфесйкЬ ерйумблфщмЭнб Ю бнпоеЯдщфб мЭсз кбй пй
лбуфйчЭнйет фуймпэчет мрпспэн нб кбибсЯжпнфбй ме Энб
уцпхггбсЬкй всегмЭнп ме члйбсь несь кбй пхдЭфесп
убрпэнй. Гйб фпхт дэукплпхт лекЭдет, чсзуймпрпйЮуфе
рспъьнфб ейдйкЬ. МефЬ фпн кбибсйумь, нб оерлЭнефе ме
Ьципнп несь кбй нб уфегнюнефе. Мз чсзуймпрпйеЯфе
брпохуфйкЭт укьнет Ю дйбвсщфйкЭт пхуЯет.
Фп еущфесйкь фпх цпэснпх кбибсЯжефбй кбфЬ рспфЯмзуз
кЬие цпсЬ мефЬ кЬие чсЮуз, ьуп еЯнбй бкьмз члйбсь.
Нб чсзуймпрпйеЯфе жеуфь несь кбй брпссхрбнфйкь, нб
оерлЭнефе ерймелют кбй нб уфегнюнефе ме мблбкь рбнЯ.
Брпцеэгефе фб брпохуфйкЬ рспъьнфб.
Фб боеупхЬс мрпспэн нб рлЭнпнфбй убн кбнпнйкЬ
укеэз, бкьмз кбй уфп рлхнфЮсйп рйЬфщн.
ВсщмйЬ кбй лЯрз брпмбксэнпнфбй брь фпн рЯнбкб
чейсйумпэ ме уцпхггЬсй ьчй брпохуфйкь Ю ме мблбкь
рбнЯ.
Фп бнпоеЯдщфп бфуЬлй мрпсеЯ нб лекйбуфеЯ бн рбсбмЭней
уе ербцЮ ерЯ мбксьн ме несь ме мегЬлз ресйекфйкьфзфб
блЬфщн Ю ме вЯбйб брпссхрбнфйкЬ (ресйЭчпнфб
цщуцьсп). МефЬ фпн кбибсйумь, нб оерлЭнефе ме
Ьципнп несь кбй нб уфегнюнефе ерймелют. ЕрйрлЭпн
еЯнбй укьрймп нб уцпхггЯжефе ендечьменб оечейлЯумбфб
неспэ.
ЕлЭгофе фйт фуймпэчет фпх цпэснпх
Нб елЭгчефе фбкфйкЬ фйт фуймпэчет гэсщ брь фзн
рьсфб фпх цпэснпх. Бн еЯнбй цибсмЭнет,
брехихниеЯфе уфп рлзуйЭуфесп КЭнфсп ФечнйкЮт
ÕрпуфЮсйозт. Ден ухнйуфЬфбй нб чсзуймпрпйеЯфе фп
цпэснп ьуп ден Эчпхн бнфйкбфбуфбиеЯ пй фуймпэчет.
БнфйкбфЬуфбуз фзт лхчнЯбт цщфйумпэ фпх
цпэснпх
1. Бцпэ брпухндЭуефе фп цпэснп
брь фп злекфсйкь дЯкфхп, вгЬлфе фп
гхЬлйнп кбрЬкй фзт иЮкзт фзт
лхчнЯбт (влЭре ейкьнб).
2. ВгЬлфе фз лхчнЯб кбй
бнфйкбфбуфЮуфе фзн ме мйб
бнЬлпгз: фЬузт 230V, йучэпт 25
W, уэндеузт E 14.
3. ОбнбмпнфЬсефе фп кбрЬкй кбй
ербнбухндЭуфе фп цпэснп уфп злекфсйкь дЯкфхп.
Кбибсйумьт фзт хблпкесбмйкЮт
ерйцЬнейбт мбгейсЭмбфпт
Брпцэгефе фз чсЮуз дйбвсщфйкюн Ю брпохуфйкюн
брпссхрбнфйкюн, ьрщт фб рспъьнфб уе цйЬлет spray
гйб barbecue кбй цпэснпхт, оелекйбуфйкЬ кбй рспъьнфб
бнфйукщсйбкЬ, фб брпссхрбнфйкЬ уе укьнз кбй фб
уцпхггЬсйб ме лейбнфйкЮ ерйцЬнейб: мрпспэн нб
гсбфупхнЯупхн бнербньсищфб фзн ерйцЬнейб.
УхнЮищт бскеЯ нб рлэнефе фп рлбЯуйп мбгейсЭмбфпт
ме Энб уцпхггЬсй всегмЭнп кбй нб фп уфегнюуефе ме
брпсспцзфйкь чбсфЯ кпхжЯнбт.
Бн фп рлбЯуйп еуфйюн еЯнбй йдйбЯфесб лесщмЭнп,
ресЬуфе фп ме ейдйкь рспъьн гйб фпн кбибсйумь
хблпкесбмйкюн ерйцбнейюн, оерлэнефе кблЬ кбй
уфегнюуфе ерймелют.
Гйб нб брпмбксэнефе фб рйп бниекфйкЬ хрплеЯммбфб
всщмйЬт чсзуймпрпйЮуфе Энб кбфЬллзлп оЭуфсп (ден
рбсЭчефбй). БцбйсЭуфе бмЭущт фп хлйкь рпх чэизке,
чщсЯт нб ресймЭнефе нб ксхюуей з ухукехЮ, юуфе нб
фб хрплеЯммбфб нб мз учзмбфЯупхн кспэуфет.
ЕрйфхгчЬнпнфбй еобйсефйкЬ брпфелЭумбфб
чсзуймпрпйюнфбт Энб уцпхггбсЬкй брь бфублЭнйп
бнпоеЯдщфп уэсмб- ейдйкь гйб хблпкесбмйкЭт
ерйцЬнейет- всегмЭнп ме убрпхньнесп.
Бн уфп рлбЯуйп еуфйюн лйюупхн кбфЬ лЬипт пхуЯет
ьрщт рлбуфйкь Ю жЬчбсз, бцбйсЭуфе фйт бмЭущт ме
фп оЭуфсп, ьуп з ерйцЬнейб еЯнбй бкьмз жеуфЮ.
Бцпэ кбибсйуфеЯ, мрпсеЯфе нб ресйрпйзиеЯфе фзн
ерйцЬнейб ме Энб ейдйкь рспъьн гйб фз ухнфЮсзуз кбй
фзн рспуфбуЯб: фп бьсбфп цйлм рпх бцЮней фп
рспъьн бхфь рспуфбфеэей фзн ерйцЬнейб уе
ресЯрфщуз рпх чхиеЯ кЬфй кбфЬ фп мбгеЯсемб.
УхуфЮнефбй нб екфелеЯфе фйт есгбуЯет бхфЭт ме фз
ухукехЮ члйбсЮ (ьчй жеуфЮ) Ю ксэб.
ИхмзиеЯфе нб оерлЭнефе рЬнфб ме кбибсь несь кбй
нб уфегнюнефе ерймелют фзн ерйцЬнейб: фб
хрплеЯммбфб иб мрпспэубн нб гЯнпхн кспэуфет уфб
ерьменб мбгейсЭмбфб.
Eidik£ proiÕnta gi£ th
kaqariÕthta tou ualokeramikoÝ
ApoxustikÕ me l£ma kai l£mej
antikat£stashj
Stahl-Fix, SWISSCLEANER, WK
TOP
Alla proiÕnta gi£ ualokeramikÕ Katast¾mata oikiakèn
Pou mpore te na ta
promhqeute te
Katast¾mata gi£ e dh
Hobby kai sidhrikën
Hobby, Supermarkets
eidèn
ФечнйкЮ хрпуфЮсйоз
Èб рсЭрей нб гнщуфпрпйеЯфе фб бкьлпхиб:
фп мпнфЭлп фзт ухукехЮт (Mod.)
фпн бсйимь уейсЬт (S/N)
БхфЭт пй фелехфбЯет рлзспцпсЯет всЯукпнфбй уфзн
фбмрелЯфуб чбсбкфзсйуфйкюн рпх всЯукефбй уфз
ухукехЮ Ю/кбй уфз ухукехбуЯб.
22
Page 23

Instruções para a utilização
FOGÃO E FORNO
GB
English, 1 ЕллзнйкЬ,12
GR
CE6VP5 GR
PT
Português, 23
Índice
PT
Instalação, 24-25
Posicionamento e nivelamento
Ligação eléctrica
Dados técnicos
Descrição do aparelho, 26
Vista de conjunto
Painel de comandos
Início e utilização, 27-30
Ligar o forno
Programas
Timer electrónico
Conselhos práticos para a cozedura
Tabela de cozedura no forno
Utilização do plano de cozedura de
vitrocerâmica, 31
Zonas de cozedura
Ligar e desligar as zonas de cozedura
Precauções e conselhos, 32
Segurança geral
Eliminação
Respeitar e preservar o meio ambiente
Manutenção e cuidados, 33
Desligar o aparelho
Limpeza do aparelho
Substituir a lâmpada de iluminação do forno
Limpar o plano de cozedura de vitrocerâmica
Assistência técnica
Page 24

Instalação
PT
Antes de colocar em funcionamento o novo aparelho,
leia atentamente este livrete de instruções, pois
contém informações importantes sobre a instalação e
o funcionamento seguro do aparelho.
Guarde as instruções de funcionamento do aparelho
para consultas posteriores: Certifique-se de que as
instruções sejam conservadas junto com o aparelho em
caso de venda, cessão ou mudança.
A instalação do aparelho deve ser realizada segundo
estas instruções e por pessoal profissional qualificado.
Qualquer intervenção de regulação ou manutenção,
deve ser efectuada com o aparelho desligado da rede
eléctrica.
Posicionamento e nivelamento
É possível instalar o aparelho ao lado de móveis não
mais altos que a superfície do plano de cozedura.
Assegurar-se de que a parede em contacto com a
parte traseira do aparelho seja de um material não
inflamável e resistente ao calor (T 90°C).
Para uma instalação correcta:
colocar o aparelho na cozinha, na sala de jantar ou
numa sala única (não na casa de banho);
Se o plano de cozedura for mais alto que os
móveis, o aparelho deverá ser posicionado a pelo
menos 200 mm de distância dos mesmos.
Se o fogão for instalado embaixo de uma prateleira,
esta deverá estar pelo menos a 420 mm do plano
de cozedura.
HOOD
Min. mm.
600
mm.
420
Min.
instalado conforme as instruções contidas no
respectivo livrete.
Nivelamento
Tal distância deve ser de
700 mm se as prateleiras
forem de material
inflamável (ver figura);
Não colocar cortinas
mm. with hood
420
mm. without hood
650
atrás do fogão ou a
700
Min. mm.
min.
min.
menos de 200 mm dos
seus lados;
Se houver exaustor, o
mesmo deverá ser
Se for necessário nivelar o
aparelho, parafusar os pés* de
regulação nos específicos
lugares colocados nos cantos na
base do fogão (ver figura).
As pernas* fornecidas com o
aparelho, devem ser encaixadas
na base do fogão.
Ligação eléctrica
Montagem do cabo de fornecimento
Abertura da caixa de bornes:
Utilize uma chave de fenda, para fazer alavanca nas
linguetas laterais da tampa da caixa de bornes;
puxe e abra a tampa
da caixa de bornes.
Para instalar o cabo, realize as seguintes operações:
desapertar o parafuso da braçadeira e os parafusos
dos contactos.
As pontes são predispostas pela fábrica para
ligação a 230 V monofásico (ver figura).
230V 1N~
H07RN-F 3x4 CEI-UNEL 35364
NL
5
3
4
Para efectuar as ligações eléctricas das figuras,
utilizar as duas pontes situadas dentro da caixa
(ver figura - referênciaP)
1
2
P
NL2L1
Presente apenas em alguns modelos.
*
24
L3
Page 25

400V 2N~
H05RR-F 4x2.5 CEI-UNEL 35363
NL2L1
Depois de ter instalado o aparelho, o acesso ao cabo
de alimentação e à tomada da corrente deve ser fácil.
O cabo não deve ser dobrado nem comprimido.
PT
5
3
4
1
2
400V 3N~
H05RR-F 5x2.5 CEI-UNEL 35363
NL3L1L2
5
3
4
fixe o cabo de alimentação na apropriada
braçadeira e feche a tampa da caixa de bornes.
Ligação do cabo de fornecimento à rede eléctrica
Monte no cabo uma ficha em conformidade com as
normas para a carga indicada na placa de
identificação aplicada no aparelho.
O aparelho deve ser ligado directamente à rede
utilizando um interruptor omnipolar com abertura
mínima entre os contactos de 3 mm, colocado entre o
aparelho e a rede. O interruptor deve ser
dimensionado para a carga indicada e deve respeitar
as normas em vigor sobre a corrente eléctrica (o
condutor de terra não deve ser interrompido pelo
interruptor). O cabo de alimentação deve ser colocado
de maneira que em nenhum ponto entre em contacto
com temperaturas superiores aos 50ºC.
Antes de efectuar a ligação, certifique-se que:
o aparelho tenha uma ligação à terra e seja em
conformidade com a legislação;
a tomada tenha a capacidade de suportar a carga
máxima de potência da máquina, indicada na placa
de identificação;
a tensão de alimentação seja entre os valores da
placa de identificação;
a tomada seja compatível com a ficha do aparelho.
Se a tomada não for compatível com a ficha,
contacte um técnico autorizado para a substituição.
Não utilize extensões ou fichas múltiplas.
1
2
O cabo deve ser verificado periodicamente e
substituído somente por técnicos autorizados.
A empresa exime-se de qualquer
respo
nsabilidade se estas regras não forem
obedecidas.
DADOS TÉCNICOS
Medidas do Forno
HxLxP
Volume
Medidas úteis do
forno
Tensão e frequência
de fornecimento
Plano de cozedura
eléctrico
Para a frente à
esquerda
Atrás à esquerda
Atrás à direita
Para a frente à direita
Absorção máxima do
plano eléctrico
ENERGY LABEL
(ETIQUETA DE
ENERGIA)
32x43,5x40 cm
56 l
largura 42 cm
profundidade 44 cm
altura 8,5 cm
vide a placa das características
1700 W
1200 W
1700 W
1200 W
5800 W
Directiva 2002/40/CE acerca
dos fornos eléctricos.
Norma EN 50304
Consumo de energia com
convecção Natural – função de
aquecimento:
Forno Tradicional
Consumo de energia declarado
para classe de convecção
forçada – função de
aquecimento:
?
Forno para pastéis.
Directivas Comunitárias:
73/23CEE de 19/02/73 (Baixa
Tensão) e posteriores
modificações – 89/336/CEE de
03/05/89 (Compatibilidade
Electromagnética) e posteriores
modificações - 93/68/CEE de
22/07/93 e posteriores
modificações.
25
Page 26

Descrição do aparelho
PT
Vista de conjunto
vitrocerâmica
Painel de comandos
BANDEJA PINGADEIRA
Plano de
Prateleira GRADE
Pé regulável
GUIAS de deslizamento
das prateleiras
posição 5
posição 4
posição 3
posição 2
posição 1
Pé regulável
Painel de comandos
Selector
PROGRAMAS
TERMOSTATO
Indicador luminoso do
TERMOSTATO
Selector do
TIMER
ELECTRÓNICO*
Indicador luminoso
CHAPA ACTIVA
Botões de comando das
CHAPAS ELÉCTRICAS
Presente apenas em alguns modelos.
*
26
Page 27

Início e utilização
Quando o acender pela primeira vez,
aconselhamos fazer funcionar o forno vazio pelo
menos durante meia hora com a máxima
temperatura e a porta fechada. Verifique que o local
esteja bem ventilado antes de desligar o forno e
abrir a porta. O aparelho pode emitir um odor
desagradável devido à evaporação das substâncias
de protecção utilizadas durante o processo de
fabricação.
Nunca encoste objectos directamente no fundo do
forno, para evitar riscos de danos ao esmalte.
Ligar o forno
1. Para seleccionar o programa de cozedura que
desejar, rode o selector dos PROGRAMAS.
2. Escolha a temperatura recomendada para o
programa ou aquela desejada girando o selector do
TERMOSTATO.
Uma lista com os programas de cozedura e as
respectivas temperaturas aconselhadas pode ser
consultada na específica tabela (veja a Tabela de
cozedura no forno).
Durante a cozedura é sempre possível:
modificar o programa de cozedura mediante o
selector dos PROGRAMAS;
modificar a temperatura mediante o selector do
TERMOSTATO;
planificar a duração e a hora do fim da cozedura
(ver abaixo);
interromper a cozedura se recolocar o selector
dos PROGRAMAS na posição 0;
Nunca encoste objectos directamente no fundo do
forno, para evitar riscos de danos ao esmalte. Utilize
somente a posição 1 do forno no caso de cozer
usando o espeto rotatório.
Indicador luminoso do TERMOSTATO
Se estiver ligado significa que o forno está a
produzir calor. Desliga-se quando no interior do
forno for alcançada a temperatura seleccionada. A
esta altura, o indicador começa a piscar indicando
que o termostato está a funcionar e mantém
constante a temperatura.
Luz do forno
Acende-se girando o selector PROGRAMAS em uma
posição diferente do 0. Permanece acesa
enquanto o forno estiver a funcionar. Seleccionando
com o selector, a luz acende-se sem activar
algum elemento aquecedor.
Ventilação de arrefecimento
Para reduzir a temperatura externa do forno, alguns
modelos dispõem de uma ventoinha de
arrefecimento que gera um jacto de ar que sai entre
o painel de comandos e a porta do forno.
!No final da cozedura, a ventoinha de arrefecimento
continua a funcionar até o forno arrefecer
suficientemente.
Dispositivo de bloqueio da porta
Alguns modelos
dispõem de um
dispositivo de
bloqueio da porta
posicionado entre o
A
painel de comandos e
a porta do forno. Para
abrir a porta, pressione
o dispositivo A
indicado na figura.
PT
Coloque sempre os recipientes de cozedura sobre
a grade fornecida.
27
Page 28
PT
Programas de cozedura
! Para todos os programas pode ser regulada uma
temperatura entre 50°C e MÁX., excepto:
BARBECUE (é aconselhável configurar somente
em MÁX.)
GRATIN (é aconselhável não ultrapassar a
temperatura de 200°C).
Programa de FORNO TRADICIONAL
utilizar até dois tabuleiros no máximo
contemporaneamente.
Programa do FORNO PARA PIZZA
Activam-se os elementos aquecedores inferior e
circular e entra em funcionamento a ventoinha. Esta
combinação possibilita um aquecimento rápido do
forno, com um grande fluxo de calor principalmente
por baixo. Se utilizar mais de uma prateleira de cada
vez, será necessário trocar a posição das mesmas
na metade da cozedura.
Activam-se os dois elementos aquecedores inferior
e superior. Com a cozedura tradicional é melhor
utilizar uma única prateleira: ao utilizar várias
prateleiras obtém-se uma distribuição não uniforme
do calor.
Programa FORNO DOCE
Liga-se o elemento aquecedor traseiro e entra em
funcionamento a ventoinha para garantir a
distribuição do calor no interior do forno em modo
suave e uniforme. Este programa é indicado para a
cozedura de comidas delicadas, (especialmente
doces que necessitarem de levitação) e algumas
preparações mignon em 3 prateleiras
simultaneamente.
Programa de FAST COOKING
Liga-se os elementos aquecedores e entra em
funcionamento a ventoinha para garantir a
distribuição do calor no interior do forno em modo
constante e uniforme.
Este programa não necessita de aquecimento
prévio. É especificamente indicado para cozeduras
rápidas de alimentos previamente preparados
(congelados ou previamente cozidos). Os melhores
resultados são obtidos se utilizar apenas uma
prateleira.
Programa de COZEDURA MÚLTIPLA
Activam-se todos os elementos aquecedores
(superior, inferior e circular) e entra em
funcionamento a ventoinha. Como o calor é
constante e uniforme em todo o forno, o ar coze e
cora os alimentos de maneira uniforme. É possível
* Presente apenas em alguns modelos.
Programa de BARBECUE
Activa-se o elemento aquecedor superior e começa a
funcionar o espeto rotatório (se houver). Uma
temperatura alta e directa do grill é aconselhada
para os alimentos que necessitarem de uma alta
temperatura na superfície. Para esta modalidade de
cozedura, deixe sempre a porta do forno fechada.
Programa de GRATIN
Activa-se o elemento aquecedor superior e começam
a funcionar a ventoinha e o espeto rotatório (se
houver). A combinação destas características
aumenta a eficácia da radiação térmica unidirecional
dos elementos aquecedores através da circulação
forçada do ar no interior do forno.
Deste modo impede-se a queimadura dos alimentos
em superfície, permitindo ao calor de penetrar
correctamente. Para esta modalidade de cozedura,
deixe sempre a porta do forno fechada..
Timer electrónico*
Consente a visualização da hora e a função de
contador de minutos com contagem regressiva.
Todas as funções tornam-se operativas
aproximadamente 7 segundos após a sua
programação.
Como regular o relógio
Depois da ligação à rede eléctrica do aparelho ou
depois de falta de corrente, o visor piscará com :
0:00
Carregue na tecla
teclas
e + para programar a hora exacta. Para o
avançõ rápido, mantenha premidas as teclas.
G e sucessivamente nas
28
Page 29

Se for preciso acertar a hora, repita a operação
acima descrita.
Função contador de minutos
Para activar esta função, carregue na tecla
visor aparecerá o símbolo
n. Cada pressão da tecla
n e no
+ corresponde a um incremento de tempo de 10
segundos até 99 minutos e 50 segundos. Depois
disto, cada pressão da tecla corresponderá a um
incremento de tempo de um minuto até um máximo
de 10 horas.
Com a tecla volta-se para trás.
Após ter configurado o tempo desejado, o timer
começará a contagem regressiva. No final do
tempo, tocará um sinal acústico que pode ser
parado se for premida uma tecla qualquer.
É possível visualizar a hora carregando na tecla
o símbolo n indica que a função de contador de
minutos está configurada. Depois de
aproximadamente 7 segundos, o visor volta
automaticamente ao contador de minutos.
n e
Conselhos práticos para a cozedura
PT
! Nas cozeduras ventiladas não utilize as posições
das prateleiras 1 e 5: o contacto muito directo com o
calor pode queimar os alimentos mais sensíveis às
altas temperaturas.
! Nos programas BARBECUE e GRATIN,
principalmente se realizadas com o espeto rotatório,
coloque a bandeja pingadeira na posição 1 para
recolher os resíduos de cozedura (molhos e/ou
gordura).
COZEDURA MÚLTIPLA
Utilize as posições 2 e 4, coloque na 2 os
alimentos que necessitarem de mais calor.
Coloque a bandeja pingadeira embaixo e a grade
em cima.
BARBECUE
Para anular um tempo já programado
Carregue na tecla até que o visor mostre 0:00.
Regulação do volume do sinal acústico
Depois de ter escolhido e confirmado as regulações
do relógio mediante a tecla é possível regular o
volume do sinal acústico de alarme.
Coloque a grade na posição 3 ou 4; disponha os
alimentos no centro da grade.
É aconselhável configurar o nível de potência no
máximo. O elemento aquecedor superior é
controlado por um termostato e poderia não ficar
constantemente aceso.
FORNO para PIZZA
Utilize uma forma de alumínio leve, apoie-a na
grelha do forno.
Para obter uma pizza crocante, não utilize a
bandeja pingadeira que, prolongando os tempos
de cozedura, impede a formação da crosta.
No caso de pizzas com muita cobertura é
aconselhável colocar o queijo mozzarella na
metade da cozedura.
29
Page 30

PT
Tabela de cozedura no forno
Programa s Alimentos Peso
Pato
Forno
Tradicional
Forno para
Pastéis
Cozinha Rápida
Cozedura
Múltipla
Forno para
Pizza
Grill
Gratin
Carne de vitela ou vaca assada
Carne de porco assada
Biscoitos (de massa tenra)
Tortas doces
Tortas doces
Torta de fruta
Plum cake
Pão-de-ló
Crêpes recheadas (em 2 prateleiras)
Queques pequenos (em 2 prateleiras)
Salgadinhos folhados como queijo
(em 2 prateleiras)
Bignés (em 3 prateleiras)
Biscoitos (em 3 prateleiras)
Merengues (em 3 prateleiras)
Congelados
Pizza
Misto abóbora e camarão panado
Torta rústica de espinafre
Panzerotte
Lasanha
Pãezinhos doirados
Bolinhos de frango
Pré-cozidos
Asas de frango doiradas
Comidas Frescas
Biscoitos (de massa tenra)
Plum cake
Salgadinhos folhados de queijo
Pizza (em 2 prateleiras)
Lasanha
Cordeiro
Frango assado com batatas
Cavala
Plum cake
Bignés (em 2 prateleiras)
Biscoitos (em 2 prateleiras)
Pão-de-ló (em 1 prateleira)
Pão-de-ló (em 2 prateleiras)
Tortas salgadas
Pizza
Carne de vitela ou vaca assada
Frango
Linguado e chocas
Espetinhos de calamares e camarão
Chocas
Filé de bacalhau
Verduras na grelha
Bife de vitela
Chouriças
Hambúrgueres
Cavala
Tostas (ou pão torrado)
Frango na grelha
Chocas
(Kg)
1
1
1
1
0.5
1
0.7
0.5
1.2
0.6
0.4
0.7
0.7
0.5
0.3
0.4
0.5
0.3
0.5
0.4
0.4
0.4
0.3
0.6
0.2
1
1
1
1+1
1
1
0.5
0.5
0.5
1
1.5
0.5
1
1
0.7
0.6
0.6
0.8
0.4
0.8
0.6
0.6
1
4 ou 6
1.5
1.5
Posição das
prateleiras
3
3
3
3
3
3
2 ou 3
3
3
2 ou 4
2 ou 4
2 ou 4
1 e 3 e 5
1 e 3 e 5
1 e 3 e 5
2
2
2
2
2
2
2
2
2
2
2
2 ou
4
3
2
2 ou 4
2
2
2 ou 4
2 ou 4
2
2 ou 4
3
3
2
2 ou 3
4
4
4
4
3 ou 4
4
4
4
4
4
2
2
Pré
aquecimento
(minutos)
15
15
15
15
15
15
15
15
15
15
15
15
15
15
15
-
-
-
-
-
-
-
-
-
-
-
15
10
10
15
10
10
10
10
10
10
15
15
10
10
-
-
-
-
-
-
-
-
-
10
10
Temperatura
aconselh ada
200
200
200
180
180
180
180
180
160
200
190
210
180
180
90
250
200
220
200
200
180
220
200
200
180
210
230
180
180
200
180
170
190
180
170
170
200
220
220
180
Max
Max
Max
Max
Max
Max
Max
Max
Max
Max
200
200
Duração da
cozedura
(minutos)
65-75
70-75
70-80
15-20
30-35
20-30
40-45
40-50
25-30
30-35
20-25
15-20
20-25
20-25
180
12
20
30-35
25
35
25-30
15-20
20-25
15-18
45
10-12
15-20
30-35
40-45
60-70
30-35
40-50
20-25
10-15
15-20
20-25
25-30
15-20
25-30
60-70
10-12
8-10
10-15
10-15
15-20
15-20
15-20
10-12
15-20
3-5
55-60
30-35
30
Page 31

Utilização do plano de cozedura de
vitrocerâmica
A cola aplicada nas guarnições deixa alguns
traços de graxa no vidro. Antes de utilizar o
aparelho, é recomendável eliminá-la com um
produto não abrasivo específico para a limpeza.
Durante as primeiras horas de funcionamento, pode
ser que note odor de borracha, que em todo o caso
logo desaparecerá.
Zonas de cozedura
O plano de cozedura é equipado com 4 elementos
aquecedores eléctricos. Durante o funcionamento,
tornam-se vermelhos:
A. Zonas aquecedoras
A
B
C
correspondente é superior aos 60ºC, mesmo no
caso em que o elemento aquecedor esteja
desligado mas esteja ainda quente.
radiantes
B
B. Zonas de cozedura
radiantes extensíveis
C. Indicador do calor resíduo:
A
indica que a temperatura da
zona de cozedura
Ligar e desligar as zonas de cozedura
Zonas de cozedura tradicionais
As zonas de cozedura tradicionais são formadas por
elementos aquecedores circulares. Ficam vermelhos
após uma dezena de segundos depois de terem sido
dos.
acendi
Cada zona de cozedura é equipada com um botão de
comando que possibilita seleccionar 12 temperaturas
diferentes, desde um valor mínimo de 1 até 12 no
máximo.
Pos. Chapa radiante
0 Apagada
1 Para derreter manteiga ou chocolate
2
Para aquecer líquidos
3
4
Para cremes e molhos
5
6
Para cozer com a temperatura de ebulição
7
8
Para assar
9
10
Para grandes cozidos
11
12 Para fritar
) Activação de ambas as zonas de cozedura
Conselhos práticos para utilização do plano de
cozedura
Para obter as melhores performances do plano de
cozedura:
empregue panelas com fundo chato e espesso,
para ter a certeza que haverá uma perfeita
aderência à zona de cozedura;
empregue sempre panelas com diâmetro
s
uficiente para cobrir completamente a chapa
eléctrica, para aproveitar todo o calor produzido;
PT
Zonas de cozedura extensíveis
Os elementos radiantes extensíveis (B) podem ser
reconhecidos pela presença de uma zona aquecedora
dupla. É possível acender somente a zona interna
menor ou então am
O selector de comando possibilita escolher entre dois
níveis de potência, ambos reguláveis desde um valor
mínimo de 1 até 12 no máximo:
rodando
relógio desde 1 até 12 regula-se o nível de potência
mais baixo.
Rodando o selector até o fim (A), identificável por um
leve clique, activa-se a potência máxima que, também
esta, pode ser regulada de 12 até 1 rodando o selector
na direcção contrária aos ponteiros do relógio. Para
voltar ao valor de potência mínima será necessário
colocar novamente o selector na posição 0.
No caso de zonas de cozedura duplas, a primeira
parte da rotação do selector activa a zona de
cozedura menor (interna). Para activá-las ambas (a
interna e a externa
selector na posição final ()) e seleccionar o nível de
potência que desejar, entre 12 e 1.
o selector na direcção dos ponteiros do
bas.
) será necessário colocar o
certifique-se que o fundo das panelas esteja
sempre perfeitamente
às zonas de cozedura será ideal e seja as
panelas seja o plano de cozedura irão durar por
mais tempo;
evite utilizar as mesmas
nos queimadores a gás: a concentração de calor
nos queimadores a gás poderá deformar o fundo
das panelas, que desta maneira
aderência;
nunca deixe uma zona de cozedura radiante
acesa se não houver uma panela em cima, pois
poderia danificar-se.
enxuto e limpo: a aderência
panelas que emprega
perderá
31
Page 32

Precauções e conselhos
PT
Este aparelho foi projectado e fabricado em
conformidade com as normas internacionais de
segurança.
Estas advertências são fornecidas por razões de
segurança e devem ser lidas com atenção.
Segurança geral
As instruções são válidas somente para os
países de destino para os quais os símbolos
constam no livrete e na placa de identificação
aparelho.
Este aparelho foi concebido para utilização de tipo
não profissional no âmbito de moradas.
Este aparelho não deve ser instalado ao ar livre,
mesmo num sítio protegido. É muito perigoso deixálo exposto à chuva e temporais.
Não toque no aparelho se estiver descalço, ou se as
suas mãos ou pés estiverem molhados ou húmidos.
Este aparelho deve ser empregado exclusivamente
para cozer alimentos, somente por pessoas adultas
e segundo as instruções apresentadas neste
folheto.
Este folheto diz respeito a um aparelho de classe 1
(isolado) ou classe 2 - subclasse 1 (situado entre
dois móveis).
Durante o uso deste aparelho, os elementos
aquecedores e algumas das partes da porta do
forno esquentam-se muit
não tocar nos mesmos e mantenha as crianças
afastadas.
Certifique-se de que os cabos de alimentação de
outros electrodomésticos não entrem em contacto
com partes quentes do forno.
Nunca cubra as aberturas de ventilação e de
eliminação de calor.
Não apoie sobre as chapas eléctricas panelas
instáveis ou deformadas, para evitar que tombem.
Posicione-as sobre o plano de cozedura com os
cabos virados para o centro do aparelho.
Utilize luvas de forno para colocar e tirar recipientes.
Não utilize líquidos inflamáveis (álcool, gasolina,
etc.) perto do aparelho enquanto este estiver
funcionando.
Não guarde material inflamável no vão inferior de
depósito ou no interior do forno: se o aparelho for
inadvertidamente colocado a funcionar, poderia
incendiar-se.
Assegurar-se sempre que os selectores estejam na
posição 0 quando o aparelho não for utilizado.
Não puxe pelo cabo para desligar a ficha da
tomada eléctrica, pegue pela ficha.
o. Tome cuidado para
do
Não realize operações de limpeza ou manutenção
sem antes ter desligado o aparelho da rede
eléctrica.
Em caso de defeitos do aparelho, nunca procure
consertá-lo sozinho. Os consertos efectuados por
pessoas não qualificadas podem causar lesões ou
ulteriores maus funcionamentos do aparelho.
Contactar a Assistência.
Não coloque objectos pesados sobre a porta do
forno aberta.
As superfícies internas da gaveta (se houver)
podem ficar muito quentes.
Eliminação
Eliminação do material de embalagem: obedeça as
regras locais: assim as embalagens poderão ser
reutilizadas.
A directiva Europeia 2002/96/CE relativa aos
resíduos de equipamentos eléctricos e electrónicos
(REEE) prevê que os electrodomésticos não sejam
eliminados no normal fluxo dos resíduos sólidos
urbanos. Os aparelhos não mais utilizados devem
ser recolhidos separadamente para optimizar o
custo de recuperação e reciclagem dos materiais
que os compõem e impedir potenciais danos à
saúde e ao meio ambiente. O símbolo da lixeira
cancelada está indicado em todos os produtos para
lembrar ao proprietário o dever de colecta selectiva.
Os electrodomésticos em desuso poderão ser
entregues ao serviço de colecta público, ser
levados junto às áreas municipais específicas ou,
se for previsto pelas leis nacionais em matéria,
poderão ser devolvidos ao revendedor no momento
da compra de novos produtos de tipo equivalente.
Todos os principais produtores de
electrodomésticos estão activos na criação e
gestão dos sistemas de colecta e eliminação dos
aparelhos velhos e em desuso.
Respeitar e preservar o meio ambiente
Utilizando o forno nos horários a partir do fim da
tarde, até as primeiras horas da manhã, estará
contribuindo para reduzir a carga de absorção das
empresas de fornecimento de electricidade.
Mantenha sempre a porta do forno fechada durante
os programas BARBECUE e GRATIN, quer para
obter os melhores resultados, quer para economizar
energia (aproximadamente 10%).
Controle e mantenha limpas as guarnições da porta
para que não tenham resíduos de comida e possam
aderir bem na porta, evitando dispersões de calor.
32
Page 33

Manutenção e cuidados
Desligar o aparelho
Antes de realizar qualquer operação, desligue o
aparelho da alimentação eléctrica.
Limpeza do aparelho
Evite o emprego de detergentes abrasivos ou
corrosivos, tais como tira-manchas e produtos contra
ferrugem, detergentes em pó e esponjas com
superfície abrasiva, pois podem arranhar
irremediavelmente a superfície.
Nunca utilize equipamento de limpeza a vapor ou de
alta pressão para limpar a aparelhagem.
Limpe o vidro da porta do forno utilizando
esponjas e produtos não abrasivos e enxugue
com um pano macio. Não utilize materiais
ásperos ou espátulas metálicas afiadas, pois
podem arranhar a superfície e partir o vidro.
As partes externas esmaltadas ou inoxidáveis e as
guarnições de borracha podem ser limpas com uma
esponja molhada com água morna e sabão neutro.
Se for difícil remover as manchas, empregue
produtos específicos. Após a limpeza, enxaguar
com água abundante e enxugar. Não empregue pós
abrasivos nem substâncias corrosivas.
O interior do forno deve ser sempre limpo de
preferência depois de cada utilização, enquanto
ainda estiver morno. Utilize água quente e
detergente, enxagúe cuidadosamente e enxugue
com um pano macio. Evite produtos abrasivos.
Os acessórios podem ser facilmente lavados
como quaisquer utensílios, inclusive numa
máquina de lavar loiça.
Eliminar a sujeira e a gordura do painel de
comandos utilizando uma esponja não abrasiva
ou um pano macio.
O aço inoxidável poderá manchar-se se ficar em
contacto durante muito tempo com água fortemente
calcária ou com detergentes agressivos (contendo
fósforo). Após a limpeza, enxaguar com água
abundante e enxugar com atenção. Para mais é
aconselhado enxugar eventuais vazamentos de água.
Verificação das guarnições do forno
Verifique periodicamente as guarnições ao redor da porta
do forno. Se houver danos, contacte o Centro de
Assistência Técnica mais perto. É aconselhável não usar o
forno até que as guarnições não tenham sido substituídas.
Substituir a lâmpada de iluminação do forno
1. Após ter desligado o forno
da electricidade, remova a
tampa de vidro do portalâmpadas (ver figura).
2. Retire a lâmpada e substitua-a
por outra análoga: tensão 230V,
potência 25 W, engate E 14.
3. Monte novamente a tampa e restabeleça a ligação
eléctrica do forno.
Limpar o plano de cozedura de
vitrocerâmica
Evite o emprego de detergentes abrasivos ou corrosivos,
tais como sprays para churrasqueiras e fornos, tira-
manchas e produtos contra ferrugem, detergentes em pó e
esponjas com superfície abrasiva: podem arranhar
irremediavelmente a superfície.
Normalmente é suficiente lavar o plano de cozedura
com uma esponja húmida e enxugá-lo com papel
absorvente de cozinha.
Se o plano estiver muito sujo, esfregue com
produto específico para limpeza de superfícies de
vitrocerâmica, enxagúe bem e enxugue com atenção.
Para remover os maiores acúmulos de sujeira,
uma espátula apropriada (não fornecida junto com o
aparelho). Remova imediatamente o material
derramado, sem aguardar que o aparelho a
para evitar que os resíduos grudem. Podem ser
obtidos excelentes resultados se usar uma esponja
especial de fios de aço inoxidável - específica
planos de vitrocerâmica - molhada de água e sabão.
No caso em que no plano de cozedura tenham-se
acidentalmente fundidas substâncias como plástico
ou açúcar
espátula, até que a superfície esteja ainda quente.
Depois de limpo, o plano poderá ser tratado com
um produto es
protecção: a película invisível deixada por este
produto protegerá a superfície se algo for
derramado durante a cozedura.
realizar estas operações e manutenção enquanto o
aparelho estiver morno (não quente) ou frio.
Lembre-se sempre de enxaguar o pl
cozedura com água limpa e de enxugá-lo com
cuidado: os resíduos poderiam grudar durante as
sucessivas cozeduras.
Detergente para
vidro-cerâmica
Raspador a lâmina Passatempos e construçôes
Stahl-Fix
SWISSCLEANER
WK TOP
, remova-as imediatamente com a
pecífico para a manutenção e a
É recomendável
Fontes de abastecimento
Artigos domésticos,
Bricolage,
Ferramenta,Gêneros alimentares
um
use
rrefeça,
para
ano de
Assistência técnica
É necessário comunicar o seguinte:
o modelo da máquina (Mod.);
o número de série (S/N).
Estas informações encontram-se na placa de
identificação situada no aparelho e/ou na
embalagem.
PT
33
Page 34

PT
34
Page 35

PT
35
Page 36

PT
07/2007 - 195057137.01
36
 Loading...