


Hotpoint RVM5160RH3SS, RVM5160RH2SS, RVM5160RH1SS, RVM5160DH3WW, RVM5160DH3CC Owner’s Manual
...MICROWAVE OVEN
SAFETY INFORMATION . . . . . . . 3-5
USING YOUR OVEN
Oven Features. . . . . . . . . . . . . . . . . . . . . . . . .6
Power Levels. . . . . . . . . . . . . . . . . . . . . . . . . .7
Features . . . . . . . . . . . . . . . . . . . . . . . . . . . 8-10
Defrost . . . . . . . . . . . . . . . . . . . . . . . . . . . .10-11
Other Features . . . . . . . . . . . . . . . . . . . . 12-13
CARE AND CLEANING
Care and Cleaning . . . . . . . . . . . . . . . . . 14-16
TROUBLESHOOTING
Things that are Normal . . . . . . . . . . . . . . . . 18 Microwave Terms . . . . . . . . . . . . . . . . . . . . . 17
CONSUMER SUPPORT
Warranty . . . . . . . . . . . . . . . . . . . . . . . . . . . . 19
Consumer Support . . . . . . . . . . . .Back Cover
Write the model and serial numbers here:
Model #_________________
Serial # _________________
You can find them on a label inside the oven.
OWNER’S MANUAL
AVM4160
JNM3161
JVM3160
RVM5160
Artistry™ Series
ESPAÑOL
Para consultar una version en español de este manual de instrucciones, visite nuestro sitio de internet GEAppliances.com.
GE is a trademark of the General Electric Company. Manufactured under trademark license.
49-40669-6 02-18 GEA

THANK YOU FOR MAKING GE APPLIANCES A PART OF YOUR HOME.
Whether you grew up with GE Appliances, or this is your first, we’re happy to have you in the family.
We take pride in the craftsmanship, innovation and design that goes into every GE Appliances product, and we think you will too. Among other things, registration of your appliance ensures that we can deliver important product information and warranty details when you need them.
Register your GE appliance now online. Helpful websites and phone numbers are available in the Consumer Support section of this Owner’s Manual. You may also mail in the pre-printed registration card included in the packing material.
2 |
|
49-40669-6 |

IMPORTANT SAFETY INSTRUCTIONS
READ ALL INSTRUCTIONS BEFORE USING THE APPLIANCE
WARNING |
To reduce the risk of burns, electric shock, fire, injury to persons, or exposure to |
excessive microwave energy: |
|
|
|
When using electrical appliances, basic safety precautions should be followed, including the following:
Read all instructions before using this appliance.
Read and follow the specific precautions in the PRECAUTIONS TO AVOID POSSIBLE EXPOSURE TO EXCESSIVE MICROWAVE ENERGY section on page 5.
Use this appliance only for its intended use as described in this manual. Do not use corrosive chemicals or vapors in this appliance. This microwave oven is specifically designed to heat, dry or cook food, and is not intended for laboratory or industrial use.
This appliance should be serviced only by qualified service personnel. Contact nearest authorized service facility for examination, repair, or adjustment.
INSTALLATION
Install or locate this appliance only in accordance with the provided installation instructions.
This appliance must be grounded. Connect only to a properly grounded outlet. See the GROUNDING INSTRUCTIONS section on page 5.
Be certain to place the front surface of the door 3 inches or more back from the counter top edge to avoid accidental tipping of the appliance in normal usage.
Recommended clearances: 3 inches on each side, 3 inches on the top, and 1 inch in the rear.
Do not operate this appliance if it has a damaged power cord or plug, if it is not working properly, or if it has been damaged or dropped.
Keep power cord away from heated surfaces.
Do not let cord hang over edge of table or counter.
Do not immerse power cord or plug in water.
Do not cover or block any opening on the appliance.
Do not store this appliance outdoors. Do not use this product near water - for example, in a wet basement, near a swimming pool, or in a similar location.
Do not mount over a sink.
TO REDUCE THE RISK OF FIRE IN THE CAVITY:
—Do not overcook food. Carefully attend appliance when paper, plastic or other combustible materials are placed inside the oven while cooking.
—Remove wire twist-ties and metal handles from paper or plastic containers before placing them in the oven.
—If materials inside the oven ignite, keep the oven door closed, turn the oven off and disconnect the power cord, or shut off power at the fuse or circuit breaker panel.
—Do not store any materials in the oven when not in use. Do not leave paper products, cooking utensils, or food in the cavity when not in use. All racks should be removed from oven when not in use.
—Do not operate the microwave feature without food in the oven.
TO REDUCE THE RISK OF BURNS
Be careful when opening containers of hot food. Use pot holders and direct steam away from face and hands.
Vent, pierce, or slit containers, pouches or plastic bags to prevent build-up of pressure.
Be careful when touching the turntable, door, rack or walls of the oven which may become hot during use.
Liquids and certain foods heated in the microwave oven can present a risk of burn when removing them from the microwave. The potential for a burn is greater in young children, who should not be allowed to remove hot items from the microwave.
INFORMATION SAFETY
READ AND SAVE THESE INSTRUCTIONS
49-40669-6 |
3 |

SAFETY INFORMATION
IMPORTANT SAFETY INSTRUCTIONS
READ ALL INSTRUCTIONS BEFORE USING THE APPLIANCE

 WARNING
OPERATING
As with any appliance, close supervision is necessary when used by children.
Do not operator the oven without the turntable in place. The turntable must be unrestricted so it can turn.
Make sure all cookware used in your microwave oven is suitable for microwaving. Most glass casseroles, cooking dishes, measuring cups, custard cups, pottery or china dinnerware which does not have metallic trim or glaze with a metallic sheen can be used in compliance with cookware manufacturers’ recommendations.
Do not store anything directly on top of the microwave surface when the microwave is in operation.
Some products such as whole eggs and sealed containers - for example, closed jars - are able to explode and should not be heated in the microwave oven.
Do not overcook potatoes. The could dehydrate and catch fire.
Do not cover any other part of the oven with metal foil. This will cause overheating of the oven.
Cook meat and poultry thoroughly—meat to at least an INTERNAL temperature of 160°F and poultry to at least an INTERNAL temperature of 180°F. Cooking to these temperatures usually protects against foodborne illness.
This oven is not approved or tested for marine use.
CLEANING
Keep the oven free from grease buildup.
Do not clean with metal scouring pads. Pieces can burn off the pad and touch electrical pars involving risk of electric shock.
When cleaning surfaces of door and oven that comes together on closing the door, use only mild, nonabrasive soaps, or detergents applied with a clean sponge or soft cloth. Rinse well.
SUPER HEATED WATER
Ŷ /LTXLGV VXFK DV ZDWHU FRIIHH RU WHD DUH DEOH WR be overheated beyond the boiling point without appearing to be boiling. Visible bubbling or boiling when the container is removed from the microwave oven is not always present. THIS COULD RESULT IN VERY HOT LIQUIDS SUDDENLY BOILING OVER WHEN THE CONTAINER IS DISTURBED OR A SPOON OR OTHER UTENSIL IS INSERTED INTO THE LIQUID.
Ŷ 7R UHGXFH WKH ULVN RI LQMXU\ WR SHUVRQV
-Do not overheat the liquid.
-Stir the liquid both before and halfway through heating it.
-Do not use straight-sided containers with narrow necks.
-After heating, allow the container to stand in the microwave oven for a short time before removing the container.
-Use extreme care when inserting a spoon or other utensil into the container.
READ AND SAVE THESE INSTRUCTIONS
4 |
49-40669-6 |
IMPORTANT SAFETY INSTRUCTIONS
READ ALL INSTRUCTIONS BEFORE USING THE APPLIANCE
PRECAUTIONS TO AVOID POSSIBLE EXPOSURE TO EXCESSIVE MICROWAVE ENERGY
(a)Do Not Attempt to operate this oven with the door open since open-door operation can result in harmful exposure to microwave energy. It is important not to defeat or tamper with the safety interlocks.
(b)Do Not Place any object between the oven front face and the door or allow soil or cleaner residue to accumulate on sealing surfaces.
(c)Do Not Operate the oven if it is damaged.
It is particularly important that the oven door close properly and that there is no damage to the:
(1)door (bent),
(2)hinges and latches (broken or loosened),
(3)door seals and sealing surfaces.
(d)The Oven Should Not be adjusted or repaired by anyone except properly qualified service personnel.
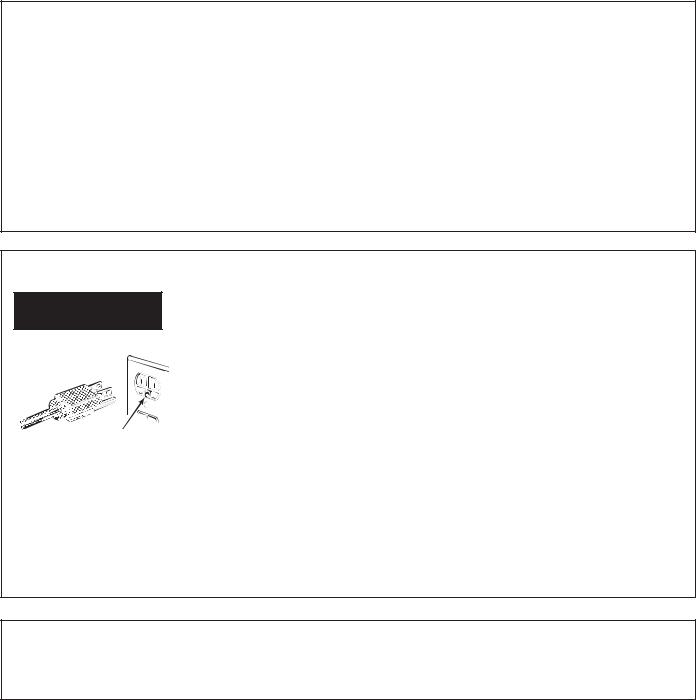
GROUNDING INSTRUCTIONS

 WARNING Improper use of the grounding plug can result in a risk of electric shock.
|
This appliance must be |
|
grounded. In the event of |
|
an electrical short circuit, |
|
grounding reduces the |
|
risk of electric shock by |
Ensure proper ground |
providing an escape wire |
exists before use. |
for the electric current. |
This appliance is equipped with a power cord having a grounding wire with a grounding plug. The plug must be plugged into an outlet that is properly installed and grounded.
Consult a qualified electrician or service technician if the GROUNDING INSTRUCTIONS are not completely understood, or if doubt exists as to whether the appliance is properly grounded.
If the outlet is a standard 2-prong wall outlet, it is your personal responsibility and obligation to have it replaced with a properly grounded 3-prong wall outlet.
Do not under any circumstances cut or remove the third (ground) prong from the power cord.
Do not use an extension cord. If the power cord is too short, have a qualified electrician or service technician install an outlet near the appliance.
For best operation, plug this appliance into its own electrical outlet to prevent flickering of lights, blowing of fuse or tripping of circuit breaker.
INFORMATION SAFETY
NOTICE: PACEMAKERS
Most pacemakers are shielded from interference from electronic products, including microwaves. However, patients with pacemakers may wish to consult their physicians if they have concerns.
READ AND SAVE THESE INSTRUCTIONS
49-40669-6 |
5 |

USING YOUR OVEN
Features
Throughout this manual, features and appearance may vary from your model.
Convenience Cooking
Popcorn |
|
Beverage |
Potato |
Reheat |
|
Defrost |
Cook |
|
Weight/Time |
Time |
|
Express Cook |
Timer |
||
On/Off |
|||
1 |
2 |
3 |
Add |
30 Sec. |
|||
4 |
5 |
6 |
Turntable |
7 |
8 |
9 |
Surface |
Light |
|||
Power |
0 |
Set |
Vent |
Level |
Clock |
||
Cancel |
|
Start |
|
Off |
|
Pause |
|
1 |
Door Latches |
|
|
2 |
Window with Metal Shield. Screen allows cooking |
5 |
Removable Turntable. Turntable and support must |
|
to be viewed while keeping microwaves confined |
|
be in place when using the oven. The turntable may |
|
in the oven. |
|
be removed for cleaning. |
3 |
Window with Metal Shield. Screen allows cooking |
6 |
Removable Turntable Support. The turntable |
|
WR EH YLHZHG ZKLOH NHHSLQJ PLFURZDYHV FRQ¿QHG LQ |
|
support must be in place when using the oven. |
|
the oven. |
|
|
4 |
Control Panel. |
|
|
6 |
49-40669-6 |

Changing the power level
Changing the Power Level: The power level may be entered or changed before or during cooking. Power Level is set for Level 10 (High) unless it is changed.
1.Press Power Level button.
2.Enter new power level by using the number pads or press the Power Level button multiple times until you find the level you want.
3.After you have selected the power level, wait five seconds. The display will go back to the Cook Time screen.
4.Enter cooking time and press START.
OR
1.Press Cook Time button.
2.Enter your cooking time.
3.Press Power Level button.
4.Enter new power level by using the number pads or press the Power Level button multiple times until you find the level you want.
5.After you have selected the power level, wait five seconds. The display will go back to the Cook Time (Enter Time) screen.
6.Press START.
Variable power levels add flexibility to microwave cooking. The power levels on the microwave oven can be compared to the surface units on a range. Each power level gives you microwave energy a certain percent of the time. Power level 7 is microwave energy 70% of the time. Power level 3 is energy 30% of the time. Most cooking will be done on High (power level 10) which gives you 100% power. Power level 10 will cook faster but food may need more frequent stirring, rotating or turning over. A lower setting will cook more evenly and need less stirring or rotating of the food. Some foods may have better flavor, texture or appearance if one of the lower settings is used. Use a lower power level when cooking foods that have a tendency to boil over, such as scalloped potatoes and some casseroles.
Rest periods (when the microwave energy cycles off) give time for the food to “equalize” or transfer heat to the inside of the food. An example of this is shown with Power level 3—the defrost cycle. If microwave energy did not cycle off, the outside of the food would cook before the inside was defrosted.
Here are some examples of uses for various power levels:
High 10 (100%): Fish, bacon, vegetables, boiling liquids.
Med-High 7 (70%): Gentle cooking of meat and poultry; baking casseroles and reheating.
Medium 5 (50%): Slow cooking and tenderizing for stews and less tender cuts of meat.
Low 2 or 3 (20 or 30%): Defrosting; simmering; delicate sauces.
Warm 1 (10%): Keeping food warm; softening butter.
NOTE: You can also change the power level during many cooking modes by pressing the power level button entering a valid power level.
OVEN YOUR USING
49-40669-6 |
7 |

USING YOUR OVEN
About the features
Cook Time
Allows you to microwave from 1 second to 99 minutes and 99 seconds.
Power level 10 (HIGH) is automatically set, but you may change it for more flexibility.
1.Press Cook Time.
2.Enter cooking time.
3.Press START.
Cooking will start when the countdown begins in the display.
You may open the door during Cook Time to check the food. Close the door and press START to resume cooking.
Express Cook
This is a quick way to set cooking time from 1-6 minutes.
1.Press one of the Express Cook pads (from 1-6) for 1-6 minutes of cooking at power level 10. For example, press the 2 pad for 2 minutes of cooking time.
The power level can be changed as time is counting down. Press POWER LEVEL and enter 1-10.
NOTE: Express Cook function pertains to pads 1-6 only.
Add 30 Sec
It will add 30 seconds to the time counting down each time the pad is pressed. Each touch will add 30 seconds, up to 99 minutes and 99 seconds.
Add 30 sec can also be used like an express 30 seconds button. The microwave oven will start immediately when pressed.
Popcorn
To use the Popcorn feature:
1.Press the POPCORN button once for 2.0 ounce bag, twice for
2.5ounce bag, or three times for a 3.0 ounce bag.
2.Press START.
Cooking will start when the countdown begins in the display.
You can not change the selection or quantity after the feature has started.
IMPORTANT: Do not use the sensor features twice in succession on the same food portion. If food is undercooked after the first countdown, use Cook Time for additional time.
If food is undercooked after the countdown, use Cook Time for additional cooking time. We recommend 30 seconds and watch carefully.
Cook
Time
Express Cook
1 2 3
4 5 6
Add
30 Sec
Popcorn
Use only with prepackaged microwave popcorn weighing 2.5 to 3.0 ounces.
8 |
49-40669-6 |

About the features
Reheat
The Reheat feature reheats servings of previously cooked foods or a plate of leftovers.
Place the cup of liquid or covered food in the oven.
1.Press the REHEAT button up to six times to choose the correct selection.
Press once for a pizza. Press twice for vegetables.
Press three times for a plate of leftovers. Press four times for soup.
Press five times for meat. Press six times for pasta.
2.Press the reheat pad again after food type has been entered in order to select quantity.
3.Press START.
Cooking will start when the countdown begins in the display.
Reheat
After removing food from the oven, stir, if possible, to even out the temperature. Reheated foods may have wide variations in temperature. Some areas of food may be extremely hot.
If food is not hot enough after the countdown use Cook Time for additional reheating time.
Some Foods Not Recommended for Use With Reheat It is best to use Cook Time for these foods:
Bread products.
Foods that must be reheated uncovered.
Foods that need to be stirred or rotated.
Foods calling for a dry look or crisp surface after reheating.
NOTE: Do not use this feature twice in succession on the same food portion—it may result in severely overcooked or burnt food.
Beverage
Use the Beverage feature to heat various amounts of liquids measured in ounces: Place the liquid into the microwave oven.
4 oz. |
1/2 cup |
8 oz. |
1 cup |
12 oz. |
1-1/2 cups |
|
|
16 oz. |
2 cupls |
1.Press the Beverage button up to four times to choose the correct selection.
Press once for a 4 ounce beverage. Press twice for a 8 ounce beverage. Press three times for a 12 ounce beverage. Press four times for a 16 ounce beverage.
2. Press START.
Cooking will start when the countdown begins in the display.
Beverage
Potato
To use the Potato feature:
Place the potato(es) into the oven.
1.Press the Potato button up to four times to choose the correct selection.
Press once for 1 item. Press twice for 2 items. Press three times for 3 items. Press four times for 4 items.
2.Press START.
Cooking will start when the countdown begins in the display.
NOTE: Do not use this feature twice in succession on the same food portion. It may result in severely overcooked or burnt food.
Potato
OVEN YOUR USING
49-40669-6 |
9 |

USING YOUR OVEN
Defrosting
Weight Defrost
Use Weight Defrost for meat, poultry and
fish. Use Time Defrost for most other frozen Defrost foods. (Time Defrost is explained on page Weight/Time
13.)
1.Press DEFROST once for Weight Defrost.
2.Enter the weight in pounds.
3.Press START.
Cooking will start when the countdown begins in the display.
Defrosting Tips
Remove meat from package and place on microwavesafe dish.
When the oven signals, turn the food over. Remove defrosted meat or shield warm areas with small pieces of foil.
After defrosting, most meats need to stand 5 minutes to complete defrosting. Large roasts should stand for about 30 minutes.
Conversion Guide
If the weight of food is stated in pounds and ounces, the ounces must be converted to tenths (.1) of a pound.
Ounces Pounds
1-2 .1
3.2
4-5 .3
6-7 .4
8.5
9-10 .6
11 .7
12-13 .8
14-15 .9
Note: Max 6.0 lbs.
Time Defrost
Allows you to defrost for a selected length of time. See the Defrosting Guide on page 14 for suggested times (Weight Defrost is explained on page 12).
1. Press DEFROST twice for Time Defrost.
Defrost
Weight/Time
2.Enter defrosting time in minutes and seconds.
3.Press START.
Cooking will start when the countdown begins in the display.
At one half of selected defrosting time, turn food over and break apart or rearrange pieces for more even defrosting. Shield any warm areas with small pieces of foil. The oven will continue to defrost if you don’t open the door and turn the food.
Noises may be heard during defrosting. This is normal when oven is not operating at High power.
Defrosting Tips
Foods frozen in paper or plastic can be defrosted in the package. Closed packages should be slit, pierced or vented AFTER food has partially defrosted. Plastic storage containers should be partially uncovered.
Family-size, prepackaged frozen dinners can be defrosted and microwaved. If the food is in a foil container, transfer it to a microwave-safe dish.
Foods that spoil easily should not be allowed to sit out for more than one hour after defrosting. Room temperature promotes the growth of harmful bacteria.
For more even defrosting of larger foods, such as roasts, use Time Defrost. Be sure large meats are completely defrosted before cooking.
When defrosted, food should be cool
but softened in all areas. If still slightly icy, return to the microwave very briefly, or let it stand a few minutes.
10 |
49-40669-6 |
Defrosting
Defrosting Guide
Food |
|
Time |
|
Comments |
|
|
|||
Breads, Cakes |
|
1/4 min. |
|
|
Bread, buns, or rolls (1 piece) |
|
|
Rearrange after half the time. |
|
Sweet rolls (approx. 12 oz.) |
|
2 to 4 min. |
|
|
Fish and Seafood |
|
6 to 9 min. |
|
|
Fillets, frozen (1 lb.) |
|
|
Place block in casserole. Turn over and break up after half the time. |
|
Shellfish, small pieces (1 lb.) |
|
3 to 7 min. |
|
|
Fruit |
|
1 to 5 min. |
|
|
Plastic pouch—1 or 2 |
|
|
|
|
(10-oz. package) |
|
|
|
|
Meat |
|
2 to 5 min. |
|
Place unopened package in oven. Let stand 5 minutes after defrosting. |
Bacon (1 lb.) |
|
|
||
Franks (1 lb.) |
|
2 to 5 min. |
|
Place unopened package in oven. Microwave just until franks can be separated. |
|
|
|
|
Let stand 5 minutes, if necessary, to complete defrosting. |
Ground meat (1 lb.) |
|
4 to 6 min. |
|
Turn meat over after first half of time. |
Roast: beef, lamb, veal, pork |
|
9 to 13 min. |
|
Use power level 10. |
|
|
per lb. |
|
|
Steaks, chops and cutlets |
|
4 to 8 min. |
|
Place unwrapped meat in cooking dish. Turn over after first half of time and |
|
|
per lb. |
|
shield warm areas with foil. After second half of time, separate pieces with table |
|
|
|
|
knife. Let stand to complete defrosting. |
Poultry |
|
14 to 20 min. |
|
Place wrapped chicken in dish. Unwrap and turn over after first half of time. After |
Chicken, broiler-fryer, cut up |
|
|
||
(21»2 to 3 lbs.) |
|
|
|
second half of time, separate pieces and place in cooking dish. Microwave 2 to 4 |
|
|
20 to 25 min. |
|
minutes more, if necessary. Let stand a few minutes to finish defrosting. |
Chicken, whole (21»2 to 3 lbs.) |
|
|
Place wrapped chicken in dish. After half the time, unwrap and turn chicken over. |
|
|
|
|
|
Shield warm areas with foil. To complete defrosting, run cold water in the cavity |
|
|
7 to 13 min. |
|
until giblets can be removed. |
Cornish hen |
|
|
Place unwrapped hen in the oven breast-side-up. Turn over after first half of time. |
|
|
|
per lb. |
|
Run cool water in the cavity until giblets can be removed. |
Turkey breast (4 to 6 lbs.) |
|
3 to 8 min. |
|
Place unwrapped breast in microwave-safe dish breast-side-down. After first half |
|
|
per lb. |
|
of time, turn breast-side-up and shield warm areas with foil. Defrost for second |
|
|
|
|
half of time. Let stand 1 to 2 hours in refrigerator to complete defrosting. |
OVEN YOUR USING
49-40669-6 |
11 |

USING YOUR OVEN
About the other features
Clock
To change the time of day.
1.Press the Set Clock button. (The microwave should not be running.)
2.Enter the appropriate time of day. Clock is on a 12-hour scale.
3.Press Set Clock or Start to accept the time.
Pause
In addition to starting many functions, START/PAUSE allows you to stop cooking without opening the door or clearing the display and resume cooking later.
Child Lock-Out
Press the CANCEL/OFF button to stop and cancel cooking at any time.
Control Lock-Out
You may lock the control panel to prevent the oven from being accidentally started during cleaning or being used by children.
To lock or unlock the controls, press and hold the CANCEL/ OFF button for three seconds. When the control panel is locked, LOCKED will be displayed briefly anytime a button or dial is pressed. “L” will show in the display.
Surface Light
Press SURFACE LIGHT once for bright light, twice for the night light or a third time to turn the light off.
Timer
NOTE: The Timer indicator will be lit while the timer is operating.
Timer
The Timer operates as a minute timer and can be used at any time, even when the oven is operating.
1.Press the Timer button.
2.Enter a time.
3.Press the Timer 3 Start button to start.
To cancel, press the Timer button or Cancel button.
NOTE: If you press the Cancel button to cancel the timer and you are cooking at the same time, it will cancel your cooking selection also.
When time is up, the oven will signal.
To turn off the timer signal, press Timer or Cancel
Set
Clock
Start
Pause
Cancel
Off
Lock Controls
Hold 3 Sec
Cancel
Off
Lock Controls
Hold 3 Sec
Surface
Light
Timer
On/Off
12 |
49-40669-6 |
 Loading...