

Page 1
GENERAL
The XM500 allows for communication between standard
EXCEL 5000 controllers and the Excel Building Supervisor
Central, or any controller on the Light Commercial Building
System (LCBS) and L
TCP/IP based LAN/WAN networks.
The XM500 is easy to install and to configure. Typically, with
all necessary network information being available, it can be
made operational within minutes.
The XM500 converts the serial data received from the
controller or workstation central into TCP/IP packets and vice
versa.
On its serial port, the XM500 behaves like a standard Hayes
compatible modem: It is addressed with Hayes commands,
and instead of a telephone number, IP addresses are used.
ONSTATION™, via standard Ethernet-
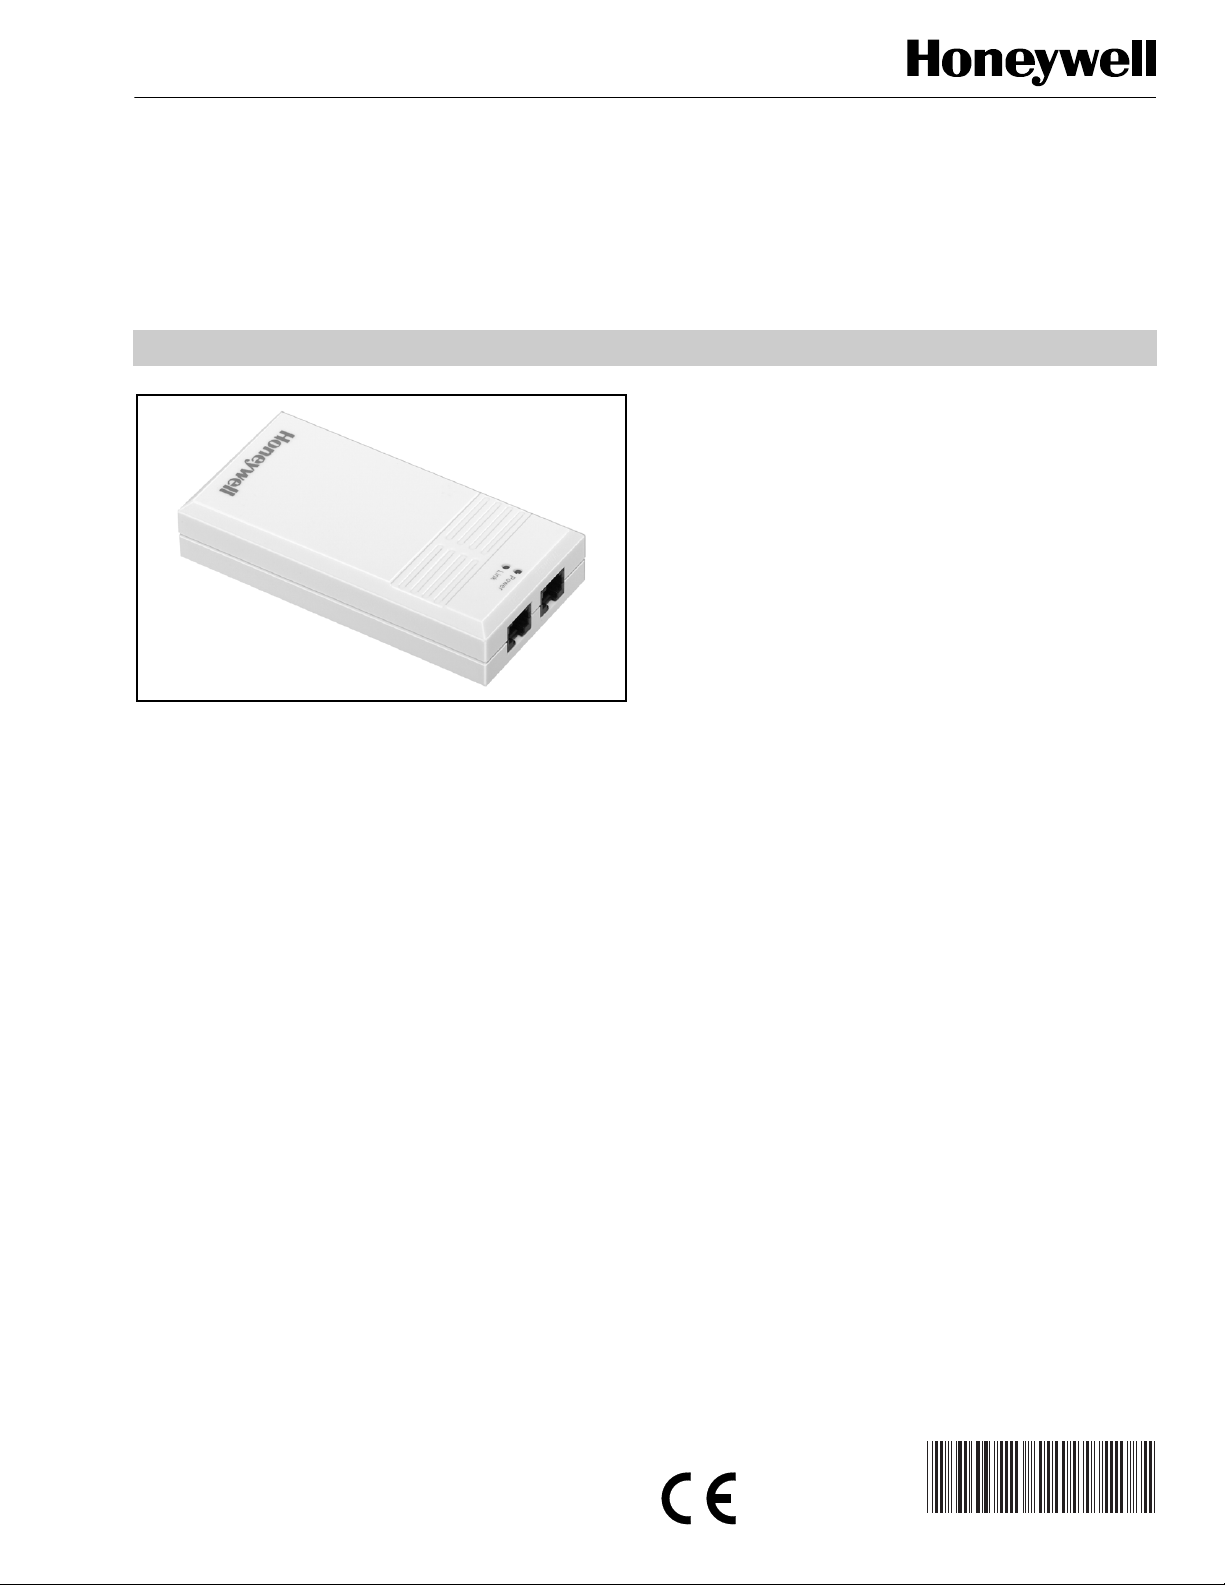
XM500
TCP/IP Modem
PRODUCT DATA
FEATURES
• Communication between XBS or LONSTATION™
centrals and EXCEL 5000 controllers via standard
Ethernet-TCP/IP LAN/WAN.
• TCP/IP provides more reliable and faster
communications than analog modem.
• Compatible with all HVAC systems connecting through
an SLTA-10.
• Compatible to EXCEL 5000 controllers with integrated
modem communication (O.S. version 2.01.00 or later).
• Compatible to EXCEL 5000 modem devices XM100A,
XDM506.
• Compatible to all XBS or L
dial-up functionality via COM-port.
• Completely self-contained device.
• Quick and easy installation and set-up.
LIMITATIONS
The Echelon MIPS protocol requires all outbound commands/
queries be answered within 1000 milliseconds (1 sec). If any
part of the Wide Area Network is comprised of a satellite link,
it is likely to have a “propagation delay” of more than one
second, thus eliminating the use of a WAN modem. Before
installation, the user should perform tests to obtain the
response time of the network. (See “Configuration” on
page 3.)
ONSTATION™ centrals with
The XM500 is designed to replace the analog modem used in
our Excel 5000 and LCBS systems and provide the same
functionality using TCP/IP communications.
The XM500 may be easily configured with the IP Connect
software provided or manually via Windows Terminal
Program. The LAN/WAN network server requires no software
download for the XM500.
® U.S. Registered Trademark
Copyright © 2003 Honeywell International Inc.
All Rights Reserved
Contents
General ............................................................................. 1
Features ........................................................................... 1
Limitations ........................................................................ 1
Specifications ................................................................... 2
Ordering Information ........................................................ 2
Configuration .................................................................... 3
Programming the XM500 ................................................. 4
Technical Installation and Set-Up (Optional) .................... 6
74-3468-3
Page 2

XM500 TCP/IP MODEM
SPECIFICATIONS
Ver sion s: All include the TCP/IP modem, 2 velcro strips, and
this Product Data Sheet.
XM500-US: US power supply, DB25 to DB9 converter,
RS-232 cable (RJ-45 to DB25), 2 IP address stickers.
XM500-EU: Standard European power supply “EURO-plug”,
RS-232 cable (RJ-45 to DB9).
XM500-UK: UK power supply, RS-232 cable (RJ-45 to DB9).
Dimensions: See Fig. 1.
Weight: 4 oz (113g).
TPE:
10BASE-T (Twisted Pair Ethernet).
RJ-45 connector.
IEEE 802.3/Ethernet compliant.
Terminal:
RS-232C serial communications.
RJ-45 connector.
50 to 115,200 bps.
Full modem control.
Hardware and software flow control.
Electrical Ratings:
Voltage: 6 Vdc.
Current: 200 mA.
Power Consumption: 140mA at 5 Vdc.
Environmental Ratings:
Operating temperature: 32 to 122°F (0 to 50°C).
Storage temperature: 14 to 158°F (-10 to +70°C).
Relative humidity: 10 to 95% non-condensing.
Processor and Memory:
Main processor: 68HC000.
Ethernet Coprocessor: SMC91C96.
Memory:
RAM: 64K byte with 2K byte NVRAM.
EPROM: 256K byte.
Software: IP-Connect software is provided to configure the
XM500 modem. The various controllers and workstations
are configured using Honeywell-specific software for serial
communication with EXCEL 5000 and LCBS systems.
Network Management:
SNMP/MIB-II: RFC 1155, 1157, and 1213.
Network Protocols Supported:
ARP: RFC 826.
DHCP: RFC 2131 and 2132.
DNS: RFC 1034 and 1035.
ICMP: RFC 792.
IP: RFC 791.
PPP: RFC 1332, 1661, and 1662.
RARP: RFC 903.
RIP: RFC 1058.
SLIP: RFC 1055.
TCP: RFC 793.
UDP: RFC 768.
Protection Standards: FCC Class A.
Approvals:
CE approval according to the following standards:
EN 55022, Class A
IEC 801-2
IEC 801-3
IEC 801-4
NOTE: The RS-232 and Ethernet cables should be fitted
with non-conductive protective boots (or sleeves)
over the RJ45 connectors to remove electrostatic
discharge susceptibility.
Power-fail and Data Storage
All TCP/IP related initialization data (e.g., IP address, network
mask and gateway) are automatically stored in NVRAM.
All RS-232 related initialization data should be stored in
NVRAM by the user. See the Hayes Command Set
section.
If this is done, the XM500 will resume operation after power-
fail automatically with all preset initializations.
Serial Interfaces: At the front, the XM500 provides two serial
interfaces (see Fig. 2).
Power Supply: At the rear, the XM500 has a socket for the
power supply and an on/off switch. (See Fig. 3.)
LED Lights: Two status indicators for POWER and LINK
integrity (see Fig. 4) with the following meanings:
POWER LED ON: Correct power supply connected.
LINK LED ON: Correct TCP/IP (10bT) connection established.
Link LED equates to dial tone.
ORDERING INFORMATION
When purchasing replacement and modernization products from your TRADELINE® wholesaler or distributor, refer to the
TRADELINE® Catalog or price sheets for complete ordering number.
If you have additional questions, need further information, or would like to comment on our products or services, please write or
phone:
1. Your local Honeywell Automation and Control Products Sales Office (check white pages of your phone directory).
2. Honeywell Customer Care
1885 Douglas Drive North
Minneapolis, Minnesota 55422-4386
In Canada—Honeywell Limited/Honeywell Limitée, 35 Dynamic Drive, Scarborough, Ontario M1V 4Z9.
International Sales and Service Offices in all principal cities of the world. Manufacturing in Australia, Canada, Finland, France,
Germany, Japan, Mexico, Netherlands, Spain, Taiwan, United Kingdom, U.S.A.
74-3468—3 2
Page 3
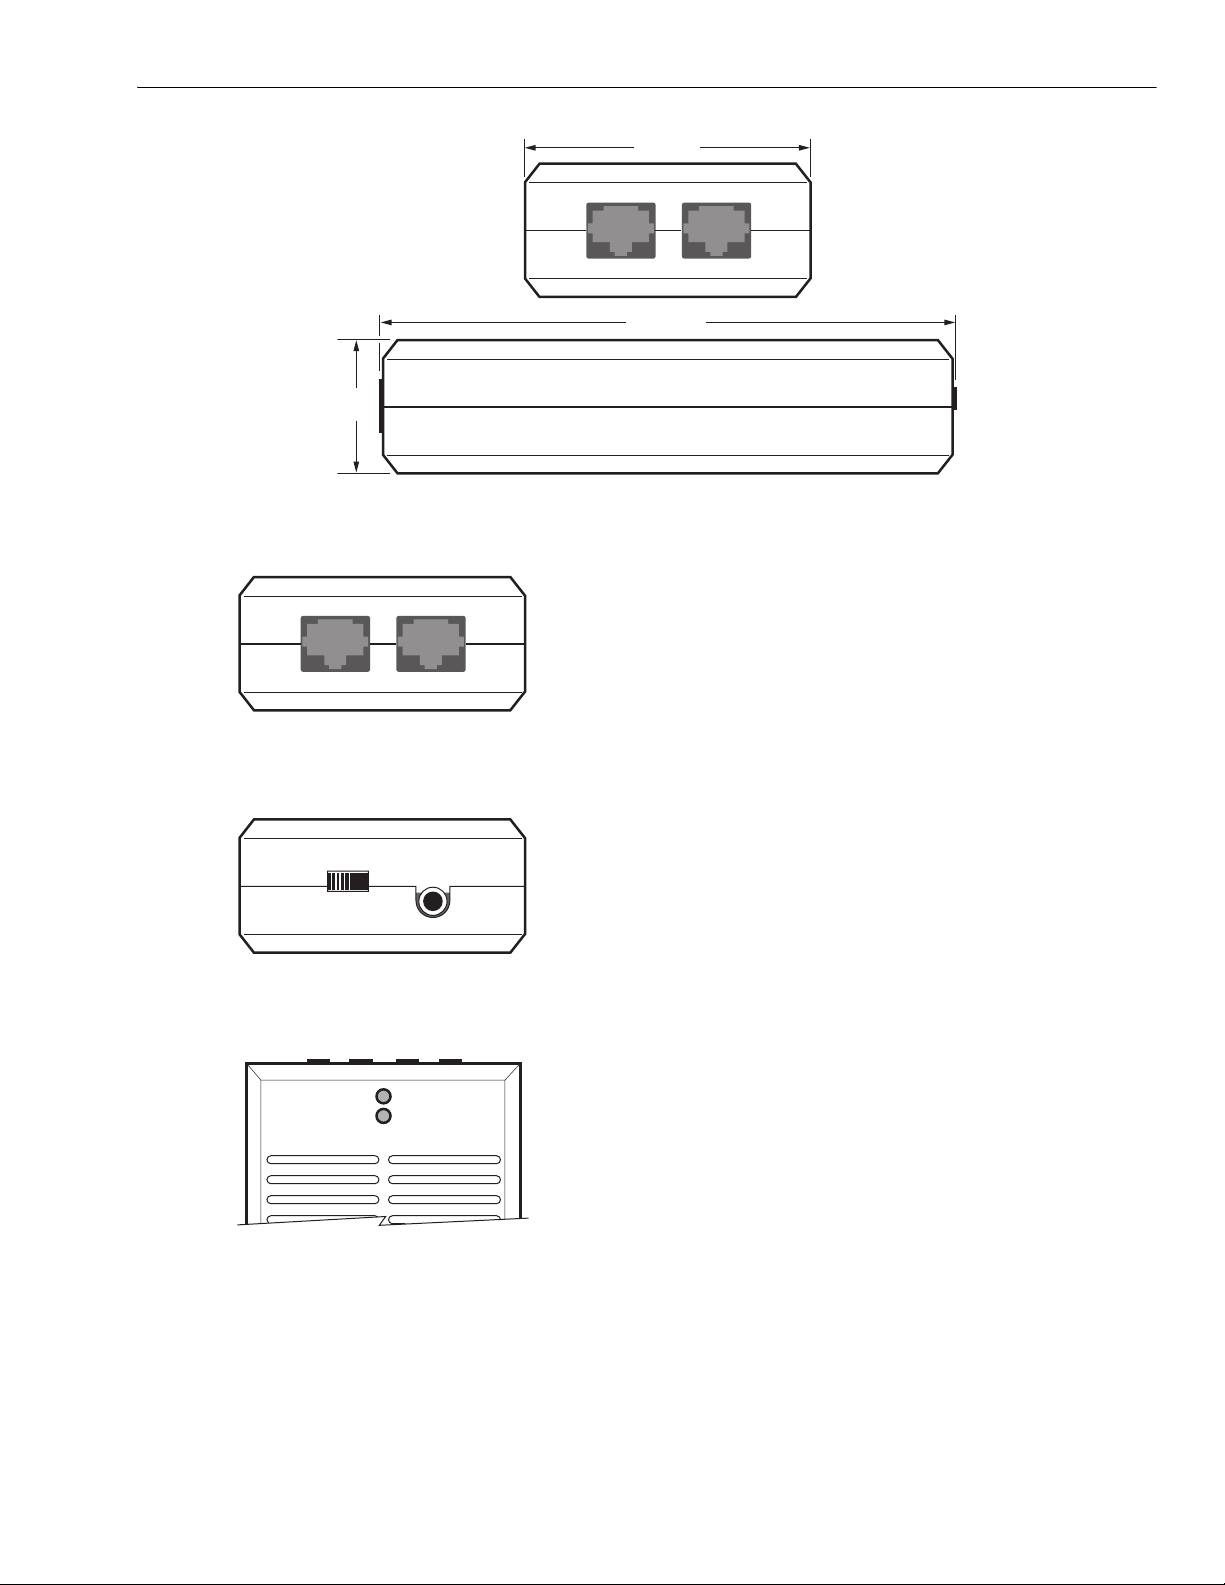
1
TPE
2
M19503
1-1/8
(28)
2-1/2 (64)
TPE
TERMINAL
4-15/16 (125)
Fig. 1. Dimensions of the XM500 in in. (mm).
Test Network Response Time
TERMINAL
The network administrator should run a “trace route” between
the LAN and remote location to ensure the cumulative
response time is not near or over 1000 milliseconds.
Otherwise, the user can encounter connectivity issues.
XM500 TCP/IP MODEM
M1950
Fig. 2. Serial interface locations.
I
Fig. 3. Power supply location.
Fig. 4. LED light locations.
CONFIGURATION
0
TERMINAL
POWER
LINK
TPE
M1950
M19504
Locations must have LAN/WAN connection
A (10bT) TCP/IP LAN/WAN connection must be available in
every location, where an EXCEL controller or a workstation
shall be operated via the XM500.
Every TCP/IP Modem needs an official IP address
This IP address must be official and permanent. It will serve
as the telephone number for the workstation or EXCEL
controller that is connected to it.
EXAMPLE: 160.221.71.130
NOTES:
1. If communication is only done internally in the
LAN, unofficial IP addresses will be sufficient.
2. If only dynamic IP addresses are available: Use a
DHCP server and have it allocate the identical IP
address every time it does a dynamic IP address
allocation.
3. For an intermediate test, the IP address of a PC
can be borrowed, but the PC must be switched off
during this test.
4. If an XM500 is connected to a LAN network which
itself is connected to WAN by using one official IP
address only via Proxy server or dynamic NAT,
this controller cannot be addressed from the
WAN.
5. Every controller that has to be accessed by the
TCP/IP modem needs its own IP address.
6. If the connection between two LANs itself is done
via dial-up, fixed IP addresses in the TCP/IP
Modem will not work. Contact your local system
administrator for help in this case.
Ethernet LAN/WAN Information Needed
It is mandatory to get the following information from the
person that is responsible for supervising and maintaining the
LAN/WAN Ethernet system in the locations where the XM500
shall be operated:
Every TCP/IP Modem needs a network mask
EXAMPLE: 255.255.252.0
3 74-3468—3
Page 4

XM500 TCP/IP MODEM
Every TCP/IP Modem needs a default gateway
EXAMPLE: 160.221.68.1
NOTE: If access is needed via a WAN or INTERNET into the
LAN, it may be necessary to release access through
a firewall/router.
PROGRAMMING THE XM500
1. Retrieve the WAN modem, RS-232C cable, and the
DB25 to DB9 male to female converter.
2. Hook the RJ-45 (Ethernet) plug of the RS-232C cable
to the Terminal port of the XM500 modem.
3. Hook the DB25 male plug of the converter to the DB25
female plug of the RS-232C cable.
4. Hook the DB9 female plug of the converter to Port #1
on the PC.
5. Plug the power cord into a socket and then plug the
other end into the modem. Turn on the modem. You
should see the Power light on top of the modem on. The
Link light should not be on.
6. Retrieve the disk labeled XM500 Modem Installation
Disk.
7. Insert this disk into the a: drive of your PC.
8. From the desktop, double click on the My Computer
icon, then double click on the 3-1/2 Floppy (A:) icon.
9. Inside the A: drive double click on the file entitled:
IP-Connect.exe.
10. Wait for the configuration screen to appear (see Fig. 5).
11. Retrieve the IP Address, Gateway Address and
Network Mask numbers from your network
administrator.
12. Wait until the screen finishes connecting the modem to
one of the COM ports.
13. When the modem is ready the status screen should
read: Please select device XM500 is connecting to…
14. Choose the device, which the modem is going to be
connecting to or the workstation, from which the modem
is connecting.
NOTE: If you are connecting from XBS, make sure
you choose the same baud rate as the
controller to which you connect.
15. Once you have chosen a device, the status bar should
read: Please Configure XM500.
16. Correctly fill in the IP Address making sure that the
numbers are in the appropriate position between the
periods. Repeat for Gateway Address and Network
Mask.
17. Click on the Download button.
18. Wait for the status bar to read: XM500 is configured
successfully (see Fig. 6).
19. In the Current Settings box, click the Read button.
20. Ensure that the configured modem settings are correct.
21. Click the Save to file button.
NOTE: Save this small text file somewhere safe. It
saves all the configuration information. So, if
you have trouble with the modem you can
send this file in for troubleshooting.
The modem is now configured for that specific site. This
modem will not work on other sites unless it is reconfigured to
do so.
NOTES:
— Take one of the stickers from the box, and mark
the IP address on the modem. It can be useful to
mark which site the modem should be going to so
that the different modems are not confused.
— The final screen should have the same values in
the Configure box and the Current Settings box.
Fig. 5. XM500 blank configuration screen.
74-3468—3 4
Fig. 6. XM500 configuration screen.
Page 5

XM500 TCP/IP MODEM
Cabling Connections
To the Workstation…
1. Connect an Ethernet cable (RJ-45 to RJ-45) to the TPE
port of the XM500 and to the Ethernet LAN socket with
the IP address that was configured for the modem.
2. Connect the RJ-45 plug of the RS-232C cable (included
with the modem) to a standard RS-232 cable.
NOTE: It is necessary to purchase one of these cables
at your nearest computer parts store.
3. Connect standard RS-232 cable to PC port number one.
4. Connect the power supply to the XM500.
5. Turn on the XM500.
To Controller (XL50/100/500,XDM506,XM100A)...
1. Connect an Ethernet cable (RJ-45 to RJ-45) to the TPE
port of the XM500 and to the Ethernet LAN socket with
the IP address that was configured for the modem.
2. Connect the RJ-45 plug of the RS-232C cable (included
with the modem) to the controller.
NOTE: The 25 to 9 pin adapter is required for the
XL50/100/500 controllers. A XW571 cable
(purchased separately) is required for XDM506
and XM100A.
3. Connect the power supply to the XM500.
4. Turn on the XM500.
To an SLTA…
1. Connect Ethernet cable (RJ-45 to RJ-45) to the XM500
TPE port and to the Ethernet LAN socket with the IP
address that was configured for the modem.
2. Connect the RJ-45 plug of the RS-232C cable to the
SLTA Modem Cable.
NOTE: It is necessary to purchase separately the
Modem Installation Cable (Honeywell part
number 32002517-001).
3. Set SLTA-10 dipswitches for modem communications
(see form 95-7511-2).
4. Connect the power supply to the XM500.
5. Turn on the XM500.
6. Check to ensure both the Power and Link LED on the
modem remain lit. If the link light does not remain on,
the modem is not connected to a network.
LONSTATION™ and LONSPEC™ Configuration
1. Begin from the desktop.
2. Double click My Computer.
3. Double click Control Panel.
4. Double click Modems.
5. Click Add.
6. Click the box Don’t detect my modem; I will select it
from a list.
7. Click Next.
8. Under Manufacturers column, click Standard Modem
Types.
9. Under Models column, click Standard 28800 bps
Modem.
10. Click Next.
IMPORTANT
Determine whether the modem is connected to
COM1 or COM2.
11. Choose the appropriate COM port from the list.
12. Click Next.
13. Wait for indication of proper modem configuration.
14. Click Finish.
15. You should be returned to the main screen and see the
Standard 28800 bps modem has been configured.
16. Click Properties.
17. Change the Maximum Speed from 28800 to 38400.
18. Click OK.
NOTE: The modem is now configured to run at its highest
baud rate in L
These programs will also now recognize the modem.
ONSTATION™ 3.0 and LONSPEC™.
Configuration for XBS
Refer to the XBS Checkout and Test (Form 74-3422) for
instructions on configuring the workstation for modem
communication via a XPC500 card or com port.
Modem module menu
In the modem module menu do the settings equivalent to a
normal modem set-up.
IMPORTANT
1. The IP address is entered in the same fields where
a telephone number would have been entered.
2. The XM500 accepts an IP address entered with
commas like 160,221,71,130 or entered with dots
(e.g., 160.221.71.130), or as 4 3-digit octets with
leading zeros and no spaces (e.g., 160221071130).
Baud rate
The XBS supports baud rates up to 38.400 bps.
IMPORTANT
If baud rates 19.200 and 38.400 bps are to be used
the autobauding MUST be switched <on>.
1. At Sending PC, wait for <connect>.
2. A transparent data communication should be possible.
3. Verify this:
a. Transmit some information.
b. Check that it is received on the target PC.
5 74-3468—3
Page 6

XM500 TCP/IP MODEM
TECHNICAL INSTALLATION AND SET-UP (OPTIONAL)
For ease of use, it is recommended to use the IP-Connect
Software provided to configure the XM500 controller.
However, if desired the XM500 may be configured manually.
The following sections provide the technical details to
configure the XM500 using Windows Terminal program.
IMPORTANT
For L
ONSTATION™ and LONSPEC™, refer to the
L
ONSTATION™ and LONSPEC™ Configuration
section on page 5.
Data Line Monitor
For every modem start-up, using a data line monitor is highly
recommended in order to allow checking the communication
and the RS-232 line status during commissioning.
RS-232 Breakout Box
As the XM500 does not provide LED indication of the line
status of TxD, RxD and other control, using a standard
RS-232 breakout box can be helpful.
Setting Up the XM500
1. Start a terminal program and set it up for 9.600 bps.
2. Enter <ATEV1><ENTER> and verify that the XM500
returns <OK>.
3. Enter the commands listed below in order to initialize
the XM500 for the TCP/IP communication between XBS
or L
ONSTATION™ and EXCEL 5000/15 controllers:
a. lockmem off : (unlocks nonvolatile memory).
b. stty xxxxx : (sets RS-232 Baud Rate to xxxxx bps;
default is 9600 bps; supported baud rates:
2.400/4.800/9.600/19.200/38.400)
IMPORTANT
If baud rates 19.200 and 38.400 bps are to be used
the autobauding MUST be switched <on> after the
TCP/IP initialization has been completed.
c. ifconfig 160.221.71.130 255.255.252.0
This example is for an IP address 160.221.71.130
with appropriate network mask 255.255.252.0.
(note the blank space between IP address and
network mask).
d. route add net default 160.221.68.1 1
(Example of a gateway definition)
Please check with the local network administrator if
a gateway definition is necessary. The parameters
are the default gateway address (160.221.68.1) and
the number of hops to the gateway(1). They must be
separated by a space
e. lockmem on : (locks nonvolatile memory).
f. autobaud on : (enables the XM500 to adapt its serial
baud rate to that of the controller or the workstation
central. This is only needed if baud rates 19.200 and
38.400 bps are to be used for XL50.)
IMPORTANT
• Above user commands can only be recognized by
the XM500 when the autobaud is <off>.
• This means that the autobaud <on> command
MUST be used AFTER the user commands have
been entered.
• If user commands should be changed, then FIRST
autobaud must be set to <off>.
4. Enter the following AT commands in order to initialize
the XM500 for the required serial behavior.
AT Commands for XM500 Connected to XL5000
Controllers with O.S. 2.01.00 or Later and for
XBS via COM Port
ATE0X1&C1&D1
E0:echo off
(X1: ignore busy signal and dial tone,
&C1: carrier-detect follows connection,
&D1: Hang-up on DTR transition)
AT&W
(save init profile in NVRAM)
AT Commands for XM500 Connected to
Modem Devices XM100A, XDM506 and
for XBS with XPC500 Card
ATE0V0X1&C1&D1
AT&W
(save init profile in NVRAM)
IMPORTANT
• Due to an initialization problem of the XBS for the
XPC500 card, reliable remote communication can
not be granted with XBS 1.4.4 or older in
combination with XPC500.
• It is NOT recommended to use XM500 in
combination with XPC500.
74-3468—3 6
Page 7

XM500 TCP/IP MODEM
Testing the TCP/IP communication
This test is to verify that both XM500s are fully initialized and
are connected to the LAN/WAN:
1. Connect a PC to each of the two XM500s that shall
communicate, and start a terminal program on both
PCs. PC terminal baud rate MUST be set to that which
the attached XM500 was programmed.
2. <ping> the IP address of the XM500 to which the other
PC is connected.
EXAMPLE: Command: <ping 160.221.71.131>
Answer: <160.221.71.131 is alive>
This answer means that the TCP/IP
communication to the target XM500 is working.
If the target XM500 cannot be reached, the
answer will be:
<no answer from 160.221.71.131>
3. If the ping-test was successful, you can set-up and test
a transparent communication by proceeding as follows:
a. Action at Sending PC:<ATD 160.221.71.131>
b. Action at Target PC:
(1) Wait for <ring>
(2) Enter <ata>
(3) Wait for <connect>
EXCEL 5000 Controller Set-Up
Firmware required
— Excel 500 firmware 2.03.03 or newer.
— Excel 100C firmware 2.03.03 or newer.
— Excel 50 firmware 2.03.03 or newer.
— XM100A firmware 1.03.01
— XDM506 firmware 1.03.01
Baud rate
— For XM100A the maximum baud rate is 9.600.
— For XDM506 the maximum baud rate is 2400.
— For XL50, XL100C and XL500 (XC5010C or
XCL5010), the supported baud rates are 2.400, 4.800,
9.600 bps, 19.200 bps and 38.400 bps. (Other baud
rates are not supported.)
1. When the controller is powered-up:
a. Enter the Start-up operating sequence.
b. Go to modem baud rate.
c. Enter the desired baud rate value.
2. When the controller is in operation:
a. Enter the System Data menu.
b. Go to modem baud rate.
c. Enter the desired baud rate value.
IMPORTANT
If baud rates 19.200 and 38.400 bps are to be used
the autobauding MUST be switched <on>.
Hayes Command Set (See Table 1)
NOTE: AT&F and ATZ is not supported. This has the benefit
that once the XM500 has been initialized, it will
always and consistently show the same pre-defined
serial behavior.
Table 1. Hayes Command Set.
Command Description
+++ Hang-up (close connection)
A, A0 Answer incoming connection
D Dial (connect) to an IP address. Format of the address
(addr) is:
xxx,xxx,xxx,xxx [;port]
or xxx.xxx.xxx.xxx [:port]
Dial modifiers are:
addr
L: Dial last IP
Paddr
Ta dd r
The default port number is 3001.
E, E0 Character echo disabled
E1 Character echo enabled (default)
I, I0 Display software version number
Q, Q0 Result codes enabled (default)
Q1 Result codes disabled
Q2 Result codes during and after handshake disabled
V, V0 Numeric result codes
V1 Verbose (word) result codes (default)
X, X0 Busy not detected; dial tone not detected
Result codes 0-4 enabled
X1 Busy not detected; dial tone not detected
Result codes 0-5 enabled
X2 Busy not detected; dial tone detected
Result codes 0-6 enabled
X3 Busy detected; dial tone not detected
Result codes 0-5 and 7 enabled
X4 Busy detected; dial tone detected
Result codes 0-7 enabled (default)
&C, &C0 Carrier detect always on (default)
&C1, &C2 Carrier detect follows connection
&D, &D0 Ignore DTR (default)
&D1, &D2,
&D3
&R, &R0 Enable input H/W flow control (RTS only; CTS is always
&R1, &R2 Disable input H/W flow control (default)
&V, &V0 View configuration settings
&W, &W0,
&W1
S registers Command format is: AT[S[reg]]=[n] or AT[S[reg]]?
S0 Ring to answer on. Zero requires ATA command to
S1 Counts number of rings
S7 Wait for carrier (default is 60 sec).
Hang-up on DTR transition
high)
Save profile in NVRAM
answer; non zero is auto answer mode (default is zero)
7 74-3468—3
Page 8

XM500 TCP/IP MODEM
Verbose Result Codes
1. Unsupported modem commands return <ok>.
2. A TCP/IP connection refused equates to <busy>
3. No connection equates to <no carrier>.
User Commands
Table 2 shows the user commands that are commonly used
and necessary in order to initialize the XM500 for
communication with EXCEL 5000 system devices.
Table 2. User Commands.
Command Description
a
autobaud
ifconfig display or set network interface information.
lockmem display or set the system parameters lock state <on> or <off>.
ping send ICMP ECHO_REQUEST datagrams.
route display or modify the routing table.
stty display or set the serial baud rate.
a
Autobauding is only supported for 9.600, 19.200 and
38.400 bps.
NOTE: The terminal mode is fixed. That is, eight bits per
display or set the autobauding state: <on> or <off>.
Default is <off>.
character, one stop bit, no parity bits, no S/W flow
control.
Cable Specifications
RS-232 CABLE (RJ45 TO DB9/DB25)
IMPORTANT
The RS-232 cable is a special calibration cable.
Standard RJ45 to RS-232 connectors will not work.
Table 3. PIN Assignment RS-232 Cable.
PIN at RJ45 Description PIN at DB9 PIN at DB25
1 DCD → 18
2 ← RTS 7 4
3GND57
4 RxD → 23
5 ← TxD 3 2
6 no connect
7CTS →
a
6
,8 5,6
8 ← DTR 4 20
a
Note that the DTR signal is looped back in order to supply
DSR to the terminal (XBS or EXCEL 5000 CPU).
ETHERNET CABLE
Use a standard 10BASE-T twisted pair Ethernet cable with
RJ45 plugs.
a
LONSPEC™ and LONSTATION™ are trademarks of Echelon® Corporation.
By using this Honeywell literature, you agree that Honeywell will have no liability for any damages arising out of your use
or modification to, the literature. You will defend and indemnify Honeywell, its affiliates and subsidiaries, from and
against any liability, cost, or damages, including attorneys’ fees, arising out of, or resulting from, any modification to the
literature by you.
Automation and Control Solutions Honeywell International Honeywell Europe S.A. Honeywell Latin American
Honeywell International Inc. Honeywell Limited-Honeywell Limitée Control Products 3 Avenue du Bourget
1985 Douglas Drive North 35 Dynamic Drive Honeywell Building 1140 Brussels 480 Sawgrass Corporate Parkway
Golden Valley, MN 55422 Scarborough, Ontario 17 Changi Business Park Central 1 Belgium Suite 200
74-3468—3 B.B. Rev. 4-03 www.honeywell.com
M1V 4Z9 Singapore 486073 Sunrise FL 33325
Printed in U.S.A. on recycled
paper containing at least 10%
post-consumer paper fibers.
Region
 Loading...