

Page 1
Energy Management
Thermostat
Weekday/Weekend
(5-day/
Saturday/Sunday)
Programmable
Heat and/or Cool
Conventional
and Heat Pump
T7512A,B,C,D
1
USER’S GUIDE
69-1153
69-1153
Page 2

Welcome to the world of comfort and energy
savings with your new Honeywell Energy
Management Thermostat.
advantage of special programs you can subscribe to that can further increase your energy
savings.
This thermostat allows full weekday/weekend
programming so you can set the thermostat to
control the temperature in your home according
to your personal schedule and preferences.
When programmed according to the instructions
in this guide, the features available with this
thermostat will not only keep you comfortable,
but will also save you energy.
In addition to being programmable, this thermostat also contains a communications module.
This module allows your utility company to
communicate with your thermostat to take
These special programs can include one or both
of the following:
Time-of-Use Pricing. If your utility offers
Time-of-Use Pricing rates, this thermostat
will communicate with the utility to inform
you of the rate in effect at any given time.
The rate that is in effect is indicated on the
thermostat display as shown in Fig. 1. A
special feature of this thermostat allows
you to set an offset temperature that
automatically adjusts your energy use for
each rate. This typically involves control-
2
69-1153
Page 3
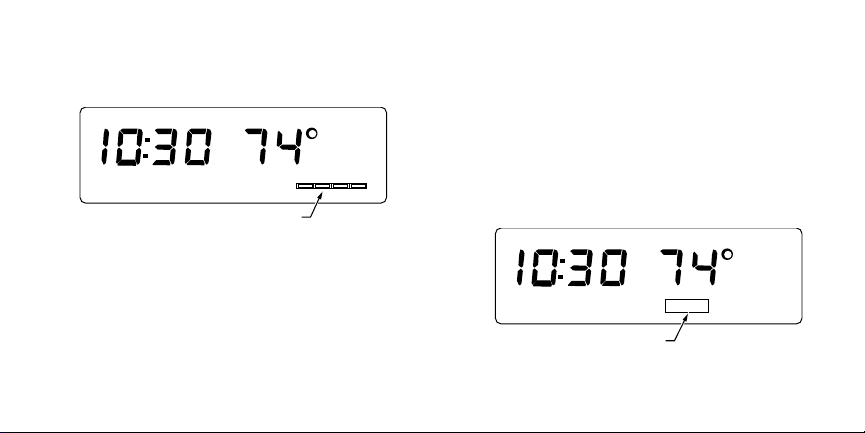
ling your home at a higher temperature
during the cooling season and a lower
temperature during the heating season.
TUE
INDICATOR FOR TIME-OF USE PRICING
AM
HR
COOL
AUTO
1 2 3 4
Fig. 1. Time-of-use pricing indicator.
Direct Load Control. If your utility offers
Direct Load Control (DLC), this thermostat
can be controlled by your utility to limit
your cooling and heating use during peak
demand times. When your thermostat is
M7904
under DLC, the word SAVING is displayed
on the thermostat. See Fig. 2.
You must subscribe to these programs
before your utility company can communicate with your thermostat. If you have any
questions concerning the application of this
thermostat or these special programs and
features, please contact your local utility.
AM
TUE
SAVING
HR
SAVINGS INDICATOR
COOL
AUTO
M7903
Fig. 2. Savings indicator.
3
69-1153
Page 4

Table Of Contents
Recovery From Setback ................................................................................................................ 5
Programming Your Thermostat ...................................................................................................... 6
Personal Programming Charts ...................................................................................................... 8
Step 1—Set the Current Time/Day ...................................................................................... 10
Step 2—Enter the Program Schedules ............................................................................... 10
Step 3—Set the System and Fan Controls .......................................................................... 12
Step 4—Start the Thermostat Program ............................................................................... 14
Operating Your Thermostat ........................................................................................................... 14
Thermostat Operation When Special Programs are in Effect ....................................................... 18
Replacing the Thermostat Batteries ..............................................................................................20
Troubleshooting Guide .................................................................................................................. 22
Toll-Free Customer Assistance ..................................................................................................... 27
Warranty Conditions...................................................................................................................... 28
4
69-1153
Page 5

RECOVERY FROM SETBACK
The term
thermostat uses to operate the heating or
cooling equipment to return the house from the
energy savings setting you selected for when
you are away or asleep to the temperature you
prefer when you are home and awake.
This thermostat uses a recovery process that
turns your heating/cooling equipment on or off at
the time you program the temperature to
change. For example, if you program the
thermostat’s heating program to 72°F at 6:00
AM, the heating equipment will come on at 6:00
AM and begin warming the house to 72°F. If you
recovery
refers to the process the
want the temperature in the house to be 72°F at
6:00 AM, you should program the thermostat to
an earlier time; for example, 5:30. (The exact
amount of time it takes your home to warm or
cool to the temperature you want depends on
many factors such as the size of your heating/
cooling equipment and the outdoor temperature.)
If this thermostat is for a heat pump system, the
thermostat uses an algorithm when recovering
from setback that helps reduce the use of
auxiliary heat.
5
69-1153
Page 6

PROGRAMMING
YOUR THERMOSTAT
IMPORTANT
Batteries must be installed to maintain
time and date in the event of power loss.
You will find it helpful to complete the Personal
Programming Charts on the following pages
before you begin programming the thermostat.
Plan your program schedule of time and
temperature settings for various times of the day
by filling in the boxes in the Personal Programming Charts. There are four time periods
available for weekdays, Saturday, and Sunday—
WAKE, LEAVE, RETURN, and SLEEP on the
T7512A,B,C,D Thermostats. These periods can
be displayed individually on the thermostat as
you press the WEEKDAY SCHEDULE or
WEEKEND SCHEDULE keys. You may want to
enter a different schedule for the cooling and the
heating seasons.
WAKE is the time you get up. Generally you
want the house at a comfortable temperature when you wake up and get ready to
go to work or school. Set the WAKE time
earlier than your alarm clock so the house
6
69-1153
Page 7

has time to warm up or cool down before
you get up.
LEAVE is the time you leave for work or
school. Generally, once you leave the
house, you want the temperature higher or
lower (depending on the season) so that
you can save energy while you are away.
RETURN is the time you return from work or
school. Once again, you want the house at
a comfortable temperature when you
return and go about the normal activities
of your day before bedtime. Set the
RETURN time earlier than the time you
actually get home so the house has time
to warm up or cool down before you get
there.
SLEEP is the time you usually go to sleep.
While you are sleeping, you can save
energy by setting the thermostat to control
the temperature higher or lower (depending on the season). For more comfortable
sleeping, some people choose not to raise
the cooling temperature at night.
If you decide not to program the thermostat, it
automatically controls heating and cooling
temperatures as follows:
Starting at 6:00 AM every day, the thermostat
sets the heating temperature to 68° and the
cooling temperature to 76°F.
7
69-1153
Page 8

At 10:00 PM every night, the thermostat sets the
heating temperature back to 60°F; the cooling
temperature remains at 76°F.
You do not need to enter a time and temperature
program for every period if your schedule does
not require it. For example, if your house is
occupied during the day on weekdays, you can
program only the WAKE and SLEEP times.
NOTE: Temperatures cannot be set any higher
than 88°F or any lower than 45°F.
Personal Programming Charts
Cooling Schedule (for Summer Use):
Schedule
Weekday WAKE
Saturday WAKE
Sunday WAKE
8
Time
Period Time
LEAVE
RETURN
SLEEP
LEAVE
RETURN
SLEEP
LEAVE
RETURN
SLEEP
Cooling
Temperature
69-1153
Page 9

Heating Schedule (for Winter Use): If you subscribe to Time-of-Use Pricing, use the
Schedule
Weekday WAKE
Saturday WAKE
Sunday WAKE
Time
Period Time
LEAVE
RETURN
SLEEP
LEAVE
RETURN
SLEEP
LEAVE
RETURN
SLEEP
Heating
Temperature
following table to plan the offset values you will
enter for each Time-of-Use Pricing rate, use a
numerical value as described in Enter Offset
Values. You should enter a different offset value
for the heating and cooling seasons, see chart.
You do not need to enter an offset for rate 1.
Offsets for
Cooling Season (+)
Rate 2 Rate 3 Rate 4 Rate 2 Rate 3 Rate 4
Offsets for
Heating Season (-)
9
69-1153
Page 10

Before programming the thermostat, remove the
clear plastic overlay that covers the display.
When pressing the keys, use the ball of your
finger or a soft pencil eraser; using sharp
fingernails or pencil points can damage the
keypad. If you make a mistake during programming, press the Run Program key and reprogram the time, temperature, or offset value with
the error.
Step 1—Set the Current Time/Day
To set the time, press and release the Set
Clock/Day key once. Press Ahead or Back
keys until the current time is displayed. To set
the day, press and release the Set Clock/Day
key again. Press Ahead or Back keys until the
current day is displayed. After you have set the
time and day, press the Run Program key.
Step 2—Enter the Program Schedules
Entering a Heating Schedule
Refer to your Personal Programming Charts and
proceed as follows:
Press the System key until the thermostat
displays the word HEAT to indicate you
are in the heating mode. Press and
release the Weekday Schedule key once.
The words WAKE, MON...FRI and SET
appear on the display.
Press the Ahead or Back keys to set the
weekday WAKE time from your Personal
Programming Charts. Press the Warmer
10
69-1153
Page 11

or Cooler keys to set the weekday WAKE
temperature from your Personal Programming Charts.
Repeat the above sequence for the other
weekday schedules: LEAVE, RETURN, and
SLEEP.
Press the Weekend Schedule key until SAT,
WAKE and SET appear on the display. Set
the WAKE, LEAVE, RETURN and SLEEP
schedules for Saturday just as you did for
the weekdays.
Press the Weekend Schedule key again so
that SUN, WAKE and SET appear on the
display. Set the WAKE, LEAVE, RETURN
and SLEEP schedules for Sunday just as
you did for the weekdays and Saturday.
Enter Offset Values
Enter the offset value for each Time-of-Use
Pricing rate using the Offset key. You can enter
offset numbers only if you are a subscriber to
Time-of-Use Pricing.
The offset value you enter is the number of
degrees you are willing to allow the heating or
cooling temperature you have already programmed for normal operation to change so you
can save money at each rate. For example, if
you normally want your home heated to 72°
when rate 1 is in effect, but are willing to let your
home cool to 70° when rate 2 is in effect, your
heating offset value for rate 2 is -2 (72° -2° =
70°). If you do not enter an offset, the offset is 0°.
The first time you press the Offset key, the offset
11
69-1153
Page 12

for rate 1 is displayed (note the indicator on the
thermostat display as shown in Fig. 1). Use the
Warmer and Cooler keys to set the offset value.
Repeat the procedure for each rate. After you
have entered the last offset value, press the
Run Program key.
Entering a Cooling Schedule
Press the System key until the thermostat
displays the word COOL to indicate you are in
the cooling mode.
Enter cooling temperatures for the WAKE,
LEAVE, RETURN and SLEEP times by
following the same instructions as for Entering a
Heating Schedule above. If you subscribe to
Time-of-Use Pricing, enter offset values for the
cooling season as you did for the heating
season.
Step 3—Set the System
and Fan Controls
After programming the thermostat, set the
system and fan controls as follows:
System Control
If you have a conventional heating/cooling
system, the system can be set to: HEAT, COOL
or OFF. If you have a heat pump system, the
system can be set to: HEAT, EM. HEAT, COOL
or OFF.
12
69-1153
Page 13

You can change the system setting by pressing
the System key. Each time you press the key,
the system status changes to the next setting.
The status of the system is as follows when the
associated indicator is displayed:
HEAT: The thermostat will control your
heating system according to the schedule
you programmed (heat pump in heating
mode).
EM. HEAT: The thermostat will disable the
heat pump and control the emergency
heater element according to the schedule
you programmed.
COOL: The thermostat will control your air
conditioning system according to the
schedule you programmed (heat pump in
cooling mode).
No status: Both the heating and air condition-
ing systems are off (heat pump off)
displayed.
Fan Control
There are two fan settings: AUTO and ON.
Set the fan at the setting you want by pressing the
Fan key. Each time you press the key, the fan
status changes to the next setting.
When FAN is displayed, the fan is on continuously. Use this setting for improved air circulation
during special occasions or for more efficient
electronic air cleaning.
13
69-1153
Page 14

When nothing is displayed, the fan is in AUTO
mode (it comes on with the heating or cooling
equipment, as needed). AUTO is the normal
setting for most homes and allows a singlespeed fan to turn on automatically with the air
conditioner or furnace. If you have a two-speed
fan, it usually runs on high with the air conditioner and on low with the furnace.
Step 4—Start the Thermostat Program
To start the thermostat using the program you
have just entered, press the Run Program key.
14
OPERATING YOUR THERMOSTAT
Normally you want your thermostat to run
according to the program you entered; however,
you can also change your program to perform
the following operations.
NOTE: The system control must be set to
HEAT or COOL to perform the following
operations.
Temporarily Change Temperature Setting
for the Current Period Only
Press the Warmer or Cooler key until the
temperature you want is displayed. The temporary setting stays in effect only until the next
69-1153
Page 15

scheduled program change. (If you subscribe to
Time-of-Use Pricing, it stays in effect only until
the next rate change.) To cancel the temperature
change, press the Run Program key. When a
temporary temperature is in effect, the display
alternates between the time/temperature and the
temporary setting.
Hold a Temperature Indefinitely
You could find this operation useful when you go
out of town on business or on vacation.
Press the Hold Temp key and then set the
temperature using the Warmer or Cooler keys.
This temperature stays in effect until you press
the Run Program key.
Check the Current Temperature Setting
To check the current (programmed) temperature
setting, press the Present Setting key. Then
verify the setting you selected.
Check the Programs You Entered
Press the Weekday Schedule or Weekend
Schedule key. Each time you press the key, the
next program schedule is displayed. You can use
this feature to verify that you correctly entered
the program as shown in your Personal Programming Charts.
Cancel a Program
You can cancel a program by pressing the
Weekday Schedule or Weekend Schedule key
15
69-1153
Page 16

until the program you want to cancel is displayed; then press the Clear key.
NOTE: You cannot cancel the WEEKDAY
WAKE program.
COOL, then press the Usage key. Each time you
press the Usage key, the thermostat displays the
next usage value. The HR and MIN segments
are lit and the display shows the numerical value
for each.
Check Usage
This thermostat keeps a record of the current
and accumulated on-time of your heating and
cooling equipment. It tracks
(since midnight) and
current day
accumulated
usage
usage (since
the accumulator was last cleared). If you
subscribe to Time-of-Use Pricing, the thermostat
records usage for each rate.
To view heating or cooling equipment usage,
press the System key to display HEAT or
If you do not subscribe to Time-of-Use Pricing,
the thermostat displays current usage the first
time you press the Usage key and accumulated
usage the next time you press the Usage key.
If you subscribe to Time-of-Use Pricing, there
are eight usage values that can be displayed.
The first time you press the Usage key, the
thermostat displays the current usage value for
rate 1. Each time you press the Usage key
again, usage values for rates 2, 3 and 4 ,
16
69-1153
Page 17

respectively,are then incrementally displayed. If
you continue to press the Usage key, accumulated usage values are repeated for rates 1
through 4.
Permanently Change a Program
To permanently change a program, repeat the
appropriate steps in Programming Your Thermostat.
Press the Run Program key to stop viewing
usage.
Current day usage is automatically cleared at
midnight. To clear an accumulated value, press
the Usage key until the value you want to clear
is displayed and then press the Clear key. If you
subscribe to Time-of-Use Pricing, your utility can
also clear the accumulators by sending a
message to the thermostat.
Return to Normal Program or Start Program
Any time you want to return to the normal
program or start the program, press the Run
Program key. If you temporarily changed the
temperature or you used the Hold Temp key,
pressing the Run Program key will cancel your
change.
Change Fan or System Control Settings
Change the fan setting by pressing the Fan key.
Each time you press the key, the fan status
17
69-1153
Page 18

changes to the next setting. When FAN is
displayed, the fan is on continuously. When
nothing is displayed, the fan is in AUTO mode (it
comes on with the heating or cooling equipment,
as needed).
THERMOSTAT OPERATION
WHEN SPECIAL PROGRAMS
ARE IN EFFECT
Change the system setting by pressing the
System key. Each time you press the key, the
system status changes to the next setting.
Normally your thermostat operates as you
programmed it. If you subscribe to either of the
following special programs, there may be times
when it does not operate as you expect. Before
calling for service, read the following information.
Direct Load Control (DLC)
When the thermostat is operating under DLC,
the amount of time your heating/cooling system
can operate is controlled by radio signal from
18
69-1153
Page 19

your utility company. If you notice the temperature in your home is higher or lower than the
setting you programmed into the thermostat,
check the thermostat display. To indicate the
equipment is under DLC, the thermostat displays
the word SAVING. You cannot control the
heating/cooling equipment when it is under DLC.
When the utility releases your thermostat from
DLC, your heating or cooling equipment may not
be immediately available. To prevent damage to
your heating and cooling equipment and to allow
the utility to bring the equipment on-line effectively of all homes that subscribe to DLC, your
thermostat automatically calculates and initiates
a time delay before the heating or cooling
equipment comes on. You cannot override this
time delay.
Time-of-Use Pricing
If you subscribe to Time-of-Use Pricing, the
thermostat displays the rate in effect, see Fig. 1.
You cannot adjust which rate is in effect; you can
only adjust the temperature offset value for each
rate. Refer to Programming Your Thermostat
section for information on setting the offset value
for Time-of-Use Pricing. To notify you a rate
change will be occurring, the Time-of-Use
indicator on the thermostat begins blinking onehalf hour before the rate change takes effect.
19
69-1153
Page 20

When a rate change message is received by the
thermostat, your heating/cooling system
automatically operates at the temperature and
offset value you programmed. You cannot
temporarily override the offset. If you need to
change the offset, refer to Programming Your
Thermostat.
For additional information about either of these
programs, contact your utility company.
REPLACING THE
THERMOSTAT BATTERIES
IMPORTANT
Batteries must be installed to maintain
the time and date in the event of a
power loss. Although the thermostat
has a low battery indicator, replace the
batteries once every two years to
prevent the thermostat from losing its
time/date information in the event of a
momentary power loss.
As the batteries run low, the display shows
Lo.
This low battery indication flashes for one to
20
bAt
69-1153
Page 21

two months before the batteries run out completely. Replace the batteries as soon as
possible after the indicator starts flashing.
You will need two AA alkaline batteries; nonalkaline batteries will not last as long, and can
leak, causing damage to the thermostat or the
wall surface. We recommend Energizer®
batteries.
• Use a coin to carefully remove the battery
door.
• Press down on the left ends of the batteries
to remove them.
• Install the fresh batteries as shown in Fig. 3.
Make sure positive and negative terminals
are oriented correctly.
• Replace the battery door.
21
INSTALL TWO AA ALKALINE
BATTERIES AS SHOWN
Fig. 3. Battery replacement
M7905
69-1153
Page 22

TROUBLESHOOTING GUIDE
IF... THEN…
Display will not come on. • There is no power applied to the thermostat. Check fuse or
circuit breaker.
Temperature display will not •You have reached the temperature setting limit. The setting
go lower than 45°F or higher range is 45°F to 88°F.
than 88°F during programming.
Temperature change occurs • Check the program times for the period in question. Be sure
incorrectly. that AM and PM indications are correct. Make sure the current
day and time are correct. Reprogram if necessary.
• Remember that it takes time for the system to recover. Refer
to Recovery from Setback section.
22
69-1153
Page 23

Heating will not come on. • Check that the system control on the thermostat is set to
HEAT.
• Check the display. If SAVING is displayed, the system is in in
DLC mode and the thermostat is utility controlled. Heating
cannot come on until the DLC period ends.
• If the temperature setting is higher than current temperature,
and the display says HEAT, contact your utility company.
Cooling will not come on. • Check that the system control on the thermostat is set to
COOL.
• Check the system fuse or circuit breaker and replace or reset,
if necessary.
• Check the display. If SAVING is displayed, the system is in
DLC mode and the thermostat is utility controlled. Cooling
cannot come on until the DLC period ends.
23
69-1153
Page 24

Cooling will not come on. (
cont.
) • The thermostat has a built-in time delay on cooling. To prevent
equipment damage, allow five to ten minutes after changing
the setting before the air conditioner starts.
• If temperature setting is lower than the current temperature,
and the display shows COOL, set the system control to the
OFF setting for ten minutes. After ten minutes, return the
system control to the COOL setting. If the air conditioner
comes on, the compressor may have reached its high limit
temperature protection and shut down. If the air conditioner
does not come on after ten minutes and the display shows
COOL, contact your utility.
The house is too warm or • Press Present Setting key to check the current temperature
too cool. setting.
• If desired, change the temperature setting. See Operating
Your Thermostat section.
24
69-1153
Page 25

The house is too warm or • If you subscribe to Real-time Pricing, you may need to adjust
too cool. (
cont.
) your offset values to provide a more comfortable temperature.
• Check the display. If SAVING is displayed, the system is in
DLC mode and your thermostat is utility controlled. Cooling or
heating cannot come on until the DLC period ends.
System ON indicator is lit, • Allow time for the furnace or heat pump to heat up and the
but no heat is coming from fan to come on before checking for heat at the register.
the registers.
The thermostat’s current • Be aware that it is normal for the current setting and
setting does not match display temperature to differ occasionally.
the display temperature. • During recovery from setback or setup, setting and display
temperatures may differ to within ±1° for up to 30 minutes
after the recovery period.
25
69-1153
Page 26

Incorrect room temperature • The thermostat is factory-calibrated, and cannot be adjusted.
showing on thermostat display. •You are a subscriber to one of the special pricing programs
Thermostat is flashing and your thermostat has lost communication with the utility
CALL <xxx-xxxx>. company. Call the number displayed on the thermostat or the
number on the thermostat label for information.
26
69-1153
Page 27

TOLL-FREE CUSTOMER ASSISTANCE
For all questions concerning this thermostat, please read and follow the instructions. If additional
assistance is needed, call your utility’s Customer Assistance number.
Before you call, please have the following information available—thermostat model number and
date code, type of heating/cooling system (hot water, warm air, oil, gas, heat pump, etc).
27
69-1153
Page 28

WARRANTY CONDITIONS.C.WARRANTY CONDITIONS;
Honeywell warrants this product, excluding battery, to be free from defects in the workmanship or
materials, under normal use and service, for a period of one (1) year from the date of purchase by
the consumer. If, at any time during the warranty period, the product is defective or malfunctions,
Honeywell shall repair or replace it (at Honeywell’s option) within a reasonable period of time.
If the product is defective,
(i) return it, with a bill of sale or other dated proof of purchase, to the retailer from which you
purchased it, or
(ii) package it carefully, along with proof of purchase (including date of purchase) and a short
description of the malfunction, and mail it, postage prepaid, to the following address:
Honeywell Inc.
Return Goods Department
1050 Berkshire Lane
Plymouth, MN 55441-4437
28
69-1153
Page 29

This warranty does not cover removal or reinstallation costs. This warranty shall not apply if it is
shown by Honeywell that the defect or malfunction was caused by damage which occurred while
the product was in the possession of a consumer.
Honeywell’s sole responsibility shall be to repair or replace the product within the terms stated
above. HONEYWELL SHALL NOT BE LIABLE FOR ANY LOSS OR DAMAGE OF ANY KIND,
INCLUDING ANY INCIDENTAL OR CONSEQUENTIAL DAMAGES RESULTING, DIRECTLY OR
INDIRECTLY, FROM ANY BREACH OF ANY WARRANTY, EXPRESS OR IMPLIED, OR ANY
OTHER FAILURE OF THIS PRODUCT. Some states do not allow the exclusion or limitation of
incidental or consequential damages, so this limitation may not apply to you.
THIS WARRANTY IS THE ONLY EXPRESS WARRANTY HONEYWELL MAKES ON THIS
PRODUCT. THE DURATION OF ANY IMPLIED WARRANTIES, INCLUDING THE WARRANTIES
OF MERCHANTABILITY AND FITNESS FOR A PARTICULAR PURPOSE, IS HEREBY LIMITED
TO THE ONE YEAR DURATION OF THIS WARRANTY. Some states do not allow limitations on
how long an implied warranty lasts, so the above limitation may not apply to you.
29
69-1153
Page 30

This warranty gives you specific legal rights, and you may have other rights which vary from state
to state.
If you have any questions concerning this warranty, please write our Customer Assistance Center,
Honeywell Inc., P.O. Box 524, Minneapolis, MN 55440-0524. In Canada, write Retail Products
ON15-02H, Honeywell Limited/Honeywell Limitée, 155 Gordon Baker Road, North York, Ontario
M2H 2C9.
30
69-1153
Page 31

31
69-1153
Page 32

Home and Building Control
Honeywell Inc.
Honeywell Plaza
P.O. Box 524
Minneapolis, MN 55408-0524
69-1153 R.L. 9-97
Copyright © 1997 Honeywell Inc. All Rights Reserved ® U.S. Registered Trademark www.honeywell.com/yourhome
Home and Building Control
Honeywell Limited-Honeywell Limitée
155 Gordon Baker Road
North York, Ontario
M2H 3N7
32
Printed in U.S.A. on recycled
paper containing at least 10%
post-consumer paper fibers.
69-1153
 Loading...