

Honeywell 7850LP-I1-5210E, WLAN Secure Wireless Client, SWC User Manual

Honeywell WLAN
Secure Wireless Client (SWC)
For:
Dolphin
Dolphin
Dolphin
Dolphin
Dolphin
Dolphin
®
6100/6500 Terminal with Windows® CE 5.0
®
7600 Terminal with Windows® CE 5.0
®
7600 Terminal with Windows Mobile
®
7850 Terminal with Windows Mobile
®
9700 Terminal with Windows Mobile
®
9900 Terminal with Windows Mobile
®
6
®
5.0
®
6.5
®
6.1
User’s Guide

Disclaimer
Honeywell International Inc. (“HII”) reserves the right to make changes in specifications and other information contained in this document without prior notice, and the reader should in all cases consult HII to
determine whether any such changes have been made. The information in this publication does not represent a commitment on the part of HII.
HII shall not be liable for technical or editorial errors or omissions contained herein; nor for incidental or
consequential damages resulting from the furnishing, performance, or use of this material.
This document contains proprietary information that is protected by copyright. All rights are reserved. No
part of this document may be photocopied, reproduced, or translated into another language without the
prior written consent of HII.
Web Address: www.honeywellaidc.com
Trademarks
Dolphin, Dolphin RF, HomeBase, Mobile Base, and QuadCharger are trademarks or registered trademarks of Hand Held Products, Inc. or Honeywell International Inc.
Microsoft, Windows, Windows Mobile, Windows CE, Windows NT, Windows 2000, Windows ME, Windows XP, ActiveSync, Outlook, and the Windows logo are trademarks or registered trademarks of Microsoft Corporation.
Other product names mentioned in this manual may be trademarks or registered trademarks of their
respective companies and are the property of their respective owners.
Patents
Please refer to the product packaging for a list of patents.
©2007–2010 Honeywell International Inc. All rights reserved.

Table of Contents
Chapter 1 - Configuring the WLAN Connection
Introduction ..........................................................................................................................1-1
Accessing the WLAN SWC..................................................................................................1-1
Command Bar Icon Colors.............................................................................................1-2
Connection Status Indicator ...........................................................................................1-2
Enabling the WLAN Radio Driver.........................................................................................1-3
Establishing a Connection ...................................................................................................1-4
Config Tab ...........................................................................................................................1-6
Activating the Configuration ...........................................................................................1-6
Config Tab Buttons ........................................................................................................1-6
Using the Scan Feature .................................................................................................1-6
Network Window ..................................................................................................................1-8
Association Modes .........................................................................................................1-8
Common Configurations ....................................................................................................1-13
WEP .............................................................................................................................1-13
PEAPv1-MSCHAPV2...................................................................................................1-14
WPA-PSK.....................................................................................................................1-14
Static IP........................................................................................................................1-15
Status Tab..........................................................................................................................1-17
Chapter 2 - Working in Ad Hoc Mode
Introduction ..........................................................................................................................2-1
Requirements.......................................................................................................................2-1
Setting up a Static IP......................................................................................................2-1
Initiating an Ad Hoc Connection...........................................................................................2-2
Chapter 3 - Setting up the WLAN SWC with DeviceConfig
Overview ..............................................................................................................................3-1
Configuring the DeviceConfig.exm File................................................................................3-1
Setting up the Terminal ..................................................................................................3-2
Enabling a Profile ...........................................................................................................3-2
Changing Power Save Mode ...............................................................................................3-3
Chapter 4 - Administrative Tools
Overview ..............................................................................................................................4-1
IP Tab ..................................................................................................................................4-1
Honeywell WLAN Secure Wireless Client
(SWC) User’s Guide
WLANSupp-UG Rev G
2/10
iii

Advanced Tab ..................................................................................................................... 4-2
STATUS......................................................................................................................... 4-3
STATUS_VERBOSE ..................................................................................................... 4-3
SCAN............................................................................................................................. 4-3
SCAN_RESULTS .......................................................................................................... 4-3
LIST_NETWORKS ........................................................................................................4-4
SELECT_NETWORK ....................................................................................................4-4
ENABLE_NETWORK .................................................................................................... 4-4
REMOVE_NETWORK................................................................................................... 4-4
SAVE_CONFIG ............................................................................................................. 4-4
DISCONNECT............................................................................................................... 4-4
REASSOCIATE ............................................................................................................. 4-4
DHCP release................................................................................................................ 4-4
DHCP renew.................................................................................................................. 4-4
RADIO off ......................................................................................................................4-4
DEBUG on..................................................................................................................... 4-4
DEBUG off..................................................................................................................... 4-5
Technical Assistance........................................................................................................... 5-1
Online Technical Assistance.......................................................................................... 5-1
iv WLANSupp-UG Rev G
2/10
Honeywell WLAN Secure Wireless Client
(SWC) User’s Guide
1
Configuring the WLAN Connection
Introduction
Note: Screen captures in this user’s guide may differ from what appears on your device.
The WLAN Secure Wireless Client (SWC) configures the wireless connection of the 802.11b/g radio for
numerous Dolphin terminals.
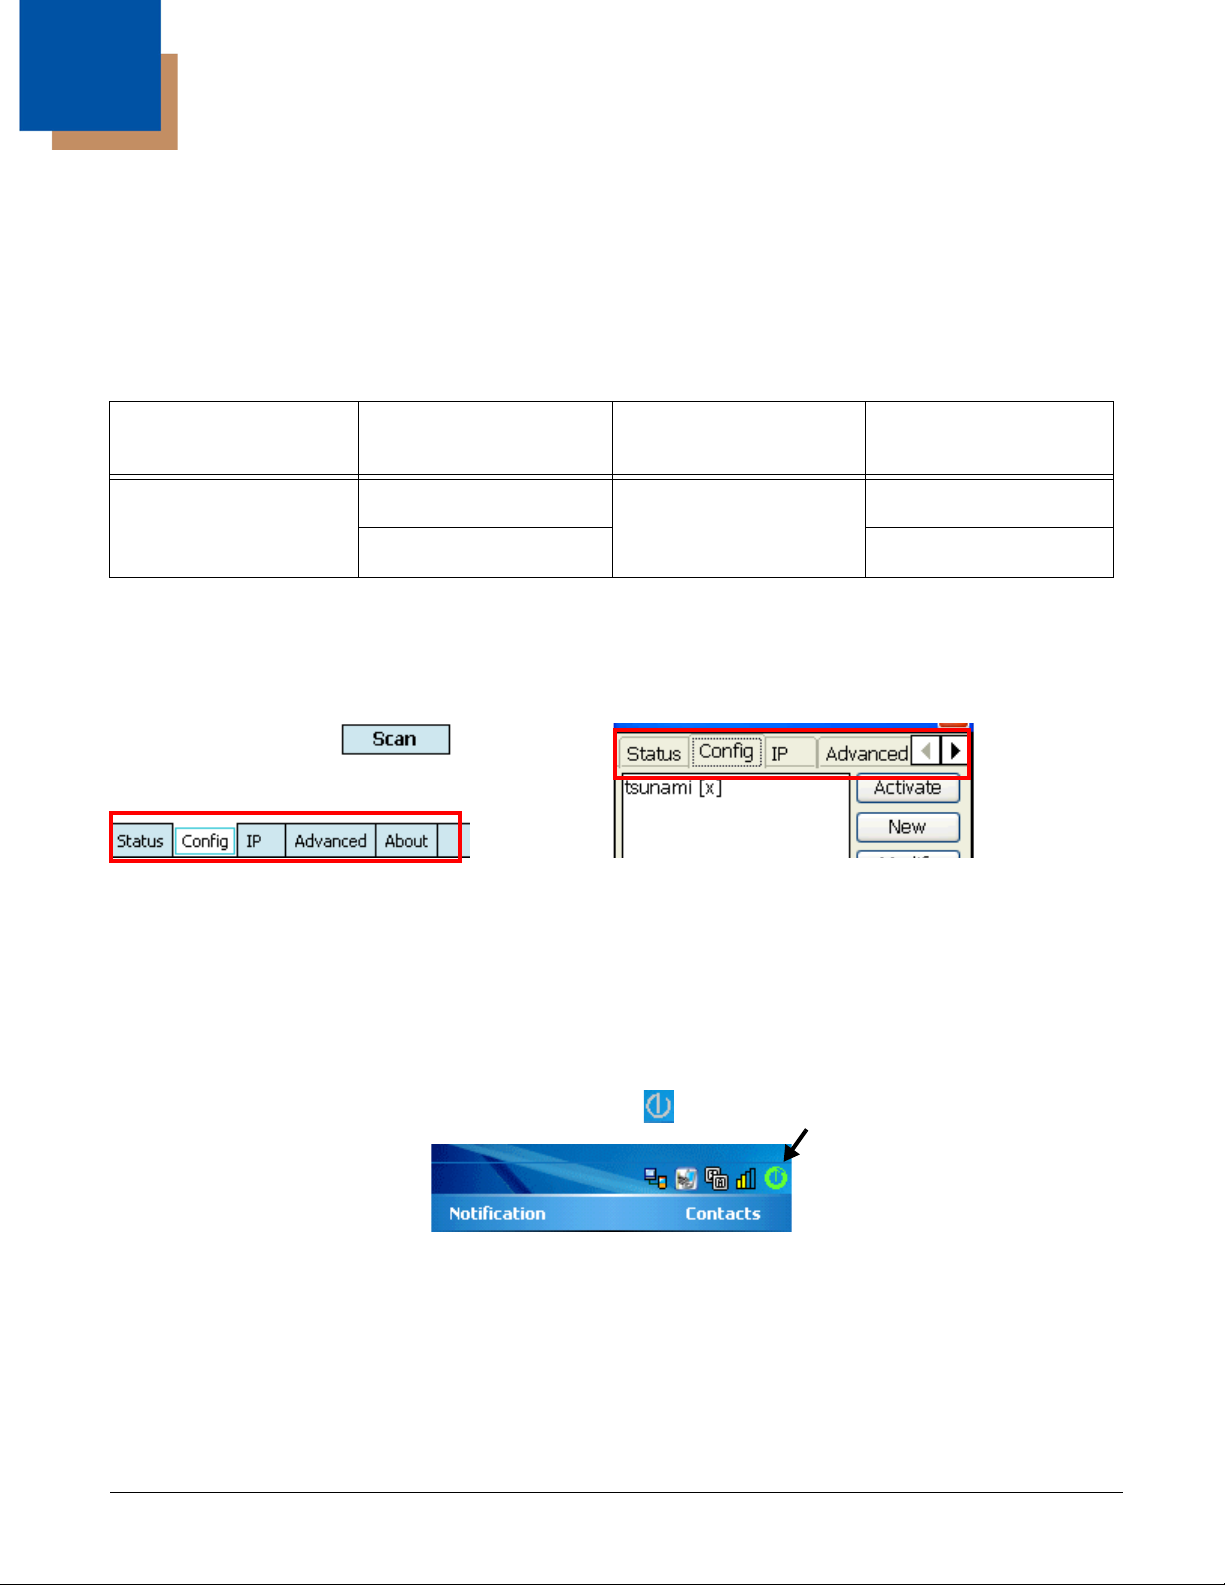
Windows Mobile 6.5 Windows Mobile 6 Windows Mobile 5.0 Windows CE 5.0
Dolphin 9700 Dolphin 7600 Dolphin 7850 Dolphin 7600
Dolphin 9900 Dolphin 6100/6500
The different operating systems format the application windows of the SWC differently. For example, on
terminals running Windows CE, the tabs appear at the top of the window whereas on terminals running
Windows Mobile, the tabs appear at the bottom of the window.
Windows Mobile Windows CE
Despite the different formatting, the content of the application window is the same on both terminals.
Server-Assigned IP Addresses
Please note that all server-assigned IP addresses use Dynamic Host Configuration Protocol (DHCP).
Accessing the WLAN SWC
On the Today screen, tap the icon in the command bar .
This icon displays in different colors to indicate the status of the radio; see Command Bar Icon Colors on
page 1-2.
The SWC opens displaying the Status tab, which is empty until a connection is configured. After a
connection to an access point or network is configured and active, this tab displays the connection
status.
1 - 1
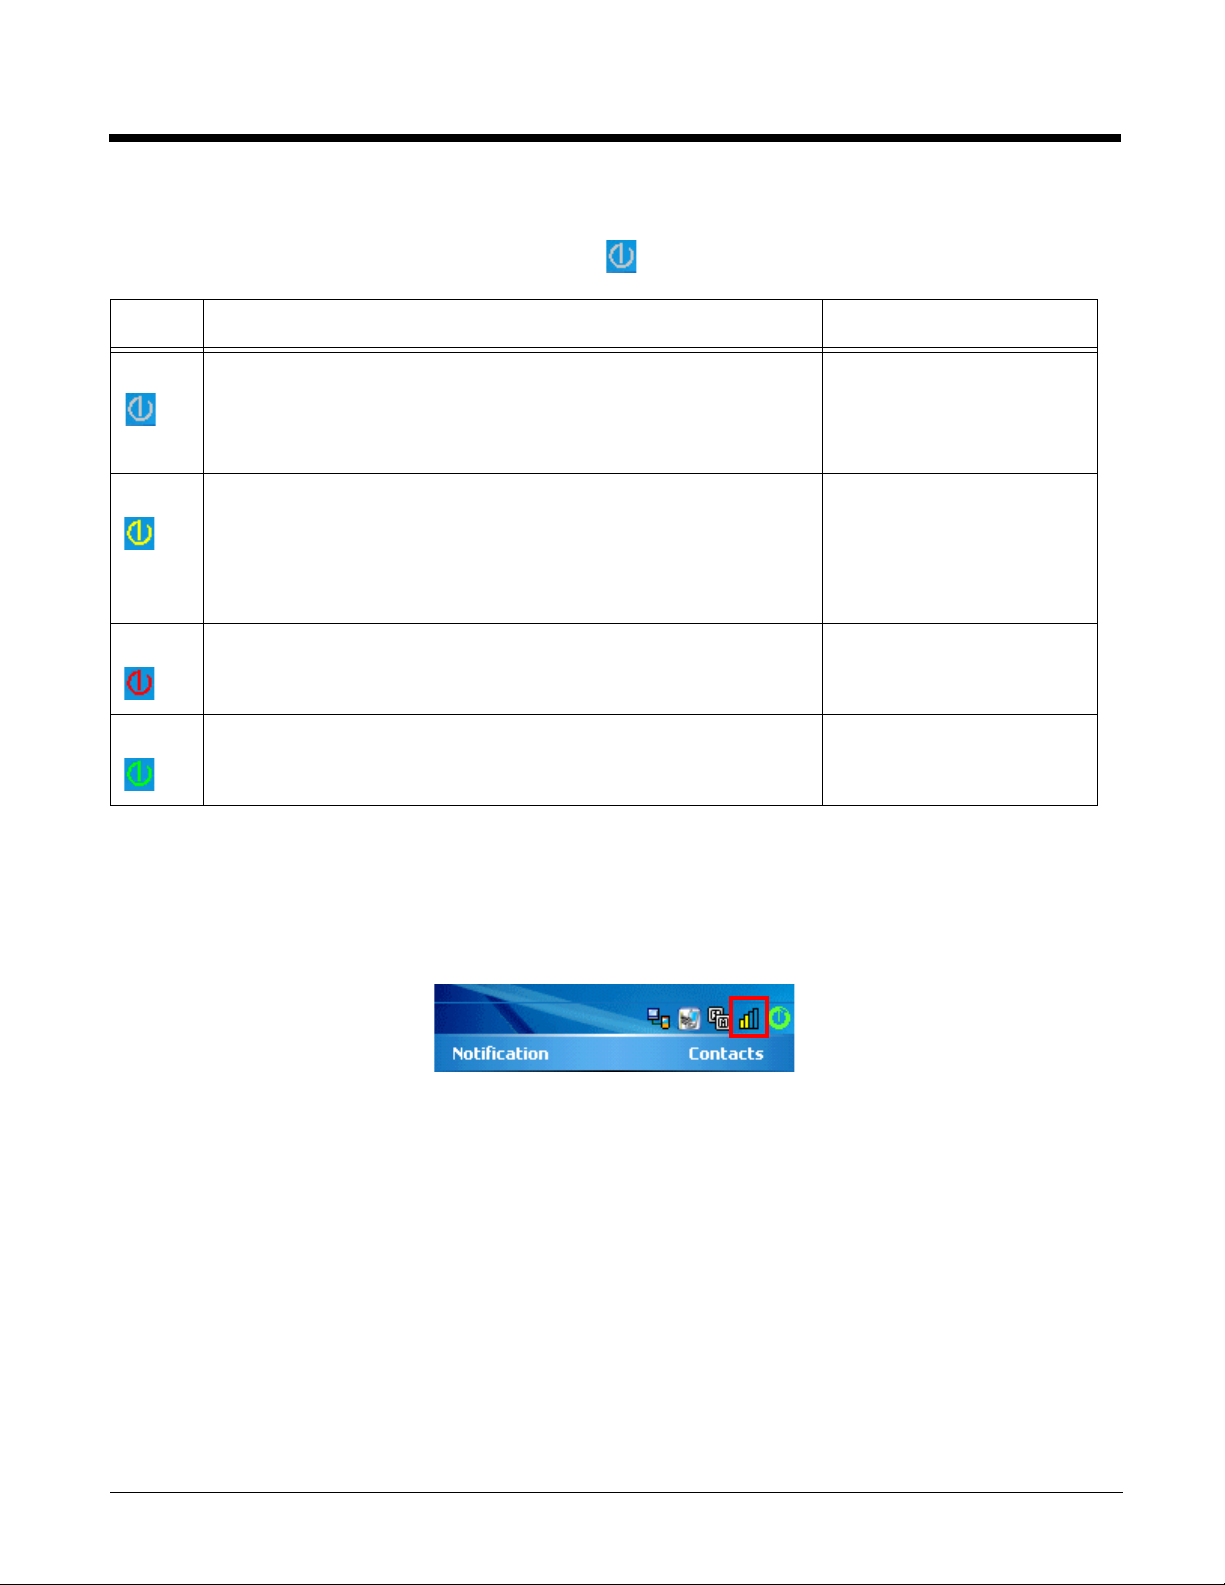
Command Bar Icon Colors
The icon in the command bar on the Today screen changes according to the status of the radio.
Color Meaning Matching Status
Gray
The radio is
•Disabled
•Idle
• Not connecting
Yellow The connection is
• Associating (icon stops spinning)
NO RADIO
RADIO OFF
DISCONNECTED
INACTIVE
ASSOCIATING
AUTHENTICATING
• Authenticating (icon stops spinning)
• Negotiating DHCP address (icon spins clockwise)
• Out-of-Range
Red Authentication failed and the connection failed as a result. ASSOCIATED
(but not authenticated)
Green The connection is authenticated with a valid DHCP address. COMPLETE
Note: The color of the icons matches the statuses displayed on the Status Tab (see page 1-17).
Connection Status Indicator
The command bar contains a status strength indicator.
The bars indicate the strength of the signal when the radio is transmitting.
If the radio is not transmitting, a small “x” appears over the bars.
1 - 2

Enabling the WLAN Radio Driver
The radio driver must be enabled for the radio to transmit a signal at all. You cannot connect to a network
unless the radio is enabled.
For this Terminal Configuration, Do this…
Dolphin 6100/6500/7600 with Windows
CE 5.0
Dolphin 7600 with Windows Mobile 6
Dolphin 9900 with Windows Mobile 6.1
Dolphin 9700 with Windows Mobile 6.5
Dolphin 7850
For details about enabling and disabling the radios on each terminal, refer to the User’s Guide for each
terminal, which are available for download from the web site: www.honeywellaidc.com.
Tap the UP arrow in the lower, right corner of the
screen.
Ta p Start > Settings > Connections tab >
Dolphin Wireless Manager.
Ta p Start > Settings > Connections tab > Radio
Manager.
1 - 3
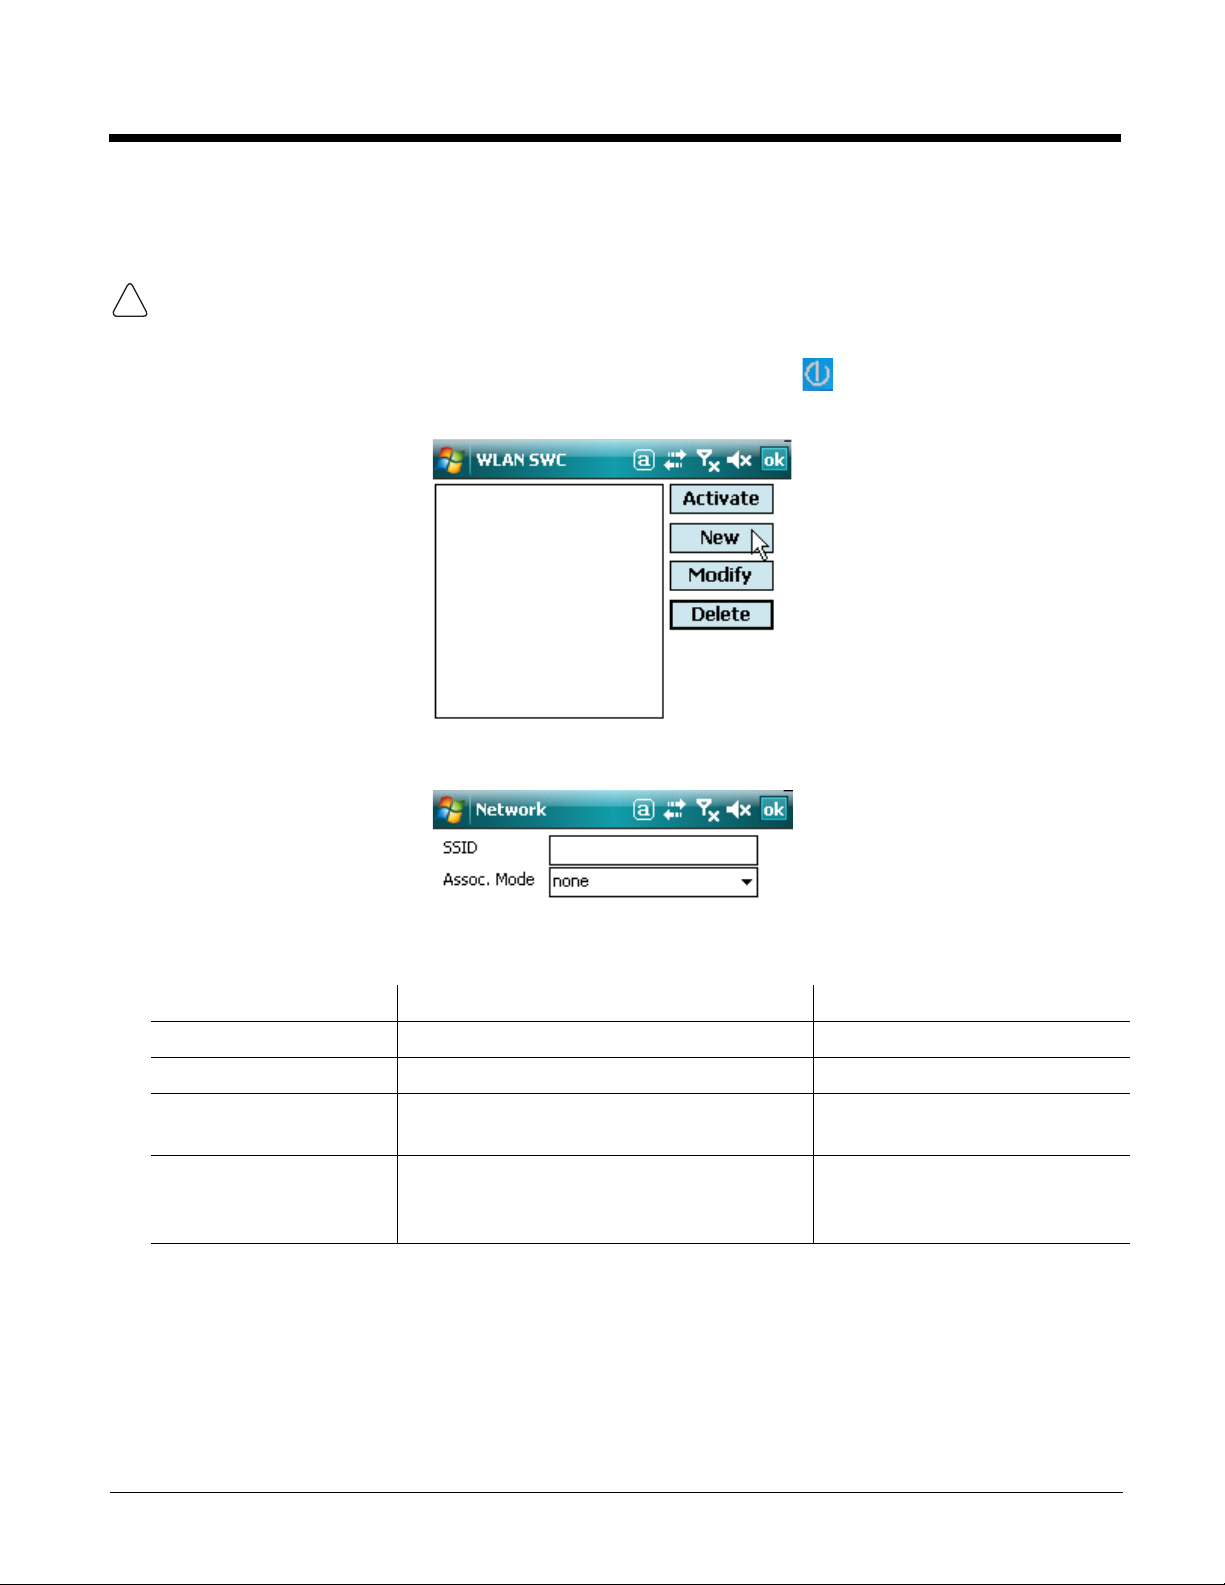
Establishing a Connection
!
Requirements
The parameters you enter in the SWC depend entirely upon the wireless network established in
your facility. If you do not know what to enter in these fields, contact your network administrator.
1. On the Today screen or Desktop, tap the icon in the command bar .
2. Tap the Config tab and tap New.
3. On the Network window, type in the SSID.
4. Select the Assoc. Mode that corresponds to your network configuration from the drop-down list.
Select To connect with… For more information…
None No authentication or encryption. None (page 1-8)
IEEE 802.1X (WEP) WEP encryption and EAP authentication. IEEE 802.1X (WEP) (page 1-9)
WPA-Personal (PSK)
WPA2-Personal (PSK)
WPA-Enterprise (EAP)
WPA2-Enterprise
(EAP)
Note: The Dolphin 6100/6500/7600 with Windows CE 5.0 supports WPA2 encryption only.
5. The fields and options required by the association mode, encryption, and EAP methods appear on
the Network Window (see page 1-8) after each is selected.
6. If required by the association mode, select the Encryption method.
7. If required by the association mode, select the EAP Method; (see page 1-9).
1 - 4
WPA encryption and PSK authentication. WPA-Personal (PSK) & WPA2-
Personal (PSK) (page 1-11)
WPA encryption and EAP authentication. WPA-Enterprise (EAP) &
WPA2-Enterprise (EAP) (page
1-12)
8. If required or desired, enter keys or passwords.
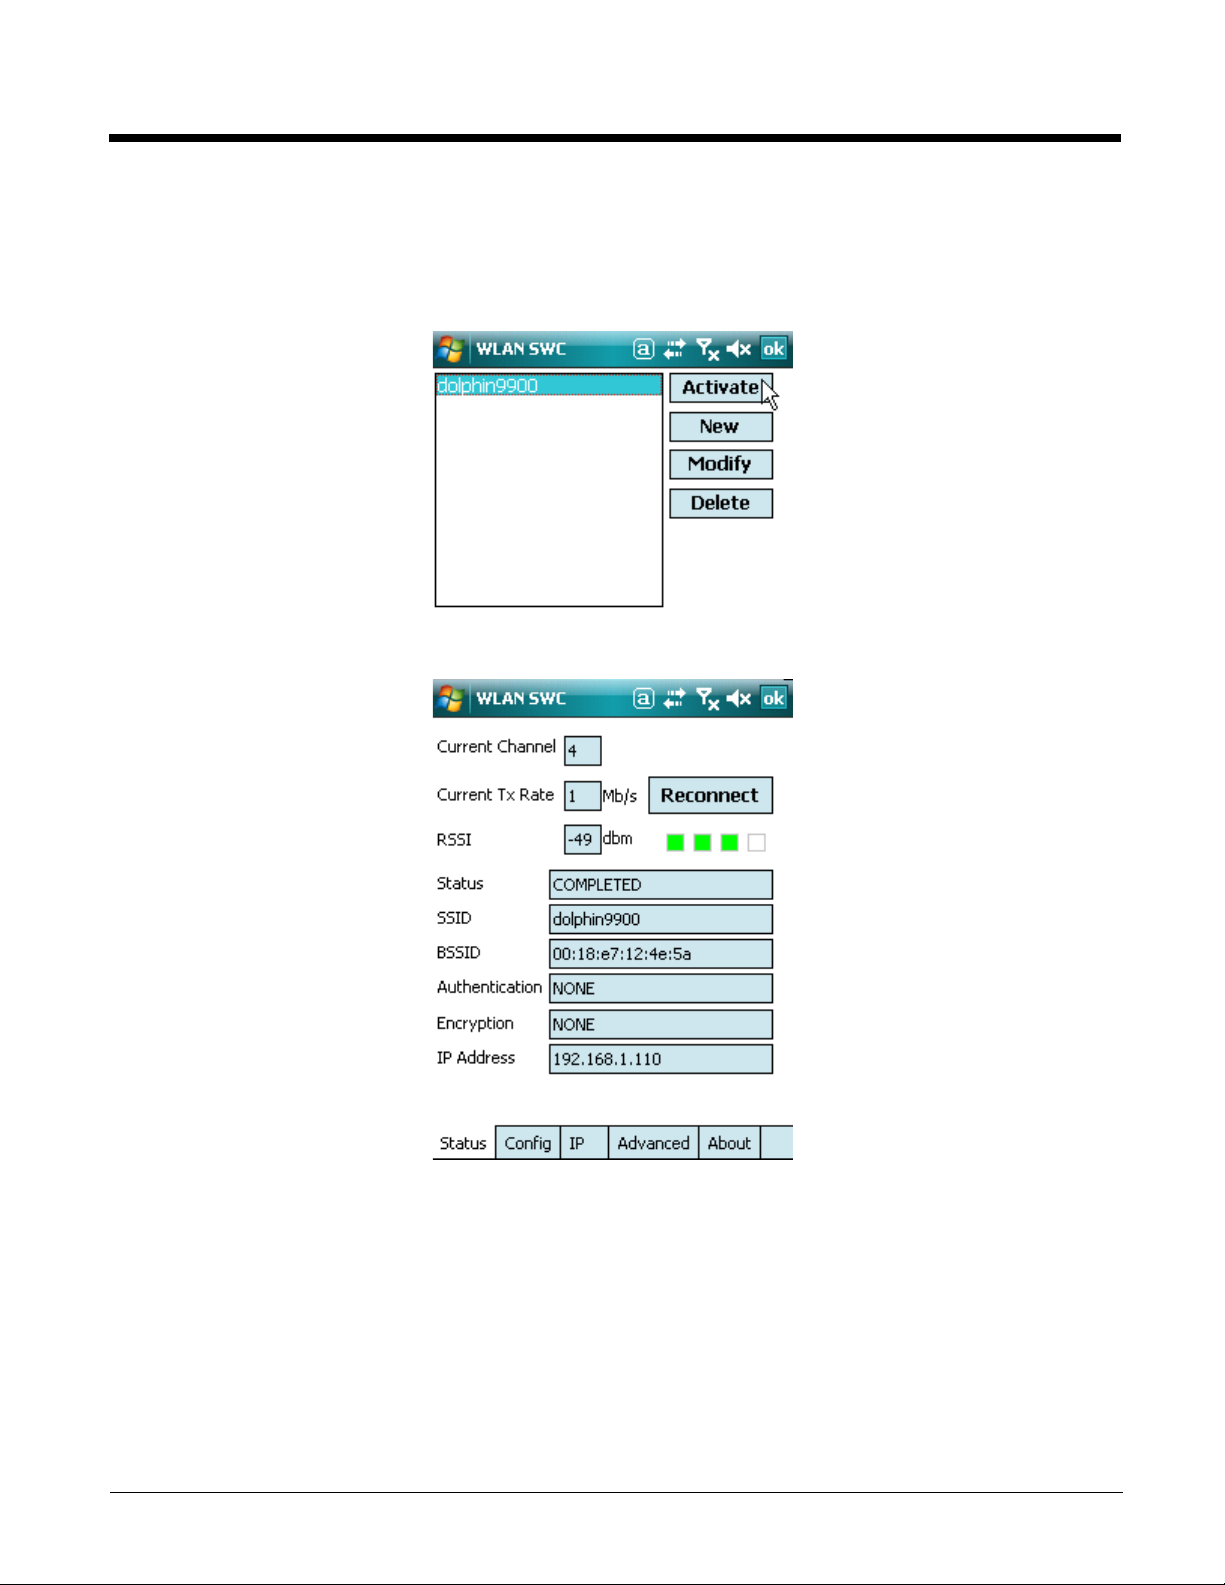
9. Tap OK. You are returned to the Config tab where the SSID now appears in the list.
10. Select the device in the list and tap Activate. The configuration activates and the Dolphin terminal
attempts to connect to the network according to the parameters you entered.
11. The Status tab appears displaying the connection status.
1 - 5
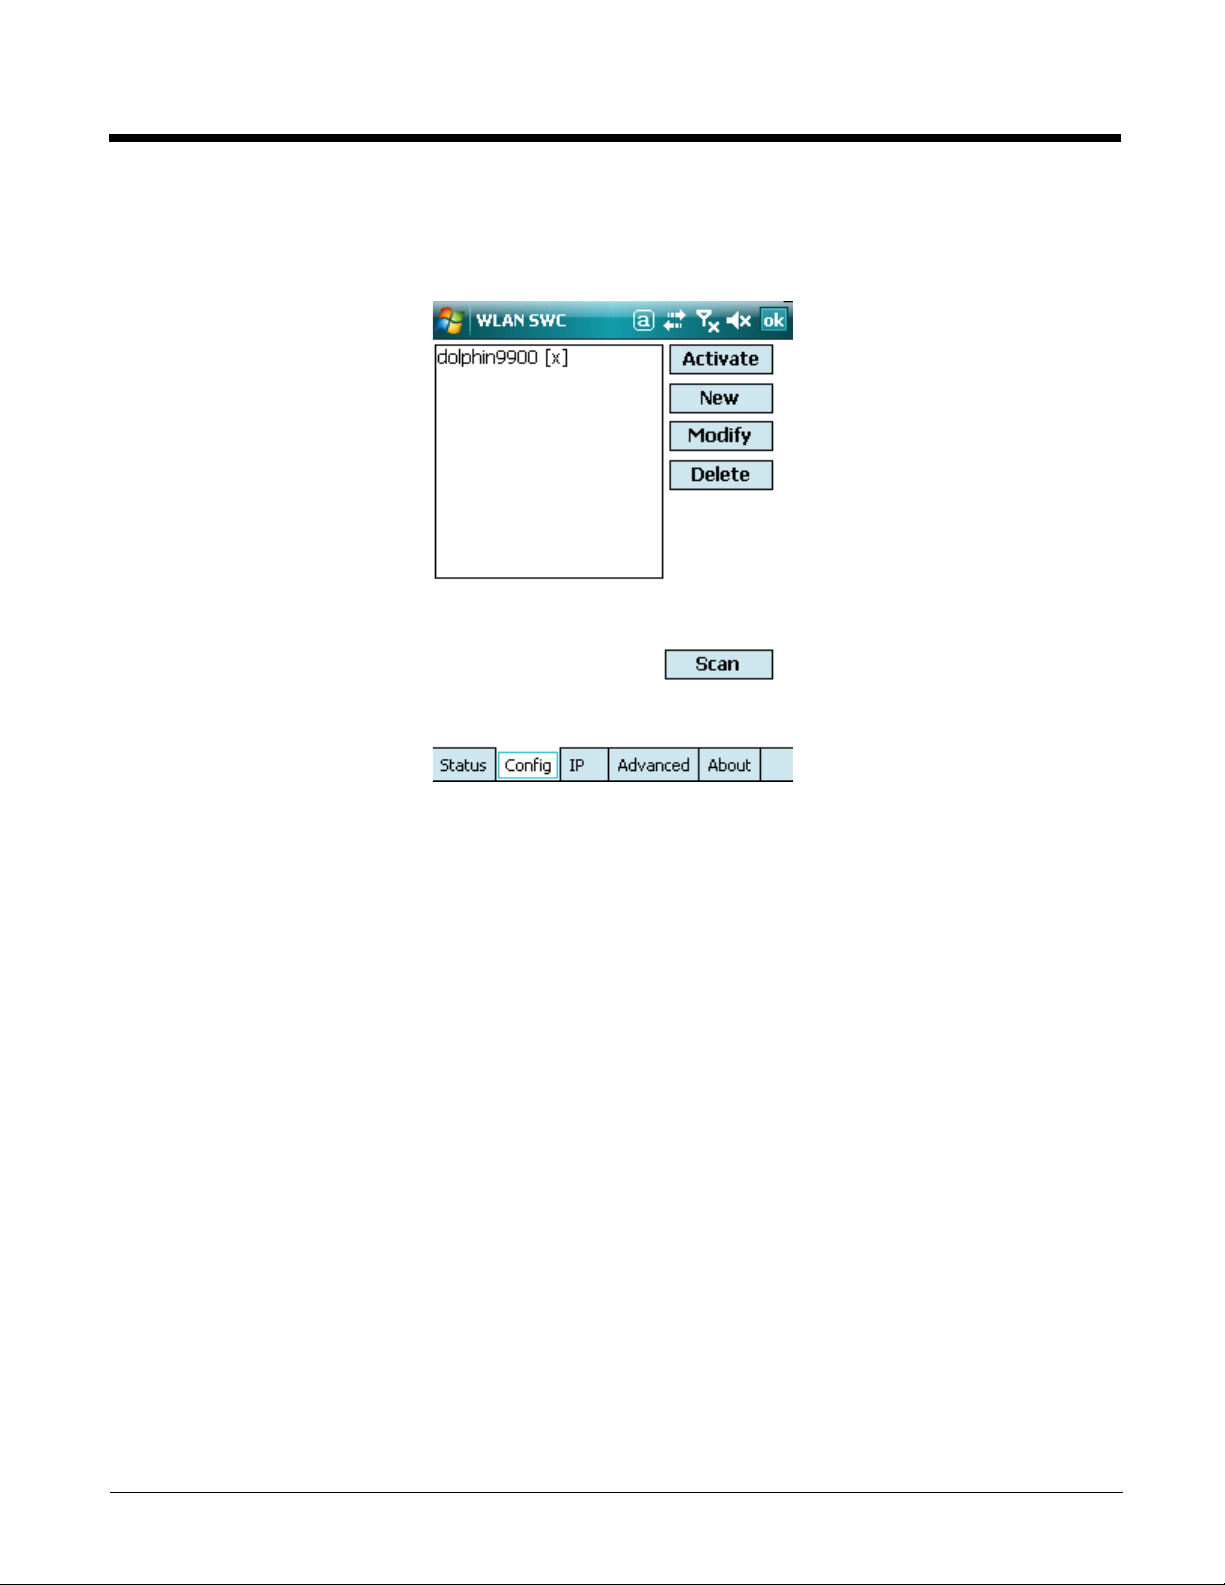
Config Tab
You manage connections and configurations on the Config tab. You also determine which configuration
the terminal uses to connect.
Activating the Configuration
To connect, you must select the configuration in the list and tap Activate. The terminal will not attempt to
connect until you tap Activate.
The Config tab stores all the configurations you have created in the list but activates only one
configuration at a time. To switch connections, simply select it on the Config tab and tap Activate.
On the Config tab, an “[x]” appears next to the activated configuration.
Config Tab Buttons
Modify To modify an existing configuration, select it in the list and tap Modify. The Network
window appears displaying the data for the selected configuration. Make your
changes and tap OK to save. Then, tap Activate to start connecting.
Add To manually add a connection, tap Add. A blank Network window appears.
Complete Steps 5–8 of Establishing a Connection (see page 1-4).
Delete To delete a connection, select it in the list and tap Delete.
Using the Scan Feature
The Scan button on the Config tab queries for the local, configured, wireless network for devices in range
of the terminal. when you tap Scan on the Config tab, the query starts, and the results appear on the
1 - 6
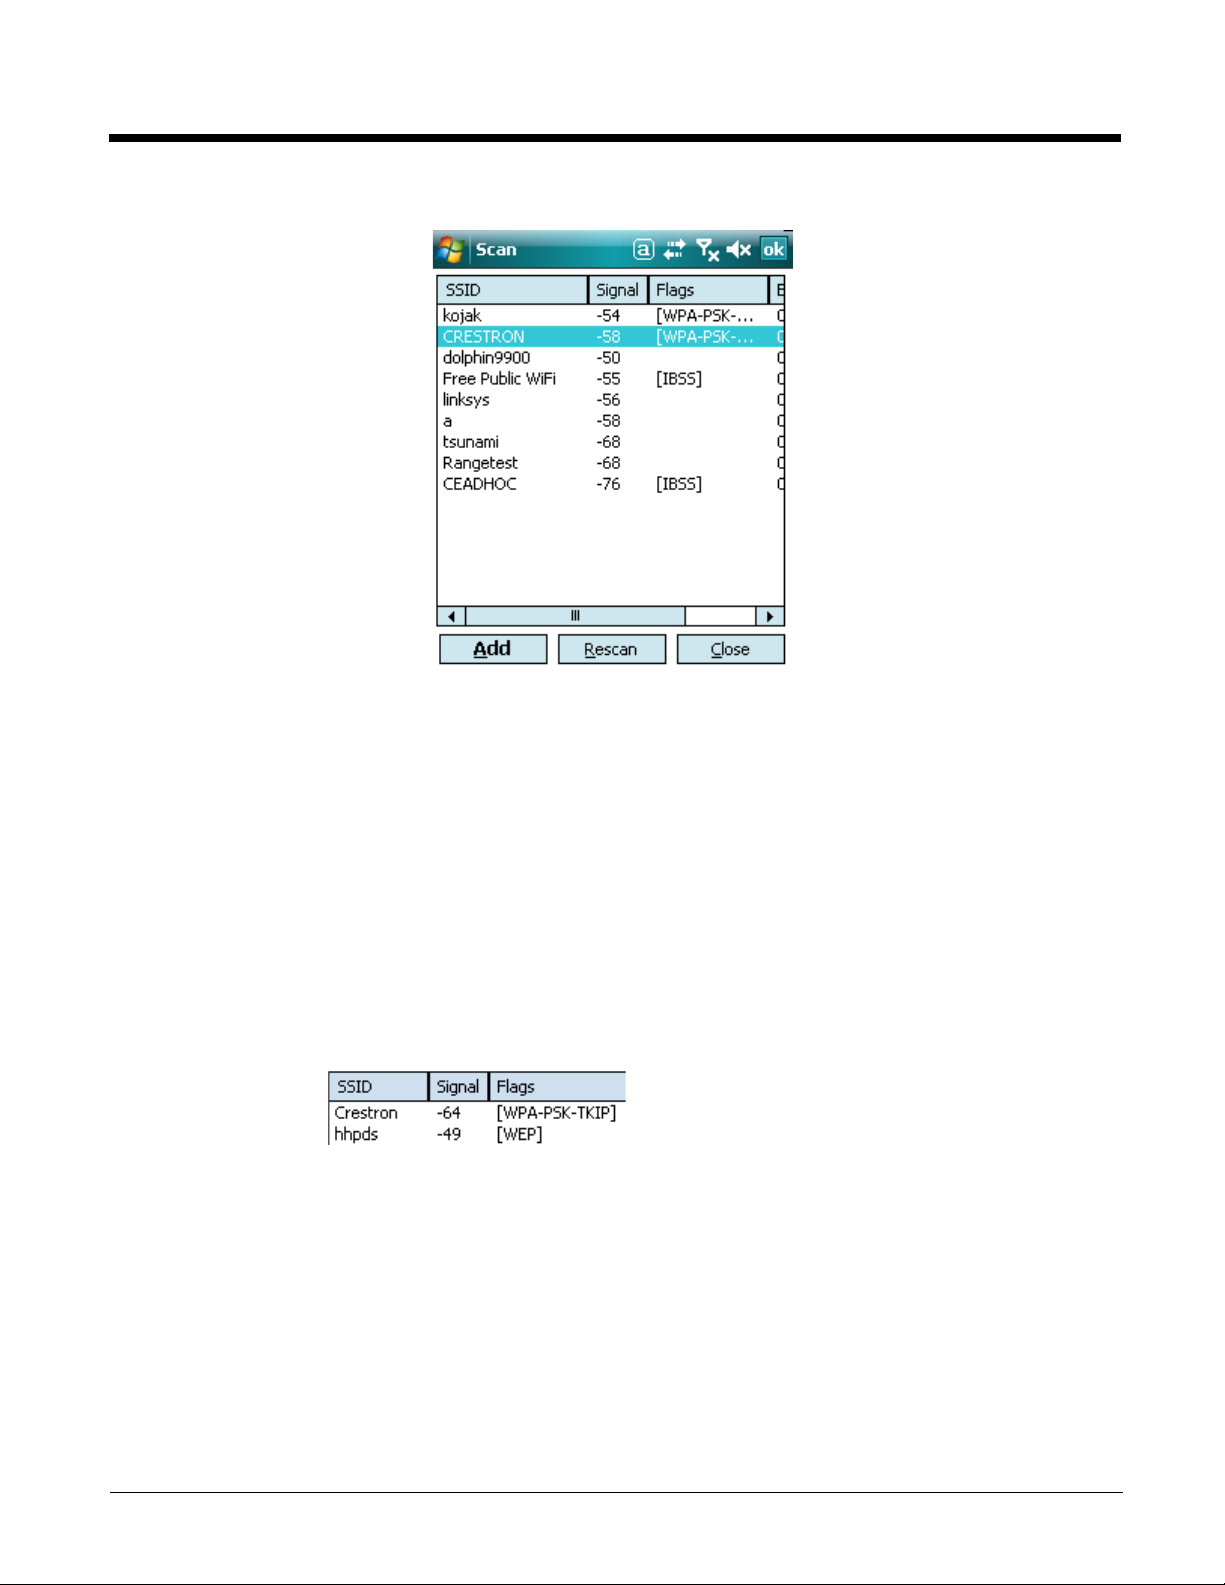
Scan window appears.
Buttons
Add Tap this button after you’ve selected an item in the list. It opens the Network
Window (see page 1-8) so that you can configure the connection.
Rescan Tap this button to rescan the wireless network if you don’t see the device you’re
looking for in the list.
Close Tap this button to close the Scan window and return to the Config Tab.
Columns
SSID Displays the SSID of the device. (This is the name of the device you are connecting
to.)
Signal Displays the signal in dBMs.
Flags Displays the association mode and encryption required to connect to the device.
BSSID Displays the full BSSID. (This is the MAC address of your terminal.)
Channel Displays the channel in kHz.
1 - 7
 Loading...