

Honeywell SUGPACK-UK, SUEPACK-E, SUGPACK-EU, Sucre Box, SUEPACK-EG Quick Installation Manual
...
-English-
Le Sucre™
Quick Installation guide
MANDATORY STEPS TO FOLLOW BEFORE BEGINNING
YOUR INSTALLATION ................................................................ 2
Panel Identification ............................................................................................. 2
STEP 1: Connecting Le Sucre ........................................................................... 3
STEP 2: Creating your account on Internet...................................................... 5
INSTALLING YOUR SYSTEM ..................................................... 6
Registering the « Badge Reader » or the keypad ............................................ 9
Registering the badges .................................................................................... 13
Registering the Door Contact .......................................................................... 13
Registering the motion sensor ........................................................................ 14
Installing other peripherals.............................................................................. 16
Finalizing the installation ................................................................................. 16
Le Sucre pre-configured parameters ...................................... 16
800-19460-C
10/2015

MANDATORY STEPS TO FOLLOW BEFORE BEGINNING YOUR
INSTALLATION
Panel Identification
Please be sure to identify the type of panel you have as some slight differences exist in the installation
process from one version to another.
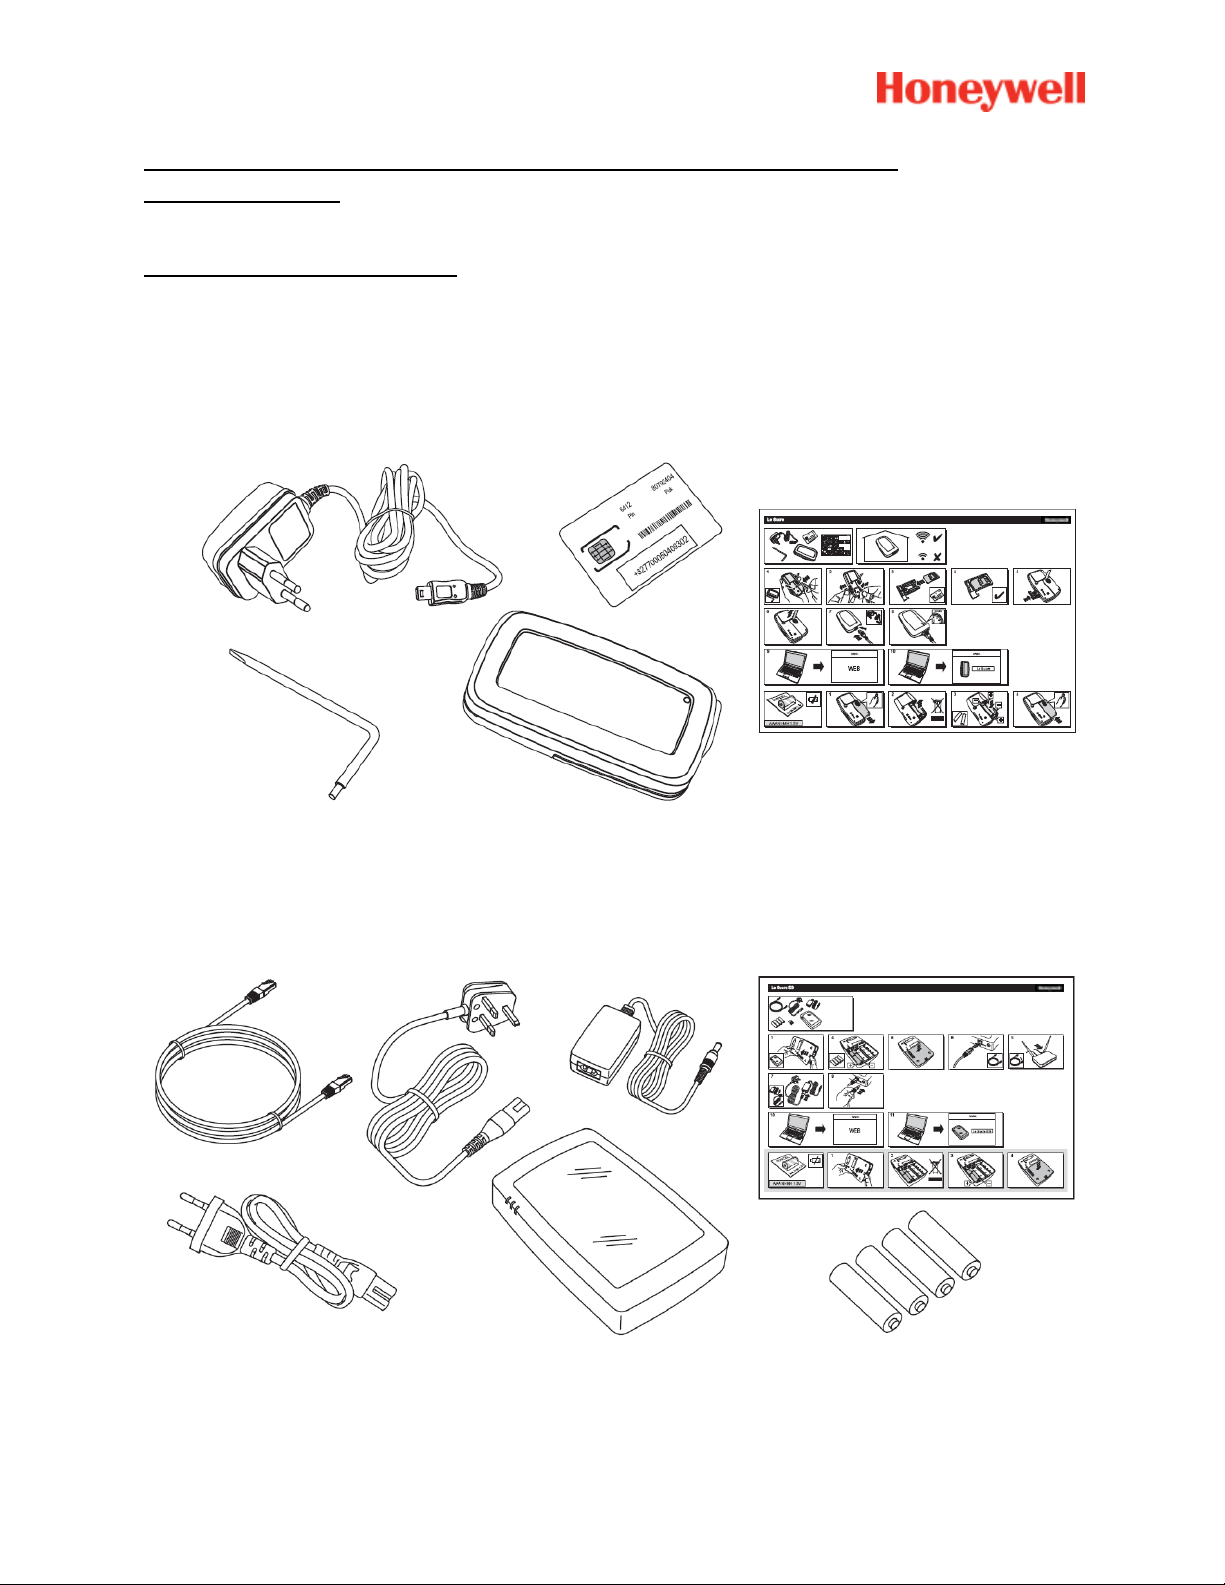
Sucre GPRS (SUGPACK-EU/SUGPACK-UK)
Sucre Box (SUEPACK -E)
2

Sucre Box+ (SUEPACK-EG)
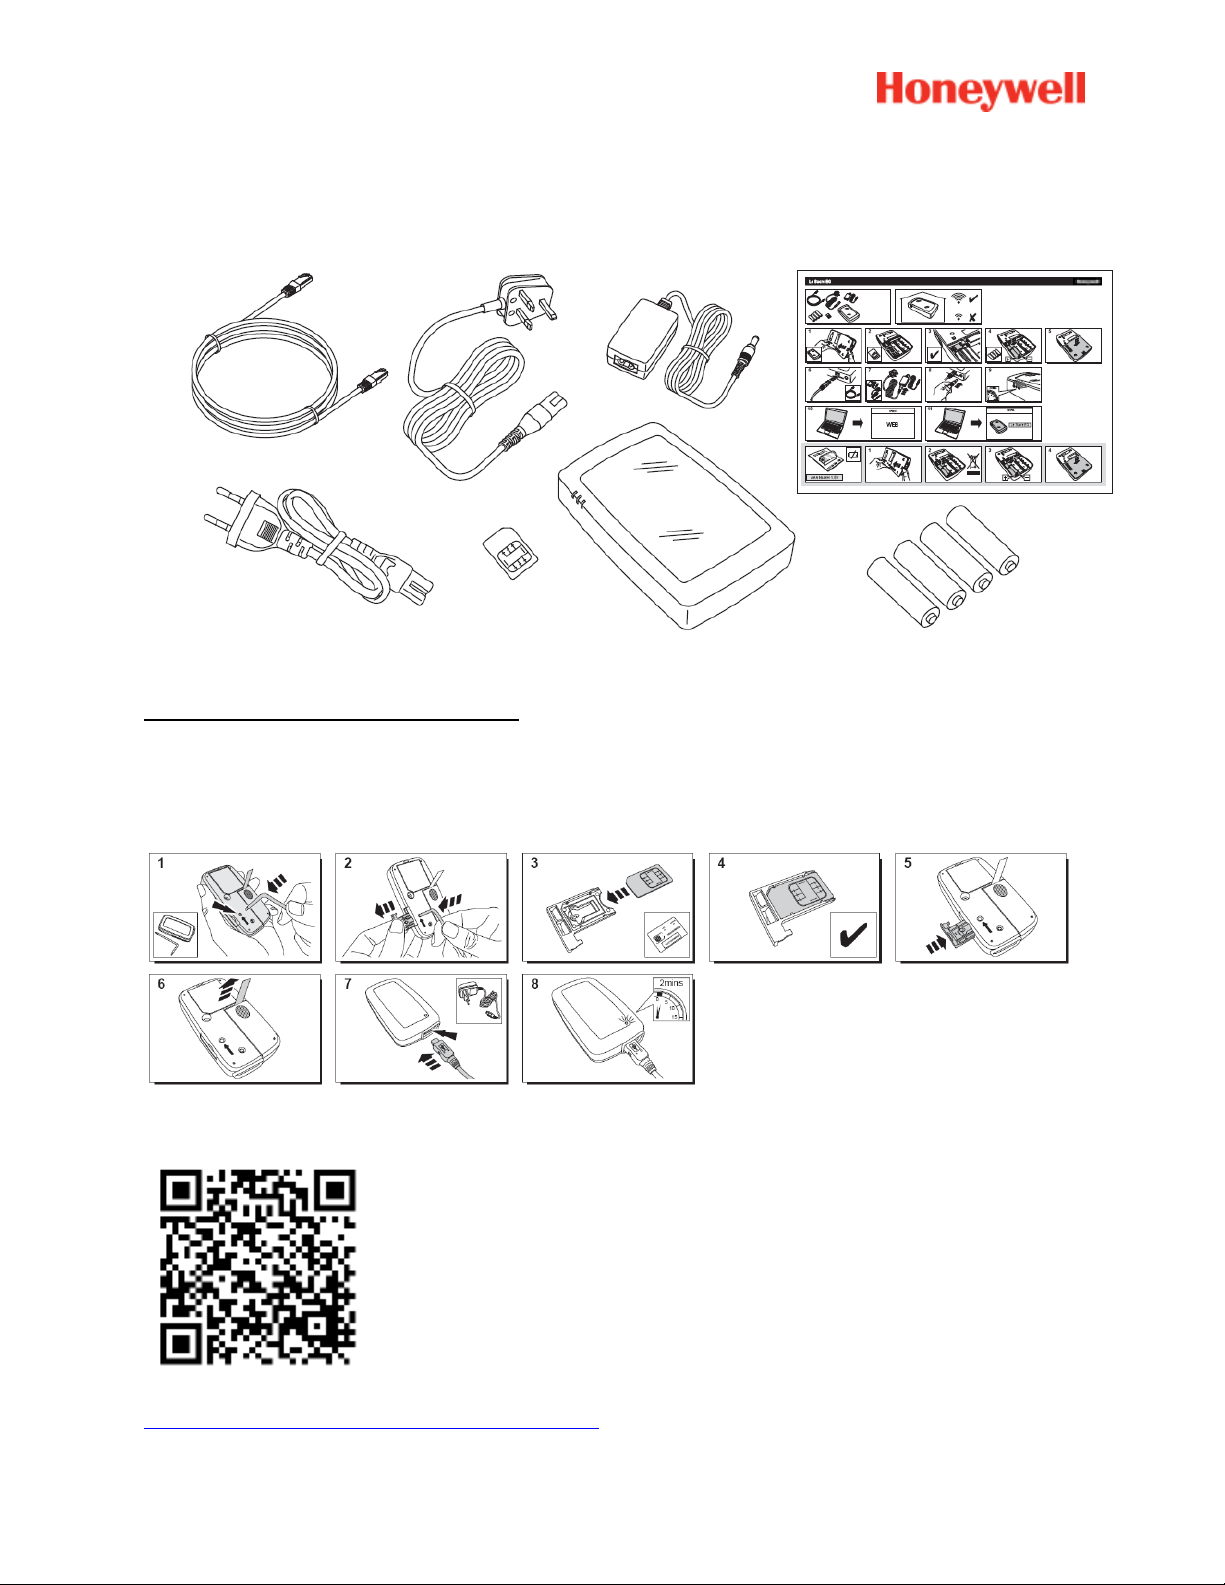
STEP 1: Connecting Le Sucre
Sucre GPRS
A help video can be found here:
http://honeywell.total-connect.eu/video/lesucre.mp4
3
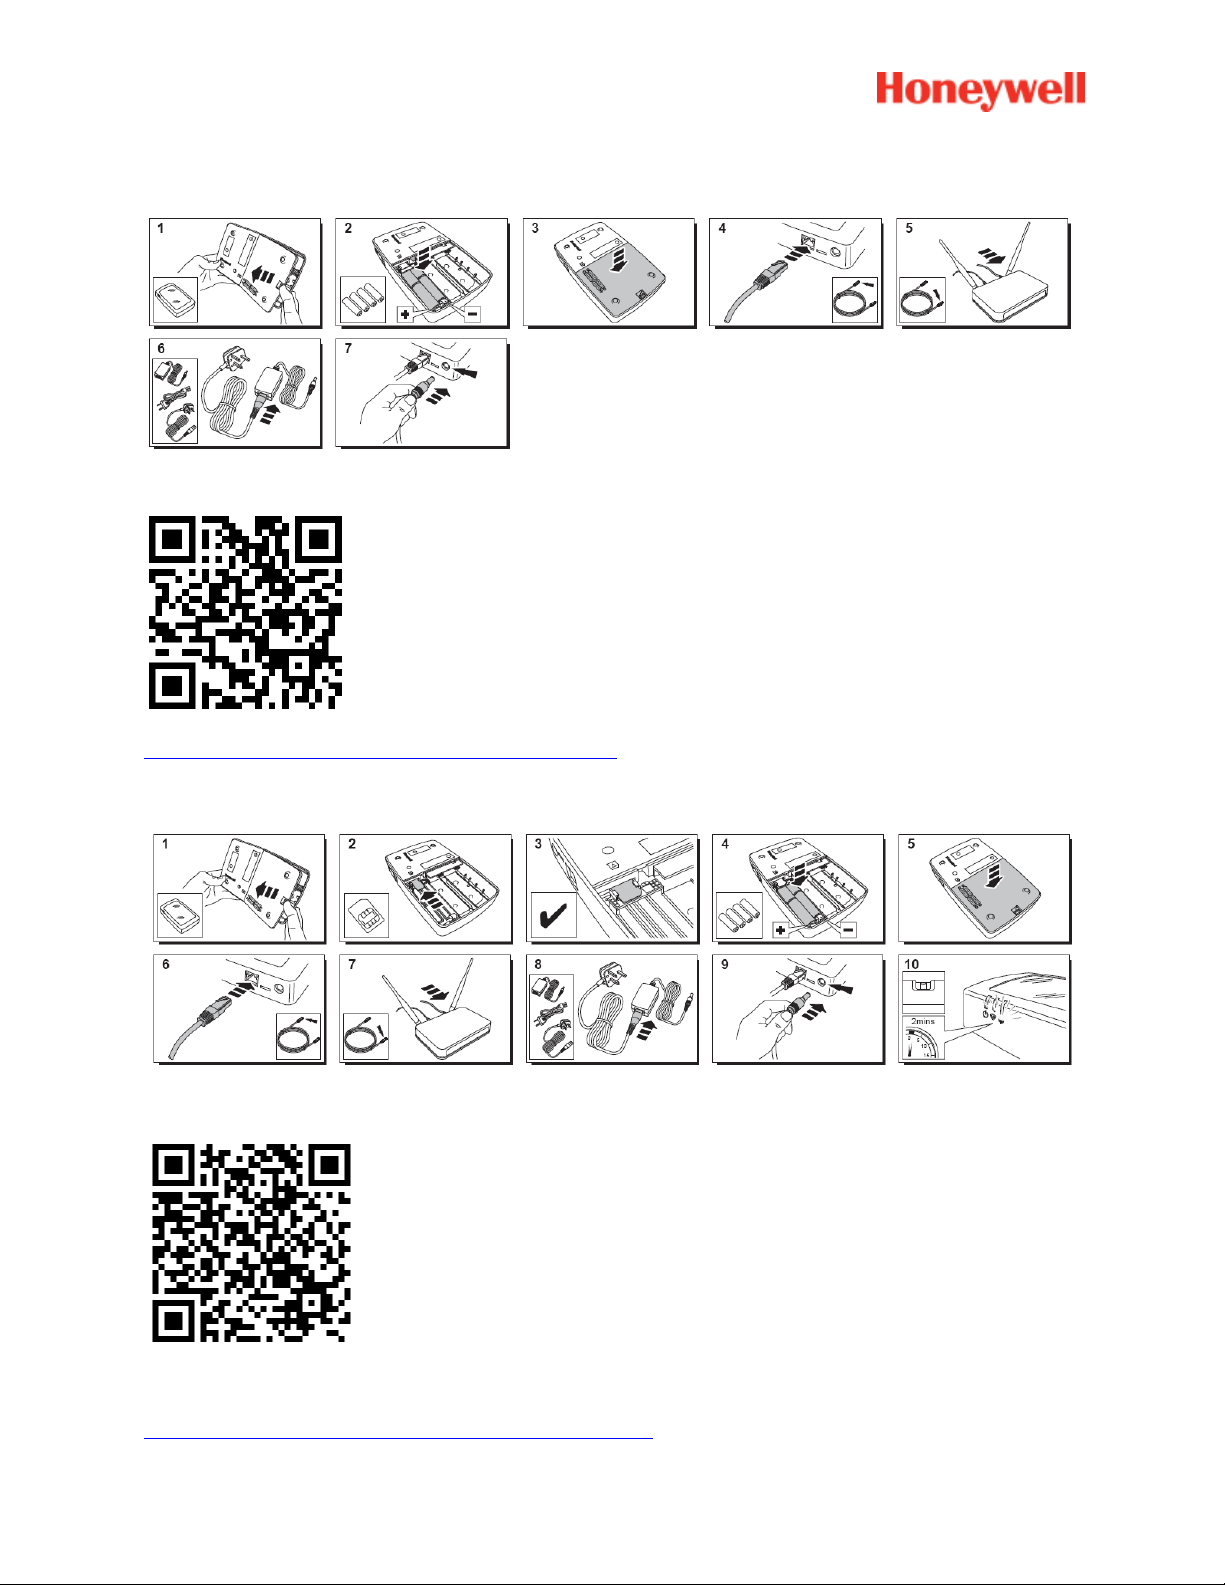
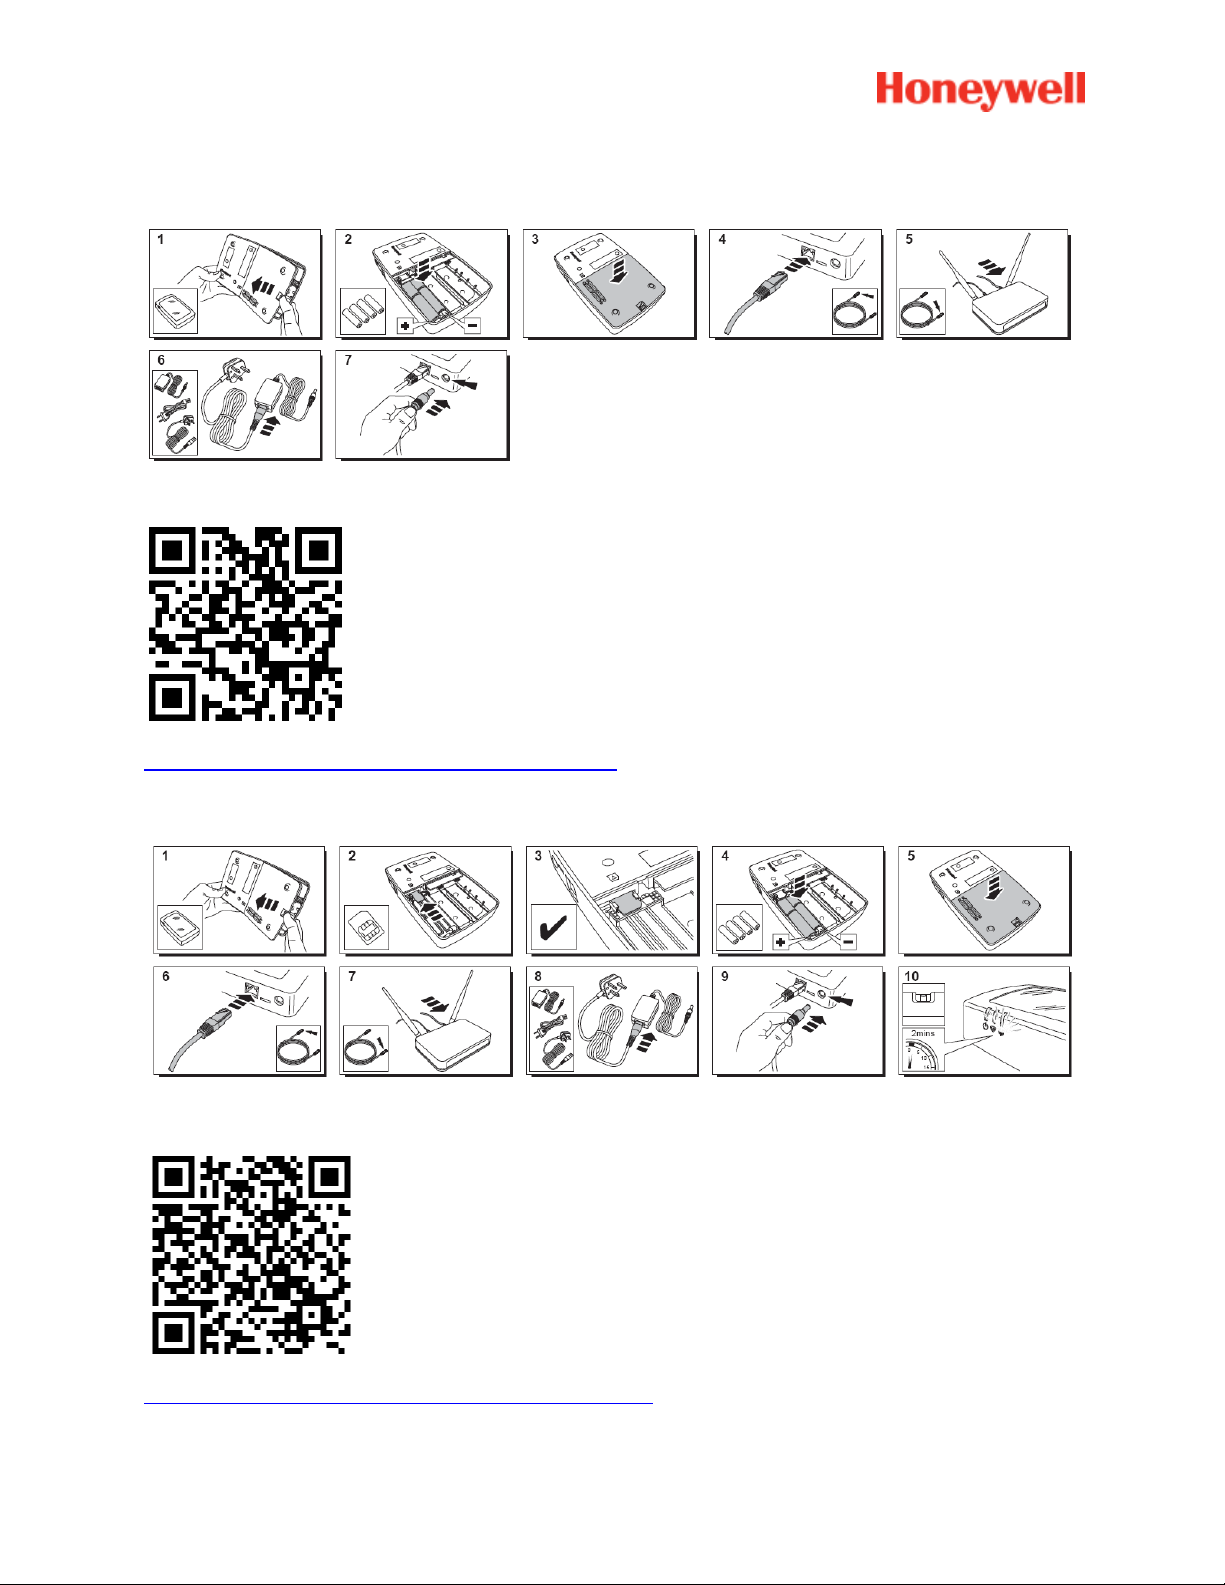
Sucre Box
A help video can be found here:
http://honeywell.total-connect-eu/video/sucrebox.mp4
Sucre Box+
A help video can be found here:
http://honeywell.total-connect-eu/video/sucreboxplus.mp4
4
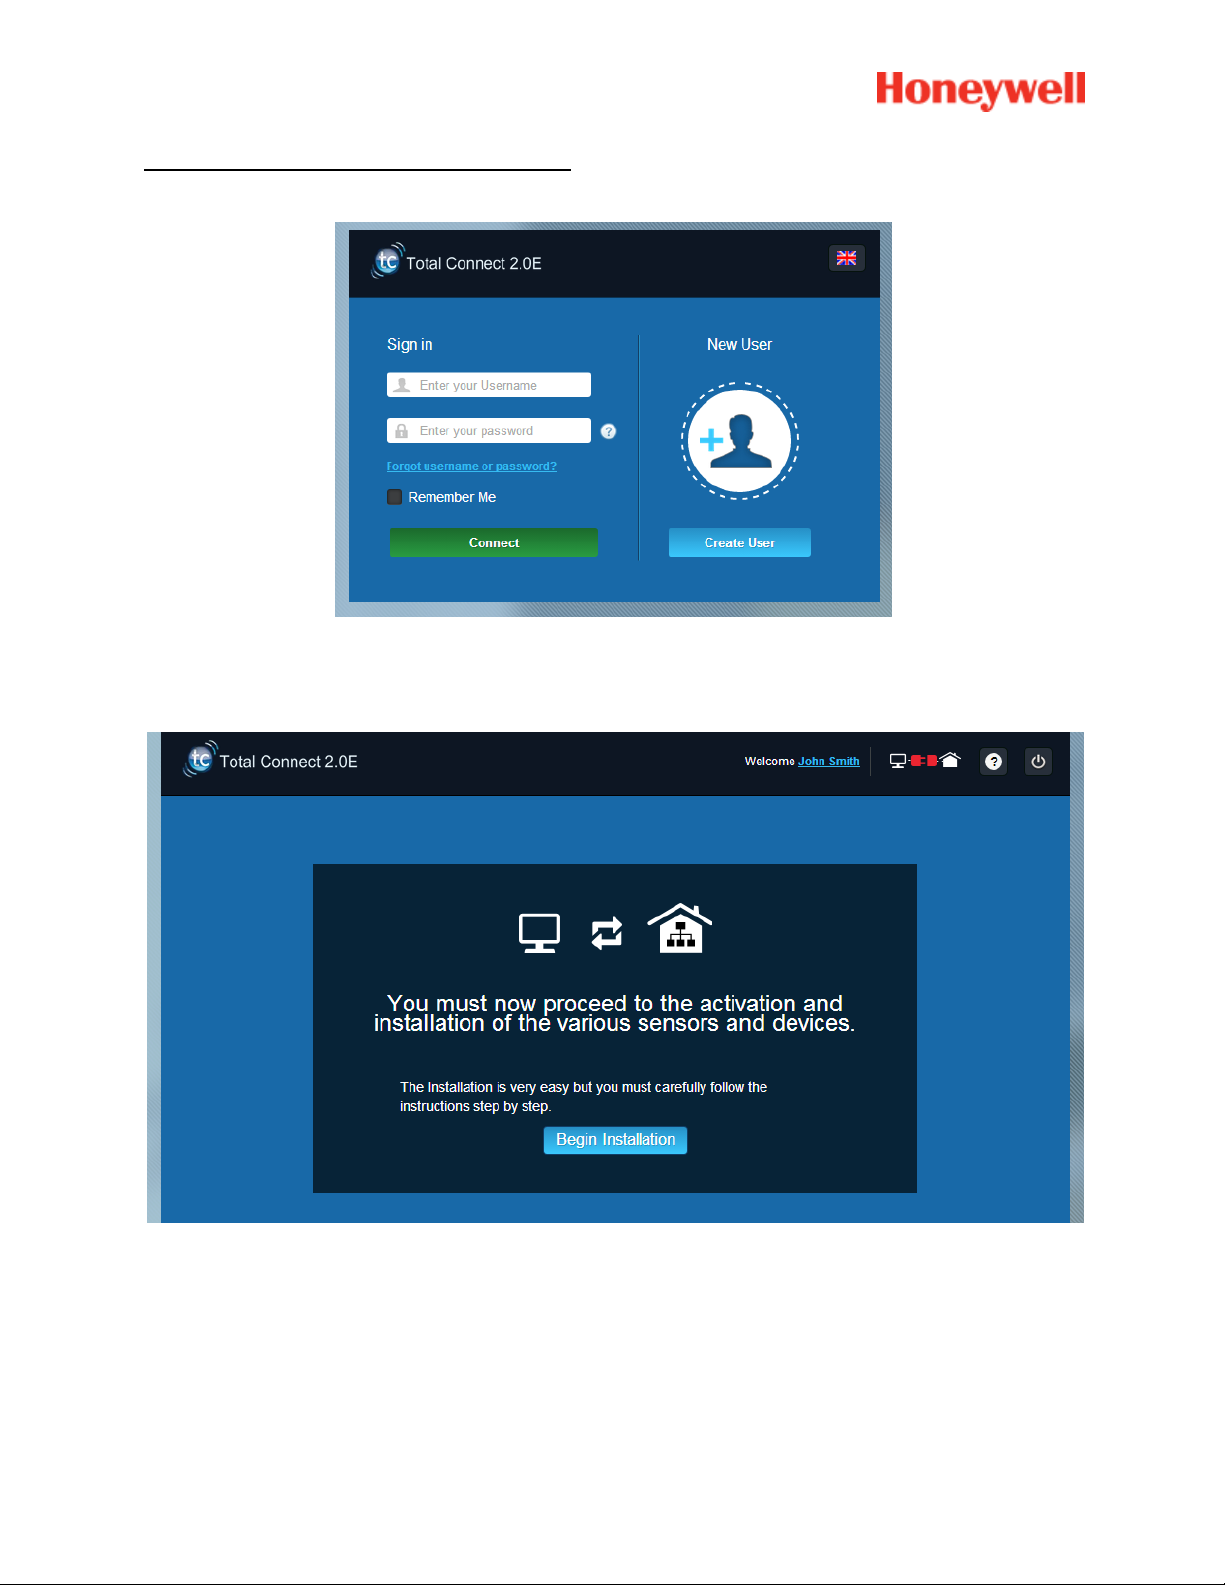
STEP 2: Creating your account on Internet
1. Logon to the website https://tc20e.total-connect.eu
2. Click on “Create user” to create your account. You will then be asked to enter a 20 digit long ID
code. This code is printed on a sticker located on Le Sucre.
3. You will then be able to choose your username and password used to login the system. You
will also be asked to enter a valid email to be contacted in case of problem or forgotten
password.
All fields with * are mandatory.
Once you have completed the form, check the case at the bottom of the page to agree to the Terms and
conditions and click on “Next”.
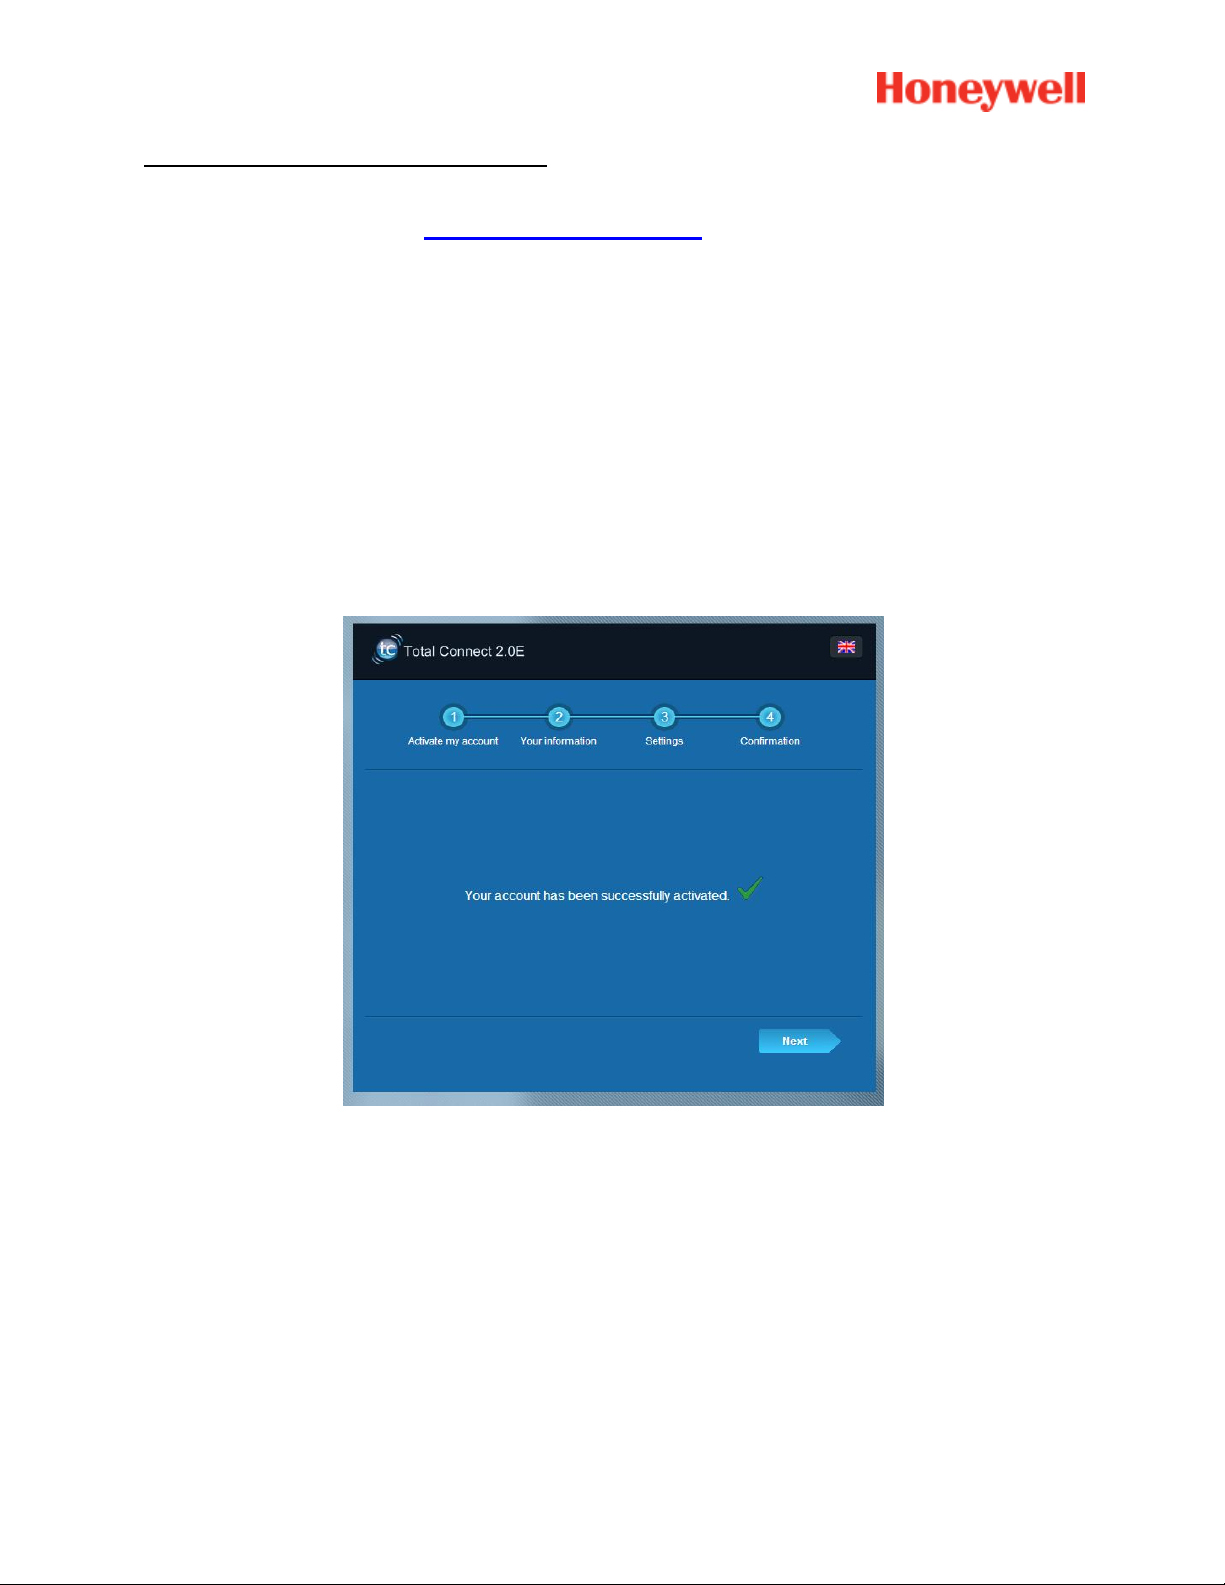
The following message then appears: « Your account has been sucessfully activated ». Clik on the blue
button to continue.
A confirmation email will be sent to you reminding your login and password for the website.
Some information regarding the specificities of your system will also be given. If you haven’t
recived the email please check in the Spam directory also.
Now you can log in you account through the main page of the website.
5

INSTALLING YOUR SYSTEM
After logging in, the following message then appears:
1. The first step is to set your contacts: these are the people who will be notified by email or SMS
when an alarm or a problem occurs in your premises.
Up to three contacts can be set up. The first contact is usually yourself and is mandatory. The
second and third contacts are optional and can be skipped during the installation. You will be able
to modify these contacts at any time after the initial installation.
6

You have to use the international format when entering the contacts’ phone numbers. Example:
number starting with +44 for the UK or +33 for France.
2. Depending on your panel, you may have to enter a phone number corresponding to the SIM card
supplied with your system
You have to use the international format when entering the SIM card phone number.
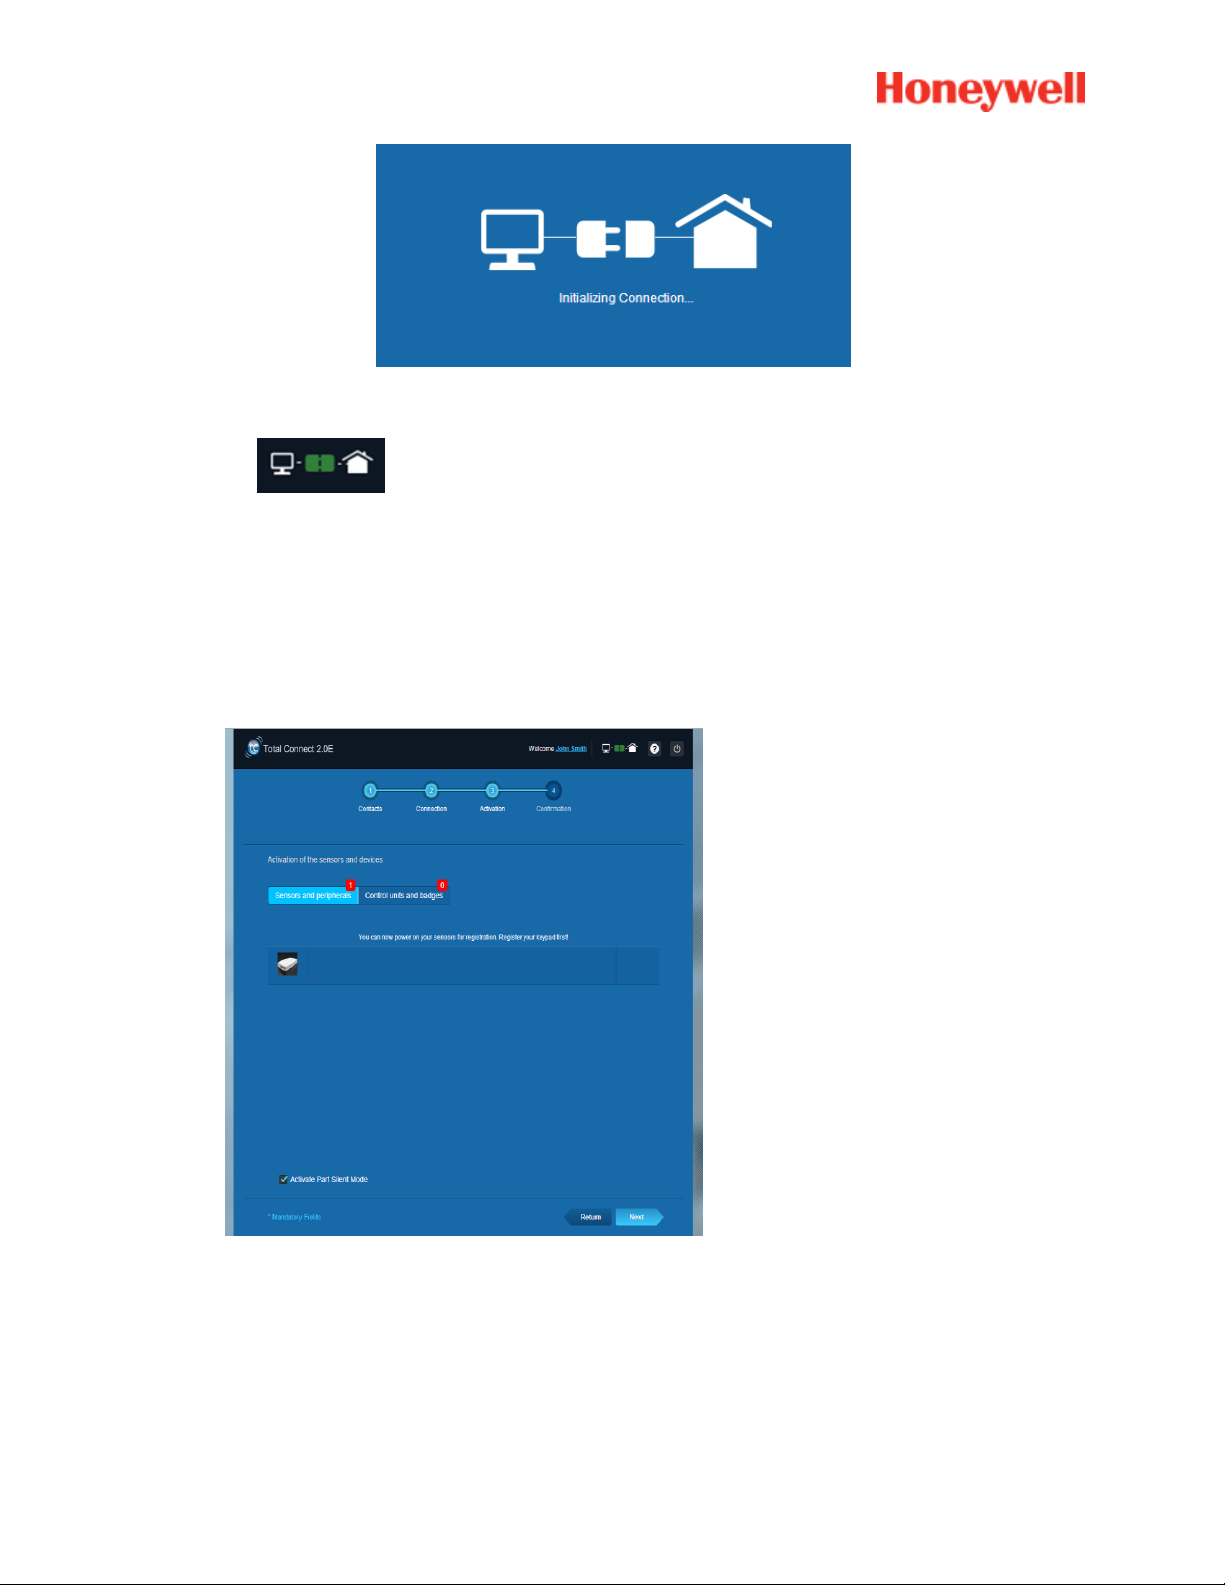
After following the different steps on the screen, the connection with Le Sucre™ begins
7
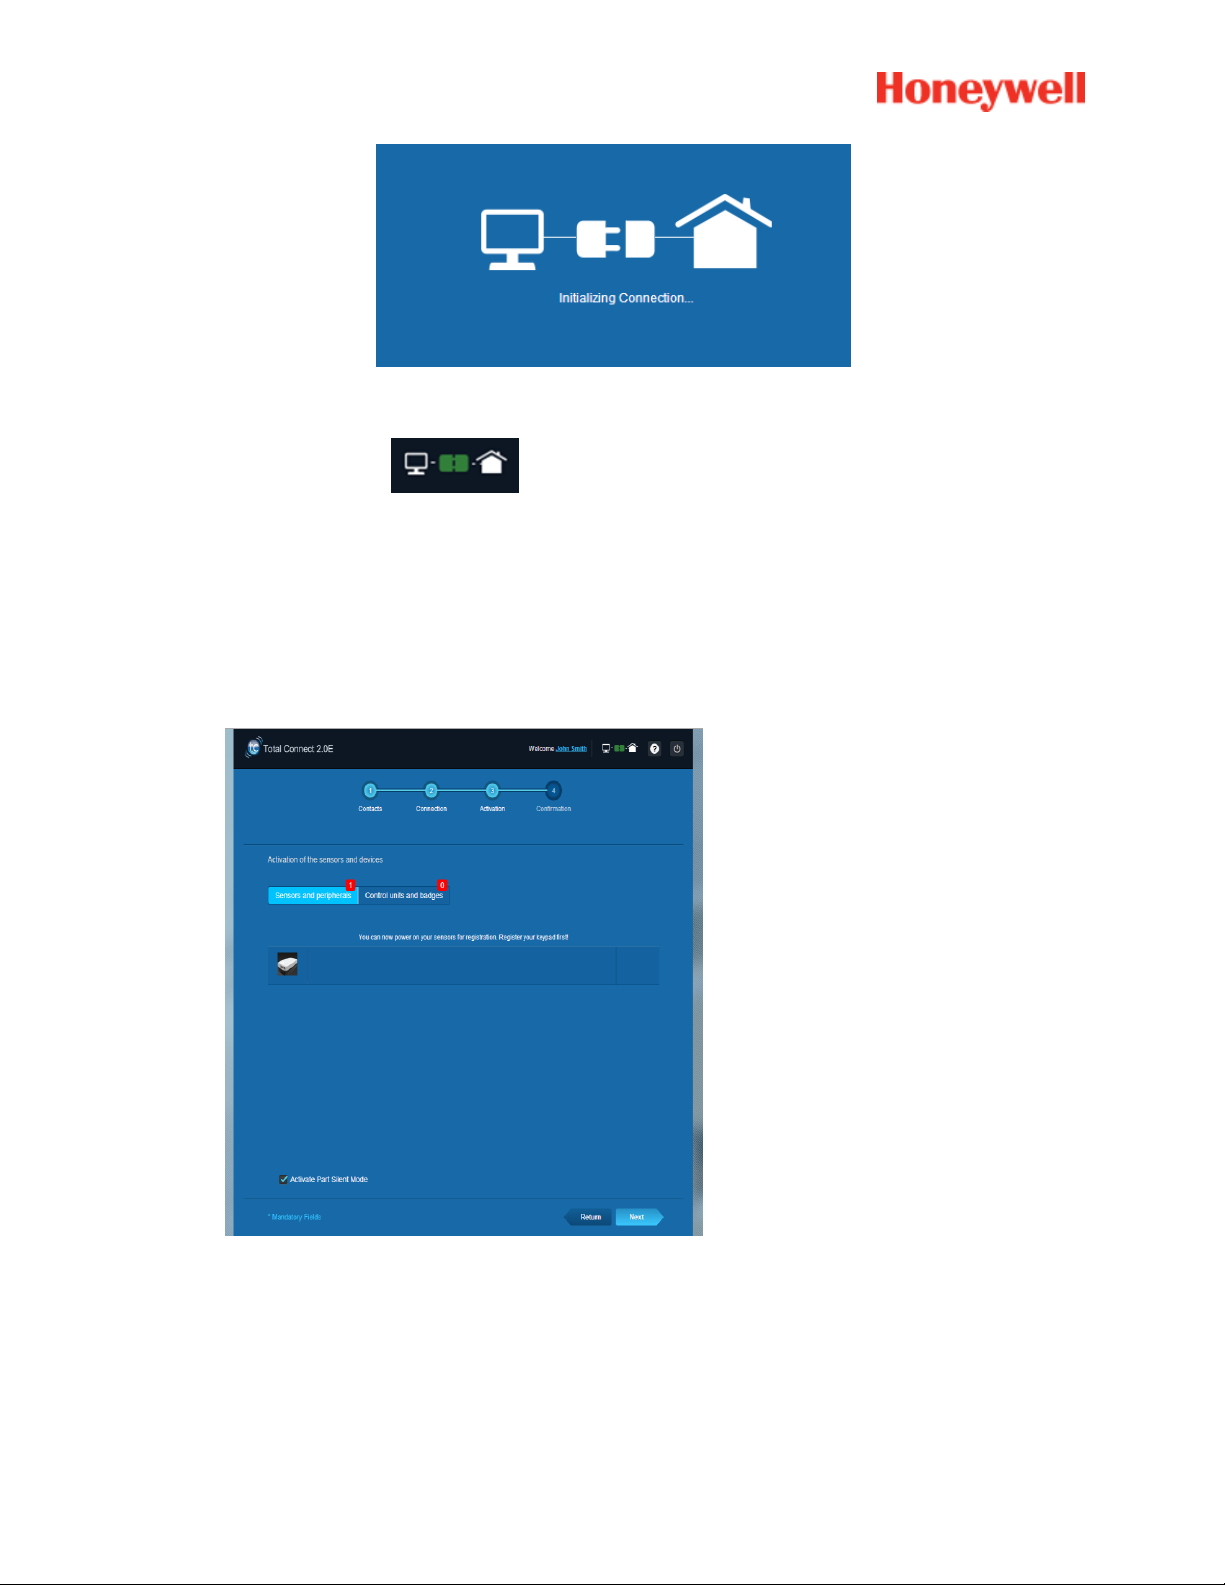
The connection may take several minutes. Once the connection is established you will see the green icon
at the top right of the page: .
The system is now in the installation mode
3. Wait for Le Sucre™ to be recognized by the Website and to be displayed on the screen as
shown below :
8

You can now start to install your devices and sensors:
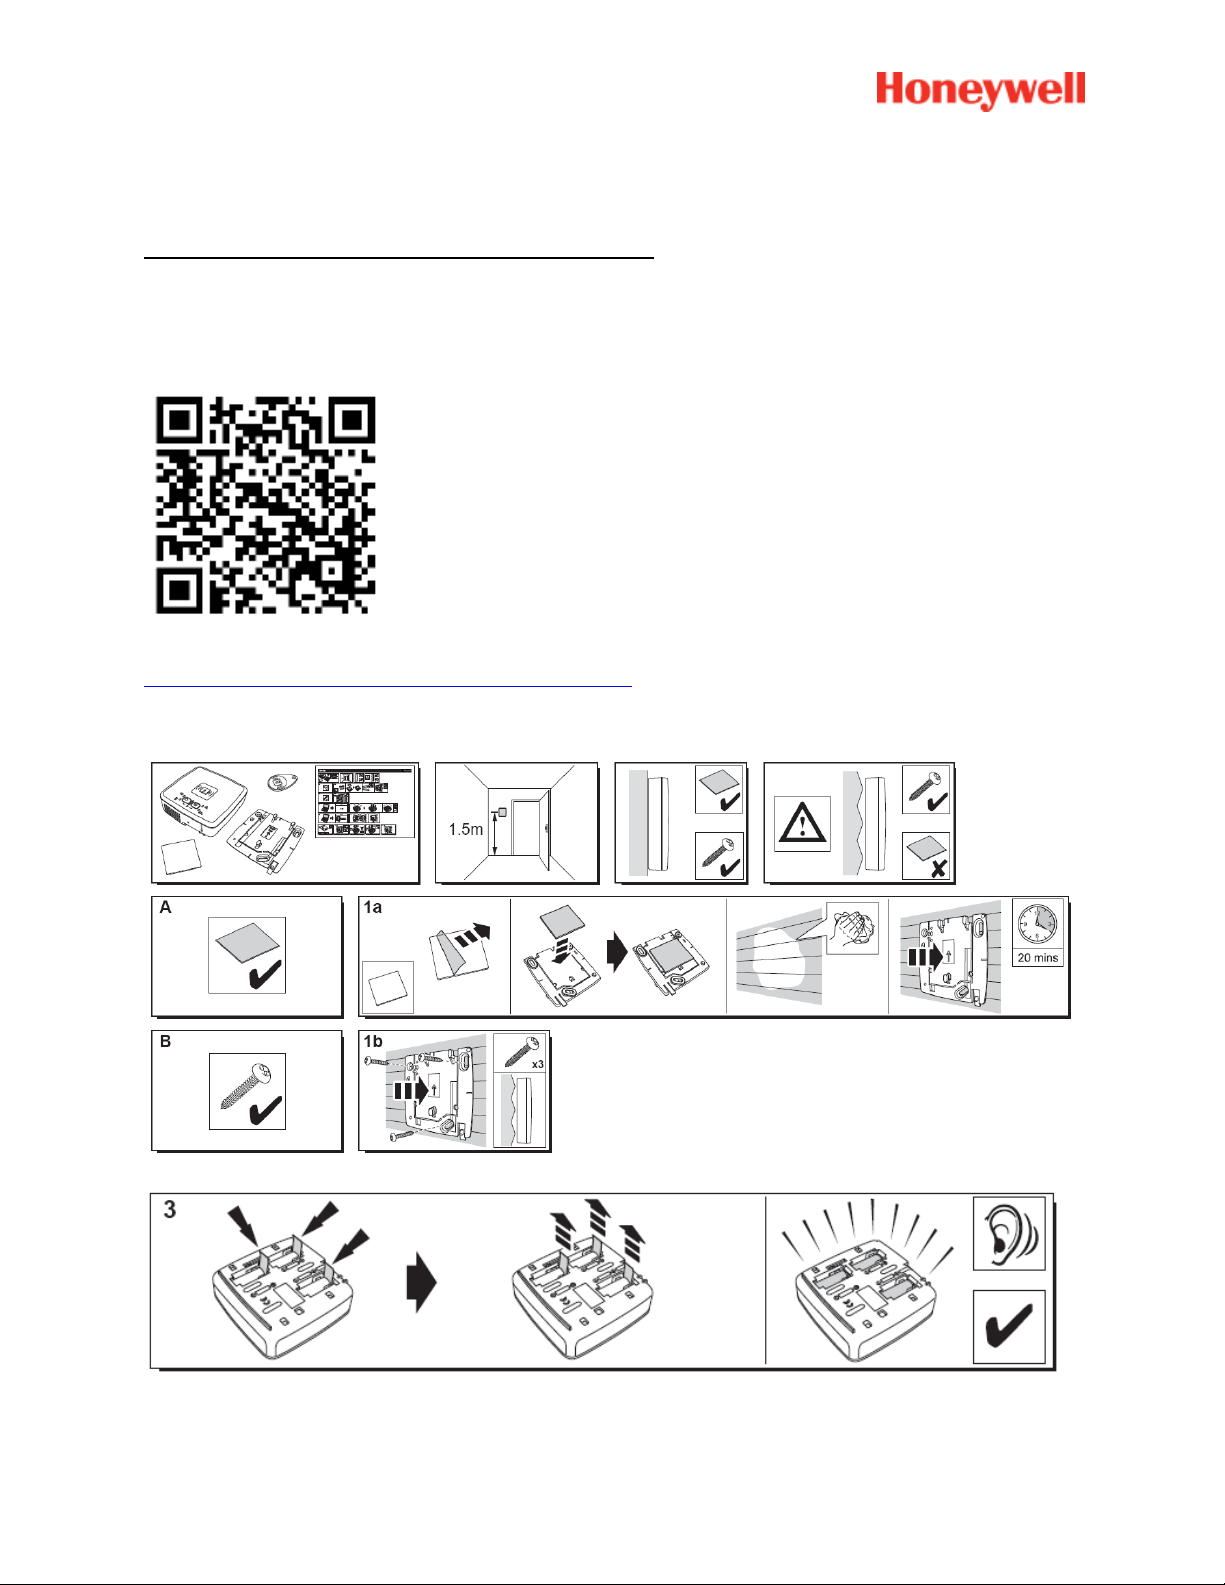
Registering the « Badge Reader » or the keypad
1. Badge reader
A help video can be found here:
http://honeywell.total-connect.eu/video/SPR-S8EZ.mp4
9
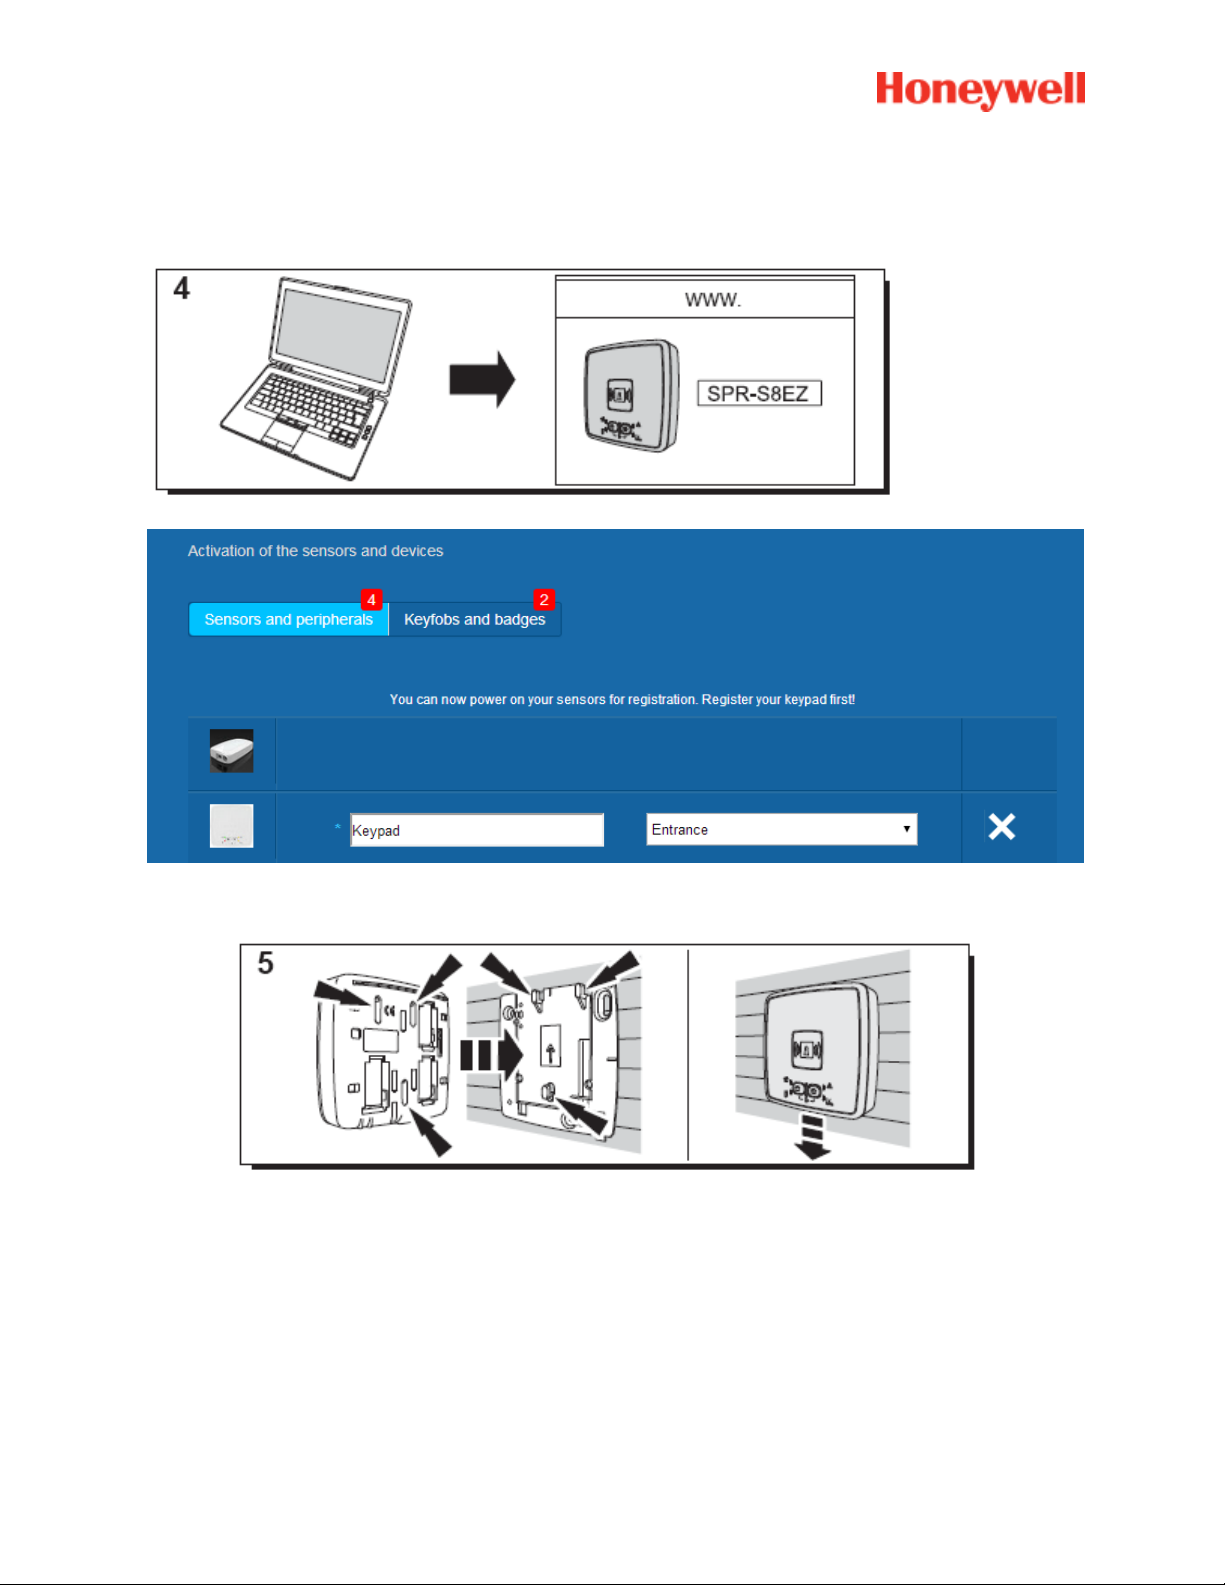
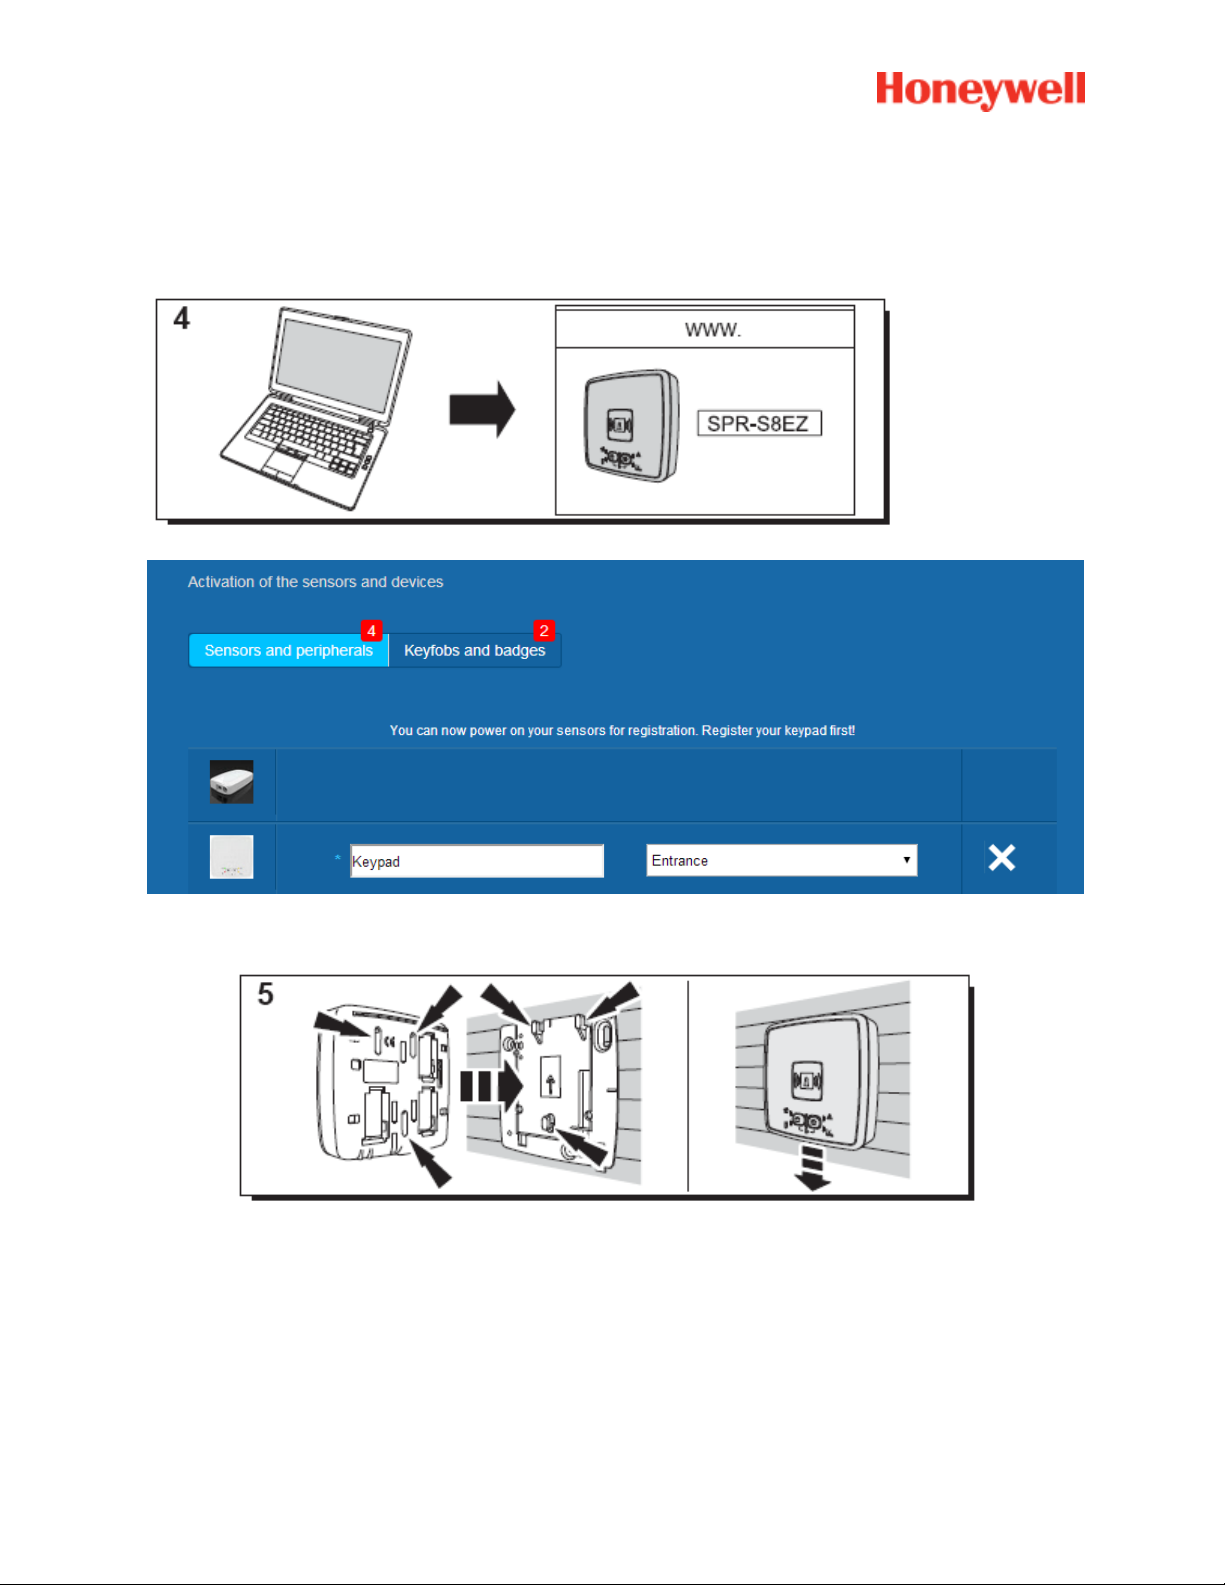
The badge reader plays a series of beeps and then 3 fast beeps. The Website shows the detection of the
new peripheral with the message in the upper strip: ”New Devicel incoming… ”
Wait for the badge reader to appear in the “Sensors and peripherals” section as shown below:
Set the location and the name you want to give to it : here the name is “Keypad” and the location is
“Entrance”.
Warning : To validate the name field you have to click elsewhere on the screen with the mouse.
The badge reader is now saved and registered on your system.
10

2. Keypad
A help video can be found here:
http://honeywell.total-connect.eu/video/GKP-S8M.mp4
The keypad plays a series of beeps. The Website shows the detection of the new peripheral with the
message in the upper strip: ”New Device incoming… ”
Wait for the keypad to appear in the “Sensors and peripherals” section as shown below:
11
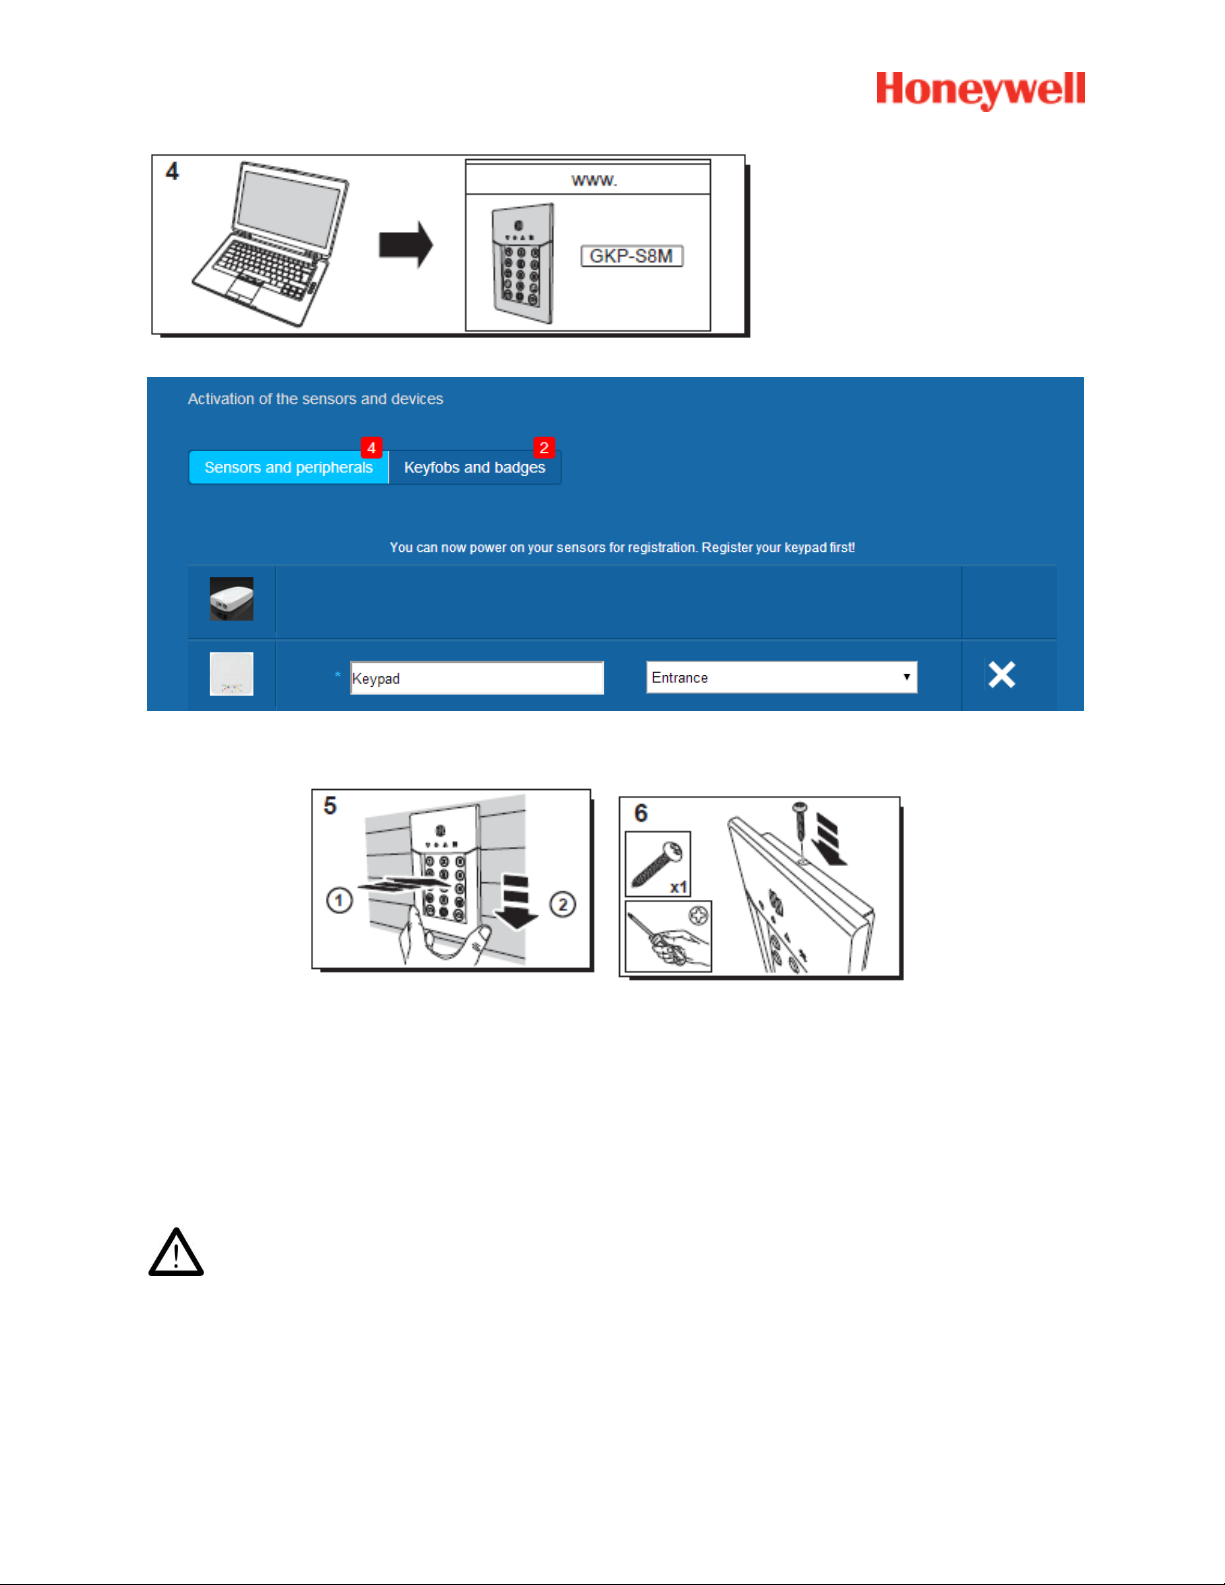
Set the location and the name you want to give to it : here the name is “Keypad” and the location is
“Entrance”.
Warning : To validate the name field you have to click elsewhere on the screen with the mouse.
The keypad is now saved and registered on your system.
Please refer to the keypad manual to set up user codes. By default, user 1 has the code
1234. Don’t forget to change it at installation!
12

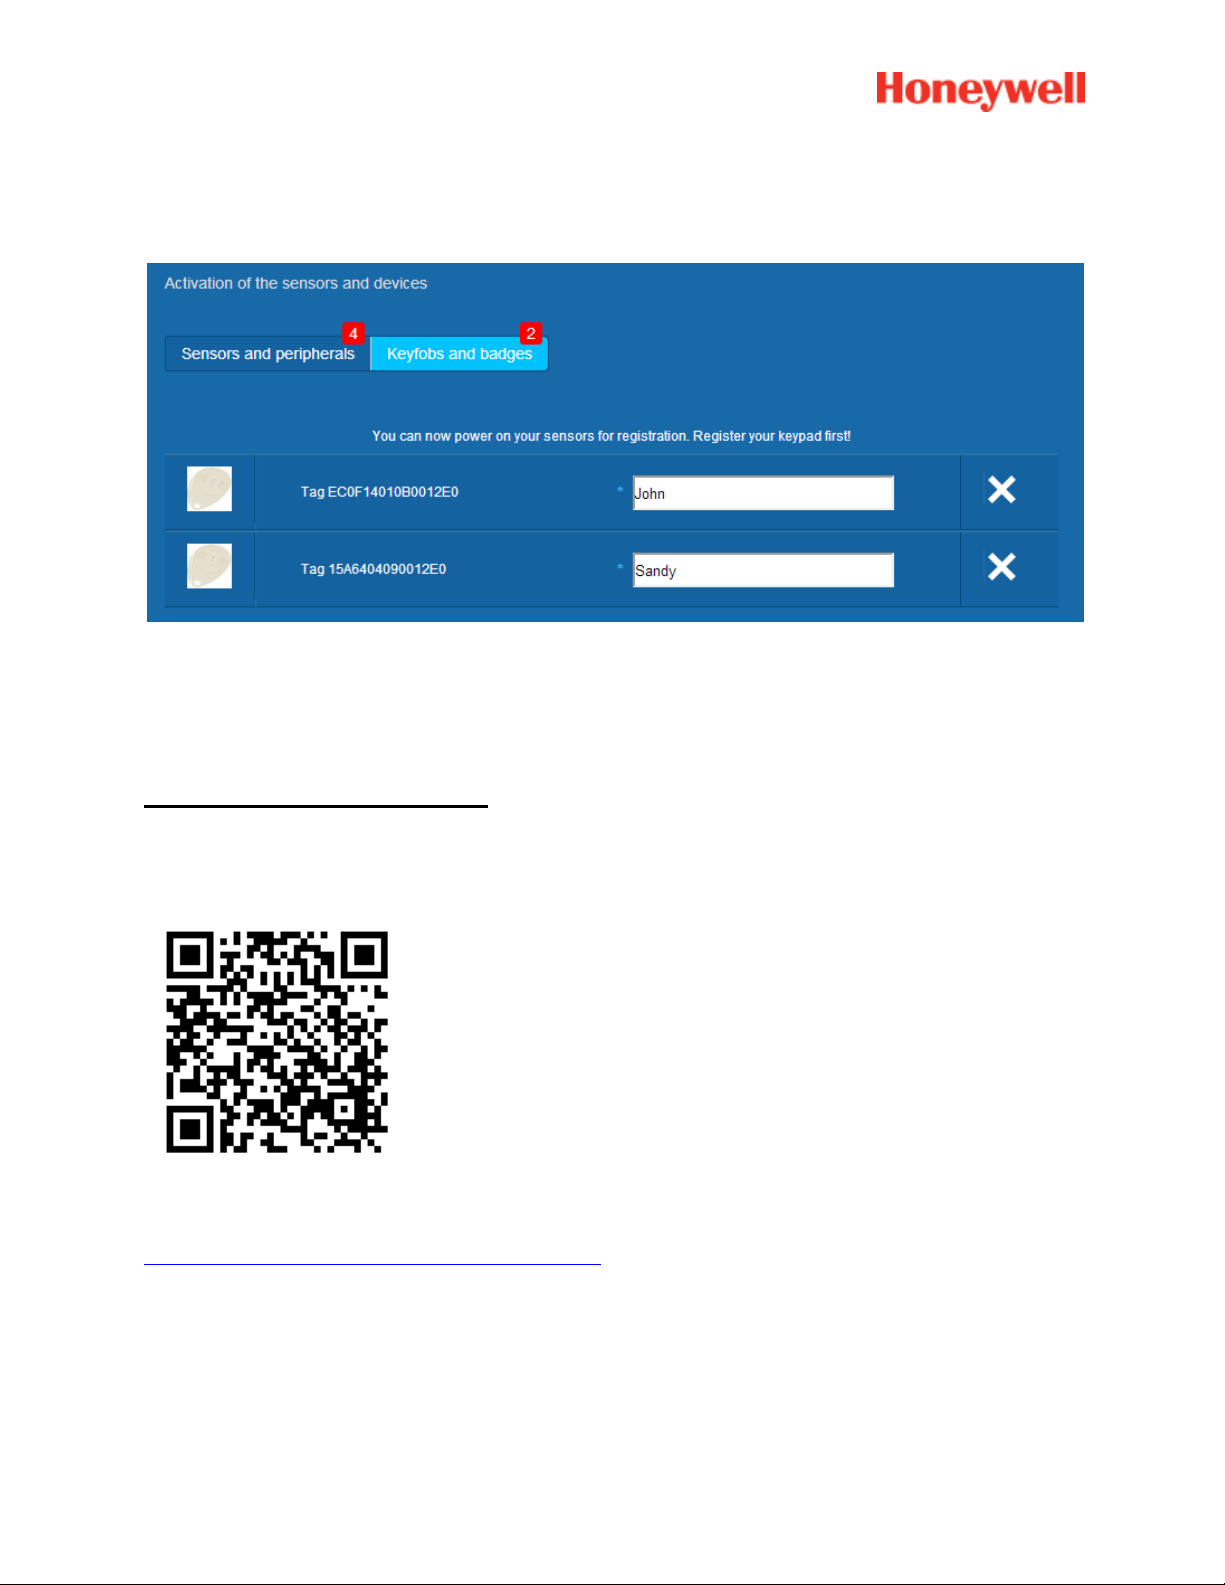
Registering the badges
To register the first Badge, present it at the front centre of the Badge reader or keypad until you hear a
beep. The Badge appears in the “Keyfobs and badges” section.
You can now set the owner’s name in the field next to the Badge serial number. Register the next Badge
the same way.
Here both “John” and “Sandy” ‘s badges have been registered.
The badges are now saved and registered on your system.
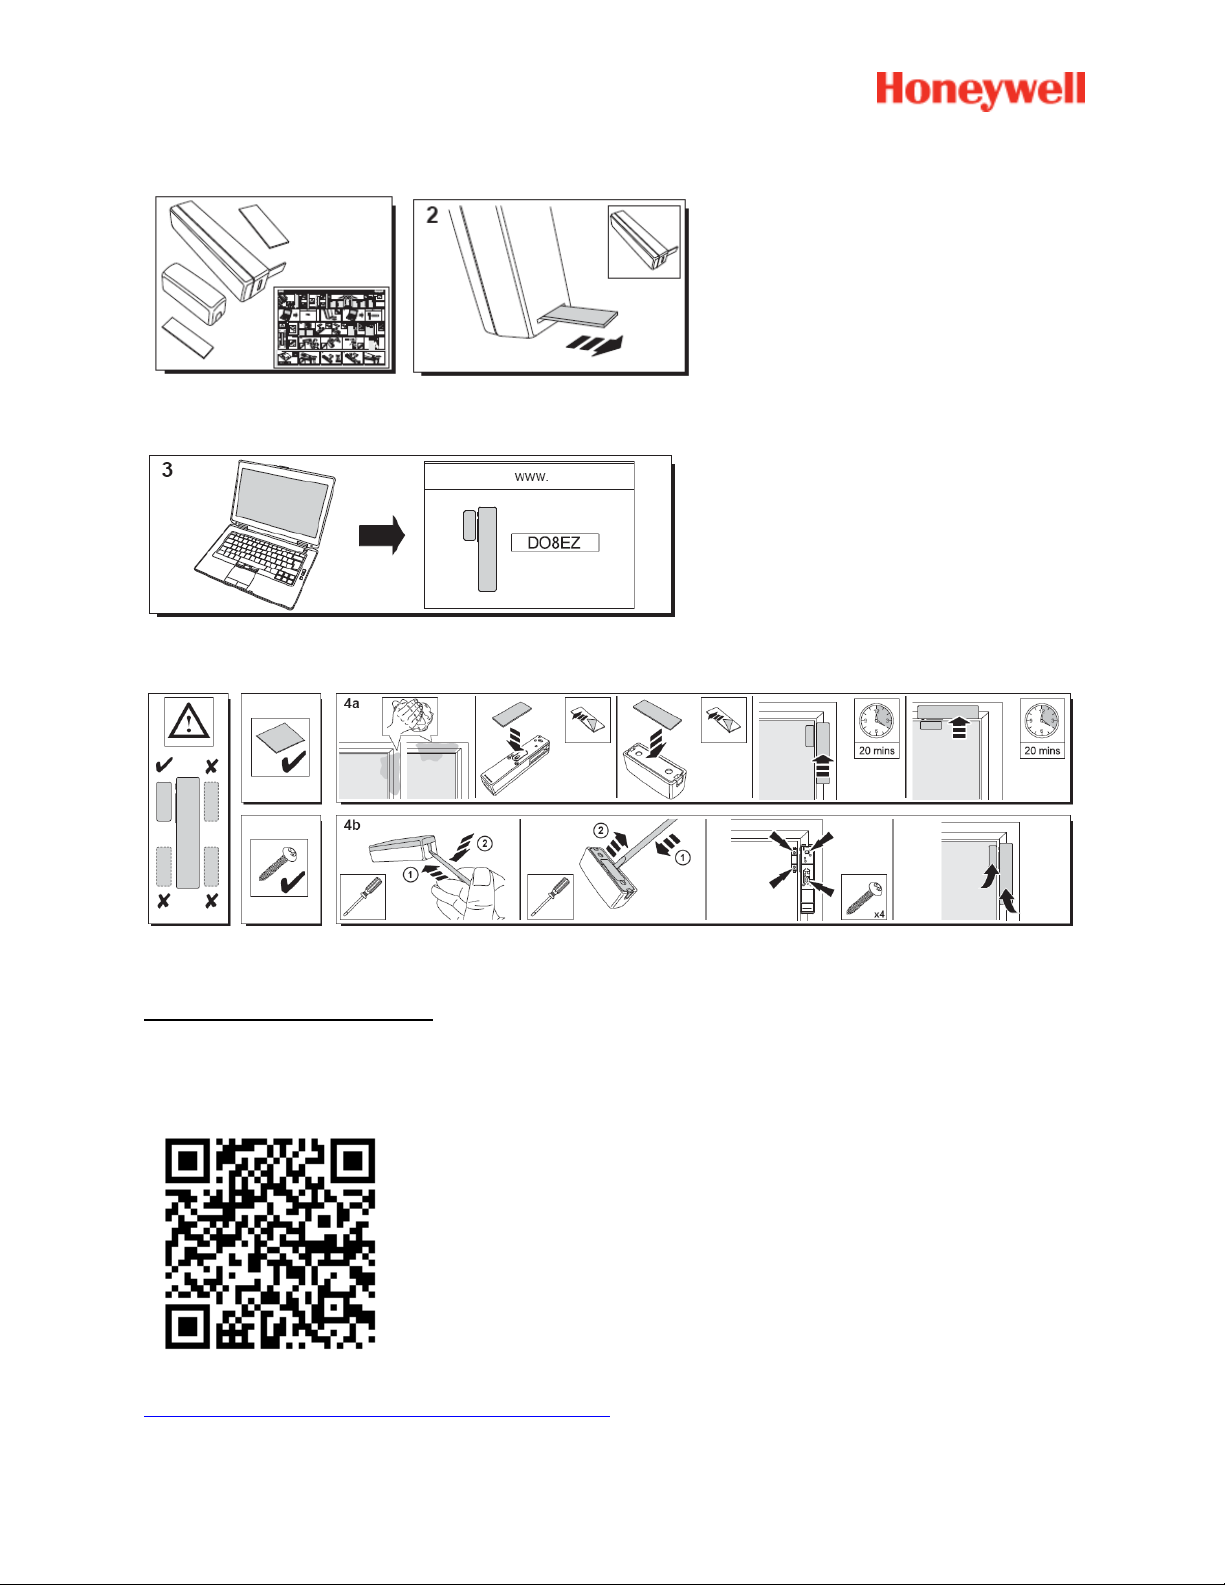
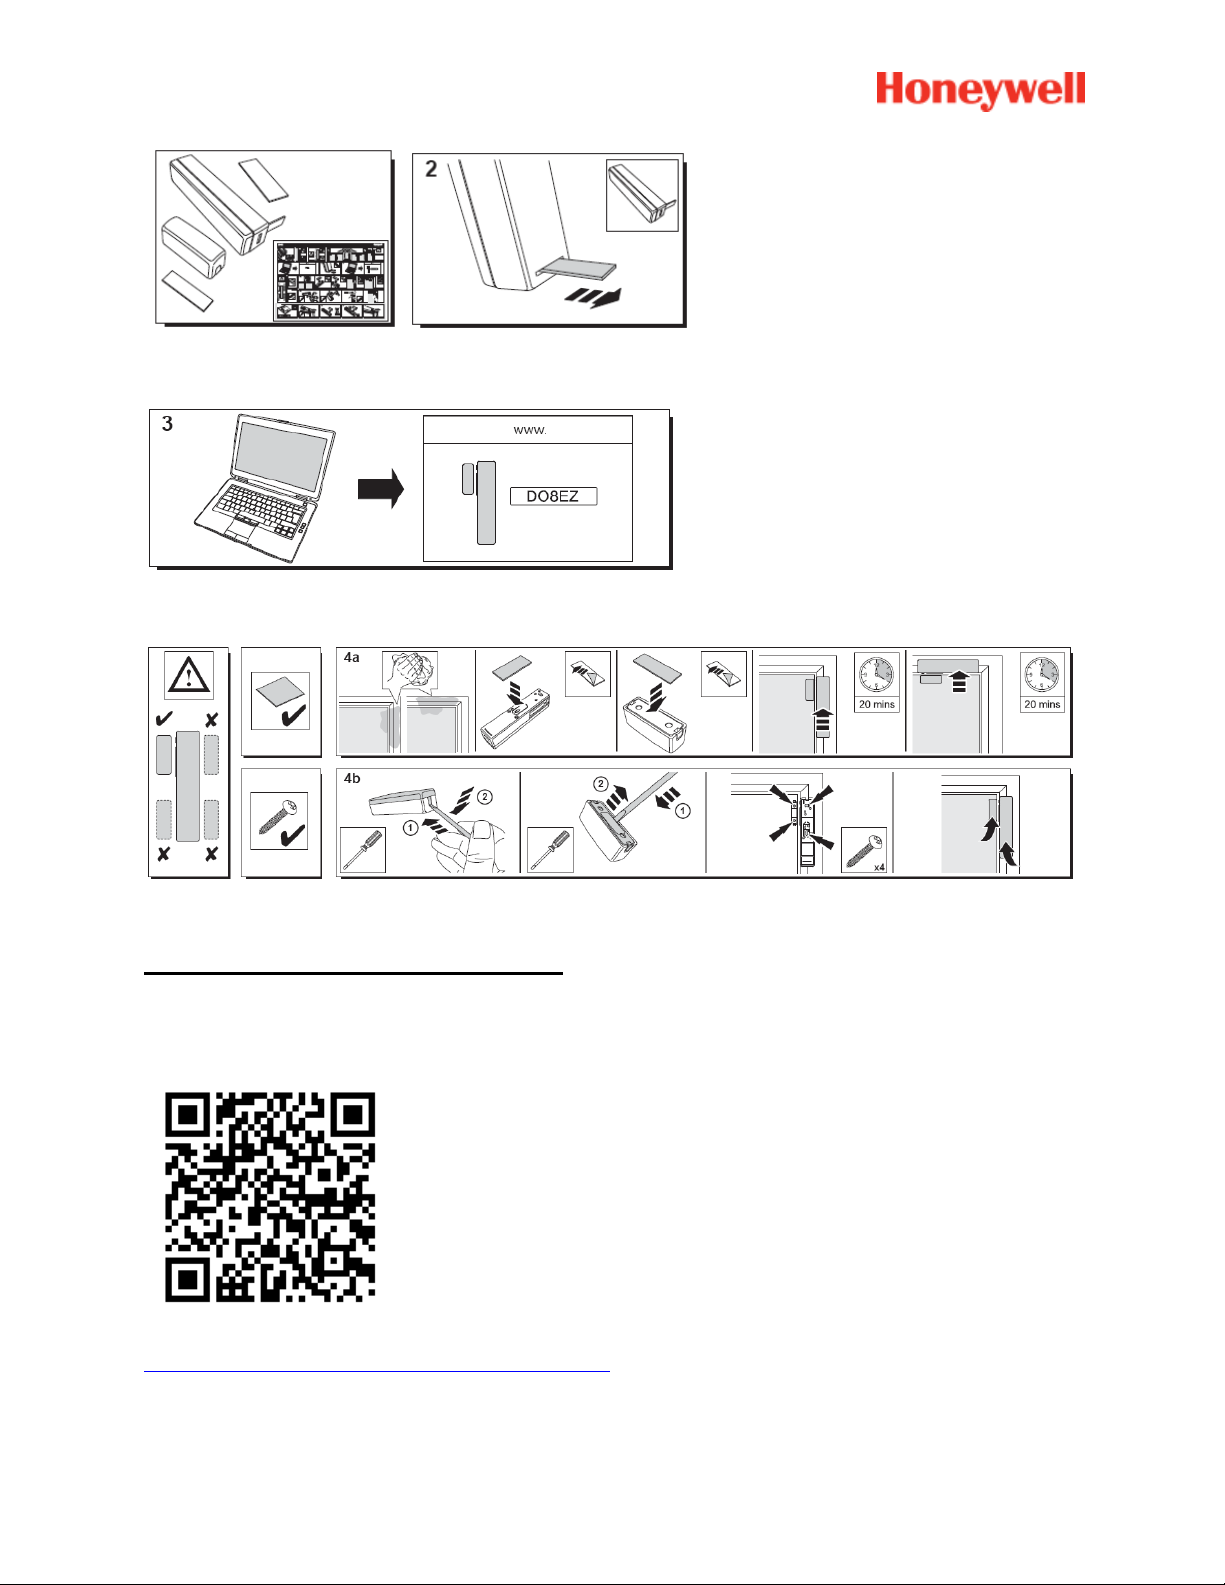
Registering the Door Contact
A help video can be found here:
http://honeywell.total-connect.eu/video/DO8EZ.mp4
13
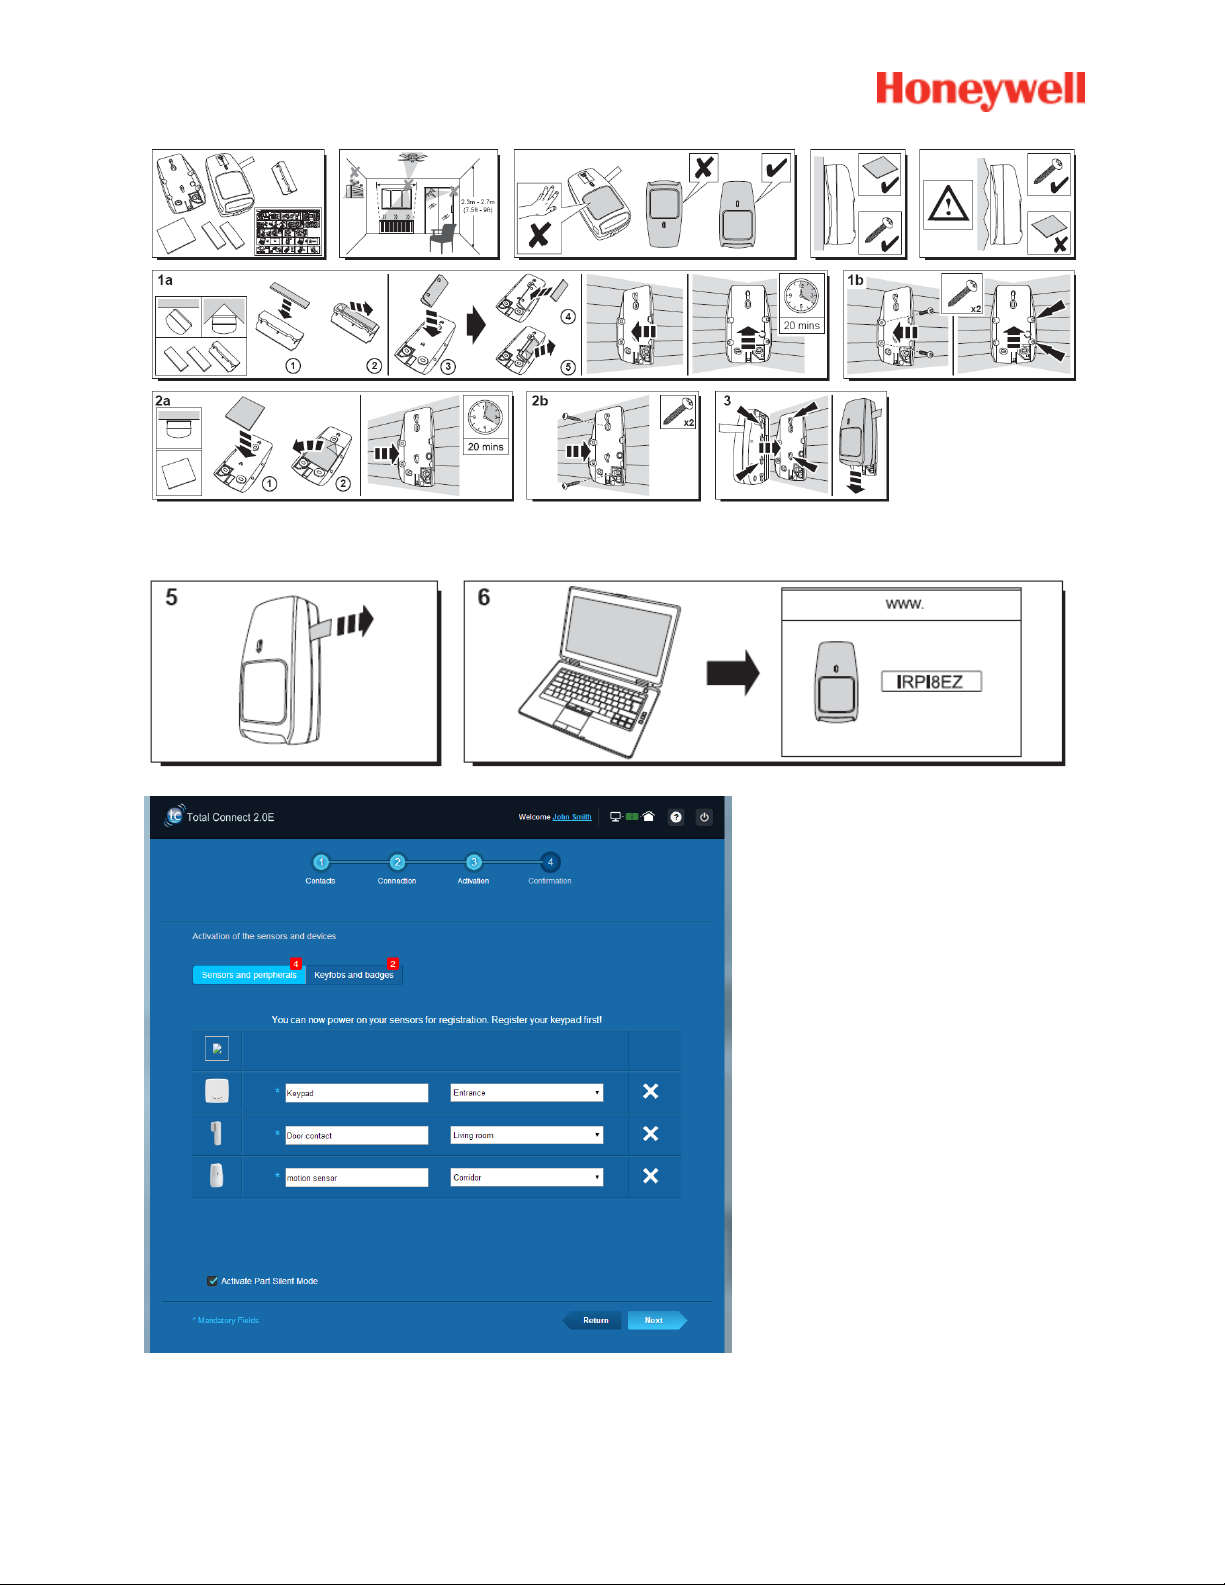
Registering the motion sensor
A help video can be found here:
http://honeywell.total-connect.eu/video/IRPI8EZ.mp4
14
15

Installing other peripherals
For each device being registered you have the upper message “New Device incoming…” and you will
hear the beeps from the badge reader.
Finalizing the installation
Once all peripherals are registered , finish the installation by clicking on the “Finish” button.
The finalization may take several minutes.
Le Sucre pre-configured parameters
- Peripheral parameter :
- DO8M, SHK8M detectors are :
Delayed
In partial partition (working in total and partial mode)
- IRPI8M, IR8M, CAMIR-F1, DT8M, DTPI8M, FG8M detectors are :
Delayed
In total partition (working only in total mode)
- All Life safety detectors (CO8M, DFS8M) are:
Immediate
In 24/24 partition
- DET8M detector is:
Immediate
In 24/24 partition
- CAMIR-F1 parameters:
Pictures per set: 5
Time between pictures: 300 ms
- Entry/Exit delays:
o Total partition
Entry delay: 30 s
Exit delay: 30s
o Partial partition
Entry delay: 30s
Exit delay: 30s
- Tag reader siren parameters:
Intrusion alarm duration: 180s
- Smoke alarm duration: 300s
Entry and exit beeps:
Beeps only present for total arm, silent for partial arm
16

-Français-
Le Sucre™
Guide d'installation rapide
ÉTAPES À SUIVRE OBLIGATOIREMENT AVANT DE
COMMENCER L'INSTALLATION ................................................ 2
Identification du type de centrale ...................................................................... 2
Étape 1 : Connexion de l'unité Le Sucre .......................................................... 3
Étape 2 : Création de votre compte sur Internet .............................................. 5
INSTALLATION DE VOTRE SYSTÈME ...................................... 6
Enregistrement du « Lecteur de badge » ou du clavier .................................. 9
Enregistrement des badges............................................................................. 12
Enregistrement du contact de porte ............................................................... 13
Enregistrement du détecteur de mouvement ................................................. 14
Installation d'autres périphériques ................................................................. 16
Finalisation de l'installation ............................................................................. 16
Paramètres préconfigurés de l’unité Le Sucre ....................... 16
800-19460-C
01/2016
,
ÉTAPES À SUIVRE OBLIGATOIREMENT AVANT DE COMMENCER
L'INSTALLATION
Identification du type de centrale
Veillez à identifier le type de centrale dont vous disposez, car le processus d’installation présente de
légères différences selon les versions.
Sucre GPRS (SUGPACK-EU/SUGPACK-UK)
Sucre Box (SUEPACK –E)
2
Sucre Box + (SUEPACK-EG)
Étape 1 : Connexion de l'unité Le Sucre
Sucre GPRS
Vous trouverez une vidéo d’aide ici :
http://honeywell.total-connect.eu/video/lesucre.mp4
3
Sucre Box
A help video can be found here:
http://honeywell.total-connect-eu/video/sucrebox.mp4
Sucre Box+
A help video can be found here:
http://honeywell.total-connect-eu/video/sucreboxplus.mp4
4

Étape 2 : Création de votre compte sur Internet
1. Connectez-vous au site Web https://tc20e.total-connect.eu
2. Cliquez sur « Créer un utilisateur» pour créer votre compte. Entrez ensuite le code « ID code »
à 20 chiffres. Ce code se trouve sur une étiquette collée sur l'unité Le Sucre.
3. Vous pourrez ensuite choisir votre nom d'utilisateur et votre mot de passe pour vous connecter
à votre système. Vous devrez également entrer une adresse e-mail valide afin d'être contacté
en cas de problème ou si vous oubliez votre mot de passe.
Tous les champs marqués d'un * sont obligatoires.
Une fois le formulaire rempli, cochez la case au bas de la page pour accepter les Conditions générales,
puis cliquez sur « Suivant ».
Le message suivant apparaît : « Votre compte a été correctement activé ». Cliquez sur le bouton bleu
pour continuer.
Un e-mail de confirmation vous sera adressé pour vous rappeler l'identifiant et le mot de passe
qui vous donnent accès au site Web. Il vous fournira également quelques informations
concernant les spécificités de votre système. Si vous n’avez pas reçu cet e-mail, veuillez vérifier
dans le dossier « Courrier Indésirable ».
Vous pouvez maintenant vous connecter à votre compte depuis la page d'accueil du site Web.
5
INSTALLATION DE VOTRE SYSTÈME
Une fois connecté, le message suivant apparaît :
1. La première étape consiste à définir vos contacts : il s'agit des personnes qui recevront une
notification par e-mail ou par SMS si une alarme se déclenche ou si un problème survient dans
vos locaux.
Vous pouvez définir jusqu'à trois contacts. Le premier contact (il s'agit de vous en général) est
obligatoire. Le deuxième et le troisième contact sont facultatifs et peuvent être ignorés au cours
de l'installation. Vous pourrez modifier ces contacts à tout moment après l’installation initiale.
6

Vous devez entrer les numéros de téléphone des contacts au format international. Exemple :
numéro commençant par +44 pour le Royaume-Uni ou +33 pour la France.
2. Selon votre type de centrale, il est possible que vous deviez saisir un numéro de téléphone
correspondant à la carte SIM fournie avec votre système
Vous devez entrer le numéro de téléphone correspondant à la carte SIM au format international.
Après avoir réalisé les différentes étapes qui s’affichent à l’écran, la connexion avec l’unité Le Sucre™
commence
7
Elle peut prendre plusieurs minutes. Une fois la connexion établie, l'icône verte s'affiche en haut, à droite
de la page : .
Le système est désormais en mode d'installation
3. Attendez que Le Sucre™ soit reconnu par le site Web et apparaisse à l'écran comme
ci-dessous :
8
Vous pouvez à présent commencer à installer les périphériques et les capteurs :
Vous trouverez une vidéo d’aide ici :
http://honeywell.total-connect.eu/video/SPR-S8EZ.mp4
Enregistrement du « Lecteur de badge » ou du clavier
1. Lecteur de badge
9
Le lecteur de badge émet une série de signaux sonores, puis trois signaux sonores courts. Le site Web
annonce la détection du nouveau périphérique avec le message suivant dans le bandeau supérieur :
« Arrivée d'un nouveau périphérique… »
Attendez que le lecteur de badge apparaisse dans la section « Détecteurs et périphériques », comme
ci-dessous :
Indiquez l'emplacement et le nom que vous souhaitez lui donner : ici le nom est « Keypad » et
l'emplacement est « Entrance ».
Avertissement : pour valider le champ Nom, vous devez cliquer ailleurs sur l'écran avec la souris.
Le lecteur de badge est désormais enregistré sur votre système.
10

2. Clavier
Vous trouverez une vidéo d’aide ici :
http://honeywell.total-connect.eu/video/GKP-S8M.mp4
Le lecteur de badge émet une série de signaux sonores. Le site Web annonce la détection du nouveau
périphérique avec le message suivant dans le bandeau supérieur : « Arrivée d'un nouveau
périphérique… »
Attendez que le clavier apparaisse dans la section « Détecteurs et périphériques », comme ci-dessous :
11

Indiquez l'emplacement et le nom que vous souhaitez lui donner : ici le nom est « Keypad » et
l'emplacement est « Entrance ».
Avertissement : pour valider le champ Nom, vous devez cliquer ailleurs sur l'écran avec la souris.
Le lecteur de badge est désormais enregistré sur votre système.
Merci de vous référer au manuel du clavier pour définir les codes utilisateur. Par défaut,
l’utilisateur 1 a le code 1234. N’oubliez pas de le changer lors de l’installation !
Enregistrement des badges
Pour enregistrer le premier badge, présentez-le devant le lecteur de badge ou le clavier jusqu'à ce qu'un
signal sonore retentisse. Le badge apparaît dans la section « Keyfobs and badges ».
12
Vous pouvez maintenant saisir le nom du propriétaire dans le champ texte face au numéro de série du
badge. Enregistrez le badge suivant de la même manière.
Ici les badges de « John » et de « Sandy » ont été enregistrés.
Les badges sont désormais enregistrés sur votre système.
Enregistrement du contact de porte
Vous trouverez une vidéo d’aide ici :
http://honeywell.total-connect.eu/video/DO8EZ.mp4
13
Enregistrement du détecteur de mouvement
Vous trouverez une vidéo d’aide ici :
http://honeywell.total-connect.eu/video/IRPI8EZ.mp4
14
 Loading...