

Page 1
Einbau-Anleitung • Installation Instructions
Instructions de montage • Istruzioni di montaggio
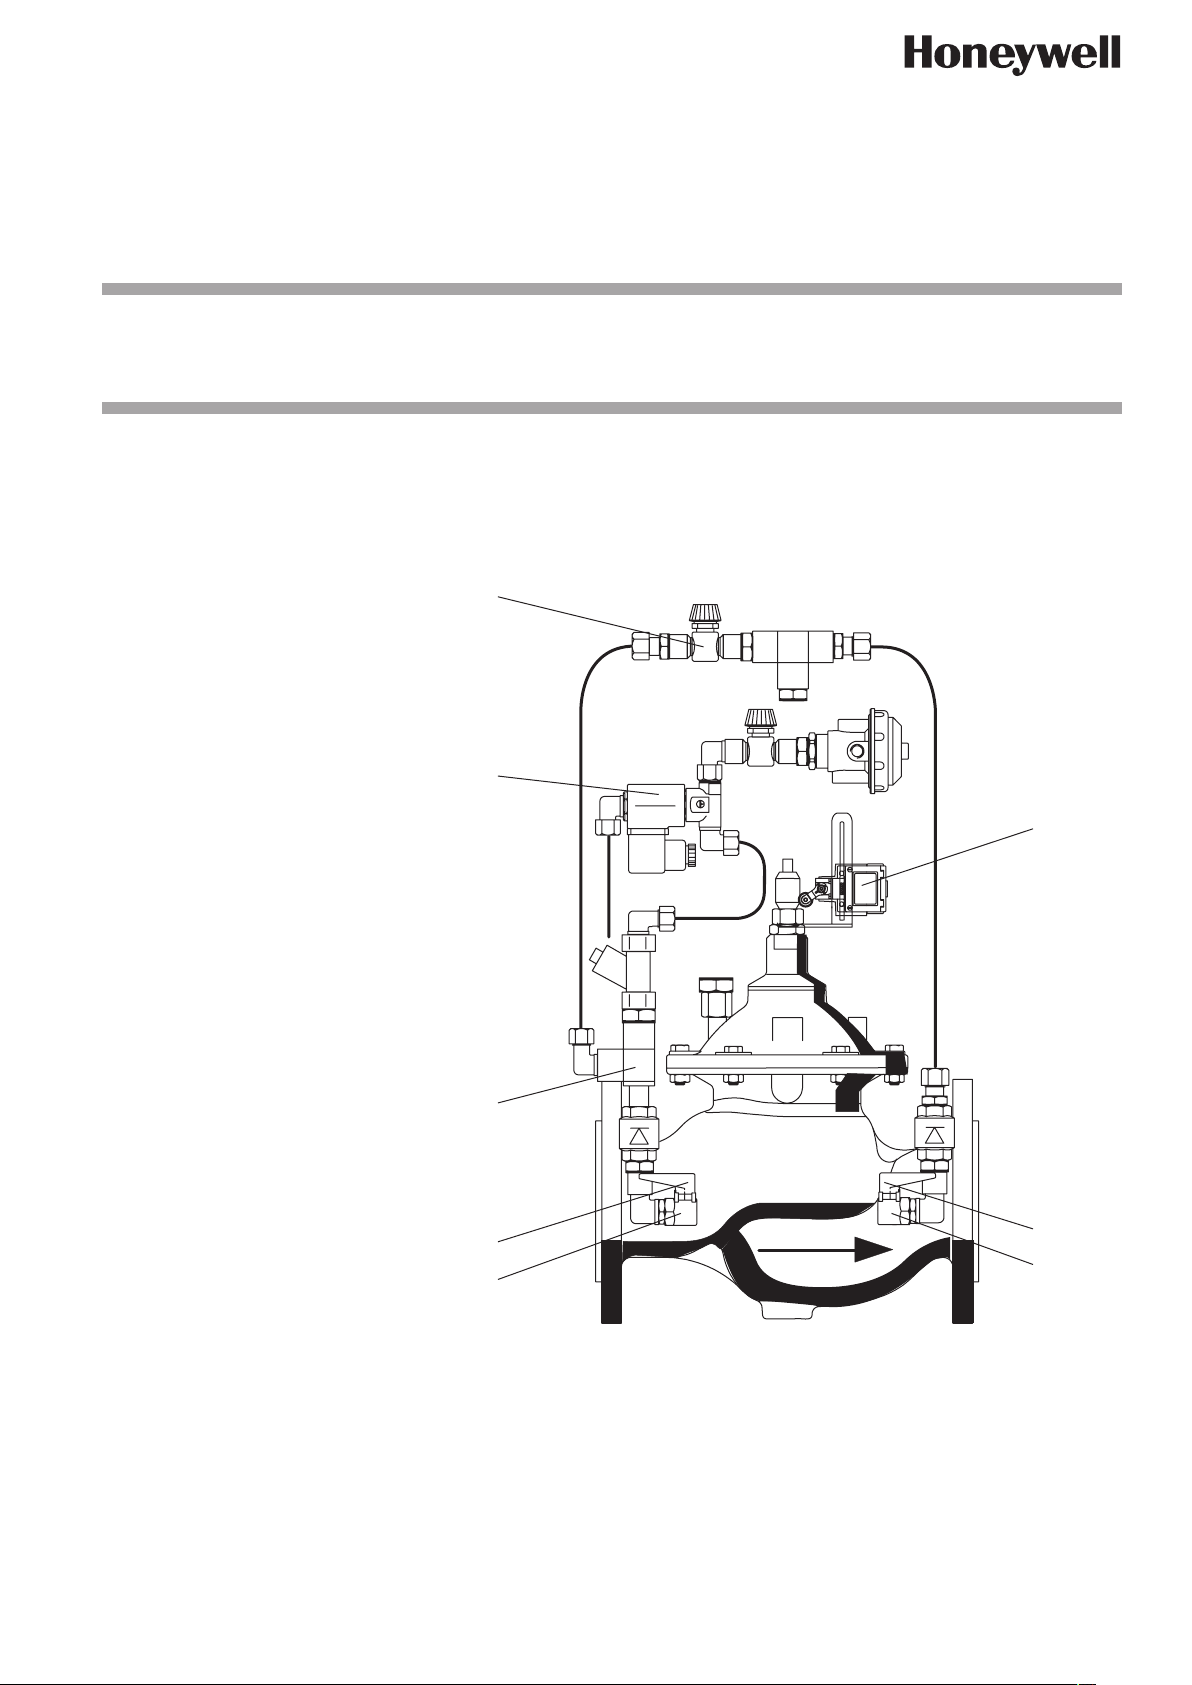
E1 Bauteile • Components • Pièces • Componenti
➁
➀= Magnetventil
Solenoid valve
Vanne magnétique
Elettrovalvola
PS300
➁= Regulierventil
Check valve
Clapet anti-retour
Valvola di ritegno
➂= Absperr-Kugelhahn
Manual ball valve
Clapet à bille
Valvola di intercettazione a sfera
➃= Endschalter
Limit switch
Contact de fin de course
Interruttore di finecorsa
➄= Filtereinsatz
Filter insert
Garniture de filtration
Inserto filtro
➀
➁
➂
➄
➃
➂
➄
EB-PS300 Rev. B
Page 2
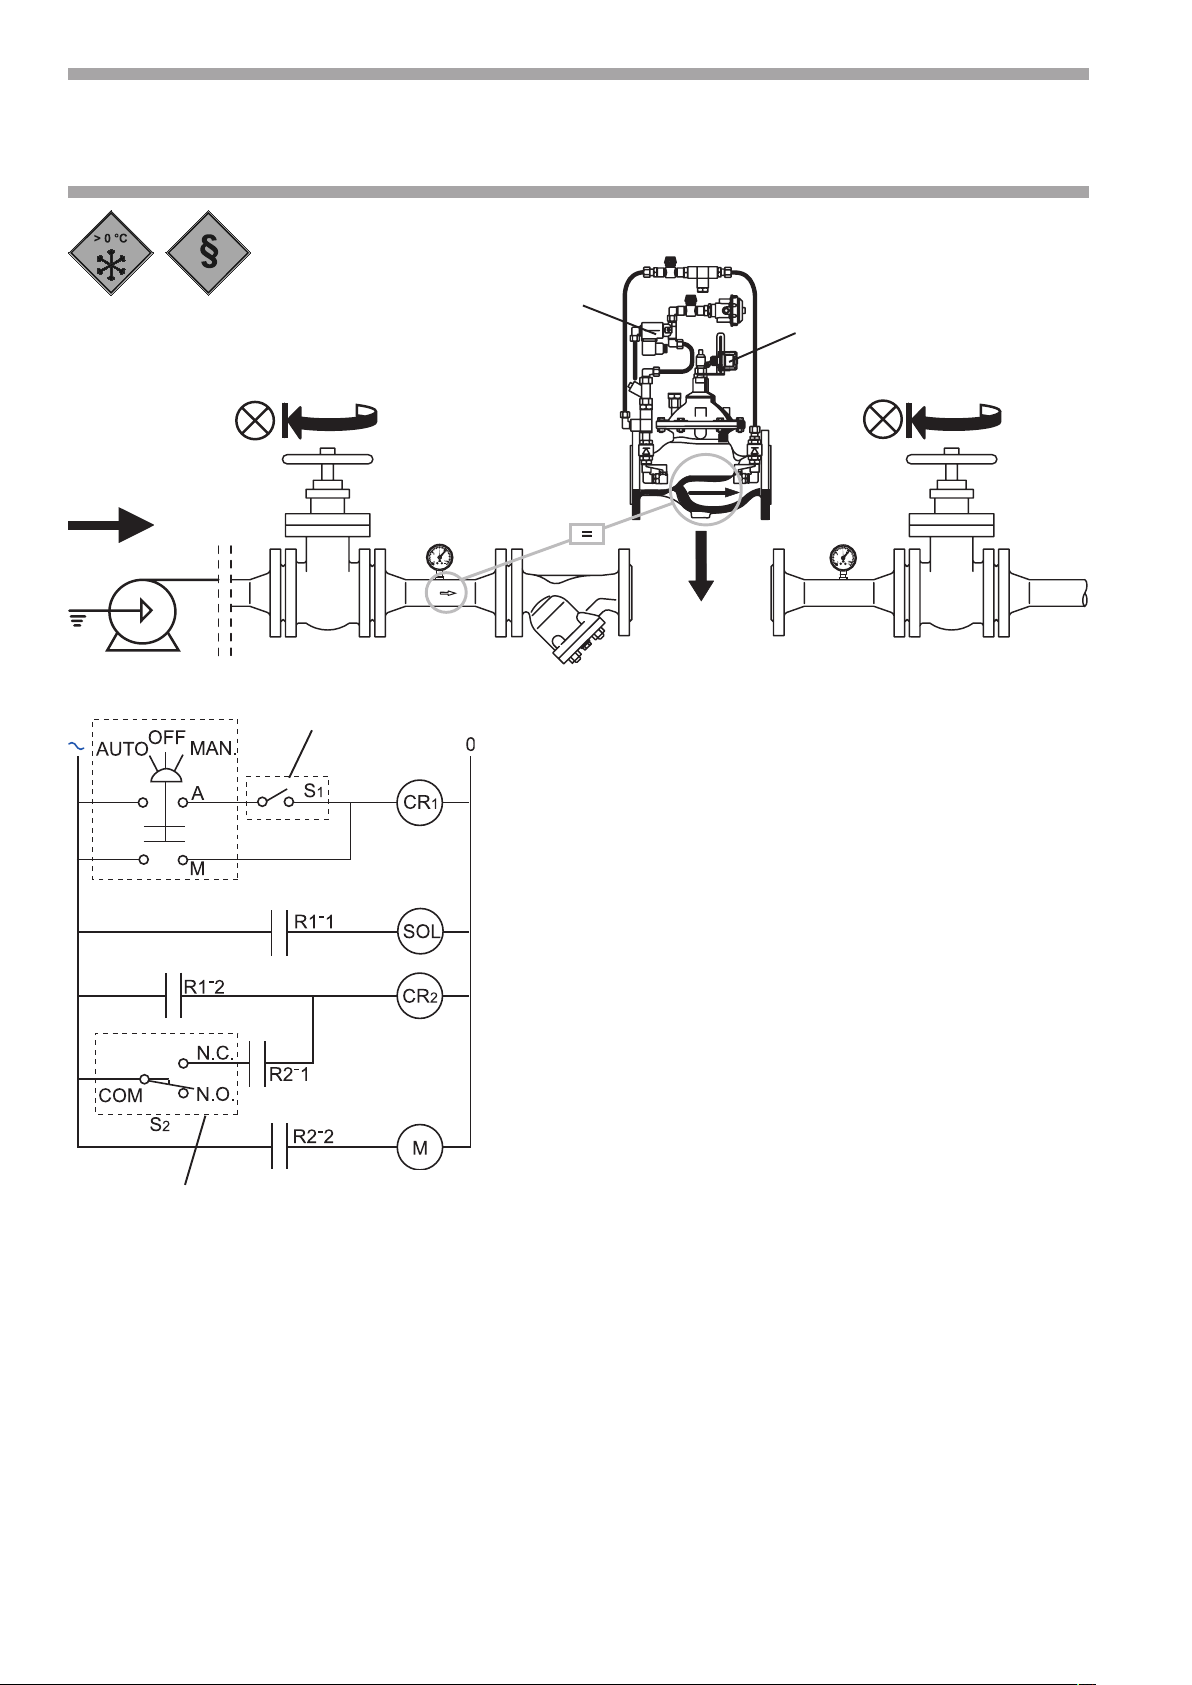
E2 Einbau • Installation • Installation • Installazione
➀
➃
max. 16 bar
min. 0,7 bar
❶
➀
❷
❸
Schließen Sie das Magnetventil ➀ über den Arbeitskontakt
R1-1 des Relais CR1 am Bedienpult an.
Connect the solenoid valve ➀ to the control panel through N.O.
contact R1-1 of Relay CR1.
Raccordez l’électrovalve ➀ au panneau de commande par
l’intermédiaire du contact N.O. R1-1 du relais CR1.
Collegare l’elettrovalvola ➀ al pannello di controllo mediante il
contatto N.O. R1-1 del relè CR1.
➃
Verbinden Sie den Endschalter ➃ mit dem Bedienpult. Dieser
Stromkreis sollte bei betätigtem Schalter (Ventil geschlossen)
unterbrochen sein. Der Endschalter sollte an Relaisspule CR2
parallel zum Arbeitskontakt R1-2 des Relais CR1 angeschlossen werden.
Connect the limit switch ➃ to the control panel. The connection
should be „Open“ while the switch is pressed (the valve is
closed). The limit switch should be connected to the relay coil
CR2 in parallel to N.O. contact R1-2 of relay CR1.
Raccordez le contact de fin de course ➃ au panneau de
commande. La connexion doit être en position „Ouvert“ tant que
le contact de fin de course reste sollicité (la valve est fermée).
Le contact de fin de course doit être raccordé à la bobine du
relais CR2 en parallèle avec le contact N.O. R1-2 du relais CR1.
Collegare l’interruttore di finecorsa ➃ al pannello di controllo. Il
collegamento deve essere aperto quando si preme
l’interruttore (valvola chiusa). L’interruttore di finecorsa deve
essere collegato alla bobina del relè CR2 in parallelo con il
contatto N.O. R1-2 del relè CR1.
Page 3

Inbetriebnahme • Commissioning • Mise en service
E3
Messa in servizio
❶
❷
❸
❺
❹
Page 4

Schaltkreis überprüfen • Check electric circle • Vérification
E4
❸
de la boucle électrique • Controllo circuito elettrico
❶
❷
➱ R1-1 geschlossen • closed • fermé • chiuso
➱ R1-2 geschlossen • closed • fermé • chiuso
➱ R2-1 geschlossen • closed • fermé • chiuso
➱ R2-2 geschlossen • closed • fermé • chiuso
gedrückt halten
hold it in pressed position
maintenir le contact
de fin de course sollicité
Tenere premuto
❹
8
11
❺
entlasten
release
relâcher le contact de fin de course
rilasciare
➱ R1-1 offen • open • ouvert • aperto
➱ R1-2 offen • open • ouvert • aperto
➱ R2-1 offen • open • ouvert • aperto
➱ R2-2 offen • open • ouvert • aperto
➱ Pumpenmotor stoppt
➱ Pump motor stops
10
➱ Le moteur de la pompe s’arrête
➱ Il motore della pompa si arresta
9
➱ R1-1 offen • open • ouvertaperto • aperto
➱ R1-2 offen • open • ouvert • aperto
➱ R2-1 geschlossen • closed • fermé • chiuso
➱ R2-2 geschlossen • closed • fermé • chiuso
❻❼
➱ Ventil öffnet
➱ Valve is opening
➱ La valve s’ouvre
➱ La valvola si apre
➱ Ventil schließt
➱ Valve is closing
➱ La valve se ferme
➱ La valvola si chiude
Automation and Control Solutions
Honeywell GmbH
Hardhofweg
74821 Mosbach
Phone: (49) 6261 810
Fax: (49) 6261 81309
www.honeywell.com
Manufactured for and on behalf of the Environmental
and Combustion Controls Division of Honeywell
Technologies Sàrl, Rolle, Z.A. La Pièce 16, Switzerland
by its Authorised Repre-sentative Honeywell GmbH
MU1H-1333GE23 R0209
Subject to change without notice
© 2009 Honeywell GmbH
MU1H-1333GE23 R0209
 Loading...