

Honeywell MX7 Tecton User Manual

MX7 Tecton™
Hand-Held Computer
Microsoft® Windows® Embedded CE 6 Operating System
User's Guide

Disclaimer
Honeywell International Inc. (“HII”) reserves the right to make changes in specifications and other information contained in this
document without prior notice, and the reader should in all cases consult HII to determine whether any such changes have
been made. The information in this publication does not represent a commitment on the part of HII.
HII shall not be liable for technical or editorial errors or omissions contained herein; nor for incidental or consequential damages
resulting from the furnishing, performance, or use of this material.
This document contains proprietary information that is protected by copyright. All rights are reserved. No part of this document
may be photocopied, reproduced, or translated into another language without the prior written consent of HII.
© 2011-2012 Honeywell International Inc. All rights reserved.
Web Address: www.honeywellaidc.com
RFTerm is a trademark or registered trademark of EMS Technologies, Inc. in the United States and/or other countries.
Microsoft®Windows, ActiveSync®, MSN, Outlook®, Windows Mobile®, the Windows logo, and Windows Media are
registered trademarks or trademarks of Microsoft Corporation.
Marvell®is a registered trademark of Marvell Technology Group Ltd., or its subsidiaries in the United States and other
countries.
Summit Data Communications, the Laird Technologies Logo, the Summit logo, and "Connected. No Matter What" are
trademarks of Laird Technologies, Inc.
The Bluetooth®word mark and logos are owned by the Bluetooth SIG, Inc.
Symbol®is a registered trademark of Symbol Technologies. MOTOROLA, MOTO, MOTOROLA SOLUTIONS and the
Stylized M Logo are trademarks or registered trademarks of Motorola Trademark Holdings, LLC and are used under license.
Hand Held is a trademark of Hand Held Products, Inc., a subsidiary of Honeywell International.
Wavelink®, the Wavelink logo and tagline, Wavelink Studio™, Avalanche Management Console™, Mobile Manager™, and
Mobile Manager Enterprise™ are trademarks of Wavelink Corporation, Kirkland.
RAM®and RAM Mount™ are both trademarks of National Products Inc., 1205 S. Orr Street, Seattle, WA 98108.
Acrobat®Reader © 2012with express permission from Adobe Systems Incorporated.
Other product names or marks mentioned in this document may be trademarks or registered trademarks of other companies
and are the property of their respective owners.
Patents
For patent information, please refer to www.honeywellaidc.com/patents.
Limited Warranty
Refer to www.honeywellaidc.com/warranty_information for your product’s warranty information.

Table of Contents
Chapter 1: Introduction 1-1
About this Guide 1-1
End User License Agreement (EULA) 1-1
Laser Warnings and Labels 1-2
Label Location 1-2
Label 1-2
Components 1-3
Front 1-3
Back 1-4
I/O Port and Cables 1-5
Scanner / Imager Aperture 1-6
Handle 1-6
Handstrap 1-6
Keypads 1-7
55 Key Delete Primary ANSI Keypad 1-7
55 Key Backspace Primary ANSI Keypad 1-7
32 Key Numeric-Alpha Keypad 1-8
Chapter 2: Set Up A New MX7 Tecton 2-1
Hardware Setup 2-1
Software Setup 2-1
Battery 2-2
Connect or Remove the Battery Pack 2-2
Insert/Replace Battery 2-2
Remove Battery 2-3
Hotswap the Main Battery 2-3
Charge or Recharge the Main Battery 2-4
Backlights and Indicators 2-5
Status LEDs 2-5
System Status LED 2-5
Alpha mode Status LED 2-5
Scan Status 2-5
Toggle Vibrate Indicator 2-6
Tapping the Touch Screen with a Stylus 2-7
Touch Screen 2-8
Calibrating the Touch Screen 2-8
Adjusting the Display Backlight Timer 2-8
Apply the Touch Screen Protective Film 2-8
Set Date and Time Zone 2-9
i

Set Power Scheme Timers 2-10
Battery Power Scheme 2-10
AC Power Scheme 2-10
Set Speaker Volume 2-11
Using the Keypad 2-11
Using the Control Panel 2-11
Setup Terminal Emulation Parameters 2-12
Using the AppLock Switchpad 2-13
Using the Keypad 2-13
Using the Touch Screen 2-13
Using the Input Panel / Virtual Keyboard 2-14
Connecting Bluetooth Devices 2-15
Taskbar Connection Indicator 2-15
Reboot Sequences 2-16
Suspend / Resume 2-16
Warmboot 2-16
Attaching the Handstrap 2-17
Attaching the Trigger Handle 2-18
Assemble the Carry Case 2-19
Carry Case with Metal Snaps 2-19
Connecting the Headset Cable 2-20
Adjust Headset / Microphone and Secure Cable 2-21
Cleaning the Touch Screen and Scanner Aperture 2-22
Startup Help 2-23
Continuous Scan Mode 2-23
Chapter 3: Connecting Cables to the MX7 Tecton 3-1
Connecting the USB Client and Power Cable 3-1
Connecting the Serial and Power Cable 3-2
Connecting an External Power Supply 3-3
Connecting Vehicle Power 3-4
DC to DC Power Supply Installation 3-4
Connecting Electrical Cables to Power Sources 3-4
Wiring Schematic 3-5
Connect Vehicle Electrical Connection 3-5
Vehicle 12V Bare Wire Adapter 3-7
Vehicle Cable Connection Cable (Fuse Not Shown) 3-7
Connecting the Power Cable to the Vehicle 3-8
Connect Vehicle 12VDC Connection 3-9
Connect Power Supply to Vehicle Cradle 3-10
ii

Cradle Power Connector Port 3-10
Chapter 4: Product Agency Compliance - MX7 Tecton 4-1
Laser Light Safety Statement 4-3
Vehicle Power Supply Connection Safety Statement 4-5
Chapter 5: Technical Assistance 5-1
iii

iv

Chapter 1: Introduction
The MX7 Tecton™ with Microsoft Windows®Embedded CE 6 operating system is a rugged, portable, hand-held mobile
computer capable of wireless data communications. The MX7 Tecton can transmit information using an 802.11 network card
and it can store information for later transmission through an RS232 or USB port. The MX7CS (Cold Storage) device functions
normally in various temperature ranges.
The MX7 Tecton is vertically oriented and features backlighting for the display. Keypads are available in 55-key alphanumeric
and 32-key numeric-alpha versions.
This device can be scaled from a limited function batch computer to an integrated wireless scanning computer. A trigger handle
is available as an accessory.
The stylus attached to the handstrap is used to assist in entering data and configuration. Protective film for the touch screen is
available as an accessory.
The MX7 Tecton is powered by a 2200mAh Lithium-Ion main battery pack and an internal Super-capacitor (Super-cap) battery.
About this Guide
This MX7 Tecton User's Guide provides instruction for the end-user or system administrator to follow when setting up a new
MX7 Tecton.
This user's guide has been developed for aMX7 Tectonwith a Microsoft® Windows® Embedded CE 6operating system.
End User License Agreement (EULA)
When a new MX7 Tecton starts up a EULA is displayed on the touch screen. It remains on the screen until the Accept or
Decline button is tapped with a stylus.
Tap the Accept button to accept the EULA terms and the MX7 Tecton continues the startup process. The EULA is not
presented to the user again.
Tap the Decline button to decline the EULA and the MX7 Tecton will reboot. It will continue to reboot until the Accept button is
tapped with the stylus.
Note: The EULA will be presented after any operating system upgrade or re-installation, including language-specific
operating systems.
1-1

Laser Warnings and Labels
l Do not look into the laser’s lens.
l Do not stare directly into the laser beam.
l Do not remove the laser caution labels from the MX7 Tecton.
l Do not connect the laser bar code aperture to any other device. The laser bar code aperture is certified for use with the
MX7 Tecton only.
Caution
Laser radiation when open. Please read the caution labels. Use of controls, adjustments or performance of
procedures other than those specified herein may result in hazardous radiation exposure.
Label Location
Label
1-2
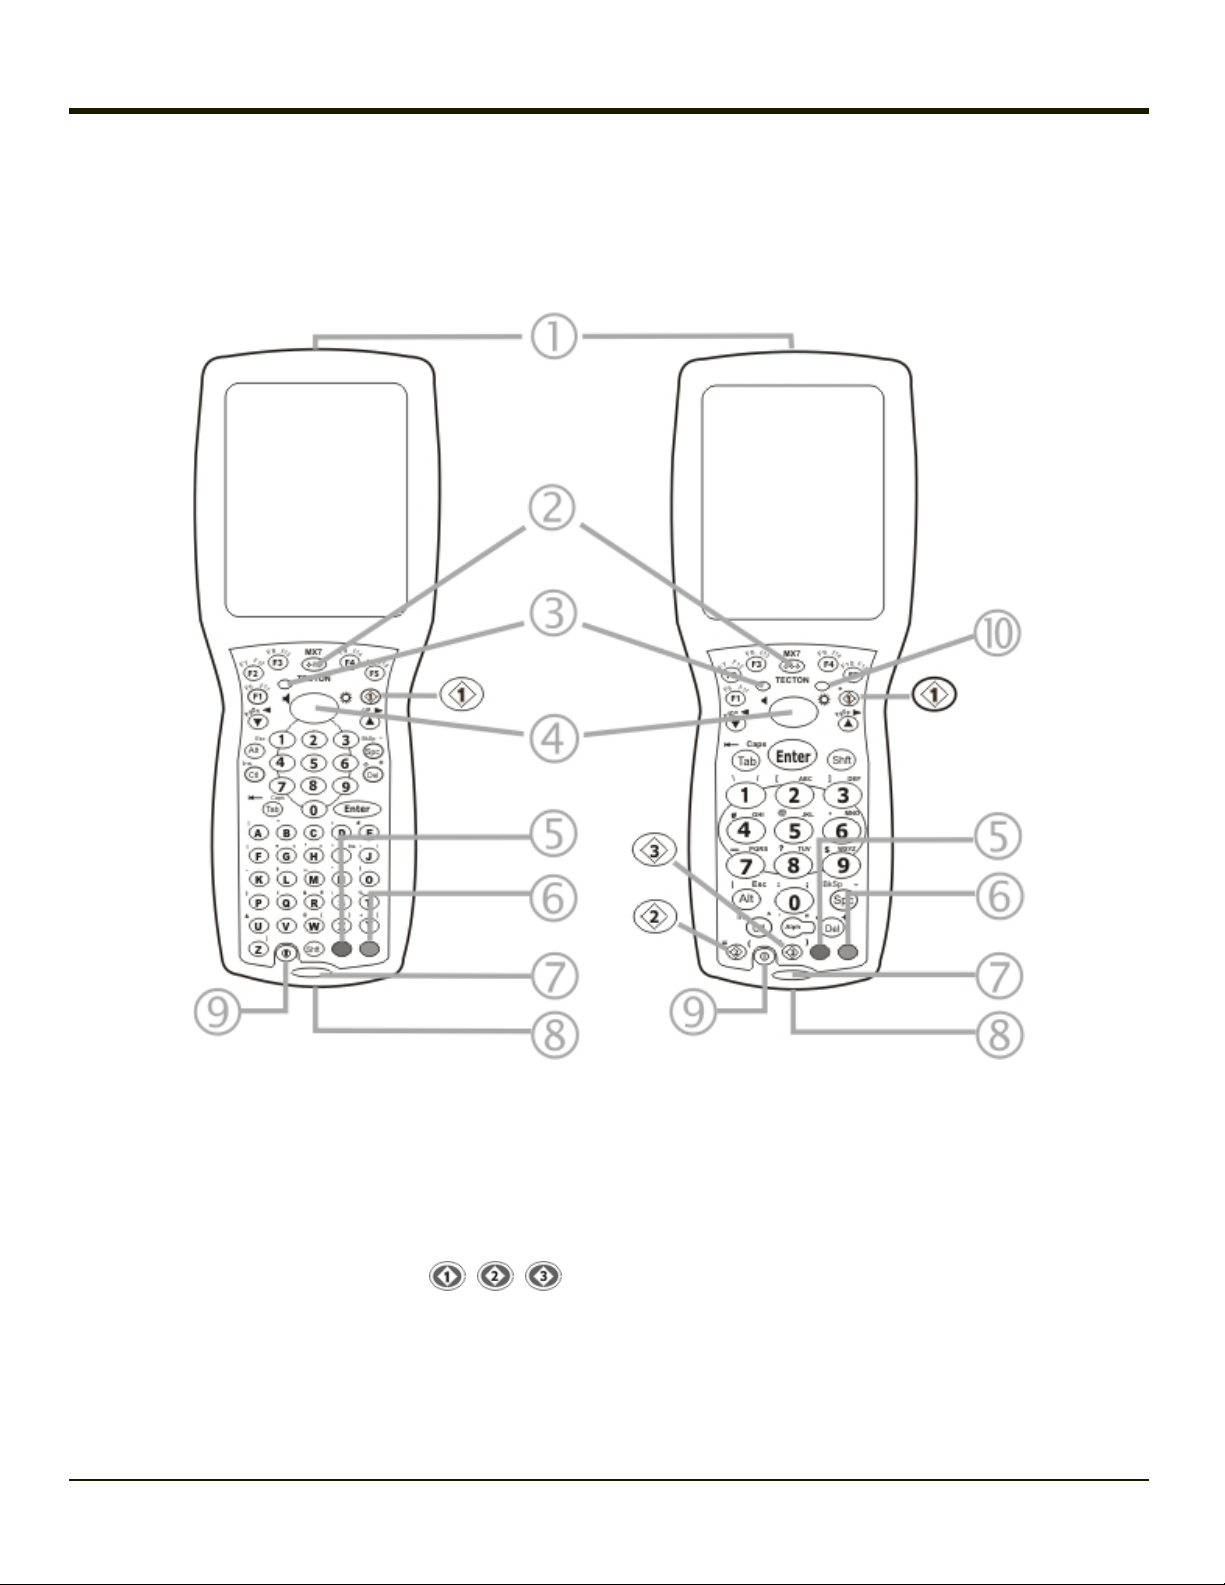
Components
Front
1. Scanner/Imager Aperture
2. Speaker
3. System Status LED
4. Scan Button
5. Orange Key (Sticky Key)
6. Blue Key (Sticky Key)
7. Scan Status LED
8. Cable Port
9. On / Off Button
10. Alpha Lock LED (32-Key only)
Diamond Keys
1-3

Back
1. Scanner/Imager Aperture
2. Stylus and Stylus Pocket
3. Trigger Handle Attach Points
4. Main Battery
5. Battery Fastener
6. Cable Port
1-4
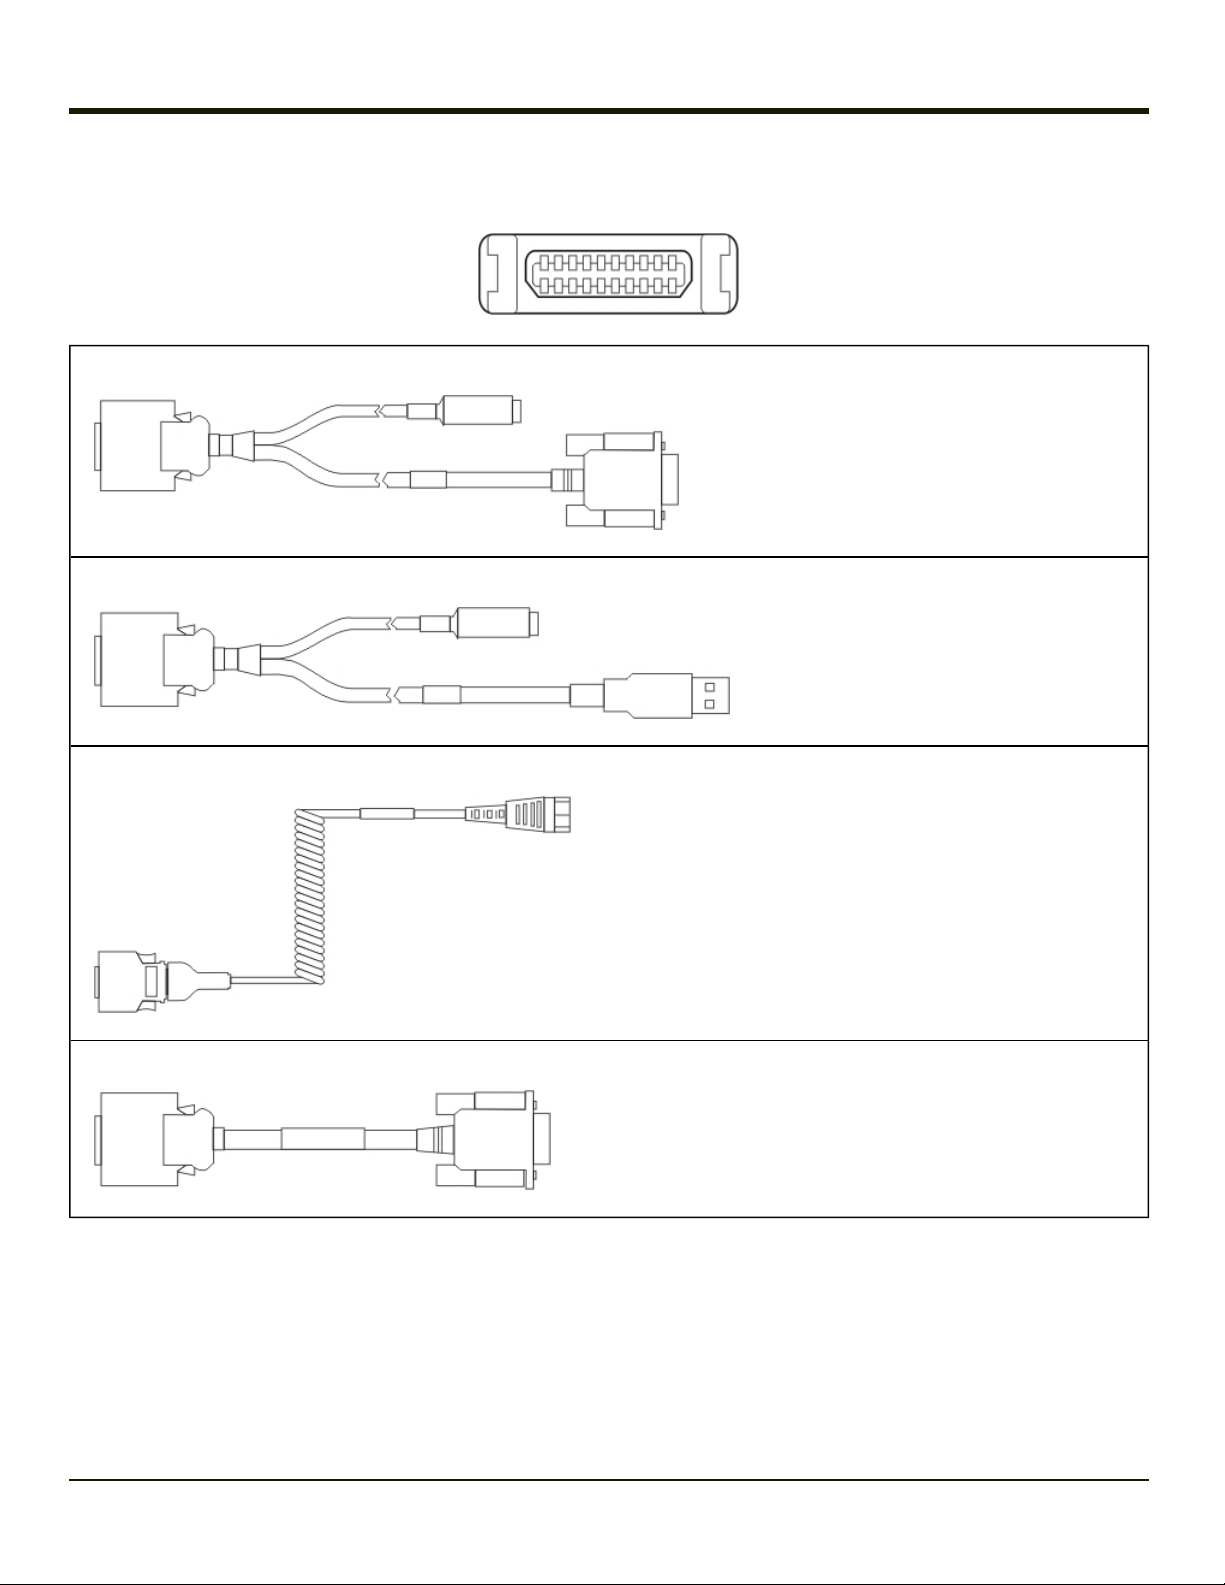
I/O Port and Cables
Cable: Multipurpose RS232 and Power MX7055CABLE
Cable: Multipurpose USB and Power MX7052CABLE
Adapter/Cable: Audio MX7060CABLE
Adapter: RS232 PC port to D9 male MX7058CABLE
1-5
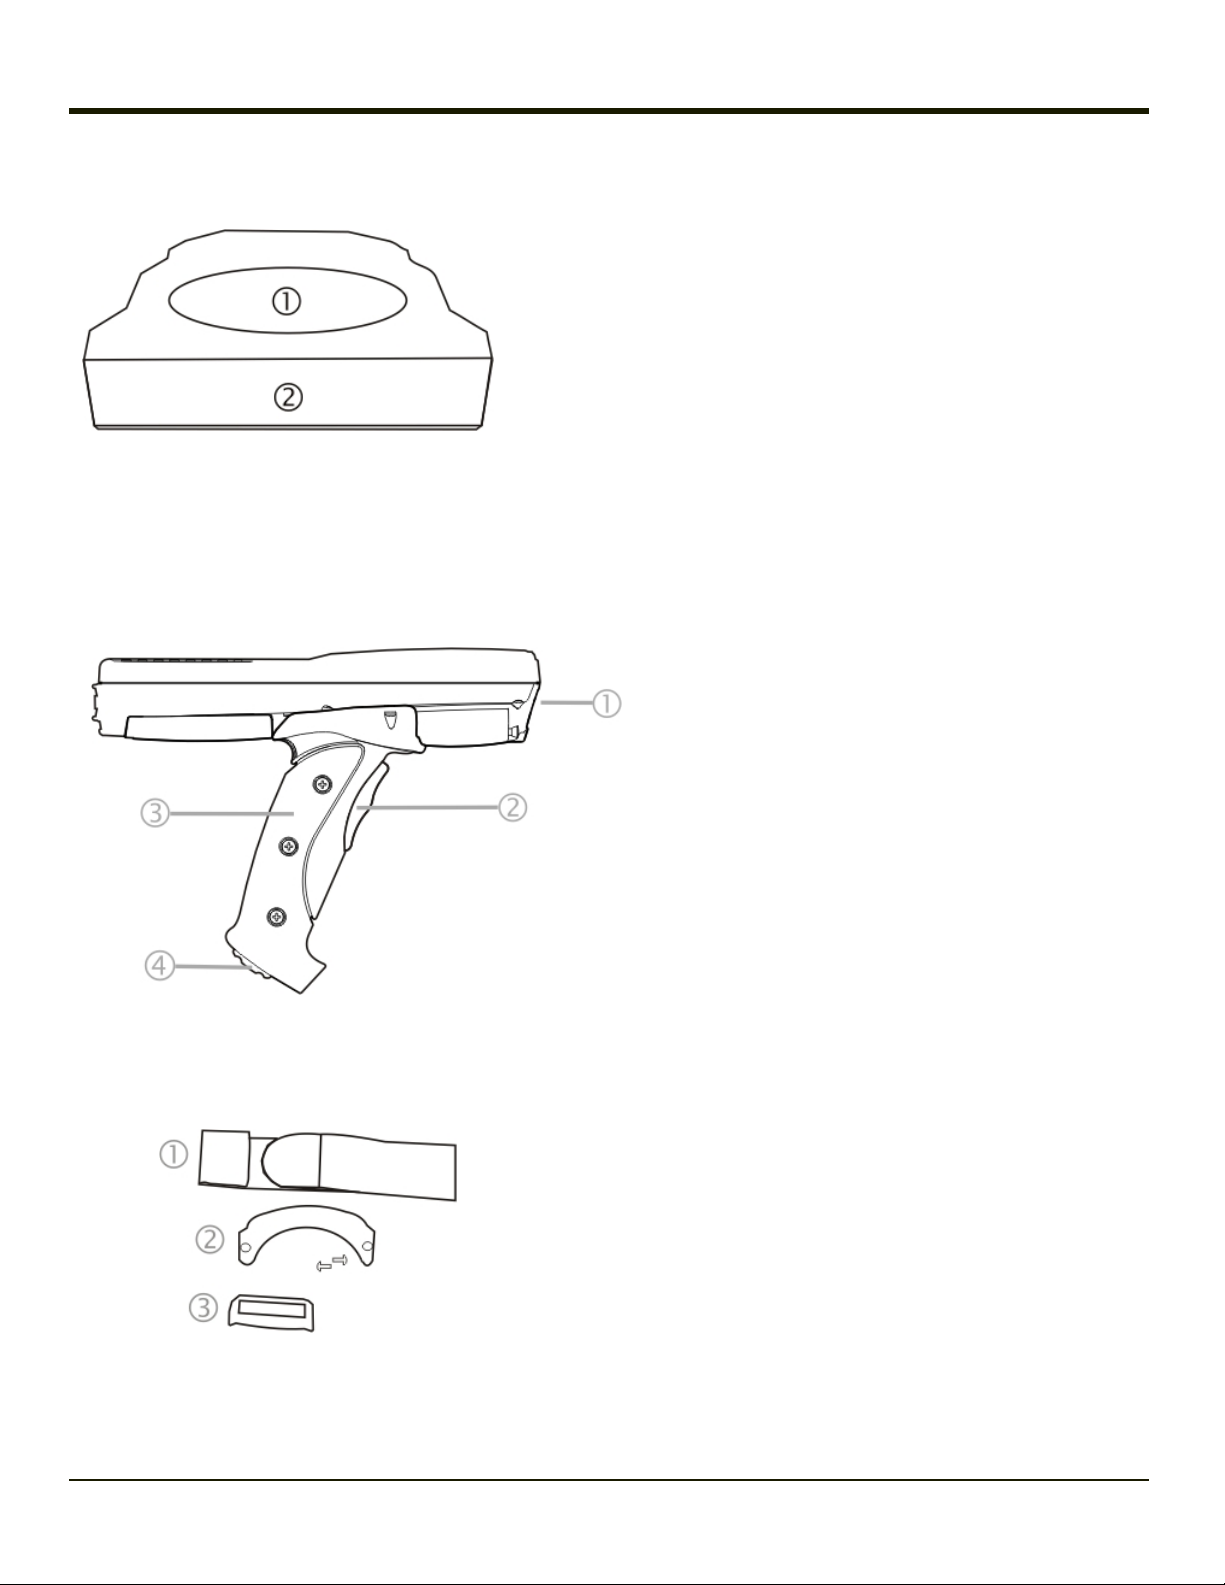
Scanner / Imager Aperture
1. Scanner / Imager Aperture
2. MX7 Tecton Front
Caution: Never stare directly into the beam aperture.
If Continuous Scan Mode has been enabled (default is disabled), the laser is always on and decoding. Caution: Laser beam
is emitted continuously. Do not stare into the laser beam.
Handle
Handstrap
1. Imager / Scanner Aperture
2. Trigger
3. Handle
4. Tether Attach Point
1. Handstrap
2. Handstrap Retainer Bracket and mounting screws
3. Handstrap Clip
1-6
Keypads
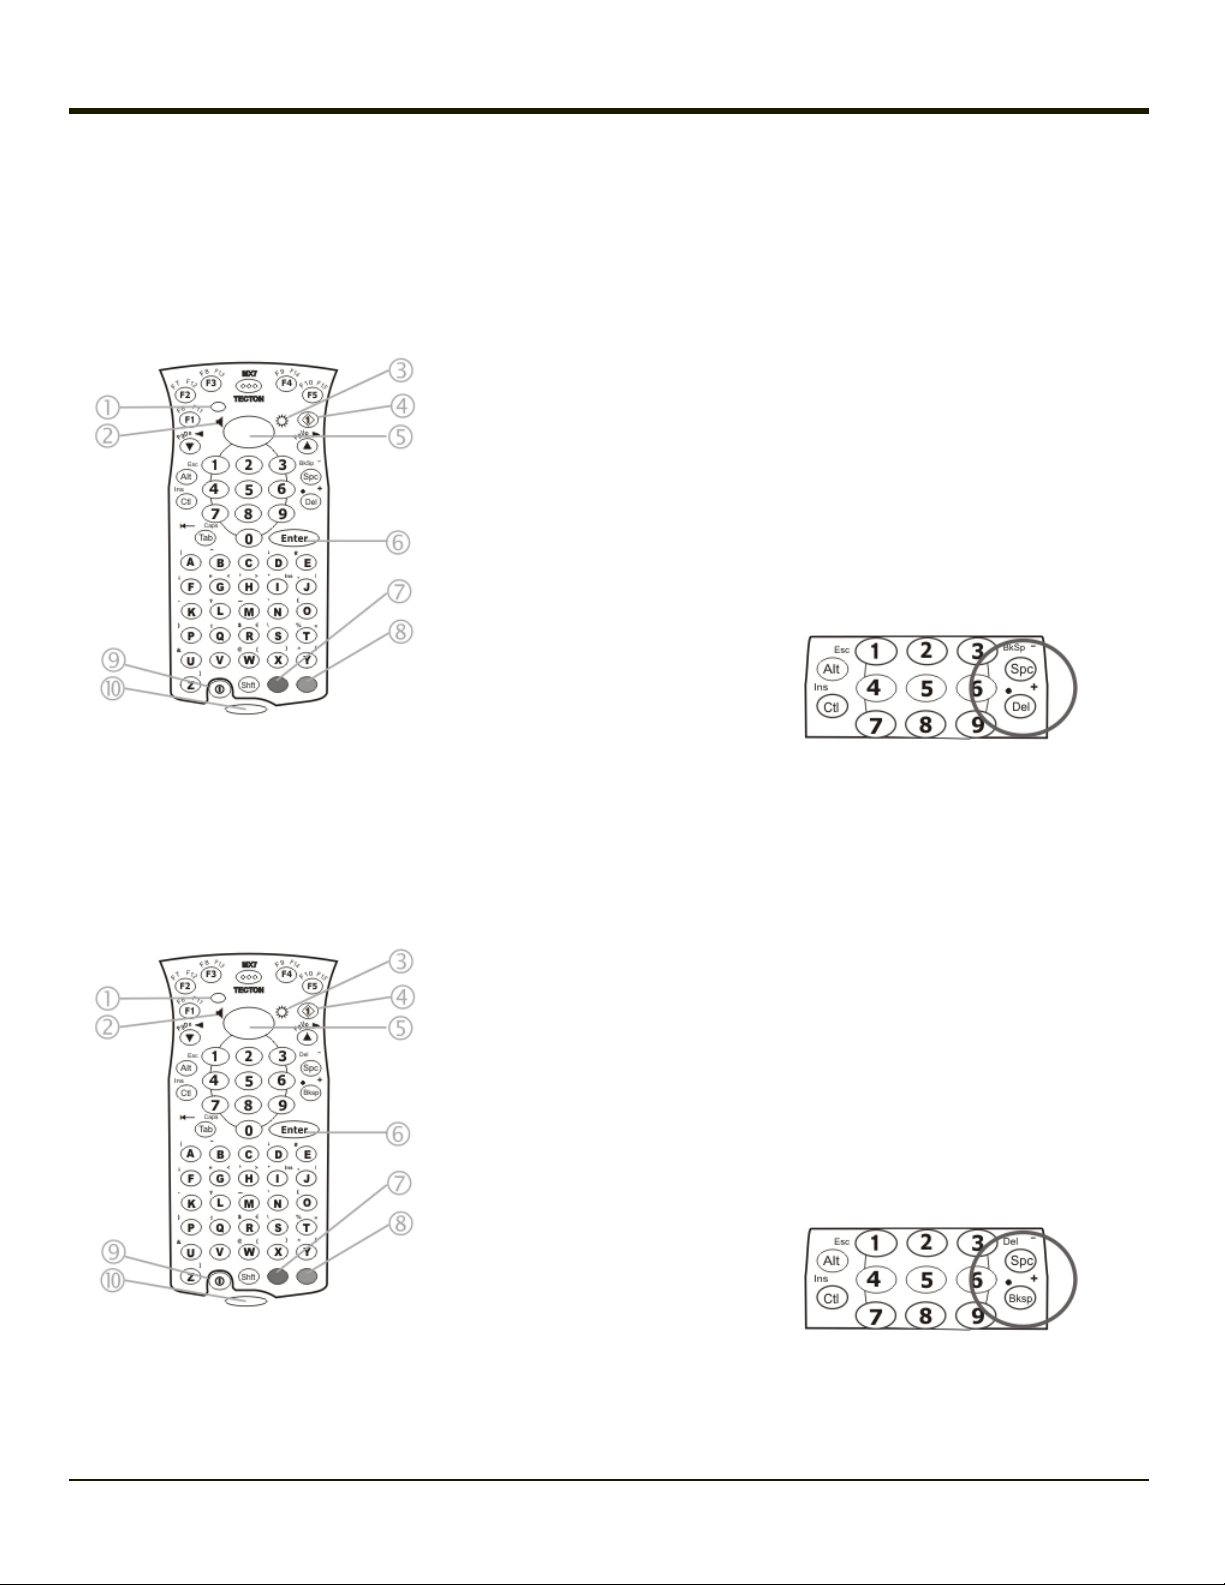
55 Key Delete Primary ANSI Keypad
1. System Status LED
2. Volume Control Icon
3. Display Brightness Icon
4. Diamond Key
5. Scan Button
6. Enter Key
7. Orange Key (Sticky Key)
8. Blue Key (Sticky Key)
9. On Off Button
10. Scan Status LED
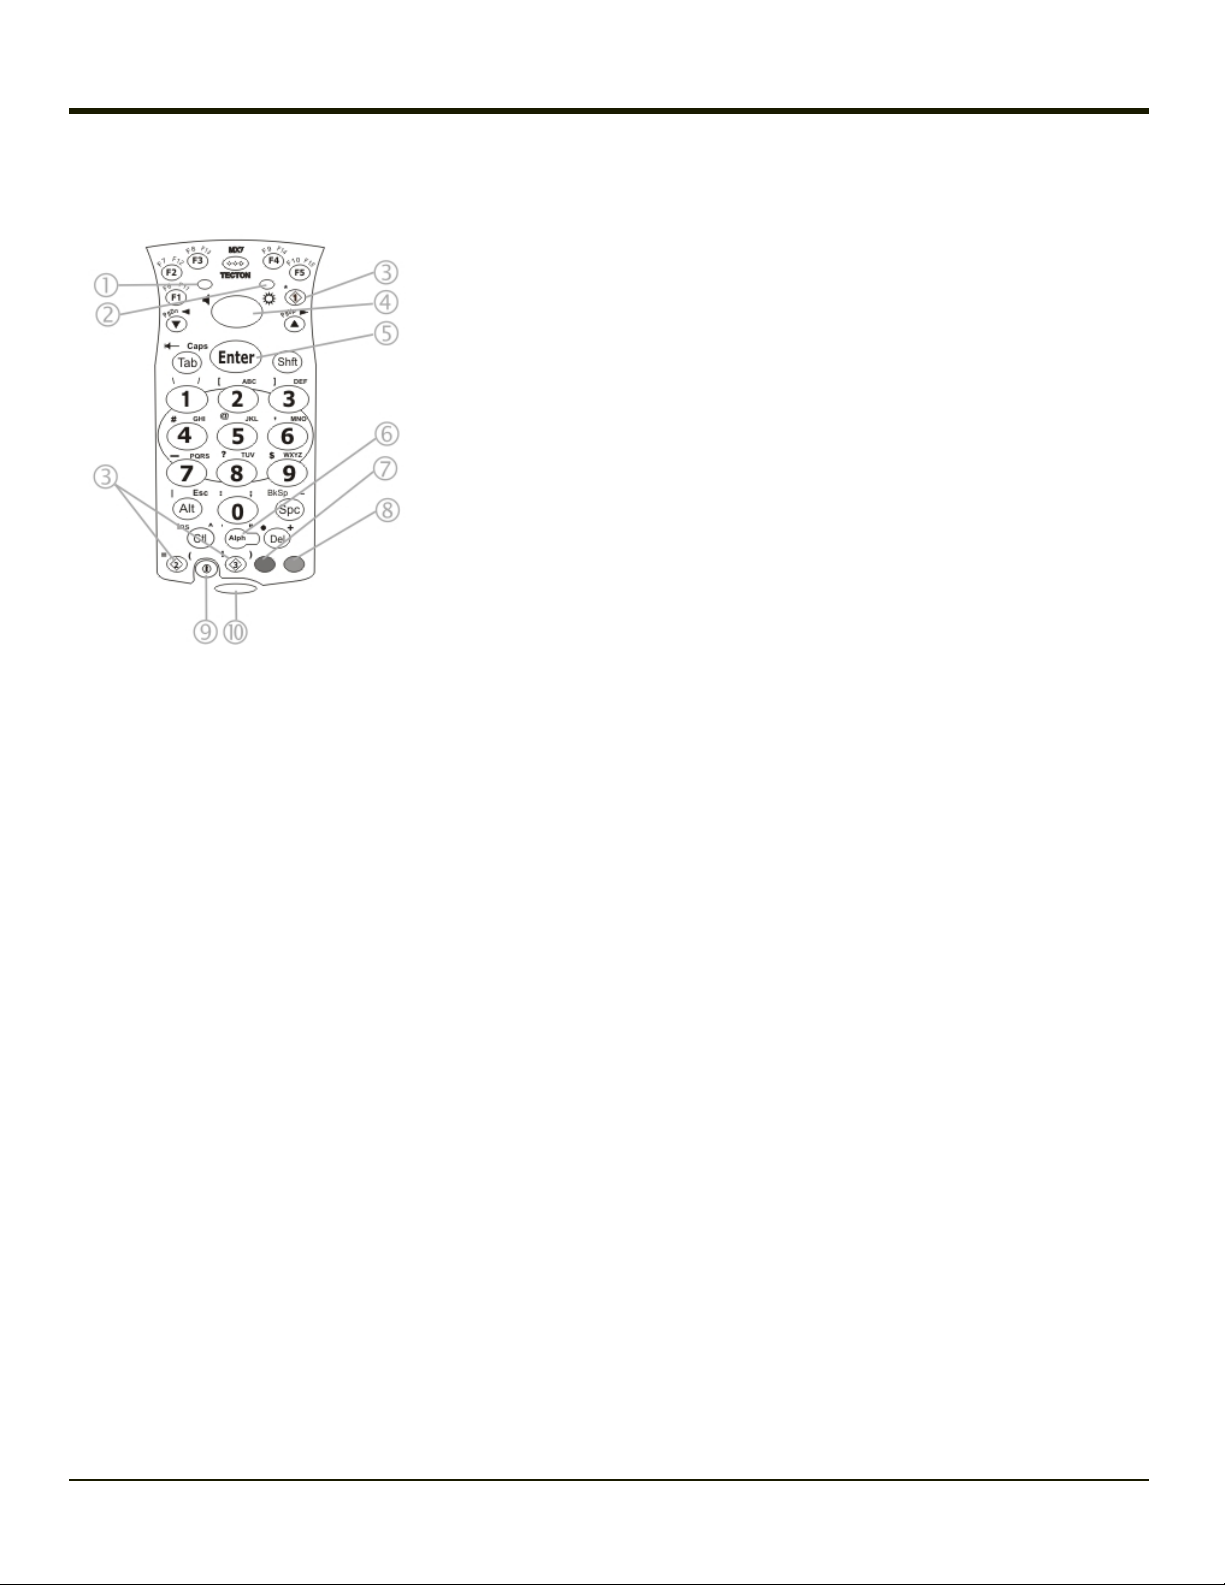
55 Key Backspace Primary ANSI Keypad
Spc and Del key location
1. System Status LED
2. Volume Control Icon
3. Display Brightness Icon
4. Diamond Key
5. Scan Button
6. Enter Key
7. Orange Key (Sticky Key)
8. Blue Key (Sticky Key)
9. On Off Button
10. Scan Status LED
Spc and Bksp key location
1-7
32 Key Numeric-Alpha Keypad
1. System Status LED
2. Alpha Status LED
3. Diamond Keys
4. Scan Button
5. Enter Key
6. Alph Key
7. Orange Key (Sticky Key)
8. Blue Key (Sticky Key)
9. On Off Button
10. Scan Status LED
1-8

Chapter 2: Set Up A New MX7 Tecton
This page lists a quick outline of the steps you might take when setting up a new MX7 Tecton. More instruction for each step is
listed later in this guide. Please refer to the MX7 TectonReference Guide for additional information and instruction.
Contact Technical Assistance if you need additional help.
Note: Installing or removing accessories should be performed on a clean, well-lit surface. When necessary, protect the work
surface, the MX7 Tecton, and components from electrostatic discharge.
Hardware Setup
1. Connect accessories.
2. Connect cables.
3. Insert/connect a fully charged battery
4. Press the Power key.
Software Setup
Hardware setup should be completed before starting software setup.
1. Calibrate Touch screen
2. Set Date and Time Zone
3. Set Power Schemes Timers
4. Set Speaker Volume
5. Pair Bluetooth devices
6. Setup Wireless client parameters
7. Setup terminal emulation parameters
8. Setup the AppLock parameters
9. Set the DCWedge parameters
Please refer to the MX7 TectonReference Guide for additional information and instruction.
2-1

Battery
Connect or Remove the Battery Pack
The MX7 Tecton will not function unless the battery pack is in place and securely latched.
Be sure to place the unit in Suspend Mode before removing the battery. Failing to properly place the device in Suspend mode
will result in a loss of all unsaved data.
An MX7 Tecton will retain data, while the main battery is removed and replaced with a fully charged main battery, for 5 minutes.
Important: When the internal battery power is Low or Very Low connect the AC adapter to the MX7 Tecton before replacing the
main battery.
Note: The battery should not be replaced in a dirty, harsh or hazardous environment. When the battery is not connected to
the MX7 Tecton, any dust or moisture that enters the battery well or connector may transfer to the battery/well
terminals, potentially causing damage.
Warning. Only useHoneywell batteries as replacements:MX7A380BATT / MX7392BATT or a Low Temperature (CS) Battery :
MX7A381BATT / MX7393BATT / MX7396BATTERY
Insert/Replace Battery
To insert the main battery, complete the following steps:
1. Detach the bottom hook of the handstrap (if installed).
2. Tilt the end (without the latch) of the fully charged battery pack into the upper end of the battery compartment, and firmly
press the other end until it is fully inserted into the battery compartment
3. Push down on the battery until the retaining clip clicks into place.
4. Replace the handstrap clip in its holder (if installed).
The MX7 Tecton draws power from the battery immediately upon successful connection.
2-2

Remove Battery
To remove the battery, complete the following steps:
1. Place the MX7 Tecton in Suspend mode.
2. Detach the bottom hook of the handstrap (if installed).
3. Slide the battery retaining clip down to release the main battery.
4. Pull the battery up and out of the battery well.
Place the discharged battery pack in a powered battery charger.
Hotswap the Main Battery
Place the MX7 Tecton in Suspend Mode. Honeywell recommends any work in progress be saved prior to replacing the battery
pack.
Simply replace the discharged battery with a fully-charged battery. An MX7 Tecton, with a fully charged internal battery, will
retain data during a battery hotswap for 5 minutes.
2-3

Charge or Recharge the Main Battery
Warning. Only useHoneywell batteries as replacements:MX7A380BATT / MX7392BATT or a Low Temperature (CS) Battery :
MX7A381BATT / MX7393BATT / MX7396BATTERY
Note: The MX7 Tecton Battery Charger is designed for an indoor, protected environment.
New batteries must be fully charged prior to use.
The main battery can be recharged in an AC powered Battery Charger after the battery has been removed from the MX7 Tecton
or its packing material when new.
The main battery while in the MX7 Tecton can be recharged using several different methods.
Note: An external power source is required before the main battery in the MX7 Tecton will recharge.
The main battery can be recharged while it is in the MX7 Tecton:
l by connecting the MX7 Tecton AC power adapter to the I/O connector at the base of the MX7 Tecton.
l by docking the MX7 Tecton in a powered desk cradle
l by docking the MX7 Tecton in a powered vehicle cradle
l or by connecting the car power adapter (CLA) to the I/O connector at the base of the MX7 Tecton.
Note: An uninterrupted external power source (wall AC adapters) transfers power to the computer’s internal charging
circuitry which, in turn, recharges the main battery and internal battery. Frequent connection to an external power
source, if feasible, is recommended to maintain internal battery charge status as the internal battery cannot be
recharged by a dead or missing main battery.
2-4
 Loading...