

Page 1

MX7 Tecton™ Mobile Computer
with Microsoft® Windows® Mobile 6.5
User’s Guide
Page 2

Disclaimer
Honeywell International Inc. (“HII”) reserves the right to make changes in specifications and other information contained in this
document without prior notice, and the reader should in all cases consult HII to determine whether any such changes have been
made. The information in this publication does not represent a commitment on the part of HII.
HII shall not be liable for technical or editorial errors or omissions contained herein; nor for incidental or consequential damages
resulting from the furnishing, performance, or use of this material.
HII disclaims all responsibility for the selection and use of software and/or hardware to achieve intended results.
This document contains proprietary information that is protected by copyright. All rights are reserved. No part of this document
may be photocopied, reproduced, or translated into another language without the prior written consent of HII.
© 2011-2014 Honeywell International Inc. All rights reserved.
Web Address: www.honeywellaidc.com
Trademarks
RFTerm is a trademark or registered trademark of EMS Technologies, Inc. in the United States and/or other countries.
®
Microsoft
trademarks or trademarks of Microsoft Corporation in the United States and/or other countries.
Marvell
Summit Data Communications, the Laird Technologies Logo, the Summit logo, and “Connected. No Matter What” are trademarks of Laird Technologies, Inc.
The Bluetooth
microSD and microSDHC are trademarks or registered trademarks of SD-3C, LLC in the United States and/or other countries.”
Symbol
Logo are trademarks or registered trademarks of Motorola Trademark Holdings, LLC and are used under license.
Hand Held is a trademark of Hand Held Products, Inc., a subsidiary of Honeywell International.
RAM
Wavelink
Manager Enterprise™ are trademarks of Wavelink Corporation, Kirkland.
Wi-Fi
marks or registered trademarks of Wi-Fi Alliance.
Acrobat
Other product names or marks mentioned in this document may be trademarks or registered trademarks of other companies
and are the property of their respective owners.
Windows®, ActiveSync®, MSN, Outlook®, Windows Mobile®, the Windows logo, and Windows Media are registered
®
is a registered trademark of Marvell Technology Group Ltd., or its subsidiaries in the United States and other countries.
®
word mark and logos are owned by the Bluetooth SIG, Inc.
®
is a registered trademark of Symbol Technologies. MOTOROLA, MOTO, MOTOROLA SOLUTIONS and the Stylized M
®
and RAM Mount™ are both trademarks of National Products Inc., 1205 S. Orr Street, Seattle, WA 98108.
®
, the Wavelink logo and tagline, Wavelink Studio™, Avalanche Management Console™, Mobile Manager™, Mobile
®
, WMM®, Wi-Fi Mutlimedia™, Wi-Fi Protected Access®, WPA™, WPA2™ and the Wi-Fi CERTIFIED™ logo are trade-
®
Reader © 2014 with express permission from Adobe Systems Incorporated.
Patents
For patent information, please refer to www.hsmpats.com.
Page 3

Table of Contents
Chapter 1 - MX7 Tecton Agency Compliance
Laser Warnings .................................................................................................................................. 1-1
Laser Label Location.......................................................................................................................... 1-1
Laser Safety Statement...................................................................................................................... 1-1
Model Number and Serial Number Labels ......................................................................................... 1-1
FCC Part 15 Statement...................................................................................................................... 1-1
FCC 5GHz Statement ........................................................................................................................ 1-2
Canadian Compliance........................................................................................................................ 1-2
CE Mark ............................................................................................................................................. 1-3
RF Notices ......................................................................................................................................... 1-3
RF Safety Notice ................................................................................................................................ 1-3
Bluetooth ............................................................................................................................................ 1-3
Honeywell Scanning & Mobility Product Environmental Information.................................................. 1-3
Dealer License - Republic of Singapore............................................................................................. 1-3
Vehicle Power Supply Connection Safety Statement ........................................................................ 1-3
Chapter 2 - Getting Started
Overview ............................................................................................................................................ 2-1
About this Guide................................................................................................................................. 2-1
Out of the Box .................................................................................................................................... 2-1
Initial Setup for MX7 Tecton ............................................................................................................... 2-2
Hardware Setup........................................................................................................................... 2-2
Software Setup ............................................................................................................................ 2-2
Components....................................................................................................................................... 2-3
Front View ................................................................................................................................... 2-3
Back View.................................................................................................................................... 2-4
I/O Port and Cables ..................................................................................................................... 2-4
Scanner / Imager Aperture .......................................................................................................... 2-5
Handle ......................................................................................................................................... 2-6
Handstrap .................................................................................................................................... 2-6
Keypads....................................................................................................................................... 2-7
55 Key Primary Delete ANSI Keypad.................................................................................... 2-7
55 Key Primary Backspace ANSI Keypad ............................................................................ 2-7
32 Key Numeric-Alpha Keypad ............................................................................................. 2-8
Locking and Unlocking the MX7 Tecton............................................................................................. 2-8
Unlocking the MX7 Tecton .......................................................................................................... 2-8
Rebooting the MX7 Tecton ................................................................................................................ 2-9
Suspend / Resume ...................................................................................................................... 2-9
Warmboot .................................................................................................................................... 2-9
Restart ......................................................................................................................................... 2-9
Clean Boot / Reset ...................................................................................................................... 2-9
Inserting and Removing the Battery Pack ........................................................................................ 2-10
Inserting the Battery .................................................................................................................. 2-10
Removing the Battery ................................................................................................................ 2-10
Charging the Main Battery ............................................................................................................... 2-10
LEDs and Indicators......................................................................................................................... 2-11
System Status LED ................................................................................................................... 2-11
Alpha mode Status LED ........................................................................................................... 2-11
i
Page 4

Scan Status Indicator .................................................................................................................2-11
Toggle Vibrate Indicator .............................................................................................................2-11
Tapping the Touch Screen with a Stylus ..........................................................................................2-12
Calibrating the Touch Screen ...........................................................................................................2-12
Setting the Display Backlight Timer..................................................................................................2-12
Applying the Touch Screen Protective Film......................................................................................2-12
Setting the Date and Time Zone.......................................................................................................2-13
Setting Speaker Volume ...................................................................................................................2-13
Using the Keypad.......................................................................................................................2-13
Using a Control Panel ................................................................................................................2-13
Setting Terminal Emulation Parameters ...........................................................................................2-14
Using the AppLock Switchpad ..........................................................................................................2-14
Using the Keypad.......................................................................................................................2-14
Using the Touch Screen.............................................................................................................2-14
Using the Input Panel / Virtual Keyboard..........................................................................................2-15
Connecting to Bluetooth Devices .....................................................................................................2-16
Taskbar Bluetooth Indicator .......................................................................................................2-16
Attaching the Handstrap ...................................................................................................................2-17
Attaching the Trigger Handle ............................................................................................................2-18
Assembling the Carry Case ..............................................................................................................2-19
Connecting a Headset Cable............................................................................................................2-19
Adjusting Headset / Microphone and Securing the Cable..........................................................2-20
Connecting the USB Client and Power Cable ..................................................................................2-21
Connecting the Serial and Power Cable...........................................................................................2-21
Assembling the AC/DC Power Supply..............................................................................................2-22
Startup Help......................................................................................................................................2-23
Chapter 3 - Hardware Configuration
System Hardware ...............................................................................................................................3-1
802.11 a/b/g Wireless Client ........................................................................................................3-1
Central Processing Unit ...............................................................................................................3-1
System Memory ...........................................................................................................................3-1
Internal SD Card Slot ...................................................................................................................3-1
Video Subsystem .........................................................................................................................3-2
Power Supply ...............................................................................................................................3-2
COM Ports ...................................................................................................................................3-2
RS232 Serial Port ........................................................................................................................3-2
USB Client Port ............................................................................................................................3-2
Audio Connection.........................................................................................................................3-2
Audio Support ..............................................................................................................................3-3
Speaker .................................................................................................................................3-3
Volume Control ......................................................................................................................3-3
Voice......................................................................................................................................3-3
Scanner / Imager Port ..................................................................................................................3-3
Bluetooth EZPair (or LXEZ Pairing) .............................................................................................3-3
Keypads .......................................................................................................................................3-4
55 Key Keypads ....................................................................................................................3-4
32 Key Keypad ......................................................................................................................3-5
Display .........................................................................................................................................3-6
Display Backlight Timer .........................................................................................................3-6
Status LEDs .................................................................................................................................3-6
ii
Page 5

Cold Storage Configuration ..........................................................................................................3-6
Cold Storage Battery .............................................................................................................3-6
Snowflake Decal ....................................................................................................................3-7
Heating Elements ..................................................................................................................3-7
Recharging Cold Storage Batteries .......................................................................................3-7
Hot-swapping the Cold Storage Battery ................................................................................3-7
Normal Operation Temperature Ranges ...............................................................................3-7
Chapter 4 - Power Modes and Batteries
Power Modes......................................................................................................................................4-1
On Mode ......................................................................................................................................4-1
Suspend Mode .............................................................................................................................4-1
Off Mode ......................................................................................................................................4-1
Batteries .............................................................................................................................................4-2
Checking Battery Status...............................................................................................................4-2
Main Battery Pack ........................................................................................................................4-2
Battery Hotswapping ....................................................................................................................4-2
Low Battery Warning....................................................................................................................4-2
Super-cap Internal Battery ...........................................................................................................4-2
Handling Batteries Safely .............................................................................................................4-3
Chapter 5 - Software Configuration
Introduction.........................................................................................................................................5-1
Windows Mobile .................................................................................................................................5-1
Installed Software ...............................................................................................................................5-1
Software Load ..............................................................................................................................5-1
Software Backup ..........................................................................................................................5-1
Version Control ............................................................................................................................5-1
Boot Loader..................................................................................................................................5-2
Startup Folders and Launch Sequences......................................................................................5-2
Software Development .......................................................................................................................5-2
Today Screen .....................................................................................................................................5-2
Start Menu....................................................................................................................................5-3
Configurable Today Screen Listing ..............................................................................................5-3
Date..............................................................................................................................................5-3
Device Unlocked / Device Locked................................................................................................5-3
Notification Bar.............................................................................................................................5-3
Status Icons .................................................................................................................................5-4
Soft Keys......................................................................................................................................5-4
Installed Programs..............................................................................................................................5-4
Internet Explorer Mobile ...............................................................................................................5-4
Office Mobile Applications............................................................................................................5-4
ActiveSync ...................................................................................................................................5-4
AppLock (Option) .........................................................................................................................5-5
Summit .........................................................................................................................................5-5
Windows Media............................................................................................................................5-5
Bluetooth (Option) ........................................................................................................................5-5
RFTerm (Option) ..........................................................................................................................5-5
Status Popup................................................................................................................................5-5
iii
Page 6

HSM Connect (or LXEConnect) ...................................................................................................5-5
GrabTime .....................................................................................................................................5-5
Synchronize with a local time server .....................................................................................5-6
Enhanced Launch ........................................................................................................................5-6
MX7 Tecton OS Upgrade ...................................................................................................................5-7
Preparation...................................................................................................................................5-7
Procedure.....................................................................................................................................5-7
Battery State and OS Upgrade ....................................................................................................5-8
Update Help .................................................................................................................................5-8
Start Menu Options.............................................................................................................................5-8
Office Mobile ..............................................................................................................................5-11
Settings ......................................................................................................................................5-11
Personal .....................................................................................................................................5-12
System .......................................................................................................................................5-12
Connections ...............................................................................................................................5-14
Settings Panels.................................................................................................................................5-14
Clock & Alarms...........................................................................................................................5-14
Time.....................................................................................................................................5-14
Alarms .................................................................................................................................5-15
More ....................................................................................................................................5-15
Lock............................................................................................................................................5-16
Password .............................................................................................................................5-16
Hint ......................................................................................................................................5-17
Power .........................................................................................................................................5-18
Battery .................................................................................................................................5-18
Advanced.............................................................................................................................5-19
Sounds & Notifications ...............................................................................................................5-20
Sounds ................................................................................................................................5-20
Notifications .........................................................................................................................5-21
Today .........................................................................................................................................5-22
Appearance .........................................................................................................................5-22
Items....................................................................................................................................5-22
Personal Panels ...............................................................................................................................5-23
About Info (or About LXE) ..........................................................................................................5-23
Software ..............................................................................................................................5-23
Hardware .............................................................................................................................5-23
Version ................................................................................................................................5-23
Buttons .......................................................................................................................................5-24
Program Buttons..................................................................................................................5-24
Up/Down Control .................................................................................................................5-25
Input ...........................................................................................................................................5-26
Input Method........................................................................................................................5-26
Word Completion .................................................................................................................5-27
Options ................................................................................................................................5-27
Owner Information......................................................................................................................5-28
System Panels..................................................................................................................................5-29
About..........................................................................................................................................5-29
Version ................................................................................................................................5-29
Device ID .............................................................................................................................5-29
Copyrights ...........................................................................................................................5-30
Backlight.....................................................................................................................................5-31
Brightness............................................................................................................................5-31
iv
Page 7

Battery Power ......................................................................................................................5-32
External Power ....................................................................................................................5-32
Battery........................................................................................................................................5-33
Certificates .................................................................................................................................5-34
Personal ..............................................................................................................................5-34
Intermediate.........................................................................................................................5-34
Root .....................................................................................................................................5-35
Encryption ..................................................................................................................................5-35
External GPS .............................................................................................................................5-36
License Manager........................................................................................................................5-37
Managed Programs....................................................................................................................5-37
Memory ......................................................................................................................................5-38
Main.....................................................................................................................................5-38
Storage Card .......................................................................................................................5-38
Mixer ..........................................................................................................................................5-39
MX7 Tecton Options ..................................................................................................................5-40
Communication....................................................................................................................5-40
Misc .....................................................................................................................................5-40
Status Popup .......................................................................................................................5-41
Peripherals .................................................................................................................................5-42
Regional Settings .......................................................................................................................5-43
Registry ......................................................................................................................................5-45
Load User Defaults ..............................................................................................................5-45
Save User Defaults..............................................................................................................5-45
Load Factory Defaults .........................................................................................................5-45
Warmboot ............................................................................................................................5-45
Restart .................................................................................................................................5-45
Remove Programs .....................................................................................................................5-46
Screen........................................................................................................................................5-46
General................................................................................................................................5-46
Align Screen ........................................................................................................................5-47
Clear Type ...........................................................................................................................5-47
Text Size..............................................................................................................................5-48
Task Manager ............................................................................................................................5-49
Wi-Fi...........................................................................................................................................5-49
Connections Panels..........................................................................................................................5-50
Beam..........................................................................................................................................5-50
Connections ...............................................................................................................................5-51
Advanced Options ...............................................................................................................5-51
Domain Enroll.............................................................................................................................5-52
Network Cards ...........................................................................................................................5-53
USB to PC..................................................................................................................................5-54
Standard Microsoft Applications .......................................................................................................5-54
Calculator ...................................................................................................................................5-54
Calendar.....................................................................................................................................5-55
Contacts .....................................................................................................................................5-55
Email ..........................................................................................................................................5-56
File Explorer ...............................................................................................................................5-56
Getting Started ...........................................................................................................................5-57
Help............................................................................................................................................5-57
Notes..........................................................................................................................
Pictures and Video .....................................................................................................................5-58
Tasks..........................................................................................................................................5-59
................5-58
v
Page 8

Windows Live .............................................................................................................................5-59
Windows Media..........................................................................................................................5-60
Internet Explorer Mobile .............................................................................................................5-61
Options ................................................................................................................................5-62
Office Mobile ..............................................................................................................................5-64
Excel Mobile ........................................................................................................................5-64
PowerPoint Mobile...............................................................................................................5-65
Word Mobile ........................................................................................................................5-65
OneNote Mobile...................................................................................................................5-66
Remote Desktop ...............................................................................................................................5-67
Set Remote Desktop Mobile Options .........................................................................................5-67
Connect to a Remote Server......................................................................................................5-68
Installing Applications .......................................................................................................................5-69
Preparation.................................................................................................................................5-69
Package File Installation ............................................................................................................5-69
PKG Installation Help .................................................................................................................5-69
Using ActiveSync..............................................................................................................................5-70
Introduction ................................................................................................................................5-70
Initial Setup ................................................................................................................................5-71
Connect via USB........................................................................................................................5-71
Cable for USB ActiveSync Connection................................................................................5-71
Explore .......................................................................................................................................5-71
Backup Data Files using ActiveSync..........................................................................................5-71
Requirements ......................................................................................................................5-71
Connect ...............................................................................................................................5-71
Disconnect ...........................................................................................................................5-71
MX7 Tecton with a Disabled Touch Screen ...............................................................................5-72
Reset and Loss of Host Re-connection......................................................................................5-72
ActiveSync Help .........................................................................................................................5-72
Configuring the MX7 Tecton with HSM Connect (or LXEConnect) ..................................................5-73
Install HSM Connect ..................................................................................................................5-73
Using HSM Connect...................................................................................................................5-73
Chapter 6 - AppLock (Application Locking)
Introduction.........................................................................................................................................6-1
Setup a New Device ...........................................................................................................................6-1
Administration Mode ...........................................................................................................................6-1
End User Mode...................................................................................................................................6-2
Passwords ..........................................................................................................................................6-3
AppLock Password Help ..............................................................................................................6-3
End-User Switching Technique ..........................................................................................................6-3
Using a Stylus Tap .......................................................................................................................6-3
Using the Switch Key Sequence ..................................................................................................6-3
Hotkey (Activation hotkey) ...........................................................................................................6-4
End User Internet Explorer (EUIE) .....................................................................................................6-4
Application Configuration....................................................................................................................6-5
Application....................................................................................................................................6-5
Launch Button .......................................................................................................................6-7
Security ........................................................................................................................................6-9
Setting an Activation Hotkey..................................................................................................6-9
Setting a Password in the Security Panel..............................................................................6-9
vi
Page 9

Options.......................................................................................................................................6-10
Status .........................................................................................................................................6-11
View.....................................................................................................................................6-11
Log.......................................................................................................................................6-12
Save As ...............................................................................................................................6-12
AppLock Help ...................................................................................................................................6-12
AppLock Error Messages .................................................................................................................6-13
Chapter 7 - Bluetooth Configuration
Introduction.........................................................................................................................................7-1
Initial Configuration .............................................................................................................................7-1
Subsequent Use .................................................................................................................................7-2
Bluetooth Devices...............................................................................................................................7-3
Clear Button .................................................................................................................................7-3
Discover Button............................................................................................................................7-3
Discovering ............................................................................................................................7-4
Bluetooth Device List .............................................................................................................7-4
Bluetooth Device Menu ................................................................................................................7-5
Right Click Menu Options ......................................................................................................7-5
Bluetooth Properties ..............................................................................................................7-6
Settings...............................................................................................................................................7-6
Turn On Bluetooth Button ............................................................................................................7-6
Options.........................................................................................................................................7-7
Reconnect ..........................................................................................................................................7-8
Options ........................................................................................................................................7-8
About ..................................................................................................................................................7-9
Easy Pairing and Auto-Reconnect......................................................................................................7-9
Bluetooth Indicators ..........................................................................................................................7-10
Bluetooth Bar Code Reader Setup ...................................................................................................7-10
Introduction ................................................................................................................................7-10
MX7 Tecton with Label...............................................................................................................7-11
MX7 Tecton without Label..........................................................................................................7-11
Bluetooth Reader Beep and LED Indications ...................................................................................7-12
Bluetooth Printer Setup ....................................................................................................................7-12
Chapter 8 - Data Collection Wedge
Introduction.........................................................................................................................................8-1
Symbol or Honeywell scanner......................................................................................................8-1
Hand Held Products Imager .........................................................................................................8-1
Data Processing Overview .................................................................................................................8-2
Main....................................................................................................................................................8-3
Continuous Scan Mode ................................................................................................................8-4
COM1 .................................................................................................................................................8-4
Notification..........................................................................................................................................8-5
Vibration .......................................................................................................................................8-5
Data Options.......................................................................................................................................8-7
Enable Code ID............................................................................................................................8-8
Enable Code ID Options ........................................................................................................8-9
Enable Code ID Buttons ........................................................................................................8-9
vii
Page 10

Symbology Settings .....................................................................................................................8-9
Clear Button.........................................................................................................................8-10
Advanced Button .................................................................................................................8-10
Processing Order.................................................................................................................8-10
Enable, Min, Max .................................................................................................................8-11
Strip Leading/Trailing Control ..............................................................................................8-11
Bar Code Data Match List ...................................................................................................8-12
Add Prefix/Suffix Control .....................................................................................................8-13
Symbologies...............................................................................................................................8-14
AIM Symbologies.................................................................................................................8-14
HHP Symbologies ...............................................................................................................8-15
Advanced Button (Hand Held Products Imager Only) .........................................................8-15
HHP Properties....................................................................................................................8-29
Ctrl Char Mapping ......................................................................................................................8-30
Translate All.........................................................................................................................8-30
Custom Identifiers ......................................................................................................................8-31
Name text box .....................................................................................................................8-32
ID Code text box..................................................................................................................8-32
Custom ID Buttons ..............................................................................................................8-32
Control Code Replacement Examples .......................................................................................8-33
Bar Code Processing Examples ................................................................................................8-33
Length Based Bar Code Stripping..............................................................................................8-35
Processing........................................................................................................................................8-37
Enable buffered key output ........................................................................................................8-37
Same buffer limit ........................................................................................................................8-37
Delay between (key) buffers ......................................................................................................8-37
About ................................................................................................................................................8-38
Hat Encoding ....................................................................................................................................8-39
Chapter 9 - Enhanced Launch Utility
Introduction.........................................................................................................................................9-1
Registry Based Launch Items.............................................................................................................9-1
Launch Startup Options ...............................................................................................................9-3
Script Based Launch Items.................................................................................................................9-4
Enhanced Launch Utility Use .......................................................................................................9-4
File Names ...................................................................................................................................9-4
Command line structure ...............................................................................................................9-4
Comments....................................................................................................................................9-5
Commands Supported by Launch................................................................................................9-6
Copy ......................................................................................................................................9-6
Delete ....................................................................................................................................9-6
DelRegData ...........................................................................................................................9-6
DelRegKey ............................................................................................................................9-7
ElseIf......................................................................................................................................9-7
ElseIfFile................................................................................................................................9-7
EndIf .....................................................................................................................................9-8
EndIfFile ................................................................................................................................9-8
EndIfTerm ..............................................................................................................................9-8
FCopy ....................................................................................................................................9-8
IfFile.......................................................................................................................................9-9
IfTerm ....................................................................................................................................9-9
viii
Page 11

Launch...................................................................................................................................9-9
LaunchCmd .........................................................................................................................9-10
Message ..............................................................................................................................9-10
Mkdir....................................................................................................................................9-10
Rmdir ...................................................................................................................................9-11
SetRegData .........................................................................................................................9-11
SetRegKey ..........................................................................................................................9-12
Shortcut ...............................................................................................................................9-12
Launch Error Messages ...................................................................................................................9-13
Example Script File...........................................................................................................................9-14
Chapter 10 - Enabler Installation and Configuration
Introduction.......................................................................................................................................10-1
Installation ........................................................................................................................................10-1
Installing the Enabler on Mobile Devices..........................................................................................10-1
Enabler Uninstall Process ................................................................................................................10-2
Stop the Enabler Service ..................................................................................................................10-2
Update Monitoring Overview ............................................................................................................10-2
Mobile Device Wireless and Network Settings .................................................................................10-2
Preparing a Device for Remote Management ..................................................................................10-3
Remote Management Utility (RMU) ...........................................................................................10-3
Wireless Configuration Application (WCA).................................................................................10-3
User Interface ...................................................................................................................................10-4
Enabler Configuration ................................................................................................................10-4
File Menu Options ......................................................................................................................10-5
Avalanche Update using File > Settings ....................................................................................10-6
Menu Options ......................................................................................................................10-6
Connection ..........................................................................................................................10-7
Execution.............................................................................................................................10-8
Server Contact.....................................................................................................................10-9
Data ...................................................................................................................................10-10
Preferences .......................................................................................................................10-11
Taskbar..............................................................................................................................10-13
Scan Config .......................................................................................................................10-13
Display...............................................................................................................................10-15
Shortcuts ...........................................................................................................................10-16
SaaS..................................................................................................................................10-17
Adapters ............................................................................................................................10-18
Status ................................................................................................................................10-20
Exit.....................................................................................................................................10-21
Using Remote Management ...........................................................................................................10-22
Using eXpress Scan .......................................................................................................................10-22
Creating Bar Codes..................................................................................................................10-22
Scanning Bar Codes ................................................................................................................10-22
Process Complete....................................................................................................................10-23
Chapter 11 - Wireless Network Configuration
Introduction.......................................................................................................................................11-1
Important Notes ................................................................................................................................11-1
ix
Page 12

Summit Client Utility .........................................................................................................................11-1
Help............................................................................................................................................11-1
Summit Tray Icon .......................................................................................................................11-2
Using Windows Mobile Wireless Manager .................................................................................11-2
Create a New Network Connection .....................................................................................11-3
Edit a Network Connection ..................................................................................................11-4
Switch Control to SCU .........................................................................................................11-5
Main ...........................................................................................................................................11-5
Auto Profile ..........................................................................................................................11-6
Admin Login.........................................................................................................................11-6
Profile .........................................................................................................................................11-8
Buttons ................................................................................................................................11-9
Profile Parameters .............................................................................................................11-10
Status .......................................................................................................................................11-11
Diags ........................................................................................................................................11-12
Global.......................................................................................................................................11-13
Custom Parameter Option .................................................................................................11-14
Global Parameters.............................................................................................................11-14
Sign-On vs. Stored Credentials ......................................................................................................11-17
Using Stored Credentials .........................................................................................................11-17
Using a Sign On Screen...........................................................................................................11-17
Windows Certificate Store vs. Certs Path.......................................................................................11-19
User Certificates.......................................................................................................................11-19
Root CA Certificates.................................................................................................................11-19
Using the Certs Path .........................................................................................................11-19
Using the Windows Certificate Store .................................................................................11-19
Configuring Profiles ........................................................................................................................11-21
No Security...............................................................................................................................11-21
WEP .........................................................................................................................................11-22
LEAP ........................................................................................................................................11-23
PEAP/MSCHAP .......................................................................................................................11-25
PEAP/GTC ...............................................................................................................................11-27
WPA/LEAP...............................................................................................................................11-29
EAP-FAST................................................................................................................................11-31
EAP-TLS ..................................................................................................................................11-33
WPA PSK.................................................................................................................................11-35
Certificates......................................................................................................................................11-36
Generating a Root CA Certificate.............................................................................................11-36
Installing a Root CA Certificate ................................................................................................11-39
Generating a User Certificate...................................................................................................11-39
Exporting a User Certificate ...................................................................................................
Installing a User Certificate ......................................................................................................11-43
Verify Installation......................................................................................................................11-43
..11-42
Chapter 12 - Keymaps
Introduction.......................................................................................................................................12-1
55 key Alphanumeric Keymap - Primary Delete ........................................................................12-1
55 Key 5250 Alphanumeric KeyMap - Primary Delete...............................................................12-6
55 key Alphanumeric Keymap - Primary Backspace ...............................................................12-11
32 key Numeric-Alpha Keymap................................................................................................12-16
x
Page 13

Chapter 13 - Battery Charger
Unpacking your Battery Charger ......................................................................................................13-1
Introduction.......................................................................................................................................13-1
Cautions and Warnings ....................................................................................................................13-2
Battery Charger..........................................................................................................................13-2
Lithium-Ion Battery Pack ............................................................................................................13-2
Front View ........................................................................................................................................13-2
Top View..........................................................................................................................................13-3
Installation ........................................................................................................................................13-4
Assemble the Power Supply ......................................................................................................13-4
Setup..........................................................................................................................................13-4
Mounting...........................................................................................................................................13-5
Charging Batteries ............................................................................................................................13-6
Inserting a Battery into the Charging Pocket..............................................................................13-6
Remove the Battery from the Charging Pocket..........................................................................13-6
Interpreting the Charging Pocket LEDs ............................................................................................13-6
Battery Charger Help ........................................................................................................................13-7
Charger Cleaning, Storage and Service ...........................................................................................13-8
Cleaning .....................................................................................................................................13-8
Storage.......................................................................................................................................13-8
Service .......................................................................................................................................13-8
Battery Cleaning, Storage and Service ............................................................................................13-9
Cleaning .....................................................................................................................................13-9
Storage.......................................................................................................................................13-9
Service .......................................................................................................................................13-9
Chapter 14 - Cradles
Unpacking your Cradles ...................................................................................................................14-1
Overview...........................................................................................................................................14-1
Preparing the Cradle for Use ............................................................................................................14-1
Tethered Scanners and the MX7 Tecton Cradles ............................................................................14-2
Maintenance .....................................................................................................................................14-2
Cleaning ...........................................................................................................................................14-2
Using a Desktop Cradle....................................................................................................................14-3
Introduction ................................................................................................................................14-3
Quick Start - Desktop Cradle .....................................................................................................14-3
Battery Charging in a Desktop Cradle........................................................................................14-3
Front View ..................................................................................................................................14-4
Back View ..................................................................................................................................14-5
Top View ....................................................................................................................................14-6
Desktop Mounting Footprint .......................................................................................................14-6
Installing and Removing the Docking Bay Adapter Cup ............................................................14-7
Installing ..............................................................................................................................14-7
Removing ............................................................................................................................14-7
Assemble/Attach the AC Power Adapter ...................................................................................14-8
Connecting Input/Output Cables to the Desktop Cradle ............................................................14-9
Attaching a Serial Cable ......................................................................................................14-9
Attaching the Input/Output (I/O) Cable ................................................................................14-9
Cradle LEDs...............................................................................................................................14-9
Docked LED ........................................................................................................................14-9
xi
Page 14

Spare Battery LED.............................................................................................................14-10
MX7 Tecton System Status LED Status when Docked .....................................................14-10
Docking and Undocking the MX7 Tecton .................................................................................14-10
Dock the MX7 Tecton ........................................................................................................14-10
Undock the MX7 Tecton ....................................................................................................14-10
Inserting / Removing a Spare Battery from the Desktop Cradle ..............................................14-11
Inserting a Spare Battery ...................................................................................................14-11
Removing a Spare Battery ................................................................................................14-11
Desktop Cradle Help ................................................................................................................14-12
Using a Passive Vehicle Cradle .....................................................................................................14-14
Introduction ..............................................................................................................................14-14
Quick Start ...............................................................................................................................14-14
Components.............................................................................................................................14-15
U-Bracket Footprint ...........................................................................................................14-15
RAM Assembly Components.............................................................................................14-15
RAM Assembly Footprint ...................................................................................................14-16
Installing the Cradle U-Bracket ................................................................................................14-16
Installing the RAM Bracket.......................................................................................................14-17
Using a Powered Vehicle Cradle ....................................................................................................14-18
Introduction ..............................................................................................................................14-18
Quick Start ...............................................................................................................................14-18
Components.............................................................................................................................14-19
Front View .........................................................................................................................14-19
Back View..........................................................................................................................14-20
Installing or Removing Vehicle Cradle Adapter Cup and Top Adapter ....................................14-21
Installing the Adapter ...............................................................................................................14-22
Charging Pocket Adapter Cup ...........................................................................................14-22
Retainer Insert ...................................................................................................................14-22
Removing the Adapter Assembly.............................................................................................14-23
RAM Bracket Mounting ............................................................................................................14-24
RAM Bracket Mounting Points...........................................................................................14-24
Vehicle Cradle RAM Ball Assembly...................................................................................14-25
RAM Circular Base Footprint .............................................................................................14-25
DC/DC Power Supply Installation, Screws on Top of lid..........................................................14-26
Connecting Electrical Cables to Power Sources ...............................................................14-26
Specifications for Electrical Supply....................................................................................14-26
Wiring Schematic...............................................................................................................14-27
Connecting Vehicle Electrical Supply ................................................................................14-27
DC/DC Power Supply Installation, Screws on Side of Lid........................................................14-29
Connecting Electrical Cables to Power Sources ...............................................................14-29
Specifications for Electrical Supply....................................................................................14-29
Wiring Schematic...............................................................................................................14-30
Connecting to Vehicle Power ............................................................................................14-30
Vehicle 12V Bare Wire Adapter ...............................................................................................14-32
Vehicle Cable Connection Cable (Fuse Not Shown) .........................................................14-32
Connecting the Power Cable to the Vehicle ......................................................................14-32
Connecting Vehicle 12 VDC Supply ..................................................................................14-32
Connecting Power Supply to Vehicle Cradle .....................................................................14-33
Attaching a Serial or I/O Connector...................................................................................14-33
Vehicle Cradle Strain Relief Cable Clamps .......................................................................14-34
Vehicle Cradle LED..................................................................................................................14-34
Docking the MX7 Tecton in a Powered Vehicle Cradle ...........................................................14-35
xii
Page 15

Removing the MX7 Tecton from a Powered Vehicle Cradle....................................................14-36
Powered Vehicle Cradle Help ..................................................................................................14-36
Chapter 15 - Technical Specifications
MX7 Tecton Hardware......................................................................................................................15-1
MX7 Tecton Dimensions and Weight ...............................................................................................15-1
MX7 Tecton Environmental Specifications .......................................................................................15-2
MX7 Tecton Network Card Specifications ........................................................................................15-2
Summit 802.11 a/b/g SDIO 2.4/5.0GHz .....................................................................................15-2
Bluetooth ....................................................................................................................................15-2
MX7 Tecton AC/DC Wall Adapter ....................................................................................................15-2
Desktop Cradle .................................................................................................................................15-3
Serial Port ..................................................................................................................................15-3
Vehicle Mounted Cradle ...................................................................................................................15-4
Serial Port ..................................................................................................................................15-4
Power Connector Port................................................................................................................15-5
Battery Charger ................................................................................................................................15-5
Electrical.....................................................................................................................................15-5
Temperature...............................................................................................................................15-5
Dimensions ................................................................................................................................15-5
Chapter 16 - Customer Support
Technical Assistance ........................................................................................................................16-1
Product Service and Repair..............................................................................................................16-1
Limited Warranty ..............................................................................................................................16-1
xiii
Page 16

xiv
Page 17
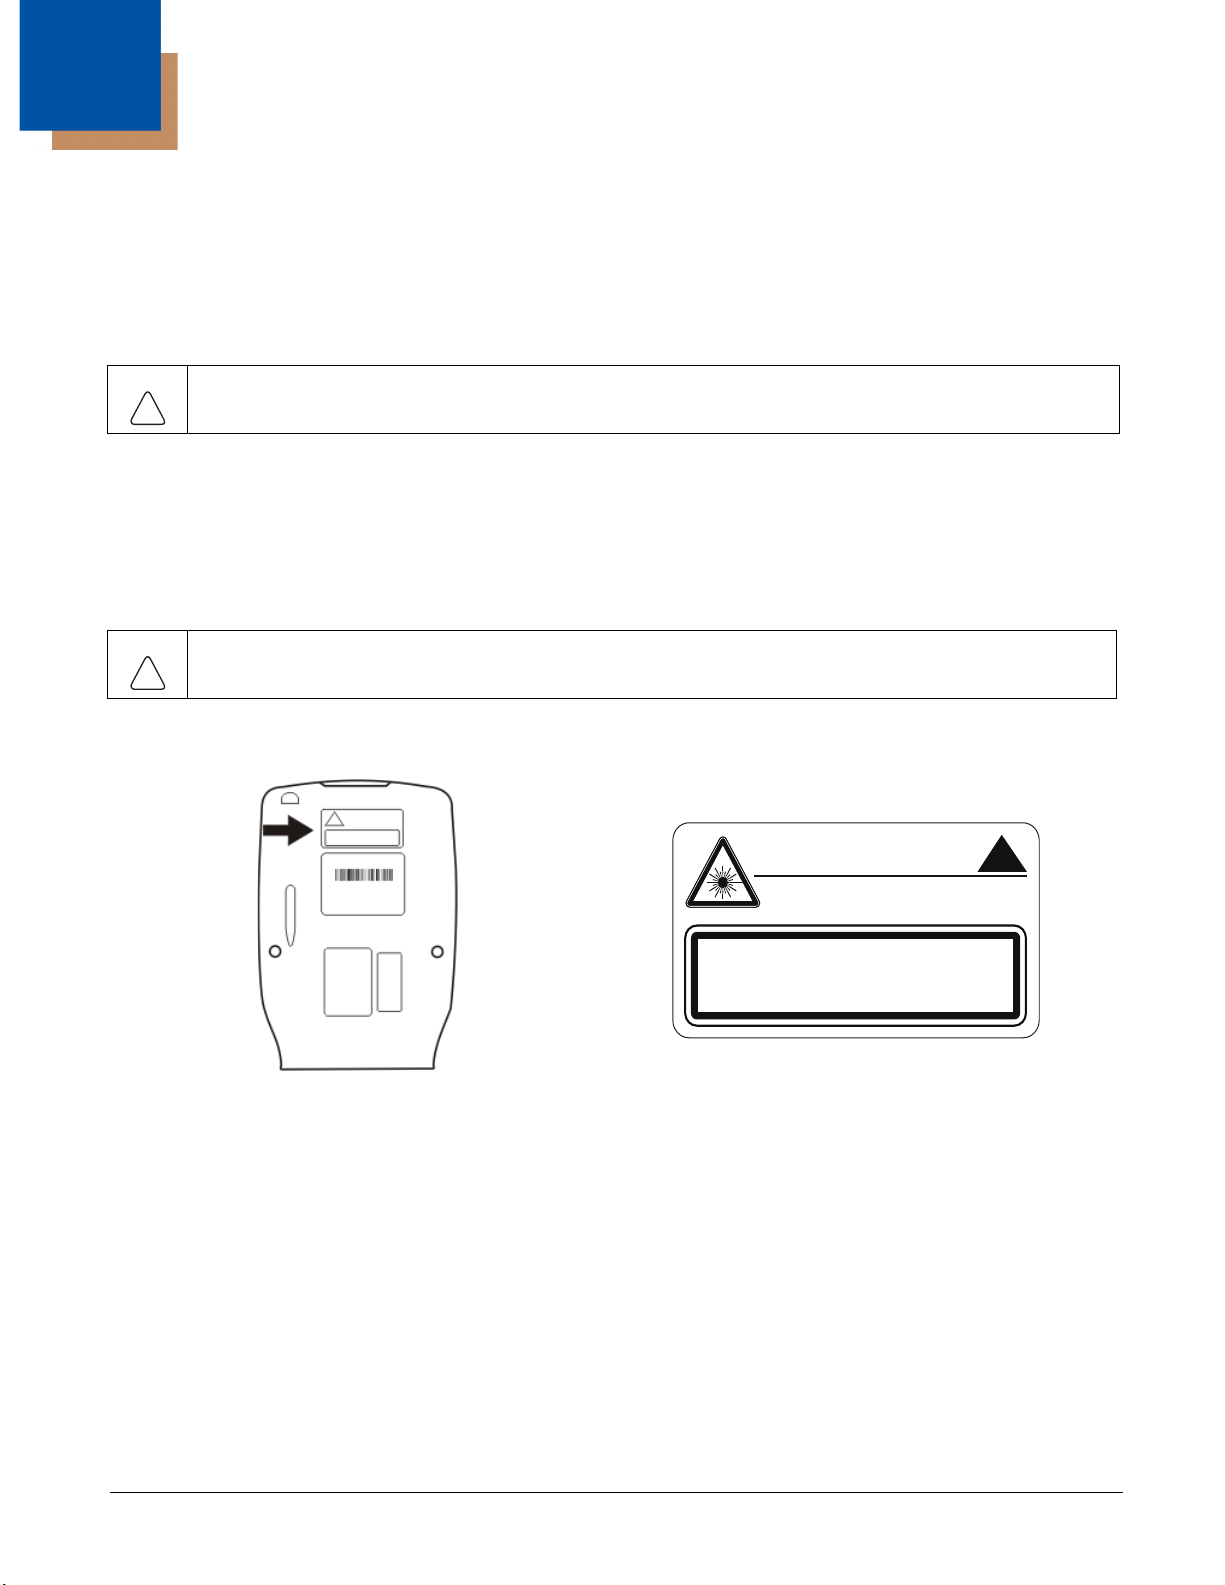
1
!
!
AVOID EXPOSURE - LASER RADIATION IS
EMITTED FROM THIS APERTURE.
LASER LIGHT - DO NOT STARE INTO BEAM
CLASS 2 LASER PRODUCT
1.0mW - 630 - 680nm
COMPLIES WITH 21 CFR 1040.10 AND 1040.11
EN60825-1:2007 IEC60825-1:2007
MX7 Tecton Agency Compliance
MX7 Tecton mobile computers meet or exceed the requirements of all applicable standards organizations for safe operation.
However, as with any electrical equipment, the best way to ensure safe operation is to operate them according to the agency
guidelines that follow. Read these guidelines carefully before using your MX7 Tecton.
This documentation is relevant for the following models: Tecton, TectonCS.
Caution: RISK OF EXPLOSION IF BATTERY IS REPLACED BY AN INCORRECT TYPE. The battery should be disposed of
by a qualified recycler or hazardous materials handler. Do not incinerate the battery or dispose of the battery with
general waste materials.
Laser Warnings
• Do not look into the laser’s lens.
• Do not stare directly into the laser beam.
• Do not remove the laser caution labels from the Tecton.
• Do not connect the laser bar code aperture to any other device. The laser bar code aperture is certified for use with the MX7
Tecton only.
Caution: Laser radiation when open. Read the caution labels. Use of controls, adjustments or performance of procedures other
than those specified herein may result in hazardous radiation exposure.
Laser Label Location
If the following label is attached to your product, it indicates
the product contains an engine with a laser aimer:
Laser Safety Statement
This device has been tested in accordance with and complies with IEC60825-1 ed2 (2007). Complies with 21 CFR 1040.10 and
1040.11, except for deviations pursuant to Laser Notice No. 50, dated June 24, 2007.
LASER LIGHT, DO NOT STARE INTO BEAM, CLASS 2 LASER PRODUCT, 1.0 mW MAX OUTPUT: 630-680nM.
Model Number and Serial Number Labels
The model (item) number and serial number for the terminal are located on labels affixed to the back of the terminal.
FCC Part 15 Statement
This device complies with part 15 of the FCC Rules. Operation is subject to the following two conditions:
1. This device may not cause harmful interference.
2. This device must accept any interference received, including interference that may cause undesired operation.
1 - 1
Page 18

This equipment has been tested and found to comply with the limits for a Class B digital device pursuant to part 15 of the FCC
Rules. These limits are designed to provide reasonable protection against harmful interference in a residential installation. This
equipment generates, uses, and can radiate radio frequency energy and, if not installed and used in accordance with the
instructions, may cause harmful interference to radio communications. However, there is no guarantee that interference will not
occur in a particular installation. If this equipment does cause harmful interference to radio or television reception, which can be
determined by turning the equipment off and on, the user is encouraged to try to correct the interference by one or more of the
following measures:
• Reorient or relocate the receiving antenna.
• Increase the separation between the equipment and receiver.
• Connect the equipment into an outlet on a circuit different from that to which the receiver is connected.
• Consult the dealer or an experienced radio or television technician for help.
If necessary, the user should consult the dealer or an experienced radio/television technician for additional suggestions. The
user may find the following booklet helpful: “Something About Interference.” This is available at FCC local regional offices. Honeywell is not responsible for any radio or television interference caused by unauthorized modifications of this equipment or the
substitution or attachment of connecting cables and equipment other than those specified by Honeywell. The correction is the
responsibility of the user.
Caution: Any changes or modifications made to this equipment not expressly approved by Honeywell may void the FCC authorization to operate this equipment.
FCC 5GHz Statement
LAN devices are restricted to indoor use only in the band 5150-5250 MHz. For the band 5600-5650 MHz, no operation is permitted.
When using IEEE 802.11a wireless LAN, this product is restricted to indoor use, due to its operation in the 5.15- to 5.25-GHz
Frequency range. The FCC requires this product to be used indoors for the frequency range of 5.15 GHz to 5.25 GHz to reduce
the potential for harmful interference to co-channel mobile satellite systems. High-power radar is allocated as the primary user
of the 5.25- to 5.35-GHz and 5.65- to 5.85-GHz bands. These radar stations can cause interference with and/or damage to this
device.
Canadian Compliance
This ISM device complies with Canadian RSS-210.
Operation is subject to the following conditions:
1. This device may not cause harmful interference.
2. This device must accept any interference received, including interference that may cause undesired operation.
This Class B digital apparatus complies with Canadian ICES-003.
1 - 2
Page 19
CE Mark
The CE marking indicates compliance with the following directives:
• 1995/5/EC R&TTE
• 2011/65/EU RoHS (Recast)
In addition, complies to 2006/95/EC Low Voltage Directive, when shipped with recommended power supply. European contact::
Hand Held Products Europe BV
Nijverheidsweg 9-13
5627 BT Eindhoven
The Netherlands
Honeywell shall not be liable for use of our product with equipment (i.e., power supplies, personal computers, etc.) that is not CE
marked and does not comply with the Low Voltage Directive.
RF Notices
This device (FCC ID: KDZLXE-MX7T and IC ID: 1995B-LXEMX7T) contains transmitter Module FCC ID: TWG-SDCMSD30AG and IC ID: 6616A-SDCMSD30AG.
This device does not transmit simultaneously on adjacent or non-adjacent channels.
RF Safety Notice
Caution:
This device was tested for typical body-worn operation. Use only Honeywell tested and approved accessories to ensure FCC
Compliance. The use of third-party accessories may not comply with FCC RF exposure compliance requirements, and should
be avoided. To comply with FCC RF exposure requirements, this device must be operated in the hand with a minimum separation distance of 2.5 cm (0.9842 inch) or more from a person's body.
Bluetooth
Class II
Honeywell Scanning & Mobility Product Environmental Information
Refer to www.honeywellaidc.com/environmental for the RoHS / REACH / WEEE information.
Dealer License - Republic of Singapore
Vehicle Power Supply Connection Safety Statement
Vehicle Power Supply Connection: If the supply connection is made directly to the battery, a 10A slow-blow fuse should be
installed in the positive lead within 5 inches (12.7 cm) of the battery positive (+) terminal.
1 - 3
Page 20

1 - 4
Page 21

2
Getting Started
Overview
The MX7 Tecton™ is a rugged, portable, hand-held mobile computer capable of wireless data communications. The MX7 Tecton can transmit information using an 802.11 network card and it can store information for later transmission through an RS232
or USB port. The MX7CS (Cold Storage) device functions normally in various temperature ranges.
The MX7 Tecton is vertically oriented and features backlighting for the display. Keypads are available in 55-key alphanumeric
and 32-key numeric-alpha versions.
This device can be scaled from a limited function batch computer to an integrated wireless scanning computer. A trigger handle
is available as an accessory.
The stylus attached to the hand strap is used to assist in entering data and configuring the device. Protective film for the touch
screen is available as an accessory.
The MX7 Tecton is powered by a 2200 mAh Lithium-Ion main battery pack and an internal Super-capacitor (Super-cap) battery.
Note: Contact Technical Assistance (page 16-1) for upgrade availability if your application or control panels are not the same
as the application or control panels presented in this guide.
About this Guide
This MX7 Tecton User’s Guide provides instruction for the system administrator to follow when configuring a MX7 Tecton. Also
included are setup and use instructions for the MX7 Tecton Battery Charger, Desktop Cradle, Passive Vehicle Mounted Cradle,
and Powered Vehicle Mounted Cradle.
Note: The MX7 Tecton may have a Microsoft Windows CE 6 or Microsoft Windows Mobile 6.5 operating system. This guide is
for the MX7 Tecton with a Windows Mobile 6.5 operating system
Out of the Box
After you open the shipping carton verify it contains the following items:
•MX7 Tecton
• Rechargeable battery
• Hand Strap (attached to the MX7 Tecton)
• Quick Start Guide
• Getting Started Disc
If you ordered accessories for the MX7 Tecton, verify they are also included with the order. Keep the original packaging material
in the event the MX7 Tecton should need to be returned for service. For details, see Product Service and Repair (page 16-1)
2 - 1
Page 22

Initial Setup for MX7 Tecton
Following are steps you might take when setting up a new MX7 Tecton. Follow the links for further instruction for each step. Contact Technical Assistance (page 16-1) if you need additional help.
Note: Installing or removing accessories should be performed on a clean, well-lit surface. When necessary, protect the work
surface, the MX7 Tecton, and components from electrostatic discharge.
Hardware Setup
1. Connect accessories e.g., hand strap (if necessary), trigger handle, etc.
2. Provide a power source:
• Insert a fully charged main battery.
• Connect a power cable (USB/Power or Serial/Power).
• Place the MX7 Tecton in a powered desktop or vehicle mounted cradle.
3. Press the Power key.
Software Setup
Hardware setup should be completed before starting software setup.
1. Calibrate Touch display.
2. Set Date and Time Zone.
3. Set Power Timers.
4. Set Speaker Volume.
5. Pair Bluetooth devices.
6. Set Wireless client parameters.
7. Set terminal emulation parameters.
8. Set AppLock parameters.
9. Set DCWedge parameters.
2 - 2
Page 23

Components
55-key Keypad 32-key Keypad
Front View
1. Scanner/Imager Aperture
2. Speaker
3. System Status LED
4. Scan Button
5. Orange Key (Sticky Key)
6. Blue Key (Sticky Key)
7. Scan Status LED
8. Cable Port
9. On / Off Button
10. Alpha Lock LED (32 Key
keypad only)
Diamond Keys
2 - 3
Page 24
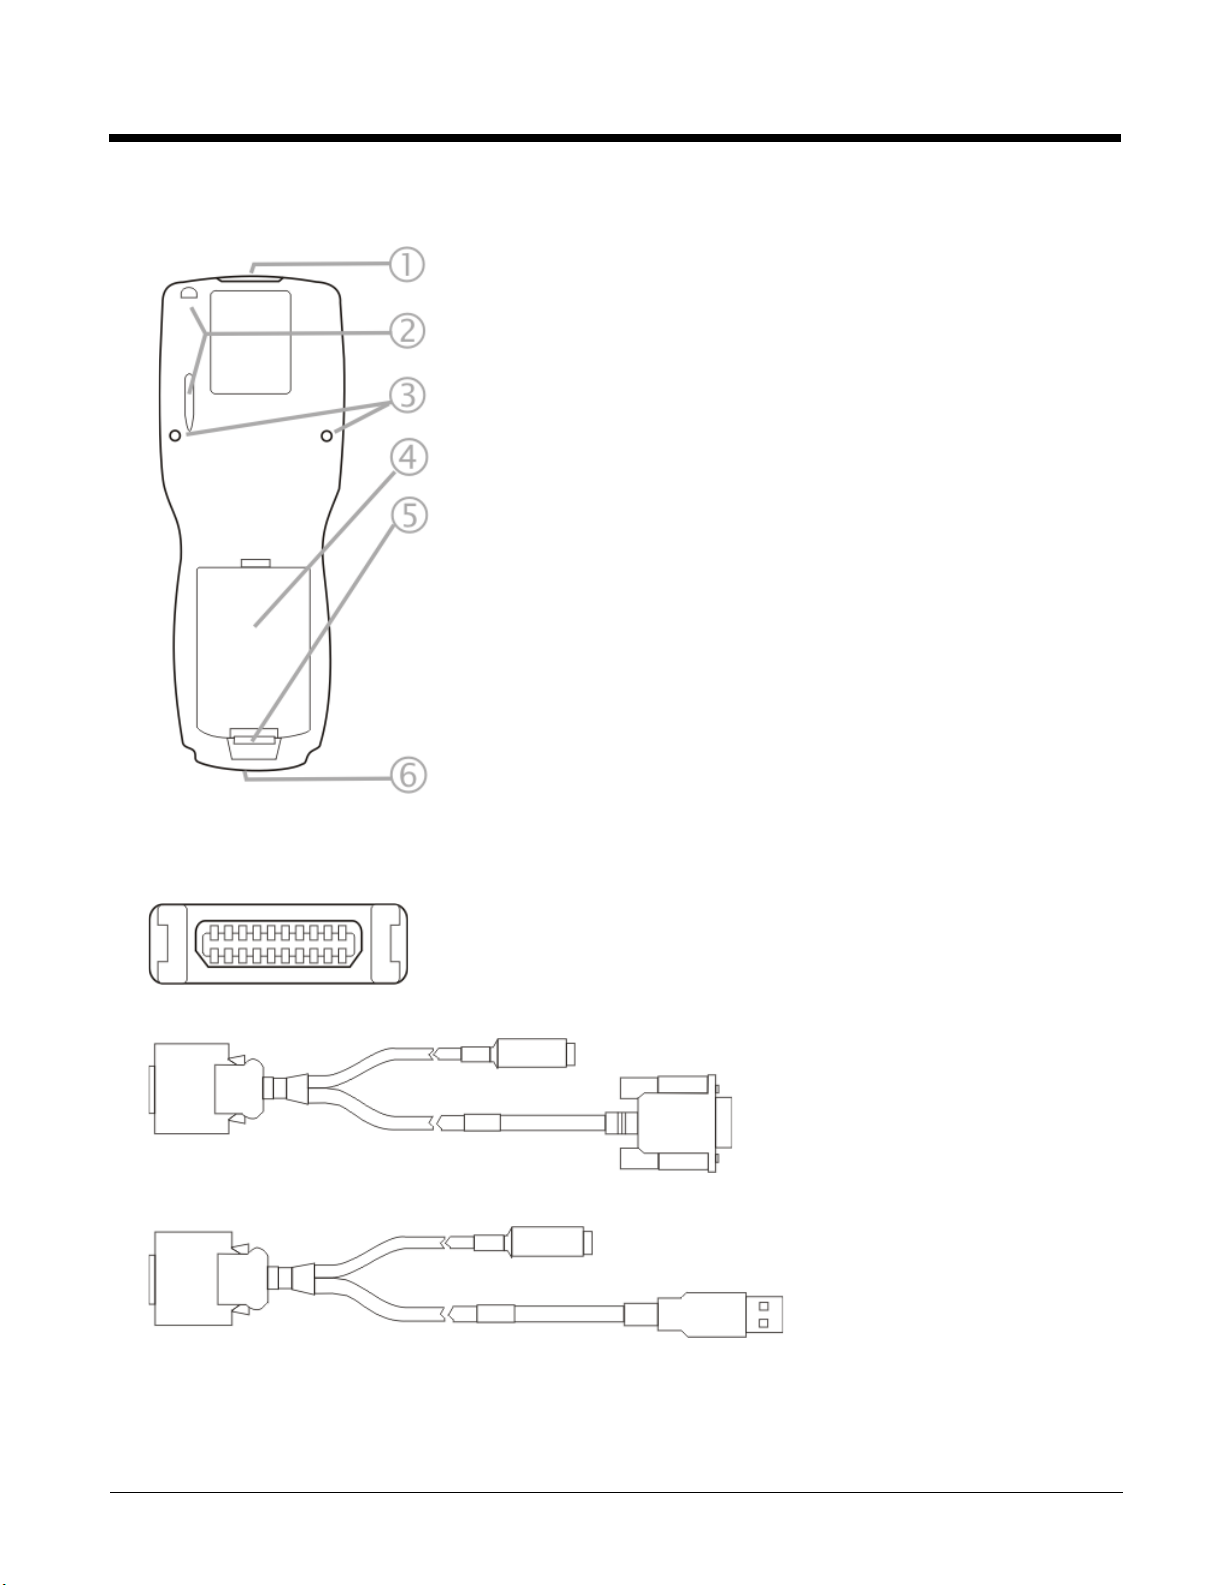
Back View
1. Scanner/Imager Aperture
2. Stylus and Stylus Pocket
3. Trigger Handle Attach Points
4. Main Battery
5. Battery Fastener
6. Cable Port
I/O Port and Cables
Input / Output Port (I/O)
Cable: Multipurpose RS232 and Power (MX7055CABLE)
Cable: Multipurpose USB and Power (MX7052CABLE)
2 - 4
Page 25

Adapter/Cable: Audio (MX7060CABLE)
Adapter: RS232 PC port to D9 male (MX7058CABLE)
Scanner / Imager Aperture
1. Scanner Aperture
2. MX7 Tecton Front
Caution: Never stare directly into the beam aperture.
If Continuous Scan Mode has been enabled (disabled by default, setting can be changed by user), the laser is always on
and decoding and the laser beam is emitted continuously.
2 - 5
Page 26
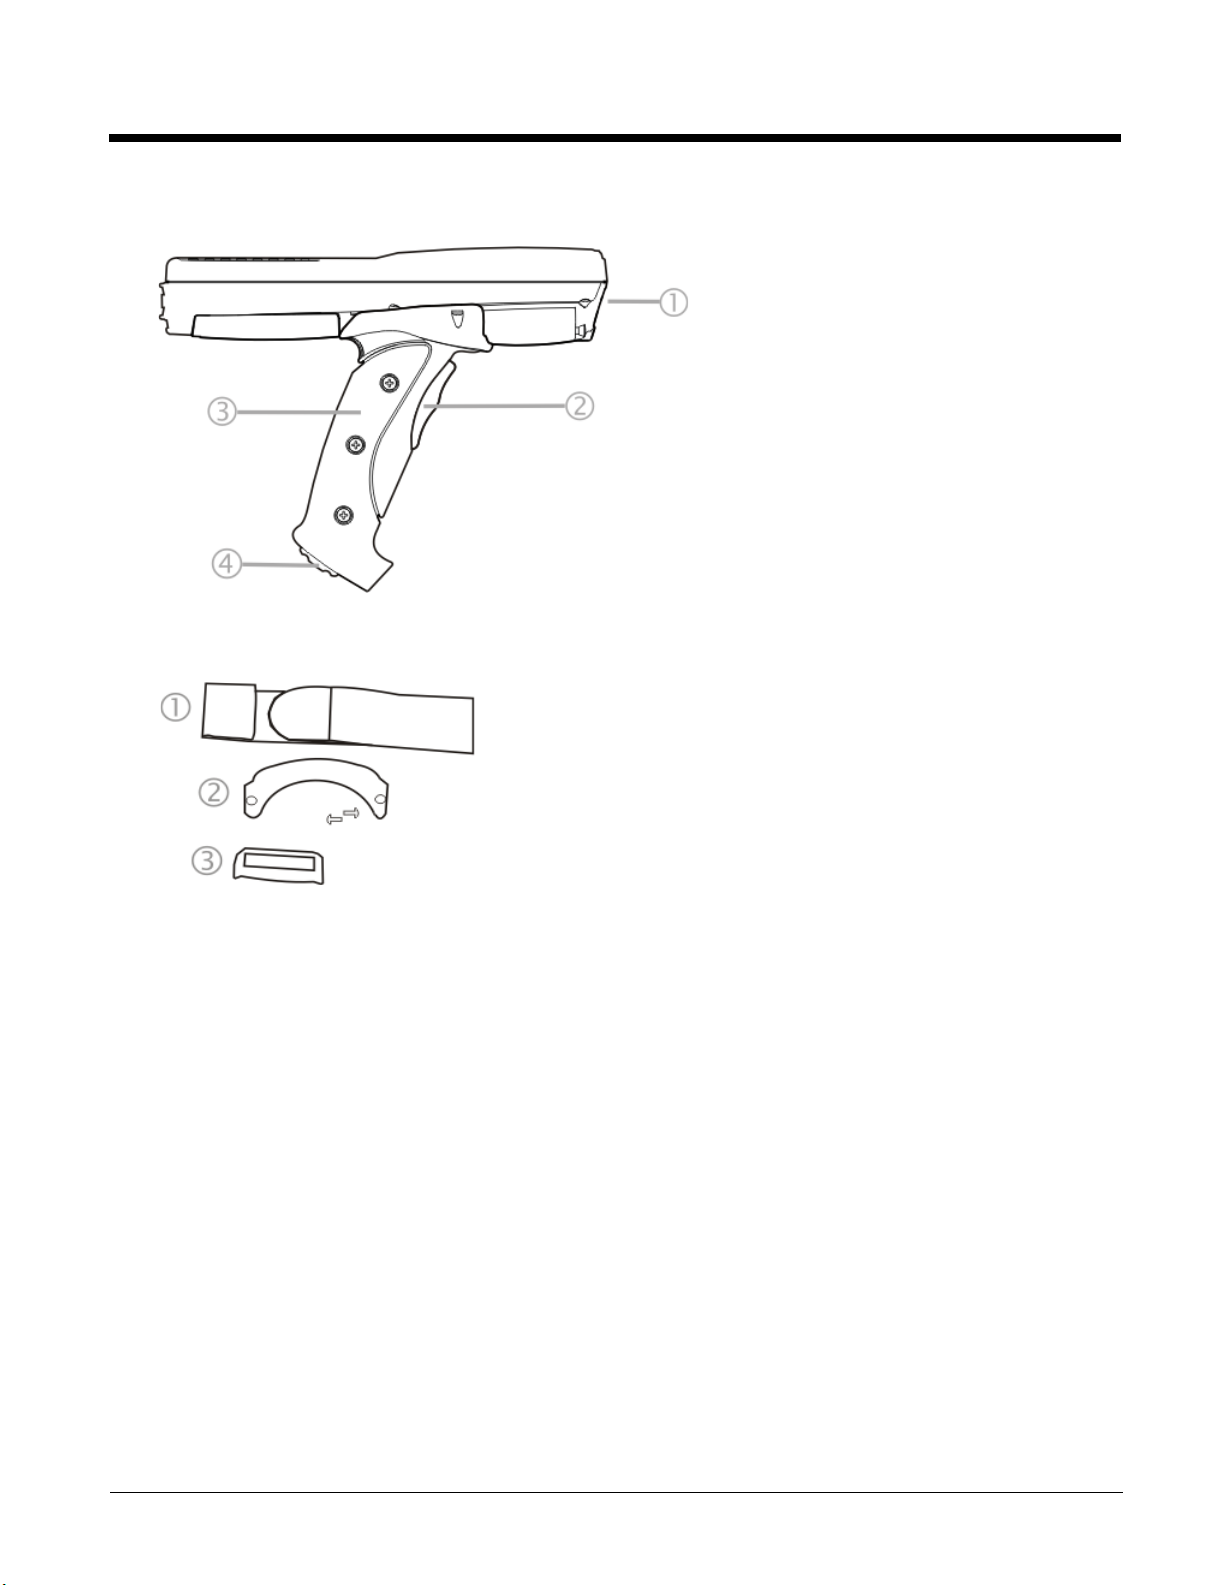
Handle
Handstrap
1. Imager / Scanner Aperture
2. Trigger
3. Handle
4. Tether Attach Point
1. Handstrap
2. Handstrap Retainer Bracket and mounting screws
3. Handstrap Clip
2 - 6
Page 27
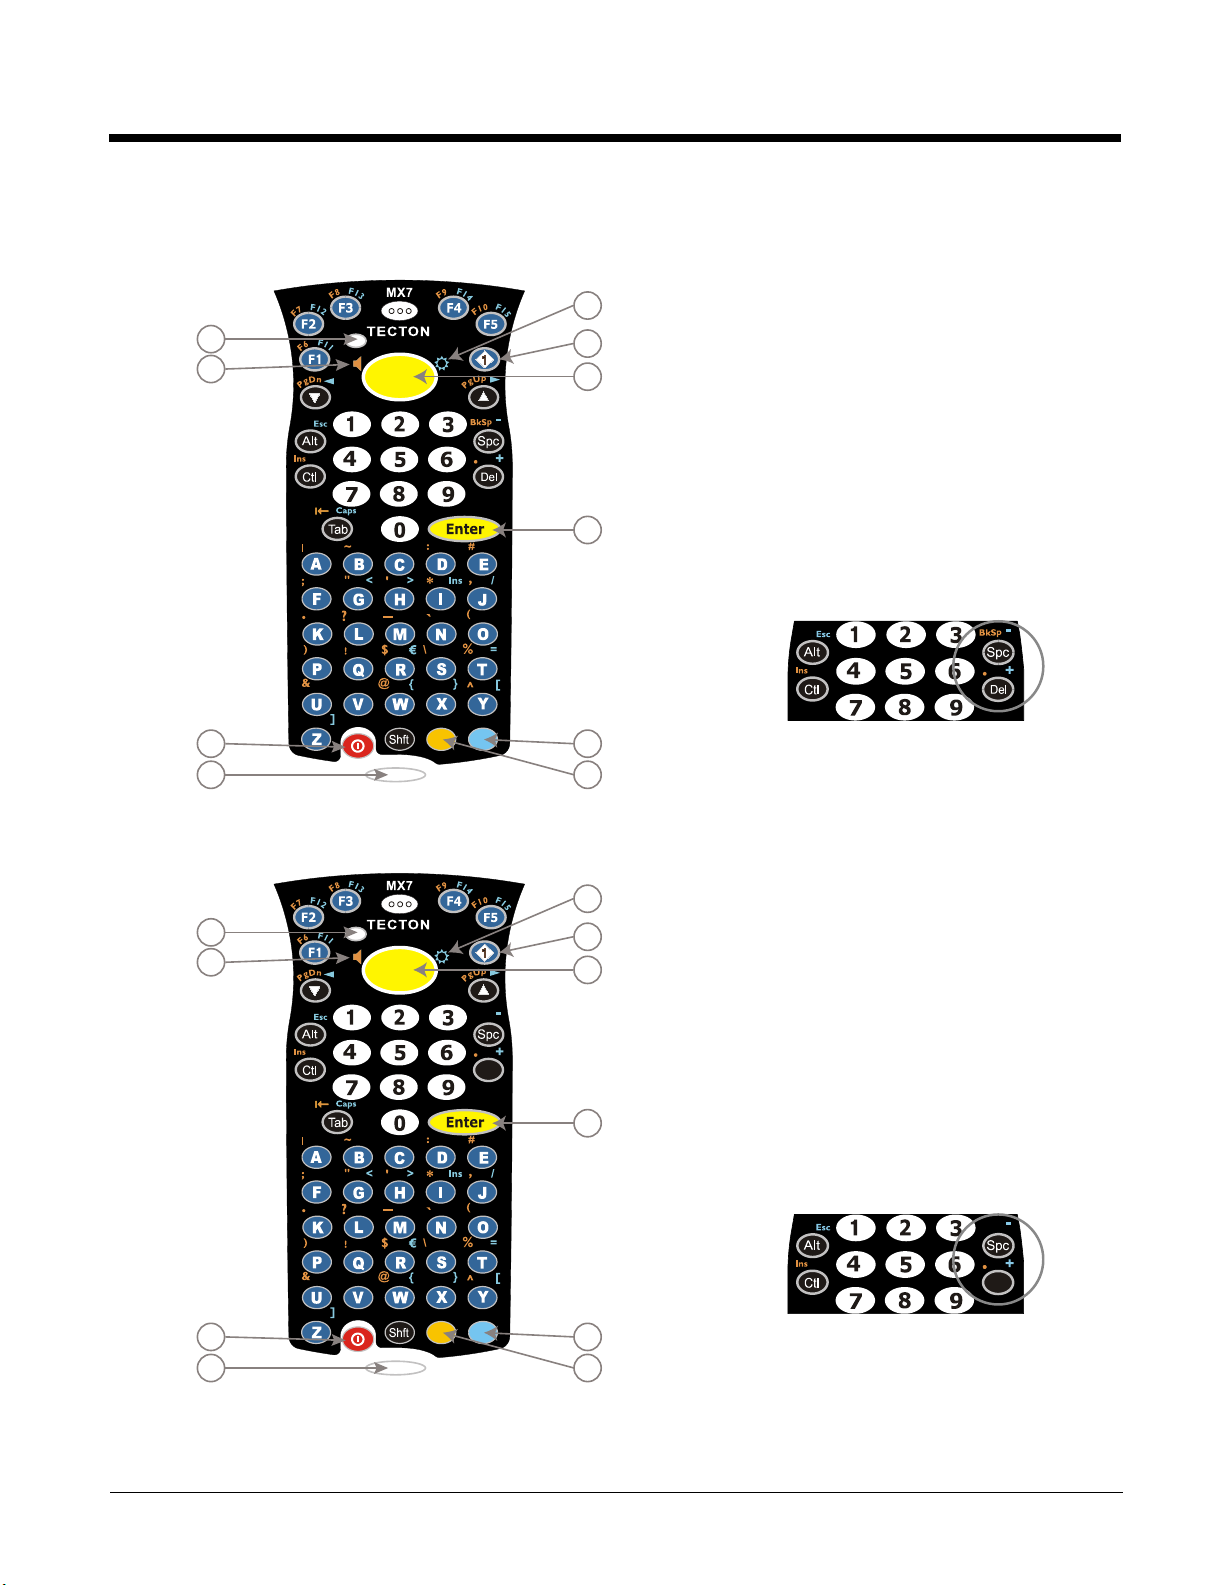
Keypads
1
2
4
5
6
7
8
10
9
3
BkSp
Del
1
2
4
5
6
7
8
10
9
3
BkSp
Del
55 Key Primary Delete ANSI Keypad
1. System Status LED
2. Volume Control Icon
3. On Off Button
4. Scan Status LED
5. Orange Key (Sticky Key)
6. Blue Key (Sticky Key)
7. Enter Key
8. Scan Button
9. Diamond Key
10. Display Brightness Icon
Spc and Del key location
55 Key Primary Backspace ANSI Keypad
1. System Status LED
2. Volume Control Icon
3. On Off Button
4. Scan Status LED
5. Orange Key (Sticky Key)
6. Blue Key (Sticky Key)
7. Enter Key
8. Scan Button
9. Diamond Key
10. Display Brightness Icon
Spc and Bksp key location
2 - 7
Page 28

32 Key Numeric-Alpha Keypad
1
2
8
6
7
3
10
9
5
4
1. System Status LED
2. Alpha Status LED
3. Diamond Keys
4. Scan Button
5. Enter Key
6. Alph Key
7. Orange Key (Sticky Key)
8. Blue Key (Sticky Key)
9. On Off Button
10. Scan Status LED
Locking and Unlocking the MX7 Tecton
Locking the MX7 Tecton
The MX7 Tecton can be locked manually by tapping Start > Lock. By default, this option is included on the Start screen at the
bottom of the screen. Care should be taken to not accidentally tap this area of the Start screen.
Note: Review the Unlock process before locking the MX7 Tecton.
Lock can be removed from the Today screen by selecting Start > Settings > Today > Items (page 5-22) tab. Deselect Device
Lock.
The MX7 Tecton can also be configured to Lock automatically after a defined period of inactivity. This setting is accessed via
Start > Settings > Lock > Password tab. By default, this option is Disabled.
The password and hint are configured by selecting Start > Settings > Lock > Password (page 5-16) and Hint (page 5-17) tabs.
Unlocking the MX7 Tecton
When the MX7 Tecton is locked, the Start screen displays Unlock at the lower part of the screen.
• If there is no password or PIN set, tap Unlock on the next screen to unlock the MX7 Tecton. The MX7 Tecton is returned
to normal operation.
•If there is a password or PIN set, enter the password/PIN and tap Unlock. If several unsuccessful attempts are made, the
MX7 Tecton may be configured to display a password hint.
2 - 8
Page 29

Rebooting the MX7 Tecton
When the Desktop/Start screen is displayed or an application begins, the power up sequence is complete. If you have previously saved your settings, they will be restored on reboot. Application panel changes are saved when OK is tapped on an application properties panel.
During the processes that follow there may be small delays while MX7 Tecton wireless clients connect to the network and Bluetooth relationships establish or re-establish.
Suspend / Resume
Quickly tapping the Power key places the MX7 Tecton in Suspend mode. Quickly tapping the Power key again, pressing any
key, pressing the trigger (on the trigger handle), or tapping the touch screen, returns the MX7 Tecton from Suspend and to
the exact state before the Power key press. The System LED blinks green when the video display is Off (and the device is
not in Suspend Mode or critical suspend).
Warmboot
A warmboot reboots the MX7 Tecton without erasing any registry data. Configuration settings and data in RAM are preserved during a warmboot. Network sessions are lost and any data in running applications that has not been previously
saved may be lost. CAB files already installed remain installed.
• Using the Registry control panel, tap the Warmboot button. The MX7 Tecton immediately warmboots.
Restart
The OS and CAB files are reloaded. Restart erases the contents of RAM but preserves all registry configuration settings.
Any files that are stored only in RAM drives will be lost. Restart erases any user-stored applications or data, but preserves
anything stored on the System drive in flash (which are files explicitly copied to the System folder, plus the registry files created by the OS). All CABs and applications that are configured are reinstalled by the Launch utility. Touch screen calibration
data is preserved. Network sessions are lost, and any data in running applications that has not been specifically sent to
storage may be lost.
• Tap the Restart button on the Registry control panel. The operating system performs the operation and the MX7 Tecton
restarts.
• An alternate method to Restart is to hold down the Blue key, the Scan key and the Power key until the screen blanks.
Release the keys and the MX7 restarts (may also be called a cold boot). Be sure the press the Scan key, not the Enter
key. Pressing the Enter key begins a warmboot function instead of a coldboot function.
Clean Boot / Reset
Important -- Because of the extreme nature of resetting the Windows Mobile device to factory default settings, this process
should be used only as an emergency procedure and suspend/resume or restart should be used whenever necessary.
To reset all Windows Mobile device configuration to factory defaults:
1. Hold down the Blue + Scan + Power keys at the same time. After the key sequence is complete, the display turns solid
white. Be sure to press the Scan key, not the Enter key.
2. Release the keys and immediately press and hold the Enter + Scan keys. After the keypress, the display turns dark. (If
these keys are not pressed immediately the MX7 Tecton performs a Cold Boot. Wait until the MX7 Tecton boots and try
again.)
3. Release the Reset key sequence. A message is displayed stating the change is in process. If the message does not
appear, try again.
When all programs have finished loading, the Windows Mobile Start screen is displayed. If prompted, tap the touch screen
to set up your Windows Mobile based device.
2 - 9
Page 30

Inserting and Removing the Battery Pack
Note: The battery should not be replaced in a dirty, harsh or hazardous environment. When the battery is not connected to the
MX7 Tecton, any dust or moisture that enters the battery well or connector may transfer to the battery/well terminals,
potentially causing damage. Only use Honeywell batteries as replacements: MX7A380BATT / MX7392BATT or a Low
Temperature (CS) Battery : MX7A381BATT / MX7393BATT / MX7396BATTERY.
The MX7 Tecton will not function unless the battery pack is in place and securely latched. Any work in progress should be saved
prior to replacing the battery pack.
Be sure to place the unit in Suspend Mode before removing the battery. Failing to properly place the device in Suspend mode
will result in a loss of all unsaved data.
An MX7 Tecton will retain data, while the main battery is removed and replaced with a fully charged main battery, for 5 minutes.
Note: When internal battery power is Low or Very Low connect the AC/DC adapter to the MX7 Tecton before replacing the main
battery.
Inserting the Battery
To insert the main battery, complete the following steps:
1. Place the MX7 Tecton in Suspend Mode (if On).
2. Detach the bottom hook of the handstrap (if installed).
3. Tilt the end (without the latch) of the fully charged battery pack into the upper end of the battery compartment, and
firmly press the other end down until it is fully inserted into the battery compartment
4. Push down on the battery until the retaining clip clicks into place. The MX7 Tecton draws power from the battery
immediately upon successful connection.
5. Replace the handstrap clip in its holder (if installed).
Removing the Battery
To remove the battery, complete the following steps:
1. Place the MX7 Tecton in Suspend mode (if On).
2. Detach the bottom hook of the handstrap (if installed).
3. Slide the battery retaining clip down to release the main battery.
4. Pull the battery up and out of the battery compartment.
5. Place the discharged battery pack in a powered battery charger to re-charge.
Charging the Main Battery
Note: The MX7 Tecton Battery Charger is designed for an indoor, protected environment.
New batteries must be fully charged prior to use.
The main battery can be recharged in an AC powered Battery Charger after the battery has been removed from the MX7 Tecton
or its packing material when new.
The main battery can be recharged while it is in the MX7 Tecton:
• by connecting the MX7 Tecton AC power adapter to the I/O connector at the base of the MX7 Tecton.
• by docking the MX7 Tecton in a powered desk cradle.
• by docking the MX7 Tecton in a powered vehicle cradle.
• or by connecting the car power adapter (CLA) to the I/O connector at the base of the MX7 Tecton.
Note: An uninterrupted external power source (wall AC adapters) transfers power to the computer’s internal charging circuitry
which, in turn, recharges the main battery and internal battery. Frequent connection to an external power source, if
feasible, is recommended to maintain internal battery charge status as the internal battery cannot be recharged by a dead
or missing main battery.
2 - 10
Page 31

LEDs and Indicators
The Scan Status oval shaped indicator is situated below the keypad and next to the On button.
LEDs (Light Emitting Diodes) are located on the front of the MX7 Tecton. They are:
• System Status LED indicates power management status. It is located at the top left of the keypad, below the F3 key.
• Alpha Mode Status LED applies to the 32-key keypad only. It is located below the F4 key on the 32-key keypad.
System Status LED
Blinking Red Battery power fail; critical suspend mode.
Steady Red Main battery low.
Blinking Green Display turned off.
Yellow / Amber A few seconds when Power key is pressed.
No Color No user intervention required.
Alpha mode Status LED
Steady Green Device is in “Alpha” character input mode.
No Color Device is in “Numeric” key input mode.
Scan Status Indicator
Steady Green Good scan.
Steady Amber Decoder engine storing changed parameters.
Steady Red Scan in progress.
No Color Scanner / Imager ready for use or no scanner installed.
Toggle Vibrate Indicator
The vibration motor is activated when a scan is completed successfully (good scan vibration) or with a failure (scan key
released before good scan, timeout, or rejected because of Data Options configuration). The vibrations can be detected
under the handstrap or through the trigger handle.
Vibrate indicator is toggled on and off in the Data Collection application, using the Notification tab. Toggle the vibrate indicator on or off by tapping the desired radio button for Good Scan Vibration and Bad Scan Vibration.
Options are: Off, Short, Medium or Long.
Vibration can also be adjusted by tapping the speaker icon in the top right corner of the Start screen. A Volume window
opens. Tap the Vibrate radio button to toggle vibration on and off. Vibration duration can be set using the Data Collection
control panels.
2 - 11
Page 32

Tapping the Touch Screen with a Stylus
Note: Always use the point of the stylus for tapping or making strokes on the touch screen.
Never use an actual pen, pencil, or sharp/abrasive object to write on the touch screen.
Hold the stylus as if it were a pen or pencil. Touch an element on the screen with the tip of the stylus then lift the stylus from the
screen. Using a stylus is similar to moving the mouse pointer then left-clicking icons on a desktop computer screen.
Firmly press the stylus into the stylus holder when the stylus is not in use. There is a stylus holder in the hand strap and the trigger handle. A stylus replacement kit is available.
Using the stylus to tap icons on the touch screen is the basic action that can:
• Open applications.
• Choose menu commands.
• Select options in dialog boxes or drop-down boxes.
• Drag the slider in a scroll bar.
• Select text by dragging the stylus across the text.
• Place the cursor in a text box prior to typing in data.
• Place the cursor in a text box prior to retrieving data using a bar code decoder or an input/output device connected to a serial
port on a cradle.
Calibrating the Touch Screen
If the touch screen is not responding properly to stylus taps, you may need to recalibrate the touch screen.
Recalibration involves tapping the center of a target. If you miss the center, keep the stylus on the screen, slide it over the target's center, and then lift the stylus.
To recalibrate the screen, select Start > Settings > System > Screen (page 5-46) > General tab. To begin, tap the Align Screen
button on the display with the stylus.
Follow the instructions on the screen and press the Enter key to save the new calibration settings or press Esc to cancel or quit.
Setting the Display Backlight Timer
The backlight settings use Honeywell-determined default timeouts. Different timeouts can be set for the backlights when using
main battery or external power. The backlights timer can be disabled for a particular mode by unchecking a check box. When
the backlight timer is disabled (check box is unchecked), the backlight never turns off (or dims) in that mode.
Default values are 30 seconds for Battery, 1 minute for External. Brightness level default value is 60% for the keypad and display.
When the backlight timer expires, the display backlight and the display are Off, as is the keypad backlight. The backlights are
turned on when the touch screen is tapped or a button is pressed. Adjust these settings using the Backlight control panel.
Applying the Touch Screen Protective Film
1. Clean the touch screen of fingerprints, lint particles, dust and smudges.
2. Remove the protective film from its container. Remove any protective backing from the film sheet by lifting the backing from
a corner of the film. Discard the backing.
3. Apply the film to the touch screen starting at one side and smoothing it across the display.
4. If air bubbles appear, raise the film slightly and continue smoothing the film across the display until it covers the glass
surface of the display.
5. If dust, lint or smudges are trapped between the protective film and the glass display, remove the protective film, clean the
display and apply the protective film again.
2 - 12
Page 33

Setting the Date and Time Zone
Note: The first time the MX7 Tecton is powered up, or the device powers up from a reset/cold boot, the time may be reset to the
factory default value.
Set the current date, time, time zone and assign a daylight savings location using control panels. Or double-tap the Date icon in
the taskbar to begin.
There is very little functional change from standard desktop PC Date/Time Properties options. Adjust the settings and tap the
OK button or the Apply button to save changes to the registry. Any changes take effect immediately.
Setting Speaker Volume
The speaker is located on the front of the device, between MX7 and Tecton.
Speaker volume can be adjusted to a comfortable level for the listener by using key presses or by changing settings in a control
panel. Speaker sounds can be disabled.
Using the Keypad
Note: Speaker sounds must be enabled before the following key sequences can adjust the volume.
The volume is increased or decreased one step each time the volume key sequence is pressed.
To adjust speaker volume:
• Tap the Orange key then the Scan key to enter volume change mode.
• Use the Up Arrow and Down Arrow keys. A beep is emitted at each arrow key press. When the volume reaches maximum
level, two extra beeps are emitted.
• Press any key, except the keys you used to adjust the volume, to exit.
Volume control using a keypad key press has six volume settings that match those supported by the control panel. Volume
does not “roll-over” from minimum to maximum or from maximum to minimum. Continuously holding down the up or down
arrow keys does not cause an automatic repeat of the up (or down) arrow key.
Using a Control Panel
Sounds for Events and Programs are enabled by default. Notifications are disabled by default. See Sounds & Notifications
(page 5-20)
1. Tap the speaker icon in the top right corner of the Start screen. A Volume window opens.
2. Move the slider up and down to adjust the speaker volume.
3. If desired, tap the Off radio button to turn sounds off.
4. If desired, tap the Vibrate radio button to turn Vibrate on. Vibrate is off by default.
2 - 13
Page 34

Setting Terminal Emulation Parameters
Before you make a host connection, you will, at a minimum, need to know:
• the alias name or IP address (Host Address) and
• the port number (Telnet Port) of the host system to properly set up your host session.
1. Make sure the MX7 Tecton network settings are configured and functional. If you are connecting over wireless LAN
(802.11
2. From Start > Programs, run RFTerm or tap the RFTerm icon on the desktop.
3. Select Session > Configure from the application menu and select the host type that you require. This will depend on the
type of host system that you are going to connect to; i.e., 3270 mainframe, AS/400 5250 server or VT host.
4. Enter the Host Address of the host system that you wish to connect to. This may either be a DNS name or an IP address of
the host system.
5. Update the telnet port number, if your host application is configured to listen on a specific port. If not, use the default telnet
port.
6. Select OK.
7. Select Session > Connect from the application menu or tap the Connect button on the Tool Bar.
8. Upon a successful connection, you should see the host application screen displayed.
To change options such as Display, Colors, Cursor, Bar Code, etc., refer to these sections in the RFTerm User’s Guide for complete descriptions of these and other features.
x), make sure your MX7 Tecton is communicating with the Access Point.
Using the AppLock Switchpad
Note: The touch screen must be enabled.
Switchpad Menu
Tap the switchpad icon in the taskbar.
A checkmark on the switchpad menu indicates applications currently active or available for Launching by the MX7 Tecton user.
When Keyboard, on the Switchpad Menu, is selected, the default input method (Input Panel, Transcriber, or custom input
method) is activated.
Switchpad Icon
Using the Keypad
One switch key sequence (or hotkey) is defined by the Administrator for the end-user to use when switching between locked
applications. This is known as the Activation key.
When the Activation key sequence is pressed on the keypad, the next application in the AppLock configuration is moved to
the foreground and the previous application moves to the background. The previous application continues to run in the
background. MX7 Tecton key presses affect the application in focus only.
Using the Touch Screen
The Switchpad Menu figure shown above is an example and is shown only to aid in describing how the user can switch
between applications using a stylus.
When the user taps the Switchpad icon with the stylus, a menu pops up listing the applications available to the user. The
user can tap an application name in the popup menu and the selected application is brought to the foreground. The previous application continues to run in the background. Stylus taps affect the application in focus only. When you need to use
the Input Panel, tap the Keyboard option. Input Panel taps affect the application in focus only.
2 - 14
Page 35

Using the Input Panel / Virtual Keyboard
The input panel / virtual keyboard is always available when needed e.g., text entry.
Place the cursor in the text entry field and, using the stylus:
• Tap the Shift key to type one capital letter.
• Tap the CAPS key to type all capital letters.
• Tap the áü key to access symbols.
Some applications do not automatically display the Input Panel. In this case, do the following to use the Input Panel:
Keyboard icon in the taskbar
Transcriber icon in the taskbar
Block recognizer or Letter recognizer icon in the taskbar
1. If the keyboard icon is not displayed in the taskbar, tap the icon which is present.
2. Tap the up arrow beside the icon and select Keyboard.
3. Tap the Keyboard icon in the taskbar. Tapping the Keyboard icon in the taskbar is a toggle action (On/Off).
4. Move the cursor into the text entry field when you want to enter data using the Input Panel.
5. When finished entering data, tap the icon in the Taskbar again.
2 - 15
Page 36

Connecting to Bluetooth Devices
Before connecting to Bluetooth Devices:
• The system administrator, using the options on the EZPair (or LXEZ Pairing) control panel has discovered, paired, connected
and disconnected Bluetooth devices for the MX7 Tecton.
• The system administrator has enabled and disabled EZPair (or LXEZ Pairing) parameters for the MX7 Tecton.
• The system administrator has also assigned a Computer Friendly Name using the EZPair (or LXEZ Pairing) control panel for
the MX7 Tecton.
To connect Bluetooth devices, the MX7 Tecton should be as close as possible and in direct line of sight (distances up to 32.8
feet or 10 meters) with the targeted Bluetooth device during the discovery and pairing process.
If the Bluetooth devices are in Suspend, tap the power key to wake the MX7 Tecton.
Using the correct procedure, wake the targeted Bluetooth device if necessary.
There may be audible or visual signals as both devices discover and pair with each other.
Taskbar Bluetooth Indicator
MX7 Tecton is connected to one or more of the targeted Bluetooth device(s).
MX7 Tecton is not connected to any Bluetooth device.
MX7 Tecton is ready to connect with any Bluetooth device.
MX7 Tecton is out of range of all paired Bluetooth device(s). Connection is inactive.
There may be audible or visual signals from paired devices as they move back into range and re-connect with the Bluetooth
client in the MX7 Tecton.
2 - 16
Page 37

Attaching the Handstrap
Note: Either the trigger handle is attached to the MX7 Tecton or the handstrap is attached, not both. In the absence of a trigger
handle, the handstrap should be used at all times. The handstrap is pre-installed on a MX7 Tecton.
1. Handstrap Retainer Bracket
2. Handstrap and tethered stylus
3. Handstrap Clip
Tool Required: Phillips #1 screwdriver (not supplied)
1. Place the MX7 Tecton with the screen facing down, on a flat stable surface.
2. Attach the handstrap retainer bracket to the MX7 Tecton with the screws and washers provided.
3. Slip the Handstrap Clip into the bracket at the base of the MX7 Tecton.
4. Making sure the closed loop fastener surfaces on the handstrap are facing up, slide the strap through the pin in the bottom
bracket and the clip.
5. Fold each end of the strap over so that the closed loop fastener surfaces mate evenly.
6. Test the strap's connection making sure the MX7 Tecton is securely connected to each end of the handstrap's connectors.
Check the closed loop fastener, retainer bracket and clip connections frequently. If they have loosened, they must be tightened
or replaced before the MX7 Tecton is placed into service again.
2 - 17
Page 38

Attaching the Trigger Handle
Either the trigger handle or the handstrap is attached, not both. Honeywell recommends that, in the absence of a trigger handle,
the handstrap be used at all times.
Pressing the trigger on the trigger handle activates the integrated scanner and functions the same as the Scan button on the
keypad. With the trigger handle installed the Scan key on the keypad remains active. A trigger press duplicates the Scan button
press operation.
• The handle is built of a durable, flexible plastic.
• The handle will not detach from the MX7 Tecton if the unit is dropped.
• The trigger handle is a mechanical device. Battery or external A/C power is not
required for operation.
• The trigger handle does not need to be removed when replacing the main battery
pack.
• The trigger handle might also be called a pistol grip.
Tool required: Torque wrench capable of torquing to 3±1 in/lb (.34±.11 N/m).
1. Place the MX7 in Suspend.
2. Place the MX7 Tecton with the screen facing down, on a flat stable surface.
3. Remove the handstrap, if installed. Tool required: Phillips #1 screwdriver.
4. Remove the main battery.
5. Slide the locking tab on the underside of the trigger handle into the slot at the back of the battery compartment and press it
firmly into place.
6. Ensure that the main battery can be inserted into the battery compartment before securing the trigger handle in place.
7. Attach the trigger handle to the MX7 Tecton (as shown above) with the screws provided.
8. Torque the pan head screws to 3±1 in/lb (.34±.11 N/m).
9. Secure the strap tether to the trigger handle.
10. Place the stylus in the stylus holder in the bottom of the trigger handle. Tie the stylus tether to the stylus and the trigger
handle.
Periodically check the trigger handle for wear and the connection for tightness. If the handle gets worn or damaged, it must be
replaced. If the trigger handle connection loosens, it must be tightened or replaced before the MX7 Tecton is placed back in service.
2 - 18
Page 39

Assembling the Carry Case
Note: Accessory installation or removal should be performed on a clean, well-lit surface. When necessary, protect the work
surface, the MX7 Tecton, and components from electrostatic discharge.
The main battery can be removed and inserted without taking the MX7 Tecton out of the carry case.
1. Remove any cables connected to the I/O port at the bottom of the MX7 Tecton.
2. Remove the rubber boot from the MX7 Tecton.
3. Separate the hook and loop fabric on the carry case without removing the hook and loop fabric from the carry case.
4. Slip the removable, clear plastic protector for the keypad and touch screen into the case. Position it against the openings for
the keypad and touch screen in the carry case. The voice case does not require the clear plastic protector.
5. Slide the MX7 Tecton into the case, making sure the touch screen and keypad (including the Scan LED) are visible and
accessible through the front openings of the case.
6. Securely tether the stylus to the case, if necessary. Place the stylus in the stylus holder on the handstrap or in the trigger
handle.
7. Loosen then tighten the handstrap (on cases without a trigger handle opening) until the carry case assembly is secure in
your hand.
8. When a shoulder strap is available, secure the clips at each end of the shoulder strap to the D rings on either side of the
carry case. The shoulder strap allows the MX7 Tecton to hang upside down until needed.
Carry Case with Metal Snaps
The metal snap has a bulge in the lip and a dot indentation on the opposite side. To close the carry case, tuck the lip bulge
under the snap lip and press on the dot to snap closed.
Pull the snap up to open the carry case.
Connecting a Headset Cable
The headset consists of an earpiece, a microphone, a clothing clip and a cable. The headset attaches to the audio cable end of
the voice cable which attaches to the MX7 Tecton.
When the headset is cabled to the MX7 Tecton, the microphone and speaker on the front of the device are automatically disabled.
1. Microphone
2. Headphones
3. Connects to voice cable end of voice
cable
2 - 19
Page 40

1. Connect to MX7 Tecton I/O port
2
1
2. Connect to Headset Cable
1. Connect the MX7 Tecton voice cable I/O connector to the I/O port on the MX7 Tecton.
2. Slide the voice cable ends of the headset assembly and the voice cable together until they click shut. Do not twist or bend
the connectors.
3. Adjust the headset and microphone. Use the clothing clip to secure the cable to your clothing.
Voice Cable
Adjusting Headset / Microphone and Securing the Cable
Do not twist the microphone boom when adjusting the microphone. The microphone should be adjusted to be about two finger widths from your mouth.
Make sure the microphone is pointed at your mouth. Note the small “Talk” label near the mouthpiece. Make sure the Talk
label is in front of your mouth. The microphone cable can be routed over or under clothing.
Under Clothing
• Leave the cable exposed only at the top of the collar.
• Be sure to leave a small loop of cable to allow movement of your head.
Over Clothing
• Use clothing clips to hold the cable close to your body.
• Tuck the cable under the belt, but leave a small loop where it goes under the belt.
• Do not wear the cable on the front of your body. It may get in your way or get caught on protruding objects.
2 - 20
Page 41

Connecting the USB Client and Power Cable
Insert A/C
Adapter Cable
Connect to Input/
Output Port
Connect to USB
client port
Connect to Input/
Output Port
Insert A/C
Adapter Cable
Connect to Serial
client port
Note: AC/DC Adapter must be assembled before this process begins.
Note: Do not connect AC power to the AC Adapter until instructed in the following procedure.
1. Holding the cable I/O connector, pinch the catch release buttons in until the catches are open. Connect the cable to the
MX7 Tecton I/O port by matching the shape of the I/O connector on the cable with the shape of the I/O connector at the
base of the MX7 Tecton. Release the catch release buttons.
2. Insert the AC adapter single pin cable.
3. Connect the AC Adapter to an indoor power source (wall outlet).
4. Insert the USB client plug into the target USB Client port. The MX7 Tecton and the USB client are connected.
Connecting the Serial and Power Cable
Note: AC/DC Adapter must be assembled before this procedure begins.
Note: Do not connect AC power to the AC Adapter until instructed in the following procedure.
1. Holding the cable I/O connector, squeeze the catch release buttons in until the catches are open. Connect the cable to the
2. Connect the AC adapter single pin cable.
3. Connect the assembled AC/DC Adapter to an indoor power source (wall outlet).
4. Connect the RS232 cable end to the desired serial device. Turn the thumbscrews clockwise until the connection is finger-
MX7 Tecton I/O port by matching the shape of the I/O connector on the cable with the shape of the I/O connector at the
base of the MX7 Tecton. Release the catch release buttons.
tight. The MX7 Tecton and the serial device are connected.
2 - 21
Page 42

Assembling the AC/DC Power Supply
1. Connects to multi-purpose cables connected to the I/O port on the MX7 Tecton
2. AC receptacle
3. Wall plug
4. AC connection from wall to adapter
To apply external power to the MX7 Tecton follow the steps below in sequence.
1. Plug the 3 prong AC adapter cable end into an indoor AC power source (e.g., wall outlet).
2. Firmly press the female end of the power cable into the male connector on the power adapter. When AC power is being
supplied to the power adapter, the LED on the power adapter illuminates green. The AC adapter is ready for use.
3. Squeeze the catches of the (USB/Power or Serial/Power) I/O connector and push the cable connector into the MX7 Tecton
I/O port until it clicks. The click means the connector is seated firmly.
4. Press the power cable connector pin from the AC adapter into the connector on the (USB/Power or Serial/Power) cable
attached to the base of the MX7 Tecton. External power is now being supplied to the MX7 Tecton.
Whenever possible, use the AC power adapter with the MX7 Tecton to conserve the main battery power and maintain a charge
in the internal battery.
2 - 22
Page 43

Startup Help
Issue:
Can’t change the date/time or adjust the volume.
Solution:
AppLock is installed and may be running in User Mode on the MX7 Tecton. AppLock user mode restricts access to the control panels.
Issue:
Touch screen is not accepting stylus taps or needs recalibration.
Solution:
If the touch screen is not accepting stylus taps, press Ctrl+Esc (Blue+Alt) to force the Start Menu to appear. Use the arrow
keys to move from program to program. Press Enter to open folders or start a program e.g., Registry panel Warmboot button.
Issue:
The MX7 Tecton seems to lockup as soon as it is rebooted.
Solution:
There may be slight delays while the wireless clients connect to the network, authorization for voice-enabled applications
complete, Wavelink Avalanche management of the MX7 Tecton startup completes, and Bluetooth relationships establish or
re-establish. When the desktop appears or an application begins, the MX7 Tecton is ready for use.
Issue:
New MX7 Tecton main batteries don't last more than a few hours.
Solution:
New batteries must be fully charged prior to first use. Li-Ion batteries (like all batteries) gradually lose their capacity over
time (in a linear fashion) and never just stop working. This is important to remember – the MX7 Tecton is always ‘on’ even
when in the Suspend state and draws a small amount of battery power at all times.
Cold Storage Battery Life – minimum 2.5 hours while the unit is roaming, powered on with ambient temperature -10°C
(14°F) or above, display backlight turned on, keypad LED backlight on, radio connected to Access Point, and scanner
decoding bar codes. The Li-Ion main battery (MX7A381BATT, MX7393BATT, and MX7396BATTERY) has been designed
specifically for the Cold Storage device. This 1250mAh battery has a blue label while the standard 2200mAh battery has a
white (MX7A380BATT and MX7392BATT) label.
Issue:
Keep losing ActiveSync connection between my host computer and the MX7 Tecton.
Solution:
Disconnect the USB cable, wait 1-2 seconds and reconnect the cable. The MX7 Tecton will not enter Suspend as long as
an ActiveSync session is running. The ActiveSync session prevents it from going into suspend.
2 - 23
Page 44

2 - 24
Page 45

3
Hardware Configuration
System Hardware
802.11 a/b/g Wireless Client
The MX7 Tecton has an 802.11 network card that supports diversity with two internal antennas. The CPU board does not
allow hot swapping the network card. WEP, WPA and LEAP are supported.
Central Processing Unit
The CPU is an 806MHz Marvell PXA-320 CPU. The OS image is stored in internal flash and is loaded into RAM for execution. Turbo mode switching is supported and turned on by default.
The MX7 Tecton supports the following I/O components of the core logic:
• One SD card slot under the main battery pack.
• One serial port.
• One Digitizer Input port (Touch screen).
Program CAB files, MX7 Tecton utilities, wireless drivers, the registry and registry backup information are stored in internal
Flash.
System Memory
The CPU configuration supports 256MB on-board flash. The system optimizes for the amount of RAM available.
Internal flash is used for boot loader code and system low-level diagnostics code. Bootloader code is validated at system
startup.
Internal SD Card Slot
One SD Memory card slot for Expansion Memory, located in the main battery well, and protected by a rubber flap. 1GB and
4GB flash memory cards are available from Honeywell.
3 - 1
Page 46

Video Subsystem
The touch screen is a 3.5” (8.9 cm) diagonal viewing area, ¼ VGA 320 by 240 pixel TFT Reflective Active Color LCD. Backlighting is available and can be turned on and off with key sequences. The turn-off timing is configured through the Start >
Settings > Control Panel > Display icon. The display controller supports Microsoft CE 6 graphics modes.
A touch screen allows mouse functions (tapping on the display or signature capture) using a stylus. The touch screen has
an actuation force with finger less than 100 grams. The color display has an LED backlight and is optimized for indoor use.
The display appears black when the MX7 Tecton is in Suspend Mode.
Power Supply
The MX7 Tecton uses one of two batteries for operation.
• Main Battery. A rechargeable 2200 mAh Lithium-Ion (Li-Ion) battery pack. The battery pack recharges while in the MX7
Tecton when the device is connected to the optional external MX7 Tecton AC/DC power source. The main battery pack
can be removed from the MX7 Tecton and inserted in the MX7 Tecton Battery Charger which simultaneously charges up
to four battery packs in four hours. A new main battery pack can be fully charged in 6 hours when it is in an MX7 Tecton
connected to AC power and 3.5 hours when it is in the MX7 Tecton battery charger.
• Low temperature. A rechargeable Lithium-Ion (Li-Ion) battery pack has a 1250 mAh capacity.
• Super-capacitor (Super-cap). No backup “battery” is used. Super-cap internal battery maintains RAM and other vital
settings during a critical shutdown.
Note: An uninterrupted external power source (wall AC adapters) transfers power to the MX7 Tectons internal charging
circuitry which, in turn, recharges the main battery and Super-cap battery. Frequent connection to an external power
source, if feasible, is recommended to maintain main battery charge status as the Super-cap battery cannot be
recharged by a dead or missing main battery.
COM Ports
The MX7 Tecton has one mini D 20-pin serial port (a multifunction I/O port) that can be configured by the user. It has a
power input interface to allow powering the MX7 Tecton from an external source (AC/DC power supply or vehicle power).
The power input interface range is 10 - 18VDC.
RS232 Serial Port
Configured as COM1. Bi-directional full duplex and supports data rates up to 115 Kb/s. The port does not have RI or CD
signals nor does it support 5V switchable power on pin 9 for tethered scanners. The serial port driver supports full duplex
communications over the serial port. It supports data exchange via ActiveSync, but does not automatically start ActiveSync
when connected. The Cable, Multipurpose RS232 and Power and the Adapter, RS232 PC port to D9 male accessories can
be used with the RS232 serial port. External AC power is available when the multipurpose RS232/Power cable is connected. External AC power is not available for the Adapter, RS232 PC port to D9 male option. Power is drawn from the main
battery pack when this adapter is connected..
USB Client Port
The MX7 Tecton has one USB Client port for ActiveSync applications. An accessory USB cable, Cable, Multipurpose USB
and Power is available to connect the MX7 Tecton to a USB Type A plug on a PC for ActiveSync functions. External AC
power is available when the multipurpose USB Client/Power cable is connected.
Audio Connection
An audio headset interface is available using the Adapter, Audio accessory with the I/O port. The connection cable con-
nects the MX7 Tecton to a Voxware quick disconnect 4-pin interface. This cable adapts to specific styles of headsets for
voice input, stereo or mono output. The MX7 Tecton with a Summit Client supports mono only. A 3-wire connector with (at
a minimum) connections for ground, microphone, and 1 speaker. Connecting the headset to the MX7 Tecton COM port
turns off audio output to the MX7 Tecton speaker on the front of the device. All sounds previously directed to the speaker
are redirected to the headphone, including beeps. Bias voltage for an electric condenser microphone is available. External
AC power is not available for this option. Power is drawn from the main battery pack.
3 - 2
Page 47

Audio Support
Speaker
The speaker supplies audible verification signals normally used by the Windows operating system. The speaker is
located on the front of the MX7 Tecton, above the MX7 Tecton logo. The mobile device emits a Sound Pressure Level
(loudness) of at least 102 dB measured as follows:
• Frequency: 2650 + 100 Hz
• Distance: 10 cm on axis in front of Speaker opening in front of unit.
• Duration: Continuous 2650 Hz tone.
The default is 1 beep for a good scan and 2 beeps for a bad scan.
Vol u me Con tro l
Volume control is managed by a Windows control panel, an API and the Orange-Scan up/down arrow key sequence.
Voi c e
All Microsoft-supplied audio codecs are included in the OS image. The hardware codecs, the input and output analog
voice circuitry and the system design are designed to support voice applications using a headset connected to the
Adapter, Audio accessory cable and the MX7 Tecton I/O connector.
Scanner / Imager Port
The MX7 Tecton has one integrated bar code scanner/imager port. Only one scan engine is installed at a time. Scan
engines are not “hot swappable”. The MX7 Tecton may have one of the following bar code decoding engines:
• Short Range Laser Scanner, SE955I
• Base Laser Scanner, SE955E
• Multi-Range “LORAX” Laser, SE1524ER
• Hand Held Products 2D Area Imager, 5300
• Honeywell Laser Scanner, N43XX
• Honeywell Laser Scanner, N73XX
Note: 955E does not support aim mode. Any attempt to adjust the aiming beam using 955E programming bar codes will
fail. The Base Laser scanner does not decode Codablock, Code93i or Telepen symbologies.
The integrated scan engine activates when the Scan button on the front of the MX7 Tecton is depressed or when the trigger
on an installed trigger handle is depressed. The Data Collection application is available to set scanner/imager options.
Functionality of the integrated scan engine driver is based on the decoder driver version installed in the MX7 Tecton. Functions may include audible tones on good scan (at the maximum dB supported by the speaker), failed scan, Scan LED indication of a scan in progress, among other functions. If enabled, a vibration device provides a tactile response on a good
scan event.
Bluetooth EZPair (or LXEZ Pairing)
The MX7 Tecton contains Bluetooth version 2.1 with Enhanced Data Rate (EDR). Bluetooth device connection (or pairing)
can occur at distances up to 32.8 ft (10 meters) Line of Sight. The wireless client retains network connectivity while Bluetooth is active and the paired device is within range.
The user will not be able to select PIN authentication or encryption on connections from the MX7 Tecton. However, the MX7
Tecton supports authentication requests from pairing devices. If a pairing device requests authentication or encryption, the
MX7 Tecton displays a prompt for the PIN or passcode. Maximum encryption is 128 bit. Encryption is based on the length
of the user’s passcode.
Bluetooth devices can be paired and managed using the EZPair (or LXEZ Pairing) control panel.
• The MX7 Tecton does not have a Bluetooth managed LED.
• The LED on a mobile Bluetooth scanner illuminates during a scanning operation; the Scan LED on the MX7 Tecton does
not illuminate.
• Bar code data captured by a mobile Bluetooth scanner is manipulated by the settings in the Data Collection control panel.
• Multiple beeps may be heard during a bar code scan using a mobile Bluetooth scanner; beeps from the mobile Bluetooth
scanner as the bar code data is accepted/rejected, and other beeps from the MX7 Tecton during final bar code data
manipulation.
3 - 3
Page 48

Keypads
BkSp
Del
BkSp
Del
55 Key Keypads
ANSI Primary Delete ANSI Primary Backspace 5250 Primary Delete
Using the 55 Key Alpha-Numeric Keypad
There are three options available for the 55 key keypad:
1. 55 key Alphanumeric Keymap - Primary Delete (page 12-1).
2. 55 Key 5250 Alphanumeric KeyMap - Primary Delete (page 12-6). 5250 commands are displayed on the keypad overlay next to the affected keys.
3. 55 key Alphanumeric Keymap - Primary Backspace (page 12-11). This keypad resembles the ANSI Primary
Delete keypad with the exception that the Del key function on the ANSI Primary Delete keypad is replaced by
the BkSp key function.
3 - 4
• When using a sequence of keys that includes a sticky key, press the sticky key first, release it, then press the
rest of the key sequence.
• When using a sequence of keys that includes the Orange or Blue keys, press the color key first then the rest of
the key sequence.
• Alphabetic keys default to lower case letters. Press the Shft key, then the alphabetic key for an uppercase letter.
• When the computer boots, the default condition of Caps (or CapsLock) is Off. The Caps (or CapsLock) condition
can be toggled with Blue plus Tab key sequence.
Page 49

32 Key Keypad
Triple Tap Alpha
Using the 32 Key Numeric with Triple Tap Alpha
32 key Numeric-Alpha Keymap (page 12-16)
• When using a sequence of keys that require an alpha key, first press the Alph key. Use the Shft sticky key or
the Caps key sequence (Blue+Tab) for upper case alphabetic characters. See 32 key Numeric-Alpha Keymap
(page 12-16).
• Pressing the Alph key forces “Alpha” mode for the 2,3,4,5,6,7,8, and 9 keys. The 1 and 0 keys continue to place
a 1 and 0 into the text field.
• To create a combination of numbers and letters before pressing Enter, tap the Alph key to toggle between Alpha
and Numeric mode.
• When using a sequence of keys that do not include the Alph key but does include a sticky key, press the sticky
key first then the rest of the key sequence.
3 - 5
Page 50

Display
The touch screen display is an active color LCD unit capable of supporting VGA graphics modes. Display size is 240 x 320
pixels in portrait orientation. The covering is designed to resist stains. The touch screen allows signature capture and touch
input. A pen stylus is included. The touch screen responds to an actuation force (touch) of 4 oz. of pressure (or greater).
The color display is optimized for indoor lighting. The display is black when the device is in Suspend Mode or when both
batteries have expired and the unit is Off.
Display Backlight Timer
When the Backlight Timer expires the display backlight is turned off. The default value for the battery power timer is 3
seconds. The default value for the external power timer is “never” and the check box is blank. The backlight timer dims
the backlight on the touch screen and the keypad at the end of the specified time. When the display wakes up, the
Backlight timer begins the countdown again. The keypad backlight can be synchronized with the display backlight
activity.
Status LEDs
• The MX7 Tecton does not have a Bluetooth managed LED. Bluetooth activity indicators are located in the taskbar.
• System Status LED is located at the top left of the keypad, above the Scan button.
• The Scan Status LED is located below the keypad.
• The Alpha Mode LED is located below the F4 key on the 32-key keypad (Numeric-Alpha keypad).
LED Color - Activity Indicates ...
System Status Red - Blinking Power fail. Replace the main battery with a fully charged main battery.
Red - Steady Main Battery Low. If the main battery is not replaced with a fully charged battery before
Green - Blinking Display Off. No user intervention required.
No Color MX7 Tecton is either full on - with the display on (backlights may be dimmed when the
Scan Status Green - Steady Good scan.
Red – Steady Scan in progress.
No color Integrated Scanner / Imager ready for use.
Amber - Steady Bar code decoder engine is storing changed parameters.
Alpha Mode
(Alph LED)
Green - Steady MX7 Tecton 32-key is in Alpha character input mode.
No color MX7 Tecton 32-key is in Numeric key input mode.
Or
Connect the MX7 Tecton to external AC power then replace the main battery with a fully
charged main battery.
the main battery fails, the MX7 Tecton is turned Off.
status LED has no color) or in Suspend - with the display off.
Cold Storage Configuration
• MX7 Tecton 1250mAh Cold Storage battery has a blue label.
• Snowflake decal above the MX7 Tecton keypad.
• Heating element visible on the touch screen and the scan aperture.
Cold storage battery is recharged in the MX7 Tecton Battery Charger, MX7 Tecton Desk Cradle and when in an MX7 Tecton
attached to an external power source (e.g., AC adapter).
The Cold Storage version is designed to operate normally when reading bar codes and moving from, and into, cold storage
warehouses, freezers and vehicles where the temperatures may vary between -30°C and 5°C (-22°F and 41°F).
Cold Storage Battery
There is no change in the way the Cold Storage battery is inserted into and removed from the MX7 Tecton battery well.
Battery Life – minimum 2.5 hours while the unit is roaming, powered on with ambient temperature -10°C (14°F) or
above, Display backlight turned on, Keypad LED backlight on, radio connected to Access Point, and scanner decoding
bar codes.
3 - 6
Page 51

The Li-Ion main battery (MX7A381BATT and MX7393BATT) has been designed specifically for the Cold Storage
device. This 1250mAh battery has a blue label while the standard MX7 Tecton 2200mAh battery has a white
(MX7A380BATT and MX7392BATT) label.
Snowflake Decal
A Cold Storage device has a snowflake decal between the touch screen and the keypad. The decal is located to the left
when the screen is facing forward.
Heating Elements
Heating elements activate when ambient temperature drops below 0°C (32°F). Using the stylus when performing
screen touch functions is recommended. There may be some condensation as the Cold Storage device moves in and
out of cold storage areas. The condensation on the touch screen and the scan aperture quickly dissipates.
The touch screen heating elements and scanner aperture heating elements may be visible when the Cold Storage
device is tilted slightly. No user interaction is required to turn the heating elements on/off. Stylus taps on the touch
screen function normally. Due to the heating element overlaying the scan aperture, bar code scanning may require the
user to move the scan aperture closer to the bar code for good scan results.
Recharging Cold Storage Batteries
The Cold Storage battery pack can be recharged to full capacity while in a Cold Storage MX7 Tecton connected to an
external power source and also while the Cold Storage battery pack is inserted in the charging bay in a powered MX7
Tecton cradle. The battery pack temperature must be above 10°C (50°F) before re-charging can begin.
Battery packs in the Battery Charger begin charging when the battery pack temperature is between 10°C (50°F) and
40°C (100°F).
To charge the Cold Storage battery pack to full capacity, the Battery Charger firmware must be V1.07 or greater. The
firmware version is noted on the battery charger label on the bottom of the charger.
Contact Product Service and Repair (page 16-1) if your battery charger firmware needs to be upgraded.
The Battery Charger and AC adapter are not designed to operate in a freezer or cold storage environment.
Hot-swapping the Cold Storage Battery
The Cold Storage mobile device, with a fully charged Super-cap battery, retains data during a main battery hot-swap at
-30°C (-22°F) for at least 90 seconds. The temperature of the fully charged replacement Cold Storage main battery
must be +10°C (14°F), or above.
Normal Operation Temperature Ranges
• In the freezer where the temperature ranges between –30°C to -18°C (-22°F to 0°F).
• In the loading dock where temperature ranges between 0°C to 5°C (32°F to 41°F) with the relative humidity at 65%
• Moving between the freezer and a loading/unloading area where the temperature transitions from -30°C to 5°C (22°F to 41°F).
3 - 7
Page 52

3 - 8
Page 53

4
Power Modes and Batteries
Power Modes
The MX7 Tecton has three power modes: On, Suspend and Off.
On Mode
The Display
When the display is On:
• the keypad, touch screen and all peripherals function normally
• the display backlight is on until the Backlight timer expires
The MX7 Tecton
After a new MX7 Tecton has been received, a charged main battery inserted, and the Power key tapped, the MX7 Tecton is
always On until both batteries are drained completely of power.
When the main battery and Super-cap battery are drained completely, the unit is in the Off mode. The unit transitions from
the Off mode to the On mode when a charged main battery is inserted or external power is applied and the Power key is
pressed.
Suspend Mode
The Suspend mode is entered when the unit is inactive for a predetermined period of time or the user taps the Power key.
MX7 Tecton Suspend timers are set using Windows control panels.
Wake-up Events - all configurable via a Power Management API call:
• Any key on the keypad
• Stylus touch on the touch screen
• Handle trigger press
• Connecting to AC adapter
• Power button tap
• USB connection
• COM port control CTS
• Real time clock
• Bluetooth device reconnect / disconnect message
When the MX7 Tecton wakes up, the Display Backlight and the Power Off timers begin the countdown again. When any one
of the above events occurs prior to the Power Off timer expiring, the timer starts the countdown again. The MX7 Tecton
does not need to be placed in Suspend mode before hotswapping the main battery.
Off Mode
The unit is in Off Mode when the main battery and the Super-cap battery are depleted. Insert a fully charged main battery
and press the Power key to turn the MX7 Tecton On.
4 - 1
Page 54

Batteries
The MX7 Tecton is designed to work with a Lithium-Ion (Li-ion) battery. Under normal conditions it should last approximately
eight to ten hours before requiring a recharge. The more you use the scanner or the wireless transmitter, the shorter the time
required between battery recharges.
A suspended MX7 Tecton maintains settings for a minimum of two days using a main battery that has reached the Low Warning
point and a fully charged Super-cap internal battery. The MX7 Tecton retains data, during a main battery hot swap, for at least 5
minutes.
Note: New main battery packs must be charged prior to use. This process takes up to four hours in an MX7 Tecton Battery
Charger and six hours when the MX7 Tecton is connected to external power.
Checking Battery Status
Tap the Battery tab on the Power panel. Battery level, power status and charge remaining is displayed.
Note: When the Battery control panel is displayed power management is disabled, meaning the backlights and display will
not turn off nor will the unit suspend, after the configured inactivity times expire.
Main Battery Pack
The main battery pack has a rugged plastic enclosure that is designed to withstand the ordinary rigors of an industrial environment. Exercise care when transporting the battery pack making sure it does not come in contact with excessive heat or
any power source other than the MX7 Tecton Battery Charger or the MX7 Tecton unit.
When the main battery pack is properly installed in the unit it provides up to eight hours of operation depending upon use
and accessories installed. The battery pack is resistant to impact damage and falls of up to four feet to a concrete surface.
Under normal conditions it should last approximately eight hours before requiring a recharge. The more you use the scanner or the wireless transmitter, the shorter the time required between battery recharges.
Battery Hotswapping
Note: When the internal battery power is Low or Very Low (can be viewed on the Power control panel) connect the AC
adapter to the MX7 Tecton before replacing the main battery pack.
When the main battery power level is low, the MX7 Tecton will signal the user with the low battery warning indicator (the
Status LED remains a steady red) that continues until the main battery is replaced, the battery completely depletes, or
external power is applied to the MX7 Tecton using an AC Adapter.
You can replace the main battery by first placing the MX7 Tecton in Suspend Mode then removing the discharged main battery and installing a charged main battery within a five minute time limit (or before the Super-cap internal battery depletes).
When the main battery is removed the MX7 Tecton enters Critical Suspend state; the MX7 Tecton remains in Suspend
mode, the display is turned off and the internal battery continues to power the unit for at least five minutes.
Though data is retained, the MX7 Tecton cannot be used until a charged main battery is installed. After installing the new
battery, press the Power key. Full operational recovery from Suspend can take several seconds while the client is re-establishing a network link. If the internal battery depletes before a fully charged main battery can be inserted, the MX7 Tecton
will turn Off.
Low Battery Warning
It is recommended that the main battery pack be removed and replaced when its energy depletes. When the main battery
Low Battery Warning appears (the Status LED remains a steady red) perform an orderly shut down, minimizing the operation of any installed devices and insuring any information is saved that should be saved.
Super-cap Internal Battery
The MX7 Tecton has an internal battery that is designed to provide limited-duration electrical power in the event of main
battery failure. The energy needed to maintain the internal battery near full charge at all times is drawn from the MX7 Tecton main battery. It takes 5 minutes or less to fully charge the internal battery. The duration of internal battery life is dependent upon operation of the MX7 Tecton, its features and any operating applications. The internal battery has a minimum
service life of two years. The Super-cap internal battery is replaced by Honeywell.
4 - 2
Page 55

Handling Batteries Safely
• Never dispose of a battery in a fire. This may cause an explosion.
• Do not replace individual cells in a battery pack.
• Do not attempt to pry open the battery pack shell.
• Be careful when handling any battery. If a battery is broken or shows signs of leakage do not attempt to charge it. Dispose
of it using proper procedures.
Caution
Nickel-based cells contain a chemical solution which burns skin, eyes, etc. Leakage from cells is the only possible way for
such exposure to occur. In this event, rinse the affected area thoroughly with water. If the solution contacts the eyes, get
immediate medical attention.
NiMH and Li-Ion batteries are capable of delivering high currents when accidentally shorted. Accidental shorting can occur
when contact is made with jewelry, metal surfaces, conductive tools, etc., making the objects very hot. Never place a battery in a pocket or case with keys, coins, or other metal objects.
4 - 3
Page 56

4 - 4
Page 57

5
Software Configuration
Introduction
There are several different aspects to the setup and configuration of the MX7 Tecton. Many of the setup and configuration settings are dependent upon the optional features such as hardware and software installed on the mobile device. The examples
found in this section are to be used as examples only, because the configuration of your specific MX7 Tecton may vary. The following sections provide a general reference for the configuration of the MX7 Tecton and some of its optional features. Contact
Technical Assistance (page 16-1) for information on the latest upgrades.
Windows Mobile
Note: For general use instruction, refer to commercially available Windows Mobile user’s guides or the Windows Mobile on-line
Help application in the MX7 Tecton
This section’s contents assumes the system administrator is familiar with Microsoft Windows options and capabilities loaded on
most standard Windows desktop computers.
Therefore, the sections that follow describe only those Windows capabilities that are unique to the MX7 Tecton and its Windows
Mobile environment.
Installed Software
Note: Some options require an external modem connection. Modems are not available from Honeywell.
When you order an MX7 Tecton you receive the software files required by the separate programs needed for operation and wireless client communication. The files are loaded and stored in folders in the mobile device.
This section lists the contents of the folders and the general function of the files. Files installed in each MX7 Tecton are specific
to the intended function of the MX7 Tecton.
Files installed in mobile devices that are configured for a wireless environment usually contain a radio specific driver – the driver
for the radio is specific to the manufacturer of the radio installed in the wireless host environment and is not interchangeable.
Software Load
The software loaded on the MX7 Tecton computer consists of Windows Mobile Operating System, hardware-specific OEM
Adaptation Layer, device drivers, Internet Explorer for Windows Mobile browser and MX7 Tecton-specific utilities. The software supported by the MX7 Tecton is summarized below:
• Operating System - Full Operating System License: Includes all operating system components, including Windows
Mobile kernel, file system, communications, connectivity (for remote APIs), device drivers, events and messaging,
graphics, keyboard and touch screen input, window management, and common controls.
• Network and Device Drivers
• Bluetooth (Option)
• AppLock (Option)
• RFTerm (VT220, TN5250, TN3270) Terminal Emulation (Option).
• CE API Routines
Software Backup
Application programs and data that are normally RAM resident are backed up via ActiveSync.
Version Control
Version numbers are applied to the boot loader and the OS image independently. The version information stored consists of
the build number, plus the date and time of compile (in lieu of a build number). These version numbers are stored in nonvolatile storage, where the user cannot inadvertently modify them. A Settings panel and API are provided so the user can
reference the version numbers for support purposes.
The MX7 Tecton has a unique 128-bit ID code as required by the Windows Mobile specification. This ID number is generated by the boot loader. This ID code is available in the About Info settings panel, and via a Win32 standard API.
5 - 1
Page 58

In addition, an API is provided to return a standard copyright string, so that applications may reference this to be sure they
are running on a Honeywell mobile device for licensing purposes.
Boot Loader
The MX7 Tecton supports a proprietary boot loader. It is the responsibility of the boot loader to:
• Initialize all system hardware
• Initiate OS startup
• Handle wakeup from system suspend, loading saved state
The MX7 Tecton re-starts the OS during warmboot and restart.
Startup Folders and Launch Sequences
The MX7 Tecton operating system uses two startup folders:
• User applications placed in the Windows\Startup folder automatically run during a reboot. They are deleted upon a clean
boot.
• User applications placed in the System folder automatically run during a reboot.
Software Development
The CE API Programming Guide documents CE API calls for the MX7 Tecton. It is intended as an addition to the standard Microsoft Windows Mobile API documentation.
A Software Developers Kit (SDK) and additional information about software development can be found on the Developer Portal.
Contact Technical Assistance (page 16-1) for more information.
Today Screen
For general use instruction, refer to commercially available Windows Mobile user guides or the Windows Mobile on-line Help on
the MX7 Tecton.
The main screen for the MX7 Tecton is known as the Today screen. The Today screen shows various options and status icons.
The Today screen appearance can be configured using the Today (page 5-22) control panel. Both the appearance of the Today
screen and the items displayed may be configured.
1. Start menu
2. Configurable Today screen listing
3. Notification Bar
4. Status icons
5. Soft Keys
5 - 2
Page 59

Start Menu
The Start menu consists of applications and folders.
• Selecting an application from the menu starts that application.
• Selecting a folder opens a window displaying the contents of the folder.
• Selecting Settings displays the Settings panels by category.
• Selecting Help displays context sensitive help. The contents displayed in the help window vary depending on the screen
displayed before Help was accessed.
Programs not appearing on the Start menu can be accessed by using the File Explorer.
Configurable Today Screen Listing
The items displayed in the Today screen listing can be configured from Start > Settings > Today > Items. For more information, see Today (page 5-22) settings later in this chapter.
Date
When the Date is enabled to display on the Today screen, the date is displayed on the left side of the screen and the time is
displayed on the right side. If there are any alarms set, a bell icon is displayed under the current time. For more information,
see the Clock & Alarms (page 5-14).
Device Unlocked / Device Locked
When the MX7 Tecton is unlocked, tapping on Device unlocked locks the MX7 Tecton.
When the MX7 Tecton is locked, tapping on Unlock at the bottom of the screen unlocks the MX7 Tecton. Depending on the
settings, a password may be required. The MX7 Tecton can also be configured to lock after a period of inactivity. For more
information, see the Lock (page 5-16) settings.
Notification Bar
The Notification Bar is displayed at the top of the Today screen. The notification bar remains visible even when other
screens are selected, though the icons displayed may vary.
When the Notification bar is displayed on other screens there may be an X (close the current screen/program) or an ok
(accept the current input and close the screen).
Category Icon Function
Network The Windows Mobile Wireless Manager is managing the wireless connection and the MX7
Network A wireless manager is managing the wireless connection.
Network A wireless manager is managing the wireless connection and has detected one or more wire-
Network A wireless manager is managing the wireless connection and has not detected a wireless net-
Volume The speaker is on.
Volume The speaker is off.
Volume Vibrate is on.
Power The MX7 Tecton is connected to external power.
Power The MX7 Tecton is operating on battery power. The strength of the battery is indicated by the
Tecton is connected to a wireless network.
less networks in range.
work in range.
number of bars displayed: 0 (low battery) to 4 (fully charged battery).
5 - 3
Page 60

Status Icons
Additional icons may be displayed at the lower edge of the Today screen.
Note: Summit signal strength icons are displayed only when the Summit Client Utility is controlling the radio.
Icon Function
MX7 Tecton is connected to one or more of the targeted Bluetooth device(s).
MX7 Tecton is not connected to any Bluetooth device.
MX7 Tecton is ready to connect with any Bluetooth device.
MX7 Tecton is out of range of all paired Bluetooth device(s). Connection is inactive.
Summit radio is not currently associated or authenticated to an Access Point.
The signal strength for the currently associated/authenticated Access Point is less than -90 dBm
The signal strength for the currently associated/authenticated Access Point is -71 dBm to -90 dBm
The signal strength for the currently associated/authenticated Access Point is -51 dBm to -70 dBm
The signal strength for the currently associated/authenticated Access Point is greater than -50 dBm
More information on Bluetooth activity and settings can be found in Bluetooth Configuration (page 7-1).
Soft Keys
Soft Keys are displayed at the bottom of the Today screen. The keys displayed vary by the active screen/application.
The soft keys generally provide menus for the selected application. By default, on the Today screen, the left Soft Key (Calendar) can also be accessed by pressing F1 and the right Soft Key (Contacts) can be accessed by pressing F2. The
assignments for the Soft Keys can be edited using Buttons (page 5-24).
Installed Programs
Additional information on installed programs is listed below.
Internet Explorer Mobile
This browser is a subset of and is compatible with IE 7.0 (as might be installed on a desktop PC). Internet Explorer Mobile
8 has two viewing modes: Reading mode and Overview mode.
For information on general configuration options, see the Windows Mobile help system on the MX7 Tecton or other commercially available Internet Explorer configuration resources. Tap the IE Menu soft key (on the lower right) and select Tools
> Options to set up the default home page, view browsing history, setup privacy and security, preferred language, and
Other options.
If an Internet Explorer webpage is larger than the MX7 Tecton screen can display at one time, use touch screen gestures
for horizontal and vertical scrolling.
For information on the version of Internet Explorer loaded on the MX7 Tecton, tap the Favorites soft key and select About
Internet Explorer.
Office Mobile Applications
Office 2003 and Office 2007 formats are supported, though these are subset applications so not all objects may appear as
expected.
ActiveSync handles all file format conversions for Office Mobile files transferred between the MX7 Tecton and the host PC.
ActiveSync
ActiveSync can be setup to synchronize with an Exchange server. Contact your system administrator for configuration information.
5 - 4
Page 61

AppLock (Option)
The AppLock program is accessed by the user or the AppLock Administrator at bootup or upon completion of a cold boot.
Set parameters using the Administration option in the Settings Panel.
Summit
SCU (Summit Client Utility)
Summit automatically installs and runs after every cold boot. See Wireless Network Configuration (page 11-1) for Summit Client Utility setup information and instruction.
Certs
Contents of README.TXT file located in Start > Summit > Certs menu option. See Wireless Network Configuration
for instruction on acquiring CA and user certificate files.
Windows Media
Codecs are included for WMA, WMV, MP3 and WAV files.
Bluetooth (Option)
Only installed on a Bluetooth equipped MX7 Tecton. The System Administrator can Discover and Pair targeted Bluetooth
devices for each MX7 Tecton. The System Administrator can enable / disable Bluetooth settings and assign a Computer
Friendly Name for each MX7 Tecton. Bluetooth can be accessed using the Bluetooth control panel, or by tapping the Bluetooth icon on the Today screen.
RFTerm (Option)
The application can be accessed by tapping Start > RFTerm.
Refer to the RFTerm Reference Guide for complete information and instruction. WAV files added by the user should be
stored in System\LXE\RFTerm\Sounds.
Status Popup
The Status Popup provides real time information on several status icons when a specified keypress occurs.
To use the Status Popup, first map a key to the Status window. Use the Buttons panel (Start > Settings > Personal > But-
tons) to assign a key to Admin Statpop (for the Admin Popup) and StatPopup (for the User Popup). Use a Diamond key for
the popup. If a Function key is used, that Function key is not available to other applications such as RFTerm.
Use the MX7 Tecton Options control panel to configure other parameters including:
• Dismiss Status Popup on 5 second timeout.
• Information to include in Admin or User Status Popup.
The Status Popup can be dismissed by the expiration of the timeout (if enabled), tapping the status window or pressing the
key assigned to close the popup.
For more information, refer to the Buttons (page 5-24) and MX7 Tecton Options (page 5-40)settings.
HSM Connect (or LXEConnect)
HSMConnect allows a user with an ActiveSync connection between a PC and the MX7 Tecton to display the MX7 Tecton
screen on the host PC. Any keystrokes on the host PC are passed to the MX7 Tecton as if they were keystrokes on the MX7
Tecton keypad.
HSM Connect for the MX7 Tecton running Windows Mobile is available for download to the MX7 Tecton from the Getting
Started Disc. Contact Technical Assistance (page 16-1) if the Getting Started Disc shipped with the MX7 Tecton is not
available.
GrabTime
GrabTime is a utility to synchronize the MX7 Tecton with a world-wide time server. GrabTime can be started as a service by
setting it in the Launch option. See Enhanced Launch Utility (page 9-1) for information.
5 - 5
Page 62

Synchronize with a local time server
• Use ActiveSync to copy GrabTime.ini from the My Device > Windows folder on the MX7 Tecton to the host PC.
• Edit GrabTime.ini (on the host PC) to add the local time server’s domain name to the beginning of the list of servers.
You can then optionally delete the remainder of the list.
• Copy the modified GrabTime.ini to the My Device > Windows folder on the MX7 Tecton.
Enhanced Launch
Launch is a utility that runs automatically at startup. A partial list of Enhanced Launch functions includes:
• Launch a .CAB file
• Run an .EXE or .BAT file
• Process a .REG file
• Manipulate files and directories
• Modify registry keys
• Perform conditional operations
Note: The Enhanced Launch utility does not interact with or affect the AppLock Launch command.
For a complete list of Launch functions including commands and command structure, see Enhanced Launch Utility (page 9-
1).
5 - 6
Page 63

MX7 Tecton OS Upgrade
Depending on the size of the operating system, the total time required for a successful upgrade may require several minutes.
The OS upgrade files are unique to your MX7 Tecton physical configuration and date of manufacture. OS upgrade files designed
for one device configuration should not be used on a different device configuration.
The MX7 Tecton running Windows Mobile must be returned to the manufacturer, Honeywell, if the device is to be re-imaged with
any other Windows operating system (for example, Windows CE 6).
During the upgrade process all settings revert to factory defaults. Parameters will need to be changed from factory defaults to
your preferred values at the conclusion of the upgrade process.
Preparation
• Contact Technical Assistance (page 16-1) to get the OS upgrade files from Honeywell.
• Removing and installing the SD Flash card should be performed on a clean, well-lit surface.
• Always perform MX7 Tecton updates when it has a fully charged main battery and/or a dependable external power source
connected to the MX7 Tecton.
Procedure
1. Place the new image files and MX7Update on a SD card.
2. Place the MX7 Tecton in Suspend Mode and remove the main battery.
SD Card Location
3. Lift the rubber barrier and slide the SD card out of the slot. Do not remove the rubber barrier. The MX7 Tecton may not
have a SD card in the slot because the OS is in flash.
4. Place the card with the new image files on it into the SD slot. The label on the SD card should be facing up.
5. Launch MX7UPDATE.EXE in My Device > Storage Card.
6. Verify the Target OS = WinMobile check box is checked
7. Important: If a failure occurs during the update, DO NOT RESTART (or coldboot). Follow the instructions on the
screen to Exit the update utility then restart the update utility.
8. Tap Start to start the update. The check box is dimmed when the Update is processing. Do not touch the device until
the install/update is complete.
Update Icon
5 - 7
Page 64

When the bootloader process is complete, tap the Yes button to reboot to complete the update process. Tap the No button
and the update is not complete.
When the process is finished (MX7 Tecton has restarted), remove the SD card, replace the rubber barrier and replace the
main battery. Turn the MX7 Tecton on.
Check the OS update version by viewing the About Info (or About LXE) Settings panel.
Note: If the application displays “Update OS Image Failed” or “Update Boot Loader Image Failed”, do not Restart the system
manually. Perform a warm boot, then try the upgrade again. Restarting will cause a system crash, since there is no
valid image in the MX7 Tecton system.
Battery State and OS Upgrade
A fully charged main battery should be installed in the MX7 Tecton prior to upgrading the operating system. A prompt may
appear when the battery reaches Critical Low that informs the user there is not enough power in the main battery to perform the upgrade.
The operating system will not be able to execute the OS upgrade when the battery level is too low (25% or less), as there is
a high risk that the power remaining in the battery expires when executing the upgrade and the MX7 Tecton will be left in an
inoperable state.
When main battery power level is too low, connect external power to the MX7 Tecton before performing the upgrade procedure. Do not disconnect external power before the upgrade process is complete.
The MX7 Tecton running Windows Mobile must be returned to Honeywell if the device is to be imaged with any other Windows operating system (for example, Windows CE).
Update Help
Issue:
The powered device won't boot up after the upgrade is finished.
Solution:
Send the MX7 Tecton to Product Service and Repair (page 16-1) for re-imaging. Warning: Opening the device e.g.,
removing endcaps or access panels, etc., could void the user's authority to operate this equipment.
Start Menu Options
The following options represent the factory default program installation. Your system may be different based on the software and
hardware options purchased.
5 - 8
Page 65

Use the up and down arrow keys on the MX7 Tecton to quickly scroll through the icons,
or,
using screen touch gestures, brush the window up or down with a finger or the stylus.
ActiveSync. Basic ActiveSync configuration, including synchronization with an Exchange server. See Using
ActiveSync (page 5-70)
Avalanche. Enabler Installation and Configuration (page 10-1) installation files are loaded, but not installed at initial
startup, on the mobile device when it is shipped.
Calculator (page 5-54)
Calendar (page 5-55). Can be synchronized with PC Outlook calendar using ActiveSync.
Contacts (page 5-55). Address book application. Can be synchronized with PC Outlook address book using Ac-
tiveSync.
Email (page 5-56). Can be synchronized with PC Outlook email using ActiveSync or it can synchronize with an Ex-
change server.
File Explorer (page 5-56). Displays a structured picture of files on the system.
Help (page 5-57). Access Windows Mobile help system on the MX7 Tecton. Options to search using Windows Live
Search are available.
Internet Explorer Mobile (page 5-61). Access web pages on the Internet.
Windows Live (page 5-59). Instant Messaging service. Internet access required.
Notes (page 5-58). Notebook application. Select Menu > View Recording Toolbar to create an audio note. Can be
synchronized with PC Outlook notes using ActiveSync.
Office Mobile (page 5-11). Access to Excel, PowerPoint, Word and OneNote. Compatible with Microsoft Office 2007.
Pictures and Video (page 5-58). Picture/video viewer application. Can be synchronized with PC My Documents folder
using ActiveSync.
5 - 9
Page 66

Remote Desktop (Auto). A shortcut to Remote Desktop Mobile with Connect activated..
Remote Desktop (page 5-67). Display remote desktop. Setup for computer, user name, password and domain re-
quired. Use Options to setup connected options for the remote desktop.
Settings Panels (page 5-14). Access to system level setup programs. Connections Panels (page 5-50), Personal
Panels (page 5-23), and System Panels (page 5-29) among others.
Task Manager (page 5-49). View and cancel running tasks.
Tasks (page 5-59). Task list application. Can be synchronized with PC Outlook task list using ActiveSync.
Text. Requires an email application. Can be synchronized with PC Outlook email using ActiveSync or it can synchronize with an Exchange server.
Today (page 5-22). Configure the appearance and the items to display on the Today screen.
Windows Live (page 5-59). Sign in to Microsoft Windows Live online service. Internet access required.
Windows Media (page 5-60). Audio visual management program. Not supported on the MX7 Tecton.
5 - 10
Page 67

Office Mobile
Excel Mobile (page 5-64). Spreadsheets can be edited, data can be sorted, formatting and changes are pre-
served.
PowerPoint Mobile (page 5-65). Open, view and edit slides in landscape or portrait format. Zoom and GoTo fea-
tures enabled.
Word Mobile (page 5-65). Open, view, edit documents. Formats are saved. Spelling checker, cut and paste are
available, undo and redo commands.
OneNote Mobile (page 5-66).
Settings
Clock & Alarms (page 5-14). Set Date, Time, Time Zone, and alarms.
Lock (page 5-16). Set password protection.
Power (page 5-18). Review battery status. Set time limit before device is turned off.
Sounds & Notifications (page 5-20) Enable / disable sounds and vibrations. Set volume parameters and assign
sound (wav) files to OS events.
Today (page 5-22). Configure the Today screen.
Connections Panels (page 5-50). Set up various connections between a host and the MX7 Tecton.
Personal Panels (page 5-23). Configure Buttons, Input method and Owner information.
System Panels (page 5-29). Review system information. Set up operating system and equipment parameters.
5 - 11
Page 68

Personal
System
About Info (or About LXE) (page 5-23). View software, hardware, versions and network IP. No user
intervention required.
Buttons (page 5-24). Set functions of programmable buttons.
Input (page 5-26). Set input options for keypad, touch screen and voice.
Owner Information (page 5-28). Set the mobile device owner details (name, phone, etc.). Enter notes.
About (page 5-29). Display OS version information. Set device name.
AppLock (Application Locking) (page 6-1). AppLock Administration utility.
Backlight (page 5-31). Set the display backlight brightness and display/keypad backlight timeout. Configure the
timeout based on type of power source: battery or external power.
Battery (page 5-33). View voltage and status of the main battery.
Bluetooth Configuration (page 7-1). Set the parameters for Bluetooth device connections. .
Certificates (page 5-34). Manage digital certificates used for secure communication.
Data Collection Wedge (page 8-1) utility for data collected from bar code scans. Set data collection device, no-
tifications, data stripping, prefix/suffix, and vibration (if installed) options. Assign baud rate, parity, stop bits and
data bits for COM1 port. Assign collected data manipulation parameters.
Encryption (page 5-35). Enable file encryption on removable storage cards.
External GPS (page 5-36). Configure serial GPS access.
5 - 12
Page 69

License Manager (page 5-37). View license information for installed licensed applications.
Managed Programs (page 5-37). View install history for .NET programs.
Memory (page 5-38). Display current state of virtual memory.
Mixer (page 5-39). Adjust the input and output parameters – volume, side-tone, and record gain, for headphone,
software and microphone.
MX7 Tecton Options (page 5-40). Set various device specific configuration options.
Peripherals (page 5-42). Enable or disable touch screen heater and scanner window heater, if installed. Set the
heater trip point in degrees C.
Regional Settings (page 5-43). Set appearance of numbers, currency, time and date based on country region
and language settings.
Registry (page 5-45). Load User Defaults, Save User Defaults, Load Factory Defaults, and Warmboot.
Remove Programs (page 5-46). Remove user installed programs.
Screen (page 5-46). Calibrate touch screen, adjust text options.
Task Manager (page 5-49). Display running tasks. Cancel running tasks.
Wi-Fi (page 5-49). Set the parameters for a Summit client.
5 - 13
Page 70

Connections
Beam (page 5-50). Enable receiving InfraRed and Bluetooth beams. (Not supported on the MX7 Tecton.)
Connections (page 5-51). Configure connections to servers.
Domain Enroll (page 5-52). Enroll in Active Directory domain.
Network Cards (page 5-53). Set the parameters for a wireless network using the utility included in Windows Mo-
bile.
USB to PC (page 5-54). Set up an ActiveSync connection between a host PC and the MX7 Tecton.
Settings Panels
Clock & Alarms
Time
5 - 14
Adjust the settings and tap ok to save the changes. Select Yes on the popup box and the changes take effect immediately. The Time can be set for both a Home and a Visiting location.
Page 71

Alarms
To set an alarm:
1. Tap the check box to enable the alarm.
2. Tap < Description > and enter a description. The description is limited to 63 characters.
3. Tap the day (or days) to play the alarm.
4. Tap the time to set the time to play the alarm. Set the time and tap ok to return to the Alarms panel.
5. Tap the Bell icon to set the notification. Notifications may include sound, light flash (the Alpha LED flashes) and
vibration. Set the desired options and tap ok to return to the Alarms panel.
6. Tap ok when finished to dismiss the Alarms panel.
More
5 - 15
Page 72

Lock
Password
Set the lock / unlock behavior for the MX7 Tecton.
Setting Default
Prompt if device unused for Unchecked
Timer 0 minutes
Password type Simple PIN
Password <blank>
Confirm <blank>
Password hint <blank>
5 - 16
Prompt if phone unused for
Tap the check box and set the inactivity timeout before the MX7 Tecton locks.
Password type
When selecting a Password type the MX7 Tecton displays a numeric keypad or the input panel depending on the
type of password selected.
Select the Password type, Simple PIN (numeric) or strong alphanumeric. Enter the desired password and confirm.
Note that Windows Mobile places restrictions on what it considers a valid password. If the chosen password is not
strong enough, a warning is displayed and a new password should be entered and confirmed.
Note: After a password has been entered, the password must be used to access the Lock panels again.
Page 73

Hint
If the password entry isn’t successful after a predefined number of attempts, the password hint is displayed.
5 - 17
Page 74

Power
Reports the current battery state and allows the user to set suspend timeouts.
Setting Default
On battery power:
Turn off device if not used for Enabled
Timer setting 5 minutes
On external power:
Turn off device if not used for Enabled
Timer setting 5 minutes
Battery
5 - 18
Battery power is displayed for both the main and internal Super-cap batteries (backup battery).
Page 75

Advanced
Select the inactivity timeout period before the MX7 Tecton goes into Suspend mode. The settings on this panel are for
the suspend timers only.
Backlight timers are set using the Backlight (page 5-31) settings panel.
5 - 19
Page 76

Sounds & Notifications
Set volume parameters and assign sound WAV files to Windows Mobile events. Options that cannot be edited by the user
are dimmed.
Sounds
Setting Default
Events Enabled
Programs Enabled
Notifications Enabled
Screen taps Disabled
Hardware buttons Disabled
5 - 20
Follow the instructions on the screen and tap OK to save the changes. Changes take effect immediately.
Page 77

Notifications
The Event box lists several events that can have an associated notification. The notification, depending on the event
selected, may consist of playing a sound, displaying a screen message, flashing a light or triggering the vibration
motor.
When the flash light option is selected, the MX7 Tecton flashes the Alpha LED.
When finished, tap OK to save the changes.
5 - 21
Page 78

Today
Configure the appearance and the items to display on the Today screen.
Appearance
Use the Appearance panel to assign a theme for the device. The default theme is Windows Mobile Classic Blue. Any
user installed themes are included in the list.
Items
Use the Items panel to select the items to be shown on the Start panel. Calendar must be selected as well as Date if
the date is the only item to be shown on the Start menu.
The Today timeout timer refers to the “return to Today screen” function. When the device is placed in Suspend, and
the timer expires, a return from Suspend displays the Today screen, not the application in focus when the MX7 Tecton
was placed in Suspend. The application in focus, which is running in the background, will need to be selected again.
Use Options to set display parameters for highlighted items in the Checked Items list.
5 - 22
Page 79

Personal Panels
About Info (or About LXE)
The data cannot be edited by the MX7 Tecton user on these panels.
Tab Contents
Software GUID, Windows CE Version, OAL Version, Bootloader Version, Compile Ver-
Hardware CPU Type, Codec Type, Display, Flash memory, and DRAM memory
Versions Revision level of software modules and .NET Compact Framework Version.
Network IP Current IP address, MAC address, and gateway address for all network ports
Software
The Software tab may display the current language. All languages are built into the OS image; English, French, German, Simplified Chinese, Traditional Chinese, Japanese, Korean, Spanish, Thai. .
Hardware
The Hardware tab displays hardware information such as CPU, keyboard type, display and memory.
Version
The Versions tab displays the versions of many of the software programs installed. Not all installed software installed
on the MX7 Tecton is included in this list and the list varies depending on the applications loaded on the MX7 Tecton.
The Image line displays the revision of the system software installed. Refer to the last three digits to determine the revision level.
Version window information is retrieved from the registry.
Modify the Registry using the Registry Editor. Use caution when editing the Registry and make a backup copy of the
registry before changes are made.
The registry settings for the Version tab are under HKEY_LOCAL_MACHINE \ Software \ LXE \ Version in the registry.
To add a user application to the Version panel, create a new string value under the HKLM\Software\LXE\Version key.
The string name should be the Application name to appear in the Version window. The data for the value should be the
version number to appear in the Version window .
Version strings can be equal to or less than 254 characters. Because the strings are displayed in a text box, any number can be accommodated, up to the 64K byte text box limitation.
sion, Programmable Component Version(s) and Language. Language indicates
localized version.
Utilities, Drivers, Image, CE API, and Internet Explorer.
(802.11 radio, ActiveSync).
Network
The Network IP tab displays the MAC address of the network adapter(s) plus IP address and gateway for connected
adapters.
5 - 23
Page 80

Buttons
Program Buttons
Program buttons can be used to assign functions to certain keys such as F1 through F5 and the diamond keys. Buttons
can only be assigned to programs that have an icon in the Start menu or the Settings folder (including sub-folders). A
program that is not in the above mentioned locations does not show up in the list here.
Note: The button links to the shortcut to the program, not the executable file.
Note: The System Administrator uses the Buttons setting panels to assign a Status User key and a Status Admin key
on the Status Popup panel, see Status Popup (page 5-41).
Setting Default
32-Key Keypad
F1 Left Softkey
F2 Right Softkey
F3, F4, F5, D1, D2, D3 <None>
55-Key Keypad
F1 Left Softkey
F2 Right Softkey
F3, F4, F5, D1 <None>
To assign a button:
1. Tap to highlight the desired button.
2. Select the program or shortcut from the Assign a
program drop down box.
3. Tap ok.
5 - 24
Page 81

Up/Down Control
Customize the delay before repeating and the repeat rate for the up/down controls.
5 - 25
Page 82

Input
Setting Default
Input Method Keyboard
Small keys Enabled
Word Completion
Suggest words when entering text Enabled
Suggest after entering A space
Suggest number word(s) 4
Add a space after word Enabled
Enable auto correct Enabled
Options
Voice recording format 8000 Hz, 8 Bit, Mono
Default zoom level for writing 200%
Default zoom level for typing 100%
Capitalize first letter of sentence Enabled
Scroll upon reaching the last line Enabled
Input Method
Select the preferred method of input.
5 - 26
The default method of input is the keyboard or input panel. When the cursor is located in a field allowing text input, the
input panel may automatically be displayed. If not automatically displayed, the input panel can be accessed by tapping
on the keyboard icon at the bottom center of the screen.
If a different input method is active, the icon for that input method is displayed instead of the keyboard icon.
Tap ok to save any changes.
Page 83

Word Completion
Options
5 - 27
Page 84

Owner Information
Set the MX7 Tecton owner details.
Identification
Name, Company, Address, Telephone, E-mail Blank
Notes
Notes Blank
Enter the information and tap ok to save the changes. The changes take effect immediately.
Note: Owner Identification name listed in Start > Settings > Personal > Owner > Information is not used during Bluetooth
operation.
5 - 28
Page 85

System Panels
About
The About panels show OS versions, allow device name and description input and display copyright information.
Version
This screen displays information on the installed operating system and the hardware. Note that Windows Mobile is
based on a Windows CE engine. The underlying version of Windows CE is displayed here.
Device ID
The device name and description can be changed by the user. Enter the name and description using either the keypad
or the Input Panel and tap ok to save the changes. The changes take effect immediately.
Note: The Device name listed in Start > Settings > System > About > Device ID is not used during Bluetooth
operation.
5 - 29
Page 86

Copyrights
This screen is presented for information only. The Copyrights information cannot be changed by the user.
5 - 30
Page 87

Backlight
Set the power management timers for the display and keypad backlights. Set the display brightness for battery and external
power.
Setting Default
Brightness 60%
Battery Power
Turn off backlight if device not used for 30 seconds
Turn on backlight when a button is pressed or the screen is tapped Enabled
External Power
Turn off backlight if device not used for 1 minute
Turn on backlight when a button is pressed or the screen is tapped Enabled
Brightness
Slide the marker left and right to select the desired keypad and display brightness level. Adjust the settings and tap OK
to save the changes. The changes take effect immediately
When the backlight timer expires, the display backlight and the display are Off, as is the keypad backlight. This is the
System Idle state, there is no separate User Idle state.
5 - 31
Page 88

Battery Power
When the MX7 Tecton is on battery power and the backlight timer expires, the display and the backlights for the display
and keypad are turned off. Adjust the settings and tap OK to save the changes. The changes take effect immediately.
External Power
5 - 32
When the MX7 Tecton is on external power and the backlight timer expires, the display and the backlights for the display and keypad are turned off. Adjust the settings and tap OK to save the changes. The changes take effect immediately.
Page 89

Battery
This panel is used to view the status and percentage of power remaining in the MX7 Tecton main battery.
Jacked is shown in the Status box when the Main battery is receiving external power.
The main battery is charged/recharged when the MX7 Tecton is docked in a powered cradle or directly cabled to an external power source.
The internal battery draws power from the Main battery to maintain a charge. The Super-cap battery voltage and percentage of power fluctuate continuously.
When there is no Main battery in the unit, the internal battery begins to discharge as it maintains RAM and other vital settings. After a Main battery is installed, the internal battery begins to draw power from the Main battery again and is fully
recharged in five minutes or less.
Note: Frequent connection to an external power source, if feasible, is recommended to maintain main battery charge status
as the Super-cap battery cannot be recharged by a dead or missing main battery.
5 - 33
Page 90

Certificates
Manage digital certificates used for secure communication.
View – displays details of the certificate. Personal certificates may be extended from the view screen.
Delete – removes the certificate from the device. Delete is not available if the certificate was installed by a device adminis-
trator.
Certificates are divided into three types: Personal, Intermediate and Root.
See Certificates (page 11-36) chapter for detailed instruction on generating certificates.
Personal
This panel lists any installed Personal certificates. Personal certificates are used to identify the user of the device.
To install a User certificate:
1. Copy the .pfx or .p12 file to a folder on the MX7 Tecton.
2. Use File Explorer to browse to the location of the file and open
the file by tapping the file name.
3. Type in the password to unlock the certificate and tap Done.
4. The new certificate is copied to the Personal certificate store on
the MX7 Tecton.
5 - 34
Intermediate
This panel lists any installed Intermediate certificates. Intermediate
certificates are used to help authenticate certificates received from
other hosts.
To install an Intermediate certificate:
1. Copy a DER-encoded .cer file, a base64-encoded .cer file or a
.pfx file to a folder on the MX7 Tecton.
2. Use File Explorer to browse to the location of the file and open
the file by tapping the file name.
3. The new certificate is copied to Intermediate certificate store on
the MX7 Tecton.
Page 91

Root
This panel lists any installed Root certificates. Root certificates are
used to authenticate certificates received from other hosts.
To install a Root certificate:
1. Copy a DER-encoded .cer file, a base64-encoded .cer file or a
.pfx file to a folder on the MX7 Tecton.
2. Use File Explorer to browse to the location of the file and open
the file by tapping the file name.
3. The new certificate is copied to Root certificate store on the MX7
Tecton.
Encryption
This panel enables or disables encryption of data files on removable storage cards. The default is Disabled. Tap the check
box to encrypt files when placed on a storage card.
5 - 35
Page 92

External GPS
Setting Default
GPS Program Port None
GPS Hardware Port None
Baud Rate 4800
Access Automatic
This panel configures serial GPS access over hardware serial ports using the Microsoft GPS manager. The port used,
baud rate and port sharing must be specified.
In order to use the configuration items on these panels, GPS applications must use the Microsoft GPS API interface rather
than reading the serial port directly. If the GPS application reads the serial port directly, these settings are not necessary.
5 - 36
Page 93

License Manager
Use this option to view software license registration details, and service contract length for purchased software installed on
the MX7 Tecton. Note the following image is a sample screen.
Your License Manager panel may show more tabs, e.g., RFTerm, depending on the number of software applications running on the MX7 Tecton that require a license.
Software and driver version information is located in About (page 5-29). Copyright information is located in the Copyrights
tab of the About control panel.
Managed Programs
This panel displays the install history for .NET managed programs. The list is read only.
See Remove Programs (page 5-46).
5 - 37
Page 94

Memory
These panels report the current state of virtual memory.
Main
The split between Storage memory and Program memory is not adjustable.
Storage Card
5 - 38
The pop-up list shows all mounted storage, both fixed and removable.
The Find prompt at the bottom of the screen launches the Search utility.
Page 95

Mixer
The MX7 Tecton has a speaker located above the scan button. It is active when a headset is not connected to the device.
Use the settings on these panels to adjust the volume, record gain and sidetone for microphone input, speaker and speaker
output.
Headsets can be enabled, disabled and selected using these panels.
Setting Default
Output
Speaker Volume 6.0 dB
Headset Volume 3.0 dB
Input
Input Mic1
Record Gain 24.0 dB
Boost + 30.0 dB
Sidetone 6.0 dB / Disabled
Tap and hold the sliders and move them either left or right, or tap the left and right arrows, to adjust decibel levels.
Tap the Test button on the Output panel to hear a changed setting.
5 - 39
Page 96

MX7 Tecton Options
Set MX7 Tecton specific device options. Options that cannot be edited by the user are dimmed.
Communication
By default, TCP/IP version 6 is enabled on the MX7 Tecton. Tap to uncheck this check box to disable TCP/IP version 6.
By default, Remote Desktop Autologin is disabled. Tap this check box to enable Remote Desktop Autologin.
Autolaunch TimeSync enables time synchronization when the MX7 Tecton boots.
Misc
5 - 40
There are no user configurable options on this screen.
Page 97

Status Popup
When the Status popup window is enabled, and displayed, it is placed on top of the window in focus and hides any
data beneath it.
The Status Popup window is closed by pressing the assigned Status User or Status Admin key sequence.
Note: Use a Diamond key for the assigned key sequence to use when opening and closing the popup. If a Function
key is used, that Function key is not available to applications that generally use Function keys such as RFTerm.
Using the Buttons settings panel (Start > Settings > Personal > Buttons > Program Buttons), the System Administrator must first assign a Status User key for the end-user when they want to toggle the Status Popup Window on or off.
Select the desired key and assign that key to StatPopup.
Similarly the System Administrator must also assign a Status Admin key to perform the same function for the Admin
popup. Select the desired key and assign that key to Admin StatPop.
Status popup window display options (taskbar icons) are assigned on the Status Popup tab. E.g., WLAN radio, Battery
meter, Bluetooth status, RFTerm SecID's (Secondary IDs), etc.
The default is for the User and Admin status popup windows to show all status information. The 5-second timeout to
remove the status popup from the display is disabled by default for the User and Admin status popup windows.
5 - 41
Page 98

Peripherals
This panel is used to enable and disable the touch screen heater and scan window heater.
Setting Default
Touch screen heater Enabled
Scan window heater Enabled
Heater Trip Point 0º C / 32º F
Note: Settings have no effect if the touch screen / scan window heaters are not installed.
Click the radio button to enable or disable the heaters.
Choose a different trip point from the drop down list and tap OK. The change is in effect after the Peripherals panel is
saved.
5 - 42
Page 99

Regional Settings
Regional Settings has the same general format and function as Regional Settings on a PC.
5 - 43
Page 100

5 - 44
 Loading...