

Page 1
Quick Start Guide
Lyric T5 Wi-Fi Thermostat
Page 2
Mercury Notice: If this product is replacing a control that
contains mercury in a sealed tube, do not place the old
control in the trash. Contact the Thermostat Recycling
Corporation at 18002388192 or thermostat-recycle.org
for information on how and where to properly and safely
dispose an old thermostat.
DISCONNECT POWER BEFORE INSTALLATION.
Can cause electrical shock or equipment damage.
Compatibility
• Compatible with most heating, cooling,
and heat pump systems
• Required: 24 VAC power (“C” wire)
• Does not work with electric baseboard heat (120240V)
• Does not work with millivolt systems
• Android or iOS smartphone, tablet or device
For help, contact:
WEB: yourhome.honeywell.com/support
EMAIL: MyLyric@honeywell.com
PHONE: 18006333991
SOCIAL:
Twitter: @Honeywell_Home,
Facebook: Honeywell Home
Page 3

Welcome
The Lyric T5 WiFi Thermostat is a WiFi® enabled comfort system designed to be easy
to use, as well as maximize your home comfort. Lyric T5 WiFi thermostat provides
control of single stage and multi stage conventional and heat pump heating and
cooling systems.
Key features:
• Connect to the Internet and control
your heating/cooling system from
anywhere with your smart devices.
• View and change your heating/cooling
system settings.
• Programming options to fit any lifestyle:
– Geo Fencing: Use a smartphone’s
location to manage comfort when
home or away.
– Smart Scheduling: Use
combination of Geo Fencing and
time scheduling to fit a busy,
active lifestyle.
– Time Scheduling: Programs for
7Day, 1Day, 511, or 52,
with 4 periods during day.
– No scheduling: You can also
control your comfort manually by
adjusting the temperature yourself.
• Receive alerts, service reminders via
e-mail, and get automatic software and
features upgrades.
Download free Honeywell Lyric app:
• Once connected to WiFi and registered
Honeywell Lyric app., you can control
your thermostat from anywhere
through your tablet or smartphone.
The Honewell Lyric app is available
for Apple® iPhone®, iPad® devices
at iTunes® or at Google Play® for all
Android™ devices.
• It allows you much wider offer of
scheduling options and other comfort
setting compared to standard “on
device only” control.
• Download the Lyric App and register
a new account or enter an existing
account. Add a new device and follow
the steps to configure, set up and
connect the Lyric thermostat to the
local WiFi network.
3
Page 4
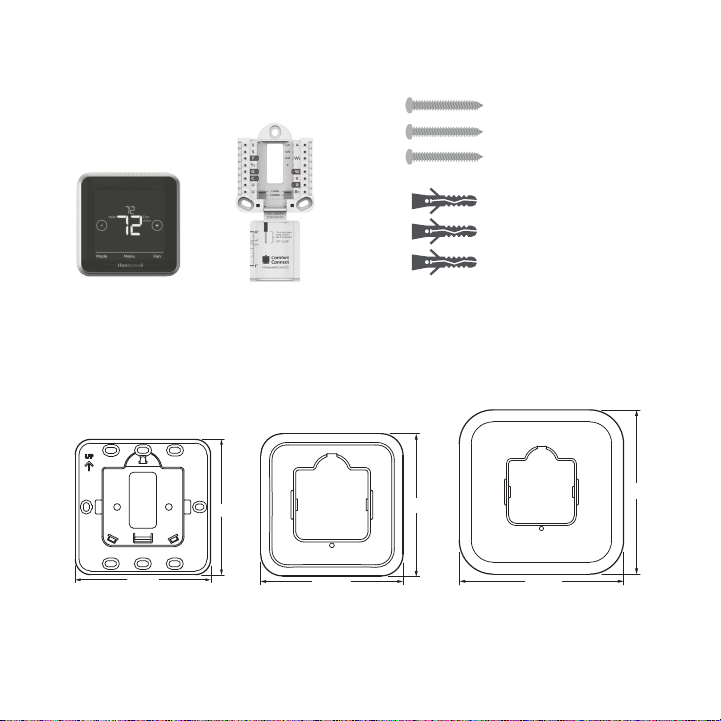
Included in your box:
4
6-7/64
Thermostat Honeywell Standard
16 Connector (S16)
Optional Accessories Available:
3-57/6
(99)
3-29/32 (99)
Honeywell Standard
Installation Adapter
329/32 in (99mm.) x
357/64 in (99mm.)
Honeywell Decorative
Cover Plate – Small
449/64 in (121mm.) x
4-49/64 (121)
449/64 in (121mm.)
4 5
Screws and Anchors
4-49/64
(121)
Honeywell Decorative
Cover Plate – Large
(155)
6-7/64 (155)
67/64 in (155mm.) x
67/64 in (155mm.)
Page 5

Tools you will need:
Ballpoint pe
Small fl
Wire stripper
Phillips screwdriver
Needle-nose pliers*
Drill and
drill bit (7/32")*
*Tools you might need
To photograph your existing wiring and
at head screwdriver
n
*
Honeywell Lyric app
To configure your system
and connect to your smartphone
Smartphone
access the thermostat app
Page 6
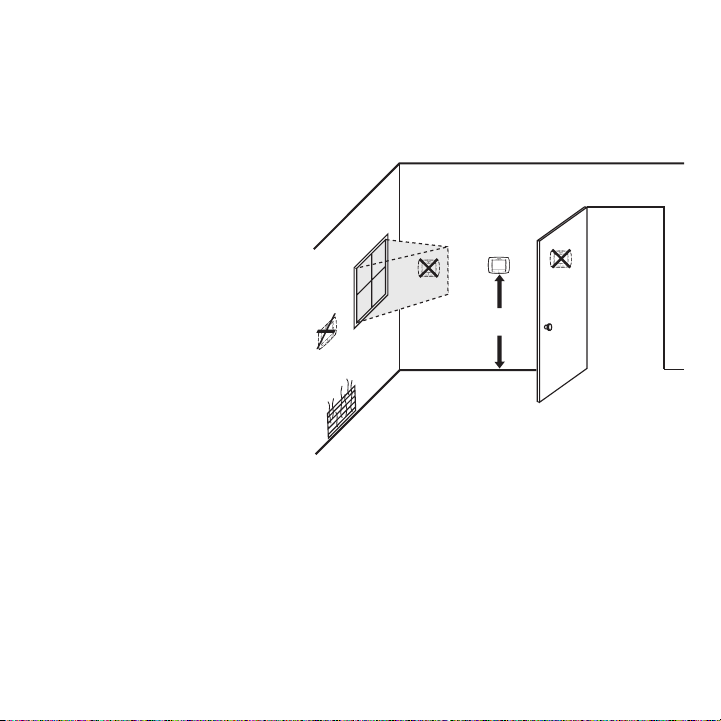
Installation
The Lyric T5 WiFi Thermostat should
be mounted in a suitable location.
• Install the thermostat about
5 ft. (1.5m) above the floor in an
area with good air circulation at
average temperature. See Fig. 1.
• Do not install the thermostat
where it can be affected by:
– Drafts or dead spots behind
doors and in corners.
– Hot or cold air from ducts.
– Radiant heat from sun or
appliances.
– Concealed pipes and
chimneys.
– Unheated (uncooled) areas
such as an out side wall
behind the thermostat.
YES
NO
NO
5 FEET
[1.5 METERS]
Fig. 1. Selecting thermostat location.
NO
6 7
Page 7
1 Turn OFF power (important!)
To protect yourself and the equipment,
turn OFF the power at the breaker box
or switch that controls your heating/
cooling system.
2 Make sure the power is OFF!
Try turning ON your heating/cooling
system by changing the temperature. If
you can’t get the system to turn ON in
5 minutes, you’ll know the power is OFF.
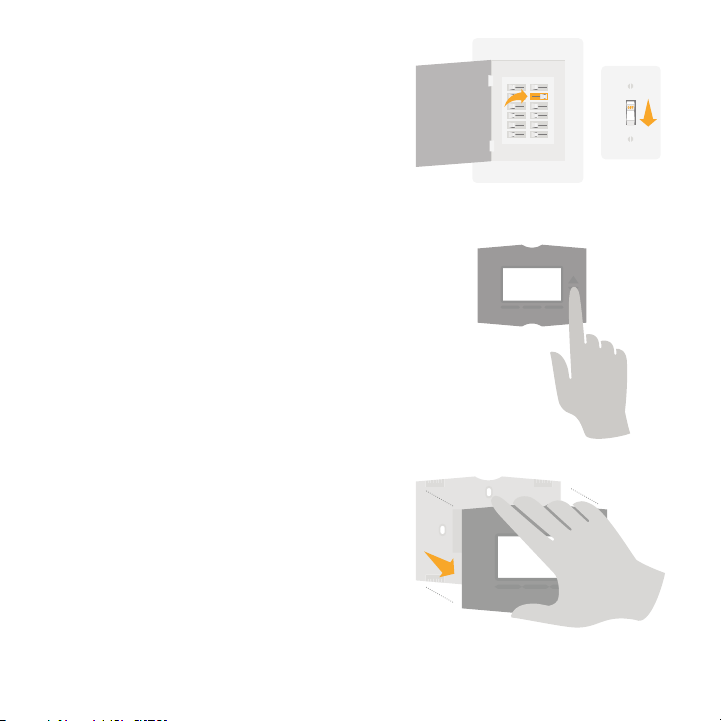
3 Take the faceplate off your old
thermostat.
On most thermostats, you can take off
the faceplate by grasping and gently
pulling. Some thermostats may have
screws, buttons, or clasps.
Do not remove any wires from your
thermostat.
OR
Switch
Breaker box
75
Page 8
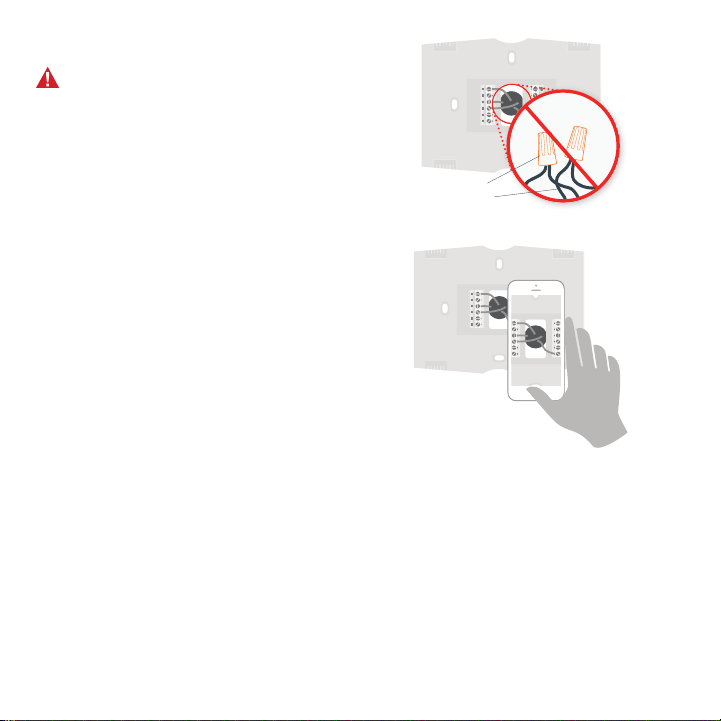
4 Make sure there are no 120/240V
Thick bl
wires.
Do you have thick black wires with
wire nuts? Is your thermostat 120V
or higher? If you answered yes to
either of these questions, you have
a line voltage system and the Lyric
thermostat will not work.
If you are unsure visit:
yourhome.honeywell.com/support
5 Take a picture of how your wiring
looks right now.
Be sure to include the letters next
to the terminals where the wires
are inserted. This will be a helpful
reference when wiring your Lyric
thermostat.
Wire nuts
ack wires
8
Page 9

6 Record if you have wires in the following terminals.
Do no include jumpers.
Check all that apply:
Terminal Color of Wire
R
Rc
RH
7 Record the existing wire configuration.
Note the color of the wires that are plugged into your old thermostat’s
terminals. You will need this information to correctly wire your Lyric
thermostat.
Terminal Color of Wire
L
C
W2
W
U1
U2
If there are wires in terminals that are not listed, you will need additional
wiring support. Visit yourhome.honeywell.com/support to find out if the
Lyric thermostat will work for you.
Tip: You can also use the wiring guide in the Lyric app to create a diagram of
how to wire the new Standard 16 Connector.
Terminal Color of Wire
K
G
Y2
Y
Page 10

8 Disconnect wires & remove the
old thermostat’s wall plate.
Use a screwdriver or a ballpoint
pen to release wires from
terminals.
Tip: To prevent wires from falling
back into the wall, wrap the wires
around your ballpoint pen.
9 Insert the wall anchors
(included).
It is recommended that you use
the screws and wall anchors
included in the box when
mounting your thermostat.
You can use the Honeywell
Standard 16 Connector to mark
where you want to place the wall
anchors. Drill bit size 7/32”.
10
Page 11

10 Check for any paint gaps or screw
holes left by the old thermostat.
If you choose to use the optional
Honeywell Decorative Cover Plate
and Standard Installation Adapter to
hide blemishes, snap the Connector
to Installation Adapter. For more
information see page 12.
11 Bundle and insert wires through
the new Honeywell Standard 16
Connector.
Gather the wires and guide them
through the hole in the middle of the
Standard 16 Connector.
Make sure at least 1/4-inch of each
wire is exposed for easy insertion
into the wire terminals. You can use
the “wiring guide” on the Standard
16 Connector door to measure the
correct length for exposed wire.
L/A
S
1
A
AUX
S
1
W
2
AUX
W
2
Y
E
Y
2
O/B
G
W
C
K
U
R
1
R
U
2
C
Page 12

OPTIONAL:
Use either small or large Decorative
Cover Plate sold separately to cover any
paint gaps or screw holes left by the old
thermostat.
(For more info where to purchase
thermostat accessories, go to
yourhome.honeywell.com)
First attach Connector to Installation Adapter (picture 1
and 2). In the next step, attach Decorative Cover Plate to
create a tight fit of the thermostat to wall (picture 3).
1 2 3
12
Page 13

12 Review your answer from Step 6.
K
R
R
C
Set the R-switch up or down based on your
wiring notes in Step 6.
If there is only one wire connected to R,
then your system uses this wire to power
both heating and cooling. Set the R-switch
to the up position.
If you have an R or Rh, and Rc wire, then
your system uses R or Rh to power the
heating system and Rc to power the cooling
system. Set the R-switch to the down
position.
S1
1
S
Y
Y
2
G
C
U
1
U2
L/A
A
O/B
AUX
W2
E
W
K
R
R
C
NOTE: U-switch on the bottom left of the
Honeywell Standard 16 Connector is not
needed for this thermostat version.
13 Firmly connect remaining wires from
Step 7.
Push down on the tab to put remaining
wires into its corresponding terminal on
the Standard 16 Connector (one wire per
terminal) until it is firmly in place.
Gently tug on wires to verify they are secure.
To release wires, push down the terminal
levers on the on sides of Standard 16
Connector.
If you checked Insert Wire(s) into Terminal(s)
R (only)
R
C
H
(only)
R
R
C
R
H
R
RC
(only)
Set the R-Switch
R
R & RC
R
R & RC
RH wire
Rc wire
RH wire
Rc wire
R wire
Rc wire
R wire
R
Rc
R
Rc
R
Rc
R
Rc
R
Rc
Page 14

14 Mount the Standard 16
Breaker box
Connector.
Mount the Standard 16
Connector using the provided
screws and anchors. Install all
(3) anchors & screws for a secure
fit on your wall. Make sure the
Standard 16 Connector is level,
ideally by using bubble level,
keeping the bubble between the
two lines.
15 Attach your Lyric T5 WiFi
Thermostat.
Align the Lyric thermostat
onto Honeywell Standard 16
Connector and firmly snap it into
place.
16 Turn your power ON.
Turn ON the power at the breaker
box or switch that controls the
heating/ cooling system.
L/A
S
A
1
AUX
S1
W2
AUX
W2
Y
E
Y
2
O/B
G
W
C
K
U
R
1
R
U2
L/A
S
S
Y
U
U
S
1
S1
Y
Y
2
G
C
U
1
U2
A
O/B
AUX
2
W
Y
E
2
G
W
C
K
R
R
C
L/A
A
AUX
W2
AUX
W2
E
O/B
W
K
R
R
C
OR
C
ON
Switch
14 15
Page 15

17 Log in to configure and connect
Your Lyric thermostat is not yet configured
to control your heating/cooling system.
To complete your setup, download the
Lyric App and register a new account or
enter an existing account.
Android
Search Google Play for Honeywell Lyric.
Create an account and log in to configure
and connect.
iOS
Search the App Store for Honeywell Lyric.
Create an account and log in to configure
and connect.
Page 16

How to use your Lyric T5 WiFi Thermostat
• Actual time / ISU or Alert
number
• Schedule information
– Following time
based schedule or
geo-location-based
schedule.
• System status information
– Cool On, Heat On
(Emer gency H eat On),
Auto changeover On
• Indoor temperature
set-point
– Touch + and – to change
temperature setting and
select Hold until time or
Permanent hold.
• Indoor temperature
• Mode
– Select system mode
Heat/C ool/Of f/EM
Heat (emergency heat).
Actual System mode is
displayed on the left side
of indoor temper ature
• Menu
– Touch to display options.
Star t here to set a
program schedule
Following Schedule
Mode
Heat
Wake Away Home Sleep
The Screen wakes up by pressing
the center area with the displayed
temperature.
It stays lit for 45 seconds after you
complete changes. Depending
on how your thermostat was
installed, the screen light may
always be on
AM
Fan
Auto
Sched.
Menu FanMode
On/Off
16 17
• Connection status
information
– Status of connec tion
to your W iFi router
and Internet
• Messaging centre
– Showing devic e
setup options,
reminders and
aler ts, st atus
of programmed
schedules, schedule
overrides.
• Actual schedule period
– Shows actual
schedule period
Wake/Away/Home /
Sleep. The active
schedule period is
indicated wit h an
underline (e.g. Wake)
• Sched. On/Off
– Acti vate or
deactivate your
progr amming
schedule
• Fan
– Select Fan mode
Auto/On/Circulate.
Actual Fan mode
is displayed on th e
right side of actual
indoor temperature
Page 17

How to use your Lyric app
Access the
menu
Use shortcuts to
easily activate your
favorite settings
Change mode heating, cooling, or off
Set away
View weather
forecast
Set desired
temperature
Interested in more Lyric products? Visit yourhome.honeywell.com to learn about all
available products connected by the Lyric app.
App is regularly enhanced and may change.
Page 18

Get the most from Lyric T5 WiFi Thermostat
Diverse programming options that fit any lifestyle:
1. LocationBased scheduling – Lyric thermostat uses your
smartphone’s location to know when you’re away, and saves
you energy. Through geofence technology, it senses your
return and helps make you comfortable upon arrival. You can
also manually override your current setting when you’ll be out
for a few hours by using the Away button on the thermostat or
in the app.
2. Smart scheduling – Use combination of Geo Fencing and
time scheduling to fit a busy active schedule.
3. TimeBased scheduling – Programming type support for
7Day 1Day, 511, or 52 with 4 periods.
4. No scheduling – Control your comfort manually by
adjustment of temperature set points only.
Custom Shortcuts for unique situations. Save the shortcuts you
really like and they’ll be available on your app any time you want.
Customizable comfort has never been so simple.
!
Smart Alerts. Push notifications remind you of filter changes, warn
you of extreme indoor temperatures or of your heating/cooling
system failures.
Adaptive recovery. The Lyric thermostat learns your heating and
cooling cycle times to deliver just the right temperature, right when
you want it.
Auto changeover. When enabled, the thermostat automatically
selects heating or cooling depending on the indoor temperature.
18 19
Page 19

Frequently Asked Questions
Will Lyric thermostat still work if WiFi connection is lost?
Yes, the temperature can be adjusted directly at the thermostat. However, some features, including
shortcuts and geofencing, are managed only through the Lyric app and will not function while the
connection is down. The Lyric thermostat will automatically reconnect to WiFi once the network is
restored.
Lyric thermostat is not finding the in home WiFi network.
Lyric thermostat operates in the 2.4GHz range. That may be why the Lyric thermostat does not
see the network but the smartphone, which operates in both the 2.4 and 5.0 GHz range, sees the
network. Most routers will broadcast two networks, one SSID on the 5.0 GHz radio and one SSID on
the 2.4 GHz radio.
Can Lyric thermostat be used in a home that does not have WiFi?
Lyric thermostat can work as a basic thermostat without WiFi. The key features, including location
based temperature control and custom shortcuts, require a WiFi connection.
Why does the screen on the Lyric thermostat go blank?
When someone is not touching the thermostat, the display goes to sleep to conserve energy or to
not disturb you at night. The thermostat can still be controlled through the Lyric app. Touching the
thermostat screen wakes it up. You can adjust default display behavior in menu of the thermostat.
A change was made on the Lyric app but it has not shown up on the Lyric thermostat.
There may be a short delay after making temperature and setting changes in the app.
Can there be multiple users for geofencing?
Yes, there can be multiple users. Geofencing will trigger based on the last person to leave and the
first person to return. To properly use geofencing with multiple users:
• Each user needs to create their own Lyric account.
• Each user should use their login ID and password across his or her devices, including
smartphones and tablets.
• No two users should share the same account.
Page 20

Frequently Asked Questions
How are multiple users set up with Lyric thermostat?
Access can be given to any or all Lyric thermostat locations through the Lyric app. Start by pressing
the three-line menu icon in the upper left-hand corner of the home screen. Press the gear wheel
next to the location name. Select Users and press + Add User located at the bottom of the screen.
Type in the email address of the person to be invited. If they have a Lyric account set up, the location
will be automatically added to their account. If they don’t have an account, they will receive an email
invitation prompting them to download the app and create their own account.
Note: All individuals with access to a thermostat share the same user privileges. Users added will be
able to change the thermostat’s settings and shortcuts, as well as add or delete other users.
Is there a way to extend the signal strength?
The range or distance of the WiFi signal is determined by the homeowner’s router. Check the
router’s manual for additional information.
There is a alert that says WiFi Signal Lost. What does that mean?
The WiFi signal to the Lyric thermostat has been lost. Wait for the thermostat to reconnect or select
a new network within the Lyric app configuration menu. If the thermostat is unable to reconnect, you
will need to troubleshoot the router to determine the cause.
Why is the thermostat showing up as offline (strike-through WiFi icon) on top of right corner of
thermostat display?
If the Lyric thermostat displays a strike-through WiFi icon on its screen or shows up as offline
on the Lyric app, it has lost connection to the network. Make sure the router is powered and
broadcasting. The home’s WiFi network may need to be reset by power cycling the router. Consult
the router’s instruction manual for directions on power cycling. When the network has been restored,
the thermostat will automatically reconnect.
An activation email hasn’t been received.
An email will be sent from connectedHome@alarmnet.com. An activation email is needed to
complete the Lyric account setup. If an activation email is not received after five minutes, check the
Spam folder of the email account.
If you do not find it in the Spam folder, click on the Resend button and the activation email will be
resent. If you still do not receive your activation email, please contact the Lyric Technical Support
team at 18006333991 for help.
20 21
Page 21

Regulatory information
FCC Compliance Statement (Part 15.19) (USA
only)
This device complies with Part 15 of the FCC
Rules. Operation is subject to the following two
conditions:
1 This device may not cause harmful
interference, and
2 This device must accept any interference
received, including interference that may
cause undesired operation.
FCC Warning (Part 15.21) (USA only)
Changes or modifications not expressly
approved by the party responsible for
compliance could void the user’s authority to
operate the equipment.
FCC Interference Statement (Part 15.105 (b))
(USA only)
This equipment has been tested and found
to comply with the limits for a Class B digital
device, pursuant to Part 15 of the FCC Rules.
These limits are designed to provide reasonable
protection against harmful interference in
a residential installation. This equipment
generates uses and can radiate radio frequency
energy and, if not installed and used in
accordance with the instructions, may cause
harmful interference to radio communications.
However, there is no guarantee that interference
will not occur in a particular installation. If this
equipment does cause harmful interference
to radio or television reception, which can be
determined by turning the equipment off and
on, the user is encouraged to try to correct the
interference by one of the following measures:
• Reorient or relocate the receiving antenna.
• Increase the separation between the
equipment and receiver.
• Connect the equipment into an outlet on
a circuit different from that to which the
receiver is connected.
• Consult the dealer or an experienced radio/
TV technician for help.
RSSGEN
Under Industry Canada regulations, this radio
transmitter may only operate using an antenna
of type and maximum (or lesser) gain approved
for the transmitter by Industry Canada. To
reduce potential radio interference to other
users, the antenna type and its gain should
be so chosen that the equivalent isotropically
radiated power (e.i.r.p.) is not more than that
necessary for successful communication.
Operation is subject to the following two
conditions:
1 This device may not cause interference, and
2 This device must accept any interference,
including interference that may cause
undesired operation of the device.
Page 22

Notes
22 23
Page 23

Notes
Page 24

Wi-Fi® is a registered trademark of Wi-Fi Alliance®
33-00151-01
Automation and Control Solutions
Honeywell International Inc.
1985 Douglas Drive North
Golden Valley, MN 55422
yourhome.honeywell.com
® U.S. Registered Trademark.
© 2016 Honeywell International Inc.
33-00151—01 M.S. 03-16
Printed in U.S.A.
 Loading...