

Page 1

Marathon™ Reference Guide
Microsoft® Windows® XP® Operating System
LXE | WORX | Handheld Computer
E-EQ-MARATHONRG-A
Copyright © 2011 by LXE®, Inc., An EMS Technologies Company. All Rights Reserved.
Page 2

Notices
LXE Inc. reserves the right to make improvements or changes to published Marathon information at any time without notice.
While reasonable efforts have been made in the preparation of this publication to assure its accuracy, LXE assumes no liability
resulting from any errors or omissions in this publication, or from the use of the information contained herein. Further, LXE
Incorporated, reserves the right to revise this publication and to make changes to it from time to time without any obligation to
notify any person or organization of such revision or changes.
Trademarks
Copyright © 2011 by LXE Inc., An EMS Technologies Company, 125 Technology Parkway, Norcross, GA 30092 U.S.A. (770)
447-4224
LXE® and Spire® are registered trademarks of LXE Inc.
Microsoft®, ActiveSync®, MSN, Outlook®, Windows®, Windows Mobile®, the Windows logo, and Windows Media are
either registered trademarks or trademarks of Microsoft Corporation in the United States and/or other countries.
Intel and Intel Atom are trademarks or registered trademarks of Intel Corporation or its subsidiaries in the United States and
other countries.
Summit Data Communications, Inc. Summit Data Communications, the Summit logo, and “The Pinnacle of Performance” are
trademarks of Summit Data Communications, Inc.
The Bluetooth® word mark and logos are owned by the Bluetooth SIG, Inc. and any use of such marks by LXE, Inc. is under
license.
Symbol® is a registered trademark of Symbol Technologies. MOTOROLA® and the Stylized M Logo are registered
trademarks of Motorola®, Inc.
PowerScan is a registered trademark of Datalogic Scanning, Inc., located in Eugene, OR.
Qualcomm® is a registered trademark of Qualcomm Incorporated. Gobi is a trademark of Qualcomm Incorporated.
Freefloat WLinq, Freefloat LinkOne and Freefloat AccessOne are registered trademarks of Freefloat, Mölndalsvägen 30B, SE-
412 63 Gothenburg, Sweden.
PenMount, the PenMount logo are registered trademarks of Salt International Corporation, Taipei, Taiwan, R.O.C.
AuthenTec, (developed TruPrint Sensor used in Biometric Mouse) TouchChip and TrueSuite are registered trademarks and
QuickSec, SafeXcel, Fusion, SafeZone, Eikon, TrueNav, SteelCoat, TouchStone, DataDefender and KeepSafe are
trademarks of AuthenTec, Inc., Melbourne, FL.
When any part of this publication is in PDF format: “Acrobat ® Reader Copyright © 2011 Adobe Systems Incorporated. All
rights reserved. Adobe, the Adobe logo, Acrobat, and the Acrobat logo are trademarks of Adobe Systems Incorporated”
applies.
Other product names mentioned within this publication may be trademarks or registered trademarks of other companies.
Page 3

Table of Contents
Introduction 1
Overview 1
Microsoft Windows License Agreement (First Boot) 1
Quick Start 2
Components 3
Front View 3
Rear View 4
Bottom View 5
Right Side View 5
Left Side View 6
LED Indicators 7
Power Button 7
Status LEDs 7
Using a Stylus 8
Marathon Configuration Options 9
Date and Time 9
Power Management 9
Speaker Volume 9
Connect Bluetooth Devices 9
Restart/Shutdown 9
Calibrate Touch Screen 9
Data Entry 10
Keyboard Data Entry 10
Barcode Data Entry 10
Magnetic Card Data Entry 10
Touch Screen Data Entry 10
Hardware 11
Hardware Configuration 11
Processor, Memory and Storage 11
Display 11
Audio 11
Wireless Communication 11
Power Management 11
Power Input / Battery 12
Backup Battery 12
Power Button 13
Reset Button 13
E-EQ-MARATHONRG-A [ i ] Marathon™ Reference Guide
Page 4

Table of Contents
External Connectors 14
USB Connectors 14
Audio Connector 14
Power Supply Connector 14
Antenna Connectors 14
Docking Connector 14
Keyboard 15
Backlighting 15
Sticky Keys 15
Sticky Key Indicators 15
Biometric Mouse 16
Security Features 16
Navigation 16
Touch Screen 17
Calibrating the Touch screen 17
Refresh the Touch Screen Calibration Points 17
Disabling the Touch Screen 17
The Display 18
Adjust Display Brightness 18
Cleaning the Display 18
Software 19
Introduction 19
Operating System 19
Microsoft Windows Setup and Configuration 19
Microsoft Windows License Agreement (First Boot) 19
Drive C Folder Structure 20
Software Loaded on Drive C 20
Control Panel 21
LXESystem Info 21
Display 21
Power Options 22
TruePrint 22
Wi-Fi 22
Bluetooth 23
LXE 8650 Bluetooth Ring Scanner/Imager 23
Devices Tab 23
Options Tab 26
Bluetooth Icon 26
COM Ports Tab 27
E-EQ-MARATHONRG-A [ ii ] Marathon™ Reference Guide
Page 5

Table of Contents
Hardware Tab 28
Network Configuration 29
802.11 Wireless Radios 29
Ethernet Connector 29
GPS (Optional) 29
WWAN 29
Bluetooth 29
Wireless Network Configuration for LXE Devices 30
Important Notes 30
Summit Client Utility 31
Help 31
Summit Tray Icon 32
Wireless Zero Config Utility 33
Main Tab 34
Admin Login 35
Profile Tab 36
Buttons 37
Profile Parameters 38
Status Tab 40
Diags Tab 41
Global Tab 42
Custom Parameter Option 43
Global Parameters 44
Logon Options 48
Single Signon 49
Pre-Logon Connection 49
Sign-On vs. Stored Credentials 50
How to: Use Stored Credentials 50
How to: Use Sign On Screen 51
How to: Use Windows Username and Password 51
Windows Certificate Store vs. Certs Path 52
User Certificates 52
Root CA Certificates 52
Configuring the Profile 54
No Security 54
WEP 55
LEAP 56
PEAP/MSCHAP 58
PEAP/GTC 60
E-EQ-MARATHONRG-A [ iii ] Marathon™ Reference Guide
Page 6

Table of Contents
WPA/LEAP 62
EAP-FAST 64
EAP-TLS 66
WPA PSK 68
Certificates 69
Generating a Root CA Certificate 69
Installing a Root CA Certificate 73
Generating a User Certificate 74
Exporting a User Certificate 77
Installing a User Certificate 79
Using Peripherals / Accessories 80
Attach an Auxiliary Battery 80
Install a SIM Card 82
Replacing the Main Battery 83
Barcode Readers 85
2D Imager 86
Magnetic Stripe Reader 87
Marathon Recovery DVD 87
Marathon Recovery Solution 87
Startup 88
Wizard walk-through 89
Loading an Operating System on the Marathon 89
KeyMaps 90
Technical Specifications 94
Physical Specifications 94
Environmental Specifications 95
Display Specifications 95
AC/DC Adapter 95
Auxiliary Batteries (Optional) 96
38Whr Auxiliary Battery 96
63Whr Auxiliary Battery 96
Pinouts 97
USB Connector 97
Docking Connector 98
Revision History 99
Index 100
E-EQ-MARATHONRG-A [ iv ] Marathon™ Reference Guide
Page 7

Introduction
Overview
The LXE Marathon™ handheld computer is a rugged, Ultra-Mobile Personal Computer equipped with a Microsoft®Windows
operating system. The Marathon is capable of wireless data communications using an 802.11a/b/g/n radio. Additional
connectivity options include Bluetooth and GPS.
This Marathon™ Reference Guide has been developed for a Marathon with a Windows®XP Professional operating system.
The Marathon is a tablet-style computer with a 62-key QWERTY keyboard with number pad and features a 7.1" color display.
The touch screen display supports WVGA(800x480 resolution) and is available optimized for either indoor or outdoor lighting.
The keyboard is illuminated to facilitate use in dimly lit areas. A biometric mouse is included for security and screen navigation.
Available add on modules include a magnetic stripe card reader and a 2D imager.
The Marathon provides the power and functionality of a desktop computer in a portable unit. The desktop dock, much like a
docking port for a conventional laptop, provides provisions for an external monitor and USB connections for devices such as a
USB keyboard and mouse.
For information on the desktop dock and RAM MountTMvehicle dock options see Marathon Dock Reference Guide for details.
Terminal Emulation Software
LXE provides Freefloat AccessOne for terminal emulation needs for the Marathon. Click here for the Freefloat website.
®
Barcode Decoder Software
LXE provides Freefloat LinqOne for barcode decoding needs for the Marathon. Click here for the Freefloat website.
Click here for the Motorola web site SDK link for the Symbol 4400 2D Imager.
Keyboard Keymapping Software
There are many keyboard key-mapping applications available on the world wide web. There is no keyboard mapping application
available from LXE for the Marathon. Yet.
Magnetic Stripe Reader Software
The Magnetic Stripe Reader software supports the Microsoft Windows OLE for Point of Service (OPOS) / Unified Point of
Service (UPOS) driver. Click here to download Microsoft Point of Service for .NET.
POS for .NET is Microsoft’s implementation of UPOS for the .NET platform. POS for .NET is backward-compatible with
existing implementations of UPOS on the Microsoft Windows platform, OPOS. POS for .NET is implemented for Microsoft
.NET Framework v1.12.
Microsoft Windows License Agreement (First Boot)
If your Marathon is shipped with a Microsoft Windows operating system pre-installed, it may be necessary to complete the
Windows licensing/registration screens when starting the Marathon for the first time. To complete this information, you may
need the Microsoft Windows software/product key that is included with the Marathon.
Please refer to Microsoft Windows License Agreement (First Boot) for instruction.
E-EQ-MARATHONRG-A [ 1 ] Marathon™ Reference Guide
Page 8

Quick Start
Quick Start
This section’s instructions are based on the assumption that your new system is pre-configured and requires only accessory
installation and a power source.
In general, the sequence of events is:
1. Install any accessory modules (magnetic stripe card reader, imager) and carrying straps.
2. Provide a power source for the Marathon:
l Connect a power cable, or
l Place the Marathon in a powered desktop or vehicle mount dock, or
l Install a fully charged auxiliary battery.
3. Connect accessories, e.g. USB devices, headset, etc.
4. Press the Power button to turn the Marathon on.
Note: Installation instructions for attaching a carrying strap, connecting a power cable and placing the Marathon in a
powered desktop dock or vehicle dock are in the Marathon User Guide.
E-EQ-MARATHONRG-A [ 2 ] Marathon™ Reference Guide
Page 9
Components
Components
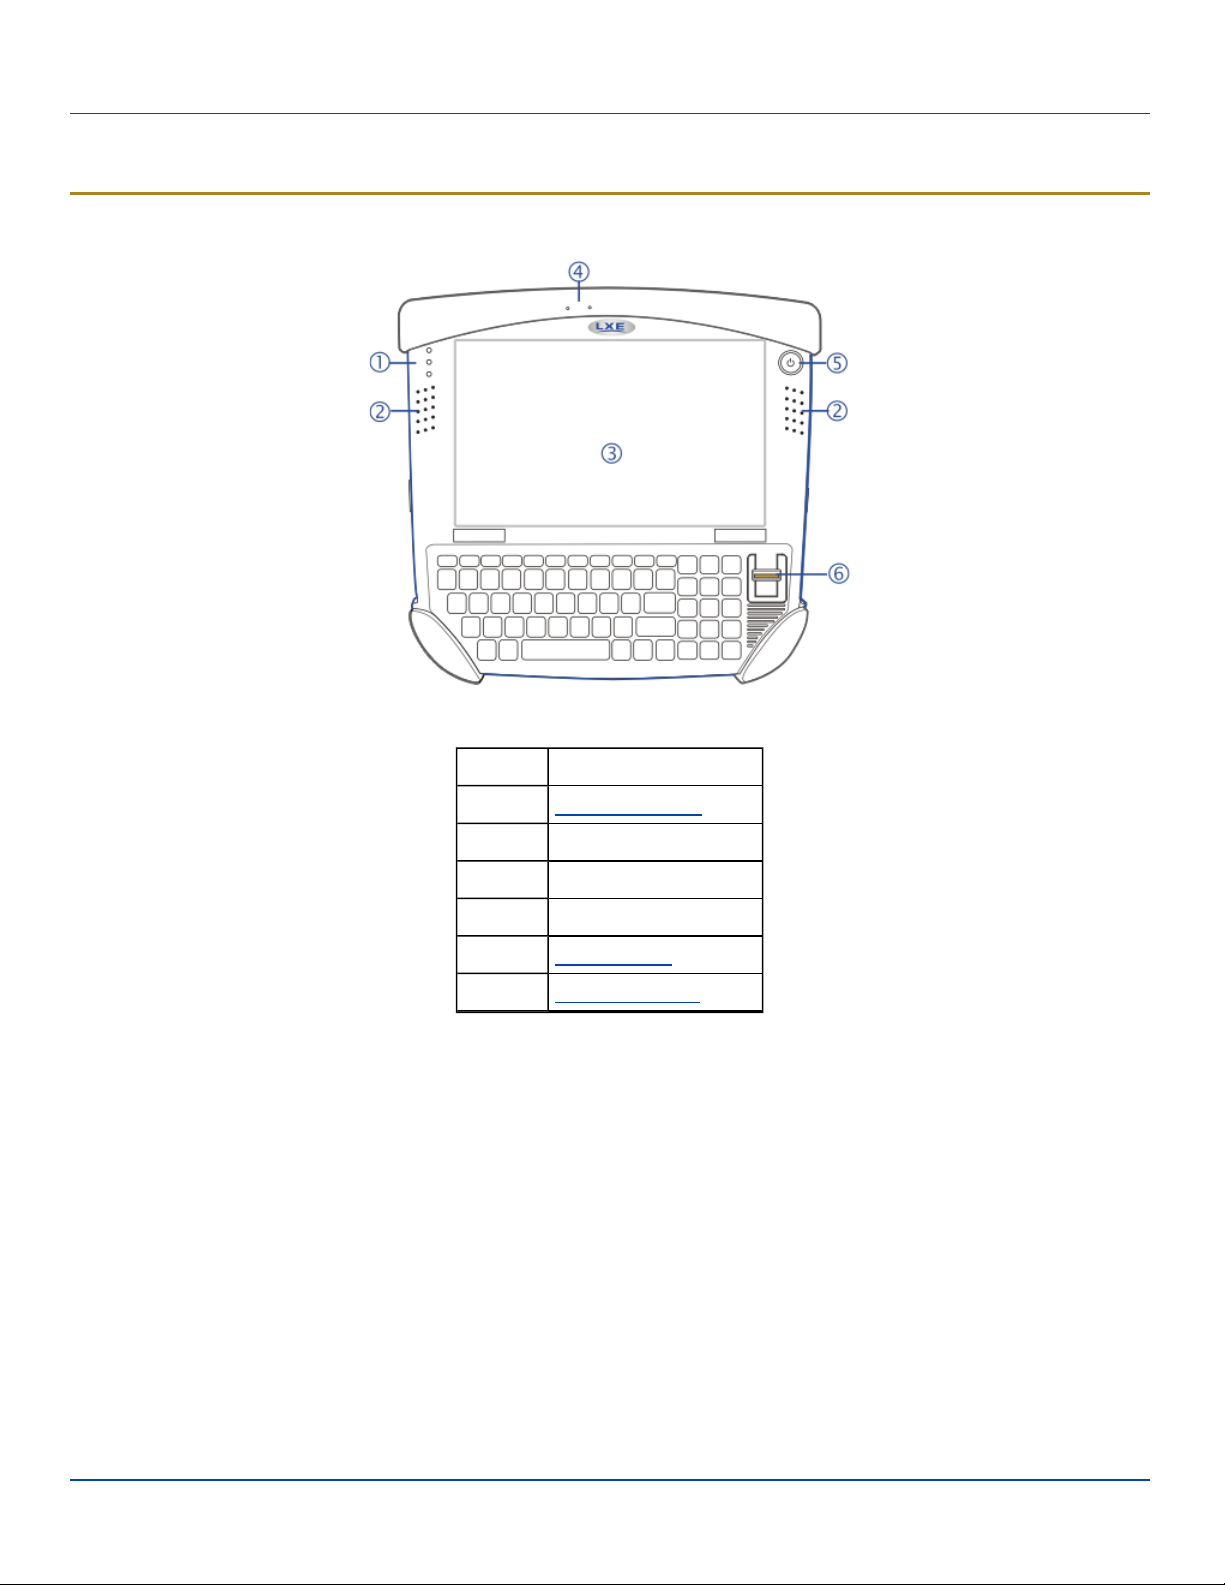
Front View
Marathon Components, Front
Position Function
1 Status Indicators
2 Speakers
3 Touch Screen / Display
4 Microphone
5 Power Button
6 Biometric Mouse
E-EQ-MARATHONRG-A [ 3 ] Marathon™ Reference Guide
Page 10
Rear View
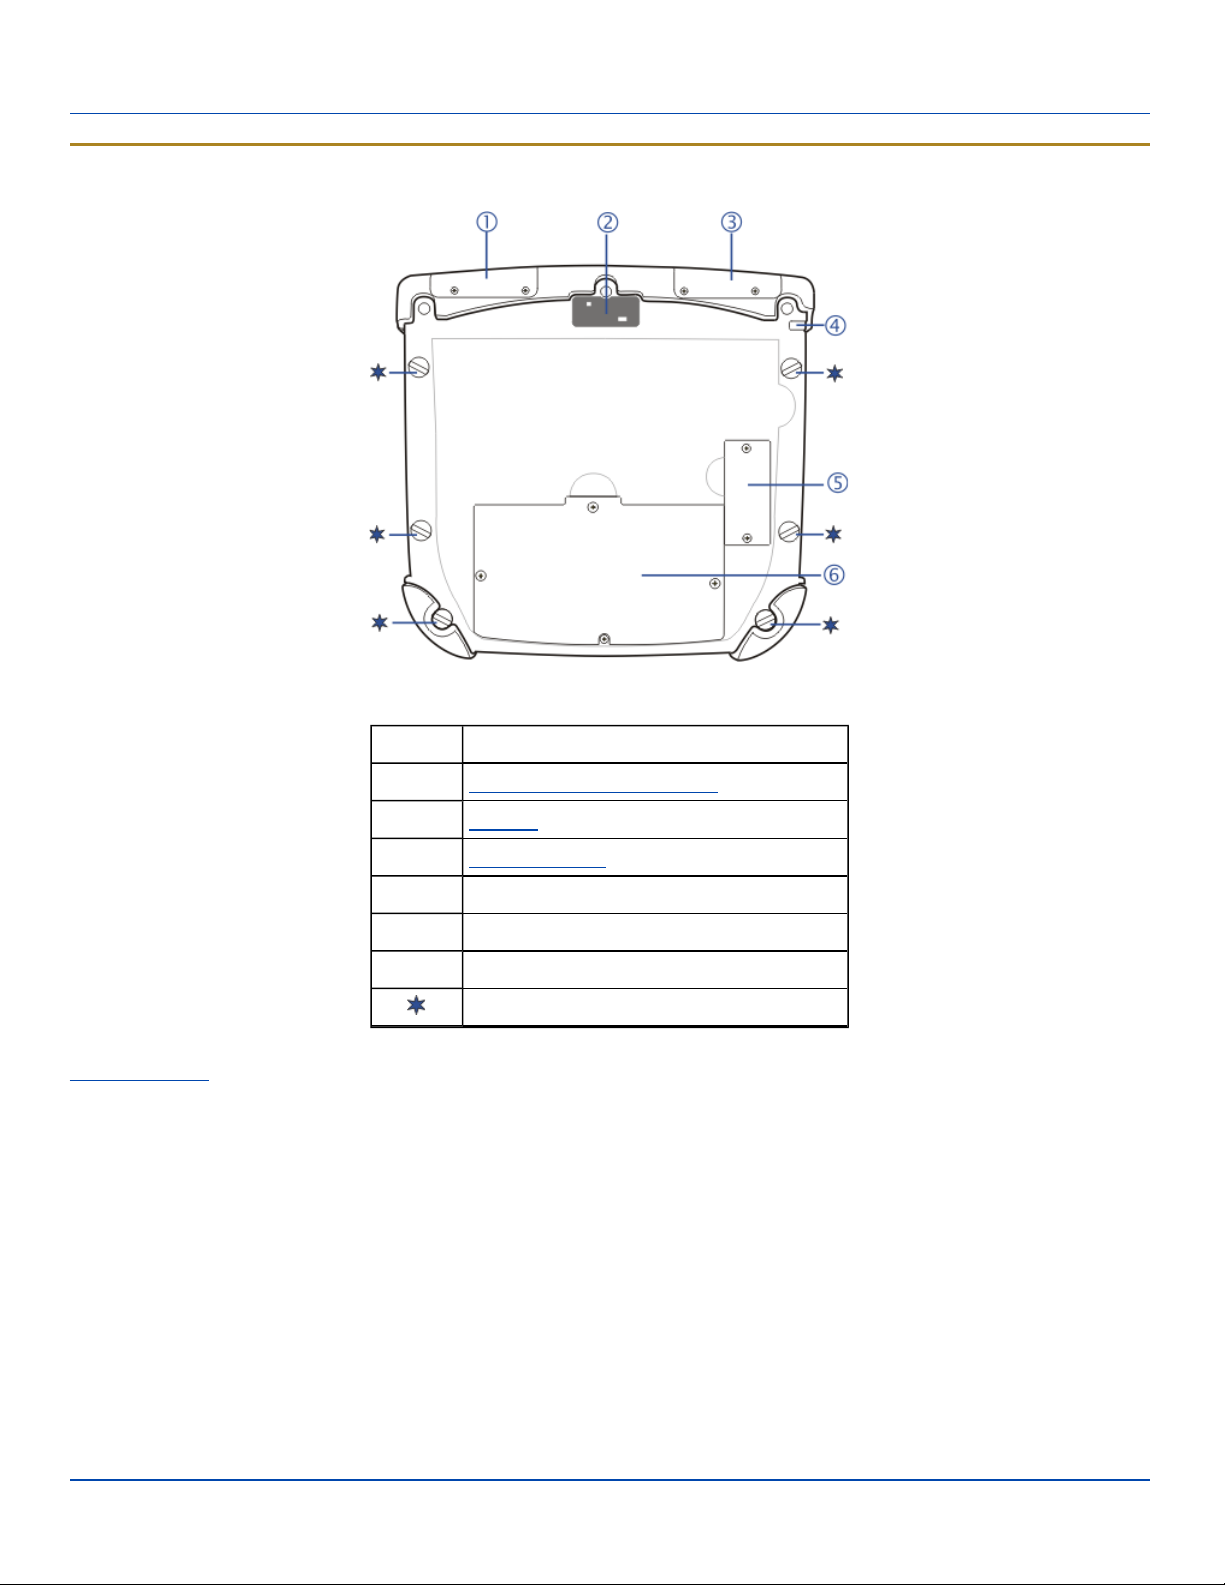
Rear View
Marathon Components, Rear
Position Function
1 Magnetic Stripe Card Reader Add-on Cover
2 Camera
3 Barcode Imager Add-on Cover
4 Tethered Stylus
5 External Battery Connector Cover
6 Internal Battery / SIM Card Cover
Handstrap Connection
Auxiliary battery is not installed in image shown above.
E-EQ-MARATHONRG-A [ 4 ] Marathon™ Reference Guide
Page 11
Bottom View
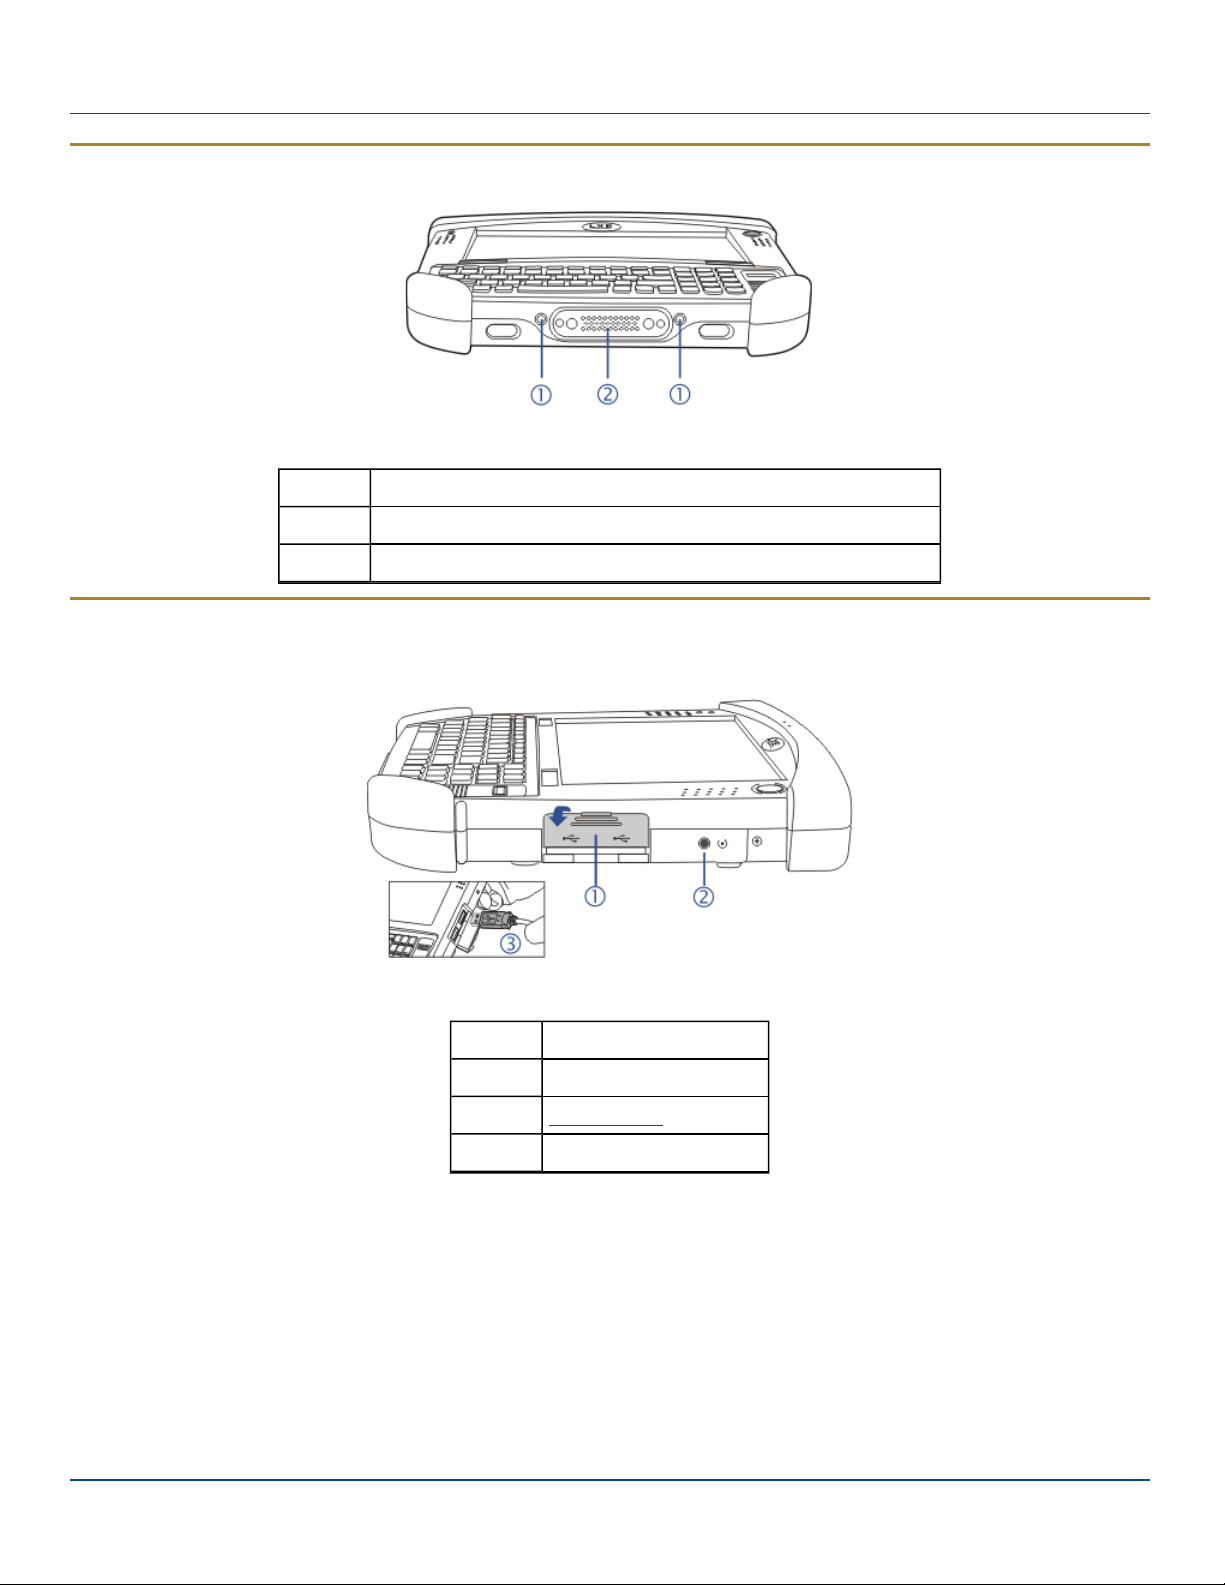
Bottom View
Marathon Components, Bottom
Position Function
1 External Antenna Connections (for use in vehicle mount dock)
2 Docking Connector (for use in desktop and vehicle mount docks)
Right Side View
The components are on the right edge of the Marathon when viewed from the front.
Marathon Components, Right
Position Function
1 USBPort Cover
2 Reset Button
3 Two USB2.0 Host Ports
E-EQ-MARATHONRG-A [ 5 ] Marathon™ Reference Guide
Page 12
Left Side View
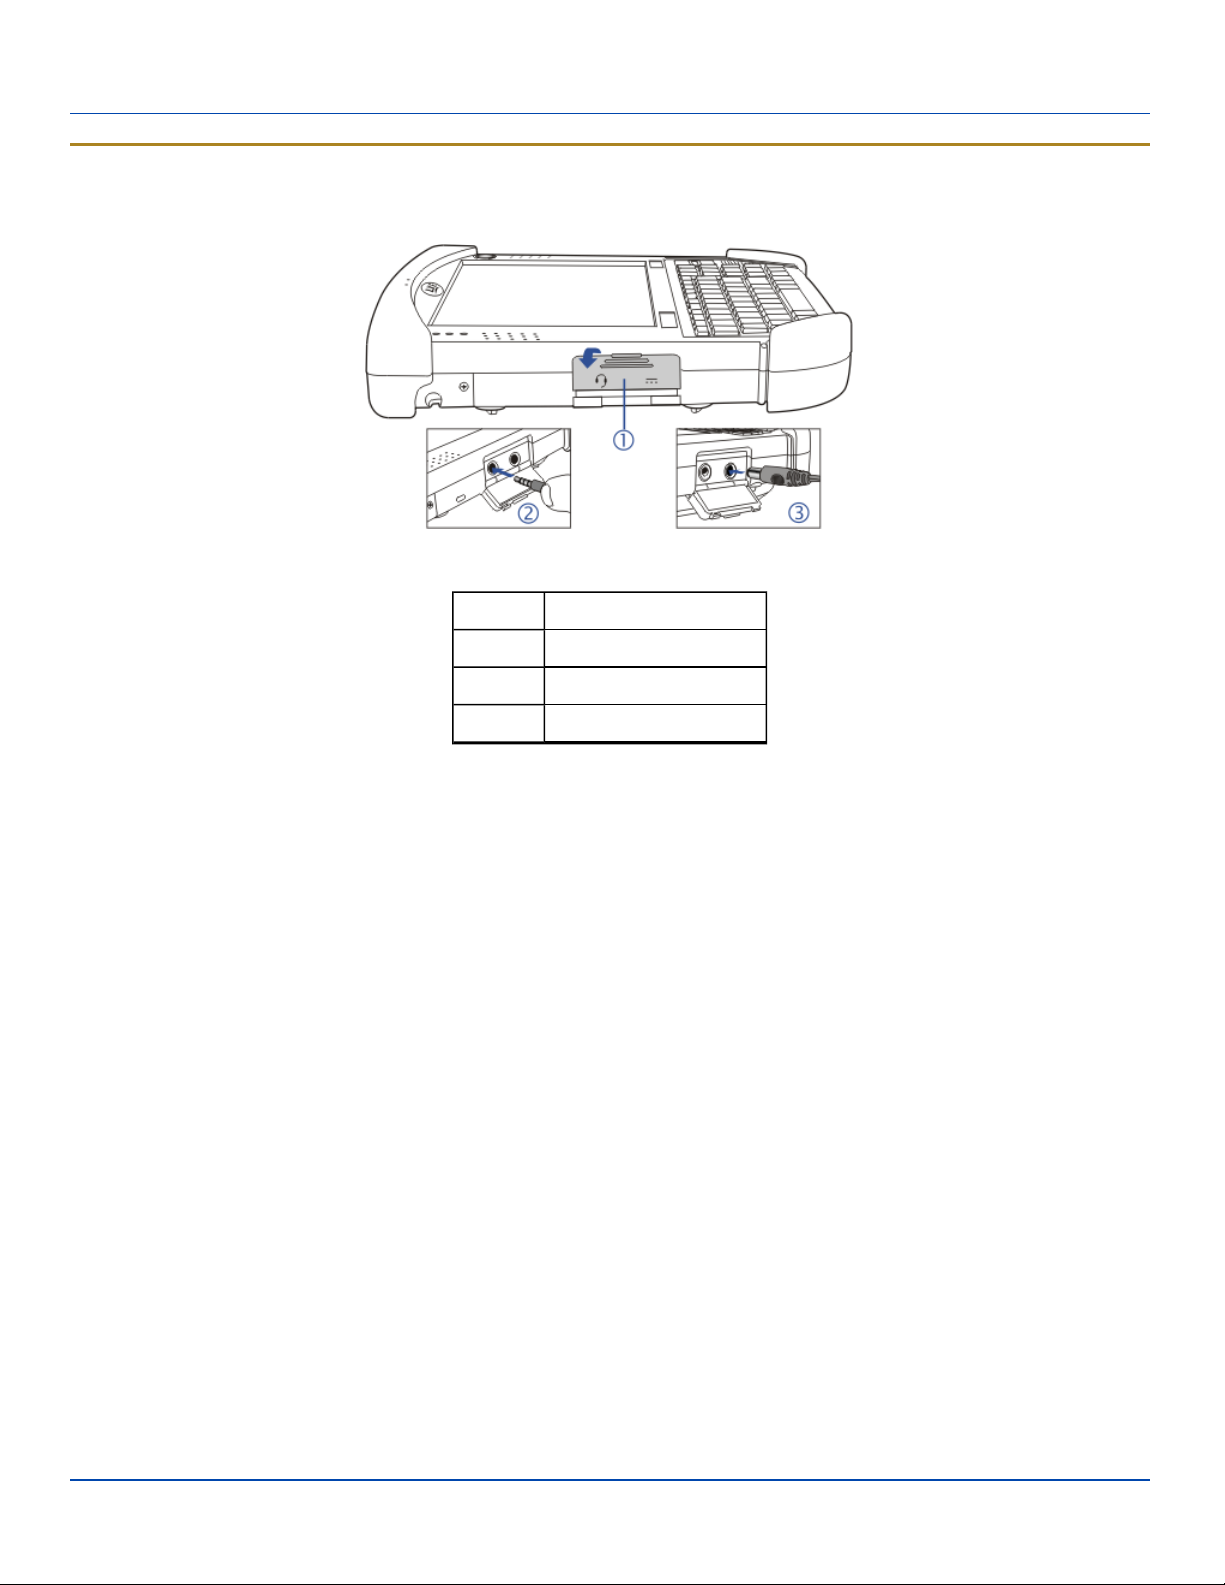
Left Side View
The components are on the left edge of the Marathon when viewed from the front.
Marathon Components, Left
Position Function
1 Power/Audio Port Cover
2 Audio Jack
3 Power Connector
E-EQ-MARATHONRG-A [ 6 ] Marathon™ Reference Guide
Page 13
LED Indicators
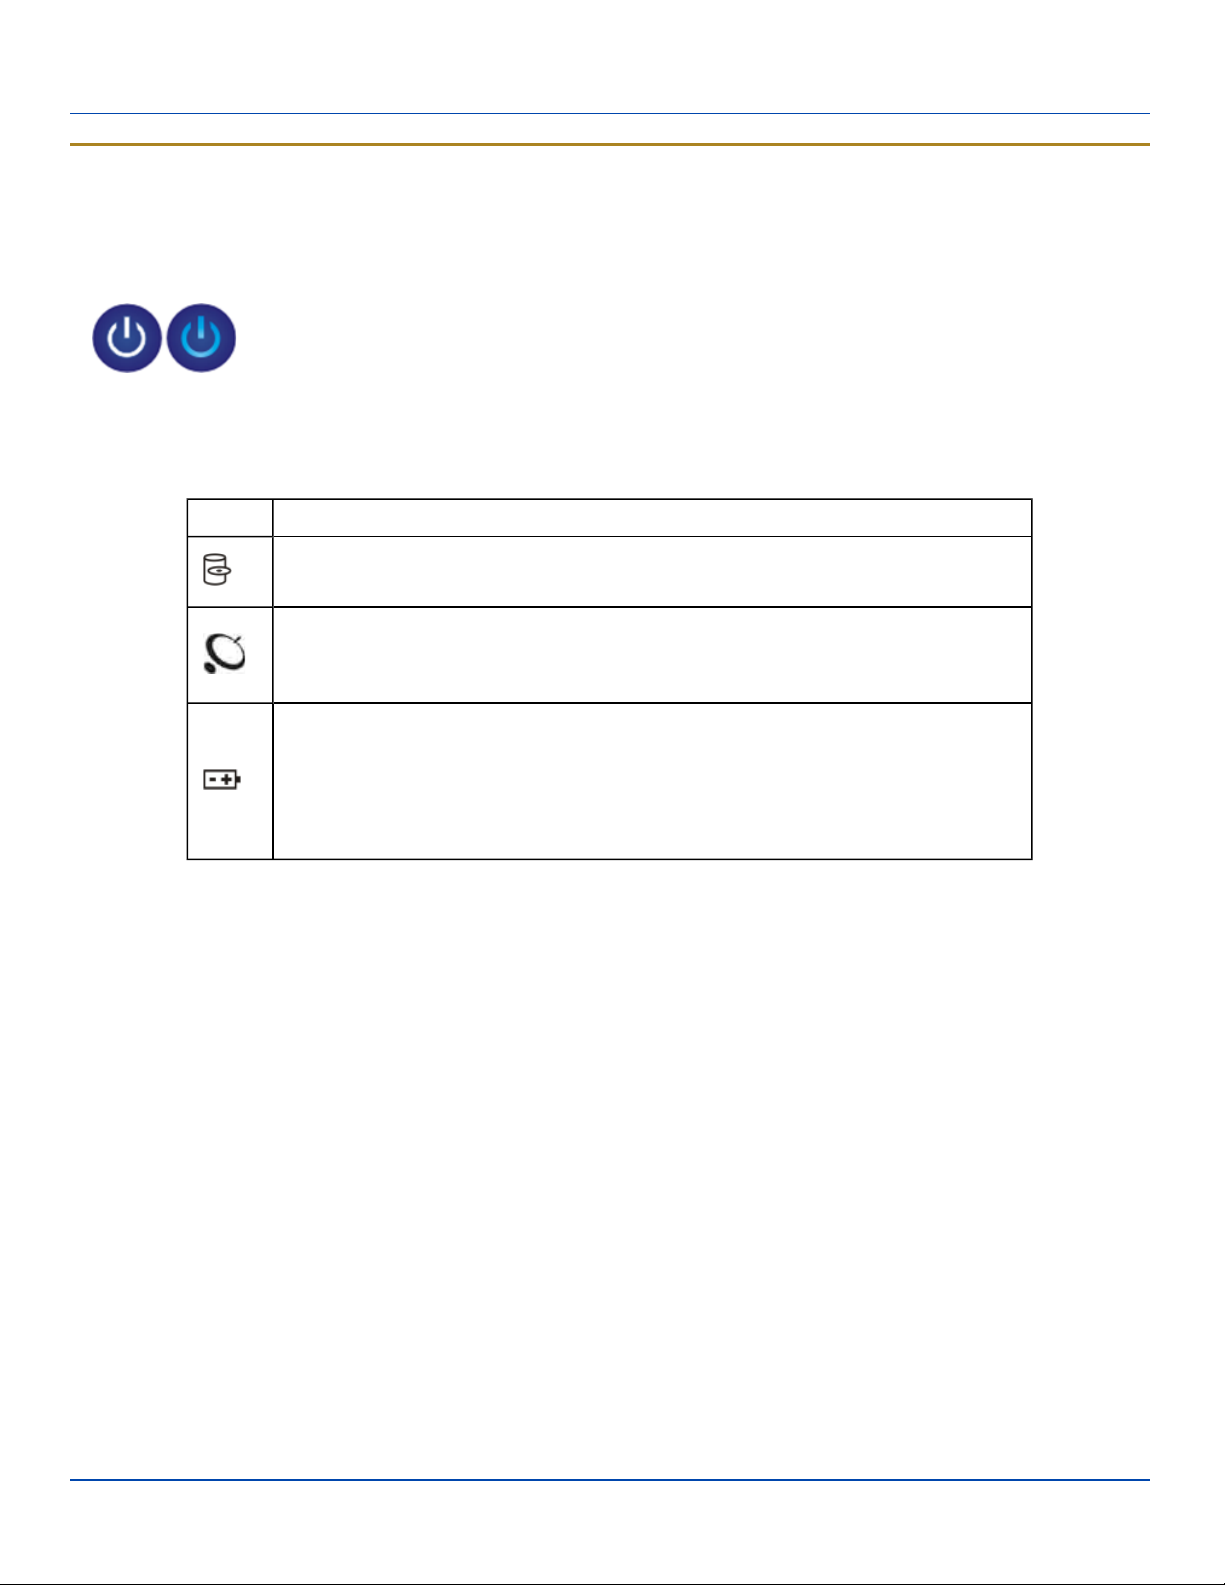
LED Indicators
Power Button
The power button is backlit as follows:
l Off when Marathon is Off.
l Solid blue when Marathon is On.
l Flashes blue when Marathon is in Standby Mode.
Status LEDs
Status LED indicators are located next to the upper left hand corner of the display.
Symbol Function
Indicates the storage drive status:
l Flashes green when drive is accessed
Indicates the wireless status:
l Solid blue when Marathon is On, does not blink when connection/re-connection
occurs.
Indicates the battery status:
l Off when battery is fully charged.
l Solid green when battery is discharged
l Solid orange when battery is charging
l Flashing orange when battery is low or has failed.
E-EQ-MARATHONRG-A [ 7 ] Marathon™ Reference Guide
Page 14

Using a Stylus
Using a Stylus
Note: Always use the point of the stylus for tapping or making strokes on the touch screen.
Never use an actual pen, pencil, or sharp/abrasive object to write on the touch screen.
Hold the stylus as if it were a pen or pencil. Touch an element on the screen with the tip of the stylus then remove the stylus
from the screen.
Firmly press the stylus into the stylus holder when the stylus is not in use.
Using a stylus is similar to moving the mouse pointer then left-clicking icons on a desktop computer screen.
Using the stylus to tap icons on the touch screen is the basic action that can:
l Open applications
l Choose menu commands
l Select options in dialog boxes or drop-down boxes
l Drag the slider in a scroll bar
l Select text by dragging the stylus across the text
l Place the cursor in a text box prior to typing in data
l Place the cursor in a text box prior to retrieving data using an input/output device.
A right-click can be simulated by touching the touch screen with the stylus and holding it for a short time.
A right click is generated by tapping the mouse icon , usually located in the upper right hand corner of the screen.
After tapping, the mouse icon highlights the right button. The next touch screen tap is treated as a right click. The
mouse icon returns to the left button highlighted so subsequent taps are treated as left clicks.
Note: If the mouse icon is not displayed, this feature can be enabled by tapping the PenMount icon in the System
Tray. From the menu that pops up, tap Right Button to enable the mouse icon. When this option is enabled, a
checkmark is displayed in the menu.
The Biometric Mouse can be used instead of the touch screen.
A stylus replacement kit is available.
E-EQ-MARATHONRG-A [ 8 ] Marathon™ Reference Guide
Page 15

Marathon Configuration Options
Marathon Configuration Options
Many configuration options are available via the Microsoft Windows Controlpanel. For additional information, please refer to
Help and Support on the Start menu for configuration details.
Date and Time
Use the Windows interface to set date, time and time zone.
l Double tap time display in System Tray
l Tap Start |Control Panel | Date and Time (Classic view)
l Tap Start |Control Panel | Date, Time, Language and Regional Options | Change the Date and Time (Category
view)
Power Management
Use the Windows interface to set power management options.
l Tap Start | Control Panel | Power Options (Classic view)
l Tap Start | Control Panel | Performance and Maintenance | Power Options (Category view)
Speaker Volume
Use the Windows interface to control speaker volume.
l Double tap speaker icon in System Tray
l Tap Start | Control Panel | Sound and Audio Devices (Classic view)
l Tap Start | Control Panel | Sounds, Speech and Audio Devices | Adjust the System Volume (Category view)
Connect Bluetooth Devices
Use the Windows interface to manage Bluetooth devices.
l Tap Start | Control Panel | Bluetooth Devices (Classic view)
l Tap Start | Control Panel |Printers and Other Hardware | Bluetooth Devices (Category view)
Restart/Shutdown
Use the Windows interface to restart or shut down the Marathon.
l Tap Start |Shut Down | Restart
l Tap Start |Shut Down | Shut down
Calibrate Touch Screen
To calibrate the touch screen, tap Start | Programs | PenMount Universal Driver | Utility | PenMount Control Panel.
Select PenMount 6000 USB and then tap Configure. Select Standard Calibration or Advance Calibration.
Advanced Calibration allows the user to select the number of calibration points. With either option, follow the on screen
instructions to touch the red square, hold the touch and then lift the stylus to complete the calibration process.
E-EQ-MARATHONRG-A [ 9 ] Marathon™ Reference Guide
Page 16

Data Entry
Data Entry
You can enter data into the Marathon through several different methods. Manual data entry methods include the keyboard and
touch screen. Automated data entry methods include the imager module, a wireless Bluetooth scanner, a tethered USB
scanner and the magnetic card reader module.
Keyboard Data Entry
Refer to Key Maps for 101-key keyboard equivalent key presses.
The 62-key keyboard with number pad is used to manually input data that is not collected otherwise. Almost any function that a
full sized computer keyboard can provide is duplicated on the keyboard but it may take a few more keystrokes to accomplish a
keyed task.
When using the keyboard, some keys have multiple functions. The primary alpha or numeric character is printed on the key.
Barcode Data Entry
The Marathon supports an accessory imager module for barcode label reading, as well as a wireless Bluetooth barcode
scanner and a tethered USB scanner.
Keyboard data entries can be mixed with barcode data entries.
Magnetic Card Data Entry
The Marathon supports an accessory magnetic card reading module. Keyboard data entries can be mixed with magnetic card
data reader entries.
Touch Screen Data Entry
Note: If the touch screen is not accepting pen touches, the touch screen should be re-calibrated. See Touch Screen
Calibration.
Note: Always use the point of the stylus for tapping or making strokes on the display. Never use an actual pen, pencil or
sharp object to write on the touch screen.
The touch screen can be used in conjunction with the keyboard and a barcode decoder.
l Touch the stylus to the field of the data entry form to receive the next data feed.
l The cursor begins to flash in the field.
l The unit is ready to accept data from either the keyboard, the accessory imager, a wireless Bluetooth device or a device
connected to a serial port on a powered dock.
Note: The touch screen may be disabled. Please refer to Disabling the Touch Screen.
E-EQ-MARATHONRG-A [ 10 ] Marathon™ Reference Guide
Page 17

Hardware
Hardware Configuration
Processor, Memory and Storage
The Marathon has an Intel®Atom Z530 (1.6GHz) processor.
System memory is 1 GB or 2 GB DDR2 SDRAM.
Storage is supplied by an internal solid state hard drive (8, 16, 32 or 64GB).
Display
A 7.1"WVGA (800x480) display is installed. The display includes a touch screen. Depending on the option ordered, the display
is optimized for either indoor our outdoor ambient lighting. An Intel®controller is provided for the display. The controller is
capable of supporting a second display when the Marathon is docked in a desktop dock with an external display attached to the
VGAport on the dock.
Audio
The Marathon contains two integrated speakers and an integrated microphone. An audio connector is available for an external
headset.
Wireless Communication
The following options are available:
l 802.11 WLAN radio
l Bluetooth
l WWAN (not available in this release)
l GPS
Power Management
The Marathon uses Microsoft Windows Power Management. The Marathon has two operating modes: Normal and Standby.
In Normal operating mode all systems are powered up and the video display is on. However, Microsoft Windows also allows
the display and hard disks to be shut down in normal mode to conserve energy.
The Standby mode shuts down many devices such as the display and hard drives. For complete details on the standby mode,
please refer to the Microsoft Help andSupport (Start | Help and Support).
E-EQ-MARATHONRG-A [ 11 ] Marathon™ Reference Guide
Page 18

Power Input / Battery
Power Input / Battery
The Marathon is powered by a main battery (Lithium Ion rechargeable 2200 mAh)concealed inside the Marathon case, that
provides 3.5 hours of operation without a recharge. The main battery can only be recharged using external power sources, such
as an indoor AC/DC adapter connected directly to the Marathon or an auxiliary battery (38Whr and 63Whr) attached directly to
the Marathon. The main battery remains concealed in the Marathon while charging.
The main battery will also recharge when the Marathon is docked in a powered desktop dock or vehicle dock. With an installed
fully charged auxiliary battery, Marathon battery life is increased to 6 or 10 hours based on the auxiliary battery selected.
The main battery and an attached auxiliary battery are re-charged whenever the Marathon is:
l connected to an AC power adapter
l placed in a powered desktop dock
l placed in a powered vehicle dock.
An auxiliary battery can also be charged, when not attached to the Marathon, when:
l an auxiliary battery is placed in the 4 bay battery charger.
l an auxiliary battery is placed in the Spare charging bay on the desktop dock
Backup Battery
The LXE Marathon has a permanent lithium battery installed to maintain time, date and BIOS setup information. The backup
battery is not user serviceable and should last five years with normal use before it requires replacement. The lithium backup
battery should only be exchanged by authorized service personnel.
E-EQ-MARATHONRG-A [ 12 ] Marathon™ Reference Guide
Page 19

Power Button
Power Button
The power (on/off) button is a push button located on the upper right corner of the Marathon. If the Marathon is Off, pressing the
power button turns the Marathon On.
If the Marathon is On, Windows determines the results of a power button press based on user configuration. For example, the
Marathon may be configured to:
l Shut down
l Hibernate
l Ignore the power button press
l Ask user to choose.
Power button behavior is configured by selecting Start |Settings | Control Panel | Power Options |Advanced tab.
Pressing and holding the power switch for several seconds forces a shutdown.
The Marathon is designed for a controlled shutdown when using the power button. A controlled shutdown first closes any open
programs, and then shuts down the Windows operating system. When the main battery is discharged, DO NOT remove
external power from the Marathon without first shutting down the Marathon.
The Marathon shutdown may be initiated in any of the following ways:
l Selecting the Shutdown option from the Windows Start Menu.
l Selecting the Shutdown option from the Windows Task Manager. The Windows Task Manager is displayed by press-
ing Ctrl-Alt-Del and clicking the Task Manager button.
l Momentarily pressing and releasing the power button. The Marathon behavior when the power button is pressed can be
configured in the Power Options Control Panel.
l Pressing and holding the power button for approximately five seconds. Any open programs and the Windows operating
system are shut down before power off. Note that this option must be used to shut down when the operating system is
not responding.
For more information on the Windows shutdown process, please refer to Help and Support on the Windows Start menu or
commercially available Windows guides.
Reset Button
The Reset button is on the right side of the Marathon. Press the Reset button in with the tip of the stylus and the Marathon
immediately reboots. A reset button press performs the same function as the software key sequence Start | Shutdown |
Restart.
E-EQ-MARATHONRG-A [ 13 ] Marathon™ Reference Guide
Page 20

External Connectors
External Connectors
The following external connectors are located on the Marathon:
l Two USB 2.0 Host ports
l External power supply connector.
l Audio connector is a 3.5 mm jack for a headset.
l Docking connector on bottom for use with vehicle mounted dock or desktop dock
l External antenna connectors on bottom for use with vehicle mounted dock.
l COM 1 is accessible when docked in a vehicle mounted or desktop dock.
l COM 2 is reserved for add-on modules (imager or magnetic card reader).
USB Connectors
There are two USB 2.0 Host ports, located on the right side and protected by a sliding cover.
Audio Connector
The Audio connector is a standard 3.5mm connector for an external headset, located on the left side and protected by a sliding
cover.
Power Supply Connector
The power connector is a barrel style connector, located on the left side and protected by a sliding cover. AC/DC power is
supplied to the Marathon through the power connector.
The Marathonpower supply connector accepts DC input voltage at 19 Volts.
Antenna Connectors
The antenna connectors are located on the bottom of the Marathon. The antenna connectors are for external GPS and WWAN
antennas. The external antennas connect to the Marathonvehicle dock. No antenna connects directly to these ports on the
Marathon.
Docking Connector
The docking connector is located on the bottom of theMarathon. The connector interfaces with the matching connector in the
Marathon desktop and vehicle mounted dock, allowing theMarathon to interface with USB, serial or other ports present on the
selected dock.
E-EQ-MARATHONRG-A [ 14 ] Marathon™ Reference Guide
Page 21

Keyboard
Keyboard
The keyboard has 62 keys, including a number pad. A biometric mouse is located to the right of the keyboard. When using the
keyboard, some keys have multiple functions. The primary alpha or numeric character is printed on the key. Refer to Key Maps
for 101-key keyboard equivalent key presses.
Marathon Keyboard
Backlighting
l Keys have a dark grey background with frosted white characters for visibility with the backlight on or off.
l Keys are backlit with a white light, except for sticky keys (see below) that have a different backlight color when the key
is active.
Sticky Keys
ALT, CTL, SHIFT, FN and NUM LCK are sticky keys and function as described below:
l Press key once and key stays sticky for next keystroke.
l Press key and hold for a second and a half and the key stays sticky until sticky key is pressed again. For example,
press NUM LCK once and NUM LCK stays ON, press it again and it turns OFF.
Sticky Key Indicators
l NUM LCK: Amber backlight indicates sticky key is active.
l ALT, CTL, SHIFT, FN: Blue backlight indicates sticky key is active.
E-EQ-MARATHONRG-A [ 15 ] Marathon™ Reference Guide
Page 22

Biometric Mouse
Biometric Mouse
The Marathon contains a biometric mouse located on the right next to the keypad.
The biometric mouse performs two functions, security and screen navigation (simulating a mouse). Use the F9 function key to
toggle between the two features.
Security Features
As a security device, the biometric mouse can restrict device access to only those users whose fingerprint scan is stored on
the Marathon. Examples include:
l Windows logon can be performed with a fingerprint scan as opposed to the traditional user name and password. You
must create a Windows user account with a password, then shutdown and restart the Marathon before you can add fingerprint security to that user account. After rebooting, create fingerprint security, then shutdown and restart the Marathon to save the password in the registry.
l Internet Explorer web site login information (user name and password) can be stored and accessed only after a suc-
cessful fingerprint scan.
l SecureLock, a part of the Fingerprint software package, can be used to create a virtual disk that can only be accessed
after a successful fingerprint scan. Without an authorized fingerprint scan, the drive is not accessible or displayed in
Windows explorer.
l Files and folders may be assigned encryption that limits access to only those users who have a stored fingerprint.
For information on using the finger print security feature, select Start | Programs | Fingerprint Software | Help.
Navigation
By default, the biometric mouse is enabled for cursor navigation. Sliding a finger over the biometric mouse moves the cursor in
the same direction the finger moves. The sensitivity (motion speed) may be adjusted or the feature disabled. Select Start |
Settings | Control Panel | TruePrint to configure this feature.
Tapping a finger on the biometric mouse is treated as a mouse left-click. Two taps in quick succession is treated as a doubletap. Tapping and holding is treated as a right-click.
E-EQ-MARATHONRG-A [ 16 ] Marathon™ Reference Guide
Page 23

Touch Screen
Touch Screen
Calibrating the Touch screen
Although the Marathon touch screen is installed and calibrated before the Marathon leaves LXE, users may make adjustments
to the calibration. To calibrate the touch screen, select Start | Programs | PenMount Universal Driver | Utility | PenMount
Control Panel. On the Device tab, double-click the PenMount 6000 USB icon. On the Calibrate tab, tap either the Standard
Calibration or the Advanced Calibration button.
Advanced Calibration uses more calibration points than the Standard Calibration option.
Follow the instructions on the screen. The calibration utility displays a red square on the screen. Touch the center of the square
with the stylus and hold for a few seconds. Release and repeat with the next square. After all locations have been touched, the
calibration utility saves the settings and automatically closes.
If no input is received, the calibration utility times out. Press the ESC button to exit the calibration utility without saving any
changes.
Refresh the Touch Screen Calibration Points
Select Start | Programs | PenMount Universal Driver | Utility | PenMount Control Panel. On the Device panel, single-
click the PenMount 6000 USB icon. Click the Refresh button. The touch screen is refreshed immediately. Click OK to close
the control panel.
Troubleshooting
If when using the Intel Ultra Mobile GMA Driver and rotating the screen, the touch screen will require re-calibration for the
rotated screen touch areas. Connect and use a USB mouse, instead of screen touch, to access the control panels needed for
re-calibration.
Disabling the Touch Screen
If desired, the touch screen can be disabled in the Windows control panel. Once disabled, the touch screen remains disabled
until it is enabled again.
To disable the touch screen, access the Windows control panel and click on System | Hardware | Device Manager | Mice
and other pointing devices. Under the list there is a listing for PenMount USB Mouse. Right click on this listing and select
Disable from the Device Usage menu.
To enable the touch screen, follow the same process, selecting Enable from the right click menu.
E-EQ-MARATHONRG-A [ 17 ] Marathon™ Reference Guide
Page 24

The Display
The Display
The Marathon display is capable of supporting WVGA graphics modes (800x480). The display covering is designed to resist
stains. The touch screen allows signature capture and touch input. A display optimized for outdoor viewing is available.
The touch screen is a Resistive Panel with a scratch resistant finish that can detect touches by a stylus, and translate them
into computer commands. In effect, it simulates a computer mouse. Only Delrin or plastic styluses should be used. An extra or
replacement stylus may be ordered from LXE.
Note: Always use the point of the stylus for tapping or making strokes on the display. Never use an actual pen, pencil or
sharp object to write on the touch screen.
Adjust Display Brightness
The display can be lightened or darkened by using the Fn key and the keypad:
1. Hold the Fn key down for a few seconds until the Fn key remains illuminated (sticky).
2. Press the 9 (brightness up) key to brighten the display.
3. Press the 3 (brightness down) key to darken the display.
The display brightness and darkness have nine levels. The display levels are managed by the Windows operating system. The
Fn key active sticky mode takes precedence if the NumLck key is illuminated (sticky) during this process.
Cleaning the Display
Keep fingers and rough or sharp objects away from the display. If the glass becomes soiled or smudged, clean only with a
standard household cleaner such as Windex®without vinegar or use Isopropyl Alcohol. Do not use paper towels or harshchemical-based cleaning fluids since they may result in damage to the glass surface. Use a clean, damp, lint-free cloth. Do not
scrub optical surfaces. If possible, clean only those areas which are soiled. Lint/particulates can be removed with clean,
filtered canned air.
E-EQ-MARATHONRG-A [ 18 ] Marathon™ Reference Guide
Page 25

Software
Introduction
Like any personal computer, there are many aspects to the setup and configuration of the Marathon. Much of the setup and
configuration of the Marathon is dependent upon the optional features (both hardware and software) installed on the computer.
Since the Marathon uses the Microsoft Windows Plug and Play operating system, much of the hardware setup is automatic.
The examples found in this section are to be used as samples only; as the configuration of your specific computer may vary.
The following sections provide a general reference for the configuration of the Marathon and its optional features.
Please refer to commercially available Microsoft Windows user guides or to Windows on-line Help applications for more
information on Windows’ options for system configuration.
Operating System
This Marathon™ Reference Guide has been developed for a Marathon with a Windows®XP Professional operating system.
The Marathon is available with the following operating systems:
l Windows
l Windows
l Windows
®
XP Professional
®
Embedded Standard
®
7 Professional
Microsoft Windows Setup and Configuration
After the system files are processed, Microsoft Windows begins to load. Windows maintains a System Registry and INI files.
Standard Windows configuration options apply to the Marathon. Configuration options are located in either the System Tray or
the Control Panel:
l The System Tray contains icons for adjusting the time, date or volume level.
l The Control Panel contains icons for many other configuration options, such as Power Management, Regional and Lan-
guage Options, etc.
l The Control Panel icons are also used to add, delete or modify software installed on the Marathon.
Please refer to Help and Support on the Windows Start menu or commercially available Windows guides for more information
on configuration options in Windows.
Microsoft Windows License Agreement (First Boot)
If your Marathon is shipped with a Microsoft Windows operating system pre-installed, it is necessary to complete the Windows
licensing/registration screens when starting the Marathon for the first time. To complete this information, you may need the
Microsoft Windows software key that was included with the Marathon.
When Microsoft Windows is started by the user for the first time (known as the “out of the box experience”), a series of
questions is presented. If prompted, the product key (printed on a decal attached to the Marathon) must be entered. The series
of prompts and responses allow the user to configure Microsoft Windows XP on the Marathon according to the user’s needs.
Proceed with the remainder of the boot process.
E-EQ-MARATHONRG-A [ 19 ] Marathon™ Reference Guide
Page 26

Drive C Folder Structure
Drive C Folder Structure
Microsoft Windows is installed in the \Windows folder. In addition, Microsoft Windows creates other folders and several
subfolders. For more information on the folders Microsoft Windows uses, please refer to commercially available Windows
reference guides.
Software Loaded on Drive C
The software loaded on the Marathon computer consists of:
l BIOS
l Microsoft Windows XP Professional
l device drivers
l radio software
l touch screen software
The software installed on the Marathon is summarized below.
Note: Due to the complex folder structure and System Registry under Microsoft Windows, software should not be
removed manually. Instead use the Add or Remove Programs icon in the Windows Control Panel.
Microsoft Windows
Microsoft Windows is installed in the \Windows subfolder, which is the Windows default. In addition, Windows places files in
other folders and subfolders during installation. For more information, please refer to commercially available Windows user
guides.
Device Drivers
Device drivers are installed for all installed hardware options, such as the display, touch screen, radios, Ethernet port, etc. For
more information on Microsoft Windows device drivers, please refer to commercially available Windows guides.
Radio Software
The Marathon is delivered with the radio software installed. Because the Marathon uses a Microsoft Windows operating
system, the radio installation includes Windows device drivers.
Touch Screen Software
PenMount Universal software is installed for calibrating the Marathon’s touch screen. Please see Touch Screen Calibration for
more information.
E-EQ-MARATHONRG-A [ 20 ] Marathon™ Reference Guide
Page 27
Control Panel
Control Panel
Most control panel applets on the Marathon are standard Microsoft Windows items. For help and information on the standard
control panels, please refer to Help and Support.
The panels listed below may differ from a standard Microsoft Windows equipped PC or laptop.
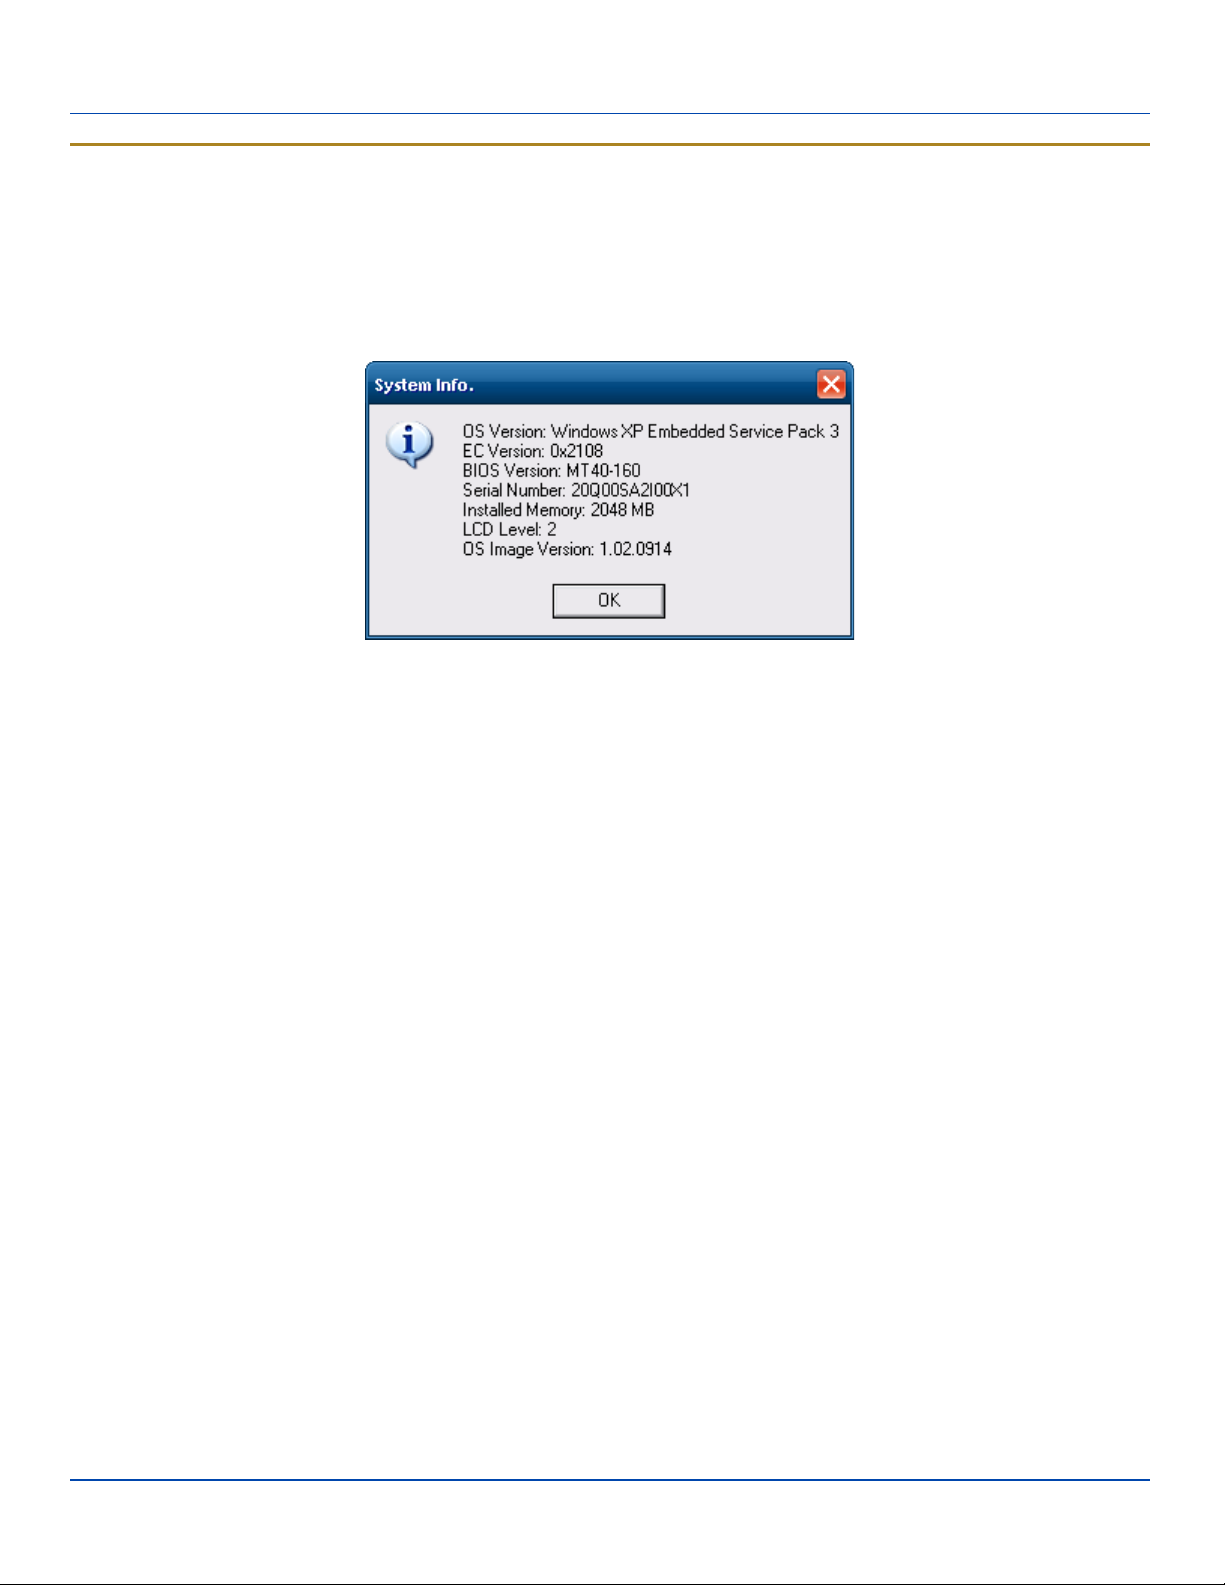
LXE System Info
Display
This is a standard Microsoft Windows control panel applet. On the Settings tab, two displays are supported. By default,
display #1 is the Marathon's built in WVGA display. Display #2 is an external display connected to the VGA port on the
Marathon desktop dock.
E-EQ-MARATHONRG-A [ 21 ] Marathon™ Reference Guide
Page 28
Power Options
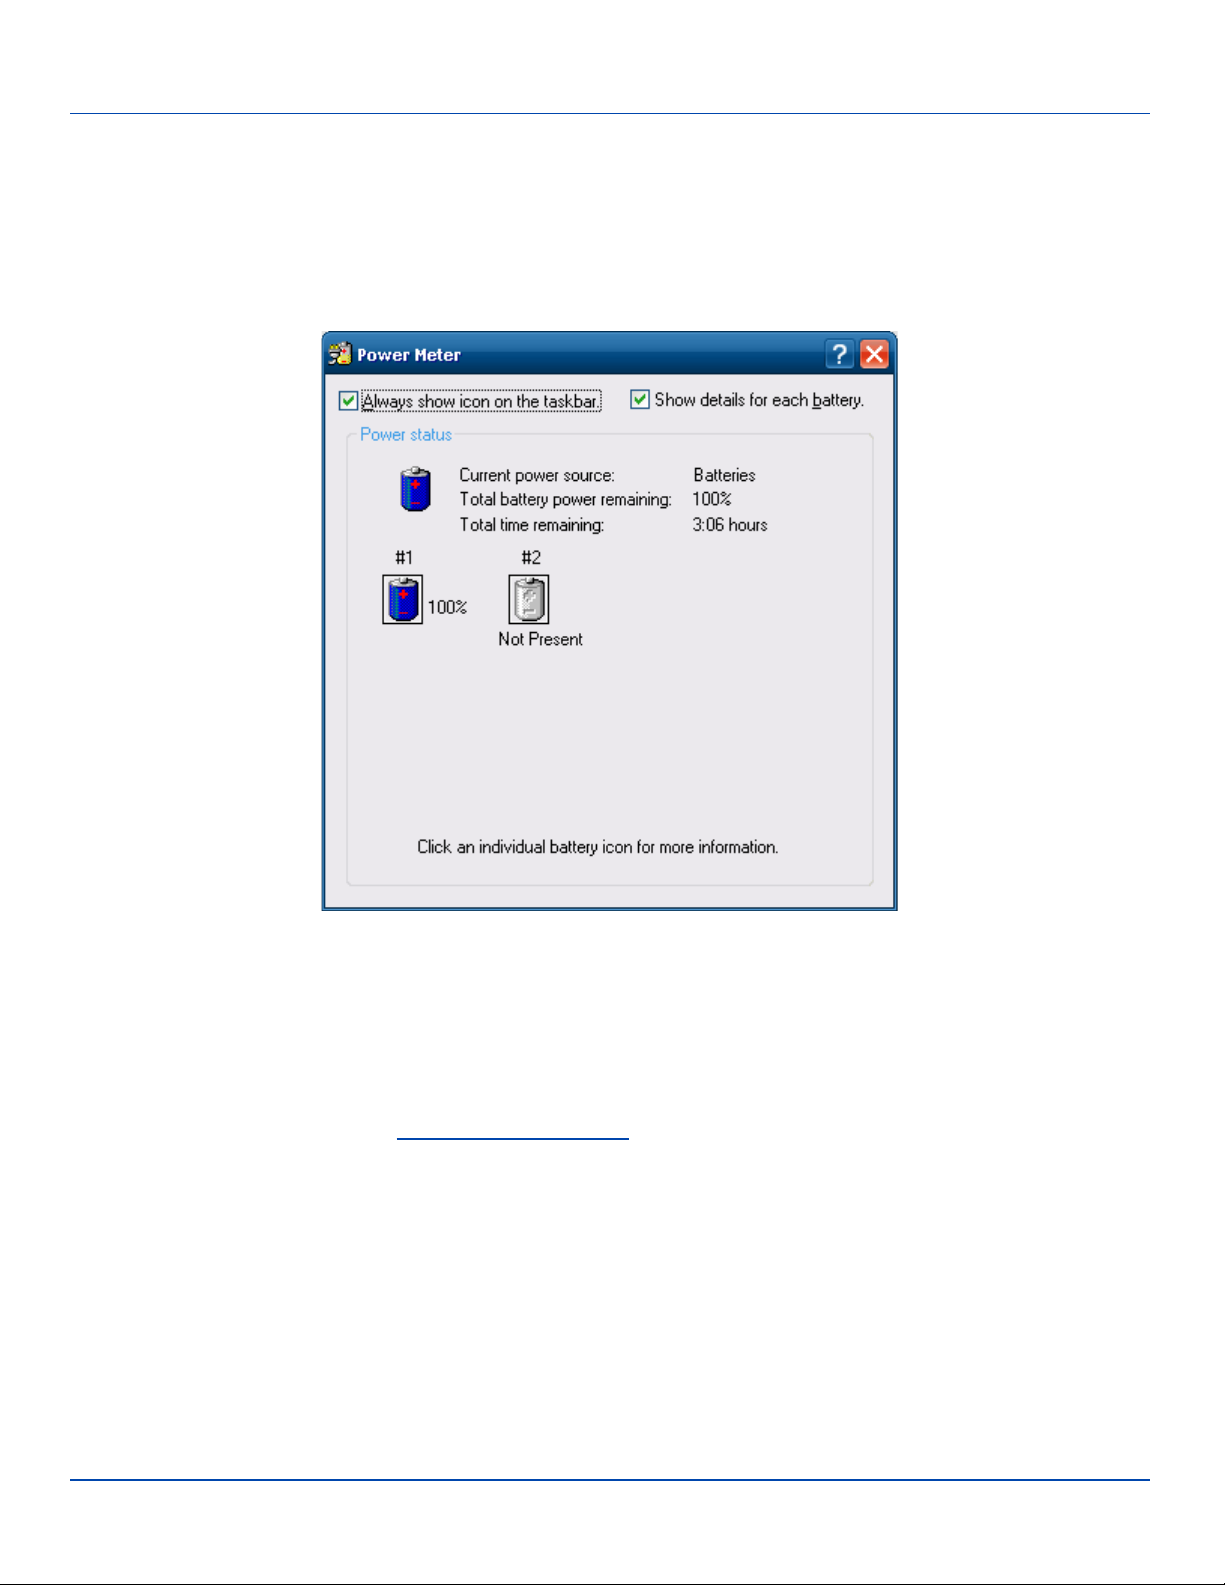
Power Options
Power schemes can be configured that will be in effect when the Marathon is attached to an external power supply or docked in
a powered dock as well as when running on battery power.
On the Power Meter tab, battery #1 refers to the main battery concealed inside the Marathon case. Battery #2 is an optional
auxiliary battery that connects to the back of the Marathon.
TruePrint
Use the TruePrint control panel to configure the fingerprint module for screen navigation. Motion sensitivity can be adjusted
and the fingerprint module navigation can be disabled.
Wi-Fi
The Wi-Fi icon provides access to the Summit Client Utility (SCU) where the default profile can be edited for use with the
wireless network.
E-EQ-MARATHONRG-A [ 22 ] Marathon™ Reference Guide
Page 29
Bluetooth
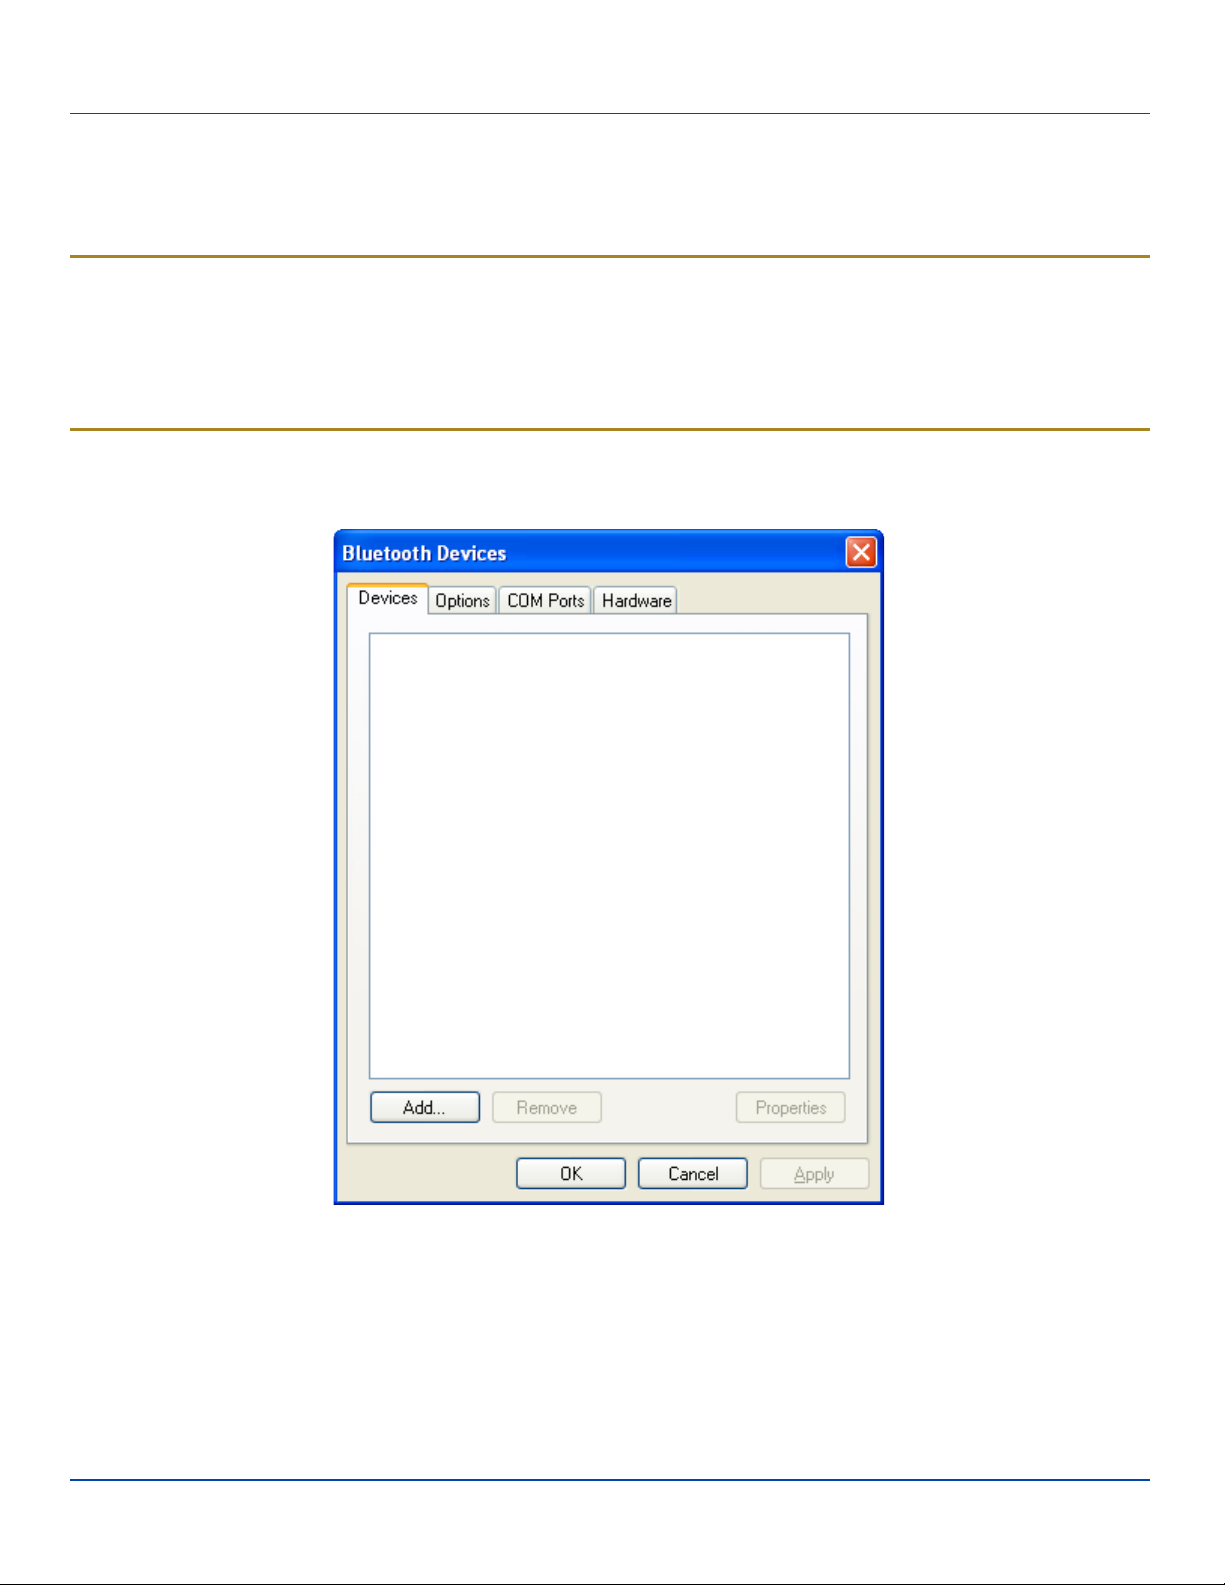
Bluetooth
The Bluetooth control panel can be accessed either by clicking the Bluetooth icon in the taskbar (if visible) or by clicking on the
Bluetooth Devices option in the Windows control panel.
LXE 8650 Bluetooth Ring Scanner/Imager
Use the Bluetooth Device Wizard in the Microsoft Windows Control Panel to discover and manage the Bluetooth scanner
connection.
Do not use the ComponentSoft wedge software (provided with the LXE 8650 series Bluetooth Ring Scanners) on the
Marathon.
Devices Tab
The Devices tab displays any previously discovered Bluetooth devices.
Bluetooth Devices Tab
If there are no Bluetooth devices shown or if the desired device is not shown, use the Add Bluetooth Device Wizard to discover
Bluetooth devices.
Click the Add button to start the wizard.
E-EQ-MARATHONRG-A [ 23 ] Marathon™ Reference Guide
Page 30
Devices Tab
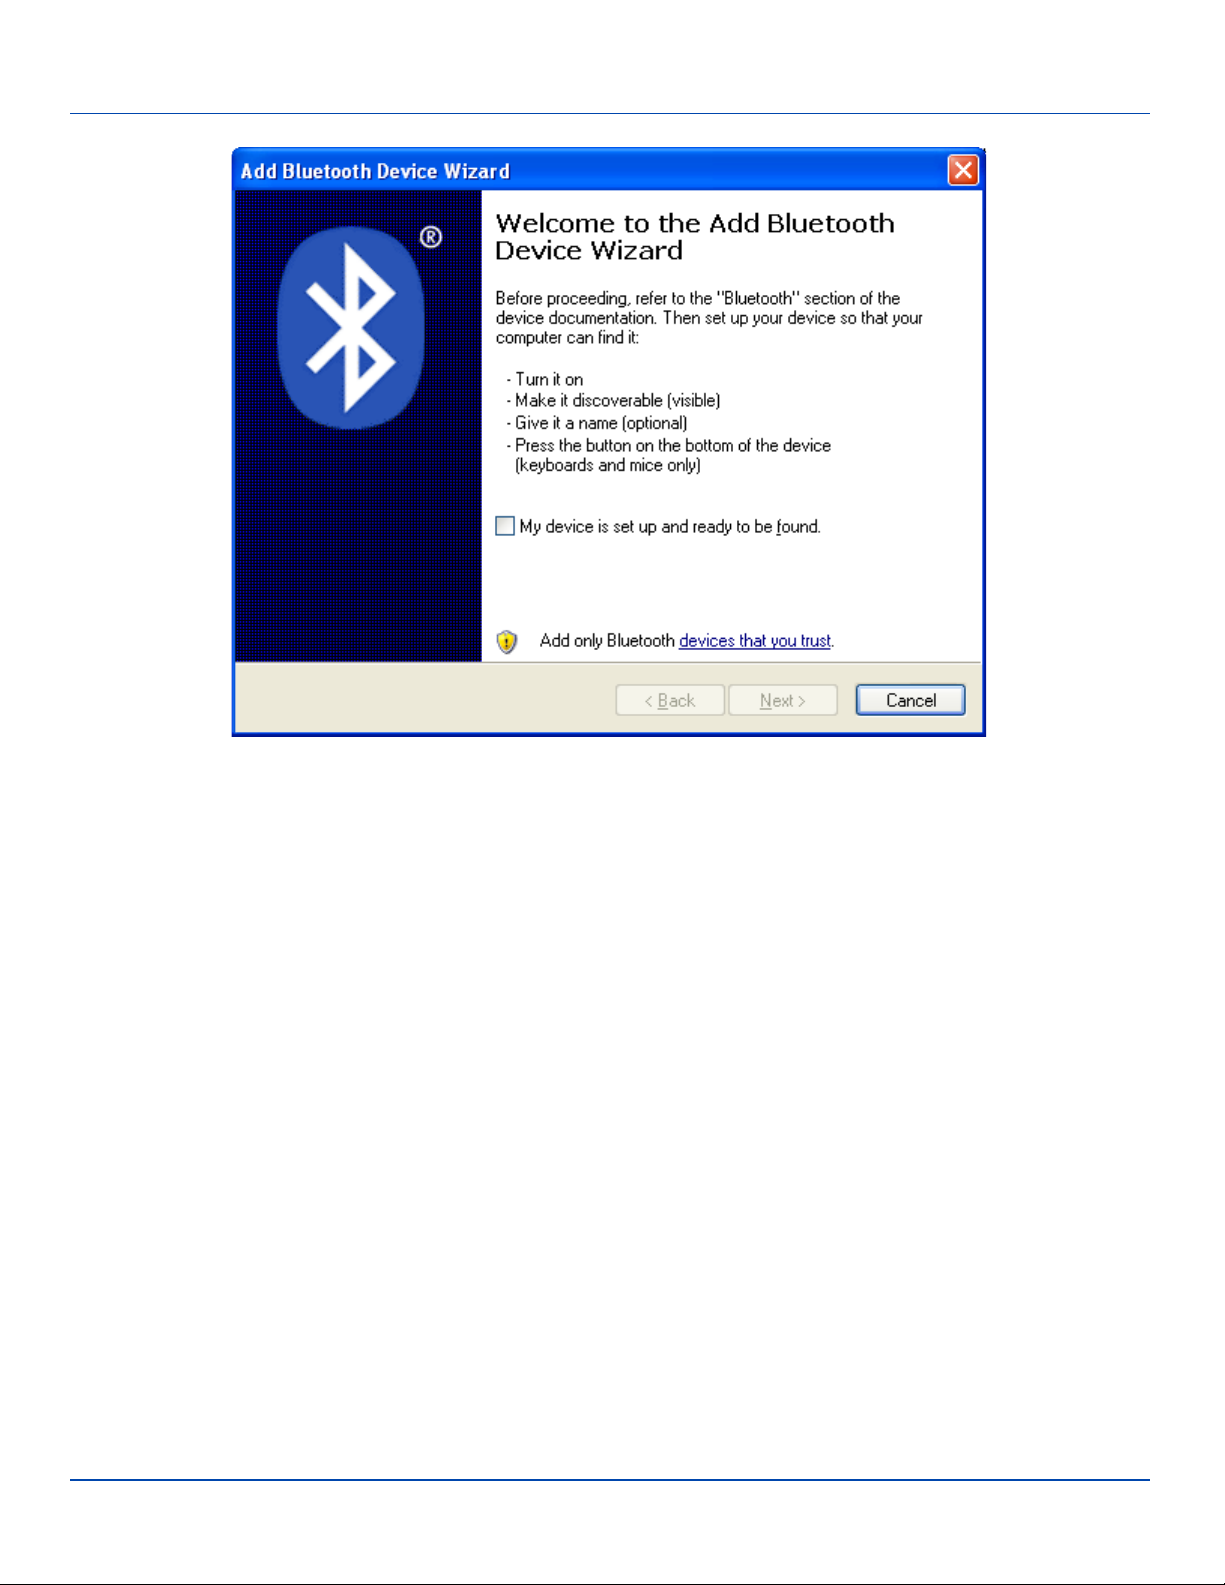
Add Bluetooth Device Wizard
The wizard cannot be started until the checkbox indicating the device is set up and ready to be found is checked.
If any Bluetooth devices are discovered, they are displayed.
E-EQ-MARATHONRG-A [ 24 ] Marathon™ Reference Guide
Page 31

Devices Tab
Discovered Bluetooth Devices
Select the desired Bluetooth device and click Next.
Select the appropriate passkey option.
The Bluetooth device is ready to use.
E-EQ-MARATHONRG-A [ 25 ] Marathon™ Reference Guide
Page 32

Options Tab
Options Tab
Bluetooth Options Tab
This tab contains various Bluetooth connection options. More information can be found using Help and Support on the
Windows Start menu.
Bluetooth Icon
To add the Bluetooth icon to the taskbar enable (click to place a checkmark in) Show the Bluetooth icon in the notification
area. When the Bluetooth icon is in the taskbar, the following right-click menu options are available:
Add a Bluetooth Device
Show Bluetooth Devices
Send a File
Receive a File
Join a Personal Area Network
Open Bluetooth Settings
Remove Bluetooth Icon
More information can be found using Help and Support on the Windows Start menu.
E-EQ-MARATHONRG-A [ 26 ] Marathon™ Reference Guide
Page 33

COM Ports Tab
COM Ports Tab
Bluetooth COM Ports Tab
This tab displays the COM ports used by Bluetooth devices, such as the Bluetooth printer illustrated. More information can be
found using Help and Support on the Windows Start menu.
E-EQ-MARATHONRG-A [ 27 ] Marathon™ Reference Guide
Page 34

Hardware Tab
Hardware Tab
Bluetooth Hardware Tab
This tab hardware information for Bluetooth. More information can be found using Help and Support on the Windows Start
menu.
E-EQ-MARATHONRG-A [ 28 ] Marathon™ Reference Guide
Page 35

Network Configuration
Network Configuration
There are several networking options available for the Marathon.
802.11 Wireless Radios
Please refer to the instructions for configuring the 802.11 radio in Wireless Network Configuration.
Ethernet Connector
A wired Ethernet connection is only available when the Marathon is docked in a desktop dock. Please see the Marathon Dock
Reference Guide for more information.
For more information on configuring the Microsoft Windows network settings, please refer to Help and Support on the Windows
Start menu or commercially available Windows networking literature.
GPS (Optional)
When the GPS module is factory installed in the Marathon, based on the current Marathon configuration the GPS module will
use COM 51to retrieve the Marathons latitude (the location north or south of the equator in degrees) and longitude (the angular
distance from the Prime Meridian in degrees).
WWAN
Not available in this release.
Bluetooth
Please refer to the information on configuring the Bluetooth radio.
1
Verify COM port setting: Start | Settings | Control Panel | System | Hardware | Device Manager | Ports (COM / LPT)
E-EQ-MARATHONRG-A [ 29 ] Marathon™ Reference Guide
Page 36

Wireless Network Configuration for LXE Devices
The Summit client device is a Summit 802.11a/b/g/n radio, capable of 802.11a, 802.11b, 802.11g and 802.11n data rates.The
radio can be configured for no encryption, WEP encryption or WPA security.
Security Options Supported are
l None
l WEP
l LEAP
l WPA-PSK
l WPA/LEAP
l PEAP-MSCHAP
l PEAP-GTC
l EAP-TLS
l EAP-FAST
Important Notes
It is important that all dates are correct on the Marathon and host computers when using any type of
certificate. Certificates are date sensitive and if the date is not correct authentication will fail.
Verify and adjust the date using the Date and Time control panel.
It may be necessary to upgrade radio software in order to use certain Summit Client Utility (SCU)
features.Contact your LXE representative for details.
When using the 802.11a radio, the U-NII 1 band is the preferred band for indoor operation. For
regulatory domains in which the U-NII 3 band is allowed, the following channels are supported: 149,
153, 157 and 161. The AP must be configured accordingly.
E-EQ-MARATHONRG-A [ 30 ] Marathon™ Reference Guide
Page 37

Summit Client Utility
Summit Client Utility
Access:
Start | Programs | Summit | SCU or
SCU Icon on Desktop or
Summit Tray Icon (if present) or
Wi-FI Icon in the Windows ControlPanel (if present)
The Main Tab provides information, admin login and active profile selection.
Profile specific parameters are found on the Profile Tab. The parameters on this tab can be set to unique values for each profile.
This tab was labeled Config in early versions of the SCU.
The Status Tab contains information on the current connection.
The Diags Tab provides utilities to troubleshoot the radio.
Global parameters are found on the Global Tab. The values for these parameters apply to all profiles. This tab was labeled
Global Settings in early versions of the SCU.
Help
Help is available by clicking the ? icon in the title bar on most SCU screens.
The Summit Client Utility (SCU) help may also be accessed by selecting Start | Help and tapping the Summit Client Utility link.
The SCU does not have to be accessed to view the help information using this option.
E-EQ-MARATHONRG-A [ 31 ] Marathon™ Reference Guide
Page 38

Summit Tray Icon
Summit Tray Icon
The Summit tray icon provides access to the SCU and is a visual indicator of radio status.
The Summit tray icon is displayed when:
l The Summit radio is installed and active
l The Windows Zero Config utility is not active
l The Tray Icon setting is On
Click the icon to launch the SCU.
Use the tray icon to view the radio status:
The radio is not currently associated or authenticated to an Access Point
The signal strength for the currently associated/authenticated Access Point is less than -90 dBm
The signal strength for the currently associated/authenticated Access Point is -71 dBm to -90 dBm
The signal strength for the currently associated/authenticated Access Point is -51 dBm to -70 dBm
The signal strength for the currently associated/authenticated Access Point is greater than -50 dBm
E-EQ-MARATHONRG-A [ 32 ] Marathon™ Reference Guide
Page 39

Wireless Zero Config Utility
Wireless Zero Config Utility
l The WZC utility has an icon in the toolbar that looks like a computer with a red X beside it, indicating that Wireless Zero
Config application is enabled but the connection is inactive at this time (the device is not connected to a network). The
WZC icon may not be visible until control is passed to the WZC utility as described below.
l You can use either the Wireless Zero Configuration Utility or the Summit Client Utility (SCU) to connect to your net-
work. LXE recommends using the Summit Client Utility to connect to your network. The Wireless Zero Configuration
Utility cannot control the complete set of security features of the radio.
How To: Use the Wireless Zero Config Utility
1. Select ThirdPartyConfig in the Active Profile drop down box on the Main tab.
2. A message appears that a Power Cycle is required to make settings activate properly.
3. Tap OK.
4. Restart the Marathon.
The Summit Client Utility passes control to Wireless Zero Config and the WZC Wireless Information control panel. Using the
options in the Wireless Zero Config panels, set up radio and security settings.
How to: Switch Control to SCU
1. To switch back to SCU control, select any other profile except ThirdPartyConfig in the SCU Active Config drop down
list on the Main tab.
2. A message appears that a Power Cycle is required to make settings activate properly.
3. Tap OK.
4. Restart the Marathon.
Radio control is passed to the Summit Client Utility.
E-EQ-MARATHONRG-A [ 33 ] Marathon™ Reference Guide
Page 40

Main Tab
Main Tab
Start | Programs | Summit | Main tab
Factory Default Settings
Admin Login SUMMIT
Radio Enabled
Active Config/Profile ThirdPartyConfig
Regulatory Domain FCC, ETSI or Worldwide
SCU - Main Tab
The Main tab displays information about the wireless client device including:
l SCU (Summit Client Utility) version
l Driver version
l Radio Type (ABGN is an 802.11 a/b/g/n radio).
l Regulatory Domain
l Copyright Information can be accessed by tapping the About SCU button
l Active Config profile / Active Profile name
l Status of the client (Down, Associated, Authenticated, etc).
The Active Profile can be switched without logging in to Admin mode. Selecting a different profile from the drop down list does
not require logging in to Administrator mode. The profile must already exist. Profiles can be created or edited after the Admin
login password has been entered and accepted.
When the profile named “ThirdPartyConfig” is chosen as the active profile, the Summit Client Utility passes control to
Windows Zero Config for configuration of all client and security settings for the network module.
E-EQ-MARATHONRG-A [ 34 ] Marathon™ Reference Guide
Page 41

Admin Login
The Disable Radio button can be used to disable the network card. Once disabled, the button label changes to Enable Radio.
By default the radio is enabled.
The Admin Login button provides access to editing wireless parameters. Profile and Global may only be edited after entering
the Admin Login password.
The password is case-sensitive.
Once logged in, the button label changes to Admin Logout. To logout, either tap the Admin Logout button or exit the SCU
without tapping the Admin Logout button.
Admin Login
To login to Administrator mode, tap the Admin Login button.
Once logged in, the button label changes to Admin Logout. The admin is automatically logged out when the SCU is exited. The
Admin can either tap the Admin Logout button, or the OK button to logout.
Main Tab – Enter Admin Password
Enter the Admin password (the default password is SUMMIT and is case sensitive) and tap OK. If the password is incorrect,
an error message is displayed.
The Administrator default password can be changed on the Global tab.
The end-user can:
l Turn the radio on or off on the Main tab.
l Select an active Profile on the Main tab.
l View the current parameter settings for the profiles on the Profile tab.
l View the global parameter settings on the Global tab.
l View the current connection details on the Status tab.
l View radio status, software versions and regulatory domain on the Main tab.
l Access additional troubleshooting features on the Diags tab.
After Admin Login, the end-user can also:
l Create, edit, rename and delete profiles on the Profile tab.
l Edit global parameters on the Global tab.
l Enable/disable the Summit tray icon in the taskbar.
E-EQ-MARATHONRG-A [ 35 ] Marathon™ Reference Guide
Page 42

Profile Tab
Profile Tab
Start | Programs | Summit | Profile tab
Note: Tap the Commit button to save changes before leaving this panel or the SCU. If the panel is exited before tapping
the Commit button, changes are not saved!
Factory Default Settings
Profile Default
SSID Blank
Client Name Blank
Power Save Fast
Tx Power Maximum
Bit Rate Auto
Radio Mode See Profile Parameters for default
Auth Type Open
EAP Type None
Encryption None
SCU – ProfileTab
When logged in as an Admin (see Admin Login), use the Profile tab to manage profiles. When not logged in as an Admin, the
parameters can be viewed, and cannot be changed. The buttons on this tab are dimmed if the user is not logged in as Admin.
The Profile tab was previously labeled Config.
E-EQ-MARATHONRG-A [ 36 ] Marathon™ Reference Guide
Page 43

Buttons
Buttons
Button Function
Commit Saves the profile settings made on this screen. Settings are saved in the profile.
Credentials
Delete
New
Rename
Scan
Allows entry of a username and password, certificate names, and other information required to authenticate with
the access point. The information required depends on the EAP type.
Deletes the profile. The current active profile cannot be deleted and an error message is displayed if a delete is
attempted.
Creates a new profile with the default settings (see Profile Parameters) and prompts for a unique name. If the
name is not unique, an error message is displayed and the new profile is not created.
Assigns a new, unique name. If the new name is not unique, an error message is displayed and the profile is not
renamed.
Opens a window that lists access points that are broadcasting their SSIDs. Tap the Refresh button to view an
updated list of APs. Each AP’s SSID, its received signal strength indication (RSSI) and whether or not data
encryption is in use (true or false). Sort the list by tapping on the column headers.
If the scan finds more than one AP with the same SSID, the list displays the AP with the strongest RSSI and the
least security.
SCU – Scan
If you are logged in as an Admin, tap an SSID in the list and tap the Configure button, you return to the Profile
window to recreate a profile for that SSID, with the profile name being the same as the SSID (or the SSID with a
suffix such as “_1” if a profile with the SSID as its name exists already).
WEP Keys
/ PSK
Keys
Note: Unsaved Changes – The SCU will display a reminder if the Commit button is not clicked before an attempt is made
to close or browse away from this tab.
Important – The settings for Auth Type, EAP Type and Encryption depend on the security type chosen.
Allows entry of WEP keys or pass phrase as required by the type of encryption.
E-EQ-MARATHONRG-A [ 37 ] Marathon™ Reference Guide
Page 44

Profile Parameters
Profile Parameters
Parameter Default Explanation
Edit Profile Default
SSID Blank
Client
Name
Power
Save
Tx Power Maximum
Bit Rate Auto
Auth Type Open
EAP Type None
Blank
Fast
A string of 1 to 32 alphanumeric characters, establishes the name of the Profile.
Options are Default or ThirdPartyConfig.
A string of up to 32 alphanumeric characters. Establishes the Service Set Identifier (SSID) of the
WLAN to which the client connects.
A string of up to 16 characters. The client name is assigned to the network card and the device using
the network card. The client name may be passed to networking wireless devices, e.g. Access
Points.
Power save mode is On.
Options are: Constantly Awake Mode (CAM) power save off, Maximum (power saving mode) and
Fast (power saving mode).
Maximum setting regulates Tx power to the Max power setting for the current regulatory domain.
Options are: Maximum, 50mW, 30mW, 20mW, 10mW, 5mW, or 1mW.
Setting the rate to Auto will allow the Access Point to automatically negotiate the bit rate with the
client device.
Options are: Auto, 1 Mbit, 2, 5.5, 6, 9, 11, 12, 18, 24, 36, 48 or 54 Mbit.
802.11 authentication type used when associating with the Access Point.
Options are: Open, LEAP, or Shared key.
Extensible Authentication Protocol (EAP) type used for 802.1x authentication to the Access Point.
Options are: None, LEAP, EAP-FAST, PEAP-MSCHAP, PEAP-GTC, or EAP-TLS.
Note: EAP Type chosen determines whether the Credentials button is active and also
determines the available entries in the Credentials pop-up window.
Type of encryption to be used to protect transmitted data. Available options may vary by SCU
version.
Options are: None, WEP(or Manual WEP), WEPEAP(or Auto WEP), CKIP (or CKIP Manual),
Encryption None
Parameter Default Explanation
Radio
Mode
BGA
Rates
Full
CKIPEAP(or CKIP Auto), WPA PSK, WPA TKIP, WPA CCKM, WPA2 PSK, WPA2 AES, or
WPA2 CCKM.
Note: The Encryption type chosen determines if the WEP Keys / PSK Keys button is active
and also determines the available entries in the WEP or PSK pop-up window.
Specify 802.11a, 802.11b and/or 802.11g rates when communicating with the AP. The options
displayed for this parameter depend on the type of radio installed in the mobile device.
Options:
B rates only (1, 2, 5.5 and 11 Mbps)
BG Rates Full (All B and G rates)
G rates only (6, 9, 12, 18, 24, 36, 48 and 54 Mbps)
BG optimized or BG subset (1, 2, 5.5, 6, 11, 24, 36 and 54 Mbps)
A rates only (6, 9, 12, 18, 24, 36, 48 and 54 Mbps)
E-EQ-MARATHONRG-A [ 38 ] Marathon™ Reference Guide
Page 45

Profile Parameters
Parameter Default Explanation
ABG Rates Full (All A rates and all B and G rates with A rates preferred)
BGA Rates Full (All B and G rates and all A rates with B and G rates preferred)
Ad Hoc (when connecting to another client device instead of an AP)
Default:
BGA Rates Full (for 802.11a/b/g/n radio)
It is important the Radio Mode parameter correspond to the AP to which the device is to connect. For example, if this
parameter is set to G rates only, the Marathon may only connect to APs set for G rates and not those set for B and G rates.
Contact your LXE representative if you have questions about the antenna(s) installed on your Marathon.
E-EQ-MARATHONRG-A [ 39 ] Marathon™ Reference Guide
Page 46

Status Tab
Status Tab
Start | Programs | Summit | Status tab
SCU – Status Tab
This screen provides information on the radio:
l The profile being used
l The status of the radio card (down, associated, authenticated, etc.)
l Client information including device name, IP address and MAC address.
l Information about the Access Point (AP) maintaining the connection to the network including AP name, IP address and
MAC address.
l Channel currently being used for wireless traffic
l Bit rate in Mbit.
l Current transmit power in mW
l Beacon period – the time between AP beacons in kilomircoseconds. (one kilomicrosecond = 1,024 microseconds)
l DTIM interval – A multiple of the beacon period that specifies how often the beacon contains a delivery traffic indication
message (DTIM). The DTIM tells power saving devices a packet is waiting for them. For example, if DTIM = 3, then
every third beacon contains a DTIM.
l Signal strength (RSSI) displayed in dBm and graphically
l Signal quality, a measure of the clarity of the signal displayed in percentage and graphically.
There are no user entries on this screen.
Note: After completing radio configuration, it is a good idea to review this screen to verify the radio has associated (no
encryption, WEP) or authenticated (LEAP, any WPA), as indicated above.
E-EQ-MARATHONRG-A [ 40 ] Marathon™ Reference Guide
Page 47

Diags Tab
Diags Tab
Start | Programs | Summit | Diags tab
SCU – Diags Tab
The Diags screen can be used for troubleshooting network traffic and radio connectivity issues.
l (Re)connect – Use this button to apply (or reapply) the current profile and attempt to associate or authenticate to the
wireless LAN. All activity is logged in the Diagnostic Output box on the lower part of the screen.
l Release/Renew – Obtain a new IP address through release and renew. All activity is logged in the Diagnostic Output
box. If a fixed IP address has been assigned to the radio, this is also noted in the Diagnostic Output box. Note that the
current IP address is displayed above this button.
l Start Ping – Start a continuous ping to the IP address specified in the text box to the right of this button. Once the but-
ton is clicked, the ping begins and the button label changes to Stop Ping. Clicking the button ends the ping. The ping
also ends when any other button on this screen is clicked or the user browses away from the Diags tab. The results of
the ping are displayed in the Diagnostic Output box.
l Diagnostics – Also attempts to (re)connect to the wireless LAN. However, this option provides more data in the Diag-
nostic Output box than the (Re)connect option. This data dump includes radio state, profile settings, global settings, and
a list of broadcast SSID APs.
l Save To… – Use this save the results of the diagnostics to a text file. Use the explorer window to specify the name and
location for the diagnostic file. The text file can viewed using an application such as WordPad.
E-EQ-MARATHONRG-A [ 41 ] Marathon™ Reference Guide
Page 48

Global Tab
Global Tab
Start | Programs | Summit | Global tab
The parameters on this panel can only be changed when an Admin is logged in with a password. The current values for the
parameters can be viewed by the general user without requiring a password.
Note: Tap the Commit button to save changes. If the panel is exited before tapping the Commit button, changes are not
saved!
Factory Default Settings
Roam Trigger -65 dBm
Roam Delta 5 dBm
Roam Period 10 sec.
BG Channel Set Full
DFS Channels Off
DFS Scan Time 120 ms.
Ad Hoc Channel 1
Aggressive Scan On
CCX Optimized
WMM Off
Auth Server Type 1
TTLS Inner Method Auto-EAP
PMK Caching Standard
TX Diversity On
RX Diversity On Start on Main
Frag Threshold 2346
RTS Threshold 2347
LED Off
Tray Icon On
Hide Passwords On
Admin Password SUMMIT (or blank)
Auth Timeout 8 seconds
Certs Path C:\Program Files\Summit\certs
Ping Payload 32 bytes
Ping Timeout 5000 ms
Ping Delay ms 1000 ms
Login Options Use SCU credentials
E-EQ-MARATHONRG-A [ 42 ] Marathon™ Reference Guide
Page 49

Custom Parameter Option
SCU – Global Tab
Custom Parameter Option
LXE does not support the parameter Custom option. The parameter value is displayed as “Custom” when the operating system
registry has been edited to set the Summit parameter to a value that is not available from the parameter’s drop down list.
Selecting Custom from the drop down list has no effect. Selecting any other value from the drop down list will overwrite the
“custom” value in the registry.
E-EQ-MARATHONRG-A [ 43 ] Marathon™ Reference Guide
Page 50

Global Parameters
Global Parameters
Parameter Default Function
Roam
Trigger
Roam
Delta
Roam
Period
BG Channel Set
DFS
Channels
-65 dBm
5 dBm
10 sec.
Full
Off
If signal strength is less than this trigger value, the client looks for a different Access Point with a
stronger signal.
Options are: -50 dBm, -55, -60, -65, -70, -75, -80, -85, -90 dBm or Custom.
The amount by which a different Access Point signal strength must exceed the current Access
Point signal strength before roaming to the different Access Point is attempted.
Options are: 5 dBm, 10, 15, 20, 25, 30, 35 dBm or Custom.
The amount of time, after association or a roam scan with no roam, that the radio collects Received
Signal Strength Indication (RSSI) scan data before a roaming decision is made.
Options are: 5 sec, 10, 15, 20, 25, 30, 35, 40, 45, 50, 55, 60 seconds or Custom.
Defines the 2.4GHz channels to be scanned for an AP when the radio is contemplating roaming. By
specifying the channels to search, roaming time may be reduced over scanning all channels.
Options are:
Full (all channels)
1,6,11 (the most commonly used channels)
1,7,13 (for ETSI and TELEC radios only)
Custom.
Support for 5GHZ 802.11a channels where support for DFS is required.
Options are: On, Off.
Note: Not supported (always off) in some releases.
DFS Scan
Time
Ad Hoc
Channel
Aggressive
Scan
120 ms.
1
On
ABG radio only. The amount of time the radio will passively scan each DFS channel to see if it will
receive a beacon.
Recommended value is 1.5 times that of the AP's beacon period.
Use this parameter when the Radio Mode profile parameter is set to Ad Hoc.
Specifies the channel to be used for an Ad Hoc connection to another client device. If a channel is
selected that is not supported by the by the radio, the default value is used.
Options are:
1 through 14 (the 2.4GHz channels)
36, 40, 44, 48 (the UNII-1 channels)
When set to On and the current connection to an AP weakens, the radio aggressively scans for
available APs.
Aggressive scanning works with standard scanning (set through Roam Trigger, Roam Delta and
Roam Period). Aggressive scanning should be set to On unless there is significant co-channel
interference due to overlapping APs on the same channel.
Options are: On, Off
E-EQ-MARATHONRG-A [ 44 ] Marathon™ Reference Guide
Page 51

Global Parameters
Parameter Default Function
Use of Cisco Compatible Extensions (CCX) radio management and AP specified maximum
transmit power features.
Options are:
CCX or
CCX
Features
Optimized
Full - Use Cisco IE and CCX version number, support all CCX features. The option known as "On"
in previous versions.
Optimized –Use Cisco IE and CCX version number, support all CCX features except AP assisted
roaming, AP specified maximum transmit power and radio management.
Off - Do not use Cisco IE and CCX version number.
Cisco IE = Cisco Information Element.
WMM Off
Auth
Server
TTLS Inner
Method
PMK Caching
Type 1
Auto-EAP
Standard
Use of Wi-Fi Multimedia extensions.
This parameter cannot be changed.
Specifies the type of authentication server.
Options are: Type 1 (ACS server) and Type 2 (non-ACS server)
Authentication method used within the secure tunnel created by EAP-TTLS.
Options are:
AUTO-EAP (Any available EAPmethod)
MSCHAPV2
MSCHAP
PAP
CHAP
EAP-MSCHAPV2
Type of Pairwise Master Key (PMK)caching to use when WPA2 is in use. PMK caching is designed
to speed up roaming between APs by allowing the client and the AP to cache the results of 802.1X
authentications, eliminating the need to communicate with the ACS server. Standard PMK is used
when there are no controllers. The reauthentication information is cached on the original AP. The
client and the AP use the cached information to perform the four-way handshake to exchange keys.
Opportunistic PMK(OPMK) is used when there are controllers. The reauthentication information
cached on the controllers. The client and the controller behind the AP use the cached information to
perform the four-way handshake to exchange keys.
If the selected PMK caching method is not supported by the network infrastructure, every roam
requires full 802.11X authentication, including interaction with the ACS server.
If the active profile is using WPA2 CCKM, the global PMKCaching setting is ignored and the client
attempts to use CCKM.
Options are: Standard, OPMK
E-EQ-MARATHONRG-A [ 45 ] Marathon™ Reference Guide
Page 52

Global Parameters
Parameter Default Function
TX Diversity On
RX Diversity
Contact your LXE representative if you have questions about the antenna(s) installed on your Marathon.
Parameter Default Function
Frag
Thresh
RTS
Thresh
LED Off
Tray Icon On
On Start on
Main
2346
2347
If the packet size (in bytes) exceeds the specified number of bytes set in the fragment threshold, the
packet is fragmented (sent as several pieces instead of as one block). Use a low setting in areas
where communication is poor or where there is a great deal of wireless interference.
Options are: Any number between 256 bytes and 2346 bytes.
If the packet size exceeds the specified number of bytes set in the Request to Send (RTS) threshold,
an RTS is sent before sending the packet. A low RTS threshold setting can be useful in areas where
many client devices are associating with the Access Point.
Options are: Any number between 0 and 2347.
The LED on the wireless card is not visible to the user when the wireless card is installed in a sealed
mobile device.
Options are: On, Off.
Determines if the Summit icon is displayed in the System tray.
Options are: On, Off
How to handle antenna diversity when transmitting packets to the Access Point.
Options are: Main only, and On.
How to handle antenna diversity when receiving packets from the Access Point.
Options are: On-start on Main, and Main only
Hide
Password
Admin
Password
Auth
Timeout8seconds
Certs Path certs
On
SUMMIT
(or
Blank)
When On, the Summit Config Utility masks passwords (characters on the screen are displayed as an
*) as they are typed and when they are viewed. When Off, password characters are not masked.
Options are: On, Off.
A string of up to 64 alphanumeric characters that must be entered when the Admin Login button is
tapped. If Hide Password is On, the password is masked when typed in the Admin Password Entry
dialog box. The password is case sensitive. This value is masked when the Admin is logged out.
Options are: none.
Specifies the number of seconds the Summit software waits for an EAP authentication request to
succeed or fail.
If the authentication credentials are stored in the active profile and the authentication times out, the
association fails. No error message or prompting for corrected credentials is displayed.
If the authentication credentials are not stored in the active profile and the authentication times out,
the user is again prompted to enter the credentials.
Options are: An integer from 3 to 60.
A valid folder path, of up to 64 characters, where WPA Certificate Authority and User Certificates are
stored on the mobile device when not using the Windows certifcates store. LXE suggests ensuring
the Windows folder path currently exists before assigning the path in this parameter. See Certificates
for instructions on obtaining CA and User Certificates. This value is masked when the Admin is
logged out.
Options are: none.
The complete path is C:\Program Files\Summit\certs
E-EQ-MARATHONRG-A [ 46 ] Marathon™ Reference Guide
Page 53

Global Parameters
Parameter Default Function
Ping
Payload
32 bytes
Ping
Timeoutms5000
Maximum amount of data to be transmitted on a ping.
Options are: 32 bytes, 64, 128, 256, 512, or 1024 bytes.
The amount of time, in milliseconds, that a device will be continuously pinged. The Stop Ping button
can be tapped to end the ping process ahead of the ping timeout.
Options are: Any number between 0 and 30000 ms.
Ping Delay
ms
Login
Options
1000
SCU Use SCU or Windows login credentials. More info.
The amount of time, in milliseconds, between each ping after a Start Ping button tap.
Options are: Any number between 0 and 30000 ms.
Note: Tap the Commit button to save changes. If this panel is closed before tapping the Commit button, changes are not
saved!
E-EQ-MARATHONRG-A [ 47 ] Marathon™ Reference Guide
Page 54

Logon Options
Logon Options
There are two options available, a single signon which uses the Windows username and password as the credentials for
802.1x authentication and pre-logon which uses saved credentials for 802.1x authentication before Windows logon.
If either option is enabled, the credentials entered here take precedence over any credentials entered on the Profile tab.
To use either option, select LogonOptions from the Property list which activates the Logon Options button.
Click the Logon Options button.
Logon Options - Global Tab
PreLogon Options
E-EQ-MARATHONRG-A [ 48 ] Marathon™ Reference Guide
Page 55

Single Signon
Single Signon
To use the Single Singon option, select the checkbox for Use the Windows username and password when available.
When the active profile is using LEAP, PEAP-MSCHAP, PEAP-GTC or EAP-FAST, the Summit Client Utililty ignores the
username and password, if any, saved in the profile. Instead, the username and password used for Windows logon is used.
Any certificates needed for authentication must still be specified in the profile.
Click OK then click Commit.
Pre-Logon Connection
To use the Pre-logon connection, select the checkbox for Enable pre-logon connection. This option is designed to be used
when:
l EAP authentication is required for a WLAN connection
l Single Signon is configured, so the Windows username and password are used as credentials for EAPauthentication
l The WLAN connection needs to be established before the Windows logon.
Once this option is enabled, the Authentication delay and Association timeout values can be adjusted as necessary. Both
values are specified in milliseconds (ms).
The default authentication delay is 5000 ms and the valid range is 0 - 600,000 ms.
The default association timeout is 10,000 ms and the valid range is 10,000 to 600,000 ms.
Click on the Credentials button to enter the logon credentials.
Pre-Logon Credentials
If using the Windows certificate store:
l Check the Use MS store checkbox. The default is to use the Full Trusted Store.
l To select an individual certificate, click on the Browse button.
l Uncheck the Use full trusted store checkbox.
l Select the desired certificate and click Select. You are returned to the Credentials screen.
If using the Certs Path option:
l Leave the Use MS store box unchecked.
l Enter the certificate filename in the CA Cert text box.
Click OK then click Commit.
E-EQ-MARATHONRG-A [ 49 ] Marathon™ Reference Guide
Page 56

Sign-On vs. Stored Credentials
Sign-On vs. Stored Credentials
When using wireless security that requires a user name and password to be entered, the Summit Client Utility offers these
choices:
l The Username and Password may be entered on the Credentials screen. If this method is selected, anyone using the
device can access the network.
l The Username and Password are left blank on the Credentials screen. When the device attempts to connect to the net-
work, a sign on screen is displayed. The user must enter the Username and Password at that time to authenticate.
l When using Summit with the Marathon, there is an option on the Global tab use the Windows user name and password
to log on instead of any username and password stored in the profile.
How to: Use Stored Credentials
1. After completing the other entries in the profile, click on the Credentials button.
2. Enter the Username and Password on the Credentials screen and click the OK button.
3. Click the Commit button.
4. For LEAP and WPA/LEAP, configuration is complete.
5. For PEAP-MSCHAP and PEAP-GTC, importing the CAcertificate into the Windows certificate store is optional.
6. For EAP-TLS, import the CA certificate into the Windows certificate store. Also import the User Certificate into the Windows certificate store.
7. Access the Credentials screen again. Make sure the Validate server and Use MS store checkboxes are checked.
8. The default is to use the entire certificate store for the CA certificate. Alternatively, use the Browse button next to the
CA Cert (CA Certificate Filename) on the Credentials screen to select an individual certificate.
9. For EAP-TLS, also enter the User Cert (User Certificate filename) on the credentials screen by using the Browse but-
ton.
10. If using EAP FAST and manual PAC provisioning, input the PAC filename and password..
11. Click the OK button then the Commit button.
12. If changes are made to the stored credentials, click Commit to save those changes before making any additional
changes to the profile or global parameters.
13. Verify the device is authenticated by reviewing the Status tab. When the device is property configured, the Status tab
indicates the device is Authenticated and the method used.
Note: See Configuring the Profile for more details.
Note: If invalid credentials are entered into the stored credentials, the authentication will fail. No error message is
displayed and the user is not prompted to enter valid credentials.
E-EQ-MARATHONRG-A [ 50 ] Marathon™ Reference Guide
Page 57

How to: Use Sign On Screen
How to: Use Sign On Screen
1. After completing the other entries in the profile, click on the Credentials button. Leave the Username and Password
blank. No entries are necessary on the Credentials screen for LEAP or LEAP/WPA.
2. For PEAP-MSCHAP and PEAP-GTC, importing the CAcertificate into the Windows certificate store is optional.
3. For EAP-TLS, import the CA certificate into the Windows certificate store. Also import the User Certificate into the Windows certificate store.
4. Access the Credentials screen again. Make sure the Validate server and Use MS store checkboxes are checked.
5. The default is to use the entire certificate store for the CA certificate. Alternatively, use the Browse button next to the
CA Cert (CA Certificate Filename) on the Credentials screen to select an individual certificate.
6. For EAP-TLS, also enter the User Cert (User Certificate filename) on the credentials screen by using the Browse but-
ton.
7. Click the OK button then the Commit button.
8. When the device attempts to connect to the network, a sign-on screen is displayed.
9. Enter the Username and Password. Click the OK button.
Sign-On Screen
10. Verify the device is authenticated by reviewing the Status tab. When the device is property configured, the Status Tab
indicates the device is Authenticated and the method used.
11. The sign-on screen is displayed after a reboot.
Note: See Configuring the Profile for more details.
If a user enters invalid credentials and clicks OK, the device associates but does not authenticate. The user is again prompted
to enter credentials.
If the user clicks the Cancel button, the device does not associate. The user is not prompted again for credentials until:
l the device is rebooted,
l the radio is disabled then enabled,
l the Reconnect button on the Diags Tab is clicked or
l the profile is modified and the Commit button is clicked.
How to: Use Windows Username and Password
Please see Logon Options for information.
E-EQ-MARATHONRG-A [ 51 ] Marathon™ Reference Guide
Page 58

Windows Certificate Store vs. Certs Path
Windows Certificate Store vs. Certs Path
Note: It is important that all dates are correct on the Marathon and host computers when using any type of certificate.
Certificates are date sensitive and if the date is not correct authentication will fail.
If using the Windows Certificate Store, the Windows Account must have a password. The password cannot be left
blank. The Summit Client Utility uses the Windows user account credentials to access the Certificate Store. The
Windows user account credentials need not be the same as the wireless credentials entered in the Summit Client
Utility.
User Certificates
EAP-TLS authentication requires a user certificate. The user certificate must be stored in the Windows certificate store.
l To generate the user certificate, see Generating a User Certificate.
l To import the user certificate into the Windows certificate store, see Installing a User Certificate.
l A Root CA certificate is also needed. Refer to the section below.
Root CA Certificates
Root CA certificates are required for EAP/TLS, PEAP/GTC and PEAP/MSCHAP. Two options are offered for storing these
certificates. They may be imported into the Windows certificate store or copied into the Certs Path folder.
How To: Use the Certs Path
1. See Generating a Root CA Certificate and follow the instructions to download the Root Certificate to a PC.
2. Copy the certificate to specified folder on the mobile device. The default location for Certs Path is C:\Program Files\Summit\certs. A different location may be specified by using the Certs Path global variable.
3. When completing the Credentials screen for the desired authentication, do not check the Use MS store checkbox after
checking the Validate server checkbox.
4. Enter the certificate name in the CA Cert textbox.
5. Click OK to exit the Credentials screen and then Commit to save the profile changes.
E-EQ-MARATHONRG-A [ 52 ] Marathon™ Reference Guide
Page 59

Root CA Certificates
How To: Use Windows Certificate Store
1. See Generating a Root CA Certificate and follow the instructions to download the Root Certifcate to a PC.
2. To import the certificate into the Windows store, See Installing a Root CA Certificate.
3. When completing the Credentials screen for the desired authentication, be sure to check the Use MS store checkbox
after checking the Validate server checkbox.
4. The default is to use all certificates in the store. If this is OK, skip to the last step.
5. Otherwise, to select a specific certificate click on the Browse (…) button.
Choose Certificate
6. Uncheck the Use full trusted store checkbox.
7. Select the desired certificate and click the Select button to return the selected certificate to the CA Cert textbox.
8. Click OK to exit the Credentials screen and then Commit to save the profile changes.
E-EQ-MARATHONRG-A [ 53 ] Marathon™ Reference Guide
Page 60

Configuring the Profile
Configuring the Profile
Use the instructions in this section to complete the entries on the Profile tab according to the type of wireless security used by
your network. The instructions that follow are the minimum required to successfully connect to a network. Your system may
require more parameters than are listed in these instructions. Please see your system administrator for complete information
about your network and its wireless security requirements.
To begin the configuration process:
l On the Main Tab, click the Admin Login button and enter the password.
l LXE recommends editing the default profile with the parameters for your network. Select the Default profile from the pull
down menu.
l Make any desired parameter changes as described in the applicable following section determined by network security
type and click the Commit button to save the changes.
IMPORTANT – Remember to click the Commit button after making changes to ensure the changes are saved. Many versions
of the SCU (Summit Client Utility) display a reminder if the Commit button is not clicked before an attempt is made to close or
browse away from the tab in focus if there are unsaved changes.
If changes are made to the stored credentials, click Commit to save those changes first before making any additional changes.
No Security
To connect to a wireless network with no security, make sure the following profile options are used.
l Enter the SSID of the Access Point assigned to this profile
l Set EAP Type to None
l Set Encryption to None
l Set Auth Type to Open
No Security Profile Configuration
Once configured, click the Commit button. Ensure the correct Active Profile is selected on the Main tab. The SCU Main tab
shows the device is associated after the radio connects to the network.
E-EQ-MARATHONRG-A [ 54 ] Marathon™ Reference Guide
Page 61

WEP
WEP
To connect using WEP, make sure the following profile options are used.
l Enter the SSID of the Access Point assigned to this profile
l Set EAP Type to None
l Set Encryption to WEP or Manual WEP (depending on SCU version)
l Set Auth Type to Open
WEP Profile Configuration
Click the WEP keys/PSKs button.
WEP Keys
Valid keys are 10 hexadecimal or 5 ASCIIcharacters (for 40-bit encryption)or 26 hexadecimal or 13 ASCII characters (for 128bit encryption). Enter the key(s) and click OK.
Once configured, click the Commit button. Ensure the correct Active Profile is selected on the Main tab. The SCU Main tab
shows the device is associated after the radio connects to the network.
E-EQ-MARATHONRG-A [ 55 ] Marathon™ Reference Guide
Page 62

LEAP
LEAP
To use LEAP (without WPA), make sure the following profile options are used.
l Enter the SSID of the Access Point assigned to this profile
l Set EAP Type to LEAP
l Set Encryption to WEP EAP or Auto WEP (depending on SCU version)
l Set Auth Type as follows:
l If the Cisco/CCX certified AP is configured for open authentication, set the Auth Type radio parameter to
Open.
l If the AP is configured for network EAP only, set the Auth Type radio parameter to LEAP.
LEAP Profile Configuration
See Sign-On vs. Stored Credentials for information on entering credentials.
E-EQ-MARATHONRG-A [ 56 ] Marathon™ Reference Guide
Page 63

LEAP
To use Stored Credentials, click on the Credentials button. No entries are necessary for Sign-On Credentials as the user will
be prompted for the Username and Password when connecting to the network.
LEAP Credentials
Enter the Domain\Username (if the Domain is required), otherwise enter the Username.
Enter the password.
Click OK then click the Commit button. Ensure the correct Active Profile is selected on the Main tab. The SCU Main tab
shows the device is associated after the radio connects to the network.
E-EQ-MARATHONRG-A [ 57 ] Marathon™ Reference Guide
Page 64

PEAP/MSCHAP
PEAP/MSCHAP
To use PEAP/MSCHAP, make sure the following profile options are used.
l Enter the SSID of the Access Point assigned to this profile
l Set EAP Type to PEAP-MSCHAP
l Set Encryption to WPA TKIP
l Set Auth Type to Open
PEAP/MSCHAP Profile Configuration
See Sign-On vs. Stored Credentials for information on entering credentials.
Click the Credentials button.
l No entries except the CA Certificate Filename are necessary for Sign-On Credentials as the user will be prompted for
the User Name and Password when connecting to the network.
l For Stored Credentials, User, Password and the CA Certificate Filename must be entered.
Enter these items as directed below.
PEAP/MSCHAP Credentials
E-EQ-MARATHONRG-A [ 58 ] Marathon™ Reference Guide
Page 65

PEAP/MSCHAP
Enter the Domain\Username (if the Domain is required), otherwise enter the Username.
Enter the password.
Leave the CA Certificate File Name blank for now.
Click OK then click Commit. Ensure the correct Active profile is selected on the Main Tab.
See Windows Certificate Store vs. Certs Path for more information on certificate storage.
Once successfully authenticated, import the CA certificate into the Windows certificate store. Return to the Credentials screen
and check the Validate server checkbox.
PEAP/MSCHAP Certificate Filename
If using the Windows certificate store:
l Check the Use MS store checkbox. The default is to use the Full Trusted Store.
l To select an individual certificate, click on the Browse button.
l Uncheck the Use full trusted store checkbox.
l Select the desired certificate and click Select. You are returned to the Credentials screen.
If using the Certs Path option:
l Leave the Use MS store box unchecked.
l Enter the certificate filename in the CA Cert textbox.
Click OK then click Commit.
The device should be authenticating the server certificate and using PEAP/MSCHAP for the user authentication.
Ensure the correct Active Profile is selected on the Main tab. The SCU Main tab shows the device is associated after the radio
connects to the network.
Note: The date must be properly set on the device to authenticate a certificate.
E-EQ-MARATHONRG-A [ 59 ] Marathon™ Reference Guide
Page 66

PEAP/GTC
PEAP/GTC
To use PEAP/GTC, make sure the following profile options are used.
l Enter the SSID of the Access Point assigned to this profile
l Set EAP Type to PEAP-GTC
l Set Encryption to WPA TKIP
l Set Auth Type to Open
PEAP/GTC Profile Configuration
See Sign-On vs. Stored Credentials for information on entering credentials.
Click the Credentials button.
l No entries except the CA Certificate Filename are necessary for Sign-On Credentials as the user will be prompted for
the User Name and Password when connecting to the network.
Enter these items as directed below.
PEAP/GTC Credentials
Enter the Domain\Username (if the Domain is required), otherwise enter the Username.
E-EQ-MARATHONRG-A [ 60 ] Marathon™ Reference Guide
Page 67

PEAP/GTC
Enter the password.
Leave the CA Certificate File Name blank for now.
Click OK then click Commit. Ensure the correct Active Profile is selected on the Main Tab.
See Windows Certificate Store vs. Certs Path for more information on certificate storage.
Once successfully authenticated, import the CA certificate into the Windows certificate store. Return to the Credentials screen
and check the Validate server checkbox.
PEAP/GTC Certificate Filename
If using the Windows certificate store:
l Check the Use MS store checkbox. The default is to use the Full Trusted Store.
l To select an individual certificate, click on the Browse button.
l Uncheck the Use full trusted store checkbox.
l Select the desired certificate and click Select. You are returned to the Credentials screen.
If using the Certs Path option:
l Leave the Use MS store box unchecked.
l Enter the certificate filename in the CA Cert textbox.
Click OK then click Commit.
The device should be authenticating the server certificate and using PEAP/GTC for the user authentication.
Ensure the correct Active Profile is selected on the Main tab. The SCU Main tab shows the device is associated after the radio
connects to the network.
Note: The date must be properly set on the device to authenticate a certificate.
E-EQ-MARATHONRG-A [ 61 ] Marathon™ Reference Guide
Page 68

WPA/LEAP
WPA/LEAP
To use WPA/LEAP, make sure the following profile options are used.
l Enter the SSID of the Access Point assigned to this profile
l Set EAP Type to LEAP
l Set Encryption to WPA TKIP
l Set Auth Type as follows:
l If the Cisco/CCX certified AP is configured for open authentication, set the Auth Type radio parameter to
Open.
l If the AP is configured for network EAP only, set the Auth Type radio parameter to LEAP.
WPA/LEAP Profile Configuration
E-EQ-MARATHONRG-A [ 62 ] Marathon™ Reference Guide
Page 69

WPA/LEAP
See Sign-On vs. Stored Credentials for information on entering credentials.
To use Stored Credentials, click on the Credentials button. No entries are necessary for Sign-On Credentials as the user will
be prompted for the Username and Password when connecting to the network.
WPA/LEAP Credentials
Enter the Domain\Username (if the Domain is required), otherwise enter the Username.
Enter the password.
Click OK then click the Commit button. Ensure the correct Active Profile is selected on the Main tab The SCU Main tab
shows the device is associated after the radio connects to the network.
E-EQ-MARATHONRG-A [ 63 ] Marathon™ Reference Guide
Page 70

EAP-FAST
EAP-FAST
To use EAP-FAST, make sure the following profile options are used.
l Enter the SSID of the Access Point assigned to this profile
l Set EAP Type to EAP-FAST
l Set Encryption to WPA TKIP
l Set Auth Type to Open
The SCU supports EAP-FAST with automatic or manual PAC provisioning. With automatic PAC provisioning, the user
credentials, whether entered on the saved credentials screen or the sign on screen, are sent to the RADIUS server. The
RADIUS server must have auto provisioning enabled to send the PAC provisioning credentials to the Marathon.
EAP-FAST Profile Configuration
For automatic PAC provisioning, once a username/password is authenticated, the PAC information is stored on the Marathon.
The same username/password must be used to authenticate each time. See the note below for more details.
For manual PAC provisioning, the PAC filename and Password must be entered.
See Sign-On vs. Stored Credentials for information on entering credentials.
The entries on the Credentials screen are determined by the type of credentials (stored or sign on) and the type of PAC
provisioning (automatic or manual).
Click on the Credentials button.
To use Stored Credentials, click on the Credentials button. No entries are necessary for Sign-On Credentials with automatic
PAC provisioning as the user will be prompted for the Username and Password when connecting to the network.
E-EQ-MARATHONRG-A [ 64 ] Marathon™ Reference Guide
Page 71

EAP-FAST
EAP-FAST Credentials
To use Sign-On credentials:
l Do not enter a User and Password as the user will be prompted for the Username and Password when connecting to the
network.
To use Stored Credentials:
l Enter the Domain\Username (if the Domain is required), otherwise enter the Username.
l Enter the password.
To use Automatic PAC Provisioning:
l No additional entries are required.
To use manual PAC Provisioning:
l Enter the PAC Filename and PAC Password.
l The PAC file must be copied to the folder specified in the Certs Path global variable. The PAC file must not be read
only.
Tap OK then click the Commit button. Ensure the correct Active Profile is selected on the Main tab. The SCU Main tab shows
the device is associated after the radio connects to the network.
Note: When using Automatic PAC Provisioning, once authenticated, there is a file stored in the \System folder with the
PAC credentials. If the username is changed, that file must be deleted. The filename is autoP.00.pac.
E-EQ-MARATHONRG-A [ 65 ] Marathon™ Reference Guide
Page 72

EAP-TLS
EAP-TLS
To use EAP-TLS, make sure the following profile options are used.
l Enter the SSID of the Access Point assigned to this profile
l Set EAP Type to EAP-TLS
l Set Encryption to WPA TKIP
l Set Auth Type to Open
EAP-TLS Profile Configuration
See Sign-On vs. Stored Credentials for information on entering credentials.
Click the Credentials button.
l No entries except the User Certificate Filename and the CA Certificate Filename are necessary for Sign-On Credentials
as the user will be prompted for the User Name when connecting to the network.
l For Stored Credentials, User and the CA Certificate Filename must be entered.
Enter these items as directed below.
EAP-TLS Credentials
E-EQ-MARATHONRG-A [ 66 ] Marathon™ Reference Guide
Page 73

EAP-TLS
Enter the Domain\Username (if the Domain is required), otherwise enter the Username.
Leave the certificate file name entries blank for now.
Click OK then click Commit. Ensure the correct Active Profile is selected on the Main tab.
Once successfully authenticated, import the user certificate into the Windows certificate store.
Return to the Credentials screen.
Use the Browse button to locate the User Cert from the certificate store. Highlight the desired certificate and press the Select
button. The name of the certificate is displayed in the User Cert box.
Some versions of the SCU require a User Cert password. If this entry field is present, enter the password for the user
certificate in the User Cert pwd box.
See Windows Certificate Store vs. Certs Path for more information on certificate storage.
Check the Validate server checkbox.
EAP-TLS Credentials
If using the Windows certificate store:
l Check the Use MS store checkbox. The default is to use the Full Trusted Store.
l To select an individual certificate, click on the Browse button.
l Uncheck the Use full trusted store checkbox.
l Select the desired certificate and click Select. You are returned to the Credentials screen.
If using the Certs Path option:
l Leave the Use MS store box unchecked.
l Enter the certificate filename in the CA Cert textbox.
Click OK then click Commit.
The Marathon should be authenticating the server certificate and using EAP-TLS for the user authentication.
Ensure the correct Active Profile is selected on the Main tab. The SCU Main tab shows the device is associated after the radio
connects to the network.
See Certificates for information on generating a Root CA certificate or a User certificate.
Note: The date must be properly set on the device to authenticate a certificate.
E-EQ-MARATHONRG-A [ 67 ] Marathon™ Reference Guide
Page 74

WPA PSK
WPA PSK
To connect using WPA/PSK, make sure the following profile options are used:
l Enter the SSID of the Access Point assigned to this profile
l Set EAP Type to None
l Set Encryption to WPA PSK
l Set Auth Type to Open
WPA/PSK Profile Configuration
Click the WEP keys/PSKs button.
PSK Entry
This value can be 64 hex characters or an 8 to 63 byte ASCII value. Enter the key and click OK.
Once configured, click the Commit button. Ensure the correct Active Profile is selected on the Main tab. The SCU Main tab
shows the device is associated after the radio connects to the network.
E-EQ-MARATHONRG-A [ 68 ] Marathon™ Reference Guide
Page 75

Certificates
Certificates
Note: Please refer to the LXE Security Primer to prepare the Authentication Server and Access Point for communication.
Note: It is important that all dates are correct on the Marathon and host computers when using any type of certificate.
Certificates are date sensitive and if the date is not correct authentication will fail.
Root Certificates are necessary for EAP-TLS, PEAP/GTC and PEAP/MSCHAP.
1. Generate a Root CA Certificate either from the Marathon or using a PC.
2. If a PC was used to request the certificate, copy the certificate to the Marathon.
3. Install the Root CA Certificate.
User Certificates are necessary for EAP-TLS
1. Generate a User Certificate either from the Marathon or using a PC.
2. If a PC was used to request the certificate, copy the certificate to the Marathon.
3. Install the User Certificate.
Generating a Root CA Certificate
Note: It is important that all dates are correct on the Marathon and host computers when using any type of certificate.
Certificates are date sensitive and if the date is not correct authentication will fail.
The easiest way to get the root CA certificate is to use a browser on a PC to navigate to the Certificate Authority. To request
the root CA certificate, open a browser to
http://<CA IP address>/certsrv.
The Marathon can be used to generate the certificate instead of a PC.
Sign into the CA with any valid username and password.
Logon to Certificate Authority
E-EQ-MARATHONRG-A [ 69 ] Marathon™ Reference Guide
Page 76

Generating a Root CA Certificate
Certificate Services Welcome Screen
Click the Download a CA certificate, certificate chain or CRL link.
Make sure the correct root CA certificate is selected in the list box.
E-EQ-MARATHONRG-A [ 70 ] Marathon™ Reference Guide
Page 77

Generating a Root CA Certificate
Download CA Certificate Screen
E-EQ-MARATHONRG-A [ 71 ] Marathon™ Reference Guide
Page 78

Generating a Root CA Certificate
Click the DER button.
To download the CA certificate, click on the Download CA certificate link.
Download CA Certificate Screen
Click the Save button and save the certificate. Make sure to keep track of the name and location of the certificate.
Install the certificate on the Marathon.
E-EQ-MARATHONRG-A [ 72 ] Marathon™ Reference Guide
Page 79

Installing a Root CA Certificate
Installing a Root CA Certificate
Note: This section is only if the Windows certificate store is used. If the certificate store is not used, copy the certificate
to the C:\Program Files\Summit\certs folder or other path specified in the Summit Certs global parameter.
Copy the certificate file to the Marathon. The certificate file has a .CER extension. Locate the file and double click on it.
Certificate Information
Click the Install Certificate button.
The certificate import wizard starts. Allow Windows to automatically select the certificate store.Click Next and Finish. An
import successful message is displayed.
E-EQ-MARATHONRG-A [ 73 ] Marathon™ Reference Guide
Page 80

Generating a User Certificate
Generating a User Certificate
The easiest way to get the user certificate is to use the browser on the Marathon or a PC to navigate to the Certificate
Authority. To request the user certificate, open a browser to
http://<CA IP address>/certsrv.
Sign into the CA with the username and password of the person who will be logging into the mobile device.
Logon to Certificate Authority
This process saves a user certificate file. There is no separate private key file as used on Windows CE devices.
E-EQ-MARATHONRG-A [ 74 ] Marathon™ Reference Guide
Page 81

Generating a User Certificate
Click the Request a certificate link.
Click on the User Certificate link.
Certificate Services Welcome Screen
Request a Certificate Screen
E-EQ-MARATHONRG-A [ 75 ] Marathon™ Reference Guide
Page 82

Generating a User Certificate
Submit User Certificate Request Screen
Click on the Submit button. if there is a message box asking if you want to confirm the request, click Yes.
The User Certificate is issued.
Advanced Certificate Details
Install the user certificate on the requesting computer by clicking the Install this certificate link.
If the requesting computer is the Marathon, then the process is finished. otherwise, export the certificate as described below.
E-EQ-MARATHONRG-A [ 76 ] Marathon™ Reference Guide
Page 83

Exporting a User Certificate
Exporting a User Certificate
Select Tools |Internet Options | Content and click the Certificates button.
Certificate Listing
Make sure the Personal tab is selected. Highlight the certificate and click the Export button.
The Certificate Export Wizard is started
Select Yes, export the private key and click Next.
Uncheck Enable strong protection and check Next.
The certificate type must be PKCS #12 (.PFX).
E-EQ-MARATHONRG-A [ 77 ] Marathon™ Reference Guide
Page 84

Exporting a User Certificate
When the private key is exported, you must enter the
password, confirm the password and click Next. Be
sure to remember the password as it is needed when
installing the certificate.
Supply the file name for the certificate. Use the Browse
button to select the folder where you wish to store the
certificate. The certificate is saved with a .PFX
extension.
Click Finish. and OK to close the Successful Export message.
Locate the User Certificate in the specified location. Copy to the Marathon. Install the User certificate.
E-EQ-MARATHONRG-A [ 78 ] Marathon™ Reference Guide
Page 85

Installing a User Certificate
Installing a User Certificate
After generating and exporting the user certificate, copy it from the PC to the Marathon. Copy the certificate to a location on the
Marathon.
Locate the certificate file (it has a .PFX extension) and double click on it.
The certificate import wizard starts.
Confirm the certificate file name and location.
You are prompted for the password that was assigned when the certificate was exported.
Certificate Password
It is not necessary to select either of the checkboxes.
On the next screen, allow Windows to automatically select the certificate store, then click Next and Finish. An import
successful message is displayed.
E-EQ-MARATHONRG-A [ 79 ] Marathon™ Reference Guide
Page 86

Using Peripherals / Accessories
Contact your LXE representative for the Marathon Accessory Catalog.
Attach an Auxiliary Battery
Note: LXE recommends that installation or removal of accessories be performed on a clean, well-lit surface. Protect the
work surface, the Marathon, and components from electrostatic discharge. Contact Customer Support at LXE for
assistance when attaching or removing an auxiliary battery.
1. Turn the MarathonOff. Remove any cables, straps or accessories attached to the Marathon.
2. Place the Marathon face down on a stable surface.
3. Remove the 2 mounting screws securing the auxiliary battery connector cover to the Marathon and remove the cover.
Put the screws and cover aside in a safe place.
4. Line up the charging pins on the auxiliary battery with the charging pins in the Marathon auxiliary battery connector bay.
5. Connect the auxiliary battery to the Marathon using the captive screws in the auxiliary battery.
E-EQ-MARATHONRG-A [ 80 ] Marathon™ Reference Guide
Page 87

Attach an Auxiliary Battery
6. Re-attach accessories, if any.
7. Turn the Marathon on.
The Marathon is ready for use.
Remove the auxiliary battery from the Marathon when preparing to recharge the auxiliary battery in a powered desktop dock or
in a Marathon multi-charger. Up to four auxiliary batteries can be charged simultaneously in the battery multi-charger.
LXE recommends, when the Marathon will not have an auxiliary battery attached, that the auxiliary battery connector cover be
in place, protecting the Marathon auxiliary battery connector opening.
E-EQ-MARATHONRG-A [ 81 ] Marathon™ Reference Guide
Page 88

Install a SIM Card
Install a SIM Card
Note: LXE recommends that installation or removal of accessories be performed on a clean, well-lit surface. Protect the
work surface, the Marathon, and components from electrostatic discharge. Contact Customer Support at LXE for
assistance when installing or removing a SIM card.
Turn the Marathon off.
Place the Marathon face down on a stable surface.
1. Remove the 4 mounting screws securing the battery cover to the Marathon and remove the battery cover. Put the
screws aside in a safe place.
2. Lift the battery using the pull strap and move it aside. Do not disconnect the battery.
3. Push the SIM card holder up (in the direction of the word OPEN on the holder) to release the lock.
4. Carefully lift the SIM card holder up. Do not remove the SIM card holder.
5. Slide a SIM card into the slot using the guides on the inside of the slot. Do not remove the SIM card holder.
6. The angled corner of the SIM card ensures that the card fits the correct way in the slot.
7. Lower the holder, containing the SIM card, into the opening.
8. Slide the SIM card holder down (in the direction of the word LOCK on the holder) to lock the SIM card flat in the opening
(LOCK).
9. Replace the battery in the battery well.
10. Replace the battery cover, securing it with the original 4 screws.
E-EQ-MARATHONRG-A [ 82 ] Marathon™ Reference Guide
Page 89

Replacing the Main Battery
Replacing the Main Battery
Note: LXE recommends that installation or removal of accessories be performed on a clean, well-lit surface. Protect the
work surface, the Marathon, and components from electrostatic discharge. Contact Customer Support at LXE for
assistance when installing or removing a main battery.
1. Turn the Marathon Off. Remove any cables or accessories attached to the Marathon.
2. Place the Marathon face down on a stable surface.
3. Remove the 4 mounting screws securing the battery cover to the Marathon and remove the battery cover. Put the
screws aside in a safe place, i.e. where they can't get knocked off the table and onto the carpet and lost forever in the
grey and black pattern.
4. Lift the battery using the pull strap.
5. Hold the battery out of the way and carefully separate the Marathon plug (on the right) from the plug cabled to the main
battery. Do not bend the pins.
E-EQ-MARATHONRG-A [ 83 ] Marathon™ Reference Guide
Page 90

Replacing the Main Battery
6. Connect the new battery cabled plug to the plug on the Marathon.
7. Lower the connected battery into the battery well using the pull strap.
8. Replace the battery cover, securing it with the original 4 screws.
Connect the Marathon to an external power source. The main battery will be fully charged in 2 hours.
The Marathon is ready for use.
Li-Ion Battery
When disposing of the lithium-ion battery, the following precautions should be observed: The battery should be disposed of
properly. The battery should not be disassembled or crushed. The battery should not be heated above 212°F (100°C) or
incinerated.
CAUTION - RISK OF EXPLOSION IF BATTERY IS REPLACED BY AN INCORRECT TYPE.
DISPOSE OF USED BATTERIES ACCORDING TO THE INSTRUCTIONS.
E-EQ-MARATHONRG-A [ 84 ] Marathon™ Reference Guide
Page 91

Barcode Readers
Barcode Readers
The Marathon can use the following external barcode readers:
An add-on barcode reader imager accessory is available for the Marathon. It can be configured by scanning the barcodes in the Marathon Barcode Programming Guide.
Tethered scanners (LXE 8500 series tethered to a serial port on the vehicle dock) are configured by
scanning the engine-specific barcodes in the scanner manufacturer's programming guide. The manufacturer's guides are usually shipped with the barcode reader.
LXE wireless Bluetooth 8800 series are configured by scanning the engine-specific barcodes in the
scanner manufacturer's programming guide. The manufacturer's guides are usually shipped with the barcode reader.
LXE Bluetooth 8900 tethered scanner (serial, USB, PS/2) is configured by scanning the engine-specific
barcodes in the scanner manufacturer's programming guide. The manufacturer's guides are usually
shipped with the barcode reader.
The body worn LXE Bluetooth Ring Scanner module may be using a Symbol 4400 Ring Imager or a
Symbol 955 Ring Scanner.
The BTRS module is configured by scanning the barcodes in the Bluetooth Ring Scanner Module.
E-EQ-MARATHONRG-A [ 85 ] Marathon™ Reference Guide
Page 92

2D Imager
2D Imager
The optional 2D Imager (barcode decoder) is attached to the top right hand area of the Marathon (when the display is visible).
When present, the 2D Imager uses COM2.
When Freefloat LinqOne is installed, and the user wishes to decode a barcode using the 2D imager, the NumLock key must be
highlighted. Then to scan a barcode, aim the Imager scan aperture at the barcode and press the minus (-) key on the numeric
keypad. The minus key is the default hotkey for the Imager / LinqOne combination.
Contact Customer Support at LXE for 2D Imager Add-In installation instruction.
Note: LXE recommends that installation or removal of accessories be performed on a clean, well-lit surface. Protect the
work surface, the Marathon and components from electrostatic discharge. Contact Customer Support at LXE for
assistance when installing or removing the Imager Add-on Module.
E-EQ-MARATHONRG-A [ 86 ] Marathon™ Reference Guide
Page 93

Magnetic Stripe Reader
Magnetic Stripe Reader
The optional Magnetic Stripe Reader (MSR) is attached to the top left hand area of the Marathon(when the display is visible).
When present, the Magnetic Stripe Reader uses COM3 and supports Microsoft OPOS/JPOS.
The user will need to create a company-specific magnetic stripe reader Point of Sale (POS) application.
Contact Customer Support at LXE for Magnetic Stripe Reader Add-In installation instruction.
Note: LXE recommends that installation or removal of accessories be performed on a clean, well-lit surface. Protect the
work surface, the Marathon, and components from electrostatic discharge. Contact Customer Support at LXE for
assistance when installing or removing the Magnetic Stripe Reader Add-on module.
Marathon Recovery DVD
Marathon Recovery Solution
Contact Customer Support at LXE to get the latest updates before performing the processes that follow.
The ‘Recovery Solution 2’, also known as RS2, is a method to restore the software on your Marathon to the same state it had
when it was shipped from the factory. When RS2 is used on your Marathon, it destroys any information on your hard disk so
please make sure that any information on the hard disk that needs to be preserved is backed up before using RS2.
In order to use RS2, the following components are needed:
1. A Marathon capable of booting from a USB mass storage device
2. A USB DVD player
3. A RS2 DVD suitable for your combination of OS, language and Marathon model
The RS2 works in the following way:
E-EQ-MARATHONRG-A [ 87 ] Marathon™ Reference Guide
Page 94

Startup
1. RS2 boots from the RS2 DVD via USB
2. RS2 executes the Recovery Wizard 2.0, also known as the Wizard, which guides you through the rest of the recovery
process
3. RS2 partitions and formats the primary disk.
4. RS2 writes an OS image to the primary disk. By default the image from the RS2 media is used. In order to achieve
better flexibility and performance, the RS2 image files can be put on a network share instead. To achieve this simply
copy the .wim file found in the root on the RS2 media to a shared network folder. Please note that in order to access a
shared network folder from RS2 you must use wired Ethernet and the RJ45 port of your Marathon and not WLAN.
5. When the Wizard completes, RS2 restarts the system which is now returned to its shipping state in terms of the
installed OS.
Startup
1. Attach the USB DVD player to the Marathon. Use the standard USB connector instead of the ‘Multi Purpose Connector’
on the Marathon.
2. Insert the RS2 media into the USB DVD player
3. Start the Marathon. Please note that the BIOS must be configured to boot from the USB DVD player. If this is not the
case please modify the boot order in the BIOS of your Marathon.
4. When the Marathon boots from the USB DVD player the BIOS asks you to press a key in order to continue to boot from
the RS2 media. Please press a key when prompted to boot from the RS2.
5. RS2 is now booted and the Wizard will start.
E-EQ-MARATHONRG-A [ 88 ] Marathon™ Reference Guide
Page 95

Wizard walk-through
Wizard walk-through
1. The first screen shown by the Wizard displays some generic and licensing information. By clicking Next you accept
these licensing terms.
2. The second screen of the Wizard is used to gather information on how the RS2 process should be performed. Select the
method to be used and the source location of the OS image. By default the OS image on the RS2 media is used. By
pressing the button placed on the right side of the field labeled Image File you can browse to the preferred OS image if,
for instance, it has been placed on a network share.
3. The third screen shown by the Wizard lets you confirm the information gathered thus far before the actual RS2 process
is started. When you click on the Next button you will be asked to confirm that you want to start the RS2 process. This
is the last chance to abort RS2.
4. The fourth screen is shown by the Wizard during the actual processing and it informs you of what is happening. This
process could take 30 minutes or more depending on the actual OS image, USB standard, etc.
5. The last screen of the Wizard shows the result of the RS2 process. When prompted click Finish to close the Wizard.
Next press any key to shutdown the Marathon. Please remove the RS2 media when the Marathon has been shutdown
to avoid booting up the Marathon into RS2 again. Your Marathon has now gone through the whole RS2 process.
Loading an Operating System on the Marathon
If it becomes necessary to reload the Marathon operating system there are two options available.
1. A recovery DVD from LXE. The recovery DVD is customized for the type of hard drive and operating system installed in
the Marathon.
2. A user provided operating system. The user must:
l Provide their own installation source of a supported operating system (such as Windows XP)
l Have a valid activation key for that operating system.
Contact your LXE representative for information on the Marathon Recovery DVD.
E-EQ-MARATHONRG-A [ 89 ] Marathon™ Reference Guide
Page 96

KeyMaps
ALT, CTL, FN, NUM LCK and SHIFT are sticky keys:
l Press once, illuminates blue and stays sticky for next keypress.
l Press and hold for 1.5 seconds, illuminates blue and stays sticky until the same key is pressed again.
l The Num Lck key illuminates orange when in sticky mode.
Only Function keys (F1 through F10) are programmable.
To get this key/function Press these keys in this order...
Power / Suspend Power
Display backlight up Fn 9
Display backlight down Fn 3
Fn mode Fn
Alt mode Alt
Control mode Ctl
Shift mode Shift
Escape Esc
Space Space
Enter Ent
Num Lock Num Lck
Capslock Shift (and hold 1.5 seconds)
Uppercase Alpha (toggle) Shift
Back space Bk
Tab Tab
Up arrow (cursor up) Num Lck OFF 8
Down arrow (cursor down) Num Lck OFF 2
Right arrow (cursor right) Num Lck OFF 6
Left arrow ( cursor left) Num Lck OFF 4
Delete Del
F1 F1
F2 F2
F3 F3
F4 F4
F5 F5
F6 F6
F7 F7
E-EQ-MARATHONRG-A [ 90 ] Marathon™ Reference Guide
Page 97

KeyMaps
To get this key/function Press these keys in this order...
F8 F8
F9 F9
F10 F10
a A
b B
c C
d D
e E
f F
g G
h H
i I
j J
k K
l L
m M
n N
o O
p P
q Q
r R
s S
t T
u U
v V
w W
x X
y Y
z Z
A Shift A
B Shift B
C Shift C
D Shift D
E Shift E
E-EQ-MARATHONRG-A [ 91 ] Marathon™ Reference Guide
Page 98

KeyMaps
To get this key/function Press these keys in this order...
F Shift F
G Shift G
H Shift H
I Shift I
J Shift J
K Shift K
L Shift L
M Shift M
N Shift N
O Shift O
P Shift P
Q Shift Q
R Shift R
S Shift S
T Shift T
U Shift U
V Shift V
W Shift W
X Shift X
Y Shift Y
Z Shift Z
1 Num Lck ON 1
2 Num Lck ON 2
3 Num Lck ON 3
4 Num Lck ON 4
5 Num Lck ON 5
6 Num Lck ON 6
7 Num Lck ON 7
8 Num Lck ON 8
9 Num Lck ON 9
0 Num Lck ON 0
Fn M
. (period)
Num Lock ON . (period)
E-EQ-MARATHONRG-A [ 92 ] Marathon™ Reference Guide
Page 99

KeyMaps
To get this key/function Press these keys in this order...
- (dash or minus sign)
Fn S
Num Lock ON - (dash or minus sign)
/ /
\ Fn G
' (single quote/apostrophe) Fn L
, (comma) Fn C
; (semicolon) Fn J
= (equal sign) Fn D
! Fn Q
@ Fn I (letter i)
# Fn E
$ Fn R
% Fn T
& Fn U
Fn W
* (asterisk)
Num Lck ON or OFF *
( Fn O
) Fn P
" (double quote) Fn K
< Fn Z
> Fn X
: (colon) Fn H
Fn F
+ (plus sign)
Num Lck ON or OFF (plus sign) +
? Fn /
_ (underscore) Fn A
E-EQ-MARATHONRG-A [ 93 ] Marathon™ Reference Guide
Page 100

Technical Specifications
Physical Specifications
Features Details
CPU Intel®1.6 GHz Atom™
BIOS AMIBIOS
Memory RAM 1 or 2 GB SDRAM
Display Controller WVGA/SVGA compatible controller
Storage 8, 16, 32 or 64 GB
Two (2) Type A USB 2.0 Host Ports
External Connectors/
Interfaces
Internal Interfaces
Audio Connector
Power Connector
Docking connector including external antenna connectors
SIM Card Slot
Auxiliary battery connector
Add-on module connectors for Imager and Magnetic Stripe Card Reader
Power Connector
Power Switch Sealed power switch
Dimensions
Main Battery Rechargeable 2200mAh Lithium Ion Smart Battery Pack
CMOS Camera Module Supports OpenGL 1.2 and DirectX. Manage using Microsoft APIs.
Requires specified power supply with 19V output
Integrated battery, auxiliary battery optional
Width: 8.1 in (206 mm)
Height: 7.8 in (197 mm)
Depth: 1.3 in (33 mm)
Note: Dimensions are without add-on modules or auxiliary battery
E-EQ-MARATHONRG-A [ 94 ] Marathon™ Reference Guide
 Loading...