

Page 1

HONEYWELL
EASY TO CARE TOP FILL
EVAPORATIVE HUMIDIFIER
MODEL HCM-750 Series
IMPORTANT SAFETY
INSTRUCTIONS
READ AND SAVE THESE SAFETY
INSTRUCTIONS BEFORE USING
THIS HUMIDIFIER
When using electrical appliances, basic precautions should always be followed to reduce
the risk of fire, electric shock, and injury to
persons, including the following
1. Always place this humidifier on a firm, flat and
level surface. This humidifier may not work
properly on an uneven surface.
2. Place this humidifier in an area where it is not
accessible to children.
3. Do not place the humidifier near any heat
sources such as stoves, radiators, and heaters.
4. Do not use the humidifier outdoors.
5. Before using the humidifier, check the power
cord for any signs of damage. If the cord is
found to be damaged, DO NOT USE and return
the humidifier to the manufacturer under the
warranty agreement for repair.
6. This appliance has a polarized plug (one blade
is wider than the other). To reduce the risk of
shock, this plug is intended to fit only one way
in a polarized outlet. If the plug does not fit
securely in the outlet, reverse the plug. If it still
does not fit, contact a qualified electrician.
DO NOT attempt to defeat this safety feature.
7. To disconnect the humidifier, first turn controls
to the OFF position, then grip the plug and pull
it from the wall outlet. Never pull by the cord.
8. A loose fit between the AC outlet (receptacle)
and plug may cause overheating and a
distortion of the plug. Contact a qualified
electrician to replace loose or worn outlet.
9. The humidifier should always be unplugged
and emptied when not in operation or while
being serviced or cleaned.
10. Never tilt or attempt to move the humidifier
while it is operating or filled with water.
UNPLUG the humidifier before moving.
11. This humidifier requires regular cleaning. Refer
to the CLEANING instructions provided. Never
clean the humidifier in any manner other than
as instructed in this manual.
12. Do not direct moisture flow directly at
individuals, walls or furniture.
13. When a humidifier is used in a closed room
or small rooms, check periodically for proper
ventilation, as excessive humidity can cause
condensation stains on walls.
14. Turn the humidifier OFF if you notice moisture
on the inside of your windows. For proper
humidity reading use a hygrometer, which is
available in many hardware and department
stores, or by ordering one from
the manufacturer.
15. This product is intended for residential
use only.
The Honeywell trademark is used by Kaz, Inc. under license from Honeywell International Inc.
Honeywell International Inc. makes no representation or warranties with respect to this product.
Page 2
INTRODUCTION
How it Works:
The Easy to Care Evaporative Humidifier is designed to quietly provide invisible cool moisture.
Water is pumped from the water reservoir through the water flow channel. Water is dispersed
from water flow channel into the wicking filter which helps remove minerals and impurities
from the water. A fan quietly pushes moisture out of the wick and into the air in the form of an
ultra fine invisible mist.
The unique top fill design makes filling as easy as watering a plant. This unit is also equipped
with a water circulating feature which helps indicate when refilling is needed.
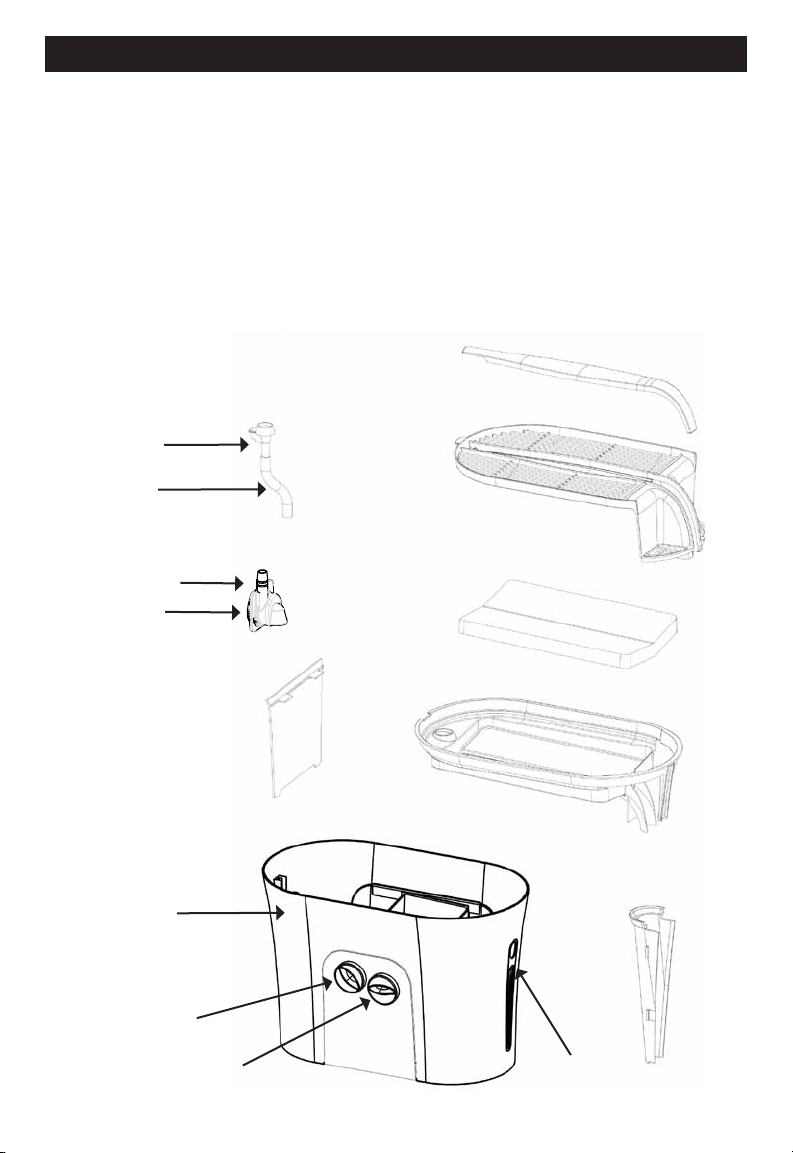
Your humidifier is made up
of these parts:
Top Grille
Water Outlet
Water Hose
Wicking Filter
Pump Outlet
Water Pump
Clear Protective Cover
Main Housing Water Fill Bafflel
Main Housing
On/Off Switch
Moisture Output Switch
2
Wicking Filter Tray
Fill Funnel
Water Window
Page 3
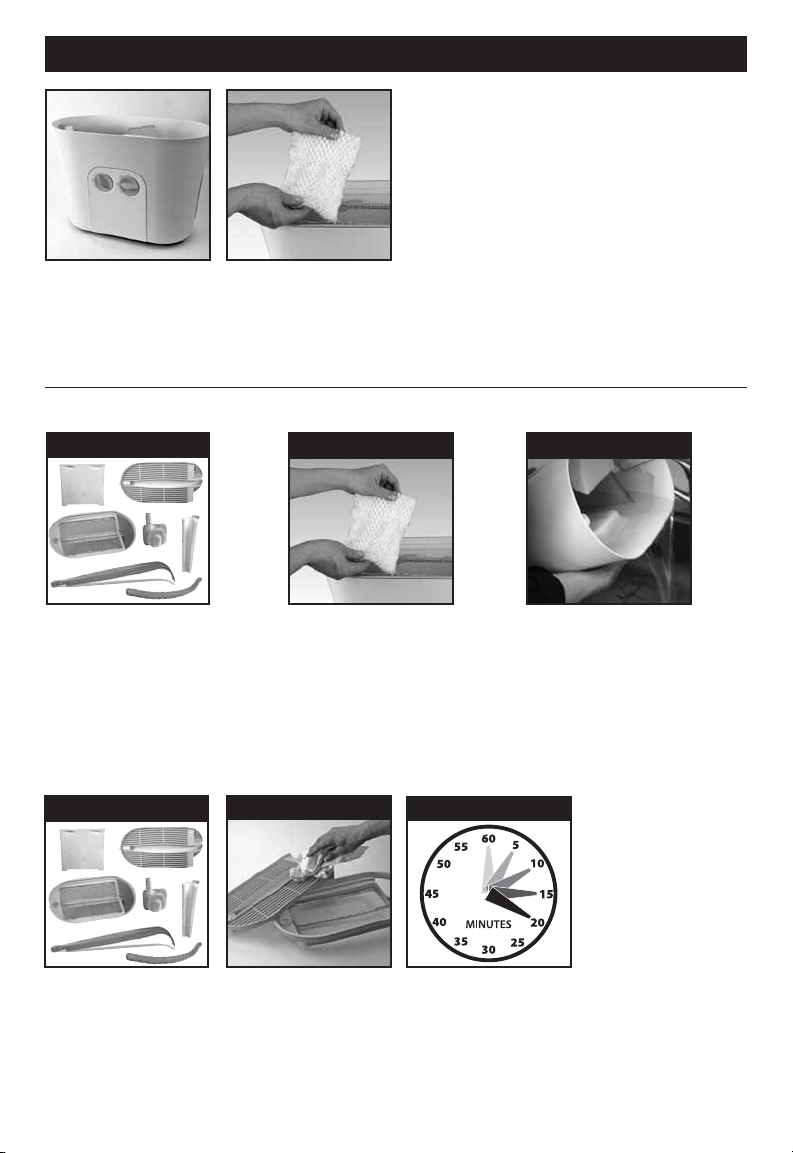
SETTING UP YOUR HUMIDIFIER
Remove from box
Remove packaging material. Remove and set aside instruction
manual. Recycle box and packaging materials or save box for
end of season storage.
To prevent water pump from shifting during transportation
it has been taped to the inside of your humidifier. Remove
grille and filter tray and locate the water pump on the bottom
of the main housing. Remove shipping tape located on water
pump and place water pump back in slot.
Replace filter tray and grille on top of main housing.
Make sure it is securely in place and hose is not bent or
crimped or unit will not operate.
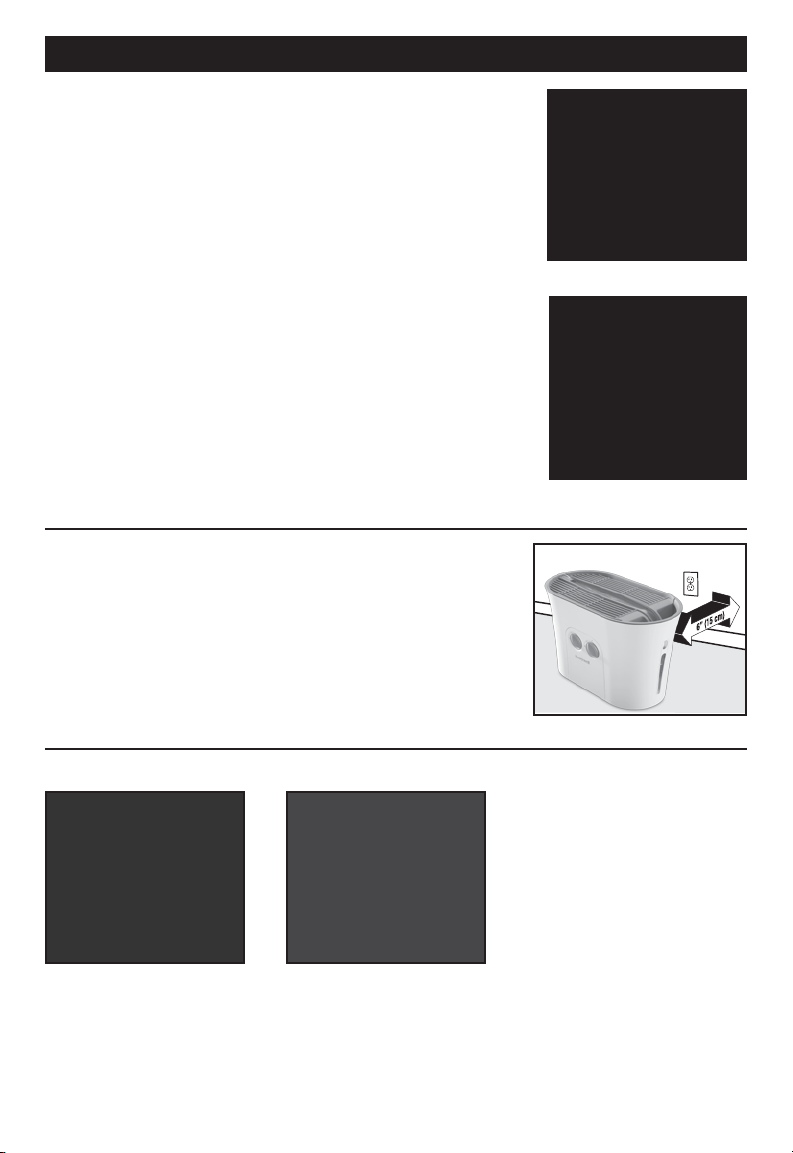
Placement
Select a firm, level location at least 6" (15cm) from any
walls for proper airflow. Place the humidifier on a waterresistant surface, as water can damage furniture and some
flooring.
Kaz will not accept responsibility for property damage
caused by water spillage.
Figure 1
Figure 2
Filling
Fill pitcher or jug with up to
1.5 gallon of cool water.
Note: You can fill this
humidifier with as much
as 1.5 gallon of water or
as little as a cup of water.
Pour water into the fill funnel
area located on the top of
the unit.
Indications that your humidifier
needs to be refilled are:
- Water will stop circulating
through the water channel.
- Your humidifier will start to
sound louder.
- Water level is not visible in
water window or below the
refill line
3
Page 4
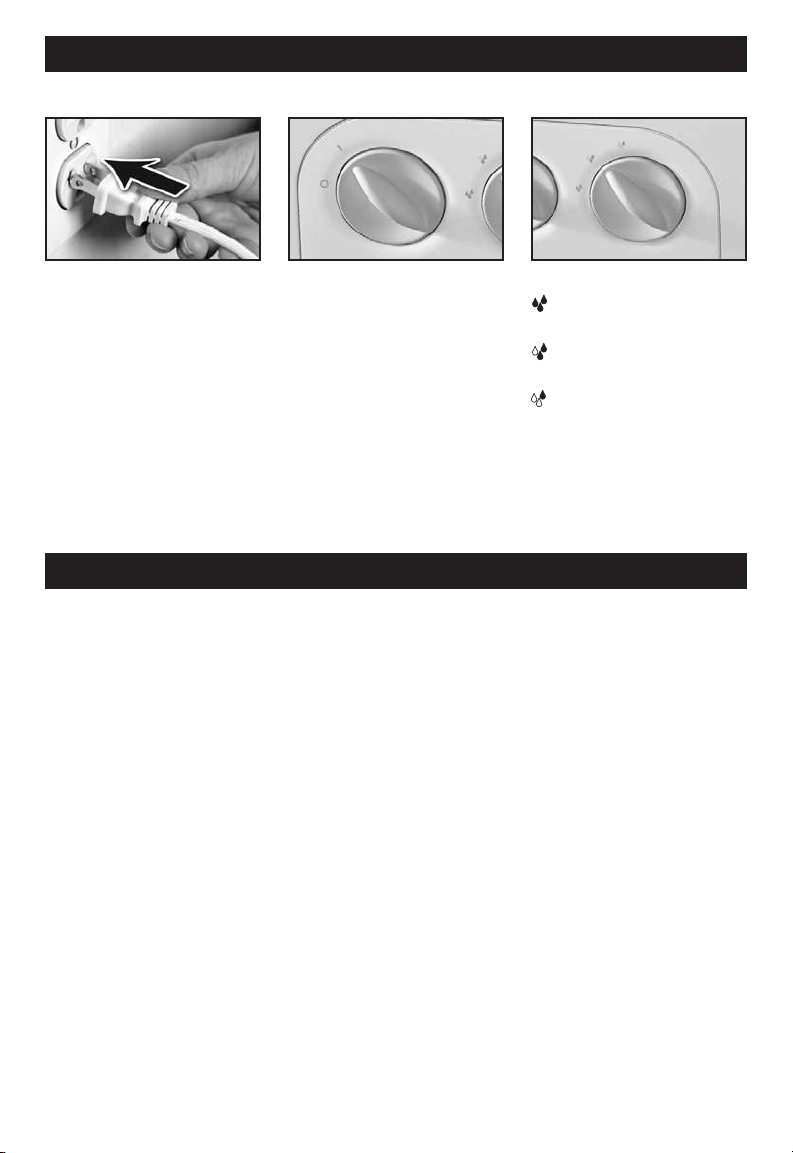
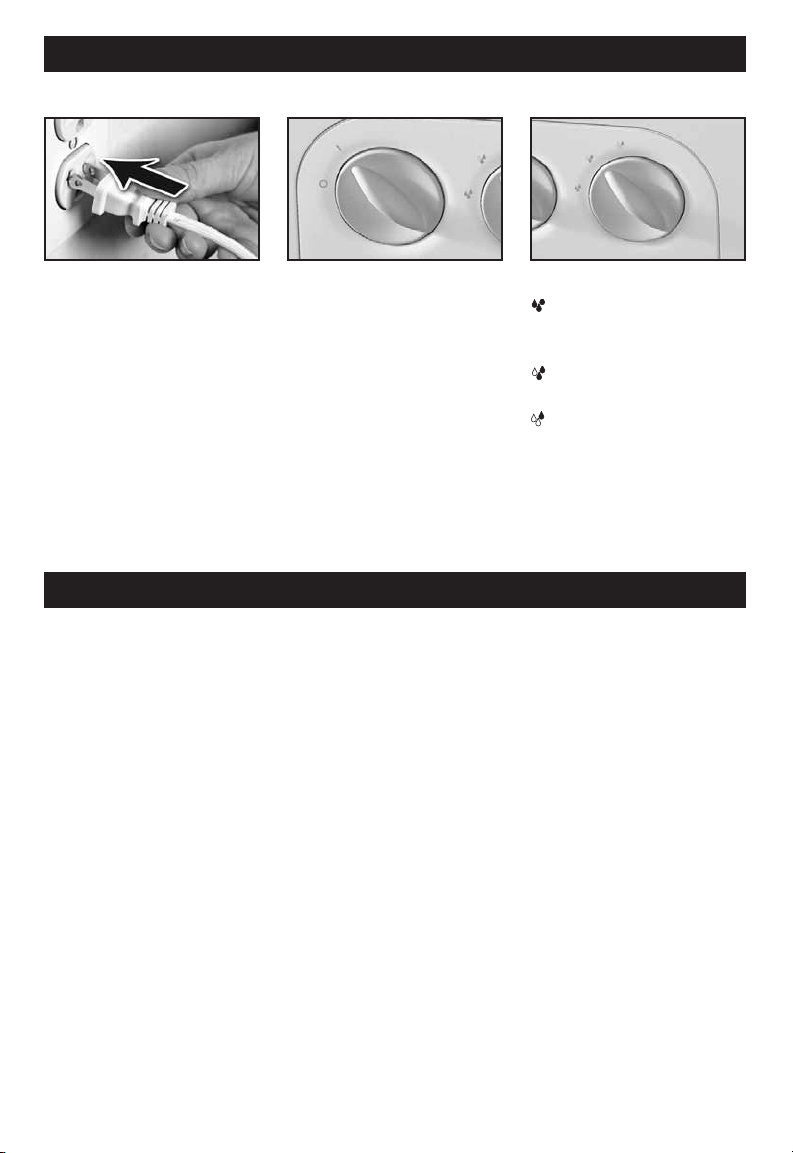
OPERATING: HCM-750 Series
On/Off
With the power switch in the
OFF position, plug the filled
humidifier into a polarized 120V
outlet. DO NOT FORCE THE
POLARIZED PLUG INTO THE
OUTLET; It will only fit one way.
DO NOT plug in humidifier with
wet hands to avoid electric shock.
NOTE: DO NOT OPERATE WITH TOP COVER REMOVED.
Doing so could result in water spilling from humidifier.
Power
Turn the power knob to the
On position.
Output Controls
Set your output control to:
High: Maximum Moisture
Medium:
Low: Sound Sleep or
for Larger Rooms
Moisture
Maintenance
Small Rooms
REPLACING YOUR WICKING FILTER
It is recommended that you change your wicking filter every 1-2 months depending on water quality and usage.
To extend filter life remove filter from unit when not in use and allow to dry in a well ventilated area.
NOTE: Wicking Filter performance will diminish depending on the mineral content of the water and the amount of
airborne dust in the environment.
IMPORTANT: CHECK WICKING FILTER REGULARLY.
Any of the following conditions indicate that it is time to replace the Wicking Filter.
• A buildup of impurities and minerals on the Wicking Filter (evidenced by discoloration of the Wicking Filter)
• An appreciable decrease in Humidifier output. Please keep in mind if your relative humidity is high your
humidifier will put out less moisture.
• The top surface of the Wicking Filter is not moist to the touch
• The Wicking Filter has large holes or tears
The Wicking Filter should be replaced at least one or two times during the season, depending on usage, mineral
content of the water and the environment. We encourage you to only use a Honeywell HAC-700 Replacement
Wicking Filter. The use of other Wicking Filters may lead to sub-standard performance.
4
Page 5
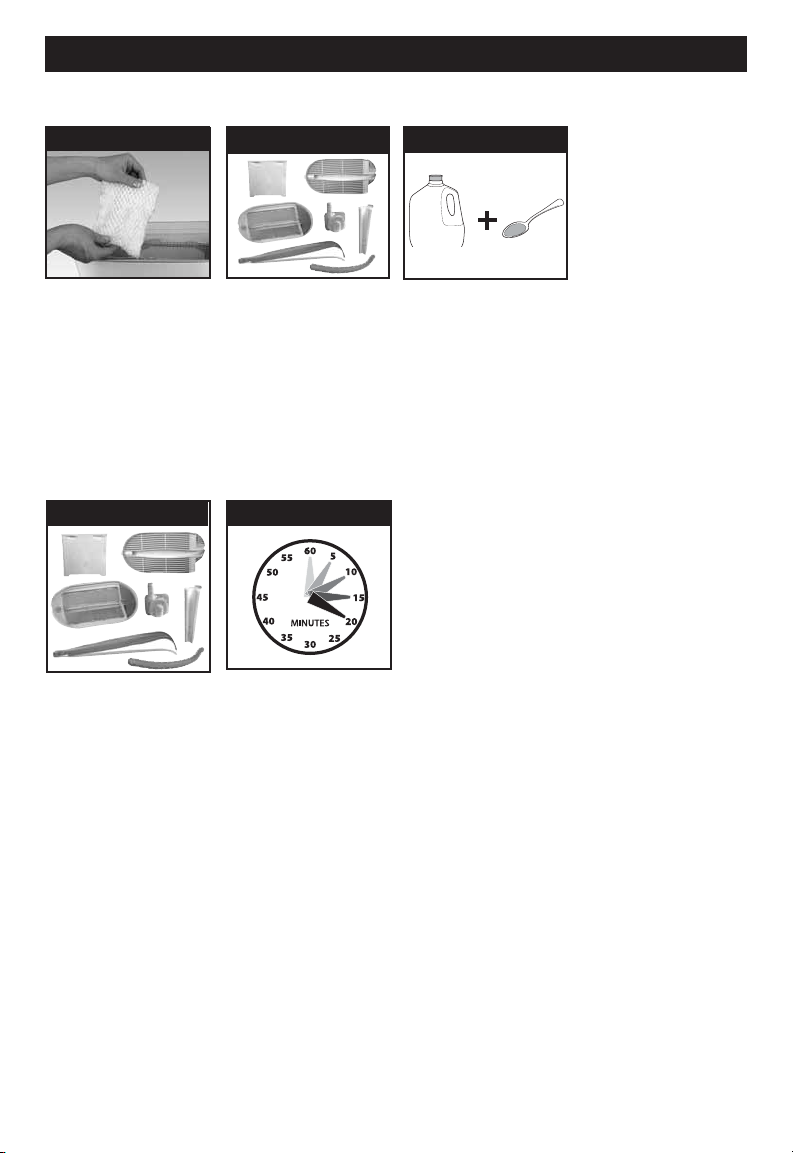
REPLACING YOUR WICKING FILTER (Continued)
STEP 1 STEP 2 STEP 3
Replacement
Wicking Filter HAC-700
or Filter B.
STEP 5 STEP 6 STEP 7 STEP 8
Soak new filters in cool
water.
With dry hands unplug
humidifier and carry to
kitchen or bathroom.
DO NOT wring filters. Place new filters in the
Remove top grille and
set aside.
filter tray.
STEP 4
Remove the wicking filters from the filter tray.
Discard the old wicking
filters.
Replace top grille.
CLEANING: HCM-750 Series
NOTE: It is recommended that all maintenance be done in the kitchen or bathroom on a water
resistant surface.
Weekly Cleaning: To properly clean your humidifier we recommend the process of scale
removal and disinfecting.
Protective
Clear Cover
Water Hose
Dishwasher Safe: The following parts are TOP RACK dishwasher safe
for residential dishwashers operating at temperatures below 70°C/158°F.
It is recommended that you run the dishwasher on the light duty or normal
cycle. Do not wash humidifier parts with soiled articles/dishes.
DO NOT USE DETERGENTS. If you use your dishwasher to clean the following parts you will not need to follow the disinfecting and scaling procedure.
Please Note: Do not place parts on lower rack of dishwasher. Using
the lower rack could cause damage to the humidifier
parts and dishwasher.
Fill
Funnel
Top Grille
Pump
Wicking Filter
Tray
Water Fill Baffle
5
Page 6
CLEANING: HCM-750 Series (continued)
The main housing and wicking filters are
NOT DISHWASHER SAFE.
Placing these parts in the dishwasher will
damage your humidifier and render it unable to
operate properly.
Main Housing
Wicking Filters
Scale Removal directions:
STEP 1
Remove top grille, filters,
filter tray, water pump, water
hose, fill baffle, clear
protective cover and water
fill funnel and set aside.
STEP 4
STEP 2 STEP 3
Set Wicking Filters aside.
Note: Wicking filters cannot be
de-scaled or disinfected. Doing
so will damage filters and unit
will not operate properly.
STEP 5
STEP 6
Empty water from the
humidifier by pouring out in the
direction of the control panel.
Follow the indicator arrows
located inside the main housing.
Fill water reservoir of main
housing with 2 cups vinegar.
With your unit
un-assembled,
proceed to the
disinfecting
instructions.
Place water pump,
water hose, water fill
baffle, protective clear
cover and fill funnel
inside main housing to
soak in vinegar.
6
Gently wipe grille and
filter tray with undiluted
vinegar if you choose
not to use the dishwasher option.
Soak for 20 minutes.
Rinse main housing and
parts not put in dishwasher until vinegar
smell is gone.
Page 7
CLEANING: HCM-750 Series (continued)
Disinfecting directions: Disinfect following scale removal
STEP 1
DO NOT DISINFECT the
Wicking Filters.
STEP 4
Soak water hose, water
pump, water fill baffle,
fill funnel and protective
clear cover in water
reservoir of the main
housing if these parts
were not cleaned on the
top rack of dishwasher.
STEP 2
Set aside top grille,
protective clear cover,
filter tray, water pump,
water hose, water fill
baffle and fill funnel.
STEP 5
Soak for 15-20 minutes.
Wipe top grille and filter
tray with the water - bleach
solution if these parts were
not placed in dishwasher.
Thoroughly rinse main
housing and any parts not
placed in dishwasher until
the smell of bleach is gone.
STEP 3
1
l
g
a
Add 1 TB of bleach to 1
gallon water. Add 1 gallon
of water/bleach solution to
water reservoir of the main
housing. Using this mixture
wipe the walls of the main
housing.
NOTE: USING MORE
THAN 1 TB OF BLEACH
PER GALLON OF
WATER WILL RESULT
IN DAMAGE TO YOUR
HUMIDIFIER.
Note: Please be careful of clothing, rugs and other non bleach resistant materials when
disinfecting. Spilling bleach on clothing, rugs and certain surfaces may cause damage.
7
Page 8
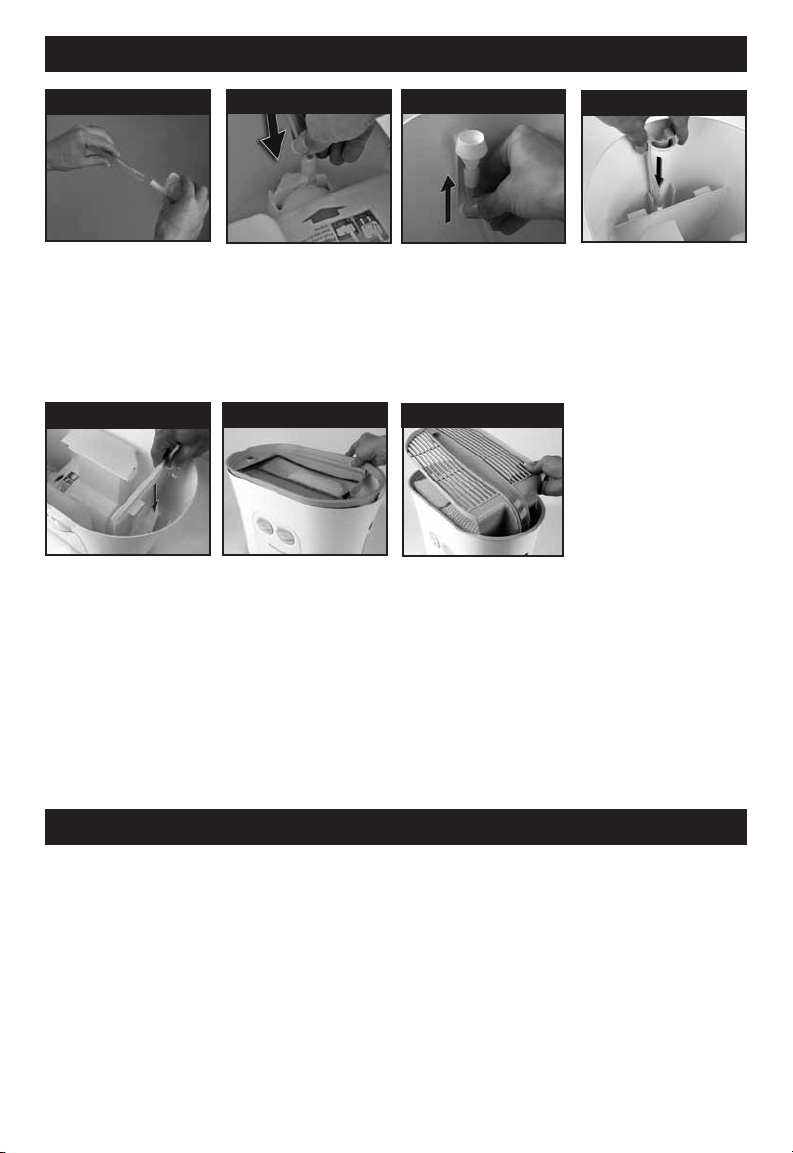
RE-ASSEMBLING: HCM-750 Series
STEP 1
Insert pump outlet
into hose opening and
gently press into place
until water pump outlet
will not sit any further
inside water tube.
STEP 5
Re-insert the water fill
baffle into the water
reservoir of the main
housing by lining up
with the guides and
gently pushing down
to insert.
STEP 2
Insert water pump/hose
assembly into slot
in main housing.
Note: The pump will
only fit one way.
STEP 6
Place filter tray onto
main housing. Then
replace the filters back
onto the filter tray.
STEP 3
Affix water hose to
main housing by gently
inserting water hose
onto the water outlet.
STEP 7
Replace the top grille and
protective clear cover.
STEP 4
Line up the fill funnel
with the slots behind
the water window.
Gently insert into place.
END-OF-SEASON CARE AND STORAGE
Follow the CLEANING instructions when the humidifier will not be used for at least one week or more, or
at the end of the season.
NOTE: Discard old filters and start with new filters next season.
Dry the humidifier completely before storing.
DO NOT store with water inside the main housing water reservoir or water tube.
Pack unit in original carton and store in a cool, dry location.
8
Page 9
CONSUMER RELATIONS
Mail questions or comments to:
Kaz, Inc.
Consumer Relations Dept.
250 Turnpike Road, Southborough, MA
01772
Please be sure to specify model number.
Call us toll-free at: 1-800-477-0457
E-mail: consumerrelations@kaz.com
Or visit our website at: www.kaz.com
TO ORDER REPLACEMENT PARTS
HAC-700 Replacement Wicking Filter
HCM-750 Grille (Top Grille)
HCM-750 Filter Tray (Wicking Filter Tray)
HCM-750 Cover (Clear Protective Cover)
HCM-750 Level (Fill Funnel)
HCM-750 Fill Wall (Water Fill Baffle)
750/200 Pump (Water Pump)
HCM-750 Hose (Water Hose)
PC-2 Protec™ Antimicrobial Cleaning
Cartridge
ELECTRICAL RATINGS
The Honeywell HCM-750 Series models are rated at 120V, 60 Hz.
NOTE: IF YOU EXPERIENCE A PROBLEM, PLEASE CONTACT CONSUMER RELATIONS FIRST
OR SEE YOUR WARRANTY. DO NOT RETURN THE HUMIDIFIER TO THE ORIGINAL PLACE OF
PURCHASE. DO NOT ATTEMPT TO OPEN THE MOTOR HOUSING OR TAMPER WITH INTERLOCK SWITCH YOURSELF, DOING SO MAY VOID YOUR WARRANTY AND CAUSE DAMAGE
TO THE PRODUCT OR PERSONAL INJURY.
FREQUENTLY ASKED QUESTIONS
Cleaning
Question Answer
How do I clean inside the water pump? You can clean the inside of the pump by turning
the cover counter-clockwise. Remove the cover
and you can clean the housing and disk.
What parts are dishwasher safe? The water hose, water pump, protective clear
cover, top grille, filter tray, water fill baffle and
water funnel.
How do I assemble my humidifier after cleaning? See page 8 of your owners manual.
Can I use dish soap to clean my humidifier? It is not recommended that you use dish soap to
clean your humidifier as it is very hard to remove
all the soap and this could cause damage to
your humidifier. It is important that if you are
using your dishwasher to clean these parts that
detergent is NOT used.
9
Page 10

FREQUENTLY ASKED QUESTIONS (Continued)
Cleaning (Continued)
Question Answer
Can I add water treatments to this humidifier? You should only add water treatments to your
Operation
Question Answer
What setting should I put my humidifier on? You should run your humidifier on the highest
I ran my humidifier overnight in a very dry
room and the humidity barely changed but my
water level decreased quite a bit.
Can I run my humidifier without filters? No, your humidifier will not operate properly without
How often should I change my wicking filters? In general the wicking filters will last 1-2 month
How do I know my humidifier is operating
properly
I cannot see any mist coming out of my
humidifier.
humidifier that are specifically made for
evaporative humidifiers such as the Protec
microbial Cleaning Cartridge, model PC-1 or PC-2.
Using water treatments that are not recommended
for evaporative humidifiers could damage your
humidifier. If you are concerned about hard water
it is recommended you use distilled water in your
humidifier.
setting if your room is very dry. Once you are at a
more comfortable humidity you can turn your output
setting to a lower setting.
It may take a few days for your humidity to increase.
Wood, rugs and other objects in your room will
absorb moisture before before you can feel the effects if it is extremely dry.
filters. The filters absorb the moisture distributed
by the water flow channel. A quiet fan then blows
through the filters distributing moisture into the air.
depending on water quality and usage. See Filter
Replacement section for information on how to
determine when it is time to change the filters.
You will see water flowing through the water flow
channel on the top of the humidifier. You will also
notice a decrease in the water level after 8 hrs of
use.
Your humidifier uses the process of evaporative.
This produces an ultra fine invisible moisture. You
will see your water level decrease and this is an
indication your humidifier is operating properly.
See Troubleshooting Guide for more.
TM
Anti-
10
Page 11

FREQUENTLY ASKED QUESTIONS (Continued)
Operation (Continued)
Question Answer
There is no water running through the water
flow area on the top housing.
Why did my humidifier suddenly start
sounding loud?
How much water does my humidifier hold? Your humidifier can hold up to 1.5 Gallons of water.
First check to make sure there is water in your
humidifier. If yes, check your water pump to make
sure it is properly seated in the holding area. Next
check to make sure the water hose is firmly attached to both the water pump and the water outlet.
Last, make sure there is nothing obstructing the
water flow area on the top grille or water hose.
If these steps do not help, please see our
Troubleshooting Guide or contact our customer
service department at 1-800-477-0457.
Check your water level. If your humidifier starts
sounding louder it is an indication that you need to
refill your humidifier.
How long will my humidifier run when full? Your humidifier will run up to 17 hrs on high and
48 hrs on low.
11
Page 12

TROUBLESHOOTING
1. Water is not flowing
a. Check to be sure there is water in the tank and it is covering the pump
b. Check water hose to be sure there are no kinks. Water hose should be pushed fully
onto both the water outlet and pump
c. Make sure pump is fully seated in slot at bottom of main housing
d. Turn unit off, then back on to help clear any air in the system
e. If water still is not flowing, remove pump, disassemble and make sure pump impeller
can spin freely and there is nothing blocking pump inlet or other water passages
f. Make sure the grille is fully seated and can accept water from the supply funnel
2. Unit flows water but does not produce mist
a. This unit does not produce visible mist
3. Unit flows water but filter is not moist
a. Check to be sure the holes in the water feature are not blocked and can drip water
onto the filters
4. Pump makes a swishing sound
a. The pump may have sucked in air. Be sure there is enough water in the tank to cover
the pump.
b. After filling, turn the unit off for a few seconds, then turn it back on to clear the
system of air.
5. Pump makes a whirring sound
a. The pump may not be properly seated. Be sure to push pump fully into slot in main
housing. After seating the pump properly, turn the unit off for a few seconds, then
turn it back on. This will allow the pump to synchronize with the drive magnet.
6. Unit has poor output
a. Make sure the filters are moist and you can feel airflow coming through the filters.
b. Make sure the water fill baffle and grille are properly seated.
c. If both a and b are OK, the relative humidity in your home could be high. The unit will
automatically regulate the output based on the amount of humidity already in the air.
7. Unit makes dripping or trickling sound
a. Make sure the fill funnel is properly assembled and mounted in the tank behind the
water window.
b. Make sure the grille is properly seated and the fill funnel can accept water.
c. Make sure the mesh supporting the filter is not damaged.
12
Page 13

3 YEAR LIMITED WARRANTY
You should first read all instructions before
attempting to use this product.
A. This 3 year limited warranty applies to
repair or replacement of product found to be
defective in material or workmanship. This
warranty does not apply to damage resulting
from commercial, abusive, unreasonable use
or supplemental damage. It also does not
apply to the filter or Protec™ Antimicrobial
Cartridge. Defects that are the result of
normal wear and tear will not be considered
manufacturing defects under this warranty.
KAZ IS NOT LIABLE FOR INCIDENTAL
OR CONSEQUENTIAL DAMAGES OF ANY
NATURE. ANY IMPLIED WARRANTY OF
MERCHANTABILITY OR FITNESS FOR A
PARTICULAR PURPOSE ON THIS PRODUCT
IS LIMITED IN DURATION TO THE
DURATION OF THIS WARRANTY.
Some jurisdictions do not allow the exclusion
or limitation of incidental or consequential
damages or limitations on how long an
implied warranty lasts, so the above
limitations or exclusions may not apply to
you. This warranty gives you specific legal
rights, and you also may have other rights
which vary from jurisdiction to jurisdiction.
This warranty applies only to the original
purchaser of this product from the original
date of purchase.
B. At its option, Kaz will repair or replace
this product if it is found to be defective in
material or workmanship.
C. This warranty does not cover damage
resulting from any unauthorized attempts
to repair or from any use not in accordance
with the instruction manual.
D. Return defective product to Kaz,
Incorporated with a brief description of the
problem. Include proof of purchase and a
$10 US/$15.50 CAN check or money order
for handling, return packing and shipping
charges. Please include your name, address
and a daytime phone number.
You must prepay shipping charges.
We suggest having tracking or delivery
confirmation. Send to:
In U.S.A.:
Kaz, Incorporated
Attn: Returns Department
4755 Southpoint Drive
Memphis, TN 38118
USA
In Canada:
Kaz Canada, Inc.
Attn: Returns Department
510 Bronte Street South
Milton, ON L9T 2X6
Canada
Please go to www.kaz.com and register
your product under the Customer Care Center and receive product information updates
and new promotional offers.
©2010 Kaz, Incorporated. All Rights Reserved.
P/N: 31IMM750190
13
Page 14

HONEYWELL HUMIDIFICADOR
EVAPORATIVO DE FÁCIL
CUIDADO, LLENADO POR
ARRIBA
MODELO de la Serie HCM-750
INSTRUCCIONES
IMPORTANTES DE
SEGURIDAD
LEA Y GUARDE ESTAS INSTRUCCIONES DE SEGURIDAD ANTES DE
USAR ESTE HUMIDIFICADOR
Siempre se deben tomar las precauciones
básicas cuando se usen artefactos eléctricos
para reducir el riesgo de incendio, choque
eléctrico y lesiones personales, incluyendo lo
siguiente:
1. Siempre coloque este humidificador sobre una
superficie firme, plana y nivelada.
Es posible que este humidificador no funcione
debidamente sobre una superficie desnivelada.
2. Coloque este humidificador en un lugar fuera del
alcance de los niños.
3. No coloque el humidificador cerca de ninguna
fuente térmica como estufas, radiadores y
calentadores.
4. No use el humidificador al aire libre.
5. Antes de usar el humidificador, verifique que el
cordón eléctrico no tenga señales de avería. Si
considera que el cordón está estropeado,
NO LO USE y devuelva el humidificador al
fabricante conforme al acuerdo de garantía para
su reparación.
6. Este artefacto tiene un enchufe polarizado (una
punta es más ancha que la otra). Para reducir el
riesgo de choque, este enchufe ha sido diseñado
para que encaje de una forma solamente en un
tomacorriente polarizado. Si el enchufe no encaja
completamente en el tomacorriente, inviértalo. Si
aún no encaja, comuníquese con un electricista
competente. NO trate de ir en contra de esta
Kaz Inc utiliza la marca de comercio Honeywell con autorización de Honeywell International Inc.
Honeywell International Inc. no hace ninguna declaración o garantía con respecto a este producto.
característica de seguridad.
7. Para desconectar el humidificador, primero
coloque los controles en la posición apagada
(OFF), luego sujete el enchufe y sáquelo del
tomacorriente. Nunca tire del cordón.
8. Una conexión floja entre la toma de corriente
alterna (tomacorriente o receptáculo) y el
enchufe puede hacer que el enchufe se
recaliente y se deforme. Comuníquese con
un electricista competente para cambiar un
tomacorriente flojo o gastado.
9. Se debe desenchufar y vaciar el humidificador
siempre que no esté funcionando o durante su
reparación o limpieza.
10. Nunca incline ni trate de mover el humidificador
mientras esté funcionando o esté lleno de agua.
DESENCHÚFELO antes de moverlo.
11. El humidificador se debe limpiar con regularidad.
Consulte las instrucciones de LIMPIEZA
provistas. Nunca limpie el humidificador de
ninguna otra manera que no sea conforme con
las instrucciones de este manual.
12. Nunca oriente el vapor directamente hacia
personas, paredes o muebles.
13. Si usa el humidificador en una habitación
cerrada o en una habitación pequeña, debe
comprobar periódicamente que haya la
adecuada aireación ya que un nivel de humedad
demasiado elevado provocará manchas de
condensación en las paredes.
14. Apague el humidificador si se forma
condensación en el interior de las ventanas.
Para obtener el nivel de humedad exacto, use
un higrómetro que puede conseguir en una
ferretería o en un gran almacén. También puede
hacer un pedido al fabricante.
15. Este producto está fabricado solo para uso
residencial.
27
Page 15

INTRODUCCIÓN
Cómo Funciona:
El humidificador Ultrasónico de Cuidado Fácil está diseñado para proveer silenciosamente vapor
frío invisible. El agua se bombea desde el depósito de agua a través del canal de flujo de agua.
El agua es dispersada del canal de flujo de agua al filtro filamentoso, el cual ayuda a capturar
los minerales y las impurezas del agua. Un ventilador silencioso empuja el vapor fuera del filtro
al aire en forma de un vapor invisible ultra fino.
El diseño único de llenado por arriba hace que sea tan fácil como vertir agua a una planta.
Esta unidad está equipada con una característica de circulación de agua la cual ayuda a
indicar cuando se necesita rellenar.
Su humidificador consta de las
siguientes partes:
Salida del agua
Manguera del agua
Salida de la Bomba
Bomba de agua
Cubierta Principal del Deflector
de Llenado de Agua
Cubierta Principal
Cubierta Transparente
Protectora
Rejilla Superior
Filtro Filamentoso
Bandeja del Filtro
Filamentoso
Embudo de
Llenado
Interruptor Encendido/Apagado
Interruptor de Salida de Humedad
28
Ventana del Agua
Page 16

INSTALAR SU HUMIDIFICADOR
Saque de la caja
Retire el material de empaque. Retire y coloque a un lado el
manual de instrucciones. Recicle la caja y el material de empaque o guarde la caja para almacenar al final de la temporada.
Para prevenir que la bomba de agua se mueva al transportarla se ha pegado al interior de su humidificador. Retire la
rejilla y la bandeja del filtro y localice la bomba de agua en el
fondo de la cubierta principal. Retire la cinta para transporte de
la bomba de agua y ponga la bomba de agua en la ranura.
Vuelva a colocar la bandeja del filtro y la rejilla en la parte superior de la cubierta principal.
Asegúrese que esté segura en su lugar y que la manguera
no esté doblada o presionada o la unidad no funcionará.
Colocación
Seleccione una ubicación firme y nivelada retirada por lo
menos 15 cm (6”) de cualquier pared para un flujo de aire apropiado. Coloque el humidificador en una superficie resistente
al agua, ya que el agua puede dañar algunos muebles o pisos.
Kaz no aceptará responsabilidad alguna por daños causados
por derramamiento de agua.
Figura 1
Figura 2
Llenado
Llene una jarra con hasta
1.5 galones de agua fría.
Nota: Usted puede llenar
este humidificador con
hasta 1.5 galones de agua
ó con tan sólo una taza
de agua.
Vierta el agua en el área del
embudo de llenado localizado en la parte superior de
la unidad.
Indicaciones de que su humidificador necesita ser rellenado:
- El agua deja de circular a
través del canal de agua.
- Su humidificador hace un
ruido más fuerte.
- El nivel del agua no es visible
en la ventana del agua o debajo de la línea de rellenado.
29
Page 17
OPERACIÓN: Series HCM-750
Encendido/Apagado
Con el interruptor de Encendido
en posición de APAGADO, conecte
el humidificador lleno a un tomacoriente polarizado de 120V~. NO
FORCE EL ENCHUFE POLARIZADO EN EL TOMACORRIENTE;
es unidireccional.
NO conecte el humidificador con
las manos mojadas para evitar
descarga eléctrica.
NOTA: NO OPERE SIN LA CUBIERTA SUPERIOR.
El hacerlo podría resultar en derramamiento de agua del humidificador.
Potencia
Gire la perilla de la potencia
a la posición de ENCENDIDO.
Controles de Salida
Ajuste su control de salida en:
Alto: Humedad Máxima
para Habitaciones
más Grandes
Medio: Conservación de la
Humedad
Bajo: Sueño Profundo
o Habitaciones
Pequeñas
REEMPLAZAR SU FILTRO FILAMENTOSO
Es recomendable cambiar su filtro filamentoso cada 1-2 meses dependiendo de la calidad del agua y el uso.
Para aumentar la vida útil del filtro retire el filtro de la unidad cuando no esté en uso y permita que seque en un
área ventilada.
NOTA: El desempeño del Filtro Filamentoso disminuirá dependiendo del contenido mineral del agua y de la
cantidad de polvo aerotransportado en el medio ambiente.
IMPORTANTE: REVISE REGULARMENTE EL FILTRO FILAMENTOSO.
Cualquiera de las siguientes condiciones indican que es momento de cambiar su Filtro Filamentoso.
• Acumulación de impurezas y minerales en el Filtro Filamentoso (evidenciado por la decoloración del Filtro
Filamentoso)
• Disminución notoria de la salida del Humidificador. Por favor recuerde que si la humedad relativa es alta su
humidificador producirá menos humedad.
• La cubierta superior del Filtro Filamentoso no se siente húmeda al tacto.
• El Filtro Filamentoso tiene agujeros y rasgaduras grandes.
El Filtro Filamentoso deber cambiarse al menos una o dos veces durante la temporada, dependiendo del
uso, contenido mineral en el agua y el medio ambiente. Lo invitamos a utilizar sólo el Reemplazo del Filtro
Filamentoso Honeywell HAC-700. El uso de otros Filtros Filamentosos puede resultar en un desempeño por
debajo de lo normal
30
Page 18

REEMPLAZAR SU FILTRO FILAMENTOSO (Continuación)
PASO 1 PASO 2 PASO 3
Reemplazo del Filtro
Filamentoso HAC-700
ó Filtro B.
PASO 5 PASO 6 PASO 7 PASO 8
Sumerja los nuevos
filtros en agua fría.
Con las manos secas
desconecte el humidificador y llévelo al baño
o cocina.
NO exprima los filtros. Coloque los nuevos
Quite la rejilla superior y
colóquela a un lado.
filtros en la bandeja
del filtro.
PASO 4
Retire los filtros filamentosos de la bandeja
del filtro. Deseche los
filtros filamentosos
usados.
Vuelva a colocar la
rejilla superior.
LIMPIEZA: Series HCM-750
NOTA: Es recomendable que todos los mantenimientos sean realizados en la cocina o baño en
una superficie resistente al agua.
Limpieza Semanal: Para limpiar adecuadamente su humidificador le recomendamos el proceso
de eliminación de sarro y desinfección.
Seguro para Lavavajillas: Las siguientes partes son seguras para
la CANASTILLA SUPERIOR del lavavajillas, para lavavajillas de uso residencial operando a temperaturas menores a los 70°C/158°F. Es recomendable
que opere su lavavajillas en el ciclo suave o normal. No lave el humidificador
con artículos/platos sucios.
NO UTILICE DETERGENTES. Si utiliza su lavavajillas para lavar las siguientes
partes necesitará seguir el procedimiento de eliminación de sarro y desinfección.
Por favor Note: No coloque las partes en la canastilla inferior del
lavavajillas. El hacerlo puede causar daño en las partes del humidifica-
Cubierta
Transparente
Protectora
Manguera del Agua
dor y en el lavavajillas.
Rejilla Superior
Bomba de agua
Bandeja del Filtro
Filamentoso
Deflector de Llenado de Agua
Embudo de Llenado
31
Page 19

LIMPIEZA: Series HCM-750 (continuación)
La cubierta principal y los filtros
filamentosos NO SON SEGUROS PARA EL
LAVAVAJILLAS.
El colocar estas partes en el lavavajillas dañará
su humidificador y lo hará incapaz de funcionar
adecuadamente.
Cubierta Principal
Filtros Filamentosos
Instrucciones para Eliminar el Sarro:
PASO 1
Retire la rejilla superior, los
filtros, la bandeja del filtro, la
bomba del agua, la manguera
del agua, el deflector de
llenado, la cubierta transparente
protectora y el embudo
de llenado de agua y póngalos
a un lado.
PASO 4
PASO 5
PASO 2 PASO 3
Coloque los Filtros
Filamentosos a un lado.
Nota: Los filtros filamentosos
no pueden someterse a la
eliminación de sarro o
desinfección. El hacerlo dañará
los filtros y la unidad no operará
adecuadamente.
Vacíe el agua del humidificador
vertiéndola en la dirección
del panel de control. Siga las
flechas indicadoras ubicadas
en el interior de la cubierta
principal. Llene el depósito de
agua de la cubierta principal
con 2 tazas de vinagre.
PASO 6
Con la unidad
desarmada,
proceda con las
instrucciones de
desinfección.
Coloque la bomba de
agua, la manguera
del agua, el deflector
de llenado de agua, la
cubierta transparente
protectora y el embudo
de llenado dentro de
la cubierta principal y
remójelos en vinagre.
32
Gentilmente limpie
la rejilla y la bandeja
del filtro con vinagre
sin diluir si decide no
utilizar la opción del
lavavajillas.
Sumerja durante 20
minutos. Enjuague la
cubierta principal y las
partes, no coloque en
el lavavajillas hasta que
el olor a vinagre haya
desaparecido.
Page 20

LIMPIEZA: Series HCM-750 (continuación)
Instrucciones de Desinfección: Disinfecte después de eliminar el sarro
PASO 1
NO DESINFECTE los
Filtros Filamentosos.
PASO 4
Remoje la manguera del
agua, la bomba del agua,
el deflector de llenado
de agua, el embudo de
llenado y la cubierta
transparente protectora
en el depósito de agua
de la cubierta principal
si estas partes no fueron
lavadas en la canastilla
superior del lavavajillas.
PASO 2
Deje a un lado la rejilla
superior, la cubierta
transparente protectora, la bandeja del filtro,
la bomba del agua, la
manguera del agua, el
deflector de llenado de
agua y el embudo de
llenado.
Agregue 1 CUCH de
cloro a 1 galón de agua.
Agregue 1 galón de la
solución de agua/vinagre
al depósito de agua de la
cubierta principal. Utilizando esta mezcla limpie
las paredes de la cubierta
principal.
PASO 5
Sumerja durante 15-20
minutos.
Limpie la rejilla superior y
la bandeja del filtro con la
solución de agua/vinagre si
estas partes no fueron lavadas
en el lavavajillas.
Enjuague a fondo la cubierta
principal y cualquier otra parte
no colocada en el lavavajillas
hasta que el olor a cloro
desaparezca.
1
l
g
a
PASO 3
NOTA: UTILIZAR
MÁS DE 1 CUCH DE
CLORO POR GALÓN
DE AGUA PUEDE
PROVOCAR DAÑO EN
SU HUMIDIFICADOR.
Note: Por favor cuide la ropa, tapetes, y otros materiales no resistentes al cloro cuando esté
desinfectando. El derramar cloro en la ropa, tapetes y ciertas superficies puede causar daños.
33
Page 21

REENSAMBLAJE: Series HCM-750
PASO 1
Inserte la salida de la
bomba a la abertura de
la manguera y presione
gentilmente hasta que
ya no avance más dentro del tubo de agua.
PASO 5
Vuelva a insertar el
deflector de llenado
de agua al depósito
de agua de la cubierta
principal, alineando con
las guías y empujando
con cuidado hacia abajo
para encajar.
PASO 2
Inserte el ensamblaje
de la bomba/manguera
del agua dentro de la
ranura en la cubierta
principal.
Nota: la bomba entra
solo en un sentido.
PASO 6
Coloque la bandeja del
filtros en la cubierta principal. Después
vuelva a colocar los
filtros en la bandeja del
filtros.
PASO 3
Coloque la manguera
del agua en la cubierta
principal insertando con
gentileza la manguera
del agua en la salida del
agua.
PASO 7
Vuelva a colocar la rejilla superior y la cubierta
transparente protectora.
PASO 4
Alinee el embudo de
llenado con las ranuras
ubicadas detrás de la
ventana del agua.
Inserte con gentileza en
su lugar.
CUIDADO Y ALMACENAJE DE FIN DE TEMPORADA
Siga las instrucciones de LIMPIEZA cuando el humidificador no esté en uso por al menos una semana o
más, o al final de la temporada.
NOTA: Deseche los filtros usando y empiece con nuevo filtros la siguiente temporada.
Seque completamente el humidificador antes de almacenarlo.
NO almacene con agua en el depósito de agua de la cubierta principal o en el tubo de agua.
Empaque la unidad en la caja original y guarde en un lugar fresco y seco.
34
Page 22

SERVICIO AL CONSUMIDOR
Envíe sus preguntas o comentarios a:
Kaz, Incorporated
Consumer Relations Dept.
250 Turnpike Road
Southborough, MA 01772 USA
Por favor especifique el número del
modelo.
Llámenos al número de teléfono de llamada
gratis de larga distancia: 1-800-477-0457
e-mail: consumerrelations@kaz.com
O visítenos en nuestro sitio web: www.kaz.com
PARA ORDENAR PARTES DE REEMPLAZO
HAC-700 Reemplazo de Filtro Filamentoso
HCM-750 Rejilla (Rejilla Superior)
HCM-750 Bandeja del Filtro
(Bandeja del Filtro Filamentoso)
HCM-750 Cubierta
(Cubierta Transparente Protectora)
HCM-750 Nivel (Embudo de Llenado)
HCM-750 Pared de Llenado
(Deflector de Llenado de Agua)
750/200 Bomba (Bomba de agua)
HCM-750 Manguera (Manguera del Agua)
PC-2 Cartucho de Limpieza
Antimicrobiana Protec
MR
PREGUNTAS FRECUENTES
Limpieza
Pregunta Respuesta
¿Cómo limpio el interior de la bomba de agua? Puede limpiar el interior de la bomba girando la
¿Qué partes son seguras para el lavavajillas? La manguera del agua, la bomba del agua, la cu-
cubierta hacia la izquierda. Retire la cubierta
para limpiarla junto con el filtro.
bierta transparente protectora, la rejilla superior,
la bandeja del filtro, el deflector de llenado de
agua y el embudo del agua.
¿Cómo ensamblo mi humidificador después de
limpiarlo?
¿Puedo utilizar detergente para platos para
limpiar mi humidificador?
Vea la página 34 de su manual de usuario.
No es recomendable que utilice detergente para
platos para limpiar su humidificador, ya que es
muy difícil remover todo el detergente y puede
causar daño a su humidificador. Es importante
queNO utilice detergente si está utilizando su
lavavajillas para limpiar estas partes.
35
Page 23

PREGUNTAS FRECUENTES (Continuación)
Limpieza (Continuación)
Pregunta Respuesta
¿Puedo agregar tratamientos de agua a este
humidificador?
Operación
Pregunta Respuesta
¿En qué ajuste puedo colocar mi humidifica-
dor?
Utilicé mi humidificador toda la noche en una
habitación muy seca y la humedad casi no
cambió pero el nivel del agua disminuyó.
¿Puedo operar mi humidificador sin los filtros? No, su humidificador no puede operar adecuada-
¿Qué tan frecuente debo cambiar mis filtros
filamentosos?
¿Cómo se que mi humidificador está operando
correctamente?
No puedo ver vapor saliendo de mi humidificador.
36
Sólo debe agregar a su humidificador los tratamientos de agua que son fabricados especialmente
para humidificadores evaporativos tales como el
Cartucho de Limpieza Antimicrobiana Protect
modelo PC-1 ó PC-2. Utlizar tratamientos de agua
que no son recomendados para humidificadores
evaporativos puede dañar su humidificador. Si le
preocupa la dureza del agua le recomendamos que
utilice agua destilada en su humidificador.
Usted debe operar su humidificador en el ajuste más
alto si su habitación está muy seca. Una vez que
tenga una humedad más cómoda usted puede cambiar el nivel de salida a un ajuste más bajo.
Puede tardar varios días en aumentar el nivel de
humedad. Si está extremadamente seco, la madera,
alfombras y otros objetos en su habitación pueden
absorber la humedad antes que pueda sentir los
efectos.
mente sin los filtros. Los filtros absorben la humedad
distribuida por el canal del flujo del agua. Después
un ventilador silencioso soplará a través de los filtros
distribuyendo la humedad en el aire.
En general los filtros filamentosos pueden durar de
1 - 2 meses dependiendo de la calidad de agua y el
uso. Consulte la sección de Cambio de Filtro para
información de cómo determinar cuando es tiempo
de cambiar los filtros.
Usted notará que el agua fluye a través del canal de
flujo de agua en la parte superior del humidificador.
También notará una disminución en el nivel de agua
después de 8 horas de uso.
Su humidificador utiliza el proceso de evaporación.
Esto produce una humedad invisible ultra fina.
Observará que su nivel de agua disminuye y esto es
un indicador que su humidificador está operando correctamente.
Vea la Guía de Solución de Problemas para mayor
información.
MR
,
Page 24

PREGUNTAS FRECUENTES (Continuación)
Operación (Continuación)
Pregunta Respuesta
No hay agua circulando en el área de circulación de agua en la cubierta superior.
¿Por qué mi humidificador repentinamente
empezó a hacer un ruido fuerte?
¿Cuánta agua cabe en mi humidificador? Su humidificador puede contener hasta 1.5 Gallones
¿Cuánto tiempo funcionará mi humidificador
cuando esté lleno?
Primero asegúrese que su humidificador tenga
agua. Si es así, revise su bomba de agua para asegurarse que esté colocada correctamente en el área
de soporte. Luego revise para asegurarse que la
manguera del agua esté conectada firmemente a la
bomba y a la salida del agua. Por último, asegúrese
que nada obstruya el área del flujo del agua en la
rejilla superior o en la manguera del agua.
Si estos pasos no ayudan, por favor consulte
nuestra Guía de Solución de Problemas o contacte
nuestro departamento de servicio al consumidor al
1-800-477-0457
Revise su nivel de agua. Si su humidificador
empieza a hacer un ruido fuerte es un indicador que
necesita rellenar su humidificador.
de agua.
Su humidificador operará hasta 17 horas en el
ajuste alto y 48 horas en el ajuste bajo.
37
Page 25

SOLUCIÓN DE PROBLEMAS
1. No está fluyendo el agua
a. Revise para asegurarse que el tanque tenga agua y que esta cubra la bomba.
b. Revise la manguera del agua y asegúrese que no esté torcida. La manguera debe
conectarse completamente en la salida del agua y en la bomba.
c. Asegúrese que la bomba esté colocada correctamente en la ranura en el fondo de la
cubierta principal.
d. Apague la unidad y después vuélvala a encender para ayudar a eliminar algún aire
en el sistema.
e. Si todavía no circula el agua, saque la bomba, desármela y asegúrese que la rueda
de la bomba gire libremente y que las entradas de la bomba u otros pasajes de agua
no tengan obstrucciones.
f. Asegúrese que la rejilla esté bien colocada y pueda aceptar agua del embudo.
2. La unidad circula el agua pero no produce vapor
a. Esta unidad no produce vapor visible.
3. La unidad circula el agua pero el filtro no está humedo
a. Revise para asegurarse que los agujeros de la característica de agua no estén blo-
queados y puedan gotear agua en los filtros.
4. La bomba hace un sonido siseante
a. La bomba puede haber succionado aire. Asegúrese que haya suficiente agua en el
tanque para que cubra la bomba.
b. Después de llenar, apague la unidad por unos segundos, después enciéndala de
nuevo para eliminar el aire en el sistema.
5. La bomba tiene un zumbido
a. La bomba puede no estar colocada correctamente. Asegúrese de empujar completa-
mente la bomba en la ranura en la cubierta principal. Después de colocar la bomba
correctamente, apague la unidad por unos segundos, después vuélvala a encender.
Esto permitirá que la bomba se sincronice con el imán impulsor.
6. La unidad tiene poca salida
a. Asegúrese que los filtros estén humedos y pueda sentir circulación de aire saliendo
del filtro.
b. Asegúrese que el deflector de llenado de agua y la rejilla estén colocados correcta-
mente.
c. Si ambos a y b están BIEN, la humedad relativa de su hogar debe estar alta. La
unidad regulará automáticamente la salida basada en la cantidad de humedad que
esté en el aire.
7. La unidad hace un sonido de goteo o escurrimiento
a. Asegúrese que el embudo de llenado esté correctamente armado y montado en el
tanque detrás de la ventana del agua.
b. Asegúrese que la rejilla esté colocada correctamente y que el embudo de llenado
pueda aceptar agua.
c. Asegúrese que la malla que soporta al filtro no esté dañada.
38
Page 26

3 AÑOS DE GARANTÍA LIMITADA
Usted debe leer primero todas las intrucciones antes de intentar utilizar este producto.
A. La presente garantía limitada de 5 años
cubre la reparación o remplazo del producto
si éste presenta un defecto de fábrica o de
mano de obra. Esta garantía excluye todo
daño resultante del uso comercial, abusivo
o inadecuado del producto, o de daños
asociados. De igual manera no aplica al filtro
o Cartucho Antimicrobiano ProtectMR. Las
defectos resultantes del desgaste normal no
se consideran defectos de fábrica en virtud
de la presente garantía.
KAZ QUEDA EXENTA DE TODA
RESPONSABILIDAD POR LOS DAÑOS FORTUITOS O INDIRECTOS DE
CUALQUIER CLASE. CUALQUIER
GARANTÍA IMPLÍCITA DE CALIDAD
COMERCIAL O DE CONVENIENCIA
RELACIONADA CON ESTE PRODUCTO,
TENDRÁ LA MISMA VIGENCIA QUE LA
PRESENTE GARANTÍA.
En ciertos lugares, no se permite la exclusión
o limitación de daños fortuitos o indirectos,
ni los límites de duración aplicables a una
garantía implícita. Por consiguiente, es
posible que estas limitaciones o exclusiones
no se apliquen en su caso. Esta garantía
le otorga derechos legales específicos y
usted puede que tenga otros, que varían de
un lugar a otro. La presente garantía sólo
es válida para el comprador original del
producto a partir de la fecha de compra.
B. A su juicio, Kaz reparará o reemplazará este
producto si se considera que sus materiales
o su mano de obra son defectuosos dentro
del período de garantía.
C. Esta garantía no cubre daños ocasionados
por tentativas no autorizadas de reparar
el producto o del uso del mismo en
contravención de las indicaciones que
aparecen en el manual de instrucciones.
D. Devuelva el producto defectuoso, con flete
pagado y prueba de compra, junto con
cheque o giro postal por $10.00 US/$15.50
CAN para cubrir gastos de administración,
empaque de regreso y envío. Por favor
incluya su nombre, dirección y un número de
teléfono para comunicarse durante el día.
Los gastos de envío deben pagarse por
adelentado. Le sugerimos que pida confir-
mación del seguimiento o de la entrega. Mande
el envío a:
En los Estados Unidos:
Kaz, Incorporated
Attn: Returns Department
4755 Southpoint Drive
Memphis, TN 38118
USA
En Canada:
Kaz Canada, Inc.
Attn: Returns Department
510 Bronte Street South
Milton, ON L9T 2X6
Canada
Por favor visite www.kaz.com y registre su producto en el Centro de Atención al Cliente y reciba
información y actualizaciones de su productos y
nuevas ofertas promocionales.
©2010 Kaz, Incorporated.
Todos los derechos reservados
P/N: 31IMM750190
39
Page 27

40
 Loading...