

Page 1
OWNER’S MANUAL
The Honeywell trademark is used by Kaz, Inc. under license from Honeywell International Inc.
Honeywell International Inc. makes no representation or warranties with respect to this product.
Console Humidifiers with Air Washing Technology
MODELS:
HCM-6009
HCM-6009-TGT
HCM-6010-CST
HCM-6011
HCM-6012
HCM-6012I-CST
HCM-6013
HCM-6011WW
Page 2

2
When using electrical appliances, basic precautions should always be
followed to reduce the risk of fire, electric shock, and injury to persons,
including the following:
1. Always place this humidifier on a firm, flat and level surface. This humidifier may not work
properly on an uneven surface.
2. Place this humidifier in an area where it is not accessible to children.
3. Do not place the humidifier near any heat sources such as stoves, radiators, and heaters.
4. Do not use the humidifier outdoors.
5. Before using the humidifier, check the power cord for any signs of damage. If the cord is
found to be damaged, DO NOT USE and return the humidifier to the manufacturer under
the warranty agreement for repair.
6. This appliance has a polarized plug (one blade is wider than the other). To reduce the risk
of shock, this plug is intended to fit only one way in a polarized outlet. If the plug does
not fit securely in the outlet, reverse the plug. If it still does not fit, contact a qualified
electrician. DO NOT attempt to defeat this safety feature.
7. To disconnect the humidifier, first turn controls to the OFF position, then grip the plug and
pull it from the wall outlet. Never pull by the cord.
8. A loose fit between the AC outlet (receptacle) and plug may cause overheating and a
distortion of the plug. Contact a qualified electrician to replace loose or worn outlet.
9. The humidifier should always be unplugged and emptied when not in operation or while
being serviced or cleaned.
10. Never tilt or attempt to move the humidifier while it is operating or filled with water.
UNPLUG the humidifier before moving.
11. This humidifier requires regular cleaning. Refer to the CLEANING instructions
provided. Never clean the humidifier in any manner other than as instructed in this
manual.
12. Do not direct moisture flow directly at individuals, walls or furniture.
13. When a humidifier is used in a closed room or small rooms, check periodically for proper
ventilation, as excessive humidity can cause condensation stains on walls.
14. Turn the humidifier OFF if you notice moisture on the inside of your windows. For proper
humidity reading use a hygrometer, which is available in many hardware and department
stores, or by ordering one from the manufacturer.
15. This product is intended for residential use only.
IMPORTANT SAFETY INSTRUCTIONS
READ AND SAVE THESE SAFETY INSTRUCTIONS BEFORE USING THIS
HUMIDIFIER
Page 3

3
Introduction
H O W DOES I T W O R K ?
COOL MOISTURE SYSTEM:
Dry air is pulled through the humidifier and the QuietCare™ fan blows out invisible, moisture-balanced
air. Unwanted minerals and bacteria from the water are trapped inside the Filter. When the unit is running
you will not see or feel a “mist”. You will know your humidifier is putting moisture into the air as you
watch the water level in your tank decrease throughout the day.
AIR WASHING PRE FILTER:
The Filter in your humidifier also includes a specially formulated “pre-filter” which helps capture some
dust, dirt, pollen and other small particles that pass through the filter.
Protec™ Treated Filter: Your filter has been treated with Protec™ which helps prevent surface growth and
migration of mold, mildew, algae, fungus and odor-causing bacteria in the filter for its life – approximately
1-3 months**. Keep in mind, depending on your water quality, mineral deposits can still clog or discolor
the filter, affecting its life and that of the humidifier.
**The agent contained in this product is intended to prolong filter life only by inhibiting the growth of unsightly mold, mildew and algae, as well as controlling
odor from odor-causing bacteria. The filter does not protect users or others against bacteria, viruses, germs or other disease-causing organisms. Always follow
the humidifier manufacturer’s instructions regarding cleaning, maintenance and servicing of your humidifier.
Page 4
4
Set-Up
NOTE: We recommend that the humidifier be disinfected prior to first use.
Please see CLEANING INSTRUCTIONS.
Select a firm, level, flat location - at least six inches (15 cm) from any wall for proper air flow. Place the
humidifier on a water-resistant surface, as water can damage furniture and some flooring.
Kaz will not accept responsibility for property damage caused by water spillage.
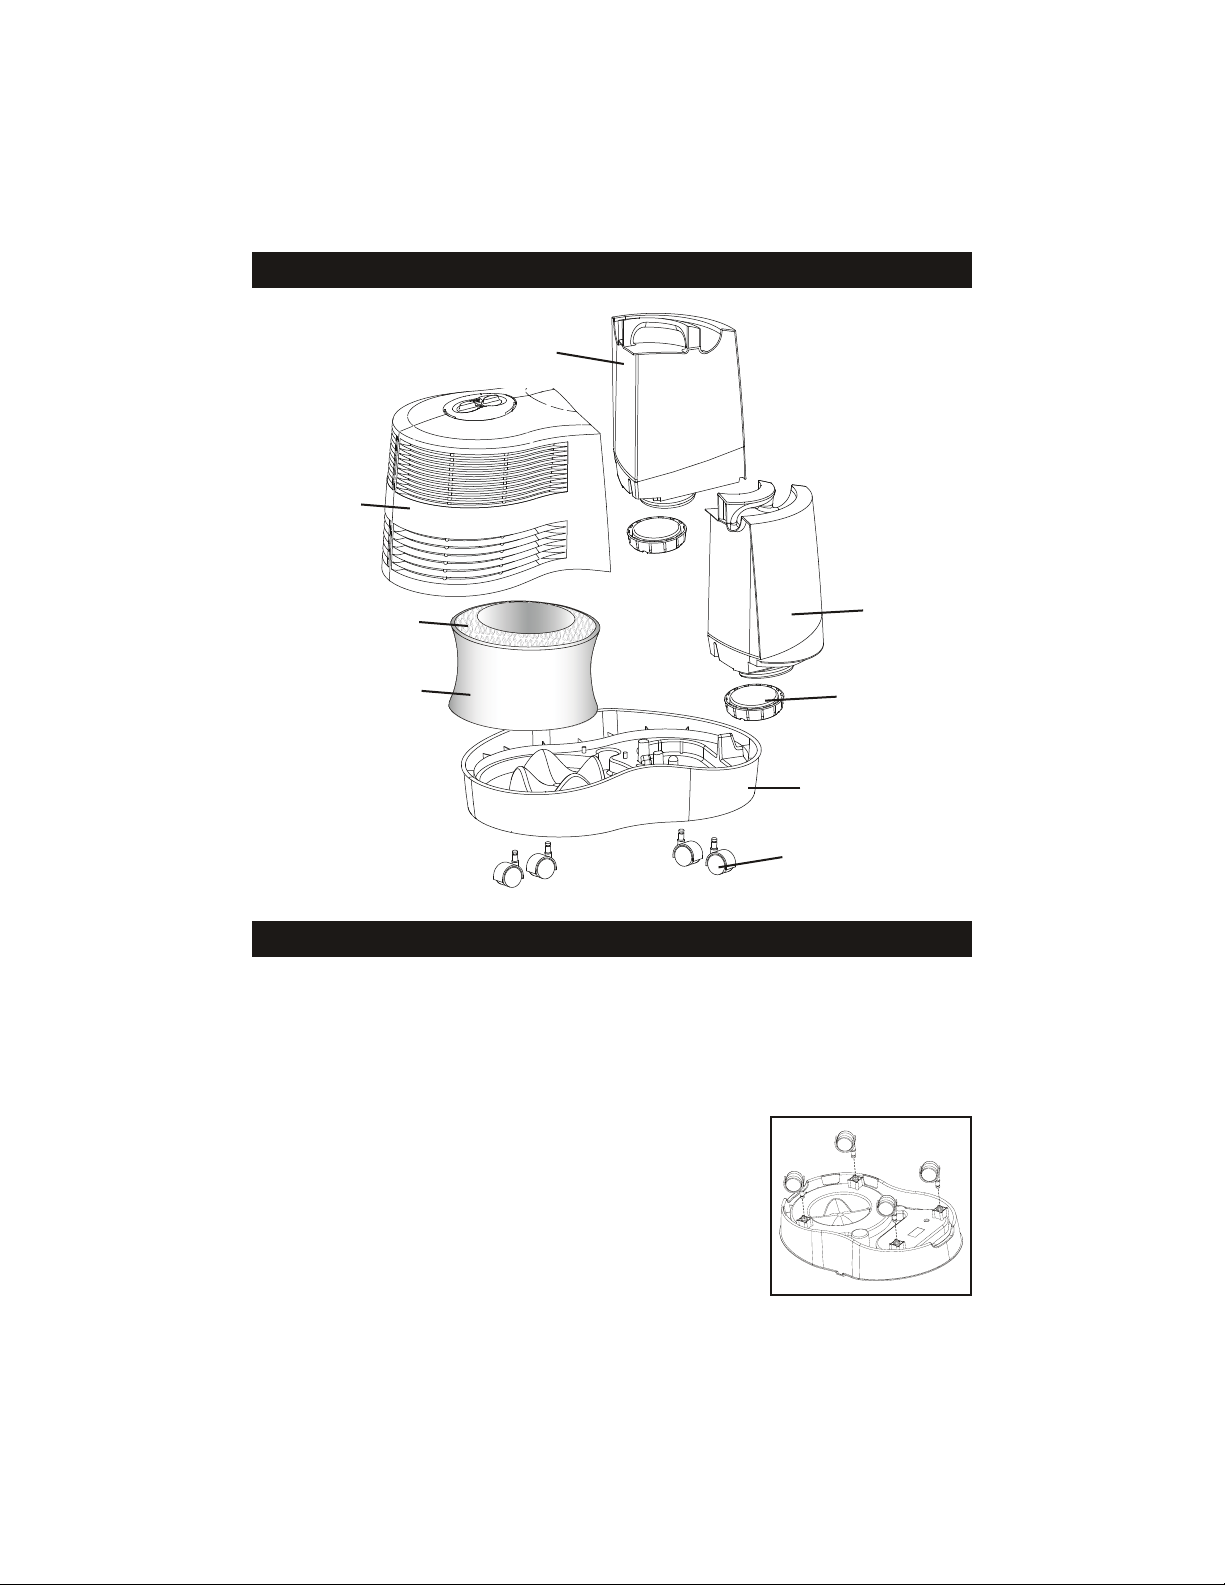
Install Casters:
• Make sure the humidifier is unplugged and in the OFF position.
• Turn the Base of the humidifier upside down.
• Push the wheels into each wheel base pin until you hear them snap into
position (Fig.1).
NOTE: Save your box for end of season storage (See End of Season Care
and Storage Section).
Water Tank
Water Tank
Base
Casters
Pre-Filter
Your Humidifier
Fig. 1
Tank Cap
Motor
Housing
Filter
Page 5
5
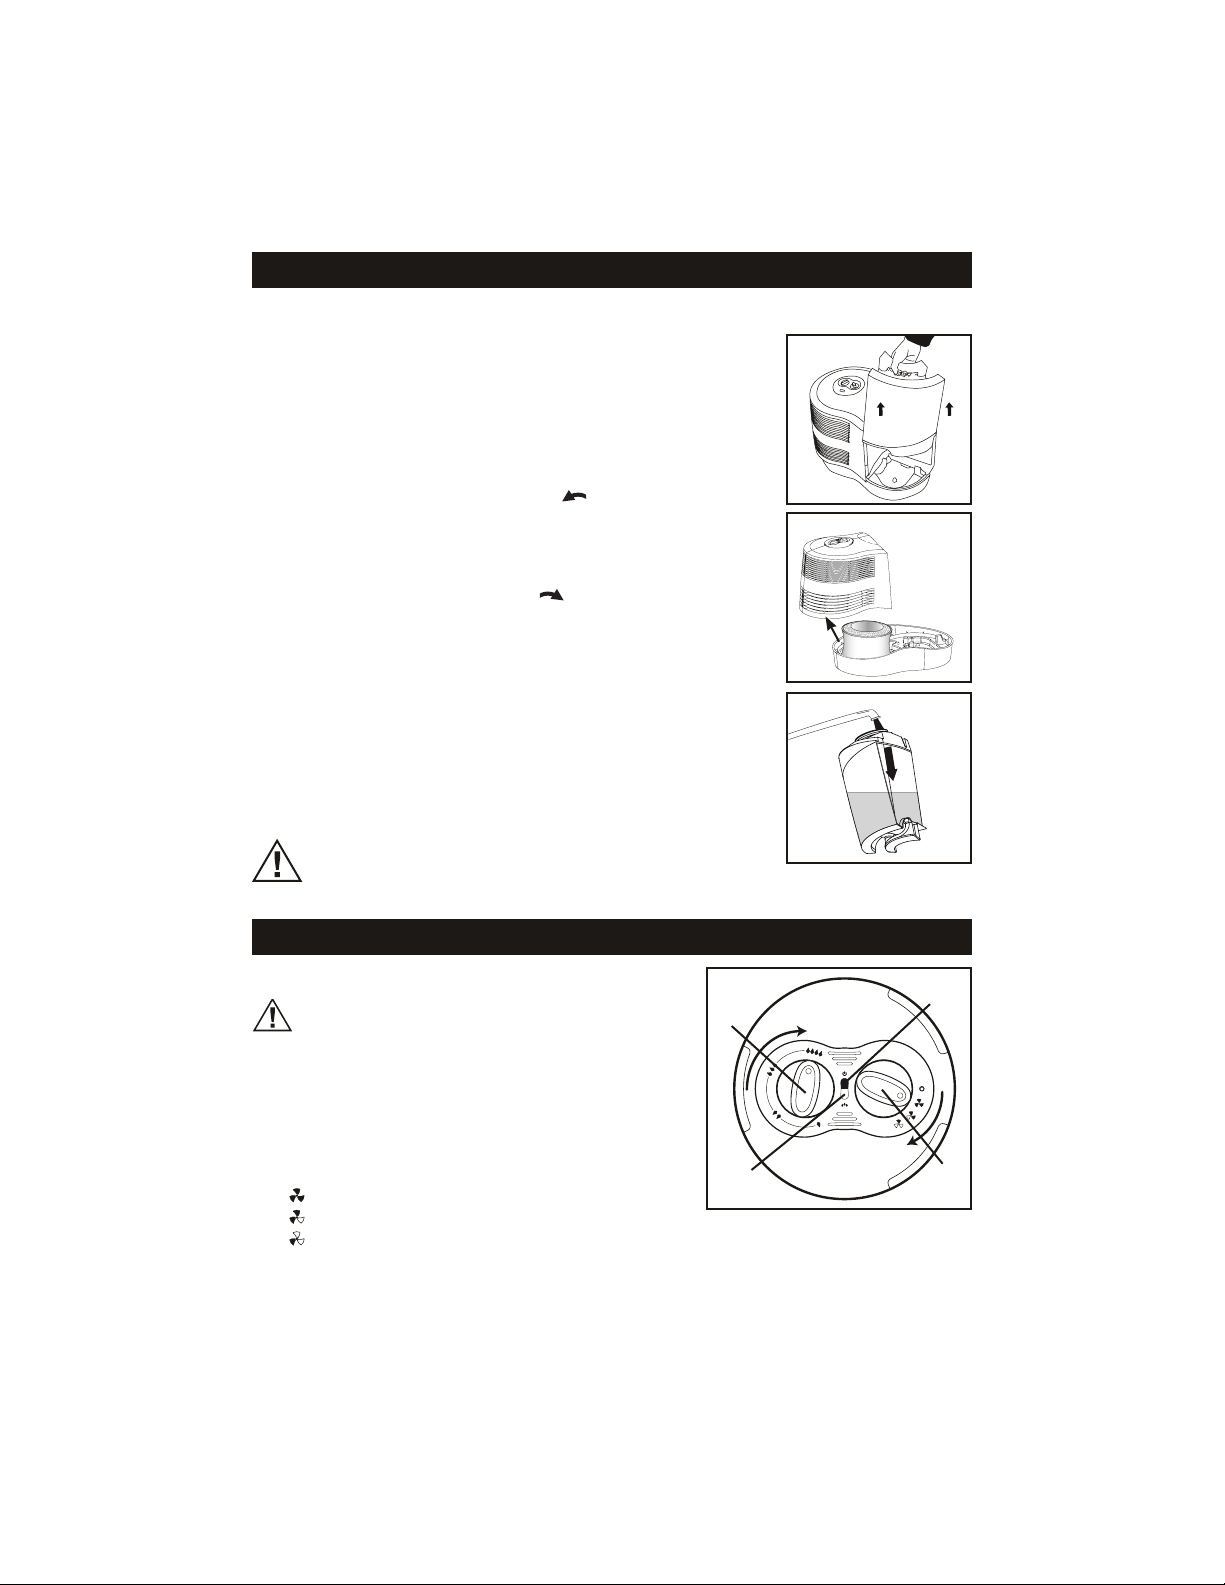
• Remove the Water Tanks by grasping the handle and pulling straight up. Set aside (Fig. 2).
• Lift up on the Motor Housing to remove and set aside (Fig. 3). Remove the
Filter from the Base before filling the unit with water. Soak the Filter in a
sink full of cool water to help reduce mineral buildup and place back in the
humidifier while wet. DO NOT SQUEEZE OR WRING OUT THE FILTER. To
help extend the life of your Filter, repeat this step each time you fill your
humidifier.
• Turn the Water Tank upside down so that the Fill Cap is facing up; unscrew
the Fill Cap by turning it counter-clockwise and set aside.
• Fill each Water Tank with COOL tap water (Fig. 4). Distilled water is not
necessary as the water is filtered by the Filter. DO NOT USE HOT WATER. Doing
so may damage the humidifier.
• Replace the Fill Cap by turning it clockwise . DO NOT OVER-TIGHTEN.
Turn the Water Tank right-side up.
NOTE: When carrying the filled Water Tank please use the handle and place
your other hand under the tank for additional support. Carry only one at a time.
• Place the Motor Housing back into the Base.
• Position each Water Tank in the humidifier and push into place. Some water will
empty into the Base. Note: The tanks do not drain simultaneously, one tank
will drain before the other.
• Once the filled tanks have been positioned, do not attempt to move the humidifier.
If it has to be moved, unplug the humidifier and remove the Water Tanks first.
CAUTION: DO NOT POUR WATER INTO THE GRILLE IN THE FRONT
OF THE HUMIDIFIER. DOING SO MAY DAMAGE THE HUMIDIFIER OR
CAUSE PERSONAL INJURY.
Manual Control Operation (Models HCM-6009, HCM-6011, HCM-6011WW)
P OW E R
CAUTION: DO NOT PLUG IN THE HUMIDIFIER WITH WET
HANDS AS AN ELECTRICAL SHOCK COULD OCCUR.
• With the power switch in the OFF position, plug
the filled humidifier into a polarized 120V outlet.
DO NOT FORCE THE POLARIZED PLUG INTO THE OUTLET; it will
only fit one way.
O UT P U T / FA N S P EE D C O NT R OL
Set the fan speed to the desired position (Fig. 5).
HIGH: For fast humidifying
MED: For everyday moisture control
LOW: For minimum operation (ideal for nighttime use, or when silent operation is needed)
NOTE: Turn the humidifier off if the humidity level feels too moist or you notice condensation
forming on the walls.
Power Light
(Illuminated)
Fig. 5
Humidistat
Knob
Fan Speed
Knob
Desired
Humidity
Light
Fig. 4
Fig. 3
Filling
Fig. 2
Page 6
6
Manual Control Operation (Models HCM-6009, HCM-6009-TGT, HCM-6011, HCM-6011WW) (Continued)
H UM I D I ST A T
The humidistat allows you to adjust and select the humidity level
to your personal preference. Your humidifier will turn on and off
throughout the day and night to maintain the desired humidity level
you have selected.
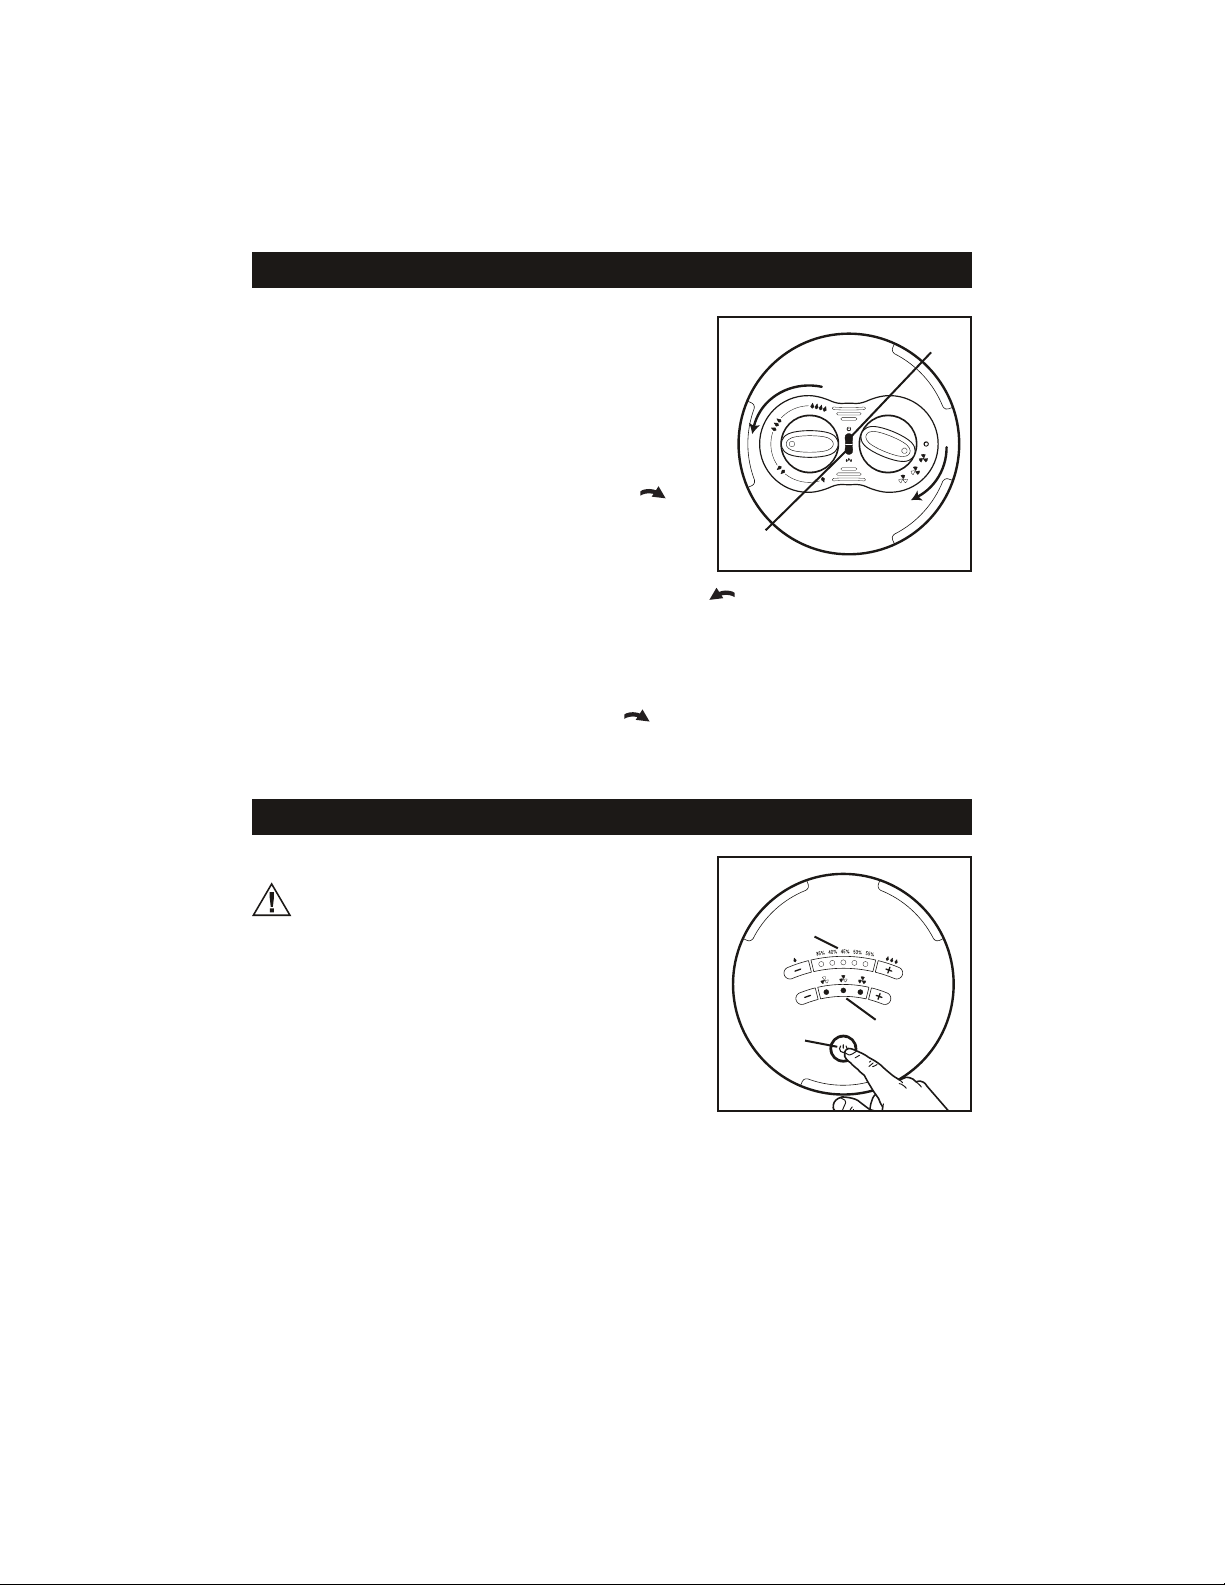
H OW T O S E T T H E H U MI D IS T AT
First, turn the humidifier on and select your output/speed level.
Set the humidistat on High by turning the knob clockwise
to the
end (Fig. 5).
• Let the humidifier run on high for a least one hour or until your
room has reached a comfortable humidity level.
• At this point, slowly turn your Humidistat knob counter-clockwise
until the humidifier shuts off and
the Desired Humidity light illuminates (Fig. 6).
• Now that your Humidistat knob is set, the humidifier will automatically turn back on when your room
drops below your comfort setting and will automatically turn off again when the setting is reached.
NOTE: If the humidifier fan will not start or restart when you select a fan speed, the Advanced Mist
™
Humidistat may be set too low. Turn the dial clockwise
to the end (Fig. 5 ). The Desired Humidity light
will turn Off when the unit is producing moisture. When the Desired Humidity light turns ON, you have
reached optimal humidity.
Fig. 6
Power Light
(Illuminated)
Desired
Humidity Light
(Illuminated)
P OW E R
CAUTION: DO NOT PLUG IN THE HUMIDIFIER WITH WET
HANDS AS AN ELECTRICAL SHOCK COULD OCCUR.
• With the power OFF, plug the filled
humidifier into a polarized 120V outlet.
DO NOT FORCE THE POLARIZED PLUG INTO THE OUTLET; it will
only fit one way.
S TE P 1 : P OW E R
• Press the Power button to start the humidifier. Your humidifier
will automatically start on High power, Continuous Mode (Fig. 7).
Fig. 7
Fan Speed
Control
Humidistat
Control
Power
Button
EasySet™ Control Operation (Model HCM-6013i)
Page 7
7
EasySet™ Control Operation (Model HCM-6013i) (Continued)
• To turn your humidifier OFF simply press the Power button again.
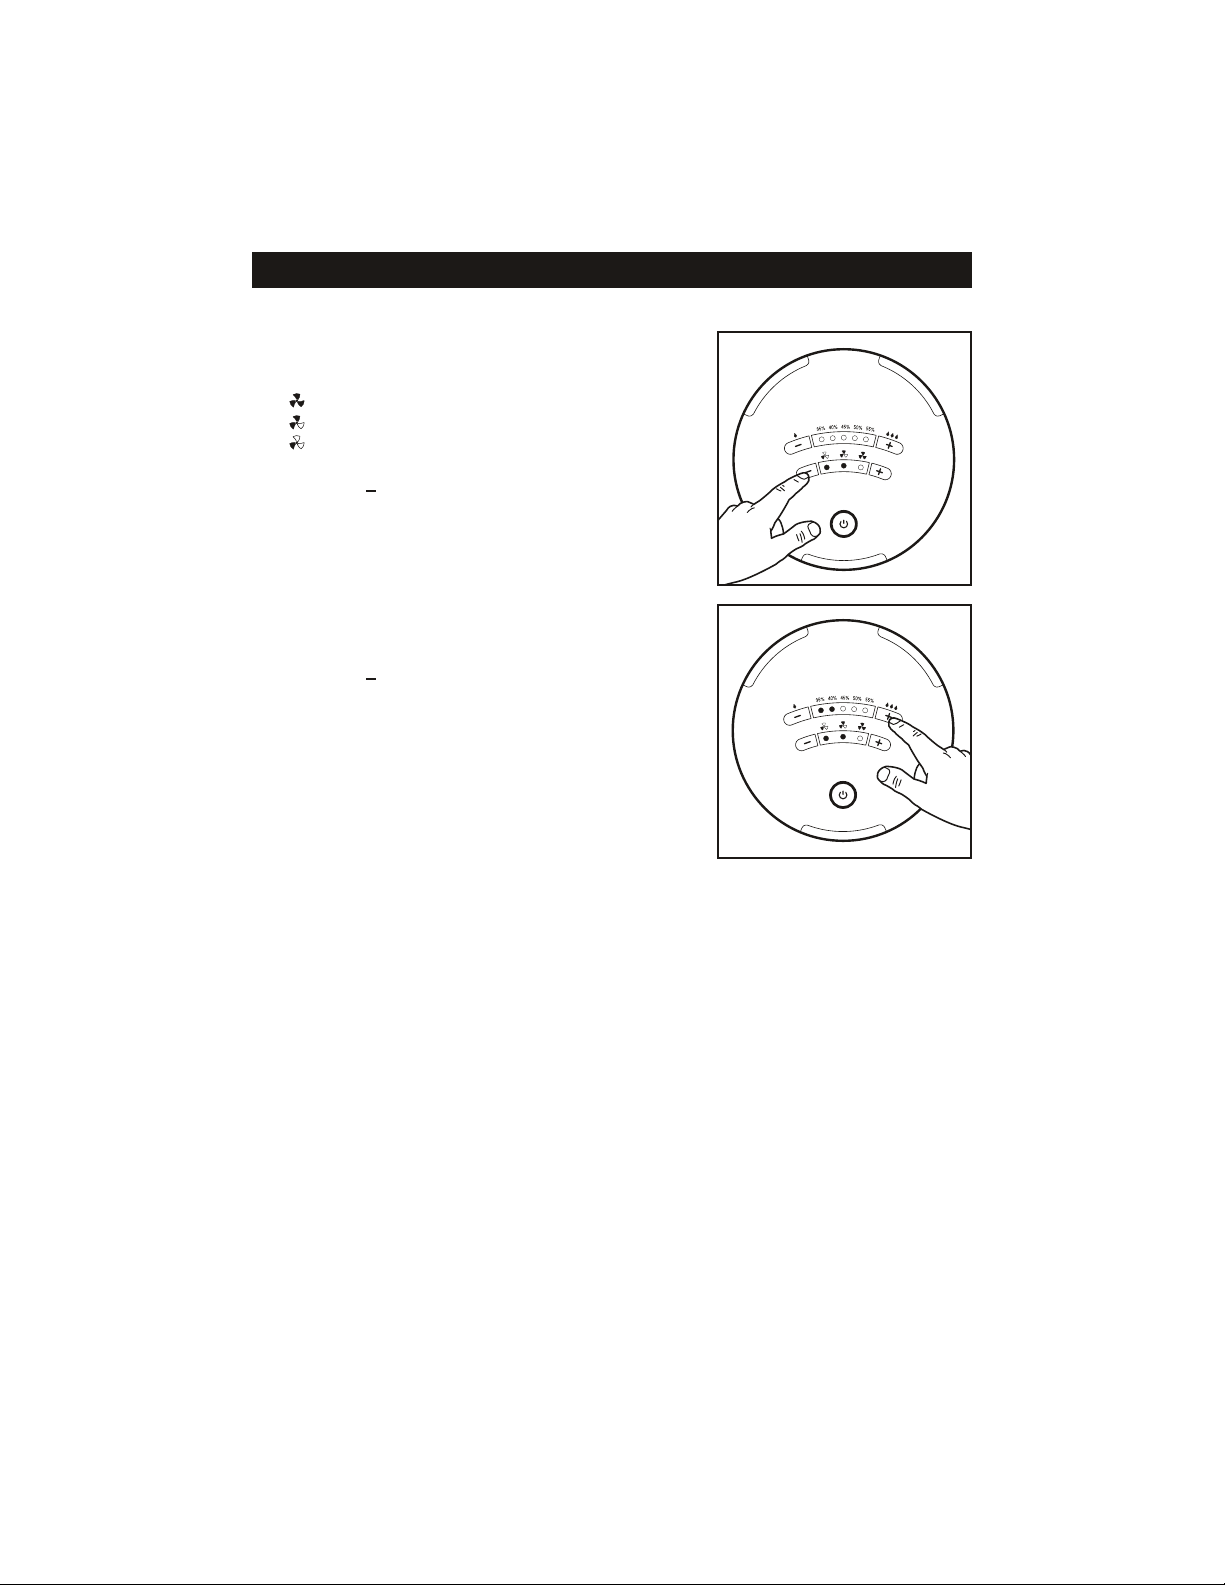
S TE P 2 : O UT P UT / F AN S P EE D C O N T RO L
Your unit has three output levels/fan speeds:
HIGH: For fast humidifying
MED: For everyday moisture control
LOW: For minimum operation (ideal for nighttime use)
• Push the up button (+) to increase output level and push the
down button (
) to decrease output level. The LED’s will
illuminate to reflect which speed you have selected (Fig. 8).
NOTE: Turn the humidifier off if the humidity level fe els too
moist or you notice condensation forming on the walls.
S TE P 3 : S ET HU M ID I TY
• Set your desired humidity anywhere between 35% and 55%.
• Push the up button (+) to increase desired humidity and push the
down button (
) to decrease desired humidity. The LED’s will
illuminate to reflect which desired humidity level you have
selected (Fig. 9).
For example: If you set your humidity at 40%, the 35% and 40%
LED’s will be illuminated.
• Once you have set your desired humidity, the unit will operate
under this setting until the unit is turned off or your selected
humidity is reached.
• When the desired room humidity has been reached the fan
will automatically shut off. (The humidity LED’s will remain
illuminated)
• The fan will turn back on when your room decreases beyond your set level.
NOTE: Your room humidity can often fluctuate. It is normal for your unit to turn itself on and off
throughout the day as it is monitoring your changing environment.
To turn your unit off and then back on and select your desired output setting (see Step 2).
Fig. 8
Fig. 9
Page 8
8
P OW E R
CAUTION: DO NOT PLUG IN THE HUMIDIFIER WITH WET
HANDS AS AN ELECTRICAL SHOCK COULD OCCUR.
• With the power OFF, plug the filled humidifier into a polarized 120V
outlet. DO NOT FORCE THE POLARIZED PLUG INTO THE OUTLET; it
will only fit one way.
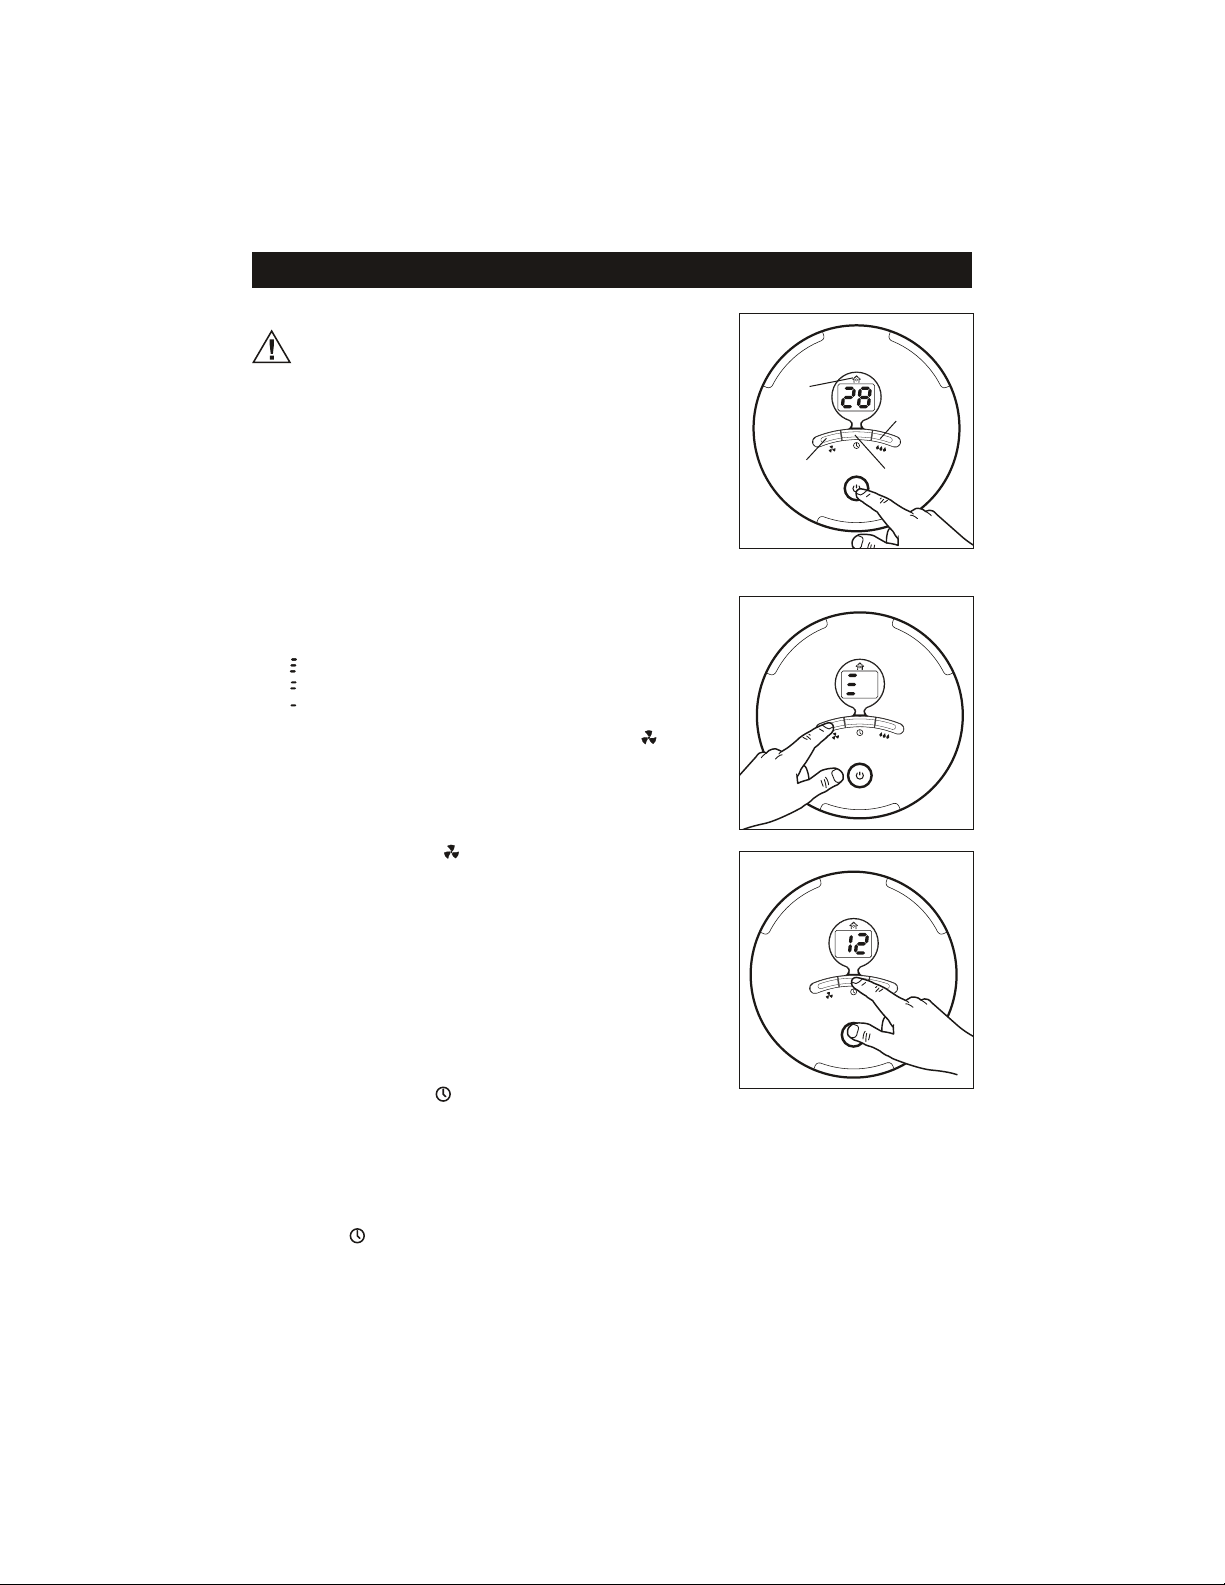
S TE P 1 : P OW E R
• Press the Power button to start the humidifier. Your humidifier will
automatically start on High power, Continuous Mode. The display
will be illuminated and will reflect the current room humidity
(Fig. 10).
• To turn your humidifier OFF simply press the Power button again.
S TE P 2 : O UT P UT / F AN S P EE D C O N T RO L
Your unit has three output levels/fan speeds:
HIGH: For fast humidifying
MED: For everyday moisture control
LOW: For minimum operation (ideal for nighttime use)
• To change your fan speed press the fan speed button (
) up or
down (Fig. 11).
• Once you have selected your desired speed the display will go back
to showing the current room humidity after 3 seconds.
NOTE: If you wish to change or check your output/speed setting simply
press the fan speed button (
) once and it will show you your setting.
If you would like to change it, continue to push the button up or down
until you have reached your desired setting. Again, after 3 seconds the
display will revert to showing the current room humidity.
NOTE: Turn the humidifier off if the humidity level fe els too moist
or you notice condensation forming on the walls.
S TE P 3 : T IM E R C ON T RO L
• You can set your timer for up to 18 hours. This function should only
be used if you desire that the humidifier be automatically shut off
after a certain period of time.
• Press the Timer button (
) up or down to set how many hours you
would like the humidifier to run (Fig. 12).
• When the display indicates your desired time, wait 3 seconds.
• After 3 seconds, your desired time is set and the display will revert back to showing the current room
humidity.
NOTE: If you wish to change your timer setting or check to see how much time is left, simply press the
Timer button (
) once and it will show you the time left. If you want to change the time remaining,
continue to push the button up or down until you have reached your desired time. Again, after 3 seconds
the display will revert to showing the current room humidity. If you set a timer but no longer wish to have
it set, turn the unit off and then repeat steps 1 and 2.
Digital EasySet™ Control Operation (Model HCM-6012 & HCM-6012-CST)
Fig. 10
Fig. 11
Fig. 12
Humidistat
Control
Fan Speed
Control
Timer
Control
Desired
Humidity
Light
Page 9

9
S TE P 4 : S ET HU M ID I TY
• You can set your desired humidity in 1% increments anywhere from 25% to 65%.
• To set your desired humidity, press the humidity button ( ) up or down (Fig. 13).
• When the display indicates your desired humidity setting wait 3 seconds.
• After 3 seconds your desired humidity is set and the display will revert back to showing the current
room humidity.
NOTE: If you wish to change your humidity setting or check to see what you set, simply press the humidity
button once and it will show you the set humidity. If you want to
change it, continue to push the button up or down until you have
reached your new desired humidity. Again, after 3 seconds the
display will revert to showing the current room humidity.
• Once you have set your humidity the unit will operate under this
setting until the unit is turned off or your selected humidity is
reached.
• When your desired room humidity has been reached the fan will
shut off and the house icon (
) on the top of your d isplay will
illuminate (Fig. 14). It will stay illuminated until your desired
humidity decreases at which time the fan will turn back on.
NOTE: Your room humidity can often fluctuate. It is normal for
your unit to turn itself on and off throughout the day as it is
monitoring your changing environment.
To go back to continuous mode, turn your unit off and then
back on and select your desired output setting (see step 2).
Digital EasySet™ Control Operation (Model HCM-6012 & HCM-6012-CST) (Continued)
Fig. 13
Fig. 14
NOTE: To ensure proper humidity in your home, you should use a
hygrometer (room humidity indictor) such as the E-10 and place across
the room from your humidifier.
(Hygrometer sold separately)
Page 10

10
Cleaning
STEP ONE:
SCALE REMOVAL
BASE
1. Fill the Base with:
• 1 cup (8 ozs.) of undiluted white vinegar
2. Let solution stand for 20 minutes.
3. With the vinegar in the Base, clean all interior
surfaces with a soft cloth or brush to help
remove scales.
4. Rinse the Base thoroughly with water to remove
scale and cleaning solution.
STEP TWO:
DISINFECTING
WATER TANK/BASE
1. Fill the Water Tank with:
• 1 teaspoon of household bleach
and
• 1 gallon of water
Pour some of this solution into the Base.
2. Let solution stand for 20 minutes.
3. Rinse with water until the smell of bleach
is gone.
NOTES:
• The use of other water treatment products and chemicals may cause deterioration of the Filter or
damage the humidifier, thereby hindering the humidifier’s effectiveness.
You should clean your humidifier regularly as needed.
Cleaning involves two steps, SCALE REMOVAL and DISINFECTING.
Be sure to perform these in the proper order to avoid harmful chemical interactions.
• First, turn off and unplug the humidifier.
• Remove the Water Tanks and Motor Housing.
• Remove the Filter from the Base.
• Empty any water from the Base.
NOTE: REMOVE FILTER BEFORE CLEANING
Failure to remove Filter during cleaning will destroy the Filter.
Page 11

11
End-of-Season Care and Storage
• Follow the CLEANING instructions when the humidifier will not be used for at least one week or more, or
at the end of the season.
• At the end of the season, remove and throw away the Filter; do not store with a used Filter.
• Dry the humidifier completely before storing. DO NOT store with water inside the Base or Water Tank.
• Pack the unit in its original carton and store in a cool, dry location.
• Before next use, remember to clean your humidifier, install a new Filter.
Consumer Relations
Prolonging the Life of the Filter and Maintaining a Clean Humidifier
NOTE: DO NOT ATTEMPT TO CLEAN THE FILTER WITH ANY CHEMICAL SOLUTIONS, DOING SO WILL
DAMAGE THE FILTER.
• It is normal for a filter to discolor from mineral build-up. This will vary depending on water quality.
• DO NOT clean the filter using any chemical solution.
• If your filter appears to be clogged by hard water or mineral deposits, soak it in a sink full of cool
water for 10 minutes. DO NOT SQUEEZE OR WRING OUT THE FILTER. Always place filter back in the
humidifier wet.
• Always purchase Honeywell Brand filters (model number Filter E/HC-14) as the fan motor of this
humidifier and the filter are designed to function efficiently as a set. Using any other filter could damage
the motor or reduce the humidifier’s performance.
• Be sure to empty water from the Water Tank and Base when not in use.
Mail questions or comments to:
Kaz, Incorporated
Consumer Relations Dept.
250 Turnpike Road
Southborough, MA 01772
Call us toll-free at: 1-800-477-0457
E-mail: consumerrelations@kaz.com
Or visit our website at: www.kaz.com
Please be sure to specify a model number.
Purchase replacement Filter model number Filter E/HC-14 and Protec
™
Cartridge part number PC-1
(1 pack) or PC-2 (2 pack)
NOTE: IF YOU EXPERIENCE A PROBLEM, PLEASE CONTACT CONSUMER RELATIONS FIRST OR SEE
YOUR WARRANTY. DO NOT RETURN THE HUMIDIFIER TO THE ORIGINAL PLACE OF PURCHASE. DO
NOT ATTEMPT TO OPEN THE MOTOR HOUSING YOURSELF, DOING SO MAY VOID YOUR WARRANTY
AND CAUSE DAMAGE TO THE PRODUCT OR PERSONAL INJURY.
Electrical Ratings
The Honeywell QuietCare™ Series models are rated at 120V, 60 Hz.
Page 12

12
PROBLEM POSSIBLE CAUSE CORRECTIVE ACTION
The unit is on (the lights are
illuminated) but I don’t see
any moisture
Cool Moisture humidifiers produce
invisible mist. You will not see the
moisture but you will feel cool air coming
from the unit.
Monitor the water level in your tank/base.
If you notice a decrease in the water tank
over a 24 hr. Period your unit is running
normally.
Unit is out of water Refill and reinstall water tank
Humidity level is set too low Reset humidity to a higher level. If you
have a manual humidistat/knob (Models
HCM-6011i/HCM-6011WW) turn the knob
clockwise to the end.
Unit is not on level surface Place the unit on a firm, flat, and level
surface
There is too much moisture inside the
unit
Turn off the power and completely dry out
the unit
Filter has not absorbed water Wait 15 minutes so the filter gets fully
absorbed or soak your filter in water. (Do
not squeeze or wring out the filter) See
filling instructions for more information.
Mineral buildup in water tray See Cleaning instructions. Regular
cleaning is recommended to keep the unit
functioning properly.
Filter needs to be replaced If your filter is discolored, clogged or torn
replace your filter (Model Filter E/HC-14).
Visit the retailer where you purchased your
unit or call 1-800-477-0457.
The unit is not running; no
lights are illuminated
Not plugged in properly Check the polarized plug to ensure it is
fully inserted in the wall
Airflow obstruction Check airflow. Are there any obstructions
preventing airflow?
Unit is off due to timer Press Power button (HCM-6012i only)
Power unit is not installed properly Reinstall the power unit
Humidity level was set but
unit does not start
Humidity level is set too low Reset humidity to a higher level. If you
have a manual humidistat/knob (Models
HCM-6011/HCM-6011WW) turn the knob
clockwise to the end.
Humidity level was set but
the unit does not shut off
Humidity level is set too high Reset humidity to a lower level.
Troubleshooting
Page 13

13
Troubleshooting (Continued)
PROBLEM POSSIBLE CAUSE CORRECTIVE ACTION
Humidity display is too high
(Models HCM-6012, HCM-
6013)
Moisture/condensation accumulated
in the humidity sensor
Turn off the unit and completely dry out the unit
Unit is overfilled with water Drain the excess water from the base and
completely dry out the unit
Filter turns brown Filter may need to be replaced If you filter is light brown or rust colored after
a short amount of time it’s probably from
mineral deposits. Soak filter in a sink full of
cool water to help break up the deposits. The
discoloration may remain but it should not
affect the humidifier’s performance. If you
notice a performance decrease or live in a hard
water area you may have to replace your filter
more regularly. Replace your filter (Model
Filter E/HC-14). Visit the retailer you purchased
your unit from or call 1-800-477-0457.
Condensation forming on
the windows and/or walls
Humidity level is set too high Reset humidity to a lower level and/or reduce
the output level.
Unit is placed too close to the wall
and/or windows
Relocate the unit
Humidifier has strange
odor or unit does not seem
to be as clean as when I
purchased it
Unit needs to be cleaned Clean your unit as directed in the Cleaning
section. Regular cleaning is recommended to
keep the unit functioning properly.
The humidifier cycles on/off The humidifier is responding to
your room humidity based on the
humidistat setting. This is normal.
Set the humidistat to a higher or lower desired
setting. If you do not want your unit to cycle
on/off periodically run your unit on “Continuous
Mode”. See operating instructions.
Water leaks from tank Rubber tank ring is missing or
improperly placed
Remove tank cap then replace or reposition the
ring. Make sure the cap spring valve operates
freely.
Tank cap not tight enough Tighten the cap
Tank cap is too tight Tank cap over tightened Lightly lubricate the cap gasket with petroleum
jelly to ease opening.
Page 14

14
You should first read all instructions before
attempting to use this product.
A. This 3 year limited warranty applies to repair or
replacement of product found to be defective
in material or workmanship. This warranty
does not apply to damage resulting from
commercial, abusive, unreasonable use or
supplemental damage. Defects that are the
result of normal wear and tear will not be
considered manufacturing defects under this
warranty.
KAZ IS NOT LIABLE FOR INCIDENTAL
OR CONSEQUENTIAL DAMAGES OF ANY
NATURE. ANY IMPLIED WARRANTY OF
MERCHANTABILITY OR FITNESS FOR A
PARTICULAR PURPOSE ON THIS PRODUCT IS
LIMITED IN DURATION TO THE DURATION OF
THIS WARRANTY.
Some jurisdictions do not allow the exclusion
or limitation of incidental or consequential
damages or limitations on how long an implied
warranty lasts, so the above limitations
or exclusions may not apply to you. This
warranty gives you specific legal rights, and
you also may have other rights which vary
from jurisdiction to jurisdiction. This warranty
applies only to the original purchaser of this
product from the original date of purchase.
B. At its option, Kaz will repair or replace this
product if it is found to be defective in material
or workmanship.
C. This warranty does not cover damage resulting
from any unauthorized attempts to repair
or from any use not in accordance with the
instruction manual.
D. Return defective product to Kaz, Incorporated
with a brief description of the problem. Include
proof of purchase and a $10 US/$15.50 CAN
check or money order for handling, return
packing and shipping charges. Please include
your name, address and a daytime phone
number.
You must prepay shipping charges.
We suggest having tracking or delivery
confirmation. Send to:
In U.S.A.:
Kaz, Incorporated
Attn: Returns Department
4755 Southpoint Drive
Memphis, TN 38118
USA
In Canada:
Kaz Canada, Inc.
Attn: Returns Department
510 Bronte Street South
Milton, ON L9T 2X6
Canada
Please go to www.kaz.com and register your
product under the Customer Care Center and
receive product information updates and new
promotional offers.
3 Year Limited Warranty
Page 15

31
MANUAL DE UTILIZACIÓN
La marca registrada Honeywell es utilizada por Kaz, Inc. bajo licencia de Honeywell International Inc. Honeywell
International Inc. no hace representaciones o garantías con respecto a este producto.
Humidificadores tipo consola con tecnología de purificación de aire
MODELOS :
HCM-6009
HCM-6009-TGT
HCM-6010-CST
HCM-6011i
HCM-6012i
HCM-6012i-CST
HCM-6013i
HCM-6011WW
Page 16

32
El uso de aparatos eléctricos requiere las siguientes precauciones elementales
para minimizar los riesgos de incendio, choque eléctrico o heridas:
1. Coloque el humidificador sobre una superficie firme, plana y nivelada, pues puede que no
funcione correctamente sobre una superficie desigual.
2. Coloque el humidificador fuera del alcance de los niños.
3. No ponga el humidificador cerca de ninguna fuente de calor como estufas, radiadores o
aparatos de calefacción.
4. No use el humidificador en el exterior.
5. Antes de usar el humidificador, compruebe que el cable de alimentación no esté dañado. En
caso contrario, NO USE EL APARATO, devuélvalo al fabricante para que lo repare, de acuerdo
con la garantía.
6. Este aparato viene con un enchufe polarizado (una patilla más ancha que otra). Para minimizar
el riesgo de choque eléctrico, sólo hay una forma de introducir el enchufe en la toma de
corriente polarizada. Si el enchufe no entra completamente, gírelo. Si aún así no logra introducir
el enchufe en la toma, llame a un electricista. El enchufe polarizado es un dispositivo de
seguridad, NO LO EVITE.
7. Para desenchufar el aparato, apague los botones y saque el enchufe de la toma de corriente.
Nunca desenchufe el aparato tirando del cable de alimentación.
8. Una conexión suelta entre la salida de corriente alterna y el enchufe puede provocar
recalentamiento y deformación del enchufe. Pida a un electricista que cambie las tomas de
corriente defectuosas o sueltas.
9. Apague y vacíe el humidificador siempre que no vaya a usarlo y para limpiarlo o efectuar su
mantenimiento.
10. No incline ni desplace el humidificador mientras esté funcionando o esté lleno de agua.
DESENCHUFE el humidificador antes de moverlo.
11. Su humidificador requiere una limpieza asidua. Consulte las instrucciones de LIMPIEZA
adjuntas. No limpie el humidificador de ninguna otra forma que no sea la indicada en el
presente manual.
12. Nunca oriente el vapor directamente hacia personas, paredes o muebles.
13. Si usa el humidificador en un espacio cerrado o en una habitación pequeña, compruebe
periódicamente que haya la adecuada aireación pues demasiada humedad provocará manchas
de condensación en las paredes.
14. Apague el humidificador si se forma condensación en el interior de las ventanas. Para obtener
el nivel de humedad exacto, use un higrómetro que puede conseguir en una ferretería o en un
gran almacén. También puede hacer un pedido al fabricante.
IMPORTANTES INSTRUCCIONES
DE SEGURIDAD
LEA Y CONSERVE LAS SIGUIENTES INSTRUCCIONES DE SEGURIDAD
ANTES DE USAR EL HUMIDIFICADOR:
Page 17

33
Introducción
¿ C Ó M O FUNCIONA E L H U M I D I F I C A D O R ?
SISTEMA DE VAPOR FRÍO
:
El humidificador aspira el aire seco y el ventilador QuietCareMC dispersa en la habitación aire invisible y de
humedad equilibrada. Los minerales y bacterias no deseados del agua quedan retenidos en el filtro. El aparato
no produce “bruma” que pueda verse ni olerse. Sabemos que el humidificador está dispersando humedad en el
aire al ver bajar el nivel de agua del depósito en el transcurso del día.
PREFILTRO DE PURIFICACIÓN DE AIR
El filtro del humidificador viene con un prefiltro especialmente diseñado para retener parte del polvo, suciedad,
polen y otras pequeñas partículas.
Filtro tratado con Protec
MC
: El filtro viene tratado con ProtecMC, un producto que impide la proliferación y la
migración de moho, algas, hongos y bacterias causantes de olores, sobre el filtro, durante toda su duración,
aproximadamente entre 1 y 3 meses**. No olvide que la calidad del agua influirá en la sedimentación de
minerales, que pueden obstruir e incluso descolorir el filtro, influyendo en la duración de éste y en la de su
humidificador.
**El agente del filtro está diseñado para prolongar la duración del filtro únicamente impidiendo el desarrollo de moho y algas y disminuyendo los olores causados por las
bacterias. El filtro no protege al usuario de las bacterias, virus, gérmenes ni demás agentes patógenos. Siga siempre las instrucciones del fabricante del humidificador referentes
a la limpieza, mantenimiento y reparación del humidificador.
Page 18

34
Instalación
NOTA: Le recomendamos desinfectar el humidificador antes de usarlo por primera vez.
Consulte las instrucciones de LIMPIEZA.
Coloque el humidificador sobre una superficie firme, plana y nivelada, a al menos 15 cm (6 pulgadas) de las
paredes, para obtener una circulación de aire adecuada (Fig. 1). Coloque el humidificador sobre una superficie
resistente al agua, pues el agua puede dañar los muebles y ciertos tipos de piso.
Kaz no se hace responsable de los daños originados por derrames de agua.
Instalación de las ruedas :
• Compruebe que el humidificador está apagado (OFF) y desenchufado.
• Vuelque la base del humidificador.
• Inserte cada rueda en su correspondiente varilla de la base hasta que
encajen (Fig. 1).
NOTA: Conserve el embalaje para guardar el humidificador al final de
la temporada (véase la sección Limpieza al final de la temporada y
almacenamiento).
Depósito de agua
Base
Depósito
de agua
Ruedas
Prefiltro
Partes del humidificador
Fig. 1
Tapa del
depósito
Cajetín
del motor
Filtro
Page 19

35
• Saque el depósito sujetando el asa y tirando hacia arriba, y colóquelo a un lado. (Fig. 2).
• Levante el cajetín del motor. Colóquelo a un lado (Fig. 3). Antes de llenar el aparato
con agua, saque el filtro de la base y déjelo en remojo en un fregadero lleno de
agua fría, para ayudar a reducir la acumulación de minerales. Vuelva a colocarlo en
la base aún mojado. NO RETUERZA NI ESTRUJE EL FILTRO. Para que su filtro dure
más, repita esta operación cada vez que llene su humidificador.
• Voltee el depósito de forma que la tapa de llenado quede mirando hacia arriba.
Desenrosque la tapa de llenado girándola en dirección opuesta a las agujas del reloj
y déjela a un lado.
• Llene cada depósito con agua fría del grifo (Fig. 4). No es necesario utilizar agua
destilada ya que el agua se filtra a través del filtro. NO USE AGUA CALIENTE,
podría dañar el humidificador.
• Vuelva a colocar la tapa de llenado girándola en la dirección de las agujas del
reloj
. NO APRIETE DEMASIADO. Vuelva a invertir el depósito para colocarlo en
la posición correcta.
NOTA: cuando mueva el depósito lleno de agua, sírvase del asa con una mano y
coloque la otra bajo el depósito para sostenerlo mejor. Transporte los depósitos
uno a uno.
• Vuelva a colocar el cajetín del motor sobre la base.
• Coloque cada depósito en el humidificador y empuje para encajarlos en el
aparato. Caerá algo de agua en la base. Nota: los depósitos no se vacían
simultáneamente, uno se vaciará antes que el otro.
• Una vez colocados los depósitos llenos en el humidificador, no debe moverlo.
Si necesita desplazar el humidificador, desenchúfelo y retire los depósitos
previamente.
CUIDADO: NO VIERTA EL AGUA POR LA REJILLA FRONTAL DEL
HUMIDIFICADOR, PODRÍA DAÑARLO O DAÑARSE.
Fig. 4
Fig. 3
LLENADO
Fig. 2
Funcionamiento manual (Modelos HCM-6009, HCM-6011i, HCM-6011WW)
P UE S T A E N MA R CH A
CUIDADO: NO ENCHUFE EL HUMIDIFICADOR CON LAS MANOS MOJADAS,
PUEDE RECIBIR UN CHOQUE ELÉCTRICO.
• Apague el interruptor de alimentación y enchufe el humidificador lleno de agua en una toma de corriente polarizada
de 120 V. NO FUERCE EL ENCHUFE POLARIZADO PARA METERLO EN LA TOMA DE CORRIENTE. El enchufe sólo
entra de una sola manera en la toma.
C ON T R O L D E L A H UM E DA D Y LA VE L OC I DA D D E L V EN T IL A DO R
Ajuste la velocidad del ventilador en la posición deseada (Fig. 5).
MÁXIMO: para conseguir rápidamente la humedad deseada.
NORMAL: para el funcionamiento diario.
MÍNIMO: para un funcionamiento más lento (ideal durante la noche o cuando desee un
funcionamiento silencioso).
Page 20

36
Funcionamiento manual (Modelos HCM-6009, HCM-6009-TGT, HCM-6011i, HCM-6011WW) (Continuación)
Modo continuo: si desea que el humidificador funcione
ininterrumpidamente, ajuste la velocidad del ventilador.
(No ajuste el control de humedad.)
NOTA: apague el humidificador si hay demasiada humedad o si se
forma condensación en las paredes.
C ON T R O L D E H UM E DA D AD V AN C E D M I ST
M C
El control de humedad Advanced MistMC le permite obtener el grado de
humedad que desee. El humidificador se pondrá en marcha y se parará
día y noche para mantener el grado de humedad deseado.
A JU S T E D E L R EG U LA D OR DE H U M ED A D
Ponga en marcha el humidificador y ajuste el nivel de humedad y la velocidad que desee. Seguidamente, ajuste el
control de humedad Advanced Mist
MC
al máximo girando el botón en el sentido de las agujas del reloj
(Fig. 5).
• Deje el humidificador funcionando al máximo durante una hora como mínimo o hasta que obtenga un grado de
humedad confortable en la habitación.
• Seguidamente, gire lentamente el control de humedad en el sentido
contrario a las agujas del reloj
hasta que el humidificador se detenga
y se encienda la luz del grado de humedad deseado (Fig. 6).
• o Su control de humedad ya está ajustado. El humidificador volverá a
ponerse en marcha automáticamente cuando el grado de humedad de
la habitación sea inferior al ajustado y se apagará automáticamente
cuando obtenga dicho nivel.
NOTA: Si el ventilador del humidificador no se pone (o no vuelve a ponerse)
en marcha una vez seleccionada la velocidad, puede que haya ajustado el
control de humedad Advanced Mist
MC
demasiado bajo. Gire el botón al
máximo en el sentido de las agujas del reloj
(Fig. 5). La luz del grado de
humedad se apagará cuando el humidificador esté funcionando. Cuando la
luz del grado de humedad deseado se prenda, significa que ha obtenido el
grado de humedad deseado.
I ON I Z A DO R (Serie HCM-6011i y HCM-6011WW únicamente)
El ionizador contribuye a refrescar el aire.
• Para poner en marcha el ionizador, pulse una vez el botón correspondiente: la luz se prenderá. Nota: para que el
ionizador funcione, el humidificador debe estar accionado.
• Para detener el ionizador, basta con volver a pulsar el botón correspondiente: la luz se apagará.
NOTA el ionizador se detendrá automáticamente cuando obtenga el grado de humedad seleccionado (la luz del
grado de humedad deseado se prenderá. Véase Fig. 6). El ionizador volverá a ponerse en marcha a la vez que el
humidificador.
Fig. 6
Luz de
alimentación
(prendida)
Luz del grado
de humedad
deseado
(prendida)
Botón del
ionizador
Luz de
alimentación
(prendida)
Fig. 5
Control de
humedad
Botón de
velocidad del
ventilador
Luz del
grado de
humedad
deseado
Botón del
ionizador
Page 21

37
Funcionamiento de los mandos EasySetMC (Modele HCM-6013i)
P UE S T A E N MA R CH A
ATENCIÓN: NO ENCHUFE EL HUMIDIFICADOR CON LAS MANOS
MOJADAS, PUEDE RECIBIR UN CHOQUE ELÉCTRICO.
• Apague el interruptor de alimentación (posición OFF) del humidificador y
enchúfelo lleno de agua en una toma de corriente polarizada de 120 V.
NO FUERCE EL ENCHUFE POLARIZADO PARA METERLO EN LA TOMA DE
CORRIENTE. El enchufe sólo entra de una sola manera en la toma.
E TA P A 1 : PU E ST A E N MA R CH A
• Prenda el humidificador (interruptor en posición ON). Su humidificador se
pondrá en marcha automáticamente en modo continuo, a máxima potencia
(Fig. 7).
• Para apagar el humidificador, basta con volver a pulsar el interruptor (posición OFF).
E TA P A 2 : AJ U ST E D E LA PR O DU C CI Ó N D E
H UM E D A D Y DE LA V E L OC I DA D DE L
V EN T I L AD O R
Su humidificador tiene 3 ajustes del nivel de producción de humedad y
de velocidad del ventilador:
MÁXIMO: para conseguir rápidamente el grado de humedad
deseado.
NORMAL: para el funcionamiento diario.
MÍNIMO: para un funcionamiento más lento (ideal durante la noche).
• Pulse el botón (+) para aumentar la producción de humedad y el botón
( )
para disminuirla. Los LED (diodos fotoemisores) se prenderán para indicar
la velocidad seleccionada (Fig. 8).
Modo continuo: Si desea que el humidificador funcione ininterrumpidamente, ajuste la velocidad del
ventilador. (No ajuste el control de humedad). El aparato funcionará a la velocidad seleccionada hasta que lo
apague o se vacíe.
NOTA: Apague el humidificador si hay demasiada humedad o si se forma
condensación en las paredes.
E TA P A 3 : AJ U ST E D E L N IV E L D E H UM E D A D
• Ajuste el nivel de humedad que desee entre 35 % y 55 %.
• Pulse el botón (+) para aumentar el nivel de humedad y el botón
( )
para
disminuirlo. Los LED (diodos fotoemisores) se prenderán para indicar el
nivel de humedad seleccionado (Fig. 9).
Por ejemplo: Si ha seleccionado el nivel de humedad a 40 %, los LED 35
% y 40 % se prenderán.
• Una vez ajustado el nivel de humedad deseado, el humidificador funcionará
según dicho ajuste hasta que lo apague o alcance el nivel de humedad seleccionado.
• Una vez alcanzado el nivel de humedad deseado en la habitación, el aparato se detendrá automáticamente. (Los
LED del nivel de humedad permanecerán prendidos.)
• El humidificador volverá a ponerse en marcha cada vez que el nivel de humedad de la habitación sea más bajo que
el seleccionado.
Fig. 8
Fig. 9
Fig. 7
Control de
humedad
Botón de
velocidad del
ventilador
Bouton
marchearrêt
Page 22

38
NOTA : el nivel de humedad de una habitación varía constantemente. Por tanto, es normal que el aparato se
ponga en marcha y se detenga continuamente para mantener el nivel de humedad de la habitación durante
todo el día.
Para volver al modo continuo, apague el aparato, vuelva a ponerlo en marcha y escoja el nivel de humedad deseado
(véase la etapa 2).
I ON I Z A DO R
El ionizador contribuye a refrescar el aire.
• Para poner en marcha el ionizador, pulse una vez el botón correspondiente: la luz se prenderá. Nota: para que el
ionizador funcione, el humidificador debe estar accionado.
• Para detener el ionizador, basta con volver a pulsar el botón correspondiente: la luz se apagará.
NOTA: El ionizador se detendrá automáticamente cuando obtenga el grado de humedad seleccionado (la luz del
grado de humedad deseado se prenderá. Véase Fig. 7). El ionizador volverá a ponerse en marcha a la vez que el
humidificador.
Funcionamiento de los mandos EasySetMC (Modele HCM-6013i) (Continuación)
P UE S T A E N MA R CH A
ATENCIÓN: NO ENCHUFE EL HUMIDIFICADOR CON LAS MANOS
MOJADAS, PUEDE RECIBIR UN CHOQUE ELÉCTRICO.
• Apague el interruptor de alimentación (posición OFF) del humidificador y
enchúfelo lleno de agua en una toma de corriente polarizada de 120 V.
NO FUERCE EL ENCHUFE POLARIZADO PARA METERLO EN LA TOMA DE
CORRIENTE. El enchufe sólo entra de una sola manera en la toma.
E TA P A 1 : PU E ST A E N MA R CH A
• Prenda el humidificador (interruptor en posición ON). Su humidificador se
pondrá en marcha automáticamente en modo continuo, a máxima potencia.
La pantalla indicará el nivel de humedad ambiente (Fig. 10).
• Para apagar el humidificador, basta con volver a pulsar el interruptor
(posición OFF).
E TA P A 2 : AJ U ST E D E LA PR O DU C CI Ó N D E H UM E DA D
Y D E LA VE L OC I DA D D EL VE N TI L AD O R
Su humidificador tiene 3 ajustes del nivel de producción de humedad y la
velocidad del ventilador:
MÁXIMO: para conseguir rápidamente el grado de humedad deseado.
NORMAL: para el funcionamiento diario.
MÍNIMO: para un funcionamiento más lento (ideal durante la noche).
• Para cambiar la velocidad del ventilador, pulse el botón de ajuste del
ventilador (
) hacia arriba o abajo (Fig. 11).
• 3 segundos después de haber seleccionado la velocidad, la humedad
ambiente volverá a aparecer en la pantalla.
Funcionamiento digital EasySetMC (Modelo HCM-6012i & HCM-6012i-CST)
Fig. 10
Fig. 11
Control de
humedad
Botón de
velocidad del
ventilador
Botón del
temporizador
Luz del
nivel de
humedad
deseado
Page 23

39
NOTA: Para cambiar o comprobar el ajuste de la producción de vapor y la velodcidad, basta con pulsar una vez el
botón de la velocidad del ventilador (
) y el ajuste aparecerá en la pantalla. Para cambiarlo, siga pulsando arriba o
abajo el botón hasta que aparezca la selección deseada. Espere 3 segundos y el nivel de humedad ambiente volverá a
aparecer en la pantalla.
Modo continuo: si desea que el humidificador funcione
ininterrumpidamente, ajuste la velocidad del ventilador. (No ajuste el
control de humedad). El aparato funcionará a la velocidad seleccionada
hasta que lo apague o se vacíe.
NOTA: apague el humidificador si hay demasiada humedad o si se forma
condensación en las paredes.
E TA P A 3: AJ U ST E DE L T E MP O RI Z AD O R
• Puede ajustar el temporizador por un período de hasta 18 horas. Use
esta función únicamente si desea que el humidificador deje de funcionar
automáticamente transcurrido cierto tiempo.
• Pulse el botón del temporizador (
) arriba o abajo para seleccionar el número de horas que desee que funcione el
humidificador (Fig. 12).
• Cuando aparezca la selección deseada en la pantalla, espere 3 segundos.
• Pasados 3 segundos, el tiempo de funcionamiento está ajustado y la
pantalla volverá a indicar el nivel de humedad ambiente.
NOTA: Si desea cambiar el ajuste del temporizador o comprobar cuánto
tiempo de funcionamiento le queda al aparato, basta con pulsar una vez el
botón del temporizador (
): la pantalla indicará el tiempo que queda. Para
cambiarlo, basta con pulsar el botón arriba o abajo hasta que la selección
deseada aparezca en la pantalla. Pasados 3 segundos, el nivel de humedad
ambiente volverá a aparecer en la pantalla. Si ha ajustado el temporizador
y desea desactivarlo, apague el aparato y siga las etapas 1 y 2.
E TA P A 4 : AJ U ST E D E L N IV E L D E H UM E D A D
• Puede ajustar el nivel de humedad entre 25 % y 65 %, grado a grado.
• Para ajustar el nivel de humedad que desee, pulse el botón del control
de humedad (
) hacia arriba o abajo (Fig. 13).
• Cuando aparezca el nivel de humedad deseado, espere 3 segundos.
• 3 segundos después, el nivel de humedad está ajustado y volverá a
aparecer el nivel de humedad ambiente en la pantalla.
NOTA: Para cambiar el ajuste del nivel de humedad o comprobar el nivel
preajustado, basta con pulsar una vez el botón del control de humedad
para visualizarlo. Para modificarlo, vuelva a pulsar el botón del control de
humedad arriba o abajo hasta que aparezca el nivel deseado. 3 segundos
después, la humedad ambiente volverá a aparecer en la pantalla.
• Una vez ajustado el nivel de humedad deseado, el humidificador funcionará según dicho ajuste hasta que lo apague
o la habitación alcance el nivel de humedad seleccionado.
• Una vez alcanzado el nivel de humedad deseado en la habitación, el aparato se apagará. El símbolo de una casa
(
) en la parte superior de la pantalla se prenderá (Fig. 14) y permanecerá prendido hasta que descienda el
nivel de humedad y el humidificador vuelva a ponerse en marcha.
Funcionamiento digital EasySetMC (Modelo HCM-6012i & HCM-6012i-CST) (Continuación)
Fig. 12
Fig. 13
Fig. 14
Page 24

40
Funcionamiento digital EasySetMC (Modelo HCM-6012i) (Continuación)
NOTA: el nivel de humedad de una habitación varía constantemente. Por tanto, es normal que el aparato se
ponga en marcha y se detenga continuamente para mantener el nivel de humedad de la habitación durante
todo el día.
Para volver al modo continuo, apague el aparato, vuelva a ponerlo en marcha y escoja el nivel de humedad
deseado (véase la etapa 2).
I ON I Z A DO R
El ionizador contribuye a refrescar el aire.
• Para poner en marcha el ionizador, pulse una vez el botón correspondiente: la luz se prenderá. Nota: para que el
ionizador funcione, el humidificador debe estar accionado.
• Para detener el ionizador, basta con volver a pulsar el botón correspondiente: la luz se apagará.
NOTA: El ionizador se detendrá automáticamente cuando obtenga el grado de humedad seleccionado (la luz del
grado de humedad deseado se prenderá. Véase Fig. 7). El ionizador volverá a ponerse en marcha a la vez que el
humidificador.
Limpieza
Debe limpiar su humidificador regularmente como necesitado.
La limpieza de su humidificador debe realizarse en 2 etapas : QUITAR LAS INCRUSTACIONES y DESINFECCIÓN.
Debe realizar las operaciones en el orden indicado para evitar una interacción peligrosa de los productos
químicos.
• Apague y desenchufe el humidificador.
• Retire los depósitos y el cajetín del motor.
• Retire el filtro de la base.
• Bote el agua de la base.
NOTA: Para asegurar una humedad adecuada en su hogar, usted debería
usar un higrómetro (acusador de humedad ambiente) tal como el E-10 y
colocarlo del otro lado del ambiente en el cual se
encuentra el humidificador.
(Higrómetro vendido por separado)
Page 25

41
Prolongue la duración del filtro y mantenga limpio el humidificador
NOTA: NO LIMPIE EL FILTRO CON NINGUNA SOLUCIÓN QUÍMICA DE NINGÚN TIPO, PODRÍA DAÑARLO.
• Es normal que el filtro cambie de color debido a la sedimentación de minerales, lo cual varía según la calidad del
agua.
• NO limpie el filtro con ninguna solución química de ningún tipo.
• Si el filtro parece obstruido por la dureza del agua o la acumulación de minerales, déjelo 10 minutos en remojo en
un fregadero lleno de agua fría. NO RETUERZA NI ESTRUJE EL FILTRO. Vuelva a colocar el filtro en el humidificador
aún mojado siempre.
• Compre siempre los filtros de marca Honeywell (número Filtro E/HC-14) pues el ventilador del motor de su
humidificador y el filtro están diseñados para funcionar eficazmente de forma conjunta. Si usa otro tipo de filtros
podría dañar el motor o disminuir la eficacia de su humidificador.
• Cuando no vaya a usar el aparato, asegúrese de vaciar el agua de los depósitos y de la base.
ETAPA 1:
QUITAR LAS INCRUSTACIONES
BASE
1. Llene la base con :
• 1 taza (250 mL) de vinagre blanco no diluído.
2. Deje actuar la solución durante 20 minutos.
3. Sin quitar la solución de la base, limpie todas las
superficies interiores de la base con un paño suave o
un cepillo blando para despegar las incrustaciones.
4. Enjuague a fondo la base con agua para deshacerse
de las incrustaciones y la solución limpiadora.
ETAPA 2:
DESINFECCIÓN
DEPÓSITO /BASE
1. Llene el depósito con:
• 1 cucharadita de lejía
y
• 4 litros (1 galón) de agua.
Vierta un poco de esta solución en la base.
2. Deje actuar la solución durante 20 minutos.
3. Enjuague con agua hasta que el olor a lejía
desaparezca.
NOTES:
• El uso de otros productos de tratamiento del agua o productos químicos puede dañar el filtro y el humidificador,
disminuyendo su eficacia.
NOTA : QUITE EL FILTRO ANTES DE LIMPIAR SU APARATO
De lo contrario destruirá el filtro.
Page 26

42
Limpieza al final de la temporada y almacenamiento
• Al final de la temporada de uso, o cuando no vaya a usar el humidificador durante más de una semana,
limpie el aparato siguiendo las instrucciones de la sección LIMPIEZA.
• Al final de una temporada de uso, retire y bote el filtro. No debe dejar un filtro usado en el humidificador
cuando vaya a guardar el aparato.
• Asegúrese que todos los componentes del humidificador están secos antes de guardarlo. Vacíe
completamente la base y los depósitos antes de guardar el aparato.
• Coloque el humidificador en su embalaje original y guárdelo en un lugar fresco y seco.
• Antes de volver a usar el humidificador, recuerde que debe limpiarlo e instalar un filtro.
Atención al cliente
Envíe sus preguntas o comentarios a:
Kaz, Incorporated
Consumer Relations Dept.
250 Turnpike Road
Southborough, MA 01772
Llame gratis al 1 800 477-0457
Envíe un correo electrónico: consumerrelations@
kaz.com
O visítenos: www.kaz.com
Por favor, especifique el número de modelo.
Compre los filtros de recambio número Filtro E/HC-14 y los cartuchos ProtecMC PC-1 (1 paquete) o PC-2 (2
paquetes).
NOTA: SI EXPERIMENTA UN PROBLEMA, LE ROGAMOS EN PRIMER LUGAR PONERSE EN CONTACTO
CON EL DEPARTAMENTO DE RELACIONES CON EL CONSUMIDOR O BIEN CONSULTAR SU GARANTÍA.
NO DEVUELVA EL ELEMENTO HUMIDIFICADOR A SU LUGAR DE COMPRA ORIGINAL. NO INTENTE
ABRIR EL ALOJAMIENTO DEL MOTOR USTED MISMO; EL HACERLO PUEDE ANULAR SU GARANTÍA Y
PROVOCAR DAÑOS EN EL PRODUCTO O A LAS PERSONAS.
Características eléctricas
Los modelos de la serie QuietCareMC de Honeywell poseen las siguientes características eléctricas: 120 V,
60 Hz.
Page 27

43
PROBLEMA CAUSA POSIBLE SOLUCIÓN
El aparato está enchufado (las
luces prendidas), pero no sale
vapor.
Los humidificadores de vapor frío producen
un vapor invisible. No verá la humedad, pero
sentirá el aire fresco que sale del aparato.
Observe el nivel del agua en los depósitos/
base. Si en el transcurso de 24 horas nota que
desciende, el aparato funciona normalmente.
El aparato está vacío. Llene el depósito de agua y vuelva a colocarlo
en su sitio.
El nivel de humedad seleccionado es
demasiado bajo.
Ajuste el nivel de humedad a un grado más
elevado. Si el control de humedad de su aparato
es manual (modelos HCM-6011i y HCM6011WW), gire el botón completamente en el
sentido de las agujas del reloj.
El aparato no está colocado en una superficie
horizontal.
Coloque el aparato sobre una superficie firme,
llana y horizontal.
Hay demasiada humedad en el aparato. Apague el aparato y deje que se seque
completamente.
El filtro no está embebido de agua. Espere 15 minutos hasta que el filtro se
embeba totalmente o sumérjalo en agua. (No
estruje ni retuerza el filtro.) Refiérase a las
instrucciones de llenado para más detalles.
Acumulación de minerales en la bandeja del
agua.
Vea las instrucciones de limpieza. Para que
funcione adecuadamente, debe limpiar su
aparato con asiduidad.
Debe cambiar el filtro. Si el filtro está descolorido, obstruido o roto,
cámbielo (modelo Filtro E/HC-14). Para ello,
vaya al lugar donde compró el aparato o llame
al 1 800 477-0457.
El aparato no funciona, no se
prende ninguna luz.
No está enchufado correctamente. Compruebe que el enchufe está totalmente
introducido en la toma de corriente.
Algo obstruye la circulación de aire. Compruebe la circulación de aire. ¿Hay algo
que la obstruye?
El temporizador lo ha detenido. Pulse el interruptor de alimentación (modelo
HCM-6012i únicamente).
El bloque motor no está instalado
correctamente.
Vuelva a instalar el bloque motor.
Solución de problemas
Page 28

44
Solución de problemas (Continuación)
PROBLEMA CAUSA POSIBLE SOLUCIÓN
El nivel de humedad está
ajustado, pero el aparato no se
pone en marcha.
El nivel de humedad seleccionado es
demasiado bajo.
Ajuste el nivel de humedad a un grado más
elevado. Si el control de humedad de su
aparato es manual (modelos HCM-6011i y
HCM-6011WW), gire el botón completamente
en el sentido de las agujas del reloj.
El nivel de humedad está
ajustado, pero el aparato no
se detiene.
El nivel de humedad seleccionado es
demasiado alto.
Ajuste el nivel de humedad un grado más bajo.
La humedad programada es
demasiado elevada. (modelos
HCM-6012i y HCM-6013i)
Hay vapor y/o condensación en el detector
de humedad.
Apague el humidificador y deje que se seque
completamente.
Hay demasiada agua en su humidificador. Vacíe el excedente de agua de la base ydeje
secar completamente el humidificador.
El filtro se ha puesto
amarillento.
Puede que necesite cambiar el filtro. Si el filtro se pone amarillento o como oxidado
en poco tiempo, probablemente sea por un
depósito mineral. Remójelo en un lavabo
lleno de agua fría para que dichos depósitos
desaparezcan. Aunque no vuelva a obtener el
color inicial del filtro, eso no afecta al buen
funcionamiento del humidificador. Si nota que
la eficacia del humidificador disminuye o vive
en un lugar donde el agua es dura, quizás tenga
que cambiar el filtro más a menudo. Cambie
el filtro (modelo Filtro E/HC-14). Vaya al lugar
donde compró el aparato o llame al
1 800 477-0457.
Hay condensación en las
paredes y/o cristales.
El nivel de humedad seleccionado es
demasiado elevado.
Ajuste el nivel de humedad un grado más bajo
y/o reduzca la producción de vapor.
El aparato está colocado demasiado cerca de
las paredes y/o cristales.
Desplace el aparato.
El humidificador desprende un
olor raro o no parece tan limpio
como cuando lo compré.
Debe limpiar el aparato. Limpie el aparato siguiendo las instrucciones
de la sección Limpieza. Se recomienda una
limpieza asidua para que el aparato funcione
correctamente.
Page 29

45
Solución de problemas (Continuación)
PROBLEMA CAUSA POSIBLE SOLUCIÓN
El humidificador se prende y se
para de forma cíclica.
El humidificador reacciona al nivel de
humedad de la habitación dependiendo
del ajuste del control de humedad. Es
normal.
Ajuste el control de humedad a un grado mayor o
menor. Si no desea que el humidificador se accione
y se detenga de forma cíclica, prográmelo en modo
continuo. Vea las instrucciones de funcionamiento.
El depósito gotea. No hay anillo de caucho sobre
el depósito o no está colocado
correctamente.
Quite el tapón del depósito y vuelva a colocarlo o
vuelva a colocar el anillo. Compruebe que no hay
ningún obstáculo que impida el movimiento de la
válvula de resortes del tapón.
El tapón del depósito no está bastante
apretado.
Apriete el tapón.
El tapón del depósito está
demasiado apretado.
El tapón del depósito ha estado
demasiado apretado.
Lubrifique ligeramente la junta hermética del tapón
con vaselina para facilitar la abertura.
Page 30

46
Por favor, lea todas las instrucciones antes de
usar este aparato.
A. La presente garantía limitada de 5 años cubre
la reparación o sustitución de todo producto
con un defecto de fábrica o de mano de obra.
Esta garantía excluye los defectos ocasionados
por el uso comercial, abusivo o desrazonable
y los daños adicionales. Los fallos resultantes
del desgaste normal no se consideran defectos
de fábrica en virtud de la presente garantía.
KAZ QUEDA EXENTA DE TODA
RESPONSABILIDAD POR DAÑOS
FORTUITOS O INDIRECTOS DE TODO
TIPO. TODA GARANTÍA IMPLÍCITA DE
CALIDAD COMERCIAL O DE CONVENIENCIA
RELACIONADA CON ESTE PRODUCTO
TENDRÁ LA MISMA VIGENCIA QUE LA
PRESENTE GARANTÍA.
En ciertos lugares no se permite la exclusión o
limitación a daños fortuitos o indirectos, ni los
límites de duración aplicables a una garantía
implícita. Por consiguiente, es posible que
estas limitaciones o exclusiones no se apliquen
en su caso. Esta garantía le confiere unos
derechos precisos, reconocidos por la ley.
Dichos derechos difieren de un lugar a otro y
es posible que usted tenga otros. La presente
garantía sólo será válida con el comprador
inicial del producto a partir de la fecha de
compra inicial.
B. Kaz se reserva todo derecho de reparación
o sustitución del presente producto si se
constata que presenta un defecto de fábrica o
mano de obra.
C. Esta garantía no cubre los daños ocasionados
por tentativas de reparación no autorizadas
o por el uso no conforme con el presente
manual.
D. Para devolver un producto defectuoso a Kaz,
Incorporated, adjunte una descripción breve
del problema junto con una prueba de compra
y un cheque o giro postal de 10,00 $ US ó
15,50 $ CAD para los gastos de manutención,
embalaje de vuelta y reenvío. Indique su
nombre, dirección y un número de teléfono
donde podamos localizarle durante el día.
Los gastos de envío deben pagarse
por adelentado. Le sugerimos que pida
confirmación del seguimiento o de la entrega.
Mande el envío a:
En los Estados Unidos:
Kaz, Incorporated
Attn: Returns Department
4755 Southpoint Drive
Memphis, TN 38118
USA
En Canadá:
Kaz Canada, Inc.
Attn: Returns Department
510 Bronte Street South
Milton (Ontario) L9T 2X6
Canada
Por favor visite www.kaz.com y registre su producto
en el Centro de Atención al Cliente y reciba información
y actualizaciones de su productos y nuevas ofertas
promocionales.
GARANTÍA LIMITADA DE 5 AÑOS
Page 31

©2011 Kaz, Incorporated.
All rights reserved.
Tous droits réservés.
Todos los derechos reservados.
P/N: 31IM6009193
 Loading...