

Page 1
www.jmatek.com
E-mail: usinfo@jmatek.com
EN
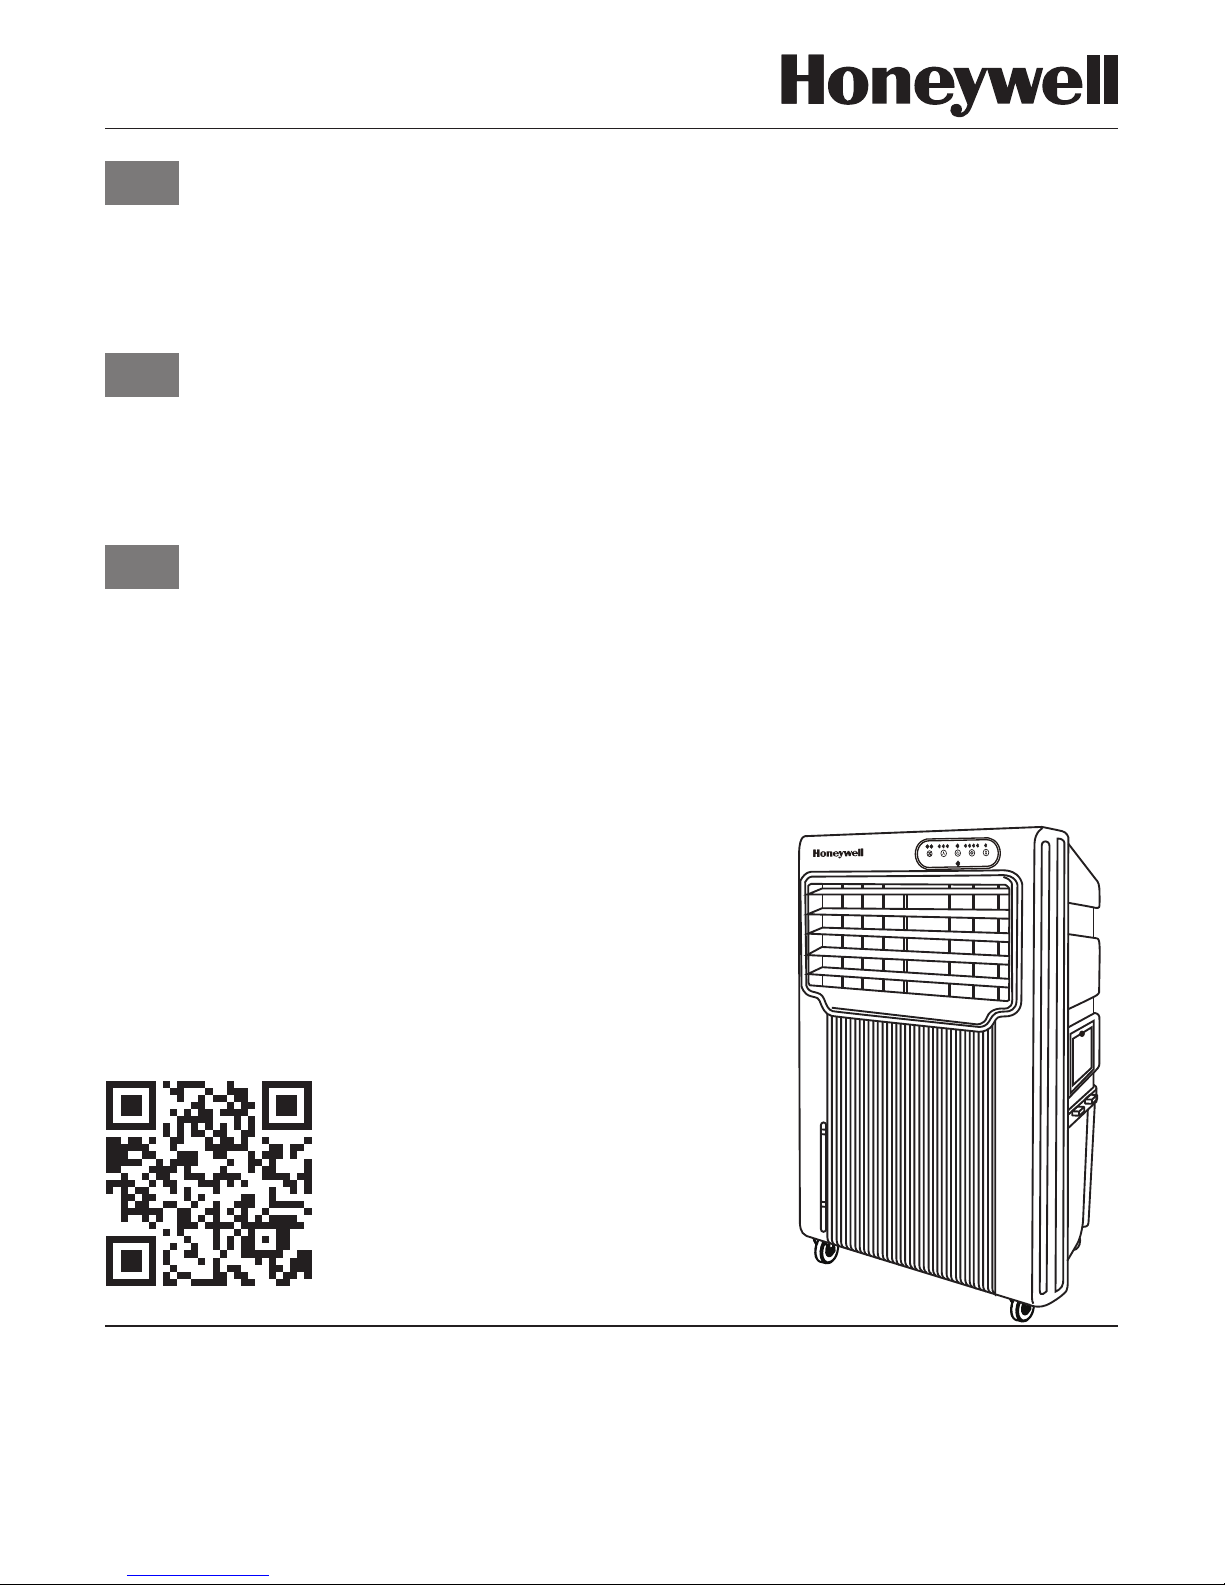
Portable Evaporative Air Cooler
User Manual
Read and save these instructions before use
FR
Refroidisseur d'air par évaporation portatif
Mode d'emploi
Lire ces instructions avant l'utilisation et les conserver
ES
Enfriadores de Aire Evaporativos Portátil
Manual de Uso
Lea y guarde estas instrucciones antes de usar
Model / Modèle / Modelo:
CO70PE
Product video/
Video de producto/
Vidéo produit :
Customer Support:
Assistance Au Client:
Servicio de atencion a clientes:
USA/ EE.UU: 1-800-474-2147
CANADA/ CANADÁ
#
: 1-888-209-0999
#Canada Customer Support service
available for models sold in Canada only.
Page 2
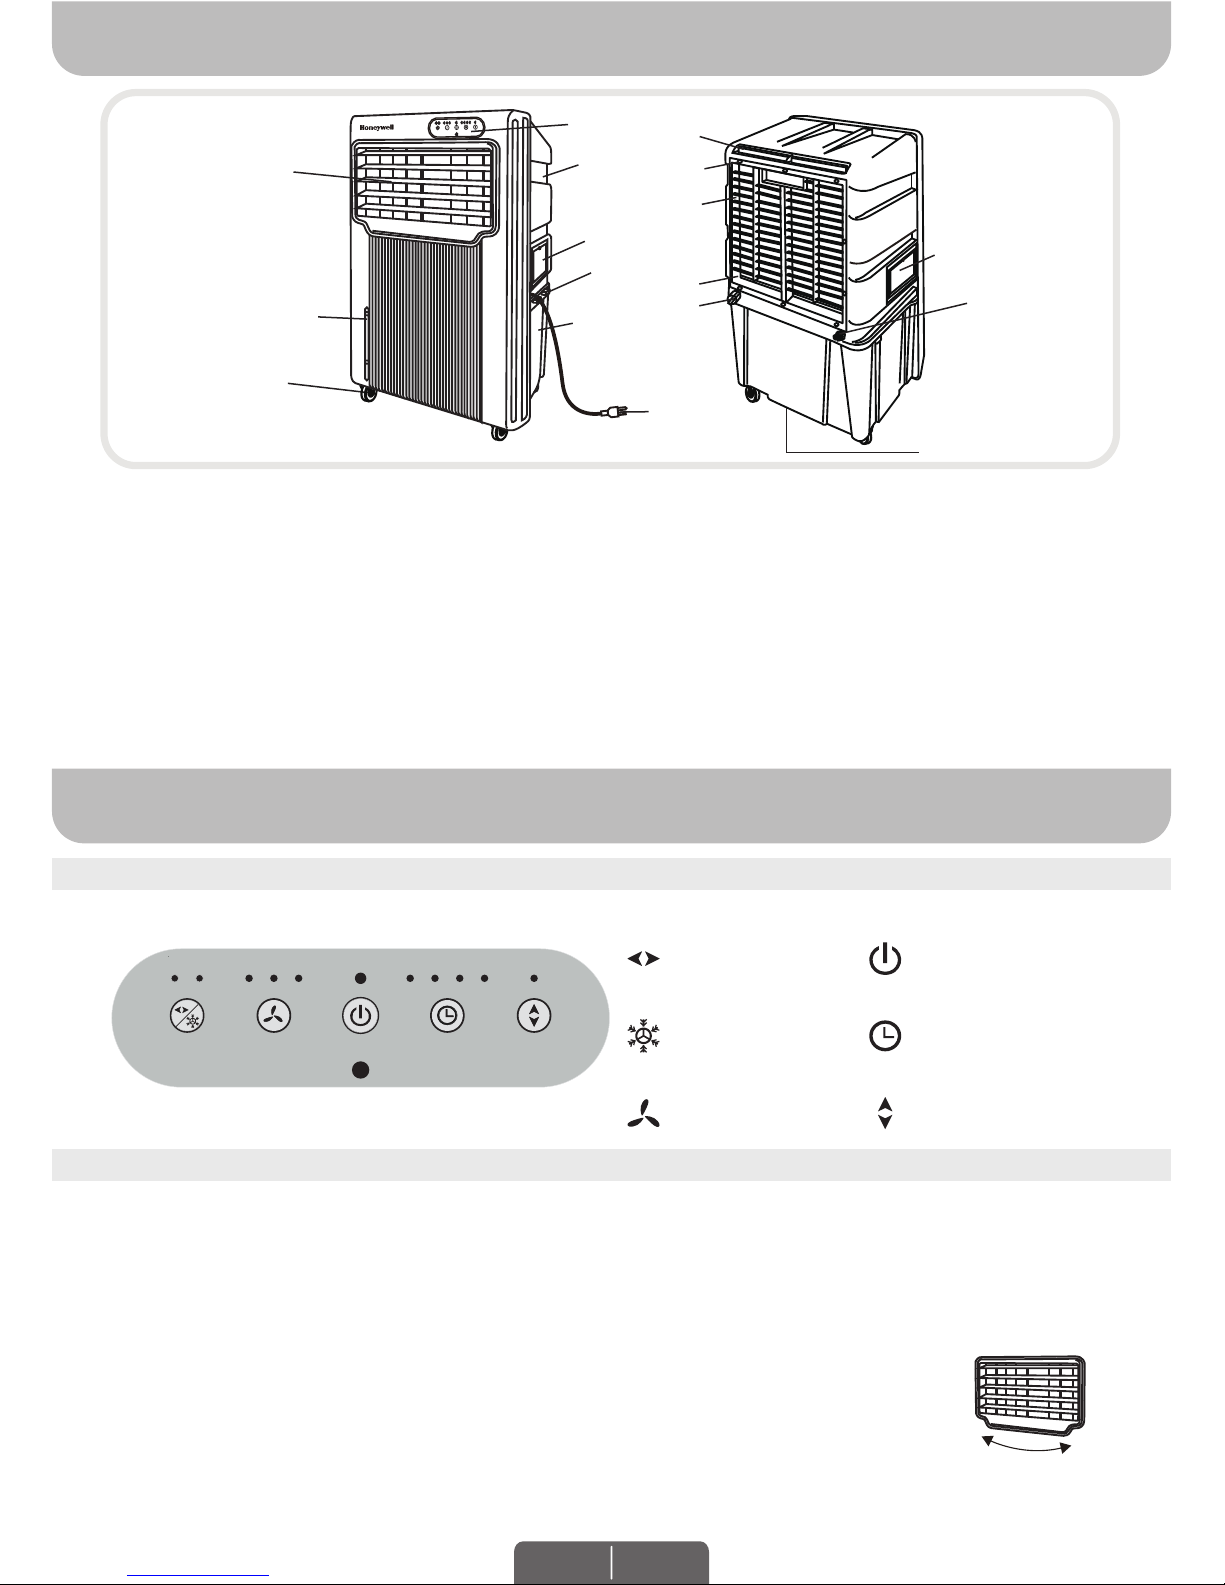
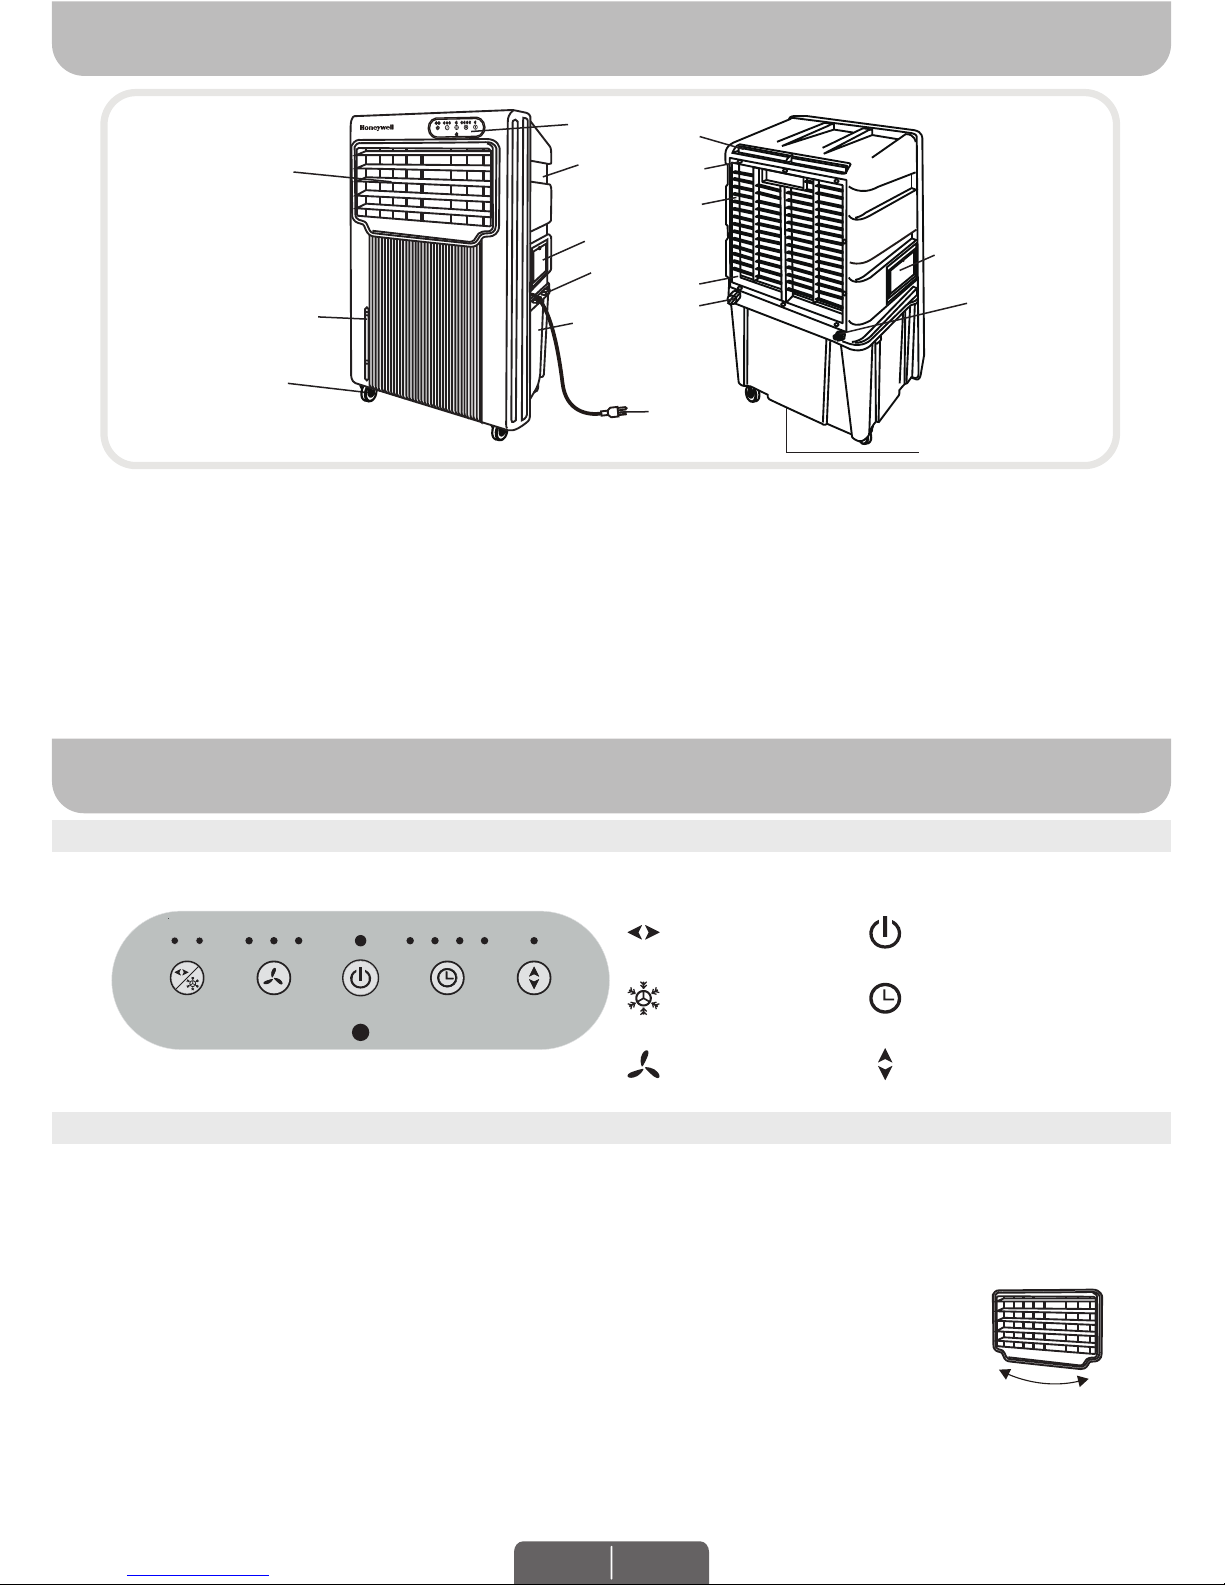
1) Control Panel
2) Handle
3) Louvers
4) Water Level Indicator
5) Casters
6) Ice Compartment Lid
7) Power Cord Wrap
8) Water Tank
9) Power Cord & Plug
10) Plastic Net Filter
11) Rear Grill Screw
12) Honeycomb Cooling Media
13) Rear Grill
14) Water Regulator
15) Water Fill Door
16) Water Inlet Valve
17) Drain Plug
PARTS DESCRIPTION
(5)
(1)
(2)
(3)
(10)
(8)
(11)
(12)
(14)
(16)
(15)
(13)
(17)
(6)
(7)
(4)
(9)
WARNING -- READ AND SAVE THE AIR COOLER SAFETY & MAINTENANCE GUIDE AND USER
MANUAL BEFORE USING THIS PRODUCT. FAILURE TO FOLLOW THESE INSTRUCTIONS MAY
DAMAGE AND/ OR IMPAIR ITS OPERATION AND VOID THE WARRANTY.
WARNING: FOR OUTDOOR MODEL CO70PE, USE ONLY ON GFCI PROTECTED RECEPTACLES.
USE & OPERATION
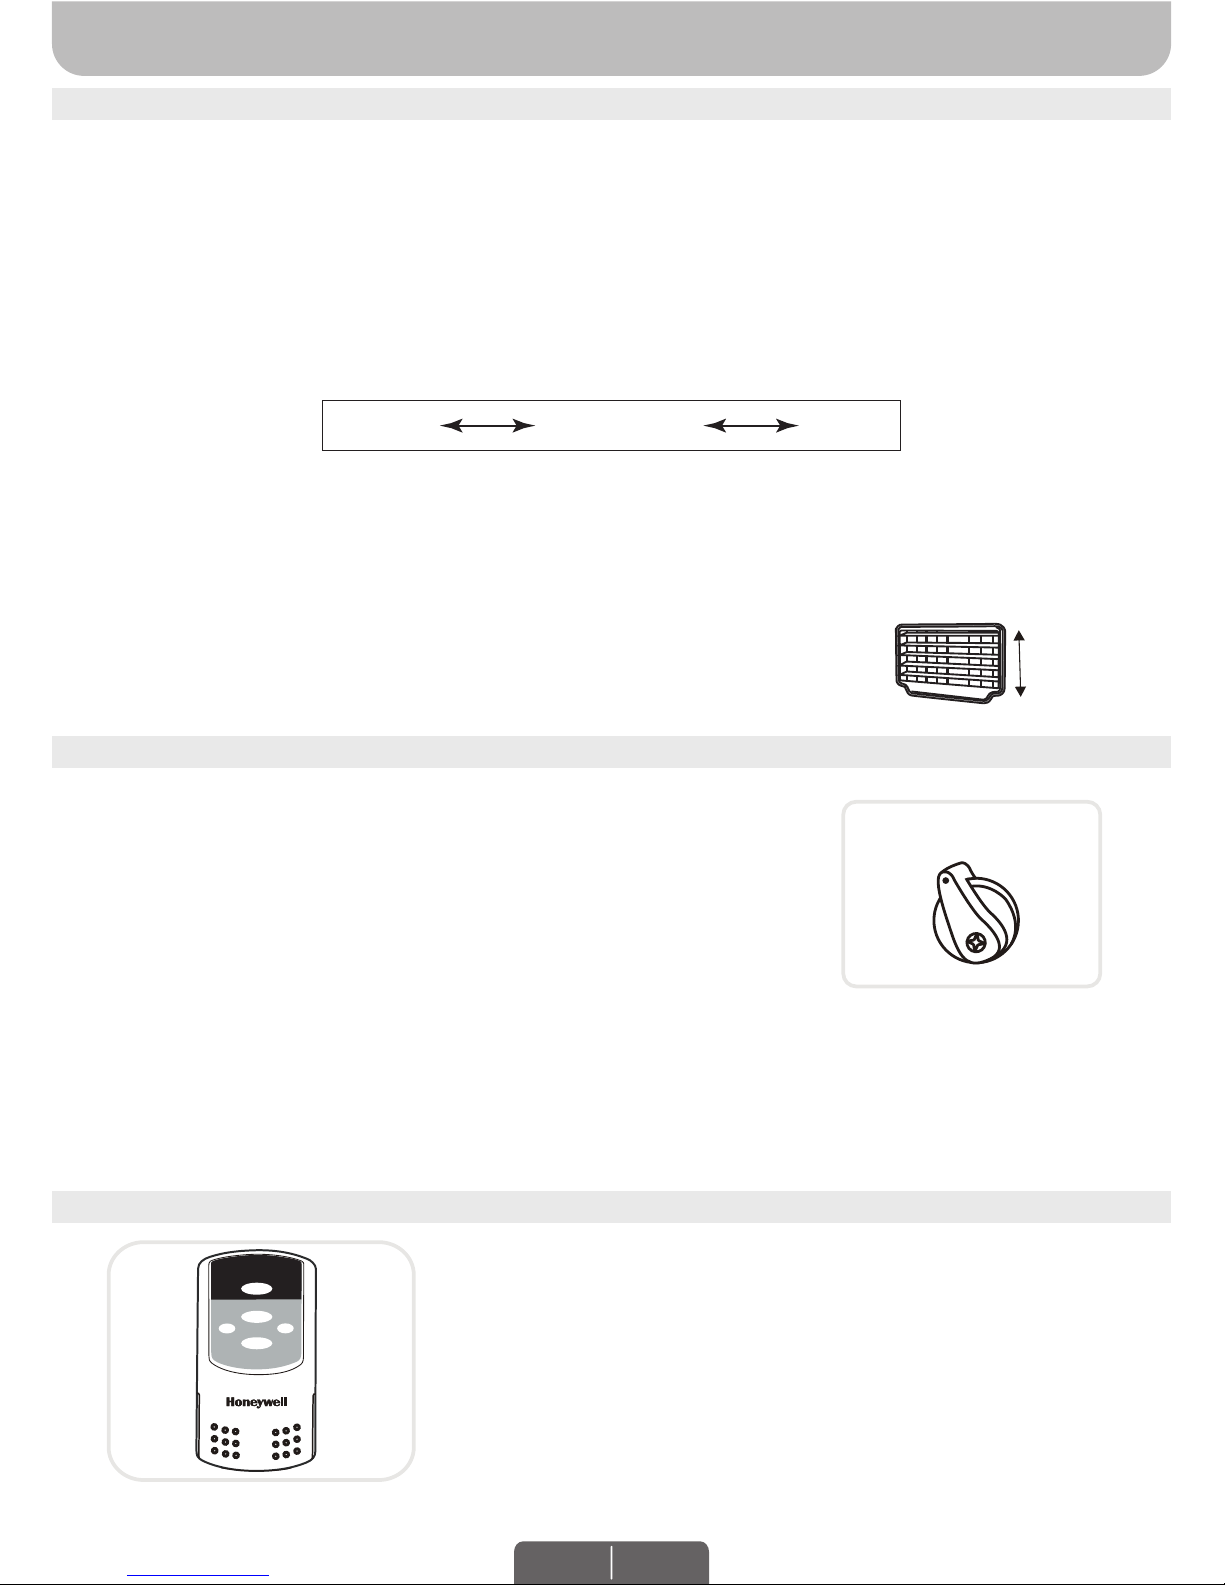
CONTROL PANEL
FUNCTION BUTTONS
POWER
Press the POWER button to turn the unit on. The cooler will start automatically at medium speed. After a
few seconds the speed will switch to low. To turn the unit off, press the button again.
MODE
Press the MODE button to activate evaporative cooling and/or louver swing modes.
Press the MODE button until the “S” indicator light is illuminated on the control panel.
The Vertical Louvers will begin to move left to right automatically.
Press the MODE button until the “C” indicator light is illuminated to activate evaporative
cooling. The water pump will operate and you will feel the cooler air after the Honeycomb
Cooling Media is completely wet.
H M L 0.5 124S C
MODE SPEED POWER TIMER SWING(H)
SWING(V)
Icons on Display Screen
Power
Timer
Swing
(Horizontal Louvers)
Swing
(Vertical Louvers)
Cool
Speed
LOUVER
MOVEMENT
EN 1
Page 3
EN 2
Pressing the MODE button until both “S” and “C” are illuminated will activate both Swing (Vertical
Louvers) and Cool modes simultaneously.
Note: When the “C” mode is not selected, the unit functions in a fan only mode, without evaporative
cooling.
SPEED
Press the SPEED button repeatedly to change the speed between High - Medium - Low.
The indicator light will show the selected speed:
TIMER
Press the TIMER button until the desired time duration setting is selected. When the set time has
passed, the unit will automatically turn off (unit remains in Standby mode until power cord is unplugged
from electrical socket). The TIMER function allows you to program the unit for up to 7.5 hours of use.
SWING(H)
Press the SWING (H) button until the indicator light turns on. This activates the
Horizontal Louvers and they will begin to move up and down automatically.
USE & OPERATION (CONTINUED)
FUNCTION BUTTONS (CONTINUED)
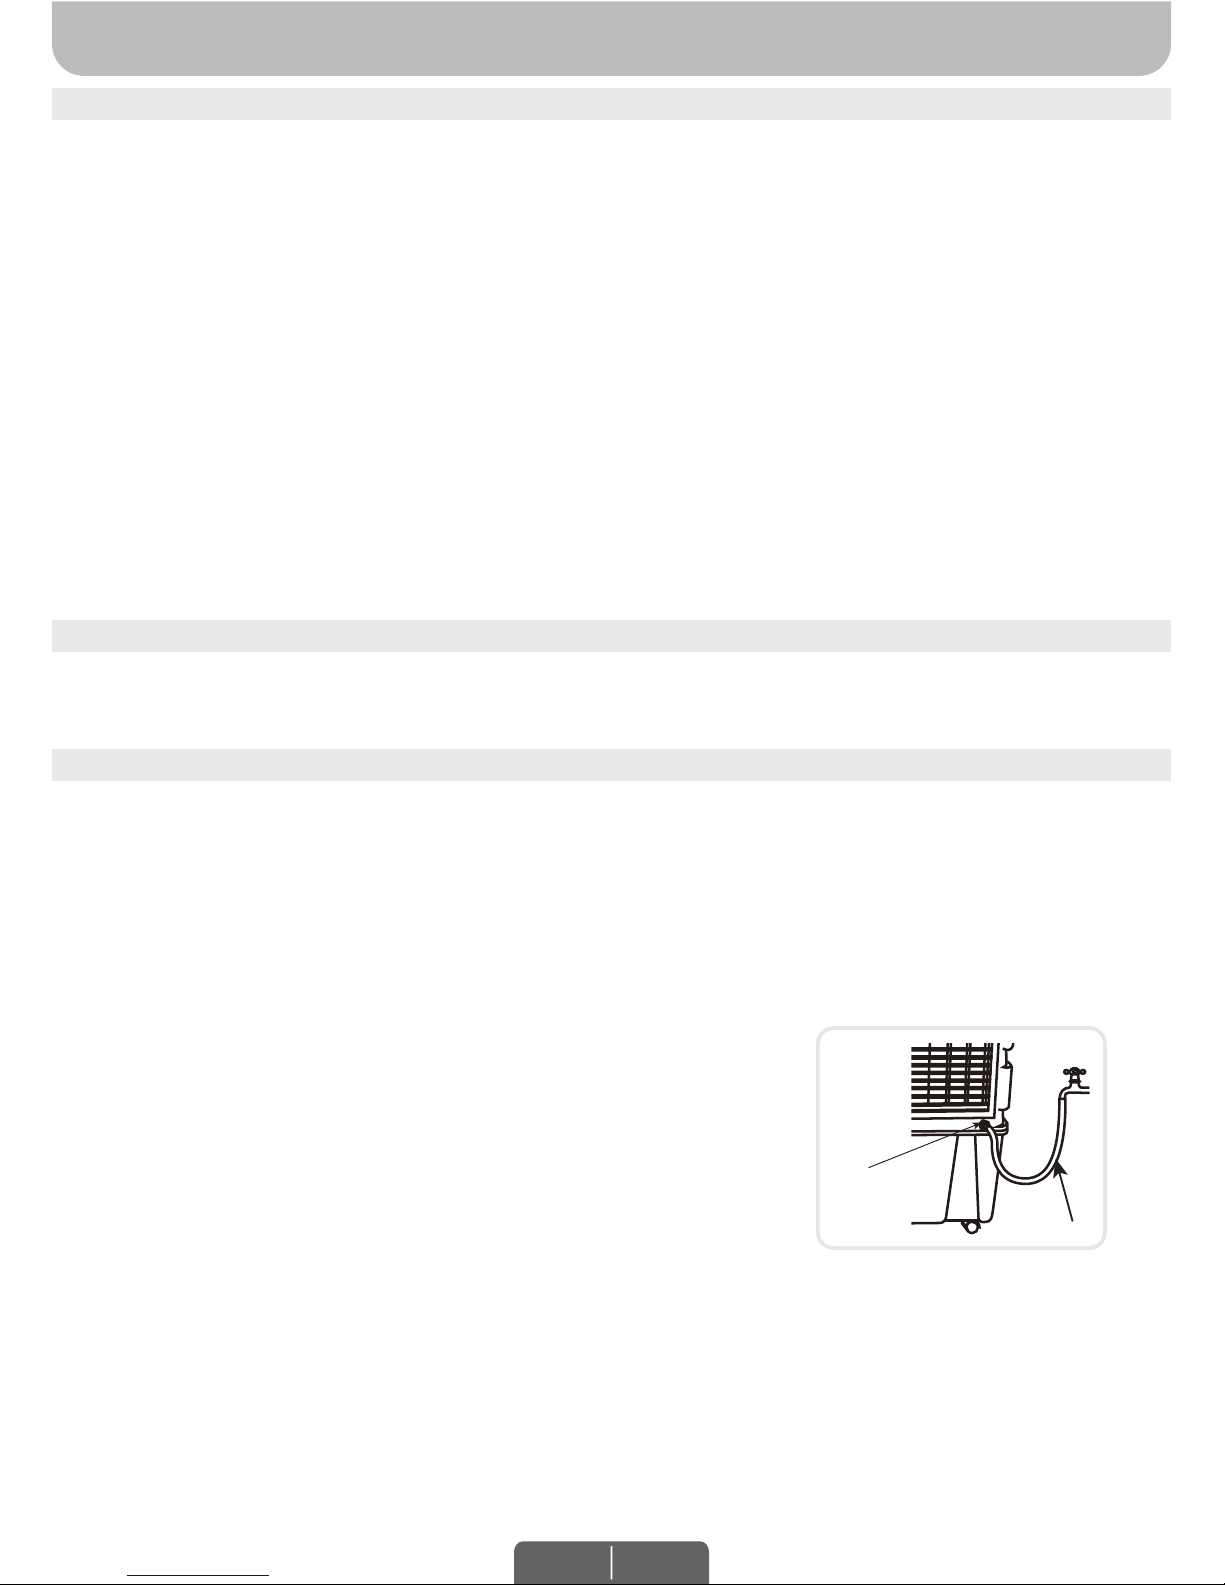
REMOTE CONTROL
ROOM COOLING AND HUMIDIFYING
: ON / OFF
: Controls the motion of the horizontal louvers
: Controls the Timer function for automatic off
: Controls the motion of the vertical louvers and
evaporative Cooling On / Off
: Low / Medium / High
POWER
SWING
TIMER
MODE
SPEED
Water Regulator
MIN
MAX
In cooling mode, Honeywell Air Coolers provide cool, moist air through the
evaporation of water. There is a manual Water Regulator knob located
behind the ice compartment of the unit. This allows you to adjust the
amount of water pumped over the Honeycomb Cooling Media, thus helping
to control cooling and humidification levels.
When the Water Regulator is set to MIN, the water pump distributes a
minimal amount of water to the Honeycomb Cooling Media. This results in
less water evaporation and reduces the cooling effect.
When the Water Regulator is set to MAX, the water pump distributes the maximum amount of water to
the Honeycomb Cooling Media. This results in maximum water evaporation and greater cooling
performance.
High (H)
Medium (M)
Low (L)
LOUVER
MOVEMENT
SWING (H)
SPEED
TIMER MODE
ON/OFF
Page 4
USE & OPERATION (CONTINUED)
FILLING WITH WATER
COOLER LOCATION
Make sure to position the air cooler correctly before you set up and start using the product. Please refer
to the COOLER LOCATION section of the separate Safety & Maintenance Guide.
It is ideal to use the Continuous Water Supply Connection to run the unit for long periods of time without
refilling the tank. This also helps prevent pump failure in case the cooler is running with inadequate water
in the tank.
The remote control requires AAA (2 x 1.5V) batteries for replacement.
Open the battery compartment at the back of the remote control and insert the batteries inside. Care
must be taken to insert the batteries according to the correct polarity (+ / –) markings shown inside
the battery compartment.
Always point the remote control signal transmitter towards the unit when operating. Make sure that
the signal path is not obstructed.
Remove the batteries if the unit is not going to be used for an extended period of time.
Do not drop the remote control.
Do not mix different types of batteries such as alkaline, carbon-zinc, or rechargeable batteries.
Do not mix old and new batteries.
Do not recharge the battery.
Exhausted batteries are to be removed from the product and safely disposed of as per local
regulations.
Do not dispose of batteries in fire. Batteries may explode or leak.
WARNING: Caution for ingestion of the small battery. Keep away from children and animals.
•
•
•
•
•
•
•
•
•
•
Note:
REMOTE CONTROL (CONTINUED)
CAUTION:
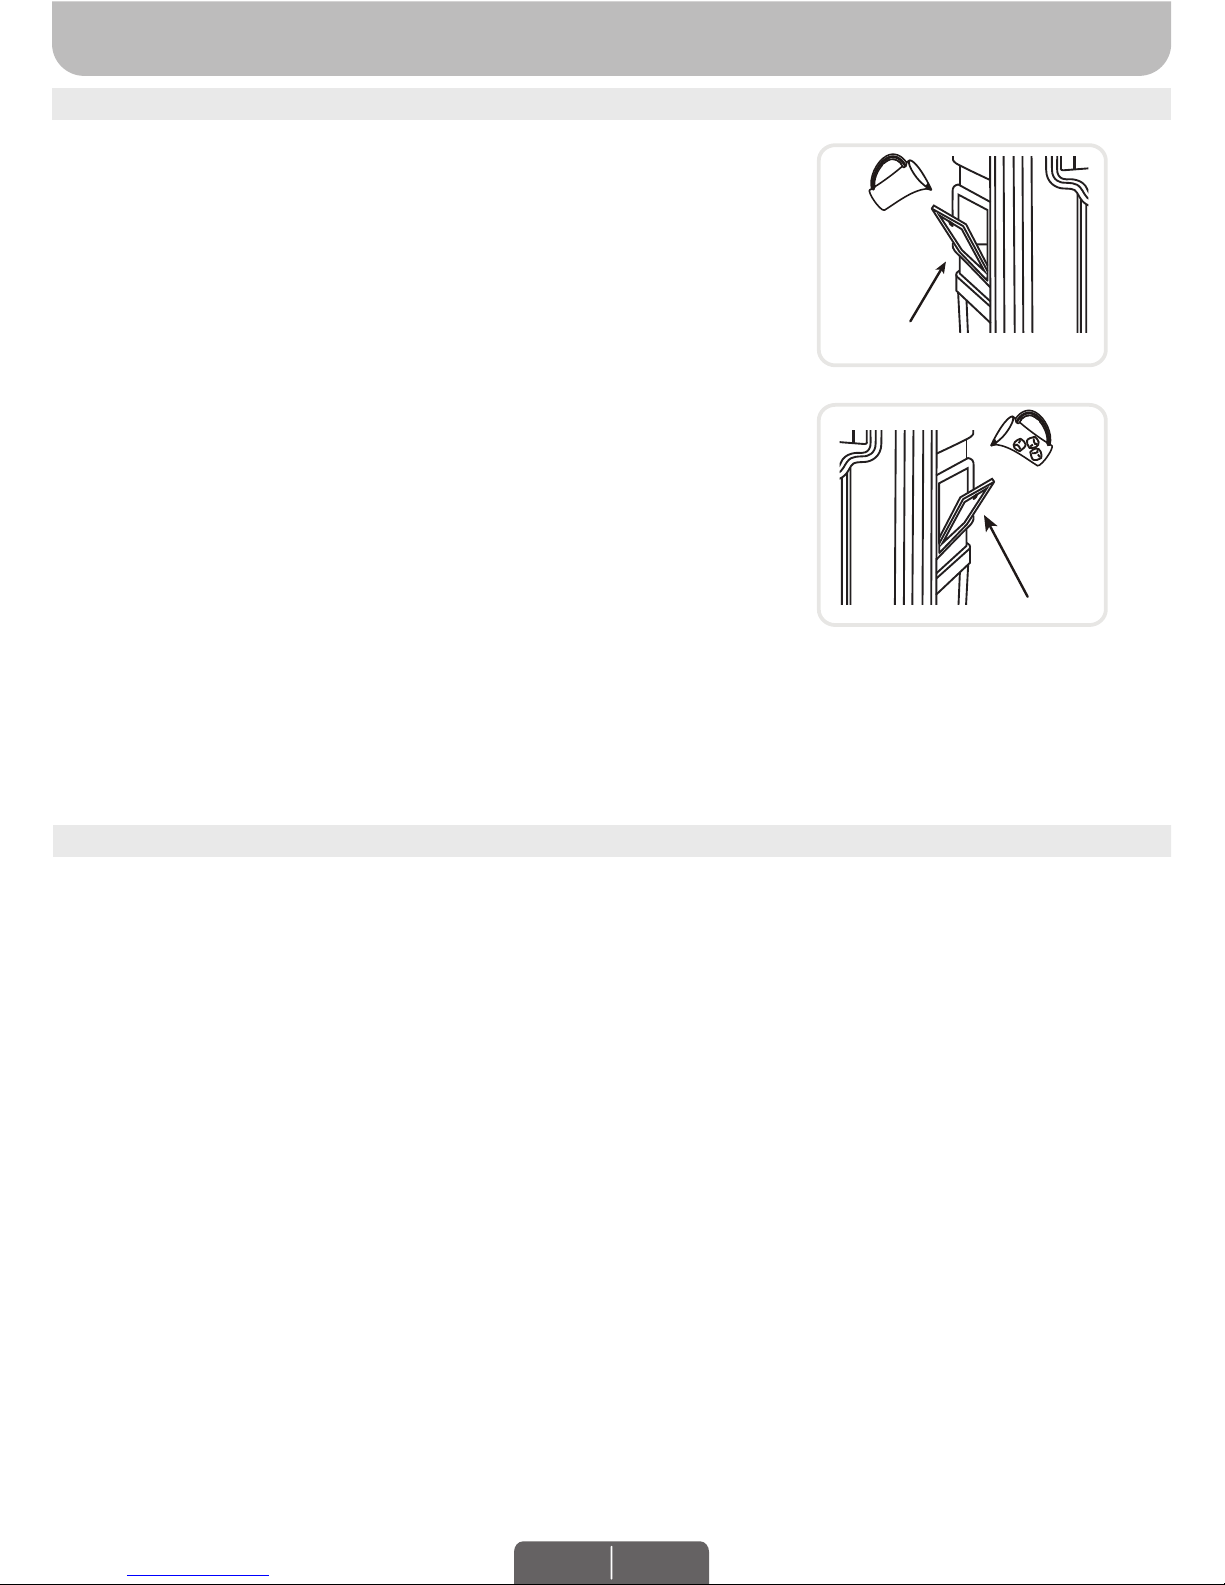
Unplug the unit from the electrical power outlet before filling or emptying the water tank.
Continuous Water Supply Connection:
Locate the male connector at one end of the garden hose. Insert the
garden hose connector into the water inlet valve of the cooler. Screw
and tighten the water inlet valve onto the threaded part of the garden
hose connector, making sure the hose connector is secured to
ensure there will be no leaks. If there is leakage, the hose and the
water inlet valve may not be connected properly. Try to disconnect,
replace and tighten the water inlet valve again.
When the connection is secured, turn ON the water supply and the
water will flow into the water tank of the cooler.
The cooler is now set so the water refills automatically when the
water tank is empty, or when the water reaches below a minimum
level.
When the water tank is full, the water inlet valve will automatically
stop the water supply from overflowing.
WARNING: The maximum water inlet pressure is 0.5 MPa.
•
•
•
•
For a continuous water supply, you will need a garden hose that is
connected to a main water supply.
Water
Inlet Valve
Garden Hose
EN 3
Page 5
FILLING WITH WATER (CONTINUED)
USE & OPERATION (CONTINUED)
Manual Water Tank Refill:
Open the Water Fill Door located on the side of the unit.
The Water Level Indicator is located at the front of the unit. Refill the
water tank when water level is low. Do not fill water above the "Max."
water level mark to avoid water droplets collecting on the louvers.
Check the water level in the tank before running the COOL function.
Make sure that the water in the tank is above the minimum water level
mark. Running the unit in COOL mode with inadequate water may
cause pump failure.
WARNING: Always ensure the water in the water tank is above the
minimum (Min.) water level mark for both Continuous & Manual Water
Refill. Running the unit in Cool mode with inadequate water may
cause pump failure.
Note: The water capacity refers to the total volume of water that can
be contained within the air cooler water tank and water distribution
system. The water capacity in the tank at the “Max.” indicator level
may be lower than the actual water capacity of the air cooler.
Note: If ice is available, you may add ice in the ice tray to enhance the
cooling performance.
Water Fill Door
Ice Tray
EN 4
*Applicable for models with Low Water Alarm feature only.
LOW WATER ALARM*
The unit is equipped with a low water sensor. In Cooling Mode, when water in the tank is below the
minimum level, you will hear a beeping sound and the indicator light will flash continuously. The unit will
automatically pause evaporative cooling.
Refill the water tank to deactivate the alarm in cooling mode. First switch OFF the unit and unplug from
the power outlet. Fill the water tank with water above the minimum water level mark. Plug in and switch
ON again.
To deactivate the alarm and continue using the unit as a fan (without evaporative cooling), switch the
unit OFF and then ON again. The Low Water Alarm will not activate in Fan only mode. The Low Water
Alarm will sound again if the COOL function is activated while the water tank is still empty.
Page 6
CLEANING & DRAINING THE WATER TANK
If the cooler will not be used for a long period of time, please refer to the STORAGE & MAINTENANCE
GUIDELINES located in the separate Safety & Maintenance Guide.
Move the unit to a location where the water can be drained. Remove the cap from the Drain plug
located at the bottom of the unit. Allow the tank to empty.
Refill the water tank with clean water, up to the maximum level and drain it completely.
Use a damp cloth to remove the dirt and dust from the surface of the unit. Never use corrosive
elements or chemicals to clean this product.
When the product is not in use, store the unit in a dry place out of direct sunlight.
•
•
•
•
WARNING:
Before cleaning the unit, switch the unit OFF and disconnect from the electrical socket.
USE & OPERATION (CONTINUED)
CLEANING THE PLASTIC NET FILTER* AND HONEYCOMB COOLING MEDIA
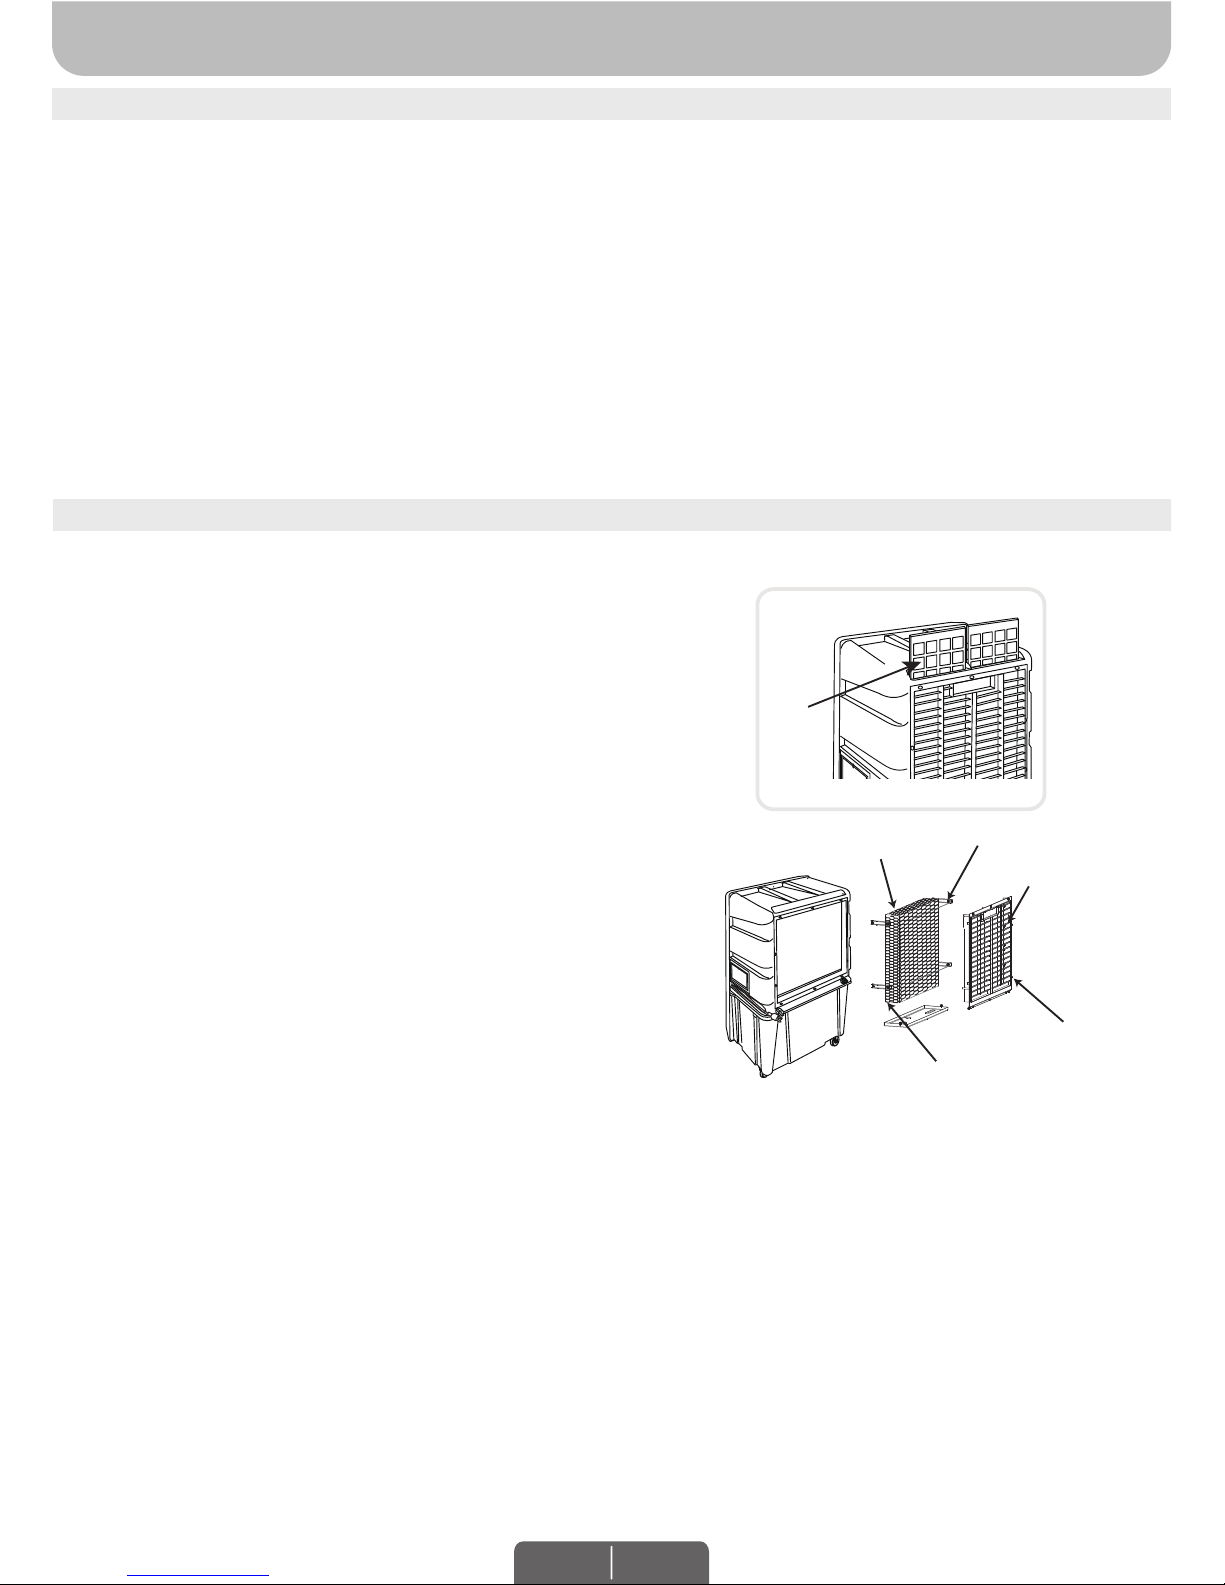
The appliance is supplied with a Plastic Net Filter* and
Honeycomb Cooling Media.
The Plastic Net Filter* and Honeycomb Cooling Media
are located inside the Rear Grill. See Figure 1 for
instructions on how to remove them from the unit for
cleaning and maintenance.
Do not run the unit in COOL mode with stale water in
the tank. You must empty the water tank and refill with
fresh water, especially if the tank has not been cleaned
in a long time.
The cleaning frequency for the Honeycomb media
depends on local air and water conditions. In areas
where the mineral content of water is high, mineral
deposits may build up on the Honeycomb Cooling
Media and restrict air flow. Draining the water tank and
refilling with fresh water at least once a week will help
reduce mineral deposits. If mineral deposits remain on
the Honeycomb Cooling Media, the media should be
removed and washed under fresh water. The media
should be cleaned every two months or sooner,
depending on your needs.
For best results allow the Honeycomb Cooling Media to
dry after each use by turning off the cool function 15
minutes before turning the unit off.
•
•
•
•
•
*Applicable for models with Plastic Net Filter only.
Honeycomb
Cooling Media
Rear Grill
Horizontal Bar
Figure 1:
Slide out the Plastic Net Filter* and clean with water.
Remove all the screws from the Rear Grill of the Air Cooler.
Carefully pull out the rear grill from the cooler.
Carefully pull out the Honeycomb Cooling Media from the rear
grill.
There are two Horizontal Bars holding the Honeycomb Cooling
Media in place. Remove all the screws from the Horizontal Bars
and then pull the bars off of the Honeycomb Cooling Media.
Replace or clean media with water and a damp cloth as
needed.
WARNING: DO NOT operate the Air Cooler when the
Rear Grill or Honeycomb Media is removed from the Air Cooler,
or if there is a loose-fitting Rear Grill or Honeycomb Cooling
Media. Doing so can cause serious injury or dangerous
electrical shock.
1.
2.
3.
4.
5.
6.
Removing the Plastic Net Filter*/ Honeycomb Cooling Media:
WARNING: Switch the unit OFF and disconnect from the
electrical socket.
Screws
Screws
Plastic
Net
Filter
EN 5
Page 7
DESCRIPTION DES PIÈCES
(5)
(1)
(2)
(3)
(10)
(8)
(11)
(12)
(14)
(16)
(15)
(13)
(17)
(6)
(7)
(4)
(9)
AVERTISSEMENT -- LIRE ET CONSERVER LE GUIDE DE SÉCURITÉ ET D’ENTRETIEN ET LE
MANUEL DE L’UTILISATEUR DU REFROIDISSEUR D’AIR AVANT D’UTILISER LE PRODUIT. NE
PAS SUIVRE CES CONSIGNES POURRAIT ENDOMMAGER ET/OU PERTURBER SON
FONCTIONNEMENT ET ANNULER LA GARANTIE.
UTILISATION ET FONCTIONNEMENT
PANNEAU DE COMMANDE
FUNCTION BUTTONS
Interrupteur (POWER)
Appuyer sur l’INTERRUPTEUR pour mettre l’appareil en marche. Le refroidisseur fonctionnera
automatiquement à la vitesse moyenne. Après quelques secondes, la vitesse basculera à faible. Pour
éteindre l’appareil, appuyer sur l’interrupteur de nouveau.
Mode (MODE)
Appuyer sur le bouton MODE pour mettre en marche le refroidissement par évaporation
et/ou mode Oscillation.
Appuyer sur le bouton MODE jusqu’à ce que le clignotant “S” soit illuminé sur le panneau
de commande. Les grilles d’aération verticales commenceront à osciller de gauche à
droite automatiquement.
Appuyer sur le bouton MODE jusqu’à ce que le clignotant “C” soit illuminé pour mettre en marche le
refroidissement par évaporation. La pompe à eau fonctionnera et vous sentirez l’air frais une fois que le
système de refroidissement en nid d’abeilles sera entièrement trempé.
H M L 0.5 124S C
MODE SPEED POWER TIMER SWING(H)
SWING(V)
Icônes sur l’écran d’affichage
Interrupteur
Minuterie
Oscillation
(Grilles d’aération
horizontales)
Oscillation
(Grilles d’aération
verticales)
Refroidissement
Vitesse
MOUVEMENT DES
GRILLES D’AÉRATION
FR 1
Panneau de commande
Poignée
Grille d’aération
Indicateur de niveau d’eau
Roulettes
Couvercle du
compartiment à glaçons
1)
2)
3)
4)
5)
6)
Fixation pour le cordon
d’alimentation
Réservoir d’eau
Cordon électrique
et prise
Filtre en plastique net
Vis de la grille arrière
7)
8)
9)
10)
11)
Système de refroidissement
en nid d’abeilles
Grille arrière
Régulateur d’eau
Porte pour le remplissage
Vanne de l’entrée d’eau
Bouchon de vidange
12)
13)
14)
15)
16)
17)
Page 8

FR 2
Appuyer sur le bouton MODE jusqu’à ce que “S” et “C” soient tous deux illuminés active à la fois le
modes Oscillation (Grilles d’aération verticales) et Refroidissement.
Remarque: Lorsque le symbole mode “C” n’est pas illuminé, l’appareil fonctionne uniquement en mode
VENTILATEUR sans refroidissement par évaporation.
Vitesse (SPEED)
Appuyer sur le bouton de la VITESSE à plusieurs reprises pour changer la vitesse entre Élevée —
Moyenne — Faible. Le voyant indiquera la vitesse choisie:
Minuterie (TIMER)
Appuyer sur le bouton MINUTERIE jusqu’à ce que le temps désiré soit réglé. Une fois la période
écoulée, l’appareil s’arrêtera automatiquement (l’unité reste en mode Veille jusqu’à ce que le cordon
d’alimentation soit débranché de la prise électrique). La fonction MINUTERIE vous permet de
programmer l’appareil afin qu’il fonctionne pendant 7,5 heures au maximum.
Oscillation (H) (SWING (H))
Appuyer sur le bouton Oscillation(H) jusqu’à ce que le voyant s’illumine.
Ceci active le the Grilles d’aération horizontales et les grilles d’aération
commenceront à osciller automatiquement.
UTILISATION ET FONCTIONNEMENT (SUITE)
BOUTONS DE FONCTION (SUITE)
TÉLÉCOMMANDE
REFROIDISSEMENT DE LA PIÈCE ET HUMIDIFICATION
Régulateur d’eau
MIN
MAX
En mode refroidissement, les refroidisseurs d’air de Honeywell fournissent
de l’air humidifié grâce à l’évaporation de l’eau. Un bouton de régulation
manuelle de l’eau se trouve dans le compartiment à glaçons de l’appareil.
Celui-ci permet le réglage de la quantité d’eau pompée par le système de
refroidissement en nid d’abeilles, contribuant ainsi à régler le degré de
refroidissement et d’humidification.
Lorsque le régulateur d’eau est réglé à MIN, la pompe à eau distribue une
quantité minimale d’eau au système de refroidissement en nid d’abeilles, ce
qui réduit l’évaporation d’eau et l’effet de refroidissement.
Lorsque le régulateur d’eau est réglé à MAX, la pompe à eau distribue une quantité maximale d’eau au
système de refroidissement en nid d’abeilles, ce qui augmente l’évaporation d’eau et l’effet de
refroidissement.
Élevée (H)
Moyenne (M)
Faible (L)
MOUVEMENT DES
GRILLES D’AÉRATION
SWING (H)
SPEED
TIMER MODE
ON/OFF
EN MARCHE / ÉTEINDRE
Commande le mouvement des grilles d’aération
horizontales
Commande la fonction de minuterie pour un arrêt
automatique
Commande le mouvement des grilles d’aération
verticales et Refroidissement par évaporation En
Marche / Éteindre
Faible / Moyenne / Élevée
Interrupteur (POWER)
Oscillation (H) (SWING (H))
Minuterie (TIMER)
Mode (MODE)
Vitesse (SPEED)
:
:
:
:
:
Page 9

UTILISATION ET FONCTIONNEMENT (SUITE)
REMPLISSAGE
POSITION DU REFROIDISSEUR D’AIR
Veiller à placer le refroidisseur d’air comme il se doit avant de l’installer et de l’utiliser. Il convient de se
reporter à la section POSITION DU REFROIDISSEUR D’AIR du Guide de sécurité et d’entretien.
Pour la remplacer, il convient de se procurer une pile plate AAA (2 x 1.5V).
Ouvrir le compartiment de la pile à l’arrière de la télécommande et insérer une pile plateà l’intérieur.
Veiller à respecter l’indication de polarité (+/— ) qui se trouve à l’intérieur du compartiment de pile.
Lorsque la commande est utilisée, le signal du transmetteur doit toujours être pointé vers l’appareil. Il
convient de s’assurer que des objets ne font pas obstacle au signal.
Enlever les piles si l’appareil ne doit pas être utilisé pendant une période prolongée.
Ne pas laisser tomber la télécommande.
Ne pas mélanger les différents types de piles telles que les piles alcalines, carbone-zinc ou
rechargeables.
Ne pas mélanger de vieilles piles avec des neuves.
Ne pas recharger la pile.
Les piles déchargées doivent être retirées de l'appareil et éliminées en toute sécurité conformément
aux réglementations locales.
Ne pas jeter les piles au feu. Elles peuvent exploser ou couler.
ATTENTION: Faire preuve de prudence pour éviter l'ingestion de la petite pile. Garder loin des enfants
et des animaux.
•
•
•
•
•
•
•
•
•
•
Remarque:
TÉLÉCOMMANDE (SUITE)
ATTENTION:
Débrancher l’appareil avant de vider ou de remplir le réservoir d’eau.
Raccord d’alimentation continue en eau:
Trouver le raccord mâle à un bout du tuyau d’arrosage. Insérer le
raccord du tuyau d’arrosage dans la vanne d’entrée d’eau du
refroidisseur. Visser et serrer la vanne de l’entrée d’eau sur la partie
filetée du raccord du tuyau d’arrosage en s’assurant qu’il y est bien
fixé afin d’éviter toute fuite. S’il y a une fuite, le tuyau et la vanne
d’entrée d’eau ne sont peut-être pas raccordés correctement.
Essayer de dévisser, de replacer et de visser à nouveau la vanne
d’entrée d’eau.
Lorsque le raccord ne fuit plus, OUVRIR l’alimentation en eau et l’eau
s’écoulera dans le réservoir d’eau du refroidisseur.
Le refroidisseur est maintenant prêt, donc l’eau est renouvelée
automatiquement lorsque le réservoir d’eau est vide, ou lorsque l’eau
se trouve sous le niveau minimal.
Lorsque le réservoir d’eau est plein, la vanne d’entrée d’eau
empêche automatiquement le débordement du réservoir d’eau.
AVERTISSEMENT:
La pression maximale d’entrée d’eau est de 0,5MPa.
•
•
•
•
Pour une alimentation en eau continue, un tuyau d’arrosage connecté à
une alimentation en eau principale est nécessaire.
Vanne de
l’entrée d’eau
Tuyau d’arrosage
FR 3
Page 10

REMPLISSAGE (SUITE)
UTILISATION ET FONCTIONNEMENT (SUITE)
Remplissage manuel du réservoir d’eau:
Ouvrir la porte de remplissage qui se trouve sur le côté de l’appareil.
L’indicateur du niveau d’eau se trouve à l’avant de l’unité. Remplir le
réservoir d’eau lorsque le niveau d’eau est faible. Ne pas dépasser la
marque de niveau pour éviter les gouttelettes d'eau sur les grilles
d'aération. Vérifier le niveau d’eau dans le réservoir avant de mettre en
marche la fonction REFROIDISSEMENT. S’assurer que l’eau du
réservoir dépasse la marque du niveau d’eau minimal. Faire fonctionner
l’appareil en mode REFROIDISSEMENT sans la quantité d’eau
suffisante peut causer une panne de la pompe.
Remarque: La capacité d'eau correspond au volume total d'eau qui
peut être contenu dans le réservoir et le système de distribution d'eau
du refroidisseur d'air. La capacité d'eau dans le réservoir au niveau de
l'indicateur « Max. » peut-être inférieure à la capacité d'eau réelle du
refroidisseur d'air.
Remarque: Pour améliorer le rendement du refroidisseur, des glaçons
peuvent être ajoutés dans le compartiment qui se trouve sur le dessus
de l’appareil.
Porte de remplissage de l’eau
Compartiment à glaçons
NETTOYER ET VIDANGER LE RÉSERVOIR D’EAU
Si le refroidisseur n’est pas utilisé pendant une longue période, il convient de se reporter aux
DIRECTIVES D’ENTREPOSAGE ET D’ENTRETIEN du Guide de sécurité et d’entretien.
Déplacer l’appareil jusqu’à un endroit où l’eau peut être vidangée. Enlever le bouchon de vidange
situé dans la partie inférieure de l’appareil. Laisser le réservoir se vider.
Remplir le réservoir d’eau avec de l’eau propre, jusqu’au niveau maximal, puis le vider complètement.
Utiliser un chiffon humide pour retirer la saleté et la poussière de la surface de l’appareil. Ne jamais
utiliser de produits corrosifs ou chimiques pour nettoyer cet appareil.
Lorsque le produit n’est pas utilisé, le ranger dans un endroit sec hors de la lumière directe du soleil.
•
•
•
•
AVERTISSEMENT:
Avant de nettoyer l’appareil, l’éteindre et le débrancher de la prise électrique.
FR 4
*S’applique uniquement aux modèles munis de l’avertisseur de bas niveau d’eau.
AVERTISSEUR DE BAS NIVEAU D’EAU*
L’appareil est muni d’un capteur de bas niveau d’eau. En mode Refroidissement, lorsque l’eau du
réservoir n’atteint plus le niveau minimal, un bip se fait entendre et le symbole le voyant clignote
automatiquement. Le refroidissement par évaporation cessera alors automatiquement.
Remplir le réservoir d’eau pour désactiver l’avertisseur en mode REFROIDISSEMENT. Éteindre en
premier lieu l’appareil et le débrancher de la prise électrique. Remplir le réservoir d’eau en dépassant la
marque de niveau minimal. Brancher et mettre en marche de nouveau.
Pour désactiver l’avertisseur et continuer d’utiliser l’appareil en tant que ventilateur (sans refroidissement
par évaporation), éteindre l’appareil et le remettre en marche. En mode VENTILATEUR l’avertisseur de
bas niveau d’eau ne s’activera pas. L’avertisseur de bas niveau d’eau retentira de nouveau si la fonction
REFROIDISSEMENT est activée alors que le réservoir d’eau est toujours vide.
Page 11

UTILISATION ET FONCTIONNEMENT (SUITE)
NETTOYAGE DU FILTRE* EN PLASTIQUE NET ET DU SYSTÈME DE REFROIDISSEMENT EN NID D’ABEILLES
L’appareil est vendu avec un filtre* en plastique net et un
système de refroidissement en nid d’abeilles.
Le filtre* en plastique net et le système de refroidissement en nid d’abeilles se trouvent derrière la grille
arrière. Pour savoir comment les retirer de l’appareil en
vue de leur nettoyage et de leur entretien, consulter la
figure1.
Ne pas faire fonctionner l’unité en mode REFROIDISSEMEMT quand de l’eau stagnante se trouve dans le
réservoir. Vous devez vider l’eau et la remplacer par de
l’eau propre, surtout si le réservoir n’a pas été nettoyé
depuis longtemps.
La fréquence de nettoyage du système en nid d’abeilles
dépend de l’état de l’eau et de l’air. Dans les régions où
l’eau est riche en minéraux, des dépôts peuvent
s’accumuler sur le système de refroidissement en nid
d’abeilles et nuire à la circulation d’air. Vider le réservoir
d’eau et le remplir d’eau propre au moins une fois par
semaine contribueront à réduire les dépôts de minéraux.
Si les dépôts de minéraux subsistent sur le système de
refroidissement en nid d’abeilles, le système devra être
retiré et lavé avec de l’eau propre. Le système devra
être nettoyé tous les deux mois ou plus souvent, selon le
besoin.
Pour obtenir les meilleurs résultats, laisser sécher le
système de refroidissement en nid d’abeilles après
chaque utilisation en éteignant la fonction REFROIDISSEMENT pendant 15 minutes avant d’éteindre
l’appareil.
•
•
•
•
•
*S’applique uniquement aux modèles avec Filtre en plastique net.
Système de refroidissement
en nid d’abeilles
Grille
arrière
Barres
horizontales
Figure 1:
Retirer le Filtre* en plastique net et le nettoyer avec de l’eau.
Retirer toutes les vis de la grille arrière du refroidisseur d’air.
Retirer soigneusement la grille arrière du refroidisseur.
Pour retirer le système de refroidissement en nid d’abeilles de
la grille arrière.
Deux barres horizontales qui maintiennent en place la plaque
de refroidissement en nid d’abeilles. Retirer toutes les vis des
barres horizontales, puis les barres de la plaque de
refroidissement en nid d’abeilles.
Nettoyer le système avec de l’eau et un chiffon humide ou le
remplacer au besoin.
AVERTISSEMENT: NE PAS UTILISER le refroidisseur d’air
lorsque la grille arrière ou Système de refroidissement en nid
d’abeilles est retirée du refroidisseur d’air ou si la grille arrière
ou Système de refroidissement en nid d’abeilles ne tient pas en
place correctement. Cela peut causer de sérieuses blessures
ou de dangereuses décharges électriques.
1.
2.
3.
4.
5.
6.
Retirer le Filtre* en plastique net/ le système de refroidissement
en nid d’abeilles:
AVERTISSEMENT: l’éteindre et le débrancher de la prise
électrique.
Vis
Vis
Filtre en
plastique
net
FR 5
Page 12

1) Panel de Control
2) Manija
3) Deflectores
4) Indicador de Nivel de Agua
5) Ruedas
6) Compartimento de Hielo
7) Porta Cable
8) Tanque de Agua
9) Cable de Alimentación y Enchufe
10) Filtro de Red Plástico
11) Rejilla Trasera Tornillos
12) Filtro de Enfriamiento Honeycomb
13) Rejilla Trasera
14) Regulador de Agua
15) Bandeja de Agua
16) Válvula de Entrada de Agua
17) Tapón de Agua
DESCRIPCIÓN DE PARTES
(5)
(1)
(2)
(3)
(10)
(8)
(11)
(12)
(14)
(16)
(15)
(13)
(17)
(6)
(7)
(4)
(9)
USO Y FUNCIONAMIENTO
PANEL DE CONTROL
BOTONES DE FUNCIÓN
Encendido/ Apagado (POWER)
MODO (MODE)
Iconos en la Pantalla Display
ENC / APAG
Tiempo
Oscilación
(Deflectores
Horizontales)
Oscilación
(Persianas Verticales)
Frío
Velocidad
MOVIMIENTO
DE PERSIANAS
ES 1
ADVERTENCIA -- LEA Y GUARDE LA GUIA DE MANTENIMIENTO Y EL MANUAL DE INSTRUCCIONES ANTES DE USAR ESTE PRODUCTO. EL INCUMPLIMIENTO DE ESTAS INSTRUCCIONES PUEDE DAÑAR Y / O PERJUDICAR SU FUNCIONAMIENTO E INVALIDAR LA
GARANTÍA.
ADVERTENCIA: ÚNICAMENTE PARA MODELOS DE EXTERIORES CO70PE, UTILICE ÚNICAMENTE
EN TOMA CORRIENTES Y ENCHUFES PROTEGIDOS GFCI.
Presione el botón POWER para encender la unidad. El enfriador comenzará automáticamente a
funcionar a velocidad media. Después de unos segundos la velocidad cambiará a baja. Para apagar la
unidad, presione el botón nuevamente.
Pulse el botón MODE para activar el modo de enfriamiento evaporativo y / o la oscilación
de las persianas.
Pulse el botón MODE hasta que la luz indicadora "S" se ilumina en el panel de control.
Las persianas verticales comenzarán a moverse de izquierda a derecha de forma automática.
Presione el botón MODE hasta que la luz indicadora "C" se ilumina para activar el
enfriamiento por evaporación. La bomba de agua funcionará y usted sentirá el aire más
fresco después que el filtro de enfriamiento Honeycomb esté completamente mojado.
H M L 0.5 124S C
MODE SPEED POWER TIMER SWING(H)
SWING(V)
Page 13

ES 2
VELOCIDAD (SPEED)
TEMPORIZADOR (TIMER)
OSCILACIÓN (H) (SWING (H))
USO Y FUNCIONAMIENTO (CONTINUACIÓN)
BOTONES DE FUNCIÓN (CONTINUACIÓN)
CONTROL REMOTO
ENFRIAMIENTO DE AMBIENTE Y HUMIDIFICACIÓN
: Enc / Apag
: Controla el movimiento de los deflectores
: Control de función de apagado automático
: Controla el movimiento de las persianas verticales y el
encendido / apagado del enfriamiento evaporativo
: Baja / Media / Alta
•
•
•
•
Nota:
Encendido (POWER)
Oscilación (SWING (H))
Tiempo (TIMER)
Modo (MODE)
Velocidad (SPEED)
Regulador De Agua Manual
MIN
MAX
Alta (H)
Media (M)
Baja (L)
SWING (H)
SPEED
TIMER MODE
ON/OFF
MOVIMIENTO
DE PERSIANAS
Si se pulsa el botón MODE hasta tanto" S "y" C "se iluminan, se activará la oscilación (Persianas
verticales) y el modo enfriamiento simultáneamente.
Nota: Cuando no se selecciona el modo "C", la unidad funcionará en modo ventilación únicamente, sin
enfriamiento por evaporación.
Presione el botón TIMER hasta seleccionar la duración del tiempo deseado. Cuando ha transcurrido el
tiempo establecido, la unidad se apagará automáticamente (la unidad permanece en el modo stand-by
hasta que el cable de alimentación es desenchufado de la toma eléctrica). La función TIMER permite
programar el funcionamiento de la unidad hasta 7,5 horas de uso.
Pulse el botón OSC.(H) hasta que la luz indicadora se encienda. Esto activa el
movimiento de las persianas horizontales que empezarán a moverse hacia arriba
y hacia abajo de forma automática.
El control remote requiere dos pilas AAA (2 x 1.5V) para su reemplazo.
Abra el compartimento para pilas en la parte de atrás del control remoto e inserte la pila. Asegúrese
de colocar la pila de acuerdo a la polaridad correcta (+ / -) indicada dentro del compartimento para
pilas.
Siempre apunte el transmisor de señal del control remoto hacia la unidad cuando se opera.
Asegúrese de que la ruta de la señal no esté obstruida.
Retire las pilas si la unidad no se va a utilizar durante un período prolongado de tiempo.
No deje caer el control remoto.
Pulse repetidamente el botón SPEED para cambiar la velocidad entre Alta - Media - Baja.
La luz indicadora mostrará la velocidad seleccionada:
En modo FRÍO, los enfriadores Honeywell entregan aire hidratado a través
de la evaporación de agua. Hay un control manual de regulación de agua
ubicado en el compartimento de hielo de la unidad. Esto le permite ajustar
la cantidad de agua bombeada en el filtro de enfriamiento, lo que ayuda a
controlar los niveles de enfriamiento y humidificación.
Cuando el regulador de agua se establece en MIN, la bomba de agua
distribuye una cantidad mínima de agua al filtro de enfriamiento
Honeycomb. Esto se traduce en menos evaporación de agua y reduce el
efecto de enfriamiento.
Cuando el regulador de agua se establece en MAX, la bomba de agua distribuye la cantidad máxima
de agua al filtro de enfriamiento Honeycomb. Esto se traduce en la máxima evaporación del agua y el
rendimiento de enfriamiento mejora.
Page 14

USO Y FUNCIONAMIENTO (CONTINUACIÓN)
LLENADO CON AGUA
UBICACIÓN DEL ENFRIADOR
CONTROL REMOTO (CONTINUACIÓN)
ES 3
Puerta de
Llenado de Agua
•
•
•
•
•
No mezcle diferentes tipos de pilas, alcalinas, de carbono-zinc, o pilas recargables.
No mezcle pilas nuevas con viejas.
No recargue la batería.
Las baterías agotadas deben ser removidas del producto y desechadas de forma segura de acuerdo
a las regulaciones locales.
No arrojar las baterías al fuego. Las baterías podrían explotar o derramarse.
ADVERTENCIA: Peligro de ingestión de la batería pequeña. Manténgala alejada de niños y animales.
Asegúrese de colocar el enfriador de aire correctamente antes de configurar y empezar a usar el
producto. Por favor, consulte la sección de la Guía de seguridad y de mantenimiento separada.
Recarga Manual del Tanque de Agua:
Abra la puerta de llenado de agua ubicada en el costado de la unidad.
El indicador de nivel de agua está ubicado en la parte frontal de la
unidad. Recargue el tanque de agua cuando el nivel de agua está bajo.
No colocar agua por encima de la marca de “Max” del indicador de
nivel de agua, para evitar que gotas de agua se acumulen en las rejillas.
Revise el nivel de agua en el tanque antes de poner en funcionamiento
el modo Frío.
PRECAUCIÓN:
Desenchufe la unidad de la toma de corriente eléctrica antes de vaciar o llenar el depósito de agua.
Conexión del Suministro de Agua Continuo:
Para obtener un suministro continuo de agua, necesitará que una
manguera esté conectada a un suministro de agua de la red.
Es Ideal usar la conexión de suministro agua continuo para operar la unidad por largos periodos de
tiempo sin volver a llenar de agua. Esto también ayuda a prevenir el fallo de la bomba en caso de que
el enfriador de aire esté funcionando con agua insuficiente en el tanque.
Ubique el conector macho en un extremo de la manguera.
Inserte el conector de la manguera a la válvula de entrada de agua
del enfriador. Atornille y ajuste la válvula de entrada de agua en la
parte roscada del conector de la manguera, asegurándose de que el
conector de la manguera esté fijo para asegurar que no haya
perdidas. Si hay una perdida, es posible que la manguera y la válvula
de entrada de agua no estén conectados correctamente.Trate de
desconectar, sustituir y ajustar la válvula de entrada de agua
nuevamente.
Cuando se asegure la conexión, encienda el suministro de agua y el
agua fluirá hacia el tanque del enfriador.
Ahora, el enfriador está configurado para que el agua se recargue de
forma automática cuando el tanque esté vacío, o cuando el agua
esté por debajo del nivel mínimo.
Cuando el tanque está lleno de agua, la válvula de entrada de agua
detendrá automáticamente el suministro de agua para evitar que el
tanque desborde.
ADVERTENCIA:
La presión máxima de entrada de agua es de 0,5 MPa.
•
•
•
•
Válvula de
entrada de
agua
Manguera
de jardín
Page 15

*Aplica únicamente para los modelos con función Alarma de Bajo Nivel de Agua.
USO Y FUNCIONAMIENTO (CONTINUACIÓN)
ES 4
ALARMA DE NIVEL BAJO DE AGUA*
La unidad está equipada con un sensor de nivel de agua bajo. En modo Frío, cuando el tanque de agua
está por debajo del nivel mínimo, UD escuchará la alarma y un LED indicador parpadeará
continuamente. La unidad dejará de funcionar en modo enfriamiento evaporativo automáticamente.
Vuelva a llenar el tanque de agua para desactivar la alarma en el modo de Frío. Primero apague la
unidad y desenchufe desde la toma de corriente. Llene el depósito de agua con agua por encima de la
marca de nivel mínimo de agua. Conecte y encienda de nuevo.
Para desactivar la alarma y continuar usando la unidad como un ventilador (sin refrigeración por
evaporación), apague la unidad y vuelva a encenderla. La alarma de bajo nivel de agua no funciona en
modo sólo ventilador. La alarma de bajo nivel de agua volverá a sonar si la función Frío se activa
mientras que el tanque de agua sigue vacío.
LIMPIEZA Y VACIADO DEL TANQUE DE AGUA
Mueva la unidad a un lugar donde el agua pueda ser drenada. Retire el tapón de drenaje
situado en la parte inferior de la unidad. Permita que el tanque se vacíe.
Vuelva a llenar el tanque de agua con agua limpia hasta el nivel máximo y drene completamente.
Use un paño húmedo para eliminar la suciedad y el polvo de la superficie de la unidad. Nunca utilice
elementos corrosivos o productos químicos para limpiar este producto.
Cuando el producto no está en uso, almacene la unidad en un lugar seco fuera de la luz solar directa.
•
•
•
•
ADVERTENCIA:
Antes de limpiar la unidad, apague la unidad y desconecte de la toma de corriente.
A continuación se presentan las instrucciones para limpiar y mantener el Enfriador de aire. Si el Enfriador
no se usa por un largo período de tiempo, por favor, consulte las instrucciones de almacenamiento y
mantenimiento situadas en la Guía de seguridad y de mantenimiento separada.
LLENADO CON AGUA
Puerta
de Hielo
NOTA: La capacidad de agua se refiere al volumen total de agua que
puede ser contenida dentro del depósito de agua del enfriador de aire y
el sistema de distribución de agua. La capacidad del depósito de agua
en “Max” indica que está en la máxima capacidad de agua del enfriador
de aire.
ADVERTENCIA: Asegúrese siempre de que el agua en el depósito de
agua está por encima del mínimo (Min.) Marca de nivel de agua, tanto
para continuo como manual de recarga de agua. La ejecución de la
unidad en modo de FRIO con agua inadecuada puede causar fallo de la
bomba.
NOTA: Si hay hielo disponible puede agregar hielo en el compartimento
de hielo para mejorar el rendimiento de la refrigeración.
Page 16

USO Y FUNCIONAMIENTO (CONTINUACIÓN)
*Aplicable a modelos con Filtro de Red Plástico solamente.
Soporte Horizontal
Figura 1:
Tornillos
Tornillos
Filtro
De Red
Plástico
ES 5
LIMPIEZA DEL FILTRO DE RED PLÁSTICO* Y FILTRO DE ENFRIAMIENTO HONEYCOMB
El aparato se suministra con un filtro de red plástico* y un
filtro de enfriamiento Honeycomb.
El filtro de red plástico* y filtro de enfriamiento
Honeycomb se encuentran dentro de la rejilla posterior.
Véase la figura 1 para obtener instrucciones sobre la
manera de sacarlos de la unidad para la limpieza y el
mantenimiento.
No haga funcionar la unidad en modo FRIO con agua
estancada en el tanque. Debe vaciar el depósito de agua
y volver a llenarlo con agua, sobre todo si el tanque no se
ha limpiado en mucho tiempo.
La frecuencia de limpieza de los filtros de enfriamiento
Honeycomb depende de las condiciones del aire y del
agua local. En las zonas donde el contenido mineral del
agua es alto, depósitos minerales pueden acumularse en
los filtros de enfriamiento Honeycomb y restringir el flujo
de aire. El vaciado del depósito de agua y el rellenado de
agua fresca por lo menos una vez por semana le ayudará
a reducir los depósitos de minerales. Si los depósitos
minerales permanecen en el filtro de enfriamiento
Honeycomb, los filtros de enfriamiento deben ser
retirados y lavados con agua fresca. Los medios de
enfriamiento deben limpiarse cada dos meses, o antes,
dependiendo de sus necesidades.
Para obtener los mejores resultados y cuidar el filtro de
enfriamiento Honeycomb, deje secar después de cada
uso desactivando la función de frío 15 minutos antes
de apagar la unidad.
•
•
•
•
•
Filtro de
Enfriamiento
Honeycomb
Rejilla
Trasera
Deslice el filtro de red plástico y limpie con agua.
Remueva todos los tornillos de la rejilla posterior del
Enfriador.
Tire cuidadosamente de la rejilla posterior del Enfriador.
Saque el Filtro de Red Plástico* y limpie con agua según
sea necesario.
Para sacar el Medio Honeycomb retire el Marco
posterior y deslice el Honeycomb fuera del marco.
Reemplace o limpie con agua y un paño húmedo
cuando sea necesario.
ADVERTENCIA: NO opere el enfriador de aire cuando
la rejilla trasera o marco trasero se retira del enfriador de
aire, o si la rejilla o marco trasero están sueltos. Si lo
hace, puede causar lesiones graves o una descarga
eléctrica peligrosa.
1.
2.
3.
4.
5.
6.
Extracción del Filtro de Red Plástico* para polvo / filtro de
enfriamiento Honeycomb:
ADVERTENCIA: Apague la unidad y desconecte del toma
corriente.
Page 17

Model / Modèle / Modelo CO70PE
TECHNICAL SPECIFICATIONS / CARACTÉRISTIQUES TECHNIQUES /
ESPECIFICACIONES TÉCNICAS
ELECTRICAL WIRING DIAGRAM / DIAGRAMME DU CIRCUIT ÉLECTRIQUE /
DIAGRAMA DE CIRCUITO ELÉCTRICO
Cooling Media / Système de refroidissement /
Filtro de Enfriamiento
Honeycomb
Product Dimension / Dimensions de l’appareil /
Dimensiones del producto
706 (W) x 426 (D) x 1008 (H) mm
27.8 (W) x 16.8 (D) x 39.7 (H) in
Net Weight / Poids net / Peso Neto 18.5 kg / 40.8 lbs
Voltage / Tension / Voltaje 110 - 120 V
Frequency / Fréquence / Frecuencia 60 Hz
Ampere / Ampère / Amperaje 2.4 A
Wattage / Puissance / Watts 280 W
Water Capacity / Capacité du réservoir d’eau /
Capacidad agua ^
70 Litres / Litros
18.5 Gallons / Galones
Version: 110 - 120V/60Hz
For USA Outdoor Models Only. This appliance is equipped with a GFCI plug.
Press the TEST button and then the RESET button once every month to ensure proper operation.
Uniquement pour les USA modèles en plein air. Utiliser uniquement avec des prises protégées par des disjoncteurs différentiels
(GFCI). Appuyez sur le bouton TEST, puis sur le bouton RESET une fois par mois pour assurer un bon fonctionnement.
Para modelos para exteriores en los EUA. Este producto está equipado con un conector GFCI.
Presione el botón TEST y luego el botón RESET una vez al mes para asegurar una operación apropiada.
Capacitor
Transformer
COOL
PUMP
COOL
PLUG
H M
M
PCB1
PCB2
M
~
M
L
L
HOR
N
OSC
SWING
^To avoid water spillage, water tank max. water level is/ Pour éviter les fuites d'eau le niveau d'eau maximum est /
Para evitar derrames de agua, tanque de agua máx. nivel del agua es: 14.8 gallons (56L).
Page 18

SERVICE AND WARRANTY
EN
1-YEAR LIMITED WARRANTY
Read all the instructions before attempting to use this product.
This 1 year limited warranty applies to repair or replacement product found to be defective in material or
workmanship.
A.
B.
C.
D.
E.
F.
This warranty does not apply to any damage resulting from commercial, abusive, unreasonable
use or supplemental damage. Defects that are the result of normal wear and tear will not be
considered manufacturing defects under this warranty.
JMATEK NORTH AMERICA LLC IS NOT LIABLE FOR INCIDENTAL OR CONSEQUENTIAL
DAMAGES OF ANY NATURE. ANY IMPLIED WARRANTY OF MERCHANTABILITY OR FITNESS
FOR A PARTICULAR PURPOSE ON THIS PRODUCT IS LIMITED IN DURATION TO THE DURATION
OF THIS WARRANTY.
Some jurisdictions do not allow the exclusion or limitation of incidental or consequential damages or
limitations on how long an applied warranty lasts, so the above limitations or exclusions may not
apply to you. This warranty gives you specific legal rights, and you also may have other rights which
vary from jurisdiction to jurisdiction. This warranty applies only to the original purchaser of this
product from the original date of purchase.
At its option, JMATEK NORTH AMERICA LLC will repair or replace this product if it is found to be
defective in material or workmanship.
This warranty does not cover damage resulting from any unauthorized attempts to repair or
from any use not in accordance with the instruction manual.
This warranty applies only if the unit is purchased new from an authorized retailer and is
non-transferable from the original purchaser of the item.
This product is manufactured according to specifications of the country of sale. Any warranties
accompanied with this product is only valid in the country of purchase.
Please read the Instruction Manual carefully before setting up or using this product. If you
believe this product to be suffering from a manufacturing fault, or if you have inquiries about
this product, please contact our Customer Support:
CUSTOMER SUPPORT:
When contacting our Customer Support, please have the information below along with the proof of
purchase. All warranty requests must be accompanied by a proof of purchase, which is a copy of
the original receipt.
: .......................................................................................................................
: .......................................................................................................................
: .......................................................................................................................
Model
Date of purchase
Purchased from
USA
JMATEK NORTH AMERICA LLC
Mahwah, New Jersey 07495 USA
Phone: 1-800-474-2147
Email: usinfo@jmatek.com
Web: www.jmatek.com
CANADA*
GORDON R. WILLIAMS CORP.
Mississauga, ON L5L0B3 CANADA
Phone: 1-888-209-0999
Email: info@williamshvac.com
*Canada Customer Support service available for models sold in Canada only.
Page 19

SERVICE ET GARANTIE
FR
GARANTIE LIMITÉE DE 1 ANNEE
Lisez toutes les instructions avant d'utiliser ce produit.
La durée de la garantie est d'une annee, à partir de la date d’achat du rafraîchisseur et se termine à
la fin de la période prescrite.
A.
B.
C.
D.
E.
F.
Cette garantie ne s'applique pas aux dommages résultant d'un usage abusif ou déraisonnable
ou de dommages. Les défauts qui sont le résultat d'une usure normale ne seront pas
considérés comme des défauts de fabrication en vertu de cette garantie.
JMATEK NORTH AMERICA LLC N'EST PAS RESPONSABLE DES DOMMAGES DIRECTS OU
INDIRECTS DE QUELQUE NATURE QUE CE SOIT. TOUTE GARANTIE IMPLICITE DE
QUALITÉ MARCHANDE OU D'ADÉQUATION A UN USAGE PARTICULIER DE CE PRODUIT
EST LIMITÉE DANS LE TEMPS À LA DURÉE DE CETTE GARANTIE.
Certaines juridictions n'autorisent pas l'exclusion ou la limitation des dommages fortuits ou
consécutifs ou de limitation sur la durée d'une garantie appliquée, de sorte que les limitations
ou exclusions susmentionnées peuvent ne pas s'appliquer à vous. Cette garantie vous donne
des droits légaux spécifiques; vous pouvez également avoir d'autres droits qui varient d'une
juridiction à l'autre. Cette garantie s'applique uniquement à l'acheteur original de ce produit à
partir de la date d'achat originale.
À sa discrétion, JMATEK NORTH AMERICA LLC réparera ou remplacera ce produit s'il est jugé
défectueux au niveau de matériau ou de fabrication.
Cette garantie ne couvre pas les dommages résultants de tentatives non autorisées de
réparation ou de toute utilisation non conforme aux instructions du manuel d'utilisation.
Cette garantie est valable uniquement si l'appareil est acheté neuf chez un détaillant autorisé et elle
est incessible de la part de l'acheteur original de l'article.
Ce produit est fabriqué selon les spécifications du pays de vente. Toutes les garanties accompagnant ce produit sont valables uniquement dans le pays d'achat.
Veuillez lire le manuel d'instructions attentivement avant de configurer ou d'utiliser ce produit.
Si vous croyez ce produit porteur d'un défaut de fabrication, ou si vous avez des questions sur
ce produit, veuillez communiquer avec notre Service à la clientèle:
ASSISTANCE AU CLIENT:
Lorsque vous communiquez avec notre Service à la clientèle, veuillez avoir les informations
ci-dessous avec la preuve d'achat. Toutes les demandes de garantie doivent être accompagnées
d'une preuve d'achat, soit une copie de la facture originale.
: .......................................................................................................................
: .......................................................................................................................
: .......................................................................................................................
Modèle
Date d'achat
Acheté auprès de
USA
JMATEK NORTH AMERICA LLC
Mahwah, New Jersey 07495 USA
Téléphone: 1-800-474-2147
Email: usinfo@jmatek.com
Web: www.jmatek.com
CANADA*
GORDON R. WILLIAMS CORP.
Mississauga, ON L5L0B3 CANADA
Téléphone: 1-888-209-0999
Email: info@williamshvac.com
*Le service client Canadien est disponible uniquement pour les modèles vendus sur le territoire Canadien.
Page 20

SERVICIO Y GARANTIA
ES
GARANTÍA LIMITADA DE 1 AÑOS
Lea todas las instrucciones antes de tratar de utilizar este producto.
Esta garantía limitada de un año se aplica a la reparación o sustitución del producto siempre
que haya algún defecto de material o de manipulación.
A.
B.
C.
D.
E.
F.
Esta garantía no aplica para cualquier daño resultante del uso comercial, abusivo, irracional o
derivado de daños adicionales. Los defectos que sean resultado del desgaste normal por el uso no
serán considerados como defectos de fábrica bajo esta garantía.
JMATEK NORTH AMERICA LLC NO ES RESPONSABLE DE LOS DAÑOS SECUNDARIOS O
DERIVADOS DE NINGUNA NATURALEZA. CUALQUIER GARANTÍA TÁCITA DE
COMERCIABILIDAD O DE PREPARACIÓN PARA UN USO CONCRETO DE ESTE
PRODUCTO QUEDA LIMITADA A LA DURACIÓN DE ESTA GARANTÍA.
Algunas jurisdicciones no permiten la exclusión o limitación de daños incidentales o consecuentes o
limitaciones sobre la duración de la garantía aplicada, por lo que las limitaciones o exclusiones
anteriores podrían no aplicarse en su caso. Esta garantía le otorga derechos legales específicos, y
usted también podría tener otros derechos que varían de una jurisdicción a otra. Esta garantía aplica
solo al comprador original de este producto con la fecha original de compra.
Dado el caso, JMATEK NORTH AMERICA LLC reparará o sustituirá este producto si se detecta
algún defecto de material o de manipulación.
La garantía no cubre el daño causado por cualquier intento no autorizado de reparar el
producto, ni el derivado de no utilizarlo de acuerdo con el manual de instrucciones.
Esta garantía aplica solo si la unidad es adquirida, nueva, de un distribuidor autorizado y no es
transferible del comprador original del producto.
Este producto está manufacturado de acuerdo a las especificaciones del país de venta. Cualquier
garantía que acompañe este producto es válida únicamente en el país de compra.
Por favor, lea el manual de instrucciones detenidamente antes de configurar o de utilizar este
producto. Si considera que este producto sufre un defecto de fabricación, o si tiene dudas
sobre el mismo, por favor contacte con nuestro Servicio de Atención al Cliente:
SERVICIO DE ATENCIÓN A CLIENTES:
Cuando contacte con nuestro Servicio de Atención al Cliente, por favor tenga la siguiente
información preparada como prueba de compra. Todas las solicitudes de cobertura de la
garantía tendrán que ir acompañadas de una prueba de compra, que será una copia de la
factura original.
: .......................................................................................................................
: .......................................................................................................................
: .......................................................................................................................
Modelo:
Fecha de compra
Adquirido en
USA
JMATEK NORTH AMERICA LLC
Mahwah, New Jersey 07495 USA
Téléphone: 1-800-474-2147
Email: usinfo@jmatek.com
Web: www.jmatek.com
CANADA*
GORDON R. WILLIAMS CORP.
Mississauga, ON L5L0B3 CANADA
Téléphone: 1-888-209-0999
Email: info@williamshvac.com
*Servicio de atención a clientes en Canadá disponible solo para modelos vendidos en Canadá.
Page 21

JMATEK North America LLC
Mahwah, New Jersey 07495 USA
Phone: 1-800-474-2147
Email: usinfo@jmatek.com
Web: www.jmatek.com
© 2015 JMATEK Limited. All rights reserved.
The Honeywell Trademark is used under license from
Honeywell International Inc.
Honeywell International Inc. makes no representations
or warranties with respect to these products.
This product is manufactured by Airtek Int'l Corp. Ltd.
(subsidiary of JMATEK Ltd.)
EN
© 2015 JMATEK Limited. Tous droits réservés.
La Marque Déposée Honeywell est utilisée sous
licence de Honeywell International Inc.
Honeywell International Inc. n'offre aucune
recommandation ni de garantie au sujet de ce produit.
Ce produit est fabriqué par Airtek Int'l Corp. ltée
(une filiale de JMATEK ltée)
FR
© 2015 JMATEK Limited. Todos los derechos reservados.
La marca Honeywell es usada bajo licencia de
Honeywell International Inc.
Honeywell International Inc. no representa
ni garantiza este producto.
Este producto es fabricado por Airtek Int'l Corp. Ltd.
(subsidiaria de JMATEK Ltd.)
ES
Customer Support:
Assistance Au Client:
Servicio de atencion a clientes:
USA/ EE.UU: 1-800-474-2147
CANADA/ CANADÁ
#
: 1-888-209-0999
#Canada Customer Support service
available for models sold in Canada only.
 Loading...