

Page 1
Portable Evaporative Air Cooler
for Outdoor, Indoor & Commercial Use
Enfriador de aire portátil por evaporación
Ideal para Uso Externo, Interno y Comercial
OWNER’S MANUAL
Read and save these instructions before use
MANUAL DEL USUARIO
Lea y guarde estas instrucciones antes de usar
Model: CO30XE
Modelo: CO30XE
Power rating: 288 Watts
Potencia: 288W
Voltage rating: 120 Volt AC, 60Hz
Tensión: 120V~60Hz
Para consultas sobre productos o soporte técnico visite: www.honeywellaircoolers.com
For product inquiries or support, visit www.honeywellaircoolers.com
Customer Support : 1-800-474-2147
Centro de servicios al cliente: 1-800-474-2147
Made in China
Fabricado en China
Page 2
1
1
QUICK START GUIDE
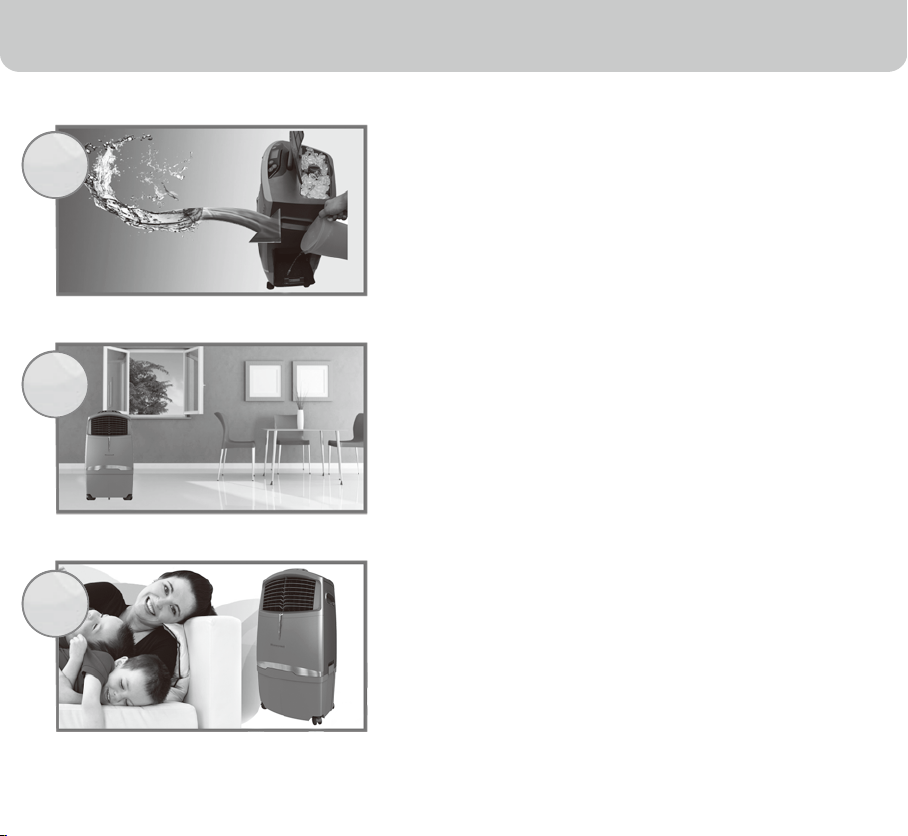
Fill with water and plug into a standard
power outlet.
Note: Please make sure the household power voltage
matches the product specifications.
2
2
3
3
Place near an open door or window.
Note : Evaporative air cooler requires cross ventilation.
Turn ON and enjoy the cooling breeze.
Note: Start with LOW speed and gradually increase
to higher speed for optimum cooling performance.
Page 3

INDEX
Read all instructions carefully before setting up and operating the unit, and please keep
this instruction manual for future reference. This manual is designed to provide you with
important information needed to setup, operate, maintain, and troubleshoot your cooler.
Failure to follow these instructions may damage and/or impair its operation and void the
warranty.
SECTION
1. THANK YOU .........................................................................................................
2. USER TIPS ...........................................................................................................
3. SAFETY INSTRUCTIONS ...................................................................................................
4. PARTS DESCRIPTION ........................................................................................
5. USE & OPERATION .............................................................................................
Control Panel .....................................................................................................
Function Buttons .................................................................................................
Low water alarm and cooler location ...................................................................
Room Cooling and Humidifying ...........................................................................
Remote Control ...................................................................................................
Fill Water ......................................................... .................... ...............
6. CLEANING & MAINTENANCE .............................................................................
7. TROUBLESHOOTING GUIDE .............................................................................
8. TECHNICAL SPECIFICATIONS ...........................................................................
9. ELECTRICAL WIRING DIAGRAM ........................................................................
10. SERVICE AND WARRANTY ................................................................................
.... ............
PAGE
2
3
5
8
9
9
10
12
13
14
15
16
18
20
20
21
1
Page 4

THANK YOU
Congratulations on your purchase of this versatile Honeywell Evaporative Air Cooler. For
optimum cooling from your cooler, fill the water tank to maximum level and load ice inside
the ice compartment before you turn on your air cooler.
Cooler Location – Indoors (Important - Please Read!)
Place the cooler in front of an open door or window. Ensure that there is adequate cross ventilation in the room by leaving a door or window open opposite the cooler.
Following these guidelines will ensure your cooler will work as effectively as possible.
Not an Air Conditioner (Important - Please Read!)
The evaporative air cooler is not an air conditioner as it does not use a compressor or
refrigerant gas. It should not be expected to cool as efficiently as a refrigerated air conditioner.
2
Page 5
USER TIPS
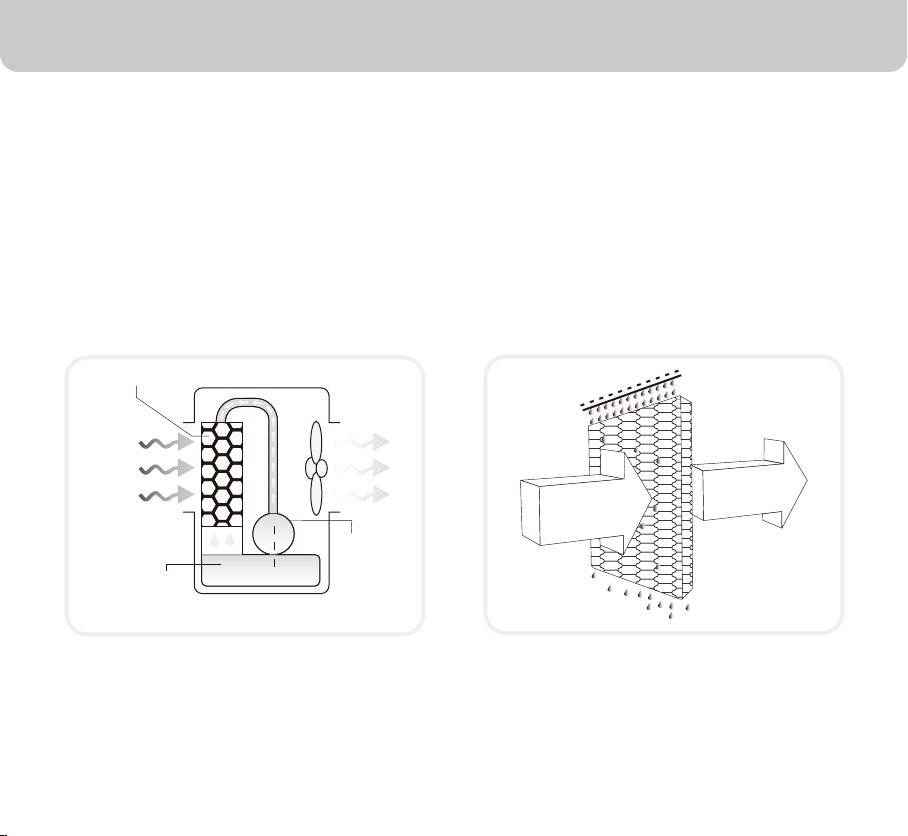
Energy Efficient, No Compressor
Honeywell Evaporative Air Coolers are built to maximize energy efficiency and keep costs low.
Warm air is drawn into the cooler through the Honeycomb Cooling Media. Water pumped from
the tank pours over the honeycomb media. As the warm air passes through the media, the
water absorbs the heat, naturally cooling and humidifying the air. A fan propels the cooled air
out into the room. This no-compressor system cools naturally, efficiently and inexpensively.
Honeycomb Cooling Media
Cool and
humid air
Water
Evaporative Air Cooling Mechanism
Pump
Warm and
dry air
3
Page 6
USER TIPS
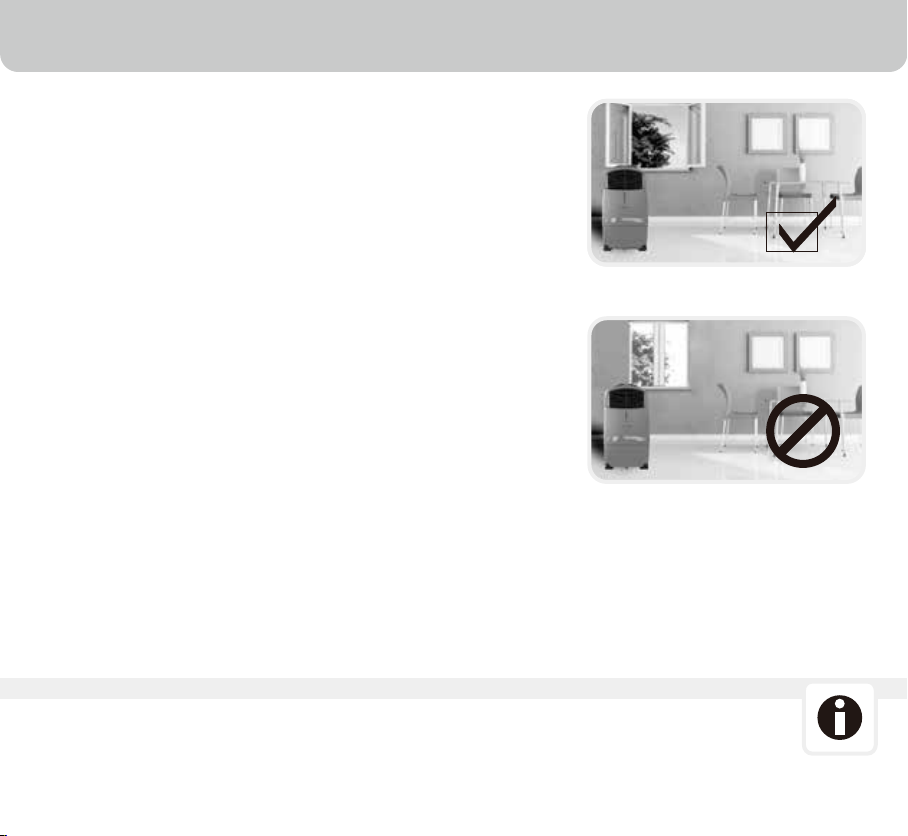
Indoor Use
The recommended maximum relative humidity level is 60% or
less, which allows a noticeable temperature decrease. The
temperature decrease will be greater in drier climates
because higher evaporation occurs when the humidity is low.
The evaporative air cooler should not be used in enclosed
spaces. It must be kept level and there must be water in the
water tank. The room should have doors and windows
opened to allow free air flow. The evaporative air cooler works
best when placed near an open window, so that outside air is
drawn into the evaporative air cooler, the air circulates in the
room, then exits via the door. The maximum cooling effect is
felt when a person is in the flow of air coming out of the
evaporative air cooler.
Room with open windows & door
(RECOMMENDED)
The evaporative air cooler can also be used to humidify dry
air during cool weather. To be used for humidification the
windows and doors should be closed to allow the humidified
air to accumulate.
Room with closed windows & door
(NOT-RECOMMENDED)
Outdoor Use
Unit should be placed a minimum 10 inches away from any wall.
NOTE
When the product is used for the first time the Honeycomb Cooling Media will have an odor
which will dissipate in a few hours or so of initial use.
4
Page 7
SAFETY RULES
READ AND SAVE THESE INSTRUCTIONS:
When using electrical appliances, basic safety precautions should always be followed:
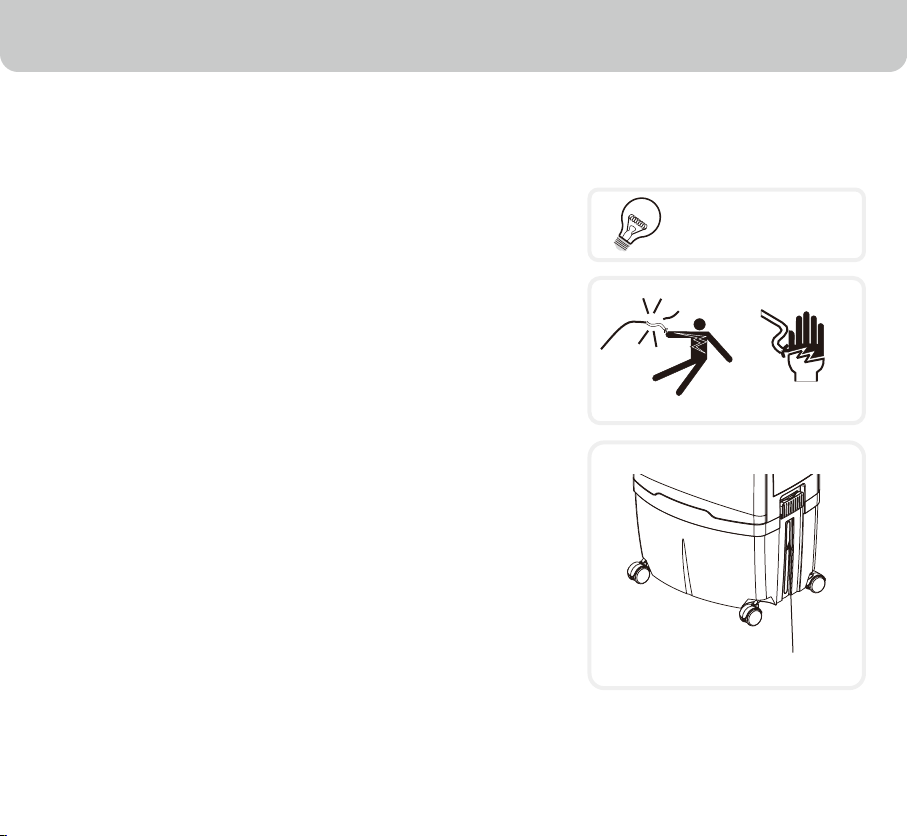
Your cooler runs on 120 Volt AC, 60 Hz current. Check the
•
household voltage to ensure it matches the appliance's rate
specification.
Before operating the product remove it from its packaging
•
and check that it is in good condition.
DO NOT operate any product with a damaged cord or plug.
•
We recommend not using an extension cord with this
appliance.
DO NOT run power cord under carpeting, or cover it with
•
rugs or runners. Keep the cord away from areas where it may
be tripped over.
Always unplug the product before refilling the water tank.
•
Always unplug the appliance from the power source before
•
cleaning, servicing or relocating the unit.
Remove the power cord from the electrical receptacle by
•
grasping and pulling on the power cord plug-end only, never
pull the cord.
DO NOT use the product in areas where gasoline, paint or
•
other flammable goods and objects are stored.
When using the COOL setting, check the water tank to
•
ensure that it is full. Operation of this cooler on the COOL
setting with an empty tank may result in damage to the water
pump.
Warning: To reduce the risk of fire or electric shock, do not
•
use this appliance with any solidstate speed control device.
120 Volt AC, 60 Hz
SHOCK HAZARD
WATER LEVEL INDICATOR
5
Page 8
SAFETY RULES
•
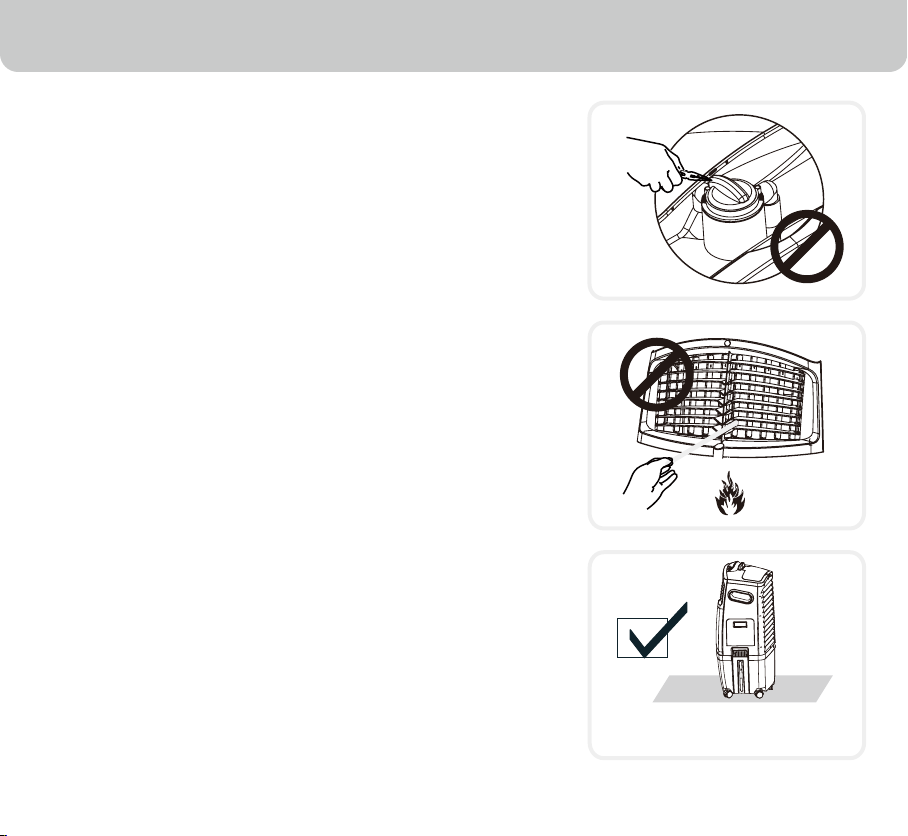
DO NOT attempt to repair or adjust any electrical or mechanical functions of the cooler, as this may void the warranty.
•
DO NOT cover the air inlet or outlet on the appliance as this
may cause motor damage.
DO NOT insert or allow objects to enter any ventilation or
•
exhaust opening as this may damage the product and could
cause electrical shock or fire.
DO NOT operate with the Honeycomb media removed as this
•
will overload and damage the motor.
•
DO NOT leave the operating appliance unattended for any
extended period of time.
•
DO NOT let children play with this appliance, packaging or
plastic bags.
If the unit is damaged or if it malfunctions, do not continue to
•
use it. Refer to the Troubleshooting Guide (page 18) and
contact the service center.
Place the unit on a level floor.
•
This product is not intended for use in wet or damp locations.
•
•
DO NOT use in bathrooms. Never locate the product where
it may fall into a bathtub or other water container.
Store in a dry area when not in use.
•
This appliance is not intended for use by persons (including
•
children or elderly) with reduced physical, sensory or mental
capabilities, or lack of experience and knowledge, unless
they have been given supervision or instruction concerning the
use of the appliance by a person responsible for their safety.
•
Always grip the side handles to move the cooler.
FLOOR LEVEL
6
Page 9

SAFETY RULES
Use Only on GFCI Protected Receptacles.
•
•
Power cords have to be contained. If they must run along the ground, make sure every inch
of them is secured so they will not be tripped over.
The wiring and connections must be waterproof. Be sure the connections (to the air cooler)
•
never get wet. Your unit is waterproof, but everything attached to it must be waterproof, too.
Set up your unit so it cannot be tripped over or wobble loose. It must rest on a solid
•
support.
Warning: To reduce the risk of fire or electric shock, do not use this appliance with any solidstate
speed control device.
7
Page 10
PARTS DESCRIPTION
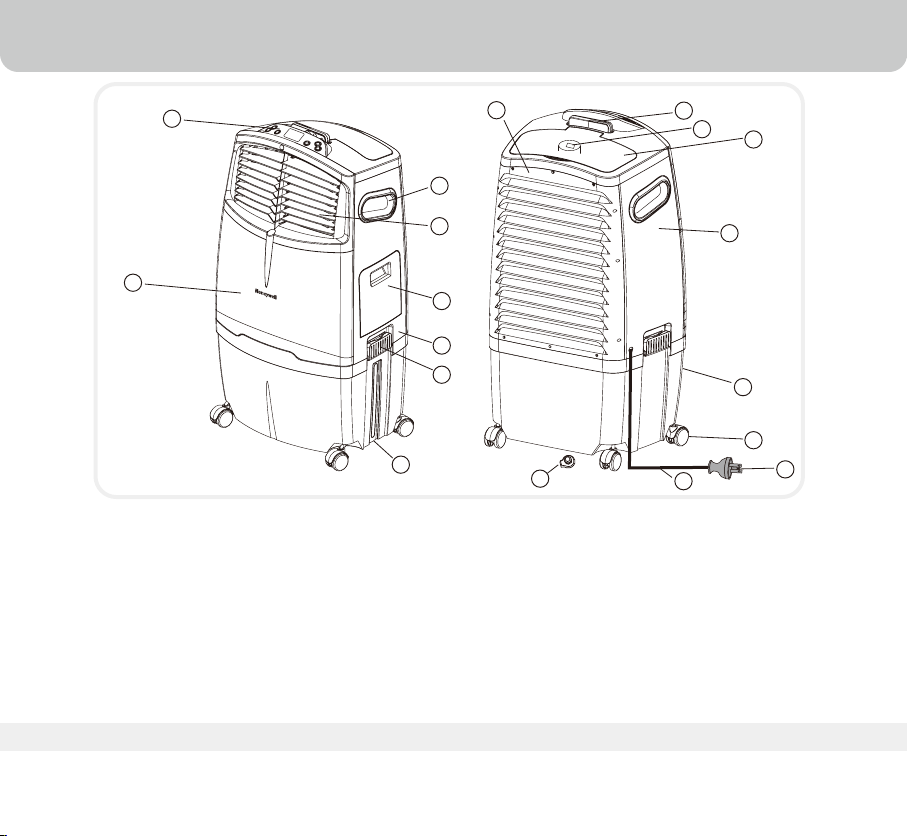
1
11
1
Control Panel
2
Handle
3
Louvers
4
Left Side Panel
5
Water Tank
6
Power Cord
7
Power Plug
8
Casters
9
Ice Compartment Lid
10
2
3
16
15
14
12
17
10
Back Grill
11
Front Panel
12
Water Level Indicator
13
Remote Control
14
Latch
15
Right Side Panel
16
Water Fill Door
17
Drain Plug
18
Water Regulator (under part 9)
13
18
9
4
5
8
6
7
ACCESSORIES:
Remote Control (2 AAA Batteries not included)
8
Page 11
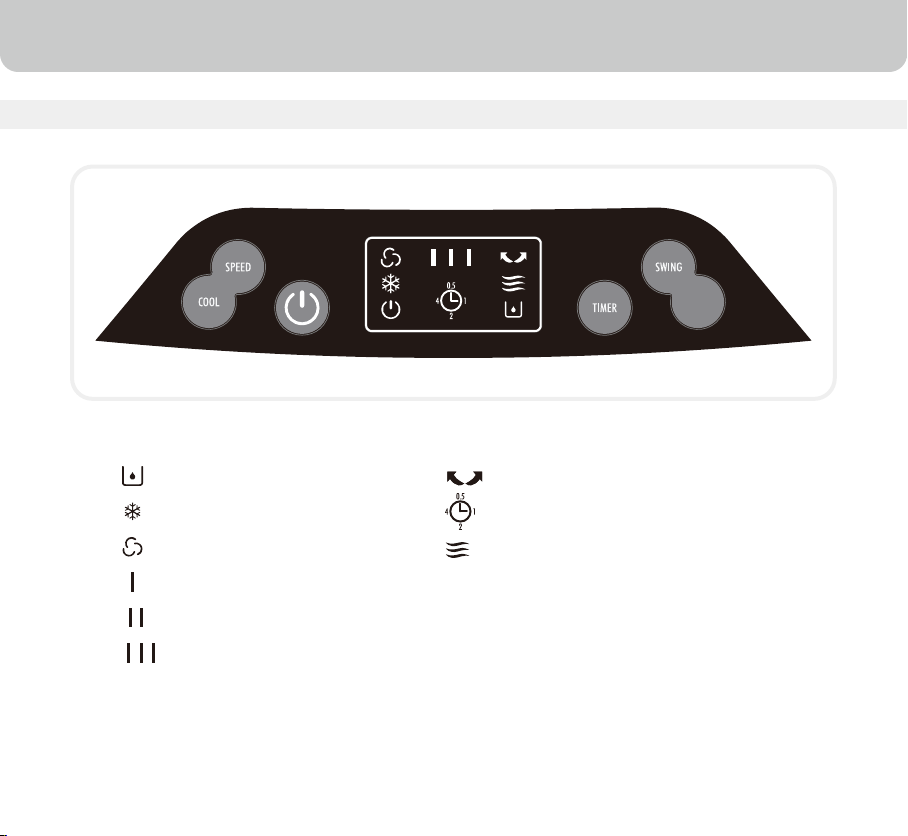
CONTROL PANEL
Lighted Display Icons
USE & OPERATION
NATURAL
Low water level in tank
Cool
Speed
Low speed
Medium speed
High speed
Swing
Time delay set
Natural
9
Page 12
USE & OPERATION
FUNCTION BUTTONS
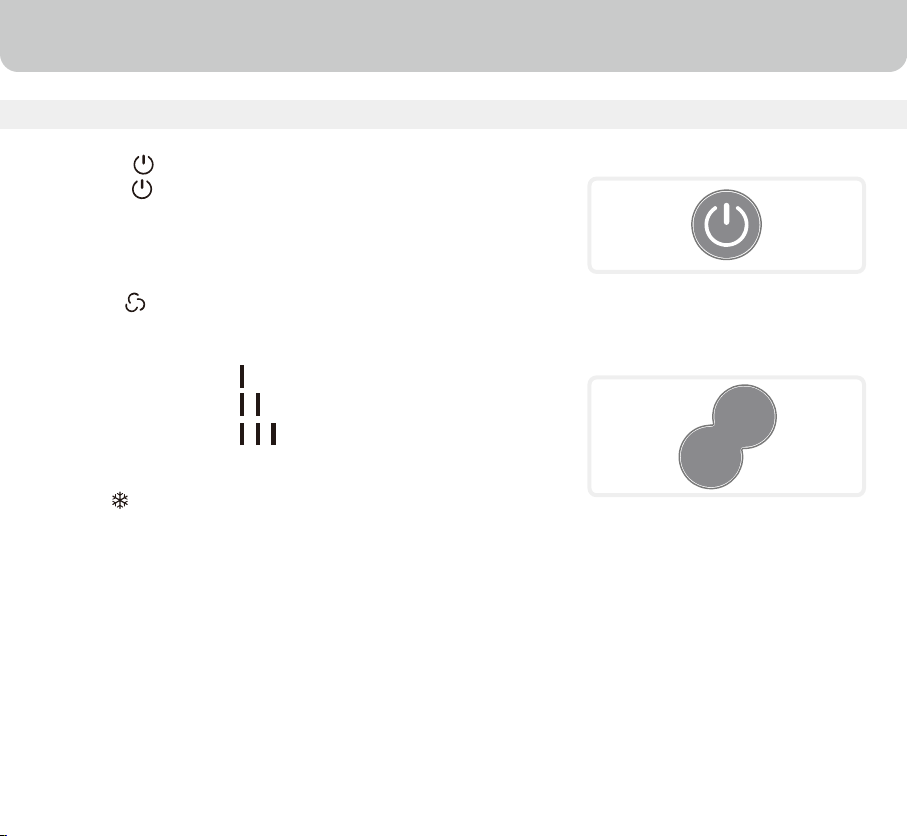
POWER
Press the button to turn the unit on. To turn the unit
off, press the button again. The cooler will start automatically at
medium speed. After a few seconds the speed will switch to low.
SPEED
Press the FAN or SPEED button repeatedly and the speed
will change. The indicator light will show the selected speed.
Low Speed
Medium Speed
High Speed
COOL
To begin cooling the desired area press the COOL
button. The indicator light will come on and the water
pump will operate. You will feel the cooler air after the
Honeycomb Cooling Media is completely wet.
SPEED
COOL
10
Page 13

USE & OPERATION
SWING
Press the SWING button. The indicator light will come on
and the louvers will begin to move from right to left automatically.
Manually adjust the horizontal louvers to change vertical airflow.
NATURAL
When the NATURAL button is pressed, the fan speed
will change in between HIGH / MEDIUM / LOW / STOP
to simulate a natural wind effect and will repeat the same
cycle at every 24 seconds. When the NATURAL button is
pressed, the symbol will illuminate in the display.
TIMER
Press the TIMER button until the indicator light comes on to
your desired timer. Once the set time has passed, the unit will
automatically shut off. The Timer function allows you to program
the unit for up to 8 hours of use.
LOUVER MOVEMENT
SWING
NATURAL
TIMER
11
Page 14

USE & OPERATION
LOW WATER ALARM FUNCTION
The unit is equipped with a low water sensor. When water in the tank is below the
minimum level, you will hear 10 beeps and the COOL indicator light will flash
continuously. At the same time the power to the pump inside the unit will be cut off
to protect the life of the pump.
To disengage the alarm function, turn off and unplug the unit from the power
outlet, and fill the tank with water above the minimum level.
To turn off the alarm function and continue to use it in FAN mode, turn off the unit
and turn the unit on. If the COOL button is pressed again without filling the tank with
water, the low water alarm will activate again.
12
Page 15
ROOM COOLING AND HUMIDIFYING
When the Water Regulator is set to MIN, the water pump
distributes a minimal amount of water to the Honeycomb
Cooling Media. This results in less water evaporation and
reduces the effect.
When the Water Regulator is set to MAX, the water pump
distributes the maximum amount of water to the Honeycomb
Cooling Media. This results in maximum water evaporation
and the cooling performance improves.
USE & OPERATION
Water Regulator
13
Page 16

USE & OPERATION
REMOTE CONTROL
Power: On / Off
SPEED
COOL
POWER
SWING
TIMER
NATURAL
Speed: Low / Medium / High
Cool/Fan: Controls cooling or fan option
Swing: Controls the motion of the louvers
Timer:
Natural:
Controls timer function for automatic shut off
When the NATURAL button is pressed,
the fan speed will change in between
HIGH / MEDIUM / LOW / STOP to simulate a
natural wind effect and will repeat the same
cycle at every 24 seconds. When the NATURAL
button is pressed, the symbol will illuminate
in the display.
Remote Control (2 AAA Batteries not included)
NOTE
•
Open the battery compartment at the back of the remote control and insert two new
AAA dry cell batteries. Care must be taken to insert the batteries according to the
correct polarity (+ / –) markings shown inside the battery compartment.
•
Always point the remote control signal transmitter towards the unit when operating.
•
Make sure that the signal path is not obstructed.
•
Remove the batteries if the unit is not going to be used for an extended period of time.
•
Do not drop the remote control.
•
Do not mix different types of batteries such as alkaline, carbon-zinc, or rechargeable batteries.
•
Do not mix old and new batteries.
•
Exhausted batteries are to be removed from the product.
14
Page 17

CAUTION
Unplug from power when refilling.
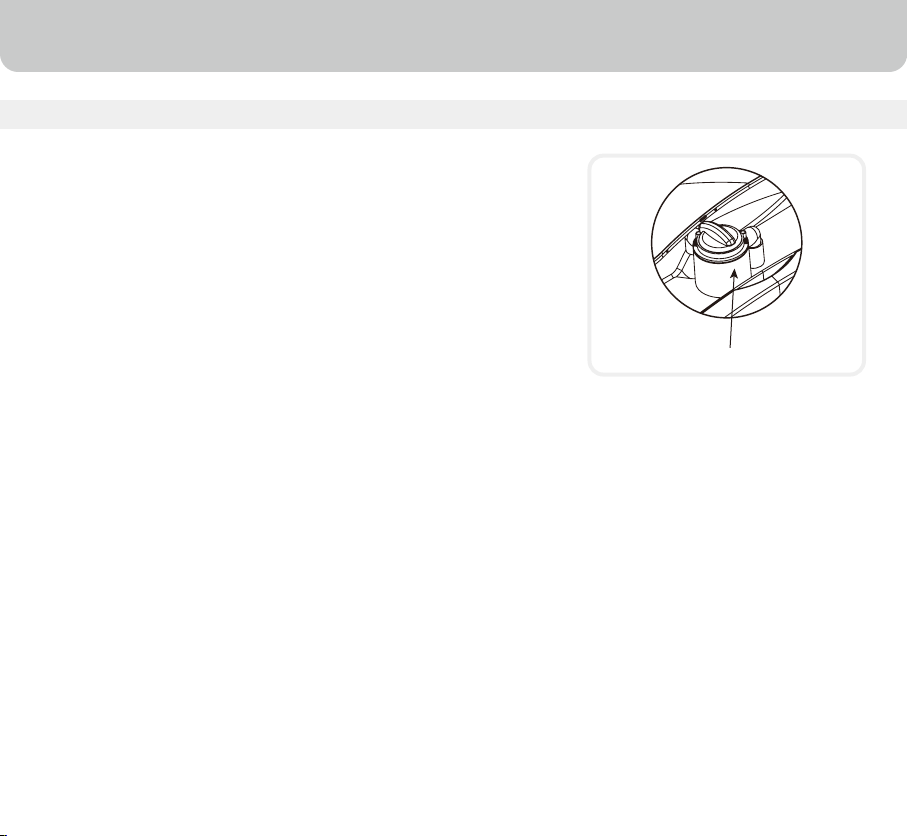
Filling With Water
Unplug the air cooler from power supply.
Check water level indicator located on the front of the unit to
determine the level of water inside the water tank. The water
tank of this cooler holds up to 8 gallons of water. Be sure
water in the tank is always above the minimum water level
mark.
To refill the water tank, open the Water Fill Door located below
the right side panel and fill water to the Max Level, as indicated
on the Water Level Indicator. Do not fill water above the Max
water level mark.
For better cooling performance, it is recommended to put ice
cubes inside the ice compartment located on the top of the
cooler.
USE & OPERATION
Water Fill Door
Top Ice Loading Compartment
After refilling the water tank and loading ice, close the water fill
door, connect the power supply and turn on.
Note :
Running the unit with inadequate water may cause pump
failure.
15
Page 18

CLEANING & MAINTENANCE
WARNING
Before cleaning the unit, switch it to the OFF position and remove the plug from the
•
power socket.
To clean the outside, use a damp cloth to remove dirt and dust.
•
Never use corrosive elements or any chemicals to clean this product.
•
When the product is not in use, store the unit in a dry place out of direct sunlight.
•
DRAINING AND CLEANING THE WATER TANK
Turn the power OFF and disconnect the air cooler from the
•
power supply.
Move the unit to a location where it can be drained. Remove
•
the drain plug from the drainage tube and allow the tank to
empty. (see parts description on page 8).
Once the tank is empty, unlock the latches on both sides
•
and lift off the cooler top section as shown in the figure and
place it vertically on the floor. Be careful not to bend the
water pickup tube that hangs below the unit.
Refill the water tank with clean water and drain it completely.
•
Clean the water tank with detergent or a damp cloth and
•
rinse it thoroughly.
Place the unit top carefully on the tank and lock the latches.
•
Refill the water tank with clean water, up to the maximum level.
•
The air cooler is now ready to be used. This cleaning
•
process should be repeated weekly to maintain the integrity
of the unit and to remove particles filtered from the air.
Drain Plug
Latch
Water Pick Up Tube
16
Page 19

CLEANING & MAINTENANCE
CLEANING THE HONEYCOMB COOLING MEDIA
The appliance is supplied with Honeycomb Cooling Media.
•
The Honeycomb Cooling Media is located inside the back panel.
•
Open the back panel by using a star screw driver to clean or
replace the Honeycomb Cooling Media. It is recommended
that the Honeycomb Cooling Media be replaced every year,
depending on use and environment.
Draining the water reservoir and refilling with fresh water at
•
least once a week will greatly reduce mineral deposits in the
pads and help to extend the life of Honeycomb Cooling Media.
Do not run the unit in COOL mode with stale water in the tank.
•
You must empty the water tank and refill with fresh water,
especially if the tank has not been cleaned in a long time.
The cleaning frequency for the Honeycomb Cooling Media
•
depends on local air and water conditions. In areas where
the mineral content of water is high, mineral deposits may build
up on the Honeycomb Cooling Media and restrict air flow.
Draining the water reservoir and refilling with fresh water
at least once a week will help reduce mineral deposits. If
mineral deposits remain on the Honeycomb Cooling
Media, the media should be removed and washed under
fresh water. The media should be cleaned every two months or
sooner, depending on your needs.
For best results allow the Honeycomb Cooling Media to dry
•
after each use by turning off the cool function 15 minutes
before turning the unit off.
Open Screws
Back Panel
Honeycomb Cooling Media
17
Page 20

TROUBLESHOOTING GUIDE
PROBLEM POSSIBLE CAUSE SOLUTION
No discharge of air Cord is not plugged in.
Power is not on. Turn the unit ON by pressing
Not Cooling / Unit is
making noise
Odors When the Cooler is new.
Pump is not turned ON.
Low or no water in tank,
when COOL is selected.
Damaged Pump or Calcium
deposits on blower.
If the Cooler has been used. There may be an algae issue.
Make sure power cord is
plugged in and the supply
switch is on.
button on the control panel.
On Control Panel, turn COOL
FUNCTION to ON.
Refill water tank.
Contact service center.
When the unit is used for the
first time, the Honeycomb
Cooling Media will have an
odor, which will dissipate
within a few hours of initial use.
Replace the Honeycomb Cooling
Media.
Customer Support: 1-800-474-2147
18
Page 21

TROUBLESHOOTING GUIDE
PROBLEM POSSIBLE CAUSE SOLUTION
The unit does not respond Remote control batteries. Check batteries. Replace if
needed. Try to operate using
the control panel.
Damaged Control Panel. Try activating with the Remote
Control. If the unit responds,
then it may be the Control Panel
that is experiencing problems.
Contact Customer Service Center.
If neither Remote Control nor
Control Panel works - contact
Customer Service Center.
Customer Support: 1-800-474-2147
19
Page 22

TECHNICAL SPECIFICATIONS
MODEL NO. CO30XE
Voltage
Frequency
Wattage
Water Tank Capacity
Cooling Media
Product Dimension
Net Weight
ELECTRICAL WIRING DIAGRAM
120V~
60Hz
288 Watts
8 Gallons
Honeycomb
18(W) x 13.9(D) x 33.7(H) inch
24.9 lbs
BU
20
Page 23

SERVICE AND WARRANTY
1-YEAR LIMITED WARRANTY
Read all the instructions before attempting to use this product.
This 1 year limited warranty applies to repair or replacement product found to be defective in
material or workmanship.
This warranty does not apply to any damage resulting from commercial, abusive, unreasonable
A.
use or supplemental damage. Defects that are the result of normal wear and tear will not be
considered manufacturing defects under this warranty.
JMA NORTH AMERICA LLC IS NOT LIABLE FOR INCIDENTAL OR CONSEQUENTIAL
DAMAGES OF ANY NATURE. ANY IMPLIED WARRANTY OF MERCHANTABILITY OR
FITNESS FOR A PARTICULAR PURPOSE ON THIS PRODUCT IS LIMITED IN DURATION
TO THE DURATION OF THIS WARRANTY.
Some jurisdictions do not allow the exclusion or limitation of incidental or consequential
damages or limitations on how long an applied warranty lasts, so the above limitations or
exclusions may not apply to you. This warranty gives you specific legal rights, and you
also may have other rights which vary from jurisdiction to jurisdiction. This warranty
applies only to the original purchaser of this product from the original date of purchase.
At its option, JMA NORTH AMERICA LLC will repair or replace this product if it is found to be
B.
defective in material or workmanship.
This warranty does not cover damage resulting from any unauthorized attempts to repair or
C.
from any use not in accordance with the instruction manual.
21
Page 24

SERVICE AND WARRANTY
Please read the Instruction Manual carefully before setting up or using this product. If you
D.
believe this product to be suffering from a manufacturing fault, or if you have inquiries about
this product, please contact our Customer Support:
CUSTOMER SUPPORT
JMA North America LLC
Mahwah, New Jersey 07495 USA
Phone : 1-800-474-2147
Email: info@jmana.us
Web: www.honeywellaircoolers.com
When contacting our Customer Support, please have the information below along with the
proof of purchase. All warranty requests must be accompanied by a proof of purchase, which
is a copy of the original receipt.
Model : .......................................................................................................................
Date of purchase: .......................................................................................................................
Purchased from : .......................................................................................................................
22
Page 25

1
2
GUÍA DE INICIO RÁPIDO
Llene con agua y conecte a una toma de
corriente estándar.
Nota: Por favor, asegúrese de que la toma de corriente
esta ajustada a la configuración correcta de acuerdo con
las especificaciones del producto.
Colocar cerca de una puerta o ventana
abierta.
Nota: Enfriadores de aire por evaporación trabajan con
el mecanismo de enfriamiento por evaporación que
requiere una ventilación cruzada
3
Encienda y disfrutar de la brisa fresca.
Nota: Comience con velocidad baja y aumentar
gradualmente a una velocidad más alta para un
rendimiento óptimo de enfriamiento.
Page 26

ÍNDICE
Lea todas las instrucciones cuidadosamente antes de de instalar y operar la unidad,
y por favor mantenga este manual de instrucciones para referencia futura. Este manual
está diseñado para ofrecerle información importante necesaria para instalar, operar,
mantener y solucionar problemas de su enfriador. No seguir estas instrucciones puede
dañar y / o poner en peligro el funcionamiento y anular la garantía.
SECCIÓN
1. GRACIAS ..............................................................................................................
2. CONSEJOS PARA EL USUARIO .........................................................................
3. REGLAS DE SEGURIDAD ...................................................................................
4. DESCRIPCIÓN DE PARTES ................................................................................
5. USO Y OPERACIÓN .............................................................................................
Panel de Control ...............................................................................................
Botones de funciones .........................................................................................
Función de alarma de nivel bajo de agua y Colocaci n de enfriador .........................
Enfriamiento y humidificacion del ambiente ..........................................................
Control Remoto .................................................................................................
Llenado de agua ................................................................................................
6. LIMPIEZA Y MANTENIMIENTO ...........................................................................
7. GUÍA DE SOLUCIÓN DE PROBLEMAS ..............................................................
8. ESPECIFICACIONES TÉCNICAS ........................................................................
9. DIAGRAMA DE CABLEADO ELÉCTRICO ...........................................................
10. SERVICIO Y GARANTIA ......................................................................................
PÁGINA
24
25
27
30
31
31
32
34
35
36
37
38
40
42
42
43
23
Page 27

GRACIAS
Felicitaciones por su compra de este versátil Enfriador de aire por evaporación Honeywell. Para
un óptimo desempeño de su unidad, primero llénela con agua. Si dispone de hielo, eso aumentará
su potencia de enfriamiento. Por favor lea estas instrucciones cuidadosamente.
Importante: Colocación de Enfriador (cuando se utiliza en el interior)
Situe el enfriador en frente de una ventana o puerta abierta. Aseguresé que hay una adecuada
ventilación en la estancia dejando una puerta o ventana abierta en el otro lado del enfriador.
Si sigue estas instrucciones se asegurará que su enfriador trabajará de forma efectiva.
Importante: No es un Aire Acondicionado
El enfriador de aire evaporativo no es un aire acondicionado ya que no utiliza un compressor o
gas refrigerante. No deberia esperar que enfrie tan bajo como un aire acondicinado.
24
Page 28

FRÍO ~ EFICIENTE ~ NATURAL
CONSEJOS PARA EL USUARIO
El enfriamiento de aire por evaporación es la manera más natural de enfriamiento, similar a una
brisa que recorre un lago. Esta disminución de la temperatura de esta brisa produce un efecto
refrescante y relajante en la personas. El enfriador de aire evaporativo refresca el aire por medio
de la evaporación del agua. Cuando el agua se evapora del aire, se obtiene como resultado una
mezcla de moléculas de aire y agua. Este intercambio químico requiere calor que es tomado de
las moléculas del agua, resultando un enfriamiento de la temperatura del aire que sale del aparato.
Medio de enfriamiento Honeycomb
Aire Húmedo
y frío
Agua
Mecanismo de enfriamiento de aire por Evaporación
Bomba
Aire Cálido
y seco
25
Page 29

CONSEJOS PARA EL USUARIO
Uso En El Interior
El nivel recomendado de humedad relativa máxima es 60% o
menos, lo que permite que se aprecie un descenso en la
temperatura. La disminución de temperatura será mayor en los
climas mas secos, porque una mayor evaporación es producida
cuando la humedad es baja.
El enfriador de aire no debe ser utilizado en espacios cerrados.
Se debe mantener el nivel de agua en el tanque. La habitación
debe tener puertas y ventanas abiertas para permitir el flujo de
aire libre. El enfriador de aire por evaporación funciona mejor
cuando se coloca cerca de una ventana abierta, de modo que
el aire exterior es succionado por el enfriador, el aire circula en
el cuarto, y luego sale a través de la puerta o ventana. El efecto
de enfriamiento máximo se siente cuando la persona esta
ubicado directamente en el flujo de aire que sale desde el
enfriador.
El enfriador de aire también puede ser utilizado para humidificar
el aire seco durante el invierno. Para poder utilizarlo como un
humidificador, las puertas y ventanas deben estar cerradas para
permitir que se acumule el aire humidificado. El enfriador de aire
por evaporación no es un aire acondicionado, ya que no utiliza un
compresor o un gas refrigerante. No se debe esperar que enfrie el
ambiente tan eficientemente como un aire acondicionado de
refrigeración.
Uso En El Exterior
La unidad debe ser colocada mínimo 10 pulgadas (25,40 cm) de distancia de cualquier pared.
Operar con la ventana y puerta
abierta (Recomendado)
Operar con la ventana y puerta
cerrada (NO Recomendado)
NOTA
Cuando se utiliza el producto por primera vez el panal Honeycomb de enfriamiento
emitirá un olor q se disipara aproximadamente en una semana después del uso inicial.
26
Page 30

REGLAS DE SEGURIDAD
LEA Y GUARDE ESTAS INSTRUCCIONES:
Cuando se utilicen aparatos eléctricos, siempre deberían tomarse precauciones de
seguridad básicas:
Su enfriador funciona con 120 Voltios , 60 Hz de corriente.
•
Compruebe la tensión de la casa para asegurarse de que
coincida con la especificación de potencia del aparato.
Antes de utilizar el producto de sacarlo de su embalaje y
•
comprobar que esta en buenas condiciones.
NO utilice ningún producto con un cable o enchufe dañado.
•
No se recomienda utilizar un cable de extensión con este
aparato.
NO pasar el cable eléctrico por debajo de alfombras.
•
Mantener el cable lejos de areas donde pueda causar
tropiezos.
Desenchufe siempre el producto antes de volver a llenar el
•
tanque de agua.
Siempre desconecte el aparato de la fuente de alimentación
•
antes limpieza, mantenimiento o reubicación de la unidad.
•
Remover el cable eléctrico del toma corriente agarrar y jalar
solo del enchufe, nunca jalar del cable.
•
NO use el producto en areas donde se encuentren productos inflamables como gasolina o pintura.
•
Al usar el ajuste "COOL", por favor revisar que el tanque de
agua se encuentre lleno. El funcionamiento de esta unidad
en el ajuste "COOL" con un tanque vacio puede resultar en
danos a la bomba de agua.
PELIGRO DE ELECTROCUCIÓN
120V CA, 60Hz
INDICADOR DE NIVEL DE AGUA
27
Page 31

REGLAS DE SEGURIDAD
NO intente reparar ni ajustar ninguna función eléctrica ó
•
mecánica del enfriador, ya que esto puede anular la garantía.
NO obstruya la entrada ó salida de aire del aparato ya que
•
puede causar daños al motor.
NO inserte ni permita que entren objetos a través de ninguna
•
abertura de ventilación ó escape ya que esto puede dañar al
producto y podría causar descargas eléctricas ó incendios.
NO ponga en funcionamiento el aparato sin el medio Honeyc-
•
omb ya que esto sobrecargará y dañará al motor.
NO deje el aparato funcionando sin atención por un periodo
•
de tiempo extendido.
NO deje que los niños jueguen con este aparato, su
•
empaque ni con las bolsas plásticas.
Si la unidad se daña o funciona mal, no continúe haciéndola
•
funcionar. Consulte la sección de Solución de problemas y/o
por favor busque consejo profesional.
Coloque la unidad sobre un piso nivelado.
•
Este producto no se destina para uso en lugares mojados o
•
extremadamente húmedos.
•
Nunca ubique el producto donde pudiera caer en una bañera
u otros contenedores de agua. No lo use en baños ni en
exteriores.
Cuando no se utilice siempre guárdelo en un área seca.
•
Este aparato no se destina a ser usado por personas
•
(incluyendo niños) con capacidades físicas, sensoriales ó
mentales reducidas, ó falta de experiencia y conocimiento, a
menos que sean supervisados o instruidos acerca de su uso
por una persona responsable de su seguridad.
Siempre tome la unidad de sus manijas laterales para moverla.
•
NIVEL DEL PISO
28
Page 32

REGLAS DE SEGURIDAD
Use sólo en receptáculos GFCI protegidos.
•
•
Los cables eléctricos tienen que estar protegidos. Si van a estar extendidos a lo largo del suelo,
asegúrese de que cada centímetro esté en perfecto estado y protegido para evitar tropiezos.
El cable y los conectores tiene que ser resistentes al agua. Asegúrese de que las conexiones
•
(al refrigerador de aire) nunca se humedezcan. Su equipo es resistente al agua, pero todo
aquello que se le añada tiene que serlo también.
Coloque su unidad en un lugar en el que no pueda tropezarse con ella y esté estable. Debe
•
apoyarse en un soporte firme.
Advertencia: Para reducir el riesgo de incendios o descargas eléctricas, no utilice este aparato
con cualquier dispositivo de velocidad de estado sólido de control.
29
Page 33

DESCRIPCIÓN DE PARTES
1
11
12
1 Panel de Control
2 Manija
3 Deflectores
4 Panel del Lado Izquierdo
5 Tanque de agua
6 Cable Eléctrico
7 Enchufe de alimentación
8 Ruedecillas
9 Tapa del compartimiento de hielo
10
2
3
16
15
14
17
13
18
9
4
5
8
6
7
10 Panel Trasero
11 Panel Frontal
12 Indicador de Nivel de Agua
13 Control Remoto
14 Traba
15 Panel del Lado Derecho
16 Puerta de Llenado de Agua
17 Tapón de Drenaje
18 Regulador de Agua (bajo parte 9)
ACCESORIOS:
Control Remoto (2 pilas AAA no incluídas)
30
Page 34

PANEL DE CONTROL
Íconos en la pantalla LED
USO Y OPERACIÓN
NATURAL
Bajo nivel de agua en el tanque
Enfriamiento
Velocidad
Velocidad baja
Velocidad media
Velocidad alta
Oscilación
Selección de demora de tiempo
Natural
31
Page 35

USO Y OPERACIÓN
BOTONES DE FUNCIONES
ENCENDIDO (POWER)
Presione el botón ENCENDIDO para encender la unidad.
Para apagarla, presione el botón nuevamente. La función de
enfriado arrancará automáticamente a velocidad media.
Luego de unos pocos segundos la velocidad cambiará a baja.
VELOCIDAD (SPEED)
resione el botón Ventilador ó Velocidad repetidamente y la
velocidad cambiará. La luz indicadora mostrará la velocidad
seleccionada.
Baja (Low)
Media (Med)
Alta (High)
ENFRIAMIENTO (COOL)
Para comenzar a enfriar el área deseada presione el botón
ENFRIAMIENTO (COOL). Se encenderá el indicador y la
bomba de agua funcionará. Puede sentir el aire más frío
luego de que el medio Honeycomb esté completamente
mojado.
VELOCIDAD
FRÍO
32
Page 36

USO Y OPERACIÓN
OSCILACIÓN (SWING)
Presione el botón OSCILACIÓN (SWING). La luz indicadora
se encenderá y los deflectores comenzarán a moverse de
derecha a izquierda automáticamente. Ajuste manualmente los
deflectores horizontales para cambiar el flujo de aire vertical.
NATURAL (NATURAL)
Cuando se pulsa el botón NATURAL, la velocidad del
ventilador cambiará entre ALTO / MEDIO / BAJO / DETENER
para simular un efecto natural del viento y se repetirá el mismo
ciclo cada 24 segundos. Cuando se pulsa el botón NATURAL,
el símbolo se ilumina en la pantalla.
TEMPORIZADOR (TIMER)
Presione el botón TIMER hasta que la luz indicadora vaya a
su tiempo deseado. Una vez que el tiempo seleccionado haya
pasado, la unidad se apagará automáticamente. La función
Temporizador le permite programar la unidad hasta 8 horas de
uso.
MOVIMIENTO DE DEFLECTORES
OSC
NATURAL
TIEMPO
33
Page 37

USO Y OPERACIÓN
FUNCIÓN DE ALARMA DE NIVEL BAJO DE AGUA
Esta unidad está equipada con un sensor de nivel bajo de agua. Cuando el agua
del tanque está por debajo del nivel mínimo, usted escuchará 10 timbres y el
indicador LED de FRÍO se prenderá y apagará continuamente. Al mismo tiempo,
se cancelará el suministro de energía a la bomba interna de la unidad con el fin
de proteger la vida de la bomba.
Para deshabilitar la función de alarma, apague y desconecte la unidad del enchufe
de energía y llene el tanque con agua por arriba del nivel mínimo.
Para apagar la función de la alarma y continuar usándola en modo VENTILADOR
(FAN), apague la unidad y enciéndala de nuevo. Si se presiona de nuevo el botón
FRÍO sin haber llenado el tanque con agua, la alarma de nivel bajo de agua se
activará de nuevo.
34
Page 38

USO Y OPERACIÓN
ENFRIAMIENTO Y HUMIDIFICACION DEL AMBIENTE
Cuando el regulador de agua esta en MIN, la bomba de
agua proporciona la cantidad mínima de agua a la placa de
evaporación. Eso reduce la evaporación de agua y
disminuye el efecto de enfriamiento.
Cuando el regulador de agua está en MAX, la bomba de
agua proporciona la máxima cantidad de agua a la placa de
evaporación. Esto produce un aumento de la evaporación
de agua y un mejor efecto de enfriamiento.
Regulador de água
35
Page 39

USO Y OPERACIÓN
CONTROL REMOTO
Power (Alimentación):
Speed (Velocidad):
Cool/Fan:
(Frío / Ventilador)
Swing:
(Oscilación)
Timer (Temporizador):
Natural (Natural):
Control Remoto (2 pilas AAA no incluídas)
NOTA:
•
Por favor abrir el compartimiento para la batería ubicado en la parte trasera del control
remoto y instale dos baterías AAA nuevas. Asegúrese de instalar las baterías de
acuerdo con la polaridad correcta (+/-) siguiendo las marcas ubicadas en la parte
interior del compartimiento.
•
Siempre apunte el transmisor de señal de control remoto hacia la unidad cuando se opera.
•
Asegúrese de que la trayectoria de la señal no este obstruido.
•
Remueva las baterías del control remoto si no va a ser usada por un tiempo prolongado.
•
No dejar caer el control remoto.
•
No mezclar diferentes tipo de pilas como alcanila, carbon-zinc o pilas recargables.
•
No mezclar pilas viejas y nuevas.
•
Pilas caducadas deben ser removidas del producto.
36
Encendido / Apagado
Baja / Media / Alta
Controla la opción de enfriamiento
ó ventilación
Controla el movimiento de los
deflectores
Controla la función de temporización
para apagado automático
Cuando se pulsa el botón NATURAL, la
velocidad del ventilador cambiará entre
ALTO / MEDIO / BAJO / DETENER
para simular un efecto natural del viento
y se repetirá el mismo ciclo cada 24
segundos. Cuando se pulsa el botón
NATURAL, el símbolo se ilumina en la pantalla.
ENC/APAG
VEL
FRÍO
OSC.
TIEMPO
NATURAL
Page 40

CUIDADO
desenchufar la unidad cuando se llene de agua.
Llenado de Agua
Desenchufe el refrigerador del aire de alimentación.
Compruebe el indicador de nivel de agua situado en la parte
frontal de la unidad para determinar el nivel de agua dentro del
tanque de agua. el agua tanque de este refrigerador tiene
capacidad para 30 litros de agua. Asegúrese agua en el
depósito siempre está encima de la marca de nivel de agua
mínimo.
Para rellenar el tanque de agua, abrir la puerta de llenado de
agua situado debajo el panel del lado derecho y llenar de agua
al nivel máximo, como se indica en el indicador de nivel de
agua. No llene de agua por encima de la máxima marca de
nivel de agua.
Para un mejor rendimiento de refrigeración, se recomienda que
se ponga hielo cubitos de hielo del interior del compartimiento
situado en la parte superior de la enfriador.
USO Y OPERACIÓN
Puerta de llenado de agua
Compartimiento de carga de hielo superior
Después de rellenar el tanque de agua y la carga de hielo,
cierre el llenado de agua puerta, conecte la fuente de
alimentación y enciéndalo.
Nota:
Ejecución de la unidad con agua inadecuada puede causar la
bomba fracaso.
37
Page 41

LIMPIEZ A Y MANTENIMIENTO
ADVERTENCIAS
Antes de limpiar la unidad, apáguela y desenchufe la enchufe del tomacorriente.
•
Para limpiar la parte externa, use una tela húmeda para quitar la suciedad y el polvo.
•
Nunca use detergentes, elementos corrosivos ni otros químicos para limpiar este
•
producto.
Cuando no utilice el producto, guárdelo en un lugar seco y alejado de la luz solar directa.
•
LIMPIEZA Y VACIAMIENTO DEL TANQUE DE AGUA
Apague y desconecte el enfriador de la red de alimentación.
•
Desplace la unidad a una ubicación donde pueda vaciarse
•
y quite el tapón del tubo de drenaje (vea la descripción de
partes en la página 30).
Una vez que el tanque esté vacío, afloje las trabas en
•
ambos lados y levante la parte superior como se muestra
en la figura y colóquela verticalmente sobre el piso. Tenga
cuidado de no doblar el tubo de ingreso de agua que
cuelga por debajo de la unidad.
Rellene el tanque con agua limpia y vuelva vacíelo comple-
•
tamente.
Limpie el tanque con detergente o un trapo húmedo y
•
enjuáguelo bien.
Coloque la parte superior de la unidad cuidadosamente
•
sobre el tanque y apriete las trabas.
Rellene el tanque con agua limpia, hasta el nivel máximo.
•
La unidad ahora está lista para usarse. Este procedimiento
•
de limpieza debería repetirse semanalmente para mantener la integridad de la unidad y eliminar las partículas
filtradas del aire.
Tubo de
Drenaje
Traba
Tubo de agua
38
Page 42

LIMPIEZ A Y MANTENIMIENTO
LIMPIEZA DEL MEDIO DE ENFRIAMIENTO HONEYCOMB
El aparato se entrega con Medio De Enfriamiento
•
Honeycomb.
El Medio De Enfriamiento Honeycomb se ubican dentro del
•
panel trasero. Ábralo usando un destornillador estrella para
limpiar o cambiar el Medio De Enfriamiento Honeycomb.
Se recomienda que el Medio De Enfriamiento Honeycomb
se reemplacen anualmente, dependiendo del uso y
ambiente.
Si vacía el tanque de agua y lo rellena con agua fresca al
•
menos una vez por semana reducirá notoriamente los
depósitos minerales en las almohadillas y extenderá la vida
útil del Medio De Enfriamiento Honeycomb.
No haga funcionar el aparato en modo FRÍO con agua
•
rancia en el tanque. Debe vaciar el tanque y rellenarlo con
agua fresca, especialmente si no ha sido limpiado por un
periodo prolongado.
La frecuencia de limpieza para el Medio De Enfriamiento
•
Honeycomb depende las condiciones de aire y agua
locales. En áreas donde el contenido de minerales en el
agua es elevado, se pueden acumular depósitos de
minerales sobre el Medio De Enfriamiento Honeycomb,
al medio debería quitarse y lavarse bajo el agua fresca.
El medio debería limpiarse cada dos meses o menos,
dependiendo de sus necesidades.
Para mejores resultados deje secar el Medio De
•
Enfriamiento Honeycomb luego de cada uso desactivando
la función de enfriamiento por 15 minutos antes de apagar
la unidad.
Medio De Enfriamiento Honeycomb
Tornillos
Panel
trasero
39
Page 43

GUÍA DE SOLUCIÓN DE PROBLEMAS
PROBLEMA POSIBLE CAUSA SOLUCIÓN
No hay salida de aire Cable eléctrico no esta
conectado
La unidad no esta encendida
Asegúrese que el cable eléctrico
este enchufado y el interruptor
de alimentación en ON
Intente prender la unidad
apretando los botones en el panel
de control o en el control remoto
No enfría / La unidad hace
ruido
Emisión de olor Nueva unidad
Atención al cliente: 1-800-474-2147
Bomba de agua no esta prendida
Nivel de agua bajo o vacio en
el tanque de agua, cuando se
selecciona función COOL
Bomba de agua dañada o
depósitos de calcio en el soplador
Unidad usada Puede haber depósitos de algas
40
Encienda la función COOL en
el panel de control o en el
control remoto
Rellenar el tanque de agua
Contacte el centro de servicio
Cuando la unidad es utilizada
por primera vez, el panal
Honeycomb emite un olor que
será disipado en una semana
después del uso inicial.
en el panel Honeycomb Cambiar el panel.
Page 44

GUÍA DE SOLUCIÓN DE PROBLEMAS
PROBLEMA POSIBLE CAUSA SOLUCIÓN
La unidad no responda Cambiar las baterías del control
remoto (* Solamente las unidades que tienen control remoto)
PCB dañado Intente usar el control remoto.
Revisar las baterías cambiarlas
si es necesario. Intente operar
desde el panel del control.
Si la unidad responde, ajustar
los sujetadores del panel PCB.
Contacte el centro de servicio
Si no funciona el control remoto
o el panel de control, el panel
de PCB podría estar dañado.
Pro favor contacte el centro de
servicio.
Atención al cliente: 1-800-474-2147
41
Page 45

ESPECIFICACIONES TÉCNICAS
MODELO Nº CO30XE
Tensión
Frecuencia
Potencia
Capacidad del tanque de agua
Medio de enfriamiento
Dimensiones
Peso neto
DIAGRAMA DE CABLEADO ELÉCTRICO
BU
120V~
60Hz
288 Watts
30 Litros
Honeycomb
458(W) x 352(D) x 856(H) mm
11,3 Kg
42
Page 46

SERVICIO Y GARANTIA
GARANTÍA LIMITADA DE 1 AÑO
Lea todas las instrucciones antes de intentar utilizar este produto.
Esta garantía limitada de un año se aplica a la reparación o sustitución del producto siempre
que haya algún defecto de material o de manipulación.
A.
La garantía no cubre ningún daño resultante de un uso comercial, abusivo o irracional, ni
daños causados intencionadamente. Los defectos resultantes del uso normal y la rotura no
se considerarán defectos de fabricación a efectos de esta garantía.
JMA NORTH AMERICA LLC NO ES RESPONSABLE DE LOS DAÑOS SECUNDARIOS O
DERIVADOS DE NINGUNA NATURALEZA. CUALQUIER GARANTÍA TÁCITA DE
COMERCIABILIDAD O DE PREPARACIÓN PARA UN USO CONCRETO DE ESTE
PRODUCTO QUEDA LIMITADA A LA DURACIÓN DE ESTA GARANTÍA.
Algunas jurisdicciones no permiten la inclusión o limitación de los daños accidentales o derivados
del uso o sobre el periodo de duración de la garantía, de forma que las limitaciones indicadas
pueden no afectarle. Esta garantía le otorga derechos legales específicos, pero usted también
puede tener otros derechos que varíen de una jurisdicción a otra. Esta garantía solamente se
aplicará al comprador original del producto y comenzará en la fecha original de la compra.
B.
Dado el caso, JMA NORTH AMERICA LLC reparará o sustituirá este producto si se detecta
algún defecto de material o de manipulación.
C.
La garantía no cubre el daño causado por cualquier intento no autorizado de reparar el producto,
ni el derivado de no utilizarlo de acuerdo con el manual de instrucciones.
43
Page 47

SERVICIO Y GARANTIA
Por favor, lea el manual de instrucciones detenidamente antes de configurar o de utilizar este
D.
producto. Si considera que este producto sufre un defecto de fabricación, o si tiene dudas
sobre el mismo, por favor contacte con nuestro Servicio de Atención al Cliente:
ATENCIÓN AL CLIENTE
JMA North America LLC
Mahwah, New Jersey 07495 USA
Phone : 1-800-474-2147
Email: info@jmana.us
Web: www.honeywellaircoolers.com
Cuando contacte con nuestro Servicio de Atención al Cliente, por favor tenga la siguiente
información preparada como prueba de compra. Todas las solicitudes de cobertura de la
garantía tendrán que ir acompañadas de una prueba de compra, que será una copia de la
factura original.
Model : .......................................................................................................................
Fecha de compra: .......................................................................................................................
Punto de venta : .......................................................................................................................
44
Page 48

JMA North America LLC
Mahwah, New Jersey 07495 USA
Phone : 1-800-474-2147
Email: info@jmana.us
Web: www.honeywellaircoolers.com
November 2013
© 2013 AirTek Int’l Corp. Ltd. All rights reserved.
The Honeywell Trademark is used under license from
Honeywell International Inc.
Honeywell International Inc. makes no representations
or warranties with respect to this product.
This product is manufactured by Airtek Int’l Corp. Ltd.
 Loading...