

Honda HS828 Owner's Manual

Thank you for purchasing a Honda snowblower. We want to help you get
the best results from your new snowblower and to operate it safely. This
manual contains the information on how to do that; please read it carefully.
This owner’s manual describes the operation and maintenance of Honda
snowblower:
HS624/HS828
All information in this publication is based on the latest product
information available at the time of printing. Honda Motor Co., Ltd.
reserves the right to make changes at any time without notice and
without incurring any obligation. No part of this publication may be
reproduced without written permission.
This manual should be considered a permanent part of the snowblower
and should remain with it if it is resold.
Safety Messages
Your safety and the safety of others is very important. We have provided
important safety messages in this manual and on the snowblower. Please
read these messages carefully.
A safety message alerts you to potential hazards that could hurt you or
others. Each safety message is preceded by a safety alert symbol
and one of three words: DANGER, WARNING, or CAUTION.
A
These mean
m
instructions.
You WILL be KILLED or SERIOUSLY HURT if you don’t follow
B You CAN be KILLED or SERIOUSLY HURT if you don’t
follow instructions.
B You CAN be HURT if you don’t follow instructions.
Each message tells you what the hazard is, what can happen, and what
you can do to avoid or reduce injury.
Damage Prevention Messages
You will also see other important messages that are preceded by the word
NOTICE.
This word means:
/TzEiq y
don’t follow instructions.
The purpose of these messages is to help prevent damage to your
snowblower, other property, or the environment.
our snbwblower or other property could be damaged if you
1
CONTENTS
SAFETY
Safety Label Locations
Safety
COMPONENT
CONTROLS
Engine
Fuel
Fuel gauge
Chute crank
Starter
Throttle
Shift
Chute
Drive clutch lever and auger clutch lever
Skid
Foot pedal
Transmission
PRE-OPERATION
Fuel recommendation
Engine oil
Hydrostatic transmission fluid
Auger
Other
STARTING
SNOW BLOWER
Clearing
STOPPING THE ENGINE
MAINTENANCE
Maintenance
Tool
Engine oil change
Spark plug service
Track-adjustment .........................................................................................
Wheel/Tire
Auger/Blower
TRANSPORTING ..............................................................................................
Before
Loading ..........................................................................................................
STORAGE
TROUBLESHOOTING..
SPECIFICATIONS .............................................................................................
COSTOMER
INDEX
................................................................................................................
...................................................................................
Information .........................................................................................
IDENTIFICATION..
.........................................................................................................
switch
valve.. .......................................................................................................
grip ..........................................
lever ......................................................................................................
guide ...................................................................................................
plate, scraper .......................................................................................
and blower bolts.. ..............................................................................
checks..
kit.. .........................................................................................................
loading ...............................................................................................
.................................................................................................................
..................................................................................................
.......................................................................................................
...................................................................................................
lever(Engine speed)
.......................................................................................................
release lever..
CHECK.. ..............................................................................
...................................................................................
.........................................................................................................
...............................................................................................
THE ENGINE ..................................................................................
OPERATION .........................................................................
snow ...............................................................................................
..................................................................................
................................................................................................
schedule .................................................................................
...........................................................................................
.........................................................................................
inspection.. ................................................................................
inspection..
..........................................................................................................
.....................................................................................
SERVICE
INFORMATION
......................................................................
. .........................................................
.......................................................................
....................................................
........................................................................
.....................................................................
...........................................................................
..........................................................
2
3
3
.4
.7
.9
.9
.9
10
10
.l 1
.l 1
.12
.12
13
.14
15
.16
.17
17
19
20
.21
.21
.22
.27
.30
.32
.34
.35
.36
37
38
.39
.40
.41
.42
.42
.42
44
.47
.48
.50
51
SAFETY
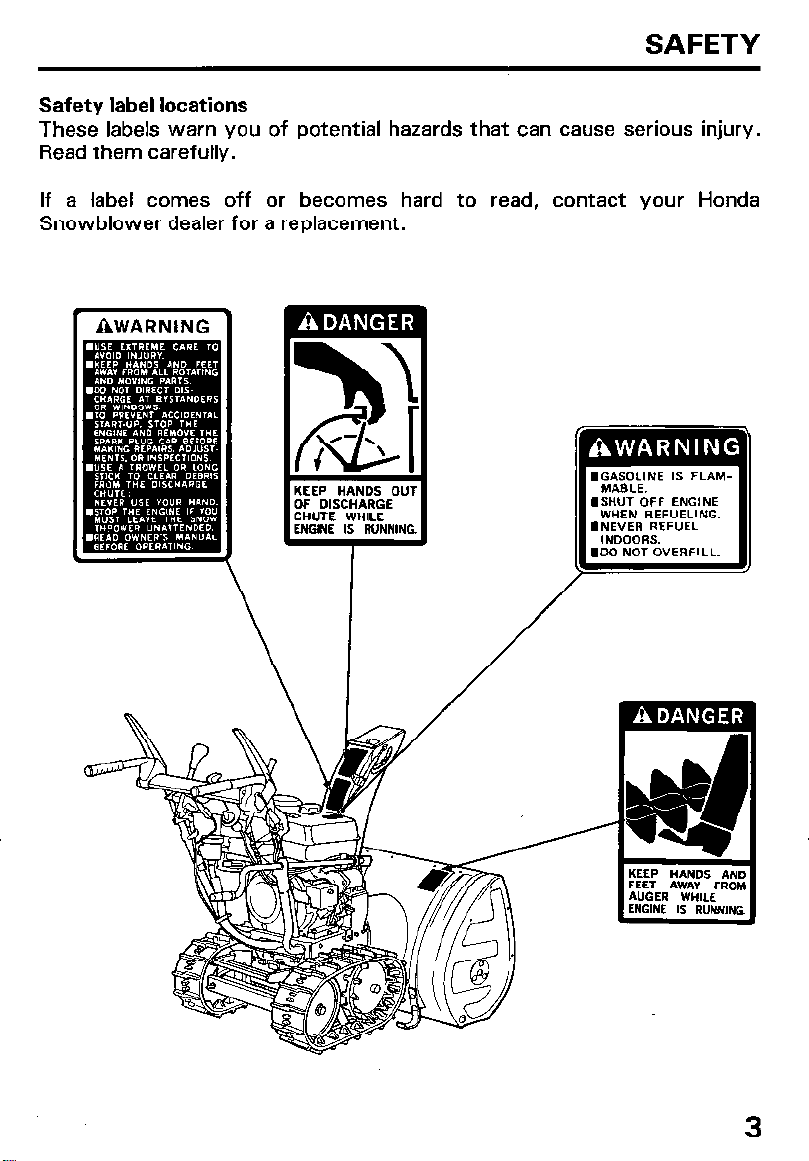
Safety label locations
These labels warn you of potential hazards that can cause serious injury.
Read them carefully.
If a label comes off or becomes hard to read, contact your Honda
Snowblower dealer for a replacement.
3

Safety information
To ensure safe operation
l Always make a pre-operation check (pages 17 thru 21 1 before you
start the engine. You may prevent an accident or equipment damage.
l Honda snowblowers are designed to give safe and dependable service
if operated according to instructions. Read and understand this Owner’s
Manual before operating the snowblower. Failure to do so could result
in personal injury or equipment damage.
l Before operating the snowblower, inspect the area in which you are
going to clear snow. Remove debris and other obstacles the
snowblower might strike or throw, as that may cause injury or damage
to the snowblower.
l Inspect the snowblower before operating it. Repair any damage and
correct any malfunction before operation.
If you hit an obstacle while operating the snowblower, stop the engine
immediately, and check for damage. Damaged equipment may increase
the possibility of injury during operation.
l Do not use the snowblower when visibility is poor. Under conditions of
poor visibility, there is a greater risk of striking an obstacle or causing
injury.
l Never use the snowblower to clear snow from a gravel road or
driveway, as rocks may be picked up and ejected. They may cause
injury to bystanders.
4

l Adjust the snow discharge chute to avoid hitting the operator,
bystanders, windows, and other objects with ejected snow. Stay clear
of the snow discharge chute while the engine is running.
l Children and pets must be kept away from the area of operation to
avoid injury from flying debris and contact with the snowblower.
l To avoid overturning, be careful when changing the direction of the
snowblower while operating it on a slope.
Do not use the snowblower to remove snow from roofs. The
snowblower may overturn on steep slopes if left unattended, causing
injury to the operator or bystanders.
l Know how to stop the snowblower quickly, and understand the
operation of all controls.
l Never permit anyone to operate the snowblower without proper
instruction. If people or pets suddenly appear in front of the
snowblower while it is in operation, immediately release the auger and
drive clutch levers to stop the snowblower and avoid possible injury
from rotating auger blades.
l If the snow discharge chute becomes clogged, stop the engine and use
a wooden stick to unclog it. Never put your hand into the snow
discharge chute while the engine is running; serious personal injury
could result,
5
l Gasoline is extremely flammable and is explosive under certain
conditions.
Do not smoke or allow flames or sparks where the snowblower is
refueled or where gasoline is stored. Allow the engine to cool down
before refueling.
Refuel in a well-ventilated area with the engine stopped.
Do not overfill the fuel tank, and make sure the filler cap is closed
securely after refueling.
l Never run the engine in an enclosed or confined area. Exhaust contains
poisonous carbon monoxide gas;
exposure can cause loss of
consciousness and may lead to death.
l The muffler becomes very hot during operation and remains hot for a
while after stopping the engine. Be careful not to touch the muffler
while it is hot. Let the engine cool before storing the snowblower
indoors.
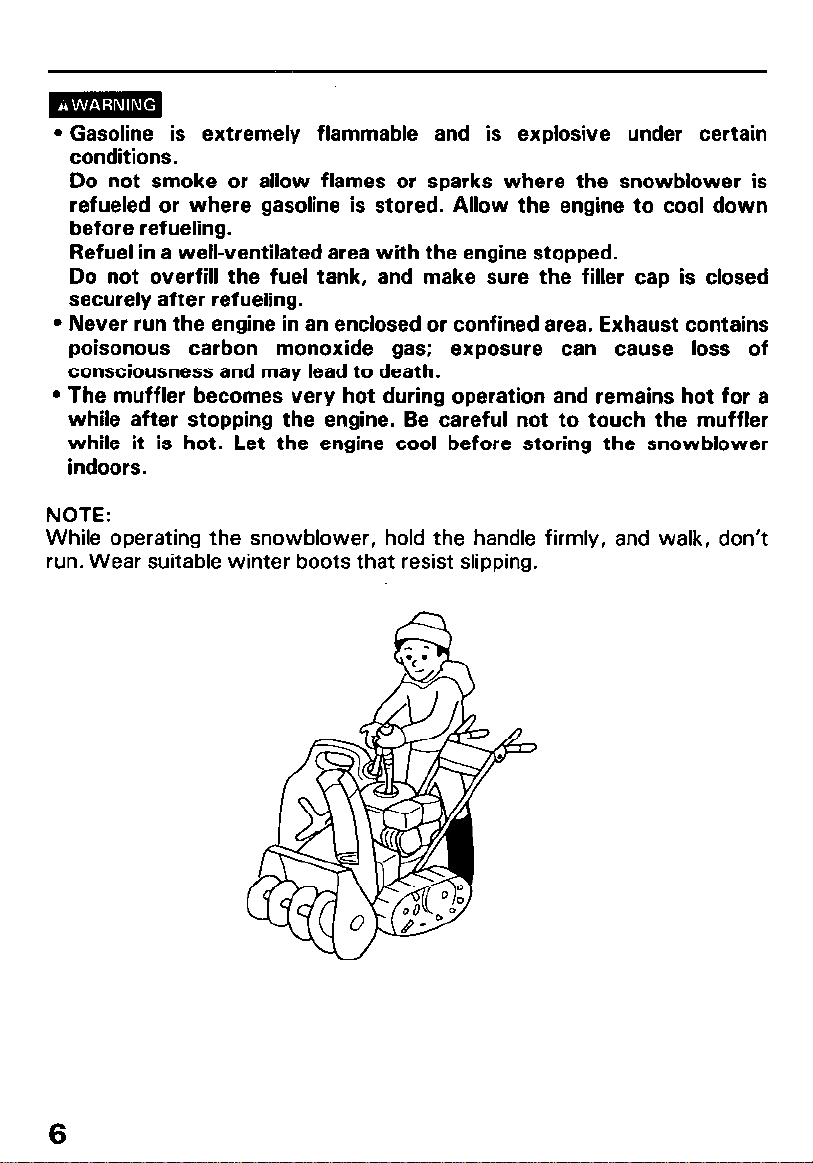
NOTE:
While operating the snowblower, hold the handle firmly, and walk, don’t
run. Wear suitable winter boots that resist slipping.
6
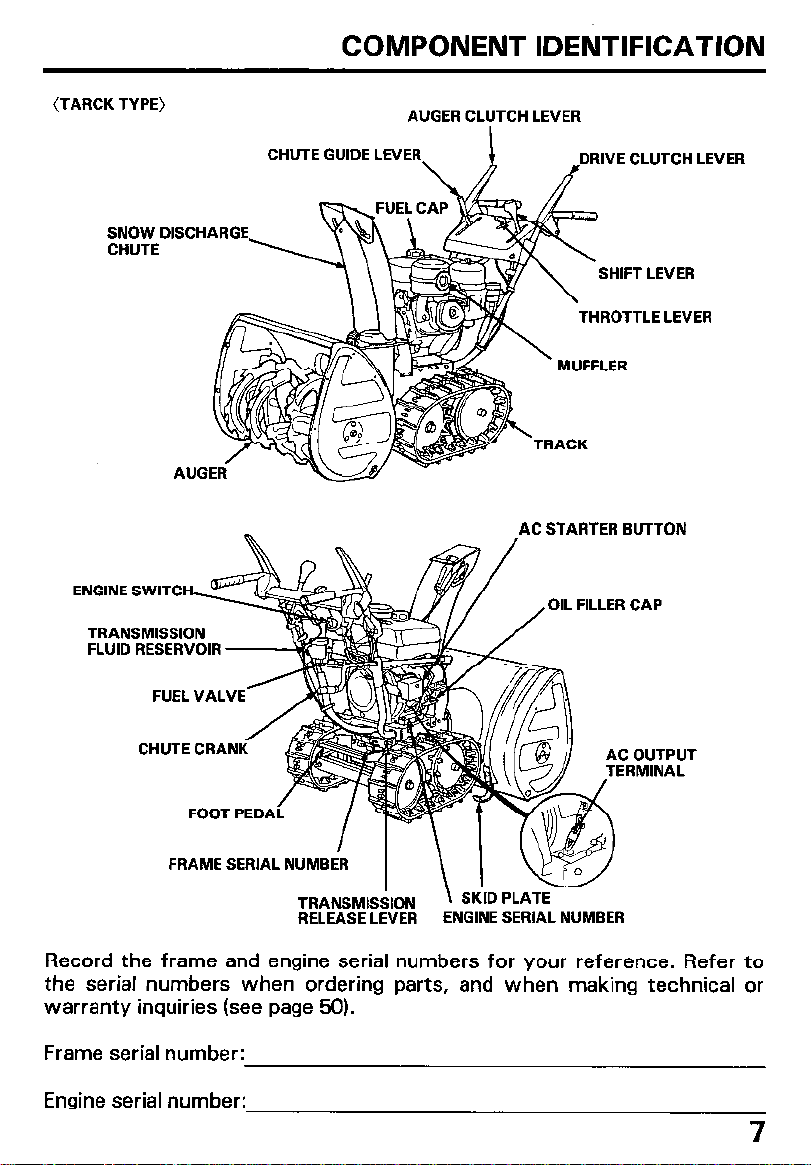
COMPONENT IDENTIFICATION
(TARCK TYPE)
SNOW DISCHARGE
CHUTE
TRANSMISSION
FLUID RESERVOIR
AUGER CLUTCH LEVER
CHUTE GUIDE LEVER
\lF-ET-f rs--
DRIVE CLUTCH LEVER
THROTTLE LEVER
&
r
’ MUFFLER
TRACK
AC STARTER BUTTON
OIL FILLER CAP
-SHIFT LEVER
FUEL VALVE-
CHUTE CRAN
FRAME SERlAL
2
NUMBER
RELEASE LEVER
ENGINE SERIAL NUMBER
UT
L
Record the frame and engine serial numbers for your reference. Refer to
the serial numbers when ordering parts, and when making technical or
warranty inquiries (see page 50).
Frame serial number:
Engine serial number:
7

(WHEEL TYPE)
SNOW DISCHARG
CHUTE GUIDE LE;ER
AUGER CLUTCH LEVER
DR!VE
CLUTCH LEVER
THROTTLE LEVER
8
ENGINE SWlTCH
FUEL VALVE
CHUTE CRAN
TRANSMISSION
RELEASE LEVER
SKID PLATE
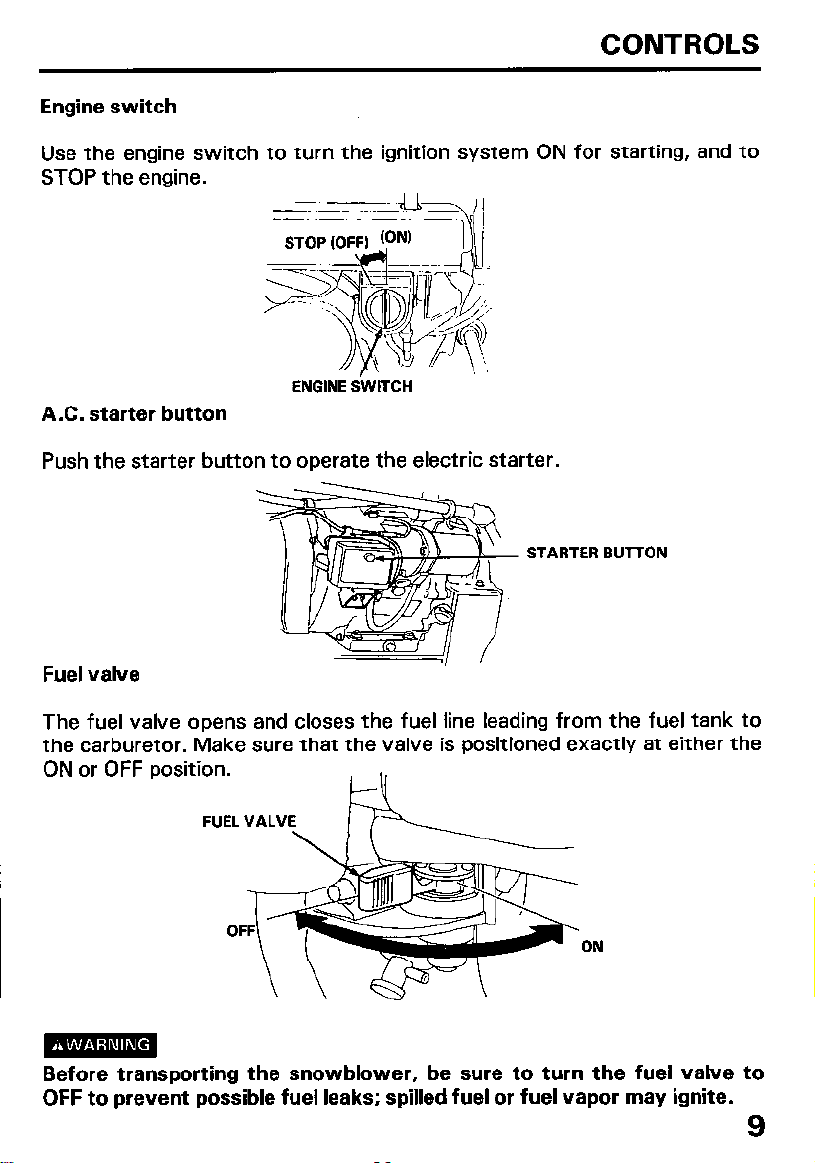
CONTROLS
Engine switch
Use the engine switch to turn the ignition system ON for starting, and to
STOP the engine.
ENGINE SWITCH
A.C. starter button
Push the starter button to operate the electric starter.
STARTER BUTTON
Fuel valve
The fuel valve opens and closes the fuel line leading from the fuel tank to
the carburetor. Make sure that the valve is positioned exactly at either the
ON or OFF
ON
Before transporting the snowblower, be sure to turn the fuel valve
OFF to prevent possible fuel leaks; spilled fuel or fuel vapor may ignite.
to
9
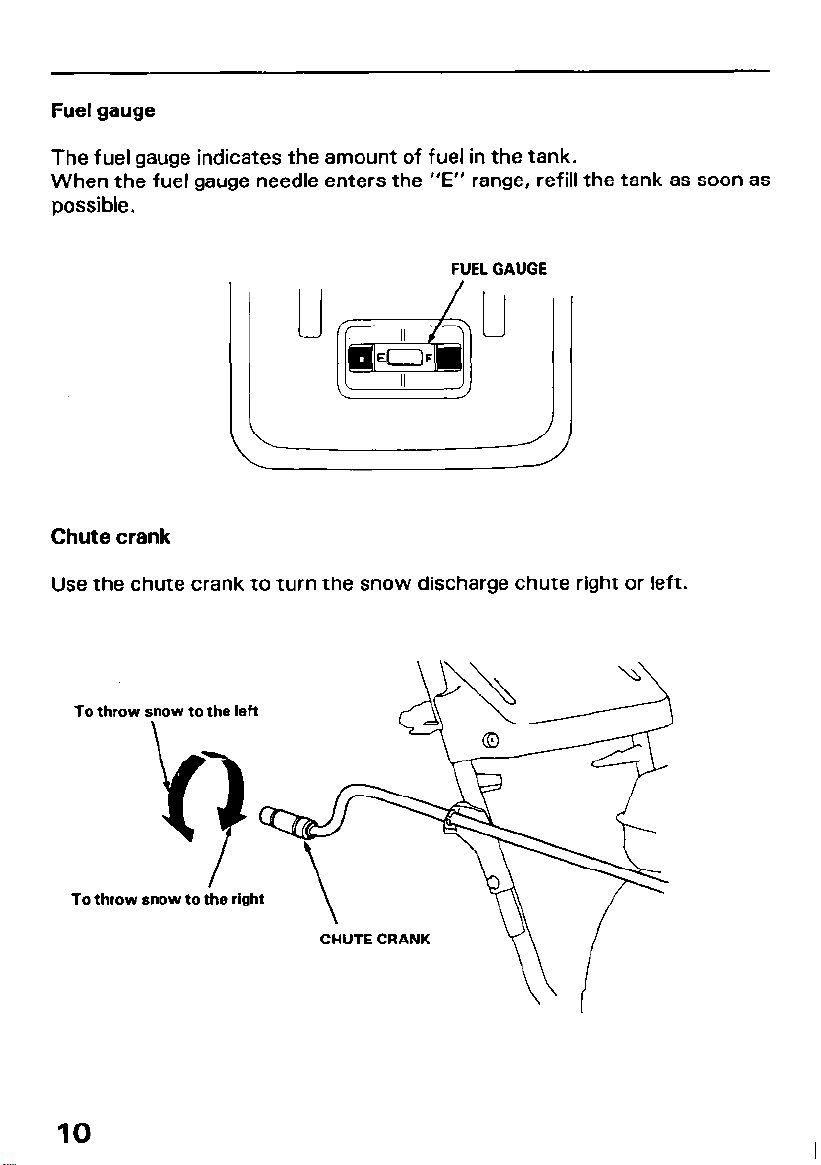
Fuel gauge
The fuel gauge indicates the amount of fuel in the tank.
When the fuel gauge needle enters the “E” range, refill the tank as soon as
possible.
FUEL GAUGE
Chute crank
Use the chute crank to turn the snow discharge chute right or left.
To throw snow to the
9
To throw snow to the right
10
left
CHUTE CRANK

Starter grip
See page 22 for starting procedures.
Pull this grip to start the engine.
STARTER GRIP
Throttle lever (engine speed)
The throttle lever controls engine speed from SLOW to FAST, it will stay
in any designated position. Set the lever to CHOKE when the engine is cold.
THROTTLE LEVER
SLOW
11

Shift lever
The shift lever selects FORWARD (F), NEUTRAL (N), or REVERSE (RI
hydrostatic transmission drive.
The shift lever also controls the transmission drive ratio; moving the lever
farther from NEUTRAL increases drive speed. While clearing snow, use the
shift lever to control drive speed, so you can leave the throttle lever in the
FAST position for best snow-clearing performance.
REVERSE
SHIFT LRlER
FORWARD
Chute guide
The chute guide controls the snow discharge angle.
HIGH AND FAR
OW AND NEAR
CHUTE
GUID
LEVER
12
HIGH AND FAR
LOW AND NEAR
CHUTE GUIDE
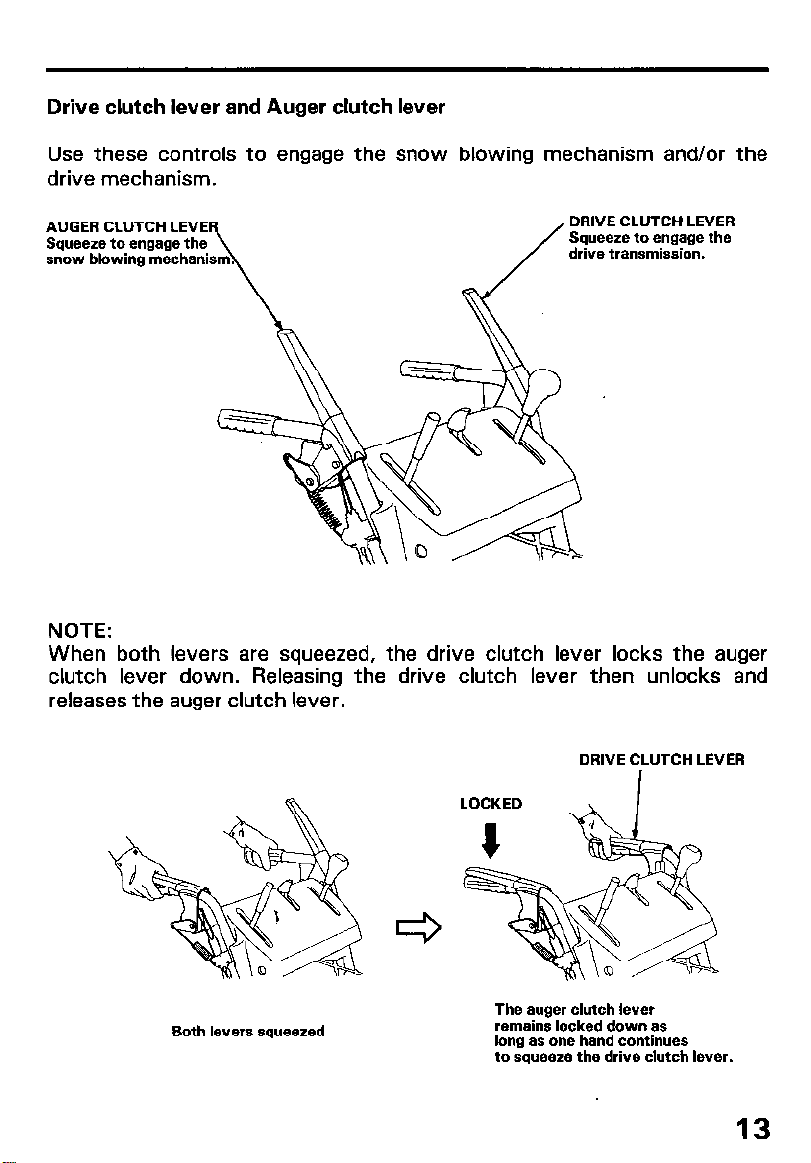
Drive clutch lever and Auger clutch lever
Use these controls to engage the snow blowing mechanism and/or the
drive mechanism.
AUGER CLUTCH LEVE
Squeeze to engage the
snow blowing mechani
DRNE CLUTCH LEVER
Squeeze to engage the
drive transmission.
NOTE:
When both levers are squeezed, the drive clutch lever locks the auger
clutch lever down. Releasing the drive clutch lever then unlocks and
releases the auger clutch lever.
DRIVE CLUTCH LEVER
Both levers squeezed
The auger clutch lever
remains locked down as
long as one hand continues
to squeeze the drive clutch lever.
13
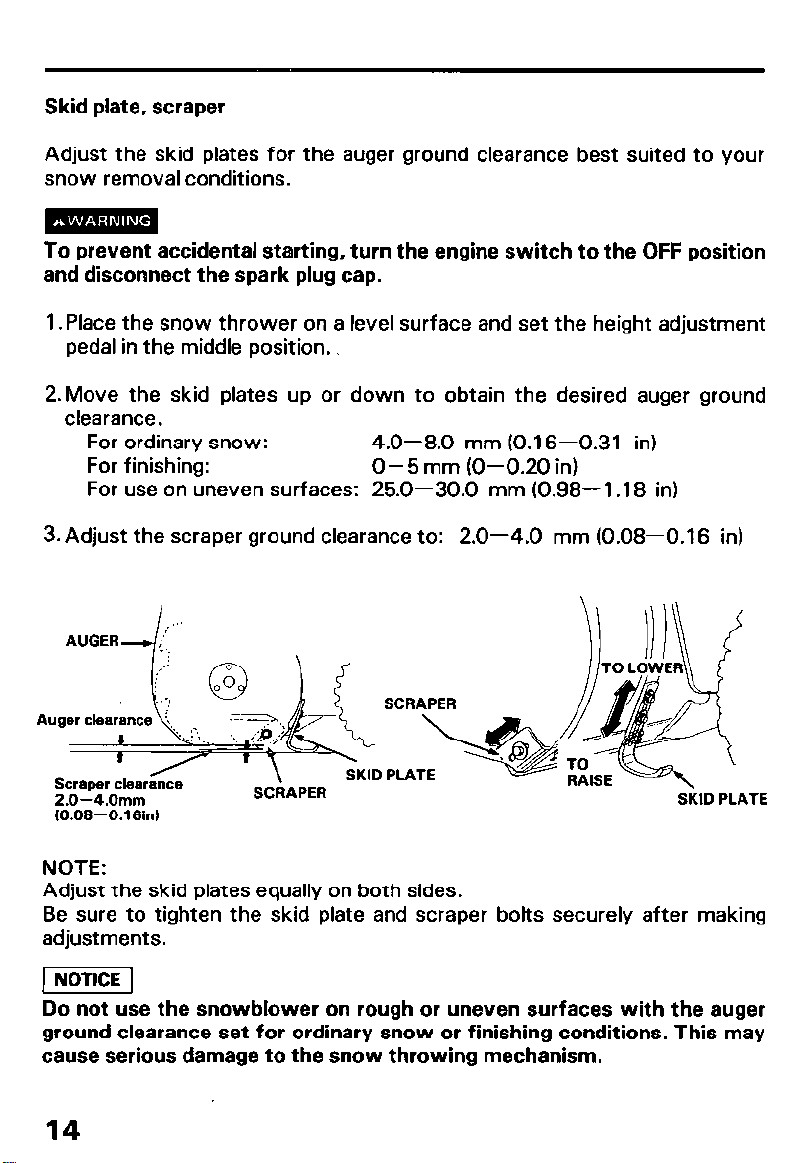
Skid plate, scraper
Au~:;a~~~~~~D~~~
Adjust the skid plates for the auger ground clearance best suited to your
snow removal conditions.
To prevent accidental starting, turn the engine switch to the OFF position
and disconnect the spark plug cap.
1 .Place the snow thrower on a level surface and set the height adjustment
pedal in the middle position.,
2.Move the skid plates up or down to obtain the desired auger ground
clearance.
For ordinary snow:
For finishing:
For use on uneven surfaces: 25.0-30.0 mm (0.98- 1 .18 in)
3. Adjust the scraper ground clearance to: 2.0-4.0 mm (0.08-0.16 in)
4.0-8.0 mm (0.16-0.31 in)
0- 5 mm (O-0.20 in)
2.0--4.Omm
(O.OB-0.16ln)
NOTE:
Adjust the skid plates equally on both sides.
Be sure to tighten the skid plate and scraper bolts securely after making
adjustments.
Do not use the snowblower on rough or uneven surfaces with the auger
ground clearance set for ordinary snow or finishing conditions. This may
cause serious damage to the snow throwing mechanism.
14
SCRAPER
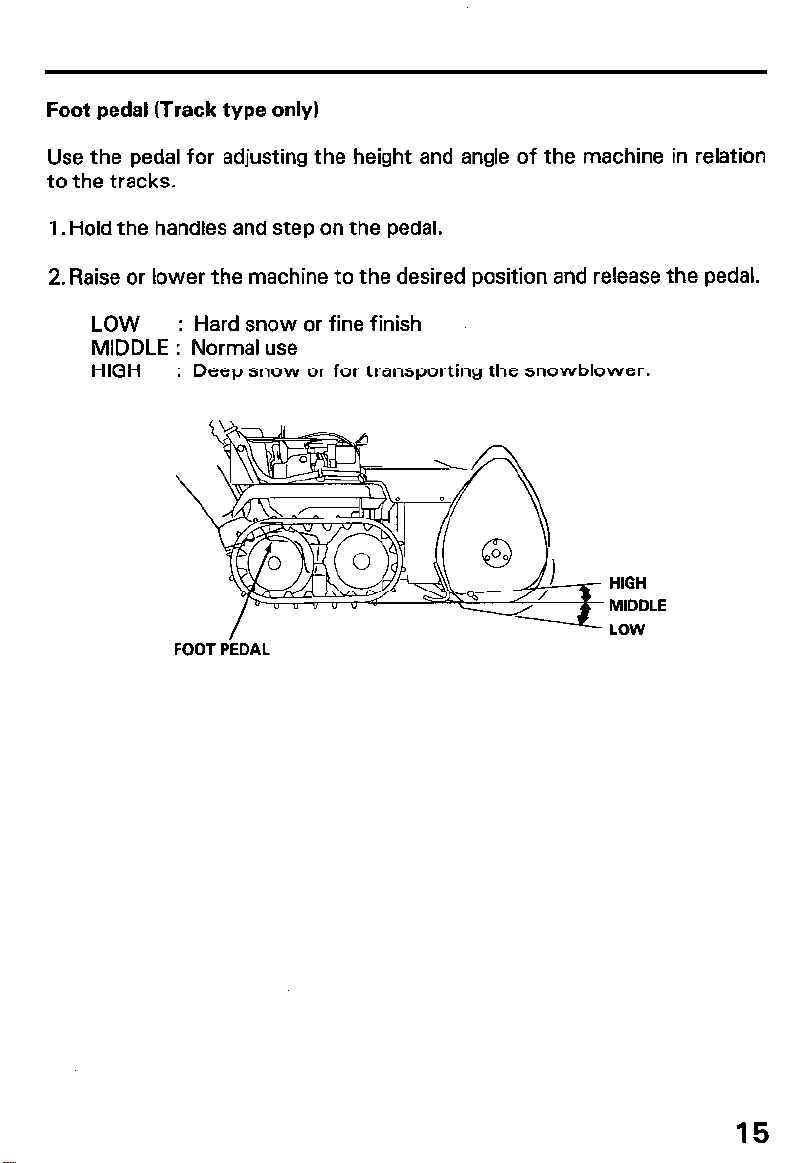
Foot pedal (Track type only)
Use the pedal for adjusting the height and angle of the machine in relation
to the tracks.
1. Hold the handles and step on the pedal.
2. Raise or lower the machine to the desired position and release the pedal.
LOW
: Hard snow or fine finish
MIDDLE : Normal use
HIGH
: Deep snow or for transporting the snowblower.
FOOT PEDAL
HIGH
MIDDLE
LOW
15
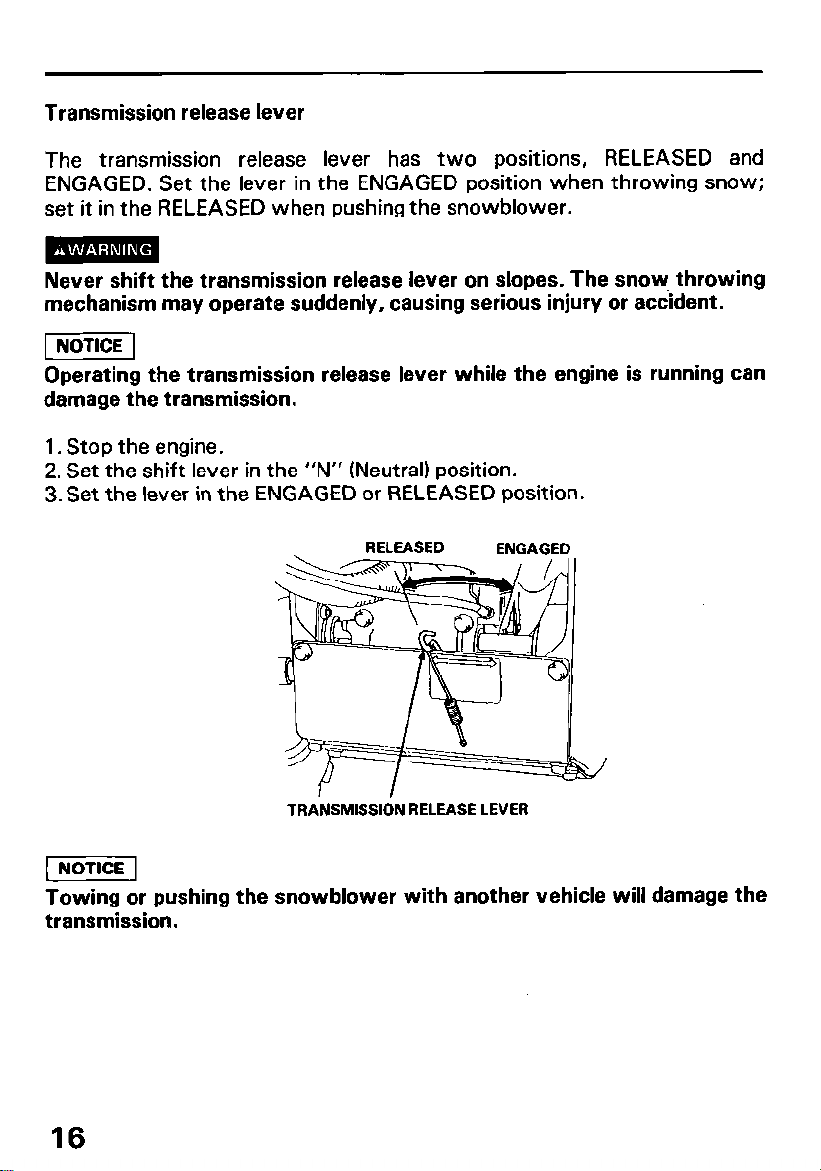
Transmission release lever
The transmission release lever has two positions, RELEASED and
ENGAGED. Set the lever in the ENGAGED position when throwing snow;
set it in the RELEASED when pushing the snowblower.
Never shift the transmission release lever on slopes. The snow throwing
mechanism may operate suddenly, causing serious injury or accident.
Operating the transmission release lever while the engine is running can
damage the transmission.
1. Stop the engine.
2. Set the shift lever in the “N” (Neutral) position.
3. Set the lever in the ENGAGED or RELEASED position.
RELEASED
TRANSMISSION RELEASE LEVER
ENGAGED
Towing or pushing the snowblower with another vehicle will damage the
transmission.
16
 Loading...