

Page 1
HBV2500S
ELECTRIC MULCHING BLOWER / VACUUM
OPERATOR’S MANUAL (Original Instructions)
Important! It is essential that you read the instructions in this manual before
operating this machine.
Page 2

ENGLISH (Original Instructions)
You r bl ow er vacuum h as b ee n enginee re d an d
ma nufac tu re d to Ho melit e' s high st andar d f or
dependability, ease of operation, and operator safety.
When properly cared for, it will give you years of rugged,
trouble-free performance.
Thank you for buying a Homelite product.
GENERAL SAFETY RULES
1. Important safety instruction
n Pl ea se read all o f th e sa fety and op er at ing
instructions car efu lly before using thi s pro duct.
Please pay particular attention to all sections of this
User Guide that carry warning symbols and notices.
n This appliance is not intended for use by persons
(including children) with reduced physical, sensory
or mental capabilities, or lack of experience and
knowledge, unless they have been given supervision
or instruction concerning use of the appliance by a
person responsible for their safety.
n Children should be supervised to ensure that they do
not play with the appliance.
2. Training
n Read the instructions carefully. Be familiar with the
controls and the proper use of the appliance.
n Never allow children to use the appliance.
n Never allow people unfamiliar with these instructions
to use the appliance. Local Regulations may restrict
the age of the operator.
n Never operate the appliance while people, especially
children, or pets are nearby.
n The operator or user is responsible for accidents or
hazards occurring to other people or their property.
3. Preparation
n Wh ile ope ra ti ng th e ap plian ce , always we ar
substantial footwear and long trousers
n Dress Properly - Do not wear loose clothing or
jewelry. They c an be cau ght in mo ving par ts.
Use of rubber gloves and substantial footwear is
recommended when working outdoors.
n Wear protective hair covering to contain long hair.
Wear protective goggles while operating.
n To prevent dust irritation the wearing of a face mask
is recommended.
n Before using, check the supply and extension cord for
signs of damage and aging.Do not use the appliance
if the cord is damaged or worn.
n Never operate the appliance with defective guards or
shields, or without safety devices, for example debris
collector in place.
n Only use a weather proof extension cable fitted with a
coupler according to IEC60320-2-3
4. Operation
n Always direct the cable to the rear away from the
appliance.
n If the cord becomes damaged during use, disconnect
the cord from the supp ly immediately. DO NOT
TOUCH THE CORD BEFORE DISCONNECTING
THE SUPPLY. Do not use the appliance if the cord is
damaged or worn.
n Do not carry the appliance by the cable.
n Avoid Dangerous Environment - Don't use appliances
in damp or wet locations.
n Disconnect the appliance from the mains supply
Whenever you leave the machine. Before clearing
a blockage. Before checking, cleaning or working
on the appliance. If the appliance starts to vibrate
abnormally.
n Operate the appliance only in daylight or in good
artificial light.
n Do not overreach and keep your balance at all times.
n Always be sure of your footing on slopes.
n Walk, never run.
n Keep all cooling air inlets clear of debris.
n Never blow debris in the direction of bystanders.
n Appliance should be supplied via a residual device
with a tripping current of not more than 30mA.
5. Maintenance and storage
n Keep all nuts, bolts and screw tight to make sure the
appliance is in safe working condition.
n Ch eck t he ap pl iance f reque nt ly fo r wea r or
deterioration.
n Replace worn or damaged parts.
n Use only genuine replacement parts and accessories.
n Store Idle Appliances Indoors - When not in use,
appliances should be stored indoors in dry, and high
or locked-up place - out of reach of children.
6. Additional safety rules for blower vacuum
n Alw ays wear adequate protectiv e clothing when
operating the tool to avoid injuries to face, eyes,
hands, feet, head or hearing, Use safety glasses or a
face shield, high boots or sturdy shoes, long trousers,
work gloves, a hard hat and ear defenders.
n Do not start the tool when it is upside down or when it
is not in the operating position.
n Switch the motor off and remove the plug when the
tool is not being used, left unattended, being cleaned,
being moved from one place to another or when the
extension cord is entangled or damaged.
n Do not operate the tool near people, especially
children or pets. Turn it off if they get too close.
Maintain a safe distance of at least 5m from other
people when using the tool.
n Never direct the blower tube towards bystanders or
pets. Never blow debris in the direction of bystanders
or pets. The operator is responsible for accidents or
1
Page 3
ENGLISH (Original Instructions)
hazards occurring to other people or their property.
n Do not handle the plug or the tool with wet hands and
do not use the tool in the rain.
n Use only outdoor rated extension leads that are so
marked .Keep the extension cord away from heat, oil
and sharp edges.
n Ensure that the extension lead is secured in a
manner that prevents it form disconnecting from the
plug whilst in use.
n Keep all the air intakes and the blower tube free of
dust, lint, hair and other material that may cause a
reduction in air flow.
n Keep a balanced and stable stance while using the
tool.
n Do not switch on the tool in enclose d or poorly
ventilated spaces or in the presence of inflammable
and /or explosive substance such as liquids, gases
and powders.
n Do not get distracted and always concentrated on
what you are doing. Use common sense. Never
operate the tool when you are tired, sick or under the
influence of alcohol or other drugs.
n Do not operate this appliance with long loose hair
or loose fitting jewelry. Tie long loose hair back and
remove loose fitting jewelry.
n Do not allow the blower vacuum to pick up any
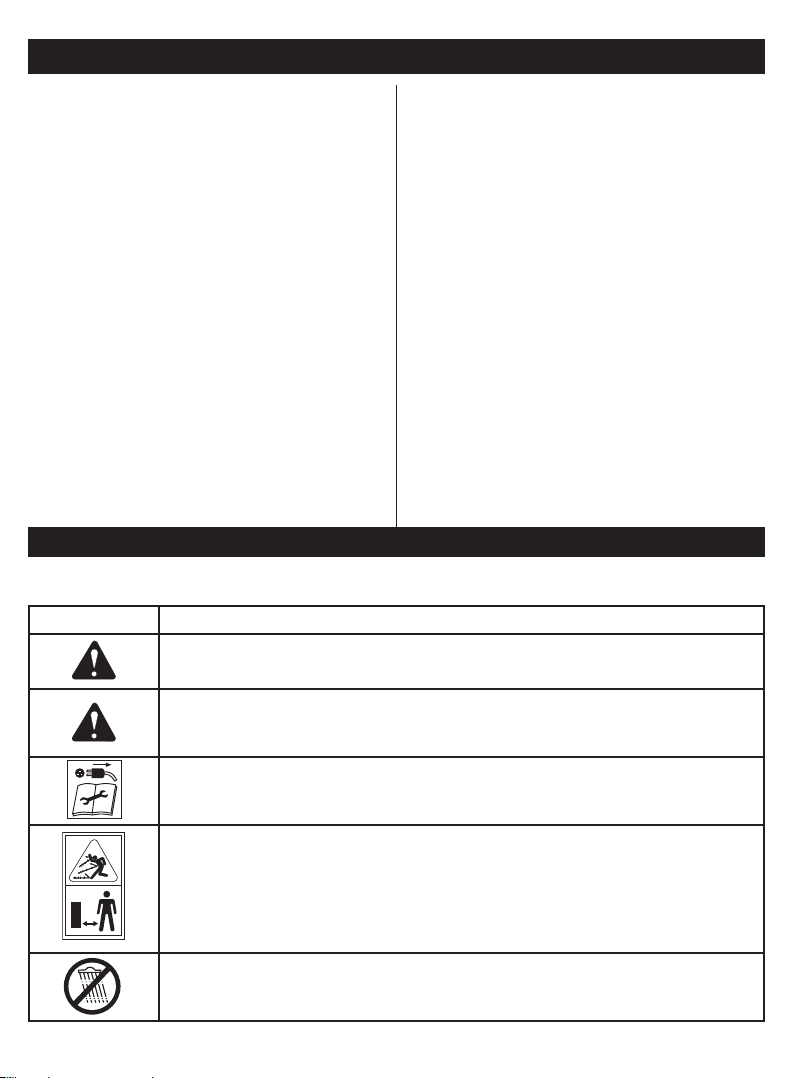
SYMBOLS
Some of the following symbols may be used on your tool. Please study them and learn their meaning. Proper
interpretation of these symbols will allow you to operate the tool more safely and effectively.
Symbol Explanation
WARNING!
These following warning symbols are displayed on the garden vacuum to remind you of the
safety precautions you should take when operating it.
WARNING!
This garden vacuum should only be used by those persons who have read and understood all
the safety and operating instruction contained in the User Guide. Be aware of the safety of all
persons in the work area at all times.
WARNING!
Switch the garden vacuum OFF and disconnect from the mains supply before making
adjustments, cleaning blockages, or starting any cleaning and maintenance procedures.
burning or smoldering materials like ashes, cigarette
butts etc.
n Do not attempt to pick up breakable objects like
glass, plastics, china etc.
n Do not use in vacuum operation without the collection
bag fitted
n Do not use the blower vacuum in either the vacuum
or the blower position on gravel surfaces.
n Only operate the tool during broad daylight or with
adequate artificial light.
n When the tool is not in use, store it in a dry place and
out of reach of children.
n After use, disconnect the tool from the power supply
and check for damage. If you have the slightest
doubts, contact an authorized service centre.
n Only use the tool according to the instructions given
in this manual.
n Check regularly that screws are tight.
n Use only spare parts and accessories recommended
by the manufacture.
n Do not try to repair the tool or access internal parts.
Contact authorized service centers only.
n It is recommended that the blower vacuum should be
used with a Residual Current Device (RCD) with a
tripping current of no more than 30mA.
WARNING!
Keep other people out of the danger area!
WARNING!
Do not use this garden vacuum in the rain. Avoid using it in damp conditions.
2
Page 4

ENGLISH (Original Instructions)
WARNING!
When using this garden vacuum, always wear protective glasses.
WARNING!
Wear ear protection.
WARNING!
Read this safety and operating instructions in this booklet and keep it in a safe place for future
reference.
WARNING!
Dangerous feed orifice. Keep hands and feet out of the openings while the machine is
running.
WARNING!
Rotating Fans. Keep hands and feet out of the openings while the machine is running.
ENVIRONMENTAL PROTECTION
Waste electrical products should not be disposed of with household waste. Please recycle
where facilities exist. Check with your local authority or retailer for recycling advice.
VACUUM MODE
If the quick change lever is pointing on this symbol, the unit operates in vaccum mode
BLOWER MODE
If the quick change lever is pointing on this symbol, the unit operates in blow mode
SPECIFICATION
Type .................................................................HBV2500S
Voltage............................................................220-240 V~
Frequency................................................................ 50 Hz
Rated power .......................................................... 2500W
Insulation ...............................................................Class II
Air velocity ..........................................................220 km/h
Air volume .........................................................9 m³ / min
No load motor speed ........................................14000/min
Net weight (without cable) ....................................... 3.8Kg
Mulching Ratio ............................................................10:1
Sound pressure level ................................ LPA:88.2 dB(A)
Sound power level .................................LWA:101.6 dB(A)
Vibration level ................................................ah: 3.7 m/s²
KPA: 1.0dB(A)
KWA: 1.0dB(A)
K:1.5m/s²
DESCRIPTION
Fig 1
1. Shoulder strap
2. Trigger
3. Motor housing
4. Upper hook for collection bag
5. Quick change lever
6. Power cord
7. Collection bag connector
8. Lower hook for collection bag
9. Collection bag
10. Wheels
11. Lower tube
12. Tube connection screw hole
13. Upper tube
14. Front handle
15. Shoulder strap mounting hook
Fig 2
11. Lower tube
13. Upper tube
3
Page 5

ENGLISH (Original Instructions)
Fig 3
12. Tube connection screw hole
Fig 4
16. Rib
17. Wheel bracket
Fig 5
18. Screw
Fig. 6
19. Screw
Fig 7
20. Strap
21. Hook
Fig 8
7. Collection bag connector
Fig 10
2. Trigger
Fig 11
22. Blow mode selected
Fig 13
23. Vacuum mode selected
ASSEMBLY
UNPACKING
n Carefully remove the product and any accessories
from the box.
n Inspe ct the product care fully to make sure no
breakage or damage occurred during shipping.
n Do not discard the packing material until you have
carefully inspected and satisfactorily operated the
product.
n If any parts are damaged or missing, please call your
Homelite service centre for assistance.
n The blower vac is supplied with some components not
assembled. To assemble these, proceed as follows:
1. Assembly of the tube (Fig. 2-5)
n Insert the lower tube (11) into the upper tube(13)
and align the screw hole (12) so that the screw can
fit through. Fix the tubes together by tightening the
screw.
n Slide the wheel bracket (17) over the lower tube as
shown in figure 4. Align the screwhole and securely
fasten the screw (18) to attach the wheel bracket to
the lower tube.
2. Attaching the tube to the motor housing (Fig. 6)
n Slide the tube which you assembled in step 1 over the
the motor housing.
n Insert and tighten screw (19) to fix blower tube on the
product.
3. Attaching the collection bag (Fig. 7-9)
n Connect the strap (20) of the bag to the hook on the
motor housing (21)
n Attach the plastic plug-in connector on the bag to the
motor housing outlet until it clicks into its position (fig.
8)
n Attach the strap on the lower end of the collection bag
to the hook on the tube (8)
n To disconnect, perform all above steps in reverse
order
4. Attaching the shoulder strap (Fig. 1)
n Clip the shoulder strap (1) into the shoulder strap
mounting hook (15)
n Adjust length for comfortable use
OPERATION
INTEND USE: This blower vac uum is intended for
cleaning in dry areas(blow mode and suction mode) in
domestic use. Potential risk may occur if not for such
use.
SWITCHING BETWEEN SUCTION MODE AND BLOW
MODE (Fig. 11-12)
Warning:
Always ensure that your unit is switched off and
has fully stopped before changing the mode of
operation. Do not force the quick change lever.
It should move smoothly without resistance. If
you encounter problems, disconnect from power
supply and clean the lever mechanism.
For blow mode:
n Switch the quick change lever(5) to point at the blow
symbol (22) (see fig. 11)
For suction/vacuum mode:
n Switch the quick change lever (5) to point at the
vacuum symbol (23) (see fig. 12)
STARTING THE BLOWER VACUUM
1. Connect the blower vacuum to the power supply
2. Choose the correct operation mode (blow mode or
suction mode – see section above)
3. Hold the line product firmly with both hands and pull
the trigger (2) to start operation. Make sure that the
blower vacuum is pointing in a safe direction while
switching it on.
STOPPING YOUR BLOWER VACUUM
n To stop the blower vacuum, just release the trigger
(2).
EMPTYING THE COLLECTION BAG
It is not necessary to remove the collection bag from
4
Page 6

ENGLISH (Original Instructions)
the blower vac when the bag needs to be emptied. The
rear side of the bag has a full length zip to open it for
emptying. Simply open the zip and empty the contents.
Ensure to close the zip prior to operating the blower vac.
TIPS FOR USING YOUR BLOWER VACUUM
The following points may assist you in the operation of
the blower vac.
n Vacuum dr y lea ves, cuttings or general gar den
debris. The mulching performance when picking up
wet material is not optimal and wet material also
increases clogging.
n Avoid using the vac on areas where there are stones,
or other hard objects. These objects will damage the
MAINTENANCE
PROBLEM POSSIBLE CAUSE SOLUTION
1. No mains power (power failure)
Motor won’t start
2. Connection lead defect
3. Motor or switch defect
impeller of the blower vac.
n It is also advisable not to allow the blower vac to
pick up soil. Soil generally contains moisture and
when combined with other garden debris can clog the
blower vac.
n The blower vac is not a garbage disposal unit. Do
not attempt to mulch any other material than garden
debris.
n For bet ter p erfo rma n ce a nd com for t, it i s
recommended to empty the collection bag when it
becomes approximately half full. This reduces the
weight and also allows the vac operation to perform
at its highest level.
1. Check fuse (10 A)
2. Replace lead or have lead checked (electrician)Never
use defect lead
3. To solve the problem, contact the manufacturer or an
authorized company (see customer service list).
Material is
not sucked
in properly
(reduced
vacuuming
power)
1. Machine is clogged or blocked
2. Bag too full
3. Extension cable too long,
or cross section too small.
Socket too far away from main
connection, and cross section
1. Clean machine
2. Empty bag
3. Extension cable at least 1.5 m, maximum 25 m long.
Cross- section of at least 2.5 mm in longer cables.
of connection lead too small.
DISPOSAL
Waste electrical products should not be disposed of together with household waste. Please recycle
where facilities exist. Check with your local authority or retailer for recycling advice.
MAINTENANCE AND STORAGE INFORMATION
Prior to cleaning or any maintenance, always ensure the power plug has been removed from the electric power supply.
When you have finished using the blower vac, always check to make sure the product is clean and free of dirt and
debris. It is especially important to check and clear debris around the quick change lever. To check this area, remove
the collection bag and ensure the discharge side of the tube is free of debris and dirt. Operate the selector lever
backwards and forwards to ensure correct operation
n Do not use solvents to clean the blower vac.
n Store the blower vac in a dry place, and out of reach of children.
POWER CORD MAINTENANCE
If the supply cord needs replacing, the task must be carried out by the manufacturer, the manufacturer’s agent, or an
authorised service centre in order to avoid a safety hazard.
5
Page 7

LIMITED WARRANTY (Original Instructions)
TTI warrants this outdoor product to be free of defects in material and workmanship for 24 months from the date of purchase by the
original purchaser, subject to the limitations below. Please keep your invoice as proof of date of purchase.
This warranty is only applicable where the product is used for personal and non-commercial purposes. This warranty does not
cover damage or liability caused by / due to misuse, abuse, accidental or intentional acts by user, improper handling, unreasonable
use, negligence, failure by end user to follow operating procedures outlined in the user’s manual, attempted repair by non-qualified
professional, unauthorized repair, modification, or use of accessories and/or attachments not specifically recommended by authorized
party. Please see your local dealer for list of authorized service centres in your area.
This warranty does not cover belts, brushes, bags, bulbs or any part which ordinary wear and tear results in required replacement during
warranty period. This warranty does not cover transportation cost or consumable items such as fuses and batteries.
This limited warranty is void if the product’s original identification (trade mark, serial number, etc.) markings have been defaced, altered or
removed or if product is not purchased from an authorized reseller or if product is sold AS IS and / or WITH ALL FAULTS.
Where permitted, the provisions of this limited warranty are in lieu of any other written warranty, whether express or implied, written or oral,
including any warranty of MERCHANTABILITY OR FITNESS FOR A PARTICULAR PURPOSE. IN NO EVENT SHALL WE BE LIABLE
FOR SPECIAL, INCIDENTAL, CONSEQUENTIAL OR INCIDENTAL DAMAGES. OUR MAXIMUM LIABILITY SHALL NOT EXCEED THE
ACTUAL PURCHASE PRICE PAID BY YOU FOR THE PRODUCT.
This warranty is valid only in the European Union, Australia and New Zealand. Outside these areas, please contact your authorized
Homelite dealer to determine if another warranty applies.
EC DECLARATION OF CONFORMITY (Original Instructions)
Manufacturer: Homelite Far East Co.,Ltd
Address: 24/F, CDW building, 388 Castle Peak Road, Tsuan Wan, HongKong.
Name and address of the person authorised to compile the technical file:
Name:Simon Del-Nevo
Address:Techtronic Industries Europe, Middle East and Africa, Medina House,Fieldhouse Lane,Marlow,Bucks,UK,SL7 1TB
Herewith we declare that the product
Category ................................................................................................Blower / Vac
Model ....................................................................................................... HBV2500S
Serial number ...................................................................... See product rating label
Year of Construction ............................................................ See product rating label
n is in conformity with the relevant provisions of the Machinery Directive
2006/42/EC
n is in conformity with the provisions of the following other EC-Directives
2006/95/EC(LVD-Directive)
2004/108/EC(EMC-Directive), and
2000/14/EC(Noise-Directive) incl. modifications(2005/88/EC)
And furthermore, we declare that
n the following (parts/clauses of) European harmonised standards have been used
EN55014-1:2006,EN55014-2:1997+A1:2001,EN61000-3-2:2006,EN61000-3-3:1995+A1:2001 +A2:2005,
EN 60335-1:2002+A1:2004+A11:2004+A12:2006+A2:2006+A13:2008,
Parts of IEC 60335-2-100:2002,prEN 15503:2006,EN 62233:2008,EN ISO 3744:1995,
n the following (parts/clauses of) other technical standards and specifications have been used
ISO11094:1991
Measured sound power level LwA: 101.6 dB(A); KwA: 1.0dB(A)
Guaranteed sound power level 103dB(A)
Conformity assessment method to Annex V/ Directive 2000/14/EC
Place, date: HongKong, 29/10/2009 Signature: Andrew John Eyre BEng CEng MIET
Vice president of Engineering
Page 8

TECHTRONIC INDUSTRIES EMEA
Medina House, Fieldhouse Lane,
Marlow, Bucks
SL7 1TB-UNITED KINGDOM
RYOBI TECHNOLOGIES (UK) LIMITED.
Medina House,
Fieldhouse Lane, Marlow,
Buckinghamshire,
SL7 1TB,
UNITED KINGDOM
Tel: + 44 (0) 1628 894400
Fax: + 44 (0) 1628 894401
Technical Helpline : + 44 (0) 800 389 0305
TECHTRONIC INDUSTRIES FRANCE SAS
Immeuble Le Grand Roissy
Z.A. du Gué - 35 rue de Guivry
77990 LE MESNIL AMELOT FRANCE
Phone: + 33(0)1 60 94 69 70
Fax: + 33(0)1 60 94 69 79
RYOBI BELGIUM
Avenue des Pâquerettes, 55
Zoning artisanal - bâtiment 5
B - 1410 Waterloo
BELGIQUE
Tel : + 32(0) 2357 8140
Fax : + 32(0) 2357 8149
TTI ITALIA SRL
Via Fratelli Gracchi, 39
20092 Cinisello Balsamo (MI)
Italia
Tel : + 39(0) 5923 8408
Fax : + 39(0) 5924 6960
TECHTONIC INDUSTRIES IBERIA S.L
Av. De la Industria,52
Coslada – Madrid – España
Tel: 91 485 12 10
TECHTRONIC INDUSTRIES SOUTH AFRICA
CO. (PTY) LTD
P.O Box 83888, South Hills, Johannesburg, 2136
South Africa
TECHTRONIC INDUSTRIES (ASIA) CO., LTD.
24/F, CDW Building,
388 Castle Peak Road,
Tsuen Wan, Hong Kong.
Tel : + 852 2402 6888
RYOBI TECHNOLOGIES GMBH
Itterpark 4
D-40724 Hilden
DEUTSCHLAND
Tel: + 49 (0) 2103 2958-0
Fax: + 49 (0) 2103 2958-29
RYOBI TECHNOLOGIES GMBH
Vertriebsbüro Österreich
Schinitzgasse 13
A-8605 Kapfenberg
Tel.: + 43 (0) 3862 23590-0
Fax: + 43 (0) 3862 23590-25
TECHTRONIC INDUSTRIES AUSTRALIA PTY LIMITED.
Building B, Rosehill Industrial Estate,
3 Shirley Street,
Rosehill NSW 2142
AUSTRALIA
Tel: (02) 8892 1800 or 1300 361 505
Fax: 1800 807 993
TECHTRONIC INDUSTRIES (NZ) LIMITED.
27 Clemow Drive, Mt Wellington
PO Box 12-806, Penrose, Auckland
NEW ZEALAND
Tel: + 64 (0) 9 573 0230
Free Call: +64 0800 279 624
Fax: + 64 (0) 9 573 0231
A&M MIDDLE EAST FZCO
P.O.Box 61254
Jedel Ali, Dubai,
UNITED ARAB EMIRATES
Tel.: + 9714 8861399
Fax: + 9714 8861400
TECHTRONIC INDUSTRIES DENMARK APS
Stamholmen 147, 4.
DK-2650 Hvidovre
Denmark
Tlf 43 56 55 55, Fax 43 56 55 56
E-mail: kundeservice@tti-emea.com
TECHTRONIC INDUSTRIES NORWAY AS
Tlf.: 800 12 493, Faks: 800 12 492
E-mail: kundetjeneste@tti-emea.com
TECHTRONIC INDUSTRIES SWEDEN AB
Tel (+46) 08 24 60 30. fax (+46) 08 24 60 31.
E-mail: kundtjanst@tti-emea.com
TECHTRONIC INDUSTRIES FINLAND OY
Tel. 0800 1 09000, Fax 0800 1 09001
Email: asiakaspalvelu@tti-emea.com
 Loading...