

Page 1
0
INSTALLATION AND OPERATION MANUAL.
MANUEL D’INSTALLATION ET D’UTILISATION.
INSTALLATIONS UND BEDIENUNGSANLEITUNG.
Page 2

1
English / CONTENTS.
Page
Safety information 2
Safety guidelines 2
Warning symbols 3
Liability 3
Foreword 3
General information 3
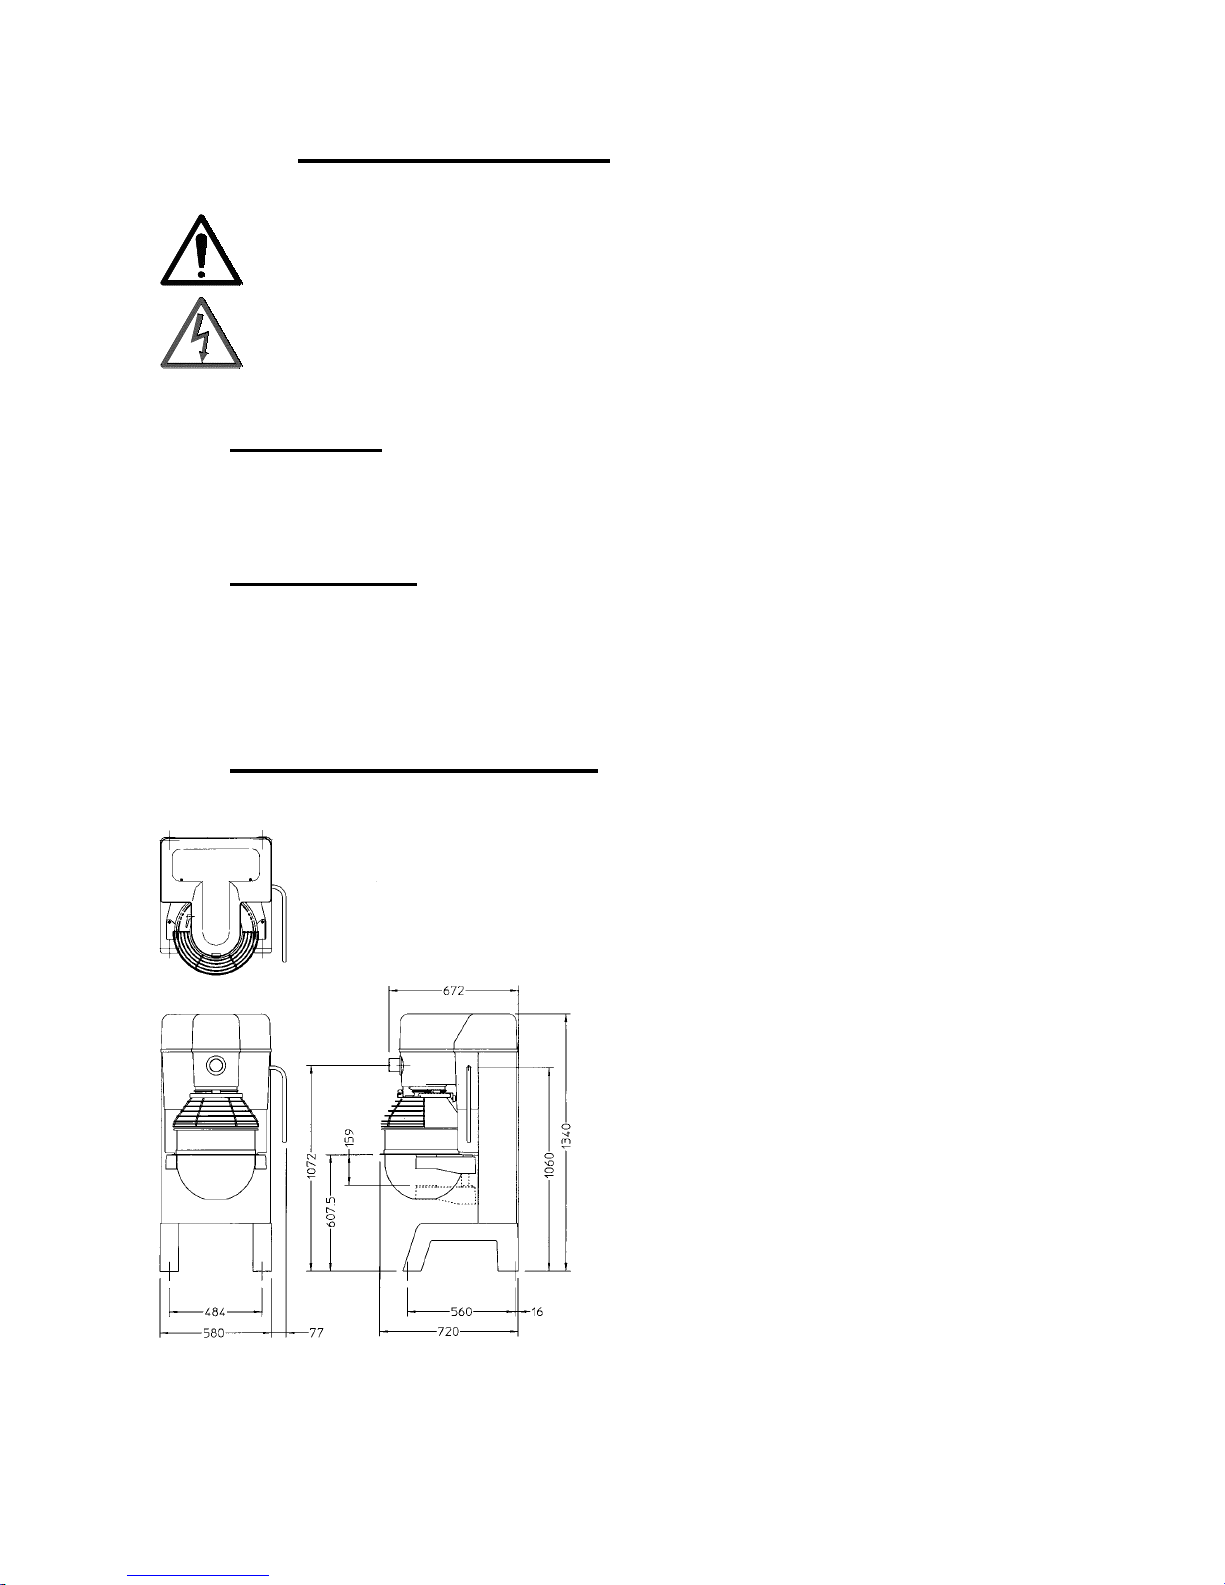
Mixer dimensions. Figure 1 3
Technical information. Table 1 4
Installation 4
Unpacking and handling 4
Location 5
Electrical installation 5
Electrical connection 6
Commissioning and operating instructions 6
Operation 6
Using for the first time 6
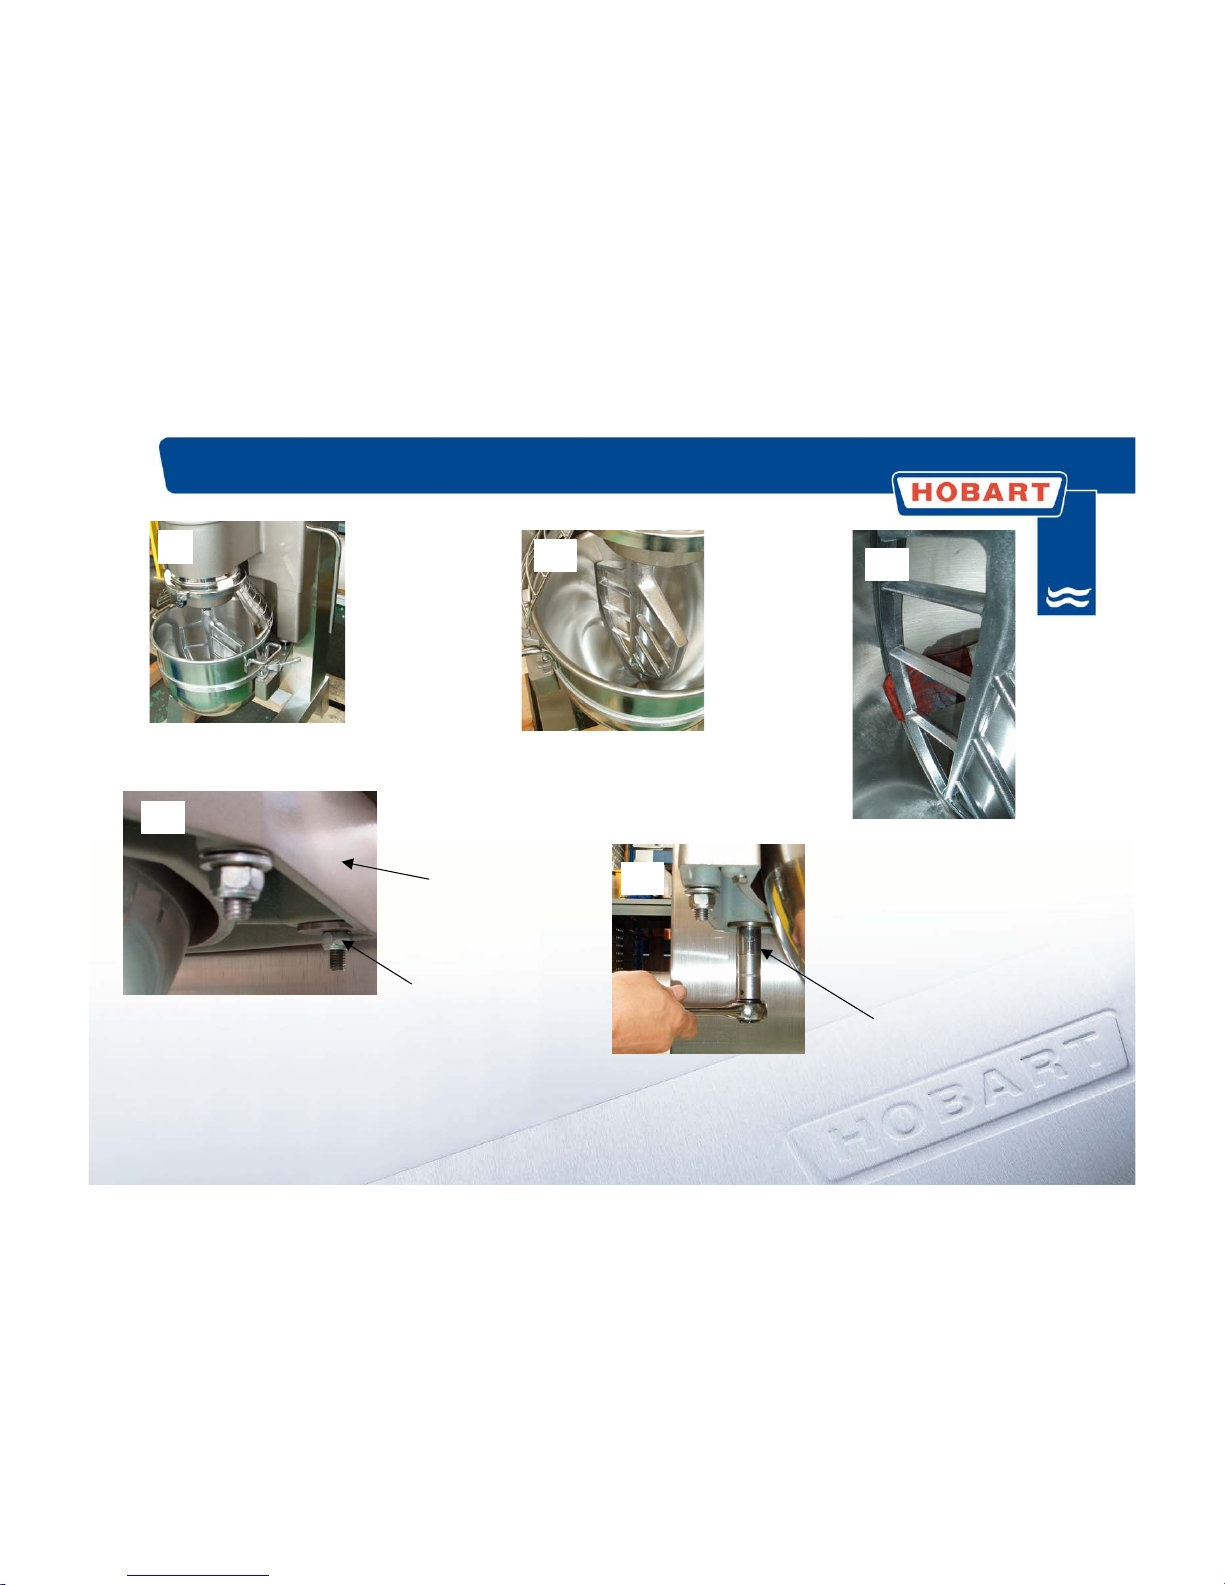
Mixer component identification. Figure 2 6
Using the bowl scraper 7
General bowl scraper use 7
Operating with the bowl scraper 8
Cleaning the bowl scraper 8
When mixing has finished 8
Using the attachment facility 9
Attachment safety instructions 9
Fitting an attachment 9
Safety instructions 9
Never 10
Always 10
Mixing capacity chart 11
Mixing chart-kitchen capacities HSM30 / NCM300. Table 2 11
Mixing chart-bakery capacities HSM30 / NCM300. Table 3. 11
Mixing chart-kitchen capacities HSM40 / NCM400. Table 4. 12
Mixing chart-bakery capacities HSM40 / NCM400. Table 5 12
Mixing chart-kitchen capacities 20 litre bowl. Table 6. 12
Mixing chart-bakery capacities 20 litre bowl. Table 7. 12
Mixer agitators 13
Cleaning 14
Cleaning before initial use 14
Cleaning after use 14
Guard removal and cleaning 14
Mixer maintenance 15
Fault finding 16
Recommended spares 17
Notes 18
Service information and addresses 19
Page 3

2
1.0 SAFETY INFORMATION.
The procedures and precautions contained in this manual are understood to apply to the
machinery only when it is used in the prescribed manner.
If the machinery is used other than in the recommended manner, the operator will be
responsible for his/her own safety and for the safety of the other persons who may be
involved.
The information in this manual has been prepared to assist the operator to understand,
maintain, and operate the mixer. In order to prevent accidents, read, understand and
follow all the precautions and warnings contained in this manual before installation or
operating for the first time. This manual must be studied to obtain a clear understanding of
the mixer and its capabilities.
1.1 SAFETY GUIDELINES.
Ensure sufficient precautions are observed during manually handling of the mixer
particularly when moving into position on installation. Reference must be made to manual
handling regulations. The mixer weights are given in table 1.
· Do not hose or pressure clean this appliance. It is vital to adhere to the cleaning
instructions detailed in section 9 of this manual.
· Do not remove any covers or loosen any fittings whilst the machine is operating.
· Ensure this manual is kept in an easily accessible place for future reference near the
mixer.
· All operators must be trained in the safe operation of the mixer and attachments.
· Ensure the electrical supply has been isolated before attempting to service or move
the mixer.
· Rotating machinery and electricity are potentially hazardous and may cause injury if
sufficient precautions are not taken prior to operating or servicing the machine.
· Always have your mixer and attachments regularly serviced; at least twice a year,
depending on frequency of use.
· Important! When using reduced size equipment only the following bowls detailed in
section 12 must be used. Do not operate a mixer with any other reduced size bowl
combinations. Reduced sizes are 30 or 20 litre bowls on an HSM40 / NCM400 or 20
litre bowl on an HSM30 / NCM300. The recommended spares table in section 12
details the respective bowl and agitator part numbers.
Page 4
3
1.2 WARNING SYMBOLS.
To identify the safety messages in this manual, the following symbols have been used
The " Warning" symbol is found primarily where the corresponding information is
important for the safe use of the machinery.
The electrical hazard symbol is used when there are risks of an electrical nature.
Prior to servicing the machinery, always disconnect the power cable from the
mains supply.
1.3 LIABILITY.
Installations and repairs which are not carried out by Authorised technicians or the use
of other than original spare parts, and any technical alterations to the machine, may
affect the warranty set out in the standard conditions of sale.
2.0 FOREWORD.
Hobart reserves the right to alter the design of their products without prior notice. Whilst
every effort is made to ensure this publication reflects the latest design, the Company
cannot guarantee full compliance.
Take pride in your HSM/NCM mixer - keep it clean and in good mechanical and electrical
condition.
3.0 GENERAL INFORMATION
The information and instructions contained in this manual may not cover all details or
variations in the equipment, nor provide for
every eventuality to arise with installation,
operation, or maintenance. If additional
information is required please contact your
local Hobart office.
The HSM30, HSM40, NCM300 and NCM400
mixer range are designed to mix food
products as detailed on the specification
charts (tables 2, 3, 4 and 5).
The HSM mixers are manufactured from 2
mettalic painted castings, fabricated stainless
steel pedestal, back panel & feet, with a lastic
moulded top cover
The NCM mixers are manufactured from 2
iron castings, fabricated steel pedestal,
aluminium cast feet, with a plastic moulded
top cover all with a Hobart grey paint finish.
The machine is rated to operate on the
electrical supplies shown in table 1. The
mixer is fitted with a ‘no volt release’ safety
feature to prevent automatic restarting after a
supply failure or disconnection from the
mains.
FIGURE 1. OVERALL DIMENSIONS.
Page 5
4
The bowl support and the guard are interlocked so that when either are not in their correct
operating positions, the mixer will not work. The standard mixer is delivered with guard,
bowl and agitators.
Table 1. Technical information.
Description Units HSM30
NCM300
HSM40
NCM400
Motor power kW (hp) 1.1 (1.5) 1.1 (1.5)
Maximum speed of rotating part (50Hz) rpm 1425 1425
Nominal electrical supply 1 ph Volts/Hz 230/50 230/50
3 ph 400/50 400/50
Full load current at above voltage 1 ph Amps 7.4 7.4
3 ph Amps 2.8 2.8
Locked rotor current at above voltage 1ph Amps 44 16
3 ph Amps 16 16
Recommended fuse size 230v/1 ph/50hz amps 20 20
Recommended fuse size 230v/3 ph/50hz amps 16 16
Recommended fuse size 400v/3 ph/50hz amps 10 10
Maximum ambient temperature
o
C40 40
Attachment hub drive size -- Number 12 Number 12
Mixer weight including agitator and bowl
(empty)
Kg (Lbs) 241 (531) 246 (542)
Noise level dB (A)
##
less than
70
##
less than
70
Shipping weight kg (Lbs) 255 (562) 260 (573)
Shipping dimensions (carton) LxWxHcm99x81x155 99x81x155
Storage conditions. Temperature and humidity.
o
C,
% RH
+5 to +38,
85
+5 to +38,
85
Class of appliance
#
Class I
#
Class I
Enclosure IP rating IP44 IP44
Wiring terminal size; single phase/3 phase mm
2
1.5/1.0 1.5/1.0
#
Refer to section 4.3.
##
In accordance with EN-ISO 12001:1996.
4.0 INSTALLATION.
4.1 UNPACKING AND HANDLING.
Where ever possible the food mixer should be transported to the installation position in
the packaging provided to avoid damage. Do not use a sharp knife to cut into the box as
damage to the machine may occur. Check for possible shipping damage. If the unit is
found to be damaged, save the packaging material and contact your nearest Hobart sales
office.
Caution: The mixer is a heavy object and must be correctly handled and lifted
to avoid personal injury.
Page 6

5
With the machine in the vicinity of its final position remove from the transportation pallet
following the instructions provided with the packaging. The machine is affixed to the pallet
by four retaining bolts through the pallet into the threaded feet.
Care must be taken during this operation to ensure: -
a) All required safety measures are taken to ensure correct lifting and handling to avoid
risk of injury through dropping, falling and tilting.
b) No damage occurs to the machine, which could impair the normal operation.
The top cover is packed separately within the main carton. Only fit the top cover once the
mixer is in position. Do not lift or manoeuvre the mixer by using the top cover.
4.2 LOCATION.
The mixer is not suitable for outdoor installation and must not be installed where a water
jet could be used for cleaning. The mixer must only be operated by trained staff and must
be installed in an area where the use and maintenance is restricted to trained personnel.
Select a suitable flat level surface that can support the weight of the mixer and bowl
contents when full (refer to table 1 for weights and dimensions). In areas where stability
may be an issue, the machine should be secured in position.
Ensure there is sufficient space around the mixer to enable safe operation of the bowl lift
handle, attachment hub (if fitted) and removal/replacement of the mixing bowl. Servicing
may be more difficult because of reduced clearances and you should always check that
equipment specifications permit the close proximity of other equipment. Refer to figure 1
for the overall dimensions of the mixer. Service access is required to the rear and top of
the mixer.
4.3 ELECTRICAL INSTALLATION.
The electrical installation of the mixer must conform to the local electricity board
regulations. When installed in the United Kingdom the installation must be in accordance
with the current edition of the IEE Regulations for electrical equipment in buildings and the
Electricity at work act.
A competent person must carry out the electrical installation.
The technical data shown in table 1 details the electrical requirements for the various
mixer options.
The HSM30, HSM40, NCM300 and NCM400 mixers are ‘class I’ appliances where the
protection against electric shock does not rely solely on basic insulation. An external
electrical isolator and MCB/fuses (both items supplied by others) must be fitted to the
incoming electrical supply to the mixer. In addition a 30mA residual current device is
strongly recommended to provide extra protection.
Note: The single-phase model must not be installed via a 13 amp fused plug.
Page 7
6
2
1
3
4
5
6
11
7
8
9
10
4.4 ELECTRICAL CONNECTION.
Refer to the wiring diagram supplied with the mixer and enclosed in the document
envelope.
Check direction of rotation.
5.0 COMMISSIONING AND OPERATING INSTRUCTIONS.
5.1 OPERATION
This food mixer is only for professional use by suitably trained persons.
Ensure operators have read and understood this manual and have
received adequate training.
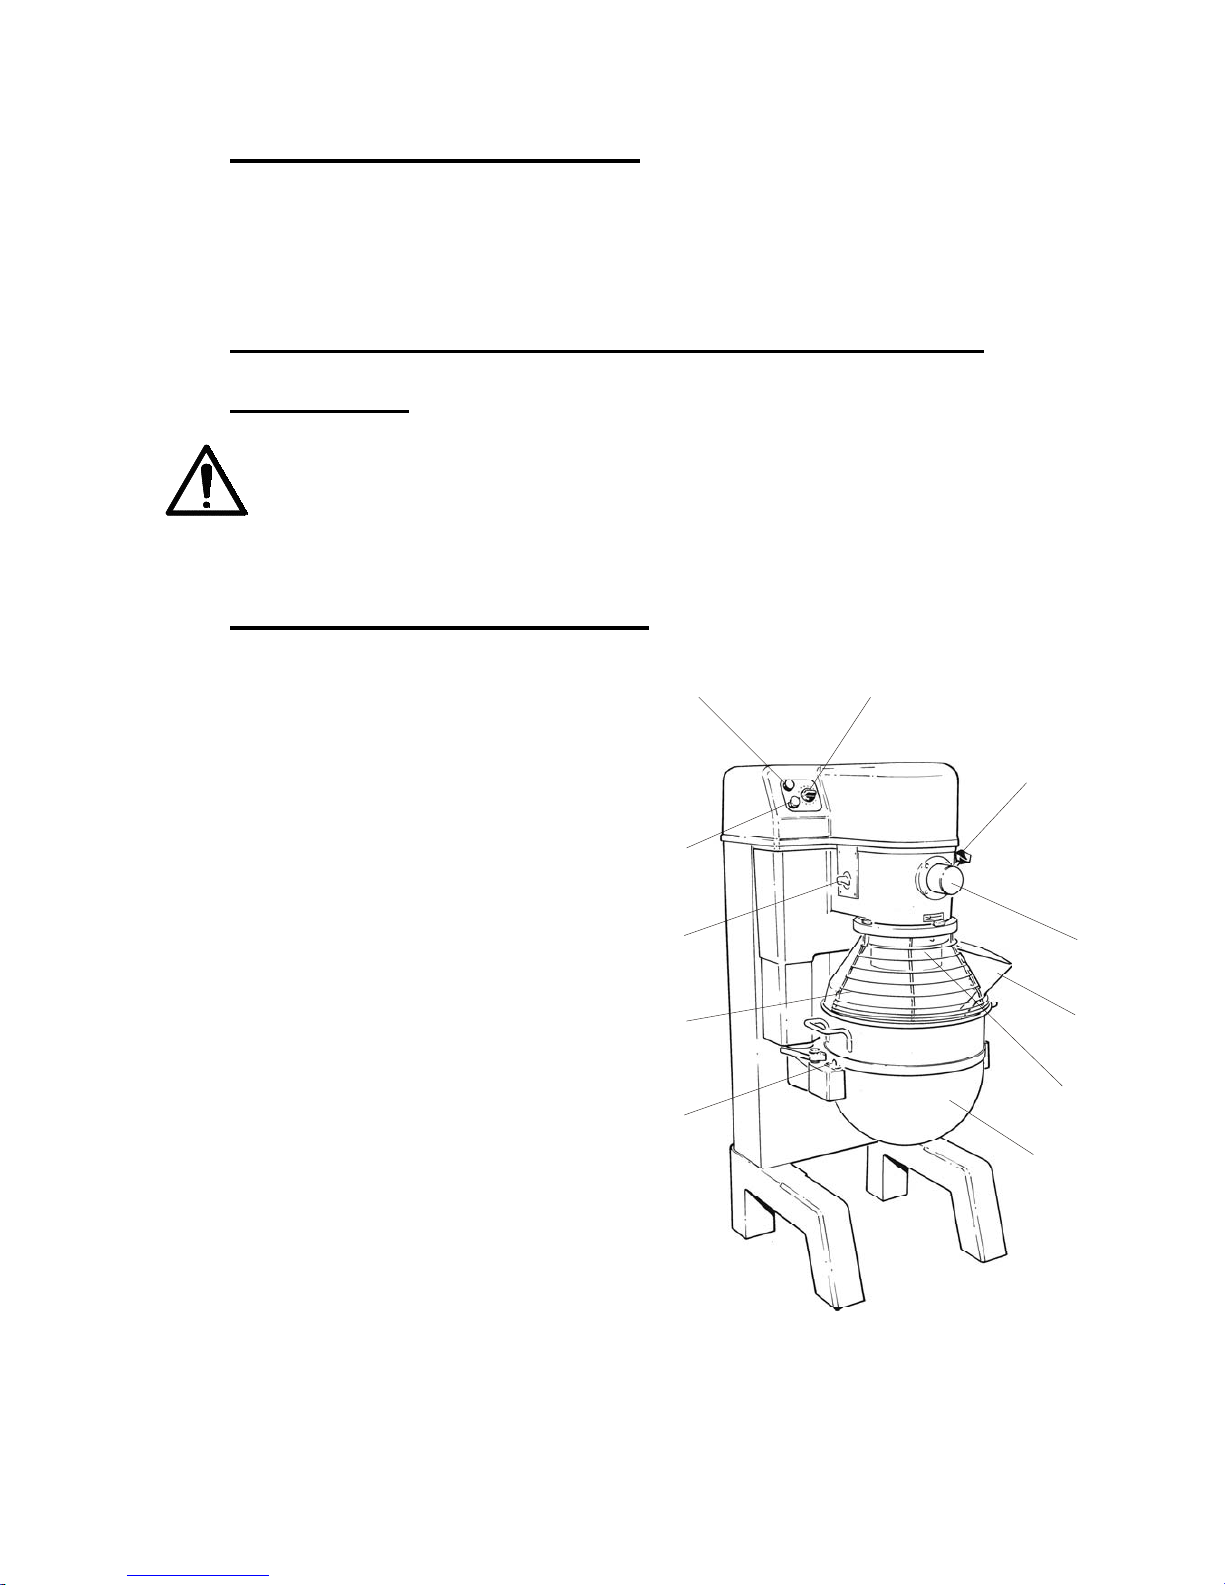
Refer to figure 2 for the mixer component identification.
5.2 USING FOR THE FIRST TIME.
Before use for the first time thoroughly clean the
bowl and agitator as described in the cleaning
section 9.
Ensure the mixer is switched off.
Ensure the cover (10) is fitted to the hub (where
applicable) if an attachment is not in use.
· Always remove any attachment before
using the agitator.
· Lower the bowl support by using the hand
lever.
· Rotate the front of the guard (5) to allow
access to the bowl.
· Place the required agitator in the bowl
(7), and fit the bowl onto the bowl support in
the lowered position.
Position the bowl by aligning the back of the
bowl with the stop situated on the bowl support.
Engage the alignment pins (6) on the bowl
support into the bowl ‘ears’,and secure in place
with the bowl clamps.
FIGURE 2. MIXER COMPONENT
IDENTIFICATION.
Page 8

7
· Important! When using reduced size equipment only the following bowls detailed in
section 12 must be used. Do not operate a mixer with any other reduced size bowl
combinations. Reduced sizes are 30 or 20 litre bowls on an HSM40 / NCM400 or 20
litre bowl on an HSM30 / NCM300. The recommended spares table in section 12
details the respective bowl and agitator part numbers.
Slide the agitators on the shaft turning to engage the drive pin in the "L" slot.
· Add ingredients to the bowl and raise the bowl by hand lever.
· Rotate the front of the guard (5) to the operating (closed) position.
(NOTE. An electrical interlock is fitted to the bowl support to prevent accidental starting
when bowl is in the down position and an electrical interlock is also fitted to the guard to
prevent accidental starting when in the open position).
Select the desired speed (4) and set timer setting (1) if fitted.
· Setting the Timer .
a) Non-timed operation - Adjust the timer to the “HOLD” position.
b) Timed Operation – Turn timer past the desired position and then rotate back to
the desired time
· Start the machine by pressing start button (2). Note the mixer speed must not be
changed while the machine is operating. Stop (3) the mixer before changing speed.
If machine fails to operate, please check that the bowl support is in the up position and the
guard is in the operating position.
5.3 USING THE BOWL SCRAPER.
5.3.1 GENERAL BOWL SCRAPER USE.
The mixer bowl scraper attachment continually scrapes the sides of the bowl as the
agitator turns causing material around the sides and bottom of the bowl to be constantly
re-introduced into the mixture. Manual scraping is not required when using the bowl
scraper. The bowl scraper should only be used with stainless steel bowls.
Always use the correct size sleeve with the scraper arm. Be careful not to mix sleeves and
arms if you have multiple sizes of scrapers. Always ensure the correct scraper is used with
the right sized bowl.
Page 9
1
4th July 2006
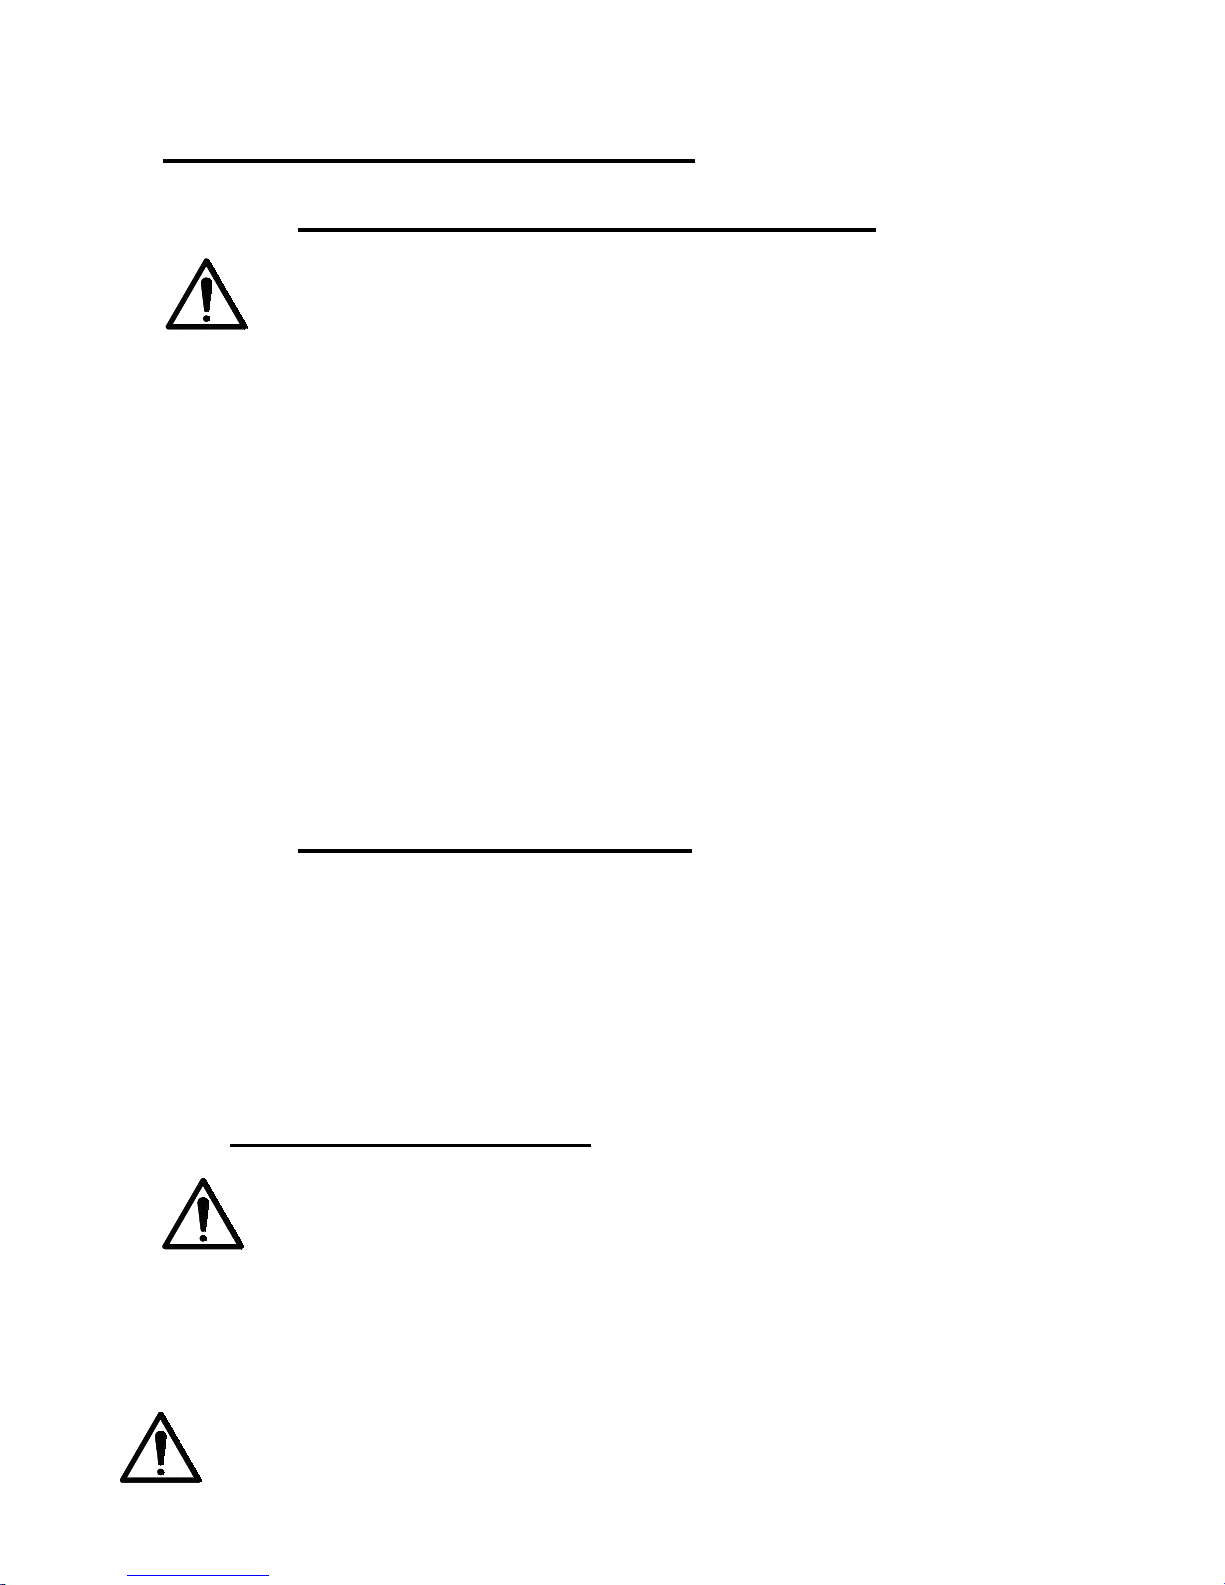
HSM30/40 bowl height adjustment.
Fit the beater and raise the
bowl to the ‘up’ position.
Isolate the electricity supply to
the mixer. Rotate the beater to
an accessible position.
Using a gauge of the
correct thickness (1.5 mm)
check the clearance
between the beater and
bowl.
Rotate the lock nut anti-clockwise to
reduce the clearance and clockwise
to increase the clearance.
The height of the bowl support on
the guide rods determines the bowl
to beater clearance. If the
clearance is incorrect adjust the
lock nut to alter the height.
Lock nut
Bowl
support
19mm
socket.
1.
2.
3.
4.
5.
Page 10

8
5.3.2 OPERATING WITH THE BOWL SCRAPER.
1. Place the bowl scraper in the bowl before lifting into position as described in section
5.1.
2. Lubricate the surface of the bowl with vegetable oil or shortening, especially in the
area above the product where the sleeve may rub against the bare surface of the
bowl.
3. The bowl scraper rotates clockwise as you look into the bowl. Insert the scraper
shaft into the bayonet housing and rotate 90o anti-clockwise.
4. Raise the bowl to its operating position. Add the ingredients and mix normally.
5. After mixing lower the bowl and rotate the bowl scraper clockwise and lower to
remove.
Note:
¨ Only use speeds 1 and 2.
¨ Products, which can be mixed, whilst using the bowl scraper are: mashed potato,
waffle batter, cake batter, icing, creaming shortening/sugar, creaming eggs/sugar, and
mayonnaise.
¨ The bowl scraper should only be used with a wire whip or flat beater only. Do not use
when mixing dough products.
¨ Never raise a bowl of stiff product (i.e. cream cheese, shortening, unmashed potatoes)
with the scraper arm located in the housing. The scraper arm can be permanently bent
and become damaged by rotating agitators. Load the bowl with ingredient after it is
raised.
5.3.3 CLEANING THE BOWL SCRAPER.
Remove the plastic sleeve from the stainless steel arm. Tapping the sleeve against the
edge of a table will aid its removal. Clean both parts in a sink with hot water and detergent
solution. Rinse with clean water and dry.
Slide the sleeve onto the arm so the bevelled edge is the leading edge. Use water as a
lubricant. The end of the sleeve must be flush with the end of the arm.
Note: Do not use aggressive chemicals to clean the sleeve since they may degrade the
plastic material.
5.4 WHEN MIXING HAS FINISHED.
· When mixing is complete stop the machine using the stop button (3).
· Rotate the front of the guard (5) to the open position.
· Lower the bowl support and remove agitator from shaft (8).
· If fitted remove the bowl scraper from the bayonet housing by rotating anti-
clockwise.
· Remove bowl (7) and agitator from mixer to empty .
Page 11
9
USING THE ATTACHMENT FACILITY.
5.5.1 ATTACHMENT SAFETY INSTRUCTIONS.
The following instructions must be observed when using the mixer with
attachments. Please also refer to the safety instructions detailed in section 6.0
and the instructions provided with the attachment.
THE ATTACHMENT AND/OR MIXER SHOULD ONLY BE USED BY A FULLY
TRAINED AND COMPETENT PERSON.
· Do not fit an attachment while the mixer is operating.
· Do not wear loose clothing.
· Do not use the mixer or attachment if a fault develops or the machine is unsafe.
· Do not access rotating parts.
· Do not use excessive force when operating the attachment, which could affect the
stability of the mixer.
· Do not operate the mixer if parts are disassembled.
· Always use the attachment and/or mixer in a well-lit area.
· Always ensure the attachment is operating at the correct speed.
· Always clean the attachments after use and refer to the attachment manufacturer’s
cleaning instructions.
· Always service your mixer and attachments regularly; at least twice a year depending
on the frequency of use.
5.5.2 FITTING AN ATTACHMENT.
When installing the attachment ensure the electricity supply is isolated.
Loosen the thumb screw (item 12 shown on figure 2) situated on the attachment hub and
remove the plastic cover and put in a safe place to be refitted after use.
Offer the shaft of the attachment to the hub and ensure the square shank of the
attachment locates in the square drive of the mixer
Secure the attachment by tightening the thumbscrew.
Select the correct mixer speed for the type of attachment fitted.
6.0 SAFETY INSTRUCTIONS.
A FULLY TRAINED AND COMPETENT PERSON MUST ONLY USE THE
ATTACHMENT AND/OR MIXER.
The following instructions must be observed when using the mixer.
Note: The mixer must only be used for the purpose it was design and inline with the
supplied operating instructions.
When mixing ingredients care must be taken to avoid the inhalation of dust particles
e.g. flour. Reference should be made to product supplier’s data sheets to ensure
adequate precautions/protections are taken.
Page 12

10
Items such as flour must be added in such a manner to avoid dust particles being
dispersed into the local atmosphere.
When manoeuvring or lifting a bowl and contents with a total weight in excess of
25kg a bowl truck must be used (Hobart part number M-L108865).
6.1 NEVER
· Operate the mixer or attachment if a fault develops or the mixer is unsafe.
· Wear loose clothing.
· Attempt to reach into the bowl when mixing.
· Access rotating parts.
· Fit the agitator to the mixer without a bowl in place.
· Leave the agitator on machine without the bowl being fitted.
· Operate the mixer with both attachments and agitator fitted.
· Leave the gear lever in mid position.
· Use the gear lever to stop the machine.
· Change speed whilst the mixer is operating.
· Use excessive force when operating which could affect the stability of the mixer.
· Operate the mixer if parts are disassembled.
· Over ride the safety switches fitted to the mixer.
· Open the guard to stop machine.
· Use the bowl lift handle to stop machine.
· Use the mixer in an unsafe condition.
· Clean the mixer with scouring powder or a scouring pad.
· Clean aluminium agitators in a dishwasher.
· Inhale mixing ingredient dust particles.
6.2 ALWAYS
· Use the mixer in a well-lit area.
· Ensure the bowl, bowl clamps, agitator, attachment and guard are correctly fitted to
the mixer.
· Disconnect the mains electricity supply before cleaning the mixer.
· Clean the mixer daily.
· Remove Agitator before using any attachments.
· Stop mixer before adding more ingredients.
· Use the stop button to stop machine.
· Clean the bowl, agitators and attachments after use.
· Clean the mixer using mild soap and water.
· Service the mixer and attachments at least twice a year depending on the frequency of
use.
· Use the mixer as intended and inline with the operating instructions.
· Use the correct reduced size equipment (bowl and agitators specified in section 12).
Page 13
11
7.0 MIXING CAPACITY CHART
The following charts (Tables 2, 3, 4, 5, 6 and 7) show the maximum recommended
capacities for the mixer. With high gluten flour reduce the dough batch size by 10%.
Always ensure the correct agitator is selected for the mix.
Dough capacities are based on water at a temperature of 21oC and a 12% flour moisture
content. If colder water is used, the mixing capacity will need to be reduced. Colder water
temperatures result in a product which is harder to mix. Ensure the correct speed is
selected.
DO NOT EXCEED THE SPECIFIED MIX QUANTITY
Overloading the mix can be detrimental to the quality of the finished product and affect the
life expectancy of the machine. Always refer to the mixing chart
The maximum capacity for the mixers: -
HSM30 / NCM300 = 28.75 litres
HSM40 / NCM400 = 38.5 litres
Table 2 HSM30 / NCM300 Kitchen Capacities - Single Batch
Type of Product Quantity
Recommended
Agitator
Recommended
speeds
Egg Whites 1.7 litres (3 pints) Whip 1/2/3
Mashed Potatoes 10.4 kg (23 Lbs) B Beater 1
Mayonnaise (Oil) 13.6 litres (24 pints) Whip 2 / 3
Whipped Cream 17.0 litres (30 pints) Whip 1/2/3
Table 3 HSM30 / NCM300 Bakery Capacity - Single Batch
Type of Product Quantity Recommended
Agitator
Recommended
Speeds
Cake, Madeira 13.5 kg (30 Lbs) B Beater 1/2/3
Cake , Pound 12.7 kg (28 Lbs) B Beater 1/2/3
Light Batter (Sponge Cake) 9.1 kg (20 Lbs) B Beater 1/2/3
Steamed pudding 13.5 kg (30 Lbs) E or EB 1/2/3
Yorkshire batter 13.6 litres (24 pints) B or C whip 2 or 3
Dough (light -medium) 13.5 kg (30 Lbs)
(65% A/R)
(8.8kg flour 4.7 litre water)
ED Hook 1 only
Dough (heavy) 10.9 kg (24 Lbs)
(50% A/R)
(7.3 kg flour 3.6 litre water)
ED Hook 1 only
Pizza dough 6.8 kg (15Lbs) E or ED only 1 only
Pie Pastry 10.9 kg (24 Lbs) Pastry Knife
ED Hook
1 only
Fat & Sugar for Sponge Cake 10.9 kg (24 Lbs) Whip 1/2/3
Page 14

12
Table 4 HSM40 / NCM400 Kitchen Capacities - Single Batch
Type of Product Quantity
Recommended
Agitator
Recommended
speeds
Egg Whites 2 litres (3.5 pints) Whip 1/2/3
Mashed Potatoes 12.7 kg (28 Lbs) B Beater 1
Mayonnaise (Oil) 17 litres (30 pints) Whip 2 / 3
Whipped Cream 22.6 litres (40 pints) Whip 1/2/3
Table 5 HSM40 / NCM400 Bakery Capacity - Single Batch
Type of Product Quantity Recommended
Agitator
Recommended
Speeds
Cake, Madeira 18 kg (40 Lbs) B Beater 1/2/3
Cake , Pound 16 kg (35 Lbs) B Beater 1/2/3
Light Batter (Sponge Cake) 12.7 kg (28 Lbs) B Beater 1/2/3
Steamed pudding 18 kg (40 Lbs) E or EB 1/2/3
Yorkshire batter 17 litres (30 pints) B or C whip 2 or 3
Dough (light-medium) 18 kg (40 Lbs)
(65% A/R
(11 kg flour 7 litre water)
ED Hook 1 only
Dough (heavy) 13.5 kg (30 Lbs)
(50% A/R)
(9 kg flour 4.5 litre water)
ED Hook 1 only
Pizza dough 9.1 kg (20 Lbs) E or ED only 1 only
Pie Pastry 13.5 kg (30 Lbs) Pastry Knife
ED Hook
1 only
Fat & Sugar for Sponge Cake 13.5 kg (30 Lbs) Whip 1/2/3
Table 6. 20 Litre bowl Kitchen Capacities - Single Batch
Type of Product Quantity
Recommended
Agitator
Recommended
speeds
Egg Whites 1.1 litres (2 pints) Whip 1/2/3
Mashed Potatoes 6.8 kg (15 Lbs) B Beater 1
Mayonnaise (Oil) 11.4 litres (20 pints) Whip 2 / 3
Whipped Cream 11.4 litres (20 pints) Whip 1/2/3
Table 7. 20 Litre bowl Bakery Capacity - Single Batch
Type of Product Quantity Recommended
Agitator
Recommended
Speeds
Cake, Madeira 9 kg (20 Lbs) B Beater 1/2/3
Cake , Pound 9 kg (20 Lbs) B Beater 1/2/3
Light Batter (Sponge Cake) 6.4 kg (14 Lbs) B Beater 1/2/3
Steamed pudding 9 kg (20 Lbs) E or EB 1/2/3
Yorkshire batter 9.1 litres (16 pints) B or C whip 2 or 3
Dough (light-medium) 9.1 kg (20 Lbs)
(65% A/R)
(5.6 kg flour 3.5 litre water)
ED Hook 1 only
Dough (heavy) 5.8 kg (13 Lbs)
(50% A/R)
(3.9 kg flour 1.9 litre water)
ED Hook 1 only
Pizza dough 5.0 kg (10 Lbs) E or ED only 1 only
Page 15
13
Pie Pastry 7.3 kg (16 Lbs) Pastry Knife
ED Hook
1 only
Fat & Sugar for
Sponge Cake
6.8 kg (15 Lbs) Whip 1/2/3
* A/R absorption ratio.
Speed “1” (LOW) is for Heavy mixtures such as dough, heavy batters and mashed potatoes
Speed “2” (MEDIUM) is for mixing cake batters
Speed “3” (HIGH) is for mixing the maximum amount of air into light batches. The “D”
whip is generally used for whipping cream, beating egg whites, mixing light icings,
meringues and whipping.
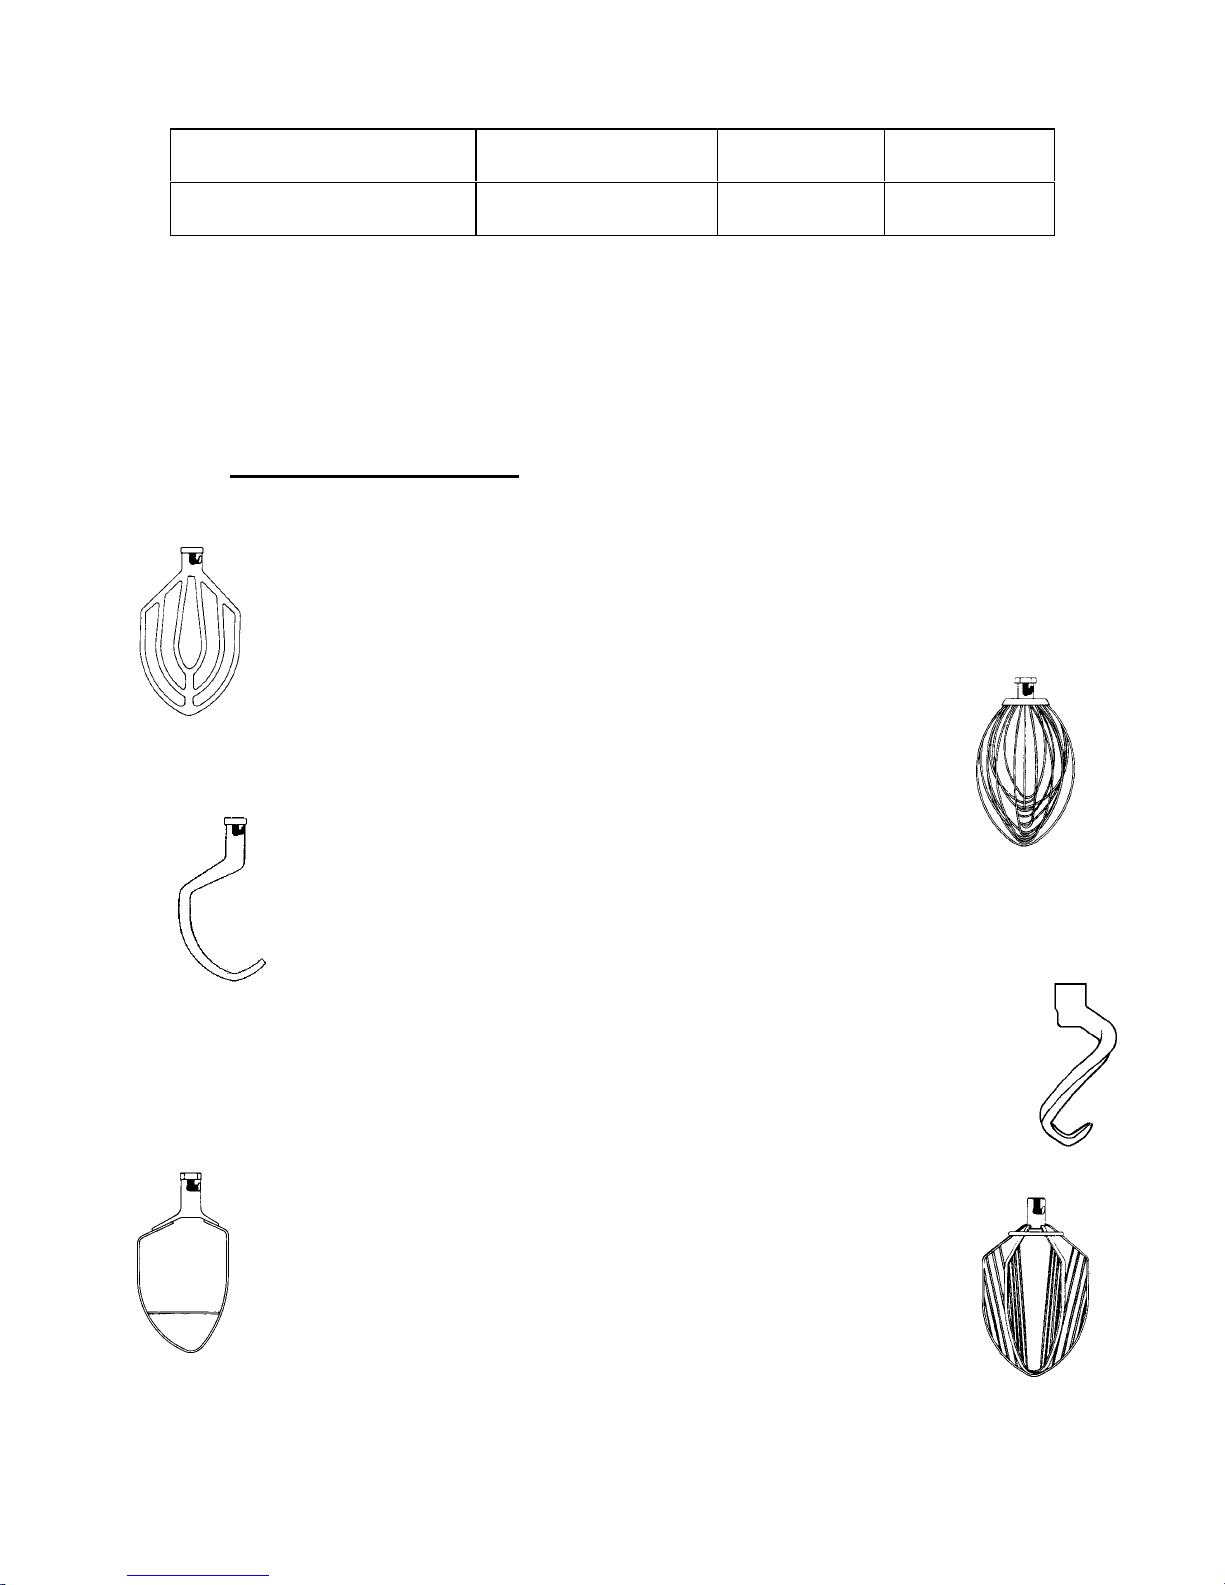
8.0 MIXER AGITATORS.
The agitators available for the mixer are designed for the specific duties as follows:
The ‘B Beater’ is a multi-purpose agitator for mashing potatoes and other
cooked vegetables, mixing cakes, batters, and icings. Use first speed for
starting most operations, increasing to speed 2 for finishing where applicable.
The ‘D Whip’ is designed for maximum blending of air into light products. It can
be used for whipping cream, beating egg whites, and mixing very light egg
whites. The whip is commonly used on speeds two and three.
The ‘E Dough Hook’ is used for mixing bread, roll and pizza dough which
require folding and stretching action for optimum development. The dough
hook should be used predominantly on speed 1.
The ‘ED Dough Hook’ is used for mixing bread, roll and pizza dough which require
folding and stretching action for optimum development. The dough hook should be
used predominantly on speed 1.
The ‘PK Pastry Knife’ is used for mixing pastry. The Pastry knife should be
used in speed 1 only.
The ‘C Winged Whip’ is used for light batters, mayonnaise oil and mashed
potatoes. The whip can be used in speeds 1, 2 or 3.
Page 16

14
9.0 CLEANING.
DO NOT HOSE OR PRESSURE CLEAN THIS MIXER
DO NOT USE ANY ABRASIVE CLEANERS
Ensure that the machine is disconnected from the main electrical power supply prior to
cleaning
9.1 CLEANING BEFORE INITIAL USE.
Before using for the first time, thoroughly wash new mixer bowls, agitators and attachments.
Wash in hot water and a mild detergent solution. This procedure should also be followed for
bowls and agitators before whipping egg whites or whole eggs.
9.2 CLEANING AFTER USE.
After use, clean the mixing bowl, agitators and attachments with hot water, using a
suitable non-abrasive detergent and soft bristle brush. (Flushing the bowl with hot water
immediately after use will ease the cleaning).
Note: Do not clean the aluminium agitators in a dishwasher
Clean the mixer with a hot damp cloth; thoroughly wipe the bowl support arms and all
exterior surfaces. The guard should be cleaned as follows.
9.3 GUARD REMOVAL & CLEANING.
The guard assembly has been designed to be removed easily for machine washing.
To remove the guard assembly.
· Ensure that the bowl support is in the lowered position.
· Remove the agitator and bowl.
· Withdraw the interlock plunger and rotate the guard deflector assembly in an anti-
clockwise direction until the unit disengages from the sprung retainers. At this point
care should be taken, as the guard will now be able to drop freely from the machine.
· Carefully lower the guard assembly and remove.
Cleaning the guard.
The guard should be cleaned at the end of each day.
Once the guard is removed it can be cleaned with hot water, using a suitable nonabrasive detergent and soft bristle brush. Alternatively the guard can be cleaned in a
commercial dishwasher.
To refit guard assembly to the machine.
· Orientate the guard with the deflector to the back of the mixer and push on to the
mixer.
· Rotate the guard deflector clockwise so it is fully engaged onto the sprung retainers.
When in position the guard will come to a dead stop.
Page 17

15
10.0 MIXER MAINTENANCE.
A HOBART TRAINED AND COMPETENT PERSON SHOULD CARRY OUT
SERVICING.
Do not remove any covers or loosen any fittings while the mixer is operating.
Ensure the electrical supply has been isolated before attempting to service or
move the mixer. The motor and transmission are packed with special grease,
which will last for several years. When replacement is needed, contact your
local service centre.
The bowl support guide rods should be lubricated occasionally with a small amount of
food grade grease applied with the fingertip, to prevent corrosion and ensure smooth
operation
It is recommended that the mixer is serviced regularly (recommended twice yearly)
A spare parts Manual (ple200459) is available on request from Hobart National Parts
Distribution Centre. For continued safe and reliable operation of this mixer, it is
recommended that servicing is only carried out by Hobart trained service personnel.
Page 18

16
11.0 FAULT FINDING.
Fault Possible cause Remedy
Blown control circuit fuse Check and replace faulty fuse
Bowl guard is not in the correct
operating position
Check that guard is in the closed
position
Speed selection lever not in correct
operating position
Set to required speed position
Electrical supply isolated Plug in and switch on.
Machine fails to start.
Machine still fails to operate Call local Hobart service centre.
Scraper (option) binds
on bowl.
Scraper rubbing dry Lubricate bowl surface with
vegetable oil or shortening
Scraper (option) bevel
edge not leading.
Plastic sleeve incorrectly fitted Remove the arm and correctly
install the plastic sleeve.
Excessive
bowl/scraper
clearance
Bent scraper arm or incorrect bowl
clearance
Call local Hobart service centre
Gear selection lever incorrectly
positioned.
Move to correct speed position.Motor starts but
agitator fails to rotate.
Machine still fails to operate Call local Hobart service centre
Page 19

17
12.0 RECOMMENDED SPARES
Part Number Description
PLE200459 Catalogue of replacement parts
144452-1 Motor 1 phase. 230/50/1 (as appropriate for model)
138725 Capacitor, start (160-200 µF) (as appropriate for model)
138724 Capacitor, run (15 µF) (as appropriate for model)
144453-1 Motor 3 phase. 400/50/3(as appropriate for model)
00-737986 Drive belt
00-737991-4 Top cover, timer NCM300, NCM400
00-737991-3 Top cover, no timer NCM300, NCM400
00-737991-9 Top cover, timer HSM30, HSM40
141932 Switch, gear change
EPM-E-16-14 Switch Start,
EPM-E-16-15 Switch Stop,
SS-E-18-11 Timer, 30 min
140807 Reed switch, guard.
144358 Switch, bowl support
00-738163 Guard. HSM30 / NCM 300
00-738164 Guard. HSM40 / NCM400
142403-10 Thermal overload, 230/50/1(as appropriate for model)
142403-8 Thermal overload, 400/50/3 (as appropriate for model)
141440-1 Contactor
140869-10 Fuse, control 315mA
140869-19 Fuse, control 2A
140908-3 Transformer 400/50/3
OSM-E-1-12 Oil seal
R-9440-E Beater, HSM30 / NCM300
R-9443-E Whip, HSM30 / NCM300
141721 ED hook, HSM30 / NCM300
53572 Beater, HSM40 / NCM400
53577 Whip, HSM40 / NCM400
140688 ED hook, HSM40 / NCM400
SU-E-3-4 Light food grade oil
00-738662 20 litre bowl to suit HSM30, HSM40, NCM300 and NCM400. Adaptor
required for HSM40 / NCM400
00-738664 30 litre bowl to suit HSM40 / NCM400
53600 Adaptor to suit 30 litre bowl for HSM40 / NCM400
10470-E D Whip, 20 litre (half size)
10469-E Beater, 20 litre (half size)
51831 E flat hook 20 litre (half size)
ML-109241 Bowl scraper assembly 20 litre including blade and housing
737458-2 Blade-scraper 20 litre
ML-109242 Bowl scraper assembly 30 litre including blade and housing
737458-3 Blade-scraper 30 litre
ML-109243 Bowl scraper assembly 40 litre including blade and housing
737458-4 Blade-scraper 40 litre
00-738071 Housing-bowl scraper (all capacities)
Page 20

18
NOTES:
Page 21

19
13.0 SERVICE CONTACT NUMBERS.
Hobart trained service technicians strategically located at national Hobart service
branches are prepared to give you fast, efficient and reliable service. Protect your
investment by having a Hobart inspection contract, which assures the continued, efficient
operation of your Hobart machines, spares and accessories.
For further details please contact: -
Department Telephone Facsimile
SALES: 07002 101 101 020 88364396
SERVICE 07002 202 202 01733 371709
SPARES 07002 303 303 01733 371332
Continued product improvement is a Hobart Still policy, specifications may change without notice.
The Hobart Manufacturing Company Limited
Hobart House, 51 The Bourne,
Southgate, London N14 6RT
Tel: 07002 101101 Fax 020 883604
Page 22

20
Français / SOMMAIRE.
Page
Notes concernant la sécurité 21
Consignes de sécurité 21
Symboles de mise en garde 22
Responsabilité 22
Avant-propos 22
Généralités 22
Figure 1. Dimensions. 22
Tableau 1. Données techniques. 23
Installation 23
Déballage et manutention 23
Emplacement 24
Installation électrique 24
Raccordements électriques 25
Consignes de mise en marche et d’utilisation 25
Utilisation 25
Première utilisation 25
Composants du batteur-mélangeur. Figure 2 25
Utilisation du racloir de cuve 26
Généralités concernant l’utilisation du racloir de cuve 26
Fonctionnement avec le racloir de cuve 27
Nettoyage du racloir de cuve 27
Lorsque la préparation est terminée 27
Utilisation des accessoires 28
Consignes de sécurité concernant les accessoires 28
Montage des accessoires 28
Consignes de sécurité 29
Ne jamais 29
Toujours 30
Tableaux de capacités de préparation 30
Tableau 2 HSM30 / NCM300 Capacités cuisine – par charge 30
Tableau 3 HSM30 / NCM300 Capacités pâtisserie – par charge 31
Tableau 4 HSM40 / NCM400 Capacités cuisine - par charge 31
Tableau 5 HSM40 / NCM400 Capacités pâtisserie - par charge 31
Tableau 6 20 liters cuve. Capacités cuisine - par charge 32
Tableau 7 20 liters cuve. Capacités pâtisserie - par charge 32
Outils 33
Nettoyage 33
Nettoyage avant la première utilisation 33
Nettoyage après usage 34
Démontage et nettoyage de la grille 34
Maintenance de l’appareil 35
Recherche des pannes 35
Pièces de rechange recommandées 36
Notes 37
Service après-vente et adresses 38
Page 23

21
1.0 NOTES CONCERNANT LA SÉCURITÉ.
Il est entendu que les procédures et précautions décrites dans le présent manuel ne
valent que lorsque le batteur-mélangeur est utilisé suivant les instructions. Dès lors où
l’appareil est utilisé autrement, l’opérateur est responsable de sa propre sécurité ainsi que
celle des autres personnes impliquées.
Ce manuel a été rédigé dans le but d’aider l’opérateur à comprendre et à utiliser le
batteur-mélangeur ainsi qu’à en prendre soin. Afin de prévenir tout accident, il est
important de lire, de comprendre et de respecter les précautions et mises en gardes ciaprès avant d’installer ou de manipuler l’appareil pour la première fois. Ce manuel est à
étudier pour bien cerner l’appareil et ses fonctions.
1.1 CONSIGNES DE SÉCURITÉ.
Les précautions adéquates doivent être prises pendant la manutention manuelle du
batteur-mélangeur, surtout lors de son installation. Pour ce faire, il convient de consulter
la réglementation concernant la manutention manuelle. Les masses des appareils sont
données dans le tableau 1.
· Ne pas nettoyer l’appareil au jet d’eau ou à la pression. Les consignes de nettoyage indiquées
dans la section 9 de ce manuel sont à respecter de manière impérative.
· Ne pas enlever de couvercle et ne desserrer aucun accessoire lorsque l’appareil est en plein
travail.
· Conserver ce manuel dans un endroit facilement accessible, non loin de l’appareil, pour
pouvoir le consulter.
· Tous les opérateurs doivent être formés à l’utilisation de l’appareil et des accessoires.
· Vérifier que l’appareil est coupé de l’alimentation secteur avant de procéder à sa
révision ou avant de le déplacer.
· Les appareils à parties tournantes et l’électricité peuvent être dangereux et provoquer
des accidents, si les précautions suffisantes ne sont pas prises préalablement à la
manipulation ou à la révision de l’appareil.
· Faire réviser le batteur-mélangeur et les accessoires de manière régulière, au moins
deux fois par an, selon la fréquence d’utilisation.
· Important ! En ce qui concerne les équipements de taille réduite, seules les cuves
suivantes (détails à la section 12) doivent être employées. Ne pas utiliser le batteurmélangeur avec d’autres combinaisons de cuves de taille réduite. Dans la gamme des
tailles réduites, il existe des cuves de 30 et 20 litres, adaptées au modèle HSM40 /
NCM400, et de 20 litres pour l’appareil HSM30 / NCM300. Les références respectives
des cuves et des agitateurs sont indiquées dans le tableau des pièces de rechange
recommandées, à la section 12.
Page 24

22
1.2 SYMBOLES DE MISE EN GARDE.
Les messages de sécurité contenus dans ce manuel sont identifiés par les
symboles suivants.
Le symbole "Attention" accompagne essentiellement les mises en garde
importantes au bon usage de l’appareil.
La présence de ce symbole indique un risque de nature électrique. Avant de
réviser le batteur-mélangeur, il est impératif de débrancher le câble
d’alimentation de la prise secteur.
1.3 RESPONSABILITÉ.
Les installations et réparations non effectuées par un technicien agréé, ainsi que l’usage
de pièces de rechange autres que d’origine, ou toute altération technique réalisée sur
l’appareil peuvent affecter la garantie stipulée dans les conditions générales de
vente.
2.0 AVANT-PROPOS.
Hobart se réserve le droit d’apporter des modifications à la conception de ses produits
sans préavis. Bien que tout soit mis en œuvre pour que les informations présentées dans
cette publication soient en accord avec le dernier modèle, la société ne peut garantir une
conformité absolue.
Il est important de prendre soin du batteur-mélangeur HSM / NCM, de le maintenir propre
et en bon état mécanique et électrique.
Les informations et consignes données dans ce manuel ne couvrent pas obligatoirement
tous les détails et variantes de l’appareil, ni ne prévoient toutes les situations qui peuvent
se présenter durant l’installation, l’utilisation ou la maintenance. Des compléments
d’information peuvent être obtenus auprès de votre vendeur Hobart.
3.0 GÉNÉRALITÉS
La gamme de batteurs-mélangeurs HSM30,
NCM300, HSM40 et NCM400 est conçue pour
réaliser des préparations alimentaires suivant
les tableaux de spécifications (tableaux 2, 3, 4
et 5). Le mélangeur HSM30/40 est manufacturé
de deux bâtis peints metalic, le piédestal
fabriqué d'acier inoxydable, une base, de
panneau arrière, avec la couverture supérieure
en plastique moulé. Le mélangeur NCM300/400
est manufacturé de deux moulages en fer, avec
une base en acier manufacturé, des pieds en
aluminium, un couvercle en plastique moulé et
une plaque arrière en acier. L’ensemble est fini
en couleur gris Hobart. L’appareil est réglé
pour fonctionner sur les alimentations décrites
dans le tableau 1, et est équipé d’une sécurité à
minimum de tension qui interdit le redémarrage
automatique de l’appareil après une panne ou
une coupure d’alimentation.
FIGURE 1. DIMENSIONS
Page 25

23
Le porte-cuve et la grille de protection sont tous les deux munis d’un système de
verrouillage qui empêche l’appareil de fonctionner tant que ces éléments ne sont pas
prêts. L’appareil standard est livré avec grille, cuve et outils.
TABLEAU 1. DONNÉES TECHNIQUES.
Description Unité HSM30 /
NCM300
HSM40 /
NCM400
Puissance du moteur kW 1,1 1,1
Vitesse max. de la partie tournante (50 Hz) rpm 1425 1425
Alimentation nominale monophasé Volts/Hz 230/50 230/50
triphasé 400/50 400/50
Courant de pleine charge pour tension cidessus monophasé
A7,4 7,4
triphasé A 2,8 2,8
Courant à rotor bloqué pour tension cidessus monophasé
A44 16
triphasé A 16 16
Fusible recommandé 230 V/1 ph/50 Hz A 20 20
Fusible recommandé 230 V/3 ph/50 Hz A 16 16
Fusible recommandé 400 V/3 ph/50 Hz A 10 10
Température ambiante maximum
o
C40 40
Prise d’accessoires -- type 12 type 12
Masse du batteur-mélangeur avec
agitateur et cuve (vide)
kg 241 246
Niveau sonore dB (A)
##
Inférier à 70
##
Inférier à 70
Masse d’expédition kg 255 260
Dimensions d’expédition (carton) LxlxH cm 99x81x155 99x81x155
Conditions de stockage. Température et
humidité.
o
C, %
hum. rel.
+5 à +38,
85
+5 à +38,
85
Classe de l’appareil
#
Classe I
#
Classe I
Indice IP d’armoire IP44 IP44
Taille du terminal de câblage monophasé mm
2
1,5 1,5
triphasé mm
2
1,0 1,0
#
Voir section 4.3.
##
En accord avec la norme EN-ISO 12001:1996
4.0 INSTALLATION.
4.1 DÉBALLAGE ET MANUTENTION.
Dans la mesure du possible et par mesure de protection du batteurmélangeur, conserver celui-ci dans son emballage pour le transporter
jusqu’à son emplacement d’installation. Ne pas utiliser de couteau
pointu pour découper l’emballage sous peine d’endommager l’appareil.
Vérifier que l’appareil n’a pas été abîmé durant le transport. Dans le
cas coutraire, conserver l’emballage et contacter l’agence Hobart la
plus proche.
Page 26

24
Attention : Le batteur-mélangeur est un objet lourd qui nécessite d’être
manipulé et levé correctement pour éviter tout accident.
Suivre les consignes fournies avec l'emballage et placer l’appareil à proximité de son
emplacement final avant de le libérer de sa palette de transport. L’appareil est fixé à la
palette par quatre boulons de retenue enfoncés au travers de la palette dans les pieds
taraudés.
Durant cette opération, veiller à ce que :-
a) Toutes les mesures de sécurité nécessaires soient prises pour assurer un levage et
une manutention corrects, de manière à éviter tout risque d’accident par lâchage,
chute ou basculement.
b) L’appareil ne subisse aucune détérioration qui pourrait affecter son fonctionnement
normal.
Le couvercle supérieur est emballé séparément dans le carton principal. Ne fixer ce
couvercle que lorsque le batteur-mélangeur est en place. Ne pas lever ou manipuler
l’appareil par le couvercle supérieur.
4.2 EMPLACEMENT.
Le batteur-mélangeur n’est pas adapté à un usage en extérieur, et ne doit pas être
installé là où un jet d’eau pourrait être utilisé pour le nettoyer. L’appareil ne doit être
utilisé que par des personnes formées, et se trouver dans une zone où son usage et sa
maintenance sont restreints à un personnel formé.
Choisir une surface plane adéquate, capable de supporter la masse du batteurmélangeur et celle de la cuve pleine (consulter le tableau 1 pour connaître les masses et
les dimensions). Dans les zones où la stabilité peut être un problème, il importe que
l’appareil soit fermement immobilisé.
Prévoir suffisamment d’espace autour de l’appareil pour pouvoir, sans danger, manipuler
la poignée de montée de cuve, la prise d’accessoires (si montée), et retirer/remplacer la
cuve. La révision de l’appareil peut être plus difficile s’il n’y a pas beaucoup d’espace
libre, et il est important de toujours vérifier que les caractéristiques de l’appareil
permettent d’avoir d’autres appareils juste à côté. Voir figure 1 pour connaître les
dimensions du batteur-mélangeur. Un accès pour l'entretien est nécessaire à l'arrière et
au-dessus du batteur-mélangeur.
4.3 INSTALLATION ÉLECTRIQUE.
L’installation électrique du batteur-mélangeur doit être conforme aux normes de
l’entreprise d’électricité locale.
L’installation électrique doit être effectuée par une personne habilitée.
Les données techniques du tableau 1 donnent les caracteristiques électriques pour les
diverses options de l’appareil.
Page 27

25
2
1
3
4
5
6
11
7
8
9
10
Les batteurs-mélangeurs HSM30 / NCM300 et HSM40 / NCM400 sont des appareils de
‘classe I’ : la protection contre les chocs électriques ne dépend pas exclusivement de
l’isolation de base. L’installations electrique doit être conformes à la legislation en vigeur
au jour de l’installation.
4.4 RACCORDEMENTS ÉLECTRIQUES.
Consulter le schéma de câblage électrique fourni avec l’appareil et se trouvant dans
l’enveloppe.
Vérifier le sens de rotation.
5.0 CONSIGNES DE MISE EN MARCHE ET
D’UTILISATION.
5.1 UTILISATION
Cet appareil est exclusivement destiné à un usage professionnel par des
personnes suffisamment formées. Les opérateurs doivent avoir lu et
compris ce manuel, et avoir reçu une formation adéquate.
La figure 2 énumère le nom de chaque composant du batteur-mélangeur.
5.2 PREMIÈRE UTILISATION.
Avant la toute première utilisation, il est important
de bien nettoyer la cuve et l’outil selon les
instructions de la section 9.
Vérifier que l’appareil est éteint.
Vérifier que le couvercle (11) est fixé sur la prise
d’accessoires (le cas échéant), si aucun
accessoire n’est utilisé.
· Retirer impérativement tout accessoire
avant d’utiliser l’agitateur.
· Abaisser le porte-cuve à l’aide du levier
manuel.
· Tourner le devant de la grille de protection
(5) pour permettre l’accès à la cuve.
· Placer l’outil adéquat dans la cuve (7), puis
soulever celle-ci sur le porte-cuve abaissé.
FIGURE 2. COMPOSANTS DU BATTEUR-
MELANGEUR.
Page 28

26
Positionner la cuve en alignant l’arrière de celle-ci avec le dispositif d’arrêt qui se trouve
sur le porte-cuve. Enclencher les goujons d’assemblage du porte-cuve (6) dans les
« oreilles » de la cuve, puis immobiliser le tout à l’aide des vis à poignée.
Important ! En ce qui concerne les équipements de taille réduite, seules les cuves
suivantes (détails à la section 12) doivent être employées. Ne pas utiliser le batteurmélangeur avec d’autres combinaisons de cuves de taille réduite. Dans la gamme des
tailles réduites, il existe des cuves de 30 et 20 litres, adaptées au modèle HSM40 /
NCM400, et de 20 litres pour l’appareil HSM30 / NCM300. Les références respectives
des cuves et des agitateurs sont indiquées dans le tableau des pièces de rechange
recommandées, à la section 12.
Glisser les outils sur l’arbre en faisant tourner pour enclencher l’axe d’entraînement dans
l’encoche en L.
· Ajouter les ingrédients dans la cuve puis lever celle-ci à l’aide du levier manuel.
· Tourner le devant de la grille de protection (5) en position de travail (fermée).
(N.B. : Le porte-cuve est équipé d’un système de verrouillage électrique qui interdit les
démarrages intempestifs lorsque la cuve est abaissée. La grille de protection est
également dotée d’un système de verrouillage électrique qui interdit les démarrages
intempestifs lorsqu’elle est ouverte).
Sélectionner la vitesse (4) et régler la minuterie (1) s’il y en a une.
· Réglage de la minuterie.
a) Fonctionnement sans minuterie - Régler la minuterie sur « HOLD ».
b) Fonctionnement avec minuterie – Tourner la minuterie juste après la position
désirée puis la faire revenir à l’heure voulue.
· Mettre l’appareil en route en appuyant sur le bouton de démarrage (2). N.B. : la vitesse
ne doit pas être changée pendant que l’appareil travaille. Il convient de toujours arrêter
(3) le batteur-mélangeur avant de changer de vitesse.
5.3 UTILISATION DU RACLOIR DE CUVE
5.3.1 GÉNÉRALITÉS CONCERNANT L’UTILISATION DU
RACLOIR DE CUVE (OPTION).
Le racloir de cuve est un accessoire de l’appareil qui racle en permanence les parois de
la cuve, pendant que l’agitateur tourne, pour ramener le produit qui se trouve sur les
côtés et dans le fond de la cuve dans la préparation. Un raclage manuel n’est pas
nécessaire avec le racloir de cuve. Cet accessoire ne doit être utilisé qu’avec des cuves
en inox.
Veiller à utiliser la taille de manchon qui correspond avec le bras de racloir. Faire
attention à ne pas mélanger les manchons et les bras en cas d’utilisation de différentes
tailles de racloirs.
Page 29

27
5.3.2 FONCTIONNEMENT AVEC LE RACLOIR DE CUVE
1 Placer le racloir dans la cuve avant de lever celle-ci en position de travail (voir
section 5.1.)
2 Lubrifier la surface de la cuve avec de l’huile végétale ou de la matière grasse, en
insistant sur la zone au-dessus du produit, là où le manchon a des chances de
frotter contre la paroi nue de la cuve.
3 Si on regarde dans la cuve, le racloir tourne dans le sens des aiguilles d’une
montre. Insérer l’arbre du racloir dans le logement à baïonnette puis le faire pivoter
à 90° dans le sens contraire des aiguilles d’une montre.
4 Lever la cuve en position de travail. Ajouter les ingrédients et mélanger
normalement.
5 Lorsque la préparation est terminée, descendre la cuve puis faire pivoter le racloir
dans le sens des aiguilles d’une montre avant de le baisser pour le retirer.
N.B. :
¨ N’utiliser que les vitesses 1 et 2.
¨ Les produits pouvant être préparés lorsque le racloir est installé sont les suivants :
purée de pommes de terre, pâte à gaufre, pâte à gâteau, glaçages, travail matière
grasse/sucre, travail œufs/sucre, et mayonnaise.
¨ Utiliser le racloir de cuve uniquement avec un fouet métallique ou un batteur plat. À
éviter pour les préparations de pâtes dures.
¨ Ne jamais lever une cuve contenant un produit ferme (ex. fromage blanc, matière
grasse, purée non écrasée) lorsque le bras du racloir se trouve dans le logement. Le
bras du racloir peut se plier de manière irréversible et se retrouver abîmé par les
outils en rotation. Attendre que la cuve soit levée pour la remplir d’ingrédients.
5.3.3 NETTOYAGE DU RACLOIR DE CUVE
Ôter le manchon en plastique du bras en inox. Pour faciliter son retrait, on peut tapoter le
manchon contre le rebord d’une table. Nettoyer les deux éléments dans un évier, avec de
l’eau chaude et un détergent. Rincer à l’eau propre et sécher.
Glisser le manchon par-dessus le bras de sorte que le bord biseauté soit le bord
d’attaque. Utiliser de l’eau comme lubrifiant. Le bout du manchon doit être aligné avec
l’extrémité du bras.
N.B. :
Ne pas utiliser de produit chimique agressif pour nettoyer le manchon car ils risquent
d’endommager le plastique.
5.4 LORSQUE LA PRÉPARATION EST TERMINÉE.
· Lorsque la préparation est terminée, arrêter l’appareil à l’aide du bouton d’arrêt (3).
· Tourner le devant de la grille (5) en position ouverte.
· Abaisser le porte-cuve et retirer l’agitateur de l’arbre (8).
· Démonter le racloir de cuve (s’il était monté) de sa fixation à baïonnette, en le faisant
tourner dans le sens contraire des aiguilles d’une montre.
· Retirer la cuve (7) et l’agitateur de l’appareil pour la vider.
Page 30

28
5.5 UTILISATION DES ACCESSOIRES
5.5.1 CONSIGNES DE SÉCURITÉ CONCERNANT LES
ACCESSOIRES
Les consignes suivantes doivent impérativement être respectées lors de
l’utilisation du batteur-mélangeur avec les accessoires. Lire également
les consignes de sécurité de la section 6.0 et les consignes fournies avec
les accessoires.
LES ACCESSOIRES ET/OU LE BATTEUR-MÉLANGEUR NE DOIVENT ÊTRE
UTILISÉS QUE PAR DES PERSONNES SUFFISAMMENT FORMÉES ET
COMPÉTENTES.
· Ne pas fixer d’accessoire lorsque le batteur-mélangeur est en plein travail.
· Ne pas porter de vêtements lâches.
· Ne pas utiliser le batteur-mélangeur ou un accessoire si une panne survient et que la
machine devient dangereuse à utiliser.
· Ne pas essayer d’atteindre les parties tournantes.
· Ne pas exercer, au moment de l’utilisation de l’accessoire, une force excessive qui
pourrait rendre le batteur-mélangeur instable.
· Ne pas faire fonctionner le batteur-mélangeur lorsque des pièces sont démontées.
· Toujours utiliser les accessoires et/ou le batteur-mélangeur dans un endroit bien
éclairé.
· Toujours vérifier que les accessoires sont utilisés avec la bonne vitesse.
· Toujours nettoyer les accessoires après le travail, et se référer aux procédures de
nettoyage préconisées par le fabricant d’accessoires.
· Toujours faire réviser le batteur-mélangeur et les accessoires à intervalles réguliers,
au moins deux fois par an selon la fréquence d’utilisation.
5.5.2 MONTAGE DES ACCESSOIRES SUR LA PRISE
D’ACCESSORES.
Vérifier, avant de monter les accessoires, que l’appareil est coupé de l’alimentation
secteur.
Desserrer la vis à oreilles (pièce 12 sur la figure 2) située sur le moyeu pour accessoires,
puis ôter le couvercle en plastique et le garder dans un endroit sûr pour le remettre
après l’utilisation.
Présenter l’arbre de l’accessoire devant le moyeu, et vérifier que la tige carrée de
l’accessoire entre dans le conducteur carré de l’appareil.
Fixer l’accessoire en place en serrant la vis à oreilles.
Régler le levier de vitesse sur la vitesse adaptée au type d’accessoire.
Page 31

29
6.0 CONSIGNES DE SÉCURITÉ.
LA MANIPULATION DE L’ACCESSOIRE ET/OU DU BATTEURMÉLANGEUR DOIT ÊTRE EXCLUSIVEMENT RÉSERVÉE À UNE
PERSONNE FORMÉE ET COMPÉTENTE.
Les consignes suivantes, relatives à l’utilisation du batteur-mélangeur, sont à respecter
de manière impérative.
N.B. : L’appareil ne doit être utilisé que pour effectuer les tâches entrant dans ses
attributions, et conformément aux consignes d’utilisation fournies.
Lors du mélange des ingrédients, il convient d’éviter l’inhalation de particules
de poussière, comme la farine. Les fiches techniques du fournisseur du produit
précisent les précautions à prendre et les protections à prévoir.
Des produits comme la farine doivent être ajoutés d’une manière précise, de
façon à éviter la dispersion de particules de poussière dans l’atmosphère
environnante.
Si la cuve avec son contenu pèse plus de 25 kg, utiliser un chariot (Référence
Hobart M-L108865) pour la manœuvrer ou la soulever.
6.1 NE JAMAIS. ATTENTION
· Ne jamais faire fonctionner le batteur-mélangeur ou l’accessoire lorsqu’une panne
survient ou lorsque l’appareil est dangereux.
· Ne jamais porter des vêtements lâches.
· Ne jamais essayer de mettre la main à l’intérieur de la cuve lorsque l’appareil
mélange.
· Ne jamais essayer d’atteindre les parties tournantes.
· Ne jamais fixer l’outil sur le batteur-mélangeur sans cuve.
· Ne jamais laisser l’outil sur l’appareil sans cuve.
· Ne jamais faire fonctionner le batteur-mélangeur avec les accessoires sur la prise
d’accessoire et l’outil installés en même temps.
· Ne jamais laisser le levier de changement de vitesse en position intermédiaire.
· Utiliser le levier de changement de vitesse pour arrêter l’appareil.
· Ne jamais changer de vitesse lorsque l’appareil mélange.
· Ne jamais exercer, lorsque l’appareil travaille, une force excessive susceptible de
rendre le batteur-mélangeur instable.
· Ne jamais faire fonctionner le batteur-mélangeur lorsque des pièces sont démontées.
· Ne jamais ignorer les commutateurs de sécurité installés sur l’appareil.
· Ne jamais ouvrir la grille de protection pour arrêter l’appareil.
· Ne jamais utiliser la poignée de montée de cuve pour arrêter l’appareil.
· Ne jamais utiliser l’appareil s'il ne fonctionne pas en toute sécurité.
· Ne jamais nettoyer l’appareil avec de la poudre à récurer ou un tampon de récurage.
· Ne jamais inhaler les particules de poussière des ingrédients de mélange.
Page 32

30
6.2 TOUJOURS
· Utiliser le batteur-mélangeur dans un endroit bien éclairé.
· Vérifier que la cuve, les vis à poignée, l’outil, l’accessoire et la grille sont
correctement fixés sur l’appareil.
· Couper l’alimentation secteur avant de nettoyer l’appareil.
· Nettoyer l’appareil quotidiennement.
· Retirer l’outil avant d’utiliser tout accessoire.
· Arrêter le batteur-mélangeur avant d’ajouter des ingrédients.
· Utiliser le bouton d’arrêt pour arrêter l’appareil.
· Nettoyer la cuve, les outils et les accessoires après le travail.
· Nettoyer l’appareil au savon doux et à l’eau.
· Faire réviser le batteur-mélangeur et ses accessoires au moins deux fois par an,
selon la fréquence d’utilisation.
· Utiliser les équipements de taille réduite adaptés (cuve et agitateurs spécifiés à la
section 12).
7.0 TABLEAUX DE CAPACITÉS DE PRÉPARATION
Les tableaux suivants (Tableaux 2, 3, 4, 5, 6 et 7) indiquent quelles sont les capacités
maximales recommandées du batteur-mélangeur. Avec une farine à haute teneur en
gluten, réduire la quantité de préparation de 10 %.
Vérifier que l’agitateur utilisé convient au type de préparation.
Les capacités indiquées se basent sur une eau à 21°C et une farine à 12 % de teneur en
eau. Ces capacités doivent être réduites si l’eau est plus froide, car des températures
d’eau plus froides rendent le mélange d’un produit plus difficile. Vérifier le bon réglage de
la vitesse.
NE PAS DÉPASSER LA QUANTITÉ DE PRÉPARATION SPÉCIFIÉE
Une trop grosse quantité de préparation peut nuire à la qualité du produit fini et altérer la
durée de vie de l’appareil. Il convient de toujours consulter les tableaux de préparation.
Capacité maximale des batteurs-mélangeurs :-
HSM30 / NCM300 = 28,75 litres
HSM40 / NCM400 = 38,5 litres
Tableau 2 HSM30 / NCM300 Capacités cuisine - par charge
Type de produit Quantité Outil
recommandé
Vitesses
recommandées
Blancs en neige 1,7 litre Fouet 1 / 2 / 3
Purée de pommes de terre 10,4 kg Batteur B 1
Mayonnaise (huile) 13,6 litres Fouet 2 / 3
Crème fouettée 17,0 litres Fouet 1 / 2 / 3
Page 33

31
Tableau 3 HSM30 / NCM300 Capacités pâtisserie - par charge
Type de produit Quantité Outil
Recommandé
Vitesses
recommandées
Gâteau de Madère 13,5 kg Batteur B 1 / 2 / 3
Quatre-quarts 12,7 kg Batteur B 1 / 2 / 3
Préparation légère (biscuit
de Savoie)
9,1 kg Batteur B 1 / 2 / 3
Pudding cuit à la vapeur 13,5 kg E ou EB 1 / 2 / 3
Yorkshire pudding 13,6 litres Fouet B ou C 2 ou 3
Pâte (légère - moyenne) 13,5 kg
(TA 65 %)
(8.8 kg de farine 4,7 litres
d’eau)
Crochet ED 1 exclusivement
Pâte (lourde) 10,9 kg
(TA 50 %)
(7,3 kg de farine 3,6 litres
d’eau)
Crochet ED 1 exclusivement
Pâte à pizza 6,8 kg E ou ED
exclusivement
1 exclusivement
Tourtes, tartes 10,9 kg Couteau à
pâtisserie
Crochet ED
1 exclusivement
Matière grasse & sucre
pour biscuit de Savoie
10,9 kg Fouet 1 / 2 / 3
Tableau 4 HSM40 / NCM400 Capacités cuisine - par charge
Type de produit Quantité Outil
recommandé
Vitesses
recommandées
Blancs en neige 2 litres Fouet 1 / 2 / 3
Purée de pommes de terre 12,7 kg Batteur B 1
Mayonnaise (huile) 17 litres Fouet 2 / 3
Crème fouettée 22,6 litres Fouet 1 / 2 / 3
Tableau 5 HSM40 / NCM400 Capacités pâtisserie - par charge
Type de produit Quantité Outil
recommandé
Vitesses
recommandées
Gâteau de Madère 18 kg Batteur B 1 / 2 / 3
Quatre-quarts 16 kg Batteur B 1 / 2 / 3
Préparation légère (biscuit de
Savoie)
12,7 kg Batteur B 1 / 2 / 3
Pudding cuit à la vapeur 18 kg E ou EB 1 / 2 / 3
Yorkshire pudding 17 litres Fouet B ou C 2 ou 3
Pâte (légère - moyenne) 18 kg (TA 65 %)
(11 kg de farine 7 litres d’eau)
Crochet ED 1 exclusivement
Pâte (lourde) 13,5 kg (TA 50 %)
(9 kg de farine 4,5 litres d’eau)
Crochet ED 1 exclusivement
Pâte à pizza 9,1 kg E ou ED
exclusivement
1 exclusivement
Tourtes, tartes 13,5 kg Couteau à
pâtisserie
Crochet ED
1 exclusivement
Matière grasse & sucre pour
biscuit de Savoie
13,5 kg Fouet 1 / 2 / 3
Page 34

32
Tableau 6. 20 litres cuve. Capacités cuisine - par charge
Type de produit Quantité Outil
recommandé
Vitesses
recommandées
Blancs en neige 1.1 litres Fouet 1 / 2 / 3
Purée de pommes de terre 6.8 kg Batteur B 1
Mayonnaise (huile) 11.4 litres Fouet 2 / 3
Crème fouettée 11.4 litres Fouet 1 / 2 / 3
Tableau 7. 20 litres cuve. Capacités pâtisserie -par charge
Type de produit Quantité Outil
recommandé
Vitesses
recommandées
Gâteau de Madère 9 kg Batteur B 1 / 2 / 3
Quatre-quarts 9 kg Batteur B 1 / 2 / 3
Préparation légère (biscuit de
Savoie)
6.4 kg Batteur B 1 / 2 / 3
Pudding cuit à la vapeur 9 kg E ou EB 1 / 2 / 3
Yorkshire pudding 9.1 litres Fouet B ou C 2 ou 3
Pâte (légère - moyenne) 9.1 kg (65% A/R)
(5.6 kg de farine 3.5 litre
d’eau)
Crochet ED 1 exclusivement
Pâte (lourde) 5.8 kg (50% A/R)
kg de farine 1.9 litre d’eau)
Crochet ED 1 exclusivement
Pâte à pizza 5.0 kg E ou ED
exclusivement
1 exclusivement
Tourtes, tartes 7.3 kg Couteau à
pâtisserie
Crochet ED
1 exclusivement
Matière grasse & sucre pour
biscuit de Savoie
6.8 kg Fouet 1 / 2 / 3
* TA taux absorbant.
La vitesse “1” (BAS) est destinée aux mélanges lourds telles que les pâtes dures, les pâtes
molles lourdes et les purées de pommes de terre.
La vitesse “2” (MOYEN) est destinée au mélange des pâtes à gâteau.
La vitesse “3” (ÉLEVÉ) sert à mélanger le maximum d’air dans les préparations légères.
Le fouet « D » s’utilise pour fouetter la crème fraîche, battre les blancs en neige,
préparer des glaçages légers, des meringues et fouetter.
Page 35

33
8.0 LES OUTILS.
Les outils destinés au batteur-mélangeur sont conçus pour les opérations décrites cidessous :
Le ‘batteur B’ est un agitateur polyvalent servant à réaliser des purées de
pommes de terre et d’autres légumes cuits, des pâtes à gâteau et à crêpe et
des glaçages. Sélectionner la vitesse 1 pour démarrer la plupart des
opérations, puis passer à la vitesse 2 pour finir le travail, au besoin.
Le ‘fouet D’ est conçu pour mélanger le maximum d’air dans les produits légers. Il
sert à fouetter la crème fraîche, battre les blancs en neige et mélanger des blancs
en neige très légers. Ce fouet s’utilise sur les vitesses 2 et 3.
Le ‘crochet ED’ sert à pétrir les pâtes à pain et la pâte à pizza, qui nécessitent
d’être pliées et étirées pour un développement optimal. Ce crochet s’utilise
principalement sur la vitesse 1.
Le ‘couteau à pâtisserie’ sert à mélanger les pâtes à tarte et à tourte. Le
couteau à pâtisserie s’utilise seulement sur la vitesse 1.
9.0 NETTOYAGE
NE PAS NETTOYER L’APPAREIL AU JET D’EAU OU À LA PRESSION
NE PAS UTILISER DE NETTOYANTS ABRASIFS
Couper l’appareil de l’alimentation secteur avant de procéder au nettoyage
9.1 NETTOYAGE AVANT LA PREMIÈRE UTILISATION.
Avant d’utiliser l’appareil pour la première fois, il convient de nettoyer soigneusement la cuve,
les outils et les accessoires du nouveau batteur-mélangeur. Utiliser pour cela de l’eau chaude
et un détergent doux. Nettoyer de la même manière la cuve et les outils avant de battre des
blancs en neige ou des œufs entiers.
Page 36

34
9.2 NETTOYAGE APRÈS USAGE.
Après usage, il convient de nettoyer la cuve, les outils et les accessoires à l’eau chaude,
en utilisant un détergent non-abrasif adéquat et une brosse à poils doux. (Un rinçage à
l’eau chaude juste après le travail facilite le nettoyage de la cuve).
Nettoyer le batteur-mélangeur avec un chiffon chaud et humide, et bien essuyer les bras
de la cuve ainsi que toutes les surfaces extérieures. Nettoyer également la grille de la
manière suivante.
9.3 DÉMONTAGE ET NETTOYAGE DE LA GRILLE.
La grille a été conçue pour être démontée facilement afin de nettoyer l’appareil.
Démontage de la grille :
· Vérifier que le porte-cuve est abaissé.
· Retirer la cuve et l’agitateur.
· Retirer le piston de verrouillage et faire tourner le déflecteur de la grille dans le sens
oppose des aiguilles d’une montre jusqu’à ce que l’ensemble se libère des dispositifs
de retenue à ressorts. Il convient alors d’être vigilant car la grille n’est plus retenue et
peut tomber de l’appareil.
· Abaisser la grille avec précaution et la retirer.
Nettoyer la grille.
Il est important de nettoyer la grille de protection tous les jours après le travail.
Une fois la grille retirée, celle-ci peut être lavée à l’eau chaude, en utilisant un détergent
non-abrasif adéquat et une brosse à poils doux. La grille peut également être lavée dans
un lave-vaisselle ménager.
Remontage de la grille sur l’appareil.
· Orienter la grille en positionnant le déflecteur à l’arrière de l’appareil, puis emboîter la
grille sur l’appareil en poussant.
· Tourner le déflecteur de la grille dans le sens des aiguilles d’une montre pour
l’enclencher complètement dans les dispositifs de retenue à ressorts. Une fois en
place, la grille ne bouge plus.
Il convient de nettoyer la grille chaque jour après le travail.
Page 37

35
10.0 MAINTENANCE DE L’APPAREIL.
LA MAINTENANCE DE L’APPAREIL DOIT ÊTRE EFFECTUÉE PAR UNE
PERSONNE COMPÉTENTE, FORMÉE PAR HOBART.
Ne pas enlever de couvercle et ne desserrer aucun accessoire lorsque l’appareil est en
plein travail. Couper l’appareil de l’alimentation secteur avant de le réviser ou de le
déplacer.
Le moteur et la transmission sont lubrifiés avec une graisse spéciale qui durera plusieurs
années. En cas de besoin de remplacement, contacter le service après-vente local.
Pour prévenir la corrosion et assurer un bon fonctionnement, il convient de lubrifier les
tiges du porte-cuve de temps en temps, avec une petite quantité d’huile propre à la
consommation appliquée avec le bout du doigt.
Il est conseillé de faire réviser régulièrement (deux fois par an) l’appareil.
Un catalogue de pieces de recharge (ple200459) est disponible sur demande auprès du
service SAV Hobart le plus proche. Afin que cet appareil continue à fonctionner en toute
sécurité et fiabilité, il est conseillé de confier son entretien à des techniciens qualifiés de
Hobart.
11.0 RECHERCHE DES PANNES
Défaut Cause possible Solution
L’appareil ne démarre pas Fusible de circuit de
commande a sauté
Vérifier et remplacer le fusible
défaillant
La grille n’est pas en position
de travail
Vérifier que la grille de
protection est fermée
Le levier de changement de
vitesse n’est pas
correctement positionné
Régler sur la bonne vitesse
L’appareil est coupé de
l’alimentation secteur
Brancher et allumer l’appareil
L’appareil ne fonctionne
toujours pas
Contacter le centre local de
service après-vente Hobart
Le racloir (option) se coince
contre les parois de la cuve
Le racloir frotte sur une
surface sèche
Lubrifier les parois de la cuve
avec de l’huile végétale ou de
la matière grasse
Le bord biseauté du racloir
(option) n’est pas le bord
d’attaque
Le manchon en plastique
n’est pas mis correctement
Ôter le racloir et insérer
correctement le manchon en
plastique.
Trop d’espace entre la cuve
et le racloir
Le bras du racloir est plié ou
dégagement cuve incorrect
Contacter le centre local de
service après-vente Hobart
Le moteur démarre mais
l’agitateur ne tourne pas
Levier de changement de
vitesse mal positionné
Régler sur la bonne vitesse
L’appareil ne fonctionne
toujours pas
Contacter le centre local de
service après-vente Hobart
Page 38

36
12.0 PIÈCES DE RECHANGE RECOMMANDÉES
Référence Description
PLE200459 Catalogue de pieces de recharge
144452-1 Moteur monophasé 230/50/1 (selon modèle)
138725 Condensateur, démarrage (160-200 µF) (selon modèle)
138724 Condensateur, fonctionnement (15 µF) (selon modèle)
144453-1 Moteur triphasé 400/50/3 (selon modèle)
00-738242 Courroie d’entraînement
00-737991-4 Couvercle supérieur, minuterie NCM300, NCM400
00-737991-3 Couvercle supérieur, pas de minuterie NCM300, NCM400
00-737991-9 Couvercle supérieur, minuterie HSM30, HSM40
141932 Commutateur, changement de vitesse
EPM-E-16-14 Commutateur démarrage
EPM-E-16-15 Commutateur arrêt
SS-E-18-11 Minuterie 30 min.
140807 Interrupteur à lames, grille de protection
144358 Commutateur, porte-cuve
00-738163 Grille. HSM30 / NCM300
00-738164 Grille. HSM40 / NCM400
142403-10 Surcharge thermique, 230/50/1 (selon modèle)
142403-8 Surcharge thermique, 400/50/3 (selon modèle)
141440-1 Contacteur
140869-10 Fusible, commande 315 mA
140869-19 Fusible, commande 2 A
140908-3 Transfo. 400/50/3
OSM-E-1-12 Joint étanche à l’huile
R-9440-E Batteur, HSM30 / NCM300
R-9443-E Fouet, HSM30 / NCM300
141721 Crochet ED, HSM30 / NCM300
53572 Batteur, HSM40 / NCM400
53577 Fouet, HSM40 / NCM400
140688 Crochet ED, HSM40 / NCM400
00-738662 Cuve 20 litres pour HSM30 / NCM300 et HSM40 / NCM400. Adaptateur
requis pour HSM40 / NCM400
00-738664 Cuve 30 litres pour HSM40 / NCM400
53600 Adaptateur pour installer la cuve de 30 litres sur un HSM40 / NCM400
50181 20 liters adaptateur de cuve
10470-E Fouet 20 liters
10469-E Batteur 20 liters
51831 Crochet 20 liters
ML-109241 Ensemble racloir de cuve 20 litres comprenant lame et logement
737458-2 Lame-racloir 20 litres
ML-109242 Ensemble racloir de cuve 30 litres comprenant lame et logement
737458-3 Lame-racloir 30 litres
ML-109243 Ensemble racloir de cuve 40 litres comprenant lame et logement
737458-4 Lame-racloir 40 litres
00-738071 Logement-racloir (toutes capacités)
Page 39

37
NOTES :
Page 40

38
13.0 SERVICE APRÈS-VENTE ET ADRESSES
Nos techniciens qualifiés S.A.V, stratégiquement répartis dans les établissements
Hobart, sont prêts à vous offrir un service rapide, efficace et fiable. Protégez votre
investissement en optant pour un contrat d’inspection Hobart afin d’assurer la continuité
et la qualité de fonctionnement de vos appareils, pièces de rechange et accessoires
Hobart.
Renseignements :-
Téléphone Fax
DIRECTION COMMERCIAL 01 64 11 60 00 01 64 11 60 05
DIRECTION SERVICE 01 64 11 60 77 01 64 11 60 03
Hobart ayant une politique d’amélioration constante de ses produits, les spécifications peuvent changer
sans préavis.
Compagnie Hobart
ZI Paris-Est,
1, Allee du 1er Mai,
Croissy-Beaubourg
BP68-77312
Marne-la-Vallee
France
Tél. : +33 (0)1 64 11 60 00 Fax : +33 (0)1 64 11 60 01
Page 41

39
Deutsch / INHALT
Seite
Information zur Sicherheit 40
Sicherheitsrichtlinien 40
Warnsymbole 41
Haftung 41
Vorwort 41
Allgemeines 41
Ausmaße des Mixers. Abbildung 1 42
Technische Information. Tabelle 1 42
Installation 43
Auspacken und Handhabung 43
Standort 43
Elektrische Installation 44
Stromanschluß 44
Inbetriebnahme- und Betriebsanweisung 44
Betrieb 44
Erste Inbetriebnahme 45
Identifikation der Mixerbauteile. Abbildung 2 45
Verwendung des Schüsselschabers 46
Allgemeines zur Verwendung des Schüsselschabers 46
Betrieb mit dem Schüsselschaber 46
Reinigung des Schüsselschabers 47
Nach dem Rühren 47
Verwendung des möglichen Zubehörs 48
Sicherheitsanweisung für das Zubehör 48
Einsetzen eines Zubehörteils 48
Sicherheitsanweisungen 49
Niemals 49
Immer 50
Tabelle der Mischmengen 50
Küchenübliche Mengen HSM30 / NCM300. Tabelle 2 50
Bäckereiübliche Mengen HSM30 / NCM300. Tabelle 3. 51
Küchenübliche Mengen HSM40 / NCM400. Tabelle 4. 51
Bäckereiübliche Mengen HSM40 / NCM400. Tabelle 5 51
Küchenübliche Mengen 20 litre schüssel. Tabelle 6. 52
Bäckereiübliche Mengen 20 litre schüssel. Tabelle 7. 52
Mixerrührwerke 53
Reinigen 54
Reinigung vor der ersten Inbetriebnahme 54
Reinigung nach dem Gebrauch 54
Entfernen und Reinigen des Schutzgitters 54
Wartung des Geräts 55
Fehlersuche 56
Empfohlene Ersatzteile 57
Notizen 58
Kundendienstinformation und Adressen 59
Page 42

40
1.0 INFORMATION ZUR SICHERHEIT
Die Verfahren und Vorsichtsmaßnahmen in diesem Handbuch beziehen sich
ausschließlich auf den sachgerechten Einsatz des Geräts.
Wenn das Gerät nicht sachgemäß eingesetzt wird, dann ist der Bediener für seine
eigene Sicherheit sowie die Sicherheit anderer Personen verantwortlich.
Die Information in diesem Handbuch wurde zusammengestellt, um den Bediener beim
Verständnis, der Wartung und des Betriebs des Mixers zu unterstützen. Zur Verhütung
von Unfällen sollten alle Vorsichtsmaßnahmen und Warnhinweise in diesem Handbuch
gelesen, verstanden und befolgt werden, bevor das Gerät installiert oder zum ersten Mal
in Betrieb genommen wird. Das Handbuch muß gründlich durchgelesen werden, damit
man sich ein klares Verständnis bezüglich des Mixers und seiner Arbeitsweise vermittelt.
1.1 SICHERHEITSRICHTLINIEN
Sicherstellen, daß die Sicherheitsvorkehrungen während der manuellen Handhabung
des Mixers beachtet werden, besonders wenn das Gerät bei der Installation in Position
gebracht wird. Hierbei müssen die Vorschriften zur manuellen Handhabung beachtet
werden. Die Gewichtsangaben zum Mixer finden sich auf Tabelle 1.
· Zur Reinigung des Geräts keine Druckschläuche verwenden. Es ist äußerst wichtig,
daß die Reinigungsanweisungen in Abschnitt 9 dieses Handbuch befolgt werden.
· Keine Abdeckungen abnehmen oder Bauteile lockern, während sich das Gerät in
Betrieb befindet.
· Dafür sorgen, daß dieses Handbuch zur späteren Bezugnahme zugänglich in Nähe
des Geräts aufbewahrt wird.
· Alle Bedienungspersonal muß im sicheren Betrieb des Mixers und seines Zubehörs
ausgebildet werden.
· Vor Beginn von Wartungsarbeiten oder Positionswechsel des Mixers sicherstellen,
daß zunächst die Stromzufuhr isoliert wurde.
· Rotierende Maschinen und Strom sind mögliche Gefahrenquellen und können zu
Verletzung führen, wenn vor Betrieb oder Wartung des Geräts keine ausreichenden
Sicherheitsvorkehrungen getroffen werden.
· Der Mixer und sein Zubehör sollten regelmäßig, mindestens zweimal pro Jahr – je
nach Häufigkeit des Betriebs – gewartet werden.
Wichtig! Bei der Verwendung von Einrichtungen reduzierter Größen dürfen nur die in
Abschnitt 12 detaillierten Schüsseln verwendet werden. Der Mixer darf nicht unter
Verwendung einer anderen Kombination von Schüsseln reduzierter Größe betrieben
werden. Bei reduzierten Größen handelt es sich um 30- oder 20-Liter-Schüsseln für
einen HSM40 / NCM400 oder eine 20-Liter-Schüssel für einen HSM30 / NCM300. Die
Tabelle für empfohlene Ersatzteile in Abschnitt 12 gibt die jeweiligen Ersatzteilnummern
für Schüssel und Rührwerk an.
Page 43

41
1.2 WARNSYMBOLE
Sicherheitshinweise in diesem Handbuch werden wie folgt identifiziert:
Das Symbol “Achtung” wird hauptsächlich dort vorgefunden, wo der
entsprechende Warnhinweis für den sicheren Betrieb des Geräts von
Bedeutung ist.
Das Symbol für Stromgefahr wird dort verwendet, wo Gefahr aufgrund von
Elektrizität besteht. Vor Wartung des Geräts immer zunächst das Netzkabel
aus der Steckdose ziehen.
1.3 HAFTUNG
Installations- und Reparaturarbeiten, die nicht von entsprechend qualifiziertem
Fachpersonal ausgeführt werden, oder die Verwendung von Nicht-Originalersatzteilen
sowie jegliche technische Änderung am Gerät können die in den Allgemeinen
Geschäftsbedingungen enthaltenen Garantiebedingungen beeinträchtigen.
2.0 VORWORT
Die Firma Hobart behält sich das Recht vor, das Design ihrer Produkte ohne vorherige
Ankündigung zu ändern. Während wir uns äußerst darum bemühen, daß diese
Veröffentlichung dem neuesten Designstand entspricht, kann das Unternehmen dies
jedoch nicht völlig garantieren.
Seien Sie auf Ihren HSM/NCM-Mixer stolz – halten Sie das Gerät sauber und in gutem
mechanischen und elektrischen Zustand.
Es ist möglich, daß die Information und Anweisungen in diesem Handbuch nicht alle
Details oder Modelle des Gerätes mit einbeziehen und sich auch nicht auf alle
Möglichkeiten erstrecken, die sich durch Installation, Betrieb oder Wartung ergeben.
Wenn Sie zusätzliche Information benötigen, dann setzen Sie sich bitte mit Ihrem
örtlichen Hobart-Vertreter in Verbindung.
3.0 ALLGEMEINE INFORMATION.
Die Mixermodelle HSM und NCM dienen zum Mischen und Rühren von Lebensmitteln
gemäß den Angaben auf den Tabellen (Tabellen 2, 3, 4 und 5). Der Mixer HSM30/40
bestent aus einem getriebeuaster aus stauzgiuss, edelstahz unterbau, verkleidung und
füßen, sowie einer Kunststoffabdeckung . Der Mixer NCM300/400 In der Hauptsache
besteht das Gerät aus 2 gusseisernen Gehäuseteilen, einem geschweissten Stahlsockel, Aluminiumfüßen, einer Kunststoffabdeckung und einer Rückwand aus Metall. Die
Endlackierung ist in Hobart-Grau ausgeführt.
Das Gerät hat eine Nennleistung entsprechend der auf Tabelle 1 angegebenen Stromzufuhren. Der Mixer ist mit einem Nullspannungssicherheitsschal-ter ausgerüstet, um nach
Stromausfall oder Isolierung von der Hauptstrom-versorgung einen auto-matischen
Neustart zu verhindern.
Page 44

42
Der Schüssel-träger und das Schutzgitter sind
sicherheitsverriegelt, damit der Mixer nicht in
Betrieb genommen werden kann, wenn eines
dieser Teile nicht seine korrekte
Betriebsposition hat. Die Standardausführung
des Mixers wird mit Schutzgitter, Schüssel
und Rührwerken geliefert.
ABBILDUNG 1. GESAMTAUSMAßE
Tabelle 1. Technische Information
Beschreibung Einheiten HSM30 /
NCM300
HSM40 /
NCM400
Motorenleistung KW (hp) 1.1 (1.5) 1.1 (1.5)
Maximalgeschwindigkeit des
Rotationsteils (50Hz)
U/Min 1425 1425
Nennstromzufuhr 1-phasig Volt/Hz 230/50 230/50
3-phasig 400/50 400/50
Hochstrom bei obiger Spannung, 1-phasig Ampere 7.4 7.4
3-phasig Ampere 2.8 2.8
Kurzschlußstrom bei obiger Spannung, 1phasig
Ampere 44 16
3-phasig Ampere 16 16
Empfohlene Sicherungen 230V/1-phas./50Hz Ampere 20 20
Empfohlene Sicherungen 230V/3-phas./50Hz Ampere 16 16
Empfohlene Sicherungen 400V/3-phas./50Hz Ampere 10 10
Maximale Umgebungstemperatur
o
C4040
Antriebsgröße der Zubehörnabe -- Nummer
12
Nummer12
Mixergewicht einschließlich Rührwerk und
Schüssel (leer)
Kg 241 246
Lärmpegel dB (A)
##
<70
##
<70
Versandgewicht Kg 255 260
Versandausmaße (Kiste) LxBxH cm 99x81x155 99x81x155
Lagerbedingungen – Temperatur und
Feuchtigkeit.
o
C, % RF +5 to +38,85+5 to +38,
85
Geräteklasse
#
Klasse I
#
Klasse I
IP-Klasse des Gehäuses IP44 IP44
Drahtanschlußgröße 1-phasig mm
2
1.5 1.5
3-phasig 1.0 1.0
Page 45

43
#
Siehe Abschnitt 4.3.
##
In Übereinstimmung mit EN-ISO 12001:1996
4.0 INSTALLATION.
4.1 AUSPACKEN UND HANDHABUNG
Das Gerät sollte, wenn möglich, in der Transportverpackung an den
Aufstellort gebracht werden, um Beschädigung zu vermeiden. Zum
Aufschneiden des Versandkartons kein scharfes Messer verwenden,
da das Gerät hierdurch beschädigt werden könnte. Auf möglichen
Transportschaden prüfen. Wenn die Einheit beschädigt ist, das
Verpackungsmaterial aufbewahren und sich an die nächste Hobart-
Verkaufsstelle wenden.
Achtung: Der Mixer ist sehr schwer und muß korrekt gehandhabt und
angehoben werden, um Verletzung zu vermeiden.
Wenn das Gerät am Aufstellort ist, gemäß der Anweisung auf der Verpackung von der
Transportpalette nehmen. Das Gerät ist mittels von vier Haltebolzen durch die Pallette in
die Gewindefüße des Geräts verankert.
Während dieses Vorgangs muß auf folgendes geachtet werden:
a) Es müssen alle erforderlichen Sicherheitsvorkehrungen getroffen werden, um ein
korrektes Anheben und Handhaben zu gewährleisten, um das Risiko von Verletzung
durch Fallenlassen, Herunterfallen oder Kippen des Geräts zu vermeiden.
b) Das Gerät sollte nicht in einer Weise beschädigt werden, die den normalen Betrieb
beeinträchtigen könnte.
Der Deckel ist separat im Hauptversandkarton verpackt. Diesen erst dann aufsetzen,
wenn der Mixer in Position ist. Den Mixer nicht mittels des Deckels anheben oder
positionsmäßig verändern.
4.2 STANDORT
Der Mixer eignet sich nicht zur Installation im Freien und darf nicht dort installiert werden,
wo zwecks Reinigung ein Wasserstrahl eingesetzt wird. Der Mixer darf nur von
fachkundigem Personal bedient werden und muß in einem Bereich aufgestellt werden, wo
Betrieb und Wartung auf Fachpersonal beschränkt sind.
Eine geeignete, ebene Stellfläche wählen, die das Gewicht des Mixers und Schüsselinhalt
bei voller Schüssel aufnehmen kann (für Gewichte und Ausmaße siehe Tabelle 1). In
Bereichen, in denen Stabilität ein Problem darstellt, sollte das Gerät in seiner Position
abgesichert werden.
Sicherstellen, daß um den Mixer genügend Spielraum besteht, um einen sicheren Betrieb
des Schüsselhubhebels, der Zubehörnabe (wenn vorhanden) sowie
Entfernen/Wiedereinsetzen der Rührschüssel zu gewährleisten. Aufgrund von
unzulänglichen Spielräumen könnten Wartungsarbeiten erschwert werden, und Sie
sollten zudem immer prüfen, ob die Gerätespezifikation unmittelbare Nähe anderer
Page 46

44
Geräte zuläßt. Die Gesamtausmaße des Mixers sind auf Abbildung 1 ersichtlich.
Wartungszugang ist hinten und oben am Mixer erforderlich.
4.3 ELEKTRISCHE INSTALLATION.
Die elektrische Installation des Mixers muß den Vorschriften des örtlichen
Elektrizitätswerks entsprechen.
Die elektrische Installation muß von einem Fachmann durchgeführt werden.
Die technischen Daten auf Tabelle 1 detaillieren die Stromerfordernisse für die
verschiedenen Mixermodelle.
Die Modelle HSM30, NCM300, HSM40 und NCM400 zählen zur Geräteklasse I, bei
denen Schutz vor Elektroschock nicht nur auf Grundisolierung zurückgeht. Ein externer
Trennschalter und Leitungsschutzschalter/Sicherungen (beide von anderen geliefert)
müssen an der Stromzufuhr zum Mixer eingebaut werden. Zusätzlich wird eine 30 mA
Fehlerstromschutzeinrichtung nachdrücklich empfohlen, die zusätzlichen Schutz bietet.
ACHTUNG - Nach Anschluss an der maschine an die strom-versorgung. Muss das
schutz-gitter betaetiegt werden um den sicherheits-schalter zu initialisieren
4.4 STROMANSCHLUSS
Wir verweisen auf den Schaltplan, der dem Mixer beiliegt und sich in der
Dokumentenmappe findet.
Die Rotationsrichtung prüfen.
5.0 INBETRIEBENAHME- UND BETRIEBSANWEISUNG
5.1 BETRIEB
Dieser Mixer ist für professionellen Gebrauch gedacht, wobei er nur von
fachlich ausgebildetem Personal betrieben werden sollte. Sicherstellen,
daß das Bedienungspersonal dieses Handbuch gelesen und verstanden
hat und entsprechend ausgebildet wurde.
Zur Identifikation der Mixerbauteile verweisen wir auf Abbildung 2.
Page 47

45
2
1
3
4
5
6
11
7
8
9
10
5.2 ERSTE INBETRIEBNAHME
ACHTUNG - Nach Anschluss an der maschine an die strom-versorgung. Muss das
schutz-gitter betaetiegt werden um den sicherheits-schalter zu initialisieren
Vor der ersten Inbetriebnahme Schüssel und Rührwerk gründlich gemäß Abschnitt 8
‘Reinigung’ reinigen.
Sicherstellen, daß das Gerät ausgeschaltet ist.
Sicherstellen, daß der Deckel (10) an der Nabe
angebracht ist (wo zutreffend), wenn kein
Zubehörteil verwendet wird.
· Vor Verwendung des Rührwerks immer
erst alle Zubehörteile entfernen.
· Mit Hilfe des Handhebels den
Schüsselträger senken.
· Den vordern Teil des Schutzgitters (5)
rotieren, um Zugang zur Schüssel zu erlangen.
· Das gewünschte Rührwerk in die Schüssel
geben (7) und die Schüssel in den
Schüsselträger in der abgesenkten Position
einsetzen.
Die Schüssel durch Ausrichten der Rückseite
der Schüssel auf den Anschlag am
Schüsselträger in Position bringen. Die
Ausrichtstifte (6) am Schüsselträger in die
Schüsselansätze einrasten lassen und mit den
Schüsselklemmen absichern.
ABBILDUNG 2. IDENTIFIKATION
DER MIXERBAUTEOLE.
· Die Rührwerke auf die Welle schieben und drehen, damit der Antriebsstift im “L”-
Schlitz einrastet.
· Die Zutaten in die Schüssel geben und die Schüssel mit dem Handhebel anheben.
· Den Vorderteil des Schutzgitters (5) in die Betriebsposition (geschlossen) rotieren.
· Wichtig! Bei der Verwendung von Einrichtungen reduzierter Größen dürfen nur die in
Abschnitt 12 detaillierten Schüsseln verwendet werden. Der Mixer darf nicht unter
Verwendung einer anderen Kombination von Schüsseln reduzierter Größe betrieben
werden. Bei reduzierten Größen handelt es sich um 30- oder 20-Liter-Schüsseln für
einen HSM40 / NCM400 oder eine 20-Liter-Schüssel für einen HSM30 / NCM300. Die
Page 48

46
Tabelle für empfohlene Ersatzteile in Abschnitt 12 gibt die jeweiligen
Ersatzteilnummern für Schüssel und Rührwerk an.
(ANMERKUNG: Der Schüsselträger verfügt über eine elektrische Sicherheitsverriegelung,
um versehentliche Inbetriebnahme, wenn sich die Schüssel in der unteren Position
befindet, zu vermeiden, wobei das Schutzgitter ebenfalls eine elektrische
Sicherheitsverriegelung hat, um eine versehentliche Inbetriebnahme in der offenen
Position zu verhindern).
Die gewünschte Geschwindigkeit (4) und, wenn vorhanden, Timereinstellung (1) wählen.
· Einstellen des Timers
a) Betrieb ohne Timer – Stellen Sie den Timer auf die Position “HOLD”.
b) Betrieb mit Timer – Drehen Sie den Timer über die gewünschte Position hinaus und
stellen Sie ihn dann auf die gewünschte Zeit zurück.
· Das Gerät durch Betätigung des Ein-Schalters (2) in Betrieb nehmen. Wir weisen
darauf hin, daß die Mixergeschwindigkeit nicht geändert werden darf, während sich das
Gerät in Betrieb befindet. Vor Änderung der Geschwindigkeit, zunächst das Gerät am AusSchalter (3) ausschalten.
Wenn sich das Gerät nicht einschaltet, prüfen, daß der Schüsselträger in der oberen
Position ist und sich das Schutzgitter in der Betriebsposition befindet.
5.3 VERWENDUNG DES SCHÜSSELSCHABERS
5.3.1 ALLGEMEINES ZUR VERWENDUNG DES SCHÜSSEL-
SCHABERS
Der Schaber der Rührschüssel schabt die Seiten der Schüssel fortlaufend, während das
Rührwerk den Teig wendet, wodurch der Teig um die Seiten und den Boden der Schüssel
ständig wieder in die Teigmischung eingeführt wird. Bei Verwendung des
Schüsselschabers ist kein manuelles Schaben notwendig. Der Schüsselschaber sollte nur
bei Edelstahlschüsseln verwendet werden.
Für den Schaberarm immer eine Manschette korekter Größe verwenden. Wenn Sie
Schaber in mehreren Größen haben, darauf achten, daß Manschetten und Arme nicht
miteinder verwechselt werden.
5.3.2 BETRIEB MIT DEM SCHÜSSELSCHABER
1. Den Schüsselschaber vor dem Anheben der Schüssel gemäß Abschnitt 5.1 in die
Schüssel geben.
2. Die Oberfläche der Schüssel mit Pflanzenöl oder-fett bestreichen, besonders im
Bereich über dem Produkt, wo die Manschette gegen die blanke Schüsseloberfläche
reiben kann.
3. Der Schüsselschaber rotiert – bei Blick in die Schüssel – im Uhrzeigersinn. Die
Schaberwelle in das Bajonettgehäuse einsetzen und 90° gegen den Uhrzeigersinn
drehen.
4. Die Schüssel in ihre Betriebsposition anheben. Die Zutaten hinzugeben und normal
mischen.
Page 49

47
5. Nach dem Mischen die Schüssel senken und den Schüsselschaber im Uhrzeigersinn
rotieren und zur Herausnahme senken.
Hinweis:
¨ Nur die Geschwindigkeitseinstellungen 1 und 2 verwenden.
¨ Produkte, die unter Verwendung des Schüsselschabers, verrührt werden können, sind:
Kartoffelpüree, Waffelteig, Kuchenteig, Zuckerguß, Cremigrühren von Fett/Zucker
sowie Mayonnaise.
¨ Der Schüsselschaber sollte nur mit einem Rührbesen oder flachen Quirl verwendet
werden. Bei Kneten von Teigprodukten nicht verwenden.
¨ Eine Schüssel mit steifem Produkt (d.h. Rahmkäse, Ziehfett, nicht pürierten Kartofflen)
niemals mit Schaberarm im Gehäuse anheben. Der Schaberarm kann permanent
verbogen werden und durch die rotieren Rührwerke beschädigt werden. Die Schüssel
mit Zutaten füllen, nachdem sie angehoben wurde.
5.3.3 REINIGUNG DES SCHÜSSELSCHABERS
Die Plastikmanschette vom Schaberarm entfernen. Ein leichtes Klopfen der Manschette
gegen die Tischkante vereinfacht das Entfernen. Beide Teile in einem Spülbecken mit
heißem Wasser und Spülmittel waschen. Mit sauberem Wasser abspülen und trocknen.
Die Manschette so auf den Arm schieben, daß die abgeschrägte Kante zur Führungskante
wird. Als Schmiermittel Wasser verwenden. Das Ende der Manschette muß mit dem Ende
des Arms auf einer Linie sein.
Hinweis:
Zur Reinigung der Manschette keine scharfen Chemikalien verwenden, da diese das
Plastikmaterial beeinträchtigen könnten.
5.4 NACH DEM RÜHREN
· Nach Beendigung des Rührens das Gerät mittels des Aus-Schalters (3)
ausschalten.
· Den Vorderteil der Schutzvorrichtung (5) in die offene Position rotieren.
· Den Schüsselträger senken und das Rührwerk von der Welle nehmen (8).
· Den Schüsselschaber, wenn vorhanden, durch Drehen gegen den Uhrzeigersinn
aus dem Bajonettgehäuse nehmen.
· Die Schüssel (7) und das Rührwerk zwecks Entleerung vom Mixer nehmen.
Page 50

48
5.5 VERWENDUNG DES MÖGLICHEN ZUBEHÖRS
5.5.1 SICHERHEITSANWEISUNG FÜR DAS ZUBEHÖR
Die folgenden Anweisungen müssen bei Betrieb eines Mixers mit Zubehörteilen
beachtet werden. Wir verweisen zudem auch auf die Sicherheitshinweise in
Abschnitt 6.0 sowie die dem Zubehör beiliegenden Anweisungen.
ZUBEHÖR UND/ODER MIXER DÜRFEN NUR VON FACHLICH AUSGEBILDETEM
PERSONAL VERWENDET WERDEN.
· Kein Zubehör anbringen, während sich der Mixer in Betrieb befindet.
· Keine lose Kleidung tragen.
· Mixer oder Zubehör nicht verwenden, wenn ein Fehler auftritt oder das Gerät nicht
sicher ist.
· Sich von rotierenden Teilen fernhalten.
· Bei Betrieb des Zubehör keine übermäßige Kraft anwenden, welche die Stabilität des
Mixers beeinträchtigen könnte.
· Den Mixer nicht in Betrieb nehmen, wenn Bauteile demontiert sind.
· Zubehör und/oder Mixer immer in einem gut beleuchteten Bereich in Betrieb nehmen.
· Immer sicherstellen, daß das Zubehör bei korrekter Geschwindigkeit arbeitet.
· Zubehör nach Gebrauch immer reinigen und hierbei die Reingungsanweisung des
Herstellers beachten.
· Mixer und Zubehör immer regelmäßg warten; mindesten zweimal pro Jahr, je nach
Häufigkeit des Betriebs.
5.5.2 EINSETZEN EINES ZUBEHÖRTEILS
Beim Einsetzen eines Zubehörteils sicherstellen, daß die Stromzufuhr unterbrochen ist.
Die Daumenschrauben (Posten 12 auf Abbildung 2) an der Zubehörnabe lockern und den
Platiskdeckel abnehmen; diesen sicher aufbewahren, damit er nach dem Gebrauch
wieder angebracht werden kann.
Die Welle des Zubehörs in die Nabe geben und sicherstellen, daß der rechteckige Schaft
des Zubehörs in den rechteckigen Antrieb des Mixers einrastet.
Das Zubehörteil durch Festziehen der Daumenschrauben absichern.
Die korrekte Mixergeschwindigkeit für das jeweilige Zubehörteil wählen.
Page 51

49
6.0 SICHERHEITSANWEISUNGEN
ZUBEHÖR UND/ODER MIXER DÜRFEN NUR VON FACHLICH
AUSGEBILDETEM PERSONAL VERWENDET WERDEN :
Bei Betrieb des Mixers müssen die folgenden Anweisungen befolgt werden.
Hinweis: Der Mixer darf nur für den für ihn bestimmten Zweck und entsprechend der
beiliegenden Betriebsanweisung betrieben werden.
Beim Mischen von Zutaten muss darauf geachtet werden, dass die Inhalation
von Staubpartikeln, wie z.B. Mehl, vermieden wird. Wir empfehlen eine
Bezugnahme auf die Produktdatenblätter des Lieferanten, damit sichergestellt
wird, dass ausreichende Vorsichts-/Schutzmassnahmen getroffen werden.
Produkte, wie z.B. Mehl, müssen so zugegeben werden, dass eine Dispersion von
Staubpartikeln in die Umweltatmosphäre vermieden wird.
Beim Manövrieren oder Anheben einer Schüssel mit Inhalt mit einem
Gesamtgewicht von mehr als 25 kg muss ein Schüsselwagen verwendet
werden (Hobart-Ersatzteilnummer M-L108865).
6.1 NIEMALS …
· Mixer oder Zubehör verwenden, wenn sich ein Fehler entwickelt oder der Mixer nicht
sicher ist.
· Lose Kleidung tragen.
· Während des Betriebs in die Schüssel greifen.
· Sich rotierenden Teilen nähern.
· Das Rührwerk am Mixer anbringen, wenn keine Schüssel vorhanden ist.
· Das Rührwerk am Gerät lassen, wenn keine Schüssel vorhanden ist.
· Den Mixer in Betrieb nehmen, wenn sowohl ein Rührwerk als auch ein Zubehörteil
angebracht sind.
· Den Geschwindigkeitshebel in der Mittelposition lassen.
· Zum Anhalten der Maschine den Getriebehebel verwenden.
· Die Geschwindigkeit während des Betriebs ändern.
· Während des Betriebs übermäßige Kraft anwenden, was die Stabilität des Mixers
beeinträchtigen könnte.
· Den Mixer in Betrieb nehmen, wenn Teile demontiert sind.
· Die Sicherheitsschalter am Mixer umgehen.
· Zum Anhalten des Geräts das Schutzgitter öffnen.
· Zu Anhalten des Geräts den Schüsselhubhebel verwenden.
· Den Mixer in unsicherem Zustand in Betrieb nehmen.
· Den Mixer mit Scheuerpulver oder einem Scheuerschwamm reinigen.
· Die Aluminiumrührwerke in einer Spülmaschine reinigen.
· Die Staubpartikel von Mischzutaten dürfen niemals eingeatmet werden.
· Die korrekten Ausrüstungsteile reduzierter Größe (in Anschnitt 12 spezifizierte
Schüsseln und Rührwerke) müssen verwendet werden.
Page 52

50
6.2 IMMER …
· Den Mixer in einem gut beleuchteten Bereich in Betrieb nehmen.
· Sicherstellen, daß Schüssel, Schüsselklemmen, Rührwerk, Zubehör und Schutzgitter
korrekt am Mixer angebracht sind.
· Vor Reinigung des Mixers den Netzstecker aus der Steckdose ziehen.
· Den Mixer täglich reinigen.
· Vor der Verwendung von Zubehör das Rührwerk abnehmen.
· Vor der Zugabe weiterer Zutaten den Mixer abschalten.
· Zum Abschalten des Geräts die Aus-Taste verwenden.
· Nach Gebrauch Schüssel, Rührwerke und Zubehör reinigen.
· Den Mixer mit milder Seife und Wasser reinigen.
· Den Mixer und Zubehör mindestens zweimal Pro Jahr, warten, je nach Häufigkeit des
Betriebs.
· Die korrekten Ausrüstungsteile reduzierter Größe (in Anschnitt 12 spezifizierte
Schüsseln und Rührwerke) müssen verwendet werden.
7.0 TABELLEN DER MISCHMENGEN
Die folgenden Tabellen (Tabellen 2, 3, 4, 5, 6 und 7) zeigen die maximal empfohlenen
Mischmengen für den Mixer an. Bei Mehl mit hohem Glutengehalt die Teigmenge um
10% reduzieren.
Immer sicherstellen, daß für den jeweiligen Teig das korrekte Rührwerk verwendet wird.
Teigmengen basieren auf einer Wassertemperatur von 21°C und einem
Mehlfeuchtigkeitsgehalt von 12%. Kältere Wassertemperaturen ergeben ein Produkt,
das sich schwerer kneten läßt. Sicherstellen, daß die korrekte Geschwindigkeit gewählt
wird.
DIE ANGEGEBENE, ZU VERARBEITENDE MENGE NIEMALS ÜBERSCHREITEN
Ein Überschreiten der Menge kann die Qualität des fertigen Produkts sowie die
Lebensdauer des Geräts beeinträchtigen. Bitte, beziehen Sie sich immer auf die
Tabellenübersicht.
Die maximal zu verarbeitenden Mengen der Mixer sind folgende: -
HSM30 / NCM300 = 28,75 Liter
HSM40 / NCM400 = 38,5 Liter
Tabelle 2 HSM30/NCM300 Küchenübliche Mengen – pro Verarbeitungsgang
Lebensmittel Menge
Empfohlenes
Rührwerk
Empfohlene
Geschwindig-
keiten
Eiweiß 1,7 Liter Rührbesen 1/2/3
Kartoffelpüree 10,4 kg Quirl B 1
Mayonnaise (Öl) 13,6 Liter Rührbesen 2 / 3
Schlagsahne 17,0 Liter Rührbesen 1/2/3
Page 53

51
Tabelle 3 HSM30/NCM300 Bäckereiübliche Mengen – pro Verarbeitungsgang
Lebensmittel Menge Empfohlenes
Rührwerk
Empfohlene
Geschwindig-
keiten
Teig, Sandkuchen 13,5 kg Quirl B 1/2/3
Teig, Früchtekuchen 12,7 kg Quirl B 1/2/3
Leichter Teig (Biscuitkuchen) 9,1 kg Quirl B 1/2/3
Teig, für Aufläufe 13,5 kg E oder EB 1/2/3
Pfannkuchenteig 13,6 Liter Rührbesen B
oder C
2 or 3
Teig (leicht – mittel) 13,5 kg
(65% Absorp.)
(8,8kg Mehl, 4,7 Liter Wasser)
Knethaken ED Nur 1
Teig (schwer) 10,9 kg
(50% Absorp.)
(7,3 kg Mehl, 3,6 Liter Wasser)
Knethaken ED Nur 1
Pizzateig 6,8 kg Nur E oder ED Nur 1
Pastetenteig 10,9 kg Teigmesser
Knethaken ED
Nur 1
Fett & Zucker für Biscuitkuchen
10,9 kg Rührbesen 1/2/3
Tabelle 4 HSM40/NCM400 Küchenübliche Mengen – pro Verarbeitungsgang
Lebensmittel Menge
Empfohlenes
Rührwerk
Empfohlene
Geschwindig-
keiten
Eiweiß 2 Liter Rührbesen 1/2/3
Kartoffelpüree 12,7 kg Quirl B 1
Mayonnaise (Öl) 17 Liter Rührbesen 2 / 3
Schlagsahne 22,6 Liter Rührbesen 1/2/3
Tabelle 5 HSM40 / NCM400 Bäckereiübliche Mengen – pro Verarbeitungsgang
Lebensmittel Menge Empfohlenes
Rührwerk
Empfohlene
Geschwindig-
keiten
Teig, Sandkuchen 18 kg Quirl B 1/2/3
Teig, Früchtekuchen 16 kg Quirl B 1/2/3
Leichter Teig (Biscuitkuchen) 12,7 kg Quirl B 1/2/3
Teig, für Aufläufe 18 kg E oder EB 1/2/3
Pfannkuchenteig 17 Liter Rührbesen B
oder C
2 oder 3
Teig (leicht – mittel) 18 kg
(65% Absorp.)
(11 kg Mehl, 7 Liter Wasser)
Knethaken ED Nur 1
Teig (schwer) 13,5 kg
(50% Absorp.)
(9 kg Mehl, 4,5 Liter Wasser)
Knethaken ED Nur 1
Pizzateig 9.1 kg E or ED only Nur 1
Pastetenteig 13,5 kg Teigmesser
Knethaken ED
Nur 1
Fett & Zucker für Biscuitkuchen
13,5 kg Rührbesen 1/2/3
Page 54

52
Tabelle 6. 20 litre schüssel. Küchenübliche Mengen – pro Verarbeitungsgang
Lebensmittel Menge
Empfohlenes
Rührwerk
Empfohlene
Geschwindig-
keiten
Eiweiß 1.1 liter Rührbesen 1/2/3
Kartoffelpüree 6.8 kg Quirl B 1
Mayonnaise (Öl) 11.4 liter Rührbesen 2 / 3
Schlagsahne 11.4 liter Rührbesen 1/2/3
Tabelle 7. 20 litre schüssel. Bäckereiübliche Mengen – pro Verarbeitungsgang
Lebensmittel Menge Empfohlenes
Rührwerk
Empfohlene
Geschwindig-
keiten
Teig, Sandkuchen 9 kg Quirl B 1/2/3
Teig, Früchtekuchen 9 kg Quirl B 1/2/3
Leichter Teig (Biscuitkuchen) 6.4 kg Quirl B 1/2/3
Teig, für Aufläufe 9 kg E oder EB 1/2/3
Pfannkuchenteig 9.1 litres Rührbesen B
oder C
2 oder 3
Teig (leicht – mittel) 9.1 kg (65% A/R)
(5.6 kg Mehl 3.5 liter Wasser)
Knethaken ED Nur 1
Teig (schwer) 5.8 kg (50% A/R)
(3.9 kg Mehl 1.9 litre Wasser
Knethaken ED Nur 1
Pizzateig 5.0 kg E or ED only Nur 1
Pastetenteig 7.3 kg Teigmesser
Knethaken ED
Nur 1
Fett & Zucker für Biscuitkuchen
6.8 kg Rührbesen 1/2/3
Geschwindigkeit “1” (NIEDRIG) ist für schwere Mischungen, wie z.B. Teig, dickflüssige
Pfannkuchenteige und Kartoffelpüree
Geschwindigkeit “2” (MITTTEL) ist zum Mischen von Kuchenteigen
Geschwindigkeit “3” (HOCH) ist für die Inkorporation von maximalen Luftmengen in
leichte Teige. Der Rührbesen “D” wird allgemein zum Schlagen von Sahne und Eiweiß,
Mischen von leichtem Zuckerguß, Meringuen und Schlagen verwendet.
Page 55

53
8.0 MIXERRÜHRWERKE
Die für den Mixer verfügbaren Rührwerke wurden wie folgt für spezifische
Einsatzzwecke entwickelt:
Der ‘Quirl B’ ist ein Mehrzweckrührwerk zum Pürieren von Kartoffeln oder
anderen gekochten Gemüsen sowie zum Mischen von Kuchenteigen,
Pfannkuchenteigen und Zuckergüssen. Benutzen Sie zur Einleitung der
meisten Vorgänge zunächst die Geschwindigkeitsstufe 1 und gehen Sie
dann, wenn notwendig, auf Stufe 2 über.
Der ‘Rührbesen D’ dient dazu, in leichte Produkte die maximale
Luftmenge einzumischen. Er kann zum Schlagen von Sahne, Eiweiß und
sehr leichten Eiweißmischungen verwendet werden. Der Rührbesen wird
normalerweise auf den Geschwindigkeitsstufen zwei und drei verwendet.
Der ‘Knethaken E’ wird zum Kneten von Brot- Brötchen- und Pizzateigen
verwendet, die viel geknetet und gedehnt werden müssen, um richtig
aufzugehen. Der Knethaken sollte vorwiegend auf Geschwindigkeitsstufe
1 verwendet werden.
Der ‘Knethaken ED’ wird zum Kneten von Brot- Brötchen- und Pizzateigen
verwendet, die viel geknetet und gedehnt werden müssen, um richtig
aufzugehen. Der Knethaken sollte vorwiegend auf Geschwindigkeitsstufe 1
verwendet werden
Das ‘Teigmesser PK’ wird zum Teigmischen verwendet. Das
Teigmesser sollte nur auf Geschwindigkeitsstufe 1 verwendet werden.
Der ‘Flügelrührbesen C’ wird für leichte Pfannkuchenteige, Mayonnaisenöl
und Kartoffelpüree verwendet. Der Rührbesen kann auf den
Geschwindigkeitsstufen 1, 2 oder 3 verwendet werden.
Page 56

54
9.0 REINIGEN
DEN MIXER NICHT ABSPRITZEN ODER MIT DAMPFDRUCK REINIGEN
KEINE SCHEUERMITTEL VERWENDEN
Vor der Reinigung sicherstellen, daß die Netzversorgung des Geräts
unterbrochen wurde.
9.1 REINIGUNG VOR DER ERSTEN INBETRIEBNAHME
Vor der ersten Inbetriebnahme die neuen Mixerschüsseln, Rührwerke und Zubehör gründlich
waschen. In heißem Wasser und mit milder Spülmittellösung waschen. Dieses Verfahren sollte
bei Schüsseln und Rührwerken auch vor dem Schlagen von Eiweiß oder ganzen Eiern befolgt
werden.
9.2 REINIGUNG NACH DEM GEBRAUCH
Nach dem Gebrauch die Mixerschüssel, Rührwerke und Zubehör in heißem Wasser
unter Verwendung eines geeigneten, nicht scheuernden Spülmittels und einer Bürste mit
weichen Borsten waschen. (Ein sofortiges Ausspülen der Schüssel mit heißem Wasser
nach dem Gebrauch erleichtert die Reinigung).
HINWEIS: Die Aluminiumrührwerke nicht in der Geschirrspülmaschine reinigen.
Den Mixer mit einem heißen, feuchten Tuch reinigen; die Schüsselträgerarme und alle
Außenflächen gründlich abwischen. Das Schutzgitter sollte wie folgt gereinigt werden:
9.3 ENTFERNEN & REINIGEN DES SCHUTZGITTERS
Das Schutzgitter läßt sich einfach abnehmen und in der Geschirrspülmaschine reinigen.
Beim Abnehmen des Schutzgitters -
· Sicherstellen, daß der Schüsselträger in der unteren Position ist.
· Rührwerk und Schüssel entfernen.
· Ziehen Sie den Verschlußstößel heraus und drehen Sie die Schutzvorrichtung
entgegen dem Uhrzeigersinn, bis er aus der Federhaltung ausrastet. Vorsicht , da die
Schutzvorrichtung jetzt ungehindert von der Maschine fallen kann.
· Das Schutzgitter vorsichtig senken und entfernen.
Reinigung der Schutzvorrichtung.
Die Schutzvorrichtung sollte am Ende jedes Tages gereinigt werden.
Die Schutzvorrichtung kann nach dem Entfernen mit heißem Wasser unter Verwendung
eines geeigneten, nicht scheuernden Spülmittels und einer Bürste mit weichen Borsten
gereinigt werden. Die Schutzvorrichtung kann aber auch in einer kommerziellen
Geschirrspülmaschine gereinigt werden.
Zum Wiederanbringen des Schutzgitters am Gerät -
· Das Schutzgitter mit dem Abweiser gegen die Rückseite des Mixers ausrichten und
auf den Mixer schieben.
· Den Schutzgitterabweiser gegen den Uhrzeigersinn drehen, damit er voll in die
Federhalterung einrastet. Wenn das Schutzgitter in Position ist, dann läßt es sich
nicht weiter drehen.
Das Schutzgitter sollte am Ende jedes Arbeitstages gereinigt werden.
Page 57

55
10.0 WARTUNG DES GERÄTS.
DIE WARTUNG SOLLTE VON EINEM VON HOBART AUSGEBILDETEN
UND KOMPETENTEN FACHMANN DURCH-GEFÜHRT WERDEN
Keine Abdeckungen abnehmen oder Zubehörteile lockern, während das Gerät in Betrieb
ist. Vor der Durchführung von Wartungsarbeiten oder Positionsveränderung
des Mixers sicherstellen, daß die Stromzufuhr isoliert wurde.
Motor und Getriebe sind mit Spezialfett gefüllt, das mehrere Jahre lang halten
sollte. Wenn dessen Ersatz notwendig wird, dann setzen Sie sich bitte mit Ihrem
örtlichen Kundendienstzentrum in Verbindung.
Die Führungsstangen des Schüsselträgers sollten gelegentlich mit etwas Fett der
Lebensmittelklasse, das mit der Fingerspitze aufgetragen wird, geschmiert werden, um
Korrosion zu verhindern und reibungslosen Betrieb zu gewährleisten.
Wir empfehlen, daß der Mixer regelmäßig gewartet wird (am besten zweimal pro Jahr).
Ein Ersatzteilkatalog (ple200459) ist auf Anfrage von Ihrem örtlichen Hobart Service
Centre erhältlich. Um einen fortlaufenden sicheren und verläßlichen Betrieb dieses
Mixers zu gewährleisten, empfehlen wir, dass die Wartung nur von durch Hobart
ausgebildetem Kundendienstpersonal durchgeführt wird.
Page 58

56
11.0 FEHLERSUCHE
Fehler Mögliche Ursache Maßnahme
Sicherung durchgebrannt. Defekte Sicherung prüfen und
austauschen
Schüsselschutzgitter befindet sich
nicht in der korrekten
Betriebsposition.
Prüfen, daß das Schutzgitter
geschlossen ist
Der Geschwindigkeitshebel
befindet sich nicht in der korrekten
Betriebposition
Auf die erforderliche
Geschwindigkeit einstellen
Die Stromzufuhr ist unterbrochen Den Stecker einstecken und die
Stromzufuhr einschalten
Das Gerät funktioniert immer noch
nicht
Das örtliche Hobart-
Kundendienstzentrum
heranziehen
Gerät startet nicht.
Nach Anschluss an der maschine
an die strom-versorgung. Muss das
schutz-gitter betaetiegt werden um
den sicherheits-schalter zu
initialisieren.
Das örtliche Hobart-
Kundendienstzentrum
heranziehen
(Optionsweiser)
Schaber reibt an der
Schüssel
Schaber reibt sich trocken Die Schüsseloberfläche mit
Pflanzenöl oder Fett schmieren
Schrägkante des
(optionsweisen)
Schabers führt nicht
Die Plastikmanschette wurde falsch
eingesetzt
Den Arm entfernen und die
Plastikmanschette korrekt
einsetzen
Zu großer Abstand
zwischen Schüssel
und Schaber
Schaberarm verbogen oder
falscher Schüsselabstand
Das örtliche Hobart-
Kundendienstzentrum
heranziehen
Der Geschwindigkeitshebel ist
falsch positioniert
In die korrekte Position bringenDer Motor läuft an,
aber das Rührwerk
dreht sich nicht
Das Gerät funktioniert immer noch
nicht
Das örtliche Hobart-
Kundendienstzentrum
heranziehen
Page 59

57
12.0 EMPFOHLENE ERSATZTEILE
Teilnummer Beschreibung
PLE200459 Ersatzteilkatalog
144452-1 Motor 1-phasig 230/50/1 (je nach Modell)
138725 Schaltschütz, Start (160-200 µF) (je nach Modell)
138724 Schaltschütz, Betrieb (15 µF) (je nach Modell)
144453-1 Motor 3-phasig 400/50/3(je nach Modell)
00-737986 Antriebsriemen
00-737991-4 Deckel, Zeitgeber NCM300 NCM400
00-737991-3 Deckel, ohne Zeitgeber NCM300, NCM400
00-737991-9 Deckel, Zeitgeber HSM30, HSM40
141932 Schalter, Geschwindigkeitswechsel
EPM-E-16-14 Schalter, Start
EPM-E-16-15 Schalter, Stopp
SS-E-18-11 Timer, 30 min
00-738401 Reed-Schalter, Schutzgitter
00-738402 Control Relay
144358 Schalter, Schüsselträger
00-738477 Schutzgitter. NCM 300
00-738475 Schutzgitter. HSM40 / NCM400
142403-10 Thermische Überlastung, 230/50/1(je nach Modell)
142403-8 Thermal overload, 400/50/3 (je nach Modell)
141440-1 Schaltschütz
140869-10 Sicherung, Steuerung 315mA
140869-19 Sicherung, Steuerung 2A
140908-3 Transformator 400/50/3
OSM-E-1-12 Öldichtung
R-9440-E Quirl, HSM30 / NCM300
R-9443-E Rührbesen, HSM30 / NCM300
141721 ED-Teighaken, HSM30 / NCM300
53572 Quirl, HSM40 / NCM400
53577 Rührbesen, HSM40 / NCM400
140688 ED-Teighaken, HSM40 / NCM400
SU-E-3-4 Leichtes Öl der Lebensmittelklasse
00-738662 20-Liter-Schüssel für HSM30 / NCM300 und HSM40 / NCM400. Für
HSM40 / NCM400 ist ein Adapter erforderlich.
00-738664 30-Liter-Schüssel für HSM40 / NCM400
53600 Adapter für 30-Liter-Schüssel für HSM40 / NCM400
10470-E Rührbesen, 20 liter
10469-E Quirl, 20 liter
51831 Teighaken, 20 liter
ML-109241 Schüsselschabereinheit, 20 Liter, einschließlich Klinge und Gehäuse
737458-2 Klinge - Schaber, 20 Liter
ML-109242 Schüsselschabereinheit, 30 Liter, einschließlich Klinge und Gehäuse
737458-3 Klinge - Schaber, 30 Liter
ML-109243 Schüsselschabereinheit, 40 Liter, einschließlich Klinge und Gehäuse
737458-4 Klinge - Schaber, 40 Liter
00-738071 Gehäuse - Schüsselschaber (alle Größen)
Page 60

58
NOTIZEN:
Page 61

59
13.0 KUNDENDIENSTKONTAKTNUMMERN
Die von Hobart ausgebildeten Kundendienstmechaniker, die strategisch in den
nationalen Hobart-Kundendienstzentren eingesetzt werden, sind bereit, Ihnen schnellen,
effizienten und verläßliche Kundendienst zur Verfügung zu stellen. Schützen Sie Ihre
Investition durch einen Hobart-Inspektionsvertrag, wodurch fortlaufender und effizienter
Betrieb Ihrer Hobart-Maschinen, Ersatzteile und Zubehör gewährleistet wird.
Fortlaufende Verbesserungen gehören zur Geschäftspolitik von Hobart Still und Spezifkationen können
sich daher ohne vorherige Ankündigung ändern.
Hobart GmbH
Am Holderstock 4
Postfach 1620
D-77652 Offenburg
PLE200458 D 09-02
 Loading...