

Page 1
Item # _____________________________________
Quantity ___________________________________
C.S.I. Section 114000
FOODWASTE DISPOSER
701 S Ridge Avenue, Troy, OH 45374
1-888-4HOBART • www.hobartcorp.com
FOR INSTALLATION OF HOBART DISPOSERS ON EXISTING CONES
REPLACEMENT CONE ADAPTERS
FOODWASTE DISPOSER REPLACEMENT CONE ADAPTERS
F7543 – Foodwaste Disposer Replacement Cone Adapters Page 1 of 4
Page 2
FOODWASTE DISPOSER
REPLACEMENT CONE ADAPTERS
HOW TO REPLACE OLD FOODWASTE DISPOSERS
Each year, thousands of commercial
foodwaste disposers reach the age and
condition where it is more practical to
replace than to maintain them.
Adapters are usually required to t
disposers to original cones (including
sink or trough connections). In order to
choose the correct adapter for replacement installation, follow the procedure
below.
PROCEDURE:
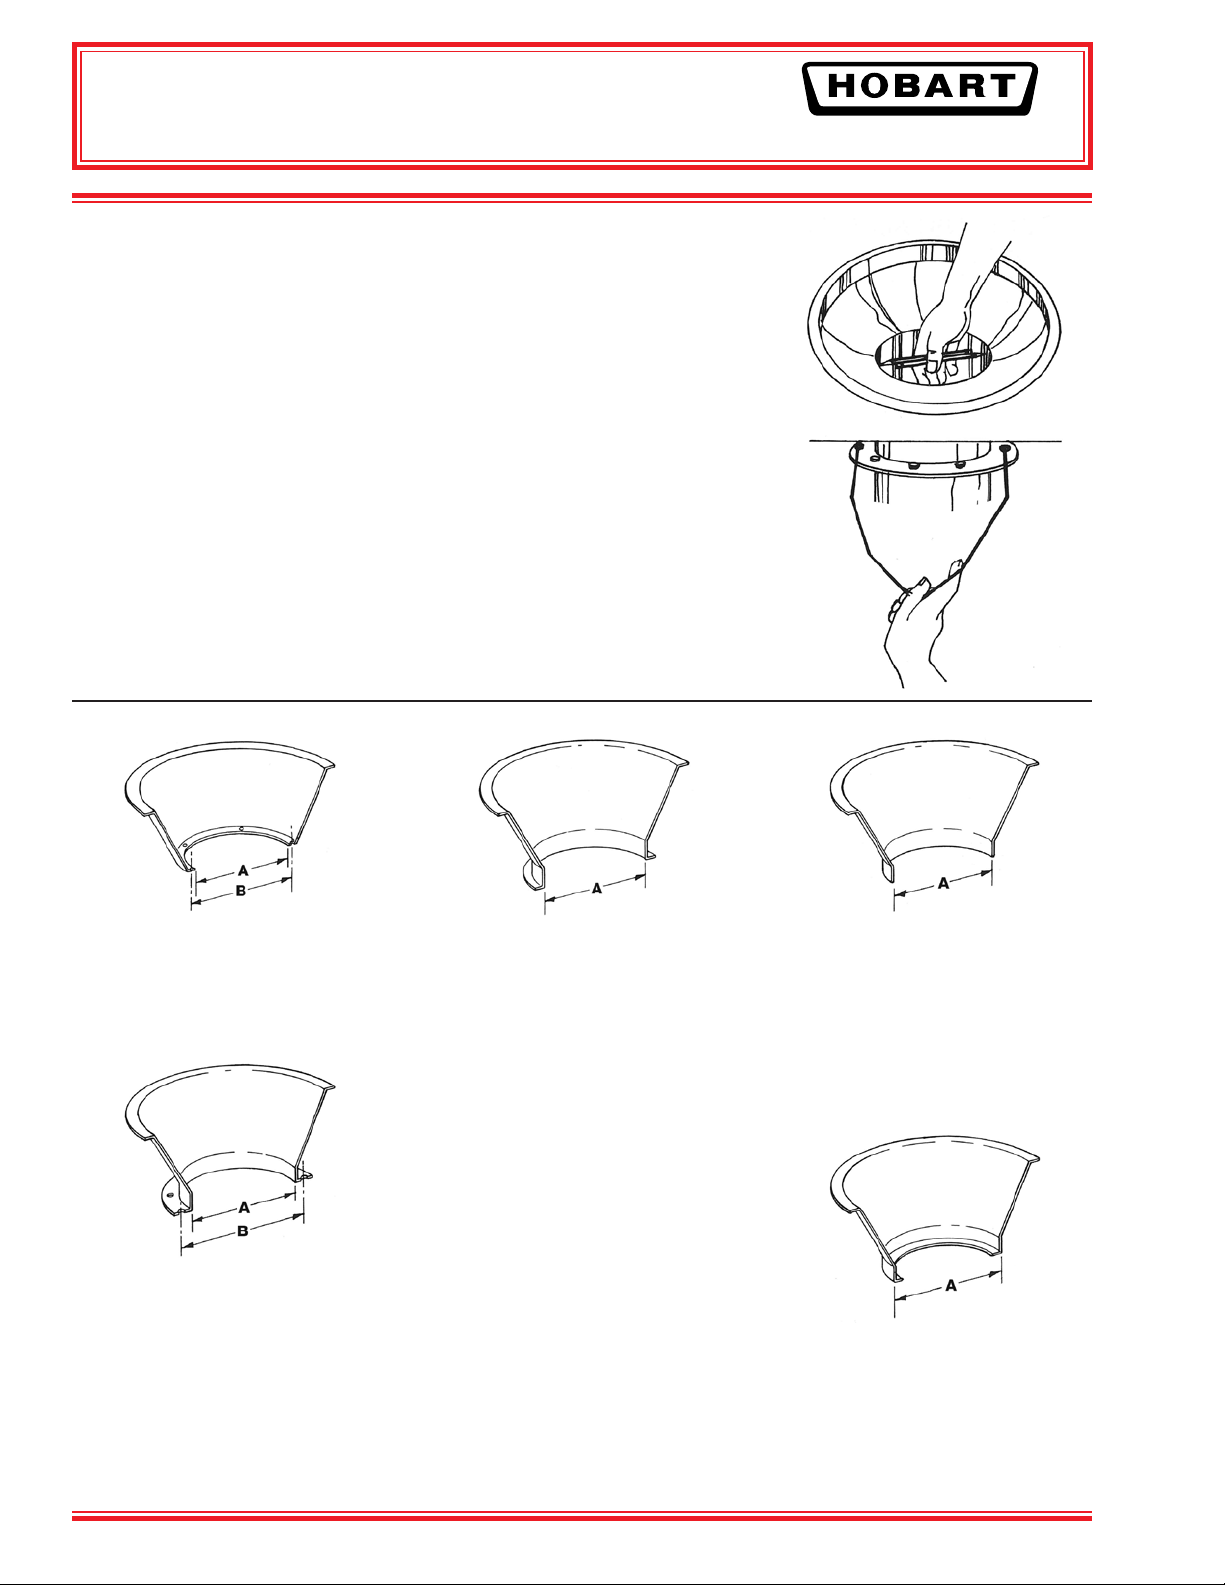
STEP 1
Identify Cone type on chart below.
STEP 2
Measure throat opening size of cone
(inside diameter). (Dimension A)
A suggested method is to use two sticks
or pencils. Insert them into the throat of
the cone, sliding them apart until they
touch the sides at the widest part of the
throat. Then remove and measure their
extended length. (Figure 1)
STEP 3
Measure bolt circle diameter (DISTANCE
BETWEEN CENTER OF OPPOSITE
BOLT HOLE). (Dimension B).
If old Disposer is still in place, measure
with calipers or form one from stiff wire.
Bend until ends touch center of opposite bolt heads. Remove and measure
distance between ends. (Figure 2)
STEP 4
When dimensions A & B and Cone Type
have been determined, select proper
adapter from list on facing page.
IMPORTANT: Measure height of old
disposer and check drain size. Compare
to dimensions in specication sheet to
make certain your new disposer will t.
701 S Ridge Avenue, Troy, OH 45374
1-888-4HOBART • www.hobartcorp.com
Figure 1
Figure 2
TYPE 1
BOWL TYPE CONE
The Disposer is bolted directly to a
turned-in ange or a loose ring inside
cone.
TYPE 2
CONE W/LARGE FLANGE
The Disposer bolts directly to the ange
on the bottom of this type Cone.
TYPE 3
CONE W/SMALL FLANGE LIP
The Disposer fastens to a small lip on
the bottom of the Cone by one of the
following methods:
1. Two-piece Clamp Rings – spread and
reassemble above cone lip – bolts
fasten to Disposer.
2. Loose Collar Ring slips onto the
Cone before the lip is rolled on the
Cone. The Disposer bolts to the
collar.
3. Molded or hose-type rubber
connector ts over the Cone lip and
is secured by means of hose clamp
type connector.
TYPE 4
SLEEVE TYPE CONE
Raise Disposer using adjustable support
legs so that the Cone sleeve ts tightly
into a seal in the mouth of the Disposer.
Only FD-150 thru FD-500, FD2-150
thru FD2-300, FD3-150 thru FD3-300
and FD4-150 thru FD4-500. Disposers
with adjustable legs can be used with
this type Cone.
TYPE 5
SLEEVE TYPE CONE
Turned-in ange, against which a seal is
compressed. Only FD-150 thru FD-500,
FD2-150 thru FD2-300, FD3-150 thru
FD3-300 and FD4-150 thru FD4-500.
Disposers with adjustable legs can be
used with this type Cone.
Page 2 of 4 F7543 – Foodwaste Disposer Replacement Cone Adapters
Page 3

FOODWASTE DISPOSER
701 S Ridge Avenue, Troy, OH 45374
1-888-4HOBART • www.hobartcorp.com
REPLACEMENT CONE ADAPTERS
SIZING CHART
DIMENSION
CONE TYPE
A B
1 41⁄2 51⁄2
2 41⁄2 51⁄2
2 6 63⁄4 Atomic ML-31160 All None
2 9 111⁄8 Hobart ML-31168 All None
3 41⁄2 —
3 6 —
3 8 — In-Sink-Erator, Toledo ML-31166 All
3 45⁄8 — FMC ML-31169 All None
3 51⁄4 — FMC ML-31170 All None
3 65⁄8 —
4 41⁄2 — Red Goat ML-31162
4 6 — Waste King ML-31163 None
4 61⁄2 — Salvajor ML-31164 None
4 63⁄8 — General Electric ML-31165 None
5 531⁄32 — Hobart ML-31161 None
4 7 — Red Goat None
3 7 —
NOTE: If disposer is installed in sink or trough, it will be connected to an adapter exactly like the cone connection.
USED BY
Hobart, Kitchen Pig,
Salvajor, Bus Boy
Waste King, Red Goat,
In-Sink-Erator, National,
Big Genie
In-Sink-Erator, Waste
King, Toledo
In-Sink-Erator, Waste
King, Toledo, Bus Boy
In-Sink-Erator,
Toast-Master
National, Big Genie,
Toledo
ADAPTER
REQUIRED
ML-31167 All
ML-31159 All None
ML-31159 All None
ML-31160 All
ML-31171 All None
None All None
FOR
HOBART
MODELS
FD 2-15 0
FD2-200
FD2-300
FD 3-150
FD3-200
FD3-300
FD-500
FD 4-150
FD4-200
FD4-300
FD4-500
SPECIAL
INSTRUCTIONS
Reuse loose internal
clamp ring, if present.
Remove Waste King,
loosen collar, or push it
up and out of the way.
Reuse clamp ring
mounting screws.
None
Use Disposer legs to
“jack-up” so cone sleeve
is inserted in Disposer
throat.
F7543 – Foodwaste Disposer Replacement Cone Adapters Page 3 of 4
Page 4

FOODWASTE DISPOSER
REPLACEMENT CONE ADAPTERS
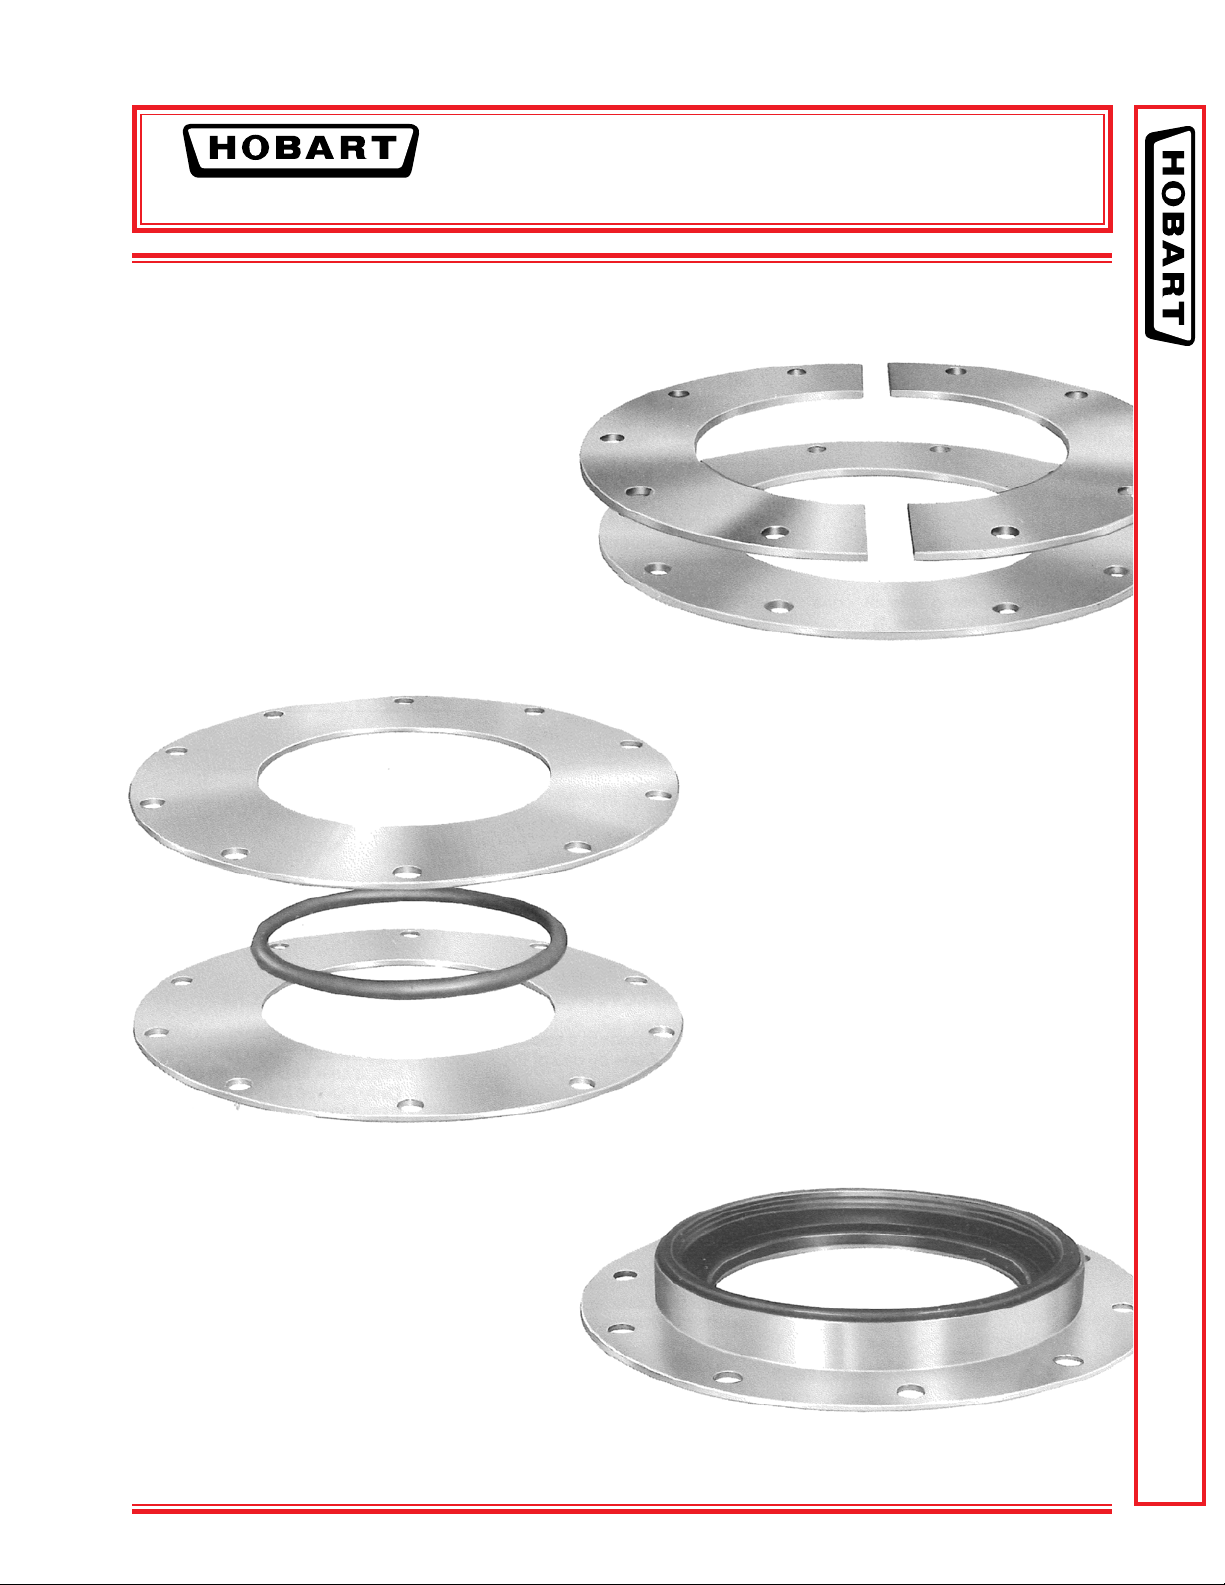
STAINLESS STEEL ADAPTER KIT DESCRIPTIONS
ADAPTER #ML-31167
Bolts directly to a Type #1 Cone.
ADAPTER #ML-31162,
#ML-31163, #ML31164 and
#ML-31165
Use an “O” Ring to seal around the
sleeve of a Type #4 Cone.
701 S Ridge Avenue, Troy, OH 45374
1-888-4HOBART • www.hobartcorp.com
ADAPTER #ML-31166
Bolts directly to existing clamp ring of
Type #3 Cone. Reuse clamp ring and
screws already on the Cone.
ADAPTERS #ML-31159,
#ML-31160, #ML-31169,
#ML-31170 and #ML-31171
Clamp to ange of Type #2 or Type #3
Cones. Rubber splash guard between
solid ring and split ring. Use silicone seal
to make it permanent.
As continued product improvement is a policy of Hobart, specications are subject to change without notice.
ADAPTER #ML-31168
Bolts directly to a Type #2 Cone.
ADAPTER #ML-31161
Retains a special seal which is
compressed against a Type #5 Cone.
NOTE: Sealastic or similiar silicone
gasket material should be used if
additional sealing is required when
adapting a new disposer to an existing
cone.
Page 4 of 4 F7543 – Foodwaste Disposer Replacement Cone Adapters
F7543 (REV. 03/14) LITHO IN U.S.A. (H-01)
 Loading...